

Page 1

KD-X472DBT / KD-X272DBT / KD-X172DB
ENGLISH
ESPAÑOL
NEDERLANDS
PORTUGUÊS
DEUTSCH
FRANÇAIS
ITALIANO
DIGITAL MEDIA RECEIVER
Quick Start Guide
RECEPTOR DE MEDIOS DIGITALES
Guía de inicio rápido
DIGITALE MEDIAONTVANGER
Snelstartgids
RECEPTOR MÉDIA DIGITAL
Guia de Início Rápido
DIGITAL-MEDIA-RECEIVER
Schnellstartanleitung
RÉCEPTEUR MULTIMÉDIA NUMÉRIQUE
Guide de démarrage rapide
RICEVITORE MULTIMEDIALE DIGITALE
Guida di avvio rapido
For detailed operations and information, refer to the INSTRUCTION MANUAL on the following
website:
Para obtener más información y detalles sobre las operaciones, consulte el MANUAL DE
INSTRUCCIONES en el siguiente sitio web:
Raadpleeg de GEBRUIKSAANWIJZING op de volgende website voor gedetailleerde informatie over
de bediening:
Para as operações e informações detalhadas, consulte o MANUAL DE INSTRUÇÕES no website
abaixo:
Für detaillierte Bedienungen und Informationen siehe BEDIENUNGSANLEITUNG auf der folgenden
Website:
Pour les opérations et les informations détaillées, reportez-vous au MANUEL D’INSTRUCTIONS sur
le site web suivant.
Per le operazioni e le informazioni dettagliate, fare riferimento al ISTRUZIONI PER L’USO nel
seguente sito web:
<http://www.jvc.net/cs/car/>
B5K-0665-00 [E]
Page 2

Information on Disposal of Old Electrical and Electronic Equipment and Batteries (applicable
for countries that have adopted separate waste collection systems)
Products and batteries with the symbol (crossed-out wheeled bin) cannot be disposed as household waste.
Old electrical and electronic equipment and batteries should be recycled at a facility capable of handling
these items and their waste byproducts.
Contact your local authority for details in locating a recycle facility nearest to you. Proper recycling and
waste disposal will help conserve resources whilst preventing detrimental effects on our health and the
environment.
Notice: The sign “Pb” below the symbol for batteries indicates that this battery contains lead.
Información acerca de la eliminación de equipos eléctricos, electrónicos y baterías al final de
la vida útil (aplicable a los países que hayan adoptado sistemas independientes de recogida
de residuos)
Los productos y las baterías con el símbolo de un contenedor con ruedas tachado no podrán ser desechados
como residuos domésticos.
Los equipos eléctricos, electrónicos y baterías al final de la vida útil, deberán ser reciclados en
instalaciones que puedan dar el tratamiento adecuado a estos productos y a sus subproductos residuales
correspondientes.
Póngase en contacto con su administración local para obtener información sobre el punto de recogida más
cercano. Un tratamiento correcto del reciclaje y la eliminación de residuos ayuda a conservar los recursos y
evita al mismo tiempo efectos perjudiciales en la salud y el medio ambiente.
Nota: El símbolo “Pb” debajo del (contenedor con ruedas tachado) en baterías indica que dicha batería
contiene plomo.
Informatie over het weggooien van elektrische en elektronische apparatuur en batterijen
(particulieren)
Dit symbool geeft aan dat gebruikte elektrische, elektronische producten en batterijen niet bij het normale
huishoudelijke afval mogen.
Lever deze producten in bij de aangewezen inzamelingspunten, waar ze gratis worden geaccepteerd en op
de juiste manier worden verwerkt, teruggewonnen en hergebruikt.
Voor inleveradressen zie www.nvmp.nl, www.ictmilieu.nl, www.stibat.nl. Wanneer u dit product op de
juiste manier als afval inlevert, spaart u waardevolle hulpbronnen en voorkomt u potentiële negatieve
gevolgen voor de volksgezondheid en het milieu, die anders kunnen ontstaan door een onjuiste verwerking
van afval.
Opgelet: Het teken “Pb” onder het teken van de batterijen geeft aan dat deze batterij lood bevat.
Informação sobre a forma de deitar fora Velho Equipamento Eléctrico, Electrónico e baterias
(aplicável nos países que adotaram sistemas de recolha de lixos separados)
Produtos e baterias com o símbolo (caixote do lixo com um X) não podem ser deitados fora junto com o
lixo doméstico.
Equipamentos velhos eléctricos, electrónicos e baterias deverão ser reciclados num local capaz de o fazer
bem assim como os seus subprodutos.
Contacte as autoridades locais para se informar de um local de reciclagem próximo de si. Reciclagem e
tratamento de lixo correctos ajudam a poupar recursos e previnem efeitos prejudiciais na nossa saúde e
no ambiente.
Note: o símbolo “Pb” abaixo do símbolo em baterias indica que esta bateria contém chumbo.
Entsorgung von gebrauchten elektrischen und elektronischen Geräten und Batterien
(anzuwenden in Ländern mit einem separaten Sammelsystem für solche Geräte)
Das Symbol (durchgestrichene Mülltonne) auf dem Produkt oder seiner Verpackung weist darauf hin, dass
dieses Produkt nicht als normaler Haushaltsabfall behandelt werden darf, sondern an einer Annahmestelle
für das Recycling von elektrischen und elektronischen Geräten und batterien abgegeben werden muss.
Durch Ihren Beitrag zur korrekten Entsorgung dieses Produktes schützen Sie die Umwelt und die
Gesundheit Ihrer Mitmenschen.
Unsachgemässe oder falsche Entsorgung gefährden Umwelt und Gesundheit. Weitere Informationen
über das Recycling dieses Produktes erhalten Sie von Ihrer Gemeinde oder den kommunalen
Entsorgungsbetrieben.
Achtung: Das Zeichen „Pb“ unter dem Symbol fur Batterien zeigt an, dass diese Batterie Blei enthalt.
i
Page 3

Information sur l’élimination des anciens équipements électriques et électroniques et piles
électriques (applicable dans les pays qui ont adopté des systèmes de collecte sélective)
Les produits et piles électriques sur lesquels le pictogramme (poubelle barrée) est apposé ne peuvent pas
être éliminés comme ordures ménagères.
Les anciens équipements électriques et électroniques et piles électriques doivent être recyclés sur des sites
capables de traiter ces produits et leurs déchets.
Contactez vos autorités locales pour connaître le site de recyclage le plus proche. Un recyclage adapté et
l’élimination des déchets aideront à conserver les ressources et à nous préserver des leurs effets nocifs sur
notre santé et sur l’environnement.
Remarque: Le symbole “Pb“ ci-dessous sur des piles électrique indique que cette pile contient du plomb.
Informazioni sullo smaltimento delle vecchie apparecchiature elettriche ed elettroniche e
delle batterie (valide per i paesi che hanno adottato sistemi di raccolta differenziata)
I prodotti e le batterie recanti il simbolo di un cassonetto della spazzatura su ruote barrato non possono
essere smaltiti insieme ai normali rifiuti di casa.
I vecchi prodotti elettrici ed elettronici e le batterie devono essere riciclati presso un'apposita struttura in
grado di trattare questi prodotti e di smaltirne i loro componenti.
Per conoscere dove e come recapitare tali prodotti nel luogo a voi più vicino, contattare l'apposito ufficio
comunale. Un appropriato riciclo e smaltimento aiuta a conservare la natura e a prevenire effetti nocivi alla
salute e all'ambiente.
Nota: Il simbolo “Pb” sotto al simbolo delle batterie indica che questa batteria contiene piombo.
For Israel
Declaration of Conformity with regard to the RE Directive 2014/53/EU
Declaration of Conformity with regard to the RoHS Directive 2011/65/EU
Manufacturer:
JVCKENWOOD Corporation
3-12, Moriya-cho, Kanagawa-ku, Yokohama-shi, Kanagawa, 221-0022, JAPAN
EU Representative:
JVCKENWOOD Europe B.V.
Amsterdamseweg 37, 1422 AC UITHOORN, THE NETHERLANDS
Declaración de conformidad con respecto a la Directiva RE 2014/53/EU
Declaración de conformidad con respecto a la Directiva RoHS 2011/65/EU
Fabricante:
JVCKENWOOD Corporation
3-12, Moriya-cho, Kanagawa-ku, Yokohama-shi, Kanagawa, 221-0022, JAPAN
Representante en la UE:
JVCKENWOOD Europe B.V.
Amsterdamseweg 37, 1422 AC UITHOORN, THE NETHERLANDS
Conformiteitsverklaring met betrekking tot de RE-richtlijn van de Europese Unie (2014/53/EU)
Conformiteitsverklaring met betrekking tot de RoHS richtlijn van de Europese Unie (2011/65/EU)
Fabrikant:
JVCKENWOOD Corporation
3-12, Moriya-cho, Kanagawa-ku, Yokohama-shi, Kanagawa, 221-0022, JAPAN
EU-vertegenwoordiger:
JVCKENWOOD Europe B.V.
Amsterdamseweg 37, 1422 AC UITHOORN, THE NETHERLANDS
Declaração de conformidade relativa à Directiva RE 2014/53/EU
Declaração de conformidade relativa à Directiva RoHS 2011/65/EU
Fabricante:
JVCKENWOOD Corporation
3-12, Moriya-cho, Kanagawa-ku, Yokohama-shi, Kanagawa, 221-0022, JAPAN
Representante na UE:
JVCKENWOOD Europe B.V.
Amsterdamseweg 37, 1422 AC UITHOORN, THE NETHERLANDS
ii
Page 4

Konformitätserklärung in Bezug auf die RE-Vorschrift 2014/53/EU
Konformitätserklärung in Bezug auf die RoHS-Vorschrift 2011/65/EU
Hersteller:
JVCKENWOOD Corporation
3-12, Moriya-cho, Kanagawa-ku, Yokohama-shi, Kanagawa, 221-0022, JAPAN
EU-Vertreter:
JVCKENWOOD Europe B.V.
Amsterdamseweg 37, 1422 AC UITHOORN, THE NETHERLANDS
Déclaration de conformité se rapportant à la directive RE 2014/53/EU
Déclaration de conformité se rapportant à la directive RoHS 2011/65/EU
Fabricant:
JVCKENWOOD Corporation
3-12, Moriya-cho, Kanagawa-ku, Yokohama-shi, Kanagawa, 221-0022, JAPAN
Représentants dans l’UE:
JVCKENWOOD Europe B.V.
Amsterdamseweg 37, 1422 AC UITHOORN, THE NETHERLANDS
Dichiarazione di conformità alla Direttiva RE 2014/53/EU
Dichiarazione di conformità relativa alla direttiva RoHS 2011/65/EU
Produttore:
JVCKENWOOD Corporation
3-12, Moriya-cho, Kanagawa-ku, Yokohama-shi, Kanagawa, 221-0022, JAPAN
Rappresentante UE:
JVCKENWOOD Europe B.V.
Amsterdamseweg 37, 1422 AC UITHOORN, THE NETHERLANDS
English
Hereby, JVCKENWOOD declares that the radio
equipment “KD-X472DBT/KD-X272DBT/KD-X172DB”
is in compliance with Directive 2014/53/EU.
The full text of the EU declaration of conformity is
available at the following internet address:
http://www.jvc.net/cs/car/eudoc/
Français
Par la présente, JVCKENWOOD déclare que
l’équipement radio « KD-X472DBT/KD-X272DBT/
KD-X172DB » est conforme à la directive
2014/53/UE.
L’intégralité de la déclaration de conformité UE est
disponible à l’adresse Internet suivante :
http://www.jvc.net/cs/car/eudoc/
Deutsch
Hiermit erklärt JVCKENWOOD, dass das Funkgerät
“KD-X472DBT/KD-X272DBT/KD-X172DB” der
Richtlinie 2014/53/EU entspricht.
Der volle Text der EU-Konformitätserklärung
steht unter der folgenden Internetadresse zur
Verfügung:
http://www.jvc.net/cs/car/eudoc/
Nederlands
Hierbij verklaart JVCKENWOOD dat de radioapparatuur
“KD-X472DBT/KD-X272DBT/KD-X172DB” in
overeenstemming is met Richtlijn 2014/53/EU.
De volledige tekst van de EU-verklaring van
overeenstemming is te vinden op het volgende
internetadres:
http://www.jvc.net/cs/car/eudoc/
Italiano
Con la presente, JVCKENWOOD dichiara che
l΄apparecchio radio “KD-X472DBT/KD-X272DBT/
KD-X172DB” è conforme alla Direttiva 2014/53/UE.
Il testo integrale della dichiarazione di conformità
UE è disponibile al seguente indirizzo internet:
http://www.jvc.net/cs/car/eudoc/
Español
Por la presente, JVCKENWOOD declara que el
equipo de radio “KD-X472DBT/KD-X272DBT/
KD-X172DB” cumple la Directiva 2014/53/EU.
El texto completo de la declaración de
conformidad con la UE está disponible en la
siguiente dirección de internet:
http://www.jvc.net/cs/car/eudoc/
Português
Deste modo, a JVCKENWOOD declara que o
equipamento de rádio “KD-X472DBT/
KD-X272DBT/KD-X172DB” está em conformidade
com a Diretiva 2014/53/UE.
O texto integral da declaração de conformidade
da UE está disponível no seguinte endereço de
internet:
http://www.jvc.net/cs/car/eudoc/
Polska
Niniejszym, JVCKENWOOD deklaruje, że sprzęt
radiowy “KD-X472DBT/KD-X272DBT/KD-X172DB”
jest zgodny z dyrektywą 2014/53/UE.
Pełny tekst deklaracji zgodności EU jest dostępny
pod adresem:
http://www.jvc.net/cs/car/eudoc/
Český
Společnost JVCKENWOOD tímto prohlašuje, že
rádiové zařízení “KD-X472DBT/KD-X272DBT/
KD-X172DB” splňuje podmínky směrnice
2014/53/EU.
Plný text EU prohlášení o shodě je dostupný na
následující internetové adrese:
http://www.jvc.net/cs/car/eudoc/
iii
Page 5

Magyar
JVCKENWOOD ezennel kijelenti, hogy a
„KD-X472DBT/KD-X272DBT/KD-X172DB“
rádióberendezés megfelel a 2014/53/EU
irányelvnek.
Az EU konformitási nyilatkozat teljes szövege az
alábbi weboldalon érhető el:
http://www.jvc.net/cs/car/eudoc/
Svenska
Härmed försäkrar JVCKENWOOD att
radioutrustningen “KD-X472DBT/KD-X272DBT/
KD-X172DB” är i enlighet med direktiv
2014/53/EU.
Den fullständiga texten av EU-försäkran
om överensstämmelse finns på följande
Internetadress :
http://www.jvc.net/cs/car/eudoc/
Suomi
JVCKENWOOD julistaa täten, että radiolaite
“KD-X472DBT/KD-X272DBT/KD-X172DB” on
direktiivin 2014/53/EU mukainen.
EU-vaatimustenmukaisuusvakuutusvaatimus
löytyy kokonaisuudessaan seuraavasta internetosoitteesta:
http://www.jvc.net/cs/car/eudoc/
Slovensko
S tem JVCKENWOOD izjavlja, da je radijska oprema
»KD-X472DBT/KD-X272DBT/KD-X172DB« v skladu
z Direktivo 2014/53/EU.
Celotno besedilo direktive EU o skladnosti je
dostopno na tem spletnem naslovu:
http://www.jvc.net/cs/car/eudoc/
Slovensky
Spoločnosť JVCKENWOOD týmto vyhlasuje, že
rádiové zariadenie „KD-X472DBT/KD-X272DBT/
KD-X172DB“ vyhovuje smernici 2014/53/EÚ.
Celý text EÚ vyhlásenia o zhode nájdete na
nasledovnej internetovej adrese:
http://www.jvc.net/cs/car/eudoc/
Dansk
Herved erklærer JVCKENWOOD, at radioudstyret
“KD-X472DBT/KD-X272DBT/KD-X172DB” er i
overensstemmelse med Direktiv 2014/53/EU.
EU-overensstemmelseserklæringens fulde ordlyd
er tilgængelig på følgende internetadresse:
http://www.jvc.net/cs/car/eudoc/
Ελληνικά
Με το παρόν, η JVCKENWOOD δηλώνει ότι ο
ραδιοεξοπλισμός «KD-X472DBT/KD-X272DBT/
KD-X172DB» συμμορφώνεται με την Οδηγία
2014/53/ΕΕ.
Το πλήρες κείμενο της δήλωσης συμμόρφωσης
της ΕΕ είναι διαθέσιμο στην ακόλουθη διεύθυνση
στο διαδίκτυο:
http://www.jvc.net/cs/car/eudoc/
Eesti
Käesolevaga JVCKENWOOD kinnitab, et
„KD-X472DBT/KD-X272DBT/KD-X172DB“
raadiovarustus on vastavuses direktiiviga
2014/53/EL.
ELi vastavusdeklaratsiooni terviktekst on
kättesaadav järgmisel internetiaadressil:
http://www.jvc.net/cs/car/eudoc/
Latviešu
JVCKENWOOD ar šo deklarē, ka radio aparatūra
„KD-X472DBT/KD-X272DBT/KD-X172DB” atbilst
direktīvas 2014/53/ES prasībām.
Pilns ES atbilstības deklarācijas teksts ir pieejams
šādā tīmekļa adresē:
http://www.jvc.net/cs/car/eudoc/
Lietuviškai
Šiuo JVCKENWOOD pažymi, kad radijo įranga
„KD-X472DBT/KD-X272DBT/KD-X172DB“ atitinka
2014/53/EB direktyvos reikalavimus.
Visą EB direktyvos atitikties deklaracijos tekstą
galite rasti šiuo internetiniu adresu:
http://www.jvc.net/cs/car/eudoc/
Malti
B’dan, JVCKENWOOD jiddikjara li t-tagħmir
tar-radju “KD-X472DBT/KD-X272DBT/KD-X172DB”
huwa konformi mad-Direttiva 2014/53/UE.
It-test kollu tad-dikjarazzjoni ta’ konformità huwa
disponibbli fl-indirizz intranet li ġej:
http://www.jvc.net/cs/car/eudoc/
HRVATSKI / SRPSKI JEZIK
JVCKENWOOD ovim izjavljuje da je radio oprema
“KD-X472DBT/KD-X272DBT/KD-X172DB” u skladu
s Direktivom 2014/53/EU.
Cjeloviti tekst deklaracije Europske unije o
usklađenosti dostupan je na sljedećoj internet
adresi:
http://www.jvc.net/cs/car/eudoc/
ROMÂNĂ
Prin prezenta, JVCKENWOOD declară că
echipamentul radio “
KD-X172DB
2014/53/UE.
Textul integral al declarației de conformitate UE este
disponibil la urmatoarea adresă de internet:
http://www.jvc.net/cs/car/eudoc/
KD-X472DBT/KD-X272DBT/
” este în conformitate cu Directiva
БЪЛГАРСКИ
С настоящото JVCKENWOOD декларира,
че радиооборудването на “
KD-X272DBT/KD-X172DB
Директива 2014/53/ЕС.
Пълният текст на ЕС декларацията за
съответствие е достъпен на следния интернет
адрес:
http://www.jvc.net/cs/car/eudoc/
Turkish
Burada, JVCKENWOOD “
” radyo ekipmanının 2014/53/AB
KD-X172DB
Direktifine uygun olduğunu bildirir.
AB uyumluluk deklarasyonunun tam metni
aşağıdaki internet adresinde mevcuttur.
http://www.jvc.net/cs/car/eudoc/
Русский
JVCKENWOOD настоящим заявляет, что
радиооборудование «KD-X472DBT/KD-X272DBT/
KD-X172DB» соответствует Директиве
2014/53/EU.
Полный текст декларации соответствия
ЕС доступен по следующему адресу в сети
Интернет:
http://www.jvc.net/cs/car/eudoc/
Українська
Таким чином, компанія JVCKENWOOD заявляє,
що радіообладнання «KD-X472DBT/
KD-X272DBT/KD-X172DB» відповідає Директиві
2014/53/EU.
Повний текст декларації про відповідність ЄС
можна знайти в Інтернеті за такою адресою:
http://www.jvc.net/cs/car/eudoc/
KD-X472DBT/
” е в съответствие с
KD-X472DBT/KD-X272DBT/
iv
Page 6

SOFTWARE LICENSE AGREEMENT
The software embedded in the Product (hereinafter the "Licensed Software") provided by Licensor is
copyrighted to or sublicensable by the Licensor, and this Agreement provides for the terms and conditions
which Users shall follow in order to use the Licensed Software.
The User shall use the Licensed Software by agreeing with the terms of this Software License Agreement.
This Agreement shall be deemed completed at the time the User (hereinafter the "User") initially used the
Product in which the "Licensed Software" is embedded.
The Licensed Software may include the software which has been licensed to the Licensor directly or
indirectly from any third party. In such case, some third parties require the Users to follow their conditions
for use separately from this Software License Agreement. Such software shall not be subject to this
Agreement, and the Users are urged to read the "Important Notice concerning the Software" to be provided
separately below.
Article 1 General Provision
The Licensor shall grant to the User a non-exclusive and non-transferable (other than the exceptional case
referred to in Article 3, Paragraph 1) licensed to use the Licensed Software within the country of the User.
(the country where the User bought the Product (hereinafter the "Country")
Article 2 License
1. The license granted under this Agreement shall be the right to use the Licensed Software in the
Product.
2. The User shall not duplicate, copy, modify, add, translate or otherwise alter, or lease the Licensed
Software and any related documents, whether in whole or in part.
3. The use of the Licensed Software shall be limited to personal purpose, and the Licensed Software shall
not be distributed, licensed or sub-licensed whether it is for commercial purpose or not.
4. The User shall use the Licensed Software according to the directions described in the operation
manual or help file, and is prohibited to use or duplicate any data in a manner violating the Copyright
Law or any other laws and regulations by applying whole or a part of the Licensed Software.
Article 3 Conditions for Grant of License
1. When the User transfers the Product, it may also transfer the license to use the Licensed Software
embedded in the Product (including any related materials, updates and upgrades) on condition that
no original, copies or related materials continue in the possession of the User, and that the User shall
cause the transferee to comply with this Software License Agreement.
2. The User shall not carry out reverse engineering, disassembling, decompiling or any other code
analysis works in connection with the Licensed Software.
Article 4 Right pertaining to the Licensed Software
Any and all copyrights and other rights pertaining to the Licensed Software and related documents
shall belong to the Licensor or the original holder of the right who granted to the Licensor the license or
sublicense for the Licensed Software (hereinafter the "Original Rightholder"), and the User shall not be
entitled to any right other than the license granted hereunder, in respect of the Licensed Software and any
related documents.
Article 5 Indemnification of Licensor
1. Neither the Licensor nor the Original Rightholder shall be liable for any damage incurred by the User
or any third party due to the exercise of the license granted to the User under this Agreement, unless
otherwise restricted by law.
2. The Licensor will offer no guarantee for the merchantability, convertibility and consistency with
certain objective of the Licensed Software.
Article 6 Liability to Third Party
If any dispute has arisen with any third party due to an infringement upon a copyright, patent or any
other intellectual property right that was caused by the User's use of the Licensed Software, the User shall
settle such dispute at its own cost and hold the Licensor and the Original Rightholder harmless from any
inconvenience it may cause.
Article 7 Confidentiality
The User shall keep the confidentiality of such portion of the Licensed Software, related documents thereof
or any other information to be granted under this Agreement, as well as the conditions of this Agreement
as has not yet entered the public domain, and shall not disclose or divulge the same to any third party
without approval of the Licensor.
Article 8 Termination
In case the User falls under any of the events described in the following items, the Licensor may
immediately terminate this Agreement or claim that the User compensates for the damage incurred by the
Licensor due to such event:
(1) when the User violated any provision of this Agreement; or
(2) when a petition has been filed against the User for an attachment, provisional attachment,
provisional disposition or any other compulsory execution.
v
Page 7

Article 9 Destruction of the Licensed Software
If this Agreement is terminated pursuant to the provision of Article 8, the User shall destroy the Licensed
Software, any related documents and copies thereof within two (2) weeks from such date of termination.
Article 10 Protection of Copyright
1. The copyright and all the other intellectual property rights relating to the Licensed Software
shall belong to the Licensor and the Original Rightholder, and in no event shall they be under the
ownership of the User.
2. The User shall, whenever it uses the Licensed Software, comply with any laws relating to the
copyright and other intellectual property rights.
Article 11 Export Restriction
1. It is prohibited to export the Licensed Software and any related documents outside the country
of the User (including transmission thereof outside the country of the User via Internet of other
communication tools).
2. The User shall understand that the Licensed Software shall be subject to the export restrictions
adopted by the country of User and any other countries.
3. The User shall agree that the software will be subject to any and all applicable international and
domestic laws (including the export control regulation of the country of User and any other countries,
and any restrictions concerning the end-users, the use by end-users and importing countries to be
provided by the country of User and any other countries, and any other governmental authorities).
Article 12 Miscellaneous
1. In the event any part of this Agreement is invalidated by operation of law, the residual provisions
shall continue in force.
2. Matters not stipulated in this Agreement or any ambiguity or question raised in the construction of
this Agreement shall be provided or settled upon good-faith consultation between the Licensor and
the User.
3. The Licensor and the User hereby agree that this Agreement is governed by the laws of Japan, and
any dispute arising from, and relating to the rights and obligations under, this Agreement shall be
submitted to the exclusive jurisdiction of the Tokyo District Court for its first instance.
Important Notice concerning the Software
-jansson
Copyright (c) 2009-2012 Petri Lehtinen <petri@digip.org>
Permission is hereby granted, free of charge, to any person obtaining a copy of this software and associated
documentation files (the "Software"), to deal in the Software without restriction, including without
limitation the rights to use, copy, modify, merge, publish, distribute, sublicense, and/or sell copies of the
Software, and to permit persons to whom the Software is furnished to do so, subject to the following
conditions:
The above copyright notice and this permission notice shall be included in all copies or substantial portions
of the Software.
THE SOFTWARE IS PROVIDED "AS IS", WITHOUT WARRANTY OF ANY KIND, EXPRESS OR IMPLIED, INCLUDING
BUT NOT LIMITED TO THE WARRANTIES OF MERCHANTABILITY, FITNESS FOR A PARTICULAR PURPOSE
AND NONINFRINGEMENT. IN NO EVENT SHALL THE AUTHORS OR COPYRIGHT HOLDERS BE LIABLE FOR ANY
CLAIM, DAMAGES OR OTHER LIABILITY, WHETHER IN AN ACTION OF CONTRACT, TORT OR OTHERWISE,
ARISING FROM, OUT OF OR IN CONNECTION WITH THE SOFTWARE OR THE USE OR OTHER DEALINGS IN THE
SOFTWARE.
-cJSON
Copyright (c) 2009 Dave Gamble
Permission is hereby granted, free of charge, to any person obtaining a copy of this software and associated
documentation files (the "Software"), to deal in the Software without restriction, including without
limitation the rights to use, copy, modify, merge, publish, distribute, sublicense, and/or sell copies of the
Software, and to permit persons to whom the Software is furnished to do so, subject to the following
conditions:
The above copyright notice and this permission notice shall be included in all copies or substantial portions
of the Software.
THE SOFTWARE IS PROVIDED "AS IS", WITHOUT WARRANTY OF ANY KIND, EXPRESS OR IMPLIED, INCLUDING
BUT NOT LIMITED TO THE WARRANTIES OF MERCHANTABILITY, FITNESS FOR A PARTICULAR PURPOSE
AND NONINFRINGEMENT. IN NO EVENT SHALL THE AUTHORS OR COPYRIGHT HOLDERS BE LIABLE FOR ANY
CLAIM, DAMAGES OR OTHER LIABILITY, WHETHER IN AN ACTION OF CONTRACT, TORT OR OTHERWISE,
ARISING FROM, OUT OF OR IN CONNECTION WITH THE SOFTWARE OR THE USE OR OTHER DEALINGS IN THE
SOFTWARE.
vi
Page 8

-CMP
The MIT License (MIT)
Copyright (c) 2014 Charles Gunyon
Permission is hereby granted, free of charge, to any person obtaining a copy of this software and associated
documentation files (the "Software"), to deal in the Software without restriction, including without
limitation the rights to use, copy, modify, merge, publish, distribute, sublicense, and/or sell copies of the
Software, and to permit persons to whom the Software is furnished to do so, subject to the following
conditions:
The above copyright notice and this permission notice shall be included in all copies or substantial portions
of the Software.
THE SOFTWARE IS PROVIDED "AS IS", WITHOUT WARRANTY OF ANY KIND, EXPRESS OR IMPLIED, INCLUDING
BUT NOT LIMITED TO THE WARRANTIES OF MERCHANTABILITY, FITNESS FOR A PARTICULAR PURPOSE
AND NONINFRINGEMENT. IN NO EVENT SHALL THE AUTHORS OR COPYRIGHT HOLDERS BE LIABLE FOR ANY
CLAIM, DAMAGES OR OTHER LIABILITY, WHETHER IN AN ACTION OF CONTRACT, TORT OR OTHERWISE,
ARISING FROM, OUT OF OR IN CONNECTION WITH THE SOFTWARE OR THE USE OR OTHER DEALINGS IN THE
SOFTWARE.
nanopb
Copyright (c) 2011 Petteri Aimonen <jpa at nanopb.mail.kapsi.fi>
This software is provided 'as-is', without any express or implied warranty. In no event will the authors be
held liable for any damages arising from the use of this software.
Permission is granted to anyone to use this software for any purpose, including commercial applications,
and to alter it and redistribute it freely, subject to the following restrictions:
1. The origin of this software must not be misrepresented; you must not claim that you wrote
the original software. If you use this software in a product, an acknowledgment in the product
documentation would be appreciated but is not required.
2. Altered source versions must be plainly marked as such, and must not be misrepresented as being the
original software.
3. This notice may not be removed or altered from any source distribution.
sha2
AUTHOR: Aaron D. Gifford - http://www.aarongifford.com/
Copyright (c) 2000-2001, Aaron D. Gifford
All rights reserved.
You may obtain a copy of the license at
https://opensource.org/licenses/BSD-3-Clause
THE SOFTWARE IS PROVIDED “AS IS”, WITHOUT WARRANTY OF ANY KIND, EXPRESS OR IMPLIED, INCLUDING
BUT NOT LIMITED TO THE WARRANTIES OF MERCHANTABILITY, FITNESS FOR A PARTICULAR PURPOSE
AND NONINFRINGEMENT. IN NO EVENT SHALL THE AUTHORS OR COPYRIGHT HOLDERS BE LIABLE FOR ANY
CLAIM, DAMAGES OR OTHER LIABILITY, WHETHER IN AN ACTION OF CONTRACT, TORT OR OTHERWISE,
ARISING FROM, OUT OF OR IN CONNECTION WITH THE SOFTWARE OR THE USE OR OTHER DEALINGS IN THE
SOFTWARE.
Posix
Copyright (c) 1990, 1993
The Regents of the University of California. All rights reserved.
Redistribution and use in source and binary forms, with or without modification, are permitted provided
that the following conditions are met:
1. Redistributions of source code must retain the above copyright notice, this list of conditions and the
following disclaimer.
2. Redistributions in binary form must reproduce the above copyright notice, this list of conditions and
the following disclaimer in the documentation and/or other materials provided with the distribution.
3. All advertising materials mentioning features or use of this software must display the following
acknowledgement:
This product includes software developed by the University of California, Berkeley and its contributors.
4. Neither the name of the University nor the names of its contributors may be used to endorse or
promote products derived from this software without specific prior written permission.
Copyright (C) 1993 by Sun Microsystems, Inc. All rights reserved.
Developed at SunPro, a Sun Microsystems, Inc. business.
Permission to use, copy, modify, and distribute this software is freely granted, provided that this notice is
preserved.
Copyright (C) 1991-2, RSA Data Security, Inc. Created 1991. All rights reserved.
License to copy and use this software is granted provided that it is identified as the “RSA Data Security, Inc.
MD4 Message-Digest Algorithm” in all material mentioning or referencing this software or this function.
vii
Page 9

Copyright (c) 1995, 1996 Carnegie-Mellon University. All rights reserved.
Author: Chris G. Demetriou
Permission to use, copy, modify and distribute this software and its documentation is hereby granted,
provided that both the copyright notice and this permission notice appear in all copies of the software,
derivative works or modified versions, and any portions thereof, and that both notices appear in supporting
documentation.
CARNEGIE MELLON ALLOWS FREE USE OF THIS SOFTWARE IN ITS “AS IS” CONDITION. CARNEGIE MELLON
DISCLAIMS ANY LIABILITY OF ANY KIND FOR ANY DAMAGES WHATSOEVER RESULTING FROM THE USE OF
THIS SOFTWARE.
Carnegie Mellon requests users of this software to return to
Software Distribution Coordinator or Software.Distribution@
CS.CMU.EDU
School of Computer Science
Carnegie Mellon University
Pittsburgh PA 15213-3890
any improvements or extensions that they make and grant Carnegie the rights to redistribute these
changes.
License is also granted to make and use derivative works provided that such works are identified as
“derived from the RSA Data Security, Inc. MD4 Message-Digest Algorithm” in all material mentioning or
referencing the derived work.
RSA Data Security, Inc. makes no representations concerning either the merchantability of this software or
the suitability of this software for any particular purpose. It is provided “as is” without express or implied
warranty of any kind.
Copyright (c) 1993 Martin Birgmeier
All rights reserved.
You may redistribute unmodified or modified versions of this source code provided that the above
copyright notice and this and the following conditions are retained.
This software is provided “as is”, and comes with no warranties of any kind. I shall in no event be liable for
anything that happens to anyone/anything when using this software.
These notices must be retained in any copies of any part of this documentation and/or software.
T-Kernel 2.0
This product uses the source code of T-Kernel 2.0 under T-License 2.0 granted by T-Engine Forum
(www.tron.org)
BSD-3-Clause
Copyright (c) 2000-2001, Aaron D. Gifford
All rights reserved.
You may obtain a copy of the license at
https://opensource.org/licenses/BSD-3-Clause
THE SOFTWARE IS PROVIDED “AS IS”, WITHOUT WARRANTY OF ANY KIND, EXPRESS OR IMPLIED, INCLUDING
BUT NOT LIMITED TO THE WARRANTIES OF MERCHANTABILITY, FITNESS FOR A PARTICULAR PURPOSE AND
NONINFRINGEMENT. IN NO EVENT SHALL THE AUTHORS OR COPYRIGHT HOLDERS BE LIABLE FOR ANY CLAIM,
DAMAGES OR OTHER LIABILITY, WHETHER IN AN ACTION OF CONTRACT, TORT OR OTHERWISE, ARISING FROM,
OUT OF OR IN CONNECTION WITH THE SOFTWARE OR THE USE OR OTHER DEALINGS IN THE SOFTWARE.
LFS Subsystem
Copyright The Regents of the University of California. All rights reserved.
You may obtain a copy of the license at
https://directory.fsf.org/wiki/License:BSD-4-Clause
THE SOFTWARE IS PROVIDED “AS IS”, WITHOUT WARRANTY OF ANY KIND, EXPRESS OR IMPLIED, INCLUDING
BUT NOT LIMITED TO THE WARRANTIES OF MERCHANTABILITY, FITNESS FOR A PARTICULAR PURPOSE AND
NONINFRINGEMENT. IN NO EVENT SHALL THE AUTHORS OR COPYRIGHT HOLDERS BE LIABLE FOR ANY CLAIM,
DAMAGES OR OTHER LIABILITY, WHETHER IN AN ACTION OF CONTRACT, TORT OR OTHERWISE, ARISING FROM,
OUT OF OR IN CONNECTION WITH THE SOFTWARE OR THE USE OR OTHER DEALINGS IN THE SOFTWARE.
Accordo2 Player
Apache License
Licensed under the Apache License,
Version 2.0, January 2004(the “License”);
You may obtain a copy of the license at
http://www.apache.org/licenses/LICENSE-2.0
THE SOFTWARE IS PROVIDED “AS IS”, WITHOUT WARRANTY OF ANY KIND, EXPRESS OR IMPLIED, INCLUDING
BUT NOT LIMITED TO THE WARRANTIES OF MERCHANTABILITY, FITNESS FOR A PARTICULAR PURPOSE AND
NONINFRINGEMENT. IN NO EVENT SHALL THE AUTHORS OR COPYRIGHT HOLDERS BE LIABLE FOR ANY CLAIM,
DAMAGES OR OTHER LIABILITY, WHETHER IN AN ACTION OF CONTRACT, TORT OR OTHERWISE, ARISING FROM,
OUT OF OR IN CONNECTION WITH THE SOFTWARE OR THE USE OR OTHER DEALINGS IN THE SOFTWARE.
viii
Page 10
Installation/Connection
This section is for the professional installer.
For safety’s sake, leave wiring and mounting to professionals. Consult the car audio dealer.
WARNING
• The unit can only be used with a 12 V DC power supply, negative ground.
• Disconnect the battery’s negative terminal before wiring and mounting.
• Do not connect Battery wire (yellow) and Ignition wire (red) to the car chassis or Ground wire (black) to
prevent a short circuit.
• To prevent short circuit:
– Insulate unconnected wires with vinyl tape.
– Be sure to ground this unit to the car’s chassis again after installation.
– Secure the wires with cable clamps and wrap vinyl tape around the wires that comes into contact with
metal parts to protect the wires.
CAUTION
• Install this unit in the console of your vehicle. Do not touch the metal parts of this unit during and shortly
after use of the unit. Metal parts such as the heat sink and enclosure become hot.
• Do not connect the wires of speakers to the car chassis or Ground wire (black), or connect them in
parallel.
• Connect speakers with a maximum power of more than 50 W. If the maximum power of the speakers is
lower than 50 W, change the
• Mount the unit at an angle of less than 30º.
• If your vehicle wiring harness does not have the ignition terminal, connect Ignition wire (red) to the
terminal on the vehicle’s fuse box which provides 12 V DC power supply and is turned on and off by the
ignition key.
• Keep all cables away from heat dissipate metal parts.
• After the unit is installed, check whether the brake lamps, blinkers, wipers, etc. on the car are working
properly.
• If the fuse blows, first make sure the wires are not touching car’s chassis, then replace the old fuse with
one that has the same rating.
[AMPGAIN]
setting to avoid damaging the speakers.
Basic procedure
1 Remove the key from the ignition switch, then disconnect the
terminal of the car battery.
2 Connect the wires properly. See “Wiring connection” on page 3.
3 Install the unit to your car. See the following “Installing the unit
(in-dash mounting)”.
4 Connect the terminal of the car battery.
5 Press B SRC to turn on the power.
6 Detach the faceplate and reset the unit within 5 seconds. See “How to
reset” on page 4.
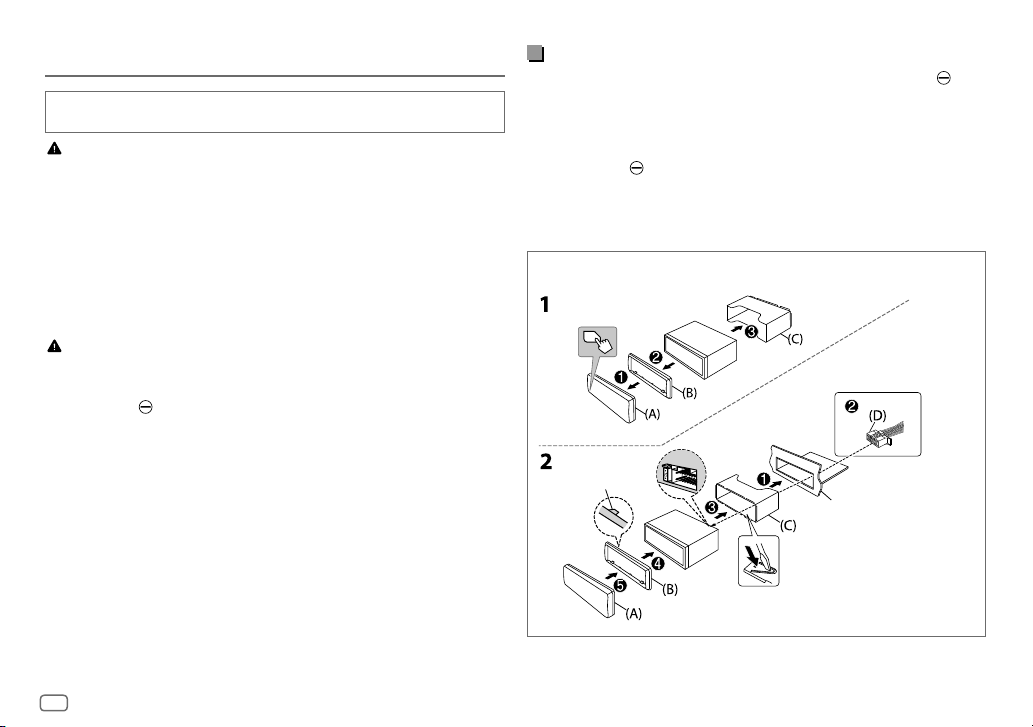
Installing the unit (in-dash mounting)
Hook on the top side
Dashboard of your car
Dashboard
Bend the appropriate tabs to hold the
sleeve firmly in place.
2
Page 11

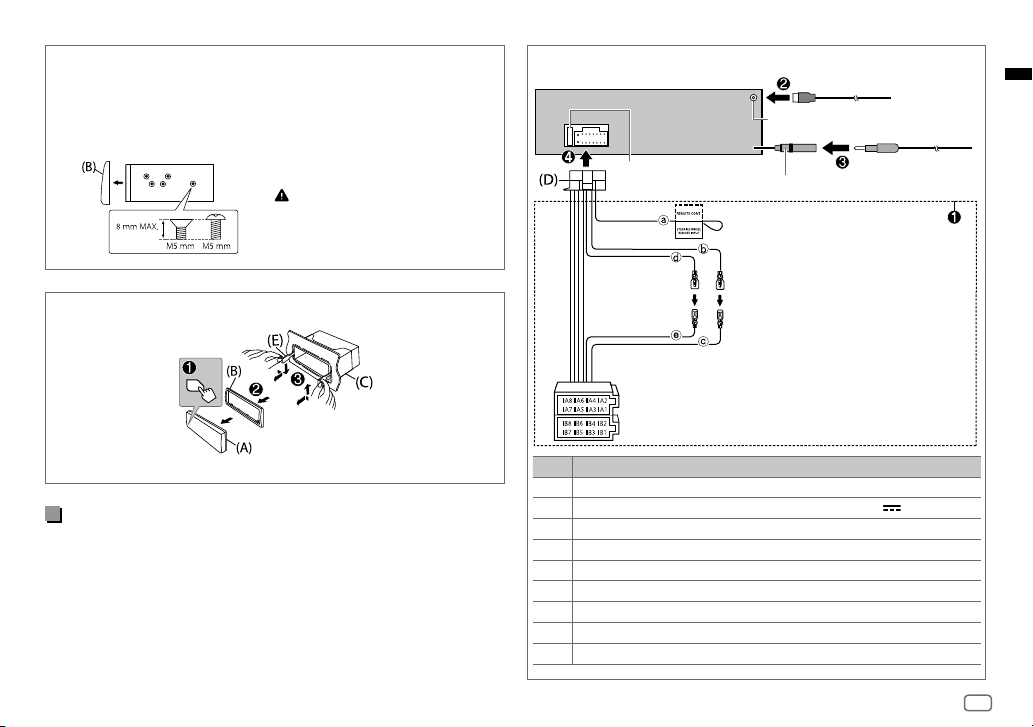
Installing the unit (without mounting sleeve)
1 Remove the mounting sleeve and trim plate from the unit.
2 Align the holes in the unit (on both sides) with the vehicle
mounting bracket and secure the unit with screws (commercially
available).
Wiring connection
DAB antenna jack (SMB connector)
Removing the unit
Part list (supplied)
(A) Faceplate (×1)
(B) Trimplate (×1)
(C) Mounting sleeve (×1)
(D) Wiring harness (×1)
(E) Extraction key (×2)
Use only the specified screws.
Using wrong screws might damage
the unit.
Fuse (10 A)
ISO connectors
Pin Color and function
A4 Yellow : Battery
A5 Blue/White : Power control (12 V
A6 Orange/white : Car light control switch
A7 Red : Ignition (ACC)
A8 Black : Earth (ground) connection
B1, B2
B3, B4
B5, B6
B7, B8
Purple
Gray
White
Green
]
]
, Gray/black
]
]
, Purple/black
[
, White/black
, Green/black
Antenna terminal
a Light blue/yellow: To the steering
wheel remote control adapter
b Yellow: Battery wire
c Yellow: A4
d Red: Ignition wire
e Red: A7
: Rear speaker (right)
[
: Front speaker (right)
: Front speaker (left)
[
[
: Rear speaker (left)
350 mA)
3
Page 12

Before Use
IMPORTANT
• To ensure proper use, please read through this Guide before using
this product. It is especially important that you read and observe
Warnings and Cautions in this Guide.
• Please keep the Guide in a safe and accessible place for future
reference.
WARNING
Do not operate any function that takes your attention away from safe
driving.
CAUTION
Volume setting:
• Adjust the volume so that you can hear sounds outside the car to
prevent accidents.
• Lower the volume before playing digital sources to avoid
damaging the speakers by the sudden increase of the output level.
General:
• Avoid using the external device if it might hinder safe driving.
• Make sure all important data has been backed up. We shall bear no
responsibility for any loss of recorded data.
• Never put or leave any metallic objects (such as coins or metal
tools) inside the unit to prevent a short circuit.
4
Basics (on faceplate)
*1 Only for illustration purpose.
Volume knob
Detach
button
Attach Detach How to reset
To On the faceplate
Turn on the power
Adjust the volume Turn the volume knob.
Select a source
Change the display information*2
*2 One of the display information supports Music Synchronization Effect. The illumination color or brightness level of
the buttons changes and synchronizes with the music level.
KD-X172DB:
Display window*1
KD-X272DBT/
KD-X172DB:
Auxiliary input
jack
USB input
terminal
KD-X272DBT:
KD-X172DB:
Reset the unit
within 5 seconds
after detaching the
faceplate.
Press B SRC.
• Press and hold to turn off the power.
Press B SRC repeatedly.
Press
repeatedly.
Page 13
Getting Started
1
Cancel the demonstration
When you turn on the power for the first time (or
[YES]
), the display shows: “CANCEL DEMO” “PRESS” “VOLUME KNOB”
1 Press the volume knob.
[YES]
is selected for the initial setup.
2 Press the volume knob again.
“DEMO OFF” appears.
2
Set the clock and date
1 Press and hold .
2 Turn the volume knob to select
To adjust the clock
3 Turn the volume knob to select
[CLOCK]
[CLOCKADJUST]
4 Turn the volume knob to make the settings, then press the knob.
Set the time in the order of “Hour” “Minute”.
5 Turn the volume knob to select
6 Turn the volume knob to select
To set the date
7 Turn the volume knob to select
[CLOCK FORMAT]
[12H] or [24H]
[DATESET]
8 Turn the volume knob to make the settings, then press the knob.
Set the date in the order of “Day” “Month” “Year”.
9 Press to exit.
To return to the previous setting item, press
[FACTORY RESET]
, then press the knob.
, then press the knob.
, then press the knob.
, then press the knob.
, then press the knob.
.
is set to
3
Set the basic settings
1 Press and hold .
2 Turn the volume knob to select an item (see the following table), then
press the knob.
3 Repeat step 2 until the desired item is selected or activated.
4 Press to exit.
To return to the previous setting item, press
[SYSTEM]
[KEY BEEP]
[FACTORY RESET]
[CLOCK]
[CLOCK DISPLAY]
[ENGLISH]
[РУССКИЙ]
[ESPANOL]
[FRANCAIS]
[DEUTSCH]*
* Only for KD-X472DBT.
(Not applicable when 3-way crossover is selected.)
[ON]: Activates the keypress tone. ; [OFF]: Deactivates.
[YES]: Resets the settings to default (except the stored station). ;
[NO]: Cancels.
[ON]: The clock time is shown on the display even when the unit is
turned off. ; [OFF]: Cancels.
Select the display language for menu and music information if
applicable.
By default, [ENGLISH] is selected.
.
Default: [XX]
5
Page 14

Digital Radio
About DAB (Digital Audio Broadcasting)
DAB is one of the digital radio broadcasting systems available today. It can
deliver digital quality sound without any annoying interference or signal
distortion. Furthermore, it can carry text, pictures and data.
In contrast to FM broadcast, where each program is transmitted on its own
frequency, DAB combines several programs (called “services”) to form one
“ensemble”.
The “primary component” (main radio station) is sometimes accompanied
by a “secondary component” which can contain extra programs or other
information.
Preparation:
1 Connect a DAB antenna (commercially available) to the DAB antenna
jack. (Page3)
2 Press B SRC repeatedly to select DAB.
3 Press and hold DAB to start the Service List update.
“DAB SORTING” appears and update starts.
Updates take up to 3 minutes. No interruption (such as traffic
information) is possible during updates.
To cancel the Service List update: Press and hold
Search for an ensemble
1 Press B SRC repeatedly to select DAB.
2 Press S / T to search for an ensemble automatically.
(or)
Press and hold S / T until “M” flashes, then press repeatedly to
search for an ensemble manually.
3 Press S / T to select a service (either primary or secondary) to
listen to.
DAB again.
Settings in memory
You can store up to 18 services.
Store a service
While listening to a service....
Press and hold one of the number buttons (1 to 6).
(or)
1 Press and hold the volume knob until “PRESETMODE” flashes.
2 Turn the volume knob to select a preset number, then press the knob.
“MEMORY” appears once the service is stored.
Select a stored service
Press one of the number buttons (1to6).
(or)
1 Press DAB to enter DAB search select mode.
2 Turn the volume knob to select
knob.
3 Turn the volume knob to select a preset number, then press the knob.
To cancel, press and hold
DAB.
[PRST]
(preset service), then press the
6
Page 15

Analog Radio
USB/iPod
Search for a station
1 Press B SRC repeatedly to select FM or AM.
2 Press S / T to search for a station automatically.
(or)
Press and hold S / T until “M” flashes, then press repeatedly to
search for a station manually.
Settings in memory
You can store up to 18 stations for FM and 6 stations for AM.
Store a station
While listening to a station....
Press and hold one of the number buttons (1 to 6).
(or)
1 Press and hold the volume knob until “PRESETMODE” flashes.
2 Turn the volume knob to select a preset number, then press the knob.
“MEMORY” appears once the station is stored.
Select a stored station
Press one of the number buttons (1to6).
(or)
1 Press .
2 Turn the volume knob to select a preset number, then press the knob.
Selectable source:
• KD-X472DBT: USB/iPod USB or iPod BT
• KD-X272DBT/KD-X172DB: USB
(For KD-X172DB, press USB to directly select USB
source.)
Start playback
The source changes automatically and playback starts when you attach a
device (USB device/ iPod/iPhone) to the USB input terminal.
To On the faceplate
Reverse/Fast-forward
Select a file
Select a folder
Repeat play
Random play
Press and hold S / T.
Press S / T.
Press 2 J / 1 K.
Press 4 repeatedly.
Press 3 repeatedly.
7
Page 16

Menu Settings
1 Press and hold to enter menu settings.
2 Turn the volume knob to select an item, then press the knob.
3 Repeat step 2 until the desired item is selected/activated.
4 Press to exit.
To return to the previous setting item, press
• Refer to the INSTRUCTION MANUAL on the following website for the
detailed explanation of each item: <http://www.jvc.net/cs/car/>
• The availability of each item vary depending on the model.
Menu items
[EQ SETTING]
[AUDIO CONTROL]
[SOUND EFFECT]
[DISPLAY]
[COLOR]
[TUNER SETTING]
[BT MODE]
[REMOTE APP]
[MIC GAIN]
[NR LEVEL]
[ECHO CANCEL]
[SYSTEM]
[CLOCK]
[ENGLISH]
[РУССКИЙ]
[ESPANOL]
[FRANCAIS]
[DEUTSCH]
[DEMO MODE]
*1 For KD-X472DBT/KD-X272DBT: Applicable only while talking on the phone.
*2 Only for KD-X472DBT.
: Selects a preset equalizer or adjusts your own sound
settings.
: Sets your preferred audio settings.
: Sets your preferred sound effect.
: Sets your preferred control for the display window.
: Sets your preferred illumination color for buttons.
: Settings for radio source.
: Settings for using a Bluetooth device.
: Settings for using smartphone to control this unit.
*1 : Sets the sensitivity of the microphone.
*1 : Adjusts the noise reduction level.
*1 : Adjusts the echo cancellation delay time.
: Settings for this unit.
: Adjusts the clock.
: Selects language for the menu and music information.
: Selects language for the menu and music information.
: Selects language for the menu and music information.
: Selects language for the menu and music information.
*2 : Selects language for the menu and music information.
: Activates or deactivates the display demonstration.
8
.
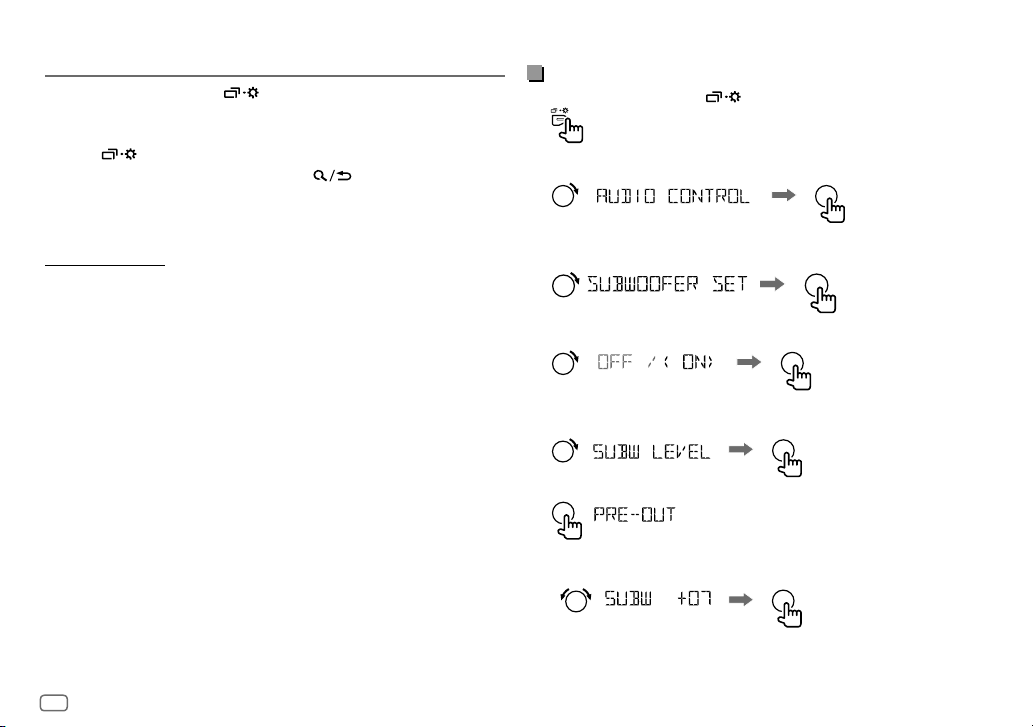
Examples of some well-used settings
Subwoofer Level Setting
1 Press and hold to enter menu settings.
2 Turn the volume knob clockwise to select
the knob.
3 Turn the volume knob clockwise to select
the knob.
4 Turn the volume knob clockwise to select
5 Turn the volume knob clockwise to select
knob.
6 Press the volume knob if
7
Turn the volume knob to adjust the subwoofer level, then press the knob.
[PRE-OUT]
[AUDIO CONTROL]
[SUBWOOFER SET]
[ON]
, then press the knob.
[SUB.W LEVEL]
is shown on the display.
, then press the
, then press
, then press
Page 17

8 Press to exit the setting menu.
Note:
For KD-X272DBT/KD-X172DB, you need to set
[SUB.W/SUB.W]
Illumination Color Setting
For KD-X472DBT, you can set your preferred illumination color for each zone.
before you can make the subwoofer level settings.
[SPK/PRE OUT]
to
[REAR/SUB.W]
5 Turn the volume knob to choose a color, then press the knob.
•
[COLOR01]
to
[COLOR49]
: The color you have created for
is shown.
to
[COLORFLOW03]
: The selected color pattern is
or
•
[USER]
[NIGHTCOLOR]
•
[COLORFLOW01]
different speeds.
•
[CRYSTAL]/[FLOWER]/[FOREST]/[GRADATION]/[OCEAN]
[RELAX]/[SUNSET]
shown. (Selectable only when
in step 4.)
6 Repeat step 4 and step 5 to set color for other zones.
7 Press to exit.
[DAYCOLOR]
: Color changes at
[ALLZONE]
is selected
or
/
1 Press and hold to enter menu settings.
2 Turn the volume knob clockwise to select
3 Press the volume knob if
[PRESET]
4 Turn the volume knob to choose a zone (
then press the knob.
[COLOR]
is shown on the display.
[ALL ZONE], [ZONE 1], [ZONE 2]
, then press the knob.
),
Other Information
For playback operations of AUX, Spotify, AMAZON ALEXA sources, refer to
the INSTRUCTION MANUAL on the following website:
<http://www.jvc.net/cs/car/>
• The availability of each source vary depending on the model.
Note for specifications
Bluetooth Frequency Range:
2.402 GHz — 2.480 GHz
Bluetooth RF Output Power (E.I.R.P.):
+4 dBm (MAX), Power Class 2
Speaker Impedance:
4 Ω — 8 Ω
Operating Voltage:
12 V DC car battery
9
Page 18

Bluetooth®
• Depending on the Bluetooth version, operating system and the
firmware version of your mobile phone, Bluetooth features may not
work with this unit.
• Be sure to turn on the Bluetooth function of the device to make the
following operations.
• Signal conditions vary depending on the surroundings.
(for KD-X472DBT/KD-X272DBT)
Connect the microphone
Connect the supplied microphone to the microphone input jack on the rear
panel.
(B) “[Device Name]”
Press the volume knob to start pairing.
• If “PAIRING” “PIN 0000” scrolls on the display, enter the PIN code
“0000” into the Bluetooth device.
• If only “PAIRING” appears, operate the Bluetooth device to confirm
pairing.
“PAIRING COMPLETED” appears when pairing is completed and “
up when the Bluetooth connection is established.
“VOL–YES” “BACK–NO”
” will light
Answer a call
Press or the volume knob.
• To adjust the phone volume
• To end a call, press and hold or the volume knob.
[00]
to
[35]
, turn the volume knob.
Adjust the
microphone
angle
Secure using cord
clamps (not supplied)
if necessary.
Pair and connect a Bluetooth device for the first time
1 Press B SRC to turn on the unit.
2 Search and select the name of your receiver (“KD-X472DBT”/
“KD-X272DBT”) on the Bluetooth device.
3 Perform (A) or (B) depending on what appears on the display.
For some Bluetooth devices, pairing sequence may vary from the steps
described below.
(A) “[Device Name]”
“XXXXXX” is a 6-digit passkey randomly generated during each pairing.
Ensure that the passkeys appear on the unit and Bluetooth device
are the same.
Press the volume knob to confirm the passkey.
Operate the Bluetooth device to confirm the passkey.
10
“XXXXXX” “VOL–YES” “BACK–NO”
Audio player via Bluetooth
1 Press B SRC repeatedly to select BTAUDIO.
• For KD-X272DBT: Pressing enters BT AUDIO directly.
2 Operate the audio player via Bluetooth to start playback.
To On the faceplate
Play back/pause Press the volume knob.
Select group or folder
Reverse skip/Forward skip
Reverse/Fast-forward
Repeat play
Random play
Press 2 J / 1 K.
Press S / T.
Press and hold S / T.
Press 4 repeatedly.
Press 3 repeatedly.
Page 19

Page 20

Instalación/Conexión
Esta sección es para los instaladores profesionales.
Para fines de seguridad, deje que un profesional realice el cableado y el montaje. Consulte con un
distribuidor de productos de audio para automóviles.
ADVERTENCIA
• La unidad puede utilizarse solamente con una fuente de alimentación de 12 V CC con negativo a masa.
• Desconecte el terminal negativo de la batería antes de realizar el cableado y el montaje.
• Para evitar un cortocircuito, no conecte el cable de la batería (amarillo) ni el cable de encendido (rojo) al chasis del
vehículo o cable de conexión a masa (negro).
• Para evitar cortocircuitos:
– Utilice una cinta de vinilo para aislar los cables no conectados.
– Asegúrese de volver a conectar a masa esta unidad al chasis del automóvil después de la instalación.
– Para proteger los cables, asegúrelos con abrazaderas de cables y con una cinta de vinilo, enrolle los cables que
entran en contacto con partes metálicas.
PRECAUCIÓN
• Instale esta unidad en la consola de su vehículo. No toque las partes metálicas de la unidad durante o un poco
después del uso de la unidad. Las partes metálicas, tales como el disipador de calor o la carcasa, pueden estar muy
calientes.
• No conecte los cables
• Conecte altavoces con una potencia máxima de más de 50 W. Si la potencia máxima de los altavoces es inferior a
50 W, cambie el ajuste
• Monte la unidad a un ángulo de menos de 30°.
• Si el mazo de conductores de su vehículo no dispone de terminal de encendido, conecte el cable de encendido
(rojo) al terminal de la caja de fusibles del vehículo, el cual suministrará una alimentación de 12 V CC y podrá
conectarse y desconectarse mediante la llave de encendido.
• Mantenga todos los cables alejados de las partes metálicas disipadoras de calor.
• Después de instalar la unidad, compruebe que las lámparas de freno, las luces intermitentes, el limpiaparabrisas,
etc. funcionen satisfactoriamente.
• Si se funde el fusible, en primer lugar asegúrese de que los cables no estén en contacto con el chasis del vehículo y,
a continuación, reemplace el fusible usado por otro del mismo régimen.
de los altavoces al chasis del vehículo, al cable de conexión a masa (negro) o en paralelo.
[AMPGAIN]
para evitar daños en los mismos.
Procedimiento básico
1 Quite la llave del interruptor de encendido; después, desconecte el
terminal
2 Conecte los cables correctamente. Consulte “Conexión del cableado” en la
página 3.
3 Instale la unidad en su automóvil. Consulte lo siguiente “Instalación de la
unidad (montaje en el tablero)”.
4 Conecte el terminal de la batería del automóvil.
5 Pulse B SRC para encender la unidad.
6 Extraiga la placa frontal y reinicialice la unidad en menos de 5 segundos.
Consulte “Cómo reinicializar” en la página 4.
Instalación de la unidad (montaje en el tablero)
de la batería del automóvil.
Gancho en el
lado superior
Salpicadero del automóvil
Salpicadero
Doble las lengüetas apropiadas para
retener firmemente la manga en su lugar.
2
Page 21
Instalación de la unidad (sin manguito de montaje)
1 Retire de la unidad, el manguito de montaje y la placa embellecedora.
2 Alinee los orificios de la unidad (en ambos lados) con la ménsula de
montaje del vehículo y asegure la unidad con los tornillos (disponibles
en el mercado).
Conexión del cableado
Toma de antena DAB (conector SMB)
Desmontaje de la unidad
Lista de piezas (suministradas)
(A) Placa frontal (×1)
(B) Placa embellecedora (×1)
(C) Manguito de montaje (×1)
(D) Mazo de conductores (×1)
(E) Herramienta de extracción (×2)
Utilice solo los tornillos
especificados. El uso de tornillos
incorrectos puede dañar la unidad.
Fusible (10 A)
Terminal de la antena
a Luz azul/amarilla: Al adaptador del
mando a distancia del volante de la
dirección
b Amarillo: Cable de la batería
c Amarillo: A4
d Rojo: Cable de encendido
e Rojo: A7
Conectores ISO
Patilla Color y función
A4 Amarillo : Batería
A5 Azul/blanco : Control de alimentación (12 V
A6 Naranja/blanco : Interruptor de control de las luces del automóvil
A7 Rojo : Encendido (ACC)
A8 Negro : Conexión a tierra (masa)
B1, B2
B3, B4
B5, B6
B7, B8
Púrpura
]
Gris
Blanco
Verde
]
, Púrpura/negro
, Gris/negro
]
, Blanco/negro
]
, Verde/negro
[
[
[
[
: Altavoz trasero (derecho)
: Altavoz delantero (derecho)
: Altavoz delantero (izquierdo)
: Altavoz trasero (izquierdo)
350 mA)
3
Page 22

Antes del uso
IMPORTANTE
• Antes de utilizar este producto y para asegurar su uso correcto, lea
esta guía por completo. En especial, lea y observe las Advertencias y
Precauciones incluidas en esta guía.
• Guarde la guía en un lugar seguro y accesible para futuras consultas.
ADVERTENCIA
No utilice ninguna función que pueda desviar su atención mientras está
conduciendo el vehículo.
PRECAUCIÓN
Ajuste del volumen:
• Ajuste el volumen a un nivel que le permita oír los ruidos del exterior
para impedir accidentes.
• Antes de reproducir fuentes digitales, baje el volumen para evitar que el
repentino aumento del nivel de salida cause daños a los altavoces.
General:
• Evite el uso de dispositivos externos cuando puedan afectar la
seguridad de conducción.
• Asegúrese de tener una copia de respaldo de todos los datos
importantes. No aceptamos responsabilidad alguna por la pérdida de
los datos grabados.
• Para evitar cortocircuitos, nunca coloque ni deje objetos metálicos
(por ejemplo, monedas o herramientas metálicas) dentro de la unidad.
4
Puntos básicos (en la placa frontal)
*1 Solo para fines ilustrativos.
Rueda de volumen
Botón de
liberación
Fijar Desmontar Cómo reinicializar
Para En la placa frontal
Encender la unidad
Ajustar el volumen Gire la rueda de volumen.
Seleccionar una fuente
Cambiar la información en
pantalla*2
*2 Una de las informaciones en pantalla admite el Efecto de sincronización de música. El color de iluminación o el nivel de brillo
de los botones cambia y se sincroniza con el nivel de música.
KD-X172DB:
Ventanilla de visualización*1
KD-X272DBT/
KD-X172DB:
Toma de
entrada auxiliar
Terminal de
entrada USB
KD-X272DBT:
KD-X172DB:
Reinicialice la unidad en
menos de 5 segundos
después de haber
extraído la placa frontal.
Pulse
B SRC.
• Pulse y mantenga pulsado para apagar la
unidad.
Pulse
B SRC repetidamente.
Pulse
repetidamente.
Page 23

Procedimientos iniciales
1
Cancele la demostración
Cuando enciende la unidad por primera vez (o
[YES]
), en la pantalla se muestra: “CANCEL DEMO” “PRESS” “VOLUME KNOB”
1 Pulse la rueda de volumen.
Se selecciona
2 Pulse de nuevo la rueda de volumen.
Aparece “DEMO OFF”.
2
Ajuste del reloj y la fecha
1 Pulse y mantenga pulsado .
2 Gire la rueda de volumen para seleccionar
la rueda.
Para ajustar el reloj
3 Gire la rueda de volumen para seleccionar
pulse la rueda.
4 Gire la rueda de volumen para realizar los ajustes y, a continuación, pulse la
rueda.
Ajuste la hora en el orden de “Hora”
5 Gire la rueda de volumen para seleccionar
pulse la rueda.
6 Gire la rueda de volumen para seleccionar
pulse la rueda.
Para ajustar la fecha
7 Gire la rueda de volumen para seleccionar
pulse la rueda.
8 Gire la rueda de volumen para realizar los ajustes y, a continuación, pulse la
rueda.
Ajuste la fecha en el orden de “Día”
[YES]
para la configuración inicial.
9 Pulse para salir.
Para volver al elemento de ajuste anterior, pulse
[FACTORY RESET]
[CLOCK]
[CLOCKADJUST]
“Minutos”.
[CLOCK FORMAT]
[12H] o [24H]
[DATESET]
“Mes” “Año”.
está ajustado a
y, a continuación, pulse
y, a continuación,
y, a continuación,
y, a continuación,
y, a continuación,
.
3
Realice los ajustes básicos
1 Pulse y mantenga pulsado .
2 Gire la rueda de volumen para seleccionar un elemento (consulte la
siguiente tabla) y, a continuación, pulse la rueda.
3 Repita el paso 2 hasta que se seleccione o active el elemento deseado.
4 Pulse para salir.
Para volver al elemento de ajuste anterior, pulse
[SYSTEM]
[KEY BEEP]
[FACTORY RESET] [YES]: Se restablecen los ajustes predeterminados (excepto la emisora
[CLOCK]
[CLOCK DISPLAY]
[ENGLISH]
[РУССКИЙ]
[ESPANOL]
[FRANCAIS]
[DEUTSCH]*
* Solo para KD-X472DBT.
(No aplicable si se ha seleccionado crossover de 3 vías.)
[ON]: Activa el tono de pulsación de teclas. ; [OFF]: Se desactiva.
memorizada). ;
[ON]: La hora del reloj siempre se visualiza en la pantalla cuando la unidad
está apagada. ;
Seleccione el idioma de visualización para el menú y la información de la
música, si corresponde.
Por defecto, se selecciona
[NO]: Se cancela.
[OFF]: Se cancela.
[ENGLISH].
.
Predeterminado: [XX]
5
Page 24
Radio digital
Acerca de DAB (Radiodifusión de audio digital)
DAB es unos de los sistemas de radiodifusión digital de radio disponibles en la
actualidad. Puede proporcionar sonido de calidad digital sin ninguna interferencia
molesta ni distorsión de la señal. Asimismo, puede proveer texto, imágenes, y
datos.
A diferencia de la difusión de FM, donde cada programa se transmite en su propia
frecuencia, la DAB combina diversos programas (denominados “servicios”) para
formar un “ensemble” (conjunto).
El “componente primario” (emisora de radio principal) viene a veces acompañado
de un “componente secundario” que puede contener programas adicionales u
otra información.
Preparativos:
1 Conecte una antena DAB (disponible en el mercado) a la toma de antena
DAB. (Página3)
2 Pulse B SRC repetidamente para seleccionar DAB.
3 Pulse y mantenga pulsado DAB para iniciar la actualización de la
lista de servicios.
Aparece “DAB SORTING” y comienza la actualización.
Esto tarda un máximo de 3 minutos. La interrupción (como información de
tráfico, por ejemplo) no es posible durante la actualización.
Para cancelar la actualización de la lista de servicios: Pulse y mantenga
pulsado
Búsqueda de un ensemble
1 Pulse B SRC repetidamente para seleccionar DAB.
2 Pulse S / T para la búsqueda automática de un ensemble.
(o)
Pulse y mantenga pulsado S / T hasta que parpadee “M” y, a
continuación, pulse repetidamente para la búsqueda manual de un
ensemble.
3 Pulse S / T para seleccionar el servicio (sea primario o secundario)
que desea escuchar.
DAB otra vez.
Ajustes en la memoria
Puede guardar hasta 18 servicios.
Guardar un servicio
Mientras escucha un servicio....
Pulse y mantenga pulsado uno de los botones numéricos (1 a 6).
(o)
1 Pulse y mantenga pulsada la rueda de volumen hasta que “PRESETMODE”
parpadee.
2 Gire la rueda de volumen para seleccionar un número de preajuste y, a
continuación, pulse la rueda.
Aparece “MEMORY” una vez almacenado el servicio.
Seleccione una emisora almacenada
Pulse uno de los botones numéricos (1a6).
(o)
1 Pulse DAB para ingresar al modo de selección de búsqueda DAB.
2 Gire la rueda de volumen para seleccionar
continuación, pulse la rueda.
3 Gire la rueda de volumen para seleccionar un número de preajuste y, a
continuación, pulse la rueda.
Para cancelar, pulse y mantenga pulsado
[PRST]
(servicio preajustado) y, a
DAB.
6
Page 25

Radio analógica
Búsqueda de una emisora
1 Pulse B SRC repetidamente para seleccionar FM o AM.
2 Pulse S / T para la búsqueda automática de emisoras.
(o)
Pulse y mantenga pulsado S / T hasta que parpadee “M” y, a
continuación, pulse repetidamente para realizar la búsqueda manual de
emisoras.
Ajustes en la memoria
Puede almacenar hasta 18 emisoras de FM y 6 emisoras de AM en la memoria.
Almacene una emisora
Mientras escucha una emisora....
Pulse y mantenga pulsado uno de los botones numéricos (1 a 6).
(o)
1 Pulse y mantenga pulsada la rueda de volumen hasta que “PRESETMODE”
parpadee.
2 Gire la rueda de volumen para seleccionar un número de preajuste y, a
continuación, pulse la rueda.
Aparece “MEMORY” una vez almacenada la emisora.
Seleccione una emisora almacenada
Pulse uno de los botones numéricos (1a6).
(o)
1 Pulse .
2 Gire la rueda de volumen para seleccionar un número de preajuste y, a
continuación, pulse la rueda.
USB/iPod
Fuente seleccionable:
• KD-X472DBT: USB/iPod USB o iPod BT
• KD-X272DBT/KD-X172DB: USB
(En el KD-X172DB, pulse USB para seleccionar
Inicie la reproducción
La fuente cambia automáticamente y la reproducción se inicia al conectar un
dispositivo (dispositivo USB/ iPod/iPhone) al terminal de entrada USB.
Para En la placa frontal
Retroceder/avanzar
rápidamente
Seleccionar un archivo
Seleccionar una carpeta
Repetir reproducción
Reproducción aleatoria
directamente la fuente USB.)
Pulse y mantenga pulsado
Pulse
S / T.
Pulse 2
J / 1 K.
Pulse 4
repetidamente.
Pulse 3
repetidamente.
S / T.
7
Page 26
Ajustes del menú
1 Pulse y mantenga pulsado para acceder a los ajustes del menú.
2 Gire la rueda de volumen para seleccionar un elemento y, a continuación,
pulse la rueda.
3 Repita el paso 2 hasta que se seleccione o active el elemento deseado.
4 Pulse para salir.
Para volver al elemento de ajuste anterior, pulse
• Para obtener más detalles sobre cada una de las opciones, consulte el MANUAL
DE INSTRUCCIONES en el siguiente sitio web: <http://www.jvc.net/cs/car/>
• La disponibilidad de cada opción varía según el modelo.
Elementos del menú
[EQ SETTING]
[AUDIO CONTROL]
[SOUND EFFECT]
[DISPLAY]
[COLOR]
[TUNER SETTING]
[BT MODE]
[REMOTE APP]
[MIC GAIN]
[NR LEVEL]
[ECHO CANCEL]
[SYSTEM]
[CLOCK]
[ENGLISH]
[РУССКИЙ]
[ESPANOL]
[FRANCAIS]
[DEUTSCH]
[DEMO MODE]
*1 Para KD-X472DBT/KD-X272DBT: Aplicable solamente mientras se habla por teléfono.
*2 Solo para KD-X472DBT.
: Selecciona un ecualizador preajustado o realiza sus propios
ajustes de sonido.
: Establece sus ajustes de audio preferidos.
: Establece el efecto de sonido preferido.
: Establece su control preferido para la ventanilla de
: Establece el color de iluminación preferido para los botones.
: Configuración de esta unidad.
: Ajusta el reloj.
: Selecciona el idioma para el menú y la información de música.
visualización.
: Configuración de la fuente de radio.
: Configuración utilizando un dispositivo Bluetooth.
: Configuración utilizando un smartphone para controlar esta
unidad.
*1 : Establece la sensibilidad del micrófono.
*1 : Ajusta el nivel de reducción de ruido.
*1 : Ajusta el tiempo de retardo de cancelación de eco.
: Selecciona el idioma para el menú y la información de música.
: Selecciona el idioma para el menú y la información de música.
: Selecciona el idioma para el menú y la información de música.
*2 : Selecciona el idioma para el menú y la información de música.
: Activa o desactiva la demostración en pantalla.
.
Ejemplos de algunos ajustes de uso frecuente
Ajuste del nivel de subwoofer
1 Pulse y mantenga pulsado para acceder a los ajustes del menú.
2 Gire la rueda de volumen en sentido horario para seleccionar
CONTROL]
y, a continuación, pulse la rueda.
3 Gire la rueda de volumen en sentido horario para seleccionar
SET]
y, a continuación, pulse la rueda.
4 Gire la rueda de volumen en sentido horario para seleccionar
continuación, pulse la rueda.
5 Gire la rueda de volumen en sentido horario para seleccionar
y, a continuación, pulse la rueda.
6 Pulse la rueda de volumen si
7
Gire la rueda de volumen para ajustar el nivel de subwoofer y, a continuación,
pulse la rueda.
[PRE-OUT]
se muestra en la pantalla.
[AUDIO
[SUBWOOFER
[ON]
y, a
[SUB.W LEVEL]
8
Page 27

8 Pulse para salir del menú de ajuste.
Nota:
Para KD-X272DBT/KD-X172DB, deberá ajustar
[SUB.W/SUB.W]
Ajuste del color de iluminación
Para KD-X472DBT, el color de iluminación preferido se puede ajustar para cada
zona.
antes de realizar los ajustes de nivel de subwoofer.
[SPK/PRE OUT]
a
[REAR/SUB.W]
o
5 Gire la rueda de volumen para seleccionar un color y, a continuación, pulse
la rueda.
•
[COLOR01]
a
•
[USER]
[DAYCOLOR]
•
[COLORFLOW01]
las velocidades.
•
[CRYSTAL]/[FLOWER]/[FOREST]/[GRADATION]/[OCEAN]
[RELAX]/[SUNSET]
seleccionado. (Puede seleccionarse sólo si se selecciona
[ALLZONE]
6 Repita los pasos 4 y 5 para definir el color para las otras zonas.
7 Pulse para salir.
[COLOR49]
: Se muestra el color que ha creado para
o
[NIGHTCOLOR]
a
en el paso 4.)
.
[COLORFLOW03]
: Se muestra el patrón del color
: El color cambia según
/
1 Pulse y mantenga pulsado para acceder a los ajustes del menú.
2 Gire la rueda de volumen en sentido horario para seleccionar
continuación, pulse la rueda.
3 Pulse la rueda de volumen si
4 Gire la rueda de volumen para elegir una zona (
y, a continuación, pulse la rueda.
[PRESET]
se muestra en la pantalla.
[ALL ZONE], [ZONE 1], [ZONE 2]
[COLOR]
y, a
Otras informaciones
Con respecto a las operaciones de reproducción de las fuentes AUX, Spotify,
AMAZON ALEXA, consulte el MANUAL DE INSTRUCCIONES en el siguiente sitio
web: <http://www.jvc.net/cs/car/>
• La disponibilidad de cada fuente varía según el modelo.
Nota sobre las especificaciones
Rango de frecuencia Bluetooth:
2,402 GHz — 2,480 GHz
Potencia de salida de RF Bluetooth (E.I.R.P.):
+4 dBm (MAX), potencia clase 2
Impedancia del altavoz:
4 Ω — 8 Ω
)
Voltaje de trabajo:
Batería de 12 V CC para vehículos
9
Page 28

Bluetooth®
• Las funciones Bluetooth podrían no funcionar con esta unidad, dependiendo
de la versión de Bluetooth, del sistema operativo y de la versión de firmware
de su teléfono móvil.
• Para realizar las siguientes operaciones, asegúrese de activar la función
Bluetooth del dispositivo.
• Las condiciones de la señal varían dependiendo del entorno.
(para KD-X472DBT/KD-X272DBT)
Conecte el micrófono
Conecte el micrófono suministrado a la toma de entrada de micrófono en el panel
trasero.
Ajuste el
ángulo del
micrófono
Asegúrelo mediante
abrazaderas para cable
(no suministradas) si
fuera necesario.
Emparejar y conectar por primera vez un dispositivo
Bluetooth
1 Pulse B SRC para encender la unidad.
2 Busque y seleccione el nombre de su receptor (“KD-X472DBT”/
“KD-X272DBT) en el dispositivo Bluetooth.
3 Realice (A) o (B) dependiendo de los datos mostrados en la pantalla.
En el caso de algunos dispositivos Bluetooth, la secuencia de emparejamiento
puede diferir de lo descrito en los siguientes pasos.
(A) “[Nombre del dispositivo]”
“XXXXXX” es una clave de 6 dígitos que se genera aleatoriamente durante
cada emparejamiento.
Asegúrese de que las claves que aparecen en la unidad coincidan con las
que aparecen en el dispositivo Bluetooth.
Pulse la rueda de volumen para confirmar la clave.
Opere el dispositivo Bluetooth para confirmar la clave.
“XXXXXX” “VOL–YES” “BACK–NO”
(B) “[Nombre del dispositivo]”
Pulse la rueda de volumen para iniciar el emparejamiento.
• Si “PAIRING” “PIN 0000” aparece en la pantalla, ingrese el código PIN
“0000” en el dispositivo Bluetooth.
• Si solo aparece “PAIRING”, opere el dispositivo Bluetooth para confirmar
el emparejamiento.
El mensaje “PAIRING COMPLETED” aparece cuando ha finalizado el
emparejamiento; “
” se iluminará cuando se establezca la conexión Bluetooth.
“VOL–YES” “BACK–NO”
Contestar una llamada
Pulse o la rueda de volumen.
• Para ajustar el volumen del teléfono de
• Para finalizar una llamada, pulse y mantenga pulsado
volumen.
[00]
a
[35]
, gire la rueda de volumen.
o la rueda de
Reproductor de audio a través de Bluetooth
1 Pulse B SRC repetidamente para seleccionar BT AUDIO.
• Para KD-X272DBT: Si pulsa
2 Para iniciar la reproducción, utilice el reproductor de audio a través de
Bluetooth.
Para En la placa frontal
Reproducción/pausa Pulse la rueda de volumen.
Seleccione un grupo o carpeta
Omisión hacia atrás/omisión
hacia delante
Retroceder/avanzar rápidamente
Repetir reproducción
Reproducción aleatoria
se accede directamente a BT AUDIO.
J / 1 K.
Pulse 2
Pulse
S / T.
Pulse y mantenga pulsado
Pulse 4
repetidamente.
Pulse 3
repetidamente.
S / T.
10
Page 29

Page 30

Installeren/Verbinden
Dit gedeelte is voor de professionele installateur.
Laat het monteren en verbinden voor de veiligheid door een vakman uit voeren. Raadpleeg de autoaudiohandelaar.
WAARSCHUWING
• Dit toestel kan uitsluitend worden gebruikt in een auto met 12 Volt gelijkstroom, negatieve aarding.
• Ontkoppel de negatieve pool van de accu alvorens te verbinden en monteren.
• Voorkom kortsluiting en sluit derhalve het accudraad (geel) en ontstekingsdraad (rood) niet op het autochassis of
de aardedraad (zwart) aan.
• Om kortsluiting te voorkomen:
– Isoleer niet-verbonden draden met isolatieband.
– Aard dit toestel beslist op het autochassis na het monteren.
– Zet de draden vast met draadklemmen en wikkel isolatietape om de draden die in contact komen met
metalen onderdelen, om de draden te beschermen.
VOORZORGEN
• Installeer dit toestel in de console van uw voertuig. Raak de metalen onderdelen van dit toestel niet aan tijdens en
kort na het gebruik. Metalen onderdelen zoals de warmteafvoer en behuizing worden heet.
• Verbind de
• Verbind luidsprekers met een maximaal vermogen van meer dan 50 W. Indien het maximale vermogen van
• Monteer het toestel met een kleinere hoek dan 30°.
• Indien de bedradingsbundel van uw auto geen ontstekingsaansluiting heeft, moet u het ontstekingsdraad (rood)
• Houd alle kabels en draden uit de buurt van metalen onderdelen die warmte afgeven.
• Controleer na het installeren van het toestel of de remlichten, richtingaanwijzers, ruitenwissers enz. van de auto
• Als de zekering is doorgebrand, controleer dan eerst of de draden niet het autochassis raken en ver vang vervolgens
draden van de luidspreker niet met het autochassis, aardedraad (zwar t) en sluit niet in serie aan.
de luidsprekers lager dan 50 W is, moet u ter bescherming van de luidsprekers de
veranderen.
van de aansluiting verbinden met de aansluiting op de zekeringbox van de auto die 12 Volt gelijkstroom en door
de contactsleutel wordt in- en uitgeschakeld.
juist functioneren.
de oude zekering door een nieuwe met dezelfde stroomsterkte.
[AMPGAIN]
instelling
Basisprocedure
1 Haal de sleutel uit het contactslot en ontkoppel vervolgens de
aansluiting van de auto-accu.
2 Verbind de draden juist. Zie “Verbinden van draden” op pagina3.
3 Installeer het toestel in de auto. Zie het volgende “Installeren van het
toestel (in-dashboard montage)”.
4 Verbind de aansluiting van de auto-accu.
5 Druk op B SRC tom het toestel in te schakelen.
6 Verwijder het voorpaneel en stel het toestel binnen 5 seconden terug.
Zie “Terugstellen” op pagina4.
Installeren van het toestel (in-dashboard montage)
Haak aan de
bovenkant
Dashboard van uw auto
Dashboard
Buig de vereiste lipjes zodat de huls
goed op zijn plaats wordt gehouden.
2
Page 31

Installeren van het toestel (zonder bevestigingshuls)
1 Verwijder de bevestigingshuls en sierplaat van het toestel.
2 Breng de gaten in het apparaat (beide kanten) in lijn met de
bevestigingsbeugel van de auto en zet het apparaat met schroeven
(los verkrijgbaar) vast.
Verbinden van draden
DAB-antenneaansluiting (SMB-stekker)
Verwijderen van het toestel
Onderdelenlijst (bijgeleverd)
(A) Voorpaneel (×1)
(B) Sierplaat (×1)
(C) Bevestigingshuls (×1)
(D) Bedradingsbundel (×1)
(E) Verwijdersleutel (×2)
Gebruik alleen de gespecificeerde
schroeven. Het gebruik van
verkeerde schroeven kan het toestel
beschadigen.
Zekering (10 A)
Antenne-aansluiting
a Lichtblauw/geel: Naar de stuur-
afstandsbedieningsadapter
b Geel: Accukabel
c Geel: A4
d Rood: Ontstekingskabel
e Rood: A7
ISO-stekkers
Pen Kleur en functie
A4 Geel : Accu
A5 Blauw/wit : Stroomregeling (12 V
A6 Oranje/wit : Autoverlichtingsschakelaar
A7 Rood : Contact (ACC)
A8 Zwart : Massaverbinding
B1, B2
B3, B4
B5, B6
B7, B8
Paars
Grijs
Wit
Groen
]
]
]
, Wit/zwart
]
, Paars/zwart
, Grijs/zwart
, Groen/zwart
[
[
[
[
: Achterluidspreker (rechts)
: Voorluidspreker (rechts)
: Voorluidspreker (links)
: Achterluidspreker (links)
350 mA)
3
Page 32
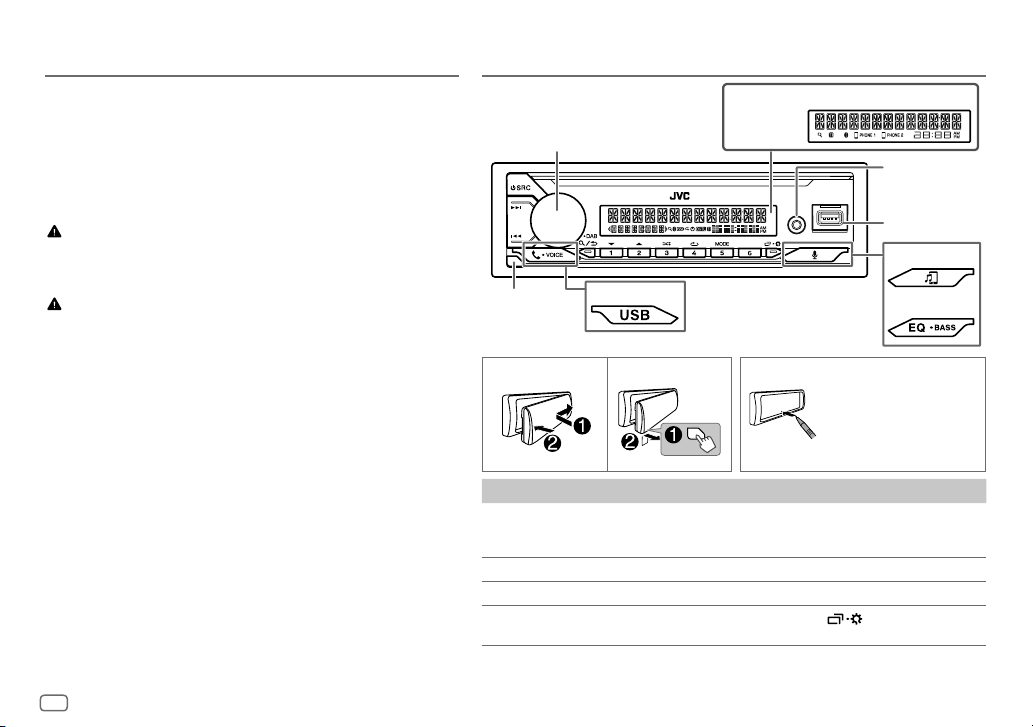
Alvorens gebruik
BELANGRIJK
• Lees alvorens dit product in gebruik te nemen deze handleiding door
voor een juist gebruik. Het is vooral belangrijk dat u de Waarschuwingen
en Voorzorgsmaatregelen in deze handleiding goed doorleest en
opvolgt.
• Bewaar deze handleiding ter referentie op een veilige en toegankelijke
plaats.
WAARSCHUWING
Bedien of gebruik geen functies die uw aandacht van de
verkeersveiligheid af zou kunnen leiden.
VOORZORGEN
Volume-instelling:
• Voorkom ongelukken en stel het volume derhalve zodanig in dat u
geluid van buiten nog goed kunt horen.
• Verlaag het volume alvorens de weergave van digitale bronnen te
starten om beschadiging van de luidsprekers door een plotselinge
verhoging van het uitgangsniveau te voorkomen.
Algemeen:
• Vermijd het gebruik van externe apparatuur indien het de veiligheid
tijdens het rijden in gevaar kan brengen.
• Maak beslist een back-up van alle belangrijke data. Wij zijn niet
aansprakelijk voor het verlies van opgenomen data.
• Voorkom kortsluiting en steek derhalve nooit metalen voorwerpen
(zoals munten en gereedschap) in het toestel.
4
Basispunten (op voorpaneel)
*1 Alleen ter illustratie.
Volumeknop
Verwijdertoets
Bevestigen Verwijderen Terugstellen
Voor het Op het voorpaneel
Inschakelen van de stroom
Instellen van het volume Verdraai de volumeknop.
Een bron selecteren
Veranderen van de
displayinformatie*2
*2 Een van de weergave -informaties ondersteunt het muzieksynchronisatie- effect. De verlichtingskleur of het
helderheidsniveau van de knoppen verandert en wordt gesynchroniseerd met het muziekniveau.
KD-X172DB:
Displayvenster*1
KD-X272DBT/
KD-X172DB:
Auxingangsaansluiting
USBingangsaansluiting
KD-X272DBT:
KD-X172DB:
Stel het toestel terug
binnen 5 seconden na
het verwijderen van het
voorpaneel.
Druk op
B SRC.
• Houd even ingedrukt om de stroom uit te
schakelen.
Druk herhaaldelijk op
Druk herhaaldelijk op
B SRC.
.
Page 33

Starten
1
Annuleren van de demonstratie
Wanneer u de stroom voor het eerst inschakelt (of wanneer
[YES]
is gesteld), verschijnt: “CANCEL DEMO” “PRESS” “ VOLUME KNOB”
1 Druk op de volumeknop.
[YES]
is de basisinstelling.
2 Druk nogmaals op de volumeknop.
“DEMO OFF” verschijnt.
2
Instellen van de klok en datum
1 Houd even ingedrukt.
2 Draai de volumeknop om
Instellen van de klok
3 Draai de volumeknop om
de knop.
4 Draai de volumeknop om de instellingen te maken en druk vervolgens op
de knop.
Stel de tijd in de volgorde van “Uur”
5 Draai de volumeknop om
de knop.
6 Draai de volumeknop om
knop.
Instellen van de datum
7 Draai de volumeknop om
knop.
8 Draai de volumeknop om de instellingen te maken en druk vervolgens op
de knop.
Stel de datum in de volgorde van “Dag”
[CLOCK]
te kiezen en druk vervolgens op de knop.
[CLOCKADJUST]
[CLOCK FORMAT]
[12H] of [24H]
[DATESET]
te kiezen en druk vervolgens op
“Minuut” in.
te kiezen en druk vervolgens op
te kiezen en druk vervolgens op de
te kiezen en druk vervolgens op de
“Maand” “Jaar”.
9 Druk op om te verlaten.
Druk op
om naar het voorgaande instelonderdeel terug te keren.
[FACTORY RESET]
op
3
Instellen van de basisinstellingen
1 Houd even ingedrukt.
2 Draai de volumeknop om een onderdeel te kiezen (zie de volgende tabel),
en druk vervolgens op de knop.
3 Herhaal stap 2 totdat het gewenste onderdeel is gekozen of geactiveerd.
4 Druk op om te verlaten.
Druk op
[SYSTEM]
[KEY BEEP]
[FACTORY RESET] [YES]: Stelt de instellingen naar de standaardinstellingen terug
[CLOCK]
[CLOCK DISPLAY]
[ENGLISH]
[РУССКИЙ]
[ESPANOL]
[FRANCAIS]
[DEUTSCH]*
* Alleen voor KD-X472DBT.
om naar het voorgaande instelonderdeel terug te keren.
Basisinstelling: [XX]
(Niet van toepassing indien 3-weg crossover is gekozen.)
[ON]: Activeren van de toetsdruktoon. ; [OFF]: Uitschakelen.
(uitgezonderd opgeslagen zenders). ;
[ON]: De tijd wordt op het display getoond, ook wanneer de stroom is
uitgeschakeld. ;
Kies indien van toepassing de displaytaal voor het menu en
muziekinformatie.
[ENGLISH] is de standaardinstelling.
[OFF]: Geannuleerd.
[NO]: Geannuleerd.
5
Page 34

Digitale radio
Meer over DAB (Digital Audio Broadcasting)
DAB is een van de hedendaagse beschikbare digitale radio-uitzendsystemen. DAB
levert een digitale geluidskwaliteit, zonder interferentie en signaalvervorming.
DAB kan tevens tekst, beelden en data versturen.
In tegenstelling tot FM-uitzendingen waarmee ieder programma op zijn eigen
frequentie wordt uitgezonden, combineert DAB diverse programma’s (die we
“services” noemen) tot een groep (oftewel een “ensemble”).
Het “primaire component” (de hoofdradiozender) wordt soms vergezeld door een
“secundair component” die extra programma’s of andere informatie heeft.
Voorbereiding:
1 Verbind een DAB-antenne (los verkrijgbaar) met de DAB-antenne-
aansluiting. (Pagina3)
2 Druk herhaaldelijk op B SRC om DAB te kiezen.
3 Houd DAB even ingedrukt om de servicelijst bij te werken.
“DAB SORTING” verschijnt en de update start.
Het updaten duurt ongeveer 3 minuten. Tijdens het updaten kan er geen
andere informatie (bijvoorbeeld verkeersinformatie) worden ontvangen.
Annuleren van het updaten van de servicelijst: Houd
ingedrukt.
Opzoeken van een ensemble
1 Druk herhaaldelijk op B SRC om DAB te kiezen.
2 Druk op S / T om automatisch een ensemble op te zoeken.
(of)
Houd S / T even ingedrukt totdat “M” knippert en druk vervolgens
herhaaldelijk om een ensemble handmatig op te zoeken.
3 Druk op S / T om een te beluisteren service (primair of secundair) te
kiezen.
DAB weer even
Geheugeninstellingen
U kunt maximaal 18 services opslaan.
Opslaan van een service
Tijdens het luisteren naar een service....
Houd een van de cijfertoetsen (1 tot 6) even ingedrukt.
(of)
1 Houd de volumeknop ingedrukt totdat “PRESET MODE” knippert.
2 Draai de volumeknop om een voorkeurnummer te kiezen en druk
vervolgens op de knop.
“MEMORY” verschijnt wanneer de service is opgeslagen.
Kiezen van een opgeslagen service
Druk op een van de cijfertoetsen (1 tot 6).
(of)
1 Druk op DAB om de DAB-zoekselectiefunctie te activeren.
2 Draai aan de volumeknop om
vervolgens op de knop.
3 Draai de volumeknop om een voorkeurnummer te kiezen en druk
vervolgens op de knop.
Houd
DAB even ingedrukt om te annuleren.
[PRST]
(voorkeurservice) te kiezen en druk
6
Page 35

Analoge Radio
Opzoeken van een zender
1 Druk herhaaldelijk op B SRC om FM of AM te kiezen.
2 Druk op S / T om automatisch een zender op te zoeken.
(of)
Houd S / T even ingedrukt totdat “M” knippert en druk vervolgens
herhaaldelijk om een zender handmatig op te zoeken.
Geheugeninstellingen
U kunt maximaal 18 zenders voor FM en 6 zenders voor AM opslaan.
Opslaan van een zender
Tijdens het luisteren naar een zender....
Houd een van de cijfertoetsen (1 tot 6) even ingedrukt.
(of)
1 Houd de volumeknop ingedrukt totdat “PRESET MODE” knippert.
2 Draai de volumeknop om een voorkeurnummer te kiezen en druk
vervolgens op de knop.
“MEMORY” verschijnt wanneer de zender is opgeslagen.
Kiezen van een opgeslagen zender
Druk op een van de cijfertoetsen (1 tot 6).
(of)
1 Druk op .
2 Draai de volumeknop om een voorkeurnummer te kiezen en druk
vervolgens op de knop.
USB/iPod
Kiesbare bron:
• KD-X472DBT: USB/iPod USB of iPod BT
• KD-X272DBT/KD-X172DB: USB
(Druk voor KD-X172DB op USB om de USB-bron direct
Starten van de weergave
De bron verandert automatisch en het afspelen start wanneer u een apparaat
(USB-apparaat/ iPod/iPhone) op de USB-ingang aansluit.
Voor het Op het voorpaneel
Snel achterwaarts/Snel
voorwaarts
Kiezen van een bestand
Kiezen van een map
Afspelen herhalen
Willekeurig afspelen
te selecteren.)
Houd
S / T even ingedrukt.
Druk op
S / T.
Druk op 2
J / 1 K.
Druk herhaaldelijk op 4
Druk herhaaldelijk op 3
.
.
7
Page 36

Menu-Instellingen
1 Houd ingedrukt om naar menu-instellingen te gaan.
2 Draai de volumeknop om een onderdeel te kiezen en druk vervolgens op
de knop.
3 Herhaal stap 2 totdat het gewenste onderdeel is gekozen/geactiveerd.
4 Druk op om te verlaten.
Druk op
• Raadpleeg de GEBRUIKSAANWIJZING op de volgende website voor een
gedetailleerde uitleg over elk item: <http://www.jvc.net/cs/car/>
• De beschikbaarheid van elk item varieert afhankelijk van het model.
Menu-items
[EQ SETTING]
[AUDIO CONTROL]
[SOUND EFFECT]
[DISPLAY]
[COLOR]
[TUNER SETTING]
[BT MODE]
[REMOTE APP]
[MIC GAIN]
[NR LEVEL]
[ECHO CANCEL]
[SYSTEM]
[CLOCK]
[ENGLISH]
[РУССКИЙ]
[ESPANOL]
[FRANCAIS]
[DEUTSCH]
[DEMO MODE]
*1 Voor de KD-X472DBT/KD-X272DBT: Alleen van toepassing tijdens het bellen.
*2 Alleen voor KD-X472DBT.
om naar het voorgaande instelonderdeel terug te keren.
: Selecteert een vooraf ingestelde equalizer of past uw eigen
geluidsinstellingen aan.
: Stelt uw gewenste audio-instellingen in.
: Stelt uw gewenste geluidseffect in.
: Stelt uw gewenste besturing voor het weergavevenster in.
: Stelt uw gewenste verlichtingskleur in voor knoppen.
: Instellingen voor radiobron.
: Instellingen voor het gebruik van een Bluetooth-apparaat.
: Instellingen voor het gebruik van een smartphone om dit
apparaat te bedienen.
*1 : Stelt de gevoeligheid van de microfoon in.
*1 : Past het ruisonderdrukkingsniveau aan.
*1 : Past de vertragingstijd van de echo-onderdrukking aan.
: Instellingen voor dit apparaat.
: Stelt de klok in.
: Selecteert de taal voor het menu en muziekinformatie.
: Selecteert de taal voor het menu en muziekinformatie.
: Selecteert de taal voor het menu en muziekinformatie.
: Selecteert de taal voor het menu en muziekinformatie.
*2 : Selecteert de taal voor het menu en muziekinformatie.
: Activeert of deactiveert de displaydemonstratie.
Voorbeelden van enkele veelgebruikte instellingen
Subwooferniveau-instelling
1 Houd ingedrukt om naar menu-instellingen te gaan.
2 Draai de volumeknop met de klok mee om
druk vervolgens op de knop.
3 Draai de volumeknop met de klok mee om
druk vervolgens op de knop.
4 Draai de volumeknop met de klok mee om
vervolgens op de knop.
5 Draai de volumeknop met de klok mee om
vervolgens op de knop.
6 Druk op de volumeknop als
7
Draai de volumeknop om het niveau van de subwoofer in te stellen en druk
vervolgens op de knop.
[PRE-OUT]
[AUDIO CONTROL]
[SUBWOOFER SET]
[ON]
te kiezen en druk
[SUB.W LEVEL]
op het display wordt getoond.
te kiezen en
te kiezen en
te kiezen en druk
8
Page 37

8 Druk op om het instelmenu te verlaten.
Opmerking:
Voor KD-X272DBT/KD-X172DB moet u
[SUB.W/SUB.W]
Kleurinstelling van verlichting
Voor KD-X472DBT kunt u de gewenste verlichtingskleur instellen voor elke zone.
voordat u de niveau-instellingen van de subwoofer kunt maken.
[SPK/PRE OUT]
instellen op
[REAR/SUB.W]
5 Draai de volumeknop om een kleur te kiezen en druk vervolgens op de
knop.
•
[COLOR01]
tot
•
[USER]
heeft gemaakt, wordt getoond.
•
of
6 Herhaal stap 4 en stap 5 om de kleur in te stellen voor andere zones.
7 Druk op om te verlaten.
[COLORFLOW01]
bij de verschillende snelheden.
•
[CRYSTAL]/[FLOWER]/[FOREST]/[GRADATION]/[OCEAN]
[RELAX]/[SUNSET]
getoond. (Alleen kiesbaar indien
gekozen.)
[COLOR49]
: De kleur die u voor
tot
[DAYCOLOR]
[COLORFLOW03]
: Het gekozen kleurpatroon wordt
[ALLZONE]
of
[NIGHTCOLOR]
: De kleur verandert
/
in stap 4 is
1 Houd ingedrukt om naar menu-instellingen te gaan.
2 Draai de volumeknop met de klok mee om
vervolgens op de knop.
3 Druk op de volumeknop als
4 Draai de volumeknop om een zone te kiezen (
en druk vervolgens op de knop.
[PRESET]
[COLOR]
te kiezen en druk
op het display wordt getoond.
[ALL ZONE], [ZONE 1], [ZONE 2]
Andere informatie
Raadpleeg de GEBRUIKSAANWIJZING op de volgende website voor het afspelen
van AUX, Spotify, AMAZON ALEXA-bronnen: <http://www.jvc.net/cs/car/>
• De beschikbaarheid van elke bron varieert afhankelijk van het model.
Opmerking voor specificaties
Bluetooth-frequentiebereik:
2,402 GHz — 2,480 GHz
Bluetooth RF-uitgangsvermogen (E.I.R.P.):
+4 dBm (MAX), vermogensklasse 2
Luidsprekerimpedantie:
4 Ω — 8 Ω
)
Bedrijfsvoltage:
12 V gelijkstroom-autoaccu
9
Page 38

Bluetooth®
• Afhankelijk van de Bluetooth-versie, het besturingssysteem en de
firmwareversie van uw mobiele telefoon, werken Bluetooth-functies mogelijk
niet met dit apparaat.
• Zorg dat u de Bluetooth-functie van het apparaat inschakelt om de volgende
bedieningen uit te voeren.
• De signaalcondities verschillen afhankelijk van de omgeving.
(voor de KD-X472DBT/KD-X272DBT)
Verbind de microfoon
Sluit de bijgeleverde microfoon aan op de microfooningang op het achterpaneel.
Stel de
hoek van de
microfoon in
Zet indien nodig met
snoerklemmen (niet
bijgeleverd) vast.
Een Bluetooth apparaat voor het eerst koppelen en
verbinden
1 Druk op B SRC om het toestel in te schakelen.
2 Zoek en selecteer de naam van uw receiver (“KD-X472DBT”/“KD-X272DBT”)
op het Bluetooth-apparaat.
3 Voer afhankelijk van wat op het display verschijnt (A) of (B) uit.
Met bepaalde Bluetooth apparaten wordt het koppelen mogelijk anders dan
hieronder beschreven uitgevoerd.
(A) “[Naam apparaat]”
“XXXXXX” is een 6-cijferige sleutel die willekeurig tijdens het koppelen wordt
gemaakt.
Controleer dat de sleutels die op het toestel en het Bluetooth apparaat
verschijnen hetzelfde zijn.
Druk op de volumeknop om de sleutel te bevestigen.
Bedien het Bluetooth apparaat om de sleutel te bevestigen.
“XXXXXX” “VOL–YES” “BACK–NO”
(B) “[Naam apparaat]”
Druk op de volumeknop om het koppelen te starten.
• Voer wanneer “PAIRING” “PIN 0000” over het display rolt de PIN-code
“0000” in het Bluetooth apparaat in.
• Indien alleen “PAIRING” verschijnt, bedien dan het Bluetooth apparaat
om het koppelen te bevestigen.
“PAIRING COMPLETED” verschijnt zodra het koppelen is voltooid en “
wanneer de Bluetooth verbinding is gemaakt.
“VOL–YES” “BACK–NO”
” licht op
Beantwoorden van een gesprek
Druk op of de volumeknop.
• Draai de volumeknop om het volume van de telefoon aan te passen van
[35]
.
• Houd
of de volumeknop ingedrukt om een oproep te beëindigen.
[00]
Audiospeler via Bluetooth
1 Druk herhaaldelijk op B SRC om BT AUDIO te kiezen.
• Voor de KD-X272DBT: Druk op
2 Bedien de audiospeler via Bluetooth om het afspelen te starten.
Voor het Op het voorpaneel
Afspelen/pauzeren Druk op de volumeknop.
Kiezen van een groep of map
Achterwaarts verspringen/
Voorwaarts verspringen
Snel achterwaarts/Snel
voorwaarts
Afspelen herhalen
Willekeurig afspelen
en voer BT AUDIO direct in.
J / 1 K.
Druk op 2
Druk op
S / T.
Houd
S / T even ingedrukt.
Druk herhaaldelijk op 4
Druk herhaaldelijk op 3
.
.
tot
10
Page 39

Page 40

Instalação/Conexão
Esta secção é para o instalador profissional.
Para o propósito de segurança, encarregue as ligações e a montagem a profissionais. Consulte o
revendedor de áudio para automóveis.
AVISO
• Este aparelho só pode ser utilizado com um fornecimento de energia de CC de 12 V, com terra negativa.
• Desconecte o terminal negativo da bateria antes de efetuar as conexões e montagem.
• Não conecte o fio da bateria (amarelo) e o fio da ignição (vermelho) ao chassis do automóvel ou fio terra (preto)
para prevenir um curto-circuito.
• Para evitar um curto-circuito:
– Isole os fios não ligados com uma fita de vinilo.
– Certifique-se de aterrar este aparelho ao chassis do automóvel de novo após a instalação.
– Segure os fios com braçadeiras de cabo e enrole a fita de vinilo em torno dos fios que entrem em contacto com
partes metálicas para proteger os fios.
CUIDADO
• Instale este aparelho na consola do seu automóvel. Não toque nas partes de metal deste aparelho durante e logo
após a utilização do aparelho. As partes de metal, tal como o dissipador de calor e a caixa ficam muito quentes.
• Não conecte os fios
• Conecte altifalantes com uma potência máxima acima de 50 W. Se a potência máxima dos altifalantes for inferior a
50 W, altere a definição
• Monte o aparelho num ângulo inferior a 30°.
• Se a cablagem do seu automóvel não tiver um terminal de ignição, ligue o fio de ignição (vermelho) ao terminal
na caixa de fusíveis do automóvel que forneça uma energia de CC de 12 V e que seja ligado e desligado pela chave
de ignição.
• Mantenha todos os cabos longe das partes metálicas de dissipação de calor.
• Depois que o aparelho tiver sido instalado, verifique se as lâmpadas de stop, os pisca-piscas, os limpa para-brisas,
etc. do automóvel estão funcionando corretamente.
• Se o fusível queimar-se, primeiro certifique-se de que os fios não estão em contato com o chassis do automóvel e,
em seguida, substitua o fusível por um novo com a mesma capacidade.
dos altifalantes ao chassis do automóvel ou fio terra (preto), nem os conec te em paralelo.
[AMPGAIN]
para evitar danos aos altifalantes.
Processo básico
1 Retire a chave do interruptor de ignição e, em seguida, desconecte o
terminal
2 Conecte os fios adequadamente. Consulte “Conexão da cablagem” na
página 3.
3 Instale o aparelho no seu automóvel. Consulte o seguinte “Instalação do
aparelho (montagem no tablier)”.
4 Conecte o terminal da bateria do automóvel.
5 Prima B SRC para ligar o aparelho.
6 Retire o painel frontal e reinicie o aparelho dentro de 5 segundos. Consulte
“Como reiniciar” na página 4.
Instalação do aparelho (montagem no tablier)
da bateria do automóvel.
Enganche o
lado superior
Tablier do seu automóvel
Tablier
Dobre as bordas apropriadas para manter
a manga firme na posição correta.
2
Page 41

Instalação do aparelho (sem manga de montagem)
1 Retire a manga de montagem e a placa de guarnição do aparelho.
2 Alinhe os orifícios no aparelho (em ambos lados) com o suporte de
montagem do veículo e fixe o aparelho com parafusos (disponíveis
comercialmente).
Conexão da cablagem
Tomada de antena DAB (conector SMB)
Remoção do aparelho
Lista de peças (fornecidas)
(A) Painel frontal (×1)
(B) Placa de guarnição (×1)
(C) Manga de montagem (×1)
(D) Cablagem (×1)
(E) Chave de extração (×2)
Utilize apenas os parafusos
especificados. Utilizar parafusos
inadequados pode danificar o
aparelho.
Fusível (10 A)
Terminal de antena
a Azul claro/amarelo: Ao adaptador
do controlo remoto do volante de
direção
b Amarelo: Fio da bateria
c Amarelo: A4
d Vermelho: Fio de ignição
e Vermelho: A7
Conectores ISO
Pino Cor e função
A4 Amarelo : Bateria
A5 Azul/branco : Controlo de energia (12 V
A6 Laranja/branco : Interruptor de controlo das luzes do automóvel
A7 Vermelho : Ignição (ACC)
A8 Preto : Conexão terra (massa)
[
[
: Altifalante traseiro (direito)
: Altifalante frontal (direito)
: Altifalante frontal (esquerdo)
: Altifalante traseiro (esquerdo)
B1, B2
B3, B4
B5, B6
B7, B8
]
Roxo
Cinzento
Branco
Verde
, Roxo/preto
]
]
, Branco/preto
]
, Verde/preto
[
, Cinzento/preto
[
350 mA)
3
Page 42

Antes de utilizar
IMPORTANTE
• Para garantir a utilização adequada, leia atentamente este Guia antes
de utilizar o produto. É especialmente importante que leia e observe os
Avisos e Cuidados neste Guia.
• Guarde o Guia em um lugar seguro e acessível para futuras consultas.
AVISO
Não opere nenhuma função que prejudique a sua atenção para uma
condução segura.
CUIDADO
Definição do volume:
• Ajuste o volume de forma que possa ouvir os sons de tráfego para
prevenir acidentes.
• Baixe o volume antes de iniciar a leitura de fontes digitais para evitar
danos aos altifalantes pelo aumento súbito do nível de saída do som.
Geral:
• Evite utilizar o dispositivo externo se o mesmo puder prejudicar a
condução segura do veículo.
• Certifique-se de fazer uma cópia de segurança de todos os dados
importantes. Não aceitaremos nenhuma responsabilidade por
quaisquer perdas de dados gravados.
• Para prevenir curtos-circuitos, nunca coloque nem deixe cair objetos
metálicos (moedas ou ferramentas de metal, por exemplo) dentro do
aparelho.
4
Fundamentos (no painel frontal)
*1 Somente para a finalidade de ilustração.
Botão de volume
Botão de
remoção
Colocar Retirar Como reiniciar
Para No painel frontal
Ligar a corrente
Ajustar o volume Rode o botão do volume.
Selecione uma fonte
Mudar a informação no visor*2
*2 Uma das informações no visor suporta o Efeito de Sincronização de Música. A cor da iluminação e o nível do brilho dos
botões muda e sincroniza com o nível de música.
KD-X172DB:
Visor*1
KD-X272DBT/
KD-X172DB:
Tomada de
entrada auxiliar
Terminal de
entrada USB
KD-X272DBT:
KD-X172DB:
Reinicie a unidade
dentro de 5 segundos
após remover o painel
frontal.
Prima
B SRC.
• Mantenha premido para desligar a
alimentação.
Prima
B SRC repetidamente.
Prima
repetidamente.
Page 43

Introdução
1
Cancelar a demonstração
Ao ligar a alimentação pela primeira vez (ou ao definir
aparece o seguinte no visor: “CANCEL DEMO”
1 Prima o botão de volume.
[YES]
é selecionado para a configuração inicial.
2 Prima o botão de volume de novo.
Aparece a indicação “DEMO OFF”.
2
Defina o relógio e a data
1 Mantenha premido.
2 Rode o botão de volume para selecionar
Para ajustar o relógio
3 Rode o botão de volume para selecionar
prima-o.
4 Rode o botão de volume para fazer as definições e, em seguida, prima-o.
Defina a hora na ordem de “Horas”
5 Rode o botão de volume para selecionar
prima-o.
6 Rode o botão de volume para selecionar
prima-o.
Para definir a data
7 Rode o botão de volume para selecionar
8 Rode o botão de volume para fazer as definições e, em seguida, prima-o.
Defina a data na ordem de “Dia”
“Minutos”.
“Mês” “Ano”.
9 Prima para sair.
Para voltar ao item de definição anterior, prima
[FACTORY RESET]
“PRESS” “ VOLUME KNOB”
[CLOCK]
e, em seguida, prima-o.
[CLOCKADJUST]
[CLOCKFORMAT]
[12H] ou [24H]
[DATESET]
e, em seguida, prima-o.
.
para
e, em seguida,
e, em seguida,
e, em seguida,
[YES]
3
Faça as definições básicas
1 Mantenha premido.
2 Rode o botão do volume para selecionar um item (consulte a seguinte
tabela) e, em seguida, prima-o.
),
3 Repita o passo 2 até que o item desejado seja selecionado ou ativado.
4 Prima para sair.
Para voltar ao item de definição anterior, prima
[SYSTEM]
[KEY BEEP]
[FACTORY RESET] [YES]: Reinicia as definições às predefinições (exceto a estação
[CLOCK]
[CLOCK DISPLAY]
[ENGLISH]
[РУССКИЙ]
[ESPANOL]
[FRANCAIS]
[DEUTSCH]*
* Somente para Only for KD-X472DBT.
(Não aplicável se o cruzamento de 3 vias estiver selecionado.)
[ON]: Ativa o som de pressão de tecla. ; [OFF]: Desativa.
armazenada). ;
[ON]: A hora do relógio é apresentada no visor mesmo quando o aparelho
está desligado. ;
Selecione o idioma de apresentação para o menu e a informação de música
se aplicável.
Por predefinição,
[NO]: Cancela.
[OFF]: Cancela.
[ENGLISH] é selecionado.
.
Predefinição: [XX]
5
Page 44

Rádio digital
Sobre DAB (Digital Audio Broadcasting)
DAB é um dos sistemas de radiodifusão digital disponíveis atualmente. Pode
proporcionar um som de qualidade digital sem interferência desagradável ou
distorção do sinal. Além disso, pode transmitir texto, imagens e dados.
Em contraste com a transmissão FM, onde cada programa é transmitido na sua
própria frequência, o DAB combina vários programas (chamados “serviços”) para
formar um “ensemble” (sinal completo ou conjunto).
Algumas vezes, o “componente primário” (estação de rádio principal) é
acompanhado por um “componente secundário”, que pode conter programas
extras ou outras informações.
Preparação:
1 Ligue uma antena DAB (disponível comercialmente) à tomada de antena
DAB. (Página 3)
2 Prima B SRC repetidamente para selecionar DAB.
3 Mantenha DAB premido para iniciar a atualização da Lista de
serviços.
“DAB SORTING” aparece e a atualização começa.
A atualização pode demorar até 3 minutos. Nenhuma interrupção (tal como
informação de tráfego) é possível durante uma atualização.
Para cancelar a atualização da Lista de serviços: Mantenha
premido novamente.
Procure um ensemble
1 Prima B SRC repetidamente para selecionar DAB.
2 Prima S / T para procurar um ensemble automaticamente.
(ou)
Mantenha S / T premido até que “M” comece a piscar e, em seguida,
prima repetidamente para procurar um ensemble manualmente.
3 Prima S / T para selecionar um serviço (primário ou secundário) para
escutar.
DAB
Definições na memória
Pode armazenar até 18 serviços.
Armazene um serviço
Durante a escuta de um serviço....
Mantenha premido um dos botões numéricos (1 a 6).
(ou)
1 Mantenha o botão do volume premido até que “PRESET MODE” comece a
piscar.
2 Rode o botão do volume para selecionar um número predefinido e, em
seguida, prima-o.
“MEMORY” aparece uma vez quando o serviço é armazenado.
Selecione um serviço armazenado
Prima um dos botões numéricos (1 a 6).
(ou)
1 Prima DAB para entrar no modo de seleção de procura de DAB.
2 Rode o botão do volume para selecionar
seguida, prima-o.
3 Rode o botão do volume para selecionar um número predefinido e, em
seguida, prima-o.
Para cancelar, mantenha
DAB premido.
[PRST]
(serviço predefinido) e, em
6
Page 45
Rádio analógico
Procura de uma estação
1 Prima B SRC repetidamente para selecionar FM ou AM.
2 Prima S / T para procurar uma estação automaticamente.
(ou)
Mantenha S / T premido até que “M” comece a piscar e, em seguida,
prima repetidamente para procurar uma estação manualmente.
Definições na memória
Pode armazenar até 18 estações para FM e 6 estações para AM.
Armazene uma estação
Durante a escuta de uma estação....
Mantenha premido um dos botões numéricos (1 a 6).
(ou)
1 Mantenha o botão do volume premido até que “PRESET MODE” comece a
piscar.
2 Rode o botão do volume para selecionar um número predefinido e, em
seguida, prima-o.
“MEMORY” aparece uma vez quando a estação é armazenada.
Selecione uma estação armazenada
Prima um dos botões numéricos (1 a 6).
(ou)
1 Prima .
2 Rode o botão do volume para selecionar um número predefinido e, em
seguida, prima-o.
USB/iPod
Fonte selecionável:
• KD-X472DBT: USB/iPod USB ou iPod BT
• KD-X272DBT/KD-X172DB: USB
(Para o KD-X172DB, prima USB para selecionar a fonte
Inicie a reprodução
A fonte muda e a reprodução começa automaticamente ao ligar um dispositivo
(dispositivo USB/ iPod/iPhone) ao terminal de entrada USB.
Para No painel frontal
Retrocesso/Avanço rápido
Selecionar um ficheiro
Selecionar uma pasta
Reprodução repetida
Reprodução aleatoria
USB diretamente.)
Mantenha
S / T premido.
Prima
S / T.
Prima 2
J / 1 K.
Prima 4
repetidamente.
Prima 3
repetidamente.
7
Page 46

Definições Do Menu
1 Mantenha premido para entrar nas definições do menu.
2 Rode o botão do volume para selecionar um item e, em seguida, prima-o.
3 Repita o passo 2 até que o item desejado seja selecionado/ativado.
4 Prima para sair.
Para voltar ao item de definição anterior, prima
• Consulte o MANUAL DE INSTRUÇÕES no website abaixo para uma explicação
detalhada de cada item: <http://www.jvc.net/cs/car/>
• A disponibilidade de cada item varia dependendo do modelo.
Itens do menu
[EQ SETTING]
[AUDIO CONTROL]
[SOUND EFFECT]
[DISPLAY]
[COLOR]
[TUNER SETTING]
[BT MODE]
[REMOTE APP]
[MIC GAIN]
[NR LEVEL]
[ECHO CANCEL]
[SYSTEM]
[CLOCK]
[ENGLISH]
[РУССКИЙ]
[ESPANOL]
[FRANCAIS]
[DEUTSCH]
[DEMO MODE]
*1 Para KD-X472DBT/KD-X272DBT: Aplicável apenas enquanto está a falar no telefone.
*2 Somente para Only for KD-X472DBT.
: Seleciona um equalizador predefinido ou ajusta as suas
próprias definições do som.
: Define suas definições de áudio preferidas.
: Define seu efeito de som preferido.
: Define seu controlo preferido para o visor.
: Define sua cor de iluminação preferido para os botões.
: Definições para fonte de rádio.
: Definições para um dispositivo Bluetooth.
: Definições para utilizar um smartphone para controlar este
aparelho.
*1 : Define a sensibilidade do microfone.
*1 : Ajusta o nível de redução de ruído.
*1 : Ajusta o tempo de atraso do cancelamento de eco.
: Definições para este aparelho.
: Ajusta o relógio.
: Seleciona o idioma para o menu e informações de música.
: Seleciona o idioma para o menu e informações de música.
: Seleciona o idioma para o menu e informações de música.
: Seleciona o idioma para o menu e informações de música.
*2 : Seleciona o idioma para o menu e informações de música.
: Ativa ou desativa a demonstração.
.
Exemplos de algumas definições bem utilizadas
Definição do Nível do Subwoofer
1 Mantenha premido para entrar nas definições do menu.
2 Rode o botão do volume no sentido horário para selecionar
CONTROL]
e, em seguida, prima-o.
3 Rode o botão do volume no sentido horário para selecionar
SET]
e, em seguida, prima-o.
4 Rode o botão do volume no sentido horário para selecionar
seguida, prima-o.
5 Rode o botão do volume no sentido horário para selecionar
em seguida, prima-o.
6 Prima o botão do volume se
7
Rode o botão do volume para ajustar o nível do subwoofer e, em seguida,
prima-o.
[PRE-OUT]
aparecer no visor.
[AUDIO
[SUBWOOFER
[ON]
[SUB.W LEVEL]
e, em
e,
8
Page 47
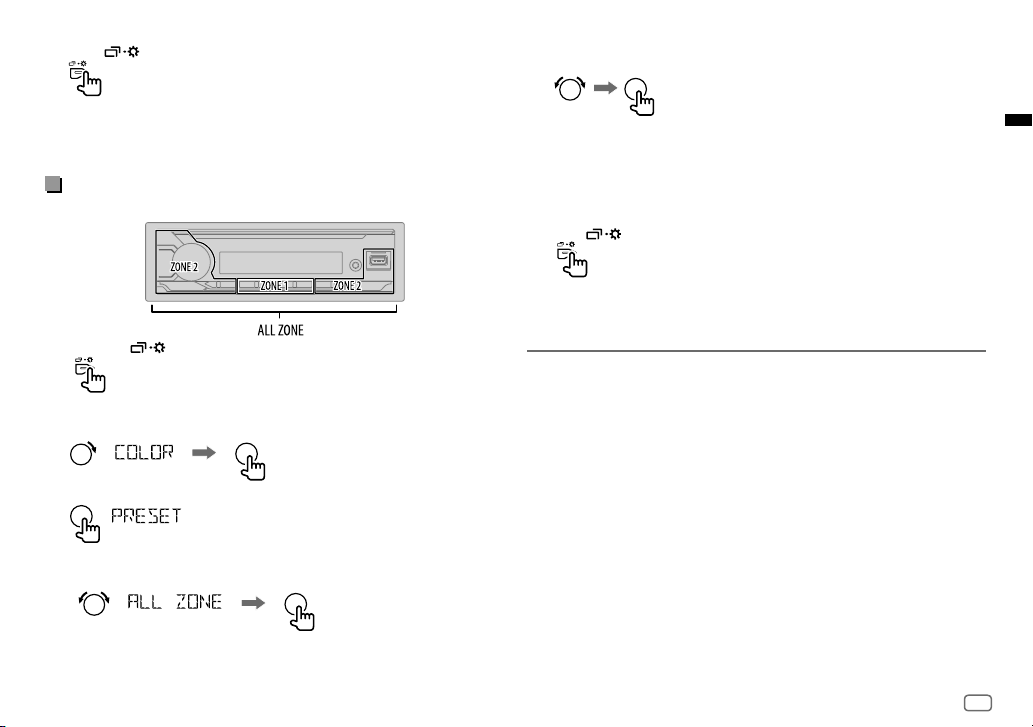
8 Prima para sair do menu de definição.
Nota:
Para o KD-X272DBT/KD-X172DB, precisa definir
ou
[SUB.W/SUB.W]
Definição da Cor de Iluminação
Para KD-X472DBT, pode definir sua cor de iluminação preferida para cada zona.
antes de poder fazer as definições do nível do subwoofer.
[SPK/PRE OUT]
para
[REAR/SUB.W]
5 Rode o botão do volume para selecionar uma cor e, em seguida, prima-o.
•
[COLOR01]
a
•
[USER]
aparece.
•
[COLORFLOW01]
6 Repita o passo 4 e o passo 5 para definir a cor para outras zonas.
7 Prima para sair.
velocidades diferentes.
•
[CRYSTAL]/[FLOWER]/[FOREST]/[GRADATION]/[OCEAN]
[RELAX]/[SUNSET]
mostrado. (Selecionável somente se
selecionado no passo 4.)
[COLOR49]
: A cor criada para
[DAYCOLOR]
a
[COLORFLOW03]
: O padrão de cor selecionado é
ou
: A cor muda em
[ALLZONE]
[NIGHTCOLOR]
/
for
1 Mantenha premido para entrar nas definições do menu.
2 Rode o botão do volume no sentido horário para selecionar
seguida, prima-o.
3 Prima o botão do volume se
4 Rode o botão de volume para selecionar uma zona (
[ZONE 2]
) e, em seguida, prima-o.
[PRESET]
aparecer no visor.
[ALL ZONE], [ZONE 1]
[COLOR]
e, em
,
Outras informações
Para as operações de reprodução de fontes AUX, Spotify, AMAZON ALEXA,
consulte o MANUAL DE INSTRUÇÕES no website abaixo:
<http://www.jvc.net/cs/car/>
• A disponibilidade de cada fonte varia dependendo do modelo.
Nota para as especificações
Intervalo de frequência de Bluetooth:
2,402 GHz — 2,480 GHz
Potência de saída RF de Bluetooth (E.I.R.P.):
+4 dBm (MÁX), Classe de potência 2
Impedância do altifalante:
4 Ω — 8 Ω
Voltagem de funcionamento:
Bateria de automóvel de CC 12 V
9
Page 48

Bluetooth®
• Dependendo da versão de Bluetooth, do sistema operativo e da versão do
firmware do seu telemóvel, as funções Bluetooth podem não funcionar com
este aparelho.
• Certifique-se de que liga a função Bluetooth do dispositivo para realizar as
seguintes operações.
• As condições do sinal variam dependendo dos arredores.
(para KD-X472DBT/KD-X272DBT)
Conecte o microfone
Ligue o microfone fornecido à tomada de entrada para microfone no painel
traseiro.
Ajuste o
ângulo do
microfone
Segure com as
abraçadeiras de cabo
(não fornecidas) se for
necessário.
Emparelhe e ligue um dispositivo Bluetooth pela
primeira vez
1 Prima B SRC para ligar a alimentação do aparelho.
2 Busque e selecione o nome do seu recetor (“KD-X472DBT”/“KD-X272DBT”)
no dispositivo Bluetooth.
3 Realize (A) ou (B) dependendo do que aparecer no visor.
Para alguns dispositivos Bluetooth, a sequência de emparelhamento pode
variar dos passos descritos a seguir.
(A) “[Nome do dispositivo]”
“XXXXXX” é uma chave de acesso de 6 dígitos gerada aleatoriamente durante
cada emparelhamento.
Certifique-se de que as chaves de acesso que aparecem no aparelho e no
dispositivo Bluetooth são iguais.
Prima o botão do volume para confirmar a chave de acesso.
Opere o dispositivo Bluetooth para confirmar a chave de acesso.
“XXXXXX” “VOL–YES” “BACK–NO”
(B) “[Nome do dispositivo]”
Prima o botão do volume para iniciar o emparelhamento.
• Se “PAIRING” “PIN 0000” se deslocar no visor, introduza o código PIN
“0000” no dispositivo Bluetooth.
• Se somente “PAIRING” aparecer, opere o dispositivo Bluetooth para
confirmar o emparelhamento.
“PAIRING COMPLETED” aparecerá quando o emparelhamento for concluído e “
acender-se-á quando a conexão Bluetooth for estabelecida.
“VOL–YES” “BACK–NO”
Responder uma chamada
Prima ou o botão do volume.
• Para ajustar o volume do telefone de
• Para terminar uma chamada, mantenha
premido.
[00]
para
[35]
, rode o botão do volume.
ou o botão do volume
Leitor de áudio via Bluetooth
1 Prima B SRC repetidamente para selecionar BTAUDIO.
• Para KD-X272DBT: Premir
2 Opere o leitor de áudio via Bluetooth para iniciar a reprodução.
Para No painel frontal
Reprodução/pausa Prima o botão de volume.
Selecionar um grupo ou pasta
Saltar para trás/para a frente
Retrocesso/Avanço rápido
Reprodução repetida
Reprodução aleatoria
seleciona BT AUDIO diretamente.
J / 1 K.
Prima 2
Prima
S / T.
Mantenha
S / T premido.
Prima 4
repetidamente.
Prima 3
repetidamente.
”
10
Page 49

Page 50
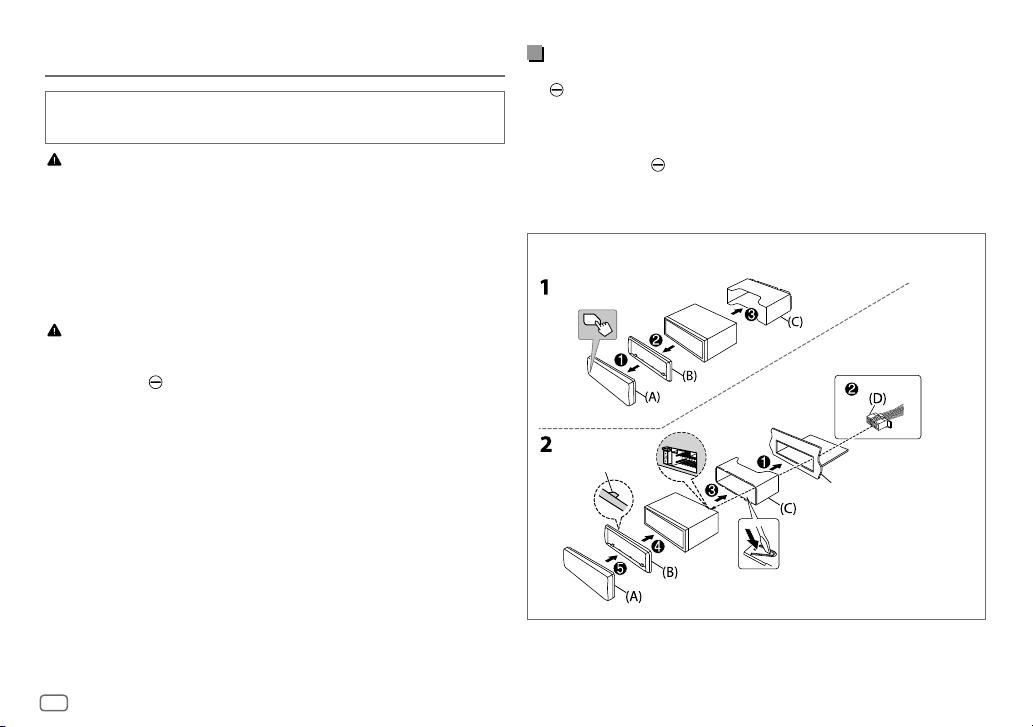
Einbau/Anschluss
Dieser Abschnitt ist für den professionellen Einbautechniker gedacht.
Überlassen Sie aus Sicherheitsgründen die Arbeiten zur Montage und Verkabelung ausgewiesenem
Fachpersonal. Lassen Sie sich vom Autoradiohändler beraten.
WARNUNG
• Das Gerät kann nur bei 12 V DC-Versorgung mit negativer Masse eingebaut werden.
• Trennen Sie den negativen Batterieanschluss vor der Verkabelung und Befestigung ab.
• Schließen Sie nicht das Batteriekabel (gelb) das Zündkabel (rot) an der Fahrzeugkarosserie oder dem Massekabel
(schwarz) an, um einen Kurzschluss zu vermeiden.
• Zum Verhindern von Kurzschlüssen:
– Isolieren Sie nicht angeschlossene Kabel mit Vinylband.
– Sicherstellen, daß das Gerät nach dem Einbau a Chassis des Fahrzeugs geerdet wird.
– Sichern Sie die Kabel mit Kabelklemmen und wickeln Sie Vinylband um die Kabel, die mit Metallteilen in
Berührung kommen, um die Kabel zu schützen.
ACHTUNG
• Montieren Sie dieses Gerät in der Konsole Ihres Fahrzeugs. Keine Metallteile dieses Geräts bei und kurz nach der
Verwendung des Geräts berühren. Metallteile wie der Kühlkörper und das Gehäuse werden heiß.
• Verbinden Sie nicht die
schließen sie parallel an.
• Schließen Sie Lautsprecher mit einer Maximalleistung von mehr als 50 W an. Wenn die Maximalleistung der
Lautsprecher unter 50 W ist, ändern Sie die Einstellung von
vermeiden.
• Montieren Sie das Gerät mit einem Winkel von weniger als 30°.
• Wenn Ihr Fahrzeugkabelbaum nicht die Zündklemme hat, verbinden Sie das Zündkabel (rot) mit der Klemme
am Sicherungskasten des Fahrzeugs, die 12 V DC-Versorgung bietet und durch den Zündschlüssel ein- und
ausgeschaltet wird.
• Halten Sie alle Kabel von hitzeableitenden Metallteilen fern.
• Überprüfen Sie nach der Montage des Geräts, ob die Bremslichter, Blinker, Scheibenwischer usw. ordnungsgemäß
funktionieren.
• Wenn die Sicherung durchbrennt, überprüfen Sie zuerst, dass die Drähte nicht die Karosserie berühren, und
ersetzen Sie dann die durchgebrannte Sicherung durch eine neue Sicherung mit der gleichen Nenngröße.
-Drähte von Lautsprechern mit der Karosserie, dem Massekabel (schwarz) oder
[AMPGAIN]
, um Beschädigung der Lautsprecher zu
Grundlegendes Verfahren
1 Ziehen Sie den Schlüssel aus dem Zündschloss, und trennen Sie dann den
-Klemme der Autobatterie ab.
2 Schließen Sie die Kabel richtig an. Siehe “Verdrahtungsanschluss” auf
Seite3.
3 Bauen Sie das Autoradio in Ihrem Fahrzeug ein. Siehe folgendes “Einbau
der Einheit (Einbau im Armaturenbrett)”.
4 Schließen Sie die -Klemme der Autobatterie an.
5 Drücken Sie B SRC zum Einschalten.
6 Nehmen Sie die Frontblende ab und setzen Sie das Gerät innerhalb von
5 Sekunden zurück. Siehe “Rücksetzen” auf Seite 4.
Einbau der Einheit (Einbau im Armaturenbrett)
Haken auf der
Oberseite
Armaturenbrett Ihres Autos
Armaturenbrett
Die geeigneten Zapfen biegen, um die
Manschette sicher festzuhalten.
2
Page 51

Installieren der Einheit (ohne die Einbauhalterung)
1 Nehmen Sie die Einbauhalterung und den Frontrahmen vom Gerät ab.
2 Richten Sie die Öffnungen am Gerät (an beiden Seiten) mit der
Befestigungskonsole am Fahrzeug aus und sichern Sie das Gerät mit
Schrauben (im Handel erhältlich).
Verdrahtungsanschluss
DAB-Antennenbuchse (SMB-Anschluss)
Entfernen der Einheit
Teileliste (mitgeliefert)
(A) Frontblende (×1)
(B) Frontrahmen (×1)
(C) Einbauhalterung (×1)
(D) Kabelbaum (×1)
(E) Ausziehschlüssel (×2)
Verwenden Sie nur die
vorgeschriebenen Schrauben. Durch
Verwendung falscher Schrauben kann
das Gerät beschädigt werden.
Sicherung (10 A)
Antennenanschluss
a Hellblau/Gelb: Zum Lenkrad-
Fernbedienungsadapter
b Gelb: Batteriekabel
c Gelb: A4
d Rot: Zündkabel
e Rot: A7
ISO-Anschlüsse
Stift Farbe und Funktion
A4 Gelb : Batterie
A5 Blau/Weiß : Stromsteuerung (12 V
A6 Orangefarben/Weiß : Auto-Lichtreglerschalter
A7 Rot : Zündung (ACC)
A8 Schwarz : Erdungsanschluss (Masse)
B1, B2
B3, B4
B5, B6
B7, B8
Lila
Grau
Weiß
Grün
]
, Lila/Schwarz
]
, Grau/Schwarz
]
, Weiß/Schwarz
]
, Grün/Schwarz
[
[
[
: Hinterer Lautsprecher (rechts)
: Vorderer Lautsprecher (rechts)
: Vorderer Lautsprecher (links)
[
: Hinterer Lautsprecher (links)
350 mA)
3
Page 52

Vor der Inbetriebnahme
WICHTIG
• Um richtige Verwendung sicherzustellen, lesen Sie die Anleitung vor
der Verwendung des Produkts sorgfältig durch. Es ist besonders wichtig,
dass Sie die Warnungen und Vorsichtshinweise in dieser Anleitung lesen
und beachten.
• Bitte bewahren Sie die Anleitung an sicherer Stelle und griffbereit zum
Nachschlagen auf.
WARNUNG
Bedienen Sie keine Funktion, die Ihre Aufmerksamkeit vom Straßenverkehr
ablenkt.
ACHTUNG
Lautstärkeeinstellung:
• Stellen Sie die Lautstärke so ein, dass Sie immer noch Geräusche von
außerhalb des Fahrzeugs hören können, um Unfälle zu vermeiden.
• Senken Sie die Lautstärke vor dem Abspielen digitaler Tonquellen,
um Beschädigung der Lautsprecher durch plötzliche Tonspitzen zu
vermeiden.
Allgemeines:
• Vermeiden Sie Verwendung des externen Geräts, wenn dieses das
sichere Fahren behindern kann.
• Stellen Sie sicher, dass alle wichtigen Daten gesichert sind. Wir
übernehmen keine Haftung für jeglichen Verlust aufgenommener
Daten.
• Stellen Sie sicher, dass keine Metallgegenstände (wie etwa Münzen
oder Werkzeuge) ins Innere des Geräts gelangen und Kurzschlüsse
verursachen.
Grundlagen (auf Frontblende)
*1 Nur für Illustrationszwecke.
Lautstärke-Regler
AbnehmenTaste
Anbringen Abnehmen Rücksetzen
Zum Auf der Frontblende
Einschalten
Einstellen der Lautstärke Drehen Sie den Lautstärke-Regler.
Quelle auswählen
Ändern der Display-Information*2
*2 Eine der Displayinformationen unterstützt den Musik-Synchronisationseffekt. Die Beleuchtungsfarbe und der Helligkeitsgrad
der Tasten werden gewechselt und mit der Musiklautstärke synchronisiert.
KD-X172DB:
Displayfenster*1
KD-X272DBT/
KD-X172DB:
AuxiliaryEingabebuchse
USBEingangsterminal
KD-X272DBT:
KD-X172DB:
Nehmen Sie einen Reset
am Gerät innerhalb
von 5 Sekunden nach
dem Abnehmen der
Frontblende vor.
Drücken Sie
• Zum Ausschalten halten Sie die Taste gedrückt.
Drücken Sie
Drücken Sie
B SRC.
B SRC wiederholt.
wiederholt.
4
Page 53

Erste Schritte
1
Brechen Sie die Demonstration ab
Beim ersten Einschalten des Geräts (oder wenn
ist), erscheint Folgendes im Display: “CANCEL DEMO”
1 Drücken Sie den Lautstärke-Regler.
[YES]
ist für das ursprüngliche Setup gewählt.
2 Drücken Sie den Lautstärke-Regler erneut.
“DEMO OFF” erscheint.
2
Stellen Sie die Uhrzeit und das Datum ein
1 Halten Sie gedrückt.
2 Drehen Sie den Lautstärke-Regler zum Wählen von
Sie dann den Regler.
Zum Einstellen der Uhr
3 Drehen Sie den Lautstärke-Regler zum Wählen von
drücken Sie dann den Regler.
4 Drehen Sie den Lautstärke-Regler, um die Einstellungen vorzunehmen,
und drücken Sie dann den Regler.
Stellen Sie die Zeit in der Reihenfolge “Stunde”
5 Drehen Sie den Lautstärke-Regler zum Wählen von
drücken Sie dann den Regler.
6 Drehen Sie den Lautstärke-Regler zum Wählen von
drücken Sie dann den Regler.
Zum Einstellen des Datums
7 Drehen Sie den Lautstärke-Regler zum Wählen von
Sie dann den Regler.
8 Drehen Sie den Lautstärke-Regler, um die Einstellungen vorzunehmen,
und drücken Sie dann den Regler.
Stellen Sie das Datum in der Reihenfolge “Tag”
9 Drücken Sie zum Beenden.
Zum Zurückschalten zum vorherigen Einstellelement drücken Sie
[FACTORY RESET]
auf
“PRESS” “ VOLUME KNOB”
[CLOCK]
[CLOCKADJUST]
“Minute” ein.
[CLOCK FORMAT]
[12H] oder [24H]
[DATESET]
“Monat” “Jahr”.
[YES]
gestellt
, und drücken
, und
, und
, und
, und drücken
.
3
Einstellen der grundlegenden Einstellungen
1 Halten Sie gedrückt.
2 Drehen Sie den Lautstärke-Regler zum Wählen eines Gegenstands (siehe
folgende Tabelle), und drücken Sie dann den Regler.
3 Wiederholen Sie Schritt 2, bis der gewünschte Gegenstand gewählt oder
aktiviert ist.
4 Drücken Sie zum Beenden.
Zum Zurückschalten zum vorherigen Einstellelement drücken Sie
[SYSTEM]
[KEY BEEP]
[FACTORY RESET] [YES]: Setzt die Einstellungen auf Standardwerte zurück (ausgenommen
[CLOCK]
[CLOCK DISPLAY]
[ENGLISH]
[РУССКИЙ]
[ESPANOL]
[FRANCAIS]
[DEUTSCH]*
* Nur für KD-X472DBT.
(Nicht anwendbar, wenn 3-Wege-Übergang gewählt ist.)
[ON]: Aktiviert den Tastenberührungston. ; [OFF]: Deaktiviert.
gespeicherte Sender). ;
[ON]: Die Uhrzeit wird im Display angezeigt, auch wenn das Gerät
ausgeschaltet wird. ;
Wählen Sie die Anzeigesprache für das Menü und die Musik-Information,
wo zutreffend.
Als Standard ist
[NO]: Hebt auf.
[OFF]: Hebt auf.
[ENGLISH] ausgewählt.
.
Standard: [XX]
5
Page 54

Digitalradio
Wissenwertes über DAB (Digital Audio Broadcasting)
DAB ist eines der heute verfügbaren digitalen Rundfunksendesysteme. Es kann
Klang in Digitalqualität ohne störende Interferenzen oder Signalverzerrung liefern.
Außerdem kann dieser Dienst Text, Bilder und Daten übermitteln.
Im Gegensatz zu FM (UKW)-Sendungen, wo jedes Programm auf seiner eigenen
Frequenz übertragen wird, kombiniert DAB mehrere Programme (“Dienste”
genannt), um ein sogenanntes “Ensemble” zu bilden.
Die “Primärkomponente” (Hauptrundfunksender) wird manchmal von einer
“Sekundärkomponente” begleitet, die zusätzliche Programme oder andere
Informationen enthalten kann.
Vorbereitung:
1 Schließen Sie eine DAB-Antenne (im Handel erhältlich) an die DAB-
Antennenbuchse an. (Seite3)
2 Drücken Sie B SRC wiederholt, um DAB zu wählen.
3 Halten Sie DAB gedrückt, um die Aktualisierung der Dienstliste zu
starten.
“DAB SORTING” erscheint, und die Aktualisierung beginnt.
Die Aktualisierung dauert bis zu 3 Minuten. Keine Unterbrechung (wie
Verkehrsansagen) ist während der Aktualisierung möglich.
Zum Abbrechen der Aktualisierung der Dienstliste: Halten Sie
erneut gedrückt.
Suchen Sie nach einem Ensemble
1 Drücken Sie B SRC wiederholt, um DAB zu wählen.
2 Drücken Sie S / T, um ein Ensemble automatisch zu suchen.
(oder)
Halten Sie S / T gedrückt, bis “M” blinkt, und drücken Sie die Taste
dann wiederholt, um ein Ensemble manuell zu suchen.
3 Drücken Sie S / T, um einen Dienst (primär oder sekundär) zum
Hören zu wählen.
DAB
Einstellungen im Speicher
Sie können bis zu 18 Dienste speichern.
Speichern eines Dienstes
Beim Hören eines Dienstes...
Halten Sie eine der Zifferntasten (1bis 6) gedrückt.
(oder)
1 Halten Sie den Lautstärke-Regler gedrückt, bis “PRESETMODE” blinkt.
2 Drehen Sie den Lautstärke-Regler zum Wählen einer Festsendernummer,
und drücken Sie dann den Regler.
“MEMORY” wird angezeigt, wenn der Dienst gespeichert ist.
Wählen Sie einen gespeicherten Dienst aus
Drücken Sie eine der Zifferntasten (1bis 6).
(oder)
1 Drücken Sie DAB, um auf DAB-Suche-Wahlmodus zu schalten.
2 Drehen Sie den Lautstärke-Regler zum Wählen von
(Festsenderdienst), und drücken Sie dann den Regler.
3 Drehen Sie den Lautstärke-Regler zum Wählen einer Festsendernummer,
und drücken Sie dann den Regler.
Zum Abbrechen halten Sie
DAB gedrückt.
[PRST]
6
Page 55

Analogradio
Suche nach einem Sender
1 Drücken Sie B SRC wiederholt, um FM (UKW) oder AM zu wählen.
2 Drücken Sie S / T, um einen Sender automatisch zu suchen.
(oder)
Halten Sie S / T gedrückt, bis “M” blinkt, und drücken Sie die Taste
dann wiederholt, um einen Sender manuell zu suchen.
Einstellungen im Speicher
Sie können bis zu 18 Sender für FM (UKW) und 6 Sender für AM speichern.
Speichern eines Senders
Während des Hörens eines Senders....
Halten Sie eine der Zifferntasten (1bis 6) gedrückt.
(oder)
1 Halten Sie den Lautstärke-Regler gedrückt, bis “PRESETMODE” blinkt.
2 Drehen Sie den Lautstärke-Regler zum Wählen einer Festsendernummer,
und drücken Sie dann den Regler.
“MEMORY” wird angezeigt, wenn der Sender gespeichert ist.
Wählen Sie einen gespeicherten Sender aus
Drücken Sie eine der Zifferntasten (1bis 6).
(oder)
1 Drücken Sie .
2 Drehen Sie den Lautstärke-Regler zum Wählen einer Festsendernummer,
und drücken Sie dann den Regler.
USB/iPod
Wählbare Quelle:
• KD-X472DBT: USB/iPod USB oder iPod BT
• KD-X272DBT/KD-X172DB: USB
(Für KD-X172DB drücken Sie USB, um direkt die USB-
Starten Sie die Wiedergabe
Die Quelle wechselt automatisch, und die Wiedergabe beginnt, wenn Sie ein
Gerät (USB-Gerät/ iPod/iPhone) an der USB-Eingangsklemme anschließen.
Zum Auf der Frontblende
Vorspulen/Rückspule
Auswählen einer Datei
Auswählen eines Ordners
Wiederholte Wiedergabe
Zufallswiedergabe
Quelle zu wählen.)
Halten Sie
S / T gedrückt.
Drücken Sie
Drücken Sie 2
Drücken Sie 4
Drücken Sie 3
S / T.
J / 1 K.
wiederholt.
wiederholt.
7
Page 56

Menü-Einstellungen
1 Halten Sie gedrückt, um auf Menü-Einstellungen zu schalten.
2 Drehen Sie den Lautstärke-Regler zum Wählen eines Gegenstands, und
drücken Sie dann den Regler.
3 Wiederholen Sie Schritt 2, bis der gewünschte Gegenstand gewählt/
aktiviert ist.
4 Drücken Sie zum Beenden.
Zum Zurückschalten zum vorherigen Einstellelement drücken Sie
• Siehe BEDIENUNGSANLEITUNG auf der folgenden Seite für detaillierte
Erklärungen jedes Elements: <http://www.jvc.net/cs/car/>
• Die Verfügbarkeit jedes Elements ist nach dem Modell unterschiedlich.
Menüelemente
[EQ SETTING]
[AUDIO CONTROL]
[SOUND EFFECT]
[DISPLAY]
[COLOR]
[TUNER SETTING]
[BT MODE]
[REMOTE APP]
[MIC GAIN]
[NR LEVEL]
[ECHO CANCEL]
[SYSTEM]
[CLOCK]
[ENGLISH]
[РУССКИЙ]
[ESPANOL]
[FRANCAIS]
[DEUTSCH]
[DEMO MODE]
*1 Für KD-X472DBT/KD-X272DBT: Nur anwendbar, während am Telefon gesprochen wird.
*2 Nur für KD-X472DBT.
: Wählt einen Vorwahl-Equalizer oder stellt Ihre eigenen
Klangeinstellungen ein.
: Stellt Ihre bevorzugten Audio-Einstellungen ein.
: Stellt Ihren bevorzugten Klangeffekt ein.
: Wählen Sie Ihre bevorzugte Steuerung für das Anzeigefenster.
: Stellt Ihre bevorzugte Beleuchtungsfarbe für Tasten ein.
: Einstellungen für Radioquelle.
: Einstellungen zur Verwendung eines Bluetooth-Geräts.
: Einstellungen zur Verwendung des Smartphones zur
Steuerung dieser Einheit.
*1 : Stellt die Empfindlichkeit des Mikrofons ein.
*1 : Passt den Rauschunterdrückung-Pegel an.
*1 : Passt die Verzögerungszeit für die Echobeseitigung an.
: Einstellungen für diese Einheit.
: Stellt die Uhr ein.
: Wählen die Sprache für das Menü und die Musikinformation.
: Wählen die Sprache für das Menü und die Musikinformation.
: Wählen die Sprache für das Menü und die Musikinformation.
: Wählen die Sprache für das Menü und die Musikinformation.
*2 : Wählen die Sprache für das Menü und die Musikinformation.
: Aktiviert oder deaktiviert die Displaydemonstration.
.
Beispiele einiger häufig verwendeter Einstellungen
Subwoofer-Pegeleinstellung
1 Halten Sie gedrückt, um auf Menü-Einstellungen zu schalten.
2 Drehen Sie den Lautstärkeregler im Uhrzeigersinn zum Wählen von
[AUDIO CONTROL]
3 Drehen Sie den Lautstärkeregler im Uhrzeigersinn zum Wählen von
[SUBWOOFER SET]
4 Drehen Sie den Lautstärkeregler im Uhrzeigersinn zum Wählen von
und drücken Sie dann den Regler.
5 Drehen Sie den Lautstärkeregler im Uhrzeigersinn zum Wählen von
[SUB.W LEVEL]
6 Drücken Sie den Lautstärkeregler, wenn
7
Drehen Sie den Lautstärkeregler zum Einstellen des Subwoofer-Pegels, und
drücken Sie dann den Regler.
, und drücken Sie dann den Regler.
, und drücken Sie dann den Regler.
, und drücken Sie dann den Regler.
[PRE-OUT]
im Display gezeigt wird.
[ON]
,
8
Page 57

8 Drücken Sie zum Verlassen des Einstellen-Menüs.
Hinweis:
Für KD-X272DBT/KD-X172DB müssen Sie
[SUB.W/SUB.W]
können.
Einstellung der Beleuchtungsfarbe
Für KD-X472DBT können Sie Ihre bevorzugte Beleuchtungsfarbe für jede Zone
einstellen.
stellen, bevor Sie die Subwoofer-Pegeleinstellungen vornehmen
[SPK/PRE OUT]
auf
[REAR/SUB.W]
oder
5 Drehen Sie den Lautstärke-Regler, um eine Farbe zu wählen, und drücken
Sie dann den Regler.
•
[COLOR01]
bis
•
[USER]
[NIGHTCOLOR]
•
[COLORFLOW01]
bei unterschiedlichen Geschwindigkeiten.
•
[CRYSTAL]/[FLOWER]/[FOREST]/[GRADATION]/[OCEAN]
[RELAX]/[SUNSET]
gezeigt. (Nur wählbar, wenn
gewählt ist.)
6 Wiederholen Sie Schritt 4 und Schritt 5, um die Farbe für andere Zonen
einzustellen.
7 Drücken Sie zum Beenden.
[COLOR49]
: Die Farbe, die Sie für
festgelegt haben, wird gezeigt.
bis
[COLORFLOW03]
: Das gewählte Farbmuster wird
[DAYCOLOR]
: Die Farbe wechselt
[ALLZONE]
in Schritt 4
oder
/
1 Halten Sie gedrückt, um auf Menü-Einstellungen zu schalten.
2 Drehen Sie den Lautstärkeregler im Uhrzeigersinn zum Wählen von
und drücken Sie dann den Regler.
3 Drücken Sie den Lautstärkeregler, wenn
4 Drehen Sie den Lautstärke-Regler zum Wählen einer Zone (
[ZONE 1], [ZONE 2]
), und drücken Sie dann den Regler.
[PRESET]
im Display gezeigt wird.
[ALL ZONE]
[COLOR]
,
Andere informationen
Für Wiedergabebedienungen von AUX, Spotify, AMAZON ALEXA Quellen siehe
BEDIENUNGSANLEITUNG auf der folgenden Website:
<http://www.jvc.net/cs/car/>
,
• Die Verfügbarkeit jeder Quelle ist nach dem Modell unterschiedlich.
Hinweis zu technischen Daten
Bluetooth-Frequenzbereich:
2,402 GHz — 2,480 GHz
Bluetooth HF-Ausgangsleistung (E.I.R.P.):
+4 dBm (MAX), Leistungsklasse 2
Lautsprecherimpedanz:
4 Ω — 8 Ω
Betriebsspannung:
12-V-DC-Fahrzeugbatterie
9
Page 58
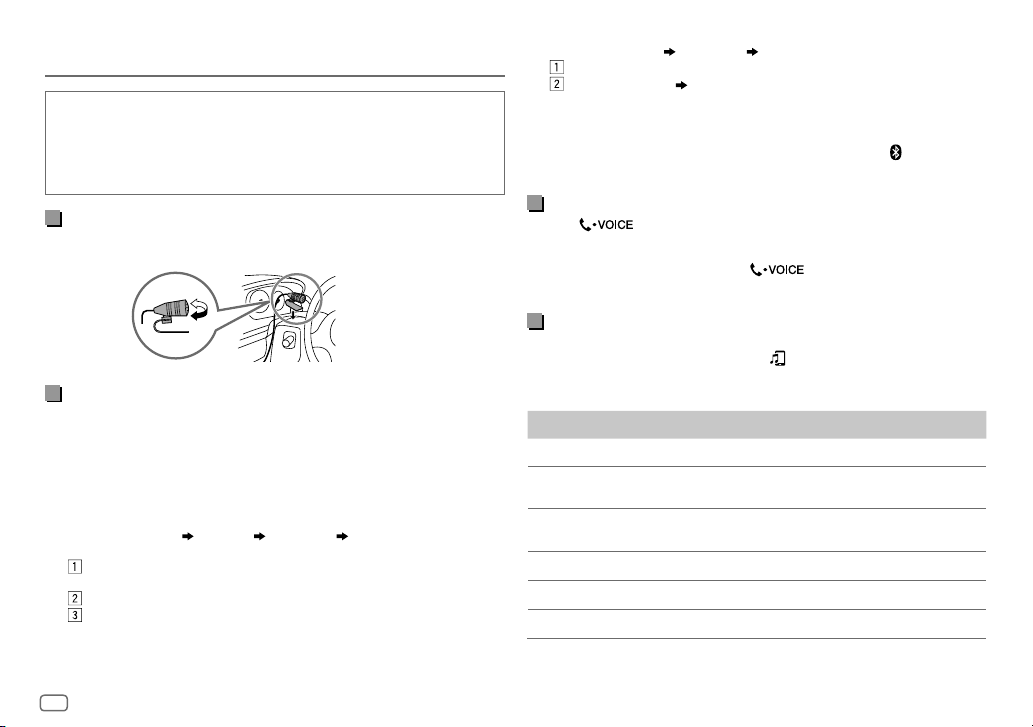
Bluetooth®
• Je nach der Bluetooth-Version, dem Betriebssystem und der Firmwareversion
Ihres Mobiltelefons arbeiten einige Bluetooth-Merkmal möglicherweise nicht
auf dieser Einheit.
• Schalten Sie die Bluetooth-Funktion des Geräts ein, um die folgenden
Bedienungen auszuführen.
• Die Signalbedingungen sind je nach Umgebung unterschiedlich.
(für KD-X472DBT/KD-X272DBT)
Schließen das Mikrofon an
Schließen Sie das mitgelieferte Mikrofon an der Mikrofon-Eingangsbuchse an der
Rückseite an.
Stellen Sie den
Mikrofonwinkel
ein
Sichern Sie das Kabel mit
Kabelklemmen (nicht
mitgeliefert), wenn
erforderlich.
Zum erstmaligen Registrieren und Anschließen eines
Bluetooth-Geräts
1 Drücken Sie B SRC, um die Einheit einzuschalten.
2 Suchen und wählen Sie den Namen Ihres Receivers (“KD-X472DBT”/
“KD-X272DBT”) auf dem Bluetooth-Gerät.
3 Führen Sie (A) oder (B) aus, je nachdem was im Display erscheint.
Bei manchen Bluetooth-Geräten kann sich die Pairing-Sequenz von den unten
beschriebenen Schritten unterscheiden.
(A) “[Gerätename]”
“XXXXXX” ist ein 6-stelliger Passkey, der bei jedem Pairing zufällig erzeugt wird.
Stellen Sie sicher, dass die Passkeys an der Einheit und am Bluetooth-Gerät
übereinstimmen.
Drücken Sie den Lautstärke-Regler zum Bestätigen des Passkeys.
Bedienen Sie das Bluetooth-Gerät, um den Passkey zu bestätigen.
“XXXXXX” “VOL–YES” “BACK–NO”
(B) “[Gerätename]”
Drücken Sie den Lautstärke-Regler zum Starten des Pairing-Vorgangs.
• Wenn “PAIRING” “PIN 0000” durch das Display läuft, geben Sie den
PIN-Code “0000” im Bluetooth-Gerät ein.
• Wenn nur “PAIRING” erscheint, bedienen Sie das Bluetooth-Gerät, um
das Pairing zu bestätigen.
“PAIRING COMPLETED” erscheint, wenn das Pairing fertig ist, und “
wenn die Bluetooth-Verbindung hergestellt ist.
“VOL–YES” “BACK–NO”
” leuchtet auf,
Nehmen Sie einen Ruf entgegen
Drücken oder den Lautstärke-Regler.
• Zum Einstellen der Telefon-Lautstärke
Lautstärkeregler.
• Zum Beenden eines Anrufs halten Sie
gedrückt.
[00]
bis
[35]
drehen Sie den
oder den Lautstärkeregler
Audioplayer über Bluetooth
1 Drücken Sie B SRC wiederholt, um BTAUDIO zu wählen.
• Für KD-X272DBT: Durch Drücken von
2 Bedienen Sie den Audioplayer über Bluetooth zum Starten der
Wiedergabe.
Zum Auf der Frontblende
Wiedergabe/Pause Drücken Sie den Lautstärke-Regler.
Wählen Sie die Gruppe oder den
Ordner
Rückwärts-Sprung/VorwärtsSprung
Vorspulen/Rückspule
Wiederholte Wiedergabe
Zufallswiedergabe
gehen Sie direkt zu BT AUDIO.
Drücken Sie 2
Drücken Sie
Halten Sie
Drücken Sie 4
Drücken Sie 3
J / 1 K.
S / T.
S / T gedrückt.
wiederholt.
wiederholt.
10
Page 59

Page 60
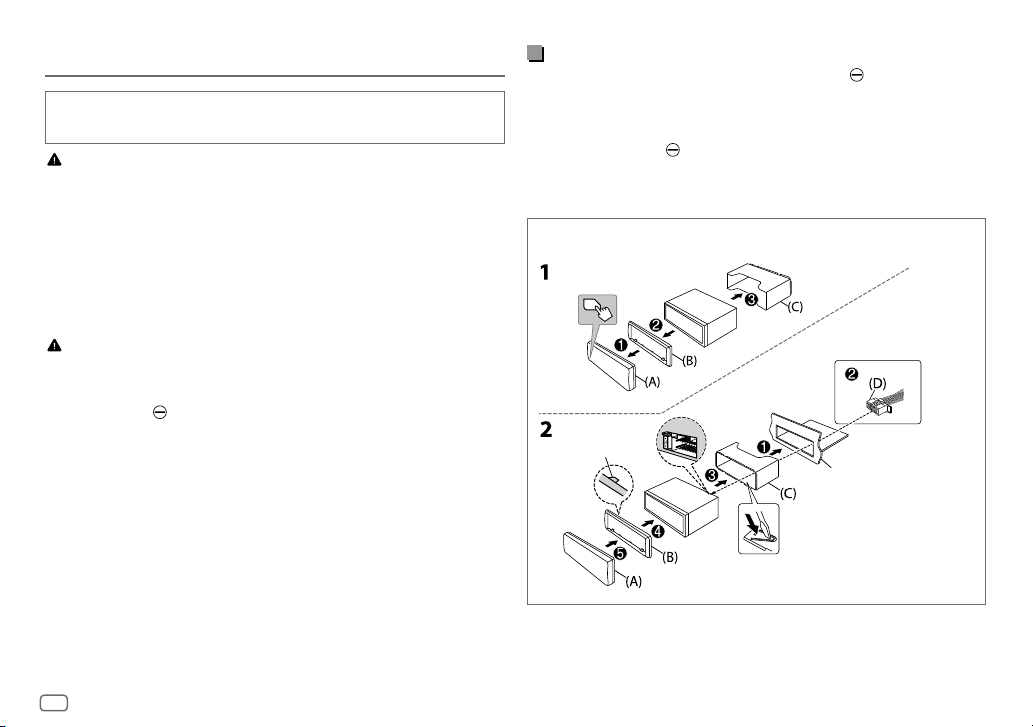
Installation/Connexion
Cette section est réservée aux installateurs professionnels.
Pour des raison de sécurité, laissez le travail de câblage et de montage des professionnels. Consultez
votre revendeur autoradio.
MISE EN GARDE
• L’appareil peut uniquement être utilisé avec une alimentation de 12 V CC, à masse négative.
• Déconnectez la borne négative de la batterie avant le câblage et le montage.
• Ne connectez pas le fil de batterie (jaune) et le fil d’allumage (rouge) au châssis de la voiture ou au fil de masse
(noir) pour éviter les courts-circuits.
• Pour éviter les courts-circuits:
– Isolez les fils non connectés avec du ruban adhésif.
– Assurez-vous de raccorder de nouveau la mise à la masse de cet appareil au châssis de la voiture après
l’installation.
– Fixez les câbles avec des serre-câbles et enrouler un ruban de vinyle autour des câbles qui entrent en contact
avec des pièces métalliques pour protéger les câbles.
AVERTISSEMENT
• Installez cet appareil dans la console de votre véhicule. Ne touchez pas les parties métalliques de cet appareil
pendant ou juste après son utilisation. Les parties métalliques, comme le dissipateur de chaleur et le boîtier,
deviennent chaudes.
• Ne connectez pas les fils
• Connectez des enceintes avec une puissance maximum de plus de 50 W. Si la puissance maximum des enceintes
est inférieure à 50 W, changez le réglage
• Montez l’appareil avec un angle de moins de 30°.
• Si le faisceau de fils de votre véhicule ne possède pas de borne d’allumage, connectez le fil d’allumage (rouge) à la
borne du boîtier de fusible de votre véhicule qui offre une alimentation de 12 V CC et qui se met en et hors service
avec la clé de contact.
• Gardez tous les câbles à l’écart des dissipateurs thermiques.
• Après avoir installé l’appareil, vérifiez si les lampes de frein, les indicateurs, les clignotants, les essuie-glaces, etc.
de la voiture fonctionnent correctement.
• Si un fusible saute, assurez-vous d’abord que les câbles ne touches pas le châssis de la voiture puis remplacez le
vieux fusible par un nouveau de même valeur.
des l’enceintes au châssis de la voiture, au fil de masse (noir) ou en parallèle.
[AMPGAIN]
pour éviter d’endommager les enceintes.
Procédure de base
1 Retirez la clé de contact, puis déconnectez la borne de la batterie de la
voiture.
2 Connectez les fils correctement. Voir “Connexions” à la page3.
3 Installez l’appareil dans votre voiture. Reportez-vous à “Installation de
l’appareil (montage encastré)” ci-après.
4 Connectez la borne de la batterie de la voiture.
5 Appuyez sur B SRC pour mettre l’appareil sous tension.
6 Détachez la façade et réinitialisez l’appareil avant 5 secondes. Voir
“Comment réinitialiser” à la page4.
Installation de l’appareil (montage encastré)
Crochet sur le
côté supérieur
Tableau de bord
Tableau de bord
de votre voiture
Tordez les languettes appropriées pour
maintenir le manchon en place.
2
Page 61

Installation de l’appareil (sans le manchon de montage)
1 Retirez le manchon de montage et la plaque de garniture de l’appareil.
2 Alignez les entailles de l’appareil (des deux côtés) avec le support de
montage du véhicule et fixez l’appareil avec les vis (en vente dans le
commerce).
Connexions
Prise d’antenne DAB (connecteur SMB)
Retrait de l’appareil
Liste de pièces (fourni)
(A) Façade (×1)
(B) Plaque de garniture (×1)
(C) Manchon de montage (×1)
(D) Faisceau de fils (×1)
(E) Clé d’extraction (×2)
N’utiliser que les vis spécifiés.
L’utilisation de vis incorrects peut
endommager l’appareil.
Fusible (10 A)
Borne de l’antenne
a Bleu clair/jaune: À l’adaptateur de
télécommande volant
b Jaune: Câble de batterie
c Jaune: A4
d Rouge: Câble d’allumage
e Rouge: A7
Connecteurs ISO
Broche Couleur et fonction
A4 Jaune : Pile
A5 Bleu/Blanc : Commande d’alimentation (12 V
A6 Orange/Blanc : Commutateur d’éclairage de la voiture
A7 Rouge : Allumage (ACC)
A8 Noir : Connexion à la terre (masse)
B1, B2
B3, B4
B5, B6
B7, B8
Violet
Gris
Blanc
Ver t
]
]
]
]
, Violet/Noir
, Gris/Noir
, Blanc/Noir
, Vert/Noir
[
[
[
[
: Enceinte arrière (droite)
: Enceinte avant (droite)
: Enceinte avant (gauche)
: Enceinte arrière (gauche)
350 mA)
3
Page 62

Avant l’utilisation
IMPORTANTES
• Pour utiliser correctement l’appareil, veuillez lire ce Guide complément
avant de l’utiliser. Il est particulièrement important que vous lisiez et
acceptiez les avertissements et les précautions de ce Guide.
• Veuillez garder ce Guide dans un endroit sûr et accessible pour une
utilisation future.
MISE EN GARDE
N’utilisez aucune fonction qui risque de vous distraire de la conduite sure
de votre véhicule.
Fonctionnement de base (sur la façade)
*1 Uniquement à des fins d’illustration.
Bouton de volume
Fenêtre d’affichage*1
KD-X272DBT/
KD-X172DB:
Prise d’entrée
auxiliaire
Prise d’entrée
USB
KD-X272DBT:
AVERTISSEMENT
Réglage du volume:
• Ajustez le volume de façon à pouvoir entendre les sons extérieurs à la
voiture afin d’éviter tout risque d’accident.
• Réduisez le volume avant de reproduire des sources numériques afin
d’éviter d’endommager les enceintes par la soudaine augmentation du
niveau de sortie.
Généralités:
• Éviter d’utiliser le périphérique extérieur s’il peut gêner une conduite en
toute sécurité.
• Assurez-vous que toutes les données importantes ont été sauvegardées.
Nous ne pouvons pas être tenu responsable pour toute perte des
données enregistrées.
• Veuillez faire en sorte de ne jamais mettre ou laisser d’objets métalliques
(tels que des pièces ou des outils) dans l’appareil, afin d’éviter tout
risque de court-circuit.
4
Touche de
détachement
Attachez Détachez Comment réinitialiser
Pour Sur la façade
Mettez l’appareil sous tension
Ajustez le volume Tournez le bouton de volume.
Sélectionner la source
Changez l’information sur
l’affichage*2
*2 Une des informations de l’affichage prend en charge l’effet de synchronisation musicale. La couleur d’éclairage ou le niveau
de luminosité des touches change et est synchronisé avec le niveau de la musique.
KD-X172DB:
KD-X172DB:
Réinitialisez l’appareil en
moins de 5 secondes
après avoir détaché la
façade.
Appuyez sur
• Maintenez la touche enfoncée pour mettre
Appuyez répétitivement sur
Appuyez répétitivement sur
B SRC.
l’appareil hors tension.
B SRC.
.
Page 63

Prise en main
1
Annulez la démonstration
Quand vous mettez l’appareil sous tension pour la première fois (ou que
RESET]
est réglé sur
“VOLUME KNOB”
1 Appuyez sur le bouton de volume.
[YES]
2 Appuyez de nouveau sur le bouton de volume.
“DEMO OFF” apparaît.
2
Réglez l’horloge et la date
1 Maintenez enfoncée .
2 Tournez le bouton de volume pour choisir
bouton.
Pour ajuster l’horloge
3 Tournez le bouton de volume pour choisir
le bouton.
4 Tournez le bouton de volume pour faire les réglages, puis appuyez sur le
bouton.
Réglez l’heure dans l’ordre “Heures”
5 Tournez le bouton de volume pour choisir
le bouton.
6 Tournez le bouton de volume pour choisir
le bouton.
Pour régler la date
7 Tournez le bouton de volume pour choisir
bouton.
8 Tournez le bouton de volume pour faire les réglages, puis appuyez sur le
bouton.
Réglez la date dans l’ordre “Jour”
[YES]
), l’affichage montre: “CANCEL DEMO” “PRESS”
est choisi pour le réglage initial.
[CLOCK]
[CLOCKADJUST]
“Minutes”.
[CLOCK FORMAT]
[12H] ou [24H]
[DATESET]
“Mois” “Année”.
, puis appuyez sur le
, puis appuyez sur le
9 Appuyez sur pour quitter.
Pour retourner à l’option de réglage précédente, appuyez sur
[FACTORY
, puis appuyez sur
, puis appuyez sur
, puis appuyez sur
.
3
Faites les réglages de base
1 Maintenez enfoncée .
2 Tournez le bouton de volume pour sélectionner un élément (voir le
tableau suivant), puis appuyez sur le bouton.
3 Répétez l’étape 2 jusqu’à ce que l’élément souhaité soit sélectionné ou
activé.
4 Appuyez sur pour quitter.
Pour retourner à l’option de réglage précédente, appuyez sur
[SYSTEM]
[KEY BEEP]
[FACTORY RESET] [YES]: Réinitialise les réglages aux valeurs par défaut (sauf la station
[CLOCK]
[CLOCK DISPLAY]
[ENGLISH]
[РУССКИЙ]
[ESPANOL]
[FRANCAIS]
[DEUTSCH]*
* Uniquement pour KD-X472DBT.
(Non applicable quand la transition 3 voies est sélectionnée.)
[ON]: Met en service la tonalité des touches. ; [OFF]: Met hors service la
fonction.
mémorisée). ;
[ON]: L’horloge apparaît sur l’affichage même quand l’appareil est hors
tension. ;
Sélectionnez la langue d’affichage pour le menu et l’information sur le
morceau si elle est disponible.
Par défaut,
[NO]: Annulation.
[OFF]: Annulation.
[ENGLISH] est sélectionné.
.
Défaut: [XX]
5
Page 64

Radio numérique
À propos du DAB (Digital Audio Broadcasting)
DAB est l’un des systèmes de radio numérique disponibles aujourd’hui. Il peut
offrir un son de qualité numérique sans toutes les interférences gênantes ni les
distorsions des signaux. De plus, il peut transporter des textes, des images et des
données.
Contrairement aux émissions FM, où chaque programme est émis sur sa propre
fréquence, les émissions DAB combinent plusieurs programmes (appelés
“services”) pour former un “ensemble”.
La “composante primaire” (station radio principale) est parfois accompagnée d’une
“composante secondaire” qui peut contenir des programmes supplémentaires ou
d’autres informations.
Préparation:
1 Connectez une antenne DAB (en vente dans le commerce) à la prise
d’antenne DAB. (Page3)
2 Appuyez répétitivement sur B SRC pour sélectionner DAB.
3 Maintenez enfoncée DAB pour démarrer la mise à jour de la Liste
des services.
“DAB SORTING” apparaît et la mise à jour démarre.
La mise à jour prend un maximum de 3 minutes. Aucune interruption (telle
que des informations routières) n’est possible pendant la mise à jour.
Pour annuler la mise à jour de la Liste des service: Maintenez de nouveau
enfoncée
Recherche d’un ensemble
1 Appuyez répétitivement sur B SRC pour sélectionner DAB.
2 Appuyez sur S / T pour rechercher un ensemble automatiquement.
(ou)
Maintenez en enfoncé S / T jusqu’à ce que “M” clignote, puis appuyez
répétitivement dessus pour rechercher un ensemble manuellement.
3 Appuyez sur S / T pour choisir le service (primaire ou secondaire) que
vous souhaitez écouter.
DAB.
Réglages en mémoire
Vous pouvez mémoriser un maximum de 18 services.
Mémorisez un service
Pendant l’écoute d’un service....
Maintenez enfoncée une des touches numériques (1 à 6).
(ou)
1 Maintenez enfoncé le bouton de volume jusqu’à ce que “PRESETMODE”
clignote.
2 Tournez le bouton de volume pour choisir un numéro de préréglage, puis
appuyez sur le bouton.
“MEMORY” apparaît une fois que le service est mémorisé.
Sélectionnez un service mémorisé
Appuyez sur l’une des touches numériques (1 à 6).
(ou)
1 Appuyez sur DAB pour entrer en mode de sélection de recherche
DAB.
2 Tournez le bouton de volume pour choisir
appuyez sur le bouton.
3 Tournez le bouton de volume pour choisir un numéro de préréglage, puis
appuyez sur le bouton.
Pour annuler, maintenez enfoncée
DAB.
[PRST]
(service préréglé), puis
6
Page 65

Radio Analogique
Recherchez une station
1 Appuyez répétitivemenent sur B SRC pour sélectionner FM ou AM.
2 Appuyez sur S / T pour rechercher une station automatiquement.
(ou)
Maintenez en enfoncé S / T jusqu’à ce que “M” clignote, puis appuyez
répétitivement dessus pour rechercher une station manuellement.
Réglages en mémoire
Vous pouvez mémoriser un maximum de 18 stations pour FM et de 6 stations
pour AM.
Mémorisez une station
Pendant l’écoute d’une station....
Maintenez enfoncée une des touches numériques (1 à 6).
(ou)
1 Maintenez enfoncé le bouton de volume jusqu’à ce que “PRESETMODE”
clignote.
2 Tournez le bouton de volume pour choisir un numéro de préréglage, puis
appuyez sur le bouton.
“MEMORY” apparaît une fois que la station est mémorisée.
Sélectionnez une station mémorisée
Appuyez sur l’une des touches numériques (1 à 6).
(ou)
1 Appuyez sur .
2 Tournez le bouton de volume pour choisir un numéro de préréglage, puis
appuyez sur le bouton.
USB/iPod
Source sélectionnable:
• KD-X472DBT: USB/iPod USB ou iPod BT
• KD-X272DBT/KD-X172DB: USB
(Pour le KD-X172DB, appuyez sur USB pour
Démarrez la lecture
La source change automatiquement et la lecture démarre quand vous connectez
un périphérique (périphérique USB/ iPod/iPhone) à la prise d’entrée USB.
Pour Sur la façade
Recherche rapide vers
l’arrière/vers l’avant
Sélectionnez un fichier
Sélectionnez un dossier
Lecture répétée
Lecture aléatoire
sélectionner directement la source USB.)
Maintenez enfoncée
Appuyez sur
Appuyez sur 2
Appuyez répétitivement sur 4
Appuyez répétitivement sur 3
S / T.
S / T.
J / 1 K.
.
.
7
Page 66

Réglages du menu
1 Maintenez enfoncée pour entrer en réglages du menu.
2 Tournez le bouton de volume pour choisir un élément, puis appuyez sur le bouton.
3 Répétez l’étape 2 jusqu’à ce que l’élément souhaité soit sélectionné ou activé.
4 Appuyez sur pour quitter.
Pour retourner à l’option de réglage précédente, appuyez sur
• Reportez-vous au MANUEL D’INSTRUCTIONS sur les sites web suivant pour une
explication détaillée de chaque élément: <http://www.jvc.net/cs/car/>
• La disponibilité de chaque élément varient en fonction du modèle.
Éléments du menu
[EQ SETTING]
[AUDIO CONTROL]
[SOUND EFFECT]
[DISPLAY]
[COLOR]
[TUNER SETTING]
[BT MODE]
[REMOTE APP]
[MIC GAIN]
[NR LEVEL]
[ECHO CANCEL]
[SYSTEM]
[CLOCK]
[ENGLISH]
[РУССКИЙ]
[ESPANOL]
[FRANCAIS]
[DEUTSCH]
[DEMO MODE]
*1 Pour KD-X472DBT/KD-X272DBT: Utilisable uniquement pendant que vous parlez au téléphone.
*2 Uniquement pour KD-X472DBT.
: Sélectionne un égaliseur préréglé ou ajuste vos propres réglages du
son.
: Règle vos réglages audio préférés.
: Règle votre effet sonore préféré.
: Règle votre commande préférée pour la fenêtre d’affichage.
: Règle votre couleur d’éclairage préférée pour les touches.
: Réglages pour la source radio.
: Réglages pour l’utilisation d’un périphérique Bluetooth.
: Réglages pour l’utilisation d’un smartphone pour commander cet
appareil.
*1 : Règle la sensibilité d’un microphone.
*1 : Ajuste du niveau de réduction de bruit.
*1 : Ajuste le temps de retard d’annulation de l’écho.
: Réglages pour cet appareil.
: Règle l’horloge.
: Sélectionne la langue pour le menu et les informations sur le
morceau.
: Sélectionne la langue pour le menu et les informations sur le
morceau.
: Sélectionne la langue pour le menu et les informations sur le
morceau.
: Sélectionne la langue pour le menu et les informations sur le
morceau.
*2 : Sélectionne la langue pour le menu et les informations sur le
morceau.
: Met en ou hors service la démonstration des affichages.
8
.
Exemples de certains réglages utilisés fréquemment
Réglage du niveau de caisson de grave
1 Maintenez enfoncée pour entrer en réglages du menu.
2 Tournez le bouton de volume dans le sens des aiguilles d’une
montre pour choisir
3 Tournez le bouton de volume dans le sens des aiguilles d’une
montre pour choisir
4 Tournez le bouton de volume dans le sens des aiguilles d’une
montre pour choisir
5 Tournez le bouton de volume dans le sens des aiguilles d’une
montre pour choisir
6 Appuyez sur le bouton de volume si
l’affichage.
7
Tournez le bouton de volume pour ajuster le niveau de caisson de
grave, puis appuyez sur le bouton.
[AUDIO CONTROL]
[SUBWOOFER SET]
[ON]
, puis appuyez sur le bouton.
[SUB.W LEVEL]
, puis appuyez sur le bouton.
, puis appuyez sur le bouton.
, puis appuyez sur le bouton.
[PRE-OUT]
apparaît sur
Page 67

8 Appuyez sur pour quitter le menu de réglage.
Remarque:
Pour le KD-X272DBT/KD-X172DB, vous devez régler
ou
[SUB.W/SUB.W]
Réglage de la couleur d’éclairage
Pour le KD-X472DBT, vous pouvez régler votre couleur d’éclairage préférée pour
chaque zone.
avant de faire les réglages du niveau de caisson de grave.
[SPK/PRE OUT]
sur
[REAR/SUB.W]
5 Tournez le bouton de volume pour choisir une couleur, puis appuyez sur le
bouton.
•
[COLOR01]
à
•
[USER]
ou
•
6 Répétez l’étape 4 et l’étape 5 pour régler la couleur pour les autres zones.
7 Appuyez sur pour quitter.
[COLORFLOW01]
une vitesse différente.
•
[CRYSTAL]/[FLOWER]/[FOREST]/[GRADATION]/[OCEAN]
[RELAX]/[SUNSET]
apparaît. (Sélectionnable uniquement quand
est choisi à l’étape 4.)
[COLOR49]
: La couleur que vous avez créée pour
[NIGHTCOLOR]
apparaît.
à
[COLORFLOW03]
: Le motif de couleur sélectionné
: La couleur change à
[DAYCOLOR]
[ALLZONE]
/
1 Maintenez enfoncée pour entrer en réglages du menu.
2 Tournez le bouton de volume dans le sens des aiguilles d’une montre pour
choisir
[COLOR]
, puis appuyez sur le bouton.
3 Appuyez sur le bouton de volume si
4 Tournez le bouton de volume pour choisir une zone (
[ZONE 2]
), puis appuyez sur le bouton.
[PRESET]
apparaît sur l’affichage.
[ALL ZONE], [ZONE 1]
,
Autres informations
Pour les opérations de lecture de sources AUX, Spotify, AMAZON ALEXA,
reportez-vous au MANUEL D’INSTRUCTIONS sur le site web suivant:
<http://www.jvc.net/cs/car/>
• La disponibilité de chaque source varie en fonction du modèle.
Remarque pour les spécifications
Plage de fréquences Bluetooth:
2,402 GHz — 2,480 GHz
Puissance de sortie RF Bluetooth (E.I.R.P.):
+4 dBm (MAX), Classe d’alimentation 2
Impédance d’enceinte:
4 Ω — 8 Ω
Tension de fonctionnement:
Batterie de voiture 12 V CC
9
Page 68

Bluetooth®
• En fonction de la version Bluetooth, du système d’exploitation et de la
version du micrologiciel de votre téléphone portable, la fonction Bluetooth
peut ne pas fonctionner avec cet appareil.
• Assurez-vous d’activer la fonction Bluetooth du périphérique pour réaliser les
opérations suivantes.
• La condition du signal varie en fonction de l’environnement.
(pour KD-X472DBT/KD-X272DBT)
Connectez le microphone
Branchez le microphone fourni sur la prise d’entrée du microphone sur le panneau
arrière.
Ajustez
l’angle du
microphone
Fixez si nécessaire en
utilisant des serrecâbles (non fourni).
Faites le pairage et connectez un périphérique
Bluetooth pour la première fois
1 Appuyez sur B SRC pour mettre l’appareil sous tension.
2 Recherchez et sélectionnez le nom de votre récepteur (“KD-X472DBT”/
“KD-X272DBT”) sur le périphérique Bluetooth.
3 Réalisez (A) ou (B) en fonction de ce qui apparait sur l’affichage.
Pour certains périphériques Bluetooth, la séquence de pairage peut varier en
fonction des étapes décrites ci-dessous.
(A) “[Nom du périphérique]”
“XXXXXX” est un code à 6 chiffres généré aléatoirement pendant chaque
pairage.
Assurez-vous que les codes qui apparaissent sur l’appareil et le
périphérique Bluetooth sont les mêmes.
Appuyez sur le bouton de volume pour valider le code.
Utilisez le périphérique Bluetooth pour valider le code.
“XXXXXX” “VOL–YES” “BACK–NO”
(B) “[Nom du périphérique]”
Appuyez sur le bouton de volume pour démarrer le pairage.
• Si “PAIRING” “PIN 0000” défile sur l’affichage, entrez le code PIN “0000”
sur le périphérique Bluetooth.
• Si seul “PAIRING” apparaît, utilisez le périphérique Bluetooth pour
confirmer le pairage.
“PAIRING COMPLETED” apparaît quand le pairage est terminé et “
quand la connexion Bluetooth est établie.
“VOL–YES” “BACK–NO”
” s’allume
Répondre à un appel
Appuyez sur ou sur le bouton de volume.
• Pour ajuster le volume du téléphone entre
volume.
• Pour terminer un appel, maintenez enfoncé
[00]
et
[35]
, tournez le bouton de
ou le bouton de volume.
Lecteur audio via Bluetooth
1 Appuyez répétitivement sur B SRC pour sélectionner BT AUDIO.
• Pour KD-X272DBT: Appuyer sur
AUDIO.
2 Commandez le lecteur audio via Bluetooth pour démarrer la lecture.
Pour Sur la façade
Lecture/pause Appuyez sur le bouton de volume.
Choisissez un groupe ou un
dossier
Saut vers l’arrière/saut vers l’avant
Recherche rapide vers l’arrière/
vers l’avant
Lecture répétée
Lecture aléatoire
permet d’accéder directement à BT
Appuyez sur 2
Appuyez sur
Maintenez enfoncée
Appuyez répétitivement sur 4
Appuyez répétitivement sur 3
J / 1 K.
S / T.
S / T.
.
.
10
Page 69

Page 70

Installazione e collegamenti
Questa sezione è destinata agli installatori.
Per motivi di sicurezza si raccomanda di affidare l’installazione e i collegamenti elettrici a un tecnico
professionista. Rivolgersi al proprio rivenditore.
AVVERTENZA
• Questo apparecchio è installabile esclusivamente nei veicoli provvisti di alimentazione da 12 V CC con messa a
terra sul negativo.
• Prima d’installarlo e di eseguire i collegamenti elettrici scollegare il cavo negativo della batteria.
• Per evitare la formazione di cortocircuiti non collegare il cavo della batteria (giallo) né il cavo di accensione del
motore (rosso) al telaio del veicolo né al cavo di messa a terra (nero).
• Per prevenire i cortocircuiti:
– Avvolgere con del nastro adesivo i cavi non collegati.
– Al termine dell’installazione si deve nuovamente collegare l’unità a massa attraverso la carrozzeria della
vettura.
– Fissare in posizione tutti i cavi con apposite fascette e av volgere con del nastro adesivo quelli che possono
andare a contatto con parti metalliche.
ATTENZIONE
• Installare l’unità nella console del veicolo. Non toccarne le parti metalliche durante e subito dopo l’uso. Parti
metalliche come il dissipatore di calore e l’involucro infatti si riscaldano molto.
• Non collegare i cavi
• Collegare diffusori di potenza massima superiore a 50 W. Se la potenza è inferiore a 50 W, per non danneggiarli è
necessario cambiare l’impostazione
• Installare l’apparecchio a un angolo inferiore a 30°.
• Se il fascio di cavi preassemblati del veicolo non dispone del connettore di accensione, collegare il cavo di
accensione (rosso) alla presa nella scatola dei fusibili del veicolo stesso che fornisce 12 V CC e viene alimentata e
disalimentata dalla chiave di accensione.
• Tenere tutti i cavi lontani dalle parti metalliche che dissipano calore.
• Dopo aver installato l’unità, controllare che le luci dei freni, i lampeggianti, i tergicristalli ecc. del veicolo funzionino
correttamente.
• Se il fusibile brucia assicurarsi innanzitutto che i cavi non siano a contatto con il telaio del veicolo e quindi
sostituirlo con uno nuovo dalle medesime caratteristiche elettriche.
dei diffusori al telaio del veicolo, al cavo di messa a terra (nero) né in parallelo.
[AMPGAIN]
.
Procedura di base
1 Sfilare la chiave di accensione e scollegare la presa della batteria del
veicolo.
2 Collegare correttamente i cavi elettrici. Vedere la sezione “Collegamento
dei cavi” a pagina3.
3 Installare l’unità nell’automobile. Vedere la sezione “Installazione
dell’apparecchio (nel cruscotto)”.
4 Ricollegare il cavo della batteria del veicolo.
5 Premere B SRC per accendere l’impianto.
6 Rimuovere il frontalino ed entro 5 secondi resettare l’unità. Vedere la
sezione “Come resettare” a pagina4.
Installazione dell’apparecchio (nel cruscotto)
Agganciare alla
parte alta
Cruscotto del veicolo
Cruscotto
Piegare le linguette necessarie per mantenere
la custodia nella posizione corretta.
2
Page 71

Installazione dell’apparecchio (senza manicotto di montaggio)
1 Rimuovere il supporto di montaggio e la piastrina di finitura dall’unità.
2 Allineare i fori dell’unità (di entrambi i lati) con quelli della staffa di
montaggio del veicolo e fissarvela usando comuni viti.
Collegamento dei cavi
Presa antenna DAB (connettore SMB)
Rimozione dell’apparecchio
Elenco delle parti (in dotazione)
(A) Frontalino (×1)
(B) Piastrina di finitura (×1)
(C) Supporto di montaggio (×1)
(D) Fascio dei cavi (×1)
(E) Chiavetta di estrazione (×2)
Usare soltanto le viti specificate.
L’uso di viti diverse può causare il
danneggiamento dell’unità.
Fusibile (10 A)
Presa d’antenna
a Azzurro/giallo: All’adattatore per
telecomando da volante
b Giallo: Cavo della batteria
c Giallo: A4
d Rosso: Cavo di accensione
e Rosso: A7
Connettori ISO
Contatto Colori e funzione
A4 Giallo : Batteria
A5 Blu/bianco : Alimentazione (12 V
A6 Arancione/bianco : Selettore di controllo illuminazione del veicolo
A7 Rosso : Accensione (ACC)
A8 Nero : Collegamento a terra (massa)
B1, B2
B3, B4
B5, B6
B7, B8
Porpora
Grigio
Bianco
Verde
]
]
, Grigio/nero
]
, Bianco/nero
]
, Verde/nero
, Porpora/nero
[
[
[
: Diffusore posteriore (destro)
[
: Diffusore anteriore (destro)
: Diffusore anteriore (sinistro)
: Diffusore posteriore (sinistro)
350 mA)
3
Page 72

Prima dell’uso
IMPORTANTE
• Prima di usare l’apparecchio, e per usarlo in modo corretto, si
raccomanda di leggere a fondo questa Guida. È particolarmente
importante leggere e osservare gli avvisi e le note di attenzione nella
Guida.
• Tenere la Guida in un luogo sicuro e prontamente accessibile per ogni
necessità futura.
AVVERTENZA
Non usare l’apparecchio in alcun modo che distragga dalla guida.
Fondamenti (sul frontalino)
*1 Solo per scopo illustrativo.
Manopola del volume
Finestra del display*1
KD-X272DBT/
KD-X172DB:
Presa d’ingresso
ausiliario
Presa d’ingresso
USB
KD-X272DBT:
ATTENZIONE
Regolazione del volume:
• Per ridurre il rischio d’incidenti regolare il volume in modo che sia
possibile udire i rumori esterni al veicolo.
• Per evitare di danneggiare i diffusori con l’aumento improvviso del
livello d’uscita, ridurre il volume prima di riprodurre le sorgenti digitali.
Generale:
• Non usare un apparecchio esterno se ciò può far distrarre dalla guida.
• Eseguire il backup di tutti i dati importanti. Il produttore
dell’apparecchio non accetta alcuna responsabilità in caso di perdita dei
dati registrati.
• Non inserire né lasciare nell’apparecchio corpi metallici quali monete o
attrezzi, pena la possibilità di cortocircuiti.
4
Pulsante di
rimozione
Applicare Rimuovere Come resettare
Per Dal frontalino
Accendere l’impianto
Regolare il volume Ruotare la manopola del volume.
Selezione della sorgente
Cambiare le informazioni
visualizzate sul display*2
*2 Tra le informazioni visualizzate vi è anche l'effetto di sincronizzazione musicale. Il colore d’illuminazione o il livello di
luminosità dei tasti varia in sincronia con il livello audio.
KD-X172DB:
KD-X172DB:
Resettare l’apparecchio
entro 5 secondi dalla
rimozione del frontalino.
Premere
B SRC.
• Premere a lungo per spegnere l’impianto.
Premere
B SRC quante volte necessario.
Premere
quante volte necessario.
Page 73

Operazioni preliminari
1
Annullare il funzionamento dimostrativo
Alla prima accensione dell’unità (o quando s’imposta
display mostra: “CANCEL DEMO”
1 Premere la manopola del volume.
L’impostazione predefinita è
2 Premere nuovamente la manopola del volume.
Viene visualizzata l’indicazione “DEMO OFF”.
2
Impostare l’ora e la data
1 Premere a lungo .
2 Ruotare la manopola del volume sino a selezionare
premerla.
Per regolare l’ora
3 Ruotare la manopola del volume sino a selezionare
premerla.
4 Ruotando la manopola del volume eseguire le varie impostazioni e quindi
premerla.
Impostare l’ora nella sequenza “Ora”
5 Ruotare la manopola del volume sino a selezionare
premerla.
6 Ruotare la manopola del volume sino a selezionare
premerla.
Per impostare la data
7 Ruotare la manopola del volume sino a selezionare
premerla.
8 Ruotando la manopola del volume eseguire le varie impostazioni e quindi
premerla.
Impostare la data nella sequenza “Giorno”
“PRESS” “ VOLUME KNOB”
[YES]
.
“Minuti”.
9 Premere per uscire.
Per ritornare all’impostazione precedente premere
[FACTORY RESET]
[CLOCK]
[CLOCKADJUST]
[CLOCKFORMAT]
[12H] o [24H]
[DATESET]
“Mese” “Anno”.
.
su
e quindi
e quindi
e quindi
[YES]
), il
e quindi
e quindi
3
Eseguire le impostazioni di base
1 Premere a lungo .
2 Ruotare la manopola del volume sino a selezionare l’elemento desiderato
(vedere la tabella che segue), e quindi premerla.
3 Ripetere il passo 2 sino a selezionare o attivare l’elemento d’interesse.
4 Premere per uscire.
Per ritornare all’impostazione precedente premere
[SYSTEM]
[KEY BEEP]
[FACTORY RESET] [YES]: ripristina le impostazioni di fabbrica (a eccezione di quelle salvate
[CLOCK]
[CLOCK DISPLAY]
[ENGLISH]
[РУССКИЙ]
[ESPANOL]
[FRANCAIS]
[DEUTSCH]*
* Solo per il modello KD-X472DBT.
(Non selezionabile quando è selezionato il crossover a tre vie.)
[ON]: attiva il tono alla pressione dei tasti. ; [OFF]: disattiva il tono.
dall’utilizzatore). ;
[ON]: sul display appare l’ora anche ad apparecchio spento. ; [OFF]: annulla.
Selezionare la lingua di visualizzazione del menu e delle informazioni
musicali, se disponibile.
La lingua predefinita è
[NO]: annulla.
[ENGLISH].
.
Impostazione predefinita: [XX]
5
Page 74

Radio digitale
Informazioni sulla funzione DAB (Digital Audio Broadcasting)
Il DAB è uno dei sistemi di diffusione radio digitale oggi disponibili. Esso offre
un suono di qualità digitale esente da interferenze o distorsioni del segnale. Può
inoltre trasmettere testi, immagini e dati.
A differenza della diffusioni FM, ove ciascun programma è trasmesso nella propria
frequenza, il sistema DAB combina diversi programmi (chiamati “servizi”) in modo
da formare un “gruppo” unico.
La “componente primaria” (l’emissione radiofonica principale) è a volte
accompagnata da una “componente secondaria” che può contenere altri
programmi o informazioni.
Preparazione:
1 Collegare l’antenna DAB (del tipo comunemente disponibile in commercio)
all’apposita presa d’ingresso DAB. (Pagina3)
2 Premere quante volte necessario B SRC sino a selezionare DAB.
3 Premere a lungo DAB per avviare l’aggiornamento dell’elenco dei
servizi.
Appare “DAB SORTING” e l’aggiornamento ha inizio.
Questa operazione può richiedere sino a tre minuti. Durante l’aggiornamento
non è possibile ricevere altri dati, ad esempio le informazioni sul traffico.
Per annullare l’aggiornamento dell’elenco dei servizi: premere nuovamente a
lungo
1 Premere quante volte necessario B SRC sino a selezionare DAB.
2 Premere S / T per cercare automaticamente un gruppo.
(o)
Premere a lungo S / T sino a quando “M” inizia a lampeggiare, quindi
3 Premere S / T per selezionare il servizio (primario o secondario) da
DAB.
Ricerca di gruppi di servizi
premerlo quante volte necessario a individuare manualmente il gruppo
desiderato.
ascoltare.
Impostazioni in memoria
È possibile registrare sino a 18 servizi.
Per salvare un servizio
Durante l’ascolto di un servizio...
Premere a lungo uno dei tasti numerici (da 1 a 6).
(o)
1 Premere a lungo manopola del volume sino a quando “PRESET MODE”
inizia a lampeggiare.
2 Ruotare la manopola del volume sino a selezionare il numero di
preimpostazione desiderato e quindi premerla.
Una volta ripristinato il servizio appare “MEMORY”.
Per selezionare un servizio salvato in memoria
Premere uno dei tasti numerici (da 1 a 6).
(o)
1 Premere DAB per accedere al modo di selezione della ricerca DAB.
2 Ruotando la manopola del volume selezionare
quindi premerla.
3 Ruotare la manopola del volume sino a selezionare il numero di
preimpostazione desiderato e quindi premerla.
Per annullare l’operazione premere a lungo
[PRST]
(servizi preimpostati),
DAB.
6
Page 75

Radio analogica
Ricercare una stazione
1 Premere B SRC sino a selezionare FM o AM.
2 Premere S / T per ricercare automaticamente le stazioni.
(o)
Premere a lungo S / T sino a quando “M” inizia a lampeggiare, quindi
premerlo quante volte necessario sino a individuare manualmente la
stazione desiderata.
Impostazioni in memoria
Con questo apparecchio è possibile salvare in memoria sino a 18 stazioni FM e
sino a 6 stazioni AM.
Per salvare una stazione in memoria
Mentre si ascolta una stazione....
Premere a lungo uno dei tasti numerici (da 1 a 6).
(o)
1 Premere a lungo manopola del volume sino a quando “PRESET MODE”
inizia a lampeggiare.
2 Ruotare la manopola del volume sino a selezionare il numero di
preimpostazione desiderato e quindi premerla.
Quando la stazione è stata salvata, appare “MEMORY”.
Selezionare le stazioni salvate in memoria
Premere uno dei tasti numerici (da 1 a 6).
(o)
1 Premere .
2 Ruotare la manopola del volume sino a selezionare il numero di
preimpostazione desiderato e quindi premerla.
USB/iPod
Sorgenti selezionabili:
• KD-X472DBT: USB/iPod USB o iPod BT
• KD-X272DBT/KD-X172DB: USB
(Con il modello KD-X172DB premere USB per
Avviare la riproduzione
La sorgente cambia automaticamente e la riproduzione inizia quando si collega
un dispositivo (dispositivo USB/ iPod/iPhone) al terminale di ingresso USB.
Per Dal frontalino
Avanzare o retrocedere
rapidamente
Selezionare un file
Seleziona una cartella
Ripetizione
Riproduzione casuale
selezionare direttamente la sorgente USB)
Premere a lungo
Premere
Premere 2
Premere 4
Premere 3
S / T.
S / T.
J / 1 K.
quante volte necessario.
quante volte necessario.
7
Page 76

Impostazioni Menu
1 Premere a lungo per accedere alle impostazioni del menu.
2 Ruotando la manopola del volume selezionare l’elemento desiderato;
quindi premerla.
3 Ripetere il passo 2 sino a selezionare/attivare l’elemento desiderato.
4 Premere per uscire.
Per ritornare all’impostazione precedente premere
• Fare riferimento al ISTRUZIONI PER L’USO disponibile nel seguente sito web per
la spiegazione dettagliata di ciascuna voce: <http://www.jvc.net/cs/car/>
• La disponibilità di ciascuna voce varia a seconda del modello.
Voci di menu
[EQ SETTING]
[AUDIO CONTROL]
[SOUND EFFECT]
[DISPLAY]
[COLOR]
[TUNER SETTING]
[BT MODE]
[REMOTE APP]
[MIC GAIN]
[NR LEVEL]
[ECHO CANCEL]
[SYSTEM]
[CLOCK]
[ENGLISH]
[РУССКИЙ]
[ESPANOL]
[FRANCAIS]
[DEUTSCH]
[DEMO MODE]
*1 Per KD-X472DBT/KD-X272DBT: Applicabile solo durante una conversazione telefonica.
*2 Solo per il modello KD-X472DBT.
: Seleziona un equalizzatore preimpostato o regola le proprie
impostazioni audio.
: Imposta le impostazioni audio preferite.
: Imposta l’effetto sonoro preferito.
: Imposta il comando preferito per la finestra del display.
: Imposta il colore di illuminazione preferito per i tasti.
: Impostazioni per la sorgente radio.
: Impostazioni per l’uso di una periferica Bluetooth.
: Impostazioni per l’utilizzo dello smartphone per controllare
questa unità.
*1 : Imposta la sensibilità del microfono.
*1 : Regola il livello di riduzione del rumore.
*1 : Regola il ritardo di cancellazione dell’eco.
: Impostazioni per l’unità.
: Regola l’orologio.
: Seleziona la lingua per i menu e le informazioni sulla musica.
: Seleziona la lingua per i menu e le informazioni sulla musica.
: Seleziona la lingua per i menu e le informazioni sulla musica.
: Seleziona la lingua per i menu e le informazioni sulla musica.
*2 : Seleziona la lingua per i menu e le informazioni sulla musica.
: Attiva o disattiva la dimostrazione del display.
.
Esempi di alcune impostazioni ben utilizzate
Impostazione del livello del subwoofer
1 Premere a lungo per accedere alle impostazioni del menu.
2 Ruotare la manopola del volume in senso orario per selezionare
[AUDIO CONTROL]
3 Ruotare la manopola del volume in senso orario per selezionare
[SUBWOOFER SET]
4 Ruotare la manopola del volume in senso orario per selezionare
quindi premerla.
5 Ruotare la manopola del volume in senso orario per selezionare
[SUB.W LEVEL]
6 Premere la manopola del volume se
7
Ruotare la manopola del volume per regolare il livello del subwoofer, quindi
premerla.
, quindi premerla.
, quindi premerla.
, quindi premerla.
[PRE-OUT]
viene visualizzato sul display.
[ON]
,
8
Page 77
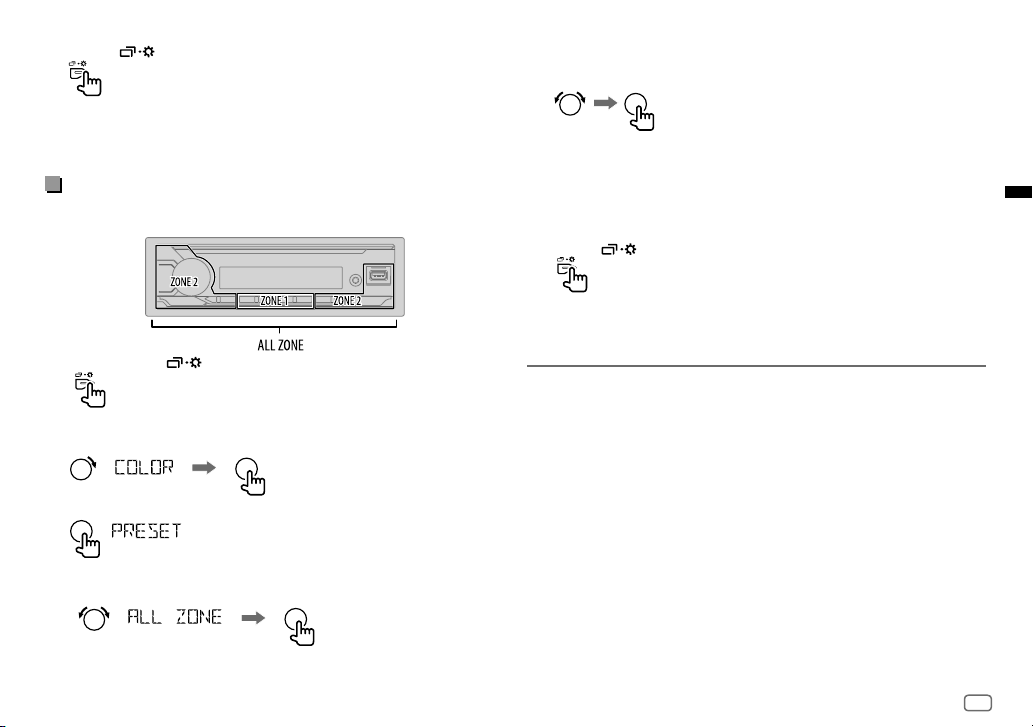
8 Premere per uscire dal menu di impostazione.
Nota:
Con il modello KD-X272DBT/KD-X172DB prima d'impostare il livello del subwoofer
è necessario impostare
Impostazione del colore d’illuminazione
Nel modello KD-X472DBT è possibile impostare il colore d'illuminazione preferito
per ciascuna zona.
[SPK/PRE OUT]
su
[REAR/SUB.W]
o su
[SUB.W/SUB.W]
.
5 Ruotando la manopola del volume selezionare il colore desiderato, quindi
premerla.
• Da
[COLOR01]
a
•
[USER]
[NIGHTCOLOR]
• Da
[COLORFLOW01]
diverse velocità.
•
[CRYSTAL]/[FLOWER]/[FOREST]/[GRADATION]/[OCEAN]
[RELAX]/[SUNSET]
(selezionabili soltanto quando al passo 4 si seleziona
[ALLZONE]
6 Ripetere i passi 4 e 5 per impostare il colore delle altre zone.
7 Premere per uscire.
[COLOR49]
: appare il colore creato per
.
a
[COLORFLOW03]
: appare il motivo a colori selezionato.
.)
[DAYCOLOR]
o
: i colori cambiano a
/
1 Premere a lungo per accedere alle impostazioni del menu.
2 Ruotare la manopola del volume in senso orario per selezionare
quindi premerla.
3 Premere la manopola del volume se
4 Ruotare la manopola del volume sino a selezionare la zona desiderata
(
[ALL ZONE], [ZONE 1], [ZONE 2]
[PRESET]
)), quindi premerla:
viene visualizzato sul display.
[COLOR]
Altre informazioni
Per le operazioni di riproduzione di sorgenti AUX, Spotify, AMAZON ALEXA, fare
riferimento al ISTRUZIONI PER L’USO disponibile nel seguente sito web:
<http://www.jvc.net/cs/car/>
,
• La disponibilità di ciascuna sorgente varia a seconda del modello.
Nota per le specifiche
Gamma di frequenza Bluetooth:
2,402 GHz — 2,480 GHz
Potenza di uscita RF Bluetooth (E.I.R.P.):
+4 dBm (MAX), Categoria di potenza 2
Impedenza altoparlanti:
4 Ω — 8 Ω
Tensione operativa:
Batteria auto 12 V CC
9
Page 78
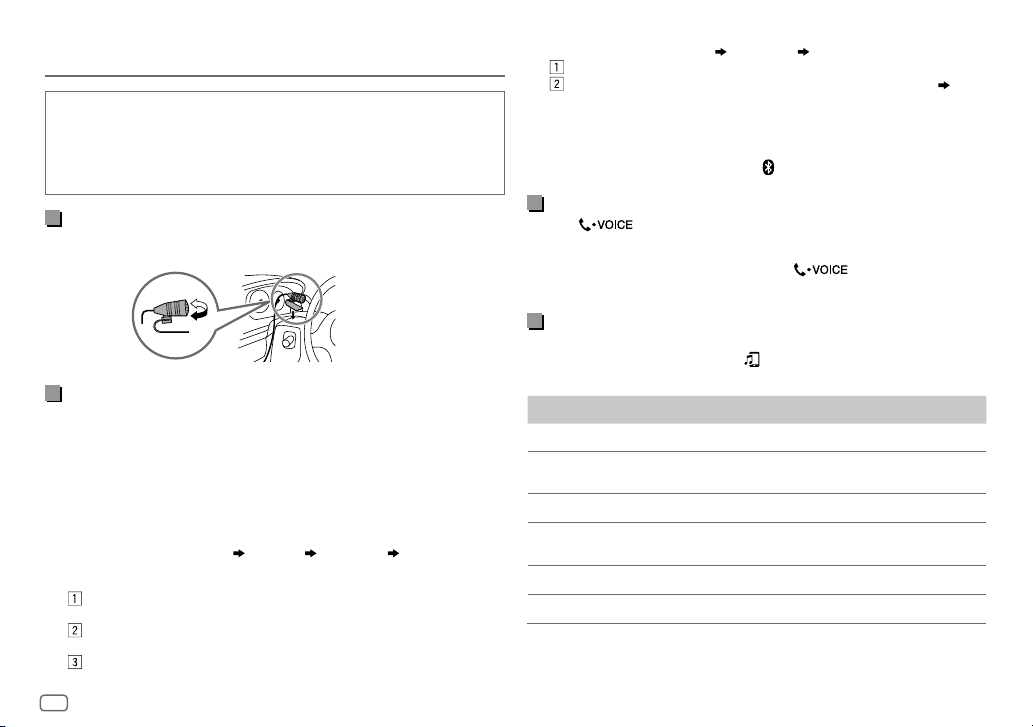
Bluetooth®
• La connessione Bluetooth potrebbe non funzionare a seconda della
sua versione o del sistema operativo e della versione del firmware dello
smartphone in uso.
• Prima di effettuare le operazioni di seguito illustrate è necessario attivare la
funzione Bluetooth del dispositivo.
• Le condizioni del segnale possono essere influenzate dai corpi circostanti.
(per KD-X472DBT/KD-X272DBT)
Collegare il microfono
Collegare il microfono in dotazione al jack di ingresso microfono sul pannello
posteriore.
Regolazione
dell’angolo
del microfono
Se necessario assicurare
con un fermacavo
(non in dotazione
all’apparecchio).
Accoppiamento e connessione iniziale di un dispositivo
Bluetooth
1 Premere B SRC per accendere l’apparecchio.
2 Cercare e selezionare il nome del proprio ricevitore (“KD-X472DBT”/
“KD-X272DBT”) sul dispositivo Bluetooth.
3 Sulla base del testo che appare in scorrimento sul display dare luogo
all’operazione (A) o (B).
Con alcune periferiche Bluetooth la sequenza di accoppiamento potrebbe
variare rispetto alle due qui oltre descritte.
(A) “[Nome del dispositivo]”
“XXXXXX” è la password da 6 cifre generata in modo casuale durante ogni
singola operazione di accoppiamento.
Accertarsi che le password visualizzate sull’apparecchio e sul dispositivo
Bluetooth siano identiche.
Premere la manopola del volume dell’apparecchio per confermare la
password.
Confermare ora la password dalla periferica Bluetooth.
“XXXXXX” “VOL–YES” “BACK–NO”
(B) “[Nome del dispositivo]”
Premere la manopola del volume per avviare l’accoppiamento.
• Se sul display dell’apparecchio appare in scorrimento “PAIRING” “PIN
0000” inserire nella periferica Bluetooth il codice PIN “0000”.
• Se appare solo “PAIRING” confermare l’accoppiamento dalla periferica
Bluetooth.
Al termine dell’accoppiamento appare “PAIRING COMPLETED” e all’individuazione
di una periferica Bluetooth appare inoltre “
“VOL–YES” “BACK–NO”
”.
Rispondere a una chiamata
Premere o la manopola del volume.
• Per regolare il volume del telefono da
volume.
• Per terminare una chiamata, premere a lungo
volume.
[00]
a
[35]
, ruotare la manopola del
o la manopola del
Come usare un lettore audio Bluetooth
1 Premere quante volte necessario B SRC sino a selezionare BTAUDIO.
• Per KD-X272DBT: La pressione di
2 Avviare la riproduzione dal lettore audio tramite Bluetooth.
Per Dal frontalino
Riproduzione/pausa Premere la manopola del volume.
Selezionare un gruppo o una
cartella
Saltare all’indietro o in avanti
Avanzare o retrocedere
rapidamente
Ripetizione
Riproduzione casuale
fa accedere direttamente ad BT AUDIO.
J / 1 K.
Premere 2
Premere
S / T.
Premere a lungo
Premere 4
Premere 3
S / T.
quante volte necessario.
quante volte necessario.
10
Page 79

Page 80

• Microsoft and Windows Media are either registered trademarks or trademarks of Microsoft Corporation in the United States and/or other countries.
• Use of the Made for Apple badge means that an accessory has been designed to connect specifically to the Apple product(s) identified in the badge and has been certified by the developer to meet
Apple performance standards. Apple is not responsible for the operation of this device or its compliance with safety and regulatory standards. Please note that the use of this accessory with an
Apple product may affect wireless performance.
• Apple, iPhone, iPod, iPod touch, and Lightning are trademarks of Apple Inc., registered in the U.S. and other countries.
• Android is a trademark of Google LLC.
• SPOTIFY and the Spotify logo are among the registered trademarks of Spotify AB.
• The Bluetooth® word mark and logos are registered trademarks owned by Bluetooth SIG, Inc. and any use of such marks by JVCKENWOOD Corporation is under license. Other trademarks and trade
names are those of their respective owners.
• Amazon Alexa is not available in all languages and countries.
• Amazon, Alexa and all related logos are trademarks of Amazon.com, Inc. or its affiliates.
© 2019 JVCKENWOOD Corporation
1019DTSMDTJEIN
 Loading...