

Page 1
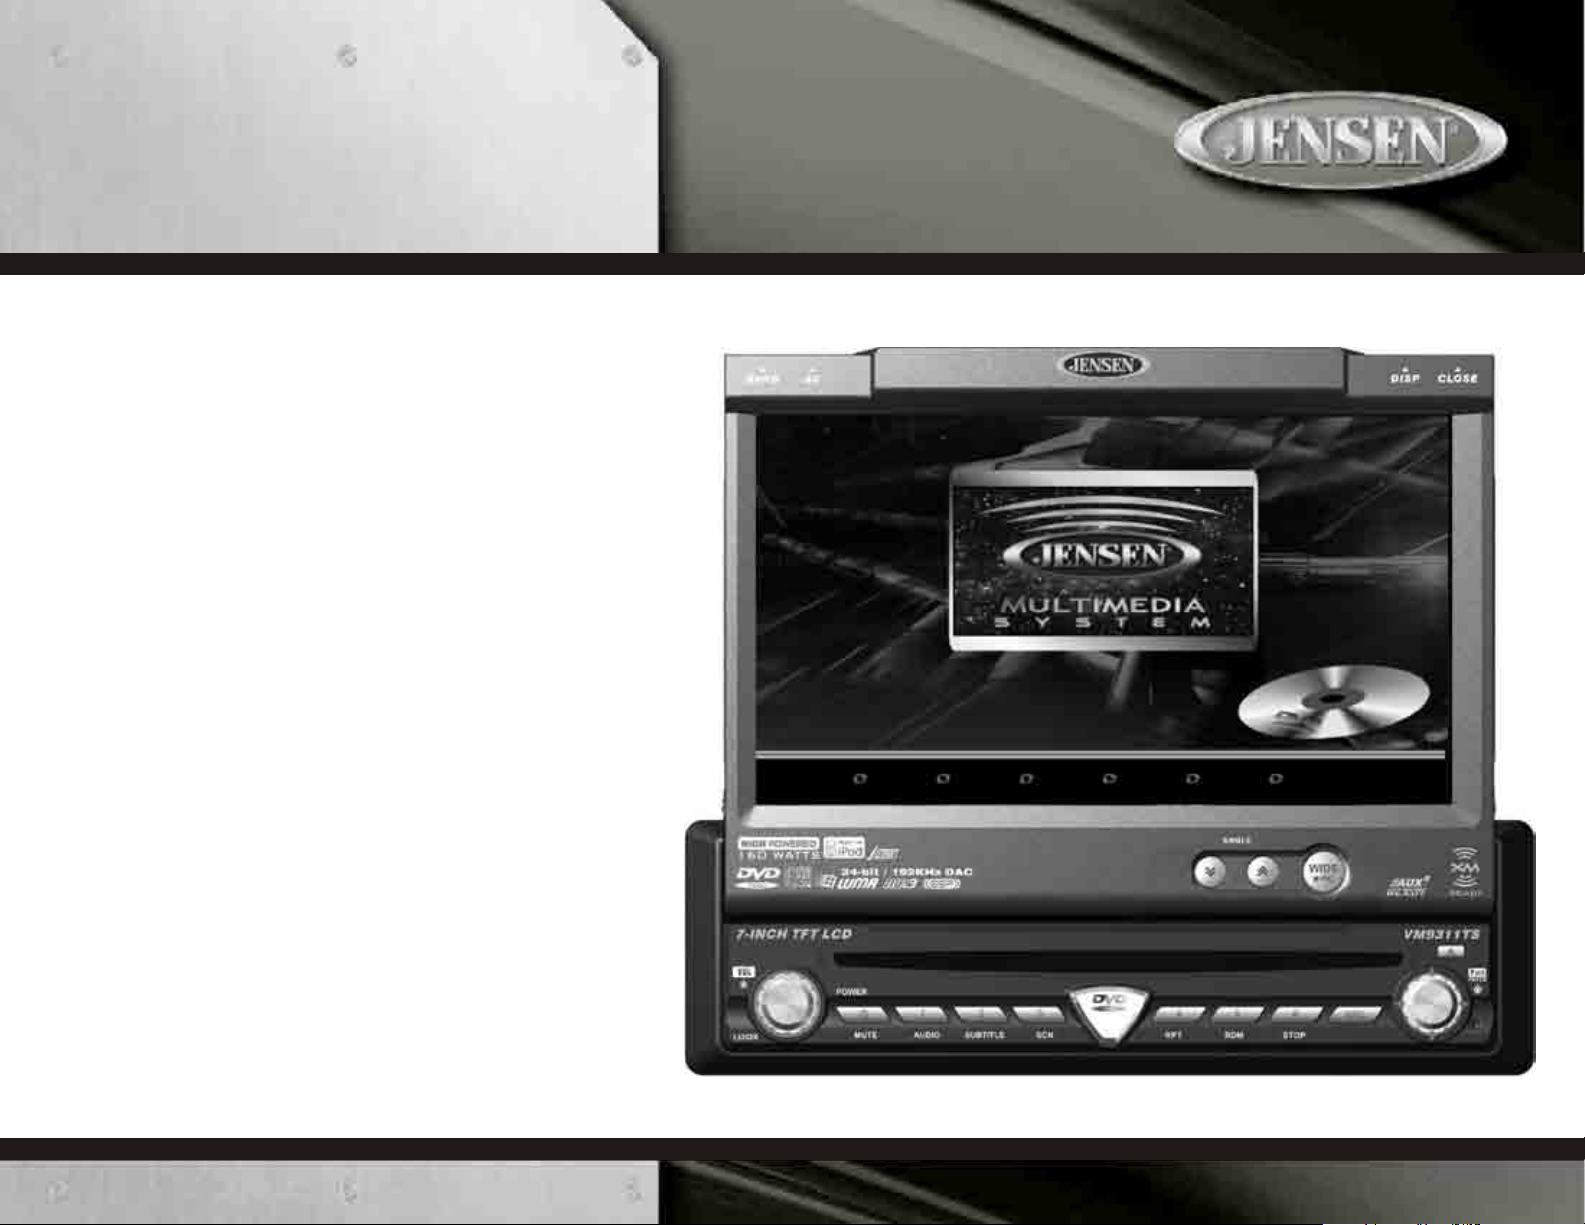
VM9311TS
Instruction Manual
Manual de Instrucciones
Guide d'instructions
Page 2

Page 3

CONTENTS
Thank you for choosing a Jensen product. We hope you will find the instructions in this owner’s
manual clear and easy to follow. If you take a few minutes to look through it, you’ll learn how to
use all the features of your new Jensen VM9311TS Mobile Multimedia AM/FM/DVD Receiver
for maximum enjoyment.
Preparation............................................................................................................................ 1
Installation............................................................................................................................. 5
Controls and Indicators......................................................................................................... 6
Remote Control..................................................................................................................... 9
Using the TFT Monitor ........................................................................................................ 11
Operating Instructions......................................................................................................... 12
System Setup Menu............................................................................................................ 13
Tuner Operation.................................................................................................................. 15
XM Radio Operation............................................................................................................ 16
DVD/VCD Video Operation................................................................................................. 18
DVD/Disc Setup Menu........................................................................................................ 21
DVD/Disc Audio Operation.................................................................................................. 23
iPod Operation.................................................................................................................... 24
Troubleshooting .................................................................................................................. 25
Specifications...................................................................................................................... 28
12-month Limited Warranty .................................................................................................28
CONTENIDO
Gracias por elegir los productos Jensen. Esperamos que encuentre en este manual
instrucciones claras y fáciles de seguir. Si se toma unos pocos minutos para leerlo, aprenderá
cómo utilizar todas las funciones de su nuevo radio Jensen para su máximo entretenimiento.
Preparación......................................................................................................................... 29
Instalación........................................................................................................................... 33
Controles e Indicadores...................................................................................................... 34
Control Remoto................................................................................................................... 37
Utilización del Monitor TFT ................................................................................................. 39
Instrucciones de Operación ................................................................................................ 41
Menú de Configuración de Sistema.................................................................................... 42
Operación del Radio ........................................................................................................... 44
Operación de Radio XM
Operación del Video de DVD/VCD ..................................................................................... 48
Menú Configuración del DVD/Disc...................................................................................... 51
Operación del Audio de DVD/Disco.................................................................................... 53
Operación de iPod .............................................................................................................. 55
Solución de Problemas ....................................................................................................... 56
Especificaciones ................................................................................................................. 59
Garantia Limitade de 12 Meses .......................................................................................... 59
®
.................................................................................................... 45
TABLE DES MATIÈRES
Merci d'avoir choisi un produit Jensen . Nous espérons que vous allez trouver les instructions
dans ce guide de propriétaire claires et faciles à suivre . Prenez quelques minutes à le
consulter, vous apprendrez à utiliser toutes les fonctions de votre nouvelle radio Jensen pour
en tirer une jouissance maximum.
Preparation......................................................................................................................... 61
Installation.......................................................................................................................... 65
Controles et indicateurs...................................................................................................... 67
Telecommande................................................................................................................... 70
Utilisation du moniteur TFT................................................................................................ 72
Instructions d'operation...................................................................................................... 74
Menu configuration du systeme ......................................................................................... 76
Operation tuner AM/FM.......................... ............................................................................ 78
Operation radio XM............................................................................................................ 79
Operation platine DVD ....................................................................................................... 81
Menu de configuration DVD/disque.................................................................................... 84
Operation audio DVD/disque.............................................................................................. 86
Operation iPod ................................................................................................................... 88
Depannage......................................................................................................................... 89
Specifications..................................................................................................................... 92
Garantie limitée de 12 mois ................................................................................................ 92
i
Page 4

ii
Page 5
VM9311TS
PREPARATION
Congratulations on your purchase of the Jensen VM9311TS
Mobile Multimedia Receiver.
It’s a good idea to read all of the instructions before beginning
the installation. We recommend having your Jensen
VM9311TS installed by a reputable installation shop.
Features
DVD
• Compatible formats: DVD-R, DVD-RW, DVD+R,
DVD+RW, CD-R, CD-RW, CD-DA, MP3, WMA, SVCD,
VCD and AVI, MPEG1, MPEG2 and JPEG
• Region 1 playback
• 16:9 Aspect ratio - Cinema/Normal/Off
• Front panel DVD control
• High-speed Fast Forward 2X, 4X, 8X, 32X
• Play, Pause, Stop, Slow
• Chapter Up / Down
• Wolfson Microelectronics high performance 24-bit, 192
kHz DAC supports 2-channel "Down-Mix” audio modes
MP3/WMA
• GIGA MP3 - Store up to 999 MP3 files on a DVD
• ID3-tag compatible
• Direct track access
• Play, pause, stop, track up / down
CD
• CD-text compatible
• High-speed audible track search
• Random, repeat A-B, intro
• Play, pause, slow, track up/down
• Last position memory
AM/FM Tuner
• US/Euro/Latin/Asia Tuner
• 30 Station presets (18FM/12AM)
• JENSEN Plus Tuner II
Outboard Media Module
• External Module for connecting XM Radio and iPod
XM Ready
• Requires Optional Terk XMD1000
• Requires Optional Terk XMDJEN100 or Jensen JXMC
• Advanced display shows the artist, song title, and XM
channel and category at a glance
• Direct Channel entry
Made for iPod
• High speed direct connect interface for playlist, artists,
albums, songs, photos and video
• Intuitive iPod interface
• Charges and controls all dockable iPod's
• Requires jLinkcable iPod cable (Sold Separately)
NOTE: Photo and Video access with Gen 5 iPod's
only .
Chassis
• TSD - Touch Screen Display menu control
• 7-inch TFT active-matrix LCD, 336, 960 pixels (1440W X
234H)
• Full automatic motorized TFT LCD flip-out and up
• 16-step TFT LCD tilt adjustment
• 1.0 Din (Single DIN)
• Import ISO/DIN mountable
• Trim Ring Included
• Beep Tone confirmation
• Heat management system - Incorporates forced aircooling to keep the chip-sets operating at nominal
temperatures
• Heavy duty galvanized chassis
General
• Full function infrared remote control
• 1 NTSC composite video output for additional screens
• TSD- Touch Screen Display menu control
• High performance audio processor
• Electronic volume, bass, treble, balance and fader
• Bass center frequency adjustment - 60, 80, 100, 130,
150 and 200Hz
• Bass Q factor - 1.0, 1.25, 1.5 and 2.0
• Treble center frequency adjustment - 10, 12.5, 15 and
17kHz
• Subwoofer crossover - 80, 120 and 160Hz
• Subwoofer Phase - 0, 180 degrees
• Subwoofer level - variable
• 100-ohm low impedance preamp outputs - all channels
• 5V Peak / 2V RMS RCA outputs - all channels
• 1-pair Front RCA outputs
• 1-pair Rear RCA outputs
• Single Subwoofer RCA output
• 1-pair Auxiliary RCA A/V inputs
• Flex fader
• Front panel (when screen is closed) high contrast LCD
• Rotary encoder audio control
• Joystick menu navigation
Tools and Supplies
You will need these tools and supplies to install your
VM9311TS:
• Torx type, flat-head and Philips screwdrivers
• Wire cutters and strippers
• T ools to remove existing radio (screwdriver, socket wrench
set or other tools)
• Electrical tape
• Crimping tool
• Volt meter/test light
• Crimp connections
• 18 gauge wire for power connections
• 16 – 18 gauge speaker wire
WARNING! Only connect the unit to a12-volt
power supply with proper grounding.
WARNING! Never install this unit where operation
and viewing could interfere with safe driving
conditions.
WARNING! To reduce the risk of a traffic accident
(except when using for rear view video camera)
never use the video display function while driving
the vehicle. This is a violation of federal law.
WARNING! Never disassemble or adjust the unit.
WARNING! To prevent injury from shock or fire,
never expose this unit to moisture or water.
WARNING! Never use irregular discs.
WARNING! To prevent damage to the mechanism
inside this unit, avoid impact to the TFT monitor.
WARNING! Using an improper fuse may cause
damage to the unit and result in a fire.
1
Page 6
WARNING! The monitor employs an automatic
motorized mechanism. To prevent damage to the
core mechanism, please do not push, pull or
swivel the monitor manually.
Optional Accessories
Terk iAUX3 READY (Sold Separately)
• Can connect to any portable media device or multimedia
device using a standard 3.5mm plug.
• Converts 3.5mm auxiliary input to RCA stereo outputs for
easy connection to the radio’s auxiliary inputs.
Jensen NAV100 GPS Navigation (Sold Separately)
• Connects via A/V Inputs
Disconnecting the Battery
To prevent a short circuit, be sure to turn off the ignition and
remove the negative (-) battery cable prior to installation.
NOTE: If the VM9311TS is to be installed in a car
equipped with an on-board drive or navigation
computer, do not disconnect the ba ttery cable. If
the cable is disconnected, the computer memory
may be lost. Under these conditions, use extra
caution during installation to avoid causing a
short circuit.
VM9311TS
2
Page 7
VM9311TS
3
iAUX
3
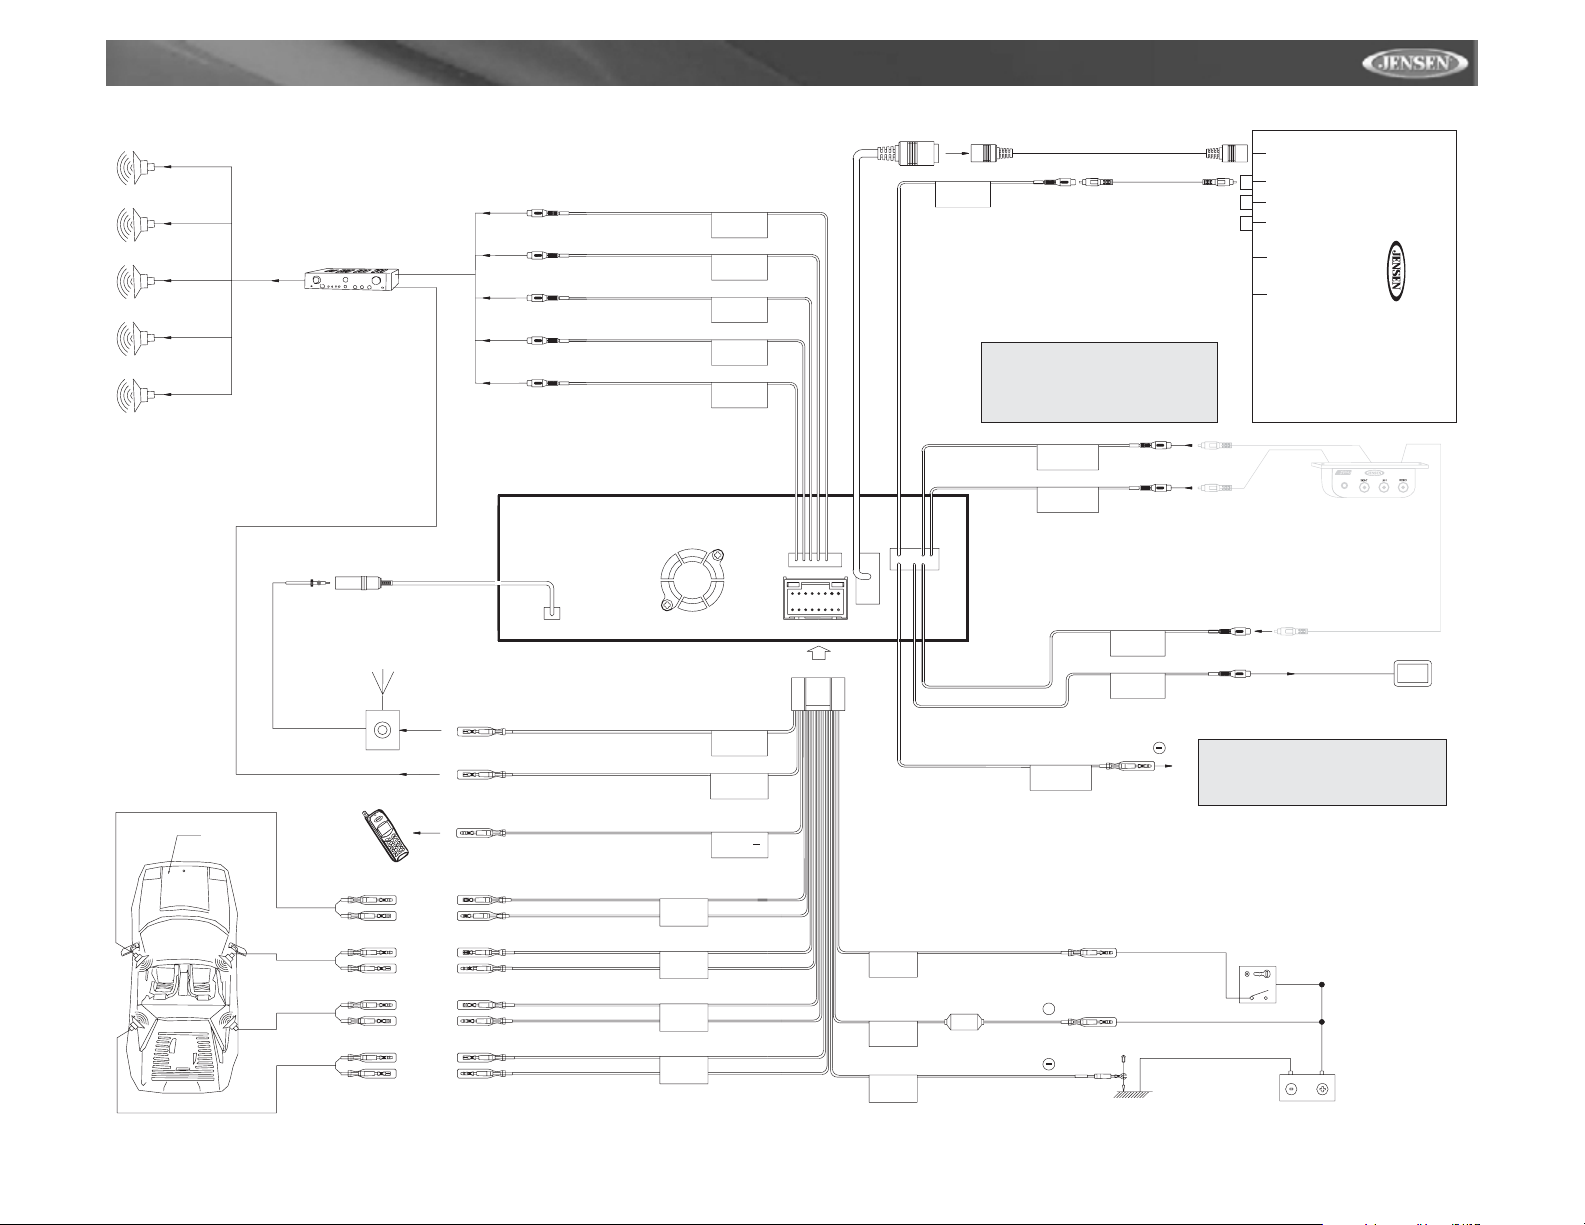
WIRING DIAGRAM
Car
External PowerAmplifier
Antenna Jack
Antenna
Car Phone
BLUE
RED
WHITE
RED
WHITE
Auto antenna control (connect to antenna
control lead & power supply of antenna
amplifier)
External power amplifier control
Mute (leave open if not connected)
SUB.W
FRONTR
FRONTL
REAR R
REAR L
BLUE
ANT.CONT
BLUE/WHITE
P.CONT
BROWN
MUTE
Harness Cord
Media Module Cable / BLACK
MEDIA MODULE
VIDEO INPUT
NOTE: See the Multimedia
Connections Diagram for
additional connections
through the Media Module.
PINK
YELLOW
AUX IN/L
AUX IN/R
PARKING BRAKE
PRK SW
AUX INVIDEO
REAR VIDEO
OUT 1
WHITE
RED
Head Unit
Video Out
XMAudio Left
XMAudio Right
XM Control Data
iPod
AUDIOVIDEOINPUT
3.5mm
(Sold Separately)
3.5mm
YELLOW
YELLOW
Rear Video 1
NOTE: Please refer to
"Parking Brake Sequence"
on page
11.
Media Module
FRONTL+
FRONTL-
FRONTR+
FRONTR-
REAR R+
REAR R-
REAR L+
REAR L-
FRONTL
FRONTR
REAR R
REAR L
WHITE +
WHITE/BLACK -
GREY+
GREY/BLACK -
PURPLE +
PURPLE/BLACK -
GREEN +
GREEN/BLACK -
RED
ACC
YELLOW
BATT
BLACK
GND
BATTERY +
FUSE (10A)
BATTERY
ACC
Ground
Ignition Switch
Battery
3
Page 8
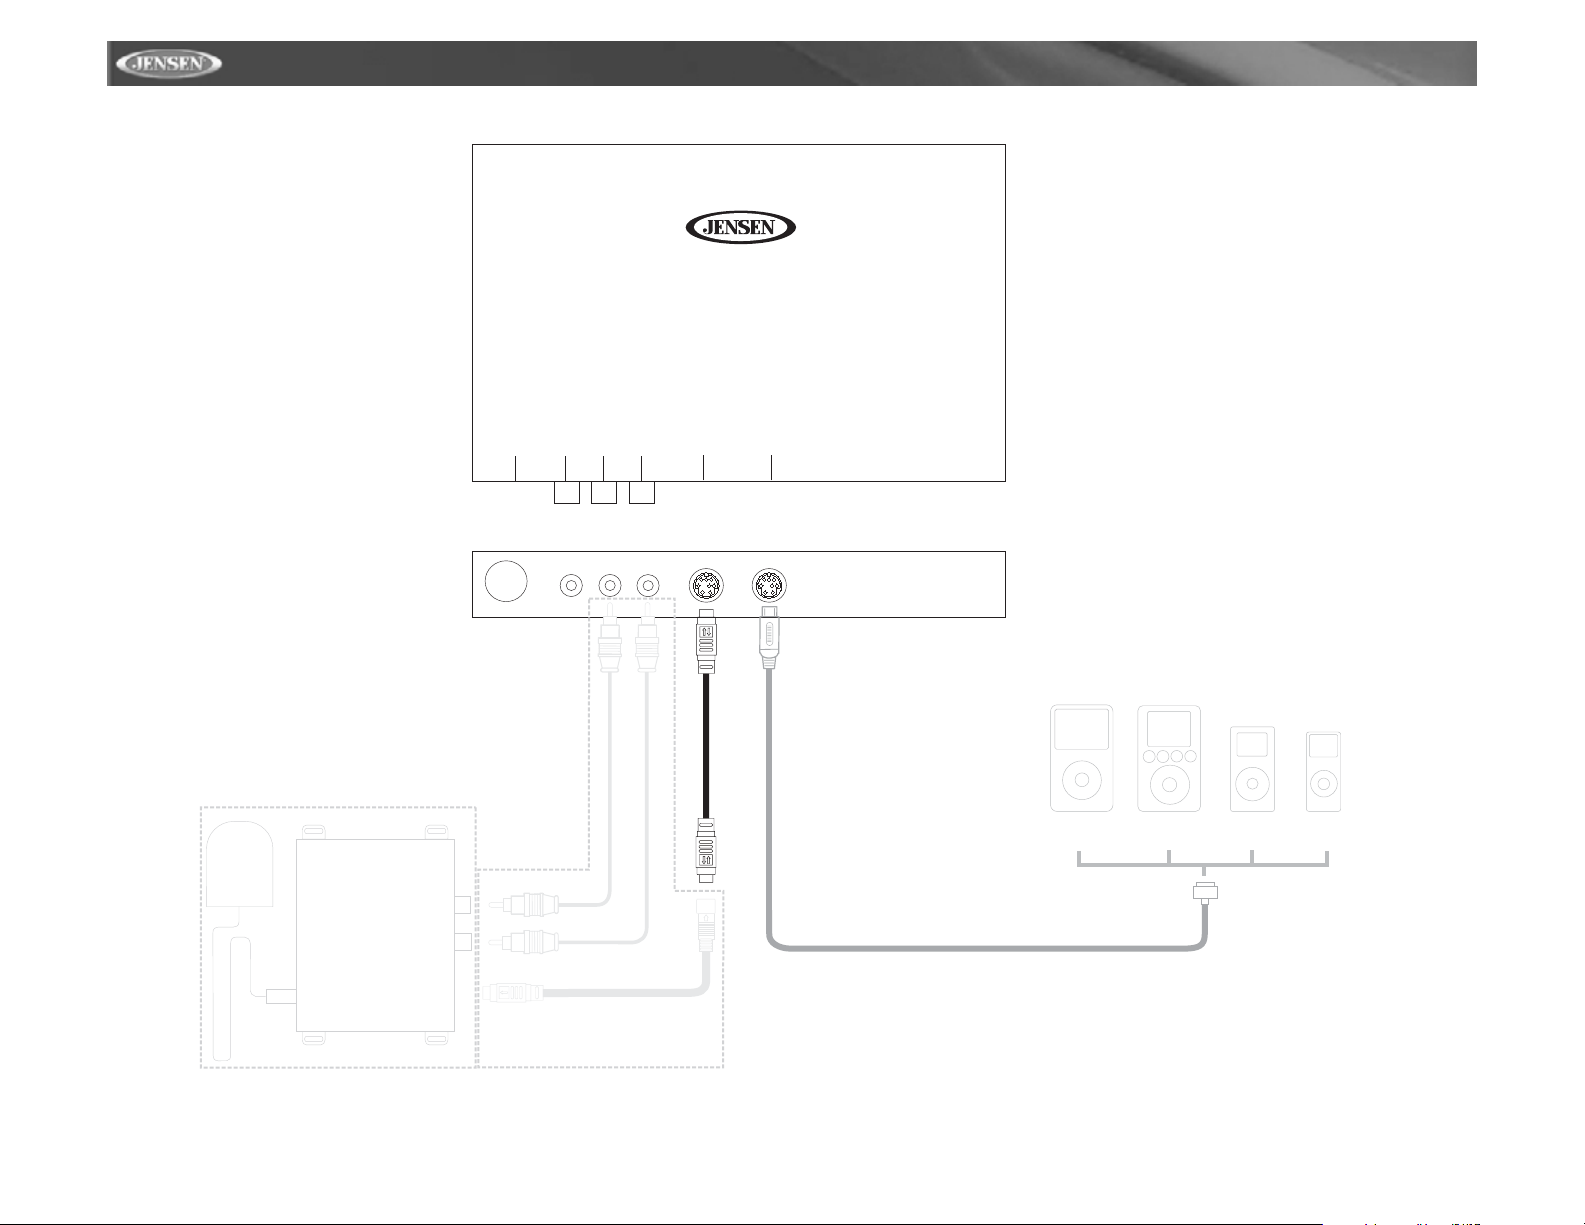
WIRING DIAGRAM - MULTIMEDIA CONNECTIONS
VM9311TS
Media Module
*TERK XMDJEN100 cables (sold separately)
**TERK XMD1000 Direct Tuner and antenna (sold
separately)
**
Head Unit
VideoOut
XMAudioLeft
XMAudioRight
XM Control Data
iPod
iPod Video
iPod
iPod Mini
iPod Nano
*
jLink iPod Cable (Sold Separately)
4
Page 9
VM9311TS
7-INCH
TFT
7-INCH
TFT
7-INCH
TFT
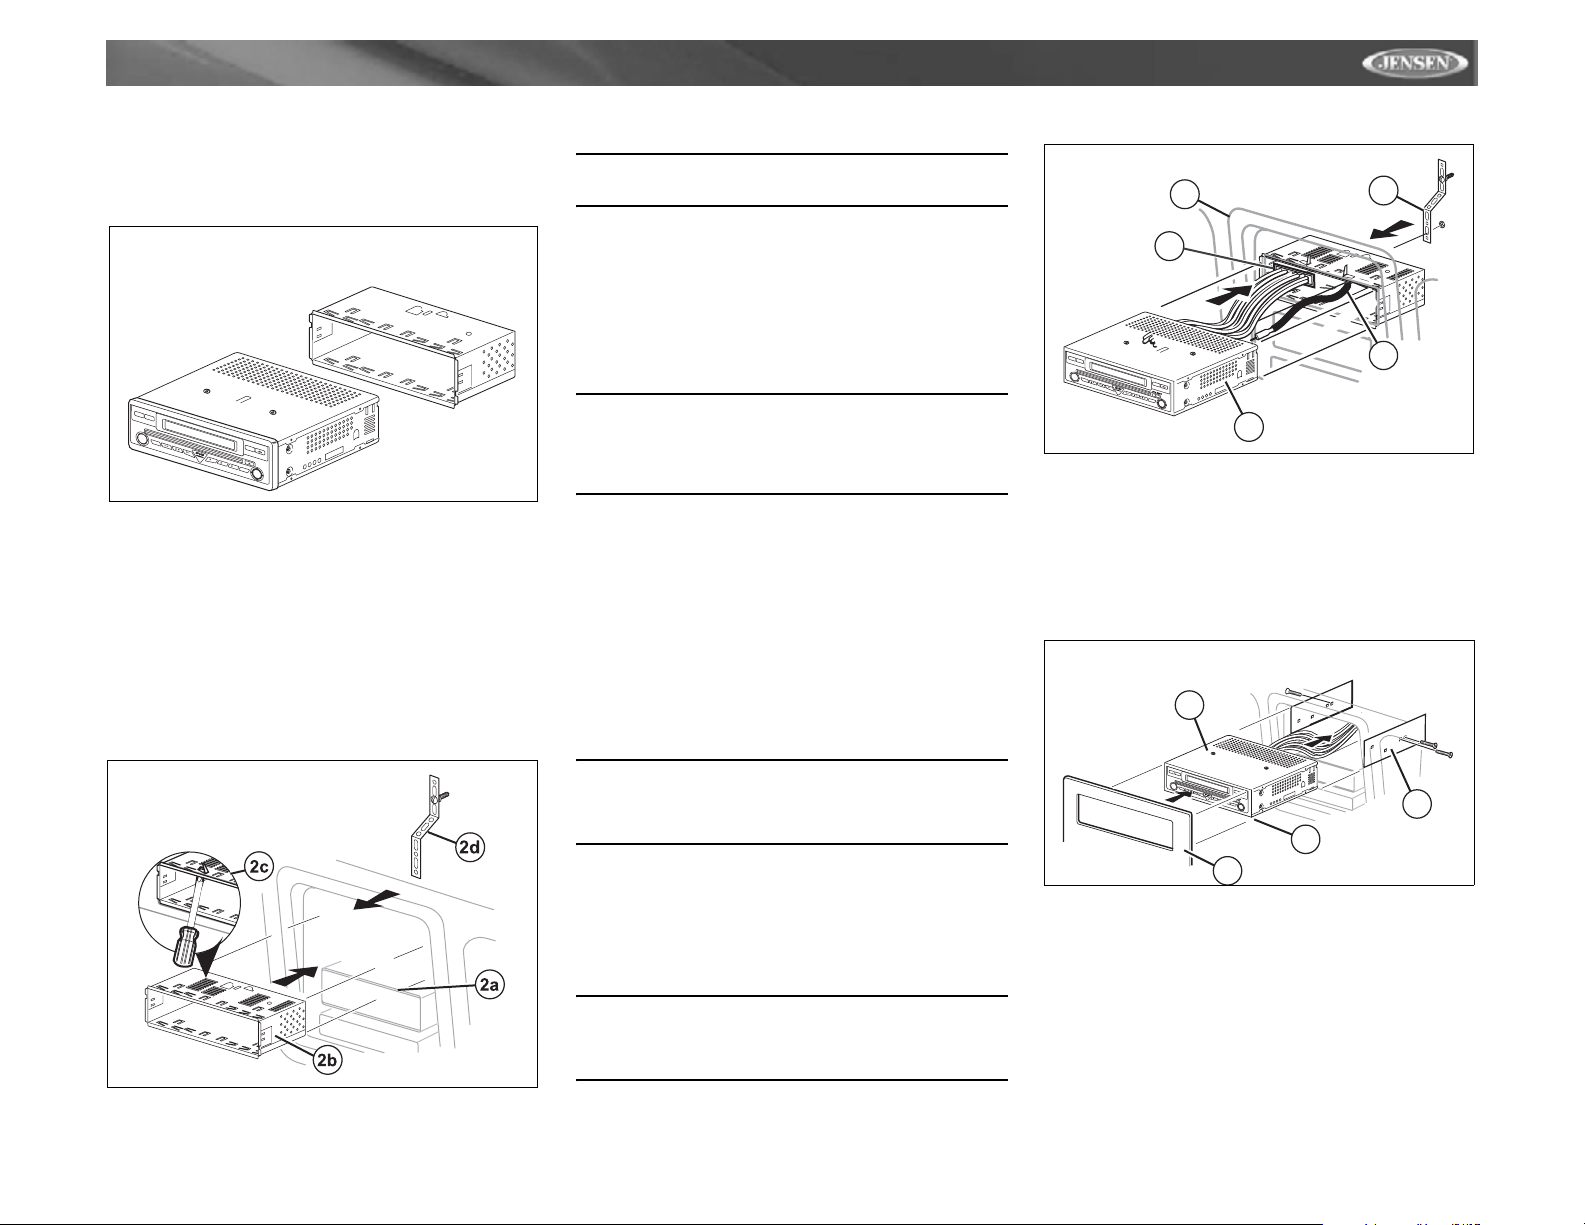
INSTALLATION
Pre-installation
1. Press the metal levers on both sides to remove the half-
sleeve from the radio.
PREPARE RADIO
CAUTION! Be careful not to damage the car
wiring.
3. Place the radio in front of the dashboard opening so the
wiring can be brought through the mounting sleeve.
Wiring
Complete wiring as illustrated in the wiring diagram on page
3. Once the wiring is complete, reconnect the battery
negative terminal. If there is no ACC available, connect the
ACC lead to the power supply with a switch.
7-INCH
BAND
T
FT
AS
7-INCH
D
AM/FM/DVD/MP3
IGITAL
T
FT
R
VOL
LO/DX
ECEIVER
POWER
MUTE
SCN
OPEN
DISP
VM9311TS
RPT
RDM
Push
STOP
SRC
ENTER
2. Install the half-sleeve.
a. Install adapter if necessary (optional).
b. Install half-sleeve into adapter or dashboard (use only
the supplied screws). Do not force the sleeve into the
opening or cause it to bend or bow.
c. Locate the series of bend-tabs along the top, bottom
and sides of the mounting sleeve. With the sleeve fully
inserted into the dashboard opening, bend as many of
the tabs outward as necessary so that the sleeve is
firmly secured to the dashboard.
d. Install support strap to make the unit more stable.
INSTALL HALF SLEEVE
NOTE: When replacing a fuse, be sure to use
correct type and amperage to avoid damaging
the radio. The VM9311TS uses one 10 amp miniATM fuse, located in the black filter box in-line
with the main wire harness.
Final Installation
After completing the wiring connections, turn the unit on to
confirm operation (ignition switch must be on). If unit does not
operate, recheck all wiring until problem is corrected. Once
proper operation is achieved, turn off the ignition switch and
proceed with final mounting of the chassis.
1. Connect wiring adapter to existing wiring harness.
2. Connect antenna lead.
3. Carefully slide the radio into the half-sleeve, making
sure it is right-side-up, until it is fully seated and the
spring clips lock it into place.
NOTE: For proper operation of the CD/D VD play er,
the chassis must be mounted within 20° of
horizontal. Make sure the unit is mounted within
this limitation.
4. Attach one end of the perforated support strap
(supplied) to the screw stud on the rear of the chassis
using the hex nut provided. Fasten the other end of the
perforated strap to a secure part of the dashboard either
above or below the radio using the screw and hex nut
provided. Bend the strap to position it as necessary.
CAUTION! The rear of the radio must be
supported with the strap to prevent damage to
the dashboard from the weight of the radio or
improper operation due to vibration.
5. Replace any items you removed from the dashboard.
5
FINAL INSTALLATION
5
4
1
7-INCH
D
IGITAL
7-INCH
T
FT
BAND
T
FT
AS/PS
VM9510
AM/FM/DVD/MP3
Push
R
ECEIVER
MUTE
PWR
OPEN
DISP
AVAUXIN
Push
MODE
ENTER
2
3
Final ISO-DIN Installation
1. Remove trim ring.
2. Mount factory brackets on new radio using existing
screws from old radio.
3. Slide radio chassis into dash opening and secure.
4. Reinstall dash panel.
FINAL ISO-DIN INSTALLATION
3
7-INCHDIGITALTFT
7-INCHTFT
BAND
AS/PS
VM9510
AM/FM/DVD/MP3RECEIVER
Push
MUTE
PWR
OPEN
DISP
AVAU
X
IN
Push
MODE
ENTER
2
1
4
Using the iAUX3 External AV Connector
The iAUX3 (sold separately) allows you to connect a variety
of external devices, including a VCR, DVD player, portable
MP3 player, etc., to your VM9311TS without removing the
radio.
To install the iAUX
back of the VM9311TS (see the Wiring Diagram on page 3),
and then install the iAUX
plugging in auxiliary devices.
3
, connect it to the AUX-IN cables on the
3
in a location convenient for
Page 10
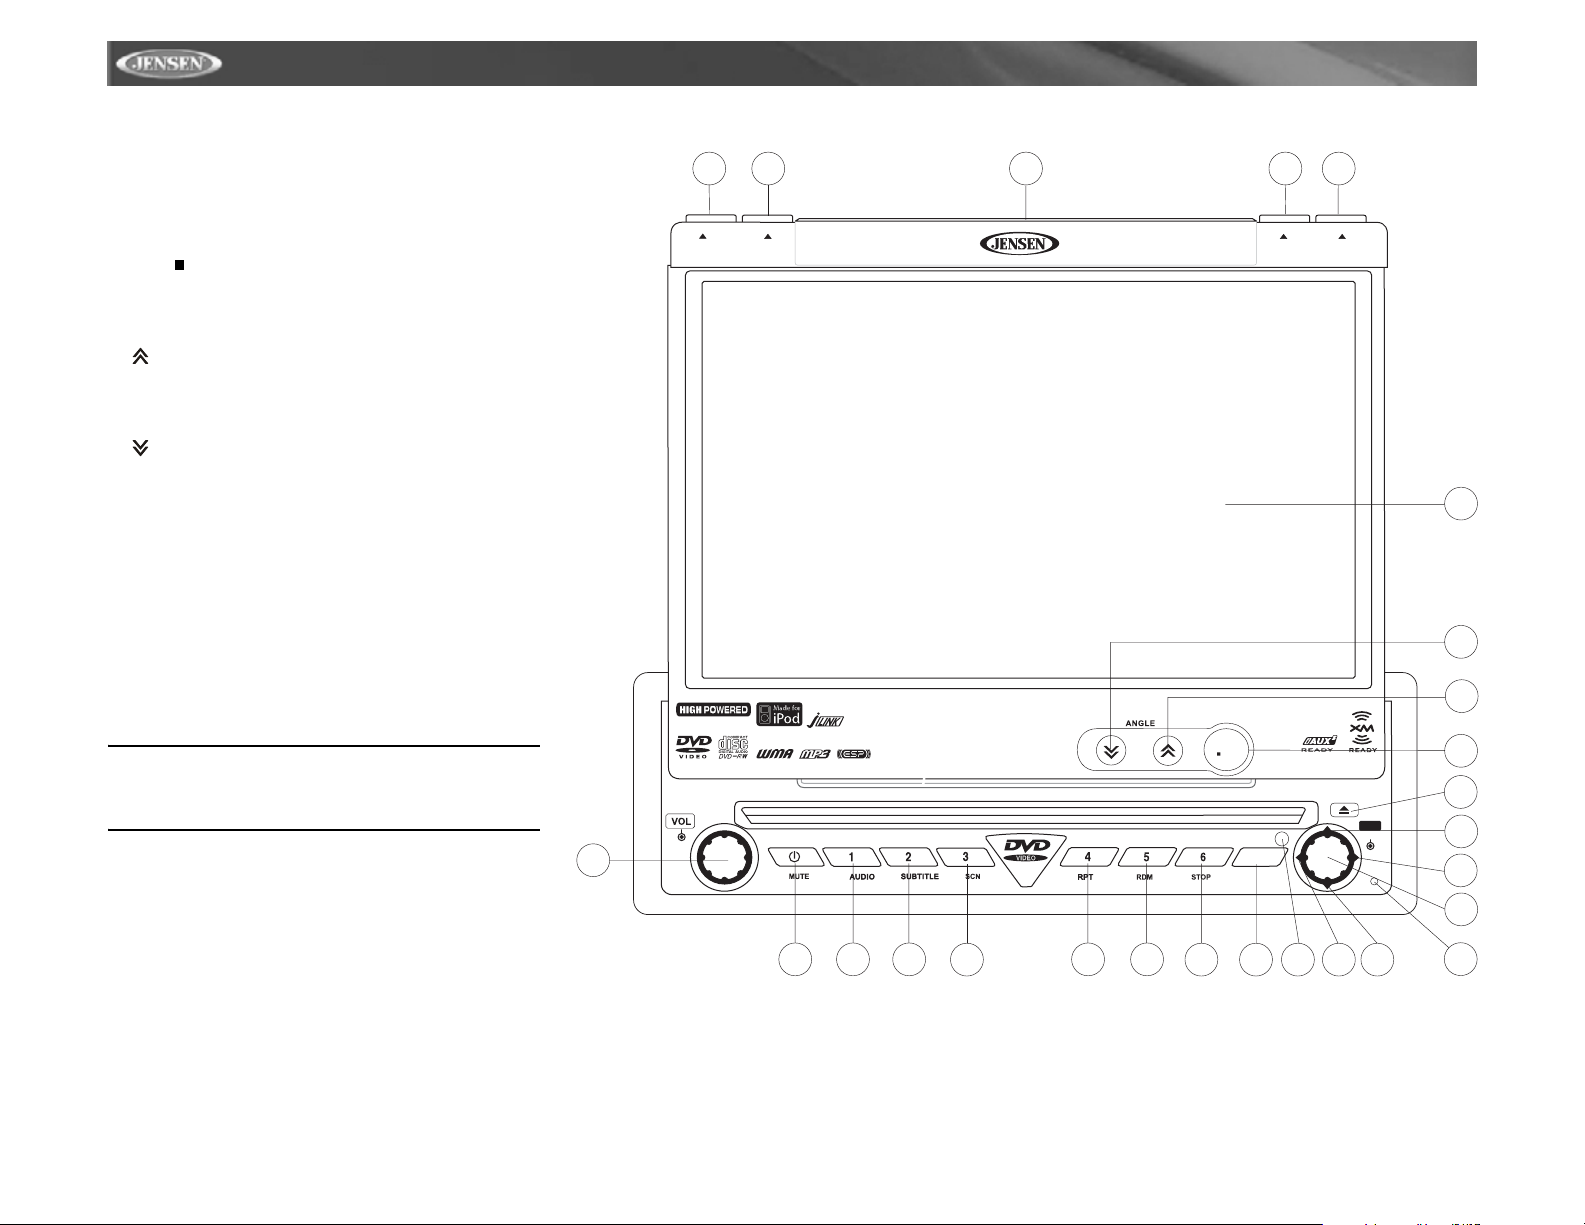
CONTROLS AND INDICATORS
Button Operation
1. OPEN
Press to activate the automatic mechanical system and move
the TFT monitor into viewing position. Press again to close
the TFT.
2. WIDE/ PIC
Press to adjust the display aspect of the picture to one of
three settings: Cinema, Normal or OFF. Press and hold to
access picture settings.
3. ( )
Press to adjust the upward tilt angle of the screen one step at
a time. Press and hold this button to continuously adjust the
upward tilt or picture settings.
4. ( )
Press to adjust the downward tilt angle of the screen one step
at a time. Press and hold this button to continuously adjust
the downward tilt or picture settings.
5. DISP
Press to display system information on the screen.
6. VOL/LO/DX
Rotate to adjust the volume. Press and release to enter and/
or confirm audio settings. Press and hold to activate the Local
(LOC) setting.
7. POWER/MUTE
Press once to turn the unit on. Press again to mute the
volume. Press and hold to turn the unit off.
NOTE: The VM9311TS features Softmute, which
will allow the volume to increase or decrease
gradually when the MUTE function is activated or
deactivated.
8. 1/AUDIO
DVD Mode: Press to select audio language during playback.
TUNER Mode: Press once to play preset radio station
channel 1. Press and hold to store the current radio station in
preset channel 1.
9. 2/SUBTITLE
DVD Mode: Press once to select the subtitle language during
playback.
TUNER Mode: Press once to play preset radio station
channel 2. Press and hold to store the current radio station in
preset channel 2.
6
BAND
160 WATTS
7-INCH LCD TFT
LO/DX
AS
24-bit / 192KHz DAC
POWER
7 8 9
2326
1010 11 12
VM9311TS
1
5
CLOSE
DISP
SRC
AUDIOVIDEO INPUT
25
VM9311TS
EJECT
Push
ENTER
WIDE
PIC
131415 16 19
24
4
3
2
21
18
17
20
22
6
Page 11
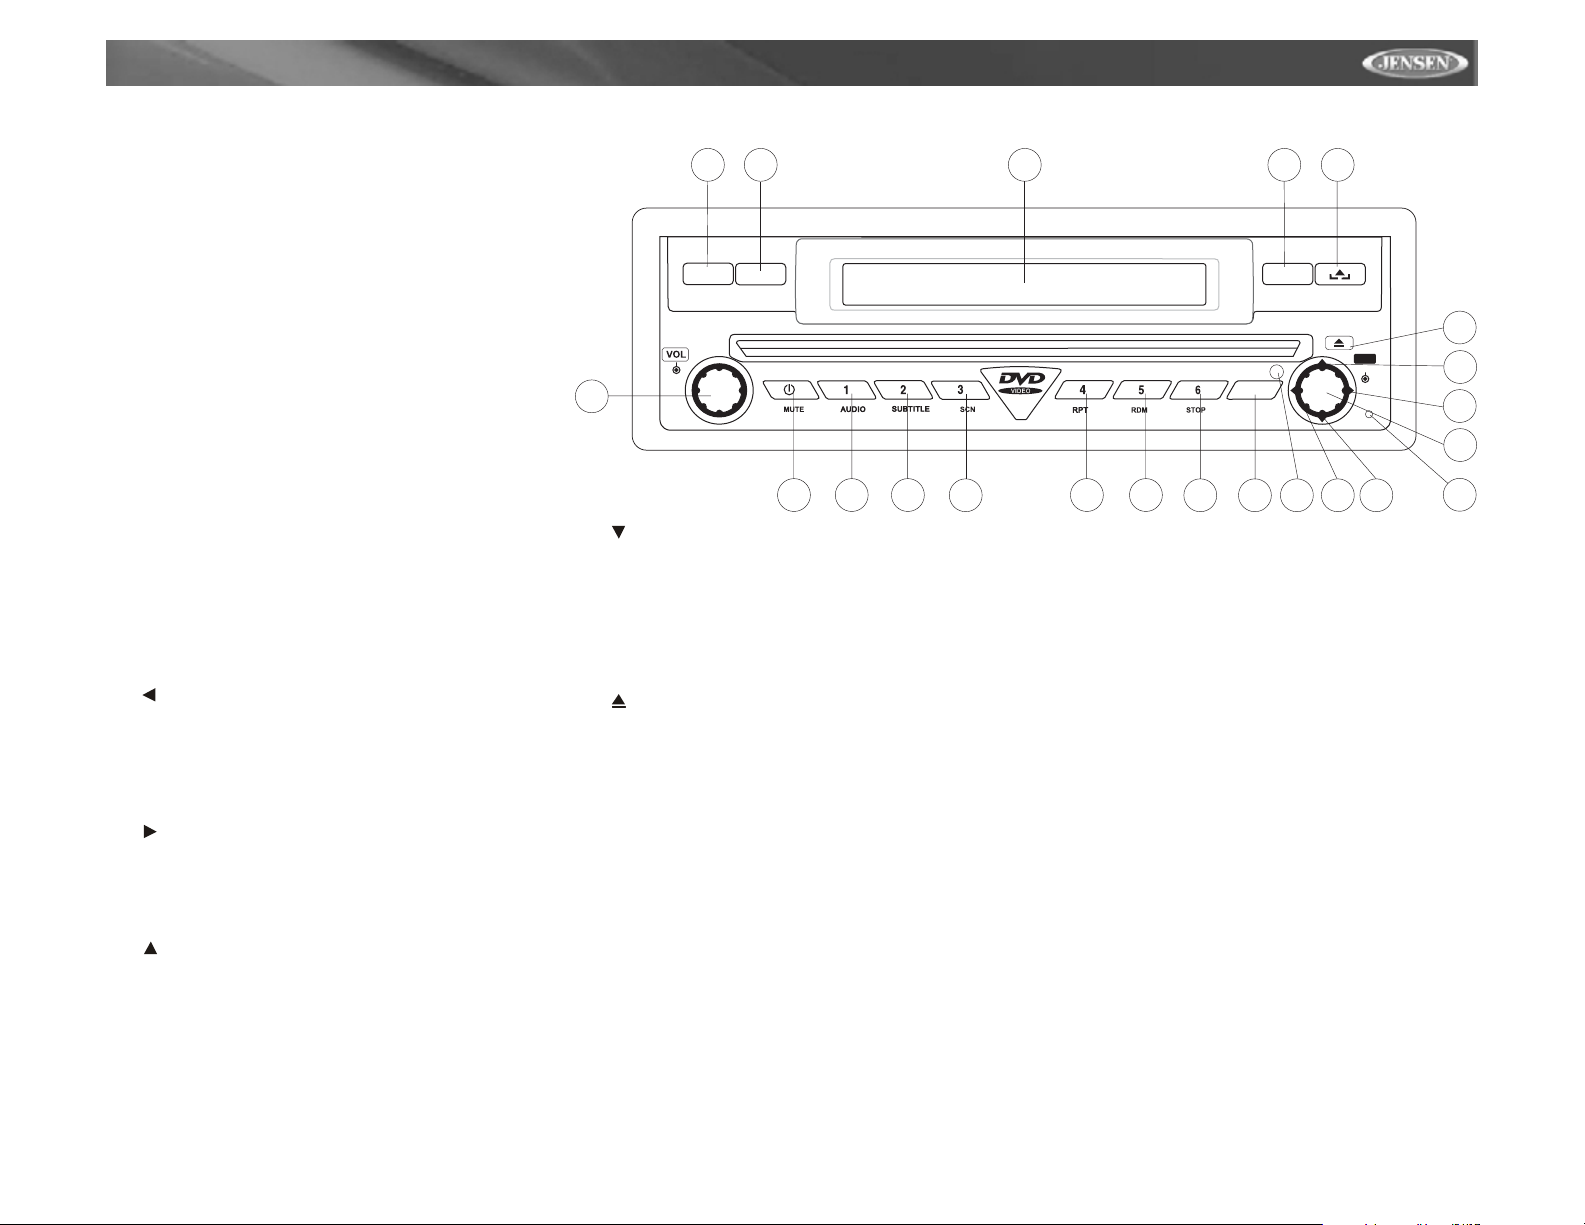
VM9311TS
7-INCH TFT
CONTROLS AND INDICATORS
10. 3/SCN
DVD Mode: Press once to start scan playback.
TUNER Mode: Press once to play preset radio station
channel 3. Press and hold to store the current radio station in
preset channel 3.
11. 4/RPT
DVD Mode: Press once to start repeat playback.
TUNER Mode: Press once to play preset radio station
channel 4. Press and hold to store the current radio station in
preset channel 4.
12. 5/RDM
DVD Mode: Press once for random playback.
TUNER Mode: Press once to play preset radio station
channel 5. Press and hold to store the current radio station in
preset channel 5.
13. 6/STOP
DVD Mode: Press once to stop playback.
TUNER Mode: Press once to play the preset radio station
channel 6. Press and hold to store the current radio station in
preset channel 6.
14. BAND
TUNER Mode: Press to switch between FM and AM.
15. SRC
Press once to select playing mode.
16. ( )
DVD Mode: Press once to play back the previous chapter/
track.
TUNER Mode: Press once to auto-search for the previous
available radio station.
MENU Mode: Press once to move the cursor to the left.
17. ( )
DVD Mode: Press once to enter the next chapter or track.
TUNER Mode: Press once to auto-search the next available
radio station.
MENU Mode: Press once to move the cursor to the right.
18. ( )
DVD Mode: Press once for fast forward/fast reverse.
TUNER Mode: Press to go up one frequency step.
MENU Mode: Press once to move the cursor up.
6
19. ( )
DVD Mode: Press once for slow forward/slow reverse.
TUNER Mode: Press to go down one frequency step.
MENU Mode: Press once to move the cursor down.
20. PLAY/ENTER
DVD Mode: Press once to start a playback.
Press once to confirm a selection.
21. ( )
Press once for disc insertion/ejection.
Press and hold to reset core mechanism position.
22. RESET
Press to reset system settings to factory default (except the
password and parental lock setting).
23. LCD Display
24. TFT Display
25. IR Remote Control Receiver
26. AS (Auto Store)
Press to automatically store strong radio stations in the six
preset channels in the current band.
7-INCH TFT
BAND
7-INCH LCD TFT
LO/DX
AS
POWER
7 8 9
AM/FM/DVD/MP3 RECEIVER
1010 11 12
SRC
13 15
514 2326
DISP
1
OPEN
VM9311TS
EJECT
Push
ENTER
16 1925
21
18
17
20
22
7
Page 12
CONTROLS AND INDICATORS
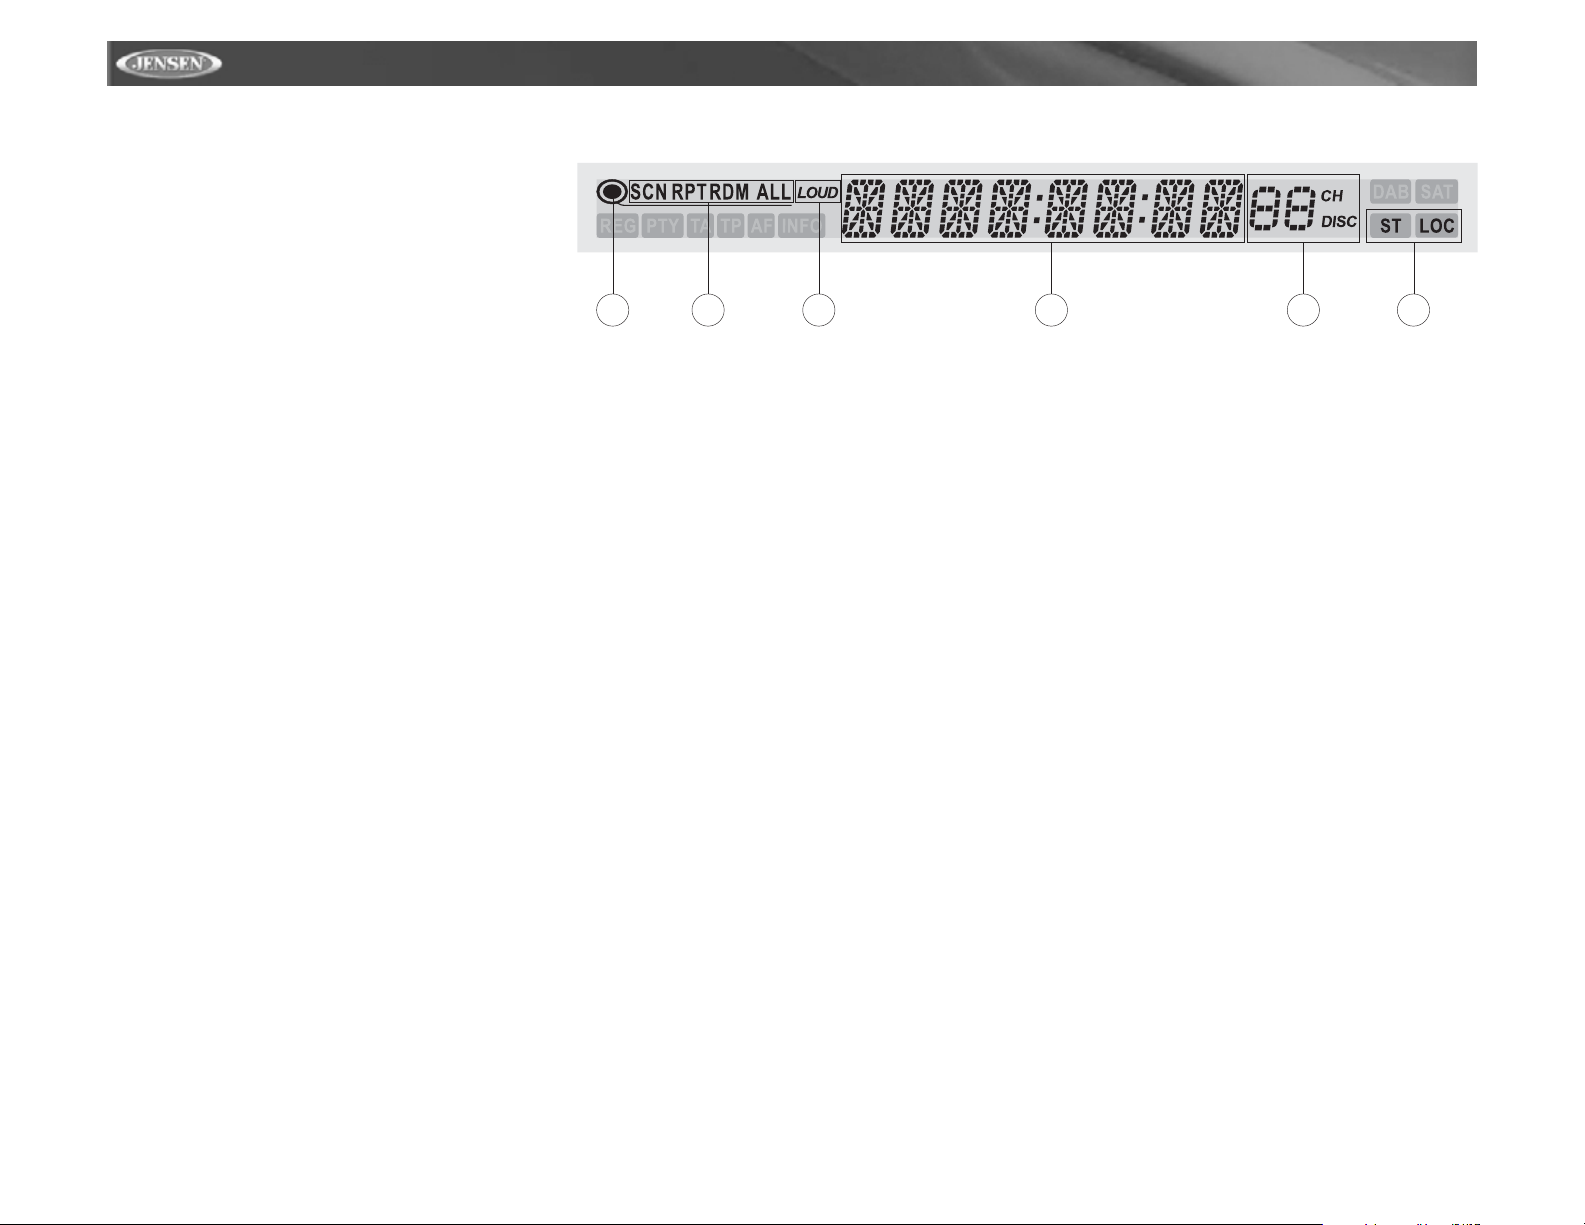
LCD Display/Indicators
1. Disc Indicator
Illuminated when disc is loaded
2. DVD Playback Indicators (SCN/RPT/RDM/ALL)
The following DVD playback indicators become Illuminated
when the corresponding function is active:
• SCN: scan playback
• RPT: repeat playback
• RDM: random playback
• ALL: playback all chapters
3. Loudness Indicator (LOUD)
The loudness indicator becomes illuminated when the LOUD
function is activated.
4. Main Display
The main display is an 8 digit, 14 segment LCD which
displays the time, tuning frequency and other text
information.
5. Channel/Disc Display
The channel/disc display is a 2 digit, 7 segment LCD display
which displays the disc number or radio channel indicators
when the corresponding function is active:
• CH: radio is activated
• DISC: DVD mode is activated
6. Stereo/Local Indicator
The stereo/local indicator illuminates one of the following
indicators when the corresponding function is active:
• ST: radio is in stereo mode
• LOC: local radio station seeking function is activated
VM9311TS
1 2 3 4 5 6
8
Page 13
VM9311TS
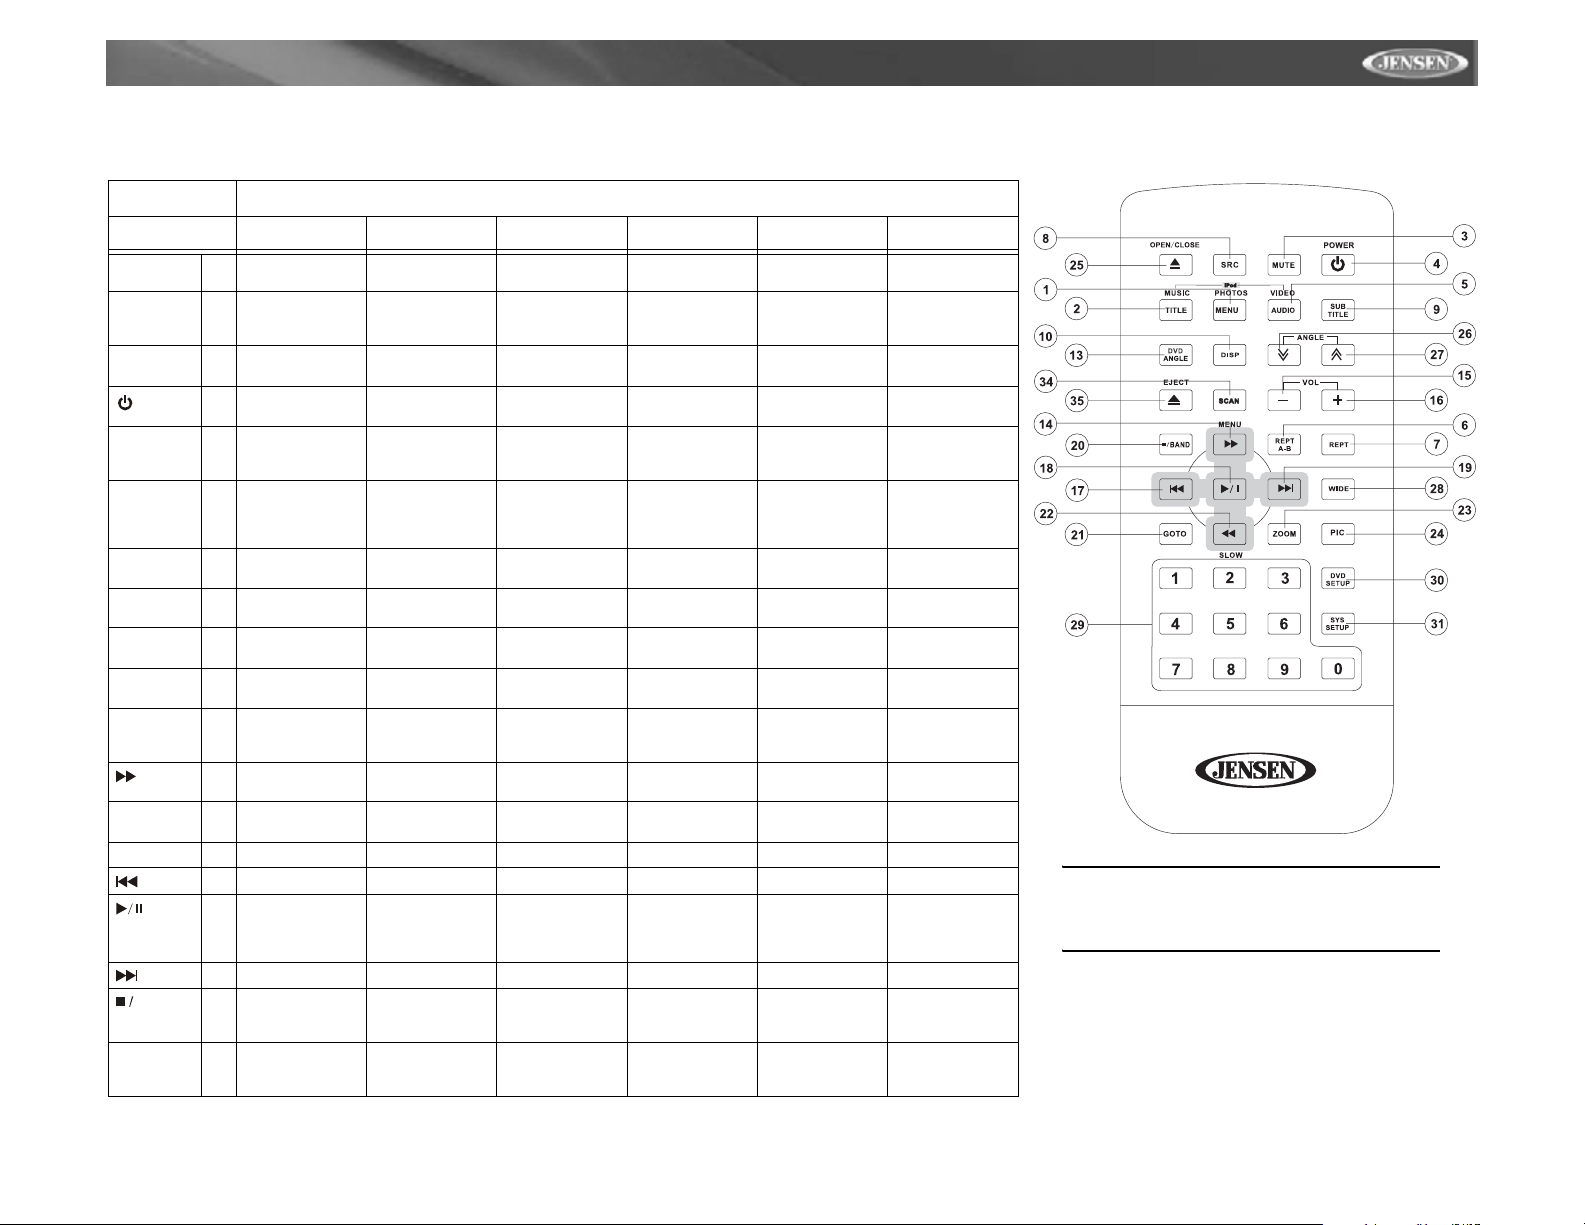
REMOTE CONTROL
Table 1: Remote Control Functions
Button Function
Name/Ref # DVD VCD AM/FM CD/MP3 XM iPod
MENU 1 Enters the main
TITLE 2 Enters the title
MUTE 3 Toggles on/off
POWER
AUDIO 5 Changes the
REPT A-B 6 Setup to repeat
REPT 7 Repeats playback
SRC 8 Selects playing
SUBTITLE 9 Language selec-
DISP 10 Displays playing
DVD
ANGLE
VOL - 15 Decreases vol-
VOL + 16 Increases volume Increases volume Increases volume Increases volume Increases volume Increases volume
BAND 20 Stops playback Stops playback Selects FM/AM
GOTO 21 Goes to specific
menu of the disc
menu of the disc
audio output
4 Turns the power
on/off
audio language
for disc playback
playback from
time frame A to
time frame B
of current chapter
mode
tion for subtitle
information
13 Plays back disc in
different angle for
a scene
14 Fast Forward Fast Forward Manual tune up Selects next folder Next channel in
ume
17 Previous chapter Previous chapter Seek down Previous track Previous channel Previous track
18 Play/Pause Play/Pause Press for PS (Pre-
19 Next chapter Next chaper Seek up Next track Next channel Next track
time frame and
playback
Turns on PBC
when playing VCD
Plays first ten seconds of each
chapter/title
Toggles on/off
audio output
Turns the power
on/off
Selects Left, Right
or Stereo
Setup to repeat
playback from
time frame A to
time frame B
Repeats playback
of current chapter
Selects playing
mode
Displays playing
information
Decreases volume
Goes to specific
time frame and
playback
Toggles on/off
audio output
Turns the power
on/off
Selects playing
mode
Displays playing
information
Decreases volume
view Scan). Press
and hold for AS
(Auto Store).
band
Displays XM
Setup Menu
Selects Category
Search Mode
Toggles on/off
audio output
Turns the power
on/off
Selects Left, Right
or Stereo
Repeat single,
repeat folder, of f
Selects playing
mode
Display playing
information
Decreases volume
Play/Pause ENTER
Stops playback Selects XM, XM1,
Toggles on/off
audio output
Turns the power
on/off
Selects playing
mode
Selects Channel
Search mode
Displays playing
information
current category
Decreases vol-
ume
XM2, or XM3
band
Press for Direct
Channel Input
Selects Photo
mode
Selects Music
mode
Toggles on/off
audio output
Turns the power
on/off
Selects Video
mode
Repeats playback
of current track
Selects playing
mode
Display playing
information
Accesses iPod
Menu
Decreases volume
NOTE: Your remote control may differ
slightly from the one pictured here. The
above diagram is for illustrative purposes
only.
9
Page 14
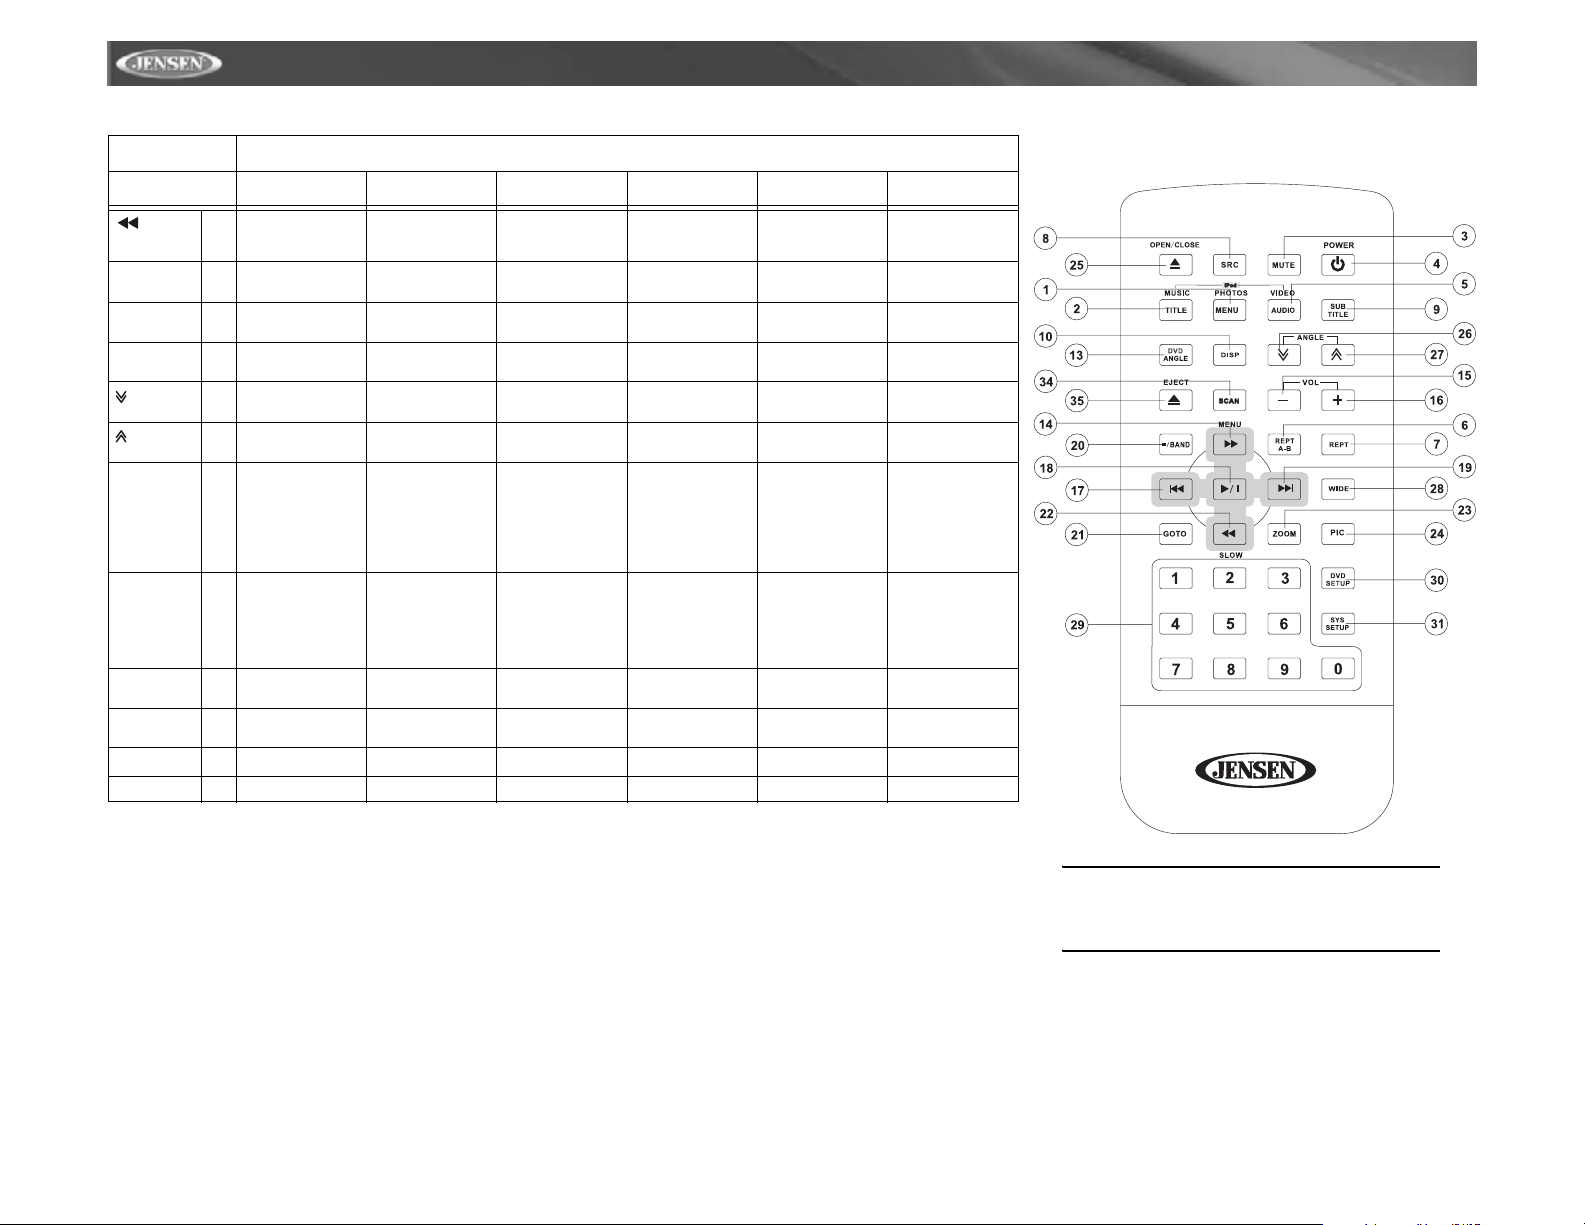
Table 1: Remote Control Functions
Button Function
Name/Ref # DVD VCD AM/FM CD/MP3 XM iPod
22 1/2, 1/4, 1/6, 1/7
playback
ZOOM 23 Zooms in/out on
PIC 24 Displays set-up
OPEN/
CLOSE
WIDE 28 (For DVD and
0, 1, 2, 3, 4,
5, 6, 7, 8, 9,
0 (Numeric
Keypad)
DVD
SETUP
SYS
SETUP
SCAN 34
EJECT 35 Ejects disc Ejects disc Ejects disc Ejects disc Ejects disc Ejects disc
an image
parameters
25 Opens/Closes the
TFT monitor
26 Decreases moni-
tor tilt angle
27 Increases monitor
tilt angle
AUX IN) Selects
display mode:
CINEMA, NORMAL or OFF
29 Directly accesses
chapter
30 Displays DVD
Setup menu
31 Displays System
Setup menu
1/2, 1/4, 1/6, 1/7
playback
Zooms in/out on
an image
Displays set-up
parameters
Opens/Closes the
TFT monitor
Decreases monitor tilt angle
Increases monitor
tilt angle
Selects display
mode: CINEMA,
NORMAL or OFF
Displays DVD
Setup menu
Displays System
Setup menu
Manual tune down Previous folder Previous channel
Displays set-up
parameters
Opens/Closes the
TFT monitor
Decreases monitor tilt angle
Increases monitor
tilt angle
Selects display
mode: CINEMA or
OFF
1-6 selects preset
for current band
Displays System
Setup menu
Displays set-up
parameters
Opens/Closes the
TFT monitor
Decreases monitor tilt angle
Increases monitor
tilt angle
Selects display
mode: CINEMA or
OFF
Directly accesses
track
Displays System
Setup menu
within current category
XM Channel
Guide mode
Displays set-up
parameters
Opens/Closes the
TFT monitor
Decreases monitor tilt angle
Increases monitor
tilt angle
Selects display
mode: CINEMA or
OFF
1-6 selects preset
for current band
Displays System
Setup menu
Play/Pause
Displays set-up
parameters
Opens/Closes the
TFT monitor
Decreases monitor tilt angle
Increases monitor
tilt angle
Selects display
mode: CINEMA or
OFF in Music
mode or CINEMA, NORMAL,
OFF in photo or
video
Press button "1"
to view the available pages while
in "Playlists, Artists, Albums and
Songs".
Displays System
Setup menu
VM9311TS
10
NOTE: Your remote control may differ
slightly from the one pictured here. The
above diagram is for illustrative purposes
only.
Page 15

VM9311TS
USING THE TFT MONITOR
Open/Close TFT Monitor
Open TFT Monitor
Press the OPEN button (1) on the front panel or press the
( ) button (25) of the front zone remote control to activate
the mechanism that moves the display panel into the viewing
position.
Close TFT Monitor
Press the OPEN button (1) on the front panel or press the
( ) button (25) of the front zone remote control to load the
display panel back into the compartment.
TFT Monitor Auto Open
If “TFT Auto Open” is “on” when the unit is turned on, the
monitor automatically moves to the viewing position.
If “TFT Auto Open” is ”off” when the unit is turned on, press
the OPEN button (1) or ( ) button (25) on the remote control
to move the monitor into the viewing position.
If “TFT Auto Open” is set to ”Manual”, the TFT will not close
when the key is turned off.
Monitor Tilt Angle Adjustment
A known characteristic of LCD panels is the quality of the
display in relationship to the viewing angle. The monitor
angle can be adjusted for optimum viewing using one of the
following methods:
Step by Step Angle Adjustment
Press the ( ) or ( ) button (3, 4) on the monitor frame to
adjust the tilt angle of the screen one step at a time.
Continuous Angle Adjustment
Press and hold the ( ) or ( ) button (3, 4) on the monitor
frame to adjust the tilt angle in a continuous motion.
Aspect Ratio
Press the DISP button (28) on the remote control or WIDE/
PIC button (2) on the monitor to adjust the aspect ratio as
follows:
CINEMA
The entire screen is extended
horizontally to the aspect ratio of 16 to
9. The extension ratio is the same at
any point.
NORMAL
The conventional display image has a
4 to 3 ratio of horizontal to vertical,
leaving a blank area on the right and
left sides of the display.
OFF
Image Setting
Table 2 shows the video output mode for each playing
source.
Table 2: Video Output Modes
Playing Source Video Output Modes
AM/FM TUNER RGB Mode
XM TUNER RGB Mode
iPod RGB Mode
DVD RGB Mode
AUX IN CVBS Mode
*CVBS – Composite Video Baseband Signal
Parameter Adjustment Procedure
1. Enter Picture Quality Setting Mode:
Press the PIC button (24) on the remote or press and
hold the WIDE/PIC button (2) on the monitor panel.
2. Select Item to Set:
Press the (>>) (
<<) buttons (14, 22) on the remote or the
(/\) or (V) buttons (18, 19) on the control panel.
3. Set Parameters:
Press (|<<) (>>|) buttons (17, 19) on the remote or press
(<) (>) buttons (16, 17) on the control panel.
4. Exit Picture Quality Setting Mode:
Press the PIC button (24) on the remote or press and
hold the WIDE/PIC button (2) on the monitor panel.
Parking Brake
Parking Brake Inhibit
When the pink "Parking" wire is connected to the vehicle
brake switch, the front TFT monitor will display video
only when the parking brake sequence is engaged.
Before starting the parking brake sequence, the radio
must be on with the video media disc inserted and
playing.
Parking Brake Sequence
There are two situations that can start the Parking Brake
Sequence (this is the preferred method). The timing
window is between 3 ~ 5 seconds.
• Parking brake is engaged (on) when the vehicle is
started or the accessory/ignition is turned on. To
activate video, the following sequence of events must
be completed:
a. Release parking brake for 3 ~ 5 seconds.
b. Reapply parking brake.
c. Video should be displayed on the TFT monitor
within 1 ~ 2 seconds.
• Parking break is disengaged (off) when the vehicle is
started or the accessory/ignition is turned on. To
activate video, the following sequence of events must
be completed:
a. Set parking brake for 3 ~ 5 seconds.
b. Release parking brake for 3 ~ 5 seconds.
c. Reapply parking brake.
d. Video should be displayed on the TFT monitor
within 1 ~ 2 seconds.
Monitor Movement Mechanism
If an obstruction occurs in the monitor path, the following
protective measurements can be executed to prevent
damage to the mechanism or monitor:
Table 3: Monitor Protective Measures
Obstruction
Monitor loading out horizontally
Monitor loading in horizontally
Monitor loading out vertically
Monitor loading in vertically
Self
Protection
Monitor is automatically
loaded into unit
Unit stops at
obstruction
point
Unit stops at
obstruction
point
Unit stops at
obstruction
point
After the protective procedure is executed, normal operation
is resumed by pressing the OPEN button (1) or disconnecting
and reconnecting the power.
OPEN Button
Pressed
Monitor fully
extended horizontally
Monitor fully
extended horizontally
Monitor swivels back to the
unit
Monitor swivels back to the
unit
Power
Reconnected
Monitor is automatically
loaded into unit
Monitor is automatically
loaded into unit
Monitor swivels back to the
unit
Monitor swivels back to the
unit
11
Page 16
OPERATING INSTRUCTIONS
n
Power On / Off
Press the /MUTE button (7) to turn the unit on. The buttons
on the front of the unit light up and “WELCOME” appears
briefly in the LCD panel (23), followed by the current mode
status. If the TFT screen is open, only the current mode
status is displayed. You can also turn on the unit by pressing
the OPEN button (1) and opening the TFT screen.
Press and hold the /MUTE button (7) on the front panel or
the POWER button (4) on the remote to power off the
unit.The monitor is drawn back into the main compartment
and the LCD screen displays “BYE BYE”.
Audible Beep Confirmation
An audible beep tone confirms each function selection. The
beep tone can be disabled through the System Setup menu.
Mute
Press the /MUTE button (7) on the front panel or the MUTE
button (3) on the remote to mute the volume from the unit.
Press the MUTE button again to restore the volume. “MUTE”
is displayed on the LCD monitor. Adjusting the volume or
using any of the audio setup features cancels the mute
function.
Playing Source Selection
Press the SRC button (15) on the front panel or the SRC
button (8) on the remote to change between available playing
sources in the following order: TUNER, DVD, AUX IN, iPod
and XM. The playing mode is displayed on the TFT and LCD
screens.
AUX IN Mode
An external peripheral device can be connected to this unit
via RCA output and “AUX-IN”.
Volume Adjustment
To increase or decrease the volume level, turn the ROTARY
ENCODER (6) on the front panel or press the VOL+/ VOL-
buttons (15, 16) on remote control. When the volume level
reaches “0” or “40”, a beep sounds, indicating that the
adjustment limit has been reached. The volume ranges from
“0” to “40”. The LCD or TFT screen displays the volume level
for 3 seconds.
Programmable Turn-On Volume
This feature allows the user to select a turn-on volume setting
regardless of the volume setting prior to turning the unit off.
To program a specific volume level, push and hold the VOL/
LO/DX knob (6) while the yellow volume bar is displayed on
the screen. The unit will beep two times to confirm your turnon volume setting.
Audio Control Menu
The Audio Control feature allows you to easily adjust your
audio system to meet the acoustical characteristics of your
vehicle, which vary depending on the type of vehicle and its
measurements. To get the best possible sound quality from
your new system, be sure to adjust the settings for the
speakers as well. Proper setting of the Fader and Balance
boosts the effects of the cabin equalizer.
Accessing the Audio Control Menu
Press the VOL/LO/DX knob (6) on the front panel once to
display the “AUDIO” menu.
Selecting an Audio Feature for Adjustment
Continuously press the VOL/LO/DX knob (6) on the front
panel, or press the (>>)/(
control or the (/\)/(V) buttons (18, 19) on the joystick to select
the audio feature to be adjusted.
Adjusting an Audio Feature
Rotate the VOL/LO/DX knob (6), press the (|<<)/(>>|) buttons
(17, 19) on the remote control, or press the (<)/(>) buttons
(16, 17) on the joystick to adjust the selected feature to the
desired setting.
Table 4: Audio Adjustments
Audio Function Adjustable Range
EQ User
BASS -14 to +14
TREBLE -14 to +14
SUB -7 to +7
LOUD 0 (off), 1-4
FAD (Fade) -9 to +9
BAL -9 to +9
NOTE: The Bass and Treble levels are only
adjustable when EQ is set to “User” mode.
<<) buttons (14, 22) on the remote
Flat
Jazz
Pop
Classical
Rock
Vocal
VM9311TS
Loudness
The Loud function compensates for deficiencies in sound
ranges at low levels. Loudness levels range from 1-4 or “off”.
The Loudness level/function is dependent on the main
volume setting. As the volume is increased, less Loudness
compensation is applied to the audio signal. This is referred
to "Auto-Loudness". The possible loudness settings are as
follows:
•Off
• 1 - Slight bass boost at low volume level
• 2 - Moderate bass boost at low volume level
• 3 - Good bass boost at low to mid volume level
• 4 - maximum bass boost at mid volume level
When the Loud function is on, “LOUD” is displayed on the
screen.
Exiting the Audio Control Menu
Press and hold the VOL/LO/DX knob (6) or stop making
adjustments for a few seconds to exit the audio control menu.
System Reset
To correct a system halt or other
illegal operation, use the tip of a pen
to press the RESET button (22)
located on the front bottom-right corner of the unit. After a
system reset, the unit restores all factory default settings.
NOTE: If the unit is reset while a DVD is playing,
the DVD resumes play once the reset is
complete.
Line Mute
If the “MUTE” wire is connected, audio output mutes when a
telephone call is received by the car phone or when verbal
navigation is performed.
[RESET] Butto
12
Page 17
VM9311TS
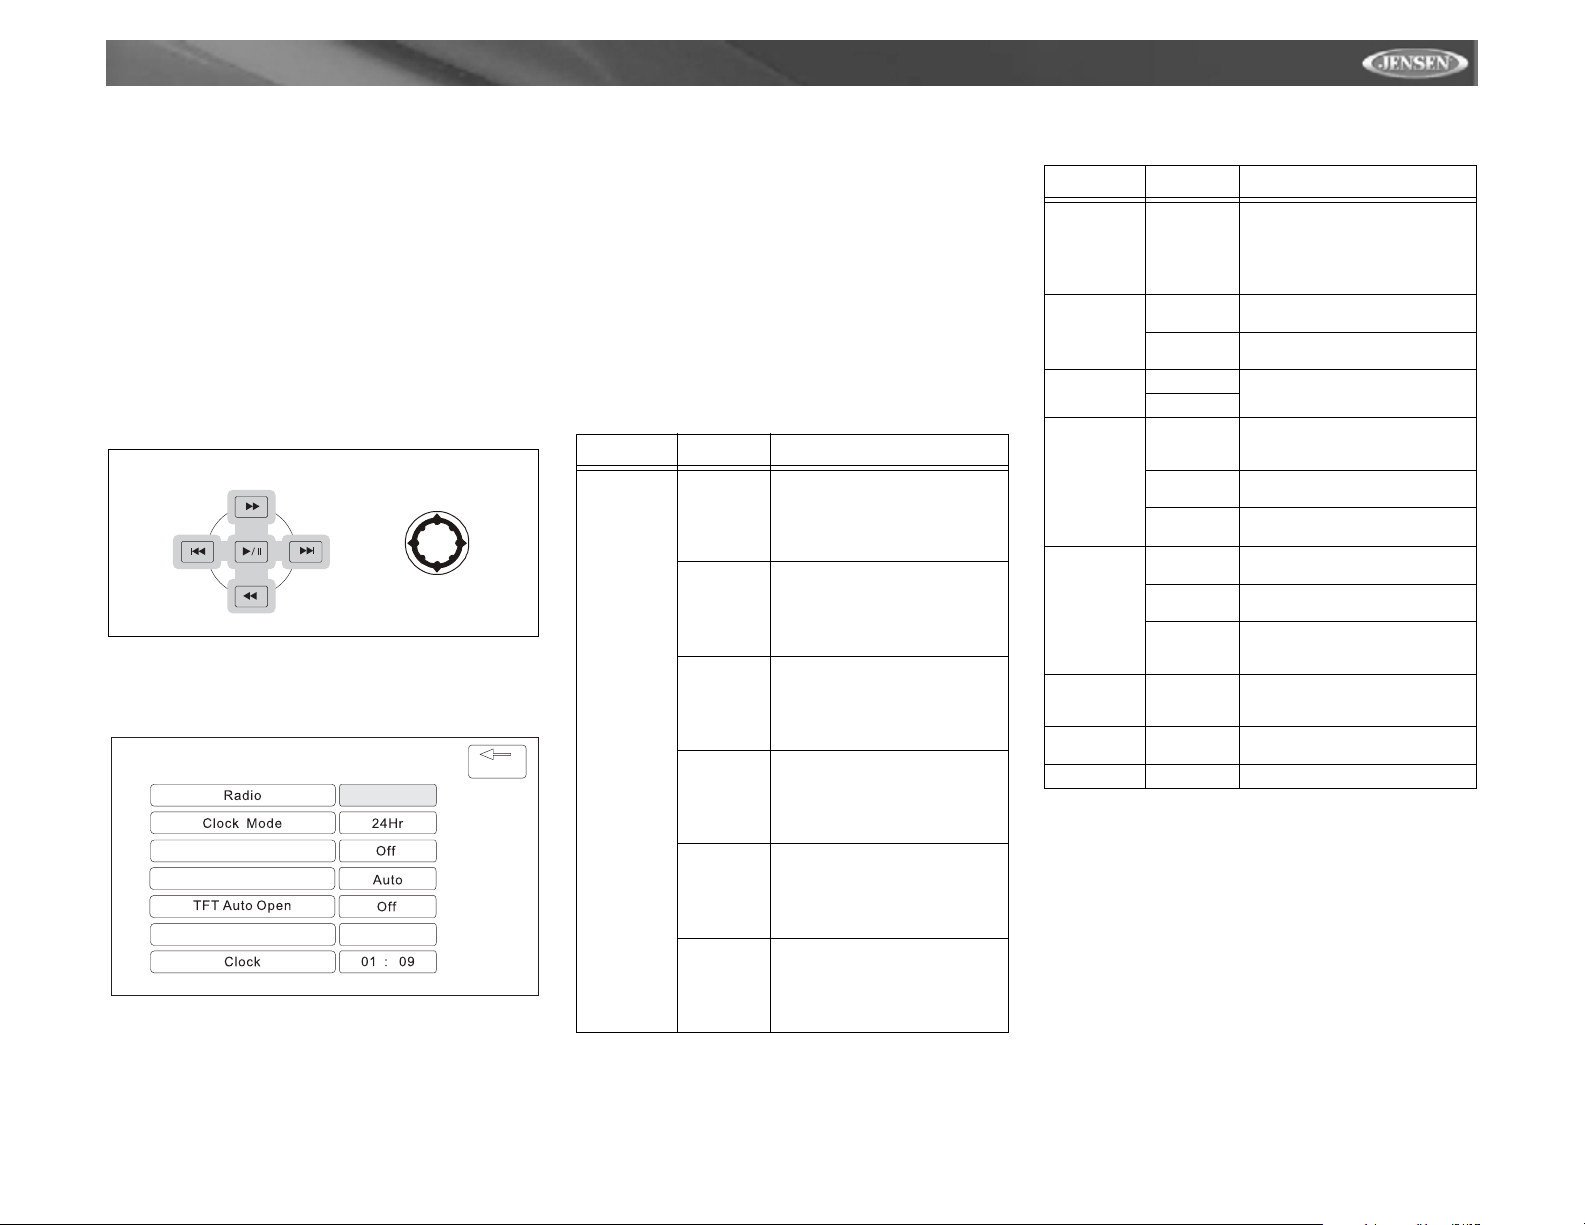
SYSTEM SETUP MENU
In “System Setup” mode, “ASP CONFIG”, “GENERAL
SETUP” and “SCREEN CAL” are available for adjustment.
Setup can be performed by pressing the dedicated button on
the remote control or by touching the top left corner of the
TFT screen.
For system settings, press the SYS SETUP button (31) on
the remote control or touch “SETUP” on the screen to enter
the “SETUP” menu. “SYS SETUP” is highlighted in green.
General Setup Menu
Accessing the General Setup Menu
To access the “GENERAL SETUP” Menu, press the direction
buttons on the joystick (16, 17, 18, 19) or remote control (14,
17, 18, 19, 22) to highlight “GENERAL SETUP” in green.
DIRECTION BUTTONS
Press the >/|| button (18) on the remote control to enter the
“GENERAL SETUP” menu. A menu appears with the option
for the first item, “Radio”, highlighted in light blue.
GENERAL SETUP
USA
Screen Saver
Video Format
Beep On
Selecting a Feature for Adjustment
Press the >> or
the /\ or V buttons (18, 19) on the joystick to select the feature
to be adjusted.
<< buttons (14, 22) on the remote control or
BACK
Adjusting a Feature
1. Enter the option field for the feature you want to adjust
by pressing the >/|| button (18) on the remote or by
pressing the ENTER (joystick) button (20) on the unit. A
submenu appears in a second row with the selected
option highlighted in light blue.
2. Select a new value by pressing the >> or
<< buttons (14,
22) on the remote control or the /\ or V buttons (18, 19)
on the joystick.
3. Confirm your selection by pressing the
<<, |<<, or >>|
buttons (14, 17, 19) on the remote control, or the < or >
button (16, 17) on the joystick. The new value is
highlighted in light blue and setup is complete.
Table 5: General Setup Menu Features
Setting Options Function
Radio USA • AM Frequency Spacing - 10kHz
Europe • AM Frequency Spacing - 9kHz
South
America 1
South
America 2
Arabia • AM Frequency Spacing - 9kHz
Korea • AM Frequency Spacing - 9kHz
• AM Frequency Band 530kHz~1720kHz
• FM Frequency Spacing - 200kHz
• FM Frequency Band -
87.5MHz~107.9MHz
• AM Frequency Band 522kHz~1620kHz
• FM Frequency Spacing - 50kHz
• FM Frequency Band -
87.5MHz~108.0MHz
• AM Frequency Spacing - 10kHz
• AM Frequency Band 530kHz~1720kHz
• FM Frequency Spacing - 100kHz
• FM Frequency Band -
87.5MHz~108.0MHz
• AM Frequency Spacing - 5kHz
• AM Frequency Band 520kHz~1600kHz
• FM Frequency Spacing - 100kHz
• FM Frequency Band -
87.5MHz~108.0MHz
• AM Frequency Band 531kHz~1620kHz
• FM Frequency Spacing - 100kHz
• FM Frequency Band -
87.5MHz~108.0MHz
• AM Frequency Band 531kHz~1602kHz
• FM Frequency Spacing - 200kHz
• FM Frequency Band -
88.1MHz~107.9MHz
Table 5: General Setup Menu Features
Setting Options Function
China • AM Frequency Spacing - 9kHz
Clock Mode 12H Clock displays 12 hour time using
24H Clock displays 24 hour time up to
Screen Saver On Turn screen saver on/off.
Off
Video Format
(Input circuitry autodetects the
video signal
from the Aux
In source).
TFT Auto
Open
Beep On When turned on, an audible beep
Clock (HH:MM) See “Adjusting the clock” to learn
BACK Return to previous menu.
Auto The color signal output is switched
NTSC The color signals are output in the
PAL The color signals are output in the
On The TFT panel automatically opens
Off You must press the OPEN button
Manual When the ignition is turned OFF, the
• AM Frequency Band 522kHz~1620kHz
• FM Frequency Spacing - 100kHz
• FM Frequency Band -
87.5MHz~108.0MHz
AM and PM.
23:59.
automatically based on the current
video input signal - NTSC or PAL.
standard NTSC format.
standard PAL format.
when the unit is turned on.
(1) to open the TFT panel.
TFT panel DOES NOT retract if it
was previously out
tone confirms each function selection.
how to set the clock.
Adjusting the Clock
Method 1 – TFT screen open:
1. Access the “Clock” setting under the General Setup
menu.
2. Press the >> or
<< buttons (14, 22) on the remote
control or the /\ or V buttons (18, 19) on the joystick to
move the cursor to the “Hour” or “Min” position.
3. Press the |<<, or >>| buttons (17, 19) on the remote
control or the < or > buttons (16, 17) on the joystick to
adjust the hour or minutes.
4. Press the
<< button (14) on the remote control to confirm
setup.
Method 2 – TFT screen closed:
13
Page 18
VM9311TS
1. Press and hold the DISP button (5) until the clock
flashes in the LCD display.
1. Press the /\ or V buttons (18, 19) on the joystick to move
the cursor to the “Hour” or “Min” position.
2. Press the < or > buttons (16, 17) on the joystick to adjust
the hour or minutes.
3. Press the DISP button (5) on the unit to confirm setup.
Returning to the System Setup Menu
To return to the System Setup menu, move to “BACK”, then
press the >/|| button (18) on the remote control.
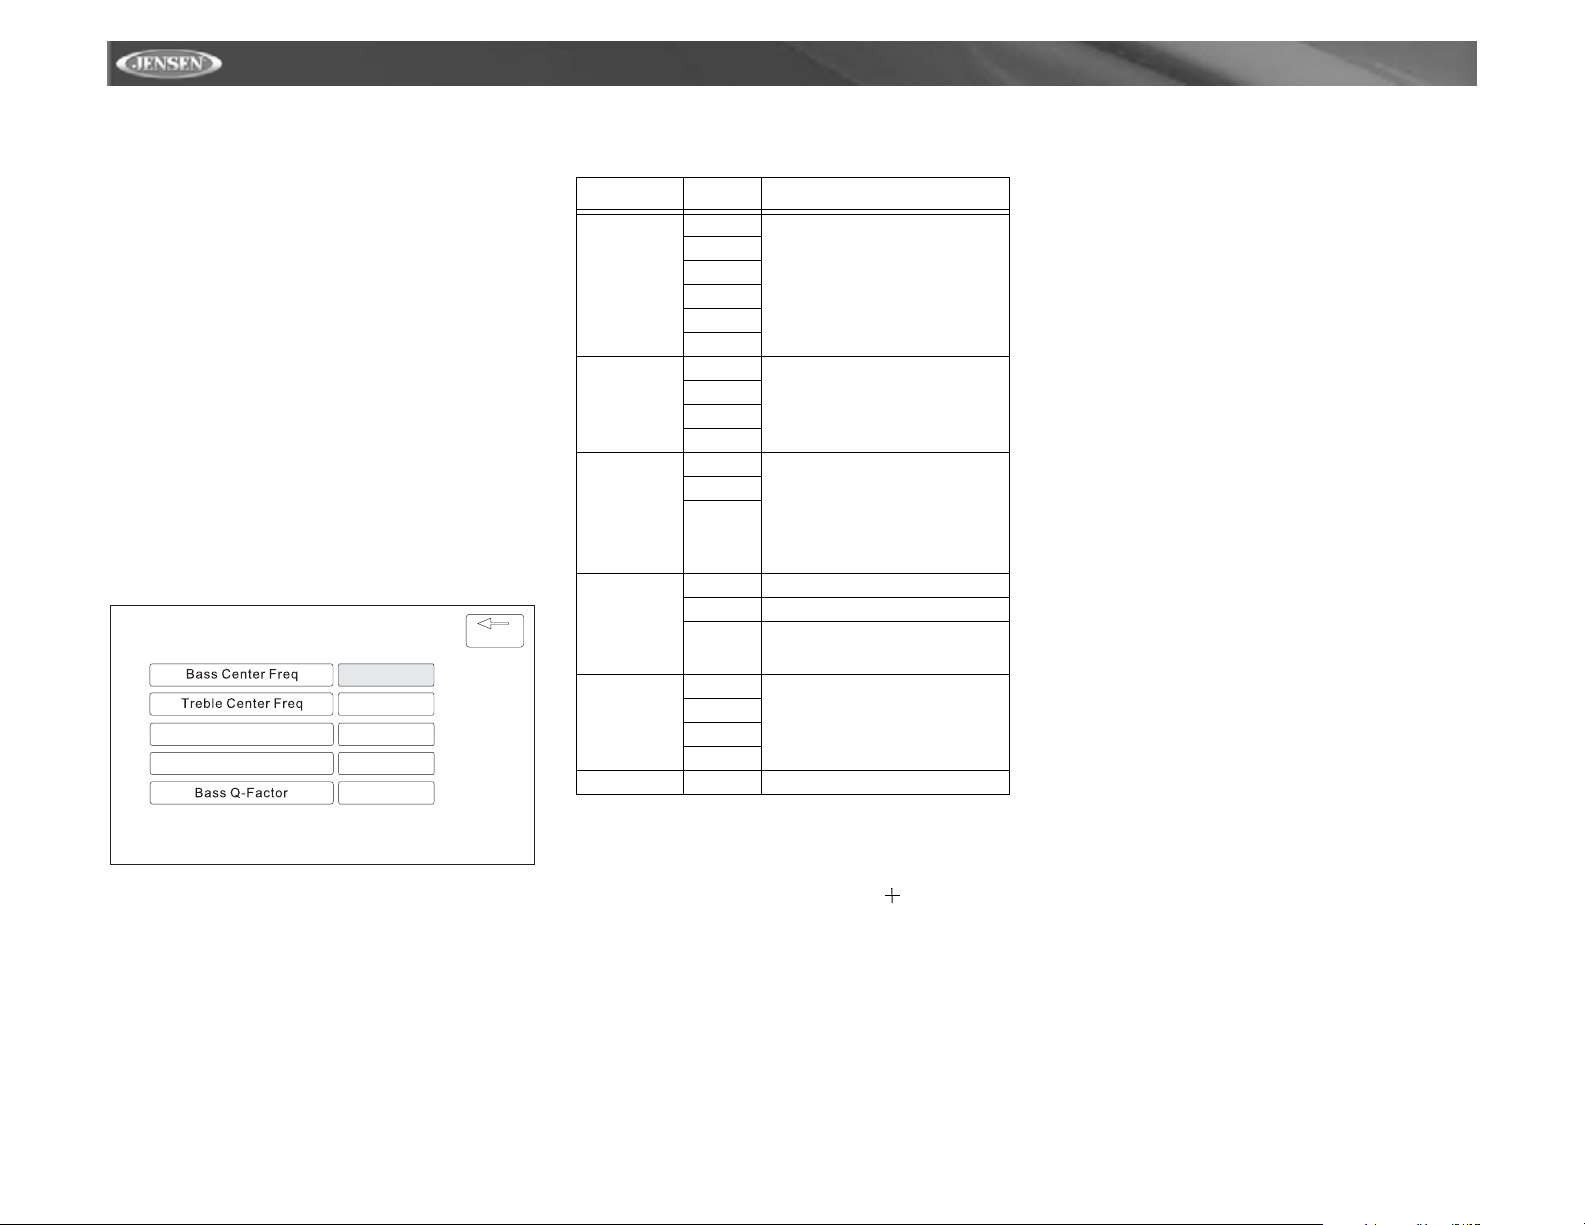
ASP (Audio Sound Processing) Config
Menu
The ASP Config Menu allows you to make fine audio
adjustments.
Accessing the ASP Config Menu
To access the “ASP CONFIG” Menu from the “SYSTEM
SETUP” menu, press the direction buttons on the joystick
(16, 17, 18, 19) or remote control (14, 17, 18, 19, 22) to
highlight “ASP CONFIG” in green. Press the >/|| button (18)
on the remote control to enter the “ASP CONFIG” menu. A
menu appears with the option for the first item, “Bass Center
Freq”, highlighted in light blue.
ASP CONFIG
60Hz
15kHz
Sub Filter
Sub Phase
Adjusting a Feature
1. Enter the option field for the feature you want to adjust
by pressing the >/|| button (18) on the remote or by
pressing the ENTER (joystick) button (20) on the unit. A
submenu appears in a second row with the selected
option highlighted in light blue.
2. Select a new value by pressing the >> or
22) on the remote control or the /\ or V buttons (18, 19)
on the joystick.
3. Confirm your selection by pressing the
buttons (22, 17, 19) on the remote control, or the < or >
80Hz
0D
1.5
BACK
<< buttons (14,
<<, |<<, or >>|
button (16, 17) on the joystick. The new value is
highlighted in light blue and setup is complete.
Table 6: ASP Config Menu Features
Setting Options Function
Bass Center
Freq
Treble Center
Freq
Sub.W Filter 80Hz Selecting a crossover frequency sets
Sub.W Phase 0D Subwoofer output IN phase
Bass Q-Factor 1.0 When the Bass Center Frequency is
BACK Return to previous menu.
60Hz According to the audio source, select
80Hz
100Hz
130Hz
150Hz
200Hz
10KHz According to the audio source, select
12.5KHz
15KHz
17KHz
120Hz
160Hz
180D Subwoofer output OUT OF phase
1.25
1.5
2.0
the Bass Center Frequency to
achieve the best Bass effect.
the Treble Center Frequency to
achieve the best Treble effect.
a cut-off frequency of the subwoofer's
LPF (low-pass filter) and the
“SMALL” speakers' HPF (high-pass
filter). The Crossover frequency setting has no effect if the subwoofer is
set to “OFF” and any other speaker is
set to “LARGE”.
NOTE: Depending on your installation, reversing the subwoofer phase
may increase Bass output.
selected, adjusting the Bass Q-Factor alters the sharpness of the Bass
output.
Screen Calibration
To access the “Screen Calibration” function from the
SYSTEM SETUP menu, press “SCREEN CAL”.
After entering calibration mode, a crosshair appears in a
corner quadrant of the screen. To begin calibration, press and
hold the crosshair for one second until it moves to the next
quadrant. Continue for each quadrant until the calibration is
completed.
Exiting the System Setup Menu
To exit setup mode and resume normal playback, press the
SYS SETUP button (31) on the remote control or the DISP
button (5) on the front panel.
14
Page 19
VM9311TS
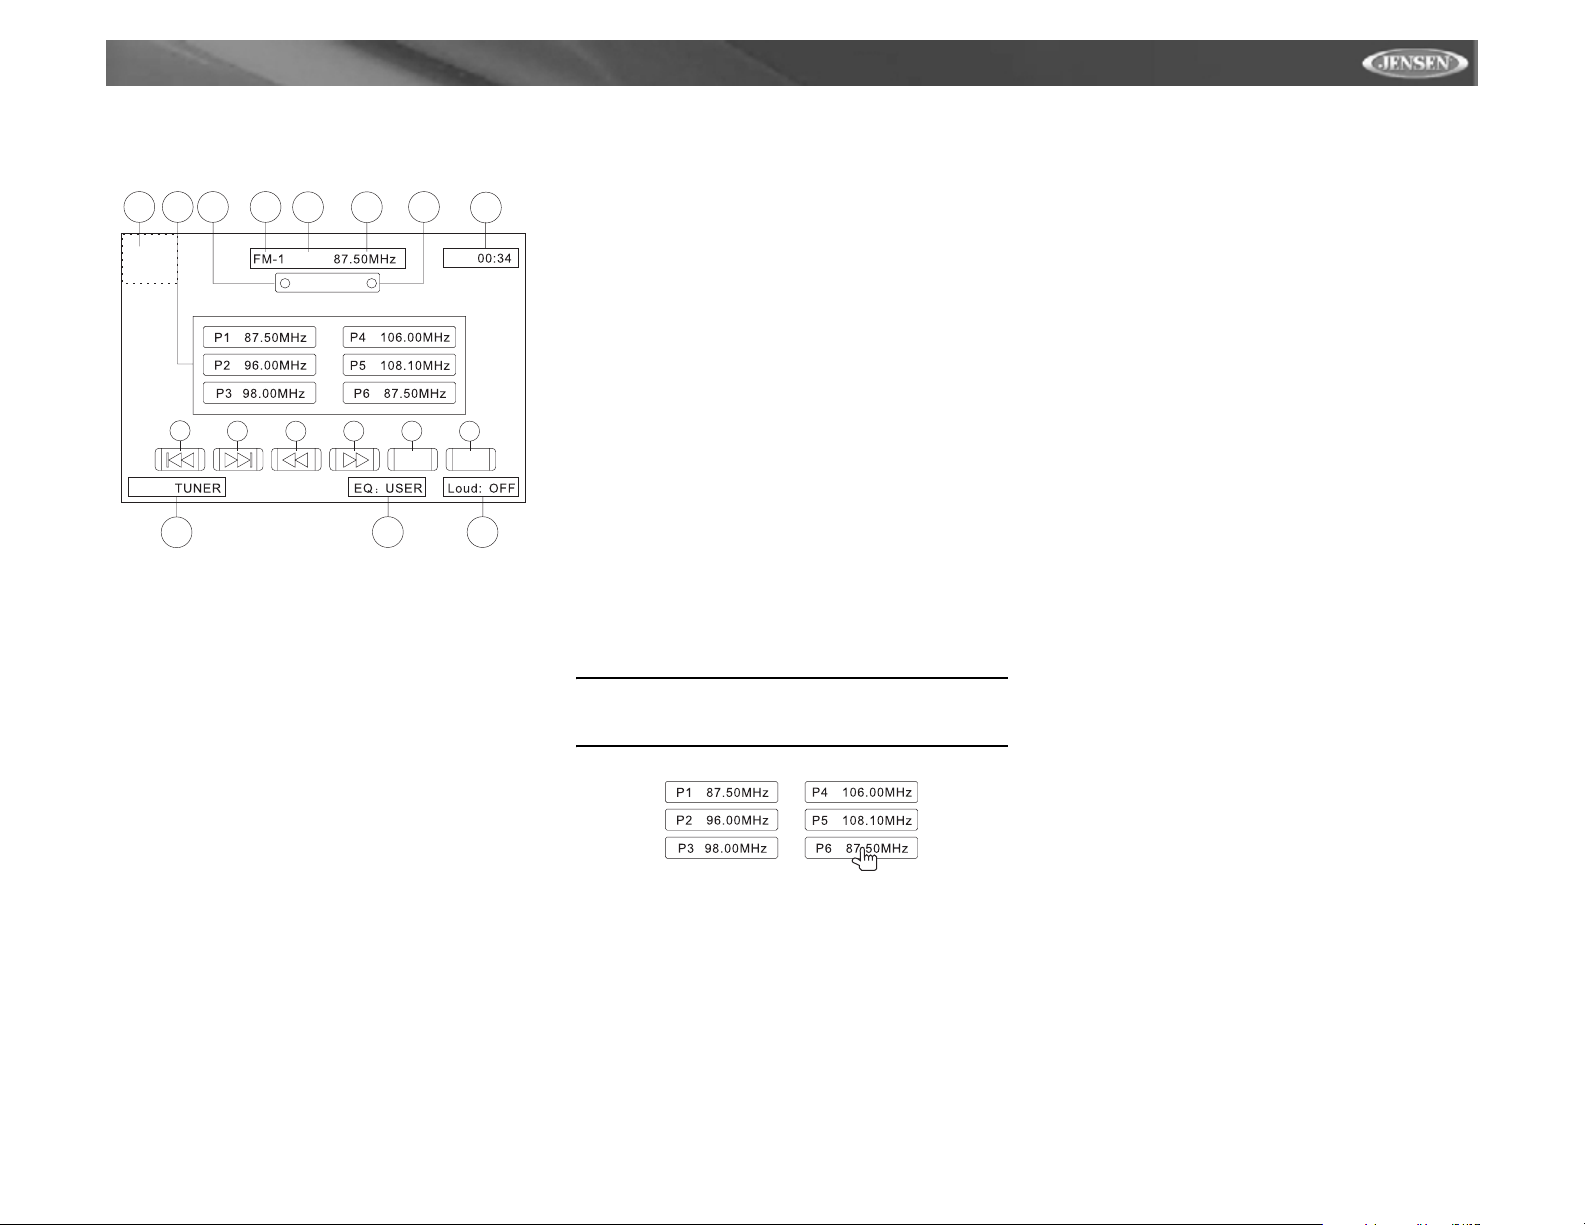
TUNER OPERATION
Tuner TFT Display
17
Source:
11
12
10 2
P1
PRESETS
13 14
4 1
6
7
1. Current Radio Band Indicator
2. Radio Frequency Indicator
3. Clock
4. Stereo Broadcasting Indicator
5. Strong Local Signal Broadcasting Indicator
6. Preset Radio Stations: Touch to recall preset stations or
touch and hold to store a station
7. Playing Mode
8. User Defined Equalizer Level
9. Loud Setting Indicator
10. Current Preset Station Indicator
11. |<<: Touch to seek backward
12. >>|: Touch to seek forward
13. <<: Touch to tune backward one step
14. >>: Touch to tune forward one step
15. BAND: Touch to change between AM/FM bands
16. AS: Touch to automatically store stations
17. Touch this area to return to the MAIN MENU
Switch to Radio Tuner source
Press the SRC button (15) on the front panel or remote
control (8) to switch to the TUNER source.
Select FM/AM Band
Touch the BAND button (15) on the screen, or press the
BAND button on the unit (14) or remote control (20) to
15 16
BAND
8
5
3
AS
9
change between the following bands: FM1, FM2, FM3, AM1,
and AM2.
Seek Tuning
Press the >>| button (19) on remote control or the > button on
the joystick (17) to seek the next station higher.
Press the |<< button (17) on the remote control or the <
button on the joystick (16) to seek the next station lower.
Manual Tuning
Press the /\ or V buttons (18, 19) on the joystick to increase
or decrease the tuning frequency one step.
Using Preset Stations
Six numbered preset buttons store and recall stations for
each band. All six stored stations (P1-P6) for the current
band appear on the screen.
Storing a Station
1. Select a band (if needed), then select a station.
2. Touch and hold an on-screen preset button (6) for three
seconds. The preset number appears at the top of the
screen.
Recalling a Station
1. Select a band (if needed).
2. Touch an on-screen preset button (6) to select the
corresponding stored station.
NOTE: You can also use the numered buttons on
the control panel to store and recall preset
stations.
Auto Store (AS)/Preview Scan
Automatic Storing of Preset Stations
To select six strong stations and store them in the current
band:
1. Select a band (if needed).
2. Press the AS button (26) on the control panel or touch
AS (16) on screen for 2 seconds to activate the Auto
Store function.
The new stations replace stations already stored in that band.
Preview Scan
Scan the AM or FM band for a preview of available stations in
your particular area. Press the play/pause button on the
remote control once (short press) or push in on the joystick
once (short press). Press again to stop preview scan.
Local Radio Station Seeking (LOC)
When the Local function is on, only radio stations with a
strong radio signal are played. To activate the Local function
in AM/FM tuner mode, press and hold the VOL/LO/DX knob
(6) on the front panel while the yellow volume bar IS NOT
visible. Press VOL/LO/DX again to turn Local off. When the
Local function is active, “LOC” appears on the screen and a
green indicator is illuminated.
15
Page 20
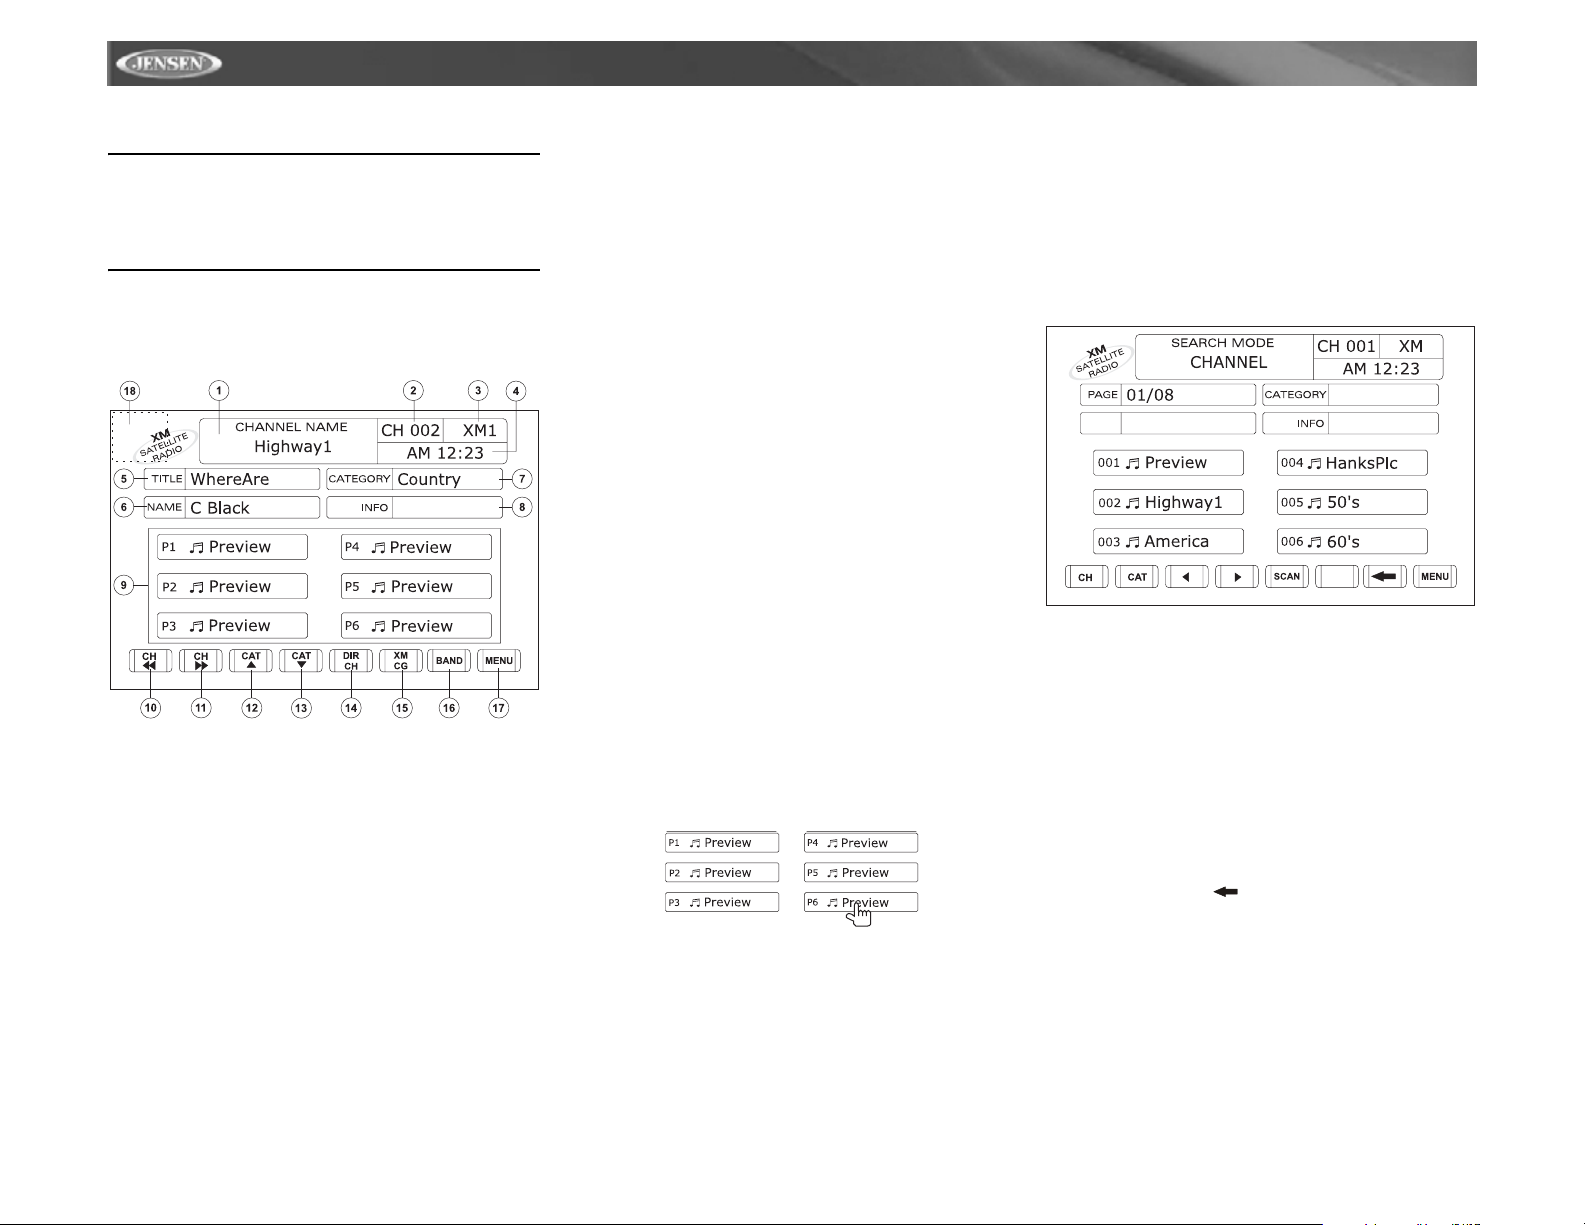
XM RADIO OPERATION
Listeners can subscribe to XM® Radio on the
Web by visiting www.xmradio.com, or by calling
(800) 967-2346. Customers should have their
Radio ID ready (see “Displaying the Identification
(ID) Code”). Customers can receive a limited
number of free-to-air channels without activation.
Accessing XM® Radio Mode
Press the SRC button (8) on the front panel or remote control
(8) to switch to the XM source.
1. XM channel name
2. XM channel number
3. XM band
4. Time
5. Song title
6. Artist name
7. Song category
8. Data services information
9. Current preset channels/on-screen preset buttons
10. CH <<: Select the previous channel
11. CH >>: Slect the next channel
12. CAT /\: Select next channel in current category only
13. CAT V: Select previous channel in current category only
14. DIR CH: Press to enter channel directly using keypad on
screen
15. XM CG: Access Channel/Category Guide mode
16. BAND: Change between XM, XM1, XM2 and XM3
bands
17. MENU: Access the XM Setup Menu
18. Touch this area to return to the MAIN MENU
Displaying the Identification (ID) Code
Before you listen to XM® Radio, you must subscribe to the
service using your radio’s identification number. To display
the radio ID, press the < or > buttons (16, 17) on the joystick
or the CH << or CH >> buttons on the touch screen
repeatedly to tune to channel “000”. The screen displays the
8-character XM radio ID under “CHANNEL NAME”.
Selecting a Station
Press the < or > buttons (16, 17) on the joystick, the |<< or
>>| buttons (17, 19) on remote control, or the CH << or CH
>> buttons on the touch screen to change to another station.
Preset Mode
To enter preset mode, touch the BAND button on the screen,
or press the BAND button on the unit (14) or remote control
(20) to change between the following bands: XM1, XM2, or
XM3 (indicated in the top right corner of the TFT screen).
Six numbered preset buttons store and recall stations for
each band. All six stored stations (P1-P6) for the current
band appear on the TFT screen.
Storing a Station
1. Select a band (if needed), then select a station.
2. Touch and hold an on-screen preset button for three
seconds. The preset number appears at the top of the
screen.
Recalling a Station
1. Select a band (if needed).
2. Touch an on-screen preset button to select the
corresponding stored station.
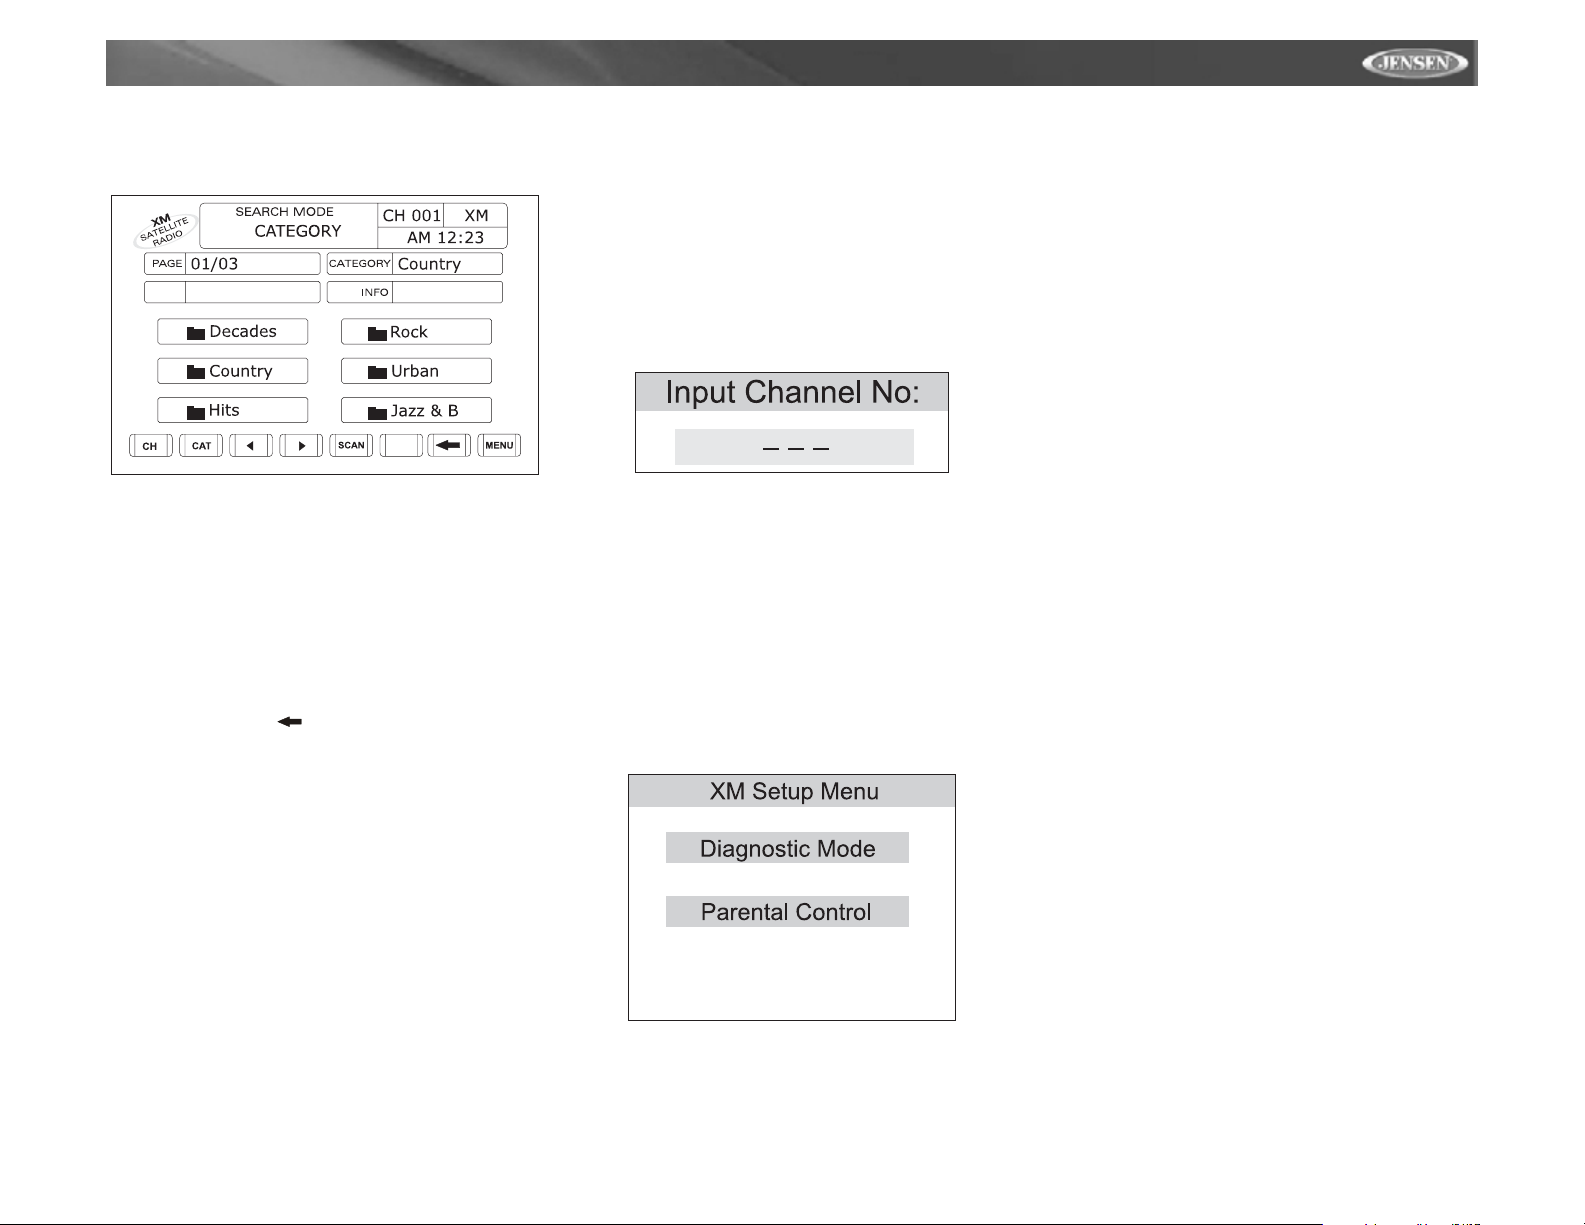
Channel/Category Guide Mode
There are two search modes to help navigate through
channels and or categories. To access the Channel/Category
Guide mode press, the ZOOM button (23) on the remote
control or the XM CG button on the touch screen.
Channel Guide is the default search mode. To access
Category Guide, press the TITLE button (2) on the remote
control or touch CAT on the touch screen. To return to
VM9311TS
Channel Guide, press the SUBTITLE button (9) on the
remote control.
Channel Guide Mode
When Channel Guide mode is selected, “Search Mode” and
“CHANNEL” appear in the top half of the user interface. “XM”
appears in the top right corner and the first six XM channels
are displayed in the boxes in the bottom half of the TFT
screen.
• While in Search Mode, to switch between Channel and
Category search modes, press the CH or CAT buttons in
the touch screen.
• Press the >> button (14) on the remote control, the /\
button (18) on the joystick, or the > button on the touch
screen to view the next page of stations. Each page
contains six channels to select from.
• Press the << button (22) on remote control, the V button
(19) on the joystick, or the < button on the touch screen to
view the previous page of stations. Each page contains six
channels to select from.
• Press the on-screen SCAN button to preview each of the
6 channels on screen for 10 seconds.
• Press the on-screen button to return to the Preset
Mode screen.
• Press the on-screen MENU button to access the XM
Setup Menu.
To select a channel while in Channel Guide mode, press the
corresponding preset number (1-6) on the unit, remote
control, or touch screen. The channel will begin playing and
the unit will return to the Preset Mode. While in Preset Mode,
press and hold an on-screen preset button (or 1-6 on the unit
or remote control) to store the channel playing.
16
Page 21
VM9311TS
Category Guide Mode
When Category Mode is selected, “Search Mode” and
“CATEGORY” appear in the top half of the user interface.
• While in Search Mode, to switch between Channel and
Category search modes, press the CH or CAT buttons in
the touch screen.
• Press the >> button (14) on the remote control, the /\
button (18) on the joystick, or the > button on the touch
screen to view the next six categories.
• Press the << button (22) on the remote control, the V
button (19) on the joystick, or the < button on the touch
screen to view the previous six categories.
• Press the on-screen SCAN button to preview each
channel in the selected category for 10 seconds.
• Press the on-screen button to return to the Preset
Mode screen.
• Press the on-screen MENU button to access the XM
Setup Menu.
To select a station in a specific category, perform the
following steps.
1. To select a category, press the corresponding preset
number (1-6) on the front of the unit, the remote control,
or the touch screen. Once a category is selected, the
stations in that category will be displayed on the screen.
2. Press the >> button (14) on the remote control, the /\
button (18) on the joystick, or the > button on the touch
screen to view the next six stations.
Press the << button (22) on remote control, the V button
(19) on the joystick, or the < button on the touch screen
to view the previous six stations in the selected
category.
3. To select a channel while in Category Guide mode,
press the corresponding preset number (1-6) on the
unit, remote control, or touch screen. The channel will
begin playing and the unit will return to the Preset Mode.
While in Preset Mode, press and hold an on-screen
preset button (or 1-6 on the unit or remote control) to
store the channel playing.
Press the TITLE button (2) to return to the Category Mode
main page and select a different category.
Direct Tuning
To enter a station directly, perform the following steps.
1. Press the GOTO button (21) until the following screen
appears.
2. Use number keys on the remote control to enter the
desired XM radio station. You must enter a 3 digit
number (for example, 004).
3. Press the >/|| button (18) on the remote control or the
joystick ENTER button (20) on the unit or just let the
keypad "time out" after 4 seconds and the station will be
entered automatically. Use the on-screen “CLR” button
to correct entry mistakes and “OK” to enter the channel
number.
XM Setup Menu
While in XM radio mode, press the MENU button (1) on the
remote control to view the XM Setup Menu.
Press MENU to exit the current submenu or menu and return
to the previous screen.
Diagnostic Mode
This feature is reserved for use by service professionals for
troubleshooting.
Parental Control
By default, this feature is unlocked and all channels can be
accessed by anyone listening to the radio. To lock a station
(PASSWORD is highlighted by default):
1. Press the << button (22) on the remote control or V button (19) on the joystick until "Channel Number" is highlighted blue.
2. Enter the three digit channel number to be locked.
3. Return to the PASSWORD field and enter “1264” using
the remote control.
4. Press the >/|| button (18) and the small yellow lock will
close, indicating that the channel(s) are locked.
5. Select the LOCK option at the bottom of the menu to
lock the channel.
Press the MENU button (1) on the remote control twice to
return to the main XM page.
To unlock a channel (PASSWORD is highlighted by default):
1. Enter “1264” using the remote control, then the >/|| button (18). The yellow lock icon will open.
2. Press the << button (22) on the remote control or the V
button (19) on the joystick until CHANNEL NUMBER is
highlighted.
3. Enter the three digit channel number to be unlocked.
4. Return to the PASSWORD field and enter “1264” using
the remote control.
5. Press the >/|| button (18).
6. Select the UNLOCK option at the bottom of the menu to
unlock the channel.
Press the MENU button (1) twice on the remote control to
return to the main XM page.
17
Page 22
DVD/VCD VIDEO OPERATION
NOTE: When properly installed, DVD video cannot be
displayed on the main TFT screen unless the parking brake is
applied. If you attempt to play a DVD while the vehicle is
moving, the TFT screen displays “PARKING” with a blue
background. Rear video screens, if applicable, will operate
normally.
Opening/Closing the TFT Video Screen
Opening the TFT Screen
To open the TFT video screen, press the OPEN button (1).
The unit beeps and then opens.
Closing the TFT Screen
Press the OPEN button (1) again to close the TFT screen. If
the screen is in the “IN” position, it moves out before closing.
Insert/Eject Disc
Upon inserting a DVD disc, DVD mode is entered and disc
play begins.
NOTE: If Parental Lock (Rating) is activated and
the disc inserted is not authorized, the 4-digit
code must be entered and/or the disc must be
authorized (see “RAT ING (Parental Lock) Menu”
on page 21).
Y ou cannot insert a disc if there is already a disc in the unit or
if the power is off.
NOTE: DVD-R and D VD-RW will not play unless the
recording session is finalized and the DVD is
closed.
Ejecting a Disc
Press the button (21) on the unit or remote control (35) to
eject the disc. The unit automatically reverts to Tuner mode.
You may eject a disc with the unit powered off. The unit will
remain off after the disc is ejected.
Reset the Loading Mechanism
If the disc loads abnormally or an abnormal core mechanism
operation occurs, press and hold the button (21) on the
unit or remote control (35) to reset the loading mechanism.
Normal operation resumes.
Accessing DVD Mode
To switch to DVD mode when a disc is already inserted,
press the SRC button (15) on the front panel or remote
control (8) until “DVD” appears at the bottom of the screen.
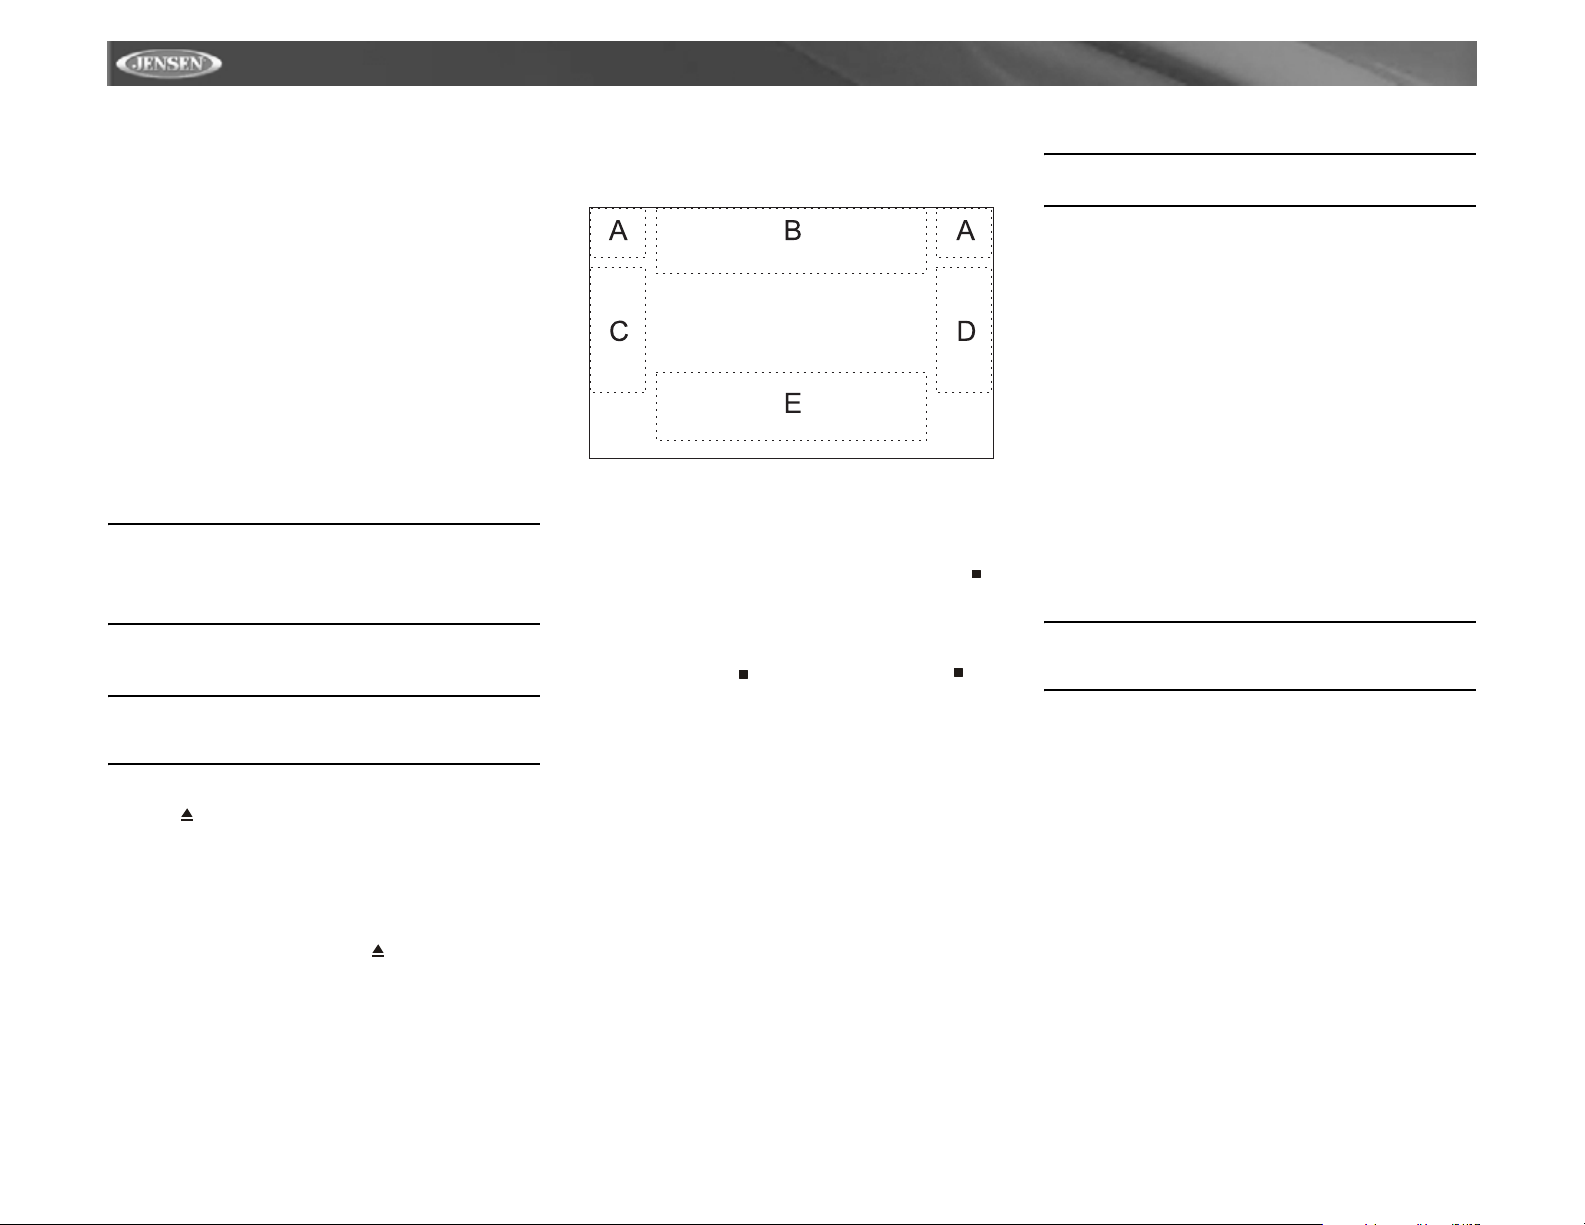
Using the Touch-Screen Controls
The touch key areas for DVD playback are outlined below.
A – Return to MAIN MENU
B – DISP key: Displays playing information
C – Select previous chapter
D – Select next chapter
E – Display the following on-screen controls: Menu,
|<<, >>|, <<, >>.
Controlling Playback
Stopping Playback
Touch the stop button ( ) on the screen or press the /
BAND button (20) on the remote control to stop DVD play.
Pausing Playback
Touch the play/pause button (
>/|| button on the remote control (18) to suspend or resume
disc play.
Slow Motion Playback
Press the << button (22) on the remote control or the V
button (19) on the joystick to play the current title in slow
motion at 1/2, 1/4, 1/6 or 1/7, the normal speed. Press
(18) to resume normal play. Continue pressing the << or V
button to slow reverse.
Repeat Playback
Press the REPT button (7) on the remote control to alter
repeat mode according to the following:
• DVD: Repeat Title, Repeat Chapter, Repeat Off
• VCD (PBC Off): Repeat Single, Repeat Off
• MP3: Repeat Single, Repeat Folder, Repeat Off
>/||, ,
>/||) on the screen or press the
>/||
VM9311TS
NOTE: For VCD play, the repeat function is not
available if PBC is on.
Sectional Repeat Function (A-B)
Use the A-B function to define a specific area of a disc to
repeat.
• Press the REPT A-B button (6) on the remote control to
set the start point (A) of the repeated section.
• Press the REPT A-B button again once you reach the
desired end point (B) of the repeated section. The
selected portion of the DVD will now repeat continuously.
• Press the REPT A-B button again to cancel the A-B
section setting and stop repeat play.
Random Playback
With a DVD, VCD, or CD playing, press the RDM button (33)
on the remote control to activate random playback and play
all chapters/tracks in random order. “On” appears on the
screen.
Press the >>| button (19) on the remote control or the >
button on the joystick (17) to play the next random track.
Press the RDM button again to turn random play off.
NOTE: When a VCD is playing with PBC turned
“On”, activating random playback automatically
turns PBC off.
Accessing the DVD Menu
Press the MENU button (1) on the remote control to recall the
main DVD menu. Use the directional (arrow) buttons (<, >, /\
& V) on the joystick (16, 17, 18, 19) to select a title from the
menu.
Press the TITLE button (2) on the remote control to select a
different title for playback.
Press the
(joystick) button (20) to confirm your selection and begin
playback.
Moving Through Chapters
Press the >>| button (19) on the remote control or the >
button on the joystick (17) to advance to the next chapter on
the DVD.
Press the |<< button (17) on the remote control or the <
button on the joystick (16) to move to the previous chapter.
>/|| button (18) on the remote control or the ENTER
18
Page 23
VM9311TS
Fast Forward
Press the >> button (14) on the remote control or the /\ button
(18) on the joystick to fast forward. Keep pressing and
releasing the button to increase the rate from “2X” to “4X”,
“8X”, and “20X”.
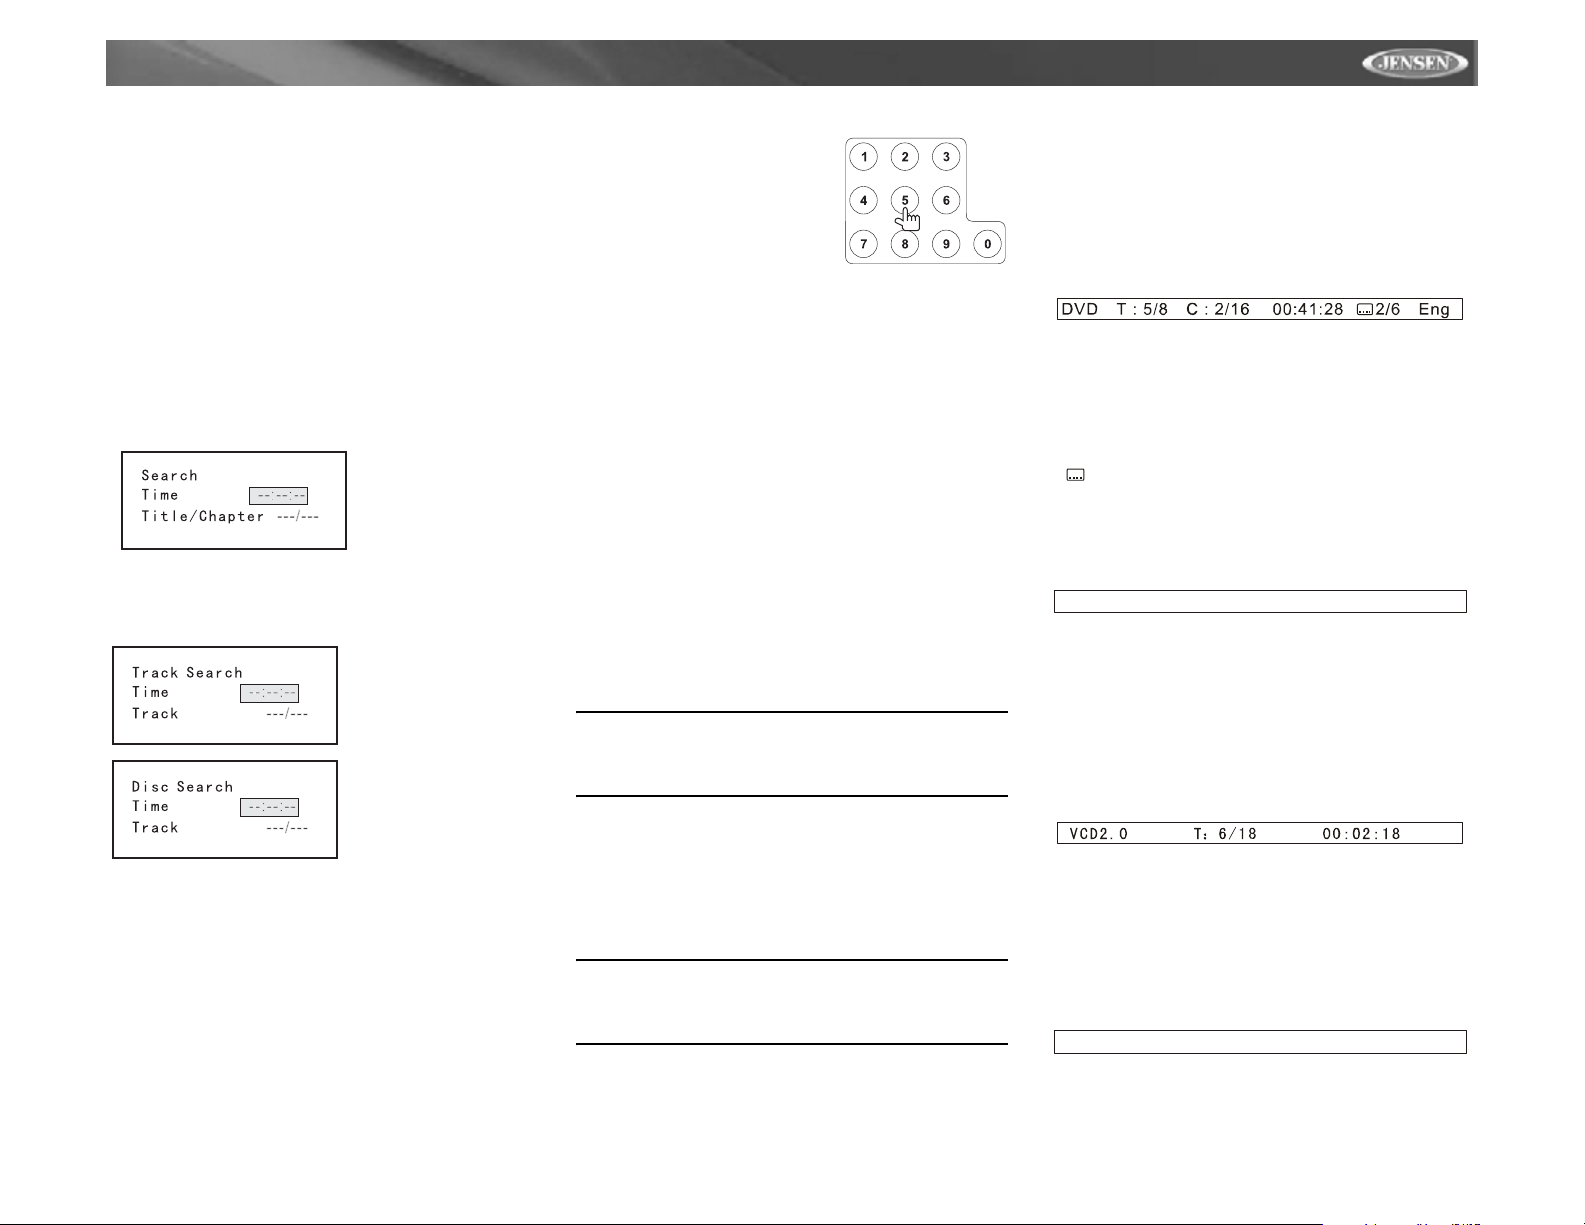
Goto Search
During DVD or VCD playback, perform the following steps to
use the GOTO feature to access a specific location on a disc:
1. Press the GOTO button (21) on remote control to enter
“GO TO” mode.
2. Press the >> or
control or the < or > buttons (16, 17) on the joystick to
select a category (highlighted in blue).
• For DVD mode, you can choose Time or Title/Chapter
search.
• For VCD mode, press the GOTO button to choose
between Track Search, Disc Search and Exit.
3. Enter a time into the field using the numeric keypad (29)
on the remote control.
4. Press the >/|| button (18) on the remote control or the
ENTER (joystick) button (20) to go to the specified
location on the disc.
5. Press the GOTO button again to exit.
<< buttons (14, 22) on the remote
DVD Search
Time – Go to specific
time in current title
Title/Chapter – Go to
specific time in a
chapter
VCD Track Search
Time – Go to specific
time in the current track
Track – Go to specific
track
VCD Disc Search
Time – Go to specific
time on disc
Track – Go to specific
track
Direct Chapter / Track Selection
During DVD, VCD and CD
playback, you can use the numeric
keypad on the remote control (29)
to access a track directly.
Viewing an Alternate
Picture Angle (DVD
Only)
Some DVDs contain scenes that have been shot
simultaneously from different angles. For discs recorded with
multiple angles, press the ANGLE button (13) on the remote
control to toggle available angles of the on-screen image.
Zooming
Press the ZOOM button (23) on the remote control to enlarge
and pan through the video image using the following options:
“Q1”, “Q2”, “Q3”, and “OFF”.
Multi-Language Discs (DVD Only)
Changing Audio Language
If you are watching a disc recorded in multiple languages,
press the AUDIO button (5) on the remote control to choose
a language.
Changing Subtitle Language
If you are watching a disc recorded in multiple languages with
subtitles, press the SUBTITLE button (9) on the remote
control to choose the language in which you would like the
subtitles to appear.
NOTE: During VCD playback, press the AUDIO
button (5) on the remote control to choose
between Left Channel, Right Channel, and
Stereo.
PBC (Play Back Control - VCD Only)
For VCDs with play back functionality, play back control
(PBC) provides additional controls for VCD playback.
Press the MENU button (1) on the remote control to toggle
the PBC function “On”/”Off”. Once PBC is on, playback starts
from track one of the play list.
NOTE: When PBC is activated, fast forward, slow
playback, and previous/next track are available.
Repeat and direct track selection are not
available.
When PBC is activated, selecting random, scan, or search
playback automatically deactivates PBC.
Playback Information
During DVD and VCD playback, press the INFO button (10)
on the remote control to display playback information on the
screen, including the media playing and current playback
time.
DVD Playback Information
The following information is displayed at the top of the screen
during DVD playback:
• T : 5/8 – “5 / 8" indicates the fifth of 8 titles on the DVD is
currently playing.
• C : 2/16 – “2 / 16" indicates that the second of 16 titles
on the DVD is currently playing.
• 00:41:28 – “00:41:28” indicates the playback time of the
current title.
• 2 / 6 Eng – The language display information indicates
the second language out of 6 (English) is currently being
used.
The following information appears at the bottom of the screen
during DVD or CD playback:
Source: DVD/CD EQ: Flat Loud: Level 1
• Source: DVD/CD – “DVD/CD” is the current playing
source.
• EQ: FLAT – The equalizer setting is FLAT.
• Loud: Level 1 – The Loud option is set to Level 1
loudness.
VCD Playback Information
The following information is displayed at the top of the screen
during VCD playback:
• VCD2.0 – Format of current disc.
• T : 6/18 – “6/18” indicates the sixth of 18 tracks on the VCD
is currently playing.
00:02:18 – “00:02:18” indicates the playback time of the
current track.
The following information appears at the bottom of the screen
during VCD playback:
Source: DVD/CD EQ: Flat Loud: Level 1
• Source: DVD/CD – “DVD/CD” is the current playing
source for the front zone.
19
Page 24
• EQ:FLAT – The equalizer setting is FLAT.
• Loud: Level 1 – The Loud option is set to Level 1
loudness.
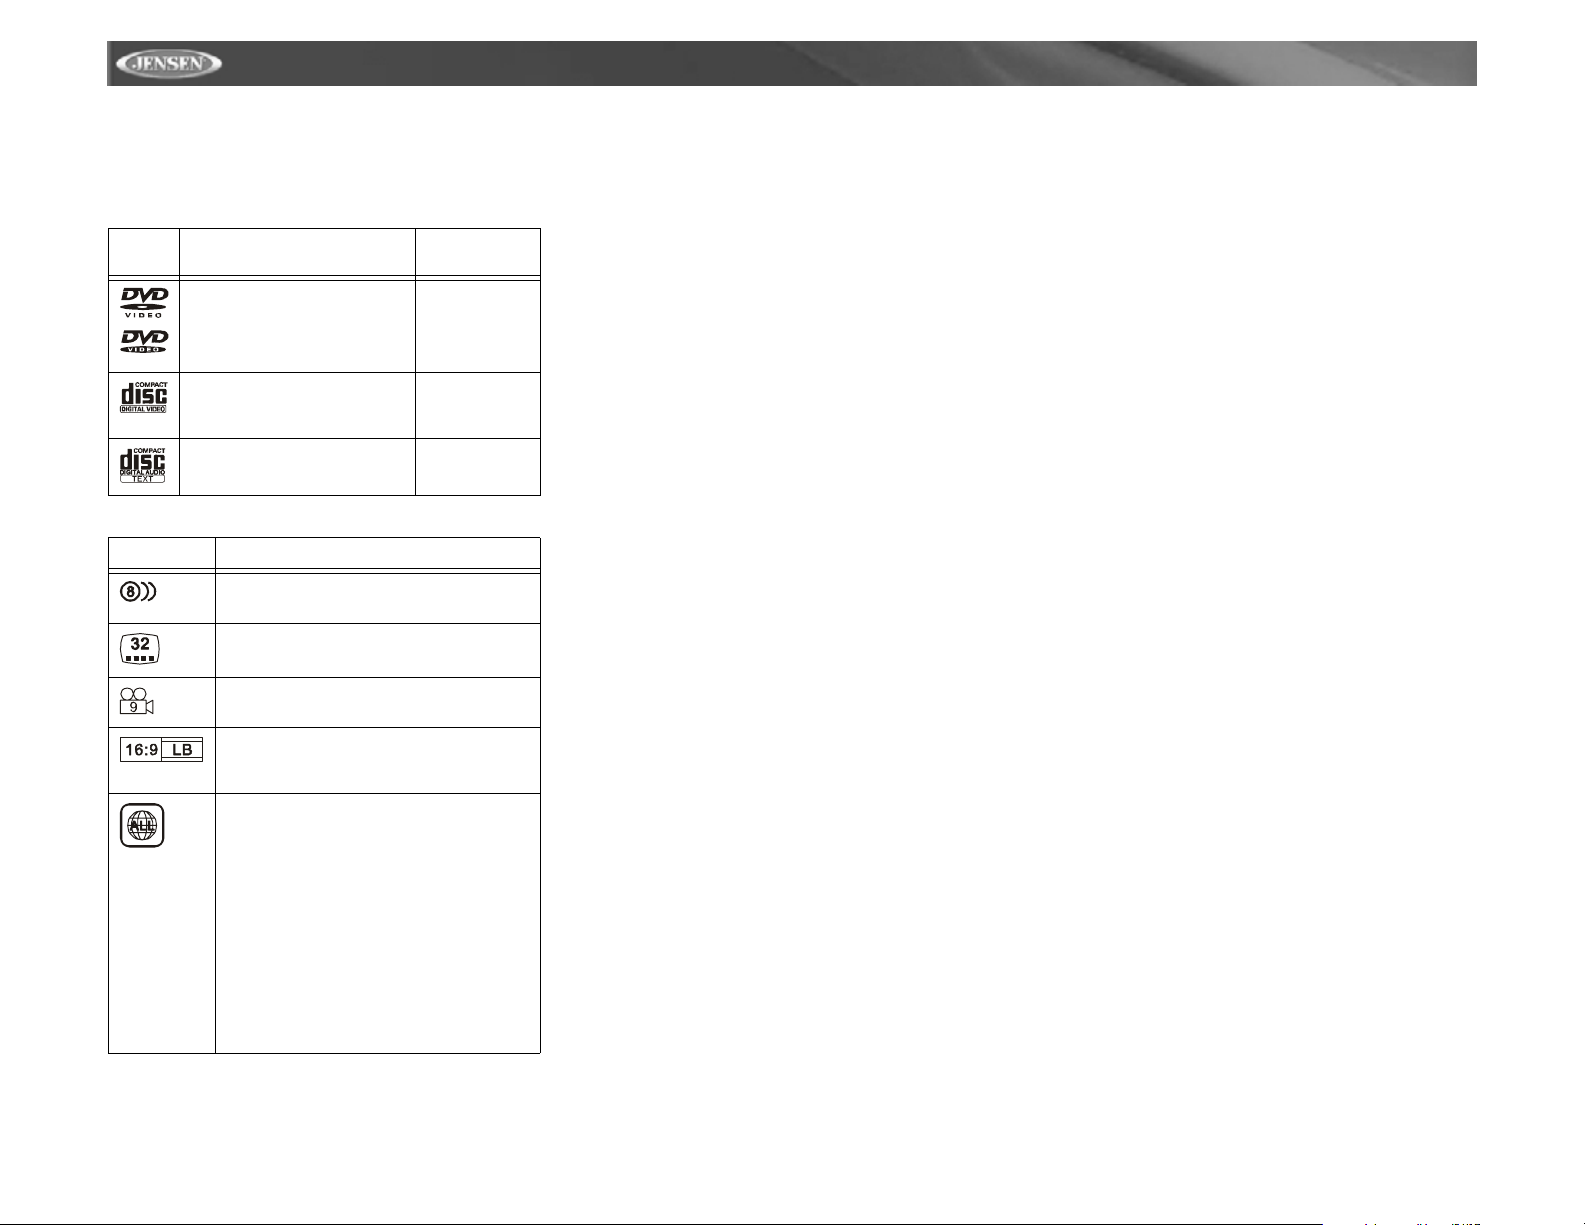
General Disc Information
Table 7: Disc Properties
Symbo
l
12cm Disc Properties
Single side single layer (DVD-5)
Single side double layer (DVD-9)
Double side single layer (DVD-10)
Double side double layer (DVD-18)
Single side single layer (VCD)
Single side single layer 74 minutes
Table 8: Disc Symbols
Symbol Meaning
Number of voice languages recorded. The number inside the icon indicates the number languages on the disc (maximum of 8).
Number of subtitle languages available on the
disc (maximum of 32).
Max Play
Time
(MPEG 2
Method)
133 minutes
242 minutes
266 minutes
484 minutes
(MPEG 1
Method)
74 minutes
VM9311TS
Number of angles provided (maximum of 9).
Aspect ratios available. “LB” stands for Letter Box
and “PS” stands for Pan/Scan. In the example on
the left, the 16:9 video can be converted to Letter
Box video.
Indicates the region code where the disc can be
played.
• Region 1: USA, Canada, East Pacific Ocean
Islands
• Region 2: Japan, Western Europe, Northern
Europe, Egypt, South Africa, Middle East
• Region 3: Taiwan, Hong Kong, South Korea,
Thailand, Indonesia, South-East Asia
• Region 4: Australia, New Zealand, Middle and
South America, South Pacific Ocean Islands/
Oceania
• Region 5: Russia, Mongolia, India, Middle
Asia, Eastern Europe, North Korea, North
Africa, North-West Asia
• Region 6: Mainland China
• ALL: All regions
20
Page 25
LANGUAGE
DVD SETUP
AUDIO
VIDEO
RATING
VM9311TS
DVD/DISC SETUP MENU
NOTE: A DVD/disc must be loaded into the
mechanism and playing prior to accessing the
DVD Setup menu. While the DVD/disc is playing,
press the DVD SETUP button (30) on the remote
to access the DVD Setup menu.
In “DVD Setup” mode, “LANGUAGE”, “VIDEO”, “AUDIO” and
“RATING” (parental lock) are available for setup. These
operations can be performed using the remote control or
joystick controls.
Accessing the DVD Setup Screen
For system settings, press the DVD SETUP button (30) on
the remote control or touch “SETUP” on the screen to enter
the “SETUP” menu. “SYS SETUP” is highlighted in green.
To access the “DVD SETUP” Menu, press the V button (7) on
the remote control to choose the “DVD SETUP” option, then
press the >/|| button (18), or just touch “DVD SETUP” on the
screen. “LANGUAGE” is highlighted in green.
DVD SETUP
NOTE: Once the DVD setup is complete, the
settings are memorized. To return to the factory
default settings, press the RESET button (25) on
the front panel.
Accessing a Menu
To access a menu (LANGUAGE, VIDEO, AUDIO, or
RATING), press the direction buttons on the joystick (16, 17,
18, 19) or remote control (14, 17, 18, 19, 22) to highlight the
desired menu in green. You can also touch the on-screen
menu selection to access that menu.
BACK
Selecting a Feature for Adjustment
Once inside a menu, press the >> or
<< buttons (14, 22) on
the remote control or the /\ or V buttons (18, 19) on the
joystick to select the feature to be adjusted.
Adjusting a Feature
1. Enter the option field for the feature you want to adjust
by pressing the >/|| button (18) on the remote or by
pressing the ENTER (joystick) button (20) on the unit. A
submenu appears in a second row with the selected
option highlighted in light blue.
2. Select a new value by pressing the >> or
<< buttons (14,
22) on the remote control or the /\ or V buttons (18, 19)
on the joystick.
3. Confirm your selection by pressing the
<<, |<<, or >>|
buttons (22, 17, 19) on the remote control, or the < or >
button (16, 17) on the joystick. The new value is
highlighted in light blue and setup is complete.
LANGUAGE Menu
If a DVD supports more than 1 Subtitle or Audio language, all
the languages are available for selection during playback. If
the selected language is not supported by the DVD, then the
default language is used. During playback, press the
SUBTITLE (9) or AUDIO (5) button on the remote control to
change the language directly. This will not affect the DVD
menu settings.
Table 9: LANGUAGE Menu Features
Setting Options Function
Subtitle English Select the default language in which
Auto
Off
Audio English Select the default language in which
DVD Menu English Select the default language in which
BACK Return to previous menu.
you would like subtitles (if applicable) to
be displayed.
you would like audio (when optional) to
be played.
you would like the DVD menu (if applicable) to be displayed.
VIDEO Menu
Table 10: VIDEO Menu Features
Setting Options Function
TV Shape
(Aspect
Ratio)
Angle
Mark
BACK Return to previous menu.
4:3 PS With 16:9 display, the left and right sides
4:3 LB With 16:9 display, the top and bot to m ar e
16:9 Image is presented in wide view with a
On Angle indicator (if applicable) is shown.
Off Angle indicator is not shown.
are cut off.
cut off.
16:9 aspect ratio.
NOTE: For standard discs not formatted for
“widescreen”, use of the 16:9 aspect ratio will
result in image distortion.
AUDIO Menu
Table 11: AUDIO Menu Features
Setting Options Function
DRC Off Employ the Dynamic Range Control for
On
BACK Return to previous menu.
better playback for low volumes.
RATING (Parental Lock) Menu
The DVD system has a built-in parental lock feature to
prevent unauthorized persons from viewing restricted disc
content. By default, the rating system is unlocked. Once
setup, the parental lock is released only by entering the
correct password. Once the password is entered, rating is
available for setup.
Table 12: RATING Menu Features
Setting Options Function
Password _ _ _ _ Enter a 4-digit password to acti-
vate the “Rating” feature.
21
Page 26
Table 12: RATING Menu Features
Setting Options Function
Rating 1. Kid Safe Select the appropriate rating level
2. G
3. PG
4. PG-13
5. PG-R
6. R
7. NC-17
8. Adult
Load Factory Reset Select “Reset” to restore the fac-
BACK Return to previous menu.
for the intended audience.
You may override higher ratings
by using your password.
tory default settings for the Rating
system only.
To reset the password, access the “RATING” menu and enter
the current password. Once the correct password is entered,
you can access the “Password” field and enter a new one.
NOTE: Record the password and keep it in a safe
place for future reference. The rating for each
disc is marked on the disc, disc packing, or
documentation. If the rating is not available on
the disc, the parental lock feature is unavailable.
Some discs restrict only portions of the disc and
the appropriate content will play. For details,
please refer to the disc description.
VM9311TS
22
Page 27
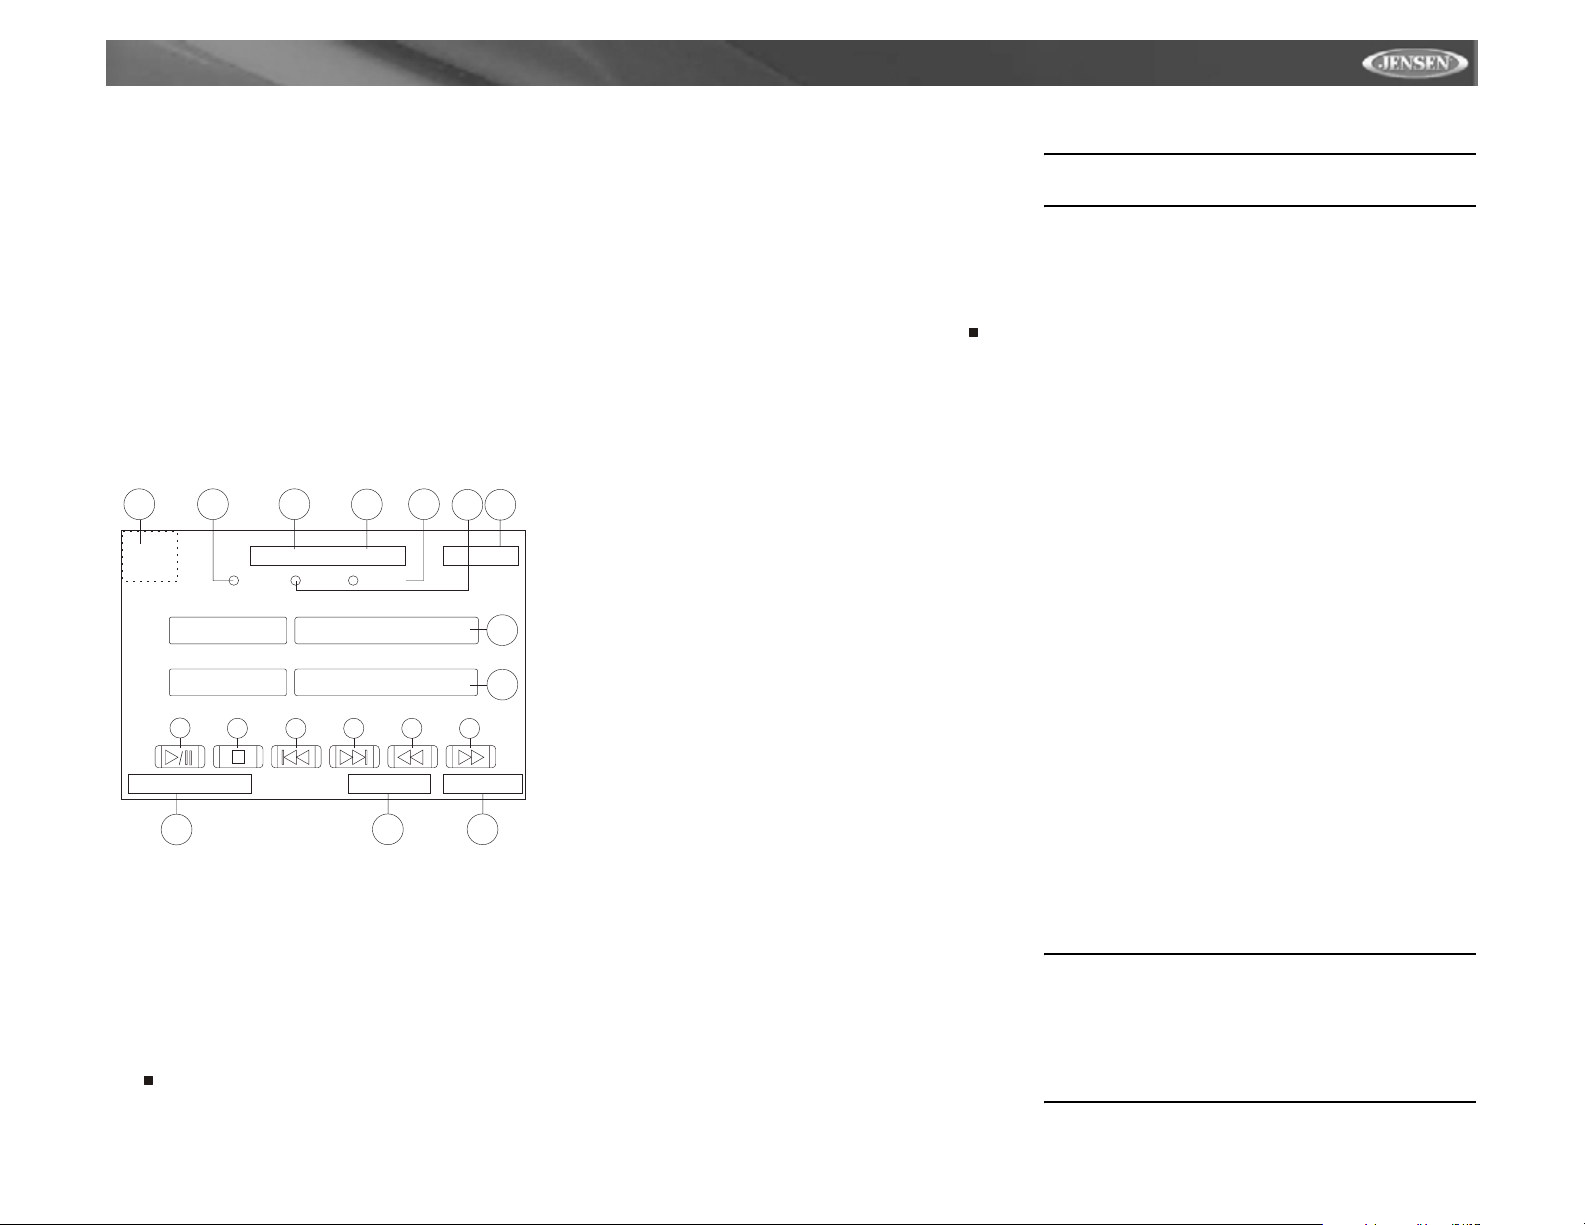
VM9311TS
DVD/DISC AUDIO OPERATION
Instructions for TFT control and Insert/Eject are the same for
DVD, CD and MP3 operation. Please see the DVD/Disc
Video Operation section for information about these topics.
The VM9311TS will play music or other audio files from the
following disc media:
• CD-DA
• CD-R/RW with MP3 or WMA files
•DVD
• DVD-R/RW with MP3 or WMA files
Upon inserting a disc with the TFT screen open, the disc and
track title (if available), along with the track number and
playing time appear on the screen.
CD Player User Interface
The on-screen indicators and touch key areas for CD
playback are outlined below.
9
3 1
T: 02/18 00:00:51
Repeat S can
Random
Disc Title Ultra
Track Name Useless
10
11
12 13
Source: DVD/CD EQ: USER Loud: OFF
16
1. Current track and total number of tracks on disc
2. Elapsed playing time
3. Touch to activate/deactivate Repeat play mode
4. Touch to activate/deactivate Scan mode
5. Touch to activate/deactivate Random mode
6. Current time
7. Disc Title
8. Track Title
9. Touch to return to MAIN MENU
10. >/||: Touch to play/pause disc playback
11. : Touch to stop disc playback
12. |<<: Touch to move to previous track
2
14 15
17
5
6
4
AM
1:322
7
8
18
13. >>|: Touch to move to next track
14. <<: Touch to rewind current track
15. >>: Touch to fast forward current track
16. Playing Mode
17. User Defined Equalizer Level
18. Loud Setting Indicator
Controlling Playback
Stopping Playback
Press the 6/STOP button (13) on the front panel or the /
BAND button (20) on the remote control to stop disc play.
To resume playback, press the ENTER button, or the joystick
(20), on the front panel or the >/|| button on the remote
control (18).
Pausing Playback
Press the ENTER button, or the joystick (20), on the front
panel or the >/|| button on the remote control (18) to suspend
or resume disc play.
Moving Through Tracks
Press the >>| button (19) on the remote control or the >
button on the joystick (17) to advance to the next track on the
disc.
Press the |<< button (17) on the remote control or the <
button on the joystick (16) to move to the previous track.
Repeat Playback
Press the 4/RPT button (11) on front panel or the REPT
button (7) on remote control to alter repeat mode according to
the following:
• DVD: Repeat Title, Repeat Chapter, Repeat Off
• CD-DA: Repeat Single, Repeat Off
• CD-R/RW: Repeat Single, Repeat Off
• DVD-R/RW: Repeat Single, Repeat Off
Track Scan Select (CD-DA discs only)
During disc play, press the 3/SCN button (10) on the unit or
the SCN button (34) on the remote control to play the first 10
seconds of each track. When a desired track is reached,
press the SCN button again to cancel the function and play
the selected track.
Random Play Select
During disc play, press the 5/RDM button (12) to play the
tracks on the disc in a random, shuffled order. In Random
Play mode, you can Press the |<< or >>| button (17, 19) on
remote control or the < or > button (16, 17) on the joystick to
select a track in random order instead of the normal
progression. Press 5/RDM again to cancel Random Play
mode.
NOTE: CD-R and CD-RW will not play unless the
recording session is finalzed.
Fast Forward
Press the >> button (14) on the remote control or the /\ button
(18) on the joystick to fast forward. Keep pressing and
releasing the button to increase the rate from “2X” to “4X”,
“8X”, and “20X”.
MP3/WMA Operation
This player allows you to play back MP3 and WMA files
recorded onto CD-R/RW's and DVD-R/RW’s. For CD-RW
discs, please make sure it is formatted using the full method
and not the quick method to prevent illegal disc operation.
Up to 999 songs/files can be burned onto a disc for a MEGA
DVD music mix. Do not exceed this number of songs/files or
disc readability problems may occur.
MP3 Format Compatibility
The file naming formats listed below are compatible with this unit:
• ISO 9660 – file name: 12 characters, file extension: 3
characters
• ISO 9660 – file name: 31 characters, file extension: 3
characters
• Joliet – 64 characters
If the file or folder name does not conform to ISO 9660 file
system standards, it may not be displayed or played back
correctly. Use the following settings when compressing audio
data for your MP3 disc:
• Transfer Bit Rate: 128kbps
• Sampling Frequency: 48kHz
When recording MP3 up to the maximum disc capacity,
disable additional writing. For recording on an empty disc up
to maximum disc capacity, use the "Disc at once" setting.
Playing MP3/WMA Files
After inserting a MP3/WMA disc, files will play in the
sequence of the “Root’ directory. Use the numeric keypad
(29) on the remote control to access files directly.
NOTE: When burning MP3 / WMA files onto a DVD
disc, use the 2X or 4X burning option, if available.
This slower burning speed will help eliminate
buffer errors and increase disc reading reliability.
Also, use folders when burning large numbers of
songs / files to a disc for easy music navigation.
Select the "Disc at Once" option and close your
disc.
23
Page 28
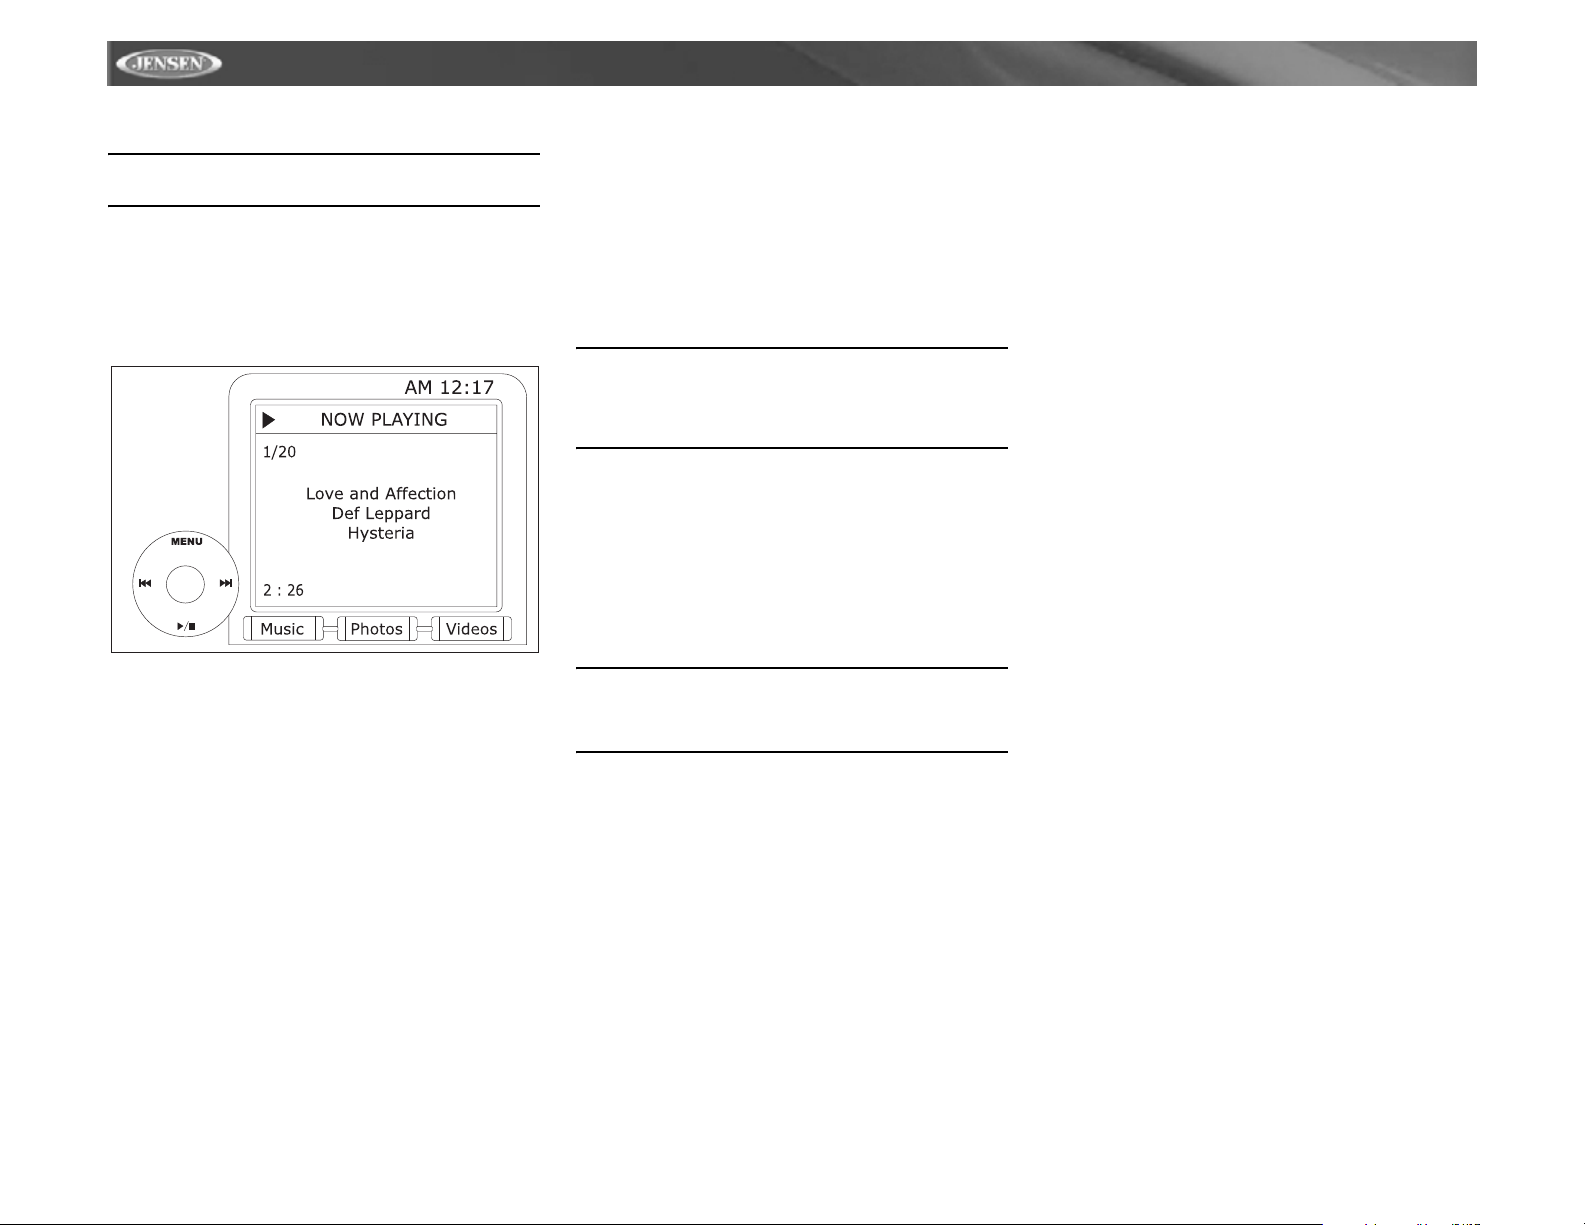
IPOD OPERATION
NOTE: Be sure your iPod has the latest Apple
firmware installed to avoid connectivity issues.
Accessing iPod Mode
The unit will automatically switch to iPod mode when an iPod
is plugged into the media module. To return to the iPod menu
from any other source menu, press the SRC button (15) on
the front panel or remote control (8) until the iPod menu
appears on the screen.
Video Playback
While iPod video can be viewed on the VM9311TS screen,
you must use the iPod to control video playback options.
Press the AUDIO button (5) on the remote control to access
the iPod VIDEO mode. The VM9311TS will release control
back to the iPod so you can select video media to be
displayed on the VM9311TS TFT monitor. To exit VIDEO
mode, press the >> button (14) on the remote control or
MENU button on the iPod.
NOTE: To transmit the video from your iPod to the
VM9311TS screen, you must set the following
options through the iPod video settings menu: TV
Out = On, TV Signal = NTSC, and Widescreen =
On.
Photo Playback
While iPod photos can be viewed on the VM9311TS screen,
you must use the iPod to control photo playback options.
Press the MENU button (1) on the remote control to access
the iPod PHOTO mode. The VM9311TS will release control
back to the iPod so you can select video media to be
displayed on the VM9311TS TFT monitor. To exit PHOTO
mode, press the >> button (14) on the remote control or
MENU button on the iPod.
VM9311TS
Controlling your iPod
The following remote control buttons are used to access the
iPod menus:
TITLE = Music
MENU = Photos
AUDIO = Videos
Use the joystick on the unit or the directional keys on the
remote control to navigate the iPod menus.
Music Playback
Press the >>| button (19) on remote control, or the > button
on the joystick (17) to move to the next item on the menu.
Press the |<< button (17) on the remote control, or the <
button on the joystick (16) to move to the previous item on the
menu.
Press the >/|| button (18) on the remote control or the joystick
ENTER button (20) on the head unit to select the highlighted
menu option.
Press the >> button (14) on the remote control or the /\ button
(18) on the joystick to return to the previous menu.
NOTE: After disconnecting your iPod, the
VM9311TS will always return to last mode
accessed when your iPod is plugged back into
the unit.
Fast Forward/Fast Reverse
Press and hold the |<< or >>| buttons (17, 19) for 1 second
and continue to hold for fast forward or fast reverse. Release
to resume normal play.
Search Playlist/Artist/Album/Song
T o search through Playlists, Artists, Albums and Songs, press
the 1 button (29) on the remote control keypad while in one of
the following directories: Playlist, Artist, Album or Song. The
selected directory will be accessed with the number of pages
and files in that directory displayed at the top of the page. To
access the page or file, enter the page or file number directly
from the remote control keypad. Press the |<< or >>| button
(17, 19) on the remote control or the < or > button (16, 17) on
the joystick to select the desired song or track.
24
Page 29
VM9311TS
TROUBLESHOOTING
Table 13: Troubleshooting
Problem Cause Corrective Action
GENERAL
Unit will not power on Radio Fuse blown Install new fuse with correct rating
Car battery fuse blown Install new fuse with correct rating
Illegal operation Press the RESET button located in the bottom right corner of the front panel
Remote control does not function Battery depleted Replace battery with new one
Battery installed incorrectly Remove battery and install correctly
No/low audio output Improper audio output connection Check wiring and correct
Volume set too low Increase volume level
Improper “MUTE” connection Review wiring diagram and check “MUTE” connection
Speakers damaged Replace speakers
Heavily biased volume balance Adjust the channel balance to the center position
Speaker wiring is in contact with metal part of car Insulate all speaker wiring connections
Poor sound quality or distortion Pirated disc is in use Use original copy
Speaker power rating not compat ible with unit Connect proper speakers
Speaker is shorted Check speaker contact
Tel-Mute malfunction “MUTE” wire is grounded Check that “MUTE” connection is not grounded and that it’s properly insulated
Unit resets itself when engine is off Incorrect connection between ACC and positive battery
TFT MONITOR
Monitor does not open automatically TFT Auto Open is turned off Turn TFT Auto Open on
No image Incorrect connection to parking brake wire Check wiring and correct
Flashing image or interference appears on screen DVD is not compatible with current TV system settings Change setup to accommodate disc
Prolonged image or improper height/width ratio display
Monitor stops at incorrect position Moving path is blocked Press OPEN key to restart monitor movement
TUNER
Weak station searching Auto antenna is not fully extended Connect the auto antenna control cable properly
Cannot insert disc Disc already inside unit Eject current disc and insert new one
wire
PRK SW is activated and parking brake is not engaged Stop vehicle in safe place and apply parking brake
Improper video signal connections Check wiring and correct
Improper aspect ratio setup Use correct aspect ratio setting
Auto antenna not properly connected Connect the auto antenna control cable properly
LOCAL function is activated Turn LOCAL function off
Check wiring and correct
25
Page 30

Table 13: Troubleshooting
Problem Cause Corrective Action
Disc does not play back Disc is warped or scratched Use disc in good condition
Disc is dirty or wet Clean disc with soft cloth
Laser pickup is dirty Clean laser pickup with cleaning disc
Incompatible disc is used Use compatible disc
Disc rating exceeds Parental Lock rating limit Change Parental Lock settings to lower restriction
Disc region code is not compatible with unit Use disc with proper region code
Disc is inserted upside down Insert disc with label side up
Image blurred, distorted, or dark Disc is illegally copied Use original disc
PBC cannot be used during VCD playback PCB is not available on the disc
No repeat or searching while playing VCD PCB is on Turn PCB off
MP3
Interruption occurred during playback Disc is dirty or scratched Clean disc or replace
File is damaged/bad recording Recreate disc with good files
Incorrect playback message displayed Message is longer than LCD can display
XM RADIO
No Sound Incorrect cable connections Check RCA cables
XM source not available Incorrect cable connections Check XM Data cable or Media Module Cable
“ANTENNA” appears on the XM main screen Antenna not connected Check satellite antenna connection
All other Errors Reset Media Module
IPOD
iPod source not available Incorrect cable connections Check jLink and Media Module cables
Cannot see video and photo media on TFT screen Wrong iPod Video Settings Change iPod video settings to TV Out = On
All other errors Reset Media Module
Check Media Module yellow RCA video input cable
VM9311TS
Error Messages
Table 14: Error Messages
Message Displayed Cause Corrective Action
Loading Disc is being read
No Disc Disc is dirty Clean disc with soft cloth
Disc is upside down Insert disc with label side up
Disc not present in loading compartment Insert disc
Bad Disc Disc is dirty Clean disc with soft cloth
Disc is upside down Insert disc with label side up
Unknown disc Disc format is not compatible with this unit
Region Error DVD is not compatible with region code of unit
Error illegal mechanism operation Press EJECT key for 5 seconds to reset loading mechan ism
26
Page 31

VM9311TS
Care and Maintenance
1. Use only a clean silicone cloth and neutral detergent to
clean the front panel or monitor. A rough cloth and nonneutral detergent (such as alcohol) may result in
scratching or discoloration.
2. Do not get water or cleaning fluids on the unit.
3. If the temperature inside the player gets too hot, a
protective circuit automatically stops play of the disc. If
this occurs, allow the unit to cool before operating the
player again.
4. Never insert anything other than a 5” (12 cm) compact
disc into the player as the mechanism can be damaged
by foreign objects.
5. Do not attempt to use a 3” (8 cm) CD-Single disc in this
unit, either with or without an adaptor, as damage to the
player and/or disc may occur. Such damage is not
covered by the Warranty on this product.
6. The CD player may not operate properly in extreme hot
or cold. If such conditions occur, allow the interior of the
vehicle to reach a normal temperature before using
player.
7. When the vehicle warms up during cold weather or
under damp conditions, condensation may appear on
the LCD panel. Should this occur, the screen will not
operate properly until the moisture has evaporated.
8. We suggest you use a cleaning disc in this unit more
frequently than in the unit in your home due to the
environmental conditions of the vehicle.
27
Page 32

SPECIFICATIONS
CEA Power Ratings
Power Output: 13 watts RMS X 4 channels into 4-ohms @ <
1% THD+N
Signal to Noise Ratio: 70dBA below reference. (Reference:
1 watt, 4-ohms)
Frequency Response: 20Hz to 20kHz, -3dB. Aux input used
as source reference
Reference Supply Voltage: 14.4VDC
DVD/CD Player
Compatible Formats: Compatible formats: DVD-R, DVDRW, DVD+R, DVD+R W, CD-R, CD-RW, CD-DA, MP3, WMA,
SVCD, VCD, AVI and MPEG1, MPEG2, and JPEG
Signal to Noise Ratio: >
Dynamic Range: >95dB
Frequency Response: 20Hz to 20kHz, -3dB
Channel Separation: > 60dB @ 1kHz
D/A Converter(s): High performance 24-bit, 192kHz, multi-
bit Sigma-Delta modulator.
Video
Format: NTSC, PAL (auto-detection)
Output: 1Vp-p (75-ohm)
Input: 1Vp-p (75-ohm)
FM Tuner
Tuning Range: 87.5MHz - 107.9MHz
Mono Sensitivity (-30dB): 9dBf
Quieting Sensitivity (-50dB): 15dBf
Alternate Channel Selectivity: 70dB
Signal to Noise Ratio @ 1kHz: 58dB
Image Rejection: 60dB
Stereo Separation @ 1kHz: >30dB
Frequency Response: 30Hz - 15kHz, -3dB
AM Tuner
Tuning Range: 530kHz - 1720kHz
Sensitivity (-20dB): 30uV
Signal to Noise Ratio @ 1kHz: 50dB
Image Rejection: 60dB
95dBA
Frequency Response: 50Hz - 2kHz, -3dB
Monitor
Screen Size: 7.0" (Measured diagonally), 16:9 Widescreen
• 6.06" (154.1mm) W X 3.42" (87mm) H
Screen Type: TFT Liquid Crystal Display (LCD) active matrix
Response Time: 30mSec rise time, 50mSec fall time
Resolution:
• DVD/Composite Video in: 336,960 sub pixels, 1440
(W) X 234 (H)
Viewing angle:
• 65 degrees left or right
• 40 degrees up
• 65 degrees down
General
Auxiliary Input impedance: 10k
Power Supply: 11 to 16VDC, negative ground
Power Antenna (Blue): 500mA max, current limited
protection
Amplifier Remote (Blue/White): 500mA, current limited
protection
Fuse: 10-amp, mini ATM type
DIN chassis dimensions: 2"H X 7"W X 7"D (50mm x
178mm x 178mm)
Operating Temperature: -20C ~ 70C
* Specifications subject to change without notice.
12-MONTH LIMITED
WARRANTY
AUDIOVOX CORPORATION (the Company) warrants to the
original retail purchaser of this product that should this
product or any part thereof, under normal use and conditions,
be proven defective in material or workmanship within 12
months from the date of original purchase, such defect(s) will
be repaired or replaced with new or reconditioned product (at
the Company's option) without charge for parts and repair
labor. To obtain repair or replacement within the terms of this
Warranty, please contact Audiovox at the telephone number
provided below.
This Warranty does not extend to the elimination of car static
or motor noise, to correction of antenna problems, to costs
incurred for installation, removal, or reinstallation of the
product, or damage to tapes, compact discs, accessories or
vehicle electrical systems. This Warranty does not apply to
any product or part thereof which, in the opinion of the
Company, has suffered or been damaged through alteration,
improper installation, mishandling, misuse, neglect, accident,
or by removal or defacement of the factory serial number/bar
code label(s) or markings. THE EXTENT OF THE
VM9311TS
COMPANY'S LIABILITY UNDER THIS WARRANTY IS
LIMITED TO THE REP AIR OR REPLACEMENT PROVIDED
ABOVE AND, IN NO EVENT, SHALL THE COMPANY'S
LIABILITY EXCEED THE PURCHASE PRICE PAID BY
PURCHASER FOR THE PRODUCT.
This Warranty is in lieu of all other express warranties or
liabilities. ANY IMPLIED WARRANTIES, INCLUDING ANY
IMPLIED WARRANTY OF MERCHANTABILITY, SHALL BE
LIMITED TO THE DURATION OF THIS WRITTEN
WARRANTY. ANY ACTION FOR BREACH OF ANY
WARRANTY HEREUNDER INCLUDING ANY IMPLIED
WARRANTY OF MERCHANTABILITY MUST BE BROUGHT
WITHIN A PERIOD OF 12 MONTHS FROM DATE OF
ORIGINAL PURCHASE. IN NO CASE SHALL THE
COMPANY BE LIABLE FOR ANY CONSEQUENTIAL OR
INCIDENTAL DAMAGES FOR BREACH OF THIS OR ANY
OTHER WARRANTY, EXPRESS OR IMPLIED,
WHATSOEVER. No person or representati ve is authorized to
assume for the Company any liability other than expressed
herein in connection with the sale of this product.
Some states do not allow limitations on how long an implied
warranty lasts or the exclusion or limitation of incidental or
consequential damage so the above limitations or exclusions
may not apply to you. This Warranty gives you specific legal
rights and you may also have other rights which vary from
state to state.
U.S.A: 1-800-323-4815
CANADA: Call 1-800-323-4815 for the location of a warranty
station serving your area.
Audiovox Electronics Corporation
Hauppauge, NY 11788
Technical Assistance: 1-800-323-4815
www.jensen.com
© 2006 Audiovox
Ver 1.0
Printed in China
28
Page 33

VM9311TS
PREPARACIÓN
Felicitaciones por comprar el Receptor Multimedia Móvil
Jensen VM9311TS.
Es buena idea leer completamente las instrucciones antes de
iniciar la instalación. Le recomendamos realizar la instalación
de su Jensen VM9311TS en una tienda reconocida.
Características
DVD
• Formatos compatibles: DVD-R, DVD-RW, DVD+R,
DVD+RW, CD-R, CD-RW, CD-DA, MP3, WMA, SVCD,
VCD, AVI y MPEG1, MPEG2 y JPEG
• Aparato de lectura de la región 1
• Modos de pantalla CINEMA (Ancho), NORMAL y OFF
• Front panel DVD control
• Delantero Rápido de alta velocidad 2X, 4X, 8X, 32X
• Juego, Pausa, Parada, Lenta
• Capítulo Encima / Abajo
• Wolfson Microelectronics alto rendimiento 24-bit, 192 kHz
DAC las ayudas 2-canal "Abajo-Mezclan" modos audio
MP3/WMA
• GIGA MP3 - Almacene hasta 999 archivos MP3 en un
DVD
• Etiqueta ID3 compatible
• Acceso directo de la pista
• Juego, pausa, parada, capítulo encima / abajo
CD
• Texto del CD Compatible
• Búsqueda audible de alta velocidad de la pista
• Reproducción aleatori, repetición A-B, introducción
• Juego, pausa, lento, pista arriba/abajo
• Memoria pasada de la posición
AM/FM Tuner
• Sintonizador del US/Euro/Latin/Asia
• 30 precolocaciones de la estación (18FM/12AM)
• JENSEN Plus Tuner II
Outboard Media Module
• Adaptador de entrada para XM radio y iPod
XM Listo
• Requiere opcional Terk XMD1000
• Requiere opcional Terk XMDJEN100 o Jensen JXMC
• La exhibición avanzada demuestra el artista, el título de la
canción, y XM canal y categoría
• Entrada de canal directa
iPod List
• Exhibe toda la información del texto incluyendo categoría,
nombre de la pista, artista y número de canal
• Interfaz intuitivo del iPod
• Controla y cargas todos los iPods a menos que "Shuffle"
• Requiere el cable jLinkcable del iPod (vendido por
separado)
NOTA: La foto y el vídeo tienen acceso con los
iPod de la generación 5 únicos.
Chassis
• Pantalla activa del LCD de la matriz de 7 pulgadas, 336,
960 pixeles (1440W X 234H)
• TFT motorizado automático lleno, El LCD mueve de un
tirón hacia fuera y sube
• 16 ajustes de la inclinación del paso TFT LCD
• 1.0 Din (solo DIN)
• Importación ISO/DIN aumentable
• Anillo incluido
• Confirmación del tono de la señal sonora
• Sistema de gerencia del calor - incorpora aire-refrescarse
forzado a mantener viruta-fija el funcionamiento en las
temperaturas nominales
• Chasis galvanizado resistente
General
• Mando a distancia infrarrojo de la función completa
• 1 NTSC salida de vídeo compuesto para las pantallas
adicionales
• TSD - En control de menú de la pantalla del tacto
• Procesador del audio del alto rendimiento
• Volumen, bajo, triple, equilibrio y atenuador electrónicos
• Ajuste bajo de la frecuencia de centro - 60, 80, 100,
130, 150 y 200Hz
• Factor de Bajo Q - 1.0, 1.25, 1.5 y 2.0
• Ajuste triple de la frecuencia de centro - 10, 12.5, 15 y
17kHz
• Cruce de Subwoofer - 80, 120 y 160Hz
• Fase de Subwoofer - 0, 180 grados
• Nivel de Subwoofer - variable
• 100-ohm salidas bajas del preamplificación de la
impedancia - todos los canales
• 5V Peak / 2V RMS RCA salidas - todos los canales
• 1-par salidas delanteras de RCA
• 1-par posterior salidas de RCA
• Sola salida de subwoofer RCA
• 1-par entradas auxiliares de RCA Audio/Video
• Atenuador de la flexión
• Alto contraste delantero LCD del panel (cuando la pantalla
es cerrada)
• Control rotatorio del audio del codificador
• Navegación del menú de la palanca de mando
Herramientas y Provisiones
Usted necesitará las siguientes herramientas y provisiones
para instalar su VM9311TS:
• Llave torx, destornilladores planos y Phillips
• Cúter y peladores de cables
• Herramientas para quitar el radio existente (destornillador,
llave inglesa y otras herramientas).
• Cinta aisladora
• Herramienta crimpadora
• Luz de testeo/medición de voltios
• Conectores para crimpar
• Cable de calibre 18 para conexiones eléctricas
• Cable para altavoz de calibre 16 - 18
¡CUIDADO! Solamente conecte la unidad a una
fuente de alimentación de 12 voltios con toma a
tierra adecuada.
¡CUIDADO! Nunca instale la unidad donde pueda
interferir con la visión y las condiciones para un
manejo seguro.
¡CUIDADO! Para reducir el riesgo de accidente de
tráfico (excepto cuado utilice la cámara de video
para mirar hacia atrás) nunca utilice la función
de pantalla de video mientras maneje el vehículo.
Esta es una violación a la ley federal.
¡CUIDADO! Nunca desarme o ajuste la unidad.
¡CUIDADO! Para prev enir lesiones por choque
eléctrico o incendio, nunca exponga la unidad a
humedad o agua.
¡CUIDADO! Nunca utilice discos irregulares o
fallados.
¡CUIDADO! Para prevenir daños al mecanismo
adentro de la unidad, evite golpear el monitor
TFT.
¡CUIDADO! No cambie el fusible en el cable de
29
Page 34

alimentación.
¡CUIDADO! El monitor emplea un mecanismo
motorizado automático. Para evitar daños al
mecanismo central, por favor, no empuje, jale o
gire el monitor manualmente.
Accesorios Opcionales
Listo para iAUX3 (vendido por separado)
• Puede conectar a cualquier dispositivo multimedia
portable usando un enchufe estándar de 3.5mm
• Convierte entrada auxiliar 3.5mm a salida estéreo RCA
para una fácil conexión a las entradas auxiliares de radios
Navegación de Jensen NAV100 GPS (vendido por
separado)
• Conecta vía entradas audio/video
Desconexión de la Batería
Para prevenir un cortocircuito, asegúrese de apagar la
ignición y quitar el cable negativo (-) de la batería antes de la
instalación.
NOT A: Si el VM9311TS se instala en un automóvil
equipado con una unidad a bordo o una
computadora de navegación, no desconecte el
cable de la batería. Si el cable se desconecta, la
memoria de la computadora puede borrarse. Bajo
estas circunstancias, sea muy cuidadoso
durante la instalación y así evitar un posible
cortocircuito.
VM9311TS
30
Page 35

VM9311TS
3
iAUX
3
DIGRAMA CABLEADO
Amplificador de Potencia Externo
CONECTADORDELAANTENA
AZUL
ROJO
BLANCO
ROJO
BLANCO
SUB.W
DELANTERO DERECHA
FRONTR
DELANTERO IZQUIERDA
FRONTL
POSTERIOR DERECHA
REAR R
POSTERIOR IZQUIERDA
REAR L
Cable del Módulo de los Medios / NEGRO
MEDIA MODULE
VIDEO INPUT
NOTA: Vea el diagrama de
conexiones de las Multimedias
para las conexiones adicionales
a través del módulo de los medios.
ENTRADAAUXILIAR IZQUIERDA
ENTRADAAUXILIAR DERECHA
AMARILLO
AUX IN/L
AUX IN/R
BLANCO
ROJO
Head Unit
Video Out
XM Audio Left
XM Audio Right
XM ControlData
iPod
(Vendidopor
Separado)
AUDIOVIDEOINPUT
Media Module
3.5mm
3.5mm
AUTOMÓVIL
Antena
TELÉFONO CELULAR
FRENTE L+
FRENTE L-
FRENTE R+
FRENTE R-
POSTERIOR R+
POSTERIOR R-
POSTERIOR L+
POSTERIOR L-
Control de antena de automóvil
(conecte a toma de control de antena)
Control delAmplificadorde
Energía Externa
Enmudecer (deje abierto si no
está conectado)
FRONTL
FRONTR
REAR R
REAR L
ARNÉS DE CABLEADO
AZUL
ANT.CONT
AZUL/BLANCO
P.CONT
MARRÓN
MUTE
BLANCO +
BLANCO/NEGRO -
GRIS +
GRIS/NEGRO -
PÚRPURA+
PÚRPURA/NEGRO -
VERDE +
VERDE/NEGRO -
31
ROJO
ACC
AMARILLO
BATT
NEGRO
GND
SALIDAVIDEO POSTERIOR 1
FRENO DE ESTACIONAMIENTO
ROSA
PRK SW
ACC
BATERÍA +
FUSIBLE (10A)
BATERÍA
ENTRADA VIDEO AUXILIAR
AUX INVIDEO
REAR VIDEO
OUT 1
Tierra
AMARILLO
AMARILLO
VideoZona 1
NOTA: Refiera a la sección del
"Freno de Estacionamiento"
para más información.
Interruptor
de Ignición
Batería
Page 36

DIGRAMA CABLEADO - MÓDULO DE LOS MEDIOS
VM9311TS
Media Module
*Cables de TERK XMDJEN100 (vendidos por separado)
**TERK XMD1000 dirigen el sintonizador y la antena
(vendidos por separado)
**
Head Unit
VideoOut
XMAudioLeft
XMAudioRight
XM Control Data
iPod
iPod Video
iPod
iPod Mini
iPod Nano
*
Cable del jLink de iPod (vendido por separado)
32
Page 37

VM9311TS
7-INCH
TFT
7-INCH
TFT
7-INCH
TFT
INSTALACIÓN
Preinstalación
1. Presione las palancas metálicas en ambos lados para
quitar la media manga del radio..
PREPARE EL RADIO
3. Ubique el radio en frente de la apertura del tablero de manera
tal que los cables puedan pasar porA la manga de m o nt a je.
Cableado
Complete el cableado como se ilustra en el “DIGRAMA
CABLEADO” en la página 31. Una vez que se haya completado el
cableado, conecte nuevamente el terminal negativo de la batería. Si
no hay un ACC disponible, conecte la punta del ACC a la
alimentación de energía con un interruptor.
INSTALACIÓN FINAL
5
1
4
7-INCH
BAND
T
FT
AS
7-INCH
D
AM/FM/DVD/MP3
IGITAL
T
FT
R
VOL
LO/DX
ECEIVER
POWER
MUTE
SCN
OPEN
DISP
VM9311TS
RPT
RDM
Push
STOP
SRC
ENTER
2. Instale la media manga.
a. Instale el adaptador si es necesario (opcional).
b. Instale la media manga dentro del adaptador o del
tablero (solamente utilice los tornillos provistos).
No fuerce la manga al introducirla en la apertura o
provoque que se doble.
c. Localice la serie de lengüetas para doblar en la
parte superior, inferior y costados de la manga de
montaje. Con la manga completamente insertada
en la apertura del tablero, doble hacia afuera todas
las lengüetas que sean necesarias para que la
manga esté asegurada firmemente al tablero.
d. Instale las correas de soporte para hacer que la
unidad sea más estable.
NOTA: Cuando reemplace un fisible, asegúrese
de utilizar el tipo y amperaje correcto para evitar
dañar el radio. El VM9311TS utiliza un fusible
mini ATM de 10 amperes, ubicado en la caja de
filtro negra en línea con el arnés del cable
principal.
Instalación Final
Luego de completar las conexiones del cableado, encienda la
unidad para confirmar la operación (el interrup tor de la ignición debe
estar encendido). Si la unidad no opera, verifique nuevamente todas
las conexiones de cables hasta que se solucione el problema. Una
vez que se alcanza una operación co rrecta, ap ague el interruptor de
ignición y proceda con el montaje final del chasis.
1. Conecte el adaptador del cableado a un arnés de cableado
existente.
2. Conecte la punta de la antena.
3. Cuidadosamente deslice el radio dentro de la media manga,
asegurándose que el lado correcto esté hacia arriba, hast a
que esté completamente colocado y que las presillas lo traben
en su lugar.
7-INCH
D
IGITAL
7-INCH
T
FT
BAND
T
FT
AS/PS
VM9510
AM/FM/DVD/MP3
Push
R
ECEIVER
MUTE
PWR
OPEN
DISP
AVAUXIN
Push
MODE
ENTER
2
3
5. Vuelva a colocar cualquier objeto que haya sacado del
tablero.
Instalación del ISO-DIN Final
1. Quite el anillo.
2. Monte los soportes de fábrica en el nuevo radio
utilizando los tornillos de su antiguo radio.
3. Deslice el chasis del radio a la apertura del tablero y
asegúrelo.
4. Reinstale el panel del tablero.
INSTALACIÓN FINAL ISO-DIN
3
INSTALE LA MEDIA MANGA
NOT A: Para una correcta operación del equipo de
CD/DVD, el chasis debe estar montado dentro de
los 20° de horizontalidad. Asegúrese de que la
unidad esté montada dentro de este límite.
4. Adjunte un extremo de la cinta de soporte perforada (provista)
al perno en la parte trasera del chasis utilizando la tuerca
hexagonal provista. Asegure el otro extremo de la cinta
7-INCHDIGITALTFT
7-INCHTFT
BAND
AS/PS
VM9510
AM/FM/DVD/MP3
Push
RECEIVER
MUTE
PWR
OPEN
DISP
AVAU
X
I
N
Push
MODE
ENTER
2
1
4
perforada a una parte segura del tablero, ya sea arriba o abajo
del radio, utilizando un tornillo y una tuerca hexagonal
provista. Doble la cinta hasta colocarla en la posición
necesaria.
¡CUIDADO! La parte trasera del radio debe estar
soportada con la cinta para prevenir daño al
tablero debido al peso del radio o prevenir una
¡CUIDADO! Tenga cuidado de no dañar el
operación incorrecta debido a la vibración.
cableado del automóvil.
Utilizando el Conector AV Externo iAUX
El iAUX3 le permite conectar una gran variedad de
dispositivos externos, incluyendo reproductor de DVD y
VCR, de MP3 portables, etc., a su VM9311TS sin quitar el
radio.
Para instalar el iAUX
parte trasera del VM9311TS (vea ““DIGRAMA CABLEADO”
en la página 31”), e instale luego el iAUX
conveniente para enchufar dispositivos auxiliares.
3
, conéctelo a los cables AUX-IN en la
3
en un lugar
3
33
Page 38

CONTROLES E INDICADORES
Botones de Operación
1. OPEN
Presione para activar el sistema mecánico automático y
mover el monitor a una posición visible. Presiónelo
nuevamente para cerrar el TFT.
2. WIDE/ PIC
Presione para ajustar la presentación de la imagen en una de
tres opciones: Cinema (ancho), Normal o OFF. Presione y
mantenga presionado este botón para acceder a la
configuración de imagen.
3. ( )
Presione para ajustar el ángulo de inclinación ascendente de
la pantalla un paso por vez. Presione y mantenga
presionado este botón continuamente para ajustar la
inclinación ascendente o las configuraciones de imagen.
4. ( )
Presione para ajustar el ángulo de inclinación descendente
de la pantalla un paso a la vez. Presione y mantenga
presionado este botón continuamente para ajustar la
inclinación descendiente o las configuraciones de imagen.
5. DISP
Presione para mostrar la información del sistema en la
pantalla.
6. VOL/LO/DX
Gire el botón para ajustar el volumen. Presione y suelte este
botón para ingresar y/o confirmar las configuraciones de
audio. Presione y mantenga presionado este botón para
activar la configuración Local (LOC).
7. POWER/MUTE
Presione para encender la unidad. Presiónelo nuevamente
para enmudecer el volumen. Presione y mantenga
presionado este botón para apagar la unidad.
NOTA: El VM9311TS ofrece Softmute, que
permitirá que el volumen aumente o disminuya
gradualmente cuando se activa o se desactiva la
función MUTE.
8. 1/AUDIO
Modo DVD: Presione para seleccionar el lenguaje del audio
durante la reproducción.
Modo TUNER (Radio): Presione una vez para reproducir la
estación de radio seleccionada previamente en canal 1.
Presione y mantenga presionado para almacenar la estación
de radio actual en el canal 1 de la memoria.
9. 2/SUBTITLE
Modo DVD: Presione una vez para seleccionar el lenguaje
del subtítulo durante la reproducción.
Modo TUNER: Presione una vez para reproducir la estación
de radio seleccionada previamente en canal 2. Presione y
VM9311TS
1
2326
BAND
160 WATTS
7-INCH LCD TFT
AS
24-bit / 192KHz DAC
POWER
WIDE
6
LO/DX
7 8 9
1010 11 12
mantenga presionado para almacenar la estación de radio
actual en el canal 2 de la memoria.
131415 16 19
5
CLOSE
DISP
24
4
3
SRC
AUDIOVIDEO INPUT
VM9311TS
EJECT
Push
ENTER
PIC
2
21
18
17
20
25
22
34
Page 39

VM9311TS
7-INCH TFT
CONTROLES E INDICADORES
10. 3/SCN
Modo DVD: Presione una vez para iniciar la reproducción en
escaneo.
Modo TUNER: Presione una vez para reproducir la estación
de radio seleccionada previamente en canal 3. Presione y
mantenga presionado para almacenar la estación de radio
actual en el canal 3 de la memoria.
11. 4/RPT
Modo DVD: Presione una vez para iniciar la reproducción en
repetición.
Modo TUNER: Presione una vez para reproducir la estación
de radio seleccionada previamente en canal 4. Presione y
mantenga presionado para almacenar la estación de radio
actual en el canal 4 de la memoria.
12. 5/RDM
Modo DVD: Presione una vez para una reproducción
aleatoria.
Modo TUNER: Presione una vez para reproducir la estación
de radio seleccionada previamente en canal 5. Presione y
mantenga presionado para almacenar la estación de radio
actual en el canal 5 de la memoria.
13. 6/STOP
Modo DVD: Presione una vez para detener la reproducción.
Modo TUNER: Presione una vez para reproducir la estación
de radio seleccionada previamente en canal 6. Presione y
mantenga presionado para almacenar la estación de radio
actual en el canal 6 de la memoria.
14. BAND
Modo TUNER: Presione para cambiar entre bandas FM y
AM.
15. SRC
Presione una vez para seleccionar el modo de reproducción.
16. ( )
Modo DVD: Presione una vez para reproducir el capítulo/
pista previo.
Modo TUNER: Presione una vez para buscar
automáticamente una estación de radio previa disponible.
Modo MENU: Presione una vez para mover el curso a la
izquierda.
17. ( )
Modo DVD: Presione una vez para ingresar al capítulo o
pista siguiente.
Modo TUNER: Presione una vez para buscar
automáticamente una estación de radio siguiente disponible.
7-INCH TFT
7-INCH LCD TFT
BAND
AS
AM/FM/DVD/MP3 RECEIVER
POWER
6
LO/DX
7 8 9
Modo MENU: Presione una vez para mover el curso a la
derecha.
18. ( )
Modo DVD: Presione una vez para avance rápido/retroceso
rápido.
Modo TUNER: Presione para subir un lugar en la frecuencia.
Modo MENU: Presione una vez para mover el cursor hacia
arriba.
19. ( )
Modo DVD: Presione una vez para avance o retroceso en
cámara lenta.
Modo TUNER: Presione para bajar un lugar en la frecuencia.
Modo MENU: Presione una vez para mover el cursor hacia
abajo.
20. PLAY/ENTER
Modo DVD: Presione una vez para iniciar la reproducción.
Presione una vez para confirmar una selección.
21. ( )
Presione una vez para insertar o eyectar un disco.
Presione y mantenga presionado para reanudar la posición
del mecanismo central.
22. RESET
Presione para volver la configuración del sistema a como
sale fábrica (excepto la contraseña y la configuración de
bloqueo de padres).
1010 11 12
1
514 2326
OPEN
DISP
VM9311TS
EJECT
Push
ENTER
SRC
13 15
16 1925
23. Pantalla LCD
24. Pantalla TFT
25. Receptor de Control Remoto Infrarrojo
26. AS (Almacenaje Automático)
Presione para almacenar automáticamente estaciones de
radio fuertes en los seis canales de memoria en la banda
actual.
21
18
17
20
22
35
Page 40

CONTROLES E INDICADORES
Pantalla LCD/Indicadores
1. Indicador de Disco
Iluminado cuando un disco está adentro.
2. Indicadores de Reproducción de DVD (SCN/RPT/RDM/
ALL)
Los indicadores de reproducción de DVD se iluminan cuando
la función correspondiente se activa:
• SCN: reproducción en escaneo
• RPT: reproducción en repetición
• RDM: reproducción aleatoria
• ALL: reproducción de todos los capítulos
3. Indicador de Volumen (LOUD)
El indicador de volumen se ilumina cuando se activa la
función LOUD.
4. Pantalla Principal
La pantalla principal es un LCD (Pantalla de Cristal Líquido)
de 8 dígitos y 14 segmentos que muestra la hora, frecuencia
en sintonía y alguna otra información de texto.
5. Pantalla de Canal/Disco
La pantalla de canal/disco es un LCD de 2 dígitos y 7
segmentos que muestra los indicadores de número de disco
o canal de radio cuando la función correspondiente se activa:
• CH: radio activado
• DISC: modo DVD activado
6. Indicador Estéreo / Local
El indicador de estéreo/local ilumina uno de los siguientes
indicadores cuando la función correspondiente se activa:
• ST: radio en modo estéreo
• LOC: función de búsqueda de radio local activa
VM9311TS
1 2 3 4 5 6
36
Page 41

VM9311TS
CONTROL REMOTO
Tabla 1: Funciones de Control Remoto
Botón Función
Nombre/
Referencia
MENU 1 Ingresa al menú
TITLE 2 Ingresa al menú
MUTE 3 Alterna salida de audio encendido/apagado
POWER
AUDIO 5 Cambia el audio
REPT A-B 6 Configurar para
REPT 7 Repite la repro-
SRC 8 Selecciona el modo de reproducción
SUBTITLE 9 Selección de len-
DISP 10 Muestra información sobre la reproducción
DVD
ANGLE
VOL - 15 Baja el volumen
VOL + 16 Sube el volumen
4 Enciende/apaga
13 Reproduce el
14 Adelante el con-
17 Selecciona el
18 Detiene la repro-
DVD VCD
principal del disco
de títulos del disco
del lenguaje en la
reproducción de
un disco
reproducir en
repetición desde
A hasta B
ducción del
capítulo actual
guaje para el subtítulo
disco en un diferente ángulo para
una escena
tenido del disco
capítulo previo
para reproducir
ducción/Inicia la
reproducción
Enciende el PBC
cuando reproduce VCD
Reproduce los
primeros diez segundos de cada
capítulo/título
Selecciona a la
izquierda, a la
derecha o estereofonia
Configurar para
reproducir en
repetición desde
A hasta B
Repite la reproducción del
capítulo actual
Adelante el contenido del disco
Selecciona el
capítulo previo
para reproducir
Detiene la reproducción/Inicia la
reproducción
SINTONIZADOR
Manual temple
para arriba
Selecciona el
canal previo
Presione para PS
(la exploración de
la inspección previo). Presione y
sostenga para AS
(el almacén auto).
CD/MP3 XM iPod
Ingresa al menú
Setup XM
Selecciona modo
de la búsqueda de
la categoría
Selecciona a la
izquierda, a la
derecha o estereofonia
Repita solo, repita
la carpeta, OFF
(apagado)
Modo de la
búsqueda del
canal
Carpeta siguiente Canal siguiente
Selecciona la
pista previa para
reproducir
Detiene la reproducción/Inicia la
reproducción
dentro de la categoría actual
Selecciona el
canal previo
Selecciona modo
de la foto
Selecciona modo
de la música
Selecciona el
modo video
Repite la reproducción de la pista
actual
Tiene acceso al
menú del iPod
Selecciona la
pista previa para
reproducir
ENTER
NOTA: Su control remoto puede ser
ligeramente distinto del que se exhibe aquí
en imagen. El diagrama de arriba es
solamente ilustrativo.
37
Page 42

Tabla 1: Funciones de Control Remoto
Botón Función
VM9311TS
Nombre/
Referencia
19 Selecciona el
BAND 20 Detiene la repro-
GOTO 21 Va a un momento
22 Reproducción 1/2,
ZOOM 23 Se acerca o se
PIC 24 Muestra
OPEN/
CLOSE
WIDE 28 Selecciona modo
0, 1, 2, 3, 4,
5, 6, 7, 8, 9,
0 (Numeric
Keypad)
DVD
SETUP
SYS
SETUP
SCAN 34
EJECT 35 Eyecta el disco
25 Abre/Cierra el monitor TFT
26 Reduce el ángulo de inclinación del monitor
27 Incrementa el ángulo de inclinación del monitor
29 Ingresa directa-
30 Accede al menú
31 Accede al menú de Configuración del Sistema
DVD VCD
capítulo siguiente
para reproducir
ducción
determinado y
reproduce
1/4, 1/6, 1/7
aleja de una imagen
parámetros de
configuración
de reproducción:
Cinema, Normal o
OFF.
mente al capítulo
de Configuración
de DVD
Selecciona el
capítulo siguiente
para reproducir
Detiene la reproducción
Va a un momento
determinado y
reproduce
Reproducción 1/2,
1/4, 1/6, 1/7
Se acerca o se
aleja de una imagen
Muestra
parámetros de
configuración
Selecciona modo
de reproducción:
Cinema, Normal o
OFF.
Accede al menú
de Configuración
de DVD
SINTONIZADOR
Canal siguiente
de la búsqueda
Selecciona banda
FM/AM
Manual que templa abajo
Muestra
parámetros de
configuración
Selecciona modo
de reproducción:
Cinema o OFF.
1-6 selecciona lo
que está en
memoria en la
banda actual
CD/MP3 XM iPod
Selecciona la
pista siguiente
para reproducir
Detiene la reproducción
Carpeta anterior Canal anterior
Muestra
parámetros de
configuración
Selecciona modo
de reproducción:
Cinema o OFF.
Ingresa directamente a la pista
Canal siguiente Selecciona la
Selecciona banda
XM, XM1, XM2, o
XM3
Presione para la
entrada directa
del canal
dentro de la categoría actual
Muestra
parámetros de
configuración
Selecciona modo
de reproducción:
Cinema o OFF.
1-6 selecciona lo
que está en
memoria
pista siguiente
para reproducir
Juego/pausa
Muestra
parámetros de
configuración
Selecciona modo
de reproducción:
Cinema o OFF en
modo de la
música o Cine,
Normal, OFF en
modo de la foto y
del vídeo.
Presione el botón
"1" para visión las
páginas disponibles mientras que
en "Playlists, artistas, álbumes y
canciones".
NOTA: Su control remoto puede ser
ligeramente distinto del que se exhibe aquí
en imagen. El diagrama de arriba es
solamente ilustrativo.
38
Page 43

VM9311TS
UTILIZACIÓN DEL MONITOR TFT
Abrir/Cerrar el Monitor TFT
Abrir el Monitor TFT
Presione el botón OPEN (1) en el panel delantero o presione
el botón ( , 25) en el control remoto de la zona delantera
para activar el mecanismo que mueve la pantalla hacia una
posición visible.
Close TFT Monitor
Presione el botón OPEN (1) en el panel delantero o presione
el botón ( , 25) en el control remoto para volver la pantalla
a su compartimiento.
TFT Monitor Auto Open
Si "TFT Auto Open" está en posición "on" (encendido)
cuando la unidad está encendida, el monitor
automáticamente se mueve hacia una posición visible.
Si "TFT Auto Open" está en "off" (apagado) cuando la unidad
está encendida, presione el botón OPEN (1) o el botón ( ,
25) en el control remoto de la zona delantera para mover el
monitor a una posición visible.
Si la abertura automática del TFT está en "Manual", la
pantalla no se cerrará cuando la llave se apague.
Ajuste de Ángulo de Inclinación del
Monitor
Una característica conocida de los paneles LCD es la calidad
de la imagen en relación al ángulo de visión. El ángulo del
monitor se puede ajustar para una visión óptima utilizando
uno de los siguientes métodos:
Ajuste de Ángulo Paso a Paso
Presione el botón ( ) o ( ) (3, 4) en el cuadro del monitor
para ajustar el ángulo de inclinación de la pantalla de un
paso por vez.
Ajuste de Ángulo Continuo
Presione y mantenga el botón ( ) o ( ) (3, 4) en el cuadro
del monitor para ajustar el ángulo de inclinación en
movimiento continuo.
Proporción de la Imagen
Presione el botón DISP (28) en el control remoto o el botón
WIDE/PIC (2) en el monitor para ajustar la proporción de la
imagen de siguiente forma:
Proporción de la Imagen
La Tabla 2 demuestra el modo de salida video para cada
fuente que juega.
Fuente de Reproducción
AM/FM TUNER Modo RGB
XM TUNER Modo RGB
iPod Modo RGB
AUX IN Modo CVBS
**CVBS - Señal de base de banda de video compuesta
(Composite Video Baseband Signal)
Procedimiento de Ajuste de Parámetro
1. Ingresar en modo de Configuración de Calidad de
Imagen:
Presione el botón PIC (24) en el remoto o presione y
mantenga el botón WIDE/PIC (2) en el panel del moni-
tor.
2. Seleccione los elementos a configurar:
Presione los botones (>>) (
presione y mantenga los botones (/\) o (V) (18, 19) en el
panel del monitor.
3. Configure los Parámetros:
Presione los botones (|<<) (>>|) (17, 19) en el remoto o
presione y mantenga los botones (<) o (>) (16, 17) en el
panel del monitor.
4.
Salir del Modo de Configuración de Calidad de Imagen:
Presione el botón
mantenga el botón
TOTAL (CINEMA)
Toda la pantalla se extiende
horizontalmente a la proporción de 16
a 9. La proporción de extensión es la
misma en cualquier punto.
NORMAL
La pantalla convencional tiene una
proporción horizontal-vertical de 4 a 3,
dejando un área negra en los lados
derecho e izquierdo de la pantalla.
OFF
Tabla 2: Formatos de Salida de Video
Formato de Salida de Video
<<) (14, 22) en el remoto o
PIC
(24) en el remoto o presione y
WIDE
/PIC
(2) en el panel del monitor.
Freno de Mano
Bloqueo con Freno de Mano
Cuando el alambre rosado del "PARKING" está
conectado con el interruptor del freno del vehículo, el
monitor delantero de TFT exhibirá el vídeo solamente
cuando se contrata la secuencia del freno de mano.
Antes de comenzar la secuencia del freno de mano, la
radio debe estar encendido con el disco video de los
medios insertado y jugar.
Secuencia fel Freno de Mano
Hay dos situaciones que pueden comenzar la secuencia
del freno de mano (éste es el método preferido). La
ventana de la sincronización es entre el 3 ~ 5 segundos.
• Se contrata el freno de estacionamiento (encendido)
cuando se enciende el vehículo o se gira el accesorio/
la ignición. Para activar el vídeo, los acontecimientos
siguientes deben ser terminados:
a. Lance el freno de mano para 3 ~ 5 segundos.
b. Reactivaron el freno de mano.
c. El vídeo se debe exhibir en el monitor de TFT en el
plazo de 1 ~ 2 segundos.
• Se contrata el freno de mano y (apagado) cuando se
enciende el vehículo o se gira el accessory/ignition.
Para activar el vídeo, los acontecimientos siguientes
deben ser terminados:
a. Active el freno de mano para 3 ~ 5 segundos.
b. Lance el freno de mano para 3 ~ 5 segundos.
c. Reactivaron el freno de mano.
d. El vídeo se debe exhibir en el monitor de TFT en el
plazo de 1 ~ 2 segundos.
Mecanismo de Movimiento de Monitor
Si ocurre una obstrucción en la ruta del monitor, las medidas
de protección siguientes se pueden tomar para prevenir
daños en el mecanismo o en el monitor:
Tabla 3: Medidas de Protección del Monitor
Obstrucción
Monitor cargado hacia
afuera horizontalmente
Monitor cargado hacia
adentro horizontalmente
Protección
Propia
El monitor se
guarda
automáticamente en la
unidad
La unidad se
detiene en un
punto de
obstrucción
Botón OPEN
Presionado
Monitor extendido completamente de forma
horizontal
Monitor extendido completamente de forma
horizontal
Energía
Reconectada
El monitor se
guarda
automáticamente en la
unidad
El monitor se
guarda
automáticamente en la
unidad
39
Page 44

Tabla 3: Medidas de Protección del Monitor
VM9311TS
Obstrucción
Monitor cargado hacia
afuera verticalmente
Monitor cargado hacia
adentro verticalmente
Protección
Propia
La unidad se
detiene en un
punto de
obstrucción
La unidad se
detiene en un
punto de
obstrucción
Botón OPEN
Presionado
El monitor gira
de vuelta hacia
la unidad
El monitor gira
de vuelta hacia
la unidad
Energía
Reconectada
El monitor gira
de vuelta hacia
la unidad
El monitor gira
de vuelta hacia
la unidad
Luego de ejecutar el procedimiento de protección, se
reasume la operación normal presionando el botón OPEN (1)
o desconectando y reconectando la energía.
40
Page 45

VM9311TS
INSTRUCCIONES DE OPERACIÓN
Encendido / Apagado
Presione el botón /MUTE (7) para encender la unidad. Los
botones en la delantera de la unidad se encienden y
"WELCOME" aparece brevemente en el panel LCD (17),
seguido por el modo actual. Si la pantalla TFT está abierta,
solamente se exhibe el modo actual. También puede
encender la unidad presionando el botón OPEN (1) y
abriendo la pantalla TFT.
Presione y mantenga el botón /MUTE (7) en el panel
delantero o el botón POWER (4) en el remoto para apagar la
unidad. El monitor se mueve hacia adentro del
compartimento principal y la pantalla LCD muestra "BYE
BYE".
Confirmación Bip Audible
Un sonido audible confirma la selección de cada función. El
BEEP (tono de la señal sonora) puede ser lisiado a través del
menú System Setup.
Mute
Presione el botón /MUTE (7) en el panel delantero o el
botón MUTE (3) en el remoto para enmudecer el volumen de
la unidad. Presione el botón MUTE nuevamente para
restablecer el volumen. "MUTE" aparece en el monitor LCD.
Ajustar el volumen o utilizar cualquiera de las funciones de
configuración de audio cancela la función de enmudecer.
Selección de Fuente de Reproducción
Presione el botón SRC (15) en el panel delantero o el botón
SRC (8) en el remoto para cambiar entre las fuentes de
reproducción disponibles en el orden siguiente: TUNER,
DVD, AUX IN, iPOD y XM. El modo de reproducción aparece
en las pantallas TFT y LCD.
Modo AUX IN
Un dispositivo periférico externo se puede conectar a esta
unidad vía una salida RCA y "AUX-IN".
Ajuste de Volumen
Para subir o bajar el volumen, gire el codificador giratorio
(ROTARY ENCODER, 6) en el panel delantero o presione
los botones VOL+/VOL- (15,16) en el control remoto.
Cuando el volumen alcanza "0" o "40", un sonido como bip
indica que el límite de ajuste se alcanzó. El volumen va
desde "0" a "40". La pantalla LCD o TFT exhiben el nivel de
volumen por 3 segundos.
Volumen en Inicio Programable
Esta función permite al usuario seleccionar un volumen de
encendido, sin importar el volumen en el cual se dejó la
unidad al apagarla. Para programar un volumen específico,
mantenga presionado el botón VOL/LO/DX (6) mientras la
barra de volumen amarilla se exhibe en pantalla. La unidad
sonará con dos bip para confirmar la configuración de
volumen en encendido.
Menú de Control de Audio
La función de Control de Audio le permite ajustar fácilmente
su sistema de audio para alcanzar las características
acústicas de su vehículo, las cuales varían de acuerdo al tipo
de vehículo y sus medidas. Para obtener el mejor sonido
posible de su nuevo sistema, asegúrese de ajustar la
configuración de sus altavoces también. Una configuración
adecuada de balances izquierdo-derecho y delantero-trasero
potencia los efectos del ecualizador de la cabina.
Accediendo al Menú de Control de Audio
Presione el botón VOL/LO/DX (6) en el panel delantero una
vez para mostrar el menú "AUDIO".
Seleccionando una Función de Audio para Ajustar
Presione continuamente el botón VOL/LO/DX (6) en el panel
delantero, o presione los botones (>>)/(<<) (14, 22) en el
control remoto o los botones (/\)/(V) (18, 19) en el joystick
para seleccionar la función de audio a ajustar.
Ajustando una Función de Audio
Rote el botón VOL/LO/DX (6), presione los botones (|<< )/
(>>|) (17, 19) en el control remoto, o presione los botones (<
)/(>) (16, 17) en el joystick para ajustar la función
seleccionada con la configuración deseada.
Función Audio Rango de Ajuste
EQ (ecualizador) User
BASS (bajo) -14 a +14
TREBLE (agudos) -14 a +14
SUB -7 a +7
Tabla 4: Ajustes de Audio
Flat
Jazz
Pop
Classical
Rock
Vocal
Tabla 4: Ajustes de Audio
Función Audio Rango de Ajuste
LOUD 0 (apagado), 1-4
FAD (balance delantero - tra-
sero)
BAL (balance derecho -
Izquierdo)
NOTA: Los niveles de Graves y Agudos son
ajustables únicamente cuando el EQ
-9 a +9
-9 a +9
(ecualizador) está en modo "User".
Intensidad
La intensidad level/function es dependiente en el ajuste
principal del volumen. Mientras que se aumenta el volumen,
menos remuneración de la intensidad se aplica a la señal
audio. Ésta es referidad "Auto-Loudness". Los ajustes
posibles de la intensidad son como sigue:
• OFF (Apagado)
• 1 - Alza baja leve en el nivel del bajo volumen
• 2 - Alza baja moderada en el nivel del bajo volumen
• 3 - Buena alza baja en el punto bajo al nivel mediados de
del volumen
• 4 - Alza baja máxima en el nivel mediados de del volumen
Saliendo del Menú de Control de Audio
Presione y mantenga el botón VOL/LOC/DX (6) o deje de
hacer ajustes por unos segundos para salir del menú de
control de audio.
Reinicio del Sistema
Para corregir una interrupción del
sistema u otra operación irregular,
utilice la punta de un lápiz para
presionar el botón de reinicio (RESET, 22) ubicado en la
esquina delantera derecha inferior de la unidad. Luego del
reinicio del sistema, la unidad reestablece todas las
configuraciones de fábrica.
NOTA: Si la unidad se reinicia mientras está en
ejecución un DVD, el DVD reasume su
reproducción una vez que el reinicio se complete.
[RESET] Button
Enmudecedor de Línea
Si el cable "MUTE" (enmudecedor) está conectado, la salida
del audio se enmudece cuando una llamada de teléfono se
recibe en el teléfono del auto o cuando se realiza navegación
verbal.
41
Page 46

MENÚ DE CONFIGURACIÓN DE SISTEMA
En modo de Configuración de Sistema ("System Setup"),
Configuración ASP ("ASP CONFIG") y Configuración
General "GENERAL SETUP" están disponibles para ajustes.
La configuración se puede realizar presionando el botón
dedicado en el control remoto o tocando la esquina superior
izquierda de la pantalla TFT.
Para configuraciones del sistema, presione el botó SYS
SETUP (31) en el control remoto o toque "SETUP" en la
pantalla para ingresar al menú de Configuración del Sistema.
"SYS SETUP" es remarcado en verde.
Menú de Configuración General
Accediendo al Menú de Configuración General
Para acceder al Menú de Configuración General ("GENERAL
SETUP"), presione los botones de dirección en el joystick
(16, 17, 18, 19) o en el control remoto (14, 17, 18, 19, 22)
para remarcar "GENERAL SETUP" en verde.
Botones de la Dirección
Presione el botón >/|| (18) en el control remoto para entrar al
menú de Configuración General ("GENERAL SETUP"). Un
menú aparece con la opción para el primer ítem, "Radio",
resaltado en luz azul.
GENERAL SETUP
USA
Screen Saver
Video Format
Beep On
BACK
Seleccionando una Función para Ajuste
Presione los botones >> o << (14, 22) en el control remoto o
los botones /\ o V (18, 19) en el joystick para seleccionar la
función a ajustar.
Ajustando una Función
1. Ingrese en el campo de opción para la función que
desea ajustar presionando el botón >/|| (18) en el control remoto o presionando el botón ENTER (joystick)
(20) en la unidad. Un submenú aparece en segunda fila
con la opción seleccionada remarcada en celeste.
2. Seleccione un nuevo valor presionando los botones >>
o << (14, 22) en el control remoto o los botones /\ o V
(18, 19) en el joystick.
3. Confirme su selección presionando los botones <<, |<<,
o >>| (22, 17, 19) en el control remoto, o los botones < o
> (16, 17) en el joystick. El nuevo valor se remarca en
celeste y la configuración se completa.
Tabla 5: Función de Menú de Configuración General
Configuración Opciones Función
Radio USA • AM Frequency Spacing - 10kHz
Europe • AM Frequency Spacing - 9kHz
South
America 1
South
America 2
Arabia • AM Frequency Spacing - 9kHz
• AM Frequency Band -
• FM Frequency Spacing - 200kHz
• FM Frequency Band -
• AM Frequency Band -
• FM Frequency Spacing - 50kHz
• FM Frequency Band -
• AM Frequency Spacing - 10kHz
• AM Frequency Band -
• FM Frequency Spacing - 100kHz
• FM Frequency Band -
• AM Frequency Spacing - 5kHz
• AM Frequency Band -
• FM Frequency Spacing - 100kHz
• FM Frequency Band -
• AM Frequency Band -
• FM Frequency Spacing - 100kHz
• FM Frequency Band -
530kHz~1720kHz
87.5MHz~107.9MHz
522kHz~1620kHz
87.5MHz~108.0MHz
530kHz~1720kHz
87.5MHz~108.0MHz
520kHz~1600kHz
87.5MHz~108.0MHz
531kHz~1620kHz
87.5MHz~108.0MHz
VM9311TS
Tabla 5: Función de Menú de Configuración General
Configuración Opciones Función
Korea • AM Frequency Spacing - 9kHz
China • AM Frequency Spacing - 9kHz
Clock Mode
(Modo Reloj)
Screen Saver
(Protector de
Pantalla)
Formato
video (el
trazado de
circuito de la
entrada autodetects la
señal video
de la aux.
TFT Auto
Open (Apertura
Automática
del TFT)
Beep On (Encen-
Clock (Reloj) (HH:MM) Ve a "Ajuste del re loj" para a prender
12H El reloj muestra el horario en 12
24H El reloj muestra el horario en 24
On (Encendidi)
Off (apagado)
Auto
(Automático
)
NTSC Las señales de color salen en el
PAL Las señales de color salen en el
On (Encendido)
Off (Apagado)
Manual Cuando la ignición se da vuelta
didi)
Poniendo en Hora el Reloj
Modo 1 – Pantalla TFT abierta:
1. Acceda a la configuración del reloj ("Clock") bajo el
menú de Configuración General.
2. Presione los botones >> o
remoto o los botones /\ o V (18, 19) en el joystick para
• AM Frequency Band 531kHz~1602kHz
• FM Frequency Spacing - 200kHz
• FM Frequency Band -
88.1MHz~107.9MHz
• AM Frequency Band 522kHz~1620kHz
• FM Frequency Spacing - 100kHz
• FM Frequency Band -
87.5MHz~108.0MHz
horas utilizando AM y PM.
horas hasta las 23:59.
Encendido/apagado de protector de
pantalla.
La salida de color de la señal se
cambia automáticamente basada
en el disco actual.
formato estándar NTSC.
formato estándar PAL.
El panel TFT se abre automática-
mente cuando la unidad se
enciende.
Usted debe presionar el botón
OPEN (1) para abrir el panel TFT.
APAGADO, el panel de TFT no
contrae si estaba previamente
hacia fuera
Un sonido audible confirma la
selección de cada función.
cómo se pone en hora el reloj.
Volver al menú anterior.
<< (14, 22) en el control
42
Page 47

VM9311TS
mover el cursor a la posición de hora ("Hour") o de
minuto ("Min").
3. Presione los botones |<< o >>| (17, 19) en el control
remoto o los botones < o > (16, 17) en el joystick para
ajustar la hora o minutos.
4. Presione el botón
<< (14) en el control remoto para
confirmar la configuración.
Método 2 - Pantalla TFT cerrada:
1. Presione y mantenga presionado el botón DISP (5)
hasta que el reloj destelle en la pantalla LCD.
2. Presione los botones /\ o V (18, 19) en el joystick para
mover el cursor a la posición de hora ("Hour") o minuto
("Min").
3. Presione los botones < o > (16, 17) en el joystick para
ajustar la hora o minutos.
4. Presione el botón DISP (5) en la unidad para confirmar
la configuración.
Regresar al Menú de Configuración de Sistema
Para regresar al menú de Configuración de Sistema,
muévase hasta "BACK", luego presione el botón >/|| (18) en
el control remoto.
Menú de configuración de ASP
(Procesamiento de Sonido de Audio)
El Menú de Configuración de ASP le permite realizar ajustes
de audio finos.
Accediendo al Menú de Configuración de ASP
Para acceder al Menú de Configuración ASP ("ASP
CONFIG") desde el menú "SYSTEM SETUP", presione los
botones de dirección en el joystick (16, 17, 18, 19) o en el
control remoto (14, 17, 18, 19, 22) para remarcar "CONFIG
ASP" en verde. Presione el botón >/|| (18) en el control
remoto para entrar al menú de Configuración de ASP ("ASP
CONFIG"). Un menú aparece con la opción para el primer
ítem, Frecuencia Central de Graves ("Bass Center Freq",
resaltado en celeste.
ASP CONFIG
Sub Filter
Sub Phase
60Hz
15kHz
80Hz
0D
1.5
BACK
Ajustando una Función
1. Ingrese en el campo de opción para la función que
desea ajustar presionando el botón >/|| (18) en el control remoto o presionando el botón ENTER (joystick)
(20) en la unidad. Un submenú aparece en segunda fila
con la opción seleccionada remarcada en celeste.
2. Seleccione un nuevo valor presionando los botones >>
o << (14, 22) en el control remoto o los botones /\ o V
(18, 19) en el joystick.
3. Confirme su selección presionando los botones <<, |<<,
o >>| (22, 17, 19) en el control remoto, o los botones < o
> (16, 17) en el joystick. El nuevo valor se remarca en
celeste y la configuración se completa.
Tabla 6: Funciones de Menú de Configuración de ASP
Configuración Opciones Función
Bass Center
Frequency
(Frecuencia
Central de
Graves)
Treble Center
Frequency
(Frecuencia
Central de
Agudos)
60Hz De acuerdo a la fuente de audio,
80Hz
100Hz
130Hz
150Hz
200Hz
10KHz De acuerdo a la fuente de audio,
12.5KHz
15KHz
17KHz
seleccione la Frecuencia Central de
Graves para alcanzar el mejor efecto
de Graves.
seleccione la Frecuencia Central de
Agudos para alcanzar el mejor efecto
de Agudos.
Tabla 6: Funciones de Menú de Configuración de ASP
Configuración Opciones Función
Sub Filter (Filtro de Altavoz
de Graves)
Sub phase(
Fase de
Altavoz de
Grave)
Bass
Q0Factor
(Factor Q de
Graves)
80Hz Seleccionando una frecuencia de
120Hz
160Hz
0D Salida de altavoz de grave en fase
180D Salida del altavoz de graves FUERA
1.0 Cuando se selecciona la Frecuencia
1.25
1.5
2.0
cruzamiento configura una frecuencia de corte del LPF (filtro de paso
bajo) del altavoz de graves (subwoofer) y el HPF (filtro de paso alto)
del altavoz "SMALL". La configuración de frecuencia del Cruzamiento
no tiene efecto si el altavoz de graves
está en "OFF" o si cualquier otro
altavoz está configurado en
"LARGE".
DE fase.
NOTA: Dependiendo de su i nstalación, revertir la fase del altavoz de
graves puede incrementar la salida
de Graves.
Central de Graves, ajustar el Factor
Q de Graves altera la salida afilada
de Graves.
Volver al menú anterior.
Calibración de la Pantalla
En el menú de la SYSTEM SETUP, para acceder al
Calibración de la Pantalla, presione el botone "SYSTEM
CAL" en verde.
Después de entrar en modo de la calibración, un aparece
en un cuadrante de la esquina de la pantalla. Para comenzar
la calibración, la prensa y sostener el para un segundo
hasta que se mueve al cuadrante siguiente. Continúe para
cada cuadrante hasta que se termina la calibración.
Saliendo del Menú de Configuración de
Sistema
Para salir del modo de configuración y reasumir una
reproducción normal, presione el botón de Configuración de
Sistema (SYS SETUP, 31) en el control remoto o el botón
DISP (5) en el panel delantero.
43
Page 48

OPERACIÓN DEL RADIO
Pantalla del Sintonizador de TFT
17
Source:
11
12
10 2
P1
PRESETS
13 14
4 1
6
7
1. Indicador de Banda de Radio Actual
2. Indicador de Frecuencia de Radio
3. Reloj
4. Indicador de Transmisión en Estéreo
5. Indicador de Transmisión de Señal Local Fuerte
6. Estaciones de Radio Preseleccionadas: Toque para
llamar nuevamente estaciones preseleccionadas, o
toque y mantenga para guardar una estación
7. Modo de Reproducción de Zona Delantera
8. Modo de Reproducción de Zona Trasera
9. Nivel de Ecualizador Definido por el Usuario
10. Indicador de Configuración de Volumen
11. Indicador de Estaciones Actualmente en Memoria
12. |<<: Toque para buscar hacia atrás
13. >>|: Toque para buscar hacia adelante
14. <<: Toque para sintonizar hacia atrás un paso a la vez
15. >>: Toque para sintonizar hacia adelante un paso a la
16. BAND: Toque y cambia entre bandas AM/FM
17. AS: Toque para guardar estaciones automáticamente
18. Toque esta área para volver al MENÚ PRINCIPAL
Cambio a fuente de Sintonizador de Radio
Presione el botón SRC en el panel delantero (15) o control
remoto (8) para cambiar a la fuente RADIO.
15 16
BAND
8
5
3
AS
9
Selección de banda FM/AM
Toque el botón BAND (15) en la pantalla, o presione el botón
BAND en la unidad (14) o en el control remoto (20) para
cambiar entre las siguientes bandas: FM1, FM2, FM3, AM1,
y AM2.
Búsqueda de Sintonía
Presione el botón >>| (19) en el control remoto o el botón >
(17) en el joystick para buscar la estación siguiente más alta.
Presione el botón |<< (17) en el control remoto o el botón <
(16) en el joystick para buscar la estación siguiente más baja.
Sintonía Manual
Presione los botones >> o << (14, 22) en el control remoto o
los botones /\ o V (18, 19) en el joystick para incrementar o
bajar la frecuencia de sintonía un paso a la vez.
tonizar continuamente hasta que los suelte.
Utilizando Estaciones Preconfiguradas
Seis botones numerados almacenan y sintonizan estaciones
preseleccionadas por cada banda. T odas las seis estaciones
almacenadas en cada banda (P1 a P6) aparecen en la
pantalla.
Almacenando una Estación
1. Seleccione una banda (si es necesario), luego seleccione una estación.
2. T oque y mantenga un botón de preselección en pantalla
(6) por tres segundos. El número preseleccionado
aparece en la parte superior de la pantalla.
Sintonizando una Estación
1. Seleccione una banda (si es necesario).
2. Toque un botón de preselección en pantalla (6) para
seleccionar la estación almacenada correspondiente.
NOTA: Usted puede también utilizar numered los
botones en el panel de control para almacenar y
recordar preestablezca las estaciones.
VM9311TS
Almacenamiento Automático (AS)/
Exploración Previo
Almacenamiento Automático de Estaciones
Preconfiguradas
Para seleccionar seis estaciones fuertes y almacenarlas en
la banda actual:
1. Seleccione una banda (si es necesario).
2. Presione AS botón (26) en el panel de control o toqúelo
AS (16) en la pantalla por 2 segundos para activar la
función de Almacenaje Automático.
Las nuevas estaciones reemplazan las almacenadas
anteriormente en esa banda.
Exploración de la Inspección previo
Explore la venda de la o de FM para una inspección previo
de estaciones disponibles en su área particular. Presione el
botón de play/pause en el mando a distancia una vez (prensa
corta) o empuje adentro en la palanca de mando una vez
(prensa corta). Presione otra vez para parar el picosegundo.
Buscador de Estaciones de Radio Local
(LOC)
Cuando la función Local está encendida, solamente se
reproducen radios con señal fuerte. Para activar la función
Local en modo de radio AM/FM, mantenga presionado el
botón LO/DX (6) en el panel delantero mientras la barra de
volumen amarillo NO ESTÁ visible. Presione nuevamente
LO/DX para apagar la función Local. Cuando está active la
función Local, "LOC" aparece en pantalla y un indicador
verde se ilumina.
44
Page 49

VM9311TS
OPERACIÓN DE RADIO XM
Usted puede suscribir a la radio de XM® en
www.xmradio.com, o llamando (800) 967-2346.
Usted necesitará la identificación de la radio
(véase la sección de la Exhibir el Número de la
Identificación). Los clientes reciben un número
pequeño de los canales sin la activación.
Accediendo a Modo Radio XM (XM® Radio
Mode)
Presione el botón SRC (15) en el panel delantero o en el
control remoto (8) para cambiar a la fuente XM.
1. Nombre de canal XM
2. Número de canal XM
3. Banda XM
4. Hora
5. Título de la canción
6. Nombre de artista
7. Categoría de canción
8. Información de servicios de datos
9. Canales actuales/botones preseleccionados en pantalla
10. CH <<: Seleccione el canal anterior
11. CH >>: Seleccione el próximo canal
12. CAT /\: Seleccione el próximo canal en la categoría
actual solamente
13. CAT V : Seleccione el previo canal en la categoría actual
solamente
14. DIR CH: Presione para ingresar al canal directamente
usando un teclado numérico en pantalla
®
15. XM CG: Modo de Acceso a Canal/Guía de Categoría
16. BAND: Cambie entre bandas XM, XM1, XM2 y XM3
17. MENÚ: Accediendo al Menú de Configuración XM
18. Toca esta área para volver al Menú Principal (MAIN
MENU)
Mostrando el Código de Identificación (ID)
Antes de que escuche el Radio XM® , usted debe inscribirse
al servicio usando su número de identificación del radio.
Para mostrar el ID del radio, presione los botones < o > (16,
17) en el joystick o los botones CH << o CH >> en la pantalla
táctil repetidamente para sintonizar el canal "000". La
pantalla muestra el identificador (ID) de 8 caracteres del
radio XM bajo "CHANNEL NAME".
Seleccionando una Estación
Presione los botones < o > (16, 17) en el joystick, los botones
|<< o >>| (17, 19) en el control remoto, o los botones CH << o
CH >> en la pantalla táctil para cambiar a otra estación.
Modo de Preselección
Para ingresar en modo de preselección, toque el botón
BAND en la pantalla, o presione el botón BAND (14) en la
unidad o (20) en el control remoto para cambiar entre las
siguientes bandas: XM1, XM2 o XM3 (indicado en la esquina
superior derecha de la pantalla TFT).
Seis botones numerados almacenan y sintonizan estaciones
preseleccionadas por cada banda. T odas las seis estaciones
almacenadas en cada banda (P1 a P6) aparecen en la
pantalla TFT.
Almacenando una Estación
1. Seleccione una banda (si es necesario), luego seleccione una estación.
2. T oque y mantenga presionado un botón de preselección
en pantalla por tres segundos. El número
preseleccionado aparece en la parte superior de la
pantalla.
Sintonizando una Estación
1. Seleccione una banda (si es necesario).
2. Toque un botón de preselección en pantalla para
seleccionar la estación almacenada ahí.
Modo de Guía de Canal/Categoría
Hay dos modos de búsqueda que ayuda a navegar a través
de los canales o categorías. Para acceder al modo de Guía
de Canal/Categoría, presione el botón ZOOM (23) en el
control remoto o el botón XM CG en la pantalla táctil.
Guía de Canal es el modo de búsqueda por defecto. Para
acceder a la Guía de Categoría, presione el botón TITLE (2)
en el control remoto o toque CAT en la pantalla táctil. Para
volver a Guía de Canal, presione el botón SUBTITLE (9) en
el control remoto.
Modo de Guía de Canal
Cuando el modo de Guía de Canal está seleccionado,
"Search Mode" y "CHANNEL" aparecen en la mitad superior
de la interfaz de usuario. "XM" aparece en la esquina
superior derecha y los primeros seis canales XM se
muestran en las cajas en la mitad inferior de la pantalla TFT.
• Mientras está en Modo de Búsqueda, para cambiar entre
modos de búsqueda de Canal y Categoría, presione los
botones CH o CAT en la pantalla táctil.
• Presione el botón >> (14) en el control remoto, el botón /\
(18) en el joystick, o el botón > en la pantalla táctil para
ver la próxima página de estaciones. Cada página
contiene seis canales de los cuales seleccionar.
• Presione el botón << (22) en el control remoto, el botón V
(19) en el joystick, o el botón < en la pantalla táctil para
ver la previa página de estaciones. Cada página contiene
seis canales de los cuales seleccionar.
• Presione el botón SCAN en pantalla para prever cada uno
de los 6 canales en pantalla por 10 segundos.
• Presione el botón en pantalla p ara volver a la pant alla
de Modo de Preselección (Preset Mode).
45
Page 50

VM9311TS
• Presione el botón MENÚ en pantalla para acceder al
Menú de Configuración XM (XM Setup Menu).
Para seleccionar un canal mientras está en modo Guía de
Canal (Channel Guide), presione el número de preselección
correspondiente (1-6) en la unidad, el control remoto o la
pantalla táctil. El canal iniciará la reproducción y la unidad
volverá a Modo de Preselección (Preset Mode). Mientras
está en Modo de Preselección, mantenga presionado el
botón de preselección en pantalla (o 1-6 en la unidad o el
control remoto) para almacenar el canal en reproducción.
Modo de Guía de Categoría
Cuando el modo de Guía de Categoría (Category Mode) está
seleccionado, "Search Mode" y "CATEGORY" aparecen en
la mitad superior de la interfaz de usuario.
• Mientras está en Modo de Búsqueda, para cambiar entre
modos de búsqueda de Canal y Categoría, presione los
botones CH o CAT en la pantalla táctil.
• Presione el botón >> (14) en el control remoto, el botón /\
(18) en el joystick, o el botón > en la pantalla táctil para
ver las próximas seis categorías.
• Presione el botón << (22) en el control remoto, el botón V
(19) en el joystick, o el botón < en la pantalla táctil para
ver las seis categorías previas.
• Presione el botón SCAN en pantalla para prever cada uno
de los canales en la categoría seleccionada por 10
segundos.
• Presione el botón en pantalla para volver a la pant alla
de Modo de Preselección (Preset Mode).
• Presione el botón MENÚ en pantalla para acceder al
Menú de Configuración XM (XM Setup Menu).
Para seleccionar una estación en la categoría especificada,
siga los siguientes pasos.
1. Para seleccionar una categoría, presione el número de
preselección correspondiente (1-6) en la parte delantera
de la unidad, el control remoto o la pantalla táctil. Una
vez que se selecciona la categoría, las estaciones en la
categoría se mostrarán en pantalla.
2. Presione el botón >> (14) en el control remoto, el botón
/\ (18) en el joystick, o el botón > en la pantalla táctil
para ver las próximas seis estaciones.
Presione el botón << (22) en el control remoto, el botón
V (19) en el joystick, o el botón < en la pantalla táctil
para ver las seis estaciones previas en la categoría
seleccionada.
3. Para seleccionar un canal mientras está en modo Guía
de Categoría (Category Guide), presione el número de
preselección correspondiente (1-6) en la unidad, el
control remoto o la pantalla táctil. El canal iniciará la
reproducción y la unidad volverá a Modo de
Preselección (Preset Mode). Mientras está en Modo de
Preselección, mantenga presionado el botón de
preselección en pantalla (o 1-6 en la unidad o el control
remoto) para almacenar el canal en reproducción.
Presione el botón TITLE (2) para volver a la página principal
del Modo Categoría y seleccione una categoría diferente.
Sintonía Directa
Para ingresar una estación directamente, realice los
siguientes pasos.
1. Presione el botón GOTO (21) hasta que aparezca la
siguiente pantalla.
2. Use los números en el control remoto para ingresar la
estación de radio XM deseada. Usted debe digitar 3
número (por ejemplo, 004).
3. Presione el botón >/|| (18) en el control remoto o
ENTER (20) en el joystick en la unidad o simplemente
deje que se agote el tiempo de espera para el teclado
numérico luego de 4 segundos y se ingresará la
estación automáticamente. Utilice el botón "CLR" en
pantalla para corregir los errores de entrada de datos y
luego "OK" para ingresar el número del canal.
Menú de Configuración de XM
Mientras está en modo radio XM, presione el botón MENÚ
(1) en el control remoto para ver el Menú de Configuración
XM.
Presione MENU para salir del submenú o menú actual y
retornar a la pantalla anterior.
Modo de Diagnóstico
Esta función se reserve para ser el servicio profesional como
soluciones de problemas o preguntas.
Control del Padre
Por el defecto, esta característica es abierta y todos los
canales se pueden alcanzar por cualquier persona que
escucha la radio. Para trabar una estación (la PASSWORD
es destacada por el defecto):
1. Presione el botón << (22) en el mando a distancia o el
botón de V (19) en la palanca de mando hasta que el
"número de canal" es azul destacado.
2. Incorpore el número de canal de tres cifras que se
trabará.
3. Vuelva al campo de la P ASS WORD e introduzca "1264"
que usa el mando a distancia.
4. Presione el botón >/|| (18) y la cerradura amarilla
pequeña se cerrará, indicando que el channel(s) es
bloqueado.
5. Seleccione la opción de la LOCK en el fondo del menú
para trabar el canal.
Presione el botón del MENÚ (1) en el mando a distancia dos
veces para volver a la página principal XM.
• Para abrir un canal (la PASSWORD es destacada por el
defecto):
1. Introduzca "1264" que usa el mando a distancia,
entonces el botón >/|| (18). El icono amarillo de la cerradura se abrirá.
2.
46
Page 51

VM9311TS
3. Presione el botón << (22) en el mando a distancia o \/
botón (19) en la palanca de mando hasta que se
destaca el CHANNEL NUMBER.
4. Incorpore el número de canal de tres cifras que se
abrirá.
5. Vuelva al campo de la PASSWORD e introduzca "1264"
que usa el mando a distancia.
6. Presione el botón >/|| (18).
7. Seleccione la opción del UNLOCK en el fondo del menú
para abrir el canal.
Presione el botón del MENÚ (1) dos veces en el mando a
distancia para volver a la página principal XM.
47
Page 52

OPERACIÓN DEL VIDEO DE DVD/VCD
NOTA: Cuando está adecuadamente instalado, el video en
DVD no puede reproducirse en la pantalla TFT principal a
menos que el freno de estacionamiento esté puesto. Si usted
intenta ver un DVD mientras el vehículo está en movimiento,
la pantalla TFT muestra "PARKING" con un fondo azul. Las
pantallas de video traseras, si corresponde, operarán
normalmente.
Abriendo / Cerrando la Pantalla de Video
TFT
Abriendo la Pantalla TFT
Para abrir la pantalla de video TFT, presione el botón OPEN
(1). La unidad hace un ruido de bip y luego se abre.
Cerrando la Pantalla TFT
Presione el botón OPEN (1) nuevamente para cerrar la
pantalla TFT. Si la pantalla está en la posición "IN", la misma
se mueve hacia afuera antes de cerrarse.
Insertar/Expulsar Disco
Luego de insertar un disco DVD, el modo DVD se inicia y
comienza la reproducción del disco.
NOT A: Si el Seguro de Padres (Rating) se activa y
el disco que se inserta no está autorizado, se
debe ingresar un código de 4 dígitos y/o el disco
debe ser autorizado (vea "Menú de
CALIFICACIÓN (Bloqueo de Padres)" en página
19.)
Usted no puede insertar un disco si ya hay un disco en la
unidad o si está apagada.
NOTA: El CD-R/RW y DVD-R/RW, DVD+R/RW no
funcionarán a menos que la sesión de grabación
se cierre.
Eyectar un Disco
Presione el botón (21) en la unidad o en el control remoto
(25) para eyectar al disco. La unidad automáticamente
vuelve al modo de Radio. Usted puede eyectar el disco con
la energía apagada y la unidad permanecerá apagada luego
de que el disco se haya eyectado.
Reinicie el Mecanismo de Carga
Si el disco se carga anormalmente o si ocurre una operación
del mecanismo central anormal, presione y mantenga el
botón (21) en la unidad o el control remoto (25) para
reiniciar el mecanismo de carga. La operación normal
reasume.
Accediendo al Modo DVD
Para cambiar a modo DVD cuando un disco ya está
insertado, presione el botón SRC en el panel delantero (15) o
control remoto (8) hasta que el DVD aparezca en la parte
baja de la pantalla.
Usando los Controles Táctiles de Pantalla
Las áreas táctiles para reproducción de DVD se deta llan abajo
A - Vuelve al menú principal (MAIN MENU)
B - Llave DISP: Muestra información sobre la reproducción
C - Selecciona el capítulo anterior
D - Selecciona el capítulo siguiente
E - Muestra los siguientes controles en pantalla: Menú,
, |<<, >>|, <<, >>.
Controlando la Ejecución
Deteniendo la Ejecución
Presione el botón de detener ( ) en la pantalla o presione el
botón /BAND (20) en el control remoto para detener la
reproducción del DVD.
Deteniendo la Reproducción
Presione le botón de reproducir/detener (
presione el botón
suspender o reasumir la reproducción del disco.
Ejecución en Cámara Lenta
Presione el botón << (22) en el control remoto o el botón V
(17) en el joystick para ejecutar el título actual en cámara
lenta a ½, ¼, 1/6 o 1/7 de la velocidad norma. Presione
(18) para reanudar la reproducción normal. Continúe
>/|| en el control remoto (18) para
.
>/||,
>/||) en la pantalla o
>/||
VM9311TS
presionando los botones << o V para bajar la velocidad de
reversa.
Reproducción en Repetición
Presione el botón REPT (7) en el control remoto para variar
el modo de repetición de la siguiente forma:
• DVD: Repetir Título, Repetir Capítulo, Apagar Repetir
• VCD (PBC apagado): Repetir Simple, Apagar Repetir
• MP3: Repetir Simple, Repetir Carpeta, Apagar Repetir
NOTA: Para una reproducción VCD, la función
repetir no está disponible si PBC está encendido.
Función de Repetición Seccional (A-B)
Utilice la función A-B para definir un área específica de un
disco para repetir.
• Presione el botón REPT A-B (6) en el control remoto para
configurar el punto de partida (A) de la sección repetida.
• Presione el botón REPT A-B una vez que alcanzó el
punto de finalización deseado (B) de la sección repetida.
La porción seleccionada del DVD se repetirá ahora
continuamente.
• Presione el botón REPT A-B nuevamente para cancelar
la configuración de la sección A-B y detener la ejecución
en repetición.
Reproducción Aleatoria
Con un DVD, VCD o CD en preproducción, presione el botón
RDM (33) en el control remoto para activar la reproducción
aleatoria y reproducir todos los capítulos/pistas en orden
aleatorio. "On" aparece en pantalla.
Presione el botón >>| (19) en el control remoto o el botón >
(17) en el joystick para buscar la estación aleatoria siguiente.
Presione el botón RDM nuevamente para apagar la
reproducción aleatoria.
NOT A: Cuando un V CD se está reproduciendo con
PBC encendido en "On", el activar la
reproducción aleatoria automáticamente apaga
el PBC.
Accediendo al Menú DVD
Presione el botón MENU (1) en el control remoto para
mostrar el menú de DVD principal. Utilice los botones
direccionales (flechas) (<, >, /\ y V) en el joystick (16, 17, 18,
19) para seleccionar un título del menú.
Presione el botón TITLE (2) en el control remoto para
seleccionar un título diferente para reproducir.
48
Page 53

VM9311TS
Presione el botón >/|| (18) en el control remoto o ingrese el
botón ENTER (20) para confirmar su selección e iniciar la
reproducción.
Moviéndose a Través de Capítulos
Presione el botón >>| (19) en el control remoto o el botón >
(17) en el joystick para avanzar al próximo capítulo en el
DVD.
Presione el botón |<< (17) en el control remoto o el botón <
(16) en el joystick para ir al capítulo previo.
Avance Rápidoo
Presione el botón >> (14) en el control remoto o el botón /\
(18) en el joystick para avance rápido. Mantenga
presionando y soltando el botón para incrementar la
velocidad "2X" a "4X", "8X" y "20X".
Ir a Búsqueda (goto)
Durante la reproducción de DVD o VCD, realiza los
siguientes pasos para utilizar la función GOTO para acceder
a una ubicación específica en el disco:
1. Presione el botón GOTO (21) en el control remoto para
ingresar al modo "GO TO".
2. Presione los botones o (14, 22) en el control
remoto o los botones o (16, 17) en el joystick para
seleccionar una categoría (remarcada en azul).
• Para modo DVD, usted puede elegir el buscador de
Hora o Título/Capítulo.
Para modo DVD, usted
puede elegir el
buscador de Hora o
Título/Capítulo.
• Para modo VCD, presione el botón GOTO para elegir
entre Búsqueda de Pista (Track Search), Búsqueda de
Disco (Disc Search) y Salir (Exit).
Para modo DVD, usted
puede elegir el
buscador de Hora o
Título/Capítulo.
Para el modo de VCD,
presione el botón
GOTO para elegir entre
la búsqueda de la pista,
la búsqueda del disco y
la salida
3. Ingrese una hora en el campo utilizando el teclado
numérico (29) en el control remoto.
4. Presione el botón >/|| (18) en el control remoto o
ingrese el botón ENTER (joystick) (20) para ir a una
ubicación específica en el disco.
5. Presione el botón GOTO nuevamente para salir.
Capítulo Directo / Selección de Pista
Durante la reproducción del DVD,
VCD y CD, usted puede utilizar el
teclado numérico en el control
remoto (29) para acceder a una
pista directamente.
Viendo un Ángulo de
Imagen Alterno (DVD
Solamente)
Algunos DVDs contienen escenas que han sido grabadas
simultáneamente desde diferentes ángulos. Para discos
grabados en múltiples ángulos, presione el botón ANGLE
(13) en el control remoto para alternar entre los ángulos
disponibles en la imagen en pantalla.
Acercándose
Presione el botón ZOOM (23) en el control remoto para
agrandar y panear la imagen del video utilizando las
siguientes opciones: "Q1", "Q2", "Q3", y "OFF".
Discos con Lenguaje Múltiple (DVD
Solamente)
Cambiando el Lenguaje del Audio
Si usted está mirando un disco grabado en múltiples
lenguas, presione el botón AUDIO (5) en el control remoto
para elegir un lenguaje.
Cambiando el Lenguaje del Subtítulo
Si usted está viendo un disco grabado en múltiples lenguajes
con subtítulos, presione el botón SUBTITLE (9) en el control
remoto para elegir el lenguaje en el cual le gustaría que
aparezcan los subtítulos.
NOTA: Durante la reproducción de un VCD,
presione el botón AUDIO (5) en el control remoto
para elegir entre Canal Izquierdo, Canal Derecho
y Estéreo.
PBC (Control de Reproducción) (VCD
Solamente)
Para VCDs con funcionalidad de reproducción, PBC (control
de reproducción) provee controles adicionales para la
reproducción de un VCD.
Presione le botón MENÚ (1) en el control remoto para
alternar la función PBC entre encendido o apagado (On/Off).
Una vez que el PBC esté encendido, la reproducción
comienza de la pista uno de la lista de reproducción.
NOT A: Cuando el PBC se activa, el avance rápido,
reproducción lenta y pista previa/siguiente están
disponibles. Repetir y selección de pista directa
no están disponibles.
Cuando el PBC se activa, el seleccionar aleatorio, escaneo o
búsqueda automáticamente desactiva PBC.
Información de Reproducción
Durante la reproducción de DVD y VCD, presione el botón
INFO (10) en el control remoto para mostrar información de
reproducción en pantalla incluyendo el medio en
reproducción y el tiempo de reproducción actual.
Información de Reproducción de DVD
La siguiente información se muestra en la parte tapa de la
pantalla durante la reproducción de un DVD:
• T : 5/8 - "5 / 8" indica el quinto de 8 títulos en el DVD que
está reproduciendo actualmente.
• C : 2/16 - "2 / 16" indica el segundo de 16 títulos en el
DVD se está reproduciendo actualmente.
• 00:41:28 - "00:41:28" indica el tiempo de reproducción del
título actual.
• 2 / 6 Eng - La información de lenguaje indica el
segundo lenguaje de 6 (Inglés) que actualmente está en
uso.
49
Page 54

VM9311TS
La siguiente información se muestra en la parte inferior de la
pantalla durante la reproducción de un DVD:
Source: DVD/CD EQ: Flat Loud: Level 1
• Source DVD/CD es la fuente de reproducción actual para
la zona delantera.
• EQ: PLANO - El ecualizador está configurado en plano
(FLAT).
• Volumen Nivel 1 - La opción de Volumen está
configurada a volumen de Nivel 1.
Información de Reproducción de DVD
La siguiente información se muestra en la parte tapa de la
pantalla durante la reproducción de VCD:
• VCD2.0 - Formato del disco actual.
• T : 6/18 - "6 / 18" indica el sexto de 18 títulos en el VCD
que está reproduciendo actualmente.
• 00:02:18 - "00:02:18" indica el tiempo de reproducción
del título actual.
La siguiente información se muestra en la parte inferior de la
pantalla durante la reproducción de un VCD:
Source: DVD/CD EQ: Flat Loud: Level 1
• Source DVD/CD - "DVD" es la fuente de reproducción
actual para la zona delantera.
• EQ: PLANO - El ecualizador está configurado en plano
(FLAT).
• Volumen Nivel 1 - La opción de Volumen está
configurada a volumen de Nivel 1.
Información de Disco General
Table 7: Propiedades del Disco
Símbolo Propiedades de Disco de 12 cm
Lado simple capa simple 74 minutos
Table 8: Símbolos de Disco
Símbolo Significado
Número de lenguajes de voz grabados. El
número dentro del ícono indica el número de lenguajes en el disco (máximo de 8).
Número de lenguajes en subtítulo disponibles en
el disco (máximo de 32).
Número de ángulos provistos (máximo de 9).
Proporción de imagen disponible. "LB" significa
Letter Box (Buzón) y "PS" significa Pan/Scan
(paneo/escaneo). En el ejemplo en la izquierda, el
video 16:9 se puede convertir a video Letter Box.
Indica el código de área donde el disco se puede
pasar.
• Región 1: USA, Canadá, Islas del Océano
Pacífico Este
• Región 2: Japón, Europa de Oeste, Europa
del Norte, Egipto, Sudáfrica y Oriente Medio.
• Región 3: Taiwán, Hong King, Corea del Sur,
Tailandia, Indonesia y Asia del sudeste.
• Región 4: Australia, Nueva Zelanda, América
Central y América del Sur, Islas Oceánicas del
Pacífico Sur/Oceanía.
• Región 5: Rusia, Mongolia, India, Asia
Central, Europa del Este, Corea del Norte,
África del Norte, Asia Noroeste.
• Región 6: China Continental
• TODO: Todas las Regiones
Tiempo de
Repord. Máx.
Table 7: Propiedades del Disco
Símbolo Propiedades de Disco de 12 cm
Lado simple capa simple (DVD-5)
Lado simple capa doble (DVD-9)
Lado doble capa simple (DVD-10)
Lado doble capa doble (DVD-18)
Lado simple capa simple (VCD) (Método MPEG 1)
Tiempo de
Repord. Máx.
(Método MPEG 2)
133 minutos
242 minutos
266 minutos
484 minutos
74 minutos
50
Page 55

LANGUAGE
DVD SETUP
AUDIO
VIDEO
RATING
VM9311TS
MENÚ CONFIGURACIÓN DEL DVD/DISC
para remarcar el menú deseado en verde. Usted también
NOTA: Un DVD/disco se debe cargar en el
mecanismo y jugar antes de tener acceso al
menú de la disposición de DVD. Mientras que el
DVD/disco está jugando, presione el botón DVD
SETUP en el telecontrol para tener acceso al
menú de la disposición de DVD.
En modo "DVD Setup" (Configuración de DVD),
"LANGUAGE" (Lenguaje), "VIDEO", "AUDIO" y "RATING"
(Control de padres) están disponibles para su configuración.
Esta operación puede ser realizada utilizando el control
remoto o los controles con el joystick.
Pantalla de Configuración de DVD
Para configuraciones del sistema, presione el botón DVD
SETUP (30) en el control remoto o toque "SETUP" en la
pantalla para ingresar al menú de configuración ("SETUP").
"SYS SETUP" es remarcado en verde.
Para acceder al menú "DVD SETUP", presione el botón V (7)
en el control remoto para elegir la opción de configuración de
DVD ("DVD SETUP"), luego presione el botón >/|| (18), o
solamente toque en la pantalla "DVD SETUP". "LANGUAGE"
(lenguaje), es remarcado en verde.
DVD SETUP
NOTA: Una vez que se completa la configuración
del DVD, las configuraciones se memorizan. Para
volver a la configuración de fábrica, presione el
botón RESET (25) en el panel delantero.
Menú de Acceso
Para acceder al menú (LANGUAGE, VIDEO, AUDIO o
RATING), presione los botones de dirección en el joystick
(16, 17, 18, 19) o en el control remoto (14, 17, 18, 19, 22)
BACK
puede tocar la selección de menú en pantalla para acceder al
menú.
Seleccionando una Función para Ajuste
Una vez dentro del menú, presione los botones >> o << (14,
22) en el control remoto o los botones /\ or V (18, 19) en el
joystick para seleccionar la función a ajustar.
Ajustando una Función
1. Ingrese en el campo de opción para la función que
desea ajustar presionando el botón >/|| (18) en el control remoto o presionando el botón ENTER (joystick)
(20) en la unidad. Un submenú aparece en segunda fila
con la opción seleccionada remarcada en celeste.
2. Seleccione un nuevo valor presionando los botones >>
or << (14, 22) en el control remoto o los botones /\ o V
(18, 19) en el joystick.
3. Confirme su selección presionando los botones <<, |<<,
o >>| (22, 17, 19) en el control remoto, o los botones < o
> (16, 17) en el joystick. El nuevo valor se remarca en
celeste y la configuración se completa.
Menú LANGUAGE (Lenguaje)
Si un DVD soporta más de 1 Subtítulo o lenguaje de Audio,
todos los lenguajes están disponibles para ser seleccionados
durante la reproducción. Si el DVD no soporta el lenguaje
seleccionado, entonces se utiliza el lenguaje
predeterminado. Durante la reproducción, presione el botón
SUBTITLE (9) o AUDIO (5) en el control remoto para
cambiar el lenguaje directamente. Esto no afectará la
configuración del menú DVD.
Table 9: Funciones del Menú LANGUAGE
Configuración Opciones Function
Subtítulos Inglés Seleccione el leng uaje predetermi-
Automático
Off
Audio Inglés Seleccione el lenguaje predetermi-
Menú DVD Inglés Seleccione el lenguaje predetermi-
BACK Volver al menú anterior.
nado en el cual usted quiere ver los
subtítulos (si aplica).
nado en el cual usted quiere escu char el audio (cuando sea optativo).
nado en el cual usted quiere ver el
menú DVD (si aplica).
Menú VIDEO
Table 10: Funciones del Menú VIDEO
Configuración Opciones Function
TV Shape
(Proporción)
Angle Mark
(Marca de
Ángulo)
BACK Volver al menú anterior.
NOTA: Para discos estándar sin formato para
"widescreen" o pantalla ancha, el uso de la
proporción 16:9 distorsionará la imagen.
4:3 PS Con pantalla de 16:9, los lados
4:3 LB Con panta lla de 16:9, la parte de arriba
16:9 La imagen se presenta en vista ancha
On
(Encendido)
Off (Apagado)
izquierdo y derecho están cortados
y de abajo están cortadas
con una proporción de 16:9
Se muestra el indicador de ángulo (si
aplica)
No se muestra el indicador de ángulo
Menú de AUDIO
Table 11: Funciones del Menú AUDIO
Configur
ación
DRC Off (Apa-
BACK Volver al menú anterior.
Opciones Función
gado)
On (Encen-
dido)
Emplee el Control de Rango Dinámico
para mejor reproducción en volúmenes
bajos.
Menú RATING (Bloqueo de Padres)
El sistema de DVD tiene una función de bloqueo de padres
incorporada para prevenir que personas no autorizadas vean
contenidos restringidos. Predeterminadamente, el sistema
de calificación está desbloqueado. Una vez configurado, el
bloqueo de padres se desbloquea solamente con la
51
Page 56

contraseña correcta. Una vez que se ingresa la contraseña,
la calificación está lista para ser configurada.
Table 12: Funciones de Menú RATING
Configuración Opciones Función
Password
(Contraseña)
Rating (clasificación)
Load Factory
(Carga de Fabrica)
BACK Volver al menú anterior.
_ _ _ _ Ingrese una contraseña de 4
1. Seguridad
de Niños
2. G
3. PG
4. PG-13
5. PG-R
6. R
7. NC-17
8. Adulto
Reiniciar Seleccione "Reset" (reiniciar)
dígitos para activar la función de
"Rating" (clasificación).
Seleccione el nivel de clasificación adecuado para la audiencia a la que se dirige.
Usted puede sustituir con una
clasificación más alta utilizando
su contraseña.
para reestablecer la configuración de fabrica para el sistema
de clasificación solamente (Rating system only).
Para reestablecer la contraseña, ingrese el menú "RATING"
e ingrese la contraseña actual. Una vez que se ingresa la
contraseña correcta, usted accede al campo "Password" e
ingresa la nueva contraseña.
VM9311TS
NOTA: Guarde la contraseña y manténgala en un
lugar seguro para futura referencia. La
clasificación de cada disco está marcada en el
disco, en su envoltorio o documentación. Si el
disco no tiene clasificación, la función de
bloqueo de padres no está disponible. Algunos
discos restringen solamente porciones del disco
y el contenido apropiado se verá. Para detalles,
por favor refiérase a la descripción del disco.
52
Page 57

VM9311TS
OPERACIÓN DEL AUDIO DE DVD/DISCO
Las instrucciones para el control de TFT e Insertar/Expulsar
son las mismas para operar DVD, CD, y MP3. Por favor, vea
la sección Operación del Video de DVD/SDISC para obtener
información sobre estos temas.
El VM9311TS jugará música u otros archivos audio de los
medios siguientes del disco:
• CD-DA
• CD-R/RW con los archivos de MP3 o de WMA
•DVD
• DVD-R/RW con los archivos de MP3 o de WMA
Después de insertar un disco con la pantalla de TFT ábrase,
el disco y el título de la pista (si esta' disponible), junto con el
número de la pista y el tiempo el jugar aparece en la pantalla.
Interfaz Utilizador del Lector de SD
Las teclas táctiles para reproducción de tarjeta CD se
describen abajo.
9
3 1
T: 02/18 00:00:51
Repeat S can
Random
Disc Title Ultra
Track Name Useless
10
11
12 13
Source: DVD/CD EQ: USER Loud: OFF
16
1. Pista actual y número total de pistas en disco
2. Transcurrido jugando tiempo
3. Tacto para activar o para desactivar modo del juego de
la repetición
4. Tacto para activar o para desactivar modo de
exploración
5. Tacto para activar o para desactivar modo al aleatoria
6. Tiempo actual
7. Título del Disco
8. Título de la Pista
9. Tacto a volver al MENÚ PRINCIPAL
2
14 15
17
5
6
4
AM
1:322
7
8
18
10. >/||: Tacto al aparato de lectura del disco del juego o de
la pausa
11. : Tacto para parar aparato de lectura del disco
12. |<<: Tacto a moverse a la pista anterior
13. >>|: Tacto a moverse a la pista siguiente
14. <<: Tacto para rebobinar la pista actual
15. >>: Tacto a ayunar pista actual delantera
16. Zona Delantera Que juega Modo
17. Zona Posterior Que juega Modo
18. Método de codificación de medios que son jugados
19. "Surround Music" seleccionado
Controlando la Reproducción
Deteniendo la Reproducción
Presione el botón 6/STOP (13) en el panel delantero o el
botón /BAND (20) en el control remoto para detener la
reproducción del DVD. Para reasumir aparato de lectura,
presione botón ENTER (20) en el panel delantero o el botón
>/|| en el mando a distancia (18).
Pausando la Reproducción
Presione le botón ENTER (20) en el panel delantero o el
botón >/|| en el control remoto (18) para pausar o reasumir la
reproducción del disco.
Búsqueda de Pista
Presione el botón >>| (19) en el control remoto o el botón >
(17) en el joystick para buscar la pista siguiente más alta.
Presione el botón |<< (17) en el control remoto o el botón <
(16) en el joystick para buscar la pista siguiente más baja.
Repita la Reproducción
Presione el botón 4/RPT (11) en panel delantero o el botón
de REPT (7) en mando a distancia para alterar modo de la
repetición según el siguiente:
• DVD: Repeat Title, Repeat Chapter, Repeat Off
• CD-DA: Repeat Single, Repeat Off
• CD-R/RW: Repeat Single, Repeat Off
• DVD-R/RW: Repeat Single, Repeat Off
Exploración de la Pista Selecta (discos CD-DA
solamente)
Durante juego del disco, presione el botón 3/SCN (10) en la
unidad o el botón de SCN (34) en el mando a distancia para
jugar los primeros 10 segundos de cada pista. Cuando se
alcanza una pista deseada, presione el botón de SCN otra
vez para cancelar la función y para jugar la pista
seleccionada.
Reproducción Aleatoria
Con la reproducción de disc, presione el botón 5/RDM (12)
en el panel delantero para activar la reproducción aleatoria.
En modo reproducción aleatoria, usted puede presionar el
botón |<< o >>| (17, 19) en mando a distancia o el botón < o
> (16, 17) en la palanca de mando para seleccionar una pista
en orden al azar en vez de la progresión normal. Presione los
5/RDM otra vez para cancelar modo al azar del juego.
NOTA: El CD-R y CD-RW no funcionarán a menos
que la sesión de grabación se cierre.
Avance Rápido
Presione el botón >> (14) en el control remoto o el botón /\
(18) en el joystick para avance rápido. Mantenga
presionando y soltando el botón para incrementar la
velocidad "2X" a "4X", "8X" y "20X".
Operación MP3/WMA
Este reproductor le permite pasar archivos MP3 grabados en
CD-ROM, CD-R y CD-RW. Para discos CD-RW, por favor
asegúrese que esté formateado utilizando un método
completo y no un método rápido para prevenir una operación
irregular del disco.
Hasta 999 canciones o archivos se pueden quemar sobre un
disco para una mezcla MEGA de la música de DVD. No
exceda este número de canciones o los archivos o los
problemas de la legibilidad del disco pueden ocurrir.
Compatibilidad del Formato MP3
Los formatos de nombre de archivo listados abajo son
compatibles con esta unidad:
• ISO 9660 - nombre de archivo: Extensión de archivo de
12 caracteres: 3 caracteres
• ISO 9660 - nombre de archivo: Extensión de archivo de
31 caracteres: 3 caracteres
• Joliet: 64 caracteres
Si el nombre del archivo o de la carpeta no cumple los
estándares del sistema de archivo ISO 9660, pude que no
aparezca o se reproduzca correctamente.
Utilice la siguiente configuración cuando esté comprimiendo
datos de audio para su disco MP3:
• Rango de Transferencia de Bits: 320kbps
• Frecuencia de Muestreo: 48kHz
Cuando esté grabando un MP3 a la capacidad máxima del
disco, deshabilite grabaciones adicionales. Para grabar en
53
Page 58

un disco vacío hasta el máximo de la capacidad del disco,
utilice la configuración "Disc at once".
Reproduciendo Archivos MP3/WMA
Luego de insertar un disco MP3/WMA, los archivos pasarán
en la secuencia del directorio raíz.
Utilice el teclado numérico (29) del control remoto para
acceder a los archivos directamente.
NOTA: Cuando MP3/WMA que se queman archiva
sobre un disco de DVD, utilice la opción ardiente
2X o 4X, si esta' disponible. Esta velocidad
ardiente más lenta ayudará a eliminar errores del
almacenador intermediario y a aumentar
confiabilidad de lectura del disco. También,
carpetas del uso al quemarse una gran cantidad
de canciones/de archivos a un disco para la
navegación fácil de la música.
Además, seleccione la opción del “Disc at Once”
(disco inmediatamente) en su software ardiente
al quemarse discos de DVD.
VM9311TS
54
Page 59

VM9311TS
OPERACIÓN DE IPOD
NOTA: Sea seguro que su iPod tiene los soportes
lógico inalterable más últimos de Apple
instalados para evitar ediciones de la
conectividad.
Al Modo del iPod del Acceso
La unidad cambiará automáticamente al modo del iPod
cuando un iPod se tapa en el módulo de los medios. Para
volver al menú del iPod de cualquier otro menú de la fuente,
presione el botón de SRC (15) en el panel delantero o el
mando a distancia (8) hasta que el menú del iPod aparece en
la pantalla.
Controlar su iPod
Los botones siguientes del mando a distancia se utilizan para
tener acceso a los menús del iPod:
TITLE = Música
MENU = Fotos
AUDIO = Videos
Utilice la palanca de mando en la unidad o las llaves
direccionales en el mando a distancia para navegar los
menús del iPod.
Lectura de la Música
Presione el botón >>| (19) en el control remoto o el botón >
(17) en el joystick para seleccione el artículo siguiente en el
menú.
Presione el botón |<< (17) en el control remoto o el botón <
(16) en el joystick para seleccione el artículo anterior en el
menú.
Presione el botón >/|| (18) en el control remoto o el botón
ENTER (20) en el joystick para seleccionar la opción
destacada del menú.
Presione el botón >> (14) en el control remoto o el botón /\
(18) en el joystick para volver al menú anterior.
Lectura de Video
Mientras que el vídeo del iPod se puede ver en la pantalla
VM9311TS, usted debe utilizar el iPod para controlar las
opciones video del aparato de lectura.
Presione el botón AUDIO (5) en el mando a distancia para
tener acceso al modo del VÍDEO del iPod. El control de
lanzamiento de la voluntad VM9311TS de nuevo al iPod así
que a usted puede seleccionar los medios video para ser
exhibido en el monitor de VM9311TS TFT. Para dar salida al
modo VIDEO presione el botón >> (14) en el mando a
distancia o el botón del MENÚ en el iPod.
NOTA: Para transmitir el vídeo de su iPod a la
pantalla VM9311TS, usted debe fijar las opciones
siguientes a través del menú video de los ajustes
del iPod: TV Out = On, TV Signal = NTSC, y
Widescreen = On.
Lectura de Foto
Mientras que el vídeo del iPod se puede ver en la pantalla
VM9311TS, usted debe utilizar el iPod para controlar las
opciones foto del aparato de lectura.
Presione el botón MENU (1) en el mando a distancia para
tener acceso al modo del PHOTO del iPod. El control de
lanzamiento de la voluntad VM9311TS de nuevo al iPod así
que a usted puede seleccionar los medios video para ser
exhibido en el monitor de VM9311TS TFT. Para dar salida al
modo PHOTO presione el botón >> (14) en el mando a
distancia o el botón del MENÚ en el iPod.
NOTA: Después de desconectar su iPod, el
VM9311TS volverá siempre al modo pasado
alcanzado cuando su iPod se tapa nuevamente
dentro de la unidad.
Revés Delantero/Rápido Rápido
Para ayunar el revés delantero o rápido, presiona y sostiene
los botones |<< o >>| (17, 19) para 1 segundos y continúan
sosteniendo. Lance para reasumir el juego normal.
Busque Playlist/El Artista/El Álbum/La Canción
Para buscar con Playlists, los artistas, los álbumes y las
canciones, presionan el botón 1 (29) en el mando a distancia
mientras que en uno de los directorios siguientes: Playlist,
artista, álbum o canción. El directorio seleccionado será
alcanzado con el número de páginas y de archivos en que
directorio exhibido en la tapa de la página. Para tener acceso
a la página o al archivo, incorpore el número de la página o
de archivo directamente del telclado numérico de mando a
distancia. Presione el botón de |<< o >>| (17, 19) en el
mando a distancia o el botón de < o > (16, 17) en la palanca
de mando para seleccionar la canción o la pista deseada.
55
Page 60

SOLUCIÓN DE PROBLEMAS
Tabla 13: Troubleshooting
Problema Causa Acción Correctiva
GENERAL
La unidad no se encenderá El Fusible del Radio se quemó InstalInstalar un nuevo fusible con la clasificación adecuada
El fusible de la batería del auto se quemó Instalar un nuevo fusible con la clasificación adecuada
Operación Ilegal Presione el botón RESET localizado en la esquina derecha inferior del panel delantero
Control remoto no funciona Batería vacía Reemplace la betería por una nueva
Batería instalada incorrectamente Quite la batería e instálela correctamente
No hay sonido o es bajo Conexión de salida de audio inadecuada Verifique el cableado y corríjalo
Se puso el volumen muy bajo Incremente el nivel de volumen
Conexión "MUTE" inadecuada Revise el diagrama del cableado y verifique la conexión "MUTE"
Altavoces dañados Reemplace los altavoces
Balance de volumen fuertemente sesgado Ajuste el balance del canal a la posición central
El cable del altavoz está en contacto con una parte de
metal del automóvil
Calidad de sonido pobre o distorsión Disco pirata en uso Utilice copias originales
Potencia de parlante no compatible con la unidad Conecte altavoces adecuados
Altavoz está cortado Verifique el contacto del altavoz
Malfuncionamiento del Tel-Mute El cable de "MUTE" está conectado a tierra Verifique que la conexión "MUTE" no esté a tierra y que esté apropiadamente aislada
La unidad se reinicia sola cuando el motor está
apagado
MONITOR TFT
El Monitor no se abre automáticamente La apertura automática (Auto Open) del TFT está apa-
No hay imagen Conexión incorrecta al cable de freno de estaciona-
Imagen destellante o interferencia en pantalla El DVD no es compatible con la configuración del
Imagen prolongada o proporción de pantalla alto/
ancho inadecuadas
El monitor se detiene en una posición incorrecta La ruta de movimiento está bloqueada Presione el botón OPEN para reiniciar el movimiento del monitor
SINTONIZADOR
Búsqueda de estaciones débil La antena del auto no está completamente extendida Conecte el cable de control de antena del auto adecuadamente
No puede insertar un disco Hay un disco adentro de la unidad Eyecte el disco actual e inserte uno nuevo
Conexión incorrecta entre el ACC y el cable de batería
positivo
gada
miento
PRK SW está activado y el freno de esta cionamiento no
enganchó
sistema de TV
Conexiones de señal de video inadecuadas Verifique el cableado y corríjalo
Configuración de proporción incorrecto Utilice una configuración de proporción correcta
La antena del auto no está adecuadamente conectada Conecte el cable de control de antena del auto adecuadamente
Función LOCAL está activada Apague la función LOCAL
Aísle todos los cables de conexión del altavoz
Verifique el cableado y corríjalo
Encienda TFT Auto Open
Verifique el cableado y corríjalo
Detenga el vehículo en un lugar seguro y ponga el freno de estacionamiento
Cambie la configuración para acomodarse al disco
VM9311TS
56
Page 61

VM9311TS
Tabla 13: Troubleshooting
Problema Causa Acción Correctiva
El disco no se reproduce El disco está doblado o rayado Utilice un disco en buenas condiciones
Disco sucio o mojado Limpie el disco con una tela suave
El láser está sucio Limpie la punta del láser con un disco de limpieza
Se utiliza un disco incompatible Utilice un disco compatible
La clasificación del disco excede el límite del Bloqueo
de Padres
El código de región del disco no es compatible con la
unidad
El disco está al revés Inserte el disco con el sello hacia arriba
Imagen borrosa, distorsionada u oscura El disco es una copia ilegal Utilice un disco original
El PBC no se puede utilizar durante la reproduc-
ción de VCD
No hay repetición o búsqueda mientras se repro-
duce un VCD
MP3
Ocurrió una interrupción durante la reproducción Disco sucio o rayado Limpie el disco o reemplace
Se muestra un mensaje de reproducción incorrecta El mensaje es más largo de lo que puede mostrar el
RADIO XM
Ninguno sonido Conexiones de cable incorrectas Verifique las conexiones de cable de RCA
XM fuente no disponible Conexiones de cable incorrectas Verifique las conexiones de cable de XM cable del cable de los datos o del módulo de los medios
ANTENNA aparece en XM la pantalla de la cañería Antena no conectada Verifique la conexión basada en los satélites de la antena
El resto de los errores Reajuste el Módulo de los Medios
IPOD
Fuente del iPod no disponible Conexiones de cable incorrectas Verifique las conexiones de cable del módulo del jLink y de los medios
No puede ver medios del vídeo y de la foto en la
pantalla de TFT
El resto de los errores Reajuste el Módulo de los Medios
PCB no disponible en el disco
PCB está encendido Apague el PCB
El archivo está dañado o mal grabado Cree nuevamente el disco con archivos buenos
LCD
Wrong iPod Video Settings Cambie los ajustes video del iPod a TV Out = On
Cambie la configuración del Bloqueo de Padres a una restricción inferior
Utilice un disco con código de región adecuado
Verifique la conexión de cable video de la entrada del amarillo RCA del módulo de los medios
Mensajes de Error
Tabla 14: Mensajes de Errors
Mensaje Mostrado Causa Acción Correctiva
Carga El disco está siendo leído
No Disc (no hay disco) El disco está sucio Limpie el disco con una tela suave
El disco está al revés Inserte el disco con el sello hacia arriba
El disco no está en el compartimento correspondiente Inserte un disco
Disco Malo El disco está sucio Limpie el disco con una tela suave
El disco está al revés Inserte el disco con el sello hacia arriba
Disco desconocido El formato del disco no es compatible con esta unidad
57
Page 62

Tabla 14: Mensajes de Errors
Mensaje Mostrado Causa Acción Correctiva
Region Error (Error de Región) El DVD no es compatible con el código de región de la
Error Operación del mecanismo ilegal Presione EJECT por 5 segundos para reiniciar el mecanismo de carga
unidad
Cuidado y Mantenimiento
1. Utilice solamente un paño de silicona limpio y detergente neutro para limpiar el panel delantero o monitor.
Una tela dura y detergente que no es neutro (tal como
alcohol) puede rayar o decolorar.
2. No ponga agua o fluidos de limpieza en la unidad.
3. Si la temperatura dentro del reproductor llega a ser muy
caliente, un circuito de protección automáticamente
detendrá la ejecución del disco. En este caso, deje que
la unidad se enfríe antes de utilizar nuevamente el
reproductor.
4. Nunca inserte nada que no sea un disco compacto de
5" (12 cm) dentro del reproductor, pues el mecanismo
se puede dañar debido a objetos extraños.
5. No intente utilizar CD simples de 3" (8 cm.) en esta
unidad, con o sin adaptador, pues puede causar daños
en el equipo y/o en el disco. Tales daños no están
cubiertos por la garantía de este producto.
6. El reproductor de CD puede no operar apropiadamente
en calor o frío extremos. Si tales condiciones se dan,
espere hasta que el interior del vehículo alcance una
temperatura normal antes de utilizar el reproductor.
7. Cuando el vehículo se calienta durante clima frío o bajo
condiciones de humedad, puede aparecer
condensación en el panel LCD. Si esto ocurre, la
pantalla no operará apropiadamente hasta que la
humedad se haya evaporado.
8. Sugerimos que utilice un disco de limpieza en esta
unidad más frecuentemente que en la unidad en su
casa debido a las condiciones ambientales del vehículo.
VM9311TS
58
Page 63

VM9311TS
ESPECIFICACIONES
Calificación de Energía CEA
Sortie puissance : 13 Watt RMS x 4 Chaînes x 4 Ohms @<
1% THD+N
Rapport signalement au bruit : 70 dBA sous référence
(Référence 1 watt, 4 Ohms)
Réponse fréquence : 20Hz jusqu'à 20 kHz, -3dB entrée
auxiliaire utilisé comme référence source
Voltage référence fourni : 14.4 VDC
Platine DVD/CD
Formats compatibles : DVD-R, DVD-RW, DVD+R,
DVD+RW, CD-R, CD-RW, CD-DA, MP3, WMA, SVCD, VCD,
et MPEG1, MPEG2 et JPEG.
Rapport signalement au bruit : > 95dBA
Gamme dynamique : > 95dB
Réponse fréquence : 20Hz jusqu'à 20kHz, -3dB
Séparation des chaînes : > 60dB @ 1kHz
Convertisseurs D/A : Haute performance 24bit, 192 kHz,
multi-bit modulateur Sigma Delta.
Vidéo
Format : NTSC, PAL (auto-détection)
Sortie : 1 Vp-p (75 ohms)
Entrée : 1 Vp-p, (75 ohms)
Tuner FM
Gamme de syntonisatioin : 87.5MHz à 107.9MHz
Sensibilité Mono (-30dB) : 9dBr
Seuil de sensation douloureuse (50dB) : 15dBr
Sélectivité de chaîne alternative : 70dB
Rapport signalement au bruit @ 1kHz : 58dB
Rejet d'image : 60dB
Séparation stéréo @ 1kHz : >30dB
Réponse fréquence : 30Hz à 15kHz, -3dB
Tuner AM
Gamme de syntonisation : 530kHz à 1720kHz
Sensibilité (-20dB) : 30uV
Rapport signalement au bruit @ 1kHz : 50dB
Rejet d'image : 60dB
Réponse fréquence : 50Hz à 2kHz, -3dB
Moniteur
Taille de l'écran : 7.0'' (mesure diagonale), 16 :9 écran large
• 6.06'' (154.1mm) largeur x 3.42'' (87mm) hauteur
Type d'écran : TFT Affichage aux cristaux liquides (LCD)
matrice active
Temps de réponse : 30millisecondes temps de montée, 50
millisecondes temps de descente
Résolution :
• DVD/Vidéo composite en 336,960 sous pixels, 1440
largeur x 234 hauteur
Angle de visionnement :
• 65 degrés droite ou gauche
• 40 degrés vers le haut
• 65 degrés vers le bas
Général
Impédance entrée auxiliaire : 10k
Alimentation : 11 à 16VDC, terre négative
Antenne de Puissance (bleu): 500mA max, protection
limitée au courant électrique
Extérieur d'Amplificateur (bleu/blanc): 500mA , protection
limitée au courant électrique
Fusible : 10-Amp, type mini ATM
Dimensions de châssis DIN : 2''x 7'' x 7'' (50mm x 178mm x
178mm)
Température de fonctionnement : -20C ~ 70C
*Les spécifications sont susceptible d'être changé sans
avertissement
Garantia Limitade de 12 Meses
AUDIOVOX CORPORATION (la Compañía) garantiza al
comprador minorista original del presente producto que en el
caso de que este producto o cualquiera de las partes del
mismo, bajo circunstancias y condiciones de uso normal,
tuviera algún defecto, tanto en el material como en la mano
de obra, dentro de un plazo de 12 meses a partir de la fecha
de compra original, dicho(s) defecto(s) serán reparados o
reemplazados (a criterio de la Compañía) sin cargo alguno
por las piezas y la mano de obra para la reparación. Para
obtener servicios de reparación o sustitución en virtud de los
términos y las condiciones de la presente Garantía, entre en
contacto con por favor Jensen en el número de teléfono
proporcionado abajo.
Esta Garantía no cubre la eliminación de la estática del
autóvil ni los ruidos del motor, la corrección de los problemas
de antena, los gastos incurridos para la remoción o la
reinstalación del producto, o los daños provacados a las
cintas, los discos compactos, los accesorios o los sistemas
eléctricos del vehículo. Esta Garantía no se aplica a aquellos
productos, o partes de los mismos, que según opinión de la
Compañía, hayan sufrido algún daño o fue dañado como
consecuencia de alguna alteración, instalación incorrecta,
maltrato, uso indebido, negligencia, accidente o por la
eliminación o mutilación de las etiquetas correspondientes al
número de serie y código de barras de la fábrica. LA
RESPONSABILIDAD QUE LA COMPAÑIA ASUME EN
VIRTUD DE LA PRESENTE GARANTIA SE LIMITA A LA
REPARACION O LA SUSTITUCION QUE SE MENCIONAN
ANTES Y, BAJO NINGUNA CIRCUNSTANCIA, LA
RESPONSABILIDAD DE LA COMPAÑIA HABRA DE
EXCEDER EL PRECIO DE COMPRA QUE EL
COMPRADOR PAGO POR EL PRODUCTO.
Esta Garantía reemplaza a toda otra garantía expresa o
implícita. TODA GARANTIA IMPLICITA, INCLUYENDO
AQUELLAS GARANTIAS IMPLICITAS DE BUENA CALIDAD
Y COMERCIABILIDAD, ESTARA LIMITADA A LA
DURACION DE ESTA GARANTIA ESCRITA. CUALQUIER
TIPO DE DEMANDA JUDICIAL POR INCUMPLIMIENTO DE
ALGUNAS DE LAS CONDICIONES DE LA GARANTIA
ESPECIFICADA EN EL PRESENTE, INCLUIDA
CUALQUIER GARANTIA IMPLICITA DE BUENA CALIDAD
Y COMERCIABILIDAD, DEBERA PRESENTARSE EN EL
PLAZO DE 12 MESES A PARTIR DE LA FECHA DE LA
COMPRA ORIGINAL. DE NINGUN MODO LA COMPAÑIA
TENDRA RESPONSABILIDAD ALGUNA POR CUALQUIER
DAÑO O PERJUICIO INDIRECTO O INCIDENTAL
OCASIONADO POR EL INCUMPLIMIENTO DE LA
PRESENTE GARANTIA, O DE CUALQUIER OTRA
GARANTIA EXPRESA O IMPLICITA. Ninguna persona ni
representante está autorizada a asumir responsabilidad
alguna en nombre de la Compañía, excepto por lo expresado
en la presente garantía, en relación con la venta de este
producto.
Algunos estados no permiten limitaciones respecto de la
duración de una garantía implícita o la exclusión o limitación
de los daños indirectoso incidentales, por lo tanto, es posible
que las limitaciones antes citadas no correspondan en su
caso. La presente Garantía le otorga derechos especiales y
usted puede gozar de otros derechos que varían de un
estado a otro.
U.S.A : 1-800-323-4815
CANADA: Llamar a 1-800-323-4815 para la ubicación de la
estación que le proporciona servico de garantía
Audiovox Electronics Corporation
Hauppauge, NY 11788
Technical Assistance: 1-800-323-4815
www.jensen.com
© 2006 Audiovox
Ver 1.0
Impreso en China
59
Page 64

VM9311TS
60
Page 65

VM9311TS
PREPARATION
Félicitations pour l'achat du récepteur Jensen mobile
multimédia.
C'est une bonne idée de lire toutes les instructions avant de
commencer l'installation. Nous recommandons que vous
installiez votre Jensen VM9311TS par une boutique
d'installation normale.
Fonctions
DVD
• Des formats compatible : DVD-R, DVD-RW, DVD+R,
DVD+RW, CD-R, CD-RW, CD-DA, MP3, WMA, SVCD,
VCD, AVI et MPEG1, MPEG2 et JPEG.
• Reproduction Région 1
• Rapport largeur/longueur 16 :9 - Cinéma/Normal/OFF
• Contrôle DVD panneau d'avant
• Avance rapide 2X, 4X, 8X et 32X
• Reproduction, Pause, Arrêt, Lent
• Chapitre vers le haut/vers le bas
• 24 bit à haute performance Wolfson Microelectronics, 194
kHz DAC soutient des modes d'audio mélange-abaisseur
à 2-chaîne
MP3/WMA
• GIGA MP3 - Vous pouvez stocker jusqu'à 999 fichiers
MP3 sur un DVD
• Compatible avec onglet ID3
• Accès direct à la piste
• Reproduction, Pause, Arrêt, Piste vers le haut/vers le bas
CD
• Compatible avec CD-texte
• Recherche audible à grande vitesse de voie
• Aléatoire, répétition A-B, introduction
• Play, pause, lent, voie vers le haut/bas
• Dernière mémoire de position
Tuner AM/FM
• Tuner Etats-Unis/Europe/Amérique Latine/Asie
• 30 stations pré-réglées (18FM/12AM)
• Tuner II JENSEN Plus
Outboard Media Module
• Adaptateur entrée pour Radio XM, et iPod
Prêt pour XM
• Exige une Terk XMD 1000 facultatif
• Exige un T erk XMD JEN100 facultatif ou de Jensen JXMC
• Affichage avancée montre l'artiste, le titre de la chanson et
chaîne XM et catégorie dans un regard
• Entrée de chaîne directe
Prêt pour iPod
• Affiche toute l'information du texte y compris la catégorie,
le nom de la piste, l'artiste, et le numéro de la chaîne
• Contrôle et frais
• Interface intuitive d'iPod
• Exige le câble jLinkcable d'iPod (vendu séparément)
A NOTER : La photo et la vidéo accèdent avec
des iPod de la génération 5 seuls.
Châssis
• Un affichage à cristaux liquides TFT à matrice actif à 7
pouces, pixels 336, 960 (1440 Largeur x 234 Hauteur)
• L'affichage à cristaux liquides TFT automatique, motorisé
à bascule
• Ajustement d'inclination de l'affichage à cristaux liquides
TFT à 16 pas
• 1.0 Din (Simple DIN)
• Importation ISO/DIN montable
• Rondelle décorative inclus
• Confirmation de la tonalité bip
• Système de gestion de la chaleur, Incorpore de la
ventilation froide de sorte que les puces fonctionnent à
des températures nominales.
• Châssis galvanisé à haute résistance
Général
• Télécommande pleine fonction à infra-rouge
• Sortie vidéo composite 1 NSTC pour des écrans
supplémentaires
• Contrôle menu pour affichage sur écran - TSD
• Processeur audio à haute performance
• Volume, basse, aigu, balance et équilibreur électroniques
• Ajustement de fréquence centre de basse - 60, 80,
100, 130, 150 et 200 Hz
• Facteur Q de basse - 1.0, 1.25, 1.5 et 2.0
• Ajustement de fréquence centre d'aigu - 10, 12.5, 15 et
17 kHz
• Aire de recouvrement caisson de basse - 80, 120 et
160 Hz
• Phase caisson de basse - 0 à 180 degrés
• Niveau de caisson de basse - variable
• Impédance basse à 100ohms sorties pré-amplificateur toutes les chaînes
• Sortie RCA à 5V Peak/2V RMS - toutes les chaînes
• Sorties RCA un paire devant
• Sorties RCA un paire à arrière
• Sortie RCA à caisson de basse simple
• Entrée RCA A/V un paire Auxiliaire
tous les iPods sauf « Shuffle »
• Equilibreur Flex
• Panneau d'avant (Lorsque l'écran est fermé) à l'affichage
à cristaux liquides de haut contraste
• Contrôle audio enchiffreur à rotation
• Navigation menu avec la manette
Outils et matériel
Vous aurez besoin des outils et du matériel suivants pour
installer la radio :
• Type Torx des tournevis plat et Philips
• Des coupeurs de fil et séparateurs d'épuisement
• Outils pour enlever la radio existante (tournevis, un
ensemble de clés à douille et d'autres outils)
• Bande électrique
• Outil à sertissage
• Voltmètre/lumière d'épreuve
• Connexions à sertissage
• Fer jauge 18 pour branchage puissance, fer jauge 16-18
de haut parleur
Avertissement ! Branchez l'appareil à une
alimentation de 12 V avec une bonne terre.
Avertissement ! N'installez jamais cet appareil
dans un endroit ou l'opération et le visionnement
peuvent interférer avec la sécurité de conduite.
Avertissement ! Pour réduire le risque d'un
accident de voiture (sauf lorsque vous l'utilisez
pour la caméra à vue arrière) n'utilisez jamais la
fonction de visionnement de vidéo lorsque vous
conduisez. C'est une violation de la loi fédérale.
Avertissement ! Ne démontez jamais et n'ajustez
jamais cet appareil.
Avertissement ! Pour prévenir des
endommagement par le choc ou le feu, n'exposez
jamais cet appareil à l'humidité ou à l'eau.
Avertissement ! N'utilisez jamais de disques
irréguliers.
61
Page 66

Avertissement ! Pour prévenir des
endommagements au mécanisme à l'intérieur de
cet appareil, évitez des impacts sur le moniteur
TFT.
Avertissement ! Utilisation d'un fusible incorrect
peut endommager cet appareil et causer un feu.
Avertissement ! Le moniteur utilise un
mécanisme automatique motorisé. Pour
empêcher d'endommager ce mécanisme crucial,
veuillez ne pas pousser, tirer ou manipuler le
moniteur à la main.
Accessoires facultatifs
Prêt pour iAUX3 (vendu séparément)
• Peut être branché à n'importe quel engin média portatif ou
un engin multi-média en utilisant une prise standardisée
de 3,5mm.
• Convertir l'entrée auxiliaire 3,5mm à des sorties stéréos
RCA pour un branchement facile aux entrées auxiliaires
de radios.
Navigation de Jensen NAV100 GPS (vendu séparément)
• Se relie par l'intermédiaire d'entrée audio/visuelle.
Débranchez la pile
Pour prévenir un court-circuit, assurez-vous que le
commutateur d'allumage est mis en arrêt, et enlevez la câble
pile négative avant l'installation.
VM9311TS
A NOTER : Si le VM9311TS est installé dans une
voiture qui est équipée d'un lecteur à bord ou un
ordinateur de navigation, ne débranchez pas la
câble pile. Si le câble est débranché la mémoire
de l'ordinateur peut être perdue. Dans ces
conditions, prenez des précautions
supplémentaires pour éviter de causer un courtcircuit.
62
Page 67

VM9311TS
3
iAUX
3
DIAGRAMME DE CÂBLAGE
Amplificateur puissance externe
Connecteur d'Antenne
Automobile
Antenne
Téléphone portable
BLEU
ROUGE
BLANC
ROUGE
BLANC
Contrôle auto antenne (branchez au
fil de sortie contrôle d'antenne)
Amplificateur puissance externe
Muet (laissé ouvert s'il n'est pas branché)
SUB.W
AVANT R
FRONTR
AVANT L
FRONTL
ARRIERE R
REAR R
ARRIERE L
REAR L
BLEU
ANT.CONT
BLEU/BLANC
P.CONT
BRUN
MUTE
Harnais de Câble
Cable de Module Média /NOIR
MEDIA MODULE
VIDEO INPUT
A NOTER : Voir le diagramme des
connexions Multimédia pour des
connexions supplémentaires
à travers le Module Média.
FREIN DE STATIONNEMENT
ROSE
JAUNE
AUX IN/L
AUX IN/R
PRK SW
ROUGE
AUX INVIDEO
REAR VIDEO
OUT 1
Head Unit
Video Out
XMAudio Left
XMAudio Right
XM Control Data
iPod
BLANC
(Vendu
Séparément)
JAUNE
JAUNE
supplémentaire1
A NOTER : Voyez la section de
Frein de stationnement pour
plus d'information.
AUDIOVIDEOINPUT
3.5mm
3.5mm
Vidéo
Media Module
AVANT L+
AVANT L-
AVANT R+
AVANT R-
ARRIERE R+
ARRIERE R-
ARRIERE L+
ARRIERE L-
FRONTL
FRONTR
REAR R
REAR L
BLANC +
BLANC/NOIR -
GRIS +
GRIS/NOIR -
POURPRE +
POURPRE/NOIR -
VERT+
VERT/NOIR-
63
ROUGE
ACC
JAUNE
BATT
NOIR
GND
FUSIBLE (10A)
PILE +
PILE
ACC
Terre
Commutateur
d'allumage
Pile
Page 68

CÂBLAGE POUR MEDIA MODULE
VM9311TS
Media Module
*Câbles TERK XMD JEN 100 (vendu séparément)
**Tuner Direct et antenne TERK XMD 1000 (vendu
séparément)
**
Head Unit
VideoOut
XMAudioLeft
XMAudioRight
XM Control Data
iPod
iPod Video
iPod
iPod Mini
iPod Nano
*
Câble d'iPod de JLink (vendu séparément)
64
Page 69

VM9311TS
7-INCH
TFT
7-INCH
TFT
INSTALLATION
Pré-installation
1. Appuyez sur les lévriers métalliques sur les deux côtés
pour enlever le demi-manche de la radio..
Précaution : Prenez soin de ne pas endommager
le câblage de la voiture.
INSTALLATION FINALE
5
4
PREPARER LA RADIO
7-INCH
BAND
T
FT
AS
7-INCH
D
AM/FM/DVD/MP3
IGITAL
T
FT
R
VOL
LO/DX
ECEIVER
POWER
MUTE
SCN
OPEN
DISP
VM9311TS
RPT
RDM
Push
STOP
SRC
ENTER
2. Installez le demi-manche.
a. Installez l'adaptateur si nécessaire (facultatif).
b. Installez le demi-manche dans l'adaptateur ou dans le
tableau de bord (n'utilisez que des écrous fournis). Ne
forcez pas le manche dans l'ouverture et ne le pliez
pas.
c. Trouvez la série de languettes de plissage sur la partie
supérieure, la partie inférieure et les côtés du manchon
de montage. Avec le manchon inséré jusqu'au bout
dans le tableau de bord, pliez autant de languettes que
vous pouvez pour fixer fermement le manchon dans le
tableau de bord.
d. Intallez le demi-manchon. Installez le courroie de
soutien de sorte que l'appareil soit plus stable. Install
support strap to make the unit more stable.
INTALLEZ LE DEMI-MANCHON
3. Placez la radio devant l'ouverture du tableau de bord de
sorte que le câblage puisse traverser le manchon de
montage.
Câblage
Câblage complet comme illustré dans le “DIAGRAMME DE
CÂBLAGE” à la page 63. Dès que le câblage est terminé,
rebranchez la borne négative de la pile. S'il n'y a pas d'ACC,
branchez le fil de sortie ACC à l'alimentation avec
l'interrupteur.
A NOTER : Lorsque vous remplacez un fusible
assurez-vous que vous utilisez le type correct et
le bon ampérage pour éviter d'endommager la
radio. Le VM9311TS utilise un fusible à 10 Amp
mini-ATM, situé dans la boîte de filtre noire aligné
avec le harnais câblage principal.
Installation finale
Après avoir terminé les branchements de câbles mettez
l'appareil en marche pour confirmer l'opération (le
commutateur d'allumage doit être en fonction). S'il n'y a pas
d'opération, revérifiez tout le câblage jusqu'à ce que les
problèmes soient corrigés. Lorsque l'opération est atteinte,
mettez le commutateur d'allumage en arrêt et procéder à
l'installation finale du châssis.
1. Branchez l'adaptateur de câblage au harnais de
câblage existant.
2. Branchez le fil d'antenne.
3. Glissez la radio avec soin dans le demi-manchon en
vous assurant qu'il est bien aligné sur le bon côté
jusqu'à ce qu'il soit bien assis et les agrafes élastiques
la mettent fermement en place.
A NOTER : Pour une bonne opération de la pla tine
CD/DVD, le châssis doit être monté à l'intérieur
de 20° de l'horizontal. Assurez-vous que l'appareil
est monté à l'intérieur de cette gamme.
1
7-INCH
D
IGITAL
7-INCH
T
FT
BAND
T
FT
AS/PS
VM9510
AM/FM/DVD/MP3
Push
R
ECEIVER
MUTE
PWR
OPEN
DISP
AVAU
X
I
N
Push
MODE
ENTER
2
3
le boulon et l'écrou hexagonal fournis. Pliez la courroie
pour la positionner comme il faut.
A NOTER : Pour une bonne opération de la pla tine
CD/DVD, le châssis doit être monté à l'intérieur
de 20° de l'horizontal. Assurez-vous que l'appareil
est monté à l'intérieur de cette gamme.
5. Glissez la radio avec soin dans le demi-manchon en
vous assurant qu'il est bien aligné sur le bon côté
jusqu'à ce qu'il soit bien assis et les agrafes élastiques
la mettent fermement en place.
6. Attachez un bout de la courroie de soutien perforée
(fournie) au boulon à l'arrière du châssis en utilisant
l'écrou hexagonal fourni. Attachez l'autre bout de la
courroie perforée à une partie sûre du tableau de bord,
soit au-dessus de ou au-dessous de la radio, en utilisant
le boulon et l'écrou hexagonal fournis. Pliez la courroie
pour la positionner comme il faut.
Final ISO-DIN Installation
1. Enlevez la rondelle décorative.
2. Montez les équerres d'usine sur la nouvelle radio en
utilisant les écrous existants de l'ancienne radio.
3. Glissez la radio dans l'ouverture du tableau de bord et
tenez fermement en place.
4. Réinstallez le panneau du tableau.
4. Attachez un bout de la courroie de soutien perforée
(fournie) au boulon à l'arrière du châssis en utilisant
l'écrou hexagonal fourni. Attachez l'autre bout de la
courroie perforée à une partie sûre du tableau de bord,
soit au-dessus de ou au-dessous de la radio, en utilisant
65
Page 70

.
7-INCH
TFT
FINAL ISO-DIN INSTALLATION
3
7-INCH
D
IGITALTFT
7-INCH
BAND
T
FT
AS/PS
VM9510
AM/FM/DVD/MP3RECEIVER
Push
MUTE
PWR
DISP
MODE
4
VM9311TS
OPEN
AVAU
X
I
N
Push
ENTER
1
2
Utilisation du connecteur AV externe iAUX
3
Le iAUX3 vous permet de brancher une variété d'engins
externes y compris un VCR, une platine DVD, une platine
MP3 portatif, etc., à votre VM9311TS sans enlever la radio.
Pour installer le iAUX
3
, branchez-le aux câbles AUX-IN au
dos du VM9311TS (voir “DIAGRAMME DE CÂBLAGE” à la
page 63) et puis installer le iAUX
3
dans un emplacement
convenable pour brancher des engins auxiliaires.
66
Page 71

VM9311TS
CONTROLES ET INDICATEURS
Opération de bouton
1. Ouvrir
Appuyez pour activer le système mécanique automatique et
déplacez le moniteur TFT dans une position de
visionnement. Appuyez de nouveau pour fermer le TFT.
2. WIDE/PIC
Appuyez pour ajuster l'aspect d'affichage ou l'image à un des
trois réglages Cinema, Normal ou OFF. Appuyez et
maintenez pour accéder aux réglages d'image.
3. ( )
Appuyez pour ajuster l'angle de l'inclination supérieur de
l'écran une étape à la fois. Appuyez et maintenez pour
ajuster l'inclination vers le haut ou les réglages d'image.
4. ( )
Appuyez pour ajuster l'angle de l'inclination vers le bas de
l'écran une étape à la fois. Appuyez et maintenez pour
ajuster l'inclination vers le bas d'une manière continue ou des
réglages d'image.
5. DISP
Appuyez pour afficher l'information du système sur l'écran.
6. VOL/LO/DX
Faites tourner le bouton VOL/LO/DX (6) pour ajuster le
volume. Appuyez et relâchez pour entrer et/ou confirmer les
réglages audio. Appuyez et maintenez pour activer le réglage
LOC (local).
7. POWER/MUTE
Appuyez une fois sur le bouton POWER/MUTE pour mettre
l'appareil en marche. Appuyez de nouveau pour assourdir le
volume. Appuyez et maintenez pour mettre l'appareil en
arrêt.
A NOTER : Le VM9311TS a Softmute qui permet
au volume d'augmenter ou de diminuer au fur et à
mesure que la fonction MUTE est activée ou
désactivée.
8. 1/AUDIO
Mode DVD : Appuyez pour sélectionner la langue audio
pendant la reproduction.
Mode Tuner : Appuyez une fois pour jouer la station radio
chaîne I pré-réglée. Appuyez et maintenez pour mettre en
mémoire la station radio courante dans la chaîne pré-réglée.
6
9. 2/SUBTITLE
Mode DVD : Appuyez une fois pour sélectionner la langue
des sous-titres pendant la reproduction.
Mode Tuner : Appuyez une fois pour jouer la station de radio
pré-réglée chaîne 2. Appuyez et maintenez pour mettre en
mémoire la station de radio courante dans la chaîne 2.
BAND
160 WATTS
7-INCH LCD TFT
LO/DX
AS
24-bit / 192KHz DAC
POWER
7 8 9
2326
1010 11 12
1
5
CLOSE
DISP
SRC
AUDIOVIDEO INPUT
25
VM9311TS
EJECT
Push
ENTER
WIDE
PIC
131415 16 19
24
4
3
2
21
18
17
20
22
67
Page 72

CONTROLES ET INDICATEURS
7-INCH TFT
10. 3/SCN
Mode DVD : Appuyez une fois pour commencer le balayage
de la reproduction.
Mode Tuner : Appuyez une fois pour jouer la station de radio
pré-réglée chaîne 3. Appuyez et maintenez pour mettre en
mémoire la station de radio courante dans la chaîne
préréglée 3.
11. 4/RPT
Mode DVD : Appuyez une fois pour commencer la répétition
de la reproduction.
Mode Tuner : Appuyez une fois pour jouer la station de radio
pré-réglée chaîne 4. Appuyez et maintenez pour mettre en
mémoire la station de radio courante dans la chaîne préréglée 4.
12. 5/RDM
Mode DVD : Appuyez de nouveau pour une reproduction au
hasard.
Mode Tuner : Appuyez une fois pour jouer la station de radio
pré-réglée chaîne 5. Appuyez et maintenez pour mettre en
mémoire la station de radio courante dans la chaîne préréglée 5.
13. 6/STOP
Mode DVD : Appuyez une fois pour arrêter la reproduction.
Mode Tuner : Appuyez une fois pour jouer la station de radio
pré-réglée chaîne 6. Appuyez et maintenez pour mettre en
mémoire la station de radio courante dans la chaîne préréglée 6.
14. BAND
Mode Tuner : Appuyez pour changer entre AM et FM.
15. SRC
Appuyez une fois pour sélectionner la mode de reproduction.
16. ( )
Mode DVD : Appuyez une fois pour reproduire le chapitre/
piste précédent.
Mode Tuner : Appuyez une fois pour recherche automatique
de la station de radio précédente disponible.
Mode Menu : Appuyez une fois pour déplacer le curseur vers
le gauche.
17. ( )
Mode DVD : Appuyez une fois pour entrer le chapitre ou le
piste prochain.
Mode Tuner : Appuyez une fois pour recherche automatique
de la station de radio prochaine disponible.
6
Mode Menu : Appuyez une fois pour déplacer le curseur vers
la droite.
18. ( )
Mode DVD : Appuyez une fois pour avance ou retrait rapide.
Mode Tuner : Appuyez pour avance d'une fréquence.
Mode Menu : Appuyez une fois pour déplacer le curseur vers
le haut.
19. ( )
Mode DVD : Appuyez une fois pour avance ou retraite
ralentie.
Mode Tuner : Appuyez pour reculer d'une fréquence.
Mode Menu : Appuyez une fois pour déplacer le curseur vers
le bas.
20. PLAY/ENTER
Mode DVD : Appuyez une fois pour commencer la
reproduction.
Appuyez une fois pour confirmer une sélection.
21. ( )
Appuyez une fois pour insertions/éjection du disque.
Appuyez et maintenez pour régler de nouveau la position du
mécanisme de noyau.
22. RESET
Appuyez pour régler de nouveau les réglages du système
aux défauts d'usine (sauf le mot de passe et les réglages du
verrouillage parental).
7-INCH TFT
BAND
7-INCH LCD TFT
LO/DX
AS
POWER
7 8 9
AM/FM/DVD/MP3 RECEIVER
1010 11 12
23. Affichage à cristaux liquides
24. Affichage à cristaux liquides
25. Récepteur télécommande IR
26. AS (Auto stockage)
Appuyez pour auto-stocker les stations de radio fortes dans
les six chaînes pré-réglées de la bande courante.
SRC
13 15
VM9311TS
1
514 2326
OPEN
DISP
VM9311TS
EJECT
16 1925
Push
ENTER
21
18
17
20
22
68
Page 73

VM9311TS
CONTROLES ET INDICATEURS
Affichage à cristaux liquides/indicateurs
1. Indicateur du disque
Illuminé lorsqu'un disque est chargé.
2. Indicateurs de reproduction DVD (SCN/RPT/RDM/ALL)
Les indicateurs de reproduction DVD suivants deviennent
illuminés lorsque la fonction correspondante est active.
• SCN : Balayage reproduction
• RPT : Répétition de la reproduction
• RDM : Reproduction au hasard
• ALL : Reproduction de tous les chapitres
3. Indicateur d'intensité (LOUD)
L'indicateur d'intensité devient illuminé lorsque la fonction
LOUD est activé.
4. Affichage principal
L'affichage principal est un affichage de cristaux liquides de 8
chiffres et 14 segments qui afficher l'heure, la fréquence
syntonisée et d'autres informations de texte.
5. Affichage chaîne/disque
L'affichage chaîne/disque est un affichage aux cristaux
liquides de 2 chiffres et 7 segments qui affiche le numéro de
disque ou la chaîne de radio lorsque la fonction
correspondante est active:
• CH : la radio est activée
• DISC : Mode DVD ou CDC est activée
6. Indicateur stéréo/local
L'indicateur stéréo/local illumine l'un des indicateurs suivants
lorsque la fonction correspondante est active.
• ST : la radio est en mode stéréo
• LOC : La fonction de recherche des stations locales est
activée
1 2 3 4 5 6
69
Page 74

TELECOMMANDE
Table 1: Fonctions de télécommande
Bouton Fonction
Nom/Ref # DVD VCD AM/FM CD/MP3 XM iPod
MENU 1 Entre le menu
TITLE 2 Entre dans le
MUTE 3 Bascule la sortie audio en marche/en arrêt
POWER
AUDIO 5 Change la langue
REPT A-B 6 Réglage pour
REPT 7 Répète la repro-
SRC 8 Sélectionne la mode de reproduction
SUBTITLE 9 Sélection de
DISP 10 Affiche l'information de reproduction
DVD
ANGLE
VOL - 15 Rabaisse le volume
VOL + 16 Augmente le volume
principal du
disque
menu du disque
4 Met la puissance en marche/en arrêt
audio pour la
reproduction du
disque
répéter la reproduction du délai A
jusqu'au délai B
duction du chapitre courant
langue pour soustitres
13 Reproduit le
disque d'un angle
différent pour une
scène
14 Avance rapide du
contenu du disque
17 Sélectionne le
chapitre précédent pour reproduction
18 Fait pause pen-
dant reproduction/
commence la
reproduction
Met en marche le
PBC lorsque le
VCD est en train
de jouer
Joue les dix
premières secondes de chaque
chapitre/titre
Choisit à gauche,
bien, ou stéréo
Réglage pour
répéter la reproduction du délai A
jusqu'au délai B
Répète la reproduction du chapitre courant
Avance rapide du
contenu du disque
Sélectionne le
chapitre précédent pour reproduction
Fait pause pendant reproduction/
commence la
reproduction
Sélectionne le
une station de
radio après
Recherche de le
une station de
radio précédent
Choisissez pour le
PS (balayage de
prévision). Serrez
et tenez pour AS
(magasin automatique).
Choisit à gauche,
bien, ou stéréo
Répétez simple,
répétez la chemise, OFF
Prochaine chemise
Sélectionne le
piste précédent
pour reproduction
Fait pause pendant reproduction/
commence la
reproduction
Affiche le menu
de configuration
XM
Mode de recherche de catégorie
Mode de recherche de la manche
Canal précédent Accède au menu
Cherche une station de radio disponible en
diminuant la
fréquence de syntonisation
Sélectionne la
mode photo
Sélectionne la
mode musique
Sélectionne la
mode vidéo
Répète la reproduction de la piste
courante
iPod
Sélectionne le
piste précédent
pour reproduction
ENTER
VM9311TS
A NOTER : Votre télécommande peut
différer légèrement de celle décrite ici. Le
diagramme ci-dessus est pour des buts
d'illustration seulement.
70
Page 75

VM9311TS
Table 1: Fonctions de télécommande
Bouton Fonction
Nom/Ref # DVD VCD AM/FM CD/MP3 XM iPod
19 Sélectionne le
prochain chapitre
pour reproduction
Sélectionne le
prochain chapitre
pour reproduction
Recherche de
prochain canal
Sélectionne le
prochain piste
pour reproduction
Recherche de
prochain canal
Sélectionne le
prochain chapitre
pour reproduction
BAND 20 Arrête la repro-
GOTO 21 Va au délai spéci-
ZOOM 23 Fait un zoom sur/
PIC 24 Affiche les paramètres de configuration
OPEN/
CLOSE
WIDE 28 Sélectionne la
0, 1, 2, 3, 4,
5, 6, 7, 8, 9,
0 (Numeric
Keypad)
DVD
SETUP
SYS
SETUP
SCAN 34
EJECT 35 Ejecte le disque
duction
fique et reproduction
22 Reproduction 1/2,
1/4, 1/6, 1/7
arrière l'image
25 Ouvre/Ferme le moniteur TFT
26 Rabaisse l'angle de l'inclination du moniteur
27 Augmente l'angle de l'inclination du moniteur
mode d'affichage:
CINEMA, NORMAL ou OFF
29 Accède directe-
ment au chapitre
30 Accède au menu
configuration DVD
31 Accède au menu configuration système
Arrête la reproduction
Va au délai spécifique et reproduction
Reproduction 1/2,
1/4, 1/6, 1/7
Fait un zoom sur/
arrière l'image
Sélectionne la
mode d'affichage:
CINEMA, NORMAL ou OFF
Accède au menu
configuration DVD
Sélectionne la
bande AM/FM
Station précédente manuellement choisie
Sélectionne la
mode d'affichage:
CINEMA ou OFF
1-6 sélectionne
pré-réglé pour la
bande courante
Arrête la reproduction
Chemise précédente
Sélectionne la
mode d'affichage:
CINEMA ou OFF
Accède directement au piste
Sélectionne la
bande XM, XM1;
XM2 ou XM3
Choisissez pour
l'entrée directe de
canal
Canal précédent
dans la catégorie
choisie
Mode de guide du
canal XM
Sélectionne la
mode d'affichage:
CINEMA ou OFF
1-6 Sélectionne
les pré-réglés
pour la bande
courante
Reproduction/
Pause
Sélectionne la
mode d'affichage:
CINEMA ou OFF
en mode de
musique ou CINEMA, NORMAL
ou OFF en mode
de photo ou de
vidéo
Appuyez sur le
bouton 1 pour
regarder les
pages disponibles tandis que
dans Playlists,
artistes, albums et
chansons
A NOTER : Votre télécommande peut
différer légèrement de celle décrite ici. Le
diagramme ci-dessus est pour des buts
d'illustration seulement.
71
Page 76

UTILISATION DU MONITEUR TFT
Ouvrir/fermer moniteur TFT
Ouvrir moniteur TFT
Appuyez sur le bouton OPEN (1) sur le panneau d'avant ou
sur le bouton ( ) (25) sur la télécommande de la zone
d'avant pour activer le mécanisme qui fait déplacer le
panneau d'affichage vers une position de visonnement.
Fermer le moniteur TFT
Appuyez sur le bouton OPEN (1) sur le panneau d'avant ou
sur le bouton ( ) (25) sur la télécommande pour charger le
panneau d'affichage dans son compartiment.
Ouverture automatique du moniteur TFT
Si « TFT Auto Open » est en marche lorsque l'appareil est en
marche, le moniteur automatiquement prend la position de
visionnement.
Si « TFT Auto Open » est en arrêt lorsque l'appareil est en
marche, appuyez sur le bouton OPEN (1) ou sur le bouton
( ) (25) sur la télécommande zone d'avant pour faire
déplacer le moniteur dans une position de visionnement.
Si « TFT Auto Open » est réglé à manuel, le TFT ne se
fermera pas lorsque l'allumage est en arrêt.
Ajustement angle d'inclinaison du
moniteur
Un caractéristique connu des panneaux d'affichage aux
cristaux liquides et la qualité de l'affichage par rapport à
l'angle de visionnement. L'angle du moniteur peut être ajusté
pour un visionnement optimal en utilisant l'une des méthodes
suivantes :
Ajustement d'angle étape par étape
Appuyez sur le bouton ( ) ou ( ) sur le cadre du moniteur
pour ajuster l'angle d'inclinaison du moniteur une étape à la
fois.
Ajustement d'angle continu
Appuyez et maintenez l'appui sur les boutons ( ) ou ( )
(3, 4) sur le cadre du moniteur pour ajuster l'angle
d'inclinaison de manière continue.
Rapport largeur/longueur
Appuyez sur le bouton DISP (28) sur la télécommande ou le
bouton WIDE/PIC sur le moniteur pour ajuster le rapport
largeur/longueur comme suit :
Réglage d'image
Tableau 2 montre la mode de sortie vidéo pour chaque
source de reproduction.
Source de reproduction Format de sortie vidéo
AM/FM TUNER Mode RGB
XM TUNER Mode RGB
iPod Mode RGB
AUX IN Mode CVBS
*CVBS - signalement composite vidéo dande de base
Procédures d'ajustement des paramètres
1. Entrez dans la mode de réglage de la qualité de
l'image :
Appuyez sur le bouton PIC (24) sur la télécommande ou
appuyez et maintenez l'appui sur le bouton WIDE/PIC
(2) sur le panneau du moniteur.
2. Sélectionnez l'article à régler :
Appuyez sur les boutons (>>) (<<) (14, 22) sur la
télécommande ou appuyez et maintenez l'appui sur les
boutons (/\) (V) (18, 19) sur le panneau du moniteur.
3. Réglez le paramètre :
Appuyez sur les boutons (|<<) (>>|) (17, 19) sur la
télécommande ou les boutons (<) (>) (16, 17) sur le
panneau du moniteur.
4. Sortir de la mode de réglage de la qualité de l'image:
Appuyez sur le bouton PIC (24) sur la télécommande ou
appuyez et maintenez l'appui sur le bouton WIDE/PIC
(2) sur le panneau du moniteur.
CINEMA (PLEIN)
L'écran entier est étendu dans le sens
horizontal dans un rapport largeur
longueur de 16 à 9. Le rapport
d'extension est le même à n'importe
quel point.
NORMAL
L'affichage de l'image conventionnel a
un rapport de 4 à 3 d'horizontal à
vertical laissant des zones blanches à
droite et à gauche de l'écran.
OFF
Tableau 2: Modes de sortie vidéo
VM9311TS
Freins de parking
Inhiber freins de parking
Lorsque le fil Parking rose est branché à l'interrupteur
des freins du véhicule, le moniteur TFT d'avant
n'affichera du vidéo que lorsque la séquence des freins
de parking est engagée. Avant de commencer la
séquence des freins de parking, la radio doit être en
marche avec un disque de média vidéo inséré et en jeu.
Séquence des freins de parking
Il y a deux situations qui peuvent démarrer la séquence
des freins de parking (c'est la méthode préférée.) La
fenêtre de synchronisation est entre le ~ 3 de 5
secondes.
• Les freins de parkings sont engagés lorsque le
véhicule est allumé ou l'accessoire/commutateur
d'allumage est en marche. Pour activer la vidéo la
séquence suivante d'évènements doit être terminée :
a. Relâchez le frein de parking pendant 3 ~ 5
secondes.
b. Rappliquez le frein de parking.
c. Du vidéo doit être affiché sur le moniteur TFT dans
1 ~ 2 secondes.
• Les freins de parkings sont désengagés lorsque le
véhicule est allumé ou l'accessoire/commutateur
d'allumage est en marche. Pour activer la vidéo la
séquence suivante d'évènements doit être terminée.
a. Réglez le frein de parking pendant 3 ~ 5 secondes.
b. Relâchez le frein de parking pendant 3 ~ 5
secondes.
c. Rappliquez le frein de parking.
d. Du vidéo doi t être aff iché sur le monit eu r TFT d ans
1 ~ 2 secondes.
Mécanisme du mouvement du moniteur
S'il y a un obstacle dans le chemin du moniteur, les mesures
de protection suivantes peuvent être exécutées pour
empêcher d'endommager le mécanisme ou le moniteur :
Tableau 3: Mesures de protection du moniteur
Obstacle
Moniteur se
charge horizontalement
Protection de
soi
Moniteur se
charge
automatiquement dans
l'appareil
Le bouton
OPEN est
appuyé
Moniteur
s'étend horizontalement
Puissance
rebranchée
Le moniteur se
charge
automatiquement dans
l'appareil
72
Page 77

VM9311TS
Tableau 3: Mesures de protection du moniteur
Obstacle
Moniteur se
décharge
horizontalement
Moniteur se
décharge
verticalement
Le moniteur
se charge
verticalement
Protection de
soi
L'appareil
s'arrête au
point d'obstruction
L'appareil
s'arrête au
point d'obstruction
L'appareil
s'arrête au
point d'obstruction
Le bouton
OPEN est
appuyé
Le moniteur
s'étend horizontalement
Le moniteur se
pivote dans
l'appareil
Le moniteur se
pivote dans
l'appareil
Puissance
rebranchée
Moniteur se
charge
automatiquement dans
l'appareil
Le moniteur se
pivote tout seul
dans l'appareil
Le moniteur se
pivote dans
l'appareil
Après que la mesure de protection est exécutée, l'opération
normale est reprise en appuyant sur le bouton OPEN (1) ou
en débranchant et rebranchant la puissance.
73
Page 78

INSTRUCTIONS D'OPERATION
Puissance en marche/en arrêt
Appuyez sur le bouton /MUTE (1) pour mettre l'appareil en
marche. Les boutons sur le devant de l'appareil s'illuminent
et WELCOME apparaît brièvement sur le panneau
d'affichage aux cristaux liquides (24) suivi par le statut de
mode courante. Si l'écrant TFT est ouvert, seulement le
statut de mode courante est affiché.
Appuyez et maintenez l'appui sur le bouton /MUTE (1) sur
le panneau d'avant ou le bouton POWER (4) sur la
télécommande pour désalimenter l'appareil. Le moniteur est
retiré vers le compartiment principal et l'écran d'affichage aux
cristaux liquides affiche « BYE BYE ».
Confirmation du bip sonore
Un bip sonore confirme la sélection de chaque fonction. La
tonalité de signal sonore peut être handicapée par le menu
d’System Setup.
Muet
Appuyez sur le bouton /MUTE (1) sur le panneau d'avant
ou sur le bouton MUTE (3) sur la télécommande pour
assourdir le volume de l'appareil. Appuyez de nouveau sur le
bouton MUTE pour rétablir le volume. MUTE est af fiché sur le
moniteur de l'affichage aux cristaux liquides. Ajustement du
volume ou l'utilisation des fonctions configuration audio va
annuler la fonction muet.
Sélection de la source de reproduction
Appuyez sur le bouton SRC/P.MODE (18) sur le panneau
d'avant ou sur le bouton SRC (8) sur la télécommande pour
changer entre les sources de reproduction disponible dans
l'ordre suivant : Tuner, DVD/CD, Aux in, iPod et XM. La mode
de reproduction sera affichée sur l'écran TFT ou l'affichage
aux cristaux liquides.
Mode Aux In
Un engin externe périphérique peut être branché à cet
appareil à travers les connecteurs RCA standardisés pour
vidéo et audio droite/gauche.
Ajustement du volume
Pour augmenter ou diminuer le volume, tournez l'enchiffreur
à rotation (6) sur le panneau d'avant ou appuyez sur les
boutons VOL+ /VOL- (15, 16) sur la télécommande. Lorsque
le volume atteint 0 ou 40, il y a un bip sonore qui indique que
la limite de l'ajustement à été atteinte. Le volume va de 0 à
40. L'écran TFT ou l'affichage aux cristaux liquides affiche le
niveau de volume pendant 3 secondes.
Volume temps de fermeture programmable
Cette fonction permet à l'utilisateur de sélectionner un
réglage de volume temps de fermeture peu importe le
réglage de volume avant la mise en arrêt de l'appareil. Pour
programmer un niveau de volume spécifique, appuyez et
maintenez l'appui sur le bouton AUDIO (2) lorsque la barre
de volume jaune est affichée sur l'écran. L'appareil va biper
deux fois pour confirmer votre réglage de volume temps de
fermeture.
Menu contrôle d'audio
La fonction contrôle d'audio vous permet d'ajuster facilement
votre système audio pour satisfaire aux caractéristiques
acoustiques de votre véhicule qui dépend du type de
véhicule et ses dimensions. Pour obtenir la meilleure qualité
de son de votre système, soyez sûrs d'ajuster les réglages
pour les haut parleurs aussi. Le bon réglage de l'équilibreur
et la balance augmente les effets de l'égaliseur de cabine.
Accéder au Menu Contrôle d'audio
Appuyez sur le bouton VOL/LOC/DX (6) sur le panneau
d'avant pour afficher le menu « AUDIO ».
Sélection d'une fonction AUDIO pour ajustement
Appuyez de manière continue sur le bouton VOL/LOC/DX (6)
sur le panneau d'avant ou sur les boutons (>>)/(
sur la télécommande ou sur les boutons (/\)/(V) (18, 19) sur la
manette pour sélectionner une fonction audio à être ajustée.
Ajustement d'une fonction audio
Faites tourner le bouton VOL/LOC/DX (6), appuyez sur les
boutons (|<<)/(>>|) buttons (17, 19) sur la télécommande, ou
appuyez sur les boutons (<)/(>) (16, 17) sur la manette pour
ajuster la fonction sélectionnée au réglage désiré.
<<) (14, 22)
VM9311TS
Tableau 4: Ajustements Audio
Fonction Audio Ajustements
EQ User
Flat
Jazz
Pop
Classical
Rock
Vocal
Bass (Basse) -14 à +14
Treble (Aigu) -14 à +14
Fader (Equilibreur) -7 à +7
Balance -9 à +9
Sub -9 à +9
Loud (Intensité) Off (Arrêt), 1-4
A NOTER : Les niveaux d'aigu et de basse ne sont
ajustables que lorsque le EQ est réglé à la mode
Utilisateur.
Intensité
Le niveau/Fonction Intensité dépend du réglage de volume
principal. Au fur et à mesure que l'intensité est augmentée
moins de compensation audio est appliquée au signale
d'audio. Ceci est connu sous le nom d'Intensité Automatique.
Les réglages d'intensité possibles sont comme suit :
• Off (Arrêt)
• 1 - Légère augmentation de basse à un niveau de volume
bas
• 2 - Augmentation de basse modérée à un niveau de
volume bas
• 3 - Une bonne augmentation de basse à un niveau bas à
moyen du volume
• 4 - Augmentation maximum de basse à un niveau moyen
du volume.
Sortir du menu contrôle audio
Appuyez et maintenez l'appui sur le bouton VOL/LO/DX (6),
ou arrêtez de faire des ajustements pendant quelques
secondes pour sortir du menu contrôle audio.
74
Page 79

VM9311TS
Réinitialisation du système
Pour corriger un arrêt du système ou
autre opération illégale utiliser la
pointe d'un stylo pour appuyer sur le
bouton RESET (25) situé au coin gauche en bas de l'écran
TFT. Après la réinitialisation du système, l'appareil rétablit
tous les réglages par défaut de l'usine.
A NOTER : Si l'appareil est réinitialisé alors qu'un
DVD est en train de jouer , le D V D reprend lorsque
la réinitialisation est termiinée.
Ligne Muet
Si le câble MUTE est branché la sortie audio s'assourdit
lorsqu'on reçoit un appel téléphonique sur la téléphone de
voiture ou lorsque la navigation verbale est performée. Voir
“Câblage” à la page 65.
[RESET] Button
75
Page 80

MENU CONFIGURATION DU SYSTEME
En mode System Setup, ASP CONFIG et GENERAL SETUP
sont disponibles pour ajustement. La Configuration peut être
effectué en appuyant sur le bouton dédié sur la
télécommande ou en touchant le coin gauche en haut de
l'écran TFT.
Pour les réglages du système, appuyez sur le bouton SYS
SETUP (31) sur la télécommande ou touchez SETUP sur
l'écran pour entrer dans le menu SETUP. SYS SETUP est
surligné en vert.
Menu configuration générale
Accéder au menu configuration générale
Pour accéder le menu GENERAL SETUP, appuyez sur les
boutons de direction (16, 17, 18, 19) sur la manette ou sur la
télécommande (14, 17, 18, 19, 22) pour surligner GENERAL
SETUP en vert.
BOUTONS DE DIRECTION
Appuyez sur le bouton >/II (18) sur la télécommande pour
entrer dans le menu GENERAL SETUP. Un menu apparaît
avec l'option pour le premier article, « Radio » surligné en
bleu.
GENERAL SETUP
USA
Screen Saver
Video Format
Beep On
BACK
Sélection d'une fonction pour ajustement
Appuyez sur les boutons >> ou << (14, 22) sur la
télécommande ou les boutons (/\) (V) (18, 19) sur la manette
pour sélectionner la fonction à être ajustée.
Ajuster une fonction
1. Entre le champ d'option pour la fonction que vous
voulez ajuster, en appuyant sur le bouton >/II (18) sur la
télécommande ou en appuyant sur le bouton ENTER
(manette) (20) sur l'appareil. Un sous-menu apparaît
dans le deuxième rang avec l'option sélectionnée surlignée en bleu.
2. Sélectionnez une nouvelle valeur en appuyant sur les
boutons >> ou << (14, 22) sur la télécommande ou sur
les boutons (/\) (V) (18, 19) sur la manette.
3. Sélectionnez une nouvelle valeur en appuyant sur les
boutons >> ou << (14, 22) sur la télécommande ou sur
les boutons (/\) (V) (18, 19) sur la manette.
Tableau 5: Fonctions menu configuration générale
Réglage Options Fonction
Radio USA • AM Frequency Spacing - 10kHz
Europe • AM Frequency Spacing - 9kHz
South
America 1
South
America 2
Arabia • AM Frequency Spacing - 9kHz
• AM Frequency Band 530kHz~1720kHz
• FM Frequency Spacing - 200kHz
• FM Frequency Band -
87.5MHz~107.9MHz
• AM Frequency Band 522kHz~1620kHz
• FM Frequency Spacing - 50kHz
• FM Frequency Band -
87.5MHz~108.0MHz
• AM Frequency Spacing - 10kHz
• AM Frequency Band 530kHz~1720kHz
• FM Frequency Spacing - 100kHz
• FM Frequency Band -
87.5MHz~108.0MHz
• AM Frequency Spacing - 5kHz
• AM Frequency Band 520kHz~1600kHz
• FM Frequency Spacing - 100kHz
• FM Frequency Band -
87.5MHz~108.0MHz
• AM Frequency Band 531kHz~1620kHz
• FM Frequency Spacing - 100kHz
• FM Frequency Band -
87.5MHz~108.0MHz
VM9311TS
Tableau 5: Fonctions menu configuration générale
Réglage Options Fonction
Korea • AM Frequency Spacing - 9kHz
China • AM Frequency Spacing - 9kHz
Clock Mode
(Mode horloge)
Screen Saver
(Economiseur d'écran)
Format vidéo
(La circuiterie d'entrée
détecte
automatiquement le signal
vidéo de la
source Aux
In.)
TFT Auto
Open (TFT
Ouverture
Automatique)
Beep On Un bip sonore confirme la sélection
Clock (HH:MM) Voir « Ajustement de l'horloge »
12H L'horloge montre le temps à 12
24H L'horloge montre l'heure à 24 heu-
On Met l'économiseur d'écran en
Off
Auto La sortie signal couleur est allumée
NTSC Les signaux couleur sont sortis
PAL Les signaux couleur sont sorties
On Le panneau TFT s'ouvre automa-
Off Vous devez appuyer sur le bouton
Manual Lorsque le commutateur d'allumage
Ajustement de l'horloge
Méthode 1 L'écran TFT s'ouvre
1. Accéder au réglage Horloge sous le menu Configuration
Générale.
• AM Frequency Band 531kHz~1602kHz
• FM Frequency Spacing - 200kHz
• FM Frequency Band -
88.1MHz~107.9MHz
• AM Frequency Band 522kHz~1620kHz
• FM Frequency Spacing - 100kHz
• FM Frequency Band -
87.5MHz~108.0MHz
heures en utilisant le système AM
et PM
res jusqu'à 23:59.
marche et en arrêt.
automatiquement base sur le signal
d'entrée de video courante - NTSC
ou PAL.
dans le format standardize NTSC.
dans le format standardize PAL.
tiquement lorsque l'appareil est mis
en marche.
OPEN (1) pour ouvrir le panneau
TFT.
est éteint, le panneau TFT ne se
retire pas s'il était dehors avant.
de chaque fonction.
pour apprendre comment régler
l'horloge.
Retour au menu précédent
76
Page 81

VM9311TS
2. Appuyez sur les boutons >> ou << (14, 22) sur la
télécommande ou les boutons /\ ou V (18, 19) sur la
manette pour déplacer le curseur jusqu'à la position
Heure ou Minutes.
3. Appuyez sur les boutons |<<, ou >>| (17, 19) sur la
télécommande ou les boutons < ou > (16, 17) sur la
manette pour ajuster les heures ou les minutes.
4. Appuyez sur le bouton
<< (22) sur la télécommande
pour confirmer la configuration.
Méthode 2 - Ecran TFT fermé
1. Appuyez et maintenez le bouton DISP (5) jusqu'à ce
que l'horloge clignote sur le panneau d'affichage aux
cristaux liquides.
2. Appuyez sur les boutons /\ ou V (18, 19) sur la manette
pour déplacer le curseur à la position Heures ou
Minutes.
3. Appuyez sur les boutons < ou > (16, 17) sur la manette
pour ajuster les heures ou les minutes.
4. Appuyez sur le bouton DISP (5) sur l'appareil pour
confirmer la configuration.
Retournez au menu Configuration du Système
Pour revenir au menu Configuration du Système, allez à
BACK et puis appuyez sur le bouton >/|| (18) sur la
télécommande.
Menu ASP (traitement de son audio)
config
Le menu ASP Config vous permet de faire des ajustements
audio fins.
Accéder au menu ASP Config
Pour accéder au menu ASP CONFIG depuis le menu
SYSTEM SETUP, appuyez sur les boutons de direction sur la
manette (16, 17, 18, 19) ou sur la télécommande (14, 17, 18,
19, 22) pour surligner ASP CONFIG en vert. Appuyez sur le
bouton >/|| (18) sur la télécommande pour entrer dans le
menu ASP CONFIG. Un menu apparaît avec l'option pour le
premier article « Bass Center Freq » surligné en bleu.
ASP CONFIG
Sub Filter
Sub Phase
60Hz
15kHz
80Hz
0D
1.5
BACK
Ajustement d'une fonction
1. Entrer dans le champ d'option pour la fonction que vous
voulez ajuster, en appuyant sur le bouton >/|| (18) sur la
télécommande ou en appuyant sur le bouton ENTER
(manette) (20) sur l'appareil. Un sous-menu dans le
deuxième rang avec l'option sélectionnée surlignée en
bleu.
2. Sélectionnez une nouvelle valeur en appuyant sur les
boutons >> ou << (14, 22) de la télécommande, ou les
boutons >> ou << (18, 19) sur la manette.
3. Confirmez votre sélection en appuyant sur les boutons
<<, |<<, ou >>| (22, 17, 19) sur la télécommande ou les
boutons < ou > (16, 17) sur la manette. La nouvelle
valeur est surlignée en bleu et la configuration est
terminée.
Tableau 6: ASP Config Menu Features
Setting Options Function
Bass Center
Freq
Treble Center
Freq
60Hz According to the audio source, select
80Hz
100Hz
130Hz
150Hz
200Hz
10KHz According to the audio source, select
12.5KHz
15KHz
17KHz
the Bass Center Frequency to
achieve the best Bass effect.
the Treble Center Frequency to
achieve the best Treble effect.
Tableau 6: ASP Config Menu Features
Setting Options Function
Sub.W Filter 80Hz Selecting a crossover frequency sets
120Hz
160Hz
Sub.W Phase 0D Subwoofer output IN phase
180D Subwoofer output OUT OF phase
Bass Q-Factor 1.0 When the Bass Center Frequency is
1.25
1.5
2.0
BACK Return to previous menu.
a cut-off frequency of the subwoofer's
LPF (low-pass filter) and the
“SMALL” speakers' HPF (high-pass
filter). The Crossover frequency setting has no effect if the subwoofer is
set to “OFF” and any other speaker is
set to “LARGE”.
NOTE: Depending on your installation, reversing the subwoofer phase
may increase Bass output.
selected, adjusting the Bass Q-Factor alters the sharpness of the Bass
output.
Calibrage d'Écran
Pour accéder le Calibrage d'Écran du menu de SYSTEM
SETUP, surligner SCREEN CAL en vert.
Après être entré le mode de calibrage, un apparaît dans
un quart de cercle faisant le coin de l'écran. Pour commencer
le calibrage, la pression et tenir le pour une seconde
jusqu'à ce qu'il se déplace au prochain quart de cercle.
Continuez pour chaque quart de cercle jusqu'à ce que le
calibrage soit accompli.
Sortir du menu configuration du système
Pour sortir de la mode de configuration et reprendre la
reproduction normale, appuyez sur le bouton SYS SETUP
(31) sur la télécommande ou sur le bouton DISP (5) sur le
panneau d'avant.
77
Page 82

OPERATION TUNER AM/FM
Affichage tuner TFT
17
Source:
11
12
10 2
P1
PRESETS
13 14
4 1
6
7
1. Indicateur Bande Radio Courante
2. Indicateur de la fréquence de radio
3. Horloge
4. Indicateur de transmission en stéréo
5. Indicateur de transmission de signal local fort
6. Des stations de radio pré-réglées. Touchez pour
rappeler les stations pré-réglées ou touchez et
maintenez pour stocker une station.
7. Mode de reproduction zone d'avant
8. Mode de reproduction zone d'arrière
9. Niveau d'égaliseur défini par l'utilisateur
10. Indicateur de réglage d'intensité
11. Indicateur de station pré-réglée courante
12. |<< : Touchez pour chercher en arrière
13. >>| : Touchez pour chercher en avant
14. << : Touchez pour syntoniser une étape à l'arrière
15. >> : Touchez pour syntoniser une étape en avant
16. BAND : T ouchez pour changer entres les bandes AM et
FM
17. AS : Touchez pour automatiquement stocker les
stations
18. Touchez cette zone pour revenir au MAIN MENU
Changer à la source tuner radio
Appuyez sur le bouton SRC (15) sur le panneau d'avant, ou
le bouton SRC sur la télécommande (6) pour changer à la
source TUNER.
15 16
BAND
8
5
3
AS
9
Sélectionnez bande AM/FM
Touchez le bouton BAND sur l'écran (15), sur l'appareil (14)
ou sur la télécommande (20) pour changer entre les bandes
suivantes : FM1, FM2, FM3, AM1 et AM2.
Rechercher la syntonisation
Appuyez sur le bouton >>| (19) sur la télécommande ou le
bouton > sur la manette pour chercher la prochaine station
supérieure.
Appuyez sur le bouton |<< (17) sur la télécommande ou sur
le bouton < (16) sur la manette pour chercher la prochaine
station inférieure.
Syntonisation à la main
Appuyez sur les boutons /\ ou V (18, 19) sur la manette pour
augmenter ou diminuer la fréquence de syntonisation par une
étape.
Utilisation des stations pré-réglées
Six boutons de préréglages numérotés stockent et rappellent
des stations pour chaque bande. Toutes les six stations
stockées (P1 à P6) pour la bande courante apparaissent sur
l'écran.
Stocker une station
1. Sélectionnez une bande (si nécessaire) et puis sélectionnez une station.
2. T ouchez et maintenez sur le bouton pré-réglé sur l'écran
(6) pendant 3 secondes. Le numéro pré-réglé apparaît
en haut de l'écran.
Rappeler une station
1. Sélectionnez une bande (si nécessaire).
2. Touchez un bouton pré-réglé sur l'écran (6) pour
sélectionner la station stockée correspondante.
A NOTER : Vous pouvez également employer
numered des boutons sur le panneau de
commande pour stocker et se rappeler préréglez
les stations.
VM9311TS
Stockage automatique (AS)/Balayage de
prévision
Pour sélectionner six stations fortes et les stocker dans la
bande courante.
1. Sélectionnez une bande (si nécessaire)
2. Appuyez sur le bouton de AS (26) sur le panneau de
commande ou touchez AS (16) sur l'écran pour 2
secondes pour activer la fonction de stockage
automatique
Les nouvelles stations remplacent les stations déjà stockées
dans cette bande.
Balayage de prévision
Balayez la bande de AM ou de FM pour une prévision des
stations disponibles dans votre secteur particulier. Appuyez
sur le bouton de play/pause sur la télécommande une fois
(pression courte) ou enfoncez sur le manche une fois
(pression courte). Serrez encore pour arrêter la picoseconde.
Recherche de stations de radio locale
Lorsque la fonction Locale est en marche, seulement des
stations de radio avec un signal radio fort sont jouées. Pour
activer la fonction locale lorsque vous êtes dans la mode
tuner AM/FM, appuyez et maintenez l'appui sur le bouton LO/
DX (6) sur le panneau d'avant alors que la barre jaune de
volume N'EST PAS visible. Appuyez de nouveau sur le
bouton LO/DX pour mettre Local en arrêt. Lorsque la fonction
Local est active, LOC apparaît sur l'écran et un indicateur
vert s'illumine.
78
Page 83

VM9311TS
OPERATION RADIO XM
Des écouteurs peuvent souscrire à la radio XM
sur le Web en visitant www.xmradio.com ou en
appelant (800) 967-2346. Les clients doivent
avoir leur identité radio prête (V oir « Affichage du
code d'identification (ID) » à la page 79.). Les
clients peuvent recevoir un nombre limité de
chaînes libres à transmettre sans activation.
Accéder à la mode Radio XM
Appuyez sur le bouton SRC (15) sur le panneau d'avant ou
sur la télécommande (8) pour changer à la source XM.
1. Nom de chaîne XM
2. Numéro de chaîne XM
3. Bande XM
4. Temps
5. Titre de la chanson
6. Nom de l'artiste
7. Catégorie de chanson
8. Information service de données
9. Chaînes pré-réglées courantes/bouton pré-réglés sur
l'écran
10. CH<<: Sélectionnez la chaîne précédente
11. CH >> : Sélectionnez la chaîne prochaine
12. CAT /\ : Sélectionnez la chaîne prochaine dans la
catégorie courante uniquement
13. CAT V : Sélectionnez la chaîne précédente dans la
catégorie courante uniquement
14. DIR CH : Appuyez pour entrer directement dans la
chaîne en utilisant le clavier sur l'écran ;
15. XM CG : Accéder à la mode Chaîne/Guide de catégorie
16. BAND : Change entre les bandes XM, XM1, XM2, XM3
17. MENU : Accéder au menu configuration XM
18. Touchez cette région pour retourner au Menu Principal
Affichage du code d'identification (ID)
Avant d'écouter la radio XM, vous devez souscrire au service
en utilisant le numéro d'identification de votre radio. Pour
afficher l'identification radio, appuyez sur les boutons < ou >
(16, 17) sur la manette, ou CH<< ou CH>> sur l'écran tactile
plusieurs fois pour syntoniser à la chaîne 000. L'écran affiche
l'identification radio XM à 8 caractères sous le CHANNEL
NAME.
Sélectionner une station
Appuyez sur les boutons < ou > (16, 17) sur la manette ou
sur les boutons I<< ou >>I (17, 19) sur la télécommande ou
sur CH<< ou CH>> sur l'écran tactile pour changer à une
autre station.
Mode de pré-réglage
Pour entrer en mode pré-réglage, touchez le bouton BAND
sur l'écran, ou appuyez sur le bouton BAND sur l'appareil
(14) ou sur la télécommande (20) pour changer entre les
bandes suivantes : XM1, XM2, XM3 (indiqué au coin droite
en haut de l'écran TFT).
Six boutons de préréglage numérotés stockent et rappellent
des stations pour chaque bande. Toutes les six stations
stockées (P1-P6) sur la bande courante apparaissent sur
l'écran TFT.
Stocker une station
1. S.électionnez une bande (si nécessaire) et puis sélectionnez une station
2. Touchez et maintenez la touche sur un bouton de
préréglage sur l'écran pendant trois secondes. Le
numéro pré-réglé apparaît en haut de l'écran.
Rappeler une station
1. Sélectionnez une bande (si nécessaire)
2. Touchez un bouton de préréglage sur l'écran pour
sélectionner la station stockée correspondante.
Mode Chaîne/Guide de catégorie
Il y a deux modes de recherche pour aider à naviguer à
travers les chaînes et les catégories. Pour accéder à la mode
Guide de Chaîne/Catégorie appuyez sur le bouton ZOOM
(23) sur la télécommande ou le bouton XM CG sur l'écran
tactile.
Guide de chaîne est la mode de recherche par défaut. Pour
accéder au Guide de Catégorie, appuyez sur le bouton
TITLE (2) sur la télécommande ou touchez CAT sur l'écran
tactile. Pour revenir au Guide de Chaîne, appuyez sur le
bouton SUBTITLE (9) sur la télécommande.
Mode Guide de Chaîne
Lorsque la mode Guide de Chaîne est sélectionné, Search
Mode et CHANNEL apparaissent dans la moitié supérieur de
l'interface de l'utilisateur. XM apparaît au coin droite en haut
et les six premières chaînes XM sont affichées dans des
boîtes dans la moitié inférieur de l'écran TFT.
• Lorsque vous êtes en Search Mode, pour changer entre
les modes de recherche Chaîne et Catégorie, appuyez
sur les boutons CH ou CAT sur l'écran tactile.
• Appuyez sur le bouton >> (14) sur la télécommande ou le
bouton (/\) (18) sur la manette ou le bouton > sur l'écran
tactile pour voir la prochaine page de stations. Chaque
page contient six chaînes à sélectionner.
• Appuyez sur le bouton << (22) sur la télécommande ou le
bouton (V) (19) sur la manette ou le bouton < sur l'écran
tactile pour voir la page précédente de stations. Chaque
page contient six chaînes à sélectionner.
• Appuyez sur le bouton SCAN sur l'écran pour revoir
chacune des six chaînes sur l'écran pendant 10 seconde
• Appuyez sur le bouton pour revenir à l'écran Mode de
Pré-réglage.
79
Page 84

VM9311TS
• Appuyez sur le bouton Menu sur l'écran pour accéder au
menu configuration XM.
Pour sélectionner une chaîne lorsque vous êtes en mode
Guide de Chaîne, appuyez sur le bouton de pré-réglage
correspondant (1-6) sur l'appareil, la télécommande ou
l'écran tactile. La chaîne va commencer à jouer et l'appareil
reviendra au Mode de pré-réglage. Lorsque vous êtes en
mode de pré-réglage, appuyez et maintenez l'appui sur un
bouton de pré-réglage sur l'écran (ou 1-6 sur l'appareil ou la
télécommande) pour stocker une chaîne qui est en train de
jouer.
Mode Guide de Catégorie
Lorsque la Mode Catégorie est sélectionnée, Search Mode et
CATEGORY apparaissent sur la moitié supérieur de
l'interface.
• Lorsqu'en mode recherche, pour changer entre les modes
de recherche Chaîne et Catégorie, appuyez sur les
boutons CH et CAT sur l'écran tactile.
• Appuyez sur le bouton >> (14) sur la télécommande ou le
bouton /\ sur la manette ou le bouton > sur l'écran tactile
pour voir les six prochaines catégories.
• Appuyez sur le bouton << (22) sur la télécommande ou le
bouton V sur la manette ou le bouton < sur l'écran tactile
pour voir les six catégories précédentes.
• Appuyez sur le bouton SCAN sur l'écran pour revoir
chaque chaîne dans la catégorie sélectionnée pendant 10
secondes.
• Appuyez sur le bouton sur l'écran pour revenir à
l'écran Mode de Préréglage.
• Appuyez sur le bouton MENU sur l'écran pour accéder au
menu Configuration XM.
Pour sélectionner une stations dans une catégorie
spécifique, exécutez les étapes suivantes :
1. Pour sélectionner une catégorie appuyez sur le numéro
pré-réglé correspondant (1-6) sur le devant de l'appareil, ou sur la télécommande ou sur l'écran tactile. Lorsqu'une catégorie a été sélectionnée, les stations dans
cette catégorie seront affichées sur l'écran.
2. Appuyez sur le bouton >> (14) sur la télécommande ou
le bouton /\ sur la manette (18) ou sur le bouton > sur
l'écran tactile pour voir les six prochaines stations.
Appuyez sur le bouton << (22) sur la télécommande ou
le bouton V sur la manette (19) ou le bouton < sur
l'écran tactile pour voir les six stations précédentes dans
la catégorie sélectionnée.
3. Pour sélectionner une chaîne lorsque vous êtes en
mode Catégorie, appuyez sur le bouton pré-réglé
correspondant (1-6) sur l'appareil, sur la télécommande
ou sur l'écran tactile. La chaîne va commencer à jouer
et l'appareil reviendra à la Mode de Préréglage. Lorsque
vous êtes en mode de préréglage appuyez et maintenez
l'appui sur un bouton pré-réglé sur l'écran (ou 1-6 sur
l'appareil ou sur la télécommande) pour stocker la
chaîne qui est en train de jouer.
Appuyez sur le bouton TITLE (2) pour revenir à la page
principale de la Mode Catégorie et sélectionnez une
catégorie différente.
Syntonisation directe
Pour entrer une station directement, exécutez les étapes
suivantes :
1. Appuyez sur le bouton GOTO (21) jusqu'à ce que
l'écran suivant apparaisse.
2. Utilisez les clés numériques sur la télécommande pour
entrer la station de radio XM désirée. Vous devez entrer
un numéro à 3 chiffres (par exemple : 004).
3. Appuyez sur le bouton >/II (18) sur la télécommande ou
le bouton ENTER (manette) (20) sur l'appareil, ou
laissez un temps mort sur le pavé après 4 secondes et
la station va être entrée automatiquement. Utilisez le
bouton CLR sur l'écran pour corriger des fautes et OK
pour entrer le numéro de la chaîne.
Menu configuration XM
Lorsqu'en mode radio XM, appuyez sur le bouton MENU (1)
sur la télécommande pour voir le menu configuration XM.
Appuyez sur MENU pour sortir du menu ou du sous-menu
courant, et revenir à l'écran précédent.
Mode Diagnostique
Cette fonction est réservée pour les techniciens pour
dépannage.
Contrôle Parental
Par défaut, cette fonction n'est pas verrouillée et toutes les
chaînes peuvent être accédée par qui écoute la radio. Pour
fermer une station (le PASSWORD est accentué par défaut) :
1. Pour verrouiller une station, appuyez sur le bouton <<
(22) sur la télécommande ou le bouton V (19) sur la
manette jusqu'à ce que Channel Number soit surligné
en bleu.
2. Entrez le numéro de chaîne à être verrouillé.
3. Revenez au champ de PASSWORD et écrivez « 1264 »
employant la télécommande.
4. Serrez le bouton >/|| (18) et la petite serrure jaune se
fermeront, indiquant que le channel(s) sont verrouillé.
5. Choisissez l'option de LOCK au fond du menu pour
fermer le canal.
Appuyez deux fois sur le bouton MENU (1) pour revenir à la
page principale XM.
To unlock a channel (PASSWORD is highlighted by default):
1. Écrivez «1264 » employant la télécommande, puis le
bouton >/|| (18). L'icône jaune de serrure s'ouvrira.
2. Appuyez sur le bouton << (22) sur la télécommande ou
le bouton V (19) sur la manette jusqu'à ce que Channel
Number soit surligné en bleu.
3. Entrez le numéro de chaîne à être verrouillé.
4. Revenez au champ de PASSWORD et écrivez « 1264 »
employant la télécommande.
5. Serrez le bouton >/|| (18).
6. Choisissez l'option de UNLOCK au fond du menu pour
ouvrez le canal.
Appuyez deux fois sur le bouton MENU (1) pour revenir à la
page principale XM.
80
Page 85

VM9311TS
OPERATION PLATINE DVD
A NOTER : Lorsque bien installé, la vidéo DVD ne peut pas
être affichée sur l'écran TFT principal à moins que les freins
de parking ne soient appliqués. Si vous essayez de jouer une
vidéo DVD alors que le véhicule est en motion, l'écran TFT
affiche PARKING avec un arrière fonds en bleu. Des écrans
de vidéo en arrière fonctionneront normalement si applicable.
Ouvrir/fermer l'écrant vidéo TFT
Ouvrir l'écran TFT
Pour ouvrir l'écrant vidéo TFT appuyez sur le bouton OPEN
(1). L'appareil fait bip et puis s'ouvre.
Fermer l'écran TFT
Appuyez de nouveau sur le bouton OPEN (1) pour fermer
l'écran vidéo TFT. Si l'écran est dans la position IN, il sort
avant de se fermer.
Insérer/ejecter un disque
Après avoir inséré un disque DVD, on entre dans la mode
DVD et le disque se met à jouer.
A NOTER : Si la verrouille parentale (classement)
est activée et le disque inséré n'est pas autorisé,
le code à 4 chiffre doit être entré et/ou le disque
doit être autorisé (voir “Menu RATING (verrouille
parentale)” à la page 84).
Vous ne pouvez insérer un disque s'il y a déjà un disque dans
l'appareil ou si la puissance est en arrêt.
A NOTER : CD-R/RW, DVD-R/RW, DVD+R/RW ne
joueront pas à moins que la séance
d'enregistrement ne soit fermée.
Ejection du disque
Appuyez sur le bouton sur l'appareil (21) ou sur la
télécommande (25) pour éjecter le disque. L'appareil
reviendra automatiquement à la mode Tuner. Vous pouvez
éjecter un disque avec la puissance en arrêt et l'appareil
restera en arrêt après l'éjection du disque.
Réinitialiser le mécanisme de chargement
Si le disque se charge d'une manière anormale ou une
opération anormale du mécanisme de coeur arrive, appuyez
et maintenez le bouton (21) sur l'appareil ou sur la
télécommande (25) pour réinitialiser le mécanisme de
chargement. L'opération normale reprend.
Accéder à la mode DVD
Pour changer à la mode DVD lorsqu'un disque est déjà
inséré, appuyez sur le bouton SRC (15) sur le panneau
d'avant ou sur la télécommande (8) jusqu'à ce que DVD
apparaisse en bas de l'écran.
Utilisation des contrôles d'écran tactile
Les zones de touche importante pour la reproduction DVD
sont décrites ci-dessous :
A - Retour au MAIN MENU
B - Clé DISP Affiche l'information relativement à la reproduction
C - Sélectionnez le chapitre précédent
D - Sélectionnez le prochain chapitre
E - Affiches les contrôles d'écran suivants : Menu,
>>|, |<<, >>.
>/||, , <<,
Contrôler la reproduction
Arrêter la reproduction
Appuyez sur le bouton arrêt sur l'écran ou appuyez sur le
bouton /BAND (20) sur la télécommande pour arrêter la
reproduction DVD.
Faire pause pendant la reproduction
Touchez le bouton reproduction/pause (
appuyez sur le bouton
suspendre ou reprendre la reproduction du disque.
Reproduction en ralenti
Appuyez sur le bouton << (22) sur la télécommande ou le
bouton V (19) sur la manette pour jouer le titre courant en
ralenti à ½, ¼, 1/6, 1/7 de la vitesse normale. Appuyez sur le
bouton
>/|| (18) pour reprendre la reproduction normale.
Conntinuez à appuyer sur le bouton << ou le bouton V pour
reculer en ralenti.
>/|| sur la télécommande (18) pour
>/||) sur l'écran ou
Répéter la reproduction
Appuyez sur le bouton REPT (7) sur la télécommande, pour
changer la mode de répétition selon le suivant :
• DVD : Répéter le titre, répéter le chapitre, répéter en
arrêt
• VCD (PBC en arrêt) : Répéter simple, Répeter Off
• MP3 : Répeter simple, Répéter le dossier, Répeter Off
A NOTER : Pour la reproduction VCD, la fonction
de répétition ne sera pas disponible si le PBC est
en marche.
Fonction de répétition par sections (A-B)
Utilisez la fonction A-B pour définir une zone spécifique du
disque à répéter
• Appuyez sur le bouton REPT A-B (6) sur la
télécommande pour régler le point de commencement
(A) de la section répétée.
• Appuyez de nouveau sur le bouton REPT A-B dès que
vous arrivez au point final désiré (B) de la section
répétée. La partie sélectionnée du DVD va se répéter
d'une manière continue.
• Appuyez de nouveau sur le bouton REPT A-B pour
annuler la section A-B et arrêter la reproduction répétée.
Reproductiobn au hasard
Appuyez sur le bouton RDM (33) sur la télécommande, alors
qu'un DVD, VCD ou CD est en train de jouer, pour activer la
reproduction au hasard, et pour jouer tous les chapitres/
pistes dans un ordre mélangé. « ON » apparaît sur l'écran.
Appuyez sur le bouton >>| (19) sur la télécommande ou le
bouton > (17) sur la manette pour jouer la prochaine piste au
hasard.
Appuyez de nouveau sur le bouton RDM pour arrêter la
reproduction au hasard.
A NOTER : Lorsqu'un VCD est en train de jouer
avec le PBC en marche, activation de la
reproduction au hasard met automatiquement en
arrêt le PBC.
Accéder au menu DVD
Appuyez sur le bouton MENU (1) sur la télécommande pour
rappeler le menu principal DVD. Utilisez les boutons de
direction (flèches) (<, >, /\ et V) sur la manette (16, 17, 18,
19) pour sélectionner un titre du menu.
81
Page 86

VM9311TS
Appuyez sur le bouton TITLE (2) sur la télécommande pour
sélectionner un titre différent pour la reproduction.
Appuyez sur le bouton
bouton ENTER (manette) (20) pour confirmer votre sélection
et commencer la reproduction.
>/|| (18) sur la télécommande ou le
Se déplacer à travers les chapitres
Appuyez sur le bouton >>| (19) sur la télécommande ou le
bouton > (17) sur la manette pour avancer jusqu'au prochain
chapitre du DVD.
Appuyez sur le bouton |<< (17) sur la télécommande ou le
bouton < (16) sur la manette pour aller au chapitre précédent.
Avance rapide/recul rapide
Appuyez sur le bouton >> (14) sur la télécommande ou le
bouton ^ (18) sur la manette pour une avance rapide.
Appuyez et relâchez le bouton pour augmenter la vitesse de
2x, 4x, 8x et 20x. Continuez à appuyer sur les boutons >> ou
^ pour reculer rapidement.
Recherche GOTO (aller à)
Pendant la reproduction DVD ou VCD, exécutez les étapes
suivantes pour utiliser la fonction GOTO (Aller à) pour
accéder à un emplacement spécifique sur le disque :
1. Appuyez sur le bouton GOTO (21) sur la télécommande
pour entrer dans la mode GOTO.
2. Appuyez sur les boutons >> ou << (14, 22) sur la
télécommande ou les boutons < ou > (16, 17) sur la
manette pour sélectionner une catégorie (surligné en
bleu).
• Pour la mode DVD vous pouvez choisir le Temps
ou la recherche Titre/Chapitre
Recherche DVD
Temps - Allez à un
temps spécifique dans
le titre courant
Titre/Chapitre - Allez à
un temps spécifique
dans le chapitre
• Pour la mode VCD, appuyez sur le bouton GOTO
pour choisir en tre Recherche de Piste, Recherche
du disque et Sortie.
VCD Recherche Piste
Temps - Allez à un temps
spécifique dans la piste
courante
Piste - Allez à la piste
spécifique
VCD Recherche Disque
Temps - Allez à un temps
spécifique sur le disque
Piste - Allez à la piste
spécifique
3. Entrez un temps dans le champ en utilisant le pavé
numérique sur la télécommande.
4. Appuyez sur le bouton >/|| (18) sur la télécommande ou
le bouton ENTER (manette) (20) pour aller à
l'emplacement spécifique sur le disque.
5. Appuyez de nouveau sur le bouton GOTO pour sortir
Chapitre direct/Sélection de Piste
Pendant la reproduction CD, VCD
et DVD, vous pouvez utiliser le
pavé numérique sur la
télécommande (29) pour accéder
à une piste directement.
Visionner un angle de
l'image alternatif (DVD
uniquement)
Certains DVDs contiennent des scènes qui ont été tourné
simulatnément de différents angles. Pour des disques
enregistrés avec des angles multiples, appuyez sur le bouton
ANGLE (13) sur la télécommande pour basculer entre les
angles disponibles de l'image sur l'écran.
Zoom
Appuyez sur le bouton ZOOM (23) sur la télécommande pour
agrandir ou faire un panoramique à travers l'image vidéo en
utilsiant les options suivantes : Q1, Q2, Q3 et OFF.
Disques multi-langues (DVD uniquement)
Changement de langue audio
Si vous êtes en train de regarder un disque enregistré en
langues multiples, appuyez sur le bouton AUDIO (5) sur la
télécommande pour choisir une langue.
Changement de langue de sous-titre
Si vous regardez un disque enregistré en langues multiples
avec sous-titres, appuyez sur le bouton SUBTITLE (9) sur la
télécommande pour choisir la langue dans laquelle vous
voudriez que les sous-titres apparaissent.
A NOTER : Pendant la reproduction VCD, appuyez
sur le bouton AUDIO (5) sur la télécommande
pour choisir entre Chaîne Gauche, Chaîne Droite
et Stéréo.
PBC (contrôle de la reproduction) (VCD
uniquement)
Pour les VCDs avec la fonctionnalité de reproduction,
contrôle de reproduction (PBC) offre des contrôles
supplémentaires pour une reproduction VCD.
Appuyez sur le bouton MENU (1) sur la télécommande pour
basculer la fonction PBC ON/OFF. Lorsque le PBC est en
marche, la reproduction commence à partir de la première
piste de la liste d'écoute.
A NOTER : Lorsque le PBC est activé, avance
rapide, reproduction en ralenti, et piste
précédente/prochaine sont disponibles. La
répétition et la sélection directe de la piste ne
sont pas disponibles.
Lorsque le PBC est activé, sélectionner la reproduction au
hasard, le balayage et la recherche de la reproduction
désactivent automatiquement le PBC.
Information de reproduction
Pendant la reproduction DVD et VCD, appuyez sur le bouton
INFO (10) sur la télécommande pour afficher l'information sur
la reproduction sur l'écran, y compris la média et le temps de
la reproduction courant.
Information de reproduction DVD
L'information suivante est affichée en haut de l'écran qu'un
DVD est en train de jouer.
• T : 5/8 - « 5/8 » indique que le cinquième des huit titres sur
le DVD est en train de jouer.
• C : 2/16 - « 2/16 » indique que le deuxième des 16 titres
sur le DVD est en train de jouer.
• 00 :41 :26 - « 00 :41 :26 » indique le temps de
reproduction du titre courant.
82
Page 87

VM9311TS
• 2 / 6 Eng – L'information de l'affichage de langue
indique que la deuxième langue des 6 (English) est en
train d'être utilisée.
• L'information suivante apparaît en bas de l'écran alors
qu'un DVD ou CD est en train de jouer :
Source: DVD/CD EQ: Flat Loud: Level 1
• Source: DVD/CD - « DVD/CD » est la source de
reproduction courante pour la zone avant.
• EQ: Flat (Plat) - L'égaliseur est réglé à plat.
• Loud (Intensité) : Level (Niveau) 1 - L'option Intensité est
réglée au niveau 1 de l'intensité.
Information de reproduction VCD
L'information suivante est affichée en haut de l'écran alors
qu'un VCD est en train de jouer :
• VCD 2.0 - Format du disque courant.
• T 6/.18 - « 6/18 » indicque que le sixième des 18 pistes
sur le VCD est en train d'être joué.
• 00.02.18 - « 00.02.18 » indique le temps de reproduction
de la piste courante.
L'information suivante apparaît en bas de l'écran pendant la
reproduction VCD :
Source: DVD/CD EQ: Flat Loud: Level 1
• Source: DVD/CD - « DVD/CD » est la source de
reproduction courante pour la zone avant.
• EQ: Flat (Plat) - L'égaliseur est réglé à plat.
• Loud (Intensité) : Level (Niveau) 1 - L'option Intensité est
réglée au niveau 1 de l'intensité.
Information générale du disque
Tableau 7: Propriétés du disque
Tableau 7: Propriétés du disque
Symbol
e
Propriétés du disque 12cm
Simple côté simple couche 74 minutes
Tableau 8: Symboles du disque
Symbole Signification
Le nombre de langues voix enregistré. Le numéro
à l'intérieur de l'icône Indique le nombre de
langues sur le disque (un maximum de 8).
Le nombre de langues de sous-tirage disponible
sur le disque (maximum 32).
Le nombre d'angles fourni (maximum de 9).
Rapport largeur longueur disponible. LB veut dire
Boîte de Lettres et PS veut dire Panoramique/Balayage. Dans l'exemple à gauche le vidéo 16.9 est
converti en vidéo Boîte à Lettres.
Indique le code de la region où le disque peut être
joué
• Région 1 : Etats-Unis, Canada, Pacifique Est,
Iles d'Océan.
• Région 2 : Japon, Europe Occidental, Europe
Septentrional, Egypte, L'Afrique du Sud,
Proche-Orient.
• Région 3 : Taiwan, Hong Kong, Corée du Sud,
Thailande, Indonésie, Asie du Sud-Est.
• Région 4 : Australie, Nouvelle Zélande,
Amérique Centrale et du Sud, lles de
Pacifique du Sud, Océanie.
• Région 5 : Russie, Mongolie ; Inde, Asie
Centrale, Europe Orientale, Corée du Nord,
Afrique du Nord, Asie de Nord-Ouest.
• Région 6 : Chine continentale.
Temps de
reproduction
maximum
Symbol
e
Propriétés du disque 12cm
Simple côté simple couche DVD-5
Simple côté double couche DVD-9
Simple côté simple couche(DVD-10)
côté double couche(DVD-18)
Simple
Simple côté simple couche VCD
Temps de
reproduction
maximum
MPEG 2 meth-
ode
133 minutes
242 minutes
266 minutes
484 minutes
(MPEG 1 Methode)
74 minutes
83
Page 88

LANGUAGE
DVD SETUP
AUDIO
VIDEO
RATING
MENU DE CONFIGURATION DVD/DISQUE
A NOTER : Un DVD/disque doit être chargé dans
le mécanisme et est en train de jouer avant
d'accéder au menu configuration DVD. Lorsque le
DVD/Disque est en train de jouer, appuyez sur le
bouton DVD SETUP sur la télécommande pour
accéder au menu configuration DVD.
En mode DVD Setup, LANGUAGE, VIDEO, AUDIO et
RATING (verrouille parentale) sont disponible pour
configuration. Cette opération peut être exécutée en utilisant
les boutons de commande de la télécommande ou de la
manette.
Accéder à l'écran de configuration du DVD
Pour les réglages du système appuyez sur le bouton DVD
SETUP (30) sur la télécommande ou touchez SETUP sur
l'écrant pour entrer dans le menu SETUP. SYS SETUP est
surligné en vert.
Pour accéder au menu DVD SETUP, appuyez sur le bouton
V (7) sur la télécommande pour choisir l'option DVD SETUP,
et puis appuyez sur le bouton >/|| (18) ou simplement
touchez DVD SETUP sur l'écran. LANGUAGE est surligné
en vert.
DVD SETUP
A NOTER : Lorsque la configuration DVD est
terminée, les réglages sont mis en mémoire. P our
revenir aux réglages par défaut de l'usine
appuyez sur le bouton RESET (25) sur le panneau
d'avant.
Accéder à un menu
Pour accéder à un menu (LANGUAGE, VIDEO, AUDIO ou
RATING) appuyez sur les boutons de directions sur la
BACK
manette (16,17, 18, 19) ou sur la télécommande (14, 17, 18,
19, 22) pour surligné le menu désiré en vert. Vous pouvez
aussi toucher la sélection du menu sur l'écran pour accéder à
ce menu-là.
Sélection d'une fonction pour ajustement
A l'intérieur du menu, appuyez sur les boutons >> ou << (14,
22) sur la télécommande ou les boutons /\ ou V (18, 19) sur
la manette pour sélectionner une fonction à être ajustée.
Ajustement d'une fonction
1. Entrer dans le champ d'option pour la fonction que vous
voulez ajuster en appuyant sur le bouton >/|| (18) sur la
télécommande ou en appuyant sur le bouton ENTER
(manette) (20) sur l'appareil. Un sous-menu apparaît
dans le deuxième rang avec l'option sélectionnée surligné en bleu.
2. Sélectionnez une nouvelle valeur en appuyant sur les
boutons >> ou << (14, 22) sur la télécommande ou les
boutons /\ ou V (18, 19) sur la manette.
3. Confirmez votre sélection en appuyant sur les boutons
<<, |<<, ou >>| (22, 17, 19) sur la télécommande ou les
boutons < ou > (16, 17) sur la manette. La nouvelle
valeur est surligné en bleu et la configuration est
complète.
Menu LANGUAGE
Si le DVD soutient plus d'une langue de Sous-titre ou d'audio,
toutes les langues sont disponible pour sélection pendant la
reproduction. Si la langue sélectionnée n'est pas soutenue
par le DVD, alors une langue par défaut est utilisée. Pendant
la reproduction, appuyez sur le bouton SUBTITLE (9) ou
AUDIO (5) sur la télécommande pour changer la langue
directement. Ceci n'aura aucun effet sur les réglages du
menu DVD.
Tableau 9: Fonction Menu LANGUAGE
Réglages Options Fonction
Subtitle
(Sous-titre)
Audio Anglais Sélectionnez la langue par défaut dans
Menu DVD Anglais Sélectionnez la langue par défaut dans
Anglais Sélectionnez la langue par défaut dans
Chinois
Auto
En arrêt
Chinois
Chinois
laquelle vous voudriez que les soustitres (si nécessaire) soient affichés..
laquelle vous voudriez que l'audio (lorsque facultatif) soit reproduit.
laquelle vous voudriez que le menu
DVD (si applicable) soit affiché.
VM9311TS
Menu VIDEO
Tableau 10: Fonctions Menu Vidéo
Réglages Options Fonction
TV Shape
(rapport
largeur:lon
gueur
Angle Mark
(Marque
d'angle)
BACK Retour au menu précédent
A NOTER : Pour des disques standardisés qui
n'ont pas été formatés pour « écran large »
l'utilisation d'un rapport largeur/longueur de 16 :9
va tordre l'image.
Menu AUDIO
Réglages Options Fonction
DRC En arrêt Employez le contrôle de gamme
BACK Retour au menu précédent.
Menu RATING (verrouille parentale)
Le système DVD a une fonction verrouille parentale
encastrée pour empêcher des personnes non-autorisée de
voir du contenu du disque restreint. Par défaut, le système de
classement n'est pas verrouillé. Configuré, la verrouille
parentale n'est relâché qu'en en entrant le mot de passe
correct. Dès que le mot de passe est entré, le classement est
disponible pour configuration.
Réglages Options Fonction
Password
(Mot de
passe)
4:3 PS Avec un affichage 16.9, les côtés droite
4:3 LB Avec un affichage 16.9, le haut et le bas
16:9 L'image est présentée dans une vue
On (En
marche)
Off (En
arrêt)
et gauche sont coupées.
sont coupes.
large avec un rapport largeur/longueur
de 16:9.
Indicateur d'angle (si applicable) est
montré
L'indicateur d'angle n'est pas montré
Tableau 11: Fonctions menu audio
En marche
dynamique pour une reproduction
meilleure à des volumes bas.
Tableau 12: Fonctions Menu RATING
_ _ _ _ Entrez un mot de passe de 4 chif-
fre pour activer la Fonction
classement.
84
Page 89

VM9311TS
Tableau 12: Fonctions Menu RATING
Réglages Options Fonction
Rating
(Classement )
Load Factory
(Chargement
d'usine Réinitialisation)
BACK Retour au menu précédent.
Pour réinitialiser le mot de passe, accéder au menu RATING,
et entrez le nouveau mot de passe. Le mot de passe correct
entré, vous pouvez accéder au champ Mot de Passe et
entrer un nouveau mot de passe.
A NOTER : Enregistrez le mot de passe et gardezle dans un endroit sûr. Le classement pour
chaque disque est marqué sur le disque,
l'emballage du disque ou la documentation. Si le
classement n'est pas disponible sur le disque, la
fonction verrouille parentale ne sera pas
disponible non plus. Certains disques
restreignent seulement certaines parties du
disque et le contenu approprié va jouer . Pour des
détails, veuillez vous référer à la description du
disque.
1. Kid Safe
(Sécurisé
Enfant)
2. G
3. PG
4. PG-13
5. PG-R
6. R
7. NC-17
8. Adult
Sélectionnez
Reset pour
rétablir les
réglages par
Sélectionné le niveau de classement approprié pour l'assistance
visée.
Vous pouvez surpasser des
classements plus hauts en utilisant votre mot de passe.
Défaut d'usine pour le système de
classement Uniquement.
85
Page 90

OPERATION AUDIO DVD/DISQUE
Instructions pour le contrôle du TFT et Insérer/Ejecter sont
les mêmes pour l'opération DVD, CD et MP3. Voir la section
Opération Vidéo DVD/Disque pour avoir des informations sur
ce sujet.
Le VM9311TS va jouer de la musique et d'autres fichiers
audio des média disques suivants :
• CD-DA
• CD-R/RW avec des fichiers MP3 et WMA.
•DVD
• DVD-R/RW avec des fichiers MP3 et WMA
Lorsque vous insérez un disque avec l'écran TFT ouvert, le
titre du disque et de la piste (si disponible) avec le numéro de
la piste et le temps de reproduction apparaissent sur l'écran.
Utilisation des contrôles d'écran CD
Les clés touches pour la reproduction carte CD sont décrits
ci-dessous :
9
3 1
T: 02/18 00:00:51
Repeat S can
Random
Disc Title Ultra
Track Name Useless
10
11
12 13
Source: DVD/CD EQ: USER Loud: OFF
16
1. Voie courante et nombre total des voies sur le disque
2. Écoulé jouant le temps
3. Contact pour activer ou mettre le mode hors tension de
jeu de répétition
4. Contact pour activer ou mettre le mode hors tension de
balayage
5. Contact pour activer ou mettre le mode aléatoire
6. Temps courant
7. Titre de disque
8. Titre de voie
9. Contact à retourner au MENU PRINCIPAL
2
14 15
17
5
6
4
AM
1:322
7
8
18
10. >/|| : Contact au playback de disque de jeu ou de pause
11. : Contact pour arrêter le playback de disque
12. |<< : Contact à déplacer à la voie précédente
13. >>| : Contact à déplacer à la prochaine voie
14. << : Contact pour rebobiner la voie courante
15. >> : Touch to fast forward current track
16. Zone Avant Jouant Le Mode
17. Zone Arrière Jouant Le Mode
18. Méthode de codage de médias étant joués
19. Effet entourez musique (Surround Music) choisi
Contrôler la reproduction
Arrêter la reproduction
Appuyez sur le bouton 6/STOP (13) sur le panneau d'avant
ou le bouton /BAND (20) on the remote control to stop disc
play.
Pour reprendre la reproduction, appuyez sur le bouton
ENTER ou la manette (20) sur le panneau d'avant, ou le
bouton >/|| (18) sur la télécommande.
Faire pause pendant la reproduction
Appuyez sur le bouton ENTER, ou la manette (20) sur le
panneau d'avant, ou sur le bouton >/|| pour suspendre ou
reprendre la reproduction du disque.
Se déplacer à travers les pistes
Appuyez sur le bouton >>| sur la télécommande ou le bouton
> sur la manette pour avancer jusqu'à la prochaine piste sur
le disque.
Appuyez sur le bouton |<< sur la télécommande ou sur le
bouton < sur la manette pour vous déplacer jusqu'à la piste
précédente.
Répéter la reproduction
Appuyez sur le bouton 4/RPT (11) sur le panneau d'avant ou
le bouton REPT (7) sur la télécommande pour changer la
mode de répétition comme suit :
• DVD : Répéter titre, Répéter chapitre, Répéter en arrêt
• CD-DA : Répéter simple, Répéter en arrêt
• CD-R/RW : Répéter simple, répéter en arrêt
• DVD-R/RW : Répéter simple, répéter en arrêt
Sélectionner balayage de la piste (CD-DA uniquement)
Pendant la reproduction du disque, appuyez sur le bouton 3/
SCN (10) sur l'appareil, ou le bouton SCN (34) sur la
télécommande pour jouer les 10 premières secondes de
chaque piste. Lorsque vous arrivez à une piste désirée,
appuyez de nouveau sur le bouton SCN pour annuler la
fonction et jouer la piste sélectionnée.
VM9311TS
Sélectionner la reproduction au hasard
Pendant la reproduction du disque, appuyez sur le bouton 5/
RDM (12) pour jouer les pistes sur un disque dans un ordre
mélangé. Dans la mode Reproduction au Hasard, vous
pouvez appuyer sur les boutons |<< ou >>| sur la
télécommande ou les boutons < ou > (16, 17) sur la manette
pour sélectionner une piste dans l'ordre mélangé au lieu de la
progression normale. Appuyez de nouveau sur le bouton 5/
RDM pour annuler la mode de Reproduction au Hasard.
A NOTER : CD-R et CD-RW ne joueront que si la
séance d'enregistrement est fermée.
Avance rapide
Appuyez sur le bouton >> (14) sur la télécommande ou le
bouton /\ (18) sur la manette pour faire avance rapide.
Continuez à appuyer et relâcher le bouton pour augmenter la
vitesse de 2X à 4X, 8X et 20X.
Opération MP3/WMA
Cet appareil vous permet de reproduire des fichiers MP3/
WMA enregistrés sur des CD-R/RWs et sur des DVD-R/
RWs. Pour des disques CD-RW, rassurez-vous qu'ils soient
formatés en utilisant la méthode pleine et non pas la méthode
rapide pour empêcher une opération illégale du disque.
Jusqu'à 999 chansons ou dossiers peuvent être brûlés sur un
disque pour un mélange de musique du MÉGA DVD.
N'excédez pas ce nombre de chansons ou les dossiers ou
les problèmes de lisibilité de disque peuvent se produire.
Format compatibilité MP3
Les formats de nomination de fichiers listés ci-dessous sont
compatible avec cet appareil
• ISO 9660 - nom de fichier 12 caractères, extension de
fichier 3 caractères
• ISO 9660 - nom de fichier 31 caractères, extension de
fichier 3 caractères
• Joliet - 64 caractères
Si le fichier ou le dossier ne conforment pas aux standards du
système de fichiers ISO 9660, il peut ne pas être affiché ou
reproduit correctement.
Utilisez les réglages suivants lorsque vous comprimez des
données audio pour votre disque MP3.
• Taux de transfert de bits - 320kbps
• Fréquence d'échantillon - 48 kHz
Lorsque vous enregistrez MP3 jusqu'à la capacité maximum
du disque, désactiver l'écriture supplémentaire. Pour
86
Page 91

VM9311TS
enregistrer sur un disque vide jusqu'à la capacité maximum
du disque, utilisez le réglage « Disque tout de suite ».
Jouer des fichiers MP3/WMA
Après insertion d'un disque MP3/WMA, des fichiers seront
reproduit dans la séquence du répertoire racine.
Utilisez le pavé numérique sur la télécommande (29) pour
accéder aux fichiers directement.
A NOTER : Lorsque vous enregistrez des fichiers
MP3/WMA sur un disque DVD, utilisez l'option
d'enregistrement 2X ou 4X (si disponible). Cette
vitesse d'enregistrement va aider à éliminer des
erreurs de tampon et à augmenter la fiabilité de
la lisibilité du disque. Aussi, utilisez des dossiers
lorsque vous enregistrez un grand nombre de
chanson/fichiers sur un disque pour faciliter la
navigation musique.
En outre, choisissez l'option de « Disc at Once »
(disque immédiatement) dans votre logiciel
brûlant en brûlant DVD.
87
Page 92

OPERATION IPOD
A NOTER : Soyez sûr que votre iPod a les derniers
progiciels de Apple installés pour éviter des
issues de connectivité.
Accéder à la mode iPod
L'appareil va automatiquement changer à la mode iPod,
lorsqu'un iPod est branché au module média. Pour revenir au
mode iPod à partir de n'importe quelle autre source menu,
appuyez sur le bouton SRC sur le panneau d'avant (15) ou
sur la télécommande (8) jusqu'à ce que le menu iPod
apparaisse sur l'écran.
Contrôler votre iPod
Les boutons de télécommande suivants sont utilisés pour
accéder aux menus iPod :
TITLE = Musique
MENU = Photos
AUDIO = Vidéos
Utilisez la manette sur l'appareil ou les clés de direction sur la
télécommande pour naviguer des menus iPod.
Reproduction de la musique
Appuyez sur le bouton >>| (19) sur la télécommande ou le
bouton > (9) sur la manette pour vous déplacer jusqu'au
prochain article sur le menu.
Appuyez sur le bouton |<< (17) sur la télécommande ou le
bouton < (8) sur la manette pour vous déplace jusqu'à l'article
précédent sur le menu.
Appuyez sur le bouton >/|| (18) sur la télécommande ou le
bouton ENTER sur la manette (20) sur l'installation de tête,
pour sélectionner l'option menu surlignée.
Appuyez sur le bouton >> (14) sur la télécommande ou le
bouton /\ (18) sur la manette pour revenir au menu
précédent.
Reproduction du vidéo
Alors que le vidéo iPod peut être vu sur l'écran du
VM9311TS, vous devez utiliser le iPod pour contrôler les
options de reproduction du vidéo.
Appuyez sur le bouton AUDIO (5) sur la télécommande pour
accéder au mode de VIDÉO d'iPod. Le contrôle de la
diffusion de la volonté VM9311TS de nouveau à l'iPod ainsi à
vous peut choisir les médias visuels pour être montré sur le
moniteur de VM9311TS TFT. Pour annuler le mode VIDEO
appuyez sur le bouton >> (14) sur la télécommande ou le
bouton de MENU sur l'iPod.
A NOTER : Pour transmettre du vidéo depuis
votre iPod à l'écran du VM9311TS, vous devez
regler les options suivantes à travers le menu
réglages vidéo iPod : TV Out = en marche, TV
Signal = NTSC, et Widescreen = En marche.
Reproduction de photos
Alors que les photos iPod peuvent être vu sur l'écran du
VM9311TS, vous devez utilisez le iPod pour contrôler les
options de reproduction de photos.
Appuyez sur le bouton MENU (1) sur la télécommande pour
accéder au mode de PHOTO d'iPod. Le contrôle de la
diffusion de la volonté VM9311TS de nouveau à l'iPod ainsi à
vous peut choisir les médias visuels pour être montré sur le
moniteur de VM9311TS TFT. Pour annuler le mode PHOTO
appuyez sur le bouton >> (14) sur la télécommande ou le
bouton de MENU sur l'iPod.
A NOTER : Après avogg ir débranché votre iPod,
le VM9311TS va toujours revenir à la dernière
mode accédée lorsque votre iPod était branché à
l'appareil.
Inverse vers l'avant/rapide rapide
Pour jeûner l'inverse vers l'avant ou rapide, appuient sur et
tiennent les boutons de |<< ou de >>| (17, 19) pour 1
seconde et continuent à se tenir. Libérez pour reprendre le
jeu normal.
Rechercher par playlists/les artistes/les albums/les
chansons
Pour rechercher par Playlists, les artistes, les albums et les
chansons, appuient sur le bouton 1 (29) sur la télécommande
VM9311TS
tandis que dans un des annuaires suivants : Playlist, artiste,
album ou chanson. L'annuaire choisi sera consulté avec le
nombre de pages et de dossiers du fait annuaire montré au
dessus de la page. Pour accéder à la page ou au dossier,
écrivez le nombre de page ou de dossier directement du
clavier de télécommande. Appuyez sur le bouton de |<< ou
de >>| (17, 19) sur la télécommande ou le bouton de < ou >
(16, 17) sur le manche pour choisir la chanson ou la voie
désirée.
88
Page 93

VM9311TS
DEPANNAGE
Tableau 13: Depannage
Problème Cause Modalité de reprise
GÉNÉRAL
L'appareil ne se met pas en marche Fusible radio a sauté Installez un nouveau
Le fusible de la pile voiture a sauté Fusible avec le classement correct
Opération illégale Appuyez sur le bouton RESET situé dans le coin en bas, à droite du panneau d'avant
La télécommande ne fonctionne pas Pile vidé Remplacez la pile
La pile est installé incorrectement Enlevez la Pile et installez-la correctement
Pas de sortie audio Branchement sortie audio incorrect Vérifiez le câblage et branchez
Volume est réglé trop bas Augmentez le niveau de volume
Branchement MUTE incorrect Revoyez le diagramme de câblage et vérifiez le branchement « MUTE »
Haut-parleurs endommagés Remplacez les haut-parleurs
Déséquilibre de volume Ajuster l'équilibre de chaîne vers la Position de centre
Le câblage haut parleur est en contact Isolez tous les branchements de avec la partie métallique de la voiture haut-parleurs
Mauvaise qualité de son ou distorsion Utilisation des disques piratés Utilisez copie Originale
Classement de puissance haut parleur Branchez les haut-parleurs qu'il faut N'est pas compatible avec l'appareil
Court-circuit de haut-parleurs Vérifiez le cont act de haut-parleurs
Mauvais fonctionnement Le fil Mute es terré Vérifez que le branchement « MUTE » de Tel-Mute n'est pas terré et qu'il est bien isolé
L'appareil se réinitialise Branchement incorrect Vérifiez le câblage et corrigez Lorsque le moteur est coupé entre ACC et positi f
Moniteur TFT
Moniteur ne s'ouvre Ouverture automatique TFT Mettez ouverture automatique TFT en marche
Pas d'image Branchement incorrecte Vérifiez câblage et corrigez
Le commutateur de PRK est actionné et le frein de sta-
tionnement n'est pas engagé
Image clignotante ou interférence apparaît sur
l'écran
Image allongée et affichage rapport hauteur/
largeur
Moniteur s'arrête a une position incorrecte Le chemin de mouvement est bloqué Appuyez sur le bouton OPEN pour redémarrer le mouvement du moniteur
TUNER
Faible recherche de stations Antenne auto n'est pas Branchez le câble de contrôle d'antenne auto correctement
Ne peut pas insérer disque Disque déjà chargé dans l'appareil Ejectez le disque co urant et insérez le nouveau
Le disque ne joue pas Disque est tordu ou Egratigné Utilisez les disque en bonne condition
DVD n'est pas compatible avec les réglages du système
Télé courant
Les branchements vidéo signalement incorrecte Vérifiez le câblage et corrigez
Configuration rapport largeur longueur incorrecte Utilisez le réglage du rapport largeur/longueur
Etendue jusqu'au bout antenne auto n'est Branchez le câble de contrôle d'antenne auto correctement
La fonction locale est activée Mettez la fonction locale en arrêt
Disque est sale ou moite Nettoyez le disque avec un tissu Doux
Le pickup laser est sale Nettoyez le pickup laser avec un Disque de nettoyage
Utilisation d'un disque Incompatible Utilisez un disque compatible
L'estimation de disque dépasse la limite parentale
d'estimation de serrure
Arrêtez le véhicule dans un endroit
Changez la configuration pour accommoder le disque
Changez les réglages de
89
Page 94

Tableau 13: Depannage
Problème Cause Modalité de reprise
La code de région du disque N'est pas compatibl e avec
L'appareil
Le disque est inséré sens dessus sense dessous Insérez le disque avec l'étiquette en haut
Image flou, déformé ou sombre Le disque est illégalement copié Utilisez le disque original
Ne peut pas utiliser PBC No repeat or searching
while playing VCD
Pas de répétition ou de Recherche lorsqu'on joue
Le VCD
MP3
Interruption pendant la Le disque est sale ou égratigné Nettoyez le disque ou remplacez-le
Message de reproduction Incorrecte est affichée Le message est plus grand que l'affichage aux cristaux
RADIO XM
Acoustique non disponible Jonctions de câble incorrectes Vérifiez les jonctions de câble de RCA
Source XM non disponible Jonctions de câble incorrectes Vérifiez les jonctions de câble de câble des données XM et de Media Module
ANTENNA apparaît sur XM l'écran primaire Antenne non reliée Vérifiez les raccordements satellites d'antenne
Toutes autres erreurs Remettez Media Module
iPod
Source d'iPod non disponible Jonctions de câble incorrectes Vérifiez le jLink et les jonctions de câble de module de médias
Ne peut pas voir des médias de vidéo et de photo
sur l'écran de TFT
Toutes autres erreurs Remettez Media Module
PBC n'est pas disponible sur le disque
PBC est en marche Mettez le PBC en arrêt
Fichier est endommagé/ Mauvais enregistrement Recréez le disque avec de bons fichiers
liquides
Arrangements faux de vidéo d'iPod Vérifiez la jonction de câble visuelle d'entrée du jaune RCA de module de médias
Utilisez le disque avec la bonne code de région
VM9311TS
Messages d'erreur
Tableau 14: Messages d'erreur
Message d'erreur Cause Modalité de reprise
Chargement Le disque est en train d'êre lu
Pas de disque
Mauvais disque Le disque est sale Nettoyez le disque
Unknown disc Le format disque n'est pas compatible avec cet appareil
Erreur Région DVD n'est pas compatible avec la code région de
Erreur Opération de mécanisme illégale Appuyez sur le bouton EJECT pendant 5 secondes pour réinitialiser le mécanisme de chargement
Le disque est sale Nettoyez le disque avec un tissu doux
Le disque est sens dessus Sens dessous Insérez le disque avec l'étiquette en haut
Aucun disque dans le Compartiment de chargement Insérez un disque avec un tissu doux
Le disque est sens dessus Sens dessous Insérez le disque avec l'étiquette en haut
l'appareil
90
Page 95

VM9311TS
Soin et entretien
1. N'utilisez qu'un tissu propre en silicone et une lessive
neutre pour nettoyer le panneau d'avant ou le moniteur.
Un tissu rugueux ou une lessive qui n'est pas neutre (tel
que l'alcool) peut mener à des égratignures ou des discolorations.
2. Ne versez pas d'eau ou des fluides sur l'appareil.
3. Si la température à l'intérieur de la platine monte trop
haut, un circuit de protection arrête automatiquement la
reproduction du disque. Si cela arrive, permettez à
l'appareil de se refroidir avant d'opérer la platine de
nouveau.
4. N'insérez jamais rien qu'un disque compact de 5''
(12cm) dans la platine comme le mécanisme peut être
endommagé par l'introduction des objets étrangers.
5. N'essayez pas d'utiliser un disque CD simple de 3'' (8)
dans cet appareil, avec ou sans un adaptateur. Cela
peut endommager la platine ou le disque. De tels dégâts
ne sont pas couvert par le garanti sur ce produit.
6. La platine CD peut ne pas opérer dans des froids ou des
chaleurs extrêmes. Si de telles conditions arrivent,
permettez à la température à l'intérieur du véhicule de
redevenir normal avant de remettre la platine CD en
marche.
7. Lorsque le véhicule se réchauffe quand il fait froid ou
humide, de la condensation peut apparaître sur le
panneau d'affichage aux cristaux liquides. Si cela arrive,
l'écran ne fonctionnera pas bien jusqu'à ce que
l'humidité s'évapore.
8. Nous recommandons que vous utilisez un disque de
nettoyage plus fréquemment que pour l'appareil chez
vous à cause des conditions environnementales dans le
véhicule.
91
Page 96

SPECIFICATIONS
Classement Puissance CEA
Amplificateur Principal
Sortie puissance : 18 Watt RMS x 4 chaînes x 4 Ohms @<
1% THD+N
Rapport signalement au bruit : 70 dBA sous référence
(Référence 1 watt, 4 Ohms)
Réponse fréquence : 20Hz jusqu'à 20 kHz, -3dB entrée
auxiliaire utilisé comme référence source
Voltage référence fourni : 14.4 VDC
Platine DVD/CD
Formats compatibles : DVD-R, DVD-RW, DVD+R, DVD+RW,
CD-R, CD-RW, CD-DA, MP3, WMA, HDCD, SVCD, VCD,
MPEG2, MPEG4, JPEG, dossiers de WMA/WMA écrits à un
disque DVD+R/W ou DVD-R/W et photo Kodak CD.
Rapport signalement au bruit : > 95dBA
Gamme dynamique : > 95dB
Réponse fréquence : 20Hz jusqu'à 20kHz, -3dB
Séparation des chaînes : > 60dB @ 1kHz
Convertisseurs D/A : 6 chaînes haute performance 24bit, 192
kHz, multi-bit modulateur Sigma Delta.
VIDÉO
Format : NTSC, PAL (auto-détection)
Sortie : 1 Vp-p (75 ohms)
Entrée : 1 Vp-p, (75 ohms)
Tuner FM
Gamme de syntonisatioin : 87.5MHz à 107.9MHz
Sensibilité Mono (-30dB) : 9dBr
Seuil de sensation douloureuse (50dB) : 15dBr
Sélectivité de chaîne alternative : 70dB
Rapport signalement au bruit @ 1kHz : 58dB
Rejet d'image : 60dB
Séparation stéréo @ 1kHz : >30dB
Réponse fréquence : 30Hz à 15kHz, -3dB
Tuner AM
Gamme de syntonisation : 530kHz à 1720kHz
Sensibilité (-20dB) : 30uV
Rapport signalement au bruit @ 1kHz : 50dB
Rejet d'image : 60dB
Réponse fréquence : 50Hz à 2kHz, -3dB
Moniteur
Taille de l'écran : 7.0'' (mesure diagonale), 16 :9 écran large
• 6.06'' (154.1mm) largeur x 3.42'' (87mm) hauteur
Type d'écran : TFT Affichage aux cristaux liquides (LCD)
matrice active
Temps de réponse : 30millisecondes temps de montée, 50
millisecondes temps de descente
Résolution :
DVD/Vidéo composite en 336,960 sous pixels, 1440 largeur x
234 hauteur
Angle de visionnement :
• 65 degrés droite ou gauche
• 40 degrés vers le haut
• 65 degrés vers le bas
Général
Impédance entrée auxiliaire : 10k
Alimentation : 11 à 16VDC, terre négative
Antenne de puissance (bleu): 500mA maximum, protection
limitée par le courant électrique
Amplificateur de télécommande (blanc/bleu): 500mA,
protection limitée par le courant électrique
Fusible : 10-Amp, type mini ATM
Dimensions de châssis DIN : 2" X 7" X 7" (50mm x 178mm x
178mm)
Température de fonctionnement : -20C ~ 70C
*Les spécifications sont susceptible d'être changé sans
avertissement
GARANTIE LIMITÉE DE 12
MOIS
AUDIOVOX CORPORATION (la Société) garantit à l’acheteur
initial du produit que si tou t ou partie de ce produit, en cours
d’utilisation et sous des conditions normales, venait à présenter
des vices de matière primitive ou des défauts de fabrication, dans
les 12 mois suivant la date d’achat initial, ce(s) dé fa ut( s)
sera(seront) réparé(s) ou rempl acé(s) par un produit neuf ou
reconditionné (au choix de la Société), sans frais de pièces ni de
main-d’oeuvre. Si ce produit doit être réparé ou remplacé durant
la période de la Garantie, entrez en contact avec svp Jensen au
numéro de téléphone fourni ci-dessous.
Cette Garantie ne couvre pas l'éleminati on des parasites ou des
bruits générés par le moteu r, la correction des problèmes
d'antenne, les frais encourus pour l'installation, le retrait ou la
réinstallation du produit, ni les dommages causés aux cassettes,
disques compacts, accessoires ou au système électrique du
véhicule. Cette Garantie ne s'applique pas aux produits ou aux
parties consituantes qui, de l'avis de la Compagnie, ont été
endommagés par suite de modification, d'i nstallation incorrecte,
de mauvaise manipulation, d'utilisation abusive, de négligence,
d'accident, ou encore du retra it ou du grif fonnage d es inscriptio ns
ou de l'étiquette code à barres/numéro de série installé en usine.
SELON LES TERMES DE CETTE GARANTIE, LA
VM9311TS
RESPONSABILITE DE LA SOCIETE EST LIMITEE A LA
REPARATION OU AU REMPLACEMENT, TEL(LE) QU’IL(ELLE)
EST STIPULE(E) CI-DESSUS ET, EN AUCUN CAS, LA
RESPONSABILITE DE LA SOCIETE NE POURRA EXCEDER
LE PRIX D’ACHAT PAYE PAR L’ACHETEUR DU PRODUIT.
Cette Garantie remplace toute aut re garantie expresse ou
responsabilité. TOUTE GARANTIE TACITE, COMPRENANT
TOUTE GARANTIE DE QUALITE LOYALE ET MARCHANDE,
EST LIMITEE A LA DUREE DE CETTE GARANTIE ECRITE.
TOUTE ACTION POUR RUPTURE DE TOUTE GARANTIE,
SELON LES TERMES DE LA PRESENTE, COMPRENANT
TOUTE GARANTIE IMPLICITE DE QUALITE LOYALE ET
MARCHANDE, DOIT ETRE INTENTEE DANS LES 12 MOIS A
COMPTER DE LA DATE D’ACHAT INITIAL. EN AUCUN CAS LA
SOCIETE NE SERA RESPONSABLE DE TOUT DOMMAGE
INDIRECT OU FORTUIT POUR RUPTURE DE CETTE
GARANTIE OU DE TOUTE AUTRE GARANTIE, EXPRESSE OU
IMPLICITE, DE QUELLE QUE NATURE QUE CE SOIT. Aucune
personne ni aucun représentant n’est autorisé(e) à assumer, au
nom de la Société, d’autre responsabilité que celle exprimée
dans la présente, et se rapportant à la vente de ce produit.
Certains Etats n’autorise pas les restrictions relatives à la durée
d’application des garantie s implici tes ni l’ex clusion o u la limit ation
des dommages indirects ou fortui ts. Dans ces Etats, de telles
limitations ou exclusions ne s’appliquent donc pas. Cette
Garantie vous donne des droits juridiques spécifiques et vous
pouvez également jouir d’au tres droits, suivant l’Etat dans lequel
vous vivez.
U.S.A : 1-800-323-4815
CANADA: Composez le 1-800-323-4815 connaitre l’adresse du
poste de garantie de votre région.
Audiovox Electronics Corporation
Hauppauge, NY 11788
Technical Assistance: 1-800-323-4815
www.jensen.com
© 2006 Audiovox
Ver 1.0
Imprimé en Chine
92
 Loading...