


Page 1 of 137
STORCenter ix2 Network Storage
Your Iomega® StorCenter ix2 Network Storage provides flexible, high performance data storage that can be used on a single computer or a network.
Your StorCenter Network Drive supports two connection options:
Network—connect the drive to a network to allow multiple users to access the StorCenter as a local disk drive.
Ethernet on a single computer—connect the drive directly to a single computer via the Ethernet port.
http://www.iomega.com/support/manuals/ix-series/221-0809/en/consolidated/printall.h... 25-7-2010

Page 2 of 137
Safety Information
Observe the following guidelines when performing any work on your StorCenter device:
1.Follow all instructions marked on the StorCenter device and in the documentation.
2.Use only the power supply cable provided with the StorCenter device. Always use the appropriate power supply cable for your country.
3.Unplug the StorCenter device before cleaning. Do not use liquid or aerosol cleaners. Use a damp cloth for cleaning.
4.Do not use the StorCenter device near water. Do not spill liquid on or into the StorCenter device.
5.Do not place the StorCenter device on an unstable surface.
6.Openings in the StorCenter device cabinet are provided for ventilation and should not be blocked or covered.
7.Make sure the StorCenter device has ample ventilation (at least 6" or 127 mm) in front and behind the StorCenter device. Do not place the StorCenter device near or on a radiator or heat register.
8.Do not walk on the power cord or allow anything to rest on it.
9.There is a danger of explosion if the battery is incorrectly replaced. Replace only with the same or equivalent type recommended by the equipment manufacturer. Dispose of used batteries according to local, state, regional, and federal regulations.
Under any of the following conditions, unplug the StorCenter device from the wall outlet and contact technical support:
The power cord or plug is damaged.
Liquid has been spilled into the StorCenter device.
The StorCenter device does not function properly when the operating instructions are followed.
The StorCenter device was dropped or the cabinet is damaged.
| top of page |
http://www.iomega.com/support/manuals/ix-series/221-0809/en/consolidated/printall.h... 25-7-2010
Page 3 of 137
http://www.iomega.com/support/manuals/ix-series/221-0809/en/consolidated/printall.h... 25-7-2010

Page 4 of 137
About the Iomega® StorCenter ix2 Network Storage
Key Features
Status Indicators
Default Settings
Open Source Software
Key Features
Network sharing
Ethernet connectivity (10/100/1000Base-TX)
Built-in USB printer sharing
No server or host required
Active Directory Services (ADS) Support
Array support: JBOD, RAID 1
Supports mixed networks (Windows, Mac OS, and Linux/UNIX systems)
Supports SMB/CIFS (Windows), AFP (Macintosh), NFS (UNIX/Linux), and FTP protocols.
Supports 2 USB printers.
Supports 2 USB storage devices.
Single cable install, no drivers required
Large capacity
| top of page |
http://www.iomega.com/support/manuals/ix-series/221-0809/en/consolidated/printall.h... 25-7-2010

Page 5 of 137
Key Benefits
Plug and Share—easily store and share files from any computer on the network
Low Cost—network storage without the expense of a server
Automatic configuration—with Iomega StorCenter Manager software
| top of page |
Status Indicators
The indicator lights on the StorCenter device allow the drive to visually demonstrate its status.
Color |
Activity |
Meaning |
|||
Red |
Solid |
Drive not ready/Drive Failure |
|||
Red |
Flashing |
Drive not ready, busy (formatting drive, resetting to |
|||
default settings, repairing drive, or powering down) |
|||||
|
|
|
|
||
Blue |
Solid |
Drive powered up and ready |
|||
Blue |
Steady Pulse |
Device starting up |
|||
Blue |
Flashing |
Drive in use, transferring data (reading / writing) |
|||
Red / Blue |
Alternating |
The drive ID feature has been activated on the drive |
|||
| top of page | |
|
|
|||
|
|
|
|
|
|
Default Settings
IP address: If no DHCP server is found on your network the StorCenter will get a self-assigned IP address in the 169.254.x.x range.
Device Name: The default name for your StorCenter is Storage.
SMB Share Name: public
| top of page |
http://www.iomega.com/support/manuals/ix-series/221-0809/en/consolidated/printall.h... 25-7-2010

Page 6 of 137
Open Source Software
The software included in this product contains copyrighted software that is licensed under open source agreements. Components of this software covered under GPL or other open source licenses are fully documented as to license and redistribution requirements in the ReadMe file provided with the software. A copy of this ReadMe may, at Iomega’s discretion and subject to change at any time, will be available on Iomega’s Support and Download site at www.iomega.com. You may download the corresponding source code (when source code distribution is required) from the Iomega web site at www.iomega.com/support. To locate the download page for open source code, select your Iomega product and your operating system. Scroll down the page to the search field and enter “open source.” In addition, you can also obtain a copy of the applicable open source code on CD by sending a money order or check for $10 to:
Iomega Corporation, ATTN: Source Code
4059 South 1900 West
Roy, UT 84067 USA
Please include the model name for your Iomega product with the request.
| top of page |
http://www.iomega.com/support/manuals/ix-series/221-0809/en/consolidated/printall.h... 25-7-2010
Page 7 of 137
Connecting the StorCenter device
Check Package Contents
Initial Setup
Initial Configuration
Uninstalling the Storage Manager
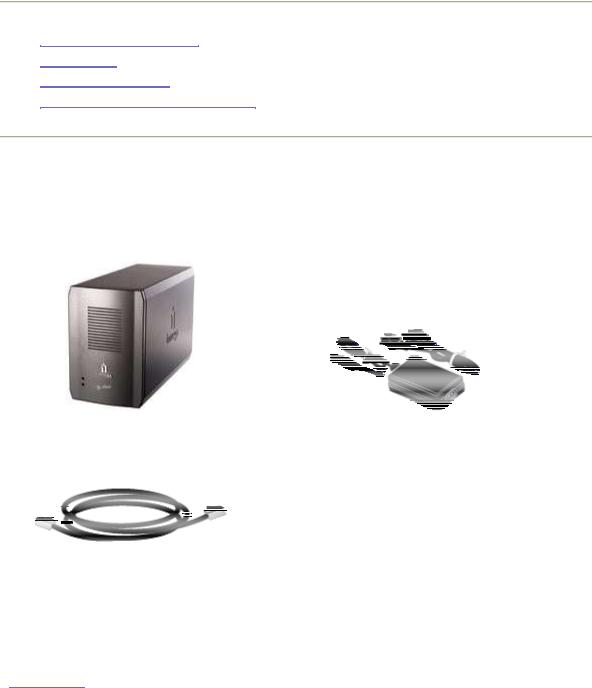
Check Package Contents
Verify that the box contains the following items:
Iomega® StorCenter ix2 Network Storage
Inline Power Supply
(Models may vary)
Ethernet Cable
NOTE: Package contents may vary. The illustrations may not match your package contents.
| top of page |
http://www.iomega.com/support/manuals/ix-series/221-0809/en/consolidated/printall.h... 25-7-2010

Page 8 of 137
Connecting the StorCenter device
Check Package Contents
Initial Setup
Initial Configuration
Uninstalling the Storage Manager
Initial Setup
NOTE: If you have purchased more than one StorCenter, complete all steps on one before setting up additional devices.
1.Use the included network cable to connect the StorCenter device to a network hub or switch.
—or —
Use the included network cable to connect the StorCenter device directly to a computer.
2.Connect the included power cord to the back of the StorCenter device and an Uninterruptible Power Supply (UPS).
NOTE: Never plug your StorCenter device directly into a wall socket or power strip. Unexpected loss of power may corrupt data or damage the StorCenter device operating system.
http://www.iomega.com/support/manuals/ix-series/221-0809/en/consolidated/printall.h... 25-7-2010

Page 9 of 137
3. Power on the StorCenter device using the power button on the back panel.
4.Start your computer, wait for the operating system to load, then insert the CD.
NOTE: If the software doesn't run automatically, double click on the CD icon, then double click the Setup icon.
Linux Users: The installer writes information to the /usr/bin directory which requires root-level access. To successfully install the StorCenter Manager software, you will need to either log in as root or use sudo to launch the installer from the command line.
5.Install the StorCenter Storage Manager software. Once the installation completes, the StorCenter Storage Manager software will launch automatically.
NOTE: StorCenter Manager will automatically scan your network when launched. If you receive a message from Windows Firewall alerting you of network activity, click the unblock button.
NOTE: For best results use a computer that is connected to the same router, hub, or switch as the StorCenter device.
6.Once the StorCenter Manager software has found the StorCenter device, log into the StorCenter device. If you are logging in for the first time, follow the Device Setup Wizard that will help you create an administrator account and configure the StorCenter device.
| top of page |
http://www.iomega.com/support/manuals/ix-series/221-0809/en/consolidated/printall.h... 25-7-2010

Page 10 of 137
Connecting the StorCenter device
Check Package Contents
Initial Setup
Initial Configuration
Uninstalling the Storage Manager
Initial Configuration
This section provides step-by-step instructions for the initial setup of your device. If you are configuring more than one StorCenter, completely configure one device before starting up the next device.
1.The StorCenter Manager opens automatically to begin the Device Setup Wizard. Click Next to start the Device Setup.
If the StorCenter Manager software does not detect the storage device, the Hardware Setup Wizard screen displays explaining how to properly connect the wiring. Once communication is established, the Device Setup Wizard begins. Click Next to start the Device Setup. Refer to troubleshooting for more information.
2.Identify your storage device on the network. Enter the following information and click Next to continue:
Storage Device Name—Enter a name to identify the StorCenter device on your network. The device name should be unique and cannot include, spaces, or special characters (such as " / \ [ ] : ; | & = , + * ? < >).
NOTE: If you are configuring more than one StorCenter device at a time, configure the device name before starting up the next device.
Storage Device Descriptive Name—Enter a descriptive name for the StorCenter device. This should be a more descriptive name.
3. Configure email notification. Enter the following information and click Next to continue:
Notification Email Address—Enter one or more valid email addresses, separated by spaces. When problems are detected by the system, the device will send notification messages to all of the email addresses in this list.
http://www.iomega.com/support/manuals/ix-series/221-0809/en/consolidated/printall.h... 25-7-2010
Page 11 of 137
Additional Credentials Required—Check this option only if your network has a corporate firewall that blocks SMTP traffic, requiring additional credentials for SMTP messages to pass through. Most users will not need to check this option. If this box is checked, enter the following additional information to identify your SMTP server:
Email Server (SMTP)—Enter the address of your SMTP server.
Sender Email Address—Enter an email address for the StorCenter Device to use as the From address when it creates messages.
Email Login—Enter the username used to log into the email account you entered above.
Email Password—Enter the password for the email account.
Confirm Password—Confirm the password for the email account. It must match the password provided above.
Send a test email message—Click this option if you wish to confirm that the email notification is working properly. A confirmation page will appear upon success. Click OK to return to the Device Setup.
4.Set the device clock. First, choose a time zone from the pull-down list. Next, choose how your time will be set:
Internet Time Server—Check the Automatically synchronize with an Internet time server check box to use the default time server. To specify a certain time server, check Specify the time server and type the URL of the Internet time server you wish to use in the Server text box.
Manually—Uncheck the Automatically synchronize with an Internet time server check box. In the text boxes that appear, enter the current Date (MM/DD/YYYY), Time (hh:mm), and select either AM or PM.
5.Save your settings.
Click Apply to save your settings. If the settings were successfully applied, a confirmation pag displays a summary of the setup settings. If you have changed the default device name (storag when you click Apply, the Restart Required page displays. Click Apply to restart your StorCent Device. When the device is restarted, your connection may be temporarily lost, and you may n to log into the device Manager when the connection is restored.
You should now see a Congratulations page contains your StorCenter Device name and its network IP address, and links to the two Shared Folders, public and Backups, that were create on your StorCenter Device. The StorCenter Device will attempt to connect these Shared Folder folders on your local computer. On Windows systems, drive letters will automatically be assign to the connected Shared Folders.
http://www.iomega.com/support/manuals/ix-series/221-0809/en/consolidated/printall.h... 25-7-2010

Page 12 of 137
From the Congratulations page, you can access your Shared Folders, read the Feature Overvie and configure Retrospect.
If you wish to configure the more advanced features of the StorCenter device, see the help system by clicking the  icon.
icon.
You can now begin using your StorCenter Device. You can also perform the following optional configuration tasks as needed:
|
Connecting to the StorCenter |
|
|
Updating the Firmware |
|
||||||||||||||||||||||||||
|
Configuring the StorCenter |
|
|
Backing Up Your Files to the |
|||||||||||||||||||||||||||
|
|
|
|
|
|
|
|
|
|
|
|
|
|
|
|
|
|
|
|
|
|
|
|
|
|
|
|
|
|
|
|
|
Configuring Network Services |
|
|
StorCenter |
|||||||||||||||||||||||||||
|
|
|
|
|
|
|
|
|
|
|
|
|
|
|
|
|
|
|
|
|
|
|
|
|
|
|
|
|
|
|
|
|
Changing the Default Language |
|
|
Connecting External Storage |
|||||||||||||||||||||||||||
|
Changing the Device Name |
|
|
|
Connecting USB Printers |
|
|||||||||||||||||||||||||
|
|
|
|
|
|
|
|
|
|
|
|
|
|
|
|
|
|
|
|
|
|
|
|
|
|
|
|
|
|||
|
Changing the Date and Time |
|
|
Using Your Device with a Digital |
|||||||||||||||||||||||||||
|
|
|
|
|
|
|
|
|
|
|
|
|
|
|
|
|
|
|
|
|
|
|
|
|
|
|
|
||||
|
Participating in Windows Networks |
|
Camera |
||||||||||||||||||||||||||||
|
|
|
|
|
|
|
|
|
|
|
|
|
|
|
|
|
|
|
|
|
|
|
|
|
|
|
|||||
|
Filenaming Conventions |
|
|
Using the Media Server |
|||||||||||||||||||||||||||
|
|
|
|
|
|
|
|
|
|
|
|
|
|
|
|
|
|
|
|
|
|
|
|
|
|
|
|||||
|
Protecting Your Data |
|
|
Using Video Surveillance |
|||||||||||||||||||||||||||
|
Managing Users |
|
|
|
Searching for Files |
|
|
||||||||||||||||||||||||
|
Managing Groups |
|
|
Resetting the StorCenter |
|||||||||||||||||||||||||||
|
|
|
|
|
|
|
|
|
|
|
|
|
|
|
|
|
|
|
|
|
|
|
|
||||||||
|
Managing Shared Folders |
|
|
Using Remote Access |
|||||||||||||||||||||||||||
|
|
|
|
|
|
|
|
|
|
|
|
|
|
|
|
|
|
|
|
|
|
|
|||||||||
|
Erasing the StorCenter |
|
|
|
Browsing the StorCenter via the |
||||||||||||||||||||||||||
|
|
|
|
|
|
|
|
|
|
|
|
|
|
|
|
|
|
|
|
|
|
||||||||||
|
Setting Disk Protection |
|
|
Shared Storage Tab |
|||||||||||||||||||||||||||
|
|
|
|
|
|
|
|
|
|
|
|
|
|
|
|
|
|
|
|
|
|||||||||||
|
Checking Device Status |
|
|
Torrents Downloads |
|
||||||||||||||||||||||||||
|
Configuring Email Notification |
|
|
Managing Quotas |
|
||||||||||||||||||||||||||
|
|
|
|
|
|
|
|
|
|
|
|
|
|
|
|
|
Security Settings |
|
|||||||||||||
|
|
|
|
|
|
|
|
|
|
|
|
|
|
|
|
|
Port Forwarding |
||||||||||||||
|
|
|
|
|
|
|
|
|
|
|
|
|
|
|
|
|
|
|
|
|
|
|
|
|
|
|
|
|
|
|
|
| top of page |
http://www.iomega.com/support/manuals/ix-series/221-0809/en/consolidated/printall.h... 25-7-2010

Page 13 of 137
HomeProductsSupport & DownloadsGlobal Sites
Sign u
product registrationsupport policycontact ussite helporder assistance
Enter
|
|
Looking for Something?
Our apologies, the page you have requested is not available at convenience we have listed some of our most commonly reque
Iomega North America Home page Links to Iomega® products, information, and data storage solutions.
Online Store Shop online, the easy and risk-free supplier for yo
Current Products Iomega has a solution for your data managem
Support & Downloads Our Online Customer Support & Downloa to get the help you need! Find how-to information & answers t download user's manuals, get help around the clock via e-mail or download the latest software & drivers for your product!
Search If you would prefer, you may use the onsite search engi keyword in the search box at the top right and clicking search.
Sitemap See the Iomega North America Web Site at a glance.
Legacy Products The products in this section are no longer bein
Iomega, although some may still be available through a variety
http://www.iomega.com/support/manuals/ix-series/221-0809/en/consolidated/printall.h... 25-7-2010
Page 14 of 137
© 2010 Iomega Corporation
http://www.iomega.com/support/manuals/ix-series/221-0809/en/consolidated/printall.h... 25-7-2010

Page 15 of 137
Using the StorCenter
|
Connecting to the StorCenter |
|
|
Updating the Firmware |
|
||||||||||||||||||||||||||
|
Configuring the StorCenter |
|
|
Backing Up Your Files to the |
|||||||||||||||||||||||||||
|
|
|
|
|
|
|
|
|
|
|
|
|
|
|
|
|
|
|
|
|
|
|
|
|
|
|
|
|
|
|
|
|
Configuring Network Services |
|
|
StorCenter |
|||||||||||||||||||||||||||
|
|
|
|
|
|
|
|
|
|
|
|
|
|
|
|
|
|
|
|
|
|
|
|
|
|
|
|
|
|
|
|
|
Changing the Default Language |
|
|
Connecting External Storage |
|||||||||||||||||||||||||||
|
Changing the Device Name |
|
|
|
Connecting USB Printers |
|
|||||||||||||||||||||||||
|
|
|
|
|
|
|
|
|
|
|
|
|
|
|
|
|
|
|
|
|
|
|
|
|
|
|
|
|
|||
|
Changing the Date and Time |
|
|
Using Your Device with a Digital |
|||||||||||||||||||||||||||
|
|
|
|
|
|
|
|
|
|
|
|
|
|
|
|
|
|
|
|
|
|
|
|
|
|
|
|
||||
|
Participating in Windows Networks |
|
Camera |
||||||||||||||||||||||||||||
|
|
|
|
|
|
|
|
|
|
|
|
|
|
|
|
|
|
|
|
|
|
|
|
|
|
|
|||||
|
Filenaming Conventions |
|
|
Using the Media Server |
|||||||||||||||||||||||||||
|
|
|
|
|
|
|
|
|
|
|
|
|
|
|
|
|
|
|
|
|
|
|
|
|
|
|
|||||
|
Protecting Your Data |
|
|
Using Video Surveillance |
|||||||||||||||||||||||||||
|
Managing Users |
|
|
|
Searching for Files |
|
|
||||||||||||||||||||||||
|
Managing Groups |
|
|
Resetting the StorCenter |
|||||||||||||||||||||||||||
|
|
|
|
|
|
|
|
|
|
|
|
|
|
|
|
|
|
|
|
|
|
|
|
||||||||
|
Managing Shared Folders |
|
|
Using Remote Access |
|||||||||||||||||||||||||||
|
|
|
|
|
|
|
|
|
|
|
|
|
|
|
|
|
|
|
|
|
|
|
|||||||||
|
Erasing the StorCenter |
|
|
|
Browsing the StorCenter via the |
||||||||||||||||||||||||||
|
|
|
|
|
|
|
|
|
|
|
|
|
|
|
|
|
|
|
|
|
|
||||||||||
|
Setting Disk Protection |
|
|
Shared Storage Tab |
|||||||||||||||||||||||||||
|
|
|
|
|
|
|
|
|
|
|
|
|
|
|
|
|
|
|
|
|
|||||||||||
|
Checking Device Status |
|
|
Torrents Downloads |
|
||||||||||||||||||||||||||
|
Configuring Email Notification |
|
|
Managing Quotas |
|
||||||||||||||||||||||||||
|
|
|
|
|
|
|
|
|
|
|
|
|
|
|
|
|
Security Settings |
|
|||||||||||||
|
|
|
|
|
|
|
|
|
|
|
|
|
|
|
|
|
Port Forwarding |
||||||||||||||
|
|
|
|
|
|
|
|
|
|
|
|
|
|
|
|
|
|
|
|
|
|
|
|
|
|
|
|
|
|
|
|
Connecting to Shared Folders
The simplest way to connect to the shared folders on your StorCenter device is to run the StorCenter Manager software. StorCenter Manager is included on the Solutions CD that came with your drive. Once installed, the StorCenter Manager software will run automatically. StorCenter Manager will automatically connect you to the shared folders that you have permission to access. You can configure which shares are automatically connected by clicking Access Shared Folders on the StorCenter Manager Home screen. Simply check the folders to which you wish to be connected and click Apply. Once StorCenter Manager has connected to the shared folders, your computer should reconnect to the StorCenter automatically every time it is restarted. StorCenter Manager is available for Windows, Mac OS X, and Linux.
In some cases, you may wish to connect to the shared folder without using the StorCenter Manager. The following instructions describe how this is done:
Mapping a Drive Letter in Windows:
This process will map a drive letter to the StorCenter device.
http://www.iomega.com/support/manuals/ix-series/221-0809/en/consolidated/printall.h... 25-7-2010

Page 16 of 137
1.Open an Explorer window.
2.Select Map Network Drive... from the Tools menu.
3.Select the Drive letter to which you wish to map the shared folder.
4.In the Folder text area, enter \\<IP Address>\<Share Name> or
\\<Device Name>\<Share Name>.
NOTE: <Device Name> refers to the Storage Device Name setting you entered during the initial configuration. <Share Name> refers to the shared folder you would like to access. The default folders on the StorCenter device are public and Backups. If you have created users there also may be a shared folder for each user.
Example: \\StorCenter\public or \\192.168.0.55\public
5.Check the Reconnect at Login option if you wish to reconnect to this drive letter when restarting your computer.
6.Click Finish to confirm the drive map.
7.Enter the Username and Password, if necessary, to connect to the shared network folder.
8.Verify that the mapped network drive shows up correctly in My Computer.
NOTE: You may need to map new drive letters if you make changes to StorCenter device users and shares.
| top of page |
Accessing Shares in Mac OS X:
If you are using Mac OS X v. 10.5 (Leopard) the StorCenter device should automatically appear in the left hand navigation bar of the Finder window under the heading SHARED. In some cases, you may need to click on ALL... and browse to your network drive. If you are using a version of Mac OS X other than 10.5 or could not find your network drive, use the following instructions:
1.Select Connect to Server... from the Finder's Go menu.
2.Enter smb://<Device IP address> or smb://<Device Name>.local., then click Connect.
NOTE: <Device Name> refers to the Storage Device Name setting you entered during the initial configuration.
http://www.iomega.com/support/manuals/ix-series/221-0809/en/consolidated/printall.h... 25-7-2010

Page 17 of 137
NOTE: See Finding the IP Address in Mac OS X for information of finding the IP
address or device name of the StorCenter device.
3.Enter a user name and password (required only if you have enabled permissions), then click Connect, otherwise click the Guest radio button and click Connect. The default shares do not require a user name or password.
4.Select the share you wish to mount, then click OK.
5.The share will appear on the Desktop.
| top of page |
http://www.iomega.com/support/manuals/ix-series/221-0809/en/consolidated/printall.h... 25-7-2010
Page 18 of 137
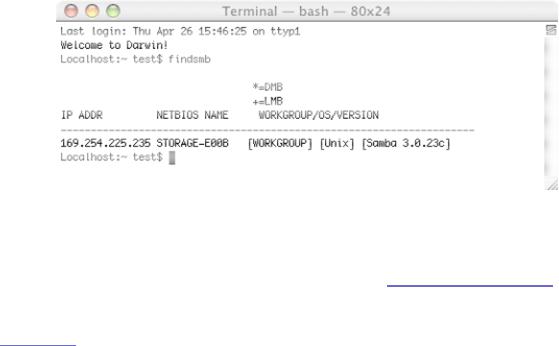
Finding the IP Address in Mac OS X
To find the StorCenter device on your network:
NOTE: The client computer must be on the same subnet or network segment as the StorCenter device.
1.Launch the Terminal application located in the Utilities folder.
2.Enter the command findsmb and hit enter. This may take a moment to run.
3.The findsmb tool will return a list of all the devices it finds on your network. Locate the StorCenter device on the list.
NOTE: The default name for your StorCenter device is Storage. If you have changed the name of your StorCenter device, look for that name on the list.
Use the IP address or device name listed in findsmb to connect to shared folders.
| top of page |
http://www.iomega.com/support/manuals/ix-series/221-0809/en/consolidated/printall.h... 25-7-2010

Page 19 of 137
Using the StorCenter
|
Connecting to the StorCenter |
|
|
Updating the Firmware |
|
||||||||||||||||||||||||||
|
Configuring the StorCenter |
|
|
Backing Up Your Files to the |
|||||||||||||||||||||||||||
|
|
|
|
|
|
|
|
|
|
|
|
|
|
|
|
|
|
|
|
|
|
|
|
|
|
|
|
|
|
|
|
|
Configuring Network Services |
|
|
StorCenter |
|||||||||||||||||||||||||||
|
|
|
|
|
|
|
|
|
|
|
|
|
|
|
|
|
|
|
|
|
|
|
|
|
|
|
|
|
|
|
|
|
Changing the Default Language |
|
|
Connecting External Storage |
|||||||||||||||||||||||||||
|
Changing the Device Name |
|
|
|
Connecting USB Printers |
|
|||||||||||||||||||||||||
|
|
|
|
|
|
|
|
|
|
|
|
|
|
|
|
|
|
|
|
|
|
|
|
|
|
|
|
|
|||
|
Changing the Date and Time |
|
|
Using Your Device with a Digital |
|||||||||||||||||||||||||||
|
|
|
|
|
|
|
|
|
|
|
|
|
|
|
|
|
|
|
|
|
|
|
|
|
|
|
|
||||
|
Participating in Windows Networks |
|
Camera |
||||||||||||||||||||||||||||
|
|
|
|
|
|
|
|
|
|
|
|
|
|
|
|
|
|
|
|
|
|
|
|
|
|
|
|||||
|
Filenaming Conventions |
|
|
Using the Media Server |
|||||||||||||||||||||||||||
|
|
|
|
|
|
|
|
|
|
|
|
|
|
|
|
|
|
|
|
|
|
|
|
|
|
|
|||||
|
Protecting Your Data |
|
|
Using Video Surveillance |
|||||||||||||||||||||||||||
|
Managing Users |
|
|
|
Searching for Files |
|
|
||||||||||||||||||||||||
|
Managing Groups |
|
|
Resetting the StorCenter |
|||||||||||||||||||||||||||
|
|
|
|
|
|
|
|
|
|
|
|
|
|
|
|
|
|
|
|
|
|
|
|
||||||||
|
Managing Shared Folders |
|
|
Using Remote Access |
|||||||||||||||||||||||||||
|
|
|
|
|
|
|
|
|
|
|
|
|
|
|
|
|
|
|
|
|
|
|
|||||||||
|
Erasing the StorCenter |
|
|
|
Browsing the StorCenter via the |
||||||||||||||||||||||||||
|
|
|
|
|
|
|
|
|
|
|
|
|
|
|
|
|
|
|
|
|
|
||||||||||
|
Setting Disk Protection |
|
|
Shared Storage Tab |
|||||||||||||||||||||||||||
|
|
|
|
|
|
|
|
|
|
|
|
|
|
|
|
|
|
|
|
|
|||||||||||
|
Checking Device Status |
|
|
Torrents Downloads |
|
||||||||||||||||||||||||||
|
Configuring Email Notification |
|
|
Managing Quotas |
|
||||||||||||||||||||||||||
|
|
|
|
|
|
|
|
|
|
|
|
|
|
|
|
|
Security Settings |
|
|||||||||||||
|
|
|
|
|
|
|
|
|
|
|
|
|
|
|
|
|
Port Forwarding |
||||||||||||||
|
|
|
|
|
|
|
|
|
|
|
|
|
|
|
|
|
|
|
|
|
|
|
|
|
|
|
|
|
|
|
|
Configuring the StorCenter device
You can customize your StorCenter device by changing the advanced configuration settings. These settings include: User Management, Workgroup and Domain membership, External Storage and Printer Management, Media Server Settings, etc.
The simplest way to configure these settings is to run the StorCenter Manager software that is included on the Solutions CD. Log into the management utility using the administrator username and password you created during the initial setup of the StorCenter device. Click on the Settings tab to begin working with the StorCenter device settings. For more information on the advanced settings, see the help system by clicking the  icon.
icon.
You can also enter the configuration tool by entering the IP address or device name in your web browser (e.g., http://<storage> or http://192.168.0.55). If you have enabled security, you will be required to enter the administrator username and password. Click on the Settings tab to begin working with the StorCenter device settings. For more information on the advanced settings, see the help system by clicking the  icon.
icon.
http://www.iomega.com/support/manuals/ix-series/221-0809/en/consolidated/printall.h... 25-7-2010

Page 20 of 137
| top of page |
http://www.iomega.com/support/manuals/ix-series/221-0809/en/consolidated/printall.h... 25-7-2010
Page 21 of 137
Using the StorCenter
|
Connecting to the StorCenter |
|
|
Updating the Firmware |
|
||||||||||||||||||||||||||
|
Configuring the StorCenter |
|
|
Backing Up Your Files to the |
|||||||||||||||||||||||||||
|
|
|
|
|
|
|
|
|
|
|
|
|
|
|
|
|
|
|
|
|
|
|
|
|
|
|
|
|
|
|
|
|
Configuring Network Services |
|
|
StorCenter |
|||||||||||||||||||||||||||
|
|
|
|
|
|
|
|
|
|
|
|
|
|
|
|
|
|
|
|
|
|
|
|
|
|
|
|
|
|
|
|
|
Changing the Default Language |
|
|
Connecting External Storage |
|||||||||||||||||||||||||||
|
Changing the Device Name |
|
|
|
Connecting USB Printers |
|
|||||||||||||||||||||||||
|
|
|
|
|
|
|
|
|
|
|
|
|
|
|
|
|
|
|
|
|
|
|
|
|
|
|
|
|
|||
|
Changing the Date and Time |
|
|
Using Your Device with a Digital |
|||||||||||||||||||||||||||
|
|
|
|
|
|
|
|
|
|
|
|
|
|
|
|
|
|
|
|
|
|
|
|
|
|
|
|
||||
|
Participating in Windows Networks |
|
Camera |
||||||||||||||||||||||||||||
|
|
|
|
|
|
|
|
|
|
|
|
|
|
|
|
|
|
|
|
|
|
|
|
|
|
|
|||||
|
Filenaming Conventions |
|
|
Using the Media Server |
|||||||||||||||||||||||||||
|
|
|
|
|
|
|
|
|
|
|
|
|
|
|
|
|
|
|
|
|
|
|
|
|
|
|
|||||
|
Protecting Your Data |
|
|
Using Video Surveillance |
|||||||||||||||||||||||||||
|
Managing Users |
|
|
|
Searching for Files |
|
|
||||||||||||||||||||||||
|
Managing Groups |
|
|
Resetting the StorCenter |
|||||||||||||||||||||||||||
|
|
|
|
|
|
|
|
|
|
|
|
|
|
|
|
|
|
|
|
|
|
|
|
||||||||
|
Managing Shared Folders |
|
|
Using Remote Access |
|||||||||||||||||||||||||||
|
|
|
|
|
|
|
|
|
|
|
|
|
|
|
|
|
|
|
|
|
|
|
|||||||||
|
Erasing the StorCenter |
|
|
|
Browsing the StorCenter via the |
||||||||||||||||||||||||||
|
|
|
|
|
|
|
|
|
|
|
|
|
|
|
|
|
|
|
|
|
|
||||||||||
|
Setting Disk Protection |
|
|
Shared Storage Tab |
|||||||||||||||||||||||||||
|
|
|
|
|
|
|
|
|
|
|
|
|
|
|
|
|
|
|
|
|
|||||||||||
|
Checking Device Status |
|
|
Torrents Downloads |
|
||||||||||||||||||||||||||
|
Configuring Email Notification |
|
|
Managing Quotas |
|
||||||||||||||||||||||||||
|
|
|
|
|
|
|
|
|
|
|
|
|
|
|
|
|
Security Settings |
|
|||||||||||||
|
|
|
|
|
|
|
|
|
|
|
|
|
|
|
|
|
Port Forwarding |
||||||||||||||
|
|
|
|
|
|
|
|
|
|
|
|
|
|
|
|
|
|
|
|
|
|
|
|
|
|
|
|
|
|
|
|
Configuring Network Services
Network Services
Access the Network Services page by navigating to the Settings tab and clicking Network Services.
This page provides access to the following network connectivity features:
Network Settings
Bluetooth
FTP (File Transfer Protocol)
NFS (UNIX/Linux File Sharing)
SNMP (Simple Netowrk Management Protocol)
SMB/CIFS (Windows File Sharing)
http://www.iomega.com/support/manuals/ix-series/221-0809/en/consolidated/printall.h... 25-7-2010

Page 22 of 137
AFP (Apple File Sharing)
| top of page |
http://www.iomega.com/support/manuals/ix-series/221-0809/en/consolidated/printall.h... 25-7-2010

Page 23 of 137
Using the StorCenter
|
Connecting to the StorCenter |
|
|
Updating the Firmware |
|
||||||||||||||||||||||||||
|
Configuring the StorCenter |
|
|
Backing Up Your Files to the |
|||||||||||||||||||||||||||
|
|
|
|
|
|
|
|
|
|
|
|
|
|
|
|
|
|
|
|
|
|
|
|
|
|
|
|
|
|
|
|
|
Configuring Network Services |
|
|
StorCenter |
|||||||||||||||||||||||||||
|
|
|
|
|
|
|
|
|
|
|
|
|
|
|
|
|
|
|
|
|
|
|
|
|
|
|
|
|
|
|
|
|
Changing the Default Language |
|
|
Connecting External Storage |
|||||||||||||||||||||||||||
|
Changing the Device Name |
|
|
|
Connecting USB Printers |
|
|||||||||||||||||||||||||
|
|
|
|
|
|
|
|
|
|
|
|
|
|
|
|
|
|
|
|
|
|
|
|
|
|
|
|
|
|||
|
Changing the Date and Time |
|
|
Using Your Device with a Digital |
|||||||||||||||||||||||||||
|
|
|
|
|
|
|
|
|
|
|
|
|
|
|
|
|
|
|
|
|
|
|
|
|
|
|
|
||||
|
Participating in Windows Networks |
|
Camera |
||||||||||||||||||||||||||||
|
|
|
|
|
|
|
|
|
|
|
|
|
|
|
|
|
|
|
|
|
|
|
|
|
|
|
|||||
|
Filenaming Conventions |
|
|
Using the Media Server |
|||||||||||||||||||||||||||
|
|
|
|
|
|
|
|
|
|
|
|
|
|
|
|
|
|
|
|
|
|
|
|
|
|
|
|||||
|
Protecting Your Data |
|
|
Using Video Surveillance |
|||||||||||||||||||||||||||
|
Managing Users |
|
|
|
Searching for Files |
|
|
||||||||||||||||||||||||
|
Managing Groups |
|
|
Resetting the StorCenter |
|||||||||||||||||||||||||||
|
|
|
|
|
|
|
|
|
|
|
|
|
|
|
|
|
|
|
|
|
|
|
|
||||||||
|
Managing Shared Folders |
|
|
Using Remote Access |
|||||||||||||||||||||||||||
|
|
|
|
|
|
|
|
|
|
|
|
|
|
|
|
|
|
|
|
|
|
|
|||||||||
|
Erasing the StorCenter |
|
|
|
Browsing the StorCenter via the |
||||||||||||||||||||||||||
|
|
|
|
|
|
|
|
|
|
|
|
|
|
|
|
|
|
|
|
|
|
||||||||||
|
Setting Disk Protection |
|
|
Shared Storage Tab |
|||||||||||||||||||||||||||
|
|
|
|
|
|
|
|
|
|
|
|
|
|
|
|
|
|
|
|
|
|||||||||||
|
Checking Device Status |
|
|
Torrents Downloads |
|
||||||||||||||||||||||||||
|
Configuring Email Notification |
|
|
Managing Quotas |
|
||||||||||||||||||||||||||
|
|
|
|
|
|
|
|
|
|
|
|
|
|
|
|
|
Security Settings |
|
|||||||||||||
|
|
|
|
|
|
|
|
|
|
|
|
|
|
|
|
|
Port Forwarding |
||||||||||||||
|
|
|
|
|
|
|
|
|
|
|
|
|
|
|
|
|
|
|
|
|
|
|
|
|
|
|
|
|
|
|
|
Configuring Network Services
|
Network Settings |
|
|
SNMP (Simple Netowrk Management |
|||||
|
Bluetooth |
|
|
Protocol) |
|||||
|
|
|
|
|
|
|
|
|
|
FTP (File Transfer Protocol) |
|
SMB/CIFS (Windows File Sharing) |
|||||||
|
|
|
|
|
|
|
|
||
|
NFS (UNIX/Linux File Sharing) |
|
AFP (Apple File Sharing) |
||||||
|
|
|
|
|
|
|
|
|
|
Network Settings
Access the Network Settings page by navigating to the Settings tab and clicking Network Services → Network Settings.
Network Settings displays your current network settings and enables those settings to be modified. The network settings identify your DNS servers and WINS servers and how your system's IP address is determined. In most cases it is recommended that you leave the
Automatically configure all network settings checked. Most system IP addresses and other network settings can normally be configured automatically. If you are unsure, it is best to leave this checked.
http://www.iomega.com/support/manuals/ix-series/221-0809/en/consolidated/printall.h... 25-7-2010

Page 24 of 137
If a DHCP server is unavailable, the device could auto-assign an IP address or you can manually configure the network settings. If you are comfortable with network technology, uncheck Automatically configure all network settings, which clears all checkboxes. When the checkbox is empty, the text boxes below are enabled.
If you only want to configure your DNS Servers and WINS Servers, you can uncheck
Automatically configure all network settings and check Automatically configure IP Address.
If you choose to manually configure your network settings, supply the following information:
DNS Servers—the IP addresses of the DNS (Domain Name System) servers.
DNS is used for translating the domain name to IP addresses.
WINS Servers—the IP addresses of the WINS server.
IP Address—the static IP address of the Iomega StorCenter device.
An unused IP address from within the range used by the LAN should be used.
Subnet Mask—the subnet that the IP address belongs to.
The default value is 255.255.255.0.
Gateway—the gateway IP address needs to be entered in this field.
Check Enable jumbo frame support to enable jumbo frame support. Jumbo frame support is useful for transferring large files, such as multimedia files, over a network. Jumbo frame support increases transfer speed by placing large files in fewer data packets. It also reduces the demand on the device hardware by having the CPU process more data in fewer data packets.
Jumbo frame support should only be enabled if you are sure your network is jumbo-frame compatible and all network devices have been configured to support jumbo frames. It is recommended that you confirm all network interface cards (NICs) are configured to support jumbo frames before enabling this feature.
Click Apply to save your changes.
NOTE: If you change the network settings, the device restarts and you have to log back in.
| top of page |
http://www.iomega.com/support/manuals/ix-series/221-0809/en/consolidated/printall.h... 25-7-2010

Page 25 of 137
Using the StorCenter
|
Connecting to the StorCenter |
|
|
Updating the Firmware |
|
||||||||||||||||||||||||||
|
Configuring the StorCenter |
|
|
Backing Up Your Files to the |
|||||||||||||||||||||||||||
|
|
|
|
|
|
|
|
|
|
|
|
|
|
|
|
|
|
|
|
|
|
|
|
|
|
|
|
|
|
|
|
|
Configuring Network Services |
|
|
StorCenter |
|||||||||||||||||||||||||||
|
|
|
|
|
|
|
|
|
|
|
|
|
|
|
|
|
|
|
|
|
|
|
|
|
|
|
|
|
|
|
|
|
Changing the Default Language |
|
|
Connecting External Storage |
|||||||||||||||||||||||||||
|
Changing the Device Name |
|
|
|
Connecting USB Printers |
|
|||||||||||||||||||||||||
|
|
|
|
|
|
|
|
|
|
|
|
|
|
|
|
|
|
|
|
|
|
|
|
|
|
|
|
|
|||
|
Changing the Date and Time |
|
|
Using Your Device with a Digital |
|||||||||||||||||||||||||||
|
|
|
|
|
|
|
|
|
|
|
|
|
|
|
|
|
|
|
|
|
|
|
|
|
|
|
|
||||
|
Participating in Windows Networks |
|
Camera |
||||||||||||||||||||||||||||
|
|
|
|
|
|
|
|
|
|
|
|
|
|
|
|
|
|
|
|
|
|
|
|
|
|
|
|||||
|
Filenaming Conventions |
|
|
Using the Media Server |
|||||||||||||||||||||||||||
|
|
|
|
|
|
|
|
|
|
|
|
|
|
|
|
|
|
|
|
|
|
|
|
|
|
|
|||||
|
Protecting Your Data |
|
|
Using Video Surveillance |
|||||||||||||||||||||||||||
|
Managing Users |
|
|
|
Searching for Files |
|
|
||||||||||||||||||||||||
|
Managing Groups |
|
|
Resetting the StorCenter |
|||||||||||||||||||||||||||
|
|
|
|
|
|
|
|
|
|
|
|
|
|
|
|
|
|
|
|
|
|
|
|
||||||||
|
Managing Shared Folders |
|
|
Using Remote Access |
|||||||||||||||||||||||||||
|
|
|
|
|
|
|
|
|
|
|
|
|
|
|
|
|
|
|
|
|
|
|
|||||||||
|
Erasing the StorCenter |
|
|
|
Browsing the StorCenter via the |
||||||||||||||||||||||||||
|
|
|
|
|
|
|
|
|
|
|
|
|
|
|
|
|
|
|
|
|
|
||||||||||
|
Setting Disk Protection |
|
|
Shared Storage Tab |
|||||||||||||||||||||||||||
|
|
|
|
|
|
|
|
|
|
|
|
|
|
|
|
|
|
|
|
|
|||||||||||
|
Checking Device Status |
|
|
Torrents Downloads |
|
||||||||||||||||||||||||||
|
Configuring Email Notification |
|
|
Managing Quotas |
|
||||||||||||||||||||||||||
|
|
|
|
|
|
|
|
|
|
|
|
|
|
|
|
|
Security Settings |
|
|||||||||||||
|
|
|
|
|
|
|
|
|
|
|
|
|
|
|
|
|
Port Forwarding |
||||||||||||||
|
|
|
|
|
|
|
|
|
|
|
|
|
|
|
|
|
|
|
|
|
|
|
|
|
|
|
|
|
|
|
|
Configuring Network Services
|
Network Settings |
|
|
SNMP (Simple Netowrk Management |
|||||
|
Bluetooth |
|
|
Protocol) |
|||||
|
|
|
|
|
|
|
|
|
|
FTP (File Transfer Protocol) |
|
SMB/CIFS (Windows File Sharing) |
|||||||
|
|
|
|
|
|
|
|
||
|
NFS (UNIX/Linux File Sharing) |
|
AFP (Apple File Sharing) |
||||||
|
|
|
|
|
|
|
|
|
|
Bluetooth
The Bluetooth settings can be accessed by an administrator from the Settings tab → Network Services → Bluetooth.
Once a Bluetooth adapter is detected, files can be uploaded to a configurable destination folder on the Iomega StorCenter device from a Bluetooth device.
Configuring Bluetooth settings
1. Check or uncheck Enable Bluetooth Transfer to enable or disable Bluetooth.
http://www.iomega.com/support/manuals/ix-series/221-0809/en/consolidated/printall.h... 25-7-2010

Page 26 of 137
2.Once Bluetooth Transfer is enabled, the Enable Security checkbox can be checked to require Bluetooth users to supply a unique PIN that you have defined before allowing them to transfer files to the destination folder on the Iomega StorCenter device. If you have enabled security, you must define a unique PIN number, which will be supplied by devices attempting to upload data using Bluetooth.
3.Define a destination folder for files uploaded with Bluetooth. Transferred files can only be saved to the Iomega StorCenter device's destination folder defined here.Click the rightmost folder to view any subfolders. Click a subfolder to set it as the destination folder.
4.Click Apply to save your settings.
| top of page |
http://www.iomega.com/support/manuals/ix-series/221-0809/en/consolidated/printall.h... 25-7-2010

Page 27 of 137
Using the StorCenter
|
Connecting to the StorCenter |
|
|
Updating the Firmware |
|
||||||||||||||||||||||||||
|
Configuring the StorCenter |
|
|
Backing Up Your Files to the |
|||||||||||||||||||||||||||
|
|
|
|
|
|
|
|
|
|
|
|
|
|
|
|
|
|
|
|
|
|
|
|
|
|
|
|
|
|
|
|
|
Configuring Network Services |
|
|
StorCenter |
|||||||||||||||||||||||||||
|
|
|
|
|
|
|
|
|
|
|
|
|
|
|
|
|
|
|
|
|
|
|
|
|
|
|
|
|
|
|
|
|
Changing the Default Language |
|
|
Connecting External Storage |
|||||||||||||||||||||||||||
|
Changing the Device Name |
|
|
|
Connecting USB Printers |
|
|||||||||||||||||||||||||
|
|
|
|
|
|
|
|
|
|
|
|
|
|
|
|
|
|
|
|
|
|
|
|
|
|
|
|
|
|||
|
Changing the Date and Time |
|
|
Using Your Device with a Digital |
|||||||||||||||||||||||||||
|
|
|
|
|
|
|
|
|
|
|
|
|
|
|
|
|
|
|
|
|
|
|
|
|
|
|
|
||||
|
Participating in Windows Networks |
|
Camera |
||||||||||||||||||||||||||||
|
|
|
|
|
|
|
|
|
|
|
|
|
|
|
|
|
|
|
|
|
|
|
|
|
|
|
|||||
|
Filenaming Conventions |
|
|
Using the Media Server |
|||||||||||||||||||||||||||
|
|
|
|
|
|
|
|
|
|
|
|
|
|
|
|
|
|
|
|
|
|
|
|
|
|
|
|||||
|
Protecting Your Data |
|
|
Using Video Surveillance |
|||||||||||||||||||||||||||
|
Managing Users |
|
|
|
Searching for Files |
|
|
||||||||||||||||||||||||
|
Managing Groups |
|
|
Resetting the StorCenter |
|||||||||||||||||||||||||||
|
|
|
|
|
|
|
|
|
|
|
|
|
|
|
|
|
|
|
|
|
|
|
|
||||||||
|
Managing Shared Folders |
|
|
Using Remote Access |
|||||||||||||||||||||||||||
|
|
|
|
|
|
|
|
|
|
|
|
|
|
|
|
|
|
|
|
|
|
|
|||||||||
|
Erasing the StorCenter |
|
|
|
Browsing the StorCenter via the |
||||||||||||||||||||||||||
|
|
|
|
|
|
|
|
|
|
|
|
|
|
|
|
|
|
|
|
|
|
||||||||||
|
Setting Disk Protection |
|
|
Shared Storage Tab |
|||||||||||||||||||||||||||
|
|
|
|
|
|
|
|
|
|
|
|
|
|
|
|
|
|
|
|
|
|||||||||||
|
Checking Device Status |
|
|
Torrents Downloads |
|
||||||||||||||||||||||||||
|
Configuring Email Notification |
|
|
Managing Quotas |
|
||||||||||||||||||||||||||
|
|
|
|
|
|
|
|
|
|
|
|
|
|
|
|
|
Security Settings |
|
|||||||||||||
|
|
|
|
|
|
|
|
|
|
|
|
|
|
|
|
|
Port Forwarding |
||||||||||||||
|
|
|
|
|
|
|
|
|
|
|
|
|
|
|
|
|
|
|
|
|
|
|
|
|
|
|
|
|
|
|
|
Configuring Network Services
|
Network Settings |
|
|
SNMP (Simple Netowrk Management |
|||||
|
Bluetooth |
|
|
Protocol) |
|||||
|
|
|
|
|
|
|
|
|
|
FTP (File Transfer Protocol) |
|
SMB/CIFS (Windows File Sharing) |
|||||||
|
|
|
|
|
|
|
|
||
|
NFS (UNIX/Linux File Sharing) |
|
AFP (Apple File Sharing) |
||||||
|
|
|
|
|
|
|
|
|
|
FTP
The FTP page can be accessed by navigating to the Settings tab and clicking Network Services → FTP.
This page allows you to enable FTP StorCenter device. When you check StorCenter device using FTP.
(File Transfer Protocol) access to your Iomega Enable FTP Access, you can send files to your Iomega
Click Apply to save your changes.
http://www.iomega.com/support/manuals/ix-series/221-0809/en/consolidated/printall.h... 25-7-2010

Page 28 of 137
| top of page |
http://www.iomega.com/support/manuals/ix-series/221-0809/en/consolidated/printall.h... 25-7-2010

Page 29 of 137
Using the StorCenter
|
Connecting to the StorCenter |
|
|
Updating the Firmware |
|
||||||||||||||||||||||||||
|
Configuring the StorCenter |
|
|
Backing Up Your Files to the |
|||||||||||||||||||||||||||
|
|
|
|
|
|
|
|
|
|
|
|
|
|
|
|
|
|
|
|
|
|
|
|
|
|
|
|
|
|
|
|
|
Configuring Network Services |
|
|
StorCenter |
|||||||||||||||||||||||||||
|
|
|
|
|
|
|
|
|
|
|
|
|
|
|
|
|
|
|
|
|
|
|
|
|
|
|
|
|
|
|
|
|
Changing the Default Language |
|
|
Connecting External Storage |
|||||||||||||||||||||||||||
|
Changing the Device Name |
|
|
|
Connecting USB Printers |
|
|||||||||||||||||||||||||
|
|
|
|
|
|
|
|
|
|
|
|
|
|
|
|
|
|
|
|
|
|
|
|
|
|
|
|
|
|||
|
Changing the Date and Time |
|
|
Using Your Device with a Digital |
|||||||||||||||||||||||||||
|
|
|
|
|
|
|
|
|
|
|
|
|
|
|
|
|
|
|
|
|
|
|
|
|
|
|
|
||||
|
Participating in Windows Networks |
|
Camera |
||||||||||||||||||||||||||||
|
|
|
|
|
|
|
|
|
|
|
|
|
|
|
|
|
|
|
|
|
|
|
|
|
|
|
|||||
|
Filenaming Conventions |
|
|
Using the Media Server |
|||||||||||||||||||||||||||
|
|
|
|
|
|
|
|
|
|
|
|
|
|
|
|
|
|
|
|
|
|
|
|
|
|
|
|||||
|
Protecting Your Data |
|
|
Using Video Surveillance |
|||||||||||||||||||||||||||
|
Managing Users |
|
|
|
Searching for Files |
|
|
||||||||||||||||||||||||
|
Managing Groups |
|
|
Resetting the StorCenter |
|||||||||||||||||||||||||||
|
|
|
|
|
|
|
|
|
|
|
|
|
|
|
|
|
|
|
|
|
|
|
|
||||||||
|
Managing Shared Folders |
|
|
Using Remote Access |
|||||||||||||||||||||||||||
|
|
|
|
|
|
|
|
|
|
|
|
|
|
|
|
|
|
|
|
|
|
|
|||||||||
|
Erasing the StorCenter |
|
|
|
Browsing the StorCenter via the |
||||||||||||||||||||||||||
|
|
|
|
|
|
|
|
|
|
|
|
|
|
|
|
|
|
|
|
|
|
||||||||||
|
Setting Disk Protection |
|
|
Shared Storage Tab |
|||||||||||||||||||||||||||
|
|
|
|
|
|
|
|
|
|
|
|
|
|
|
|
|
|
|
|
|
|||||||||||
|
Checking Device Status |
|
|
Torrents Downloads |
|
||||||||||||||||||||||||||
|
Configuring Email Notification |
|
|
Managing Quotas |
|
||||||||||||||||||||||||||
|
|
|
|
|
|
|
|
|
|
|
|
|
|
|
|
|
Security Settings |
|
|||||||||||||
|
|
|
|
|
|
|
|
|
|
|
|
|
|
|
|
|
Port Forwarding |
||||||||||||||
|
|
|
|
|
|
|
|
|
|
|
|
|
|
|
|
|
|
|
|
|
|
|
|
|
|
|
|
|
|
|
|
Configuring Network Services
|
Network Settings |
|
|
SNMP (Simple Netowrk Management |
|||||
|
Bluetooth |
|
|
Protocol) |
|||||
|
|
|
|
|
|
|
|
|
|
FTP (File Transfer Protocol) |
|
SMB/CIFS (Windows File Sharing) |
|||||||
|
|
|
|
|
|
|
|
||
|
NFS (UNIX/Linux File Sharing) |
|
AFP (Apple File Sharing) |
||||||
|
|
|
|
|
|
|
|
|
|
NFS (UNIX/Linux File Sharing)
NFS (Network File System) allows remote hosts to mount file systems over a network and interact with them as though they were mounted locally. NFS provides another protocol for sharing storage data with Linux hosts. To enable NFS, navigate to the Settings tab, click Network Services → NFS, and check the Enable NFS checkbox.
If you are logged in as the root user on a client machine accessing the Iomega StorCenter device through NFS, you can mount a secured share and access the files on it by checking the Allow root account access checkbox.
http://www.iomega.com/support/manuals/ix-series/221-0809/en/consolidated/printall.h... 25-7-2010

Page 30 of 137
When NFS is enabled, you can configure rules for host-based access to folders.
Rules can be added to specify the hosts that are allowed to access folders using NFS. This page allow you to configure NFS rules to specify access for hosts. For example, *.cs.foo.com matches all hosts in the domain cs.foo.com. To export a folder to all hosts on an IP address or subnetwork simultaneously, specify an IP address and netmask pair as address/netmask where the netmask can be in dotted-decimal format, or as a contiguous mask length. For example, either /255.255.252.0 or /22 will result in identical subnetworks.
NOTE: NFS cannot be enabled when an Active Directory server is in use.
| top of page |
http://www.iomega.com/support/manuals/ix-series/221-0809/en/consolidated/printall.h... 25-7-2010
 Loading...