


Copyright © 2002 Iomega Corporation. All rights reserved. Iomega, the |
|
stylized “i” logo, Zip, and IomegaWare are either registered trademarks |
|
or trademarks of Iomega Corporation in the United States and/or other |
|
countries. Microsoft and Windows are either registered trademarks or |
|
trademarks of Microsoft Corporation in the United States and/or other |
|
countries. Apple, Macintosh, Mac, iMac, FireWire and the FireWire logo |
|
are either registered trademarks or trademarks of Apple Computer, Inc., |
|
in the United States and/or other countries. Certain other product |
|
names, brand names, and company names may be trademarks or |
30932302 9/21/02 b |
designations of their respective owners. |
Zip® 750MB USB/FireWire® Drive
Quick Install
Lecteur Zip 750Mo USB/FireWire
Installation rapide
USB/FireWire-Zip-Laufwerk mit 750MB
Schnellinstallation
Unità Zip 750MB USB/FireWire
Installazione rapida
Unidad Zip USB/FireWire de 750MB
Instalación rápida
dade Zip USB/FireWire de 750MB
Instalação rápida
Zip 750MB USB/FireWire-drive
Snelle Installatie
Zip 750MB USB/FireWire-enhet
Snabbinstallation
Zip 750MB USB/FireWire-drev
Hurtig Installation
Zip 750MB USB/FireWire-stasjon
Rask Installering
Zip 750Mt USB/FireWire -asema
Pika-asennus
www.iomega.com
1 |
5 |
6-Pin |
4-Pin |
2
6
3
4 7
English
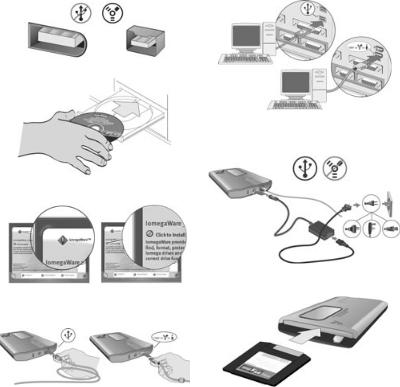
NOTE: For important information on USB/FireWire guidelines, detailed installation instructions, and troubleshooting, see the User’s Manual on the Start Here First CD. You must have Microsoft® Internet Explorer® 5.0 or higher or Netscape Navigator® 6.1 or higher installed on your system.
USB Users—If your computer does not have native support for USB 2.0, you must install a USB 2.0 controller for the Zip® drive to run at USB 2.0 speed.
1.FireWire Users—If you will be connecting to a 6-pin FireWire connection, use the FireWire cable that shipped with the Zip drive. If you will be connecting to a 4-pin FireWire connection, you will need to purchase a 4-pin to 6-pin FireWire cable from your local computer retailer and a power supply from http://www.iomega.com before connecting the Zip drive.
2.Start your computer, wait for the operating system to load, then insert the Start Here First CD.
3.Select your language, then select the IomegaWare™ icon from the menu. Select “Click to Install” to start the software installation.
4.Connect the USB/FireWire adapter cable to the back of the Zip drive.
5.Connect the other end of the cable to the appropriate USB/FireWire connection on your computer. CAUTION! Do not use USB/FireWire extension cables with the Zip drive. Data loss may result.
6.USB Users—Connect the power supply to the Zip drive, then plug into an electrical outlet.
CAUTION! Use the power supply that shipped with the Zip drive. Other power supplies may damage the drive.
FireWire Users—A power supply may be required with some FireWire configurations. Refer to the User’s Manual.
7.Restart your computer. Insert a Zip disk and your Zip drive is now ready to use. NOTE: You will need to purchase a Zip disk (this package did not include a Zip disk).
Customer Support Options
For all of your service and support needs visit us at http://www.iomega.com.
CE (European Community)
This Iomega product conforms to the following European Directive(s) and Standard(s): Application of Council Directives: 73/23/EEC, 89/336/EEC. Standards to which Conformity is declared: EN60950, EN55022, EN55024, EN61000-3-2 and EN61000-3-3. Importer’s Name: Iomega Netherlands branch of Iomega International, S.A. Type of Equipment: Information Technology Equipment.
Manufacturer/Responsible Party
Iomega Corporation 1821 West 4000 South Roy, UT 84067 USA www.iomega.com
2 |
3 |
Français
REMARQUE : Pour obtenir d'importantes informations sur les instructions USB/FireWire, les instructions d'installation détaillées et le dépannage, consultez le Guide de l'utilisateur sur le CD Commencer ici. Microsoft® Internet Explorer® 5.0 (ou plus récent) ou Netscape Navigator® 6.1 (ou plus récent) doit être installé sur votre système.
Utilisateurs USB—Si votre ordinateur ne prend pas en charge USB 2.0 de manière native, vous devez installer un contrôleur USB 2.0 pour que le lecteur Zip® fonctionne aux vitesses USB 2.0.
1.Utilisateurs FireWire—Si vous utilisez un connecteur FireWire à 6 broches, employez le câble FireWire fourni avec le lecteur Zip. Si vous utilisez un connecteur FireWire à 4 broches, vous devrez acheter un câble d'adaptateur FireWire 4 broches/6 broches auprès de votre revendeur local, ainsi qu'un bloc d'alimentation auprès de http://www.iomega.com avant de connecter le lecteur Zip.
2.Démarrez votre ordinateur, attendez le chargement du système d'exploitation et insérez le CD Commencer ici.
3.Sélectionnez votre langue, puis l’icône IomegaWare™ dans le menu. Sélectionnez “Cliquez pour procéder à l'installation” pour démarrer l'installation du logiciel.
4.Connectez le câble adaptateur USB/FireWire à l’arrière du lecteur Zip.
5.Connectez l'autre extrémité du câble au port USB/FireWire approprié de votre ordinateur.
ATTENTION ! N'utilisez pas de câbles prolongateurs USB/FireWire avec votre lecteur Zip. Vous risqueriez de perdre des données.
6.Utilisateurs USB—Connectez le bloc d'alimentation au lecteur Zip et raccordez-le à une prise secteur.
ATTENTION ! Utilisez le bloc d'alimentation livré avec le lecteur Zip. Les autres risquent d'endommager le lecteur.
Utilisateurs FireWire—Il se peut qu'un bloc d’alimentation soit nécessaire pour certaines configurations FireWire. Consultez le Guide de l'utilisateur.
7.Redémarrez votre ordinateur. Insérez une disquette Zip et votre lecteur Zip est prêt à fonctionner.
REMARQUE : Vous devez acheter une disquette Zip (ce coffret n’en contenait pas).
Options d'assistance clientèle
Pour tous vos besoins en matière de service et d’assistance, visitez notre site http://www.iomega.com.
4
Deutsch
HINWEIS: Wichtige Informationen zu den USB/FireWire-Richtlinien, detaillierte Installationsanweisungen und Hinweise zur Fehlerbehebung finden Sie im Benutzerhandbuch auf der Einstiegs-CD. Auf Ihrem System muß Microsoft® Internet Explorer® 5.0 oder höher bzw. Netscape Navigator® 6.1 oder höher installiert sein.
USB-Benutzer—Wenn der Computer keine systemeigene Unterstützung für USB 2.0 aufweist, müssen Sie einen USB 2.0-Controller installieren, damit das Zip®-Laufwerk mit USB 2.0-Geschwindigkeiten arbeiten kann.
1.FireWire-Benutzer—Wenn eine Verbindung mit einem FireWire-Anschluß mit 6 Pins hergestellt werden soll, müssen Sie das im Lieferumfang für das Zip-Laufwerk enthaltene FireWire-Kabel verwenden. Wenn eine
Verbindung mit einem FireWire-Anschluß mit 4 Pins hergestellt werden soll, müssen Sie sich bei Ihrem
Computerfachhändler vor Ort ein FireWire-Kabel mit Adapterfunktion für 4 zu 6 Pins und bei http://www.iomega.com ein Netzteil besorgen, bevor Sie das Zip-Laufwerk anschließen können.
2.Starten Sie den Computer, warten Sie, bis das Betriebssystem geladen ist, und legen Sie dann die Einstiegs-CD ein.
3.Wählen Sie die entsprechende Sprache und anschließend im Menü das IomegaWare™-Symbol aus. Wählen Sie Zum Installieren hier klicken, um die Software zu installieren.
4.Schließen Sie das USB/FireWire-Adapterkabel an der Rückseite des Zip-Laufwerks an.
5.Schließen Sie das andere Ende des Kabels an den entsprechenden USB/FireWire-Anschluß des Computers an.
VORSICHT: Verwenden Sie für Zip-Laufwerke keine USB/FireWire-Verlängerungskabel. Andernfalls könnten Daten verlorengehen.
6.USB-Benutzer—Schließen Sie das Netzteil an das Zip-Laufwerk an, und schließen Sie es dann an eine
Steckdose an.
VORSICHT: Verwenden Sie das im Lieferumfang des Zip-Laufwerks enthaltene Netzteil. Durch andere
Netzteile kann es zu Beschädigungen des Laufwerks kommen.
FireWire-Benutzer—Für einige FireWire-Konfigurationen kann ein Netzteil erforderlich sein. Lesen Sie im
Benutzerhandbuch nach.
7.Starten Sie den Computer neu. Das Zip-Laufwerkist funktionsbereit, sobald Sie eine Zip-Diskette eingelegt haben.
HINWEIS: Zip-Disketten müssen separat erworben werden (im Lieferumfang dieses Pakets ist keine Zip-Diskette enthalten).
Kunden-Support
Alle möglichen Dienste und den Support finden Sie unter http://www.iomega.com/europe.
5
Italiano
NOTA: per ottenere informazioni importanti sulle linee guida USB/FireWire, istruzioni di installazione dettagliate e informazioni sulla risoluzione dei problemi, consultare il Manuale dell'utente disponibile sul CD Inizia qui. È necessario che sul sistema sia installato Microsoft® Internet Explorer® 5.0 o versione successiva oppure Netscape Navigator® 6.1 o superiore.
Utenti USB—Se il computer non dispone di supporto nativo per USB 2.0, per far funzionare l'unità Zip® alla velocità USB 2.0 è necessario installare un controller USB 2.0.
1.Utenti FireWire—Se si collega l'unità a una porta FireWire a 6 pin, usare il cavo FireWire fornito in dotazione con l'unità Zip. Se si collega l'unità a una porta FireWire a 4 pin, è necessario acquistare un cavo FireWire a
4 – 6 pin dal rivenditore di computer locale e un alimentatore all'indirizzo Internet http://www.iomega.com prima di collegare l'unità Zip.
2.Avviare il computer, attendere il caricamento del sistema operativo, quindi inserire il CD Inizia qui.
3.Selezionare la lingua e l'icona del programma IomegaWare™ dal menu. Selezionare “Fare clic per installare” per iniziare a installare il software.
4.Inserire il cavo adattatore USB/FireWire nella parte posteriore dell'unità Zip.
5.Collegare l'altra estremità del cavo alla relativa porta USB/FireWire del computer.
ATTENZIONE! Non usare prolunghe per cavi USB/FireWire con l'unità Zip. Questa operazione può causare la perdita dei dati.
6.Utenti USB—Collegare l'alimentatore all'unità Zip e inserirlo in una presa di corrente.
ATTENZIONE! Usare l'alimentatore fornito a corredo con l'unità Zip. L'utilizzo di altri alimentatori potrebbe danneggiare l'unità.
Utenti FireWire—Alcune configurazioni FireWire potrebbero richiedere l'utilizzo di un alimentatore. Consultare il Manuale dell'utente.
7.Riavviare il computer. Inserire un disco Zip nell'unità: a questo punto è possibile iniziare a usare l'unità Zip.
NOTA: è opportuno acquistare un disco Zip (la confezione del prodotto non contiene il disco Zip).
Opzioni di assistenza clienti
Per ottenere informazioni sull'assistenza e la manutenzione dei prodotti Iomega, visitare il sito Web all'indirizzo http://www.iomega.com.
6
 Loading...