


Iomega® ScreenPlay® TV Link DX
HD Media Player
The Iomega ScreenPlay TV Link DX is an easy and convenient way to browse digital content transferred to, or stored on, a USB drive and watch it on your TV. In addition, you can stream content from the Internet directly to your TV and browse and play media files stored on your home network volumes or DLNA-compliant devices connected to your network.
Browse and share media files on your home network
Directly access online content from Internet media sites, including Flickr® and YouTube™, and from Internet feeds such as Internet Radio, podcasts, or RSS
Access social media sites (for example, Facebook or Twitter)
1080p High Definition*
Compatible with the latest media formats
DivX® Plus HD Certified
DLNA certified
*Must be supported by the TV. Used automatically if the TV supports it and the ScreenPlay TV Link DX is connected via HDMI with Auto setting.
NOTE: It may be a criminal offense under applicable copyright laws to make unauthorized copies of copyright protected material, including videos, films, broadcasts, and non-original sound and video recordings. This equipment should not be used for these purposes.
Iomega, the stylized "i" logo, and ScreenPlay are either registered trademarks or trademarks of Iomega Corporation in the United States and/or other countries. Microsoft and Windows are either registered trademarks or trademarks of Microsoft Corporation in the United States and/or other countries. Apple and Mac are registered trademarks or trademarks of Apple Inc. in the United States and/or other countries. Certain other product names, brand names, and company names may be trademarks or designations of their respective owners.

ScreenPlay TV Link DX Specifications
Supported Media Formats
Supported AV Connections
Supported Computer Interfaces
Network Client Requirements
Format Requirements
Supported Media Formats
The ScreenPlay TV Link DX supports the following types of media files:
Video* |
Music/Audio |
Photos |
|||
|
MPEG-1 |
|
MP3 |
|
JPEG |
MPEG-2 up to HD |
|
AC3 (Dolby Digital Encoding) |
|
BMP |
|
|
MP@HL 1080p |
|
WAV |
|
GIF |
|
MPEG-4 (part 10) |
|
WMA |
|
PNG |
|
up to 1080p |
|
OGG Vorbis |
|
TIFF |
|
XviD |
|
DTS |
|
|
|
H.264 |
|
AAC (non-DRM) |
|
|
|
WMV |
|
FLAC |
|
|
VC-1 (SMPTE 421M)
RMVB up to SD
*Supported file extensions for videos, wrappers, and associated audio/support files include avi, asf, divx, mkv, mov, mp2, mp4, mpe, mpeg, mpg, m4a, m4v, vob, xvid, ifo, iso (DVD ISO), WMV, FLV, AVCHD, M2TS, TS
NOTE: Although the ScreenPlay TV Link DX supports the listed file types, it might not be able to support every codec used to create the files. Check the support area on www.iomega.com for the latest information on supported file types.
| top of page |
Supported AV Connections
The ScreenPlay TV Link DX provides high quality audio/video output* through the following TV connections:
HDMI (High-Definition Multimedia Interface)
Composite video and audio L/R
Optical Audio (S/PDIF)
*Supported video output resolutions depend on the connection used. An HDMI connection supports the following resolutions:
480p 60 Hz, 576p 50 Hz, 720p 50 Hz, 720p 60 Hz, 1080i 50 Hz, 1080i 60 Hz, 1080p 23.976 Hz, 1080p24 fps, 1080p50 fps, 1080p60 fps, Auto.
CAUTION! The ScreenPlay TV Link is not intended for in-car entertainment use. Unstable power or vibration may damage the ScreenPlay TV Link or connected USB devices.

| top of page |
Supported Computer Interfaces
In addition to the AV connections listed above, the ScreenPlay TV Link DX supports the following computer interfaces:
10/100 Ethernet for wired network connection
Wireless Ready support for Iomega 802.11n WiFi adapters
USB 2.0 for external USB devices
NOTE: Use of a network router or hub is recommended for network connection. The package does not include a network router or hub.
| top of page |
Network Client Requirements
When the ScreenPlay TV Link is connected to a network, client computers on the network must use one of the following operating systems:
Microsoft® Windows® XP / Windows Vista™ / Windows 7 (all versions)
Mac OS X, version 10.4 - 10.6
| top of page |
Format Requirements
External USB devices connected to the ScreenPlay TV Link DX, such as flash drives or external hard drives, can be formatted NTFS, FAT32, Mac OS Extended (HFS+), Mac OS Extended Journaled, Ext2, or Ext3.
| top of page |

License Notices
About DivX Video and Video-On-Demand
About AVC and VC-1 Video
About DTS 2.0+Digital Out
Open Source
About DivX Video and Video-On-Demand
DivX® is a digital video format created by DivX,Inc. This is an official DivX Certified device that plays DivX video. Visit www.divx.com for more information and software tools to convert your files into DivX video.
This DivX Certified® device must be registered in order to play DivX Video-on-Demand (VOD) content. To generate the registration code, locate the DivX VOD section in the device setup menu. Go to vod.divx.com with this code to complete the registration process and learn more about DivX VOD.
| top of page |
About AVC and VC-1 Video
THIS PRODUCT IS LICENSED UNDER THE AVC PATENT PORTFOLIO LICENSE FOR THE PERSONAL AND NON-COMMERCIAL USE OF A CONSUMER TO (i) ENCODE VIDEO IN COMPLIANCE WITH THE AVC STANDARD (“AVC VIDEO”) AND/OR (ii) DECODE AVC VIDEO THAT WAS ENCODED BY A CONSUMER ENGAGED IN A PERSONAL AND NON-COMMERCIAL ACTIVITY AND/OR WAS OBTAINED FROM A VIDEO PROVIDER LICENSED TO PROVIDE AVC VIDEO. NO LICENSE IS GRANTED OR SHALL BE IMPLIED FOR ANY OTHER USE. ADDITIONAL INFORMATION MAY BE OBTAINED FROM MPEG LA, L.L.C. SEE HTTP://WWW.MPEGLA.COM
THIS PRODUCT IS LICENSED UNDER THE VC-1 PATENT PORTFOLIO LICENSE FOR THE PERSONAL AND NON-COMMERCIAL USE OF A CONSUMER TO (i) ENCODE VIDEO IN COMPLIANCE WITH THE VC-1 STANDARD (“VC-1 VIDEO”) AND/OR (ii) DECODE VC-1 VIDEO THAT WAS ENCODED BY A CONSUMER ENGAGED IN A PERSONAL AND NON-COMMERCIAL ACTIVITY AND/OR WAS OBTAINED FROM A VIDEO PROVIDER LICENSED TO PROVIDE VC-1 VIDEO. NO LICENSE IS GRANTED OR SHALL BE IMPLIED FOR ANY OTHER USE. ADDITIONAL INFORMATION MAY BE OBTAINED FROM MPEG LA, L.L.C. SEE HTTP://WWW.MPEGLA.COM
| top of page |
About DTS 2.0+Digital Out
Manufactured under license under U.S. Patent #'s: 5,451,942; 5,956,674; 5,974,380; 5,978,762; 6,487,535 & other U.S. and worldwide patents issued and pending. DTS and the Symbol are registered trademarks, & DTS 2.0+Digital Out and the DTS logos are trademakrs of DTS, Inc. Product includes software. © DTS, Inc. All Rights Reserved.

| top of page |
Open Source
The software included in this product contains copyrighted software that is licensed under open source agreements. Components of this software covered under GPL or other open source licenses are fully documented as to license and redistribution requirements in the ReadMe file provided with the software. A copy of this ReadMe may, at Iomega’s discretion and subject to change at any time, be available on Iomega’s Support and Download site at www.iomega.com/support. You may download the corresponding source code (when source code distribution is required) from the Iomega web site at www.iomega.com/support. To locate the download page for open source code, select your Iomega product and your operating system. Scroll down the page to the search field and enter “open source.”
In addition, you can also obtain a copy of the applicable open source code on CD by sending a money order or check for $10 to:
Iomega Corporation
ATTN: Source Code
4059 South 1900 West
Roy, UT 84067 USA
Please include the model name for your ScreenPlay product with the request.
| top of page |

Installation and Setup
|
Installation Overview |
|
Connecting to a Network |
|
||||||||
|
Package Contents |
|
|
|
First Time Startup |
|
||||||
|
|
|
|
|
|
|
|
|
|
|
|
|
|
Safety Information |
|
|
Power Down/Disconnect |
|
|||||||
|
|
|
|
|
|
|
|
|
|
|
||
|
Connectors and Indicators |
|
Settings |
|
||||||||
|
Connecting to a TV |
|
|
|
|
|
|
|
||||
|
|
|
|
|
|
|
|
|
|
|
|
|
Installation Overview
Your ScreenPlay TV Link DX enables you to easily create a digital home entertainment center with online access. To get started, connect the ScreenPlay TV Link DX to your TV and home network, then complete first time setup. It doesn't matter if you connect to your network first or your TV first. It will be easiest to set up your ScreenPlay TV Link DX if it’s connected to both before you power it up the first time.
| top of page |
Installation and Setup
|
Installation Overview |
|
Connecting to a Network |
|
||||||||
|
Package Contents |
|
|
|
First Time Startup |
|
||||||
|
|
|
|
|
|
|
|
|
|
|
|
|
|
Safety Information |
|
|
Power Down/Disconnect |
|
|||||||
|
|
|
|
|
|
|
|
|
|
|
||
|
Connectors and Indicators |
|
Settings |
|
||||||||
|
Connecting to a TV |
|
|
|
|
|
|
|
||||
|
|
|
|
|
|
|
|
|
|
|
|
|
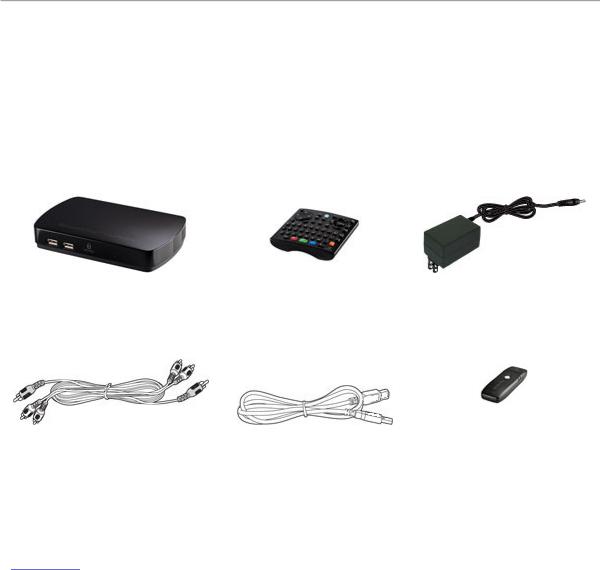
Package Contents
Iomega ScreenPlay |
Remote Control with |
Power Supply |
TV Link DX |
QWERTY Keyboard |
|
Composite AV Cable |
HDMI Cable |
Iomega 802.11n WiFi Adapter |
NOTE: Package contents may vary. For maximum transfer rate and reliability, use the cables provided.
| top of page |

Installation and Setup
|
Installation Overview |
|
Connecting to a Network |
|
||||||||
|
Package Contents |
|
|
|
First Time Startup |
|
||||||
|
|
|
|
|
|
|
|
|
|
|
|
|
|
Safety Information |
|
|
Power Down/Disconnect |
|
|||||||
|
|
|
|
|
|
|
|
|
|
|
||
|
Connectors and Indicators |
|
Settings |
|
||||||||
|
Connecting to a TV |
|
|
|
|
|
|
|
||||
|
|
|
|
|
|
|
|
|
|
|
|
|
Safety Information
Safety Guidelines
Do not operate the ScreenPlay TV Link DX with wet hands or near water.
Do not bend cables in a sharp angle.
Keep the ScreenPlay TV Link DX and cables out of reach of children.
Keep the ScreenPlay TV Link DX and its accessories away from heat sources.
Safety Ratings
|
Device Input Rating |
DC 12 volt |
|
|
Power Supply Input Voltage |
100Vac - 240Vac |
|
|
Power Supply Output Voltage |
12VDC +/- 6% |
|
|
Power Supply Max Current |
3 amp |
|
|
Operational Temperature Limits |
0-35° C |
|
| top of page | |
|
||
|
|
|
|

Installation and Setup
|
Installation Overview |
|
Connecting to a Network |
|
||||||||
|
Package Contents |
|
|
|
First Time Startup |
|
||||||
|
|
|
|
|
|
|
|
|
|
|
|
|
|
Safety Information |
|
|
Power Down/Disconnect |
|
|||||||
|
|
|
|
|
|
|
|
|
|
|
||
|
Connectors and Indicators |
|
Settings |
|
||||||||
|
Connecting to a TV |
|
|
|
|
|
|
|
||||
|
|
|
|
|
|
|
|
|
|
|
|
|
Connectors and Indicators
Rear Panel
1.Power connector—Always connect the included power supply when using the ScreenPlay TV Link DX.
2.Composite video output connector—Use for composite connection to a TV; connect to yellow video input jack on the TV.
3.L/R stereo audio output connectors—Use for composite/RCA audio connection; connect to red/white audio input jacks on the TV.
4.HDMI connector—Use to connect the ScreenPlay TV Link DX to an HDTV or high definition Home Theater System. Outputs standard, enhanced, or high-definition video, plus multichannel audio (surround sound).
5.Optical audio connector—Outputs optical audio signal. Connect to a receiver using an optical audio cable (not included).
6.Ethernet connector—Use for wired network connection (Ethernet cable not included).
7.USB 2.0 host port—Use to connect an Iomega WiFi adapter or external USB device to the ScreenPlay TV Link DX.
| top of page |
Front Panel
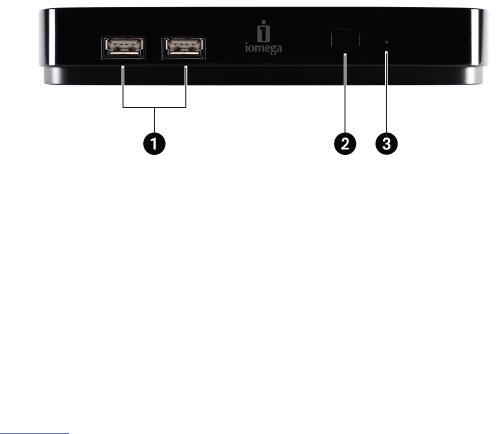
1.USB 2.0 host ports (2)—Use to connect an Iomega WiFi adapter or external USB device to the ScreenPlay TV Link DX.
2.Remote receiver—When using the remote control, always point it toward the receiver.
NOTE: Media player functions controlled by the remote are available only when the ScreenPlay TV Link DX is connected to a TV. Some functions are not supported by all playable file types.
3.Power/access LED—LED glows blue when the ScreenPlay TV Link DX is powered up; blinks when the ScreenPlay TV Link DX is loading or accessing files; blinks once when the ScreenPlay TV Link DX receives a command from the remote control. Glows solid red when the ScreenPlay TV Link DX is powered off.
| top of page |
Installation and Setup
|
Installation Overview |
|
Connecting to a Network |
|
||||||||
|
Package Contents |
|
|
|
First Time Startup |
|
||||||
|
|
|
|
|
|
|
|
|
|
|
|
|
|
Safety Information |
|
|
Power Down/Disconnect |
|
|||||||
|
|
|
|
|
|
|
|
|
|
|
||
|
Connectors and Indicators |
|
Settings |
|
||||||||
|
Connecting to a TV |
|
|
|
|
|
|
|
||||
|
|
|
|
|
|
|
|
|
|
|
|
|
Connecting to a TV
The ScreenPlay TV Link DX supports several options for connecting to video and audio on your TV or home entertainment center. Choose the option that provides the best quality video and audio supported by your TV.
HDMI — This is the best connection to use with an HDTV. It uses a single cable for both video and audio.
Composite video with L/R audio — This connection type is compatible with most standard TVs. It uses a single cable for video and audio.
Optical audio — This option provides better audio quality than L/R audio.
NOTE: Do not connect the ScreenPlay TV Link DX through a VCR. Video signals fed through a VCR may be affected by copyright protection systems and the picture will be distorted on the television.
HDMI Connection
HDMI (high-definition media interface) supports standard, enhanced, or high-definition video, plus multi-channel digital audio, on a single cable connection. This connection option is supported only on high-definition (HD) TVs.
1.Connect the HDMI cable to the back of the ScreenPlay TV Link DX.
2.Connect the other end of the HDMI cable to the HDMI input connection on the TV set.
| top of page |
Composite Video Connection
Composite video is compatible with most TV sets. The following instructions use the composite video connector on the ScreenPlay TV Link DX and the L/R audio connectors. If desired, you can use the optical audio option rather than L/R audio.
1.Connect the composite AV cable to the composite video output connector (yellow) and the L/R audio output connectors (red and white) on the back of the ScreenPlay TV Link DX, matching the colors.

2.Connect the yellow (video) connector on the other end of the cable to the composite VIDEO input connection on the TV set.
3.Connect the white connector to the Left (L) audio input connection on the TV set.
4.Connect the red connector to the Right (R) audio input connection on the TV set.
| top of page |
Optical Audio Connection
The ScreenPlay TV Link DX includes an optical audio connector for high quality digital audio output. You will need to obtain an optical audio cable to connect the ScreenPlay TV Link DX to an AV amplifier (receiver) with a digital audio decoder.
NOTE: You will get multi-channel sound effect only if the audio source file carries it.
| top of page |
Installation and Setup
|
Installation Overview |
|
Connecting to a Network |
|
||||||||
|
Package Contents |
|
|
|
First Time Startup |
|
||||||
|
|
|
|
|
|
|
|
|
|
|
|
|
|
Safety Information |
|
|
Power Down/Disconnect |
|
|||||||
|
|
|
|
|
|
|
|
|
|
|
||
|
Connectors and Indicators |
|
Settings |
|
||||||||
|
Connecting to a TV |
|
|
|
|
|
|
|
||||
|
|
|
|
|
|
|
|
|
|
|
|
|
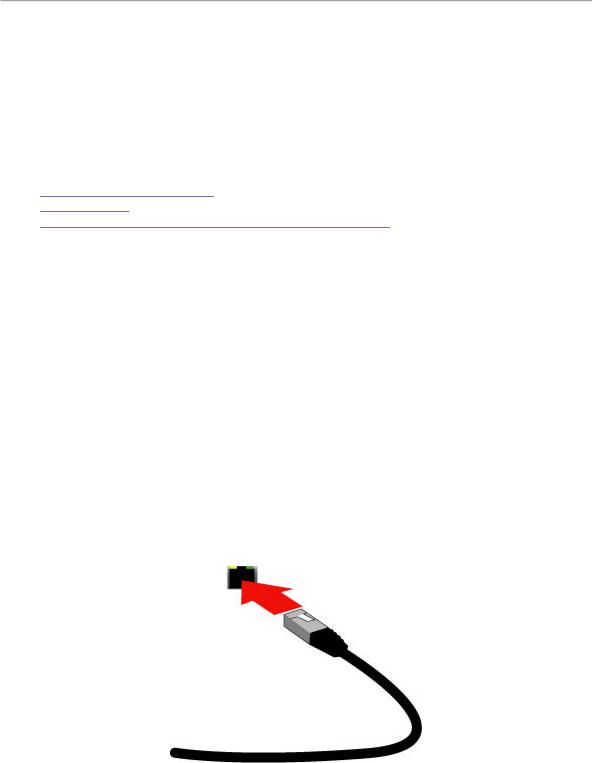
Connecting to a Network
Physical Network Connection
Network Setup
Connecting to the TV Link DX from a Networked Computer
Physical Network Connection
Connect the ScreenPlay TV Link DX to your home network for access to online media, as well as media content stored on your network volumes. You can connect the ScreenPlay TV Link DX via Ethernet (wired network) or WiFi (wireless network).
NOTE: The ScreenPlay TV Link DX cannot be connected to Ethernet and WiFi at the same time. An Ethernet connection will provide the best results when playing videos from your network.
Wired Network:
Use a standard Ethernet cable to connect the ScreenPlay TV Link DX to a network router, hub, or switch. (Ethernet cable not included.)
— or —
Connect the ScreenPlay TV Link DX to the Ethernet port on a networked computer.
NOTE: A network hub or router is recommended for a wired network connection. The ScreenPlay TV Link DX package does not include a network hub, router, or ethernet cable.

Wireless Network:
The ScreenPlay TV Link DX is fully WiFi-ready and can connect to a wireless network using an Iomega 802.11n WiFi adapter. To make the connection, plug the included WiFi adapter into the USB host port on the back of the ScreenPlay TV Link DX. This will keep the USB host ports on the front of the ScreenPlay TV Link DX available for connecting external USB devices.
NOTE: You must have a wireless network in place to support a WiFi connection. If you do not already have a wireless network installed, you will need to obtain a wireless router and install it.
| top of page |
Network Setup
After completing the physical network connection, follow the steps under first time startup to automatically configure your network connection.
To configure the network connection manually after first time power up, select Network > Network setup from the Settings menu. Click here to view complete step-by-step instructions for completing network setup manually.
Once ScreenPlay TV Link DX is configured for your network, you will be able to browse and play media files stored on your network volumes. You will also be able to use the online media features. See Using Player Features for additional information.
NOTE: If you need to enter a username and password to login to a network volume, you can use either the virtual keyboard on the ScreenPlay TV interface or the QWERTY keyboard on the remote control. The password can use any combination of numbers, letters (lower case or caps), or extended characters, including punctuation characters. To display and select extended characters on the virtual keyboard, select the Option button at the bottom of the virtual keyboard screen.
| top of page |
Connecting to the ScreenPlay TV Link DX from a Networked Computer
You can access an external USB device connected to the ScreenPlay TV Link DX from a computer on your network. Follow the instructions below.
NOTE: The network computer must be on the same subnet or network segment as the ScreenPlay DX.
NOTE: You do not need to map a network drive letter in order to access network volumes from the ScreenPlay DX TV menus. Media files stored on your network volumes will be automatically available to browse and play.
Manually mapping a drive letter from a Windows PC
1. Select the Settings icon on the ScreenPlay home screen:

2.Use the up/down navigation buttons to highlight Network and press Enter.
3.Select Network setup and press Enter.
4.Note the IP address assigned to the ScreenPlay DX.
5.Using a PC connected to the Network, right click on the Computer (Vista) or My Computer (XP) icon and select Map Network Drive.
6.Select the drive letter you want to use for the ScreenPlay DX, then enter the IP address for the ScreenPlay DX in the field next to Folder (for example, \\192.168.1.151).
7.You can now use My Computer or Windows Explorer to browse the ScreenPlay DX and copy files from your network volumes onto the ScreenPlay DX.
Connecting to the ScreenPlay DX from a Mac
1. Select the Settings icon on the ScreenPlay home screen:
2.Use the up/down navigation buttons to highlight Network and press Enter.
3.Select Network setup and press Enter.
4.Note the IP address assigned to the ScreenPlay DX.
5.On a Mac connected to the network, select Connect to Server from Finder’s Go menu.
6.Under Server Address, enter “smb://” followed by the IP address for the ScreenPlay DX (for example, smb://192.168.1.151).
7.Click Connect.
8.Select the ScreenPlay public share to mount it on your desktop.
| top of page |

Installation and Setup
|
Installation Overview |
|
Connecting to a Network |
|
||||||||
|
Package Contents |
|
|
|
First Time Startup |
|
||||||
|
|
|
|
|
|
|
|
|
|
|
|
|
|
Safety Information |
|
|
Power Down/Disconnect |
|
|||||||
|
|
|
|
|
|
|
|
|
|
|
||
|
Connectors and Indicators |
|
Settings |
|
||||||||
|
Connecting to a TV |
|
|
|
|
|
|
|
||||
|
|
|
|
|
|
|
|
|
|
|
|
|
First Time Startup
The first time you power up the ScreenPlay TV Link DX after connecting it to a TV, you will see a setup wizard that enables you to select some basic settings. The setup wizard will not appear again unless you reset the ScreenPlay TV Link DX to factory defaults.
1.If you have not already done so, connect the ScreenPlay TV Link DX to your network and your TV.
NOTE: It doesn’t matter if you connect to your network first or your TV first.
2.Connect the included power supply to the back of the ScreenPlay TV Link DX.
3.Place the ScreenPlay TV Link DX on a stable surface and connect the power supply to an uninterruptible power supply (UPS) or power outlet.
CAUTION! Do not move the ScreenPlay TV Link DX while it is powered up to avoid damage or data loss. Use only the included power supply.
NOTE: The ScreenPlay TV Link DX will power up automatically when power is connected. The indicator light will flash while the player powers up, then glow steadily.
4.Turn on your TV and change the input setting as needed to receive input from the ScreenPlay TV Link DX.
5.When the ScreenPlay setup wizard appears on the TV screen, select your language and press the Enter button on the remote control.
6.Select the aspect ratio needed for your TV screen (16:9 for wide-screen display or 4:3 for full-screen).
7.Select ON for Quick Start Mode if you want the ScreenPlay TV Link DX to go into screensaving standby mode when you push the power button on either the remote control or the player front panel. This will turn off video output without shutting down power to the ScreenPlay TV Link DX.
If you select OFF for Quick Start Mode, the power buttons on the remote control and player front panel will turn power to the ScreenPlay TV Link DX off and on.
NOTE: Start up from standby mode is much faster than start up from complete power off. If you want to use quick start mode, you can completely power down the ScreenPlay TV Link DX using the Shutdown option from the Settings menu.

8.If the ScreenPlay TV Link DX is connected to a network, select Network setup to automatically configure the network connection.
NOTE: If your ScreenPlay TV Link DX is not yet connected to a network, you can skip the network configuration during first time startup. Use Settings > Network > Network setup to configure a network connection later on. See Network Setup for detailed instructions.
NOTE: If your network is secure, the virtual keyboard will appear so you can enter your password. You can enter text using the virtual keyboard interface or the QWERTY keyboard on the remote control. When you are finished, press Enter.
9.When the setup wizard is finished, press Enter to automatically return to the ScreenPlay TV Link DX home screen.
| top of page |

Installation and Setup
|
Installation Overview |
|
Connecting to a Network |
|
||||||||
|
Package Contents |
|
|
|
First Time Startup |
|
||||||
|
|
|
|
|
|
|
|
|
|
|
|
|
|
Safety Information |
|
|
Power Down/Disconnect |
|
|||||||
|
|
|
|
|
|
|
|
|
|
|
||
|
Connectors and Indicators |
|
Settings |
|
||||||||
|
Connecting to a TV |
|
|
|
|
|
|
|
||||
|
|
|
|
|
|
|
|
|
|
|
|
|
Settings
|
Audio/Video |
|
Shutdown |
||||
|
|
|
|
|
|
|
|
|
Playback |
|
|
File Management |
|||
|
System |
|
|
Eject USB device |
|||
|
Network |
|
|
|
|
||
The Settings menu allows you to view or change configuration options for the ScreenPlay TV Link DX. To access the Settings menu, go to the ScreenPlay TV Link DX home screen and use the right/left navigation buttons to select the Settings icon:
Use the up/down navigation buttons to scroll through the Settings functions. Press the Enter button to display menus and options for the highlighted function.
To set the configuration for a function, use the up and down navigation buttons to highlight the option you want to use, then press Enter to confirm the setting. To return to the list of functions,
press the Back button [  ].
].
Audio/Video
Video Output
Select the AV connection you are using between the ScreenPlay TV Link DX and the TV and press Enter to access the configuration options for the video output mode.
Composite |
Select the appropriate regional television standard: |
|
|
|
NTSC — Americas |
|
|
PAL — Europe and Asia |
|
NOTE: Your ScreenPlay TV Link DX will be set by default to use |
|
|
the standard of the region where it was purchased. |
|
Component |
Select the resolution that optimizes display on the TV: |
|
480p 60 Hz
576p 50 Hz
720p 50 Hz
720p 60 Hz
1080i 50 Hz
1080i 60 Hz
HDMI |
Select Auto if you want the ScreenPlay TV Link DX to |
|
|
automatically adjust the video output resolution based on the |
|
|
selected video file, or specify a display resolution from the |
|
|
supported options: |
|
|
|
480p 60 Hz |
|
|
576p 50 Hz |
|
|
720p 50 Hz |
|
|
720p 60 Hz |
|
|
1080i 50 Hz |
|
|
1080i 60 Hz |
|
|
1080p 23.976 Hz |
|
|
1080p24 fps |
|
|
1080p50 fps |
|
|
1080p60 fps |
|
Aspect ratio |
4:3 — full-screen |
|
|
|
|
16:9 — wide-screen |
|
Audio output |
Stereo — RCA (red/white) audio connection |
|
|
|
|
Digital — Optical audio connection |
| top of page | |
|
||
|
|
|
|
Playback
Subtitle mode |
On — Display subtitles when supported by the selected video |
|
Off — Do not display subtitles |
Subtitle font size |
24, 28, 32, 36, 40, 44, 48, or 52 pixels |
Additional Encoding |
Western Europe (ISO) |
|
Central Europe (Windows-1250) |
|
Central Europe (ISO) |
|
Traditional Chinese (Big5) |
|
Simplified Chinese (GB18030) |
|
Japanese (Shift-JIS) |
|
Korean (EUC-KR) |
|
Cyrillic (Windows-1251) |
|
Cyrillic (KO18-R) |
|
Turkish (Windows-1254) |
|
Greek (Windows-1253) |
|
Greek (ISO) |
|
Arabic (Windows-1256) |
|
Hebrew (ISO-8859-8) |
Audio track display |
List music tracks by either Title or File name |
Photo scaling |
Keep as original |
|
Fit to screen |
|
Display in full screen |
Transition effect |
Normal |
|
|
|
Fade |
||
|
|
|
Wipe |
||
|
|
|
Zoom |
||
|
|
|
Push |
||
|
|
|
Replace |
||
|
|
|
Checkerboard |
||
|
|
|
Random |
||
|
Slideshow interval |
3 sec, 5 sec, 10 sec, 20 sec, 30 sec, 1 min, or 5 min |
|||
|
Browser display |
Select the browser display mode for Photos, Movies, and Music |
|||
|
|
|
files. You can select the mode for each media type separately. |
||
|
|
|
Preview mode — Media files will be listed in the ScreenPlay |
||
|
|
|
browser by title or file name. When a file is selected, the display |
||
|
|
|
will show a preview window for a movie or photo or start playing |
||
|
|
|
a music file. |
||
|
|
|
Thumbnail mode — Media files will be displayed in the |
||
|
|
|
ScreenPlay browser using thumbnails rather than titles or |
||
|
|
|
filenames. For photos, this option will show a thumbnail of each |
||
|
|
|
image file. For music, this option will display the album cover for |
||
|
|
|
each music track. |
||
|
DivX DRM VOD |
Registration — Displays the registration code to use when |
|||
|
|
|
registering your ScreenPlay TV Link DX for DivX Video-on- |
||
|
|
|
Demand. Register at http://vod.divx.com |
||
|
|
|
|
|
|
|
|
|
Deactivation — Turns off DivX registration |
||
| top of page | |
|
|
|
||
|
|
|
|
|
|
System
Language — Select the language for the user interface
Options: |
English |
English |
|
Français |
French |
|
Italiano |
Italian |
|
Deutsch |
German |
|
Español |
Spanish |
|
|
Chinese Simplified |
|
|
Chinese Traditional |
|
|
Korean |
|
|
Japanese |
|
Netherlands |
Dutch |
|
Ελληνικά |
Greek |
|
Polski |
Polish |
|
Русский |
Russian |
|
Svenska |
Swedish |
|
Suomi |
Finnish |
|
Português |
Portuguese |
|
תירבע |
Hebrew |
|
ﺔﯾﺑرﻌﻟا |
Arabic |
|
Čeština |
Czech |
|
Türkçe |
Turkish |
|
Dansk |
Danish |
|
Norsk |
Norwegian |
|
Magyar |
Hungarian |
 Loading...