


9, &" 6
Washer-dryer
Instructions for installation and use
Стиральная машина с сушкой
Руководство по установке и эксплуатации
Lavante-séchante
Instruction pour l'installation et l'emploi
Пералня със сушилня
Инструкция за експлоатация
Mosó-szárítógép
Használati útmutató
Praèka se sušièkou
Návod k instalaci a použití
Práèka so sušièkou
Rady na lepšie pranie

GB Washer-dryer |
1 |
|
|
Instructions for installation and use |
|
CIS Стиральная машина с сушкой |
15 |
|
|
Руководство по установке и эксплуатации |
|
F |
Lavante-séchante |
29 |
|
Instruction pour l'installation et l'emploi |
|
BG Пералня със сушилня |
43 |
|
|
Инструкция за експлоатация |
|
HU Mosó-szárítógép |
51 |
|
|
Használati útmutató |
|
CZ |
Praèka se sušièkou |
59 |
|
Návod k instalaci a použití |
|
SK Práèka so sušièkou |
67 |
|
|
Rady na lepšie pranie |
|

Quick guide
Here are the 12 topics explained in this manual. Read, learn and have fun: you will discover many secret ways to get a better wash,moreeasilyandmakingyourwasher-dryerlastlonger.
1. Installation and removal (p. 11)
Installation, after delivery or transport, is the most important operation for the correct functioning of your washer-dryer. Always check:
1.That the electric system conforms to regulations;
2.That the inlet and draining pipes are connected correctly.
Never use pipes that have already been used.
3.That the washer-dryer is levelled properly; something worth checking to aid the performance of your washer-dryer;
4.That the drum's fixing screws have been removed from the back of the washer-dryer;
2. What goes in your washer-dryer and how to start it (p. 2)
8. How to dry (p. 5)
A few handy tips to get the best drying cycle from your appliance.
A correct distribution of your laundry is vital to the successful outcome of the wash and the life of the washer-dryer. Learn all the tips and secrets to dividing your linen: colour, type of fabric.
3. Guide to understanding labels (p. 6)
The symbols on the labels of your garments are easy to understand and equally important for the success of your wash. The guide includes simple instructions to help you choose the right temperature, wash cycles and ironing methods.
4. Useful tips to avoid mistakes (p. 7)
9. Care and maintenance (p. 12)
With just a bit of care, it will repay you with loyalty and devotion. With the necessary upkeep, it will wash for years and years to come.
10. Problems and solutions (p. 9 and 10)
Before calling a technician, read these pages: immediate solutions may be found for a number of problems. If the problem persists, call your local Indesit customer services who will be pleased to help. Any failure will be repaired, as soon as possible.
Years back, our grandmothers were the ones who gave us good advice - and in those days synthetic fibres did not exist: washing was easy. Today, your washer-dryer offers you helpful advice allowing you to wash wool even better than an expert laundress would by hand.
5. The detergent dispenser (p. 8)
How to use the detergent dispenser and the bleach compartment.
6. Understanding the control panel (p. 3)
11. Technical characteristics (p. 10)
Herein are the technical features of your washer-dryer: model type number, electric and water specifications, size, capacity, speed of the spin cycle and compliance with Italian and European regulations.
12. Safety for you and your family (p. 13)
Here you will find the necessary safety guidelines, and it is important for you to read this section carefully.
Washer-dryer’s control panel is very simple. It has only a few essential buttons to help you choose any type of wash cycle, ranging from the most energetic, capable of cleaning a mechanic’s overalls, to the most delicate for wool. Familiarising yourself with it will help you get the best out of your wash while helping your washer-dryer last longer. It’s easy.
7. Guide to the wash programmes (p. 4)
Herein is an easy table to help you choose the right programme, temperature, detergents and possible additives. Choose the right programme and you will get better results with your wash while saving time, water and energy, day after day.
1 Instructions for installation and use

What goes in your washer-dryer?
Before washing, you can do a great deal to ensure better results. Divide your garments according to fabric and colour. Read the labels, follow their guidelines.
Before washing.
Divide your washing according to the type of fabric and colour fastness.
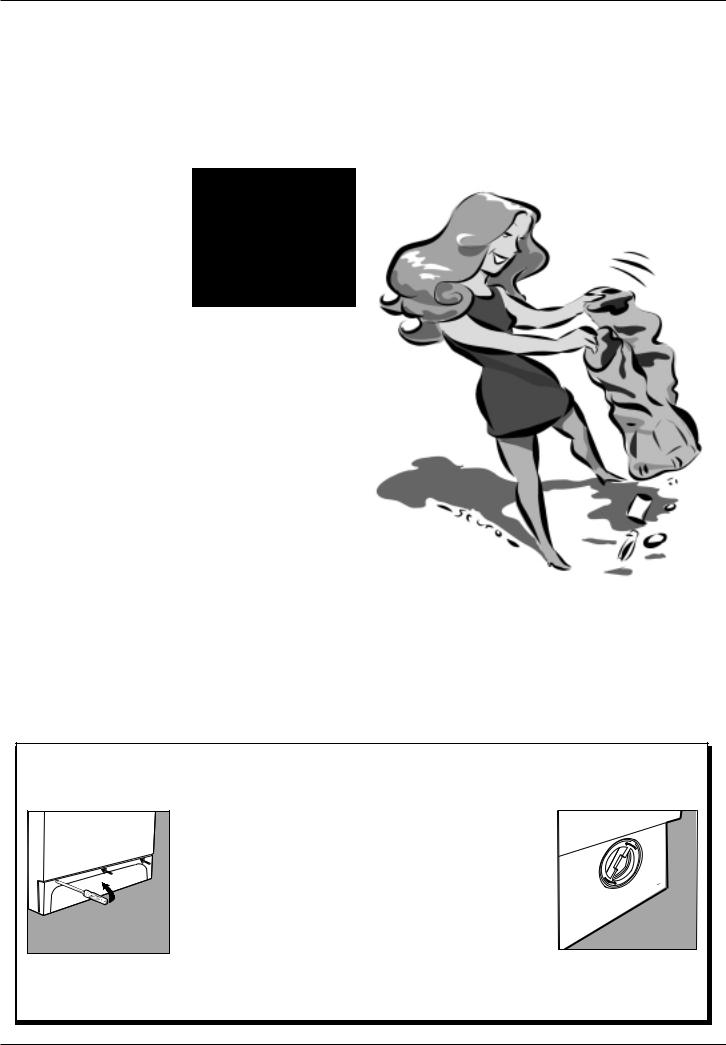
Empty all pockets (coins, paper, money and small obejects) and ensure all loose buttons are repaired or removed prior to loading.
The labels say it all.
Always look at the labels: they tell you everything about your garment and how to wash it in the best possible way.
The table on page 6 shows all meanings behind these symbols. Their recommendations are important to achieve better wash results.
Big and small happily together.
This washer-dryer has a special electronic control device for even distribution: before the spin cycle starts, this device allows the garments to positions themselves, to minimise noise and vibrations during the spin cycle.
Dividing your garments according to fabric and colour, is very important for good results
Starting the washer-dryer
After installing your new washer-dryer, start a wash cycle by setting programme "1" at 90 degrees.
Starting your washer-dryer in the right way is important for the quality of your wash, to help prevent future problems and enhance life expectancy of your appliance. Once you have loaded your washer-dryer and added the detergent together with any fabric conditioner, always check that:
For more delicate garments:
protect underwear, tights and stockings and delicate items by placing them in a canvas pouch
1.The door is closed correctly.
2.The plug is secured in the socket.
3.The water supply is turned on.
4.Selector knob A is positioned on one of the symbols (Stop/ Reset).
Choosethedesiredprogramme
The programme is selected according to the type of garments that need to be washed.To choose a programme, refer to the table on page 4. Turn knob A until the selected programme is aligned with the mark on the knob, turn knob B to the desired temperature settings,check that knob C is in the desired position, if necessary use buttons E, F, G and lastly, press on/off button H (I position).
At the end of the wash cycle...
Lamp I will flash quickly for a few seconds, then it will begin flashing more slowly.
Then turn the washer-dryer off by pressing on-off button H (O position).You can now open the washer-dryer door safely. After having removed the freshly cleaned washing, leave the door open to allow air circulation inside the drum.
Always disconnect electricity at the socket and turn off the water supply.
Remember that, in the event of a power failure, or should the washer-dryer switch itself off, the programme chosen will remain in its memory.
How to eliminate the most common stains
Ink and biro Dab with a wad of cotton soaked in methyl alcohol or alcohol at 90°. Tar Dab with fresh butter, rub in turpentine then wash immediately.
Wax Scrape away, then run a hot iron between two sheets of absorbent paper. Then rub in cotton with turpentine or methyl alcohol.
Chewing gum Rub in nail polish remover and wipe with a clean rag.
Mold Cotton and white linen should be placed in a solution of 5 parts water, one bleach and a spoon of vinegar, then washed immediately. For other white fabrics, use hydrogen peroxide at 10 volumes and wash immediately.
Lipstick Dab with ether on wool or cotton. Use tricloroetilene for silk.
Nail polish Place a sheet of absorbent paper on the side of the stain, wet it with nail polish remover, shifting the garment as the sheet gradually changes colour.
Grass Dab with a wad of cotton soaked in methyl alcohol.
Instructions for installation and use 2
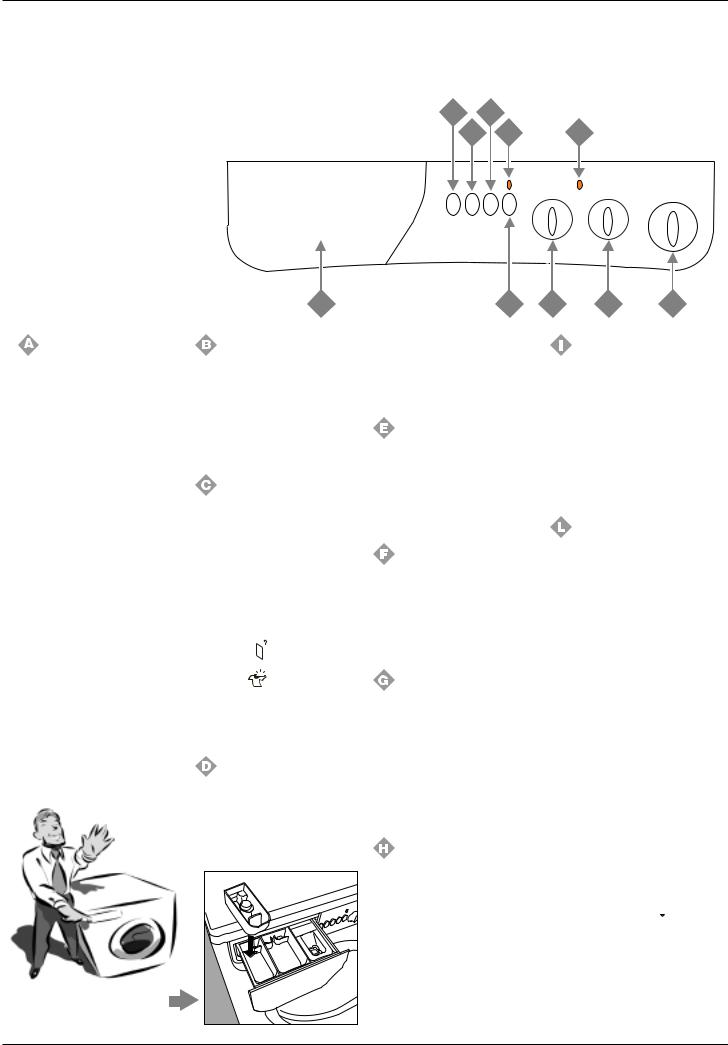
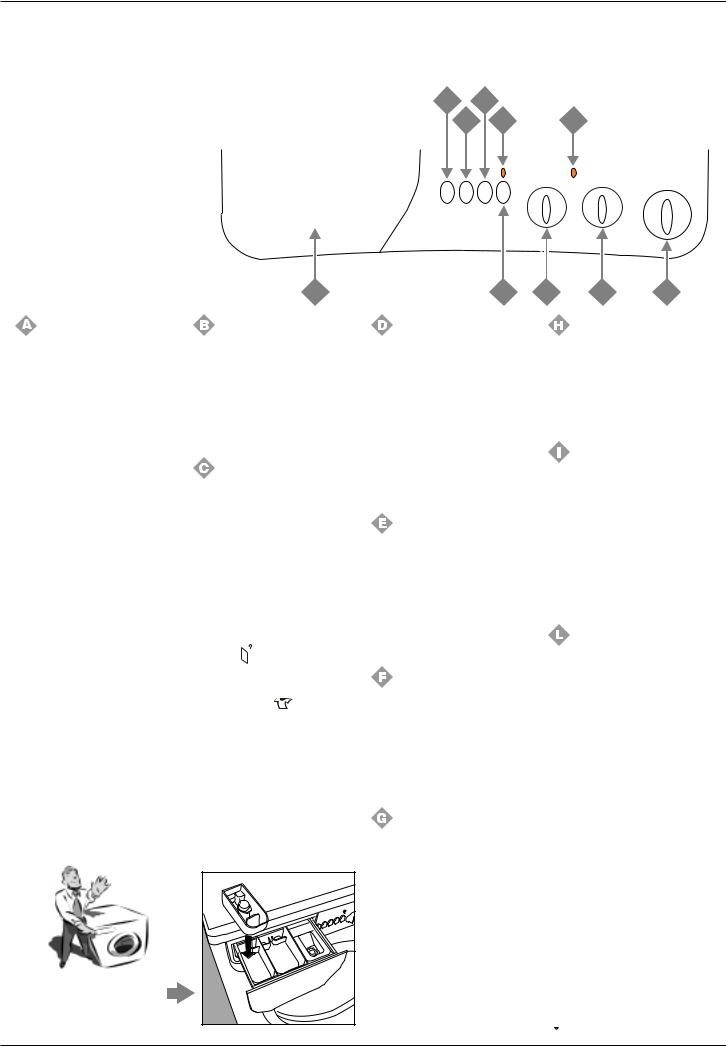
Understanding the control panel
Here I’m in command
Making the right choice is important. And it’s easy. |
E G |
F I L
D H C B A
Programme selector knob
Use this knob to select the wash programme.
Turn this knob clockwise only.
To select a programme, you should turn the knob so that the symbol/number of the desired programme is in line with the pointer on the knob.
Now press on/off button H (position I), pilot lamp I will start flashing.
After 5", the setting will be accepted, pilot lamp I will stop flashing (staying lit) and the wash cycle will begin.
Should you wish to interrupt the programme in progress or set a new one, select one of the symbols (Stop/Reset) and wait 5" : when the cancellation has been accepted, pilot lamp I flashes, and you can then turn the appliance off.
After the wash cycle has been set and accepted by the washerdryer, turning the knob will have no effect (except for when it is on position Stop/Reset).
The detergent dispenser with the additional bleach compartment is here.
Temperature control knob
It is used to set the wash temperature in the recommended programme table on pag. 4. It also allows you to reduce the temperature recommended for the selected programme, and even to set a cold wash cycle ( ).
).
Drying cycle knob
Use this knob to select the desired drying cycle. Two options are available:
A - Based on time: From 40 minutes to 150.
B - Based on the damp level of the dry clothes:
Iron :slightly damp clothes, easy to iron.
Wardrobe  : dry clothes to put away.
Extra dry  : very dry clothes, recommended for towelling and bathrobes.
A cooling stage is foreseen at the end of the drying cycle.
Detergent dispenser
It is divided into 3 compartments:
1.Detergent for pre-wash;
2.Detergent for the main cycle wash;
3.Fabric conditioner.
4 |
|
|
3 |
1 |
2 |
The washer-dryer is equipped with an extra compartment 4 (provided as an accessory) for the bleach, to be inserted in compartment 1.
Slow spin
Use this button to reduce the spinning speed from 800 to 400 rpm for the cotton and linen programmes and from 700 to 400 rpm for the synthetic fabrics programmes.
Rapid wash
This button reduces the length of the wash programme by about 30%. It cannot be used with special programmes (see page 4) or those for wool and silk.
Stain removal (see page 8)
Thanks to this command, the washer-dryer will carry out a more intensive wash that optimises the effectiveness of the liquid additives, thus allowing more resistant stains to be removed. When you press the stain removal button, you cannot activate the pre-wash.
On-off
When button H is pressed, the washer-dryer is switched on, when it is not the machine is switched off.
Turning the appliance off does not cancel the selected programme.
On-off lamp / door locked
Lamp I flashes slowly when the appliance is switched on and awaiting instructions and at the end of a cycle, indicating that the door can be opened. It flashes quickly when the door should not be opened. A steady light means the appliance has accepted the selected programme.
Drying cycle lamp
When this lamp is on, it means that knob C has been set on a drying cycle and at the end of the wash cycle, the appliance will run the selected tumble drying cycle.
Anti-crease
This function (represented by the symbol ) interrupts the wash programme, keeping the washing soaking in water before draining. It is only enabled in programmes for synthetic fabrics, silk and curtains. It is very useful, because it prevents delicate and synthetic fabrics from creasing (for example, when you cannot take the washing out at the end of the wash cycle but only a few hours later).The programme can be completed by turning knob A one notch. In the case of synthetic fabrics, should you prefer draining rather than a spin cycle, turn knob A until you have selected the symbol
  (Drain).
3 Instructions for installation and use
What are you washing today?
A programme for all seasons
Type of fabric and degree of soil |
Programme |
Temperature Detergent |
Fabric |
Stain rem. |
Length of Description of wash cycle |
||||
|
knob |
knob |
for wash |
softener |
button/ |
the cycle |
|
|
|
|
|
|
|
|
Bleach |
(minutes) |
|
|
|
|
|
|
|
|
|
|
|
|
|
COTTON |
|
|
|
|
|
|
|
|
|
Exceptionally soiled whites |
1 |
90°C |
|
|
|
165 |
Prewash cycle, wash cycle at 90°C, rinse |
|
|
(sheets, tablecloths, etc.) |
|
cycles, intermediate and final spin cycles |
|||||||
|
|
|
|
|
|
||||
|
|
|
|
|
|
|
|
|
|
Exceptionally soiled whites |
2 |
90°C |
|
|
Del./Trad. |
145 |
Wash cycle at 90°C, rinse cycles, |
||
(sheets, tablecloths, etc.) |
intermediate and final spin cycles |
||||||||
|
|
|
|
|
|
||||
|
|
|
|
|
|
|
|
|
|
Heavily soiled whites and fast colours |
3 |
60°C |
|
|
Del./Trad. |
130 |
Wash cycle at 60°C, rinse cycles, |
||
|
intermediate and final spin cycles |
||||||||
|
|
|
|
|
|
|
|||
|
|
|
|
|
|
|
|
|
|
Slightly soiled whites and delicate |
4 |
40°C |
|
|
Del./Trad. |
95 |
Wash cycle at 40°C, rinse cycles, |
||
colours (shirts, jumpers, etc.) |
intermediate and final spin cycles |
||||||||
|
|
|
|
|
|
||||
|
|
|
|
|
|
|
|
|
|
Rinse cycles/Bleach |
|
|
|
|
Del./Trad. |
|
Rinse cycles, intermediate and final spin cycles |
||
|
|
|
|
|
|
|
|
|
|
Spin cycle |
|
|
|
|
|
|
Draining and final spin cycle |
||
|
|
|
|
|
|
|
|
|
|
Drying cycle for cotton fabrics |
|
|
|
|
|
|
|
|
|
|
|
|
|
|
|
|
|
|
|
Stop/Reset |
|
|
|
|
|
|
Interrupts/Cancels the selected programme |
||
|
|
|
|
|
|
|
|
|
|
SYNTHETICS |
|
|
|
|
|
|
|
|
|
|
|
|
|
|
|
|
|
|
|
Heavily soiled fast colour synthetics |
5 |
60°C |
|
|
Delicate |
100 |
Wash cycle at 60°C, rinse cycles, anti- |
||
(baby linen, etc.) |
crease or delicate spin cycle |
||||||||
|
|
|
|
|
|
||||
|
|
|
|
|
|
|
|
|
|
Delicate colour synthetics |
6 |
40°C |
|
|
Delicate |
70 |
Wash cycle at 40°C, rinse cycles, anti- |
||
(all types of slightly soiled garments) |
crease or delicate spin cycle |
||||||||
|
|
|
|
|
|
||||
|
|
|
|
|
|
|
|
|
|
Delicate colour synthetics (all types of |
7 |
30°C |
|
|
|
30 |
Wash cycle at 30°C, rinse cycles and |
||
slightly soiled garments) |
|
delicate spin cycle |
|||||||
|
|
|
|
|
|
||||
|
|
|
|
|
|
|
|
|
|
Rinse cycles/Bleach |
|
|
|
|
Delicate |
|
Rinse cycles, anti-crease or delicate spin |
||
|
|
|
|
|
cycel |
||||
|
|
|
|
|
|
|
|||
|
|
|
|
|
|
|
|
|
|
Fabric softener |
|
|
|
|
|
|
Rinse cycles with automatic introduction of |
||
|
|
|
|
|
|
softener, anti-crease or delicate spin cycle |
|||
|
|
|
|
|
|
|
|||
|
|
|
|
|
|
|
|
|
|
Spin cycle |
|
|
|
|
|
|
Draining and delicate spin cycle |
||
|
|
|
|
|
|
|
|
|
|
Drying cycle for synthetic fabrics |
|
|
|
|
|
|
|
|
|
|
|
|
|
|
|
|
|
|
|
Stop/Reset |
|
|
|
|
|
|
Interrupts/Cancels the selected programme |
||
|
|
|
|
|
|
|
|
|
|
DELICATES |
|
|
|
|
|
|
|
|
|
|
|
|
|
|
|
|
|
|
|
Hand wash |
8 |
40°C |
|
|
Delicate |
45 |
Wash cycle at 40°C, rinse cycles and |
||
|
delicate spin cycle |
||||||||
|
|
|
|
|
|
|
|||
|
|
|
|
|
|
|
|
|
|
Particularly delicate garments and |
9 |
30°C |
|
|
|
50 |
Wash cycle at 30°C, rinse cycles, anti- |
||
fabrics (curtains, silk, viscose, etc.) |
|
crease or draining |
|||||||
|
|
|
|
|
|
||||
|
|
|
|
|
|
|
|
|
|
Rinse cycles/Bleach |
|
|
|
|
|
|
Rinse cycles, anti-crease or draining |
||
|
|
|
|
|
|
|
|
|
|
Spin cycle |
|
|
|
|
|
|
Draining and delicate spin cycle |
||
|
|
|
|
|
|
|
|
|
|
Draining |
|
|
|
|
|
|
Draining |
||
|
|
|
|
|
|
|
|
|
|
Drying cycle for wool |
|
|
|
|
|
|
|
|
|
|
|
|
|
|
|
|
|
|
|
Stop/Reset |
|
|
|
|
|
|
Interrupts/Cancels the selected programme |
||
|
|
|
|
|
|
|
|
|
|
Important: to cancel the wash programme you have just set, select one of the symbols (Stop/Reset) and wait for at least 5 seconds.
The data found in the table is purely indicative, and can vary according to the quantity and type of washing, the water system temperature and the room temperature.
Special programme
Daily wash Your washer-dryer has a programme available for the washing of lightly soiled garments in a short amount of time.
By setting programme 7 at a temperature of 30°C, you can wash different types of fabrics together (except for wool and silk), with a maximum load of 3 kg. This programmes allows you to save on both time and energy as it only lasts around 30 minutes.
We recommend the use of liquid detergent.
Instructions for installation and use 4
How to dry
A combinedWashing and Drying Programme
Look at table A to the side and follow the instructions provided for MAX load to have an automatic washing and drying cycle.
Follow the instructions for wash only (see page 2, the paragraph entitled "Starting the WasherDryer") and use knob C to set the type of drying cycle desired, then press button H (I position).
If the laundry load to be washed and dried exceeds the maximum load foreseen (see table A), then follow the instructions provided for wash only (see page 2, the paragraph entitled "Starting the WasherDryer").
When the wash cycle has finished, remove your washing, divide it up and replace part of it inside the drum.
Now follow the instructions provided for a dry only cycle. Repeat this procedure for the remainder of the load.
Dry only
Once you have loaded the washing that needs drying (3,5 kg max. for cottons, see table for other fabrics ), make sure that:
-the door is shut correctly;
-the plug is inserted in the socket;
-the water tap is turned on;
-button H has not been pressed (O position).
And now set the wash cycle knob
Set knob A on the appropriate drying setting  depending on the type of fabric, select the type of drying cycle required using knob C and then press on-off button H (I position).
At the end of the drying cycle...
Wait for lamp I to flash slowly, then turn the washer-dryer off by pressing on-off button H (O position). Now you can open the appliance door. Once you have removed the washing from the appliance, leave the door open or ajar to avoid the formation of bad odours and turn off the water tap.
A.
Fabric |
Load type |
Max. load |
|
Drying time (Min.) |
||
|
|
|
|
|||
type |
|
(kg) |
Extra |
|
Wardrobe |
Iron |
|
|
|
|
|||
|
|
|
dry |
|
|
|
|
|
|
|
|
|
|
Cotton, |
Clothing of |
|
|
|
|
|
Linen |
different |
3,5 |
150 |
|
144 |
138 |
|
sizes |
|
|
|
|
|
|
|
|
|
|
|
|
Cotton |
Terry |
|
|
|
|
|
|
towels |
3,5 |
150 |
|
144 |
138 |
|
|
|
|
|
|
|
Terital, |
Sheets, |
2,5 |
98 |
|
92 |
84 |
Cotton |
Shirts |
|
||||
|
|
|
|
|
|
|
Acrylics |
Pyjamas, |
1 |
65 |
|
61 |
59 |
|
socks, etc. |
|
||||
|
|
|
|
|
|
|
Nylon |
Slips, tights, |
|
|
|
|
|
|
stockings, |
1 |
65 |
|
61 |
59 |
|
etc. |
|
|
|
|
|
|
|
|
|
|
|
|
The data contained in the table are purely indicative.
For cotton loads of less than 1 Kg, use the drying programme designed for synthetic fabrics.
WOOLDRYINGCYCLE
The woollen garments drying cycle should only and exclusively be run together with the selection of a specific cycle time (150 - 100 - 60 - 40 minutes). We recommend a
60 minute drying cycle for a 1 kg load.
If one of the three levels (Extra dry  , Wardrobe
  , Iron
  ) is selected by mistake, the appliance will run a drying cycle lasting the MAX time foreseen (150 minutes).
IMPORTANT
A spin cycle is carried out during the drying if you have set a cotton programme and a level of dryness (Extra dry  , Wardrobe
  , Iron
  ).
).
WARNING
-During the drying phase, the door tends to get quite hot.
-Do not use the appliance to dry clothes that have been washed with flammable solvents (e.g. trichlorethylene).
-Do not use the appliance to dry foam rubber or similar elastomers.
-Make sure that the water tap is turned on during the drying cycles.
-This washer-dryer can only be used to dry clothes which have been pre-washed in water.
5 Instructions for installation and use
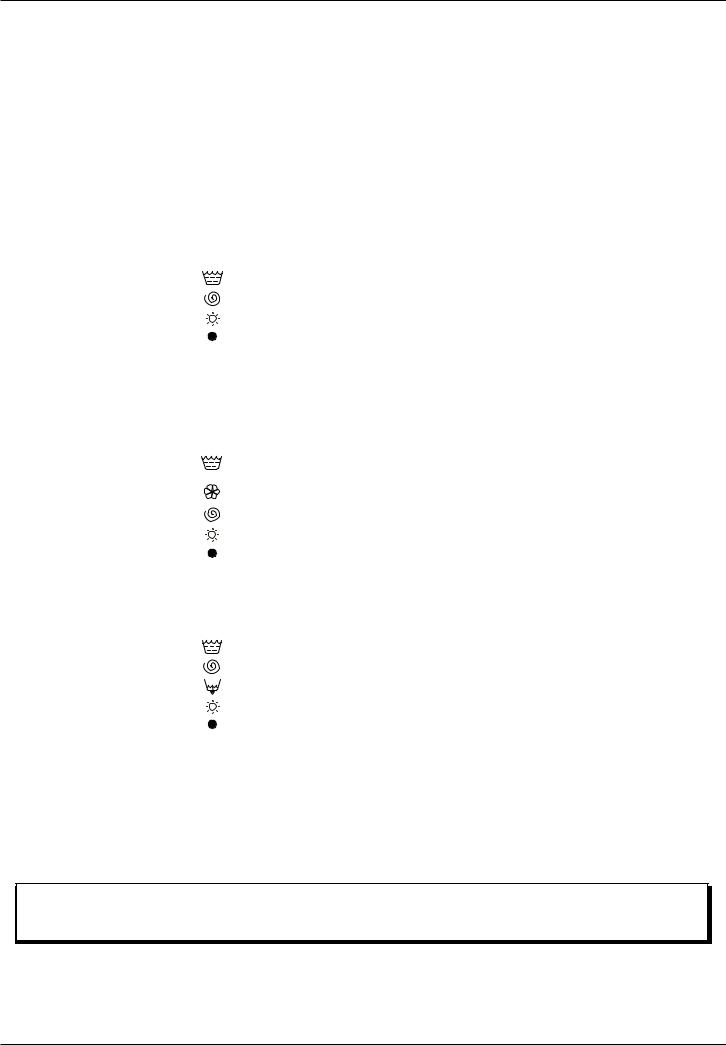
Understanding labels
Learn the meaning of these symbols and you will get better results, your garments will last longer resulting in an improved wash.
All over Europe, garment labels contain messages expressed in small yet important symbols. Understanding them is very important if you want to get better results and treat your garments the way they deserve to be treated.
These symbols are divided in five different categories and shapes: washing , bleaching
  , ironing
  , dry cleaning
  and drying
  .
.
Useful tips
Turn shirts inside out to get better results and make them last longer.
Always empty pockets of their contents.
Look at the label: it will always give you useful advice.
When loading your washing, try to have a mixture of large to small items.
Make sure you select the right temperature!
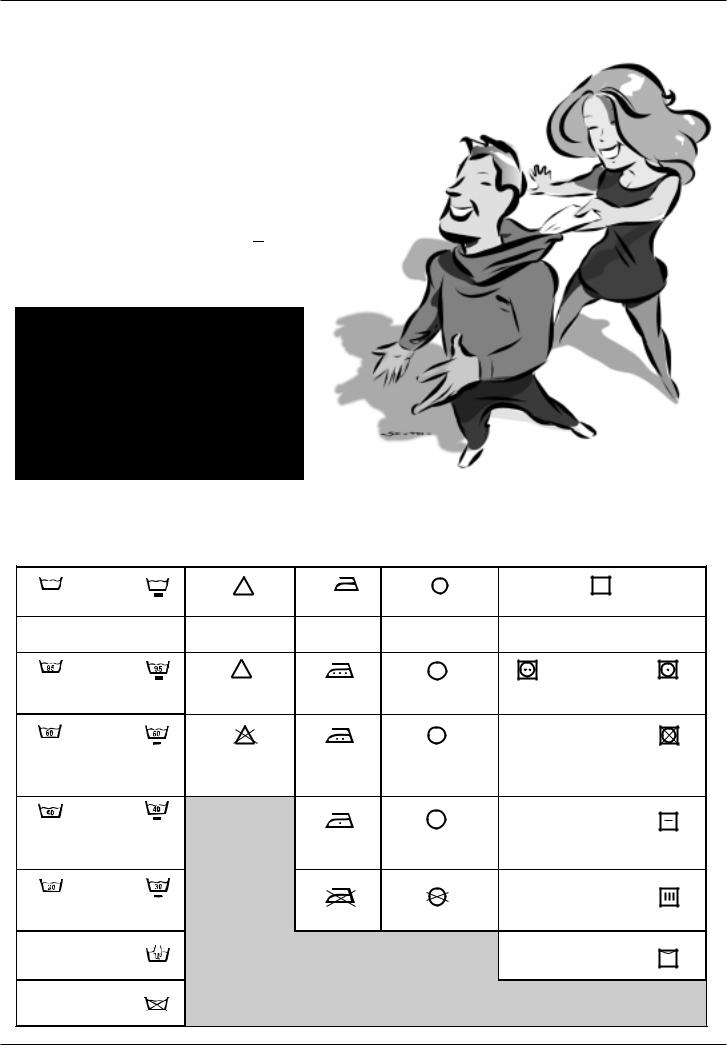
Consult and learn the symbols in this table: they will help you obtain a better wash, treat your clothes properly, and get a better performance out of your washer-dryer.
Wash |
Bleaching |
Ironing |
Dry cleaning |
Drying |
Strong |
Delicate |
|
High |
Low |
action |
action |
|
Temp. |
Temperat. |
|
cl |
|
A |
|
Wash at |
Bleaching only in |
Hot iron at max |
Dry clean with any |
|
95°C |
cold water |
200°C |
solvent |
Machine dryable |
|
|
|
P |
|
|
|
|
Dry clean only with |
|
|
|
Medium hot |
perchloride, benzine |
|
Wash at |
|
ironing at |
av., pure alcohol, |
Do not machine |
60°C |
Do not bleach |
max 150°C |
R111 and R113 |
dry |
|
|
|
F |
|
|
|
|
Dry clean with av. |
|
Wash at |
|
Iron at max |
benzine, pure alcohol |
|
40°C |
|
110°C |
and R113 |
Spread to dry |
|
|
|
|
Hang to dry |
Wash at |
|
|
|
without spin |
30°C |
|
Not ironable |
Do not dry clean |
drying |
|
|
|
|
Dry on clothes |
Hand wash |
|
|
|
hanger |
Not |
|
|
|
|
washable in |
|
|
|
|
water |
|
|
|
|
Instructions for installation and use 6

Useful tips
 Never use your washerdryer to wash... torn, fraying or non-hemmed linen. If it is absolutely neccessary, place it in a bag for protection. Do not wash coloured linen with whites.
 Watch the weight!
For best results, do not exceed the weight limits stated below (figures show weight of dry garments):
-Resistant fabrics: 5 kg maximum
-Synthetic fabrics: 2.5 kg maximum
-Delicate fabrics: 2 kg maximum
-Pure new wool: 1 kg maximum
 How much does it weigh?
1 sheet 400-500 gr.
1 pillow case 150-200 gr.
1 tablecloth 400-500 gr.
1 bathrobe 900-1,200 gr.
1 towel 150-250 gr.
 Coloured T-shirts, printed ones and shirts last longer if turned inside out before washing.
Printed T-shirts and sweatshirts should always be ironed inside out.
 Holidays: unplug the appliance.
It is recommended that you should unplug the machine from the socket and turn off the water supply. Leave the door ajar to allow air circulation to the draw and the door gasket area.This will prevent unpleasant odours.
 Dungaree alert.
Very popular “salopette” type overalls have straps with hooks that can damage the drum of your washer-dryer or other garments during the wash.To minimise the risk, place hooks in the pocket and fasten with safety pins.
WOOLCYCLE
For best results, we recommend you use a specific detergent, taking care not to wash more than 1 kg of laundry.
How to wash almost anything
 Curtains.
Curtains tend to crease a great deal. A useful tip to reduce creasing: fold the curtains and place them in a pillow case or mesh bag. Do not load anything else inside the appliance, this will ensure that the overall weight does not exceed the half load. Remember to use the specific programme 9 which automatically excludes the spin cycle.
 Quilted coats and anorak.
You can wash quilted coats and wind-cheaters, too, if they are padded with goose or duck down. Do not load more than 2-3 kg and never load 5 kg. Repeat rinse once or twice using the gentle spin.
 Trainers.
Once you have removed mud and dirt from trainers, you can even wash them with jeans or any other tough garments. Do not wash trainers with whites.
7 Instructions for installation and use
It’s important for a good wash
Useful tips about the detergent dispenser
The first secret is the easiest: the detergent dispenser is |
|
|
|
In compartment 1: |
|
|||||||||
opened by pull it outwards. |
|
|
|
|
|
|
|
|
|
|
||||
|
|
|
|
|
|
4 |
|
|
Detergent for pre-washing (powder) |
|||||
|
|
|
|
|
|
|
|
|
|
|
|
In compartment 2: |
|
|
You must follow the dosage |
Remember that liquid detergent |
|
|
|
|
|||||||||
|
|
|
Detergent for washing |
|||||||||||
recommendations provided by |
is only designed for wash |
|
|
|
(powder or liquid) |
|
||||||||
the manufacturers when adding |
cycles of up to 60 degrees on |
|
3 |
|
In compartment 3: |
|
||||||||
detergent or fabric conditioner. |
non pre-wash items. |
|
|
1 |
2 |
|
Additives (softeners, perfumes, etc.) |
|||||||
Doses will vary according to the |
Special containers are sold with |
|
In compartment 4: |
|
||||||||||
|
|
|
||||||||||||
|
|
Bleach and delicate bleach. |
||||||||||||
wash load, the water hardness |
liquid or powder detergents for |
|
|
|
||||||||||
|
|
|
|
|
||||||||||
and how soiled the washing is. |
placing inside the washer-dryer |
|
|
|
|
|
||||||||
Experience will help you select |
drum, these are positioned |
|
|
|
|
|
||||||||
the |
right |
dosage |
almost |
according to the instructions |
|
|
|
|
|
|||||
automatically: it will become your |
found in the detergent box |
|
|
|
|
|
|
|||||||
secret. |
|
|
Never |
use |
hand |
wash |
|
|
|
|
|
|||
Before adding detergent for pre- |
detergent, because it may form |
|
|
|
|
|
||||||||
washing in compartment 1, |
too much foam, which could |
Bleachcycleandstainremoval |
||||||||||||
compartment for bleach 4 has |
Detergents that are specifically |
|||||||||||||
make sure that the extra |
damage the washer-dryer. |
|
|
|
|
|
|
|||||||
not been inserted. |
|
formulated for both hand and |
button |
|
|
|
||||||||
Ensure no overfilling when |
machine |
wash |
are |
an |
|
|
|
|||||||
adding fabric conditioner in |
exception. |
|
|
|
|
If bleaching is necessary, the |
|
|
||||||
compartment 3. |
|
One last secret: when washing |
|
|
||||||||||
|
extra case 4 (provided) must be |
|
|
|||||||||||
The washer-dryer automatically |
with cold water, always reduce |
|
|
|||||||||||
inserted into compartment 1 of |
|
|
||||||||||||
adds the softener to the wash in |
the amount of detergent you use: |
|
|
|||||||||||
the detergent dispenser. |
|
|
|
|||||||||||
each programme. |
|
it dissolves less easily in cold |
|
|
|
|||||||||
|
When pouring in the bleach, be |
|
|
|||||||||||
Liquid detergent is poured into |
water than in hot water, so part |
|
|
|||||||||||
careful not to exceed the "max" |
|
|
||||||||||||
compar tment 2 just |
a few |
of it would be wasted. |
|
|
|
|
||||||||
|
|
level indicated on the central |
|
|
||||||||||
seconds before starting the |
|
|
|
|
|
|
|
|
||||||
|
|
|
|
|
|
pivot (see illustration). |
|
|
|
|||||
wash cycle. |
|
|
|
|
|
|
|
|
|
|
|
|||
|
|
|
|
|
|
|
|
The use of the additional bleach |
|
|
||||
|
|
|
|
|
|
|
|
|
|
|
|
|||
|
|
|
|
|
|
|
|
|
|
container |
excludes |
the |
|
|
|
|
|
|
|
|
|
|
|
|
possibility of using the pre-wash |
|
|
||
|
|
|
|
|
|
|
|
|
|
cycle. Traditional bleach can |
|
|
||
|
|
|
|
|
|
|
|
|
|
only be used on sturdy white |
You cannot bleach with the |
|||
|
|
|
|
|
|
|
|
|
|
fabrics, whereas delicate |
“Silk” programme and with the |
|||
|
|
|
The detergent dispenser |
can be |
|
bleach can be used |
for |
“special programmes” (see |
||||||
|
|
|
|
coloured fabrics, synthetics |
page 4). |
|
||||||||
|
|
|
removed and cleaned: pull it outwards, |
|
|
|||||||||
|
|
|
as indicated in the figure. Then leave it |
|
and for wool. |
|
Use the stain removal button |
|||||||
|
|
|
under running water for a few minutes. |
|
|
|
|
every time you want to bleach. |
||||||
|
|
|
|
|
|
|
|
|
|
|
|
|
||
|
|
|
|
|
|
|
|
|
|
|
|
|
Should you want to do it |
|
|
|
|
|
|
|
|
|
|
|
|
|
|
separately you must pour the |
|
|
|
|
|
|
|
|
|
|
|
|
|
|
bleach into |
the additional |
|
|
|
|
|
|
|
|
|
|
|
|
|
container 4, press button G |
|
|
|
|
|
|
|
|
|
|
|
|
|
|
(stain removal), star t the |
|
Cutting costs efficiently |
|
|
|
|
A guide to environmentally |
washer-dryer, then select one of |
||||||||
|
|
|
|
the symbols |
according to |
|||||||||
|
|
|
|
friendly and economic use |
|
the type of fabric. |
||||||||
|
|
|
|
|
|
|
|
|
|
of your appliance. |
|
When you bleach during a |
||
|
MAXIMISE THE LOAD SIZE |
|
|
|
|
|
|
|
|
normal wash cycle, pour the |
||||
|
Achieve the best use of energy, water, detergent and time by using the recommended |
|
detergent and any additives in |
|||||||||||
|
maximum load size. |
|
|
|
|
|
|
|
|
|
the special compartments, |
|||
|
SAVE up to 50% energy by washing a full load instead of 2 half loads. |
|
|
press button G (stain removal), |
||||||||||
|
DO YOU NEED TO PRE-WASH? |
|
|
|
|
|
|
|
|
set the programme you desire |
||||
|
|
|
|
|
|
|
|
|
and turn the washer-dryer on. |
|||||
For heavily soiled laundry only!
SAVE detergent, time, water and between 5 to 15% energy consumption by NOT selecting Prewash for slight to normally soiled laundry.
IS A HOT WASH REQUIRED?
Pretreat stains with stain remover or soak dried in stains in water before washing to reduce the necessity of a hot wash programme.
SAVE up to 50% energy by using a 60°C wash programme.
BEFORE USING A DRYING PROGRAMME ...
SAVE energy and time by selecting the highest suitable spin speed to reduce the water content in laundry before using a drying programme.
Instructionsforinstallationanduse 8
Troubleshooting
Before calling, read the following
In most cases, when your washer-dryer fails to work, the problems arising can be easily solved without having to call for a technician. Before calling for assistance, always check these points.
The washer-dryer fails to |
|
the door is open or not shut |
But where did all the water go? |
|||||
|
Simple: with the new Indesit technology, you need less than |
|||||||
start. |
|
|||||||
|
properly. |
|
|
|||||
|
|
|
|
|
half of it, to get good results on twice as much! |
|||
|
|
|
|
|
|
|||
|
Is the plug correctly inserted |
|
Is the |
On/Off |
button |
This is why you cannot see the water through the door: |
||
|
|
because there is little, very little of it, to respect the |
||||||
|
into the socket? It could have |
|
pressed? |
|
||||
|
|
|
environment yet without renouncing maximum cleanliness. |
|||||
|
been moved whilst cleaning. |
|
If it is, then a programmed start |
And, on top of that, you are also saving electricity. |
||||
|
Is there electricity in the |
|
has been set. |
|
|
|
|
|
|
|
|
|
|
|
|
|
|
|
house? |
|
Is the programmed start |
|
|
|
||
|
|
|
|
|
||||
|
A circuit breaker may have |
|
knob, in the correct position |
|
|
|
||
|
switched off as a result of too |
|
|
|
|
|||
|
|
for |
those |
models |
|
|
|
|
|
many electrical appliances |
|
|
|
|
|||
|
|
concerned? |
|
|
|
|
||
|
working at the same time. Or |
|
|
|
|
|
||
|
|
Is the water supply turned |
|
|
|
|||
|
maybe due to a general failure |
|
|
|
|
|||
|
|
|
|
|
||||
|
in your entire area. |
|
on? For safety reasons, if the |
|
|
|
||
|
Is the washer-dryer door |
|
washer-dryer does not load |
|
|
|
||
|
|
water, it cannot start a wash |
|
|
|
|||
|
closed properly? |
|
|
|
|
|||
|
|
cycle. |
|
|
|
|
|
|
|
For safety reasons, the |
|
|
|
|
|
|
|
|
|
|
|
|
|
|
|
|
|
washer-dryer cannot work if |
|
|
|
|
|
|
off, select one of the symbols |
|
|
|
|
|
|
|
|
stop/reset , then switch it |
|
|
|
|
|
|
|
|
|
|
|
|
|
|
|
|
|
back on. If the knob continues |
|
|
|
|
|
|
|
|
|
to turn, call for assistance because it is showing an anomaly.
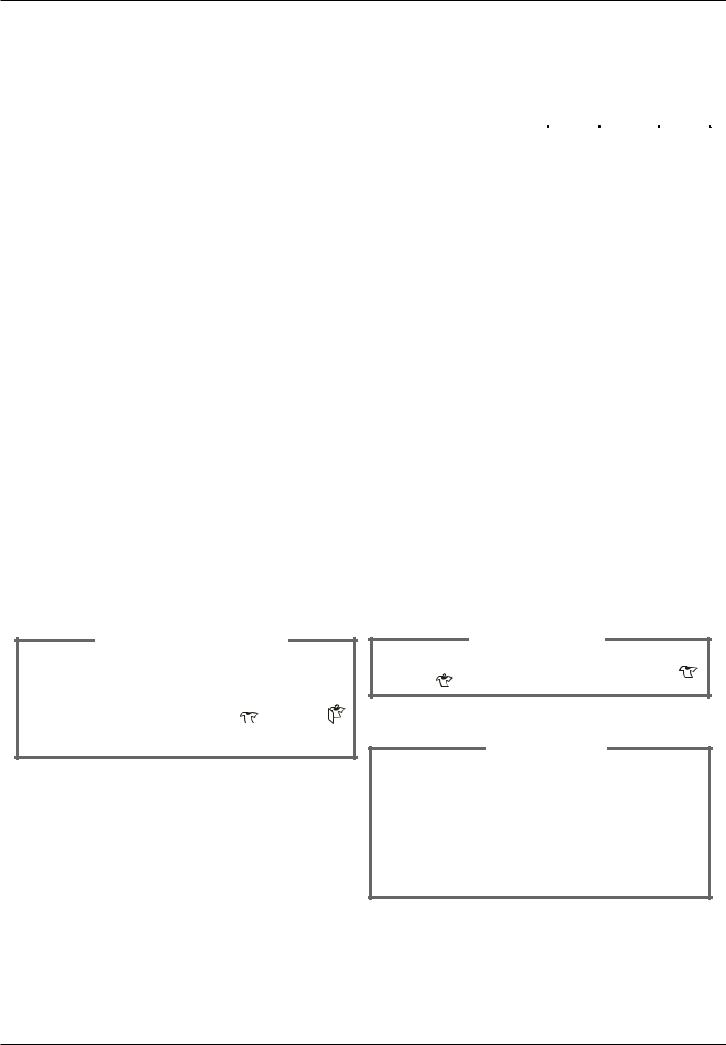
RIGHT |
|
WRONG |
Turn off the water |
|
Leave the washer-dryer |
supply after use. |
|
plugged in while |
This will eliminate |
|
cleaning. |
the possibility of |
|
Even during maintenance, |
leakage. |
|
the appliance should |
Always leave the |
|
always be unplugged. |
|
Use solvents and |
|
appliance door ajar |
|
|
to avoid bad odours. |
|
aggressive abrasives. |
|
|
Never use solvents or |
Clean the |
|
abrasives to clean the |
appliance’s |
|
external and rubber parts |
exteriors gently. |
|
of the washer-dryer. |
To clean the |
|
Neglect the detergent |
exteriors and the |
|
|
rubber parts of the |
|
dispenser. |
appliance, always |
|
It is removable and can |
use a soft cloth |
|
easily be cleaned by |
dipped in warm and |
|
leaving it under running |
soapy water. |
|
water. |
|
|
Go on holiday without |
|
|
thinking about her. |
|
|
Before leaving, always |
|
|
make sure that the |
|
|
washer-dryer is |
|
|
unplugged and that the |
|
|
water supply is turned off. |
|
|
|
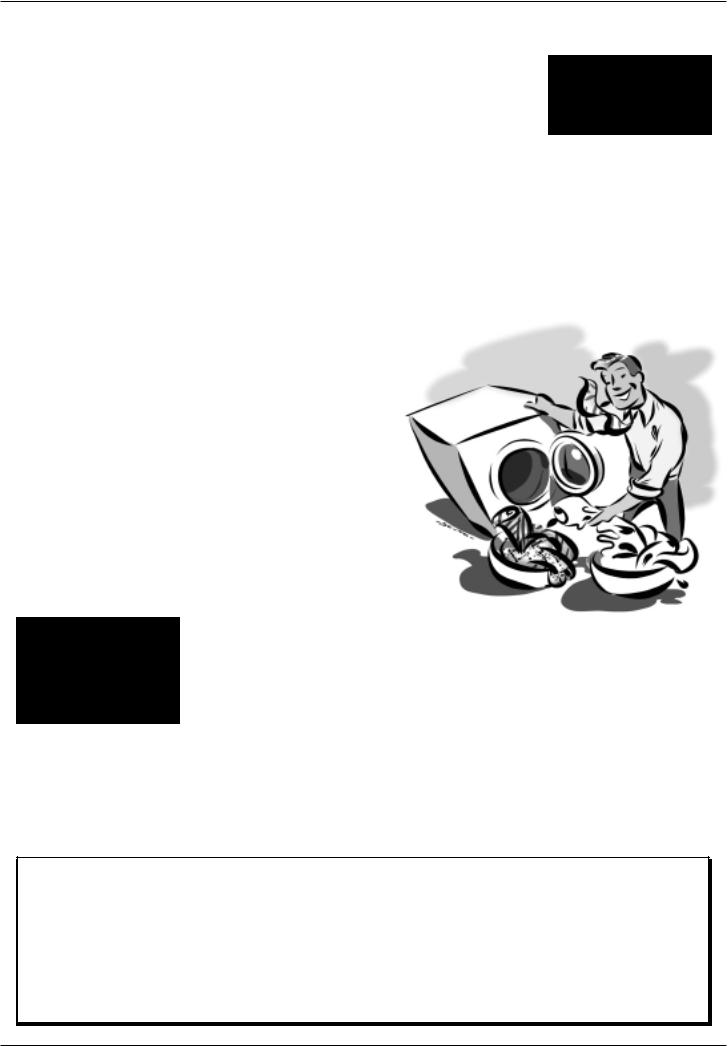
The washer-dryer fails to fill with water.
 Is the hose correctly connected to the tap?
 Is there a water shortage ?
There could be work in progress in your building or street.
 Is there sufficient water pressure? The autoclave may be malfunctioning.
 Is the tap filter clean? If the water is very calcareous, or if work has recently been carried out on the water piping, the tap filter could be clogged with particles and debris.
 Is the rubber hose kinked?
The tract of the rubber hose bringing water to washerdryer must be as straight as possible. Make sure it is not squashed or kinked.
The programme selector knob keeps turning?
 Wait a few minutes for the drain pump to empty the tub, switch the washer-dryer
The washer-dryer continuously fills and drains water.
 Is the drain hose positioned too low? It must be installed at a height ranging from 60 to 100 cm.
 Is the end of the hose immersed in water?
 Does the wall drainage system have a breather pipe? If the problem persists even after these checks, turn the water supply off the machine and call for assistance.
If you live on an upper floor of your building, there may be a problem with your drain trap.
To solve this problem, a special valve must be installed.
9 Instructions for installation and use
The washer-dryer does not drain or spin.
 Does the selected programme incorporates water draining? Some programmes stop at the end of the wash cycles and draining will have to be selected manually.
 Is the “Anti-crease" function -where provided - enabled? This function requires manual selection for draining.
 Is the drain pump clogged?
To check it, turn off the water supply, unplug the washerdryer and follow the instructions on page 12, or call for technical assistance.
Always get assistance from authorised technicians and always insist on original spare parts.
 Is the drain hose kinked?
The tract of the drain hose must be as straight as possible. Make sure the drain hose is not squashed or kinked.
 Is the washer-dryer’s drain duct clogged? Is there an extension of the drain hose? If so, is it positioned incorrectly, blocking the water flow?
Excessive vibration during the spin cycle.
 Have all transit screws been removed durind installation? See the following page on installation procedures.
 Has the washer-dryer been levelled correctly? The levelling of the appliance should be checked periodically. Adjust the feet and check them with a level.
 Is there space between the machine and adjacent units? If it is not a built-in model, the washer-dryer will oscillate a bit during the spin cycle. A few cm of space should therefore be left around it.
The washer-dryer leaks.
 Is the metal ring of the inlet hose properly attached?
Turn off the water supply, unplug the appliance and try tightening its attachment without forcing it.
 Is the detergent dispenser obstructed? Remove and wash it under tap water.
 Is the drain hose well attached? Turn off the water supply, unplug the appliance and try tightening its attachment.
Technical characteristics
Model |
WD 84 T |
|
|
|
|
Dimensions |
width 59,5 cm |
|
|
height 85 cm |
|
|
depth 53,5 cm |
|
|
|
|
Capacity |
from 1 to 5 kg for the wash programme; from 1 to 3,5 kg for the drying programme |
|
|
|
|
Electrical |
voltage 220/230 Volt 50 Hz |
|
connections |
maximum absorbed power 1850 W |
|
|
|
|
Water connections |
maximum pressure 1 MPa (10 bar) |
|
|
minimum pressure 0,05 MPa (0,5 bar) |
|
|
drum capacity 46 litre |
|
|
|
|
Spinning speed |
up to 800 rpm |
|
|
||
Control programs wash: programme 3; temperature 60°C; carried out with 5 kg load. |
||
in compliance with |
drying: run with a load of 2.5 kg and knob C et to position |
. |
IEC regulation 456 |
|
|
This appliance conforms with the following E.E.C. directives:
- 73/23/EEC of 19/02/73 (Low Voltage) and subsequent modifications
- 89/336/EEC of 03/05/89 (Electromagnetic Compatibility) and subsequent modifications
Too much foam.
 Is the detergent appropriate for machine washing? Check whether the definition on its label reads “for machine wash” or “hand and machine wash”, or any other similar wording.
 Is the correct amount being used? An excessive amount of detergent, besides producing too much foam, does not guarantee a more effective wash, and causes scaling in the internal parts of the appliance.
The washer-dryer does not dry.
 Check whether:
the plug has been correctly inserted into the socket; there is electricity in your home; the appliance door has been shut properly; a delayed start (if available) has not been selected; programme knob A has been set to position  (Stop/Reset); the drying cycle knob C has been set to position 0.
The washer-dryer doesn't dry properly.
 Check whether:
the end of the drain hose is underwater; the drain pump is obstructed; the advice given on the maximum loads has been taken; the water tap has been turned on.
If, despite all checks, the washerdryer fails to function and the problem persists, call your nearest authorised Customer Service Centre, providing the following information:
-the nature of malfunction
-the model type no. (Mod. ....)
-the serial number (S/N ....) This information can be found on the data plate situated at the back of the washer-dryer.
Instructions for installation and use 10
Installation and removal
When the new washer-
dryer arrives
Whether new or just transported to a new house, installation is extremely important for the correct functioning of your washer-dryer.
After removing the appliance from its packaging, check that it is intact. If in doubt, contact a qualified technician immediately.
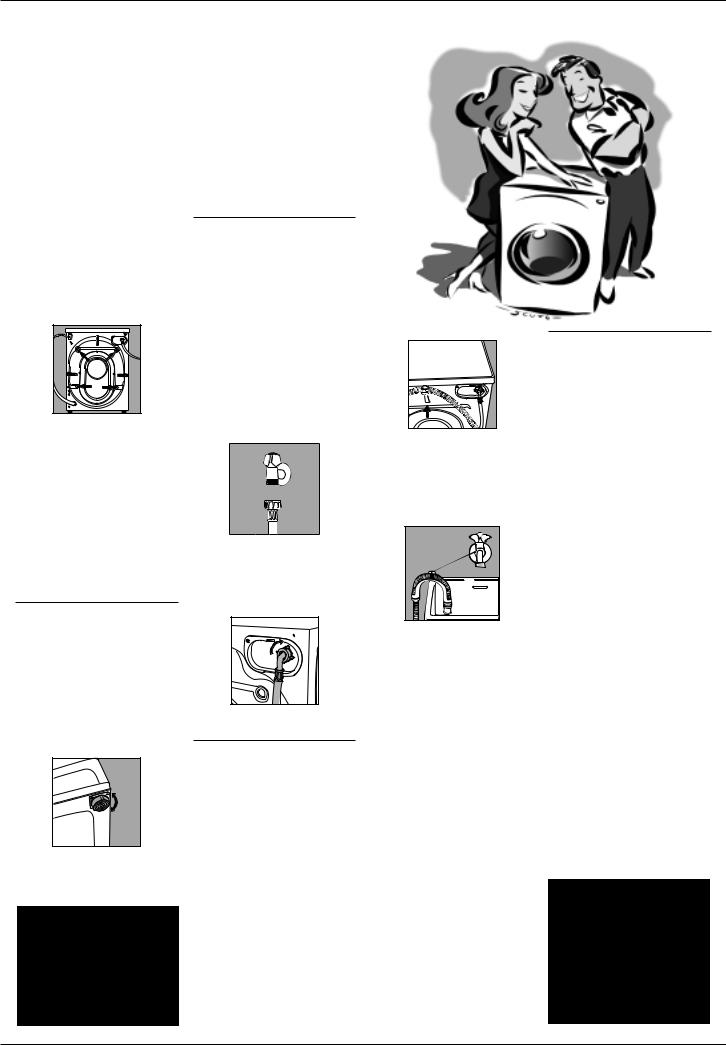
The inside of the machine is supported,fortransportation,by four screws on the back panel.
Connection to the water mains
Water pressure must range within the values indicated on the data plate on the rear of your washerdryer.If the water pipes are new or left unused, then before connecting themachinerunthewateruntilclear to remove debris. Connect the inlet hose to a cold water tap having a ¾ “ BSP thread. Ensure that the rubber sealing washer-dryers are fitted at each end of the inlet hose, with the fitter washer-dryer at the tap end.
Before using the washer-dryer, remove the screws, remove the spacers together with the rubber tubes attached to them (keeping all the parts) and use the plastic plugs provided to fill in the holes. Important: Usethecap(provided) to close the 3 holes which housed thestoppin,situatedintheright-hand part of the lower back of the washer-dryer.
Levelling
The washer-dryer must be levelled appropriatey in order to guarantee its correct functioning.To level the appliance, the front feet must be adjusted; the angle of inclination, measuredaccordingtotheworktop, must not exceed 2°.When placed oncarpet,makesuretheventilation is not reduced.
The front feet are adjustable.
Retain the transit screws, spacers and washers.
Should you move house then these should be replaced to support the inside of the machine to prevent damage when transporting the machine.

 A
A
The rubber gasket .
Connect the inlet hose to the threaded connector on the machine rear.
The hook to be used in case the drain hose ends at a height below 60 cm.
If the drains hose empties into a tub or sink then fit the plastic guide and secure it to the tap.
Water pipe inlet at the top right.
Connecting the drain hose
There are two hooks (right or left) on the rear of your washer-dryer to which the drain hose is to be fixed. Insert the other end in a stand pipe or place it on the edge of a sink or tub avoiding excessive kinks and bending. It should be placed at a height ranging from 60 to 100 cm. If it is necessary to fix the end of the hose at a height below 60 cm from the ground, it must be fixed in the appropriate hook placed on the upper part of the back panel.
The guide for draining into tubs and sinks.
The end of the drain hose must be positioned so that it cannot become submerged.
Extensions are unadvisable. In case of absolute need, the extension must have the same diameter as the original hose and must not exceed 150 cm. In case of wall draining pipes, their efficiency must be checked by a qualified technician. If the dwelling is on one of the upper floors of a building, there may be drain trap problems causing the washer-dryer to load and unload water continuously.
In order to avoid such an inconvenience, special anti-drain trap valves are available in shops.
Electric connection
Before connecting the appliance to the electric socket, be sure that:
1)the electric socket is able to sustain the appliance’s maximum power load indicated on the data plate and in compliance with the law;
2)the supply voltage is included within the values indicated on the data plate;
3)the socket is compatible with the appliance’s plug.If not, do not use adapters, but replace either the socket or the plug;
4)electric household appliances must be equipped with an “earthing” system.
Warning!
The company denies all liability if and when these norms are not respected.
Plastic bags, expanded styrofoam, nails and other packaging parts are not children’s toys, and are potentially dangerous.
11 Instructions for installation and use
Easy Care and Maintenance
Treat your machine well and it will provide many years of trouble free service
Your washer-dryer is a reliable companion in life and on the job. It is just as important for you to keep it in shape.
Your washer-dryer is designed to provide reliable service over many years. A few simple steps will help to prolong its life and avoid problems. It is advisable, to turn off water taps when the machine is not to be used, this protects the hoses, etc.
If the water in your area is too hard, use a deliming product (water is hard if it often leaves whitish stains around taps or drains, especially of bath tubs.
For more accurate information as to the type of water in your system, call the local water works or a local plumber).
Pockets must always be emptied removing even pins, badges and any other hard object.
The washer-dryer exterior should be cleaned with a rag dipped in lukewarm water and soap.
It is important to wash the detergent dispenser regularly.
To prevent dried washing powder from accumulating, place the dispenser under running water for a few minutes.
Never exaggerate with doses.
Normal detergents already contain deliming agents. Only if the water is particularly hard, that is, rich in lime content, do we recommend the use of a specific product at every wash. A periodical wash cycle with a dose of a deliming product, without detergents or washing, may prove useful.
Never use too much detergent or additives because this could cause an excess amount of foam, scaling and possible damage to the component parts of your washer-dryer.
Do not forget to empty all pockets: small objects can cause damage to your washer-dryer.
When in need, check the pump and the rubber hose.
The washer-dryer comes equipped with a self-cleaning pump that does not require any cleaning or maintenance. Small objects may accidentally fall into the pump: coins, hair clips, loose buttons and other small items. To avoid possible damage, they are withheld in an accessible pre-chamber, situated at the lower end of the pump.
Fig. 1 |
Attention: Before attempting to examine this pre-chamber, first ensure that the machine has finished its programme and is empty. Unplug the machine, as with any maintenance.
To gain access gently ease down the top of the plinth panel situated at |
|
|
the base of the machine, with a screwdriver etc, to release it. Then |
|
|
ease the top edge forward to allow it to be lifted clear (Fig. 1). Place |
|
|
a shallow dish or tray below the cover of the pre-chamber to catch |
|
|
the small amount of water present. Release the cover by turning anti- |
|
|
clockwise (Fig. 2). Ensure that the cover is securely replaced. |
Fig. 2 |
|
Re-fit the plinth cover by inserting the hooks on its lower edge into |
||
|
||
the slots and ease the top edge back into position. |
|
The water inlet hose
Check the rubber hose at least once a year. If you see any cracks, replace it immediately. When you use your washer-dryer, water pressure is very strong and a cracked tube could easily split open.
Instructions for installation and use 12
Important for the safe use of your washer-dryer
Your safety and that of
Your washer-dryer has been built in compliance your family with the strictest international safety regulations.
To protect you and all your family.
Read these instructions and all the information in this manual carefully: they are an important source, not only of numerous useful tips, but also of vital information on safety, use and maintenance.
1.the machine should not be installed in an outdoor environment, not even when a roof shelters the area, because it may be very dangerous to leave it exposed to rain and thunderstorms.
2.It must only be used by adults and exclusively for washing clothes following the instructions provided in this manual.
3.Should it have to be moved, proceed with the help of two or three people and handle it with the utmost care. Never try to do this alone, because the appliance is very heavy.
4.Before loading the washerdryer, make sure the drum is empty.
5.Never touch the washerdryer when barefoot or with wet or damp hands or feet.
6.Never use extensions or multiple plugs, which are particularly dangerous in humid environments. The power supply cable must never be bent or dangerously compressed.
I only want an authorised specialised technician with original Indesit spare parts!
7.Never open the detergent dispenser while the appliance is functioning; do not use hand wash detergent because the abundance of foam could damage its internal parts.
8.Never pull on the supply cable or the washer-dryer to disconnect it from the wall socket: it is extremely dangerous.
9.While the appliance is functioning, do not touch the drain water as it could reach very high temperatures. The appliance door, during wash cycles, tends to become hot; ensure that children do no touch it. Never force the washerdryer door because this could damage the safety lock which prevents accidental opening when the nachine is working. Allow a few minutes at the end of the program for the lock to release.
10.In case of malfunctioning, first close the water tap and unplug the appliance from the wall socket; do not under any circumstances touch internal parts in order to attempt repairs.
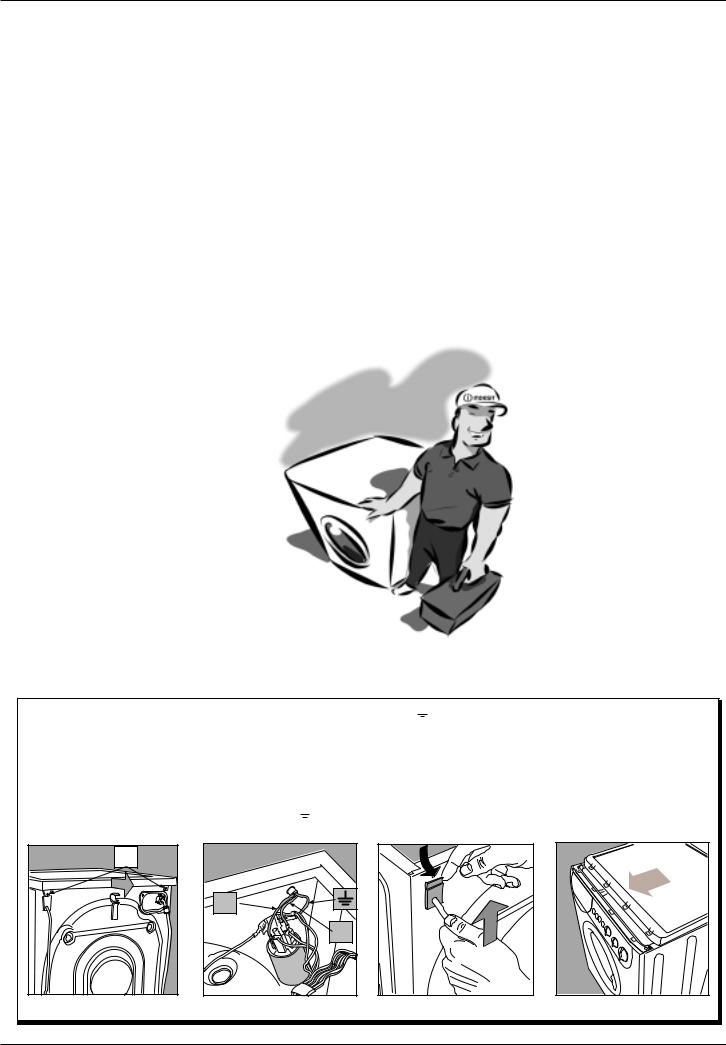
How to change the power supply cable
The washer-dryer power supply cable is special and canbepurchasedexclusively from authorised Technical Service Centres.
To replace the cable:
1. Make sure that the machine is switched off and unplugged.
2.Remove the covering lid by unscrewingthetwoscrewsI,and then pull it towards you [fig. 3].
3.Disconnect the wires from the radio interference suppressor F [fig. 4] noting as to their position (Blue=N wire; Brown=L wire) leaving the earth wire until last  .
.
N.B.: letters L, N and the
symbol  are indicated on the radio interference suppressor. 4. Remove the upper part of the cable slightly from the back panel of the appliance, pull the powersupplycableupwardsand take it out [fig. 5].
To connect the new power supply cable, reverse the procedure.
To put the covering lid back on, rest it on the washer-dryer [fig. 6] and let it slide forwards until the hooks situated on the front slide into the special slots formed into the control panel and tighten the screws back on.
I |
Fig. 3
N |
L |
F |
Fig. 4 |
Fig. 5 |
Fig. 6 |
13 Instructions for installation and use

Instructions for installation and use 14
Краткий путеводитель
Прочитайте, изучите и извлеките максимальную выгоду!
Настоящее Руководство содержит 12 разделов. Внимательно изучите их. Вы откроете для себя множество секретов эффективной стирки, узнаете возможности своей стиральной машины, научи- тесь обращаться с ней. Настоятельно рекомендуем обратить особое внимание на правила техники безопасности.
1. Установка и подключение (с. 25)
Установка — очень важная операция, от которой во многом зависит, как будет работать ваша Стиральная машина с сушкой. Обязательно проверьте:
1.Соответствие характеристик стиральной машины и электрической сети в вашем доме.
2.Правильность подключения заливного и сливного шлангов.
Не используйте шланги повторно.
3.Горизонтальность установки — это влияет на срок службы стиральной машины и качество стирки.
4.Что фиксирующиебарабaнболты,которыенаходятсянaзaднейстороне мaшины,удaлены.
8. Полезные советы (p. 19)
Как высушить белье в стиральной машине.
2. Подготовка белья и запуск машины (с. 16)
Правильный подбор стираемых вещей и равномерность загрузки гарантируют высокое качество стирки и долгий срок службы машины. В этом разделе вы найдете много полезных советов.
3. Что на этикетках (с. 20)
Выдолжнынаучитьсячитатьэтикетки,прикреплямыекодеждеибелью, чтобы правильно выбирать режимы стирки, сушки и глажения.
4. Типичные ошибки и как их избежать (с. 21)
Раньше вы обращались за советами к своим бабушкам. Но в их времена еще не было синтетических тканей и стирка считалась простым делом. Сегодня лучший консультант — Стиральная машина с сушкой. Благодаря ей вы сможете стирать даже шерстяные изделия, и результат будет лучше, чем при ручгой стирке.
5. Распределитель моющих средств (с. 22)
Советы и рекомендации по использованию отделений распределителя моющих средств.
6. Панель управления (с. 17)
Конструкция панели управления Стиральная машина с сушкой проста: всего несколько кнопок, с помощью которых вы выбираете режим стирки (от интенсивного до деликатного). При правильном выборе режима высокое качество стирки и долговечность машины гарантированы.
7. Программы стирки (с. 18)
Таблица программ позволит вам правильно выбрать температурный режим, моющие средства, ополаскиватели и смягчители. Правильный выбор программы — это не только высокое качество стирки, но и существенная экономия электроэнергии и воды.
9. Обслуживание и уход (с. 26)
Стиральная машина с сушкой — ваш настоящий друг. Проявите к нему внимание, и он ответит вам преданностью и благодарностью.
Не слишком обременительный уход за стиральной машиной продлит срок ее службы на многие годы.
10. Возможные неисправности и способы
их устранения (с. 23 и 24)
Многие проблемы вы сможете решить сами, если внимательно изучите приведенные в этом разделе рекомендации. В сложных ситуациях немедленно вызывайте техников сервисного центра Indesit.
11. Технические характеристики (с. 24)
Краткие технические данные, которые необходимо знать владельцу стиральноймашины:модель,потреблениеэлектроэнергии,расходводы, габариты, скорость вращения барабана в разных режимах, соответствие итальянским и европейским нормам и стандартам и пр.
12. Ваша безопасность и безопасность
ваших детей (с. 27)
Как обеспечить безопасность дома и семьи — это самое главное, что вы должны знать как владелец и пользователь стиральной машины.
15 Руководство по установке и эксплуатации
M
Как пользоваться машиной
Вы сделаете большое дело, если перед стиркой рассортируете белье по материалу и цвету, прочитаете этикетки на отдельных вещах и смешаете крупные вещи с мелкими.
Для получения хороших результатов очень важно разобрать белье по ткани и цвету
Подготовка белья. |
Сверяйтесь |
Разберите белье по матери- |
с этикетками. |
алу и по устойчивости ок- |
На одежде и белье имеют- |
раски. Белое и цветное бе- |
ся этикетки, показываю- |
лье стирайте отдельно. |
щие как ухаживать за эти- |
Не забудьте вынуть все из |
ми изделиями. |
карманов, особенно мелкие |
В таблице (см. с. 20) приве- |
предметы, (монеты, значки, |
дены символы, проставляе- |
иголки и др.), которые мо- |
мые на этикетках, и раскры- |
гут повредить машину. |
то их содержание. Соблюде- |
Проверьте, хорошо ли дер- |
ние правил стирки надолго |
жатся пуговицы и застегни- |
сохранит ваши вещи. |
те молнии. |
|
Смешивайте крупные и мелкие вещи при загрузке машины.
Машина оборудована электронным устройством, контролирующим загрузку барабана. Перед выполнением цикла отжима это устройство старается более или менее равномерно распределить нагрузку по барабану, что, в свою оче-
редь, зависит как от типа стираемых вещей, так и от их начальной загрузки. Если нагрузка распределена более или менее равномерно, то машина может выполнять отжим на высоких оборотах без шума и тряски.
Запуск машины
После установки новой машины включите цикл стирки по программе “1” с температурой 90°С.
Правильный пуск машины очень важен с точки зрения повышения качества стирки и увеличения срока эксплуатации оборудования. После загрузки машины и заправки моющих средств и различных добавок обязательно убедитесь в том, что:
Для защиты предметов одежды из деликатных тканей (нижнее белье, чулки) поместите их в холщевые мешочки
1. Дверца машины надежно |
|
|
|
|
|
||
закрыта. |
|
|
|
|
|
|
|
2. Машина |
включена |
â |
|
|
|
|
|
электрическую сеть. |
|
|
|
|
|
|
|
3. Открыт |
кран подачи |
|
|
|
|
|
|
âîäû. |
|
|
|
|
|
|
|
4. Рукоятка А находится в |
|
|
|
|
|
||
положении l(Stop/Reset). |
|
|
|
|
|
||
Выбор программы |
|
|
|
|
|
|
|
Выберите нужную программу |
включения/выключения H |
дать испариться оставшейся |
|||||
по таблице, которая приведена |
(позиция I). |
|
|
влаге. |
|||
на с. 18. Поверните рукоятку |
|
|
|
|
Перекройте кран подачи |
||
программатора А так, чтобы |
По окончании стирки… |
âîäû. |
|||||
выбранная программа совпала |
Индикатор |
I â |
течение |
В случае отключения элек- |
|||
c отметкой на рукоятке; при |
нескольких секунд будет |
тропитания или самопроиз- |
|||||
помощи рукоятки термостата |
мигать часто, затем замигает |
вольного выключения ма- |
|||||
В установите необходимую |
ðåæå. |
|
|
|
шины заданная программа |
||
температуру; убедитесь, что |
Выключите |
стиральную |
сохраняется в памяти. |
||||
рукоятка выбора скорости |
машину нажатием кнопки H |
|
|||||
отжима С |
находится |
â |
(положение O). Откройте |
|
|||
требуемом положении, если |
дверцу |
машины. Вынув |
|
||||
необходимо, нажмите кнопки |
белье, |
оставьте |
дверцу |
|
|||
E, F, G затем нажмите кнопку |
машины приоткрытой, чтобы |
|
|||||
Как избавиться от пятен: общие рекомендации
Паста шариковых ручек или фломастер: нанесите метиловый спирт на кусочек ваты и протрите пятно, затем стирайте при 90 °С. Деготь и смазка: счистите толстый слой загрязнения, размягчите остаток маргарином или сливочным масом, оставьте на время; затем снимите скипидаром и сразу же простирайте вещь.
Воск: счистите воск, положите ткань между двумя листами рыхлой бумаги и прогладьте горячим утюгом; сразу же обработайте ватным тампоном, смоченным скипидаром или метиловым спиртом.
Жевательная резинка: удалите с помощью жидкостьи для снятия лака, затем протрите чистой тканью.
Плесень: хлопковые и льняные ткани замочите в растворе 1 части жидкого моющего средства на 5 частей воды и добавьте столовую ложку уксуса. Тотчас простирайте. Загрязнения иных белых тканях смочите в 10%-ном растворе перекиси водорода и простирайте. Губная помада: хлопок или шерсть обработайте жидким моющим средством и протрите; шелк очищайте пятновыводителем.
Лак для ногтей: положите ткань между двумя листами рыхлой бумаги, смочите жидкостью для снятия лака. Пятна от травы: используйте тампон, смоченный этиловым спиртом.
Руководство по установке и эксплуатации 16
Панель управления
Управляя машиной — главное сделать |
E |
|
G |
L |
|
|
F |
I |
|||
правильный выбор. И это очень просто! |
|
||||
|
|
|
|
|
|
D H C B A
Переключатель программ
Используйте эту рукоятку для выборапрограммыстирки.
Поворачивайте рукоятку толькопочасовойстрелке.
Для того, чтобы выбрать программу, поверните рукоятку программаторатак,чтобысимвол/ номер требуемой программы совпалсотметкойнарукоятке.
Нажмите кнопку включения/ выключения H (позиция I), индикаторMначнетмигать.
Через 5 секунд установки будут приняты и подтверждены, цикл стиркиначнется,когдаиндикатор I перестанет мигать (останется гореть).ЕслиВыхотитепрервать программувпроцессевыполнения илиизменитьустановки,выберите один из символов (Stop/Reset) и подождите 5 секунд: отмена программы будет подтверждена мерцанием индикатора I, после этого Вы можете выключить машину.
Когда программный пуск и программаустановлены,вращения переключателяуженеимеютникакогозначения,заисключением установки в положение (Stop/ Reset).
Рукоятка выбора программ
Рукоятка предназначена для выбора температуры стирки согласнотаблицепрограмм.Кроме того,спомощьюэтойрукояткивы можете установить температуру ниже рекомендованной или выполнитьхолоднуюстирку ( ).
).
Рукоятка сушки
Используйтерукояткудлявыбора необходимойпрограммысушки:
A - Установите необходимое время:
От40до 150минут.
B - Выберите в зависимости от типабельястепеньсушки:
Глажение  : результат - увлажненные ткани, вещи легко гладить.
Гардероб :результат-хорошо высушенныеткани,вещиможно убрать.
Экстра-сушка  : результат - оченьсухиеткани,рекомендуется для вещей, которые не нужно гладить(например,банныехалаты, полотенца).
Программа сушки завершается охлаждением.
Распределитель моющих средств с дополнительной вставкой для отбеливателя находится здесь .
4 |
|
|
3 |
1 |
2 |
Распределитель моющих средств
Распределительмоющихсредств имееттриотделения:
1 - моющеесредстводляпредварительнойстирки
2 - моющеесредстводлястирки
3 - добавки(смягчители,ароматизаторыипр.)
Дополнительное отделение 4, предназначенноедляотбеливателя, можновставитьвотделение1.
Кнопка понижения скорости отжима
Используйте кнопку для пониженияскоростиотжимас800 до 400 об/мин для программ стирки хлопчатобумажных и льняныхтканейис700до400об/ мин для программ стирки синтетическихтканей.
Ускоренная стирка
При нажатии этой кнопки продолжительностьцикластирки сокращается приблизительно на 30%. Кнопка не используется в специальных программах (см. с. 18),атакжевпрограммахстирки изделийизшерстиишелка.
Удаление пятен (см. с. 22)
Этой кнопкой задается режим усиленнойстирки.Эффективность использованиядобавоккмоющему средствуувеличивается,приэтом удаляются самые стойкие загрязнения.
Кнопка включения / выключения
Нажатие на кнопку включает машину. Если кнопка ненажата,томашинавыключена.
Выключениемашинынеотменяетзаданнуюпрограмму.
Индикатор включения/ выключения и блокировки дверцы
Дверцу можно открывать, если индикаторIмигаетредко(машина включенаиждетвведенияпрограммы илипоокончаниюцикластирки).Если индикатор мигает часто, дверцу открывать нельзя. Постоянное свечениеиндикатораозначает,что машинапринялазаданнуюпрограмму.
Индикатор цикла стирки
Горящийиндикаторобозначает,что рукояткой С задан цикл сушки, который будет выполнен по окончаниюцикластирки.
Кнопка остановки с водой в машине
Этафункция(обозначеннаясимволом  )прерываетпрограммустирки, оставляябельезамоченнымвводе передсливом.Функцияприменяется только с программами стирки синтетических тканей, шелка и занавесей.Использованиефункции предотвращаетобразованиескладок наделикатныхисинтетическихтканях (например,еслиВысможетевынуть бельетолькоспустянесколькочасов послестирки).Программаможет бытьзаконченаповоротомрукоятки Анаодноделение.
В случае синтетических тканей, предпочтительнееиспользоватьслив, анеотжим,повернитерукояткуАв позицию,обозначеннуюсимволом
 (ñëèâ).
17 Руководство по установке и эксплуатации
M
Что стираем сегодня?
Программы на все случаи жизни
Ткань и степень загрязнения |
Програ- |
Температ- |
Моющее- |
Смягч- |
Удаление |
Длител- |
Описание цикла стирки |
|
|
ììà |
óðà |
средство |
итель |
пятен/От- |
ъностъ |
|
|
|
|
|
|
|
беливание цикла |
|
||
|
|
|
|
|
|
(ìèí) |
|
|
|
|
|
|
|
|
|
|
|
Хлопок |
|
|
|
|
|
|
|
|
Сильно загрязненное белое белъе |
|
|
|
|
|
|
Предварительная стирка в теплой воде-, |
|
(простъ²ни, скатерти и т.д) |
1 |
90°C |
|
|
|
165 |
Стирка при 90°C, полоскание, |
|
|
|
|
|
|
|
|
промежуточный и окончателъный отжим |
|
|
|
|
|
|
|
|
|
|
Сильно загрязненное белое белъе |
2 |
90°C |
|
|
Деликатн./ |
145 |
Стирка при 90°C, полоскание, |
|
(простъ²ни, скатерти и т.д) |
Обычн. |
промежуточный и окончателъный отжим |
||||||
|
|
|
|
|
||||
|
|
|
|
|
|
|
|
|
Сильно загрязненное белое и |
3 |
60°C |
|
|
Деликатн./ |
130 |
Стирка при 60°C, полоскание, |
|
линяющее цветное белъе |
Обычн. |
промежуточный и окончателъный отжим |
||||||
|
|
|
|
|
||||
|
|
|
|
|
|
|
|
|
Слабо загрязненное белое и цветное |
|
|
|
|
Деликатн./ |
|
Стирка при 40°C, полоскание, |
|
деликатное белъе |
4 |
40°C |
|
|
95 |
промежуточный и окончателъный отжим |
||
Обычн. |
||||||||
(рубашки, тенниски и пр.) |
|
|
|
|
|
|
||
|
|
|
|
|
|
|
||
|
|
|
|
|
|
|
|
|
Полоскание/Отбеливание |
|
|
|
|
Деликатн./ |
|
Полоскание, промежуточный и |
|
|
|
|
|
Обычн. |
|
окончателъный отжим |
||
|
|
|
|
|
|
|||
|
|
|
|
|
|
|
|
|
Отжим |
|
|
|
|
|
|
Слив и окончателъный отжим |
|
|
|
|
|
|
|
|
|
|
Сушка хлопковых тканей |
|
|
|
|
|
|
|
|
|
|
|
|
|
|
|
|
|
Остановка/запуск (Stop/Reset) |
|
|
|
|
|
|
Прерывание/отмена программы |
|
|
|
|
|
|
|
|
|
|
СИНТЕТИКА |
|
|
|
|
|
|
|
|
|
|
|
|
|
|
|
|
|
Цветная, линяющая, силъно |
5 |
60°C |
|
|
Деликатная |
100 |
Стирка при 60°C, полоскание, остановка с |
|
загрязненная (детская одежда и пр.) |
водой или деликатный отжим |
|||||||
|
|
|
|
|
|
|||
|
|
|
|
|
|
|
|
|
Цветная, деликатная, слабо |
6 |
40°C |
|
|
Деликатная |
70 |
Стирка при 40°C, полоскание, остановка |
|
загрязненная (любая одежда) |
с водой или деликатный отжим |
|||||||
|
|
|
|
|
|
|||
|
|
|
|
|
|
|
|
|
Цветная, деликатная, слабо |
7 |
30°C |
|
|
|
30 |
Стирка при 30°C, полоскание и |
|
загрязненная (любая одежда) |
|
деликатный отжим |
||||||
|
|
|
|
|
|
|||
|
|
|
|
|
|
|
|
|
Полоскание/Отбеливание |
|
|
|
|
Деликатная |
|
Полоскание, остановка с водой или |
|
|
|
|
|
|
деликатный отжим |
|||
|
|
|
|
|
|
|
||
|
|
|
|
|
|
|
|
|
Смягчение |
|
|
|
|
|
|
Полоскание, автоматическое добавление |
|
|
|
|
|
|
|
|
смягчителя, остановка с водой или |
|
|
|
|
|
|
|
|
деликатный отжим |
|
|
|
|
|
|
|
|
|
|
Отжим |
|
|
|
|
|
|
Слив и окончателъный отжим |
|
|
|
|
|
|
|
|
|
|
Сушка синтетических тканей |
|
|
|
|
|
|
|
|
|
|
|
|
|
|
|
|
|
Остановка/запуск (Stop/Reset) |
|
|
|
|
|
|
Прерывание/отмена программы |
|
|
|
|
|
|
|
|
|
|
ДЕЛИКАТ. ТКАНИ |
|
|
|
|
|
|
|
|
|
|
|
|
|
|
|
|
|
Ручная стирка |
8 |
40°C |
|
|
Деликатная |
45 |
Стирка при 40°C, полоскание и |
|
|
деликатный отжим |
|||||||
|
|
|
|
|
|
|
||
|
|
|
|
|
|
|
|
|
Осбо деликатные изделия и ткани |
9 |
30°C |
|
|
|
50 |
Стирка при 30°C, полоскание, остановка с |
|
(шторы, шелк, вискоза) |
|
водой илслив |
||||||
|
|
|
|
|
|
|||
|
|
|
|
|
|
|
|
|
Полоскание/Отбеливание |
|
|
|
|
|
|
Полоскание, остановка с водой илслив |
|
|
|
|
|
|
|
|
|
|
Отжим |
|
|
|
|
|
|
Слив и окончателъный отжим |
|
|
|
|
|
|
|
|
|
|
Ñëèâ |
|
|
|
|
|
|
Ñëèâ |
|
|
|
|
|
|
|
|
|
|
Сушка шерстяных тканей |
|
|
|
|
|
|
|
|
|
|
|
|
|
|
|
|
|
Остановка/запуск (Stop/Reset) |
|
|
|
|
|
|
Прерывание/отмена программы |
|
|
|
|
|
|
|
|
|
|
Для отмены программы выберите любой символ (Stop/Reset) и ждите 5 сек.
Данные, приведенные в таблице, являются всего лишь справочными и могут меняться в зависимости от конкретных условий стирки (объем стирки, температура воды в водопроводной системе, комнатная температура и др.)
Специальные программы
Повседневная стирка : программа быстрой стирки для слабо загрязненной одежды. Выберите программу 7 и температуру 30°C и можете стирать одежду из самых разных тканей (кроме шерсти и шелка) при максимальной загрузке барабана 3 кг. Программа, длящаяся около 30 минут, отличается экономным расходом электроэнергии. Рекомендуем пользоваться жидким моющим средством.
Руководство по установке и эксплуатации 18

Полезные советы
К о м б и н и р о в а н н а я программа стирки и сушки
ЕслиВысобираетесьпостиратьи высушитьбельевколичестве,не превышающем указанного (таблицаА,графаМАХ),следуйте инструкциям из разделаСтирка (см. стр. 16, параграф “Запуск машины”)иустановитерукояткой Свыбраннуюпрограммусушки, затем нажмите кнопку H (положение I - включено). В это случае машина автоматически перейдетпоокончаниюпрограммы стиркикпрограммесушки.
Если загрузка больше рекомендуемой(таблицаА,графа МАХ), затем следуйте инструкциям из разделаСтирка (см. стр. 16, параграф “Запуск машины”).
В конце программы стирки разделитебельетак,чтобыкаждая часть не превышала рекомендуемогоколичества.
Теперь, следуя инструкциям из разделаСушка,высушитебелье почастям.
Сушка
Загрузите белье (3,5 кг - хлопковыеткани,максимальную загрузку для других тканей см. таблицу),убедитесь,что:
-дверцазакрыта;
-стиральнаямашинаподключена кэлектросети;
-включенаподачаводы;
-кнопкавключения/выключения H ненажата(находитсявположенииO).
Установите программу
Установите рукоятку А в положение,отмеченноесимволом сушки  ,взависимостиоттипа ткани; выберите при помощи рукоятки С тип цикла сушки, затемвключитемашинукнопкой включения/выключения H (положениеI).
По окончанию сушки…
Вы можете выключить машину нажатием кнопки включения/ выключения H (положение O), когда индикатор I будет мигат редко. Теперь можно открыть машину.Вынувбельеизмашины, оставьтедверцуприоткрытойво избежание образования неприятного запаха, перекройте подачуводы.
A.
Тип ткани |
Закрузка |
Максим- |
Время сушки (минут) |
||
|
|
альная |
|
|
|
|
|
загрузка |
Экстра- |
Гардер- |
Глажен- |
|
|
(kg) |
сушка |
îá |
èå |
|
|
|
|
|
|
Хлопок, |
Разнообр- |
|
|
|
|
ëåí |
азные |
3,5 |
150 |
144 |
138 |
|
изделия |
|
|
|
|
|
|
|
|
|
|
Хлопок |
Махровые |
3,5 |
|
|
|
|
полотенц- |
150 |
144 |
138 |
|
|
|
||||
|
à è ò.ï. |
|
|
|
|
|
|
|
|
|
|
Хлопок |
Простыни, |
2,5 |
98 |
92 |
84 |
|
рубашки |
||||
|
|
|
|
|
|
|
|
|
|
|
|
Акрил |
Пижамы, |
1 |
65 |
61 |
59 |
|
носки |
||||
|
|
|
|
|
|
|
|
|
|
|
|
Нейлон |
Нижние |
|
|
|
|
|
þáêè, |
1 |
65 |
61 |
59 |
|
белье |
|
|
|
|
|
|
|
|
|
|
Данные, содержащиеся в таблице, исключительно информативны.
При загрузке менее 1 кг хлопковых тканей используйте программу сушки синтетических тканей.
Цикл сушки шерсти
Цикл сушки шерстяных изделий следует использовать
только совместно с выбором ограниченного времени (150 - 100 - 60 - 40). Мы рекомендуем 60 минутный цикл сушки для 1 кг белья.
Если один из трех уровней выбран по ошибке (Экстрасушка  , Гардероб
  , Глажение
  ), машина автоматически запустит максимально продолжительный цикл сушки (150 минут).
Важно
Если установлена программа сушки хлопковых тканей и уровень сушки (Экстра-сушка  , Гардероб
  , Глажение
  ), то во время сушки будет включаться отжим.
Внимание
-Сушить можно тольк белье, выстиранное в воде.
-Не сушите белье, которое было обработано воспламеняющимися растворителями (например, трихлорэтилен).
-Не сушите изделия, имеющие отделку из вспененной резины и аналогичных эластомеров.
-Убедитесь, что в машину поступает вода, которая необходима для конденсации влаги по время сушки.
19 Руководство по установке и эксплуатации
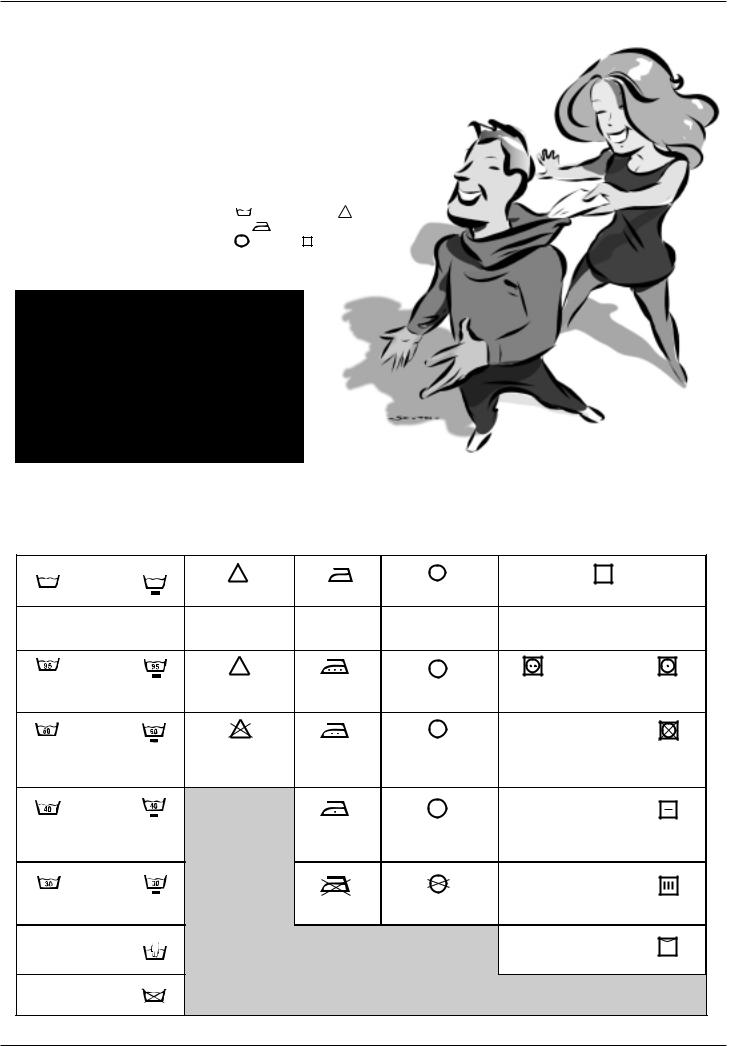
|
|
|
|
|
|
|
|
M |
Символика на этикетках |
|
|
||||||
Символы на этикетках, прикрепляемых к одежде, это |
|
|
|
|||||
своего рода инструкции, выполнение которых позволит |
|
|
|
|||||
вам добиться замечательных результатов при стирке |
|
|
|
|||||
и дольше сохранит вашу одежду. |
|
|
|
|
|
|
||
В странах Европы символи- |
Все символы разделяются на |
|
|
|
||||
ка на этикетках одежды не- |
пять групп: |
|
|
|
|
|
||
сет очень важную информа- |
стирка |
, отбеливание |
, |
|
|
|
||
цию. Вы должны научить- |
глажение |
, |
õèì- |
|
|
|
||
ся понимать эти символы, |
чистка |
и сушка . |
|
|
|
|
||
чтобы правильно ухажи- |
|
|
|
|
|
|
|
|
вать за одеждой. |
|
|
|
|
|
|
|
|
Полезные советы |
|
|
|
|
|
|
|
|
Рубашки выверните наизнанку — это позво- |
|
|
|
|
|
|||
лит добиться лучших результатов при стирке |
|
|
|
|
|
|||
и рубашки прослужат дольше. |
|
|
|
|
|
|
||
Обязательно выньте все из карманов. |
|
|
|
|
|
|
||
Перед стиркой сверьтесь с этикетками на |
|
|
|
|
|
|||
одежде. |
|
|
|
|
|
|
|
|
При загрузке машины смешивайте крупные |
|
|
|
|
|
|||
и мелкие предметы одежды. |
|
|
|
|
|
|
|
|
|
|
|
|
|
|
|
|
Температуру надо выбирать |
Изучите предлагаемую таблицу, постарайтесь запомнить |
|
|
|
правильно! |
||||
|
|
|
|
|||||
символьные обозначения. Это поможет вам лучше ухаживать |
|
|
|
|||||
за своей одеждой и использовать стиральную машину |
|
|
|
|
||||
Indesit Стиральная машина с сушкой с наибольшим эффектом. |
|
|
||||||
Стирка |
|
Отбеливание |
Глажение |
Химчистка |
|
Сушка |
||
Íîðì- |
Делик- |
|
|
|
|
|
Высокая |
Умеренная |
|
|
|
|
|
темпе- |
|||
альная |
атная |
|
|
|
|
|
температура |
|
|
|
|
|
|
ратура |
|||
|
|
|
|
|
|
|
|
|
|
|
cl |
|
|
|
A |
|
|
Стирка при |
|
Отбеливать только |
Гладить при |
Химчистка с любым |
|
Машинная |
||
95°C |
|
в холодной воде |
max200°C |
растворителем |
|
сушка |
||
|
|
|
|
|
|
P |
|
|
|
|
|
|
|
|
Химчистка: только |
|
|
Стирка при |
|
|
|
Гладить при |
перхлорид, бензин, |
|
Нельзя сушить в |
|
60°C |
|
Не отбеливать |
max150°C |
спирт, R111 и R113 |
|
машине |
||
|
|
|
|
|
|
F |
|
|
Стирка при |
|
|
|
Гладить при |
Химчистка: бензин, |
|
Сушить |
|
40°C |
|
|
|
max110°C |
спирт и R113 |
|
расправленным |
|
Стирка при |
|
|
|
|
|
Не подвергать |
|
Сушить на |
30°C |
|
|
|
Не гладить |
химчистке |
|
веревке |
|
Ручная |
|
|
|
|
|
|
|
Сушить на |
стирка |
|
|
|
|
|
|
|
плечиках |
Не стирать |
|
|
|
|
|
|
|
|
|
|
|
|
|
|
Руководство по установке и эксплуатации 20 |
||

Типичные ошибки и как их избежать
 Не стирайте в машине.
-ветхие, непрочные и “нежные” вещи. Если все-таки требуется постирать эти вещи в машине, поместите их в льняной мешочек;
-глубоко окрашенные вещи вместе с белыми вещами.
 Не превышайте рекомендованные нормы загрузки.
Если вы хотите добиться наилучших результатов стирки, не перегружайте машину. Нормы загрузки сухого белья приведены ниже:
Прочные ткани: 5 кг (максимум)
Синтетические ткани: 2,5 кг (максимум) Деликатные ткани:
2 кг (максимум) Шерсть:
1 кг (максимум)
 Что и сколько весит?
1простыня: 400-500 ã
1наволочка: 150-200 ã
1скатерть: 400-500 ã
1халат: 900-1200 ã
1полотенце: 150-200 ã
 Тенниски и бумажные свитера, окрашенные или с надписями, при стирке лучше выворачивать наизнанку. Гладить только с внутренней стороны.
 Комбинезоны.
Модные комбинезоны имеют множество шнурков, ремешков и замков, которые могут повредить барабан стиральной машины. Мелкие детали одежды во время стирки рекомендуется поместить в отдельный мешочек или положить во внутренний карман.
 Отпуск: выключите электроприборы.
Если вы не собираетесь пользоваться стиральной машиной достаточно долгое время (например, во время отпуска), то выключите ее из электросети, перекройте кран подачи воды и оставьте дверцу слегка приоткрытой, чтобы внутри машины не скапливался неприятный запах.
Шерсть
Для достижения наилучших результатов рекомендуемнезагружать более 1 кг белья и использоватьспециальные порошки для стирки шерстяных изделий.
Стирать можно практически все
|
Занавески и шторы. |
|
Стеганые одеяла и вет- |
|
Занавески и шторы обычно |
ронепроницаемые куртки. |
|||
сильно мнутся. Чтобы этого |
В машине можно стирать |
|||
избежать, сложите их акку- |
пуховые одеяла и куртки, при |
|||
ратно и положите в наволоч- |
этом не следует загружать |
|||
ку. Стирайте |
отдельно, |
более 2-3 кг изделий сразу. |
||
убедившись, что вес не пре- |
Полоскание выполните 1-2 |
|||
вышает половины рекомен- |
раза, отжим производите на |
|||
дуемой нормы загрузки. |
пониженной скорости. |
|||
Напоминаем, что существу- |
|
|
||
ет программа 9, которая ав- |
|
|
||
томатически |
исключает |
|
|
|
режим отжима. |
|
|
|
|
 Парусиновые туфли.
Парусиновые туфли предварительно очистите от грязи и стирайте с прочными тканями или джинсами, если позволяет цвет. Не стирайте с белыми вещами.
21 Руководство по установке и эксплуатации
 Loading...