

Page 1
Page 2

www.hp.com/support
$XVWUDOLD
$XVWUDOLD
₼⦌
₼⦌
氨䂾
,QGLD
,QGRQHVLD
鲵뼑ꖱ霢
0DOD\VLD
1HZ=HDODQG
3KLOLSSLQHV
6LQJDSRUH
♿䋲
ࡒ࡚ࡧࡳࡎࡷࡎ࡙
RXWRIZDUUDQW\
9LW1DP
Page 3

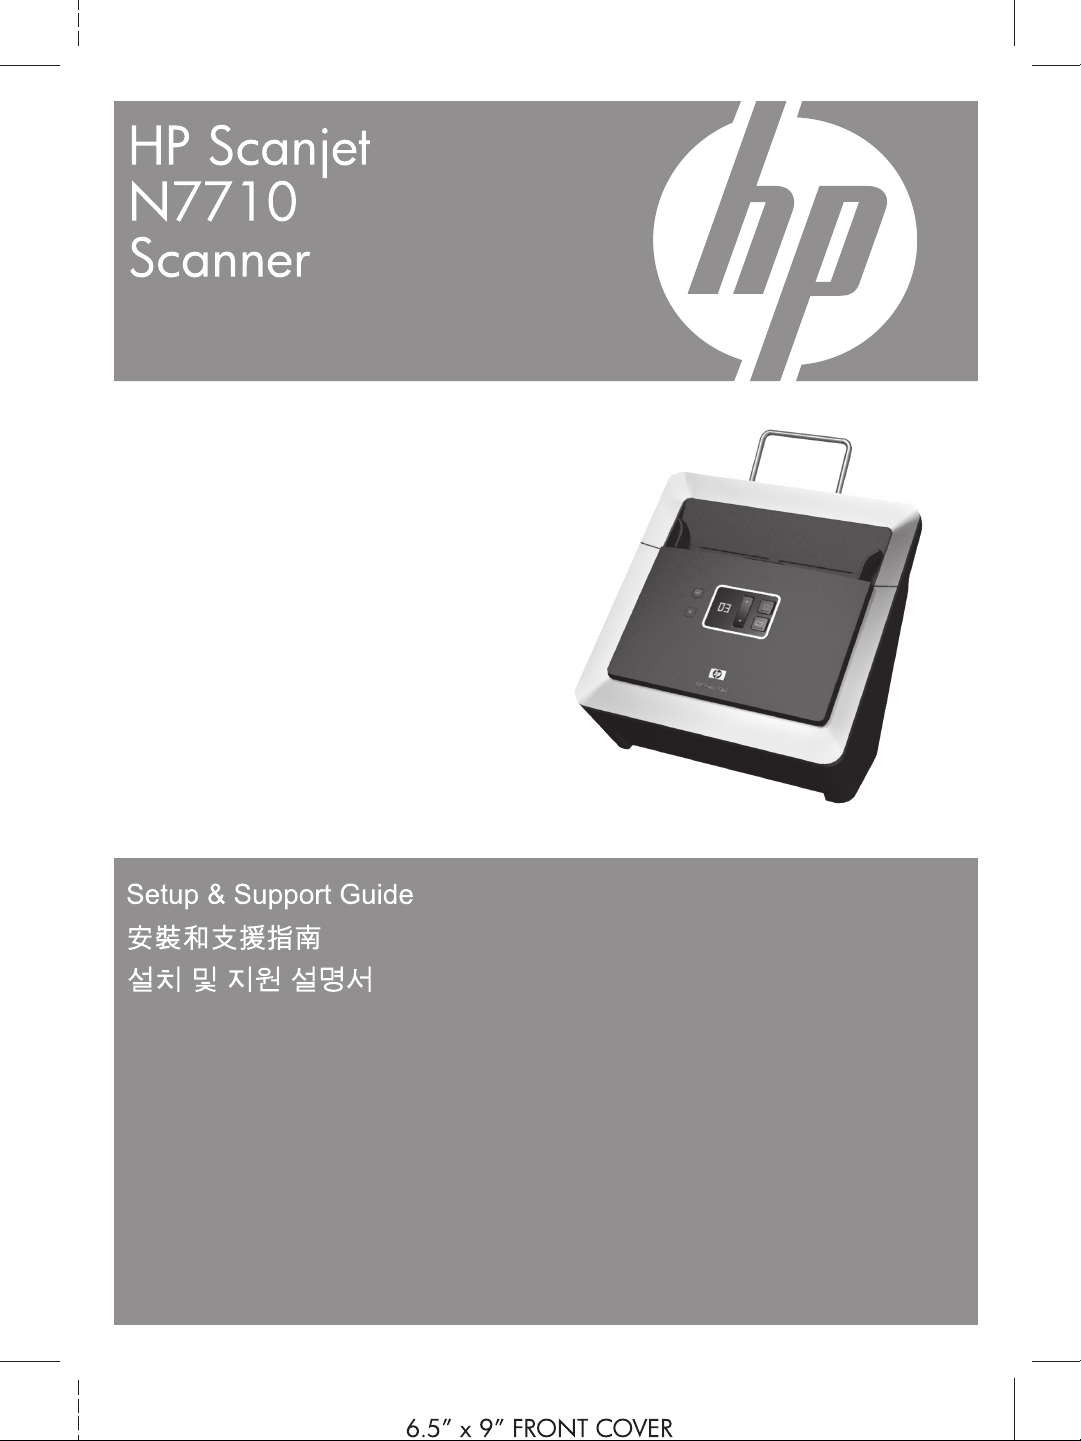
HP Scanjet N7710 Scanner
Setup and Support Guide
English
Page 4

Copyright and license
© 2007 Copyright Hewlett-Packard
Development Company, L.P.
Reproduction, adaptation or translation
without prior written permission is
prohibited, except as allowed under the
copyright laws.
The information contained herein is
subject to change without notice.
The only warranties for HP products
and services are set forth in the express
warranty statements accompanying
such products and services. Nothing
herein should be construed as
constituting an additional warranty. HP
shall not be liable for technical or
editorial errors or omissions contained
herein.
Trademark credits
ENERGY STAR is a U.S. registered
service mark of the United States
Environmental Protection Agency.
Microsoft and Windows are registered
trademarks of Microsoft Corporation.
Page 5

Contents
1 Scanner setup
Items shipped in the box.............................................................................................................2
Install the software......................................................................................................................3
Set up the hardware...................................................................................................................4
Test the installation.....................................................................................................................7
Customizable profile labels.........................................................................................................8
2 Scanner buttons and features
Scanner buttons.......................................................................................................................10
Special features........................................................................................................................10
3 Where to get additional information
HP Scanjet N7710 User Guide.................................................................................................12
HP Smart Document Scan Software Help................................................................................12
HP Scanner Tools Utility help...................................................................................................12
Help for other software programs.............................................................................................12
4 Troubleshooting
Scanner error codes.................................................................................................................13
Scanner does not work after installation...................................................................................14
Other sources for troubleshooting help....................................................................................16
5 Product care and support
Care and maintenance.............................................................................................................17
Accessibility..............................................................................................................................17
Getting assistance....................................................................................................................17
Hewlett-Packard limited warranty statement............................................................................18
English
6 Regulatory information and product specifications
Scanner specifications..............................................................................................................20
Environmental specifications....................................................................................................20
Regulatory information.............................................................................................................20
Recycle information..................................................................................................................21
Materials disposal.....................................................................................................................21
Disposal of Waste Equipment by Users in Private Households in the European Union..........21
1
Page 6
1 Scanner setup
Follow these steps to set up the scanner:
• Check the items shipped in the box
• Install the software
• Set up the hardware
• Test the installation
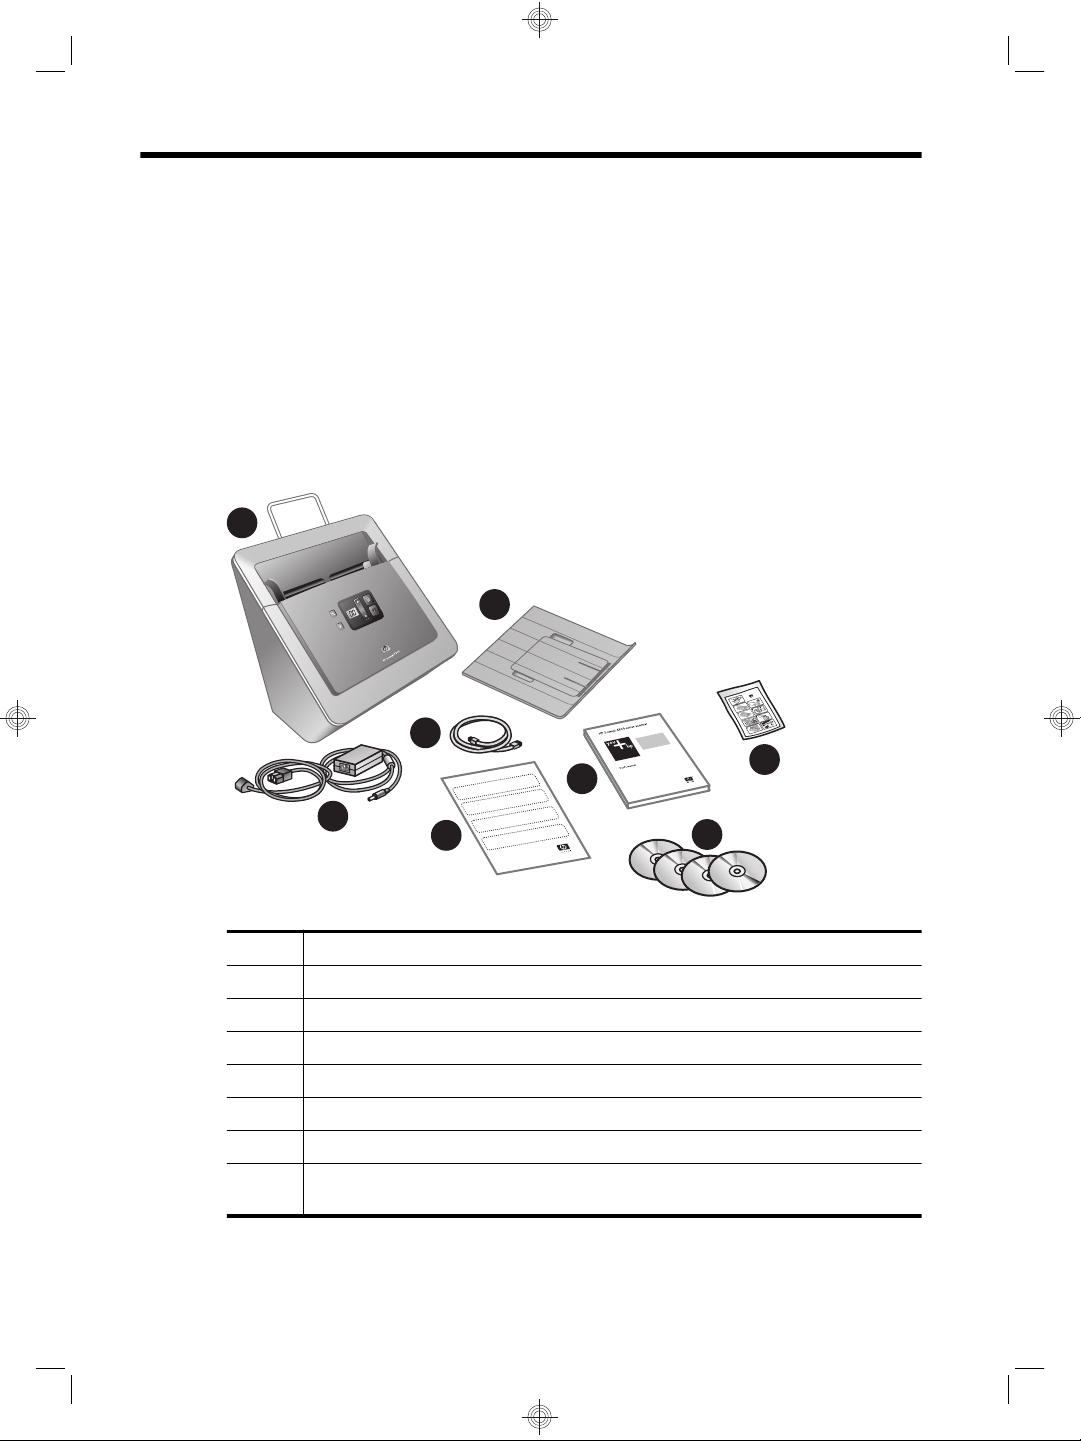
Items shipped in the box
Unpack the scanner hardware. Be sure to remove any shipping tape.
1
2
4
6
7
3
1 HP Scanjet N7710 scanner
2 Output tray
3 Power supply
4 USB cable
5 Profile labels
6 Setup and Support Guide (this book)
7 Paper-path cleaning cloth
8 Scanning software CDs (For more information, see “Included software”
on page 3.)
2 HP Scanjet N7710 Scanner
5
8
Page 7
Install the software
CAUTION: Do not connect the USB cable to the computer yet. Install the scanning
software before connecting the USB cable.
1. Insert the HP Scanning Software CD that came with the scanner into the computer
CD drive.
Wait for the installation dialog box to display. If the installation dialog box does not
display after a few moments:
a. Click Start, and then click Run. (On Windows Vista, click Start, and then type
run into the search box.)
The Run dialog box is displayed.
b.In the Open box, type d:\setup.exe (where d: is the letter of your computer's CD
drive).
c. Click OK.
2. Click Install Software to install the scanning software. Follow the onscreen
instructions to install the following applications:
• Kofax VRS 4.10
• HP Scanjet Drivers and Tools
• HP Smart Document Scan Software
3. Select the initial setting for the scanner lamp:
• In Power Save mode, the scanner lamp times out and turns off automatically after
about 15 minutes of inactivity. In this mode, the scanner is Energy Star compliant.
• In Instant Lamp On mode, the scanner lamp times out and turns off automatically
after about 15 minutes of inactivity, but it remains warm and ready to scan.
English
Included software
This section describes the scanning and document-management software programs that
come with the scanner.
In addition to the HP software programs, several popular document management
applications are included with the scanner. This additional software might not be available
for all scanner models or all countries/regions.
For information about another scanning software program, open the program, and then
click Help on the menu bar.
HP Scanning Software CD
Programs Software use
HP Smart Document Scan
Software
HP Scanner Tools Utility Use to assign profiles to numbers, to configure the buttons on
ISIS/TWAIN drivers These drivers are necessary for using the scanner with standard
Use to create high-quality scans from multi-page documents and
to automate scanning tasks you perform often.
the scanner front panel, and to find information about scanner
settings, status, and maintenance.
business applications and customized software. They meet the
minimum requirement for the scanner to work properly.
Install the software 3
Page 8
Chapter 1
(continued)
Programs Software use
Kofax VirtualReScan Use to create clearer and more readable scans from colored or
ScanSoft PaperPort CD
Programs Software use
ScanSoft PaperPort Use to organize, find, and share paper and PDF documents.
I.R.I.S. Readiris Pro CD
Programs Software use
I.R.I.S. Readiris Pro Use to scan typed documents with full-featured optical character
NewSoft Presto! BizCard CD
Programs Software use
NewSoft Presto! BizCard Use to convert business cards into a database that can be
Set up the hardware
damaged documents.
recognition (OCR) to create editable text that can be saved in a
variety of file formats.
shared by multiple users, exported to contact management
software, and synchronized with PDAs.
Complete the following tasks in order to set up the scanner hardware and prepare it for
use.
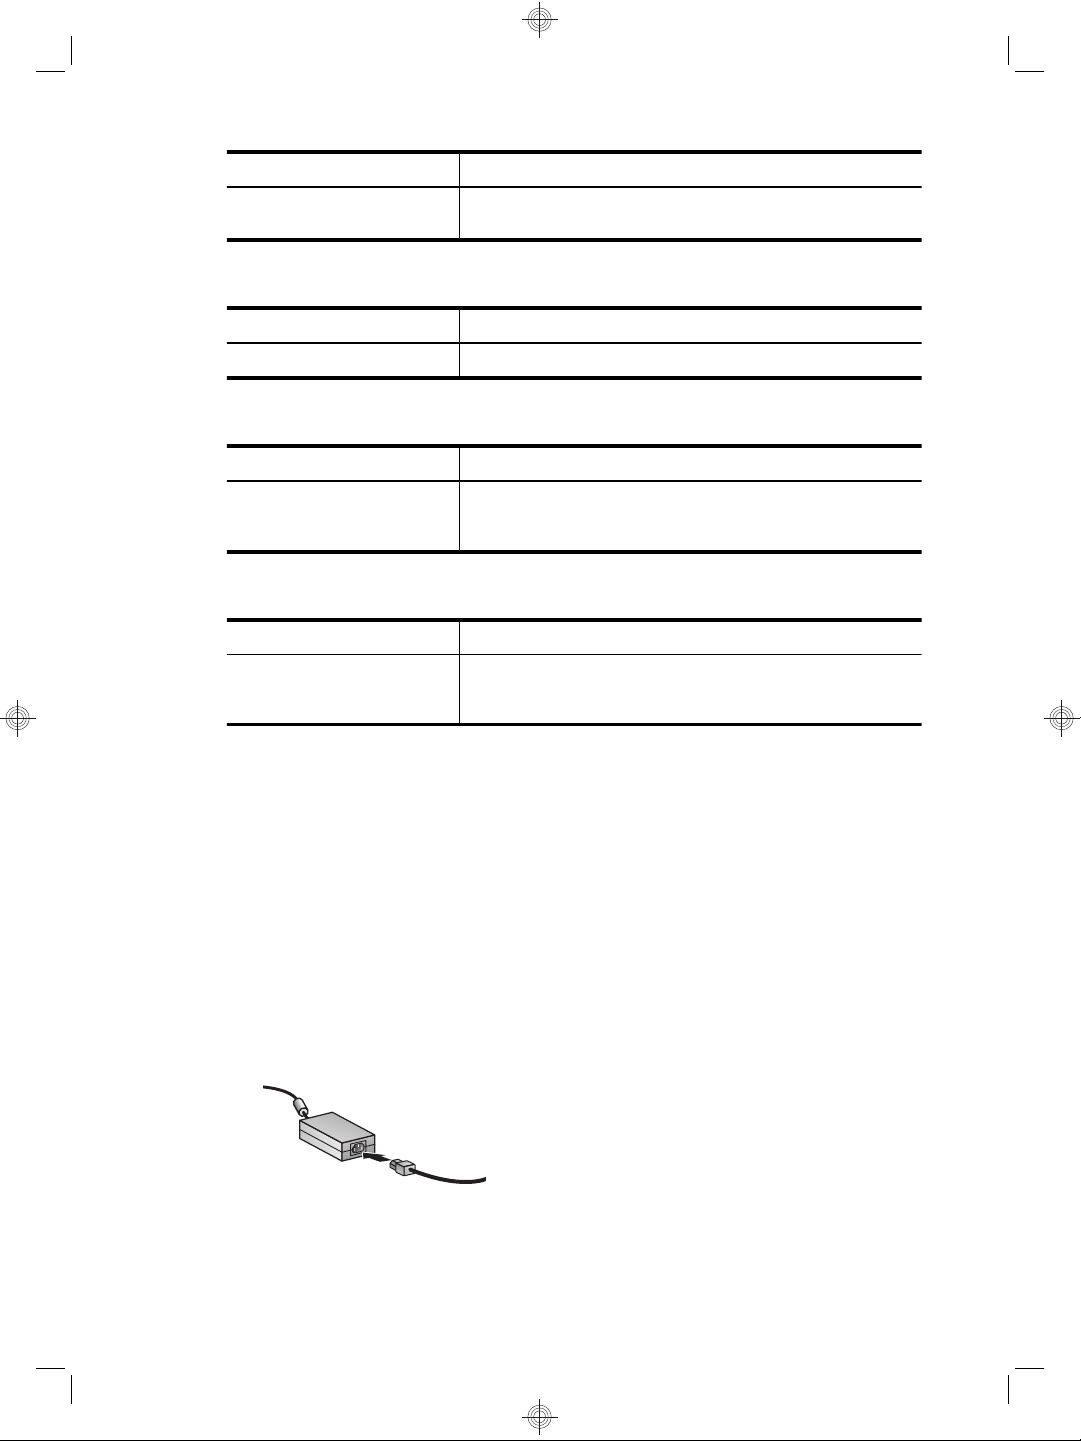
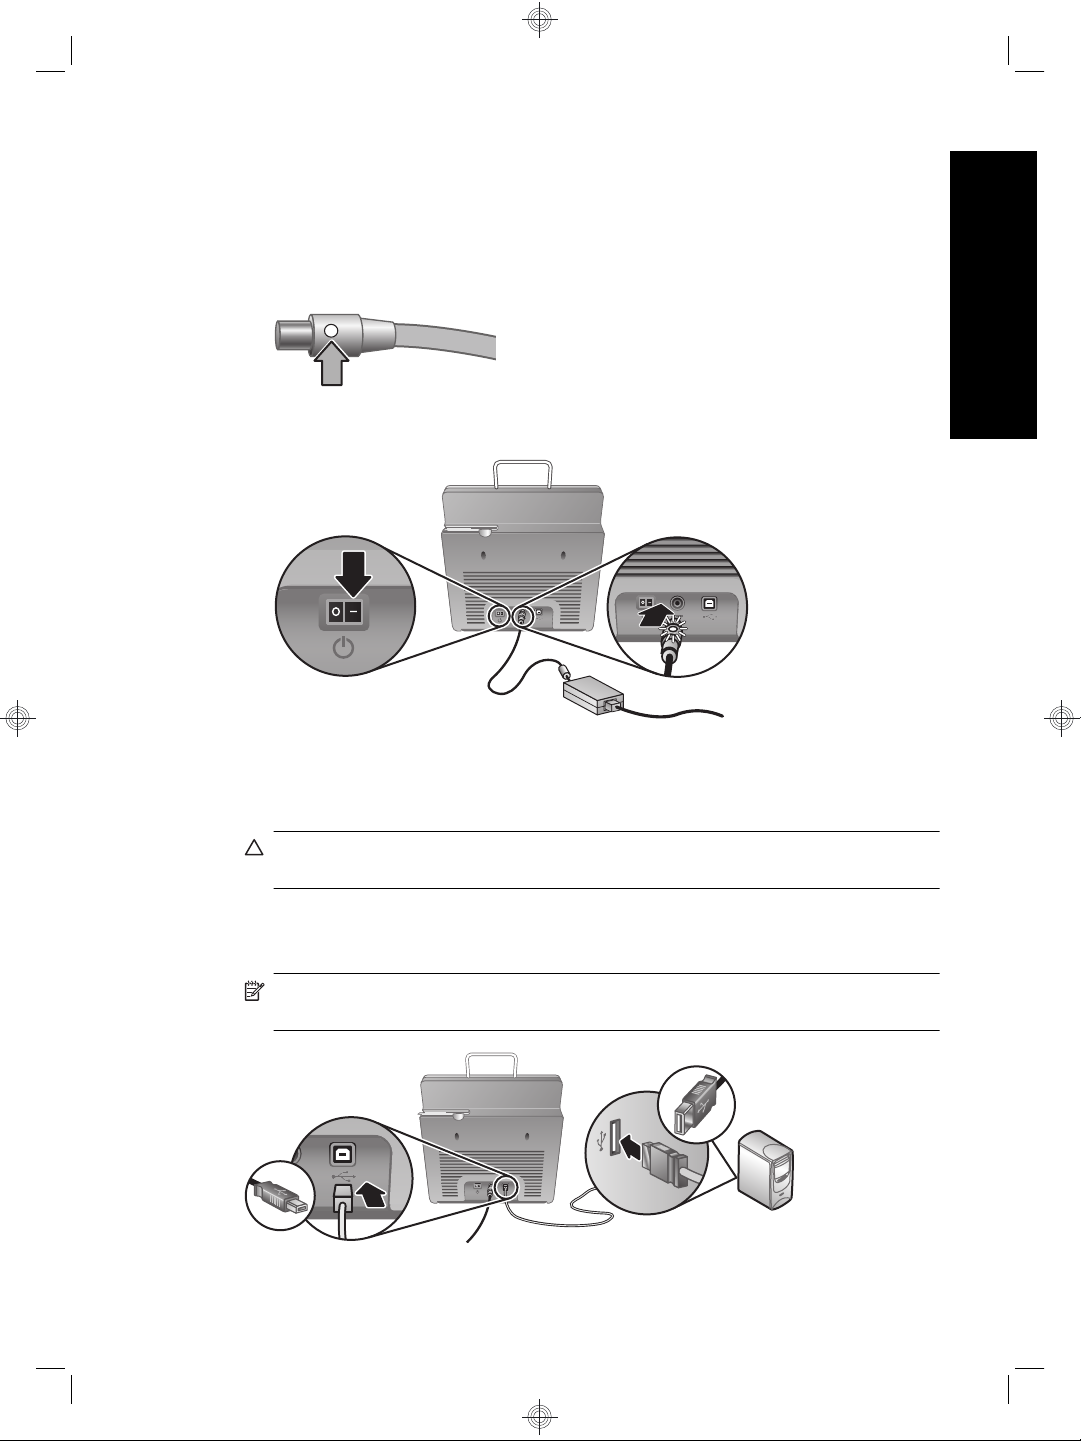
Connect the power supply
The power supply has an attached cable that plugs into the back of the scanner. The
connector on the end of this cable has a green LED that is on when the power supply is
functioning correctly.
The power supply also has an AC cable that is connected to the power supply on one
end and plugged into a power outlet or surge protector on the other end.
1. Plug the AC cable into the back of the power supply.
2. Plug the other end of the AC cable into a power outlet or a surge protector.
4 HP Scanjet N7710 Scanner
Page 9
3. Check that the green LED on the power supply cable connector is on.
• If the green LED is not on, ensure that power is available to the power outlet or
surge protector that the AC cable is plugged into.
• If power is available to the power outlet or surge protector but the green LED is
still not on, the power supply might be defective. Contact HP Support for
assistance.
4. If the green LED is on, plug the power supply into the back of the scanner.
5. Press the Power switch on the back of the scanner to the on position.
Connect the USB cable
CAUTION: Be sure you install the HP scanning software before connecting the
scanner to your computer with the USB cable. See “Install the software” on page 3.
Use the USB cable that came with the scanner to connect the scanner to the computer.
Connect the square end of the cable to the scanner and the rectangular end of the cable
to the computer.
NOTE: HP recommends using a USB port on the back of the computer for a more
reliable connection to the scanner.
English
Set up the hardware 5
Page 10
Chapter 1
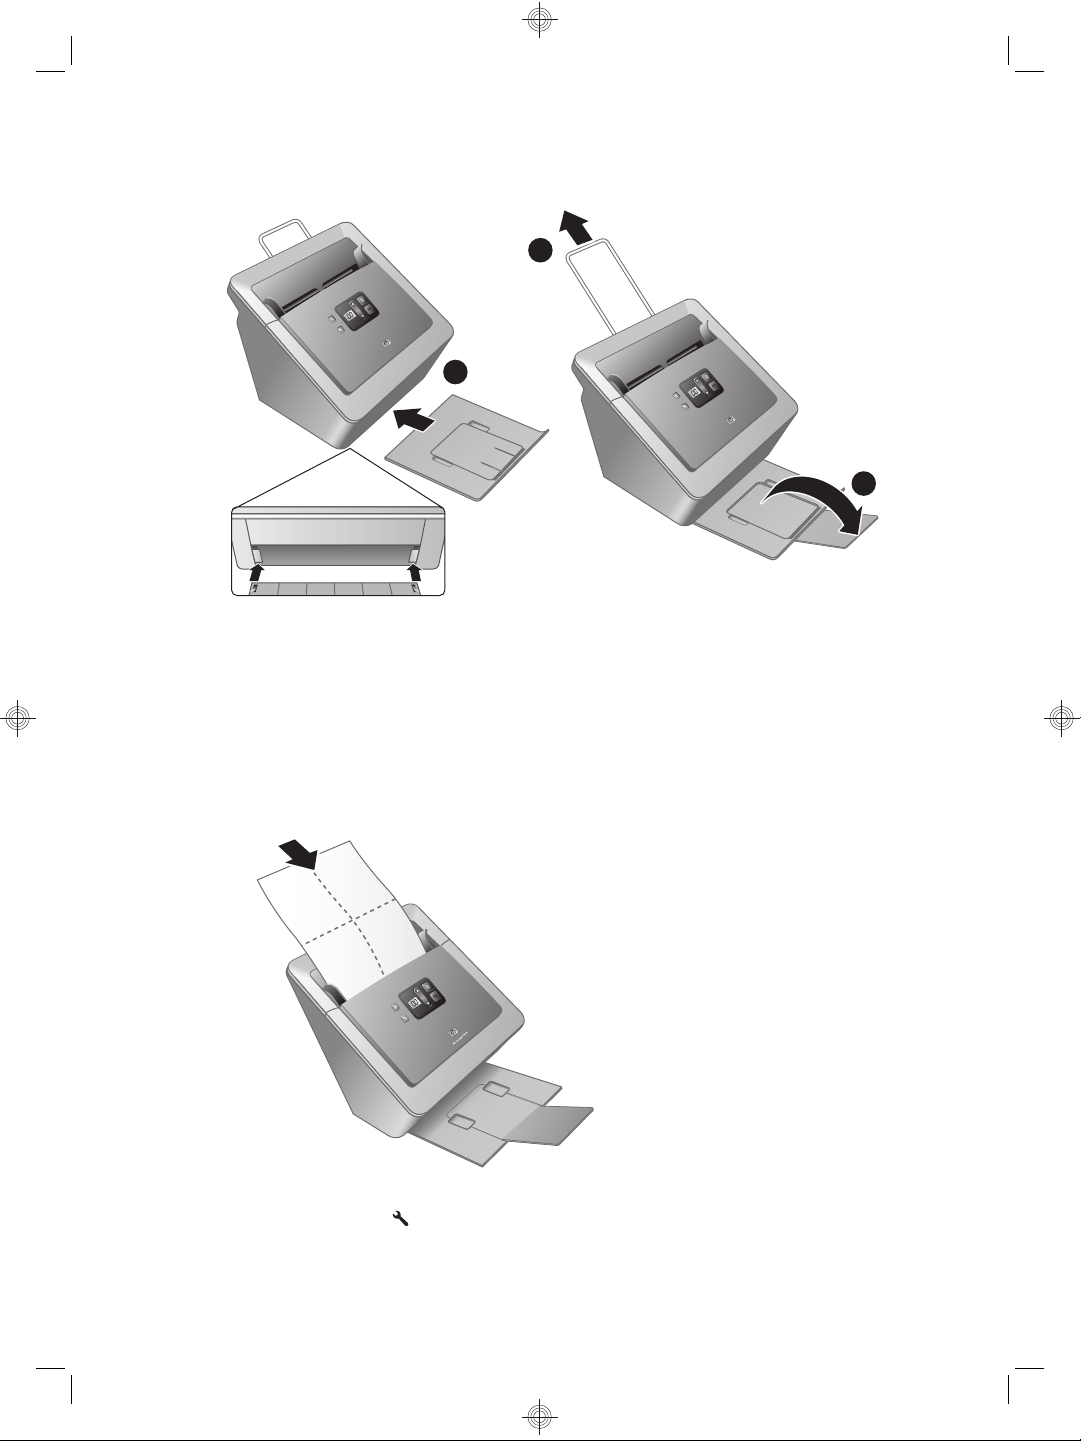
Prepare the scanner for use
1. Attach the output tray by sliding the back of the tray into the slot under the front of the
scanner.
2. For longer originals, extend the document feeder extension.
3. Extend the output tray by unfolding the flap.
4. Gently open the HP paper-path cleaning cloth package that came with the scanner.
5. Remove the cleaning cloth and unfold it.
6. Place the unfolded cloth into the document feeder.
2
1
3
7. Press the Tools ( ) button to open the Scanner Tools Utility. Click the
Maintenance tab.
6 HP Scanjet N7710 Scanner
Page 11
8. Click the Clean button to feed the cloth through the scanner.
NOTE: The cloth will feed through the scanner. This confirms that the hardware
installation was successful, the drivers and tools are installed and the scanner
hardware is functioning normally.
If the cleaning cloth does not run through the paper path and land in the output
tray, then the scanner installation may not be complete. See “Scanner does not
work after installation” on page 14 in the Troubleshooting section of this guide.
9. Repeat Step 8 at least once.
CAUTION: Wait two minutes for the components to dry before inserting paper
into the document feeder.
NOTE: You will periodically need to use a paper-path cleaning cloth for other care
and maintenance tasks. To order more paper-path cleaning cloths, go to
www.hp.com/support.
Test the installation
CAUTION: Before placing an item in the document feeder, make sure that the item
does not contain wet glue, correction fluid, or other substances that can be transferred
to the interior of the scanner.
Make sure there are no curls, wrinkles, staples, paper clips, or any other attached
material. Sheets should not be stuck together.
English
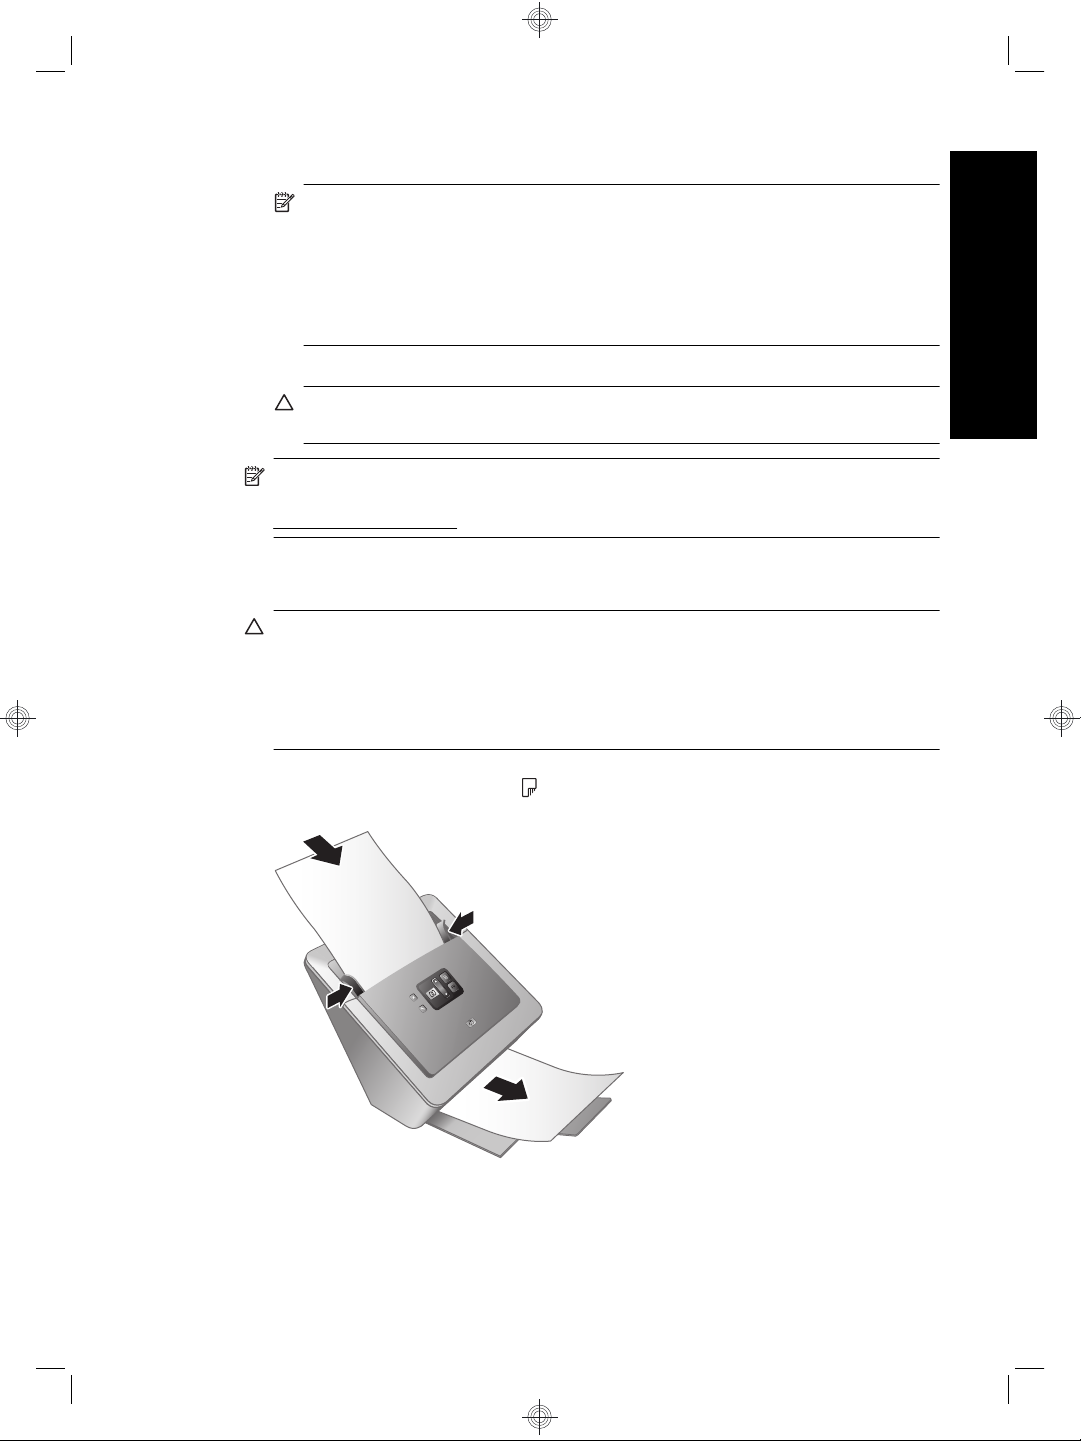
1. Place a single page in the document feeder. The page should be face down, with the
top of the page pointing down (
2. Adjust the paper guides. The paper guides must be touching both sides of the page
to work properly. Please ensure that the page is straight and the guides are against
the edges of the page.
).
Test the installation 7
Page 12
Chapter 1
3.
Press the (Scan Document To
• If you have installed HP Smart Document Scan Software, a scan of the page will
appear on your computer screen. If a scan does not appear on your computer
screen, see “Uninstall and then reinstall the HP Scanjet drivers and utilities”
on page 15.
• If you do not have HP Smart Document Scan Software installed, scan from the
software application you intend to use for scanning. If the scan processes as
normal for this application, then the software installation is successful. If it does
not process normally, consult the software help for your application.
4. Install any additional software that you want to use.
Customizable profile labels
The HP Smart Document Scan Software allows you to create profiles, which contain
settings for scanning, processing, and saving or sending documents. You can assign
profiles to numbers that are selectable from the scanner front panel. For information on
setting up profiles, see the HP Scanjet N7710 User Guide section called Set up scan
profiles.
The profile labels included with the scanner provide a place to list up to twelve numbers
and the profiles assigned to those numbers. The label can be attached directly to the pulldown tray on the front of the scanner. To remove a label from the pull-down tray, lift a
corner of the label, and then peel the label from the tray. Do not place a new label on top
of an old label.
) button. The page will feed through the scanner.
For a template that you can print if you need additional profile labels, use the
label_template.doc file located on the HP Scanning Software CD.
To customize and print a profile label, follow these steps:
1. Open the template in Microsoft Word.
2. Double-click the text form field to the right of the profile number. The dialog box is
displayed.
3. Click in the Default text field, and then enter a short description of the profile.
4. Repeat steps 2 and 3 for each profile description you want to enter.
5. Click OK.
6. Before printing on the label sheet, print the label on a plain sheet of paper. Place the
test print over a full-page label sheet to verify that the text aligns with the label sheet.
8 HP Scanjet N7710 Scanner
Page 13

7. Print on a full-page 8 1/2” x 11” or A4 label sheet and cut out each label along the
outline.
8. Place the label on the pull-down tray on the front of the scanner.
English
Customizable profile labels 9
Page 14
2 Scanner buttons and features
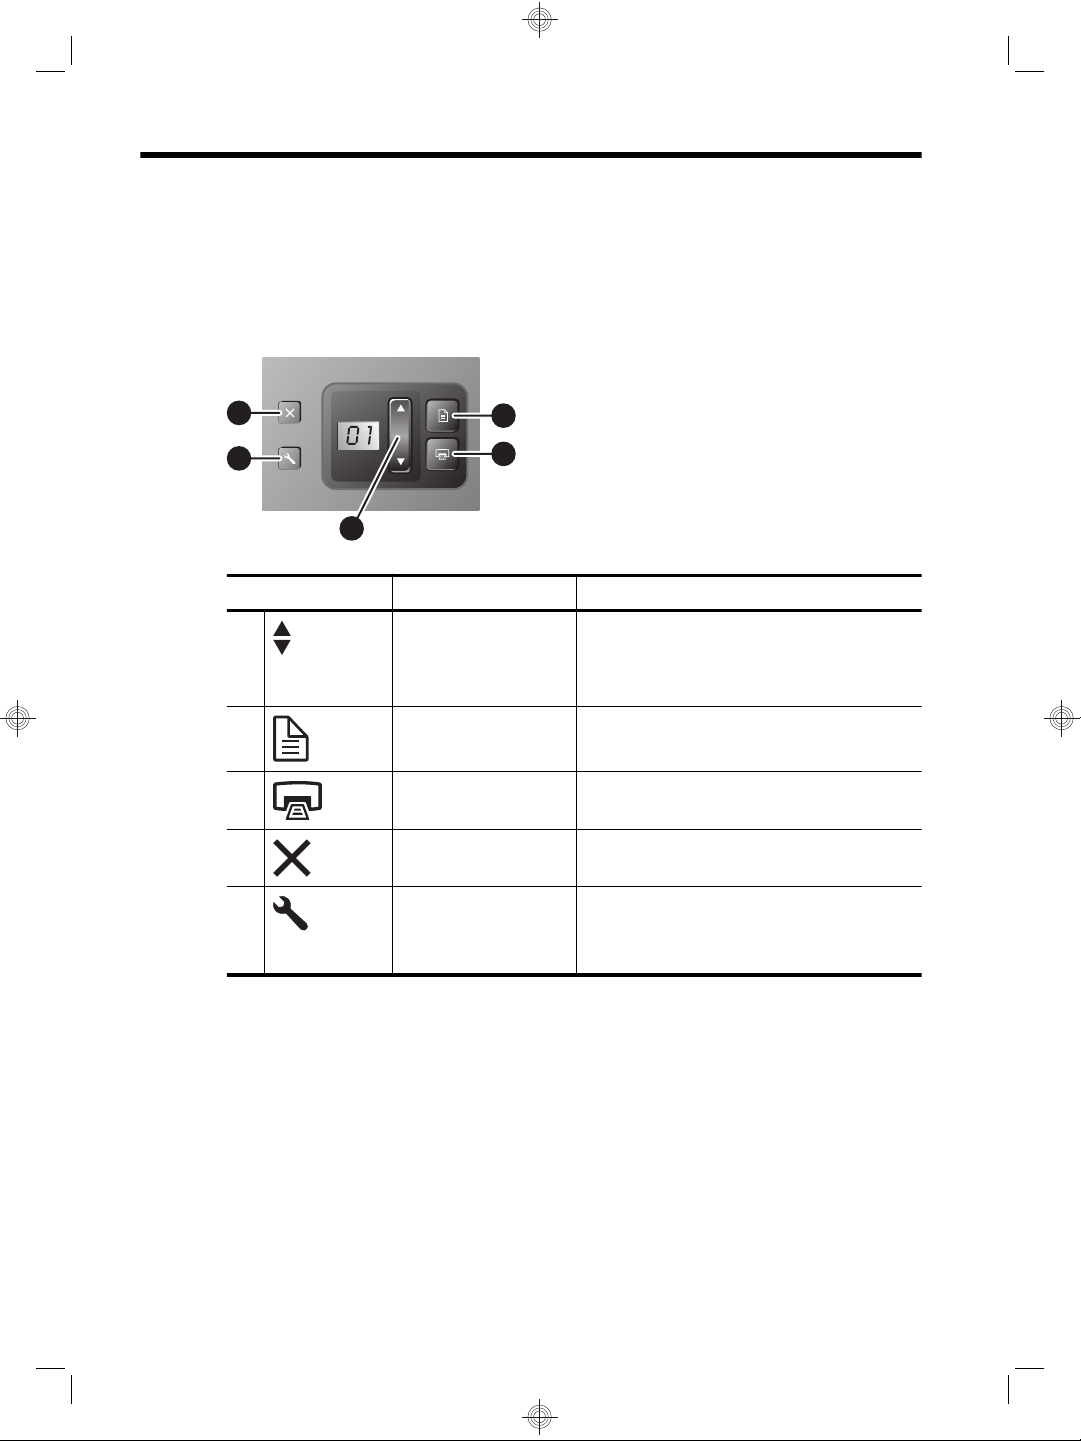
Scanner buttons
Use the buttons on the scanner front panel to start a scan, select a profile for a scan, and
configure some scanner settings.
4
5
1
Icon Button name Description
1 Select Profile Number
or Number of Copies
2 Scan Document To Start a scan using the profile assigned to the
3 Copy Print the number of copies shown.
4 Cancel Cancel a scan or copy in progress.
5 Tools Open the HP Scanner Tools Utility where you
2
3
Select a profile (before scanning) or the number
of copies (before copying).
The selected profile number or number of
copies is displayed on the front panel.
displayed number.
can configure the scanner front panel buttons,
assign profiles, and view maintenance
information.
For more information about the scanner buttons than is provided in this chapter, see the
HP Scanjet N7710 User Guide.
Special features
The following table summarizes several important features of the scanner. Many of these
features are available through the HP Smart Document Scan Software or other included
scanning software. For more information, see the HP Smart Document Scan Software
Help.
10 HP Scanjet N7710 Scanner
Page 15
Feature Description
Card slot You can use the card slot on the back of the scanner to scan
Wide range of paper sizes You can scan a stack of originals ranging in size from business
Profiles You can set up and use profiles that contain all settings
Page management You can view, edit, delete, insert, and reorder pages. You can
File management You can scan all pages to a single file, scan each page to a
Optical Character Recognition
(OCR)
Send Documents To You can set up profiles to send the scanned documents to a
rigid items such as laminated cards and embossed cards.
For information on how to use the card slot, see the scanner
User Guide.
cards to legal-size paper. You can also scan originals up to
215.9 mm x 863.6 mm (8.5 inches x 34 inches) one page at a
time.
necessary for scanning tasks such as:
Document processing
•
Saving in different file formats (i.e. searchable or non-
•
searchable PDF files) using automatic naming
mechanisms
Sending to different destinations such as e-mail, Microsoft
•
SharePoint, or other applications
also have the scanner automatically delete blank pages.
separate file, or scan to separate files based on bar codes or
blank pages in the original.
With OCR software you can scan originals as editable text that
you can send to your favorite application.
variety of destinations such as a local folder, a network folder,
e-mail, or a custom application.
English
Special features 11
Page 16

3 Where to get additional
information
The scanner comes with several sources of information about using the scanner and the
scanning software.
HP Scanjet N7710 User Guide
The scanner User Guide is the primary source for scanner information such as using,
maintaining, and troubleshooting the scanner. It is available as a compiled help (.CHM)
file.
To open the User Guide in the installed (system) language, follow these steps:
▲ Click Start, point to Programs or All Programs, point to HP, point to Scanjet, point
to N7710, and then click User Guide.
To open the User Guide in another language, follow these steps:
1. Insert the HP Scanning Software CD that came with the scanner into the computer
CD drive.
Wait for the installation dialog box to display.
2. Click View guides.
A list of languages is displayed.
3. Click the language that you want.
HP Smart Document Scan Software Help
The HP Smart Document Scan Software Help explains how to use HP Smart Document
Scan Software features such as creating and editing profiles.
To open HP Smart Document Scan Software Help, double-click the HP Smart Document
Scan Software icon on the computer desktop, and then click Help on the menu bar.
HP Scanner Tools Utility help
The HP Scanner Tools Utility help explains the scanner settings, information about
scanner status and maintenance, and how to assign scanner profiles to numbers that you
can select on the scanner front panel.
To open HP Scanner Tools Utility help, press the Tools button on the scanner front panel,
and then click Help in the HP Scanner Tools Utility dialog box.
Help for other software programs
For information about any of the software programs included with the scanner, open the
program, and then click Help on the menu bar.
12 HP Scanjet N7710 Scanner
Page 17
4 Troubleshooting
Scanner error codes
For help responding to an error code, see the appropriate topics below.
Error Code Description
Error 02 SDRAM Error Press the Power switch to the off position. Wait 30 seconds, and
Error 03 USB Error 1. Check the USB connection between the scanner and the
Error 04 Paper Jam A document feeder paper jam has been detected. Open the hatch
Error 08 Hatch Open The hatch on the document feeder is open or not securely latched.
Error 09 NVRAM ACCESS
Error
Error 10 Motor Fail Press the Power switch to the off position. Wait 30 seconds, and
Error 18 Multipick Error The scanner detected that more than one page at a time was fed
then press the Power switch to the on position. If the message is
still displayed, contact
computer.
2. Use the Windows Device Manager tool to verify that the
computer recognizes the scanner.
The Windows Device Manager tool is available on the
Hardware tab of the Systems tool in the Control Panel.
3. If the computer does not recognize the scanner, uninstall and
then reinstall the scanner software.
4. If the problem persists, contact
and clear the jam.
Please close the hatch by pressing until you hear a click, and then
rescan.
Press the Power switch to the off position. Wait 30 seconds, and
then press the Power switch to the on position. If the message is
still displayed, contact
then press the Power switch to the on position. If the message is
still displayed, contact
through the scanner. Follow these steps to resolve the error:
1. Remove the paper from the document feeder.
2. Sort through the stack to make sure the sheets are not stuck
together.
3. Make sure the paper meets the size and weight specifications,
as specified in the scanner User Guide.
4. Replace the paper into the document feeder.
If this error occurs when there is no paper feed error, the misfeed
(multipick) detection sensor is not working correctly. Contact HP
Support.
HP Support.
HP Support.
HP Support.
HP Support.
English
NOTE: You can disable misfeed (multipick) detection in the
TWAIN/ISIS Advanced Settings dialog box.
Error 23 Lamp Error Press the Power switch to the off position to turn the scanner off.
Wait 30 seconds, and then press the Power switch to the on position
Troubleshooting 13
Page 18
Chapter 4
(continued)
Error Code Description
to turn the scanner on. If the message is still displayed, contact HP
Support.
Error 24 Pick Failure The document feeder cannot pick up the paper or the paper is
jammed. Follow these steps to resolve the error:
1. Remove the paper from the document feeder.
2. Sort through the stack to make sure the sheets are not stuck
together.
3. Make sure the paper meets the size and weight specifications,
as specified in the scanner User Guide.
4. Replace the stack of originals and try again.
Scanner does not work after installation
If the scanner does not work after installation, you might see one of the following
messages displayed on the computer:
• The scanner could not be initialized.
• The scanner could not be found.
• An internal error has occurred.
• The computer cannot communicate with the scanner.
Try the following to fix the problem:
Check the cables
Verify that the cable connections are in working order.
Power supply
The power supply has an attached cable that plugs into the back of the scanner. The
connector on the end of this cable has a green LED that is on when the power supply is
functioning correctly.
The power supply also has an AC cable that is connected to the power supply on one
end and plugged into a power outlet or surge protector on the other end.
The power cable is connected between the scanner and a power outlet.
1. Check that the green LED on the power supply cable connector is on.
2. If the green LED is not on, ensure that power is available to the power outlet or surge
protector that the AC cable is plugged into.
3. If power is available to the power outlet or surge protector but the green LED is still
not on, the power supply might be defective. Contact HP Support for assistance.
4. Check that the power rocker switch is in the on position.
14 HP Scanjet N7710 Scanner
Page 19

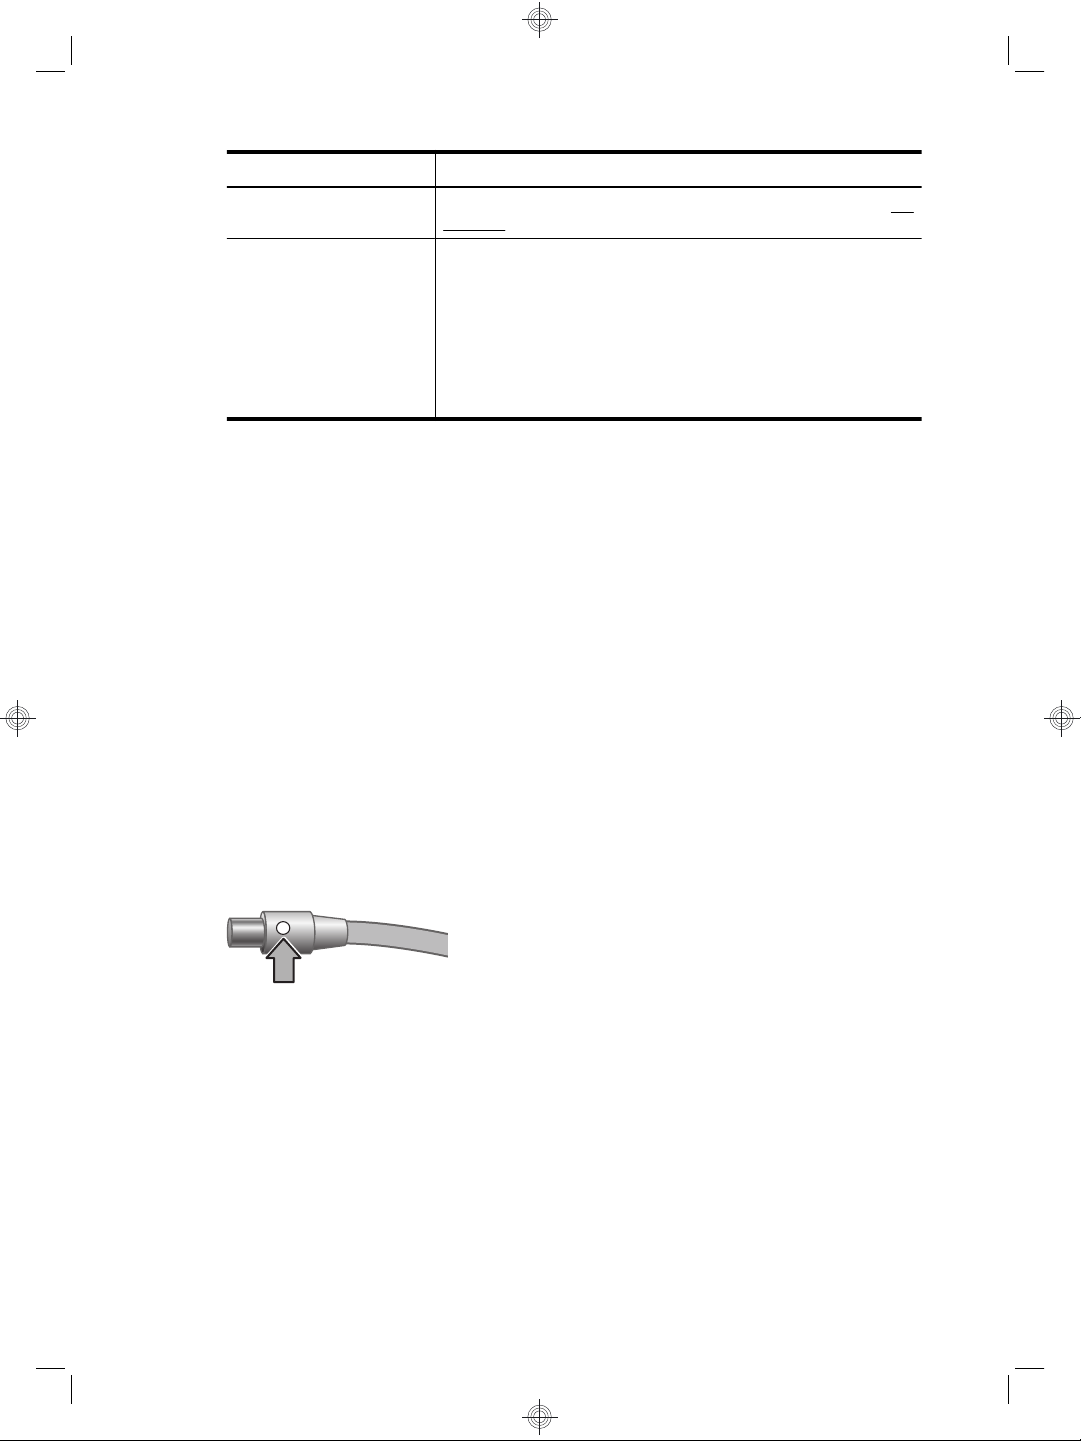
USB cable
Check the physical connection to the scanner:
• Use the cable that was included with the scanner. Another USB cable might not be
compatible with the scanner.
• Ensure that the USB cable is securely connected between the scanner and the
computer or USB hub. The trident icon on the USB cable faces up when the cable is
properly connected to the scanner.
To troubleshoot the USB connection:
1. Do one of the following tasks depending on how the scanner is connected to the
computer:
• If the USB cable is connected to a USB hub or a docking station for a laptop,
disconnect the USB cable from the USB hub or the docking station, and then
connect the USB cable directly to the computer.
• If the USB cable is directly connected to the computer, plug it into another USB
port on the computer.
• Remove all other USB devices from the computer except for the keyboard and
the mouse.
2. Turn the scanner off and then on.
3. Restart the computer.
4. After the computer has restarted, try using the scanner.
If the scanner works and you changed the way it was connected to the computer in
step 1, the communication problem might involve the USB hub or docking station.
Leave the scanner directly connected to the computer.
If the scanner does not work, uninstall and then reinstall the HP scanning software.
English
Uninstall and then reinstall the HP Scanjet drivers and utilities
If checking the scanner cable connections did not solve the problem, the problem might
have occurred because of an incomplete installation. Try uninstalling and then reinstalling
the HP scanning drivers and utilities.
1. Disconnect the USB cable from the computer.
2. Use the Add/Remove tool (in Windows Vista, the Programs and Features tool) from
the Control Panel to uninstall the following applications:
• HP Scanjet N7710 Document ISIS/TWAIN
• HP Scanjet Drivers and Tools
3. After the HP scanning software is removed, unplug the scanner from the electrical
outlet.
4. Restart the computer.
5. Insert the HP Scanning Software CD in the computer CD drive.
6. Follow the onscreen instructions to install the HP scanning software.
7. After the HP scanning software has installed, connect the scanner to an electrical
outlet, turn on the scanner, and then use the USB cable to connect the scanner to
the computer.
8. Follow the onscreen instructions.
Scanner does not work after installation 15
Page 20

Chapter 4
Other sources for troubleshooting help
For more troubleshooting help with the scanner hardware or software, see “Where to get
additional information” on page 12.
16 HP Scanjet N7710 Scanner
Page 21

5 Product care and support
This section describes the options for product support.
Care and maintenance
Occasional cleaning of the scanner helps ensure higher-quality scans. The amount of
care necessary depends upon several factors, including the amount of use and the
environment. You should perform routine cleaning as necessary.
The HP Scanner Tools Utility can remind you when service is necessary. For help locating
the utility, see “Where to get additional information” on page 12.
For instructions about maintaining the scanner, see the HP Scanjet N7710 User Guide.
For help locating the guide, see “Where to get additional information” on page 12.
CAUTION: Before placing an item in the document feeder, make sure that the item
does not contain wet glue, correction fluid, or other substances that can be transferred
to the interior of the scanner.
Make sure there are no curls, wrinkles, staples, paper clips, or any other attached
material. Sheets should not be stuck together.
Accessibility
The following accessibility options are available on this scanner:
• The LCD Reader is a software program that shows the changing contents of the
scanner front panel display. The LCD Reader enables accessibility software tools to
verbalize what is being shown on the scanner front panel.
• To prevent buttons from being pushed accidentally, you can disable the buttons on
the scanner front panel.
For more information about the LCD Reader and how to disable the scanner buttons, see
the HP Scanjet N7710 User Guide. For help locating the guide, see “Where to get
additional information” on page 12.
Customers with disabilities can get help by visiting
accessibility/prodserv/.
www.hp.com/hpinfo/community/
English
Getting assistance
In order to get the best from your HP product, please consult the following standard HP
support offerings:
Product care and support 17
Page 22

Chapter 5
1. Please consult the product documentation that came with the product.
• Review the troubleshooting section in this manual.
• Review the software documentation that is described in “Where to get additional
information” on page 12.
2. Visit the HP online support at
purchase.
HP online support is available to all HP customers. It is the fastest source for up-todate product information and expert assistance, including the following features:
• Fast E-mail access to qualified online support specialists
• Software and driver updates for your product
• Valuable product and troubleshooting information for technical issues
• Proactive product updates, support alerts, and HP newsletters (available when
you register your product)
3. HP support by phone
• Support options and fees vary by product, country/region and language.
• Fees and policies are subject to change without notice. Please check the web site
www.hp.com/support for the latest information.
4. Post-warranty period
After the limited warranty period, help is available online at
5. Extending or upgrading your warranty
If you would like to extend or upgrade the product’s warranty, please contact your
point of purchase or check the HP Care Pack offers at
6. If you already purchased an HP Care Pack Service, please check the support
conditions in your contract.
www.hp.com/support or contact your point of
www.hp.com/support.
www.hp.com/support.
Hewlett-Packard limited warranty statement
HP Scanjet N7710 scanner
1. HP warrants to you, the end-user customer, that HP hardware, accessories, and
supplies will be free from defects in materials and workmanship after the date of purchase,
for one year. If HP receives notice of such defects during the warranty period, HP will, at
its option, either replace or repair products which prove to be defective. Replacement
products may be either new or equivalent in performance to new.
2. HP warrants to you that HP software will not fail to execute its programming instructions
after the date of purchase, for the period specified above, due to defects in material and
workmanship when properly installed and used. If HP receives notice of such defects
during the warranty period, HP will replace software which does not execute its
programming instructions due to such defects.
3. HP does not warrant that the operation of HP products will be uninterrupted or error
free. If HP is unable, within a reasonable time, to repair or replace any product to a
condition as warranted, you will be entitled to a refund of the purchase price upon prompt
return of the product.
4. HP products may contain remanufactured parts equivalent to new in performance or
may have been subject to incidental use.
5. This warranty does not apply to defects resulting from (a) improper or inadequate
maintenance or calibration, (b) software, interfacing, parts, or supplies not supplied by
18 HP Scanjet N7710 Scanner
Page 23

HP, (c) unauthorized modification or misuse, (d) operation outside of the published
environmental specifications for the product, or (e) improper site preparation or
maintenance.
6. TO THE EXTENT ALLOWED BY LOCAL LAW, THE ABOVE WARRANTIES ARE
EXCLUSIVE AND NO OTHER WARRANTY OR CONDITION, WHETHER WRITTEN OR
ORAL, IS EXPRESSED OR IMPLIED, AND HP SPECIFICALLY DISCLAIMS ANY
IMPLIED WARRANTIES OR CONDITIONS OF MERCHANTABILITY, SATISFACTORY
QUALITY, AND FITNESS FOR A PARTICULAR PURPOSE. Some countries, states, or
provinces do not allow limitations on the duration of an implied warranty, so the above
limitation or exclusion might not apply to you. This warranty gives you specific legal rights,
and you might also have other rights that vary from country/region to country/region, state
to state, or province to province.
7. HP's limited warranty is valid in any country/region or locality where HP has a support
presence for this product and where HP has marketed this product. The level of warranty
service you receive may vary according to local standards. HP will not alter the form, fit,
or function of the product to make it operate in a country/region in which it was never
intended to function for legal or regulatory reasons.
8. TO THE EXTENT ALLOWED BY LOCAL LAW, THE REMEDIES IN THIS WARRANTY
STATEMENT ARE YOUR SOLE AND EXCLUSIVE REMEDIES. EXCEPT AS
INDICATED ABOVE, IN NO EVENT WILL HP OR ITS SUPPLIERS BE LIABLE FOR
LOSS OF DATA OR FOR DIRECT, SPECIAL, INCIDENTAL, CONSEQUENTIAL
(INCLUDING LOST PROFIT OR DATA), OR OTHER DAMAGE, WHETHER BASED IN
CONTRACT, TORT, OR OTHERWISE. Some countries, states, or provinces do not allow
the exclusion or limitation of incidental or consequential damages, so the above limitation
or exclusion may not apply to you.
9. THE WARRANTY TERMS CONTAINED IN THIS STATEMENT, EXCEPT TO THE
EXTENT LAWFULLY PERMITTED, DO NOT EXCLUDE, RESTRICT, OR MODIFY AND
ARE IN ADDITION TO THE MANDATORY STATUTORY RIGHTS APPLICABLE TO
THE SALE OF THIS PRODUCT TO YOU.
English
Hewlett-Packard limited warranty statement 19
Page 24

6 Regulatory information and
product specifications
This section contains regulatory information and product specifications for the HP Scanjet
N7710 scanner and accessories.
Scanner specifications
Name Description
Scanner type Duplex sheet-feed scanner
Size Width: 320 mm (12.6 inches), Depth: 270 mm (10.6 inches), Height:
Weight 5.4 kg (11.8 lbs)
Scanning element Charge-coupled device (CCD)
Interface USB 2.0 high speed (compatible with USB 1.1)
Optical resolution 600 x 600 dpi hardware
AC power 32V~, 50/60Hz, 2500mA, 80W
Power consumption For power consumption, data see the regulatory_supplement.htm file on
312 mm (12.3 inches)
the HP Scanning Software CD.
Your HP scanner is ENERGY STAR® compliant. As an ENERGY STAR®
partner, Hewlett-Packard Company has determined that this product
meets the ENERGY STAR® guidelines for energy efficiency.
Environmental specifications
Name Description
Temperature Operating the scanner: 10° to 35° C (50° to 95° F)
Storage: -40° to 60° C (-40° to 140° F)
Relative humidity Operating the scanner: 15 percent to 80 percent noncondensing 10° to 35°
C (50° to 95° F)
Storage: up to 90 percent at 0° to 60° C or (32° to 140° F)
Regulatory information
Regulatory Model Identification Number: For regulatory identification purposes your
product is assigned a Regulatory Model Number. The Regulatory Model Number for your
product is FCLSD-0704. This regulatory number should not be confused with the
20 HP Scanjet N7710 Scanner
Page 25

marketing name (HP Scanjet N7710) or product number (L1989A). Additional regulatory
information about your scanner can be found on the regulatory_supplement.htm file on
the HP Scanning Software CD.
NOTE: The regulatory label is on the bottom of the scanner. The output paper tray
covers up this label.
Recycle information
Recycling, energy consumption, and environmental information is located on the HP
Scanning Software CD that comes with the scanner. On the CD, browse for the file named
recycle_supplement.pdf.
Materials disposal
This HP product contains the following materials that might require special handling at
end-of-life:
Mercury in the fluorescent lamp in the scanner and/or transparent materials adapter.
Disposal of this material can be regulated because of environmental considerations. For
disposal or recycling information, please contact your local authorities or the Electronic
Industries Alliance (EIA)
www.eiae.org.
Disposal of Waste Equipment by Users in Private
Households in the European Union
English
This symbol on the product or on its packaging indicates that this product must not be
disposed of with your other household waste. Instead, it is your responsibility to dispose
of your waste equipment by handing it over to a designated collection point for the
recycling of waste electrical and electronic equipment. The separate collection and
recycling of your waste equipment at the time of disposal will help to conserve natural
resources and ensure that it is recycled in a manner that protects human health and the
environment. For more information about where you can drop off your waste equipment
for recycling, please contact your local city office, your household waste disposal service,
or the shop where you purchased the product.
Recycle information 21
Page 26

Chapter 6
22 HP Scanjet N7710 Scanner
Page 27

HP Scanjet N7710 掃描器
安裝和支援指南
繁體中文
Page 28

著作權與授權
© 2007 Copyright Hewlett-Packard
Development Company, L.P.
除非事先經過書面授權同意,否則不得
在著作權法同意的範圍之外從事翻印、
改寫或翻譯等行為。
本指南內容如有變更,恕不另行通知。
HP 產品與服務的保固範圍僅限於產品與
服務隨附的保固聲明中所提供的保固項
目。此處任何內容均不應解釋為額外的
保固。HP 對於本文件在技術上或編輯上
所含的錯誤或疏漏不負任何責任。
商標說明
ENERGY STAR 是美國環保署在美國的
註冊服務標誌。
Microsoft 和 Windows 是 Microsoft
Corporation 的註冊商標。
Page 29

目錄
掃描器安裝
1
包裝箱隨附物品...........................................................................................................2
安裝軟體......................................................................................................................3
安裝硬體......................................................................................................................4
測試安裝......................................................................................................................7
可自訂的設定檔標籤....................................................................................................8
掃描器按鈕與功能
2
掃描器按鈕...................................................................................................................9
特殊功能......................................................................................................................9
何處尋找更多資訊
3
HP Scanjet N7710 使用者指南..................................................................................11
HP 智慧型文件掃瞄軟體說明.....................................................................................11
HP 掃描器工具公用程式說明.....................................................................................11
其他軟體程式的說明..................................................................................................11
疑難排解
4
掃描器錯誤碼.............................................................................................................12
掃描器在安裝後無法運作...........................................................................................13
其他疑難排解說明的來源...........................................................................................14
繁體中文
產品保養與支援
5
保養和維護.................................................................................................................15
無障礙........................................................................................................................15
取得協助....................................................................................................................15
Hewlett-Packard 有限保固聲明..................................................................................16
法規資訊及產品規格
6
掃描器規格.................................................................................................................18
環境需求....................................................................................................................18
法規資訊....................................................................................................................18
回收資訊....................................................................................................................19
廢料處理....................................................................................................................19
歐盟居民廢棄設備處置方法.......................................................................................19
1
Page 30

1
掃描器安裝
請遵照這些步驟安裝掃描器:
檢查包裝盒內的物品
•
安裝軟體
•
安裝硬體
•
測試安裝
•
包裝箱隨附物品
取出掃描器硬體。請務必移除所有的包裝膠帶。
1
2
4
7
6
3
1 HP Scanjet N7710 掃描器
2
3
4 USB 纜線
5
6
7
8 Scanning software CD(如需更多資訊,請參閱位於第 3 页的「內含軟體」)
2 HP Scanjet N7710 掃描器
出紙匣
電源配接器
設定檔標籤
安裝和支援指南(本書)
進紙路徑清潔布
5
8
Page 31

安裝軟體
1. 將掃描器所附的 HP Scanning Software CD 插入電腦的光碟機中。
2.
3.
注意 請勿于此時將 USB 纜線連接至電腦。請先安裝掃描軟體再連接 USB
纜線。
稍候片刻,等安裝對話方塊顯示。幾分鐘之後,若安裝對話方塊並未顯示:
a. 按一下「開始」,再按一下「執行」。(在 Windows Vista 中,按一下
「開始」,然後在搜尋方塊中輸入「執行」)
會顯示「執行」對話方塊。
b. 在「開啟」方塊中,輸入 d:\setup.exe(此處 d: 為您電腦光碟機的字母代
號)。
按一下「確定」。
c.
按一下「安裝軟體」安裝掃描軟體。按照螢幕上的指示安裝以下應用程式:
• Kofax VRS 4.10
• HP Scanjet 驅動程式和工具
•HP 智慧型文件掃瞄軟體
為掃描燈選擇初始設定:
• 在「省電」模式中,掃描燈會在約 15 分鐘未使用後逾時並自動關閉。在
此模式中,掃描器符合 Energy Star 標準。
• 在「開啟立即掃描燈」模式中,掃描燈會在約 15 分鐘未使用後逾時並自
動關閉,但是它會保持暖機並準備好可以掃描。
繁體中文
內含軟體
本節將介紹掃描器隨附的掃描與文件管理軟體程式。
除了 HP 軟體程式以外,掃描器中還包含了一些受歡迎的文件管理應用程式。這
個額外的軟體可能並不適用於所有掃描器型號或所有國家/地區。
如需有關其他掃描軟體程式的資訊,請開啟程式,然後按一下功能表列中的「說
明」。
HP Scanning Software CD
程式 軟體用途
HP 智慧型文件掃瞄軟體
HP 掃描器工具公用程式
ISIS/TWAIN 驅動程式
Kofax VirtualReScan
用來為多頁面文件建立高品質的掃描,並自動化您常用的掃描工
作。
用來指定設定檔至號碼,以配置掃描器前面板上的按鈕及尋找有
關掃描器設定、狀態與維護的資訊。
這些驅動程式是在共用包含標準企業應用程式的掃描器和自訂軟
體時所需的驅動程式。他們符合掃描器正常運作的最低需求。
用來為彩色或破損的文件建立較清晰可讀的掃描。
安裝軟體
3
Page 32

第 1 章
ScanSoft PaperPort CD
程式 軟體用途
ScanSoft PaperPort 用於組織、尋找和共享紙質和 PDF 文件。
I.R.I.S. Readiris Pro CD
程式 軟體用途
I.R.I.S. Readiris Pro 用來掃描含有完整功能光學字元辨識 (OCR) 的鍵入文件來建立
NewSoft Presto!BizCard CD
程式 軟體用途
NewSoft Presto!BizCard
安裝硬體
完成以下工作,以安裝掃描器硬體並準備好以供使用。
連接電源配接器
電源配接器有一條插入掃描器背面的連接纜線。此纜線末端的接頭有一綠色的
LED,會在電源配接器運作正常時亮著。
電源配接器也有一條 AC 纜線,一端連接到電源配接器,另一端則插入至電源插
座或電湧保護器。
1. 將 AC 纜線插入電源配接器的背面。
可以各種檔案格式儲存的可編輯文字。
用來將名片轉換為可以由多個使用者共用、可以匯出至聯絡人管
理軟體及可以與 PDA 同步的資料庫。
2. 將 AC 纜線的另一端插入電源插座或電湧保護器。
3. 請檢查電源配接器纜線接頭上的綠色 LED 是否亮著。
• 如果綠色 LED 不亮,請確定 AC 纜線插入的電源插座或電湧保護器是否
正常供電。
• 如果電源插座或電湧保護器為正常供電,但是綠色 LED 不亮,則可能是
電源配接器有瑕疵。請聯絡 HP 支援 尋求協助。
4 HP Scanjet N7710 掃描器
Page 33

4. 如果綠色 LED 亮著,請將電源配接器插入掃描器背面。
將掃描器背面的電源開關按至開啟位置。
5.
連接 USB 纜線
注意 請確定在使用 USB 纜線將掃描器連接至電腦之前,您已經安裝了 HP
掃描軟體。請參閱位於第 3 页的「安裝軟體」。
使用掃描器隨附的 USB 纜線將掃描器連接到電腦。將纜線方形的一端連接至掃
描器,將纜線矩形的一端連接至電腦。
繁體中文
附註 HP 建議使用電腦背面的 USB 連接埠,以便更穩固地連接掃描器。
安裝硬體
5
Page 34

第 1 章
使掃描器就緒以便使用
將紙匣背面滑動到掃描器前下方的插槽中,連接出紙匣。
1.
對於較長的原稿,請將文件進紙器延伸板拉長。
2.
展開摺板來延伸出紙匣。
3.
4. 輕輕開啟掃描器隨附的 HP 進紙路徑清潔布包裝。
拿出清潔布並展開。
5.
將展開的清潔布放入文件進紙器之中。
6.
2
1
3
按下「工具」(
7.
6 HP Scanjet N7710 掃描器
)按鈕來開啟掃描器工具公用程式。按一下「維護」標籤。
Page 35

8.
9. 請重複步驟 8 至少一次。
測試安裝
按一下「清潔」按鈕來將清潔布送到掃描器中。
附註 清潔布應該會送入掃描器中。這樣可以確認硬體安裝是否成功、驅
動程式及工具是否安裝以及掃描器硬體是否能夠正常運作。
如果清潔布未通過進紙路徑且停留在了出紙匣中,則表示掃描器安裝可能
尚未完成。請參閱本指南中「疑難排解」一節的位於第 13 页的「掃描
器在安裝後無法運作」。
注意 在將紙放到文件進紙器中之前,請先等待兩分鐘讓元件晾乾。
附註 您需要定期使用進紙路徑清潔布來進行其他保養和維護工作。若要訂購
進紙路徑清潔布,請造訪
www.hp.com/support。
注意 在將原稿置於文件進紙器時,請確定原稿沒有未乾的膠水、修正液或其
他會進入掃描器內部的物質。
請確定紙張沒有捲曲、皺摺、釘書針、紙夾以及任何其他的黏附材料。紙張
不可黏在一起。
將一張紙放入文件進紙器。紙張應該面朝下,頁面的頂端要朝下放置(
1.
調整紙張導板。紙張導板必須碰觸到紙張的兩邊才能正確運作。請確定紙張
2.
是放正的,而且紙張導板緊靠紙張的邊緣。
)。
繁體中文
測試安裝
7
Page 36

第 1 章
按下掃描文件至(
3.
• 如果您已經安裝了 HP 智慧型文件掃瞄軟體,紙張的掃描影像將會顯示在
電腦螢幕上。若掃描沒有顯示在電腦螢幕上,請參閱位於第 14 页的
「解除安裝並重新安裝 HP Scanjet 驅動程式與公用程式」。
• 如果您未安裝 HP 智慧型文件掃描軟體,請從您要用來掃描的軟體應用程
式中掃描。如果此應用程式的掃描程序正常,則表示軟體安裝成功。如果
此應用程式的掃描程序不正常,請查閱您應用程式的軟體說明。
安裝其他您想要使用的軟體。
4.
可自訂的設定檔標籤
HP 智慧型文件掃描軟體可讓您建立設定檔,它包含用來掃描、處理及儲存或傳
送文件時的設定。您可以指定設定檔至可從掃描器前面板中選擇的號碼。如需設
定設定檔的資訊,請參閱《HP Scanjet N7710 使用者指南》中的「設定掃描設
定檔」。
掃描器隨附的設定檔標籤提供了一處地方可列出最多十二個號碼,以及指定至這
些號碼的設定檔。標籤可以直接貼在掃描器前面的下拉匣上。若要從下拉匣上清
除標籤,請揭起標籤一角,然後將標籤從匣上撕下來。請勿將新標籤置於舊標籤
的上面。
)按鈕。紙張應該會送入掃描器中。
如果您需要透過可以列印的範本來建立更多設定檔標籤,請使用位於 HP Scanning
Software CD 上的 label_template.doc 檔案。
若要自訂並列印設定檔標籤,請依照下列步驟執行:
1. 開啟 Microsoft Word 中的範本。
按兩下設定檔號碼右側的文字表格欄位。會顯示對話方塊。
2.
在「預設文字」欄位中按一下,然後輸入對設定檔的簡短描述。
3.
4. 針對您想要輸入的每個設定檔描述重複步驟 2 與步驟 3。
按一下「確定」。
5.
在列印於標籤頁之前,請先將標籤列印在一般的紙張上。將測試列印件放在
6.
滿版的標籤頁上,以確認文字是否與標籤頁對齊。
7. 在滿版的 8 1/2”x 11”或 A4 標籤頁上列印,並沿著輪廓剪切每個標籤。
將標籤置於掃描器前面的下拉匣。
8.
8 HP Scanjet N7710 掃描器
Page 37

2
掃描器按鈕與功能
掃描器按鈕
使用掃描器前面板上的按鈕來開始掃描、選擇掃描的設定檔,以及配置某些掃描
器設定。
4
5
1
圖示 按鈕名稱 描述
1
2
3
4
5
選擇設定檔號碼或份數 (在掃描之前)選擇設定檔或(在影印之前)選
掃描文件至 使用指定至已顯示號碼的設定檔開始掃描。
影印 按所顯示的份數進行列印。
取消 取消進行中的掃描或影印。
工具
2
3
擇份數。
選擇的設定檔號碼或份數會顯示在前面板上。
開啟 HP 掃描器工具公用程式,您可以在其中配
置掃描器前面板按鈕、指定設定檔及檢視維護資
訊。
如需比本章更詳細的掃描器按鈕資訊,請參閱《HP Scanjet N7710 使用者指
南》。
繁體中文
特殊功能
下表摘要列出掃描器的一些重要功能。這些功能中的許多功能都適用於 HP 智慧
型文件掃瞄軟體或其他隨附的掃描軟體。如需更多資訊,請參閱 HP 智慧型文件
掃瞄軟體說明。
功能 描述
卡片插槽 您可以使用掃描器後面的卡片插槽來掃描堅硬物品,例如複合
卡與浮凸卡。
掃描器按鈕與功能
9
Page 38

第 2 章
(續)
功能 描述
如需有關如何使用卡片插槽的資訊,請參閱掃描器《使用者指
南》。
各種範圍的紙張大小
設定檔 您可以設定和使用包含所有掃描工作所必需的設定之設定檔,
頁面管理 您可以檢視、編輯、刪除、插入和重新排列頁面。您也可以讓
檔案管理 您可以將所有頁面掃描至單一檔案、將每一頁面掃描至個別檔
光學字元辨識 (OCR) 使用 OCR 軟體,可以讓您將原稿當成可編輯文字來掃描並傳
傳送文件至 您可以設定設定檔,以將掃描過的文件傳送至多個目的地,例
您可以掃描一疊原稿,大小範圍可從名片到 Legal 紙張。您一
次可掃描一張最大 215.9 x 863.6 mm(8.5 x 34 英吋)的原稿。
例如:
文件處理
•
使用自動命名機制,以不同檔案格式(可搜尋或不可搜尋
•
的 PDF 檔案格式)儲存
傳送至不同目的地,例如電子郵件、Microsoft SharePoint
•
或其他應用程式
掃描器自動刪除空白頁。
案,或是根據原稿中的條碼或空白頁來掃描至不同檔案。
送至您慣用的應用程式。
如本機資料夾、網路資料夾、電子郵件或自訂應用程式。
10 HP Scanjet N7710 掃描器
Page 39

3
何處尋找更多資訊
掃描器隨附了數個資訊來源,討論掃描器和掃描軟體的使用。
HP Scanjet N7710 使用者指南
掃描器的《使用者指南》是掃描器資訊(例如使用、維護掃描器及解決掃描器的
問題)的主要來源。它為編譯過的說明 (.CHM) 檔案。
若要以安裝的(系統)語言開啟《使用者指南》,請依照下列步驟執行:
▲ 按一下「開始」,依序點選「程式集」或「所有程式」、「HP」、
「Scanjet」、「N7710」,然後按一下「使用者指南」。
若要以其他語言開啟《使用者指南》,請依照下列步驟執行:
1. 將掃描器所附的 HP Scanning Software CD 插入電腦的光碟機中。
稍候片刻,等安裝對話方塊顯示。
按一下「檢視指南」。
2.
會顯示語言清單。
按一下您要的語言。
3.
HP 智慧型文件掃瞄軟體說明
HP 智慧型文件掃瞄軟體說明說明如何使用 HP 智慧型文件掃瞄軟體的功能,例
如建立及編輯設定檔。
若要開啟 HP 智慧型文件掃瞄軟體說明,請按兩下電腦桌面上的「HP 智慧型文
件掃瞄軟體」圖示,然後按一下功能表列上的「說明」。
繁體中文
HP 掃描器工具公用程式說明
HP 掃描器工具公用程式說明介紹掃描器的設定、有關掃描器狀態及維護的資
訊,及如何將掃描器設定檔指定至您可以在掃描器前面板上選擇的號碼。
若要開啟 HP 掃描器工具公用程式說明,請按下掃描器前面板上的工具按鈕,然
後按一下 HP 掃描器工具公用程式對話方塊中的「說明」。
其他軟體程式的說明
如需有關任何掃描器隨附之軟體程式的資訊,請開啟程式,然後按一下功能表列
上的「說明」。
何處尋找更多資訊
11
Page 40

4
疑難排解
掃描器錯誤碼
如需對應錯誤碼的說明,請參閱以下適當主題。
錯誤碼 描述
錯誤 02,SDRAM 錯誤 將電源開關按至關閉位置。請等待 30 秒,然後將電源開關按至開啟
錯誤 03,USB 錯誤 1. 檢查掃描器和電腦間的 USB 連接。
錯誤 04,卡紙
錯誤 08,罩蓋開啟
錯誤 09,NVRAM 存取錯誤 將電源開關按至關閉位置。請等待 30 秒,然後將電源開關按至開啟
錯誤 10,馬達故障 將電源開關按至關閉位置。請等待 30 秒,然後將電源開關按至開啟
錯誤 18,多頁送紙錯誤
位置。若仍然顯示該訊息,請聯絡
2. 使用「Windows 裝置管理員」工具來確認電腦是否可識別掃描
器。
您可以在「控制台」中的「系統」工具的「硬體」標籤上找到
「Windows 裝置管理員」。
如果電腦不能識別掃描器,請解除安裝再重新安裝掃描器軟體。
3.
4. 如果問題仍然存在,請聯絡
偵測到文件進紙器發生卡紙。打開罩蓋,清除卡紙。
文件進紙器罩蓋為開啟的或未牢牢地鎖住。請按下罩蓋直至聽到它
卡入到位,以關閉罩蓋,再重新掃描。
位置。若仍然顯示該訊息,請聯絡
位置。若仍然顯示該訊息,請聯絡
掃描器偵測到一次有多於一頁的紙張從掃描器送入。請遵照這些步
驟解決錯誤:
從文件進紙器上取出紙張。
1.
將紙張排序,確定紙張沒有黏在一起。
2.
請確定紙張符合掃描器《使用者指南》中指定的大小與重量規
3.
格。
將紙張放回文件進紙器中。
4.
如果在沒有紙張送入錯誤時發生此錯誤,則說明偵測送紙錯誤(多
頁送紙)感應器未正確運作。聯絡 HP 支援。
HP 支援。
HP 支援。
HP 支援。
HP 支援。
錯誤 23,燈泡錯誤 將電源開關按至關閉位置,以關閉掃描器電源。請等候 30 秒,然後
錯誤 24,選紙錯誤
12 HP Scanjet N7710 掃描器
附註 您可以停用 TWAIN/ISIS「Advanced Settings」對話方塊中
的偵測送紙錯誤(多頁送紙)。
將電源開關按至開啟位置,以開啟掃描器電源。若仍然顯示該訊
息,請聯絡
文件進紙器無法選取紙張,或是卡紙。請遵照這些步驟解決錯誤:
1.
2.
3.
4.
HP 支援。
從文件進紙器上取出紙張。
將紙張排序,確定紙張沒有黏在一起。
請確定紙張符合掃描器《使用者指南》中指定的大小與重量規
格。
放回整疊原稿並再試一次。
Page 41

掃描器在安裝後無法運作
若掃描器在安裝後無法運作,您可能會在電腦上看到下列其中一項訊息:
無法起始掃描器。
•
找不到掃描器。
•
發生內部錯誤。
•
電腦無法和掃描器建立通訊。
•
請試著執行下列步驟來解決問題:
檢查纜線
確認纜線的連接是否能正常工作。
電源配接器
電源配接器有一條插入掃描器背面的連接纜線。此纜線末端的接頭有一綠色的
LED,會在電源配接器運作正常時亮著。
電源配接器也有一條 AC 纜線,一端連接到電源配接器,另一端則插入至電源插
座或電湧保護器。
電源線連接掃描器與電源插座。
1. 請檢查電源配接器纜線接頭上的綠色 LED 是否亮著。
2. 如果綠色 LED 不亮,請確定 AC 纜線插入的電源插座或電湧保護器是否正常
供電。
3. 如果電源插座或電湧保護器為正常供電,但是綠色 LED 不亮,則可能是電源
配接器有瑕疵。請聯絡 HP 支援尋求協助。
檢查電源按鍵開關是否為開啟。
4.
USB 纜線
檢查掃描器的實體連接:
• 使用掃描器隨附的纜線。其他的 USB 纜線可能與掃描器不相容。
• 請檢查 USB 纜線是否穩固地連接掃描器與電腦或 USB 集線器。當 USB 纜
線正確地連接至掃描器時,纜線上的三叉戟圖示是朝上的。
疑難排解 USB 連接:
繁體中文
掃描器在安裝後無法運作
13
Page 42

第 4 章
根據掃描器連接至電腦的方式,執行下列其中一項工作:
1.
• 若 USB 纜線是連接到 USB 集線器或筆記型電腦的銜接站,請將 USB 纜
線拔離 USB 集線器或筆記型電腦的銜接站,然後將其直接連接至電腦。
• 若 USB 纜線是直接連接至電腦,請將它插入至電腦的另一個 USB 連接
埠。
• 請自電腦移除鍵盤和滑鼠以外的所有 USB 裝置。
關閉掃描器後再將其開啟。
2.
重新啟動電腦。
3.
在電腦重新啟動之後,再試著使用掃描器。
4.
若掃描器能正常工作且您是按照步驟 1 的方法變更掃描器與電腦的連接方式
的,則通訊問題可能和 USB 集線器或銜接站有關。請繼續讓掃描器直接連接
至電腦。
若掃描器無法工作,請解除安裝再重新安裝 HP 掃描軟體。
解除安裝並重新安裝 HP Scanjet 驅動程式與公用程式
若檢查掃描器纜線無法解決問題,則問題可能是因為安裝不完全所引起。試著解
除安裝再重新安裝 HP 掃描驅動程式和公用程式。
1. 從電腦上拔除 USB 電纜線。
2. 使用「控制台」中的「新增/移除」工具(在 Windows Vista 中為「程式與功
能」工具)來解除安裝以下應用程式:
• 「HP Scanjet N7710 檔案 ISIS/TWAIN」
• 「HP Scanjet 驅動程式和工具」
3. 在移除 HP 掃描軟體之後,請自電源插座拔除掃描器。
重新啟動電腦。
4.
5. 將 HP Scanning Software CD 放入電腦的光碟機中。
6. 請按照螢幕上的指示安裝 HP 掃描軟體。
7. 在安裝 HP 掃描軟體之後,請將掃描器連接至電源插座,然後開啟掃描器電
源,接著使用 USB 纜線將掃描器連接至電腦。
按照螢幕上的說明進行。
8.
其他疑難排解說明的來源
如需更多掃描器硬體或軟體的疑難排解說明,請參閱位於第 11 页的「何處尋找
更多資訊」。
14 HP Scanjet N7710 掃描器
Page 43

5
產品保養與支援
本節將說明產品支援的選項。
保養和維護
經常清潔掃描器可以確保高品質的掃描。保養的次數依據若干因素決定,包括使
用量和環境。您應該依需要定期執行清潔。
當需要維護時,HP 掃描器工具公用程式會提醒您。如需尋找公用程式的說明,
請參閱位於第 11 页的「何處尋找更多資訊」。
如需維護掃描器的指示,請參閱 HP Scanjet N7710《使用者指南》。如需尋找
指南的說明,請參閱位於第 11 页的「何處尋找更多資訊」。
注意 在將原稿置於文件進紙器時,請確定原稿沒有未乾的膠水、修正液或其
他會進入掃描器內部的物質。
請確定紙張沒有捲曲、皺摺、釘書針、紙夾以及任何其他的黏附材料。紙張
不可黏在一起。
無障礙
下列是可用於掃描器的無障礙選項:
• LCD Reader 是軟體程式,它會顯示掃描器前面板顯示的變更內容。LCD
•
如需關於 LCD Reader 及如何停用掃描器按鈕的詳細資訊,請參閱 HP Scanjet
N7710《使用者指南》。如需尋找指南的說明,請參閱位於第 11 页的「何處尋
找更多資訊」。
身心障礙的顧客,請造訪
prodserv/ 取得協助。
取得協助
為取得 HP 產品的最佳效能,請諮詢 HP 所提供的下列標準支援:
繁體中文
Reader 可讓無障礙軟體工具語言化顯示掃描器前面板上的內容。
為了防止意外按下按鈕,您可以停用掃描器前面板上的按鈕。
www.hp.com/hpinfo/community/accessibility/
產品保養與支援
15
Page 44

第 5 章
請參閱產品隨附的產品文件。
1.
檢視本手冊中的疑難排解一節。
•
• 檢視位於第 11 页的「何處尋找更多資訊」中說明的軟體文件。
2. 請造訪 HP 線上支援,網址是:
www.hp.com/support,或聯絡當地的經銷
商。
HP 的所有顧客都可以使用 HP 線上支援。這是最快速取得最新產品資訊以及
專家協助的來源,包括下列功能:
透過電子郵件快速聯絡合格的線上支援專員
•
您產品的軟體和驅動程式更新
•
提供寶貴的技術方面的產品和疑難排解資訊
•
• 主動產品更新、支援警示和 HP 新聞通訊(註冊產品即可取得)
3. 用電話聯絡 HP 支援
• 支援選項與費用根據產品、國家/地區和語言而有所不同。
• 費用和政策如有變更,恕不另行通知。請造訪網站
www.hp.com/
support 以取得最新的資訊。
保固期後的期間
4.
在有限保固期限過後,您可以在
延長或升級您的保固
5.
若您想要延長或升級產品的保固,請聯絡當地經銷商或查詢
www.hp.com/support 取得線上協助。
www.hp.com/
support 網站提供的 HP Care Pack。
6. 如果您已經購買 HP Care Pack 服務,請檢視您合約中的支援條件。
Hewlett-Packard 有限保固聲明
HP Scanjet N7710 掃描器
1. HP 向您(最終使用消費者)保證,HP 硬體、附件及耗材,自購買之日起的
一年內,無材料及製造上的瑕疵。如果 HP 在擔保期內收到此類瑕疵的報告,HP
將對經查證後有瑕疵的產品自行決定維修或更換。更換的產品可能是全新的或其
性能相當於全新產品。
2. HP 向您保證在自購買之日起的上述指定期間內,HP 軟體若正確安裝和使
用,將不會因材料及製造上的暇疵而不執行其程式指令。若 HP 在保固期內收到
此類瑕疵的報告,HP 將更換由於瑕疵而無法執行程式指令的軟體。
3. HP 並不保證 HP 產品操作時不會中斷或無誤。如果 HP 無法在合理時間內,
維修或更換符合上述擔保條件之任何產品,HP 在您及時退回產品後,將立即退
給您購買價格的全款。
4. HP 產品可能包含性能上相當於新部件的再製部件或偶然使用過的部件。
5. 本保固並不適用於下列瑕疵成因 (a) 維護或校準不當或不足,(b) 非 HP 提供
的軟體、介面、零件或耗材,(c) 未經授權的修改或誤用,(d) 適用於產品公共環
境規格以外的操作,或 (e) 不適當的場地準備或維護。
6. 除非當地法律另有規定,上述保固具專有權且無其他保固或條件,不論書面或
口頭,明示或暗示,HP 特別聲明絕無特定目的之商品化、品質滿意度和適用性
16 HP Scanjet N7710 掃描器
Page 45

的暗示性保固或條件。有些國家/地區、州或省不許可暗示性保固之期限,因此
上述之限制或專有權可能不適用於您。本保固給予您指定的法律權利且您可能擁
有因各國家/地區、各州或各省而不同的其他權利。
7. HP 之有限擔保在本 HP 產品有支援及銷售的任何國家/地區或區域皆有效。您
接收的擔保服務程度可能因地區性標準而不同。HP 將不會改變產品的外型、大
小或功能來特別適應某國家/地區的法律或法規,強制其能夠在該國家/地區使用。
8. 除非當地法律另有規定,本保固聲明中的補償是您獨一且專有的補償。除上述
指示之外,對於資料之遺失或直接、特殊、偶發、間接的損害(包括資料或利益
損失),或其他的損害(無論根據契約、侵權行為或其他法律理論),HP 或其
供應商概不負責。有些國家/地區、州或省不許可排除或限制偶發或間接的損
壞,因此上述的限制或專有權可能不適用於您。
9. 本聲明包含的擔保條款,除非法律允許的範圍,不得排除、限制或修改,並且
是適用售予您的產品附有的強制性法規權利。
繁體中文
Hewlett-Packard 有限保固聲明 17
Page 46

6
法規資訊及產品規格
本節介紹 HP Scanjet N7710 掃描器和配件的法規資訊及產品規格。
掃描器規格
名稱 描述
掃描器類型 雙面送紙掃描器
大小
重量
掃描元件
介面
光學解析度
AC 電源 32V~,50/60Hz,2500mA,80W
耗電量
寬度:320 mm(12.6 英吋),深度:270 mm(10.6 英吋),高度:
312 mm(12.3 英吋)
5.4 kg(11.8 磅)
電荷耦合器件 (CCD)
USB 2.0 高速(與 USB 1.1 相容)
600 x 600 dpi 硬體
如需耗電量資料,請參閱 HP Scanning Software CD 上的
regulatory_supplement.htm 檔案。
您的 HP 掃描器符合 ENERGY STAR® 標準。做為 ENERGY STAR® 的合
作夥伴,Hewlett-Packard 公司已確定此產品符合 ENERGY STAR® 的能
源效率規範。
環境需求
名稱 描述
溫度
相對濕度
法規資訊
法規辨識型號:為了法規辨識的目的,您的產品擁有一個法規辨識型號
(Regulatory Model Number)。您產品的法規辨識型號為 FCLSD-0704。此法規
型號不應與行銷名稱 (HP Scanjet N7710) 或產品編號 (L1989A) 混淆。如需更多
的掃描器法規資訊,請參閱 HP Scanning Software CD 上的
regulatory_supplement.htm 檔案。
18 HP Scanjet N7710 掃描器
操作掃描器:10° 至 35° C(50° 至 95° F)
儲存掃描器:-40° 至 60° C(-40° 至 140° F)
操作掃描器:百分之 15 至百分之 80 無冷凝 10° 至 35° C(50° 至 95° F)
儲存掃描器:上限為百分之 90 無冷凝 0° 至 60° C 或(32° 至 140° F)
Page 47

附註 法規標籤位於掃描器的底部。出紙匣會遮住此標籤。
回收資訊
資源回收、耗電量和環境資訊位於掃描器隨附的 HP Scanning Software CD 上。
在 CD 中,瀏覽名為 recycle_supplement.pdf 的檔案。
廢料處理
本 HP 產品包含了下列在產品報廢時需要特殊處理的物質:
掃描器內的螢光掃描燈和/或透明材料配接器中的汞。
此廢料處理因環境考量而受到規範。如需處理或回收的資訊,請聯絡當地的主管
機關或電子工業聯盟 (EIA)
www.eiae.org。
歐盟居民廢棄設備處置方法
繁體中文
產品或其包裝上的符號說明本產品不可以和其他家庭垃圾一同丟棄。並且,您應
負責將您的廢棄設備送交指定的廢棄電器或電子設備回收地點進行處理。將廢棄
設備分纇回收處理有助於自然資源保育,並可維護人體健康及生活環境。如需棄
置廢棄設備以供回收的地點詳細資訊,請聯絡當地市政主管機關、家庭廢棄物棄
置中心或您購買產品的商店。
回收資訊
19
Page 48

第 6 章
20 HP Scanjet N7710 掃描器
Page 49

HP Scanjet N7710 스캐너
설치 및 지원 설명서
한국어
Page 50

저작권 및 라이센스
© 2007 Copyright Hewlett-Packard
Development Company, L.P.
저작권법에서 허용하지 않는 한 사전 서
면 동의 없이는 전재, 수정 또는 번역을
금합니다.
여기 포함된 정보는 사전 통보 없이 변
경될 수 있습니다.
HP 제품 및 서비스에 대한 유일한 보증
은 해당 제품 및 서비스의 보증서에 명
시되어 있습니다. 여기의 어떠한 문구
도 추가적 보증으로 해석될 수 없습니
다. HP 는 여기에 포함된 기술적 또는
편집상 오류나 누락에 대해 책임을 지지
않습니다.
상표 소유권
ENERGY STAR 는 미국 환경보호청
(EPA)의 미국 등록 서비스 상표입니다.
Microsoft 및 Windows 는 Microsoft
Corporation 의 등록 상표입니다.
Page 51

목차
1
스캐너 설치
상자에 들어 있는 항목................................................................................2
소프트웨어 설치........................................................................................3
하드웨어 설치...........................................................................................4
설치 확인.................................................................................................7
사용자 지정 프로필 레이블..........................................................................8
2
스캐너 단추 및 기능
스캐너 단추.............................................................................................10
특별한 기능.............................................................................................10
3
추가 정보를 얻는 방법
HP Scanjet N7710 사용 설명서...................................................................12
HP 지능형 문서 스캔 소프트웨어 도움말.......................................................12
HP 스캐너 도구 유틸리티 도움말.................................................................12
기타 소프트웨어 프로그램 도움말................................................................12
4
문제 해결
스캐너 오류 코드......................................................................................13
설치 후에 스캐너가 작동하지 않을 경우........................................................14
기타 문제 해결 도움말 소스........................................................................16
5
제품 관리 및 지원
관리 및 유지보수......................................................................................17
사용자 서식.............................................................................................17
제품 관련 지원.........................................................................................17
Hewlett-Packard 제한 보증.........................................................................18
6
규정 정보 및 제품 사양
스캐너 사양.............................................................................................20
환경 사양................................................................................................20
규정 정보................................................................................................20
재활용 정보.............................................................................................21
소재 폐기................................................................................................21
유럽 연합 지역에서 일반 가정의 폐기 장비 처리.............................................21
한국어
1
Page 52

1
스캐너 설치
스캐너를 설치하려면 다음과 같이 하십시오.
•
상자에 들어 있는 항목 확인
•
소프트웨어 설치
•
하드웨어 설치
•
설치 확인
상자에 들어 있는 항목
스캐너 하드웨어 포장 상자를 풀고 포장용 테이프를 떼어 내십시오.
1
2
4
7
6
1
2
3
4
5
6
7
8
2
HP Scanjet N7710 스캐너
3
5
HP Scanjet N7710 스캐너
출력 용지함
전원 공급 장치
USB 케이블
프로필 레이블
설치 및 지원 설명서(본 책자)
용지 경로 청소용 천
스캐닝 소프트웨어 CD(자세한 내용은 3 페이지의 포함된 소프트웨어 참조)
8
Page 53

소프트웨어 설치
주의 아직 USB 케이블을 컴퓨터에 연결하지 마십시오. 스캐닝 소프트웨어
를 설치한 후에 USB 케이블을 연결하십시오.
1.
스캐너와 함께 제공되는 HP Scanning Software CD 를 컴퓨터 CD 드라이브
에 넣으십시오.
설치 대화 상자가 나타날 때까지 기다립니다. 몇 분이 지나도 설치 대화 상
자가 나타나지 않으면 다음과 같이 하십시오.
a. 시작, 실행을 차례로 누르십시오. Windows Vista 의 경우 시작을 누른 다
음 검색 상자에 실행을 입력합니다.
실행 대화 상자가 표시됩니다.
b. 열기 상자에서 d:\setup.exe 를 입력합니다. 여기서 d:은 컴퓨터 CD 드라
이브의 문자입니다.
c. 확인을 누릅니다.
2.
소프트웨어 설치를 눌러 스캐닝 소프트웨어를 설치합니다. 화면에 나타나는
지시에 따라 다음과 같은 응용 프로그램을 설치합니다.
•
Kofax VRS 4.10
•
HP Scanjet 드라이버 및 도구
•
HP 지능형 문서 스캔 소프트웨어
3.
스캐너 램프의 초기 설정을 선택합니다.
•
절전 모드에서 약 15분 동안 스캐너를 사용하지 않을 경우 스캐너 램프
는 자동으로 꺼집니다. 이 모드에서 스캐너는 Energy Star 규정을 준수합
니다.
•
순간 램프 켜짐 모드에서 약 15분 동안 스캐너를 사용하지 않으면 스캐
너 램프가 자동으로 꺼지지만 예열된 상태를 유지하므로 곧바로 스캔할
수 있습니다.
포함된 소프트웨어
이 단원에서는 스캐너와 함께 제공되는 스캐닝 및 문서 관리 소프트웨어 프로
그램에 대해 설명합니다.
HP 소프트웨어 프로그램 이외에 널리 사용되는 문서 관리 응용 프로그램 일부
가 스캐너와 함께 제공됩니다. 이 추가적인 소프트웨어는 일부 스캐너 모델 또
는 일부 국가나 지역에서 사용하지 못할 수도 있습니다.
기타 스캐닝 소프트웨어 프로그램에 대한 자세한 내용을 보려면 해당 프로그램
을 연 다음 메뉴 모음에서 도움말을 누릅니다.
HP Scanning Software CD
프로그램 소프트웨어 용도
HP 지능형 문서 스캔 소프트웨어여러 페이지의 문서에서 고품질 스캔을 만들고 자주 수행하는
스캔 작업을 자동화하는 데 사용합니다.
소프트웨어 설치
한국어
3
Page 54

제 1 장
(계속)
프로그램 소프트웨어 용도
HP 스캐너 도구 유틸리티 번호에 프로필을 지정하고 스캐너 전면 패널의 단추를 구성하고
ISIS/TWAIN 드라이버 이들 드라이버는 표준 업무용 응용 프로그램 및 사용자 지정 소
Kofax VirtualReScan
스캐너 설정, 상태 및 유지보수에 대한 정보를 찾는 데 사용합니
다.
프트웨어와 함께 스캐너를 사용하는 데 필요합니다. 스캐너가
제대로 작동하려면 최소 요구 사항을 충족해야 합니다.
컬러 또는 손상된 문서에서 더욱 선명하고 가독성이 높은 스캔
을 만드는 데 사용합니다.
ScanSoft PaperPort CD
프로그램 소프트웨어 용도
ScanSoft PaperPort
용지와 PDF 문서를 구성, 검색 및 공유하는 데 사용합니다.
I.R.I.S. Readiris Pro CD
프로그램 소프트웨어 용도
I.R.I.S. Readiris Pro
타이핑된 문서를 완전한 OCR(광학 문자 인식) 기능을 통해 스
캔하여 다양한 파일 형식으로 저장할 수 있는 편집 가능 텍스트
를 만드는 데 사용합니다.
NewSoft Presto! BizCard CD
프로그램 소프트웨어 용도
NewSoft Presto! BizCard
명함을 데이터베이스로 변환하여 여러 사용자가 공유하거나 연
락처 관리 소프트웨어로 내보내거나 PDA 와 동기화하는 데 사
용합니다.
하드웨어 설치
다음 작업을 완료하여 스캐너 하드웨어를 설치하고 사용할 준비를 하십시오.
전원 공급 장치 연결
전원 공급 장치에는 스캐너 뒤에 꽂는 케이블이 연결되어 있습니다. 이 케이블
의 한쪽 끝에 있는 커넥터에는 전원 공급 장치가 제대로 작동할 때 켜지는 녹
색 LED 가 있습니다.
또한 전원 공급 장치에는 한쪽 끝을 전원 공급 장치에 연결하고 다른 한쪽 끝을
전원 콘센트나 과전압 억제기에 꽂는 AC 케이블이 있습니다.
1.
AC 케이블을 전원 공급 장치 뒤에 꽂으십시오.
4
HP Scanjet N7710 스캐너
Page 55

2.
AC 케이블의 다른 한쪽을 전원 콘센트나 과전압 억제기에 꽂으십시오.
3.
전원 공급 장치 케이블 커넥터의 녹색 LED 가 켜져 있는지 확인합니다.
•
녹색 LED 가 켜지지 않으면 AC 케이블을 꽂은 전원 콘센트나 과전압 억
제기에 전원이 들어오는지 확인합니다.
•
전원 콘센트나 과전압 억제기에 전원이 들어오지만 녹색 LED 가 여전히
켜지지 않으면 전원 공급 장치에 결함이 있을 수 있습니다. HP 고객 지원
센터에 문의하십시오.
4.
녹색 LED 가 켜져 있으면 전원 공급 장치를 스캐너 뒤에 꽂습니다.
5.
스캐너 뒤의 전원 스위치를 켜짐 쪽으로 누릅니다.
USB 케이블 연결
주의 USB 케이블을 사용하여 스캐너를 컴퓨터에 연결하기 전에 HP 스캐
닝 소프트웨어를 설치해야 합니다. 3 페이지의 소프트웨어 설치를 참조하
십시오.
스캐너와 함께 제공되는 USB 케이블을 사용하여 스캐너를 컴퓨터에 연결하십
시오. 케이블의 정사각형 모양 끝을 스캐너에 연결하고 직사각형 모양 끝을 컴
퓨터에 연결합니다.
하드웨어 설치
한국어
5
Page 56

제 1 장
참고 스캐너와 더 안정적으로 연결되도록 하려면 컴퓨터 뒷면의 USB 포트
를 사용하는 것이 좋습니다.
스캐너 사용 준비
2
1
1.
2.
3.
4.
5.
6.
6
HP Scanjet N7710 스캐너
3
스캐너 전면 아래에 있는 슬롯에 출력 용지함의 뒤쪽을 밀어 넣어 용지함을
연결합니다.
원본 용지가 긴 경우 문서 공급기 확장대를 펼칩니다.
플랩을 펼쳐 출력 용지함을 확장합니다.
스캐너와 함께 제공되는 HP 용지 경로 청소용 천이 들어 있는 포장을 천천
히 뜯습니다.
청소용 천을 꺼내 폅니다.
이 천을 문서 공급기에 넣습니다.
Page 57

7.
8.
9.
설치 확인
도구(
) 단추를 눌러 스캐너 도구 유틸리티를 엽니다. 유지보수 탭을 누릅
니다.
청소 단추를 눌러 천을 스캐너 안으로 넣습니다.
참고 천은 스캐너 내부를 통과합니다. 이렇게 하면 하드웨어가 제대로
설치되었는지 드라이버 및 도구가 설치되었는지 스캐너 하드웨어가 정
상적으로 작동하는지 확인할 수 있습니다.
청소용 천이 용지 경로를 통과하여 출력 용지함으로 나오지 않으면 스캐
너가 제대로 설치되지 않았을 수 있습니다. 이 설명서의 문제 해결 단원
에서 14 페이지의 설치 후에 스캐너가 작동하지 않을 경우를 참조하
십시오.
8단계를 최소 한 번 반복하십시오.
주의 문서 공급기에 용지를 넣기 전에 구성 부품이 마를 때까지 2분간
기다립니다.
참고 주기적으로 용지 경로 청소용 천을 사용하여 다른 관리 및 유지보수
작업을 수행해야 합니다. 용지 경로 청소용 천을 추가로 주문하려면
www.hp.com/support 를 방문하십시오.
주의 문서 공급기에 원본을 올려놓기 전에 접착제, 수정액 또는 스캐너 내
부에 묻을 수 있는 기타 이물질이 없는지 확인합니다.
주름, 구김, 스테이플, 종이 클립 또는 기타 부착물이 없는지 확인합니다. 용
지가 서로 붙어 있지 않아야 합니다.
한국어
1.
문서 공급기에 문서를 한 장 올려 놓습니다. 스캔할 면이 바닥을 향하게 놓
고 페이지의 윗부분이 아래쪽으로 오도록 합니다(
).
설치 확인
7
Page 58

제 1 장
2.
용지 조정대를 조정합니다. 제대로 작동하려면 용지 조정대가 페이지의 양
쪽 옆면에 모두 닿아야 합니다. 페이지가 똑바로 놓여져 있고 조정대가 페이
지의 가장자리에 닿아 있는지 확인하십시오.
3.
(문서 스캔 대상
•
HP 지능형 문서 스캔 소프트웨어를 설치한 경우 페이지를 스캔한 이미
) 단추를 누릅니다. 페이지가 스캐너 안으로 들어갑니다.
지가 컴퓨터 화면에 나타납니다. 스캔한 이미지가 컴퓨터 화면에 나타나
지 않으면 15 페이지의 HP Scanjet 드라이버 및 유틸리티 제거 후 재
설치를 참조하십시오.
•
HP 지능형 문서 스캔 소프트웨어를 설치하지 않은 경우 스캐닝에 사용
할 다른 소프트웨어 응용 프로그램이 있으면 해당 프로그램을 통해 스캔
하십시오. 이 응용 프로그램에서 스캔이 정상적으로 처리되면 해당 소프
트웨어가 제대로 설치된 것입니다. 올바로 진행이 되지 않을 경우 해당
애플리케이션용 소프트웨어 도움말을 참조하십시오.
4.
추가로 사용하려는 소프트웨어를 설치합니다.
사용자 지정 프로필 레이블
HP 지능형 문서 스캔 소프트웨어를 사용하면 문서 스캐닝, 처리 및 저장 또는
전송에 대한 설정이 포함된 프로필을 만들 수 있습니다. 스캐너 전면 패널에서
선택 가능한 번호에 프로필을 지정할 수 있습니다. 프로필 설정에 대한 정보는
[HP Scanjet N7710 사용 설명서]의 [스캔 프로필 설정]섹션을 참조하십시오.
스캐너에 포함된 프로필 레이블에 최대 12개의 번호와 각 번호에 지정된 프로
필을 나열할 수 있습니다. 스캐너의 앞면에 있는 풀다운 트레이에 레이블을 직
접 붙일 수 있습니다. 풀다운 트레이에서 레이블을 제거하려면 레이블의 한쪽
모서리를 떼어낸 다음 트레이에서 레이블을 벗겨내십시오. 이전 레이블 위에 새
레이블을 부착하지 마십시오.
8
HP Scanjet N7710 스캐너
Page 59

추가로 프로필 레이블이 필요한 경우 인쇄할 수 있는 템플릿으로 HP Scanning
Software CD 에 있는 label_template.doc 파일을 사용하십시오.
프로필 레이블을 사용자 지정하고 인쇄하려면 다음 절차를 따르십시오.
1.
Microsoft Word 에서 템플릿을 엽니다.
2.
프로필 번호의 오른쪽에 있는 텍스트 양식 필드를 두 번 누릅니다. 대화 상
자가 표시됩니다.
3.
기본 텍스트 필드를 누른 다음 프로필에 대한 짧은 설명을 입력합니다.
4.
입력할 각 프로필 설명에 대해 2단계와 3단계를 반복합니다.
5.
확인을 누릅니다.
6.
레이블 용지에 인쇄하기 전에 일반 용지에 레이블을 인쇄합니다. 텍스트가
레이블 용지와 잘 정렬되는지 확인하려면 전면 크기의 레이블 용지에 테스
트 인쇄를 수행합니다.
7.
전면 8과 1/2인치 x 11 인치 또는 A4 레이블 용지에 인쇄하고 외곽선을 따라
각 레이블을 잘라냅니다.
8.
스캐너의 앞면에 있는 풀다운 트레이에 레이블을 붙입니다.
사용자 지정 프로필 레이블
한국어
9
Page 60

2
스캐너 단추 및 기능
스캐너 단추
스캐너 전면 패널의 단추를 사용하여 스캔을 시작하고 스캔 프로필을 선택하며
일부 스캐너 설정을 구성할 수 있습니다.
4
5
1
아이콘 단추 이름 설명
1
2
3
4
5
프로필 번호 선택 또는
인쇄 매수
문서 스캔 대상 표시된 번호에 지정된 프로필을 사용하여 스캔
복사 표시된 인쇄 매수에 따라 인쇄합니다.
취소 작업 중인 스캔 또는 복사를 취소합니다.
도구 스캐너 전면 패널 단추를 구성하고 프로필을 지
2
3
프로필(스캔 전) 또는 인쇄 매수(복사 전)를 선
택합니다.
선택한 프로필 번호 또는 인쇄 매수가 전면 패
널에 표시됩니다.
을 시작합니다.
정하고 유지보수 정보를 볼 수 있는 HP
Scanner 도구 유틸리티를 엽니다.
이 단원에서 제공하는 스캐너 단추에 대한 정보보다 자세한 내용은 [HP Scanjet
N7710 사용 설명서]를 참조하십시오.
특별한 기능
다음 표에는 스캐너의 몇 가지 중요한 기능이 요약되어 있습니다. 이러한 기능
의 대부분은 HP 지능형 문서 스캔 소프트웨어 또는 기타 포함된 스캐닝 소프트
웨어를 통해 사용할 수 있습니다. 자세한 내용은 HP 지능형 문서 스캔 소프트
웨어 소프트웨어 도움말을 참조하십시오.
10
HP Scanjet N7710 스캐너
Page 61

기능 설명
카드 슬롯 스캐너 뒷면에 있는 카드 슬롯을 사용하여 라미네이트 카드 및
다양한 용지 크기
프로필
페이지 관리 페이지를 보고 편집하고 삭제하고 삽입하고 페이지 순서를 다
파일 관리 모든 페이지를 파일 하나로 스캔하거나 각 페이지를 별개의 파
OCR(광학 문자 인식) OCR 소프트웨어를 사용하면 원본을 편집 가능 텍스트로 스캔
문서 보내기 로컬 폴더, 네트워크 폴더, 전자 메일 또는 사용자 지정 응용
엠보싱 카드 같은 딱딱한 원본을 스캔할 수 있습니다.
카드 슬롯 사용법에 대한 자세한 내용은 스캐너 사용 설명서를
참조하십시오.
명함에서 legal 크기 용지에 이르기까지 다양한 크기의
스캔할 수 있습니다. 최대 215.9 mm x 863.6 mm
크기의 원본 페이지를 한번에 스캔할 수 있습니다.
다음과 같은 스캐닝 작업에 필요한 모든 설정이 있는 프로필을
설정하고 사용할 수 있습니다.
문서 처리
•
자동 이름 지정 방법을 사용하여 다른 파일 형식으로 저장
•
(예: 검색 가능 또는 검색 불가능 PDF 파일)
전자 메일, Microsoft SharePoint 또는 기타 응용 프로그램
•
등의 여러 대상으로 보내기
시 지정할 수 있습니다. 또한 스캐너가 빈 페이지를 자동으로
삭제하도록 설정할 수 있습니다.
일로 스캔하거나 원본에 있는 바코드나 빈 페이지를 기준으로
별개의 파일로 스캔할 수 있습니다.
하여 즐겨 사용하는 응용 프로그램으로 보낼 수 있습니다.
프로그램 등 다양한 대상으로 스캔한 문서를 보내도록 프로필
을 설정할 수 있습니다.
특별한 기능
한국어
11
Page 62

3
추가 정보를 얻는 방법
스캐너에는 스캐너 및 스캐닝 소프트웨어 사용에 대한 여러 가지 정보가 함께
제공됩니다.
HP Scanjet N7710 사용 설명서
스캐너 사용, 유지보수 및 문제 해결 등 스캐너 관련 정보는 주로 스캐너 사용
설명서에 나와 있습니다. 이 설명서는 컴파일된 도움말 파일(.CHM)로 사용할
수 있습니다.
설치된 시스템 언어로 사용 설명서를 열려면 다음 절차를 따르십시오.
▲
시작을 누르고 프로그램 또는 모든 프로그램을 가리키고 HP, Scanjet,
N7710 을 차례로 가리킨 다음 User Guide(사용 설명서)를 누릅니다.
다른 언어로 사용 설명서를 열려면 다음 절차를 따르십시오.
1.
스캐너와 함께 제공되는 HP Scanning Software CD 를 컴퓨터 CD 드라이브
에 넣으십시오.
설치 대화 상자가 나타날 때까지 기다립니다.
2.
설명서 보기를 누릅니다.
언어 목록이 표시됩니다.
3.
원하는 언어를 누릅니다.
HP 지능형 문서 스캔 소프트웨어 도움말
HP 지능형 문서 스캔 소프트웨어 도움말에는 프로필 만들기 및 편집 같은 HP
지능형 문서 스캔 소프트웨어의 기능을 사용하는 방법에 대한 설명이 나와 있
습니다.
HP 지능형 문서 스캔 소프트웨어 도움말을 열려면 컴퓨터 바탕 화면에서 HP
지능형 문서 스캔 소프트웨어 아이콘을 두 번 누른 다음 메뉴 모음에서 도움말
을 누릅니다.
HP 스캐너 도구 유틸리티 도움말
HP 스캐너 도구 유틸리티 도움말에는 스캐너 상태와 유지보수에 대한 정보, 스
캐너 설정 및 스캐너 전면 패널에서 선택할 수 있는 번호에 스캐너 프로필을 지
정하는 방법에 대한 설명이 나와 있습니다.
HP 스캐너 도구 유틸리티 도움말을 열려면 스캐너 전면 패널에서 도구 단추를
누른 다음 HP 스캐너 도구 유틸리티 대화 상자에서 도움말을 클릭합니다.
기타 소프트웨어 프로그램 도움말
스캐너에 포함된 소프트웨어 프로그램에 대한 자세한 내용을 확인하려면 해당
프로그램을 연 다음 메뉴 모음에서 도움말을 누릅니다.
12
HP Scanjet N7710 스캐너
Page 63

4
문제 해결
스캐너 오류 코드
오류 코드에 따른 대응 방법은 아래 표에서 해당 항목을 참조하십시오.
오류 코드 설명
오류 02 SDRAM 오류 전원 스위치를 꺼짐 쪽으로 누릅니다. 30초를 기다린 다음 전원 스
오류 03 USB 오류
오류 04 용지 걸림 문서 공급기의 용지 걸림이 감지되었습니다. 뚜껑을 열고 용지를 제
오류 08 뚜껑 열림 문서 공급기의 뚜껑이 열려 있거나 완전히 닫히지 않았습니다. 딸
오류 09 NVRAM 액세스 오류전원 스위치를 꺼짐 쪽으로 누릅니다. 30초를 기다린 다음 전원 스
오류 10 모터 고장 전원 스위치를 꺼짐 쪽으로 누릅니다. 30초를 기다린 다음 전원 스
오류 18 다중 급지 오류 스캐너에 두 페이지 이상이 동시에 넣어진 것을 감지했습니다. 다
위치를 켜짐 쪽으로 누릅니다. 메시지가 계속 표시되면 HP 고객 지
원 센터에 문의하십시오.
1.
스캐너와 컴퓨터 사이의 USB 연결을 확인합니다.
2.
Windows 장치 관리자 도구를 사용하여 컴퓨터에서 스캐너가
인식되는지 확인합니다.
Windows 장치 관리자 도구는 제어판에 있는 시스템 도구의
하드웨어 탭에서 사용할 수 있습니다.
3.
컴퓨터에서 스캐너를 인식하지 못하는 경우 스캐너 소프트웨
어를 제거한 다음 다시 설치합니다.
4.
그래도 문제가 지속되면
거합니다.
깍하는 소리가 날 때까지 눌러 뚜껑을 닫은 다음 다시 스캔하십시
오.
위치를 켜짐 쪽으로 누릅니다. 메시지가 계속 표시되면 HP 고객 지
원 센터에 문의하십시오.
위치를 켜짐 쪽으로 누릅니다. 메시지가 계속 표시되면
원 센터에 문의하십시오.
음 절차에 따라 오류를 해결하십시오.
1.
문서 공급기에서 용지를 제거합니다.
2.
쌓아둔 용지를 정렬하여 용지가 서로 붙지 않도록 합니다.
3.
스캐너 사용 설명서에 명시된 크기 및 무게 사양에 맞는 용지
인지 확인합니다.
4.
용지를 문서 공급기에 다시 넣습니다.
급지 오류(다중 급지) 감지 센서가 제대로 작동하지 않으면 용지 공
급에 아무런 오류가 없는데도 이 오류가 발생합니다. HP 고객 지원
센터에 문의합니다.
HP 고객 지원 센터에 문의합니다.
HP 고객 지
한국어
참고 TWAIN/ISIS 고급 설정 대화 상자에서 급지 오류(다중 급지)
감지를 비활성화할 수 있습니다.
오류 23 램프 오류 전원 스위치를 꺼짐 쪽으로 눌러 스캐너를 끕니다. 30초를 기다린
다음 전원 스위치를 켜짐 쪽으로 눌러 스캐너를 켭니다. 메시지가
계속 표시되면
HP 고객 지원 센터에 문의하십시오.
문제 해결
13
Page 64

제 4 장
(계속)
오류 코드 설명
오류 24 공급 실패 문서 공급기가 용지를 공급할 수 없거나 용지가 걸려 있습니다. 다
음 절차에 따라 오류를 해결하십시오.
1.
문서 공급기에서 용지를 제거합니다.
2.
쌓아둔 용지를 정렬하여 용지가 서로 붙지 않도록 합니다.
3.
스캐너 사용 설명서에 명시된 크기 및 무게 사양에 맞는 용지
인지 확인합니다.
4.
쌓아둔 원본을 교체한 후 다시 시도합니다.
설치 후에 스캐너가 작동하지 않을 경우
설치 후에 스캐너가 작동하지 않는 경우 컴퓨터에 다음 메시지 중 하나가 표시
될 수 있습니다.
•
스캐너를 초기화할 수 없습니다.
•
스캐너를 찾을 수 없습니다.
•
내부 오류가 발생했습니다.
•
컴퓨터가 스캐너와 통신할 수 없습니다.
문제를 해결하려면 다음을 시도하십시오.
케이블 확인
케이블이 제대로 연결되었는지 확인합니다.
전원 공급 장치
전원 공급 장치에는 스캐너 뒤에 꽂는 케이블이 연결되어 있습니다. 이 케이블
의 한쪽 끝에 있는 커넥터에는 전원 공급 장치가 제대로 작동할 때 켜지는 녹
색 LED 가 있습니다.
또한 전원 공급 장치에는 한쪽 끝을 전원 공급 장치에 연결하고 다른 한쪽 끝을
전원 콘센트나 과전압 억제기에 꽂는 AC 케이블이 있습니다.
전원 케이블은 스캐너와 전원 콘센트 연결에 사용됩니다.
1.
2.
3.
4.
14
HP Scanjet N7710 스캐너
전원 공급 장치 케이블 커넥터의 녹색 LED 가 켜져 있는지 확인합니다.
녹색 LED 가 켜지지 않으면 AC 케이블을 꽂은 전원 콘센트나 과전압 억제
기에 전원이 들어오는지 확인합니다.
전원 콘센트나 과전압 억제기에 전원이 들어오지만 녹색 LED 가 여전히 켜
지지 않으면 전원 공급 장치에 결함이 있을 수 있습니다. HP 고객 지원 센터
에 문의하십시오.
전원 로커 스위치가 켜짐 위치에 있는지 확인합니다.
Page 65

USB 케이블
다음과 같이 스캐너에 대한 물리적 연결을 확인하십시오.
•
스캐너와 함께 제공되는 케이블을 사용하십시오. 다른 USB 케이블은 이 스
캐너와 호환되지 않을 수 있습니다.
•
컴퓨터 또는 USB 허브와 스캐너가 USB 케이블로 확실하게 연결되어 있는
지 확인합니다. 케이블을 스캐너에 제대로 연결하면 USB 케이블의 삼지창
아이콘이 위로 향하도록 나타납니다.
USB 연결 문제를 해결하려면 다음과 같이 하십시오.
1.
스캐너를 컴퓨터에 연결한 방법에 따라 다음 작업 중 하나를 수행하십시오.
•
USB 케이블이 USB 허브나 랩톱용 도킹 스테이션에 연결된 경우 USB 허
브나 도킹 스테이션에서 USB 케이블을 분리한 다음 USB 케이블을 컴퓨
터에 직접 연결합니다.
•
USB 케이블이 컴퓨터에 직접 연결된 경우 컴퓨터의 다른 USB 포트에 꽂
습니다.
•
키보드와 마우스를 제외하고 컴퓨터에서 다른 모든 USB 장치를 제거합
니다.
2.
스캐너를 껐다가 다시 켭니다.
3.
컴퓨터를 재부팅합니다.
4.
컴퓨터가 다시 시작되면 스캐너를 사용해 보십시오.
1단계에서 컴퓨터에 연결하는 방법을 변경하여 스캐너가 작동하는 경우
USB 허브나 도킹 스테이션에 통신 문제가 있을 수 있습니다. 스캐너를 컴퓨
터에 직접 연결한 상태로 두십시오.
스캐너가 작동하지 않는 경우 HP 스캐닝 소프트웨어를 제거한 다음 다시 설
치하십시오.
HP Scanjet 드라이버 및 유틸리티 제거 후 재설치
스캐너 케이블 연결을 확인해도 문제가 해결되지 않으면 HP 스캐닝 드라이버
및 유틸리티가 제대로 설치되지 않았기 때문에 문제가 발생한 것일 수 있습니
다. HP 스캐닝 드라이버 및 유틸리티를 제거한 다음 다시 설치하십시오.
1.
컴퓨터에서 USB 케이블을 제거하십시오.
2.
제어판의 추가/제거 도구(Windows Vista 의 경우 프로그램 및 기능 도구)를
사용하여 다음과 같은 응용 프로그램을 제거합니다.
•
HP Scanjet N7710 문서 ISIS/TWAIN
•
HP Scanjet 드라이버 및 도구
3.
HP 스캐닝 소프트웨어를 제거한 후 전기 콘센트에서 스캐너를 뽑습니다.
4.
컴퓨터를 재부팅합니다.
5.
HP Scanning Software CD 를 컴퓨터 CD
6.
화면 지시에 따라 HP 스캐닝 소프트웨어를 설치합니다.
7.
HP 스캐닝 소프트웨어를 설치한 후 스캐너를 전기 콘센트에 연결하고 스캐
너를 켠 다음 USB 케이블을 사용하여 스캐너를 컴퓨터에 연결합니다.
8.
화면의 지시를 따릅니다.
드라이브에 넣습니다.
설치 후에 스캐너가 작동하지 않을 경우
한국어
15
Page 66

제 4 장
기타 문제 해결 도움말 소스
스캐너 하드웨어나 소프트웨어에 대한 추가 문제 해결 도움말이 필요한 경우
12 페이지의 추가 정보를 얻는 방법을 참조하십시오.
16
HP Scanjet N7710 스캐너
Page 67

5
제품 관리 및 지원
이 단원에서는 제품 지원의 옵션에 대해 설명합니다.
관리 및 유지보수
주기적으로 스캐너를 청소해 주면 고품질 스캔을 얻을 수 있습니다. 필요한 관
리 작업의 범위는 사용 횟수, 사용 환경 등 몇 가지 요소에 따라 달라집니다. 청
소는 정기적으로 반드시 해야 합니다.
HP 스캐너 도구 유틸리티에서는 수리가 필요한 시기를 알려 줍니다. 이 유틸리
티를 찾는 방법은 12 페이지의 추가 정보를 얻는 방법을 참조하십시오.
스캐너 유지보수 지침은 HP Scanjet N7710 사용 설명서를 참조하십시오. 이 설
명서를 찾는 방법은 12 페이지의 추가 정보를 얻는 방법을 참조하십시오.
주의 문서 공급기에 원본을 올려놓기 전에 접착제, 수정액 또는 스캐너 내
부에 묻을 수 있는 기타 이물질이 없는지 확인합니다.
주름, 구김, 스테이플, 종이 클립 또는 기타 부착물이 없는지 확인합니다. 용
지가 서로 붙어 있지 않아야 합니다.
사용자 서식
이 스캐너의 사용자 서식 옵션은 다음과 같습니다.
•
LCD Reader 는 스캐너 전면 패널 디스플레이의 변경 내용을 보여 주는 소
프트웨어 프로그램입니다. LCD Reader 를 사용하면 스캐너 전면 패널에 표
시되는 내용을 사용자 서식 소프트웨어를 통해 언어로 나타낼 수 있습니다.
•
실수로 단추를 누르는 것을 막기 위해 스캐너 전면 패널의 단추를 비활성화
할 수 있습니다.
LCD Reader 및 스캐너 단추를 비활성화하는 방법에 대한 자세한 내용은
HP Scanjet N7710 사용 설명서를 참조하십시오. 이 설명서를 찾는 방법은
12 페이지의 추가 정보를 얻는 방법을 참조하십시오.
장애가 있는 사용자는 웹사이트
accessibility/prodserv/에서 도움을 받을 수 있습니다.
www.hp.com/hpinfo/community/
한국어
제품 관련 지원
HP 제품을 최대한 활용하려면 다음과 같은 기본 HP 지원 서비스를 참조하십시
오.
제품 관리 및 지원
17
Page 68

제 5 장
1.
제품과 함께 제공되는 제품 설명서를 참조하십시오.
•
이 설명서의 문제 해결 단원을 검토하십시오.
•
12 페이지의 추가 정보를 얻는 방법에 설명된 소프트웨어 설명서를 검토
하십시오.
2.
www.hp.com/support 웹 사이트의
HP 온라인 지원을 방문하거나 구입처
에 문의하십시오.
HP 온라인 지원 서비스는 HP 고객이면 누구나 이용할 수 있습니다. 온라인
지원 서비스를 통해 다음과 같은 혜택은 물론, 최신 제품 정보와 전문 지원
서비스를 아주 신속하게 이용할 수 있습니다.
•
숙련된 온라인 지원 전문가에게 전자 메일을 통한 신속한 문의
•
제품 관련 최신 소프트웨어와 드라이버 이용
•
제품 정보 및 기술적 문제 해결 관련 정보 이용
•
사전 예방적 제품 업데이트, 지원 관련 알림 메시지, HP 소식지 등을 이
용(제품 등록 시 이용 가능)
3.
HP 고객 지원 센터에 전화로 문의
•
제공되는 지원 서비스와 관련 비용은 제품, 국가/지역, 언어 등에 따라
다름
•
비용 및 정책은 사전 통보 없이 변경될 수 있음 최신 정보는 웹 사이트
www.hp.com/support 에서 확인하십시오.
4.
사후 보증 기간
제한 보증 기간이 지나면
www.hp.com/support 에서 온라인 도움을 받을
수 있습니다.
5.
보증 기간 연장 또는 보증 서비스 승급
제품 보증을 연장하거나 업그레이드하려면 구입처에 문의하거나
www.hp.com/support 에서 HP Care Pack 서비스를 확인하십시오.
6.
이미 HP Care Pack 서비스를 구매한 경우 계약서에 있는 지원 조건을 확인
하십시오.
Hewlett-Packard 제한 보증
HP Scanjet N7710 스캐너
1. HP 는 HP 하드웨어, 부속품 및 소모품에 재료나 제조상의 결함이 없음을 최
종 사용자인 고객에게 제품 구입일로부터 1년 동안 보증합니다. 보증 기간 동안
결함 발생을 HP 에 통지할 경우 HP 의 재량에 따라 결함이 입증된 제품을 교환
또는 수리받을 수 있습니다. 교환품은 신제품 또는 성능면에서 그에 준하는 제
품이 될 수 있습니다.
2. HP 소프트웨어를 올바르게 설치하여 사용할 경우 제품을 구입한 날로부터
위에 정해진 기간 동안 제품의 소재 및 기술상 결함으로 인하여 프로그래밍 명
령을 실행하지 못하는 경우는 없음을 보증합니다. 보증 기간 중에 이러한 결함
을 HP 에 통지할 경우 이러한 결함으로 인해 프로그램 명령이 실행되지 않는 소
프트웨어를 교환받을 수 있습니다.
18
HP Scanjet N7710 스캐너
Page 69

3. HP 는 제품이 작동 중에 중단되지 않는다거나 오류가 발생하지 않는다는 보
증은 하지 않습니다. HP 가 보증 범위에 적용되는 결함 있는 제품을 수리하거나
교체할 수 없으면 고객은 제품을 반납하고 구입 금액을 환불받을 수 있습니다.
4. HP 제품은 성능면에서 신제품과 동등한 기능의 재생 부품을 포함할 수 있으
며 부수적 용도로 쓰일 수 있습니다.
5. HP 는 (a) 부적절하거나 부적당한 유지보수 또는 조정, (b) HP 에서 공급하지
않은 소프트웨어, 인터페이스, 부품 또는 소모품 사용, (c) 무단 개조 또는 오용,
(d) 제품의 지정된 작동 환경 사양을 벗어난 작동, (e) 부적절한 설치 장소 준비
및 유지보수로 인한 결함에 책임이 없습니다.
6. 현지법이 허용하는 범위에서 상기 보증 조항은 최종 사용자에게만 적용되고,
어떠한 다른 보증 조항이나 조건도 서면 또는 구두 형식으로 명시적 또는 묵시
적으로 나타내지 않으며 HP 는 제품의 상품성, 품질 만족도, 특정 목적에 대한
적합성 등에 대해 어떠한 묵시적 보증 조항이나 조건을 제시하지 않습니다. 일
부 구/군, 시/도 또는 국가에서는 묵시적 보증 기간에 대한 제한을 허용하지 않
으므로 위에 명시한 제한이나 제외 사항이 적용되지 않을 수 있습니다. 이 보증
은 고객에게 특정 법적 권리를 제공하며 고객은 국가/지역, 주 또는 지방에 따
라 서로 다른 권리를 가질 수도 있습니다.
7. HP 의 제한 보증은 HP 가 이 제품을 판매하고 이 제품에 대한 지원 서비스를
제공하는 국가/지역에서 유효합니다. 받을 수 있는 보증 서비스 수준은 지역 표
준에 따라 다를 수 있습니다. HP 는 법규를 따르기 위해 과거 의도적으로 변경
한 경우가 없는 한 특정 국가/지역에서만 작동되도록 제품의 형태, 맞춤 설정
또는 기능을 변경하지 않습니다.
8. 현지법이 허용하는 범위 내에서 이 보증서에 포함된 해결 방법은 귀하만의
고유하고 배타적인 해결 방법입니다. HP 는 위에서 언급한 사항에 대해서만 책
임을 지며 계약, 불법 행위 또는 그 밖의 어떠한 법적 근거에 의해서든 데이터
손실 또는 직접, 간접, 특별, 부수적, 파생적 손해(영업 이익 또는 데이터 손실
포함) 또는 기타 손해에 대하여 어떠한 경우에도 책임을 지지 않습니다. 일부
구/군, 시/도 또는 국가에서는 부수적 또는 파생적 피해에 대한 제외 사항이나
제한을 허용하지 않으므로 위의 내용이 고객에게 적용되지 않을 수도 있습니다.
9. 본 보증서에 포함된 보증 조항은 법적으로 허용되는 경우를 제외하고는 제
외, 제한, 수정할 수 없으며 본 제품 판매에 적용되는 필수 법적 권리에 부가되
는 내용입니다.
Hewlett-Packard 제한 보증
한국어
19
Page 70

6
규정 정보 및 제품 사양
이 단원에서는 HP Scanjet N7710 스캐너 및 부속품에 대한 규정 정보와 제품
사양에 대해 설명합니다.
스캐너 사양
이름 설명
스캐너 종류 양면 용지 공급 스캐너
크기
무게
스캔 소자
인터페이스 USB 2.0 고속(USB 1.1 과 호환)
광학 해상도 600 x 600dpi 하드웨어
AC 전원
소비 전력 전력 소비량 데이터는 HP Scanning Software CD 의
너비: 320mm , 길이: 270mm , 높이: 312mm
치)
5.4kg
CCD(Charged Coupled Device)
32V~, 50/60Hz, 2500mA, 80W
regulatory_supplement.htm 파일을 참조하십시오.
HP 스캐너는 ENERGY STAR® 규정을 준수합니다. Hewlett-Packard 는
ENERGY STAR® 참여 업체로서 이 제품이 에너지 절약에 대한 ENERGY
STAR® 지침에 부합함을 확인합니다.
환경 사양
이름 설명
온도
상대 습도
규정 정보
규정 모델 식별 번호: 규정 식별을 목적으로 제품에는 규정 모델 번호가 지정되
어 있습니다. 본 제품의 규정 모델 번호는 FCLSD-0704 입니다. 이 규정 번호를
마케팅 이름(HP Scanjet N7710) 또는 제품 번호(L1989A)와 혼동해서는 안 됩
니다. 스캐너에 대한 추가 규정 정보는 HP Scanning Software CD 의
regulatory_supplement.htm 파일을 참조하십시오.
20
HP Scanjet N7710 스캐너
스캐너 작동 시: 10° ~ 35°C
보관 시: -40° ~ 60°C
스캐너 작동 시: 10° ~ 35°C 에서 비응축 상대 습도 15% ~
80%
보관 시: 0° ~ 60°C 에서 최대 90%
Page 71

참고 규정 레이블은 스캐너의 바닥에 부착되어 있습니다. 이 레이블은 출력
용지함에 가려져 있습니다.
재활용 정보
재활용, 에너지 소비 및 환경 관련 정보는 스캐너와 함께 제공되는 HP Scanning
Software CD 에 들어 있습니다. 이 CD 에서 recycle_supplement.pdf 파일을 참
조하십시오.
소재 폐기
이 HP 제품은 제품 수명이 끝날 때 특수 처리가 필요한 다음 물질을 포함합니
다.
스캐너 형광등 및/또는 투명 재료 어댑터에 사용된 수은
이러한 소재의 폐기는 환경 문제와 관련하여 규제될 수 있습니다. 폐기 또는 재
활용에 대한 자세한 내용은 해당 지역의 관계 기관 또는 미국 전자산업협회(EIA,
www.eiae.org)에 문의하십시오.
유럽 연합 지역에서 일반 가정의 폐기 장비 처리
제품과 포장재에 이 기호가 부착되어 있으면 가정에서 발생하는 일반 쓰레기와
함께 처분할 수 없습니다. 이러한 폐장비는 폐기된 가전 제품을 재활용하는 지
정된 수거물 센터로 인계하여 폐기 처분해야 합니다. 제품을 폐기할 때 분리 수
거하여 재활용하면 천연 자원을 보존하고 인간의 건강과 환경을 보호하는 방법
으로 재활용하는 데 도움이 됩니다. 재활용품 수거장에 대한 자세한 내용은 현
지 관할 구청이나 가정용 쓰레기 처리장 또는 해당 제품 판매업소에 문의하십
시오.
재활용 정보
21
한국어
Page 72

 Loading...