

Page 1

Page 2

www.hp.com/support
$XVWUDOLD
$XVWUDOLD
₼⦌
₼⦌
氨䂾
,QGLD
,QGRQHVLD
鲵뼑ꖱ霢
0DOD\VLD
1HZ=HDODQG
3KLOLSSLQHV
6LQJDSRUH
♿䋲
ࡒ࡚ࡧࡳࡎࡷࡎ࡙
RXWRIZDUUDQW\
9LW1DP
Page 3

HP Scanjet N7710 Scanner
Setup and Support Guide
English
Page 4

Copyright and license
© 2007 Copyright Hewlett-Packard
Development Company, L.P.
Reproduction, adaptation or translation
without prior written permission is
prohibited, except as allowed under the
copyright laws.
The information contained herein is
subject to change without notice.
The only warranties for HP products
and services are set forth in the express
warranty statements accompanying
such products and services. Nothing
herein should be construed as
constituting an additional warranty. HP
shall not be liable for technical or
editorial errors or omissions contained
herein.
Trademark credits
ENERGY STAR is a U.S. registered
service mark of the United States
Environmental Protection Agency.
Microsoft and Windows are registered
trademarks of Microsoft Corporation.
Page 5

Contents
1 Scanner setup
Items shipped in the box.............................................................................................................2
Install the software......................................................................................................................3
Set up the hardware...................................................................................................................4
Test the installation.....................................................................................................................7
Customizable profile labels.........................................................................................................8
2 Scanner buttons and features
Scanner buttons.......................................................................................................................10
Special features........................................................................................................................10
3 Where to get additional information
HP Scanjet N7710 User Guide.................................................................................................12
HP Smart Document Scan Software Help................................................................................12
HP Scanner Tools Utility help...................................................................................................12
Help for other software programs.............................................................................................12
4 Troubleshooting
Scanner error codes.................................................................................................................13
Scanner does not work after installation...................................................................................14
Other sources for troubleshooting help....................................................................................16
5 Product care and support
Care and maintenance.............................................................................................................17
Accessibility..............................................................................................................................17
Getting assistance....................................................................................................................17
Hewlett-Packard limited warranty statement............................................................................18
English
6 Regulatory information and product specifications
Scanner specifications..............................................................................................................20
Environmental specifications....................................................................................................20
Regulatory information.............................................................................................................20
Recycle information..................................................................................................................21
Materials disposal.....................................................................................................................21
Disposal of Waste Equipment by Users in Private Households in the European Union..........21
1
Page 6

1 Scanner setup
Follow these steps to set up the scanner:
• Check the items shipped in the box
• Install the software
• Set up the hardware
• Test the installation
Items shipped in the box
Unpack the scanner hardware. Be sure to remove any shipping tape.
1
2
4
6
7
3
1 HP Scanjet N7710 scanner
2 Output tray
3 Power supply
4 USB cable
5 Profile labels
6 Setup and Support Guide (this book)
7 Paper-path cleaning cloth
8 Scanning software CDs (For more information, see “Included software”
on page 3.)
2 HP Scanjet N7710 Scanner
5
8
Page 7

Install the software
CAUTION: Do not connect the USB cable to the computer yet. Install the scanning
software before connecting the USB cable.
1. Insert the HP Scanning Software CD that came with the scanner into the computer
CD drive.
Wait for the installation dialog box to display. If the installation dialog box does not
display after a few moments:
a. Click Start, and then click Run. (On Windows Vista, click Start, and then type
run into the search box.)
The Run dialog box is displayed.
b.In the Open box, type d:\setup.exe (where d: is the letter of your computer's CD
drive).
c. Click OK.
2. Click Install Software to install the scanning software. Follow the onscreen
instructions to install the following applications:
• Kofax VRS 4.10
• HP Scanjet Drivers and Tools
• HP Smart Document Scan Software
3. Select the initial setting for the scanner lamp:
• In Power Save mode, the scanner lamp times out and turns off automatically after
about 15 minutes of inactivity. In this mode, the scanner is Energy Star compliant.
• In Instant Lamp On mode, the scanner lamp times out and turns off automatically
after about 15 minutes of inactivity, but it remains warm and ready to scan.
English
Included software
This section describes the scanning and document-management software programs that
come with the scanner.
In addition to the HP software programs, several popular document management
applications are included with the scanner. This additional software might not be available
for all scanner models or all countries/regions.
For information about another scanning software program, open the program, and then
click Help on the menu bar.
HP Scanning Software CD
Programs Software use
HP Smart Document Scan
Software
HP Scanner Tools Utility Use to assign profiles to numbers, to configure the buttons on
ISIS/TWAIN drivers These drivers are necessary for using the scanner with standard
Use to create high-quality scans from multi-page documents and
to automate scanning tasks you perform often.
the scanner front panel, and to find information about scanner
settings, status, and maintenance.
business applications and customized software. They meet the
minimum requirement for the scanner to work properly.
Install the software 3
Page 8
Chapter 1
(continued)
Programs Software use
Kofax VirtualReScan Use to create clearer and more readable scans from colored or
ScanSoft PaperPort CD
Programs Software use
ScanSoft PaperPort Use to organize, find, and share paper and PDF documents.
I.R.I.S. Readiris Pro CD
Programs Software use
I.R.I.S. Readiris Pro Use to scan typed documents with full-featured optical character
NewSoft Presto! BizCard CD
Programs Software use
NewSoft Presto! BizCard Use to convert business cards into a database that can be
Set up the hardware
damaged documents.
recognition (OCR) to create editable text that can be saved in a
variety of file formats.
shared by multiple users, exported to contact management
software, and synchronized with PDAs.
Complete the following tasks in order to set up the scanner hardware and prepare it for
use.
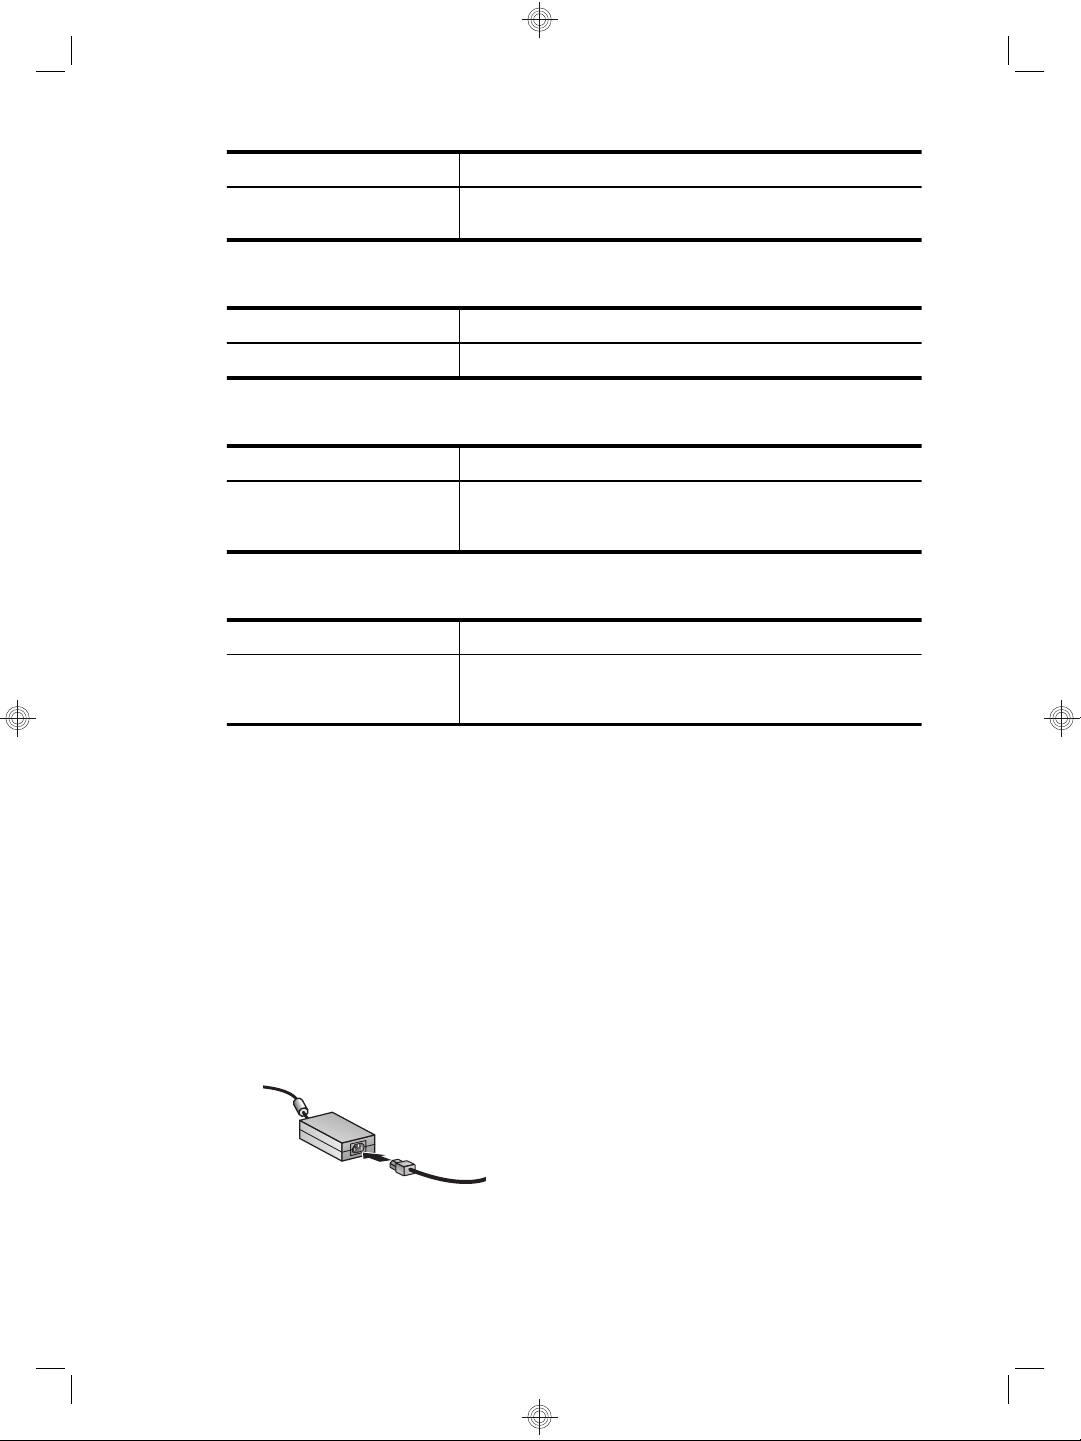
Connect the power supply
The power supply has an attached cable that plugs into the back of the scanner. The
connector on the end of this cable has a green LED that is on when the power supply is
functioning correctly.
The power supply also has an AC cable that is connected to the power supply on one
end and plugged into a power outlet or surge protector on the other end.
1. Plug the AC cable into the back of the power supply.
2. Plug the other end of the AC cable into a power outlet or a surge protector.
4 HP Scanjet N7710 Scanner
Page 9

3. Check that the green LED on the power supply cable connector is on.
• If the green LED is not on, ensure that power is available to the power outlet or
surge protector that the AC cable is plugged into.
• If power is available to the power outlet or surge protector but the green LED is
still not on, the power supply might be defective. Contact HP Support for
assistance.
4. If the green LED is on, plug the power supply into the back of the scanner.
5. Press the Power switch on the back of the scanner to the on position.
Connect the USB cable
CAUTION: Be sure you install the HP scanning software before connecting the
scanner to your computer with the USB cable. See “Install the software” on page 3.
Use the USB cable that came with the scanner to connect the scanner to the computer.
Connect the square end of the cable to the scanner and the rectangular end of the cable
to the computer.
NOTE: HP recommends using a USB port on the back of the computer for a more
reliable connection to the scanner.
English
Set up the hardware 5
Page 10

Chapter 1
Prepare the scanner for use
1. Attach the output tray by sliding the back of the tray into the slot under the front of the
scanner.
2. For longer originals, extend the document feeder extension.
3. Extend the output tray by unfolding the flap.
4. Gently open the HP paper-path cleaning cloth package that came with the scanner.
5. Remove the cleaning cloth and unfold it.
6. Place the unfolded cloth into the document feeder.
2
1
3
7. Press the Tools ( ) button to open the Scanner Tools Utility. Click the
Maintenance tab.
6 HP Scanjet N7710 Scanner
Page 11

8. Click the Clean button to feed the cloth through the scanner.
NOTE: The cloth will feed through the scanner. This confirms that the hardware
installation was successful, the drivers and tools are installed and the scanner
hardware is functioning normally.
If the cleaning cloth does not run through the paper path and land in the output
tray, then the scanner installation may not be complete. See “Scanner does not
work after installation” on page 14 in the Troubleshooting section of this guide.
9. Repeat Step 8 at least once.
CAUTION: Wait two minutes for the components to dry before inserting paper
into the document feeder.
NOTE: You will periodically need to use a paper-path cleaning cloth for other care
and maintenance tasks. To order more paper-path cleaning cloths, go to
www.hp.com/support.
Test the installation
CAUTION: Before placing an item in the document feeder, make sure that the item
does not contain wet glue, correction fluid, or other substances that can be transferred
to the interior of the scanner.
Make sure there are no curls, wrinkles, staples, paper clips, or any other attached
material. Sheets should not be stuck together.
English
1. Place a single page in the document feeder. The page should be face down, with the
top of the page pointing down (
2. Adjust the paper guides. The paper guides must be touching both sides of the page
to work properly. Please ensure that the page is straight and the guides are against
the edges of the page.
).
Test the installation 7
Page 12

Chapter 1
3.
Press the (Scan Document To
• If you have installed HP Smart Document Scan Software, a scan of the page will
appear on your computer screen. If a scan does not appear on your computer
screen, see “Uninstall and then reinstall the HP Scanjet drivers and utilities”
on page 15.
• If you do not have HP Smart Document Scan Software installed, scan from the
software application you intend to use for scanning. If the scan processes as
normal for this application, then the software installation is successful. If it does
not process normally, consult the software help for your application.
4. Install any additional software that you want to use.
Customizable profile labels
The HP Smart Document Scan Software allows you to create profiles, which contain
settings for scanning, processing, and saving or sending documents. You can assign
profiles to numbers that are selectable from the scanner front panel. For information on
setting up profiles, see the HP Scanjet N7710 User Guide section called Set up scan
profiles.
The profile labels included with the scanner provide a place to list up to twelve numbers
and the profiles assigned to those numbers. The label can be attached directly to the pulldown tray on the front of the scanner. To remove a label from the pull-down tray, lift a
corner of the label, and then peel the label from the tray. Do not place a new label on top
of an old label.
) button. The page will feed through the scanner.
For a template that you can print if you need additional profile labels, use the
label_template.doc file located on the HP Scanning Software CD.
To customize and print a profile label, follow these steps:
1. Open the template in Microsoft Word.
2. Double-click the text form field to the right of the profile number. The dialog box is
displayed.
3. Click in the Default text field, and then enter a short description of the profile.
4. Repeat steps 2 and 3 for each profile description you want to enter.
5. Click OK.
6. Before printing on the label sheet, print the label on a plain sheet of paper. Place the
test print over a full-page label sheet to verify that the text aligns with the label sheet.
8 HP Scanjet N7710 Scanner
Page 13

7. Print on a full-page 8 1/2” x 11” or A4 label sheet and cut out each label along the
outline.
8. Place the label on the pull-down tray on the front of the scanner.
English
Customizable profile labels 9
Page 14
2 Scanner buttons and features
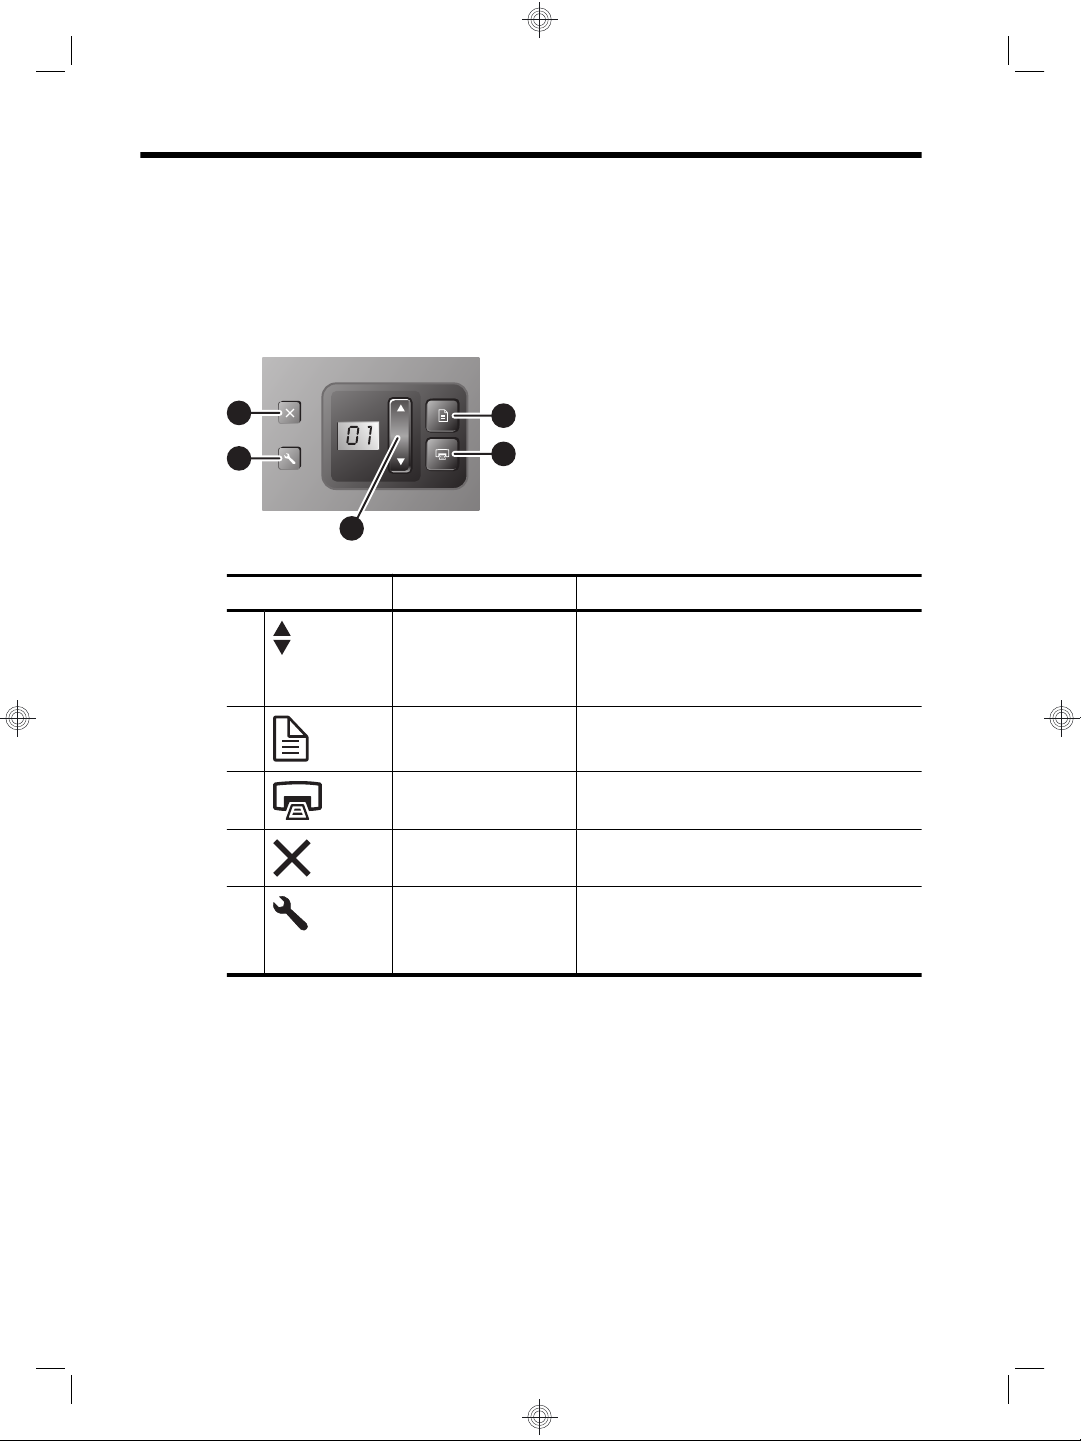
Scanner buttons
Use the buttons on the scanner front panel to start a scan, select a profile for a scan, and
configure some scanner settings.
4
5
1
Icon Button name Description
1 Select Profile Number
or Number of Copies
2 Scan Document To Start a scan using the profile assigned to the
3 Copy Print the number of copies shown.
4 Cancel Cancel a scan or copy in progress.
5 Tools Open the HP Scanner Tools Utility where you
2
3
Select a profile (before scanning) or the number
of copies (before copying).
The selected profile number or number of
copies is displayed on the front panel.
displayed number.
can configure the scanner front panel buttons,
assign profiles, and view maintenance
information.
For more information about the scanner buttons than is provided in this chapter, see the
HP Scanjet N7710 User Guide.
Special features
The following table summarizes several important features of the scanner. Many of these
features are available through the HP Smart Document Scan Software or other included
scanning software. For more information, see the HP Smart Document Scan Software
Help.
10 HP Scanjet N7710 Scanner
Page 15

Feature Description
Card slot You can use the card slot on the back of the scanner to scan
Wide range of paper sizes You can scan a stack of originals ranging in size from business
Profiles You can set up and use profiles that contain all settings
Page management You can view, edit, delete, insert, and reorder pages. You can
File management You can scan all pages to a single file, scan each page to a
Optical Character Recognition
(OCR)
Send Documents To You can set up profiles to send the scanned documents to a
rigid items such as laminated cards and embossed cards.
For information on how to use the card slot, see the scanner
User Guide.
cards to legal-size paper. You can also scan originals up to
215.9 mm x 863.6 mm (8.5 inches x 34 inches) one page at a
time.
necessary for scanning tasks such as:
Document processing
•
Saving in different file formats (i.e. searchable or non-
•
searchable PDF files) using automatic naming
mechanisms
Sending to different destinations such as e-mail, Microsoft
•
SharePoint, or other applications
also have the scanner automatically delete blank pages.
separate file, or scan to separate files based on bar codes or
blank pages in the original.
With OCR software you can scan originals as editable text that
you can send to your favorite application.
variety of destinations such as a local folder, a network folder,
e-mail, or a custom application.
English
Special features 11
Page 16

3 Where to get additional
information
The scanner comes with several sources of information about using the scanner and the
scanning software.
HP Scanjet N7710 User Guide
The scanner User Guide is the primary source for scanner information such as using,
maintaining, and troubleshooting the scanner. It is available as a compiled help (.CHM)
file.
To open the User Guide in the installed (system) language, follow these steps:
▲ Click Start, point to Programs or All Programs, point to HP, point to Scanjet, point
to N7710, and then click User Guide.
To open the User Guide in another language, follow these steps:
1. Insert the HP Scanning Software CD that came with the scanner into the computer
CD drive.
Wait for the installation dialog box to display.
2. Click View guides.
A list of languages is displayed.
3. Click the language that you want.
HP Smart Document Scan Software Help
The HP Smart Document Scan Software Help explains how to use HP Smart Document
Scan Software features such as creating and editing profiles.
To open HP Smart Document Scan Software Help, double-click the HP Smart Document
Scan Software icon on the computer desktop, and then click Help on the menu bar.
HP Scanner Tools Utility help
The HP Scanner Tools Utility help explains the scanner settings, information about
scanner status and maintenance, and how to assign scanner profiles to numbers that you
can select on the scanner front panel.
To open HP Scanner Tools Utility help, press the Tools button on the scanner front panel,
and then click Help in the HP Scanner Tools Utility dialog box.
Help for other software programs
For information about any of the software programs included with the scanner, open the
program, and then click Help on the menu bar.
12 HP Scanjet N7710 Scanner
Page 17

4 Troubleshooting
Scanner error codes
For help responding to an error code, see the appropriate topics below.
Error Code Description
Error 02 SDRAM Error Press the Power switch to the off position. Wait 30 seconds, and
Error 03 USB Error 1. Check the USB connection between the scanner and the
Error 04 Paper Jam A document feeder paper jam has been detected. Open the hatch
Error 08 Hatch Open The hatch on the document feeder is open or not securely latched.
Error 09 NVRAM ACCESS
Error
Error 10 Motor Fail Press the Power switch to the off position. Wait 30 seconds, and
Error 18 Multipick Error The scanner detected that more than one page at a time was fed
then press the Power switch to the on position. If the message is
still displayed, contact
computer.
2. Use the Windows Device Manager tool to verify that the
computer recognizes the scanner.
The Windows Device Manager tool is available on the
Hardware tab of the Systems tool in the Control Panel.
3. If the computer does not recognize the scanner, uninstall and
then reinstall the scanner software.
4. If the problem persists, contact
and clear the jam.
Please close the hatch by pressing until you hear a click, and then
rescan.
Press the Power switch to the off position. Wait 30 seconds, and
then press the Power switch to the on position. If the message is
still displayed, contact
then press the Power switch to the on position. If the message is
still displayed, contact
through the scanner. Follow these steps to resolve the error:
1. Remove the paper from the document feeder.
2. Sort through the stack to make sure the sheets are not stuck
together.
3. Make sure the paper meets the size and weight specifications,
as specified in the scanner User Guide.
4. Replace the paper into the document feeder.
If this error occurs when there is no paper feed error, the misfeed
(multipick) detection sensor is not working correctly. Contact HP
Support.
HP Support.
HP Support.
HP Support.
HP Support.
English
NOTE: You can disable misfeed (multipick) detection in the
TWAIN/ISIS Advanced Settings dialog box.
Error 23 Lamp Error Press the Power switch to the off position to turn the scanner off.
Wait 30 seconds, and then press the Power switch to the on position
Troubleshooting 13
Page 18

Chapter 4
(continued)
Error Code Description
to turn the scanner on. If the message is still displayed, contact HP
Support.
Error 24 Pick Failure The document feeder cannot pick up the paper or the paper is
jammed. Follow these steps to resolve the error:
1. Remove the paper from the document feeder.
2. Sort through the stack to make sure the sheets are not stuck
together.
3. Make sure the paper meets the size and weight specifications,
as specified in the scanner User Guide.
4. Replace the stack of originals and try again.
Scanner does not work after installation
If the scanner does not work after installation, you might see one of the following
messages displayed on the computer:
• The scanner could not be initialized.
• The scanner could not be found.
• An internal error has occurred.
• The computer cannot communicate with the scanner.
Try the following to fix the problem:
Check the cables
Verify that the cable connections are in working order.
Power supply
The power supply has an attached cable that plugs into the back of the scanner. The
connector on the end of this cable has a green LED that is on when the power supply is
functioning correctly.
The power supply also has an AC cable that is connected to the power supply on one
end and plugged into a power outlet or surge protector on the other end.
The power cable is connected between the scanner and a power outlet.
1. Check that the green LED on the power supply cable connector is on.
2. If the green LED is not on, ensure that power is available to the power outlet or surge
protector that the AC cable is plugged into.
3. If power is available to the power outlet or surge protector but the green LED is still
not on, the power supply might be defective. Contact HP Support for assistance.
4. Check that the power rocker switch is in the on position.
14 HP Scanjet N7710 Scanner
Page 19

USB cable
Check the physical connection to the scanner:
• Use the cable that was included with the scanner. Another USB cable might not be
compatible with the scanner.
• Ensure that the USB cable is securely connected between the scanner and the
computer or USB hub. The trident icon on the USB cable faces up when the cable is
properly connected to the scanner.
To troubleshoot the USB connection:
1. Do one of the following tasks depending on how the scanner is connected to the
computer:
• If the USB cable is connected to a USB hub or a docking station for a laptop,
disconnect the USB cable from the USB hub or the docking station, and then
connect the USB cable directly to the computer.
• If the USB cable is directly connected to the computer, plug it into another USB
port on the computer.
• Remove all other USB devices from the computer except for the keyboard and
the mouse.
2. Turn the scanner off and then on.
3. Restart the computer.
4. After the computer has restarted, try using the scanner.
If the scanner works and you changed the way it was connected to the computer in
step 1, the communication problem might involve the USB hub or docking station.
Leave the scanner directly connected to the computer.
If the scanner does not work, uninstall and then reinstall the HP scanning software.
English
Uninstall and then reinstall the HP Scanjet drivers and utilities
If checking the scanner cable connections did not solve the problem, the problem might
have occurred because of an incomplete installation. Try uninstalling and then reinstalling
the HP scanning drivers and utilities.
1. Disconnect the USB cable from the computer.
2. Use the Add/Remove tool (in Windows Vista, the Programs and Features tool) from
the Control Panel to uninstall the following applications:
• HP Scanjet N7710 Document ISIS/TWAIN
• HP Scanjet Drivers and Tools
3. After the HP scanning software is removed, unplug the scanner from the electrical
outlet.
4. Restart the computer.
5. Insert the HP Scanning Software CD in the computer CD drive.
6. Follow the onscreen instructions to install the HP scanning software.
7. After the HP scanning software has installed, connect the scanner to an electrical
outlet, turn on the scanner, and then use the USB cable to connect the scanner to
the computer.
8. Follow the onscreen instructions.
Scanner does not work after installation 15
Page 20

Chapter 4
Other sources for troubleshooting help
For more troubleshooting help with the scanner hardware or software, see “Where to get
additional information” on page 12.
16 HP Scanjet N7710 Scanner
Page 21

5 Product care and support
This section describes the options for product support.
Care and maintenance
Occasional cleaning of the scanner helps ensure higher-quality scans. The amount of
care necessary depends upon several factors, including the amount of use and the
environment. You should perform routine cleaning as necessary.
The HP Scanner Tools Utility can remind you when service is necessary. For help locating
the utility, see “Where to get additional information” on page 12.
For instructions about maintaining the scanner, see the HP Scanjet N7710 User Guide.
For help locating the guide, see “Where to get additional information” on page 12.
CAUTION: Before placing an item in the document feeder, make sure that the item
does not contain wet glue, correction fluid, or other substances that can be transferred
to the interior of the scanner.
Make sure there are no curls, wrinkles, staples, paper clips, or any other attached
material. Sheets should not be stuck together.
Accessibility
The following accessibility options are available on this scanner:
• The LCD Reader is a software program that shows the changing contents of the
scanner front panel display. The LCD Reader enables accessibility software tools to
verbalize what is being shown on the scanner front panel.
• To prevent buttons from being pushed accidentally, you can disable the buttons on
the scanner front panel.
For more information about the LCD Reader and how to disable the scanner buttons, see
the HP Scanjet N7710 User Guide. For help locating the guide, see “Where to get
additional information” on page 12.
Customers with disabilities can get help by visiting
accessibility/prodserv/.
www.hp.com/hpinfo/community/
English
Getting assistance
In order to get the best from your HP product, please consult the following standard HP
support offerings:
Product care and support 17
Page 22

Chapter 5
1. Please consult the product documentation that came with the product.
• Review the troubleshooting section in this manual.
• Review the software documentation that is described in “Where to get additional
information” on page 12.
2. Visit the HP online support at
purchase.
HP online support is available to all HP customers. It is the fastest source for up-todate product information and expert assistance, including the following features:
• Fast E-mail access to qualified online support specialists
• Software and driver updates for your product
• Valuable product and troubleshooting information for technical issues
• Proactive product updates, support alerts, and HP newsletters (available when
you register your product)
3. HP support by phone
• Support options and fees vary by product, country/region and language.
• Fees and policies are subject to change without notice. Please check the web site
www.hp.com/support for the latest information.
4. Post-warranty period
After the limited warranty period, help is available online at
5. Extending or upgrading your warranty
If you would like to extend or upgrade the product’s warranty, please contact your
point of purchase or check the HP Care Pack offers at
6. If you already purchased an HP Care Pack Service, please check the support
conditions in your contract.
www.hp.com/support or contact your point of
www.hp.com/support.
www.hp.com/support.
Hewlett-Packard limited warranty statement
HP Scanjet N7710 scanner
1. HP warrants to you, the end-user customer, that HP hardware, accessories, and
supplies will be free from defects in materials and workmanship after the date of purchase,
for one year. If HP receives notice of such defects during the warranty period, HP will, at
its option, either replace or repair products which prove to be defective. Replacement
products may be either new or equivalent in performance to new.
2. HP warrants to you that HP software will not fail to execute its programming instructions
after the date of purchase, for the period specified above, due to defects in material and
workmanship when properly installed and used. If HP receives notice of such defects
during the warranty period, HP will replace software which does not execute its
programming instructions due to such defects.
3. HP does not warrant that the operation of HP products will be uninterrupted or error
free. If HP is unable, within a reasonable time, to repair or replace any product to a
condition as warranted, you will be entitled to a refund of the purchase price upon prompt
return of the product.
4. HP products may contain remanufactured parts equivalent to new in performance or
may have been subject to incidental use.
5. This warranty does not apply to defects resulting from (a) improper or inadequate
maintenance or calibration, (b) software, interfacing, parts, or supplies not supplied by
18 HP Scanjet N7710 Scanner
Page 23

HP, (c) unauthorized modification or misuse, (d) operation outside of the published
environmental specifications for the product, or (e) improper site preparation or
maintenance.
6. TO THE EXTENT ALLOWED BY LOCAL LAW, THE ABOVE WARRANTIES ARE
EXCLUSIVE AND NO OTHER WARRANTY OR CONDITION, WHETHER WRITTEN OR
ORAL, IS EXPRESSED OR IMPLIED, AND HP SPECIFICALLY DISCLAIMS ANY
IMPLIED WARRANTIES OR CONDITIONS OF MERCHANTABILITY, SATISFACTORY
QUALITY, AND FITNESS FOR A PARTICULAR PURPOSE. Some countries, states, or
provinces do not allow limitations on the duration of an implied warranty, so the above
limitation or exclusion might not apply to you. This warranty gives you specific legal rights,
and you might also have other rights that vary from country/region to country/region, state
to state, or province to province.
7. HP's limited warranty is valid in any country/region or locality where HP has a support
presence for this product and where HP has marketed this product. The level of warranty
service you receive may vary according to local standards. HP will not alter the form, fit,
or function of the product to make it operate in a country/region in which it was never
intended to function for legal or regulatory reasons.
8. TO THE EXTENT ALLOWED BY LOCAL LAW, THE REMEDIES IN THIS WARRANTY
STATEMENT ARE YOUR SOLE AND EXCLUSIVE REMEDIES. EXCEPT AS
INDICATED ABOVE, IN NO EVENT WILL HP OR ITS SUPPLIERS BE LIABLE FOR
LOSS OF DATA OR FOR DIRECT, SPECIAL, INCIDENTAL, CONSEQUENTIAL
(INCLUDING LOST PROFIT OR DATA), OR OTHER DAMAGE, WHETHER BASED IN
CONTRACT, TORT, OR OTHERWISE. Some countries, states, or provinces do not allow
the exclusion or limitation of incidental or consequential damages, so the above limitation
or exclusion may not apply to you.
9. THE WARRANTY TERMS CONTAINED IN THIS STATEMENT, EXCEPT TO THE
EXTENT LAWFULLY PERMITTED, DO NOT EXCLUDE, RESTRICT, OR MODIFY AND
ARE IN ADDITION TO THE MANDATORY STATUTORY RIGHTS APPLICABLE TO
THE SALE OF THIS PRODUCT TO YOU.
English
Hewlett-Packard limited warranty statement 19
Page 24

6 Regulatory information and
product specifications
This section contains regulatory information and product specifications for the HP Scanjet
N7710 scanner and accessories.
Scanner specifications
Name Description
Scanner type Duplex sheet-feed scanner
Size Width: 320 mm (12.6 inches), Depth: 270 mm (10.6 inches), Height:
Weight 5.4 kg (11.8 lbs)
Scanning element Charge-coupled device (CCD)
Interface USB 2.0 high speed (compatible with USB 1.1)
Optical resolution 600 x 600 dpi hardware
AC power 32V~, 50/60Hz, 2500mA, 80W
Power consumption For power consumption, data see the regulatory_supplement.htm file on
312 mm (12.3 inches)
the HP Scanning Software CD.
Your HP scanner is ENERGY STAR® compliant. As an ENERGY STAR®
partner, Hewlett-Packard Company has determined that this product
meets the ENERGY STAR® guidelines for energy efficiency.
Environmental specifications
Name Description
Temperature Operating the scanner: 10° to 35° C (50° to 95° F)
Storage: -40° to 60° C (-40° to 140° F)
Relative humidity Operating the scanner: 15 percent to 80 percent noncondensing 10° to 35°
C (50° to 95° F)
Storage: up to 90 percent at 0° to 60° C or (32° to 140° F)
Regulatory information
Regulatory Model Identification Number: For regulatory identification purposes your
product is assigned a Regulatory Model Number. The Regulatory Model Number for your
product is FCLSD-0704. This regulatory number should not be confused with the
20 HP Scanjet N7710 Scanner
Page 25

marketing name (HP Scanjet N7710) or product number (L1989A). Additional regulatory
information about your scanner can be found on the regulatory_supplement.htm file on
the HP Scanning Software CD.
NOTE: The regulatory label is on the bottom of the scanner. The output paper tray
covers up this label.
Recycle information
Recycling, energy consumption, and environmental information is located on the HP
Scanning Software CD that comes with the scanner. On the CD, browse for the file named
recycle_supplement.pdf.
Materials disposal
This HP product contains the following materials that might require special handling at
end-of-life:
Mercury in the fluorescent lamp in the scanner and/or transparent materials adapter.
Disposal of this material can be regulated because of environmental considerations. For
disposal or recycling information, please contact your local authorities or the Electronic
Industries Alliance (EIA)
www.eiae.org.
Disposal of Waste Equipment by Users in Private
Households in the European Union
English
This symbol on the product or on its packaging indicates that this product must not be
disposed of with your other household waste. Instead, it is your responsibility to dispose
of your waste equipment by handing it over to a designated collection point for the
recycling of waste electrical and electronic equipment. The separate collection and
recycling of your waste equipment at the time of disposal will help to conserve natural
resources and ensure that it is recycled in a manner that protects human health and the
environment. For more information about where you can drop off your waste equipment
for recycling, please contact your local city office, your household waste disposal service,
or the shop where you purchased the product.
Recycle information 21
Page 26

Chapter 6
22 HP Scanjet N7710 Scanner
Page 27

HP Scanjet N7710 扫描仪
安装和支持指南
简体中文
Page 28

版权和许可
© 2007 Copyright Hewlett-Packard
Development Company, L.P.
未经事先书面许可,不得对本文档进行
复制、改编或翻译,除非版权法中另有
规定。
此处包含的信息如有更改,恕不另行通
知。
有关 HP 产品和服务的所有保修事项已
在产品和服务所附带的保修声明中列
出。此处内容不构成任何额外保修。HP
不对本文档中任何技术性或编辑性的错
误或疏漏负责。
商标说明
ENERGY STAR 是美国环保局的注册服
务商标。
Microsoft 和 Windows 是 Microsoft
Corporation 的注册商标。
Page 29

目录
1
扫描仪安装
包装箱内的物品...........................................................................................................2
安装软件......................................................................................................................3
安装硬件......................................................................................................................4
测试安装......................................................................................................................7
自定义配置文件标签....................................................................................................8
2
扫描仪按钮及其功能
扫描仪按钮...................................................................................................................9
特殊功能......................................................................................................................9
3
从哪里获得其他信息
HP Scanjet N7710 用户指南......................................................................................11
HP 智能文档扫描软件帮助.........................................................................................11
HP 扫描仪工具实用程序帮助.....................................................................................11
其他软件程序的帮助..................................................................................................11
4
疑难排解
扫描仪错误代码.........................................................................................................12
安装完毕后扫描仪无法正常工作................................................................................13
寻求疑难排解帮助的其他途径....................................................................................14
简体中文
5
产品保养和支持
保养和维护.................................................................................................................15
辅助功能....................................................................................................................15
获取帮助....................................................................................................................15
Hewlett-Packard 有限保修声明..................................................................................16
6
规范信息和产品技术指标
扫描仪技术指标.........................................................................................................18
环境技术指标.............................................................................................................18
规范信息....................................................................................................................18
回收信息....................................................................................................................19
材料处理....................................................................................................................19
欧盟国家私人住户对废弃家用设备的处理..................................................................19
1
Page 30

1
扫描仪安装
按以下步骤安装扫描仪:
•
检查包装箱内的物品
•
安装软件
•
安装硬件
•
测试安装
包装箱内的物品
打开扫描仪的硬件包装。确保取下所有的包装封带。
1
2
4
7
6
1
2
3
4
5
6
7
8
2
HP Scanjet N7710 扫描仪
3
5
HP Scanjet N7710 扫描仪
出纸盒
电源适配器
USB 电缆
配置文件标签
安装和支持指南(本手册)
纸张通道清洁布
Scanning Software CD(有关详细信息,请参阅位于第 3 页的“随附的软件”。)
8
Page 31

安装软件
1.
2.
3.
小心 请勿在此时将 USB 电缆连接到计算机。在连接 USB 电缆之前,请先
安装扫描软件。
将扫描仪随附的 HP Scanning Software CD 插入计算机的 CD 驱动器。
请等待,稍后将显示安装对话框。如果未出现安装对话框,请执行以下操
作:
a. 单击“开始”,然后单击“运行”。(在 Windows Vista 中,单击“开
始”,然后在搜索框中键入“运行”。)
将显示“运行”对话框。
b. 在“打开”框中,键入 d:\setup.exe(其中 d: 是您计算机 CD 驱动器的盘
符)。
c. 单击“确定”。
单击“安装软件”安装扫描软件。按屏幕提示安装下列应用程序:
• Kofax VRS 4.10
•
HP Scanjet 驱动程序和工具
•
HP 智能文档扫描软件
选择扫描仪灯的初始设置:
•
在“省电”模式下,如果扫描仪灯在约 15 分钟内无活动,则它将超时并
自动关闭。在此模式下,扫描仪符合 Energy Star 标准。
•
在“打开快速灯”模式下,如果扫描仪灯在约 15 分钟内无活动,则它将
超时并自动关闭,但其仍保持发热和预备扫描的状态。
简体中文
随附的软件
本节介绍扫描仪随附的扫描和文档管理软件程序。
除 HP 软件程序以外,本扫描仪还附带有几种常用的文档管理应用程序。并非所
有型号扫描仪或所有国家/地区都可提供此附加软件。
要了解有关其他扫描软件程序的信息,请打开该程序,然后单击菜单栏中的“帮
助”。
HP Scanning Software CD
程序 用途
HP 智能文档扫描软件 用来在扫描多页文档时获得高质量扫描效果,还可用来自动执行
HP 扫描仪工具实用程序 用来为配置文件指定号码、配置扫描仪前面板上的按钮以及查找
ISIS/TWAIN 驱动程序 当在扫描仪上使用标准商用程序和自定义软件时,这些驱动程序
Kofax VirtualReScan
您经常执行的扫描任务。
有关扫描仪设置、状态和维护的信息。
是必需的。这些程序满足扫描仪正常工作的最低要求。
用于在扫描彩色文档或损坏的文档时,获得具有较高清晰度和更
强可读性的扫描输出文件。
安装软件
3
Page 32

第 1 章
ScanSoft PaperPort CD
程序 用途
ScanSoft PaperPort
I.R.I.S. Readiris Pro CD
程序 用途
I.R.I.S. Readiris Pro
NewSoft Presto!BizCard CD
程序 用途
NewSoft Presto!BizCard
安装硬件
要安装扫描仪硬件并使扫描仪准备就绪,须完成以下工作。
连接电源适配器
电源适配器附带有一段电缆,可以插入扫描仪后部。在该电缆末端的接头处有一
个绿色 LED,当适配器正常工作时会点亮。
该电源适配器还配有一条交流电源线,其一端与适配器相连,另一端插入电源插
座或电涌保护器。
1.
将交流电源线插入电源适配器后部。
用来组织、查找和共享纸质文档和 PDF 文档。
通过全功能光学字符识别 (OCR) 技术将键入的文档扫描为能以
多种格式保存的可编辑文本。
用来将名片转换到数据库,该数据库可以被多个用户共享,可以
被导出到联系人管理软件中,还可以和 PDA 同步。
2.
3.
4
HP Scanjet N7710 扫描仪
将交流电源线的另一端插入电源插座或电涌保护器。
确保电源适配器电缆接头上的绿色 LED 能够点亮。
•
如果绿色 LED 未点亮,则应检查交流电源线所连接的电源插座或电涌保
护器中是否有电。
•
如果电源插座或电涌保护器中有电,但绿色 LED 仍不亮,则可能是电源
适配器存在故障。请联系 HP 支持以获得帮助。
Page 33

4.
若绿色 LED 是点亮的,则将适配器电缆插入扫描仪后部。
5.
将扫描仪后部的电源开关按至打开位置。
连接 USB 电缆
小心 在通过 USB 电缆将扫描仪连接到计算机之前,请确保先安装 HP 扫描
软件。请参阅位于第 3 页的“安装软件”。
使用扫描仪随附的 USB 电缆将扫描仪连接到计算机。将电缆的正方形一端插入
扫描仪,将长方形一端插入计算机。
注意 HP 建议使用计算机背面的 USB 端口,以便更可靠地连接扫描仪。
简体中文
安装硬件
5
Page 34

第 1 章
令扫描仪准备就绪
1.
将出纸盒后部插入扫描仪前部的下侧插槽内,安上出纸盒。
2.
当原件尺寸较大时,可展开送纸器上的延长板。
3.
翻开出纸盒盖,伸展出纸盒。
4.
轻轻打开扫描仪随附的 HP 纸张通道清洁布包装。
5.
取出清洁布,将其展开。
6.
将展开的清洁布放入送纸器。
2
1
3
7.
6
HP Scanjet N7710 扫描仪
按下“工具”(
)按钮,打开扫描仪工具实用程序。单击“维护”选项卡。
Page 35

8.
9.
测试安装
1.
单击“清洁”按钮将清洁布送入扫描仪。
注意 清洁布将进入并通过扫描仪。如此即可确认硬件安装成功、驱动程
序和工具已安装且扫描仪硬件目前可以正常工作。
如果清洁布未进入并通过纸张通道而是停留在出纸盒中,则可能未完全安
装扫描仪。请参阅位于第 13 页的“安装完毕后扫描仪无法正常工
作”(见本指南“疑难排解”部分)。
重复步骤 8 至少一次。
小心 在将纸张插入送纸器之前,请先等待两分钟,让部件变干燥。
注意 您需要定期地使用纸张通道清洁布来进行其他保养和维护工作。要定购
更多纸张通道清洁布,请访问
www.hp.com/support。
小心 在将原件放入送纸器之前,请确保物品上没有未干的胶水、修正液或其
他可能落入扫描仪内部的物质。
确保原件上没有卷曲、褶皱、钉书钉、纸夹或其他附着物。不要将纸张粘在
一起放入送纸器。
只能将单页纸放入送纸器。放入页面时应让待扫描的一面朝下,同时令页首
向下(
)。
简体中文
2.
调整纸张导板。纸张导板必须与纸张的两侧接触才能正常工作。请确保页面
平直放置且纸张导板与页面边缘接触。
测试安装
7
Page 36

第 1 章
3.
按下扫描文档到(
•
如果已经安装了 HP 智能文档扫描软件,则计算机屏幕上将显示扫描到的
页面。如果计算机屏幕上未出现扫描到的页面,请参阅
位于第 14 页的“卸载并重新安装 HP Scanjet 驱动程序和应用程序”。
•
如果没有安装 HP 智能文档扫描软件,则请从您计划用于扫描的软件程序
进行扫描。如果该应用程序中扫描过程正常,则说明此程序已成功安装。
如果该应用程序中扫描过程不正常,则请查阅应用程序软件帮助。
4.
安装您想要使用的任何其他软件。
自定义配置文件标签
HP 智能文档扫描软件允许您创建配置文件,此文件包含对扫描、处理以及保存
或发送文档的设置。您可以为配置文件指定号码,这些编号可以通过扫描仪前面
板进行选择。有关设置配置文件的信息,请参阅《HP Scanjet N7710 用户指
南》的“设置扫描配置文件”部分。
在扫描仪随附的配置文件标签上可以列出最多十二个号码及分配给这些号码的配
置文件。可以将此标签直接贴于扫描仪前部的下拉纸盒上。如要去除下拉纸盒上
的标签,可揭开标签一角,然后将其从纸盒上揭下。请勿在旧标签上粘贴新标
签。
)按钮。纸张将进入并通过扫描仪。
如果需要一份模板以打印更多配置文件标签,您可以使用 HP Scanning Software
CD 中的 label_template.doc 文件。
要自定义并打印一份配置文件标签,请按以下步骤操作:
1.
2.
3.
4.
5.
6.
7.
8.
8
HP Scanjet N7710 扫描仪
在 Microsoft Word 中打开配置文件标签模板。
双击配置文件号码右侧的文本表格字段。将显示对话框。
在“默认文本”字段中单击,然后输入配置文件的简要描述。
重复第 2 步和第 3 步,为每个配置文件输入描述内容。
单击“确定”。
在打印到标签纸之前,先将标签打印在一张普通纸上。将打印测试页放在整
页标签纸上,查看并确认文本与标签纸能够对齐。
再打印到整页的 8 1/2" x 11" 或 A4 标签纸上,沿边线剪下每张标签。
将标签置于扫描仪前部的下拉纸盒上。
Page 37

2
扫描仪按钮及其功能
扫描仪按钮
扫描仪前面板上的按钮可用来启动扫描、选择扫描配置文件以及对扫描仪设置进
行配置。
4
5
1
图标 按钮名称 描述
1
2
3
4
5
选择配置文件号码或份数(在扫描之前)选择配置文件或(在复印之前)
扫描文档到 使用所显示号码对应的配置文件开始扫描。
复印 按所显示的份数进行打印。
取消 取消正在进行的扫描或复印操作。
工具 打开 HP 扫描仪工具实用程序,您可以通过此实
2
3
选择份数。
所选的配置文件号码或份数将显示在前面板上。
用程序配置扫描仪前面板按钮、指定配置文件并
查看维护信息。
有关本章中提到的扫描仪按钮的详细信息,请参见《HP Scanjet N7710 用户指
南》。
简体中文
特殊功能
下表概述了本扫描仪的几项重要功能。其中许多功能都可在 HP 智能文档扫描软
件或其他随附的扫描软件中使用。有关详细信息,请参阅 HP 智能文档扫描软件
帮助。
功能 描述
卡片槽 您可以通过扫描仪背面的卡片槽扫描硬质材料,如叠层卡片和
浮凸卡片。
扫描仪按钮及其功能
9
Page 38

第 2 章
(续)
功能 描述
有关使用卡片槽的信息,请参阅扫描仪《用户指南》。
多种纸张尺寸 可以扫描一叠尺寸从名片到 legal 尺寸纸张的原件。也可以每次
配置文件 您可以创建和使用配置文件,这些文件中含有进行扫描所需的
页面管理 您可以查看、编辑、删除和插入页面,还可以重新排列页面顺
文件管理 您可以将所有页面扫描到同一个文件,也可以将每个页面扫描
光学字符识别 (OCR) 您可以通过 OCR 软件将原件扫描为可编辑文本并将其发送到
发送文档到 您可以创建配置文件,以将扫描文档发送到多种目标位置,如
扫描一页尺寸最大为 215.9 x 863.6 mm(8.5 x 34 英寸)的原
件。
所有设置,如:
文档处理
•
使用自动命名机制以不同文件格式(如可搜索或不可搜索
•
的 PDF 文件)保存文档
发送到不同的目标位置,如电子邮件程序、Microsoft
•
SharePoint 或其他应用程序
序。您也可以让扫描仪自动删除空白页。
到单独的文件,还可以按原件中的条形码或空白页扫描到不同
文件。
所需的应用程序中。
本地文件夹、网络文件夹、电子邮件程序或自定义应用程序。
10
HP Scanjet N7710 扫描仪
Page 39

3
从哪里获得其他信息
本扫描仪附带有多个介绍扫描仪和扫描仪软件使用方法的手册或帮助。
HP Scanjet N7710 用户指南
扫描仪《用户指南》是介绍扫描仪使用、维护和疑难排解方法的主要手册。该手
册为经编译的帮助 (.CHM) 文件。
要在所安装的(系统)语言中打开该《用户指南》,请按以下步骤操作:
▲
单击“开始”,依次指向“程序”或“所有程
序”、“HP”、“Scanjet”、“N7710”,然后单击“用户指南”。
要在另一种语言中打开《用户指南》,请按以下步骤操作:
1.
将扫描仪随附的 HP Scanning Software CD 插入计算机 CD 驱动器。
请等待,将显示安装对话框。
2.
单击“查看指南”。
将显示语言列表。
3.
单击您想使用的语言。
HP 智能文档扫描软件帮助
HP 智能文档扫描软件帮助将向您介绍如何使用 HP 智能文档扫描软件的各项功
能,如创建和编辑配置文件。
要打开 HP 智能文档扫描软件帮助,请双击计算机桌面上的“HP 智能文档扫描
软件”图标,然后单击菜单栏中的“帮助”。
简体中文
HP 扫描仪工具实用程序帮助
HP 扫描仪工具实用程序帮助将向您介绍扫描仪设置、有关扫描仪状态和维护的
信息以及为扫描仪配置文件指定号码的方法,您可以从扫描仪前面板选择这些号
码。
要打开 HP 扫描仪工具实用程序帮助,请按下扫描仪前面板上的工具按钮,然后
单击 HP 扫描仪工具实用程序对话框中的“帮助”。
其他软件程序的帮助
要获取有关扫描仪随附的任何软件程序的信息,请打开程序,然后单击菜单栏上
的“帮助”。
从哪里获得其他信息
11
Page 40

4
疑难排解
扫描仪错误代码
有关错误代码的帮助信息,请参阅以下相应主题。
错误代码 描述
错误 02,SDRAM 错误 将电源开关按到关闭位置。等待 30 秒钟,然后将电源开关按到打开
错误 03,USB 错误
错误 04,卡纸 检测到送纸器卡纸。打开盖板,清除卡纸。
错误 08,盖板打开 送纸器上的盖板打开或未关紧。请用力向下按盖板,直至听到咔嗒
错误 09,NVRAM 访问错误 将电源开关按到关闭位置。等待 30 秒钟,然后将电源开关按到打开
错误 10,电机故障 将电源开关按到关闭位置。等待 30 秒钟,然后将电源开关按到打开
错误 18,多张进纸错误 扫描仪检测到有多页纸被同时送入扫描仪。按以下步骤修复错误:
位置。如果仍然显示此消息,请联系
1.
检查扫描仪和计算机之间的 USB 连接。
2.
使用“Windows 设备管理器”工具检查计算机是否能够识别扫
描仪。
“Windows 设备管理器”工具位于“控制面板”中“系统”工具
的“硬件”选项卡中。
3.
如果计算机无法识别扫描仪,请卸载并重新安装扫描仪软件。
4.
如果问题仍然存在,请联系
声,然后重新扫描。
位置。如果仍然显示此消息,请联系
位置。如果仍然显示此消息,请联系
1.
取出送纸器中的纸张。
2.
将纸张重新叠放,以确保纸张未粘在一起。
3.
确保纸张符合扫描仪《用户指南》中指定的尺寸及重量技术指
标。
4.
将纸张重新放入送纸器。
如果在无进纸错误时出现此错误,则说明进纸错误(多张进纸)检
测传感器工作不正常。联系 HP 支持。
HP 支持。
HP 支持。
HP 支持。
HP 支持。
错误 23,灯错误 将电源开关按到关闭位置,关闭扫描仪。等待 30 秒钟,然后再将电
错误 24,纸张拾取故障 送纸器不能拾取纸张或纸张被卡。按以下步骤修复错误:
12
HP Scanjet N7710 扫描仪
注意 您可以在 TWAIN/ISIS“Advanced Settings”对话框中禁用
进纸错误(多张进纸)检测功能。
源开关按到打开位置,打开扫描仪。如果仍然显示此消息,请联系
HP 支持。
1.
取出送纸器中的纸张。
2.
将纸张重新叠放,以确保纸张未粘在一起。
3.
确保纸张符合扫描仪《用户指南》中指定的尺寸及重量技术指
标。
4.
将纸张放回送纸器,然后重试。
Page 41

安装完毕后扫描仪无法正常工作
如果安装完毕后扫描仪无法正常工作,您可能会在计算机上看到以下信息之一:
•
扫描仪无法初始化。
•
无法找到扫描仪。
•
发生内部错误。
•
计算机无法与扫描仪通信。
请尝试以下方法修复此问题:
检查电缆
确认电缆连接正确。
电源适配器
电源适配器附带有一段电缆,可以插入扫描仪后部。在该电缆末端的接头处有一
个绿色 LED,当适配器正常工作时会点亮。
该电源适配器还配有一条交流电源线,其一端与适配器相连,另一端插入电源插
座或电涌保护器。
电源线应连接扫描仪与电源插座。
1.
检查适配器电缆接头处的绿色 LED 是否点亮。
2.
如果绿色 LED 未点亮,则请确保交流电源线所连接的电源插座或电涌保护器
中有电。
3.
如果电源插座或电涌保护器中有电,但绿色 LED 仍不亮,则可能是电源适配
器存在故障。请联系 HP 支持以获得帮助。
4.
检查电源翘板开关是否处在打开位置。
USB 电缆
检查同扫描仪间的物理连接:
•
请使用扫描仪随附的电缆。其他 USB 电缆可能与扫描仪不兼容。
•
确保扫描仪同计算机或 USB 集线器之间的 USB 电缆连接可靠。在将 USB
电缆正确连接到扫描仪后,电缆上的三叉形图标应朝上。
排除 USB 的连接故障:
简体中文
安装完毕后扫描仪无法正常工作
13
Page 42

第 4 章
1.
根据扫描仪连接到计算机的方式,执行以下操作之一:
•
如果 USB 电缆连接了用于 USB 集线器或便携式计算机的扩展座,请断
开 USB 电缆与 USB 集线器或扩展座的连接,然后将 USB 电缆直接连接
到计算机。
•
如果 USB 电缆直接连接了计算机,则请将它插入计算机的另一个 USB 端
口。
•
拔掉计算机上除键盘和鼠标以外的所有其他 USB 设备。
2.
关闭扫描仪电源,然后重新打开。
3.
重新启动计算机。
4.
在计算机重新启动后,请尝试使用扫描仪。
如果在您按步骤 1 中的方法改变了扫描仪与计算机的连接方式后,扫描仪正
常工作,则通信问题可能就出现在 USB 集线器或扩展座上。令扫描仪直接连
接到计算机。
如果您的扫描仪无法正常工作,请卸载 HP 扫描软件并重新安装。
卸载并重新安装 HP Scanjet 驱动程序和应用程序
如果检查扫描仪电缆连接时未检查出问题,则问题可能是因安装不完全而导致
的。尝试卸载并重新安装 HP 扫描驱动程序和实用程序。
1.
断开计算机上的 USB 电缆连接。
2.
使用“控制面板”中的“添加/删除程序”工具(在 Windows Vista 中为“程
序和功能”工具)卸载下列应用程序:
•
HP Scanjet N7710 文档 ISIS/TWAIN
•
HP Scanjet 驱动程序和工具
3.
在删除了 HP 扫描软件后,请从电源插座上拔下扫描仪电源插头。
4.
重新启动计算机。
5.
将 HP Scanning Software CD 插入计算机的 CD-ROM 驱动器。
6.
按屏幕提示安装 HP 扫描软件。
7.
安装完 HP 扫描软件后,连接扫描仪电源,打开扫描仪,然后通过 USB 电缆
将扫描仪连接至计算机。
8.
按屏幕提示操作。
寻求疑难排解帮助的其他途径
有关扫描仪硬件或软件的更多疑难排解帮助信息,请参阅位于第 11 页的“从哪
里获得其他信息”。
14
HP Scanjet N7710 扫描仪
Page 43

5
产品保养和支持
本节介绍产品支持方面的选项。
保养和维护
时常清洁扫描仪有助于确保更高质量的扫描效果。扫描仪需要什么样的保养取决
于若干因素,包括使用次数和使用环境。应根据需要进行日常清洁。
HP 扫描仪工具实用程序会在需要进行保养时提醒您。有关查找该实用程序的帮
助信息,请参阅位于第 11 页的“从哪里获得其他信息”。
有关扫描仪维护的说明,请参阅 HP Scanjet N7710《用户指南》。有关查找该
指南的帮助信息,请参阅位于第 11 页的“从哪里获得其他信息”。
小心 在将原件放入送纸器之前,请确保其上没有未干的胶水、修正液或其他
可能落入扫描仪内部的物质。
确保原件上没有卷曲、褶皱、钉书钉、纸夹或其他附着物。纸张不应当粘在
一起。
辅助功能
本扫描仪提供了以下辅助功能选项:
•
•
有关 LCD Reader 以及如何禁用扫描仪按钮的更多信息,请参阅 HP Scanjet
N7710《用户指南》。有关查找该指南的帮助信息,请参阅位于第 11 页的“从
哪里获得其他信息”。
有行为障碍的用户可以通过访问
accessibility/prodserv/ 获取帮助。
获取帮助
为能最大限度地发挥 HP 产品的性能,请了解下列标准 HP 支持内容:
简体中文
LCD Reader 是一个软件程序,它能够显示扫描仪前面板显示屏上不断变化
的内容。LCD Reader 能启用辅助功能软件工具以描述扫描仪前面板上显示
的内容。
为防止扫描仪前面板上的按钮被意外按下,可禁用这些按钮。
www.hp.com/hpinfo/community/
产品保养和支持
15
Page 44

第 5 章
1.
请参阅本产品随附的产品文档。
•
请查阅本手册中的疑难排解一节。
•
请查阅位于第 11 页的“从哪里获得其他信息”中所描述的软件文档。
2.
访问 HP 在线支持,网址为
www.hp.com/support,或联系产品销售商。
HP 在线支持适用于所有 HP 用户。它是获取最新产品信息和专家帮助的最快
速通道,包括:
•
通过电子邮件快速咨询资深的在线支持专家
•
更新产品软件和驱动程序
•
重要的产品技术问题和疑难排解信息
•
主动产品更新以及支持通知和 HP 简讯(在您注册产品后可用)
3.
通过电话联系 HP 支持
•
支持选项和费用会因产品、国家/地区和语言的不同而有所差异。
•
费用及相关政策如有变更,恕不另行通知。请查看
www.hp.com/
support 网站以了解最新信息。
4.
保修期过后
在过了有限保修期后,用户可以通过
5.
保修延长或升级
若想对产品保修进行延长或升级,请联系产品销售商,或查看
www.hp.com/support 获取在线帮助。
www.hp.com/
support 上的 HP 金牌服务。
6.
如果您已经购买了 HP 金牌服务,则请查看合同中的支持条件。
Hewlett-Packard 有限保修声明
HP Scanjet N7710 扫描仪
1. HP 向您,即最终用户保证,自购买之日起一年内,HP 硬件、附件和耗材均
不会出现材料及工艺缺陷。如果 HP 在保修期内收到有关此类故障的报告,HP
将自行决定对经证实存在故障的产品进行更换或维修。更换品可能是新的,也可
能是性能等同于新产品的产品。
2. HP 向您保证,在自购买之日起的上述指定期限内,在正确安装和使用的情况
下,HP 软件不会出现因产品材料和工艺缺陷而导致的无法执行程序指令的问
题。如果 HP 在保修期内收到有关此类缺陷的报告,HP 将更换那些因存在此类
缺陷而无法执行其程序指令的软件。
3. HP 不保证其产品的运行不会中断或不会出错。如果 HP 未能在合理期限内将
任何故障产品更换或修理为保修条款中所规定的状态,则您有权在退还产品时索
要全额退款。
4. HP 产品中可能会含有性能等同于新产品的或偶然使用过的再制造部件。
5. 本保修不适用于因以下原因导致的缺陷:(a) 不当或不足的维护/校准;(b) 使
用非 HP 的软件、接口、部件或耗材;(c) 未经授权的改装或误用;(d) 在产品技
术参数所规定的环境以外操作,或 (e) 现场准备或维护不当。
6. 在当地法规所允许的范围内,以上保修为唯一保修。除此之外,不再以书面或
口头形式以及明示或暗示形式提供任何其他保修承诺。HP 特别声明,不提供针
16
HP Scanjet N7710 扫描仪
Page 45

对适销性、质量满意度和特定用途适用性的暗示的保修或规定。某些国家/地
区、州或省不允许对暗示保修期加以限制,因此上述限制或排除内容可能对您不
适用。本保修赋予您具体的法律权利,此外,您还可能获得其他权利,这会因您
所在国家/地区、州或省的不同而有所差异。
7. HP 的有限保修在任何可为本产品提供支持和销售本 HP 产品的国家/地区或
区域均有效。您能够获得的保修服务水平视当地情况而定。HP 不会出于某个国
家/地区的法律或法规原因而改变本产品的外形、尺寸或功能,以强制本产品在
该国家/地区使用。
8. 在当地法律所允许的范围内,本保修声明中的补偿是您唯一的和全部的补偿。
除上述声明以外,HP 或其供应商不对数据丢失,或直接、特殊、偶然、继发
(包括利润下降或数据丢失)损失或其他损失(无论是基于合同、民事侵权还是
其他方面)承担责任。某些国家/地区、州或省不允许排除或限制偶然的或继发
的损失,因此上述限制或排除条款可能对您不适用。
9. 除非法律许可,本保修声明中的条款不会排除、限制或修改有关向您出售本产
品的法定权利,而是作为对此法定权利的补充。
简体中文
Hewlett-Packard 有限保修声明
17
Page 46

6
规范信息和产品技术指标
本节介绍 HP Scanjet N7710 扫描仪及其附件的规范信息和产品技术指标。
扫描仪技术指标
名称 描述
扫描仪类型 双面进纸扫描仪
尺寸 宽度:320 mm(12.6 英寸),深度:270 mm(10.6 英寸),高度:312
重量 5.4 千克(11.8 磅)
扫描元件 电荷藕合器件 (CCD)
接口 USB 2.0 高速(兼容 USB 1.1)
光学分辨率 600 x 600 dpi 硬件
交流电源 32V~,50/60Hz,2500mA,80W
功耗 有关功耗的数据,请参阅 HP Scanning Software CD 中的
mm(12.3 英寸)
regulatory_supplement.htm 文件。
您的 HP 扫描仪符合 ENERGY STAR 标准。作为 ENERGY STAR 的
合作伙伴,Hewlett-Packard Company 已确认本产品符合 ENERGY
STAR 的能效规范。
®
®
®
环境技术指标
名称 描述
温度 操作扫描仪:10 至 35 摄氏度(50 至 95 华氏度)
相对湿度 操作扫描仪:15% 至 80%,非冷凝,10 至 35 摄氏度(50 至 95 华氏度)
规范信息
规范型号识别码:为进行规范识别,您的产品被指派了一个规范型号识别码。您
产品的规范型号识别码为 FCLSD-0704。请勿将此规范号码同商品名称 (HP
Scanjet N7710) 或产品编号 (L1989A) 相混淆。有关您扫描仪的其他规范信息,
请参阅 HP Scanning Software CD 中的 regulatory_supplement.htm 文件。
注意 规范标签位于扫描仪底部。出纸盒盖住了这个标签。
18
HP Scanjet N7710 扫描仪
存放扫描仪:-40 至 60 摄氏度(-40 至 140 华氏度)
存放扫描仪:0 至 60 摄氏度(32 至 140 华氏度)时最高 90%
Page 47

回收信息
有关回收、能耗和环境方面的信息见扫描仪随附的 HP Scanning Software CD。
在该 CD 中,查找名为 recycle_supplement.pdf 的文件。
材料处理
本 HP 产品中含有下列材料,这些材料可能需要在其寿命终了时予以特殊处理:
扫描仪荧光灯和/或透明材料适配器中所含的汞。
出于环境方面的考虑,对这些材料的处理可能会受到管制。有关处理或回收的信
息,请联系当地管理部门或联系电子工业协会 (EIA)
欧盟国家私人住户对废弃家用设备的处理
www.eiae.org。
位于产品或其包装上的此标志表明不能将该产品同其他家庭垃圾一同处理。相
反,您有责任将废弃设备送往指定收集点,以对这些废弃的电气和电子设备进行
回收处理。对废弃设备进行单独收集和回收将有助于保护自然资源,并确保按照
保护人类健康和环境的方式进行回收。要获取有关废弃设备回收地点的详细信
息,请联系当地市政府、家庭垃圾处理服务机构或产品销售商。
简体中文
回收信息
19
Page 48

 Loading...