

Page 1
HP Scanjet N6010
Guide d'installation et d'assistance
Installatie- en ondersteuningshandleiding
Setup and Support Guide
Page 2

Page 3

Guide d'installation et d'assistance
Français
Page 4

Copyright et licence
© 2006 Copyright Hewlett-Packard
Development Company, L.P.
La reproduction, l'adaptation ou la
traduction dans une autre langue sans
l'autorisation écrite préalable de
Hewlett-Packard est interdite, ou
autorisée conformément aux lois
relatives au copyright.
Les informations fournies ci-après sont
sujettes à modification sans préavis.
Les garanties couvrant les produits et
services HP sont énoncées
exclusivement dans la documentation
accompagnant ces produits et
services. Aucun élément du présent
document ne peut être interprété
comme constituant une garantie
supplémentaire. HP ne pourra être tenu
responsable d'aucune erreur
technique, de rédaction ou d'omission
contenue dans le présent document.
Marques déposées
ENERGY STAR est une marque
déposée aux Etats-Unis de l'agence
américaine de protection de
l'environnement (United States
Environmental Protection Agency).
Microsoft et Windows sont des
marques déposées de Microsoft
Corporation.
Page 5

Sommaire
1 Démarrage..............................................................................................................4
Etape 1. Vérification du contenu de l'emballage.....................................................4
Etape 2. Installation du logiciel................................................................................5
Etape 3. Connexion du cordon d'alimentation.........................................................5
Etape 4. Branchement du câble USB......................................................................7
Etape 5. Préparation du scanner pour son utilisation..............................................8
Etape 6. Test de l'installation.................................................................................10
CD du logiciel de numérisation HP........................................................................11
Mode Economie d'énergie ou Mode Préchauffage instantané de la lampe..........12
2 Utilisation des boutons du scanner...................................................................13
Boutons du scanner..............................................................................................13
3 Informations supplémentaires...........................................................................15
Guide de l'utilisateur HP Scanjet N6010...............................................................15
Aide de l'utilitaire Outils du scanner......................................................................15
Aides des logiciels supplémentaires.....................................................................16
4 Entretien et maintenance....................................................................................17
5 Résolution des problèmes..................................................................................18
Le scanner ne fonctionne pas après son installation............................................18
6 Assistance produits............................................................................................21
Accessibilité...........................................................................................................21
Site Web HP..........................................................................................................21
Obtention d'assistance..........................................................................................21
7 Garantie limitée HP..............................................................................................23
Déclaration de garantie limitée HP........................................................................23
8 Informations juridiques et caractéristiques du produit...................................26
Caractéristiques du scanner..................................................................................26
Caractéristiques relatives à l'environnement.........................................................26
Informations juridiques..........................................................................................27
Informations sur le recyclage et la mise au rebut de certains matériaux..............27
Français
Guide d'installation et d'assistance 3
Page 6
1
Démarrage
Procédez comme suit pour configurer le scanner :
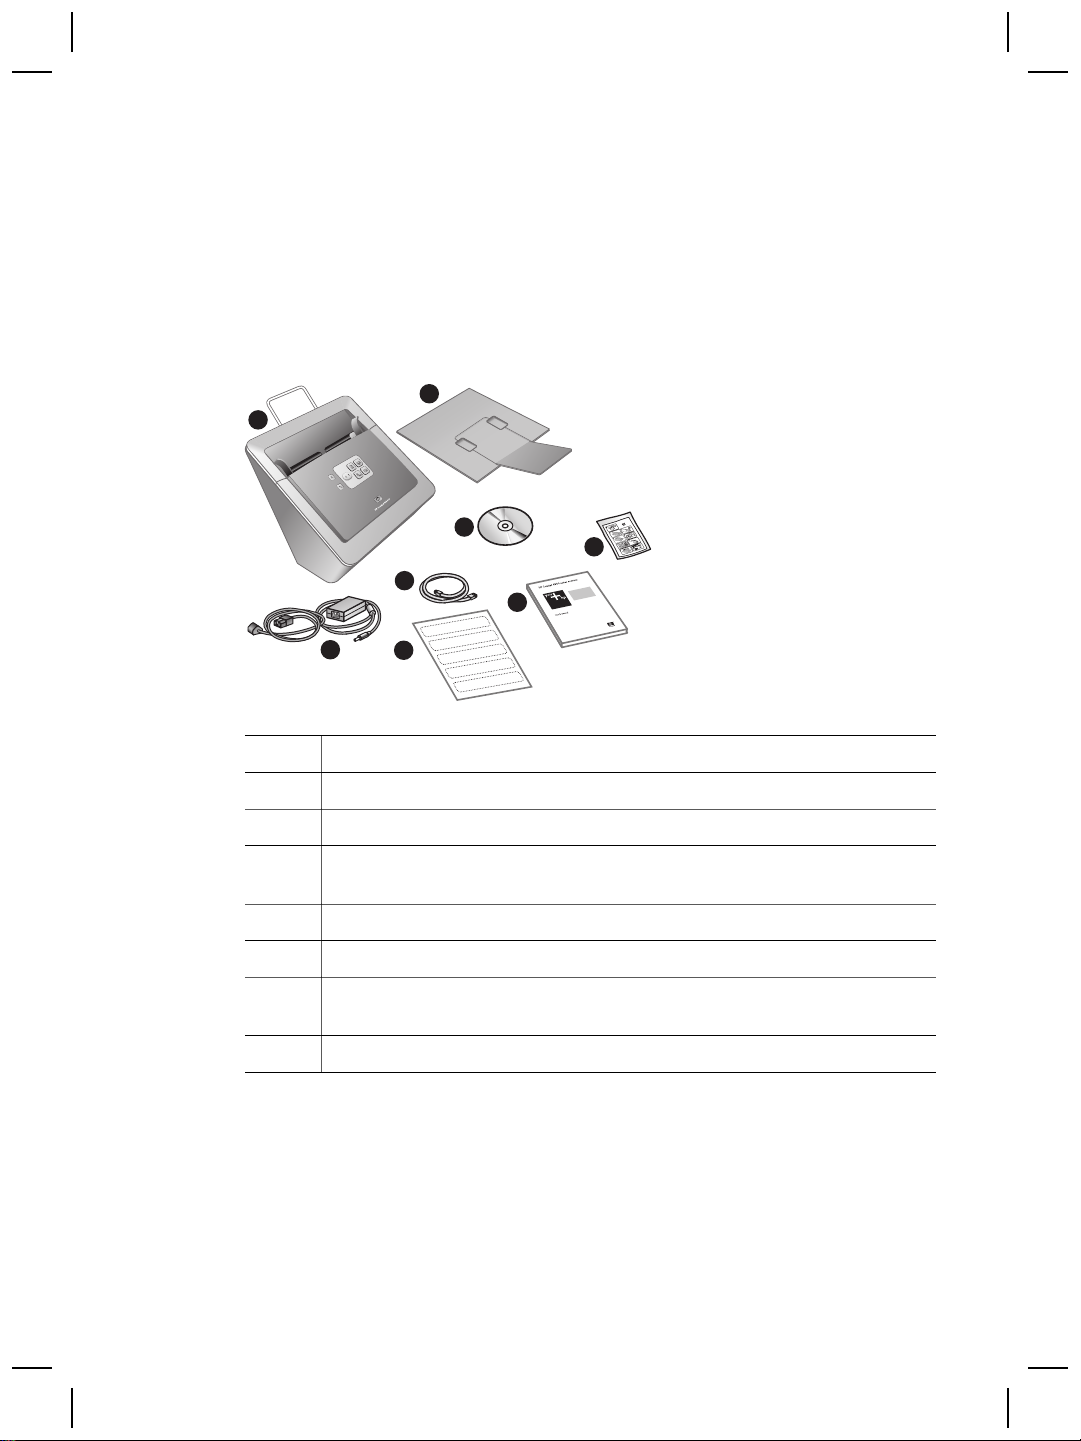
Etape 1. Vérification du contenu de l'emballage
Déballez le scanner. Veillez à retirer toutes les bandes adhésives.
8
1
4
3
6
2
1 Scanner HP Scanjet N6010
2 Cordon d'alimentation
3 Câble USB
4 CD des logiciels de numérisation (pour plus d'informations, reportez-vous à
la section CD du logiciel de numérisation HP, page 11).
5 Etiquettes du panneau avant
6 Guide d'installation et d'assistance (le présent manuel)
7 Chiffon de nettoyage pour chemin de papier (à utiliser pour une maintenance
ultérieure)
8 Bac de sortie
5
7
4 Scanner de documents feuille à feuille HP Scanjet N6010
Page 7
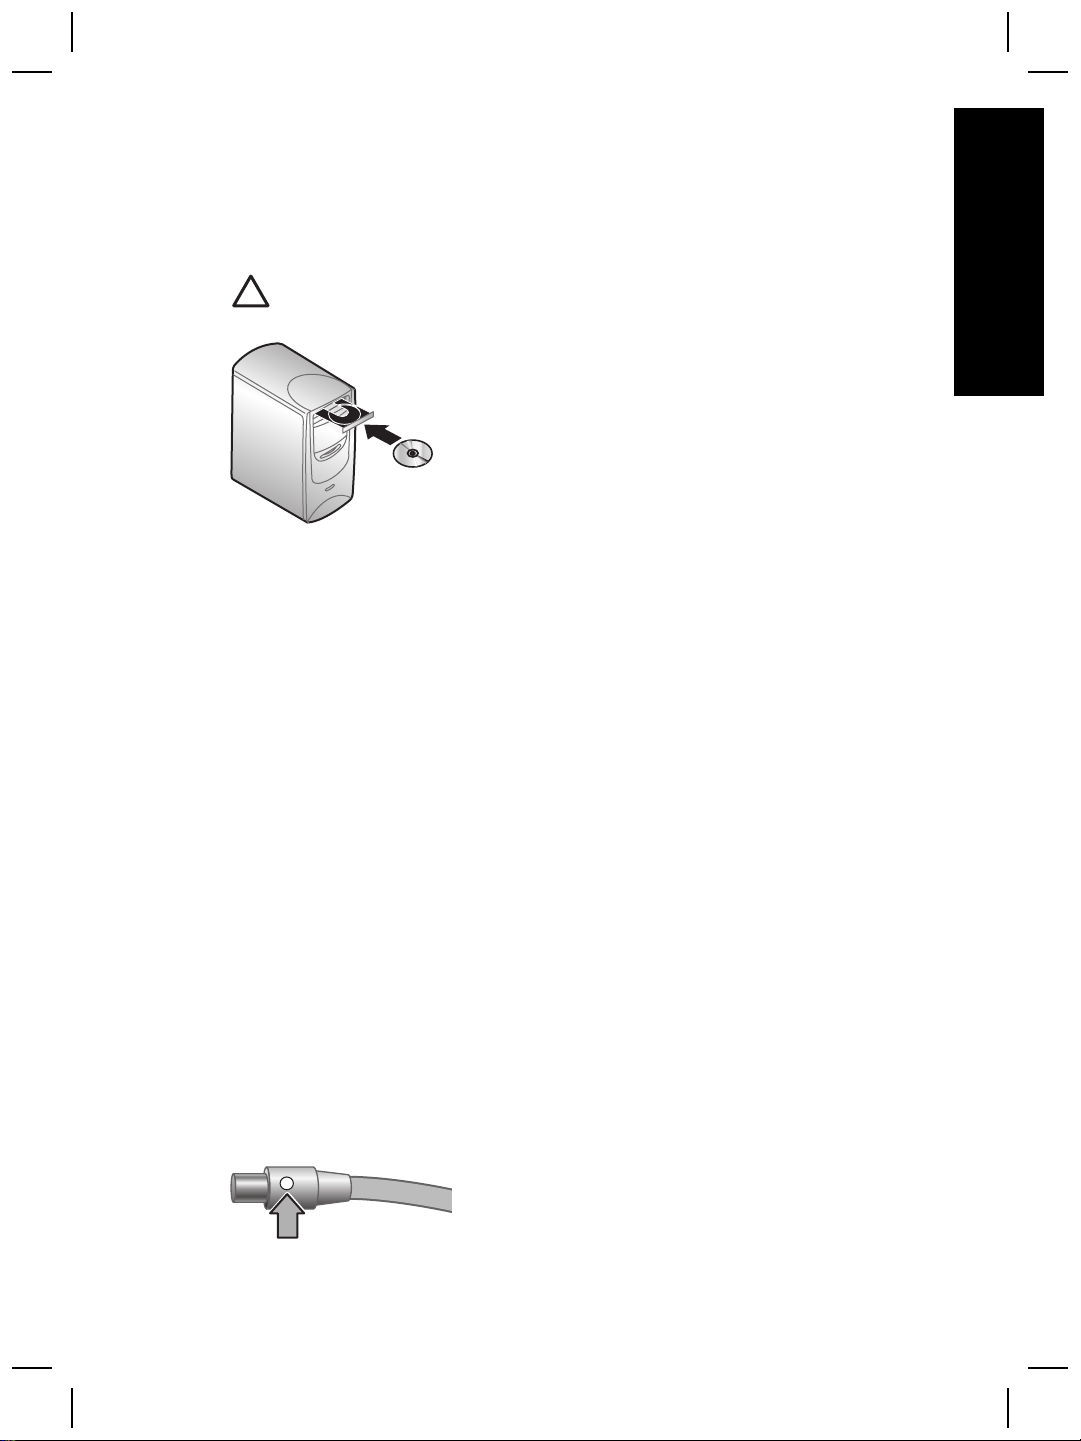
Etape 2. Installation du logiciel
Plusieurs programmes logiciels de numérisation sont livrés avec le scanner. Pour plus
d'informations sur ces programmes, reportez-vous à la section CD du logiciel de
numérisation HP, page 11.
Attention Installez le logiciel de numérisation HP avant de brancher le câble
USB sur l'ordinateur.
1. Insérez le CD HP Scanning Software CD fourni avec le scanner dans le lecteur de
CD de l'ordinateur.
2. Attendez que la boîte de dialogue d'installation s'affiche. Si elle ne s'affiche pas
après quelques instants, procédez comme suit :
a. Cliquez sur Démarrer, puis sur Exécuter.
La boîte de dialogue Exécuter s'affiche.
b. Dans la zone Ouvrir, tapez d:\setup.exe (où d:représente la lettre du lecteur de
CD-ROM de votre ordinateur).
c. Cliquez sur OK.
3. Dans la boîte de dialogue d'installation, sélectionnez les programmes logiciels que
vous souhaitez installer. Pour utiliser toutes les fonctions du scanner, HP
recommande d'installer tous les programmes du CD.
4. Suivez les instructions à l'écran pour procéder à l'installation du logiciel.
Au cours du processus d'installation, il vous demandé si vous souhaitez activer le
mode Economie d'énergie ou Préchauffage instantané de la lampe. Pour plus
d'informations sur ces options, reportez-vous à la section Mode Economie d'énergie
ou Mode Préchauffage instantané de la lampe, page 12.
Le programme d'installation contrôle également si Adobe Acrobat Reader est
installé pour l'affichage des fichiers PDF. Sinon, suivez les instructions expliquant
comment l'installer.
Français
Etape 3. Connexion du cordon d'alimentation
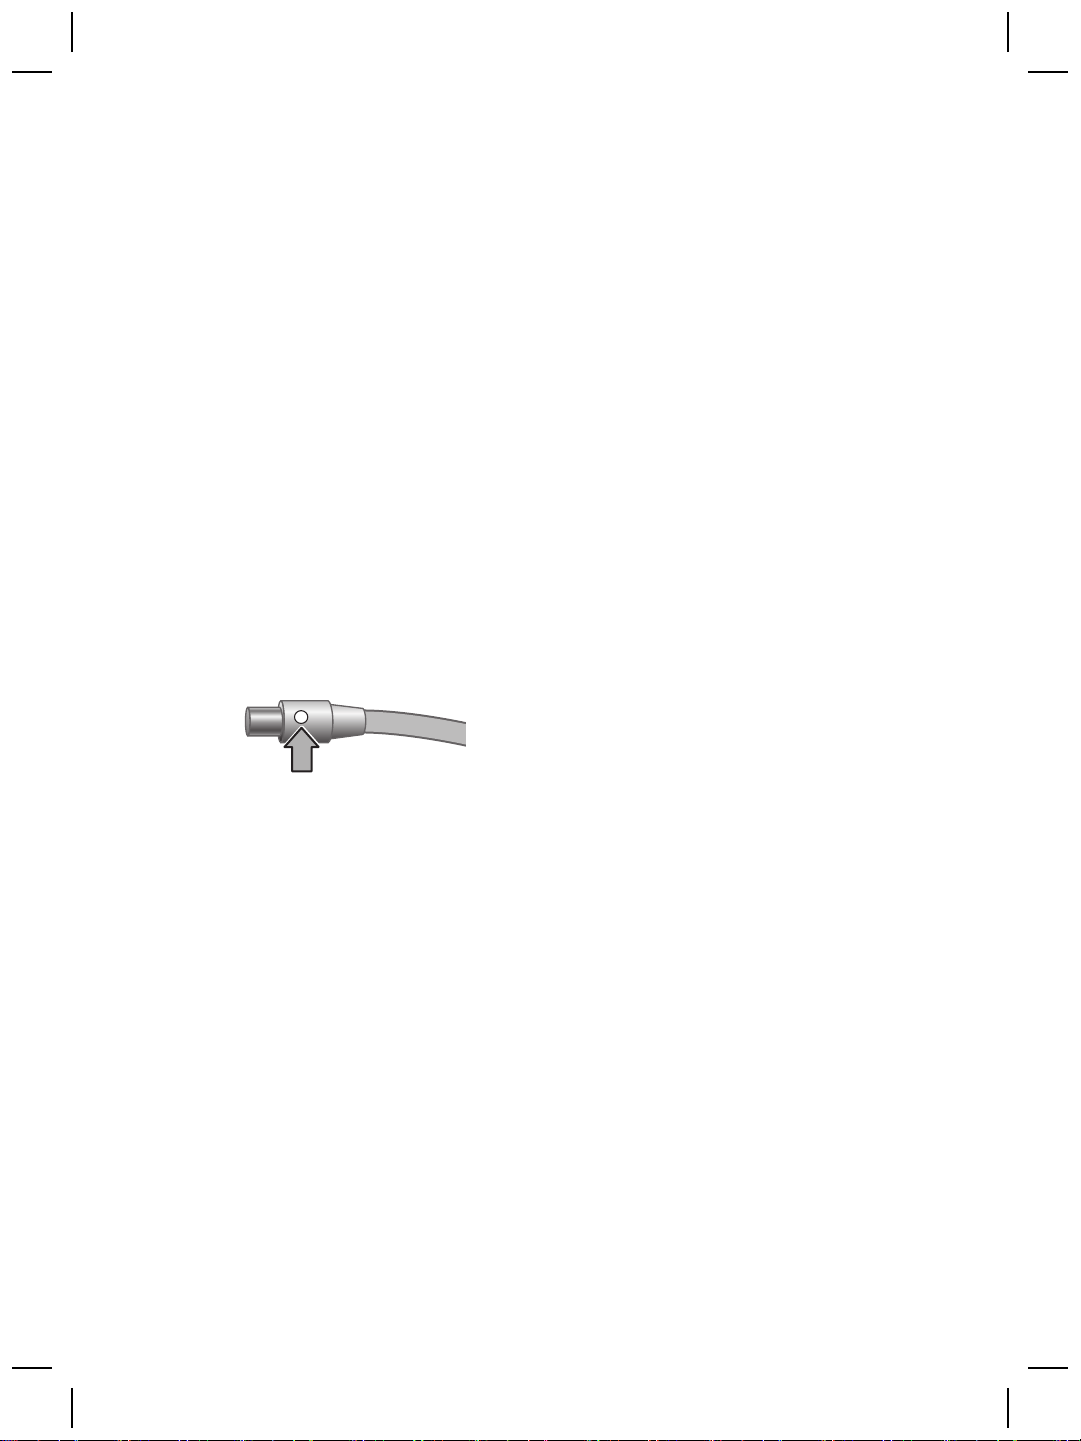
Le cordon d'alimentation possède un câble associé qui se branche à l'arrière du scanner.
Le connecteur situé à l'extrémité de ce câble possède un voyant vert qui s'allume lorsque
le cordon d'alimentation fonctionne correctement.
Guide d'installation et d'assistance 5
Page 8
Chapitre 1
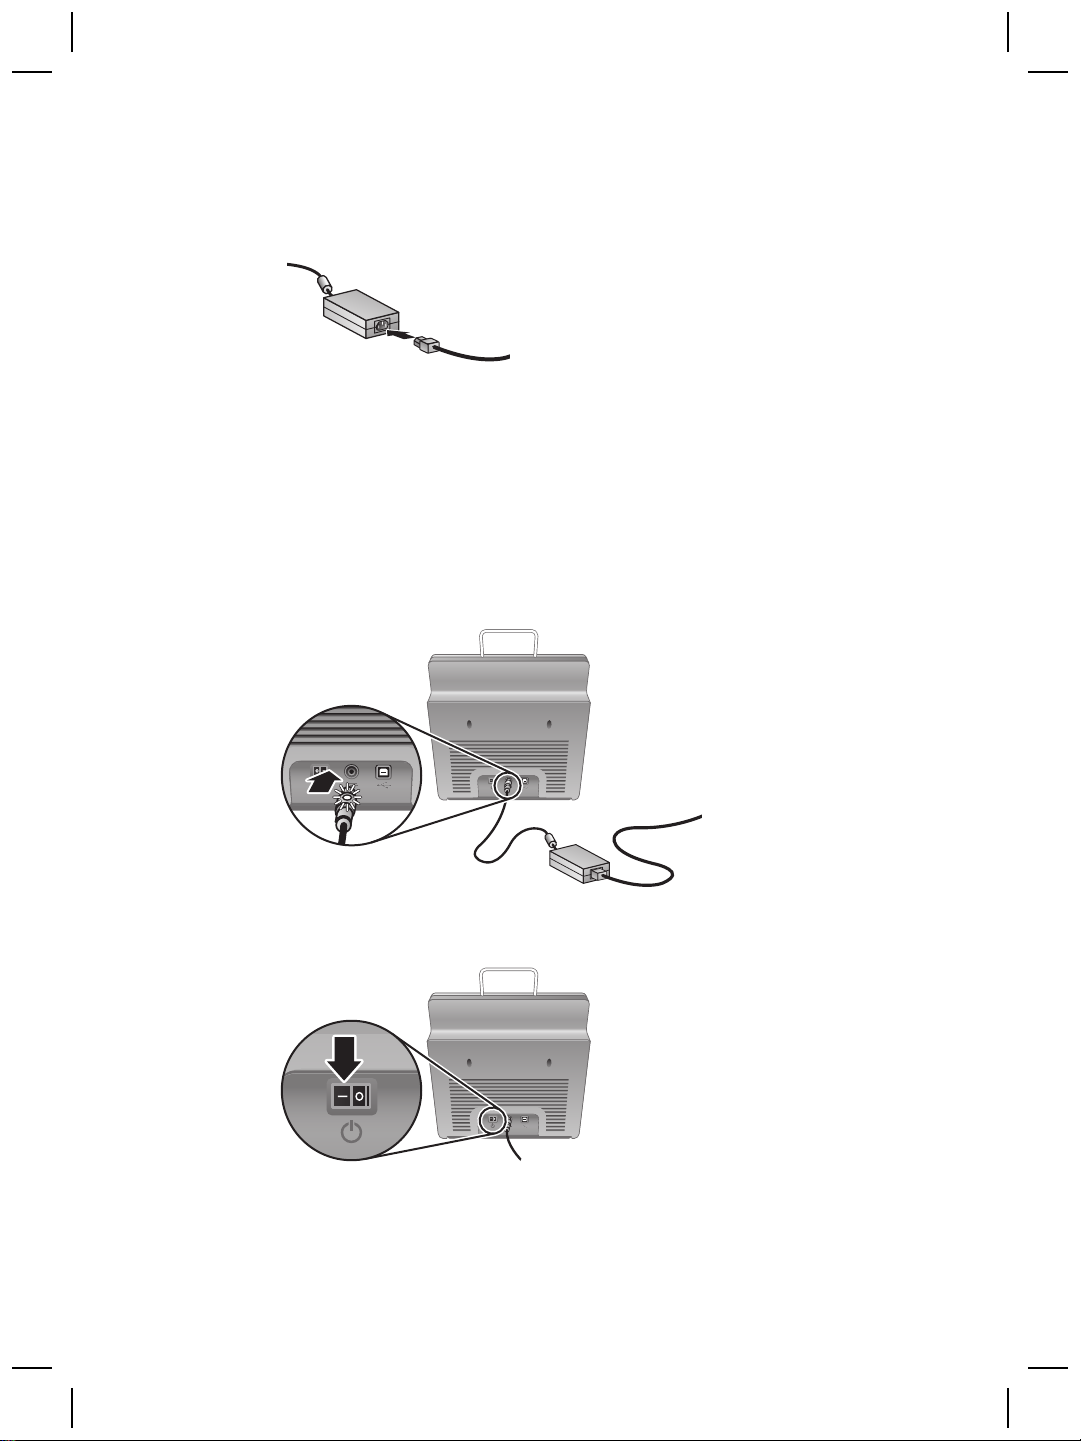
Un câble secteur est également connecté au cordon d'alimentation à une extrémité et
branché sur une prise électrique ou sur un parasurtenseur à l'autre extrémité.
1. Branchez le câble secteur à l'arrière du cordon d'alimentation.
2. Branchez l'autre extrémité du câble secteur sur une prise électrique ou sur un
parasurtenseur.
3. Vérifiez que le voyant vert situé sur le connecteur du câble du cordon d'alimentation
est allumé.
– S'il est éteint, vérifiez que la prise électrique ou le parasurtenseur sur lequel le
câble secteur est branché est alimenté.
– Si la prise électrique ou le parasurtenseur est alimenté, mais que le voyant vert
est toujours éteint, le cordon d'alimentation est peut-être défectueux. Contactez
l'assistance HP pour obtenir de l'aide.
4. Si le voyant vert est allumé, branchez le cordon d'alimentation à l'arrière du scanner.
5. Mettez le scanner sous tension. Face à l'arrière du scanner, appuyez sur
l'interrupteur d'alimentation à l'arrière gauche du scanner.
6 Scanner de documents feuille à feuille HP Scanjet N6010
Page 9
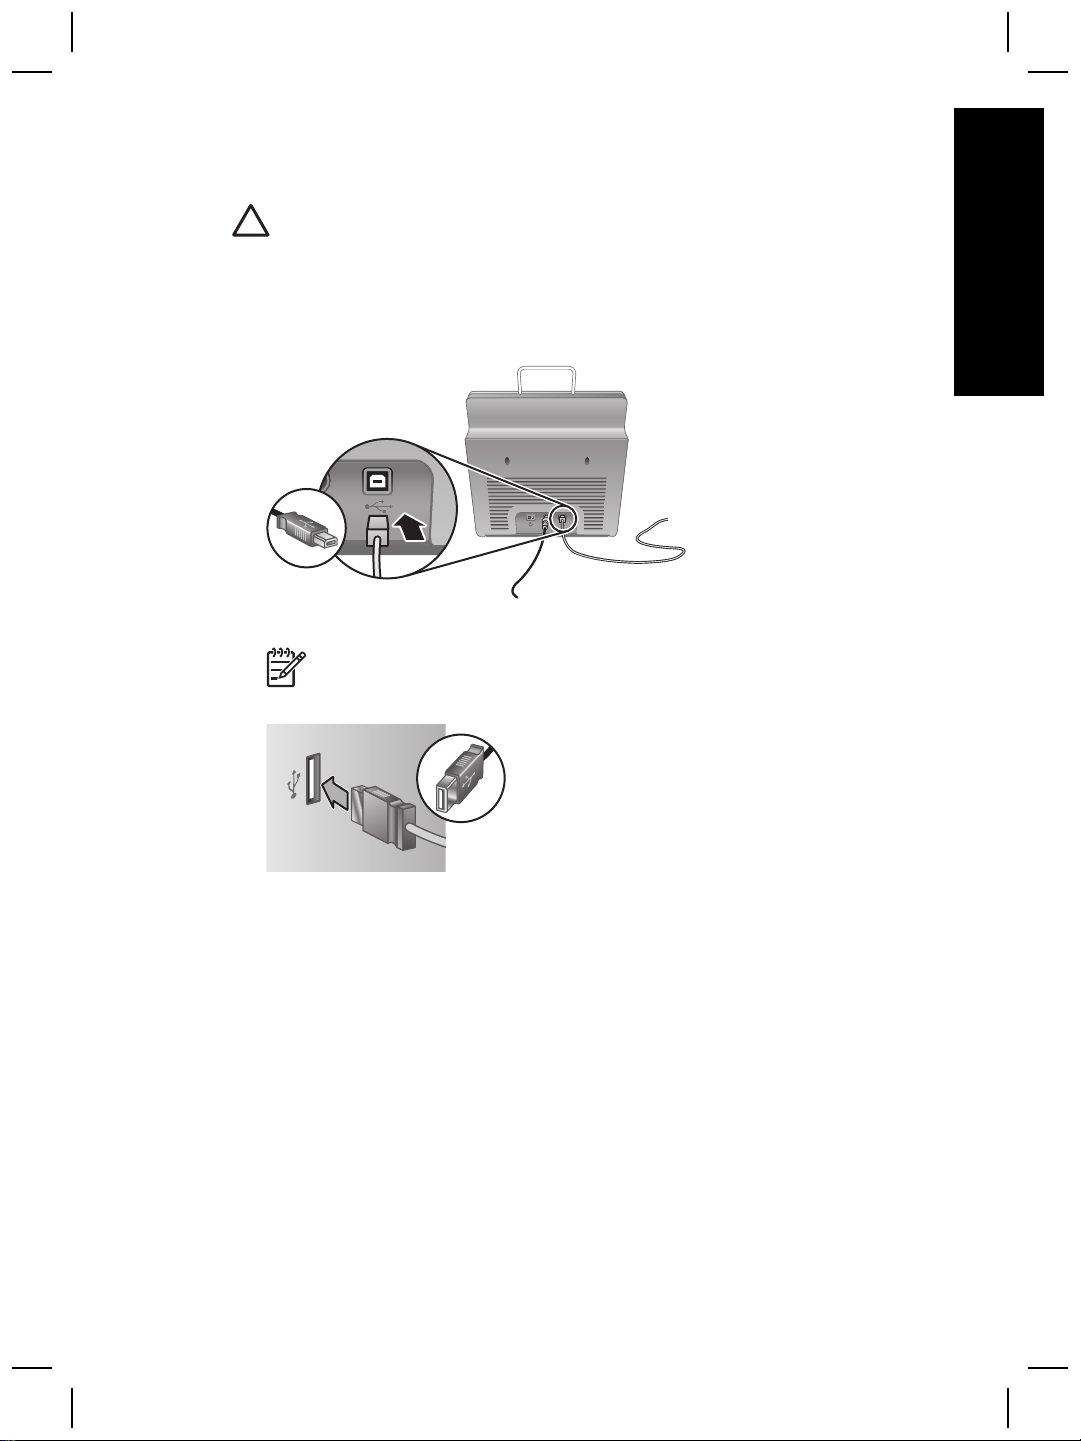
Etape 4. Branchement du câble USB
Attention Veillez à installer le logiciel avant de brancher le scanner à
l'ordinateur à l'aide du câble USB. Reportez-vous à la section Etape 2. Installation
du logiciel, page 5.
Utilisez le câble USB fourni avec le scanner pour brancher le scanner sur l'ordinateur.
1. Raccordez l'embout carré du câble au scanner.
2. Raccordez l'embout rectangulaire du câble à l'ordinateur.
Remarque Si l'ordinateur comporte un port USB à l'avant et à l'arrière,
utilisez le port USB arrière.
Français
Guide d'installation et d'assistance 7
Page 10

Chapitre 1
Etape 5. Préparation du scanner pour son utilisation
1. Installez le bac de sortie. Pour l'installer, faites glissez le bac, l'extension vers le
haut, dans les emplacements du bas du scanner.
2. Déployez l'extension du bac de sortie.
3. Pour les originaux de plus grande taille, déployez l'extension du bac d'alimentation
sur le haut du scanner.
4. Localisez l'étiquette du panneau avant livrée dans l'emballage. Retirez la protection
et placez l'étiquette sur l'extension située sous le logo HP sur le panneau avant.
8 Scanner de documents feuille à feuille HP Scanjet N6010
Page 11

Cette étiquette fournit des informations sur les boutons et voyants du panneau
avant.
Français
Guide d'installation et d'assistance 9
Page 12

Chapitre 1
Etape 6. Test de l'installation
Attention Avant de placer un élément dans le bac d'alimentation, assurez-vous
que celui-ci n'est ni encollé, ni enduit d'une substance pouvant laisser des traces
à l'intérieur du scanner.
Vérifiez l'absence de plis, d'ondulations, d'agrafes, de trombones ou de tout autre
élément attaché. Les feuilles ne doivent pas être collées entre elles.
1. Placez une seule page dans le bac d'alimentation. La page doit être positionnée
face imprimée vers le bas, avec le haut de la page pointant vers le bas (
).
2. Ajustez les guides papier. Ils doivent toucher les deux côtés de la page pour
fonctionner correctement. Assurez-vous que la page est droite et que les guides
sont placés contre les bords de la page.
Remarque Pour ajuster les guides papier, appuyez sur la partie inférieure
du guide.
3. Appuyez sur le bouton Numériser vers PDF (
La page passe dans le scanner. Une numérisation de la page doit s'afficher sur
l'écran de votre ordinateur dans l'afficheur PDF. Elle confirme la réussite de
l'installation.
Remarque Adobe Acrobat Reader ou un autre programme d'affichage PDF
doit être installé pour terminer correctement cette procédure. Si vous n'avez
pas d'afficheur PDF, lancez ce test à l'aide du bouton Numériser document.
Si aucune numérisation de la page ne s'affiche sur l'écran de votre ordinateur,
reportez-vous à Résolution des problèmes, page 18.
10 Scanner de documents feuille à feuille HP Scanjet N6010
).
Page 13

CD du logiciel de numérisation HP
Cette section décrit les programmes logiciels de numérisation HP fournis avec le
scanner. Tous les programmes sont pris en charge par les systèmes d'exploitation
Microsoft Windows 2000 et XP, y compris x-64.
Deux programmes non HP sont inclus. Ces logiciels ne sont pas disponibles pour tous
les modèles de scanner ni dans tous les pays/toutes les régions.
Français
Programmes
Logiciel de numérisation HP Le logiciel de numérisation HP inclut les utilitaires HP
Utilisation du logiciel
Outils du scanner, Copie de documents, Créateur de
PDF ainsi que les pilotes du scanner TWAIN.
● Utilisez l'utilitaire Outils du scanner pour configurer
les paramètres du bouton Numériser vers PDF,
pour associer les boutons du scanner aux
différentes applications, pour désactiver les
boutons du scanner ou pour afficher les
informations d'entretien du scanner. Vous pouvez
le lancer à partir du bouton du panneau avant
Outils du scanner ou à partir du menu Démarrer.
● Utilisez l'utilitaire Copie de documents pour
configurer les copies envoyées par le scanner vers
l'imprimante par défaut. Vous pouvez le lancer à
partir du bouton du panneau avant Copier ou à
partir du menu Démarrer.
● Le logiciel de Créateur de PDF HP utilise l'image
numérisée pour créer un fichier PDF. Il ne
comporte pas d'interface utilisateur mais vous
pouvez configurer les paramètres PDF à l'aide de
l'utilitaire Outils du scanner.
● Les pilotes TWAIN sont nécessaires pour utiliser
le scanner avec des applications d'entreprise
standard et des logiciels personnalisés. Ils
correspondent à la configuration minimale requise
pour que le scanner fonctionne correctement.
NewSoft Presto!
PageManager
NewSoft Presto!BizCard Utilisez ce logiciel pour numériser des cartes
Guide d'installation et d'assistance 11
Utilisez ce logiciel pour créer des images ou des
documents numérisés et les enregistrer sous divers
formats. Fournit un accès à la gestion de documents
(archive, réutilisation), à OCR, à la messagerie
électronique et à la télécopie.
professionnelles et organiser vos contacts dans une
base de données conviviale.
Page 14

Chapitre 1
Mode Economie d'énergie ou Mode Préchauffage
instantané de la lampe
Au cours du processus d'installation, il vous demandé si vous souhaitez activer le mode
Economie d'énergie ou Préchauffage instantané de la lampe pour le scanner. En mode
Economie d'énergie, la lampe du scanner s'éteint à la fin du délai prévu ainsi qu'après
une période d'inactivité (environ 15 minutes).
En mode Préchauffage instantané de la lampe, même si la lampe du scanner s'éteint à
la fin du délai prévu ou automatiquement après une certaine période d'inactivité
(15 minutes environ), elle reste chaude et prête à numériser.
Pour passer du mode Economie énergie au mode Préchauffage instantané de la lampe,
sélectionnez l'option Préchauffage instantané de la lampe de l'onglet Maintenance
de l'utilitaire Outils du scanner. Pour revenir au mode Economie énergie, désactivez
l'option Préchauffage instantané de la lampe.
12 Scanner de documents feuille à feuille HP Scanjet N6010
Page 15
2
Utilisation des boutons du
scanner
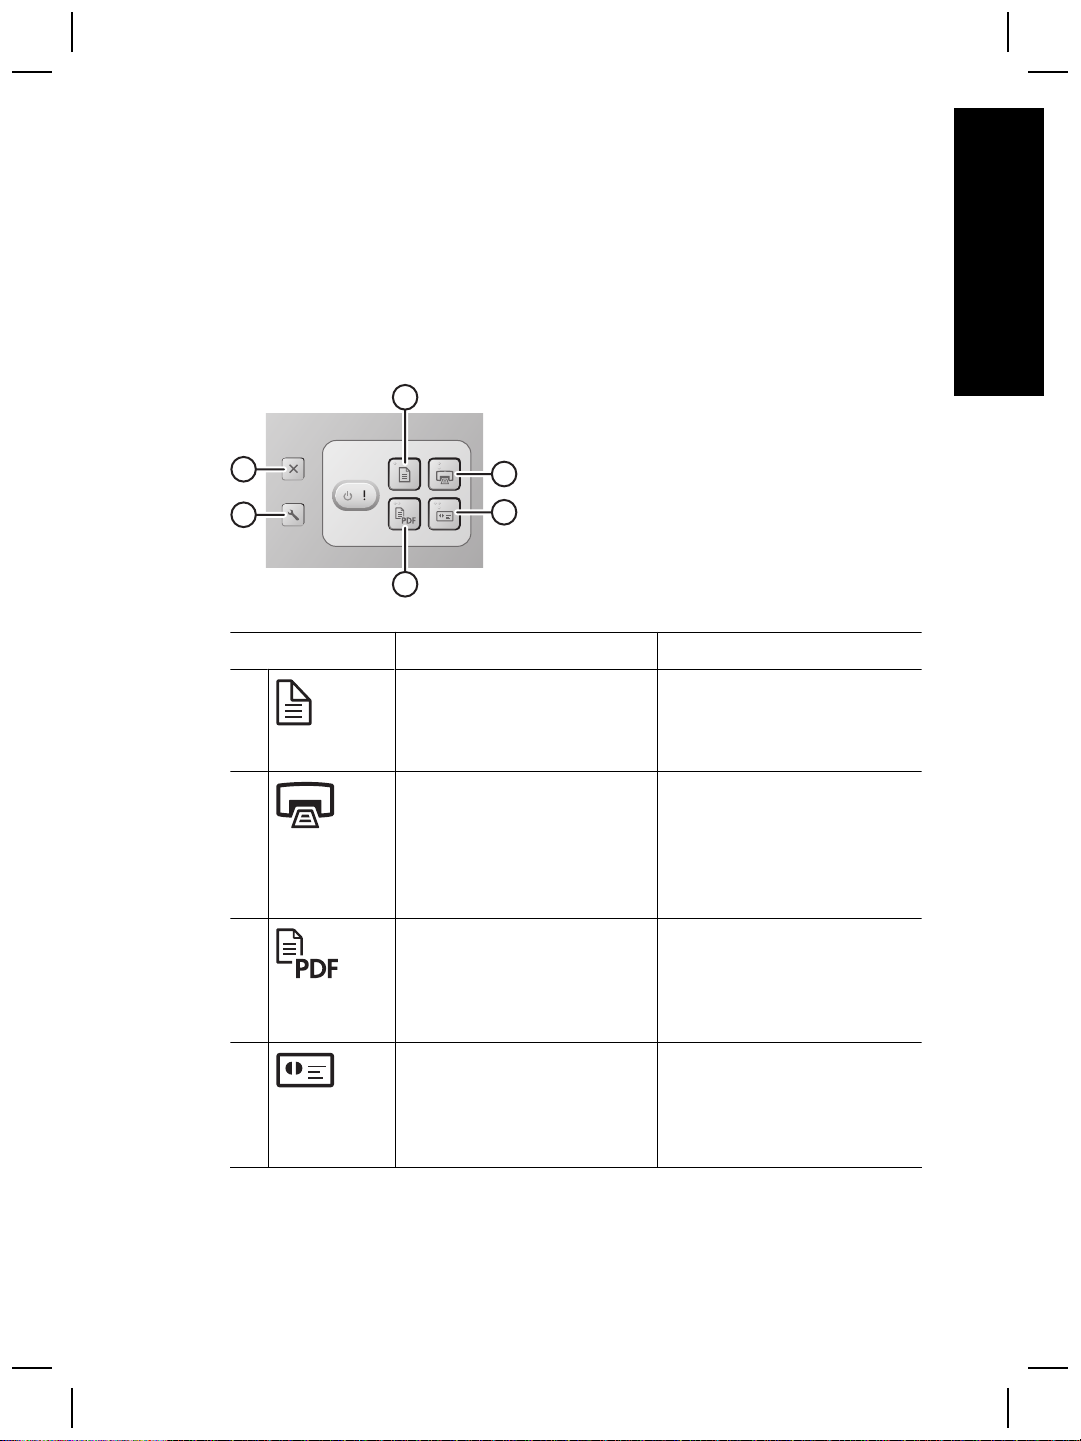
Boutons du scanner
Utilisez les boutons du panneau avant du scanner pour lancer une numérisation, en
annuler une ou configurer certains paramètres du scanner.
Français
1
5
6
3
Icône Nom du bouton Description
1 Numériser document (bouton
à gauche en haut)
2 Copier (bouton à droite en
haut)
3 Numériser vers PDF (bouton
à gauche en bas)
2
4
Lancer une numérisation. Par
défaut, ce bouton numérise
vers l'application NewSoft
Presto!PageManager.
Lancer une copie et l'envoyer
vers l'imprimante par défaut.
L'utilitaire Copie de documents
HP s'ouvre et vous permet de
sélectionner les options de
copie.
Numériser un document et
l'enregistrer au format PDF
pour partage ou stockage. Le
PDF s'ouvre automatiquement
dans l'afficheur PDF par défaut.
4 Numériser cartes
professionnelles (bouton de
droite en bas)
Guide d'installation et d'assistance 13
Numériser une carte
professionnelle. Par défaut, ce
bouton numérise vers
l'application NewSoft Presto!
BizCard.
Page 16

Chapitre 2
(suite)
5 Annuler (bouton à l'extrême
gauche en haut)
Annule une numérisation ou
une copie en cours.
6 Outils du scanner (bouton à
l'extrême gauche en bas)
Ouvrez l'utilitaire Outils du
scanner que vous pouvez
utiliser pour associer les
boutons du scanner aux
différentes applications, pour
configurer les options PDF ou
pour consulter les informations
d'entretien du scanner.
Pour plus d'informations sur les boutons du scanner, outre celles fournies dans ce
chapitre, reportez-vous au guide de l'utilisateur du scanner. Pour plus d'informations sur
le guide de l'utilisateur du scanner, reportez-vous à la section Informations
supplémentaires, page 15.
14 Scanner de documents feuille à feuille HP Scanjet N6010
Page 17

3
Informations supplémentaires
Le scanner est fourni avec plusieurs sources d'informations concernant son utilisation
ainsi que celle du logiciel de numérisation HP.
Guide de l'utilisateur HP Scanjet N6010
Le guide de l'utilisateur du scanner est la source d'informations principale pour ce produit
et fournit les informations nécessaires pour l'utiliser, l'entretenir et le dépanner. Le guide
se présente sous la forme d'un fichier PDF, ce qui vous permet de l'imprimer
partiellement ou dans son intégralité, et sous la forme d'un fichier Aide lisible à l'écran.
Pour ouvrir le guide de l'utilisateur au format PDF :
➔
Cliquez sur Démarrer, pointez sur Programmes ou sur Tous les programmes,
pointez sur HP, sur Scanjet, puis sur N6010 et cliquez sur Guide de l'utilisateur.
Pour obtenir une version PDF du guide de l'utilisateur dans une autre langue :
1. Insérez le CD du logiciel de numérisation HP fourni avec le scanner dans le lecteur
de CD de l'ordinateur.
Attendez que la boîte de dialogue d'installation s'affiche.
2. Cliquez sur Afficher ou imprimer les guides.
Une liste de langues s'affiche.
3. Cliquez sur la langue souhaitée.
Une liste de guides s'affiche.
4. Cliquez sur Guide de l'utilisateur.
Pour une version en ligne du Guide de l'utilisateur pouvant être utilisée avec le logiciel
de lecteur d'écran :
1. Insérez le CD du logiciel de numérisation HP fourni avec le scanner dans le lecteur
de CD de l'ordinateur.
Attendez que la boîte de dialogue d'installation s'affiche.
2. Cliquez sur Afficher ou imprimer les guides.
Une liste de langues s'affiche.
3. Cliquez sur la langue souhaitée.
Une liste de guides s'affiche.
4. Cliquez sur Guide de l'utilisateur en ligne.
Français
Aide de l'utilitaire Outils du scanner
Pour ouvrir l'utilitaire, procédez de l'une des manières suivantes :
● Double-cliquez sur l'icône Utilitaire Outils du scanner du bureau.
● Appuyez sur le bouton Outils du scanner (
scanner.
● Cliquez sur Démarrer, pointez sur Programmes ou sur Tous les
programmes, pointez sur HP, sur Scanjet, puis sur N6010 et cliquez sur
Utilitaire Outils du scanner.
Guide d'installation et d'assistance 15
) sur le panneau avant du
Page 18

Chapitre 3
(suite)
Cliquez sur Aide dans la boîte de dialogue Utilitaire Outils du scanner pour
ouvrir le fichier Aide.
Aides des logiciels supplémentaires
Chaque logiciel inclus sur le CD du logiciel de numérisation HP comprend une aide. Pour
ouvrir l'Aide d'un logiciel, ouvrez le logiciel, sélectionnez le menu Aide, puis sélectionnez
Aide ou Utilisation de l'aide.
16 Scanner de documents feuille à feuille HP Scanjet N6010
Page 19

4
Entretien et maintenance
Français
Un nettoyage régulier du scanner garantit des numérisations de qualité optimale.
L'entretien nécessaire dépend de plusieurs facteurs, notamment du taux d'utilisation et
de l'environnement. Nous vous conseillons d'effectuer un nettoyage de base lorsque cela
est nécessaire.
Pour plus d'informations sur l'entretien du scanner, reportez-vous au guide de l'utilisateur
du scanner. Pour plus d'informations sur le guide de l'utilisateur du scanner, reportezvous à la section Informations supplémentaires, page 15.
Attention Avant de placer un élément dans le bac d'alimentation, assurez-vous
que celui-ci n'est ni encollé, ni enduit d'une substance pouvant laisser des traces
à l'intérieur du scanner.
Vérifiez l'absence de plis, d'ondulations, d'agrafes, de trombones ou de tout autre
élément attaché. Les feuilles ne doivent pas être collées entre elles.
Guide d'installation et d'assistance 17
Page 20
5
Résolution des problèmes
Le scanner ne fonctionne pas après son installation
Si le scanner ne fonctionne pas après son installation, il se peut que l'un des messages
suivants s'affiche sur l'ordinateur :
● L'initialisation du scanner a échoué.
● Scanner introuvable.
● Une erreur interne s'est produite.
● Pas de communication entre l'ordinateur et le scanner.
Effectuez les opérations suivantes pour résoudre le problème :
Etape 1. Vérification des câbles
Assurez-vous que les connexions des câbles sont en état de marche.
Cordon d'alimentation
Le cordon d'alimentation possède un câble associé qui se branche à l'arrière du scanner.
Le connecteur situé à l'extrémité de ce câble possède un voyant vert qui s'allume lorsque
le cordon d'alimentation fonctionne correctement.
Un câble secteur est également connecté au cordon d'alimentation à une extrémité et
branché sur une prise électrique ou sur un parasurtenseur à l'autre extrémité.
Le câble d'alimentation relie le scanner à une prise secteur.
1. Vérifiez que l'interrupteur à bascule est en position on.
2. Vérifiez que le voyant vert situé sur le connecteur du câble du cordon d'alimentation
est allumé.
3. S'il est éteint, vérifiez que la prise électrique ou le parasurtenseur sur lequel le câble
secteur est branché est alimenté.
4. Si la prise électrique ou le parasurtenseur est alimenté, mais que le voyant vert est
toujours éteint, le cordon d'alimentation est peut-être défectueux. Contactez
l'assistance HP pour obtenir de l'aide.
Câble USB
Si le scanner a perdu sa connexion USB, le voyant Erreur est allumé, fixe, de couleur
orange clair. Essayez les interventions suivantes :
18 Scanner de documents feuille à feuille HP Scanjet N6010
Page 21

Vérifiez la connexion au scanner :
● Utilisez le câble fourni avec le scanner. Il se peut qu'un autre câble USB ne soit pas
compatible avec le scanner.
● Vérifiez que le câble USB est connecté correctement au scanner et à l'ordinateur
ou à un concentrateur USB. Lorsque le câble USB est correctement connecté à
l'ordinateur, l'icône représentant un trident est orientée vers le haut.
Pour résoudre les problèmes liés à la connexion USB :
1. Procédez de l'une des manières suivantes selon la façon dont le scanner est
connecté à l'ordinateur :
– Si le câble USB est connecté à un concentrateur USB ou à une station d'accueil
pour ordinateur portable, débranchez-le du concentrateur USB ou de la station
d'accueil, puis rebranchez-le directement sur l'ordinateur.
– Si le câble USB est connecté directement à l'ordinateur, branchez-le sur un
autre port USB de l'ordinateur.
– Si le câble USB est connecté à un port USB sur l'avant de l'ordinateur,
branchez-le sur un port USB à l'arrière de l'ordinateur.
– Déconnectez tous les autres périphériques USB de l'ordinateur, à l'exception
du clavier et de la souris.
2. Eteignez, puis rallumez le scanner.
3. Redémarrez l'ordinateur.
4. Une fois l'ordinateur redémarré, essayez d'utiliser le scanner.
Si le scanner fonctionne après avoir modifié la façon dont il était connecté à
l'ordinateur à l'étape 1, le problème de communication était vraisemblablement dû
au concentrateur USB ou à la station d'accueil. Laissez le scanner directement
connecté à l'ordinateur.
Si le scanner ne fonctionne pas, désinstallez, puis réinstallez le logiciel de
numérisation HP.
Français
Etape 2. Désinstallation et réinstallation du logiciel de numérisation HP
Si le problème persiste une fois les connexions du scanner vérifiées, il se peut qu'il soit
dû à une installation incomplète. Essayez de désinstaller puis de réinstaller le logiciel de
numérisation HP.
1. Déconnectez le câble USB de l'ordinateur.
2. Procédez de l'une des manières suivantes pour ouvrir le Panneau de
configuration :
– Windows XP : Cliquez sur Démarrer, puis sur Panneau de configuration.
– Windows 2000 : Cliquez sur Démarrer, pointez sur Paramètres, puis cliquez
sur Panneau de configuration.
3. Double-cliquez sur l'icône Ajout/Suppression de programmes.
La liste des programmes installés s'affiche.
4. Sélectionnez Outils et pilotes HP Scanjet N6010, puis cliquez sur Supprimer ou
sur Modifier/Supprimer.
5. Suivez les instructions à l'écran.
Si vous êtes invité à supprimer ou à réparer le logiciel, cliquez sur Supprimer.
Si vous êtes invité à redémarrer l'ordinateur, cliquez sur Non.
6. Une fois le logiciel de numérisation HP supprimé, débranchez le scanner de la prise
secteur.
Guide d'installation et d'assistance 19
Page 22

Chapitre 5
7. Redémarrez l'ordinateur.
8. Insérez le CD du logiciel de numérisation HP dans le lecteur de votre ordinateur.
9. Suivez les instructions à l'écran pour installer le logiciel de numérisation HP.
10. Une fois le logiciel de numérisation HP installé, branchez le scanner à la prise
secteur, allumez-le, puis connectez-le à l'ordinateur à l'aide du câble USB.
11. Suivez les instructions à l'écran.
Les boutons du scanner ne fonctionnent pas correctement
Après chaque étape, lancez une numérisation pour vérifier que les boutons fonctionnent.
Si le problème persiste, passez à l'étape suivante.
1. Il se peut qu'un câble ne soit pas bien branché. Assurez-vous que le câble USB et
le cordon d'alimentation sont correctement branchés.
2. Eteignez le scanner pendant 30 secondes, puis rallumez-le.
3. Redémarrez votre ordinateur.
4. Si le problème persiste, il est possible que les boutons soient désactivés. Essayez
la procédure suivante :
a. Cliquez sur Panneau de configuration, choisissez Scanners et appareils
photo, puis sélectionnez, dans la liste, le modèle de scanner qui correspond
au vôtre.
b. Essayez l'une des procédures suivantes :
• Windows 2000 : assurez-vous que l'option Désactiver les événements
de périphériques n'est pas sélectionnée.
• Windows XP : assurez-vous que l'option Ne rien faire n'est pas
sélectionnée.
5. Les boutons sont peut-être désactivés dans l'utilitaire Outils du scanner. Essayez
la procédure suivante :
a. Ouvrez l'utilitaire Outils du scanner. Pour plus d'instructions, reportez-vous à la
section Aide de l'utilitaire Outils du scanner, page 15 ou au guide de l'utilisateur
du périphérique.
b. Cliquez sur l'onglet Boutons.
c. Assurez-vous que la case Désactiver les boutons N'EST PAS cochée.
6. Assurez-vous qu'un logiciel est associé au bouton du scanner en procédant comme
suit :
a. Ouvrez l'utilitaire Outils du scanner. Pour plus d'instructions, reportez-vous à la
section Aide de l'utilitaire Outils du scanner, page 15 ou au guide de l'utilisateur
du périphérique.
b. Cliquez sur l'onglet Boutons.
c. Vérifiez que chaque bouton est associé au logiciel adéquat. Pour plus
d'informations, cliquez sur Aide dans l'utilitaire Outils du scanner.
Autres sources d'aide
Pour plus d'informations sur la résolution des problèmes concernant le scanner et les
logiciels qui l'accompagnent, reportez-vous à la section Informations supplémentaires,
page 15.
20 Scanner de documents feuille à feuille HP Scanjet N6010
Page 23

6
Assistance produits
Cette section décrit les options de l'Assistance produits.
Accessibilité
Pour éviter que les boutons ne soient involontairement activés, vous pouvez utiliser
l'utilitaire Outils du scanner pour désactiver les boutons du panneau avant. Vous pouvez
utiliser le même utilitaire pour réactiver les boutons.
Pour plus d'informations sur l'utilitaire Outils du scanner, reportez-vous au guide de
l'utilisateur du scanner. Pour plus d'informations sur le guide de l'utilisateur du scanner,
reportez-vous à la section Informations supplémentaires, page 15.
Les personnes atteintes d'un handicap peuvent obtenir de l'aide en consultant le site
Web (en anglais) à
l'adresse www.hp.com/hpinfo/community/accessibility/prodserv/.
Site Web HP
Le site Web www.hp.com donne accès à une grande diversité d'informations :
● Solutions à des problèmes techniques.
● Conseils vous permettant d'exploiter pleinement les possibilités de votre produit.
● Mises à jour des logiciels et pilotes HP
● Enregistrement de votre produit
● Abonnement aux lettres d'information, mises à jour de pilotes et de logiciels et
bulletins d'assistance
● Achat d'accessoires et de consommables HP
Français
Obtention d'assistance
Afin de tirer le meilleur parti de votre produit HP, consultez les offres d'assistance HP
standard suivantes :
1. Consultez la documentation qui accompagne le produit.
– Consultez la section de dépannage ou l'aide en ligne de ce manuel/CD.
– Consultez la section d'aide en ligne du logiciel.
2. Consultez le site Assistance en ligne HP à l'adresse www.hp.com/support ou
contactez votre revendeur.
L'assistance en ligne HP est disponible pour tous les clients HP. Il s'agit de la source
la plus rapidement accessible pour obtenir des informations à jour sur le
produit et l'assistance d'experts, ainsi que les fonctionnalités suivantes :
– Accès rapide par messagerie à des spécialistes de l'assistance en ligne
qualifiés
– Mises à jour de logiciels et de pilotes pour votre produit
– Informations précieuses relatives au dépannage et au produit pour les
problèmes techniques
– Mises à jour des produits proactives, bulletins d'assistance et lettres
d'informations HP (disponibles lorsque vous enregistrez votre produit)
Guide d'installation et d'assistance 21
Page 24

Chapitre 6
3. Assistance HP par téléphone
– Les options d'assistance et les frais varient en fonction du produit, du pays/de
la région et de la langue.
– Les frais et les règles sont sujets à modification sans préavis. Pour obtenir les
dernières informations, consultez le site Web à
l'adresse www.hp.com/support.
4. Période post-garantie
Après la période de garantie limitée, l'aide est disponible en ligne à
l'adresse www.hp.com/support.
5. Prolongation ou extension de votre garantie
Si vous souhaitez prolonger ou étendre la garantie du produit, contactez votre
revendeur ou vérifiez les offres du service HP Care Pack à
l'adresse www.hp.com/support.
6. Si vous avez déjà acheté un service HP Care Pack, vérifiez les conditions
d'assistance convenues dans votre contrat.
22 Scanner de documents feuille à feuille HP Scanjet N6010
Page 25

7
Garantie limitée HP
Les informations suivantes présentent les informations de garantie de ce produit.
Déclaration de garantie limitée HP
Produit Durée de la garantie limitée
Français
Scanner de
documents feuille à
feuille HP Scanjet
N6010
A. Etendue de la garantie limitée
1. Hewlett-Packard (HP) vous garantit, en tant que client utilisateur final (Client), que
chaque produit HP indiqué ci-dessus (Produit) est exempt de défauts matériels et
de malfaçons pour la période spécifiée ci-dessus. La période de garantie commence
à la date d'achat par le client.
2. Pour chaque produit logiciel, la garantie limitée HP ne s'applique qu'à une
défaillance d'exécution des instructions de programmation. HP ne garantit pas que
le fonctionnement des produits HP ne sera pas exempt d'interruptions, ni d'erreurs.
3. La garantie limitée d'HP ne couvre que les défauts survenus au cours d'une
utilisation normale du Produit et ne couvre pas les autres problèmes, y compris ceux
résultant :
a. D'une utilisation, d'un entretien, d'un stockage, d'une manipulation ou d'une
modification inappropriés ;
b. De logiciels, de supports, de pièces, d'accessoires, de consommables ou
d'adaptateurs ou sources électriques non fournis ou non agréés par HP ; ou,
c. D'une exploitation ou autres conditions effectuées en dehors des
caractéristiques du Produit.
4. Si de tels défauts sont portés à la connaissance d'HP pendant la période de garantie,
HP s'engage, à sa convenance, à remplacer ou à réparer le Produit établi comme
défectueux.
5. Si HP n'est pas en mesure de procéder au remplacement ou à la réparation d'un
Produit défectueux couvert par la garantie limitée HP, HP peut, sous un délai
raisonnable après avoir reçu notification du problème, fournir un produit similaire en
termes de performances ou un remboursement du prix d'achat au prorata de
l'utilisation et d'autres facteurs appropriés.
6. HP n'a aucune obligation de remplacer, réparer ou rembourser tant que le Client n'a
pas retourné le Produit défectueux à HP et fourni une preuve d'achat valide.
7. Tout produit de remplacement peut être neuf ou comme neuf, du moment où il inclut
des fonctionnalités identiques ou supérieures à celles du Produit remplacé.
1 an
Guide d'installation et d'assistance 23
Page 26

Chapitre 7
8. Un Produit peut comporter des pièces, des composants ou des matériaux
remanufacturés équivalents à des pièces, composants ou matériaux neufs dans leur
fonctionnement.
9. La garantie limitée de HP est valable dans tout pays/toute région ou localité où HP
a un centre d'assistance et une présence commerciale pour le Produit. Le niveau
des services de garantie dépend des réglementations locales. Des extensions de
garantie, comme l'échange le jour suivant, le service sur site et l'assurance pour les
dégâts accidentels, peuvent être achetées auprès d'HP.
B. Limitations de garantie
DANS LES LIMITES AUTORISEES PAR LA LEGISLATION LOCALE EN VIGUEUR, NI
HP NI SES FOURNISSEURS TIERS N'ACCORDENT AUCUNE AUTRE GARANTIE OU
CONDITION D'AUCUNE SORTE, ECRITE OU ORALE, RELATIVE A UN PRODUIT ET
REJETTENT SPECIFIQUEMENT TOUTES GARANTIES OU CONDITIONS DE
COMMERCIALISATION, DE QUALITE SATISFAISANTE ET D'ADAPTATION A UN
USAGE PARTICULIER.
C. Limitations de responsabilité
1. Dans les limites autorisées par la législation en vigueur, les recours de cette
déclaration de garantie limitée constituent les seuls et uniques recours du Client.
2. DANS LES LIMITES AUTORISEES PAR LA LEGISLATION EN VIGUEUR, A
L'EXCEPTION DES OBLIGATIONS EXPRESSEMENT ENONCEES DANS CETTE
DECLARATION DE GARANTIE LIMITEE, HP OU SES FOURNISSEURS NE
POURRONT EN AUCUN CAS ETRE TENUS RESPONSABLES DE QUELQUES
DOMMAGES DIRECTS, INDIRECTS, PARTICULIERS, FORTUITS OU
CONSECUTIFS FONDES SUR UN CONTRAT, UN PREJUDICE OU AUTRE
RAISON LEGALE, MEME SI HP A ETE AVISE DU RISQUE DE CE DOMMAGE.
D. Réglementation locale
1. Cette déclaration de garantie limitée accorde au Client des droits spécifiques. Le
client peut également avoir d'autres droits spécifiques et il se peut qu'ils varient d'un
état à l'autre aux Etats-Unis, d'une province à l'autre au Canada et d'un pays/d'une
région à un(une) autre dans le reste du monde.
2. Si cette déclaration de garantie limitée entre en conflit avec la législation locale en
vigueur, elle est réputée modifiée pour se conformer à ladite législation. Selon la
réglementation locale, certaines renonciations et limitations de cette déclaration de
garantie limitée peuvent ne pas s'appliquer au Client. Par exemple, le gouvernement
fédéral des Etats-Unis, certains états de ce pays et certains gouvernements en
dehors des Etats-Unis (y compris des provinces du Canada) peuvent :
a. Accorder au Client des droits de garantie supplémentaires ;
b. Interdire que les renonciations et limitations de cette déclaration de garantie
limitée limitent les droits obligatoires prévus par la loi pour un client (par
exemple, le Royaume-Uni) ;
c. Sinon, limiter la possibilité d'un fabricant d'appliquer de telles renonciations ou
limitations ;
d. Indiquer la durée des garanties implicites auxquelles le fabricant peut
renoncer ; ou,
e. Interdire les limitations de durée des garanties implicites.
24 Scanner de documents feuille à feuille HP Scanjet N6010
Page 27

3. Le Client peut bénéficier de droits légaux supplémentaires en fonction de son contrat
de vente. Ces droits ne sont en aucun cas affectés par cette déclaration de garantie
limitée.
4. Pour les opérations des clients aux Etats-Unis, toute garantie implicite imposée par
la loi est limitée en durée à la période de garantie expresse.
5. POUR LES OPERATIONS DES CLIENTS EN AUSTRALIE ET EN NOUVELLEZELANDE, LES CONDITIONS DE CETTE DECLARATION DE GARANTIE
LIMITEE, N'EXCLUENT, NE RESTREIGNENT NI NE MODIFIENT LES DROITS
STATUTAIRES OBLIGATOIRES APPLICABLES A LA VENTE D'UN PRODUIT A
CES CLIENTS, MAIS VIENNENT S'Y AJOUTER.
Vous pouvez bénéficier de droits légaux supplémentaires par rapport au vendeur en
fonction de votre contrat de vente. Ces droits ne sont en aucun cas affectés par cette
déclaration de garantie limitée HP.
Vous trouverez, sur la page de couverture intérieure du présent manuel, les noms et
adresses des entités HP responsables de l'application de la garantie limitée HP dans
votre pays/région.
Français
Guide d'installation et d'assistance 25
Page 28
8
Informations juridiques et
caractéristiques du produit
Vous trouverez, dans cette rubrique, les informations juridiques et les caractéristiques
produit des accessoires et du scanner HP Scanjet N6010.
Caractéristiques du scanner
Désignation Description
Type de scanner Scanner feuille à feuille recto verso
Taille Largeur : 320 mm (12,6 pouces), Profondeur : 270 mm (10,63
pouces), Hauteur : 312 mm (12,28 pouces)
Poids 5,4 kg (11,8 livres)
Elément de
numérisation
Interface USB 2.0 pleine vitesse
Résolution
optique
Alimentation
secteur
Consommation
d'énergie
Périphérique à couplage de charge
Matériel 600 x 600 dpi
100-240 V~, 50/60 Hz, 1,5 A
Fonctionnement :32 W
Mode Veille :5,25 W
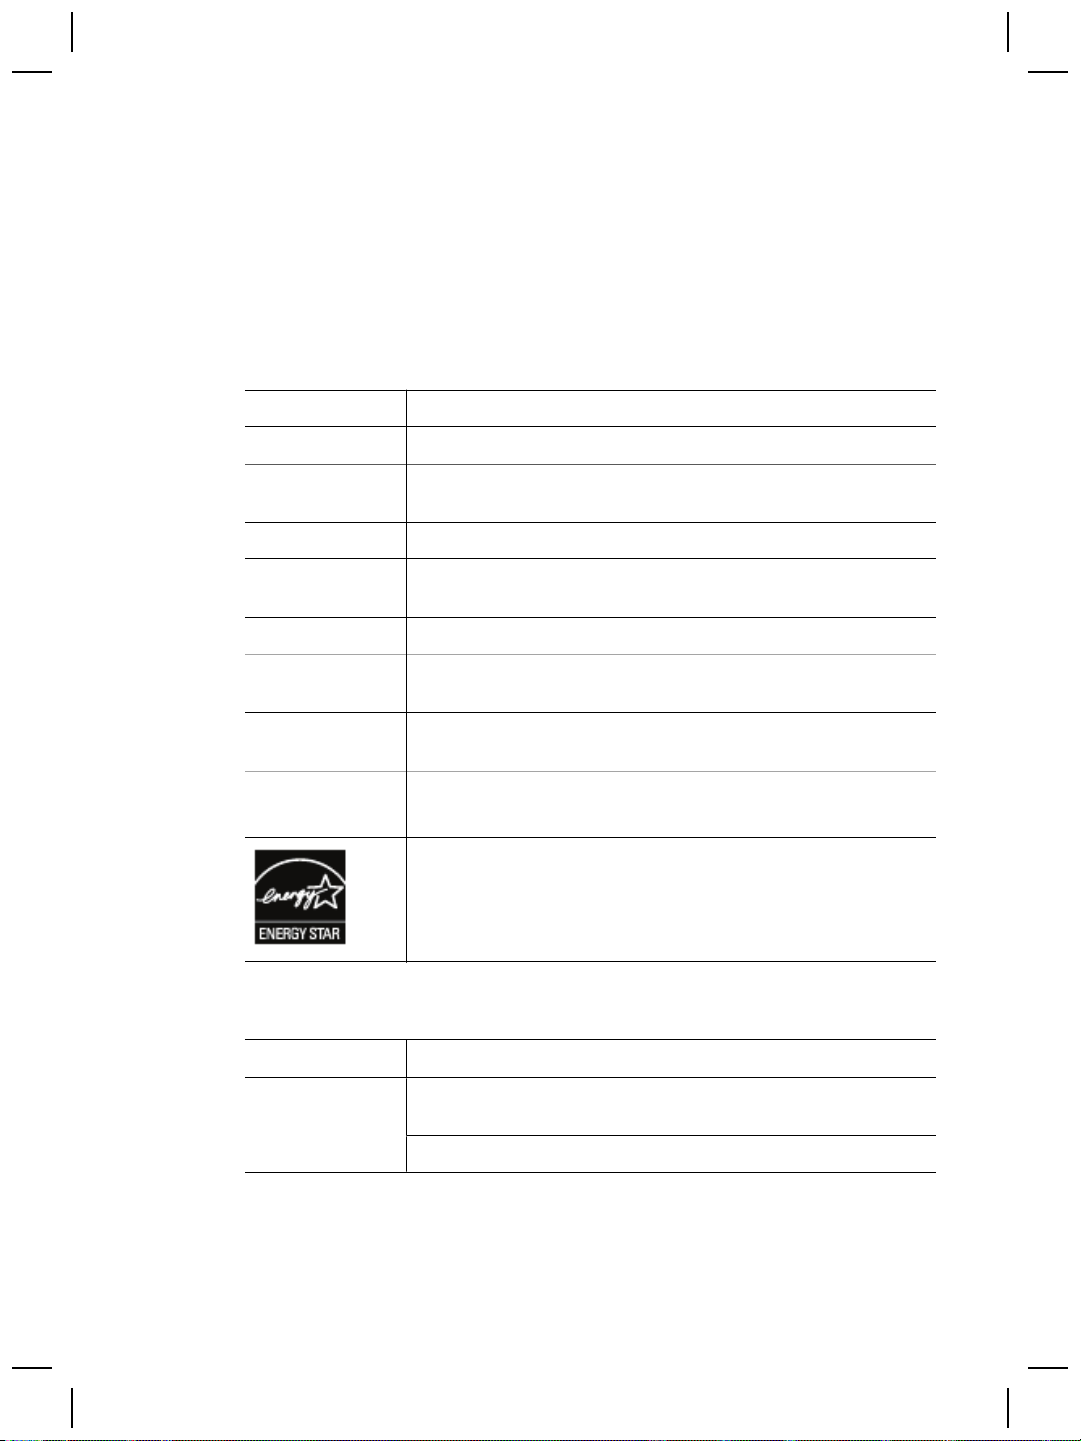
Votre scanner HP est compatible avec ENERGY STAR®. En tant
que partenaire du programme ENERGY STAR®, HewlettPackard Company a établi que le présent produit remplissait les
exigences de la norme ENERGY STAR® sur l'économie
d'énergie.
Caractéristiques relatives à l'environnement
Désignation Description
Température Lors du fonctionnement du scanner : de 10 °C à 35 °C (de 50° à
95° F)
Stockage : de -40 °C à 60 °C (de -40° à 140° F)
26 Scanner de documents feuille à feuille HP Scanjet N6010
Page 29

(suite)
Désignation Description
Humidité relative
Lors du fonctionnement du scanner : 15 % à 80 % (sans
condensation) de 10 °C à 35 °C (de 50° à 95° F)
Stockage : jusqu'à 90 % de 0 °C à 60 °C ou (32° à 140° F)
Informations juridiques
Numéro de modèle légal :Afin de permettre son identification sur le plan juridique, un
numéro de modèle légal a été attribué à votre produit. Le numéro de modèle légal de
votre produit est FCLSD-0601. Ce numéro ne doit pas être confondu avec le nom
commercial de votre appareil (HP Scanjet N6010) ou la référence produit (L1983A). Vous
trouverez des informations juridiques supplémentaires concernant votre scanner dans
le fichier regulatory_supplement.htm sur le CD du logiciel de numérisation HP.
Remarque L'étiquette légale (comportant les références et numéros de série)
se trouve au bas du scanner. Toutefois, lorsque vous insérez le bac de sortie au
bas du scanner, vous recouvrez l'étiquette légale.
Informations sur le recyclage et la mise au rebut de certains
matériaux
Les règles ci-dessous de recyclage et de mise au rebut des matériaux s'appliquent à ce
produit.
Collecte des déchets des particuliers au sein de l'Union européenne Collecte des
déchets
Français
Ce symbole, qui apparaît sur le produit ou sur son emballage, indique que ce produit ne
doit pas être jeté avec les ordures ménagères. C'est à vous de le déposer dans un point
de collecte des déchets spécialisé dans le recyclage du matériel électrique et
électronique. La collecte et le recyclage séparés des déchets permettent de préserver
les ressources naturelles et de protéger la santé des individus. Pour plus d'informations
sur les points de collecte des déchets et sur le recyclage, contactez votre revendeur, la
mairie, le service local de ramassage des ordures ou le magasin dans lequel vous avez
acheté le produit.
Programme de gestion de l'environnement
Hewlett-Packard s'engage à fournir des produits de qualité au sens environnemental du
terme. Ce produit a été conçu pour le recyclage. Le nombre de matériaux a été limité au
Guide d'installation et d'assistance 27
Page 30

Chapitre 8
minimum possible tout en assurant un fonctionnement performant et une fiabilité
optimale. Nous avons utilisé des matériaux hétérogènes conçus pour se séparer
facilement. Les dispositifs de fixation et autres connexions sont faciles à localiser ainsi
que faciles d'accès. Vous pouvez les retirer tout aussi facilement à l'aide d'outils
couramment utilisés. Les pièces clés ont été conçues pour y accéder rapidement afin de
démonter et réparer le périphérique dans les plus brefs délais. Pour plus d'informations,
visitez le site Web HP d'engagement pour l'environnement à
l'adresse :www.hp.com/globalcitizenship/environment/
Matières plastiques
Les pièces en matière plastique de plus de 25 grammes sont signalées conformément
aux normes internationales destinées à favoriser une meilleure identification des
matières plastiques en vue de leur recyclage en fin de vie.
Programme de recyclage
HP offre un nombre toujours plus grand de programmes de retour produit et de recyclage
dans de nombreux pays/nombreuses régions et est associé avec les plus grands centres
de recyclage de produits électroniques au monde. HP protège les ressources naturelles
en revendant certains de ses produits les plus populaires. Pour plus d'informations sur
le recyclage des produits HP, visitez le
site :www.hp.com/hpinfo/globalcitizenship/environment/recycle/
Traitement spécial des matériaux
Ce produit HP contient des matériaux qui risquent de nécessiter un traitement spécial
lorsqu'ils seront hors d'usage. Le mercure contenu dans la(les) lampe(s) fluorescente(s)
de ce produit est exempté de la directive européenne 2002/95/EC, Restrictions of
Hazardous Substances.
28 Scanner de documents feuille à feuille HP Scanjet N6010
Page 31

Installatie- en ondersteuningshandleiding
Nederlands
Page 32

Copyright en licentie
© 2006 Copyright Hewlett-Packard
Development Company, L.P.
Niets in deze uitgave mag worden
verveelvoudigd, gewijzigd of vertaald
zonder voorafgaande schriftelijke
toestemming, behalve voor zover is
toegestaan onder het copyright.
De informatie in dit document kan
zonder voorafgaande kennisgeving
worden gewijzigd.
De enige garanties voor HP-producten
en -services zijn beschreven in de
garantiebepalingen die bij de producten
en services horen. Niets in dit
document mag worden beschouwd als
een aanvullende garantie. HP is niet
aansprakelijk voor technische of
redactionele fouten of ontbrekende
gedeelten in dit document.
Handelsmerken
ENERGY STAR is een in de V.S.
geregistreerd servicemerk van
Environmental Protection Agency in de
Verenigde Staten.
Microsoft en Windows zijn
gedeponeerde handelsmerken van
Microsoft Corporation.
Page 33

Inhoudsopgave
1 Aan de slag............................................................................................................4
Stap 1. De inhoud van de doos controleren............................................................4
Stap 2. Installeer de software..................................................................................5
Stap 3. Sluit de voeding aan...................................................................................5
Stap 4. Sluit de USB-kabel aan...............................................................................7
Stap 5. Maak de scanner klaar voor gebruik...........................................................8
Stap 6. Test de installatie......................................................................................10
Scansoftware-cd....................................................................................................11
Power Save-modus of Instant Lamp On-modus...................................................11
2 De scannerknoppen gebruiken..........................................................................13
Scannerknoppen...................................................................................................13
3 Aanvullende informatie.......................................................................................15
HP Scanjet N6010 Gebruikershandleiding............................................................15
Help bij de Scanner Tools Utility...........................................................................15
Aanvullende hulp bij de software...........................................................................16
4 Service en onderhoud.........................................................................................17
5 Problemen oplossen...........................................................................................18
Scanner werkt niet na de installatie.......................................................................18
6 Productondersteuning........................................................................................21
Toegankelijkheid...................................................................................................21
HP-website............................................................................................................21
Ondersteuning krijgen...........................................................................................21
7 Beperkte garantie van HP...................................................................................23
Verklaring van beperkte garantie van HP..............................................................23
8 Informatie over voorschriften en productspecificaties...................................26
Specificaties van de scanner.................................................................................26
Omgevingsspecificaties.........................................................................................26
Informatie over voorschriften.................................................................................26
Informatie over hergebruik en verboden materialen..............................................27
Nederlands
Installatie- en ondersteuningshandleiding 3
Page 34

1
Aan de slag
Voer de volgende stappen uit om de scanner te installeren:
Stap 1. De inhoud van de doos controleren
Haal de scannerhardware uit de verpakking. Verwijder alle tape die is gebruikt voor het
transport.
8
1
4
3
6
2
1 HP Scanjet N6010 scanner
2 Netsnoer
3 USB-kabel
4 Scansoftware-cd (zie Scansoftware-cd op pagina 11 voor meer
informatie)
5 Labels op het bedieningspaneel
6 Installatie- en ondersteuningshandleiding (deze handleiding)
7 Reinigingsdoek voor papierbanen (voor later onderhoud)
8 Uitvoerlade
5
7
4 HP Scanjet N6010 Sheetfeed documentscanner
Page 35

Stap 2. Installeer de software
Bij de scanner worden enkele scansoftwareprogramma's meegeleverd. Zie
Scansoftware-cd op pagina 11 voor informatie over deze programma's.
Let op Installeer eerst de scansoftware voordat u de USB-kabel op de computer
aansluit.
1. Plaats de cd met scansoftware die bij de scanner is geleverd in het cd-station op de
computer.
2. Het installatiedialoogvenster wordt weergegeven. Als het installatiedialoogvenster
na enkele ogenblikken nog niet wordt weergegeven, doet u het volgende:
a. Klik op Start en op Uitvoeren.
Het dialoogvenster Uitvoeren wordt weergegeven.
b. Typ d:\setup.exe in het vak Openen (waarbij d:de stationsaanduiding is van het
cd-station van de computer).
c. Klik op OK.
3. Selecteer in het dialoogvenster de softwareprogramma's die u wilt installeren. Als u
alle functies van de scanner wilt gebruiken, is het raadzaam alle programma's op
de cd te installeren.
4. Volg de aanwijzingen op het computerscherm om de installatie te voltooien.
Tijdens de installatie wordt u gevraagd of u de Power Save-modus of de Instant
Lamp On-modus wilt inschakelen. Zie Power Save-modus of Instant Lamp On-
modus op pagina 11 voor informatie over deze opties.
Verder wordt gecontroleerd of op uw computer Adobe Acrobat Reader is
geïnstalleerd, waarmee u PDF-bestanden kunt weergeven. Als dit niet is
geïnstalleerd, worden installatie-instructies weergegeven.
Nederlands
Stap 3. Sluit de voeding aan
Aan de netvoeding is een kabel bevestigd die u in de achterzijde van de scanner kunt
steken. De connector aan het einde van deze kabel bevat een groene LED die brandt
wanneer de netvoeding correct werkt.
Installatie- en ondersteuningshandleiding 5
Page 36

Hoofdstuk 1
De netvoeding is ook voorzien van een AC-kabel die aan een zijde is verbonden met de
netvoeding en aan de andere zijde in een stopcontact of overspanningsbeveiliging moet
worden gestoken.
1. Sluit de AC-kabel op de achterkant van de netvoeding aan.
2. Sluit het andere uiteinde van de AC-kabel aan op een stopcontact of
overspanningsbeveiliging.
3. Controleer of de groene LED op de connector van het netsnoer brandt.
– Als de groene LED niet brandt, controleert u of er spanning staat op het
stopcontact of de overspanningsbeveiliging waarop de AC-kabel is
aangesloten.
– Als dit het geval is, maar de groene LED toch niet brandt, is de netvoeding
mogelijk defect. Neem contact op met de ondersteuning van HP voor hulp.
4. Als de groene LED brandt, steekt u de netvoeding in de achterzijde van de scanner.
5. Schakel de scanner in. Druk op de Aan/uit-schakelaar op de achterkant van de
scanner aan de linkerkant.
6 HP Scanjet N6010 Sheetfeed documentscanner
Page 37

Stap 4. Sluit de USB-kabel aan
Let op Installeer eerst de software voordat u de scanner via de USB-kabel op
de computer aansluit. Zie Stap 2. Installeer de software op pagina 5.
Gebruik de USB-kabel die bij de scanner is geleverd om de scanner op de computer aan
te sluiten.
1. Steek het vierkante uiteinde van de kabel in de scanner.
2. Maak het rechthoekige deel van de kabel vast aan de computer.
Opmerking Als er aan de voor- en achterkant van de computer een USB-
poort is, gebruikt u die aan de achterkant.
Nederlands
Installatie- en ondersteuningshandleiding 7
Page 38

Hoofdstuk 1
Stap 5. Maak de scanner klaar voor gebruik
1. Plaats de uitvoerlade. Schuif de lade met het verlengstuk naar boven in de geleiders
onder aan de scanner.
2. Trek het verlengstuk van de uitvoerlade naar buiten.
3. Voor langere originelen trekt u het verlengstuk van de documentinvoerlade boven
op de scanner uit.
4. Zoek het etiket voor het bedieningspaneel dat met de scanner is meegeleverd.
Verwijder de beschermfolie en plak het etiket op de uittreklade onder het HP-logo
8 HP Scanjet N6010 Sheetfeed documentscanner
Page 39

op het bedieningspaneel. Dit etiket bevat informatie over de knoppen op het
bedieningspaneel en de LED-indicatielampjes.
Nederlands
Installatie- en ondersteuningshandleiding 9
Page 40

Hoofdstuk 1
Stap 6. Test de installatie
Let op Voordat u een item in de documentinvoer plaatst, moet u eerst
controleren of het item vrij is van natte lijm, correctievloeistof of andere stoffen
die kunnen afgeven op de binnenkant van de scanner.
Controleer of het item vrij is van kreukels, vouwen, nietjes, paperclips of ander
bevestigd materiaal. De vellen mogen niet aan elkaar kleven.
1. Plaats één pagina in de documentinvoer. De pagina moet met de te bedrukken kant
naar beneden worden geplaatst en de bovenkant van de pagina naar beneden
gericht (
).
2. Stel de papiergeleiders bij. De papiergeleiders werken goed als ze tegen beide
zijden van het papier worden geschoven. Controleer of de pagina recht ligt en of de
geleiders tegen de rand van het papier zijn geplaatst.
Opmerking Druk op het onderste deel van de geleider om deze bij te
stellen.
3. Druk op de knop Scan to PDF (
De pagina wordt door de scanner gevoerd. Een scan van de pagina verschijnt nu
op het computerscherm in de PDF-viewer. Dit bevestigt dat de installatie is
geslaagd.
Opmerking Op uw computer moet Adobe Acrobat Reader of een andere
PDF-viewer zijn geïnstalleerd, anders kan dit proces niet succesvol worden
afgerond. Als u geen PDF-viewer hebt, voert u deze test uit met de knop
Scan Document.
Zie Problemen oplossen op pagina 18 als er geen scan van het vel op het
computerscherm wordt weergegeven.
10 HP Scanjet N6010 Sheetfeed documentscanner
).
Page 41

Scansoftware-cd
In dit gedeelte worden de scansoftwareprogramma's beschreven die bij de scanner zijn
meegeleverd. Alle programma's worden ondersteund door Microsoft Windows 2000 en
XP, inclusief x-64.
Er zijn twee softwareprogramma's van een andere fabrikant op de cd. Deze
softwareprogramma's zijn niet voor alle scannermodellen of in alle landen/regio's
beschikbaar.
Programma's
HP Scansoftware De HP scansoftware bestaat onder meer uit Scanner
Softwaregebruik
Tools Utility, HP Document Copy Utility, HP PDF-writer
en TWAIN-scannerstuurprogramma's.
● Met de Scanner Tools Utility kunt u instellingen
configureren voor de knop Scan to PDF, de
scannerknoppen toewijzen aan verschillende
toepassingen, de scannerknoppen uitschakelen of
informatie over het onderhoud van de scanner
weergeven. U kunt dit programma starten via de
knop Scanner Tools op het bedieningspaneel of
via het menu Start.
● Met de Document Copy Utility kunt u instellingen
opgeven voor de kopieën die van de scanner naar
de standaardprinter worden verzonden. U kunt dit
programma starten via de knop Copy op het
bedieningspaneel of via het menu Start.
● Met de HP PDF-writer wordt van het gescande
beeld een PDF-bestand gemaakt. Dit programma
heeft zelf geen gebruikersinterface, maar u kunt de
PDF-instellingen opgeven met de Scanner Tools
Utility.
● De TWAIN-stuurprogramma's zijn nodig om de
scanner te kunnen gebruiken met
standaardtoepassingen en aangepaste software.
Deze voldoen aan de systeemvereisten voor de
scanner.
Nederlands
NewSoft Presto!
PageManager
NewSoft Presto!BizCard Hiermee kunt u visitekaartjes scannen en de gegevens
Hiermee kunt u gescande beelden of documenten
maken en opslaan in diverse indelingen. Hiermee krijgt
u toegang tot documentenbeheer (archiveren,
hergebruiken), OCR, e-mail en fax.
van uw contactpersonen ordenen in een
gebruiksvriendelijke database.
Power Save-modus of Instant Lamp On-modus
Tijdens de installatie wordt u gevraagd of u de Power Save-modus of de Instant Lamp
On-modus wilt inschakelen voor de scanner. In Power Save-modus gaat de lamp van
Installatie- en ondersteuningshandleiding 11
Page 42

Hoofdstuk 1
de scanner automatisch uit als er gedurende enige tijd niets is gebeurd (na ongeveer 15
minuten).
In Instant Lamp On-modus gaat de lamp van de scanner automatisch uit als er
gedurende enige tijd niets is gebeurd (na ongeveer 15 minuten), maar blijft de scanner
warm en klaar om te scannen.
Als u van Power Save-modus wilt overschakelen naar Instant Lamp On-modus, schakelt
u de optie Instant Lamp On op de tab Maintenance (Onderhoud) van de Scanner Tools
Utility in. Als u Power Save-modus weer wilt inschakelen, schakelt u de optie Instant
Lamp On uit.
12 HP Scanjet N6010 Sheetfeed documentscanner
Page 43

2
De scannerknoppen gebruiken
Scannerknoppen
Met de knoppen op het bedieningspaneel van de scanner kunt u een scan starten of
annuleren, of enkele scannerinstellingen opgeven.
1
5
6
3
Pictogram Knopnaam Beschrijving
1 Scan Document (knop
linksboven)
2 Copy (Kopiëren, knop
rechtsboven)
3 Scan to PDF (Naar PDF
scannen, knop linksonder)
2
4
Een scan starten.Standaard
scant u via deze knop met de
toepassing NewSoft Presto!
PageManager.
Een kopie starten en naar de
standaardprinter verzenden.
Het HP Document Copyprogramma wordt geopend.
Hiermee kunt u opties voor de
kopie instellen.
Een item scannen en opslaan
als PDF-bestand om te delen of
op te slaan. Standaard wordt
het PDF-bestand automatisch
geopend in de standaard PDFviewer.
Nederlands
4 Scan Business Card
(Visitekaartjes scannen, knop
rechtsonder)
Installatie- en ondersteuningshandleiding 13
Een visitekaartje scannen.
Standaard scant u via deze
knop met de toepassing
NewSoft Presto!BizCard:
Page 44

Hoofdstuk 2
(vervolg)
5 Cancel (Annuleren, knop
uiterst linksboven)
Een gestarte scan- of
kopieertaak annuleren.
6 Scanner Tools
(Scannerhulpprogramma's,
knop uiterst linksonder)
Opent de Scanner Tools Utility,
waarmee u de scannerknoppen
kunt toewijzen aan
verschillende toepassingen,
PDF-opties kunt instellen of
informatie over het onderhoud
van de scanner kunt
weergeven.
Zie de gebruikershandleiding bij de scanner voor gedetailleerdere informatie over de
scannerknoppen dan in dit hoofdstuk wordt beschreven. Zie Aanvullende informatie
op pagina 15 voor meer informatie over de gebruikershandleiding van de scanner.
14 HP Scanjet N6010 Sheetfeed documentscanner
Page 45

3
Aanvullende informatie
De scanner bevat een aantal informatiebronnen over het gebruik van de scanner en de
scansoftware.
HP Scanjet N6010 Gebruikershandleiding
De gebruikershandleiding voor de scanner is de primaire informatiebron voor dit product
en bevat de informatie die u nodig hebt voor het gebruik en onderhoud van de scanner
en voor het oplossen van eventuele problemen. De gebruikershandleiding is beschikbaar
als PDF-bestand, zodat u het (in gedeelten) kunt afdrukken, en als Help-bestand dat u
op het beeldscherm kunt lezen.
De gebruikershandleiding in PDF-indeling openen:
➔
Klik op Start, wijs naar Programma's of Alle programma's, wijs naar HP, wijs naar
Scanjet, wijs naar N6010 en klik op User Guide (Gebruikershandleiding).
Voor een PDF-versie van de gebruikershandleiding in een andere taal:
1. Plaats de scansoftware-cd die bij de scanner is meegeleverd in het cd-station van
de computer.
Wacht totdat het installatiedialoogvenster wordt weergegeven.
2. Klik op Handleidingen weergeven of afdrukken.
Er wordt een lijst met talen weergegeven.
3. Klik op de gewenste taal.
Er wordt een lijst met handleidingen weergegeven.
4. Klik op User Guide (Gebruikershandleiding).
Als u een elektronische Help-versie van de gebruikershandleiding wilt weergeven:
1. Plaats de scansoftware-cd die bij de scanner is meegeleverd in het cd-station van
de computer.
Wacht totdat het installatiedialoogvenster wordt weergegeven.
2. Klik op Handleidingen weergeven of afdrukken.
Er wordt een lijst met talen weergegeven.
3. Klik op de gewenste taal.
Er wordt een lijst met handleidingen weergegeven.
4. Klik op Gebruikershandleiding op het scherm.
Nederlands
Help bij de Scanner Tools Utility
Voer een van de volgende handelingen uit om het hulpprogramma te openen:
● Dubbelklik op het Scanner Tools Utility-pictogram op het bureaublad.
● Druk op de knop Scanner Tools (
scanner.
● Klik op Start, wijs naar Programma's of Alle programma's, wijs naar
HP, wijs naar Scanjet, wijs naar N6010 en klik op Scanner Tools Utility
(Scannerhulpprogramma's).
Installatie- en ondersteuningshandleiding 15
) op het bedieningspaneel van de
Page 46

Hoofdstuk 3
(vervolg)
Klik op Help in het dialoogvenster Scanner Tools Utility om het Help-bestand
te openen.
Aanvullende hulp bij de software
Bij alle softwareprogramma's op de scansoftware-cd hoort software-Help. Als u de
software-Help wilt openen, opent u het desbetreffende programma, selecteert u het
menu Help en vervolgens Help of Using Help.
16 HP Scanjet N6010 Sheetfeed documentscanner
Page 47

4
Service en onderhoud
Als u de scanner af en toe schoonmaakt, blijft de kwaliteit van de scans zeer goed. Hoe
vaak u het apparaat moet schoonmaken, hangt af van een aantal factoren, waaronder
de frequentie waarmee de scanner wordt gebruikt en de omgeving waarin de scanner
staat. Reinig de scanner wanneer dit nodig is.
Zie de gebruikershandleiding bij de scanner voor instructies over het onderhoud van de
scanner. Zie Aanvullende informatie op pagina 15 voor meer informatie over de
gebruikershandleiding van de scanner.
Let op Voordat u een item in de documentinvoer plaatst, moet u eerst
controleren of het item vrij is van natte lijm, correctievloeistof of andere stoffen
die kunnen afgeven op de binnenkant van de scanner.
Controleer of het item vrij is van kreukels, vouwen, nietjes, paperclips of ander
bevestigd materiaal. De vellen mogen niet aan elkaar kleven.
Nederlands
Installatie- en ondersteuningshandleiding 17
Page 48

5
Problemen oplossen
Scanner werkt niet na de installatie
Als de scanner na de installatie niet werkt, wordt mogelijk een van de volgende berichten
op de computer weergegeven:
● De scanner kan niet worden geïnitialiseerd.
● De scanner kan niet worden gevonden.
● Er is een interne fout opgetreden.
● De computer kan niet met de scanner communiceren.
Voer de volgende stappen uit om het probleem op te lossen:
Stap 1. De kabels controleren
Controleer of alle kabels op de juiste wijze zijn aangesloten.
Voeding
Aan de netvoeding is een kabel bevestigd die u in de achterzijde van de scanner kunt
steken. De connector aan het einde van deze kabel bevat een groene LED die brandt
wanneer de netvoeding correct werkt.
De netvoeding is ook voorzien van een AC-kabel die aan een zijde is verbonden met de
netvoeding en aan de andere zijde in een stopcontact of overspanningsbeveiliging moet
worden gestoken.
Het netsnoer is aangesloten op de scanner en een stopcontact.
1. Controleer of de aan/uit-schakelaar is ingesteld op Aan.
2. Controleer of de groene LED op de connector van het netsnoer brandt.
3. Als de groene LED niet brandt, controleert u of er spanning staat op het stopcontact
of de overspanningsbeveiliging waarop de AC-kabel is aangesloten.
4. Als dit het geval is, maar de groene LED toch niet brandt, is de netvoeding mogelijk
defect. Neem contact op met de ondersteuning van HP voor hulp.
USB-kabel
Als de USB-verbinding met de scanner is verbroken, brandt het Error-lampje continu
oranje.Probeer een van de volgende oplossingen:
18 HP Scanjet N6010 Sheetfeed documentscanner
Page 49

Controleer de fysieke aansluiting op de scanner:
● Gebruik de kabel die bij de scanner wordt geleverd. Een USB-kabel van een ander
type is mogelijk niet compatibel met de scanner.
● Controleer of de USB-kabel goed is aangesloten op de scanner en de computer of
USB-hub. Het pictogram van een drietand op de USB-kabel moet naar boven wijzen
als de kabel op de juiste manier is aangesloten op de scanner.
Problemen met de USB-verbinding oplossen:
1. Voer een van de volgende handelingen uit, afhankelijk van de manier waarop de
scanner op de computer is aangesloten.
– Als de USB-kabel is aangesloten op een USB-hub of een basisstation voor een
laptop, haalt u de USB-kabel uit de USB-hub of het basisstation en sluit u de
USB-kabel rechtstreeks aan op de computer.
– Als de USB-kabel rechtstreeks is aangesloten op de computer, sluit u deze aan
op een andere USB-poort op de computer.
– Als de USB-kabel is aangesloten op een USB-poort aan de voorkant van de
computer, sluit u deze op een USB-poort aan de achterkant aan.
– Koppel alle USB-apparaten los van de computer behalve het toetsenbord en
de muis.
2. Zet de scanner uit en aan.
3. Start de computer opnieuw op.
4. Controleer of de scanner werkt nadat de computer opnieuw is opgestart.
Als de scanner werkt en u de scanner op een andere manier dan in stap 1 hebt
aangesloten, werd het communicatieprobleem mogelijk veroorzaakt door de USB-
hub of het basisstation. Zorg dat de scanner rechtstreeks op de computer blijft
aangesloten.
Als de scanner niet werkt, verwijdert u de HP-scansoftware en installeert u deze
opnieuw.
Nederlands
Stap 2. Verwijder de scansoftware en installeer deze opnieuw
Als het probleem niet is verholpen na het controleren van de kabelverbindingen, is het
probleem misschien veroorzaakt doordat de installatie niet helemaal compleet is.
Probeer de scansoftware te verwijderen en daarna opnieuw te installeren.
1. Koppel de USB-kabel los van de computer.
2. Voer een van de volgende handelingen uit om het Configuratiescherm te openen:
– Windows XP: klik op Start en vervolgens op Configuratiescherm.
– Windows 2000: Klik op Start, wijs naar Instellingen en klik op
Configuratiescherm.
3. Dubbelklik op het pictogram Software.
Er wordt een lijst weergegeven met de programma's die momenteel zijn
geïnstalleerd.
4. Selecteer HP Scanjet N6010 Divers and Tools en klik op Verwijderen of Wijzigen/
verwijderen.
5. Volg de instructies op het scherm.
Als u wordt gevraagd of u de software wilt verwijderen of herstellen, klikt u op
Verwijderen.
Als u wordt gevraagd of u de computer opnieuw wilt opstarten, klikt u op Nee.
Installatie- en ondersteuningshandleiding 19
Page 50

Hoofdstuk 5
6. Nadat u de scansoftware hebt verwijderd, haalt u de stekker van de scanner uit het
stopcontact.
7. Start de computer opnieuw op.
8. Plaats de scansoftware-cd in het cd-station van de computer.
9. Installeer de scansoftware volgens de aanwijzingen op het computerscherm.
10. Nadat de scansoftware is geïnstalleerd, sluit u de scanner weer op het
elektriciteitsnet aan, schakelt u de scanner in en sluit u de scanner via de USB-kabel
op de computer aan.
11. Volg de instructies op het scherm.
Scannerknoppen werken niet goed
Start na iedere stap een scan om te zien of de knoppen werken.Als het probleem
aanhoudt, gaat u verder met de volgende stap.
1. Misschien is er een kabel losgeraakt. Controleer of de USB-kabel en de voeding
stevig vastzitten.
2. Schakel de scanner uit, wacht ongeveer 30 seconden en schakel de scanner weer
in.
3. Start de computer opnieuw op.
4. Als het probleem aanhoudt, zijn de knoppen misschien uitgeschakeld.Probeer de
volgende procedure:
a. Open Configuratiescherm, selecteer Scanners en camera's en selecteer uw
scannermodel in de lijst.
b. Voer een van de volgende handelingen uit:
• Windows 2000: Controleer of de optie Apparaatgebeurtenissen
uitschakelen is uitgeschakeld.
• Windows XP: Controleer of de optie Geen actie ondernemen is
uitgeschakeld.
5. Misschien zijn de knoppen in de Scanner Tools Utility uitgeschakeld.Probeer de
volgende procedure:
a. Open de Scanner Tools Utility. Zie Help bij de Scanner Tools Utility
op pagina 15 of de gebruikershandleiding bij het apparaat voor instructies.
b. Selecteer het tabblad Buttons.
c. Controleer of de optie Disable scanner buttons (Scannerknoppen
uitschakelen) NIET is ingeschakeld.
6. Ga als volgt te werk om ervoor te zorgen dat er een softwareprogramma is
gekoppeld aan de scannerknop:
a. Open de Scanner Tools Utility. Zie Help bij de Scanner Tools Utility
op pagina 15 of de gebruikershandleiding bij het apparaat voor instructies.
b. Selecteer het tabblad Buttons.
c. Controleer of elke knop aan het juiste programma is gekoppeld.Klik op Help in
de Scanner Tools Utility voor meer informatie.
Andere informatiebronnen
Zie Aanvullende informatie op pagina 15 voor meer informatie over het oplossen van
problemen met de scannerhardware of -software.
20 HP Scanjet N6010 Sheetfeed documentscanner
Page 51

6
Productondersteuning
In dit gedeelte worden de opties voor productondersteuning beschreven.
Toegankelijkheid
U kunt voorkomen dat er per ongeluk op knoppen wordt gedrukt door de knoppen op het
bedieningspaneel uit te schakelen in de Scanner Tools Utility. U kunt de knoppen weer
inschakelen met hetzelfde hulpprogramma.
Zie de gebruikershandleiding bij de scanner voor meer informatie over de Scanner Tools
Utility. Zie Aanvullende informatie op pagina 15 voor meer informatie over
gebruikershandleiding voor de scanner.
Klanten met een handicap kunnen hulpinformatie krijgen op de volgende
website www.hp.com/hpinfo/community/accessibility/prodserv/ (alleen VS).
HP-website
Op www.hp.com kunt u uiteenlopende informatie vinden:
● Oplossingen voor technische problemen
● Tips om uw product effectiever en creatiever te gebruiken
● Updates voor de HP-stuurprogramma's en -software
● Productregistratie
● Abonneren op nieuwsbrieven, updates voor stuurprogramma's en software, en
ondersteuningswaarschuwingen
● Aanschaf van HP-toebehoren en accessoires
Nederlands
Ondersteuning krijgen
Haal het beste uit uw HP-product en raadpleeg de volgende standaardopties voor
ondersteuning van HP:
1. Raadpleeg de productdocumentatie die bij het product is meegeleverd.
–Lees het gedeelte over probleemoplossing of de elektronische Help van
deze handleiding of cd.
–Lees de elektronische Help in de software.
2. Ga naar HP online ondersteuning op www.hp.com/support of neem contact op
met uw leverancier.
HP online ondersteuning is beschikbaar voor alle klanten van HP: dit is de snelste
bron voor actuele productinformatie en deskundige hulp, met onder andere de
volgende voorzieningen:
– Snelle toegang via e-mail tot gekwalificeerde specialisten voor online
ondersteuning
– Updates voor software en stuurprogramma's voor uw product
– Waardevolle informatie over het product en probleemoplossing bij
technische problemen
– Proactieve productupdates, waarschuwingen van ondersteuning en HP
nieuwsbrieven (beschikbaar wanneer u uw product registreert)
Installatie- en ondersteuningshandleiding 21
Page 52

Hoofdstuk 6
3. Telefonische ondersteuning van HP
– Ondersteuningsopties en tarieven variëren per product, land/regio en taal.
– Tarieven en beleid kunnen zonder kennisgeving worden gewijzigd. Ga naar de
website www.hp.com/support voor de meest recente informatie.
4. Na de garantieperiode
Na afloop van de beperkte garantieperiode is er online hulp beschikbaar
op www.hp.com/support.
5. De garantie verlengen of uitbreiden
Als u de garantie van uw product wilt verlengen of upgraden, neemt u contact op
met uw leverancier of bekijkt u de aanbiedingen in HP Care Pack
op www.hp.com/support.
6. Als u al een HP Care Pack-service hebt aangeschaft, kunt u de overeengekomen
ondersteuningsvoorwaarden nalezen in het contract.
22 HP Scanjet N6010 Sheetfeed documentscanner
Page 53

7
Beperkte garantie van HP
In het volgende gedeelte wordt de garantie-informatie voor dit product uiteengezet.
Verklaring van beperkte garantie van HP
Product Duur van beperkte garantie
HP Scanjet N6010
Sheetfeed
documentscanner
Verlenging van beperkte garantie
1. Hewlett-Packard (HP) garandeert u, de eindgebruiker (Klant), dat elk hierboven
gespecificeerd HP-product (Product) vrij zijn van materiaal- en fabricagefouten
vanaf de datum van aankoop gedurende de bovenvermelde periode. De
garantieperiode gaat in op de datum van aankoop door de Klant.
2. Voor elk softwareproduct is de beperkte garantie van HP uitsluitend van toepassing
als programmeerinstructies niet kunnen worden uitgevoerd. HP garandeert niet dat
Producten zonder onderbreking of zonder fouten zullen werken.
3. De beperkte garantie van HP dekt uitsluitend die defecten die voortkomen uit
normaal gebruik van een Product, en dekt geen andere problemen, met inbegrip
van problemen die optreden als gevolg van:
a. Onjuist gebruik, onderhoud, opslag, behandeling of wijziging;
b. Software, media, onderdelen, accessoires, toebehoren of stroomadapters of
bronnen die niet door HP zijn geleverd of worden ondersteund; of,
c. Bediening of andere omstandigheden die buiten de specificaties van een
Product vallen.
4. Indien HP tijdens de toepasselijke garantieperiode op de hoogte wordt gesteld van
een defect in een Product, zal HP naar eigen goeddunken het defecte Product
repareren of vervangen.
5. Indien HP een defect Product dat wordt gedekt door de beperkte garantie van HP
niet kan vervangen of repareren, kan HP, binnen redelijke tijd na op de hoogte te
zijn gesteld van het defect, ofwel een ander product verstrekken dat vergelijkbaar
is wat prestaties betreft of terugbetaling van de aankoopprijs, naar rato van het
gebruik en andere toepasselijke factoren.
6. HP is niet verplicht het defecte Product te vervangen, repareren of terug te betalen
voordat de Klant het defecte Product naar HP retourneert en een geldig
aankoopbewijs overlegt.
7. Een vervangend product mag nieuw of bijna nieuw zijn, mits de functionaliteit ervan
ten minste gelijk is aan die van het te vervangen Product.
1 jaar
Nederlands
Installatie- en ondersteuningshandleiding 23
Page 54

Hoofdstuk 7
8. Een Product kan gereviseerde onderdelen, componenten of materialen bevatten
met gelijkwaardige prestaties als nieuwe onderdelen.
9. De beperkte garantie van HP is geldig in elk land/regio of elke plaats waar HP
ondersteuning biedt voor dit product en dit product op de markt heeft gebracht. Het
niveau van garantieservice kan verschillen, afhankelijk van de plaatselijke normen.
U kunt extra garantieservices aanschaffen bij HP, zoals next day exchange
(volgende dag omwisselen), on-site service (service op locatie) en accident
protection (vergoeding bij ongelukken).
B. Garantiebeperkingen
VOOR ZOVER TOEGESTAAN DOOR DE PLAATSELIJKE WETGEVING
VERSTREKKEN HP EN ZIJN LEVERANCIERS GEEN ENKELE ANDERE GARANTIE
OF VOORWAARDE, UITDRUKKELIJK OF STILZWIJGEND, MET BETREKKING TOT
EEN PRODUCT. HP EN ZIJN LEVERANCIERS BIEDEN MET NAME GEEN
IMPLICIETE GARANTIES OF VOORWAARDEN VOOR VERKOOPBAARHEID,
VOLDOENDE KWALITEIT EN GESCHIKTHEID VOOR ENIG DOEL.
C. Beperkingen van aansprakelijkheid
1. Voor zover bij de plaatselijke wetgeving toegestaan is het verhaal in deze Beperkte
garantieverklaring de enige en uitsluitende verhaalmogelijkheid van de Klant.
2. VOOR ZOVER TOEGESTAAN IN PLAATSELIJKE WETGEVING, BEHALVE MET
BETREKKING TOT DE VERPLICHTINGEN DIE UITDRUKKELIJK IN DEZE
BEPERKTE GARANTIEVERKLARING WORDEN UITEENGEZET, STELLEN HP
OF ZIJN LEVERANCIERS ZICH AANSPRAKELIJK VOOR DIRECT, INDIRECTE,
BIJZONDERE OF INCIDENTELE SCHADE OF VOOR GEVOLGSCHADE, AL DAN
NIET GEBASEERD OP CONTRACT, ONRECHTMATIGHEID OF ENIGE ANDERE
WETSTHEORIE EN AL DAN NIET OP DE HOOGTE GESTELD VAN DERGELIJKE
SCHADE.
24 HP Scanjet N6010 Sheetfeed documentscanner
Page 55

D. Plaatselijke wetgeving
1. De Klant mag aan deze Beperkte garantieverklaring bepaalde rechten ontlenen.De
Klant heeft mogelijk ook andere rechten, die verschillen per staat (Verenigde
Staten), provincie (Canada) en land/regio (elders).
2. Voor zover deze Beperkte garantieverklaring niet in overeenstemming is met de
plaatselijke wetgeving, wordt deze Beperkte garantieverklaring geacht te zijn
gewijzigd, zodat deze wel in overeenstemming is met plaatselijke wetgeving.
Volgens plaatselijke wetgeving kunnen sommige verklaringen van afstand en
beperkingen in deze Beperkte garantieverklaring niet van toepassing zijn op de
Klant. De federale overheid van de Verenigde Staten, sommige staten in de
Verenigde Staten en sommige overheden buiten de Verenigde Staten (waaronder
provincies in Canada) kunnen bijvoorbeeld:
a. De Klant aanvullende garantierechten verlenen;
b. Stellen dat de verklaringen van afstand en beperkingen in deze Beperkte
garantieverklaring de wettelijke rechten van een klant niet mogen beperken
(bijvoorbeeld in het Verenigd Koninkrijk);
c. Op andere wijze de mogelijkheid van een fabrikant beperken om dergelijke
afstandsverklaringen en beperkingen op te leggen;
d. De duur van impliciete garanties specificeren waarvan de fabrikant geen
afstand mag doen; of,
e. Beperkingen op de duur van impliciete garanties verbieden
3. De Klant heeft mogelijk op grond van de koopovereenkomst aanvullende rechten.
Dergelijke rechten worden op geen enkele manier beperkt door deze Beperkte
garantieverklaring.
4. Voor consumententransacties in de Verenigde Staten geldt dat de duur van alle
impliciete garanties die wettelijk verplicht zijn, beperkt is tot de duur van de
stilzwijgende garantie.
5. BIJ TRANSACTIES IN AUSTRALIË EN NIEUW-ZEELAND KUNNEN DE
VOORWAARDEN IN DEZE GARANTIEVERKLARING GEEN AFBREUK DOEN
AAN DE WETTELIJK VASTGELEGDE RECHTEN DIE VAN TOEPASSING ZIJN
VOOR DE VERKOOP VAN DIT PRODUCT AAN DEZE KLANTEN OF DEZE
RECHTEN WIJZIGEN OF BEPERKEN, MET UITZONDERING VAN ALLE
WETTELIJK TOEGESTANE GEVALLEN.
U hebt mogelijk op grond van de koopovereenkomst aanvullende rechten bij de verkoper.
Dergelijke rechten worden op geen enkele manier beperkt door deze Beperkte garantie
van HP.
Op de binnenkaft van dit document vindt u de namen en adressen van de HP-entiteit die
verantwoordelijk is voor Beperkte garantie van HP in uw land/regio.
Nederlands
Installatie- en ondersteuningshandleiding 25
Page 56

8
Informatie over voorschriften en
productspecificaties
In dit gedeelte worden de productspecificaties en de overheidsinformatie voor de
HP Scanjet N6010 scanner en accessoires beschreven.
Specificaties van de scanner
Naam Beschrijving
Scannertype Scanner met duplex-documentinvoer
Afmetingen Breedte: 320 mm (12,6 inch), Diepte: 270 mm (10,63 inch),
Hoogte: 312 mm (12,28 inch)
Gewicht 5,4 kg
Scannerelement CCD (Charge-Coupled Device)
Interface USB 2.0 high speed
Optische resolutie 600 x 600 dpi hardware
Spanningsvereisten
Stroomverbruik Bediening:32W
100-240 Volt wisselstroom, 50/60 Hz, 1,5A
Sluimermodus:5.25W
Uw HP-scanner voldoet aan de ENERGY STAR®-normen. Als
ENERGY STAR®-partner heeft Hewlett-Packard Company
vastgesteld dat dit product voldoet aan de ENERGY STAR®richtlijnen voor energiebesparing.
Omgevingsspecificaties
Naam Beschrijving
Temperatuur Scanner in bedrijf: 10 tot 35 °C
Bij opslag: -40 tot 60 °C
Relatieve
luchtvochtigheid
Scanner in bedrijf: 15 tot 80% zonder condens 10 tot 35 °C
Bij opslag: maximaal 90% bij 0 tot 60 °C
Informatie over voorschriften
Wettelijk Modelidentificatienummer: Van overheidswege is aan dit product een
wettelijk modelnummer toegekend. Het wettelijke modelidentificatienummer van uw
26 HP Scanjet N6010 Sheetfeed documentscanner
Page 57

product is FCLSD-0601. Dit nummer moet niet worden verward met de marketingnaam
(HP Scanjet N6010) of met het productnummer (L1983A). Meer wettelijke informatie over
de scanner vindt u in het bestand regulatory_supplement.htm op de scansoftware-cd.
Opmerking Het voorschriftetiket (met de artikel- en serienummers) bevindt zich
aan de onderzijde van de scanner. Wanneer u echter de uitvoerlade voor papier
onder aan de scanner bevestigt, bedekt u dit etiket.
Informatie over hergebruik en verboden materialen
Op dit product zijn de volgende regels betreffende hergebruik en verboden materialen
van toepassing.
Afvalverwerking van apparatuur door gebruikers in huishoudens in de Europese
Unie
Dit symbool op het product of de verpakking betekent dat dit product niet bij het normale
huishoudelijke afval hoort. Het is uw verantwoordelijkheid uw overbodige apparatuur bij
een inzamelingspunt voor elektrische en elektronische apparatuur te brengen zodat het
kan worden hergebruikt. Door uw overbodige apparatuur gescheiden van het normale
afval weg te doen, helpt u de natuurlijke hulpbronnen van de aarde te sparen en draagt
u bij aan een schoner milieu en een gezondere leefomgeving. Voor meer informatie over
inzamelingspunten van elektronisch afval kunt u contact opnemen met de gemeente
waar u woont, de vuilophaaldienst in uw gemeente of met de winkel waar u het product
hebt gekocht.
Nederlands
Milieubeleid van HP
Het beleid van Hewlett-Packard is erop gericht kwaliteitsproducten te leveren op een
milieuvriendelijke wijze. Bij het ontwerp van dit product is al rekening gehouden met de
recyclingmogelijkheden. Het aantal gebruikte materialen is tot een minimum beperkt
terwijl de betrouwbaarheid en juiste werking gewaarborgd blijven. Van elkaar
verschillende materialen zijn zo ontworpen dat ze gemakkelijk van elkaar los te maken
zijn. Bevestigingen en andere verbindingen zijn gemakkelijk te vinden, gemakkelijk
bereikbaar en met gewone gereedschappen te verwijderen. Belangrijke onderdelen zijn
goed bereikbaar gemaakt zodat ze efficiënt uit elkaar gehaald en gerepareerd kunnen
worden. Voor meer informatie gaat u naar de website voor het milieubeleid van HP
op:www.hp.com/globalcitizenship/environment/
Kunststoffen
Kunststof onderdelen die zwaarder zijn dan 25 gram zijn in overeenstemming met
internationale normen voorzien van een label. Hierdoor kunnen deze onderdelen aan
Installatie- en ondersteuningshandleiding 27
Page 58

Hoofdstuk 8
het einde van de levensduur van het product gemakkelijk worden herkend en gebruikt
voor recycling.
Recycling
HP biedt steeds meer programma's voor retournering en recycling in veel landen/regio's,
en heeft partnerships gesloten met enkele van de grootste recyclingcentra voor
elektronica ter wereld.HP spaart natuurlijke grondstoffen door zijn populairste producten
opnieuw te verkopen.Meer informatie over het recyclen van HP-producten vindt u
op: www.hp.com/hpinfo/globalcitizenship/environment/recycle/
Bijzondere verwerking van materialen
Dit HP-product bevat materialen waarvoor mogelijk een speciale afvalverwerking aan
het einde van de levensduur is vereist. Kwik in de fluorescente lamp(en) van dit product
is uitgesloten van de EU-richtlijn 2002/95/EC, over gevaarlijke stoffen.
28 HP Scanjet N6010 Sheetfeed documentscanner
Page 59

Setup and Support Guide
English
Page 60

Copyright and license
© 2006 Copyright Hewlett-Packard
Development Company, L.P.
Reproduction, adaptation or translation
without prior written permission is
prohibited, except as allowed under the
copyright laws.
The information contained herein is
subject to change without notice.
The only warranties for HP products
and services are set forth in the express
warranty statements accompanying
such products and services. Nothing
herein should be construed as
constituting an additional warranty. HP
shall not be liable for technical or
editorial errors or omissions contained
herein.
Trademark credits
ENERGY STAR is a U.S. registered
service mark of the United States
Environmental Protection Agency.
Microsoft and Windows are registered
trademarks of Microsoft Corporation.
Page 61

Contents
1 How to get started.................................................................................................4
Step 1. Check the box contents..............................................................................4
Step 2. Install the software......................................................................................5
Step 3. Connect the power supply..........................................................................5
Step 4. Connect the USB cable...............................................................................7
Step 5. Prepare the scanner for use.......................................................................8
Step 6. Test the installation...................................................................................10
Scanning software CD...........................................................................................11
Power Save mode or Instant Lamp On mode.......................................................11
2 How to use the scanner buttons........................................................................13
Scanner buttons....................................................................................................13
3 Where to get additional information..................................................................15
HP Scanjet N6010 User Guide..............................................................................15
Scanner Tools Utility help......................................................................................15
Additional software help........................................................................................16
4 Care and maintenance........................................................................................17
5 Troubleshooting..................................................................................................18
Scanner does not work after installation...............................................................18
6 Product support...................................................................................................21
Accessibility...........................................................................................................21
HP Web site...........................................................................................................21
Getting assistance.................................................................................................21
7 HP limited warranty.............................................................................................23
HP limited warranty statement...............................................................................23
8 Regulatory information and product specifications........................................25
Scanner specifications..........................................................................................25
Environmental specifications.................................................................................25
Regulatory information..........................................................................................25
Recycling and Restricted Material Information......................................................26
English
Setup and Support Guide 3
Page 62

1
How to get started
Follow these steps to set up the scanner:
Step 1. Check the box contents
Unpack the scanner hardware. Be sure to remove any shipping tape.
8
1
4
3
6
2
1 HP Scanjet N6010 scanner
2 Power supply
3 USB cable
4 Scanning software CD (For more information, see Scanning software CD
on page 11.)
5 Front-panel labels
6 Setup and Support Guide (this book)
7 Paper-path cleaning cloth (for later maintenance use)
8 Output tray
5
7
4 HP Scanjet N6010 Sheetfeed Document Scanner
Page 63

Step 2. Install the software
A number of scanning software programs are included with the scanner. For information
about these programs, see Scanning software CD on page 11.
Caution Install the scanning software before connecting the USB cable to the
computer.
1. Insert the scanning software CD that came with the scanner into the computer CD
drive.
2. Wait for the installation dialog box to display. If the installation dialog box does not
display after a few moments, do the following:
a. Click Start and then click Run.
The Run dialog box is displayed.
b. In the Open box, type d:\setup.exe (where d: is the letter of your computer's CD
drive).
c. Click OK.
3. In the installation dialog box, select which software programs you want to install. To
use all of the features of the scanner, it is recommended that you install all of the
programs on the CD.
4. Follow the onscreen instructions to complete the installation.
During the installation process you are asked whether you want to enable Power
Save mode or Instant Lamp On mode. For information about these options, see
Power Save mode or Instant Lamp On mode on page 11.
The install program will also check to see whether you have Adobe Acrobat Reader
installed for viewing PDF files. If it is not installed, you are given instructions for
installing it.
English
Step 3. Connect the power supply
The power supply has an attached cable that plugs into the back of the scanner. The
connector on the end of this cable has a green LED that is on when the power supply is
functioning correctly.
Setup and Support Guide 5
Page 64

Chapter 1
The power supply also has an AC cable that is connected to the power supply on one
end and plugged into a power outlet or surge protector on the other end.
1. Plug the AC cable into the back of the power supply.
2. Plug the other end of the AC cable into a power outlet or a surge protector.
3. Check that the green LED on the power supply cable connector is on.
– If the green LED is not on, ensure that power is available to the power outlet or
surge protector that the AC cable is plugged into.
– If power is available to the power outlet or surge protector but the green LED is
still not on, the power supply might be defective. Contact HP Support for
assistance.
4. If the green LED is on, plug the power supply into the back of the scanner.
5. Turn the scanner on. Facing the back of the scanner, press the Power switch on
the back of the scanner to the left.
6 HP Scanjet N6010 Sheetfeed Document Scanner
Page 65

Step 4. Connect the USB cable
Caution Be sure to install the software before connecting the scanner to your
computer with the USB cable. See Step 2. Install the software on page 5.
Use the USB cable that came with the scanner to connect the scanner to the computer.
1. Connect the square end of the cable to the scanner.
2. Connect the rectangular end of the cable to the computer.
Note If there is a USB port on both the front and the back of the computer,
use the USB port that is in the back.
Setup and Support Guide 7
English
Page 66

Chapter 1
Step 5. Prepare the scanner for use
1. Install the output tray. To install it, slide the tray, extension side up, into the guide
slots on the bottom of the scanner.
2. Extend the output tray extension.
8 HP Scanjet N6010 Sheetfeed Document Scanner
Page 67

3. For longer originals, extend the document feeder extension at the top of the scanner.
4. Locate the front-panel label that came in the product box. Remove the backing and
place the label on the pull-out tray that is below the HP logo on the front panel. This
label provides information about the front-panel buttons and LED indicator lights.
Setup and Support Guide 9
English
Page 68

Chapter 1
Step 6. Test the installation
Caution Before placing an item in the document feeder, make sure that the item
does not contain wet glue, correction fluid, or other substances that can be
transferred to the interior of the scanner.
Make sure there are no curls, wrinkles, staples, paper clips, or any other attached
material. Sheets should not be stuck together.
1. Place a single page in the document feeder. The page should be face down, with
the top of the page pointing down (
).
2. Adjust the paper guides. The paper guides must be touching both sides of the page
to work properly. Ensure that the page is straight and that the guides are against the
edges of the page.
Note To adjust the paper guides, press on the lower part of the guide.
3. Press the Scan to PDF (
The page will feed through the scanner. A scan of the page should appear on your
computer screen in the PDF viewer. This confirms that the installation was
successful.
Note You must have Adobe Acrobat Reader or another PDF-viewing
program installed in order to successfully complete this process. If you do
not have a PDF viewer, run this test using the Scan Document button.
If a scan of the page does not appear on your computer screen, see Troubleshooting
on page 18.
10 HP Scanjet N6010 Sheetfeed Document Scanner
) button.
Page 69

Scanning software CD
This section describes the scanning software programs that come with the scanner. All
of the programs are supported by Microsoft Windows 2000 and XP operating systems,
including x-64.
There are two non-HP software programs included. These software programs are not
available for all scanner models or all countries/regions.
Programs
HP Scanning Software The HP scanning software includes the Scanner Tools
NewSoft Presto!
PageManager
Software use
Utility, the HP Document Copy Utility, the HP PDF
writer, and the TWAIN scanner drivers.
● Use the Scanner Tools Utility to configure settings
for the Scan to PDF button, to map the scanner
buttons to different applications, to disable the
scanner buttons, or to view scanner maintenance
information. It can be launched from the Scanner
Tools front-panel button or from the Start menu.
● Use the Document Copy Utility to configure copies
sent by the scanner to your default printer. It can
be launched from the Copy front-panel button or
from the Start menu.
● The HP PDF writer takes the scanned image and
creates a PDF file. It has no user interface, but the
PDF settings can be configured using the Scanner
Tools Utility.
● The TWAIN drivers are necessary for using the
scanner with standard business applications and
customized software. They meet the minimum
requirement for the scanner to work properly.
Use to create scanned images or documents and save
them in a wide variety of formats. Provides access to
managing documents (archive, reuse), OCR, e-mail
and fax.
English
NewSoft Presto! BizCard Use to scan business cards and organize your contacts
into an easy to use database.
Power Save mode or Instant Lamp On mode
During the installation process you are asked whether you want to enable Power Save
mode or Instant Lamp On mode for the scanner. In Power Save mode, the scanner lamp
times out and turns off automatically after a period of inactivity (about 15 minutes).
In Instant Lamp On mode, although the scanner lamp times out and turns off
automatically after a period of inactivity (about 15 minutes), it remains warm and ready
to scan.
Setup and Support Guide 11
Page 70

Chapter 1
To switch from Power Save mode to Instant Lamp On mode, select the Instant Lamp
On option on the Maintenance tab of the Scanner Tools Utility. To switch back to Power
Save mode, clear the Instant Lamp On option.
12 HP Scanjet N6010 Sheetfeed Document Scanner
Page 71

2
How to use the scanner buttons
Scanner buttons
Use the buttons on the front panel of the scanner to start a scan, cancel a scan, or
configure some scanner settings.
1
5
6
3
Icon Button name Description
1 Scan Document (upper-left
button)
2 Copy (upper-right button) Start a copy and send it to your
3 Scan to PDF (lower-left button) Scan an item and save it as a
4 Scan Business Card (lower-
right button)
2
4
Start a scan. By default, this
button will scan to the NewSoft
Presto! PageManager
application.
default printer. The
HP Document Copy utility
opens and enables you to
select options for the copy.
PDF file for sharing or storing.
By default, the PDF is
automatically opened in your
default PDF viewer.
Scan a business card. By
default, this button will scan to
the NewSoft Presto! BizCard
application.
English
5 Cancel (far-left top button) Cancel a scan or copy in
progress.
6 Scanner Tools (far-left bottom
button)
Setup and Support Guide 13
Open the Scanner Tools Utility,
which you can use to map the
scanner buttons to different
applications, configure PDF
Page 72

Chapter 2
(continued)
options, or view scanner
maintenance information.
For more information about the scanner buttons than is provided in this chapter, see the
scanner user guide. For information about the scanner user guide, see Where to get
additional information on page 15.
14 HP Scanjet N6010 Sheetfeed Document Scanner
Page 73

3
Where to get additional
information
The scanner comes with several sources of information about using the scanner and the
scanning software.
HP Scanjet N6010 User Guide
The scanner user guide is the primary source of information regarding this product and
includes the information you need to know for using, maintaining, and troubleshooting
the scanner. The user guide is available as a PDF file, so that you can print all or parts
of it, and as a screen-readable Help file.
To open the user guide PDF:
Click Start, point to Programs or All Programs, point to HP, point to Scanjet, point
➔
to N6010, and then click User Guide.
For a PDF version of the user guide in another language:
1. Insert the scanning software CD that came with the scanner into the computer CD
drive.
Wait for the installation dialog box to display.
2. Click View or print guides.
A list of languages is displayed.
3. Click the language that you want.
A list of guides is displayed.
4. Click User Guide.
For an online Help version of the user guide that can be used with screen reader software:
1. Insert the scanning software CD that came with the scanner into the computer CD
drive.
Wait for the installation dialog box to display.
2. Click View or print guides.
A list of languages is displayed.
3. Click the language that you want.
A list of guides is displayed.
4. Click Onscreen User Guide.
English
Scanner Tools Utility help
To open the utility, do one of the following:
● Double-click the Scanner Tools Utility icon on the desktop.
● Press the Scanner Tools (
● Click Start, point to Programs or All Programs, point to HP, point to
Scanjet, point to N6010, and then click Scanner Tools Utility.
Click Help on the Scanner Tools Utility dialog box to open the Help file.
Setup and Support Guide 15
) button on the front panel of the scanner.
Page 74

Chapter 3
Additional software help
Each of the software programs included on the scanning software CD includes software
Help. To open the software Help, open the program, select the Help menu, and then
select Help or Using Help.
16 HP Scanjet N6010 Sheetfeed Document Scanner
Page 75

4
Care and maintenance
Occasional cleaning of the scanner helps ensure higher-quality scans. The amount of
care necessary depends upon several factors, including the amount of use and the
environment. You should perform routine cleaning as necessary.
For instructions about maintaining the scanner, see the scanner user guide. For
information about the scanner user guide, see Where to get additional information
on page 15.
Caution Before placing an item in the document feeder, make sure that the item
does not contain wet glue, correction fluid, or other substances that can be
transferred to the interior of the scanner.
Make sure there are no curls, wrinkles, staples, paper clips, or any other attached
material. Sheets should not be stuck together.
Setup and Support Guide 17
English
Page 76

5
Troubleshooting
Scanner does not work after installation
If the scanner does not work after installation, you might see one of the following
messages displayed on the computer:
● The scanner could not be initialized.
● The scanner could not be found.
● An internal error has occurred.
● The computer cannot communicate with the scanner.
Try the following to fix the problem:
Step 1. Check the cables
Verify that the cable connections are in working order.
Power supply
The power supply has an attached cable that plugs into the back of the scanner. The
connector on the end of this cable has a green LED that is on when the power supply is
functioning correctly.
The power supply also has an AC cable that is connected to the power supply on one
end and plugged into a power outlet or surge protector on the other end.
The power cable is connected between the scanner and a power outlet.
1. Check that the power rocker switch is in the on position.
2. Check that the green LED on the power supply cable connector is on.
3. If the green LED is not on, ensure that power is available to the power outlet or surge
protector that the AC cable is plugged into.
4. If power is available to the power outlet or surge protector but the green LED is still
not on, the power supply might be defective. Contact HP Support for assistance.
USB cable
If the scanner has lost its USB connection, the Error LED is lit with a steady amber light.
Try the following:
18 HP Scanjet N6010 Sheetfeed Document Scanner
Page 77

Check the physical connection to the scanner:
● Use the cable that was included with the scanner. Another USB cable might not be
compatible with the scanner.
● Ensure that the USB cable is securely connected between the scanner and the
computer or USB hub. The trident icon on the USB cable faces up when the cable
is properly connected to the scanner.
To troubleshoot the USB connection:
1. Do one of the following tasks, depending on how the scanner is connected to the
computer:
– If the USB cable is connected to a USB hub or a docking station for a laptop,
disconnect the USB cable from the USB hub or the docking station, and then
connect the USB cable directly to the computer.
– If the USB cable is directly connected to the computer, plug it into another USB
port on the computer.
– If the USB cable is connected to a USB port on the front of the computer, plug
it into a USB port on the back of the computer.
– Remove all other USB devices from the computer except for the keyboard and
the mouse.
2. Turn the scanner off and then on.
3. Restart the computer.
4. After the computer has restarted, try using the scanner.
If the scanner works and you changed the way it was connected to the computer in
step 1, the communication problem might involve the USB hub or docking station.
Leave the scanner directly connected to the computer.
If the scanner does not work, uninstall and then reinstall the HP scanning software.
Step 2. Uninstall and then reinstall the scanning software
If checking the scanner cable connections did not solve the problem, the problem might
have occurred because of an incomplete installation. Try uninstalling and then
reinstalling the scanning software.
1. Disconnect the USB cable from the computer.
2. Do one of the following tasks to open the Control Panel:
– Windows XP: Click Start, and then click Control Panel.
– Windows 2000: Click Start, point to Settings, and then click Control Panel.
3. Double-click the Add/Remove Programs icon.
A list of currently installed programs is displayed.
4. Select HP Scanjet N6010 Divers and Tools, and then click Remove or Change/
Remove.
5. Follow the onscreen instructions.
If prompted to remove or repair the software, click Remove.
If prompted to restart the computer, click No.
6. After the scanning software is removed, unplug the scanner from the electrical outlet.
7. Restart the computer.
8. Insert the scanning software CD into the computer CD drive.
9. Follow the onscreen instructions to install the scanning software.
Setup and Support Guide 19
English
Page 78

Chapter 5
10. After the scanning software has installed, connect the scanner to an electrical outlet,
turn on the scanner, and then use the USB cable to connect the scanner to the
computer.
11. Follow the onscreen instructions.
Scanner buttons are not working correctly
After each step, start a scan to see if the buttons are working. If the problem persists,
proceed with the next step.
1. A cable might be loose. Ensure that the USB cable and the power supply are
securely connected.
2. Turn off the scanner, wait 30 seconds, and then turn the scanner back on.
3. Restart your computer.
4. If the problem persists, the buttons might be disabled. Try the following procedure:
a. Open Control Panel, select Scanners and Cameras, and then select your
scanner model from the list.
b. Do one of the following:
• Windows 2000: Ensure that the Disable Device Events option is not
selected.
• Windows XP: Ensure the Take No Action option is not selected.
5. The buttons might be disabled in the Scanner Tools Utility. Try the following
procedure:
a. Open the Scanner Tools Utility. For instructions, see Scanner Tools Utility help
on page 15 or the device user guide.
b. Select the Buttons tab.
c. Verify that the Disable scanner buttons check box is NOT selected.
6. Ensure that there is a software program associated with the scanner button by doing
the following:
a. Open the Scanner Tools Utility. For instructions, see Scanner Tools Utility help
on page 15 or the device user guide.
b. Select the Buttons tab.
c. Verify that each button is associated with the correct program. For more
information, click Help in the Scanner Tools Utility.
Other sources for help
For more troubleshooting help with the scanner hardware or software, see Where to get
additional information on page 15.
20 HP Scanjet N6010 Sheetfeed Document Scanner
Page 79

6
Product support
This section describes the options for product support.
Accessibility
To prevent buttons from being accidentally pushed, use the Scanner Tools Utility to
disable the front-panel buttons. You can use the same utility to re-enable the buttons.
For more information about the Scanner Tools Utility, see the scanner user guide. For
information about the scanner user guide, see Where to get additional information
on page 15.
Customers with disabilities can get help by
visiting www.hp.com/hpinfo/community/accessibility/prodserv/ (US only).
HP Web site
Visit www.hp.com for a variety of information:
● Find solutions to technical issues.
● Learn tips for using your product more effectively and creatively.
● Update your HP drivers and software.
● Register your product.
● Subscribe to newsletters, driver and software updates, and support alerts.
● Purchase HP supplies and accessories.
Getting assistance
In order to get the best from your HP product, please consult the following standard
HP support offerings:
1. Please consult the product documentation that came with the product.
– Review the troubleshooting section or electronic Help of this manual/CD.
– Review the electronic Help section within the software.
2. Visit the HP online support at www.hp.com/support or contact your point of
purchase.
HP online support is available to all HP customers. It is the fastest source for up-to-
date product information and expert assistance, including the following features:
–Fast e-mail access to qualified online support specialists
– Software and driver updates for your product
– Valuable product and troubleshooting information for technical issues
– Proactive product updates, support alerts, and HP newsletters (available when
you register your product)
3. HP support by phone
– Support options and fees vary by product, country/region and language.
– Fees and policies are subject to change without notice. Please check the web
site www.hp.com/support for the latest information.
Setup and Support Guide 21
English
Page 80

Chapter 6
4. Post-warranty period
After the limited warranty period, help is available online
at www.hp.com/support.
5. Extending or upgrading your warranty
If you would like to extend or upgrade the product’s warranty, please contact your
point of purchase or check the HP Care Pack offers at www.hp.com/support.
6. If you already purchased an HP Care Pack Service, please check the agreed
support conditions on the contract.
22 HP Scanjet N6010 Sheetfeed Document Scanner
Page 81

7
HP limited warranty
The following information outlines the warranty information for this product.
HP limited warranty statement
Product Duration of limited warranty
HP Scanjet N6010
Sheetfeed Document
Scanner
A. Extent of limited warranty
1. Hewlett-Packard (HP) warrants to the end-user customer (Customer) that each HP
product specified above (Product) shall be free from defects in material and
workmanship for the period specified above. The warranty period begins on the date
of purchase by Customer.
2. For each software product, HP’s limited warranty applies only to a failure to execute
programming instructions. HP does not warrant that the operation of any Product
will be uninterrupted or error free.
3. HP’s limited warranty covers only those defects that arise as a result of normal use
of a Product, and does not cover any other problems, including those that arise as
a result of:
a. Improper use, maintenance, storage, handling, or modification;
b. Software, media, parts, accessories, supplies, or power adapters or sources
not provided or supported by HP; or,
c. Operation or other conditions outside a Product’s specifications.
4. If HP receives, during the applicable warranty period, notice of a defect in a Product,
HP shall at its option either replace or repair the defective Product.
5. If HP cannot replace or repair a defective Product that is covered by HP’s limited
warranty, HP may, within a reasonable time after being notified of the defect, provide
either another product similar in performance or a refund of the purchase price
prorated based on usage and other appropriate factors.
6. HP shall have no obligation to replace, repair, or refund until Customer returns the
defective Product to HP and provides a valid proof of purchase.
7. Any replacement product may be either new or like-new, provided it has functionality
at least equal to that of the Product being replaced.
8. A Product may contain remanufactured parts, components, or materials equivalent
to new in performance.
9. HP’s limited warranty is valid in any country or locality where HP has a support
presence for the Product and has marketed the Product. The level of warranty
service may vary according to local standards. Upgraded warranty services, such
as next day exchange, on-site service, and accident protection, may be purchased
from HP.
1 year
English
Setup and Support Guide 23
Page 82

Chapter 7
B. Limitations of Warranty
TO THE EXTENT ALLOWED BY LOCAL LAW, NEITHER HP NOR ITS THIRD PARTY
SUPPLIERS MAKE ANY OTHER WARRANTY OR CONDITION OF ANY KIND,
WHETHER EXPRESS OR IMPLIED, WITH RESPECT TO A PRODUCT, AND
SPECIFICALLY DISCLAIM THE IMPLIED WARRANTIES OR CONDITIONS OF
MERCHANTABILITY, SATISFACTORY QUALITY, AND FITNESS FOR A
PARTICULAR PURPOSE.
C. Limitations of Liability
1. To the extent allowed by local law, the remedies provided in this Limited Warranty
Statement (LWS) are Customer’s sole and exclusive remedies.
2. TO THE EXTENT ALLOWED BY LOCAL LAW, EXCEPT FOR THE OBLIGATIONS
SPECIFICALLY SET FORTH IN THIS LWS, IN NO EVENT SHALL HP OR ITS
THIRD PARTY SUPPLIERS BE LIABLE FOR DIRECT, INDIRECT, SPECIAL,
INCIDENTAL, OR CONSEQUENTIAL DAMAGES, WHETHER BASED ON
CONTRACT, TORT, OR ANY OTHER LEGAL THEORY AND WHETHER
ADVISED OF THE POSSIBILITY OF SUCH DAMAGES.
D. Local Law
1. This LWS gives Customer specific legal rights. Customer may also have other rights
that vary from state to state in the United States, from province to province in
Canada, and from country to country elsewhere in the world.
2. To the extent this LWS is inconsistent with local law, this LWS shall be deemed
modified to be consistent with local law. Under local law, certain disclaimers and
limitations of this LWS may not apply to Customer. For example, the federal
government of the United States, some states in the United States, and some
governments outside the United States (including provinces in Canada), may:
a. Grant Customer additional warranty rights;
b. Preclude the disclaimers and limitations in this LWS from limiting the statutory
rights of a consumer (e.g., the United Kingdom);
c. Otherwise restrict the ability of a manufacturer to enforce such disclaimers or
limitations;
d. Specify the duration of implied warranties that the manufacturer cannot
disclaim; or,
e. Disallow limitations on the duration of implied warranties
3. Customer may have additional statutory rights based on its purchase agreement.
Those rights are not in any way affected by this LWS.
4. For consumer transactions in the United States, any implied warranties imposed by
law are limited in duration to the express warranty period.
5. FOR CONSUMER TRANSACTIONS IN AUSTRALIA AND NEW ZEALAND, THE
TERMS IN THIS LWS, EXCEPT TO THE EXTENT LAWFULLY PERMITTED, DO
NOT EXCLUDE, RESTRICT, OR MODIFY, AND ARE IN ADDITION TO, THE
MANDATORY STATUTORY RIGHTS APPLICABLE TO THE SALE OF A
PRODUCT TO SUCH CUSTOMERS.
You may have additional statutory rights against the seller based on your purchase
agreement. Those rights are not in any way affected by this HP Limited Warranty.
You will find on the inside front cover of this book the names and address of the HP entity
responsible for the performance of the HP Limited Warranty in your country.
24 HP Scanjet N6010 Sheetfeed Document Scanner
Page 83

8
Regulatory information and
product specifications
This section contains regulatory information and product specifications for the
HP Scanjet N6010 scanner and accessories.
Scanner specifications
Name Description
Scanner type Duplex sheet-feed scanner
Size Width: 320 mm (12.6 in), Depth: 270 mm (10.63 in), Height:
312 mm (12.28 in)
Weight 5.4 kg (11.8 lbs)
Scanning element Charge-coupled device (CCD)
Interface USB 2.0 high-speed
Optical resolution 600 x 600 dpi hardware
AC power 100-240V~, 50/60Hz, 1.5A
Power
consumption
Operation: 32W
Sleep mode: 5.25W
Your HP scanner is ENERGY STAR® compliant. As an ENERGY
STAR® partner, Hewlett-Packard Company has determined that
this product meets the ENERGY STAR® guidelines for energy
efficiency.
Environmental specifications
Name Description
Temperature Operating the scanner: 10° to 35° C (50° to 95° F)
Storage: -40° to 60° C (-40° to 140° F)
Relative humidity Operating the scanner: 15 percent to 80 percent noncondensing
10° to 35° C (50° to 95° F)
Storage: up to 90 percent at 0° to 60° C or (32° to 140° F)
Regulatory information
Regulatory Model Identification Number: For regulatory identification purposes your
product is assigned a Regulatory Model Number. The Regulatory Model Number for your
English
Setup and Support Guide 25
Page 84

Chapter 8
product is FCLSD-0601. This regulatory number should not be confused with the
marketing name (HP Scanjet N6010) or product number (L1983A). Additional regulatory
information about your scanner can be found on the regulatory_supplement.htm file on
the scanning software CD.
Note The regulatory label (with the part numbers and serial numbers) is on the
bottom of the scanner. However, when you insert the output paper tray on the
bottom of the scanner, you will cover up the regulatory label.
Recycling and Restricted Material Information
The following recycling and restricted material policies apply to this product.
Disposal of Waste Equipment by Users in Private Households in the European
Union
This symbol on the product or on its packaging indicates that this product must not be
disposed of with your other household waste. Instead, it is your responsibility to dispose
of your waste equipment by handing it over to a designated collection point for the
recycling of waste electrical and electronic equipment. The separate collection and
recycling of your waste equipment at the time of disposal will help to conserve natural
resources and ensure that it is recycled in a manner that protects human health and the
environment. For more information about where you can drop off your waste equipment
for recycling, please contact your local city office, your household waste disposal service,
or the shop where you purchased the product.
Environmental Product Stewardship Program
Hewlett-Packard is committed to providing quality products in an environmentally sound
manner. Design for recycling has been incorporated into this product. The number of
materials has been kept to a minimum while ensuring proper functionality and reliability.
Dissimilar materials have been designed to separate easily. Fasteners and other
connections are easy to locate, access, and remove using common tools. High priority
parts have been designed to access quickly for efficient disassembly and repair. For
more information, visit HP's Commitment to the Environment Web site
at: www.hp.com/globalcitizenship/environment/
Plastics
Plastic parts over 25 grams are marked according to international standards that
enhance the ability to identify plastics for recycling purposes at the end of product life.
26 HP Scanjet N6010 Sheetfeed Document Scanner
Page 85

Recycling program
HP offers an increasing number of product return and recycling programs in many
countries/regions, and partners with some of the largest electronics recycling centers
throughout the world. HP conserves resources by reselling some of its most popular
products. For more information regarding recycling of HP products, please
visit: www.hp.com/hpinfo/globalcitizenship/environment/recycle/
Special handling of materials
This HP product contains materials that might require special handling at end-of-life.
Mercury in the fluorescent lamp(s) of this product is exempt from the European Union's
Directive 2002/95/EC, Restrictions of Hazardous Substances.
Setup and Support Guide 27
English
Page 86

Chapter 8
28 HP Scanjet N6010 Sheetfeed Document Scanner
Page 87

Page 88

ﻞﺼﻔﻟا ٨
ﻰﻠﻋ ﺔﻈﻓﺎﺤﻤﻟا ﻰﻠﻋ دراﻮﻤﻟا ﻦﻡ لﻼﺧ ةدﺎﻋإ ﻊﻴﺑ ﺾﻌﺑ ﺮﺜآأ ﺎﻬﺗﺎﺠﺘﻨﻡ ةﺮﻬﺵ .ﺪﻳﺰﻤﻟ ﻦﻡ تﺎﻡﻮﻠﻌﻤﻟا لﻮﺡ ةدﺎﻋإ ﻊﻴﻨﺼﺗ تﺎﺠﺘﻨﻡ
HP، ءﺎﺟﺮﺑ ةرﺎﻳز ﻊﻗﻮﻤﻟا ﻲﻟﺎﺘﻟا: www.hp.com/hpinfo/globalcitizenship/environment/recycle/
ﺔﺠﻟﺎﻌﻣ داﻮﻤﻟا ﺔﻘیﺮﻄﺑ ﺔﺹﺎﺧ
يﻮﺘﺤﻳ ﺞﺘﻨﻡ HP اﺬه ﻰﻠﻋ داﻮﻡ ﺪﻗ ﺐﺟﻮﺘﺴﺗ ﺎﻬﺘﺠﻟﺎﻌﻡ ﺔﻘﻳﺮﻄﺑ ﺔﺹﺎﺧ ﻲﻓ ﺔﻳﺎﻬﻧ ﺎهﺮﻤﻋ .ﻢﺗ ءﺎﻨﺜﺘﺱا ﻖﺒﺉﺰﻟا دﻮﺟﻮﻤﻟا ﻲﻓ حﺎﺒﺼﻤﻟا
يرﻮﻠﻔﻟا صﺎﺨﻟا اﺬﻬﺑ ﺞﺘﻨﻤﻟا ﻦﻡ ﻪﻴﺟﻮﺗ دﺎﺤﺗﻻا ﻲﺑوروﻷا 2002/95/EC، دﻮﻴﻘﻟا ﺔﻳرﺎﺴﻟا ﻰﻠﻋ داﻮﻤﻟا ةﺮﻄﺨﻟا.
ﻲﺑﺮﻋ
٢٧ HP Scanjet N6010 ﻞﻴﻟد داﺪﻋﻹا ﻢﻋﺪﻟاو ﺔﺤﺳﺎﻤﻠﻟ ﺔﻴﺋﻮﻀﻟا ﺔﻠﺑﺎﻘﻟا ﺔیﺬﻐﺘﻠﻟ تاﺪﻨﺘﺴﻤﻟﺎﺑ
Page 89

تﺎﻣﻮﻠﻌﻣ ﺔﻴﻤﻴﻈﻨﺕ
ﻢﻗر فﺮﻌﻣ زاﺮﻄﻟا ﻲﻤﻴﻈﻨﺘﻟا :ضاﺮﻏﻷ ﻒﻳﺮﻌﺘﻟا ،ﻲﻤﻴﻈﻨﺘﻟا ﻢﺘﻳ ﻦﻴﻴﻌﺗ ﻢﻗر زاﺮﻃ ﻲﻤﻴﻈﻨﺗ ﺞﺘﻨﻤﻠﻟ .ﻢﻗر زاﺮﻄﻟا ﻲﻤﻴﻈﻨﺘﻟا ﺞﺘﻨﻤﻠﻟ
صﺎﺨﻟا ﻚﺑ ﻮه FCLSD-0601 .ﺐﺠﻳ مﺪﻋ ﻂﻠﺨﻟا ﻦﻴﺑ ﻢﻗر زاﺮﻄﻟا ﻲﻤﻴﻈﻨﺘﻟا اﺬه ﻦﻴﺑو ﻢﺱا ﻖﻳﻮﺴﺘﻟا )HP Scanjet
N6010 (وأ ﻢﻗر ﺞﺘﻨﻤﻟا )L1983A .(ﻦﻜﻤﻳ لﻮﺼﺤﻟا ﻰﻠﻋ تﺎﻡﻮﻠﻌﻡ ﺔﻴﻤﻴﻈﻨﺗ ﺔﻴﻓﺎﺿإ لﻮﺡ ﺔﺤﺱﺎﻤﻟا ﺔﻴﺉﻮﻀﻟا ﻲﻓ ﻒﻠﻤﻟا
regulatory_supplement.htm دﻮﺟﻮﻤﻟا ﻰﻠﻋ HP Scanning Software CD.
ﺔﻈﺣﻼﻣﺪﺟﻮﺗ ﺔﻗﺎﻄﺑ ﺔﻴﻤﺴﺘﻟا ﺔﻴﻤﻴﻈﻨﺘﻟا) ﻖﻓﺮﻡ ﺎﻬﺑ مﺎﻗرأ ءاﺰﺟﻷا مﺎﻗرﻷاو ﺔﻴﻠﺴﻠﺴﺘﻟا (ﻰﻠﻋ ءﺰﺠﻟا ﻲﻠﻔﺴﻟا ﻦﻡ ﺔﺤﺱﺎﻤﻟا
ﺔﻴﺉﻮﻀﻟا .ﻦﻜﻟ ﺪﻨﻋ ﺐﻴآﺮﺗ جرد جاﺮﺧإ قرﻮﻟا ﻲﻓ ءﺰﺠﻟا ﻲﻠﻔﺴﻟا ﺔﺤﺱﺎﻤﻠﻟ ﺔﻴﺉﻮﻀﻟا يدﺆﻴﺱ ﻚﻟذ ﻰﻟإ ءﺎﻔﺧإ ﺔﻗﺎﻄﺑ
ﺔﻴﻤﺴﺘﻟا ﺔﻴﻤﻴﻈﻨﺘﻟا ﻦﻋ ﻦﻴﻋﻷا.
تﺎﻣﻮﻠﻌﻣ ﺔﺹﺎﺧ ةدﺎﻋﺈﺑ ﻊﻴﻨﺼﺘﻟا داﻮﻤﻟاو ةرﻮﻈﺤﻤﻟا
ﻖﺒﻄﻨﺗ تادﺎﺵرﻹا ﺔﻴﻟﺎﺘﻟا ﺔﺹﺎﺨﻟا ةدﺎﻋﺈﺑ ﻊﻴﻨﺼﺘﻟا داﻮﻤﻟاو ةرﻮﻈﺤﻤﻟا ﻰﻠﻋ اﺬه ﺞﺘﻨﻤﻟا.
ﺺﻠﺨﺕ ﻦﻴﻣﺪﺨﺘﺴﻤﻟا ﻦﻣ ةﺰﻬﺝﻷا ﺔﻜﻠﻬﺘﺴﻤﻟا ﻲﻓ لزﺎﻨﻤﻟا لوﺪﺑ دﺎﺤﺕﻻا ﻲﺑوروﻷا
ﺮﻴﺸﻳ اﺬه ﺰﻡﺮﻟا دﻮﺟﻮﻤﻟا ﻰﻠﻋ ﺞﺘﻨﻤﻟا وأ ﻰﻠﻋ فﻼﻐﻟا صﺎﺨﻟا ﻪﺑ ﻰﻟإ ﻪﻧأ ﻻ ﺐﺠﻳ ﺺﻠﺨﺘﻟا ﻦﻡ اﺬه ﺞﺘﻨﻤﻟا ﻊﻡ تﺎﻔﻠﺨﻡ لﺰﻨﻤﻟا
ىﺮﺧﻷا .ًﻻ ﺪ ﺑ ﻦﻡ ،ﻚﻟذ ﺮﺒﺘﻌﻳ ﺺﻠﺨﺘﻟا ﻦﻡ كزﺎﻬﺟ ،ﻒﻟﺎﺘﻟا ﻦﻋ ﻖﻳﺮﻃ ﻪﻤﻴﻠﺴﺗ ﻰﻟإ ﺰآﺮﻡ ﻊﻴﻤﺠﺗ ﺺﺼﺨﻡ ةدﺎﻋﻹ ﻊﻴﻨﺼﺗ ةﺰﻬﺟﻷا
ﺔﻴﻧوﺮﺘﻜﻟﻹا ﺔﻴﺉﺎﺑﺮﻬﻜﻟاو ،ﺔﻔﻟﺎﺘﻟا ﻚﺘﻴﻟﻮﺌﺴﻡ ﺔﻴﺼﺨﺸﻟا .ﺪﻋﺎﺴﻳ ﻊﻴﻤﺠﺘﻟا ﻞﺼﻔﻨﻤﻟا ةﺰﻬﺟﻸﻟ ﺔﻔﻟﺎﺘﻟا ةدﺎﻋإو ﺎﻬﻌﻴﻨﺼﺗ ﺪﻨﻋ ﺺﻠﺨﺘﻟا
ﺎﻬﻨﻡ ﻰﻠﻋ ظﺎﻔﺤﻟا ﻰﻠﻋ دراﻮﻤﻟا ﺔﻴﻌﻴﺒﻄﻟا ﺪآﺄﺘﻟاو ﻦﻡ ةدﺎﻋإ ﺎﻬﻌﻴﻨﺼﺗ ﺔﻘﻳﺮﻄﺑ ﻲﻤﺤﺗ ﺔﺤﺹ نﺎﺴﻧﻹا ﻲﻤﺤﺗو ﺔﺌﻴﺒﻟا .لﻮﺼﺤﻠﻟ ﻰﻠﻋ
ﺪﻳﺰﻡ ﻦﻡ تﺎﻡﻮﻠﻌﻤﻟا لﻮﺡ ﻦآﺎﻡأ ﻢﻴﻠﺴﺗ ةﺰﻬﺟﻷا ﺔﻔﻟﺎﺘﻟا ﻢﺘﺘﻟ ةدﺎﻋإ ،ﺎﻬﻌﻴﻨﺼﺗ ءﺎﺟﺮﻟا لﺎﺼﺗﻻا ﺐﺘﻜﻤﺑ ﺔﻨﻳﺪﻤﻟا ﻲﻠﺤﻤﻟا ﻚﻳﺪﻟ وأ
ﺔﻡﺪﺨﺑ ﺺﻠﺨﺘﻟا ﻦﻡ تﺎﻔﻠﺨﻡ لزﺎﻨﻤﻟا وأ ﻞﺤﻤﻟﺎﺑ يﺬﻟا ﺖﻤﻗ ءاﺮﺸﺑ ﺞﺘﻨﻤﻟا ﻪﻨﻡ.
ﺞﻣﺎﻥﺮﺑ ةرادﻹا ﺔﻴﺌﻴﺒﻟا ﺞﺘﻨﻤﻠﻟ
مﺰﺘﻠﺗ ﺔآﺮﺵ Hewlett-Packard ﻢﻳﺪﻘﺘﺑ تﺎﺠﺘﻨﻡ ﻊﻤﺠﺗ ﺎﻡ ﻦﻴﺑ ةدﻮﺠﻟا ﺔﻈﻓﺎﺤﻤﻟاو ﻰﻠﻋ ﺔﺌﻴﺒﻟا .ﺮﺒﺘﻌﺗو ةدﺎﻋإ ﻊﻴﻨﺼﺘﻟا اًءﺰﺟ
ﻻ أﺰﺠﺘﻳ ﻦﻡ ﺔﻴﻠﻤﻋ ﻢﻴﻤﺼﺗ اﺬه ﺞﺘﻨﻤﻟا .،ﻚﻟﺬﻟ ﺪﻘﻓ ﻢﺗ ﻞﻴﻠﻘﺗ دﺪﻋ داﻮﻤﻟا ﻰﻟإ ﻰﻧدأ ﺪﺡ ﻊﻡ ﺪﻴآﺄﺘﻟا ﻰﻠﻋ ةﻮﻗ ﺔﻌﺑﺎﻄﻟا ﺎﻬﺉادأو ﺎﻬﻔﺉﺎﻇﻮﻟ
ﻞﻜﺸﺑ ﻢﻴﻠﺱ .ﻢﺗ ﻢﻴﻤﺼﺗ داﻮﻤﻟا ﺮﻴﻏ ﺔﻠﺙﺎﻤﺘﻤﻟا ﺔﻘﻳﺮﻄﺑ ﺢﻤﺴﺗ ﺎﻬﻠﺼﻔﺑ ﻦﻋ ﺎﻬﻀﻌﺑ ﺔﻟﻮﻬﺴﺑ .ﻦﻜﻤﻳو ﺔﻟﻮﻬﺴﺑ ﺪﻳﺪﺤﺗ ﻊﺿاﻮﻡ ﻂﺑاوﺮﻟا
ﺎهﺮﻴﻏو ﻦﻡ تﻼﻴﺹﻮﺘﻟا لﻮﺹﻮﻟاو ﺎﻬﻴﻟإ ﺎﻬﺘﻟازإو ماﺪﺨﺘﺱﺎﺑ تاودﻷا ﺔﻌﺉﺎﺸﻟا .ﻢﺗ ﻢﻴﻤﺼﺗ ءاﺰﺟﻷا ﺔﻤﻬﻤﻟا ﺚﻴﺤﺑ ﻦﻜﻤﻳ لﻮﺹﻮﻟا
ﺎﻬﻴﻟإ ﺔﻟﻮﻬﺴﺑ ﻚﻟذو ﻞﻴﻬﺴﺘﻟ تﺎﻴﻠﻤﻋ ﻚﻔﻟا ﺢﻴﻠﺼﺘﻟاو .ﺪﻳﺰﻤﻟ ﻦﻡ ،تﺎﻡﻮﻠﻌﻤﻟا ﻢﻗ ةرﺎﻳﺰﺑ ﻊﻗﻮﻡ HP's Commitment to the
Environment) ماﺰﺘﻟا ﺔآﺮﺵ HP ﻮﺤﻧ ﺔﺌﻴﺒﻟا (ﻰﻠﻋ ﺐﻳﻮﻟا ﻲﻟﺎﺘﻟا: www.hp.com/globalcitizenship/environment/
ءاﺰﺝﻷا ﺔﻴﻜﻴﺘﺳﻼﺒﻟا
ﻢﺗ ﺰﻴﻴﻤﺗ ءاﺰﺟﻷا ﺔﻴﻜﻴﺘﺱﻼﺒﻟا ﻲﺘﻟا زوﺎﺠﺘﻳ ﺎﻬﻧزو ٢٥ ﺎًﻡاﺮﺟ ًﺎ ﻘ ﻓ و ﺮﻴﻳﺎﻌﻤﻠﻟ ﺔﻴﻟوﺪﻟا ﻲﺘﻟا ﺪﻋﺎﺴﺗ ﻰﻠﻋ ﺔﻴﻧﺎﻜﻡإ فﺮﻌﺘﻟا ﻰﻠﻋ ءاﺰﺟﻷا
ﺔﻴﻜﻴﺘﺱﻼﺒﻟا ﺔﺤﻟﺎﺼﻟا ضاﺮﻏﻷ ةدﺎﻋإ ﻊﻴﻨﺼﺘﻟا ﻲﻓ ﺔﻳﺎﻬﻧ ﺮﻤﻋ ﺞﺘﻨﻤﻟا.
ﺞﻣﺎﻥﺮﺑ ةدﺎﻋإ ﻊﻴﻨﺼﺘﻟا
حﺮﻄﺗ ﺔآﺮﺵ HP اًدﺪﻋ اًﺪﻳاﺰﺘﻡ ﻦﻡ ﺞﻡاﺮﺑ تﺎﻌﺠﺗﺮﻡ تﺎﺠﺘﻨﻤﻟا ﺞﻡاﺮﺑو ةدﺎﻋإ ﻊﻴﻨﺼﺘﻟا ﻲﻓ ﺪﻳﺪﻌﻟا ﻦﻡ لوﺪﻟا/ﻖﻃﺎﻨﻤﻟا ﺔﻓﺎﺿﻹﺎﺑ
ﻰﻟإ ءﺎآﺮﺸﻟا ﻦﻳﺬﻟا نﻮﻜﻠﻤﻳ ﺎًﻀﻌﺑ ﻦﻡ ﺮﺒآأ ﺰآاﺮﻡ ةدﺎﻋإ ﻊﻴﻨﺼﺗ ءاﺰﺟﻷا ﺔﻴﻧوﺮﺘﻜﻟﻹا ﻰﻠﻋ ىﻮﺘﺴﻡ ﻢﻟﺎﻌﻟا .ﻞﻤﻌﺗو ﺔآﺮﺵ HP
ﻞﻴﻟد داﺪﻋﻹا ﻢﻋﺪﻟاو ٢٦
Page 90

تﺎﻔﺹاﻮﻣ ﺞﺘﻨﻤﻟا تﺎﻣﻮﻠﻌﻤﻟاو ﺔﻴﻤﻴﻈﻨﺘﻟا
يﻮﺘﺤﻳ اﺬه ﻢﺴﻘﻟا ﻰﻠﻋ تﺎﻡﻮﻠﻌﻡ ﺔﻴﻤﻴﻈﻨﺗ تﺎﻔﺹاﻮﻡو ﺞﺘﻨﻤﻠﻟ ﺺﺨﺗ ﺔﺤﺱﺎﻤﻟا ﺔﻴﺉﻮﻀﻟا HP Scanjet N6010 ﺎﻬﺗﺎﻘﺤﻠﻡو.
٨
تﺎﻔﺹاﻮﻣ ﺔﺤﺳﺎﻤﻟا ﺔﻴﺋﻮﻀﻟا
ﻢﺳﻻاﻒﺹﻮﻟا
عﻮﻧ ﺔﺤﺱﺎﻤﻟا ﺔﻴﺉﻮﻀﻟاﺔﺤﺱﺎﻡ ﺔﻴﺉﻮﺿ ﻢﺘﺗ ﺎﻬﺘﻳﺬﻐﺗ قرﻮﺑ ﺢﺴﻡ ﻲﺉﻮﺿ ﻰﻠﻋ ﻦﻴﻬﺟﻮﻟا
ﻢﺠﺤﻟاضﺮﻌﻟا: ٣٢٠ ﻢﻡ )١٢٫٦ ﺔﺹﻮﺑ(، ﻖﻤﻌﻟا: ٢٧٠ ﻢﻡ )١٠٫٦٣ ﺔﺹﻮﺑ(، عﺎﻔﺗرﻻا:
٣١٢ ﻢﻡ )١٢٫٢٨ ﺔﺹﻮﺑ(
نزﻮﻟا٥.٤ ﻢﺠآ )١١.٨ ةﺮﺒﻴﻟ(
ﺮﺼﻨﻋ ﺢﺴﻤﻟازﺎﻬﺟ ﻂﺑر تﺎﻨﺤﺸﻟا
ﺔﻬﺟاﻮﻟاﻞﻗﺎﻨﻟا ﻲﻠﺴﻠﺴﺘﻟا ﻲﻤﻟﺎﻌﻟا USB 2.0 ﻲﻟﺎﻋ ﺔﻋﺮﺴﻟا
ﺔﻗﺪﻟا ﺔﻴﺉﻮﻀﻟا٦٠٠ × ٦٠٠ dpi زﺎﻬﺠﻠﻟ
ﻲﺑﺮﻋ
١٠٠-٢٤٠ ،ﺖﻟﻮﻓ ٥٠/٦٠ ،ﺰﺗﺮه ١٫٥ ﺮﻴﺒﻡأ
ﻊﺿو نﻮﻜﺴﻟا: ٥.٢٥ تاو
ﺮﺒﺘﻌﺗ ﺔﺤﺱﺎﻤﻟا ﺔﻴﺉﻮﻀﻟا ﺔﻌّﻨﺼﻤﻟا ﺔآﺮﺸﺑ HP ﺔﺹﺎﺨﻟا ﻚﺑ ﺔﻘﻓاﻮﺘﻡ ﻊﻡ ENERGY
STAR® .ﺎهرﺎﺒﺘﻋﺎﺑو ﺎًﻜﻳﺮﺵ ﻲﻓ Energy Star®، ترﺮﻗ ﺔآﺮﺵ Hewlett-Packard
نأ اﺬه ﺞﺘﻨﻤﻟا ﻊﻀﺨﻳ تادﺎﺵرﻹ Energy Star® ﺔﺹﺎﺨﻟا ةءﺎﻔﻜﺑ ﺔﻗﺎﻄﻟا ﻖﻓاﻮﺘﻳو ﺎﻬﻌﻡ.
ﺔﻗﺎﻄﻟا ﺖﻟﻮﻔﺑ رﺎﻴﺘﻟا
ددﺮﺘﻤﻟا
كﻼﻬﺘﺱا ﺔﻗﺎﻄﻟاﻞﻴﻐﺸﺘﻟا: ٣٢ تاو
تﺎﻔﺹاﻮﻣ ﺔﺌﻴﺑ ﻞﻴﻐﺸﺘﻟا
ﻢﺳﻻاﻒﺹﻮﻟا
ﺔﺟرد ةراﺮﺤﻟاﻞﻴﻐﺸﺘﻟ ﺔﺤﺱﺎﻤﻟا ﺔﻴﺉﻮﻀﻟا :ﻲﻓ ﺔﺟرد ةراﺮﺡ حواﺮﺘﺗ ﻦﻡ ١٠ ﻰﻟإ ٣٥ ﺔﺟرد ﺔﻳﻮﺌﻡ )٥٠ ﻰﻟإ
٩٥ ﺔﺟرد ﺖﻴﻬﻧﺮﻬﻓ(
ﻦﻳﺰﺨﺘﻟا :ﻲﻓ ﺔﺟرد ةراﺮﺡ حواﺮﺘﺗ ﻦﻡ -٤٠ ﻰﻟإ ٦٠ ﺔﺟرد ﺔﻳﻮﺌﻡ )-٤٠ ﻰﻟإ ١٤٠ ﺔﺟرد
ﺖﻴﻬﻧﺮﻬﻓ(
ﺔﺑﻮﻃﺮﻟا ﺔﻴﺒﺴﻨﻟاﻞﻴﻐﺸﺘﻟ ﺔﺤﺱﺎﻤﻟا ﺔﻴﺉﻮﻀﻟا :ﻦﻡ ١٥٪ ﻰﻟإ ٨٠٪ نوﺪﺑ ﻒﻴﺜﻜﺗ ﻲﻓ ﺔﺟرد ةراﺮﺡ حواﺮﺘﺗ ﻦﻡ ١٠
ﻰﻟإ ٣٥ ﺔﺟرد ﺔﻳﻮﺌﻡ )٥٠ ﻰﻟإ ٩٥ ﺔﺟرد ﺖﻴﻬﻧﺮﻬﻓ(
ﻦﻳﺰﺨﺘﻟا :ﻰﺘﺡ ٩٠٪ ﻲﻓ ﺔﺟرد ةراﺮﺡ حواﺮﺘﺗ ﻦﻡ ﺮﻔﺹ ﻰﻟإ ٦٠ ﺔﺟرد ﺔﻳﻮﺌﻡ وأ )٣٢ ﻰﻟإ
١٤٠ ﺔﺟرد ﺖﻴﻬﻧﺮﻬﻓ(
٢٥ HP Scanjet N6010 ﻞﻴﻟد داﺪﻋﻹا ﻢﻋﺪﻟاو ﺔﺤﺳﺎﻤﻠﻟ ﺔﻴﺋﻮﻀﻟا ﺔﻠﺑﺎﻘﻟا ﺔیﺬﻐﺘﻠﻟ تاﺪﻨﺘﺴﻤﻟﺎﺑ
Page 91

ج -دوﺪﺣ ﺔﻴﻟوﺆﺴﻤﻟا ﺔﻴﻥﻮﻥﺎﻘﻟا
1.ﻲﻓ رﺎﻃإ ﺎﻡ ﺢﻤﺴﺗ ﻪﺑ ﻦﻴﻧاﻮﻘﻟا ،ﺔﻴﻠﺤﻤﻟا قﺮﻃ حﻼﺹﻹا ﻲﺘﻟا ﺺﻨﻳ ﺎﻬﻴﻠﻋ نﺎﻴﺑ نﺎﻤﻀﻟا دوﺪﺤﻤﻟا )LWS (اﺬه ﻲه قﺮﻄﻟا
ةﺪﻴﺡﻮﻟا ﺔﺹﺎﺨﻟاو ﻲﺘﻟا ﻖﺤﻳ ﻞﻴﻤﻌﻠﻟ لﻮﺼﺤﻟا ﺎﻬﻴﻠﻋ.
2.ﻲﻓ رﺎﻃإ ﺎﻡ ﺢﻤﺴﺗ ﻪﺑ ﻦﻴﻧاﻮﻘﻟا ،ﺔﻴﻠﺤﻤﻟا ءﺎﻨﺜﺘﺱﺎﺑ تﺎﻡاﺰﺘﻟﻻا ﺔﺤﺿﻮﻤﻟا ﻲﻓ نﺎﻴﺑ نﺎﻤﻀﻟا دوﺪﺤﻤﻟا )LWS (،اﺬه ﻦﻟ ﻞﻤﺤﺘﺗ
ﺔآﺮﺵ HP وأ ٍيأ ﻦﻡ يدرﻮﻡ تﺎﻬﺠﻟا ﺔﻴﺟرﺎﺨﻟا ﺔﻌﺑﺎﺘﻟا ﺎﻬﻟ يﺄﺑ لﺎﺡ ﻦﻡ لاﻮﺡﻷا ﺔﻳأ ﺔﻴﻟوﺆﺴﻡ ﻦﻋ ثوﺪﺡ راﺮﺿأ
ةﺮﺵﺎﺒﻡ وأ ﺮﻴﻏ ةﺮﺵﺎﺒﻡ وأ راﺮﺿأ ﺔﻴﺉﺎﻨﺜﺘﺱا وأ ﺔﺿرﺎﻋ وأ ﺔﺒﺗﺮﺘﻡ ﻰﻠﻋ راﺮﺿأ ،ىﺮﺧأ ءاﻮﺱ نﺎآ ﻚﻟذ ﺎًﻤﺉﺎﻗ ﻰﻠﻋ ﺪﻗﺎﻌﺗ
وأ ﻰﻠﻋ رﺮﺿ وأ ﻰﻠﻋ ﺔﻳأ ﺔﻳﺮﻈﻧ ﺔﻴﻧﻮﻧﺎﻗ ،ىﺮﺧأ ءاﻮﺱو ﻢﺗ رﺎﻄﺧﻹا ﺔﻴﻟﺎﻤﺘﺡﺎﺑ ثوﺪﺡ ﻞﺜﻡ ﻚﻠﺗ راﺮﺿﻷا وأ ﻢﻟ ﻢﺘﻳ.
د -ﻦﻴﻥاﻮﻘﻟا ﺔﻴﻠﺤﻤﻟا
1.ﻊﺘﻤﺘﻳ ءﻼﻤﻌﻟا ﺐﺟﻮﻤﺑ نﺎﻴﺑ نﺎﻤﻀﻟا دوﺪﺤﻤﻟا )LWS (اﺬه قﻮﻘﺤﺑ ﺔﻴﻧﻮﻧﺎﻗ ةدﺪﺤﻡ .ﺪﻗ نﻮﻜﺗ ﻞﻴﻤﻌﻠﻟ قﻮﻘﺡ ،ىﺮﺧأ ﺪﻗو
ﻒﻠﺘﺨﺗ ﻩﺬه قﻮﻘﺤﻟا ﻦﻡ ﺔﻳﻻو ﻰﻟإ ﺔﻳﻻو ىﺮﺧأ ﻞﺧاد تﺎﻳﻻﻮﻟا ةﺪﺤﺘﻤﻟا ،ﺔﻴﻜﻳﺮﻡﻷا وأ ﻦﻡ ﺔﻌﻃﺎﻘﻡ ﻰﻟإ ﺔﻌﻃﺎﻘﻡ ىﺮﺧأ
ﻞﺧاد ،اﺪﻨآ وأ ﻦﻡ ﺔﻟود ﻰﻟإ ﺔﻟود ىﺮﺧأ ﻲﻓ يأ نﺎﻜﻡ ﺮﺧﺁ ﻲﻓ ﻢﻟﺎﻌﻟا.
2.ﺐﺠﻳ ﻞﻳﺪﻌﺗ نﺎﻴﺑ نﺎﻤﻀﻟا دوﺪﺤﻤﻟا )LWS (اﺬه ﻲﻜﻟ ﻖﻓاﻮﺘﻳ ﻊﻡ ﻦﻴﻧاﻮﻘﻟا ﺔﻴﻠﺤﻤﻟا ﻞﻜﻟ ﺔﻟود ﺎًﻘﻓو فﻼﺘﺧﻻ نﺎﻴﺑ نﺎﻤﻀﻟا
دوﺪﺤﻤﻟا )LWS (اﺬه ﻦﻋ ﻦﻴﻧاﻮﻘﻟا ﺔﻴﻠﺤﻤﻟا .ﺐﺟﻮﻤﺑو ﻩﺬه ﻦﻴﻧاﻮﻘﻟا ،ﺔﻴﻠﺤﻤﻟا ﻻ زﻮﺠﻳ ﻖﻴﺒﻄﺗ ﺾﻌﺑ دﻮﻨﺑ ءﻼﺧإ ﺔﻴﻟﻮﺌﺴﻤﻟا
دوﺪﺡو نﺎﻴﺑ نﺎﻤﻀﻟا دوﺪﺤﻤﻟا )LWS (اﺬه ﻰﻠﻋ ﻞﻴﻤﻌﻟا .ﻰﻠﻋ ﻞﻴﺒﺱ ،لﺎﺜﻤﻟا زﻮﺠﻳ ﺔﻡﻮﻜﺤﻠﻟ ﺔﻴﻟارﺪﻴﻔﻟا تﺎﻳﻻﻮﻠﻟ ةﺪﺤﺘﻤﻟا
ﺔﻴﻜﻳﺮﻡﻷا ﺾﻌﺑو تﺎﻳﻻﻮﻟا ﻞﺧاد تﺎﻳﻻﻮﻟا ةﺪﺤﺘﻤﻟا ﺾﻌﺑو تﺎﻡﻮﻜﺤﻟا جرﺎﺧ تﺎﻳﻻﻮﻟا ةﺪﺤﺘﻤﻟا) ﺎﻤﺑ ﻲﻓ ﻚﻟذ تﺎﻌﻃﺎﻘﻤﻟا
ةدﻮﺟﻮﻤﻟا ﻲﻓ اﺪﻨآ (مﺎﻴﻘﻟا ﺎﻤﺑ ﻲﻠﻳ:
أ.ﺢﻨﻡ ﻞﻴﻤﻌﻟا قﻮﻘﺡ نﺎﻤﺿ ؛ﺔﻴﻓﺎﺿإ وأ
ب.مﺪﻋ ﻖﻴﺒﻄﺗ دﻮﻨﺑ ءﻼﺧإ ﺔﻴﻟوﺆﺴﻤﻟا تاﺪﻳﺪﺤﺘﻟاو ةدراﻮﻟا ﻲﻓ نﺎﻴﺑ نﺎﻤﻀﻟا دوﺪﺤﻤﻟا )LWS (،اﺬه ﺎﻤﻡ يدﺆﻳ ﻰﻟإ
ﺪﻴﻴﻘﺗ قﻮﻘﺤﻟا ﺔﻴﻌﻳﺮﺸﺘﻟا ﺔﺡﻮﻨﻤﻤﻟا ﻚﻠﻬﺘﺴﻤﻠﻟ) ﻲﻓ ﺔﻜﻠﻤﻤﻟا ةﺪﺤﺘﻤﻟا ﻰﻠﻋ ﻞﻴﺒﺱ لﺎﺜﻤﻟا(؛ وأ
ج.ﺪﺤﻟا ﻦﻡ ةرﺪﻗ ﺔﻬﺠﻟا ﺔﻌّﻨﺼﻤﻟا ﻰﻠﻋ ﻖﻴﺒﻄﺗ ﻞﺜﻡ ﻩﺬه دﻮﻨﺒﻟا ﺔﺹﺎﺨﻟا ءﻼﺧﺈﺑ ﺔﻴﻟوﺆﺴﻤﻟا وأ ؛ﻦﻴﻧاﻮﻘﻟا وأ
د.ﺪﻳﺪﺤﺗ ةﺮﺘﻓ راﺮﻤﺘﺱا تﺎﻧﺎﻤﻀﻟا ﺔﻴﻨﻤﻀﻟا ﻲﺘﻟا رﺬﻌﺘﻳ ﻰﻠﻋ ﺔآﺮﺸﻟا ﺔﻌّﻨﺼﻤﻟا ﻲﻠﺨﺘﻟا ،ﺎﻬﻨﻋ وأ
ـه.مﺪﻋ حﺎﻤﺴﻟا دﻮﺟﻮﺑ دﻮﻴﻗ ﻰﻠﻋ ةﺮﺘﻓ راﺮﻤﺘﺱا تﺎﻧﺎﻤﻀﻟا ﺔﻴﻨﻤﻀﻟا
3.زﻮﺠﻳ ﻞﻴﻤﻌﻠﻟ نأ ﺪﺟﻮﻳ ﻪﻳﺪﻟ قﻮﻘﺡ ﺔﻴﻌﻳﺮﺸﺗ ﺔﻴﻓﺎﺿإ ﺎًﻘﻓو ﺔﻴﻗﺎﻔﺗﻻ ءاﺮﺸﻟا .ﻻو ﺮﺙﺄﺘﺗ ﻩﺬه قﻮﻘﺤﻟا يﺄﺑ ﻞﻜﺵ ﻦﻡ لﺎﻜﺵﻷا
نﺎﻴﺒﺑ نﺎﻤﻀﻟا دوﺪﺤﻤﻟا )LWS (اﺬه.
4.ﺔﺒﺴﻨﻟﺎﺑ تﻼﻡﺎﻌﻤﻟ ءﻼﻤﻌﻟا ﻲﻓ تﺎﻳﻻﻮﻟا ةﺪﺤﺘﻤﻟا ،ﺔﻴﻜﻳﺮﻡﻷا ﺮﺼﺘﻘﺗ ةﺮﺘﻓ تﺎﻧﺎﻤﻀﻟا ﺔﻴﻨﻤﻀﻟا ﻲﺘﻟا ﺎﻬﺿﺮﻓ نﻮﻧﺎﻘﻟا ﻰﻠﻋ
ةﺮﺘﻔﻟا ةدراﻮﻟا ًﺔﺡاﺮﺹ ﻲﻓ تارﺎﻌﺵإ نﺎﻤﻀﻟا.
5.ﺔﺒﺴﻨﻟﺎﺑ تﻼﻡﺎﻌﻤﻟ ءﻼﻤﻌﻟا ﻲﻓ ﺎﻴﻟاﺮﺘﺱأ ،اﺪﻨﻠﻳزﻮﻴﻧو ﻻ ﻲﻨﺜﺘﺴﺗ طوﺮﺸﻟا ةرﻮآﺬﻤﻟا ﻲﻓ نﺎﻴﺑ نﺎﻤﻀﻟا دوﺪﺤﻤﻟا )LWS (اﺬه–
ﻻإ ىﺪﻤﻠﻟ حﻮﻤﺴﻤﻟا ﻪﺑ ﺎًﻧﻮﻧﺎﻗ - وأ دﺪﺤﺗ وأ ،لﺪﻌﺗ ﺎﻤﻧإو فﺎﻀﺗ ﻰﻟإ قﻮﻘﺤﻟا ﺔﻴﻌﻳﺮﺸﺘﻟا ﺔﻳرﺎﺒﺟﻹا لﻮﻤﻌﻤﻟا ﺎﻬﺑ ﻲﻓ ﻊﻴﺑ
تﺎﺠﺘﻨﻡ HP ءﻻﺆﻬﻟ ءﻼﻤﻌﻟا.
ﺪﻗ نﻮﻜﻳ ﻞﻴﻤﻌﻠﻟ قﻮﻘﺡ ﺔﻴﻌﻳﺮﺸﺗ ﺪﺿ ﻊﺉﺎﺒﻟا ﺐﺟﻮﻤﺑ ﺔﻴﻗﺎﻔﺗا ءاﺮﺸﻟا .ﻻ ﺮﺙﺄﺘﺗ ﻩﺬه قﻮﻘﺤﻟا يﺄﺑ ﻞﻜﺵ ﻦﻡ لﺎﻜﺵﻷا نﺎﻤﻀﺑ HP
دوﺪﺤﻤﻟا اﺬه.
ﺪﺟﻮﻳ ﻪﺟﻮﻟﺎﺑ ﻲﻠﺧاﺪﻟا ﻦﻡ فﻼﻐﻟا ﻲﻡﺎﻡﻷا اﺬﻬﻟ ﺐﻴﺘ ُﻜﻟا ءﺎﻤﺱأ ﻦﻳوﺎﻨﻋو تﺎﻬﺠﻟا ﺔﻌﺑﺎﺘﻟا ﺔآﺮﺸﻟ HP ﺔﻟوﺆﺴﻤﻟا ﻦﻋ ةءﺎﻔآ ﻢﻳﺪﻘﺗ
نﺎﻤﺿ HP دوﺪﺤﻤﻟا ﻲﻓ ﻚﺘﻟود.
ﻞﻴﻟد داﺪﻋﻹا ﻢﻋﺪﻟاو ٢٤
Page 92

نﺎﻤﺽ HP دوﺪﺤﻤﻟا
ﺢﺿﻮﺗ تﺎﻡﻮﻠﻌﻤﻟا ﺔﻴﻟﺎﺘﻟا تﺎﻡﻮﻠﻌﻡ نﺎﻤﻀﻟا ﺔﺹﺎﺨﻟا اﺬﻬﺑ ﺞﺘﻨﻤﻟا.
7
نﺎﻴﺑ نﺎﻤﻀﻟا دوﺪﺤﻤﻟا ﺔآﺮﺸﻟ HP
ﺞﺘﻨﻤﻟاةﺪﻣ نﺎﻤﻀﻟا دوﺪﺤﻤﻟا
ﺔﻨﺱ ةﺪﺡاو
ﺔﺤﺱﺎﻤﻟا ﺔﻴﺉﻮﻀﻟا ﺔﻠﺑﺎﻘﻟا ﺔﻳﺬﻐﺘﻠﻟ
تاﺪﻨﺘﺴﻤﻟﺎﺑ HP Scanjet
N6010
أ -ةﺪﻣ نﺎﻤﻀﻟا دوﺪﺤﻤﻟا
1.ﻦﻤﻀﺗ ﺔآﺮﺵ Hewlett-Packard (HP) مﺪﺨﺘﺴﻤﻠﻟ ﻲﺉﺎﻬﻨﻟا) ﻞﻴﻤﻌﻟا (نأ ﻞآ ﺞﺘﻨﻡ ﻦﻡ تﺎﺠﺘﻨﻡ HP ةدﺪﺤﻤﻟا ﻩﻼﻋأ
)ﺞﺘﻨﻤﻟا (ٍلﺎﺧ ﻦﻡ بﻮﻴﻌﻟا ءاﻮﺱ ﻲﻓ داﻮﻤﻟا وأ ﻲﻓ ﺔﻋﺎﻨﺼﻟا لﻼﺧ ةﺪﻤﻟا ةدﺪﺤﻤﻟا ﻩﻼﻋأ .أﺪﺒﺗو ةﺪﻡ نﺎﻤﻀﻟا ﻦﻡ ﺦﻳرﺎﺗ ءاﺮﺵ
ﻞﻴﻤﻌﻟا ﺞﺘﻨﻤﻠﻟ.
2.ﺔﺒﺴﻨﻟﺎﺑ ﻞﻜﻟ ﺞﺘﻨﻡ ﻦﻡ تﺎﺠﺘﻨﻡ ،ﺞﻡاﺮﺒﻟا ﻻ يﺮﺴﻳ نﺎﻤﺿ HP دوﺪﺤﻤﻟا ﻻإ ﻲﻓ ﺔﻟﺎﺡ قﺎﻔﺧإ ﺞﻡﺎﻧﺮﺒﻟا ﻲﻓ ﺬﻴﻔﻨﺗ تﺎﻤﻴﻠﻌﺘﻟا
ﺔﻴﺠﻡﺮﺒﻟا .ﻻو ﻦﻤﻀﺗ ﺔآﺮﺵ HP ﻞﻴﻐﺸﺗ يأ ﺞﺘﻨﻡ ﻦﻡ ﺎﻬﺗﺎﺠﺘﻨﻡ نوﺪﺑ عﺎﻄﻘﻧا وأ نوﺪﺑ ءﺎﻄﺧأ.
3.ﻻ ﻞﻤﺸﻳ نﺎﻤﻀﻟا دوﺪﺤﻤﻟا ﺔآﺮﺸﻟ HP ﻻإ بﻮﻴﻌﻟا ﻲﺘﻟا ﺄﺸﻨﺗ ﺔﺠﻴﺘﻧ لﺎﻤﻌﺘﺱﻻا يدﺎﻌﻟا يﻷ ،ﺞﺘﻨﻡ ﻻو ﻞﻤﺸﻳ نﺎﻤﻀﻟا ﺔﻳأ
تﻼﻜﺸﻡ ،ىﺮﺧأ ﺎﻤﺑ ﻲﻓ ﻚﻟذ تﻼﻜﺸﻤﻟا ﻲﺘﻟا ﺞﺘﻨﺗ ﺎﻤﻋ ﻲﻠﻳ:
أ.ماﺪﺨﺘﺱا ﺞﺘﻨﻤﻟا وأ ﻪﺘﻧﺎﻴﺹ وأ ﻪﻨﻳﺰﺨﺗ وأ ﻞﻡﺎﻌﺘﻟا ﻪﻌﻡ وأ ﺔﻓﺎﺿإ تﻼﻳﺪﻌﺗ ﻪﻴﻟإ ﺔﻘﻳﺮﻄﺑ ﺮﻴﻏ ؛ﺔﺤﻴﺤﺹ
ب.ماﺪﺨﺘﺱا ﺞﻡاﺮﺑ وأ ﻂﺉﺎﺱو وأ ءاﺰﺟأ وأ تﺎﻘﺤﻠﻡ وأ تﺎﻡﺰﻠﺘﺴﻡ وأ تﻻﻮﺤﻡ ﺔﻗﺎﻃ وأ ردﺎﺼﻡ ﺖﺴﻴﻟ ﻦﻡ تﺎﺠﺘﻨﻡ
HP وأ ﺮﻴﻏ ةﺪﻤﺘﻌﻡ ﺔﻄﺱاﻮﺑ HP؛ وأ
ج.ﻞﻴﻐﺸﺘﻟا وأ فوﺮﻈﻟا ىﺮﺧﻷا ﺮﻴﻏ ﺔﻘﺑﺎﻄﻤﻟا تﺎﻔﺹاﻮﻤﻟ ﺞﺘﻨﻤﻟا.
4.ﻲﻓ ﺔﻟﺎﺡ ﻲﻘﻠﺗ ﺔآﺮﺵ HP، ءﺎﻨﺙأ ةﺮﺘﻓ نﺎﻤﺿ يرﺎﺱ ،لﻮﻌﻔﻤﻟا رﺎﻌﺵﻹ ﻖﻠﻌﺘﻡ دﻮﺟﻮﺑ ﺐﻴﻋ ﻲﻓ ﺪﺡأ ،تﺎﺠﺘﻨﻤﻟا مﻮﻘﺘﺱ
ﺔآﺮﺵ HP - ﺐﺴﺡ ﺎهرﺎﻴﺘﺧا - ﺎﻡإ حﻼﺹﺈﺑ وأ لاﺪﺒﺘﺱا ﺞﺘﻨﻤﻟا ﺐﻴﻌﻤﻟا.
5.اذإ ﻢﻟ ﻦﻜﻤﺘﺗ ﺔآﺮﺵ HP ﻦﻡ لاﺪﺒﺘﺱا وأ حﻼﺹإ يأ ﺞﺘﻨﻡ ﺐﻴﻌﻡ ﻊﺿﺎﺧ نﺎﻤﻀﻟ HP ،دوﺪﺤﻤﻟا ﺪﻗ مﻮﻘﺗ ﺔآﺮﺵ HP،
لﻼﺧ ةﺮﺘﻓ ﺔﻴﻨﻡز ﺔﻟﻮﻘﻌﻡ ﺪﻌﺑ ﺎهرﺎﻄﺧإ ،ﺐﻴﻌﻟﺎﺑ ﺮﻴﻓﻮﺘﺑ ﺞﺘﻨﻡ ﺮﺧﺁ ﻞﺙﺎﻤﻡ ﻲﻓ ةءﺎﻔﻜﻟا وأ ﻖﺤﻳ ﻚﻟ ةدﺎﻌﺘﺱا ﻦﻤﺙ ءاﺮﺸﻟا ﻚﻟذو
ﺐﺴﺡ ﺔﻘﻳﺮﻃ ماﺪﺨﺘﺱﻻا ﻞﻡاﻮﻌﻟاو ىﺮﺧﻷا ﺔﻤﺉﻼﻤﻟا.
6.ﻻ ﻞﻤﺤﺘﺗ ﺔآﺮﺵ HP ﺔﻳأ ﺔﻴﻟوﺆﺴﻡ نﺄﺸﺑ حﻼﺹإ تﺎﺠﺘﻨﻤﻟا وأ ﺎﻬﻟاﺪﺒﺘﺱا وأ در ﻎﻟﺎﺒﻤﻟا ﺔﻴﻟﺎﻤﻟا ﻰﻟإ ﻞﻴﻤﻌﻟا ﻰﻟإ نأ مﻮﻘﻳ
ﻞﻴﻤﻌﻟا ةدﺎﻋﺈﺑ ﺞﺘﻨﻤﻟا ﺐﻴﻌﻤﻟا ﻰﻟإ ﺔآﺮﺵ HP ﻢﻳﺪﻘﺗو ﻞﻴﻟد ﺖﺒﺜﻳ ﺔﻴﻠﻤﻋ ءاﺮﺸﻟا.
7.مﺰﺘﻠﺗ ﺔآﺮﺸﻟا نﺄﺑ نﻮﻜﻳ ﺞﺘﻨﻤﻟا ﻞﻳﺪﺒﻟا ﺎﻡإ اًﺪﻳﺪﺟ وأ ،ﺪﻳﺪﺠﻟﺎآ طﺮﺸﺑ نأ نﻮﻜﻳ ﻩؤادأ ﻰﻠﻋ ﻞﻗﻷا ﺎًﻳوﺎﺴﻡ ءادﻷ ﺞﺘﻨﻤﻟا لﺪﺒﺘﺴﻤﻟا.
8.ﺪﻗ يﻮﺘﺤﻳ ﺪﺡأ تﺎﺠﺘﻨﻤﻟا ﻰﻠﻋ ءاﺰﺟأ وأ تﺎﻧﻮﻜﻡ وأ تﺎﻡﺎﺧ دﺎﻌ ُﻡ ﺎﻬﻌﻴﻨﺼﺗ ﺊﻓﺎﻜﺗ ةﺪﻳﺪﺠﻟا ﻲﻓ ءادﻷا.
9.يﺮﺴﻳ نﺎﻤﺿ ﺔآﺮﺵ HP دوﺪﺤﻤﻟا ﻲﻓ ﺔﻳأ ﺔﻟود وأ ﺰآﺮﻡ ﻲﻠﺤﻡ ﺚﻴﺡ ﺪﺟﻮﻳ ﻞﺜﻤﻡ ﻢﻋد HP اﺬﻬﻟ ﺞﺘﻨﻤﻟا ﻲﻓو يأ نﺎﻜﻡ
ﺖﻡﺎﻗ ﺔآﺮﺵ HP ﻖﻳﻮﺴﺘﺑ اﺬه ﺞﺘﻨﻤﻟا ﻪﻴﻓ .ﺪﻗ ﻒﻠﺘﺨﻳ ىﻮﺘﺴﻡ ﺔﻡﺪﺧ نﺎﻤﻀﻟا ﺐﺴﺡ ﺮﻴﻳﺎﻌﻤﻟا ﺔﻴﻠﺤﻤﻟا .ﻦﻜﻤﻳ ءاﺮﺵ تﺎﻡﺪﺧ
نﺎﻤﻀﻟا ﻲﺘﻟا ﺖﻤﺗ ،ﺎﻬﺘﻴﻗﺮﺗ ﻞﺜﻡ ﺔﻡﺪﺧ لاﺪﺒﺘﺱا ﺞﺘﻨﻤﻟا ﻲﻓ مﻮﻴﻟا ﻲﻟﺎﺘﻟا ﺔﻡﺪﺨﻟاو ﻲﻓ ﻊﻗﻮﻤﻟا ﺔﻳﺎﻤﺤﻟاو ﻦﻡ ثداﻮﺤﻟا ﻦﻡ
ﺔآﺮﺵ HP.
ﻲﺑﺮﻋ
٢٣ HP Scanjet N6010 ﻞﻴﻟد داﺪﻋﻹا ﻢﻋﺪﻟاو ﺔﺤﺳﺎﻤﻠﻟ ﺔﻴﺋﻮﻀﻟا ﺔﻠﺑﺎﻘﻟا ﺔیﺬﻐﺘﻠﻟ تاﺪﻨﺘﺴﻤﻟﺎﺑ
ب -دوﺪﺣ نﺎﻤﻀﻟا
ﻲﻓ رﺎﻃإ ﺎﻡ ﺢﻤﺴﺗ ﻪﺑ ﻦﻴﻧاﻮﻘﻟا ،ﺔﻴﻠﺤﻤﻟا ﻻ مﺪﻘﺗ ﺔآﺮﺵ HP وأ يأ ﻦﻡ يدرﻮﻡ تﺎﻬﺠﻟا ﺔﻴﺟرﺎﺨﻟا ﻦﻴﻌﺑﺎﺘﻟا ﺎﻬﻟ ﺔﻳأ تﺎﻧﺎﻤﺿ ىﺮﺧأ
وأ ﺔﻳأ تاﺪﻬﻌﺗ ﻦﻡ يأ ،عﻮﻧ ءاﻮﺱ ﺔﺤﻳﺮﺹ وأ ،ﺔﻴﻨﻤﺿ ﺎﻤآ ﻲﻠﺨﺗ ﺔآﺮﺵ HP ﺎﻬﺘﻴﻟوﺆﺴﻡ ﻰﻠﻋ ﻪﺟو صﻮﺼﺨﻟا ﻦﻡ تﺎﻧﺎﻤﻀﻟا
وأ تاﺪﻬﻌﺘﻟا ﺔﻴﻨﻤﻀﻟا ﺔﺹﺎﺨﻟا ﺔﻴﻠﺑﺎﻘﺑ ﻊﻴﺒﻟا وأ ﺔﻤﺉﻼﻡ ﺞﺘﻨﻤﻟا ىﻮﺘﺴﻤﻟ ﻦﻴﻌﻡ ﻦﻡ ةدﻮﺠﻟا وأ ﻪﺘﻡءﻼﻡ ضﺮﻐﻟ ﻪﻨﻴﻌﺑ.
Page 93

٥.ﺪیﺪﻤﺕ نﺎﻤﻀﻟا وأ ﻩﺪیﺪﺠﺕ
اذإ ﺖﻨآ ﺐﻏﺮﺗ ﻲﻓ ﺪﻳﺪﻤﺗ نﺎﻤﺿ ﺞﺘﻨﻤﻟا وأ ،ﻩﺪﻳﺪﺠﺗ ءﺎﺟﺮﺒﻓ لﺎﺼﺗﻻا ﺬﻔﻨﻤﺑ ﻊﻴﺒﻟا يﺬﻟا ﺖﻤﻗ ءاﺮﺸﻟﺎﺑ ﻪﻨﻡ وأ ﺔﻌﺟاﺮﻡ
ضوﺮﻋ ﺔﻣﺰﺣ ﺔیﺎﻋر ءﻼﻤﻋ HP ﻰﻠﻋ ﻊﻗﻮﻤﻟا ﻲﻟﺎﺘﻟا www.hp.com/support.
٦.اذإ ﺖﻨآ ﺪﻗ ﺖﻳﺮﺘﺵا ﻞﻌﻔﻟﺎﺑ ىﺪﺡإ تاراﺪﺹإ ﺔﻣﺪﺧ ﺔﻣﺰﺣ ﺔیﺎﻋر ءﻼﻤﻋ HP، ءﺎﺟﺮﺒﻓ ﺔﻌﺟاﺮﻡ طوﺮﺵ ﻢﻋﺪﻟا ةرﻮآﺬﻤﻟا
ﻲﻓ ﺪﻘﻌﻟا ﻲﺘﻟا ﻢﺗ قﺎﻔﺗﻻا ﺎﻬﻴﻠﻋ.
ﻞﻴﻟد داﺪﻋﻹا ﻢﻋﺪﻟاو ٢٢
Page 94

ﻢﻋد ﺞﺘﻨﻤﻟا
ﺢﺿﻮﻳ اﺬه ﻢﺴﻘﻟا تارﺎﻴﺧ ﻢﻋد ﺞﺘﻨﻤﻟا.
٦
لﻮﺹﻮﻟا
ﺐﻨﺠﺘﻟ ﻂﻐﺿ رارزﻷا ﻦﻋ ﻖﻳﺮﻃ ،ﺄﻄﺨﻟا مﺪﺨﺘﺱا Scanner Tools Utility) ةادﻷا ةﺪﻋﺎﺴﻤﻟا تاودﻷ ﺔﺤﺱﺎﻤﻟا ﺔﻴﺉﻮﻀﻟا(
ﻞﻴﻄﻌﺘﻟ رارزأ ﺔﺡﻮﻠﻟا ﺔﻴﻡﺎﻡﻷا .ﺎﻤآ ﻚﻨﻜﻤﻳ ماﺪﺨﺘﺱا ﺲﻔﻧ ةادﻷا ةﺪﻋﺎﺴﻤﻟا ةدﺎﻋﻹ ﻦﻴﻜﻤﺗ رارزﻷا.
ﺪﻳﺰﻤﻟ ﻦﻡ تﺎﻡﻮﻠﻌﻤﻟا لﻮﺡ Scanner Tools Utility) ةادﻷا ةﺪﻋﺎﺴﻤﻟا تاودﻷ ﺔﺤﺱﺎﻤﻟا ﺔﻴﺉﻮﻀﻟا(، ﻊﺟار ﻞﻴﻟد ماﺪﺨﺘﺱﻻا
صﺎﺨﻟا ﺔﺤﺱﺎﻤﻟﺎﺑ ﺔﻴﺉﻮﻀﻟا .لﻮﺼﺤﻠﻟ ﻰﻠﻋ تﺎﻡﻮﻠﻌﻡ لﻮﺡ ﻞﻴﻟد ماﺪﺨﺘﺱﻻا صﺎﺨﻟا ﺔﺤﺱﺎﻤﻟﺎﺑ ،ﺔﻴﺉﻮﻀﻟا ﻊﺟار ”ردﺎﺼﻡ لﻮﺼﺤﻟا
ﻰﻠﻋ تﺎﻡﻮﻠﻌﻡ ﺔﻴﻓﺎﺿإ“ ﻲﻓ ﺔﺤﻔﺹ ١٥.
ﻊﻴﻄﺘﺴﻳ ءﻼﻤﻌﻟا ووذ تﺎﻗﺎﻋﻹا لﻮﺼﺤﻟا ﻰﻠﻋ تﺎﻤﻴﻠﻌﺘﻟا ﻲﺘﻟا نﻮﺒﻏﺮﻳ ﺎﻬﻴﻓ ﻦﻡ لﻼﺧ ةرﺎﻳز ﻊﻗﻮﻤﻟا nfo/community/accessibility/prodserv/
) تﺎﻳﻻﻮﻟا ةﺪﺤﺘﻤﻟا ﻂﻘﻓ(.
ﻊﻗﻮﻣ ﺔآﺮﺵ HP ﻰﻠﻋ ﺐیﻮﻟا
ﻢﻗ ةرﺎﻳﺰﺑ www.hp.com لﻮﺼﺤﻠﻟ ﻰﻠﻋ تﺎﻡﻮﻠﻌﻡ ﺔﻋﻮﻨﺘﻡ:
●دﺎﺠﻳإ لﻮﻠﺡ تﻼﻜﺸﻤﻠﻟ ﺔﻴﻨﻔﻟا.
●فﺮﻌﺘﻟا ﻰﻠﻋ تﺎﺤﻴﻤﻠﺗ ماﺪﺨﺘﺱﻻ ﺞﺘﻨﻤﻟا ﻞﻜﺸﺑ ﺮﺜآأ ﺔﻴﻟﺎﻌﻓ ﺐﻴﻟﺎﺱﺄﺑو ةﺮﻜﺘﺒﻡ.
●ﺚﻳﺪﺤﺗ ﺞﻡاﺮﺑ ﻞﻴﻐﺸﺗ HP ﺞﻡاﺮﺒﻟاو ىﺮﺧﻷا ﺔﺹﺎﺨﻟا ﻚﺑ.
●ﻞﻴﺠﺴﺗ ﺞﺘﻨﻤﻟا صﺎﺨﻟا ﻚﺑ.
●كاﺮﺘﺵﻻا ﻲﻓ ﺔﻡﺪﺧ ﻞﺉﺎﺱﺮﻟا ﺔﻳرﺎﺒﺧﻹا تﺎﺜﻳﺪﺤﺗو ﺞﻡاﺮﺒﻟا ﺞﻡاﺮﺑو ﻞﻴﻐﺸﺘﻟا تﺎﻬﻴﺒﻨﺗو ﻢﻋﺪﻟا.
●ءاﺮﺵ تﺎﻡﺰﻠﺘﺴﻡ تﺎﻘﺤﻠﻡو HP.
ﻲﺑﺮﻋ
٢١ HP Scanjet N6010 ﻞﻴﻟد داﺪﻋﻹا ﻢﻋﺪﻟاو ﺔﺤﺳﺎﻤﻠﻟ ﺔﻴﺋﻮﻀﻟا ﺔﻠﺑﺎﻘﻟا ﺔیﺬﻐﺘﻠﻟ تاﺪﻨﺘﺴﻤﻟﺎﺑ
لﻮﺼﺤﻟا ﻰﻠﻋ ةﺪﻋﺎﺴﻣ
لﻮﺼﺤﻠﻟ ﻰﻠﻋ ﻰﺼﻗأ ةدﺎﻔﺘﺱا ﻦﻡ ﺞﺘﻨﻡ HP صﺎﺨﻟا ،ﻚﺑ ءﺎﺟﺮﻟا ﺔﻌﺟاﺮﻡ ضوﺮﻋ ﻢﻋد HP ﻲﺱﺎﻴﻘﻟا ﺔﻴﻟﺎﺘﻟا:
١.ءﺎﺟﺮﻟا ﺔﻌﺟاﺮﻡ ﻖﺋﺎﺙو ﺞﺘﻨﻤﻟا ﺔﻘﻓﺮﻤﻟا ﻪﺑ.
–ﻢﻗ ﺔﻌﺟاﺮﻤﺑ ﻢﺴﻗ فﺎﺸﻜﺘﺳا ءﺎﻄﺧﻷا ﺎﻬﺣﻼﺹإو وأ تﺎﻤﻴﻠﻌﺘﻟا ﺔﻴﻥوﺮﺘﻜﻟﻹا ﻲﻓ اﺬه ﻞﻴﻟﺪﻟا/صﺮﻘﻟا طﻮﻐﻀﻤﻟا.
–ﻢﻗ ﺔﻌﺟاﺮﻤﺑ ﻢﺴﻗ تﺎﻤﻴﻠﻌﺘﻟا ﺔﻴﻥوﺮﺘﻜﻟﻹا ﻞﺧاد ﺞﻡﺎﻧﺮﺒﻟا.
٢.ﻢﻗ ةرﺎﻳﺰﺑ ﻊﻗﻮﻡ ﻢﻋد HP ﻰﻠﻋ ﺖﻥﺮﺘﻥﻹا ﻰﻠﻋ ناﻮﻨﻌﻟا www.hp.com/support وأ ﻞﺼﺗا ﺬﻔﻨﻤﺑ ﻊﻴﺒﻟا يﺬﻟا ﺖﻤﻗ
ءاﺮﺸﻟﺎﺑ ﻪﻨﻣ.
ﺮﻓﻮﺘﺗ ﺔﻡﺪﺧ ﻢﻋد HP ﺮﺒﻋ ﺖﻧﺮﺘﻧﻹا ﻞﻜﻟ ءﻼﻤﻋ HP .ﻩﺬهو ﺔﻡﺪﺨﻟا ﻲه عﺮﺱأ ردﺎﺼﻤﻟا ﻲﺘﻟا ﻦﻜﻤﻳ ﻦﻡ ﺎﻬﻟﻼﺧ فﺮﻌﺘﻟا
ﻰﻠﻋ تﺎﻣﻮﻠﻌﻣ ﺔﺜیﺪﺣ لﻮﺣ ﺞﺘﻨﻤﻟا لﻮﺼﺤﻟاو ﻰﻠﻋ ةﺪﻋﺎﺴﻣ ءاﺮﺒﺨﻟا، ﺎﻤﺑ ﻲﻓ ﻚﻟذ تاﺰﻴﻤﻟا ﺔﻴﻟﺎﺘﻟا:
–لﻮﺹﻮﻟا ﻊﻳﺮﺴﻟا ﺮﺒﻋ ﺪیﺮﺒﻟا ﻲﻥوﺮﺘﻜﻟﻹا ﻰﻟإ ﻲﻴﺉﺎﺼﺧأ ﻢﻋﺪﻟا ﻦﻴﻠهﺆﻤﻟا ﻰﻠﻋ ﺖﻧﺮﺘﻧﻹا
–تﺎﺜیﺪﺤﺕ ﺞﻣاﺮﺒﻟا ﺞﻣاﺮﺑو ﻞﻴﻐﺸﺘﻟا ﺞﺘﻨﻤﻠﻟ صﺎﺨﻟا ﻚﺑ
–تﺎﻡﻮﻠﻌﻡ ﺔﻤﻴﻗ لﻮﺣ ﺞﺘﻨﻤﻟا ﺔﻴﻔﻴآو فﺎﺸﻜﺘﺳا ءﺎﻄﺧﻷا ﻲﺘﻟا ﺎﻤﺑر ثﺪﺤﺕ ﻪﺑ ﺎﻬﺣﻼﺹإو، ﻚﻟذو ﺎﻤﻴﻓ ﻖﻠﻌﺘﻳ تﻼﻜﺸﻤﻟﺎﺑ
ﺔﻴﻨﻔﻟا
–تﺎﺜﻳﺪﺤﺗ ﺔﻘﺒﺴﻡ ﺞﻡاﺮﺒﻠﻟ تﺎﻬﻴﺒﻨﺗو ﻢﻋﺪﻟا وﻞﺋﺎﺳﺮﻟا ﺔیرﺎﺒﺧﻹا ﺔﺹﺎﺨﻟا ﺔآﺮﺸﺑ HP) ﺮﻓﻮﺘﺗ ﺎﻡﺪﻨﻋ ﻢﺘﻳ ﻞﻴﺠﺴﺗ ﺞﺘﻨﻤﻟا(
٣.ﻢﻋد HP ﺮﺒﻋ ﻒﺕﺎﻬﻟا
–ﻒﻠﺘﺨﺗ تارﺎﻴﺧ ﻢﻋﺪﻟا مﻮﺱﺮﻟاو ﺔﻴﻟﺎﻤﻟا ﺔﻘﺤﺘﺴﻤﻟا فﻼﺘﺧﺎﺑ ﺞﺘﻨﻤﻟا ﺔﻟوﺪﻟاو/ﺔﻘﻄﻨﻤﻟا ﺔﻐﻠﻟاو.
–مﻮﺱﺮﻟا ﺔﻴﻟﺎﻤﻟا ﺔﻘﺤﺘﺴﻤﻟا تﺎﺼﻴﻟﻮﺑو ﻦﻴﻡﺄﺘﻟا ﺔﺿﺮ ُﻋ ﺮﻴﻴﻐﺘﻠﻟ نوﺪﺑ رﺎﻌﺵإ ﻖﺒﺴﻡ .ءﺎﺟﺮﺑ ﺔﻌﺟاﺮﻡ ﻊﻗﻮﻤﻟا ﻲﻟﺎﺘﻟا ﻰﻠﻋ
ﺐﻳﻮﻟا www.hp.com/support لﻮﺼﺤﻠﻟ ﻰﻠﻋ ثﺪﺡأ تﺎﻡﻮﻠﻌﻤﻟا.
٤.ةﺮﺘﻓ ﺎﻣ ﺪﻌﺑ نﺎﻤﻀﻟا
ﺪﻌﺑ ءﺎﻬﺘﻧا ةﺮﺘﻓ نﺎﻤﻀﻟا ،ةدوﺪﺤﻤﻟا ﻢﺘﻳ ﺮﻴﻓﻮﺗ تﺎﻤﻴﻠﻌﺘﻟا ﻰﻠﻋ ﻊﻗﻮﻤﻟا ﻲﻟﺎﺘﻟا www.hp.com/support.
Page 95

٤.اذإ تﺮﻤﺘﺱا ،ﺔﻠﻜﺸﻤﻟا ﻦﻤﻓ ﻞﻤﺘﺤﻤﻟا نأ نﻮﻜﺗ رارزﻷا ﺔﻠﻄﻌﻡ .بﱢﺮﺟ ءاﺮﺟﻹا ﻲﻟﺎﺘﻟا:
أ.ﺢﺘﻓا ﺔﺣﻮﻟ ﻢﻜﺤﺘﻟا، ﻢﺙ دﺪﺡ تﺎﺤﺳﺎﻤﻟا ﺔﻴﺋﻮﻀﻟا تاﺮﻴﻣﺎﻜﻟاو، ﻢﺙ دﺪﺡ زاﺮﻃ ﺔﺤﺱﺎﻤﻟا ﺔﻴﺉﻮﻀﻟا ﺔﺹﺎﺨﻟا ﻚﺑ ﻦﻡ
ﺔﻤﺉﺎﻘﻟا.
ب.ﻢﻗ ﺬﻴﻔﻨﺘﺑ ﺪﺡأ ﻦﻴﺉاﺮﺟﻹا ﻦﻴﻴﻟﺎﺘﻟا:
•ﺔﺒﺴﻨﻟﺎﺑ مﺎﻈﻨﻟ ﻞﻴﻐﺸﺘﻟا Windows 2000 :ﺪآﺄﺗ ﻦﻡ مﺪﻋ ﺪﻳﺪﺤﺗ رﺎﻴﺨﻟا ﻞﻴﻄﻌﺕ ثاﺪﺣأ زﺎﻬﺠﻟا.
•ﺔﺒﺴﻨﻟﺎﺑ مﺎﻈﻨﻟ ﻞﻴﻐﺸﺘﻟا Windows XP :ﺪآﺄﺗ ﻦﻡ مﺪﻋ ﺪﻳﺪﺤﺗ رﺎﻴﺨﻟا مﺪﻋ ذﺎﺨﺕا يأ ءاﺮﺝإ.
٥.ﺪﻗ نﻮﻜﺗ رارزﻷا ﺔﻠﻄﻌﻡ ﻲﻓ Scanner Tools Utility) ةادﻷا ةﺪﻋﺎﺴﻤﻟا تاودﻷ ﺔﺤﺱﺎﻤﻟا ﺔﻴﺉﻮﻀﻟا .(بﱢﺮﺟ ءاﺮﺟﻹا
ﻲﻟﺎﺘﻟا:
أ.ﻢﻗ ﺢﺘﻔﺑ Scanner Tools Utility) ةادﻷا ةﺪﻋﺎﺴﻤﻟا تاودﻷ ﺔﺤﺱﺎﻤﻟا ﺔﻴﺉﻮﻀﻟا .(لﻮﺼﺤﻠﻟ ﻰﻠﻋ ،تادﺎﺵرإ
ﻊﺟار ”Scanner Tools Utility help) تﺎﻤﻴﻠﻌﺗ ةادﻷا ةﺪﻋﺎﺴﻤﻟا تاودﻷ ﺔﺤﺱﺎﻤﻟا ﺔﻴﺉﻮﻀﻟا(“
ﻲﻓ ﺔﺤﻔﺹ ١٥ وأ ﻞﻴﻟد ماﺪﺨﺘﺱا زﺎﻬﺠﻟا.
ب.دﺪﺡ ﺔﻡﻼﻋ ﺐﻳﻮﺒﺘﻟا رارزﻷا.
ج.ﻖﻘﺤﺗ ﻦﻡ مﺪﻋ ﺪﻳﺪﺤﺗ ﺔﻧﺎﺧ رﺎﻴﺘﺧﻻا Disable scanner buttons) ﻞﻴﻄﻌﺕ رارزأ ﺔﺤﺳﺎﻤﻟا ﺔﻴﺋﻮﻀﻟا(.
٦.ﺪآﺄﺗ ﻦﻡ نأ ﺪﺡأ ﺞﻡاﺮﺒﻟا ﻂﺒﺗﺮﻡ رﺰﺑ ﺔﺤﺱﺎﻤﻟا ﺔﻴﺉﻮﻀﻟا ﻦﻋ ﻖﻳﺮﻃ مﺎﻴﻘﻟا ﺎﻤﺑ ﻲﻠﻳ:
أ.ﻢﻗ ﺢﺘﻔﺑ Scanner Tools Utility) ةادﻷا ةﺪﻋﺎﺴﻤﻟا تاودﻷ ﺔﺤﺱﺎﻤﻟا ﺔﻴﺉﻮﻀﻟا .(لﻮﺼﺤﻠﻟ ﻰﻠﻋ ،تادﺎﺵرإ
ﻊﺟار ”Scanner Tools Utility help) تﺎﻤﻴﻠﻌﺗ ةادﻷا ةﺪﻋﺎﺴﻤﻟا تاودﻷ ﺔﺤﺱﺎﻤﻟا ﺔﻴﺉﻮﻀﻟا(“
ﻲﻓ ﺔﺤﻔﺹ ١٥ وأ ﻞﻴﻟد ماﺪﺨﺘﺱا زﺎﻬﺠﻟا.
ب.دﺪﺡ ﺔﻡﻼﻋ ﺐﻳﻮﺒﺘﻟا رارزﻷا.
ج.ﻖﻘﺤﺗ ﻦﻡ نأ ﻞآ رز ﻂﺒﺗﺮﻡ ﺞﻡﺎﻧﺮﺒﻟﺎﺑ ﺢﻴﺤﺼﻟا .ﺪﻳﺰﻤﻟ ﻦﻡ ،تﺎﻡﻮﻠﻌﻤﻟا ﺮﻘﻧا قﻮﻓ Help) تﺎﻤﻴﻠﻌﺕ( ﻲﻓ Scanner
Tools Utility) ةادﻷا ةﺪﻋﺎﺴﻤﻟا تاودﻷ ﺔﺤﺱﺎﻤﻟا ﺔﻴﺉﻮﻀﻟا(.
ردﺎﺼﻣ ىﺮﺧأ لﻮﺼﺤﻠﻟ ﻰﻠﻋ تﺎﻤﻴﻠﻌﺕ
لﻮﺼﺤﻠﻟ ﻰﻠﻋ ﺪﻳﺰﻡ ﻦﻡ تﺎﻤﻴﻠﻌﺘﻟا لﻮﺡ فﺎﺸﻜﺘﺱا ءﺎﻄﺧأ ءاﺰﺟأ زﺎﻬﺟ ﺔﺤﺱﺎﻤﻟا ﺔﻴﺉﻮﻀﻟا وأ ءﺎﻄﺧأ ﺞﻡاﺮﺒﻟا ﺔﺹﺎﺨﻟا ﺎﻬﺑ
،ﺎﻬﺡﻼﺹإو ﻊﺟار ”ردﺎﺼﻡ لﻮﺼﺤﻟا ﻰﻠﻋ تﺎﻡﻮﻠﻌﻡ ﺔﻴﻓﺎﺿإ“ ﻲﻓ ﺔﺤﻔﺹ ١٥.
ﻞﻴﻟد داﺪﻋﻹا ﻢﻋﺪﻟاو ٢٠
Page 96

ﻞﺼﻔﻟا ٥
فﺎﺸﻜﺘﺱﻻ ءﺎﻄﺧأ ﻞﻴﺹﻮﺗ USB ﺎﻬﺡﻼﺹإو:
١.ﻢﻗ ﺬﻴﻔﻨﺘﺑ ىﺪﺡإ مﺎﻬﻤﻟا ،ﺔﻴﻟﺎﺘﻟا ﻚﻟذو ﺐﺴﺡ ﺔﻘﻳﺮﻃ ﻞﻴﺹﻮﺗ ﺔﺤﺱﺎﻤﻟا ﺔﻴﺉﻮﻀﻟا زﺎﻬﺠﺑ ﺮﺗﻮﻴﺒﻤﻜﻟا:
–اذإ نﺎآ ﻞﺒآ USB ًﻼ ﺼ ﺘ ﻡ ﺔﺡﻮﻠﺑ ﻞﺹو USB وأ ةﺪﻋﺎﻘﺑ ﺐﻴآﺮﺗ ﺔﺹﺎﺧ زﺎﻬﺠﺑ ﺮﺗﻮﻴﺒﻤآ ،لﻮﻤﺤﻡ ﻢﻗ ﻞﺼﻔﺑ ﻞﺒآ
USB ﻦﻋ ﺔﺡﻮﻟ ﻞﺹو USB وأ ﻦﻋ ةﺪﻋﺎﻗ ،ﺐﻴآﺮﺘﻟا ﻢﺙ ﻢﻗ ﻞﻴﺹﻮﺘﺑ ﻞﺒآ USB ًة ﺮ ﺵ ﺎ ﺒ ﻡ زﺎﻬﺠﺑ ﺮﺗﻮﻴﺒﻤﻜﻟا.
–اذإ نﺎآ ﻞﺒآ USB ًﻼ ﺼ ﺘ ﻡ ﻞﻜﺸﺑ ﺮﺵﺎﺒﻡ زﺎﻬﺠﺑ ،ﺮﺗﻮﻴﺒﻤﻜﻟا ﻢﻗ ﻪﻠﻴﺹﻮﺘﺑ ﺬﻔﻨﻤﺑ USB ﺮﺧﺁ ﻰﻠﻋ زﺎﻬﺟ ﺮﺗﻮﻴﺒﻤﻜﻟا.
–اذإ نﺎآ ﻞﺒآ USB ًﻼ ﺼ ﺘ ﻡ ﺬﻔﻨﻤﺑ USB ءﺰﺠﻟﺎﺑ ﻲﻡﺎﻡﻷا ﻦﻡ زﺎﻬﺟ ،ﺮﺗﻮﻴﺒﻤﻜﻟا ﻢﻗ ﻪﻠﻴﺹﻮﺘﺑ ﺬﻔﻨﻤﺑ USB ءﺰﺠﻟﺎﺑ
ﻲﻔﻠﺨﻟا ﻦﻡ زﺎﻬﺟ ﺮﺗﻮﻴﺒﻤﻜﻟا.
–ﻢﻗ ﺔﻟازﺈﺑ ﺔﻓﺎآ ةﺰﻬﺟأ USB ىﺮﺧﻷا ﻦﻡ زﺎﻬﺟ ﺮﺗﻮﻴﺒﻤﻜﻟا اﺪﻋﺎﻡ ﺔﺡﻮﻟ ﺢﻴﺗﺎﻔﻤﻟا سوﺎﻤﻟاو.
٢.ﻢﻗ فﺎﻘﻳﺈﺑ ﻞﻴﻐﺸﺗ ﺔﺤﺱﺎﻤﻟا ﺔﻴﺉﻮﻀﻟا ﻢﺙ ﺪﻋأ ﺎﻬﻠﻴﻐﺸﺗ ةﺮﻡ ىﺮﺧأ.
٣.ﻢﻗ ةدﺎﻋﺈﺑ ﻞﻴﻐﺸﺗ زﺎﻬﺟ ﺮﺗﻮﻴﺒﻤﻜﻟا.
٤.ﺪﻌﺑ ةدﺎﻋإ ﻞﻴﻐﺸﺗ زﺎﻬﺟ ،ﺮﺗﻮﻴﺒﻤﻜﻟا لوﺎﺡ ماﺪﺨﺘﺱا ﺔﺤﺱﺎﻤﻟا ﺔﻴﺉﻮﻀﻟا.
اذإ ﻢﺗ ﻞﻴﻐﺸﺗ ﺔﺤﺱﺎﻤﻟا ﺔﻴﺉﻮﻀﻟا حﺎﺠﻨﺑ ﺖﻨآو ﺪﻗ ﺖﻤﻗ ﺮﻴﻴﻐﺘﺑ ﺔﻘﻳﺮﻃ ﺎﻬﻠﻴﺹﻮﺗ زﺎﻬﺠﺑ ﺮﺗﻮﻴﺒﻤﻜﻟا ﻲﻓ ةﻮﻄﺨﻟا ،ﻰﻟوﻷا ﺪﻗ
نﻮﻜﺗ ﺔﻠﻜﺸﻡ ﻞﻴﺹﻮﺘﻟا ﺔﻨﻤﻀﺘﻡ ﺔﺡﻮﻟ ﻞﺹو USB وأ ةﺪﻋﺎﻗ ﺐﻴآﺮﺘﻟا .كﺮﺗا ﺔﺤﺱﺎﻤﻟا ﺔﻴﺉﻮﻀﻟا ﺔﻠﺼﺘﻡ زﺎﻬﺠﺑ ﺮﺗﻮﻴﺒﻤﻜﻟا
ًة ﺮ ﺵ ﺎ ﺒ ﻡ.
اذإ ﻢﻟ ﻞﻤﻌﺗ ﺔﺤﺱﺎﻤﻟا ،ﺔﻴﺉﻮﻀﻟا ﻢﻘﻓ ﺔﻟازﺈﺑ ﺖﻴﺒﺜﺗ ﺞﻡﺎﻧﺮﺑ HP scanning ﻢﺙ ﻢﻗ ةدﺎﻋﺈﺑ ﻪﺘﻴﺒﺜﺗ ةﺮﻡ ىﺮﺧأ.
ةﻮﻄﺨﻟا ﺔﻴﻥﺎﺜﻟا :ﻢﻗ ﺔﻟازﺈﺑ ﺖﻴﺒﺜﺕ ﺞﻣﺎﻥﺮﺑ ﺢﺴﻤﻟا ﻲﺋﻮﻀﻟا ﻢﺙ ةدﺎﻋإ ﻪﺘﻴﺒﺜﺕ
اذإ ﻢﻟ دﺆﻳ ﻖﻘﺤﺘﻟا ﻦﻡ تﻼﻴﺹﻮﺗ تﻼﺒآ ﺔﺤﺱﺎﻤﻟا ﺔﻴﺉﻮﻀﻟا ﻰﻟإ ﻞﺡ ،ﺔﻠﻜﺸﻤﻟا ﺪﻗ نﻮﻜﺗ ﺔﻠﻜﺸﻤﻟا ﺐﺒﺴﺑ ءاﺮﺟإ ﺔﻴﻠﻤﻋ ﺖﻴﺒﺜﺗ ﺮﻴﻏ
ﺔﻠﻡﺎآ .لوﺎﺡ ﺔﻟازإ ﺖﻴﺒﺜﺗ ﺞﻡﺎﻧﺮﺑ ﺢﺴﻤﻟا ،ﻲﺉﻮﻀﻟا ﻢﺙ ةدﺎﻋإ ﻪﺘﻴﺒﺜﺗ ةﺮﻡ ىﺮﺧأ.
١.ﻢﻗ ﻞﺼﻔﺑ ﻞﺒآ USB ﻦﻡ زﺎﻬﺟ ﺮﺗﻮﻴﺒﻤﻜﻟا.
٢.ﻢﻗ ﺬﻴﻔﻨﺘﺑ ىﺪﺡإ ﻦﻴﺘﻤﻬﻤﻟا ﻦﻴﺘﻴﻟﺎﺘﻟا ﺢﺘﻔﻟ ﺔﺣﻮﻟ ﻢﻜﺤﺘﻟا:
–ﺔﺒﺴﻨﻟﺎﺑ مﺎﻈﻨﻟ ﻞﻴﻐﺸﺘﻟا Windows XP :ﺮﻘﻧا قﻮﻓ أﺪﺑا، ﻢﺙ ﺮﻘﻧا قﻮﻓ ﺔﺣﻮﻟ ﻢﻜﺤﺘﻟا.
–ﺔﺒﺴﻨﻟﺎﺑ مﺎﻈﻨﻟ ﻞﻴﻐﺸﺘﻟا Windows 2000 :ﺮﻘﻧا قﻮﻓ أﺪﺑا، ﻢﺙ ﺮﺵأ ﻰﻟإ تاداﺪﻋإ، ﻢﺙ ﺮﻘﻧا قﻮﻓ ﺔﺣﻮﻟ ﻢﻜﺤﺘﻟا.
٣.ﺮﻘﻧا اًﺮﻘﻧ ﺎًﺟودﺰﻡ قﻮﻓ ﺰﻡﺮﻟا ﺔﻓﺎﺽإ/ﺔﻟازإ ﺞﻣاﺮﺒﻟا.
ﻢﺘﻳ ضﺮﻋ ﺔﻤﺉﺎﻗ ﺞﻡاﺮﺒﻟﺎﺑ ﺔﺘﺒﺜﻤﻟا ﺎًﻴﻟﺎﺡ.
٤.دﺪﺡ HP Scanjet N6010 Divers and Tools، ﻢﺙ ﺮﻘﻧا قﻮﻓ ﺔﻟازإ وأ ﺮﻴﻴﻐﺕ/ﺔﻟازإ.
٥.ﻊﺒﺗا تادﺎﺵرﻹا ﻲﺘﻟا ﺮﻬﻈﺗ ﻰﻠﻋ ﺔﺵﺎﺸﻟا.
ﻲﻓ ﺔﻟﺎﺡ ﻚﺘﺒﻟﺎﻄﻡ ﺔﻟازﺈﺑ ﺞﻡﺎﻧﺮﺒﻟا وأ ،ﻪﺡﻼﺹإ ﺮﻘﻧا قﻮﻓ ﺔﻟازإ.
ﻲﻓ ﺔﻟﺎﺡ ﻚﺘﺒﻟﺎﻄﻡ ةدﺎﻋﺈﺑ ﻞﻴﻐﺸﺗ زﺎﻬﺟ ،ﺮﺗﻮﻴﺒﻤﻜﻟا ﺮﻘﻧا قﻮﻓ ﻻ.
٦.ﺪﻌﺑ نأ ﻢﺘﺗ ﺔﻟازإ ﺞﻡﺎﻧﺮﺑ ﺢﺴﻤﻟا ،ﻲﺉﻮﻀﻟا ﻢﻗ ﻞﺼﻔﺑ ﺔﺤﺱﺎﻤﻟا ﺔﻴﺉﻮﻀﻟا ﻦﻡ ﺲﺒﻘﻡ رﺎﻴﺘﻟا ﻲﺑﺮﻬﻜﻟا.
٧.ﻢﻗ ةدﺎﻋﺈﺑ ﻞﻴﻐﺸﺗ زﺎﻬﺟ ﺮﺗﻮﻴﺒﻤﻜﻟا.
٨.ﻞﺧدأ HP Scanning Software CD ﻲﻓ كﺮﺤﻡ صاﺮﻗﻷا ﺔﻃﻮﻐﻀﻤﻟا زﺎﻬﺠﺑ ﺮﺗﻮﻴﺒﻤﻜﻟا.
٩.ﻊﺒﺗا تادﺎﺵرﻹا ﻲﺘﻟا ﺮﻬﻈﺗ ﻰﻠﻋ ﺔﺵﺎﺸﻟا ﺖﻴﺒﺜﺘﻟ ﺞﻡﺎﻧﺮﺑ ﺢﺴﻤﻟا ﻲﺉﻮﻀﻟا.
١٠.ﺪﻌﺑ ﺖﻴﺒﺜﺗ ﺞﻡﺎﻧﺮﺑ ﺢﺴﻤﻟا ،ﻲﺉﻮﻀﻟا ﻢﻗ ﻞﻴﺹﻮﺘﺑ ﺔﺤﺱﺎﻤﻟا ﺔﻴﺉﻮﻀﻟا ﺲﺒﻘﻤﺑ رﺎﻴﺗ ،ﻲﺑﺮﻬآ ﻢﺙ ﻢﻗ ،ﺎﻬﻠﻴﻐﺸﺘﺑ ﻢﺙ مﺪﺨﺘﺱا ﻞﺒآ
USB ﻞﻴﺹﻮﺘﻟ ﺔﺤﺱﺎﻤﻟا ﺔﻴﺉﻮﻀﻟا زﺎﻬﺠﺑ ﺮﺗﻮﻴﺒﻤﻜﻟا.
١١.ﻊﺒﺗا تادﺎﺵرﻹا ﻲﺘﻟا ﺮﻬﻈﺗ ﻰﻠﻋ ﺔﺵﺎﺸﻟا.
ﻲﺑﺮﻋ
١٩ HP Scanjet N6010 ﻞﻴﻟد داﺪﻋﻹا ﻢﻋﺪﻟاو ﺔﺤﺳﺎﻤﻠﻟ ﺔﻴﺋﻮﻀﻟا ﺔﻠﺑﺎﻘﻟا ﺔیﺬﻐﺘﻠﻟ تاﺪﻨﺘﺴﻤﻟﺎﺑ
رارزأ ﺔﺤﺳﺎﻤﻟا ﺔﻴﺋﻮﻀﻟا ﻻ ﻞﻤﻌﺕ ﻞﻜﺸﺑ ﺢﻴﺤﺹ
ﺪﻌﺑ ﻞآ ،ةﻮﻄﺧ ﻢﻗ ءاﺮﺟﺈﺑ ﺔﻴﻠﻤﻋ ﺢﺴﻡ ﻲﺉﻮﺿ ﻖﻘﺤﺘﻠﻟ ﺎﻤﻡ اذإ ﺖﻧﺎآ رارزﻷا ﻞﻤﻌﺗ مأ ﻻ .ﻲﻓ ﺔﻟﺎﺡ راﺮﻤﺘﺱا ،ﺔﻠﻜﺸﻤﻟا ﻞﻘﺘﻧا ﻰﻟإ
ةﻮﻄﺨﻟا ﺔﻴﻟﺎﺘﻟا.
١.ﺪﻗ نﻮﻜﻳ ﻞﺒﻜﻟا ﺮﻴﻏ ﻞّﺹﻮﻡ مﺎﻜﺡﺈﺑ .ﺪآﺄﺗ ﻦﻡ ﻞﻴﺹﻮﺗ ﻞﺒآ USB تﻼﺒآو داﺪﻡإ ﺔﻗﺎﻄﻟا مﺎﻜﺡﺈﺑ.
٢.ﻢﻗ فﺎﻘﻳﺈﺑ ﻞﻴﻐﺸﺗ ﺔﺤﺱﺎﻤﻟا ﺔﻴﺉﻮﻀﻟا ﺮﻈﺘﻧاو ةﺪﻤﻟ ٣٠ ،ﺔﻴﻧﺎﺙ ﻢﺙ ﺪﻋأ ﻞﻴﻐﺸﺗ ﺔﺤﺱﺎﻤﻟا ﺔﻴﺉﻮﻀﻟا ةﺮﻡ ىﺮﺧأ.
٣.ﻢﻗ ةدﺎﻋﺈﺑ ﻞﻴﻐﺸﺗ زﺎﻬﺟ ﺮﺗﻮﻴﺒﻤﻜﻟا.
Page 97

فﺎﺸﻜﺘﺳا ءﺎﻄﺧﻷا ﺎﻬﺣﻼﺹإو
٥
ﺔﺤﺳﺎﻤﻟا ﺔﻴﺋﻮﻀﻟا ﻻ ﻞﻤﻌﺕ ﺪﻌﺑ ﺎﻬﺒﻴآﺮﺕ
اذإ ﻢﻟ ﻞﻤﻌﺗ ﺔﺤﺱﺎﻤﻟا ﺔﻴﺉﻮﻀﻟا ﺪﻌﺑ ،ﺎﻬﺒﻴآﺮﺗ ﺪﻗ ﻢﺘﻳ ضﺮﻋ ىﺪﺡإ ﻞﺉﺎﺱﺮﻟا ﺔﻴﻟﺎﺘﻟا ﻰﻠﻋ ﺔﺵﺎﺵ ﺮﺗﻮﻴﺒﻤﻜﻟا:
●The scanner could not be initialized) ترﺬﻌﺗ ﺔﺌﻴﻬﺗ ﺔﺤﺱﺎﻤﻟا ﺔﻴﺉﻮﻀﻟا(.
●The scanner could not be found) رﺬﻌﺗ رﻮﺜﻌﻟا ﻰﻠﻋ ﺔﺤﺱﺎﻤﻟا ﺔﻴﺉﻮﻀﻟا(.
●An internal error has occurred) ثﺪﺡ ﺄﻄﺧ ﻲﻠﺧاد(.
●The computer cannot communicate with the scanner) ﻻ ﻦﻜﻤﻳ زﺎﻬﺠﻟ ﺮﺗﻮﻴﺒﻤﻜﻟا لﺎﺼﺗﻻا ﺔﺤﺱﺎﻤﻟﺎﺑ
ﺔﻴﺉﻮﻀﻟا(.
حﻼﺹﻹ ﺔﻠﻜﺸﻤﻟا لوﺎﺡ مﺎﻴﻘﻟا ﺎﻤﺑ ﻲﻠﻳ:
ةﻮﻄﺨﻟا ﻰﻟوﻷا :ﻢﻗ ﺺﺤﻔﺑ تﻼﺒﻜﻟا
ﺪآﺄﺗ ﻦﻡ نأ تﻼﻴﺹﻮﺗ تﻼﺒﻜﻟا ﻞﻤﻌﺗ ﺔﻘﻳﺮﻄﺑ ﺔﺤﻴﺤﺹ.
تﻼﺒآ داﺪﻣإ ﺔﻗﺎﻄﻟا
ﺪﺟﻮﻳ ﻊﻡ تﻼﺒآ داﺪﻡإ ﺔﻗﺎﻄﻟا ﻞﺒآ ﻖﺤﻠﻡ ﻢﺘﻳ ﻪﻠﻴﺹﻮﺗ ءﺰﺠﻟﺎﺑ ﻲﻔﻠﺨﻟا ﺔﺤﺱﺎﻤﻠﻟ ﺔﻴﺉﻮﻀﻟا .يﻮﺘﺤﻳ ﻞﺹﻮﻤﻟا دﻮﺟﻮﻤﻟا ﻲﻓ ﺔﻳﺎﻬﻧ
ﻞﺒﻜﻟا ﻰﻠﻋ حﺎﺒﺼﻡ دﻮﻳاد ﺚﻋﺎﺑ ءﻮﻀﻠﻟ ،ﺮﻀﺧﻷا اﺬهو حﺎﺒﺼﻤﻟا ءﻲﻀﻳ ﻲﻓ ﺔﻟﺎﺡ ﻞﻤﻋ تﻼﺒآ داﺪﻡإ ﺔﻗﺎﻄﻟا ﻞﻜﺸﺑ ﻢﻴﻠﺱ.
ﺎﻤآ يﻮﺘﺤﺗ تﻼﺒآ داﺪﻡإ ﺔﻗﺎﻄﻟا ﻰﻠﻋ ﻞﺒآ رﺎﻴﺗ ددﺮﺘﻡ ﻢﺘﻳ ﻞﻴﺹﻮﺗ ﺪﺡأ ﻪﻴﻓﺮﻃ تﻼﺒﻜﺑ داﺪﻡإ ﺔﻗﺎﻄﻟا ﻞﻴﺹﻮﺗو فﺮﻄﻟا ﺮﺧﻵا ﺪﺡﺄﺑ
ﺲﺑﺎﻘﻡ ﺔﻗﺎﻄﻟا وأ ﻲﻗاﻮﺑ رﺎﻴﺗ.
ﻢﺘﻳ ﻞﻴﺹﻮﺗ ﻞﺒآ ﺔﻗﺎﻄﻟا ﻦﻴﺑ ﺔﺤﺱﺎﻤﻟا ﺔﻴﺉﻮﻀﻟا ﺪﺡأو ﺲﺑﺎﻘﻡ ﺔﻗﺎﻄﻟا.
١.ﺪآﺄﺗ ﻦﻡ نأ حﺎﺘﻔﻡ ﺔﻗﺎﻄﻟا ﻲﻓ ﻊﺿو ﻞﻴﻐﺸﺘﻟا.
٢.ﺪآﺄﺗ ﻦﻡ ةءﺎﺿإ حﺎﺒﺼﻡ دﻮﻳاﺪﻟا ﺚﻋﺎﺒﻟا ءﻮﻀﻠﻟ ﺮﻀﺧﻷا دﻮﺟﻮﻤﻟا ﻰﻠﻋ ﻞﺹﻮﻡ تﻼﺒآ داﺪﻡإ ﺔﻗﺎﻄﻟا.
٣.اذإ ﻢﻟ ﻦﻜﻳ حﺎﺒﺼﻡ دﻮﻳاﺪﻟا ﺚﻋﺎﺒﻟا ءﻮﻀﻠﻟ ﺮﻀﺧﻷا ،ﺎًﺌﻴﻀﻡ ﺪآﺄﺗ ﻦﻡ دﻮﺟو ﺔﻗﺎﻃ ﻲﻓ ﺲﺒﻘﻡ ﺔﻗﺎﻄﻟا وأ ﻲﻗاو رﺎﻴﺘﻟا يﺬﻟا
ﻞﺼﺘﻳ ﻪﺑ ﻞﺒآ رﺎﻴﺘﻟا ددﺮﺘﻤﻟا.
٤.اذإ ﻢﻟ ﻦﻜﻳ حﺎﺒﺼﻡ دﻮﻳاﺪﻟا ﺚﻋﺎﺒﻟا ءﻮﻀﻠﻟ ﺮﻀﺧﻷا ﺎًﺌﻴﻀﻡ ﻢﻏﺮﻟﺎﺑ ﻦﻡ لﻮﺹو ﺔﻗﺎﻄﻟا ﻰﻟإ ﺲﺒﻘﻡ ﺔﻗﺎﻄﻟا وأ ﻰﻟإ ﻲﻗاو رﺎﻴﺘﻟا
ﻦﻤﻓ ﻞﻤﺘﺤﻤﻟا نأ نﻮﻜﺗ تﻼﺒآ داﺪﻡإ ﺔﻗﺎﻄﻟا ﺎًﺒﻴﻌﻡ .ﻞﺼﺗا ﺔﻡﺪﺨﺑ ﻢﻋﺪﻟا ىﺪﻟ HP لﻮﺼﺤﻠﻟ ﻰﻠﻋ ةﺪﻋﺎﺴﻤﻟا.
ﻞﺒآ USB
ﻲﻓ ﺔﻟﺎﺡ ﺪﻘﻓ ﺔﺤﺱﺎﻤﻟا ﺔﻴﺉﻮﻀﻟا لﺎﺼﺗﻻ USB، رﺪﺼُﻳ حﺎﺒﺼﻡ LED ﺄﻄﺨﻠﻟ اًءﻮﺿ ﺎًﺘﺑﺎﺙ نﻮﻠﻟﺎﺑ ﺮﻔﺹﻷا .بﱢﺮﺟ ﺎﻡ ﻲﻠﻳ:
ﻖﻘﺤﺘﻟا ﻦﻡ لﺎﺼﺗﻻا ﻲﻠﻌﻔﻟا ﺔﺤﺱﺎﻤﻟﺎﺑ ﺔﻴﺉﻮﻀﻟا:
●مﺪﺨﺘﺱا ﻞﺒﻜﻟا ﻖﻓﺮﻤﻟا ﻊﻡ ﺔﺤﺱﺎﻤﻟا ﺔﻴﺉﻮﻀﻟا .ﺚﻴﺡ ﻦﻜﻤﻳ ﻻأ ﻖﻓاﻮﺘﺗ ﺾﻌﺑ تﻼﺒآ USB ىﺮﺧﻷا ﻊﻡ ﺔﺤﺱﺎﻤﻟا
ﺔﻴﺉﻮﻀﻟا.
●ﺪآﺄﺗ ﻦﻡ نأ ﻞﺒآ USB ﻞّﺹﻮﻡ مﺎﻜﺡﺈﺑ ﻦﻴﺑ ﺔﺤﺱﺎﻤﻟا ﺔﻴﺉﻮﻀﻟا زﺎﻬﺟو ﺮﺗﻮﻴﺒﻤﻜﻟا ﺔﺡﻮﻟو ﻞﺹو USB .نﻮﻜﻳ ﺰﻡﺮﻟا
ﻲﺙﻼﺜﻟا دﻮﺟﻮﻤﻟا ﻰﻠﻋ ﻞﺒآ USB ﺎًﻬﺠﺘﻡ ﻰﻟإ ﻰﻠﻋأ ﺎﻡﺪﻨﻋ نﻮﻜﻳ ﻞﺒﻜﻟا ًﻼ ﺼ ﺘ ﻡ ﻞﻜﺸﺑ ﺢﻴﺤﺹ ﺔﺤﺱﺎﻤﻟﺎﺑ ﺔﻴﺉﻮﻀﻟا.
ﻞﻴﻟد داﺪﻋﻹا ﻢﻋﺪﻟاو ١٨
Page 98

ﺔیﺎﻨﻌﻟا ﺔﻥﺎﻴﺼﻟاو
ﺪﻋﺎﺴﻳ ﻒﻴﻈﻨﺗ ﺔﺤﺱﺎﻤﻟا ﺔﻴﺉﻮﻀﻟا ﻦﻡ ٍنﺁ ﺮﺧﻵ ﻰﻠﻋ نﺎﻤﺿ ءاﺮﺟإ تﺎﻴﻠﻤﻋ ﺢﺴﻤﻟا ﻲﺉﻮﻀﻟا ةدﻮﺠﺑ ﻰﻠﻋأ .ﺪﻤﺘﻌﻳو راﺪﻘﻡ ﺔﻳﺎﻨﻌﻟا
ﺔﻳروﺮﻀﻟا ﺔﺑﻮﻠﻄﻤﻟا ﻰﻠﻋ ةﺪﻋ ،ﻞﻡاﻮﻋ ًﺔﻨﻤﻀﺘﻡ ﻢﺠﺡ ﻞﻴﻐﺸﺗ ﺔﺤﺱﺎﻤﻟا ﺔﻴﺉﻮﻀﻟا ﺔﺌﻴﺑو ﻞﻴﻐﺸﺘﻟا .ﺐﺠﻳو مﺎﻴﻘﻟا ﺔﻓﺎﻈﻨﻟﺎﺑ ﺔﻳروﺪﻟا
ﺎﻤﻠآ ﺖﻀﺘﻗا ةروﺮﻀﻟا ﻚﻟذ.
لﻮﺼﺤﻠﻟ ﻰﻠﻋ تﺎﻤﻴﻠﻌﺗ لﻮﺡ ﺔﻧﺎﻴﺹ ﺔﺤﺱﺎﻤﻟا ،ﺔﻴﺉﻮﻀﻟا ﻊﺟار ﻞﻴﻟد ماﺪﺨﺘﺱا ﺔﺤﺱﺎﻤﻟا ﺔﻴﺉﻮﻀﻟا .لﻮﺼﺤﻠﻟ ﻰﻠﻋ تﺎﻡﻮﻠﻌﻡ لﻮﺡ
ﻞﻴﻟد ماﺪﺨﺘﺱﻻا صﺎﺨﻟا ﺔﺤﺱﺎﻤﻟﺎﺑ ،ﺔﻴﺉﻮﻀﻟا ﻊﺟار ”ردﺎﺼﻡ لﻮﺼﺤﻟا ﻰﻠﻋ تﺎﻡﻮﻠﻌﻡ ﺔﻴﻓﺎﺿإ“ ﻲﻓ ﺔﺤﻔﺹ ١٥.
ﻪﻴﺒﻨﺕﻞﺒﻗ ﻊﺿو ﺪﺡأ ﺮﺹﺎﻨﻌﻟا ﻞﺧاد ةﺪﺡو ﺔﻳﺬﻐﺘﻟا ،تاﺪﻨﺘﺴﻤﻟﺎﺑ ﺐﺠﻳ ﺪآﺄﺘﻟا ﻦﻡ مﺪﻋ ءاﻮﺘﺡا ﻚﻟذ ﺮﺼﻨﻌﻟا ﻰﻠﻋ ﻎﻤﺹ
ﺮﻴﻏ فﺎﺟ وأ ﻞﺉﺎﺱ ﺢﻴﺤﺼﺗ وأ ﺔﻳأ داﻮﻡ ىﺮﺧأ ﻦﻡ ﻦﻜﻤﻤﻟا نأ ﻞﻘﺘﻨﺗ ﻰﻟإ ءاﺰﺟأ ﺔﺤﺱﺎﻤﻟا ﺔﻴﺉﻮﻀﻟا ﻦﻡ ﻞﺧاﺪﻟا.
ﺪآﺄﺗ ﻦﻡ مﺪﻋ دﻮﺟو ﺔﻳأ تاﺪﻌﺠﺗ وأ تﺎﺵﺎﻤﻜﻧا وأ ﺲﻴﺑﺎﺑد وأ ﻚﺑﺎﺸﻡ قرو وأ ﺔﻳأ داﻮﻡ ىﺮﺧأ ﺔﻘﻟﺎﻋ .ﺐﺠﻳ ﻻأ ﺪﺟﻮﺗ
تﺎﻗﺎﺼﺘﻟا ﻦﻴﺑ قرﻮﻟا.
٤
ﻲﺑﺮﻋ
١٧ HP Scanjet N6010 ﻞﻴﻟد داﺪﻋﻹا ﻢﻋﺪﻟاو ﺔﺤﺳﺎﻤﻠﻟ ﺔﻴﺋﻮﻀﻟا ﺔﻠﺑﺎﻘﻟا ﺔیﺬﻐﺘﻠﻟ تاﺪﻨﺘﺴﻤﻟﺎﺑ
Page 99

)ﻊﺑﺎﺗ(
ﺮﻘﻧا قﻮﻓ Help) تﺎﻤﻴﻠﻌﺕ( ﻲﻓ ﻊﺑﺮﻡ راﻮﺡ Scanner Tools Utility) ةادﻷا ةﺪﻋﺎﺴﻤﻟا تاودﻷ ﺔﺤﺱﺎﻤﻟا
ﺔﻴﺉﻮﻀﻟا (ﺢﺘﻔﻟ ﻒﻠﻤﻟا Help) تﺎﻤﻴﻠﻌﺗ(.
تﺎﻤﻴﻠﻌﺕ ﺔﻴﻓﺎﺽإ ﺞﻣاﺮﺒﻠﻟ
ﻞﻤﺘﺸﻳ ﻞآ ﺞﻡﺎﻧﺮﺑ دﻮﺟﻮﻡ ﻰﻠﻋ HP Scanning Software CD ﻰﻠﻋ Help) تﺎﻤﻴﻠﻌﺗ (ﺔﺹﺎﺧ ﻪﺑ .ﺢﺘﻔﻟ تﺎﻤﻴﻠﻌﺗ ،ﺞﻡﺎﻧﺮﺒﻟا
ﻢﻗ ﺢﺘﻔﺑ ،ﺞﻡﺎﻧﺮﺒﻟا ﻢﺙ دﺪﺡ ﺔﻤﺉﺎﻘﻟا Help) تﺎﻤﻴﻠﻌﺕ(، ﻢﺙ دﺪﺡ Help) تﺎﻤﻴﻠﻌﺕ( وأ Using Help) ماﺪﺨﺘﺳا تﺎﻤﻴﻠﻌﺘﻟا(.
ﻞﻴﻟد داﺪﻋﻹا ﻢﻋﺪﻟاو ١٦
Page 100

ردﺎﺼﻣ لﻮﺼﺤﻟا ﻰﻠﻋ تﺎﻣﻮﻠﻌﻣ ﺔﻴﻓﺎﺽإ
ﺮﻓﻮﺘﻳ ﻊﻡ ﺔﺤﺱﺎﻤﻟا ﺔﻴﺉﻮﻀﻟا ﺪﻳﺪﻌﻟا ﻦﻡ ردﺎﺼﻤﻟا ﻲﺘﻟا مﺪﻘﺗ تﺎﻡﻮﻠﻌﻡ لﻮﺡ ﺔﺤﺱﺎﻤﻟا ﺔﻴﺉﻮﻀﻟا ﺞﻡاﺮﺑو ﺢﺴﻤﻟا ﻲﺉﻮﻀﻟا.
٣
ﻞﻴﻟد ماﺪﺨﺘﺳا HP Scanjet N6010
ﺮﺒﺘﻌﻳ ﻞﻴﻟد ماﺪﺨﺘﺱا ﺔﺤﺱﺎﻤﻟا ﺔﻴﺉﻮﻀﻟا ﻮه رﺪﺼﻤﻟا ﻲﺴﻴﺉﺮﻟا تﺎﻡﻮﻠﻌﻤﻠﻟ ﺔﺹﺎﺨﻟا اﺬﻬﺑ ﺞﺘﻨﻤﻟا ﻦﻤﻀﺘﻳو تﺎﻡﻮﻠﻌﻤﻟا ﻲﺘﻟا جﺎﺘﺤﺗ
ﺎﻬﺘﻓﺮﻌﻡ ماﺪﺨﺘﺱﻻ ﺔﺤﺱﺎﻤﻟا ﺔﻴﺉﻮﻀﻟا ﺎﻬﺘﻧﺎﻴﺹو فﺎﺸﻜﺘﺱاو ءﺎﻄﺧﻷا ﻲﺘﻟا ﺪﻗ ثﺪﺤﺗ ﺎﻬﺑ ﺎﻬﺡﻼﺹإو .ﺮﻓﻮﺘﻳو ﻞﻴﻟد ماﺪﺨﺘﺱﻻا ﻒﻠﻤآ
ﻖﻴﺴﻨﺘﺑ PDF، ﻲﻟﺎﺘﻟﺎﺑو ﻚﻨﻜﻤﻳ ﻪﺘﻋﺎﺒﻃ ﻞﻡﺎﻜﻟﺎﺑ وأ ﺔﻋﺎﺒﻃ ءاﺰﺟأ ،ﻪﻨﻡ ﺎﻤآ ﺮﻓﻮﺘﻳ اﺬه ﻞﻴﻟﺪﻟا ﺎًﻀﻳأ ﻰﻠﻋ ﺔﺌﻴه ﻒﻠﻡ تﺎﻤﻴﻠﻌﺗ ﻦﻜﻤﻳ
ﻪﺗءاﺮﻗ ﻰﻠﻋ ﺔﺵﺎﺸﻟا.
ﺢﺘﻔﻟ ﻞﻴﻟد ماﺪﺨﺘﺱﻻا ﻖﻴﺴﻨﺘﺑ PDF ﻢﻗ ﻲﻟﺎﺘﻟﺎﺑ:
←ﺮﻘﻧا قﻮﻓ أﺪﺑا، ﻢﺙ ﺮﺵأ ﻰﻟإ ﺞﻣاﺮﺒﻟا وأ ﻰﻟإ ﺔﻓﺎآ ﺞﻣاﺮﺒﻟا، ﻢﺙ ﺮﺵأ ﻰﻟإ HP، ﻢﺙ ﺮﺵأ ﻰﻟإ Scanjet، ﻢﺙ ﺮﺵأ ﻰﻟإ N6010،
ﻢﺙ ﺮﻘﻧا قﻮﻓ ﻞﻴﻟد ماﺪﺨﺘﺳﻻا.
لﻮﺼﺤﻠﻟ ﻰﻠﻋ ﺔﺨﺴﻧ ﻖﻴﺴﻨﺘﺑ PDF ﻦﻡ ﻞﻴﻟد ماﺪﺨﺘﺱﻻا ﺔﻐﻠﺑ ىﺮﺧأ:
١.ﻞﺧدأ HP Scanning Software CD ﻖﻓﺮﻤﻟا ﺔﺤﺱﺎﻤﻟﺎﺑ ﺔﻴﺉﻮﻀﻟا ﻲﻓ كﺮﺤﻡ صاﺮﻗﻷا ﺔﻃﻮﻐﻀﻤﻟا زﺎﻬﺠﺑ
ﺮﺗﻮﻴﺒﻤﻜﻟا.
ﺮﻈﺘﻧا ﻰﺘﺡ ﻢﺘﻳ ضﺮﻋ ﻊﺑﺮﻡ راﻮﺡ ﺖﻴﺒﺜﺘﻟا.
٢.ﺮﻘﻧا قﻮﻓ View or print guides) ضﺮﻋ ﺔﻟدﻷا وأ ﺎﻬﺘﻋﺎﺒﻃ(.
ﻢﺘﻳ ضﺮﻋ ﺔﻤﺉﺎﻗ تﺎﻐﻠﻟﺎﺑ.
٣.ﺮﻘﻧا قﻮﻓ ﺔﻐﻠﻟا ﻲﺘﻟا ﺎهﺪﻳﺮﺗ.
ﻢﺘﻳ ضﺮﻋ ﺔﻤﺉﺎﻗ ﺔﻟدﻷﺎﺑ.
٤.ﺮﻘﻧا قﻮﻓ User Guide) ﻞﻴﻟد ماﺪﺨﺘﺳﻻا(.
لﻮﺼﺤﻠﻟ ﻰﻠﻋ راﺪﺹإ تﺎﻤﻴﻠﻌﺗ ﺔﻳرﻮﻓ ﻞﻴﻟﺪﻟ ماﺪﺨﺘﺱﻻا ﻦﻜﻤﻳ ﻪﻡاﺪﺨﺘﺱا ﺔﻄﺱاﻮﺑ ﺞﻡﺎﻧﺮﺑ ئرﺎﻗ ،ﺔﺵﺎﺸﻟا ﻢﻗ ﺎﻤﺑ ﻲﻠﻳ:
١.ﻞﺧدأ HP Scanning Software CD ﻖﻓﺮﻤﻟا ﺔﺤﺱﺎﻤﻟﺎﺑ ﺔﻴﺉﻮﻀﻟا ﻲﻓ كﺮﺤﻡ صاﺮﻗﻷا ﺔﻃﻮﻐﻀﻤﻟا زﺎﻬﺠﺑ
ﺮﺗﻮﻴﺒﻤﻜﻟا.
ﺮﻈﺘﻧا ﻰﺘﺡ ﻢﺘﻳ ضﺮﻋ ﻊﺑﺮﻡ راﻮﺡ ﺖﻴﺒﺜﺘﻟا.
٢.ﺮﻘﻧا قﻮﻓ View or print guides) ضﺮﻋ ﺔﻟدﻷا وأ ﺎﻬﺘﻋﺎﺒﻃ(.
ﻢﺘﻳ ضﺮﻋ ﺔﻤﺉﺎﻗ تﺎﻐﻠﻟﺎﺑ.
٣.ﺮﻘﻧا قﻮﻓ ﺔﻐﻠﻟا ﻲﺘﻟا ﺎهﺪﻳﺮﺗ.
ﻢﺘﻳ ضﺮﻋ ﺔﻤﺉﺎﻗ ﺔﻟدﻷﺎﺑ.
٤.ﺮﻘﻧا قﻮﻓ Onscreen User Guide) ﻞﻴﻟد ماﺪﺨﺘﺳﻻا ﻲﻥوﺮﺘﻜﻟﻹا(.
ﻲﺑﺮﻋ
١٥ HP Scanjet N6010 ﻞﻴﻟد داﺪﻋﻹا ﻢﻋﺪﻟاو ﺔﺤﺳﺎﻤﻠﻟ ﺔﻴﺋﻮﻀﻟا ﺔﻠﺑﺎﻘﻟا ﺔیﺬﻐﺘﻠﻟ تاﺪﻨﺘﺴﻤﻟﺎﺑ
Scanner Tools Utility help) تﺎﻤﻴﻠﻌﺕ ةادﻷا ةﺪﻋﺎﺴﻤﻟا تاودﻷ ﺔﺤﺳﺎﻤﻟا
ﺔﻴﺋﻮﻀﻟا(
ﺢﺘﻔﻟ ةادﻷا ،ةﺪﻋﺎﺴﻤﻟا ﻢﻗ ﺬﻴﻔﻨﺘﺑ ﺪﺡأ تاءاﺮﺟﻹا ﺔﻴﻟﺎﺘﻟا:
●ﺮﻘﻧا اًﺮﻘﻧ ﺎًﺟودﺰﻡ قﻮﻓ ﺰﻡر Scanner Tools Utility) ةادﻷا ةﺪﻋﺎﺴﻤﻟا تاودﻷ ﺔﺤﺱﺎﻤﻟا ﺔﻴﺉﻮﻀﻟا(
دﻮﺟﻮﻤﻟا ﻰﻠﻋ ﺢﻄﺱ ﺐﺘﻜﻤﻟا.
(دﻮﺟﻮﻤﻟا ﻰﻠﻋ ﺔﺡﻮﻠﻟا ﺔﻴﻡﺎﻡﻷا ﺔﺤﺱﺎﻤﻠﻟ ﺔﻴﺉﻮﻀﻟا.
ةﺪﻋﺎﺴﻤﻟا تاودﻷ ﺔﺤﺳﺎﻤﻟا ﺔﻴﺋﻮﻀﻟا(.
●ﻂﻐﺿا رﺰﻟا" تاودأ ﺔﺤﺱﺎﻤﻟا ﺔﻴﺉﻮﻀﻟا" )
●ﺮﻘﻧا قﻮﻓ أﺪﺑا، ﻢﺙ ﻢﻗ ةرﺎﺵﻹﺎﺑ ﻰﻟإ ﺞﻣاﺮﺒﻟا وأ ﻰﻟإ ﺔﻓﺎآ ﺞﻣاﺮﺒﻟا، ﻢﺙ ﻢﻗ ةرﺎﺵﻹﺎﺑ ﻰﻟإ HP، ﻢﺙ ﻢﻗ ةرﺎﺵﻹﺎﺑ
ﻰﻟإ Scanjet، ﻢﺙ ﻢﻗ ةرﺎﺵﻹﺎﺑ ﻰﻟإ N6010، ﻢﺙ ﺮﻘﻧا قﻮﻓ Scanner Tools Utility) ةادﻷا
 Loading...