

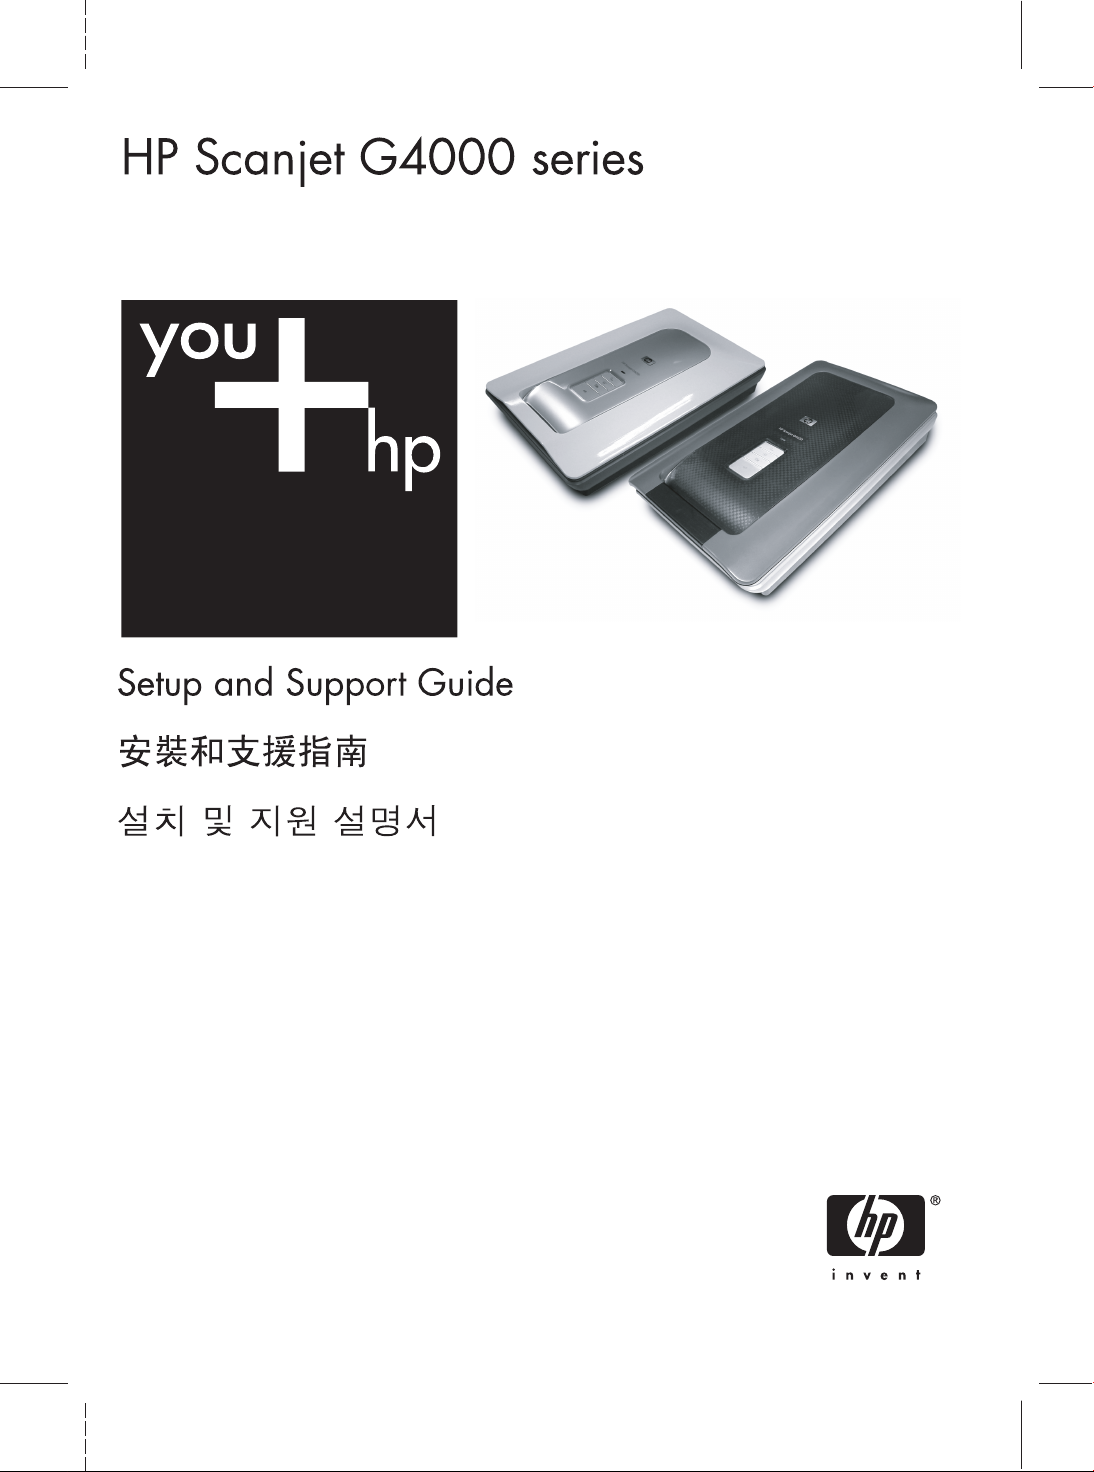
Page 1
Page 2
www.hp.com/support
Australia
Australia
(out-of-warranty)
India
Indonesia
Malaysia
New Zealand
Philippines
1300 721 147
1902 910 910
021-3881-4518
800-810-3888
3003
2802 4098
91-80-28526900
1-600-425-7737
+62 (21) 350 3408
0570-000511
03-3335-9800
1588-3003
1800 805 405
0800 441 147
2 867 3551
Singapore
Viêt Nam
6 272 5300
02-8722-8000
+66 (2) 353 9000
+84 88234530
Page 3

Setup and Support Guide
English
Page 4

Copyright and license
© 2006 Copyright Hewlett-Packard
Development Company, L.P.
Reproduction, adaptation or
translation without prior written
permission is prohibited, except as
allowed under the copyright laws.
The information contained herein is
subject to change without notice.
The only warranties for HP products
and services are set forth in the
express warranty statements
accompanying such products and
services. Nothing herein should be
construed as constituting an
additional warranty. HP shall not be
liable for technical or editorial errors
or omissions contained herein.
Trademark credits
Microsoft and Windows are registered
trademarks of Microsoft Corporation.
Page 5

Contents
1 Get started ............................................................................................................4
Step 1. Check the box contents .............................................................................4
Step 2. Install the software ....................................................................................5
Step 3. Connect the TMA cable .............................................................................5
Step 4. Connect the power supply .........................................................................6
Step 5. Connect the USB cable .............................................................................6
Step 6. Test the installation ...................................................................................8
2 How to use the scanner ......................................................................................9
Where to get additional information .......................................................................9
HP Photosmart Windows software ........................................................................9
HP Photosmart Macintosh software ....................................................................10
Front panel and accessories overview ................................................................. 10
Front-panel buttons ......................................................................................10
Transparent materials adapter (TMA) ...........................................................10
3 Scanner installation troubleshooting ..............................................................12
Uninstall and reinstall the software ......................................................................12
Check the cables .................................................................................................13
4 Regulatory information and product specifications .......................................14
Scanner specifications .........................................................................................14
Transparent materials adapter (TMA) specifications ...........................................15
Environmental specifications ...............................................................................15
Recycle and restricted material information .........................................................15
Disposal of Waste Equipment by Users in Private Households in the
European Union ...................................................................................................16
5 Product support .................................................................................................17
Accessibility .........................................................................................................17
HP Scanjet Web site ............................................................................................17
Getting assistance ...............................................................................................18
6 Hewlett-Packard limited warranty statement ..................................................19
English
Setup and Support Guide
3
Page 6
1
Get started
Follow these steps to set up the scanner:
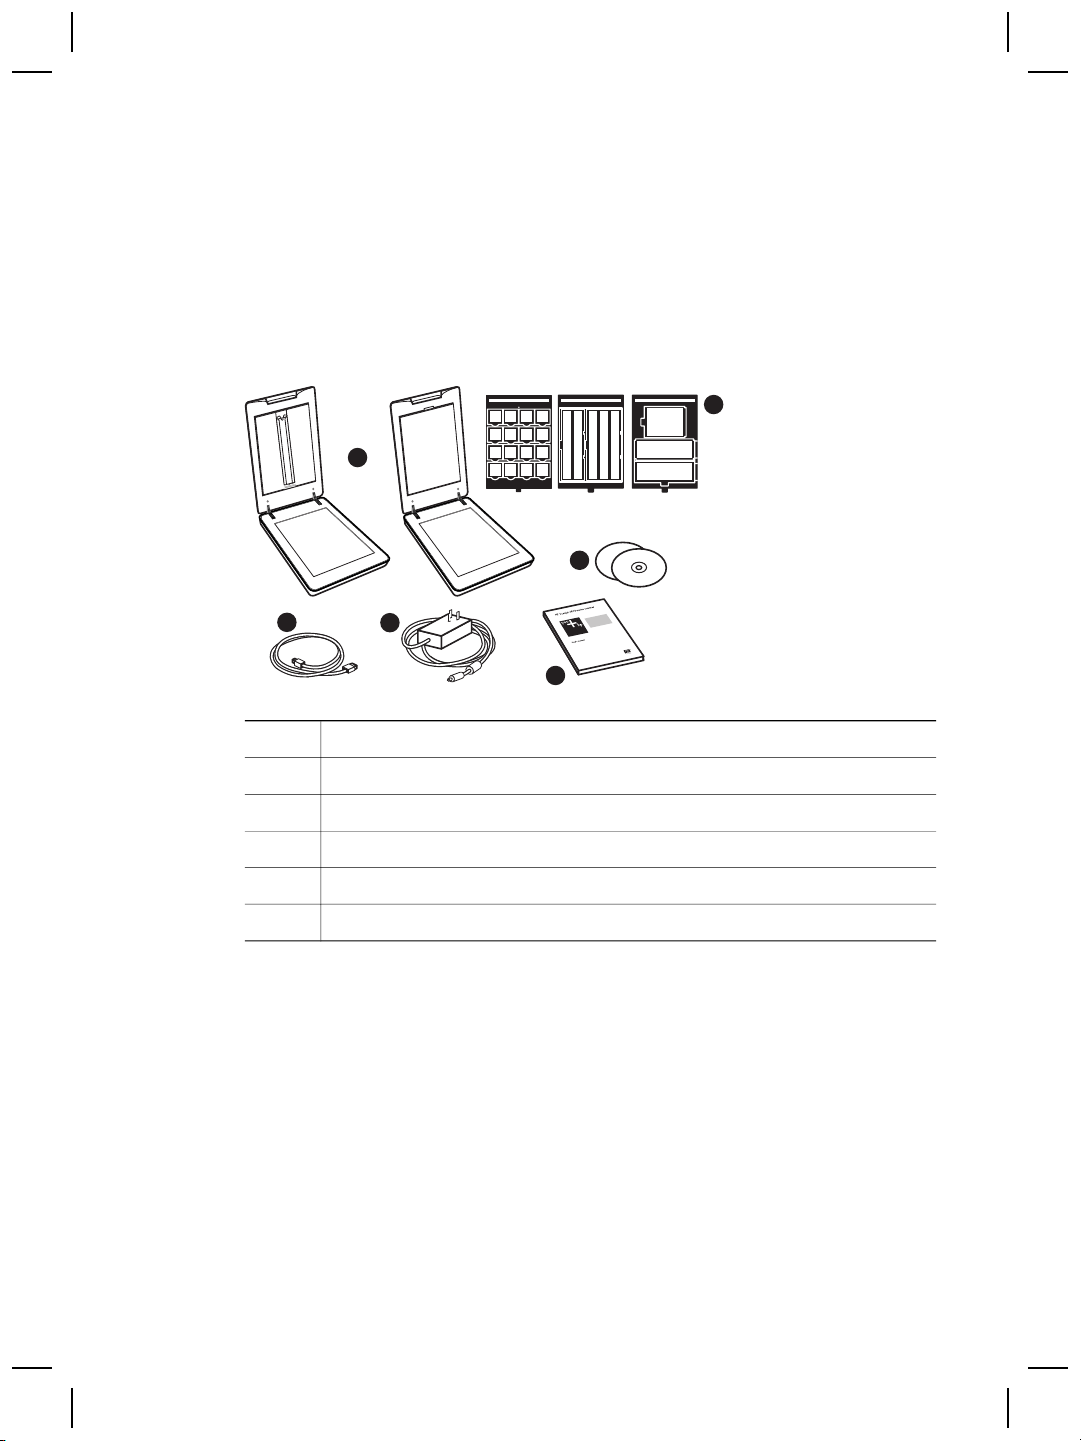
Step 1. Check the box contents
Unpack the scanner hardware. Be sure to remove any shipping tape.
1
6
5
2
1 HP Scanjet G4010 or G4050 scanner
2
3
4 Setup and Support Guide (this book)
5 Scanning software CDs
6 TMA templates (HP Scanjet G4050 only)
3
4
USB cable
Power supply
4
HP Scanjet G4000 series
Page 7
Step 2. Install the software
Caution If you are installing the software onto a Windows computer, do not
connect the USB cable to the computer yet. Install the scanning software
before connecting the USB cable. If you are installing the software into a
Macintosh computer, you can connect the USB cable either before or after
installing the software.
1. Insert the HP Photosmart CD that came with the scanner into the computer CD
drive.
For Windows installations: Wait for the installation dialog box to display. If the
installation dialog box does not display after a few moments, see Scanner
installation troubleshooting on page 12.
For Macintosh installations: Double-click on the CD icon that appears on the
desktop, and then double click on the HP Scanjet Scanner Install icon to start the
installation.
2. Click Install software to install the scanning software. Follow the onscreen
instructions to complete the scanning software installation.
English
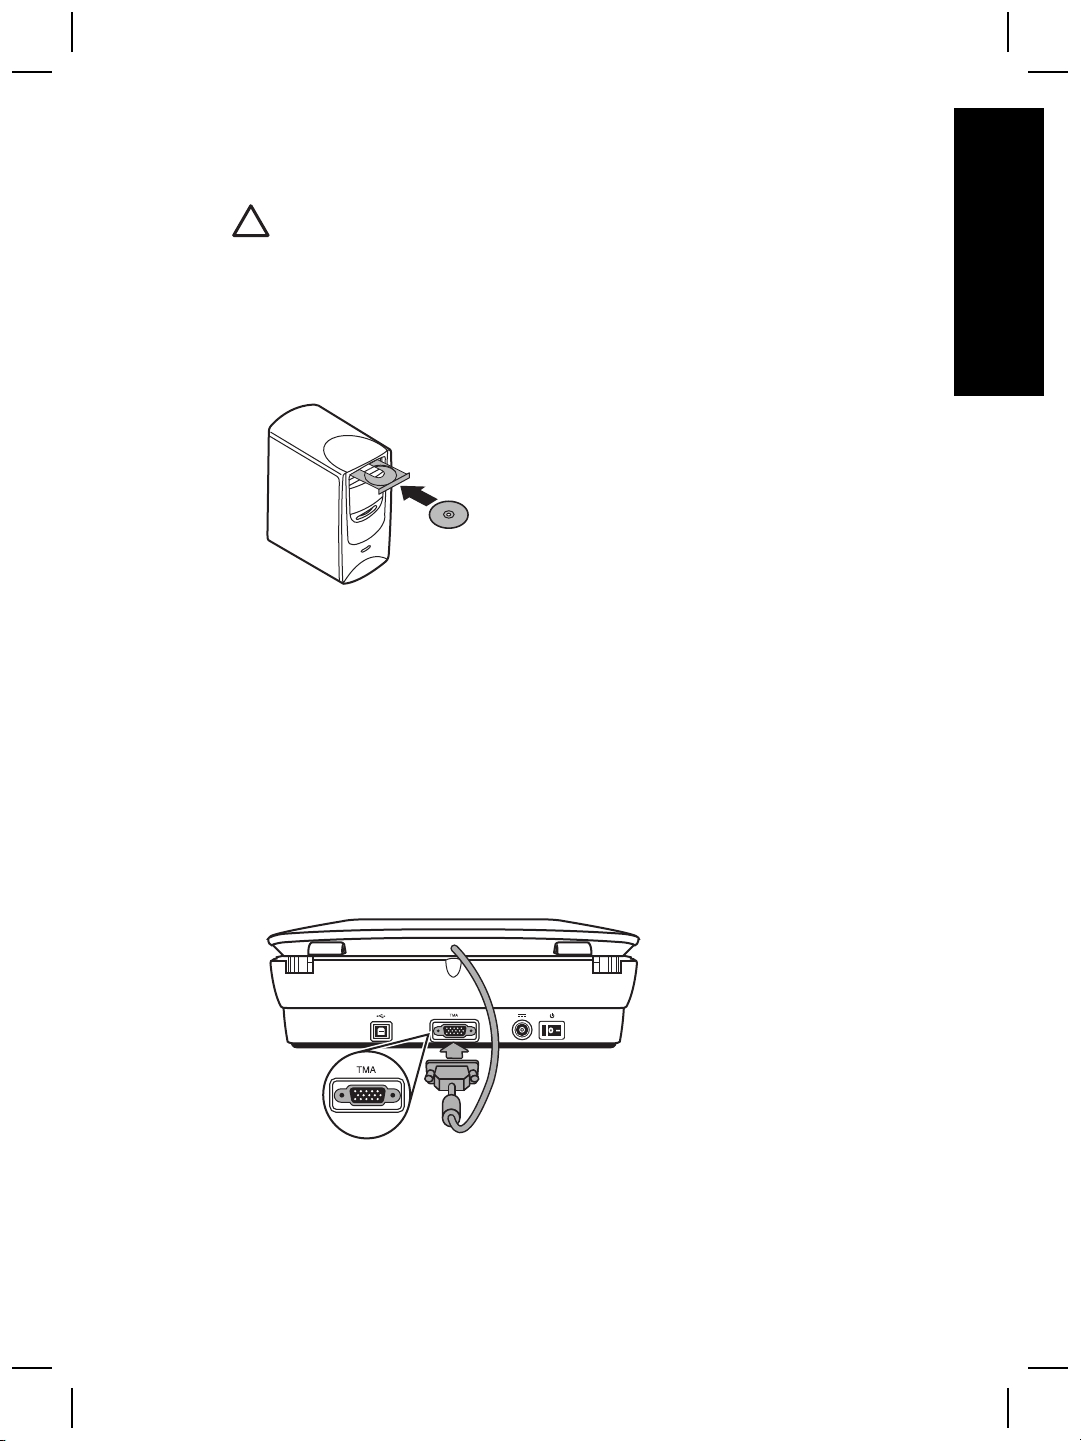
Step 3. Connect the TMA cable
➔
Connect the TMA cable from the lid to the scanner base.
Setup and Support Guide
5
Page 8
Chapter 1
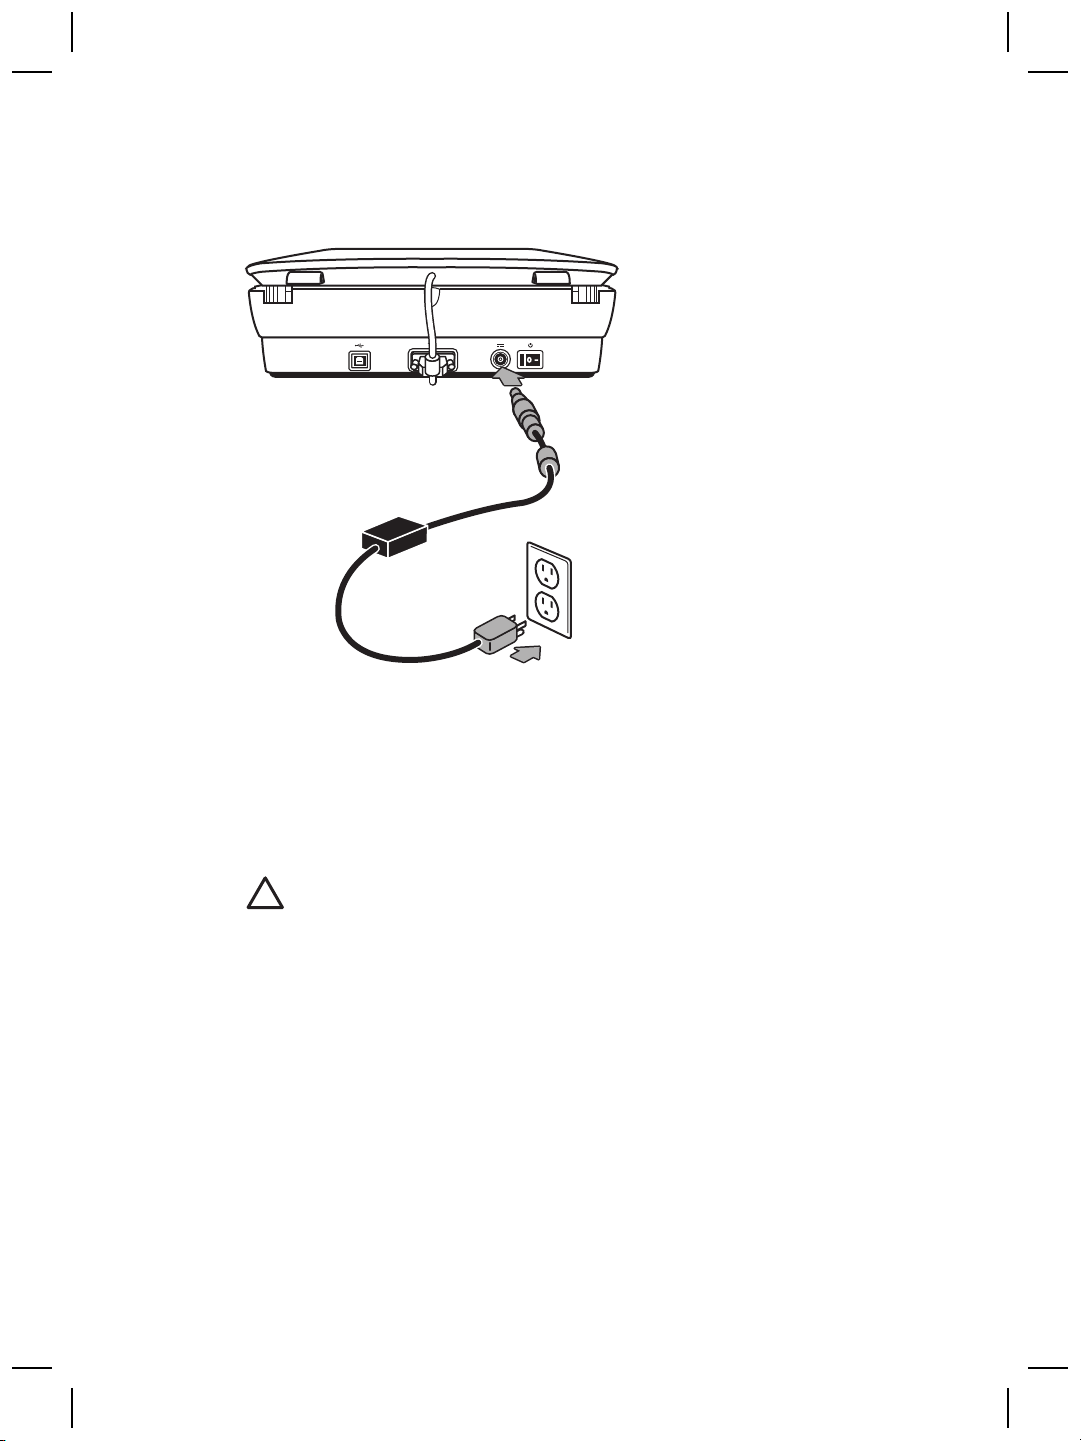
Step 4. Connect the power supply
The power supply has an attached cable that plugs into the back of the scanner.
The power supply also has an AC cable that is connected to the power supply on one
end and plugged into a power outlet or surge protector on the other end.
1. Plug the AC cable into the back of the power supply.
2. Plug the other end of the AC cable into a power outlet or a surge protector.
Step 5. Connect the USB cable
Caution If you are installing in a Windows environment, be sure you install
the HP Photosmart software before connecting the scanner to your computer
with the USB cable. See Step 2. Install the software on page 5. If you are
installing in a Macintosh environment, you can connect the USB cable either
before or after installing the software.
6
HP Scanjet G4000 series
Page 9
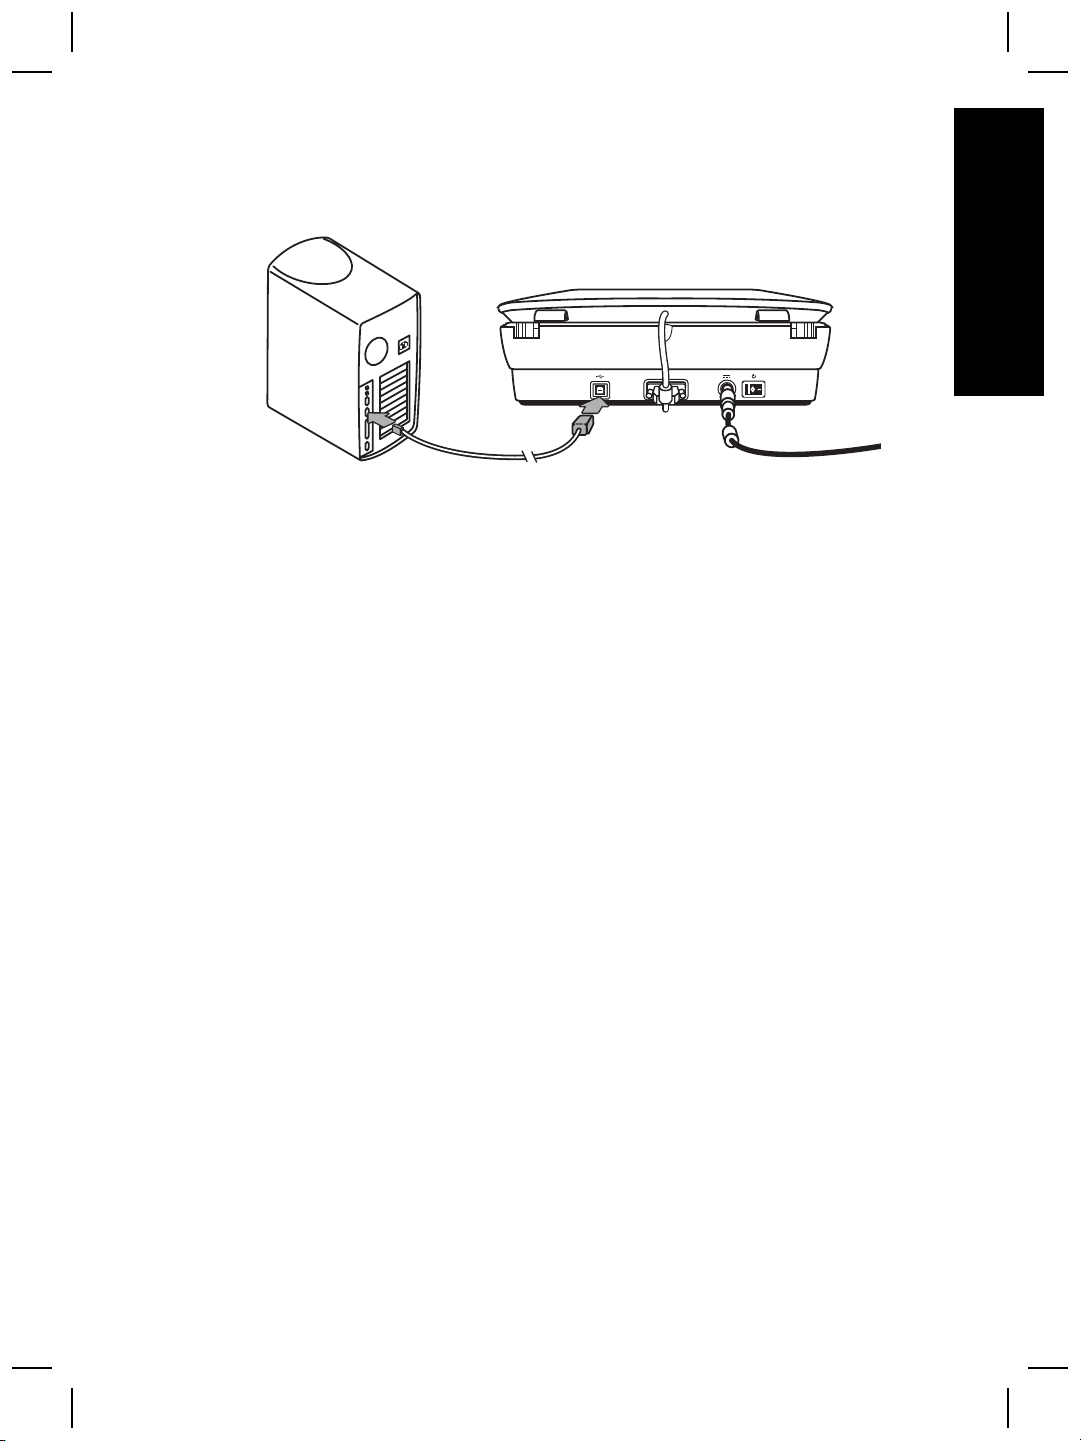
Use the USB cable that came with the scanner to connect the scanner to the computer.
1. Connect the square end of the cable to the scanner.
2. Connect the rectangular end of the cable to the computer.
English
Setup and Support Guide
7
Page 10
Chapter 1
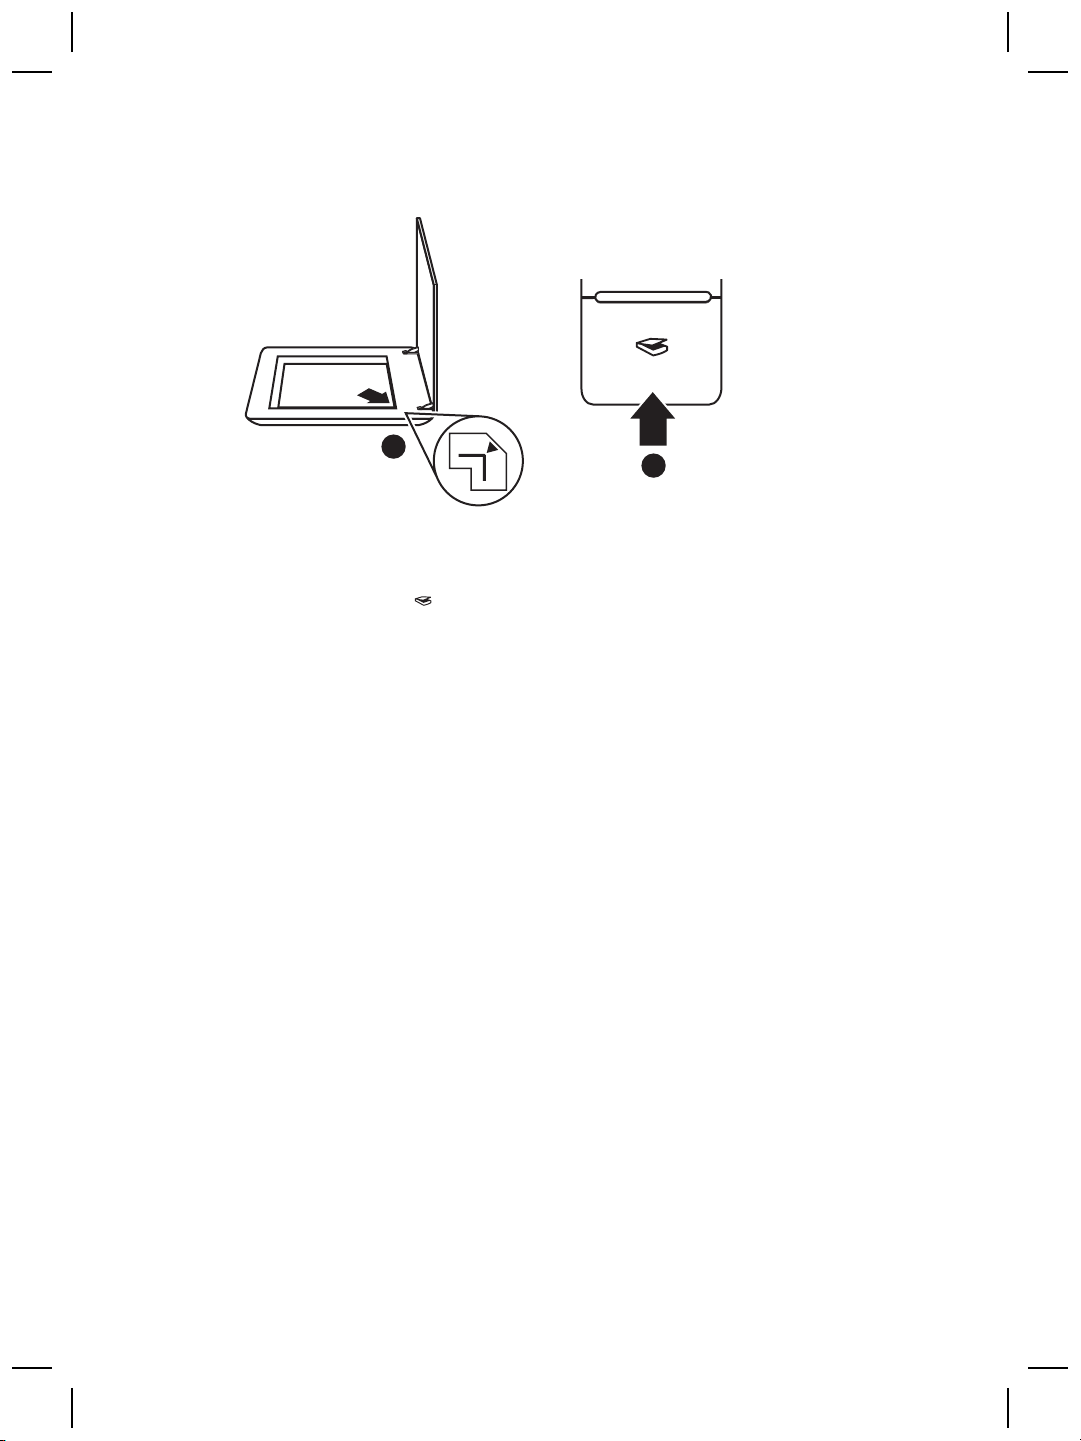
Step 6. Test the installation
1
2
1. Place a photo or document on the scanner glass as indicated by the reference
mark on the scanner.
2. Press the Scan (
What are you scanning? dialog box appears. Follow the onscreen instructions
to complete the scan.
If you are scanning using Macintosh software, the HP Scan Pro application opens
and a preview of the scan is displayed. When the preview is accepted, the
scanned image is sent to the destination that has been selected in the scanner
settings.
If the What are you scanning? dialog box or the HP Scan Pro window does not
appear, see Scanner installation troubleshooting on page 12.
) button. If you are scanning using Windows software, the
8
HP Scanjet G4000 series
Page 11

2
How to use the scanner
This section presents an overview of the scanner and how to use it.
Where to get additional information
More information about the scanner and software can be found in the scanner Help
file. If you have installed the HP Photosmart software that came with the scanner,
double-click the HP Solution Center icon on your desktop, and then click Help and
Support. Under the Documentation section, click Product Help.
To access an online version of the scanner user guide, click Start, point to Programs
or All Programs, point to HP, Scanjet, G4000 series, and then click User Guide.
Macintosh users: For information about scanning procedures, open HP Device
Manager, and then click on the question mark at the bottom of the dialog box.
HP Photosmart Windows software
When you install the HP Photosmart Windows software, two icons are added to your
desktop. These icons open programs for scanning and editing your scans.
For information on how to use HP Solution Center and HP Photosmart software,
see the scanner Help file. Double-click the HP Solution Center icon on your desktop,
and then click Help and Support. Under the Documentation section, click Product
Help.
English
To start a scan:
Double-click the HP Solution Center icon on the desktop, click the tab for the
scanner, and then click the task you want to perform.
Note If the HP Solution Center icon is not available on the desktop, click
Start, point to Programs or All Programs, point to HP, and then click
HP Solution Center.
Setup and Support Guide
HP Solution Center is the program that gets you started
scanning pictures and documents. Use the HP Solution Center
for all of the following:
● Perform scanning and copy functions
● Access help and troubleshooting information
● Access the HP Photosmart software to edit your scans
● Modify settings and preferences
HP Photosmart software is the program to use for manipulating,
printing, archiving, and sharing your images after they have
been scanned. You can get to the HP Photosmart software from
the desktop icon or through HP Solution Center.
9
Page 12
Chapter 2
HP Photosmart Macintosh software
When you install the HP scanning software on a Macintosh, two software programs
are available in the Dock: HP Device Manager and HP Photosmart Studio. These
programs are used for scanning and editing your scans.
HP Device Manager is the program that gets you started
scanning pictures and documents. Use the Device Manager for
all of the following:
● Perform scanning and copy functions
● Access help and troubleshooting information
● Access the HP Photosmart Studio to edit your scans
● Modify settings and preferences
HP Photosmart Studio is the program to use for manipulating,
printing, archiving, and sharing your images after they have
been scanned. You can open HP Photosmart Studio from the
Dock, or from the HP Device Manager Applications menu.
Front panel and accessories overview
This section presents an overview of the scanner front panel and the transparent
materials adapter (TMA).
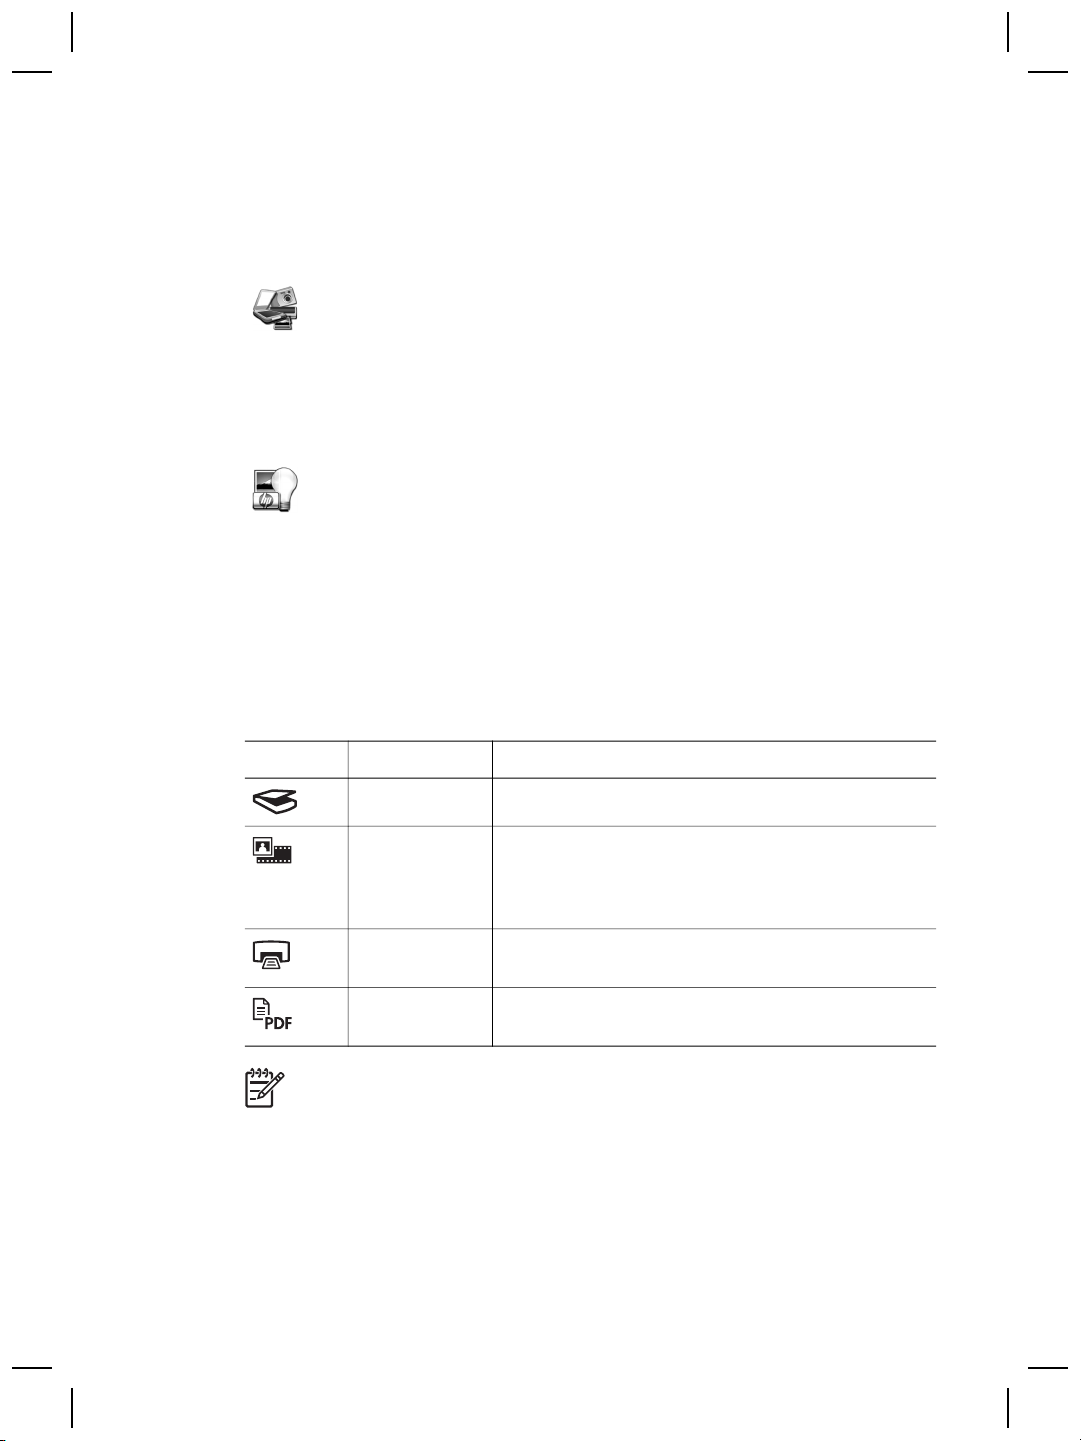
Front-panel buttons
Icon Feature name Description
Scan button Scans pictures, graphics, documents, or objects.
Scan Film
button
Copy button Scans the item and sends it to the printer to make a
Scan to PDF
button
Note For more information on the default actions of these buttons in a
Macintosh environment, open HP Device Manager, and then click on the
question mark at the bottom of the dialog box.
Scans transparent positives (such as 35 mm slides)
and negatives. Scanning film requires that you use
the transparent materials adapter (TMA) located on
the underside of the scanner lid.
copy.
Scans one or more pages and saves them as a PDF
file for sharing or storing.
Transparent materials adapter (TMA)
You can use the transparent materials adapter (TMA) to scan 35 mm slides or
negatives. With the HP Scanjet G4050 TMA you can also scan medium- and largeformat film. For more information about the TMA, see the scanner user guide. For
10
HP Scanjet G4000 series
Page 13

information about how to find the user guide, see Where to get additional information
on page 9.
English
Setup and Support Guide
11
Page 14

3
Scanner installation
troubleshooting
This section contains solutions for installation and setup problems.
Uninstall and reinstall the software
An incomplete software installation could cause the scanner not to be recognized or
the software not to launch correctly. Try uninstalling and then reinstalling the HP
Scanning software. To reinstall the HP Scanning software, you must have the HP
Photosmart software CD.
Windows environment:
1. Click Start, click Settings, and then click Control Panel (in Windows XP, click
Start, and then click Control Panel).
2. Click Add/Remove Programs (in Windows XP, this is called Add or Remove
Programs) and then select HP Scanjet G4000 series.
3. Click Remove.
4. Click Add/Remove Programs (in Windows XP, this is called Add or Remove
Programs) and then select the HP Photosmart software.
5. Click Remove.
6. Unplug the scanner USB cable from the computer.
7. Reinstall the software, using the HP Photosmart software CD that came with your
scanner. When you insert the CD, an installation interface launches
automatically. Choose the HP Photosmart software to install.
8. Reconnect the scanner USB cable after the software is installed. For more
information see Step 5. Connect the USB cable on page 6.
Macintosh environment:
1. Go to Applications/Hewlett-Packard and open HP Uninstaller.
12
Note You must have administrative privileges in order to uninstall the
software.
2. When prompted, type your username and password. The HP Uninstaller window
opens and displays the products that are available to be uninstalled.
3. Select the G4000 series product and click Next.
4. Follow the onscreen instructions to complete the uninstall process.
5. Reinstall the software, using the HP software CD that came with your scanner.
After inserting the CD, click on the CD icon that appears on your desktop to begin
the installation.
HP Scanjet G4000 series
Page 15

Check the cables
Cable type Action
Power cable The power cable is connected between the scanner and a
power outlet.
● Ensure that the power cable is securely connected
between the scanner and a live electrical outlet or surge
protector.
● If the power cable is connected to a surge protector,
ensure that the surge protector is plugged into an outlet
and turned on.
● Turn off the scanner power switch and turn off the
computer. After 60 seconds, turn the scanner back on
and then turn on the computer, in that order.
USB cable The USB cable is connected between the scanner and the
computer.
● Use the cable that was included with the scanner.
Another USB cable might not be compatible with the
scanner.
● Ensure that the USB cable is securely connected
between the scanner and the computer.
● If the USB cable is connected to a USB port on the front
of the computer, move it to a USB port on the back of the
computer.
For additional USB troubleshooting information,
see www.hp.com/support, select your country/region, and
then use the search tool to find USB troubleshooting topics.
English
TMA cable The TMA cable is connected between the TMA in the scanner
Setup and Support Guide
lid and the scanner base.
Ensure the cable is securely connected in the back of the
scanner.
13
Page 16

4
Regulatory information and
product specifications
This section contains regulatory information and product specifications for the
HP Scanjet G4000 series Photo Scanner and accessories.
Scanner specifications
Name Description
Scanner type Flatbed with transparent materials adapter (TMA)
Size G4010: 303 mm x 5088 mm x 98 mm (11.93 x 20.00 x 3.86
inches)
G4050: 303 mm x 5088 mm x 108 mm (11.93 x 20.00 x 4.25
inches)
Weight G4010: 4.4 kg (9.6 lbs)
G4050: 5.3 kg (11.6 lbs)
Scanning element Charged-coupled device
Interface USB 2.0 Hi-Speed
Hardware
resolution
Selectable
resolution
AC line voltage
Regulatory
information
4800 x 9600 dpi hardware resolution
12 dpi to 999,999 enhanced dpi at 100 percent scaling
100-120 V 60 Hz – North America
200-240 V 50 Hz – Continental Europe, United Kingdom,
Australia
100-240 V 50 Hz/60 Hz – Rest of the world
Regulatory model identification number: For regulatory
identification purposes, your product is assigned a Regulatory
Model Number. The Regulatory Model Number for your product
is FCLSD-0605. This regulatory number should not be
confused with the product name (HP Scanjet G4010 or G4050)
or product numbers (L1956A and L1957A).
Energy usage drops significantly while in ENERGY STAR®
mode, which saves natural resources, and saves money
without affecting the high performance of this product. This
product qualifies for ENERGY STAR (MOU v. 1.0), which is a
voluntary program established to encourage the development
of energy-efficient office products.
14
HP Scanjet G4000 series
Page 17

Name Description
ENERGY STAR is a U.S. registered service mark of the U.S.
EPA. As an ENERGY STAR partner, HP has determined that
this product meets ENERGY STAR guidelines for energy
efficiency. For more information on ENERGY STAR guidelines,
go to the following Web site: www.energystar.gov
Transparent materials adapter (TMA) specifications
Name Description
Media types G4010: Up to five 35 mm slides or six 35 mm negative
frames
G4050: Up to sixteen 35 mm slides, thirty 35 mm
negative frames, up to two medium format film frames
(120 roll film), or one large format film frame (220 roll
film).
Power requirements 12 Volts/400 mA max
Power consumption and
regulatory information
For power consumption data, information on power
supplies, and regulatory information, see the
regulatory_supplement.htm file on the HP Photosmart
software CD.
Environmental specifications
English
Name Description
Temperature Operating the scanner and TMA: 10° to 35°C (50° to
95°F)
Storage: -40° to 60°C (-40° to 140°F)
Relative humidity Operating the scanner and TMA: 15% to 80%
noncondensing 10° to 35°C (50° to 95°F)
Storage: up to 90% noncondensing at 0° to 60°C (32°
to 140°F)
Recycle and restricted material information
Recycling
HP offers an increasing number of product return and recycling programs in many
countries/regions, and partners with some of the largest electronics recycling centers
throughout the world. HP conserves resources by reselling some of its most popular
Setup and Support Guide
15
Page 18

Chapter 4
products. For more information regarding recycling of HP products, please
visit: www.hp.com/hpinfo/globalcitizenship/environment/recycle/
Product restricted material
This HP product contains the following material that might require special handling at
end-of-life: Mercury in the scanner fluorescent lamp and transparent materials adapter
(< 5 mg).
For recycling information, contact www.hp.com/go/recycle, your local authorities, or
the Electronic Industries Alliance at www.eiae.org.
Disposal of Waste Equipment by Users in Private
Households in the European Union
This symbol on the product or on its packaging indicates that this product must not be
disposed of with your other household waste. Instead, it is your responsibility to
dispose of your waste equipment by handing it over to a designated collection point
for the recycling of waste electrical and electronic equipment. The separate collection
and recycling of your waste equipment at the time of disposal will help to conserve
natural resources and ensure that it is recycled in a manner that protects human
health and the environment. For more information about where you can drop off your
waste equipment for recycling, please contact your local city office, your household
waste disposal service, or the shop where you purchased the product.
16
HP Scanjet G4000 series
Page 19

5
Product support
This section describes the options for product support.
Accessibility
The following accessibility options are available on this scanner:
Windows environment:
● To prevent buttons from being accidentally pushed, you can use the Button
Disable Utility to disable the buttons. You can use the same utility to re-enable
the buttons.
For more information about the Button Disable Utility, see the scanner User Guide.
● The scanner User Guide is also available in a Help format that is readable by
most screen readers. To find this file, double-click the HP Solution Center icon
on your desktop, and then click Help and Support. Under the Documentation
section, click Product Help.
Macintosh environment:
● To prevent buttons from being accidentally pushed, use the Button Disable Utility
to disable the buttons. You can use the same utility to re-enable the buttons.
For more information about the Button Disable Utility, see the HP Scanjet
Scanner Help.
● The HP Scanjet Scanner Help is available in a format that is readable by most
screen readers. To find this file, open HP Device Manager, and then click on the
question mark at the bottom of the dialog box.
Customers with disabilities can get help by
visiting www.hp.com/hpinfo/community/accessibility/prodserv/ (English only).
English
HP Scanjet Web site
Visit www.hp.com and select your country/language at the top of the page. On the
country page, select scanners from the list of products. Use this site for a variety of
information:
● Find solutions to technical issues.
● Learn tips for scanning more effectively and creatively.
● Update your HP drivers and software.
● Register your product.
● Subscribe to newsletters, driver and software updates, and support alerts.
● Purchase HP supplies and accessories.
Setup and Support Guide
17
Page 20

Chapter 5
Getting assistance
In order to get the best from your HP product, please consult the following standard
HP support offerings:
1. Please consult the product documentation that came with the product.
– Review the troubleshooting section or electronic Help of this manual/CD.
– Review the electronic Help section within the software.
2. Visit the HP online support at www.hp.com/support or contact your point of
purchase.
HP online support is available to all HP customers. It is the fastest source for upto-date product information and expert assistance, including the following features:
– Fast E-mail access to qualified online support specialists
– Software and driver updates for your product
– Valuable product and troubleshooting information for technical issues
– Proactive product updates, support alerts, and HP newsletters (available
when you register your product)
3. HP support by phone
– Support options and fees vary by product, country and language.
– Fees and policies are subject to change without notice. Please check the
Web site www.hp.com/support for the latest information.
4. Post-warranty period
After the limited warranty period, help is available online at www.hp.com/support.
5.
Extending or upgrading your warranty
If you would like to extend or upgrade the product’s warranty, please contact your
point of purchase or check the HP Care Pack Services at www.hp.com/support.
6. If you already purchased an HP Care Pack Service, please check the support
conditions in your contract.
18
HP Scanjet G4000 series
Page 21

6
Hewlett-Packard limited
warranty statement
The following information outlines the warranty information for this product.
English
Product
HP Scanjet G4000
series scanner
A. Extent of limited warranty
1. Hewlett-Packard (HP) warrants to the end-user customer (Customer) that each
HP product specified above (Product) shall be free from defects in material and
workmanship for the period specified above. The warranty period begins on the
date of purchase by Customer.
2. For each software product, HP’s limited warranty applies only to a failure to
execute programming instructions. HP does not warrant that the operation of any
Product will be uninterrupted or error free.
3. HP’s limited warranty covers only those defects that arise as a result of normal
use of a Product, and does not cover any other problems, including those that
arise as a result of:
a. Improper use, maintenance, storage, handling, or modification;
b. Software, media, parts, accessories, supplies, or power adapters or sources
not provided or supported by HP; or,
c. Operation or other conditions outside a Product’s specifications.
4. If HP receives, during the applicable warranty period, notice of a defect in a
Product, HP shall at its option either replace or repair the defective Product.
5. If HP cannot replace or repair a defective Product that is covered by HP’s limited
warranty, HP may, within a reasonable time after being notified of the defect,
provide either another product similar in performance or a refund of the purchase
price prorated based on usage and other appropriate factors.
6. HP shall have no obligation to replace, repair, or refund until Customer returns
the defective Product to HP and provides a valid proof of purchase.
7. Any replacement product may be either new or like-new, provided it has
functionality at least equal to that of the Product being replaced.
8. A Product may contain remanufactured parts, components, or materials
equivalent to new in performance.
9. HP’s limited warranty is valid in any country or locality where HP has a support
presence for the Product and has marketed the Product. The level of warranty
service may vary according to local standards. Upgraded warranty services, such
as next day exchange, on-site service, and accident protection, may be
purchased from HP.
Duration of limited warranty
1 year
B. Limitations of Warranty
TO THE EXTENT ALLOWED BY LOCAL LAW, NEITHER HP NOR ITS THIRD
PARTY SUPPLIERS MAKE ANY OTHER WARRANTY OR CONDITION OF ANY
Setup and Support Guide
19
Page 22

Chapter 6
KIND, WHETHER EXPRESS OR IMPLIED, WITH RESPECT TO A PRODUCT, AND
SPECIFICALLY DISCLAIM THE IMPLIED WARRANTIES OR CONDITIONS OF
MERCHANTABILITY, SATISFACTORY QUALITY, AND FITNESS FOR A
PARTICULAR PURPOSE.
C. Limitations of Liability
1. To the extent allowed by local law, the remedies provided in this Limited Warranty
Statement (LWS) are Customer’s sole and exclusive remedies.
2. TO THE EXTENT ALLOWED BY LOCAL LAW, EXCEPT FOR THE
OBLIGATIONS SPECIFICALLY SET FORTH IN THIS LWS, IN NO EVENT
SHALL HP OR ITS THIRD PARTY SUPPLIERS BE LIABLE FOR DIRECT,
INDIRECT, SPECIAL, INCIDENTAL, OR CONSEQUENTIAL DAMAGES,
WHETHER BASED ON CONTRACT, TORT, OR ANY OTHER LEGAL THEORY
AND WHETHER ADVISED OF THE POSSIBILITY OF SUCH DAMAGES.
D. Local Law
1. This LWS gives Customer specific legal rights. Customer may also have other
rights that vary from state to state in the United States, from province to province
in Canada, and from country to country elsewhere in the world.
2. To the extent this LWS is inconsistent with local law, this LWS shall be deemed
modified to be consistent with local law. Under local law, certain disclaimers and
limitations of this LWS may not apply to Customer. For example, the federal
government of the United States, some states in the United States, and some
governments outside the United States (including provinces in Canada), may:
a. Grant Customer additional warranty rights;
b. Preclude the disclaimers and limitations in this LWS from limiting the
statutory rights of a consumer (e.g., the United Kingdom);
c. Otherwise restrict the ability of a manufacturer to enforce such disclaimers or
limitations;
d. Specify the duration of implied warranties that the manufacturer cannot
disclaim; or,
e. Disallow limitations on the duration of implied warranties
3. Customer may have additional statutory rights based on its purchase agreement.
Those rights are not in any way affected by this LWS.
4. For consumer transactions in the United States, any implied warranties imposed
by law are limited in duration to the express warranty period.
5. FOR CONSUMER TRANSACTIONS IN AUSTRALIA AND NEW ZEALAND, THE
TERMS IN THIS LWS, EXCEPT TO THE EXTENT LAWFULLY PERMITTED,
DO NOT EXCLUDE, RESTRICT, OR MODIFY, AND ARE IN ADDITION TO,
THE MANDATORY STATUTORY RIGHTS APPLICABLE TO THE SALE OF A
PRODUCT TO SUCH CUSTOMERS.
You may have additional statutory rights against the seller based on your purchase
agreement. Those rights are not in any way affected by this HP Limited Warranty.
You will find on the inside front cover of this book the names and address of the HP
entity responsible for the performance of the HP Limited Warranty in your country.
20
HP Scanjet G4000 series
Page 23

安裝和支援指南
繁體中文
Page 24

版權與授權
© 2006 Copyright Hewlett-Packard
Development Company, L.P.
除非事先經過書面授權同意,否則不得
在著作權法同意的範圍之外從事翻印、
改寫或翻譯等行為。
本文所包含的資訊如有變更,恕不另行
通知。
本產品與服務所附的保固聲明是 HP 對
其產品與服務的唯一保固內容。除此之
外,不含任何附加保固。HP 對所含資
訊在技術或編輯上的錯誤或疏漏概不負
責。
商標信用
Microsoft 和 Windows 是微軟公司的註
冊商標。
Page 25

目錄
1
立即開始 .....................................................................................................4
步驟 1. 檢查包裝盒內物品 ..........................................................................4
步驟 2. 安裝軟體 .........................................................................................5
步驟 3. 連接 TMA 纜線 ...............................................................................5
步驟 4. 連接電源供應器 ..............................................................................6
步驟 5. 連接 USB 纜線 ...............................................................................6
步驟 6. 測試安裝 .........................................................................................8
2
如何使用掃描器 ..........................................................................................9
何處尋找更多資訊 .......................................................................................9
HP Photosmart Windows 軟體 ...................................................................9
HP Photosmart Macintosh 軟體 ...............................................................10
前面板和配件概觀 ....................................................................................10
前面板按鈕 .........................................................................................10
投影片材料配接器 (TMA) ...................................................................10
3
掃描器安裝疑難排解 .................................................................................11
解除安裝與重新安裝軟體 ..........................................................................11
檢查纜線 ...................................................................................................12
4
管制資訊及產品規格 .................................................................................13
掃描器規格 ...............................................................................................13
透明材質配接器 (TMA) 規格 .....................................................................14
環境規格 ...................................................................................................14
資源回收和限制材料的資訊 ......................................................................14
歐洲聯盟的私人設備報廢制度 ..................................................................15
5
產品支援 ...................................................................................................16
無障礙 .......................................................................................................16
HP Scanjet 網站 .......................................................................................16
取得支援 ...................................................................................................17
6
Hewlett-Packard 有限保固聲明 ..............................................................18
繁體中文
安裝和支援指南
3
Page 26

1
立即開始
請遵照這些步驟安裝掃描器:
步驟 1. 檢查包裝盒內物品
取出掃描器硬體。請務必移除所有的包裝膠帶。
1
6
5
2
1
2
3
4
5
6
3
4
HP Scanjet G4010 或 G4050 掃描器
USB 纜線
電源供應器
安裝和支援指南 (本書)
掃描軟體 CD
TMA 樣板 (僅適用於 HP Scanjet G4050)
4
HP Scanjet G4000 系列
Page 27

步驟 2. 安裝軟體
注意 若您正將軟體安裝至 Windows 電腦上,請先別將 USB 纜線連接
至電腦。請先安裝掃描軟體再連接 USB 纜線。若您正將軟體安裝至
Macintosh 電腦上,則可在安裝軟體之前或之後連接 USB 纜線。
1.
將掃描器附隨的 HP Photosmart CD 放入電腦的光碟機中。
對於 Windows 安裝: 稍候片刻,等安裝對話方塊顯示。幾分鐘之後,若
安裝對話方塊並沒有出現,請參閱位於第 11
解」。
對於 Macintosh 安裝: 連按兩下桌面上出現的 CD 圖示,然後連按兩下
HP Scanjet 掃描器安裝圖示以開始安裝。
2.
按一下「安裝軟體」以安裝掃描軟體。請按照螢幕上的指示完成掃描軟體
的安裝。
繁體中文
頁的「掃描器安裝疑難排
步驟 3. 連接 TMA 纜線
➔
將 TMA 纜線從蓋板連接至掃描器基座
安裝和支援指南
5
Page 28

第 1 章
步驟 4. 連接電源供應器
電源供應器有一個插入掃描器背面的連接纜線。
電源供應器也有一條 AC 纜線,一端連接到電源供應器,另一端則插入至電源
插座或電湧保護器。
1.
將 AC 纜線插入電源供應器的背面。
2.
將 AC 纜線的另一端插入電源插座或電湧保護器。
步驟 5. 連接 USB 纜線
注意 若您正在 Windows 環境中進行安裝,請務必先安裝 HP
Photosmart 軟體,然後再使用 USB 纜線將掃描器連接至電腦。請參閱
位於第 5
裝,則可在安裝軟體之前或之後連接 USB 纜線。
頁的「步驟 2. 安裝軟體」。若您正在 Macintosh 環境中進行安
6
HP Scanjet G4000 系列
Page 29

使用掃描器隨附的 USB 纜線將掃描器連接到電腦。
1.
將纜線的正方形端頭連接至掃描器。
2.
將纜線的長方形端頭連接至電腦。
繁體中文
安裝和支援指南
7
Page 30

第 1 章
步驟 6. 測試安裝
1
1.
如掃描器上的參考標記所示,將相片或文件放在掃描器玻璃板上。
2.
按下掃描 (
) 按鈕。若您正使用 Windows 軟體進行掃描,「您正在掃描什
2
麼?」對話方塊將會出現。請遵照螢幕上的指示完成掃描。
若您正使用 Macintosh 軟體進行掃描,則 HP Scan Pro 應用程式會開啟,
並顯示掃描的預覽影像。若您接受預覽結果,所掃描的影像會傳送到掃描
器設定中所選擇的目的地。
若「您正在掃描什麼?」對話方塊或 HP Scan Pro 視窗未出現,請參閱
位於第 11
頁的「掃描器安裝疑難排解」。
8
HP Scanjet G4000 系列
Page 31

2
如何使用掃描器
本節介紹掃描器概觀和如何使用掃描器。
何處尋找更多資訊
您可以在掃描器「說明」檔中,找到掃描器和軟體的更多資訊。若已安裝掃描
器隨附的 HP Photosmart 軟體,請連按兩下桌面上的 「HP 解決方案中心」圖
示,然後按一下「說明和支援」。在「說明文件」章節下,按一下「產品說
明」。
要存取線上版本的掃描器使用者指南,請按一下「開始」,指向「程式集」或
「所有程式」,指向 「HP」、「Scanjet」、「G4000 系列」,然後按一下
「使用者指南」。
Macintosh 使用者: 有關掃描程序的資訊,請開啟 「HP 裝置管理員」,然後
按一下對話方塊底部的問號。
HP Photosmart Windows 軟體
當您安裝 HP Photosmart Windows 軟體時,桌面會新增兩個圖示。這些圖示
可開啟用於掃描與編輯掃描的兩個程式。
如需有關如何使用 「HP 解決方案中心」與 「HP Photosmart 」軟體的資訊,
請參閱掃描器說明檔。連按兩下桌面的 「HP 解決方案中心」圖示,然後按一
下「說明與支援」。在「說明文件」章節下,按一下「產品說明」。
繁體中文
要開始掃描,請:
連按兩下桌面上的 「HP 解決方案中心」圖示,按一下掃描器的標籤,然後按
一下要執行的工作。
安裝和支援指南
HP 解決方案中心程式可讓您開始掃描圖片與文件。使用
HP 解決方案中心可進行下列所有作業:
●
執行掃描及影印功能
●
存取說明與疑難排解資訊
●
存取 HP Photosmart 軟體以編輯掃描內容
●
修改設定與偏好
HP Photosmart 軟體可在影像掃描之後,用來操作、列
印、存檔及共用影像。您可以從桌面圖示或透過 HP 解決方
案中心進入 HP Photosmart 軟體。
附註 若 「HP 解決方案中心」圖示沒有出現在桌面上,請按一下「開
始」,指向「程式集」或「所有程式」,指向 「HP」,然後按一下
「HP 解決方案中心」。
9
Page 32

第 2 章
HP Photosmart Macintosh 軟體
當您將 HP 掃描軟體安裝於 Macintosh 時,底座上會出現兩個可用的軟體程
式:HP 裝置管理員及 HP Photosmart Studio。這兩個程式可用來掃描與編輯
掃描內容。
HP 裝置管理員可讓您開始掃描圖片與文件。使用裝置管理
員可進行下列所有作業:
●
執行掃描及影印功能
●
存取說明與疑難排解資訊
●
存取 HP Photosmart Studio 來編輯您的掃描內容
●
修改設定與偏好
HP Photosmart Studio 程式可在影像掃描之後,用來操
作、列印、存檔及共用影像。您可以從底座或 HP 裝置管理
員「應用程式」功能表,開啟 HP Photosmart Studio。
前面板和配件概觀
本章節介紹掃描器前面板與投影片材料配接器 (TMA) 的概觀。
前面板按鈕
圖示
附註 如需這些按鈕在 Macintosh 環境中預設動作的詳細資訊,請開啟
「HP 裝置管理員」,然後按一下對話方塊底部的問號。
投影片材料配接器 (TMA)
您可以使用投影片材料配接器 (TMA) 掃描 35 公釐的幻燈片或負片。使用 HP
Scanjet G4050 TMA,您也可以掃描中型與大型膠捲。如需 TMA 的詳細資
訊,請參閱掃描器《使用者指南》。如需如何尋找使用者指南的相關資訊,請
參閱位於第 9
功能名稱 描述
掃瞄按鈕 掃描圖片、圖形、文件或物件。
掃瞄膠捲按鈕
影印按鈕 掃描項目並傳送至印表機以進行影印。
掃描至 PDF按鈕掃描一或多頁,並儲存為 PDF 檔,以進行檔案
頁的「何處尋找更多資訊」。
掃描投影片正片 (如 35 公釐幻燈片) 與負片。掃
描膠捲需要使用掃描器蓋板底側的投影片材料配
接器 (TMA)。
儲存或共享。
10
HP Scanjet G4000 系列
Page 33

3
掃描器安裝疑難排解
本節包含安裝和設定問題的解決方案。
解除安裝與重新安裝軟體
軟體安裝不完整會導致系統無法辨視掃描器,或是軟體無法正確啟動。嘗試解
除安裝,然後重新安裝 HP 掃描軟體。要重新安裝 HP 掃描軟體,您必須備有
HP Photosmart 軟體 CD。
Windows 環境:
1.
按一下「開始」,按一下「設定」,然後按一下「控制台」 (在 Windows
XP 中,按一下「開始」,然後按一下「控制台」)。
2.
按一下「新增/移除程式」 (在 Windows XP 中稱為「新增或移除程式」),
然後選擇 「HP Scanjet G4000 系列」。
3.
按一下「移除」。
4.
按一下「新增/移除程式」 (在 Windows XP 中稱為「新增或移除程式」),
然後選擇 「HP Photosmart」 軟體。
5.
按一下「移除」。
6.
從電腦拔除掃描器 USB 纜線。
7.
使用您掃描器隨附的 HP Photosmart 軟體 CD 重新安裝軟體。插入 CD
後,安裝介面會自動啟動。選擇 「HP Photosmart 」軟體以進行安裝。
8.
軟體安裝好之後,重新連接掃描器 USB 纜線。如需更多資訊,請參閱
位於第 6
Macintosh 環境:
1.
移至應用程式/Hewlett-Packard 並開啟「 HP 解除安裝程式」。
頁的「步驟 5. 連接 USB 纜線」。
繁體中文
2.
3.
4.
5.
安裝和支援指南
附註 您必須擁有管理權限才能解除安裝軟體。
系統提示時,鍵入您的使用者名稱與密碼。「HP 解除安裝程式」視窗會開
啟,並顯示可以解除安裝的產品。
選擇 G4000 系列產品,然後按一下「下一步」。
請按照螢幕上的指示完成解除安裝程序。
使用您掃描器隨附的 HP 軟體 CD 重新安裝軟體。插入 CD 後,按一下桌
面上出現的 CD 圖示,以開始進行安裝。
11
Page 34

第 3 章
檢查纜線
纜線類型 動作
電源線 電源線連接掃描器與電源插座。
USB 纜線 USB 纜線連接掃描器與電腦。
●
請檢查電源線是否穩固地連接掃描器與通電的電源插
座或電湧保護器。
●
若電源線連接電湧保護器,請確定電湧保護器已插入
電源插座中並且已開啟。
●
關閉掃描器電源開關,並關閉電腦。60 秒之後,請
重新開啟掃描器電源,然後開啟電腦。
●
使用掃描器隨附的纜線。其他 USB 纜線可能與掃描
器不相容。
●
確定 USB 纜線穩固地連接掃描器與電腦。
●
若 USB 纜線已連接至電腦前面的 USB 連接埠,請將
其移至電腦背面的 USB 連接埠。
如需其他 USB 疑難排解資訊,請參
閱 www.hp.com/support,選擇您所在的國家/地區,然
後使用搜尋工具尋找 USB 疑難排解主題。
TMA 纜線
將 TMA 纜線連接在掃描器蓋板中的 TMA 與掃描器基座
之間。
請確定纜線已穩固地連接至掃描器背面。
12
HP Scanjet G4000 系列
Page 35

4
管制資訊及產品規格
本章節包含 HP Scanjet G4000 系列相片掃描器與配件的管制資訊與產品規
格。
掃描器規格
名稱 描述
掃描器類型
大小
重量
掃描元素 充電耦合裝置
介面
硬體解析度
可選擇的解析度
交流電壓
法規資訊 法規辨識型號:為了法規辨識的目的,所以您的產品擁有
內附投影片材料配接器 (TMA) 的掃描器
G4010: 303 x 508 x 98 公釐 (11.93 x 20.00 x 3.86 英吋)
G4050: 303 x 508 x 108 公釐 (11.93 x 20.00 x 4.25 英
吋)
G4010: 4.4 公斤 (9.6 磅)
G4050: 5.3 公斤 (11.6 磅)
高速 USB 2.0
4800 x 9600 dpi 硬體解析度
縮放比例為百分之 100 時為 12 dpi 至 999,999 增強 dpi
北美為 100-120 V 60 Hz
歐洲大陸、英國、澳洲為 200-240 V 50 Hz
世界其他國家/地區為 100-240 V 50 Hz/60 Hz
一個法規辨識型號 (Regulatory Model Number)。您產品的
法規辨識型號為 FCLSD-0605。此法規型號不應與產品名
稱 (HP Scanjet G4010 或 G4050) 或產品編號 (L1956A 與
L1957A) 混淆。
繁體中文
安裝和支援指南
在 ENERGY STAR® 模式下,能源的使用大幅減少,如此
可在不影響本產品高效能執行下,節省自然資源並省下金
錢。本產品符合 ENERGY STAR (MOU v. 1.0),此為一個
志願計劃,旨在鼓勵發展有能源效率的辦公用品。
ENERGY STAR 是美國環保局 (EPA) 的美國註冊服務標
記。作為 ENERGY STAR 的合作夥伴,HP 已經判定本產
品符合能源效率的 ENERGY STAR 方針。如需 ENERGY
STAR 指南的詳細資訊,請至以下網站查
詢: www.energystar.gov
13
Page 36

第 4 章
透明材質配接器 (TMA) 規格
名稱 描述
紙材類型
電力需求
耗電量與管制資訊 如需耗電量資料、電源供應器的資訊以及管制資
環境規格
名稱 描述
溫度
相對濕度
G4010: 最多五張 35 公釐幻燈片或六張 35 公釐
負片
G4050: 最多十六張 35 公釐幻燈片、三十張 35
公釐負片、最多兩張中型膠捲 (120 捲膠捲) 或一張
大型膠捲 (220 捲膠捲)。
最大 12 伏特/400 毫安
訊,請參閱 HP Photosmart 軟體 CD 上的
regulatory_supplement.htm 檔案。
操作掃描器和投影片材料配接器 (TMA) 時:10°
至 35° C (50° 至 95° F)
存放:-40° 至 60° C (-40° 至 140° F)
操作掃描器與投影片材料配接器 (TMA) 時:15%
至 80% 非冷凝 10° 至 35°C (50° 至 95°F)
存放:在 0° 至 60°C (32° 至 140°F) 時高達 90%
無冷凝
資源回收和限制材料的資訊
資源回收
HP 在許多國家/地區,提供愈來愈多的產品回收與資源回收計畫,並與全球數
家規模最龐大的電子回收中心共同合作。HP 藉由轉售其最受歡迎的產品以維
護資源。如需 HP 產品回收的詳細資訊,請造
訪: www.hp.com/hpinfo/globalcitizenship/environment/recycle/
產品限制的材料
此 HP 產品包含下列在產品壽命終結時,需要特殊處理的材料:掃描器螢光燈
管和透明材料配接器中的汞 (< 5 毫克)。
如需回收資訊,請造訪 www.hp.com/go/recycle,與您當地的官方機構聯
絡,或造訪電子工業協會 (Electronic Industries Alliance) 網
站 www.eiae.org。
14
HP Scanjet G4000 系列
Page 37

歐洲聯盟的私人設備報廢制度
這個在產品或產品包裝上的符號表示,您不能將此產品連同家中的其他垃圾一
起丟棄。您有責任將要報廢的設備交到專門資源回收廢電子和電機設備的集中
地。在報廢設備時進行分別集中和資源回收,不但可以幫忙維護自然資源,也
能確保該設備的回收方式能保護人類的健康和環境。如需更多有關如何處置欲
資源回收的廢設備的資訊,請聯絡當地市政府、家用垃圾處理服務處,或是您
購買該產品的商店。
繁體中文
安裝和支援指南
15
Page 38

5
產品支援
本節將說明產品支援的選項。
無障礙
下列是可用於掃描器的無障礙選項:
Windows 環境:
●
為預防不小心按到按鈕,您可以使用「按鈕停用公用程式」停用按鈕。您
可以使用相同的公用程式重新啟用按鈕。
如需「按鈕停用公用程式」的詳細資訊,請參閱掃描器《使用者指南》。
●
掃描器《使用者指南》也有「說明」格式版本,可供大部份螢幕閱讀者參
閱。要尋找這個檔案,請連按兩下桌面的 「HP 解決方案中心」圖示,然
後按一下「說明與支援」。在「說明文件」章節下,按一下「產品說
明」。
Macintosh 環境:
●
為預防不小心按到按鈕,請使用「按鈕停用公用程式」停用按鈕。您可以
使用相同的公用程式重新啟用按鈕。
如需「按鈕停用公用程式」的詳細資訊,請參閱 HP Scanjet 掃描器說明。
●
HP Scanjet 掃描器說明採用大部分螢幕閱讀者都能閱讀的格式。要尋找這
個檔案,請開啟 「HP 裝置管理員」,然後按一下對話方塊底部的問號。
有使用障礙的客戶,可造
訪 www.hp.com/hpinfo/community/accessibility/prodserv/ (僅支援英文)。
HP Scanjet 網站
請造訪 www.hp.com 並在頁首選擇您的國家/語言。在國家/地區網頁上,請從
產品清單中選擇掃描器。請使用這個網站以取得各種資訊:
●
尋找技術問題的解決方案。
●
瞭解更有效、靈活地操作掃描器的提示。
●
更新您的 HP 驅動程式和軟體。
●
註冊產品。
●
訂閱新聞通訊、驅動程式和軟體更新及支援警示。
●
購買 HP 配件和耗材
16
HP Scanjet G4000 系列
Page 39

取得支援
為取得 HP 產品的最佳效能,請諮詢下列 HP 所提供的標準支援:
1.
2.
3.
4.
5.
6.
請參閱產品隨附的產品文件。
–
請參閱疑難排解一節或此手冊/光碟的電子版說明。
–
請檢視軟體中的電子版「說明」一節。
請造訪 HP 線上支援, 網址是: www.hp.com/support 或聯絡當地的經
銷商。
HP 的所有客戶都可以使用 HP 線上支援。這是取得最新產品資訊以及專家
協助的最快來源,包括下列功能:
–
透過電子郵件快速聯絡合格的線上支援專員
–
您產品的軟體和驅動程式更新
–
提供技術問題寶貴的產品和疑難排解資訊
–
主動產品更新、支援警示和 HP 新聞通訊 (註冊產品即可取得)
用電話聯絡 HP 支援部門
–
支援選項與費用根據產品、國家/地區和語言而有所不同。
–
費用和政策如有變更,恕不另行通知。請造訪網站,網
址: www.hp.com/support 以取得最新的資訊。
保固期後的期間
在有限保固期限過後,您可以在 www.hp.com/support。
延長或升級您的保固
若您想要延長或升級產品的保固,請聯絡當地經銷商或查
詢 www.hp.com/support。
如果您已經購買 HP Care Pack 服務,請檢查您合約中的支援條件。
繁體中文
安裝和支援指南
17
Page 40

6
Hewlett-Packard 有限保固聲明
下列資訊概述了本產品的保固資訊。
產品
HP Scanjet G4000
系列掃描器
A. 有限保固範圍
1.
Hewlett-Packard (HP) 向最終使用者 (客戶) 保證,上述所指定的每項 HP
產品 (產品) 於上述期間內,無材料及製造上的瑕疵。保固期自客戶購買之
日起生效。
2.
對於每項軟體產品,HP 有限保固僅適用於軟體無法執行程式指令的情況。
HP 不保證所有產品操作均不會發生中斷或完全無錯。
3.
HP 的有限保固僅限於在正常情況下,使用產品所造成的結果,而不涵蓋其
他任何問題,包括因下列因素所產生的問題:
a.
不當使用、維護、儲存、處理或修改;
b.
不是由 HP 提供或支援的軟體、媒體、零件、配件、供應品、電源轉接
器或來源等;或是
c.
產品規格外的操作或其他狀況。
4.
HP 如在保固期間內接獲瑕疵品通知,HP 得選擇更換或維修有瑕疵的產
品。
5.
HP 如果無法更換或維修 HP 有限保固所涵蓋的瑕疵品,HP 得在接獲該瑕
疵品通知後的合理時間內,提供另一項效能相近的產品,或是依照使用情
形與其他適切因素,退還採購費用一定比例的金額。
6.
在顧客將有瑕疵的產品及有效的購買證明退回給 HP 之前,HP 沒有更換、
維修或退款貨款的義務。
7.
任何更換的產品可能是全新或類似新的產品,且其功能至少與替換的產品
相同。
8.
產品中可能包含效能與新零件、元件或材質相等的再製零件、元件或材
質。
9.
HP 之有限保固在本產品有支援及銷售的任何國家或地區皆屬有效。保固服
務的程度可能因各地標準而不同。如需升級的保固服務,如次日更換、到
府服務及意外保護等,可以向 HP 購買。
有限保固期間
1 年
18
B. 有限保固
在地方法令允許的範圍內,HP 或其協力廠商供應商對產品不提供任何其他形
式 (包括明示或隱含) 的保固或條件,並特別否認對有關適銷性、滿意的品質以
及適用於某一用途的隱含保固或條件。
HP Scanjet G4000 系列
Page 41

C. 有限之賠償責任
1.
在地方法令允許的範圍內,本有限保固聲明 (LWS) 所提供的補償,為顧客
唯一專有的補償。
2.
在地方法令允許的範圍內,除本有限保固聲明中提供的義務之外,在任何
情況下,HP 或其協力廠商供應商對於任何直接、間接、特殊、偶然或引發
的損害概不負責,不論這是基於合約、侵權或其他法律理論,也不管是否
曾獲悉有該類損毀的可能性。
D. 地方法令
1.
本有限保固聲明賦予顧客具體的法律權利。顧客也能享有其他權利,這些
權利在美國可能因州而異、在加拿大因省而異、在世界各地則因國家/地區
而異。
2.
如果本有限保固聲明與當地法律不一致,則本有限保固聲明應加以修改,
使其與當地法令一致。根據當地法令,本有限保固聲明的部份免責聲明與
限制可能不適用於顧客。例如,美國聯邦政府、美國的部份州及美國以外
的部分政府 (包括加拿大部分省份) 可能會:
a.
賦予顧客其他保固權利;
b.
排除本有限保固聲明中,限制顧客法定權利的免責聲明與限制 (例如,
英國);
c.
否則,會限制製造廠商實施這類承擔責任之聲明或限制的能力;或
d.
詳細說明製造商無法否認的隱含保固期限;或者
e.
不容許限制隱含保固期限。
3.
顧客可以根據購買合約對經銷商行使其他法定權利。這些權利一點也不會
受到有限保固聲明的影響。
4.
對於在美國所進行的消費性交易,任何由法律暗示的保固僅限於明示保固
期限的範圍內。
5.
對於在澳洲或紐西蘭所進行的消費性交易,除法律允許之限度內,本有限
保固聲明中包含的保固條款並未排除、限制或修改適用於銷售產品給此類
顧客的法定權利,並應附加於其上。
您也可以根據購買合約對經銷商行使法定權利。這些權利一點也不會受到 HP
有限保固的影響。
您可在本書封面內頁,找到負責您所在國家/地區的 HP 有限保固效能之 HP 實
體名稱與地址。
繁體中文
安裝和支援指南
19
Page 42

Page 43

설치 및 지원 설명서
한국어
Page 44

저작권 및 라이센스
© 2006 Copyright Hewlett-Packard
Development Company, L.P.
저작권법에 따라 허용되는 경우를 제외
하고, 서면 승인 없이 전재, 개작, 번역
등을 해선 안 됩니다.
이 문서에 포함된 정보는 사전 통보 없
이 변경될 수 있습니다.
HP 제품 및 서비스에 대한 유일한 보증
은 해당 제품 및 서비스와 함께 제공되
는 명시적 보증서에 기술되어 있습니
다. 이 문서의 어떤 내용도 추가 보증
서비스가 제공되는 것으로 해석될 수
없습니다. HP는 이 문서에 포함된 기술
적 오류, 또는 편집상의 오류나 누락에
대해 책임지지 않습니다.
상표 소유권
Microsoft 및 Windows는 Microsoft
Corporation의 등록 상표입니다.
Page 45

목차
1
시작하기 .....................................................................................................4
1단계. 포장 상자의 내용물 확인 .................................................................4
2단계. 소프트웨어 설치 ..............................................................................5
3단계. TMA 케이블 연결 ............................................................................5
4단계. 전원 공급 장치 연결 ........................................................................6
5단계. USB 케이블 연결 .............................................................................6
6단계. 설치 테스트 .....................................................................................8
2
스캐너 이용 방법 .........................................................................................9
추가 정보 얻기 ............................................................................................9
Windows용 HP Photosmart 소프트웨어 ....................................................9
Macintosh용 HP Photosmart 소프트웨어 .................................................10
전면 패널 및 부속품 개요 .........................................................................10
전면 패널 단추 ...................................................................................10
투명 용지 어댑터(TMA) .....................................................................11
3
스캐너 설치 문제 해결 ..............................................................................12
소프트웨어 제거 및 재설치 .......................................................................12
케이블 상태 확인 ......................................................................................13
4
규격 정보 및 제품 사양 .............................................................................14
스캐너 사양 ..............................................................................................14
투명 용지 어댑터(TMA) 사양 ....................................................................15
환경 사양 ..................................................................................................15
재활용 및 제한 물질 .................................................................................15
가정용 전자/전기 폐품 폐기(유럽 연합) ....................................................16
5
제품 지원 ..................................................................................................17
장애인용 기능 ...........................................................................................17
HP Scanjet 웹 사이트 ...............................................................................17
제품 관련 지원 ..........................................................................................18
6
Hewlett-Packard 유한 보증서 .................................................................19
한국어
설치 및 지원 설명서
3
Page 46

1
시작하기
스캐너를 설치하려면 다음과 같이 하십시오.
1단계. 포장 상자의 내용물 확인
스캐너 하드웨어 포장 상자를 풀고 포장용 테이프를 떼어 내십시오.
1
6
5
2
1
2
3
4
5
6
3
4
HP Scanjet G4010/G4050 스캐너
USB 케이블
전원 공급 장치
설치 및 지원 설명서(본 책자)
스캐닝 소프트웨어 CD
TMA 템플릿(HP Scanjet G4050만 해당)
4
HP Scanjet G4000 시리즈
Page 47

2단계. 소프트웨어 설치
주의 스캐닝 소프트웨어를 Windows 컴퓨터에 설치하는 경우 USB 케
이블을 컴퓨터에 아직 연결하지 마십시오. 스캐닝 소프트웨어를 설치한
후에 USB 케이블을 연결하십시오. 스캐닝 소프트웨어를 Macintosh 컴
퓨터에 설치하는 경우에는 소프트웨어를 설치하기 전에 USB 케이블을
연결해도 됩니다.
1.
스캐너와 함께 제공되는 HP Smart Photosmart CD를 컴퓨터 CD 드라이브
에 넣으십시오.
Windows 컴퓨터에 설치하는 경우: 설치 대화 상자가 나타날 때까지 기다
리십시오. 몇 분이 지나도 설치 대화 상자가 나타나지 않으면 12 페이지의
스캐너 설치 문제 해결을 참조하십시오.
Macintosh 컴퓨터에 설치하는 경우 바탕 화면에서 CD 아이콘을 두 번 누
른 후 HP Scanjet 스캐너 설치 아이콘을 두 번 눌러 설치를 시작하십시오.
2.
소프트웨어 설치를 눌러 스캐닝 소프트웨어를 설치하십시오. 화면에 표시
되는 지침에 따라 스캐닝 소프트웨어 설치 과정을 끝내십시오.
한국어
3단계. TMA 케이블 연결
➔
TMA 케이블을 스캐너 덮개와 스캐너 바닥에 각각 꽂으십시오.
설치 및 지원 설명서
5
Page 48

제 1 장
4단계. 전원 공급 장치 연결
전원 공급 장치에는 스캐너 뒤에 꽂는 케이블이 연결되어 있습니다.
전원 공급 장치에는 AC 케이블도 연결되어 있습니다. 한쪽 끝은 전원 공급 장
치에 연결하고 다른 한쪽 끝은 전원 콘센트나 과전압 억제기에 꽂으면 됩니다.
1.
AC 케이블을 전원 공급 장치 뒤에 꽂으십시오.
2.
AC 케이블의 다른 한쪽을 전원 콘센트나 과전압 억제기에 꽂으십시오.
5단계. USB 케이블 연결
주의 HP Photosmart 소프트웨어를 Windows 컴퓨터에 설치하는 경우
소프트웨어를 설치한 후 USB 케이블로 스캐너와 컴퓨터를 연결하십시
오. 5 페이지의 2단계. 소프트웨어 설치를 참조하십시오. HP
Photosmart 소프트웨어를 Macintosh 컴퓨터에 설치하는 경우에는 USB
케이블로 스캐너와 컴퓨터를 연결한 후에 소프트웨어를 설치해도 됩니
다.
6
HP Scanjet G4000 시리즈
Page 49

스캐너와 함께 제공되는 USB 케이블을 사용하여 스캐너를 컴퓨터에 연결하십
시오.
1.
정사각형 모양을 한 케이블 한쪽 끝을 스캐너에 연결하십시오.
2.
직사각형 모양을 한 케이블 다른 한쪽 끝을 컴퓨터에 연결하십시오.
설치 및 지원 설명서
한국어
7
Page 50

제 1 장
6단계. 설치 테스트
1
1.
스캐너 유리의 위치 표시선이 나타내는 위치에 사진이나 문서를 올려 놓으
2
십시오.
2.
Windows용 소프트웨어로 스캔하는 경우, 스캔(
) 단추를 누르십시오. 스
캔 항목 대화상자가 표시됩니다. 화면에 표시되는 지침을 따라 스캔을 완료
하십시오.
Macintosh용 소프트웨어로 스캔하는 경우, HP Scan Pro 창이 열리면서 스
캔된 이미지가 미리보기 화면에 표시됩니다. 표시된 이미지를 그대로 적용
하면 이미지가 스캐너 설정에서 선택한 곳으로 전송됩니다.
스캔 항목 대화상자나 HP Scan Pro 창이 열리지 않으면 12 페이지의 스캐
너 설치 문제 해결을 참조하십시오.
8
HP Scanjet G4000 시리즈
Page 51

2
스캐너 이용 방법
여기에서는 스캐너에 대해 간략하게 다루고 그 이용 방법에 대해 설명합니다.
추가 정보 얻기
스캐너 및 소프트웨어에 대한 자세한 내용은 스캐너 도움말 파일을 참조하십시
오. 스캐너와 함께 제공되는 HP Photosmart 소프트웨어를 설치한 경우 바탕화
면에서 HP 솔루션 센터 아이콘을 두 번 누른 후 Help and Support를 누르십시
오. Documentation 부분에서 Product Help를 누르십시오.
스캐너 사용 설명서 파일을 열려면 시작 메뉴를 누르고 프로그램(또는 모든 프
로그램), HP, Scanjet, G4000 series을 차례로 가리킨 후 User Guide를 누르
십시오.
Macintosh 컴퓨터 사용자: 스캔 과정에 대해 자세히 알려면 HP 장치 관리자를
실행한 후 대화 상자 하단에서 물음표를 누르십시오.
Windows용 HP Photosmart 소프트웨어
Windows용 HP Photosmart 소프트웨어를 설치하면, 아이콘 두 개가 바탕화면
에 표시됩니다. 이 두 아이콘을 누르면 스캔과 편집에 이용되는 프로그램이 각
각 열립니다.
HP 솔루션 센터와 HP Photosmart 소프트웨어 이용 방법에 대한 자세한 내용
은 스케너 도움말 파일을 참조하십시오. 바탕화면에서 HP 솔루션 센터 아이콘
을 두 번 누른 후 Help and Support를 누르십시오. Documentation 부분에서
Product Help를 누르십시오.
한국어
스캔 시작 방법
설치 및 지원 설명서
HP 솔루션 센터는 그림과 문서를 스캔할 수 있는 소프트웨
어 프로그램으로, 아래와 같은 작업이 가능합니다.
●
스캔 및 복사 작업 수행
●
도움말 및 문제 해결 방법 열기
●
HP Photosmart 소프트웨어를 실행하여 스캔 이미지 편
집
●
설정 및 환경설정 수정
HP Photosmart는 스캔 작업 후 이미지를 조작, 인쇄, 보관,
공유 등을 할 수 있는 프로그램입니다. 바탕화면 아이콘이
나 HP 솔루션 센터를 통해 HP Photosmart를 열 수 있습니
다.
9
Page 52

제 2 장
바탕화면에서 HP 솔루션 센터 아이콘을 두 번 누르고 스캐너 탭을 누른 후 원
하는 작업을 누르십시오.
참고 HP 솔루션 센터 아이콘이 바탕화면에 없으면, 시작 메뉴를 누르
고 프로그램(또는 모든 프로그램), HP 등을 차례로 가리킨 후 HP 솔루션
센터를 누르십시오.
Macintosh용 HP Photosmart 소프트웨어
Macintosh 컴퓨터에 HP 스캐닝 소프트웨어를 설치하는 경우, 도크에 HP 장치
관리자와 HP Photosmart Studio가 표시됩니다. 이 소프트웨어 프로그램들을
이용하여 스캔은 물론, 스캔 이미지를 편집할 수 있습니다.
HP 솔루션 센터는 그림과 문서를 스캔할 수 있는 소프트웨
어 프로그램으로, 아래와 같은 작업이 가능합니다.
●
스캔 및 복사 작업 수행
●
도움말 및 문제 해결 방법 열기
●
HP Photosmart Studio를 실행하여 스캔 이미지 편집
●
설정 및 환경설정 수정
HP Photosmart Studio는 스캔 작업 후 이미지를 조작, 인
쇄, 보관, 공유 등을 할 수 있는 프로그램입니다. HP
Photosmart Studio 실행은 도크나 응용 프로그램 메뉴의
HP 장치 관리자에서 가능합니다.
전면 패널 및 부속품 개요
여기에서는 스캐너 전면 패널과 투명 용지 어댑터(TMA)에 대해 간단하게 다룹
니다.
전면 패널 단추
아이콘
10
기능 이름 설명
스캔 단추 그림, 그래픽, 문서, 객체 등을 스캔할 수 있습니
다.
필름 스캔 단추투명 양화(예: 35mm 슬라이드)와 음화를 스캔
할 수 있습니다. 필름을 스캔하려면 투명 용지 어
댑터(TMA)를 스캔너 덮개 아래에 부착하여 이용
해야 합니다.
HP Scanjet G4000 시리즈
Page 53

(계속)
아이콘 기능 이름 설명
복사 단추 스캔하고 프린터로 전송하여 복사본을 만들 수
있습니다.
PDF로 스캔
단추
참고 Macintosh 컴퓨터에서 이 단추들로 할 수 있는 기본 작업에 대해
자세히 알려면 HP 장치 관리자를 열고 대화상자 하단에서 물음표를 누
르십시오.
투명 용지 어댑터(TMA)
투명 용지 어댑터(TMA)를 이용하여 35mm 슬라이드나 음화를 스캔할 수 있습
니다. HP Scanjet G4050 TMA로는 중형 필름과 대형 필름도 스캔할 수 있습니
다. 사용 설명서가 있는 위치는 9 페이지의 추가 정보 얻기에서 확인할 수 있습
니다.
스캔한 페이지 한 장 이상을 PDF 파일로 저장하
여 전송하거나 저장할 수 있습니다.
한국어
설치 및 지원 설명서
11
Page 54

3
스캐너 설치 문제 해결
여기에서는 설치 및 설정 문제를 해결하는 방법에 대해 다룹니다.
소프트웨어 제거 및 재설치
소프트웨어 구성요소를 일부만 설치하면 스캐너가 인식되지 않거나 소프트웨
어가 올바르게 실행되지 않을 수 있습니다. HP 스캐닝 소프트에어를 제거하고
다시 설치해 보십시오. HP 스캐닝 소프트웨어를 다시 설치하려면 HP
Photosmart 소프트웨어 CD가 있어야 합니다.
Windows 컴퓨터를 이용하는 경우
1.
시작 메뉴를 누르고 설정, 제어판을 차례로 가리키십시오(Windows XP: 시
작, 제어판).
2.
프로그램 추가/제거를 누르고 HP Scanjet G4000 series를 선택하십시오.
3.
제거를 누르십시오.
4.
프로그램 추가/제거(Windows XP: 프로그램 추가 또는 제거)를 누른 후 HP
Photosmart 소프트웨어를 선택하십시오.
5.
제거를 누르십시오.
6.
컴퓨터에서 스캐너의 USB 케이블을 뽑으십시오.
7.
스캐너와 함께 제공되는 HP Photosmart 소프트웨어 CD를 이용하여 다시
설치하십시오. CD를 넣으면 설치 인터페이스가 자동으로 시작됩니다. 설
치할 HP Photosmart 소프트웨어를 선택하십시오.
8.
소프트웨어가 설치되면 스캐너의 USB 케이블을 다시 꽂으십시오. 자세한
내용은 6 페이지의 5단계. USB 케이블 연결을 참조하십시오.
Macintosh 컴퓨터를 이용하는 경우
1.
응용 프로그램/Hewlett-Packard 부분에서 HP Uninstaller를 실행하십시
오.
12
참고 관리자 권한이 있어야 소프트웨어를 제거할 수 있습니다.
2.
사용자 이름과 암호 입력 창이 표시되면, 입력하십시오. HP Uninstaller 창
에 제거할 제품들이 표시됩니다.
3.
G4000 제품을 선택하고 Next를 누르 시오.
4.
화면에 표시되는 지침에 따라 제거 과정을 끝내십시오.
5.
스캐너와 함께 제공되는 HP 소프트웨어 CD를 이용하여 다시 설치하십시
오. CD를 넣고 바탕화면에 표시되는 CD 아이콘을 누르십시오. 설치가 시
작됩니다.
십
HP Scanjet G4000 시리즈
Page 55

케이블 상태 확인
케이블 종류 작업
전원 케이블 전원 케이블은 스캐너와 전원 콘센트 연결에 이용됩니다.
●
●
●
USB 케이블 USB 케이블은 스캐너와 컴퓨터 연결에 이용됩니다.
●
●
●
USB 문제 해결 방법에 대한 기타 내용을 보려
www.hp.com/support에서 해당 국가/지역을 선택하
고 USB 문제 해결 관련 내용을 검색하십시오.
TMA 케이블 TMA 케이블은 스캐너 덮개의 TMA와 스캐너 바닥 연결
에 이용됩니다.
TMA 케이블을 스캐너 뒤에 올바르게 연결했는지 확인하
십시오.
스캐너와 콘센트 또는 과전압 억제기에 전원 케이블
을 올바르게 연결했는지 확인하십시오.
전원 케이블을 과전압 억제기에 연결한 경우 과전압
억제기 콘센트에 꽂혀 있고 전원이 공급되는지 확인
하십시오.
스캐너와 컴퓨터를 끄십시오. 60초 후에 스캐너를 먼
저 켠 후 컴퓨터를 켜십시오.
스캐너와 함께 제공되는 케이블을 사용하십시오. 다
른 USB 케이블은 이 스캐너와 호환되지 않을 수 있습
니다.
USB 케이블을 컴퓨터와 스캐너에 올바르게 연결했
는지 확인하십시오.
USB 케이블이 컴퓨터 앞에 있는 USB 포트에 꽂혀 있
으면, 뽑아 컴퓨터 뒤에 있는 USB 포트에 꽂으십시
오.
면,
한국어
설치 및 지원 설명서
13
Page 56

4
규격 정보 및 제품 사양
여기에서는 HP Scanjet G4000 시리즈 포토 스캐너 및 부속품 관련 규격과 제
품 사양에 대해 설명합니다.
스캐너 사양
제목 설명
스캐너 종류 투명 용지 어댑터(TMA)가 달린 플랫베드 스캐너
크기
Вес G4010: 4.4kg(9.6lb)
스캐닝 소자
인터페이스 고속 USB 2.0
하드웨어 해상도 4800 x 9600dpi 하드웨어 해상도
지원되는 해상도 12dpi - 999,999 enhanced dpi(배율 조건: 100%)
AC 전압 북미 지역: 100 - 120V 60Hz
규격 정보 규격 모델 식별 번호: 격을 식별할 수 있도록 제품에는 규
G4010: 303mm x 508mm x 98mm(11.93 x 20.00 x
3.86in.)
G4050: 303mm x 508mm x 108mm(11.93 x 20.00 x
4.25in.)
G4050: 5.3kg(11.6lb)
CCD(Charged Coupled Device)
유럽 대륙, 영국, 호주 지역: 200~240V 50Hz
기타 국가/지역: 100~240V 50Hz/60Hz
격 모델 번호가 지정되어 있습니다. 이 제품의 규격 모델
번호는 FCLSD-0605입니다. 이 규격 모델 번호는 제품 이
름(HP Scanjet G4010, G4050)이나 제품 번호(L1956A,
L1957A)와 다른 것이므로 혼동하지 마십시오.
14
ENERGY STAR® 모드를 이용하면 에너지 소비량을 크게
줄일 수 있으므로 제품 성능은 최대한 활용하면서 천연 자
원과 금전 절약 효과를 얻을 수 있습니다. 또, 이 제품은 에
너지 효율성을 갖춘 사무용품의 개발을 도모하기 위해 마
련된 자발적 프로그램인 ENERGY STAR®(3.0 버전)에 적
합합니다.
HP Scanjet G4000 시리즈
Page 57

제목 설명
ENERGY STAR는 미국 환경보호청(EPA)의 미국 등록 서
비스표입니다. HP는 ENERGY STAR 참여 업체로서 이 제
품이 ENERGY STAR의 에너지 효율성 관련 기준에 적합
함을 확인했습니다. ENERGY STAR 기준에 대해 자세히
알려면 www.energystar.gov를 참조하십시오.
투명 용지 어댑터(TMA) 사양
제목 설명
용지 종류 G4010: 35mm 슬라이드 최대 5개 또는 35mm 음
화 프레임 최대 6개
G4050: 35mm 슬라이드 최대 16개, 35mm 음화 프
레임 최대 30개, 중형 필름 프레임(120 롤 필름) 최
대 2개, 대형 필름 프레임(220 롤 필름) 1개
필요 전력 12V/400mA(최대)
전력 소비량 및 규격 정보소비 전력, 전원 공급 장치, 규격 관련 내용을 보려
면 HP Photosmart 소프트웨어 CD에서
regulatory_supplement.htm 파일을 참조하십시오.
환경 사양
제목 설명
온도 작동(스캐너, TMA): 0° - 35°C(50° - 95°F)
상대 습도 작동(스캐너, TMA): 15% - 80%[10° - 35°C(50° -
재활용 및 제한 물질
재활용
HP는 수많은 국가/지역에 걸쳐 제품 반환 및 재활용 관련 프로그램을 폭 넓게
실시하고 있을 뿐 아니라, 전 세계에서 일부 최대 전자 폐품 재활용 센터와 제
휴 관계를 맺어 활약을 벌이고 있습니다. HP는 최고의 인기를 누리고 있는 제
설치 및 지원 설명서
한국어
보관: -40° - 60°C(-40° - 140°F)
95°F)에서 응축 없음)
보관 온도 및 습도: 0° - 60°C(32° - 140°F), 최대
90%(응축 없음)
15
Page 58

제 4 장
품 중 일부 재활용하여 다시 판매함으로써 자원 보호 정신을 실천하고 있습
니다. HP 제품 재활용 관련 자세한 내용
는
은
www.hp.com/hpinfo/globalcitizenship/environment/recycle/을 참조하십시오.
제품에 이용된 제한 물질
이 HP 제품에는 스캐너 형광등과 투명 용지 어댑터에 납이 5mg 미만 정도 이
용되었으므로 폐기 시 각별히 주의해야 합니다.
재활용에 대한 자세한 내용은 www.hp.com/go/recycle 또는 미국 전자산업협
회 웹 사이트인 www.eiae.org를 참조하십시오.
가정용 전자/전기 폐품 폐기(유럽 연합)
제품과 포장재에 이 기호가 부착되어 있으면 가정에서 발생하는 일반 쓰레기
와 함께 처분할 수 없습니다. 하지만, 폐품을 지정된 전기 및 전자 기기 재활용
품 수거장에 전달하는 것은 사용자가 직접 해야 합니다. 폐품을 분리 배출하여
재활용하면 천연 자원뿐만 아니라 인체 건강 및 환경을 보호하는 데 큰 도움이
됩니다. 재활용품 수거장에 대한 자세한 내용은 현지 관할 구청이나 가정용 쓰
레기 처리장 또는 해당 제품 판매업체에 문의하십시오.
16
HP Scanjet G4000 시리즈
Page 59

5
제품 지원
여기에서는 제품 지원의 옵션에 대해 설명합니다.
장애인용 기능
이 스캐너의 장애인용 기능은 다음과 같습니다.
Windows 컴퓨터를 이용하는 경우
●
Button Disable Utility를 이용하면 실수로 단추를 누르는 일이 생기지 않도
록 단추 기능을 비활성화할 수 있습니다. 또, 단추 기능을 다시 활성화할 수
도 있습니다.
Button Disable Utility에 대한 자세한 내용은 스캐너 사용 설명서를 참조하
십시오.
●
스캐너 사용 설명서는 도움말 파일 형식으로도 제공되며 이 파일은 대부분
의 화면 낭독기로 내용을 파악할 수 있습니다. 이 파일을 열려면 컴퓨터 바
탕 화면에서 HP 솔루션 센터 아이콘을 두 번 누른 후 Help and Support를
누르십시오. Documentation 부분에서 Product Help를 누르십시오.
Macintosh 컴퓨터를 이용하는 경우
●
Button Disable Utility를 이용하면 실수로 단추를 누르는 일이 생기지 않도
록 단추 기능을 비활성화할 수 있습니다. 또, 단추 기능을 다시 활성화할 수
도 있습니다.
Button Disable Utility에 대한 자세한 내용은 HP Scanjet 스캐너 도움말을
참조하십시오.
●
CHM 형식으로 제공되는 HP Scanjet 스캐너 도움말은 대부분의 화면 낭독
기에서 지원됩니다. 이 파일을 열려면 HP 장치 관리자를 실행하고 대화 상
자 하단에서 물음표를 누르십시오.
장애가 있는 사용자
www.hp.com/hpinfo/community/accessibility/prodserv/ (영문으로만 제
공)에서 자세한 내용을 확인하십시오.
한국어
는
HP Scanjet 웹 사이트
www.hp.com 의 페이지 상단에서 국가/지역과 언어를 선택하십시오. 국가/지
역 페이지의 제품 목록에서 스캐너를 선택하십시오. 이 사이트에서 제공되는
정보는 다음과 같습니다.
●
기술 문제 해결 방법
●
더욱 효율적이고 색다른 스캔 방법
●
HP 드라이버 및 소프트웨어 업데이트
●
제품 등록
설치 및 지원 설명서
17
Page 60

제 5 장
●
소식지, 최신 드라이버와 소프트웨어 관련 정보, 지원 관련 알림 메시지 신
청
●
HP 소모품 및 부속품 구매
제품 관련 지원
HP 제품을 최대한 활용하려면 다음과 같은 기본 HP 지원 서비스를 참조하십시
오.
1.
제품과 함께 제공되는 설명서 참조
–
이 설명서/CD의 문제 해결 부분이나 도움말 파일
–
소프트웨어의 도움말 파일
2.
HP 온라인 지원 서비스 (www.hp.com/support) 이용 및 제품 구입처에
문
의
HP 온라인 지원 서비스는 HP 고객이면 누구나 이용할 수 있습니다. 온라
인 지원 서비스를 통해 다음과 같은 혜택은 물론, 최신 제품 정보와 전문 지
원 서비스를 아주 신속하게 이용할 수 있습니다.
–
숙련된 온라인 지원 전문가에게 전자 메일을 통한 문의
–
제품 관련 최신 소프트웨어와 드라이버 이용
–
제품 및 기술 문제 관련 정보 이용
–
최신 제품 정보, 지원 관련 알림 메시지, HP 소식지 등을 미리 이용(제
품 등록 시 이용 가능)
3.
HP 고객지원센터에 전화로 문의
–
제공되는 지원 서비스와 관련 비용은 제품, 국가/지역, 언어 등에 따라
다름
–
비용 및 정책은 사전 통보 없이 변경될 수 있음(자세한 내용
www.hp.com/support 참조)
4.
사후 보증 기간
제한 보증 기간이 지나면 www.hp.com/support에서 도움을 받을 수 있습
니다.
5.
보증 기간 연장 또는 보증 서비스 승급
제품 보증 기간을 연장하거나 보증 서비스 등급을 올리리면 구입처에 문의
하거나 www.hp.com/support에서 HP Care Pack 서비스에 대해 확인하
십시오.
6.
HP Care Pack 서비스를 이미 이용하고 있는 경우, 계약서에서 지원 관련 약
관을 확인하십시오.
은
18
HP Scanjet G4000 시리즈
Page 61

6
Hewlett-Packard 유한 보증서
여기에서는 이 제품 관련 보증 서비스에 대해 간략하게 설명합니다.
제품
HP Scanjet G4000
시리즈 스캐너
A. 유한 보증 적용 범위
1.
HP(Hewlett-Packard)는 상기 기간 동안 상기 HP 제품(이하 제품)에 자재
를 비롯한 제조 과정에 아무런 결함이 발생하지 않음을 최종 이용 고객(이
하 고객)에게 보증합니다. 보증 기간은 고객이 제품을 구입한 날로부터 시
작됩니다.
2.
소프트웨어 제품에 대해서는 명령이 실행되지 않는 경우에만 보증 서비스
가 적용됩니다. 소프트웨어 작동 시 중단이나 오류가 발생하지 않음을 보증
하지 않습니다.
3.
HP 유한 보증 서비스는 제품을 올바르게 사용했는데도 발생하는 결함에
만 적용되며 아래와 같은 경우에 발생하는 결함을 비롯한 기타 문제에는 적
용되지 않습니다.
a.
사용, 유지관리, 보관, 취급, 개조 등이 부적절하게 이루어진 경우.
b.
소프트웨어, 매체, 부품, 부속품, 소모품, 전원 어댑터/전원 공급 장치
등이 HP 정품이 아니거나 부적절한 제품인 경우.
c.
작동 조건이나 기타 조건이 제품 사양에 맞지 않는 경우.
4.
보증 기간 동안에 발생한 제품 결함에 대해 HP에 통보하면, 재량에 따라 제
품을 교환 또는 수리받을 수 있습니다.
5.
HP 유한 보증 적용 대상인 제품에 대해 결함을 통보받았지만 적절한 시일
내에 수리 또는 교환이 불가능한 경우에는 성능이 비슷한 다른 제품으로 교
환받거나 사용 기간을 비롯한 기타 요인을 참작하여 산출된 구입 가격을 환
불받을 수 있습니다.
6.
고객이 결함 제품과 함께 구입 일자가 기재된 증빙 서류를 제출해야 교환,
수리, 환불 등, 적절한 조치가 이루어집니다.
7.
교환받는 제품은 신품이거나 성능이 같은 신품에 버금가는 제품일 수 있습
니다.
8.
교환받는 제품에는 신품과 성능이 같은 재생 부품과 자재가 이용될 수 있습
니다.
9.
HP 유한 보증 서비스는 HP 고객 지원 센터가 있고 관련 제품이 판매되고
있는 국가/지역에서만 적용되며, 보증 적용 범위는 현지 기준에 따라 달라
질 수 있습니다. 익일 교환 서비스, 출장 서비스, 사고 예방 보험 가입 서비
스 등, 고급 보증 서비스는 유료입니다.
유한 보증 기간
1년
한국어
설치 및 지원 설명서
19
Page 62

제 6 장
B. 보증 한계
현지법에서 허용하는 한, HP를 비롯한 관련 납품업체는 제품에 대해 여기에 언
급된 것을 제외하고 어떠한 명시적/묵시적 보증 조항이나 조건을 제시하지 않
을 뿐 아니라, 제품의 상품성, 품질 만족성, 특정 용도에 대한 적합성 등에 대해
묵시적 보증 조항이나 조건을 제시하지 않습니다.
C. 책임 한계
1.
현지법에서 허용하는 한, 이 유한 보증서(LWS)에 명시된 보상책이 고객에
게만 제공되는 유일한 것입니다.
2.
현지법에서 허용하는 한, HP를 비롯한 관련 납품업체는 이 LWS에 명시된
책임 조항을 제외하고 HP를 비롯한 관련 납품업체는 계약이나 불법 행위,
기타 법 이론 등을 근거로 판단되는 직간접적 피해는 물론, 특수적 피해, 부
수적 피해, 결과적 피해 등에 대해 사전 통보를 받았다 해도 그 책임을 지
지 않습니다.
D. 현지법
1.
이 LWS에 따라 고객에게는 특정 법적 권리가 부여되며, 그 밖에 국가/지역
의 현지법에 따라 권리가 추가로 부여될 수 있습니다.
2.
이 LWS가 현지법과 상충하는 한, 이 LWS는 현지법에 맞게 수정될 것입니
다. 현지법에서 허용 안 되는 이 LWS의 면책 선언 및 책임 한계 조항은 고
객에게 적용되지 않습니다. 즉, 미국의 연방/지방 정부를 비롯한 기타 국가/
지역의 법률에는 아래와 같이 규정되어 있을 수 있습니다.
a.
고객에게 보증 권리 추가 부여.
b.
영국의 경우, 고객에게 부여되는 법적 권리를 규제하는 이 LWS의 면
책 선언 및 책임 한계 조항 배제.
c.
제조업체의 면책 선언이나 책임 한계 조항 이행 능력 규제.
d.
제조업체의 면책을 주장할 수 없도록 묵시적 보증 기간 명시.
e.
묵시적 보증 기간의 제한 불허.
3.
고객은 구매 계약서를 근거로 법적 권리가 추가로 부여될 수 있습니다. 추
가로 부여되는 권리는 이 LWS와 아무런 관련이 없습니다.
4.
미국의 경우, 고객이 구입하는 물품에 대해 묵시적 보증 기간이 명시적 보
증 기간으로 법적으로 규제되어 있습니다.
5.
호주와 뉴질랜드의 경우 법적으로 허용하지 않는 한, 이 LWS의 보증 조항
은 고객이 구입하는 물품에 대해 적용되는 법적 필수 권리에 추가로 부여되
는 것이어야 하며 그 권리를 배제, 규제, 개정해서는 안 됩니다.
귀하는 구입 계약서에 따라 판매자에 대해 기타 법적 권한을 갖고 있을 수 있습
니다. 그러한 법적 권한은 HP 유한 보증 서비스와 아무런 관련이 없습니다.
거주 국가/지역에서 HP 유한 보증 서비스를 이행하는 HP 사업체의 이름과 주
소는 이 문서의 앞 표지 안쪽에 적혀 있습니다.
20
HP Scanjet G4000 시리즈
Page 63

Page 64

 Loading...