


www.hp.com/support
Australia
Australia
(out-of-warranty)
India
Indonesia
Malaysia
New Zealand
Philippines
1300 721 147
1902 910 910
021-3881-4518
800-810-3888
3003
2802 4098
91-80-28526900
1-600-425-7737
+62 (21) 350 3408
0570-000511
03-3335-9800
1588-3003
1800 805 405
0800 441 147
2 867 3551
Singapore
Viêt Nam
6 272 5300
02-8722-8000
+66 (2) 353 9000
+84 88234530

Setup and Support Guide
English

Copyright and license
© 2006 Copyright Hewlett-Packard
Development Company, L.P.
Reproduction, adaptation or
translation without prior written
permission is prohibited, except as
allowed under the copyright laws.
The information contained herein is
subject to change without notice.
The only warranties for HP products
and services are set forth in the
express warranty statements
accompanying such products and
services. Nothing herein should be
construed as constituting an
additional warranty. HP shall not be
liable for technical or editorial errors
or omissions contained herein.
Trademark credits
Microsoft and Windows are registered
trademarks of Microsoft Corporation.

Contents
1 Get started ............................................................................................................4
Step 1. Check the box contents .............................................................................4
Step 2. Install the software ....................................................................................5
Step 3. Connect the TMA cable .............................................................................5
Step 4. Connect the power supply .........................................................................6
Step 5. Connect the USB cable .............................................................................6
Step 6. Test the installation ...................................................................................8
2 How to use the scanner ......................................................................................9
Where to get additional information .......................................................................9
HP Photosmart Windows software ........................................................................9
HP Photosmart Macintosh software ....................................................................10
Front panel and accessories overview ................................................................. 10
Front-panel buttons ......................................................................................10
Transparent materials adapter (TMA) ...........................................................10
3 Scanner installation troubleshooting ..............................................................12
Uninstall and reinstall the software ......................................................................12
Check the cables .................................................................................................13
4 Regulatory information and product specifications .......................................14
Scanner specifications .........................................................................................14
Transparent materials adapter (TMA) specifications ...........................................15
Environmental specifications ...............................................................................15
Recycle and restricted material information .........................................................15
Disposal of Waste Equipment by Users in Private Households in the
European Union ...................................................................................................16
5 Product support .................................................................................................17
Accessibility .........................................................................................................17
HP Scanjet Web site ............................................................................................17
Getting assistance ...............................................................................................18
6 Hewlett-Packard limited warranty statement ..................................................19
English
Setup and Support Guide
3
1
Get started
Follow these steps to set up the scanner:
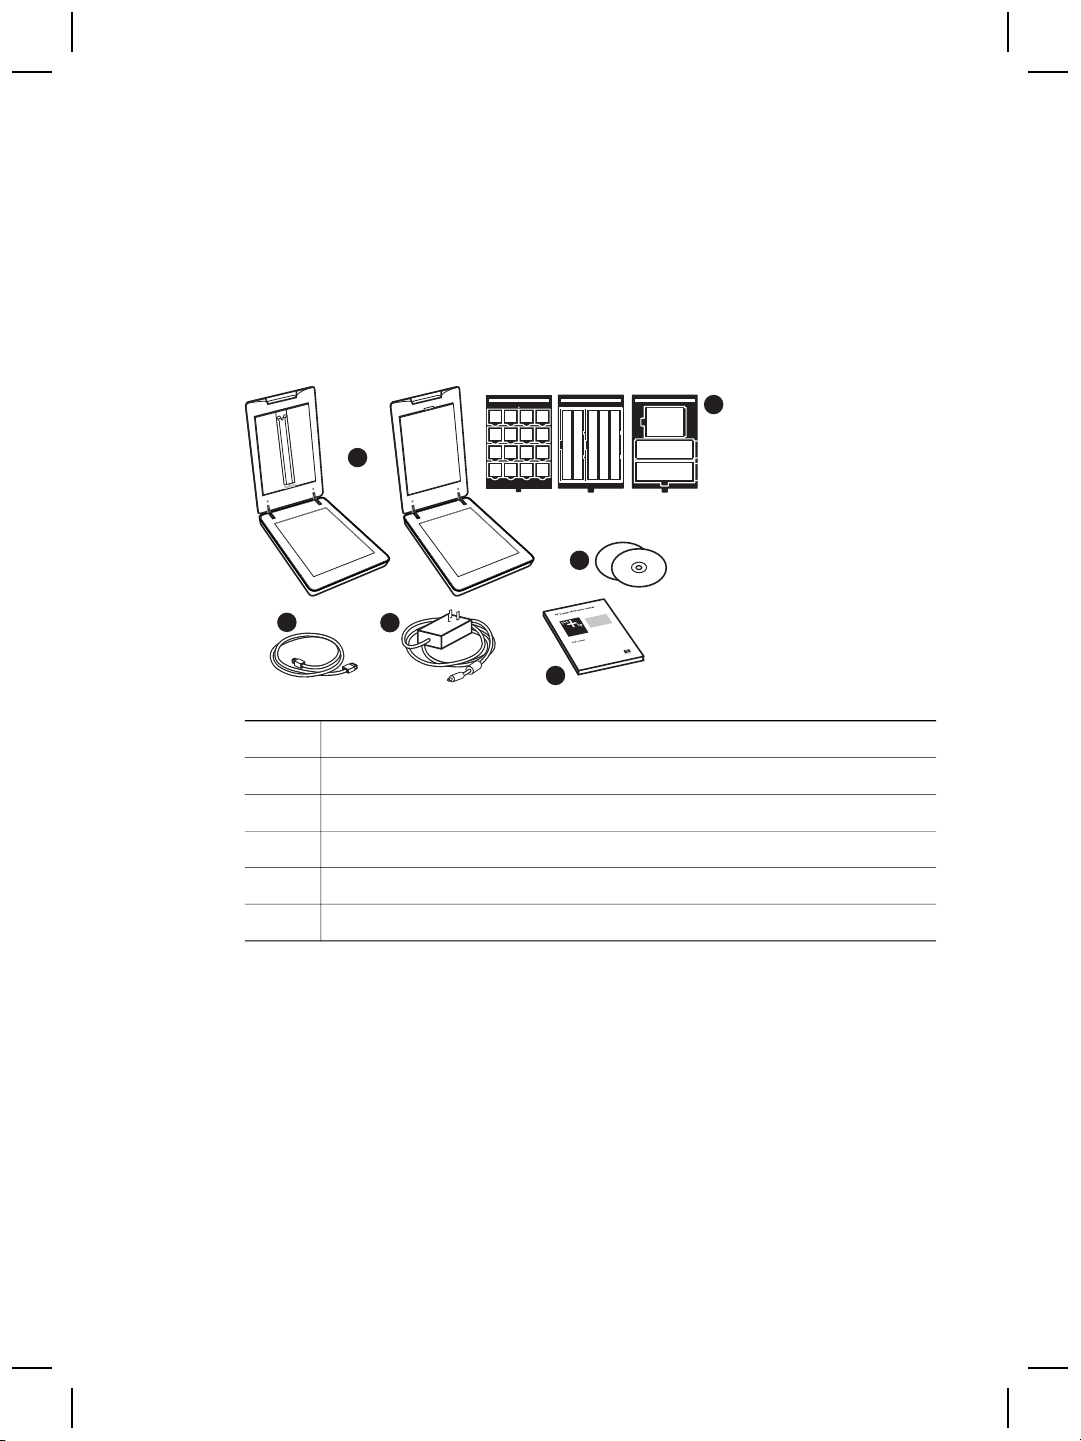
Step 1. Check the box contents
Unpack the scanner hardware. Be sure to remove any shipping tape.
1
6
5
2
1 HP Scanjet G4010 or G4050 scanner
2
3
4 Setup and Support Guide (this book)
5 Scanning software CDs
6 TMA templates (HP Scanjet G4050 only)
3
4
USB cable
Power supply
4
HP Scanjet G4000 series
Step 2. Install the software
Caution If you are installing the software onto a Windows computer, do not
connect the USB cable to the computer yet. Install the scanning software
before connecting the USB cable. If you are installing the software into a
Macintosh computer, you can connect the USB cable either before or after
installing the software.
1. Insert the HP Photosmart CD that came with the scanner into the computer CD
drive.
For Windows installations: Wait for the installation dialog box to display. If the
installation dialog box does not display after a few moments, see Scanner
installation troubleshooting on page 12.
For Macintosh installations: Double-click on the CD icon that appears on the
desktop, and then double click on the HP Scanjet Scanner Install icon to start the
installation.
2. Click Install software to install the scanning software. Follow the onscreen
instructions to complete the scanning software installation.
English
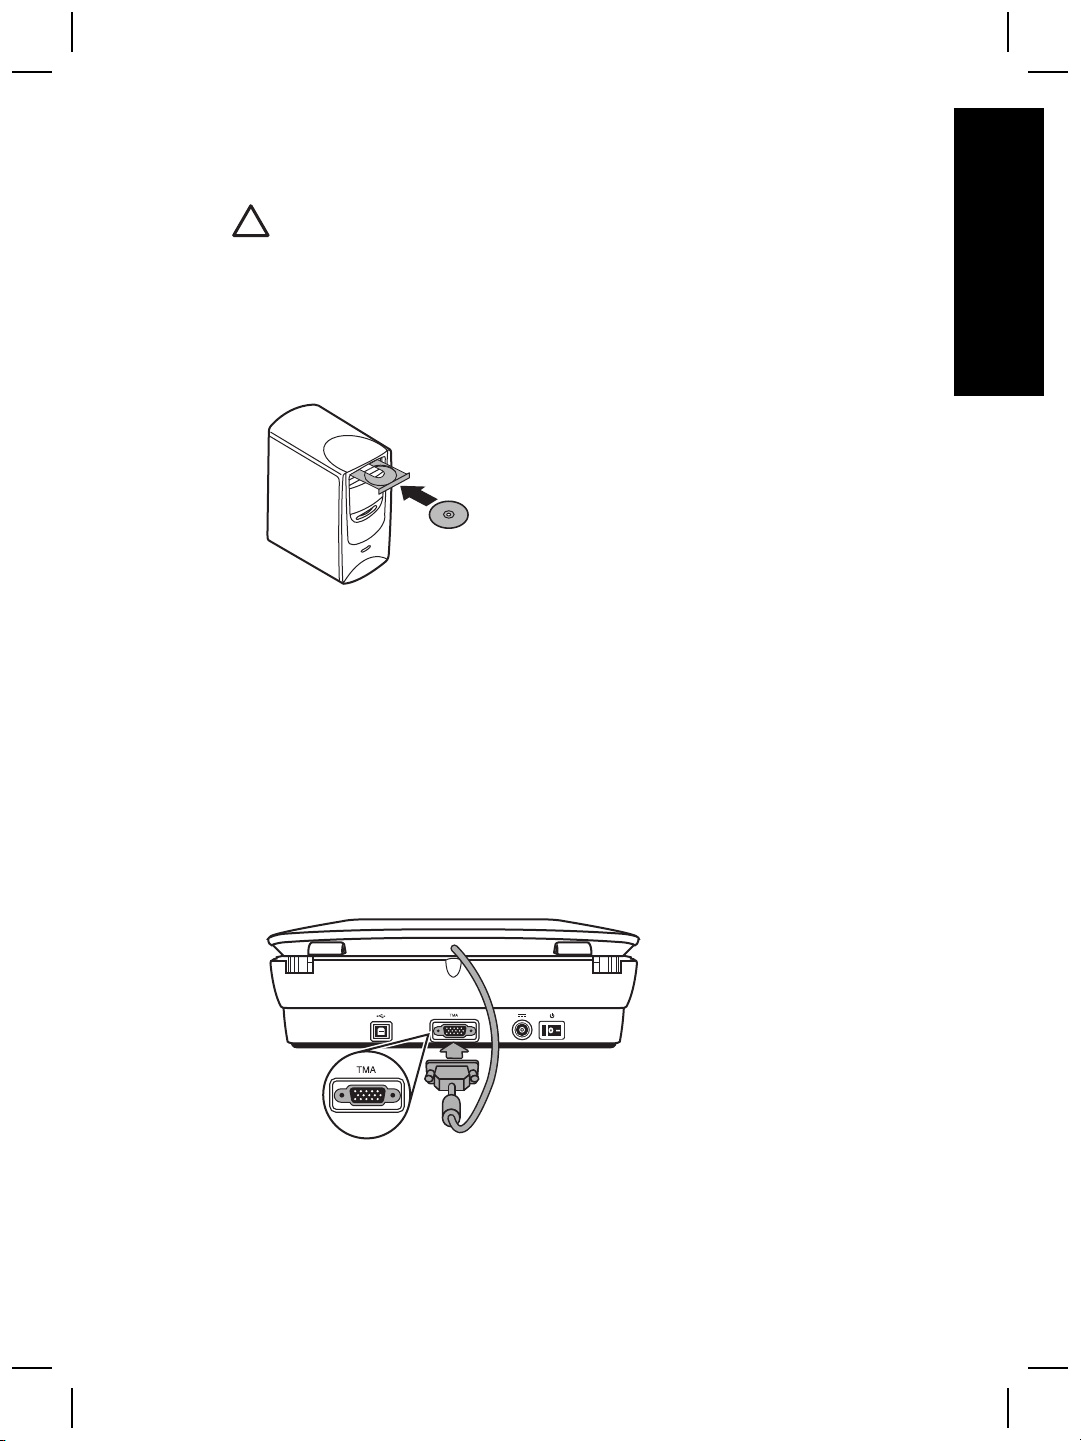
Step 3. Connect the TMA cable
➔
Connect the TMA cable from the lid to the scanner base.
Setup and Support Guide
5

Chapter 1
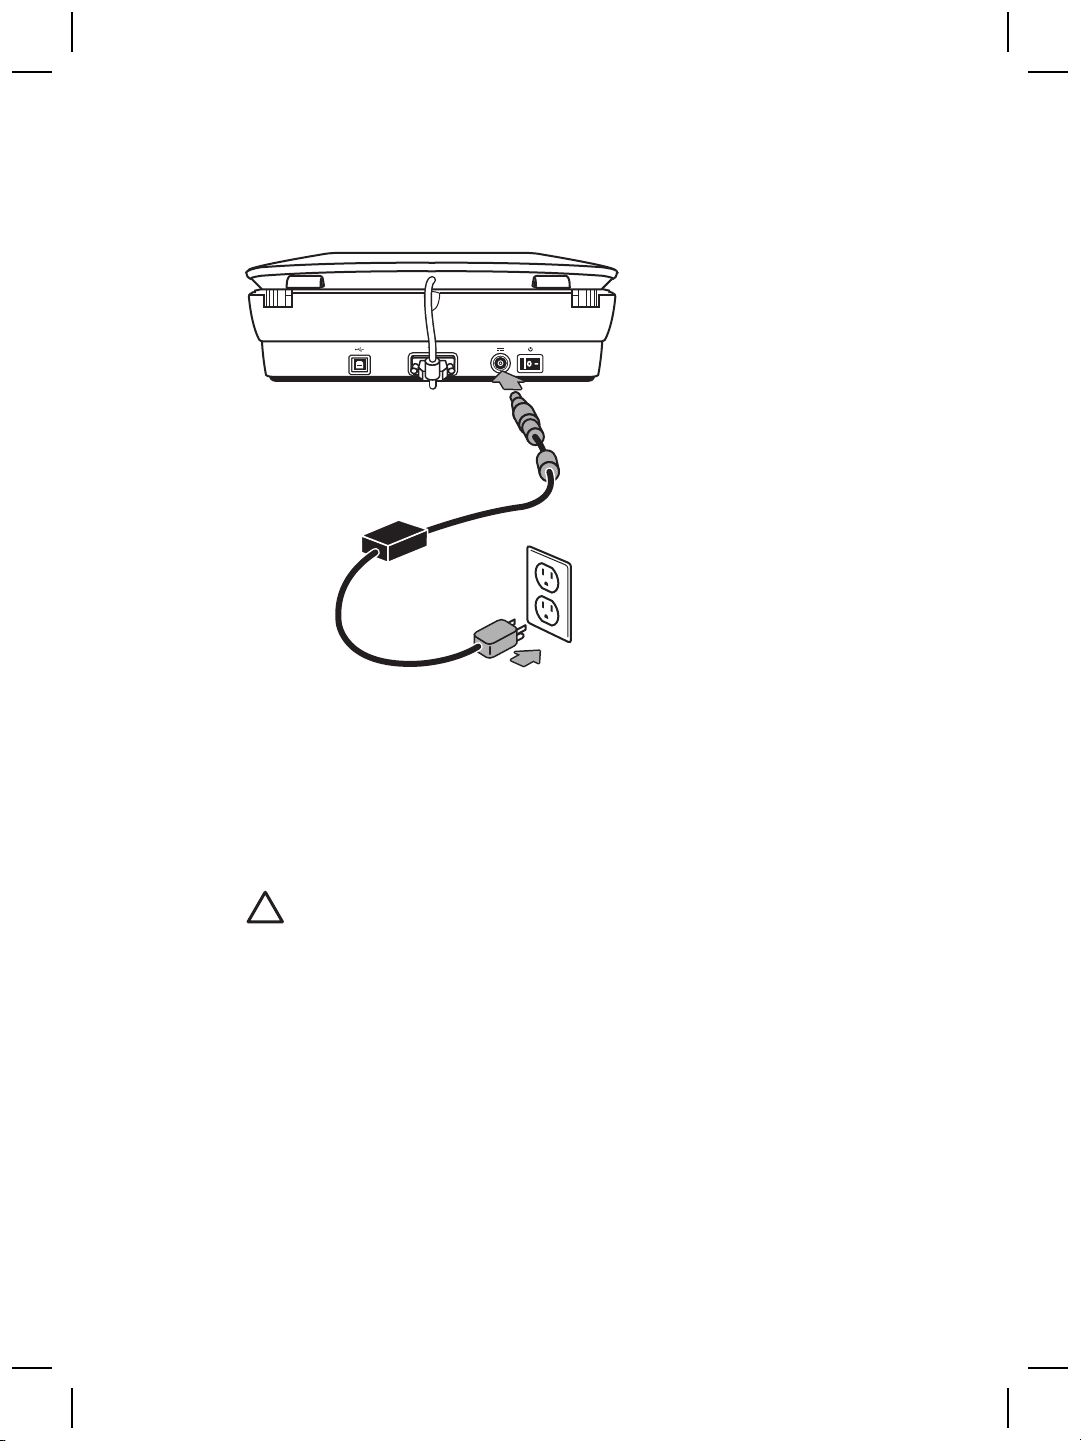
Step 4. Connect the power supply
The power supply has an attached cable that plugs into the back of the scanner.
The power supply also has an AC cable that is connected to the power supply on one
end and plugged into a power outlet or surge protector on the other end.
1. Plug the AC cable into the back of the power supply.
2. Plug the other end of the AC cable into a power outlet or a surge protector.
Step 5. Connect the USB cable
Caution If you are installing in a Windows environment, be sure you install
the HP Photosmart software before connecting the scanner to your computer
with the USB cable. See Step 2. Install the software on page 5. If you are
installing in a Macintosh environment, you can connect the USB cable either
before or after installing the software.
6
HP Scanjet G4000 series
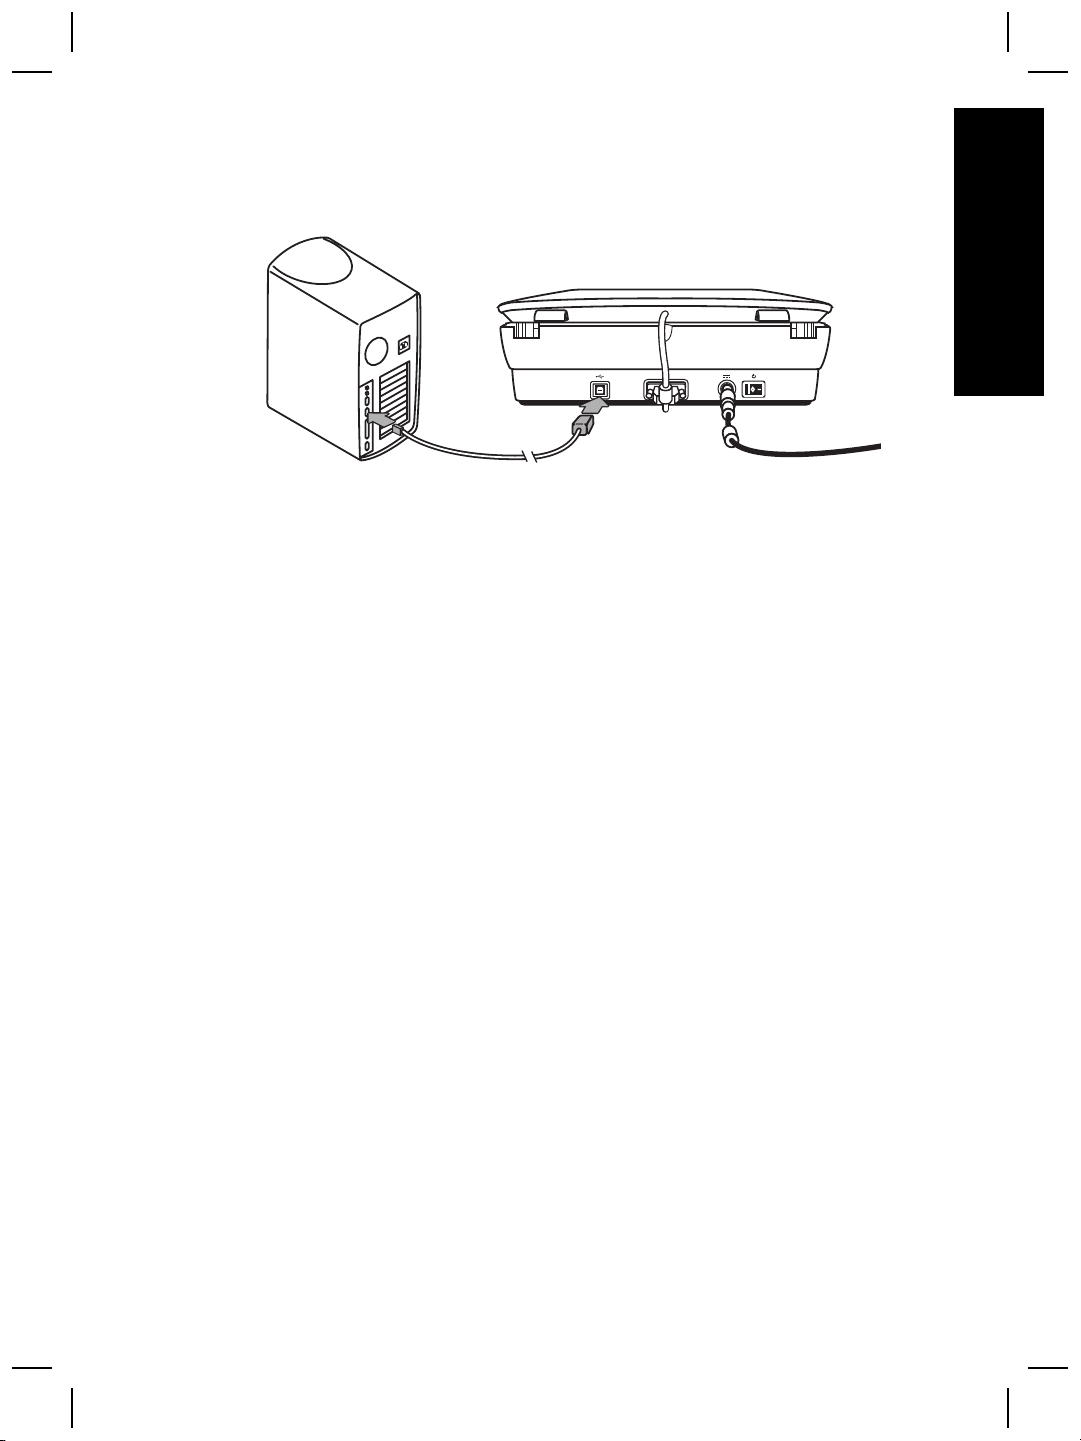
Use the USB cable that came with the scanner to connect the scanner to the computer.
1. Connect the square end of the cable to the scanner.
2. Connect the rectangular end of the cable to the computer.
English
Setup and Support Guide
7
Chapter 1
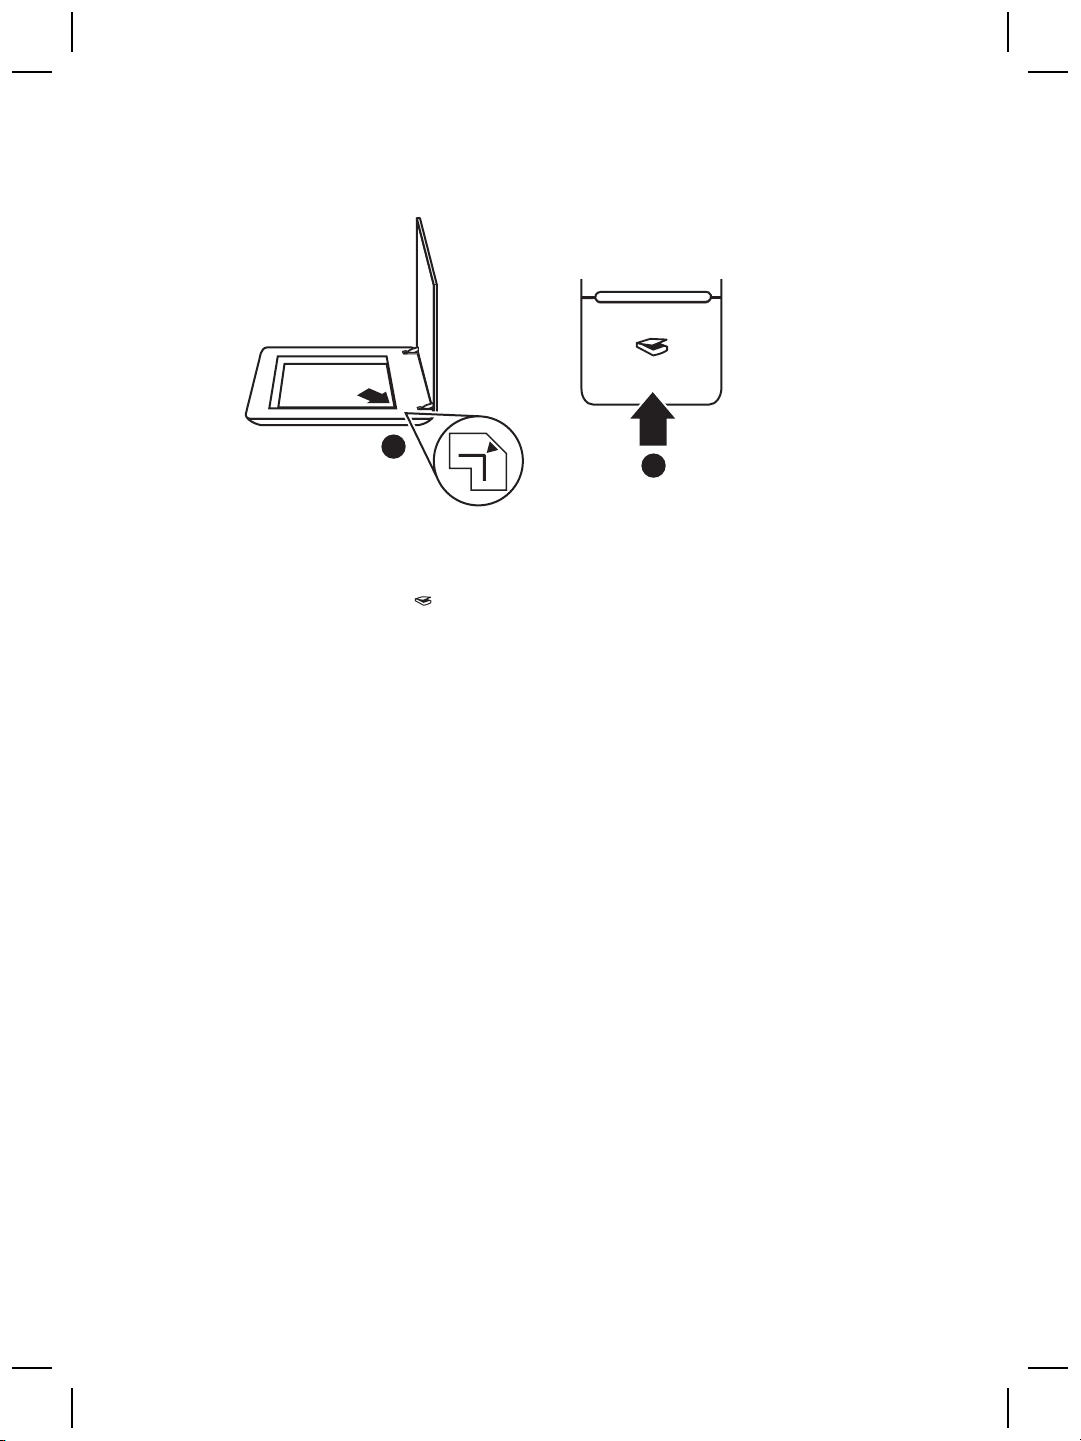
Step 6. Test the installation
1
2
1. Place a photo or document on the scanner glass as indicated by the reference
mark on the scanner.
2. Press the Scan (
What are you scanning? dialog box appears. Follow the onscreen instructions
to complete the scan.
If you are scanning using Macintosh software, the HP Scan Pro application opens
and a preview of the scan is displayed. When the preview is accepted, the
scanned image is sent to the destination that has been selected in the scanner
settings.
If the What are you scanning? dialog box or the HP Scan Pro window does not
appear, see Scanner installation troubleshooting on page 12.
) button. If you are scanning using Windows software, the
8
HP Scanjet G4000 series

2
How to use the scanner
This section presents an overview of the scanner and how to use it.
Where to get additional information
More information about the scanner and software can be found in the scanner Help
file. If you have installed the HP Photosmart software that came with the scanner,
double-click the HP Solution Center icon on your desktop, and then click Help and
Support. Under the Documentation section, click Product Help.
To access an online version of the scanner user guide, click Start, point to Programs
or All Programs, point to HP, Scanjet, G4000 series, and then click User Guide.
Macintosh users: For information about scanning procedures, open HP Device
Manager, and then click on the question mark at the bottom of the dialog box.
HP Photosmart Windows software
When you install the HP Photosmart Windows software, two icons are added to your
desktop. These icons open programs for scanning and editing your scans.
For information on how to use HP Solution Center and HP Photosmart software,
see the scanner Help file. Double-click the HP Solution Center icon on your desktop,
and then click Help and Support. Under the Documentation section, click Product
Help.
English
To start a scan:
Double-click the HP Solution Center icon on the desktop, click the tab for the
scanner, and then click the task you want to perform.
Note If the HP Solution Center icon is not available on the desktop, click
Start, point to Programs or All Programs, point to HP, and then click
HP Solution Center.
Setup and Support Guide
HP Solution Center is the program that gets you started
scanning pictures and documents. Use the HP Solution Center
for all of the following:
● Perform scanning and copy functions
● Access help and troubleshooting information
● Access the HP Photosmart software to edit your scans
● Modify settings and preferences
HP Photosmart software is the program to use for manipulating,
printing, archiving, and sharing your images after they have
been scanned. You can get to the HP Photosmart software from
the desktop icon or through HP Solution Center.
9
Chapter 2
HP Photosmart Macintosh software
When you install the HP scanning software on a Macintosh, two software programs
are available in the Dock: HP Device Manager and HP Photosmart Studio. These
programs are used for scanning and editing your scans.
HP Device Manager is the program that gets you started
scanning pictures and documents. Use the Device Manager for
all of the following:
● Perform scanning and copy functions
● Access help and troubleshooting information
● Access the HP Photosmart Studio to edit your scans
● Modify settings and preferences
HP Photosmart Studio is the program to use for manipulating,
printing, archiving, and sharing your images after they have
been scanned. You can open HP Photosmart Studio from the
Dock, or from the HP Device Manager Applications menu.
Front panel and accessories overview
This section presents an overview of the scanner front panel and the transparent
materials adapter (TMA).
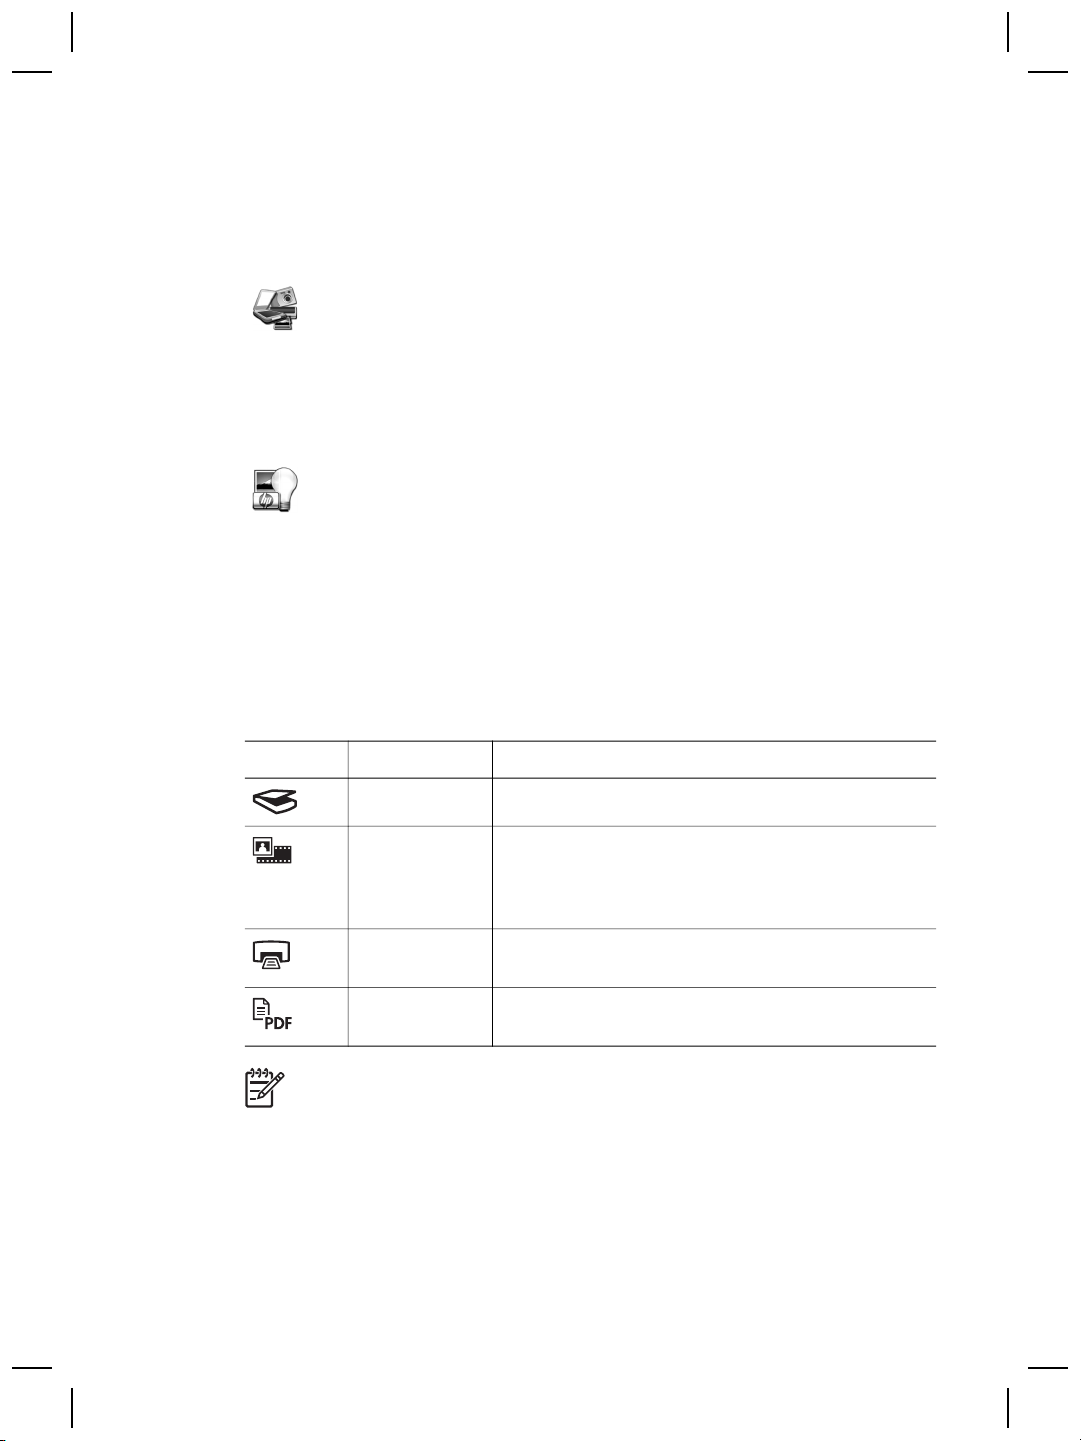
Front-panel buttons
Icon Feature name Description
Scan button Scans pictures, graphics, documents, or objects.
Scan Film
button
Copy button Scans the item and sends it to the printer to make a
Scan to PDF
button
Note For more information on the default actions of these buttons in a
Macintosh environment, open HP Device Manager, and then click on the
question mark at the bottom of the dialog box.
Scans transparent positives (such as 35 mm slides)
and negatives. Scanning film requires that you use
the transparent materials adapter (TMA) located on
the underside of the scanner lid.
copy.
Scans one or more pages and saves them as a PDF
file for sharing or storing.
Transparent materials adapter (TMA)
You can use the transparent materials adapter (TMA) to scan 35 mm slides or
negatives. With the HP Scanjet G4050 TMA you can also scan medium- and largeformat film. For more information about the TMA, see the scanner user guide. For
10
HP Scanjet G4000 series

information about how to find the user guide, see Where to get additional information
on page 9.
English
Setup and Support Guide
11

3
Scanner installation
troubleshooting
This section contains solutions for installation and setup problems.
Uninstall and reinstall the software
An incomplete software installation could cause the scanner not to be recognized or
the software not to launch correctly. Try uninstalling and then reinstalling the HP
Scanning software. To reinstall the HP Scanning software, you must have the HP
Photosmart software CD.
Windows environment:
1. Click Start, click Settings, and then click Control Panel (in Windows XP, click
Start, and then click Control Panel).
2. Click Add/Remove Programs (in Windows XP, this is called Add or Remove
Programs) and then select HP Scanjet G4000 series.
3. Click Remove.
4. Click Add/Remove Programs (in Windows XP, this is called Add or Remove
Programs) and then select the HP Photosmart software.
5. Click Remove.
6. Unplug the scanner USB cable from the computer.
7. Reinstall the software, using the HP Photosmart software CD that came with your
scanner. When you insert the CD, an installation interface launches
automatically. Choose the HP Photosmart software to install.
8. Reconnect the scanner USB cable after the software is installed. For more
information see Step 5. Connect the USB cable on page 6.
Macintosh environment:
1. Go to Applications/Hewlett-Packard and open HP Uninstaller.
12
Note You must have administrative privileges in order to uninstall the
software.
2. When prompted, type your username and password. The HP Uninstaller window
opens and displays the products that are available to be uninstalled.
3. Select the G4000 series product and click Next.
4. Follow the onscreen instructions to complete the uninstall process.
5. Reinstall the software, using the HP software CD that came with your scanner.
After inserting the CD, click on the CD icon that appears on your desktop to begin
the installation.
HP Scanjet G4000 series

Check the cables
Cable type Action
Power cable The power cable is connected between the scanner and a
power outlet.
● Ensure that the power cable is securely connected
between the scanner and a live electrical outlet or surge
protector.
● If the power cable is connected to a surge protector,
ensure that the surge protector is plugged into an outlet
and turned on.
● Turn off the scanner power switch and turn off the
computer. After 60 seconds, turn the scanner back on
and then turn on the computer, in that order.
USB cable The USB cable is connected between the scanner and the
computer.
● Use the cable that was included with the scanner.
Another USB cable might not be compatible with the
scanner.
● Ensure that the USB cable is securely connected
between the scanner and the computer.
● If the USB cable is connected to a USB port on the front
of the computer, move it to a USB port on the back of the
computer.
For additional USB troubleshooting information,
see www.hp.com/support, select your country/region, and
then use the search tool to find USB troubleshooting topics.
English
TMA cable The TMA cable is connected between the TMA in the scanner
Setup and Support Guide
lid and the scanner base.
Ensure the cable is securely connected in the back of the
scanner.
13

4
Regulatory information and
product specifications
This section contains regulatory information and product specifications for the
HP Scanjet G4000 series Photo Scanner and accessories.
Scanner specifications
Name Description
Scanner type Flatbed with transparent materials adapter (TMA)
Size G4010: 303 mm x 5088 mm x 98 mm (11.93 x 20.00 x 3.86
inches)
G4050: 303 mm x 5088 mm x 108 mm (11.93 x 20.00 x 4.25
inches)
Weight G4010: 4.4 kg (9.6 lbs)
G4050: 5.3 kg (11.6 lbs)
Scanning element Charged-coupled device
Interface USB 2.0 Hi-Speed
Hardware
resolution
Selectable
resolution
AC line voltage
Regulatory
information
4800 x 9600 dpi hardware resolution
12 dpi to 999,999 enhanced dpi at 100 percent scaling
100-120 V 60 Hz – North America
200-240 V 50 Hz – Continental Europe, United Kingdom,
Australia
100-240 V 50 Hz/60 Hz – Rest of the world
Regulatory model identification number: For regulatory
identification purposes, your product is assigned a Regulatory
Model Number. The Regulatory Model Number for your product
is FCLSD-0605. This regulatory number should not be
confused with the product name (HP Scanjet G4010 or G4050)
or product numbers (L1956A and L1957A).
Energy usage drops significantly while in ENERGY STAR®
mode, which saves natural resources, and saves money
without affecting the high performance of this product. This
product qualifies for ENERGY STAR (MOU v. 1.0), which is a
voluntary program established to encourage the development
of energy-efficient office products.
14
HP Scanjet G4000 series

Name Description
ENERGY STAR is a U.S. registered service mark of the U.S.
EPA. As an ENERGY STAR partner, HP has determined that
this product meets ENERGY STAR guidelines for energy
efficiency. For more information on ENERGY STAR guidelines,
go to the following Web site: www.energystar.gov
Transparent materials adapter (TMA) specifications
Name Description
Media types G4010: Up to five 35 mm slides or six 35 mm negative
frames
G4050: Up to sixteen 35 mm slides, thirty 35 mm
negative frames, up to two medium format film frames
(120 roll film), or one large format film frame (220 roll
film).
Power requirements 12 Volts/400 mA max
Power consumption and
regulatory information
For power consumption data, information on power
supplies, and regulatory information, see the
regulatory_supplement.htm file on the HP Photosmart
software CD.
Environmental specifications
English
Name Description
Temperature Operating the scanner and TMA: 10° to 35°C (50° to
95°F)
Storage: -40° to 60°C (-40° to 140°F)
Relative humidity Operating the scanner and TMA: 15% to 80%
noncondensing 10° to 35°C (50° to 95°F)
Storage: up to 90% noncondensing at 0° to 60°C (32°
to 140°F)
Recycle and restricted material information
Recycling
HP offers an increasing number of product return and recycling programs in many
countries/regions, and partners with some of the largest electronics recycling centers
throughout the world. HP conserves resources by reselling some of its most popular
Setup and Support Guide
15

Chapter 4
products. For more information regarding recycling of HP products, please
visit: www.hp.com/hpinfo/globalcitizenship/environment/recycle/
Product restricted material
This HP product contains the following material that might require special handling at
end-of-life: Mercury in the scanner fluorescent lamp and transparent materials adapter
(< 5 mg).
For recycling information, contact www.hp.com/go/recycle, your local authorities, or
the Electronic Industries Alliance at www.eiae.org.
Disposal of Waste Equipment by Users in Private
Households in the European Union
This symbol on the product or on its packaging indicates that this product must not be
disposed of with your other household waste. Instead, it is your responsibility to
dispose of your waste equipment by handing it over to a designated collection point
for the recycling of waste electrical and electronic equipment. The separate collection
and recycling of your waste equipment at the time of disposal will help to conserve
natural resources and ensure that it is recycled in a manner that protects human
health and the environment. For more information about where you can drop off your
waste equipment for recycling, please contact your local city office, your household
waste disposal service, or the shop where you purchased the product.
16
HP Scanjet G4000 series

5
Product support
This section describes the options for product support.
Accessibility
The following accessibility options are available on this scanner:
Windows environment:
● To prevent buttons from being accidentally pushed, you can use the Button
Disable Utility to disable the buttons. You can use the same utility to re-enable
the buttons.
For more information about the Button Disable Utility, see the scanner User Guide.
● The scanner User Guide is also available in a Help format that is readable by
most screen readers. To find this file, double-click the HP Solution Center icon
on your desktop, and then click Help and Support. Under the Documentation
section, click Product Help.
Macintosh environment:
● To prevent buttons from being accidentally pushed, use the Button Disable Utility
to disable the buttons. You can use the same utility to re-enable the buttons.
For more information about the Button Disable Utility, see the HP Scanjet
Scanner Help.
● The HP Scanjet Scanner Help is available in a format that is readable by most
screen readers. To find this file, open HP Device Manager, and then click on the
question mark at the bottom of the dialog box.
Customers with disabilities can get help by
visiting www.hp.com/hpinfo/community/accessibility/prodserv/ (English only).
English
HP Scanjet Web site
Visit www.hp.com and select your country/language at the top of the page. On the
country page, select scanners from the list of products. Use this site for a variety of
information:
● Find solutions to technical issues.
● Learn tips for scanning more effectively and creatively.
● Update your HP drivers and software.
● Register your product.
● Subscribe to newsletters, driver and software updates, and support alerts.
● Purchase HP supplies and accessories.
Setup and Support Guide
17

Chapter 5
Getting assistance
In order to get the best from your HP product, please consult the following standard
HP support offerings:
1. Please consult the product documentation that came with the product.
– Review the troubleshooting section or electronic Help of this manual/CD.
– Review the electronic Help section within the software.
2. Visit the HP online support at www.hp.com/support or contact your point of
purchase.
HP online support is available to all HP customers. It is the fastest source for upto-date product information and expert assistance, including the following features:
– Fast E-mail access to qualified online support specialists
– Software and driver updates for your product
– Valuable product and troubleshooting information for technical issues
– Proactive product updates, support alerts, and HP newsletters (available
when you register your product)
3. HP support by phone
– Support options and fees vary by product, country and language.
– Fees and policies are subject to change without notice. Please check the
Web site www.hp.com/support for the latest information.
4. Post-warranty period
After the limited warranty period, help is available online at www.hp.com/support.
5.
Extending or upgrading your warranty
If you would like to extend or upgrade the product’s warranty, please contact your
point of purchase or check the HP Care Pack Services at www.hp.com/support.
6. If you already purchased an HP Care Pack Service, please check the support
conditions in your contract.
18
HP Scanjet G4000 series

6
Hewlett-Packard limited
warranty statement
The following information outlines the warranty information for this product.
English
Product
HP Scanjet G4000
series scanner
A. Extent of limited warranty
1. Hewlett-Packard (HP) warrants to the end-user customer (Customer) that each
HP product specified above (Product) shall be free from defects in material and
workmanship for the period specified above. The warranty period begins on the
date of purchase by Customer.
2. For each software product, HP’s limited warranty applies only to a failure to
execute programming instructions. HP does not warrant that the operation of any
Product will be uninterrupted or error free.
3. HP’s limited warranty covers only those defects that arise as a result of normal
use of a Product, and does not cover any other problems, including those that
arise as a result of:
a. Improper use, maintenance, storage, handling, or modification;
b. Software, media, parts, accessories, supplies, or power adapters or sources
not provided or supported by HP; or,
c. Operation or other conditions outside a Product’s specifications.
4. If HP receives, during the applicable warranty period, notice of a defect in a
Product, HP shall at its option either replace or repair the defective Product.
5. If HP cannot replace or repair a defective Product that is covered by HP’s limited
warranty, HP may, within a reasonable time after being notified of the defect,
provide either another product similar in performance or a refund of the purchase
price prorated based on usage and other appropriate factors.
6. HP shall have no obligation to replace, repair, or refund until Customer returns
the defective Product to HP and provides a valid proof of purchase.
7. Any replacement product may be either new or like-new, provided it has
functionality at least equal to that of the Product being replaced.
8. A Product may contain remanufactured parts, components, or materials
equivalent to new in performance.
9. HP’s limited warranty is valid in any country or locality where HP has a support
presence for the Product and has marketed the Product. The level of warranty
service may vary according to local standards. Upgraded warranty services, such
as next day exchange, on-site service, and accident protection, may be
purchased from HP.
Duration of limited warranty
1 year
B. Limitations of Warranty
TO THE EXTENT ALLOWED BY LOCAL LAW, NEITHER HP NOR ITS THIRD
PARTY SUPPLIERS MAKE ANY OTHER WARRANTY OR CONDITION OF ANY
Setup and Support Guide
19

Chapter 6
KIND, WHETHER EXPRESS OR IMPLIED, WITH RESPECT TO A PRODUCT, AND
SPECIFICALLY DISCLAIM THE IMPLIED WARRANTIES OR CONDITIONS OF
MERCHANTABILITY, SATISFACTORY QUALITY, AND FITNESS FOR A
PARTICULAR PURPOSE.
C. Limitations of Liability
1. To the extent allowed by local law, the remedies provided in this Limited Warranty
Statement (LWS) are Customer’s sole and exclusive remedies.
2. TO THE EXTENT ALLOWED BY LOCAL LAW, EXCEPT FOR THE
OBLIGATIONS SPECIFICALLY SET FORTH IN THIS LWS, IN NO EVENT
SHALL HP OR ITS THIRD PARTY SUPPLIERS BE LIABLE FOR DIRECT,
INDIRECT, SPECIAL, INCIDENTAL, OR CONSEQUENTIAL DAMAGES,
WHETHER BASED ON CONTRACT, TORT, OR ANY OTHER LEGAL THEORY
AND WHETHER ADVISED OF THE POSSIBILITY OF SUCH DAMAGES.
D. Local Law
1. This LWS gives Customer specific legal rights. Customer may also have other
rights that vary from state to state in the United States, from province to province
in Canada, and from country to country elsewhere in the world.
2. To the extent this LWS is inconsistent with local law, this LWS shall be deemed
modified to be consistent with local law. Under local law, certain disclaimers and
limitations of this LWS may not apply to Customer. For example, the federal
government of the United States, some states in the United States, and some
governments outside the United States (including provinces in Canada), may:
a. Grant Customer additional warranty rights;
b. Preclude the disclaimers and limitations in this LWS from limiting the
statutory rights of a consumer (e.g., the United Kingdom);
c. Otherwise restrict the ability of a manufacturer to enforce such disclaimers or
limitations;
d. Specify the duration of implied warranties that the manufacturer cannot
disclaim; or,
e. Disallow limitations on the duration of implied warranties
3. Customer may have additional statutory rights based on its purchase agreement.
Those rights are not in any way affected by this LWS.
4. For consumer transactions in the United States, any implied warranties imposed
by law are limited in duration to the express warranty period.
5. FOR CONSUMER TRANSACTIONS IN AUSTRALIA AND NEW ZEALAND, THE
TERMS IN THIS LWS, EXCEPT TO THE EXTENT LAWFULLY PERMITTED,
DO NOT EXCLUDE, RESTRICT, OR MODIFY, AND ARE IN ADDITION TO,
THE MANDATORY STATUTORY RIGHTS APPLICABLE TO THE SALE OF A
PRODUCT TO SUCH CUSTOMERS.
You may have additional statutory rights against the seller based on your purchase
agreement. Those rights are not in any way affected by this HP Limited Warranty.
You will find on the inside front cover of this book the names and address of the HP
entity responsible for the performance of the HP Limited Warranty in your country.
20
HP Scanjet G4000 series

设置和支持指南
简体中文

版权与许可
© 2006 版权所有 Hewlett-Packard
Development Company, L.P.
未经事先书面许可,严禁复制、改编或
翻译本手册,除非版权法许可。
此处所含信息如有更改,恕不另行通
知。
HP 产品和服务的所有保修事项已在产
品和服务所附带的保修声明中列出,此
处内容不代表任何额外保修。HP 对此
处任何技术性或编辑性的错误或遗漏概
不负责。
商标注册
Microsoft 和 Windows 是 Microsoft
Corporation 的注册商标。

目录
1
使用入门 .....................................................................................................4
步骤 1. 检查盒内物品 .................................................................................4
步骤 2. 安装软件 .........................................................................................5
步骤 3. 连接 TMA 电缆 ...............................................................................5
步骤 4. 连接电源 .........................................................................................6
步骤 5. 连接 USB 电缆 ...............................................................................6
步骤 6. 测试安装 .........................................................................................8
2
如何使用扫描仪 ..........................................................................................9
从哪里获得其它信息 ...................................................................................9
HP Photosmart Windows 软件 ...................................................................9
HP Photosmart Macintosh 软件 ...............................................................10
前面板和附件概述 ....................................................................................10
前面板按钮 .........................................................................................10
透明材料适配器 (TMA) ......................................................................10
3
排除扫描仪安装故障 .................................................................................11
卸载和重新安装软件 .................................................................................11
检查电缆 ...................................................................................................12
4
法规信息和产品技术规格 ..........................................................................13
扫描仪技术规格 ........................................................................................13
透明材料适配器 (TMA) 技术规格 .............................................................14
环境规格 ...................................................................................................14
回收和限制材料信息 .................................................................................14
欧盟地区的居民如何处理废弃设备 ...........................................................15
5
产品支持 ...................................................................................................16
辅助功能 ...................................................................................................16
HP Scanjet 网站 .......................................................................................16
获得帮助 ...................................................................................................17
6
Hewlett-Packard 有限保修声明 ..............................................................18
简体中文
设置和支持指南
3

1
使用入门
按照以下步骤来安装扫描仪:
步骤 1. 检查盒内物品
打开扫描仪硬件的包装。应确保取下所有的包装封带。
1
6
5
2
1
2
3
4
5
6
3
4
HP Scanjet G4010 或 G4050 扫描仪
USB 电缆
电源
设置和支持指南(本书)
扫描软件 CD
TMA 模板(仅限 HP Scanjet G4050)
4
HP Scanjet G4000 系列

步骤 2. 安装软件
小心 如果您是在 Windows 计算机上安装软件,请先不要将 USB 电缆
连接到计算机上。在连接 USB 电缆之前,请先安装扫描软件。如果您是
在 Macintosh 计算机上安装软件,则可以在安装软件之前或之后连接
USB 电缆。
1.
将扫描仪随附的 HP Photosmart CD 插入计算机的 CD 驱动器。
Windows 安装: 等待安装对话框出现。稍后如果仍未出现安装对话框,
请参阅位于第 11 页的“排除扫描仪安装故障”。
Macintosh 安装: 双击桌面上的 CD 图标,然后双击 HP Scanjet 扫描仪
安装图标开始安装。
2.
单击“安装软件”以安装扫描软件。按照屏幕说明完成扫描软件安装。
简体中文
步骤 3. 连接 TMA 电缆
➔
将 TMA 电缆从盖板连接至扫描仪底座。
设置和支持指南
5
第 1 章
步骤 4. 连接电源
电源有一根附属电缆,可插入扫描仪的后部。
电源还配有一条交流电缆,一端与电源相连,另一端插入电源插座或电涌保护
器。
1.
将交流电缆插入电源后部。
2.
将交流电缆的另一端插入电源插座或电涌保护器。
步骤 5. 连接 USB 电缆
小心 如果在 Windows 环境下进行安装,请确保先安装 HP Photosmart
软件,然后再用 USB 电缆将扫描仪连接至计算机。请参阅
位于第 5 页的“步骤 2. 安装软件”。如果在 Macintosh 环境下进行安
装,则可以在安装软件之前或之后连接 USB 电缆。
6
HP Scanjet G4000 系列

使用扫描仪附带的 USB 电缆将扫描仪与计算机相连。
1.
将电缆的方形一端连接至扫描仪。
2.
将电缆的矩形一端连接至计算机。
简体中文
设置和支持指南
7

第 1 章
步骤 6. 测试安装
1
1.
按扫描仪上的参考标记所示,将照片或文档放在扫描仪玻璃板上。
2.
按下扫描 ( ) 按钮。如果使用 Windows 软件进行扫描,则将显示“要扫描
2
的内容?”对话框。按照屏幕说明完成扫描。
如果使用 Macintosh 软件进行扫描,则会打开 HP Scan Pro 应用程序,并
且屏幕将显示扫描预览。接受预览后,扫描的图像即被发送至在扫描仪设
置中选定的目的地。
如果没有出现“要扫描的内容?”对话框或 HP Scan Pro 窗口,请参阅
位于第 11 页的“排除扫描仪安装故障”。
8
HP Scanjet G4000 系列

2
如何使用扫描仪
本节提供扫描仪概述及有关如何使用扫描仪的信息。
从哪里获得其它信息
在扫描仪帮助文件中可以找到更多有关扫描仪和软件的信息。如果您已安装了
扫描仪随附的 HP Photosmart 软件,请双击桌面上的 “HP 解决方案中心”图
标,然后单击“帮助和支持”。在“文档”部分下单击“产品帮助”。
要访问联机版本的扫描仪用户指南,请单击“开始”,指向“程序”或“所有
程序”,依次指向 “HP”、“Scanjet”、“G4000 系列”,然后单击“用户
指南”。
Macintosh 用户: 有关扫描程序的信息,请打开 “HP 设备管理器”,然后单
击对话框底部的问号。
HP Photosmart Windows 软件
安装 HP Photosmart Windows 软件时,将在桌面上添加两个图标。这些图标
可以打开相应程序,以便扫描和编辑扫描件。
有关如何使用 “HP 解决方案中心”和 “HP Photosmart” 软件的信息,请参
阅扫描仪帮助文件。双击桌面上的 “HP 解决方案中心”图标,然后单击“帮
助和支持”。在“文档”部分下单击“产品帮助”。
简体中文
要开始扫描:
双击桌面上的 “HP 解决方案中心”图标,单击扫描仪选项卡,然后单击您要
执行的任务。
设置和支持指南
您可以从 HP 解决方案中心程序开始扫描图片和文档。使
用 HP 解决方案中心可完成以下所有操作:
●
执行扫描和复印功能
●
访问帮助和故障排除信息
●
访问 HP Photosmart 软件以编辑扫描件
●
修改设置和首选项
HP Photosmart 软件是在图像扫描后用于处理、打印、归
档和共享图像的程序。您可以从桌面图标或通过 HP 解决方
案中心访问 HP Photosmart 软件。
注意 如果桌面上未显示 “HP 解决方案中心”图标,请单击“开始”,
然后依次选择“程序”或“所有程序”、“HP” 和 “HP 解决方案中
心”。
9

第 2 章
HP Photosmart Macintosh 软件
在 Macintosh 上安装 HP 扫描软件时,Dock 中有两个可用软件程序:HP 设备
管理器和 HP Photosmart Studio。这些程序可用于扫描和编辑扫描件。
您可以从 HP 设备管理器程序开始扫描图片和文档。使用设
备管理器可完成以下所有操作:
●
执行扫描和复印功能
●
访问帮助和故障排除信息
●
访问 HP Photosmart Studio 以编辑扫描件
●
修改设置和首选项
HP Photosmart Studio 是在图像扫描后用于处理、打印、
归档和共享图像的程序。您可以从 Dock 或从 HP 设备管理
器“应用程序”菜单打开 HP Photosmart Studio。
前面板和附件概述
本部分概述了扫描仪前面板和透明材料适配器 (TMA)。
前面板按钮
图标
注意 有关这些按钮在 Macintosh 环境中的默认操作的更多信息,请打
开 “HP 设备管理器”,然后单击对话框底部的问号。
透明材料适配器 (TMA)
可以使用透明材料适配器 (TMA) 扫描 35 毫米幻灯片或底片。借助 HP Scanjet
G4050 TMA,您还可以扫描中幅面和大幅面胶片。有关 TMA 的更多信息,请
参阅扫描仪用户指南。有关如何找到用户指南的信息,请参阅
位于第 9 页的“从哪里获得其它信息”。
功能名称 说明
扫描按钮 扫描图片、图形、文档或物体。
扫描胶片按钮
复印按钮 扫描项目并将其发送到打印机以制作副本。
扫描至 PDF
按钮
扫描透明正片(例如 35 毫米幻灯片)和底片。
扫描胶片需要使用扫描仪盖板下的透明材料适配
器 (TMA)。
扫描一页或多页,并将其另存为 PDF 文件以便
共享或存储。
10
HP Scanjet G4000 系列

3
排除扫描仪安装故障
本节包含安装和设置问题的解决方法。
卸载和重新安装软件
如果软件安装不完整,可能导致无法识别扫描仪或不能正确启动软件。尝试卸
载并重新安装 HP 扫描软件。要重新安装 HP 扫描软件,您必须有 HP
Photosmart 软件 CD。
Windows 环境:
1.
依次单击“开始”、“设置”和“控制面板”(在 Windows XP 中,单
击“开始”,然后单击“控制面板”)。
2.
单击“添加/删除程序”(在 Windows XP 中称为“添加或删除程序”),
然后选择 “HP Scanjet G4000 系列”。
3.
单击“删除”。
4.
单击“添加/删除程序”(在 Windows XP 中称为“添加或删除程序”),
然后选择 “HP Photosmart” 软件。
5.
单击“删除”。
6.
从计算机上拔下扫描仪 USB 电缆。
7.
使用扫描仪随附的 HP Photosmart 软件 CD 重新安装软件。插入 CD 后,
将自动启动安装界面。选择要安装的 “HP Photosmart” 软件。
8.
安装软件后重新连接扫描仪 USB 电缆。有关更多信息,请参阅
位于第 6 页的“步骤 5. 连接 USB 电缆”。
Macintosh 环境:
1.
转至应用程序/Hewlett-Packard 并打开 “HP 卸载程序”。
简体中文
2.
3.
4.
5.
设置和支持指南
注意 您必须具有管理权限才能卸载软件。
显示提示时,键入您的用户名和密码。“HP 卸载程序”窗口将打开,并显
示可卸载的产品。
选择 G4000 系列产品并单击“下一步”。
按照屏幕说明完成卸载程序。
使用扫描仪随附的 HP 软件 CD 重新安装软件。插入 CD 后,单击桌面上
的 CD 图标开始安装。
11

第 3 章
检查电缆
电缆类型 操作
电源线 电源线连接扫描仪与电源插座。
USB 电缆 USB 电缆连接扫描仪与计算机。
●
请确保连接扫描仪和带电插座或电涌保护器的电源线
连接牢固。
●
如果将电源线连接到电涌保护器,请确保电涌保护器
插入插座并已接通。
●
关闭扫描仪电源开关并关闭计算机。60 秒后,再依
次打开扫描仪电源和计算机电源。
●
请使用随扫描仪提供的电缆。其它 USB 电缆可能与
扫描仪不兼容。
●
请确保扫描仪和计算机之间的 USB 电缆连接牢固。
●
如果 USB 电缆连接至计算机前端的 USB 端口,请将
其重新连接至计算机后部的 USB 端口。
有关其它的 USB 故障排除信息,请访
问 www.hp.com/support,选择您的国家/地区,然后使
用搜索工具查找 USB 故障排除主题。
TMA 电缆 TMA 电缆连接在扫描仪盖板中的 TMA 和扫描仪底座之
间。
确保电缆牢固地连接在扫描仪的后面。
12
HP Scanjet G4000 系列

4
法规信息和产品技术规格
本部分介绍 HP Scanjet G4000 系列照片扫描仪及其附件的法规信息和产品技
术规格。
扫描仪技术规格
名称 说明
扫描仪类型
尺寸 G4010: 303 x 508 x 98 毫米(11.93 x 20.00 x 3.86 英
重量 G4010: 4.4 千克(9.6 磅)
扫描元件 电荷耦合器
接口 USB 2.0 高速
硬件分辨率 4800 x 9600 dpi 硬件分辨率
可选择的分辨率 12 dpi 至 999,999 增强 dpi(100% 缩放)
交流线电压 100-120 伏 60 赫兹 - 北美洲
法规信息 管制型号识别码:为达到管制识别目的,您的产品指定有
带透明材料适配器 (TMA) 的平板扫描仪
寸)
G4050: 303 x 508 x 108 毫米(11.93 x 20.00 x 4.25 英
寸)
G4050: 5.3 千克(11.6 磅)
200-240 伏 50 赫兹 - 欧洲大陆、英国、澳大利亚
100-240 伏 50/60 赫兹 - 世界其它国家/地区
管制型号。您的产品的管制型号为 FCLSD-0605。请不要
将此管制型号与产品名称(HP Scanjet G4010 或
G4050)或产品编号(L1956A 和 L1957A)相混淆。
简体中文
设置和支持指南
在 ENERGY STAR® 模式下可大大降低能耗,从而在不影
响本产品高性能的情况下节约自然资源和资金。本产品符
合 ENERGY STAR (MOU v. 1.0) 标准,ENERGY STAR
是一项自愿活动,旨在鼓励开发节能高效的办公产品。
ENERGY STAR 是美国环保局在美国的注册服务标记。作
为 ENERGY STAR 的合作伙伴,HP 已经确定本产品符合
ENERGY STAR 的能效准则。有关 ENERGY STAR 准则
的更多信息,请转至以下网站: www.energystar.gov
13

第 4 章
透明材料适配器 (TMA) 技术规格
名称 说明
介质类型 G4010: 最多 5 张 35 毫米幻灯片或 6 张 35 毫米
底片条
G4050: 最多 16 张 35 毫米幻灯片、30 张 35 毫
米底片条,最多 2 张中幅面胶片条(120 卷装胶
片),或 1 张大幅面胶片条(220 卷装胶片)。
电源要求
功耗和法规信息
环境规格
名称 说明
温度
相对湿度
回收和限制材料信息
回收
HP 将在许多国家/地区推出越来越多的产品回收和再利用计划,也会与一些全
球最大的电气回收中心展开合作。HP 将通过转售某些最畅销产品来节省资
源。有关回收 HP 产品的详细信息,请访
问: www.hp.com/hpinfo/globalcitizenship/environment/recycle/
最大 12 V/400 mA
有关功耗数据、电源信息及法规信息,请参阅 HP
Photosmart 软件 CD 上的
regulatory_supplement.htm 文件。
操作扫描仪和 TMA:10°至 35°C(50°至 95°F)
存储:-40°至 60°C(-40°至 140°F)
操作扫描仪和 TMA:在 10°至 35°C(50°至 95°
F)时 15% 至 80%,非冷凝
存储:在 0°至 60°C(32°至 140°F)时最大为
90%,非冷凝
产品限制材料
此 HP 产品包含以下材料,这些材料在产品报废时可能需要进行特殊处理:扫
描仪荧光灯和透明材料适配器中所含的汞(< 5 毫克)。
14
HP Scanjet G4000 系列

有关回收方面的信息,您可以访问 www.hp.com/go/recycle,或与当地主管
部门联系,或者访问电子工业协会的网站 www.eiae.org。
欧盟地区的居民如何处理废弃设备
产品或产品包装上如果出现这一符号,表明该产品不应当和您的其他家居废弃
物一起处理。您应当负责将这类废弃的设备拿到回收废弃电子和电气设备的指
定收集点,交给他们处理。设备报废时应对废弃的设备进行分开收集和回收,
这样做将有助于保护自然资源,以及确保回收方式有助于保护人类的健康和环
境。有关您可以在何地处置废弃设备以便回收的详细信息,请与当地的主管部
门、家居废弃物处理服务机构联系,或与出售该产品的商家联系。
简体中文
设置和支持指南
15

5
产品支持
本部分介绍产品支持选项。
辅助功能
本扫描仪提供了以下辅助功能选项:
Windows 环境:
●
为避免无意中按下按钮,您可以使用“按钮禁用实用程序”以禁用按钮。
您可以使用相同的实用程序重新启用按钮。
有关“按钮禁用实用程序”的详细信息,请参阅扫描仪《用户指南》。
●
另外,还提供了帮助格式的扫描仪《用户指南》,可通过大多数屏幕阅读
器进行查看。要找到此文件,请双击桌面上的 “HP 解决方案中心”图
标,然后单击“帮助和支持”。在“文档”部分下单击“产品帮助”。
Macintosh 环境:
●
要避免无意中按下按钮,请使用“按钮禁用实用程序”禁用按钮。您可以
使用相同的实用程序重新启用按钮。
有关“按钮禁用实用程序”的详细信息,请参阅 HP Scanjet 扫描仪帮助。
●
HP Scanjet 扫描仪帮助的格式极其常见,可通过大多数屏幕阅读器进行查
看。要找到此文件,请打开 “HP 设备管理器”,然后单击对话框底部的
问号。
伤残人士可以通过访
问 www.hp.com/hpinfo/community/accessibility/prodserv/ (仅英文版)
获得帮助。
HP Scanjet 网站
访问 www.hp.com 并在页面顶端选择您所在的国家/地区。在国家/地区页面
上,从产品列表中选择扫描仪。在此站点可获得更多信息:
●
查找技术问题的解决方案。
●
了解更有成效和更有创意地进行扫描的技巧。
●
更新您的 HP 驱动程序和软件。
●
注册产品。
●
预订简讯、驱动程序和软件更新件及支持警报。
●
购买 HP 耗材和附件。
16
HP Scanjet G4000 系列

获得帮助
要最大限度地发挥 HP 产品的性能,请了解以下标准的 HP 支持内容:
1.
2.
3.
4.
5.
6.
请参阅产品附带的产品文档。
–
查看本手册的故障排除部分或 CD 中的电子版“帮助”。
–
查看软件中的电子版“帮助”部分。
访问 HP 在线支持 ( www.hp.com/support) 或联系出售产品的商家。
HP 在线支持适用于所有 HP 客户。它是获取最新产品信息和专家帮助的快
速通道,包括以下功能:
–
通过电子邮件向资深在线支持专家进行快速咨询
–
更新产品软件和驱动程序
–
重要的产品技术问题和故障排除信息
–
产品及时更新、支持通知和 HP 简讯(当您注册产品后即可获得)
通过电话联系 HP 支持
–
支持选项和费用会因产品、所在国家/地区以及语言的不同而有所差
异。
–
费用及相关政策如有变更,恕不另行通知。请登录网
站 www.hp.com/support,了解最新信息。
保修期过后
过了有限保修期之后,客户可以通过以下网站获得在线帮
助: www.hp.com/support。
保修延长或升级
如果想延长或升级产品保修,请与出售产品的商家联系,或通过以下网站
查看 HP 金牌服务: www.hp.com/support。
如果您已经购买了 HP 金牌服务,请查看合同中的支持条件。
简体中文
设置和支持指南
17

6
Hewlett-Packard 有限保修声明
以下信息列出了有关本产品的保修信息。
产品
HP Scanjet G4000
系列扫描仪
A. 有限保修范围
1.
Hewlett-Packard (HP) 向最终用户(客户)保证:上述每个 HP 产品(产
品)在以上指定的保修期内无任何材料和工艺上的缺陷,保修期自客户购
买产品之日算起。
2.
对于每个软件产品,HP 的有限保修仅适用于执行程序指令时出现的故障。
HP 不保证每个产品的运行都不会中断或没有故障。
3.
HP 的有限保修仅适用于因正常使用 HP 产品而出现的那些故障,不适用于
其它任何问题,包括因下述情况而出现的故障:
a.
不正确的使用、维护、存储、处理或修改;
b.
不是由 HP 提供或支持的软件、介质、部件、附件、耗材或电源适配器
或其它来源;或者,
c.
在产品规格外的其它条件下操作。
4.
在保修期内,如果 HP 收到任何产品缺陷通知,将由 HP 决定是更换还是
维修有缺陷的产品。
5.
如果有缺陷产品在 HP 保修范围内,但 HP 不能更换或维修,HP 将在收到
缺陷通知后的合理时间内,提供性能相似的其它产品或根据使用及其它相
关因素按购买价格的一定比例退回货款。
6.
在客户将有缺陷的产品退回 HP 并提供有效的购买凭证之前,HP 并无义务
进行更换、维修或退还货款。
7.
所有更换产品都可能是新产品或类似新产品,但其功能至少与被更换产品
相当。
8.
产品可能包含性能等同于新部件的再加工部件、组件或材料。
9.
HP 的有限保修在任何销售本产品和有本产品技术支持的国家或地区均有
效。保修服务水平可能因当地标准而异。客户可以从 HP 购买升级的保修
服务,如第二天更换、现场服务及意外保护。
有限保修期限
1 年
18
B. 保修限制
在当地法律允许的范围内,HP 及其第三方供应商不对本产品作任何其它的保
证或承诺,无论是明示的还是暗示的保证或承诺,并特别声明不对本产品的适
销性、质量满意度及对特殊用途的适用性作任何隐含的保证或承诺。
HP Scanjet G4000 系列

C. 有限责任
1.
在当地法律允许的范围内,本有限保修声明 (LWS) 中所提供的补救方法是
客户唯一的专有补偿。
2.
在当地法律允许的范围内,除本有限保修声明 (LWS) 专门所述之义务外,
HP 或其第三方供应商不对任何直接、间接、特殊、意外性或随发性损失负
责,不论它是基于合约、侵权还是任何其它法律理论,也不论是否建议过
此类损失的可能性。
D. 当地法律
1.
本有限保修声明赋予客户特定的法律权利。客户在美国不同的州、加拿大
不同的省和世界上不同的国家/地区,还可能有其它的权利。
2.
如果本有限保修声明与当地法律不一致,应将本保修声明修改为与当地法
律一致。根据当地法律,本有限保修声明的某些免责声明和限制可能不适
用于客户。例如,美国联邦政府、美国的某些州以及美国以外的某些政府
(包括加拿大的省)可能:
a.
授予客户附加保修权利;
b.
取消本有限保修声明中对消费者法定权利的免责声明和限制(例如英
国);
c.
限制生产商执行这样的免责声明或限制;
d.
指定生产商不能排除的有限保修期限;或者,
e.
不允许限制隐含保修的时间期限。
3.
根据采购协议,客户可能还有其它法定权利。这些权利不受本有限保修声
明的影响。
4.
在美国进行消费者事务处理时,法律所强制的任何暗示保修均限制在明示
的保修期限内。
5.
在澳大利亚和新西兰进行消费者事务处理时,除法律允许的范围外,本有
限保修声明中的条款不包括,也不排除、限制或修改本产品销售给此类客
户时适用的强制性法定权利。
根据采购协议,您可能还可以从经销商处获得其它法定权利。这些权利不会受
本 HP 有限保修的影响。
您可以在本书封面内侧找到在您所在国家/地区提供 HP 有限保修的 HP 实体责
任人的名称和地址。
简体中文
设置和支持指南
19


 Loading...