


HP Notebook PC
Startup Guide

Notice
This manual and any examples contained herein are provided “as is” and are subject to change without notice. Hewlett-Packard Company makes no warranty of any kind with regard to this manual, including, but not limited to, the implied warranties of merchantability and fitness for a particular purpose. Hewlett-Packard Co. shall not be liable for any errors or for incidental or consequential damages in connection with the furnishing, performance, or use of this manual or the examples herein.
Consumer transactions in Australia and the United Kingdom: The above disclaimers and limitations shall not apply to Consumer transactions in Australia and the United Kingdom and shall not affect the statutory rights of Consumers.
© Copyright Hewlett-Packard Company 2002. All rights reserved. Reproduction, adaptation, or translation of this manual is prohibited without prior written permission of Hewlett-Packard Company, except as allowed under the copyright laws.
The programs that control this product are copyrighted and all rights are reserved. Reproduction, adaptation, or translation of those programs without prior written permission of Hewlett-Packard Co. is also prohibited.
Portions of the programs that control this product may also be copyrighted by Microsoft Corporation, Phoenix Technologies, Ltd., ATI Technologies Inc., S3 Graphics Incorporated, Intel Corporation, and Adobe Systems Incorporated. See the individual programs for additional copyright notices.
This product incorporates copyright protection technology that is protected by method claims of certain U.S. patents and other intellectual property rights owned by Macrovision Corporation and other rights owners. Use of this copyright protection technology must be authorized by Macrovision Corporation and is intended for home and other limited viewing uses only unless otherwise authorized by Macrovision Corporation. Reverse engineering or disassembly is prohibited.
Microsoft®, MS-DOS®, and Windows® are U.S. registered trademarks of Microsoft Corporation. Pentium® and the Intel Inside logo are U.S. registered trademarks and Celeron™ and SpeedStep™ are U.S. trademarks of Intel Corporation. Adobe® and Acrobat® are trademarks of Adobe Systems Incorporated.
Hewlett-Packard Company
HP Notebook Customer Care
1000 NE Circle Blvd., MS 425E
Corvallis, OR 97330
2 Startup Guide

|
|
Important Safety Information |
|
|
|
CAUTION |
|
To reduce the risk of fire, use only No. 26 AWG or larger telecommunications line |
|
|
cord to connect a modem to the telephone wall jack. In Australia, the computer |
|
|
must be connected to the Telecommunication Network through a line cord that |
|
|
meets the requirements of ACA Technical Standard TS008. |
|
|
When using your computer with a telephone connection, always follow basic safety |
|
|
|
|
|
precautions to reduce the risk of fire, electric shock, and injury to persons: |
|
|
∙ Do not use this product with a telephone connection near water (for example, near a |
|
|
bathtub, sink, swimming pool, or in a wet basement). |
|
|
∙ Avoid using a telephone connection (other than a cordless type) during an electrical |
|
|
storm. There may be a remote risk of electric shock from lightning. |
|
|
∙ Do not use a telephone connection to report a gas leak in the vicinity of the leak. |
|
|
∙ Use only the power cord and batteries indicated in this manual. Do not dispose of |
|
|
batteries in a fire. They may explode. Check with local codes for possible special |
|
|
disposal instructions. |
|
|
|
|
|
HP Software Product License Agreement |
|
|
Your HP product contains software programs. CAREFULLY READ THIS LICENSE |
|
|
AGREEMENT BEFORE PROCEEDING TO OPERATE THIS EQUIPMENT. RIGHTS |
|
|
IN THE SOFTWARE ARE OFFEREDONLY ON THE CONDITION THAT THE |
|
|
CUSTOMER AGREES TO ALL TERMS AND CONDITIONS OF THE LICENSE |
|
|
AGREEMENT. PROCEEDING TO OPERATE THE EQUIPMENT INDICATES |
|
|
YOUR ACCEPTANCE OF THESE TERMS AND CONDITIONS. IF YOU DO NOT |
|
|
AGREE WITH THE TERMS OF THE LICENSE AGREEMENT, YOU MUST NOW |
|
|
EITHER REMOVE THE SOFTWARE FROM YOUR HARD DISK DRIVE AND |
|
|
DESTROY THE MASTER DISKETTES, OR RETURN THE COMPLETE HP |
|
|
PRODUCT AND SOFTWARE FOR A FULL REFUND. PROCEEDING WITH |
|
|
CONFIGURATION SIGNIFIES YOUR ACCEPTANCE OF THE LICENSE TERMS. |
|
|
UNLESS OTHERWISE STATED BELOW, THIS HP SOFTWARE LICENSE |
|
|
AGREEMENT SHALL GOVERN THE USE OF ALL SOFTWARE THAT IS |
|
|
PROVIDED TO YOU AS PART OF THE HP PRODUCT AND SHALL SUPERSEDE |
|
|
ANY OTHER SOFTWARE WARRANTY STATEMENT THAT MAY BE INCLUDED |
|
|
IN THIS HP PRODUCT OR MAY BE FOUND ONLINE. |
|
|
Operating system and software applications by Microsoft are licensed to you under the |
|
|
Microsoft License Agreement contained in the Microsoft documentation or displayed on |
|
|
your screen when Microsoft Software Products are launched. |
Startup Guide |
3 |

For a PC supplied with a Microsoft operating system: When you start the PC and accept the Microsoft End-user License Agreement (“EULA”), your license rights are valid only if a Certificate of Authenticity (“COA”) label corresponding to your Microsoft operating system is provided with your PC. The COA label can usually be found on the bottom of the computer. If the COA label does not correspond to your Microsoft operating system or is missing, contact your HP reseller for details.
Other non-HP Software and Operating Systems are covered by the appropriate vendor license. The following License Terms govern the use of the HP software:
USE. Customer may use the software on any one HP product. Customer may not network the software or otherwise use it on more than one HP product. Customer may not reverse assemble or decompile the software unless authorized by law.
COPIES AND ADAPTATIONS. Customer may make copies or adaptations of the software a) for archival purposes or (b) when copying or adaptation is an essential step in the use of the software with an HP product so long as the copies and adaptations are used in no other manner.
OWNERSHIP. Customer agrees that he/she does not have any title or ownership of the software, other than ownership of the physical media. Customer acknowledges and agrees that the software is copyrighted and protected under the copyright laws. Customer acknowledges and agrees that the software may have been developed by a third party software supplier named in the copyright notices included with the software, who shall be authorized to hold the Customer responsible for any copyright infringement or violation of this Agreement.
PRODUCT RECOVERY CD-ROM or DVD. If your HP product was shipped with a product recovery CD-ROM or DVD: (i) The product recovery CD-ROM or DVD and/or support utility software may only be used for restoring the hard disk of the HP product with which the product recovery CD-ROM or DVD was originally provided. (ii) The use of any operating system software by Microsoft contained in any such product recovery CD-ROM or DVD shall be governed by the Microsoft License Agreement.
TRANSFER OF RIGHTS IN SOFTWARE. Customer may transfer rights in the software to a third party only as part of the transfer of all rights and only if Customer obtains the prior agreement of the third party to be bound by the terms of this License Agreement. Upon such a transfer, Customer agrees that his/her rights in the software are terminated and that he/she will either destroy his/her copies and adaptations or deliver them to the third party.
SUBLICENSING AND DISTRIBUTION. Customer may not lease, sublicense the software or distribute copies or adaptations of the software to the public in physical media or by telecommunication without the prior written consent of Hewlett-Packard.
TERMINATION. Hewlett-Packard may terminate this software license for failure to comply with any of these terms provided Hewlett-Packard has requested Customer to cure the failure and Customer has failed to do so within thirty (30) days of such notice.
UPDATES AND UPGRADES. Customer agrees that the software does not include updates and upgrades which may be available from Hewlett-Packard under a separate support agreement.
4 Startup Guide

EXPORT CLAUSE. Customer agrees not to export or re-export the software or any copy or adaptation in violation of the U.S. Export Administration regulations or other applicable regulation.
U.S. GOVERNMENT RESTRICTED RIGHTS. Use, duplication, or disclosure is subject to HP standard commercial license terms and for non-DOD Departments and Agencies of the U.S. Government, the restrictions set forth in FAR 52.227-19(c)(1-2) (June 1987)
Hewlett-Packard Company, 3000 Hanover Street, Palo Alto, CA 94304 U.S.A. Copyright
(c) 2000 Hewlett-Packard Company. All Rights Reserved. Customer further agrees that Software is delivered and licensed as “Commercial computer software” as defined in DFARS 252-227-7014 (June 1995) or as a “commercial item” as defined in FAR 2.101(a), or as “Restricted computer software” as defined in FAR 52.227-19 (or any equivalent agency regulation or contract clause), whichever is applicable. The Customer agrees that it has only those rights provided for such Software by the applicable FAR or DFARS clause or the HP standard software agreement for the product involved.
Support Policy for Microsoft Operating Systems Service Pack. HP will provide end user support for HP PCs that use Microsoft Operating Systems, including its latest service packs. This support will be available 30 days after the service pack being released by Microsoft.
Edition History
Edition 1 (KB, KC) ...................................... |
April 2002 |
 This manual is printed on recycled paper.
Startup Guide |
5 |

Contents |
|
Getting Started with Your HP Notebook ....................................................................... |
9 |
Taking Inventory......................................................................................................... |
10 |
What’s in the box? ................................................................................................ |
10 |
To find more information...................................................................................... |
11 |
Identifying Parts of the Computer............................................................................... |
12 |
Front View ............................................................................................................ |
12 |
Back View............................................................................................................. |
13 |
Bottom View ......................................................................................................... |
14 |
Status Lights.......................................................................................................... |
15 |
Setting Up Your Computer ......................................................................................... |
17 |
Step 1: Install the battery ...................................................................................... |
17 |
Step 2: Connect AC power.................................................................................... |
19 |
Step 3: Connect a phone line................................................................................. |
20 |
Step 4: Turn on the computer................................................................................ |
21 |
Step 5: Set up Windows ........................................................................................ |
21 |
Step 6: Register your notebook ............................................................................. |
22 |
To connect to the Internet ..................................................................................... |
22 |
What to do next ..................................................................................................... |
22 |
Basic Operation .............................................................................................................. |
23 |
Operating Your Computer .......................................................................................... |
24 |
To turn the computer on and off ........................................................................... |
24 |
To reset the computer............................................................................................ |
25 |
To change the boot device..................................................................................... |
26 |
To use the touch pad ............................................................................................. |
27 |
To use the Fn hot keys .......................................................................................... |
29 |
To play DVD movies ............................................................................................ |
30 |
Working in Comfort with a Notebook PC .................................................................. |
31 |
Batteries and Power Management ................................................................................ |
33 |
Using Battery Power ................................................................................................... |
34 |
To check battery status.......................................................................................... |
34 |
To respond to a low-battery warning .................................................................... |
35 |
To recharge the battery ......................................................................................... |
35 |
Add-On Devices .............................................................................................................. |
37 |
Installing Additional RAM ......................................................................................... |
38 |
To install a RAM expansion module .................................................................... |
38 |
Replacing the Hard Disk Drive................................................................................... |
40 |
To replace the hard disk drive ............................................................................... |
40 |
Startup Guide |
7 |

Troubleshooting and Maintenance ............................................................................... |
41 |
Troubleshooting Techniques....................................................................................... |
42 |
Display Problems .................................................................................................. |
42 |
Hard Disk Drive Problems .................................................................................... |
43 |
Keyboard and Pointing Device Problems ............................................................. |
43 |
Performance Problems .......................................................................................... |
44 |
Power and Battery Problems................................................................................. |
44 |
Startup Problems ................................................................................................... |
45 |
Testing the Hardware.................................................................................................. |
46 |
To run the e-Diagtools diagnostic test .................................................................. |
46 |
Configuring the Computer .......................................................................................... |
48 |
To run the BIOS Setup utility ............................................................................... |
48 |
Reinstalling and Updating Software ........................................................................... |
49 |
To recover the factory installation of your hard disk ............................................ |
49 |
HP Support and Service................................................................................................. |
51 |
Getting Assistance for Your Computer....................................................................... |
52 |
To get help from the Web ..................................................................................... |
52 |
To contact HP for support or service .................................................................... |
52 |
To receive repair service ....................................................................................... |
55 |
To prepare your computer for shipment................................................................ |
56 |
Hewlett-Packard Limited Warranty Statement ........................................................... |
57 |
Reference Information ................................................................................................... |
59 |
Hardware Specifications ............................................................................................. |
60 |
Safety Information ...................................................................................................... |
64 |
Power Cords.......................................................................................................... |
64 |
Ergonomics ........................................................................................................... |
65 |
Battery Safety........................................................................................................ |
65 |
Laser Safety........................................................................................................... |
66 |
LED Safety............................................................................................................ |
66 |
Exposure to Radio Frequency Radiation............................................................... |
67 |
Regulatory Information............................................................................................... |
68 |
U.S.A..................................................................................................................... |
68 |
Canada................................................................................................................... |
69 |
European Union .................................................................................................... |
70 |
Japan ..................................................................................................................... |
71 |
Russia .................................................................................................................... |
72 |
International .......................................................................................................... |
72 |
Index ................................................................................................................................ |
75 |
8 Startup Guide

Getting Started with Your HP Notebook
Startup Guide |
9 |

Getting Started with Your HP Notebook
Taking Inventory
Taking Inventory
Congratulations! Your notebook computer sets a new standard in personal computing. Although compact and easy to carry, your computer is made with the quality and attention to detail that are the hallmark of Hewlett-Packard.
This manual shows how to set up and operate your computer, as well as what to do if you run into trouble.
What’s in the box?
∙HP notebook PC.
∙Battery (installed).
∙AC adapter and power cord.
∙Quick Start sheet.
∙Startup Guide.
∙Recovery CD or DVD, for restoring Windows and all software included with your computer.
∙Microsoft Windows manual.
∙CD with special software (for models with certain types of drives).
In addition, your HP notebook includes preinstalled software. (The exact software installed depends on your particular notebook model.)
10 Startup Guide
Getting Started with Your HP Notebook
Taking Inventory
To find more information
The following table lists other sources of information about your computer and related products.
Source
Startup Guide
Online Reference
Guide
Description and Location
This printed manual introduces your computer. It also contains setup instructions, basic operation guidelines, troubleshooting information, and warranty information.
The full Reference Guide is shipped on the computer’s hard drive, and provides a complete source for operating and maintaining the computer. Look in the online HP Library, or on the Recovery CD or DVD in \hp\Library. For Windows XP, the HP Library is in the Help and Support Center.
Online HP Notes |
For late-breaking information available after the manuals were completed, see the |
|
HP Notes in the online HP Library, or on the Recovery CD or DVD in \hp\Library. |
Microsoft Windows |
This is shipped with your computer and contains information about using the version |
manual |
of Microsoft Windows shipped with your computer. |
|
|
HP Notebook Web |
www.hp.com/notebooks |
Site |
www.europe.hp.com/notebooks (European mirror). |
HP Business |
www.hp.com/go/bizsupport |
Support Web Site |
|
Corporate |
This provides information about installing alternate operating systems, as well as |
Evaluator’s Guide |
how to configure your notebook computer in a corporate, networked environment. |
|
Located at the HP Business Support Web site. |
Startup Guide |
11 |

Getting Started with Your HP Notebook
Identifying Parts of the Computer
Identifying Parts of the Computer
Front View
1.Computer open/close latch.
2.One-Touch buttons.
3.Keyboard status lights.
4.Power button. Turns the computer on and off.
5.Touch pad, scroll pad, click buttons, plus on-off button.
6.Main status lights (left to right): power mode, battery, hard disk activity.
7.Built-in microphone*.
8.Infrared port*.
9.Wireless on-off button and indicator light*.
10.Battery.
11.CD-ROM, DVD, or other drive.
12.PS/2 keyboard or PS/2 mouse port (supports Y adapter).
*on certain models
12 Startup Guide
Getting Started with Your HP Notebook
Identifying Parts of the Computer
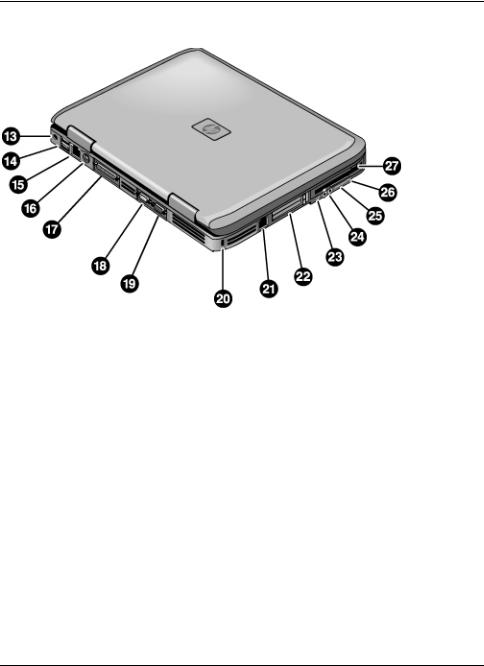
Back View
13.AC adapter jack.
14.Two universal serial bus ports (USB).
15.LAN port*.
16.S-video port*.
17.Parallel port (LPT1). Use this port for a parallel printer or other parallel device.
18.Serial port (COM1). Use this port for a serial mouse, modem, printer, or other serial device.
19.External monitor port.
20.Kensington lock slot (security connector).
21.Modem port*.
22.PC Card and CardBus slot and button (certain models have two slots and two buttons).
23.IEEE 1394 port*.
24.Audio jacks (left to right): audio out (headphones), external microphone.
25.Volume control*.
26.Audio mute button and audio mute light*.
27.Floppy disk drive*.
* on certain models
Startup Guide |
13 |
Getting Started with Your HP Notebook
Identifying Parts of the Computer
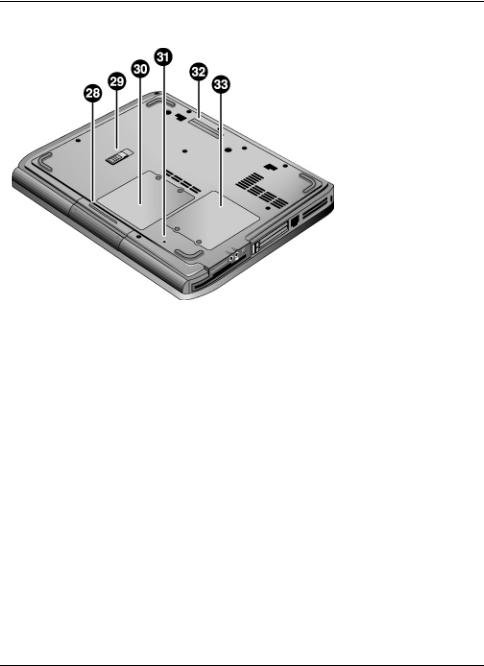
Bottom View
28. Hard disk drive. |
31. Reset button. |
29. Battery latch. |
32. Docking port*. |
30. RAM cover. |
33. Mini-PCI cover (no user parts inside). |
|
* on certain models |
14 Startup Guide
Getting Started with Your HP Notebook
Identifying Parts of the Computer
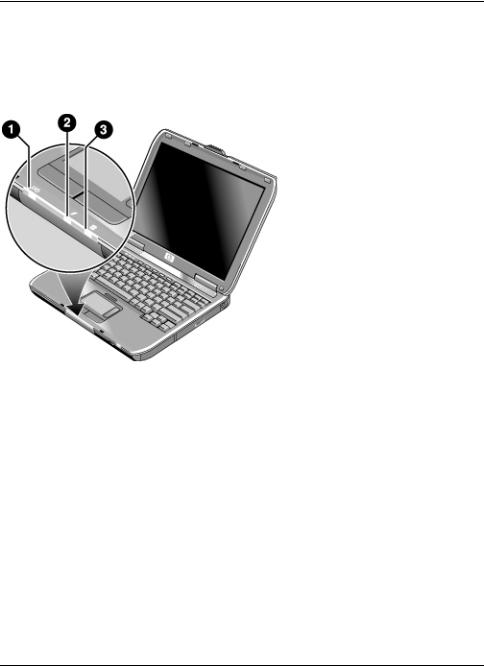
Status Lights
The computer includes a number of status lights that report power and battery status, drive activity, and keyboard functions such as Caps Lock and Num Lock.
The following diagram shows the main status lights on the front of the computer.
1.Power mode.
∙On: the computer is on (even if the display is off).
∙Blinking: the computer is in Standby mode.
∙Off: the computer is off or in Hibernate mode.
2.Hard disk drive activity.
∙On: computer is accessing the hard disk drive.
3.Battery status.
∙Green: the AC adapter is connected and the battery is fully charged.
∙Amber: the AC adapter is connected and the battery is charging.
∙Blinking: the AC adapter is connected and the battery is missing or has a fault.
∙Off: the AC adapter is not connected.
Startup Guide |
15 |
Getting Started with Your HP Notebook
Identifying Parts of the Computer
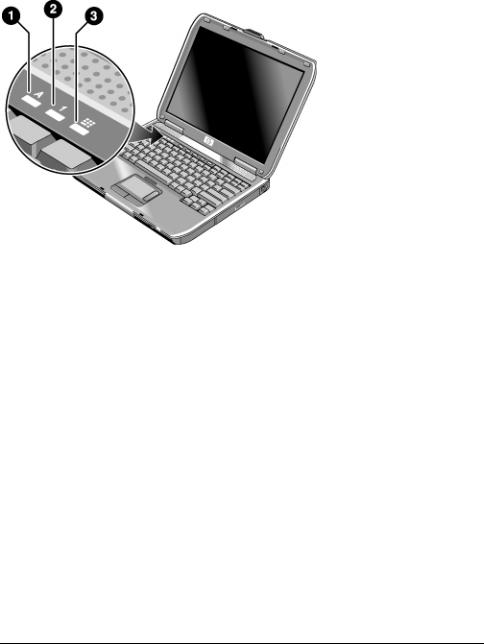
The keyboard status lights, located above the keyboard, indicate the states of the keyboard locks.
1.Caps Lock. Caps Lock is active.
2.Num Lock. Num Lock is active. (The Keypad Lock must also be on to use the embedded keypad.)
3.Keypad Lock. The embedded keypad is active (Fn+F8). Num Lock must also be on for the numeric keys—otherwise, cursor control is active (as marked on an external keyboard).
16 Startup Guide
Getting Started with Your HP Notebook
Setting Up Your Computer
Setting Up Your Computer
WARNING
WARNING
Improper use of keyboards and other input devices has been associated with ergonomic injury. For information about reducing your risk, see Working in Comfort in the online HP Library, or visit our ergonomics Web site, www.hp.com/ergo. For a summary about working with a notebook computer, see “Working in Comfort with a Notebook PC” on page 31.
If you are using your notebook computer as your primary computer, or using it for extended periods, you should use it with a full-size keyboard, monitor, and mouse. HP docking accessories offer quick, easy connections to these devices. This can reduce the risk of ergonomic injury. See Working in Comfort in the online HP Library.
When you set up your computer for the first time, you’ll install and charge the battery, connect the AC adapter, turn on the computer, and run the Windows setup program.
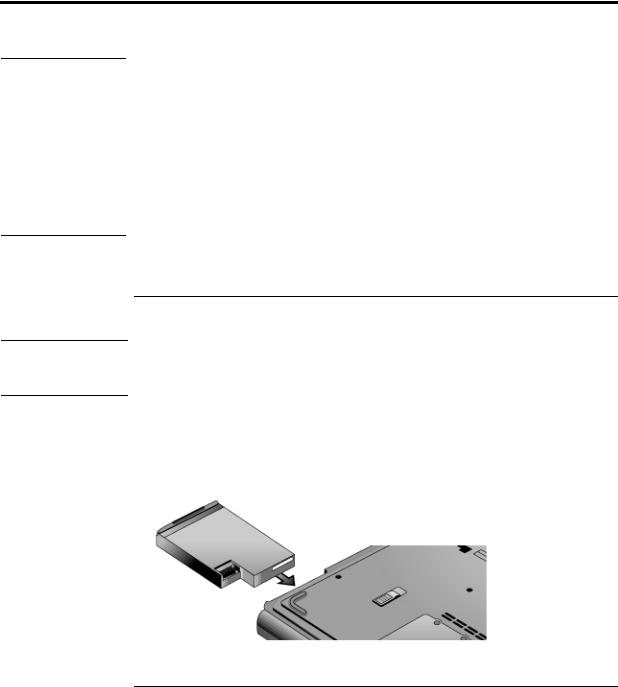
Step 1: Install the battery
Do not mutilate or puncture batteries. Do not dispose of batteries in fire, or they can burst or explode, releasing hazardous chemicals. Rechargeable batteries must be recycled or disposed of properly.
Your computer is shipped with the battery installed. If the battery has been removed, you should install it:
1.Turn the computer upside down.
2.Insert the connector end of the battery into the battery compartment and slide it in until it latches.
Startup Guide |
17 |
Getting Started with Your HP Notebook
Setting Up Your Computer
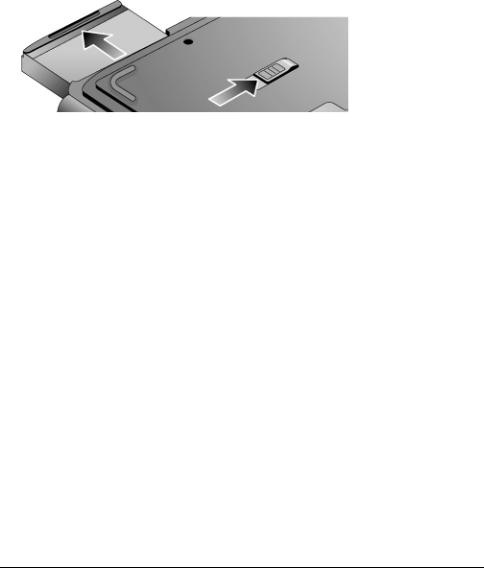
To remove the battery
1.Before removing the battery, do one of the following:
∙Shut down the computer or put it into Hibernate mode, or
∙Plug in the AC adapter.
2.Slide the battery’s release latch, and then slide the battery out of its compartment.
18 Startup Guide
CAUTION
Important
Getting Started with Your HP Notebook
Setting Up Your Computer
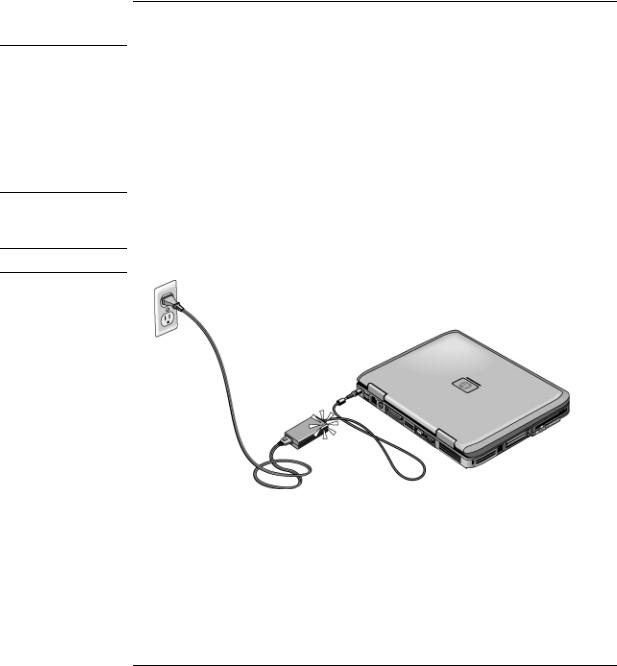
Step 2: Connect AC power
Use only the HP AC adapter included with your computer (or other approved adapter that meets the power requirements of the computer).
If “75W” is printed below the AC adapter socket on the computer, do not use a 60watt, 3.16-amp adapter, such as HP F1454A or F1781A, and do not use DC adapter accessories F1455A and F2297A.
Using the wrong AC adapter could damage the computer or adapter and may void your warranty (see "Hewlett-Packard Limited Warranty Statement" on page 57).
∙Plug the AC adapter into the computer and connect the power cord to the AC adapter, then plug the power cord into a wall outlet. The computer’s battery then starts charging.
When unplugging the AC adapter, unplug the power cord from the outlet first.
While the battery is charging, you can continue with step 3.
Startup Guide |
19 |
Getting Started with Your HP Notebook
Setting Up Your Computer
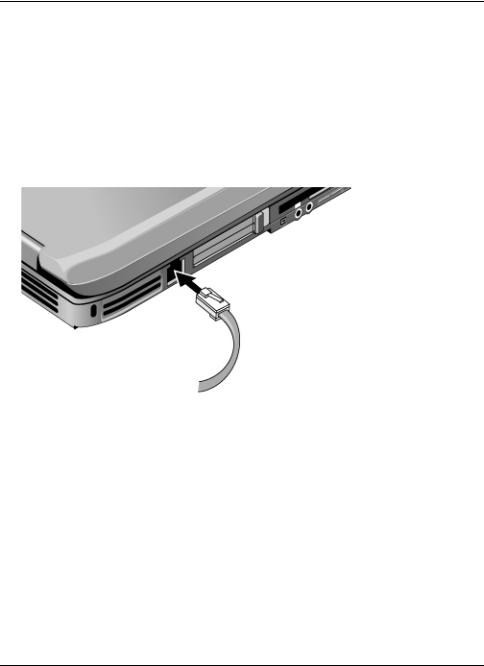
Step 3: Connect a phone line
If your computer does not include a built-in modem, you can skip this step. Also, if you prefer, you can instead connect to a PC Card modem or an external modem.
1.Make sure the telephone line is an analog line, sometimes called a data line. (You must not use a digital line.)
2.Connect the telephone cord into a telephone jack. If the plug on the phone cord doesn’t fit the jack, you may need to use an adapter.
3.Plug the other end of the phone cord into the built-in modem.
For details about using the modem, including AT commands, see the online Reference Guide.
20 Startup Guide
Getting Started with Your HP Notebook
Setting Up Your Computer
Step 4: Turn on the computer
∙Press the power button above the left side of the keyboard. The computer then boots up, and Windows starts automatically.
Hint |
If your computer does not turn on when operating on battery power, the battery may be |
|
out of power. Plug in the AC adapter and press the power button again. Leave the AC |
|
adapter plugged in for at least an hour—or 2–3 hours to charge it fully. |
|
|
Step 5: Set up Windows
Your notebook computer has Microsoft Windows preinstalled on its hard disk drive. The first time you turn on your computer, the Windows Setup program runs automatically so you can customize your setup.
1. Follow the Setup program’s instructions as they appear on the screen. If the program prompts you to enter the Product ID code, you will find this code on the bottom of the computer.
2. If your computer has a modem, check the modem’s country or region settings:
∙ Windows XP: click Start, Control Panel, Printers and Other Hardware, Phone and Modem Options, and then click Edit on the Dialing Rules tab.
∙ Windows 2000: click Start, Settings, Control Panel, double-click Phone and Modem Options, and then click Edit on the Dialing Rules tab.
Startup Guide |
21 |

Getting Started with Your HP Notebook
Setting Up Your Computer
Step 6: Register your notebook
Be sure to register your computer. Registering is free and fast, and ensures you will receive quicker, more personalized support. The information you provide during registration allows us to provide you with better products and services.
Registering your computer does the following:
∙Records your ownership of the computer with Hewlett-Packard and provides access to service, support, and information.
∙Records your ownership of the Windows XP operating system with Microsoft. If you have Windows 2000, please contact Microsoft separately to register the operating system.
If you decide not to register during Windows setup, choose the option to print the registration form, and then fax it to HP at the fax number on the form. Or you can register by calling HP Customer Care—see “To contact HP for support or service”on page 52 to find the phone number.
To connect to the Internet
If you are connected to a wired or wireless LAN with Internet access or your computer has a modem (built-in, PC Card, or external), you can connect to the Internet. For details, see the online Reference Guide—click Start, Help and Support, HP Library
(Windows XP) or Start, Programs, Hewlett-Packard, Notebook, HP Library (Windows 2000).
What to do next
∙If you’re not familiar with the version of Windows installed on your computer, click Start, Tour Windows XP or Start, Help (Windows 2000), or check the Windows manual to discover what’s new.
∙See the online Reference Guide to learn more about using and maintaining your computer—click Start, Help and Support, HP Library (Windows XP) or Start, Programs, Hewlett-Packard, Notebook, HP Library (Windows 2000).
22 Startup Guide

Basic Operation
Startup Guide |
23 |

Basic Operation
Operating Your Computer
Operating Your Computer
You can start and stop your computer using its power button. However, at certain times you may want to use other methods to start or stop the computer—depending on power considerations, types of active connections, and start-up time.
For information on caring for and protecting your computer, see “Operating Your
Computer” in the online Reference Guide.
For information about connecting your modem or LAN (depending on the model), or about connecting PC Cards or external devices, see the online Reference Guide. See the same online manual for modem AT commands.
To turn the computer on and off
Power mode
On mode
Power mode status light is on.
To enter this mode
Press the power button.
Standby mode
Saves significant power.
Turns off the display and other components. Maintains current session in RAM.
Restarts quickly.
Restores network connections. Power mode status light is blinking.
Hibernate mode
Saves maximum power.
Saves current session to disk, then shuts down. Restores network connections.
Power mode status light is off.
Shut down (off)
Saves maximum power.
Turns off without saving current session. At startup, resets everything, starts a new session, and restores network connections. Power mode status light is off.
Press the power button –or–
click Start, Turn Off Computer, Stand By (Windows XP) –or–
click Start, Shut Down, Standby (Windows 2000) –or–
allow timeout.
Press Fn+F12 –or–
click Start, Shut Down, Hibernate (Windows 2000) –or–
allow timeout.
Click Start, Turn Off Computer, Turn Off (Windows XP) –or–
click Start, Shut Down, Shut down (Windows 2000) –or–
press the power button for 4 seconds (only if the Start menu procedure doesn’t work).
To turn on: Press the power button to restart, or to resume your session from Standby or Hibernate mode.
You can also customize the way these power modes work. See the chapter titled “Batteries and Power Management” in the online Reference Guide.
24 Startup Guide
 Loading...