

Page 1

HP Netserver
Ultra3 SCSI Host Bus Adapter
Installation and Configuration
Guide
HP Part Number 5971-0821
Printed in November 2000
Page 2

Notice
The information contained in this document is subject to change without notice.
Hewlett-Packard makes no warranty of any kind with regard to this material,
including,but not limitedto, the impliedwarranties of merchantabilityand fitness
for a particular purpose.Hewlett-Packard shall not be liable for errors containedherein
or for incidentalor consequential damages in connection with the furnishing,
performance, or use of this material.
Hewlett-Packard assumes no responsibility for the use or reliability of itssoftware on
equipment that is notfurnished by Hewlett-Packard.
This document contains proprietary information that is protected by copyright. All rights
are reserved.No part of this document may be photocopied, reproduced, or translated to
anotherlanguage without the prior written consentof Hewlett-Packard Company.
Novell NetWare® is a registered trademark of Novell, Inc. SCO®, SCO OpenServer®,
and UnixWare® are registered trademarks of The Santa Cruz Operation,Inc. Windows®
95, Windows® 98, Windows® 2000 and Windows NT® are registered trademarks of
Microsoft Corporation. SCSISelect® is a registered trademark of Adaptec. Linux is
copyrighted under the GNU General Public License. Caldera Systems, the C-logo, and
OpenLinuxare either registeredtrademarks or trademarks of CalderaSystems, Inc.
Debian® Linux is a registered trademark of Debian. Redhat® is a registered trademark of
Redhat,Inc. SuSE® is a registered trademark of SuSE,Inc.TurboLinuxWorkstation® isa
registered trademark of TurboLinux, Inc. Wangtek is a registered trademark of Wangtek.
Hewlett-Packard Company
Network Server Division
Technical Communications/MS 45SLE
10955 Tantau Avenue
Cupertino,CA 95014 USA
© Copyright 2000, Hewlett-Packard Company.
Audience Assumptions
This Installation and Configuration Guide is for the person who installs, administers, and
troubleshoots LAN servers. Hewlett-Packard Company assumes you are qualified in the
servicing of computer equipment and trained in recognizing hazards in products with
hazardous energy levels.
ii
Page 3

Contents
1 Installation and Setup ...............................................................1
Bus Segments on the HP Ultra3 SCSI Host Adapter........................................... 2
Installing the HP Ultra3 S CSI Host Bus Adapter.................................................. 3
Setting Up SCSI Devices .................................................................................. 5
Choosing SCSI Cables .....................................................................................5
Connecting SCSI Devices ................................................................................ 7
HP Ultra3 SCSI Host Adapter Driver Software ...................................................13
Preloaded Ultra3 Drivers ................................................................................13
Embedded Ultra3 Drivers ...............................................................................13
Troubleshooting ..................................................................................................14
2 Configuration with SCSISelect ..............................................15
Starting SCSISelect ............................................................................................16
ExitingSCSISelect .............................................................................................17
Using SCSISelect Settings .................................................................................17
SCSI Bus Interface Definitions ....................................................................... 17
Boot Device Options .......................................................................................18
SCSI DeviceConfiguration .............................................................................18
Advanced Configuration Options ....................................................................19
Using SCSI Disk Utilities ....................................................................................22
3 Microsoft Windows NT Installation .......................................23
Installing the D river When Installing Windows NT ..............................................23
Completing a Fresh Windows NT 4.0 Installation From Floppy Disk ..............23
Completing a Fresh WindowsNT 4.0 Installation From CD-ROM ..................24
Installing the D river When Windows NT is Already Installed ..............................24
Updating Windows NT 4.0 ..............................................................................25
Using Advanced Configuration Parameters .......................................................25
Using Windows NT SCSI Parameters ............................................................26
Using Driver-specific Parameters ...................................................................27
Hot-Plug PCI Feature .....................................................................................29
Using Windows NT a nd the Host Adapter ..........................................................30
Removing a Host Adapter ...............................................................................30
iii
Page 4

Removing a Host Adapter in Windows NT 4.0 ...............................................31
Troubleshooting .................................................................................................31
Problems and Solutions ..................................................................................31
Error Messages ..............................................................................................32
adpu160m.sys Error Messages ......................................................................33
4 Microsoft Windows 2000 Installation ....................................37
Installing the D river When Installing Windows 2000 ...........................................37
Installing the D river When Windows 2000 is Already Installed ...........................37
Upgrading an Existing Windows NT Version 4 Installation to Windows 2000 ....38
Using Advanced Configuration Parameters .......................................................39
Using Windows 2000 SCSI Parameters .........................................................39
Using Driver-specific Parameters ...................................................................41
Troubleshooting ..................................................................................................42
Problems and Solutions ..................................................................................43
Error Messages ..............................................................................................43
Driver Error Mes s ages ....................................................................................44
5 Novell NetWare Installation ....................................................49
Installing the Driver When Installing NetWare ....................................................49
NetWare 3.12/3.2 ............................................................................................49
NetWare 4.12/4.2 ............................................................................................51
NetWare 5.0 ....................................................................................................52
DOS Driversfor CD-RO M Access ......................................................................53
Install CD-ROM Drivers on a DOS Bootable Hard Disk .................................53
Installing the D river When NetWare is Already Installed ....................................54
Loading the Driver at Server Bootup ..................................................................55
Using the Load Command Line Options .............................................................55
adpt160m.ham Command Line Options .........................................................56
Bit Mask Options .............................................................................................58
Sample Load Commands .... ...........................................................................59
Using NetWare and the Host Adapter ................................................................59
Using Removable Media .................................................................................59
Using the NetWare T ape Backup ...................................................................61
Using a CD-ROM with NetWare .....................................................................61
Optimizing Performance .................................................................................62
Troubleshooting ..................................................................................................63
Error Messages ..............................................................................................63
iv
Page 5

6 SCO OpenServer Installation .................................................67
Installing the Driver When Installing SCO OpenServer ......................................67
Installing SCO OpenServer 5.0.x ....................................................................67
Installing the Driver When SC O Ope nServer is Al ready Installed ......................68
Using SCO OpenServer and the Host Adap ter ..................................................73
Using Multiple Host A dapt ers .........................................................................73
Changing the Boot Disk ..................................................................................74
Using Wide SCSI Host Adapters and Devices ...............................................74
Using Tunable Parameters for the ad160 Driver ............................................74
Setting Parameters .............................................................................................74
Changing the Maximum Number of LUNs S upported ....................................75
Enabling Scatter/Gather and Tagged Queuing ...............................................75
Troubleshooting ..................................................................................................76
Error Messages ..............................................................................................80
7 SCO UnixWare Installation .....................................................83
Installing the Driver When Installing UnixWare ..................................................83
Installing the Driver When UnixWare
is Already Installed .............................................................................................84
Back Up the Computer ...................................................................................85
Load the Package .. .........................................................................................85
Modify the New System File ...........................................................................86
Rebuild the UnixWare Kernel .........................................................................86
Boot the New Kernel .......................................................................................87
Using UnixWare and the Host A dapt er ...............................................................87
Using Tunable Parameters .............................................................................88
Using Multiple Host A dapt ers .........................................................................88
Removing the Driver .......................................................................................88
Troubleshooting ..................................................................................................90
Problems and Solutions ..................................................................................90
Error Messages ..............................................................................................90
8 Linux Support ..........................................................................95
A Product Specifications ..........................................................97
B Troubleshooting ...................................................................101
v
Page 6

Troubleshooting Checklist ................................................................................101
Common Error Messages .................................................................................101
C Regulatory Information ........................................................103
Regulatory Notices - Electromagnetic Compliance ..........................................103
Notice for United States
(FederalCommunications Commission) .......................................................103
Notice for Canada (Industry Canada) ...........................................................1 05
Notice for Japan ............................................................................................105
Notice for Korea ............................................................................................106
Notice for Taiwan .......................................................................................... 1 07
D Warranty and Support ..........................................................109
Hardware Accessories Limited Warranty .........................................................109
Hewlett-Packard Hardware Accessories ......................................................109
Third-Party Hardware Products ....................................................................110
HP Repair and Telephone Support ..................................................................110
U.S. and Canada ..........................................................................................110
Other Countries ............................................................................................110
World Wide Web ...............................................................................................110
Index ...........................................................................................111
vi
Page 7
1 Installation and Setup
The HP Ultra3 Single Channel SCSI Host Bus Adapter enables you to connect
up to 15 SCSI devices—such as hard disk drives, scanners, and CD-ROM
drives—to HP Netservers with 32-bit or 64-bit PCI e xpansion s lots. You can
connectnewer Ultra3 and Ultra2 SCSI devices to the two 68-pin Low Voltage
Differential/Single-Ended (LVD/SE) connectors. You can also connect legacy
SCSI devices to the 68-pin and 50-pin internal Single-Ended (SE) connectors.
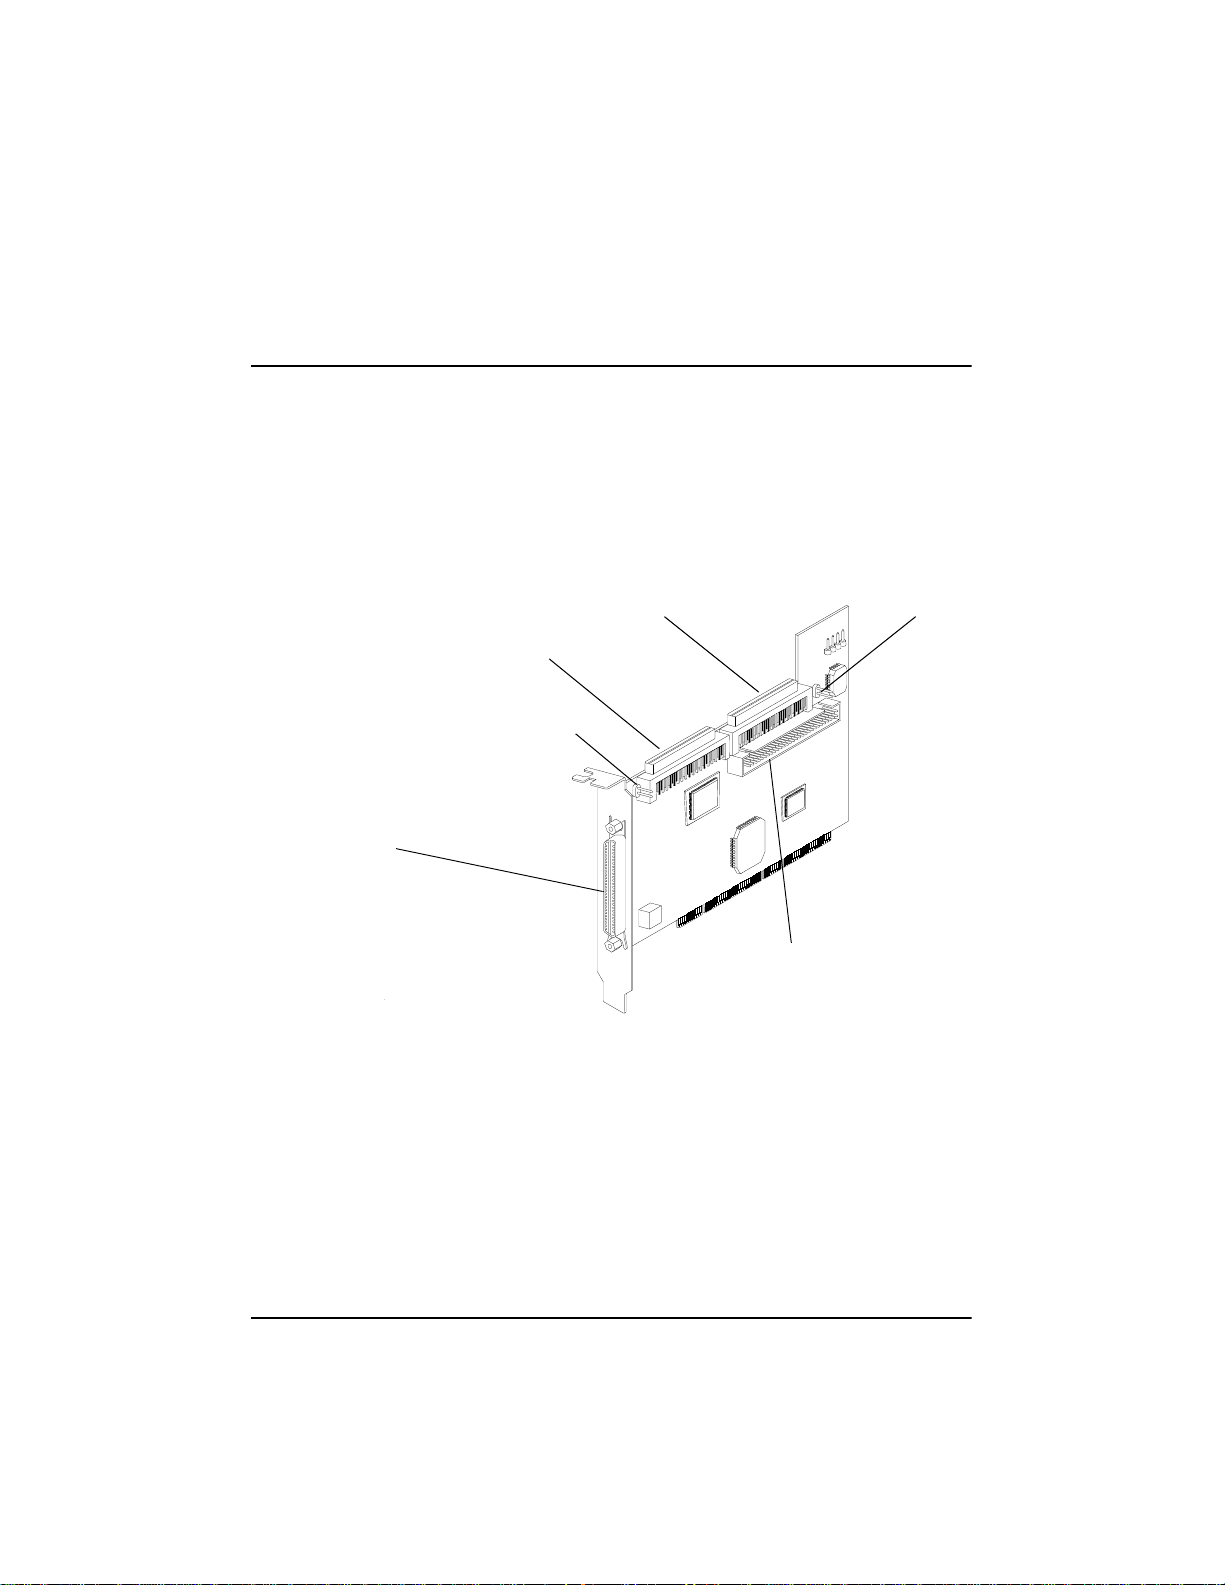
68-pin Internal LVD/SE Connector
68-pin External LVD/SE Connector
Figure 1-1. HP Ultra3 Single Channel SCSI Host Bus Adapter
Although the HP Ultra3 SCSI Host Bus Adapter is a 64-bit PCI host bus
adapter, it also works in a 32-bitPCI slot. When installed in a 32-bit PCI slot,
the host bus adapter automatically runs in the slower 32-bit m ode. This
installationguide explains how to:
• Install the HP Ultra3 SCSI host bus adapter
• Set up SCSI devices
• Connect SCSI devices
68-pin Internal SE Connector
J2
50-pin Internal SCSI SE Controller
J6
1
Page 8
Bus Segments on the HP Ultra3 SCSI Host
Adapter
The HP Ultra3 SCSI host bus adapter features technology that ensures you get
the best performance from your Ultra3 and Ultra2 SCSI devices by
electronically isolating the primary LVD/SE segment from the secondary SE
segment on the SCSI bus. This allows the HP Ultra3 SCSI host bus adapter to
support newer Ultra3 and Ultra2 SCSI devices at speeds up to 160 MBytes/sec
on the primary LVD/SE segmentwhile at the same time supportingUltra
(legacy) devices at speedsup to 40 MBytes/sec on the secondary SE segment.
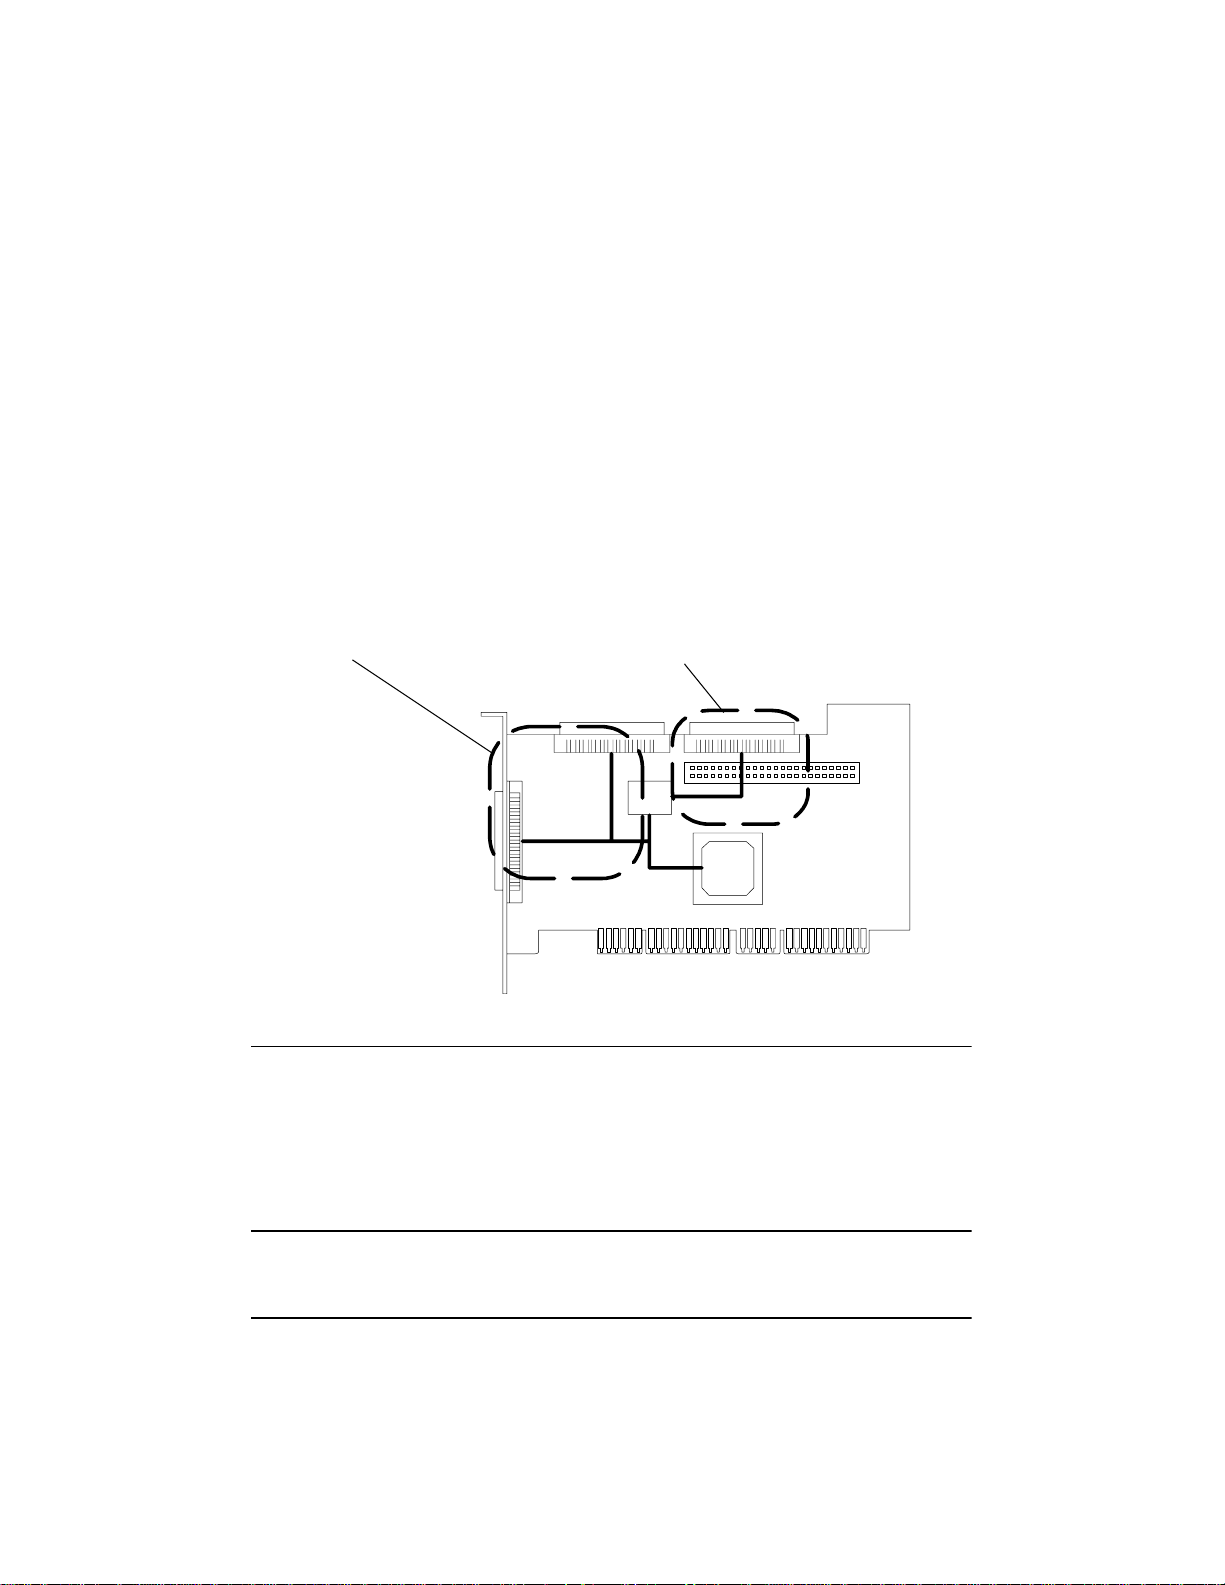
The following figure shows the two SCSI segments.
Primary LVD/SE Segment
Figure 1-2. Primary and Secondary Bus Segments
Secondary LVD/SE Segment
AIC-3860
AIC-7892
NOTE If you attach Wide Ultra or Ultra SCSI devices to the LVD/SE
connector(s), the data transfer rate for all attached Ultra3 and Ultra2
SCSI devices will drop to Ultra SCSI performance levels.However, if
you attach only Ultra3 and Ultra2 SCSI devices to the LVD/SE
connector(s), data will be transferred at the maximum possible rate
(80 MBytes/sec for Ultra2 devices and 160 MBytes/sec for Ultra3
devices).
2
Page 9
Installing the HP Ultra3 SCSI Host Bus Adapter
1. Discharge any static electricity build-up before handling the SCSI host bus
adapterby touchinga groundedmetalobject(like theexposedmetalpa rts on
the back of your HP Netserver).
WARNING Turn OFF power to the HP Netserver and disconnect the
power cord.
2. After you turn off your HP Netserver and unplug the power c ord, remove the
cover from the Netserver.
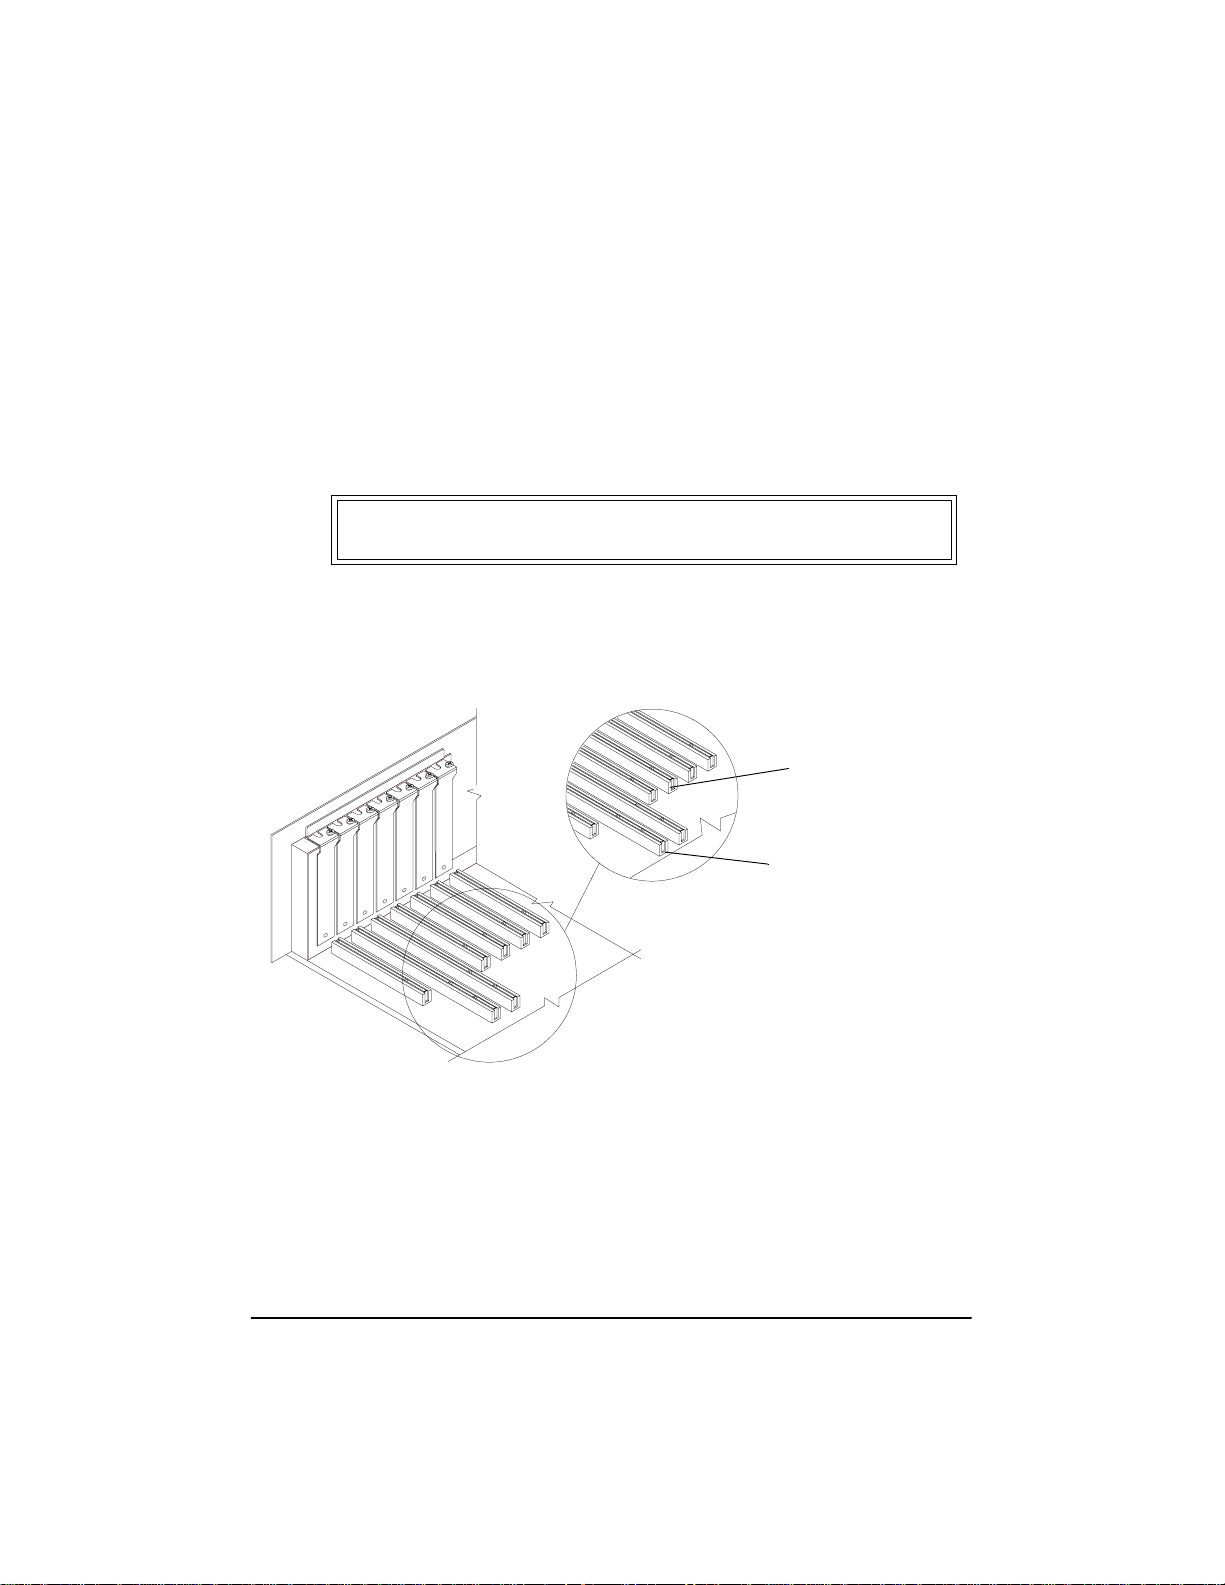
32-bit PCI Slot
64-bit PCI Slot
Figure 1-3. 32-bit and 64-bit Expansion Slots
3. Locate an unused 64-bit PCI expansion slot and remove the expansion slot
cover. If the HP Netserver does not have a 64-bit slot, you can install the host
adapterin a 32-bit PCI slot. (The expansion slot must be compliant with PCI
Rev. 2.1 or higher and must support Bus Mastering.)
3
Page 10
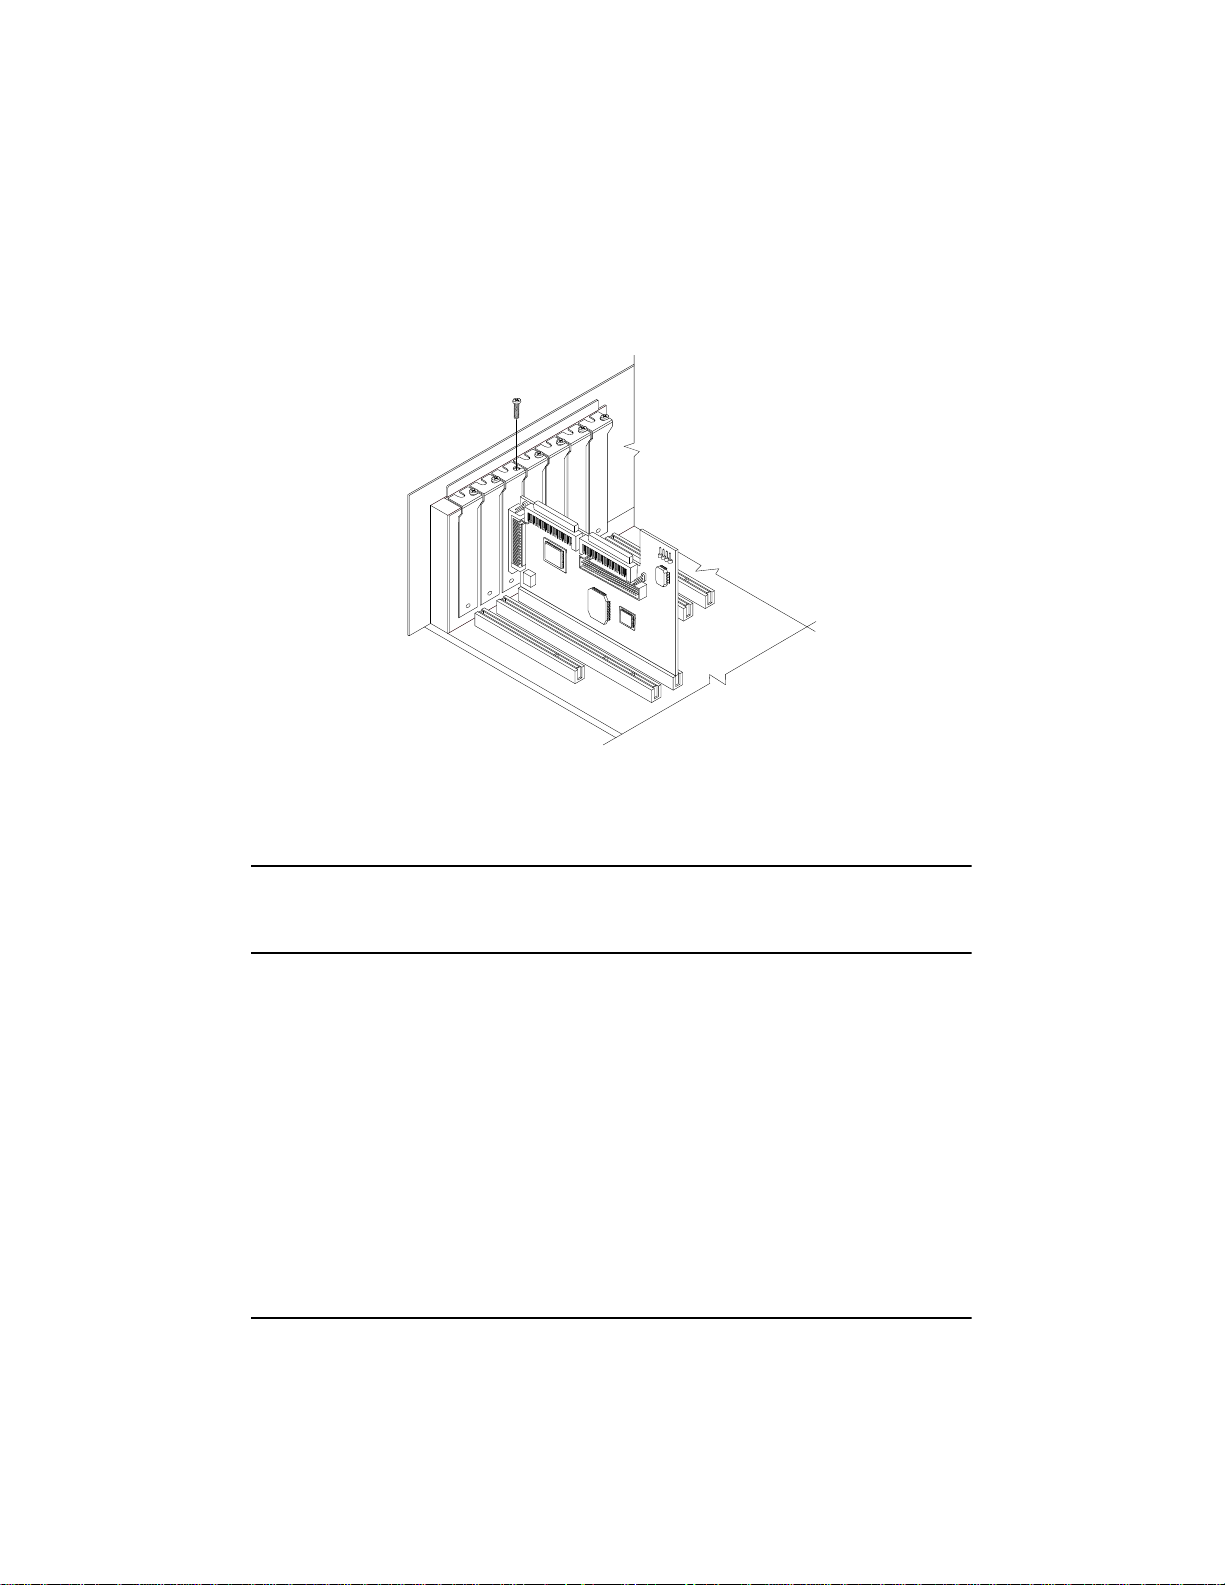
Figure 1-4. Host Bus Adapter Installed in 64-bit Slot
HP Netservers m ay have vertical or horizontal expansion slots. Refer to your
HP Netserver manual to locate the PCI s lots.
NOTE Be careful when inserting the HP Ultra3 SCSI host bus adapterin a
PCI slot. S ome 32-bit slots will not accommodate it, and the host
adapter may break if you force it into the slot.
4. Insert the HP Ultra3 SCSI host bus adapter into the PCI expansion slot; press
down firmly until the host adapter clicks into place, then replace the slot
cover screw. When installed properly, the host adapter should appear level
with the expansion slot, as shown a bove.
4
Page 11

Setting Up SCSI Devices
There are several things you may need to do to your SCSI de vices before you
connect them to the HP Ultra3 SCSI host bus adapter:
• Check the SCSI IDs
• Set the termination
• Connect the power cables.
Since setup can vary from device to device, always refer to the device’s
documentation for specific instructions.
Below are some guidelines for setting SCSI IDs and termination on your
devices.
Check the SCSI IDs
The HP Ultra3 SCSI host bus adapter and each device you connect to it must
have a unique SCSI ID number ranging from 0 to 15. No two devices can have
the same ID number. The HP Ultra3 SCSI host bus adapter is preset to SCSI ID
7 and should not be changed. If your HP Netserver will boot from a SCSI hard
disk, make sure the SCSI ID of that hard disk is set to 0. (Most SCSI hard disks
are preset to SCSI ID 0 at the factory.) The SCSI IDs for internal devices are
usually set with jumpers; SCSI IDs for external devices are usually set with a
switch on the back of the device.
Terminate the Ends
Toensure reliable communication on the SCSI bus, the device at the end of
each cable, or the end of the cable itself, must have a terminator installed (or
enabled). Terminators must be removed, or termination must be disabled, on
devices between the ends of each cable.
Choosing SCSI Cables
The Ultra3 SCSI Host Adapter kit does not include cables. Any Ultra3 drives
attachedtoHP Ultra3host bus adapters inside a HP Netserver require the use of
a special Ultra3 twisted pair cable. The HP Ultra3 cable upgrade kit part
number is P3469A. These cables can be purchased from an authorized
Hewlett-Packard reseller, or on HP Order Assistant (available on the Internet at
http://netserver.hp.com/netserver/)
See Table 1-1 that follows to determinethe correct cable for your HP Netserver
and SCSI configuration.
5
Page 12

Table 1-1. Netserver SCSI Cables
HP Netserver SCSI Devices Interface Cable Product Number
All Models HP Netserver Rack
Storage/12 (RS/12)
All Models HP SureStore H/A
TapeArray 5500
All Models HP SureStore
DLT80e/80k&DAT
40e/40k
E 800 LVD non-hot-swap
Device
LH 3000/6000 LVD non-hot-swap
Device
LH 3000/6000 LVD hot-swap Cage
(right side)
LH 3000/6000 LVD hot-swap Cage
(left side)
External D3636C - HDTS68 to
HDTS68, 2.5m
External D3637C - HDTS68 to
VHDC1, 2.5m
External C5666A – HDTS68 to
HDTS68, 0.9m
C5667A – HDTS68 to
HDTS68, 1.5m
C5699A – HDTS68 to
HDTS68, 2.5m
Internal P3469A – 47.5”
T erminated SCSI
twisted-pair*
Internal P3469A – 47.5”
T erminated SCSI
twisted-pair*
Internal P3469A – 45” Point to
point SCSI twisted-pair*
Internal Use existing twisted-pair
cable in Netserver
All Models
(except E 800,
LH 3000/6000)
All Models
(except E 800,
LH 3000/6000)
* The P3469A Cable Kit contains both Terminated and Point-to-Point SCSI cables.
6
LVD n on-hot-swap
Device
LVD hot-swap Cage Internal Use existing twisted-pair
Internal Use existing twisted-pair
cable in Netserver
cable in Netserver
Page 13
Connecting SCSI Devices
You can c onnect up to 15 SCSI devices to the HP Ultra3 SCSI host bus adapter.
Before connecting devices, be sure to review Setting Up SCSI Devices on
page 5.
Connecting the SCSI Host Adapter to the Common Tray
Connect internal Ultra3 and Ultra2 SCSI devices to the internal LVD/SE
connector on the HP Ultra3 SCSI host bus adapter. To do this, see Table 1-1 to
determine the correct cable for your HP Netserver. Follow these steps to
connect the devices:
NOTE We recommend that you keep your Ultra3 and Ultra2 SCSI devices
separate from your Ultra SCSI devices. This allows the newer Ultra3
and Ultra2 SCSI devices to transfer data at their maximum speed.
(See Bus Segments on t he HP Ultra3 SCSI Host Adapter on page 2.)
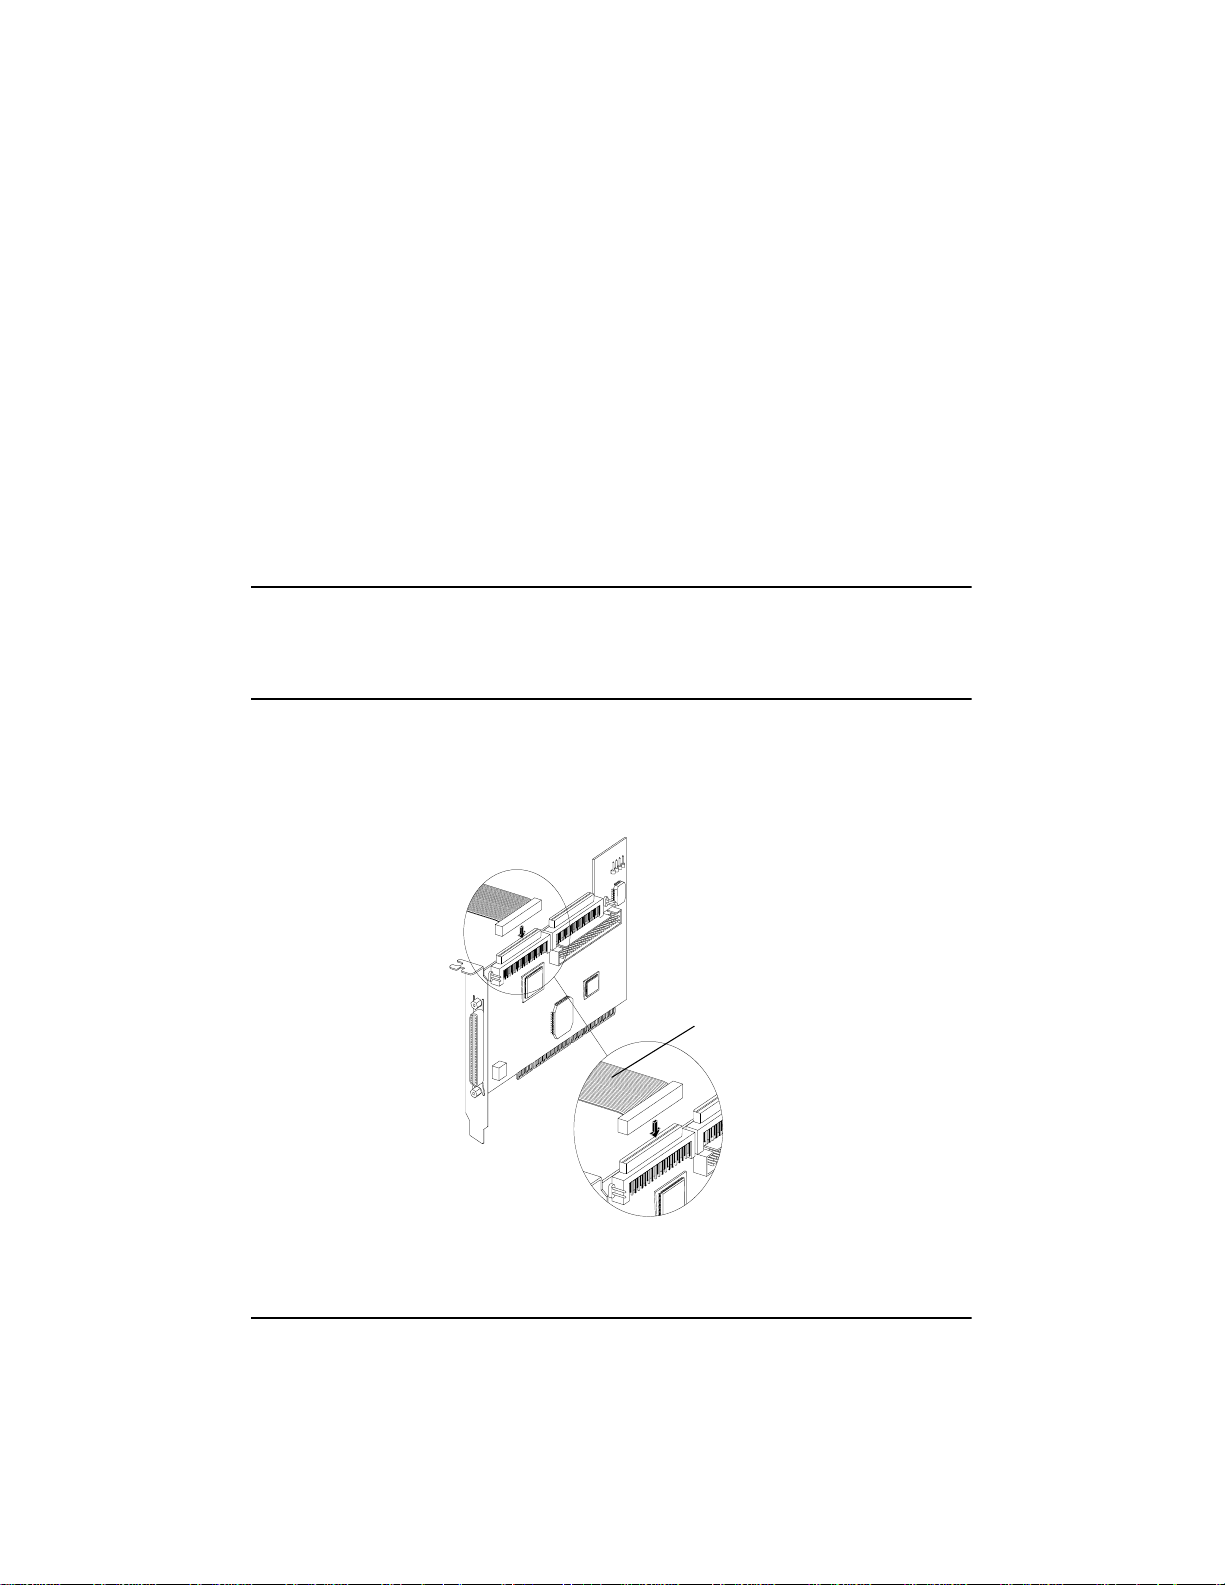
1. Use a terminated twisted-pair SCSI cable.
2. Plug the non-terminatedendofthetwisted-pair cable to the internal LVD/SE
connector.
LVD SCSI Twisted-Pair Cable
Figure 1-5. LVD SCSI Twisted-Pair Cable
7
Page 14
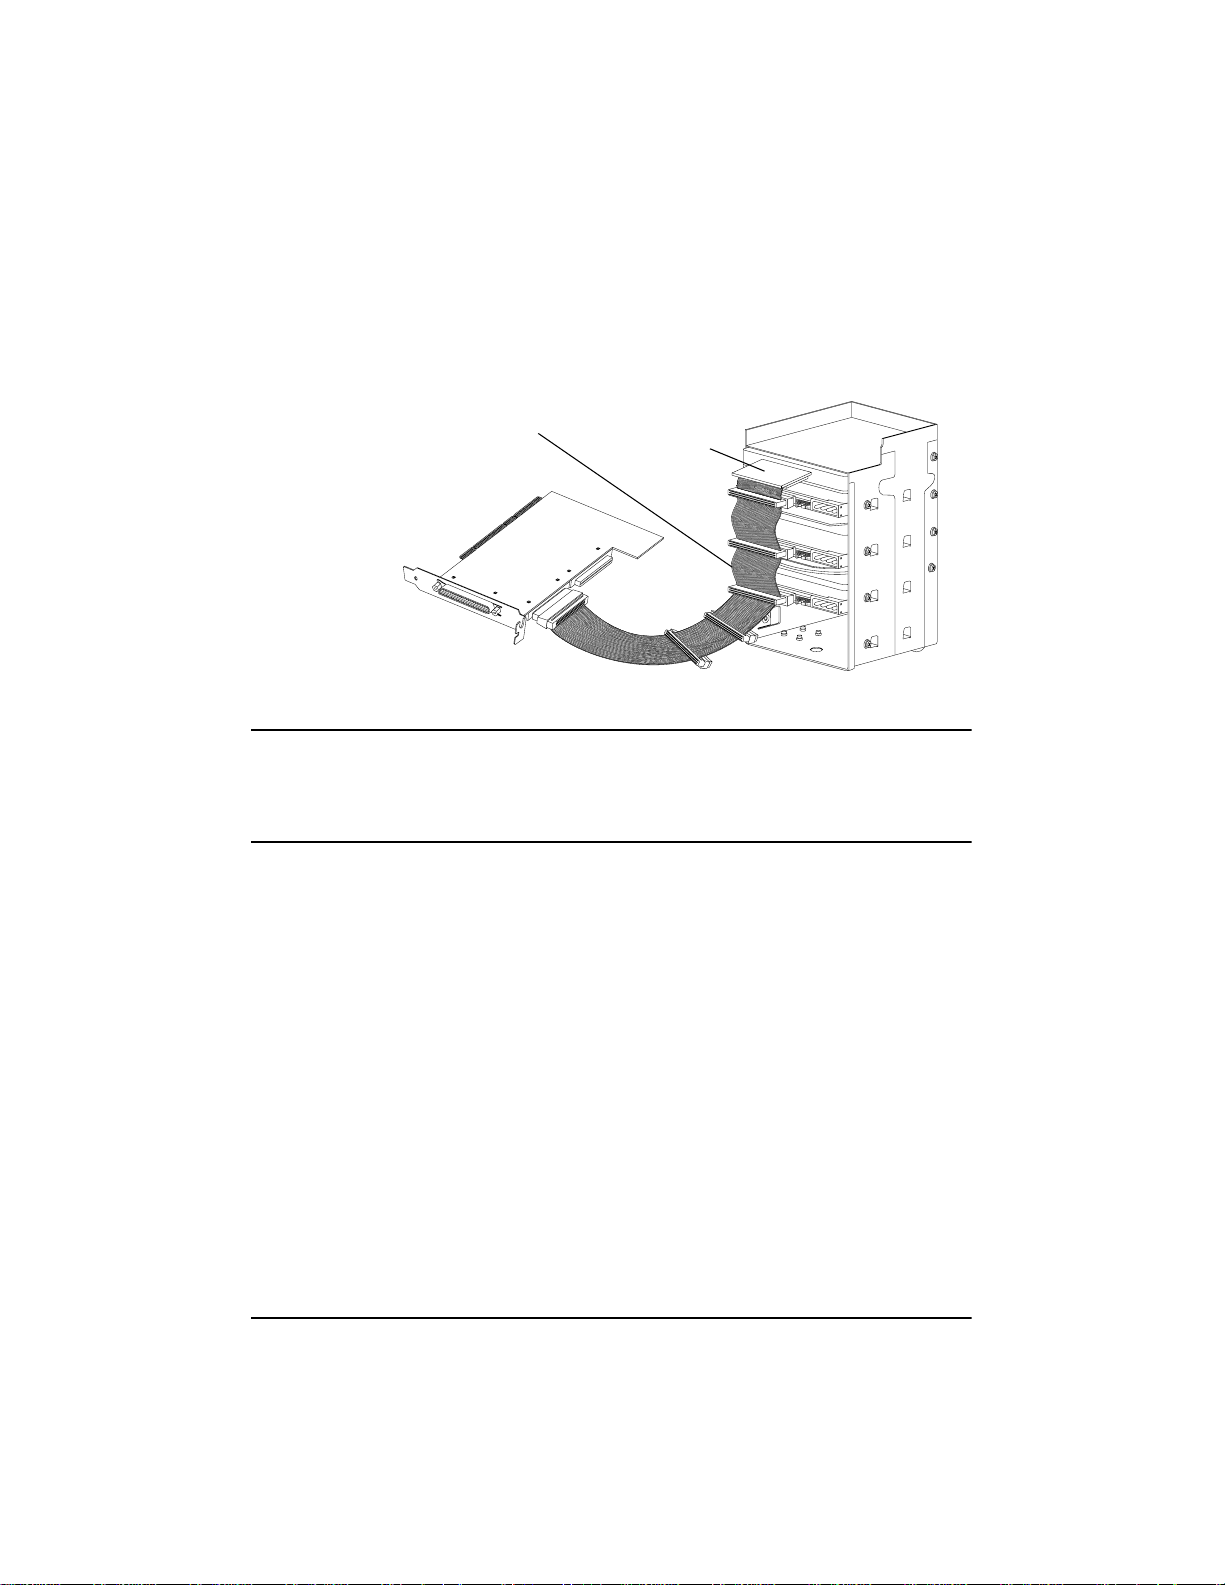
3. Plug the internalUltra2 or Ultra3 SCSI devices to the other cableconnectors,
starting with the connector at the terminated end of the cable.
Terminated LVD SCSI Twisted-Pair Cable
Terminator
Figure 1-6. Com mon Tray Cable Connection
NOTE Internal Ultra2 and Ultra3 SCSI devices come from the fa ctory with
termination disabled and cannot be changed. Proper SCSI bus
terminationis provided by the terminator at the end of the LVD SCSI
cable.
4. Connect a power cable from your HP Netserver’s internal power supply to
each internal SCSI device.
Connecting the S CS I Host Adapter to a Hot-Plug Cage
1. Use the point-to-point twisted-pair cable.
2. Plug one end of the twisted-pair cable to the internal LVD/SE connector.
3. Plug the other end of the twisted-pair cable to t he 68-pin connector on the
hot-plug cage.
8
Page 15
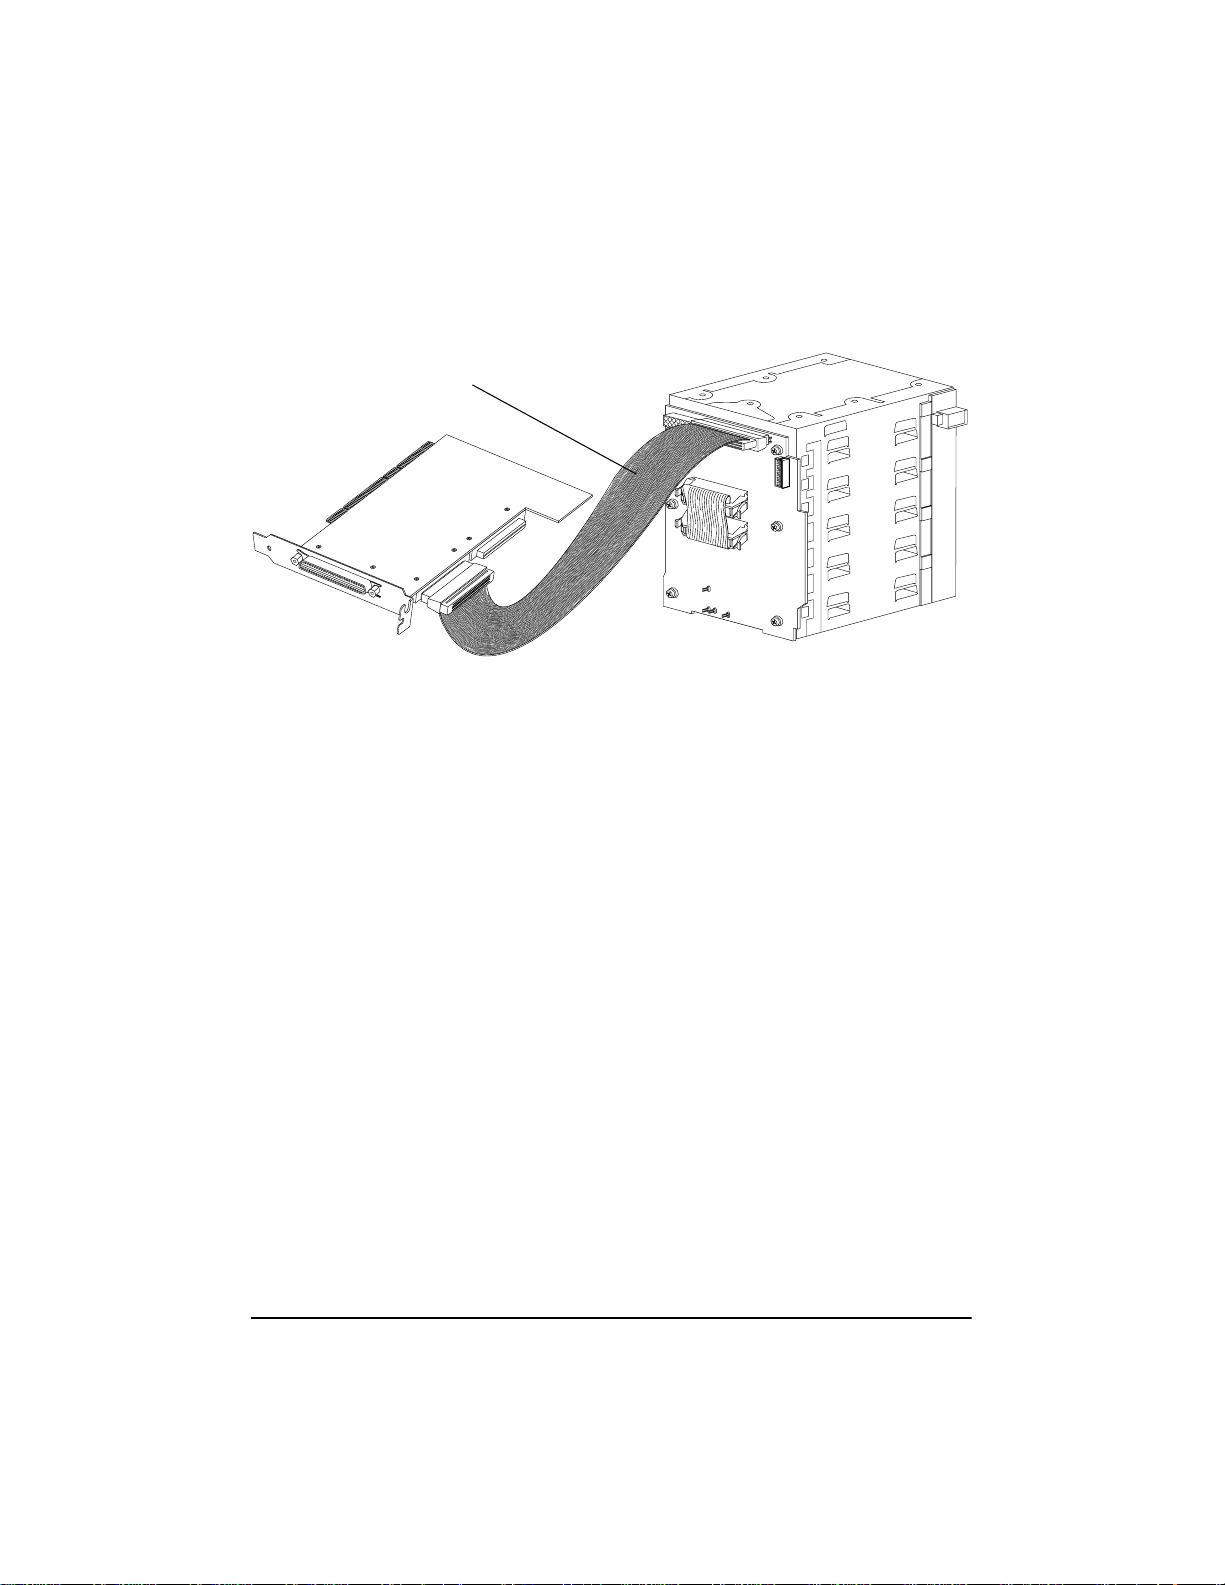
Point-to-PointLVD Twisted-Pair SCSI Cable
Figure 1-7. Hot-Plug Cage Cable Connections
Connecting Ultra/Fast Wide SCSI Devices
Connect internal Ultra/Fast Wide SCSI de vices to the 68-pin internal SE Wide
SCSI connector.To do this, use a flat 68-pin Wide SCSI cable. Follow these
steps to connect the devices:
1. Plug one end of the cable to the Ultra/Fast Wide SCSI connector on the HP
Ultra3 SC SI host b us adapter.
9
Page 16
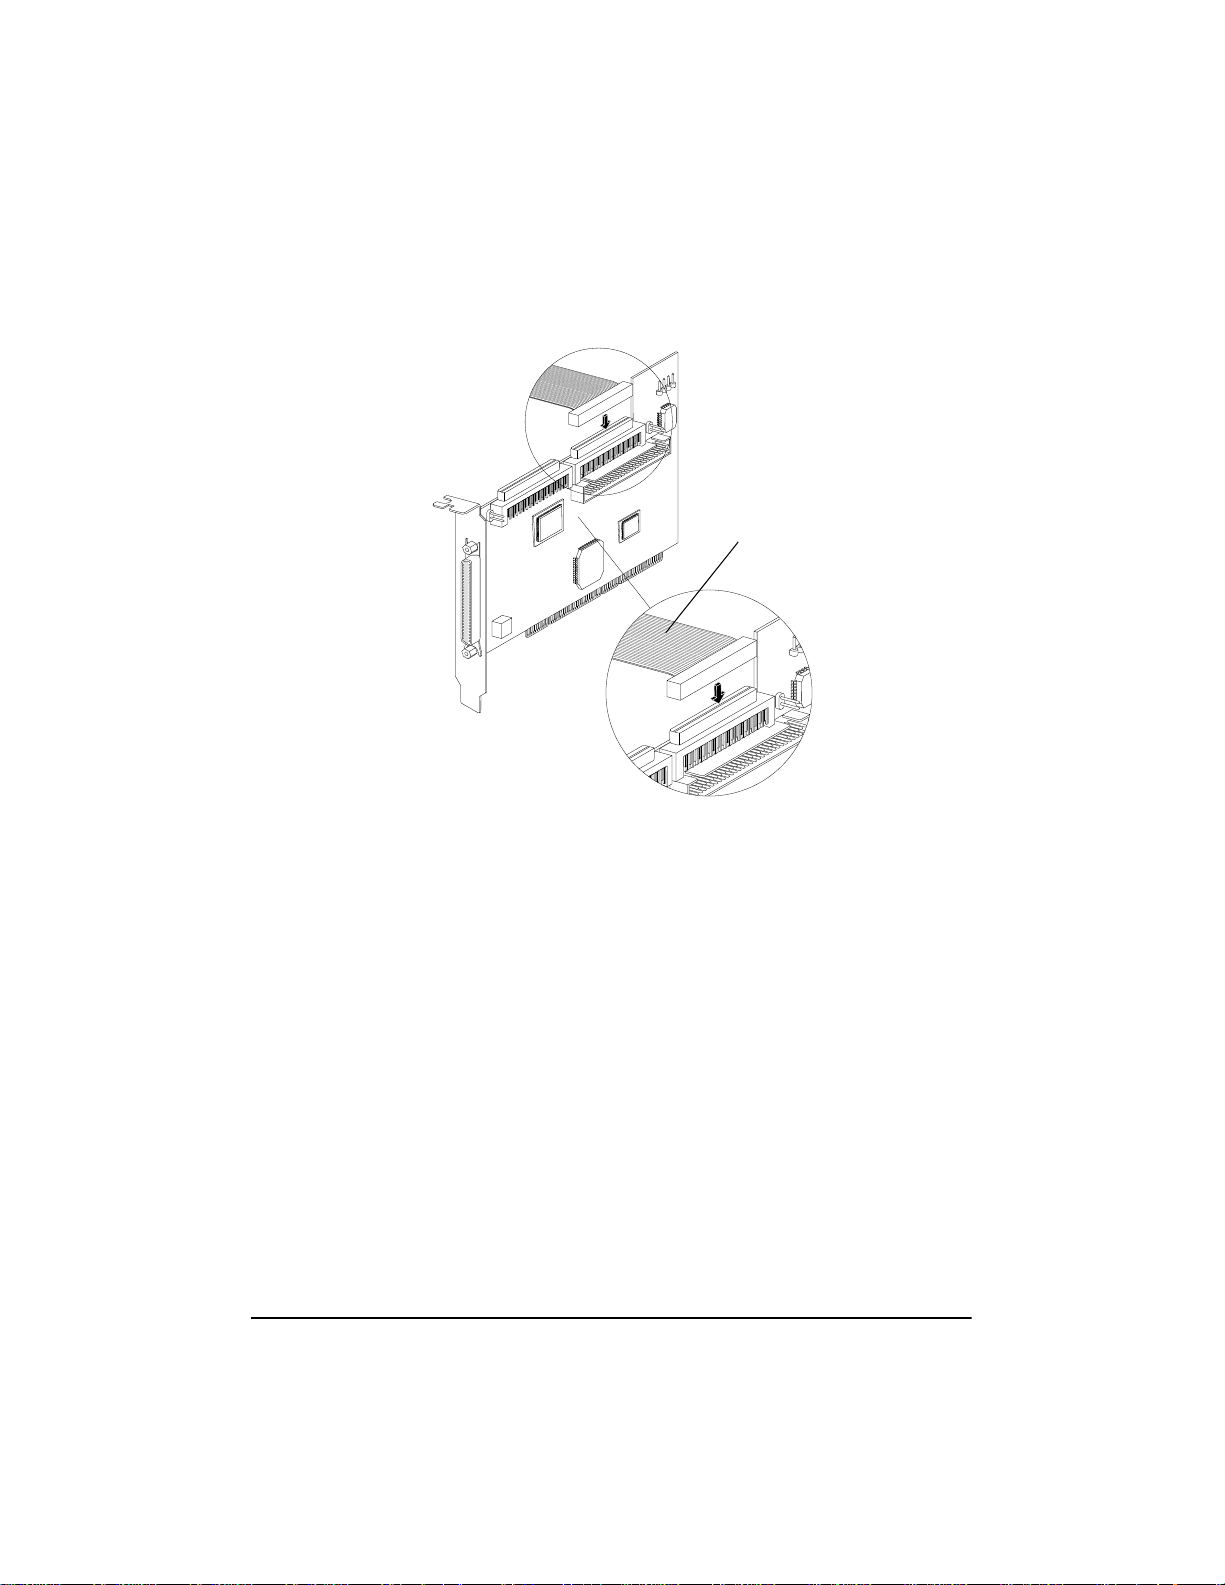
Figure 1-8. C onnecting Ultra/Fast Wide SCSI Devices
2. Plug the other end of the cable to a terminatedUltra/Fast Wide SCSI device.
3. If you have other Ultra/Fast Wide SCSI devices, attach them to the
connectors between the t wo ends of the cable. Be sure these other de vices
are unterminated.
4. Connect a power cable from your HP Netserver’s internal power supply to
each internal device.
Connecting Internal Ultra/Fast Narrow Devices
Connect internal Ultra/Fast Narrow SCSI devices that have standard 50-pin
connectors to the 50-pin internal SE Na rrow SCSI connector. To do this, use a
50-pin internal SCSI c able. Follow these steps to connect the devices:
1. Plug one end of the cable to the 50-pin internal SE Narrow SCSI connector
on the HP Ultra3 SCSI host bus adapter.
68-pin flat SCSI cable
10
Page 17
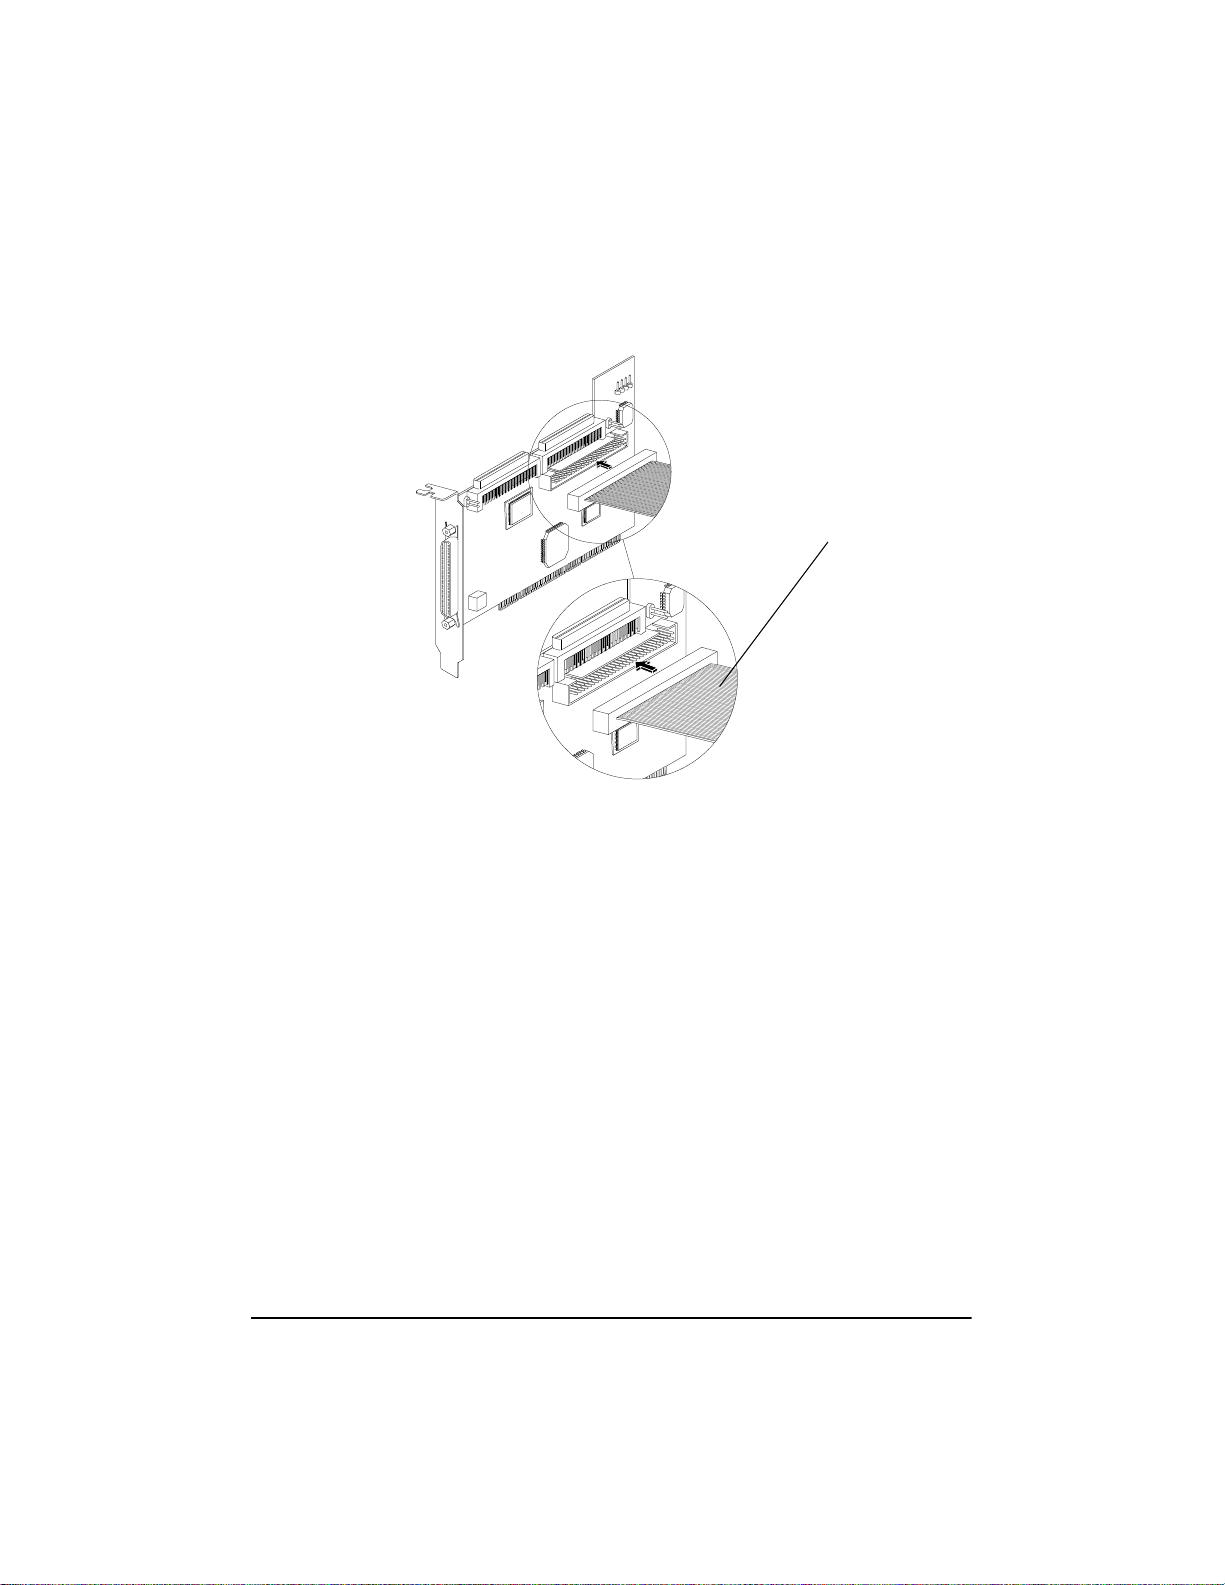
Figure 1-9. Connecting Ultra/Fast Narrow Devices
2. Plug the other end of the cable to a terminated Ultra/Fast Narrow SCSI
device.
3. If you have other Ultra/Fast Narrow SCSI devices, attach t hem to the
connectors between the t wo ends of the cable. Be sure these other de vices
are unterminated.
4. Connect a power cable from your HP Netserver’s internal power supply to
each internal device.
Connecting External SCSI Devices
Connect external Ultra2 and Ultra3 SCSI devices to the 68-pin external LVD/
SE SCSI connector. Each external device will require a high density 68-pin
external LVD SCSI cable.
50-pin SE Narrow SCSI cable
11
Page 18
NOTE We recommend that you connect only Ultra3 and Ultra2 SCSI devices
to the external SCSI connector. If you also attach older Ultra SCSI
devices, the data transfer speed of the Ultra3 and Ultra2 SCSI devices
will drop to the speed of the older devices. (See BusSegmentsonthe
HP Ultra3 SCSI Host Adapter on page 2.)
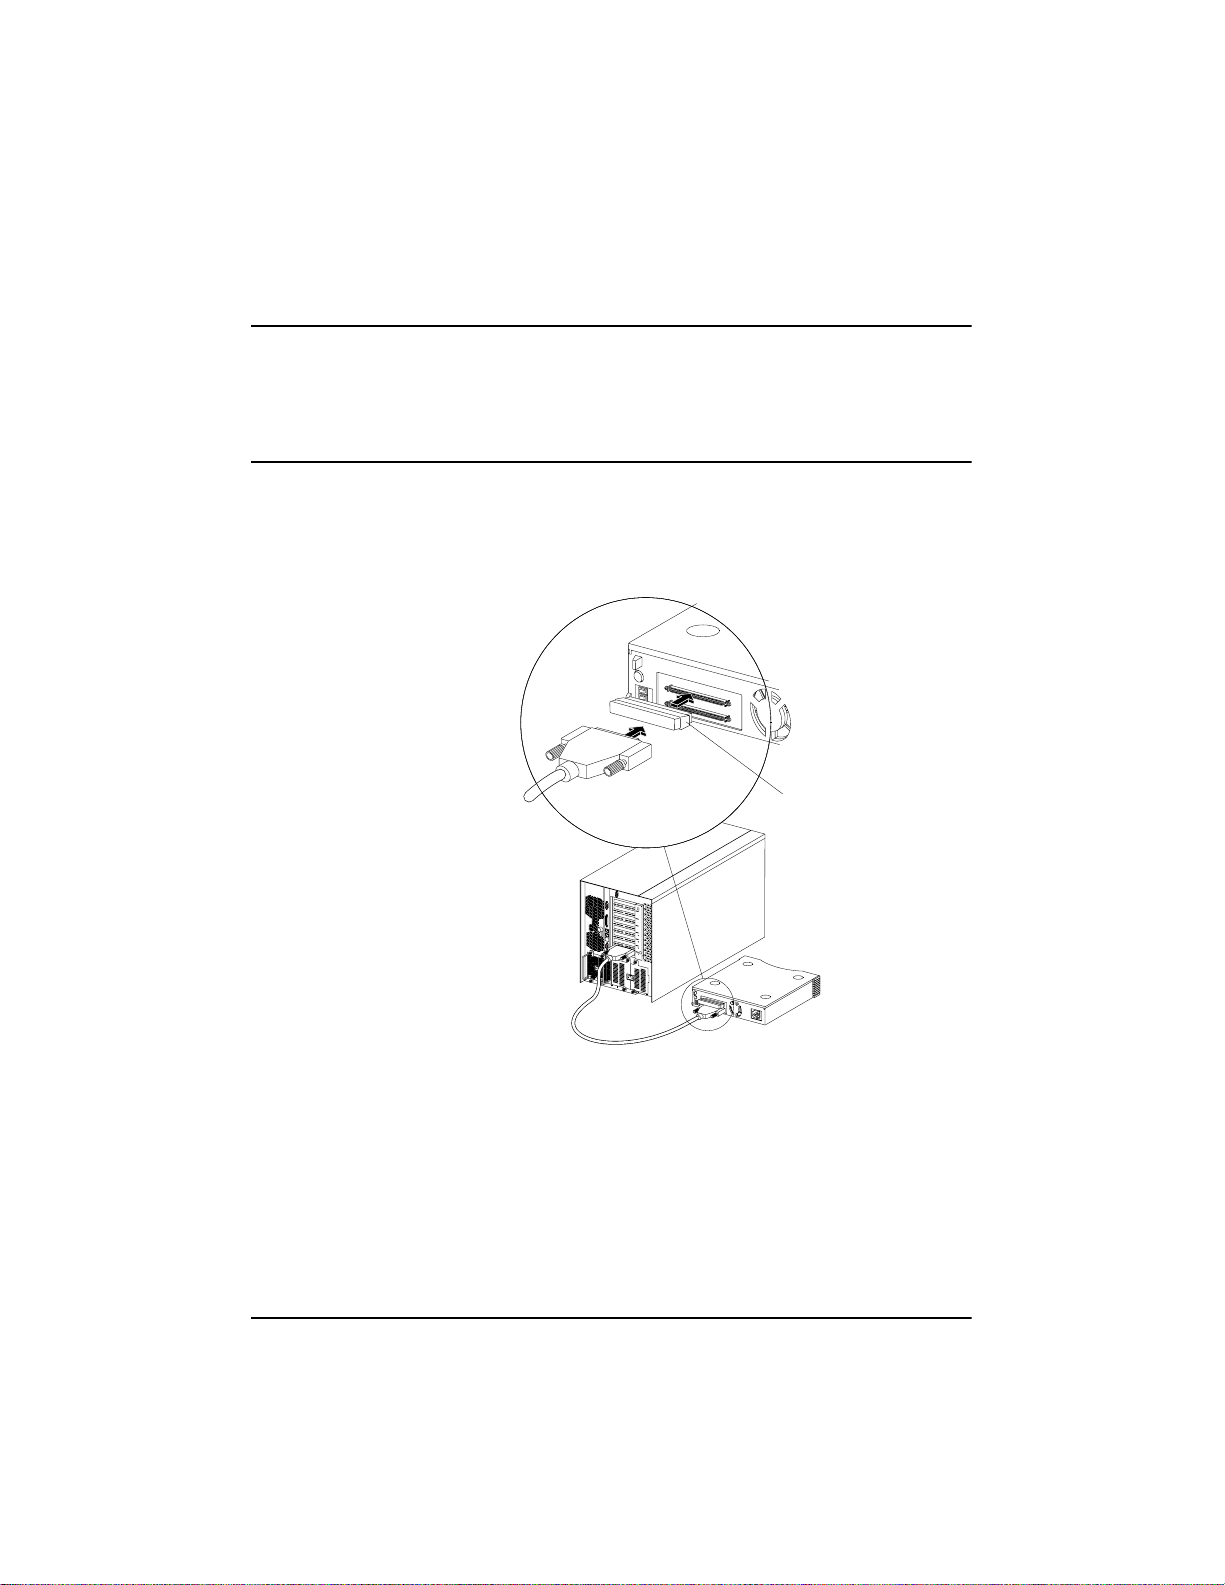
Follow these steps to connect the e xternal devices:
1. Connect one end of the external LVD SCSI cable to the external LVD/SE
connector on the HP Ultra3 SCSI host bus adapter.
SCSI Terminator
SCSI T erminator
12
Figure 1-10. Connecting External SCSI Devices
2. Connect the other end of the external SCSI cable to a SCSI connector on the
back of an external SCSI device. If you are installing only one external
device, terminate the device and skip to Step 4.
3. Connect other external devices by cabling each device to the previous one,
as shown below.
Page 19
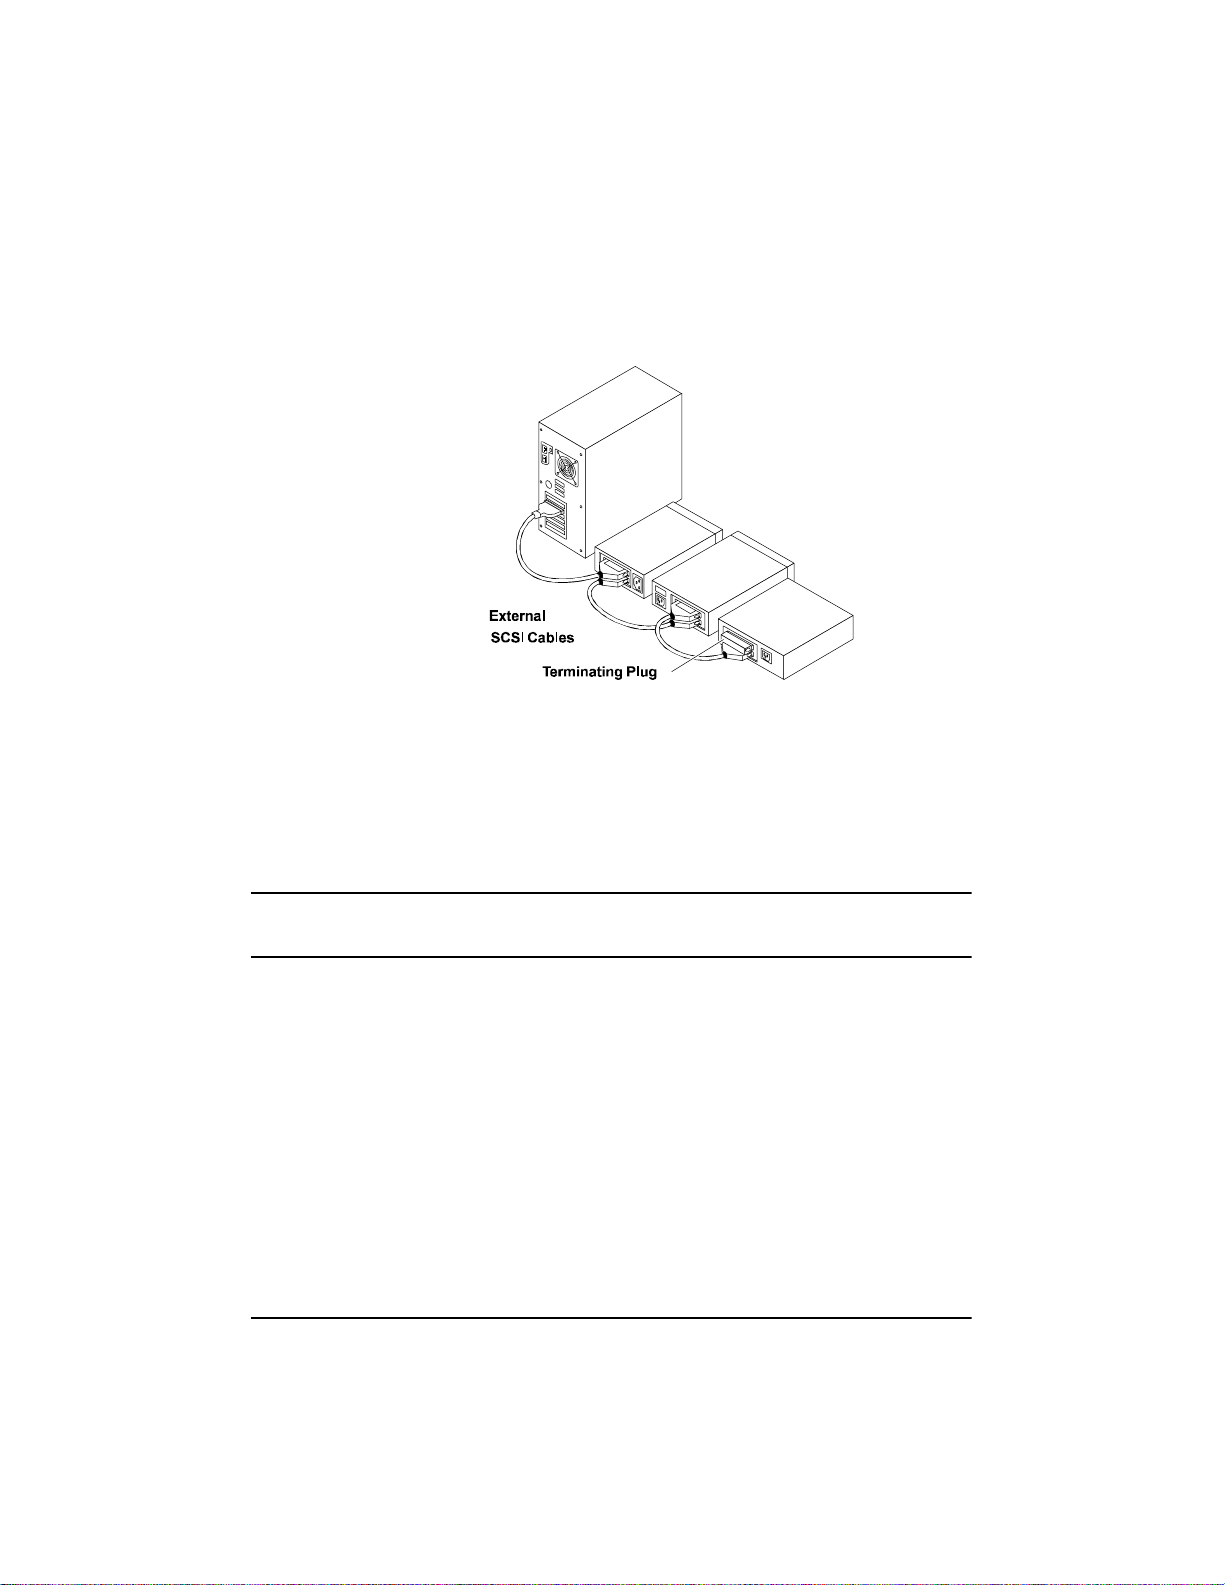
Figure 1-11. Terminating the Last External SCSI Device
4. Terminate only the device at the end of the chain. (Use of an external
multi-mode SCSI terminator is required.)
5. Connect power cables to all external devices and to the HP Netserver.
HP Ultra3 SCSI Host Adapter Driver Software
NOTE To use the HP Ultra3 SCSI host bus adapter, driver software must be
installed for your operating system.
Preloaded Ultra3 Drivers
If the HP Ultra3 SCSI host bus adapter was included as part of a HP Netserver
you purchased, then the appropriate HP driverhas already been pre-installed by
HP and you do not need to install it.
Embedded Ultra3 Drivers
Some operating systems have embedded driver support for the HP Ultra3 SCSI
host bus adapter. To determine if t he host adapter is supported by the operating
system you are using, read the operating systemmanual orcontact the operating
system vendor for information.
13
Page 20

Troubleshooting
If you ha ve any problems while installing the HP Ultra3 SCSI host bus adapter,
check the following items first:
• Are all SCSI devices powered on?
• Are all SCSI cables and power cables properly connected?
• Does each de vice on the SCSI bus have a unique SCSI ID?
• Does the total SCSI cable length exceed the maximumallowablelength?
(The maximum cablelength for the Ultra3 SCSI host adapter cannot
exceed12 meters.)
• Is the SCSI bus properly terminated?
If you are still unable to resolve a problem, contact HP Technical Support for
help.
14
Page 21

2 Configuration with SCSISelect
SCSISelect, included with the HP Ultra3 SCSI Host Bus Adapter, enables you
to change SCSI settings without opening the c omputer or handling the host bus
adapter. SCSISelectalso enables you to low-level format or verify the disk
media of your SCSI harddiskdrives.The followingtable lists the availableand
default settings for each SCSISelect option.
NOTE The defaultsettingsare appropriate for most systems.RunSCSISelect
if you need to change or view current settings, or if you would liketo
run the SCSI disk utilities. See the descriptionsof eachoptionstarting
on page 17.
SCSISelect Options Available
Settings
SCSI Bus Interface Definitions:
Host Adapter SCSI ID 0-15 7
SCSI Parity Checking Enabled, Disabled Enabled
Host Adapter SCSI Termination
LVD/SE Connectors Automatic,Enabled,
Disabled
SE Connectors Automatic
Low ON/High ON
Low OFF/High OFF
Low OFF/HighON
Boot Device Options:
Boot SCSI ID 0-15 0
Boot LUN Number
SCSI Device Configuration:
Sync Transfer Rate (MBytes/sec) 160,80.0,53.4, 40.0,
1
0-7 0
32.0, 26.8, 20.0,
16.0, 13.4, 10.0,
ASYN
Default
Setting
Automatic
Automatic
160
15
Page 22

SCSISelect Options Available
Settings
Default
Setting
Initiate Wide Negotiation Yes, No Yes (Enabled)
Enable Disconnection Yes, No Yes (Enabled)
Send Start Unit Command Yes, No Yes (Enabled)
Enable Write Back Cache
1
BIOS Multiple LUN Support
Include in BIOS Scan
2
2
N/C (No Change)
Yes, No
N/C (No
Change)
Yes, No No (Disabled)
Yes, No Yes (Enabled)
Advanced Configuration Options:
Reset SCSI Bus at IC Initialization Enabled, Disabled Enabled
Display <Ctrl> <A> Messages during
Enabled, Disabled Enabled
BIOS Initialization
Extended BIOS Translation for
Enabled, Disabled Enabled
DOS Drives > 1 GByte
Verbose/Silent Mode Verbose, Silent Verbose
Host Adapter BIOS Enabled
Enabled
Disabled: Not Scan
Disabled: Scan Bus
Domain Validation
2
Support Removable Disks Under BIOS
as Fixed Disks
2
BIOS Support for Bootable CD-ROM
BIOS Support for Int 13 Extensions
Enabled, Disabled Enabled
Disabled, Boot Only,
All Disks
2
Enabled, Disabled Enabled
2
Enabled, Disabled Enabled
Disabled
1
Setting is valid only if Multiple LUN Support is enabled
2
Settings are valid only if host adapter BIOS is enabled
Starting SCSISelect
Follow these steps to start SCSISelect:
1. Turn on or restart your system.
16
Page 23

During the startup process, pay careful attention to the messages that appear on
your screen.
2. When the following message appears on your screen, pre ss the Ctrl-A keys
simultaneously (this message appears for only a few seconds):
Press <Ctrl><A> for SCSISelect (TM) Utility!
3. From the menu that appears, use the arrow keys to move the cursor to the
option you want to select, then press Enter.
NOTE If you ha ve difficulty viewing the display, press F5 to toggle between
color and monochrome modes. (This feature may not work on some
monitors.)
Exiting SCSISelect
Follow these steps to exit SCSISelect:
1. Press Esc until a message prompts you to exit (if you changedany settings,
you are prompted to save the changes before you exit).
2. At the prompt, select Yes to exit, then press any key to reboot the computer.
Any changes made in SCSISelect will take effect the next time the computer
is booted.
Using SCSISelect Settings
To select an option, use the arrow keys to move the cursor t o the option, then
press Enter.
In some cases,selecting a n option displays another menu. You can return to the
previous menu at any time by pressing Esc.
To restore the original SCSISelect default values, press F6 from the main
SCSISelect screen.
SCSI Bus Interface Definitions
• Host Adapter SCSI ID—(Default: 7) Sets the SCSI ID for the SCSI
host bus adapter. The Ultra3 SCSI Host Bus Adapter is set at 7,which
17
Page 24

gives it the highestpriorityon the SCSI bus. We recommend that you do
not change this setting.
• SCSI Parity Checking—(Default: Enabled)WhensettoEnabled,
verifies the accuracy of data transfer on the SCSI bus. Leave this setting
enabled unless any SCSI device connected to the Ultra3 SCSI Host Bus
Adapter does not support SCSI parity.
• Host Adapter SCSI Termination—(Default: Automatic)Determines
the termination setting for the SCSI host bus adapter. The default setting
for both the LVD/SE and SE connectors is Automatic, which allows the
SCSI host bus adapter to adjustthe termination as needed depending on
the configuration of the connected SCSI devices. We recommend that
you do not change this setting.
Boot Device Options
• Boot SCSI ID—(De fault: 0) Specifies the SCSI ID of your boot device.
We recommend that you do not change the default setting.
• Boot LUN Number—(Default: 0) Specifies which LUN (Logical Unit
Number) to boot from on your boot device. This setting is not valid
unlessMultipleLUN Support is Enabled (see “Advanced Configuration
Options” on page 19).
SCSI Device Configuration
SCSI Device Configuration options can be set individually for each connected
SCSI device.
18
NOTE Toconfigure settings for a SCSI device, you must know its SCSI ID
(see “Using SCSI Disk Utilities” on page 22).
• Sync Transfer Rate—(De fault:
synchronous data transfer rate that the SCSI host adapter supports. Use
the maximum va lue of 160 MBytes/sec. If a device is not U ltra160,
select the transfer rate of the device (80, 53, 40, ...).
• Initiate Wide Negotiation—(Default: Yes)WhensettoYes, the SCSI
host bus adapter attempts 16-bit data transfer (wide negotiation). When
160) Determines the ma ximum
Page 25

set t o No, the SCSI host bus adapter uses 8-bit data transfer unless the
SCSI device requests wide negotiation.
NOTE Set Initiate Wide Negotiationto No if you are using an 8-bit SCSI
device that hangs or exhibits other performance problems with 16-bit
data transfer rate enabled.
• Enable Disconnection—(Default: Yes)WhensettoYes, allows the
SCSI device to disconnect from the SCSI bus. Leave the setting at Yes if
two or m ore SCSI devices are connected to the SCSI host bus adapter. If
only one SCSI device is connected, changing the setting to No results in
slightly better performance.
• Send Start Unit Command—(Default: Yes)WhensettoYes,theStart
Unit Command is sent to the SCSI device at bootup.
The following three options have no effectwhen the SCSI host bus adapter
BIOS is disabled. (The SCSI host bus adapter BIOS is normally enabled by
default.)
• Enable Write Back Cache—(Default: N/C) Can be used to enable or
disable the write-back cache on SCSI diskdrives connected to the host
adapter. Leave this option at its defaultsettingofN/C(no change),which
usually allows for optimum drive performance.
• BIOS Multiple LU N Support—(Default: No) Leave thissetting at No if
the device does not have multiple LogicalUnit Numbers (LUNs). When
set t o Yes, the SCSI host bus adapter BIOS provides boot support for a
SCSI device with multiple LUNs (for example, a CD “juke box” device
in which multiple CDs can be accessed simultaneously).
• Include in BIOS Scan—(Default: Yes)WhensettoYes, theSCSIhost
bus adapter BIOS includes the device as part of its BIOS s can at bootup.
Advanced Configuration Options
NOTE Do not change the Advanced ConfigurationOptionsunless absolutely
necessary.
19
Page 26

• Reset S CSI Bus at IC Initialization—(Default: Enabled)Whensetto
Enabled,the SCSI host bus adapter generatesaSCSIbus reset during its
power-oninitialization and after a hard reset.
• Display <Ctrl> <A> Messages during BIOS Initialization—(Default:
Enabled)WhensettoEnabled,theSCSIhost bus adapter BIOS displays
the Press <Ctrl> <A> for SCSISelect (TM) Utility! message on your screen
during system bootup. If this setting is disabled, you can still invoke the
SCSISelect Utility by pressing<Ctrl> <A> after the SCSI host bus
adapter BIOS banner appears.
• Extended BIOS Translation for DOS Drives > 1 GByte—(Default:
Enabled)WhensettoEnabled, provides an extended translation scheme
for SCSI hard disks with capacities greater than 1 GByte. This setting is
necessary only for MS-DOS 5.0 or above; it is not required for other
operating systems, such as NetWare or UNIX.
CAUTION Changing the translation scheme destroys all data on the
drive. Be sure to back up the data before changing the
translation scheme.
Use the MS-DOS Fdisk commandtopartitionadisklargerthan1GByte
controlled by the SCSI host bus adapter BIOS, when using DOS, Windows
3.1.x, or Windows 95/98.
• Verbose/Silent Mode—(Default: Verbose) When set Verbose, the SCSI
host bus adapter BIOS displays the host adapter model on the screen
during system bootup. When set to Silent, the message will not be
displayed during bootup.
20
• Host Adapter BIOS (Configuration Utility Reserves BIOS Spa ce )—
(Default: Enabled) Enables or disables the SCSI host bus adapter BIOS.
Leave at Enabledto allow the SCSI host bus adapter BIOS to scan and
initialize all SCSI devices.
Set to Disabled: Not scan if the devices on the SCSI bus (for
example, CD-ROM drives) are controlled by software drivers and do not
need the BIOS, and you do not want the BIOS to scan the SCSI bus.
Set to Disabled: Scan Busif youdo not needtheBIOS, but youwantitto
scan the SCSI deviceson the bus.
Page 27

The following four options have no effectwhen the SCSI host bus adapter
BIOS is disabled. (The SCSI host bus adapter BIOS is normally enabled by
default.)
• Domain Validation—(Default: Enabled) Determines the kinds of SCSI
devices connected and reduces data transfer speed when legacy SCSI
devices are detected. Displays the resulting data transfer rate.
• Support Re movable Disks Under BIOS as Fixed Di sks—(Default:
Disabled) Determines which removable-media drives are supported by
the SCSI host bus adapter BIOS. Choices are a s follows:
Disabled— No removable-media drives are treated as hard disk drives.
Software drivers are required because the drives are not controlled by the
BIOS.
CAUTION You may lose data if you remove a removable-media
cartridge from a SCSI drive controlled by the SCSI host
bus adapter BIOS while the drive is on. If you wa nt to be
able to re move the media while the drive is on, install the
removable-media software driver and set Support
Removable Disks Under BIOS as Fixed Disks to
Disabled.
Boot Only—Only the removable-media drive designated as the boot
device is treated as a hard disk drive.
All Disks—All removable-media drives supported by the BIOS are
treated as hard disk drives.
• BIOS Supp ort for Bootable CD-ROMs—(Default: Enabled)Whenset
to Enabled, the SCSI host bus adapterBIOS allowsthecomputertoboot
from a CD-ROM drive.
• BIOS Support for Int 13 Extensions—(Default: Enabled)Whensetto
Enabled,the SCSI host bus adapter BIOS supports Int 13h extensions as
required by Plug-and-Play. The setting c an be either enabled or disabled
if your s ystem is not Plug-and-Play.
21
Page 28

Using SCSI Disk Utilities
Toaccess the SCSI disk utilities, follow these steps:
1. Select the SCSI Disk Utilities option from the menu that appears after
starting SCSISelect.SCSISelect scans the SCSI bus (to determine the
devicesinstalled) and displays a list of all SCSI IDs and the devices assigned
to each ID.
2. Use the arrow keys to movethecursorto a specificID and device, then press
Enter.
3. A small menu appears, displaying the options Format Disk and Verify Disk
Media.
Format Disk—Al lows you to perform a low-level format on a hard disk
drive. Most SCSI disk devices are preformatted at the factory and do not
need to be formatted again.
CAUTION A low-level format destroys all data on the drive. Be sure
to back up your data before performing this operation. You
cannot abort a low-level format once it has started.
Verify Disk Media—Allows you to scan the media of a hard disk drive
for defects. If the utility finds bad blocks on the media, it prompts you to
reassign them; if you select yes, those blocks areno longer used. Pressing
Esc at any time aborts the utility.
22
Page 29

3 Microsoft Windows NT
Installation
This chapter explains how to install the HP Ultra3 Family Manager Set driver
adpu160m.sys for Windows NT.
If you are performing a first time Windows NT installation,see “Installing the
Driver When InstallingWindowsNT” in the next section. If Windows NT is
already installed in your system, see “Installing the Driver When Windows NT
is Already Installed” on pa ge 24.
Installing the Driver When Installing
Windows NT
The adpu160m.sys driver is not embedded on the Windows NT 4.0
installation disks (or CD-ROM) and must be added during Windows NT
installation.
Completing a Fresh Windows NT 4.0 Installation From Floppy
Disk
1. Start your system with the Windows NT Boot Disk in the floppy disk drive.
2. When prompted, insertdisk #2 in your floppy disk drive. After a few
moments you will see a blue screen. Tosetup WindowsNT now,pressEnter.
3. Press S to skip auto-detection of your SCSI host adapter.
4. Press S again to specify an additional device.
5. Press Enter to select Others; insert the HP Ultra3 Family Manager Set disk
for Windows NT into your floppy disk drive.
6. Using the arrow keys, select the following driver and press Enter:
Adaptec Ultra3 PCI SCSI Controller (NT4.0)
7. To add other host adapters,press S and repeat from Step 5 for each additional adapter and insert the appropriate driver disk.
23
Page 30

8. Press Enter to continue with the Windows NT operating system setup. Follow the instructions on-screen and in the Windows NT documentation to
complete the installation.
Completing a Fresh Windows NT 4.0 Installation From CD-ROM
1. Insert the Windows NT 4.0 CD into the CD-ROM drive.
2. Start your system. Press the F6 key when you see the following message:
“Setup is inspecting your computer’s hardware configuration...”
3. If you do not see this message, your system may not be setup to boot from a
CD-ROM. You will need to installfrom floppy disks. See “Completing a
Fresh Windows NT 4.0 Installation From Floppy Disk” on page 23.
4. When prompted, press S to specify an additional device.
5. Press Enter to select Others; insert theHP Ultra3 Family Manager Set disk
for Windows NT into your floppy disk drive.
6. Using the arrow keys, select the following driver and press Enter:
Adaptec Ultra3 PCI SCSI Controller (NT4.0)
7. To add other host adapters,press S and repeat from Step 4 for each additional adapter and insert the appropriate driver disk.
8. Press Enter to continue with the Windows NT operating system setup. Follow the instructions on-screen and in the Windows NT documentation to
complete the installation.
Installing the Driver When Windows NT is
Already Installed
Toupdate or install the adpu160m.sys driver if Windows NT 4.0 is already
installed, follow the instructions below.
24
Page 31

Updating Windows NT 4.0
1. Start Windows NT.
2. Click the Start button on the Windows NT task bar, and then point to Set-
tings.
3. Click the Control Panel.
4. Double-click the SCSI Adapters icon.
5. Click the Drivers tab, and then click the Add button.
6. In the Install Driver window, click the Have Disk button.
7. Insert the HP Ultra3 Family Manager Set disk for Windows NT into drive A.
8. From the Copy Manufacturer’s File From text box, type a:\nt4,andclick
OK.
9. In the Install Driver window, Click OK.
10. Click the New button when asked if you want to use the currently installed
driver(s) or install new one(s).
11. Type a:\nt4 again, and click Continue. The driver is now installed.
12. You must restart your computer for the changes to take effect. Click Yes to
restart your computer. Click Noto return to the SCSI Adapters window.
Using Advanced Configuration Parameters
Advanced users may use software parameters to alter the configuration of the
Windows NT device drivers supplied by HP. All Windows NT configuration
information is stored in a data structure called the Registry.You can edit this
information through a tool called the Registry Editor.
CAUTION Do not edit your registry unless it is absolutely necessary.
If there is an error in your registry, your computer may
become nonfunctional.
25
Page 32

Using Windows NT SCSI Parameters
Follow the i nstructions below to enter the registry values that affect how the
WindowsNT SCSI manager interprets the generic configurationinformation of
SCSI device drivers. All SCSI host adapters installed in your system a re
affected by the values you enter here. A list of valid values follows:
NOTE The following value keys are case-sensitive and must be entered
exactly as shown.
• DisableTaggedQueuing — A nonzerovalueindicates that the SCSI host
adapterdisables tagged queueing for SCSI devices. The data type for this
value is REG_SZ.
• DisableSynchronousTransfers — A nonzero value indicates that the
SCSI host adapter is not to initiate synchronous negotiations (but it may
still accept negotiations initiated by a SCSItarget). The data type for this
value is REG_SZ.
• DisableDisconnects — A nonzero value indicates that targets are not
permitted to disconnect during the execution of a SCSI command. The
data type for this value is REG_DWORD.
• MaximumLogicalUnit— This can limit the scan for connected devices
on the SCSI bus. Valid va lues are 1 to 8. If 1 is specified, the Windows
NT SCSI manager assumes that no SCSI targets support LUNs other
than 0. Otherwise, LUNs from 0 to 8 are scanned during system
initialization. The data type for this value is REG_DWORD.
26
• Maximum SGList — Specifies the maximum number of S catter/Gather
elements. Valid values are 17-255. The data type for this value is
REG_DWORD.
To enter Windows NT parameters, follow these steps:
1. Select Run from the Start button.
2. Type regedt32 and press Enter.
3. Open the registry list to the following location:
\HKEY_LOCAL_MACHINE \System\ C urrentControlSet\
Services\adpu160m\Parameters\Device
Page 33

If the Parameters Device keys already exist, skip toStep8 below to begin
entering values. If the keys do not yet exist, you will need to create them by
continuing with Step 4.
4. Clickontheadpu160m key.
5. Select Add Key from the Edit menu; TypeParameters in the Key Name
edit box. Leave the Class edit box blank.
6. ClickontheParameters key.
7. Select Add Key from the Edit menu; TypeDevicein the Key Name edit
box. Leave the Class edit box blank.
8. To specifyacertain hostadapter,append Device withthenumberof the host
adapter. For example, type Device0 for the first host adapter, Device1 for
the second, etc. If you omit the host adapter number, the configuration information applies to all Ultra3 Family host adapters.
9. ClickontheDevice key.
10. Select AddValuefromthe Editmenu.Inthe Value Name edit box, enter one
of the valid parameter values. Make sure to enter the appropriate data type
for the value. To enteradditional values, repeat Steps 8 and 9.
NOTE Changes made with the Registry Editor do not take effect until you
shut down and then restart your system.
Using Driver-specific Parameters
Touse the Registry Editor to enteradpu160m.sys driver-specific parameters
thataffectthe configuration informationforSCSIPCIdevice drivers, followthe
instructions below. A list of valid parameters follows:
NOTE The following parameters are case-sensitive and must be entered
exactlyas shown. Whenentering multiple parameters, each parameter
must be separated by a space.
27
Page 34

• /INSTRUMENTATION—enables recordingofI/O statisticsanderrors.
If this option is not specified, instrumentation defaults to disabled. The
data type for this value is REG_SZ.
• /INSTR_ERRLOG_Z=nnn—sets the maximum number of error log
entries, if /INSTRUMENTATION is enabled. If a number is not
specified, the maximum number or error log entries defaults to 32. Valid
values are 0-128. The data type for this value is REG_SZ.
• /MAXTAGS=nnn—specifies the tagged command queue depth. If a
number is not specified, the tagged queue depth defaults to 128. Valid
values are 1-255. The data type for this value is REG_SZ.
• /HOTPLUG —enables Hot-Plug PCI feature. If this option is not
specified, Hot-Plug PCI feature defaults to disabled.
To enter driver-specific parameters, follow these steps:
1. Select Run from the Start button.
2. Type regedt32 and press Enter.
3. Open the registry list to the following location:
\HKEY_LOCAL_MACHINE \System\ C urrentControlSet\
Services\adpu160m\Parameters\Device\DriverParameters
If the Parameters, Device, and Driver Parameters keys already exist, skipto
Step 10 below to begin enteringparameters. If the keys do not yet exist, you
will need to create them by continuing with Step 4.
28
4. Clickontheadpu160m key.
5. Select Add Key from the Edit menu; TypeParameters in the Key Name
edit box. Leave the Class edit box blank.
6. ClickontheParameters key.
7. Select Add Key from the Edit menu; TypeDevicein the Key Name edit
box. Leave the Class edit box blank.
Tospecify a certain host adapter, append Devicewith the number of the host
adapter. F or example, type Device0 for the first host adapter, Device1 for the
second, etc. If you omit the host adapter number, the configuration information
applies to all Ultra3host adapters.
Page 35

8. ClickontheDevice key.
9. Select Add Value from the Edit menu; t ype Driver Parameters in the Key
Name edit box. Enter REG_SZ asthedatatypeandpressEnter.
10. A String Editor text box appears. Enter valid parameters in the text box.
When entering multiple parameters, each parameter must be separated by a
space.
NOTE Changes made with the Registry Editor do not take effect until you
shut down and then restart your system.
Hot-Plug PCI Feature
Hot-Plug PCI is supported by the Windows NT 4.0 driveradpu160m.sys.You
will need a system that supports Hot-Plug PCI a s well as associated Hot-Plug
PCI application software in order for Hot-Plug PCI to work. Do not enable the
Hot-Plug PCI feature unless your system is Hot-PlugPCI capable and you wish
to use the Hot-Plug PCI feature.
Follow the instructions below to enable Hot-Plug PCI support in the driver:
1. Insert the HP Ultra3 Family Manager Set disk for Windows NT into drive A.
2. Select Run from the Start menu.
3. Type a:\nt4\hotp160m.reg and press Enter.
4. Click OK.
5. Reboot the system.
6. See the note following these instructions.
29
Page 36

NOTE The file hotp160m .reg adds Hot-Plug related entries into the NT
Registry, including the driver-specific registry value /HOTPLUG.
Running hotp160m.reg will overwrite your current driver-specific
registry values located at:
\HKEY_LOCAL_MACHINE\System\CurrentControlSet\
Services\adpu160m\Parameters\Device\DriverParameters
If you have previouslyadded otherdriverspecific registry values, you
should note them before running the hotp160m.reg file. After
running hotp160m.reg, you may verify and re store those previously
added driver-specific registry values, if needed.
Using Windows NT and the Host Adapter
This section contains useful information on using Windows NT and your host
adapter.
Removing a Host Adapter
Removing a host adapter can be as simple a s physically removing it from the
slot when your computer is shut down. Windows NT boots and functions
properly in this configuration,but a Warning message is generated every time
you boot Windows NT.
30
CAUTION If you haveremoved a host adapterbutstill have other host
adapters of the same type installed in your computer, do
not use Windows NT Setup to remove the device driver.
Toeliminate the Warning message, you must update the Windows NT software
configuration, as described below:
Page 37

Removing a Host Adapter in Windows NT 4.0
1. From the ControlPanel, double-clickthe SCSI Adapters icon.
2. Click the Drivers tab.
3. Using the arrow keys select the following driver:
Adaptec 29160(N), 29160, 39160, AHA-3960D, AIC-7892/7899
Ultra160 PCI SCSI Controller (NT 4.0)
4. Click the Remove button.
5. If you are sure you are removing the correct host a dapter type, click Yes.
6. Click Yes to restart the computer and initialize changes. Click No to return to
the SCSI Adapters window.
NOTE Windows NT Setup does not de lete the device driver from your
system disk; it only updates Windows NT software configuration
information so that the device driver is no longer loaded during
system bootup.
Troubleshooting
Problems and Solutions
I made changes to the host adapter configuration and Windows NT
no longer boots!
The boot manager for Windows NT contains recovery logic to allow you to
return to the last known good configuration. If you have changed your host
adapter configuration and Windows NT no longer boots, follow these steps to
recover:
1. Undo any hardware changes you have m ade to the computersinceit was last
operational.
2. Reboot the computer. Watch the display carefully during bootup. If the following message appears, press the Spacebar and follow t he instructionsonscreen to continue booting with the lastknown good configuration:
31
Page 38

Press spacebar NOW to invok e the Last Known Good menu
3. Once your computer is operational again, check all of the hardware and software configuration changes you want to make. Look specifically for conflicts with parts of the existing system configuration that are not being
changed.
Error Messages
Error messages generated by the adpu160m.sys driver can be viewed by
opening the Windows NT Event Viewer error logs.
Toview events generated by the driver, follow these steps:
1. Double-click the Event Viewer icon in the Administrative Tools program
group.
Error messages generated by the driver show up as Event ID 11. Error messages
generated by the SCSI port show up a s Event ID 9.
2. To view eventdetails, select System from the Log menu. Double-click the
adpu160m.sys driver event that has an Event ID of 11.(There may be none
or multiple driver events.)
The top portion of the E vent Detail dialog box displays information such as the
time that the event was generated, the computer on which the event occurred (in
case of remote monitoring) and the descriptionof the event. The Data section of
the Event Details dialog box displays the error messages generated.
32
3. Click the Words radio button.
In the Data section of the dialog box, the entry in the second row and second
column (to the right of the 0010: entry) lists the error message generated by the
driver. The common error messages for the driver are described below.
NOTE The entry in the third row of the last column identifies the SCSI ID of
the device originating the error.
Page 39

adpu160m.sys E rror Messages
The following error messages are listed sequentially according to the last three
digits of the error message. For example,[xxxxx010], [xxxxx011], [xxxxx012],
etc.
NOTE When reporting problems to HP Customer Support, be sure to include
the complete error message in your problem description.
[xxxxx004] Command completed with error
[xxxxx005] Command completed with error
[xxxxx006] Command completed with error
A request issued to a target device completed with indication that there is an
error. In most c ases, the error is recovered and normal operations continues.
[xxxxx010] Error issuing command
An error has occurred while the driver was s etting up its internal data structures.
[xxxxx011] Error issuing command
The requested command is not supported by this driver.
[xxxxx012] Error issuing command
[xxxxxx99] Error issuing command
The driver does not recognize the target device.
[xxxxx021] Target devic e protocol error
An unexpected event occurred during data transfer between the adapter and
target device. Normally, this indicates a faulty or non-complianttarget device.
[xxxxx022] Adapter or target device protocol error
The adapter or target device has broken the communication protocol. A badly
behaving device could cause this message to appear. Normally this is not a
serious problem. If you get this message frequently over a short period of time,
33
Page 40

it could indicate that the device or system is malfunctioning. Unplug or power
down unused devices to see if the problem persists.
[xxxxx023] Target device parity error
The driver has detected a pa rity error by the target device.
[xxxxx024] Data overrun or underrun
The adapter was given more or less data than the expected a mount of data.
[xxxxx031] Target device queue full
The target device internal buffer is full.
[xxxxx032] Target device busy
The target device reports a Busy status. Another program may already be using
this device.
[xxxxx050] Host adapter failure
[xxxxxx9A] Host adapter failure
Your host adapter may not be properly installed or is defective. Try resetting the
adapter in the PCI slot, or try installing it a different PCI slot.
[xxxxx081] Adapter initialization failure
[xxxxxx8A] Adapter initialization failure
[xxxxxx83] Adapter initialization failure
An error has occurred while the driver was setting up its internal data structures.
Verify that youradapter is supported by this version of the driver.
[xxxxx089] Unable to allocate mem ory
This indicatesthattheremaybe a problem with the amount of memory installed
in your system. Verify that your system has at least the minimum amount of
memory required by your operating system.
34
Page 41

[xxxxx096] Adapter hardware initialization failure—possible resource
conflict
The driver ha s attempted to initialize the a dapter hardwarebut failed. This
might suggest that t he adapter resources (e.g., IRQ) conflict with another board
installed in your system.
[xxxxx097] Unable to allocate mem ory
This indicatesthattheremaybe a problem with the amount of memory installed
in your system. Verify that your system has at least the minimum amount of
memory required by your operating system.
[xxxxx0af] Unable to de-allocate m emory that was allocated for a target
device
Normally, this is not a serious problem, unless you get this message frequently
over a short period of time. The memory can be reclaimed by rebooting the
system.
[xxxxx0ce] Scatter/gather limit exceeded
An I/O request packet from the system contained a Scatter/Gatherelement list
thatcontainedmoreelements than are supported by the miniport. Scatter/Gather
is a list of data segments that define the entire data transfer. Scatter/Gather is a
means to improve total data throughput. This error might be caused by a
component external to the miniport driver, such as the operating system or an
ASPI application.
[xxxxxd4] Adapter hardware failure - adapter reset
The host adapter hardware failed and the miniport has to reset the hardware.
[xxxxx0d6] Internal driver error
An error has occurred while the driver was setting up its internal data structures.
Try installing the most up-to-date version of the driver available from the HP
Web site located at http://netserver.hp.com/netserver/
35
Page 42

36
Page 43

4 Microsoft Windows 2000
Installation
This chapter explains how to install the HP Ultra3 Family Manager Set driver
for Windows 2000.
If you are performing a first-time Windows 2000 installation, see Installing the
Driver When Installing Windows 2000. If Windows 2000 is already installed in
your system,see To Update the Driver When Windows2000isAlready Installed
on page 37.)
Installing the Driver When Installing
Windows 2000
1. Start your system with the Windows 2000 Operating System CD-ROM disc
in your CD-ROM drive.
NOTE When using a CD-ROM drive to install Windows 2000 from the
bootable CD-ROM, make sure Bootable CD-ROM support is enabled
in either the system or SCSI BIOS setup utility. If these options are
not available, boot from the Windows 2000 floppy disks.
2. You may see a message:
Press any key to boot from CD.
3. After Windows 2000 has completed installation, please reinstall your SCSI
driver from the Device Manager. Follow the steps in “Installing the Driver
When Windows 2000 is Already Installed” on page 37 to ensure the desired
driver is installed.
Installing the Driver When Windows 2000 is
Already Installed
Toupdate or install the driver if Windows2000isalreadyinstalled, follow these
instructions:
37
Page 44

1. Start Windows 2000.
2. Click the Start button on the Windows 2000 task bar, and then point to
Settings.
3. Click the Control Panel.
4. Double-click the System icon.
5. Select the Hardware tab and click the Device Manager button.
6. Under SCSI and RAID Controllers, click on the + sign to the left. This will
display the SCSI adapterscurrently installed.Right-click on the device you
wish to update and select Properties.
7. Click the Driver tab and click the Update Driver button. The Update
Device Driver Wizard will start. Click Next.
8. Select the Search for a suitable driver option and click Next.
9. Select the location where the updated driver is installed and click Next.
10. At this step, Windows 2000 will recommend one of two choices. If it
recommends using the driver found on the driver disk, then click Next and
skip to Step 12. It might recommend that you keep the existing driver and
mention that it found other suitable drivers. If this is the case, select Install
one of the other drivers and click Next.
11. You may be asked to enter the path for the driver.
12. \win2000\ultra160\adpu160m.sys
13. Click Finish. You m ay be required to reboot your system.
Upgrading an Existing Windows NT Version 4
Installation to Windows 2000
1. With your operating system s tarted, insert your Windows 2000
CD-ROM and choose to upgrade your system. Your system will reboot.
2. The Windows 2000 S etup program will start. Press F6 when this message is
displayed:
Press F6 if you need to install a third party SCSI or RAID driver...
38
Page 45

3. Follow the directions from “Installing the Driver When Installing
Windows 2000” on page 37.
Using Advanced Configuration Parameters
Advanced users may use software parameters to alter the configuration of the
Windows2000devicedriverssupplied by HP.All Windows 2000 configuration
information is stored in a da ta structure supplied by Windows 2000, called the
Registry. Youcan edit this information through a tool called the Registry Editor.
CAUTION Do not edit your registry unless it is absolutely necessary.
If there is an error in your registry, your computer may
become nonfunctional
Using Windows 2000 SCSI Parameters
Follow the i nstructions below to enter the registry values that affect how the
Windows 2000 SCSI manager interprets the generic configuration information
of SCSI device drivers. Each driver has its own key reference in the registry. In
this example, the Ultra160 key is used (adpu160m). The other keys are
aic78xx, aic78u2, adf 6u160,and2930u2. All SCSI host adapters supported
by the modified key are affected by the values you enter here. A list of valid
values follows:
NOTE The following value keys are case-sensitive and must be entered
exactly as shown.
• DisableTaggedQueuing — A nonzerovalueindicates that the SCSI host
adapterdisables tagged queueing for SCSI devices. The data type for this
value is REG_SZ.
• DisableDisconnects — A nonzero value indicates that targets are not
allowed to disconnect during the execution of a SCSI command. The
data type for this value is REG_DWORD.
39
Page 46

• DisableMultipleRequests— This limits the number of commands to
each logical device to one. The da ta type for this value is
REG_DWORD.
• MaximumLogicalUnit— This can limit the scan for connected devices
on the SCSI bus. Valid va lues are 0 to 7. If 1 is specified, the Windows
2000 SCSI manager assumes that no SCSI targets support L UNs other
than 0. Otherwise, LUNs from 0 to 7 are scanned during system
initialization. The data type for this value is REG_DWORD.
• MaximumSGList — Specifies the maximum number of Scatter/Gather
elements. Valid values are 17-255. The data type for this value is
REG_DWORD.
To enter Windows 2000 parameters, follow these steps:
1. Select Run from the Start button.
2. Type regedt32 and press Enter.
3. Open the registry list to the following location:
\HKEY_LOCAL_MACHINE \System\ C urrentControlSet\
Services\adpu160m\Parameters\Device
If the Parameters\Device keys already exist, skip to Step 8 below to begin
entering values. If the keys do not yet exist, you will need to create them by
continuing with Step 4.
40
4. Clickontheadpu160m key.
5. Select Add Key from the Edit menu; type Parametersin the Key Name edit
box. Leave the Class edit box blank.
6. ClickontheParameters key.
7. Select Add Key from the Editmenu; type Devicein the Key Name edit box.
Leave the Class edit box blank.
8. To specifyacertain hostadapter,append Device withthenumberof the host
adapter. For example, type Device0 for the first host adapter, Device1 for
the second, etc. If you omit the host adapter number, the configuration
information applies to all Ultra3 host adapters.
9. ClickontheDevicekey.
Page 47

10. Select Add Value from the Edit menu. In the ValueName edit box, enter one
of the valid parameter values. Make sure to enter the appropriate data type
for the value. To enteradditional values, repeat Steps 8 and 9.
NOTE Changes made with the Registry Editor do not take effect until you
restart your system.
Using Driver-specific Parameters
Follow the instructions below to enter the registry values that affect the configuration information for SCSI PCI device drivers. Each driver has its own key
reference in the registry. In this example, the Ultra160 key is used (adpu160m).
The other keys are aic78xx , aic78u2, adf6u160,and2930u2. All SCSI host
adapters supported by the modified key are affected by the values you enter here.
A list of valid parameters follows:
NOTE The following parameters are case-sensitive and must be entered
exactlyas shown. Whenentering multiple parameters, each parameter
must be separated by a space.
• /MAXTAGS=nnn—specifies the tagged command queue depth. If a
number is not specified, the tagged queue depth defaults to 128. Valid
values are 1-255. The data type for this value is REG_SZ.
• /MEMMAP—when set, the SCSI manager is memory mapped. If this
key is not used, the default is I/O mapped. There are no valid values or
default values. The data type for this value is REG_SZ.
• /BUS_FAIRNESS—when set, the SCSI bus avoids device starvation.
There are no validvalues ordefault values. Thedatatypeforthisvalueis
REG_SZ.
To enter driver-specific parameters, follow these steps:
1. Select Run from the Start button.
2. Type regedt32 and press Enter.
3. Open the registry list to the following location:
41
Page 48

\HKEY_LOCAL_MACHINE \System\ C urrentControlSet\
Services\adpu160m\Parameters\Device
If the Parameters\Device keysalreadyexist,skiptoStep10belowtobegin
entering parameters.Ifthe keys do not yet exist, you will need to create them by
continuing with Step 4.
4. Clickontheadpu160m key.
5. Select Add Key from the Edit menu; TypeParameters in the Key Name
edit box. Leave the Class edit box blank.
6. ClickontheParameters key.
7. Select Add Key from the Edit menu; TypeDevicein the Key Name edit
box. Leave the Class edit box blank.
Tospecify a certain host adapter, append Devicewith the number of the host
adapter. F or example, type Device0 for the first host adapter, Device1 for the
second, etc. If you omit the host adapter number, the configuration information
applies to all Ultra3host adapters.
8. ClickontheDevice key.
9. Select Add Valuefrom the Edit menu; type DriverParametersin the Value
Name edit box. Enter REG_SZ asthedatatypeandpressEnter.
10. A String Editor text box appears. Enter valid parameters in the text box.
When entering multiple parameters, each parameter must be separated by a
space.
NOTE Changes made with the Registry Editor do not take effect until you
restart your system.
Troubleshooting
Most problems can be resolved by followingtherecommendations in the “Problems and Solutions” below. If you still experience problems after following the
recommendations, continue with the rest of this section.
42
Page 49

Problems and Solutions
I made changes to the host adapter configuration and Windows
2000 no longer boots!
The boot manager for Windows 2000 contains recovery logic to allow you to
return to the last known good configuration. If you have changed your host
adapter configurationand Windows 2000 no longer boots, follow these steps to
recover:
1. Undo any hardware changes you have m ade to the computersinceit was last
operational.
2. Reboot the computer. Watch the display carefully during bootup. When you
see the message Starting Windows... appear at the bottom of the screen,
press F8. This opens the Windows 2000 Advanced Options menu. Select the
Last Known Good Configuration option and select a boot profile.
3. Once your computer is operational again, check all of the hardware and
software configuration changes you want to make. Look specifically for
conflicts with parts of the existing system c onfiguration that are not being
changed.
Error Messages
Error messages generated by the Windows 2000 Driver Set can be viewed by
opening the Windows 2000 Event Viewer error logs.
Toview events generated by the driver, follow these steps:
1. Double-click the Event Viewer icon in the Administrative Tools program
group.
Error messages generated by the driver show up as Event ID 11. Error messages
generated by the SCSI port show up a s Event ID 9.
2. To view eventdetails, select System Log from the Event Viewer tree.
Double-click the appropriate Windows 2000 driver event that has an Event
ID of 11. (There may be none or multiple driver events.)
The top portion of the E vent Detail dialog box displays information such as the
time that the event was generated, the computer on which the event occurred (in
case of remote monitoring), and the description of the event. The Data section
of the Event Details dialog box displays the error messages generated.
43
Page 50

3. ClickontheWords option.
In the Data section of the dialog box, the entry in the second row and second
column (to the right of the 0010: entry) lists the error message generated by the
driver. The common error messages for the driver are described below.
NOTE The entry in the third row of the last column identifies the SCSI ID of
the device originating the error.
Driver Error Messages
The following error messages are listed sequentially according to the last three
digits of the error message. For example,[xxxxx010], [xxxxx011], [xxxxx012],
etc.
NOTE When reporting problems to HP Customer Support, be sure to include
the complete error message in your problem description.
[xxxxx004] Command completed with error
[xxxxx005] Command completed with error
[xxxxx006] Command completed with error
A request issued to a target device completed with indication that there is an
error. In most c ases, the error is recovered and normal operations continue.
[xxxxx010] Error issuing command
An error has occurred while the driver was setting up its internal data structures.
Try installing the most up-to-date version of the driver available from the HP
Web site at http://netserver.hp.com/netserver/
[xxxxx011] Error issuing command
The requested command is not supported by this driver.
44
Page 51

[xxxxx012] Error issuing command
[xxxxxx99] Error issuing command
The driver does not recognize the target device.
[xxxxx021] Target devic e protocol error
An unexpected event occurred during data transfer between the adapter and target device. Normally, this indicates a faulty or non-compliant target device.
[xxxxx022] Adapter or target device protocol error
The adapter or target device has broken the communication protocol. A badly
behaving device could c ause this message to a ppear. Normally this is not a serious problem. If you get this message frequently over a short period of time, it
could indicate that the device or system is malfunctioning.Unplug or power
down unused devices to see if the problem persists.
[xxxxx023] Target device parity error
The driver has detected a pa rity error by the target device.
[xxxxx024] Data overrun or underrun
The adapter was given more or less data than the expected a mount of data.
[xxxxx031] Target device queue full
The target device internal buffer is full.
[xxxxx032] Target device busy
The target device reports a Busy status. Another program may already be using
this device.
[xxxxx050] Host adapter failure
[xxxxxx9A] Host adapter failure
Your host adapter may not be properly installed or is defective. Try resetting the
adapter in the PCI slot, or try installing it a different PCI slot.
45
Page 52

[xxxxx081] Adapter initialization failure
[xxxxxx8A] Adapter initialization failure
[xxxxxx83] Adapter initialization failure
An error has occurred while the driver was setting up its internal data structures.
Verify that youradapter is supported by this version of the driver.
[xxxxx089] Unable to allocate mem ory
This indicatesthattheremaybe a problem with the amount of memory installed
in your system. Verify that your system has at least the minimum amount of
memory required by your operating system.
[xxxxx096] Adapter hardware initialization failure—possible resource
conflict
The driver ha s attempted to initialize the a dapter hardwarebut failed. This
might suggest that an adapter resource (for example, an IRQ) conflicts with
another board installed in your system.
[xxxxx097] Unable to allocate mem ory
This indicatesthattheremaybe a problem with the amount of memory installed
in your system. Verify that your system has at least the minimum amount of
memory required by your operating system.
[xxxxx0af] Unable to de-allocate m emory that was allocated for a target
device
Normally, this is not a serious problem, unless you get this message frequently
over a short period of time. The memory can be reclaimed by rebooting the system.
[xxxxx0ce] Scatter/gather limit exceeded
An I/O request packet from the system contained a Scatter/Gatherelement list
thatcontainedmoreelements than are supported by the miniport. Scatter/Gather
is a list of data segments that define the entire data transfer. Scatter/Gather is a
means to improve total data throughput. This error might be caused by a com-
46
Page 53

ponent external to the miniport driver, such as the operating system or an ASPI
application.
[xxxxxd4] Adapter hardware failure - adapter reset
The host adapter hardware failed and the miniport driver has to reset the hardware.
[xxxxx0d6] Internal driver error
An error has occurred while the driver was setting up its internal data structures.
Try installing the most up-to-date version of the driveravailable from the
HP Web site at http://netserver.hp.com/netserver/
47
Page 54

48
Page 55

5 Novell NetWare Installation
This chapter explains how to install the HP Ultra3 Family Manager Set driver
adpt160m.ham for Novell NetWare— NetWare 3.3, 4. 2, and 5.0.
If you are performing a first time NetWare installation, see “Installingthe
Driver When Installing NetWare” in the next section. If NetWare is already
installed in your system, see “Installing the Driver When NetWare is Already
Installed” on page 54.
Installing the Driver When Installing NetWare
To install the adpt160m.ham driver when you install NetWare, followthe
instructions below for the version of NetWare you are installing.
NetWare 3.12/3.2
Follow these instructions only if you are installing NetWare 3.12/3.2 for the
first time:
1. To complete the NetWare 3. 12/3.2 installation, you must go to the Novell
Web site at:
http://developer.novell.com/devres/sas/certinfo.htm
and then download the nwpa_up.exe update patch from the link a t the
message:
Download the NWPA Update Package.
2. Create the DOS partition on the boot hard disk drive.
3. If you are installing NetWare 3.12/3.2 from a CD-ROM attached to an HP
Ultra3 host adapter, follow the instructions in “Install CD-ROM Drivers on
a DOS Bootable Hard Disk” on page 53 to configure your computer for
CD-ROM access.
If you are installing NetWare 3. 12/3.2 from a CD-ROM attached to a host
adapterother than an HP Ultra3 host adapter, refer to your CD-ROM or
computer documentation for instructions on configuring your computer for
CD-ROM access.
49
Page 56

4. Reboot your c omputer after configuring for CD-ROM access.
5. Follow the instructions in your NetWare documentation for installing a new
server.
6. After NetWare installs the DOS portion of the software, down and exitto
DOS from the server prompt.
7. Copy the adpt160m.ham and adpt160m.ddi from the NetWare directory
of the Ultra3 Family Manager Set disk for NetWare to the c:\server.312
directory.
8. Change directoryto c:\server.312,andcopythenwpa_up. ex e patchfileto
the directory.
9. Run nwpa_up.exe (this will create another file, 31 2ptd.ex e.AnswerY to
the prompt to overwrite cdrom.nlm.)
10. Run 312ptd.exe.
11. Create the directory c:\server.312\cdsave.
12. Copy cdrom.nlmto c:\server.312\cdsave
13. Execute the followingcommand lines to swap the server’s loader:
cd 312ptd\native\loader
lswap loader.exe \server.312\server.exe
cd \server.312
50
14. Create the startup.ncf file in the c:\server.312 directory usingEdit or a text
editor with the following lines:
load c:\server.312\312 ptd\native \start\npapatch
load c:\server.312\mmattrfx
load c:\server.312\nbi31x
load c:\server.312\adpt160m
Add any additional driver load lines for dual-channel or multiple-channel host
adapters.
15. Run server.exe.
16. Note the slot number detected for the HP Ultra3 SCSI host bus adapter.
Page 57

The slot number can be added to t he startup.ncf file, as described in Step 21
below, to automate driver load using the parameter slot=x,wherex is the
detected slot number (for example, load c :\s erv er.312\adpt160m slot=2).
17. Load Install. Create the NetWarepartition,SYS volume, and mount the
volume. Complete the installation of the System and Public Files.
18. Create the autoexec.ncf file. Add the following lines and then save the file.
load after311
load c:\server.312\nwpaload
search add 1 c : \server.312\cdsave
load cdrom
19. Load the following command from the console prompt:
load c:\server.312\312ptd\patch312
20. Install the patches from the c:\server.312\312ptd directory.
21. Edit the driver load command in the startup.ncf file to include the slot
number detected in Step 16 above (for example,
load c:\server.312\adpt160m slot=2).
22. Install any recommended vendor specific patches. See the Novell Web site
for details.
23. Down and Exit the server.
24. Run server.exe.
25. Installation of the driver for NetWare 3.12/3.2 is complete.
NetWare 4.12/4.2
Follow these instructions only if you are installing NetWare 4.12/4.2 for the
first time:
1. Begin installation of NetWare 4.12/4.2 on your server as instructed in your
NetWare documentation.
2. When a screen appears that asks you to select a disk driver, press Insert.
3. Insert the HP Ultra3 Family Manager Set disk for NetWare into your floppy
disk drive.
51
Page 58

4. Press F3 and enter a:\ne tware as the path to the adpt160m.ham driver for
NetWare.
5. Select adpt160m.ham and press Enter.
6. Select No not to save existing file, Yes to save existing file cdrom.nlm.
7. Select No not to save existing file, Yes to save existing file nbi.nlm.
8. Select No not to save existing file, Yes to save existing file nwpa.nlm.
9. Select No not to save existing file, Yes to save existing file nwpaload.nlm.
10. Select Save parameter and continue, a nd press Enter.
11. To install additional adapters, follow the procedures from
Step 5.
12. When complete, select Continue the installation to complete the
installation.
NetWare 5.0
Follow these instructions only if you are installing NetWare 5.0 for the first
time:
1. Begin installation of NetWare 5.0 on your server as instructed in your
NetWare documentation.
2. When a screen appears that asks you to add device drivers, select Modify
and press Enter.
52
3. Select Storage adapters, and press Enter.
4. Press Insert to add storage drivers.
5. Press Insert toaddanunlisteddriver.
6. Insert the HP Ultra3 Family Manager Set disk for NetWare into your floppy
disk drive.
7. Press F3 and enter a: \ne tware\v5_x x as the path to the adpt160m.ham
driver for NetWare.
8. Select adpt160m.ham and press Enter.
9. Select Return to driver list, and press Enter.
Page 59

10. To install additional adapters, follow the procedures from
Step 4.
11. When complete, select Continue to complete the installation.
DOS Drivers for CD-ROM Access
The CD-ROM drivers need to be installed only if DOS accessto a CD-ROM
drive attached to a SCSI host adapter is required. If NetWare is already
installed, or if the CD-ROM drive is not connected to a SCSI adapter, these
drivers do not need to be copied or installed. However, you may choose to
install these drivers if you are having trouble accessing your CD-ROM from
Netware.
NOTE You do not need these drivers for Windows NT or UN IX.
Install CD-ROM Drivers on a DOS Bootable Hard Disk
The following systems filesshould be modified:
• config.sys
• autoexec.bat
1. Copy the files aspi8u2.sys and aspicd.sys from the DOS directory of the
Ultra3 Family Manager Set disk to your C drive. At the DOS prompt, type
the following lines and press Enter after each line:
mkdir c:\scsi
copy a:\dos\*.* c:\scsi
2. Modify config.s ys for loading aspi8u2.sys and aspicd.sys,whichis
necessary for connecting a CD-ROM. Either createthis file in C:\ if you do
not currently have a config.sys, or add these lines to the existing config.sys
file. Note that you may ne ed to change the path for the drivers.
device=c:\scsi\aspi8u2.sys /d
device=c:\scsi\aspicd.sys /d:aspicd0
3. Modify autoexec.bat for loading mscdex.exe.Either create this file in C:\
if you do not currently have autoexec.bat, or add these lines to the existing
autoexec.bat file: c:\dos\mscdex.exe /d:aspicd0 /m:12
53
Page 60

NOTE This will assign the CD-ROM to the next available drive letter,
typically D if there is only one DOS drive. If you are using MS-DOS
5.0 and do not already have mscdex.exe, you will need to either
upgrade to MS-DOS 6.0 or above, or download mscdex.exe from
Microsoft BBS or CompuServe forum.
4. Reboot your system. You are now able to access your CD-ROM drive from
the command line and from Windows.
Installing the Driver When Ne tWare is Already
Installed
Toupdate or install the adpt160m.ham driverwhen NetWare is already
installed, followthe instructions in this section. The procedures are similar for
all versions of NetWare. Procedures that are specific to a NetWare version are
noted when necessary.
1. Make a backup copy of the old driver (if it exists) before installing the new
driver.
2. Copy the adpt160m.ham driver from the HP Ultra3 Family Manager Set
disk for NetWare into the server’s startup directory (e.g., c:\nwserver,
c:\server.40) on your hard disk. This overwrites any existing version of the
driver in the directory.
54
NOTE For NetWare 3.12/3.2 and 4.12/4.2, the file is in \netware.For
NetWare 5.0, the file is in \netware\v5_xx.
3. If necessary, modify the load command line in the startup.ncf file so that
the proper path to the driver and all appropriate command line options are
specified. See “Loading the Driver at Server Bootup” on page 55.
The correct syntax to load the Ultra3 Family driver is
load [pathname]adpt160m [options].
Command line options are not case sensitive. Placing commas between
command line options is optional. See “Loading the Driver at Server Bootup”
on page 55 for possible values.
Page 61

Loading the Driver at Server Bootup
Toautomaticallyload the adpt160m.ham at server bootup, the startup.ncf file
(usually located in your server’s startup directory) must contain a l oad
command line that specifies the location of the driver and any appropriate
command line options (see “Using the Load Command Line Options” on this
page). For additional information on the startup.ncf file, referto your NetWare
documentation.
The correct syntax to load the driver is:
load [pathname]adpt160m.ham [options]
For example, the command line to load the driver from the c:\nwserver
directory, with the verbose=option on is:
load c:\nwserver\adpt160m verbose=y
Command line options are not case sensitive. Placing commas between
command line options is optional. See “Using the Load Command Line
Options” on page 55 for possible values.
To modify the s tartup.ncf file, follow these steps:
NOTE You can also use your DOS text editor to modify the startup.ncf file.
1. Type load install at the NetWare prompt and press Enter.
2. Select the appropriate menu choice that allows you to edit the startup.ncf
file.
3. Make the necessary changes. When you are done, press Esc.
Using the Load Command Line Options
You can specify several command line options when the driver is loaded. The
available options are described in the tablebelow. This table describes
command line options for the adp t160m.ham driver for Ultra3 SCSI host bus
adapter.
55
Page 62

adpt160m.ham Command Line Options
Option Values Default Description
auto_disable_tagq= on, off off Enables/disables auto disable
tagged queuing algorithm.
dev_enable= 0-FFFF FFFF Allows you to enable the driver's
registration of SCSI devices on a
per target basis. By default, all
targets are scanned. A bit value
of 0 causes the target notto
register under the operating
system. These devices a re still
accessible via ASPI. This enable
bit mask is entered in hex (see
“Bit Mask Options” on page 58).
flush_diskreq= 0-FFFF 0 A bit mask to send occasionally
ordered tags to specific targets.
By default, no targets receive
occasionally ordered tags. This
bit mask is entered in hex (see
“Bit Mask Options” on page 58).
instr= on, off off Enables/disables recordingofI/O
statistics.
lun_enable=
max_tags= 1-128 16 Specifies maximum number of
a
0-FF 01 A bit masktoenablescanning for
specific LUNs on all targets. The
default value of 01 causes the
driver to scan LUN 0 only. This
enable bit mask is entered in hex
(see “Bit Mask Options” on
page 58.)
tagged commands per device.
56
Page 63

Option Values Default Description
multlun_targets= 0 - FFFF FFFF A bit mask to enable LUNs on
selected targets. By default,
LUNs on alltargets are enabled.
This bit mask is entered in hex
(see “Bit Mask Options” on
page 58).
slot=
0-xxxx
b
0 Defines a physical slot number
for the host adapter. If 0 is
specified, or if this option is not
specified, then the driver loads
for all Ultra3 host adapters.
verbose= yes, no no Displays host adapter
configurationinformation at load
time.
a.Many multiple-LUN and removable-media devices are changers or magazines. Some of these are only
supportedby the driver throughan ASPI driver provided by the hardware vendor.
b.The values can vary and are dependent on the system configuration.
57
Page 64

Bit Mask Options
Use the example below as an aid for calculating Bit Mask option hex values.
Each SCSI deviceis enabled by a 1 in its corresponding bit position. The table
that follows the figure, lists the binary-to-hex conversions. Using this example,
if you want to e nable scanning for LUNs 0, 2, a nd 6 on all targets, then use the
command line option of lun_enable=0045.
Figure 5-1. Bit Mask Options
Binary Hex Binary Hex
0000 0 1000 8
0001 1 1001 9
0010 2 1010 A
0011 3 1011 B
0100 4 1100 C
0101 5 1101 D
0110 6 1110 E
0111 7 1111 F
58
Page 65

Sample Load Commands
Here is a simple load command with no option switches (if loaded from
drive A):
load a:\netware\adpt160m.ham
If an error message appears when attempting to load the driver, refer to
“Troubleshooting” on page 63.
Here is an example of the adpt160m.ham driver being loaded with c ommand
line options (if loaded from drive A):
load a:\netware\adpt160m.ham verbos e=y slot=2
Using NetWare and the Host Adapter
This section contains useful information on using NetWare and your host
adapter.
Using Removable Media
The adpt160m.ham driver module fully supports removable-media disk
drives, including magneto-optical drives. Removable media is treated as a
standard SCSI hard disk, with some exceptions:
• The driver only recognizes and registers media with 512 bytes/sector.
• NetWare allows you to mount/dismount the media, and to lock/unlock
the media.
NetWare’s monitor.nlm program s upports severalremovable-media options.
Follow these steps to view and configure these options:
1. Load mo nitor.nlm to display the various options.
2. Select Disk Information. All system disk drives appear.
3. Select the removable-media device. The followingdrive status items appear:
59
Page 66

Menu Choice Default Value
1. Volume Segments On Drive
2. Read After Write Verify
3. Drive Light Status
4. Driver Operating Status
5. Removable Drive Mount Status
6. Removable Drive Lock Status
1
Valid for both removable and non-removable types of SCSI disk drives.
2
Valid for removable media only.
Mount Status
Mounting causes a drive to come on-line as a NetWare storage device.
Dismounted drives are inactive and cannot be accessed.
Before you eject your currentmedia,you should first Dismount it (menu c hoice
5). When the media status is Dismounted, you can eject the media. However,
NetWare does not allow you to dismount it if the media is locked.
Toinsert your new media, wait for the drive to spin-up, and then select the
Drive Moun t option.
1
1
1
1
2
2
(selectfor list)
Hardware Level
Not Supported
Active
Mounted
Not Locked
Lock Status
If your removable-media device supports the Lock/Unlock feature, you can
lock the media (menu choice 6). The media must be in the Not Locked state
before you can eject it. If the media is Locked, i t cannot be ejected when you
press the Eject button.
60
Page 67

Using the NetWare Tape Backup
Included with Novell NetWare is a server-based tape backup utility called
sbackup.nlm. This utility allows you to backup server disk drives to a server
tape drive. The utility supports HP host adapters.
Novell NetWaredocumentation contains instructions for loading the server
backup software. Refer to the NetWare Se rver B ackup Manual to load the
tapedai, tsa,andsbackup modules.
1. Once you have loaded adpt160m.ham,loadtsaxxx.nlm (tsa312.nlm,
tsa400.nlm, tsa410.nlm) and sbackupwith these options:
:load scsi2tp.cdm
:load tsaxxx
:load sbackup
The appropriate driver that interfaces sbackup to ASPI is loaded automatically.
2. When sbackup is loaded, it asks for a login name. Enter the appropriate
name.
3. If sbackup asks you to select the device driver, select the HP DIBI-2 Tape
Driver, regardless of the type of SCSI tape drive being attached (e.g.,evenif
the tape drive is manufactured by Wangtek, do not select the W angtek
driver).
Novell publishes a list of SCSI tape drives supported by sbackup.nlm.
Using a CD-ROM with NetWare
To use a CD-ROM with Ne tWare, follow these instructions:
1. Load adpt160m.ham by entering the following line:
:load [pathname]adpt160m
2. The scsicd.cdm driver will auto-load if the device(s) are detected.
61
Page 68

NOTE For multiple LUN CDs, enable multiple LUN scanningwith the
lun_enable switch (e.g.,load adpt160m lun_enable=FF). The
lun_enable switch is needed for adpt160m.ham.
Enter the following line at the prompt:
scan all luns
1. Enter the following line at the prompt andthennotethe number and name of
the CD:
:cd device list
2. Enter the numberor volume name of the CD at the command line:
:cd mount [x] [name]
3. Edit the startup.ncffile to include the load commands in Step 1 and 2
above, if auto-mounting devices.
4. Edit the driver load command in the startup.ncf file to include the slot
number (for e xample, load c:\server.312\a dpt160m slot=2).
Optimizing Performance
The HP Ultra3 SCSI B us Master firmware increases the SCSI performance of
the HP Ultra3 host adapters under multitaskingenvironments. T he firmware
uses a paging mechanism to handle up to 255 simultaneous SCSI commands.
The Sequencer can simultaneously manage up to 128 tagged, or 1 nontagged,
SCSI commands for each SCSI device, up to a limit of 255 SCSI commands.
The firmware can queue as many commands as the operating system is able to
send to the host adapter. To set this feature, enter the following command:
62
max_tags=n
In general, a low number of max_tags gives better sequentialperformance, and
a high number a better random performance.
NOTE A large number of max_tags can also cause starvation problems
leading to deactivation with some drives.
Page 69

Troubleshooting
Error Messages
The error messages listed below are the messages associated w ith the
adpt160m.ham driver. Messages are listed sequentially according to the last
three digits of the error code. For example, [xxxxx080], [xxxxx081],
[xxxxx082], etc.
NOTE When reporting problems to HP Customer Support, be sure to include
the complete error code in your problem description.
[xxxxx080] Unable to allocate mem ory
This indicatesthattheremaybe a problem with the amount of memory installed
in your system. Verify that your system has at least the minimum amount of
memory required by your operating system.
[xxxxx081] Adapter software initialization failure
An error has occurred while the driver was setting up its internal data structures.
Verify that youradapter is supported by this version of the driver.
[xxxxx082] Internal driver error
An error has occurred while the driver was setting up its internal data structures.
Try installing the most up-to-date version of the driver available from the HP
Web site located at http://netserver.hp.com/netserver/
[xxxxx083] Adapter not supported by this version of the d river
Your adapter is not supported by the driver on your system. You may have
installed a new adapter and have not updated the driver on your system.
63
Page 70

[xxxxx084] Adapter software initialization failure
An error has occurred while the driver was setting up its internal data structures.
Try installing the most up-to-date version of the driver available from the HP
Web site located at http://netserver.hp.com/netserver/
[xxxxx085] Unable to allocate mem ory
This indicatesthattheremaybe a problem with the amount of memory installed
in your system. Verify that your system has at least the minimum amount of
memory required by your operating system.
[xxxxx087] Internal driver error
An error has occurred while the driver was setting up its internal data structures.
Try installing the most up-to-date version of the driver available from the HP
Web site located at http://netserver.hp.com/netserver/
[xxxxx088] Adapter software initialization failure
An error has occurred while the driver was setting up its internal data structures.
Try installing the most up-to-date version of the driver available from the HP
Web site located at http://netserver.hp.com/netserver/
[xxxxx089] Unable to allocate mem ory
This indicatesthattheremaybe a problem with the amount of memory installed
in your system. Verify that your system has at least the minimum amount of
memory required by your operating system.
[xxxxx096] Adapter hardware initialization failure - possible resource
conflict
The driver ha s attempted to initialize the a dapter hardwarebut failed. This
might suggest that the adapter resources (e.g., IRQ) conflict with the resources
of another board installed in your system.
64
Page 71

[xxxxx099] Adapter software initialization failure
[xxxxx09a] Adapter software initialization failure
[xxxxx09b] Adapter software initialization failure
An error has occurred initializing one of the driver’s internal data structures for
a device connected to the adapter. This may result in problems accessing the
device. Try installing the most up-to-date version of the driver available from
the HP Web site located at http://netserver.hp.com/netserver/
[xxxxx0ab] Driver already loaded for this h ost bus adapter
The driver i s already loaded for thisadapter. Verify that the correct adapter is
specified in your command line or startup file.
[xxxxx0ac] Driver already loaded for all h ost bus adapters
The driver i s already loaded for all the supported adapters in this system.
[xxxxx0a4] SCSI bus reset by third party hardware
Hardware such as an array enclosure may have reset the SCSI bus. This is a
normal condition unless you receive additional errors.
[xxxxx0a7] Unable to allocate mem ory
[xxxxx0a8] Unable to allocate mem ory
This indicatesthattheremaybe a problem with the amount of memory installed
in your system. Verify that your system has at least the minimum amount of
memory required by your operating system.
[xxxxx0a9] Possible interrupt conflict
This indicates that the adapter IRQ conflicts with the IRQ of another board
installed in your system. Check your hardware documentation for instructions
on setting and changing IRQs.
[xxxxx0c9] Invalid command line parameter
A command line option for the driveris invalid. See “Using the Load Command
Line Options” on page 55 for valid command line options.
65
Page 72

[xxxxx0ca] Invalid command line syntax
[xxxxx0cb] Invalid command line syntax
[xxxxx0cc] Invalid command line syntax
The command line syntax for the driver is incorrect. See “Using the Load
Command Line Options” on page 55 for entering the correct syntax.
[xxxxx07c] Unable to allocate mem ory
[xxxxx07d] Unable to allocate memory
[xxxxx07e] Unable to allocate mem ory
[xxxxx07f] Unable to allocate memory
This indicatesthattheremaybe a problem with the amount of memory installed
in your system. Verify that your system has at least the minimum amount of
memory required by your operating system.
66
Page 73

6 SCO OpenServer Installation
This chapter explains how to install the HP Ultra3 Family Manager Set driver
ad160 for SCO OpenServer 5.0.x. The ad160 driver supportsthe HP Ultra3
SCSI host bus adapter.
If you are performing a first time SCO OpenServer installation, see “Installing
the Driver When Installing SCO OpenServer” below, to be gin driver
installation. If SCO OpenServer is already installed in your system, see
“Installing the Driver When SCO OpenServer is Already Installed” on page 68.
Set the SCSI IDs of your devices as recommended by SCO:
• If you are installing SCO OpenServer products with a SCSI tape drive,
set the tape drive to S CSI ID 2.
• If you are installing with a CD-ROM, set the CD-ROM drive to SCSI
ID 5.
• Set the Boot SCSI hard disk drive to SCSI ID 0.
NOTE SCO OpenServer installation requires that the host bus adapter driver
be installed from a disk. Refer to the QuickStart Guide for SCO
OpenServer driver disk creation.
Installing the Driver When Installing SCO
OpenServer
To install the adl60 driverat the sametimeyou install SCO OpenServer,follow
the instructions below.
Installing SCO OpenServer 5.0.x
Follow these instructions only if you are installing SCO OpenServer 5.0.x for
the first time.
67
Page 74

NOTE Remember that UNIX commands are case sensitive. Enter the
commands exactly as shown in the instructions.
1. Insert the SCO OpenServer 5.0.x boot disk into the primary floppy disk
drive and turn ON the computer. Alternatively, insert the SCO OpenServer
5.0.x boot CD into the primary CD-ROM drive and turn ON the computer.
When you see these prompts:
SCO OpenServer (TM) Release 5
Boot
:
Type ahslink and press Enter. (The boot drive should be ID0 or ID1.)
2. Type ad160 as the package you wa nt to link to the system and press Enter.
3. Insert the re quested volume (the Ultra3 Family Manager Set disk for SCO
OpenServer) in the floppy disk drive and press Enter.
4. If the driver is properly loaded, the following message appears:
ad160.adl60:Loading module
fd(52)/ad160/driver/ad160/Driver.o text....
:
:
adl6O: Driver “adl6O” successfully loaded.
5. Follow the procedures in your SCO OpenServer documentation for
completing the installation.
Installing the Driver When SCO O p enServer is
Already Installed
Toupdate or install the adl6O driver if SCO OpenServer is already installed,
follow the instructions in this section. The procedures are similar for all
versions of SCO OpenServer.Proceduresthat are specific to a SCO version are
noted when necessary.
68
Page 75

CAUTION Improper or c orrupt driver updates might destroy your
existing UNIX file system. Back up all important files
before proceeding.
Installing or updating the driver involves the following tasks, which must be
completed in the order presented:
• Back up the old UNIX kernel and any other important files.
• Use installpkg to load the driver.
• Change the primary host bus adapter to an Ultra3 SCSI host busadapter,
if necessary.
• Rebuild the kernel to reflect the new changes.
• Reboot the computer with the new kernel.
NOTE To update or install the driver, you must first enter the S ingle User
Mode (System Maintenance Mode). Refer to the SCO OpenServer
documentation for instructions on how to use the init(m) or
shutdown(m) command to put the system into System Maintenance
Mode.
1 Perform a System Backup
If you have not already done so, back up all important files on the computer by
following these steps:
NOTE Toback up the whole system, refer to your SCO OpenServer
documentation.
a Log in as root.
b To back upthe current kernel configuration, type the following and pressEnter
after each line:
umount /stand
69
Page 76

mount /dev/boot /stand
cp /stand/unix /stand/unix.orig
NOTE If you ever need to boot up from the pre-update kernel, load the
unix.orig backup kernel at the UNIX boot: prompt. To do this,
type unix.orig and press Enter.
c This step is optional. For extra security, you may back up the mdevice file and
the sdevice.d directory To perform this backup, type the following and press
Enter:
copy -rom /etc/conf /etc/conf.bak
2 To load the driver using installpkg, follow these steps:
a AttheUNIXsystemprompt, type installpkgand pressEnter. The screendisplays
the following messages:
Confirm
Please insert the floppy disk
:
:
Strike Enter when ready
or Esc to stop.
b Insert the Ultra3 Family Manager Set disk for SCO OpenServer and press
Enter. The screen displays the following messages:
Installation is in progress - do not remove the floppy
disk. The following packages are on this disk:
NAME DESCRIPTION
ad160 Adaptec Ultra 160 Family Driver for SCO OpenServer
5.0.x/dxx
70
Page 77

Please enter the names of the packages you wish to
install, or q to quit:
c At this point, type ad160 and press Enter. The screen then displays this mes-
sage and various installation status prompts:
Installing adl60
When the driver is loaded, the following message appears, indicating that the
adl60 driver ha s been loaded into the Link K it for kernel addition:
Installed adl60
#
3 Modify the mscsi file, if necessary, to change your primary host bus adapter to an
Ultra3 SCSI host bus adapter, using the procedure below:
a Enter the following command:
cd /etc/conf/cf.d
b Use a text editor to edit this file. Enter the following command if using the vi
editor:
vi mscsi
c Search for all entries with the host bus adapter number 0 (zero). The host bus
adapter number is the third column in each entry. For example:
Host
Adapter
Prefix
xx Stp 0 2 0 0
xx Sdsk 0 0 0 0
xx Srom 0 5 0 0
1
This field applies to SCO OpenServer 5 and later.
SCSI
Device
Type
Host
Adapter
Number
TargetIDLogical
Unit
Number
Bus
1
71
Page 78

d Modify the mscsi file accordingto your hardware setup:
• If you are booting from an Ultra3 SCSI host bus a dapter, make s ure the
host adapter prefix for the host adapter number 0 is ad160.
• If you are not booting from an Ultra3 SCSI host bus adapter, make sure
the host adapter prefix for the host adapter number 0 is the appropriate
prefix for each device on your primary HP host adapter. See the table
above.
e Save the file and exit the text editor.
4 Rebuild the UNIX kernel by following these steps:
a Type the following at the# prompt and press Enter after each line:
cd /etc/conf/cf.d
./Iink_unix
Status messages appear on-screen.
b When the kernel has been built, shut down the system by typing shutdown-
g0 and pressing Enter.
c Turn OFF the system power whe n you are prompted to do so.
If you need to reconfigure your system, you may do so now.
d Add or remove host adapters or devices as needed.
5 Boot the ne w kernel by following these steps:
a Follow the on-screen instructions to reboot your system, usually by pressing
Enter.
72
Page 79

b Check the host bus adapter BIOS messages to verify that allyour installedSCSI
devices are listed.
If some or all of your installed SCSI devices do not appear at this time, your
SCSI cables may be loose,or the SCSI device setup may not be complete.If so,
go back and correct any problem before proceeding.
c Wait for UNIX to boot with the new kernel.
See “Troubleshooting” on page 76 if the system crashes or if “panic” (UNIX
error)messages are displayed at boottime.
The adl60 driver for your HP Ultra3 SCSI host bus adapter should now be
ready for use.
Using SCO OpenServer and the Host Adapter
This section contains useful information on using SCO OpenServer and your
host bus adapter.
Using Multiple Host Adapters
If you are adding an additional HP Ultra3 SCSI host bus adapter to a system
with an Ultra3SCSI host bus adapter already installed, follow the instructions
in the SCO OpenServer documentation for adding devices using the mkdev
command. When the system asks for the host adapter prefix, type ad160 and
press Enter.
73
Page 80

Changing the Boot Disk
If you are changing the boot device from a non-SCSI hard disk to a SCSI hard
disk attached to an HP Ultra3 SCSI hostbus adapter,you must reinstall SCO
OpenServer.
If you are already booting from a SCSI hard disk a ttached to an HP PCI SCSI
host bus adapter, and wish to boot from the s ame SCSI hard disk attached to an
HP Ultra3 host bus adapter, you may elect toeither reinstall SCO OpenServer
with the new driver, or update SCO OpenServer with the new driver. See
“Installing the Driver When Installing SCO OpenServer” on page 67, and
“Installing the Driver When SCO OpenServer is Already Installed” on page 68
for instructions.
Using Wide SCSI Host Adapters and Devices
SCO OpenServer 5.0.x supports SCSI IDs 0 to 15.
Using Tunable Parameters for the ad160 Driver
For SCO OpenServer, some parameters are defined in the following file:
/etc/conf/pack.d/ad160/space.c
After modifying the space.c file, you must rebuild the kernel for the new
parameterstotakeeffect. The following section describes how to set the tunable
parameters.
Setting Parameters
If the space.c file has not been modified, all the parameters are set according
to the valuesspecified by your SCSISelect utility for your HP Ultra3 SCSI host
bus adapter. However,you can override the parameters by modifying the
space.c file. The information you need to change the parameters is included
in the space.c file. Examples are provided in the following sections.
If you want to change the configuredvalues, the first number indicates whether
the default should be changed. If it is set to 0 (zero), the parameter is set to the
default. If it is set to 1, the second number is used to override the default. For
example:
74
Page 81

char variable = {1,22};
The first number is 1, which overrides the default variable with the value 22.
Examples:
The followingspecifieswhetherthehostbus adapterchecksparity on incoming
SCSI data:
ad160_parity[SCSI_NAD160]
If the second number is set to 0, parity checking is enabled. If it is set to 1,
parity checking is disabled.
ad160_parity[SCSI_NAD160] = {First number, second
number}
If, in this example, you want the host bus adapter not to check parity on
incomingSCSI data; define parameters as:
ad160_parity[SCSI_NAD160] = {1,0};
Changing the Maximum Number of LUNs Supported
The default setting for maximum number of LUNs supported is Disable.To
enable this setting, you may have to use vi to edit the space.c file located at:
/etc/conf/pack.d/ad160. Modify the following line so that lun=1:
int ad160_scan_lun=0
Enabling Scatter/Gather and Tagged Queuing
The adl60 driver supports Scatter/Gather and Tagged Queuing; however, the
Sdsk (SCSI disk module) driver controls whether these features are enabled or
disabled. Look for the Sdsk driver controls in the space. c file located at:
/etc/conf/pack. d/Sdsk/space.c
75
Page 82

Troubleshooting
My computer does not recognize my SCSI devices.
At boot time, check to see if the BIOS messages for your primary Ultra3 host
bus adapter lists all installed SCSI devices.If some or all de vices do not appear,
check your host bus adapter User’s Guide for additional troubleshooting
information, and check the following:
• Are all SCSI devices powered on?
• Are all SCSI bus cables and power cables properly connected?
• Do the host bus adapter and all devices on the SCSI bus have unique
SCSI IDs?
• Are all devices on the SCSI bus terminated properly?
• Do you have an older SCSI peripheral installed? Some older SCSI
peripherals, especially CD-ROM drives, do not properly respond to
synchronousnegotiation. As a result, these peripherals may lock or reset
theSCSI bus. To solve this problem, turn off synchronousnegotiation for
this device ID through the SCSISelect utility for the host adapter.
My computer does not recognize my host adapter.
At boot time, check to see if the BIOS message for your primary Ultra3 SCSI
host bus adapterappears. If the messages do not appear, the host bus adapter
may not be properly configured; check the following:
• The HP Ultra3 SCSI host bus adapter supports level-triggered interrupts
and can share the same interrupt with another HP Ultra3 SCSI host bus
adapter or PCI hardware that also supportslevel-triggered interrupts.
Check your host bus adapter User’s Guide and the documentation
suppliedwithyour c omputer for informationaboutconfiguring IRQs and
other parameters in the system CMOS setup.
• The boot host bus adapters should be installed into the lowest PCI device
number. The device number is determined by theslot number on the PCI
bus.
To find out the device number of your HP Ultra3 SCSI host bus adapter(s):
a Runthe SCSISelect utility(bypressingakeycombinationdisplayed on-screen at
boot time)
76
Page 83

b Look on the first screen of SCSISelect in the upper right hand corner for
Bus:Device xx:xxh (showninhexadecimal).
• If the device number is high, power OFF the computer, move the HP
Ultra3 SCSI host bus adapter to a PCI slot at the other end of the
motherboard, and run SCSISelect again to see if the number is lower.
The host bus adapter LED lights during activity. This light helps to determine
which adapter SCSISelect displays information for. Refer to your system
documentationfor further details on determining the PCI s lot number and slot
number order in the system.
I am having problems booting the computer from a SCSI drive.
NOTE If both SCSI and non-SCSI disk drives (such a s IDE) are installed, a
non-SCSI disk drive must be the boot device, unless your system
supports Bios Boot Specification (BBS). Refer to the documentation
supplied with your system for m ore information.
Make sure your host bus adapter is installed and c onfigured correctly,as
described in the documentation that came with it. Check the following if the
host bus adapteris correctly installed:
• Ensure the Drives setting (in your computer’s CMOS Setup program)
that corresponds to the SCSI boot drive is set to None or No Drives
Installed, as required for SCSI hard disk drives. See the documentation
supplied with your computer for more information.
• Ensure the host bus adapter BIOS setting in the SCSISelect utility is
Enabled.
• EnsuretheExtendedBIOSTranslation featureintheSCSISelect utility is
Disabled.The OS automatically selects the correct translation method as
needed.
• Examine the SCO OpenServer mscsi file to make sure that the correct
host bus adapter and deviceare specifiedasthe boot entry The boot entry
is the first Sdsk entryinthemscsi file (see Step 3 on page 71 for
additional information).
For SCO OpenServer 5.0.x, the boot entry looks like the example below:
77
Page 84

adl60 Sdsk0000
NOTE Each field is separated by a tab. Do not use the spacebar to separate
fields.
The meanings of the fields are as follows:
Table 6-1.
Host
Adapter
Prefix
SCSI
Device
Type
Host
Adapter
Number
Target
ID
Logical
Unit
Number
Bus
ad160 Sdsk 0 0 0 0
1
This field applies to SCO OpenServer 5 only.
• Host Adapter Prefix: Identifies the name of the host bus adapterdriver. If
you are booting from an Ultra3 SCSI host bus adapter, the Host Adapter
Prefix must be adl60.
• SCSI Device Type: Identifies the type of SCSI device. For example,
Sdsk indicates that the device is a hard disk; Srom indicates a CDROM drive; and Stp indicates a tape drive.
• Host AdapterNumber: Identifies the SCSI host busa dapter that the SCSI
device is attached to. For example, the first Ultra3 SCSI host bus adapter
is 0, the second Ultra3 SCSI host bus adapter is 1.
• Target ID: Identifies the SCSI ID of the SCSI device.
• Logical Unit Number: Identifies the Logical Unit Number (LUN) of the
SCSI device. This field is usually 0.
• Bus: Identifies the SCSI bus that the SCSI device is attached to. For most
HP host bus adapters, the bus number is 0.
If you need to edit the mscsi file, use the vi editor. You m ust build a new
kernel in order for any changes to take effect (see Step 4 on page 72).
1
78
Page 85

If you are booting from an HP Ultra3 SCSI host bus adapter and are using ISA/
EISA-based host bus adapters as secondary devices, you must disablethe BIOS
on all ISA/EISA-based host bus adapters.
If you are booting from ISA/EISA-based host bus adapters and are using an
Ultra3 SCSI host bus adapter as a secondary device, see your ISA/EISA-based
host bus adapterdocumentation to ensure that the host bus adapter is at the
lowest BIOS base address. ISA/EISA-based host bus adapters boot before the
Ultra3 SCSI host bus adapters.
My computer crashes or displays panic messages at boot time.
You may have to boot from the backup kernel created earlier. To boot from the
backup kernel, follow these steps:
1. Reboot the system.
2. At the Booting UNIX System...prompt, type unix.orig and press Enter.
3. Your system should now boot from the backup kernel that you created prior
to the driver update.
My computer hangs during heavy system load activity.
You may have to increase the maximum size available for configuration
information. To change the maximum size available for configuration
information, follow these steps:
1. At the prompt, type the followingcommand and press Enter:
cd/etc/conf/cf.d
2. Type ./configure and press Enter.
3. Under the Configuration tunables, select the Miscellaneous System
Parameters.
4. Enter the new value for the maximum size of configuration information.
5. After increasing the maximum size of configuration information and then
type q to quit.
6. Type Y to update the system configuration files.
7. Type ./link_unix and press Enter to relink the kernel.
8. Type Y to boot from the new kernel by default.
79
Page 86

9. Type Y to rebuild the kernel environment.
10. Reboot the system.
Error Messages
The error messages listed below are the messages associated w ith the adl60
driver. Me ssages are listed sequentially according to the last three digits of the
error code. For example, [xxxxx010], [xxxxx011], [xxxxx012], etc.
NOTE When reporting problems to Customer Support, be sure toincludethe
complete error message in your problem description.
[xxxxx020] Adapter or target device not responding or not connected
The target device did not respond to the adapter.If thedeviceispresent, refer to
your host bus adapter User’s Guide for troubleshooting information. If the
device is no longer connected to the system, ignore this error.
[xxxxx022] Adapter or target device protocol error
The adapter or target device has broken the communication protocol. A badly
behaving device could cause this message to appear. Normally this is not a
serious problem. If you get this message frequently over a short period of time,
it could indicate that the device or system is malfunctioning. Unplug or power
down unused devices to see if the problem persists.
[xxxxx030] Target device busy
[xxxxx032] Target device busy
The target device reports a Busy status. Another program may already be using
this device.
[xxxxx09D] Unexpected interrupt
The HP driver received an interrupt from the system that doesnot correspondto
any adapter supported by the driver. This could be caused by another host bus
adapterfrom a different vendor, such as a videocard or network card. The
problem can also be caused by malfunctioning hardware.
80
Page 87

[xxxxx0a3] Adapter diagnostic failure - possible resource conflict
The driver failed the internal software or hardware diagnostic. Refer to your
host bus adapterUser’s Guide for troubleshooting information.
[xxxxx0ca] Cannot initialize device
The system, host bus adapter, or target device is busy or is not responding. The
target device could not be initialized.
[xxxxxcb] Unable to allocate memory. Decrease ad160_instr_buffersz in space.c
The driver has requested a larger buffersizethanthe availableRAM. Eitheradd
RAM to the system or decreasethe useroption ad160_inotr_buffersz in
the /etc/conf/pack.d/ad160/space.c file.
[xxxxx0cc]CONFLICT: Di sconnection must be enabled in order for TaggedQueueing
to work
Use the SCSISelect utility ofyour host bus adapterto enable Disconnection for
each device reporting this message. Alternatively, disable Tagged Queueing in
the /etc/conf/pack.d/ad160/space.c file by setting
ad160_do_tagged=0. If Tagged Queueingisdisabled, performance may be
negatively affected.
81
Page 88

82
Page 89

7 SCO UnixWare Installation
This chapter explains how to install the HP Ultra3 Family Manager Set drivers
adst21 and adst70 for UnixWare— UnixWare 2.1x and UnixWare 7.01/7.1.
adst21 driver(or package) is used with UnixWare 2.1x. The ads t70 driver (or
package) is used with UnixWare 7.01/7.1.
If you are performing a first time UnixWare installation, see “Installing the
Driver When Installing UnixWare” in the nextsection to begin driver
installation. If UnixWare is already installed in your system, see “Installing the
Driver When UnixWare is Already Installed” on page 84.
Installing the Driver When Installing UnixWare
Toinstalleither the adst21 or adst70 driver at the same time you install
UnixWare, follow the instructions below.The procedures are the same for
UnixWare 2.1x and 7.01/7.1.
1. Insert the Install disk of the UnixWare package into the boot floppy disk
drive. Reboot your computer.
Wait for the first UnixWare installation screen and prompt to appear, then follow the
on-screeninstructions.
2. When prompted to either Install H os t Bus Adapter Drivers or Continue
Installation, first remove the Install disk, then select Install Host Bus
Adapter Driver and press Enter.
3. Insert the HP Ultra3 Family Manager Set disk for UnixWare 2.1x or 7.1 into
the primary floppy disk drive a nd press Enter(you cannot load drivers from
a secondary floppy disk drive).
4. As the driver loads, a message identifying the installed host adapter briefly
appears on screen. The installation process determines which device drivers
on the disks are needed.
5. If you have additional HBA disks, insert the next HBA disk, select Install
Another HBA Disk, and press Enter.
If all of your HBA disks have been installed, remove the last HBA disk, select
Continue Installation, and press Enter.
83
Page 90

6. If necessary, enter the DCU (Device Configuration Utility) to v iew/change
the UnixWare device driver configuration data.
7. Follow the on-screen instructions to continue with installation. Refer to the
UnixWare documentation and on-screen help files for help in selecting
options.
NOTE If your installation fails, do not attempt to use the update installation
pkgadd procedure to fix the installation. Follow the instructions in
the UnixWare documentation and in this User’s Guide to retry the
installation.
Installing the Driver When UnixWare
is Already Installed
Toupdate or install the adst21 driver or adst70 driver on a system where
UnixWare is alreadyinstalled, follow the instructions in this section. The
procedures are similar for UnixWare 2.1x and 7.1. Procedures that are specific
to a UnixWare version are noted when necessary.
CAUTION Improper or c orrupt driver updates might destroy your
existing UnixWare file system. Back up all important files
before proceeding.Consult your UnixWare documentation
for proper backup procedures.
84
Installing or updating the driver involves the following tasks, which must be
completed in the following order:
1. Back Up the Computer—Backs up the old UnixWare kernel and any other
important files.
2. Load the Package—Uses pkgadd to load the HP Ultra3 Family driver
package.
3. Modify the New System File—For computers booting from a device
connected to HP Ultra3 SCSI host bus adapter,modifies the new driver that
Page 91

was loaded in the previous procedure.L oading the driver causes the driver to
become a permanent part of the new boot kernel on re build.
4. Rebuild the UnixWare Kernel—Rebuilds the kernel with the new driver.
5. Boot the New Kernel—Reboots the computer with the new kernel.
NOTE Remember that UnixWare commands are case sensitive.Enterthe
commands exactly as shown.
Back Up the Computer
If you have not already done so, back up all important files on the computer. See your
UnixWare documentation for proper UnixWare file system backup procedures.
1. Log in as root at the UnixWare # system prompt.
2. To back up the old UnixWare kernel, type the following and press Enter:
cp /stand/unix /stand/unix.work
Load the Package
Toload the driver, follow these steps:
1. At the system prompt, type the following and press Enter:
pkgadd -d diskette1
Follow the instructions on-screen to insert the IHV HBA disk (or HP Ultra3
Family Manager Set disk for UnixWare 2.1x or UnixWare 7.01/7.1) into the
boot floppy disk drive.
2. Select the adst21 or the adst70package from the on-screen menu and press
Enter. The package is loaded into your UnixWare operating system.
3. When the package has loaded,you may be prompted to install the disk a gain.
Do not reinsert the IHV HBA disk (or HP Ultra3 Family Manager Set disk for
UnixWare 2.1x or UnixWare 7.01/7.1). Instead, type q (quit) and press Enter.
4. Type mailandpressEnter.The mail messages tell you if the installation was
successful.
85
Page 92

If a mail message informs you that the installation has failed, turn to
“Troubleshooting” on page 90.
5. Type pkginfo -l adstxx and press Enter.
6. Verify that the adst21or adst70 driver is now listed.
If the adst21 or adst70 driver does not appearin the pkginfolisting, turn to
“Troubleshooting” on page 90.
The listing should be similar to
PKGINST: adst21
NAME: Ultra160 Driver for UnixWare 2.1x
or
PKGINST: adst70
NAME: Ultra160 Driver for UnixWare 7.1
Modify the New System File
1. Display the contents of the adst21 fileby typing the following and pressing
Enter:
For UnixWare 2.1x:
cat /etc/conf/sdevice.d/adst21
For UnixWare 7.1:
cat /etc/conf/sdevice.d/adst70
2. If your computer is to boot from a device connected to a HP Ultra3 SCSI
host busadapter, verifythat theline$staticispresent immediately belowthe
line $version 2.
3. If your computer is not to boot from the HP Ultra3 SCSI host bus adapter,
and you wish to leave the driver as a loadable module, edit and verify that
the line $static is not present directly below the line $version 2.
Rebuild the UnixWare Kernel
Torebuild the UnixWare kernel with the new changes, follow these steps:
1. Type the following at the # prompt and press Enter after each line:
86
Page 93

cd /etc/conf/bin
./idbuild -B
Status messages appear.
2. When the kernel has been built, type the followingand press Enterafter
each line (0 in -g0 is zero, not the letter O):
cd /etc/conf/cf.d
cp unix /stand/unix
cd /
shutdown - g0
3. Type y and press Enter when the computer asks if you really want to shut
down. System Is Down should appear on the screen.
The UnixWare kernel is now ready for host adapter operation.
Boot the New Kernel
To reboot the computer with the new kernel, follow these s teps:
1. Follow the on-screen instructions(usually by pressingEnter)to reboot your
computer.
2. Check the bootup messages to verify that all your installed SCSI devices are
listed.
If some or all of your installed SCSI devices do not appear at this time, your
SCSI cables may be loose,or the SCSI device setup may not be complete.If so,
go back and correct any problems before proceeding.
3. Wait for UnixWare to complete bootup with the new kernel.
Refer to “Troubleshooting” on page 90 if the computer crashes or if panic
(UnixWare error) messages appear during bootup.
The updated driver for UnixWare should now be ready to use.
Using UnixWare and the Host Adapter
This section contains useful information on using UnixWare and your host
adapter.
87
Page 94

Using Tunable Parameters
For UnixWare, some parameters are defined in the following files:
/etc/conf/pack.d/adst21/space.c
or
/etc/conf/pack.d/adst70/space.c
These parameters can be tuned for either the adst21 driver or the adst70
driver. Please refer to the comments in the appropriate space.c file for a
description of these parameters. After modifying the s pace.c file, you must
rebuild the kernel then reboot the system for the new parameters to take effect.
To rebuild the kernel, type the following, and press Enter after each line:
/etc/conf/bin/idbuild -B
cp /etc/conf/cf.d/unix /stand/unix
NOTE The drivers support tagged queuing and reinitialization.
Using Multiple Host Adapters
When using multiple host adapters, consider the following:
• The host adapter and computer must be configured for multiple host
adapters as explained in the host a dapter’suser’sguide.
• To boot from the HP Ultra3 SCSI host bus adapter, make sure the host
adapterisinstalled in the lowest PCI slot number. See your host adapter’s
user’s guide.
• UnixWare 2.1x and UnixWare 7.01/7.1 supports auto-configuration.
When adding multiple host adapters to an existing UnixWare 2.1x and
7.01/7.1 system, simply install the board and reboot; the system
automatically reconfiguresand rebuildsthe kernel. If you want to select a
host adapter to boot from, simply disable the BIOS on all other host
adapters.
Removing the Driver
If you no longer need the adst21 or adst70 driver, you can use the following
procedure to remove it completely:
88
Page 95

1. Back up all important computer files.
2. At the UnixWare root prompt, type the following:
For UnixWare 2.1x:
/etc/conf/bin/idinstall -d adst21
The following files will be deleted:
/etc/conf/mdevice.d/adst21
/etc/conf/pack.d/adst21/Driver.o
/etc/conf/pack.d/adst21/space.c
/etc/conf/pack.d/adst21/disk.cfg
/etc/conf/sdevice.d/adst21
For UnixWare 7.01/7.1:
/etc/conf/bin/idinstall -d adst70
The following files will be deleted:
/etc/conf/mdevice.d/adst70
/etc/conf/pack.d/adst70/Driver.o
/etc/conf/pack.d/adst70/space.c
/etc/conf/pack.d/adst70/disk.cfg
/etc/conf/sdevice.d/adst70
3. Then, rebuild the kernel (0 in -g0 is zero, not the letter O):
/etc/conf/bin/idbuild -B -K
cp /etc/conf/cf.d/unix /unix
cd /
shutdown -g0
4. Reconfigure your computer for your alternate or replacement drive
controller, and reboot the computer.
89
Page 96

Troubleshooting
Problems and Solutions
My computer crashes or displays panic messages during the
bootup procedure!
You may have to boot from the backup kernel created earlier, and then perform
the driver update procedure again.
Toboot from the old kernel, follow these steps:
1. Reboot the computer.
2. At the Booting UNIX System… prompt or loading UnixWare graphics,
press the Spa cebar.
3. For UnixWare 2.1x: From the [boot]# prompt, first type KE RNE L=old
kernel (e.g., KERNEL=unix.work) and press Enter. Then, type go and
press Enter. Your computer should now boot from the backup kernel created
earlier in “Installing the Driver When UnixWare is Already Installed” on
page 84.
4. For UnixWare 7.01/7.1: From the [boot]# prompt, first type
BOOTPROG= old kernel (e.g., BOOTPROG=unix.work) and press
Enter. Then, type go and press Enter. Your computer should now bootfrom
the backup kernel created earlier in “InstallingtheDriverWhen UnixWare is
Already Installed” on page 84.
Torepeat the driver update procedure, follow these steps:
1. Follow the instructions in “Removing the Driver” on page 88 to delete the
driver from your computer.
2. Perform the driver update procedure again. See “Installing the Driver When
UnixWare is A lready Installed” on page 84.
Error Messages
The error messages listed below are the messages associated w ith the drive rs.
Messages are listed sequentially a ccording to the last three digits of the error
code. For example, [xxxxx020], [xxxxx021], [xxxxx022], etc.
90
Page 97

NOTE When reporting problems to Customer Support, be sure toincludethe
complete error code in your problem description.
[xxxxx003] Command completed with error
[xxxxx004] Command completed with error
[xxxxx005] Command completed with error
[xxxxx006] Command completed with error
[xxxxx007] Command completed with error
[xxxxx008] Command completed with error
[xxxxx009] Command completed with error
A request issued to a target device completed with an indication that there is an
error. In most c ases, the error is recovered and normal operation continues.
[xxxxx010] Error issuing command
An error has occurred while the driver was setting up its internal data structures.
Try installing the most up-to-date version of the driveravailable from the
http://netserver.hp.com/netserver/
[xxxxx011] Error issuing command
The requested command is not supported by this driver.
[xxxxx012] Error issuing command
The driver does not recognize the target device.
[xxxxx013] Error issuing command
[xxxxx014] Error issuing command
An error has occurred while the driver was setting up its internal data structures.
Try installing the most up-to-date version of the driver available from the HP
web site located at http://netserver.hp.com/netserver/
[xxxxx015] Error issuing command
An error has occurred withthe driver. Try installing the most up-to-date version
of the driver available from the HP web site located at
http://netserver.hp.com/netserver/
91
Page 98

[xxxxx020] Adapter or target device not responding or not connected
The target device did not respond to the adapter.If thedeviceispresent, refer to
your host adapter’suser’s guide for troubleshootinginformation. If the device is
no longer connected to the system, ignore this error.
[xxxxx021] Target device protocol error
An unexpected event occurred during data transfer between the adapter and
target device. Normally, this indicates a faulty or non-complianttarget device.
[xxxxx022] Adapter or target device protocol error
The adapter or target device has broken the communication protocol. A badly
behaving device could cause this message to appear. Normally this is not a
serious problem. If you get this message frequently over a short period of time,
it could indicate that the device or system is malfunctioning. Unplug or power
down unused devices to see if the problem persists.
[xxxxx023] Target device parity error
The driver ha s detected a parity error by the targetdevice. Try decreasing the
transfer rate or disable the Ultra SCSI speed in SCSISelect
®
. Also, make sure
you are using twisted-pairSCSI cables.
[xxxxx024] Data overrun or underrun
The adapter wa s given more or less data than was expected.
[xxxxx030] Target device busy
The target device reports a Busy status. Another program m ight already be
using this device.
[xxxxx031] Target device queue full
The target device internal buffer is full.
[xxxxx032] Target device busy
The target device reports a Busy status. Another program may already be using
this device.
92
Page 99

[xxxxx041] Command aborted
[xxxxx042] Command aborted
[xxxxx043] Command aborted
[xxxxx044] Command aborted
[xxxxx045] Command aborted
An internal c ondition caused the driver to abort the command. In most cases,
the command is retried and is recovered, and normaloperation continues.
[xxxxx046] Target device did not respond to abort sequence
The target device did not abort the command requested by the driver. Some
devices do not support the abort command properly. Normally, this indicates a
faulty or noncompliant target device.
[xxxxx047] Command aborted
An internal c ondition caused the driver to abort the command. In most cases,
the command is retried and is recovered, and normaloperation continues.
[xxxxx048] Unable to abort command
An error occurred while aborting a command. Possibly, the command has
alreadycompleted and there is nothingto abort.
[xxxxx049] Command abort in progress
This indicates an abort command has been issued. This is a normal operating
condition.
[xxxxx051] Target device did not respond to reset sequence
The target device did not reset correctly as requestedby the driver. Normally,
this indicates a faulty or noncompliant target device.
[xxxxx081] Adapter initialization failure
An error has occurred while the driver was setting up its internal data structures.
Verify that youradapter is supported by this version of the driver.
[xxxxx083] Adapter not supported by this version of the driver
Your adapter is not supported by the driver on your system. You may have
installed a new adapter and have not updated the driver on your system.
93
Page 100

[xxxxx096] Adapter hardware initialization failure - possible resource conflict
The driver ha s attempted to initialize the a dapter hardwarebut failed. This
might suggest that t he adapter resources (e.g., IRQ) conflict with another board
installed in your system.
[xxxxx097] Unable to allocate memory
This indicatesthattheremaybe a problem with the amount of memory installed
in your system. Verify that your system has at least the minimum amount of
memory required by your operating system.
[xxxxx098] Exceeded maximum number of host bus adapters
The driver has detected more host bus adapters than is supported by thisversion
of the driver or operating s ystem.
[xxxxx0a4] SCSI bus reset by third party
Hardware such as an array enclosure may have reset the SCSI bus. This is a
normal condition unless you receive additional errors.
[xxxxx0a5] SCSI bus reset by host adapter
The host adapter may have reset the SCSI bus. This is a normal conditionunless
you receive additional errors.
[xxxxx0cf] System configuration error
The driver encountered an error with your hardware. Refer to your host
adapter’suser’s guide for troubleshooting information.
[xxxxx0d0] Command timeout
The target device is either busy, not ready, malfunctioning, or is not present.
Refer to your host adapter’suser’s guide for troubleshootinginformation.
[xxxxx0d7] Target device scan failed
The driver encountered an error scanning the target device. Refer to your host
adapter’suser’s guide for troubleshooting information.
94
 Loading...