


HP m1050e, m1050y, m1160n, m1170n, m1171n Hardware manual
...HP Media Center PC
Getting Started Guide
The information in this document is subject to change without notice.
Hewlett-Packard Company® makes no warranty of any kind with regard to this material, including, but not limited to, the implied warranties of merchantability and fitness for a particular purpose.
HP shall not be liable for errors contained herein or for incidental or consequential damages in connection with the furnishing, performance, or use of this material.
THE WARRANTY TERMS CONTAINED IN THIS STATEMENT, EXCEPT TO THE EXTENT LAWFULLY PERMITTED, DO NOT EXCLUDE, RESTRICT, OR MODIFY AND ARE IN ADDITION TO ANY MANDATORY STATUTORY RIGHTS APPLICABLE TO THE SALE OF THIS PRODUCT OR SERVICE TO YOU.
HP assumes no responsibility for the use or reliability of its software on equipment that is not furnished by HP.
This document contains proprietary information that is protected by copyright. All rights are reserved. No part of this document may be photocopied, reproduced, or translated to another language without the prior written consent of HP.
Hewlett-Packard Company
P.O. Box 4010
Cupertino, CA 95015-4010
USA
© 2002–2004 Hewlett-Packard Development Company, L.P. All rights reserved.
Hewlett-Packard is a registered trademark of Hewlett-Packard Company in the United States of America and other countries/ regions.
This product incorporates copyright protection technology that is protected by method claims of certain U.S. patents and other intellectual property rights owned by Macrovision Corporation and other rights owners. Use of this copyright protection technology must be authorized by Macrovision Corporation, and is intended for home and other limited viewing uses only unless otherwise authorized by Macrovision Corporation. Reverse engineering or disassembly is prohibited. Apparatus Claims of U.S. Patent Nos. 4,631,603, 4,577,216, 4,819,098, and 4,907,093 licensed for limited viewing uses only.
Other brand or product names are trademarks of their respective holders.
HP supports lawful use of technology and does not endorse or encourage the use of our products for purposes other than those permitted by copyright law.
ii HP Media Center PC Getting Started Guide
Table of Contents
Table of Contents......................................... |
iii |
How to Use This Guide ................................. |
1 |
Safety Information ....................................... |
2 |
Before you get started, please read this important safety |
|
information about your HP Media Center PC....................... |
2 |
AC Power Safety Warnings ................................................... |
2 |
Safety and Comfort............................................................... |
2 |
Getting Help................................................. |
3 |
Help and Support Center....................................................... |
3 |
Utility Programs.................................................................... |
3 |
HP Web Site Support............................................................ |
4 |
Setup Poster......................................................................... |
4 |
Warranty and Support Guide ................................................ |
4 |
HP Media Center Software Guide .......................................... |
5 |
Application and System Recovery Programs............................. |
5 |
Instant Support ..................................................................... |
5 |
Online Guides ..................................................................... |
6 |
Microsoft Web Site............................................................... |
6 |
Inventory ..................................................... |
7 |
PC Components ................................................................... |
7 |
Setting Up the PC ......................................... |
9 |
PC Installation Overview ....................................................... |
9 |
Front of PC ........................................................................ |
11 |
Back of PC ........................................................................ |
12 |
Front and Back PC Connectors ............................................. |
13 |
Connecting to the Monitor ................................................... |
15 |
Connecting to the Internet ................................................... |
15 |
Connecting to the Internet Through a Network Port (LAN) ........ |
15 |
Connecting the Wireless LAN .............................................. |
16 |
Connecting the Remote Sensor ............................................. |
17 |
Connecting the TV Signal Source.......................................... |
18 |
Connecting the FM Radio Antenna ...................................... |
18 |
Connecting a Digital Video Camera to the PC ...................... |
18 |
Connecting an HP Personal Media Drive to the PC ................ |
19 |
Connecting to Other Devices .............................................. |
22 |
Connecting the Television Signal ................. |
23 |
Using the TV Cables ........................................................... |
23 |
Connecting the TV Signal Source ......................................... |
24 |
Connecting the TV Signal Source |
|
When You Have an Existing Setup................................... |
25 |
Using the TV as a Monitor ................................................... |
30 |
Configuring Speaker and Sound Options .... |
35 |
Sound Connector Types ...................................................... |
35 |
Sound Connector Functions.................................................. |
36 |
Speaker Configurations....................................................... |
37 |
Connecting 2/2.1 Audio Speakers ....................................... |
38 |
Connecting 4.1 Audio Speakers........................................... |
39 |
Connecting 5.1 Audio Speakers........................................... |
40 |
Connecting 7.1 Audio Speakers........................................... |
42 |
Connecting the PC to a Home Audio System .......................... |
43 |
Connecting Digital Audio .................................................... |
47 |
Configuring Audio Output ................................................... |
47 |
Configuring Audio Output with Multi-channel |
|
Sound Manager............................................................. |
48 |
Sound Effect Manager......................................................... |
50 |
Configuring Audio Output with Sound Effect Manager ............ |
51 |
Configuring Audio Output with a Sound Card........................ |
53 |
Configuring Audio for Media Center..................................... |
54 |
Configuring Audio for the WinDVD Player............................. |
54 |
Adjusting the Volume .......................................................... |
55 |
Using Headphones ............................................................. |
55 |
Using a Microphone ........................................................... |
56 |
Resolving Sound Issues ........................................................ |
57 |
Starting the PC ........................................... |
59 |
Starting the PC for the First Time ........................................... |
59 |
Selecting an ISP.................................................................. |
59 |
Media Center PC Desktop View ........................................... |
60 |
Making Recovery Discs........................................................ |
62 |
HP Products Work Better Together ........................................ |
62 |
Transferring Old PC Information to a New PC ........................ |
62 |
Important Information About Recorded TV Programs................ |
62 |
Protecting the PC ................................................................ |
63 |
Using Software Programs..................................................... |
63 |
Using HP Organize Software ............................................... |
64 |
Using PC Help & Tools ........................................................ |
64 |
Turning Off the PC .............................................................. |
64 |
Manual Standby Mode........................................................ |
65 |
Manual Hibernation Mode................................................... |
66 |
Automatic Standby or Hibernation Mode .............................. |
67 |
Installing Software .............................................................. |
68 |
Using the PC Hardware.............................. |
69 |
Using the Keyboard ........................................................... |
69 |
Special Keyboard Buttons ................................................... |
70 |
Using the Mouse................................................................. |
72 |
Wireless Keyboard Set ........................................................ |
72 |
Remote Control................................................................... |
73 |
Memory Card Reader ......................................................... |
75 |
Installing an HP Camera Docking Station............................... |
78 |
Troubleshooting ......................................... |
83 |
Problems and Solutions........................................................ |
83 |
Index ......................................................... |
93 |
Table of Contents iii
iv HP Media Center PC User’s Guide
How to Use This Guide
This guide can help you get started using your new HP Media Center PC right away.
1 Read “Safety Information” at the beginning of this book.
2 Identify the items included with your HP Media Center PC. See “Inventory” on page 7.
3 Follow the setup poster to connect your PC. See “Setting Up the PC” on page 9.
4 Read “Starting the PC for the First Time” on page 59 to learn how to turn on your PC and what to do next.
5 Read the remaining sections of this guide for information about using your HP Media Center PC.
n
A note describes important information you need.
How to Use This Guide 1

Safety Information
Before you get started, please read this important safety information about your HP Media Center PC.
This product has not been evaluated for connection to an “IT” power system (an AC distribution system with no direct connection to earth, according to IEC 60950).
AC Power Safety Warnings
The power supply is pre-set for the country/region in which you purchased the PC. If you move to another
wcountry/region, please make sure you check its voltage requirements before plugging your PC into an AC power outlet.
A warning describes information you need to avoid possible personal injury
or damage to equipment or data.
Read and follow all warnings.
Install the computer near an AC outlet. The AC power cord is your PC’s main AC disconnecting device and must be easily accessible at all times. For your safety, the power cord provided with your system has a grounded plug. Always use the power cord with a properly grounded wall outlet to avoid the risk of electrical shock.
To reduce the possibility of an electric shock from the telephone network, plug your computer into the AC outlet before connecting it to the telephone line.
Also, disconnect the telephone line before unplugging your computer from the AC power outlet.
Your system is provided with a voltage select switch for use in a 115-VAC or 230-VAC power system. The voltage select switch has been pre-set to the correct voltage setting for use in the particular country/region where it was initially sold. Changing the voltage select switch to the incorrect position can damage your PC and void any implied warranty.
Always disconnect the modem cord from the telephone system before installing or removing your computer cover.
Do not operate the computer with the cover removed.
Electrostatic discharge (ESD) can damage disk drives, add-in cards, and other components. If an ESD station is not available, wear a wrist strap attached to a metal part of the computer. Place cards on a conductive foam pad or inside the card wrapper, if possible, but never on the card wrapper.
Safety and Comfort
Follow the steps in the setup poster to set up the computer.
After assembling, but before using the computer, make sure the computer and your work area are properly set up to maintain your comfort and productivity. See the “Safety & Comfort Guide” for
important ergonomic information. Just click Start, choose All Programs, PC Help & Tools, and then click Safety & Comfort Guide.
You can find important ergonomic information on the Internet. Just type http://www.hp.com/ergo into your Web browser address box, and then press Enter on the keyboard.
2 HP Media Center PC Getting Started Guide

Getting Help
Help and Support Center
Information about your PC is in the onscreen Help and Support Center. Here you can find links to reinstall drivers, access to technical support options, and information about commonly asked questions about your computer.
Help and Support Center is onscreen Help. Press Help (the ? button) on the keyboard, or click Start on the taskbar, and then click Help and Support. In Help and Support, click HP Media Center PC help to read Help topics and run tests. Click
Connect to Customer Support (select models only) to get troubleshooting help by using the
Internet. To run a test or submit a problem to HP Instant Support, click Start a New Request and follow the onscreen instructions.
To open the Help and Support Center:
1 Press the Help button on your keyboard.
Or
Click Start on the taskbar and click Help and Support.
2 Choose HP Media Center PC help.
n
The Help and Support Center is available for select models only.
Utility Programs
HP provides special utility programs in the PC Help & Tools folder that display support information and initiate application or system recovery.
To find these programs, click Start, choose All Programs, PC Help & Tools, and then select a program or folder.
Updates from HP
HP may send updated information or patches to your desktop (not available in all countries/regions). You must be connected to the Internet to receive these updates. If you have turned off the Updates from HP feature, you will not receive these updates. To turn it back on, click Start, choose All Programs, PC Help & Tools, Updates from HP, and Re-enable Updates from HP.
Getting Help 3

HP Web Site Support
Use the Web site addresses listed in the Warranty and Support Guide for information about your PC and your technical support needs. The HP Web site provides a place where you can get supplemental information about HP computers and products and contact HP Support.
You can also go to the HP Web site for updates and software patches. Search for your model number in the Support section of the Web site.
Online Information and technical support for your PC is available at the HP Web site. Press the HP button on your keyboard, or type http://www.hp.com
into your Web browser address box, and then press Enter on the keyboard. Select your country/region from the drop-down list, and then press the arrow button next to the list.
1 Connect to the Internet: Open your Web browser, or press Connect on your keyboard.
2 Type the Web site address into your Web browser address box, and press Enter on your keyboard.
Setup Poster
The setup poster in the computer box shows how to connect your computer. For additional information and setup alternatives, refer to “Setting Up the PC” on page 9.
Warranty and Support Guide
You can find the terms of your PC warranty coverage, license information, regulatory information, operating specifications, safety information, and support contact numbers and addresses. You can get help over the telephone from HP.
4 HP Media Center PC Getting Started Guide

HP Media Center Software Guide
This guide can help you get started using the Media Center software program. Media Center allows you to use a remote control to access your recorded television (TV) programs, videos, pictures, music CDs, and DVDs.
Application and System Recovery Programs
The PC uses the operating system and installed software programs during normal operation. If your PC works improperly or stops because of the software, you may be able to repair it by restarting the PC, using System Restore, or using other methods including the system recovery programs.
You need recovery discs (CDs or DVDs) for some repairs that use the HP Application Recovery program or the HP PC System Recovery programs. Now is a good time to make your recovery discs.
For instructions on making recovery discs, repairing and recovering your software, and more information, refer to the Warranty and Support Guide that came with your PC.
Problems with software programs may be caused by corruption or damage to an individual program (application or software driver) or to part of the operating system software.
Instant Support
When you need assistance to solve a PC-related problem, use HP Instant Support (select models only). With HP Instant Support, you can run tests or submit a problem for help over the Internet. When you submit a problem, you communicate over the Internet with a Support analyst who works with you to solve the problem.
To start HP Instant Support:
1 Click Start on the taskbar.
2 Click Help and Support.
3 Click Connect to Customer Support.
4 Click Start a New Request.
5 Follow onscreen instructions to run a test or submit a problem. Your PC must be connected to the Internet to submit a request.
n
HP Instant Support is available for select models only.
Getting Help 5

Online Guides
You can find online guides and information for your PC. To view online manuals for your PC, go to the Support Web address that is listed in the Warranty and Support Guide that came with your PC, and then search for your product name and number.
Online manuals are associated with specific PC model numbers. Some models do not have online manuals.
Microsoft Web Site
For more information, search the Microsoft Web site (http://www.support.microsoft.com) for Knowledge Base articles and updates on Microsoft Windows XP Media Center Edition 2004.
You can also use the Online Spotlight link to get to the Microsoft Windows XP Media Center Web site. To get the latest news and information about your
Media Center program, press the Start button 
on your remote control, and then select Online Spotlight from the Media Center Start menu.
6 HP Media Center PC Getting Started Guide
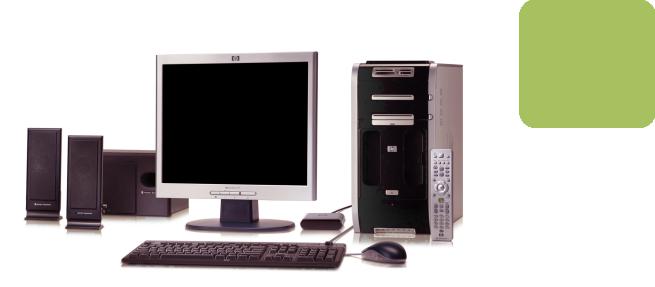
Inventory
PC Components
|
|
|
n |
|
what’s inside: |
|
PC components may |
hppavilion home pc |
where to get help |
|
vary by model. |
& |
conformity |
|
|
warranty |
warranty and license |
|
|
information |
F |
|
|
|
declaration of |
|
|
support guide |
operating specifications |
|
|
|
regulatory and safety |
|
|
|
information |
|
|
A |
|
E |
|
|
|
|
G
C
+
H
B
D
I
AHP Media Center PC
BKeyboard/wireless keyboard (wireless receiver not shown)
CWireless mouse
DMouse
Speaker system components
Your Media Center PC may come with either a set of 2.1 or a set of 5.1 speakers, depending on the model.
EDocumentation
FModem cable
GPower cord (with power adapter)
HCamera docking station lid
ICamera docking station lid
For more information about the components of your speakers, see the setup poster that came with your PC. Also, for more information about connecting your speakers, refer to “Configuring Speaker and Sound Options” on page 35.
Inventory 7
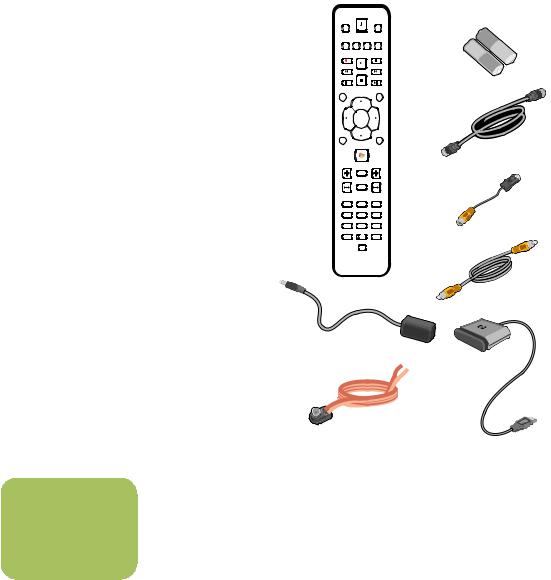
Media Center components
DVD |
|
TV |
|
|
MENU |
|
|
|
|
RADIO |
MUSIC PICTURES VIDEOS |
|
M |
|
RECORD |
PLAY |
STOP |
J |
|
REW |
|
FWD |
|
|
|
PAUSE |
|
|
|
REPLAY |
|
SKIP |
|
|
BACK |
|
GUIDE |
|
|
|
OK |
LIVE TV |
RECORDED |
|
TV |
 N
N
VOLUME |
|
CHANNEL/ |
MORE INFO |
PAGE |
|
|
MUTE |
|
|
ABC |
DEF |
1 |
2 |
3 |
GHI |
JKL |
MNO |
4 |
5 |
6 |
PQRS |
TUV |
WXYZ |
7 |
8 |
9 |
CLEAR |
[ |
ENTER |
|
0 |
|
|
|
hp media center
O
P
K
Q
L
|
J |
Remote control |
n |
K |
Remote control sensor cable (emitter) |
L |
FM radio antenna |
|
M |
Two AA batteries for remote control |
Components may vary by model.
N10-ft. coaxial cable
OS-video to composite video adapter
PComposite video cable
QRemote sensor
8 HP Media Center PC Getting Started Guide

Setting Up the PC
Follow the steps in the setup poster to set up the PC and then read the topics in this section to find out more about the location of components and connectors on your PC, and to find out about some setup alternatives.
Most of the hardware devices such as the monitor, keyboard, printer, and mouse can be connected at the back of the PC. Some peripheral devices, such as a digital video camera, can be plugged into the connectors on the back or the front of the PC.
PC Installation Overview
The following items are not provided with your PC. Be sure you have them on hand if you need them for your setup:
■Monitor (required).
■TV.
■Internet Service Provider (ISP), selected during initial setup (required for Media Center features, such as the Program Guide).
■Coaxial cable splitter.
■S-video cable(s), to connect your TV if it requires S-video.
■Audio Y cable, to connect to a stereo system. (You may need more than one audio Y adapter cable, depending on your stereo system.)
n
Some PC components listed on this page are not included with your PC.
Setting Up the PC 9
Setting up the PC
1 Connect your PC to the keyboard. See the setup poster and see “Using the Keyboard” on page 69.
2 Connect the PC to the mouse. See the setup poster.
3 Connect to the remote sensor. See the setup poster and see “Connecting the Remote Sensor” on page 17.
4 Connect the PC to the monitor. Refer to the documentation that came with the monitor.
5 Connect to the speakers. Refer to the setup poster and the documentation that came with your speakers.
6 Connect the TV signal source. See “Connecting the TV Signal Source” on page 24.
7 Connect the FM radio antenna cable. See “Connecting the FM Radio Antenna” on page 18.
8 Connect the modem to the telephone line and connect a network cable, if one is needed. See “Connecting to the Internet” on page 15 and see “Connecting to the Internet Through a Network Port (LAN)” on page 15.
9 Connect the camera docking station (not included) and digital camera (not included). See “Installing an HP Camera Docking Station” on page 78.
10 Turn on the monitor, the PC, and then turn on the speaker system.
11 Follow the onscreen instructions, including selecting an ISP using Easy Internet Sign-up.
12 Set up the Media Center. See the HP Media Center PC Software Guide.
13 After you’ve completed the initial startup and registration, connect optional devices, such as a printer or scanner, one at a time.
10 HP Media Center PC Getting Started Guide
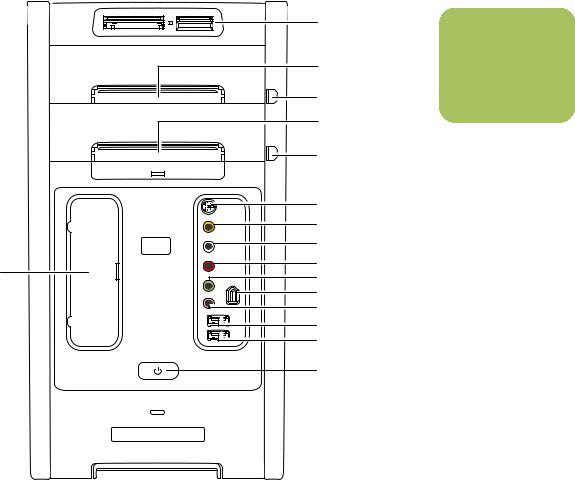
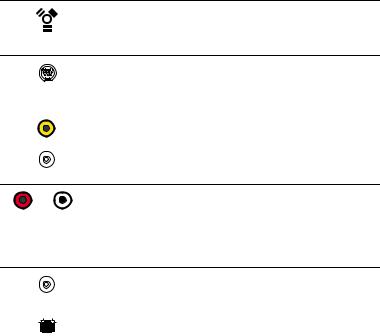
Front of PC
P
AMemory card reader
BOptical drive LED
CEject button for optical drive
DOptical drive LED
EEject button for optical drive
FS-video Input connector
GComposite video input connector
HLeft audio input connector
IRight audio input connector
A
n
B |
Location and number |
|
|
||
C |
of connectors may |
|
vary by model. |
||
|
D
E
F
G
H
I
J
K
L
M
N
O
JHeadphone (Audio Out) connector
KFireWire (IEEE 1394) connector
LMicrophone connector
MUSB 2.0 port
NUSB 2.0 port (select models only)
OOn button with power indicator
PDrive bay for the HP Personal Media Drive (removable hard disk drive that is sold separately). This bay is designed to connect the drive without additional USB or power cables.
Setting Up the PC 11

n
Location and number of connectors may vary by model.
Back of PC
A |
|
B |
|
C |
|
D |
|
E |
AUDIO OUT |
|
|
F |
SERIAL |
G |
|
H |
|
|
|
|
|
|
I |
|
ETHERNET |
|
|
|
|
J |
|
|
|
|
|
|
OUT |
IN |
|
|
|
|
|
K |
|
|
|
|
|
|
L |
|
|
OUT-TV |
LCD |
|
|
M |
R |
L |
IN VID-S |
IN VID |
TV |
FM |
N |
|
|
|
|
|
|
APower cord
BVoltage selector
CPower LED indicator
DPS/2 mouse
EPS/2 keyboard
FSerial port
GParallel port
HFireWire (IEEE 1394) port
I4 USB 2.0 (Universal Serial Bus) ports
JLAN (Ethernet)
KMicrophone
LAudio Line Out
MAudio Line In
O
|
|
OUT-TV |
LCD |
|
|
|
P |
Q |
|
R |
|
R |
L |
IN VID-S |
IN VID |
TV |
FM |
S T U V W
X
NModem (Line In RJ-11)
ODigital Audio Out and/or Wireless LAN connector, depending on the PC model
PVGA monitor (DB-15) port
QS-video (TV Out)
RLCD DVI or (Comp Out) not shown, depending on the PC model
SAudio In right
TAudio In left
US-video In
VTV In/RF-In antenna/cable connector
WFM In radio antenna
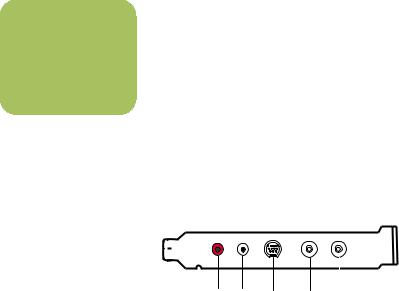
XSlot for sound card. See the following pages for more information about the sound card.
12 HP Media Center PC Getting Started Guide
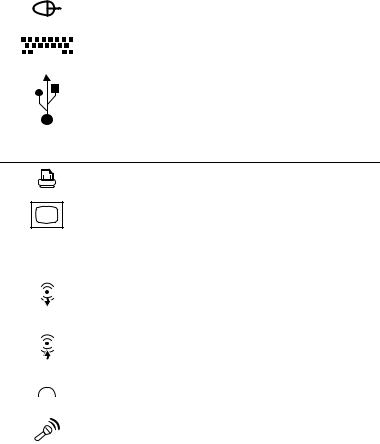
Front and Back PC Connectors
|
Connector |
|
|
||
|
or Icon |
Location on PC |
Description and Function |
||
|
|
|
|
|
|
|
|
|
|
Back panel |
Mouse |
|
|
|
|
|
|
|
|
|
|
Back panel |
Keyboard |
|
|
|
|
||
|
|
|
|
|
|
|
|
|
|
|
|
|
|
|
|
|
|
1 or 2 on front panel, depending on your PC model
4 on the back panel
Universal Serial Bus (USB) for mouse, keyboard, digital cameras, or other devices with USB connectors
|
|
|
|
|
|
Back panel |
Printer (parallel) |
|
|
|
|
|
|
||
|
|
|
|
|
|
||
|
|
|
|
|
|
|
|
|
|
|
|
|
|
Back panel |
Monitor |
|
|
|
|
|
|
|
|
SERIAL |
Back panel |
Serial port for digital cameras |
|||||
|
|
|
|
|
|
|
or other serial devices |
|
|
|
|
|
|
|
|
|
|
|
|
|
|
Back panel |
Audio Line Out (powered |
OUT |
|
speakers, green connector) |
|||||
|
|
||||||
|
|
|
|
|
|
|
|
|
|
|
|
|
|
Back panel |
Audio Line In (blue connector) |
|
|
IN |
|
|
|||
|
|
|
|
|
|
|
|
|
|
|
|
|
|
Front panel |
Headphones out |
|
|
|
|
|
|
|
|
|
|
|
|
|
|
|
|
|
|
|
|
|
|
Front panel |
Microphone In |
Setting Up the PC 13
Connector |
|
|
or Icon |
Location on PC |
Description and Function |
1 on front panel and 1 on back panel
FireWire (IEEE 1394) for video cameras and other highspeed devices
|
|
Front panel and |
S-video In/Video In |
|
|
||
|
|
on TV tuner card |
|
|
|
|
|
|
|
on the back panel |
|
|
|
|
|
|
|
Front panel |
Composite Video In |
|
|
|
|
|
|
TV tuner card on |
TV In (TV antenna or cable |
|
|
the back panel |
input) |
R L
1 set on front |
Audio In right and left |
panel and 1 set |
|
on the TV tuner |
|
card on the back |
|
panel |
|
|
|
TV tuner on the |
FM In (radio antenna input) |
|
|
back panel |
|
|
|
|
|
|
|
Back panel |
Modem |
|
|
||
|
|
|
|
14 HP Media Center PC Getting Started Guide

Connecting to the Monitor
Connect your monitor to the PC. The monitor is not included with the PC. See the documentation that came with your monitor.
Connecting to the Internet
(Select models only) |
1 |
Plug the modem cable (provided in the PC |
Connect the telephone line to the modem, which is |
|
box) into the computer modem connector on |
|
the back of the PC. |
|
inside the PC. |
2 |
Plug the other end to your telephone line wall |
|
jack connector.
Connecting to the Internet Through a Network Port (LAN)
The network interface adapter (also called a network interface card, or NIC) connects to an Ethernet (10BaseT) or Fast Ethernet (100BaseT) network hub. Connect this adapter in your PC to your local area network (LAN) hub or any broadband connection.
1 Plug a network cable into the Ethernet (RJ-45) port on the back of the PC.
2 Plug the other end of the network cable into a 10BaseT or 100BaseT port on the network hub.
The green LED (light-emitting diode) indicates a valid connection.
Setting Up the PC 15

n
The wireless LAN antenna connector is located either below the fan or in the slot above the modem connector on the back of the PC.
Connecting the Wireless LAN
Some Media Center PC models come with an 802.11b wireless LAN module and internal antenna. This device allows you to connect to the Internet from other devices that are compatible with the 802.11 wireless LAN. An additional external antenna is supplied with your system and may be connected to the 802.11 module to increase the range and sensitivity of the radio.
1 Screw the wireless LAN antenna into the wireless LAN connector on the back of the PC.
2 You may want to move the end of the antenna away from the PC to improve your signal reception.
SERIAL
ETHERNET
IN
OUT
R
T V - OU  T
T  LCD
LCD
L
S |
|
- |
|
VID |
|
IN |
VID |
|
|
|
IN |
TV
16 HP Media Center PC Getting Started Guide
Connecting the Remote Sensor
The remote sensor is a small device that connects to the PC and allows the remote control to work with the Media Center program.
1 If you have a cable TV set-top box, a satellite set-top box, or other set-top box that controls your TV signal, connect the remote control sensor cable (emitter) (A) into the back of the remote sensor.
2 Remove the paper from the backing tape on
P
the end of the cable (B) and then press the end of the cable over the remote IR receiver window on your cable TV set-top box (C).
3 Plug the remote control sensor cable into a USB connector (D) on the back of the PC.
4 Place the remote sensor so that you can easily point at it with the remote control. (An ideal spot would be on top of the monitor or desk.)
C
A
B
D
Setting Up the PC 17

n
If a Digital Video Device Auto Play window appears when you connect your camera, click
Cancel.
Connecting the TV Signal Source
For information about connecting the TV signal, see “Connecting the TV Signal Source” on page 24.
Connecting the FM Radio Antenna
(Select models only)
1 Plug the FM radio antenna cable into the FM In (E) port on the back of the PC. The FM connector is found on the TV tuner card.
2 You may want to extend the ends of the cable to improve your FM radio signal reception.
R |
L |
VID-S |
TV |
FM |
|
|
IN |
IN |
IN |
E
Connecting a Digital Video Camera to the PC
When connecting an analog camera to the PC, use |
See the documentation that came with your digital |
the Video and Audio In connectors on the front of |
video camera. |
the PC. The following instructions only apply to |
|
digital cameras. |
|
To connect a digital video camera to the PC
1 Turn on the PC, and wait for Windows XP to start.
2 Connect the video camera transfer cable into the camera and then into an open port on the front or back of the PC. Most digital video cameras use either the FireWire (IEEE 1394) or the USB port.
3 A Found New Hardware message appears. Wait two or three minutes for Windows to make the necessary settings for the new device. When installation is complete, a message appears telling you the camera is ready to use.
18 HP Media Center PC Getting Started Guide

If the PC doesn’t recognize your digital video camera:
1 Click Start on the taskbar, and then click
Control Panel.
2 Click Performance and Maintenance, if available, and then double-click the
System icon.
3 Click the Hardware tab, and then click the
Device Manager button.
4 Click the plus sign (+) next to imaging devices. If the name of the camera appears under imaging devices the device is ready. If the name is not there, try the following:
■Click Action, and then Scan for hardware changes. Look in Device Manager for a new addition under imaging devices.
■Unplug the video camera’s transfer cable from the PC and plug it into a different port. Look in Device Manager for a new addition under imaging devices.
For more information about viewing your pictures or digital video files in Media Center, or copying your pictures to CD, see the HP Media Center PC Software Guide.
Connecting an HP Personal Media Drive to the PC
The HP Media Center PC is designed to work with the HP Personal Media Drive that is purchased separately.
The HP Media Center PC has a special drive bay that includes an internal USB port and power cable that connects to the HP Personal Media Drive. The drive can be easily inserted and removed from the hard disk drive bay without turning off the PC. This feature is sometimes referred to as warm swappable.
The HP Personal Media Drive can also function as an external USB hard disk drive without installing the included software. However, HP recommends that you install the software and documentation to have access to additional features.
For information about using an HP Personal Media Drive to store and transfer information, refer to the
HP Media Center PC Software Guide and the documentation that came with the HP Personal Media Drive.
.
w
Do not move the PC with the HP Personal Media Drive inserted in the bay or connected to a USB port on the PC. This can cause damage to the drive and cause data loss.
Setting Up the PC 19
n
When your Media Center PC is in standby mode (reduced power state), the drive remains turned on.
To connect an HP Personal Media Drive to the PC
The HP Personal Media Drive has an automatic on and off feature. The drive turns on when it is plugged into an active USB port. If the PC is turned on with the drive connected, the drive automatically turns on. When the USB cable for the drive is not plugged in or when the USB power from the PC is turned off, the drive automatically turns off.
1 Turn on the PC.
2 Install the HP Personal Media Drive software that is included with the Drive (optional). For instructions about installing and using the HP Personal Media Drive software, refer to the documentation that came with your
HP Personal Media Drive.
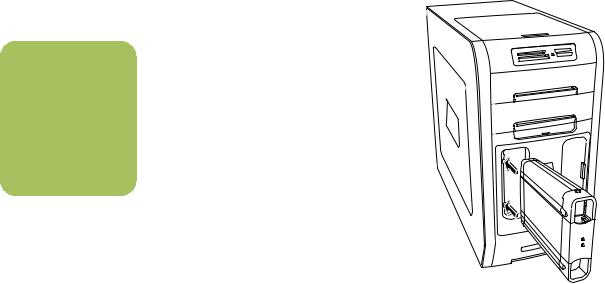
3 Line up the ridges on the bottom of the drive with the two slots on the side of the PC drive bay. Do not force the drive into the bay; it should slide easily into the bay.
4 Slide the drive all the way into the drive bay until the drive is firmly connected to the internal power and USB cables. When the PC is turned on, the blue power LED on the front of the drive is lit when the drive is inserted correctly.
20 HP Media Center PC Getting Started Guide

To disconnect an HP Personal Media Drive
You can safely remove the HP Personal Media Drive when it is not active. When the amber activity LED is blinking, the drive is active, saving or transferring data. To disconnect your HP Personal Media Drive safely:
1 Close Media Center and all other programs that may be accessing your HP Personal Media Drive.
2 Double-click the Safely Remove Hardware icon in the system tray at the bottom of the desktop. If this icon
is hidden, click the arrows on the taskbar to display it. The Safely Remove Hardware window opens.
3 Double-click USB Mass Storage Device to locate your HP Personal Media Drive. USB Mass Storage Device may be listed twice. One may contain a memory card reader or other mass storage drive.
4 Select the HP Personal Media Drive, and then click OK. The name of the drive may appear as Generic Volume followed by the assigned drive letter. A Safe to Remove Hardware message appears in the system tray at the bottom of your desktop, letting you know that the device is safe to disconnect.
5 Click Close.
6 Disconnect the drive from the PC.
w
To avoid hardware damage and data loss, always disconnect the drive safely when it is not active.
Setting Up the PC 21
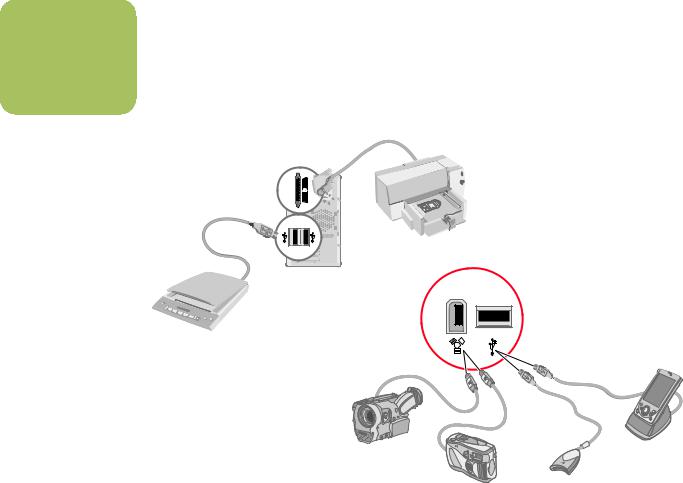
Connecting to Other Devices
nfront or back of your HP Media Center PC by using USB or FireWire ports. You can connect peripheral devices such as a printer, scanner, video camera,Other peripheral devices can be connected to the
Some peripheral devices are not included with the PC.
digital camera, memory card reader, and PDA (personal digital assistant) or handheld computer to the PC. See the documentation that came with your device.
22 HP Media Center PC Getting Started Guide

Connecting the Television Signal
Using the TV Cables
Your PC comes with the following cables for the TV signal:
■One coaxial cable (10 feet) (A). Use a coaxial cable for a BNC connector, such as the TV source signal.
■One S-video to composite video adapter cable (2 inches) (B). Connect this adapter to an S-video connector, and then attach a composite video cable to the adapter.
■One composite video cable (6 feet) (C). Use this cable to connect a composite video connector on the back of your set-top box to your PC.
You may need other or additional cables, depending on your TV and your TV signal source. For example, when your TV has an S-video connector, you may want to use an S-video cable to connect the TV out on the PC to your TV. An S-video cable provides separate color and black-and-white image signals, and delivers a sharper image than a composite video cable does.
A
B
C
n
Select the signal source for TV in the Media Center program settings.
Connecting the Television Signal 23
Connecting the TV Signal Source
Connect the signal source for the TV by using the
TV In coaxial connector or the S-video In connector.
Plug the connector of a coaxial cable from your TV antenna or from your TV cable (wall or set-top box) into the TV/RF-In (D) connector on the back of the PC, and then turn the connector to tighten it.
nPlug a cable into the S-video In (C) connector on the back of the PC; use an S-video cable (not provided)Or
Location and number of connectors may vary by model.
or use the S-video to composite video adapter cable and the composite video cable. Plug the other end of the cable into your set-top box or other device that is providing the signal source for the TV.
You must also plug audio cables (not provided) from your set-top box into the Audio In right (red) (A) connector and the Audio In left (white) (B) connector on the back of the PC, if you are using a set-top box with S-video or composite video output.
R |
L |
VID-S |
TV |
FM |
|
|
IN |
IN |
IN |
A B C D
24 HP Media Center PC Getting Started Guide
Connecting the TV Signal Source
When You Have an Existing Setup
This section describes how to connect the PC to an existing setup for your TV signal source.
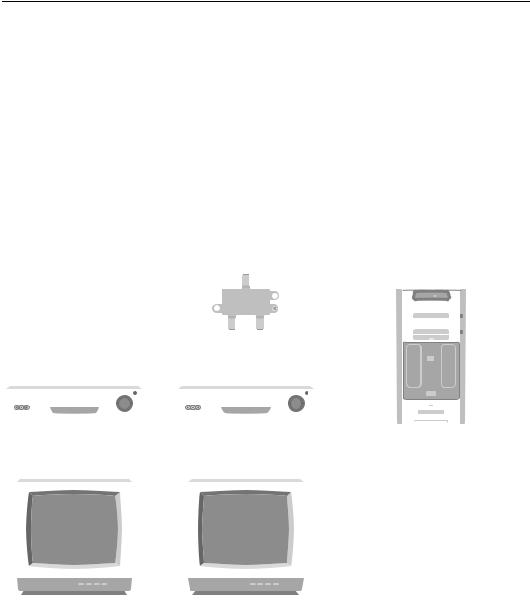
Wall to VCR to TV using coaxial cable
Remove the coaxial cable at the input to the VCR, and connect it to the input of a coaxial cable signal splitter (not included; available at electronics stores). Connect two coaxial cables to the splitter outputs. Connect one of these cables to the input of the VCR and the other one to the TV connector on the back of the PC.
|
|
|
|
Existing setup |
|
|
|
|
|
|
|
|
|
|
Add the PC with a splitter |
||||||||||||||||||
|
|
|
|
|
A |
|
|
|
|
|
|
A |
|
|
|
|
|
|
|
|
|
|
|
|
|
|
|||||||
|
|
|
|
|
|
|
|
|
|
|
|
|
|
|
|
|
|
|
|
|
|
|
|
|
|
|
|
|
|
|
|
||
|
|
|
|
|
|
|
|
|
|
|
|
|
|
|
|
|
|
|
|
|
|
|
|
|
|
|
|
|
|
|
|
|
|
|
|
|
|
|
|
|
|
|
|
|
|
|
|
|
|
|
|
|
|
|
|
|
|
|
|
|
|
|
|
|
|
|
|
|
|
|
|
|
B |
|
|
|
|
|
|
|
|
|
|
B |
|
|
|
|
|
|
|
|
|
|
|
|
|
|
|
|
|
|
|
|
|
|
|
|
|
|
|
|
|
|
|
|
|
|
C |
|
|
|
|
|
|
|
|
|
|
|
|
|
|
||
|
|
|
|
|
|
C |
|
|
|
|
|
|
|
G |
H |
|
|
|
|
|
|
|
|
|
|
||||||||
|
|
|
|
|
|
|
|
|
|
|
|
|
|
|
|
|
|
|
|
|
|
|
|||||||||||
|
|
|
|
|
|
|
|
|
|
|
|
|
|
|
|
|
|
|
|
|
|
|
|
|
|
||||||||
|
|
|
|
|
|
|
|
|
|
|
|
|
|
|
|
|
|
|
|
|
|
|
|
|
|
||||||||
|
|
|
|
|
|
|
|
|
|
|
|
|
|
|
|
|
|
|
|
|
|
|
|
|
|
|
|
|
|
||||
|
|
|
|
|
|
|
|
|
|
|
|
|
|
|
|
|
|
|
|
|
|
|
|
|
|
|
|
|
|
||||
|
|
|
|
|
|
|
|
|
|
|
|
|
|
|
|
|
|
|
|
|
|
|
|
|
|
|
|
|
|
||||
|
|
|
|
|
|
|
|
|
|
|
|
|
|
|
|
|
|
|
|
|
|
|
|
|
|
|
|
|
|
||||
|
|
|
|
|
|
|
|
|
|
|
|
|
|
C |
|
|
|
|
|
|
|
C |
|
|
|
|
|
|
|
|
|
|
|
|
|
|
|
|
|
|
|
|
|
|
|
|
|
|
|
|
|
|
|
|
|
|
|
|
|
|
|
|
|
|
|
||
|
|
|
|
|
D |
|
|
|
|
|
|
|
|
D |
|
|
|
|
|
|
|
|
J |
|
|
|
|
|
|
|
|
||
|
|
|
|
|
|
|
|
|
|
|
|
|
|
|
|
|
|
|
|
|
|
|
|
|
|
|
|
|
|||||
|
|
|
|
|
|
|
|
|
|
|
|
|
|
|
|
|
|
|
|
|
|
|
|
|
|
|
|
|
|||||
|
|
|
|
|
|
|
|
|
|
|
|
|
|
|
|
|
|
|
|
|
|
|
|
|
|
|
|
|
|||||
|
|
|
|
|
|
|
|
|
|
|
|
|
|
|
|
|
|
|
|
|
|
|
|
|
|
|
|
|
|
|
|||
|
|
|
|
|
|
|
|
|
|
|
|
|
|
|
|
|
|
|
|
|
|
|
|
|
|
|
|
|
|
|
|
|
|
|
|
|
|
|
|
|
|
|
|
|
|
|
|
|
|
|
|
|
|
|
|
|
|
|
|
|
|
|
|
|
|
|
|
|
|
|
|
|
E |
|
|
|
|
|
|
|
|
|
|
E |
|
|
|
|
|
|
|
|
|
|
|
|
|
|
|
|
|
|
|
|
|
|
|
|
|
|
|
|
|
|
|
|
|
|
|
|
|
|
|
|
|
|
|
|
|
|
|
|
|
||
|
|
|
|
|
C |
|
|
|
|
|
|
C |
|
|
|
A |
Wall |
||||||||||||||||
|
|
|
|
|
|
|
|
|
|
|
|
|
|
|
|
||||||||||||||||||
|
|
|
|
|
F |
|
|
|
|
|
|
|
|
|
|
F |
|
|
|
|
|
|
B |
Cable |
|||||||||
|
|
|
|
|
|
|
|
|
|
|
|
|
|
|
|
|
|
|
|
|
|
|
|
|
|
|
|
|
|
|
|
||
|
|
|
|
|
|
|
|
|
|
|
|
|
|
|
|
|
|
|
|
|
|
|
C |
Coaxial cable |
|||||||||
|
|
|
|
|
|
|
|
|
|
|
|
|
|
|
|
|
|
|
|
|
|
||||||||||||
|
|
|
|
|
|
|
|
|
|
|
|
|
|
|
|
|
|
|
|
|
|
|
D |
VCR In |
|||||||||
|
|
|
|
|
|
|
|
|
|
|
|
|
|
|
|
|
|
|
|
|
|
|
E |
VCR Out |
|||||||||
|
|
|
|
|
|
|
|
|
|
|
|
|
|
|
|
|
|
|
|
|
|
|
F |
TV In |
|||||||||
|
|
|
|
|
|
|
|
|
|
|
|
|
|
|
|
|
|
|
|
|
|
|
G |
Splitter In |
|||||||||
|
|
|
|
|
|
|
|
|
|
|
|
|
|
|
|
|
|
|
|
|
|
|
H |
Splitter Out |
|||||||||
|
|
|
|
|
|
|
|
|
|
|
|
|
|
|
|
|
|
|
|
|
|
||||||||||||
|
|
|
|
|
|
|
|
|
|
|
|
|
|
|
|
|
|
|
|
||||||||||||||
J TV In on back of PC
Connecting the Television Signal 25
Wall to cable TV set-top box or satellite box to VCR to TV using coaxial cable
Remove the coaxial cable at the input to the VCR, and connect it to the input of a coaxial cable signal splitter (not included; available at electronics stores). Connect two coaxial cables to the splitter outputs. Connect one of these cables to the input of the VCR and the other one to the TV connector on the back of the PC. Be sure to connect the remote control sensor cable (emitter) and position it on your set-top box or satellite box. This allows the PC to change the channel on the box. See “Connecting the Remote Sensor” on page 17.
26 HP Media Center PC Getting Started Guide
 Loading...