


 Loading...
HP Latex 850 & 820
HP SCITEX LX850 & LX820 Printers
User’s guide
© Copyright 2011, 2015 HP
Development Company, L.P. First edition
Legal notices
The information contained herein is subject to change without notice.
The only warranties for HP Products and services are set forth in the express warranty statement accompanying such products and services. Nothing herein should be construed as constituting an additional warranty. HP shall not be liable for technical or editorial errors or omissions contained herein.
Safety notice
Read and follow the operating and safety instructions before starting the printer.
Trademarks
Microsoft® and Windows® are U.S. registered trademarks of Microsoft Corporation.

Table of contents
1 |
Introduction ...................................................................................................................... |
1 |
|
The printer's main features ........................................................................................................ |
1 |
|
Documentation ......................................................................................................................... |
2 |
|
Main components .................................................................................................................... |
2 |
|
The front panel ........................................................................................................................ |
4 |
|
Printer software ........................................................................................................................ |
6 |
|
Safety precautions .................................................................................................................... |
6 |
2 |
Basic setup options ......................................................................................................... |
12 |
|
Turn the printer on and off ....................................................................................................... |
12 |
|
Change the language of the front-panel display ......................................................................... |
14 |
|
Change the units of measurement ............................................................................................. |
14 |
|
Turn the buzzer on and off ...................................................................................................... |
15 |
|
Change the front-panel display contrast .................................................................................... |
15 |
|
Start the HP Internal Print Server ............................................................................................... |
15 |
|
Change the language of the HP Internal Print Server ................................................................... |
15 |
|
Set the HP Internal Print Server preferences ................................................................................ |
15 |
3 |
Handle the substrate ...................................................................................................... |
18 |
|
Overview .............................................................................................................................. |
18 |
|
Substrate tips ......................................................................................................................... |
21 |
|
Substrate configurations .......................................................................................................... |
24 |
|
Set the carriage beam position ................................................................................................ |
25 |
|
Prepare to print ...................................................................................................................... |
26 |
|
The substrate edge holders ...................................................................................................... |
27 |
|
The ink collector kit (LX850 only) .............................................................................................. |
28 |
|
The curing plates .................................................................................................................... |
32 |
|
Load a roll onto the spindle ..................................................................................................... |
33 |
|
Load a roll into the printer ....................................................................................................... |
38 |
|
Load a roll with the 'Substrate Loading Tool' .............................................................................. |
56 |
|
Double-sided printing ............................................................................................................. |
58 |
|
Unload a roll ......................................................................................................................... |
62 |
|
View information about the substrate ........................................................................................ |
63 |
|
Substrate presets .................................................................................................................... |
63 |
ENWW |
iii |
|
Create a new substrate preset .................................................................................................. |
64 |
|
Edit a substrate preset ............................................................................................................. |
73 |
|
Remove a substrate preset ....................................................................................................... |
73 |
4 |
Handle the ink system .................................................................................................... |
74 |
|
Ink system components ............................................................................................................ |
74 |
|
How to work with ink system components .................................................................................. |
75 |
|
How to order supplies ............................................................................................................ |
80 |
|
How to recycle supplies .......................................................................................................... |
81 |
5 |
Printing options .............................................................................................................. |
82 |
|
HP Internal Print Server menus ................................................................................................. |
82 |
|
Manage print jobs ................................................................................................................. |
83 |
|
Layout method ....................................................................................................................... |
87 |
|
CallMe@HP ........................................................................................................................... |
98 |
6 |
Accessories ..................................................................................................................... |
99 |
|
How to order accessories ........................................................................................................ |
99 |
7 |
Printer specifications ..................................................................................................... |
100 |
|
Functional specifications ....................................................................................................... |
100 |
|
Physical specifications .......................................................................................................... |
102 |
|
Memory specifications .......................................................................................................... |
102 |
|
Power specifications ............................................................................................................. |
102 |
|
Air supply requirements (pneumatic spindle) ............................................................................ |
103 |
|
Ecological specifications ....................................................................................................... |
104 |
|
Environmental specifications .................................................................................................. |
104 |
|
Acoustic specifications .......................................................................................................... |
104 |
Appendix A Preset creation flowchart .............................................................................. |
105 |
|
Glossary ........................................................................................................................... |
106 |
|
Index ............................................................................................................................... |
109 |
|
iv |
ENWW |

1 Introduction
The printer's main features
Your printer is a color latex printer designed for printing high-quality images on flexible substrates from 914 mm (36 in) to 3.20 m (126 in) wide. Some major features of the printer are shown below:
●Printing speeds of up to 133 m²/h (1432 ft²/h) for outdoor-quality prints, or 45 m²/h (484 ft²/h) for indoor-quality prints
●Environmentally friendly, odorless, aqueous latex inks in six colors
●No hazardous waste
●Three-liter ink cartridges which can be changed while printing
●Print on a wide range of substrates—including most low-cost, uncoated, low-solvent-compatible substrates, and polyester fabrics including unlined flags (unlined flags only supported on LX850).
●Durable prints with outdoor display permanence up to three years unlaminated, five years laminated
●Accurate and consistent color reproduction with automatic color calibration (built-in spectrophotometer)
●The HP Internal Print Server, see Start the HP Internal Print Server on page 15, provides an easy- to-use interface including:
◦Print job management
◦Full printer status information
◦Printer alerts
◦Printer calibrations and adjustments
◦Management and installation of substrate presets
◦Printer firmware upgrades
◦Access to the online HP Printing Knowledge Center
Introduction
ENWW |
The printer's main features |
1 |

Introduction
Documentation
The following documents are provided with your printer, and can also be downloaded from http://www.hp.com/go/LX820/manuals/ or http://www.hp.com/go/LX850/manuals/.
●Site preparation guide
●User's guide
●Maintenance and troubleshooting guide
●Legal information
See the Solutions Web site for information about new substrates, at http://www.hp.com/go/LX820/ solutions/ or http://www.hp.com/go/LX850/solutions/. A new Web-based Media Finder application is being developed to collect available substrate configurations for latex printers.
Main components
The following front and rear views of the printer illustrate the main components.
Front view
1.Ink cartridges
2.Printhead access door
3.Front panel
4.HP Internal Print Server display and keyboard
5.Front door to access computer and printhead cleaner roll
6.Front Diverter roller
7.Emergency stop buttons
8.LX850 only: Tension roller
9.Substrate output spindle
10.Substrate Loading Tool
11.Spindle Supports
2 |
Chapter 1 Introduction |
ENWW |

Rear view
1.Power switches and lights
2.Circuit breakers: ACB-1, ACB-2, ACB-3, RCB-1
3.Printhead access door
4.Emergency stop buttons
5.Ink cartridges
6.Substrate pressure handles
7.LX850 only: Dual-roll spindle with differential hub (LX820 is an accessory, part number Q6705A)
8.Rear Diverter Roller
Ink collector kit (LX850 only)
Introduction
1.Ink collector container
2.8 ink collectors with replaceable foams
ENWW |
Main components |
3 |

Introduction
Printer Configuration
Shown below is a table describing the configuration of the HP Scitex family of printers.
|
HP LX610 Inks * |
|
|
|
HP LX600 Inks ** |
|
|
|
||
|
|
|
|
|
|
|
|
|
|
|
Printer |
LX850 |
LX820 |
LX800 |
LX600 |
L6550 |
LX850 |
LX820 |
LX800 |
LX600 |
L6550 |
config. |
|
|
|
|
0 |
|
|
|
|
0 |
|
|
|
|
|
|
|
|
|
|
|
Roll-to- |
√ |
√ |
√ |
√ |
√ |
√ |
√ |
√ |
√ |
√ |
Roll |
|
|
|
|
|
|
|
|
|
|
|
|
|
|
|
|
|
|
|
|
|
Roll-to- |
√ |
X |
√ |
X |
X |
√ |
X |
√ |
X |
X |
Free-Fall |
|
|
|
|
|
|
|
|
|
|
|
|
|
|
|
|
|
|
|
|
|
Roll-to- |
√ |
X |
√ |
X |
X |
√ |
X |
√ |
X |
X |
Collector |
|
|
|
|
|
|
|
|
|
|
|
|
|
|
|
|
|
|
|
|
|
Ink |
√ |
X |
√ |
X |
X |
√ |
X |
√ |
X |
X |
Collector |
|
|
|
|
|
|
|
|
|
|
|
|
|
|
|
|
|
|
|
|
|
Dual Roll |
√ |
Accessor |
√ |
Accessor |
Accessor |
√ |
Accessor |
√ |
Accessor |
Accessor |
|
|
y |
|
y |
y |
|
y |
|
y |
y |
|
|
|
|
|
|
|
|
|
|
|
Other Features |
|
|
|
|
|
|
|
|
|
|
|
|
|
|
|
|
|
|
|
|
|
Substrate |
√ |
√ |
X |
X |
X |
√ |
√ |
X |
X |
X |
Loading |
|
|
|
|
|
|
|
|
|
|
Tool |
|
|
|
|
|
|
|
|
|
|
|
|
|
|
|
|
|
|
|
|
|
Spindle |
√ |
√ |
X |
X |
X |
√ |
√ |
X |
X |
X |
Supports |
|
|
|
|
|
|
|
|
|
|
|
|
|
|
|
|
|
|
|
|
|
Double- |
√ |
√ |
√ |
√ |
√ |
X |
X |
X |
X |
X |
sided |
|
|
|
|
|
|
|
|
|
|
Printing |
|
|
|
|
|
|
|
|
|
|
|
|
|
|
|
|
|
|
|
|
|
Productivi |
√ |
√ |
√ |
√ |
√ |
X |
X |
X |
X |
X |
ty |
|
|
|
|
|
|
|
|
|
|
Improvem |
|
|
|
|
|
|
|
|
|
|
ents |
|
|
|
|
|
|
|
|
|
|
|
|
|
|
|
|
|
|
|
|
|
Diverters |
√ |
√ |
√ |
X |
X |
√ |
√ |
√ |
X |
X |
|
|
|
|
|
|
|
|
|
|
|
*Part numbers: CN673A/CN670A/CN671A/CN672A/CN674A |
**Part numbers: CC582A/CC583A/CC584A/ |
|||||||||
& CN675A refer to How to order supplies on page 80 |
|
CC588A/CC589A & CC590A |
|
|
||||||
|
|
|
|
|
|
|
|
|
|
|
The front panel
Your printer's front panel is located at the front right of the printer. It has the following important functions:
●It assists you in troubleshooting issues.
●It is used when performing certain physical operations, such as raising the carriage beam, moving spindles and rollers, and maintaining the printer.
●It displays information in brief about the status of the printer (more information is available from the HP Internal Print Server).
●It displays warning and error messages, when appropriate, with audio alerts to call attention to a warning or message.
4 |
Chapter 1 Introduction |
ENWW |

Introduction
The front panel has the following components:
1.Power key - To turn the printer off. See Turn the printer on and off on page 12.
2.Power light - Indicates the printer's power status. If the light is off, the printer is off. If it is solid green, the printer is on. If it is flashing green, the printer is in transition between on and off.
3.Status light - Indicates the printer's operational status. If the light is off, the printer is not ready. If it is solid green, the printer is ready and idle. If it is flashing green, the printer is busy: receiving data, processing or printing. If it is flashing amber, your intervention is required. If it is solid amber, a serious error has occurred.
4.Front-panel display - Displays error, warnings and information on using your printer.
5.Back key - To go to the previous step in a procedure or interaction. To go to the upper level, or leave the option in the menu, or when given an option.
6.Up key - To go up in a menu or option, or to increase a value.
7.OK key - To confirm an action while in a procedure or interaction. To enter in a submenu in the menu. To select a value when given an option.
8.Down key - To go down in a menu or option, or to decrease a value.
9.Cancel key - To cancel a procedure or interaction.
10.Move substrate key - To move the loaded substrate forwards or backwards, or rewind the whole roll.
To highlight an item in the front-panel display, press the Up or Down key until the item is highlighted. To select an item in the front-panel display, first highlight it and then press the OK key.
When this guide shows a series of front-panel display items like this: Item1 > Item2 > Item3, it means that you should select Item1, then select Item2, then select Item3.
Information about specific uses of the front panel can be found throughout this guide.
ENWW |
The front panel |
5 |

Introduction
Printer software
Your printer requires the following software:
●The HP Internal Print Server is provided with your printer and runs in a computer inside the printer. You can use it to perform the following tasks.
◦Load and unload substrate
◦Select a substrate load configuration (online help is provided)
◦Manage print jobs
◦Display printer status information
◦Display printer alerts
◦Perform printer calibrations and adjustments
◦Install and manage substrate presets
◦Upgrade the printer's firmware
◦Access the Solutions Web site for information about new substrates
●A Raster Image Processor (RIP) should be run on a separate computer; it cannot be installed on the same computer as the HP Internal Print Server.
Safety precautions
Before using your printer, read the following safety precautions to make sure you use the equipment safely.
Users are expected to have appropriate technical training and experience necessary to be aware of hazards to which that person may be exposed to in performing a task and to take appropriate measures to minimize the risks to that person or other persons.
General safety guidelines
●Refer to installation instructions before connecting the printer to the supply.
●There are no operator-serviceable parts inside the printer. Refer servicing to qualified service personnel.
●Turn off the printer, using both Branch Circuit Breakers located in the building's Power Distribution Unit (PDU), and call your service representative in any of the following cases:
◦The power cord is damaged.
◦Liquid has entered the printer.
◦There is smoke or an unusual smell coming from the printer.
◦The printer has been dropped or the drying or curing module damaged.
◦The printer's built-in Residual Current Circuit Breaker (Ground Fault Circuit Interrupter) has been repeatedly tripped.
6 |
Chapter 1 Introduction |
ENWW |
◦Fuses have blown.
◦The printer is not operating normally.
●Turn off the printer using both Branch Circuit Breakers in either of the following cases:
◦During a thunderstorm
◦During a power failure
Electrical shock hazard
WARNING! The internal circuits and drying and curing modules operate at hazardous voltages capable of causing death or serious personal injury.
Turn off the printer using both Branch Circuit Breakers located in the building's Power Distribution Unit (PDU) before servicing the printer. The printer must be connected to earthed mains outlets only.
To avoid the risk of electric shock:
●Do not attempt to dismantle the drying and curing modules or the electrical control cabinet.
●Do not remove or open any other closed system covers or plugs.
●Do not insert objects through slots in the printer.
●Test the functionality of the Residual Circuit Breaker (RCCB) every year (refer to the procedure below).


 NOTE: A blown fuse may indicate malfunctioning electrical circuits within the system. Call your service representative, and do not attempt to replace the fuse yourself.
Checking the functionality of the Residual Circuit Breaker (RCCB
Following standard Residual Current Circuit Breaker (RCCB) recommendations, it is recommended that the RCCB is test on a yearly basis. The procedure is as follows:
1.Switch off the printer from the Front Panel (do not switch off the printer from the mains switch or the circuit breakers).
2.When the printer is switched off, test that the RCCB functions correctly by pressing the test button.
●If the RCCB does not trip when the test button is pressed, this indicates that the component has failed. The device must be replaced for safety reasons, call HP Support to remove and replace the RCCB.
●If the RCCB trips, this indicates it is working correctly, return the printer to the original status and switch the printer on.
Heat hazard
The drying and curing subsystems of the printer operate at high temperatures and can cause burns if touched. To avoid personal injury, take the following precautions.
●Do not touch the internal enclosures of the printer's drying and curing modules.
●Take special care when accessing the substrate path.
Introduction
ENWW |
Safety precautions |
7 |

Introduction
Fire hazard
The drying and curing subsystems of the printer operate at high temperatures. Call your service representative if the printer's built-in Residual Current Circuit Breaker (Ground Fault Circuit Interrupter) is repeatedly tripped.
To avoid the risk of fire, take the following precautions.
●Use the power supply voltage specified on the nameplate.
●Connect the power cords to dedicated lines, each protected by a branch circuit breaker according to the information detailed in the Site Preparations documentation.
●Do not insert objects through slots in the printer.
●Take care not to spill liquid on the printer.
●Do not use aerosol products that contain flammable gases inside or around the printer.
●Do not block or cover the openings of the printer.
●Do not attempt to dismantle the drying or curing module, or the electrical control cabinet.
●Ensure that the operating temperature of the substrate loaded recommended by the manufacturer is not exceeded. If this information is not available by the manufacturer, do not load substrates that cannot be used at an operating temperature under 125°C (257°F).
●Do not load substrates with auto-ignition temperatures below 250°C (482°F). See note below.


 NOTE: Test method based on EN ISO 6942:2002; Evaluation of materials and material assemblies when exposed to a source of radiant heat, method B. The test conditions, to determine the temperature when the substrate starts ignition (either flame or glow) were: Heat flux density: 30 kW/m2, Copper calorimeter, K type thermocouple.
Mechanical hazard
The printer has moving parts that could cause injury. To avoid personal injury, take the following precautions when working close to the printer.
●Keep your clothing and all parts of your body away from the printer's moving parts.
●Avoid wearing necklaces, bracelets and other hanging objects.
●If your hair is long, try to secure it so that it will not fall into the printer.
●Take care that sleeves or gloves do not get caught in the printer's moving parts.
●Avoid standing close to the fans, which could cause injury and could also affect print quality (by obstructing the air flow).
●Do not touch gears or moving rolls during printing.
8 |
Chapter 1 Introduction |
ENWW |
Heavy substrate hazard
Special care must be taken to avoid personal injury when handling heavy substrates.
●Handling heavy substrate rolls always requires two people. Care must be taken to avoid back strain and/or injury.
●Always use a forklift, pallet truck or other handling equipment to lift substrates.
●Always wear personal protective equipment including boots and gloves.
Ink handling
Your printer does not use solvent inks and does not have the traditional problems associated with them. However, HP recommends that you wear gloves when handling ink system components.
Warnings and cautions
The following symbols are used in this manual to ensure the proper use of the printer and to prevent the printer from being damaged. Follow the instructions marked with these symbols.
WARNING! Failure to follow the guidelines marked with this symbol could result in serious personal injury or death.
CAUTION: Failure to follow the guidelines marked with this symbol could result in minor personal injury or damage to the product.
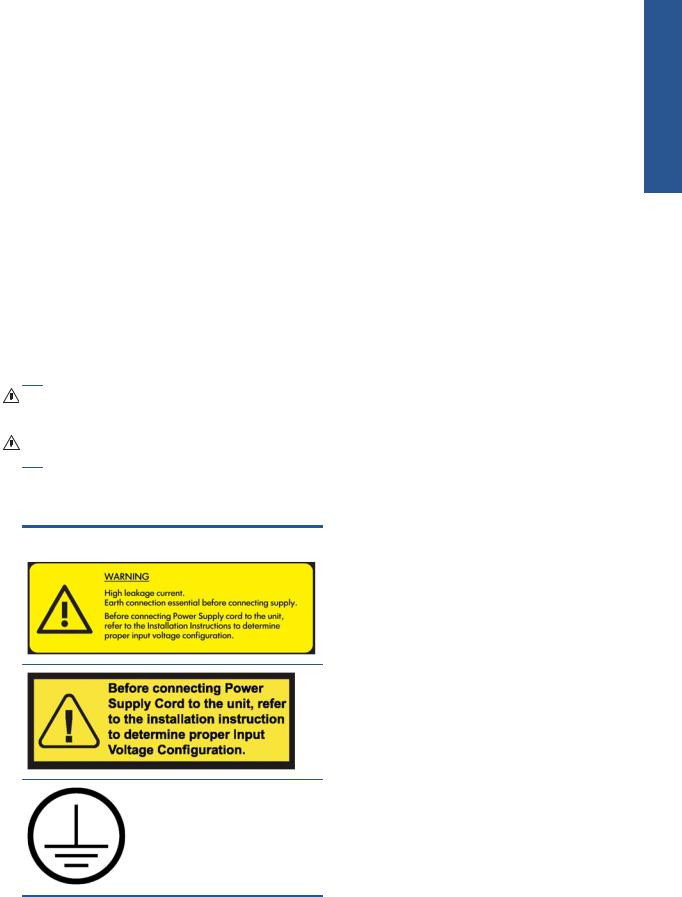
Warning labels
Label |
Explanation |
|
|
|
Current leakage may exceed 3.5 mA. |
See installation instructions before connecting to the supply. Ensure that the input voltage is within the printer's rated voltage range. The printer requires two dedicated lines, each protected by a branch circuit breaker according to site Preparation Requirements The printer must be connected to earthed mains outlets only.
Identifies the Protective Earth (PE) terminal. It is located inside the electrical control cabinet.
Introduction
ENWW |
Safety precautions |
9 |

Introduction
Label |
Explanation |
|
|
|
Electric shock hazard. The printer has two mains supplies. |
|
There are no operator-serviceable parts inside the printer. In |
|
case of operation of the fuse, parts of the printer that remain |
|
energized may represent a hazard during servicing. Refer |
|
servicing to qualified service personnel. Turn off the printer |
|
using both Branch Circuit Breakers located in the building's |
|
Power Distribution Unit (PDU) before servicing. See installation |
|
instructions before connecting to the supply. |
|
|
|
Danger of electric shock. In case of operation of the fuse, |
|
parts of the printer that remain energized may represent a |
|
hazard during servicing. Therefore, ensure that the printer is |
|
completely turned off before servicing. |
Risk of burns. Do not touch the internal enclosures of the printer's drying and curing modules.
You are recommended to wear gloves when handling ink cartridges, printhead cleaning cartridges and the printhead cleaning container.
When substrate has been loaded, the carriage descends into its normal position, and could crush your hand or anything else left underneath it.
Danger that your hands may become trapped between gearwheels
When the printer is printing, the printhead carriage travels back and forth across the substrate.
Beware of this moving part.
10 Chapter 1 Introduction |
ENWW |
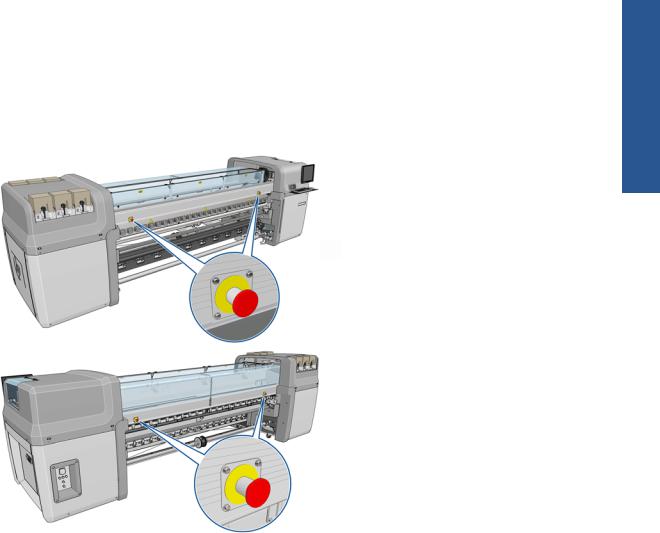
Emergency stop buttons
There are four emergency stop buttons distributed around the printer. If an emergency occurs, simply push one of the emergency stop buttons to stop all printing processes. A system error message is displayed on the front panel, and the fans turn at maximum speed. Ensure that all emergency stop buttons are released before restarting the printer.
Introduction
ENWW |
Safety precautions 11 |

2 Basic setup options
settings Personal
Turn the printer on and off
The printer has two levels of power consumption.
●Electronics on: The electronic components that use relatively little power are turned on.
●Everything on: All components are turned on, including the mechanical and drying components that use more power.
To turn on the printer:
1.Make sure that all the circuit breakers are in the up position (ACB1, ACB2, ACB3, RCB1).
2.Turn the big switch at the rear left of the printer to the on position.
3.Check that all four red lights are on (three for the three-phase line and one for the single-phase). In normal operation these lights should always be on. If any of them are off, check the front panel in case there is a system error, and consult the Maintenance and troubleshooting guide or check with your electrician.
12 Chapter 2 Basic setup options |
ENWW |

4.Go to the front panel. In some circumstances, the front-panel display comes on automatically; if not, press the Power key on the front panel and hold it down for a few seconds to turn on the printer's electronics.
5.Wait for the front panel to display the message, “Printer waiting for rearm. Press the power button.”
6.Press the Power Enable button at the rear left of the printer. This enables all of the printer's highpower subsystems.
7.Check that the orange light in the button comes on. In normal operation this light should always be on. If at any time you notice that this light is off, check the front panel in case there is a system error, and consult the Maintenance and troubleshooting guide.
8.Wait for the front panel to indicate that the printer is ready. This can take several minutes. The printer beeps if some problem is encountered. When initialization is complete, the front panel displays a Ready message. If a system error message is displayed, consult the Maintenance and troubleshooting guide.
To turn off the printer and the HP Internal Print Server computer:
1.Wait for the front panel to indicate that the printer is ready.
 NOTE: If the printer fails to reach the Ready state because of a fault, continue to the next step.
2.Turn off the HP Internal Print Server computer from the Windows start button, and wait until you see a black screen with the message No input signal.
 CAUTION: The computer may be damaged if it is turned off incorrectly.


 NOTE: If the HP Internal Print Server fails to display No input signal because of a fault, continue to the next step.
3.Press the Power key on the front panel and wait for the front-panel display to turn black; this usually takes about a minute. However, after some error conditions (such as after a substrate jam), you may need to wait up to four minutes.


 NOTE: After the printer electronics have been turned off at the front panel, the fans turn at maximum speed, for safety reasons. This is normal behavior and not a cause for concern.


 NOTE: If you have waited more than five minutes and the front-panel display has not turned black because of a fault, continue to the next step.
4.Turn the big switch at the rear left of the printer to the off position. The fans should stop.


 TIP: If you are not planning to use the printer for some days, you are recommended to disconnect all


 ink cartridge connectors.
Personal settings
ENWW |
Turn the printer on and off 13 |

settings Personal
To turn off the printer but not the HP Internal Print Server computer:
1.Wait for the front panel to indicate that the printer is ready.
2.Press the Power key on the front panel and wait for the front-panel display to turn black; this usually takes about a minute. However, after some error conditions (such as after a substrate jam), you may need to wait up to four minutes.


 NOTE: After the printer electronics have been turned off at the front panel, the fans turn at maximum speed, for safety reasons. This is normal behavior and not a cause for concern.
3.Turn circuit breakers ACB-1 (mono-phase) and ACB-3 (three-phase) to the down position. The fans should stop.
To turn off the HP Internal Print Server computer but not the printer, turn off the computer from the Windows start button, and wait until you see a black screen with the message No input signal. Then turn circuit breaker ACB-2 to the down position.
To stop the printer in emergency, hit one of the emergency stop buttons at the front or rear of the printer. A system error message is displayed on the front panel, and the fans turn at maximum speed. Ensure that all emergency stop buttons are released before restarting the printer.
Change the language of the front-panel display
There are two possible ways to change the language of the front-panel menus and messages.
●If you can understand the current front-panel display language, go to the main menu and select the
Setup menu icon  , then Front panel options > Select language.
●If you cannot understand the current front-panel display language, start with the printer powered off. At the front panel, press the OK key and hold it down. While holding the OK key down, press the Power key and hold it down. Continue to hold down both keys until the green light on the left side of the front-panel display starts flashing, and then release both keys. You can expect a delay of about one second. If the green light starts flashing without any delay, you may need to start again.
Whichever method you used, the language selection menu should now appear on the front-panel display. Highlight your preferred language with the Up and Down keys, then press the OK key.
When you have selected your preferred language, turn off the printer with the Power key and then turn it on again. The front panel will appear in the selected language.
Change the units of measurement
To change the units of measurement in the HP Internal Print Server, select the Tools menu, then Preferences, then the General tab. You can change the units of length and temperature.
To change the units of measurement in the front-panel display, select the Setup menu icon |
, then |
Front panel options > Select units, and select English or Metric. By default the units are set to metric.
14 Chapter 2 Basic setup options |
ENWW |

Turn the buzzer on and off
To turn the printer's buzzer on or off, go to the front panel's main menu and select the Setup menu icon  , then Front panel options > Enable buzzer, highlight on or off and press the OK key. The default buzzer is set to on.
 NOTE: For safety reasons, the buzzer always sounds when the carriage beam is raised or lowered.
Change the front-panel display contrast
To change the contrast of the front-panel display, select the Setup menu icon  , then Front panel
options > Select display contrast, and enter a value using the Up or Down key. Press the OK key to set the value. The default contrast is set to 50.
Start the HP Internal Print Server
You can start the HP Internal Print Server from the Windows start menu or by double-clicking its icon on the desktop.
Change the language of the HP Internal Print Server
When the HP Internal Print Server starts, it uses the language selected in the Windows Regional and Language Options. To change the selected language:
1.Open the Control Panel from the start menu.
2.If you are using the Category View of the Control Panel, open the Clock, Language, and Region category.
3.Open the Regional and Language Options.
4.In the Formats tab, change the current format to correspond with the language you want.
5.Press the OK button.
Set the HP Internal Print Server preferences
To change the HP Internal Print Server's preferences, select Preferences from the Tools menu. In the Preferences window, you will see four tabs.
Personal settings
ENWW |
Turn the buzzer on and off 15 |

settings Personal
●Units of length and temperature
●Remarks (to add as a footer to the printed file)
●Font of footer text
●Printer's IP address
●Action when job fails
●Action when job is put on hold
●Action when job has been printed
●Action when job is removed from the queue
16 Chapter 2 Basic setup options |
ENWW |
● |
Maximum roll length |
settings |
||
|
||||
● |
Gap between jobs |
Personal |
||
● |
Margins: |
|||
|
||||
|
◦ |
RIP: Margins are set as defined in the RIP. |
|
|
|
◦ |
Center: The image is horizontally centered on the loaded substrate. |
|
|
|
◦ |
Default: The default margins are set to 5.0 mm (0.02 in). You can define the default left |
|
|
|
|
|||
|
|
margin in the Job Properties window. |
|
|
The above fields are to be filled in by your service representative.
ENWW |
Set the HP Internal Print Server preferences |
17 |

3 Handle the substrate
Overview
Applications
For each printing application, some substrate types are more appropriate than others.
POP applications
Handle |
● Banners: Free-hanging, horizontally or vertically. Usually vinyl, but can be fabric. |
||
● |
Backlit: Usually inside a light box, visible by day and night. |
||
|
|||
the |
● Posters: Various sizes of flat pictures, usually framed or mounted on a rigid substrate. |
||
● |
Boards: A rigid substrate with logo, name, directional sign, etc. Longand short-term usage. |
||
substrate |
|||
● |
Floors: Stuck to the floor for directional or promotional purposes. Exposed to extreme rub |
||
|
● |
Windows: Covering all or part of a window for messaging and advertising. Usually exposed to |
|
|
|
sunlight. |
|
|
|
conditions. |
|
|
|
||
|
● |
3D: Usually laminated. |
|
Vehicle wrap applications
●Cars: Self-adhesive vinyl used to cover all or part of a vehicle. Has many uses from simple lettering and shapes to complex graphics. Can also be used for irregular shapes with vinyl cutting. Usually single cars, sometimes fleets.
●Trucks: Covering all or part of a truck for naming or advertising purposes. Can be applied to a rigid surface with self-adhesive vinyl or flexible curtains. Usually done for fleets.
●Trains: Covering single track or full train with self-adhesive vinyl. Window areas covered with perforated substrate to “see through”.
●Buses/taxis: Some are fully covered like cars; some fleets have side panels of either adhesive vinyl or framed image boards, made of rigid or flexible substrate.
18 Chapter 3 Handle the substrate |
ENWW |

Other applications
●Airport light boxes: Continuously lit from inside the box. Size varies from medium to very large images. Directional and advertising content.
●Bus shelters: Inside light box, visible by day and night. Changed very often (e.g. every week).
●Street signs: Various materials from blue back paper for billboards through light boxes and rigid boards. Some are fixed for medium periods and some changed very often.
●Billboards: Very large boards covered with tiles of images, long viewing distance and low picture resolution but vivid colors. Lately changing from tiles to banners of vinyl or polyethylene.
●Interior decoration: Walls covered with graphics to create a unique atmosphere. Usually printed on blue back paper and mounted directly on walls or rigid boards. May also be printed on vinyl or fabric.
●Building wrap: Part of a building covered with vinyl or mesh substrate, which is stretched and mounted on a frame. It is often necessary to weld or sew strips of substrate together.
●Art: Very high quality images printed on canvas or other flexible or rigid substrates.
●Directional signs: Short or long term signs, usually on rigid boards.
●OEM: Decals of names or graphics associated with the equipment. Used for home and garden equipment, appliances, vehicles, vending machines, ATM, light and heavy machinery, etc.
●Flags: Banners of fabric and textile that hang down or are mounted on poles. Used indoors and outdoors. Also used as balloons of different shapes.
Match applications to substrate types
The following table identifies the substrate types that are appropriate for each application.
Application |
|
|
|
|
|
|
|
Substrate (see key below) |
|
|
|
|
|
|
|
|||||||
|
|
|
|
|
|
|
|
|
|
|
|
|
|
|
|
|
|
|
|
|
|
|
|
A |
B |
C |
D |
E |
F |
G |
H |
I |
J |
K |
L |
M |
N |
O |
P |
Q |
R |
S |
T |
U |
V |
|
|
|
|
|
|
|
|
|
|
|
|
|
|
|
|
|
|
|
|
|
|
|
POP posters |
● |
● |
● |
● |
● |
● |
|
● |
|
● |
● |
|
|
● |
|
● |
● |
● |
● |
● |
● |
|
|
|
|
|
|
|
|
|
|
|
|
|
|
|
|
|
|
|
|
|
|
|
|
Light boxes |
|
|
● |
|
|
|
● |
● |
● |
|
|
|
● |
● |
|
|
|
|
|
|
|
|
|
|
|
|
|
|
|
|
|
|
|
|
|
|
|
|
|
|
|
|
|
|
|
Vehicle graphics |
● |
|
|
|
|
● |
● |
|
|
|
|
|
|
|
|
|
|
|
|
|
|
|
|
|
|
|
|
|
|
|
|
|
|
|
|
|
|
|
|
|
|
|
|
|
|
Wall murals |
● |
|
|
● |
● |
● |
● |
● |
● |
● |
|
|
|
● |
|
|
|
● |
|
|
|
|
|
|
|
|
|
|
|
|
|
|
|
|
|
|
|
|
|
|
|
|
|
|
|
Outdoor and event banners |
● |
● |
|
● |
|
|
|
|
|
● |
|
|
|
|
|
|
|
|
● |
● |
|
|
|
|
|
|
|
|
|
|
|
|
|
|
|
|
|
|
|
|
|
|
|
|
|
Double-sided banners |
|
● |
|
|
|
|
|
|
|
● |
● |
|
|
|
|
● |
|
|
|
|
|
|
|
|
|
|
|
|
|
|
|
|
|
|
|
|
|
|
|
|
|
|
|
|
|
Exhibition and event graphics |
● |
|
|
● |
● |
|
|
● |
● |
● |
● |
|
|
● |
|
|
|
|
|
|
|
|
|
|
|
|
|
|
|
|
|
|
|
|
|
|
|
|
|
|
|
|
|
|
|
Billboards |
|
|
|
|
|
|
|
|
|
|
|
● |
|
|
● |
|
|
|
● |
● |
|
● |
|
|
|
|
|
|
|
|
|
|
|
|
|
|
|
|
|
|
|
|
|
|
|
Textiles and carpets |
|
|
|
|
|
|
|
|
|
● |
● |
|
|
|
|
|
|
|
|
|
|
|
|
|
|
|
|
|
|
|
|
|
|
|
|
|
|
|
|
|
|
|
|
|
|
Photos and digital fine arts |
|
|
|
|
|
|
|
|
|
|
|
|
|
● |
|
|
● |
● |
|
|
|
|
|
|
|
|
|
|
|
|
|
|
|
|
|
|
|
|
|
|
|
|
|
|
|
Building coverings |
|
|
|
|
|
|
|
|
|
|
|
|
|
|
|
● |
|
|
|
|
|
|
|
|
|
|
|
|
|
|
|
|
|
|
|
|
|
|
|
|
|
|
|
|
|
Handle the substrate
ENWW |
Overview 19 |

substrate the Handle
Key to substrates |
F. Vinyl Cast |
L. BlueBack |
R. Photo |
A. Frontlit |
G. Perforated Material |
M. Backlit Paper |
S. Uncoated Tyvek |
B. Opaque |
H. Polyester |
N. Offset |
T. Surface Treated Tyvek |
C. Backlit |
I. Polypropylene |
O. Yupo |
U. Static Cling |
D. Green |
J. Woven Polyester |
P. Mesh |
V. Woven Polyethylene |
E. Vinyl Calendered |
K. Knitted Polyester |
Q. Canvas |
|
Supported substrate types
For information on new substrates, see http://www.hp.com/go/LX820/solutions/ or
http://www.hp.com/go/LX850/solutions/.
Category |
Type |
Color |
Applications |
|
|
calib. |
|
|
|
|
|
Banners |
HP HDPE Reinforced Banner1 |
Yes |
Banners, POP, flags, track |
|
|
|
covers, wall murals |
|
PVC Scrim Banner Frontlit – 100%, 150%, 250% |
Yes |
|
|
|
||
|
|
|
|
|
PVC Scrim Banner Backlit – 100%, 150%, 250% |
No |
|
|
|
|
|
|
Green Banner – 100%, 150%, 250% |
Yes |
|
|
|
|
|
|
HP Durable Frontlit Scrim Banner |
Yes |
|
|
|
|
|
Self-adhesive |
Vinyl – Calendared – 100%, 150%, 250% |
Yes |
Vehicle wraps, car/bus/track |
|
|
|
fleets, floors, signs |
|
Vinyl – Cast – 100%, 150%, 250% |
Yes |
|
|
|
||
|
|
|
|
|
Perforated Vinyl/Punch Window – 100%, 150%, 250% |
No |
|
|
|
|
|
|
HP Permanent Gloss Adhesive Vinyl |
Yes |
|
|
|
|
|
|
HP Permanent Matte Adhesive Vinyl |
Yes |
|
|
|
|
|
|
HP Air Release Adhesive Gloss Cast Vinyl |
Yes |
|
|
|
|
|
|
HP One-view Perforated Adhesive Window Vinyl |
No |
|
|
|
|
|
Film |
Polyester Film – 100%, 150%, 250% |
No |
Bus shelters, airport ads, POP, |
|
|
|
street ads |
|
HP Backlit Polyester Film1 |
Yes |
|
|
|
||
|
|
|
|
Fabric |
Polyester Fabric – 100%, 150%, 250% |
No |
Indoor flags, wall murals, |
|
|
|
interior decoration |
|
HP Heavy Textile Banner (Oeko-Tex certified)1 |
No |
|
|
|
||
|
|
|
|
|
HP Light Textile Display Banner – 150%, 250% (Oeko-Tex |
No |
|
|
certified)1 |
|
|
Paper |
HP PVC-free Wall Paper (FSC certified)2 3 |
Yes |
|
|
|
|
Blue back – 100%, 150%, 250% |
Yes |
|
|
|
|
HP Blue Back Billboard Paper |
Yes |
|
|
|
|
HP Photo-realistic Poster Paper1 |
Yes |
POP indoor and outdoor, windows, bus shelters, billboards, wall decorations
|
HP White Satin Poster Paper1 |
Yes |
|
|
|
|
|
Mesh |
Scrim banner – 100%, 150%, 250% |
No |
Building wraps |
|
|
|
|
20 Chapter 3 Handle the substrate |
ENWW |

Category |
Type |
Color |
Applications |
|
|
calib. |
|
|
|
|
|
Speciality |
Canvas Polyester – 100%, 150%, 250% |
Yes |
Fine arts, large photographs, |
|
|
|
floor covering |
|
Tyvek – 100%, 150%, 250% |
No |
|
|
|
||
|
|
|
|
|
HP Satin Canvas |
Yes |
|
|
|
|
|
|
HP DuPont Tyvek Banner1 |
No |
|
1HP Large-format Media take-back program availability varies. Some recyclable HP papers can be recycled through commonly available recycling programs. Recycling programs may not exist in your area. See http://www.hp.com/recycle/ for details.
2HP PVC-free Wall Paper printed with HP Latex Inks is GREENGUARD Children & Schools Certified. See http://www.greenguard.org/.
3HP PVC-free Wall Paper printed with HP Latex Inks meets AgBB criteria for health-related evaluation of VOC emissions of indoor building products. See http://www.umweltbundesamt.de/produkte-e/bauprodukte/agbb.htm.
The Color Calib. column indicates for each substrate whether color calibration is recommended.
 NOTE: The printer does not support substrates narrower than 914 mm (36 in).
 NOTE: Porous substrates require the use of the ink collector kit.


 NOTE: The fabric specifications supported are the following: Grammage > 100 g/m²; Fabrics "mesh" style with Porosity/Open areas < 20%; "Mesh Substrates" with Porosity/Open areas < 20%; Elasticity < 5%. For best results, print textile applications on fabric that does not stretch. Performance may vary depending on the substrate. Please consult your substrate supplier for compatibility details.
Substrate tips
General tips
Handle unprinted and printed substrates with care, and preferably with cotton gloves, to avoid fingerprints. For heavy rolls, use a forklift, and two people wearing security shoes.
Before loading a roll:
●Check that temperature and humidity in the room are within the recommended ranges for the printer. See Environmental specifications on page 104.
●Check that neither the roll nor its core are bent or deformed, which may cause the substrate to jam in the printer.
●If the roll has been stored in a place not offering the recommended environmental conditions, allow some time for it to adapt to the temperature and humidity of the printer's environment.
Handle the substrate
ENWW |
Substrate tips 21 |

● Check which is the correct side for printing, by reading the label inside the core or the note
|
|
inserted into the package (or see Tips for specific substrates on page 23). |
|
● Check that the substrate is correctly attached to the input core. Otherwise, you will see poor print |
|
|
|
quality due to substrate advance errors. |
|
● You may find it easier to load a roll if you first move the carriage beam to its highest position. |
|
|
While loading a roll, make sure the leading edge is parallel and straight across the output core, and |
|
|
attached evenly (start taping the substrate to the core at the center, then move towards the edges). |
|
|
After you have loaded a roll: |
|
|
● Make sure that the edge holders are set on both sides of the roll. Do not use any other Edge |
|
|
|
holder from another printer, only use the edge holders that came with the printer. An incorrectly |
|
|
loaded roll may cause waves or cockles in the substrate, leading to ink smearing and printhead |
|
|
crashes. |
|
● Check the correct carriage beam position for printing: high for thick substrates, normal for others. |
|
|
|
See Set the carriage beam position on page 25. |
|
● Check that you are using the correct substrate preset in the HP Internal Print Server and the correct |
|
|
|
ICC profile and other settings in the RIP. |
Handle |
|
|
● HP substrates are optimized to provide the best out-of-the-box printing experience with your |
||
|
printer. However, you may want to modify the ink limits or the number of passes; in which case, |
|
|
temperature, vacuum or tensions may need to be adjusted. You can create a new substrate preset |
|
the |
|
from the default preset you are using and make your changes. |
|
|
|
substrate |
● Use the HP Internal Print Server to check that any required calibrations have been done: color |
|
● |
For the best print quality, the substrate should stay flat and unwrinkled in the printing zone, the |
|
|
|
calibration, substrate-advance compensation, printhead alignment. See the Maintenance and |
|
|
troubleshooting guide. |
|
|
substrate advance should be constant and the substrate should move straight. |
|
|
|
● Do not cut off pieces of substrate while the substrate is loaded into the printer. This may cause the remaining substrate to jam.
After printing, try to allow 24 hours before stacking, folding or rolling printed substrates.


 NOTE: Printing on porous substrates may result in visible vapor being generated from the waterbased ink.
You can find further information on the Web:
●The specifications, finishing, processing and warranty information for each individual HP substrate are available from http://www.hp.com/go/designjet/supplies/latex/.
●HP Image Permanence information is available from http://www.hp.com/go/supplies/ printpermanence/.
●HP offers recyclable substrates such as HP HDPE Reinforced Banner, HP Wrinkle-free Flag with liner, HP Heavy Textile Banner, HP Photo-realistic Poster Paper and HP DuPont™ Tyvek® Banner. Recycling opportunities for these products may not exist in all areas. You should consult local recycling resources about recycling these products. For recycling in the USA, please go to the HP recycling services site, http://www.hp.com/go/recycleLFmedia/.
22 Chapter 3 Handle the substrate |
ENWW |

Tips for specific substrates
Substrate |
Printing side |
Printing tips |
|
|
|
HP Durable Frontlit Scrim |
Inside (smooth side) |
Use the right settings to avoid printing issues described in |
Banner |
|
Table 3-1 Substrate preset settings on page 64. |
|
|
|
HP Outdoor Frontlit Scrim |
Inside (smooth side) |
Use the right settings to avoid printing issues described in |
Banner |
|
Table 3-1 Substrate preset settings on page 64. |
|
|
|
HP HDPE Reinforced Banner |
Inside (matte side) |
This substrate is sensitive to high temperatures. Printing and |
|
|
curing temperatures are set to minimize material deformation. |
|
|
If the ambient temperature is high and you see excessive |
|
|
deformation of the substrate, raise the carriage beam to its |
|
|
highest position. Recyclable (see above). |
|
|
|
HP Permanent Gloss Adhesive |
Outside (glossy side) |
Use the right settings to avoid printing issues described in |
Vinyl |
|
Table 3-1 Substrate preset settings on page 64. |
|
|
|
HP Permanent Matte |
Outside |
Use the right settings to avoid printing issues described in |
Adhesive Vinyl |
|
Table 3-1 Substrate preset settings on page 64. |
|
|
|
HP Air Release Adhesive |
Outside |
|
Gloss Cast Vinyl |
|
|
|
|
|
HP One View Perforated |
Outside |
|
Adhesive Window Vinyl |
|
|
|
|
|
HP PVC-free Gloss Adhesive |
Outside |
|
Film |
|
|
|
|
|
HP Wrinkle-free Flag with |
Outside (fabric side) |
Take care to load the substrate and select settings correctly to |
liner |
|
avoid liner delamination while printing. Recyclable (see |
|
|
above). |
|
|
|
HP Heavy Textile Banner |
Inside |
Recyclable (see above). |
|
|
|
HP Light Textile Display |
Both sides; inside |
You are recommended to clean the platen after printing 50 m |
Banner |
recommended |
(164 ft) of substrate. |
|
|
|
HP Blue Black Billboard Paper |
Outside (white side) |
Use the right settings to avoid printing issues described in |
|
|
Table 3-1 Substrate preset settings on page 64. |
|
|
|
HP Photo-realistic Poster |
Both sides |
This substrate is sensitive to high temperatures. Printing and |
Paper |
|
curing temperatures are set to avoid material deformation. |
|
|
This substrate is recyclable: you can dispose of it together with |
|
|
cardboard. |
|
|
|
HP White Satin Poster Paper |
Outside |
|
|
|
|
HP PVC-free Wall Paper |
Outside |
|
|
|
|
HP DuPont Tyvek Banner |
Inside |
This substrate is sensitive to high temperatures. Printing and |
|
|
curing temperatures are set to minimize material deformation. |
|
|
Recycleable (see above). |
|
|
|
HP Satin Canvas |
Outside (smooth side) |
Use the right settings to avoid printing issues described in |
|
|
Table 3-1 Substrate preset settings on page 64. |
|
|
|
Handle the substrate
ENWW |
Substrate tips 23 |

substrate the Handle
Substrate configurations
The substrate can be loaded in a variety of different configurations to suit your different needs. Before loading, you must go to the HP Internal Print Server and select Substrate > Load/Unload, then select the configuration you intend to use.
The basic configurations are illustrated below. These configurations can be used for single-roll or dualroll printing, and for porous or non-porous substrates. Porous substrates require the use of the ink collector kit: see The ink collector kit (LX850 only) on page 28.
●The roll-to-roll configuration is suitable when you intend to print a whole roll without cutting it until the input roll is empty. The substrate cannot be cut in mid-roll unless printing double-sided, and then it must be reloaded afterwards.
●The roll-to-free-fall configuration (LX850 only) is suitable when you want to cut and remove each print as soon as it comes out of the printer. The substrate is kept under tension between the input roll and the tension roller; but it can be cut after the tension roller because then it is no longer under tension.
24 Chapter 3 Handle the substrate |
ENWW |

●The roll-to-free-fall with collector configuration (LX850 only) is suitable when you may want to cut the substrate and remove the output roll before the input roll is empty. The substrate is kept under tension between the input roll and the tension roller; but it can be cut after the tension roller because then it is no longer under tension.
Set the carriage beam position
The carriage beam position determines the vertical distance between the printheads and the platen. If it is too great, print quality will be impaired. If it is too small, there is a risk that the printheads will come into contact with the substrate, causing smears or damage.
To set the carriage beam position, go to the front panel and select the Substrate menu |
, then |
Substrate management, and press OK. Select Carriage beam position. You can choose the highest position, a custom position or the normal position.
●The highest position is not used for printing: it may be used for loading substrate or for maintenance tasks.
●A custom position is used for thick substrates, or for substrates that wrinkle slightly due to heating.


 TIP: Try to avoid wrinkling by using substrates that do not wrinkle, or by using a slower print


 mode that will allow you to lower the drying temperature.
We recommend setting the custom position to the thickness of the substrate plus two or three millimeters. The current setting is indicated in the front panel by a √ mark.
●The normal position is suitable for unwrinkled substrates up to 0.7 mm (0.03 in) thick.
WARNING! Keep away from the printer's moving parts until the carriage beam has reached its new position.
Handle the substrate
ENWW |
Set the carriage beam position 25 |


 NOTE: LX850 only: If you have installed the ink collector kit, the normal position and the lowest custom position are automatically adjusted to take account of that.
Prepare to print
The following steps that must be followed before the printer can print:
1.Ensure that the ink collector kit is installed for porous substrates, and not installed for non-porous substrates. See The ink collector kit (LX850 only) on page 28.
2.Start the printer. See Turn the printer on and off on page 12.
3.Go to the HP Internal Print Server and select Substrate > Load/Unload to open the Printer Configuration window.
4.Select the printer configuration that you intend to use, and press Next to see the on-screen help.
substrate the Handle


 NOTE: The Skip Substrate load check box should be checked only if the printer has just previously had the same configuration (i.e. the same substrate, same profile), and because of a severe system error, you had to restart the printer.
5.Load the substrate. Substrate loading instructions are displayed in the HP Internal Print Server window. For more detailed instructions, see Load a roll onto the spindle on page 33 and Load a roll into the printer on page 38.
6.Press the Load button in the HP Internal Print Server to start the substrate check, then enter the substrate type in the Loaded Substrate window.


 TIP: If the printer has been idle overnight with substrate loaded, and exposed to high or low


 temperatures, advance the substrate 13 to 25 cm (5 to 10 in) before printing, to avoid printhead crashes or ink smears on the substrate.
26 Chapter 3 Handle the substrate |
ENWW |
Loading...