

Page 1
HP LaserJet M5035x/M5035xs MFP
Getting Started Guide
Page 2

Copyright and License
© 2006 Copyright Hewlett-Packard Development Company, L.P.
Reproduction, adaptation or translation without prior written permission is
prohibited, except as allowed under the copyright laws.
The information contained herein is subject to change without notice.
The only warranties for HP products and services are set forth in the
express warranty statements accompanying such products and services.
Nothing herein should be construed as constituting an additional warranty.
HP shall not be liable for technical or editorial errors or omissions
contained herein.
Part number: Q7830-90906
Edition 1, 10/2006
FCC Regulations
This equipment has been tested and found to comply with the limits for a
Class A digital device, pursuant to Part 15 of the FCC rules. These limits
are designed to provide reasonable protection against harmful
interference in a residential installation. This equipment generates, uses,
and can radiate radio-frequency energy. If this equipment is not installed
and used in accordance with the instructions, it may cause harmful
interference to radio communications. However, there is no guarantee that
interference will not occur in a particular installation. If this equipment
does cause harmful interference to radio or television reception, which can
be determined by turning the equipment off and on, correct the
interference by one or more of the following measures:
• Reorient or relocate the receiving antenna. Increase separation
between equipment and receiver.
• Connect equipment to an outlet on a circuit different from that to
which the receiver is located.
• Consult your dealer or an experienced radio/TV technician.
Any changes or modifications to the device that are not expressly
approved by HP could void the user’s authority to operate this equipment.
Use of a shielded interface cable is required to comply with the Class A
limits of Part 15 of FCC rules. For more regulatory information, see the
HP LaserJet 5035MFP electronic user guide. Hewlett-Packard shall not be
liable for any direct, indirect, incidental, consequential, or other damage
alleged in connection with the furnishing or use of this information.
Trademark Credits
Windows® is a U.S. registered trademark of Microsoft Corporation.
1
Page 3
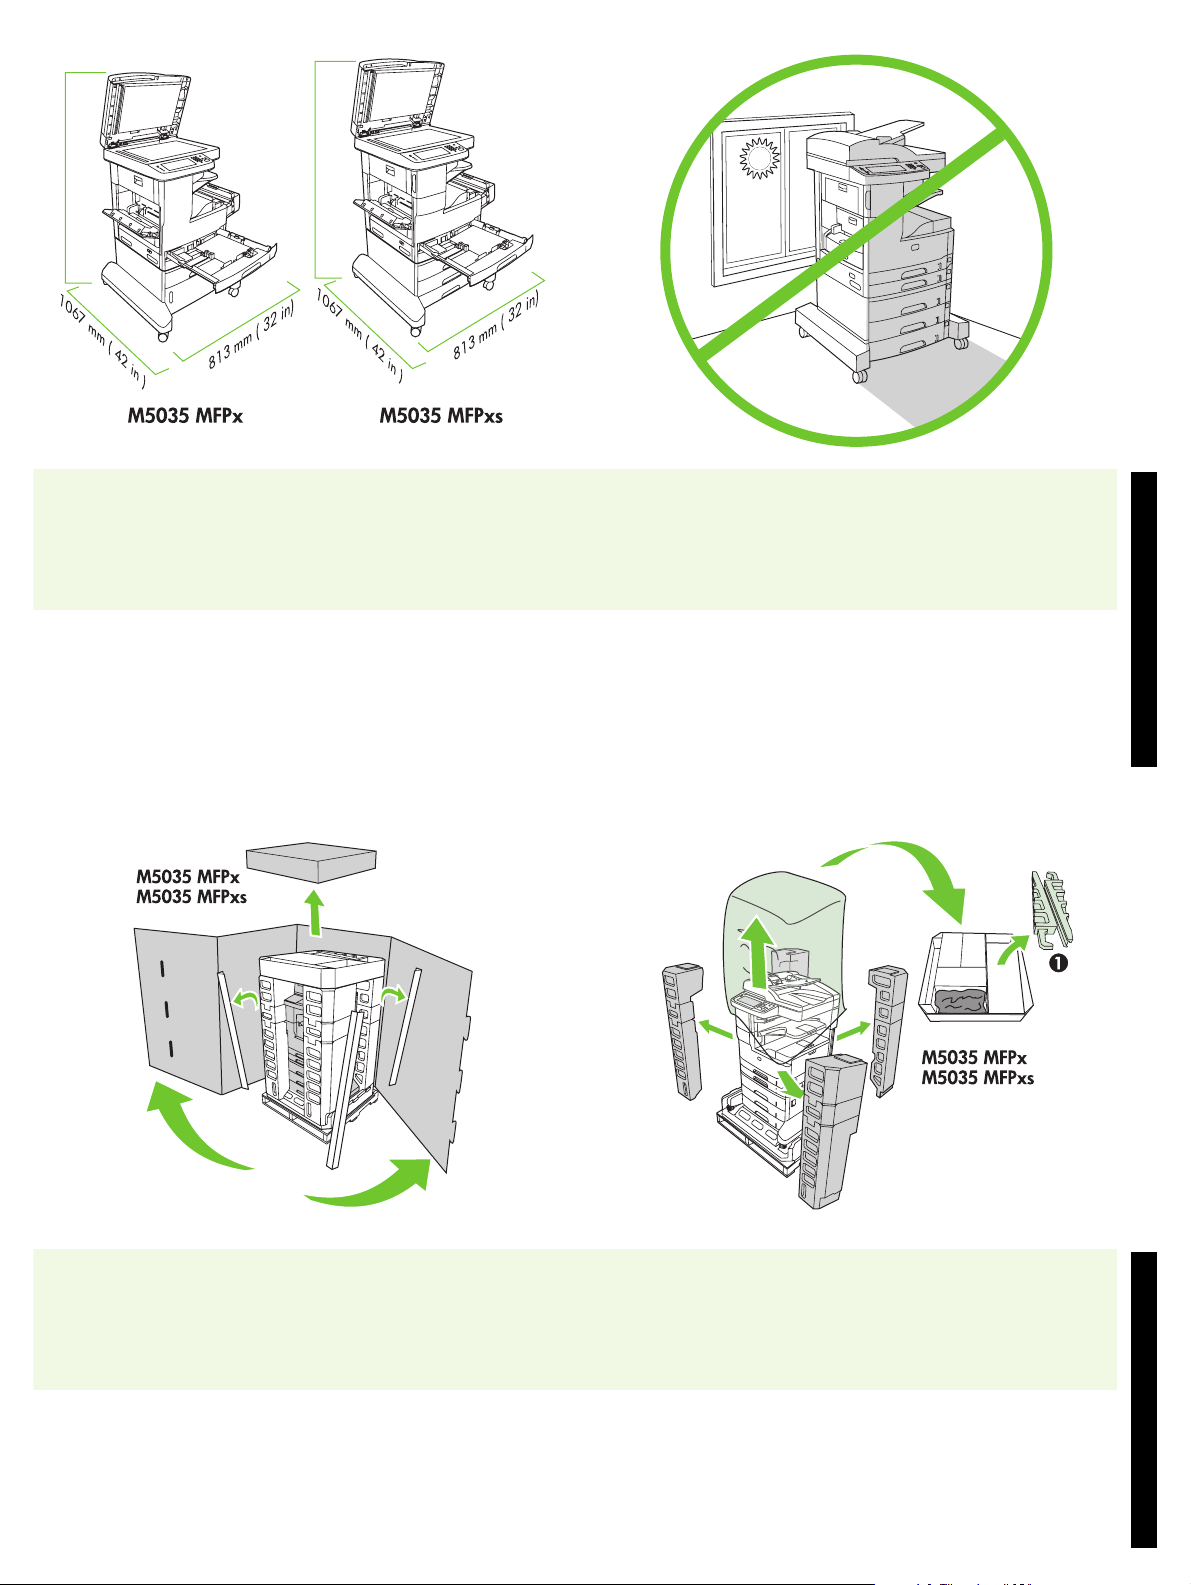
• Prepare the site
1372 mm (54 in)
Make sure there is enough space to position the device. To position the device, select a sturdy, well-ventilated, dust-free area that
1499 mm (59 in)
is out of direct sunlight to position the device.
• Unpack the device
English
1) Open the box and remove it. Set the duplexer box aside. 2) Remove the packaging, plastic cover, and locate the ramps (callout 1).
2
English
Page 4
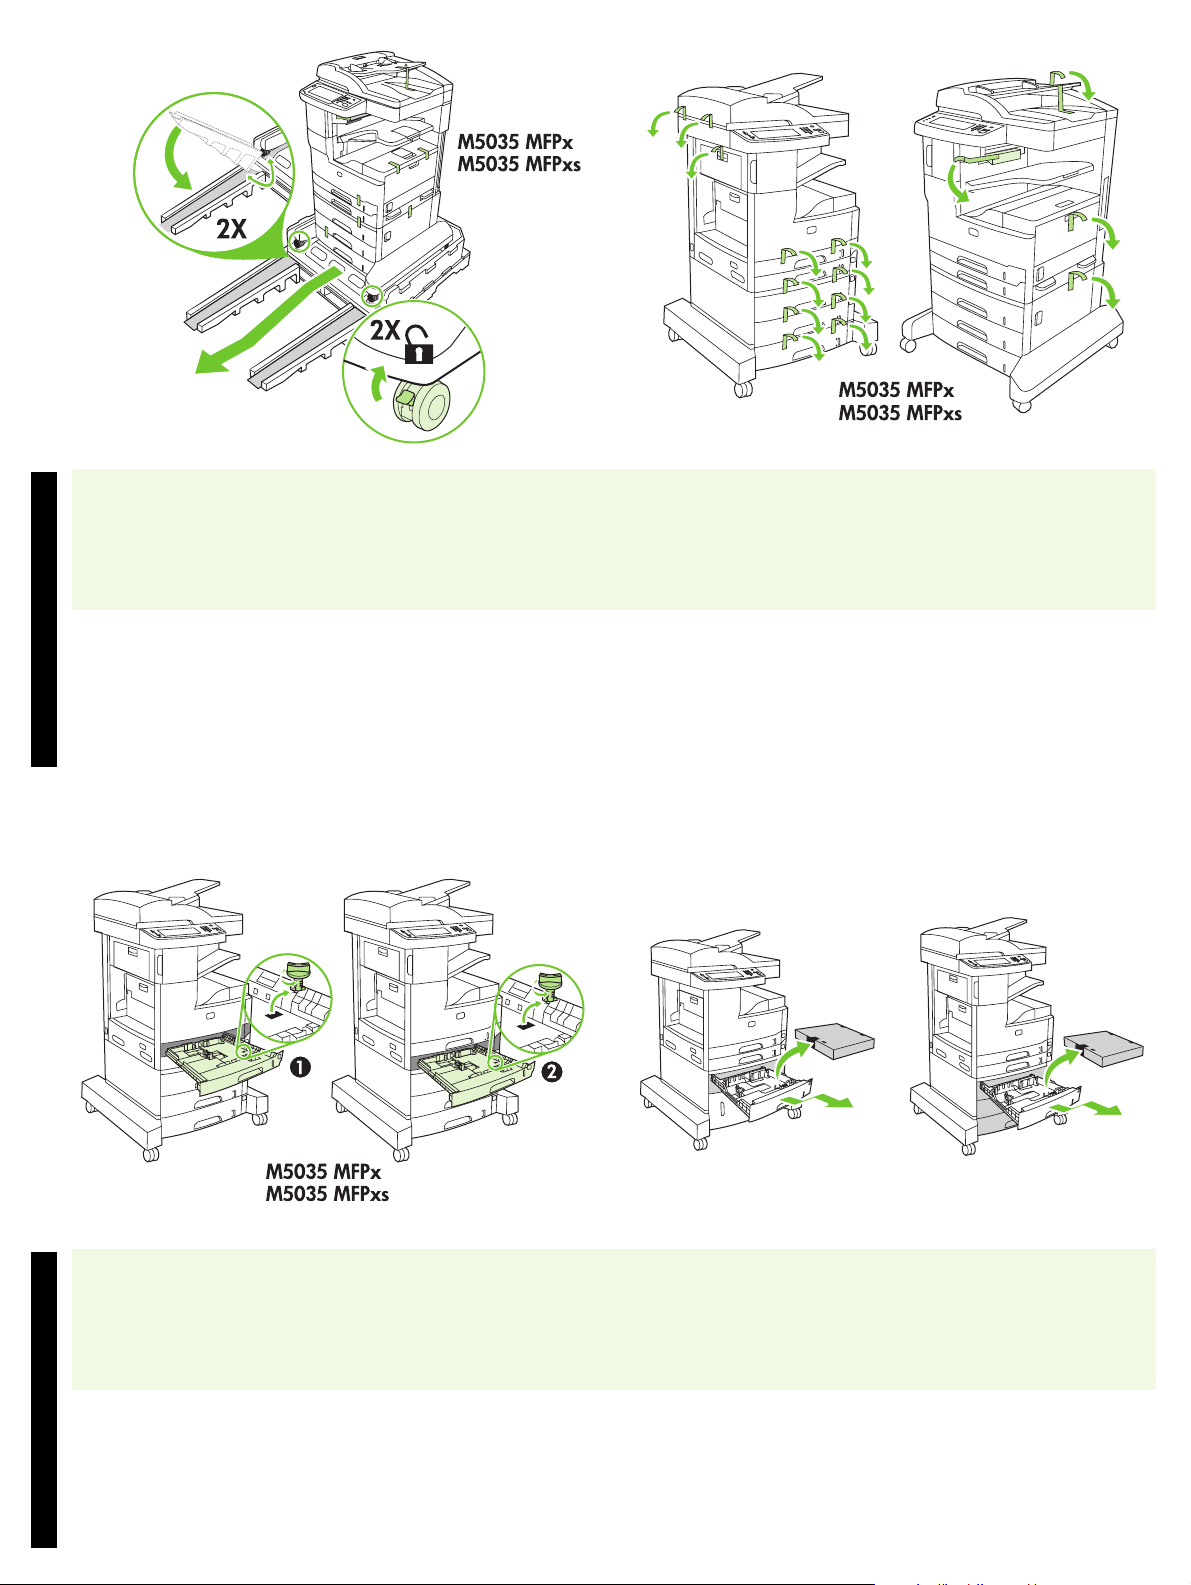
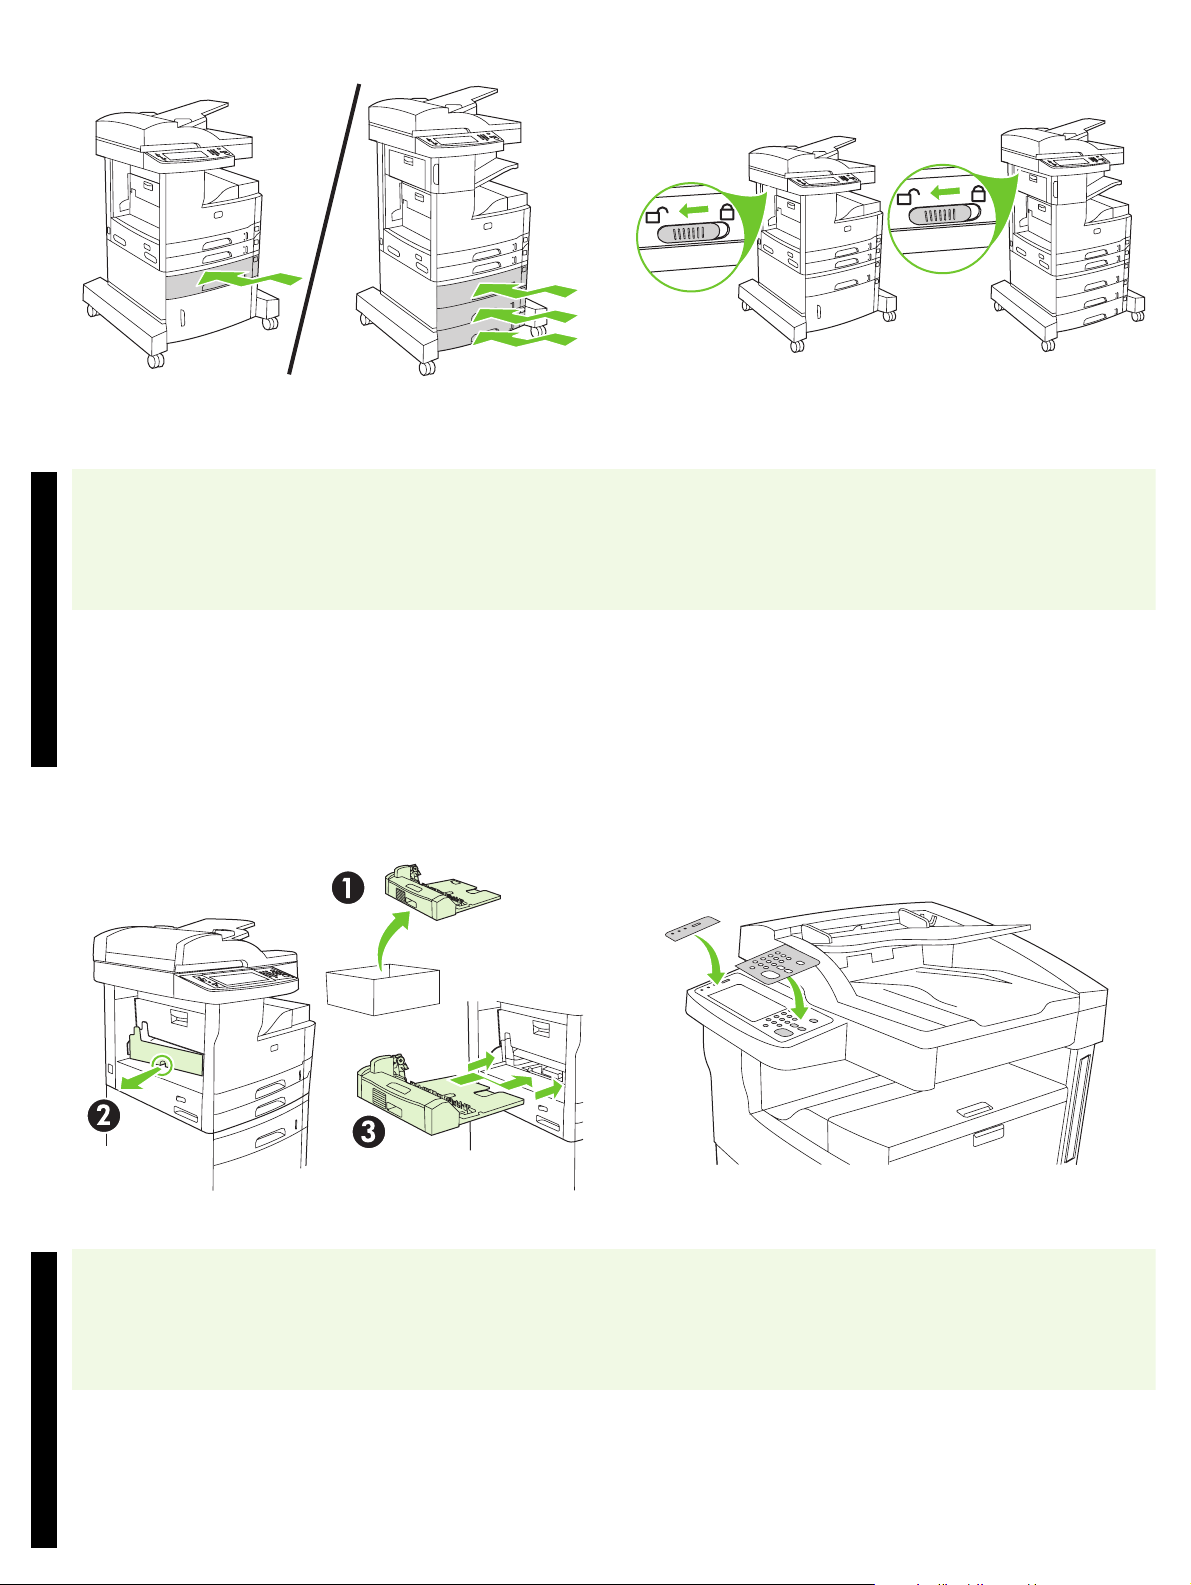
3) Install the ramps. 4) Make sure that the wheel locks are in the unlocked
position, and then roll the device onto the ramps and off of the pallet.
WARNING: Make sure that two people roll the device off of the pallet.
English
5) Remove all of the orange tape and cardboard packaging.
6) Remove the orange tray locks from tray 2 (callout 1) and tray 3
(callout 2).
English
M5035 MFPx M5035 MFPxs
7) Remove the cardboard in tray 4, tray 5, and tray 6 (XS model only).
3
Page 5
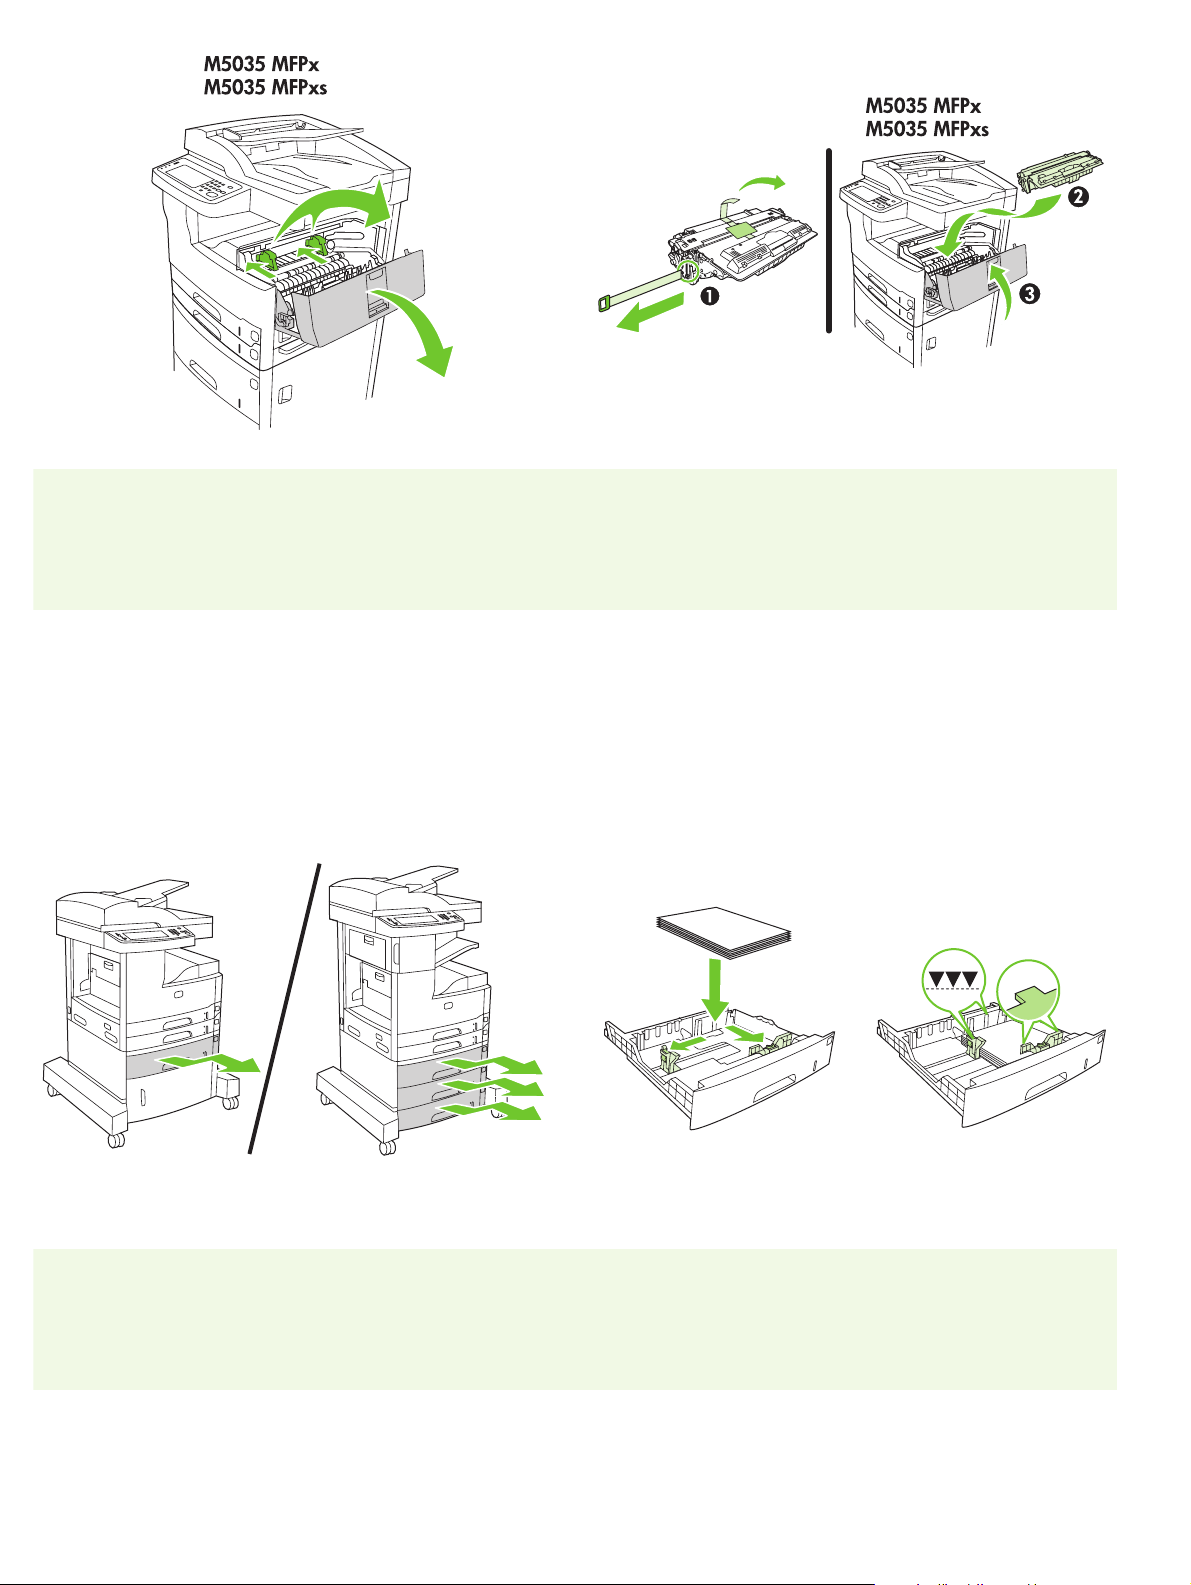
8) Open the upper-right door and remove the orange print-cartridge locks. 9) Remove the print cartridge from its packaging, remove the strip
(callout 1) and orange tape, insert the print cartridge (callout 2) into the
device, and then close the upper-right door (callout 3).
M5035 MFPx M5035 MFPxs
10) Open each tray to load the media. 11) Adjust the tray guides to match the media size, and then load the
media.
4
Page 6
M5035 MFPx M5035 MFPxs
M5035 MFPx M5035 MFPxs
12) Close all of the trays. 13) Move the scanner carriage shipping lock toward the back of the device
English
so it unlocks.
M5035 MFPx
M5035 MFPxs
14) Remove the duplexer from the box (callout 1), remove the duplexer
cover if necessary (callout 2), and then install the duplexer (callout 3).
English
15) If necessary, remove the control-panel overlays and install new
overlays.
5
Page 7
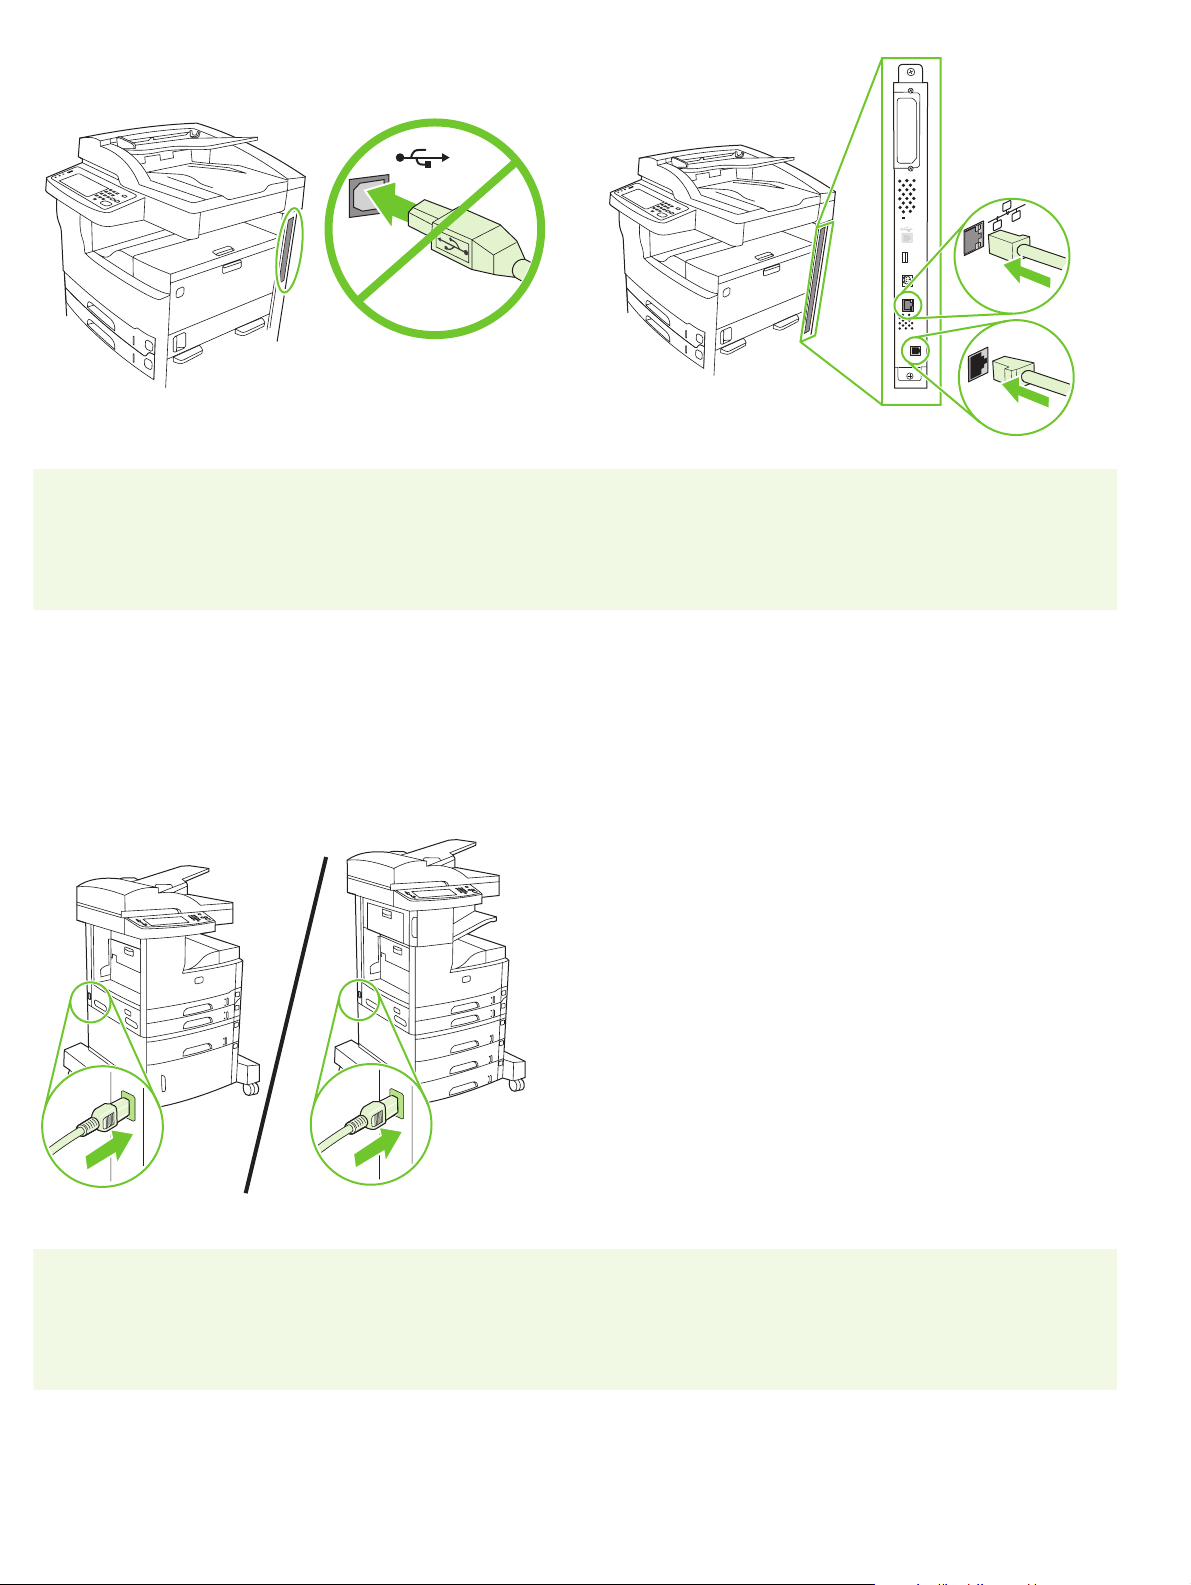
16) If you are connecting using a USB cable, wait until you are prompted
at the computer in step 26 on page 9.
17) Connect the network cable and the telephone cord (for fax).
M5035 MFPx M5035 MFPxs
18) Connect the power cable.
6
Page 8
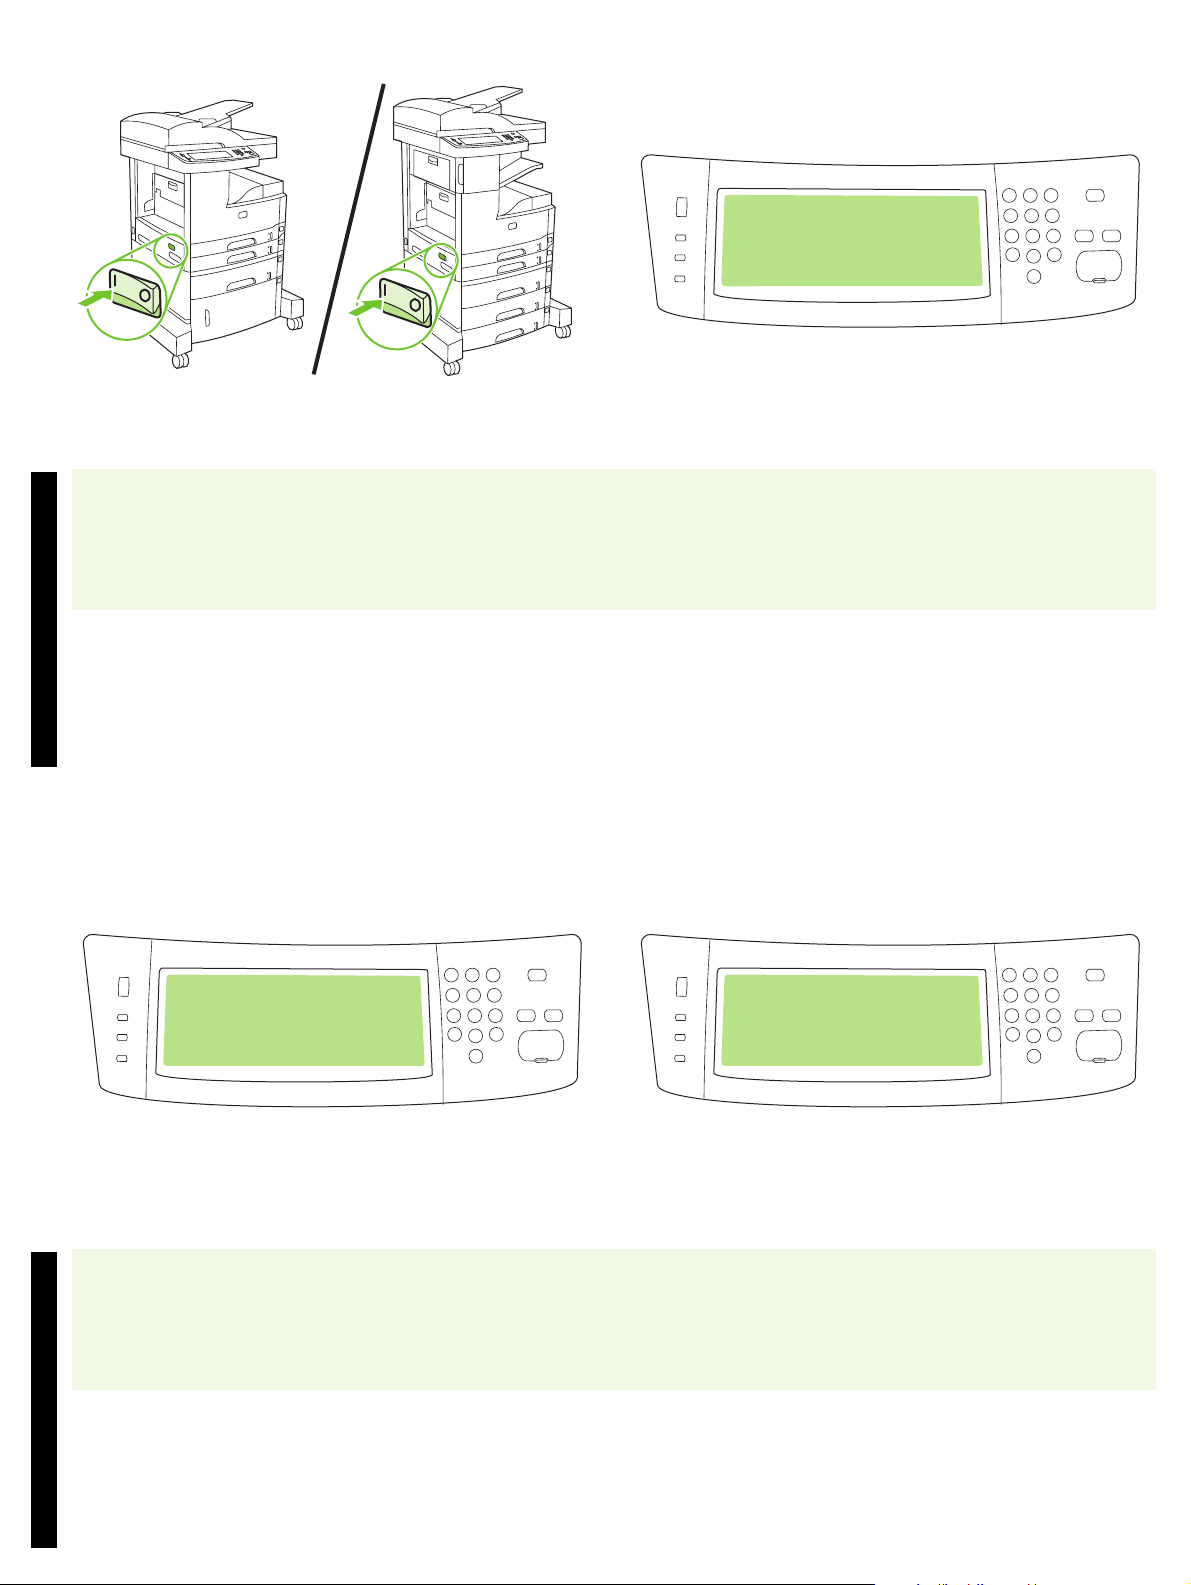
• Set up the control panel
M5035 MFPx M5035 MFPxs
19) Turn on the device. 20) Wait for the device to initialize (this might take a few minutes). If you
English
are prompted at the control panel, enter the language, date, time, location,
company name, and telephone (fax) number. Note: The location,
company name, and telephone (fax) number are required for fax
functionality.
21) If you are connected to a network, print a test page from the control
panel and check for a valid IP Address. On the control panel, touch the
Network Address button, and then touch Print. The IP address
information appears below “TCP/IP”. If your IP address information
appears, go to step 23 on page 8.
English
Note: Many networks provide IP addresses automatically. If the IP
address shows a series of zeros, make sure that you are connected to the
network and go to step 22.
7
Page 9
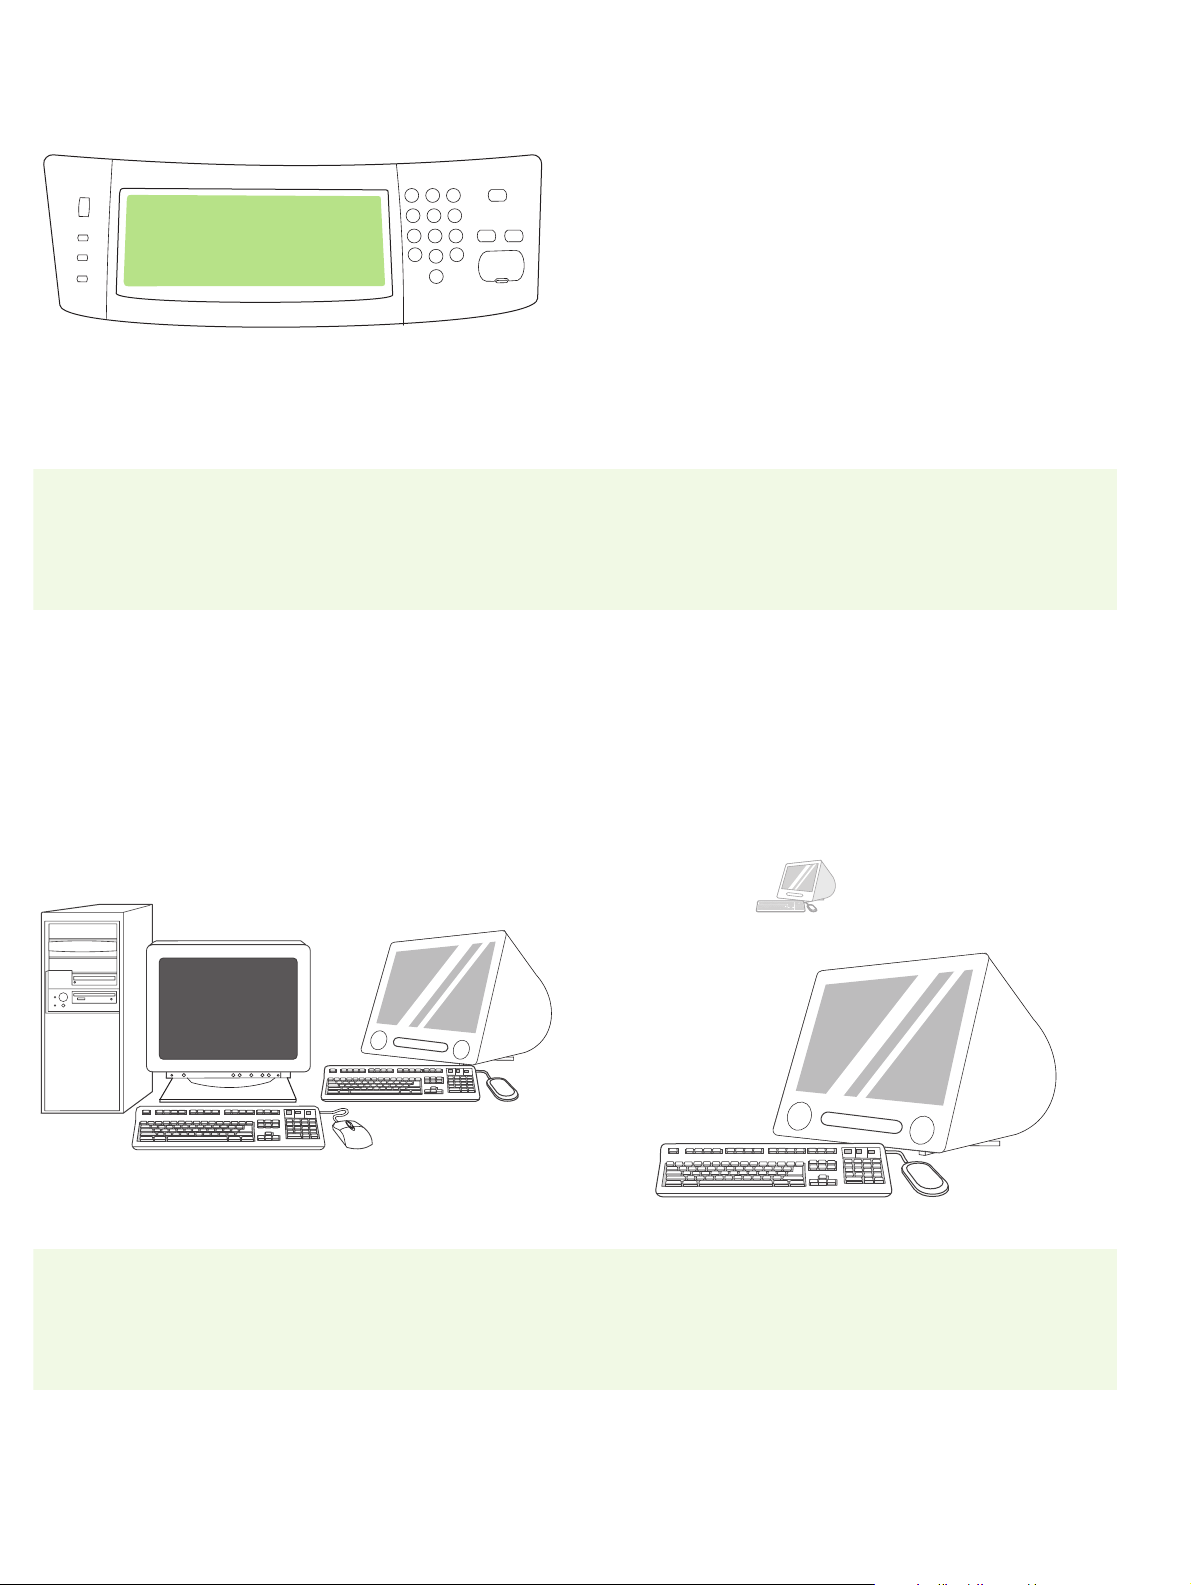
22) Configure the IP address (if necessary). On the control panel, scroll
to and touch Administration. Scroll to and touch Initial Setup, and then
Networking and I/O. Touch Embedded Jetdirect, TCP/IP, and IPV4
Settings. Touch Manual Settings, and then enter the IP Address,
Subnet Mask, and Default Gateway.
• Install the software
Macintosh
Prepare for software installation. 23) HP recommends closing all
unnecessary applications prior to installing the printing system software.
For Macintosh software installation instructions, go to step 28 on page 10.
8
Page 10

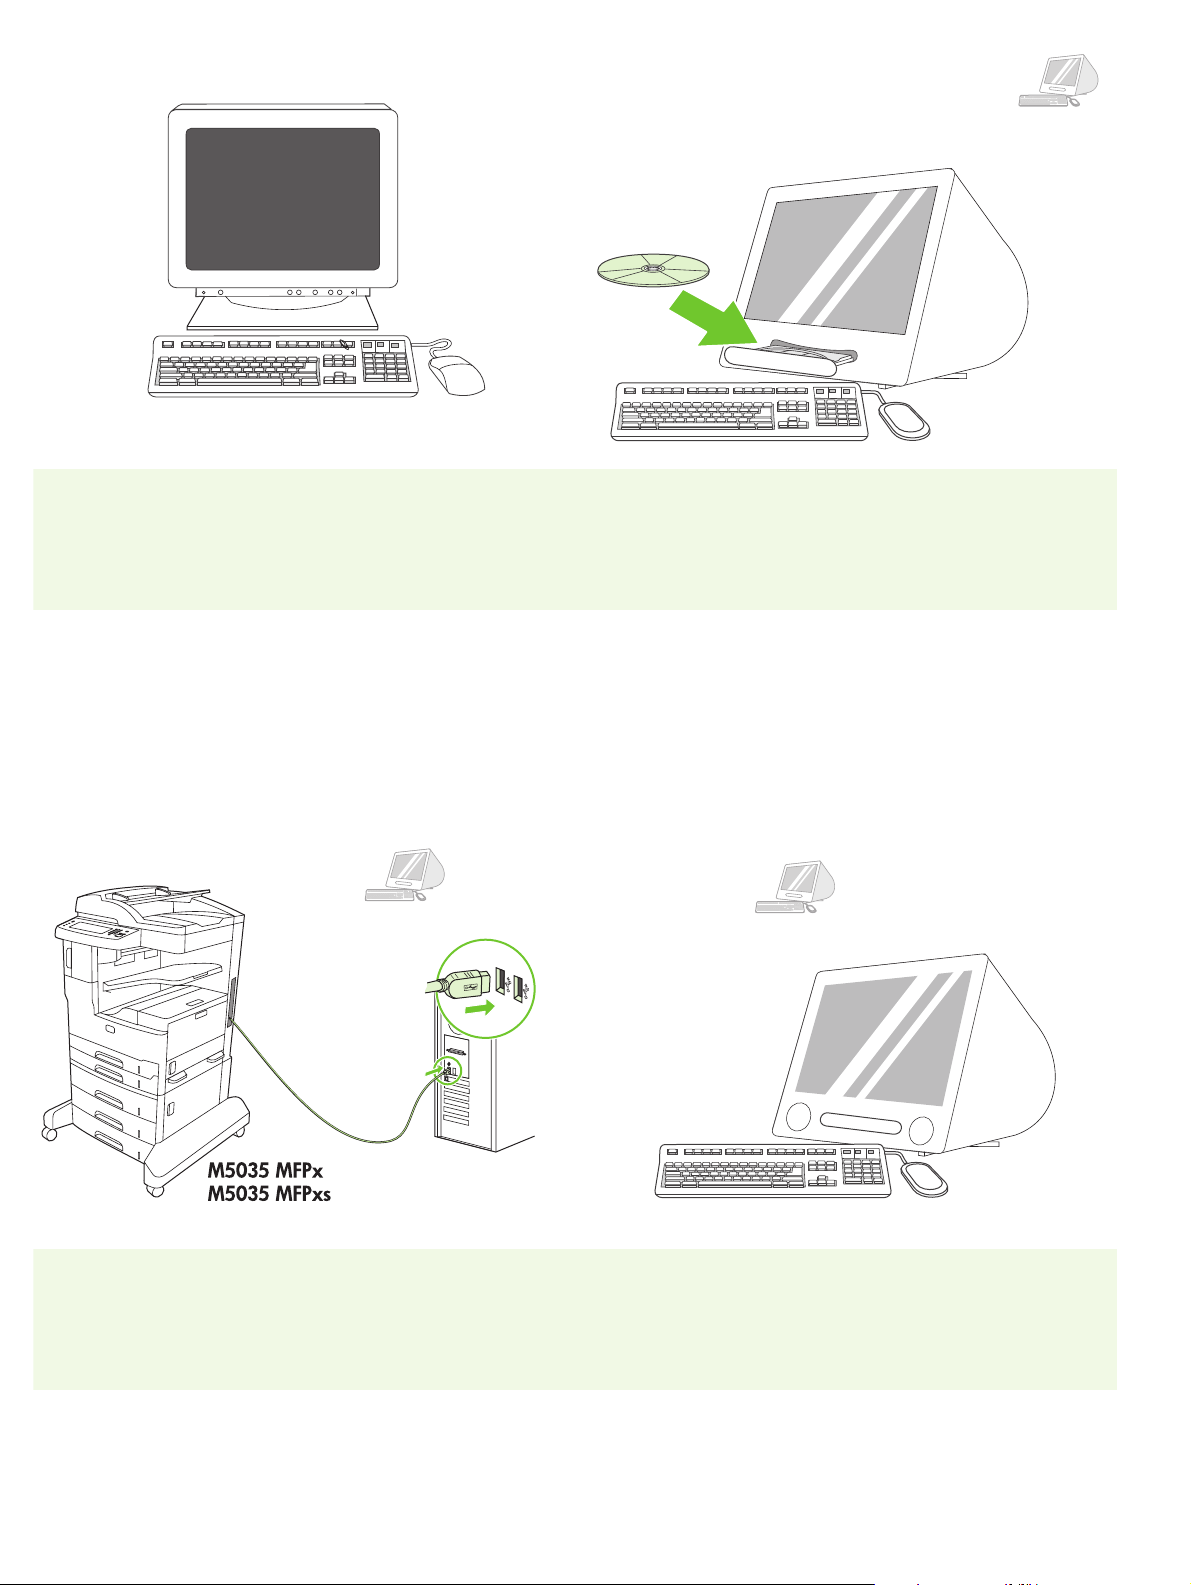
To install a USB connection, go to step 24. Windows with a direct connection (USB). 24) Install the software from
the CD before connecting the cable to the device. Note: If the New
Hardware Found message appears, insert the CD. Follow the onscreen
instructions, accept the default selections, and then go to step 35 on
English
page 11.
25) On the welcome screen, click Install Printer. The Setup Wizard
appears. Note: If the welcome screen does not appear, click Start, and
then click Run. Type X:SETUP (replace X with CD-ROM drive letter), and
click OK.
English
26) Follow the onscreen instructions. When prompted, connect a USB
cable between the device and the computer. Note: HP does not
recommend using USB hubs. Use a USB cable that is no longer than
2 meters (6.5 feet).
9
Page 11
Macintosh
27) Click Finish. If prompted, restart the computer. Go to step 35 on
page 11.
Macintosh
Connect to a Macintosh computer. 28) Place the CD in the CD-ROM
drive and run the installer. Complete an easy install. Note: Install the
software before connecting the USB cable.
Macintosh
29) Connect a USB cable between the device and the computer. Note: HP
does not recommend using USB hubs. Use a USB cable that is no longer
than 2 meters (6.5 feet).
Important: Perform steps 30-34 only if the USB cable was connected
before the software was installed. Otherwise, go to step 35 on page 11.
30) From Apple System Preferences (available in the Apple drop-down
menu) click Print & Fax, and then click the Printing tab at the top of the
window. 31) To add your device, click the “+” icon to launch the Printer
Browser. By default, the Printer Browser displays devices that are
connected through USB, Bonjour, and AppleTalk networking.
10
Page 12

Macintosh Macintosh
32) From the Printer Browser window, select the HP device. Note: If
HP software is installed, the software should automatically be configured
for Macintosh OS X V 10.4.
English
33) Click Add to create a printer queue, and then follow the prompt to
manually configure the device’s installable options. Note: Macintosh OS X
V 10.2 and V 10.3 might require you to manually select the printer model
from the Printer Model drop-down menu. 34) Under Model Name, select
the device, click Add, and go to step 35.
Test the software installation. 35) Print a page from any program to
make sure that the software is correctly installed. Note: If the page failed
to print, reinstall the software. If the page fails to print after reinstalling, go
to www.hp.com/support/M5035mfp.
English
11
Page 13

• Set up digital send
36) Open a web browser. 37) Type the device IP address (found on the
Jetdirect configuration page). 38) Select the Digital Sending tab.
39) Complete General Settings information, such as name and e-mail
address.
40) Select E-mail Settings from the left navigation menu. 41) Type the
SMTP server address. Note: If you are using an Internet Service Provider
(ISP) for Internet access and e-mail you might need to contact your ISP to
obtain the SMTP server name, and to determine if you need to enter an
account name and password for SMTP authentication.
42) Select The E-mail Address Book from the left navigation area to
enter frequently-used e-mail addresses and e-mail distribution lists.
Note: The Fax Address Book and Fax Speed Dials are located in the
left navigation area. These two features allow you to manage
frequently-used fax numbers and speed dial lists.
43) To scan a document to your computer or shared network folder, use
the Send To Folder feature (on the left navigation bar) to set up one or
more folder destinations. Note: See the embedded Web server (EWS)
guide for more information on configuring the Send To Folder feature.
12
Page 14

• Install send fax driver
44) If your device has faxing capabilities and you did not install the send
fax driver in step 25, insert the CD to install the driver. Select Custom,
Send Fax driver, and follow the instructions. Note: See the HP LaserJet
Analog Fax Accessory 300 User Guide on the installation CD for more
information.
English
• Register the device
Congratulations! The device is ready to use. The user guide is located
on the CD. See www.hp.com/support/M5035mfp for more information or
support.
Note: Save the boxes and the packing materials in case you need to
transport the device.
English
Macintosh
Register your device. Register at www.register.hp.com. This is the
quickest and easiest way for you to register to receive the following
information: technical support updates, enhanced support options, ideas
and ways to use your new HP device, and news about emerging
technologies.
13
Page 15

Troubleshooting
Area Symptom Cause/Remedy
Control-pan
el display
Print Not printing 1) Check the network or USB cable. See page 6 or page 10 for more
Blank 1) Make sure that the power cable is connected to a working power outlet.
2) Make sure that the device is turned on. See page 7 for more information.
3) If the status lights on the left side of the control panel are functioning,
adjust the contrast by using the dial in the upper left of the control panel.
4) Turn off the device, reseat the formatter, and then turn on the device.
Button on the touch
screen appears gray with
“!” markers
Device does not
recognize Letter/A4
media loaded in the tray
Jams 1) Make sure that the orange packing tape, cardboard, and orange plastic
1) Make sure that the scanner lock is unlocked. See page 5 for more
information.
2) Turn off the device, and then turn it on again.
Make sure that the media is loaded long-edge leading (with the short edge
toward the front of the device). See page 4 for more information.
information.
2) If you are printing over a network, print a configuration page and make
sure that the IP address is correct.
3) Reinstall the print driver.
shipping locks have been removed. See pages 3-4 for more information.
2) Make sure that you are using supported media. See the user guide on the
CD for more information.
3) Make sure that the media is loaded correctly.
Blank pages Make sure that the strip is removed from the print cartridge. See page 4 for
Copy Buttons on the touch
screen appear gray
Blank pages from copy Load the original media face up into the ADF.
Poor copy quality 1) Select Optimize Text/Picture and adjust the settings to match the
more information.
1) Make sure that the scanner lock is unlocked. See page 5 for more
information.
2) Turn off the device, and then turn it on again.
original.
2) Select Image Adjustment, and optimize the values for Darkness,
Sharpness, and Background Cleanup.
14
ENWW
Page 16

Troubleshooting
Area Symptom Cause/Remedy
Fax Fax icon appears gray Touch Administration, touch Initial Setup, and touch Fax Setup. Touch
Required Settings and enter the location, date/time, and fax header
information to make sure that the fax is configured correctly.
No fax icon on the
control-panel display
Fax configured but not
sending fax (phone line
not connected)
Fax configured but not
sending fax (phone line
incompatible)
Fax configured but not
receiving fax
E-mail Digital sending tab in the
embedded Web server
(EWS) does not appear
1) Make sure that the fax card is installed in the formatter correctly, and that
none of the pins are bent.
2) Print a configuration page and check the modem status on the fax
accessory page. If "Operational/Enabled" is not listed, it might be disabled or
there might be a problem with the fax hardware. See the HP LaserJet Fax
Accessory 300 User Guide for more information.
1) Make sure to use the phone cord that came with the device.
2) Make sure that the phone cord is connected securely to the device and to
an active telephone port. Hint: Use a telephone to verify that the port is
active.
Make sure that the fax is connected to a dedicated analog telephone line.
1) Make sure that a line splitter or surge-protection device is not being used.
2) Make sure that voice mail or an answering machine is not receiving the
incoming fax before the device. Remove these, or set the device
rings-to-answer to a lower number.
3) Make sure that a roll-over line is not being used, and that the fax is
connected to a dedicated analog telephone line.
An administrative password might be configured. Select Log On in the upper
right corner of the EWS.
Email Gateway Not
Responding appears on
the control-panel display
when attempting to send
an e-mail
The “from” address
cannot be changed in
Send to Email
You want to scan and
send-to-email in black
and white TIFF format
You want to change the
file type or the color
setting for e-mail
attachments
A “job failed” message is
received when a
document is scanned and
sent to e-mail
1) The SMTP gateway address might be incorrect. Contact your IT
administrator to obtain the correct address.
2) If you are using an Internet Service Provider (ISP) for e-mail, contact your
ISP provider the hostname of your SMTP gateway (request the fully qualified
domain name (FQDN), not the IP address).
3) Make sure that the entered SMTP authentication user name and
password are correct. Note: Not all SMTP gateways require a user name
and password.
The “Prevent Device User from changing the e-mail address” feature in the
EWS might be selected, or “Device Authentication” is enabled.
Use the EWS to change the default image file format by selecting Digital
Sending, Send to Email, and Advanced.
On the control-panel e-mail feature, select More Options to change the
image file format before sending the e-mail.
1) Send a test e-mail to make sure that the e-mail address is correct.
2) Make sure that the scanned document does not exceed your SMTP
gateway’s maximum allowable attachment size. If it does, use the EWS to
change the size by selecting Digital Sending and Send to Email.
ENWW
15
Page 17

Troubleshooting
Area Symptom Cause/Remedy
Staple A job is not stapled. 1) Remove the staple cassette and check if it is jammed or empty.
2) For copy jobs, select the Staple/Collate option at the control panel. For
print jobs, make sure the stapler/stacker is configured in the printer driver.
3) Use only Letter or A4-size paper for staple jobs.
Staples are not holding
the pages together.
Staples are not in the
correct location
Stack The pages might be
skewed.
The pages might not be
stacked neatly
Other All symptoms See the user guide on the CD for more information.
1) Replace the staple cartridge with a staple cartridge that is made for this
device.
2) The stapler supports jobs that have 30 or fewer pages, or a 3 mm stack
height.
1) For print jobs, adjust the page layout in the software program.
2) For copy jobs, load the document into the ADF with the long-edge feeding
first.
Make sure all the doors on the left side of the device are closed completely.
1) Use paper that meets specifications.
2) Store media in an area that meets specifications.
3) Try using paper from an unopened ream.
16
ENWW
Page 18

17
Page 19

18
Page 20

19
Page 21

20
HEWW
Page 22

HEWW
21
Page 23

22
HEWW
Page 24

•
Macintosh
•
23
Page 25

•
24
Page 26

Macintosh
Macintosh
25
Page 27

Macintosh
Macintosh
Macintosh
26
Page 28

27
Page 29

Macintosh
•
28
Page 30

M5035 MFPx M5035 MFPxs
•
29
Page 31

30
M5035 MFPx M5035 MFPxs
Page 32

M5035 MFPx M5035 MFPxs
M5035 MFPx M5035 MFPxs
M5035 MFPx
M5035 MFPxs
31
Page 33

32
M5035 MFPx M5035 MFPxs
Page 34

M5035 MFPx M5035 MFPxs
33
Page 35

•
1372 mm (54 in)
1499 mm (59 in)
•
34
Page 36

© 2006 Hewlett-Packard Development Company, L.P.
www.hp.com
Printed in Germany
*Q7830-90906*
*Q7830-90906*
Q7830-90906
 Loading...