

Page 1
HP LaserJet 9040/9050
Page 2

Page 3

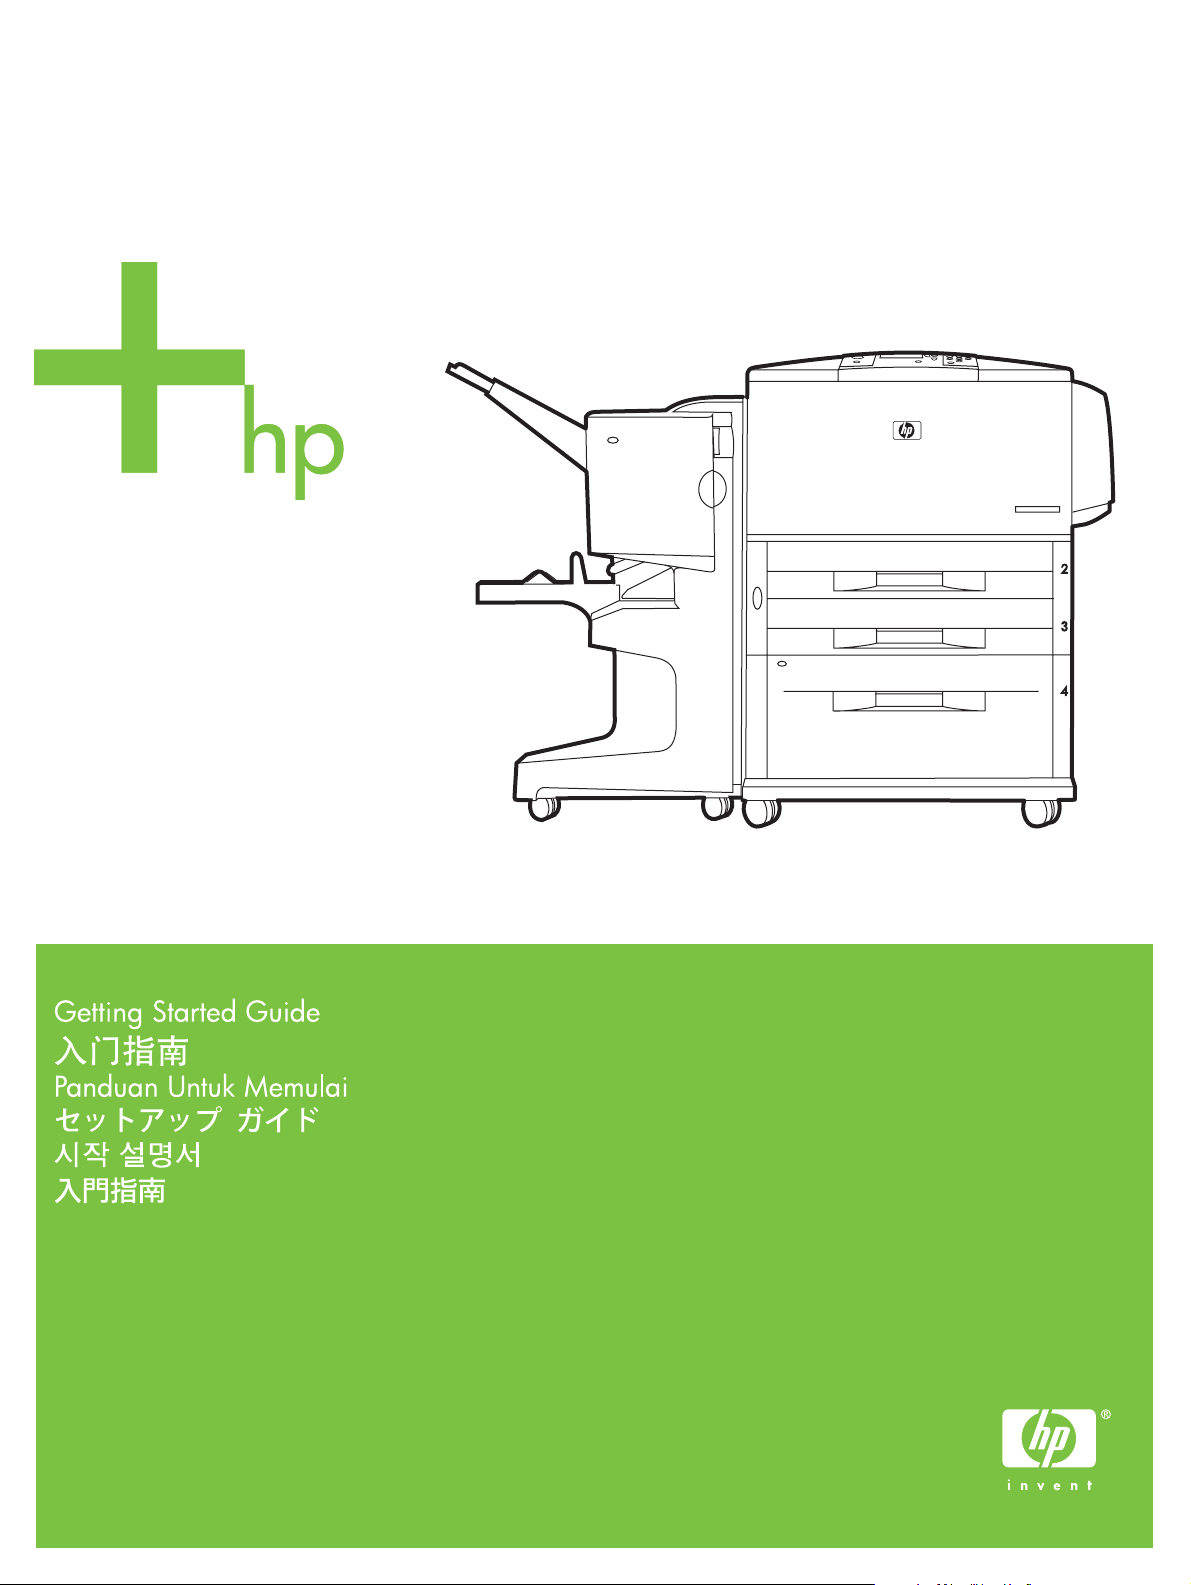
HP LaserJet 9040/9050 printer
English
Getting Started Guide
Page 4

© 2005 Copyright Hewlett-Packard
Development Company, L.P.
Reproduction, adaptation, or translation
without prior written permission is prohibited,
except as allowed under the copyright laws.
The information contained herein is subject
to change without notice.
Publication number
Q3721-90939
Edition 1, 02/2005
The only warranties for HP products and
services are set forth in the express warranty
statements accompanying such products and
services. Nothing herein should be construed
as constituting an additional warranty.
HP shall not be liable for technical or editorial
errors or omissions contained herein.
Trademark Credits
Microsoft
, Windows, and Windows NT
are U.S. registered trademarks of Microsoft
Corporation.
UNIX
is a registered trademark of
The Open Group.
All other products mentioned herein may be
trademarks of their respective companies.
Page 5

Printer Setup
Contents
Introduction. . . . . . . . . . . . . . . . . . . . . . . . . . . . . . . . . . . . . . . . . . . . . . . . . . . . . . . . . . . . . . . . . 4
Installation checklist . . . . . . . . . . . . . . . . . . . . . . . . . . . . . . . . . . . . . . . . . . . . . . . . . . . . . . . . . . 4
Prepare printer location . . . . . . . . . . . . . . . . . . . . . . . . . . . . . . . . . . . . . . . . . . . . . . . . . . . . . . . 5
Check package contents. . . . . . . . . . . . . . . . . . . . . . . . . . . . . . . . . . . . . . . . . . . . . . . . . . . . . . . 9
Locate printer parts. . . . . . . . . . . . . . . . . . . . . . . . . . . . . . . . . . . . . . . . . . . . . . . . . . . . . . . . . . 10
Remove internal packaging . . . . . . . . . . . . . . . . . . . . . . . . . . . . . . . . . . . . . . . . . . . . . . . . . . . 11
Install accessories . . . . . . . . . . . . . . . . . . . . . . . . . . . . . . . . . . . . . . . . . . . . . . . . . . . . . . . . . . 12
Install print cartridge . . . . . . . . . . . . . . . . . . . . . . . . . . . . . . . . . . . . . . . . . . . . . . . . . . . . . . . . . 14
Connect printer cables . . . . . . . . . . . . . . . . . . . . . . . . . . . . . . . . . . . . . . . . . . . . . . . . . . . . . . . 15
Connecting a parallel cable. . . . . . . . . . . . . . . . . . . . . . . . . . . . . . . . . . . . . . . . . . . . . . . 16
Connecting to Ethernet 10/100TX network (for the HP LaserJet 9040n/9050n and the
HP LaserJet 9040dn/9050dn). . . . . . . . . . . . . . . . . . . . . . . . . . . . . . . . . . . . . . . . . . . . . 17
Change the control panel overlay . . . . . . . . . . . . . . . . . . . . . . . . . . . . . . . . . . . . . . . . . . . . . . . 18
Connect power cord . . . . . . . . . . . . . . . . . . . . . . . . . . . . . . . . . . . . . . . . . . . . . . . . . . . . . . . . . 19
Configure the control panel display language. . . . . . . . . . . . . . . . . . . . . . . . . . . . . . . . . . . . . . 20
Load Tray 1. . . . . . . . . . . . . . . . . . . . . . . . . . . . . . . . . . . . . . . . . . . . . . . . . . . . . . . . . . . . . . . .21
Load Trays 2 and 3 . . . . . . . . . . . . . . . . . . . . . . . . . . . . . . . . . . . . . . . . . . . . . . . . . . . . . . . . . . 22
Print a configuration page. . . . . . . . . . . . . . . . . . . . . . . . . . . . . . . . . . . . . . . . . . . . . . . . . . . . . 23
Install printing software . . . . . . . . . . . . . . . . . . . . . . . . . . . . . . . . . . . . . . . . . . . . . . . . . . . . . . . 24
Installing Windows printing software. . . . . . . . . . . . . . . . . . . . . . . . . . . . . . . . . . . . . . . . 24
Installing Macintosh printing software . . . . . . . . . . . . . . . . . . . . . . . . . . . . . . . . . . . . . . . 24
Verify printer setup . . . . . . . . . . . . . . . . . . . . . . . . . . . . . . . . . . . . . . . . . . . . . . . . . . . . . . . . . . 26
Customer support. . . . . . . . . . . . . . . . . . . . . . . . . . . . . . . . . . . . . . . . . . . . . . . . . . . . . . . . . . .26
Warranty and regulatory information. . . . . . . . . . . . . . . . . . . . . . . . . . . . . . . . . . . . . . . . . . . . . 27
Hewlett-Packard limited warranty statement. . . . . . . . . . . . . . . . . . . . . . . . . . . . . . . . . . 27
HP’s Premium Protection Warranty. . . . . . . . . . . . . . . . . . . . . . . . . . . . . . . . . . . . . . . . . 29
HP Software License Terms . . . . . . . . . . . . . . . . . . . . . . . . . . . . . . . . . . . . . . . . . . . . . . 29
FCC regulations . . . . . . . . . . . . . . . . . . . . . . . . . . . . . . . . . . . . . . . . . . . . . . . . . . . . . . . 31
Safety Information. . . . . . . . . . . . . . . . . . . . . . . . . . . . . . . . . . . . . . . . . . . . . . . . . . . . . . 32
Declaration of Conformity . . . . . . . . . . . . . . . . . . . . . . . . . . . . . . . . . . . . . . . . . . . . . . . . . . . . . 34
English
ENWW Contents 3
Page 6
Introduction
Congratulations on your p urchase of the HP LaserJet 9040/9050 printer . This series of printers is
available in the following configurations.
HP LaserJet 9040/9050 printer
The HP LaserJet 9040/9050 printer (product number Q7697A/Q3721A) comes standard with
64 megabytes (MB) of random-access memory (RAM), wide-format printing, and two 500-sheet
trays.
Note Only the HP LaserJet 9040/9050 printer requires an optional enhanced input/output
(EIO) card to connect to a network.
HP LaserJet 9040n/9050n printer
The HP LaserJet 9040n/9050n printer (product number Q7698A/Q3722A) comes standard with
128 MB of RAM, wide-format printing, two 500-sheet trays, a 100-sheet multipurpose tray
(Tray 1), and an embedded HP Jetdirect print server.
HP LaserJet 9040dn/9050dn printer
The HP LaserJet 9040dn/9050dn printer (product number Q7699A/Q3723A) comes standard
with 128 MB of RAM, wide-format printing, two 500-sheet trays, a 100-sheet multipurpose tray
(Tray 1), an embedded HP Jetdirect print server, and a duplex printing accessory (fo r printing on
both sides of paper).
Installation checklist
This guide will help you set up and install your new printer. For correct installation, please
complete each section in order:
● Unpack the printer steps 1-4
● Install the printer steps 5-13
● Install printing software step 14
● Verify printer setup step 15
WARNING! The printer is heavy. HP recommen ds that fo ur people mov e it to av oid injury to you a nd damage
to the printer.
4 Printer Setup ENWW
Page 7

Step 1. Prepare printer location
Shipping box space requirements
Make sure that your building has a door or receiving area large enough for delivery of the
shipping box. The approximate dimensions of the shipping box are as follows:
911 x 790 mm deep x 1036 mm high (36 x 31 inches deep x 41 inches high).
Unpacking space requirements
Before removing the pl astic wrapping from the shipping box, make sure that you have enough
space to remove the contents from the shipping box, and then lift the product off its shipping
pallet. HP recommends at least 3.1 meters (10 f eet) of space around the ship ping box to remov e
all of the shipping materials.
Removing the printer from the shipping box
See the graphics on the shipping box for information about how to remove the printer from the
shipping box.
WARNING! The printer is heavy. HP recommen ds that fo ur people mov e it to av oid injury to you a nd damage
to the printer.
English
ENWW Prepare printer location 5
Page 8
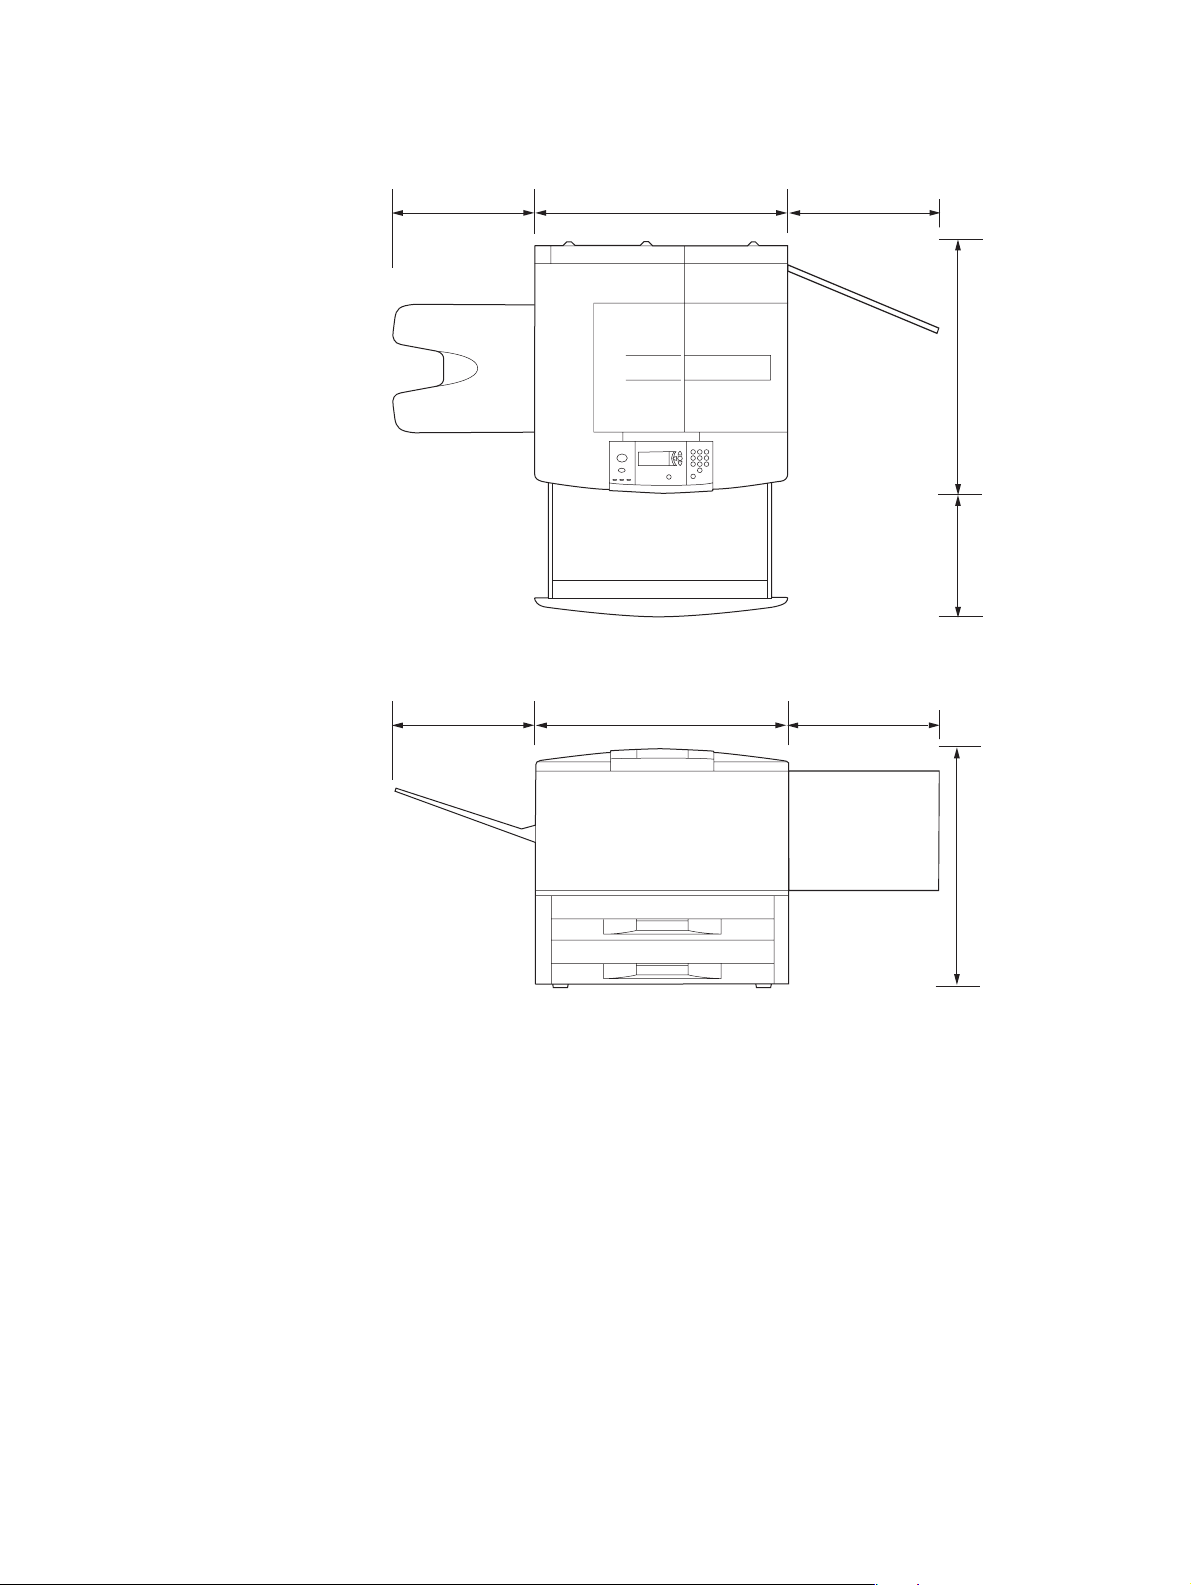
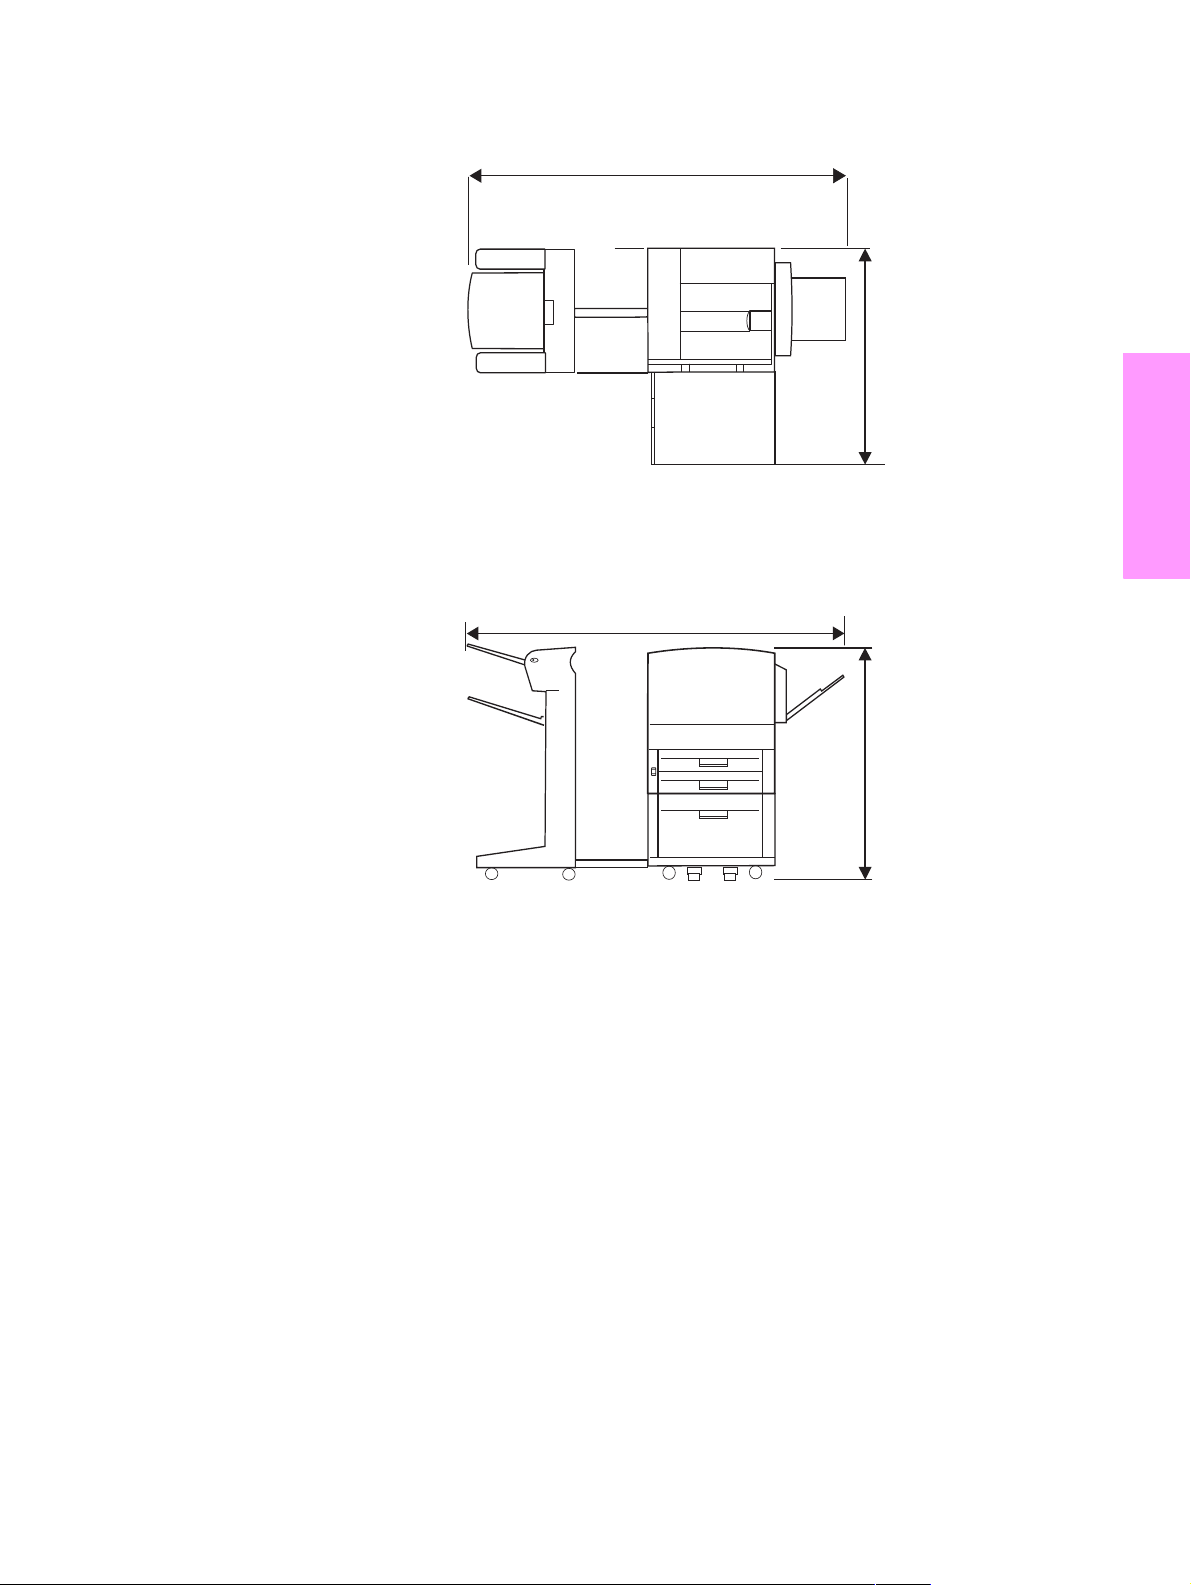
Printer size
Prepare a location for the printer that allows for these physical and environmental requirements:
353 mm
(13.9 inches)
353 mm
(13.9 inches)
638 mm (25.1 inches)
638 mm (25.1 inches)
406 mm
(16 inches)
406 mm
(16 inches)
633 mm (24.9 inches)
(17.8 inches)
368 mm
HP LaserJet 9040/9050 printer dimensions (t op and side views)
600 mm (23.6 inches)
6 Printer Setup ENWW
Page 9
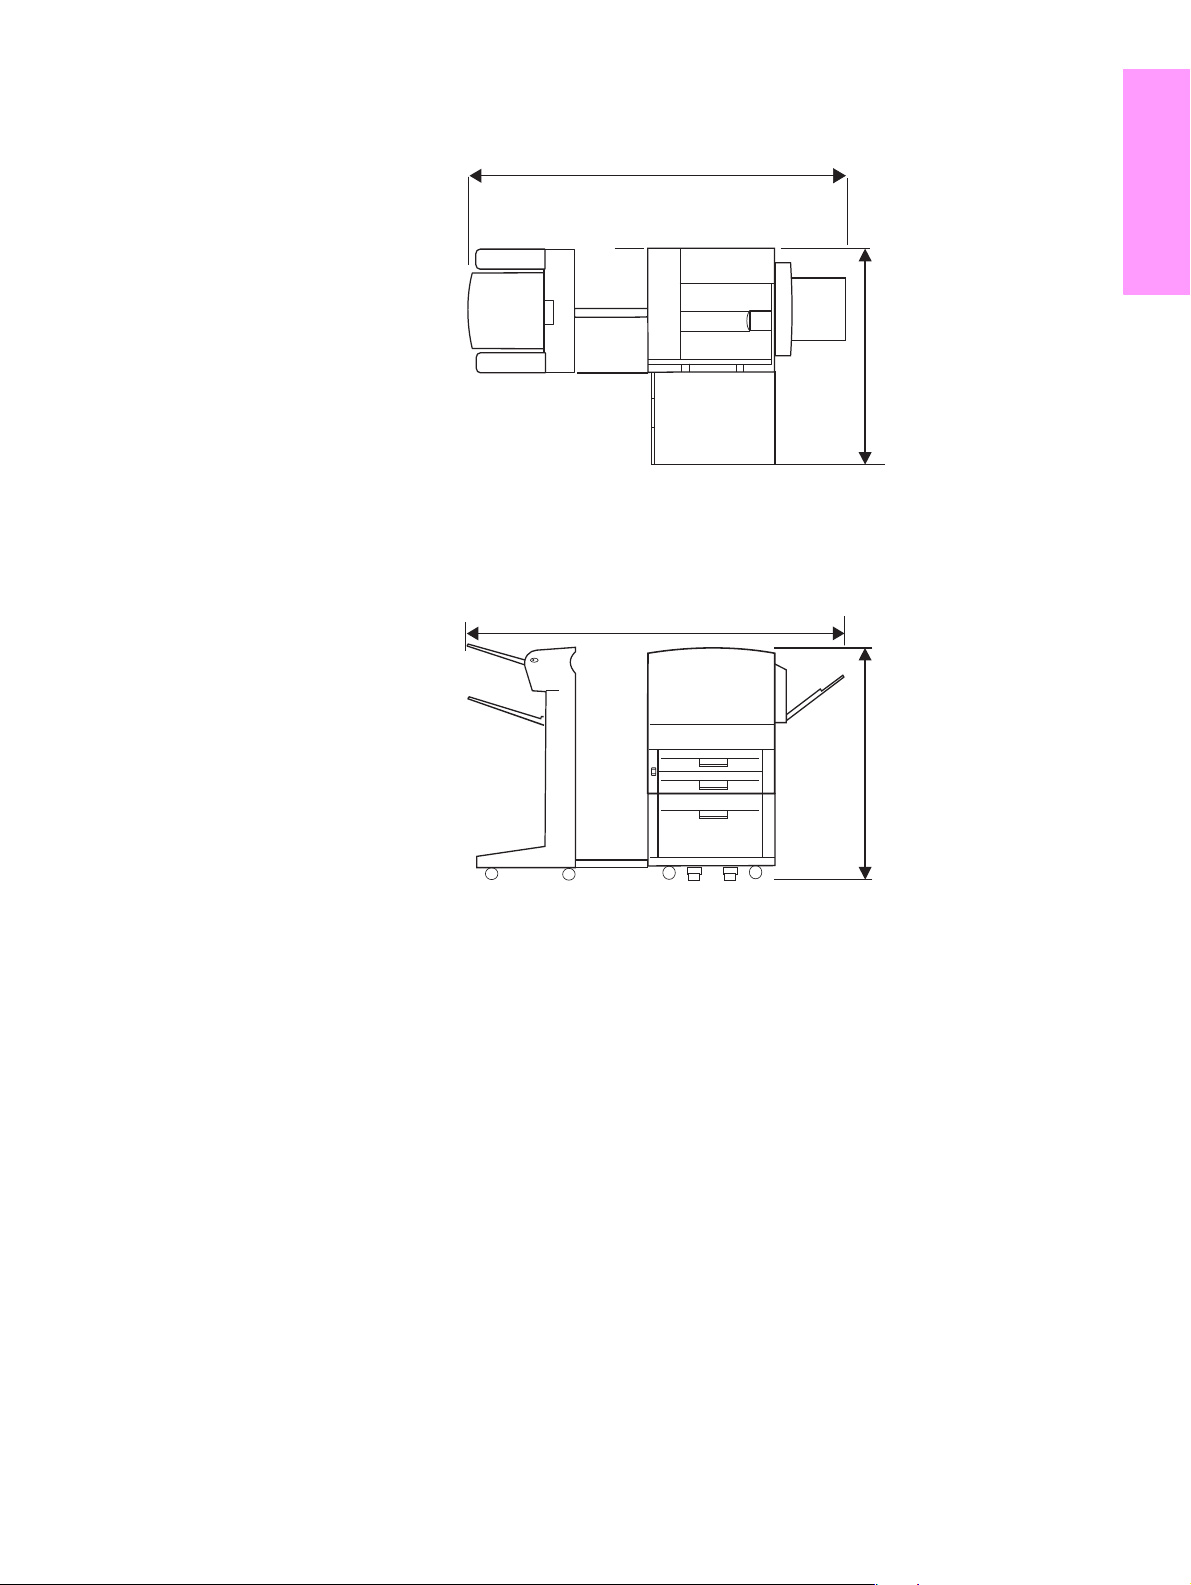
2591 mm (102 inches) to extend output
device; 2705 mm (106.5 inches) to
remove output device
1
2591 mm (102 inches) to ex tend output
device; 2705 mm (106.5 inches) to
remove output device
1
(39.4 inches)
1036 mm (40.8 in)
English
1001 mm
1
The smaller measurement is the space that is required to extend the output device with the
attachment bar still attached to the latch under optional Tray 4. The larger measurement is the
space that is required to remove the output device from the product. The additional space
allows enough clearance to remove the attachment bar from the latch under optional Tray 4.
HP LaserJet 9040/9050 with typical output device, Tray 4, and Tray 1 installed (top and
side views) to show maximum dimensions
ENWW Prepare printer location 7
Page 10

Location requirements for the printer
● A level area on a hard surface,
preferably a floor without carpet
● Adequate power supply (For
the 110 V model, a dedicated
15 A circuit is recommended;
● Space allowance around the
printer
for the 220 V model, a
dedicated 8 A circuit is
recommended)
● A well-ventilated room
● No exposure to direct sunlight
or chemicals, including
● A stable environm en t—no
abrupt temperature or humidity
changes
ammonia-based cleaning
solutions
● Relative humidity 20% to 80%
● Room temperature 10°C to
32.5°C (50°F to 91°F)
Printer weight (without print cartridge)
● HP LaserJet 9040/9050 printer: 63.5 kg (140 lb)
● HP LaserJet 9040n/9050n printer: 69.4 kg (153 lb)
● HP LaserJet 9040dn/9050dn printer: 76.2 kg (168 lb)
8 Printer Setup ENWW
Page 11
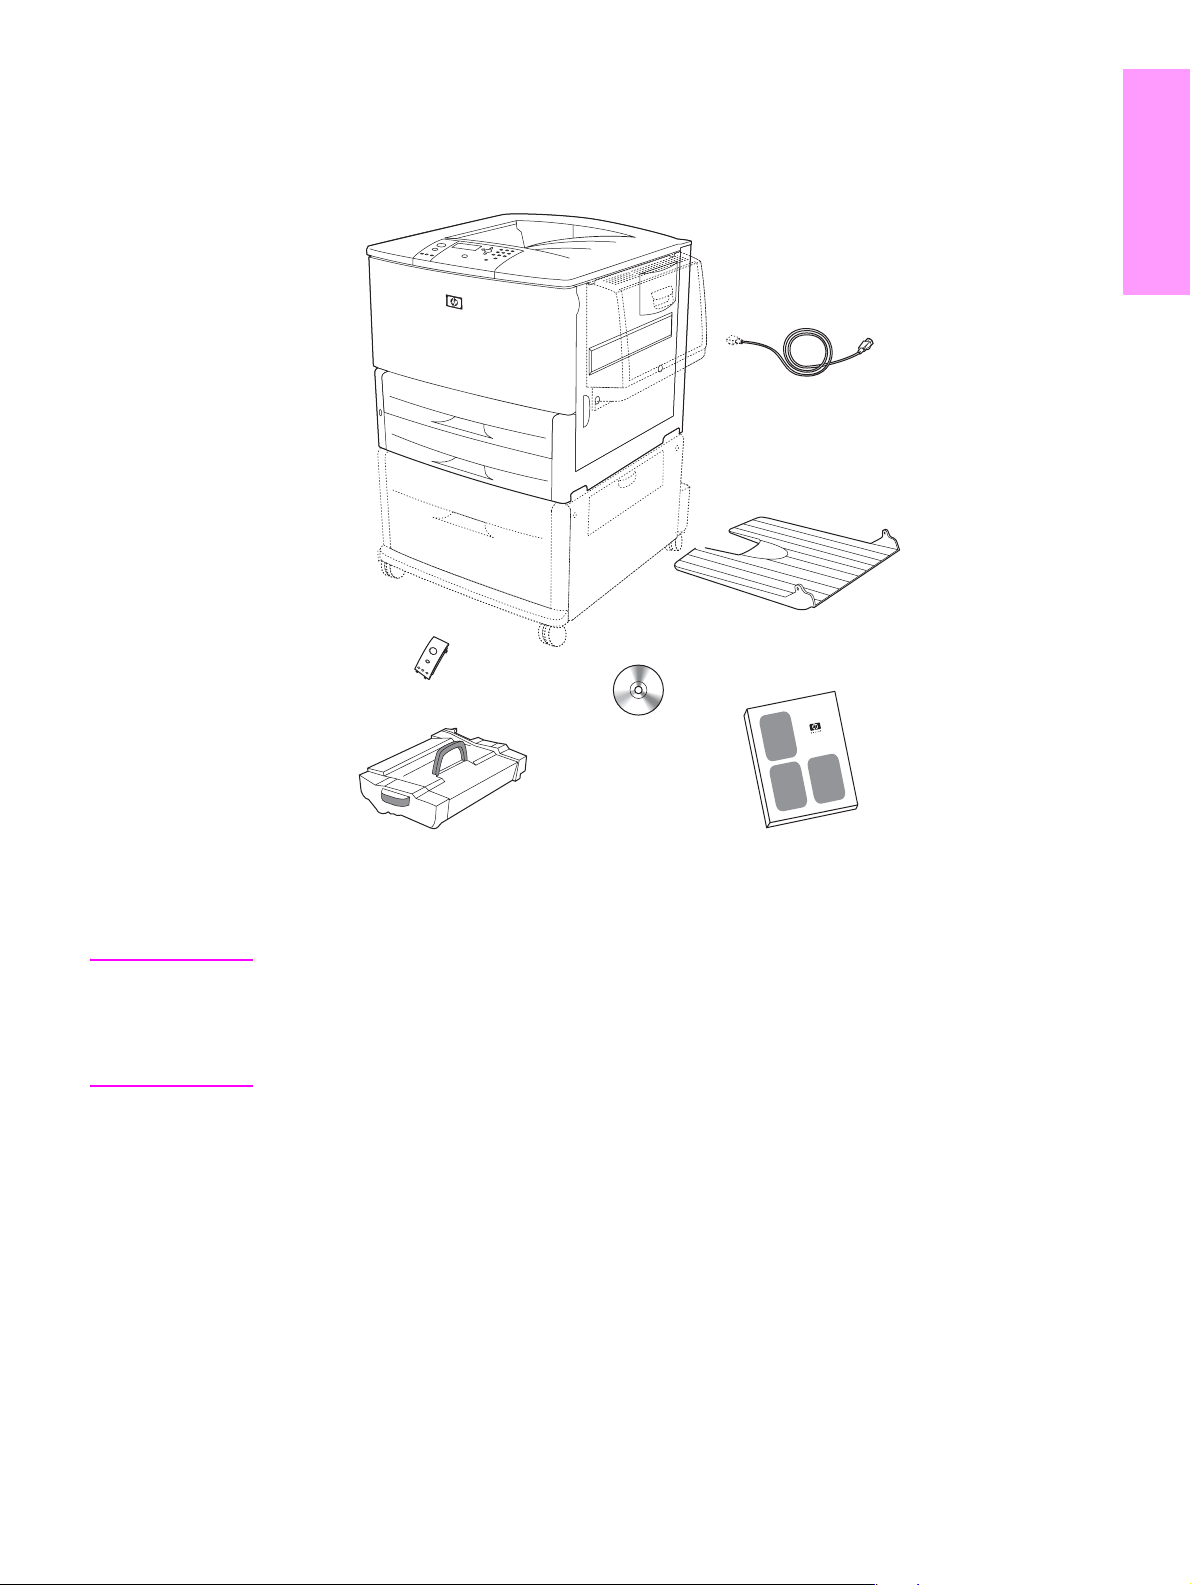
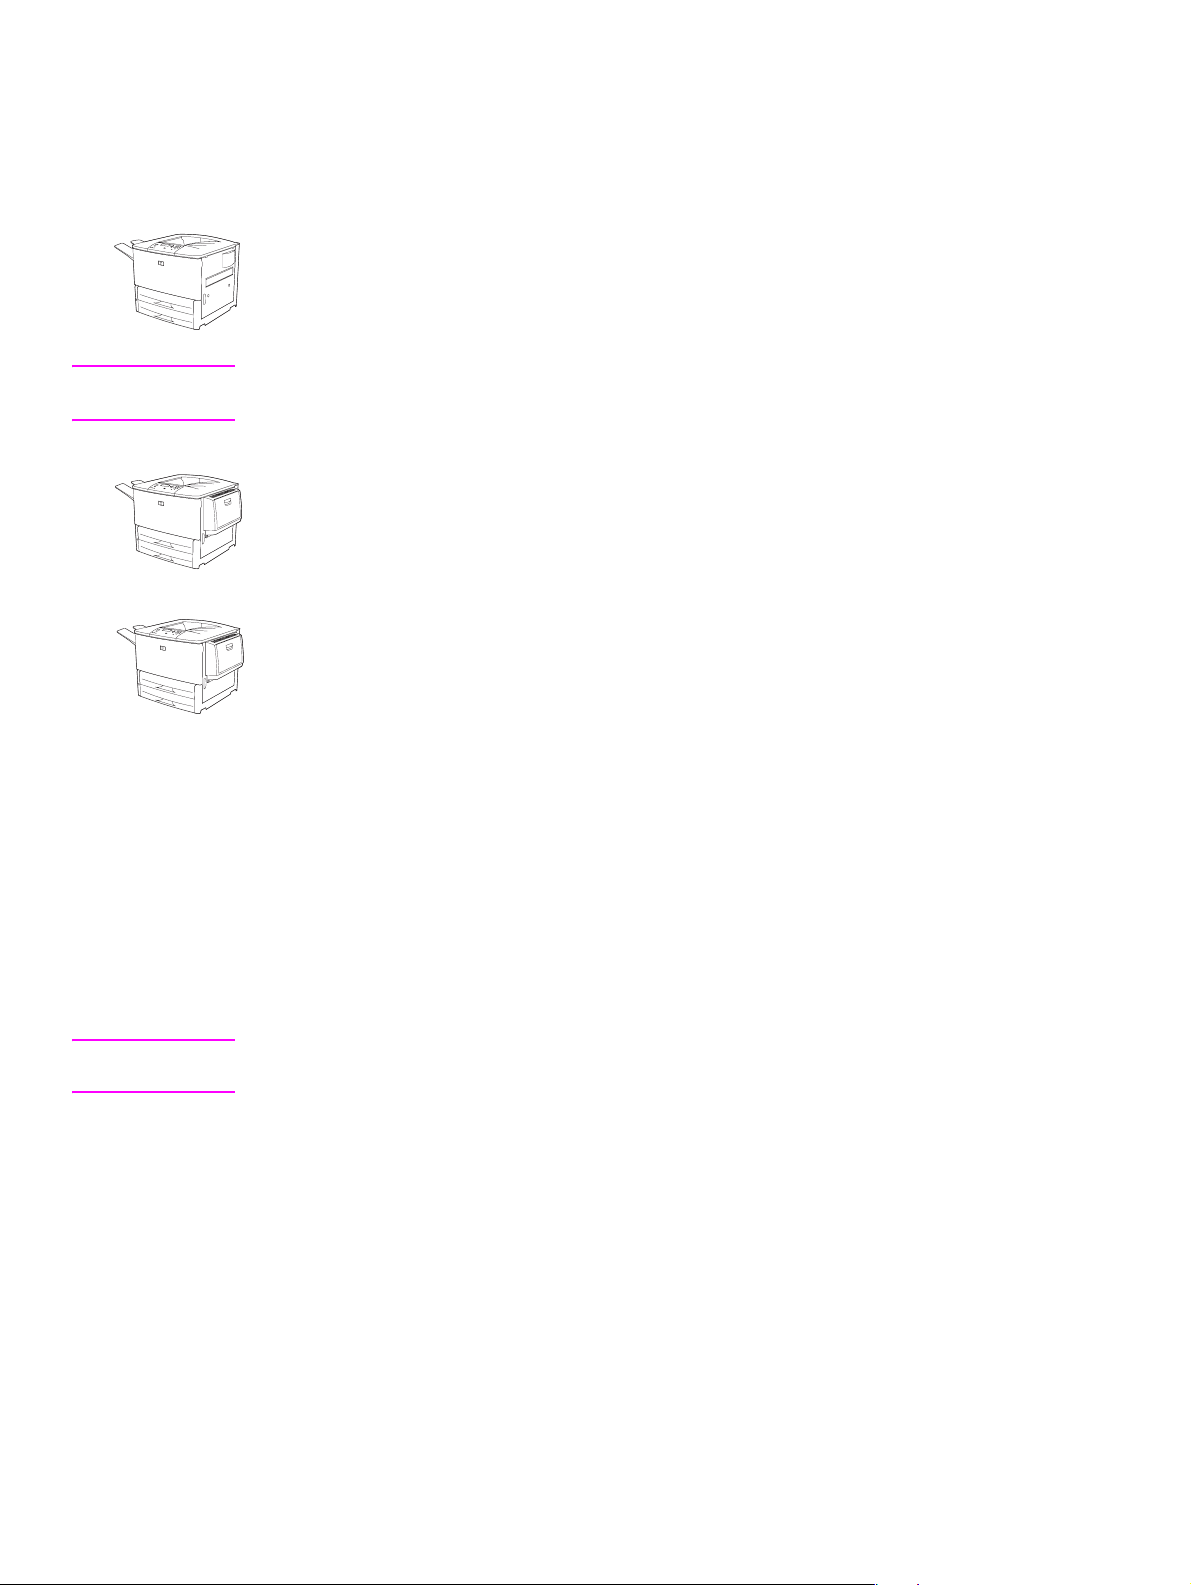
Step 2. Check package contents
printer
optional
Tray 4
English
optional
Tray 1
power cord
face-up output bin
control panel
overlay
print
cartridge
Package contents
Note The HP LaserJet 9040n/9050n printer includes T ra y 1 and an embedded HP Jetdirect print server
(not shown).
The HP LaserJet 9040dn/9050dn printer includes Tray 1, an embe dded HP Jetdirect print server
(not shown), and a duplex printing accessory (duplexer; not shown).
printer software
CD-ROM
(including use
guide)
printer documentation
(this manual)
ENWW Check package contents 9
Page 12
Step 3. Locate printer parts
The following illustrations give the location and names of the important printer parts.
1
5
2
3
4
9
10
11
Printer parts (front and rear views)
6
7
8
12
13
14
1 Face-up output bin
2 Control panel
3 Tray 2
4 Power switch
5 Tray 1
6 Standard output bin
(face-down bin)
7 Front door
8 Tray 3
9 EIO slots (2)
10 Security lock port
11 Power cord
connector
12 Local area network (LAN)
connector (RJ-45) (for t he
HP LaserJet 9040n/9050n
and 9040dn/9050dn)
13 Parallel B cable connector
14 HP Jet-Link connector (for
paper-handling accessory)
10 Printer Setup ENWW
Page 13
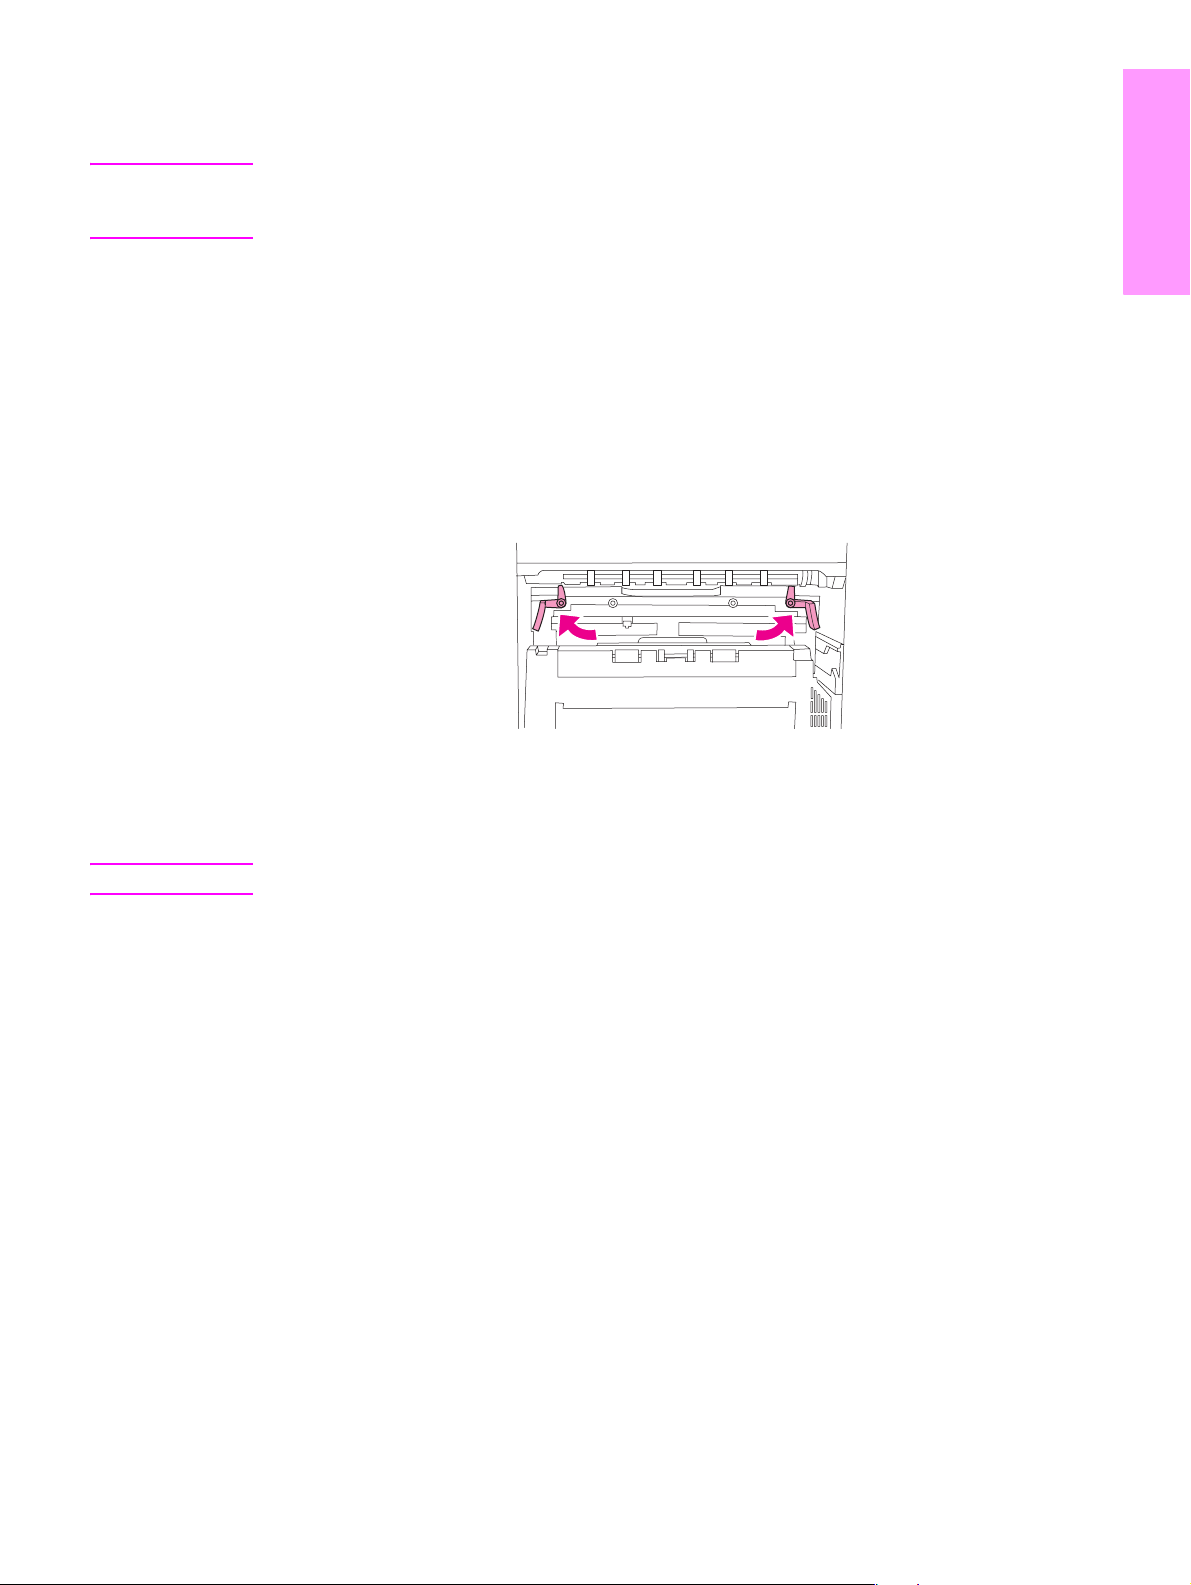
Step 4. Remove internal packaging
CAUTION The printer contains orange shipping tape and internal pack aging to prevent damage during
shipping. You must remove all shipping materials and internal packaging in order for the printer
to function correctly.
To remove internal packaging
1 Remove all orange packing material from the exterior of the printer and remove any
cardboard or styrofoam material that is not orange.
2 Remove all orange pa cking material from the sta ndard output bin and the prot ective film from
the control panel display.
3 Open the left door and pull straight back on the shipping tape to remove the two fuser
shipping locks (as shown by the diagram on the printer). Make sure that the fuser levers are
in the lock position.
English
4 Open the trays, remove any orange packing material, and close the trays.
5 Open the front door and remove the orange packing tape at the front transfer roller area and
on the lock lever for the print cartridge. Close the front door.
Note Save all packing material. You might need it to repack the printer at a later date.
ENWW Remove internal packaging 11
Page 14
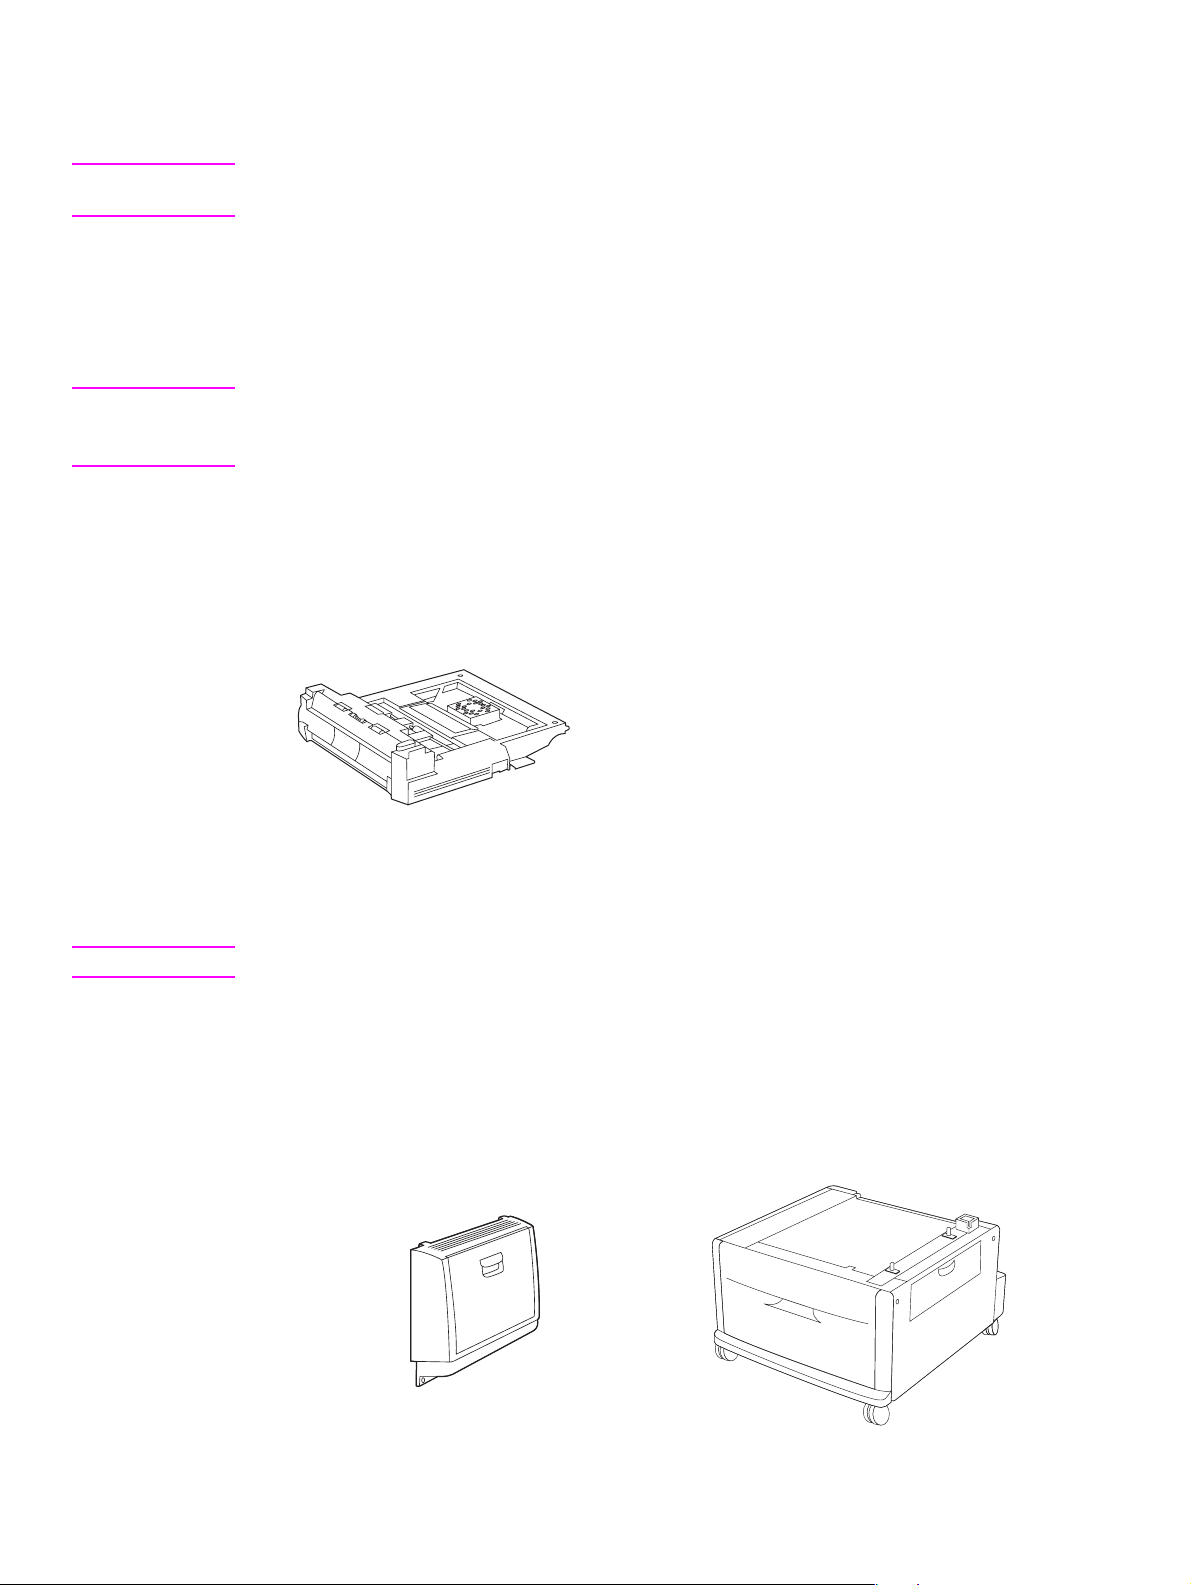
Step 5. Install accessories
WARNING! This printer weighs approximately 63.5 kg (140 lb). HP recommends that four people move it to
avoid injury to you and damage to the printer.
Install any paper-handling accessories that y o u purchased with the printer or separa tely. Use the
installation instructions that are packaged with the accessories. The instructions might be on a
CD-ROM.
Install duplexer
Note If you purchased an output device (the multifunction finisher, the 3,0 00-shee t stac ker, the 3,000-
sheet stacker/sta pler , or the 8-bin mailbo x) along with a duple x er and an input de vice (Tray 4 and/
or Tray 1), install the duplexer and the input device(s) before trying to install the output de vice.
Refer to the installation instructions that are included with the duple x er . The instructions might be
on a CD-ROM.
Duplexer
Note After you have installed the duplexer, return to this guide to complete the printer setup.
Install input device(s)
Refer to the installation instructions that are included with the input device(s). The instructions
might be on a CD-ROM.
Tray 1 and Tray 4
12 Printer Setup ENWW
Page 15
Note After you have installed the input device(s), return to this guide to complete the printer setup.
Install output device
Install any output device that you purchased. After the device is installed, go to step 6.
Refer to the installation instructions that are included with the output device. The instructions
might be on a CD-ROM.
.
English
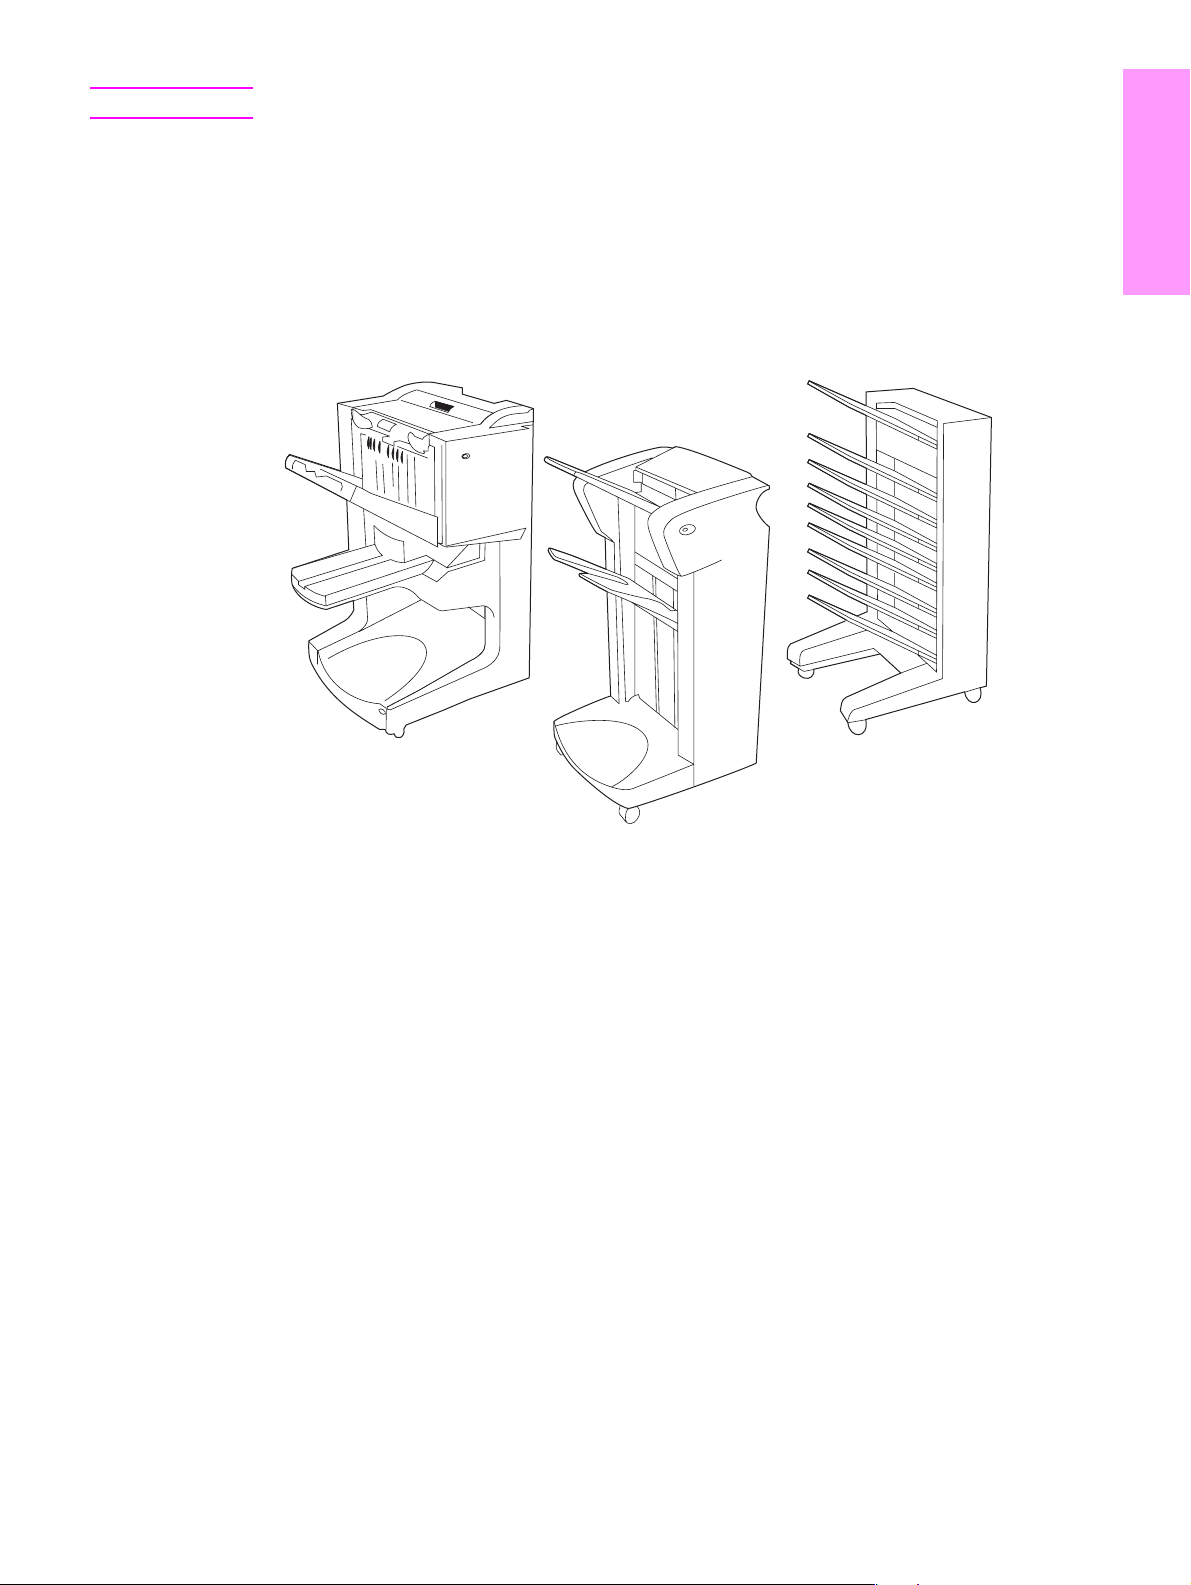
Multifunction finisher
Output devices
3,000-sheet stacker/stapler
or 3,000-sheet stacker
8-bin mailbox
ENWW Install accessories 13
Page 16
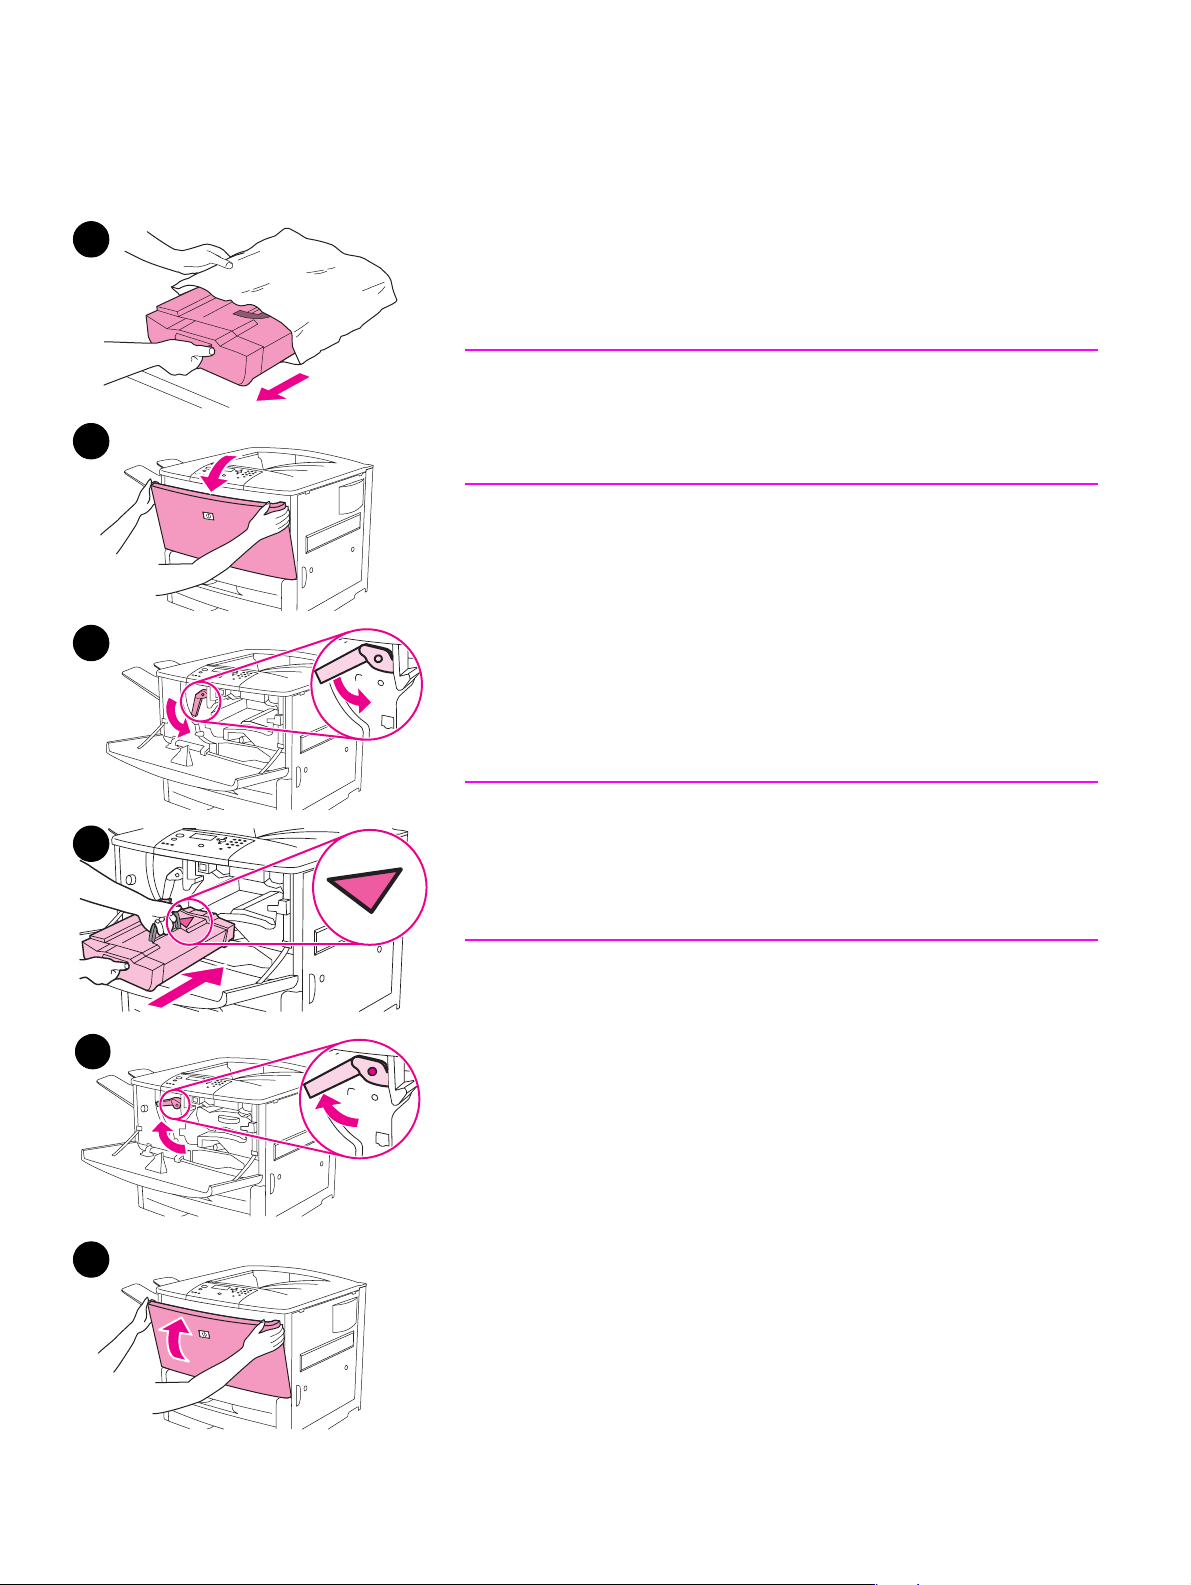
Step 6. Install print cartridge
Use this procedure to install the print cartridge. If toner gets on your clothing, wipe it off with a dry
cloth and wash the clothing in cold water. Hot water sets toner into fabric.
1
3
4
5
To install the print cartridge
1 Before removing the print cartridge from its packaging, set the print
cartridge on a sturdy surface. Gently slide the print cartridge out of
the packaging.
CAUTION
To prevent damage to the print cartridge, use two ha nds wh en hand ling
the cartr id ge.
Do not expose the print cartridge to light for more than a few minutes.
Cover the print cartridge when it is outside of the printer.
2 Gently rock the print cartridge from front to back to distribute the
toner evenly inside the cartridge. This is the only time that you need
to rock the cartridge.
3 Open the front door on the printer.
4 Rotate the green lever downward to the unlock position.
5 Hold the cartridge so that the arrow is on the left side of the
cartridge. Position the cartridge as shown, with the arro w on t he left
side pointing toward the printer, and align the cartridge with the
printing guides. Slide the cartridge into the printer as far as it will go .
Note
The print cartridge has an internal pull tab. The printer automatically
removes the pull tab afte r the print cartridge is installed and the product
is turned on. The print cartridge makes a loud noise for sev eral se conds
when the product removes the pull tab. This noise occurs with new print
cartridges only.
6 Press the button on the green lever, and turn the lever clockwise to
the lock position.
7 Close the front door.
6
7
14 Printer Setup ENWW
Page 17
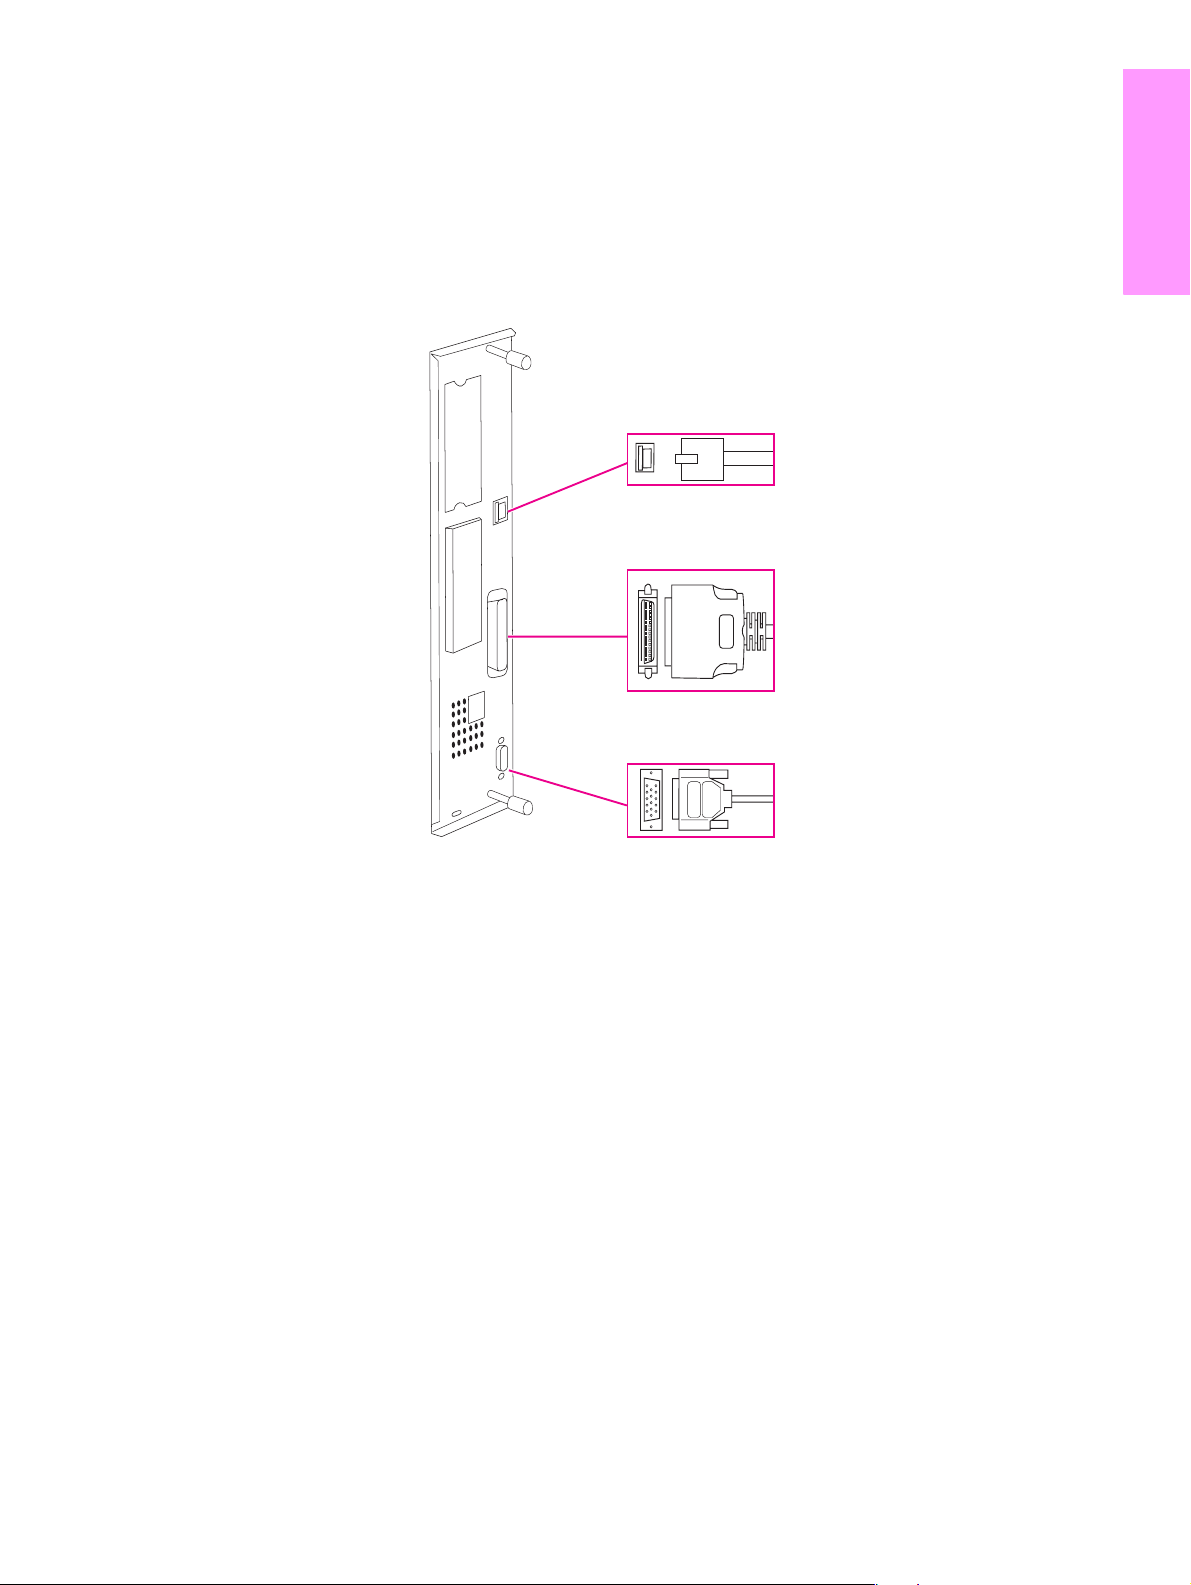
Step 7. Connect printer cables
The printer can connect to a computer using a parallel cable, or to the network using an optional
HP Jetdirect print server.
For printers equipped with the embedded HP Jetdirect print server, a network cable connection
is provided through a 10/100TX (RJ-45) connector. The printer also has a connector for an
HP Jet-Link Connector.
Local area network
(LAN) connector
(RJ-45)
Parallel B
connector (Parallel)
English
Location of interface ports
HP Jet-Link
connector (for paperhandling accessory)
ENWW Connect printer cables 15
Page 18
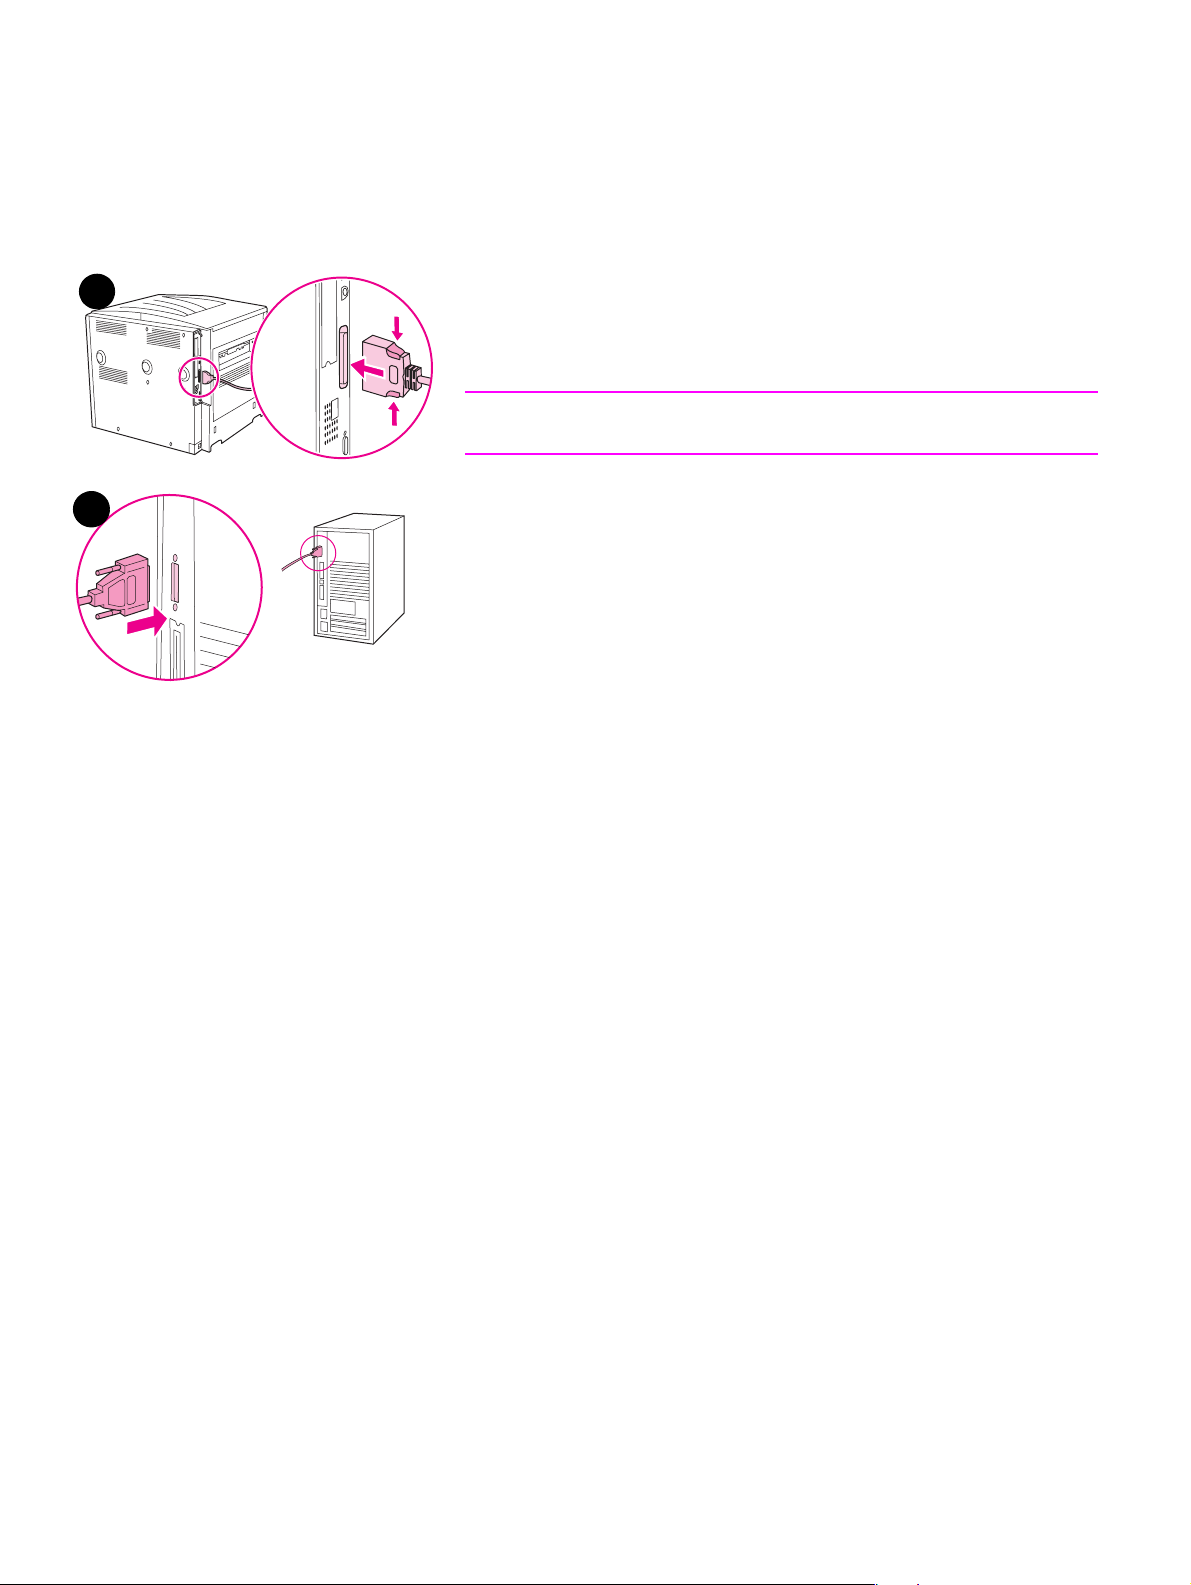
Connecting a parallel cable
Use a parallel cable if you want to connect the printer directly to a computer.
To ensure reliability, use an IEEE-1284 bidirectional B-type parallel cable. These cables are
clearly marked with “IEEE-1284.” Only IEEE-1284 cables support all of the advanced printer
features.
To connect a parallel cable
2
3
1 Make sure that the printer power cord is not connected to an outlet.
2 Connect the parallel cable to the printer parallel port. Press the
locking release levers while connecting the cable.
Note
If installing the cable is difficult, make sure you have the correct cable.
3 Connect the other end of the cable to the proper connector on the
computer.
16 Printer Setup ENWW
Page 19
Connecting to Ethernet 10/100TX network (for the HP LaserJet
9040n/9050n and the HP LaserJet 9040dn/9050dn)
English
Use the RJ-45 connector if you want to connect the printer to an Ethernet 10/100TX network.
2
3
To connect to Ethernet 10/100TX network
1 Make sure that the printer power cord is not connected to an outlet.
2 Connect a network cable to the emb edded HP Je tdirect print serve r
that is installed in the printer.
3 Connect the other end of the cable to the network port.
ENWW Connect printer cables 17
Page 20
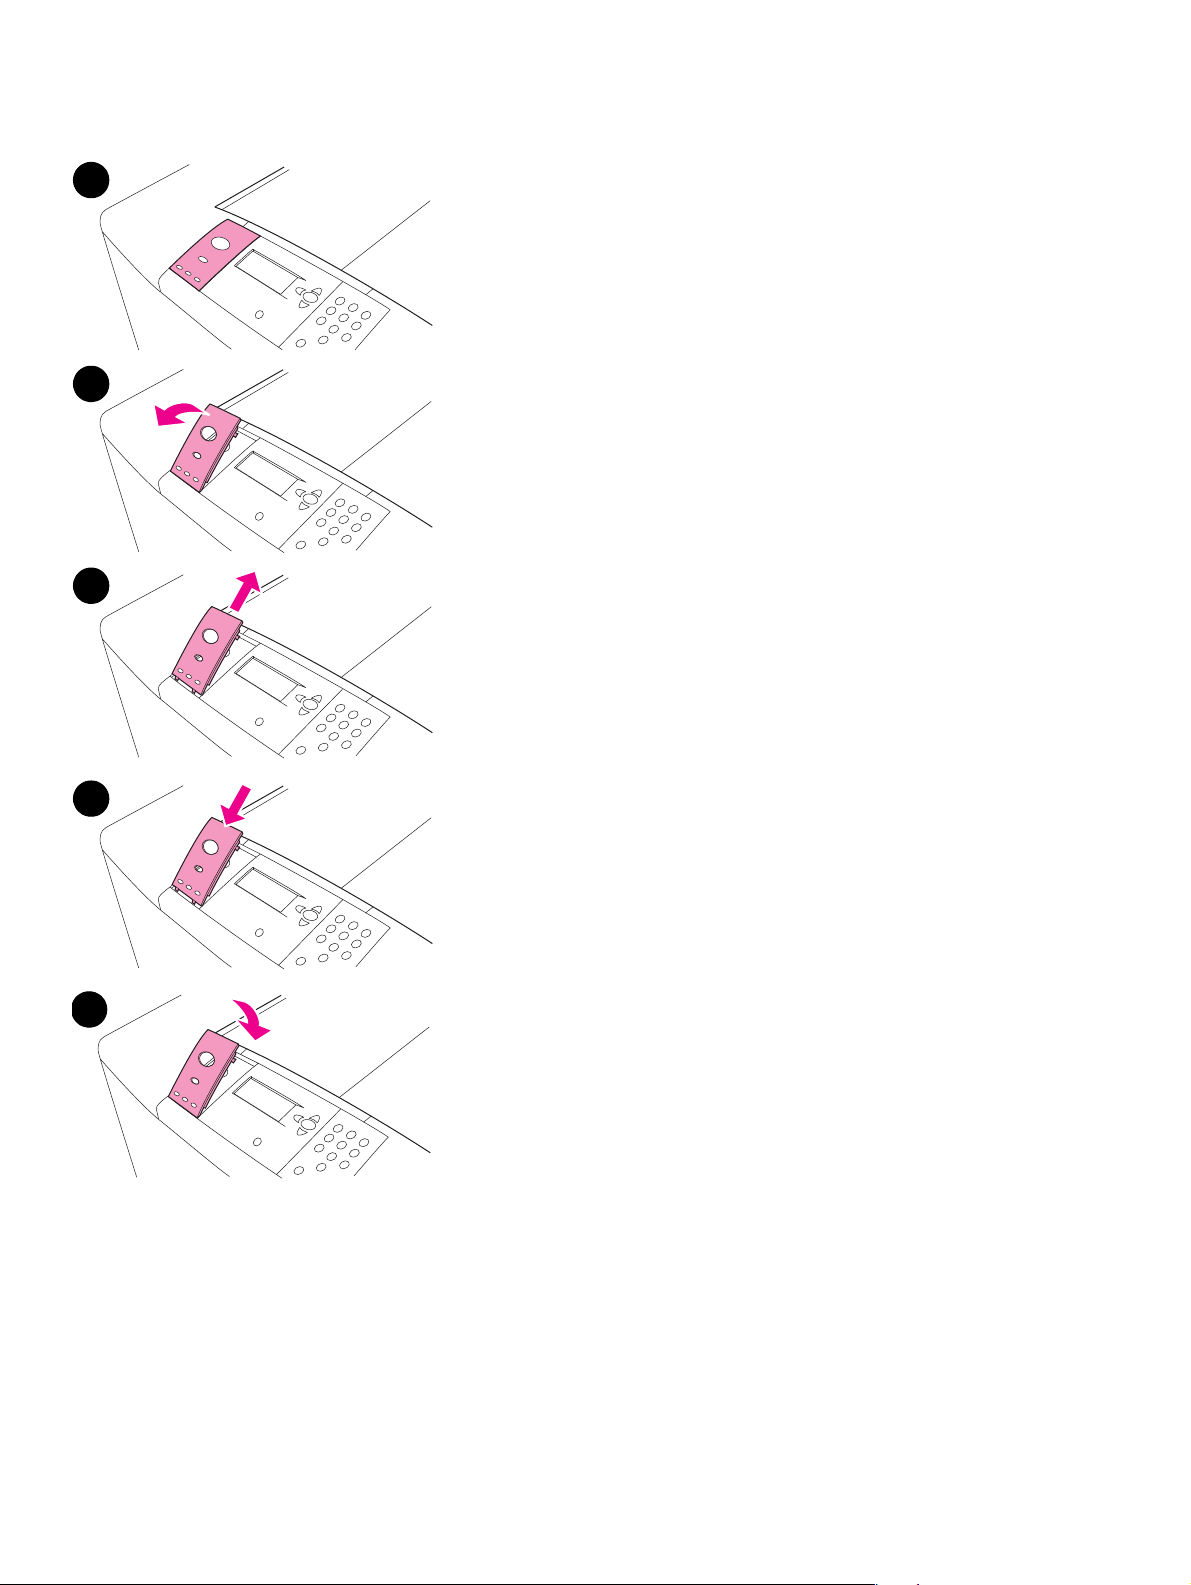
Step 8. Change the control panel overlay
1
The control panel comes with an English overlay installed. If necessary,
use the procedure below to change the control pa n el overlay to one
included in the box.
To change the overlay
1 Insert your fingernail or a thin, rigid object in back of the overla y and
lift up.
2 Gently lift the overlay up and backward to move it away from the
2
printer.
3 Position the new overlay over the control panel. Align the ends of
the overlay with t he holes on the control panel and slide the overlay
in.
4 Snap the overlay firmly onto the control panel. Ensure that the
overlay is fl at against the control panel.
3
4
5
18 Printer Setup ENWW
Page 21
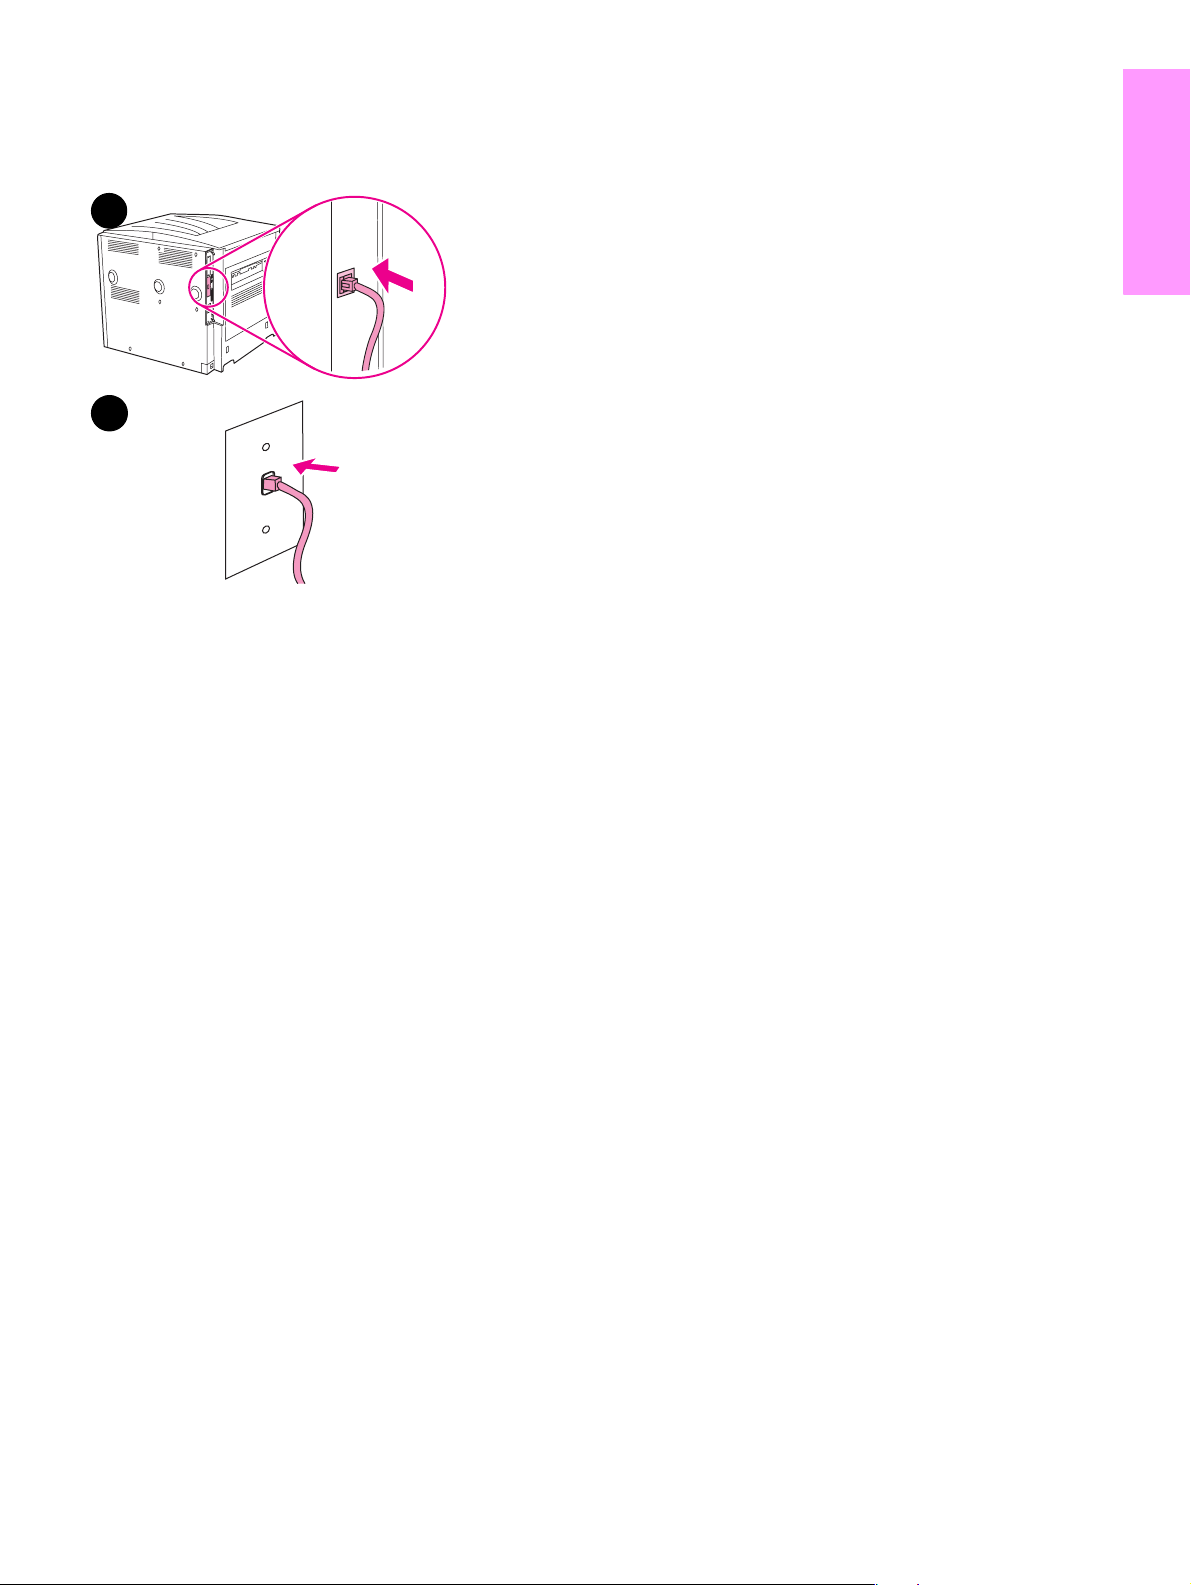
Step 9. Connect power cord
This section describes how to connect the power cord.
1
2
To connect the power cord
1 Connect the power cord to the printer and an alternating current
(AC) outlet.
CAUTION
HP recommends using a dedicated AC outlet of 15 amps for 110 V
models (15 amps for 220 V models). Do not plug other devices into the
same outlet.
To prevent damage to the printer, use only the power cord that came
with the printer.
2 Press the power switch to turn the printer on (in position). If the
Enter language message appears on the printer control panel, use
or to scroll to your language and press . After the printer
warms up, the READY message should appear on the control panel
display.
English
3
Note
When the power to the printer is turned on f or the first time , you ha ve the
option to set the language to display messages in your own language. If
no language is selected within 60 seconds of when ENTER LANGUAGE
appears on the graphical display, English is set as the language, and
ENTER LANGUAGE appears on the graphical displa y each time the product
is turned on until a language is selected.
3 If you have the optional 3,000-sheet stac ker/stapler (or stacker or
multifunction finisher), optional Tray 4, or both installed, check that
the light on each of them is solid green. If a light is amber, flashing,
or off, see the use guide.
ENWW Connect power cord 19
Page 22
Step 10. Configure the control panel display language
By default, the control panel on the printer displays messages in English. If you did not set the
language in step 9, use the following procedure to set the printer to display messages and print
configuration pages in another supported language.
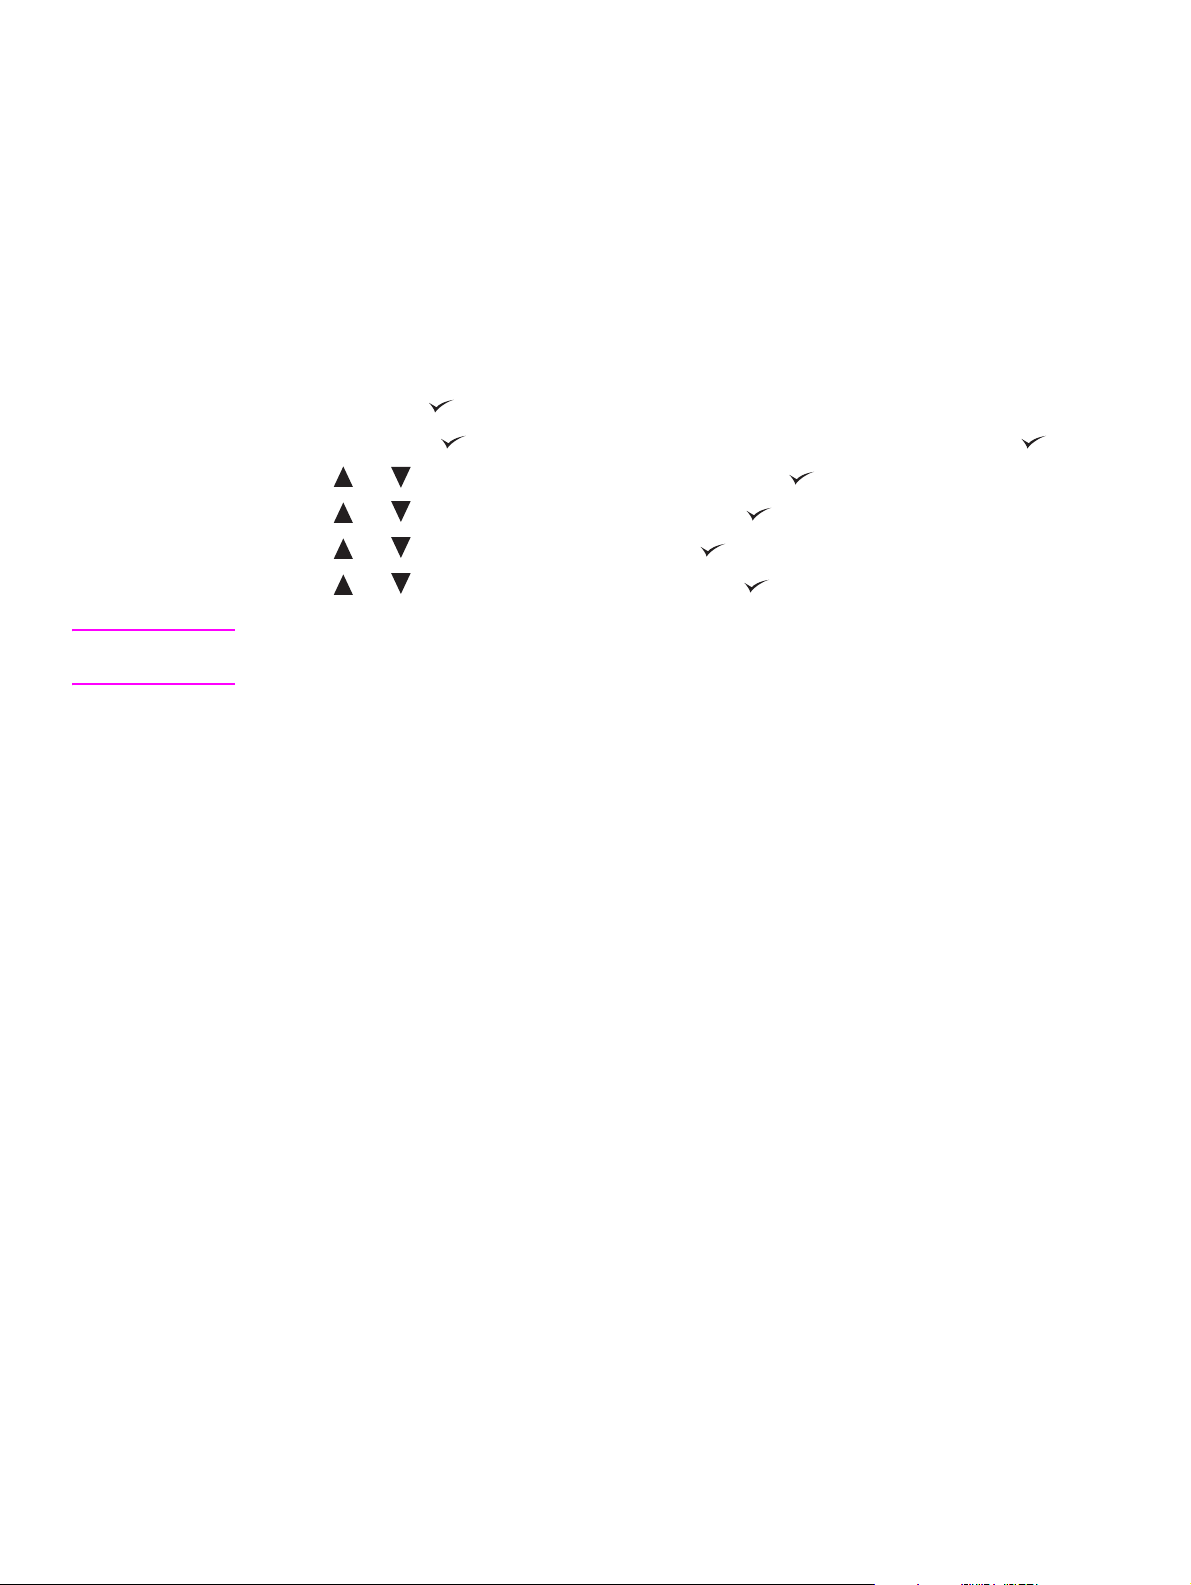
To configure the control panel language
1 Turn off the printer.
2 Turn on the printer.
3 Wait until the printer begins coun ting memory.
4 Press and hold .
5 Continue to hold until all three control panel lights illuminate, and then release .
6 Use or to scroll to Configure Device and press .
7 Use or to scroll to System Setup and press .
8 Use or to scroll to Language and press .
9 Use or to scroll to your language and press .
Note For Turkish, Czech, Russian, Hungarian, and Polish, language selection will change the default
symbol set for the specific language. For all other languages, the default symbol set is PC-8.
20 Printer Setup ENWW
Page 23
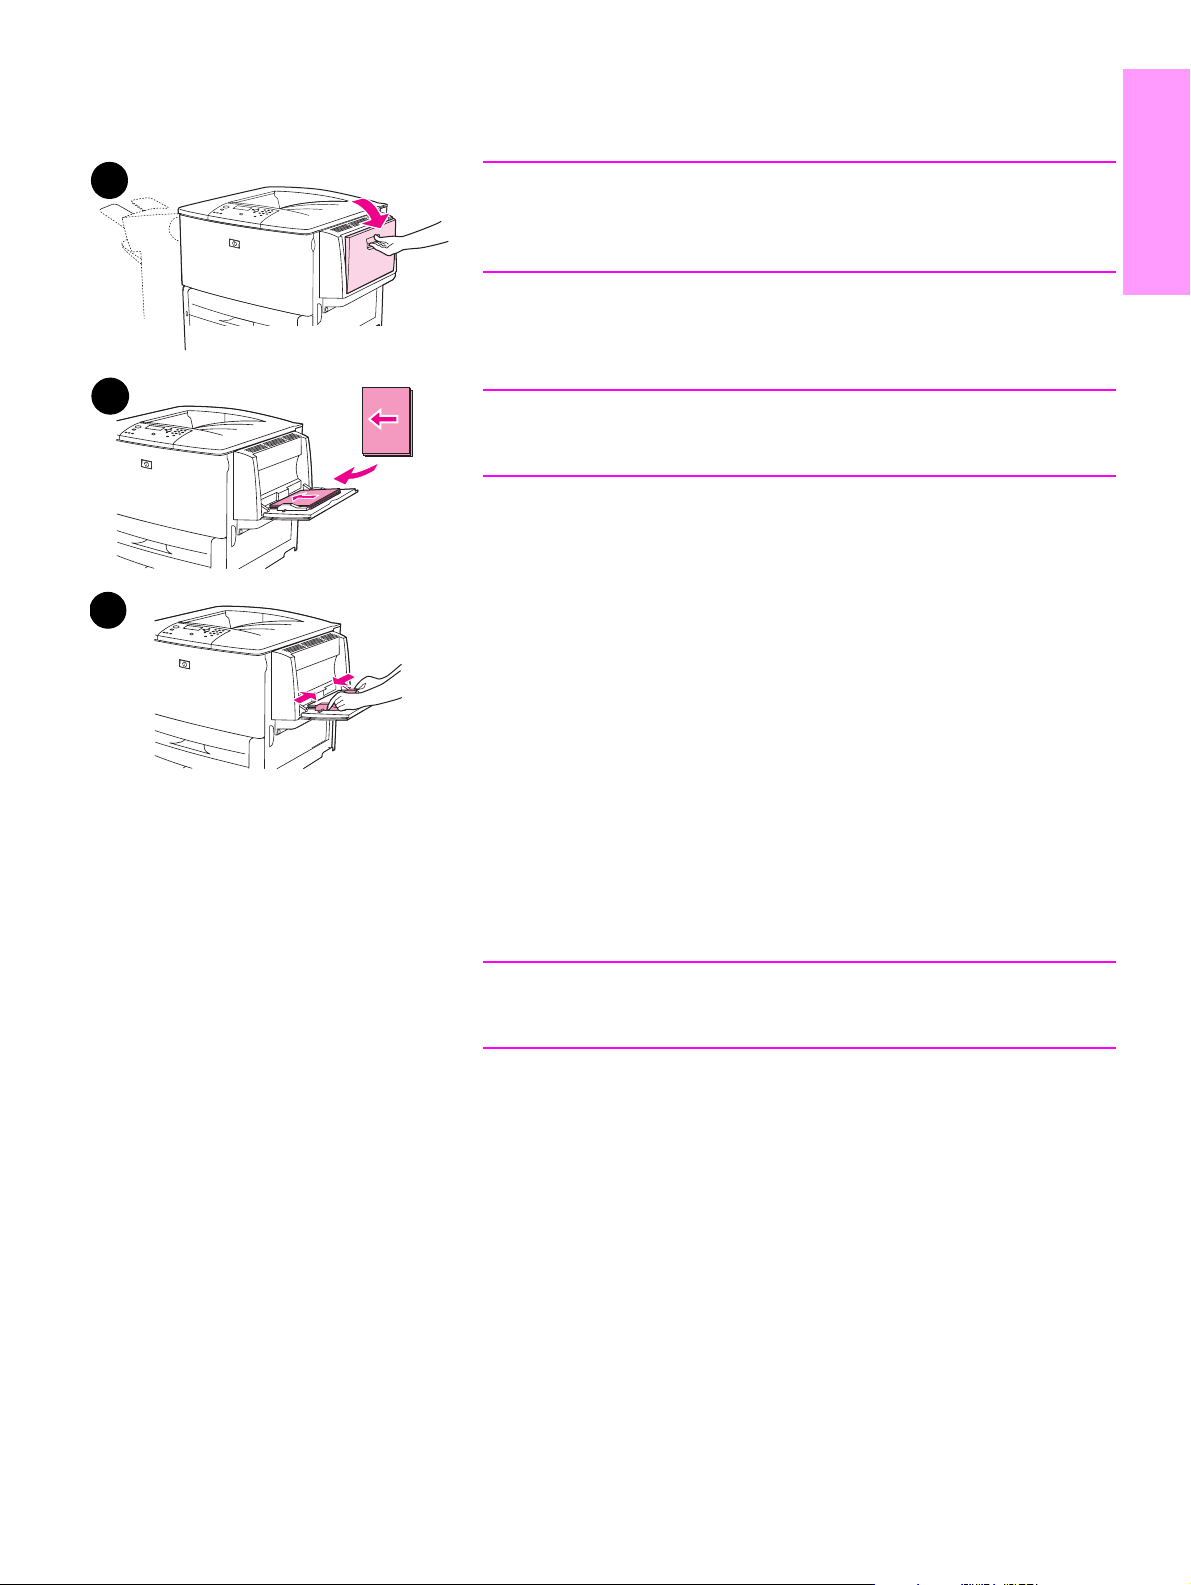
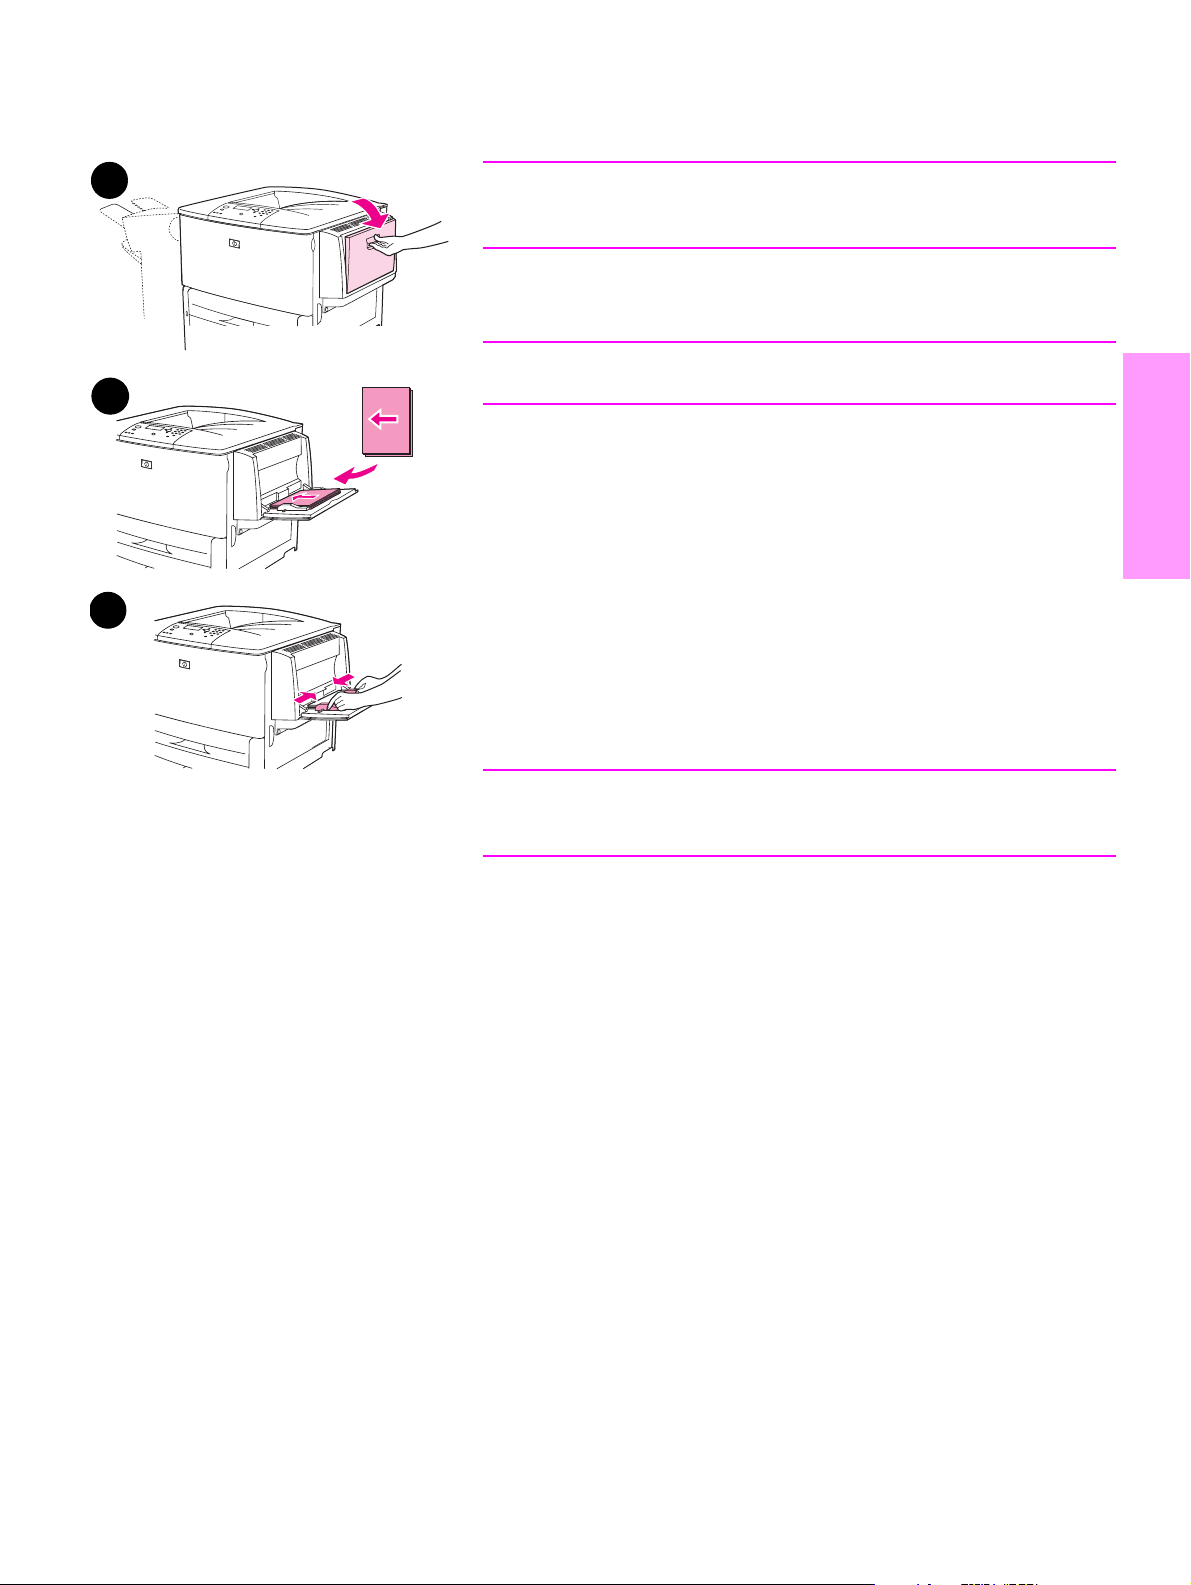
Step 11. Load Tray 1
English
1
2
Note
The HP LaserJet 9040n/9050n and the HP LaserJet 9040dn/9050dn
both come with Tray 1. An optional Tray 1 is available for the
HP LaserJet 9040/9050.
This section describes how to load A4- or letter-size paper. For
instructions on loading and configuring other sizes and types of media,
see the use guide that came on the CD-ROM.
CAUTION
To avoid a paper jam, never open a tray while the printer is printing from
that tray.
To load Tray 1
Tray 1 is a multipurpose tray that holds up to 100 sheets of standardsize paper or 10 envelopes. The product will pull paper from Tray 1 first
3
(default tray). See the use guide for information about how to change
this default.
Tray 1 provides a convenient way to print envelopes, transparencies,
custom-size paper, or other types of media without having to unload the
other trays.
1 Open Tray 1.
2 Load A4- or Letter-size paper with the long edge leading into the
printer and the side to be printed on facing up.
3 Adjust the paper guides so that they lightly touch the paper stack,
but do not bend the paper.
4 Make sure the paper fits under the tabs on the guides and not
above the load level indicators.
Note
If printing on A3-size, 11 x 17, or other long media, pull out the tray
extension until it stops.
ENWW Load Tray 1 21
Page 24
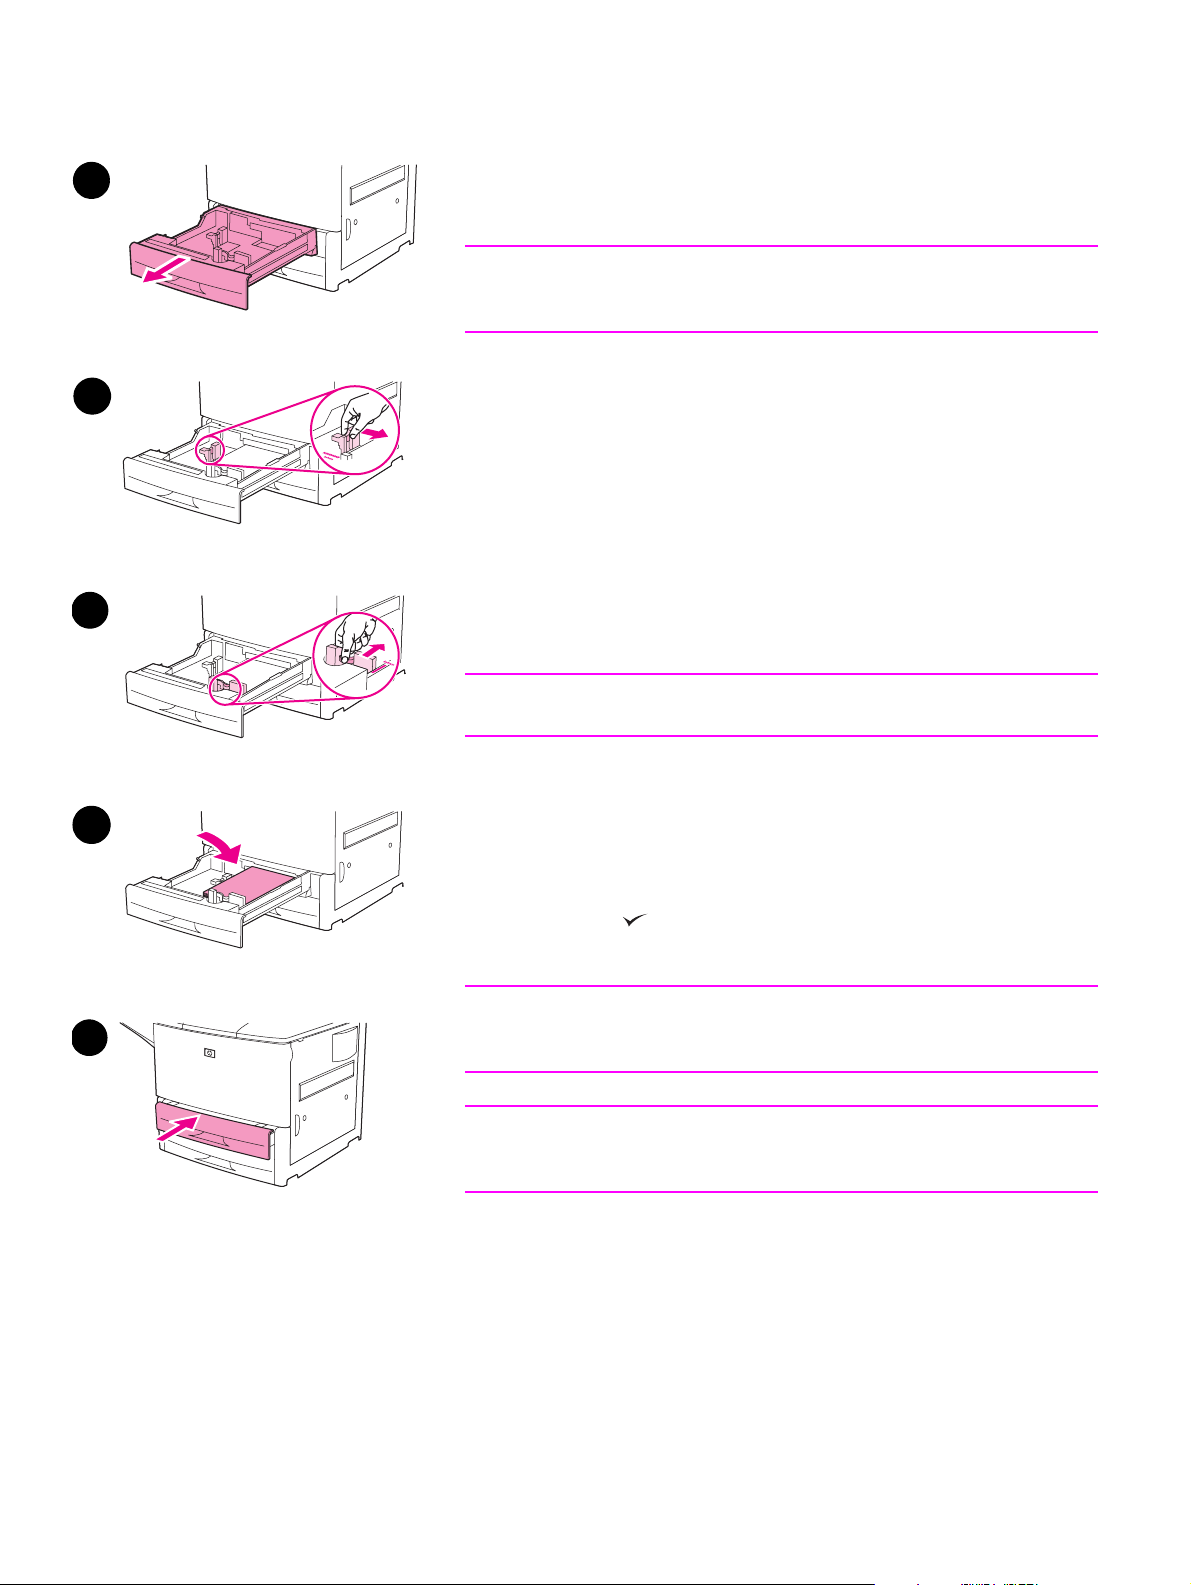
Step 12. Load Trays 2 and 3
1
This section describes how to load A4- or letter-size paper. For
instructions on loading and configuring other sizes and types of media,
see the use guide.
CAUTION
To avoid a paper jam, never open a tray while the printer is printing from
that tray.
To load Tray 2 and Tray 3
2
3
1 Open the tray until it stops.
2 Adjust the left (Y) paper guide b y pressing th e tab on th e gu ide a nd
set the guide to the correct paper size .
3 Adjust the front (X) paper guide b y pressing the tab on the guide
and set the guide to the correct paper siz e.
4 Load a stack of media with the top of the stack toward the rear of
the tray. For single-sided printing, the side to be printed should be
down. For double-sided printing, the first side to be printed should
be up.
Note
For information about printing on special media, see the use guide.
5 Set the paper lever to Standard if both guides are set to the same
Standard marking, such as Letter or A4. Otherwise, set the lever to
4
6
Custom.
6 Close the tray.
7 The paper size and type for this tray appears on the printer contr ol
panel. Press to verify or see the use guide to make changes.
8 Repeat steps 1 through 7 to load the other tray.
Note
For information about loading Tray 4, see the install guide that came
with Tray 4.
CAUTION
Never store paper or other items in the area to the left of t he paper
guides. Doing so can permanently damage the tray.
22 Printer Setup ENWW
Page 25

Step 13. Print a configuration page
Print a configuration page to make sure the printer is operating correctly.
To print a configuration page
1 Press .
2 Use or to scroll to Information and press .
3 Use or to scroll to Print Configuration and press .
The configuration page prints. If an HP Jetdirect print server is installed in the printer, an
HP Jetdirect network configuration page also prints.
If you have optional accessories such as a duplex printing accessory or Tray 4 installed, check
the configuration page to ensure that it lists them as installed.
Note For a list of shortcut keys that are available for the printer, print a menu map.
English
ENWW Print a configuration page 23
Page 26

Step 14. Install printing software
The printer comes with printing software on a CD-ROM. The printer drivers on this CD-ROM
must be installed to take full advantage of the printer features.
If you do not have access to a CD-ROM dr ive, you can download the printing software from the
Internet at www.hp.com/support/lj9050_lj9040
driven computers, the installation program for the printer software automatically checks the
computer for Internet access and provides an option to obtain the latest software from the
Internet.
Note Printer installation software for UNIX (HP-UX, Sun Solaris) networks is availa ble for download
at www.hp.com/support/net_printing.
See the HP support flyer for more information.
Installing Windows printing software
. Depending on the configuration of Windows-
This section describes how to install Windows printing software. The software is supported on
Microsoft
Windows XP, and Windows Server 2003.
Windows 9X, Windows NT 4.0, Windows 2000, Windows Millennium (Me),
To install the software
1 Quit all running programs.
2 Insert the CD-ROM into the CD-ROM drive . Depending on the computer configuration, the
installation program ma y automatically run. If th e program does no t run automatically: On the
Start menu, click Run. Type x:setup (where X is the letter of the CD-Rom drive), and click
OK.
3 Follow the instructions on the computer screen.
Installing Macintosh printing software
This section describes how to install Macintosh printing software. The software is supported on
Macintosh OS 7.5 or higher.
To install Macintosh printing software for Mac OS 8.6 to 9.2
1 Connect the network cable between the HP Jetdirect print server and a network port.
2 Insert the CD-ROM into the CD-ROM drive. The CD-ROM menu runs automati cally. If the
CD-ROM menu does not run automatically, double-click the CD-ROM icon on the desktop,
and then double-clic k the Installer icon. Th is icon is located in the Installer/<language > fo lder
of the Starter CD-ROM (where <language> is your language preference). For example, the
Installer/English folder contains th e Installer icon for the English printer software.
3 Follow the instructions on the computer screen.
4 Open the Apple Desktop Printer Utility located in the (Startup Disk): Applications: Utilities
folder.
5 Double-click Printer (AppleTalk).
6 Next to Apple Talk Printer Selection, click Change.
7 Select the printer, click Auto Setup, and then click Create.
8 On the Printing menu, click Set Default Printer.
24 Printer Setup ENWW
Page 27

Note The icon on the desktop will appear to be generic. All the print panels will appear in the print
dialog in an application.
To install Macintosh printing software for Mac OS 10.1 and later
1 Connect the network cable between the HP Jetdirect print server and a network port.
2 Insert the CD-ROM into the CD-ROM drive. The CD-ROM menu runs automati cally. If the
CD-ROM menu does not run automatically, double-click the CD-ROM icon on the desktop,
and then double-click the Installer icon. This icon is located in the Installer/<language> f older
of the Starter CD-ROM (where <language> is your language preference). For example, the
Installer/English folder contains the Installer icon for the English printer softwar e.
3 Double-click the HP LaserJet Installers folder.
4 Follow the instructions on the computer screen.
5 Double-click the Installer icon for the desired language.
6 On your computer hard drive, double-click Applications, Utilities, and then Print Center.
7 Click Add Printer.
8 Select the AppleTalk connection type on OS X 10.1 and the Rendezvous connection type on
OS X 10.2.
9 Select the printer name.
10 Click Add Printer.
English
11 Close the Print Center by clicking the close button on the upper-left corner.
Note Macintosh computers cannot be connected directly to the printer using a parallel port.
ENWW Install printing software 25
Page 28

Step 15. Verify printer setup
The easiest way to verify that the installation has been completed successfully is to print a
document from a software program.
To verify printer setup
1 Open a program of your choice. Open or create a simple document.
2 In the program, select the Print command.
3 Select the HP LaserJet 9040 or 9050 as your printer.
4 Make sure the correct printer name appears.
5 Print the document.
If the document does not print correctly, check your setup and configura tion. For additional
information, see the use guide.
Customer support
For additional information regarding the product, see the use guide on the CD-ROM. For
HP Customer Care information, see the support flyer that came with the printer.
26 Printer Setup ENWW
Page 29

Warranty and regulatory information
Hewlett-Packard limited warranty statement
HP PRODUCT DURATION OF WARRANTY
English
HP LaserJet 9040/9050,
9040n/9050n, 9040dn/
9050dn
1 HP warrants HP hardware, accessories, and supplies against defects in materials and
workmanship for the period specified abo v e . If HP receiv e s notice of such defects during the
warranty period, HP will, at its option, either repair or replace products which prove to be
defective. Replacement products may be either new or like-new.
2 HP warrants that HP software will not fail to execute its programming instructions, for the
period specified above, due to defects in material and workmanship when properly installed
and used. If HP receives notice of such defects during the warranty period, HP will replace
software media which does not execute its programming instructions due to such defects.
3 HP does not warrant that the operation of HP products will be uninterrupted or error free. If
HP is unable, within a reasonable time, to repair or replace any product to a condition as
warranted, customer will be entitled to a refund of the purchase price upon prompt return of
the product.
4 HP products may contain remanufactured parts equivalent to new in performance or may
have been subject to incidental use.
5 The warranty period begins on the date of the delivery or on the date of installation if
installed by HP. If customer schedules or delays HP installation more than 30 days after
delivery, warranty begins on the 31st day from delivery.
1 year, on-site
6 Warranty do es not apply to def ects resulting from (a) im proper or inadequate maintena nce or
calibration, (b) software, interfacing, parts or supplies not supplied by HP, (c) unauthorized
modification or misuse, (d) operat ion outside of the published environmental specifications
for the product, or (e) improper site preparation or maintenance.
7 TO THE EXTENT ALLOWED BY LOCAL LAW, THE ABOVE WARRANTIES ARE
EXCLUSIVE AND NO OTHER WARRANTY, WHETHER WRITTEN OR ORAL, IS
EXPRESSED OR IMPLIED AND HP SPECIFICALLY DISCLAIMS THE IMPLIED
WARRANTIES OR CONDITIONS OF MERCHANTABILITY, SATISFACTORY QUALITY,
AND FITNESS FOR A PARTICULAR PURPOSE.
8 HP will be liable for damage to tangible property per incident up to the greater of $300,000 or
the actual amount paid for the product that is the subject of the claim, and for damages for
bodily injury or death, to the extent that all such damages are determined by a court of
competent jurisdiction to have been directly caused by a defective HP product.
9 TO THE EXTENT ALLOWED BY LOCAL LAW, THE REMEDIES IN THIS WARRANTY
STATEMENT ARE THE CUSTOMER’S SOLE AND EXCLUSIVE REMEDIES. EXCEPT AS
INDICATED ABOVE, IN NO EVENT WILL HP OR ITS SUPPLIERS BE LIABLE FOR LOSS
OF DATA OR FOR DIRECT, SPECIAL, INCIDENTAL, CONSEQUENTIAL (INCLUDING
LOST PROFIT OR DATA), OR OTHER DAMAGE, WHETHER BASED IN CONTRACT,
TORT, OR OTHERWISE.
10 FOR CONSUMER TRANSACTIONS IN AUSTRALIA AND NEW ZEALAND; THE
WARRANTY TERMS CONTAINED IN THIS STATEMENT, EXCEPT TO THE EXTENT
LAWFULLY PERMITTED, DO NOT EXCLUDE, RESTRICT OR MODIFY AND ARE IN
ADDITION TO THE MANDATORY STATUTORY RIGHTS APPLICABLE TO THE SALE OF
THIS PRODUCT TO YOU.
ENWW Warranty and regulatory information 27
Page 30

Service During and After the Warranty Period
● If printer hardware fails during the warranty period, contact an HP-authorized service or
support provider.
● If printer hardware fails after the warranty period, and you have an HP Maintenance
Agreement or HP SupportPack, request service as specified in the agreement.
● If you do not have an HP Maintenance Agreement or HP SupportPack, cont act an
HP-authorized service or sup po rt provider.
To ensure the longevity of your HP LaserJet printer, HP provides the
following:
Extended
warranty
HP SupportPack provides coverage for the HP hardware product and all
HP-supplied internal components. The hardw are mainten ance co v e rs a period
from the date of the HP product purchase for the duration of the contract
chosen. The customer must purchase HP SupportPack within 90 days of the
HP product purchase. For more information, go to www.hp.com/support/
lj9050_lj9040.
28 Printer Setup ENWW
Page 31

HP’s Premium Protection Warranty
LaserJet Print Cartridges and Imaging Drums
Limited Warranty Statement
This HP product is warranted to be free from defects in materials and workmanship.
This warranty does not apply to products that (a) have been refilled, refurbished, remanufactured
or tampered with in any way, (b) experience problems resulting from misuse, improper storage,
or operation outside of the published environmental specifications for the printer product or (c)
exhibit wear from ordinary use.
To obtain warranty service, please return the product to place of purchase (with a written
description of the problem and print samples) or contact HP customer support. At HP's option,
HP will either replace products that prove to be defective or refund your purchase price.
TO THE EXTENT ALLOWED BY LOCAL LAW, THE ABOVE WARRANTY IS EXCLUSIVE AND
NO OTHER WARRANTY OR CONDITION, WHETHER WRITTEN OR ORAL, IS EXPRESSED
OR IMPLIED AND HP SPECIFICALLY DISCLAIMS ANY IMPLIED WARRANTIES OR
CONDITIONS OF MERCHANTABILITY, SATISFACTORY QUALITY, AND FITNESS FOR A
PARTICULAR PURPOSE.
TO THE EXTENT ALLO WED BY LOCAL LA W, IN NO EVENT WILL HP OR ITS SUPPLIERS BE
LIABLE FOR DIRECT, SPECIAL, INCIDENTAL, CONSEQUENTIAL (INCLUDING LOST
PROFIT OR DATA), OR OTHER DAMAGE, WHETHER BASED IN CONTRACT, TORT, OR
OTHERWISE.
THE WARRANTY TERMS CONTAINED IN THIS STATEMENT, EXCEPT TO THE EXTENT
LAWFULLY PERMITTED, DO NOT EXCLUDE, RESTRICT OR MODIFY AND ARE IN
ADDITION TO THE MANDATORY STATUTORY RIGHTS APPLICABLE TO THE SALE OF THIS
PRODUCT TO YOU.
English
HP Software License Terms
ATTENTION: USE OF THE SOFTWARE IS SUBJECT TO THE HP SOFTWARE LICENSE
TERMS SET FORTH BELO W . USING THE SOFTWARE INDICATES YOUR ACCEPT ANCE OF
THESE LICENSE TERMS. IF YOU DO NOT ACCEPT THESE LICENSE TERMS, YOU MAY
RETURN THE SOFTWARE FOR A FULL REFUND. IF THE SOFTWARE IS BUNDLED WITH
ANOTHER PRODUCT, YOU MAY RETURN THE ENTIRE UNUSED PRODUCT FOR A FULL
REFUND.
The following License Terms govern your use of the accompanying Software unless you have a
separate signed agreement with HP.
License Grant
HP grants you a license to Use one copy of the Software. “Use” means storing, loading,
installing, executing, or displaying the Software. You may not modify the Software or disable any
licensing or control features of the Software. If the Software is licensed for “concurrent use”, you
may not allow more than the maximum number of authorized users to Use the Software
concurrently.
Ownership
The Software is owned and cop yrighted b y HP or its third party suppliers. Your license confers no
title to, or ownership in, the Software and is not a sale of any rights in the Software. HP’s third
party suppliers may protect their rights in the event of any violation of these License Terms.
Copies and Adaptations
You may only make cop ies or a daptat ions of the Software for archival purposes or when copying
or adaptation is an essential step in the authorized Use of the Software. You must reproduce all
copyright notices in the original Software on all copies or adaptations. You may not copy the
Software onto any public network.
ENWW Warranty and regulatory information 29
Page 32

No Disassembly or Decryption
You may not disassemble or decompile the Software unless HP’s prior written consent is
obtained. In some jurisdictions, HP’s consent may not be required for limited disassembly or
decompilation. Upon request, you will provide HP with reasonably detailed information regarding
any disassembly or decompilation. You may not decrypt the Software unless decryption is a
necessary part of the operation of the Software.
Transfer
Your license will automatically terminate upon any transfer of the Software. Upon transfer, you
must deliver the Software, including any copies and related documentation, to the transferee.
The transferee must accept these License Terms as a condition to the transfer.
Termination
HP may terminate your license u pon notice f or f ailure to comply with any of these License Terms.
Upon termination, you must immediately destroy the Software, together with all copies,
adaptations, and merged portions in any form.
Export Requirements
You may not export or reexport the Software or any copy or adaptat ion in violation of any
applicable laws or regulations.
U.S. Government Restricted Rights
The Software and any accompanying documentation have been developed entirely at private
expense. They are delivered and licensed as “commercial computer software” as defined in
DFARS 252.227-7013 (Oct 1988), DFARS 252.211-7015 (May 1991), or DFARS 252.227-7014
(Jun 1995), as a “commercial item” as defined in FAR 2.101 (a), or as “Restricted computer
software” as defined in FAR 52.227-19 (Jun 1987) (or any equivalent agency regulation or
contract clause), whichever is applicable. You have only those rights provided for such Software
and any accompanying documentation by the applicable FAR or DFARS clause or the
HP standard software agreement for the product involved.
30 Printer Setup ENWW
Page 33

FCC regulations
This equipment has been tested and found to comply with the limits for a Class B digital device,
pursuant to Part 15 of the FCC rules. These limits are designed to pro vide reasonab le pro tection
against harmful interference in a residential installation. This equipment generates, uses, and
can radiate radio frequency energy, and if not installed and used in accordance with the
instructions, may cause harmful interference to radio communications. However, there is no
guarantee that interference will not occur in a particular installation. If this equipment does cause
harmful interference to radio or television reception, which can be determined by turning the
equipment off and on, the user is encouraged to try to correct the interference by one or more of
the following measures:
● Reorient or relocate the receiving antenna.
● Increase separation between equipment and receiver.
● Connect equipment to an outlet on a circuit different from that to which the receiver is
located.
● Consult your dealer or an experienced radio/TV technician.
Note Any changes or modifications to the printer not expressly approved by HP could void the user 's
authority to operate this equipment.
Use of a shielded interface cable is required to comply with the FCC rules.
Canadian DOC Regulations
Complies with Canadian EMC Class B requirements.
Conforme à la classe B des normes canadiennes de compatibilité électromagnétique (CEM).
English
VCCI Statement (Japan)
VCCI class B product
Translation
This equipment is in the Class B category information technology equipment based on the rules
of Voluntary Control Council For Interference by Information Technology Equipment (VCCI).
Although aimed for residen tial area oper ation, r adio interf erence ma y be caused when u sed near
a radio or TV receiver. Read the instructions for correct operation.
Korean EMI Statement
ENWW Warranty and regulatory information 31
Page 34

Safety Information
Laser Safety
The Center for Devices and Radiological Health (CDRH) of the U.S. Food and Drug
Administration has implemented regulations for laser products manufactured since August 1,
1976. Compliance is mandatory for products marketed in the United States. This printer is
certified as a “Class 1” laser product under the U.S. Department of Health and Human Services
(DHHS) Radiation Pe rformance Standard according to the Radiation Control for Health and
Safety Act of 1968. Since radiation emitted inside this printer is completely confined within
protective housings and external covers, the laser beam cannot escape during any phase of
normal user operation.
WARNING! Using controls, making adjustments , or perf orming procedures othe r than those specified in this
manual may result in exposure to hazardous radiation.
Material safety data sheet
Material Safety Data Sheets (MSDS) for supplies containing chemical substances (such as
toner) can be obtained by co ntacting the HP LaserJet Supplies w ebsite at www.hp.com/go/msds
or www.hp.com/hpinfo/community/environment/productinfo/safe ty
Laser Statement for Finland
.
Luokan 1 laserlaite
Klass 1 Laser Apparat
HP LaserJet 9040/9050, 9040n/9050n, 9040dn/9050dn
laserkirjoitin on käyttäjän kannalta turvallinen luokan 1 laserlaite.
Normaalissa käytössä kirjoittimen suojakotelointi estää lasersäteen pääsyn laitteen ulk opuolelle .
Laitteen turvallisuusluokka on määritetty standardin EN 60825-1 (1994) mukaisesti.
Varoitus!
Laitteen käyttäminen muulla kuin käyttöohjeessa mainitulla tavalla saattaa altistaa käyttä jän
turvallisuusluokan 1 ylittävälle näkymättömälle lasersäteilylle.
Varning!
Om apparaten används på an nat sätt än i bruksan visning specificer ats, kan an vändaren utsättas
för osynlig laserstrålning, som överskrider gränsen för laserklass 1.
HUOLTO
HP LaserJet 9040/9050, 9040n/9050n, 9040dn/9050dn
-kirjoittimen sisällä ei ole käyttäjän huollettavissa olevia kohteita. Laitteen saa avata ja huoltaa
ainoastaan sen huoltamiseen koulutettu henkilö. Tällaiseksi huoltotoimenpiteeksi ei katsota
väriainekasetin vaihtamista, paperiradan puhdistusta tai muita käyttäjän käsikirjassa lueteltuja,
käyttäjän tehtäväksi tarkoitettuja ylläpitoto im ia, jotka voidaan suorittaa ilman erikoistyökaluja.
Varo!
Mikäli kirjoittimen suojakotelo a v ataan, olet a lttiina näkymättömälle laser säteilylle laitteen ollessa
toiminnassa. Älä katso säteeseen.
Varning!
Om laserprinterns skyddshölje öppnas då apparaten är i funktion, utsättas användaren för
osynlig laserstrålning. Betrakta ej strålen. Tiedot laitt ee ssa käyt et tä vä n la se rd io din
säteilyominaisuuksista:
Aallonpituus 775-795 nm
Teho 5 mW
Luokan 3B laser
32 Printer Setup ENWW
Page 35

Po wer Cord Statement for Japan
English
ENWW Warranty and regulatory information 33
Page 36

Declaration of Conformity
according to ISO/IEC Guide 22 and EN 45014
Manufacturer’s
Name:
Manufacturer’s
Address:
declares, that the product
Product Name: HP LaserJet 9040/9050 printer
Regulatory Model
Number
3)
Product Options: ALL
conforms to the following Product Specifications:
SAFETY: IEC 60950:1999 / EN60950: 2000
EMC: CISPR 22:1997 / EN 55022:1998 - Class B
IEC 60825-1:1993+A1+A2 / EN 60825-1:1994+A11+A2 (Class 1 Laser/LED Product)
GB4943-2001
EN 61000-3-2:2000
EN 61000-3-3:1995 + A1:2001
EN 55024:1998/A1:2001
FCC Title 47 CFR, Part 15 Class B
GB9254-1998, GB17625.1-2003
Hewlett-Packard Company
11311 Chinden Boulevard
Boise, Idaho 83714-1021, USA
Including optional accessory 2000-sheet input tray (C8531A)
BOISB-0403-00
2)
/ ICES-003, Issue 4
1)
Supplementary Information:
The product herewith complies with the requirements of the EMC Directive 89/336/EEC and the Low
Voltage Directive 73/23/EEC, and carries the CE-Marking accordingly.
1) The product was tested in a typical configuration with Hewlett-Packard Personal Computer
Systems.
2) This Device complies with Part 15 of the FCC Rules. Operation is subject to the following two
Conditions: (1) this device may not cause harmful interference, and (2) this device must accept
any interference received, including interference that may cause undesired operation
3) For regulatory purposes, this product is assigned a Regulatory model number. This number
should not be confused with the product name or product number(s).
Boise, Idaho USA
October 26,2004
For Regulatory Topics only, contact:
Australia Contact: Product Regulations Manager, Hewlett-P ackard Aust ralia Ltd., 31-41 Joseph Street, Blackb urn, Victoria
3130, Australia.
European Contact: Your Local Hewlett-Packard Sales and Service Office or Hewlett- Packard Gmbh, Department HQTRE / Standards Europe, Herrenberger Straße 140, D-71034 Böblingen (FAX: +49-7031-14-3143)
USA Contact: Product Regulat ions Manager, Hewlett-Packard Company, PO Box 15, Mail Stop 160, Boise, Idaho 837070015 (Phone: 208-396-6000)
34 Printer Setup ENWW
Page 37

Declaration of Conformity
according to ISO/IEC Guide 22 and EN 45014
Manufacturer’s Name: Hewlett-Packard Company
English
Manufacturer’s
Address:
declares, that the product
Product Name: Finishing accessories for HP LaserJet 9040/9050 series printer
Model Numbers: C8084A, C8085A, C8088A, C8088B, Q5693A, Q5710A
Product Options: All
conforms to the following Product Specifications:
SAFETY: IEC 60950:1999 / EN60950:2000
EMC: CISPR 22:1997 / EN 55022:1998 - Class A
EN 61000-3-2:2000
EN 61000-3-3:1995 / A1
EN 55024:1998/A1:2001
FCC Title 47 CFR, Part 15 Class A
Supplementary Information:
The product herewith complies with the requirements of the EMC Directive 89/336/EEC and the Low
Voltage Directive 73/23/EEC, and carries the CE-Marking accordingly.
1) The product was tested in a typical configuration with Hewlett-Packard P ersonal Computer Systems.
2) This Device complies with Part 15 of the FCC Rules. Operation is subject to the following two
Conditions:
(1) this device may not cause harmful interference, and
(2) this device must accept any interference received, including interference that may cause
undesired operation.
"Warning - This is a class A product. In a domestic environment this product may cause radio
interference in which case the user may be required to take adequate measures".
For Regulatory Topics only, contact:
Australia Contact: Product Regulations Manager, Hewlett-Packard Australia Ltd., 31-41 Joseph Street, Blackburn,
Victoria 3130, Australia
European Contact: Your Local Hewlett-Packard Sales and Service Office or Hewlett-Packard Gmbh, Department HQ-
TRE / Standards Europe, Herrenberger Straße 140, D-71034 Böblingen (FAX: +49-7031-14-3143)
USA Contact: Product Regulations Manager, Hewlett-Pac kard Company , PO Box 15, Mail Stop 160, Boise , Idaho 83707-
0015 (Phone: 208-396-6000)
Montemorelos 299
Guadalajara Jalisco, 45060 Mexico
1
/ ICES-003, Issue 4
Guadalajara, Jalisco, Mexico
January 30, 2003
ENWW Declaration of Conformity 35
Page 38

36 Printer Setup ENWW
Page 39

HP LaserJet 9040/9050 打印机
简体中文
入门指南
Page 40

© 2005 Copyright Hewlett-Packard
Development Company, L.P.
未经事先书面许可,严禁进行任何形式的复
制、改编或翻译,除非版权法另有规定。
此处包含的信息如有更改,恕不另行通知。
出版号
Q3721-90939
Edition 1, 02/2005
HP 产品和服务的所有保修事项已在产品和服
务所附带的保修声明中列出,此处内容不代
表任何额外保修。 HP 公司对此处任何技术性
或编辑性的错误或遗漏概不负责。
商标说明
Microsoft
®
、 Windows® 和 Windows NT® 是
Microsoft Corporation 在美国的注册商标。
®
UNIX
是 The Open Group 的注册商标。
此处提及的其它所有产品可能是其各自公司
的商标。
Page 41

打印机设置
目录
简介. . . . . . . . . . . . . . . . . . . . . . . . . . . . . . . . . . . . . . . . . . . . . . . . . . . . . . . . . . . . . . . . . . . . . . 40
安装检查清单 . . . . . . . . . . . . . . . . . . . . . . . . . . . . . . . . . . . . . . . . . . . . . . . . . . . . . . . . . . . . . . 40
准备打印机的安装位置 . . . . . . . . . . . . . . . . . . . . . . . . . . . . . . . . . . . . . . . . . . . . . . . . . . . . . . . 41
检查包装箱内的物品 . . . . . . . . . . . . . . . . . . . . . . . . . . . . . . . . . . . . . . . . . . . . . . . . . . . . . . . . . 45
打印机部件定位. . . . . . . . . . . . . . . . . . . . . . . . . . . . . . . . . . . . . . . . . . . . . . . . . . . . . . . . . . . . . 46
取下内层包装 . . . . . . . . . . . . . . . . . . . . . . . . . . . . . . . . . . . . . . . . . . . . . . . . . . . . . . . . . . . . . . 47
安装附件 . . . . . . . . . . . . . . . . . . . . . . . . . . . . . . . . . . . . . . . . . . . . . . . . . . . . . . . . . . . . . . . . . . 48
安装打印碳粉盒. . . . . . . . . . . . . . . . . . . . . . . . . . . . . . . . . . . . . . . . . . . . . . . . . . . . . . . . . . . . . 50
连接打印机电缆. . . . . . . . . . . . . . . . . . . . . . . . . . . . . . . . . . . . . . . . . . . . . . . . . . . . . . . . . . . . . 51
连接并行电缆. . . . . . . . . . . . . . . . . . . . . . . . . . . . . . . . . . . . . . . . . . . . . . . . . . . . . . . . . . 52
连接至 Ethernet 10/100TX 网络 (适用于 HP LaserJet 9040n/9050n 和
HP LaserJet 9040dn/9050dn) . . . . . . . . . . . . . . . . . . . . . . . . . . . . . . . . . . . . . . . . . . . . 53
简体中文
更换控制面板贴面 . . . . . . . . . . . . . . . . . . . . . . . . . . . . . . . . . . . . . . . . . . . . . . . . . . . . . . . . . . . 54
连接电源线 . . . . . . . . . . . . . . . . . . . . . . . . . . . . . . . . . . . . . . . . . . . . . . . . . . . . . . . . . . . . . . . .55
配置控制面板显示屏语言 . . . . . . . . . . . . . . . . . . . . . . . . . . . . . . . . . . . . . . . . . . . . . . . . . . . . .56
装入纸盘 1. . . . . . . . . . . . . . . . . . . . . . . . . . . . . . . . . . . . . . . . . . . . . . . . . . . . . . . . . . . . . . . . . 57
装入纸盘 2 和纸盘 3 . . . . . . . . . . . . . . . . . . . . . . . . . . . . . . . . . . . . . . . . . . . . . . . . . . . . . . . . .58
打印配置页 . . . . . . . . . . . . . . . . . . . . . . . . . . . . . . . . . . . . . . . . . . . . . . . . . . . . . . . . . . . . . . . .59
安装打印软件 . . . . . . . . . . . . . . . . . . . . . . . . . . . . . . . . . . . . . . . . . . . . . . . . . . . . . . . . . . . . . . 60
安装 Windows 打印软件 . . . . . . . . . . . . . . . . . . . . . . . . . . . . . . . . . . . . . . . . . . . . . . . . . 60
安装 Macintosh 打印软件 . . . . . . . . . . . . . . . . . . . . . . . . . . . . . . . . . . . . . . . . . . . . . . . . 60
验证打印机设置. . . . . . . . . . . . . . . . . . . . . . . . . . . . . . . . . . . . . . . . . . . . . . . . . . . . . . . . . . . . . 62
客户支持 . . . . . . . . . . . . . . . . . . . . . . . . . . . . . . . . . . . . . . . . . . . . . . . . . . . . . . . . . . . . . . . . . . 62
保修和管制信息. . . . . . . . . . . . . . . . . . . . . . . . . . . . . . . . . . . . . . . . . . . . . . . . . . . . . . . . . . . . . 63
惠普有限保修声明 . . . . . . . . . . . . . . . . . . . . . . . . . . . . . . . . . . . . . . . . . . . . . . . . . . . . . . 63
HP 特别保修 . . . . . . . . . . . . . . . . . . . . . . . . . . . . . . . . . . . . . . . . . . . . . . . . . . . . . . . . . . 64
HP 软件许可条款. . . . . . . . . . . . . . . . . . . . . . . . . . . . . . . . . . . . . . . . . . . . . . . . . . . . . . . 65
FCC 规则. . . . . . . . . . . . . . . . . . . . . . . . . . . . . . . . . . . . . . . . . . . . . . . . . . . . . . . . . . . . . 66
安全信息 . . . . . . . . . . . . . . . . . . . . . . . . . . . . . . . . . . . . . . . . . . . . . . . . . . . . . . . . . . . . . 67
一致性声明 . . . . . . . . . . . . . . . . . . . . . . . . . . . . . . . . . . . . . . . . . . . . . . . . . . . . . . . . . . . . . . . .69
ZHCN 目录 39
Page 42

简介
恭喜您购买了 HP LaserJet 9040/9050 打印机。此系列打印机有以下几种配置。
HP LaserJet 9040/9050 打印机
HP LaserJet 9040/9050 打印机 (产品号为 Q7697A/Q3721A)的标准配置为 64 兆字节 (MB) 随
机存取内存 (RAM)、宽幅打印和两个 500 页纸盘。
注 只有 HP LaserJet 9040/9050 打印机需要使用可选的增强输入 / 输出 (EIO) 卡连接至网络。
HP LaserJet 9040n/9050n 打印机
HP LaserJet 9040n/9050n 打印机 (产品号为 Q7698A/Q3722A)的标准配置为 128 MB RAM、
宽幅打印、两个 500 页纸盘、一个 100 页多用途纸盘 (纸盘 1)和一个嵌入式 HP Jetdirect 打印
服务器。
HP LaserJet 9040dn/9050dn 打印机
HP LaserJet 9040dn/9050dn 打印机 (产品号为 Q7699A/Q3723A)的标准配置为 128 MB RAM、
宽幅打印、两个 500 页纸盘、一个 100 页多用途纸盘 (纸盘 1)、一个嵌入式 HP Jetdirect 打印
服务器和一个双面打印附件 (用于在纸张两面打印)。
安装检查清单
本指南将帮助您设置和安装新打印机。要进行正确安装,请按顺序完成以下每个部分中所述的
步骤:
● 打开打印机包装 步骤 1-4
● 安装打印机 步骤 5-13
● 安装打印软件 步骤 14
● 验证打印机设置 步骤 15
警告! 打印机很重。 HP 建议由四个人来移动打印机,以避免造成人身伤害或损坏打印机。
40 打印机设置 ZHCN
Page 43

步骤 1. 准备打印机的安装位置
装运箱空间要求
确保安装地点的门足够宽或有足够的空间让装运箱通过。装运箱的尺寸大致为:
911 x 790 毫米厚 x 1036 毫米高 (36 x 31 英寸厚 x 41 英寸高)。
打开包装空间要求
从装运箱撕下塑料包装纸之前,确保有足够的空间容纳从装运箱取出的物品,然后将本产品从装
运托盘上取下。 HP 建议至少在装运箱周围留出 3.1 米(10 英尺)的空间,以便取出所有装运
材料。
从装运箱中取出打印机
有关如何将打印机从装运箱中取出的信息,请参阅装运箱上的图形。
警告! 打印机很重。 HP 建议由四个人来移动打印机,以避免造成人身伤害或损坏打印机。
简体中文
ZHCN 准备打印机的安装位置 41
Page 44

打印机尺寸
准备打印机的安装位置,使其符合以下物理和环境要求:
353 毫米
(13.9 英寸)
353 毫米
(13.9 英寸)
638 毫米 (25.1 英寸)
638 毫米 (25.1 英寸)
406 毫米
(16 英寸)
406 毫米
(16 英寸)
633 毫米 (24.9 英寸)
(17.8 英寸)
368 毫米
HP LaserJet 9040/9050 打印机尺寸 (顶视图和侧视图)
600 毫米 (23.6 英寸)
42 打印机设置 ZHCN
Page 45
2591 毫米 (102 英寸)用于伸出输出
设备; 2705 毫米 (106.5 英寸)用于卸
下输出设备
1
2591 毫米 (102 英寸)用于伸出输出
设备; 2705 毫米 (106.5 英寸)用于卸
下输出设备
1
(39.4 英寸)
1001 毫米
1036 毫米 (40.8 英寸)
简体中文
1
较小尺寸是伸出输出设备所需的空间,连接杆仍连接在可选纸盘 4 下的栓锁上。较大尺寸是从本产品
卸下输出设备所需的空间。增加的空间允许您从可选纸盘 4 下的栓锁上卸下连接杆。
安装典型输出设备、纸盘 4 和纸盘 1 的 HP LaserJet 9040/9050 (顶视图和侧视图),
以显示最大尺寸
ZHCN 准备打印机的安装位置 43
Page 46

打印机安装位置要求
● 表面硬且平整的区域,最好不带地毯
● 充足的电源 (对于 110 V 机型,建议使用
专用的 15 A 电路;对于 220 V 机型,
● 打印机周围留出适当的空间
● 室内通风良好
● 不直接暴露在日光下或化学物品附近,
建议使用专用的 8 A 电路)
● 环境稳定 - 温度或湿度无突变
● 相对湿度介于 20% 至 80% 之间
包括氨基洗涤剂
● 室温 10°C 至 32.5°C (50°F 至 91°F)
打印机重量 (不包括打印碳粉盒)
● HP LaserJet 9040/9050 打印机:63.5 千克 (140 磅)
● HP LaserJet 9040n/9050n 打印机:69.4 千克 (153 磅)
● HP LaserJet 9040dn/9050dn 打印机:76.2 千克 (168 磅)
44 打印机设置 ZHCN
Page 47

步骤 2. 检查包装箱内的物品
打印机
可选纸盘 4
控制面板贴面
打印机软件
CD-ROM
(包括使用指南)
可选纸盘 1
电源线
简体中文
面朝上出纸槽
打印碳粉盒
包装箱内的物品
注 HP LaserJet 9040n/9050n 打印机包括纸盘 1 和嵌入式 HP Jetdirect 打印服务器 (未显示)。
HP LaserJet 9040dn/9050dn 打印机包括纸盘 1、嵌入式 HP Jetdirect 打印服务器 (未显示)和
一个双面打印附件 (双面打印器;未显示)。
打印机说明文件
(本手册)
ZHCN 检查包装箱内的物品 45
Page 48

步骤 3. 打印机部件定位
下图显示了打印机重要部件的位置和名称。
1
5
2
3
4
9
10
11
打印机部件 (前视图和后视图)
6
7
8
12
13
14
1 面朝上出纸槽
2 控制面板
3 纸盘 2
4 电源开关
5 纸盘 1
6 标准出纸槽
(面朝下纸槽)
7 前挡盖
8 纸盘 3
9 EIO 插槽 (2)
10 安全锁端口
11 电源线接口
12 局域网 (LAN) 接口 (RJ-45)
(用于 HP LaserJet 9040n/
9050n 和 9040dn/9050dn)
13 并行 B 电缆接口
14 HP Jet-Link 接口
(用于纸张处理附件)
46 打印机设置 ZHCN
Page 49

步骤 4. 取下内层包装
注意 打印机上有橙色装运带和内层包装材料,以防在运输途中损坏打印机。您必须取出所有装运材料
和内层包装材料,才能使打印机正常运行。
取下内层包装
1 从打印机外部取下所有橙色包装材料,并且取下所有非橙色的纸板或聚苯乙烯泡沫塑料
材料。
2 取下标准出纸槽的所有橙色包装材料和控制面板显示屏上的保护薄膜。
3 打开左挡盖,向后平拉装运胶带,取下两个加热组件装运锁 (如打印机上的图形所示)。
确保加热组件手柄位于锁定位置。
简体中文
4 打开纸盘,取下所有橙色包装材料,然后合上纸盘。
5 打开前挡盖,取下前端转印滚筒区和打印碳粉盒锁定手柄上的橙色包装胶带。合上前挡盖。
注 请保存好所有包装材料,您以后有可能需要重新包装打印机。
ZHCN 取下内层包装 47
Page 50

步骤 5. 安装附件
警告! 此打印机重约 63.5 千克 (140 磅)。 HP 建议由四个人来移动打印机,以避免造成人身伤害或损
坏打印机。
安装随打印机购买或单独购买的所有纸张处理附件。使用随附件提供的安装说明。说明可能位于
CD-ROM 上。
安装双面打印器
注 如果您随同双面打印器和输入设备 (纸盘 4 和 / 或纸盘 1)购买了输出设备 (多功能装订器、
3,000 页堆栈器、3,000 页堆栈器 / 装订器或 8 槽邮箱),请先安装双面打印器和输入设备,然后
再安装输出设备。
请参阅随双面打印器附带的安装说明。说明可能位于 CD-ROM 上。
双面打印器
注 安装完双面打印器后,请返回本指南,完成打印机设置。
48 打印机设置 ZHCN
Page 51

安装输入设备
请参阅随输入设备附带的安装说明。说明可能位于 CD-ROM 上。
纸盘 1 和纸盘 4
注 安装完输入设备后,请返回本指南,完成打印机设置。
安装输出设备
安装您所购买的任何输出设备。安装完设备后,请转至步骤 6。
简体中文
请参阅随输出设备附带的安装说明。说明可能位于 CD-ROM 上。
多功能装订器
3,000 页堆栈器 / 装订器或
3,000 页堆栈器
8 槽邮箱
输出设备
ZHCN 安装附件 49
Page 52

步骤 6. 安装打印碳粉盒
使用此步骤安装打印碳粉盒。如果碳粉沾在衣服上,请用干布将它抹去,然后用冷水洗涤衣服。
热水会使碳粉渗入纤维。
1
安装打印碳粉盒
1 从包装中取出打印碳粉盒前,请将打印碳粉盒放置在坚固的表面上。
然后将打印碳粉盒轻轻滑出包装。
注意
为防止损坏打印碳粉盒,请用双手拿取碳粉盒。
打印碳粉盒在亮光下的暴露时间不应超过几分钟。打印碳粉盒位于打印
机外部时,请将其盖住。
3
2 轻轻地前后晃动打印碳粉盒,使碳粉盒内的碳粉分布均匀。只有此
时需要晃动碳粉盒,以后不需晃动。
3 打开打印机的前挡盖。
4 将绿色手柄向下旋转至未锁定位置。
5 拿住碳粉盒,使箭头位于碳粉盒左侧。如图所示放置碳粉盒,使其
4
左侧箭头指向打印机,然后将碳粉盒与打印导轨对齐。尽量将打印
碳粉盒向打印机内部滑入。
注
打印碳粉盒有一个内部拉环。在安装打印碳粉盒并且打开本产品电
源后,打印机会自动取下拉环。在本产品取下拉环时,打印碳粉盒会发
出几秒钟的噪音。只有新打印碳粉盒才会发出噪音。
5
6 按下绿色手柄上的按钮,将手柄顺时针旋转至锁定位置。
7 合上前挡盖。
6
7
50 打印机设置 ZHCN
Page 53

步骤 7. 连接打印机电缆
打印机可以使用并行电缆连接至计算机,也可以使用可选的 HP Jetdirect 打印服务器连接至
网络。
对于配有嵌入式 HP Jetdirect 打印服务器的打印机,可以通过 10/100TX (RJ-45) 接口连接网络
电缆。打印机还有一个 HP Jet-Link 接口。
接口位置
局域网 (LAN) 接口
(RJ-45)
并行 B 接口
(并行)
HP Jet-Link 接口
(用于纸张处理附件)
简体中文
ZHCN 连接打印机电缆 51
Page 54

连接并行电缆
如果要将打印机直接连接至计算机,请使用并行电缆。
为确保可靠性,请使用 IEEE-1284 双向 B 型并行电缆。这些电缆清楚地标有 “IEEE-1284”。
仅 IEEE-1284 电缆支持所有高级打印机功能。
连接并行电缆
2
1 确保未将打印机电源线连接至插座。
2 将并行电缆连接至打印机并行端口。连接电缆时,请按下锁定释出
手柄。
注
如果很难安装电缆,则检查并确保您使用了正确的电缆。
3
3 将电缆另一端连接至计算机上的正确接口。
52 打印机设置 ZHCN
Page 55

连接至 Ethernet 10/100TX 网络(适用于 HP LaserJet 9040n/9050n
和 HP LaserJet 9040dn/9050dn)
如果要将打印机连接至 Ethernet 10/100TX 网络,请使用 RJ-45 接口。
2
3
连接至 Ethernet 10/100TX 网络
1 确保未将打印机电源线连接至插座。
2 将网络电缆连接至打印机中的嵌入式 HP Jetdirect 打印服务器。
3 将电缆的另一端连接至网络端口。
简体中文
ZHCN 连接打印机电缆 53
Page 56

步骤 8. 更换控制面板贴面
1
控制面板已安装了英文贴面。如有必要,请使用以下步骤,将控制面板
贴面更换为包装箱随附的其中一个贴面。
更换贴面
1 将手指甲或细薄的坚硬物体插入贴面下,然后将其向上掀起。
2 轻轻掀起贴面并向后拉,以便将其从打印机移开。
3 将新的贴面放在控制面板上。使贴面末端与控制面板上的孔对齐,
然后将其滑入。
2
4 将贴面用力压到控制面板上。确保贴面平展地贴在控制面板上。
3
4
5
54 打印机设置 ZHCN
Page 57

步骤 9. 连接电源线
此部分介绍了如何连接电源线。
1
2
3
连接电源线
1 将电源线连接至打印机和交流 (AC) 插座。
注意
对于 110 V 机型, HP 建议您使用专用的 15 A 交流插座 (对于 220 V
机型,建议使用 15 A)。 不要将其它设备插入同一插座。
为防止损坏打印机,请只使打印机随附的电源线。
2 按下电源开关以打开打印机 (按下位置)。如果打印机控制面板上
显示 Enter language (选择语言)信息,请使用 或 滚动查
找至您的语言,然后按下 。打印机预热后,控制面板显示屏上应
显示 READY (就绪)信息。
注
第一次打开打印机电源后,您可以选择将显示信息所用的语言设置为您
自己的语言。如果在图形显示屏显示 ENTER LANGUAGE 信息后的 60 秒内
没有选定任何语言,打印机会将英语用作显示语言,并且每次打开本产
品时, ENTER LANGUAGE 均会显示在图形显示屏上,直至选定一种语言。
3 如果您安装了可选的 3,000 页堆栈器 / 装订器(或堆栈器或多功能
装订器)、可选纸盘 4,或者两者均已安装,则检查其指示灯是否呈
绿色持续发亮。如果指示灯呈琥珀色、闪烁或熄灭,请参阅使用指
南了解相关信息。
简体中文
ZHCN 连接电源线 55
Page 58

步骤 10. 配置控制面板显示屏语言
默认设置下,打印机控制面板会以英文显示信息。如果您在步骤 9 中未设置语言,请按以下步骤
设置打印机,使其以另一种支持的语言显示信息并打印配置页。
配置控制面板语言
1 关闭打印机电源。
2 打开打印机电源。
3 等待打印机开始计算内存。
4 持续按住 。
5 继续按住 ,直至所有三个控制面板指示灯都亮起,然后松开 。
6 使用 或 滚动查找至 Configure Device (Configure Device) (配置设备),
然后按下 。
7 使用 或 滚动查找至 System Setup (System Setup) (系统设置),然后按下 。
8 使用 或 滚动查找至 Language (Language) (语言),然后按下 。
9 使用 或 滚动查找至您自己的语言,然后按下 。
注 对于土耳其文、捷克文、俄文、匈牙利文和波兰文,选择特定的语言后,默认符号集也将随之
更改。对于其它所有语言,默认符号集为 PC-8。
56 打印机设置 ZHCN
Page 59
步骤 11. 装入纸盘 1
1
2
注
纸盘 1 对 HP LaserJet 9040n/9050n 和 HP LaserJet 9040dn/9050dn 来
说是标准配置,对 HP LaserJet 9040/9050 来说是可选配置。
此部分介绍了如何装入 A4 或 letter 尺寸纸张。有关装入和配置其它尺寸
和类型介质的说明,请参阅 CD-ROM 上的使用指南。
注意
为了避免纸张卡塞,请勿在打印机从某个纸盘打印时打开该纸盘。
简体中文
装入纸盘 1
纸盘 1 是多用途纸盘,能够容纳多达 100 页标准尺寸纸张或 10 个信封。
本产品将优先从纸盘 1 (默认纸盘)取纸。有关如何更改此默认设置的
信息,请参阅使用指南。
纸盘 1 可以使您在不取出其它纸盘中的纸张的情况下,方便地打印
信封、投影胶片、自定义尺寸纸张或其它类型的介质。
3
1 打开纸盘 1。
2 装入 A4 或 Letter 尺寸纸张,长边先进入打印机,打印面朝上。
3 调整纸张导板,使其轻轻靠紧纸叠,但是不要压弯纸张。
4 确保纸张卡在导板的槽片下方,并且未盖住装入数量指示灯。
注
如果在 A3、 11 x 17 或其它长介质上打印,请拉出纸盘延伸板,直至其
停住。
ZHCN 装入纸盘 1 57
Page 60

步骤 12. 装入纸盘 2 和纸盘 3
1
此部分介绍了如何装入 A4 或 letter 尺寸纸张。有关装入和配置其它尺寸
和类型介质的说明,请参阅使用指南。
注意
为了避免纸张卡塞,请勿在打印机从某个纸盘打印时打开该纸盘。
装入纸盘 2 和纸盘 3
1 打开纸盘,直至其停住。
2
2 按下左侧 (Y) 纸张导板上的槽片并将导板设为正确的纸张尺寸。
3 按下前侧 (X) 纸张导板上的槽片并将导板设为正确的纸张尺寸。
4 装入一叠介质,使纸叠顶部朝向纸盘后面。对于单面打印,打印面
应该朝下。对于双面打印,先打印的一面应该朝上。
注
有关在特殊介质上打印的信息,请参阅使用指南。
3
5 如果两块导板设置为同一标准值,如 Letter 或 A4,则将介质杆置于
Standard (标准)位置;否则,请将其置于 Custom (自定义)
位置。
6 合上纸盘。
7 此纸盘的纸张尺寸和类型会显示在打印机控制面板上。按下
确认设置,或者参阅使用指南进行更改。
4
8 重复步骤 1 至步骤 7,在其它纸盘中装入纸张。
注
有关在纸盘 4 中装入纸张的信息,请参阅随纸盘 4 附带的安装指南。
注意
切勿将纸张或其它物品存放在纸张导板左边的区域。这样做会对纸盘造
成永久性损坏。
6
58 打印机设置 ZHCN
Page 61

步骤 13. 打印配置页
打印配置页以确保打印机操作正常。
打印配置页
1 按下 。
2 使用 或 滚动查找至 Information (信息),然后按下 。
3 使用 或 滚动查找至 Print Configuration (打印配置),然后按下 。
打印机随即会打印配置页。如果打印机中安装了 HP Jetdirect 打印服务器,则还可以打印
HP Jetdirect 网络配置页。
如果您安装了双面打印附件或纸盘 4 等可选附件,则检查配置页以确保它们作为已安装选项
列出。
注 要获得打印机快捷键列表,请打印菜单图。
简体中文
ZHCN 打印配置页 59
Page 62

步骤 14. 安装打印软件
打印机附带的 CD-ROM 上提供有打印软件。您必须安装此 CD-ROM 上的打印机驱动程序,才能
充分利用打印机功能。
如果无法访问 CD-ROM 驱动器,您可以从以下网站下载打印软件:
www.hp.com/support/lj9050
程序会自动检查计算机是否可以访问互联网,并且提供可以从互联网获得最新软件的选项。
注 您可以从以下网站下载用于 UNIX® (HP-UX, Sun Solaris) 网络的打印机安装软件:
www.hp.com/support/net_printing。
有关更多信息,请参阅 HP 支持说明。
安装 Windows 打印软件
此部分介绍了如何安装 Windows 打印软件。 Microsoft® Windows® 9X、 Windows NT® 4.0、
Windows 2000、 Windows Millennium (Me)、 Windows XP 和 Windows Server 2003 都支持该
软件。
安装软件
1 退出所有正在运行的程序。
_lj9040。视运行 Windows 的计算机的配置而定,打印机软件的安装
2 将 CD-ROM 插入 CD-ROM 驱动器。视计算机配置而定,安装程序可能会自动运行。如果程
序未自动运行:在开始菜单上单击运行。键入 x:setup (此处的 X 是指 CD-ROM 驱动器的
盘符),然后单击确定。
3 按照计算机屏幕上的说明进行操作。
安装 Macintosh 打印软件
此部分介绍了如何安装 Macintosh 打印软件。 Macintosh OS 7.5 或更高版本支持该软件。
为 Mac OS 8.6 到 9.2 安装 Macintosh 打印软件
1 使用网线连接 HP Jetdirect 打印服务器和网络端口。
2 将 CD-ROM 插入 CD-ROM 驱动器。系统将自动运行 CD-ROM 菜单。如果 CD-ROM 菜单未
自动运行,请双击桌面上的 CD-ROM 图标,然后双击安装程序图标。此图标位于启动程序
CD-ROM 的 Installer/< 语言 > 文件夹下 (其中 < 语言 > 为您选择的语言)。例如, Installer/
English 文件夹包含英语版打印机软件的安装程序图标。
3 按照计算机屏幕上的说明进行操作。
4 打开位于以下文件夹中的 Apple Desktop Printer Utility:( 启动盘) :Applications:Utilities。
5 双击 Printer (AppleTalk)。
6 在 Apple Talk Printer Selection 旁单击 Change (更改)。
7 选择打印机,单击 Auto Setup (自动设置),然后单击 Create (创建)。
8 在 Printing (打印)菜单中,单击 Set Default Printer (设置默认打印机)。
注 桌面上的图标将显示为一般图标。所有打印面板均将显示在应用程序的打印对话框中。
为 Mac OS 10.1 和更新版本安装 Macintosh 打印软件
1 使用网线连接 HP Jetdirect 打印服务器和网络端口。
60 打印机设置 ZHCN
Page 63

2 将 CD-ROM 插入 CD-ROM 驱动器。系统将自动运行 CD-ROM 菜单。如果 CD-ROM 菜单未
自动运行,请双击桌面上的 CD-ROM 图标,然后双击安装程序图标。此图标位于启动程序
CD-ROM 的 Installer/< 语言 > 文件夹下 (其中 < 语言 > 为您选择的语言)。例如, Installer/
English 文件夹包含英语版打印机软件的安装程序图标。
3 双击 HP LaserJet Installers (HP LaserJet 安装程序)文件夹。
4 按照计算机屏幕上的说明进行操作。
5 双击所需语言的 Installer (安装程序)图标。
6 在计算机硬盘驱动器上,依次双击 Applications (应用程序)和 Utilities (实用程序),然
后双击 Print Center (打印中心)。
7 单击 Add Printer (添加打印机)。
8 如果是 OS X 10.1,选择 AppleTalk 连接类型;如果是 OS X 10.2,选择 Re nd ez vous 连接类
型。
9 选择打印机名称。
10 单击 Add Printer (添加打印机)。
11 单击左上角的关闭按钮,关闭 Print Center。
注 不能使用并行端口将 Macintosh 计算机直接连接至打印机。
简体中文
ZHCN 安装打印软件 61
Page 64

步骤 15. 验证打印机设置
要验证是否已成功完成安装,最简单的方法就是通过某个软件程序打印一个文档。
验证打印机设置
1 打开您选择的程序。打开或创建一个简单的文档。
2 在程序中,选择打印命令。
3 选择 HP LaserJet 9040 或 9050 作为打印机。
4 确保正确的打印机名称出现。
5 打印文档。
如果不能正确打印该文档,则检查打印机的设置和配置。有关其它信息,请参阅使用指南。
客户支持
有关本产品的其它信息,请参阅 CD-ROM 上的使用指南。有关 HP 客户服务信息,请参阅打印
机随附的支持说明。
62 打印机设置 ZHCN
Page 65

保修和管制信息
惠普有限保修声明
HP 产品 保修期
HP LaserJet 9040/9050, 9040n/9050n,
9040dn/9050dn
1 HP 担保 HP 硬件、附件和耗材在上述指定保修期内不存在材料和工艺上的缺陷。如果 HP
获悉且经证实产品在保修期内确实存在此类缺陷,则 HP 将自行选择维修或更换产品。更换
产品可能是新产品或类似于新产品。
2 HP 担保正确安装和使用的 HP 软件在上述指定的保修期内,不会由于材料和工艺上的缺陷而
不能执行其程序设计指令。如果 HP 获悉软件介质在保修期内存在此类缺陷,则 HP 将更换
由于此类缺陷而不能执行其程序设计指令的软件介质。
3 HP 不担保 HP 产品的操作不会中断或不会出现错误。如果 HP 无法在合理的时间内按担保所
述条件修理或更换产品,则客户在迅速返还产品后有权要求收回该产品的购买款。
4 HP 产品可能含有在性能上等同于新产品的再造部件,或者可能被意外使用过的部件。
5 保修期从发货日期或安装日期 (如果由 HP 安装)算起。如果客户安排或者由于客户原因
而使 HP 在发货后的 30 天之后安装,则保修期从发货后的第 31 天算起。
6 保修不适用于因以下原因造成的缺陷:(a) 维护或校准不正确或不适当, (b) 使用不是由 HP
提供的软件、接口设备、部件或耗材, (c) 未经授权的修改或误用, (d) 运行环境在该产品公
布的环境规格范围之外,或 (e) 使用地点的准备或维护不正确。
7 在当地法律允许的范围内,上述保修是专有保修,此外并无其它暗示或明示的文字或口头的
保修或条件, HP 特别否认有任何适销性、满意的质量以及特定用途适用性的暗示保修或
条件。
1 年现场
简体中文
8 对于每次造成有形财产损失的事故, HP 负责赔偿的金额不超过 300,000 美元,或不超过为
作为索赔产品而实际支付的款额。对于身体伤害或死亡方面的损失, HP 只负责赔偿具有足
够司法管辖权的法庭所判定的,由存在缺陷的 HP 产品直接导致的所有此类损失。
9 在当地法律允许的范围内,此保修声明中的补偿是客户唯一的专有补偿。除以上所述外,HP
或其供应商在任何情况下不对任何数据丢失或直接、特殊、偶然、继发 (包括利润或数据
损失)或其它损害负责,不管损害是依据合约、侵权还是其它原因。
10 对于澳大利亚和新西兰的客户事务,除法律允许的范围外,本声明中的保修条款不排除、
限制或修改此产品销售给此类客户时适用的强制性法定权利,而只是对这些权利的补充。
保修期内和保修期后的服务
● 如果打印机硬件在保修期内出现故障,请与 HP 授权的服务或支持提供商联系。
● 如果打印机硬件在保修期满后出现故障,且您持有 HP 维护协议或 HP SupportPack,请按照
协议中的说明申请服务。
● 如果您没有 HP 维护协议或 HP SupportPack,请与 HP 授权的服务或支持提供商联系。
为确保 HP LaserJet 打印机寿命长久, HP 提供下列服务:
延长保修期 HP SupportPack 涵盖了 HP 硬件产品和 HP 提供的所有内部组件。硬件维护期
从您购买 HP 产品之日算起,一直持续到您选择的合同期限满为止。客户必须在
购买 HP 产品后的 90 天内购买 HP SupportPack。有关更多信息,请访问
www.hp.com/support/lj9050
_lj9040。
ZHCN 保修和管制信息 63
Page 66

HP 特别保修
打印碳粉盒和成像鼓的有限保修
HP 保证本产品不存在材料和工艺方面的缺陷。
本保修对以下产品不适用:(a) 经过重添碳粉、整修、再造或擅自改动的产品; (b) 因滥用、存储
不当或运行环境超出为该打印机产品公布的环境规格而导致出现故障的产品; (c) 因正常使用而
造成磨损的产品。
要获得保修服务,请将产品连同问题的书面说明以及打印样版一起退还购买处或与 HP 客户支持
部联系。 HP 将自行决定是更换确有缺陷的产品还是退回该产品的购买款项。
在当地法律允许的范围内,上述保修 是唯一的,其它明示或暗示的书面或口头的担保或条件均无
效; HP 特此否认对任何适销性、满意的质量以及特定用途适用性的暗示的保证或条件。
在当地法律允许的范围内,无论依据合约、侵权行为还是其它原因, HP 或其供应商在任何情况
下不对直接、特殊、偶然的、继发的(包括利润损失或数据丢失)或其它的损失负责。
除法律允许的范围以外,本声明中的保修条款不排除、限制或修改销售本产品时适用的强制性法
定权利。
64 打印机设置 ZHCN
Page 67

HP 软件许可条款
注意:本软件的使用必须遵守以下 HP 软件许可条款。使用本软件表示您接受这些许可条款。
如果您拒绝接受这些许可条款,则可以将软件退回,我们将退还全部货款。如果此软件随其它产
品一起发售,您可以退回全部未用过的产品,我们将退还全部货款。
除非您与 HP 签署一份单独协议,否则以下许可条款会限制您使用随附的软件。
许可授予
HP 授予您使用本软件一个副本的许可。“使用”意为存储、载入、安装、执行或显示本软件。
您不可以修改本软件,也不能禁用本软件的任何许可或控制功能。如果本软件许可 “同时
使用”,则同时使用本软件的用户数不得超过经授权的最大用户数。
所有权
本软件所有权和版权归 HP 或其第三方供应商所有。许可不给予任何对本软件的权利或所有权。
它不是对本软件任何权利的出售。如果发生违反这些许可条款的事件, HP 的第三方供应商可以
保护其权益。
复制与改编
仅在为存档目的,或者复制或改编是经授权使用本软件所必需的步骤时,才可以复制或改编本
软件。在所有副本或改编本中,您必须复制原软件中的所有版权通知。您不能将本软件复制到任
何公共网络上。
不可进行反汇编或解密
除非事先获得 HP 的书面同意,否则不得反汇编或反编译本软件。在某些区域,有限的反汇编或
反编译则不需要获得 HP 的同意。在提出申请时,您应向 HP 提供进行反汇编或反编译的合理详
细的信息。除非解密是该软件操作的必要部分,否则不能对其解密。
转让
转让本软件的同时,您的许可将自动终止。转让时,您必须将本软件,包括所有副本和相关说明
文件交付给受让人。同时,作为条件,被转让者也必须接受这些许可条款,方可进行转让。
终止
如果获悉您未能遵守这些许可条款,则 HP 可以终止您的许可。许可终止后,您必须立即将
软件、其所有副本、改编本以及任何形式的合并部分全部销毁。
出口要求
不得违反任何适用的法律或规定而出口或再出口该软件、副本或改编本。
简体中文
美国政府限制权利
本软件及其伴随的说明文件均由私人经费开发研制。它们按 DFARS 252.227-7013(1988 年
10 月)、 DFARS 252.211-7015(1991 年 5 月)或 DFARS 252.227-7014(1995 年 6 月)所定
义的 “商业计算机软件”,或按 FAR 2.101 (a) 所定义的 “商业项目”,或按 FAR 52.227-19
(1987 年 6 月)( 或 任何相当的代理机构规章或协约条款)所定义的 “受限制的计算机软件”
而发放和许可,以适用者为准。您仅拥有相应的 FAR 或 DFARS 条款或 HP 对所涉及产品的标准
软件协议所提供的对此类软件及其附带说明文件的权利。
ZHCN 保修和管制信息 65
Page 68
FCC 规则
此设备经测试符合 FCC 规则第 15 部分的 B 级数字设备限制规定。在住宅区安装时,这些限制为
防止有害干扰提供了合理保护。此设备可产生、使用并会发射无线射频能量,而且,如果未按说
明进行安装和使用,可能会对无线电通信造成有害干扰。同时,也不能保证在特定安装中不会产
生干扰的问题。如果由于使用和关闭此设备确实对收音机或电视机接收造成干扰,建议您采用以
下一种或多种措施排除干扰:
● 重新调整接收天线的方向或位置。
● 加大设备和无线电接收设备之间的距离。
● 将设备连接到与接收设备使用不同电路的电源插座上。
● 请咨询代理商或经验丰富的收音机 / 电视机技术人员。
注 未经 HP 同意而对打印机进行更改和修改会使用户无法操作此设备。
使用的屏蔽接口电缆必须符合 FCC 规则。
加拿大 DOC 规则
Complies with Canadian EMC Class B requirements.
Conforme à la classe B des normes canadiennes de compatibilité électromagnétique (CEM).
VCCI 声明 (日本)
VCCI B 级产品
翻译
依据信息技术设备干扰自动控制委员会 (VCCI) 规则,此设备属于 B 级类别信息技术设备。尽管
适用于住宅区使用,但是在收音机或电视接收器附近使用时仍可能产生无线电干扰。请参阅说明
以了解正确的操作。
韩国 EMI 声明
66 打印机设置 ZHCN
Page 69

安全信息
激光安全性
自 1976 年 8 月 1 日起,美国食品和药物管理局所属的仪器与放射保健中心 (CDRH) 就开始对制
造的激光产品实施规则要求。所有在美国上市的产品都必须遵守此规则。根据 1968 年的健康和
安全辐射控制条例,本打印机符合美国卫生与人类勤务处 (DHHS) 辐射性能标准,被定为
“1 级”激光产品。由于本打印机内部放射的辐射完全限制在保护罩和外层护盖中,因此在用户
正常操作期间激光束不会外泄。
警告! 使用非本手册指定的其它控制、调整或操作过程会导致严重的辐射泄漏。
材料安全数据表
您可以通过访问以下 HP LaserJet 耗材网站获得包含化学物质的耗材 (如碳粉)的材料安全数据
表 (MSDS):www.hp.com/go/msds
www.hp.com/hpinfo/community/environment/productinfo/safety
或
。
芬兰激光声明
Luokan 1 laserlaite
Klass 1 Laser Apparat
HP LaserJet 9040/9050, 9040n/9050n, 9040dn/9050dn
laserkirjoitin on käyttäjän kannalta turvallinen luokan 1 laserlaite.
Normaalissa käytössä kirjoittimen suojakotelointi estää lasersäteen pääsyn laitteen ulk opuolelle .
Laitteen turvallisuusluokka on määritetty standardin EN 60825-1 (1994) mukaisesti.
Varoitus!
Laitteen käyttäminen muulla kuin käyttöohjeessa mainitulla tavalla saattaa altistaa käyttäjän
turvallisuusluokan 1 ylittävälle näkymättömälle lasersäteilylle.
Varning!
Om apparaten använd s på annat sätt än i bruksanvisnin g specificerat s, kan an vändaren u tsättas
för osynlig laserstrålning, som överskrider gränsen för laserklass 1.
HUOLTO
HP LaserJet 9040/9050, 9040n/9050n, 9040dn/9050dn
-kirjoittimen sisällä ei ole käyttäjän huollettavissa olevia kohteita. Laitteen saa avata ja huoltaa
ainoastaan sen huoltamiseen koulutettu henkilö. Tällaiseksi huoltotoimenpiteeksi ei kat sota
väriainekasetin vaihtamista, paperiradan puhdistusta tai m uita käyttäjän käsikirjassa lueteltuja,
käyttäjän tehtäväksi tarkoitettuja ylläpitotoimia, jotka voidaan suorittaa ilman erikoistyökaluja.
Varo!
Mikäli kirjoittimen suojakotelo a v ataan, olet a lttiina näkymättömälle lasersäteilylle laitteen ollessa
toiminnassa. Älä katso säteeseen.
Varning!
Om laserprinterns skyddshölje öppnas då apparaten är i funktion, utsättas användaren för
osynlig laserstrålning.Betrakta ej strålen. Tiedot laitteessa käytettävän laserdiodin
säteilyominaisuuksista:
Aallonpituus 775-795 nm
Teho 5 mW
Luokan 3B laser
简体中文
ZHCN 保修和管制信息 67
Page 70

日本电源线声明
68 打印机设置 ZHCN
Page 71

一致性声明
根据 ISO/IEC Guide 22 和 EN 45014
制造商名称: Hewlett-Packard 公司
制造商地址:
本产品声明
产品名称:
管制型号 编号
3)
产品选项: 全部
符合下列产品规格:
安全:
EMC:
IEC 60950:1999 / EN60950: 2000
IEC 60825-1:1993+A1+A2 / EN 60825-1:1994+A11+A2 (Class 1 Laser/LED Product)
GB4943-2001
CISPR 22:1997 / EN 55022:1998 - Class B
EN 61000-3-2:2000
EN 61000-3-3:1995 +A1:2001
EN 55024:1998/A1:2001
FCC Title 47 CFR, Part 15 Class B
GB9254-1998, GB17625.1-2003
补充信息:
该产品符合 EMC Directive 89/336/EEC 和 Low Voltage Directive 73/23/EEC 要求,并因此附带 CE 标记。
1) 该产品在 Hewlett-Packard 个人计算机系统的典型配置下进行测试。
2) 本设备符合 FCC 规则第 15 部分。 操作取决于以下两个条件:
(1) 此设备不得产生有害干扰, (2) 此设备必须接受任何接收到的干扰 (包括可能导致不希望的操作的干扰)
3) 为达到管制目的,本产品指定有管制型号。 不应将此型号与产品名称或产品型号相混淆。
如果只需要管制主题的信息,请联系:
澳大利亚联系信息: 产品管制经理, Hewlett-Packard Australia Ltd., 31-41 Joseph Street, Blackburn, Victoria 3130, Australia.
欧洲联系信息: 您当地的 Hewlett-Packard 销售与服务机构,或者 Hewlett-Packard Gmbh, Department HQ-TRE / Standards Europe, Herrenberger Straße 140,
D-71034 Böblingen(传真: +49-7031-14-3143)
美国联系信息: 产品管制经理, Hewlett-Packard Company, PO Box 15, Mail Stop 160, Boise, Idaho 83707-0015(电话: 208-396-6000)
11311 Chinden Boulevard
Boise, Idaho 83714-1021, USA
HP LaserJet 9040/9050 打印机
包括可选附件 2000 页进纸盘 (C8531A)
BOISB-0403-00
1)
2)
/ ICES-003, Issue 4
Boise, Idaho USA
2004 年 10 月 26 日
简体中文
ZHCN 一致性声明 69
Page 72

根据 ISO/IEC Guide 22 和 EN 45014
制造商名称: Hewlett-Packard 公司
一致性声明
制造商地址:
本产品声明
产品名称: HP LaserJet 9040/9050 系列打印机的装订附件
型号: C8084A、 C8085A、 C8088A、 C8088B、 Q5693A、 Q5710A
产品选项: 所有
符合下列产品规格:
安全:
EMC:
补充信息:
该产品符合 EMC Directive 89/336/EEC 和 Low Voltage Directive 73/23/EEC 要求,并因此附带 CE 标记。
1) 该产品在 Hewlett-Packard 个人计算机系统的典型配置下进行测试。
2) 本设备符合 FCC 规则第 15 部分。 操作取决于以下两个条件:
(1) 此设备不得产生有害干扰,
(2) 此设备必须接受任何接收到的干扰 (包括可能导致不希望的操作的干扰)。
“警告 - 这是 A 级产品。 在居住环境中,本产品可能导致无线电干扰。在这种情况下,用户可能会被要求采取适当的措施。”
如果只需要管制主题的信息,请联系:
澳大利亚联系信息: 产品管制经理, Hewlett-Packard Australia Ltd., 31-41 Joseph Street, Blackburn, Victoria 3130, Australia
欧洲联系信息:您当地的 Hewlett-Pac kard 销售和服务机构,或 Hewlett-Pac kard Gmbh, Department HQ-TRE / Standards Europe, Herrenberg er Straße140, D-71034
Böblingen (传真: +49-7031-14-3143)
美国联系信息:产品管制经理, Hewlett-Packard Company, PO Box 15, Mail Stop 160, Boise, Idaho 83707-0015 (电话: 208-396-6000)
IEC 60950:1999 / EN60950:2000
CISPR 22:1997 / EN 55022:1998 - Class A
EN 61000-3-2:2000
EN 61000-3-3:1995 / A1
EN 55024:1998/A1:2001
FCC Title 47 CFR, Part 15 Class A
Montemorelos 299
Guadalajara Jalisco, 45060 Mexico
1
/ ICES-003, Issue 4
Guadalajara, Jalisco, Mexico
2003 年 1 月 30 日
70 打印机设置 ZHCN
Page 73

Printer HP LaserJet 9040/9050
Bahasa Indonesia
Panduan Untuk Memulai
Page 74

© 2005 Hak Cipta Hewlett-Packard
Development Company, L.P.
Dilarang mereproduksi, mengadaptasi atau
menerjemahkan tanpa izin tertulis terlebih
dahulu, kecuali yang diperbolehkan oleh
undang-undang hak cipta.
Informasi dalam dokumen ini dapat berubah
tanpa pemberitahuan.
Nomor publikasi
Q3721-90939
Edition 1, 02/2005
Satu-satunya jaminan untuk produk dan
layanan HP dicantumkan dalam pernyataan
jaminan yang menyertai produk dan layanan
tersebut. Dokumen ini tidak memberikan
jaminan tambahan apapun. HP tidak
bertanggung jawab atas kesalahan teknis
atau redaksional atau kelalaian yang
terdapat dalam dokumen ini.
Pemilik merek dagang
Microsoft
, Windows, dan Windows NT
adalah merek dagang terdaftar di A.S. dari
Microsoft Corporation.
UNIX
adalah merek dagang terdaftar dari
The Open Group.
Semua produk lain yang tercantum di sini
adalah merek dagang dari perusahaannya
masing-masing.
Page 75

Setup Printer
Isi
Pendahuluan. . . . . . . . . . . . . . . . . . . . . . . . . . . . . . . . . . . . . . . . . . . . . . . . . . . . . . . . . . . . . . . 74
Daftar pemeriksaan instalasi . . . . . . . . . . . . . . . . . . . . . . . . . . . . . . . . . . . . . . . . . . . . . . . . . .74
Menyiapkan lokasi printer . . . . . . . . . . . . . . . . . . . . . . . . . . . . . . . . . . . . . . . . . . . . . . . . . . . . . 75
Memeriksa isi kemasan . . . . . . . . . . . . . . . . . . . . . . . . . . . . . . . . . . . . . . . . . . . . . . . . . . . . . .79
Kenali bagian-bagian printer. . . . . . . . . . . . . . . . . . . . . . . . . . . . . . . . . . . . . . . . . . . . . . . . . . .80
Melepaskan kemasan dalam . . . . . . . . . . . . . . . . . . . . . . . . . . . . . . . . . . . . . . . . . . . . . . . . . . 81
Menginstalasi aksesori . . . . . . . . . . . . . . . . . . . . . . . . . . . . . . . . . . . . . . . . . . . . . . . . . . . . . . . 82
Menginstalasi kartrid cetak . . . . . . . . . . . . . . . . . . . . . . . . . . . . . . . . . . . . . . . . . . . . . . . . . . . .84
Menghubungkan kabel printer . . . . . . . . . . . . . . . . . . . . . . . . . . . . . . . . . . . . . . . . . . . . . . . . . 85
Menghubungkan kabel paralel . . . . . . . . . . . . . . . . . . . . . . . . . . . . . . . . . . . . . . . . . . . . 86
Menghubungkan ke jaringan Ethernet 10/100TX (untuk HP LaserJet 9040n/
9050n dan HP LaserJet 9040dn/9050dn) . . . . . . . . . . . . . . . . . . . . . . . . . . . . . . . . . . . . 87
Mengganti tutup tampilan panel kontrol . . . . . . . . . . . . . . . . . . . . . . . . . . . . . . . . . . . . . . . . . . 88
Menghubungkan kabel listrik . . . . . . . . . . . . . . . . . . . . . . . . . . . . . . . . . . . . . . . . . . . . . . . . . . 89
Mengatur konfigurasi bahasa tampilan panel kontrol . . . . . . . . . . . . . . . . . . . . . . . . . . . . . . . . 90
Mengisi Baki 1. . . . . . . . . . . . . . . . . . . . . . . . . . . . . . . . . . . . . . . . . . . . . . . . . . . . . . . . . . . . . . 91
Mengisi Baki 2 dan 3. . . . . . . . . . . . . . . . . . . . . . . . . . . . . . . . . . . . . . . . . . . . . . . . . . . . . . . . . 92
Mencetak halaman konfigurasi . . . . . . . . . . . . . . . . . . . . . . . . . . . . . . . . . . . . . . . . . . . . . . . . . 93
Menginstalasi piranti lunak pencetakan . . . . . . . . . . . . . . . . . . . . . . . . . . . . . . . . . . . . . . . . . . 94
Menginstalasi piranti lunak pencetakan Windows. . . . . . . . . . . . . . . . . . . . . . . . . . . . . . 94
Menginstalasi piranti lunak pencetakan Macintosh. . . . . . . . . . . . . . . . . . . . . . . . . . . . . 94
Verifikasi setup printer. . . . . . . . . . . . . . . . . . . . . . . . . . . . . . . . . . . . . . . . . . . . . . . . . . . . . . . . 96
Dukungan pelanggan . . . . . . . . . . . . . . . . . . . . . . . . . . . . . . . . . . . . . . . . . . . . . . . . . . . . . . . . 96
Informasi garansi dan peraturan hukum . . . . . . . . . . . . . . . . . . . . . . . . . . . . . . . . . . . . . . . . . . 97
Pernyataan garansi terbatas Hewlett-Packard . . . . . . . . . . . . . . . . . . . . . . . . . . . . . . . . 97
Garansi Perlindungan Premium HP . . . . . . . . . . . . . . . . . . . . . . . . . . . . . . . . . . . . . . . . 99
Syarat-syarat Lisensi Piranti Lunak HP. . . . . . . . . . . . . . . . . . . . . . . . . . . . . . . . . . . . . . 99
Peraturan FCC . . . . . . . . . . . . . . . . . . . . . . . . . . . . . . . . . . . . . . . . . . . . . . . . . . . . . . . 101
Informasi Keselamatan . . . . . . . . . . . . . . . . . . . . . . . . . . . . . . . . . . . . . . . . . . . . . . . . . 102
Pernyataan Kesesuaian . . . . . . . . . . . . . . . . . . . . . . . . . . . . . . . . . . . . . . . . . . . . . . . . . . . . . 104
Bahasa Indonesia
IDWW Isi 73
Page 76
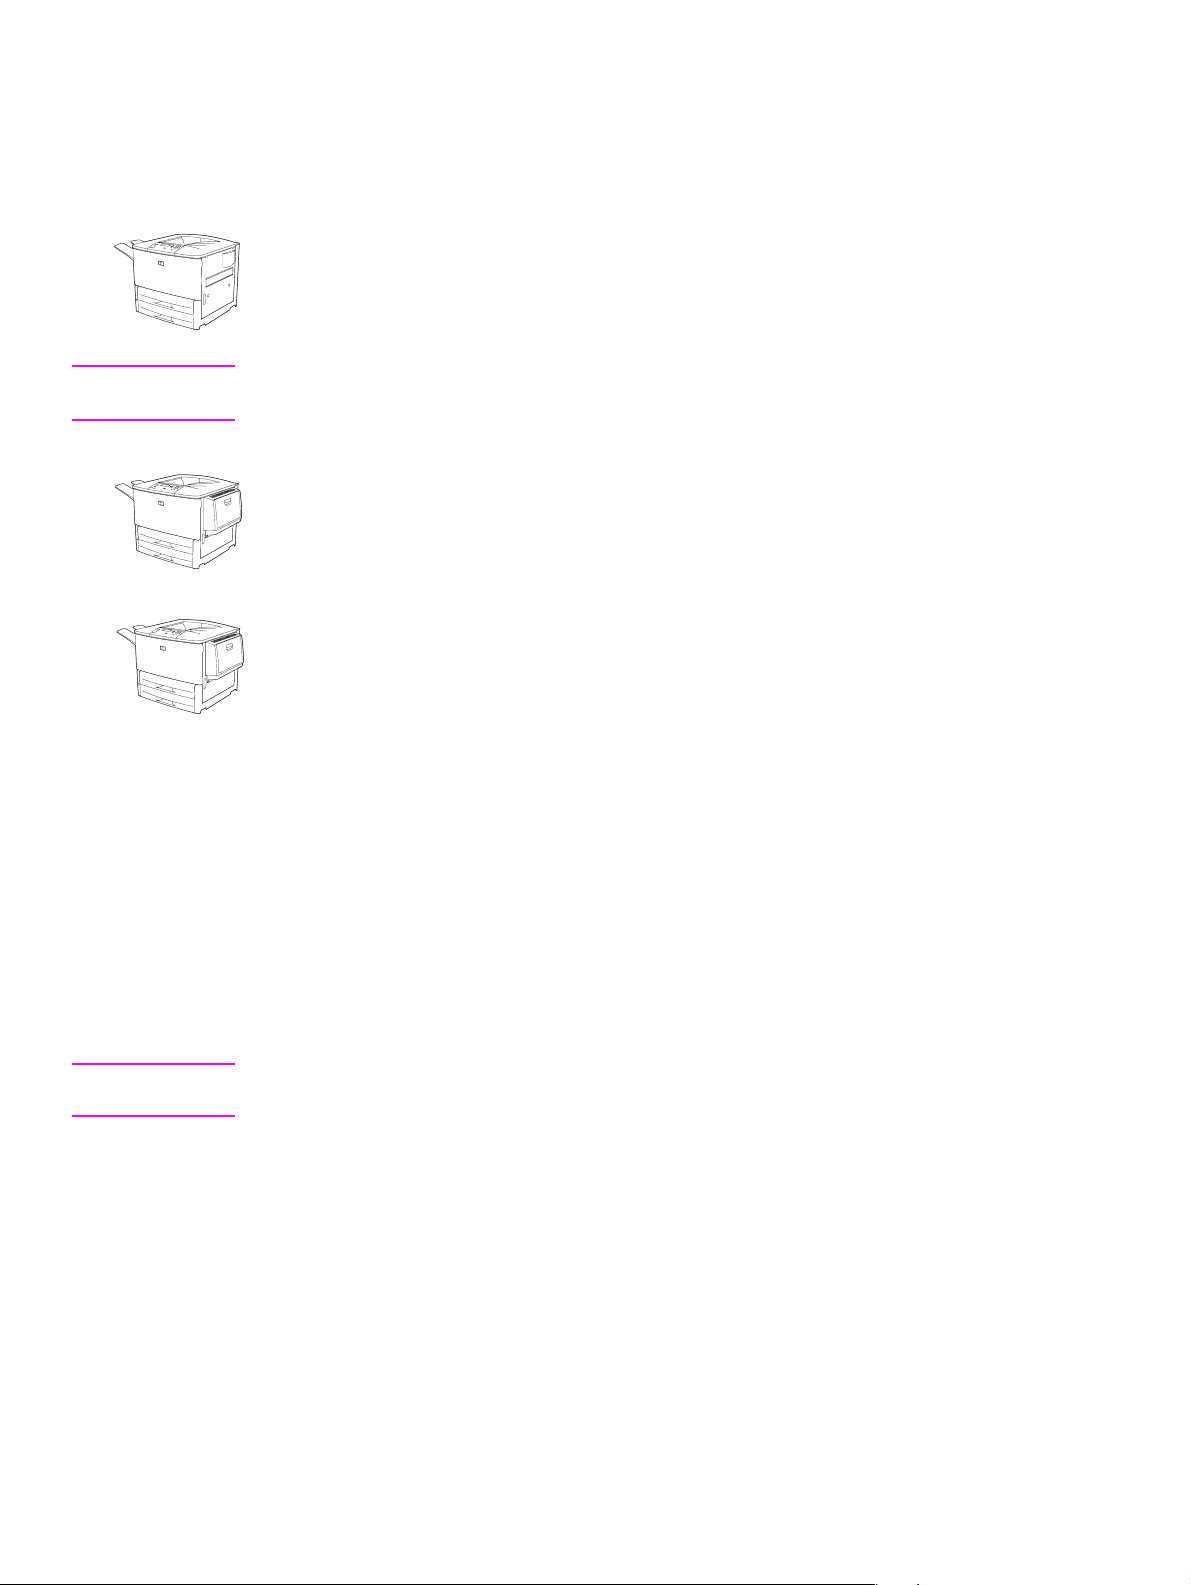
Pendahuluan
Selamat atas pembelian printer HP LaserJet 9040/9050 Anda. Rangkaian printer ini tersedia
dalam konfigurasi berikut ini.
Printer HP LaserJet 9040/9050
Printer HP LaserJet 9040/9050 (nomor produk Q7697A/Q37 21A) dilengkapi dengan fitur-fitur
standar random-access memory (RAM) 64 megabytes (MB), pencetakan format-lebar, dan dua
baki 500-lembar.
Catatan Hanya printer HP LaserJet 9040/9050 yang membutuhkan card enhanced input/output
(EIO) untuk menghubungkan ke jaringan.
Printer HP LaserJet 9040n/9050n
Printer HP LaserJet 9040n/9050n (nomor produk Q 7698A/Q3722A) dilengkapi dengan fitur-fitur
standar RAM 128 MB, pencetakan format-lebar, dua baki 500-lembar, baki multiguna
100-lembar (Baki 1), dan print server HP Jetdirect terpadu.
Printer HP LaserJet 9040dn/9050dn
Printer HP LaserJet 9040dn/9050dn (nomor produk Q7699A/Q3 723A) dilengkapi dengan fiturfitur standar RAM 128 MB, pencetakan format-lebar, dua baki 500 -lembar, baki multiguna
100-lembar (Baki 1), dan print server HP Jetdirect terpadu, dan aksesori pencetakan dupleks
(untuk mencetak bolak-balik pada kertas).
Daftar pemeriksaan instalasi
Panduan ini akan membantu Anda menset up dan menginstalasi printer baru Anda. Untuk
instalasi yang benar, harap membaca setiap bagian secara urut:
● Membuka kemasan printer langkah 1-4
● Menginstalasi printer langkah 5-13
● Menginstalasi piranti lunak
pencetakan
● Verifikasi setup printer langkah 15
PERINGATAN! Printer ini berat. HP menganjurkan empat orang memindahkannya untuk menghindari cedera
dan kerusakan pada printer.
langkah 14
74 Setup Printer IDWW
Page 77

Langkah 1. Menyiapkan lokasi printer
Persyaratan ruang kotak pengiriman
Pastikan bangunan Anda memiliki pintu atau daerah penerimaan yang cukup besar untuk
memasukkan kotak pengiriman. Ukuran dari kotak pengiriman kurang lebih sebagai berikut:
alas 911 x 790 mm x tinggi 1036 mm (alas 36 x 31 inci x tinggi 41 inci).
Persyaratan ruang untuk membuka kemasan
Sebelum membuka bungkus plastik dari kotak pengiriman, pastikan Anda memiliki cukup ruang
untuk mengeluarkan isi kotak pengiriman, dan kemudian mengangkat produk dari palet
pengirimannya. HP menganjurkan ruang setidaknya 3,1 meter (10 feet) di sekeliling kotak
pengiriman untuk mengeluarkan semua material pengiriman.
Mengeluarkan printer dari kotak pengiriman
Simak gambar pada kotak pengiriman untuk informasi tentang cara mengeluarkan printer dari
kotak pengiriman.
PERINGATAN! Printer ini berat. HP menganjurkan empat orang memindahkannya untuk menghindari cedera
dan kerusakan pada printer.
Bahasa Indonesia
IDWW Menyiapkan lokasi printer 75
Page 78

Ukuran printer
Siapkan lokasi untuk printer yang memungkin kan unt uk persyaratan fisik dan lingkungan be rikut
ini:
353 mm
(13,9 inci)
353 mm
(13,9 inci)
638 mm (25,1 inci)
638 mm (25,1 inci)
406 mm
(16 inci)
406 mm
(16 inci)
633 mm (24,9 inci)
368 mm
(17,8 inci)
Dimensi printer HP LaserJet 9040/9050 (tampak atas dan samping)
600 mm (23,6 inci)
76 Setup Printer IDWW
Page 79

2.591 mm (102 inci) untuk
memanjangkan piranti keluaran;
2.705 mm (106,5 inci) untuk melepaskan
piranti keluaran
1
2.591 mm (102 inci) untuk
memanjangkan piranti keluaran;
2.705 mm (106,5 inci) untuk melepaskan
piranti keluaran
1
1.001 mm
(39,4 inci)
1.036 mm (24,9 inci)
Bahasa Indonesia
1
Ukuran yang kecil adalah ruang yang diperlukan untuk memanjangkan piranti keluaran dengan
batang penghubung yang masih menempel pada kait di bawah Baki 4 opsional. Ukuran yang besar
adalah ruang yang diperlukan untuk melepaskan piranti keluaran tersebut dari produk. Ruang
tambahan tersebut memberikan keleluasaan untuk melepaskan batang penghubung dari kait di
bawah Baki 4 opsional.
HP LaserJet 9040/9050 dengan piranti keluaran tipikal, Baki 4, dan Baki 1 terinstalasi
(tampak atas dan samping) untuk menunjukkan dimensi maksimal
IDWW Menyiapkan lokasi printer 77
Page 80

Persyaratan lokasi untuk printer
● Bidang datar pada permukaan yang keras,
lebih dianjurkan lantai tanpa karpet.
● Suplai daya yang memadai (Untuk model
110 V, sirkuit tersendiri 15 A dianjurkan; untuk
model 220 V, sirkuit tersend iri 8 A dianjurkan)
● Cukup ruang di sekitar printer
● Lingkungan yang stabil—tanpa perubahan
● Ruang berventilasi-cukup
● Tidak terkena cahaya matahari langsung atau
suhu atau kelembaban yang mendadak
● Kelembaban relatif 20% s/d 80%
bahan kimia, termasuk cairan pembersih
berbasis amoniak
● Suhu ruangan 10°C s/d 32,5°C (50°F s/d
91°F)
Berat printer (tanpa kartrid cetak)
● Printer HP LaserJet 9040/9050: 63,5 kg (140 lb)
● Printer HP LaserJet 9040n/9050n: 69,4 kg (153 lb)
● Printer HP LaserJet 9040dn/9050dn: 76,2 kg (168 lb)
78 Setup Printer IDWW
Page 81

Langkah 2. Memeriksa isi kemasan
printer
Baki 4
opsional
Baki 1
opsional
kabel listrik
nampan keluaran
hadap-atas
Bahasa Indonesia
penutup tampilan
panel kontrol
kartrid
cetak
Isi kemasan
Catatan Printer HP LaserJet 9040n/9050n dilengkapi Baki 1 dan print server HP Jetdirect (tidak tampak).
Printer LaserJet 9040dn/9050dn dilengkapi Baki 1, print server HP Jetdirect terpadu (tidak
tampak), dan aksesori pencetakan dupleks (duplekser; tidak tampak).
piranti lunak printer
CD-ROM
(termasuk panduan
penggunaan)
dokumentasi printer
(panduan ini)
IDWW Memeriksa isi kemasan 79
Page 82

Langkah 3. Kenali bagian-bagian printer
Ilustrasi berikut ini menunjukkan lokasi dan nama bagian-bagian penting printer.
1
5
2
3
6
7
4
8
12
9
10
11
Bagian-bagian penting printer (tampak depan dan samping)
13
14
1 Nampan keluaran
hadap-atas
2 Panel kontrol
3 Baki 2
4 Saklar daya
5 Baki 1
6 Nampan keluaran
standar (nampan
hadap-bawah)
7 Pintu depan
8 Baki 3
9 Selot EIO (2)
10 Port kunci pengaman
11 Kabel listrik
konektor
12 Konektor Local area network
(LAN) (RJ-45) (untuk
HP LaserJet 9040n/9050n
dan 9040dn/9050dn)
13 Konektor kabel Paralel B
14 Konektor HP Jet-Link (unt uk
aksesori penanganankertas)
80 Setup Printer IDWW
Page 83

Langkah 4. Melepaskan kemasan dalam
PERHATIAN Printer berisi pita pengiriman oranye dan kemasan dalam untuk mencegah kerusakan selama
pengiriman. Anda harus melepaskan semua material pengiriman dan kemasan dalam agar
printer dapat berfungsi dengan benar.
Untuk melepaskan kemasan dalam
1 Lepaskan semua material kemasan oranye dari bagian luar printer dan lepaskan semua
material karton atau styrofoam yang tidak berwarna oranye.
2 Lepaskan semua material kemasan oranye dari nampan keluaran standar dan lapisan film
pelindung dari tampilan panel kontrol.
3 Buka pintu kiri dan tarik pita pengiriman lurus keluar untuk melepaskan kedua k unci
pengiriman fuser (seperti ditunjukkan oleh diagram pada printer). Pastikan bahwa kedua
tuas fuser dalam posisi terkunci.
Bahasa Indonesia
4 Buka baki-baki, lepaskan semua material kemasan oranye, dan tutup kembali.
5 Buka pintu depan dan lepaskan pita kemasan oranye di daerah transfer roller depan dan
pada tuas kunci untuk kartrid cetak. Tutup pintu depan.
Catatan Simpan semua material kemasan. Anda mungkin akan memerlukannya untuk mengemas
kembali printer.
IDWW Melepaskan kemasan dalam 81
Page 84

Langkah 5. Menginstalasi aksesori
PERINGATAN! Printer ini beratnya kurang lebih 63,5 kg (140 lb). HP menganjurkan empat orang
memindahkannya untuk menghindari cedera dan kerusakan pada printer.
Lakukan instalasi semua aksesori penanganan-kertas yang Anda beli bersama printer atau
terpisah. Gunakan petunjuk instalasi yang disertakan dengan aksesori tersebut. Petunjuk ini
mungkin terdapat pada CD-ROM.
Menginstalasi duplekser
Catatan Jika Anda membeli piranti keluaran (pengolah akhir multifungsi, penumpuk 3.000-lembar,
penumpuk/penjilid 3.000 lembar, atau kotak surat 8-nampan) bersama dengan duplekser dan
piranti masukan (Baki 4 dan/atau Baki 1), lakukan instalasi duplekser dan piranti masukan
sebelum mencoba menginstalasi piranti keluaran.
Simak petunjuk instalasi yang d isertakan dengan duplekser. Petunjuk ini mungkin terdapat pada
CD-ROM.
Duplekser
Catatan Setelah Anda menginstalasi duplekser, kembalilah ke panduan ini untuk menyelesaikan setup
printer.
82 Setup Printer IDWW
Page 85

Menginstalasi piranti masukan
Simak petunjuk instalasi y ang disertakan dengan pir anti masukan terseb ut. P etu njuk ini mungkin
terdapat pada CD-ROM.
Baki 1 dan Baki 4
Catatan Setelah Anda menginstalasi piranti masukan, kembalilah ke panduan ini untuk menyelesaikan
setup printer.
Menginstalasi piranti keluaran
Lakukan instalasi semua pir anti keluar an yang An da beli. Setelah pira nti terinstalasi, lanjutkan k e
langkah 6.
Simak petunjuk instalasi yang disertakan dengan pir anti k elu aran. Petunjuk ini mungkin terdapat
pada CD-ROM.
Bahasa Indonesia
Pengolah akhir multifungsi
Penumpuk/penjilid 3.000-lembar
atau penumpuk 3.000 lembar
Kotak surat 8-nampan
Piranti keluaran
IDWW Menginstalasi aksesori 83
Page 86

Langkah 6. Menginstalasi kartrid cetak
Gunakan prosedur ini untuk menginstalasi kartrid cetak. Jika toner mengenai pakaian Anda,
usap dengan kain kering dan cuci pakaian dengan air dingin. Air panas merekatkan toner pada
serat.
1
3
4
Untuk menginstalasi kartrid cetak
1 Sebelum mengeluarkan kartrid cetak dari kemasannya, tempatkan
kartrid cetak di permukaan yang kokoh. Geser perlahan kartrid
cetak keluar dari kemasannya.
PERHATIAN
Untuk mencegah kerusakan kartrid cetak, gunakan kedua tangan saat
menangani kartrid cetak.
Jangan sampai kartrid cetak terpapar cahaya lebih dari beber apa menit.
Lindungi kartrid cetak dengan penutup sewaktu berada di luar printer.
2 Goyang perlahan kartrid cetak dari depan ke belakang untuk
meratakan toner di dalam kartrid. Hanya pada saat ini Anda perlu
menggoyangkan kartrid.
3 Buka pintu depan pada printer.
4 Putar tuas hijau ke bawah ke posisi tak terkunci.
5 Pegang kartrid sedemikian hingga anak panah berada di sisi kiri
kartrid. Tempatkan kartrid seperti ditunjukkan, dengan anak panah
di sisi kiri mengarah ke printer, dan atur letak kartrid dengan
pemandu pencetakan. Geser kartrid ke dalam pr in te r seja u h
mungkin.
5
6
Catatan
Kartrid cetak dilengkapi dengan tab tarik dalam. Printer otomatis
melepaskan tab tarik tersebut setelah kartrid cetak terinstalasi dan
produk diaktifkan. Kartrid cetak berbunyi keras selama bebera pa detik
sewaktu produk tersebut melepaskan tab tarik. Bunyi ini hanya timbul
pada kartrid cetak baru.
6 Tekan tombol pada tuas hijau, dan putar tuas searah jarum jam ke
posisi terkunci.
7 Tutup pintu depan.
7
84 Setup Printer IDWW
Page 87

Langkah 7. Menghubungkan kabel printer
Printer dapat dihubungkan ke komputer menggunakan kabel paralel, atau ke jaringan
menggunakan print server HP Jetdirect opsional.
Untuk printer yang dilengkapi dengan print server HP Jetdirect terpadu, koneksi kabel jaringan
tersedia melalui sebuah konektor 10/100TX (RJ-45). Printer juga dilengkapi konektor untuk
HP Jet-Link Connector.
Konektor loca l area
network (LAN)
(RJ-45)
Konektor paralel B
(Paralel)
Bahasa Indonesia
Lokasi port antarmuka
Konektor HP Jet-L ink
(untuk aksesori
penanganan-kertas)
IDWW Menghubungkan kabel printer 85
Page 88

Menghubungkan kabel paralel
Gunakan kabel paralel jika Anda ingin menghubungkan printer langsung ke komputer.
Untuk memastikan keandalan, gunakan kabel paralel IEEE-1284 dwi-arah tipe-B . Kabel terseb ut
ditandai secara jelas dengan “IEEE-1284.” Hanya kabel IEEE-1284 yang mendukung sem ua fitur
lanjut dari printer.
Untuk menghubungkan kabel paralel
2
3
1 Pastikan bahwa kabel listrik printer tidak terhubung ke stopkontak.
2 Hubungkan kabel paralel ke port paralel printer. T ekan tuas pelepas
sewaktu menghubungkan kabel.
Catatan
Jika Anda sulit menginstalasi kabel, pastikan kabelnya sudah benar.
3 Hubungkan ujung kabel yan g lain ke konektor yang sesuai pada
komputer.
86 Setup Printer IDWW
Page 89

Menghubungkan ke jaringan Ethernet 10/100TX (untuk
HP LaserJet 9040n/9050n dan HP LaserJet 9040dn/9050dn)
Gunakan konektor RJ-45 jika Anda ingin menghubungkan printer ke jaringan
Ethernet 10/100TX.
2
Untuk menghubungkan ke jaringan Ethernet 10/100TX
1 Pastikan bahwa kabel listrik printer tidak terhubung ke stopkontak.
2 Hubungkan kabel jaringan ke print server HP Jetdirect te rpadu yang
terinstalasi pada printer.
3 Hubungkan ujung kabel yang lain ke port jaringan.
3
Bahasa Indonesia
IDWW Menghubungkan kabel printer 87
Page 90

Langkah 8. Mengganti tutup tampilan panel kontrol
1
Panel kontrol dilengkapi dengan tutup tampilan bahasa Ingg ris
terpasang. Bila perlu, ikuti prosedur di bawah in i untu k m eng gant i tu tu p
tampilan dengan salah satu yang disertakan di dalam kotak.
Untuk mengganti tutup tampilan
1 Selipkan kuku Anda atau benda yang tipis, kaku ke belakang tutup
tampilan dan angkat.
2 Angkat tutup tampilan perlahan ke atas dan belakang untuk
2
melepaskannya dari printer.
3 Tempatkan tutup tampilan yang baru pada panel k ontrol. Atur k edua
ujung tutup tampilan dengan lubang pada panel kontrol dan
selipkan tutup tampilan.
4 Jepitkan tutup tampilan dengan k okoh pada panel kontrol. Pastikan
bahwa tutup tampilan menempel rata pada panel kontrol.
3
4
5
88 Setup Printer IDWW
Page 91

Langkah 9. Menghubungkan kabel listrik
Bagian ini menguraikan cara menghubungkan kabel listrik.
1
2
Untuk menghubungkan kabel listrik
1 Hubungkan kabel listrik ke printer dan stopkontak arus bolak-balik
(AC).
PERHATIAN
HP menganjurkan penggunaan stopkontak AC tersendiri 15 amp untuk
model 110 V (15 amp untuk model 220 V). Jangan menancapkan
perangkat lain ke stopkontak yang sama.
Untuk menghindari kerusakan printer, gunakan hanya kabel listrik yang
disertakan dengan printer.
2 Tekan tombol daya untuk mengaktifkan printer (posisi ke dalam).
Jika pesan Enter language muncul pada panel kontrol printer,
gunakan atau untuk bergulir ke bahasa Anda dan teka n .
Setelah pemanasan printer, pesan READY akan muncul pada
tampilan panel kontrol.
3
Catatan
Apabila daya printer diaktifkan untuk pertama kalinya, Anda memiliki
pilihan untuk mengatur pesan tampilan dalam bahasa Anda. Jika tidak
ada bahasa yang dipilih dalam 60 detik sejak ENTER LANGUAGE
(MASUKKAN BAHASA) muncul pada tampilan grafis, Bahasa diatur ke
Inggris, dan ENTER LANGUAGE akan muncul pada tampilan grafis setiap
kali produk diaktifkan sampai ada bahasa yang dipilih.
Bahasa Indonesia
3 Jika Anda memiliki penumpuk/penjilid 3.000-lembar (atau
penumpuk atau pengolah akhir multifungsi) opsional, Baki 4
opsional atau keduanya terinstalasi, periksa apakah semua
lampunya menyala hijau terang. Jika ada lampu yang menyala
kuning gading, berkedip, atau mati, simak panduan penggunaan.
IDWW Menghubungkan kabel listrik 89
Page 92

Langkah 10. Mengatur konfigurasi bahasa tampilan panel kontrol
Secara default, panel kontrol pada printer menampilkan pesan berbahasa Inggris. Jika Anda
tidak mengatur bahasa pada langkah 9, gunakan prosedur berikut ini untuk mengatur pesan
tampilan dan halaman konfigurasi printer dalam baha sa lain yang didukung.
Untuk mengatur konfigurasi bahasa panel kontrol
1 Matikan printer.
2 Hidupkan printer.
3 Tunggu sampai printer mulai menghitung memori.
4 Tekan dan tahan .
5 Terus tahan sampai ketiga lampu panel kontrol menyala, kemudian lepaskan .
6 Gunakan atau untuk bergulir ke Configure Device (Configure Device) dan
tekan .
7 Gunakan atau untuk bergulir ke System Setup (System Setup) dan tekan .
8 Gunakan atau untuk bergulir ke Language (Bahasa) (Language) dan tekan .
9 Gunakan atau untuk bergulir ke bahasa Anda dan tekan .
Catatan Untuk bahasa T urki, Ceko, Rusia, Hungaria, dan P olandia, pilihan bahasa akan mengubah simbol
default y ang diatur untuk bahasa tersebut. Untuk sem ua bahasa lainnya, simbol def aultnya adalah
PC-8.
90 Setup Printer IDWW
Page 93

Langkah 11. Mengisi Baki 1
1
2
Catatan
HP LaserJet 9040n/9050n dan HP LaserJet 9040dn/9050dn dilengkapi
dengan Baki 1. Baki 1 opsional tersedia untuk HP LaserJe t 9040/9050.
Bagian ini menguraikan cara mengisikan kertas berukuran A4 atau
letter. Untuk petunjuk tentang pengisian dan pengaturan konfigurasi
media dengan ukuran dan tipe lainnya, simak panduan penggunaan
yang terdapat pada CD-ROM.
PERHATIAN
Untuk menghindari kertas macet, jangan pernah membuka baki
sewaktu printer sedang mencetak dari baki tersebut.
Untuk mengisi Baki 1
Baki 1 adalah baki multifungsi yang dapat menamp ung sampai
100 lembar kertas ukuran-standar atau 10 amplop. Produk ini akan
3
menarik kertas dari Baki 1 terlebih dulu (baki default). Simak panduan
penggunaan untuk informasi tentang cara mengganti default ini.
Baki 1 memberikan cara yang mudah un tuk mencetak amplop,
transparansi, kertas ukuran-khusus, atau tipe media lainnya tanpa
harus mengosongkan baki-baki lainnya.
1 Buka Baki 1.
Bahasa Indonesia
2 Isikan kertas ukuran A4 atau Letter dengan sisi yang panjang ke
arah printer dan sisi yang akan dicetak menghadap ke atas.
3 Atur pemandu kertas sampai tepat menyentuh tumpukan kertas,
tetapi jangan sampai menekuk kertas.
4 Pastikan bahwa kertas berada di bawah tab pada pemandu dan
tidak di atas indikator tingkat pengisian.
Catatan
Jika mencetak pada ukuran A3, 11 x 17, atau media panjang lainnya,
tarik perpanjangan baki sampai berhenti.
IDWW Mengisi Baki 1 91
Page 94
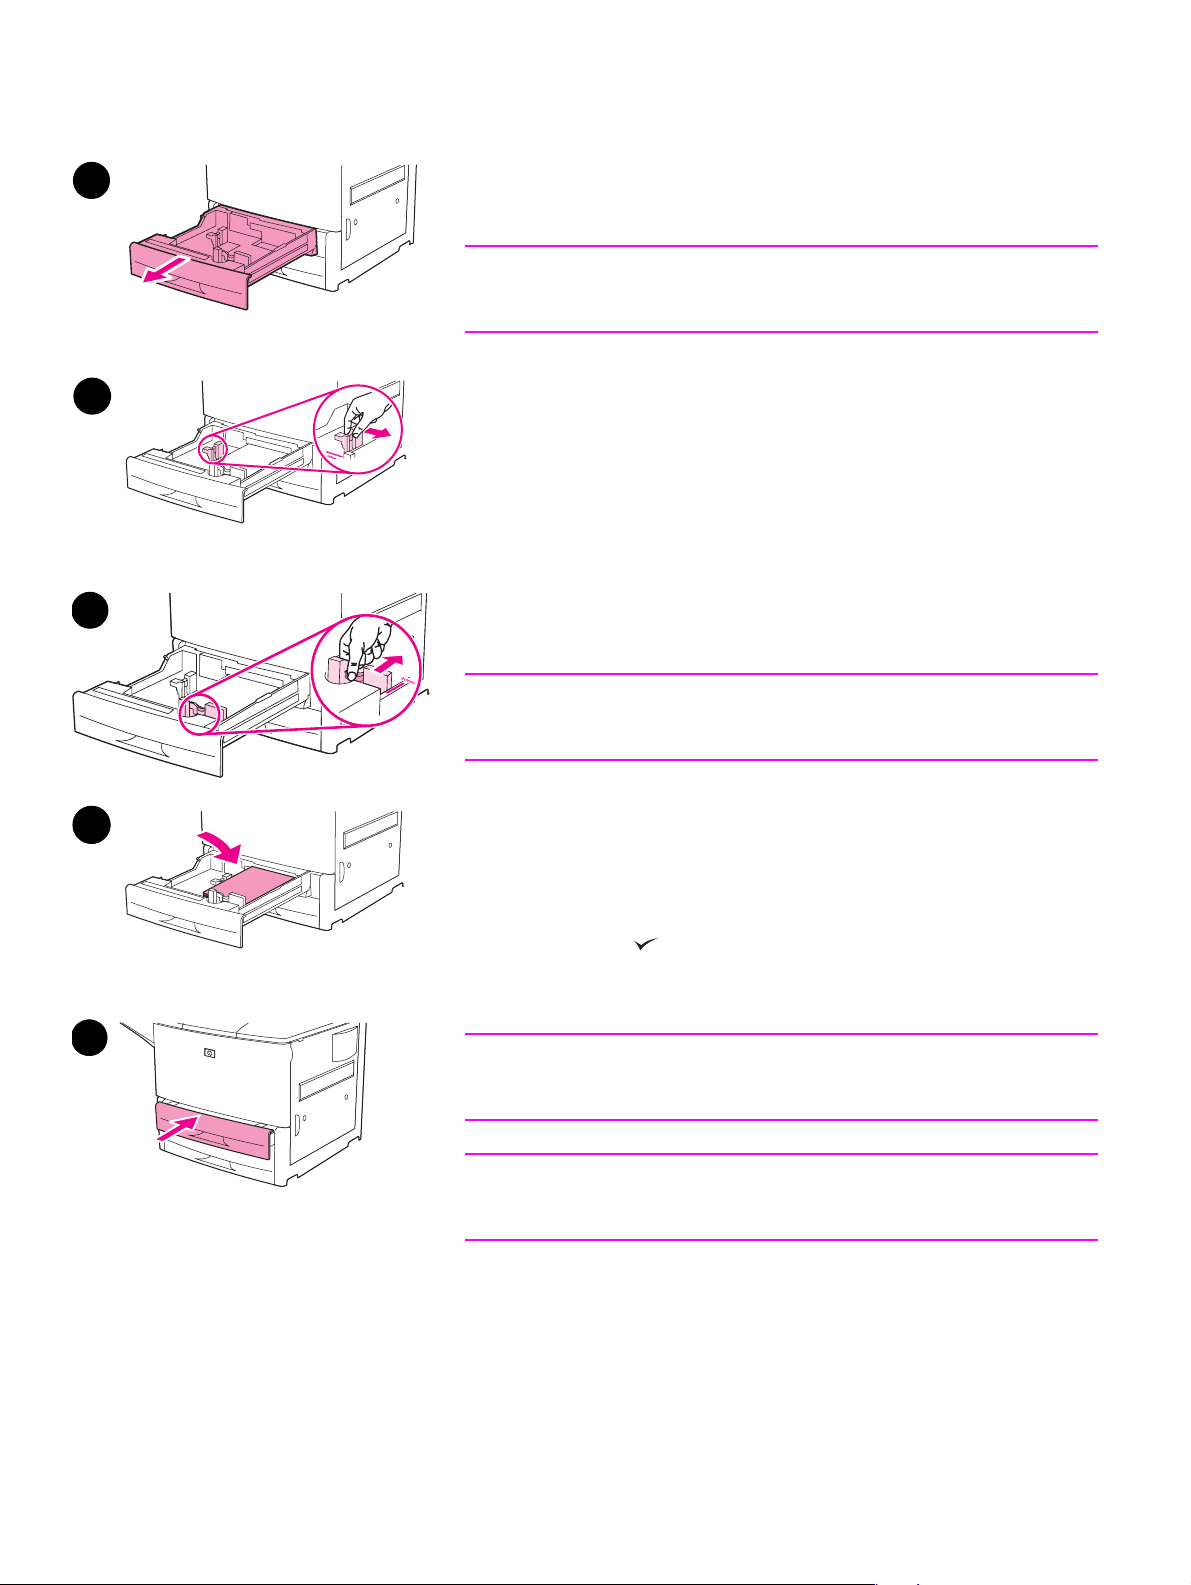
Langkah 12. Mengisi Baki 2 dan 3
1
Bagian ini menguraikan cara mengisikan kertas berukuran A4 atau
letter. Untuk petunjuk tentang pengisian dan pengatur an konfigurasi
media dengan ukuran dan tipe lainnya, simak panduan penggunaan.
PERHATIAN
Untuk menghindari kertas macet, jangan pernah membuka baki
sewaktu printer sedang mencetak dari baki tersebut.
Untuk mengisi Baki 2 dan Baki 3
2
3
1 Buka baki sampai berhenti.
2 Atur pemandu kertas kiri (Y) dengan menekan tab pada pemandu
dan geser pemandu ke uk uran kertas yang sesuai.
3 Atur pemandu kertas depan (Y) dengan menekan tab pada
pemandu dan geser pemandu ke ukuran kertas yang sesuai.
4 Isikan tumpukan media dengan ujung atas tumpukan ke arah
belakang baki. Untuk pencetakan satu sisi, sisi yang akan dicetak
menghadap ke bawah. Untuk pencetakan bolak-balik, sisi ya ng
akan pertama dicetak menghadap ke atas.
Catatan
Untuk informasi tentang pencetakan pada media khusus, simak
panduan penggunaan.
5 Atur tuas kertas ke Standard jika kedua pemandu diatur ke tanda
4
6
Standard yang sama, seperti Letter atau A4 . Jika tid ak, atur tuas k e
Custom (Khusus).
6 Tutup baki.
7 Ukuran dan tipe kertas untuk baki ini ditampilkan pada panel
kontrol. Tekan untuk verifikasi atau simak p anduan penggunaan
untuk membuat perubahan.
8 Ulangi langkah 1 sampai 7 untuk mengisi baki lainnya.
Catatan
Untuk informasi tentang mengisi Baki 4, simak panduan instalasi yang
disertakan dengan Baki 4.
PERHATIAN
Jangan pernah menyimpan kertas atau barang-barang lain di area
sebelah kiri pemandu kertas. Hal itu dapat merusak baki.
92 Setup Printer IDWW
Page 95

Langkah 13. Mencetak halaman konfigurasi
Cetak halaman konfigurasi untuk memastikan printer bekerja dengan benar.
Untuk mencetak halaman konfigurasi
1 Tekan .
2 Gunakan atau untuk bergulir ke Information (Informasi) dan tekan .
3 Gunakan atau untuk bergulir ke Print Configuration (Cetak Konfigurasi) dan
tekan .
Halaman konfigurasi dicetak. Jika print server HP Jetdirect terinstalasi pada printer, halaman
konfigurasi jaringan HP Jetdirect juga dicetak.
Jika Anda memiliki aksesori opsional seperti aksesori pencetakan bolak-balik atau Baki 4
terinstalasi, periksa halaman konfigurasi untuk memastikan mereka terdaftar sebagai
terinstalasi.
Catatan Untuk daftar tombol cepat yang tersedia untuk printer, cetak menu map (peta menu).
Bahasa Indonesia
IDWW Mencetak halaman konfigurasi 93
Page 96

Langkah 14. Menginstalasi piranti lunak pencetakan
Printer dilengkapi dengan piranti lunak pencetakan pada CD- ROM. Driv er printer pada CD-R OM
ini harus diinstalasi untuk memanfaatkan keunggulan fitur printer sepenuhnya.
Jika Anda tidak memiliki akses ke CD-ROM drive, Anda dapat mendow nload piranti lunak
pencetakan tersebut dari Internet di www.hp.com/support/lj9050_lj9040
konfigurasi komputer berbasis-Windows, progr am instalasi untuk piranti lunak printer secara
otomatis memeriksa akses Internet komputer dan memberikan pilihan untuk mendapatkan
piranti lunak yang terbaru dari Internet.
Catatan Piranti lunak instalasi printer untuk jaringan UNIX (HP-UX, Sun Solaris) tersedia untuk download
di www.hp.com/support/net_printing.
Simak brosur dukungan HP untuk informasi lebih lanjut.
Menginstalasi piranti lunak pencetakan Windows
. Tergantung dari
Bagian ini menguraikan cara untuk menginstalasi piranti lunak pencetakan Windows. Piranti
lunak ini didukung pada Microsoft
Millennium (Me), Windows XP, dan Windows Server 2003.
Windows 9X, Windows NT 4.0, Windows 2000, Windows
Untuk menginstalasi piranti lunak
1 Tutup semua program yang berjalan.
2 Masukkan CD-ROM ke dalam CD-ROM drive. Tergantung pada konfigurasi komputer,
program instalasi mungkin otomatis dija lankan. Jika progr am tidak otomatis dijalankan: P ada
menu Start, klik Run. Ketikkan x:setup (di mana X adalah huruf dari CD-Rom drive), dan
klik OK.
3 Ikuti petunjuk pada layar komputer.
Menginstalasi piranti lunak pencetakan Macintosh
Bagian ini menguraikan cara untuk menginstalasi piranti lunak pencetakan Macintosh. Piranti
lunak ini didukung pada Macintosh OS 7.5 atau y ang lebih tinggi.
Untuk menginstalasi piranti lunak pencetakan Macintosh untuk Mac OS 8.6
s/d 9.2
1 Hubungkan kabel jaringan antara print server HP Jetdirect dan port jaringan.
2 Masukkan CD-ROM ke dalam CD-ROM drive. Menu CD-ROM otomatis dijalankan. Jika
menu CD-ROM tidak otomatis dija lanka n, dobe l-klik ikon CD-ROM pada desktop, kemudian
dobel-klik ikon Installer. Ikon ini terletak di dalam folder Installer/<bahasa> dari Starter
CD-ROM (di mana <bahasa> adalah bahasa yang Anda sukai). Misalnya, folder Installer/
English berisi ikon Installer untuk piranti lunak printer berbahasa Inggris.
3 Ikuti petunjuk pada layar komputer.
4 Buka Apple Desktop Printer Utility yang terletak di (Startup Disk): Applications: Folder
Utilities.
5 Dobel-klik Printer (AppleTalk).
6 Di samping Pilihan Apple Talk Printer, klik Change.
7 Pilih printer, klik Auto Setup , kemudian klik Create.
8 Pada menu Printing, klik Set Default Printer.
94 Setup Printer IDWW
Page 97

Catatan Ikon pada desktop akan tampak generik. Semua panel cetak akan muncu l dalam dialog cetak di
dalam aplikasi.
Untuk menginstalasi piranti lunak pencetakan Macintosh untuk Mac OS
10.1 dan sesudahnya
1 Hubungkan kabel jaringan antara print server HP Jetdirect dan port jaringan.
2 Masukkan CD-ROM ke dalam CD-ROM drive. Menu CD-ROM otomatis dijalankan. Jika
menu CD-ROM tidak otomatis dija lanka n, dobe l-klik ikon CD-ROM pada desktop, kemudian
dobel-klik ikon Installer. Ikon ini terletak di dalam f older Installer/<bahasa> dari Starter
CD-ROM (di mana <bahasa> adalah bahasa yang Anda sukai). Misalnya, folder Installer/
English berisi ikon Installer untuk piranti lunak printer berbahasa Inggris.
3 Dobel-klik folder HP LaserJet Installers.
4 Ikuti petunjuk pada layar komputer.
5 Dobel-klik ikon Installer untuk bahasa yang diinginkan.
6 Pada hard drive komputer Anda, dobel-klik Applications, Utilities, kemudian Print Center.
7 Klik Add Printer.
8 Pilih tipe koneksi AppleTalk pada OS X 10.1 dan tipe koneksi Rendezvous pada OS X 10.2.
9 Pilih nama printer.
10 Klik Add Printer.
Bahasa Indonesia
11 Tutup Print Center dengan meng-klik tombol tutup di sudut kiri-atas.
Catatan Komputer Macintosh tidak dapat dihubungkan langsung ke printer menggunakan port paralel.
IDWW Menginstalasi piranti lunak pencetakan 95
Page 98

Langkah 15. Verifikasi setup printer
Cara termudah untuk verifikasi apakah instalasi telah berhasil dilakukan adalah dengan
mencetak dokumen dari program piranti lunak.
Untuk verifikasi setup printer
1 Buka program pilihan Anda. Buka atau susun sebuah dokumen sederhana.
2 Dari dalam program, pilih perintah Print.
3 Pilih HP LaserJet 9040 atau 9050 sebagai printer Anda.
4 Pastikan bahwa nama printer yang benar ditampilkan.
5 Cetak dokumen.
Jika dokumen tidak tercetak dengan benar, periksa setup dan konfigurasi Anda. Untuk inf ormasi
lebih lanjut, simak panduan penggunaan.
Dukungan pelanggan
Untuk informasi lebih lanjut tentang produk ini, simak panduan penggunaan pada CD-ROM.
Untuk informasi Layanan Pelanggan HP, simak brosur dukungan yang disertakan dengan
printer.
96 Setup Printer IDWW
Page 99

Informasi garansi dan peraturan hukum
Pernyataan garansi terbatas Hewlett-Packard
PRODUK HP JANGKA WAKTU GARANSI
HP LaserJet 9040/9050, 9040n/9050n,
9040dn/9050dn
1 HP memberi garansi untuk perangkat lunak, aksesori, dan suplai HP terhadap kerusakan
material dan pengerjaan selama jangka waktu yang ditetapkan di atas. Apabila HP
menerima pengaduan kerusakan selama masa garansi, HP akan, sesuai kebijakannya,
memperbaiki atau mengganti produk yang terbukti rusak. Produk pengganti dapat berupa
produk baru atau seperti-baru.
2 HP memberikan garansi bahwa piranti lunak HP tidak akan gagal melaksanakan perintah
pemrogramanny a, selama jang ka waktu di at as, karena kerusakan material atau penge rjaan
apabila diinstalasi dan digunakan dengan benar. Jika HP menerima pengaduan kerusakan
tersebut selama masa garansi, HP akan mengganti media piranti lunak yang tidak dapat
menjalankan perintah pemrogramannya karena kerusakan tersebut.
3 HP tidak memberikan garansi bahwa operasi produk HP tidak akan terputus atau bebas
kesalahan. Jika HP tidak dapat, dalam waktu yang cukup, memperbaiki atau mengganti
sembarang produk sesuai k ondisi y ang dijanjikan, pel anggan akan menerima pengemb alian
uang sebesar harga pembelian segera setelah produk dikembalikan.
4 Produk HP mungkin berisi komponen yang diproduksi kembali dengan performa sebanding
dengan yang baru atau yang mungkin telah terpakai.
5 Masa garansi dihitung sejak tanggal pengiriman atau sejak tanggal instalasi jika diinstalasi
oleh HP. Jika pelanggan menjadwal atau menunda instalasi HP lebih dari 30 hari setelah
pengiriman, masa garansi dimulai sejak hari ke-31 dari tanggal pembelian.
6 Garansi tidak mencakup kerusakan karena (a) pera w atan atau kalibr asi y ang tidak benar atau
tidak memadai, (b) piranti lunak, antarmuka, komponen atau suplai bukan dari HP,
(c) modifikasi tanpa ijin atau penyalahgunaan, (d) pengoperasian di luar spesifikasi lingkungan
produk yang diterbitkan, atau (e) penyiapa n atau pemeliharaan lokasi yang tidak memadai.
7 SEJA UH DIPERBOLEHKAN OLEH PERATURAN HUKUM SETEMPAT, GARANSI DI ATAS
BERSIFAT EKSLUSIF DAN TIDAK ADA GARANSI LAIN, BAIK TERTULIS ATAU LISAN,
Y ANG DINYA TAKAN A TAU TERSIRAT DAN HP SECARA KHUSUS MENYANGGAH SEMUA
GARANSI ATAU KONDISI TERSIRAT TENTANG KELAYAKAN JUAL, KUALITAS YANG
MEMUASKAN, DAN KESESUAIAN UNTUK PENGGUNAAN TERTENTU.
8 HP akan bertanggung jawab atas kerusakan hak milik yang dapat diukur per kecelakaan
sampai jumlah yang lebih besar antara $300.000 atau harga yang dibayar untuk produk
yang diperkarakan, dan atas ceder a tub uh atau k ematian, sejauh semua k erusakan terseb ut
ditetapkan oleh pengadilan dengan yuridiksi yang berkompeten disebabkan langsung oleh
produk HP yang rusak.
9 SEJAUH DIPERBOLEHKAN OLEH PERATURAN HUKUM SETEMPAT, PEMENUHAN
DALAM PERNYATAAN GARANSI INI ADALAH PEMENUHAN SATU-SATUNYA DAN
EKSLUSIF UNTUK PELANGGAN. KECUALI DINYATAKAN DI ATAS, HP ATAU
PENYALURNY A TIDAK BERTANGGUNG JAWAB ATAS KEHILANGAN DATA ATAU
KERUSAKAN LANGSUNG, KHUSUS, KEBETULAN, SEBAGAI AKIBAT (TERMASUK
KEHILANGAN KEUNTUNGAN ATAU DATA), ATAU KERUGIAN LAIN, BAIK
BERDASARKAN KONTRAK, KERUGIAN HUKUM, ATAU LAIN-LAIN.
10 UNTUK TRANSAKSI KONSUMEN DI AUSTRALIA DAN SELANDIA BARU, SYARAT-
SYARAT GARANSI YANG TERCANTUM DALAM PERNYATAAN INI, KECUALI SEJAUH
DIPERBOLEHKAN OLEH HUKUM YANG BERLAKU, TIDAK MENGHAPUSKAN,
MEMBATASI ATAU MENGUBAH DAN BERLAKU SEBAGAI TAMBAHAN DARI HAK YANG
DILINDUNGI HUKUM YANG BERLAKU ATAS PENJUALAN PRODUK INI KEPADA ANDA.
1 tahun, di-tempat
Bahasa Indonesia
IDWW Informasi garansi dan peraturan hukum 97
Page 100

Servis Selama dan Setelah Masa Garansi
● Jika perangkat keras printer rusak selama masa garansi, hubungi layanan resmi atau
penyedia dukungan-HP.
● Jika perangkat keras printer rusak setelah masa garansi, dan Anda memiliki Perjanjian
Perawatan HP atau HP SupportPack, mintalah layanan seperti yang diatur dalam perjanjian
tersebut.
● Jika Anda tidak memiliki Perjanjian Perawatan HP atau HP SupportPack, hubungi
servis resmi atau penyedia dukungan-HP.
Untuk memastikan printer HP LaserJet Anda berumur panjang,
HP menyediakan:
Garansi yang
diperluas
HP SupportPack memberikan perlindungan untuk produk perangkat keras HP
dan semua komponen internal yang disuplai HP. Program perawatan
perangkat keras berlaku sejak tanggal pembelian produk HP selama jangka
waktu dari kontrak yang dipilih. Pelanggan harus membeli HP SupportPack
dalam waktu 180 hari sejak pembelian produk HP. Untuk informasi lebih lanjut,
kunjungi www.hp.com/support/lj9050_lj9040
.
98 Setup Printer IDWW
 Loading...