

Page 1
hp LaserJet 9040mfp
hp LaserJet 9050mfp
use
Page 2

Page 3

hp LaserJet 9040mfp/9050mfp
User Guide
Page 4

Copyright and License
© 2004 Copyright Hewlett-Packard De velopment Company, L.P.
Reproduction, adaptation or translation without prior written
permission is prohibited, except as allowed under the copyright laws.
The information contained herein is subject to change without notice.
The only warranties for HP products and services are set forth in the
express warranty statements accompanying such products and
services. Nothing herein should be construed as constituting an
additional warranty. HP shall not be liable for technical or editorial
errors or omissions contained herein.
Publication number: Q3726-90907
Edition 1, 11/2004
Trademark Credits
Adobe, Acrobat, and PostScript are trademarks of Adobe Systems
Incorporated.
E
NERGY STAR
®
is a U.S. registered mark.
Linux is a U.S. registered trademark of Linus Torvalds.
Microsoft, Windows, Windows NT, and MS-DOS
are U.S. registered
trademarks of Microsof t Cor poration.
UNIX
is a registered trademark of The Open Group.
Page 5

Contents
1 The basics
Overview. . . . . . . . . . . . . . . . . . . . . . . . . . . . . . . . . . . . . . . . . . . . . . . . . . . . . . . . . . . . . . . . . . . .7
Features and benefits of the MFP. . . . . . . . . . . . . . . . . . . . . . . . . . . . . . . . . . . . . . . . . . . . . . . . .7
Parts and accessories . . . . . . . . . . . . . . . . . . . . . . . . . . . . . . . . . . . . . . . . . . . . . . . . . . . . .11
External view of MFP . . . . . . . . . . . . . . . . . . . . . . . . . . . . . . . . . . . . . . . . . . . . . . . . . . . . . .13
Helpful software for increased flexibility . . . . . . . . . . . . . . . . . . . . . . . . . . . . . . . . . . . . . . . . . . .14
Software features . . . . . . . . . . . . . . . . . . . . . . . . . . . . . . . . . . . . . . . . . . . . . . . . . . . . . . . . .14
Drivers . . . . . . . . . . . . . . . . . . . . . . . . . . . . . . . . . . . . . . . . . . . . . . . . . . . . . . . . . . . . . . . . .15
Software for Macintosh computers. . . . . . . . . . . . . . . . . . . . . . . . . . . . . . . . . . . . . . . . . . . .18
Installing the printing system software . . . . . . . . . . . . . . . . . . . . . . . . . . . . . . . . . . . . . . . . .19
Uninstalling the software . . . . . . . . . . . . . . . . . . . . . . . . . . . . . . . . . . . . . . . . . . . . . . . . . . .22
Software for networks. . . . . . . . . . . . . . . . . . . . . . . . . . . . . . . . . . . . . . . . . . . . . . . . . . . . . .23
HP Web Jetadmin . . . . . . . . . . . . . . . . . . . . . . . . . . . . . . . . . . . . . . . . . . . . . . . . . . . . . . . .23
Communicating by using the HP Jetdirect embedded print server . . . . . . . . . . . . . . . . . . .25
Communicating by using the HP Jetdirect print server . . . . . . . . . . . . . . . . . . . . . . . . . . . .25
Embedded Web Server. . . . . . . . . . . . . . . . . . . . . . . . . . . . . . . . . . . . . . . . . . . . . . . . . . . . . . . .25
HP Toolbox. . . . . . . . . . . . . . . . . . . . . . . . . . . . . . . . . . . . . . . . . . . . . . . . . . . . . . . . . . . . . . . . .26
Supported operating systems . . . . . . . . . . . . . . . . . . . . . . . . . . . . . . . . . . . . . . . . . . . . . . .26
To view HP Toolbox. . . . . . . . . . . . . . . . . . . . . . . . . . . . . . . . . . . . . . . . . . . . . . . . . . . . . . .27
HP Toolbox sections . . . . . . . . . . . . . . . . . . . . . . . . . . . . . . . . . . . . . . . . . . . . . . . . . . . . . .27
Loading input trays . . . . . . . . . . . . . . . . . . . . . . . . . . . . . . . . . . . . . . . . . . . . . . . . . . . . . . . . . . .29
Loading Tray 1 . . . . . . . . . . . . . . . . . . . . . . . . . . . . . . . . . . . . . . . . . . . . . . . . . . . . . . . . . . .29
Loading Trays 2, 3, and 4. . . . . . . . . . . . . . . . . . . . . . . . . . . . . . . . . . . . . . . . . . . . . . . . . . .32
Configuring the trays by using the Paper Handling menu . . . . . . . . . . . . . . . . . . . . . . . . .40
2 The control panel
Overview. . . . . . . . . . . . . . . . . . . . . . . . . . . . . . . . . . . . . . . . . . . . . . . . . . . . . . . . . . . . . . . . . . .41
Control-panel layout . . . . . . . . . . . . . . . . . . . . . . . . . . . . . . . . . . . . . . . . . . . . . . . . . . . . . . . . . .42
Control panel features . . . . . . . . . . . . . . . . . . . . . . . . . . . . . . . . . . . . . . . . . . . . . . . . . . . . .43
Home screen navigation . . . . . . . . . . . . . . . . . . . . . . . . . . . . . . . . . . . . . . . . . . . . . . . . . . . . . . .44
Help system . . . . . . . . . . . . . . . . . . . . . . . . . . . . . . . . . . . . . . . . . . . . . . . . . . . . . . . . . . . . . . . .45
“What is this?” Help . . . . . . . . . . . . . . . . . . . . . . . . . . . . . . . . . . . . . . . . . . . . . . . . . . . . . . .45
“Show me how” Help . . . . . . . . . . . . . . . . . . . . . . . . . . . . . . . . . . . . . . . . . . . . . . . . . . . . . .45
3 Printing
Overview. . . . . . . . . . . . . . . . . . . . . . . . . . . . . . . . . . . . . . . . . . . . . . . . . . . . . . . . . . . . . . . . . . .47
Orienting media. . . . . . . . . . . . . . . . . . . . . . . . . . . . . . . . . . . . . . . . . . . . . . . . . . . . . . . . . . . . . .48
Basic printing instructions. . . . . . . . . . . . . . . . . . . . . . . . . . . . . . . . . . . . . . . . . . . . . . . . . . . . . .53
Selecting the output bin . . . . . . . . . . . . . . . . . . . . . . . . . . . . . . . . . . . . . . . . . . . . . . . . . . . . . . .54
Selecting an output location . . . . . . . . . . . . . . . . . . . . . . . . . . . . . . . . . . . . . . . . . . . . . . . . .55
Printing on envelopes . . . . . . . . . . . . . . . . . . . . . . . . . . . . . . . . . . . . . . . . . . . . . . . . . . . . . . . . .55
Printing on special paper . . . . . . . . . . . . . . . . . . . . . . . . . . . . . . . . . . . . . . . . . . . . . . . . . . . . . .58
Printing on letterhead, prepunched paper, or preprinted paper (single-sided). . . . . . . . . . .58
Printing on labels . . . . . . . . . . . . . . . . . . . . . . . . . . . . . . . . . . . . . . . . . . . . . . . . . . . . . . . . .58
Printing on transparencies . . . . . . . . . . . . . . . . . . . . . . . . . . . . . . . . . . . . . . . . . . . . . . . . . .59
Guidelines for custom-size paper, card stock, and heavy paper . . . . . . . . . . . . . . . . . . . . .59
Printing on full-bleed paper . . . . . . . . . . . . . . . . . . . . . . . . . . . . . . . . . . . . . . . . . . . . . . . . .59
Printing on both sides of paper (duplexing) . . . . . . . . . . . . . . . . . . . . . . . . . . . . . . . . . . . . . . . .60
Using features in the printer driver . . . . . . . . . . . . . . . . . . . . . . . . . . . . . . . . . . . . . . . . . . . . . . .61
Setting the registration . . . . . . . . . . . . . . . . . . . . . . . . . . . . . . . . . . . . . . . . . . . . . . . . . . . . . . . .62
To set the registration. . . . . . . . . . . . . . . . . . . . . . . . . . . . . . . . . . . . . . . . . . . . . . . . . . . . . .62
ENWW Contents iii
Page 6

Different first page . . . . . . . . . . . . . . . . . . . . . . . . . . . . . . . . . . . . . . . . . . . . . . . . . . . . . . . . . . . 63
Including a blank back page. . . . . . . . . . . . . . . . . . . . . . . . . . . . . . . . . . . . . . . . . . . . . . . . . . . . 64
Printing multiple pages on one sheet of paper. . . . . . . . . . . . . . . . . . . . . . . . . . . . . . . . . . . . . . 64
Customizing Tray 1 operation . . . . . . . . . . . . . . . . . . . . . . . . . . . . . . . . . . . . . . . . . . . . . . . . . .65
Printing from Tray 1 when the loaded paper is requested. . . . . . . . . . . . . . . . . . . . . . . . . . 65
Manually feeding paper from Tray 1 . . . . . . . . . . . . . . . . . . . . . . . . . . . . . . . . . . . . . . . . . . 65
Specifying paper to print on . . . . . . . . . . . . . . . . . . . . . . . . . . . . . . . . . . . . . . . . . . . . . . . . . . . . 66
Benefits of printing by type and size of paper . . . . . . . . . . . . . . . . . . . . . . . . . . . . . . . . . . . 66
Job storage features . . . . . . . . . . . . . . . . . . . . . . . . . . . . . . . . . . . . . . . . . . . . . . . . . . . . . . . . . 67
Printing a private job . . . . . . . . . . . . . . . . . . . . . . . . . . . . . . . . . . . . . . . . . . . . . . . . . . . . . . 67
Releasing private jobs . . . . . . . . . . . . . . . . . . . . . . . . . . . . . . . . . . . . . . . . . . . . . . . . . . . . . 68
Deleting a private job. . . . . . . . . . . . . . . . . . . . . . . . . . . . . . . . . . . . . . . . . . . . . . . . . . . . . .68
Storing a print job . . . . . . . . . . . . . . . . . . . . . . . . . . . . . . . . . . . . . . . . . . . . . . . . . . . . . . . . 68
Printing a stored job. . . . . . . . . . . . . . . . . . . . . . . . . . . . . . . . . . . . . . . . . . . . . . . . . . . . . . . 69
Deleting a stored job . . . . . . . . . . . . . . . . . . . . . . . . . . . . . . . . . . . . . . . . . . . . . . . . . . . . . .69
Creating a QuickCopying job. . . . . . . . . . . . . . . . . . . . . . . . . . . . . . . . . . . . . . . . . . . . . . . . 70
Printing additional copies of QuickCopy jobs. . . . . . . . . . . . . . . . . . . . . . . . . . . . . . . . . . . . 70
Deleting a QuickCopy job . . . . . . . . . . . . . . . . . . . . . . . . . . . . . . . . . . . . . . . . . . . . . . . . . . 70
Proofing and holding a job. . . . . . . . . . . . . . . . . . . . . . . . . . . . . . . . . . . . . . . . . . . . . . . . . . 71
Printing the remaining copies of a held job . . . . . . . . . . . . . . . . . . . . . . . . . . . . . . . . . . . . . 71
Deleting a held job. . . . . . . . . . . . . . . . . . . . . . . . . . . . . . . . . . . . . . . . . . . . . . . . . . . . . . . . 71
4 Copying
Overview . . . . . . . . . . . . . . . . . . . . . . . . . . . . . . . . . . . . . . . . . . . . . . . . . . . . . . . . . . . . . . . . . . 73
Copy-screen navigation . . . . . . . . . . . . . . . . . . . . . . . . . . . . . . . . . . . . . . . . . . . . . . . . . . . . . . . 74
Cancel button . . . . . . . . . . . . . . . . . . . . . . . . . . . . . . . . . . . . . . . . . . . . . . . . . . . . . . . . . . . 74
OK button . . . . . . . . . . . . . . . . . . . . . . . . . . . . . . . . . . . . . . . . . . . . . . . . . . . . . . . . . . . . . . 74
Basic copying instructions . . . . . . . . . . . . . . . . . . . . . . . . . . . . . . . . . . . . . . . . . . . . . . . . . . . . . 75
Copying by using the default settings . . . . . . . . . . . . . . . . . . . . . . . . . . . . . . . . . . . . . . . . . 75
Copying by using user-defined settings. . . . . . . . . . . . . . . . . . . . . . . . . . . . . . . . . . . . . . . . 75
Copying by using the scanner glass . . . . . . . . . . . . . . . . . . . . . . . . . . . . . . . . . . . . . . . . . . 77
Copying by using the ADF. . . . . . . . . . . . . . . . . . . . . . . . . . . . . . . . . . . . . . . . . . . . . . . . . . 77
Copying books. . . . . . . . . . . . . . . . . . . . . . . . . . . . . . . . . . . . . . . . . . . . . . . . . . . . . . . . . . . 77
Using Job Mode. . . . . . . . . . . . . . . . . . . . . . . . . . . . . . . . . . . . . . . . . . . . . . . . . . . . . . . . . .78
Modifying copy settings for the current job. . . . . . . . . . . . . . . . . . . . . . . . . . . . . . . . . . . . . . . . . 78
Adjusting the copy contrast . . . . . . . . . . . . . . . . . . . . . . . . . . . . . . . . . . . . . . . . . . . . . . . . . 78
Reducing or enlarging copies . . . . . . . . . . . . . . . . . . . . . . . . . . . . . . . . . . . . . . . . . . . . . . . 78
Enhancing copies . . . . . . . . . . . . . . . . . . . . . . . . . . . . . . . . . . . . . . . . . . . . . . . . . . . . . . . .78
Copying multiple sized originals. . . . . . . . . . . . . . . . . . . . . . . . . . . . . . . . . . . . . . . . . . . . . . . . .79
Creating a stored copy job. . . . . . . . . . . . . . . . . . . . . . . . . . . . . . . . . . . . . . . . . . . . . . . . . . . . . 79
Selecting the output bin . . . . . . . . . . . . . . . . . . . . . . . . . . . . . . . . . . . . . . . . . . . . . . . . . . . . . . . 80
5 E-mail
Overview . . . . . . . . . . . . . . . . . . . . . . . . . . . . . . . . . . . . . . . . . . . . . . . . . . . . . . . . . . . . . . . . . . 81
E-mail screen navigation . . . . . . . . . . . . . . . . . . . . . . . . . . . . . . . . . . . . . . . . . . . . . . . . . . . . . . 82
Help button . . . . . . . . . . . . . . . . . . . . . . . . . . . . . . . . . . . . . . . . . . . . . . . . . . . . . . . . . . . . . 82
From: field . . . . . . . . . . . . . . . . . . . . . . . . . . . . . . . . . . . . . . . . . . . . . . . . . . . . . . . . . . . . . . 82
Clear All button . . . . . . . . . . . . . . . . . . . . . . . . . . . . . . . . . . . . . . . . . . . . . . . . . . . . . . . . . . 83
E-mail basics . . . . . . . . . . . . . . . . . . . . . . . . . . . . . . . . . . . . . . . . . . . . . . . . . . . . . . . . . . . . . . . 84
Introduction to e-mail . . . . . . . . . . . . . . . . . . . . . . . . . . . . . . . . . . . . . . . . . . . . . . . . . . . . . .84
Loading documents . . . . . . . . . . . . . . . . . . . . . . . . . . . . . . . . . . . . . . . . . . . . . . . . . . . . . . . 84
Sending documents. . . . . . . . . . . . . . . . . . . . . . . . . . . . . . . . . . . . . . . . . . . . . . . . . . . . . . . 84
Using the address book . . . . . . . . . . . . . . . . . . . . . . . . . . . . . . . . . . . . . . . . . . . . . . . . . . . . . . . 86
Creating a recipient list . . . . . . . . . . . . . . . . . . . . . . . . . . . . . . . . . . . . . . . . . . . . . . . . . . . .86
Local address book . . . . . . . . . . . . . . . . . . . . . . . . . . . . . . . . . . . . . . . . . . . . . . . . . . . . . . . 87
Typing e-mail body text . . . . . . . . . . . . . . . . . . . . . . . . . . . . . . . . . . . . . . . . . . . . . . . . . . . . 88
More information . . . . . . . . . . . . . . . . . . . . . . . . . . . . . . . . . . . . . . . . . . . . . . . . . . . . . . . . . . . . 88
iv ENWW
Page 7

6 Faxing
7 Output devices
Overview. . . . . . . . . . . . . . . . . . . . . . . . . . . . . . . . . . . . . . . . . . . . . . . . . . . . . . . . . . . . . . . . . . .91
3,000-sheet stacker . . . . . . . . . . . . . . . . . . . . . . . . . . . . . . . . . . . . . . . . . . . . . . . . . . . . . . . . . .92
Paper handling features . . . . . . . . . . . . . . . . . . . . . . . . . . . . . . . . . . . . . . . . . . . . . . . . . . . .92
3,000-sheet stacker/stapler. . . . . . . . . . . . . . . . . . . . . . . . . . . . . . . . . . . . . . . . . . . . . . . . . . . . .92
Paper handling features . . . . . . . . . . . . . . . . . . . . . . . . . . . . . . . . . . . . . . . . . . . . . . . . . . . .92
Using the stapler . . . . . . . . . . . . . . . . . . . . . . . . . . . . . . . . . . . . . . . . . . . . . . . . . . . . . . . . .92
Multifunction finisher . . . . . . . . . . . . . . . . . . . . . . . . . . . . . . . . . . . . . . . . . . . . . . . . . . . . . . . . . .95
Paper handling features . . . . . . . . . . . . . . . . . . . . . . . . . . . . . . . . . . . . . . . . . . . . . . . . . . . .95
Using the stapler . . . . . . . . . . . . . . . . . . . . . . . . . . . . . . . . . . . . . . . . . . . . . . . . . . . . . . . . .95
Making booklets . . . . . . . . . . . . . . . . . . . . . . . . . . . . . . . . . . . . . . . . . . . . . . . . . . . . . . . . . .99
8-bin mailbox. . . . . . . . . . . . . . . . . . . . . . . . . . . . . . . . . . . . . . . . . . . . . . . . . . . . . . . . . . . . . . . .99
Output features. . . . . . . . . . . . . . . . . . . . . . . . . . . . . . . . . . . . . . . . . . . . . . . . . . . . . . . . . . .99
8 Security features
Overview. . . . . . . . . . . . . . . . . . . . . . . . . . . . . . . . . . . . . . . . . . . . . . . . . . . . . . . . . . . . . . . . . .101
Foreign Interface Harness (FIH). . . . . . . . . . . . . . . . . . . . . . . . . . . . . . . . . . . . . . . . . . . . . . . .102
Requirements. . . . . . . . . . . . . . . . . . . . . . . . . . . . . . . . . . . . . . . . . . . . . . . . . . . . . . . . . . .102
Using the FIH . . . . . . . . . . . . . . . . . . . . . . . . . . . . . . . . . . . . . . . . . . . . . . . . . . . . . . . . . . .102
Secure Disk Erase . . . . . . . . . . . . . . . . . . . . . . . . . . . . . . . . . . . . . . . . . . . . . . . . . . . . . . . . . .103
Data affected . . . . . . . . . . . . . . . . . . . . . . . . . . . . . . . . . . . . . . . . . . . . . . . . . . . . . . . . . . .103
Gaining access to Secure Disk Erase . . . . . . . . . . . . . . . . . . . . . . . . . . . . . . . . . . . . . . . .103
Additional Information. . . . . . . . . . . . . . . . . . . . . . . . . . . . . . . . . . . . . . . . . . . . . . . . . . . . .104
Security Lock . . . . . . . . . . . . . . . . . . . . . . . . . . . . . . . . . . . . . . . . . . . . . . . . . . . . . . . . . . . . . .105
Job storage features . . . . . . . . . . . . . . . . . . . . . . . . . . . . . . . . . . . . . . . . . . . . . . . . . . . . . . . . .105
DSS authentication . . . . . . . . . . . . . . . . . . . . . . . . . . . . . . . . . . . . . . . . . . . . . . . . . . . . . . . . . .105
9 MFP maintenance
Overview. . . . . . . . . . . . . . . . . . . . . . . . . . . . . . . . . . . . . . . . . . . . . . . . . . . . . . . . . . . . . . . . . .107
Cleaning the MFP . . . . . . . . . . . . . . . . . . . . . . . . . . . . . . . . . . . . . . . . . . . . . . . . . . . . . . . . . . .108
General cleaning . . . . . . . . . . . . . . . . . . . . . . . . . . . . . . . . . . . . . . . . . . . . . . . . . . . . . . . .108
Cleaning the ADF delivery system . . . . . . . . . . . . . . . . . . . . . . . . . . . . . . . . . . . . . . . . . .111
Managing the print cartridge. . . . . . . . . . . . . . . . . . . . . . . . . . . . . . . . . . . . . . . . . . . . . . . . . . .116
Non-HP print cartridge . . . . . . . . . . . . . . . . . . . . . . . . . . . . . . . . . . . . . . . . . . . . . . . . . . . .116
Print cartridge authentication . . . . . . . . . . . . . . . . . . . . . . . . . . . . . . . . . . . . . . . . . . . . . . .116
Print cartridge storage . . . . . . . . . . . . . . . . . . . . . . . . . . . . . . . . . . . . . . . . . . . . . . . . . . . .116
Checking the toner level. . . . . . . . . . . . . . . . . . . . . . . . . . . . . . . . . . . . . . . . . . . . . . . . . . .117
Print cartridge conditions . . . . . . . . . . . . . . . . . . . . . . . . . . . . . . . . . . . . . . . . . . . . . . . . . . . . .118
Order cartridge . . . . . . . . . . . . . . . . . . . . . . . . . . . . . . . . . . . . . . . . . . . . . . . . . . . . . . . . . .118
Replace cartridge . . . . . . . . . . . . . . . . . . . . . . . . . . . . . . . . . . . . . . . . . . . . . . . . . . . . . . . .118
Printer maintenance kit . . . . . . . . . . . . . . . . . . . . . . . . . . . . . . . . . . . . . . . . . . . . . . . . . . . . . . .120
10 Problem solving
Overview. . . . . . . . . . . . . . . . . . . . . . . . . . . . . . . . . . . . . . . . . . . . . . . . . . . . . . . . . . . . . . . . . .121
Clearing jams . . . . . . . . . . . . . . . . . . . . . . . . . . . . . . . . . . . . . . . . . . . . . . . . . . . . . . . . . . . . . .122
Clearing jams from the input tray areas . . . . . . . . . . . . . . . . . . . . . . . . . . . . . . . . . . . . . . .123
Clearing jams from the duplex printing accessory (duplexer) . . . . . . . . . . . . . . . . . . . . . .127
Clearing jams from the output areas . . . . . . . . . . . . . . . . . . . . . . . . . . . . . . . . . . . . . . . . .129
To clear jams in the 8-bin mailbox . . . . . . . . . . . . . . . . . . . . . . . . . . . . . . . . . . . . . . . . . . .142
Solving repeated jams . . . . . . . . . . . . . . . . . . . . . . . . . . . . . . . . . . . . . . . . . . . . . . . . . . . .143
Understanding MFP messages. . . . . . . . . . . . . . . . . . . . . . . . . . . . . . . . . . . . . . . . . . . . . . . . .144
Resolving control panel messages. . . . . . . . . . . . . . . . . . . . . . . . . . . . . . . . . . . . . . . . . . .145
Correcting output quality problems. . . . . . . . . . . . . . . . . . . . . . . . . . . . . . . . . . . . . . . . . . . . . .157
Preventing wrinkles on envelopes . . . . . . . . . . . . . . . . . . . . . . . . . . . . . . . . . . . . . . . . . . .161
ENWW v
Page 8

Detecting MFP problems . . . . . . . . . . . . . . . . . . . . . . . . . . . . . . . . . . . . . . . . . . . . . . . . . . . . .161
Determining MFP problems. . . . . . . . . . . . . . . . . . . . . . . . . . . . . . . . . . . . . . . . . . . . . . . . 161
Software, computer, and product interface problems . . . . . . . . . . . . . . . . . . . . . . . . . . . . . . . 163
Communicating by using an optional HP Jetdirect print server . . . . . . . . . . . . . . . . . . . . . . . . 170
Communicating by using the HP Jetdirect embedded print server . . . . . . . . . . . . . . . . . . 170
Checking the MFP configuration . . . . . . . . . . . . . . . . . . . . . . . . . . . . . . . . . . . . . . . . . . . . . . . 171
Menu map . . . . . . . . . . . . . . . . . . . . . . . . . . . . . . . . . . . . . . . . . . . . . . . . . . . . . . . . . . . . . 171
Configuration page . . . . . . . . . . . . . . . . . . . . . . . . . . . . . . . . . . . . . . . . . . . . . . . . . . . . . . 172
Jetdirect page . . . . . . . . . . . . . . . . . . . . . . . . . . . . . . . . . . . . . . . . . . . . . . . . . . . . . . . . . . 173
Supplies status page . . . . . . . . . . . . . . . . . . . . . . . . . . . . . . . . . . . . . . . . . . . . . . . . . . . . . 174
Usage page . . . . . . . . . . . . . . . . . . . . . . . . . . . . . . . . . . . . . . . . . . . . . . . . . . . . . . . . . . . .175
PCL or PS font list . . . . . . . . . . . . . . . . . . . . . . . . . . . . . . . . . . . . . . . . . . . . . . . . . . . . . . .175
Event log page. . . . . . . . . . . . . . . . . . . . . . . . . . . . . . . . . . . . . . . . . . . . . . . . . . . . . . . . . .176
Printing a paper path test . . . . . . . . . . . . . . . . . . . . . . . . . . . . . . . . . . . . . . . . . . . . . . . . . 177
Appendix A Specifications
Overview . . . . . . . . . . . . . . . . . . . . . . . . . . . . . . . . . . . . . . . . . . . . . . . . . . . . . . . . . . . . . . . . . 179
Paper weight equivalence table . . . . . . . . . . . . . . . . . . . . . . . . . . . . . . . . . . . . . . . . . . . . . . . 180
Media specifications. . . . . . . . . . . . . . . . . . . . . . . . . . . . . . . . . . . . . . . . . . . . . . . . . . . . . . . . . 183
Supported sizes of paper for input and output . . . . . . . . . . . . . . . . . . . . . . . . . . . . . . . . . 184
Supported types of paper . . . . . . . . . . . . . . . . . . . . . . . . . . . . . . . . . . . . . . . . . . . . . . . . . 187
Labels . . . . . . . . . . . . . . . . . . . . . . . . . . . . . . . . . . . . . . . . . . . . . . . . . . . . . . . . . . . . . . . . 188
Transparencies . . . . . . . . . . . . . . . . . . . . . . . . . . . . . . . . . . . . . . . . . . . . . . . . . . . . . . . . .188
Envelopes . . . . . . . . . . . . . . . . . . . . . . . . . . . . . . . . . . . . . . . . . . . . . . . . . . . . . . . . . . . . . 188
Card stock and heavy paper . . . . . . . . . . . . . . . . . . . . . . . . . . . . . . . . . . . . . . . . . . . . . . . 189
Environmental specifications . . . . . . . . . . . . . . . . . . . . . . . . . . . . . . . . . . . . . . . . . . . . . . . . . .190
Power consumption . . . . . . . . . . . . . . . . . . . . . . . . . . . . . . . . . . . . . . . . . . . . . . . . . . . . . . 190
Power requirements . . . . . . . . . . . . . . . . . . . . . . . . . . . . . . . . . . . . . . . . . . . . . . . . . . . . . 190
Acoustical specifications . . . . . . . . . . . . . . . . . . . . . . . . . . . . . . . . . . . . . . . . . . . . . . . . . . 191
Operating environment . . . . . . . . . . . . . . . . . . . . . . . . . . . . . . . . . . . . . . . . . . . . . . . . . . . 192
Appendix B Control panel menus
Overview . . . . . . . . . . . . . . . . . . . . . . . . . . . . . . . . . . . . . . . . . . . . . . . . . . . . . . . . . . . . . . . . . 193
Retrieve job menu . . . . . . . . . . . . . . . . . . . . . . . . . . . . . . . . . . . . . . . . . . . . . . . . . . . . . . . . . . 195
Information menu . . . . . . . . . . . . . . . . . . . . . . . . . . . . . . . . . . . . . . . . . . . . . . . . . . . . . . . . . . . 195
Paper handling menu. . . . . . . . . . . . . . . . . . . . . . . . . . . . . . . . . . . . . . . . . . . . . . . . . . . . . . . . 196
Configure device menu . . . . . . . . . . . . . . . . . . . . . . . . . . . . . . . . . . . . . . . . . . . . . . . . . . . . . .197
Originals submenu . . . . . . . . . . . . . . . . . . . . . . . . . . . . . . . . . . . . . . . . . . . . . . . . . . . . . . 197
Copying submenu . . . . . . . . . . . . . . . . . . . . . . . . . . . . . . . . . . . . . . . . . . . . . . . . . . . . . . . 198
Enhancement submenu. . . . . . . . . . . . . . . . . . . . . . . . . . . . . . . . . . . . . . . . . . . . . . . . . . . 198
Sending submenu . . . . . . . . . . . . . . . . . . . . . . . . . . . . . . . . . . . . . . . . . . . . . . . . . . . . . . . 199
Printing submenu. . . . . . . . . . . . . . . . . . . . . . . . . . . . . . . . . . . . . . . . . . . . . . . . . . . . . . . . 200
Print quality submenu . . . . . . . . . . . . . . . . . . . . . . . . . . . . . . . . . . . . . . . . . . . . . . . . . . . . 203
System setup submenu . . . . . . . . . . . . . . . . . . . . . . . . . . . . . . . . . . . . . . . . . . . . . . . . . . . 204
I/O submenu . . . . . . . . . . . . . . . . . . . . . . . . . . . . . . . . . . . . . . . . . . . . . . . . . . . . . . . . . . .207
Resets submenu . . . . . . . . . . . . . . . . . . . . . . . . . . . . . . . . . . . . . . . . . . . . . . . . . . . . . . . . 210
Fax menu. . . . . . . . . . . . . . . . . . . . . . . . . . . . . . . . . . . . . . . . . . . . . . . . . . . . . . . . . . . . . . . . . 210
Diagnostics menu. . . . . . . . . . . . . . . . . . . . . . . . . . . . . . . . . . . . . . . . . . . . . . . . . . . . . . . . . . . 211
Service menu . . . . . . . . . . . . . . . . . . . . . . . . . . . . . . . . . . . . . . . . . . . . . . . . . . . . . . . . . . . . . . 212
Appendix C MFP memory and expansion
Overview . . . . . . . . . . . . . . . . . . . . . . . . . . . . . . . . . . . . . . . . . . . . . . . . . . . . . . . . . . . . . . . . . 213
Determining memory requirements . . . . . . . . . . . . . . . . . . . . . . . . . . . . . . . . . . . . . . . . . . . . . 213
Installing memory. . . . . . . . . . . . . . . . . . . . . . . . . . . . . . . . . . . . . . . . . . . . . . . . . . . . . . . . . . . 214
To install DDR memory DIMMs. . . . . . . . . . . . . . . . . . . . . . . . . . . . . . . . . . . . . . . . . . . . . 214
To install a compact flash memory card . . . . . . . . . . . . . . . . . . . . . . . . . . . . . . . . . . . . . . 217
Checking memory installation . . . . . . . . . . . . . . . . . . . . . . . . . . . . . . . . . . . . . . . . . . . . . . . . . 219
vi ENWW
Page 9

Saving resources (permanent resources). . . . . . . . . . . . . . . . . . . . . . . . . . . . . . . . . . . . . . . . .219
Web access feature . . . . . . . . . . . . . . . . . . . . . . . . . . . . . . . . . . . . . . . . . . . . . . . . . . . . . . . . .220
Using the Web access feature . . . . . . . . . . . . . . . . . . . . . . . . . . . . . . . . . . . . . . . . . . . . . .220
Appendix D Regulatory information
Environmental product stewardship program . . . . . . . . . . . . . . . . . . . . . . . . . . . . . . . . . . . . . .221
Protecting the environment . . . . . . . . . . . . . . . . . . . . . . . . . . . . . . . . . . . . . . . . . . . . . . . .221
Power consumption . . . . . . . . . . . . . . . . . . . . . . . . . . . . . . . . . . . . . . . . . . . . . . . . . . . . . .221
Toner consumption. . . . . . . . . . . . . . . . . . . . . . . . . . . . . . . . . . . . . . . . . . . . . . . . . . . . . . .221
Paper use. . . . . . . . . . . . . . . . . . . . . . . . . . . . . . . . . . . . . . . . . . . . . . . . . . . . . . . . . . . . . .221
Plastics. . . . . . . . . . . . . . . . . . . . . . . . . . . . . . . . . . . . . . . . . . . . . . . . . . . . . . . . . . . . . . . .222
HP LaserJet printing supplies . . . . . . . . . . . . . . . . . . . . . . . . . . . . . . . . . . . . . . . . . . . . . .222
HP printing supplies returns and recycling program information . . . . . . . . . . . . . . . . . . . .222
Paper . . . . . . . . . . . . . . . . . . . . . . . . . . . . . . . . . . . . . . . . . . . . . . . . . . . . . . . . . . . . . . . . .222
Material restrictions . . . . . . . . . . . . . . . . . . . . . . . . . . . . . . . . . . . . . . . . . . . . . . . . . . . . . .222
Material safety data sheets . . . . . . . . . . . . . . . . . . . . . . . . . . . . . . . . . . . . . . . . . . . . . . . .223
Extended warranty . . . . . . . . . . . . . . . . . . . . . . . . . . . . . . . . . . . . . . . . . . . . . . . . . . . . . . .223
For more information . . . . . . . . . . . . . . . . . . . . . . . . . . . . . . . . . . . . . . . . . . . . . . . . . . . . .223
Appendix E Administration tasks
Overview. . . . . . . . . . . . . . . . . . . . . . . . . . . . . . . . . . . . . . . . . . . . . . . . . . . . . . . . . . . . . . . . . .225
Embedded Web server . . . . . . . . . . . . . . . . . . . . . . . . . . . . . . . . . . . . . . . . . . . . . . . . . . . . . . .226
Configuring and verifying an IP address. . . . . . . . . . . . . . . . . . . . . . . . . . . . . . . . . . . . . . . . . .227
TCP/IP assignment . . . . . . . . . . . . . . . . . . . . . . . . . . . . . . . . . . . . . . . . . . . . . . . . . . . . . .227
Automatic discovery . . . . . . . . . . . . . . . . . . . . . . . . . . . . . . . . . . . . . . . . . . . . . . . . . . . . . .227
Dynamic Host Configuration Protocol (DHCP). . . . . . . . . . . . . . . . . . . . . . . . . . . . . . . . . .227
Verifying the TCP/IP configuration . . . . . . . . . . . . . . . . . . . . . . . . . . . . . . . . . . . . . . . . . . .227
Changing an IP address. . . . . . . . . . . . . . . . . . . . . . . . . . . . . . . . . . . . . . . . . . . . . . . . . . .227
Embedded Web server. . . . . . . . . . . . . . . . . . . . . . . . . . . . . . . . . . . . . . . . . . . . . . . . . . . .228
Digital sending configuration applet . . . . . . . . . . . . . . . . . . . . . . . . . . . . . . . . . . . . . . . . . . . . .228
LDAP addressing settings . . . . . . . . . . . . . . . . . . . . . . . . . . . . . . . . . . . . . . . . . . . . . . . . .228
Preferences settings. . . . . . . . . . . . . . . . . . . . . . . . . . . . . . . . . . . . . . . . . . . . . . . . . . . . . .229
Finding the IP address of the SMTP and LDAP servers . . . . . . . . . . . . . . . . . . . . . . . . . .229
Using control panel menus . . . . . . . . . . . . . . . . . . . . . . . . . . . . . . . . . . . . . . . . . . . . . . . . . . . .231
Device Storage Manager . . . . . . . . . . . . . . . . . . . . . . . . . . . . . . . . . . . . . . . . . . . . . . . . . . . . .231
Software for networks . . . . . . . . . . . . . . . . . . . . . . . . . . . . . . . . . . . . . . . . . . . . . . . . . . . . . . . .232
HP Web Jetadmin software . . . . . . . . . . . . . . . . . . . . . . . . . . . . . . . . . . . . . . . . . . . . . . . .232
HP Jetdirect Printer Installer for UNIX® . . . . . . . . . . . . . . . . . . . . . . . . . . . . . . . . . . . . . . .232
Diagnostics menu . . . . . . . . . . . . . . . . . . . . . . . . . . . . . . . . . . . . . . . . . . . . . . . . . . . . . . . . . . .233
Appendix F Using the HTML Help Viewer
Getting more out of help . . . . . . . . . . . . . . . . . . . . . . . . . . . . . . . . . . . . . . . . . . . . . . . . . . . . . .235
To find a help topic . . . . . . . . . . . . . . . . . . . . . . . . . . . . . . . . . . . . . . . . . . . . . . . . . . . . . . . . . .235
To create a list of favorite help topics . . . . . . . . . . . . . . . . . . . . . . . . . . . . . . . . . . . . . . . . . . .236
To copy a help topic . . . . . . . . . . . . . . . . . . . . . . . . . . . . . . . . . . . . . . . . . . . . . . . . . . . . . . . . .236
To print the current help topic . . . . . . . . . . . . . . . . . . . . . . . . . . . . . . . . . . . . . . . . . . . . . . . . .236
To find topics using the toolbar buttons . . . . . . . . . . . . . . . . . . . . . . . . . . . . . . . . . . . . . . . . . .236
Using the shortcut menu commands . . . . . . . . . . . . . . . . . . . . . . . . . . . . . . . . . . . . . . . . . . . .237
Appendix G Using accessibility shortcut keys in the Help Viewer
Using F6 to switch between the Navigation and Topic Panes . . . . . . . . . . . . . . . . . . . . . . . . .239
Shortcut keys for the Help Viewer. . . . . . . . . . . . . . . . . . . . . . . . . . . . . . . . . . . . . . . . . . . . . . .239
Shortcut keys for the Contents tab . . . . . . . . . . . . . . . . . . . . . . . . . . . . . . . . . . . . . . . . . . . . . .240
Shortcut keys for the Index tab. . . . . . . . . . . . . . . . . . . . . . . . . . . . . . . . . . . . . . . . . . . . . . . . .240
Shortcut keys for the Search tab. . . . . . . . . . . . . . . . . . . . . . . . . . . . . . . . . . . . . . . . . . . . . . . .240
Shortcut keys for the Favorites tab. . . . . . . . . . . . . . . . . . . . . . . . . . . . . . . . . . . . . . . . . . . . . .241
ENWW vii
Page 10

viii ENWW
Page 11

1
The basics
Congratulations on your purchase of the HP LaserJet 9040mfp/9050mfp. If you have not done
so, see the HP LaserJet 9040mfp/9050mfp Start Guide provided with the MFP for setup
instructions.
Overview
After the MFP is set up and ready to use, take a few moments to get to know the MFP. This
chapter introduces the following:
● Features and benefits of the MFP
● Helpful software for increased flexibility
● Embedded Web Server
● HP Toolbox
● Loading input trays
Features and benefits of the MFP
The HP LaserJet 9040mfp/9050mfp is designed to be shared by a workgroup. Use the MFP to
send black and white or color documents digitally, copy documents, and print documents. The
MFP is a standalone copier that does not require connection to a computer. With the exception of
network printing, you can select all functions at the MFP control panel.
Functions
● Two-sided copying
● Image modification
● Color digital sending
● Wide-format printing
● Document finishing
Speed and throughput
● 50 pages per minute (ppm) when scanning and printing on letter-size or International
Standards Organization (ISO) A4-size paper (HP LaserJet 9050mfp only)
● 40 ppm when scanning and printing on letter-size or ISO A4-size paper
(HP LaserJet 9040mfp only)
● 25% to 400% scalability when using the scanner glass
● 25% to 200% scalability when using the Automatic Document Feeder (ADF)
● Transmit Once, Raster Image Processing (RIP) ONCE technology
● Eight-second standby to first page
● Duty cycle of up to 300,000 pages per month
● 533 megahertz (MHz) microprocessor
ENWW Overview 7
Page 12

Resolution
● 600 dots per inch (dpi) with Resolution Enhancement technology (REt)
● FastRes 1200 provides 1200 dpi quality at full speed
● Up to 220 levels of gray
Memory
● 256 megabytes (MB) of random-access memory (RAM), expandable to 512 MB by using
industry standard 100-pin double data rate dual inline memory modules (DDR DIMMs)
● Memory Enhancement technology (MET) that automatically compresses data to use RAM
more efficiently
User interface
● Graphic display on control panel
● Embedded Web server to gain access to support and order supplies (for network-connected
products)
● HP Toolbox software to provide MFP status and alerts and print internal information pages
Language and fonts
● HP Printer Command Language (PCL) 6
● HP PCL 5e for compatibility
● Printer Management Language
● 80 scalable TrueType typefaces
● HP PostScript 3 emulation (PS)
Copying and sending
● Modes for text, graphics, and mixed text and graphics formats
● A job Interrupt feature (at copy boundaries)
● Multiple pages per sheet
● Operator attendance animations (for example, paper-jam recovery)
● The ability to copy books
● E-mail compatibility
● A sleep feature that saves energy
● One-pass duplex scanning
Print car tridge
● No-shake cartridge design
● Authentic HP print cartridge detection
● Automatic seal tab removal
8 Chapter 1 The basics ENWW
Page 13

Paper-handling
● Input
• Tray 1 (multipurpose tray): A multipurpose tray for paper, transparencies, labels, and
envelopes. Holds up to 100 sheets of paper or 10 envelopes.
• Trays 2 and 3: Two 500-sheet trays. These trays automatically detect standard paper
sizes up to 11 x 17/A3 and allow printing on custom-size paper.
• Tray 4 (2000-sheet input tray): This tray automatically detects standard paper sizes up
to 11 x 17/A3 and allows printing on custom-size paper.
• Automatic Document Feeder (ADF): Holds up to 100 sheets of Letter- or A4-size paper
or 50 sheets of 11 x 17- or A3-size paper.
• Duplex printing: Provides two-sided printing (printing both sides of the paper).
● Output
• Standard left output bin: The left output bin is located on the left side of the printer. This
bin can hold up to 100 sheets of paper.
The MFP includes one of the following output devices.
• Optional 3000-sheet stacker: Stacks up to 3,000 sheets of paper.
• Upper bin (face-up): Holds up to 100 sheets of paper.
• Lower bin (face-down): Holds up to 3,000 sheets of paper. The output bins are part
of the output device.
• Optional 3000-sheet stacker/stapler: Provides multiposition stapling for up to 50 sheets
of paper per job, or a maximum job height of 5 mm (0.2 inch).
• Upper bin (face-up): Holds up to 100 sheets of paper.
• Lower bin (face-down): Holds up to 3,000 sheets of paper. The output bins are part
of the output device.
• Optional multifunction finisher: Provides 1,000 sheets of stacking capacity, stapling for
as many as 50 sheets of paper per document, plus folding and saddle stitching of
booklets that contain up to 10 sheets of paper.
• Upper bin (face-up and face-down): Holds up to 1,000 sheets of paper.
• Lower booklet bin: Holds up to 50 boo kl ets.
• Optional 8-bin mailbox: A stacker, collator, or job separator that also provides eight
mailbox bins that can be assigned to individual users or workgroups for easy identification
and retrieval. The 8-bin mailbox can stack up to 2,000 sheets of A4- or letter-size paper in
all the bins.
• Upper bin (face-up): Holds up to 125 sheets of paper
• Bins 1 through 8 (face-down): Each holds up to 250 sheets of paper
Connectivity
● Parallel B connection
● A Foreign Interface Harness (FIH) connection (AUX)
● Local area network (LAN)-connector (RJ-45) for the embedded print server
● Optional analog fax card
● Optional HP Digital Sending Software
● Optional HP Jetdirect EIO print server cards
• Universal serial bus (USB), serial, and LocalTalk
• Fast Ethernet 10/100TX
• Wireless 802.11b
ENWW Features and benefits of the MFP 9
Page 14

Environmental features
● Sleep setting saves energy (meets ENERGY STAR® guidelines, Version 1.0
HP LaserJet 9050mfp only)
Note See Protecting the environment for more information.
Firmware updates
Firmware updates provide the ability to upgrade the MFP firmware. To download the latest
firmware, go to www.hp.com/go/lj9040mfp_firmware
follow the instructions on the screen. To easily send firmware updates to multiple products, use
the HP Web Jetadmin software (go to www.hp.com/go/webjetadmin
Internal hard disk
The internal hard disk can be used to store selected print jobs. It can support RIP ONCE
technology, and can permanently store downloaded fonts and forms in the MFP. Unlike standard
product memory, many items on the hard disk remain in the MFP even when the MFP is turned
off. Fonts that are downloaded to the hard disk are available to all users of the MFP.
Optional HP EIO hard disk
The EIO hard disk accessory can be added to the MFP to provide additional capacity for storing
fonts and forms. The MFP does not use the EIO hard disk accessory for tasks such as RIP
ONCE and stored jobs. The MFP uses the internal hard disk for these tasks.
or www.hp.com/go/lj9050mfp_firmware and
).
Both disks can be write-protected through software for additional security.
Use the device storage manager applet in HP Web Jetadmin to delete files and manage fonts on
a mass-storage device. See Embedded Web Server. For more information, see the MFP
software Help.
Hewlett-Packard Company occasionally introduces new software tools for use with your MFP
and accessories. These tools are available from the Internet. For more information, go to
www.hp.com/go/lj9040mfp
or www.hp.com/go/lj9050mfp_firmware.
Macintosh users
Use the HP LaserJet Utility to download fonts and files. See HP LaserJet Utility or the
HP LaserJet Utility Guide online Help included with your HP LaserJet Utility software for more
information.
Security features
● Foreign Interface Harness
● Secure Disk Erase
● Security lock
● Job retention
● DSS authentication
For more information about these features, see Security features.
10 Chapter 1 The basics ENWW
Page 15

Parts and accessories
Type of item Item Description or use Order
number
Paper handling 3,000-sheet
stacker
3,000-sheet
stacker/stapler
Multifunction
finisher
8-bin mail box A device that p rovides a face-up bin
Printing
supplies
Print cartridge
(avera ge of
30,000 pages at
approximately 5%
coverage)
One 3,000-sheet stacking device. The
device also offers job offset capabi liti es.
One 3,000-sheet stacking device
provides stapling for as many as
50 sheets of paper per document. The
device also offers job offset capabi liti es.
Finishing device that provides
1,000 sheets of stacker capacity,
stapling, for up to 50 sheets of paper,
and folding saddl e-stitching f or booklets
up to 10 sheets of paper.
(upper bin) and eight fa ce-down bins
that can be assign ed to indi vidua l users
or workgroups. The device also
functions as a job separator, stacker,
and sorter/collator.
Replacement HP maximum capacity,
smart print cartridge.
C8084A
C8085A
C8088B
Q5693A
C8543X
Staple cartridge Replacement HP 5,0 00 staple cartridge
for the 3,000-sheet stacker/stapler.
Replacement HP 5,000 staple cartridge
for the multifunction finish er.
C8091A
C8092A
ENWW Features and benefits of the MFP 11
Page 16

Type of item Item Description or use Order
number
Memory, fonts,
and mass
storage
SDRAM Double
Data Rate (DDR)
memory DIMMs
(100-pin)
The MFP has two memory DIMM slots.
One is used by factory-ins talled
memory.
Improves the ability of the MFP to
handle large and st ored jobs (ma ximum
512 MB with HP brand DDR DIMMs).
32 MB
64 MB
128 MB
256 MB
512 MB
Flash memory
cards
(100-pin)
Permanent st or age for font s an d forms.
The MFP supports Type 1 and Type 2
compact flash memory cards.
16 MB
32 MB
64 MB
EIO hard disk Provides an additional 20 gigabytes
(GB) of permanent storage for fonts
and forms.
Q3982A
Q2625A
Q2626A
C2627A
C2628A
Q2634A
Q2635A
Q2636A
J6073A
Cable and
interface
Enhanced EIO
Cards
accessories
Analog fax
Additional
software
HP Digital Sending
Software
features
Maintenance kit Printer
maintenance kit
● HP Jetdirect Connectivity Card for
USB, serial, and LocalTalk
connectivity
● HP Jetdirect 615N Print Server for
Fast Ethernet (10/100Base-TX)
networks (RJ-45 only)
● HP 680N Wireless 802.11b
connectivity
● HP Jetdirect 625N Print Server for
Fast Ethernet
(10/100/1000Base-TX networks)
● A customer-installable accessory
that enables t he MFP to functi on as
a stand-alone analog fax machine.
A software accessory with enhanced
digital sending features including
network authentication.
The kit contains two Type 1 roll ers,
seven Type 2 rollers, one transfer roller
assembly, and one fuser assembly.
J4135A
J6057A
J6058A
J7960A
Q3701A
T196AA
C9152A
(110 volt)
C9153A
(220 volt)
12 Chapter 1 The basics ENWW
Page 17
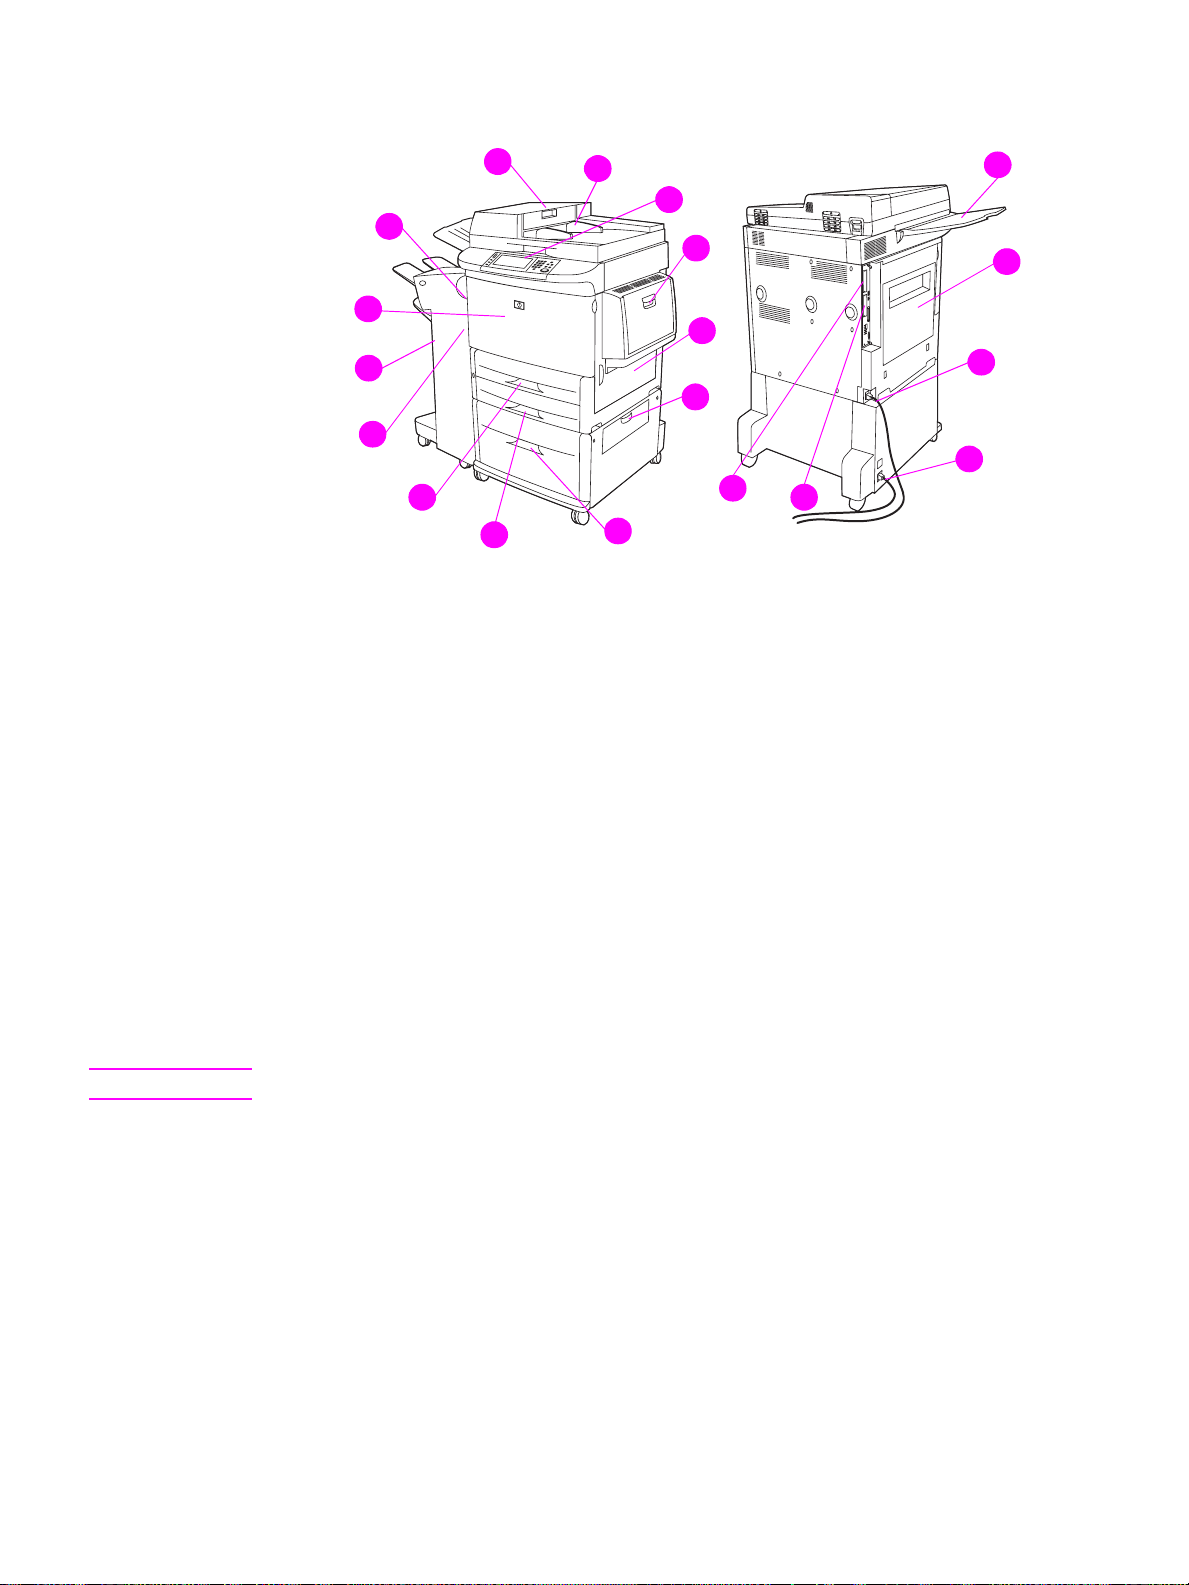
External view of MFP
1
1
1
13
1
12
1
11
1
10
1
9
1
8
1. ADF cover
2. ADF
3. Control panel with touch-screen graphical display
4. Tray 1
5. Right door
6. Vertical transfer door
7. Tray 4
8. Tray 3
9. Tray 2
10. Left door (behind output device)
11. Output device
12. Front door
13. Duplex printing accessory (inside the MFP)
14. ADF output bin
15. Left door
16. Printer power cable
17. Tray 4 power cable
18. EIO slot 1
19. EIO slot 2
1
2
1
3
1
4
1
5
1
6
1
7
1
19
1
18
1
17
1
16
1
14
1
15
Note For specific information about the output bins for each output device, see Selecting the output bin.
ENWW Features and benefits of the MFP 13
Page 18

Helpful software for increased flexibility
Included with the product is a CD-ROM that contains the printing-system software. The software
components and printer drivers on this CD-ROM help you to use the product to its fullest
potential. See the installation notes on the CD-ROM for installation instructions.
Note For the latest information about the printing system software components, see the readme file on
the Web at www.hp.com/support/lj9040mfp
about installing the printing system software, see the install notes on the CD-ROM that was
included with the product.
This section summarizes the software that is included on the CD-ROM. The printing system
includes software for the following operating environments:
● Microsoft® Windows 9X and Windows Millennium Edition (Me)
● Microsoft Windows NT® 4.0, Windows 2000, and Windows XP
● IBM OS/2 version 3.0 or later (also available on the Web)
● Apple Mac OS 7.5 or later
● Linux (also available on the Web)
The printing system also includes software for network administrators who use the following
network operating systems:
● Microsoft Windows 9X and Windows Me
● Microsoft Windows NT 4.0, Windows 2000, and Windows XP
● Microsoft Windows Server 2003
● Mac OS (EtherTalk)
● Linux (Web)
● UNIX® (Web)
or www.hp.com/support/lj9050mfp. For information
Network product installation for UNIX and other network operating systems is available from the
Web or through a local authorized HP distributor.
Note For a list of printer drivers, updated HP printing system software, and product support information,
go to www.hp.com/support/lj9040mfp or www.hp.com/support/lj9050mfp.
Software features
Automatic configuration, Update Now, and Preconfiguration features are available with the
HP LaserJet 9040mfp/9050mfp.
Driver Autoconfiguration
The HP LaserJet PCL 6 and PCL 5e drivers for Windows and the PS drivers for Windows 2000
and Windows XP feature automatic discovery and driver configuration for product accessories at
the time of installation.
14 Chapter 1 The basics ENWW
Page 19

Update Now
If you have modified the configuration of the MFP since installation, the driver can be
automatically updated with the new configuration in environments that support bidirectional
communication. Click the Update Now button to automatically reflect the new configuration in
the driver.
Note The Update Now feature is not supported from the client machine in a Point-and-Print
environment. Update Now can be used for locally-installed MFPs, and by the Point-and-Print
server.
HP Driver Preconfiguration
HP Driver Preconfiguration is a set of tools that you can use to customize and distribute
HP software in managed corporate printing environments. By using HP Driver Preconfiguration,
information technology, (IT) administrators can preconfigure the printing and device defaults for
HP printer drivers before installing the drivers in the network environment. For more information,
see the HP Driver Preconfiguration Support Guide, which is available at www.hp.com/support/
lj9040mfp or www.hp.com/support/lj9050mfp.
Drivers
Use the printer drivers to gain access to the MFP features and allow the computer to
communicate with the MFP (by using a printer language). Check the installation notes, the
readme file, and the late-breaking readme file on the CD-ROM for additional software and
languages.
The following table lists the printer drivers that are included with the MFP. The most recent
drivers are available at www.hp.com/support/lj9040mfp
you do not have access to the Internet, see the HP support flyer.) Depending on the
configuration of Windows-based computers, the installation program for the printing system
software automatically checks the computer for Internet access in order to obtain the latest
drivers.
Note The PCL 5e printer driver for all operating systems, plus the PCL 6 and PS printer drivers for
Windows NT 4.0, are available on the CD-ROM. However, these printer drivers are not installed
during typical installation. To install one of these drivers, use the Add Printer Wizard.
a
Operating system
Windows 9X and
Windows Me
Windows NT 4.0,
Windows 2000
Windows XP
Windows Server 2003
Macintosh OS
a.Not all of the MFP features are available from all drivers or operating systems. See the context-
sensitive Help in your driver for available features.
b.PostScript (PS) 3 emulation is referred to as PS throughout this guide.
c.Only PostScript Printer Description (PPDs ) files are i ncluded (see P os tScript Printer Description
Files (PPDs) and Printer Dialog Exten sion (PDEs)). If you need the Apple printer d river, it comes
with the Macintosh operating system (OS), or it can be obtained directly from Apple.
PCL 5e PCL 6 PS
➼➼➼
➼➼➼
➼➼➼
➼➼➼
➼➼➼
or www.hp.com/support/lj9050mfp. (If
b
PPD
c
➼
ENWW Helpful software for increased flexibility 15
Page 20

Note If your system did not automatically check the Internet for the latest drivers during software
installation, you can download the latest drivers from www.hp .com/support/lj9040mfp
www.hp.com/support/lj9050mfp
. After you are connected, click Downloads and Drivers to find
or
the driver that you want to download.
You can obtain Model Scripts for UNIX and Linux by downloading them from the Internet or by
requesting them from an HP-authorized service or support provider. You can download the UNIX
installers at www.hp.com/support/net_printing
.
Note If the printer driver that you want is not on the CD-ROM or it is not listed in this section, check the
installation notes, the readme file, and the late-breaking readme file to see if the printer driver is
supported. If it is not supported, contact the manufacturer or distributor of the program that you
are using and request a driver for the MFP.
Additional drivers
The following drivers are not included on the CD-ROM, but are available from the Internet or
from HP Customer Care.
● OS/2 PCL 5e/6 printer driver
● OS/2 PS printer driver
● UNIX model scripts
● Linux drivers
● HP OpenVMS drivers
Note The OS/2 drivers are available from IBM and are packaged with OS/2. They are not available in
Traditional Chinese, Simplified Chinese, Korean, or Japanese.
Note The HP OpenVMS drivers are available at h71000.www7.hp.com.
Choose the correct printer driver for your needs
Choose a printer driver based on the way that you use the MFP. Certain MFP features are
available only in the PCL 6 drivers. See the printer driver Help for available features.
● Use the PCL 6 driver to take full advantage of the MFP features. For general office printing,
the PCL 6 driver is recommended to provide optimum performance and print quality.
● Use the PCL 5e driver if you need backward compatibility with previous PCL printer drivers
or older products.
● Use the PS driver if you are printing primarily from PostScript-specific programs such as
Adobe and Corel, for compatibility with PostScript Level 3 needs, or for PS font DIMM
support.
Note The MFP automatically switches between PS and PCL printer languages.
Printer driver Help
Each printer driver has help screens that can be activated by clicking the Help button, pressing
the
F1 key, or clicking the question mark symbol in the upper-right corner in the printer driver
(depending on the Windows operating system in use). These help screens give detailed
information about the specific driver. Printer driver Help is separate from the software program
Help.
16 Chapter 1 The basics ENWW
Page 21

Gaining access to the printer drivers
Use one of the following methods to gain access to the printer drivers from your computer:
Operating
system
Windows 9X,
Windows NT, and
Windows Me
Windows 2000
and Windows XP
Temporarily change
settings
(from a software
program)
On the File menu, cli ck
Print. Select the MFP,
and then click
Properties. (The actual
steps can vary; this is the
most common method.)
On the File menu, cli ck
Print. Select the MFP,
and then clic k Properties
or Preferences. (The
actual steps can vary;
this is the most common
method.)
Change print job
default settings
(across all software
programs)
Click the Start butto n,
point to Settings, and
then click Printers.
Right-click the
appropriate MFP icon,
and then select
Properties (Windows 98
and Windows Me) or
Document Defaults
(Windows NT 4.0).
Click the Start butto n,
point to Settings, and
then click Printers or
Printers and Faxes.
Right-click the MFP i co n,
and then select Printing
Preferences.
Change
configuration
settings (for
example, add a new
input tray)
Click the Start button,
point to Settings, and
then click Printers.
Right-click the
appropriate MFP icon,
and then select
Properties. Click the
Configure tab .
Click the Start button,
point to Settings, and
then click Printers.
Right-click the
appropriate MFP icon,
and then select
Properties. Click the
Device Settings tab.
Macintosh OS 9.1 On the File menu, cli ck
Print. Change the
settings that you want on
the various pop-up
menus.
Macintosh OS X
10.1
On the File menu, cli ck
Print. Change the
settings that you want on
the various pop-up
menus.
On the File menu, click
Print. As you change
settings on the pop-up
menu, click Save
Settings.
On the File menu, click
Print. As you change
settings on the various
pop-up menus, click
Save Custom Settings.
These settings are sa v ed
as the Custom option. To
use the new settin gs, y ou
must select the Custom
option each time that y ou
open a program and
print.
Click the desktop printer
icon. From the Printing
menu, click Change
Setup.
Delete the MFP and
reinstall it. The driver will
be automatically
configured with the ne w
options when the driver is
reinstalled (AppleTalk
connections only.)
Configuration se ttin gs
might not be available in
Classic mode.
ENWW Helpful software for increased flexibility 17
Page 22

Operating
system
Temporarily change
settings
(from a software
program)
Change print job
default settings
(across all software
programs)
Change
configuration
settings (for
example, add a new
input tray)
Macintosh OS X.2 On the File menu, click
Print. Change the
settings that you want on
the various pop-up
menus.
Macintosh OS X.3 On the File menu, click
Print. Change the
settings that you want on
the various pop-up
menus.
On the File menu, click
Print. Change settings
on the various pop-up
menus. On the Presets
pop-up menu, click Save
as, and type a name for
the preset. These
settings are saved in the
Presets menu. To use
the new settings, you
must select the saved
preset option each time
that you open a program
and print.
Open the Print Center.
(Select the hard drive,
click Applications, click
Utilities, and then
double-click Print
Center.) Click the print
queue. On the Printers
menu, click Show Info.
Select the Installable
Options menu.
Configuration se ttin gs
might not be available in
Classic mode.
Open the Printer Setup
Utility. (Select the hard
drive, click Applications,
click Utilities, and then
double-click Printer
Setup Utility.) Click the
print queue. On the
Printers menu, click
Show Info. Select the
Installable Options
menu.
Software for Macintosh computers
The HP installer provides PostScript Printer Description (PPD) files, Printer Dialog Extensions
(PDEs), and the HP LaserJet Utility for use with Macintosh computers.
The embedded Web server can be used by Macintosh computers when the MFP is connected to
a network .
PostScri pt Printer Description Files (PPDs) and Printer Dialog Extension
(PDEs)
Use PPDs, in combination with the PostScript drivers, to gain access to the MFP features and to
allow the computer to communicate with the MFP. An installation program for the PPDs, PDEs,
and other software is provided on the CD-ROM. Use the appropriate PS driver that is provided
with the operating system.
18 Chapter 1 The basics ENWW
Page 23

HP LaserJet Utility
Use the HP LaserJet Utility to control features that are not available in the printer driver. Use the
illustrated screens to select the MFP features that you want. Use the HP LaserJet Utility to
perform the following tasks:
● name the MFP, assign it to a zone on the network, and download files and fonts
● configure and set the MFP for Internet protocol (IP) printing
Note The HP LaserJet Utility is not currently supported for Macintosh OS X, but the utility is supported
for the Classic environment.
Installing the printing system software
The following sections contain instructions for installing the printing system software.
The MFP comes with printing system software and printer drivers on a CD-ROM. The printing
system software on the CD-ROM must be installed to take full advantage of the MFP features.
If you do not have access to a CD-ROM drive, you can download the printing system software
from the Internet at www.hp .com/support/lj9040mfp
Note Sample model scripts for UNIX (HP-UX®, Sun Solaris) and Linux networks are available for
download at www.hp.com/support/net_printing.
or www.hp.com/support/lj9050mfp.
Installing Windows printing system software for direct connections
This section explains how to install the printing system software for Microsoft Windows 98,
Windows Me, Windows NT 4.0, Windows 2000, Windows Server 2003, and Windows XP.
Note If you are installing the software on Windows NT 4.0, Windows 2000, Windows Server 2003, or
Windows XP, make sure that you have administrator privileges.
When installing the printing software in a direct-connect environment, always install the software
before connecting the parallel cable. If the parallel cable was connected before the software
installation, see Installing the software after the parallel cable has been connected.
To install the printing system software
1 Close all of the software programs that are open or running.
2 Insert the CD-ROM into the CD-ROM drive. If the welcome screen does not open, start it by
using the following procedure:
a On the Start menu, click Run.
b Type the follo wing information: X:/setup (where X is the letter of the CD-ROM drive).
c Click OK.
3 When prompted, click Install Printer and follow the instructions on the computer screen.
4 Click Finish when the installation is complete. You might need to restart the computer.
5 Print a Test Page or a page from any software program to make sure that the software is
correctly inst a ll ed.
If installation fails, reinstall the software. If this fails, check the installation notes and readme files
on the CD-ROM or the support flyer that came with the MFP, or go to www.hp.com/support/
lj9040mfp or www.hp.com/support/lj9050mfp for help or more informatio n.
ENWW Helpful software for increased flexibility 19
Page 24

Installing Windows print ing system sof tw are for networks
The software on the CD-ROM supports network installation with a Microsoft network. For
network installation on other operating systems, go to www.hp.com/support/lj9040mfp
www.hp.com/support/lj9050mfp
MFP.
The HP Jetdirect print server has a 10/100Base-TX network port. If you need an HP Jetdirect
print server with another type of network port, see Parts and accessories or go to www.hp.c om/
support/lj9040mfp or www.hp.com/support/lj9050mfp.
The installer does not support MFP installation or MFP object creation on Novell servers. It
supports only direct-mode network installations between Windows computers and an MFP. To
install your MFP and create objects on a Novell server, use an HP utility (such as HP Web
Jetadmin or HP Install Network Printer Wizard) or a Novell utility (such as NWadmin).
To install the printing system software
1 Make sure that the HP Jetdirect print server is configured correctly for the network by
printing a configuration page (see To print an information page). On the second page that
prints, locate the MFP IP address. You might need this address to complete network
installation. If the MFP is using DHCP IP configuration, use the name on the second page.
Otherwise, if the MFP is shut down for an extended period of time, DHCP does not
guarantee that the same IP address will be issued.
2 Close all software programs that are open or running.
3 Insert the CD-ROM into the CD-ROM drive. If the welcome screen does not open, start it by
using the following procedure:
, or see the Network Installation Guide that is included with the
or
a On the Start menu, click Run.
b Type the following: X:/setup (where X is the letter of the CD-ROM drive).
c Click OK.
4 When prompted, click Install Printer and follow the instructions on the computer screen.
5 Click Finish when installation has completed. You might need to restart the computer.
6 Print a Test Page or a page from any software program to make sure that the software is
installed correctly.
Note If installation fails, reinstall the software. If this fails, check the installation notes and readme files
on the CD-ROM or the flyer that came with the MFP, or go to www.hp.com/support/lj9040mfp
www.hp.com/support/lj9050mfp for help or more information.
or
Setting up a Windows computer to use the network MFP by using
Windows-sharing
If the MFP is directly connected to a computer with a parallel cable, you can share the MFP on
the network so that other network users can use it.
See your Windows documentation for information about how to make Windows-sharing
available. After the MFP is shared, install the printing system software on all computers that
share the MFP.
20 Chapter 1 The basics ENWW
Page 25

Installing Macintosh printing system software for networks
This section describes how to install Macintosh printing system software. The printing system
software supports Mac OS versions 8.6 through 9.2.x, Mac OS version 10.1, and later.
The printing system software includes the following components:
● PostScript Printer Description (PPD) files
The PPDs, in combination with the PostScript printer drivers, provide access to the MFP
features. An installation program for the PPDs and other software is provided on the
CD-ROM that came with the MFP. Use the Apple 8 printer driver that comes with the
computer.
● HP LaserJet Utility
The HP LaserJet Utility provides access to features that are not available in the printer
driver. Use the illustrated screens to select MFP features and complete the following tasks
with the MFP:
• Name the MFP.
• Assign the MFP to a zone on the network.
• Assign an IP address to the MFP.
• Download files and fonts.
• Configure and set the MFP for IP or AppleTalk printing.
Note The HP LaserJet Utility is not currently supported for Macintosh OS X, but the utility is supported
for the Classic environment.
To install printer drivers from Mac OS 8.6 to 9.2
1 Connect the network cable between the HP Jetdirect print server and a network port.
2 Insert the CD-ROM into the CD-ROM drive. The CD-ROM menu runs automatically. If the
CD-ROM menu does not run automatically, double-click the CD-ROM icon on the desktop,
and then double-click the Installer icon. This icon is located in the Installer/<language> folder
of the Starter CD-ROM (where <language> is your language preference). (For example, the
Installer/English folder contains the Installer icon for the English software.)
3 Follow the instructions on the computer screen.
4 Open the Apple Desktop Printer Utility that is located in the {Startup Disk}: Applications:
Utilities folder.
5 Double-click Printer (AppleTalk).
6 Next to AppleTalk Printer Selection, click Change.
7 Select the MFP, click Auto Setup, and then click Create.
8 On the Printing menu, click Set Default Printer .
Note The icon on the desktop is generic. All of the specific print panels appear in the print dialog box
in a program.
To install printer drivers from Mac OS 10.1 and later
1 Connect the network cable between the HP Jetdirect print server and a network port.
2 Insert the CD-ROM into the CD-ROM drive. The CD-ROM menu runs automatically. If the
CD-ROM menu does not run automatically, double-click the CD-ROM icon on the desktop,
and then double-click the Installer icon. This icon is located in the Installer/<language> folder
of the Starter CD-ROM (where <language> is your language preference). (For example, the
Installer/English folder contains the Installer icon for the English software.)
ENWW Helpful software for increased flexibility 21
Page 26

3 Double-click the HP LaserJet Installers folder.
4 Follow the instructions on the computer screen.
5 Doub le-click the Installer icon for the appropriate language.
6 On your computer hard drive, double-click Applications, double-click Utilities, and then
double-click Print Center.
7 Click Add Printer.
8 Select the AppleTalk connection type on OS X 10.1 and the Rendezvous connection type on
OS X 10.2.
9 Select the MFP name.
10 Click Add Printer.
11 Close the Print Center by clicking the close button in the upper-left corner.
Note Macintosh computers cannot be connected directly to the MFP by using a parallel port.
Installing the software after the parallel cable has been connected
If you have already connected a parallel cable to a Windows computer, the New Hardware
Found Wizard appears when you turn on the computer.
To allow the Wizard to search the CD and automatically install the printing system
software
1 In the New Hardware Found dialog box, click Search CD-ROM drive.
2 Click Next.
3 Follow the instructions on the computer screen.
4 Print a Test Page or a page from any software program to make sure that the software is
installed correctly.
If installation fails, reinstall the software. If this fails, check the installation notes and readme files
on the CD-ROM or the flyer that came with the MFP, or go to www.hp.com/support/lj9040mfp
www.hp.com/support/lj9050mfp
for help or more information.
or
Uninstalling the software
This section explains how to uninstall the printing system software.
To remove software from Windows operating systems
Use the Uninstaller in the HP LaserJet 9040mfp/Tools program group or the
HP LaserJet 9050mfp/Tools program group to select and remove any or all of the Windows
HP printing system components.
1 Click Start and then click Programs.
2 Click the MFP name and then click Tools.
3 Click Uninstaller.
4 Click Next.
5 Select the HP printing system components that you want to uninstall.
6 Click OK.
7 Follow the instructions on the computer screen to complete the uninstallation.
22 Chapter 1 The basics ENWW
Page 27

To remove software from Macintosh operating systems
Drag the HP LaserJet folder and PPDs to the trash can.
Software for networks
For a summary of available HP network installation and configuration software solutions, see the
HP Jetdirect Print Server Administrator’s Guide. You can find this guide on the CD-ROM that is
included with the MFP.
HP Web Jetadmin
Use HP Web Jetadmin to manage HP Jetdirect connected products within your intranet by using
a browser. HP W eb Jetadmin is a browser-based management tool, and should be installed only
on a single network administration server. It can be installed and run on Red Hat Linux; Suse
Linux; Windows NT 4.0 Server and Workstation; Windows 2000 Professional, Server, and
Advanced Server; and Windows XP with Service Pack 1.
To download a current version of HP Web Jetadmin and for the latest list of supported host
systems, visit HP Customer Care Online at www.hp.com/go/webjetadmin
When HP Web Jetadmin is installed on a host server, any client can gain access to it through a
supported Web browser (such as Microsoft Internet Explorer 5.5 and 6.0 or Netscape
Navigator 7.0).
HP Web Jetadmin has the following features:
.
● The task-oriented user interface provides configurable views, saving network managers
significant time.
● The customizable user profiles let network administrators include only the function that the
user will view or use.
● Instant e-mail notification of hardware failure, low supplies, and other MFP problems can be
routed to different people.
● Remote installation and management can be completed from any location by using only a
standard Web browser.
● The advanced autodiscovery locates peripherals on the network, without manually entering
each MFP into a database.
● It offers simple integration into enterprise management packages.
● Users can quickly find peripherals based on parameters such as IP address, color capability ,
and model name.
● Peripherals can be easily organized into logical groups, with virtual office maps for easy
navigation.
● Multiple products can be configured and managed at the same time.
For the latest information about HP Web Jetadmin, go to www.hp.com/go/webjetadmin
.
UNIX
The HP Jetdirect Printer Installer for UNIX is a simple installation utility for HP-UX and Solaris
networks. It is available for download from HP Customer Care Online at www.hp.com/support/
net_printing.
Utilities
The MFP is equipped with several utilities to make it easy to monitor and manage the MFP on a
network.
ENWW Helpful software for increased flexibility 23
Page 28

Embedded Web server
This MFP is equipped with an embedded Web server, which provides access to information
about MFP and network activities. A Web server provides an environment in which Web
programs can run, similar to the way an operating system, such as Windows, provides an
environment for programs to run on your computer. The output from these programs can then be
viewed in a Web browser, such as Microsoft Internet Explorer or Netscape Navigator.
When a Web server is “embedded, ” that means that it resides on a hardware device (such as an
MFP) or in firmware, rather than as software that is loaded on a network server.
The advantage of an embedded Web server is that it provides an interface to the MFP that
anyone who has a network-connected computer or a standard Web browser can use. You do not
need to install or configure any special software. For more information about the HP embedded
Web s erver, see the Embedded Web Server User Guide. You can find this guide on the CDROM that was included with the MFP.
For information about the features and functionality of the embedded Web server, see
Embedded Web server.
HP Toolbox
The HP Toolbox is a Windows-only software program that can be used for the following tasks:
● check the MFP status
● print internal MF P page s
You can view the HP Toolbox when the MFP is connected to a network. You must have
performed a complete software installation before using the HP Toolbox.
For more information about the HP Toolbox, see HP Toolbox.
Other components and utilities
Several software programs are available f or Windows and Macintosh OS users, as well as for
network administrators. These programs are summarized in the following table.
Windows Macintosh OS Network administrator
● Software installer —
automates the printing
system installation
● Online Web registration
● HP Toolbox
● PostScript Printer
Description files (PPDs) —
for use with the PostScript
drivers that come with the
Mac OS
● LaserJ et Utili ty (available
from the Internet) — a
product management utility
for Mac OS users
● HP Toolbox (for Mac OS X
v10.2 and later)
● HP Web Jetadmin —a
browser-based system
management tool (see
www.hp.com/go/
webjetadmin for the latest
HP Web Jetadmin software)
● HP Jetdirect Printer Installer
for UNIX — available fo r
download from
www.hp.com/support/
net_printing
24 Chapter 1 The basics ENWW
Page 29

Communicating by using the HPJetdirect embedded print
server
The MFP has an embedded print server. If you cannot communicate with the MFP over the
network, check the operation of the embedded print server. Check the embedded Jetdirect
configuration page for the message I/O CARD READY, and for the correct network configuration
settings. See To print a configuration page for instructions.
Verify that the print server was able to link to the network automatically:
● Check that a link LED on the MFP’s LAN (RJ-45) connector is lit, which indicates a
successful link. A link failure is indicated when both LEDs are off.
● Check the embedded Jetdirect configuration page for error messages. The message LOSS
OF CARRIER ERROR indicates a link failure.
For link failures, check all of the network cable connections. In addition, you can try to manually
configure the link settings on the embedded print server by using the MFP control-panel menus
(MENU, CONFIGURE DEVICE, I/O, EMBEDDED JETDIRECT MENU, LINK SPEED).
Note HP Jetdirect print servers are available for many different network connections, including
802.11 networks.
Communicating by using the HPJetdirect print server
If you cannot communicate with the MFP over the network, check the operation of the print
server. Check the Jetdirect configuration page for the message I/O CARD READY.
To print a configuration page
1 On the touch screen of the graphical display touch Menu.
2 Touch Information.
3 Touch Print Configuration.
For troubleshooting information, see the documentation that came with the print server.
Embedded Web Server
The HP LaserJet 9040mfp/9050mfp comes equipped with an embedded Web server. Use the
HP embedded Web server to view the MFP and network card status and to manage printing
functions from your computer. With the HP embedded Web server, you can complete the
following tasks:
● view MFP status information
● determine the remaining life on all supplies and order new ones
● view and change tray configurations
● view and change the MFP control-panel menu configuration
● view and print internal pages
● receive notification of MFP and supplies events
● add or customize links to other Web sites
● select the language in which to show the embedded Web server pages
● view and change network configuration
ENWW Embedded Web Server 25
Page 30

You can also use the embedded Web server to perform the print-job management functions that
would usually be done at the MFP control panel, including these functions:
● Changing MFP settings
● Changing MFP configuration
● Canceling print jobs
To gain access to the embedded Web server
Note To use the embedded Web server, you must have an IP-based network and a Web browser.
In your Web browser, type the IP address assigned to the MFP. For example, if the MFP IP
address is 169.1.2.3, you would type this address: http://169.1.2.3
For more information, see the HP Embedded Web Server User Guide at www.hp.com/support/
lj9040mfp or www.hp.com/support/lj9050mfp.
HPToolbox
The HP Toolbox is a Web application that you can use for the following tasks:
● Check the MFP status
● Print internal MFP information pages
You can view the HP Toolbox when the MFP is connected to a network. The HP Toolbox
software is automatically installed as part of the typical software installation.
Note You do not need Internet access to open and use the HP Toolbox. However, if you click a link in
the Other Links area, you must have Internet access to go the site that is associated with the link.
See Other links for more information.
Supported operating systems
The HP Toolbox is supported for the following operating systems:
● Windows 98, Windows 2000, Windows Me, Windows Server 2003, and Windows XP
● Macintosh OS 10.2 or later
Supported browsers
To use the HP Toolbox, you must have one of the following browsers:
● Microsoft Internet Explorer 5.5 or later (Internet Explorer 5.2 or later for Macintosh)
● Netscape Navigator 7.0 or later (Netscape Navigator 7.0 or later for Macintosh)
● Opera Software ASA Opera 7.0 for Windows
● Safari 1.0 software for Macintos h
All HP Toolbox pages can be printed from the browser.
26 Chapter 1 The basics ENWW
Page 31

To view HP Toolbox
On the Start menu, select Programs, select HP LaserJet 9040mfp/9050mfp, and then select
HP LaserJet Toolbox.
Note You can also view the HP Toolbox by clicking the system tray icon or the desktop icon.
The HP Toolbox opens in a Web browser.
Note After you open the HP Toolbox, you can bookmark it in your browser so that you can return to it
quickly in the future.
HP Toolbox sections
The HP Toolbox software contains the following sections and options:
● Status tab
● Alerts tab
● Device Settings button
● HP Toolbox links
● Other links
Status tab
The Status tab has links to the following main pages:
● Device Status. View MFP status information. This page indicates various MFP conditions
such as a paper jam or an empty tray. Use the virtual control panel buttons on this page to
change MFP settings. After you correct a problem with the MFP, click the Refresh button to
update the device status.
● Supplies Status. View detailed supplies status such as the percent of toner remaining in the
print cartridges and the number of pages that have been printed with the current print
cartridges. This page also has links to order supplies and to find recycling information.
● Print Info Pages. Print the configuration page and other information pages that are available
for the MFP, such as the Supplies Status page, the Demo page, and the Menu Map.
Alerts tab
Use the Alerts tab to configure the MFP to automatically notify you of MFP alerts. The Alerts tab
has links to the following main pages:
● Set up status alerts
● Administrative settings
ENWW HP Toolbox 27
Page 32

Set up status alerts page
On the Set up status alerts page, you can choose to turn alerts on or off, specify when the MFP
should send an alert, and select from the following types of alerts:
● a pop-up message
● a task bar icon
Click Apply to activate the settings.
On the Administrative settings page, you can set the frequency of how often the HP Toolbox
checks for MFP alerts. The following settings are available:
● Less often: every 15,000 milliseconds
● Normal: every 8,000 milliseconds
● More often: every 4,000 milliseconds
If you want to reduce network I/O traffic, reduce the frequency that the MFP checks for alerts.
Device Settings button
Clicking the Device Settings button connects you to the MFP’s embedded Web server.
See Embedded Web Server for more information.
HP Toolbox links
The HP Toolbox links on the left side of the screen provide links to the following options:
● Select a device. Select from all of the HP Toolbox-enabled devices.
● View current alerts. View the current alerts for all of the installed products. (You must be
printing to view current alerts.)
● Text only page. View HP Toolbox as a site map linking to text-only pages.
Other links
Each page in the HP Toolbox contains links to the HP Web site for the following information:
● Product registration
● Product support
● Ordering supplies
● HP Instant Support
You must have Internet access to use any of these links. If you use a dial-up connection and did
not connect to the Internet when you first opened the HP Toolbox, you must connect to the
Internet before you can visit these Web sites.
TM
28 Chapter 1 The basics ENWW
Page 33

Loading input trays
This section contains information about loading standard- and custom-size media into the four
input trays.
CAUTION To avoid a jam, never add or remove paper from Tray 1 or open Tray 2, Tray 3, or Tray 4 while
printing or copying from that tray.
To avoid damaging the MFP, print labels, envelopes, and transparencies from Tray 1 only. Send
labels, envelopes, and transparencies to the upper bin. Print on only one side of labels, envelopes,
and transparencies.
Loading Tray 1
Tray 1 holds up to 100 sheets of paper or 10 envelopes. For more information about supported
media, see Media specifications.
To load Tray 1 for occasional one-time use
Use this procedure if Tray 1 is usually left empty and is used for printing on a variety of sizes or
types of paper.
1 Open Tray 1.
2 Load paper according to size and finishing options. See Orienting media for information
about loading preprinted, letterhead, and prepunched paper.
CAUTION To avoid jams, print sheets of labels one sheet at a time.
ENWW Loading input trays 29
Page 34

3 Adjust the paper guides so they lightly touch the paper stack, but do not bend the paper.
4 Make sure the paper fits under the tabs on the guides and not above the load level
indicators.
Note If printing on A3- or 11 x 17-size paper, or other long media, also pull out the tray extension until
it stops.
5 Look at the control panel display within a few seconds of loading the paper. (Open and close
the tray again if the time has already elapsed.)
6 If the control panel does not display the message TRAY 1 <TYPE> <SIZE>, then the tray is
ready to use.
7 If the control panel displays TRAY 1 <TYPE> <SIZE>, touch OK to change the size and type
configuration. The size menu is displayed.
8 Touch ANY SIZE. The control panel displays SETTING SAVED.
9 Touch ANY TYPE. The control panel displays SETTING SAVED.
10 If the control panel displays TRAY 1 ANY SIZE ANY TYPE, then the tray is ready for occasional
one-time use for a variety of paper.
11 Touch EXIT to accept the size and type settings.
To load Tray 1 when the same paper is used for multiple print jobs
Use the following procedure if Tray 1 is loaded continually with the same type of paper, and the
paper is not usually removed from Tray 1 between print jobs. The following procedure can also
increase the MFP performance when printing from Tray 1.
CAUTION To avoid a jam, never add or remove paper from a tray while printing from that tray.
1 Touch MENU.
2 Touch PAPER HANDLING.
3 Touch TRAY 1 SIZE.
4 Touch the correct paper size. The control panel displays SETTING SAVED.
Note If you select CUSTOM as the paper size, also select the unit of measure and the X and Y dimensions.
5 Touch TRAY 1 TYPE.
6 Touch the correct paper type. The control panel displays SETTING SAVED.
7 Touch EXIT to exit the menus.
30 Chapter 1 The basics ENWW
Page 35

8 Open Tray 1.
9 Load paper according to size and finishing options. See Orienting media for information
about loading preprinted, letterhead, and prepunched paper.
CAUTION To avoid jams, print sheets of labels one sheet at a time.
10 Adjust the paper guides so they lightly touch the paper stack, but do not bend the paper.
11 Make sure the paper fits under the tabs on the guides and not above the load level
indicators.
Note If printing on A3- or 11 x 17-size paper, or other long media, also pull out the tray extension until
it stops.
12 Look at the control panel display within a few seconds of loading the paper. The tray
configuration is displayed. (Open and close the tray again if the time has already elapsed.)
13 Touch EXIT to exit the menus. The tray is ready to use.
ENWW Loading input trays 31
Page 36

Loading Trays 2, 3, and 4
Trays 2 and 3 hold up to 500 sheets of standard media. Tray 4 holds up to 2,000 sheets of
standard media. For information about paper specifications, see Media specifications.
To load detectable standard-size paper in Trays 2, 3, and 4
Follow this procedure to load detectable standard-size paper in the tray. The following are the
detectable sizes, which are marked inside the tray:
● A4
● Letter
● A3
● Legal
● Executive
● 11 x 17
● B4 (JIS)
● B5 (JIS)
● A4-Rotated
● Letter-Rotated
CAUTION To avoid a jam, never add or remove paper from a tray while printing from that tray.
1 Open the tray until it stops.
2 Adjust the left (Y) paper guide by pressing the tab on the guide and set the guide to the
correct paper size.
32 Chapter 1 The basics ENWW
Page 37

3 Adjust the front (X) paper guide by pressing the tab on the guide and set the guide to the
correct paper size.
4 Load (orient) the paper according to size.
Note See Orienting media for information about loading preprinted, letterhead, and prepunched paper.
5 Set the Custom/Standard switch to Standard.
ENWW Loading input trays 33
Page 38

6 Close the tray.
7 Look at the control panel within a few seconds of closing the tray. (Open and close the tray if
the time has already elapsed.) The control panel displays the tray size and type
configuration. Do one of the following:
• If the size and type settings are correct, touch EXIT to accept the settings.
• If the size and type settings are not correct, touch OK. The TRAY N SIZE=*<SIZE> menu is
displayed.
8 To change the size setting, touch the correct paper size. The message SETTING SAVED is
displayed for a moment, and then the tray type menu is displayed.
Note Depending on the size that you selected, the MFP might prompt you to move the Custom/Standard
switch in the tray to another position. The MFP might also prompt you to move the paper guides.
Follow the instructions on the control panel, close the tray , and then repeat this procedure starting
with step 7.
9 To change the type setting, touch the correct paper type. The message SETTING SAVED is
displayed for a moment, and then the size and type settings are displayed.
10 If the size and type settings are correct, touch EXIT to accept the settings. The tray is ready
to use.
34 Chapter 1 The basics ENWW
Page 39

To load undetectable standard-size paper in Trays 2, 3, and 4
Follow this procedure to load undetectable standard-size paper in the tray. The following are the
undetectable sizes:
● 8K
● 16K
● A5
● Statement
● JIS Executive
● 8.5 x 13 (216 x 330 mm).
CAUTION To avoid a jam, never add or remove paper from a tray while printing from that tray.
1 Open the tray until it stops.
2 Press the tab on the front paper guide and slide the guide all the way out.
3 Press the tab on the left paper guide and slide the guide all the way out.
4 Load (orient) the paper according to size.
Note See Orienting media for information about loading preprinted, letterhead, and prepunched paper.
ENWW Loading input trays 35
Page 40

5 Adjust the left paper guide by pressing the tab on the guide and slide the guide until it gently
touches the paper
6 Adjust the front paper guide by pressing the tab on the guide and slide the guide until it
gently touches the paper.
Note When loading T ray 4, make sure that the paper guide lock is in the up position.
7 Set the Custom/Standard switch to Custom.
8 Close the tray.
36 Chapter 1 The basics ENWW
Page 41

9 Look at the control panel within a few seconds of closing the tray. (Open and close the tray if
the time has already elapsed.) The control panel displays the tray size and type settings. Do
one of the following:
• If the size and type settings are correct, touch EXIT to accept the settings.
• If the size and type settings are not correct, touch OK. The TRAY N SIZE=*<SIZE> menu is
displayed.
10 To change the size setting, touch the correct paper size. The message SETTING SAVED is
displayed for a moment, and then the tray type menu is displayed.
Note Depending on the size that you selected, the MFP might prompt you to move the Custom/Standard
switch in the tray to another position. The MFP might also prompt you to move the paper guides.
Follow the instructions on the control panel, close the tray , and then repeat this procedure starting
with step 9.
11 To change the type setting, Touch the correct paper type. The message SETTING SAVED is
displayed for a moment, and then the size and type settings are displayed.
12 If the size and type settings are correct, touch EXIT to accept the settings. The tray is ready
to use.
Loading custom media in Trays 2, 3, and 4
Use the following procedure to load custom-size paper in the tray.
CAUTION To avoid a jam, never add or remove paper from a tray while printing from that tray.
1 Open the tray until it stops.
2 Press the tab on the front (X) paper guide and slide the guide all the way out.
3 Press the tab on the left (Y) paper guide and slide the guide all the way out.
ENWW Loading input trays 37
Page 42
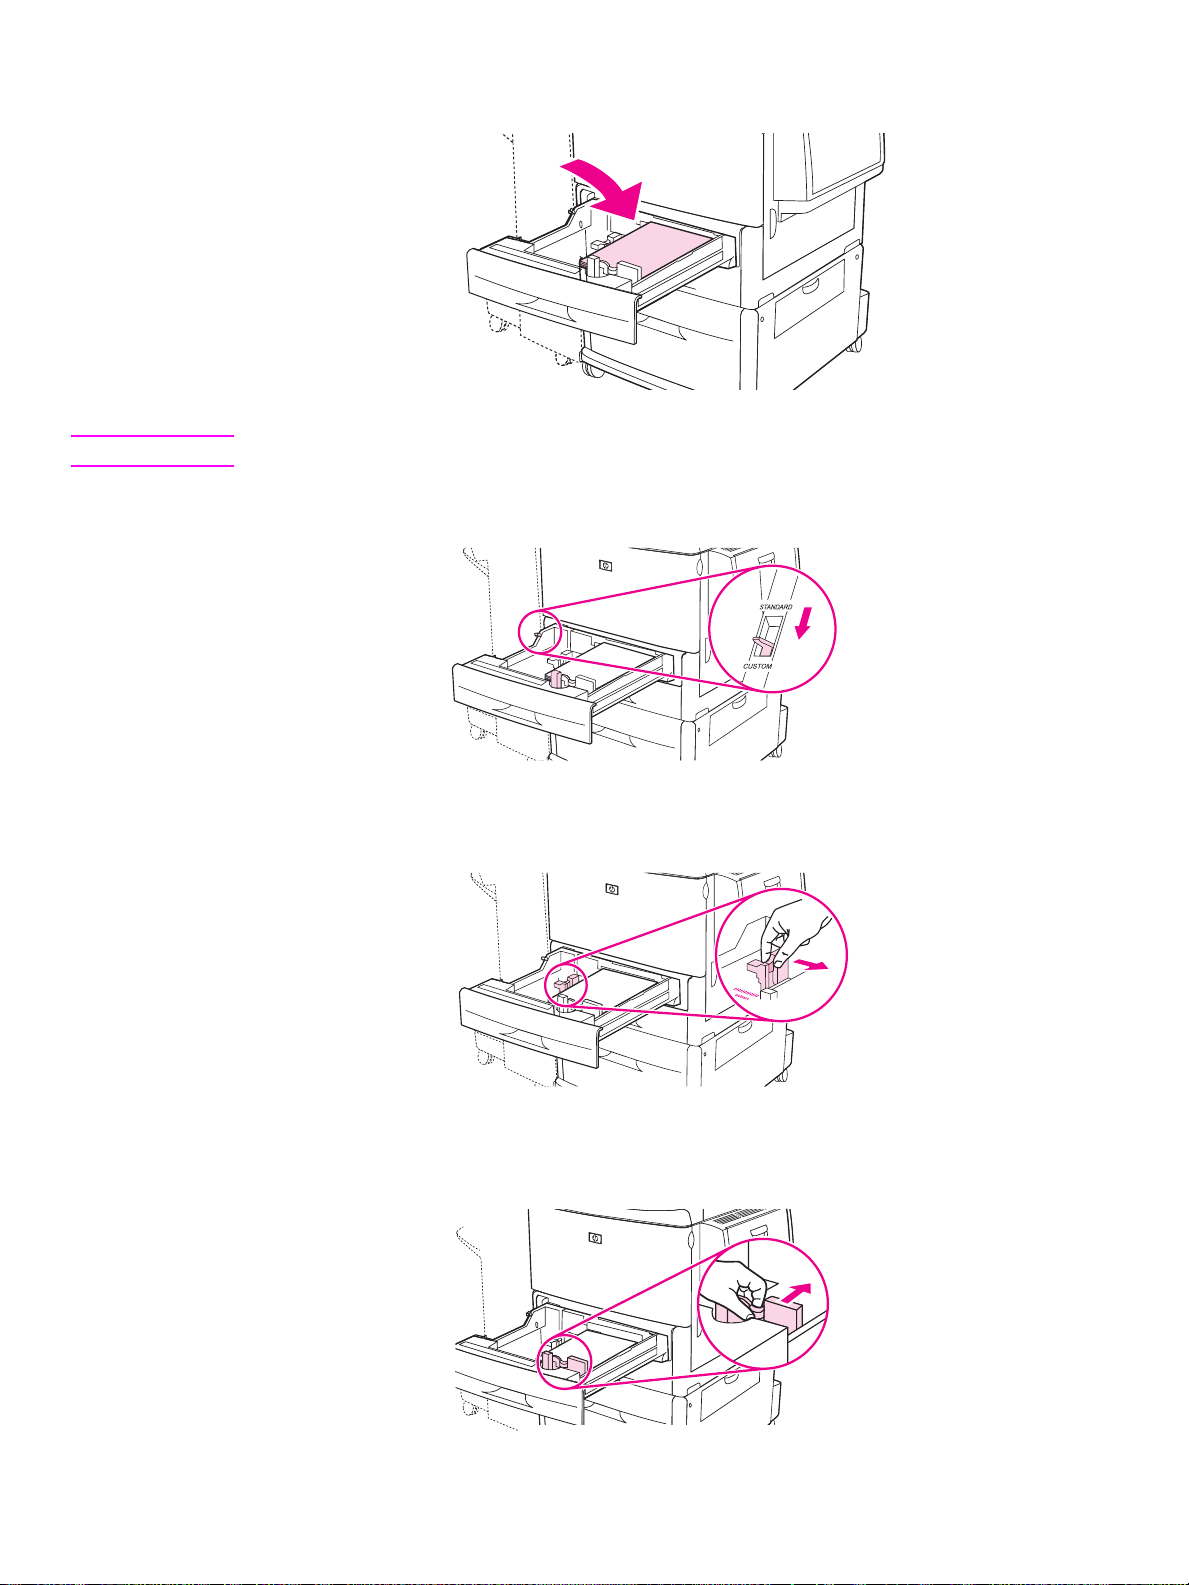
4 Load (orient) the paper according to size.
Note See Orienting media for instructions on loading preprinted, letterhead, and prepunched paper.
5 Set the Custom/Standard switch to Custom.
6 Adjust the left (Y) paper guide by pressing the tab on the guide and slide the guide until it
gently touches the paper
7 Adjust the front (X) paper guide by pressing the tab on the guide and slide the guide until it
gently touches the paper.
38 Chapter 1 The basics ENWW
Page 43
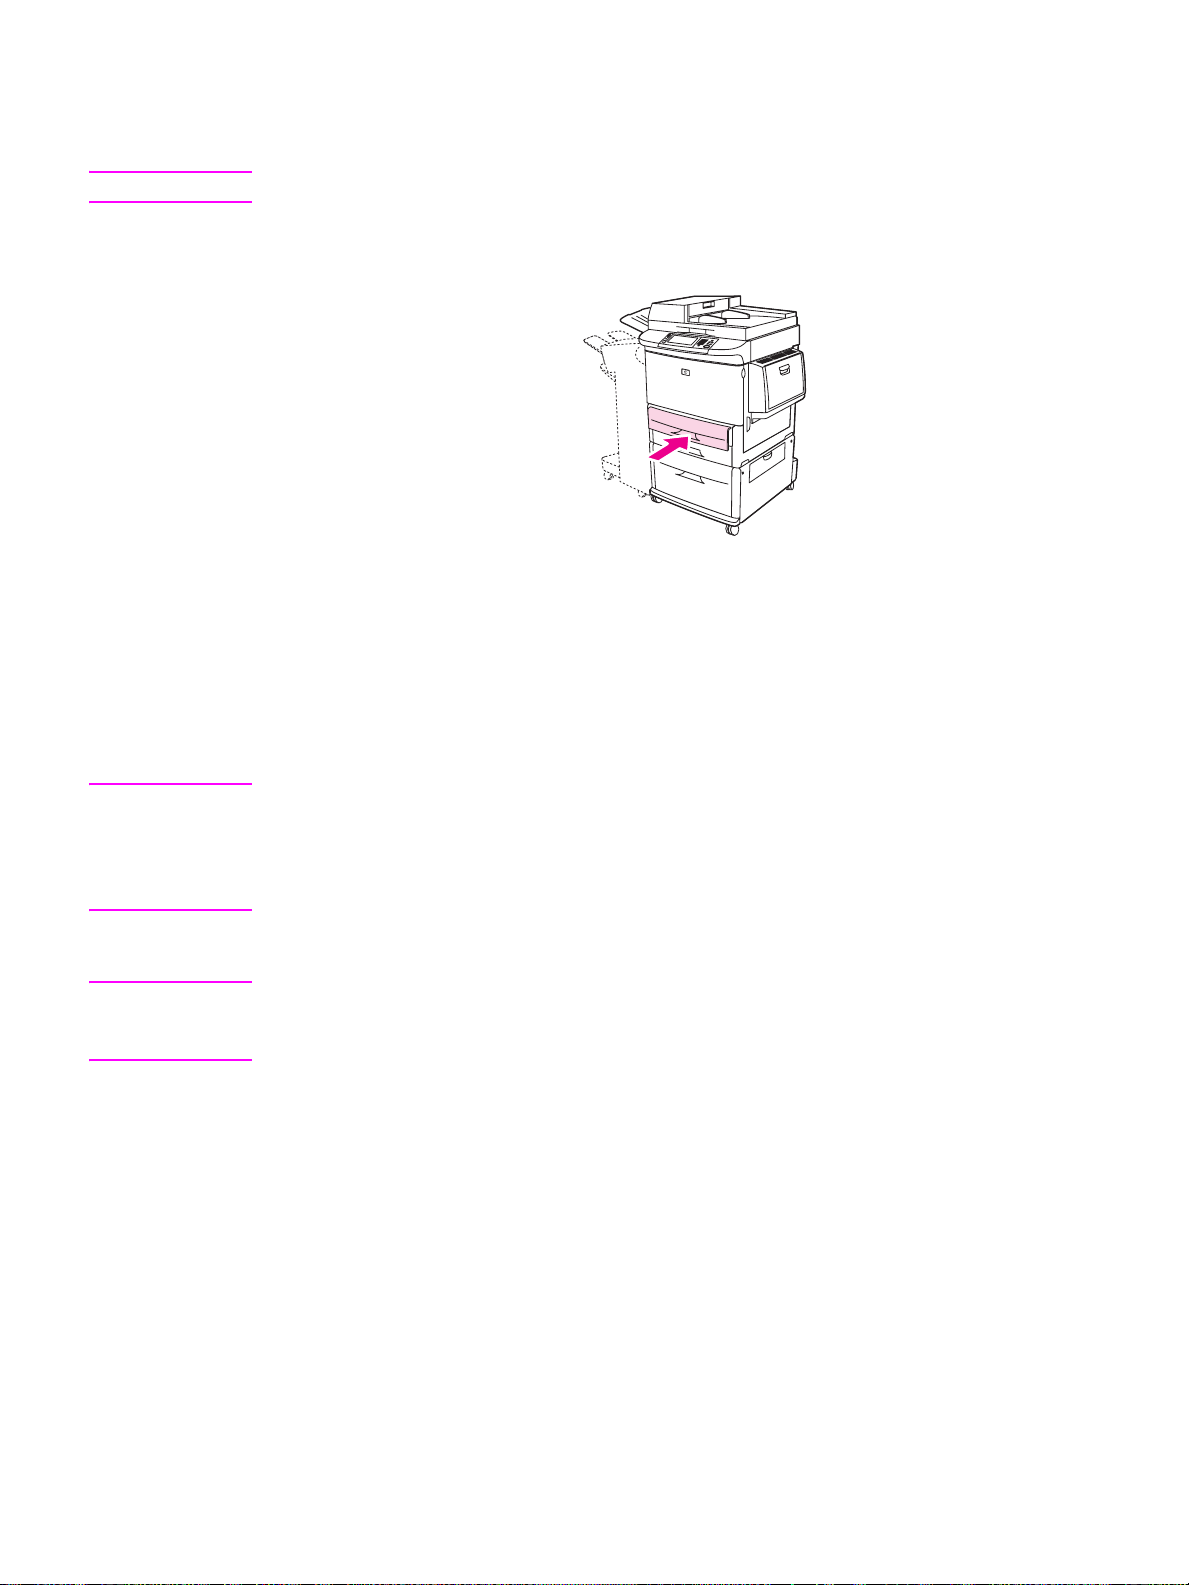
8 Note the orientation of the paper, as well as the value of the X dimension and the Y
dimension. The X and Y dimensions are marked in the tray. Y ou will need this information for
a later step.
Note When loading T ray 4, make sure that the paper guide lock is in the up position.
9 Close the tray.
10 Look at the control panel within a few seconds of closing the tray . (Open and close the tray if
the time has already elapsed.) The control panel displays the tray size and type
configuration.
• If the size and type settings are correct, touch EXIT to accept the settings. The tray is
ready to use. (You do not need to complete the rest of this procedure unless you want to
configure the exact custom dimension. See the following note for more information.)
• To change the size setting, touch OK. The TRAY N SIZE=*<SIZE> menu is displayed.
Note If the size displayed on the control panel is CUSTOM, then the tray size is set to ANY CUSTOM. The
tray will match any custom-size print job, even if the print-job dimensions are different from the
dimensions of the paper that is loaded in the tray. If you prefer, you can specify the exact
dimensions of the custom-size paper that is loaded in the tray. When you specify exact dimensions,
the dimensions are displayed as the size, rather than CUSTOM.
11 Touch CUSTOM. The UNIT OF MEASURE menu is displayed.
Note The MFP might prompt you to move the Custom/Standard switch in the tray to another position.
The MFP might also prompt you to move the paper guides. Follow the instructions on the control
panel, close the tray, and then repeat this procedure starting with step 10.
12 Touch unit of measure (MILLIMETERS or INCHES). (If you are using the measurement on the
tray guide, select MILLIMETERS.)
13 Use the numeric keypad to select the X (front to back) dimension.
14 Touch OK.
15 Use the numeric keypad to select the Y (left to right) dimension.
16 Touch OK. The control panel displays SETTING SAVED for a moment. The tray size in
dimensions is then displayed.
17 Touch EXIT to accept the settings. The tray is ready to use.
ENWW Loading input trays 39
Page 44

Configuring the trays by using the Paper Handling menu
You can configure the paper type and size for the input trays without a prompt on the MFP control
panel display. Use the following procedure to gain access to the Paper Handling menu and
configure the trays.
To conf igure the paper size for a tray
1 Touch MENU.
2 Touch PAPER HANDLING.
3 Touch TRAY N SIZE.
4 Touch the paper size loaded.
5 Touch EXIT to exit the menus.
Note Depending on the size that you selected, the MFP might prompt you to move the Custom/Standard
switch in the tray to another position. The MFP might also prompt you to move the paper guides.
Follow the instructions on the control panel, and then close the tray.
To configure the paper type for a tray
1 Touch MENU.
2 Touch PAPER HANDLING.
3 Touch TRAY N TYPE.
4 Touch the paper type loaded.
5 Touch EXIT to exit the menus.
40 Chapter 1 The basics ENWW
Page 45

2
The control panel
Overview
The MFP control panel has a touch-screen graphical display that offers an integrated approach
to copying, e-mail, and printing.
The control panel provides you with all of the features of a standard photocopier, plus printing
and e-mail capabilities. Use the control panel to describe the features of the original document,
to specify any modifications to the scanned image, and to select the features that you want in the
copy. For example, you can describe the original document as an A4-sized, duplexed, text
document, and then you can apply scaling or contrast changes in the copy. Next, select copy
options such as tray and paper size to be used for copying. The graphical display shows a
representative image (page icon) of both the original document and the copy.
In addition, use the control panel menus that to set system defaults, customize settings for a
particular job, and store and retrieve printed and scanned jobs.
This chapter introduces the following control panel topics:
● Control-panel layout
● Home screen navigatio n
● Help system
Specific information about sending, copying, and printing tasks appear in later chapters.
ENWW Overview 41
Page 46

Control-panel layout
The control panel includes a touch-screen graphical display, job-control buttons, a numeric
keypad, and three light-emitting diode (LED) indicator lights.
1. Touch-screen graphical display
2. Numeric keypad
3. SLEEP button
4. MENU button
5. STATUS button
6. STOP button
7. RESET button
8. START button
9. CLEAR button
10. Attention light
11. Data light
12. Ready light
13. Display contrast adjustment
1
13
1
12
1
11
10
1
1
1
1
2
1
9
1
3
1
4
1
5
1
6
1
7
1
8
42 Chapter 2 The control panel ENWW
Page 47

Control panel features
Features/
Function
Keys
Provides access to “What is this?” Help. This function is embedded in the
touch-scr een menus.
RESET Resets the job settings to factory or user-defined default values.
TOP Cancels the active job.
S
S
TART Begins a copy job, starts digital sending, or continues a job that has been
interrupted.
Numeric
keypad
Allows you to type numeric values for number of copies required and other numeric
values.
ENWW Control-panel layout 43
Page 48

Home screen navigation
Use the following control-panel elements in the graphical display to gain access to MFP features.
1
1
1. Touch this to use the copy screen. For more information, see Copy-screen navigation.
2. Touch this to use the e-mail screen. For more information, see E-mail basics.
3. Touch this to use the folder screen. For more information, see Sending documents.
4. Touch this to use the fax screen. For more information, see the HP Fax User Guide.
1
2
1
3
1
4
44 Chapter 2 The control panel ENWW
Page 49

Help system
At any time, you can gain access to the help system on the touch screen of the graphical display.
“What is this?” Help
The MFP provides information about any topic on the touch screen of the graphical display. On
the top level screen, touch , and then touch What is this?. After touching an item, a pop-up
dialog box opens and displays information about the item you touched. After reading the
information, touch a clear space on the screen to remove the What is this? pop-up dialog box.
On other levels of the touch screen, you can gain access to the Help system by touching ,
which is located in the upper-left corner of each screen.
“Show me how” Help
The Show me how Help contains information about how to use the MFP features.
1 On the graphical touch-screen display on the control panel, touch Help.
2 Touch Show me how. Choose a topic from the Show Me How Index screen by using the scroll
bar to highlight a topic.
3 Touch OK.
Show me how also appears on a What is this? pop-up dialog box if the item you chose is a
function that includes instructions. For example, if you touch What is this? Help, and then
touch Enhance, you see a Show me how button in the pop-up dialog box. Touch the Show me how
button for information about how to enhance your copies.
Print this topic
To print any of the Show me how instructions,
1 Touch .
2 Touch Show me how.
3 Touch the desired topic.
ENWW Help system 45
Page 50

46 Chapter 2 The control panel ENWW
Page 51

3
Overview
Printing
This chapter addresses the following topics:
● Orienting media
● Basic printing instructions
● Selecting the output bin
● Printing on envelopes
● Printing on special paper
● Printing on both sides of paper (duplexing)
● Using features in the printer driver
● Setting the registration
● Different first page
● Including a blank back page
● Printing multiple pages on one sheet of paper
● Customizing Tray 1 operation
● Specifying paper to print on
● Job storage features
• Printing a private job
• Storing a print job
• Creating a QuickCopying job
• Proofing and holding a job
ENWW Overview 47
Page 52

Orienting media
Orient media types and sizes according to the tray from which the media will print and according
to whether the media will be duplexed (printed on both sides).
Use the following table to determine how to orient paper and other media in the trays.
Type of media Tray Two-sided
(duplexed)
Letter or A4, including
letterhead
(weights up to
216 g/m
(58 lb bond)
Letter or A4, including
letterhead
(weights up to
216 g/m
(58 lb bond)
NOTE
For better duple x in g
performance, set the
size and type for
Tray 1
2
)
2
)
1 No* Long edge tow ard feed direction; side to be
1 Yes Long edge toward feed direction; first side
Media orientation
printed on facing up.
to be printed on facing down.
Note: When printing on paper that is both
prepunched and preprinted/letterhead,
orient the paper in the same way that you
would orient preprinted/letterhead paper.
* When Alternate Letterhead mode is enabled and Letterhead or Preprinted is selected as
the media type, you must orient the media for two-sided (duplex) printing. For more
information, see Alternate Letterhead mode.
48 Chapter 3 Printing ENWW
Page 53

Type of media Tray Two-sided
(duplexed)
Media orientation
Letter or A4, including
letterhead
(weights up to
199 g/m
2
)
(53 lb bond)
Letter or A4, including
letterhead
(weights up to
199 g/m
2
)
(53 lb bond)
2, 3, or 4 No* Long edge toward f ee d directio n; sid e to be
printed on facing down.
Note: When printing on paper that is both
prepunched and preprinted/letterhead,
orient the paper in the same way that you
would orient preprinted/letterhead paper.
2, 3, or 4 Yes Long edge toward feed direction; first side
to be printed on facing up.
Other standard sizes
and custom sizes
(weights up to
216 g/m
2
)
1 No* Short edge toward f eed directi on; side to be
printed on facing up.
(58 lb bond)
* When Alternate Letterhead mode is enabled and Letterhead or Preprinted is selected as
the media type, you must orient the media for two-sided (duplex) printing. For more
information, see Alternate Letterhead mode.
ENWW Orienting media 49
Page 54

Type of media Tray Two-sided
(duplexed)
Media orientation
Other standard sizes
and custom sizes
(weights up to
216 g/m
2
)
(58 lb bond)
NOTE
For better duple x in g
performance, set the
size and type for
Tray 1
Other standard sizes
and custom sizes
(weights up to
199 g/m
2
)
(53 lb bond)
1 Yes Short edge toward feed direction; first side
to be printed on facing down.
2, 3, or 4 No* Short edge toward feed dire ction; side to be
printed on facing down.
Other standard sizes
and custom sizes
(weights up to
199 g/m
2
)
2, 3, or 4 Yes Short edge toward feed dir ection; first side
to be printed on facing up.
(53 lb bond)
* When Alternate Letterhead mode is enabled and Letterhead or Preprinted is selected as
the media type, you must orient the media for two-sided (duplex) printing. For more
information, see Alternate Letterhead mode.
50 Chapter 3 Printing ENWW
Page 55

Type of media Tray Two-sided
(duplexed)
Media orientation
Prepunched letter
or A4
(weights up to
216 g/m
(58 lb bond)
NOTE
For better duple x in g
performance, set the
size and type for
Tray 1
Prepunched letter
or A4
(weights up to
199 g/m
(53 lb bond)
2
)
2
)
1 Either Long edge with h oles to w ard f eed di rection ;
(first) side to be printed on facing up.
Note: When printing on paper that is both
prepunched and preprinted/letterhead,
orient the paper in the same way that you
would orient preprinted/letterhead paper.
2, 3, or 4 Either Long edge with holes toward feed direction;
(first) side to be printed on facing down.
Note: When printing on paper that is both
prepunched and preprinted/letterhead,
orient the paper in the same way that you
would orient preprinted/letterhead paper.
* When Alternate Letterhead mode is enabled and Letterhead or Preprinted is selected as
the media type, you must orient the media for two-sided (duplex) printing. For more
information, see Alternate Letterhead mode.
ENWW Orienting media 51
Page 56

Type of media Tray Two-sided
(duplexed)
Media orientation
Labels, letter, A4-size
sheets, or
transparencies
Envelopes Tray 1
Tray 1
only
only
No
(Never dup lex)
No
(Never dup lex)
Long edge tow ard f ee d direc tion; sid e to be
printed on facing up.
Short edge toward f eed directi on; side to be
printed on facing up and the postage end
toward the MFP. If the height of the
envelope is greater than190 mm
(7.5 inches), feed the flap-edge first.
Otherwise, feed the flap-edge toward rear
of the MFP.
* When Alternate Letterhead mode is enabled and Letterhead or Preprinted is selected as
the media type, you must orient the media for two-sided (duplex) printing. For more
information, see Alternate Letterhead mode.
Alternate Letterhead mode
Windows printer drivers inclu de an Alter nate Lett erhe ad mode, w hich is config ured on th e Devi ce Settings
tab in the MFP properties (in the Windows control panel). This mode causes all print jobs with media types
of Letterhead and Preprinted to be treated as two-sided (duplexed), so that you can load paper the same
way for one-sided a nd two-side d (duplex ) printing. B ecause th e print sp eed is the same as it is for tw o-sided
(duplex) printing, one-sided jobs print at approximately half-speed.
52 Chapter 3 Printing ENWW
Page 57

Basic printing instructions
This section provides instructions for printing when you want to set options for the MFP for
Microsoft Windows or Macintosh operating systems. If possible, set the MFP options in the
software program or in the Print dialog box. In most Windows and Macintosh programs, you can
set the MFP options. If a setting is not available in the program or printer driver, you must set it by
using the MFP control panel.
To print
1 Make sure that paper is loaded in the MFP. See Loading input trays or Orienting media for
instructions.
2 If y ou loaded a custom-size paper in Tray 2, Tray 3, or Tray 4, or if y ou loaded any size paper
in Tray 1, set the tray to the size of paper that you loaded. See Loading input trays for
instructions.
3 Set the paper size.
• For Windows: On the File menu, click Page Setup or Print. If you select Print, make sure
that this MFP is selected and then click Properties.
• For Macintosh: On the File menu, select Page Setup. Make sure that this MFP is
selected.
4 In the paper size box, select one of the following:
• The size of paper that you are using
• Custom
5 Select the orientation, such as Portrait or Landscape.
6 If the printer driver is not already open, on the File menu click Print. In Windows programs,
also click Properties.
7 In the paper source box, select the paper type and size, or select the tray from which you
want paper pulled. See Specifying paper to print on.
8 Select any other settings that you want, such as duplexing, watermarks, or different first
page. For more information about these settings, see the tasks in this section.
9 Click Print to print the job.
ENWW Basic printing instructions 53
Page 58
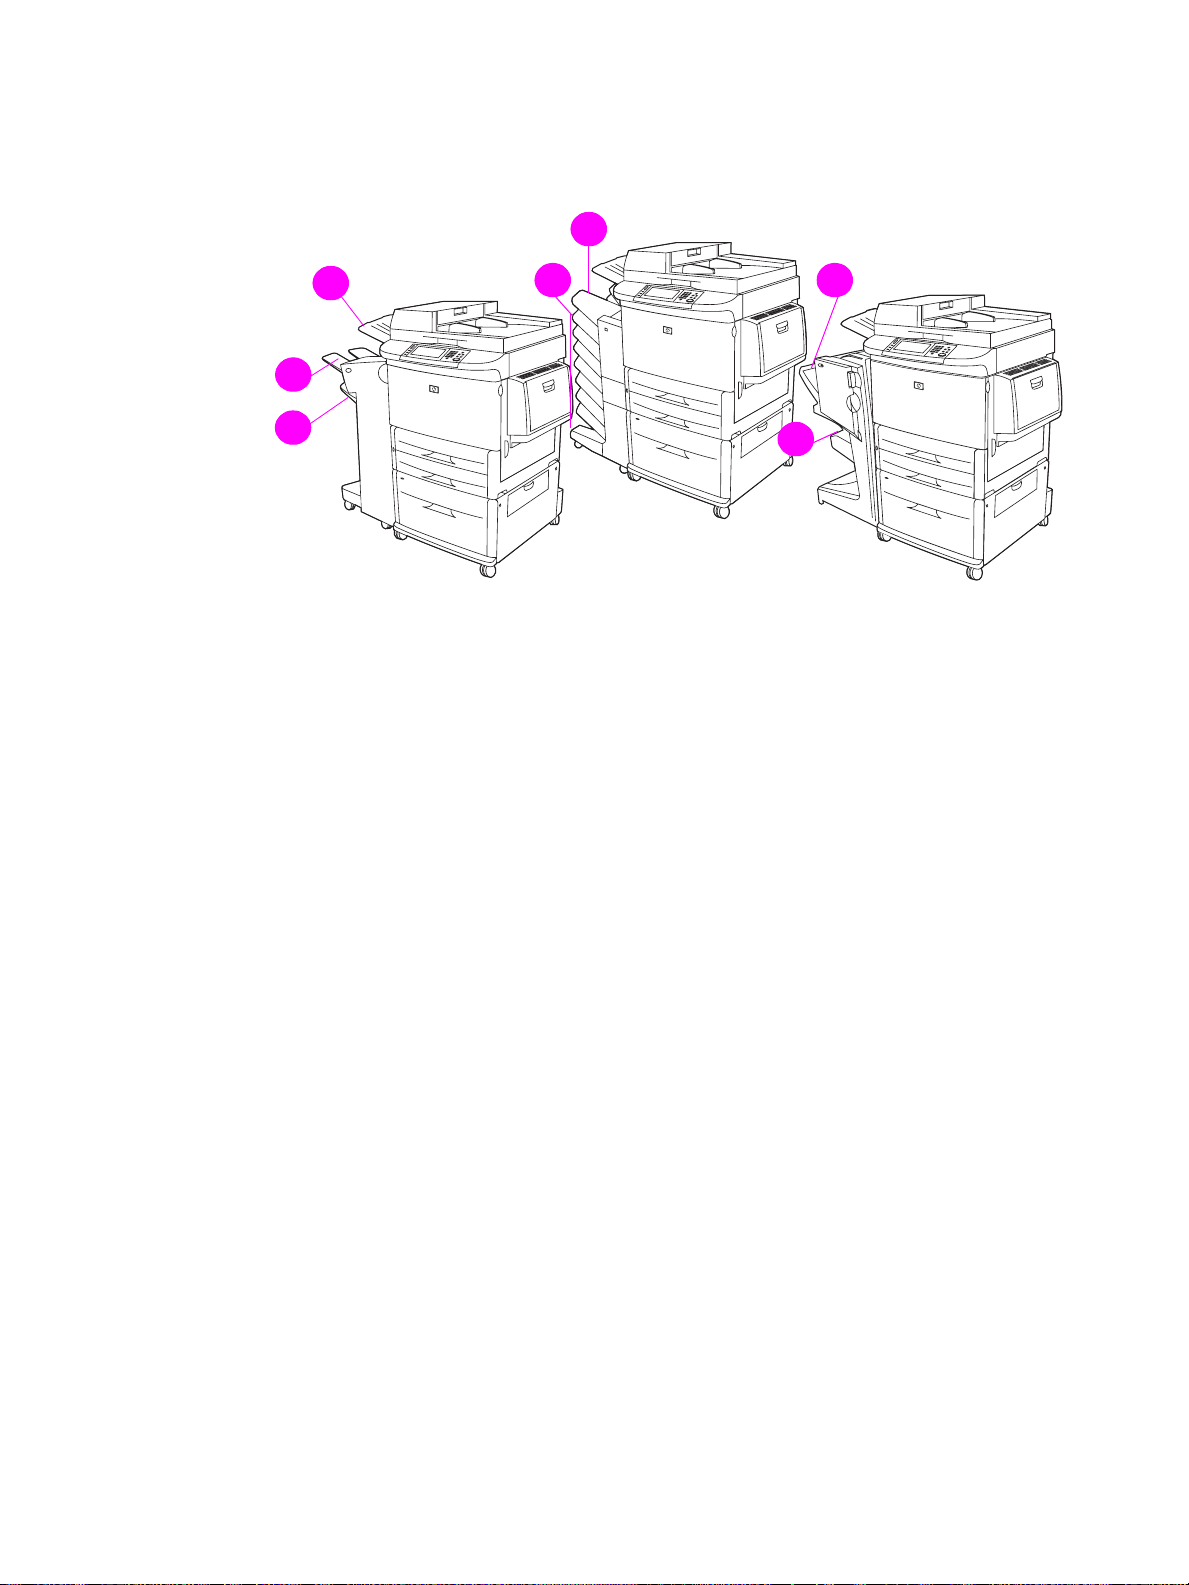
Selecting the output bin
The MFP has at least two output bin locations: the ADF output bin (1) and the output bin on the
on the output device (2).
4
1
1
1
2
1
3
1
It is recommended that you select an output location through the software program or printer
driver. For more information, see Selecting an output location.
In addition to the output locations on the output devices, the MFP has an ADF output bin (1).
5
1
6
1
7
1
Stacker or stacker/stapler output bins
If you choose the 3,000-sheet stacker or 3,000-sheet stacker/stapler, the output bins are the
upper bin (2) (face up) and the lower bin (3) (face down).
The upper bin (face-up) (2) is the top bin on the stacker or stacker/stapler. This bin holds up to
100 sheets of paper in face-up order as they exit the MFP. A sensor causes the product to stop
when the bin is full. Product operation continues when you empty or reduce the amount of paper
in the bin.
The lower bin (face-down) (3) is the lower bin on the stacker or stacker/stapler. This bin holds up
to 3,000 sheets of paper and allows you to stack or staple jobs. This bin is the default output bin.
8-bin mailbox output bins
If you choose the 8-bin mailbox, the output bins are the upper bin and the eight face-down bins.
The upper bin (4) holds up to 125 sheets of paper.
The network administrator can assign the eight bins (5) to individual users or workgroups. Each
bin can stack up to 250 sheets of paper.
Multifunction finisher output bins
If you choose the multifunction finisher, the output bins are the upper bin (6) and the lower
booklet bin (7).
The upper bin (6) is the top bin on the multifunction finisher. This bin provides 1,000 sheets of
stacking capacity, and can offset each job as it is stacked, delivering unstapled jobs face up or
face down. This bin also provides stapling for up to 50 sheets of paper per document. The
upper bin is the default output bin when the multifunction finisher is attached.
The lower booklet bin (7) is the lower bin on the multifunction finisher. This bin provides folding
and saddle stitching of booklets for up to 10 sheets of paper.
54 Chapter 3 Printing ENWW
Page 59

Selecting an output location
It is recommended that you select an output location (bin) through your program or driver.
(Where and how you make selections depends on your program or driver.) If you cannot select
an output location from the program or driver, set the default product output location from the
MFP control panel.
To select an output location at the control panel
1 Touch Menu.
2 Scroll to and touch Configure Device.
3 Scroll to and touch Printing.
4 Scroll to and touch Paper Destination to view the output bin options.
5 Scroll to the output bin or device you want, and then touch OK. The control panel displays the
message Setting Saved for a moment, and then returns to the previous screen.
Printing on envelopes
You can print on envelopes from Tray 1 only, which holds up to 10 envelopes. Many types of
envelopes can be printed on from Tray 1.
Printing performance depends on the construction of the envelope. Always test a few sample
envelopes before purchasing a large quantity. For envelope specifications, see Media
specifications or go to www.hp.com/support/lj9040mfp
or www.hp.com/support/lj9050mfp.
CAUTION Envelopes with clasps, snaps, windows, coated linings, exposed self-stick adhesives, or other
synthetic materials can severely damage the MFP. Do not use envelopes with pressure-sensitive
adhesive.
Use the following basic steps to print on envelopes.
1 Load the envelopes in Tray 1. See To load envelopes in Tray 1.
2 Change the fuser levers. See To change the fuser levers.
3 Send the print job. See To print on envelopes from a program.
Note If envelopes are wrinkled when they exit the MFP, see Preventing wrinkles on envelopes for more
information.
To load envelopes in Tray 1
1 Open Tray 1, but do not pull out the extension. (Most envelopes feed best without the
extension. However, oversize envelopes might need the extension.)
ENWW Printing on envelopes 55
Page 60

2 Load up to 10 envelopes in the center of Tray 1 with the side to be printed on facing up, and
the postage end toward the MFP. Slide the envelopes into the MFP as far as they will go
without forcing them.
3 Adjust the guides to touch the envelope stack without bending the envelopes. Make sure that
the envelopes fit under the tabs on the guides.
4 Change the fuser levers (see To change the fuser levers).
To change the fuser levers
1 Move the output device away from the MFP to gain access to the left door.
56 Chapter 3 Printing ENWW
Page 61

2 Open the left door.
WARNING! Avoid touching the adjacent fusing area. It can be hot.
3 Locate and lift up the two blue levers.
Note Return the fuser levers to the down position after printing on envelopes.
4 Close the left door.
5 Push the output device back into place.
ENWW Printing on envelopes 57
Page 62

To print on envelopes from a program
1 Load envelopes into Tray 1.
2 In your program or in the printer driver, select Tray 1, as the source.
3 Set the appropriate envelope size and type. For envelope specifications, see Media
specifications.
4 If your program does not automatically format for an envelope, specify “Portrait” for page
orientation.
CAUTION To avoid a jam, do not remove or insert an envelope after you begin printing.
5 Set margins to within 15 mm (0.6 inch) from the edge of the envelope. For best print quality,
set margins for a return and mailing address (typical address margins for a Commercial #10
or DL envelope are offered). Avoid printing over the area where the three back flaps meet on
the back of an envelope.
6 To print by type and size of paper, see Specifying paper to print on.
7 Select the upper left bin as the output location.
8 When finished printing on envelopes, return the fuser levers to the down position.
CAUTION Failure to return levers to the down position for standard paper types can result in poor print quality.
Printing on special paper
This section contains guidelines for printing on special media, which includes letterhead, labels,
transparencies, custom-size paper, and heavy paper, and printing on full-bleed paper.
Printing on letterhead, prepunched paper, or preprinted paper (single-sided)
● When printing on letterhead, prepunched, or preprinted paper, be sure to correctly orient the
paper. See Orienting media for instructions.
● If the paper is heavier than 199 g/m
load the paper only in Tray 1. See Media specificatio ns .
Printing on letterhead, prepunched paper, or preprinted paper
(double-sided)
● When printing on letterhead, prepunched, or preprinted paper, be sure to correctly orient the
paper. See Orienting media for instructions.
● When printing on both sides of prepunched paper, you must select prepunched paper as the
paper type in the Paper Handling menu at the control panel, or select prepunched paper in
the printer driver.
2
(53 lb bond) and lighter than 216 g/m2 (58 lb bond),
Printing on labels
● Orient labels according to the guidelines in Orienting media.
● Print a stack of up to 50 sheets of labels from Tray 1.
● Use only labels recommended for laser printers. Make sure that the labels meet the correct
specifications. (See Media specifications and Labels for more information.)
CAUTION Failure to follow these instructions can damage the MFP.
58 Chapter 3 Printing ENWW
Page 63

Special cautions:
● Do not load Tray 1 to capacity because labels are heavier than paper.
● Do not use labels that are separating from the backing sheet, wrinkled, or damaged in any
way.
● Do not use labels that have the backing sheet exposed. (Labels must cover the entire
backing sheet with no exposed spaces.)
● Do not feed a sheet of labels through the MFP more than once. The adhesive backing is
designed for only one pass through the MFP.
● Do not print on both sides of labels.
Printing on transparencies
● Transparencies must be able to withstand 200°C (392°F), which is the maximum
temperature for the MFP.
● Use only transparencies recommended for use in laser printers. Other transparencies can
damage the MFP.
● Select the upper bin as the output location for transparencies.
CAUTION Do not attempt to print on both sides of transparencies. Damage to the MFP or jams might result.
Guidelines for custom- size paper , card stock, and heavy pape r
● You can print on custom-size paper from Tray 1, Tray 2, Tray 3, or Tray 4.
● Any paper heavier than 199 g/m
2
(53 lb) must be printed only from Tray 1. For more
information, see Media specifications.
● If you are printing from Tr a y 1, the edge of the paper that feeds into the MFP must be at least
98 mm (3.9 inches) wide to allow rollers inside the MFP to grab the paper. The leading edge
of the paper can be no wider than 312 mm (12.3 inches).
Measuring from the leading edge to the trailing edge of the paper, the length must be a
minimum of 191 mm (7.5 inches) and a maximum of 470 mm (18.5 inches).
● If you are printing from Tray 2 or Tray 3, the edge of the paper that feeds into the MFP must
be at least 148 mm (5.8 inches) wide to allow rollers inside the MFP to grab the paper. The
leading edge can be no wider than 297 mm (11.7 inches).
Measuring from the leading edge to the trailing edge of the paper, the length must be a
minimum of 210 mm (8.3 inches) and a maximum of 432 mm (17.0 inches).
● If you are printing from Tr a y 4, the edge of the paper that feeds into the MFP must be at least
182 mm (7.2 inches) wide to allow rollers inside the MFP to grab the paper. The leading
edge can be no wider than 297 mm (11.7 inches).
Measuring from the leading edge to the trailing edge of the paper, the length must be a
minimum of 210 mm (8.3 inches) and a maximum of 432 mm (17.0 inches).
Printing on full-bleed paper
Because the MFP can print on specially cut paper up to 312 x 470 mm (12.3 x 18.5 inches), you
can print bleed images of up to 297 x 450 mm (11.7 x 17.7 inches) in size by using crop marks.
Full-bleed images can be printed from Tray 1 only. The default for edge-to-edge or full-bleed
printing is “off”. See your program Help for more information.
ENWW Printing on special paper 59
Page 64

Printing on both sides of paper (duplexing)
You can set the MFP to print automatically on both sides of the paper.
CAUTION Never try to print on both sides of labels, envelopes, transparencies, or paper heavier than
199 g/m2 (53 lb). Damage to the MFP or a jam can result.
To print on both sides of paper
1 Load (orient) the paper for duplexing. See Orienting media for instructions.
Note For better duplexing performance, set the size and type for Tray 1.
2 Select the Print on both sides option from the program or printer driver. If you cannot select
this option from one of those locations, set it at the MFP control panel. (In the Configure
Device menu, select the Printing menu, touch Duplex, and select ON.)
3 Set the Binding and Orientation options from the Print dialog box, if possible. Otherwise,
set them from the MFP control panel. See Layout options for printing on both sides of paper
for more information.
Layout options for printing on both sides of paper
The four print layout options are shown below. Select the binding and orientation options for the
MFP in the Print dialog box, if possible. The terminology in the Print dialog box for the binding
edge might be different from the terms that are listed here.
If you cannot set these options in the Print dialog box, set them at the control panel. Select the
Configure Device menu, select the Printing menu, touch Duplex Binding, and then select
the layout option that you want.
1. Long-edge
por trait (d efault)
2. Long-edge
landscape
4. Shor t-edge
landscape
3. Short-edge
portrait
60 Chapter 3 Printing ENWW
Page 65

Using features in the printer driver
When you print from a software program, many of the MFP features are available from the printer
driver. For more information about Windows drivers, see Gaining access to the printer drivers.
Note Settings in the printer driver and software program generally override control-panel settings.
(Software program settings generally override printer driver settings.)
MFP collation
The MFP collation feature allows multiple original printing. Collation has the following
advantages:
● Reduced network traffic
● Faster return to application
● All original documents
Saving MFP setup information
In the printer driver, you can save the MFP settings that you use most often, and make those
settings the default settings. For example, if almost all of your print jobs are two-sided (duplexed),
you can save duplex printing as the default setting in the printer driver.
All printer drivers for Windows 2000 and Windows XP, and PCL 6 and PCL 5e printer drivers for
Windows 9X, Windows Me, and Windows NT 4.0 allow you to save MFP print settings for
multiple kinds of print jobs. These saved print settings are called quick sets. For example, you
might want to create one quick set for printing on envelopes, and another quick set for printing
the first page of a document on letterhead.
New printer driver features
Look for Quick Sets, Scale to Fit (any page size to any page size), and Booklet Printing
options in the Windows printer driver, or see the driver online Help for more information.
Printing watermarks
A watermark is a notice, such as “Top Secret,” printed in the background of each page in a
document. Check the driver for available options, or see the driver online help for more
information.
For Macintosh, you can select “Custom” and specify the text you choose, depending on your
driver version.
ENWW Using features in the printer driver 61
Page 66

Setting the registration
Use the Set Registration feature to center the front and back images on a page that has been
duplexed (printed on both sides). This feature also allows edge-to-edge printing to be set to
within approximately 2 millimeters of all edges of the paper. Image placement will vary slightly for
each input tray. The alignment procedure must be performed for each tray. An internal-tray
registration page allows the administator to calibrate each tray.
To set the registration
1 Touch Menu.
2 Touch Configure Device.
3 Touch Print Quality.
4 Touch Set Registration.
You can select a tray by specifying a Source. The default Source is Tray 2. If you want to set the
registration for Tray 2, go to step 7. Otherwise, proceed to the next step.
5 Touch Source.
6 Touch a tray. After you touch the tray, the control panel display returns to the Set
Registration menu.
7 Touch Print Test Page.
8 Follow the instructions on the printed page.
62 Chapter 3 Printing ENWW
Page 67

Different first page
To print a different first page
Follow these instructions for printing a first page that is different from other pages in the print job.
The instructions are provided for Tray 1, however, you can print a different first page from other
trays.
1 F or Windows, select Use differ ent paper for fir st page in y our driver. Select one tray for the
first page and one of the other trays for the remaining pages. Place the paper for the first
page in the first tray you selected. (For manual feed, place paper in Tray 1 after the job is
sent to the MFP and the MFP requests paper.) For loading Tray 1, place the paper with the
side to be printed up, the top of the page facing the rear of the MFP.
For Macintosh, select First from and Remaining from in the print dialog box.
Note Where and how you make selections depends on your software program or associated printer
driver. (Some options are available only in the printer driver.)
2 Load the paper for the remaining pages of the document into another tray . You can select the
first and remaining pages by type of paper. For more information, see Specifying paper to
print on.
ENWW Different first page 63
Page 68

Including a blank back page
This option allows you to add blank pages to the end of a print job.
For Windows, select Use different paper for first page on the Paper tab of your printer driver,
and then select Back Page. You can then select the paper source that you want to use for your
back page. To turn the feature off, select No back page.
Printing multiple pages on one sheet of paper
You can print more than one page on a single sheet of paper. This feature is available in some
drivers and provides a cost-effective way to print draft pages.
To print more than one page on a sheet of paper, look for a layout or pages-per-sheet option in
the driver. (This is sometimes called 2-up, 4-up, or n-up printing.)
64 Chapter 3 Printing ENWW
Page 69

Customizing Tray 1 operation
Customize Tray 1 to fit your printing needs.
The MFP can be set to print from Tray 1 in the following situations:
● When the tray is loaded and when TRAY 1 SIZE=ANY SIZE and TRAY 1 TYPE=ANY TYPE
(formerly First mode). Print speed might be slower than normal.
● Only when the type of paper loaded is specifically requested when TRAY 1 SIZE=a specific
size and TRAY 1 TYPE=a specific type (formerly Cassette mode).
Printing from Tray 1 when the loaded paper is requested
When TRAY 1 SIZE=a specific size and TRAY 1 TYPE=a specific type (formerly Cassette mode),
the MFP treats Tray 1 like the internal trays. Instead of looking for paper in Tray 1 first, the MFP
pulls paper starting either from the bottom tray upward or starting with the tray that matches type
or size settings selected in the program from which you are printing.
In the software program or the Print dialog box, select the type and size for a tray, if possible.
Otherwise, set the type and size at the MFP control panel. (See Specifying paper to print on.)
When TRAY 1 SIZE=a specific size and TRAY 1 TYPE=a specific type is set at the MFP control
panel, an option appears in the PAPER HANDLING menu to configure size as well as type settings
for Tray 1.
Manually feeding paper from Tray 1
The manual feed feature is another way of printing on special paper from Tray 1, such as
envelopes or letterhead.
ENWW Customizing Tray 1 operation 65
Page 70

Specifying paper to print on
You can configure the MFP to select paper by type (such as plain or letterhead) and size (such
as letter or A4), as opposed to source (a paper tray).
Printing by type and size means that the MFP to pulls paper from the first tray that is loaded with
the type or size that you select. Selecting paper by type rather than source is similar to locking
out trays, which helps to protect special paper from accidental use. (However, selecting the
ANY SIZE, ANY TYPE, or PLAIN setting does not enable the tray lock-out function.)
For example, if Tray 2 is configured for letterhead, and you specify in the driver that you want to
print on plain paper, the MFP will not pull the letterhead from Tray 2. Instead, the MFP pulls
paper from a tray that has plain paper loaded and was configured for plain paper at the MFP
control panel.
Selecting paper by type and size results in significantly better print quality for heavy paper,
glossy paper, and transparencies. Using the wrong setting can result in unsatisfactory print
quality . Always print by type for special print media such as labels or transparencies. Always print
by size for envelopes.
Benefits of printing by type and size of paper
If you frequently use several kinds of paper, after the trays are set correctly, you do not have to
check which paper is loaded in each tray before you print. This is useful when the MFP is shared
and more than one person loads or removes paper. Printing by type and size of paper is a way to
be sure that print jobs always print on the appropriate paper.
To set the type for the paper when you are unsure of which type to choose, check the label on the
package of paper. For supported types of paper, see Supported types of paper for more
information.
Note The type and size settings can also be configured from the embedded Web server or
HP Web Jetadmin software for networked products. See the printer driver online Help.
To print by type and size of paper
Note Settings in the printer driver and software program override control-panel settings. (Software
program settings generally override printer driver settings.)
1 Load and adjust the trays. (See Loading input trays for more information.)
2 On the touch screen of the graphical display, press
3 Do one of the following:
• To allow the MFP to automatically pull the type and size of paper loaded in Tray 1: Set
TRAY 1 SIZE=ANY SIZE and TRAY 1 TYPE=ANY TYPE.
• To print by type and size from Tray 1: Set TRAY 1 SIZE to the size loaded, and set TRAY 1
TYPE to the type loaded.
• To print by type and size from Tray 2, Tray 3, or Tray 4 when the tray is loaded with
standard-size paper: Set the type. If the size is a detectable standard size, it will be
automatically detected. If the size is an undetectable standard size, set the size.
• To print by type and size from Tray 2, Tray 3, or Tray 4 when the tray is loaded with a
custom-size paper: Set the size and type. For the size, select Custom, and then set the
values by using the measurements on the guides in the trays.
MENU, and then touch PAPER HANDLING.
4 From the program or driver, select the type and size of paper.
5 P rin t the job.
66 Chapter 3 Printing ENWW
Page 71

Job storage features
The following special job features are available for this MFP:
● Private jobs: When you send a private job to the MFP, the job does not print until you enter a
PIN at the control panel.
● Job storage: You can download a job such as a personnel form, time sheet, or calendar to
the MFP and allow other users to print the job at any time. Stored jobs are copied to the hard
disk and are not deleted if retention space on the MFP becomes limited.
● QuickCopy jobs: You can print the requested number of copies of a job and then store a copy
of the job on the hard disk in the MFP. Storing the job allows you to print additional copies of
the job later.
● Proof and hold jobs: This feature provides a quick and easy way to print and proof one copy
of a job and then print the additional copies.
Follow the instructions in this section to gain access to the job storage features at the computer.
See the specific section for the type of job you want to create.
CAUTION If you turn the MFP off, all QuickCopy, Proof and hold, and Private jobs are deleted.
To gain access to the job storage features
For Windows
1 On the File menu, click Print.
2 Click Properties and click the Job Storage tab.
3 Select the Job Storage Mode that you want.
For Macintosh
In newer drivers: Select Job Storage from the pull-down menu in the print dialog box. In older
drivers, select Printer Specific Options.
Printing a private job
Use the private printing feature to specify that a job is not printed until you release it, First, set a
4-digit personal identification number (PIN) by typing the PIN at the MFP control panel. Next,
enter the PIN in the printer driver. The PIN is sent to the MFP as part of the print job.
To create private jobs
To specify that a job is private, in the driver, select the Private Job option, type a User Name and
Job Name, and then type a four-digit PIN. The job will not print until you enter the PIN at the
control panel.
ENWW Job storage features 67
Page 72

Releasing private jobs
You can print a private job at the control panel after the job has been sent to the MFP.
To release private jobs
1 Touch Menu.
2 Touch Retrieve Job.
3 Scroll to and touch your name.
4 Scroll to and touch your job.
5 Touch Print. (The Print icon should have next to it.)
6 Use the numeric keypad to type the PIN, and then touch OK.
Deleting a private job
A private job is automatically deleted from the MFP hard disk after you release it for printing. If
you want to delete the job without printing it, use this procedure.
To delete private jobs
1 Touch Menu.
2 Touch Retrieve Job.
3 Scroll to and touch your name.
4 Scroll to and touch your job.
5 Scroll to Delete. (Delete should have next to it.)
6 Use the numeric keypad to type the PIN, and then touch OK.
Storing a print job
You can download a print job to the MFP hard disk without printing it. Y ou can then print the job at
any time at the MFP control panel. For example, you might want to download a personnel form,
calendar, time sheet, or accounting form that other users can print when they need it.
To store a print job on the hard disk, select the Job Storage option in the driver when printing
from the MFP.
To creat e stored jobs
In the driver, select the Job Storage option and type a user name and job name. The job does
not print until someone requests it at the MFP control panel. See Printing a stored job.
68 Chapter 3 Printing ENWW
Page 73

Printing a stored job
At the control panel, you can print a job that is stored on the MFP hard disk.
To print a stored job
1 Touch Menu.
2 Scroll to Retrieve Job.
3 Touch User Name to see a list of names.
4 Scroll to and touch your name to see a list of jobs.
5 Scroll to and touch your job.
6 Touch Print.
7 To print the default number of copies, touch OK. The screen changes to Copies=n. T o change
the number, use the numeric keypad or scroll to select a new number, and touch OK.
If Print has next to it, the job is a private job and requires a PIN. See Printing a private job.
Deleting a stored job
Jobs stored on the MFP hard disk can be deleted at the control panel.
To delete a stored job
1 Touch Menu.
2 Scroll to and touch Retrieve Job.
3 Scroll to and touch your name.
4 Scroll to and touch your job.
5 Scroll to and touch Delete.
6 Touch Yes.
If Delete has next to it, the job requires a PIN to delete. See Printing a private job.
ENWW Job storage features 69
Page 74

Creating a QuickCopying job
The QuickCopy feature prints the requested number of copies of a job and stores a copy on the
MFP hard disk. Additional copies of the job can be printed later. This feature can be turned off in
the printer driver.
The default number of different QuickCopy jobs that can be stored on the MFP is 32. At the
control panel, you can set a different default number. See JOB STORAGE LIMIT=32.
To create QuickCopy jobs
CAUTION If the MFP needs additional space to store newer QuickCopy jobs, the MFP deletes other stored
QuickCopy jobs, starting with the oldest job. To permanently store a job and prevent the MFP
from deleting it when space is needed, select the Job Storage option instead of the QuickCopy
option.
In the driver, select the QuickCopy option and type a user name and a job name.
When you send the job to print, the MFP prints the number of copies that you set in the driver. To
print more quick copies at the MFP control panel, see Printing additional copies of QuickCopy
jobs.
Printing additional copies of QuickCopy jobs
This section describes how to print additional copies of a job stored on the MFP hard disk at the
control panel.
To print more copies of a QuickCopy job
1 Touch Menu.
2 Touch Retrieve Job.
3 Touch User Name to see a list of names.
4 Scroll to your job and touch OK.
5 To print the default number of copies, touch Print. The screen changes to Copies=n. To
change the number, use the numeric keypad or scroll to select a new number, and touch OK.
Deleting a QuickCop y job
Delete a QuickCopy job at the MFP control panel when you no longer need it. If the MFP requires
additional space to store new QuickCopy jobs, the MFP automatically deletes other stored
QuickCopy jobs, starting with the oldest job.
Note Stored QuickCopy jobs can be deleted at the control panel or in HP Web Jetadmin.
To delete a QuickCopy job
1 Touch Menu.
2 Touch Retrieve Job.
3 Touch your name.
4 Scroll to and touch your job.
5 Touch Delete.
6 Touch Yes.
70 Chapter 3 Printing ENWW
Page 75

Proofing and holding a job
The proof and hold feature provides a quick and easy way to print and proof one copy of a job
and then to print the additional copies.
To permanently store the job and prevent the MFP from deleting it when space is needed for
something else, select the Job Storage option in the driver.
To creat e a proof and hold job
CAUTION If the MFP needs additional space to store newer proof and hold jobs, the MFP deletes other
stored proof and hold jobs, starting with the oldest job. To permanently store a job and prevent
the MFP from deleting it when space is needed, select the Job Storage option in the driver instead
of the Proof and Hold option.
In the driver, select the Proof and Hold option and type a user name and job name.
The MFP prints one copy of the job for you to proof. Then, see Printing the remaining copies of a
held job.
Printing the remaining copies of a held job
At the MFP control panel, use the following procedure to print the remaining copies of a job held
on the hard disk.
To print a proof and hold job
1 Touch Menu.
2 Touch Retrieve Job.
3 Scroll to User Name.
4 Touch your user name.
5 Scroll to your job, and touch the job.
6 Touch Print. The screen changes to Copies=n. To change the number, use the numeric
keypad or scroll to select a new number, and touch OK.
Deleting a held job
When you send a proof and hold job, the MFP automatically deletes your previous proof and hold
job. If the job name does not have a proof and hold job associated with it, and the MFP needs
additional space, the MFP might delete other proof and hold jobs, starting with the oldest one.
To delete a proof and hold job
1 Touch Menu.
2 Touch Retrieve Job.
3 Scroll to and touch your name.
4 Scroll to and touch your job.
5 Touch Delete.
6 Touch Yes.
ENWW Job storage features 71
Page 76

72 Chapter 3 Printing ENWW
Page 77

4
Copying
Overview
This MFP can function as a standalone, walk-up copier. It is not necessary to install the printing
system software on the computer, nor is it necessary to have the computer turned on to make
photocopies. You can adjust the copy settings at the control panel. You can also copy originals
by using either the ADF or the scanner glass. The MFP can process copying, printing, and
digital-sending jobs simultaneously.
This chapter provides information about how to make copies and how to change copy settings,
including the following topics:
● Basic copying instruc tions
● Modifying copy settings for the current job
● Copying multiple sized originals
● Creating a stored copy job
● Selecting the output bin
It is recommended that you review the basic control-panel information before using the MFP
copying functions. See The control panel for more information.
ENWW Overview 73
Page 78
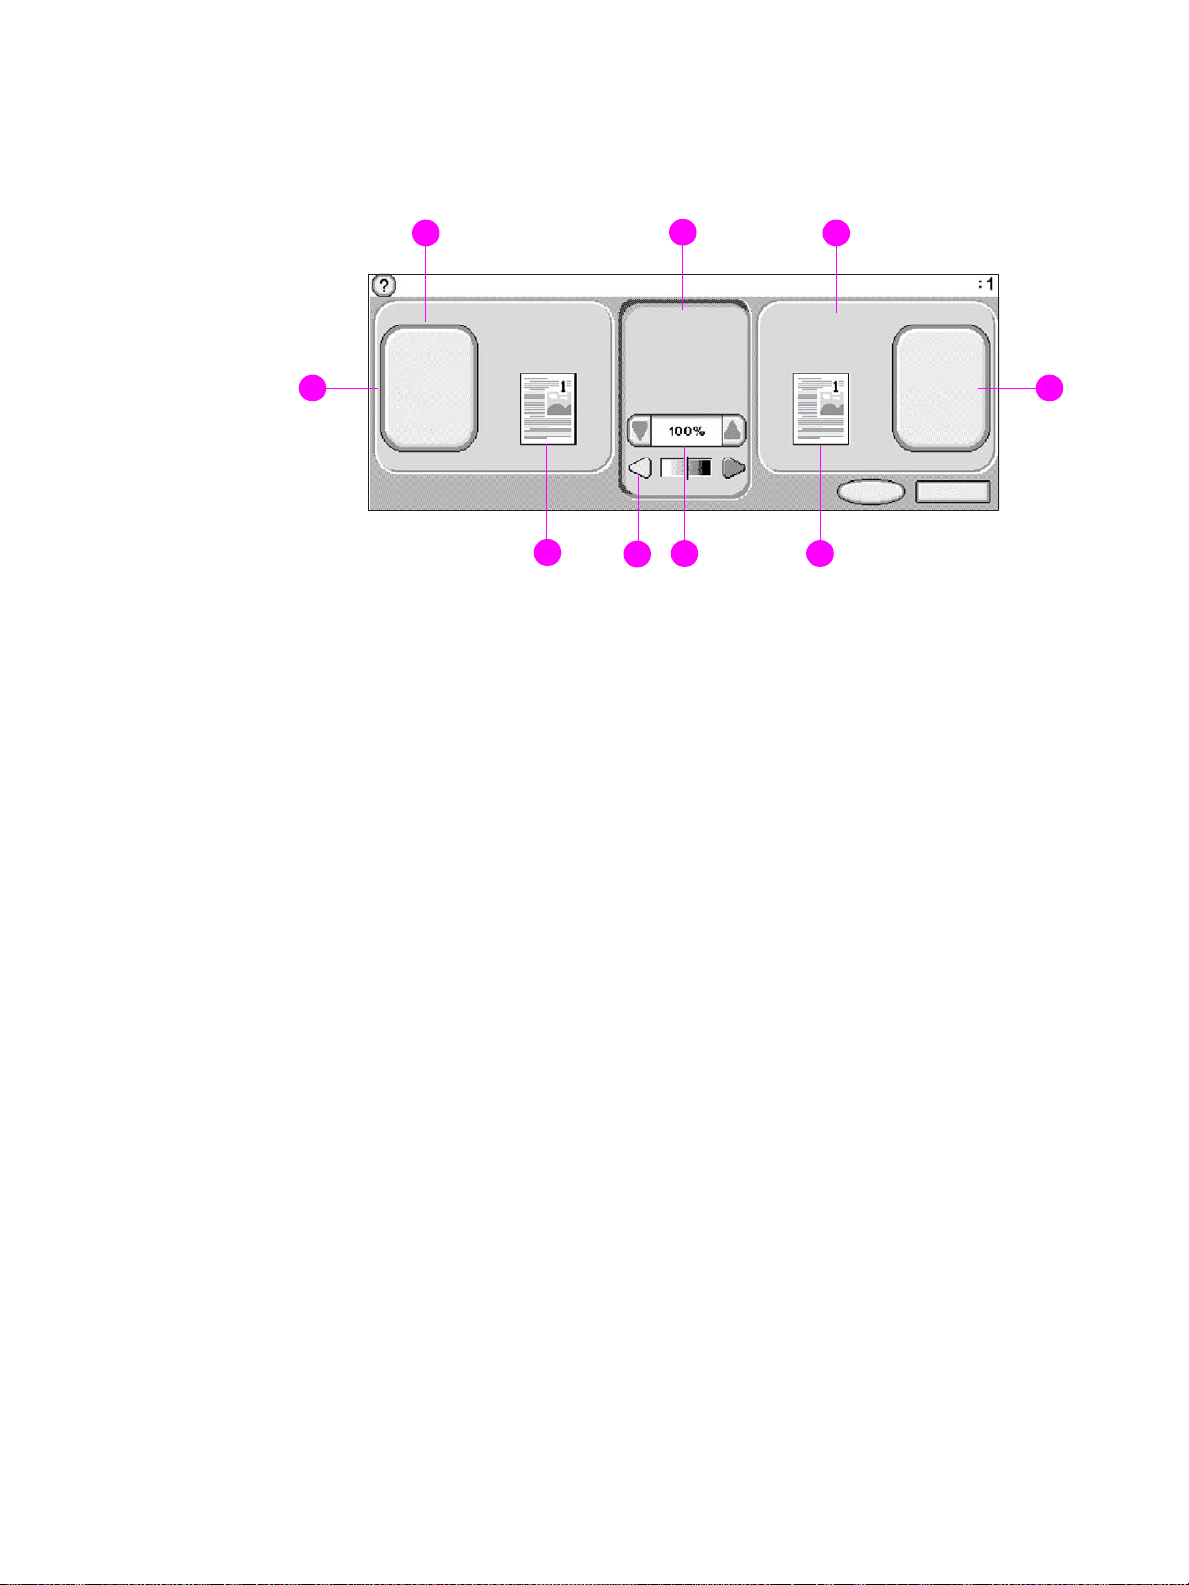
Copy-screen navigation
Navigate through the control panel features and options by using the touch-screen graphical
display.
1
1
1
2
1
3
1
9
1
8
1. Original section
2. Image modification section
3. Copy section
4. Copy settings button
5. Copy page icon
6. Reduce/enlarge
7. Contrast adjustment
8. Original page icon
9. Describe original button
● Menu: Choose from a list of menus such as the Information menu and the Paper Handling
menu.
● Help: Choose “What is this?” Help or “Show me how.” (See Help system.)
● Status messages: View the current status of the MFP, such as Ready or Scanning Page 1.
● Number of copies selected: View the current number of copies selected. The factory default
setting is 1.
1
1
6
7
5
1
4
1
User-attention error messages appear in a pop-up dialog box that prohibits normal screen
interaction until the message is cleared.
Cancel button
Each lower-level screen (any screen after the home screen) has a Cancel button. Touching the
Cancel button negates any changes you made, and takes you back to the previous screen.
OK button
Each lower-level screen on the touch screen has an OK button. T ouching the OK button accepts
any changes that you made, and takes you to the next screen.
74 Chapter 4 Copying ENWW
Page 79

Basic copying instructions
This section provides the basic instructions for copying. Standard paper sizes are automatically
detected when the document is placed on the scanner glass or loaded in the ADF. You can
override the auto-detect feature by specifying the required input (Describe Original) and output
(Copy Settings) at the control panel.
Copying by using the default settings
The default settings for copying are the following:
● Number of copies: One
● Size: Letter/A4-size original and letter/A4-size copy
Note The MFP automatically detects the original paper size if the size is standard, and makes a
same-size copy . The factory default paper-size setting is Letter or A4, only if no paper is detected.
● Page Orientation: Portrait
● Number of Sides: One-sided copying
● Page Content: Mixed (mixed text and graphics)
● Job Mode: Off
● Heavy Paper: Off
To make copies by using the default settings
1 Place the document face down on the scanner glass or in the ADF.
2 Touch Copy.
3 Press
START.
Copying by using user-defined settings
Use the following procedure to can change the settings for your copies.
To make copies by using settings other than the default settings
1 Place the original face down on the scanner glass or in the ADF.
On the touch screen of the graphical display, do the following:
2 Touch Copy.
3 Touch Original to view the options. You can select Basic options or Advanced options.
4 Touch the Basic items that describe your original. The following options are available:
• Paper Size: Select the paper size of your original.
• Orientation: Select Portrait or Landscape.
• Number of Sides: Select 1 or 2.
• Content: Select Text, Photo, or Mixed.
5 Touch the Advanced tab to view your options in the Advanced screen. The following options
are available:
• Heavy Paper: Select On if your original is heavy paper.
• Job Mode: If you are combining multiple scans into a single job, select On. (See Using Job
Mode.)
6 After you make your selections, touch OK.
ENWW Basic copying instructions 75
Page 80

Note The page icon in the Original section of the graphical display shows a representative image of
the original document.
7 Make any necessary adjustments to the contrast and reduction or enlargement by using the
Contrast Control bar and the Reduce/Enlarge button in the image modification section of
the graphical display.
8 Touch Copy to view your options. You can select Basic options or Advanced options.
9 Touch the Basic items that describe the characteristics of the copies you are making. The
following options are available:
• Size and Type: Select Auto (paper size is matched to original size), or the copy size that
you desire. Be sure that you have loaded the correct paper size in the tray.
• Number of Sides: Select 1-sided or 2-sided.
• Back Side Orientation: Select Normal or Flip (applies when 2-sided copying is
chosen),
• Pages per sheet: Select 1, 2, 4, or Booklet.
If you select 4 pages per sheet, “Z” or “N” ordering is tailored to the page orientation, and the
option to put a border around each smaller page is displayed.
.
“Z” ordering
“N” ordering
• Borders: Select Border or No Border.
• Staple: Stapling options depend on your output device and the paper size selected.
10 Touch the Advanced options, if necessary. Some of the options include the following items:
• Collation: Select Collated or Uncollated.
• Output Bin: Select the appropriate bin.
• Job Storage: Select On to indicate that the copy job should be stored on the MFP rather
than printed. Select Off to cop y the job normally . See Creating a stored copy job for more
information.
• Enhance: touch Sharpness or Background Removal.
Note The page icon in the Copy section of the graphical display shows a representative image of the
copy.
11 Use the numeric keypad to type the number of copies, and then press
START.
76 Chapter 4 Copying ENWW
Page 81

Copying by using the scanner glass
Use the scanner glass to copy small, lightweight (less than 46 g/m2 or 12 lb), or irregularly-sized
originals such as receipts, newspaper clippings, photographs, or old or worn documents. The
scanner glass can also be used to copy books, magazines, and manuals.
1 Place the document face down on the scanner glass.
2 Make any image modifications, and select any copy settings, if necessary.
3 If you are making only one copy, press
numeric keypad to type the number of copies (up to 999), and then press
copying.
If you are copying more than one page from the scanner glass, see Using Job Mode to make
a multi-page copy job.
START. If you are making multiple copies, use the
START to begin
Copying by using the ADF
Use the ADF to make as many as 999 copies of a document that has up to 100 pages
(depending on the thickness of the pages).
1 Load the document face down in the ADF. The MFP can automatically detect the paper size.
2 Make any image modifications, and select any copy settings.
3 If you are making only one copy, press
numeric keypad to type the required number of copies, and then press
START. If you are making multiple copies, use the
START.
Copying books
You can use the scanner glass to copy books.
1 Place the book face down on the scanner glass.
2 Align the book by using the book bindings. Look for the book graphic at the top of the
scanner glass to check the alignment.
3 Touch Copy.
4 Touch Original.
5 Select Book as the size.
6 Touch OK.
Note You can skip a page by touching the Skip Page button above the page icon. Touch the button
once to skip the left page, twice to skip the right page, and three times to cancel page skipping.
7 Touch Copy Settings.
8 Select any output settings you want. Select the paper size that is the closest match to the
actual size of the book that you are copying.
9 Touch OK.
10 Use the numeric keypad to type the number of copies that you want.
11 Press
Note If you are copying more than one page of a book, see Using Job Mode to make a multiple page
copy job.
START.
ENWW Basic copying instructions 77
Page 82

Using Jo b Mode
Use the Job Mode feature to build a single print job from multiple scans. You can use either the
ADF or the scanner glass. The settings for the first scan are used for subsequent scans.
1 Touch Copy.
2 Touch Describe Original.
3 Touch Advanced.
4 In the Job Mode check box, touch On.
5 Select any output settings. if necessary
6 After each page is scanned, the control panel prompts you for more pages.
7 Do one of the following:
• If the job contains more pages, load the next page, and then press
• If the job contains no more pages, touch Finished to print.
Note In Job Mode, if you scan the first page of a document by using the ADF, then you must scan all
of the pages in that document by using the ADF . If you scan the first page of a document by using
the flatbed scanner, then you must scan all of the pages in that document by using the flatbed
scanner.
START.
Modifying copy settings for the current job
You can modify your copies by adjusting the contrast, reducing or enlarging the size, or
enhancing the quality.
Adjusting the copy contrast
You can adjust the contrast by touching the arrows on the Contrast Control bar. The slider
moves to the lighter or darker area of the Contrast Control bar.
Reducing or enlarging copies
The MFP has an autoscaling feature. If the original paper size differs from the copy paper size,
the MFP can autodetect a size mismatch between the original page size and the copy page size.
The scanned image of the original page is reduced or enlarged automatically to match the copy
paper size. You can override autoscaling by using the reduce and enlarge feature.
The MFP can reduce copies to as little as 25% of the original size and enlarge copies to as much
as 400% of the original (200% when using the ADF).
To reduce or enlarge your copies, touch the arrows on the Reduce/Enlarge button until you reach
the size that you want. The scale percentage box in the center of the Reduce/Enlarge button
indicates the percentage of reduction or enlargement. You can also touch 100% to display the
keypad to type the number that you want. Touch OK to save the changes.
Enhancing copies
You can enhance the quality of your document by touching Enhance to gain access to the
enhancement screen.
78 Chapter 4 Copying ENWW
Page 83

Background removal
If you copy a document that is printed on colored paper, or if you use two-sided copying, you can
enhance the copy quality by removing any background that might cause your copy to streak or
blur. Touch the Enhance button to gain access to the embedded Background Removal screen.
Adjust the amount of background removal by touching the arrows on the Background Removal
control. The slider moves to the lighter or darker area of the Background Removal control bar.
Sharpness
The Sharpness control specifies the sharpness setting that the flatbed scanner uses when the
MFP scans your original. Sharpness enhances the edges of the original so that faint or fine text
and graphics are reproduced more sharply. Adjust the amount of sharpness by touching the
arrows on the Sharpness control bar.
Contrast
The Contrast control allows you to determine the contrast and brightness of your copy . Touch the
arrows on the Contrast control, and move the slider to the lighter or darker area of the Contrast
control bar.
Copying multiple sized originals
If the original document contains mixed-size originals, for example, a letter-size document with
several legal-size charts, see Using Job Mode for more information.
Creating a stored copy job
Turning on the job storage setting indicates that you want the copy job to be stored on the hard
disk, and that you will print the job later. You must provide the following information to create a
stored job:
1 Touch Copy.
2 Select your basic copy settings (see Copying by using user-defined settings).
3 Touch the Advanced tab.
4 At the Job Storage box, select On.
A popup dialog box is displayed, asking for the User Name, and Job Name. If Authentication
Required is selected, a Personal Identification Number (PIN), if required. To enter the PIN,
touch the small box next to Authentication Required. The keyboard is displayed when you
select User Name and Job Name. The PIN is a four-digit number that can be typed on the
numeric keypad.
5 Type the User Name.
6 Type the Job Name.
7 Type the PIN, if required.
8 Touch OK.
9 Press
START.
See Printing a stored job for information on printing a stored job.
ENWW Copying multiple sized originals 79
Page 84

Selecting the output bin
You can select an output bin for copy jobs by using the MFP control panel. For more information
about selecting an output bin, see Selecting the output bin.
80 Chapter 4 Copying ENWW
Page 85

5
Overview
The MFP offers color-scanning and digital-sending capabilities. By using the control panel, you
can scan black-and-white or color documents and send them to an e-mail address as an e-mail
attachment. To use digital sending, the MFP must be connected to a local area network (LAN).
The MFP connects directly to your LAN (see the HP LaserJet 9040mfp/9050mfp Getting Started
Guide for more information about connecting to a LAN)
Note The MFP cannot copy or print in color, but it can scan and send color images.
This chapter addresses both scanning and sending, because they are fully integrated functions.
The following topics are addressed in this chapter:
● E-mail screen navigation
● E-mail basics
● Using the address book
● More information
ENWW Overview 81
Page 86

E-mail screen navigation
Use the touch-screen graphical display to navigate through the control-panel options.
1
1
1
11
1
10
1
9
1
8
1. Help button
2. From: field - Can contain defaults set by the administrator. MFP can be configured so
that the user cannot change the From: address.
3. Scroll button
4. E-Mail Settings button
5. Back button
6. Start button
7. Clear All button - Clears all text, except the From: address if this address is set by the
administrator.
8. Subject: button
9. CC: button
10. To: button
11. From: button
Not shown: BCC: button (scroll down to see this button)
1
1
2
1
7
3
1
6
4
1
1
5
Help button
For Help, touch the button, and then select “What is this?” Help or “Show me how.” (See Help
system.)
From: field
Touch From: to type your e-mail address. The administrator can set up the From: field to
contain an e-mail address that cannot be changed by users.
To:, CC:, and BCC: buttons
Touch these buttons to set up e-mail recipients. To set up e-mail recipients, you can type e-mail
addresses by using the touch screen or by using the address book. For more information, see
Using the address book.
82 Chapter 5 E-mail ENWW
Page 87

Clear All button
Touching the Clear All button clears all text and fields that you have typed.
User-attention error messages appear in a pop-up dialog box that prohibits normal screen
interaction until the message is cleared.
ENWW E-mail screen navigation 83
Page 88

E-mail basics
Introduction to e-mail
The MFP e-mail feature offers the following benefits:
● Sends documents to multiple e-mail addresses, saving time and delivery costs.
● Delivers files in black-and-white or in color. Files can be sent in different file formats that can
● Provides verification that e-mail was delivered successfully.
With e-mail, documents are scanned into the MFP memory and sent to an e-mail address or
multiple addresses as an e-mail attachment. Digital documents can be sent in several graphics
formats, such as .TFF and .JP G (see Digital sending configuration applet), enabling recipients to
manipulate the document file in various programs to meet their specific needs. Documents arrive
in near-original quality, and then can be printed, stored, or forwarded.
The HP Digital Sending software, which can be purchased separately, offers the additional
benefits of sending to a fax machine, authenticating the user for security purposes, and scanning
to a folder.
In order to use the e-mail feature, the MFP needs to be connected to a valid SMTP local area
network that includes Internet access. Otherwise, the MFP can use an LDAP server, version 2
or version 3.
be manipulated by the recipient.
Loading documents
You can scan a document by using either the glass or the ADF. The glass and ADF can
accommodate originals as large as Ledger- and A3-size. Smaller originals, books, manuals,
receipts, irregular and worn documents, stapled documents, previously folded documents, and
photographs should be scanned using the glass. Multiple-page documents can be scanned
easily using the ADF.
Sending documents
The MFP scans both black-and-white and color originals. You can place originals either on the
scanner glass or in the ADF. The scanner glass accommodates most sizes of media, including
irregular-size documents, books, stapled documents, previously folded documents, and
photographs.
You can use default settings or change the scanning preferences and file formats. The following
are the default settings:
● Color
● PDF (requires the recipient to have an Adobe® Acrobat® viewer to view the e-mail
attachment)
To send documents
1 Place the document on the scanner glass or in the ADF.
2 Select the type of destination:
•E-mail
•Fax
•Folder
• Secondary e-mai l
•Workflow
84 Chapter 5 E-mail ENWW
Page 89

3 If prompted, type your user name and password. For more information, see DSS
authentication.
4 Type the information that is needed for sending to the specific file destination.
E-mail Complete the From:, To:, BCC:, and Subject: fields.
Your user name or other defau lt i nformation might appear in the From:
field. If so, you might not be able to change it.
Fax Complete the Fax Numbers: field.
Folder Select a folder destination from the list or type a folder path, if you are
an authenticated user.
Secondary e-mail Complete the From:, To:, BCC:, and Subject: fields.
Your user name or other defau lt i nformation might appear in the From:
field. If so, you might not be able to change it.
Workflow Select a Workflow destination.
Type the requested information for the documen t.
5 (Optional) Use Settings to change the default settings for the scanned document that you
are creating (for example, to change the type of file format that you want).
For more information, see Digital sending configuration applet.
6 (Optional) Use Describe Original to change the default settings (for example, the document
size) for the document that you are sending.
If you are sending a double-sided document, you must describe the original as a two-sided
document. For more information, see Digital sending configuration applet.
7 Press
START to begin sending.
8 When you are finished, remove the document from the scanner glass or ADF.
Using the auto-complete function
When you go to the To, CC, or From screens in the Send to E-mail screen, the auto-complete
function is activated. As you type the required address or name by using the keyboard screen,
the MFP automatically searches the address book list and displays the first matching address.
You can then select that name by touching Enter, or continue typing the name until
auto-complete finds the correct entry . If you type a character that does not match any entry in the
list, the auto-complete text is removed from the display to indicate that you are typing an address
that is not in the address book.
ENWW E-mail basics 85
Page 90

Using the address book
You can send e-mail to a list of recipients by using the address book feature of the MFP. See
your system administrator for information about configuring address lists.
Creating a recipient list
On the touch screen of the graphical display, do the following:
1 Touch E-mail.
2 Touch To: to gain access to the keyboard screen.
3 Type the first letter of the recipient’s name.
4 Touch to gain access to the address book.
5 Na vigate the entries in the address book by using the scroll bar. Hold down the arrow to
scroll quickly through the list.
6 Highlight the name to select a recipient, and then touch Add.
You can also select a distribution list by touching All, or add a recipient from a local list by
touching the Local button. Highlight the appropriate names, and then touch Add to add the
name to your list of recipients.
You can remove a recipient from your list by scrolling to highlight the recipient, and then
touching Remove.
7 The names in the recipient list are placed in the text line of the keyboard screen. If you want,
you can add a recipient that is not found in the address book by typing the e-mail address on
the keyboard. After you are satisfied with your recipient list, touch OK.
8 Touch OK on the keyboard screen.
9 Finish typing information in the CC: and Subject: fields on the Send to E-mail screen, if
necessary. You can check the list of recipients by touching the down arrow in the To: text
line.
10 Press
START
86 Chapter 5 E-mail ENWW
Page 91

Local address book
Use the local address book to store frequently-used e-mail addresses. The local address book
can be shared between MFPs that use the same server to gain access to the HP Digital Sending
software.
You can use the address book when you type e-mail addresses in the From:, To:, CC:, or BCC:
fields. You can also add or delete addresses in the address book.
To open the address book, touch the address book button in the keyboard screen. When you
touch Local, the Edit button appears. Touch this button to add or delete items from the address
book.
To add e-mail addresses to the local address book
1 Touch Local.
2 Touch Edit.
3 Touch Add.
4 In the Address field, type the e-mail address for the new entry (required).
5 In the Name field, type a name for the new entry (optional).
The Name is the alias for the e-mail address. If you do not type an alias name, the alias will be
the e-mail address itself.
6 Do one of the following:
• To add the e-mail address to the local address book and remain in the Add screen, touch
Save.
• To return to the Edit screen without saving the e-mail address, touch Cancel.
• To save the e-mail address and return to the Edit screen, touch OK.
After you add an address, the following confirmation message is displayed:
Address was stored successfully
The e-mail address is added to the public address book. All users will have access to this
address.
To delete e-mail addresses from the local address book
You can delete e-mail addresses that you no longer use.
Note To change an e-mail address, you must delete the address and add it as a new address in the
local address book.
1 Touch Local.
2 Touch Edit.
3 Touch Delete to display a list of e-mail addresses that you can deleted from the local
address book. If no addresses exit to delete, the list appears blank.
4 Touch the checkbox(es) for the e-mail address(es) that you want to delete, and then touch
OK.
The following confirmation message is displayed:
Do you want to delete the selected address(es)?
[Yes] [No]
5 Touch Yes to delete the e-mail address(es) or No to return to the Delete screen.
6 To return to the Edit screen, touch OK.
ENWW Using the address book 87
Page 92

Typing e-mail body text
Use the body text feature to type a message when sending e-mail. When you type a message,
the e-mail that you send contains your message, a divider line, and any default text that was set
by your administrator. The message text can contain up to 200 characters.
One line of the e-mail body text is visible in the Keyboard screen. Touch View to open a larger
text box to display more of the message.
More information
For information about finding the IP addresses of the SMTP and LDAP servers, and about
configuring the MFP for digital sending, see Digital sending configuration applet.
88 Chapter 5 E-mail ENWW
Page 93

6
Faxing
The MFP supports analog fax capabilities. You can purchase the analog fax separately, see
Parts and accessories for ordering information.
For additional information, see the HP Fax User Guide.
ENWW 89
Page 94

90 Chapter 6 Faxing ENWW
Page 95

7
Output devices
Overview
This chapter includes information on the following output devices:
● 3,000-sheet stacker
● 3,000-sheet stacker/stapler
● Multifunction finisher
● 8-bin mailbox
ENWW Overview 91
Page 96

3,000-sheet stacker
Paper handling features
● Stacks up to 3,000 sheets of A4- or Letter-size paper
● Stacks up to 1,500 sheets of A3- or Ledger-size paper
● Can offset jobs, or offset the first page of jobs, if desired
The lower bin (face-down bin) is the default bin for all output jobs.
3,000-sheet stacker/stapler
Paper handling features
● Stacks up to 3,000 sheets A4- or Letter-size paper
● Stacks up to 1,500 sheets of A3- or Ledger-size paper
● Can offset jobs, or offset the first page of jobs, if desired
The upper bin (face-up bin) is the default bin for all output jobs.
Using the stapler
The 3,000-sheet stacker/stapler can staple documents that contain between two pages and
50 pages of 75 g/m
64 to 199 g/m
Keep in mind these additional points:
● The stacking bin can hold up to 3,000 sheets.
● Heavier media might have a stapling limit of fewer than 50 pages.
● If the job that you want stapled contains only one sheet, or if it contains more than 50 sheets,
the MFP copies or prints the job. However it will not staple.
You can usually select the stapler in your software program or printer driver, although some
options might be available only in the printer driver. Where and how you make selections
depends on your program or driver.
2
(20 lb) paper, or equivalent 5 mm (.2 inches). The pages must be
2
(17 to 53 lb) of all sizes supported by the MFP.
To select stapling when copying
1 Touch Copy.
2 Touch Side or Top, depending on where you want the documents to be stapled, and then
touch OK.
Note The page icon on the right side of the control panel shows the position of the staple.
To select stapling as the default setting at the control panel
1 Touch Menu.
2 Scroll to and touch Configure Device.
3 Scroll to and touch Copying.
4 Scroll to and touch Staple.
5 Scroll to and touch the staple quantity.
92 Chapter 7 Output devices ENWW
Page 97

Loading staples
1 Mo ve the stacker/stapler away from the MFP.
2 Open the stapler unit door.
3 On the empty staple cartridge, pull up on the green tab, and then pull the empty cartridge
out.
ENWW 3,000-sheet stacker/stapler 93
Page 98

4 Insert the new staple cartridge, and push down on the green tab so that the cartridge locks
into place.
5 Close the stapler unit door and push the stacker/stapler back into place.
94 Chapter 7 Output devices ENWW
Page 99

Multifunction finisher
Paper handling features
● Stacks up to 1,000 sheets of A4- and letter-size paper or up to 500 sheets of A3- and
11 x 17-size paper
● Stacks up to 40 booklets of 5 sheets of A3- and ledger-size paper
● Can offset jobs
● Staples up to 50 sheets of paper per document of A4- and letter-size paper
● Staples up to 25 sheets of paper per document A3- and ledger-size paper
● Folds single pages
● Saddle-stitches and folds up to 40 booklets of 5 sheets stacked, or 20 booklets of 10 sheets
stacked.
Using the stapler
The finisher can staple documents that contain between two pages and 50 pages of 75 g/m2
(20 lb) A-4-or letter-size paper or 25 pages of A3- 11 x 17-size paper or equivalent 5.5 mm
(.22 inches). The pages must be 64 to 199 g/m
Consider these additional points:
● The upper bin (stacker bin) can hold up to 1,000 sheets stacked (not stapled). The
multifunction finisher can deliver jobs face up or face down to the upper bin.
● Heavier media might have a stapling limit of fewer than 50 pages.
2
(17 to 53 lb) of all sizes supported by the MFP.
If the job that you want stapled contains only one sheet, or if it contains more than 50 sheets, the
multifunction finisher delivers the job without staples.
You can usually select the stapler in your software program or printer driver, although some
options might be available only in the printer driver. See Gaining access to the printer drivers for
more information. Where and how you make selections depends on your program or driver.
To select stapling when copying
1 Touch Copy.
2 Touch Copy Settings.
3 In the Staple menu, touch Side or Top, depending on where you want the documents to be
stapled, and then touch OK.
Note The page icon on the right side of the touch screen shows the position of the staple.
To select stapling as the default setting at the control panel
1 Touch Menu.
2 Scroll to and touch Configure Device.
3 Scroll to and touch Staples.
4 Scroll to and touch the staple quantity.
ENWW Multifunction finisher 95
Page 100

Loading staples
1 Open the stapler unit door.
2 Slide the stapler unit toward you.
3 Turn the large green knob until the blue dot appears in the window of the stapler unit.
96 Chapter 7 Output devices ENWW
 Loading...