

Page 1

hp
LaserJet 4200
4200n 4200tn
use
4200dtn
hp
4300dtn 4300dtns 4300dtnsl
4200dtns 4200dtnsl
LaserJet 4300
4300n 4300tn
Page 2

Page 3

HP LaserJet 4200 and 4300 series printers
Use
Page 4

Copyright information
© Copyright Hewlett-Packard Company 2002
All Rights Reserved.
Except as allowed by copyright laws or
herein, reproduction, adaptation, or
translation without prior written permission is
prohibited.
A user of the Hewlett-Packard printer
associated with this user guide is granted a
license to (a) print hard copies of this user
guide for personal, internal, or company use
subject to the restriction not to sell, re-sell or
otherwise distribute the hard copies; and (b)
place an electronic copy of this user guide on
a network server provided access to the
electronic copy is limited to personal, internal
users of the Hewlett-Packard printer
associated with this user guide.
The information contained in this document
is subject to change without notice.
Third Edition, May 2003
Trademark Credits
Adobe and PostScript are trademarks of
Adobe Systems Incorporated.
CorelDRAW is a trademark or registered
trademark of Corel Corporation or Corel
Corporation Limited.
E
NERGY STAR and the Energy Star logo are
U.S. registered marks of the United States
Environmental Protection Agency.
HP-UX Release 10.20 and later and HP-UX
Release 11.00 and later on all HP 9000
computers are Open Group UNIX products.
Microsoft, Windows, and MS-DOS are
registered trademarks of Microsoft
Corporation.
TrueType is a U.S. trademark of Apple
Computer, Inc.
UNIX is a registered trademark of the Open
Group.
Page 5

Contents
About the documentation
Where to look for information . . . . . . . . . . . . . . . . . . . . . . . . . . . . . . . . . . .7
Setting up the printer . . . . . . . . . . . . . . . . . . . . . . . . . . . . . . . . . . . . . . .7
Using the printer. . . . . . . . . . . . . . . . . . . . . . . . . . . . . . . . . . . . . . . . . . .8
1 Printer basics
Overview . . . . . . . . . . . . . . . . . . . . . . . . . . . . . . . . . . . . . . . . . . . . . . . . . . .9
Printer features and benefits . . . . . . . . . . . . . . . . . . . . . . . . . . . . . . . . . . .10
Printer configurations. . . . . . . . . . . . . . . . . . . . . . . . . . . . . . . . . . . . . . . . .12
Printer parts and locations . . . . . . . . . . . . . . . . . . . . . . . . . . . . . . . . . . . . .13
Accessories and supplies . . . . . . . . . . . . . . . . . . . . . . . . . . . . . . . . . . . . .15
Moving the printer . . . . . . . . . . . . . . . . . . . . . . . . . . . . . . . . . . . . . . . . . . .16
Ordering information . . . . . . . . . . . . . . . . . . . . . . . . . . . . . . . . . . . . . . . . .17
Ordering through service or support providers. . . . . . . . . . . . . . . . . . .17
Ordering directly through the embedded Web server . . . . . . . . . . . . .17
Ordering directly through the printer software . . . . . . . . . . . . . . . . . . .18
Part numbers . . . . . . . . . . . . . . . . . . . . . . . . . . . . . . . . . . . . . . . . . . . .18
Control panel layout. . . . . . . . . . . . . . . . . . . . . . . . . . . . . . . . . . . . . . . . . .24
Control panel lights. . . . . . . . . . . . . . . . . . . . . . . . . . . . . . . . . . . . . . . .24
Control panel buttons . . . . . . . . . . . . . . . . . . . . . . . . . . . . . . . . . . . . . .25
Using the printer Help (?) system. . . . . . . . . . . . . . . . . . . . . . . . . . . . .25
Printing and changing control panel menus. . . . . . . . . . . . . . . . . . . . .26
Accessory lights. . . . . . . . . . . . . . . . . . . . . . . . . . . . . . . . . . . . . . . . . . . . .27
Printer software . . . . . . . . . . . . . . . . . . . . . . . . . . . . . . . . . . . . . . . . . . . . .28
Printer drivers. . . . . . . . . . . . . . . . . . . . . . . . . . . . . . . . . . . . . . . . . . . .29
Software for Windows-based computers . . . . . . . . . . . . . . . . . . . . . . .30
Software for Macintosh computers. . . . . . . . . . . . . . . . . . . . . . . . . . . .32
Software for networks . . . . . . . . . . . . . . . . . . . . . . . . . . . . . . . . . . . . .33
2 Printing tasks
Overview . . . . . . . . . . . . . . . . . . . . . . . . . . . . . . . . . . . . . . . . . . . . . . . . . .35
Selecting the output bin . . . . . . . . . . . . . . . . . . . . . . . . . . . . . . . . . . . . . . .36
Printing to the top (standard) output bin. . . . . . . . . . . . . . . . . . . . . . . .36
Printing to the rear output bin. . . . . . . . . . . . . . . . . . . . . . . . . . . . . . . .37
Printing to the optional stacker or stapler/stacker . . . . . . . . . . . . . . . .37
Orientation of paper when a stapler is installed . . . . . . . . . . . . . . . . . .38
Stapling documents . . . . . . . . . . . . . . . . . . . . . . . . . . . . . . . . . . . . . . . . . .39
Loading staples . . . . . . . . . . . . . . . . . . . . . . . . . . . . . . . . . . . . . . . . . .41
Loading trays . . . . . . . . . . . . . . . . . . . . . . . . . . . . . . . . . . . . . . . . . . . . . . .42
Loading tray 1 . . . . . . . . . . . . . . . . . . . . . . . . . . . . . . . . . . . . . . . . . . .42
Loading tray 2 or an optional 500-sheet tray . . . . . . . . . . . . . . . . . . . .43
Loading an optional 1,500-sheet tray. . . . . . . . . . . . . . . . . . . . . . . . . .45
Selecting which tray is used for printing. . . . . . . . . . . . . . . . . . . . . . . . . . .46
Printing by type and size of paper (locking trays). . . . . . . . . . . . . . . . .48
Manually feeding paper from tray 1 . . . . . . . . . . . . . . . . . . . . . . . . . . .49
Selecting the correct fuser mode. . . . . . . . . . . . . . . . . . . . . . . . . . . . . . . .50
Printing envelopes . . . . . . . . . . . . . . . . . . . . . . . . . . . . . . . . . . . . . . . . . . .51
Loading envelopes in tray 1 . . . . . . . . . . . . . . . . . . . . . . . . . . . . . . . . .52
Feeding envelopes automatically (optional envelope feeder) . . . . . . .53
Installing the optional envelope feeder. . . . . . . . . . . . . . . . . . . . . . . . .54
ENWW Contents 3
Page 6

Removing the optional envelope feeder. . . . . . . . . . . . . . . . . . . . . . . 55
Loading envelopes in the optional envelope feeder . . . . . . . . . . . . . . 56
Printing special paper. . . . . . . . . . . . . . . . . . . . . . . . . . . . . . . . . . . . . . . . 57
Printing labels. . . . . . . . . . . . . . . . . . . . . . . . . . . . . . . . . . . . . . . . . . . 58
Printing transparencies. . . . . . . . . . . . . . . . . . . . . . . . . . . . . . . . . . . . 59
Printing letterhead, prepunched, or preprinted paper (single-sided) . 60
Printing on paper with a special finish . . . . . . . . . . . . . . . . . . . . . . . . 61
Printing small sizes, custom sizes, or heavy paper . . . . . . . . . . . . . . 62
Setting custom paper sizes . . . . . . . . . . . . . . . . . . . . . . . . . . . . . . . . 63
Printing both sides of paper (optional duplexer). . . . . . . . . . . . . . . . . . . . 64
Guidelines for printing both sides of paper. . . . . . . . . . . . . . . . . . . . . 65
Orientation of paper for duplexing . . . . . . . . . . . . . . . . . . . . . . . . . . . 66
Layout options for printing both sides of paper. . . . . . . . . . . . . . . . . . 67
Using printer driver features. . . . . . . . . . . . . . . . . . . . . . . . . . . . . . . . . . . 68
Using job-storage features. . . . . . . . . . . . . . . . . . . . . . . . . . . . . . . . . . . . 70
Quick copying a job . . . . . . . . . . . . . . . . . . . . . . . . . . . . . . . . . . . . . . 70
Deleting a quick copy job . . . . . . . . . . . . . . . . . . . . . . . . . . . . . . . . . . 71
Proofing and holding a job . . . . . . . . . . . . . . . . . . . . . . . . . . . . . . . . . 71
Deleting a held job . . . . . . . . . . . . . . . . . . . . . . . . . . . . . . . . . . . . . . . 72
Printing a private job. . . . . . . . . . . . . . . . . . . . . . . . . . . . . . . . . . . . . . 72
Deleting a private job . . . . . . . . . . . . . . . . . . . . . . . . . . . . . . . . . . . . . 73
Storing a print job . . . . . . . . . . . . . . . . . . . . . . . . . . . . . . . . . . . . . . . . 74
Deleting a stored job. . . . . . . . . . . . . . . . . . . . . . . . . . . . . . . . . . . . . . 74
3 Managing and maintaining the printer
Overview . . . . . . . . . . . . . . . . . . . . . . . . . . . . . . . . . . . . . . . . . . . . . . . . . 75
Using the embedded Web server. . . . . . . . . . . . . . . . . . . . . . . . . . . . . . . 76
Gaining access to the embedded Web server . . . . . . . . . . . . . . . . . . 76
Viewing embedded Web server pages. . . . . . . . . . . . . . . . . . . . . . . . 77
Configuring e-mail alerts . . . . . . . . . . . . . . . . . . . . . . . . . . . . . . . . . . . . . 79
Managing the print cartridge . . . . . . . . . . . . . . . . . . . . . . . . . . . . . . . . . . 80
Checking the supply level. . . . . . . . . . . . . . . . . . . . . . . . . . . . . . . . . . 81
Print-cartridge interaction (shaking) . . . . . . . . . . . . . . . . . . . . . . . . . . 82
Cartridge Low and Cartridge Out conditions . . . . . . . . . . . . . . . . . . . 82
Checking the printer configuration . . . . . . . . . . . . . . . . . . . . . . . . . . . . . . 83
Menu map. . . . . . . . . . . . . . . . . . . . . . . . . . . . . . . . . . . . . . . . . . . . . . 83
Configuration page . . . . . . . . . . . . . . . . . . . . . . . . . . . . . . . . . . . . . . . 83
Supplies status page . . . . . . . . . . . . . . . . . . . . . . . . . . . . . . . . . . . . . 85
PS or PCL font list . . . . . . . . . . . . . . . . . . . . . . . . . . . . . . . . . . . . . . . 86
Cleaning the printer . . . . . . . . . . . . . . . . . . . . . . . . . . . . . . . . . . . . . . . . . 87
Cleaning the inside of the printer . . . . . . . . . . . . . . . . . . . . . . . . . . . . 88
Cleaning the fuser . . . . . . . . . . . . . . . . . . . . . . . . . . . . . . . . . . . . . . . . . . 89
Running the cleaning page manually . . . . . . . . . . . . . . . . . . . . . . . . . 89
Running the cleaning page automatically. . . . . . . . . . . . . . . . . . . . . . 90
Performing preventative maintenance . . . . . . . . . . . . . . . . . . . . . . . . . . . 91
Replacing the stapler unit. . . . . . . . . . . . . . . . . . . . . . . . . . . . . . . . . . . . . 92
Removing and replacing the stapler unit . . . . . . . . . . . . . . . . . . . . . . 92
4 Problem solving
Overview . . . . . . . . . . . . . . . . . . . . . . . . . . . . . . . . . . . . . . . . . . . . . . . . . 95
Clearing jams . . . . . . . . . . . . . . . . . . . . . . . . . . . . . . . . . . . . . . . . . . . . . . 96
Clearing jams from the top-cover and
print-cartridge areas . . . . . . . . . . . . . . . . . . . . . . . . . . . . . . . . . . . . . . 97
Clearing jams from the optional envelope feeder. . . . . . . . . . . . . . . . 99
Clearing jams from the trays. . . . . . . . . . . . . . . . . . . . . . . . . . . . . . . 100
Clearing jams from the optional duplexer . . . . . . . . . . . . . . . . . . . . 102
Clearing jams from the output areas . . . . . . . . . . . . . . . . . . . . . . . . 103
Clearing jams from the fuser area . . . . . . . . . . . . . . . . . . . . . . . . . . 104
4 ENWW
Page 7

Clearing jams from the optional stacker or stapler/stacker . . . . . . . . 106
Solving repeated paper jams. . . . . . . . . . . . . . . . . . . . . . . . . . . . . . . 108
Understanding printer messages . . . . . . . . . . . . . . . . . . . . . . . . . . . . . . 109
Control panel messages . . . . . . . . . . . . . . . . . . . . . . . . . . . . . . . . . . 110
Mopy disk error messages . . . . . . . . . . . . . . . . . . . . . . . . . . . . . . . . 121
Understanding accessory lights for the stacker and stapler/stacker. . . . 122
Accessory lights . . . . . . . . . . . . . . . . . . . . . . . . . . . . . . . . . . . . . . . . 122
Replacing accessories or accessory components. . . . . . . . . . . . . . . 123
Correcting print-quality problems . . . . . . . . . . . . . . . . . . . . . . . . . . . . . . 124
Determining printer problems . . . . . . . . . . . . . . . . . . . . . . . . . . . . . . . . . 131
Troubleshooting flowchart . . . . . . . . . . . . . . . . . . . . . . . . . . . . . . . . . 131
Troubleshooting flowchart for Macintosh users. . . . . . . . . . . . . . . . . 136
Selecting an alternate PPD . . . . . . . . . . . . . . . . . . . . . . . . . . . . . . . . 138
Troubleshooting the optional hard disk. . . . . . . . . . . . . . . . . . . . . . . . . . 139
Troubleshooting PS errors . . . . . . . . . . . . . . . . . . . . . . . . . . . . . . . . . . . 140
Communicating with an optional HP Jetdirect print server . . . . . . . . . . . 141
5 Service and support
Introduction . . . . . . . . . . . . . . . . . . . . . . . . . . . . . . . . . . . . . . . . . . . . . . . 143
Ordering parts and supplies . . . . . . . . . . . . . . . . . . . . . . . . . . . . . . . . . . 143
Contacting HP. . . . . . . . . . . . . . . . . . . . . . . . . . . . . . . . . . . . . . . . . . . . . 144
Getting support . . . . . . . . . . . . . . . . . . . . . . . . . . . . . . . . . . . . . . . . . 144
Obtaining extended service and support. . . . . . . . . . . . . . . . . . . . . . 145
Contacting the HP fraud hotline. . . . . . . . . . . . . . . . . . . . . . . . . . . . . 145
Warranty information. . . . . . . . . . . . . . . . . . . . . . . . . . . . . . . . . . . . . . . . 146
Hewlett-Packard limited warranty statement. . . . . . . . . . . . . . . . . . . . . . 147
Limited warranty for print-cartridge life . . . . . . . . . . . . . . . . . . . . . . . . . . 148
Guidelines for repacking the printer . . . . . . . . . . . . . . . . . . . . . . . . . . . . 148
Service information form . . . . . . . . . . . . . . . . . . . . . . . . . . . . . . . . . . 149
HP software license terms . . . . . . . . . . . . . . . . . . . . . . . . . . . . . . . . . . . 150
Appendix A Control panel menus
Overview. . . . . . . . . . . . . . . . . . . . . . . . . . . . . . . . . . . . . . . . . . . . . . . . . 151
Understanding the menus. . . . . . . . . . . . . . . . . . . . . . . . . . . . . . . . . . . . 151
Retrieve Job menu . . . . . . . . . . . . . . . . . . . . . . . . . . . . . . . . . . . . . . . . . 152
Information menu . . . . . . . . . . . . . . . . . . . . . . . . . . . . . . . . . . . . . . . . . . 153
Paper Handling menu . . . . . . . . . . . . . . . . . . . . . . . . . . . . . . . . . . . . . . . 154
Configure Device menu. . . . . . . . . . . . . . . . . . . . . . . . . . . . . . . . . . . . . . 157
Printing submenu. . . . . . . . . . . . . . . . . . . . . . . . . . . . . . . . . . . . . . . . 157
PCL submenu . . . . . . . . . . . . . . . . . . . . . . . . . . . . . . . . . . . . . . . . . . 158
Print Quality submenu . . . . . . . . . . . . . . . . . . . . . . . . . . . . . . . . . . . . 159
System Setup submenu . . . . . . . . . . . . . . . . . . . . . . . . . . . . . . . . . . 162
Output Setup submenu . . . . . . . . . . . . . . . . . . . . . . . . . . . . . . . . . . . 164
I/O submenu . . . . . . . . . . . . . . . . . . . . . . . . . . . . . . . . . . . . . . . . . . . 165
Resets submenu . . . . . . . . . . . . . . . . . . . . . . . . . . . . . . . . . . . . . . . . 166
Diagnostics menu . . . . . . . . . . . . . . . . . . . . . . . . . . . . . . . . . . . . . . . . . . 167
Service menu . . . . . . . . . . . . . . . . . . . . . . . . . . . . . . . . . . . . . . . . . . . . . 167
Appendix B Printer memory and expansion
Overview. . . . . . . . . . . . . . . . . . . . . . . . . . . . . . . . . . . . . . . . . . . . . . . . . 169
Installing memory . . . . . . . . . . . . . . . . . . . . . . . . . . . . . . . . . . . . . . . . . . 170
Checking memory installation . . . . . . . . . . . . . . . . . . . . . . . . . . . . . . . . . 172
Saving resources (permanent resources). . . . . . . . . . . . . . . . . . . . . . . . 172
Installing EIO cards or mass storage devices. . . . . . . . . . . . . . . . . . . . . 173
ENWW 5
Page 8

Appendix C Printer commands
Overview . . . . . . . . . . . . . . . . . . . . . . . . . . . . . . . . . . . . . . . . . . . . . . . . 175
Understanding PCL 6 and PCL 5e printer command syntax . . . . . . . . . 176
Combining escape sequences . . . . . . . . . . . . . . . . . . . . . . . . . . . . . 176
Entering escape characters . . . . . . . . . . . . . . . . . . . . . . . . . . . . . . . 177
Selecting PCL 6 and PCL 5e fonts . . . . . . . . . . . . . . . . . . . . . . . . . . 177
Common PCL 6 and PCL 5e printer commands . . . . . . . . . . . . . . . 179
Appendix D Specifications
Overview . . . . . . . . . . . . . . . . . . . . . . . . . . . . . . . . . . . . . . . . . . . . . . . . 181
Paper specifications. . . . . . . . . . . . . . . . . . . . . . . . . . . . . . . . . . . . . . . . 182
Supported sizes and weights of paper . . . . . . . . . . . . . . . . . . . . . . 183
Supported types of paper . . . . . . . . . . . . . . . . . . . . . . . . . . . . . . . . . 187
Guidelines for using paper . . . . . . . . . . . . . . . . . . . . . . . . . . . . . . . . 187
Paper weight equivalence table . . . . . . . . . . . . . . . . . . . . . . . . . . . . 189
Labels. . . . . . . . . . . . . . . . . . . . . . . . . . . . . . . . . . . . . . . . . . . . . . . . 190
Transparencies. . . . . . . . . . . . . . . . . . . . . . . . . . . . . . . . . . . . . . . . . 190
Envelopes. . . . . . . . . . . . . . . . . . . . . . . . . . . . . . . . . . . . . . . . . . . . . 191
Card stock and heavy paper. . . . . . . . . . . . . . . . . . . . . . . . . . . . . . . 192
Printer specifications . . . . . . . . . . . . . . . . . . . . . . . . . . . . . . . . . . . . . . . 193
Physical dimensions. . . . . . . . . . . . . . . . . . . . . . . . . . . . . . . . . . . . . 193
Printer weight (without print cartridge) . . . . . . . . . . . . . . . . . . . . . . . 194
Environmental specifications . . . . . . . . . . . . . . . . . . . . . . . . . . . . . . 194
General specifications . . . . . . . . . . . . . . . . . . . . . . . . . . . . . . . . . . . 195
Appendix E Regulatory information
FCC regulations . . . . . . . . . . . . . . . . . . . . . . . . . . . . . . . . . . . . . . . . . . . 197
Environmental product stewardship program. . . . . . . . . . . . . . . . . . . . . 198
Declarations of Conformity. . . . . . . . . . . . . . . . . . . . . . . . . . . . . . . . . . . 200
Declaration of Conformity. . . . . . . . . . . . . . . . . . . . . . . . . . . . . . . . . 200
Canadian DOC regulations. . . . . . . . . . . . . . . . . . . . . . . . . . . . . . . . 200
Safety statements . . . . . . . . . . . . . . . . . . . . . . . . . . . . . . . . . . . . . . . . . 201
Laser safety statement (U.S.). . . . . . . . . . . . . . . . . . . . . . . . . . . . . . 201
EMI statement (Korea) . . . . . . . . . . . . . . . . . . . . . . . . . . . . . . . . . . . 201
VCCI statement (Japan). . . . . . . . . . . . . . . . . . . . . . . . . . . . . . . . . . 201
Laser statement (Finland). . . . . . . . . . . . . . . . . . . . . . . . . . . . . . . . . 202
Index
6 ENWW
Page 9
About the documentation
Where to look for information
Several references are a vailable for use with this printer. For additional information or an
updated version of the user guide, visit http://www.hp.com/support/lj4200
http://www.hp.com/support/lj4300
.
Setting up the printer
Getting Started Guide
The getting started (start) guide that came with the printer contains
information for setting u p your printer. You can print a new copy
from either of these websites: http://www.hp.com/support/lj4200
http://www.hp . com/support/lj4300
.
or
or
HP Jetdirect Print Server Administrator’s Guide
The administrator’s guide contains information for configuring and
troubleshooting an HP Jetdirect (network) print server. You can
print a copy from the CD-ROM that came with the printer.
ENWW Where to look for information 7
Page 10
Using the printer
User guide
This guide (use), which you are currently reading, contains
information about using the printer and troubleshooting. It also
contains support, warranty, and re gulatory information. See the
contents for a list of topics covered.
Online Help
The online Help contains inf ormation about printer options that are
available in the printer drivers. Gain access to the online Help
through the printer driver.
Accessory guides
These guides (install) contain instructions f or installing and using
accessories or print cartridges. These guides are included with the
accessory.
8 About the documentation ENWW
Page 11

1
Printer basics
Overview
Thank you for purchasing an HP LaserJet 4200 series or 4300 series printer. If you have not
done so, see the getting started (start) guide provided with the printer for setup instructions.
Now that the printer is set up and ready to use, take a few moments to familiarize yourself with
the printer. This section introduces the following topics:
“Printer features and benefits” on page 10
“Printer configurations” on page 12
“Printer parts and locations” on page 13
“Accessories and supplies” on page 15
“Moving the printer” on page 16
“Ordering information” on page 17
“Control panel layout” on page 24
“Accessory lights” on page 27
“Printer software” on page 28
ENWW Overview 9
Page 12
Printer features and benefits
The following table describes the features for the HP LaserJet 4200 series and the HP LaserJet
4300 series printers. Bulleted items in blue denote differences between the two series.
HP LaserJet 4200 series HP LaserJet 4300 series
Speed and
throughput
Resolution
Paper handling
Prints letter-size paper at up to 35 pages per
minute (ppm) or A4-size paper at up to 33 ppm.
Instant-on fuser prints the first page in less than
8.5 seconds, saving energy and reducing costs.
“RIP ONCE” capability. (For more information,
see “RIP ONCE” on page 68.)
FastRes 1200 — produces 1200-dpi print quality
for fast, high-quality printing of business text and
graphics.
ProRes 1200 — produces 1200-dpi printing for
the best quality in line art and graphic images.
HP UltraPrecise toner for crisp, sharp output.
HP LaserJet 4200 and 4200n: hold 600 sheets of
paper.
HP LaserJet 4200tn, 4200dtn, 4200dtns, and
4200dtnsl: hold 1,100 sheets of paper.
HP LaserJet 4200dtn, 4200dtns, and 4200dtnsl
include a duplexer (duplex printing accessory) for
automatic two-sided printing. All other models are
compatible with the optional duplexer.
HP LaserJet 4200dtns includes a 500-sheet
stacker.
HP LaserJet 4200dtnsl includes a 500-sheet
stapler/stacker.
All models are expandable with optional
accessories to hold up to 2,600 sheets of paper.
All print on a wide range of sizes, types, and
weights of paper.
Prints letter-size paper at up to 45 pages per
minute (ppm) or A4-size paper at up to 43 ppm.
Instant-on fuser prints the first page in less than
8.5 seconds, saving energy and reducing costs.
“RIP ONCE” capability. (For more information,
see “RIP ONCE” on page 68.)
FastRes 1200 — produces 1200-dpi print quality
for fast, high-quality printing of business text and
graphics.
ProRes 1200 — produces 1200-dpi printing for
the best quality in line art and graphic images.
HP UltraPrecise toner for crisp, sharp output.
HP LaserJet 4300 and 4300n: hold 600 sheets of
paper.
HP LaserJet 4300tn, 4300dtn, 4300dtns, and
4300dtnsl: hold 1,100 sheets of paper.
HP LaserJet 4300dtn, 4300dtns, and 4300dtnsl
include a duplexer (duplex printing accessory) for
automatic two-sided printing. All other models are
compatible with the optional duplexer .
HP LaserJet 4300dtns includes a 500-sheet
stacker.
HP LaserJet 4300dtnsl includes a 500-sheet
stapler/stacker.
All models are expandable with optional
accessories to hold up to 2,600 sheets of paper.
All print on a wide range of sizes, types, and
weights of paper.
Memory and
processor
Language and
fonts
Print cartridge
HP LaserJet 4200: 48 megabytes (MB) of
random access memory (RAM). All other models:
64 MB RAM.
300-megahertz (MHz) processor.
HP PCL 6, PCL 5e, and PostScript 3™ (PS 3)
emulation.
80 fonts for Microsoft® Windows®.
12,000-page print cartridge.
Supplies status page with toner gauge, page
count, and information about paper sizes used.
No-shake cartridge design.
Check for authentic HP print cartridges.
HP LaserJet 4300: 64 MB of RAM. All other
models: 80 MB RAM.
350-MHz processor.
HP PCL 6, PCL 5e, and PS 3 emulation.
80 fonts for Windows.
18,000-page print cartridge.
Supplies status page with toner gauge, page
count, and information about paper sizes used.
No-shake cartridge design.
Check for authentic HP print cartridges.
10 Chapter 1 Printer basics ENWW
Page 13

HP LaserJet 4200 series HP LaserJet 4300 series
Expandable
design
Two EIO (enhanced input/output) slots for
connecting to networks or additional devices.
Expandable memory up to 416 MB.
Optional, stackable 500-sheet tray and feeder
units. Up to two optional tray and feeder units can
be installed.
Optional 1,500-sheet tray and feeder. Up to two
optional tray and feeder units can be installed,
only one of which can be a 1,500-sheet tray and
feeder.
Optional envelope feeder that holds up to
75 envelopes.
Optional duplexer for two-sided printing.
Optional stacker that can hold up to 500 sheets.
Optional stapler/stacker that can staple jobs of up
to 15 sheets or hold up to 500 unstapled sheets.
Optional storage cabinet.
Optional flash storage for forms, fonts, and
signatures.
Optional hard disk for job storage.
Two EIO slots for connecting to networks or
additional devices.
Expandable memory up to 416 MB.
Optional, stackable 500-sheet tray and feeder
units. Up to two optional tray and feeder units can
be installed.
Optional 1,500-sheet tray and feeder. Up to two
optional tray and feeder units can be installed,
only one of which can be a 1,500-sheet tray and
feeder.
Optional envelope feeder that holds up to
75 envelopes.
Optional duplexer for two-sided printing.
Optional stacker that can hold up to 500 sheets.
Optional stapler/stacker that can staple jobs of up
to 15 sheets or hold up to 500 unstapled sheets.
Optional storage cabinet.
Optional flash storage for forms, fonts, and
signatures.
Optional hard disk for job storage.
ENWW Printer features and benefits 11
Page 14
Printer configurations
The HP LaserJet 4200 series and 4300 series printers have six models each: the base, n, tn,
dtn, dtns, and dtnsl models. The following table describes the features of each model for each
series.
HP LaserJet 4200 series HP LaserJet 4300 series
Base model
n model
tn model
dtn model
48 MB RAM, expandable up to 416 MB
one 100-sheet tray and one 500-sheet tray
64 MB RAM, expandable up to 416 MB
one 100-sheet tray and one 500-sheet tray
HP Jetdirect 10/100Base-TX print server card
for network connection
64 MB RAM, expandable up to 416 MB
one 100-sheet tray and two 500-sheet trays
HP Jetdirect 10/100Base-TX print server card
for network connection friend
64 MB RAM, expandable up to 416 MB
one 100-sheet tray and two 500-sheet trays
HP Jetdirect 10/100Base-TX print server card
for network connection
duplexer for automatic two-sided printing
64 MB RAM, expandable up to 416 MB
one 100-sheet tray and one 500-sheet tray
80 MB RAM, expandable up to 416 MB
one 100-sheet tray and one 500-sheet tray
HP Jetdirect 10/100Base-TX print server card
for network connection
80 MB RAM, expandable up to 416 MB
one 100-sheet tray and two 500-sheet trays
HP Jetdirect 10/100Base-TX print server card
for network connection
80 MB RAM, expandable up to 416 MB
one 100-sheet tray and two 500-sheet trays
HP Jetdirect 10/100Base-TX print server card
for network connection
duplexer for automatic two-sided printing
dtns model
dtnsl model
64 MB RAM, expandable up to 416 MB
one 100-sheet tray and two 500-sheet trays
HP Jetdirect 10/100Base-TX print server card
for network connection
duplexer for automatic two-sided printing
500-sheet stacker output accessory
64 MB RAM, expandable up to 416 MB
one 100-sheet tray and two 500-sheet trays
HP Jetdirect 10/100Base-TX print server card
for network connection
duplexer for automatic two-sided printing
500-sheet stapler/stacker output accessory
80 MB RAM, expandable up to 416 MB
one 100-sheet tray and two 500-sheet trays
HP Jetdirect 10/100Base-TX print server card
for network connection
duplexer for automatic two-sided printing
500-sheet stacker output accessory
80 MB RAM, expandable up to 416 MB
one 100-sheet tray and two 500-sheet trays
HP Jetdirect 10/100Base-TX print server card
for network connection
duplexer for automatic two-sided printing
500-sheet stapler/stacker output accessory
12 Chapter 1 Printer basics ENWW
Page 15
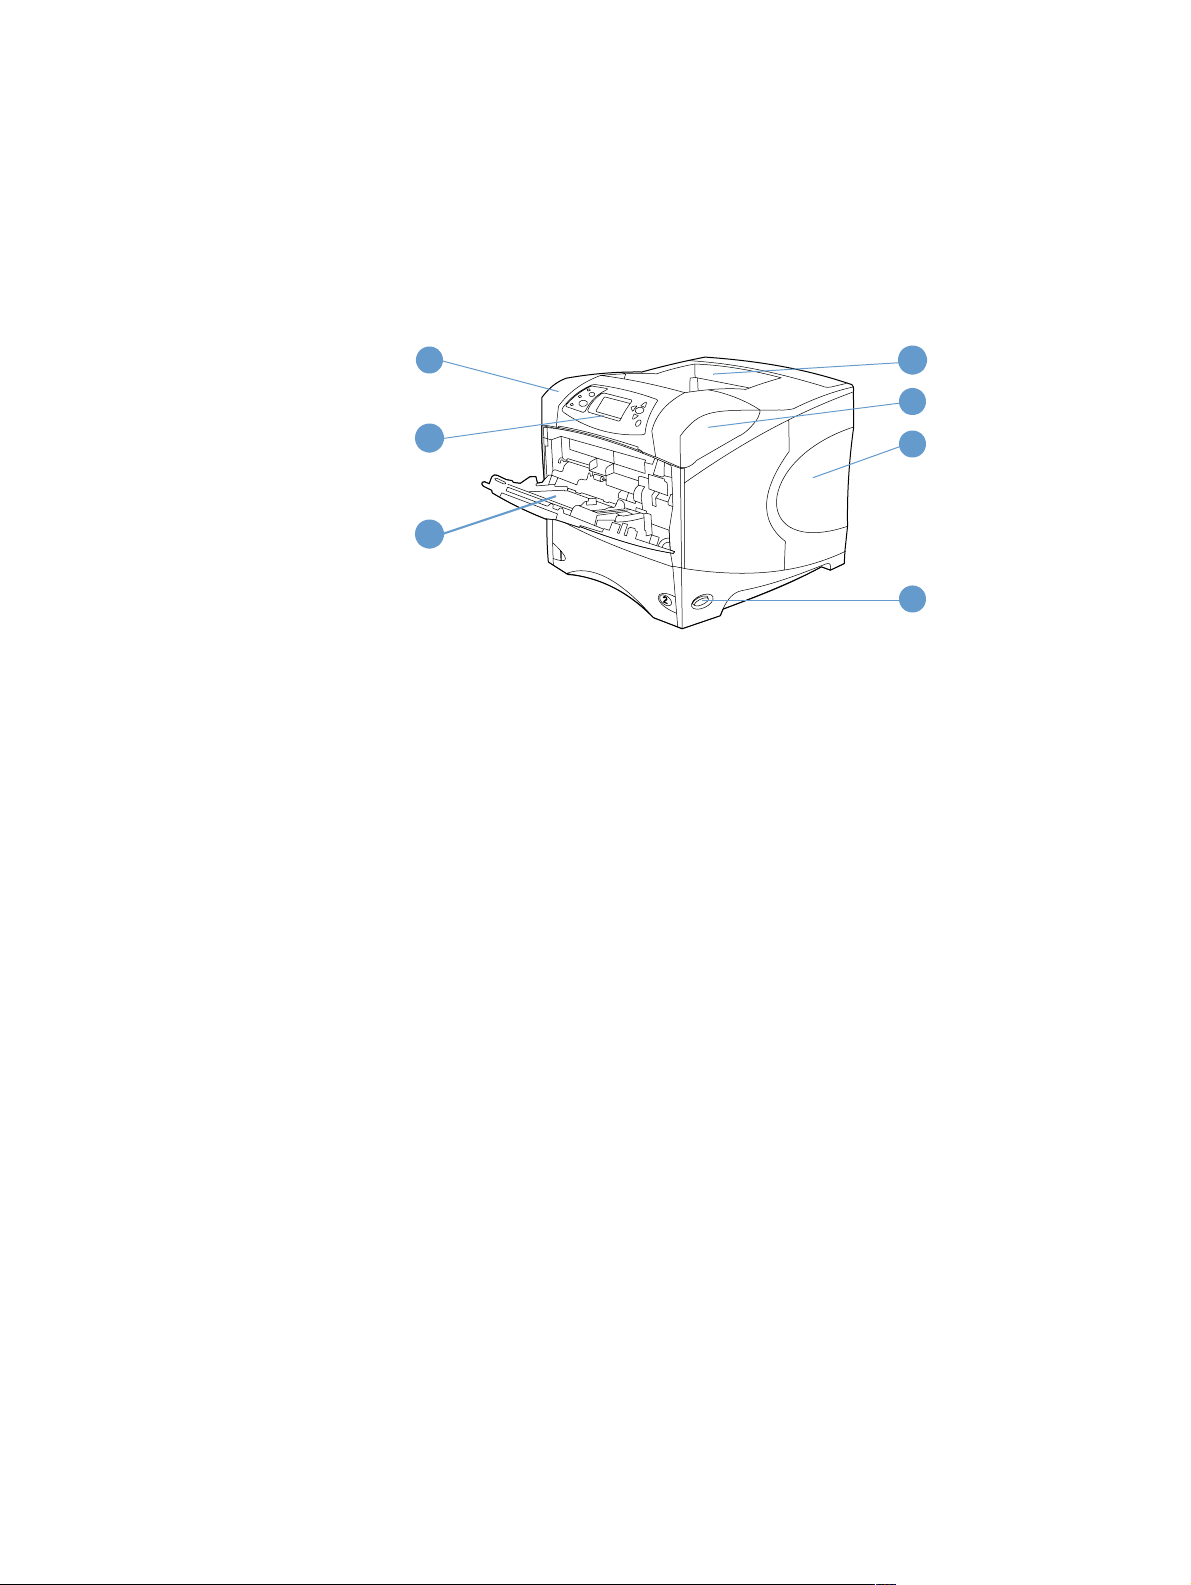
Printer parts and locations
This section describes the basic printer features. The accessories included with some models,
such as the stapler/stacker that is included in the HP LaserJet 4200dtnsl model, are not shown.
For more information about optional accessories, see “Accessories and supplies” on page 15.
Front view, tray 1 open
1
2
3
1 Top cover (print cartridge underneath)
2 Control panel
3 Tray 1 (100-sheet)
4 Top (standard) output bin
5 Serial and model numbers (under top cover)
6 Slots for additional memory
7 Power switch
4
5
6
7
ENWW Printer parts and locations 13
Page 16
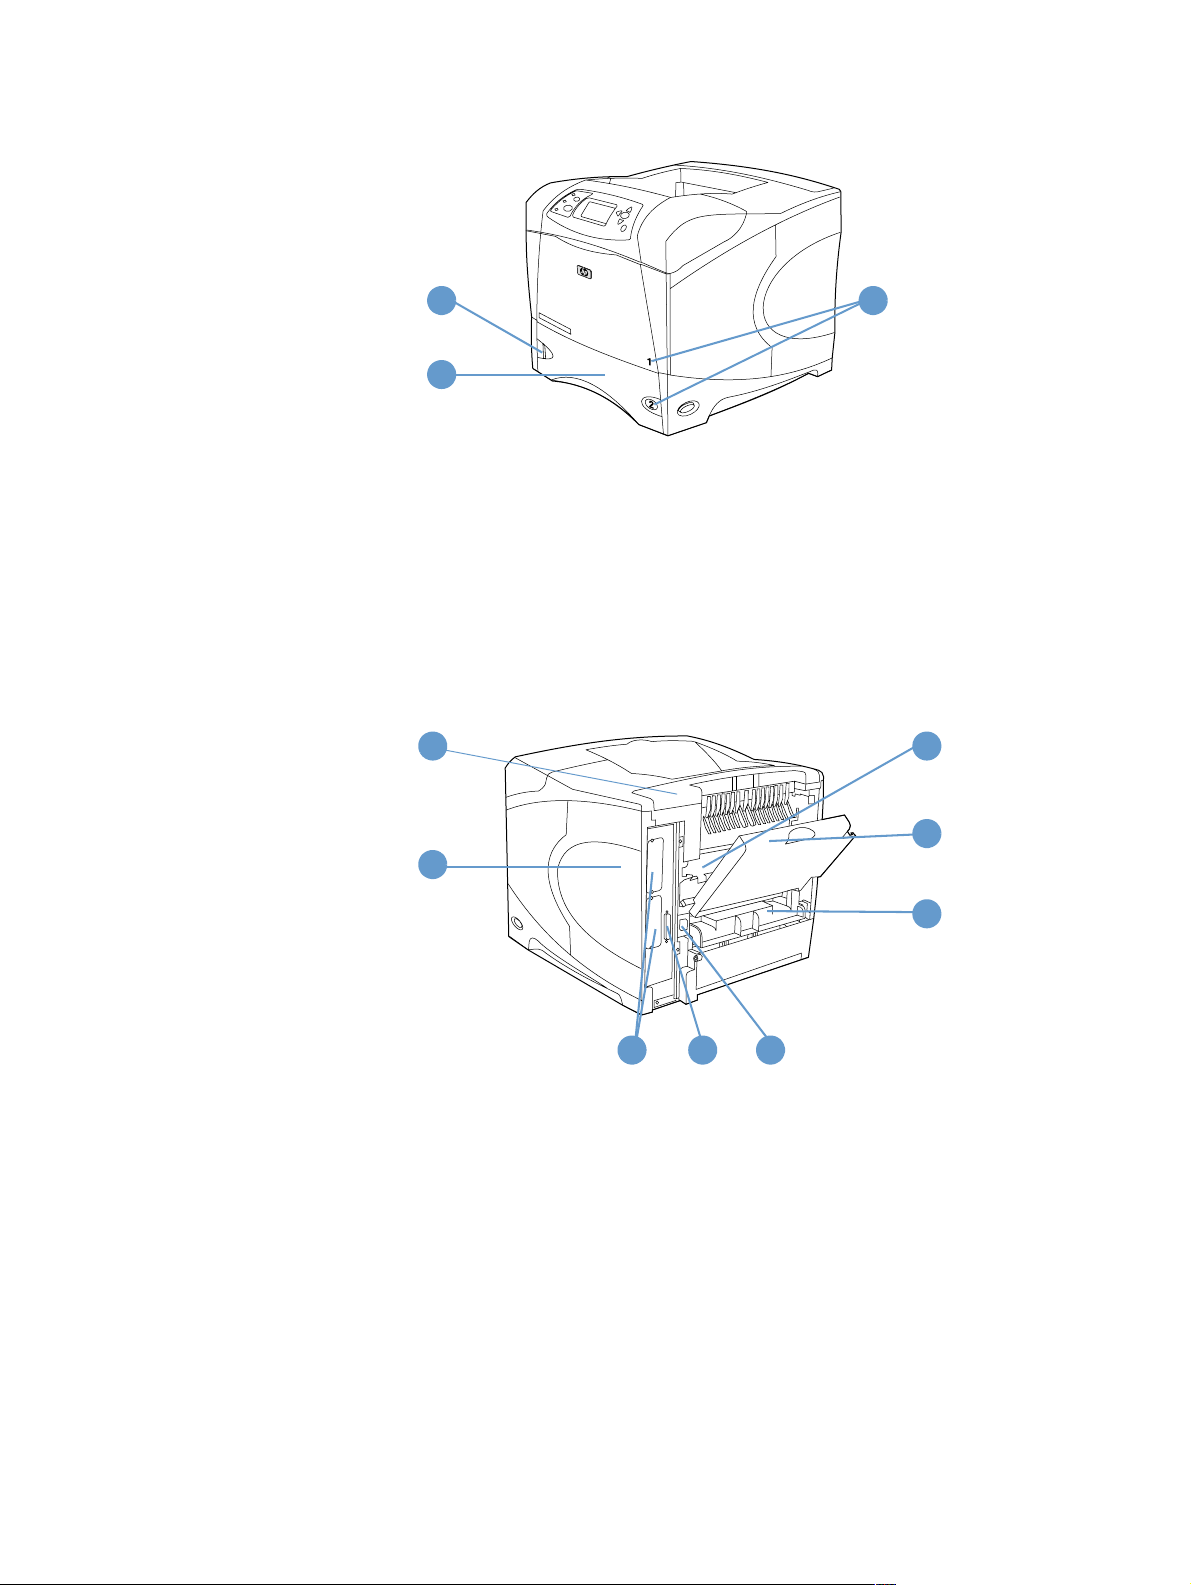
Front view, tray 1 closed
1
2
1 Paper level indicator
2 Tray 2 (500-sheet)
3 Tray numbers
Rear view
1
2
3
6
7
4
1 Accessory cover
2 Memory-access door (more than one DIMM can be installed)
3 EIO slots
4 Parallel interface port
5 Power connector
6 Fuser (can be removed to clear paper jams)
7 Rear output bin (straight-thr ough paper path)
8 Duplexer cover (not installed if the optional duplexer is installed)
53
8
14 Chapter 1 Printer basics ENWW
Page 17
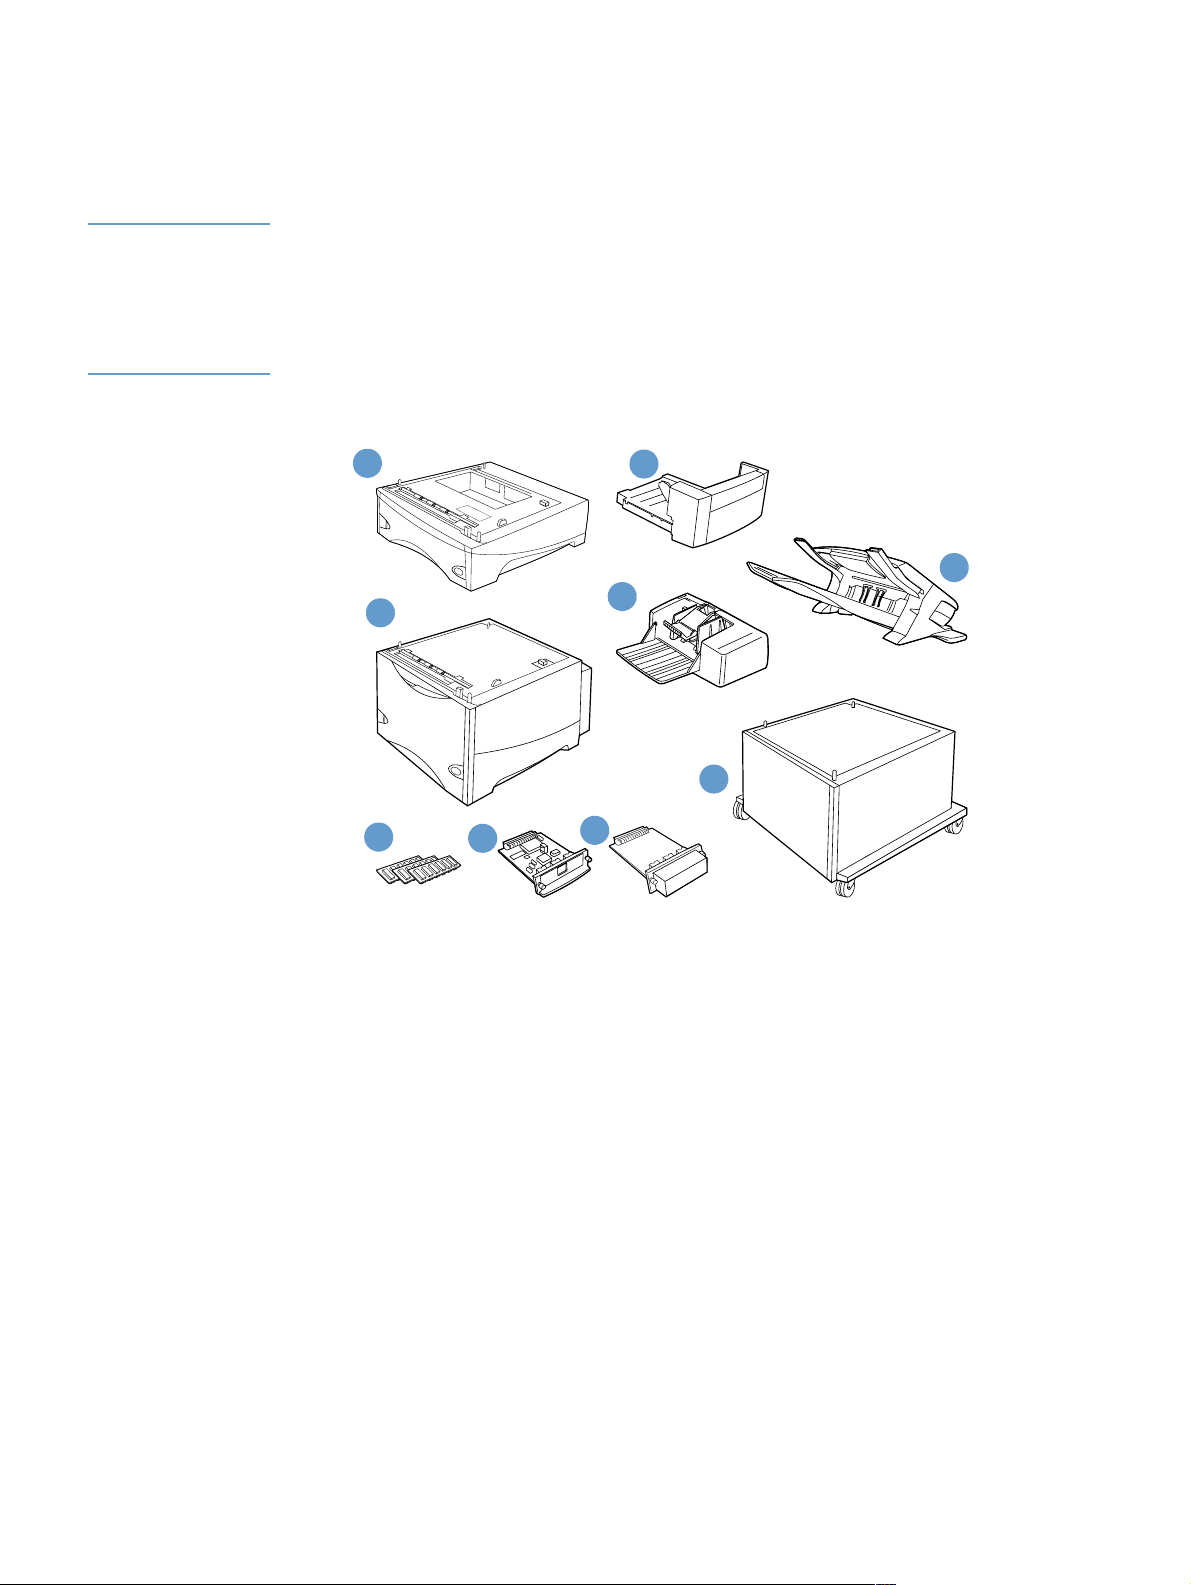
Accessories and supplies
You can increase the capabilities of the printer with optional accessories and supplies, as sho wn
below. See “Ordering information” on page 17.
Note Use accessories and supplies specifically designed for the printer to ensure optimum
performance.
The printer supports two EIO cards. One of the card slots is already used in the HP LaserJet
4200n/tn/dtn/dtns/dtnsl and 4300 n/tn/dtn/dtns/dtnsl models for the HP Jetdirect 10/100Base-TX
print server card.
1
2
4
3
9
6
7
8
1 500-sheet tray and feeder*
2 Duplex er (duplex printing accessory) for two-sided printing
3 1,500-sheet tray and feeder*
5
4 Envelope feeder
5 Stacker or stapler/stacker accessory
6 Memory DIMM, flash DIMM, or font DIMM
7 HP Jetdirect print server (EIO card)
8 Hard disk accessory (EIO card)
9 Storage cabinet for the printer
* The paper capacity of any HP LaserJet 4200 or HP LaserJet 4300 series printer can be expanded to a maximum of
2,600 sheets, achieved by installing one optional 500-sheet tray and feeder and one optional 1,500-sheet tray and
feeder. The printer supports installing 1) one optional 500-sheet tray and feeder and one optional 1,500-sheet tray and
feeder, 2)one optional 500-sheet tray and feeder, 3) one optional 1,500-sheet tray and feeder, or 4) two optional
500-sheet tray and feeder units.
ENWW Accessories and supplies 15
Page 18
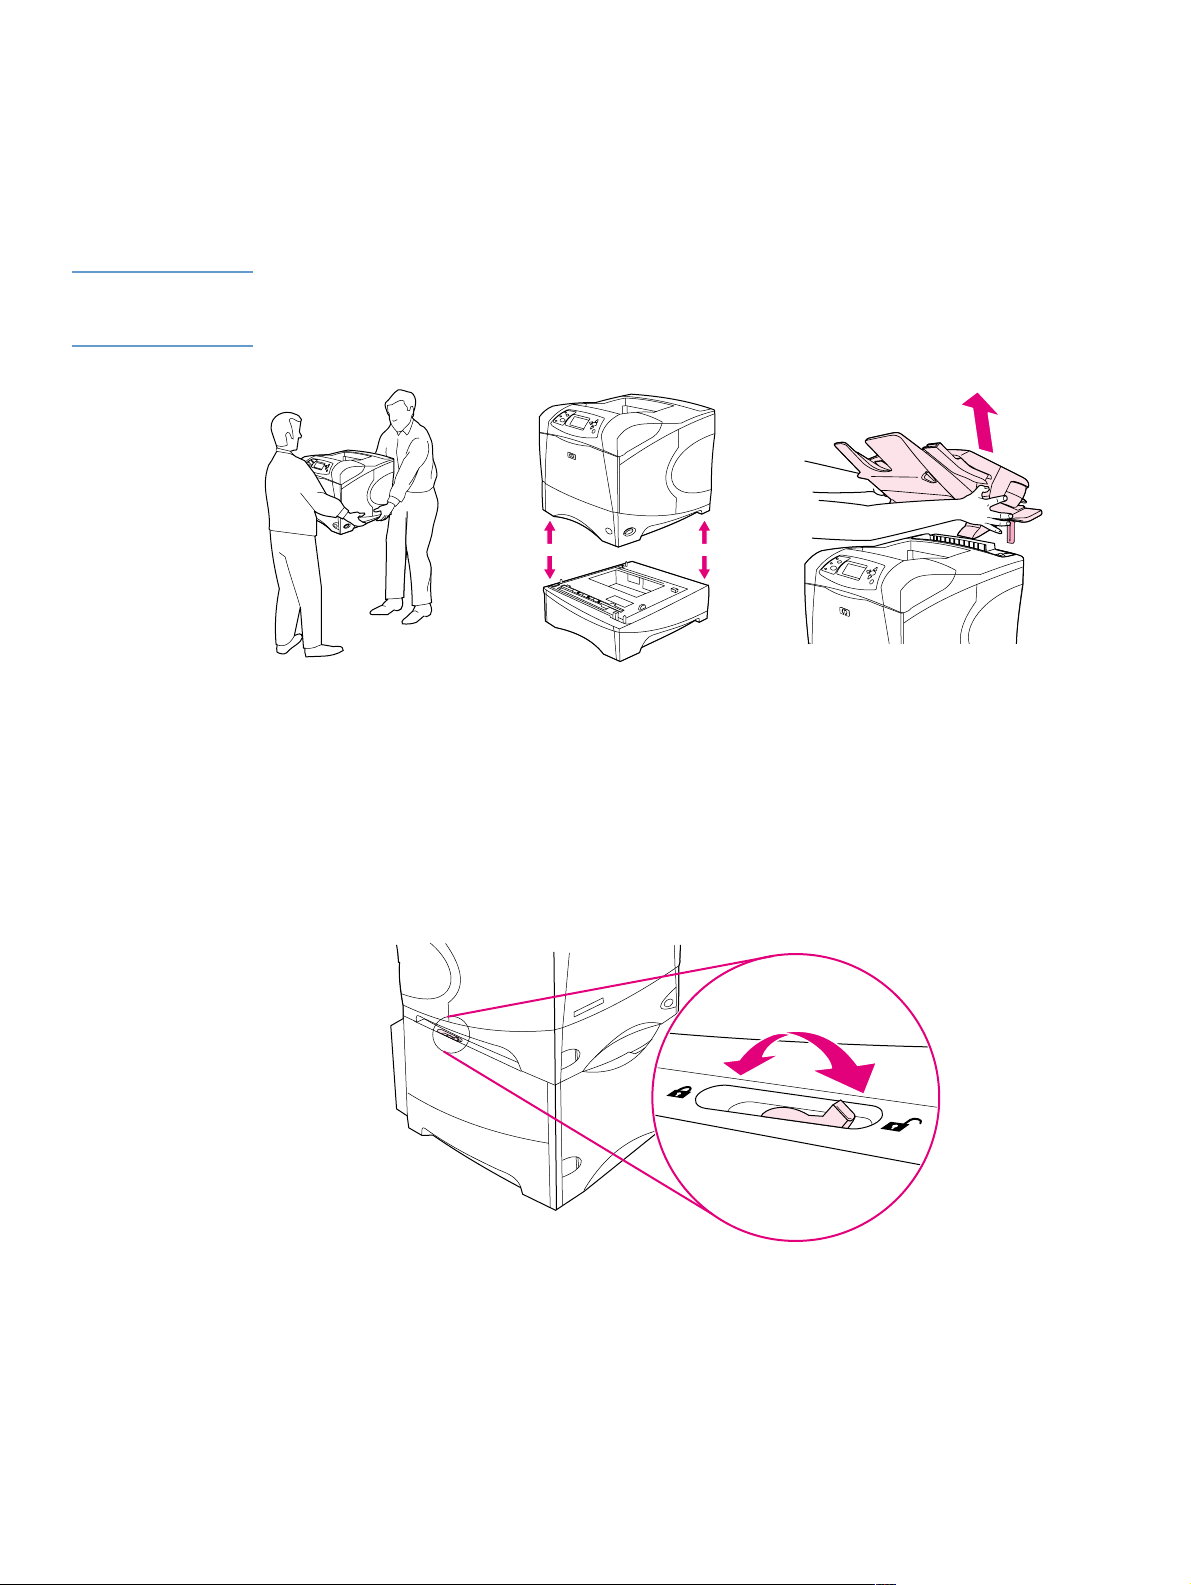
Moving the printer
The printer is heavy and should be lifted by two people. To lift the printer, grip the handles o n th e
sides of the printer. If the bottom of the printer is attached to an optional accessory (such as a
500-sheet tray and feeder, 1,500-sheet tray and feeder, or storage cabinet), the accessory
latches must be unlocked before moving the printer.
WARNING! To prevent possible injury or damage to the printer, separate the printer from any currently
installed optional accessories (for e xample, an optional tray and f eeder or a stapler/stacker) bef ore
lifting the printer.
Locking and unlocking optional accessories
For more stability against tipping over, the optional tray and feeder units and the cabinet can be
locked to the bottom of the printer.
To loc k the accessories, locate the le v er on the upper left side o f the optional tr a y and f e eder and
rotate the lever to the rear (locked) position.
To unlock the accessories, rotate the lever to the forward (unlocked) position.
16 Chapter 1 Printer basics ENWW
Page 19

Ordering information
This section contains information about how to order accessories and their part numbers. Use
only parts and accessories specifically designed for this printer. The section, “Part n umbers” on
page 18, is organized according to these types of accessories:
paper handling
memory, fonts, and mass storage
cables and interfaces
documentation
maintenance
printing supplies
Ordering through service or support providers
To order a part or accessory, contact an HP-authorized service or support provider. (See
“Ordering parts and supplies” on page 143.)
Ordering directly through the embedded Web server
Use the following st eps to order printing supplies directly through the embedd ed Web server.
(See “Gaining access to the embedded Web server” on page 76 for an explanation of this
feature.)
To order directly through the embedded Web server
1 In your Web browser, enter the IP address for the printer home, page found on the EIO
Jetdirect page. (See “Configuration page” on page 83.) This takes you to the device sta tus
page.
2 On the Information tab, click Order Supplies in the Other Links section. This provides a
URL from which to purchase supplies.
3 If asked to provide a password, enter the password (provided by the network administrator).
4 Supplies information with part numbers and printer information is provided.
5 Select the part numbers you want to order and follow the instructions on the screen.
ENWW Ordering information 17
Page 20

Ordering directly through the printer software
The printer software gives you the ability to order supplies and accessories directly, by using
your computer. Three things are required to use this feature:
The Printer Status and Alerts software must be installed on you r computer. (Use the Custom
installation option to install this software.)
The printer must be connected to your computer using a parallel cable , a TCP/ICP
connection, or a network.
You must have access to the Internet.
To order directly through the printer software
1 In the status area of the Windows t askbar (near the cloc k) , clic k the Printer icon. This opens
the status window.
2 On the left side of the status window, click the Printer icon for which you want to obtain
status.
3 In the Device Status section, scroll down to the Supplies subsection and click the Supplies
Details link.
4 Click Order Supplies. This opens a browser that provides a URL from which to purchase
supplies.
5 Select the supplies you want to order.
Part numbers
Paper handling
Item Part number Description or use
500-sheet tray and feeder unit Q2440A Consists of the tray and feeder. Order this item if
you want to add paper capacity to the printer. In
addition to the base printer, you can have a
maximum of two more trays.
1,500-sheet tray and feeder unit Q2444A Adds paper capacity to the printer. In addition to the
base printer, you can have a maximum of two more
trays. (Only one of those trays can be a
1,500-sheet tray.)
Envelope feeder Q2438A Holds up to 75 envelopes.
Duplexer (duplex printing
accessory)
500-sheet stacker Q2442A Provides an additional output bin that holds
500-sheet stapler/stacker Q2443A Allows for High-volume output with automatic job
1,000-staple cartridge Q3216A Provides three staple cartridge s.
Stapler unit Q3216-60501 Holds the staple cartridge and stapler head. (The
Storage cabinet Q2445A Raises the height of the printer and provides room
Q2439A Allows automatic printing on both sides of paper.
500 sheets.
finishing. Staples up to 15 sheets of paper.
staple cartridge is not included with the stapler unit
and must be ordered separately, if it needs to be
replaced.) Order the stapler unit if you are
experiencing stapler failure and an HP-authorized
service or support provider advises you to replace
the unit.
to store paper.
18 Chapter 1 Printer basics ENWW
Page 21
Memory, fonts, and mass storage
Item Part number Description or use
SDRAM DIMM (dual inline
memory module)
8 MB C7842A
16 MB C7843A
32 MB C7845A
64 MB Q9680A
128 MB Q9121A
Boosts the ability of the printer to handle large or
complex print jobs (maximum 416 MB with
HP-brand DIMMs).
Flash DIMM DIMM for storing fonts and forms if an EIO slot is
2 MB C4286A
4 MB C4287A
8 MB C8530A
12 MB C7867A
not available.
Font DIMM 8-MB font DIMM for printing Korean, simplified
Korean D4838A
Simplified Chinese C4293A
Traditional Chinese C4292A
Chinese, and traditional Chinese characters.
EIO hard disk J6054B Greater than 5-GB permanent storage for fonts and
forms. Also used for making multiple original prints
and for job-storage features.
Cables and interfaces
Item Part number Description or use
Parallel cables For directly connecting the printer to a PC.
2-meter IEEE-1284 cable C2950A
3-meter IEEE-1284 cable C2951A
EIO cards HP Jetdirect print server cards for connecting to a
network.
Token Ring networks J4167A
Fast Ethernet
(10/100Base-TX single
RJ-45 port)
Connectivity card for USB,
Serial, and LocalTalk
J6057A
J4135A
ENWW Ordering information 19
Page 22

Documentation
Item Part number Description or use
print media guide for the HP
LaserJet family of printers
HP LaserJet 4200/4300 series
CD-ROM
English, French, Italian,
Spanish, German, Dutch,
Portuguese, Hebrew, Greek
English, Danish, Finnish,
Norwegian, Swedish,
Czech, Hungarian, Polish,
Russian, Turkish, Arabic,
French
English, Japanese, Korean,
Simplified Chinese,
Traditional Chinese, Thai
getting started (start) guide
5980-8424 ENUS A guide to using pa per and other print media
with HP LaserJet printers (English only).
To obtain an updated version of the media
guide, go to http://www.hp.com/support/lj4200
or to http://www.hp.com/support/lj4300.
An additional copy of the CD-ROM containing
software, the use guide, and Readmes.
Q2431-60104
Q2431-60105
Q2431-60106 Note: The PCL 5e printer driver is not
available on the Asian-language CD-ROM. You
can download the PCL 5e driver from the
Internet at http://www.hp.com/support/lj4200
or at http://www.hp.com/support/lj4300.
You can download a copy of the start guide
from the Internet at http://www.hp.com/support/
lj4200 or http://www.hp.com/support/lj4300.
Note: These items are also available for download at no cost by visiting http://www.hp.com. In the Select your country/
region field at the top of the Web browser, select your country/region and click the Support block.
Maintenance
Item Part number Description or use
Printer maintenance kit User-replaceable parts and instructions for
110 V printer kit
(HP LaserJet 4200 series)
110 V printer kit
(HP LaserJet 4300 series)
220 V printer kit
(HP LaserJet 4200 series)
220 V printer kit
(HP LaserJet 4300 series)
Q2429A
Q2436A
Q2430A
Q2437A
printer maintenance. The printer maintenance
kit is a consumable item, and its cost is not
covered under warranty or most extended
warranty options.
20 Chapter 1 Printer basics ENWW
Page 23

Printing supplies
Item Part number and
Description or use
where available
Print cartridges HP UltraPrecise print cartridge.
12,000 pages
(HP LaserJet 4200 series)
18,000 pages
(HP LaserJet 4300 series)
1,000-staple cartridge Q3216A Box of three staple cartridges.
HP LaserJet paper For use with HP LaserJet printers.
Letter (8.5 by 11 inch),
500 sheets/ream, 10-ream carton
Legal (8.5 by 14 inch),
500 sheets/ream, 10-ream carton
A Letter (220 by 280 mm),
500 sheets/ream, 5-ream carton
A4 (210 by297 mm),
500 sheets/ream, 5-ream carton
A4 (210 by297 mm),
500 sheets/ream
HP LaserJet Soft Gloss paper For use with HP LaserJet printers.
Letter (220 by 280 mm),
50 sheets/box
A4 (210 by297 mm),
50 sheets/box
HP Multipurpose paper For use with all office equipment—
Letter (8.5 by 11 inch),
500 sheets/ream, 10-ream carton
Letter (8.5 by 11 inch),
500 sheets/ream, 5-ream carton
Letter (8.5 by 11 inch),
250 sheets/ream, 12-ream carton
Letter (8.5 by 11 inch), 3-hole,
500 sheets/ream, 10-ream carton
Legal (8.5 by 14 inch),
500 sheets/ream, 10-ream carton
Q1338A
Q1339A
HPJ1124/North America
HPJ1424/North America
Q2398A/Asia-Pacific
countries/regions
Q2400A/Asia-Pacific
countries/regions
CHP310/Europe
C4179A/Asia-Pacific
countries/regions
C4179B/Asia-Pacific
countries/regions and
Europe
HPM1120/North America
HPM115R/North America
HP25011/North America
HPM113H/North America
HPM1420/North America
Good for letterhead, high-value
memos, legal documents, direct mail,
and correspondence.
Specifications: 96 bright,
24 lb (90 g/m
2
).
Coated paper, good for business
documents with high impact, such as
brochures, sales material, and
documents with graphics and
photographic images.
Specifications: 32 lb (120 g/m2).
laser and inkjet printers, copiers, and
fax machines. Created for businesses
that want one paper for all their office
needs. Brighter and smoother than
other office papers.
Specifications: 90 bright, 20 lb
(75 g/m
2
)
ENWW Ordering information 21
Page 24

Printing supplies
Item Part number and
Description or use
where available
HP Office paper For use with all office equipment—
Letter (8.5 by 11 inch),
500 sheets/ream, 10-ream carton
Letter (8.5 by 11 inch), 3-hole,
HPC8511/North Amer ica
and Mexico
HPC3HP/North America
500 sheets/ream, 10-ream carton
Legal (8.5 by 14 inch),
HPC8514/North Amer ica
500 sheets/ream, 10-ream carton
Letter (8.5 by 11 inch), Quick
Pack, 2,500-sheet carton
Letter (8.5 by 11 inch), Quick Pack
HP2500S/North America
and Mexico
HP2500P/North America
3-hole, 2,500-sheet carton
A Letter (220 by 280 mm),
500 sheets/ream, 5-ream carton
A4 (210 by 297 mm),
500 sheets/ream, 5-ream carton
A4 (210 by 297 mm),
Q2408A/Asia-Pacific
countries/regions
Q2407A/Asia-Pacific
countries/regions
CHP110/Europe
500 sheets/ream, 5-ream carton
A4 (210 by 297 mm), Quick Pack
CHP113/Europe
2500 sheets/ream, 5-ream carton
HP Office recycled paper For use with all office equipment—
Letter (8.5 by 11 inch),
HPE1120/North America
500 sheets/ream, 10-ream carton
Letter (8.5 by 11 inch), 3-hole,
HPE113H/North America
500 sheets/ream, 10-ream carton
Legal (8.5 by 14 inch),
HPE1420/North America
500 sheets/ream, 10-ream carton
HP Premium Choice LaserJet paper HP’s brightest LaserJet paper. Expect
Letter (8.5 by 11 inch),
HPU1132/North Amer ica
500 sheets/ream, 10-ream carton
Letter (8.5 by 11 inch),
HPU1732 North America
250 sheets/ream, 6-ream carton
A4 (210 by 297 mm),
5-ream carton
A4 (210 by 297 mm),
Q2397A/Asia-Pacific
countries/regions
CHP412/Europe
250 sheet/ream, 5-ream carton
A4 (210 by 297 mm),
CHP410/Europe
500 sheet/ream, 5-ream carton
A4 (210 by 297 mm), 160g/m
2
CHP413/Europe
500 sheet/ream, 5-ream carton
laser and inkjet printers, copiers, and
fax machines. Good for high-volume
printing.
Specifications: 84 bright,
20 lb (75 g/m
2
).
laser and inkjet printers, copiers, and
fax machines. Good for high-volume
printing.
Satisfies U.S. Executive Order 13101
for environmentally preferable
products.
Specifications: 84 bright, 20 lb,
30 percent post-consumer content.
spectacular color and crisp black from
this paper that is extra smooth and
brilliantly white. Ideal for presentations,
business plans, external
correspondence and other high-value
documents
Specifications: 98 bright, 32 lb.
(75 g/m
2
).
22 Chapter 1 Printer basics ENWW
Page 25

Printing supplies
Item Part number and
Description or use
where available
HP Printing paper For use with HP LaserJet and inkjet
Letter (8.5 by 11 inch),
500 sheets/ream, 10-ream carton
Letter (8.5 by 11 inch),
HPP1122/North America
and Mexico
HPP113R/North America
500 sheets/ream, 3-ream carton
A4 (210 by297 mm),
CHP210/Europe
500 sheets/ream, 5-ream carton
A4 (210 by297 mm),
CHP213/Europe
300 sheets/ream, 5-ream carton
HP LaserJet transparencies For use only with HP LaserJet
Letter (8.5 by 11 inch),
50 sheets to a carton
92296T/North America ,
Asia-Pacific countries/
regions, and Europe
A4 (210 by297 mm),
50 sheets to a carton
922296U/Asia-Pacific
countries/regions and
Europe
HP LaserJet tough paper For use with HP LaserJet printers. This
Letter (8.5 by 11 inch),
Q1298A/North America
50 sheets to a carton
A4 (210 by297 mm),
50 sheets to a carton
Q1298B/Asia-Pacific
countries/regions and
Europe
printers. Created especially for small
and home offices. Heavier and brighter
than copier paper.
Specifications: 92 bright, 22 lb.
monochrome printers. For crisp, sharp
text and graphics, rely on the only
transparencies specifically designed
and tested to work with monochrome
HP LaserJet printers.
Specifications: 4.3-mil thickness.
satin-finish paper is waterproof and
tear-proof, yet doesn’t compromise on
print quality or performance. Use it for
signs, maps, menus, and other
business applications.
ENWW Ordering information 23
Page 26
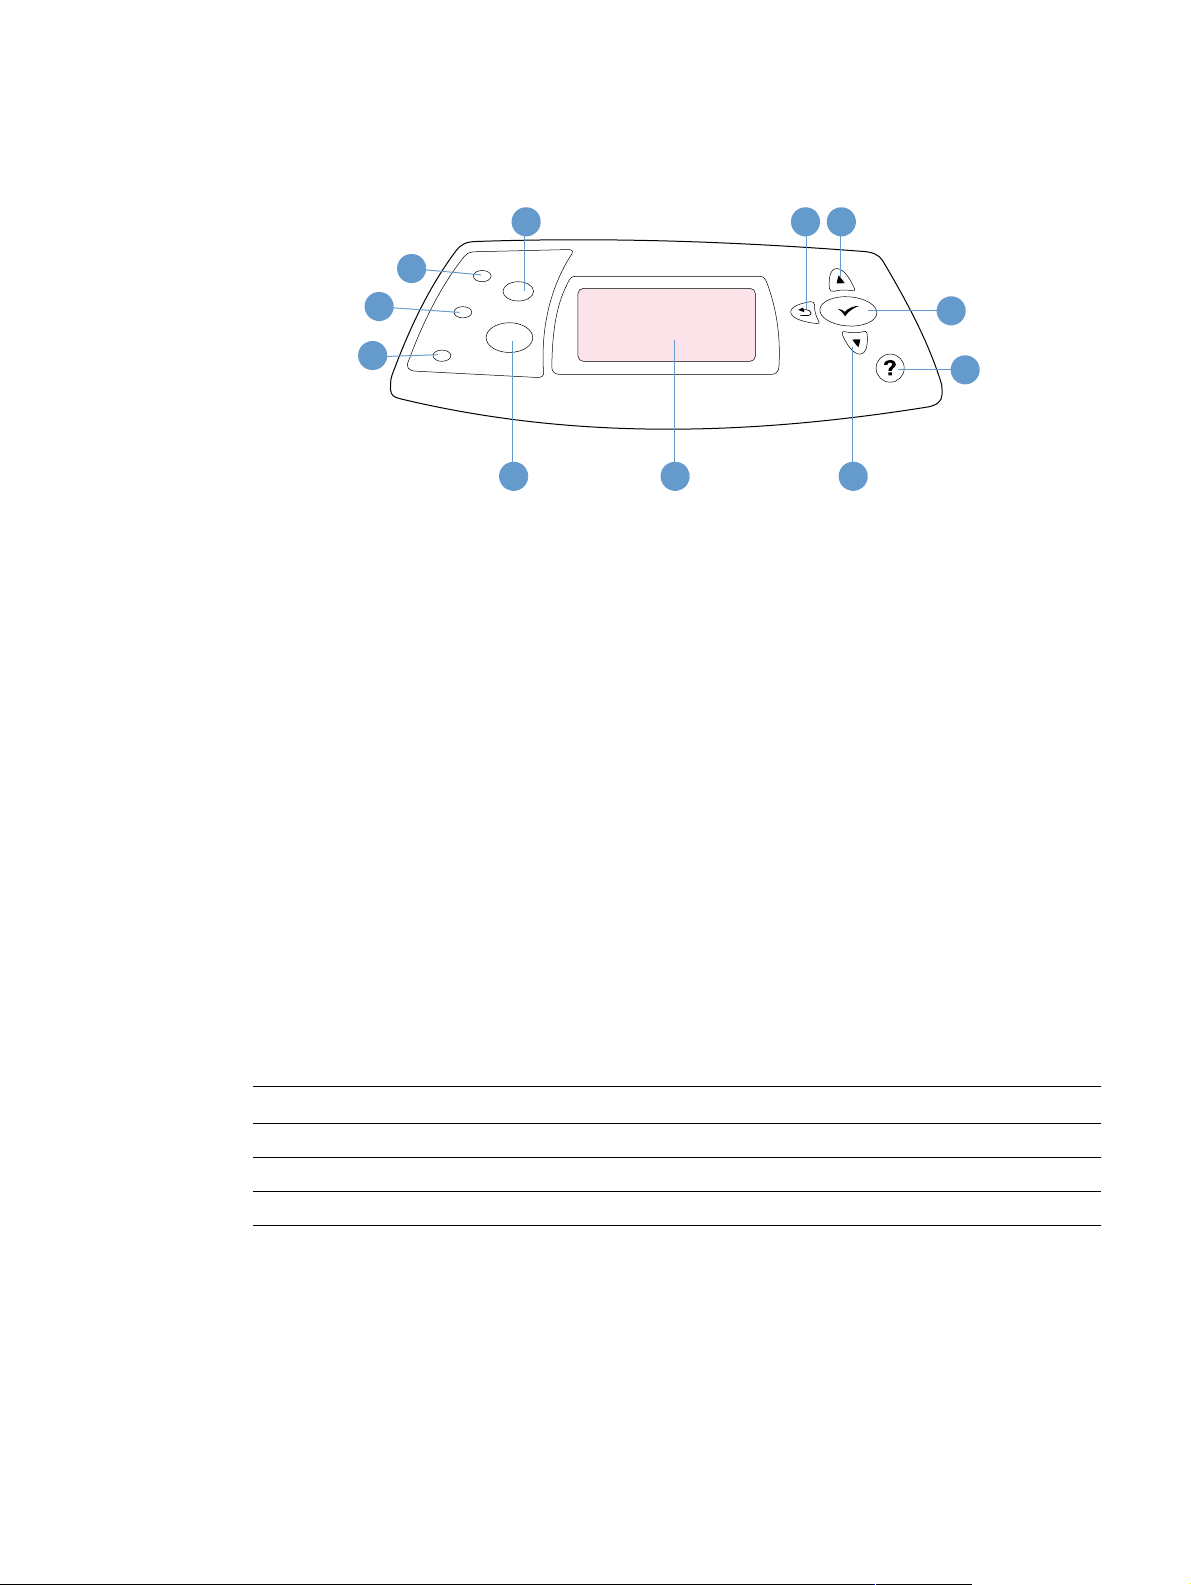
Control panel layout
2
3
4
1 CANCEL JOB button
2 Ready light
3 Data light
4 Attention light
AUSE/RESUME button
5 P
6 Control panel display
OWN ARROW button
7 D
1
1011
READY
5 6 7
9
8
ELP button
8 H
ELECT button
9 S
P ARROW button
10 U
ACK ARROW button
11 B
Control panel lights
Light Indication when lit
Ready The printer is ready to print.
Data The printer is processing information.
Attention Action is required. See the control panel display for an associated message.
24 Chapter 1 Printer basics ENWW
Page 27
Control panel buttons
Button Function
CANCEL JOB
AUSE/RESUME
P
ELECT)
(S
(BACK ARROW)
(UP ARROW)
(DOWN ARROW)
ELP)
(H
Cancels the print job that the printer is processing, clears the paper path, and
clears any continuable errors associated with the canceled job. The time that it
takes to cancel depends on the size of the print job. (Press it only once.)
When the printer is processing a print job, pauses the print job.
When the printer is paused, resumes printing or returns the printer to the Ready
state.
Exits the menus or Help.
Opens the menus.
In the menus, selects the menu item currently highlighted.
Finishes a print job that is waiting for a form feed.
Clears a continuable error, or shows the options for resolving the continuable
error.
Returns to the previous level of menus or to the previous numeric entry.
Exits Help.
Exits the menus if pressed for one full second or more.
Navigates to the previous item on the current menu.
For numeric values, increases the value to the next increment. If the button is
held down for more than one second, the value increases rapidly.
In Help, scrolls up to the previous four lines of the current topic (if any).
Navigates to the next item on the current menu.
For numeric values, decreases the value to the previous increment. If the button
is held down for more than one second, the value decreases rapidly.
In Help, scrolls down to the next four lines of the current topic (if any).
Shows additional Help for the message currently displayed. (Not all messages
have additional Help topics.)
Exits Help.
Using the printer Help (?) system
This printer features a Help system at the control panel that provides instructions for resolving
most printer errors. Some Help topics include animatio ns that appear on th e printer control panel
display to show you how to resolve an error.
To view Help for a message (if available), press H
lines, use the U
To exit the Help system, press H
P ARROW () or DOWN ARROW ( ) to scroll through the entire topic.
ELP ( ) again.
ELP ( ). If the Help topic is longer than four
ENWW Control panel layout 25
Page 28

Printing and changing control panel menus
To see the current settings for the men us and items available at the control panel, print a control
panel menu map. You might want to store the menu map near the printer for reference.
For a complete list of menu items and possible values, see “Control panel menus” on page 151.
Certain menu options appear only if the associated tray or accessory is installed. For example,
the EIO menu appears only if you have an EIO card installed.
To print a control panel menu map
1 Press SELECT ( ) to open the menus.
2 Use U
P ARROW () or DOWN ARROW ( ) to scroll to INFORMATION, and the press SELECT
().
3 Use U
P ARROW () or DOWN ARROW ( ) to scroll to PRINT MENU MAP, and then press
S
ELECT ().
To change a control panel setting
1 Press SELECT ( ) to open the menus.
2 Use U
3 Some menus might have several submenus. Use U
4 Use U
5 Press P
Note Settings in the printer driver and program override control panel settings. (Program settings
override printer driver settings.)
If you cannot gain access to a menu or it em, it is either not an option for the printer, or you have
not enabled the associated higher-level option. See y o ur netw o rk administr ato r if a functio n has
been locked. (ACCESS DENIED MENUS LOCKED appears on the printer control panel displa y.)
P ARROW () or DOWN ARROW ( ) to scroll to the menu that you want, and then
press S
scroll to the submenu item that you want, and then press S
( ). Some settings change rapidly if U
ELECT ().
P ARROW () or DOWN ARROW ( ) to
ELECT ().
P ARROW () or DOWN ARROW ( ) to scroll to the setting, and then press SELECT
P ARROW () or DOWN ARROW ( ) is held down.
An asterisk (*) appears next to the selection on the display, indicating that it is now the
default.
AUSE/RESUME to exit the menu.
26 Chapter 1 Printer basics ENWW
Page 29

Accessory lights
Use the following table to interpret the status lights on the optional 500-sheet stacker or
500-sheet stapler/stacker accessory.
Light Meaning for accessory
Solid green
Solid amber
Blinking amber
Off
The accessory is on and ready.
The accessory has an error condition that needs attention. (See
“Understanding accessory lights for the stacker and stapler/stacker” on
page 122.)
The accessory is experiencing a hardware malfunction. (See
“Understanding accessory lights for the stacker and stapler/stacker” on
page 122.)
The accessory has an error condition that needs attention. (See
“Understanding accessory lights for the stacker and stapler/stacker” on
page 122.)
The printer might be in PowerSave mode. Press any button on the printer
control panel.
The accessory has an error condition that needs attention. (See
“Understanding accessory lights for the stacker and stapler/stacker” on
page 122.)
ENWW Accessory lights 27
Page 30
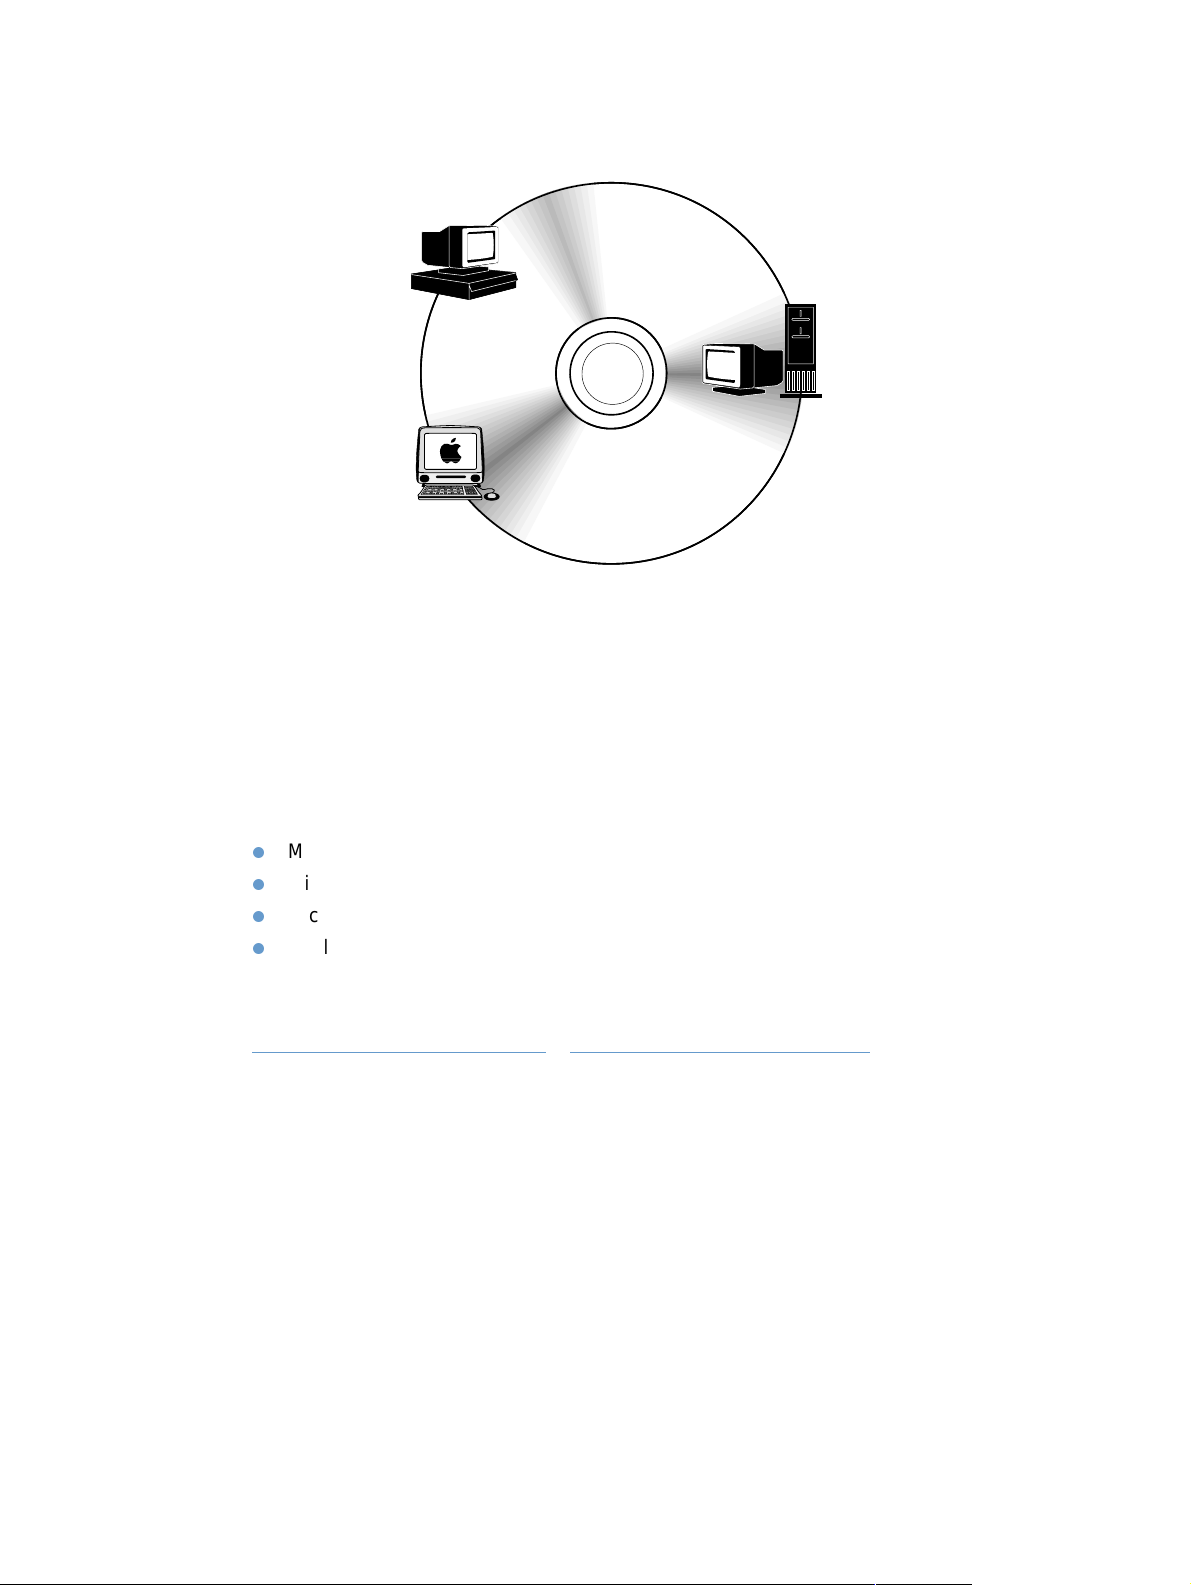
Printer software
Windows
client
Drivers
Network
administrator —
Windows software
Drivers
Network administrator —
Macintosh software
PPDs
Windows software
Macintosh
client
HP LaserJet Utility*
Fonts*
Macintosh software
PPDs
HP LaserJet Utility
* Not supported for the languages of Czech, Japanese, Korean, Russian,
Simplified Chinese, Traditional Chinese, or Turkish.
The printer CD-ROM contains the software components and drivers for end users and network
administrators. The printer drivers provided on the CD-R OM must be installed to take full
advantage of printer features. The other programs are recommended, but are not required for
operation. See the Readme file for more information.
The CD-ROM includes software d esigned for end users and network administrators operating in
the following environments:
Microsoft Windows 95, Windows 98, and Windows Millennium Edition (Me)
Microsoft Windows NT 4.0
Microsoft Windows 2000 and Windows XP
Apple Mac OS, version 8.6 to 9.xx, 10.1 or greater
Additional drivers include AutoCAD™ drivers for Windows 9.x and Windows NT 4.0).
The most recent printer drivers for all supported operating systems are available at
http://www.hp.com/support/lj4200
or http://www.hp.com/support/lj4300. If you do not have
access to the Internet, see the support flyer that came in the printer box for information about
obtaining the most recent softw are.
28 Chapter 1 Printer basics ENWW
Page 31

Printer drivers
Printer drivers allow you to gain access to the printer features and allow the computer to
communicate with the printer (by using a printer language). Check the Readme file provided on
the CD-ROM for additional software included and supported languages.
The following printer drivers are included with the printer. The most recent drivers are available
at http://www.hp.com/support/lj4200
configuration of Windows-based computers, the installation program for the printer software
automatically checks the computer for Internet access to obtain the latest drivers.
or http://www.hp.com/support /lj4 30 0. Depending on the
Operating system PCL 6 PCL 5 e
Windows 95, 98, Me
Windows NT 4.0
Windows 2000, XP
Mac OS
1. Not included on Asian-language CD-ROM.
2. PostScript printer description files.
You can obtain printer drivers for UNIX
1
PS PPDs
®
and Linux Model Scripts by down loading them from the
2
Internet or by requesting them from an HP-authoriz ed service or support provider. (See the
support flyer that came in the printer box.)
OS/2 drivers are available from IBM and are packaged with OS/2. They are not available for the
languages of Japanese, Korean, Simplified Chinese, or Traditional Chinese.
Note If the printer driver you want is not on the CD-ROM or is not listed here, check the installation
software or the printer Readme file to see if the printer driver is supported for the printer. If it is
not supported, contact the manuf acturer or distrib utor of t he prog r am y ou ar e using and requ est
a driver for the printer.
ENWW Printer software 29
Page 32

Software for Windows-based computers
The CD-ROM contains printer drivers and other p rograms for Windows computers.
Network administrators
If the printer is attached to a networ k thro u gh an HP J et dir ect EIO card, you must configure the
printer for that network before you can print. For Microsoft and Novell NetWare networks, you
can use the printer installation software. For other options, see the
Administrator’s Guide
(included with printers that contain an HP Jetdirect print server).
Select the Create Customized Installer optio n in the Customizati on Utilit y to create an
installer with the exact soft ware that you want the end users to use. The installer can be
configured to execute without user interaction and to install pre-configured driver settings for all
PCL drivers and for the PS driver in Windows 2000 and Windows XP. (Select Silent Installer,
and then select Yes, allow me to configure the drivers.) The Copy Printer Drivers Only
option in the Customization Utility also allows you to create a set of disks with dr ivers that can
be installed through the Microsoft Windows Add Printer wizard.
Select the right printer driver for your needs
Select a printer driver based on the way you use the printer. Certain printer features are
available only in the PCL 6 drivers. See the printer driver Help for availability of features.
Use the PCL 6 driver to take full adv antage of printer f eat ures. For general office p rinting, the
PCL 6 driver is recommended to provide optimum performance and print quality.
Use the PCL 5e driver if you encounter documents that print incorrectly with PCL 6 or if font
DIMM support is missing.
Use the PS driver if you are printing primarily from PostScript-specific programs such as
®
Adobe
The printer automatically switches between PS and PCL printer languages.
or Corel®.
HP Jetdirect Print Server
30 Chapter 1 Printer basics ENWW
Page 33

Gain access to the Windows printer driver
To configure the driver, gain access to it in one of the following wa ys:
Temporarily change settings
Operating system
Windows 95, 98, and MeOn the File menu, click Print, and then
Windows NT 4.0 On the File menu, click Print, and then
Windows 2000 On the File menu, click Print, and then
Windows XP On the File menu, click Print, and then
(in a program)
click Properties. (The actual steps can
vary; this is the most common method.)
click Properties. (The actual steps can
vary; this is the most common method.)
click Properties. (The actual steps can
vary; this is the most common method.)
click Preferences.
Change default settings
(across all programs)
Click the Start button, point to
Settings, and then click Printers.
Right-click the printer icon and select
Properties.
Click the Start button, point to
Settings, and then click Printers.
Right-click the printer icon and select
Document Defaults or Properties.
Click the Start button, point to
Settings, and then click Printers.
Right-click the printer icon and select
Printing Preferences or Properties.
Click the Start button, and then click
Printers and Faxes. Right-click the
printer icon, and then select Printing
Preferences or Properties.
Note Settings in the printer driver and program override control panel settings. (Program settings
override printer driver settings.)
Printer driver Help
Each printer driver has Help screens that can be activated by using either the Help b utton, the
F1 button on the computer keyboard, or a question-mark symbol in the upper right corner in the
printer driver (depending on the Window s operating system used). These Help screens give
detailed information about the specific driver. Printer driver Help is separate from your program
Help.
ENWW Printer software 31
Page 34

Software for Macintosh computers
The HP installer provides PPDs and the HP LaserJet Utility for use with Macintosh computers.
The embedded Web server ca n b e used by Macintosh computers if the printer is connected to a
network. See “Software for networks” on page 33 for more information.
PPDs
PPDs, in combination with the Apple LaserWriter 8 driver for OS 8 to 9.xx and PS Converter for
OS X 10.1 or later, allow you to gain access to the printer features and allow the computer to
communicate with the printer. An installation program for the PPDs and other software is
provided on the CD-ROM. Use the appropriate PS driver that comes with the operating system.
PDEs
PDEs (Printer Dialog Extensions), in combination with the Apple LaserWriter Driver for OS X,
allow you to gain access to the printer features and allow the computer to communicate with the
printer. An installation program for the PPDs, PDEs, and other software is provided on the
CD-ROM. Use the Apple LaserWriter driver that comes with the operating system.
HP LaserJet Utility
The HP LaserJet Utility allows control of features that are not available in the driver. The
illustrated screens make selecting printer features by using the Macintosh computer easier than
ever. Use the HP LaserJet Utility to do the following operations:
customize the printer control panel messages
name the printer, assign it to a zone on the network, downlo ad files and fonts, and change
most of the printer settings
set a password for the printer
use the computer to lock out functions at the prin te r c ont r ol pa ne l to pr event unauthorized
access (see the printer software Help)
configure and set the printer for IP printing
Note The HP LaserJet Utility currently is not supported for OS X, but the utility is supported for the
Classic environment.
Note The HP LaserJet Utility is not supported for the languages of Czech, Japanese, K orean, Russian,
Simplified Chinese, Traditional Chinese, or Turkish.
32 Chapter 1 Printer basics ENWW
Page 35

Software for networks
The printer software provides a link for the HP Web Jetadmin software for managing the printer.
For a summary of availab le HPnetwork installation and configuration software solution s, see the
HP Jetdirect Print Server Administrator’s Guide (included with printers that contain an HP Jetdirect print
server).
HP Web Jetadmin software
HP Web Jetadmin 6.5 is a Web-based software solution for remotely installing, monitoring, and
troubleshooting network-connected peripherals. The software's intuitive browser interface
simplifies cross-platform management of a wide range of devices, including HP and non-HP
printers. Management is proactive, allowing network administrators the ability to resolve printer
issues before users are affected. Download this free, enhanced-management software at http://
www.hp.com/go/webjetadmin. To obtain plug-ins to HP Web Jetadmin, clic k plug-ins, and then
click applications.
When installed on a host server, HP Web Jetadmin can be accessed by any client through a
supported Web browser by browsing to the HP Web Jetadmin host.
If installed on a host server, HP Web Jetadmin is available to any client through a supported
Web browser (such as Microsoft Internet Explorer 4.x or Netscape Navigator 4.x or later) by
browsing to the HP Web Jetadmin host.
HP Web Jetadmin features include:
Proactively manages devices with features such as e-mail notification, consumables status,
and configurable alerts
Remotely installs and configures devices
Conducts remote diagnostics of devices
Resource Manager plug-in manages disk drive, flash, and RAM memory, as well as the
forms and fonts stored on the hard drives of network printers
Integrated firmware download manager enables batch configuration upgrades to
HP Jetdirect print servers and selected printers to multiple device configuration
Configures multiple devices simultaneously
Task-oriented, Web-based interface (no client software required)
Automatically discovers devices on y our network
Allows you to create custom profiles and views
Easily organizes peripherals into logical groups with virtual office maps for ease of
navigation
Manages legacy devices that do not have an HPembedded Web server
Supports multiple protocols (TCP/IP and IPX)
Universal printer support manages third-party standard MIB-compliant printers
Integrated Web server runs HP Web Jetadmin without a dedicated Web server
(HP Web Jetadmin runs on Windows NT 4.0, Windows 2000 Professional, or Lin ux
operating systems, storing information in one central database)
Easily integrates with enterprise management solutions such as OpenView®, Computer
Associates (UniCenter)®, and Tivoli®
ENWW Printer software 33
Page 36

Views all devices across your network
Configures all devices within a device group
Creates print paths
Intelligent Update provides LAN administrators with an easy way to add components
including new languages, device support, and application plug-ins without re-installing
HP Web Jetadmin
Enhanced asset tracking and utilization provides exportable fields such as printer
capabilities and date-settable page count
Available in 20 languages to match the HP Jetdirect products
Various levels of security
HP Jetdire ct Printer Installer for UNIX
The HP Jetdirect Printer Installer for UNIX is a simple printer installation utility for HP-UX and
Solaris networks. It is available for download at http://www.hp.com/support/net_printing
.
34 Chapter 1 Printer basics ENWW
Page 37

2
Printing tasks
Overview
This section presents basic printing tasks, such as:
“Selecting the output bin” on page 36
“Stapling documents” on page 39
“Loading trays” on page 42
“Selecting which tray is used for printing” on page 46
“Selecting the correct fuser mode” on page 50
“Printing envelopes” on page 51
“Printing special paper” on page 57, for paper such as letterhead and transparencies
“Printing both sides of paper (optional duplexer)” on page 64
This section also introduces some
“Collating (mopying)” on page 68 for printing multiple originals
“RIP ONCE” on page 68
“Saving printer setup information (Quick Sets)” on page 68 for different kinds of print jobs
“Fit to Page” on page 68
“Printing booklets” on page 68
“Printing a watermark” on page 69
“Printing on a different first page” on page 69
“Printing multiple pages on one sheet of paper (pages per sheet)” on page 69
“Using job-storage features” on page 70
advanced printing tasks, such as:
ENWW Overview 35
Page 38

Selecting the output bin
The printer has these output locations: the to p (st anda rd) out put b in, t he re ar outpu t bin, and the
optional stacker or stapler/stacker.
Printing to the top (standard) output bin
The top output bin collects paper face-down, in the correct order. The top output bin should be
used for most print jobs, in cluding transp arencies. To use the top output bin, be sure that the rear
output bin is closed. To avoid paper jams, do not open or close the rear output bin while the
printer is printing.
36 2 Printing tasks ENWW
Page 39

Printing to the rear output bin
The printer always prints to the rear output bin if it is open. Paper printed to this bin will be face
up, with the last pa ge on top (reverse order).
Printing from tray 1 to the rear output bin provides the straightest paper path. Opening the rear
output bin might improve performance with the following items:
envelopes
labels
small custom-size paper
postcards
paper heavier than 120 g/m2 (32 lb)
To open the rear output bin, grasp the handle at the top of the bin. Pull the bin down, and slide
out the extension.
Opening the rear output bin disab les the op tional du ple xer (if installed) and the t op output b in. To
avoid paper jams, do not open or close the rear output bin while the printer is printing.
Printing to the optional stacker or stapler/stacker
The optional stack er or opt ional stapler/s tac ker can hold up t o 500 sheets of paper (20-lb paper).
The stacker accepts standard and custom paper sizes. The stapler/stacker accepts standard
and custom paper sizes, but only letter, legal, and A4 sizes can be stapled. Do not try to send
other types of print media, such as labels or envelopes.
When a stapler/stacker is installed, the printer automatically rotates the printed images 180° on
all paper sizes, regardless of whether the job is stapled. Paper types that must be printed in the
correct orientation (such as letterhead or prepunched paper) might need to be loaded in a
different direction. See “Orientation of paper when a stapler is installed” on page 38.
To print to the optional stacker or optional stapler/st ac k er, select the option in th e progr am, in th e
printer driver, or at the printer control panel. (Before you use the optional stacker or optional
stapler/stacker, ensure that the printer driver is set to recognize it. You need to set this setting
only once. See the printer driver online Help for details.)
For more information about supported paper, see “Supported sizes and weights of paper” on
page 183. For more information about stapling, see “Stapling documents” on page39.
ENWW Selecting the output bin 37
Page 40

Orientation of paper when a stapler is installed
All
T
When an optional stapler/stack er is installed, the printer automatically rota tes the printed images
180° on all paper sizes, even if the job is not stapled. If you are printing on paper that requires a
specific orientation (such as letterhead, preprinted paper, prepunched paper, and paper with
watermarks), make sure that the paper is loaded correctly in the tray. The correct orientation of
the paper in the trays is shown below.
Tray 1 single-sided All other trays
single-sided
For single-sided printing and stapling from tray 1, load the front sid e facing up and the top edge
toward you. For single-sided printing and stapling from all other trays, load the front side facing
down and the top edge toward the printer.
ray1 duplex
(2-sided)
For duplex (two-sided) printing and stapling from tray 1, load the front side facing down and the
top edge toward the printer. For duplex printing and stapling from all othe r trays, load the front
side facing up and the top edge toward you.
other trays duplex
(2-sided)
38 2 Printing tasks ENWW
Page 41

Stapling documents
The optional stapler/stacker can staple jobs of up to 15 sheets of paper (20-lb paper). The
stapler can staple letter-, A4-, or legal-size paper.
Paper weight can range from 60 to 120 g/m2 (16 to 32 lb). Heavier paper might have a
stapling limit of fewer than 15 sheets.
If the job you w ant stapled consists of o nly one sheet, or if it consists of more t han 15 sheets,
the printer will print the job to the bin, but the printer will not staple the job.
The stapler supports paper only. Do not try to staple other types of print media, such as
transparencies or labels.
When you are ready to have the printer staple a document, select stapling in the software. You
can usually select the stapler in your program or printer driver, although some options might be
available only in the printer driver. Where and how you make selections depends on your
program or printer driver.
If you cannot select the stapler in the pr ogram or printer driver, select the stapler at the printer
control panel. (You might need to configure the printer driver to recognize the optional sta pler/
stacker. You need to set this setting only once. See the printer driver online Help for details.)
The stapler will accept print jobs if it is out of staples, but the pages will not be stapled. The print
driver can be configured to disabl e the staple option if staples are out.
To select the stapler in the software (Windows)
1 On the File menu, click Print, and then click Properties.
2 Select the stapler according to which driver you are using:
• PCL: On the Finishing tab, select Staple.
• PS: On the Advanced tab, open the Document Options section, open the Printer
Features section, select Stapling Options/Output Destinations, and then select One
Staple Angled/Stapler.
To select the stapler in the software (Mac)
1 On the File menu, click Print, and then select Finishing from the select able prin t op tio ns.
2 In the Output Destination dialog box, select the Stapler option.
3 In the Stapler dialog box, select the stapler style.
ENWW St ap lin g do cu me n ts 39
Page 42

To select the stapler at the control panel
1 Press SELECT ( ) to open the menus.
2 Use U
3 Use U
P ARROW () or DOWN ARROW ( ) to scroll to CONFIGURE DEVICE, and then press
S
ELECT ().
P ARROW () or DOWN ARROW ( ) to scroll to OUTPUT SETUP, and then press SELECT
().
4 Use U
5 Use U
P ARROW () or DOWN ARROW ( ) to scroll to STAPLER/STACKER, and then press
S
ELECT ().
P ARROW () or DOWN ARROW ( ) to scroll to ONE, and then press SELECT ().
Note Selecting the stapler at the printer control panel changes the def ault setting to staple. It is possible
that all print jobs will be stapled.
40 2 Printing tasks ENWW
Page 43

1
Loading staples
Load staples if the printer control panel display prompts you with a
STAPLER LOW ON STAPLES message (the stapler has fewer than 70
staples left) or a STAPLER OUT OF STAPLES message (the stapler is
empty). If the stapler runs out of staples, jobs continue to print to the
stapler/stacker, but they will not be stapled.
To load staples
2
1 On the right side of the stapler/stacker, turn the stapler unit toward
the front of the printer until the unit clicks into the open po sition.
Grasp the blue staple-cartridge handle and pull the cartridge out of
the stapler unit.
2 Insert the new staple cartridge into the stapler unit and rotate the
stapler unit toward the rear of the printer until the unit snaps into
place.
ENWW St ap lin g do cu me n ts 41
Page 44

Loading trays
This section describes how to load the standard and optional printer trays.
1
2
3
Loading tray 1
Tray 1 is a multipurpose tray that holds up to 100 sheets of paper,
10 envelopes, or 20 index cards. The printer default is to pull paper from
tray 1 first, if it is loaded. To change this behavior, see “Customizing
tray 1 operation” on page 47.
Tray 1 provides a convenient way to print envelopes, transparencies,
custom-size paper, or other types of media without ha ving t o unload the
other trays. It can also be used just as a conv enient additional tra y. For
supported sizes of paper, see “Supported sizes and weights of paper”
on page 183.
If an optional stapler/stacker is installed, the printer automatically
rotates the printed images 180° on all paper sizes, even if the job is not
stapled. If you are printing on paper that requires a specific orientation
(such as letterhead, preprinted paper, prepunched paper, and paper
with watermarks), make sure that the paper is loaded correctly in the
tray. (See “Orientation of paper when a stapler is installed” on page 38.)
Note
The printer might print at a slower speed when using tray 1.
CAUTION
To avoid paper jams, do not load trays while the printer is printing.
4
Do not fan the paper. Fanning can cause misfeeds.
To load tray 1
1 Open tray 1.
2 Pull out the tray extension.
3 Set the side guides to the correct width.
5
4 Load paper in the tray. Make sure that the paper fits under the tab s
and below the maximum-height indicators.
Note
Load paper with the front side facing up and the top, short edge toward
the printer. For information about loading special paper, see “Printing
special paper” on page 57.
5 Adjust the side guides so that they ligh tly touch the paper stack but
do not bend the paper.
42 2 Printing tasks ENWW
Page 45

1
2
Loading tray 2 or an optional 500-sheet tray
The 500-sheet tray adjusts for six standard sizes (letter, A4, legal,
executive, A5, and JIS B5), as well as for many custom sizes. (See
“Supported sizes and weights of paper” on page 183.) The printer
senses standard sizes if you set the tray guides to a standard size and
the paper knob to Standard.
If an optional stapler/stacker is installed, the printer automatically
rotates the printed images 180° on all paper sizes, even if the job is not
stapled. If you are printing on paper that requires a specific orientation
(such as letterhead, preprinted paper, prepunched paper, and paper
with watermarks), make sure that the paper is loaded corr ectly in the
tray. (See “Orientation of paper when a stapler is installed” on page 38.)
CAUTION
To avoid paper jams, do not load trays while the printer is printing.
3
4
To load tray 2 or an optional 500-sheet tray
1 Remove the tray from the printer.
2 Pinch the release that is located on the left guide and slide the side
guides to the correct paper size .
3 Pinch the release that is located on the rear paper guide and slide it
to the correct paper size.
4 On the right side of the tray, turn the knob to Standard for LTR
(letter), A4, LGL (legal), EXEC (executive), A5, or JIS B5 paper.
Turn the knob to Custom for supported custom paper sizes.
ENWW Loading trays 43
Page 46

5
5 Load paper with the front side facing down and the top ed ge t o w ard
the front of the tray.
CAUTION
Do not fan the paper. Fanning can cause misfeeds.
6 Make sure that the stack is flat at all four corners and that the t op of
the stack is below the maximum-height indicators.
6
7 Slide the tray completely into the printer.
7
44 2 Printing tasks ENWW
Page 47

1
2
Loading an optional 1,500-sheet tray
The optional 1,500 sheet tray adjusts for letter, A4, and legal sizes. The
printer automatically senses which size is loaded if the tray guides are
properly adjusted.
If an optional stapler/stacker is installed, the printer automatically
rotates the printed images 180° on all paper sizes, even if the job is not
stapled. If you are printing on paper that requires a specific orientation
(such as letterhead, preprinted paper, prepunched paper, and paper
with watermarks), make sure that the paper is loaded corr ectly in the
tray. (See “Orientation of paper when a stapler is installed” on page 38.)
CAUTION
To avoid paper jams, do not load trays while the printer is printing.
To load an optional 1,500-sheet tray
3
1 Open the door of the 1,500-sheet tray.
2 If there is paper in the tray, remove it. The guides cannot be
adjusted in the next st ep, when paper is in the tray.
3 Pinch the guides at the front of the tra y an d slide them to the correct
paper size.
4 Load paper with the front side facing down and the top edge toward
the front of the tray.
4
CAUTION
Do not fan the paper. Fanning can cause misfeeds.
5 Make sure that the height of the stack does not exceed the
maximum-height indicators on the guides and th at t he fron t ed ge of
the stack is aligned with the arrows.
5
6
6 Close the door on the tray.
ENWW Loading trays 45
Page 48

Selecting which tray is used for printing
You can select how the printer pulls paper from the trays.
Understanding tray order
When the printer receives a print job, it selects the tray by trying to match the requested paper
type and size with what has been loade d in th e tr ays. Using an “autoselect” process, it searches
all availab le tr a ys f or the paper th at satisfies the request, sta rting with the bottom tray and ending
with the top tray (tray 1). The printer begins printing the job as soon as it finds the proper type/
size.
Note The “autoselect” process occurs only if no specific tray is requested for the job. If a specific tray
is requested, the job prints from the requested tray.
If paper is loaded in tray1 and tray 1 is set TRAY 1 TYPE=ANY and TRAY 1 SIZE=ANY on the
Paper Handling menu, the printer will always pull paper from tray 1 first. See “Customizing
tray 1 operation” on page 47 for more information.
If the search fails, a message appears on the printer control panel display req uesting that
you load the correct paper type/size. You can load that paper type/size, or you can override
the request by selecting a different type/size at the printer control panel.
If a tray runs out of paper during a print job, the printer automatically switches to any tray that
contains the same paper type/size.
The autoselect process changes somewhat if you customize t ray 1 operation (as explained in
“Customizing tray 1 operation” on page 47) or set tray 1 for manual feed (as explained in
“Manually feeding paper from tray 1” on page 49).
46 2 Printing tasks ENWW
Page 49

Customizing tray 1 operation
The printer can be set to print from tray 1 as long as it is loaded, or to print only from tray 1 if the
type of paper loaded is specifically requested. (See “Paper Handling menu” on page 154.)
Setting Explanation
TRAY 1 TYPE=ANY
TRAY 1 SIZE=ANY
TRAY 1 TYPE or
SIZE= a type other
than ANY
Means that the printer usually pulls paper from tray 1 first unless it is empty or
closed. If you do not keep paper in tray1 all the time, or you use tray 1 only for
manually feeding paper, keep the default setting of TRAY 1 TYPE=ANY and TRAY 1
SIZE=ANY on the Paper Handling menu.
Means that the printer treats tray 1 like the other tra ys . Instead of looking for paper in
tray 1 first, the printer pulls paper from the tray that matches type and size settings
selected from the software.
In the printer driver, you can select paper from any tray (including tray 1) by type,
size, or source. To print by type and size of paper, see “Printing by type and size of
paper (locking trays)” on page 48.
You can also determine whether the printer displays a prompt asking you if it can pull pa per from
tray 1 if it cannot find the type and size you requested in another tray. You can set the printer to
always prompt yo u before pulling from tray 1 or only prompt you if tray 1 is empty. Set the USE
REQUESTED TRAY setting on the System Setup submenu of the Configure Device menu. See
“USE REQUESTED TRAY” on page 162.
ENWW Selecting which tray is used for printing 47
Page 50

Printing by type and size of paper (locking trays)
Printing by type and size is a way to be sure that print jobs always print on the paper that you
want. You can configure the trays for the type (such as plain or letterhead) and size (such as
letter or A4) loaded in them.
If you configure the trays this wa y and th en select a certain type and size in the printer driver, the
printer automatically selects the tra y loade d with that type or size; you no longer ha ve to select a
specific tray (selecting by source). Configuring the printer this way is especially helpful if the
printer is shared, and more than one person loads or removes paper frequently.
Some older model printers have a feature that “locks out” trays to prevent printing on the wrong
paper. Printing by type and size of paper eliminates the need to lock out trays. For more
information about type and size, see “Supported sizes and weights of paper” on page 183 and
“Supported types of paper” on page 187.
Note To print by type and size from tray 2, the optional trays, or the optional envelope feeder, it might
be necessary to unload tray 1 and close it, or set TRAY 1 TYPE and TRAY 1 SIZE to types other
than ANY on the Paper Handling menu at the printer control panel. For more information, see
“Customizing tray 1 operation” on page 47.
Settings in a program or the printer driver override control panel settin gs. (Program settings
generally override printer driver settings.)
To print by type and size of paper
1 Be sure to load the trays correctly. (See the se ctions about loading paper, starting with
“Loading trays” on page 42.)
2 At the printer control panel, open the Paper Handling menu. Select the paper type for each
tray. If you are unsure which type you are loading (such as bond or recycled), check the
label on the package of paper.
3 Select the paper
• Tray 1: Set the paper size on the Paper Handling menu if the printer is set to TRAY 1
TYPE= a type other than ANY. If custom paper is loaded, also set the custom-paper siz e on
the Paper Handling menu. (For more information, see “Guidelines for custom-size paper”
on page 62.)
• Tra y 2 and optional 500-sheet trays: Standard paper siz es are aut omatica lly dete cted if
paper is properly loaded in the tray and the guides are properly adjusted. (See “Loading
tray 2 or an optional 500-sheet tray” on page 43 fo r inf ormation about tr a y adjustme nts.) I f
custom paper is loaded, set the knob in the tra y to Custom and set the custom -paper size
on the Paper Handling menu. (For more information, see “Guidelines for custom-size
paper” on page 62.)
• Optional 1,500-sheet tray: Standard paper sizes are automatically detected if paper is
properly loaded in the tray and the guides are properly adjusted. (See “Loading an
optional 1,500-sheet tray” on page 45 for information about tray adjustments.) Custom
paper is not supported.
• Optional envelope feeder: Set the paper size on the Paper Handling menu.
4 In the program or printer driver, select the type and size of paper.
size settings at the printer control panel.
Note The type and size settings can a lso be configured in the HP Web Je tadmin software for ne tworked
printers.
48 2 Printing tasks ENWW
Page 51

Manually feeding paper from tray 1
The manual feed feature is another way of printing on special paper from tray 1. Setting MANUAL
FEED to ON either in the printer driv er or at the printer control pan el stops the printer after each job
is sent, allowing you time to load special paper or other print media in tray 1. (See “MANUAL
FEED” on page 158.) Press
If there is already paper in tray 1 when you send the print job , and the printer control panel has
TRAY 1 TYPE=ANY and TRAY 1 SIZE=ANY as the default configuration for tray 1 operation, the
printer will
and TRAY 1 SIZE to types other than ANY on the Paper Handling menu.
not stop and wait for paper to be loaded. To have the printer wait, set TRAY 1 TYPE
PAUSE/RESUME to continue printing.
If you have selected
printer driver, and all print jobs sent to the printer will request manually fed paper in tray 1 unless
a specific tray has been sele cted in the printer driver. If this feature is to be used only
occasionally, it is best to set
manual feed option in the printer driver on a job-by-job basis.
Note If the SIZE and TYPE are set to ANY, and MANUAL FEED PROMPT is set to UNLESS LOADED, then the
paper will be pulled from tray 1 without prompting. If MANUAL FEED PROMPT is set to ALWAYS, then
the printer will prompt you to load paper, even if tray 1 is set to TYPE=ANY and SIZE=ANY. (See
“MANUAL FEED PROMPT” on page 162.)
MANUAL FEED=ON at the printer control panel, this setting will override the
MANUAL FEED=OFF at the printer control panel and to select the
ENWW Selecting which tray is used for printing 49
Page 52

Selecting the correct fuser mode
The printer automatically adjusts the fuser mode based on the paper t ype to which the tra y is set .
For e xample, heavy paper (such as ca rd st oc k) might n eed a high er fuser -mode set ting (suc h as
HIGH 2) in order to make the toner adhere better to the page, but transparencies need the LOW
fuser-mode setting to avoid damage to the printer. The def aul t fuse r mo de is NORMAL for all types
except transparencies (default is LOW), and rough p aper (default is HIGH 1). The default setting
generally provides the best performance for most print media types.
The fuser mode can be changed only if the paper type has been set for the tray that you are
using. (See “Printing by type and size of paper (loc king trays)” on page 48.) After the paper type
has been set for the tr ay, th en the fuser mode for that type can be changed on the Print Quality
submenu at the printer control panel. (S ee “Print Quality submenu” on page 159.)
Note Using a higher fuser mode (such as HIGH 1 or HIGH 2) improves the ability of the toner to adhere
to paper, but it might cause other problems, such as excessive curl.
The printer might print at a slower speed when the fuser mode is set to HIGH 1 or HIGH 2.
To reset the f user modes to the default sett ings, open the Configure Device menu at the printer
control panel. On the Print Quality submenu, select FUSER MODES, and then select RESTORE
MODES.
50 2 Printing tasks ENWW
Page 53

Printing envelopes
You can print envelopes from tray 1 or the optional envelope feeder. Tray 1 holds up to 10
envelopes and supports standard or custom siz es. The optional envelope feeder holds up to
75 envelopes and supports only standard envelope sizes.
For printing on any size of envelope, make sure to set the margins in your program at least
15 mm (0.6 inch) from the edge of the envelope.
Printing performance depends on the construction of the envelope. Always test a few sample
envelopes before purchasing a large quantity. For envelope specifications, see “Envelopes” on
page 191.
WARNING! Never use envelopes with coated linings, exposed self-stick adhesives, or other synthetic
materials. These items can emit no xious fumes.
CAUTION Envelopes with clasps, snaps, windows, coated linings, exposed self-stick adhesives, or other
synthetic materials can severely damage the printer.
To avoid jamming and possible printer damage, never try to print on both sides of an envelope.
Before you load envelopes, make that sure the y are flat an d not dam age d or stuck together. Do
not use envelopes with pressure-sensitive adhesive.
Note The printer might print at a slower speed when printing envelopes.
ENWW Printing envelopes 51
Page 54

1
Loading envelopes in tray 1
Many types of envelopes can be printed from tray 1. Up to 10 can be
stacked in the tray. (See “Envelopes” on page 191 for specifications.)
To load envelopes in tray 1
1 Open tray 1, but do not pull out the extens ion. (Most en v elop es f eed
best without the extension. Howev er, oversize envelopes might
2
need the extension.)
2 Load up to 10 envelopes in the center of tray 1 with the front side
facing up, and the postage-end toward the printer. Slide the
envelopes into the printer as f ar as they will go without forcing them.
3 Adjust the guides to touch the envelope stack without bending the
envelopes. Make sure that the envelopes fit under the tabs and
maximum-height indicators on the guides.
3
4 To red uce curl and jams, open the rear output bin to use the
straight-through paper path. (Se e “Printing to the rear output bin” on
page 37.)
52 2 Printing tasks ENWW
Page 55

Feeding envelopes automatically (optional envelope feeder)
With the optional envelope feeder, the printer will automatically feed up to 75 standard-size
envelopes. To order an optional envelope feeder, see “Ordering information” on page 17.
Print only on envelopes approved for use in the printer. (See “Envelopes” on page 191.)
Before you use the optional envelope feeder, ensure that the printer driver is set to
recognize it. (You need to set this setting only once. See the printer driver online Help for
details.)
Ensure that you are familiar with the parts of the optional envelope fe eder, as shown below.
1
1 Release lever
2 Envelope weight
3 Tray extension
4 Guides
2
4
3
ENWW Printing envelopes 53
Page 56

1
Installing the optional envelope feeder
Use these steps to install the optional envelope feeder onto the printer.
To install the optional envelope feeder
1 Open tray 1.
2 Remove the plastic envelope-entrance cover from the printer.
2
3
3 Insert the optional envelope feeder firmly into the printer until it
latches into position. Pull outward on the optional envelope feeder
to be sure that it is securely in place.
54 2 Printing tasks ENWW
Page 57

1
Removing the optional envelope feeder
Use these steps to remove the optional envelope feeder from the
printer.
To remove the optional envelope feeder
1 Press the release button that is located on the left side and pull the
optional envelope feeder away from the printer.
2
2 Replace the plastic envelope-entrance cover in the printer and
close tray 1.
ENWW Printing envelopes 55
Page 58

1
Loading envelopes in the optional envelope feeder
Use these steps to load envelopes in the optional envelope feeder.
To load envelopes in the optional envelope feeder
1 Fold down the envelope-feeder tray. Lift the envelope weight.
2
3
4
2 Squeeze the release lever that is located on t he left envelope guide
and slide the guides apart.
3 Load envelopes with the front side facing up, and the postage-end
toward the printer. (Stack envelopes no higher than the arrows on
the guides.) Slides the envelopes into the printer as far as they will
go without forcing them. The envelopes at the bottom of the stack
should slide in slightly further than the envelopes at the top of the
stack.
4 Adjust the guides to touch the en velopes without bending them.
5 Lower the en velope weight onto the envelopes.
6 To red uce curl and jams, open the rear output bin to use the
straight-through paper path. (Se e “Printing to the rear output bin” on
page 37.)
Note
Select the envelope size in one of these locations, trying them in this
order: in the program, in the printer driver, or on the Paper Handling
menu at the printer control panel. (See “Paper Handling menu” on
page 154.)
5
56 2 Printing tasks ENWW
Page 59

Printing special paper
This section discusses printing on types of paper that require special handling:
“Printing labels” on page 58
“Printing transparencies” on page 59
“Printing letterhead, prepunched, or preprinted paper (single-sided)” on page 60
“Printing on paper with a special finish” on page 61
“Printing small sizes, custom sizes, or heavy paper” on page 62 and “Setting custom paper
sizes” on page 63
“Setting custom paper sizes” on page 63
ENWW Printing special paper 57
Page 60

Printing labels
Use only labels recommended for use in laser printers. Make sure that labels meet the correct
specifications. (See “Labels” on page 190.)
Do:
Print a stack of up to 50 label sheets from tray 1 or a stack of up to 100 label sheets from
other trays.
Load labels in tray 1 with the front side facing up, and the top, short edge tow ard the printer.
For other trays, load paper with the front side facing down, and the top edge toward you.
Try opening the rear output bin to reduce curl and other problems. (See “Printing to the rear
output bin” on page 37.)
Do not:
Load the trays to maximum capacity because labels are heavier than paper.
Use labels that are separating from the backing sheet, wrinkled, or damaged in any way.
Use labels that have the backing sheet exposed. (Labels must cover the entire backing
sheet with no exposed spaces.)
Feed a sheet of labels through the printer more than once. The adhesive backing is
designed for only one pass throug h the printer.
Print on both sides of labels.
Print on sheets from which labels have been removed.
CAUTION Failure to follow these instructions can damage the prin te r.
58 2 Printing tasks ENWW
Page 61

Printing transparencies
Use only transparencies recommended for use in laser printers. F or tr anspare ncy specifications ,
see “Transparencies” on page 190.
At the printer control panel, open the Configure De vice menu. On the Print Quality submenu,
select FUSER MODES. Make sure that the fuser mode is set to TRANSPARENCY=LOW.
In the printer driver, set the paper type to Transparency.
At the printer control panel, open the Paper Handling menu. Set the tray type to
TRANSPARENCY for the tray that you are using.
CAUTION Failure to set the fuser mode to LOW can permanently damage the printer and fuser.
Load transparencies face up in tray 1 with the top toward the printer. Up to
50 transparencies can be loaded in tray 1.
A stack of up to 100 transparencies can be printed from tray 2 and the optional trays
(although stacking more than 50 at a time is not recommended). Because transparencies
are heavier than paper, do not load trays to maximum capacity. Load them with the side to
be printed facing down, and the top, short edge toward you.
To prevent tran spar encies f rom be co ming too ho t or sticking together, use the top output bin
and remove each transparency from the output bin before printing another.
Print only on one side of a transparency.
Place transparencies on a flat surface to cool after removing them from the printer.
If two or more transparencies feed at the same time, try fanning the stack.
Do not feed transparencies through the printer more than once.
ENWW Printing special paper 59
Page 62

Printing letterhead, prepunched, or preprinted paper
(single-sided)
When printing letterhead, prepunched, or preprinted paper, it is important to orient the paper
correctly. Follow the guidelines in this section for printing on one side only. For duplexing
guidelines, see “Guidelines for printing both sides of paper” on page 65.
Note For more information about paper with a special finish, such as laid or bond paper, see “Printing
on paper with a special finish” on page 61.
For tray 1, load paper with the front side facing up, and the top, short edge toward the printer.
Orientation for tr ay 1
For tray 2, optional 500-sheet tr ays, and the optional 1,500-sheet tray, load paper with the fron t
side facing down, and the top, short edge toward you.
Orientation for all other trays
60 2 Printing tasks ENWW
Page 63

Printing on paper with a special finish
Some paper has a special finish, such as laid paper, bond paper, and cockled paper. These
types of paper can cause issues in regard to toner adhesion and print quality. Follow these
guidelines when printing on paper with a special finish.
At the printer control panel, open the Configure De vice menu. On the Print Quality submenu,
select FUSER MODES, and then select the paper type you are using (such as BOND). Set the
fuser mode to HIGH 1 or HIGH 2. HIGH 2 provides better toner adhesion and optimal print
quality for paper with a highly textured finish. Open the Paper Handling menu and set TRAY
TYPE to HIGH 1 or HIGH 2 to enable the fuser mode.
Note The printer might print at a slower speed when set at HIGH 1 or HIGH 2.
Use the HIGH 1 and HIGH 2 settings only if you are experiencing toner-adhesion problems. The
HIGH 1 and HIGH 2 settings might increase curl and jam problems.
Some makers of these types of paper are now coating one side of the paper to enhance
toner adhesion and print quality. To take advantage of this feature, make sure to load the
paper correctly. The side on which you can read the watermark correctly is the front side, or
the side to be printed.
For tray 1, load paper with the front side facing up, and the top, short edge toward the
printer.
Orientation for tray 1
For tray 2, optional 500-sheet trays, and the optional 1,500-sheet tray, load paper with the
front side facing do wn, and the top, short edge toward you.
Orientation for all other trays
ENWW Printing special paper 61
Page 64

Printing small sizes, custom sizes, or heavy paper
Paper heavier than 120 g/m2 (32 lb) should be printed only from tray 1. Custom-size paper can
be printed from tray 1, tray 2, or an optional 500-sheet tray.
Note The printer might print at a slower speed when printing small sizes, custom sizes, and heavy
paper.
For more inf ormation about paper with a special fin ish, such as laid or bond pape r, see “Printing
on paper with a special finish” on page 61.
Weight and sizes
See below for specificat ions wh en printing on cu stom or h eavy paper . For more inf ormation, see
“Paper specifications” on page 182.
Tray Minimum size Maximum size Supported weights
Tray1 76by 127mm
(3 by 5 inches)
Tra y2 and optional
500-sheet tray
148 by 210 mm
(5.8 by 8.2 inches)
216 by 356 mm
(8.5 by 14 inches)
216 by 356 mm
(8.5 by 14 inches)
60 to 200 g/m
(16to53 lb)
60 to 120 g/m
(16to32lb)
2
2
Guidelines for heavy paper
Follow these guidelines when printing on heavy paper:
On the Paper Handling menu, set TRAY TYPE=ROUGH for the tray that you are using.
Some heavy paper requires that you also select a higher fuser mode to help prevent
unwanted toner from rubbing off onto the paper. At the printer control panel, open the
Configure Device menu. On the Print Quality submenu, select FUSER MODES, and then select
ROUGH=HIGH 2. The HIGH 2 setting might increase curl and jam problems.
To reduce curl and othe r problems, print heav y paper f rom t r ay 1 to the rear output bin. ( See
“Printing to the rear output bin” on page 37.)
Guidelines for custom-size paper
Follow these guidelines when printing on any custom-size paper:
Feed short-edge first.
In your program, set page margins at least 4.23 mm (0.17 inch) away from the edges.
Set custom size in the program, in the printer driver, or at the printer control panel. Make
sure that you set the switch in the tray to Custom. (See “Setting custom paper sizes” on
page 63.)
Additional guidelines for small or narrow paper
Follow these addit ional guidelines when printing on small or narrow paper:
Do not attempt to print on paper smaller than 76 mm (3 inches) wide or 127 mm (5 inches)
long.
To reduce curl and other prob lems , print very small custom-size paper from tr ay 1 to the rear
output bin. (See “Printing to the rear output bin” on page 37.)
HP does not recommend printing large quantities of small or narrow paper. Printing large
quantities of small or narrow paper can cause toner to leak from the print cartridge and
damage the printer or cause print-quality problems.
62 2 Printing tasks ENWW
Page 65

Setting custom paper sizes
When custom paper is loaded, size settings need to be selected in the program (the preferred
method), in the printer driver, or at the printer control panel. To reduce curl and other problems,
heavy paper and very small custom-size paper should be printed from tray 1 to the rear output
bin. (See “Printing to the rear output bin” on page 37.)
X (front edge)
Feed short
edge first
Y (side edge)
If the settings are not available in your program, set the custom paper size at the printer control
panel.
To set custom paper sizes
1 If you loaded a 500-sheet t ray with custom paper, be sure that the knob is set to Custom.
(See “Loading tray2 or an optional 500-sheet tray” on page 43.)
2 Press S
3 Use U
S
4 Use U
[N] is the number of the tray), and then press S
5 Use U
6 Use U
press S
custom paper.
7 Use U
X dimension (the front edge of the paper, as shown in the figure above). The Xdimension
can be 76 to 216 mm (3 to 8.5 inches).
8 Use U
Y dimension (the side edge of the paper, as shown in the figure above). The Y dimension
can be 127 to 356 mm (5 to 14 inches). F or e xam ple, if the cust om paper is 2 03 by 254 mm,
set X=203 mm and Y=254 mm.
ELECT ( ) to open the menus.
P ARROW () or DOWN ARROW ( ) to scroll to PAPER HANDLING, and then press
ELECT ().
P ARROW () or DOWN ARROW ( ) to scroll to TRAY 1 SIZE or TRAY [N] SIZE (where
ELECT ().
P ARROW () or DOWN ARROW ( ) to scroll to CUSTOM, and then press SELECT ().
P ARROW () or DOWN ARROW ( ) to scroll to INCHES or MM (millimeters), and then
ELECT ( ). This selects the measurement units for determining the size of your
P ARROW ( ), then DOWN ARROW ( ), and then press SELECT ( ) to set the
P ARROW ( ), then DOWN ARROW ( ), and then press SELECT ( ) to set the
ENWW Printing special paper 63
Page 66

Printing both sides of paper (optional duplexer)
The printer can automatically print on both sides of paper with an optional duplexer. This is
called duplexing. The optional duplexer supports the following paper sizes: letter, legal,
executive, A4, A5, and JIS B5.
The duplex slot co v er that is located at the r ear of the p rinter must be re mov ed when the o ptional
duplexer is installed. See the documentation included with the optional duplexer for installation
instructions. When duplexing very complex pages, additional memory might be required. (See
“Printer memor y an d expansion” on pa ge 169.)
When the printer prints using the duplexer, the page partially protrudes into the top output bin,
and then reverses to print on the second side.
Optional duplexer installed Optional duplexer removed
64 2 Printing tasks ENWW
Page 67

Guidelines for printing both sides of paper
CAUTION Do not print on both sides of labels, transparencies, envelopes, vellum, custom sizes, or paper
heavier than 28 lb (105 g/m2) because jams or damage to the printer might occur.
Note the following guidelines:
Before you use the optional duplexer, ensure that the printer driver is set to recogni ze it.
(You need to set this setting only once. See the printer driver online Help for details.)
To print on both sides of paper, make the selection in your program or the printer driver.
(See the printer driver online Help.)
If you do not use the printer driver tha t came with the printer, you might need to change the
duplex setting at the printer cont rol panel, set
Configure Device menu). Also on the Printing submenu, set DUPLEX BINDING to LONG EDGE or
SHORT EDGE. (For more information, see “Layout options for printing both sides of paper” on
page 67.)
The rear output bin must be closed to use the optional duplexer. (See “Selecting the output
bin” on page 36.) Opening the rear output bin disables the optional duplexer.
HP does not recommend manually duplexing by printing one side of a page, and then
feeding the page through the printer again to print the other side. When printing using the
optional duplexer, t he printer automatically makes necessary adjustments to reduce jams
and print-quality problems. If paper is refed through the printer, the printer is not able to
make these adjustments.
DUPLEX=ON on the Printing submenu (on the
ENWW Printing both sides of paper (optional duplexer) 65
Page 68

Orientation of paper for duplexing
Several kinds of paper (such as letterhead, preprinted paper, prepunched paper, and paper wit h
watermarks) require a specific orientation when you duplex. The optional duple xer prints the
second side of paper first. The proper orientation of the paper in the trays is shown below.
Tray 1 All other trays
For tray 1, load the front side facing down and the top edge toward you. For all other trays, load
the front side facing up and the top edge toward the printer.
66 2 Printing tasks ENWW
Page 69

Layout options for printing both sides of paper
The four duplex orientation options are shown belo w. These options can be selected in the
printer driver (the preferred method) or at the printer control p anel. (If you use the printer control
panel, go to Configure Device menu, then the Printing submenu. Sele ct DUPLEX BINDING. On the
PCL submenu, select a setting for ORIENTATION.)
1. Long-edge
portrait
2. Long-edge
2
landscape*
2
2
3
5
25
3
5
3
5
3
4. Short-edge
portrait*
3. Short-edge
landscape
1. Long-edge portrait This is the default printer setting, and the most common layout used, with
every printed image oriented right-side-up. Facing pages are read from top
to bottom on the left page, then from top to bottom on the right page.
2. Long-edge landscape* This layout is often used in accounting, data processing, and spreadsheet
programs. Every other printed image is oriented upside-down. Facing pages
are read continuously from top to bottom.
3. Short-edge landscape Each printed image is oriented right-side-up. Facing pages are read from
top to bottom on the left page, then from top to bottom on the right page.
4. Short-edge portrait* This layout is often used with clipboards. Every other printed image is
oriented upside-down. Facing pages are read continuously from top to
bottom.
* When using Windows drivers, select Flip Pages Up to get the designated binding options.
ENWW Printing both sides of paper (optional duplexer) 67
Page 70

Using printer driver features
When you print from a program, many printer features are available in the printer driver. To gain
access to Windows printer drivers, see “Gain access to the Windows printer driver” on page 31.
Note Certain printer features might not be available with all drivers. Check the drivers for available
options.
Settings in a program or the printer driver override control panel settin gs. (Program settings
generally override printer driver settings.)
Collating (mopying)
The Printer Collation feature allows multiple original prints (mopying) and provides you the
following advantages:
reduced network traffic
faster return to program
all documents are original
The default driver setting for the collating feature is on (Mopier Enabled). See the program or
printer driver online Help for specific steps to turn off collating.
RIP ONCE
RIP ONCE allows the print job to be processed one time at the printer. If your printer driver
includes this capability, the RIP ONCE function creates an image of the page and then saves a
compressed image of the page into memory. Pages are printed by decompressing page images
without pausing to process the print job again. The print job prints exact ly the same every time
because the compressed image does not depend on any other printer data.
Saving printer setup information (Quick Sets)
Printer drivers allow you to save the printer settings you use most often as the default settings.
For example, the driver might be set to print on letter size-paper with portrait orientation and
automatic tray selection (from the first available tray).
Some versions of the printer driver allow you to save printer settings for multiple kinds of print
jobs. For example, you might want to create a Quick Set for envelopes, or for printing the first
page of a document on letterhead.
See the printer driver online Help for mor e information about the Quick Sets feature.
Fit to Page
Some versions of the printer driver include a feature called Fit to Page that lets you scale the
page image from any page size to any page size. You can do this either by a numeric
percentage or by specifying a different paper size scale.
See the printer driver online Help for more information about the Fit to Page feature.
Printing booklets
Some versions of the printer driver let you control the printing of booklets when duplexing. You
can select binding on the left or right side on Letter, Legal, or A4 paper size.
See the printer driver online Help for more information about the printing booklets feature.
68 2 Printing tasks ENWW
Page 71

Printing a watermark
A watermark is a notice, such as “Confidential,” printed in the background of each page in a
document. Check the driver for available options, or see the printer driver online Help for more
information.
Printing on a different first page
Follow these instructions for printing a first page that is different from other pages in the print job.
1 For Windows, select Use different paper for first page in your printer driver. Select one
tray (or Manual Feed) for the first page and one of the other trays for the remaining pages.
Place the paper for the first page in tray 1 (or whichever tray you selected). (For manual
feed, place paper in tray 1 after the job is sent to the printer and the printer requests paper.)
For loading tray 1, place the paper with the side to be printed up and the top facing the rear
of the printer.
For Macintosh computers, select First from and Remaining from in the Print dialog box.
Note Where and how you mak e selections depends on your prog ram or associated printer driver . Some
options might be availa ble only in the printer driver.
2 Load the paper for the rema ining pages of the document in another tray. You can select the
first and remaining pages by type of pa per. For more information, see “Manually feeding
paper from tray 1” on page 49.
Printing multiple pages on one sheet of paper (pages per sheet)
You can print more than one page on a single sheet of paper. This fea ture is available in some
printer drivers, and provides a cost-effectiv e way to print draft pages.
To print more than one page on a sheet of paper, look for a Layout or Pages Per Sheet option
in the printer driver.
ENWW Using printer driver features 69
Page 72

Using job-storage features
The printer supports four distinct job-storage features that allow printing to be initiated from the
printer control panel after the print job is sent from the computer: quick copy, proof and hold,
private job, and stored job. Some features are available without an optional hard disk installed,
but to use all of the job-storage features, you must install an optional hard disk accessory in the
printer and properly configure the drivers. (For information about ordering accessories, see
“Ordering information” on page 17.)
To support job-storage features for complex jobs, HP recommends that you install additio nal
memory. (See “Ordering information” on page 17.)
CAUTION Make sure that you identify your jobs in the printer driver before printing. Using default names
might override previous jobs with the same default name or cause the job to be deleted.
Note If you turn the printer power off , all quick cop y, proof and hold, and private jobs are deleted. A job
can also be deleted at the printer contro l pan el.
Quick copying a job
The quick copy feature prints the requested number of copies of a job and stores a copy on the
optional hard disk or on the RAM disk, if an optional hard disk is not installed. Additional copies
of the job can be printed later. This feature can be turned off in the printer driver.
For more information about specifying the number of quick copy jobs that can be stored, see
“JOB STORAGE LIMIT” on page 162.
Note If you turn the printer power off , all quick cop y, proof and hold, and private jobs are deleted. A job
can also be deleted at the printer contro l pan el.
To print copies of a stored job
1 Press SELECT ( ) to open the menus.
2 Use U
3 Use U
4 Use U
5 Use U
6 Use U
P ARROW () or DOWN ARROW ( ) to scroll to RETRIEVE JOB, and then press SELECT
().
P ARROW () or DOWN ARROW ( ) to scroll to the user name that you want, and then
press S
S
S
ELECT ().
P ARROW () or DOWN ARROW ( ) to scroll to the user or job name, and then press
ELECT ( ).
P ARROW () or DOWN ARROW ( ) to scroll to PRINT, and then press SELECT ().
P ARROW () or DOWN ARROW ( ) to select the number of copies, and then press
ELECT ().
70 2 Printing tasks ENWW
Page 73

Deleting a quick copy job
When you send a quick copy job, the printer overwrites any previous jobs with the same user
and job name. If no quick copy job is already stored under the same user and job name and the
printer needs additional space, the printer might delete other quick copy jobs starting with the
oldest job. The default number of quick copy jobs that can be stored is 32. The number of quick
copy jobs that can be stored is set at the printer control panel. (See the description of “JOB
STORAGE LIMIT” on page 162.)
Note If you turn the printer power off, all quick copy, proof and hold, and private jobs are deleted. A
quick copy job can also be deleted at the printer control panel (see belo w) or in HP Web Jetadmin.
To delete a quick cop y job
1 Press SELECT ( ) to open the menus.
2 Use U
P ARROW () or DOWN ARROW ( ) to scroll to RETRIEVE JOB, and then pr ess SELECT
().
3 Use U
4 Use U
5 Use U
P ARROW () or DOWN ARROW ( ) to scroll to the user name that you w ant, and then
press S
S
ELECT ().
P ARROW () or DOWN ARROW ( ) to scroll to the user or job name, and then press
ELECT ( ).
P ARROW () or DOWN ARROW ( ) to scroll to DELETE, and then press SELECT ().
Proofing and holding a job
The proof and hold feature provides a quick and easy way to print one copy of a job for proofing
before printing the additional copies.
Note If you turn the printer power off, all quick copy, proof and hold, and private jobs are deleted.
To store the job permanently and prevent the printer from deleting it if space is needed for
something else, install an optional har d disk, and select the Stored Job option in the printer driver.
(In order to store a job, the printer must have an optional hard disk installed.)
To print the remaining copies of a held job
1 Press SELECT ( ) to open the menus.
2 Use U
P ARROW () or DOWN ARROW ( ) to scroll to RETRIEVE JOB, and then press SELECT
().
3 Use U
P ARROW () or DOWN ARROW ( ) to scroll to the user name, and th en press SELECT
().
4 Use U
5 Use U
6 Use U
P ARROW () or DOWN ARROW ( ) to scroll to the user or job name, and then press
S
ELECT ( ).
P ARROW () or DOWN ARROW ( ) to scroll to PRINT, and then press SELECT ().
P ARROW () or DOWN ARROW ( ) to scroll to the number of copies, and then press
S
ELECT ().
ENWW Using job-storage features 71
Page 74

Deleting a held job
When you send a proof and hold job, the printer automatically deletes your previous proof and
hold job. If no proof and hold job already exists with that job name, and the printer needs
additional space, the printer might delete other proof and hold jobs starting with the oldest one.
Note If you turn the printer power off, all quick copy, proof and hold, and private jobs are deleted. A
held job can also be deleted at the printer control panel.
To delete a held job
1 Press SELECT ( ) to open the menus.
2 Use U
P ARROW () or DOWN ARROW ( ) to scroll to RETRIEVE JOB, and then press SELECT
().
3 Use U
P ARROW () or DOWN ARROW ( ) to scroll to the user name, and then press SELECT
().
4 Use U
5 Use U
P ARROW () or DOWN ARROW ( ) to scroll to the user or job name, and then press
S
ELECT ( ).
P ARROW () or DOWN ARROW ( ) to scroll to DELETE, and then press SELECT ().
Printing a private job
The private printing feature lets you specify that a job is not printed until you release it using a
four-digit personal identification number (PIN) at the printer control panel. You specify the PIN in
the printer driver, and it is sent to the printer as part of the print job.
To specify a private job
To specify in the driver that a job is private, select the Private Job option and type a 4-digit PIN.
To print a private job
1 Press SELECT ( ) to open the menus.
2 Use U
P ARROW () or DOWN ARROW ( ) to scroll to RETRIEVE JOB, and then press SELECT
().
3 Use U
P ARROW () or DOWN ARROW ( ) to scroll to the user name, and then press SELECT
().
4 Use U
5 Use U
6 You are prompted to enter the PIN number. Use U
P ARROW () or DOWN ARROW ( ) to scroll to the user or job name, and then press
S
ELECT ( ).
P ARROW () or DOWN ARROW ( ) to scroll to PPINT. A lock symbol appears ne xt to
PPINT. Press S
change the first number of the PIN, and then press S
ELECT ( ).
P ARROW () or DOWN ARROW ( ) to
ELECT ( ). An * appears in place of
the number. Repeat these steps to change the remaining three numbers of the PIN.
7 Use U
P ARROW () or DOWN ARROW ( ) to scroll to the number of copies, and then press
ELECT ().
S
72 2 Printing tasks ENWW
Page 75

Deleting a private job
A private job is automatically deleted after the user releases it for printing, unless the user
selects the Stored Job option in the printer driver. (In order to store a job, the printer must have
an optional hard disk installed.)
Note If you turn the printer power off, all quick copy, proof and hold, and private jobs are deleted. A
private job can also be deleted at the printer control panel before it is ever printed.
To delete a private job
1 Press SELECT ( ) to open the menus.
2 Use U
P ARROW () or DOWN ARROW ( ) to scroll to RETRIEVE JOB, and then press SELECT
().
3 Use U
P ARROW () or DOWN ARROW ( ) to scroll to the user name, and th en press SELECT
().
4 Use U
5 Use U
P ARROW () or DOWN ARROW ( ) to scroll to the user or job name, and then press
S
ELECT ( ).
P ARROW () or DOWN ARROW ( ) to scroll to DELETE, and then press SELECT ().
(A lock symbol appears next to DELETE.)
6 You are prompted to enter the PIN number. Use U
change the first number of the PIN, and then press S
P ARROW () or DOWN ARROW () to
ELECT ( ). An * appears in place of
the number. Repeat these steps to change the remaining three numbers of the PIN.
ENWW Using job-storage features 73
Page 76

Storing a print job
You can download a print job to the optional hard disk without printing it. You can then print the
job at any time at the printer control panel. For example, you might want to download a
personnel form, calendar , time sheet, or accou nting f orm that other users can gain access to and
print.
To store a print job
To store a print job permanently on the optional hard disk, select the Stored Job option in the
driver when printing the job.
To print a stored job
1 Press SELECT ( ) to open the menus.
2 Use U
P ARROW () or DOWN ARROW ( ) to scroll to RETRIEVE JOB, and then press SELECT
().
3 Use U
P ARROW () or DOWN ARROW ( ) to scroll to the user name, and then press SELECT
().
4 Use U
5 Use U
6 Use U
P ARROW () or DOWN ARROW ( ) to scroll to the user or job name, and then press
S
ELECT ( ).
P ARROW () or DOWN ARROW ( ) to scroll to PRINT, and then press SELECT ().
P ARROW () or DOWN ARROW ( ) to scroll to the number of copies, and then press
S
ELECT ().
Deleting a stored job
Jobs stored on the optional hard disk can be deleted at the printer control panel.
To delete a stored job
1 Press SELECT ( ) to open the menus.
2 Use U
3 Use U
P ARROW () or DOWN ARROW ( ) to scroll to RETRIEVE JOB, and then press SELECT
().
P ARROW () or DOWN ARROW ( ) to scroll to the user name, and then press SELECT
().
4 Use U
5 Use U
P ARROW () or DOWN ARROW ( ) to scroll to the user or job name, and then press
S
ELECT ( ).
P ARROW () or DOWN ARROW ( ) to scroll to DELETE, and then press SELECT ().
74 2 Printing tasks ENWW
Page 77

Managing and maintaining the
3
printer
Overview
This section explains how to manage and maintain the printer.
“Using the embedded Web server” on page 76
“Managing the print cartridge” on page 80
“Configuring e-mail alerts” on page 79
“Checking the printer configuration” on page 83
“Cleaning the printer” on page 87
“Cleaning the fuser” on page 89 (cleaning manually or automatically)
“Performing preventative maintenance” on page 91
“Replacing the stapler unit” on page 92
ENWW Overview 75
Page 78

Using the embedded Web server
This printer comes equipped with an embedded W eb serve r . Use y our compute r’s standard W eb
browser to gain access to printer information provided in the embedded Web server, including:
printer control panel messages
supply levels
tray configur ation
printer control panel menu configuration
printer configuration page
supplies status page (available only if you are using gen uine HP supplies)
printer event log
printer usage (types of print jobs)
network information
instant support (troubleshooting)
product support
printer alerts
You can also use the embedded Web server to perform the print job management functions that
would usually be done at the printer control panel. These functions include:
changing printer settings
changing printer configuration
canceling print jobs
Updating embedded Web servers for multiple printers
You can use the embedded Web server plug-in for HP Web Jetadmin to configure embedded
Web server parameters, such as alerts, on multiple printers at a time. The plug-in allows for
batch configuration of all printers with both an embedded Web server and an optional hard disk
installed. To obtain this plug-in, visit http://www.hp.com/go/webjetadmin
, click plug-ins, and then
click applications.
Gaining access to the embedded Web server
Note To use the embedded Web server, you must have an IP-based network and Web browser.
Type the IP address assigned to the printer into your Web browser to gain access to the
embedded Web server. For example, if the printer IP address is 123.456.789.123, you would
enter http://123.456.789.123 into your Web browser.
If you do not know the IP address for the printer, see the printer configuration page. For more
information about printing a configurat ion page, see “Configuration page” on page 83.
76 3 Managing and maintaining the printer ENWW
Page 79

Viewing embedded Web server pages
The embedded Web server has three different sections for providing detailed information about
the printer:
Information pages
Settings pages
Network pages
The embedded Web server contents appear within three tabs located at the top of your Web
browser screen. These tabs are divided into sections that are located on the left side of the
browser. Click the section that you want to view. Under the section is a list of additional w e bsites
(Other Links) that you might use frequently.
Note Each page on the Networking tab of the embedded Web server has access to Help. For
information about a particular page, click the Help icon.
Information pages
The information pages of the embedded Web server are the informational pages for the printer.
These include:
Device status page
This page shows the printer control panel and the message that currently appears. The
P
AUSE/RESUME button also appears, so you can change the printer control panel menu
settings by using this page. Supply levels and the tray print media configuration are also
shown.
Configuration page
The printer configuration page is displayed from this site in the embedded Web server. For
more information, see “Configuration page” on page 83.
Event log page
This page shows the printer event log. For more information, see “PRINT EVENT LOG” on
page 167.
Supplies status page (available only if you are using genuine HP Supplies )
This page shows the le v e ls of th e supplies for the printer , calcul ation of the n u mber of pages
remaining, and cartridge-usage information.
Device information pa ge
Provides network management information, including device description and IP address, as
well as printer name, model number, and serial number.
Control panel page
This page shows the current control panel message.
ENWW Using the embedded Web server 77
Page 80

Settings pages
The settings pages of the embedded W eb server allo w y ou to con figure the printer b y using your
computer. These pages can be password-protected. Always consult with your network
administrator before changing the printer configuration.
Configure device page
This page allows you to configur e all of the printer settings.
Alerts page
This page allows you to configur e who will be notified electronically for a variety of different
printer events.
E-mail page
This page lists the e-mail addresses of the people who will receive electronic notification of
printer events.
Security page
This page configures the password information for the embedded Web server. Password
information should be configured only by the network administrator.
Other links page
This page is used to add other websites as direct links in the embedded Web server. These
sites are displayed on the navigational bar throughout the embedded Web server pages.
Language page
This page allows you to configur e the language in which the embedded Web server is
displayed.
Device information page
This page allows you name the device for network management needs, and shows the IP
address and server for the printer.
Time services page
Shows the network time server address and allo ws conf igur atio n of th e time server a ddress ,
synchronization interval, and the time server port.
Network pages
This section of the embedded Web server allows the network administrator to configure the
HP Jetdirect print server for the printer.
78 3 Managing and maintaining the printer ENWW
Page 81

Configuring e-mail alerts
You can use HP Web Jetadmin or the embedded Web server to configure the system to alert
you of problems with the printer. The alerts take the form of e-mail messages to the e-mail
account or accounts that you specify.
You can configure the following:
the device that you want to monitor (in this case, the printer)
what alerts are to be received (for example, alerts for jams, paper out, ORDER CARTRIDGE,
REPLACE CARTRIDGE, and cover open)
the e-mail account to which the alerts should be forwarded
For See the following section
HP We b Je tadmin
Embedded Web server
“HP Web Jetadmin software” on page 33 for general information about
HP We b Je tadmin
HP Web Jetadmin online Help for details about alerts and how to set
them up
“Using the embedded Web server” on page 76 for general information
about the embedded Web server
ENWW Configuring e-mail alerts 79
Page 82

Managing the print cartridge
This section provides information about HP print cartridges, how to store them, how to identify
genuine ones, and their life expectan cy. Information also appears about non-HP print cartridges.
HP print cartridges
When you use a genuine new HP print cartridge, part number Q1338A (12,000-page cartridge
for the HP LaserJet 4200 series) or Q1339A (18,000-page cartridge for the HP LaserJet 4300
series), you can obtain several types of information, such as the following:
amount of toner remaining
estimated number of pages remaining
number of pages printed
Non-HP print cartridges
Hewlett-Packard Company cannot recommend use of non-HP print cartridges, either new or
remanufactured. Because they are not HP products, HP cannot influence their design or control
their quality. Service or repair required as a result of using a non-HP print cartridge will
covered under th e printer warranty.
If you use a non-HP print cartridge, the printer is unable to report the levels of the supplies f or the
printer, calculation of the number of pages remaining, and cartridge-usage information.
not be
If the non-HP print cartridge was sold to you as a genuine HP product, please call the HP fraud
hotline. (See “Contacting the HP fraud hotline” on page 145.)
Print-cartridge authentication
The printer will let you know that a print cartridge is not a genuine HP print cartridge when you
insert it into the printer.
If the printer control panel message states that this is not a genuine HP print cartridge and you
believe you purchased an HP print cartridge, call the HP fraud hotline. See “Contacting the
HP fraud hotline” on page 145.
Print-cartridge storage
Do not remove t he print cartridge from its package until you are ready to use it. The shelf life of a
print cartridge in an unopened package is approximately 2.5 years.
CAUTION To prevent damage to the print cartridge, do not expose it to light for more than a few minutes.
Print-cartridge life expectancy
The life of the print cartridge depends on the amount of toner that print jobs require and the
length of life for the components inside the cartridge. When printing text at 5 percent coverage
(typical for a business letter), an HP print cartridge lasts an average of 12,000 pages
(HP LaserJet 4200 series) or 18,000 pages (HP LaserJet 4300 series). This assum es that t oner
density is set to 3 and EconoMode is off. (These are th e default settings. For details about these
settings, see the description of
page 159.)
ECONOMODE and TONER DENSITY in “Print Quality submenu” on
At any time, you can verify life expectancy by checking the supply level, as described in
“Checking the supply level” on page 81.
80 3 Managing and maintaining the printer ENWW
Page 83

Checking the supply level
You can check the supply (toner) level at the printer control panel, the embedded Web server,
printer software, or HP W eb Jetadmin.
To check the supply level at the control panel
1 Press SELECT ( ) to open the menus.
2 Use U
3 Use U
P ARROW () or DOWN ARROW ( ) to scroll to INFORMATION, and then press
ELECT ().
S
P ARROW () or DOWN ARROW ( ) to scroll to PRINT SUPPLIES STATUS PAGE, and
then press S
ELECT ( ). See “Supplies status page” on page 85 for information about the
supplies status page.
To check the supply level using the embedded Web server
1 In your Web browser, enter the IP address for the printer home page. This takes you to the
printer status page. (See “Gaining access t o the embedded Web server” on page 76.)
2 On the left side of the screen, click Supplies Sta tus. This takes you to the supplies status
page, which provides supply level information. (See “Supplies status page” on page 85 for
information about the supplies status page.)
To check the supply level using the printer software
Three things are required to use this feature:
The Printer Status and Alerts software on the CD-ROM that came with the printer must be
enabled on your computer.
The printer must be directly connected to your computer with a parallel cable.
You must have access to the Internet.
1 At the bottom right of your screen, double-click the Printer icon. This opens the status
window.
2 On the left side of the status window, click the Printer icon from which you want to obtain
status.
3 At the top of the status window, click the Supplies link. You can also scroll down to
Supplies Status.
Note If you want to order supplies , click Order Supplies. This opens a browser that produces a URL
from which to purchase supplies. Select the supplies you wish to order and finish the ordering
process.
To check the supply levels in HP Web Jetadmin
In HP Web Jetadmin, select the printer device. The device status page shows supply-level
information.
ENWW Managing the print cartridge 81
Page 84

Print-cartridge interaction (shaking)
When you install a print cartridge for the first time, gently shake it from side to side to distribute
the toner evenly inside the print cartridge. Due to the cartridge design, this is the only time you
will need to shake the print cartridge.
Cartridge Low and Cartridge Out conditions
The printer alerts you if the print cartridge is low on toner or out of toner.
When the cartridge is low on toner
When the cartridge is low on toner, the printer contr ol panel shows the ORDER CARTRIDGE
message. The
remains in the print cartridge (at 5 percent coverage, about 1,800 pages remaining for the
12,000-page cartridge in the HP LaserJet 4200 series and about 2,700 pages remaining for the
18,000-page cartridge in the HP LaserJet 4300 series).
The default is for the printer to continue printing until the toner runs out, but you might prefer to
have the printer stop instead of continuing when the
for ex ample , if y ou w ant print quality to remain consist ently high during print jobs, or if y ou do not
want the cartridge to run out during a long print job. To configure the printer to stop, set
CARTRIDGE LOW=STOP (in the System Setup submenu of the Configure Device menu). (See
“CARTRIDGE LOW” on page 163.) Then, when
printing. You can resume printing by pressing S
ORDER CARTRIDGE message first appea rs wh en abo u t 15 percent of the toner
ORDER CARTRIDGE message first appear s —
ORDER CARTRIDGE appears , the printer will stop
ELECT ( ) for each print job.
When the cartridge is out of toner or drum life
The REPLACE CARTRIDGE message appears in one of these situations:
When the print cartridge is out of toner. If CARTRIDGE OUT is set to CONTINUE (in the
System Setup submenu of the Configure Device menu), the printer continues printing
without interaction until the cartridge reaches the end of drum life. HP does not guarantee
print quality after the REPLACE CARTRIDGE message is first displayed. Replace the print
cartridge as soon as possible. (See “Ordering information” on page 17.)
CARTRIDGE message remains until you replace the print cartridge. If CARTRIDGE OUT is set to
STOP, the printer stops printing until you replace the print cartridge or resume printing by
pressing S
When the drum life of the print cartridge is out. You must replace the print cartridge to
continue printing. No override is possible, even if toner remains in the cartridge. (See
“Ordering information” on page 17.)
ELECT ( ) for each print job.
This situation occurs to protect the pr int er.
The REPLACE
82 3 Managing and maintaining the printer ENWW
Page 85

Checking the printer configuration
At the printer control panel, you can print pages that give details about the printer and its current
configuration. The following information pages are described here:
Menu map
Configuration page
Supplies status page (includes information about print-cartridge use)
PS or PCL font list
For a complete list of printer information pages, see the Information menu at the printer control
panel (“Information menu” on page 153).
Keep these pages nearby for troub leshooting. They are also useful if you contact HP Customer
Care.
Menu map
Print the menu map to see the current settings for the menus and items available at the printer
control panel.
To print a menu map
1 Press SELECT ( ) to open the menus.
2 Use U
3 Use U
You might want to store the menu map near the printer for reference. The content of the menu
map varies, depending on the options curr ently installed in the printer. (Man y of these v alues can
be overridden in the program or printer driver.)
For a complete list of control panel items and possible v alues, see “Control panel menus” on
page 151. To change a control panel setting, see “Printing and changing control panel menus”
on page 26.
P ARROW () or DOWN ARROW ( ) to scroll to INFORMATION, and then press SELECT
().
P ARROW () or DOWN ARROW ( ) to scroll to PRINT MENU MAP, and then press
S
ELECT ().
Configuration page
Use the configuration page to vie w current printer settings , to help troub lesh oot printer proble ms,
or to verify installation of optional accessories, such as memory (DIMMs), trays, and printer
languages.
Note If an HP Jetdirect print server is installed, an HP Jetdirect configuration page prints as well.
HP LaserJet 4200n/tn/dtn/dtns/dtnsl and 4300n/tn/dtn/dtns/dtnsl printers come with an
HP Jetdirect printer server installed.
ENWW Checking the printer configuration 83
Page 86

To print a configuration page at the control panel
1 Press SELECT ( ) to open the menus.
2 Use U
P ARROW () or DOWN ARROW ( ) to scroll to INFORMATION, and then press SELECT
().
3 Use U
P ARROW () or DOWN ARROW ( ) to scroll to PRINT CONFIGURATION, and then press
S
ELECT ().
An example of the configuration page follows. The content of the configuration page varies,
depending on the options currently installed in the printer.
Note You can also obtain configuration information in the embedded Web server. For details, see
“Using the embedded Web server” on page 76.
configuration page
1
2
4
5
3
1 Printer Information Lists the serial number, page counts, and other information for the printer.
2 Event Log Lists the number of entries in the event log, the maximum number of entries
viewable, and the last three entries.
3 Installed Personalities and Options Lists all printer languages that are installed (such as PS and PCL) and lists
options that are installed in each DIMM slot and EIO slot.
4 Memory Lists printer memory, PCL Driver Work Space (DWS), and
I/O buffering and resource saving information.
5 Security Lists the status of the printer control panel lock, control panel password, and
optional disk drive.
6 Paper Trays and Options Lists the size settings for all trays and lists optional paper-handling
accessories that are installed.
6
84 3 Managing and maintaining the printer ENWW
Page 87

Supplies status page
Use the supplies status page to obtain information about the print cartridge installed in the
printer, the amount of life left in the print cartridge, and the number of pages and jobs that have
been processed. The page also lets you know when you should perform the next preventative
maintenance. (See “Performing preventative maintenance” on page 91.)
Note You can also o btain supplies status information in the embedded Web server. For details, see
“Using the embedded Web server” on page 76.
To print a supplies status page at the control panel
1 Press SELECT ( ) to open the menus.
2 Use U
().
3 Use U
then press S
P ARROW () or DOWN ARROW ( ) to scroll to INFORMATION, and then press SELECT
P ARROW () or DOWN ARROW ( ) to scroll to PRINT SUPPLIES STATUS PAGE, and
ELECT ().
supplies status page
1
2
6
3
4
5
1 Supplies website Lists the local website for ordering supplies through the Internet.
2 Cartridge information Provides information about the amount of toner available in the print cartridge, print-
cartridge part number, and estimated pages remaining for the amount of toner left
in the cartridge.
3 Printing statistics Lists statistics about total number of pages and jobs processed using this print
cartridge, as well as the first and last use date for this print cartridge.
4 Manufacture information Lists the print-cartridge serial number.
5 Recycling website Lists the website for information about returning used HP print cartridges.
6 Maintenance kit gauge Shows a gauge to let you know the remaining life of the maintenance kit
components.
ENWW Checking the printer configuration 85
Page 88

PS or PCL font list
Use the font lists to see which fonts are currently installed in the printer. (The f ont lists also sho w
which fonts are resident on an optional hard disk accessory or flash DIMM.)
To print a PS or PCL font list
1 Press SELECT ( ) to open the menus.
2 Use U
P ARROW () or DOWN ARROW ( ) to scroll to INFORMATION, and then press SELECT
().
3 Use U
P ARROW () or DOWN ARROW ( ) to scroll to PRINT PS FONT LIST or PRINT PCL
FONT LIST, and then press S
ELECT ().
The PS font list shows the PS fonts installed, and gives a sample of those fonts. The following
information can be found on the PCL font list:
Font gives the font names and samples.
Pitch/Point indicates the pitch and point size of the font.
Escape Sequence (a PCL 5e progra mming command) is used to select the designated f ont.
(See the legend at the bottom of the font list page.)
Note For step-by-step instructions about using printer commands to select a font with MS-DOS®
programs, see “Selecting PCL 6 and PCL 5e fonts” on page 177.
Font # is the number used to select f onts at the printer cont rol panel (not in the prog ram). Do
not confuse the font # with the f ont ID, described belo w. The number indicates the DIMM slot
where the font is stored.
• SOFT: Downloaded fonts, which stay resident in the printer until other fonts are
downloaded to replace them, or until the printer power is turned off.
• INTERNAL: Fonts that permanently reside in the printer.
Font ID is the number you assign to soft fonts when you download them through software.
86 3 Managing and maintaining the printer ENWW
Page 89

Cleaning the printer
Use the cleaning procedure on the following page every time you change the print cartridge or
whenever print-quality problems occur . As much as possible, keep the printer fre e from dust an d
debris.
Clean the outside of the printer with a slightly water-da mpened cloth.
Clean the inside with a dry, lint-free cloth.
CAUTION Do not use ammonia-based cleaners on or around the printer.
While cleaning the printer , be careful not to touch the transf er roller (the blac k, rubber roller located
underneath the print cartridge). Skin oils on the roller can cause print-quality problems.
ENWW Cleaning the printer 87
Page 90

1
Cleaning the inside of the printer
Use these steps to clean dust and residue from the inside of the printer.
To clean the inside of the printer
1 Turn the printer power off and unplug the power cord.
2 Open the top cover and remove the print cartridge.
2
3
4
WARNING!
Avoid reaching too far into the printer. The adjacent fusing area might
be hot.
CAUTION
To prevent damage to the print cartridge, do not expose it to light for
more than a few minutes.
3 Wipe any dust or dirt off the paper fee d guides (shaded areas) with
a dry, lint-free cloth.
Note
If toner gets on your clothing, wipe it off with a dry cloth and wash
clothing in cold water. (Hot water sets toner into fabric.)
4 Using the green handle, lift t he paper-a ccess plate and wipe o ff an y
residue with a dry, lint-free cloth.
5 Reinstall the print cartridge, close the top cover, plug in the power
cord, and turn the printer power on.
5
88 3 Managing and maintaining the printer ENWW
Page 91

Cleaning the fuser
Run the printer cleaning page to keep the fuser free of toner and paper particles that can
sometimes accumulate. Accumulation of toner and particles can cause specks to appear on the
front or back side of your print jobs. (See “Specks” on page 125.)
To ensure opt im um print quality, HP recommends that you use the cleaning page e very time you
replace the print cartridge or on an automatic interval that you can set up . I f y ou ha v e an op tional
duplex er installed, you must run cleaning pages manually.
The cleaning procedure takes about 2.5 minutes to complete. A message (either CREATING
CLEANING PAGE or CLEANING) appears on the printer control panel display while the cleaning is
taking place.
Running the cleaning page manually
In order for the cleaning page to work properly, print the page on copier-grade paper (not bond,
heavy, or rough paper).
If you have an optional duplexer installed, this cleaning method is the only one you can use. To
ensure that automatic cleaning is off , see “Running the cleanin g page a utomatica lly” on page 90.
To run the cleaning page manually
1 If a duplexer is installed, open the rear output bin.
2 Press S
3 Use U
S
4 Use U
S
5 Use U
press S
ELECT ( ) to open the menus.
P ARROW () or DOWN ARROW ( ) to scroll to CONFIGURE DEVICE, and then press
ELECT ().
P ARROW () or DOWN ARROW ( ) to scroll to PRINT QUALITY, and then press
ELECT ().
P ARROW () or DOWN ARROW ( ) to scroll to CREATE CLEANING PAGE, and then
ELECT ().
6 Follow the instructions on the cleaning page to complete the cleaning process.
7 Close the rear output bin.
ENWW Cleaning the fuser 89
Page 92

Running the cleaning page automatically
Using the procedure below, you can set the printer to print cleaning pages automatically at an
interval that you select. In order for the cleaning page to run without intervention, you must keep
the selected size and plain paper type available in the printer. The printer will not interrupt a
printing job in process.
If you have an optional duplexer installed, make sure that automatic cleaning is turned off. Run
cleaning pages manually only. (See “Running the cleaning page manually” on page 89.)
To run the cleaning page automatically
1 Press SELECT ( ) to open the menus.
2 Use U
3 Use U
4 Use U
5 Use U
6 Use U
7 Use U
8 Use U
9 Use U
P ARROW () or DOWN ARROW ( ) to scroll to CONFIGURE DEVICE, and then press
S
ELECT ().
P ARROW () or DOWN ARROW ( ) to scroll to PRINT QUALITY, and then press
S
ELECT ().
P ARROW () or DOWN ARROW ( ) to scroll to AUTO CLEANING, and then press
S
ELECT ().
P ARROW () or DOWN ARROW ( ) to scroll to ON, and then press SELECT ().
P ARROW () or DOWN ARROW ( ) to scroll to CLEANING INTERVAL, and then press
S
ELECT ().
P ARROW () or DOWN ARROW ( ) to scroll to the desired interval between
1,000 and 20,000 pages, and then press S
P ARROW () or DOWN ARROW ( ) to scroll to AUTO CLEANING SIZE, and then press
S
ELECT ().
P ARROW () or DOWN ARROW ( ) to scroll to the paper size that you want the
printer to use for cleaning pages (A4 or LETTER), and then p ress S
ELECT ( ) to save your selection.
ELECT ( ) to save your
selection.
The printer automatically prints a cleaning page at the interval and page size that you selected.
You can discard the output page created by the cleaning process.
90 3 Managing and maintaining the printer ENWW
Page 93

Performing preventative maintenance
You should replace certain parts when the PERFORM PRINTER MAINTENANCE message appears
on the printer control panel display. This will help ensure that your printer maintains optimum
performance.
The maintenance message will appear every 200,000 pages. The message can be temporarily
cleared for approximately 10,000 pages using the CLEAR MAINTENANCE MESSAGE item on the
Resets submenu. (See “CLEAR MAINTENANCE MESSAGE” on page 166.) To check the
number of pages the printer has printed since new maintenance-kit components were installe d ,
print either a configuration page or a supplies status page . (See “Configur ation page” on page 83
or “Supplies status page” on page 85 for details.)
To order the printer maint enance kit, see “Ordering information” on page 17. The kit includes:
fuser
rollers (transfer, pickup, and feed)
installation instructions
Note The printer maintenance kit is a consumable item and is not covered under the original printer
warranty or under most extended warranties.
After a maintenance kit is installed, the maintenance-kit counter must be reset.
To reset the maintenance-kit counter
1 Turn the printer power off.
2 Hold down S
( ) until all three printer control panel lights flash once, and then remain on. This might
take up to 10 seconds.
3 Press U
4 Press S
Note Perf orm this procedure only after a maintenance kit has been installed. Do not use this procedure
to temporarily clear the PERFORM PRINTER MAINTENANCE message.
ELECT ( ), and then turn the printer power on. Continue holding do wn SELECT
P ARROW ( ) to scroll to NEW MAINTENANCE KIT.
ELECT ( ) to reset the maintenance-kit counter.
ENWW Performing preventative maintenance 91
Page 94

Replacing the stapler unit
1
Removing and replacing the stapler unit
Use these steps to replace a defective stapler unit in the optional
stapler/stacker.
To remove and replace the stapler unit
1 Locate the stapler unit on the right side of the stapler/stacker.
2 Rotate the stapler unit toward the front of the printer until the unit
2
3
clicks. Hold the stapler unit in this open position.
3 Push down on the tab at the top of the stapler unit.
4 Hold the tab down and pu ll the staple r un it up a nd out of th e st apler /
stacker.
5 Disconnect cable that connects the stapler unit to the stapler/
stacker. (Only the blue part detaches.) Release the white tab that
contains the blue cable connector by opening the tab to the left.
4
5
92 3 Managing and maintaining the printer ENWW
Page 95

6
6 Remove the new stapler unit from its packagin g.
7 Connect the cable on the new stapler unit to the stapler/stacker.
8 Place the peg located on the bottom of the new stapler unit into the
hole in the stapler/stacker.
9 Press down on the tab at the top of the stapler unit and push the
unit into the stapler/stacker.
10 Rotate the stapler unit toward the rear of the printer until the unit
7
clicks into place.
11 If the stapler cartridge is not installed in the stapler unit, install it
now. (See “To load staples” on page 41.)
8
10
9
ENWW Replacing the stapler unit 93
Page 96

94 3 Managing and maintaining the printer ENWW
Page 97

4
Problem solving
Overview
This section will help you to troubleshoot and solve minor printer problems.
“Clearing jams” on page 96 Occasionally, paper can jam during printing. This section will help you to
locate jams, properly clear them from the printer, and solve repeated
jams.
“Understanding printer
messages” on page 109
“Understanding accessory
lights for the stacker and
stapler/stacker” on page 122
“Correcting print-quality
problems” on page 124
“Determining printer problems”
on page 131
“Troubleshooting the optional
hard disk” on page 139
“Troubleshooting PS errors” on
page 140
“Communicating with an
optional HP Jetdirect print
server” on page 141
The printer control panel display shows various messages. It shows
printer status messages, such as INITIALIZING, and messages that
require action, such as
that require action or indicate a problem and provides instructions for
what to do. Self-explanatory messages are not included.
This section explains errors that might occur when you are printing to the
stacker or stapler/stacker accessory. This section describes error
conditions indicated by the accessory lights and solutions to try.
The printer should produce print jobs of the highest quality. If print jobs do
not look sharp and clear, defects such as lines, speck s, or smears
appear, or paper is wrinkled or curled, use this section to troubleshoot
and solve the output-quality problem.
Before you can fix a printer problem, you must understand where the
problem lies. Use the flowchart in this section to determine the printer
problem, and then follow the corresponding troubleshooting suggestions.
If you have an optional printer hard disk accessory, this sectio n ca n he l p
you identify errors that might occur while using it.
This section describes errors that might occur when you are printing
PostScript print jobs and solutions to try.
If you have an optional HP Jetdirect print server card and network print
jobs are not reaching the printer, you can use the steps in this section to
troubleshoot the issue.
CLOSE TOP COVER. This section lists messages
ENWW Overview 95
Page 98

Clearing jams
If a jam message appears on the printer control panel display, look for jammed paper or other
print media in the locations indicated in the figure belo w. Then see the procedure f or clearing the
jam. You might need to look for paper in other locations than indicate d in the jam me ssage . If th e
location of the jam is not obvious, look first in the top-cover area underneath the print cartridge.
When clearing jams, be very careful not to tear jammed paper. If a small pi ece of paper is left in
the printer, it could cause additional jams. If paper jams are a recurring pr oblem, see “Solving
repeated paper jams” on page 108.
Note After you have cleared the jammed paper, you must open and then close the top cov er to clear
a jam message.
Jam locations
Front
2
3
1 Top-cover and print-cartridge areas
2 Optional envelope feeder
3 Tray areas (tray 1, tray 2, and optional trays)
4 Optional duplexer
5 Fuser area
6 Output areas (top, rear, and optional stacker or stapler/stacker)
1
6
Back
5
4
Note Loose toner might remain in the printer after a jam and cause output-quality problems. These
problems should clear up within a few pages.
96 4 Problem solving ENWW
Page 99

1
Clearing jams from the top-cover and print-cartridge areas
Clear paper jams that occur during the printing process using this
procedure.
To clear jams from the top-cover and print-cartridge
areas
2
3
4
5
1 Open the top cover and remove the print cartridge.
CAUTION
To prevent damage to the print cartridge, do not expose it to light for
more than a few minutes.
2 Use the green handle to lift the paper-access plate.
3 Slowly pull the jammed paper out of the printer. Do not tear the
paper. If paper is difficult to remove, try clearing it from the tray
area. (See “Clearing jams from the trays” on page 100.)
Note
Avoid spilling loose toner. Using a dry, lint-free cloth, clean any loose
toner that might have fallen into the printer. If loose toner falls into the
printer, it might cause temporary problems with print quality. Loose
toner should clear from the printer after a few pages are printed.
If toner gets on your clothing, wipe it off with a dry cloth and wash
clothing in cold water. (Hot water sets toner into fabric.)
4 Open tray 1 and remove the entrance cover. If paper is present,
remove it.
5 Rotate the paper guide to chec k for additional jammed paper
underneath. If jammed paper is present, remove it.
ENWW Clearing jams 97
Page 100

6
6 Replace the entrance cover and close tray1.
7 Reinstall the print cartridge and close the top cover.
8 If a jam message persists, there is still jammed paper in the printer.
Look for the jam in another location. (See “Jam locations” on
page 96.)
If you are using a non-HP print cartridge, the message
CARTRIDGE DETECTED
7
Press P
AUSE/RESUME to continue.
might appear on the printer control panel display.
NON HP
98 4 Problem solving ENWW
 Loading...