

Page 1
start
hp LaserJet 4200L series
Page 2

© 2003 Copyright Hewlett-Packard Development Company, LP
Reproduction, adaptation or translation without prior written permission is
prohibited, except as allowed under the copyright laws.
The information contained herein is subject to change without notice.
The only warranties for HP products and services are set forth in the express
warranty statements accompanying such products and services. Nothing
herein should be construed as constituting an additional warranty. HP shall
not be liable for technical or editorial errors or omissions contained herein.
Part Number: Q3993-90911
Edition 1, 11/2003
FCC regulations
The HP LaserJet 4200L series printers have been tested and found to
comply with the limits for a Class B digital device, pursuant to Part 15 of the
FCC rules. These limits are designed to provide reasonable protection
against harmful interference in a residential installation. This equipment
generates, uses, and can radiate radio frequency energ y. If this equipment is
not installed and used in accordance with the instructions, it might cause
harmful interference to radio communications. However, there is no
guarantee that interference will not occur in a particular installation. If this
equipment does cause harmful interference to radio or television reception,
which can be determined by turning the equipment off and on, the user is
encouraged to try to correct the interference by one or more of the following
measures:
• Reorient or relocate the receiving antenna.
• Increase separation between equipment and receiver.
• Connect equipment to an outlet on a circuit different from that to which the
receiver is located.
• Consult your dealer or an experienced radio/TV technician.
Note: Any changes or modifications to the printer that are not
expressly approved by HP could void the user’s authority to operate
this equipment. Use of a shielded interface cable is required to comply
with the Class B limits of Part 15 of FCC rules.
See the HP LaserJet 4200 Series Printer User Guide on the CD-ROM for
other regulatory information. All regulatory statements and declarations for
the HP LaserJet 4200 in that guide also apply to the HP LaserJet 4200L.
1
Page 3
HP LaserJet 4200L series
1
412 mm
(16.2 inches)
HP LaserJet 4200L
series
547 mm
(21.5 inches)
1045 mm (41.1 inches)
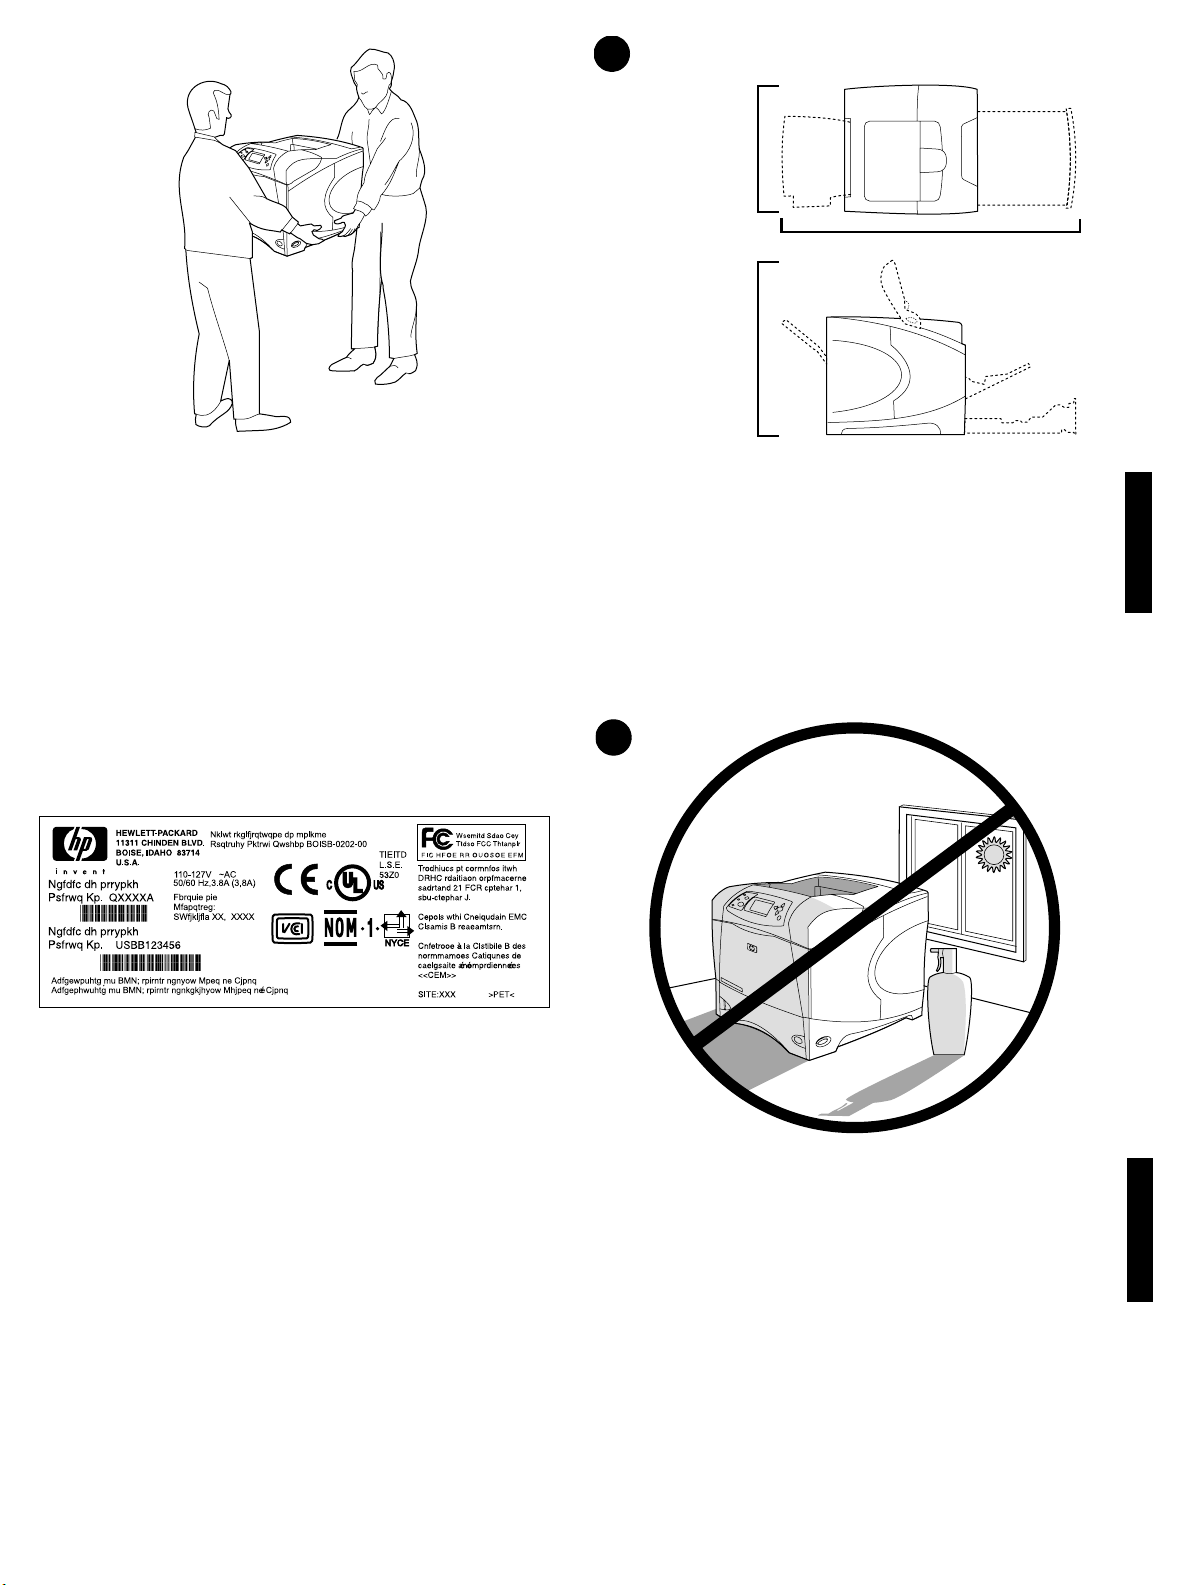
WARNING! The printer is heavy. To prevent physical injury, two people
should lift and move the printer.
Prepare the location. Place the printer in a well-ventilated room on a
sturdy, level surface. Allow space around the printer, including 2 inches
(50 mm) of space around the printer for ventilation.
English
2
Make sure that the location has an adequate power supply. Check the
voltage rating on your printer (located under the top cover). The power
supply will be either 110 to 127 Vac or 220 to 240 Vac, 50/60 Hz.
Regulate the environment. Do not place the printer in direct sunlight or
near chemicals. Make sure that the environment does not experience
abrupt changes in temperature or humidity.
• Temperature: 50° to 91° F (10° to 32.5° C)
• Relative humidity: 20 to 80%
2
English
Page 4
3
5
3
4
1
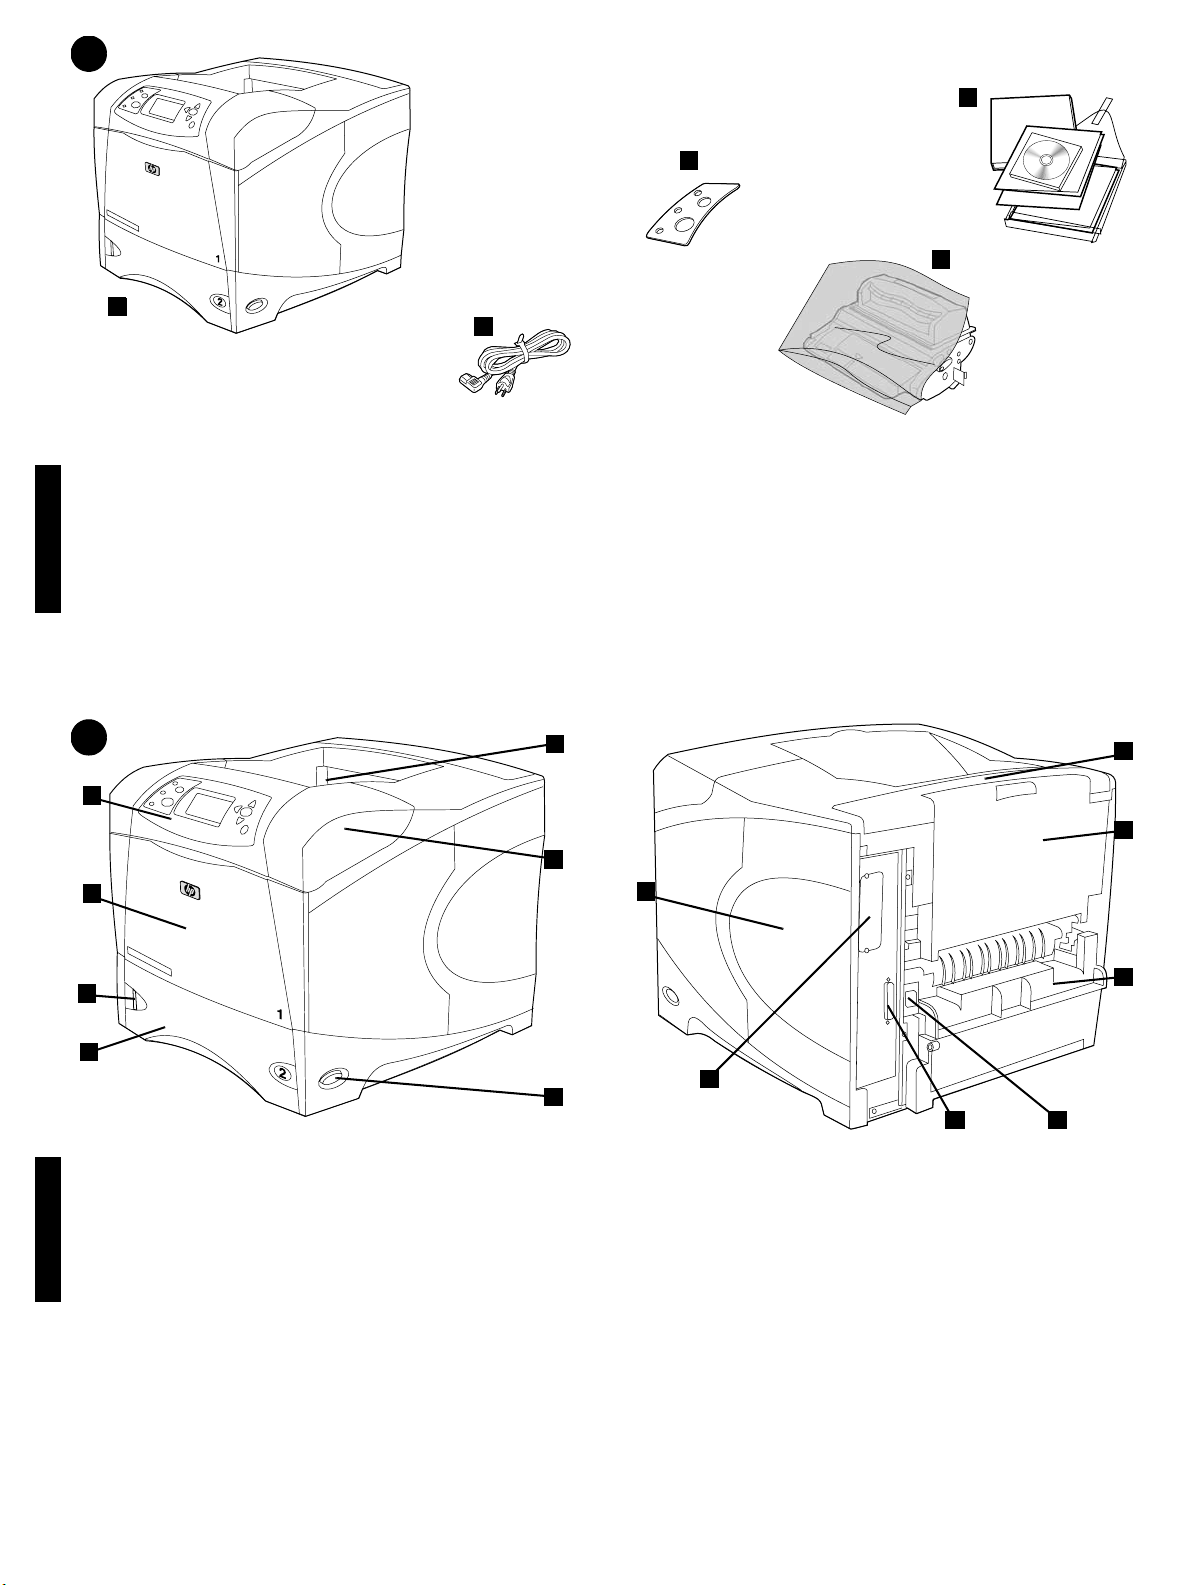
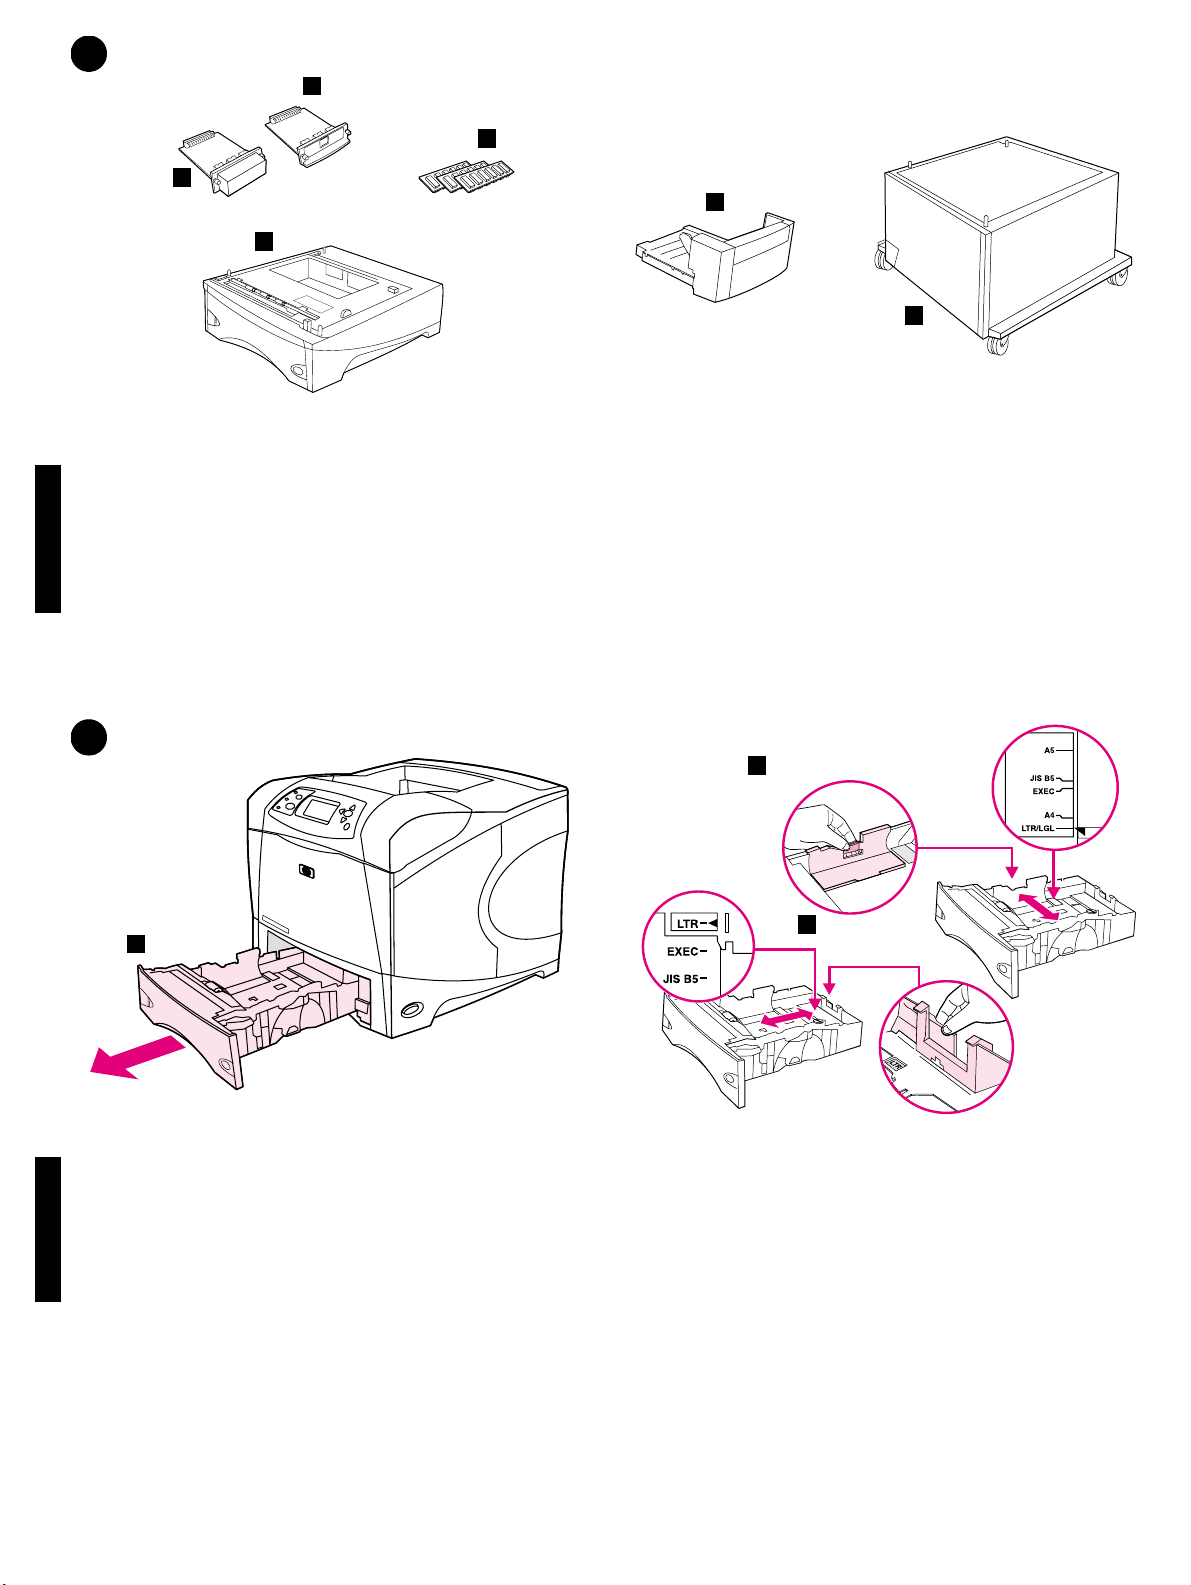
Check the package contents. Make sure that all the parts are included.
1) Printer; 2) Right-angle power cord;
4
1
2
2
5
6
3) Control panel overlay (This part might already be installed on the
printer.); 4) Print cartridge 5) Software and documentation on CD-ROM.
10
11
8
3
4
Identify printer parts. Front view: 1) Control panel; 2) Tray 1; 3) Paper
level indicator; 4) Tray 2; 5) Standard output bin; 6) Top cover (provides
access to the print cartridge, the serial number, the model number, and
the voltage rating); 7) Po we r switch
English English
12
7
Back view: 8) Memory access door; 9) EIO slot (some models have an
optional HP Jetdirect print server installed.); 10) Output-accessory cover;
11) Rear output bin; 12) Duplexer slot cover; 13) Power-cord connector;
14) Parallel interface port
3
9
14
13
Page 5
5
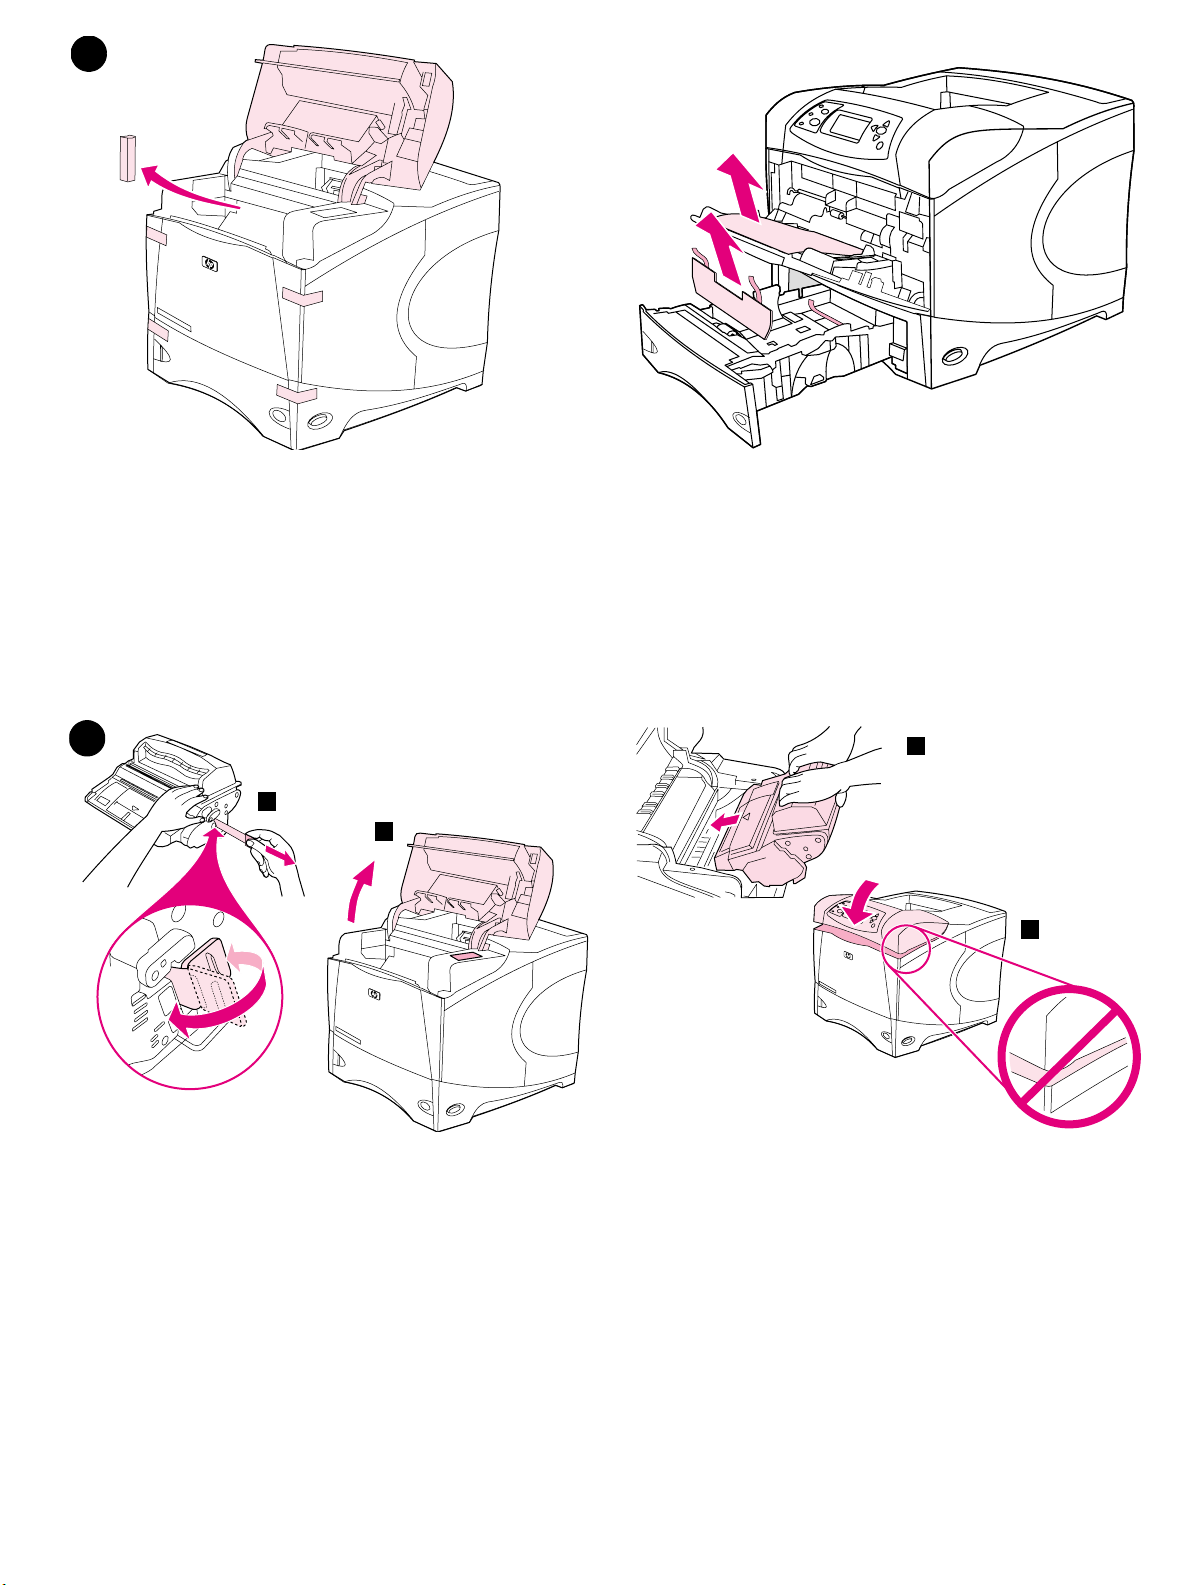
Remove the packing materials. 1) Remove the shipping bag and any
orange tape from the front and back of the printer. 2) Open the printer top
cover and remov e the f oam pac king material inside. 3) Remov e the plastic
film from the control panel display.
6
2
3
4) Open tray 1 and remove the orange sheet. 5) Open tray 2 and remove
all orange tape and packing materials. 6) Close both trays. Note: Save all
the packing material. You might need to repack the printer at a later date.
4
5
Install the print cartridge. 1) Remove the print cartridge from its
packaging. 2) Bend and then pull the sealing tab from the end of the print
cartridge to remove the entire length of the tape. CAUTION: Avoid
touching any black toner on the tape. If the toner gets on your clothing,
wipe it off with a dry cloth and wash the clothing in cold water. Hot water
sets the toner into the fabric.
3) Lift the printer top cover. 4) Slide the print cartridge into the printer as
far as it can go. 5) Close the top cover. Note: If the top cover does not
close, make sure the print cartridge is correctly installed.
4
Page 6
7
1
4
2
5
3
6
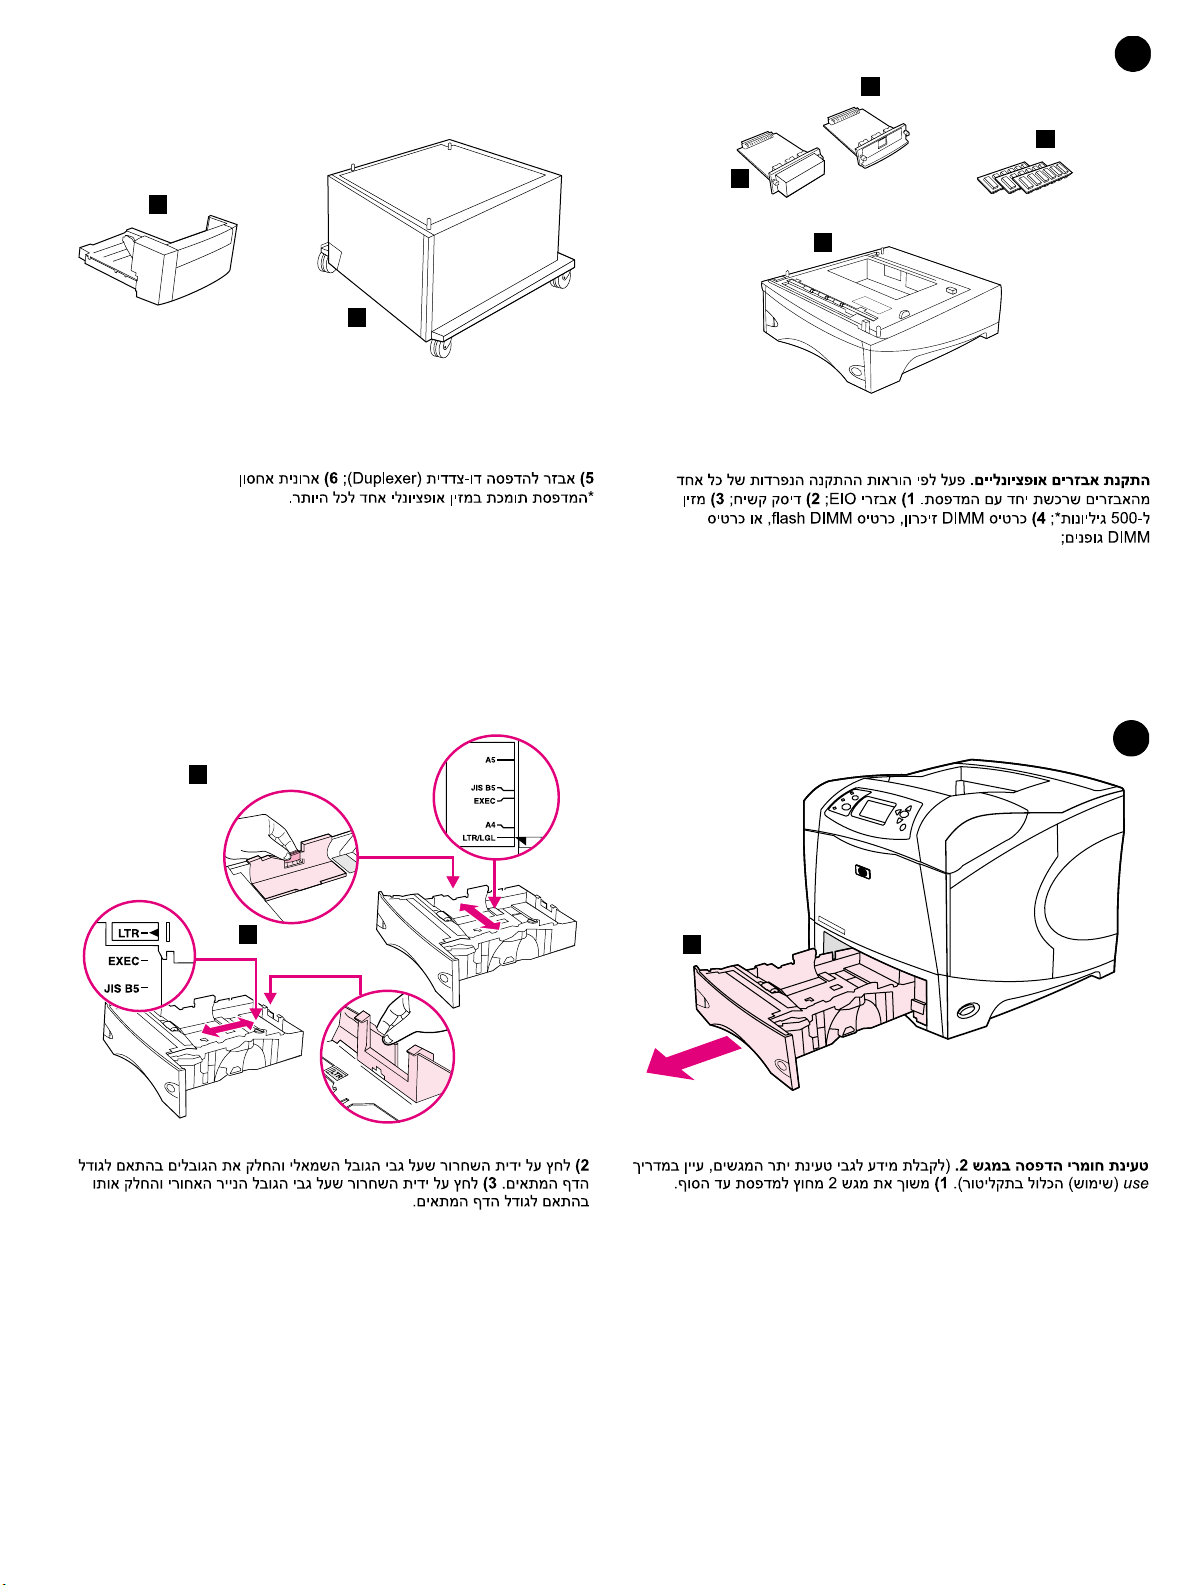
Install any optional accessories. Use the separate installation
instructions to install any accessories that you have purchased with the
printer. 1) EIO access ories; 2) Hard disk; 3) 500-sheet feeder*; 4) Memory
DIMM, flash DIMM, or font DIMM;
8
1
5) Duplexer for two-sided printing; 6) Storage cabinet
*The printer supports a maximum of one optional feeder.
2
3
Load Tra y 2. (F or inf ormation about loading other trays, see the use guide
on the CD-ROM.) 1) Pull tray 2 completely out of the printer.
English English
2) Pinch the release on the left guide and slide the guides to the correct
paper size. 3) Pinch the release on the rear paper guide and slide it to the
correct paper size.
5
Page 7

4
5
4) Rotate the blue knob on the right side of the tray to the correct paper
size. (Turn the knob to “STANDA RD” for LTR, A4, LGL, EXEC, A5, and JIS
B5 paper sizes, or to “CUSTOM” for custom paper sizes.)
9
1
5) Load paper into the paper tray with the top edge of the paper facing the
front edge of the tray. Make sure that the paper is flat at all four corners
and that the top of the stack is below the maximum-height indicators.
CAUTION: Do not fan the paper. Fanning can cause misfeeds. 6) Slide
the tray back into the printer.
Connect an interface cable. To connect the printer directly to a
computer: 1) Connect an IEEE 1284-compliant (size “B”) parallel cable
between the parallel port on the computer and the parallel port on the
printer. (Note: A parallel cable is not included.) 2) Snap the wire clips into
place to secure the cable at the printer.
To connect the printer to an Ethernet 10/100 Base-T network: Connect a
network cable between the HP Jetdirect print server and a port for the
network.
6
Page 8

10
2
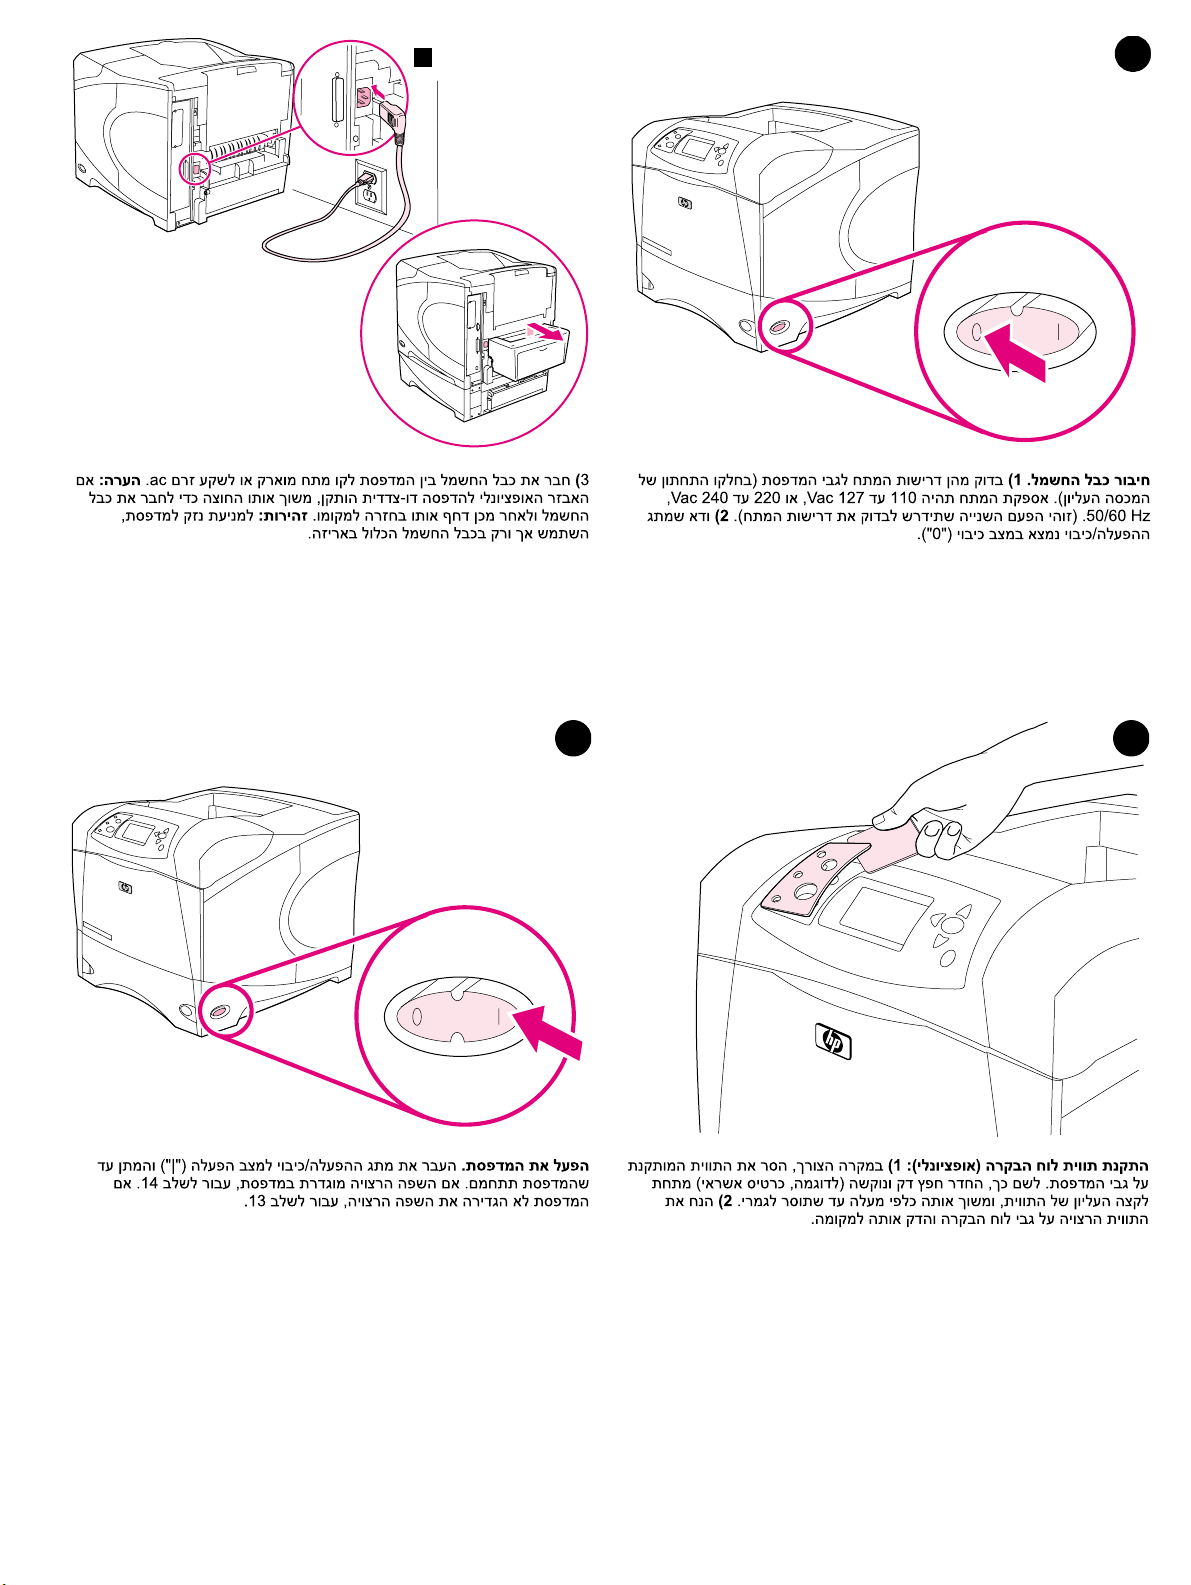
Connect the right-angle power cord. 1)Check the voltage rating on your
printer (located under the top cover). The power supply will be either 110
to 127 Vac or 220 to 240 Vac, 50/60 Hz. (This is the second time you are
checking the voltage.) 2) Make sure the power switch is in the off (“0”)
position.
2) Connect the right-angle power cord between the printer and a grounded
power strip or ac outlet. Note: If the optional duplexer has been installed,
pull the duplexer out to connect the power cord, and then push the
duplexer back in. CAUTION: To prevent damage to the printer, use only
the power cord that is provided.
11 12
Install the control panel overlay (optional): 1) If necessary, remove the
overlay that is currently installed on the printer by inserting a thin, rigid
object such as a credit card under the top edge of the overlay and then
pulling up on the overlay until it comes off. 2) Place the overlay you want
onto the control panel and snap it into place.
English English
Turn the printer power on. Turn the power switch to the on position (“|”)
and wait for the printer to warm up. If the printer automatically sets your
language, go to step 14. If the printer did not set your language, go to step
13.
7
Page 9

13 14
Set the control panel language. Use the (Up arrow) and (Down
arrow) to scroll to a language you want and press (Select) to select it.
(To change the language after it has been set, see the use guide on the
CD-ROM).
Test the printer. To verify that the printer is operating correctly, print a
configuration page. 1) Press (Select) to enter the menus. 2) Use the
(Up arrow) and (Down arrow) to scroll to INFORMATION and press
(Select). 3) Use the (Up arrow) and (Down arrow) to scroll to
PRINT CONFIGURATION and press (Select).
15
Note: If the configuration page does not print, make sure that there are no
messages (other than READY) on the control panel display, that the Ready
light (top light) is on, and that no other lights are on or blinking. Make sure
that paper is loaded and that the paper tray is properly adjusted. Make
sure that the print cartri dge is installed correctly.
Install the printing software. Procedures for software installation vary
according to the operating system and the network environment. Insert the
CD-ROM into the CD-ROM drive. When the installation wizard starts,
follow the instructions. See the Readme (read4200) on the CD-ROM if the
installation wizard does not start or for detailed installation information.
8
Page 10

16 17
Test the software installation. Print a page from any program to make
sure the software is correctly installed. Note: If installation fails, reinstall
the software. If reinstallation fails, see the Readme on the CD-ROM, see
the support flyer that came in the printer box, or visit http://www.hp .com. In
the Select your country/region field at the top, select your
country/region and click . Click the Support block.
18
Register your printer. Register your printer to receive important support
and technical information. You can register at: http://www.register.hp.com.
Congratulations. Your printer is ready to use. For information about using
the printer and troubleshooting, see these sources: 1) The use guide on
the CD-ROM; 2) This URL: http://www.hp.com/support/lj4200;
3) HP Customer Support (See the support flyer that came in the printer
box.)
English English
9
Page 11

10
Page 12

17 16
18
11
Page 13

14 13
15
12
Page 14
2
10
12 11
13
Page 15

4
5
9
1
14
Page 16
7
1
4
2
5
3
6
8
2
3
1
15
Page 17

5
4
2
3
5
6
16
Page 18

3
5
3
4
1
10
1
11
8
2
2
5
4
6
12
3
4
9
14
13
17
7
Page 19

HP LaserJet 4200L series
412 mm
(16.2 inches)
HP LaserJet 4200L
series
547 mm
(21.5 inches)
1
1045 mm (41.1 inches)
2
18
Page 20

©
2003 Hewlett-Packard Development Company, L.P.
www.hp.com/support/lj4200
*Q3993-90911*
*Q3993-90911*
Q3993-90911
 Loading...