

Page 1
start
Mulai
hp LaserJet 4200L series
Page 2

© 2003 Copyright Hewlett-Packard Development Company, LP
Reproduction, adaptation or translation without prior written permission is
prohibited, except as allowed under the copyright laws.
The information contained herein is subject to change without notice.
The only warranties for HP products and services are set forth in the express
warranty statements accompanying such products and services. Nothing
herein should be construed as constituting an additional warranty. HP shall
not be liable for technical or editorial errors or omissions contained herein.
Part Number: Q3993-90909
Edition 1, 11/2003
FCC regulations
The HP LaserJet 4200L series printers have been tested and found to
comply with the limits for a Class B digital device, pursuant to Part 15 of the
FCC rules. These limits are designed to provide reasonable protection
against harmful interference in a residential installation. This equipment
generates, uses, and can radiate radio frequency energ y. If this equipment is
not installed and used in accordance with the instructions, it might cause
harmful interference to radio communications. However, there is no
guarantee that interference will not occur in a particular installation. If this
equipment does cause harmful interference to radio or television reception,
which can be determined by turning the equipment off and on, the user is
encouraged to try to correct the interference by one or more of the following
measures:
• Reorient or relocate the receiving antenna.
• Increase separation between equipment and receiver.
• Connect equipment to an outlet on a circuit different from that to which the
receiver is located.
• Consult your dealer or an experienced radio/TV technician.
© 2003 Copyright Hewlett-Packard Development Company,
L.P.
未经事先书面许可,严禁进行任何形式的复制、改编或翻
译,除非版权法另有规定。
此处包含的信息如有更改,恕不另行通知。
HP 产品和服务的所有保修事项已在产品和服务所附带的保修
声明中列出,此处内容不代表任何额外保修。HP 公司对此处
任何技术性或编辑性的错误或遗漏概不负责。
产品号:Q3993-90909
Editon 1, 11/2003
Note: Any changes or modifications to the printer that are not
expressly approved by HP could void the user’s authority to operate
this equipment. Use of a shielded interface cable is required to comply
with the Class B limits of Part 15 of FCC rules.
See the HP LaserJet 4200 Series Printer User Guide on the CD-ROM for
other regulatory information. All regulatory statements and declarations for
the HP LaserJet 4200 in that guide also apply to the HP LaserJet 4200L.
1
Page 3
HP LaserJet 4200L series
1
412 mm
(16.2 inches)
HP LaserJet 4200L
series
547 mm
(21.5 inches)
1045 mm (41.1 inches)
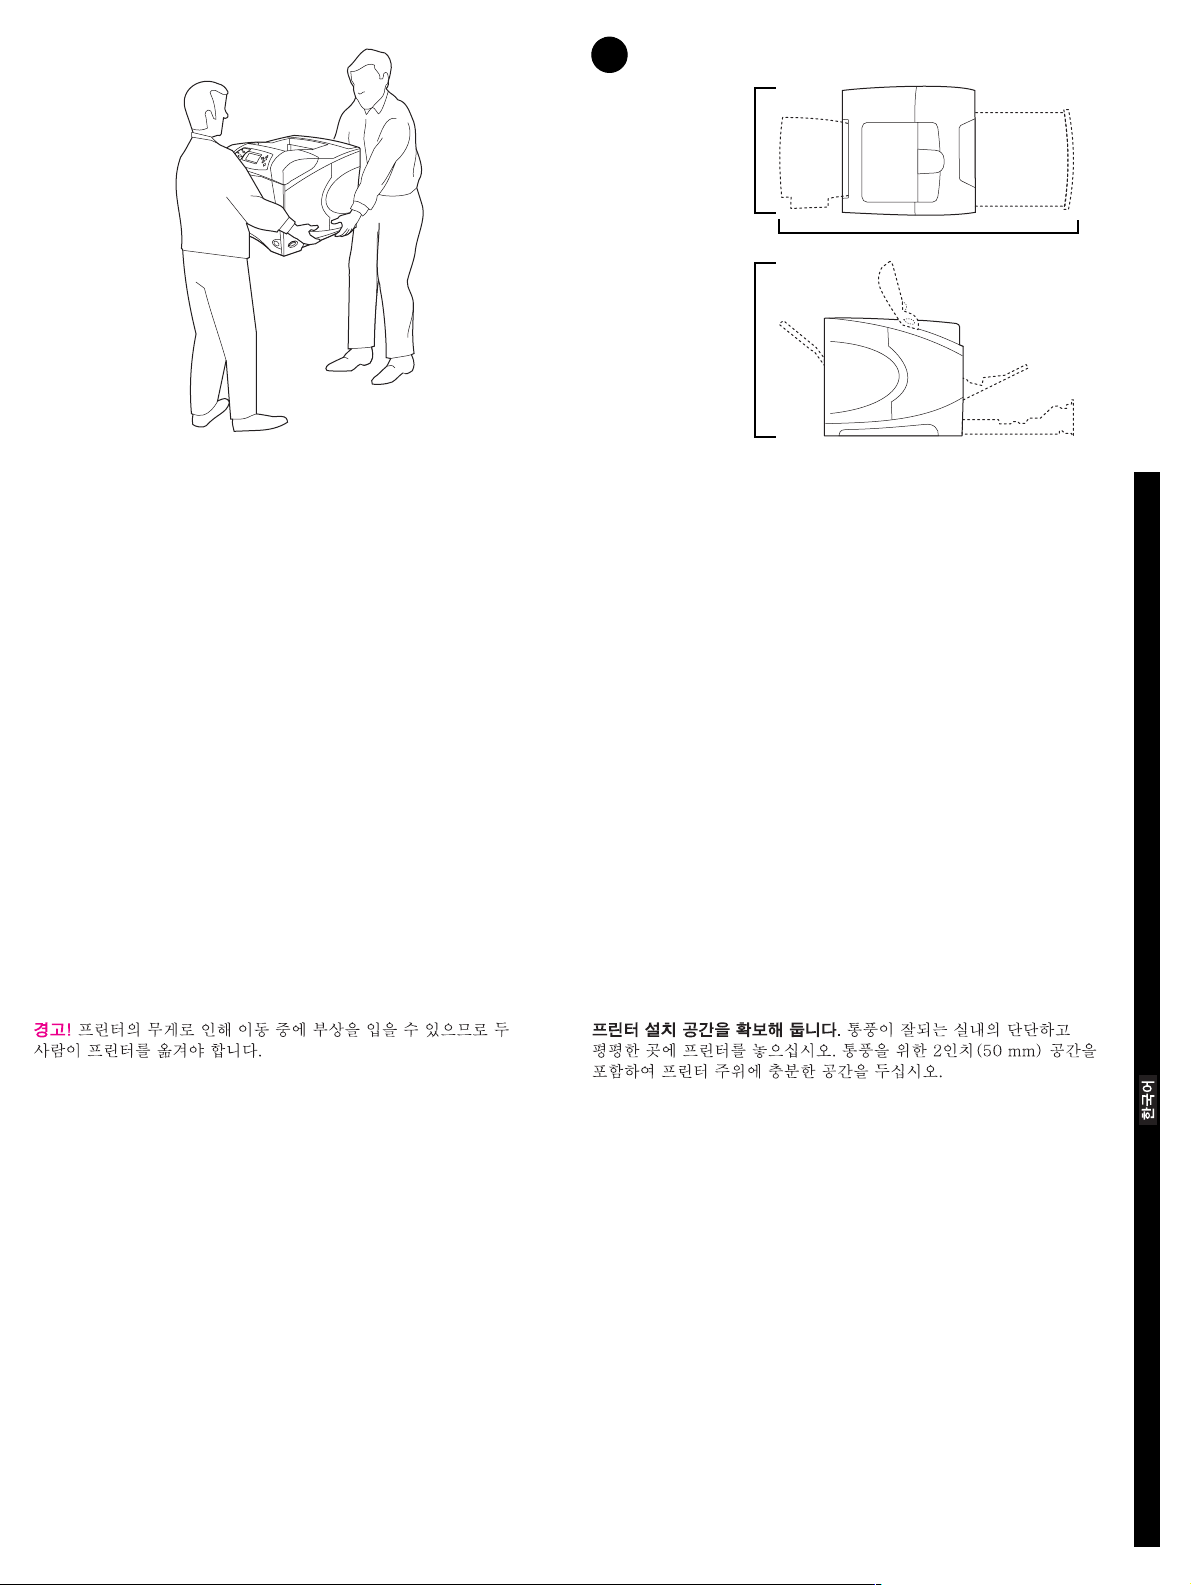
WARNING! The printer is heavy. To prevent physical injury, two people
should lift and move the printer.
警告!打印机很重。为防止身体受到伤害,应用两个人抬起
和移动打印机。
PERINGATAN! Printer berat. Untuk mencegah luka fisik, diperlukan dua
orang untuk mengangkat dan memindahkan printer.
Prepare the location. Place the printer in a well-ventilated room on a
sturdy, level surface. Allow space around the printer, including 2 inches
(50 mm) of space around the printer for ventilation.
English
准备安装位置。打印机要放在结实平整的表面上,并且通风
要良好。打印机周围应留出一定空间,包括 2 英寸 (50 毫
米)的通风空间。
简体中文
Menyiapkan tempat. Letakkan printer pada permukaan yang keras dan
rata pada tempat yang bersirkulasi udara. Beri tempat di sekeliling printer
termasuk 2 inci (50 mm) disekeliling printer untuk ventilasi.
Bahasa Indonesia
2
Page 4
2
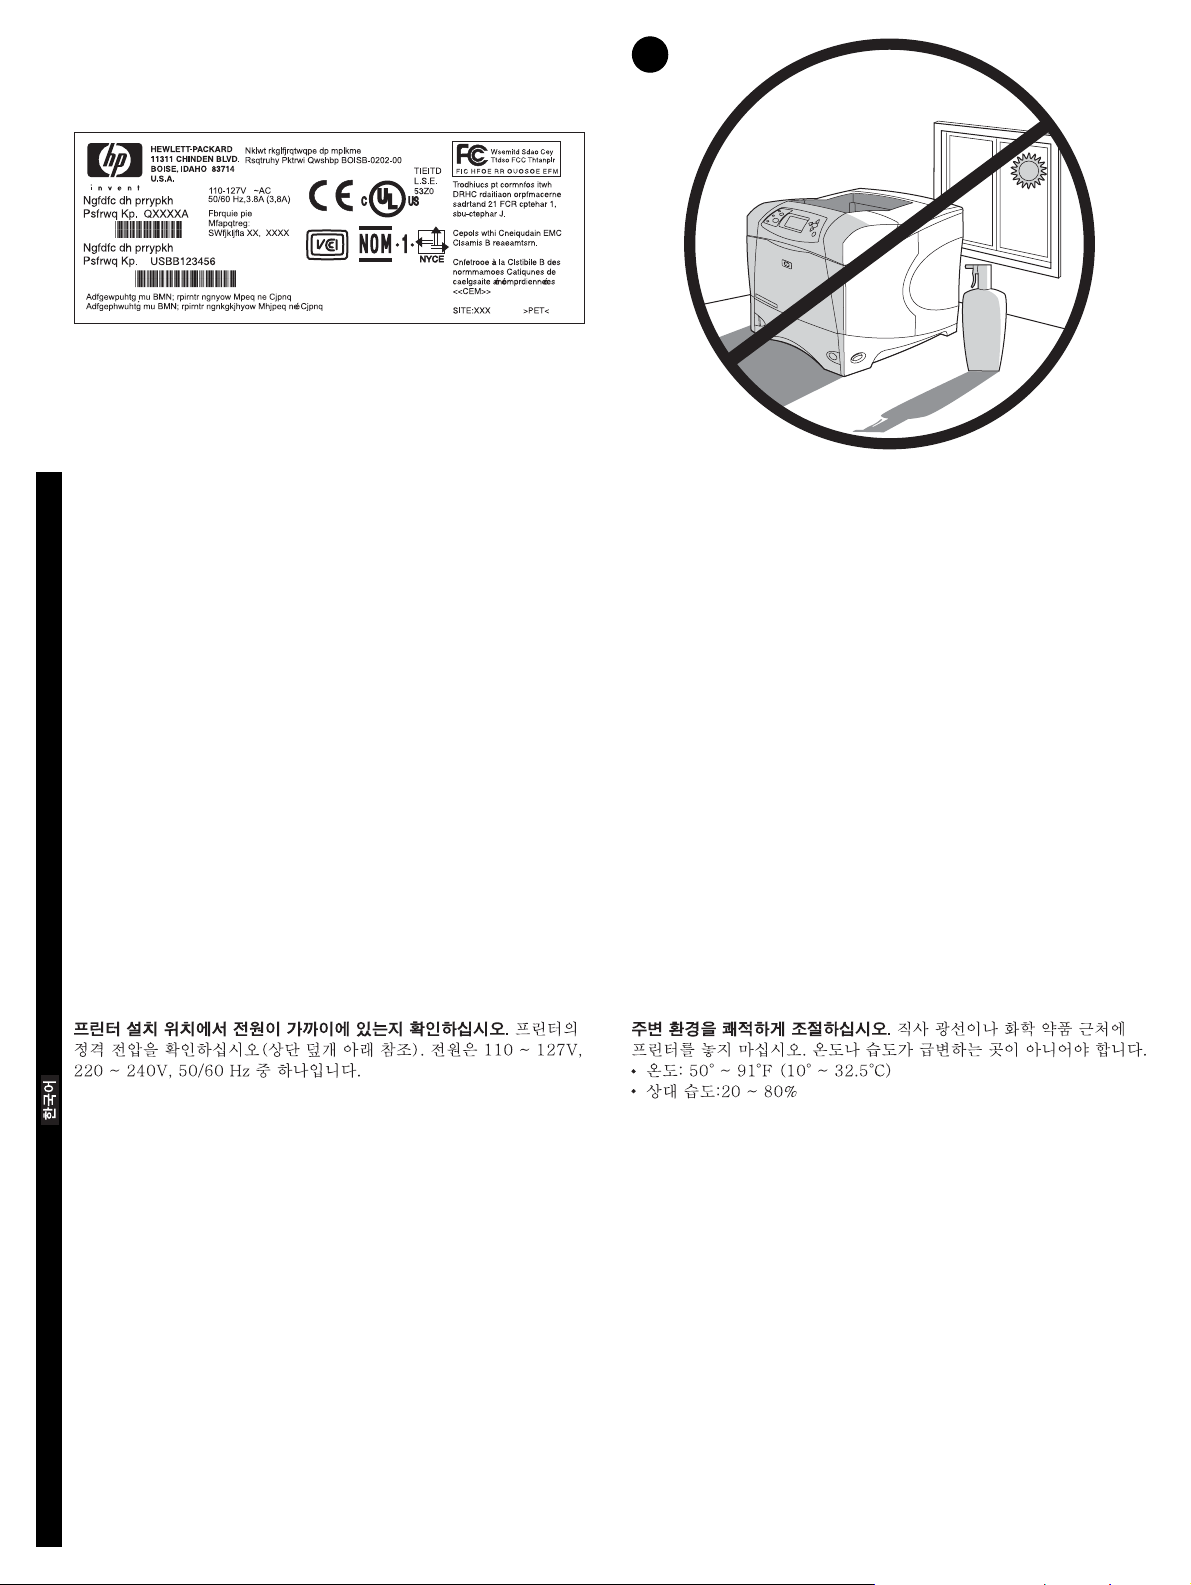
Make sure that the location has an adequate power supply. Chec k the
voltage rating on your printer (located under the top cover). The power
supply will be either 110 to 127 Vac or 220 to 240 Vac, 50/60 Hz.
English
确保放置打印机处有合适的电源。查看打印机上的电压额定
值(位于顶盖下)。电源应是交流 110-127 V 或 220-240 V,
50/60 Hz。
简体中文
Pastikan ada cukup pasokan listrik pada lokasi printer. Perik sa
voltase printer (terletak di bawah penutup atas). Pasokan listrik adalah
110 sampai 127 Vac atau 220 sampai 240 Vac, 50/60 Hz.
Bahasa Indonesia
Regulate the environment. Do not place the printer in direct sunlight or
near chemicals. Make sure that the environment does not experience
abrupt changes in temperature or humidity.
• Temperature: 50° to 91° F (10° to 32.5° C)
• Relative humidity: 20 to 80%
控制环境。请勿将打印机放在日光直射或靠近化学药品的位
置。确保环境温度或湿度不会发生剧烈变化。
• 温度:50°-91°F(10°-32.5°C)
• 相对湿度:20-80%
Atur lingkungan sekitar. Jangan meletakkan printer printer di bawah
matahari langsung atau di dekat bahan kimia. Pastikan lingkungan sekitar
tidak mengalami perubahan suhu atau kelembaban mendadak.
• Temperatur: 50° sampai 91°F (10° sampai 32,5°C)
• Kelembaban: 20 sampai 80%
3
Page 5
3
5
3
4
1
2
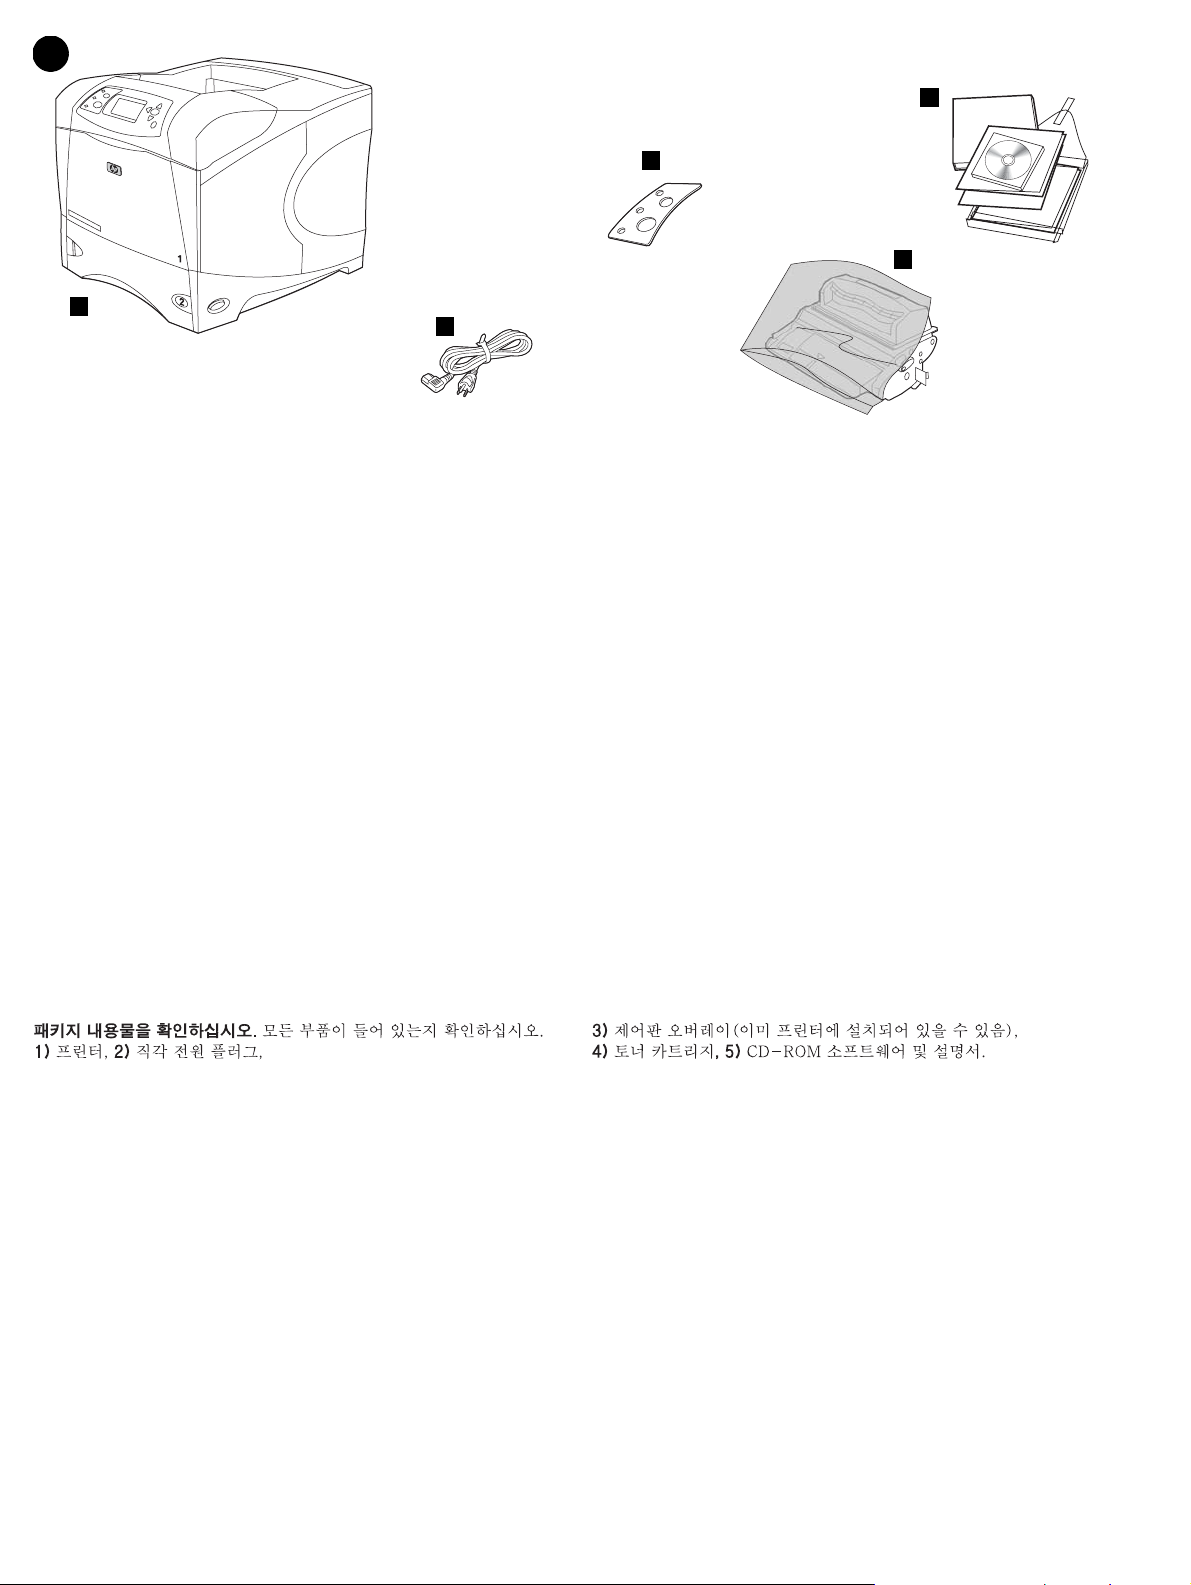
Check the package contents. Make sure that all the parts are included.
1) Printer; 2) Right-angle power cord;
检查包装箱内的物品。确保包含所有部件。1) 打印机;
2) 直角电源线;
Periksa isi kemasan. Pastikan semua komponen lengkap. 1) Printer;
2) Kabel listrik ;
3) Control panel overlay (this part might already be installed on the
printer.); 4) Print cartridge; 5) Software and documentation on CD-ROM.
3) 控制面板贴面 (此部件可能已安装在打印机上。);
4) 打印碳粉盒; 5) CD-ROM 上的软件和说明文件。
3)Penutup panel kontrol (Komponen ini mungkin sudah dipasang di
printer.); 4) Cartridge; 5) Perangkat lunak dan dokumentasi di CD-ROM.
4
Page 6
4
1
2
5
6
8
10
11
3
4
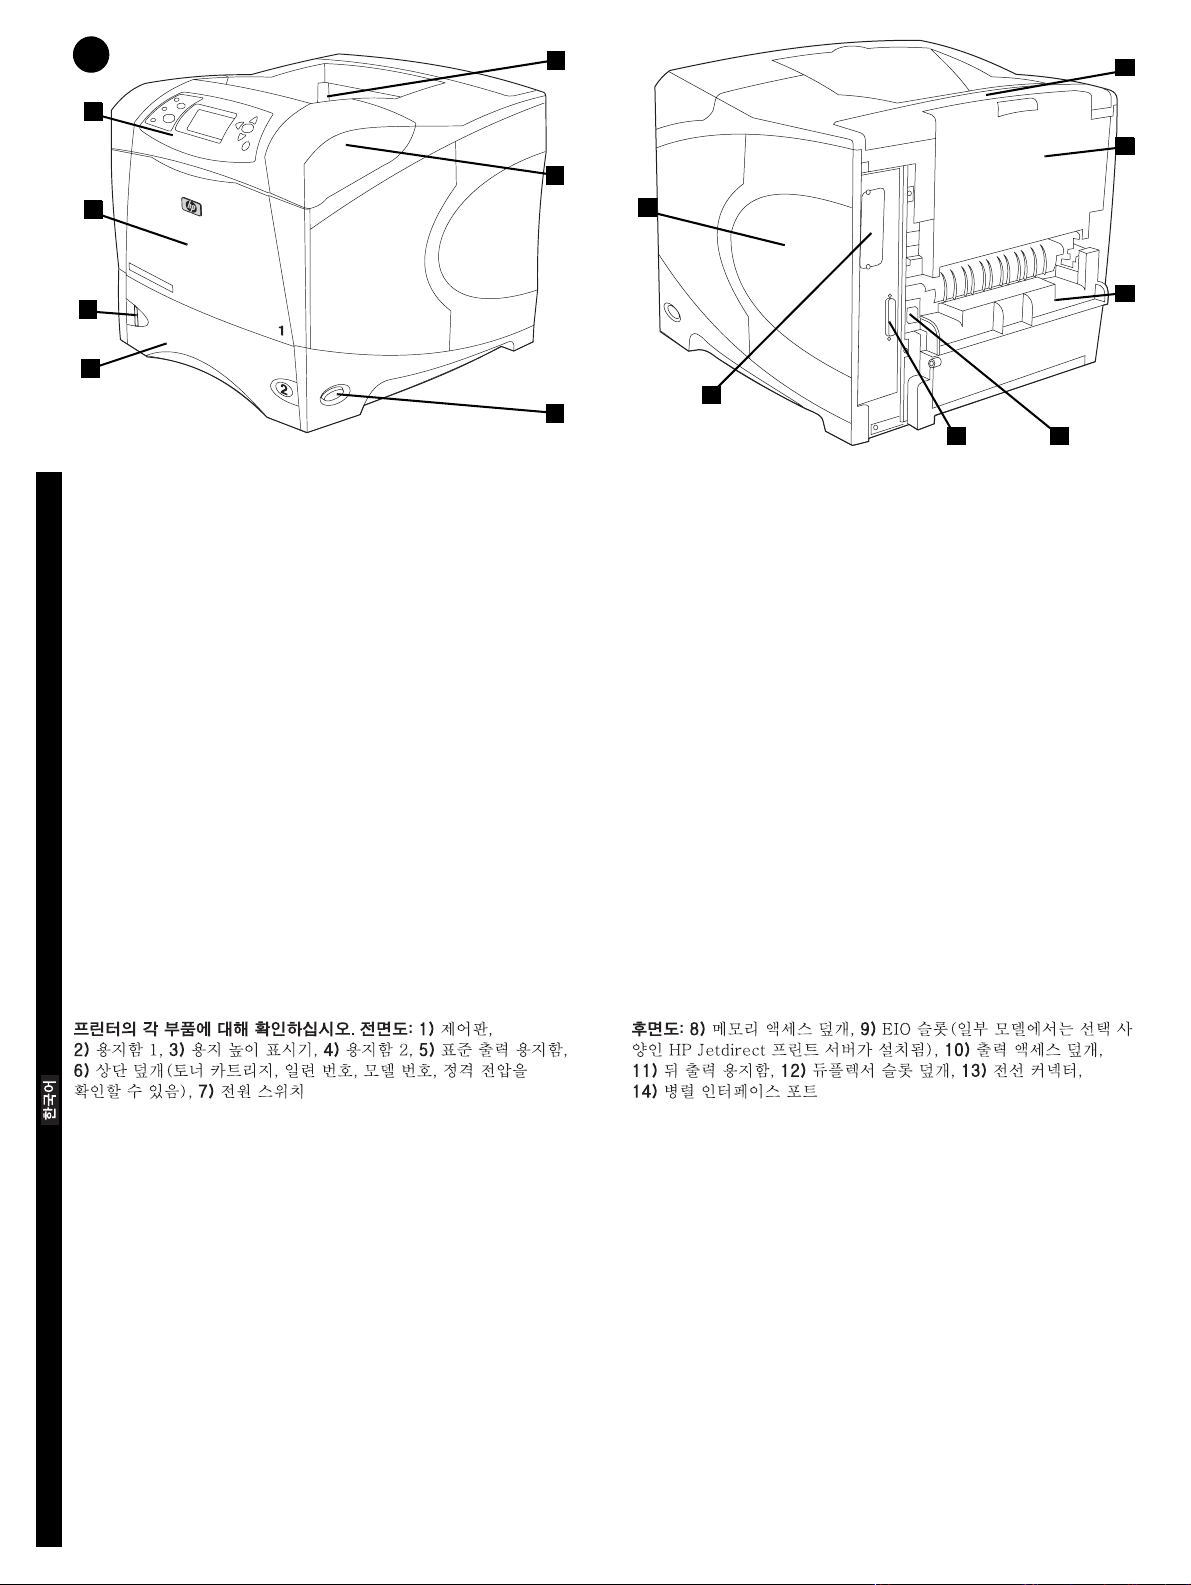
Identify printer parts. Front view: 1) Control panel; 2) Tray 1; 3) Paper
level indicator; 4) Tray 2; 5) Standard output bin; 6) Top cover (provides
access to the print cartridge, the serial number, the model number, and
the voltage rating); 7) Power switch
English
识别打印机部件。前视图:1) 控制面板; 2) 纸盘 1 ;
3) 纸位指示器; 4) 纸盘 2 ; 5) 标准出纸槽; 6) 顶盖
(通过顶盖可以查看打印碳粉盒、序列号、型号和电压额
定值); 7) 电源开关
简体中文
Mengenal bagian-bagian printer. Tampak depan: 1) Panel kontrol;
2) Nampan 1; 3) Indikator tinggi kertas; 4) Nampan 2; 5) Nampan
keluaran standar; 6) Penutup atas (memberikan akses ke cartridge,
nomor serial, nomor model dan voltase); 7) Tombol daya
12
7
Back view: 8) Memory access door; 9) EIO slot (some models have an
optional HP Jetdirect print server installed.); 10) Output-accessory cover;
11) Rear output bin; 12) Duplexer slot cover; 13) Power-cord connector;
14) Parallel interface port
9
14
13
后视图:8) 内存装卸盖; 9) EIO 插槽(某些型号已安装了
可选的 HP Jetdirect 打印服务器); 10) 输出附件盖板;
11) 后出纸槽;12) 双面打印器插槽盖板;13) 电源线接口;
14) 并行端口
Tampak belakang: 8) Pintu akses memori; 9) Selot EIO (beberapa model
dilengkapi dengan print server HP Jetdirect opsional terpasang.);
10) Penutup aksesori keluaran ; 11) Nampan keluaran belakang;
12) Penutup slot duplekser ; 13) Konektor kabel listrik ; 14) Port
antarmuka paralel
Bahasa Indonesia
5
Page 7

5
Remove the packing materials. 1) Remove the shipping bag and any
orange tape from the front and back of the printer. 2) Open the printer top
cover and remove the f oam pac king material inside. 3) Remo v e the plastic
film from the control panel display.
撕下包装材料。1) 除去装运袋并撕下打印机前面和后面的
橙色胶带。2) 打开打印机顶盖并从内部取出泡沫包装材料。
3) 从控制面板显示屏上撕去塑料膜。
Membuka kemasan. 1) Lepaskan kantong dan pita oranye dari bagian
depan dan belakang printer. 2) Buka penutup atas printer dan lepaskan
busa pengepakan di dalamnya. 3) Lepaskan film pastik dari layar panel
kontrol.
4) Open tray 1 and remove the orange sheet. 5) Open tray 2 and remove
all orange tape and packing materials. 6) Close both trays. Note: Save all
the packing material. You might need to repack the printer at a later date.
4) 打开纸盘 1 并取出橙色纸张。5) 打开纸盘 2 并撕下所
有橙色胶带和包装材料。6) 合上两个纸盘。注释:请保存好
所有包装材料,您以后有可能需要重新包装打印机。
4) Buka nampan 1 dan lepaskan lembaran oranye. 5) Buka nampan 2 dan
lepaskan semua pita oranye dan bahan pengepakan. 6) Tutup kedua
nampan. Catatan: Simpan semua bahan pengepakan. Mungkin Anda
perlu mengepak ulang printer di kemudian hari.
6
Page 8

6
2
3
4
5
Install the print cartridge. 1) Remove the print car tridge from its
packaging. 2) Bend and then pull the sealing tab from the end of the print
cartridge to remove the entire length of the tape. CAUTION: Avoid
touching any black toner on the tape. If the toner gets on your clothing,
wipe it off with a dry cloth and wash the clothing in cold water. Hot water
English
sets the toner into the fabric.
安装打印碳粉盒。1) 从包装内取出打印碳粉盒。2) 弯曲然
后拉动打印碳粉盒一端的密封胶带,撕下整条胶带。小心:
不要接触到密封胶带上的任何黑色碳粉。如果碳粉沾在衣服
上,则用干布将它抹去,然后用冷水洗涤衣服。热水会使碳
简体中文
粉融入织物中。
Memasang cartridge. 1) Buka cartridge dari kemasannya.
2) Bengkokkan lalu tarik segel dari ujung cartridge untuk melepaskan
seluruh pita. PERHATIAN: Hindari memegang toner hitam pada pita.
Apabila toner mengenai baju, bersihkan dengan kain kering dan cuci
dengan air dingin. Air panas membuat toner menyerap ke dalam kain.
Bahasa Indonesia
3) Lift the printer top cover. 4) Slide the print cartridge into the printer as
far as it can go. 5) Close the top cover. Note: If the top cover does not
close, make sure the print cartridge is correctly installed.
3) 提起打印机顶盖。4) 尽量将打印碳粉盒向打印机内部滑
入。5) 合上顶盖。注释:如果不能合上顶盖,则检查打印碳
粉盒是否正确安装。
3) Angkat penutup atas printer. 4) Geser cartridge ke dalam printer.
5) T utup penutup atas . Catatan: Apabila penutup atas tidak mau menutup ,
pastikan cartridge sudah diinstalasi dengan benar.
7
Page 9

7
1
4
2
5
3
6
Install any optional accessories. Use the separate installation
instructions to install any accessories that you have purchased with the
printer. 1) E IO accessories; 2) Hard disk; 3) 500-sheet feeder*; 4) Memory
DIMM, flash DIMM, or font DIMM;
安装任何可选的附件。使用单独的安装说明安装随打印机购
买的任何附件。1) EIO 附件;2) 硬盘;3) 500 页进纸器
*
;
4) 内存 DIMM、闪存 DIMM 或字体 DIMM ;
Pasang aksesori tambahan. Gunakan petunjuk instalasi terpisah untuk
menginstalasi aksesoris yang Anda beli. 1) Aksesori EIO ; 2) Hard disk;
3) Pengumpan 500-lembar*; 4) Memori DIMM, flash DIMM, atau font
DIMM;
5) Duplexer for two-sided printing; 6) Storage cabinet
*The printer supports a maximum of one optional feeder.
5) 用于双面打印的双面打印器; 6) 存储箱
*
打印机最多支持一个可选进纸器。
5) Duplekser untuk pencetakan dua sisi; 6) Lemari penyimpan
* Printer mendukung maksimal satu pengumpan opsional.
8
Page 10

8
2
1
Load Tra y 2. (For inf ormation about loading other trays , see the use guide
on the CD-ROM.) 1) Pull tray 2 completely out of the printer.
English
装入纸盘 2。(有关装入其它纸盘的信息,请参阅 CD-ROM 上
的使用指南。) 1) 将纸盘 2 从打印机完全拉出。
简体中文
3
2) Pinch the release on the left guide and slide the guides to the correct
paper size. 3) Pinch the release on the rear paper guide and slide it to the
correct paper size.
2) 捏紧左侧导板上的松开按钮,将导板滑至正确的纸张尺
寸。3) 捏紧后部纸张导板上的松开按钮,将其滑至正确的
纸张尺寸。
Mengisi Nampan 2. (Untuk informasi mengenai mengisi nampan yang
lain, baca panduan pada CD-ROM.) 1) Tarik nampan 2 keluar dari printer.
Bahasa Indonesia
2) Tekan pelepas pemandu sebelah kiri dan geser pada ukuran kertas
yang sesuai. 3) Tekan pelepas di belakang pemandu kertas dan geser ke
ukuran kertas yang sesuai.
9
Page 11

4
5
4) Rotate the blue knob on the right side of the tray to the correct paper
size. (Turn the knob to “STANDARD” for LTR, A4, LGL, EXEC, A5, and
JIS B5 paper sizes, or to “CUSTOM” for custom paper sizes.)
4) 将纸盘右侧的蓝色旋钮转到正确的纸张尺寸。(将旋钮转
到“STANDARD”,以 便设置 LTR、A4、LGL、EXEC、A5 和 JIS
B5 纸张尺寸;或者转到“CUSTOM”,以 便设置自定义纸张尺
寸。)
4) Putar tombol biru di sisi kanan nampan pada ukuran kertas yang
sesuai. (Putar tombol ke “STANDARD” untuk ukuran kertas LTR, A4, LGL,
EXEC, A5, dan JIS B5 atau ke “CUSTOM” untuk ukuran kertas lain.)
5) Load paper into the paper tray with the top edge of the paper facing the
front edge of the tray. Make sure that the paper is flat at all four corners
and that the top of the stack is below the maximum-height indicators.
CAUTION: Do not fan the paper. Fanning can cause misfeeds. 6) Slide
the tray back into the printer.
5) 将纸张装入纸盘,纸张顶缘朝向纸盘前边。确 保 纸 张四角
平整并且纸叠顶部低于最大高度指示器。小心:请勿展开纸
张。展开纸张可能导致送纸错误。6) 将纸盘滑回打印机。
5) Isi kertas ke dalam nampan dengan dengan ujung atas kertas
menghadap ujung depan nampan. Pastikan kertas rata pada keempat
sudut dan atas tumpukan masih dibawah indikator tinggi maksimal.
PERHATIAN: Jangan mengipas kertas. Bisa mengakibatkan salah
masuk. 6) Dorong kembali nampan ke dalam printer.
10
Page 12

9
1
Connect an interface cable. To connect the printer directly to a
computer: 1) Connect an IEEE 1284-compliant (size “B”) parallel cable
between the parallel port on the computer and the parallel port on the
printer. (Note: A parallel cable is not included.) 2) Snap the wire clips into
place to secure the cable at the printer.
English
连接接口电缆。要将打印机直接连接至计算机:1) 使用符
合 IEEE 1284 标准(“B”规格)的并行电缆连接计算机的
并行端口和打印机的并行端口。(注释:不 提供并行电
缆。)2) 将线夹卡入到位,以将电缆固定在打印机上。
简体中文
Menyambung kabel antarmuka. Untuk men yambung printer langsung ke
komputer: 1) Sambung kabel paralel IEEE 1284 (ukuran “B”) antara port
paralel komputer dengan port paralel printer. (Catatan: Kabel paralel tida k
disertakan.) 2) Pasang klip ke tempatnya supaya kabel printer tidak lepas.
Bahasa Indonesia
To connect the printer to an Ethernet 10/100 Base-T network: Connect a
network cable between the HP Jetdirect print server and a port for the
network.
要将打印机连接至 Ethernet 10/100 Base-T 网络:使用网
络电缆连接 HP Jetdirect 打印服务器和网络端口。
Untuk menyambung printer ke jaringan Ethernet 10/100 Base-T:
Sambung kabel jaringan antara HP Jetdirect print server dan port pada
jaringan.
11
Page 13

10
3
Connect the right-angle power cord. 1) Check the voltage rating on your
printer (located under the top cover). The power supply will be either 110
to 127 Vac or 220 to 240 Vac, 50/60 Hz. (This is the second time you are
checking the voltage.) 2) Make sure the power switch is in the off (“0”)
position.
连接直角电源线。1) 查看打印机上的电压额定值 (位于顶盖
下) 。电源应是 110-127 Vac 或 220-240 Vac,50/60 Hz。
(这是您第二次检查电压。)2) 确保电源开关处于关闭
(“0”)位置。
Menyambung kabel listrik. 1) Periksa voltase printer (terletak di bawah
penutup atas). Pasokan listrik adalah 110 sampai 127 Vac atau 220
sampai 240 Vac, 50/60 Hz. (Kedua kalinya Anda memeriksa voltase.)
2) Pastikan tombol daya pada posisi nonaktif (“0”).
3) Connect the right-angle power cord between the printer and a grounded
power strip or ac outlet. Note: If the optional duplexer has been installed,
pull the duplexer out to connect the power cord, and then push the
duplexer back in. CAUTION: To prevent damage to the printer, use only
the power cord that is provided.
3) 使用直角电源线连接打印机和接地的电源板或交流插
座。注释:如果安装了可选的双面打印器,请先拉出双面打
印器以连接电源线,然后再将双面打印器推回原位。
小心:为防止损坏打印机,请仅使用提供的电源线。
3) Sambung kabel listrik antara printer dengan sumber listrik ac.
Catatan: Apabila duplekser terpasang, tarik keluar duplekser untuk
menyambung kabel listrik lalu kemudian dorong kembali.
PERHATIAN: Untuk mencegah kerusakan pada printer, gunakan hanya
kabel listrik yang disediakan.
12
Page 14

11 12
Install the control panel overlay (optional): 1) If necessary, remove the
overlay that is currently installed on the printer by inserting a thin, rigid
object such as a credit card under the top edge of the overlay and then
pulling up on the overlay until it comes off. 2) Place the overlay you want
onto the control panel and snap it into place.
English
安装控制面板贴面 (可选):1) 如有必要,请按以下方法取
下打印机当前安装的贴面:将一个薄而硬的物体(如信用
卡)插入贴面的顶缘下,然后向上撬贴面,直至其脱离打印
机。2) 将所需的贴面放在控制面板上,然后卡入到位。
简体中文
Memasang penutup panel kontrol (tambahan): 1) Kalau perlu,
lepaskan penutup yang terpasang pada printer dengan menyisipkan
obyek tipis and kokoh seperti kartu kredit di bawah sudut atas penutup lalu
tarik sampai terlepas. 2) Tempatkan penutup panel kontrol pada
tempatnya.
Bahasa Indonesia
Turn the printer power on. Turn the power switch to the on position (“|”)
and wait for the printer to warm up. If the printer automatically sets your
language, go to step 14. If the printer did not set your language, go to
step 13.
打开打印机电源。将电源开关转到开启 (“|”)位置,然后
等待打印机预热。如果打印机自动设为您所需的语言,则转
至步骤 14。如果打印机没有设为您所需的语言,则转至步骤
13。
Mengaktifkan printer. Putar tombol daya pada posisi aktifk (“|”) lalu
tunggu printer melakukan pemanasan. Apabila printer secara otomatis
mengatur bahasa, ke langkah 14. Apabila tidak, ke langkah 13.
13
Page 15

13 14
Set the control panel language. Use the (Up arrow) and (Down
arrow) to scroll to a language you want and press (Select) to select it.
(To change the language after it has been set, see the use guide on the
CD-ROM).
设置控制面板语言。使用(向上 箭头)键和(向下
箭头)键滚动查找至您所需的语言,然后按下(选择)
键将其选定。(要在设置语言后更改语言,请参阅 CD-ROM
上的使用指南)。
Mengatur bahasa panel kontrol. Gunakan (Panah atas) dan
(Panah bawah) untuk memilih bahasa yang diinginkan lalu tekan
(Pilih) untuk melakukan pilihan. (Untuk mengubah bahasa setelah diatur,
baca panduan di CD-ROM).
Test the printer. To verify that the printer is operating correctly, print a
configuration page. 1) Press (Select) to enter the menus. 2) Use the
(Up arrow) and (Down arrow) to scroll to INFORMATION and press
(Select). 3) Use the (Up arrow) and (Down arrow) to scroll to
PRINT CONFIGURATION and press (Select).
测试打印机。要检查打印机是否运行正常,请打印配置页。
1) 按 下(选择)键 进 入菜单。2) 使 用(向 上 箭
头)键和 (向下箭头)键滚动查找至 INFORMATION(信
息),然后按下(选择)键。3) 使用(向上箭头)
键和(向下箭头)键滚动查找至 PRINT CONFIGURATION
(打印配置),然后按下(选择)键。
Mengetes printer. Untuk verifikasi bahwa printer bekerja dengan baik,
cetaklah halaman konfigurasi. 1) Tekan (Pilih) untuk masuk ke menu.
2) Gunakan (Panah atas) dan (Panah bawah) untuk memilih
INFORMATION lalu tekan (Pilih). 3) Gunakan (Panah atas) dan
(Panah bawah) untuk memilih PRINT CONFIGURATION lalu tekan
(Pilih).
INFORMATION
CONFIGURATION
14
PRINT
Page 16

15
Note: If the configuration page does not print, make sure that there are no
messages (other than READY) on the control panel display, that the Ready
light (top light) is on, and that no other lights are on or blinking. Make sure
that paper is loaded and that the paper tray is properly adjusted. Make
sure that the print cartridge is installed correctly.
English
注释:如果打印机没有打印配置页,则检查并确保控制面板
显示屏上没有显示任何信息(READY [就绪] 除外),就绪
指示灯(上部指示灯)亮起,并且其它任何指示灯均未亮起
或闪烁。确保已装入纸张并且纸盘调整正确。确保打印碳粉
简体中文
盒安装正确。
Catatan: Apabila tidak bisa mencetak halaman konfigurasi, pastikan tidak
ada pesan lain (selain READY) pada layar panel kontrol, lampu Ready
(lampu atas) menyala dan tidak ada lampu lain yang menyala atau
berkedip. Pastikan kertas sudah diisi dan nampan kertas sudah diatur
dengan benar. Pastikan cartridge terpasang dengan benar.
Bahasa Indonesia
READY
Install the printing software. Procedures for software installation vary
according to the operating system and the network environment. Insert the
CD-ROM into the CD-ROM drive. When the installation wizard starts,
follow the instructions. See the Readme (read4200) on the CD-ROM if the
installation wizard does not start or for detailed installation information.
安装打印软件。安装软件的步骤根据操作系统和网络环境的
不同而不同。将 CD-ROM 放入 CD-ROM 驱动器。安装向导启
动后,请按相关的说明进行操作。如果安装向导未启动或者
要查看详细的安装说明,请参阅 CD-ROM 上的 自述文件
(read4200)。
Menginstalasi perangkat lunak pencetakan. Prosedur untuk instalasi
perangkat lunak berbeda-beda tergantung sistem operasi dan lingkungan
jaringan. Letakkan CD-ROM pada drivenya. Bila petunjuk instalasi mulai,
ikuti. Baca Readme (read4200) di CD-ROM untuk informasi instalasi yang
lebih rinci apabila petunjuk instalasi tidak bekerja.
15
Page 17

16 17
Test the software installation. Print a page from any program to make
sure the software is correctly installed. Note: If installation fails, reinstall
the software. If reinstallation fails, see the Readme on the CD-ROM, see
the support flyer that came in the printer box, or visit http://www.hp.com. In
the Select your country/region field at the top , select your country/region
and click . Click the Support block.
测试软件安装。从任一程序打印一个页面,确保软件安装正
确。注释:如果安装失败,请重新安装软件。如果重新安装
仍失败,请参阅 CD-ROM 上的自述文件和随打印机包装箱提
供的支持说明,或者访问 http://www.hp.com。在 顶 部 的
Select your country/region 字段中,选择您的国家 / 地
区,然后单击 。单击支持块。
Mengetes instalasi perangkat lunak. Cetak halaman dari sembarang
program untuk memastikan perangkat lunak terinstalasi dengan baik.
Catatan: Apabila instalasi gagal, instalasi ulang perangkat lunak. Apabila
instalasi ulang gagal, baca Readme pada CD-ROM, baca brosur
dukungan yang disertakan di dalam kotak printer atau kunjungi
http://www.hp.com. Pada Select your country/region di bagian atas,
pilih negara/wilayah Anda lalu klik . Klik Support.
Register your printer. Register your printer to receive important support
and technical information. You can register at: http://www.register.hp.com.
注册打印机。注册打印机后,您便可收到重要的支持和技术
信息。您可以在以下网站上注册:
http://www.register.hp.com。
Mendaftarkan printer Anda. Daftarkan printer Anda supaya bisa
menerima dukungan dan informasi teknis. Anda bisa mendaftar di:
http://www.register.hp.com.
16
Page 18

18
Congratulations. Your printer is ready to use. For information about using
the printer and troubleshooting, see these sources: 1) The use guide on
the CD-ROM; 2) This URL: http://www.hp.com/support/lj4200 ; 3) HP
Customer Support (See the support flyer that came in the printer box.)
English
恭喜!您的打印机已准备就绪,可以使用。有关使用打印机和
排除故障的信息,请参阅以下资源:1) CD-ROM 上的使用指南;
2) 此 URL:http://www.hp.com/support/lj4200 ;
3) HP 客户支持 (参阅随打印机包装箱提供的支持说明。)
简体中文
Selamat. Printer Anda siap digunakan. Untuk informasi mengenai
menggunakan printer dan pemecahan masalah, lihat sumber-sumber
berikut ini: 1) Panduan di CD-ROM; 2) URL ini:
http://www.hp.com/support/lj4200; 3) Dukungan Pelanggan HP (Baca
brosur dukungan yang disertakan di dalam kotak printer.)
Bahasa Indonesia
17
Page 19

18
Page 20

©
2003 Hewlett-Packard Development Company, L.P.
www.hp.com/support/lj4200
*Q3993-90909*
*Q3993-90909*
Q3993-90909
 Loading...