

Page 1
start
démarrage
başlat
hp
LaserJet 4200
4200n 4200tn
4200dtn
hp
4300dtn 4300dtns 4300dtnsl
4200dtns 4200dtnsl
LaserJet 4300
4300n 4300tn
Page 2

© Copyright Hewlett-Packard Company 2002
All Rights Reserved.
Except as allowed by copyright laws or herein, reproduction, adaptation, or
translation without prior written permission is prohibited.
A user of the Hewlett-Pac kard printer associated with this guide is granted a
license to (a) print hard copies of this guide for personal, internal, or
company use subject to the restriction not to sell, resell or otherwise
distribute the hard copies; and (b) place an electronic copy of this guide on a
network server provided access to the electronic copy is limited to personal,
internal users of the Hewlett-Packard printer associated with this guide.
Part Number: Q2431-90910
First Edition, June 2002
Warranty
The information contained in this document is subject to change without
notice.
Hewlett-Packard makes no warranty of any kind with respect to this
information. HEWLETT-PACKARD SPECIFICALLY DISCLAIMS THE
IMPLIED WARRANTY OF MERCHANTABILITY AND FITNESS FOR A
PARTICULAR PURPOSE.
Hewlett-Packard shall not be liable for any direct, indirect, incidental,
consequential, or other damage alleged in connection with the furnishing or
use of this information.
FCC regulations
The HP LaserJet 4200 series printers and HP LaserJet 4300 series printers
have been tested and found to comply with the limits for a Class B digital
device, pursuant to Part 15 of the FCC rules. These limits are designed to
provide reasonable protection against harmful interference in a residential
installation. This equipment generates, uses, and can radiate radio
frequency energy. If this equipment is not installed and used in accordance
with the instructions, it might cause harmful interference to radio
communications. However, there is no guarantee that interference will not
occur in a particular installation. If this equipment does cause harmful
interference to radio or television reception, which can be determined by
turning the equipment off and on, the user is encouraged to try to correct the
interference by one or more of the following measures:
• Reorient or relocate the receiving antenna.
• Increase separation between equipment and receiver.
• Connect equipment to an outlet on a circuit different from that to which the
receiver is located.
• Consult your dealer or an experienced radio/TV technician.
Note: Any changes or modifications to the printer that are not
expressly approved by HP could void the user’s authority to operate
this equipment. Use of a shielded interface cable is required to comply
with the Class B limits of Part 15 of FCC rules.
See the use guide on the CD-ROM f or other regulatory information regarding
the HP LaserJet 4200 series printers and HP LaserJet 4300 series printers.
1
Page 3

HP LaserJet 4200/4200n/4200tn/4200dtn/4200dtns/4200dtnsl
1
HP LaserJet 4300/4300n/4300tn/4300dtn/4300dtns/4300dtnsl
412 mm
(16.2 inches)
1045 mm (41.1 inches)
HP LaserJet 4200/
4200n/4300/4300n
547 mm
(21.5 inches)
WARNING! The printer is heavy. To prevent physical injury, two people
should lift and move the printer.
IMPORTANT ! L'imprimante est lourde. Pour éviter toute blessure
physique, deux personnes sont nécessaires pour soulever et déplacer
l'imprimante.
UYARI! Yazıcı ağırdır. Yaralanmaları önlemek için, yazıcıyı iki kişi kaldırıp
taşımalıdır.
Prepare the location. Place the printer in a well-ventilated room on a
sturdy, level surface. Allow space around the printer, including 2 inches
(50 mm) of space around the printer for ventilation.
EnglishFrançaisTürkçe
Choix de l'emplacement. Placez l'imprimante dans un emplacement
bien aéré, sur une surface plane et stable. Gardez de l'espace libre autour
de l'imprimante, dont au moins 50 mm pour la ventilation.
Yazıcıyı yerleştireceğiniz yeri hazırlayın. Yazıcıyı, iyi havalandırılan bir
odada, sağlam ve düz bir zemin üzerine yerleştirin. 50 mm (2 inç)
havalandırma boşluğuyla beraber yazıcının etrafında boşluk olmalıdır.
2
Page 4
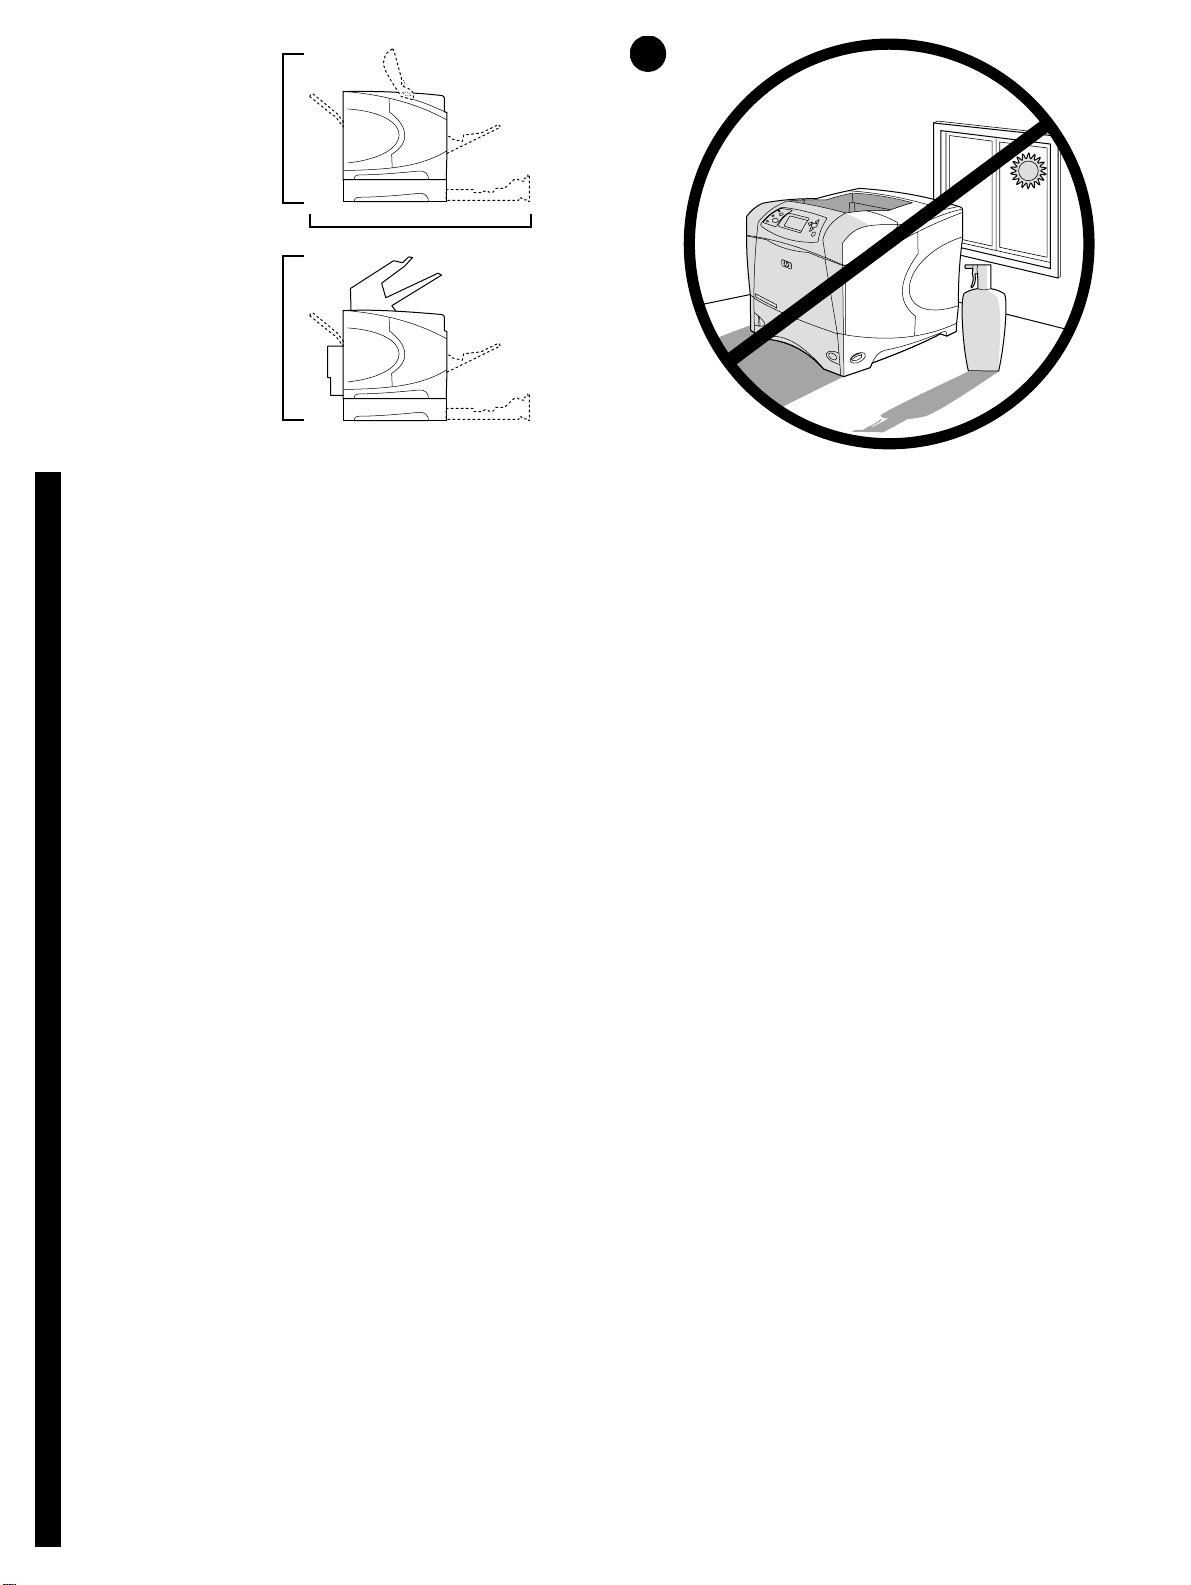
HP LaserJet 4200tn/
4200dtn/4300tn/4300dtn
670 mm
(26.4 inches)
2
HP LaserJet 4200dtns/
4200dtnsl
HP LaserJet 4300dtns/
4300dtnsl
Make sure that the location has an adequate power supply. Check the
voltage rating on your printer (located under the top cover). The power
supply will be either 110 to 127 Vac or 220 to 240 Vac, 50/60 Hz.
EnglishFrançaisTürkçe
Vérifiez que l'emplacement est doté d'un module d'alimentation
adapté. Vérifiez la tension nominale de l'imprimante (indiquée sous le
couvercle supérieur). L'alimentation électrique est de 110 à 127 V CA ou
de 220 à 240 V CA, 50/60 Hz.
740 mm
(29.1 inches)
1045 mm (41.1 inches)
Regulate the environment. Do not place the printer in direct sunlight or
near chemicals. Make sure that the environment does not experience
abrupt changes in temperature or humidity.
• Temperature: 50° to 91° F (10° to 32.5° C)
• Relative humidity: 20 to 80%
Environnement ambiant. N'exposez pas l'imprimante aux rayons directs
du soleil ni à des produits chimiques. Vérifiez que l'environnement n'est
soumis à aucun changement brusque de température ou d'humidité.
• Température : De 10 à 32,5 °C
• Humidité relative : De 20 à 80 %
Yazıcının kullanılacağı yerde yeterli bir güç kaynağı olduğundan
emin olun. Yazıcınız için gereken voltaj değerini kontrol edin (üst kapağın
altındadır). Güç kaynağı, 110 - 127 Vac veya 220 - 240 Vac, 50/60 Hz
olmalıdır.
Ortamın özellikleri. Yazıcıyı doğrudan güneş ışığı alacak şekilde veya
kimyasal maddelerin yakınına yerleştirmeyin. Ortamda ani ısı ve nem
değişiklikleri meydana gelmediğinden emin olun.
• Sıcaklık: 10° - 32,5° C (50° - 91° F)
• Bağıl nem: % 20 - % 80
3
Page 5

3
1
5
6
2
4
3
Check the package contents. Make sure that all the parts are included.
1) Printer; 2) Right-angle power cord; 3) Control panel overlay (This part
might already be installed on the printer.); 4) Print cartridge;
Vérification du contenu de l'emballage. Vérifiez que tous les éléments
sont inclus dans l'emballage. 1) Imprimante 2) Cordon d'alimentation à
prise coudée 3) Cache (plastique) du panneau de commande (peut-être
déjà installé sur l'imprimante) 4) Cartouche d'impression
8
7
5) Software and documentation on CD-ROM; 6) Optional 500-sheet
feeder*; 7) Optional stapler/stacker*; 8) Optional duplexer*;
*This item is included with some models; it is available f or all other models
as an optional accessory.
5) Logiciel et documentation sur CD-ROM 6) Bac d'alimentation optionnel
de 500 feuilles* 7) Bac d'empilement etagrafeuse optionnel* 8) Unité
d'impression recto verso optionnelle*
*Cet accessoire est fourni avec certains modèles ; il est disponible en tant
qu'accessoire optionnel pour les autres modèles.
Paketin içindekileri kontrol edin. Paketin içinde eksik parça
olmadığından emin olun. 1) Yazıcı; 2) Dik açılı güç kablosu; 3) Kontrol
paneli kaplaması (Bu parça yazıcıya zaten takılmış olabilir.); 4) Yazıc ı
kartuşu;
5) CD-ROM’daki yazılım ve belgeler; 6) İsteğe bağlı 500 sayfalık
besleyici*; 7) İsteğe bağlı zımbalayıcı/yığınlayıcı*; 8) İsteğe bağlı
dupleksleyici*;
*Bu parça bazı modellerle birlikte gelir, diğer modeller için isteğe bağlı bir
aksesuar olarak ayrıca satın alınabilir.
4
Page 6
4
1
2
5
6
8
10
11
3
4
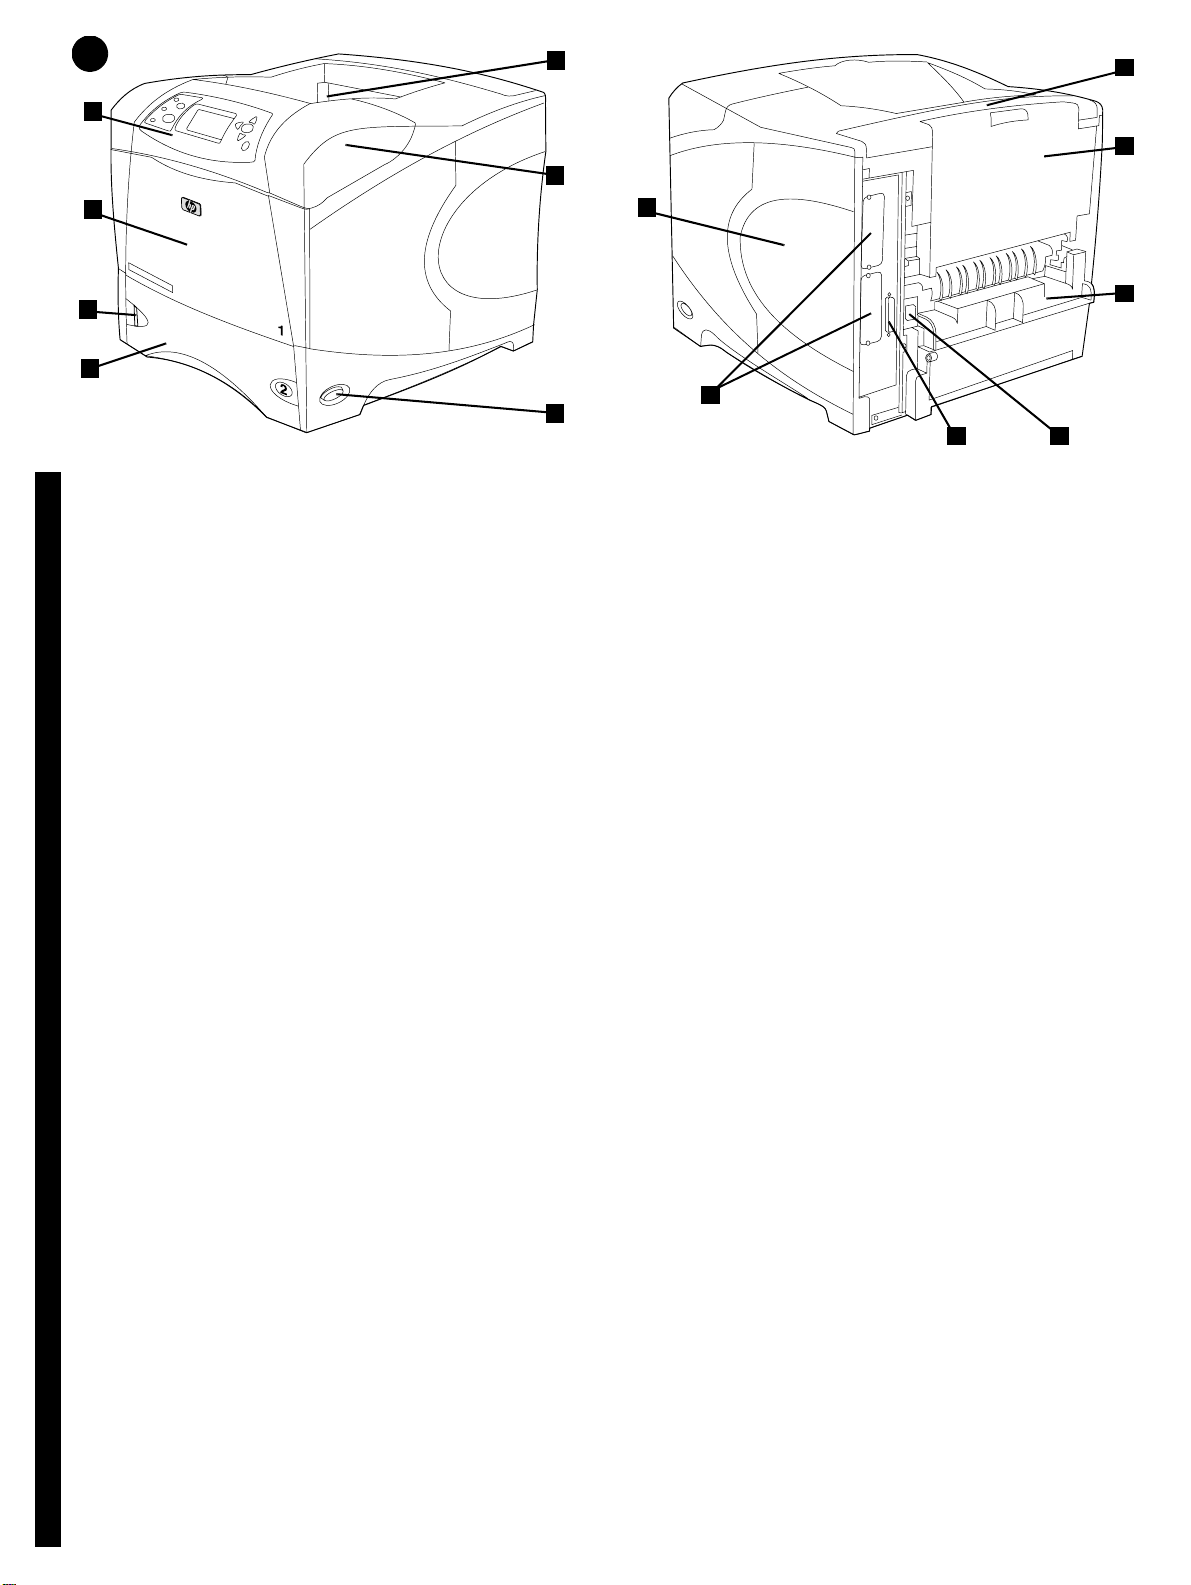
Identify printer parts. Front view: 1) Control panel; 2) Tray 1; 3) Paper
level indicator; 4) Tray 2; 5) Standard output bin; 6) Top cover (provides
access to the print cartridge, the serial number, the model number, and
the voltage rating); 7) Power switch
EnglishFrançaisTürkçe
Identification des pièces de l'imprimante. Vue avant : 1) Panneau de
commande 2) Bac 1 3) Indicateur de niveau du papier 4) Bac 2 5) Bac de
sortie standard 6) Couvercle supérieur (permet d'accéder à la cartouche
d'impression, au numéro de série, au numéro du modèle et à la tension
nominale) 7) Interrupteur marche/arrêt
Yazıcının parçalarına bakın. Önden görünüm: 1) Kontrol paneli;
2) Tepsi 1; 3) Kağıt düzeyi göstergesi; 4) Tep si 2; 5) Standart çıkış
bölmesi; 6) Üst kapak (yazıcı kartuşuna, seri numarasına, model
numarasına ve voltaj bilgilerine erişim sağlar); 7) Açma/kapama düğmesi
12
7
Back view: 8) Memory access door; 9) EIO slots (Some models have an
optional HP Jetdirect print server installed.); 10) Output-accessory cover;
11) Rear output bin; 12) Duplexer slot cover; 13) Power-cord connector;
14) Parallel interface port
Vue arrière : 8) Porte d'accès à la mémoire 9) Logements EIO (certains
modèles sont dotés du serveur d'impression HP Jetdirect optionnel)
10) Couvercle de l'accessoire de sortie 11) Bac de sortie arrière
12) Couvercle du logement de l'unité d'impression recto verso
13) Connecteur du cordon d'alimentation 14) Port d'interface parallèle
Arkadan görünüm: 8) Bellek erişim kapısı; 9) EIO yuvaları (Bazı
modellerde, isteğe bağlı HP Jetdirect yazıcı sunucusu yüklenmiştir.);
10) Çıkış aksesuar kapağı; 11) Arka çıkış bölmesi; 12) Dupleksleyici yuva
kapağı; 13) Güç kablosu konektörü; 14) Paralel arabirim bağlantı noktası
9
14
13
5
Page 7
5
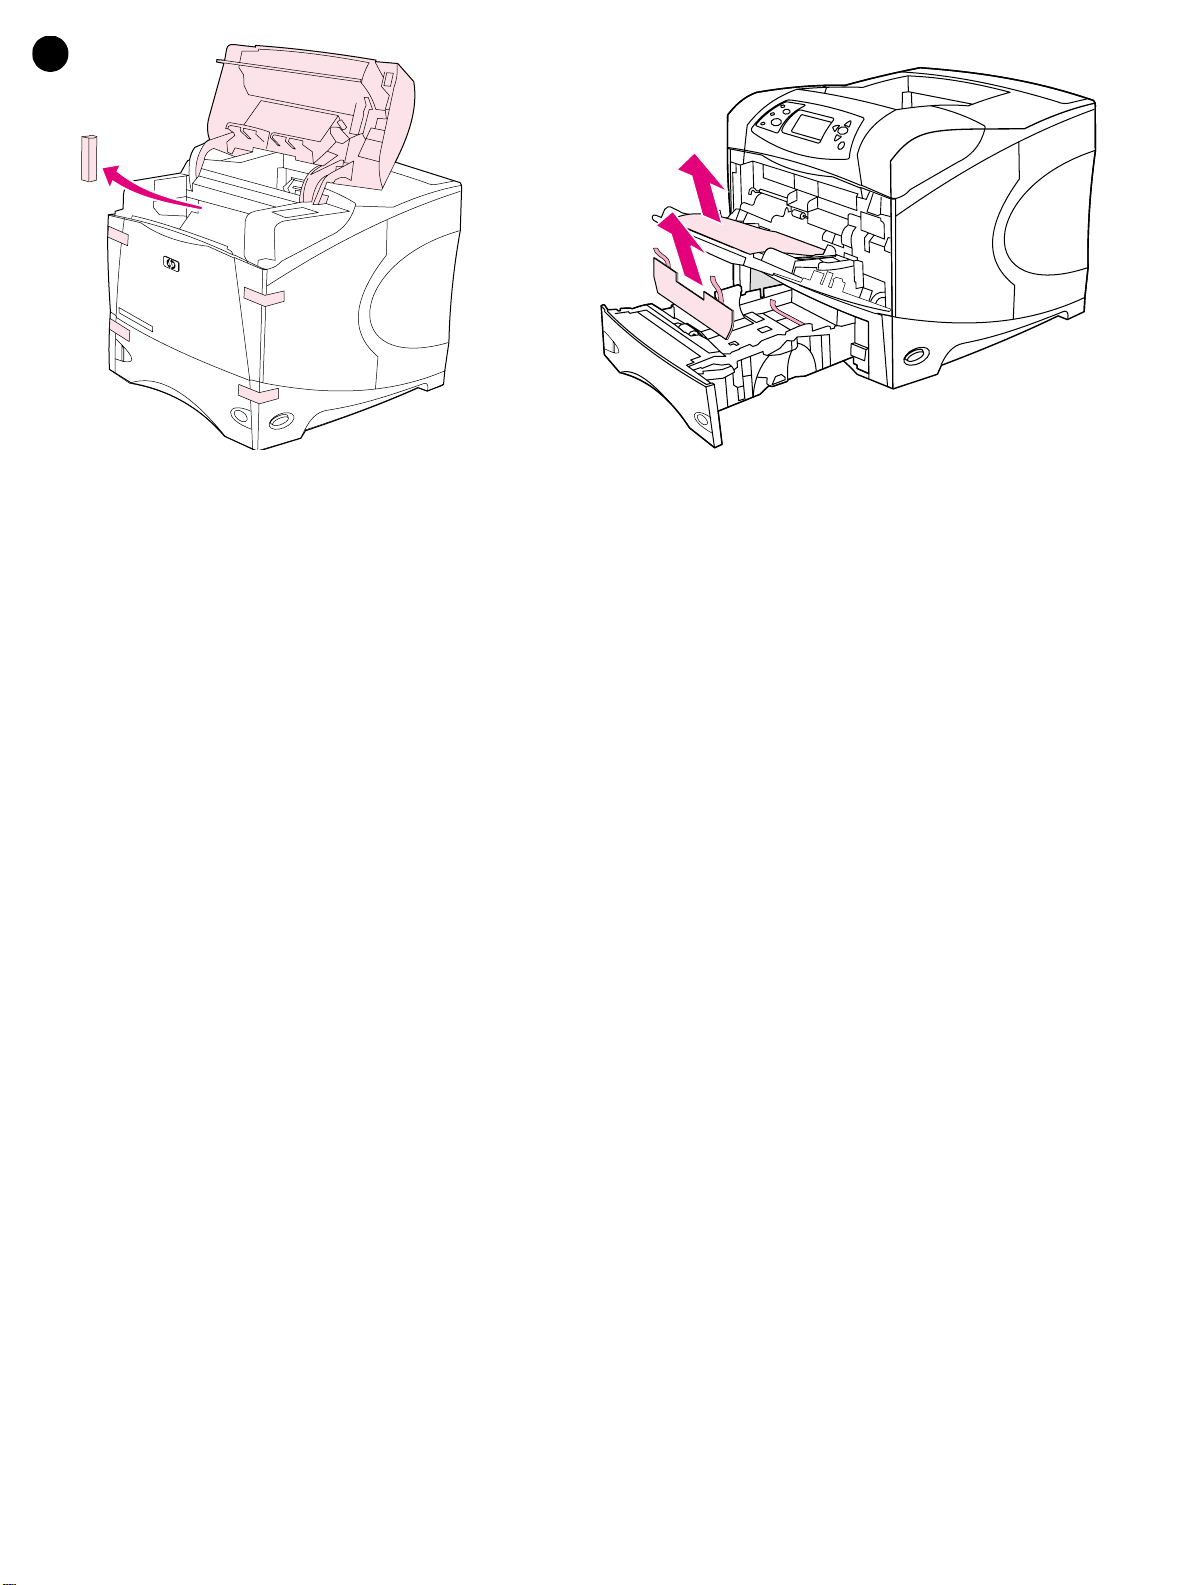
Remove the packing materials. 1) Remove the shipping bag and any
orange tape from the front and back of the printer. 2) Open the printer top
cover and remove the foam packing material inside. 3) Remove the plastic
film from the control panel display.
Retrait de l'emballage. 1) Sortez l'imprimante de sa housse, et retirez le
ruban adhésif orange à l'avant et à l'arrière de l'imprimante. 2) Ouvrez le
capot supérieur de l'imprimante et retirez l'emballage en mousse situé à
l'intérieur. 3) Retirez le film plastique de l'écran du panneau de
commande.
Ambalaj malzemelerini çıkarın. 1) Ambalaj torbasını ve yazıcının
önündeki ve arkasındaki tüm turuncu bantları çıkarın. 2) Yazıcının üst
kapağını açın ve içindeki köpük malzemeyi çıkarın. 3) İnce plastik
kaplamayı kontrol panelinin ekranından çıkarın.
4) Open tray 1 and remove the orange sheet. 5) Open tray 2 and remove
all orange tape and packing materials. 6) Close both trays. Note: Save all
the packing material. You might need to repack the printer at a later date.
4) Ouvrez le bac 1 et retirez la feuille orange. 5) Ouvrez le bac 2, et retirez
le ruban adhésif orange et les matériaux d'emballage. 6) Fermez les deux
bacs. Remarque : Conservez tous les matériaux d'emballage au cas où
vous devriez ultérieurement remballer l'imprimante.
4) Tepsi 1’i açın ve turuncu sayfayı çıkarın. 5) Tepsi 2’yi açın ve turuncu
bantları ve ambalaj malzemelerini çıkarın. 6) İki tepsiyi de kapatın.
Not: Ambalaj malzemelerini saklayın. Yazıcıyı daha sonra yeniden
paketlemeniz gerekebilir.
6
Page 8
6
2
3
4
5
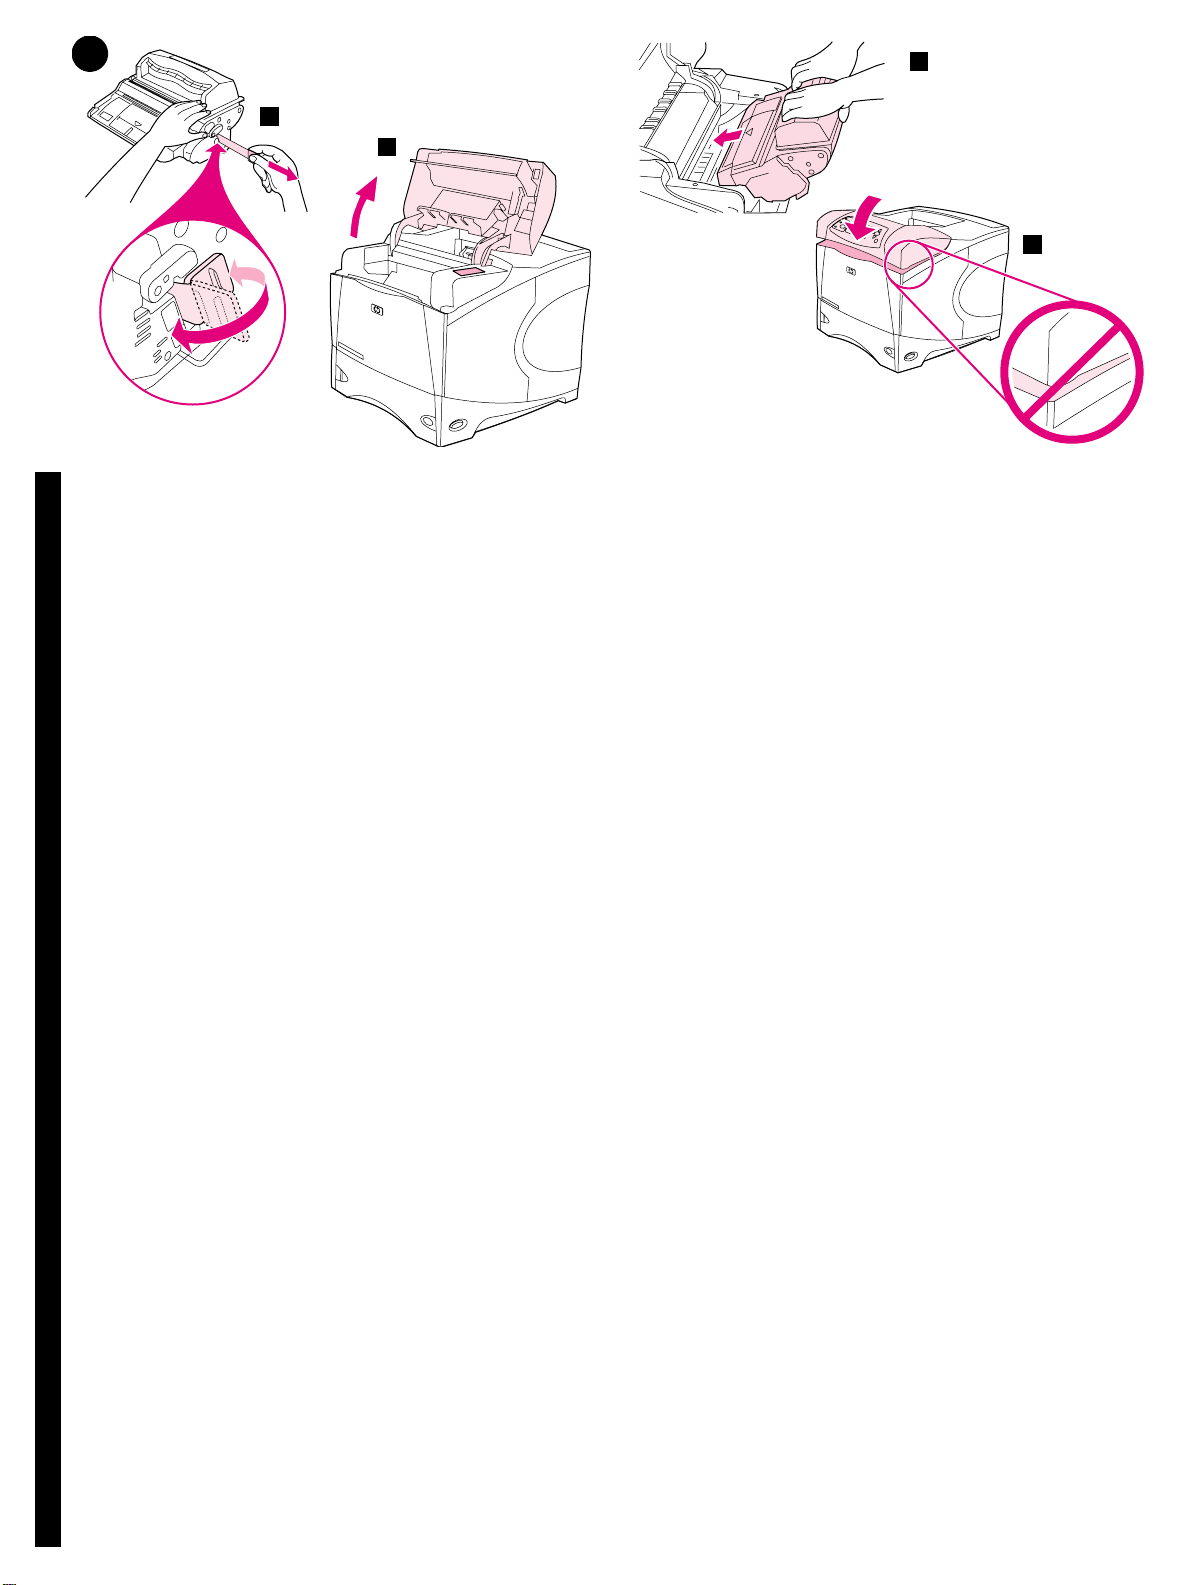
Install the print cartridge. 1) Remove the print cartridge from its
packaging. 2) Bend and then pull the sealing tab from the end of the print
cartridge to remove the entire length of the tape. CAUTION: Avoid
touching any black toner on the tape. If the toner gets on your clothing,
wipe it off with a dry cloth and wash the clothing in cold water. Hot water
EnglishFrançaisTürkçe
sets the toner into the fabric.
Installation de la cartouche d'impression. 1) Retirez la cartouche
d'impression de son emballage. 2) Pliez la bande de scellage à l'extrémité
de la cartouche, puis tirez-la pour la retirer entièrement. ATTENTION :
Evitez de toucher l'encre noire sur la bande. Si vous tachez un vêtement
avec de l'encre, essuy ez-le av ec un chiff on sec, puis lav ez-le à l'eau froide.
L'eau chaude fixe l'encre dans le tissu.
Yazıcı kartuşunu takın. 1) Yazıcı kartuşunu ambalajından çıkarın.
2) Yazıcı kartuşunun ucundaki sızdırmazlık bantını katlayın ve çekerek
tüm bantı çıkarın. DİKKAT: Banttaki siyah tonere dokunmayın. Toner
giysilerinize bulaşırsa, kuru bir bezle silin ve giysinizi soğuk suyla yıkayın.
Sıcak su, tonerin kumaşa işlemesine neden olur.
3) Lift the printer top cover. 4) Slide the print cartridge into the printer as
far as it can go. 5) Close the top cover. Note: If the top cover does not
close, make sure the print cartridge is correctly installed.
3) Soulevez le couvercle supérieur de l'imprimante. 4) Enfoncez au
maximum la cartouche dans l'imprimante. 5) Fermez le couvercle
supérieur. Remarque : Si le couvercle supérieur ne ferme pas, vérifiez si
la cartouche d'impression est installée correctement.
3) Yazıcının üst kapağını kaldırın. 4) Yazıcı kartuşunu yerine iyice
yerleştirecek şekilde yazıcıya takın. 5) Üst kapağı kapatın. Not: Üst kapak
kapanmazsa, yazıcı kartuşunun doğru takıldığından emin olun.
7
Page 9
7
1
4
2
3
5
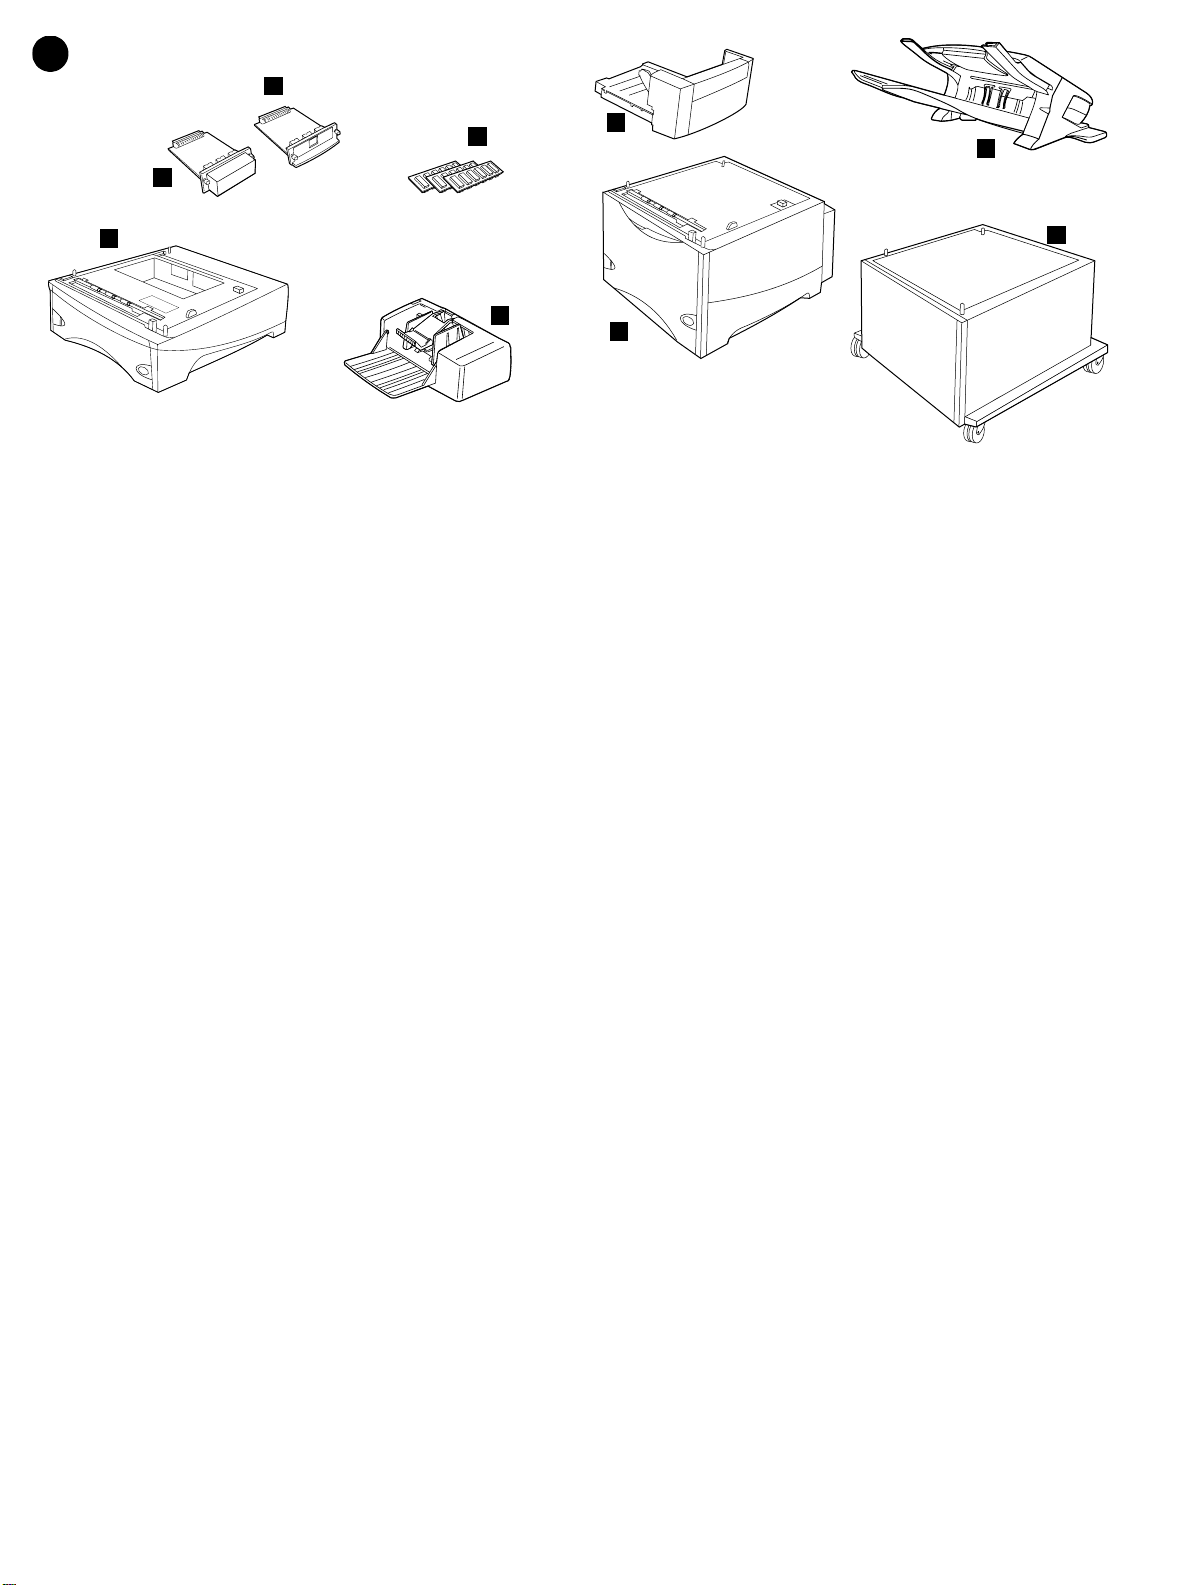
Install any optional accessories. Use the separate installation
instructions to install any accessories that you have purchased with the
printer. 1) EIO accessories; 2) Hard disk; 3) Stackable 500-sheet feeder*;
4) Memory DIMM, flash DIMM, or font DIMM; 5) Power envelope feeder;
Installation des accessoires optionnels. Suivez les instructions
d'installation propres à chaque accessoire acheté avec l'imprimante.
1) Accessoires EIO 2) Disque dur 3) Chargeur de 500 feuilles
superposable* 4) DIMM mémoire, DIMM Flash ou DIMM de polices
5) Chargeur automatique d'enveloppes
6
8
9
7
6) Duplexer for two-sided printing; 7) 1500-sheet feeder*; 8) Stacker or
Stapler/stacker; 9) Storage cabinet
*The printer supports a maximum of two optional feeders (two 500-sheet
feeders or one 500-sheet feeder and one 1,500-sheet feeder).
6) Unité d'impression recto verso 7) Chargeur de 1 500 feuilles* 8) Bac
d'empilement, ou bac d'empilement et agrafeuse 9) Meuble de stockage
*L'imprimante prend en charge jusqu'à deux chargeurs optionnels (deux
de 500 feuilles, ou un de 500 feuilles et un de 1 500 feuilles).
İsteğe bağlı aksesuarları takın. Yazıcıyla birlikte satın aldığınız
aksesuarları takmak için ilgili takma yönergelerini kullanın. 1) EIO
aksesuarları; 2) Sabit disk; 3) Yığınlanabilir 500 sayfalık besleyici*;
4) Bellek DIMM’i, flash DIMM’i veya yazı tipi DIMM’i; 5) Yüksek
performanslı zarf besleyici;
6) Çift taraflı yazdırma için dupleksleyici; 7) 1500 sayfalık besleyici*;
8) Yığınlayıcı veya Zımbalayıcı/Yığınlayıcı; 9) Saklama dolabı
*Yazıcı, en fazla iki adet isteğe bağlı besleyiciyi destekler (iki adet
500 sayfalık besleyici veya bir adet 500 sayfalık besleyici ve bir adet
1,500 sayfalık besleyici).
8
Page 10
8
2
1
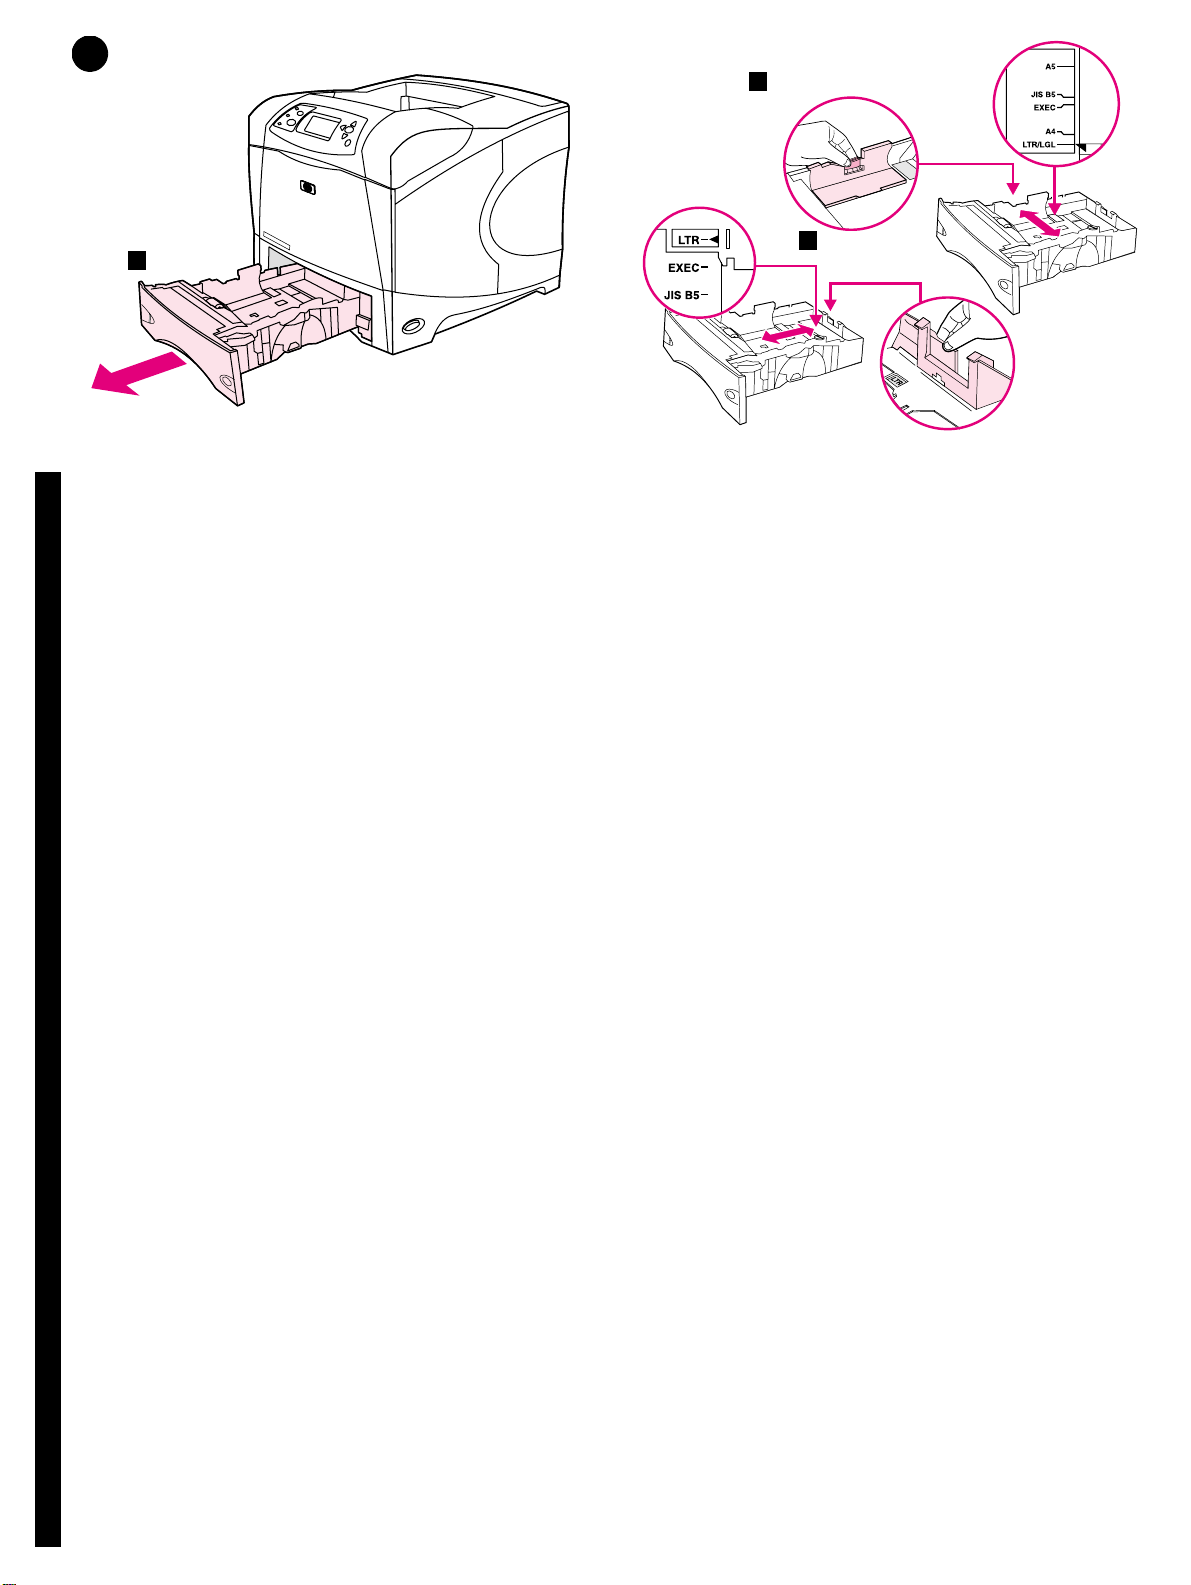
Load T ray 2. (F or inf ormation about loading other trays, see the use guide
on the CD-ROM.) 1) Pull tray2 completely out of the printer.
EnglishFrançaisTürkçe
Chargement du bac2. (Pour plus d'informations sur le chargement des
autres bacs, reportez-vous au guide de l'utilisateur sur le CD-ROM.)
1) Retirez complètement le bac 2 de l'imprimante.
3
2) Pinch the release on the left guide and slide the guides to the correct
paper size. 3) Pinch the release on the rear paper guide and slide it to the
correct paper size.
2) Pincez le levier de verrouillage du guide gauche et positionnez les
guides sur le format adéquat. 3) Pincez le levier de verrouillage du guide
de papier arrière et positionnez ce dernier sur le format adéquat.
Tepsi 2’ye Kağıt Yükleyin. (Diğer tepsilere kağıt yükleme hakkında bilgi
için, CD-ROM’daki kullanım kılavuzuna bakın.) 1) Tepsi 2’yi çekerek
yazıcıdan çıkarın.
2) Sol kılavuzdaki serbest bırakma mandalını tutun ve kılavuzları doğru
kağıt boyutuna gelecek şekilde kaydırın. 3) Arka kağıt kılavuzundaki
serbest bırakma mandalını tutun ve doğru kağıt boyutuna gelecek şekilde
kaydırın.
9
Page 11

4
5
4) Rotate the blue knob on the right side of the tray to the correct paper
size. (Turn the knob to “STANDARD” for LTR, A4, LGL, EXEC, A5, and
JIS B5 paper sizes, or to “CUSTOM” for custom paper sizes.)
4) Tournez le bouton bleu situé à droite du bac pour le placer sur le format
de papier approprié. (Positionnez le bouton sur STANDARD pour les
formats LTR, A4, LGL, EXEC, A5 et JIS B5, ou sur CUSTOM
(PERSONNALISE) pour les formats personnalisés.)
4) Tepsinin sağ tarafındaki mavi düğmeyi, doğru kağıt boyutunu
gösterecek şekilde döndürün. (LTR, A4, LGL, EXEC, A5 ve JIS B5 kağıt
boyutları için düğmeyi “STANDART” seçeneğine veya özel kağıt boyutları
için “ÖZEL” seçeneğine getirin.)
5) Load paper into the paper tray with the top edge of the paper facing the
front edge of the tray. Make sure that the paper is flat at all four corners
and that the top of the stack is below the maximum-height indicators.
CAUTION: Do not fan the paper . F anning can cause misfeeds . 6) Slide the
tray back into the printer.
5) Chargez le papier dans le bac, bord supérieur du papier face au bord
avant du bac. Vérifiez que le papier repose bien à plat (coins inclus) et
que la pile ne dépasse pas les indicateurs de hauteur maximale.
ATTENTION : Ne déramez pas le papier. Cette opération peut générer
des problèmes d'alimentation. 6) Faites glisser le bac dans l'imprimante.
5) Kağıtları tepsiye, kağıdın üst kenarı tepsinin ön kenarına bakacak
şekilde yerleştirin. Kağıtların dört köşesinin de düz olduğundan ve
yüksekliğinin, maksimum yükseklik göstergesini geçmediğinden emin
olun. DİKKAT: Kağıtları havalandırmak için birbirinden ayırmayın. Bu,
besleme işleminde sorunlara yol açabilir. 6) Tepsiyi tekrar yazıcıya takın.
10
Page 12
9
1
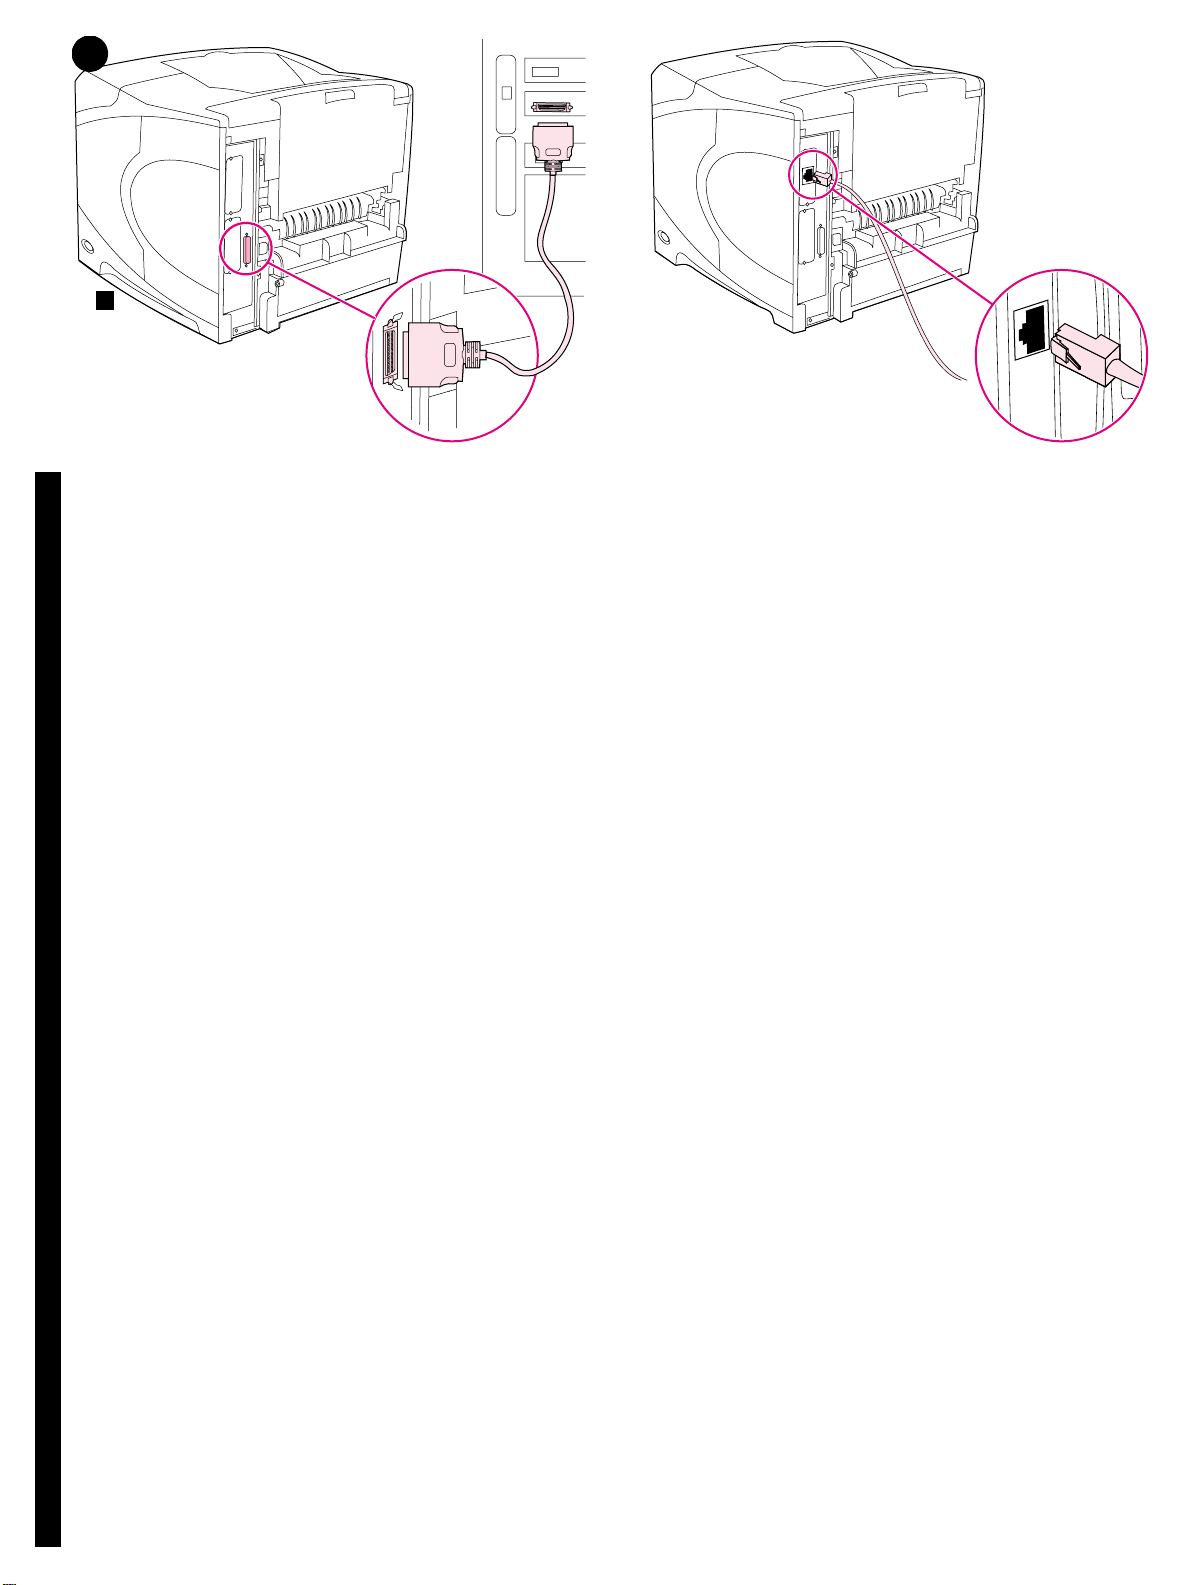
Connect an interface cable. To connect the printer directly to a
computer: 1) Connect an IEEE 1284-compliant (size “B”) parallel cable
between the parallel port on the computer and the parallel port on the
printer. (Note: A parallel cable is not included.) 2) Snap the wire clips into
place to secure the cable at the printer.
EnglishFrançaisTürkçe
Connexion d'un câble d'interface. Pour connecter l'imprimante
directement à un ordinateur : 1) Connectez un câble parallèle compatible
IEEE 1284 (connecteur B) entre le port parallèle de l'ordinateur et celui de
l'imprimante. (Remarque : Le câble parallèle n'est pas inclus.) 2) Utilisez
les clips métalliques pour fixer le câble à l'imprimante.
Arabirim kablosu takın. Yazıcıyı doğrudan bilgisayara bağlamak için:
1) Bilgisayardaki paralel bağlantı noktasıyla yazıcıdaki paralel bağlantı
noktasını, IEEE 1284 uyumlu (“B” boyutunda) bir paralel kabloyla birbirine
bağlayın. (Not: Pakette paralel kablo yoktur.) 2) Kablo klipslerini yerlerine
takarak kabloyu yazıcıya sabitleyin.
To connect the printer to an Ethernet 10/100 Base-T network: Connect a
network cable between the HP Jetdirect print server and a port for the
network.
Pour connecter l'imprimante à un réseau Ethernet 10/100 Base-T :
Connectez un câble réseau entre le serveur d'impression HP Jetdirect et
un port du réseau.
Yazıcıyı Ethernet 10/100 Base-T ağına bağlamak için: HP Jetdirect yazıcı
sunucusuyla ağdaki bir bağlantı noktasını ağ kablosuyla birbirine bağlayın.
11
Page 13

10
3
Connect the right-angle power cord. 1) Check the voltage rating on your
printer (located under the top cover). The power supply will be either 110
to 127 Vac or 220 to 240 Vac, 50/60 Hz. (This is the second time you are
checking the voltage.) 2) Make sure the power switch is in the off (“0”)
position.
Connexion du cordon d'alimentation à prise coudée. 1) Vérifiez la
tension nominale de l'imprimante (indiquée sous le couvercle supérieur).
L'alimentation électrique est de 110 à 127 V CA ou de 220 à 240 V CA,
50/60 Hz. (Il s'agit de la deuxième vérification de la tension.)
2) Assurez-vous que l'interrupteur marche/arrêt est en position Arrêt (0).
Dik açılı güç kablosunu takın. 1) Yazıcınızın voltajını kontrol edin (üst
kapağın altındadır). Güç kaynağı, 110 - 127 Vac veya 220 - 240 Vac,
50/60 Hz olmalıdır. (Bu, voltajı ikinci kez kontrol edişinizdir.)
2) Açma/kapama düğmesinin kapalı (“0”) konumda olduğundan emin olun.
3) Connect the right-angle power cord between the printer and a grounded
power strip or ac outlet. Note: If the optional duplexer has been installed,
pull the duplexer out to connect the power cord, and then push the
duplexer back in. CAUTION: To prevent damage to the printer, use only
the power cord that is provided.
3) Branchez le cordon d'alimentation à prise coudée entre l'imprimante, et
une prise de terre multiple ou une prise murale. Remarque : Si l'unité
d'impression recto verso optionnelle est installée, retirez-la pour brancher
le cordon d'alimentation, puis remettez-la en place. ATTENTION : Pour ne
pas endommager l'imprimante, utilisez uniquement le cordon
d'alimentation fourni.
3) Dik açılı güç kablosunu yazıcıya ve topraklanmış bir güç kaynağına
veya AC prizine takın. Not: İsteğe bağlı dupleksleyici takılıysa, güç
kablosunu takmak için dupleksleyiciyi dışarı çekin ve sonra yerine itin.
DİKKAT: Yazıcının hasar görmesini önlemek için, yalnızca verilen güç
kablosunu kullanın.
12
Page 14

11 12
Install the control panel overlay (optional): 1) If necessary, remove the
overlay that is currently installed on the printer by inserting a thin, rigid
object such as a credit card under the top edge of the overlay and then
pulling up on the overlay until it comes off. 2) Place the overlay you want
onto the control panel and snap it into place.
EnglishFrançaisTürkçe
Installation du cache du panneau de commande (facultatif) : 1) Si
nécessaire, retirez le cache (plastique) actuellement installé sur
l'imprimante. Pour ce faire, insérez un objet mince et rigide, comme une
carte de crédit, sous le bord supérieur du cache, puis tirez sur ce dernier.
2) Placez le cache souhaité sur le panneau de commande, puis
enclenchez-le.
Kontrol paneli kaplamasını (isteğe bağlı) takın: 1) Yazıcıya takılmış
olan kaplamayı, gerekirse, kredi kartı gibi ince ve sert bir nesneyi
kaplamanın üst kenarının altına sokup kaplama yerinden çıkana kadar
kendinize doğru çekerek çıkarın. 2) İstediğiniz kaplamayı kontrol panelinin
üstüne yerleştirin ve yerine takın.
Turn the printer power on. Turn the power switch to the on position (“|”)
and wait for the printer to warm up. If the printer automatically set your
language, go to step 14. If the printer did not set your language, go to
step 13.
Mettez l'imprimante sous tension. Placez l'interrupteur marche/arrêt sur
la position Marche (|) et laissez l'imprimante préchauffer. Si l'imprimante a
automatiquement défini votre langue, passez à l'étape 14. Si l'imprimante
n'a pas défini votre langue, passez à l'étape 13.
Yazıcıyı açın. Açma/kapama düğmesini açık konuma (“|”) getirin ve
yazıcının ısınmasını bekleyin. Yazıcı dilinizi otomatik olarak ayarlarsa,
14. adıma geçin. Yazıcı dilinizi otomatik olarak ayarlamazsa, 13. adıma
geçin.
13
Page 15

13 14
Set the control panel language. Use the (Up arrow) and (Down
arrow) to scroll to a language you want and press (Select) to select it.
(To change the language after it has been set, see the use guide on the
CD-ROM).
Paramétrage de la langue du panneau de commande. Utilisez
(flèche haut) et (flèche bas) pour accéder à la langue souhaitée, puis
appuyez sur (Sélectionner) pour la sélectionner. (Pour modifier la
langue définie, reportez-vous au guide de l'utilisateur sur le CD-ROM.)
Kontrol paneli dilini ayarlayın. Istediğiniz dili vurgulamak için (Yukarı
ok) ve (Aşağı ok) düğmelerini kullanın ve sonra seçmek için (Seç)
düğmesine basın. (Ayarladığınız dili değiştirmek için, CD-ROM’daki
kullanım kılavuzuna bakın).
Test the printer. To verify that the printer is operating correctly, print a
configuration page. 1) Press (Select) to enter the menus. 2) Use the
(Up arrow) and (Down arrow) to scroll to INFORMATION and press
(Select). 3) Use the (Up arrow) and (Down arrow) to scroll to
PRINT CONFIGURATION and press (Select).
Test de l'imprimante. Pour vérifier que l'imprimante fonctionne
correctement, imprimez une page de configuration. 1) Appuyez sur
(Sélectionner) pour accéder aux menus. 2) Utilisez (flèche haut) et
(flèche bas) pour accéder au menu INFORMATIONS, puis appuyez sur
(Sélectionner). 3) Utilisez (flèche haut) et (flèche bas) pour accéder
au menu IMPRIMER PAGE DE CONFIGURATION, puis appuyez sur
(Sélectionner).
Yazıcıyı sınayın. Yazıcının düzgün çalıştığından emin olmak için bir
yapılandırma sayfası yazdırın. 1) Menülere girmek için (Seç) tuşuna
basın. 2) (Yukarı ok) ve (Aşağı ok) kullanarak BILGI seçeneğine
gidin ve (Seç) tuşuna basın. 3) (Yukarı ok) ve (Aşağı ok)
tuşlarını kullanarak YAPİLANDİRMAYİ YAZDİR seçeneğine gidin ve
(Seç) tuşuna basın.
14
Page 16

15
Note: If the configuration page does not print, make sure that there are no
messages (other than READY) on the control panel display, that the Ready
light (top light) is on, and that no other lights are on or blinking. Make sure
that paper is loaded and that the paper tray is properly adjusted. Make
sure that the print cartridge is installed correctly.
EnglishFrançaisTürkçe
Remarque : Si la page de configuration ne s'imprime pas, vérifiez
qu'aucun message (autre que PRÊT) n'apparaît sur l'écran du panneau de
commande, que le voyant Prêt (voyant supérieur) est allumé, et qu'aucun
autre voyant n'est allumé ou ne clignote. Vérifiez que le bac contient du
papier et est correctement ajusté. Vérifiez que la cartouche d'impression
est correctement installée.
Not: Yapılandırma sayfası yazdırılmazsa, kontrol paneli ekranında (HAZİR
dışında) mesaj olmadığından, Hazır ışığının (üstteki ışık) yandığından ve
yanan ya da yanıp sönen başka ışık olmadığından emin olun. Kağıt yüklü
olduğundan ve kağıt tepsisinin doğru şekilde ayarlandığından emin olun.
Yazıcı kartuşunun doğru takıldığından emin olun.
Install the printing software. Procedures for software installation vary
according to the operating system and the network environment. Insert
the CD-ROM into the CD-ROM drive. When the installation wizard starts,
follow the instructions. See the Readme (read4300) on the CD-ROM if the
installation wizard does not start or for detailed installation information.
Installation du logiciel d'impression. Les procédures d'installation du
logiciel varient en fonction du système d'exploitation et de l'en vironnement
réseau. Insérez le CD-ROM dans le lecteur de CD-ROM. Lorsque
l'assistant d'installation démarre, suivez ses instructions. Si l'assistant
d'installation ne démarre pas ou si vous souhaitez obtenir des
informations supplémentaires sur l'installation, reportez-vous au fichier
LISEZMOI (read4300) du CD-ROM.
Yazdırma yazılımını yükleyin. Yazılımı yükleme işlemleri, işletim
sistemine ve ağ ortamına göre değişir. CD-ROM’u sürücüye yerleştirin.
Yükleme sihirbazı başladığında, yönergeleri izleyin. Yükleme sihirbazı
başlatılmazsa veya ayrıntılı yükleme bilgisi edinmek için CD-ROM’daki
Benioku (read4300) dosyasına bakın.
15
Page 17

16 17
Test the software installation. Print a page from any program to make
sure the software is correctly installed. Note: If installation fails, reinstall
the software. If reinstallation fails, see the Readme on the CD-ROM, see
the support flyer that came in the printer box, or visit http://www.hp .com. In
the Select your country/region field at the top , select your country/region
and click . Click the Support block.
Test de l'installation du logiciel. Pour vérifier que le logiciel est
correctement installé, imprimez une page à partir d'un programme.
Remarque : Si l'installation échoue, réinstallez le logiciel. Si la
réinstallation échoue, consultez le fichier LISEZMOI du CD-ROM,
reportez-vous au dépliant d'assistance fourni avec l'imprimante ou visitez
le site http://www.hp .com. Dans le champ Select y o ur country/region en
haut de la page, sélectionnez votre pays/région et cliquez sur . Cliquez
sur l'option Support.
Yazılım yüklemesini sınayın. Yazılımın doğru olarak yüklendiğinden
emin olmak için herhangi bir programı açarak bir sayfa yazdırın. Not:
Yükleme başarısız olursa yazılımı yeniden yükleyin. Yeniden yükleme de
başarısız olursa CD-ROM’daki Benioku dosyasına bakın, yazıcı
kutusunda gelen destek broşürüne gözatın veya http://www.hp.com
adresini ziyaret edin. Üst taraftaki Select your country/region
(Ülke/bölge seçin) alanında, ülke/bölge seçip düğmesini tıklatın.
Support (Destek) bloğunu tıklatın.
Register your printer. Register your printer to receive important support
and technical information. You can register at: http://www.register.hp.com.
Enregistrement de votre imprimante. Enregistrez votre imprimante afin
de recevoir des informations d'assistance et des informations techniques
importantes. Vous pouvez vous enregistrer sur le site suivant :
http://www.register.hp.com.
Yazıcınızı kaydettirin. Destek ve teknik konulardaki önemli bilgileri
alabilmek için yazıcınızı kaydettirin. Aşağıdaki adresten kaydolabilirsiniz:
http://www.register.hp.com.
16
Page 18

18
Congratulations. Your printer is ready to use. For information about using
the printer and troubleshooting, see these sources: 1) The use guide on
the CD-ROM; 2) These URLs: http://www.hp.com/support/lj4200 or
http://www.hp.com/support/lj4300; 3) HP Customer Support (See the
support flyer that came in the printer box.)
EnglishFrançaisTürkçe
Félicitations. Vous pouvez maintenant utiliser v otre imprimante. P our plus
d'informations sur l'utilisation et le dépannage de l'imprimante,
reportez-vous aux sources suivantes : 1) Le guide de l'utilisateur sur le
CD-ROM 2) Les URL suivantes : http://www.hp.com/support/lj4200 ou
http://www.hp.com/support/lj4300 3) L'assistance clientèle HP
(Reportez-vous au dépliant d'assistance fourni avec l'imprimante.)
Tebrikler. Yazıcınız artık kullanıma hazır durumdadır. Yazıcıyı kullanma
ve sorun giderme hakkında bilgi için şu kaynaklardan yararlanabilirsiniz:
1) CD-ROM’daki kulla nım kılavuzu; 2) Aşağıdaki URL’ler:
http://www.hp.com/support/lj4200 veya http://www.hp.com/support/lj4300;
3) HP Müşteri Desteği (Yazıcı kutusunda gelen destek broşürüne bakın.)
17
Page 19

18 19
Page 20

17 16
18
Page 21

14 13
15
20
Page 22

3
10
12 11
21
Page 23

4
5
9
1
22
Page 24

7
1
6
8
2
9
7
3
4
5
8
2
3
1
23
Page 25

5
4
2
3
5
6
24
Page 26

5
6
1
3
8
7
10
11
2
4
3
5
1
4
6
8
12
9
14
13
2
3
4
7
25
Page 27

HP LaserJet 4200/4200n/4200tn/4200dtn/4200dtns/4200dtnsl
HP LaserJet 4300/4300n/4300tn/4300dtn/4300dtns/4300dtnsl
412 mm
(16.2 inches)
1045 mm (41.1 inches)
HP LaserJet 4200/
4200n/4300/4300n
547 mm
(21.5 inches)
1
2
HP LaserJet 4200tn/
4200dtn/4300tn/4300dtn
670 mm
(26.4 inches)
HP LaserJet 4200dtns/
4200dtnsl
HP LaserJet 4300dtns/
4300dtnsl
740 mm
(29.1 inches)
1045 mm (41.1 inches)
26
Page 28

copyright 2002
Hewlett-Packard Company
http://www.hp.com/support/lj4200
http://www.hp.com/support/lj4300
©
*Q2431-90910*
*Q2431-90910*
Q2431-90910
 Loading...