

Page 1

HP DeskJet Printer
Reference Manual for Windows
640C Series
English
Acknowledgments
Microsoft®, Windows®, Windows NT®, and MS Windows®
are U.S. registered trademarks of Microsoft Corporation.
Screenshot(s) reprinted by permission from Microsoft
Corporation.
Notice
©Copyright by Hewlett-Packard Company 1999
All rights are reserved. No part of this document may be
photocopied, reproduced, or translated to another language
without the prior written consent of Hewlett-Packard
Company.
First edition: January 2000
Finding More Information
For more information, see the electronic
Insert the printer software CD into your CD-ROM
drive and begin the installation process by running
setup.exe
. At the opening screen select
User’s Guide
• For the latest product information, troubleshooting, and
printer software updates, visit HP’s web site at:
http://www.hp.com/support/home_products
• Right-click on any Print Settings option to view electronic
help about specific printer settings.
• Go to
Start
consult the
• If you are using DOS, information can be found in a text
document (
software CD in the
example, “enu” is the language code for English, so
dosread.txt
diskettes, the file is located in the root directory. For a list of
language codes, see page 21.
• If you are a Windows 2000 Professional user, visit HP’s web
site at
more information.
.
➔
Programs
➔
Release Notes
dosread.txt)
is located in the
http://www.hp.com/cposupport/eschome.html
HP DeskJet 640C Series
file.
. This document is on the printer
\<language code>\djcp\
\enu\djcp
User’s Guide
Open the
directory. For
directory. If you have
.
to
for
Table of Contents
How to Print
While You’re Printing . . . . . . . . . . . . . . . . . . . . . . . . 3
Printing on Different Types of Paper . . . . . . . . . 4
The HP Toolbox
Getting Help When
Things Go Wrong
Solving Common Problems . . . . . . . . . . . . . . . . . 11
Clearing Paper Jams . . . . . . . . . . . . . . . . . . . . . . . 14
What the Buttons and Lights Do . . . . . . . . . . . . .15
HP Customer Care . . . . . . . . . . . . . . . . . . . . . . . . . 16
More About Your Printer
Uninstalling the Printer Software. . . . . . . . . . . .20
Print Cartridges . . . . . . . . . . . . . . . . . . . . . . . . . . . .20
Language Codes for DOS . . . . . . . . . . . . . . . . . . .21
Product Specifications. . . . . . . . . . . . . . . . . . . . . . 22
Limited Warranty Statement . . . . . . . . . . . . . . . . 24
. . . . . . . . . . . . . . . . . . . . . . . . . . . . . . 2
. . . . . . . . . . . . . . . . . . . . . . . . . 10
. . . . . . . . . . . . . . . . . . . . . . . 11
. . . . . . . . . . . . . . . 20
Page 2
How to Print
1.
English
Lay out the page and choose the text, pictures,
fonts, and colors from your software program
(such as a word processor or drawing program).
2.
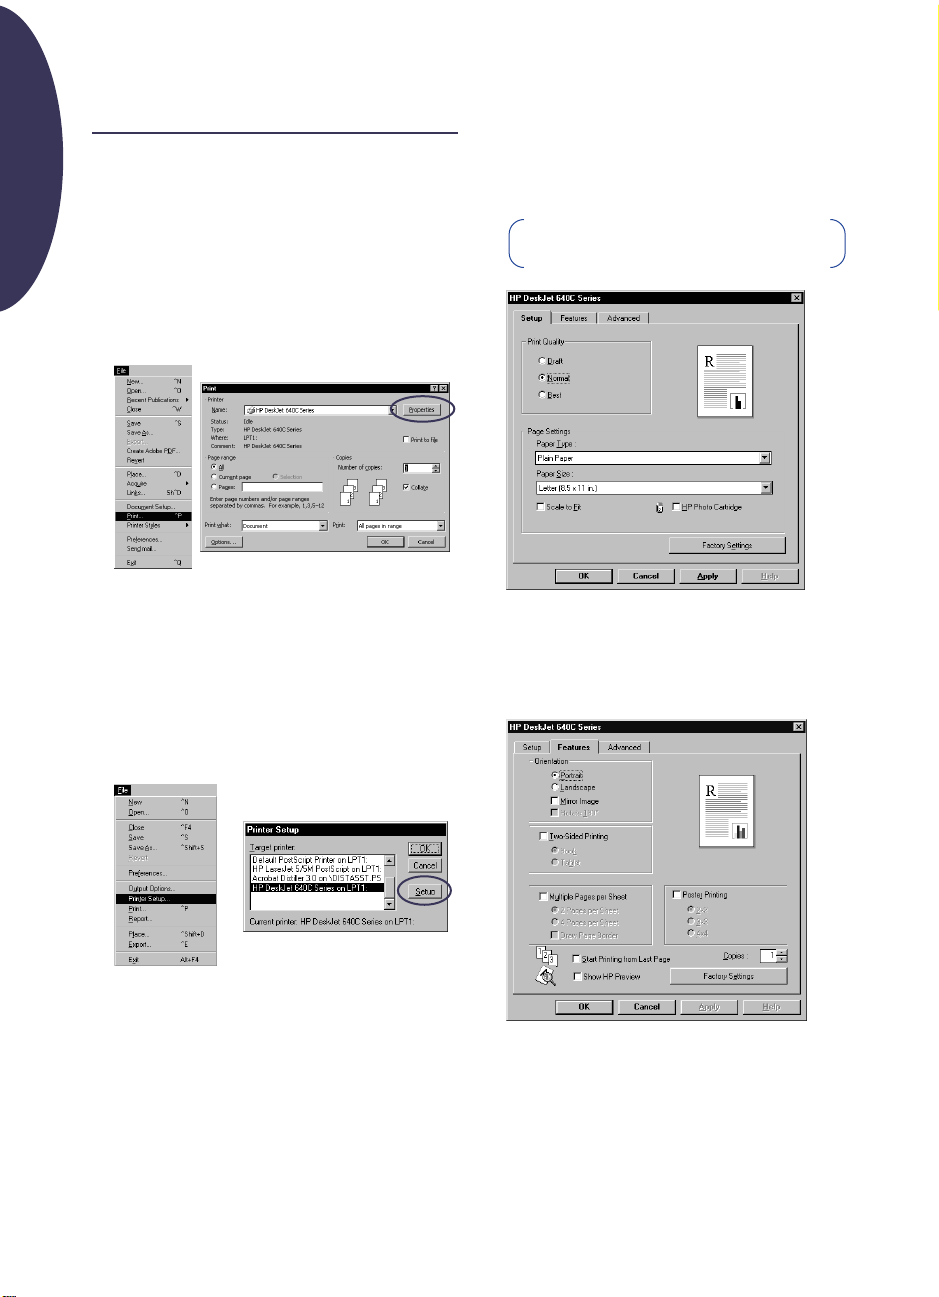
Choose your print settings in the HP print
settings box. To find the HP print settings box:
Try This...
a. Click
b. Then click whichever button you see—
Properties, Setup
c. If you still don’t see the box, click
Options
...Or Try This
a. If Print isn’t there, click
Print Setup
File
and then click
, or
Properties
.
, or
Printer
.
Printer Setup
Print
Once you’re there, choose print quality, paper
size, paper type, and scale to fit options on the
Setup
tab. For photo-realistic output, use the
HP Photo Cartridge. Be sure to check
Cartridge
.
.
Setup
,
or
Choose paper orientation, mirror image,
reverse-order printing options, two-sided
printing, multiple page printing, and poster
printing options on the
on the
Setup
tab.
Note: Your HP print settings box may differ from
those shown here.
Features
HP Photo
tab.
b. Then click whichever button you see—
Setup
or
Options
2
.
Page 3
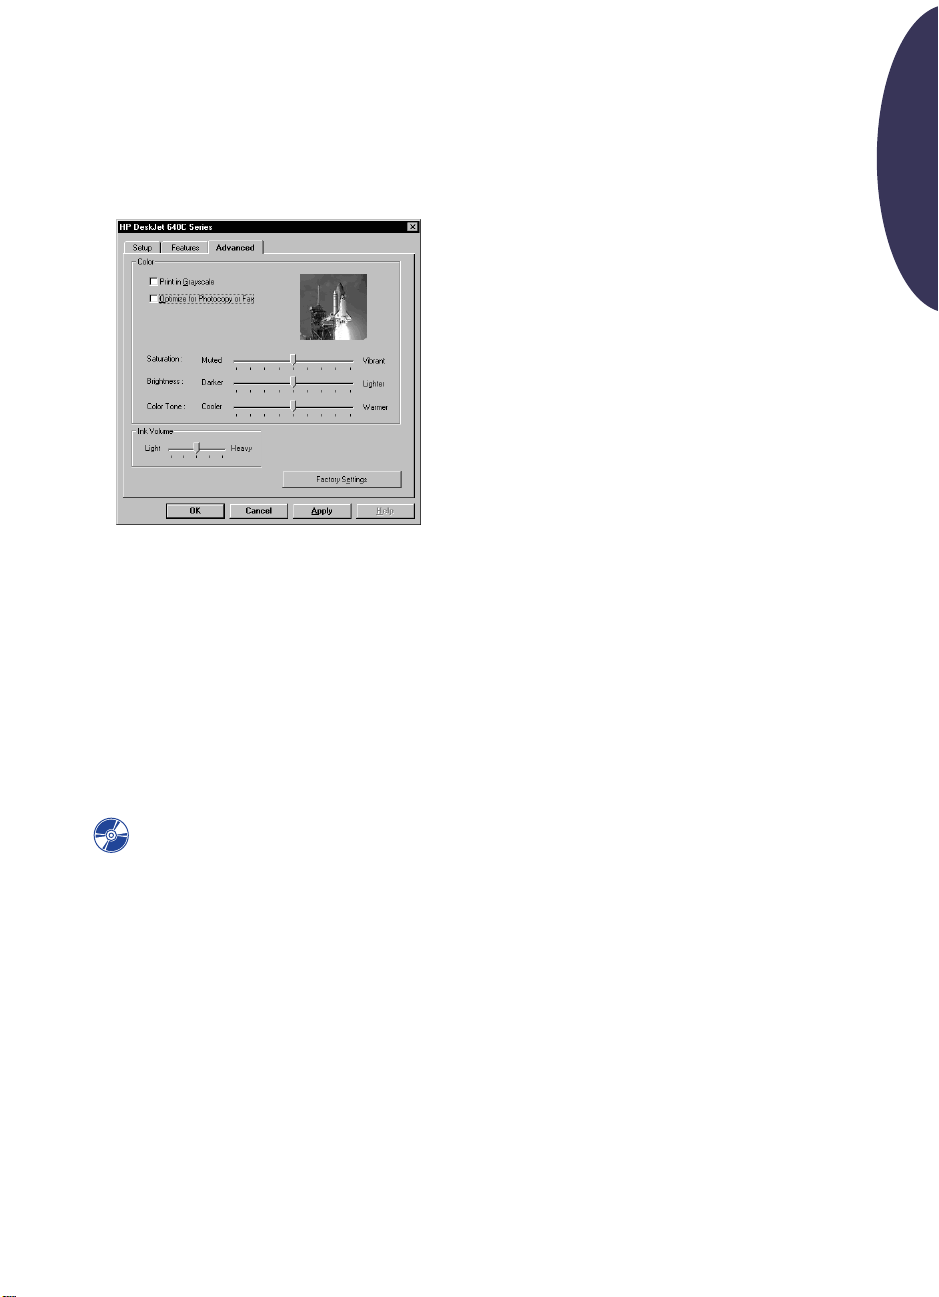
Choose color options on the
To print in black and white, check
Grayscale
images sharper by choosing
Photocopy or Fax
3.
Click OK in the
software program to start printing.
The next time you want to print this document,
you can use the
screen in your software program — simply
click it to print one copy using the same print
settings.
. Make your photocopied and faxed
.
Print
dialog box of your
Print
Advanced
Print in
Optimize for
button at the top of the
tab.
While You’re Printing
Your printer will print at different speeds,
depending on the complexity of the job and the
print quality you have chosen. If you have lots
of graphics and color in your document, it will
take longer to print.
If something goes wrong
Sometimes, in spite of your best efforts,
something goes wrong during printing. Maybe
a sheet of paper jams in the printer or nothing
happens at all. See “Solving Common Problems”
on page 11 for solutions.
English
It takes a few moments for the printing to start,
because the printer is receiving information from
the computer.
For more information about the HP Print
Settings box, see the electronic
Guide
which you can access from the
HP printer software CD.
User’s
3
Page 4
Printing on Different Types of Paper
English
Printing Photographs
I want to print…
8.5 x 11 in. or A4 Photo Paper
HP print settings to choose
Setup Tab
-
Paper Type:
Paper type
-
Print Quality: Best
-
Paper Size:
-
HP Photo Cartridge:
Features Tab
-
Orientation:
-
Two-Sided Printing:
Choose appropriate HP Photo
Choose appropriate paper size
Checked
Choose appropriate orientation
Unchecked
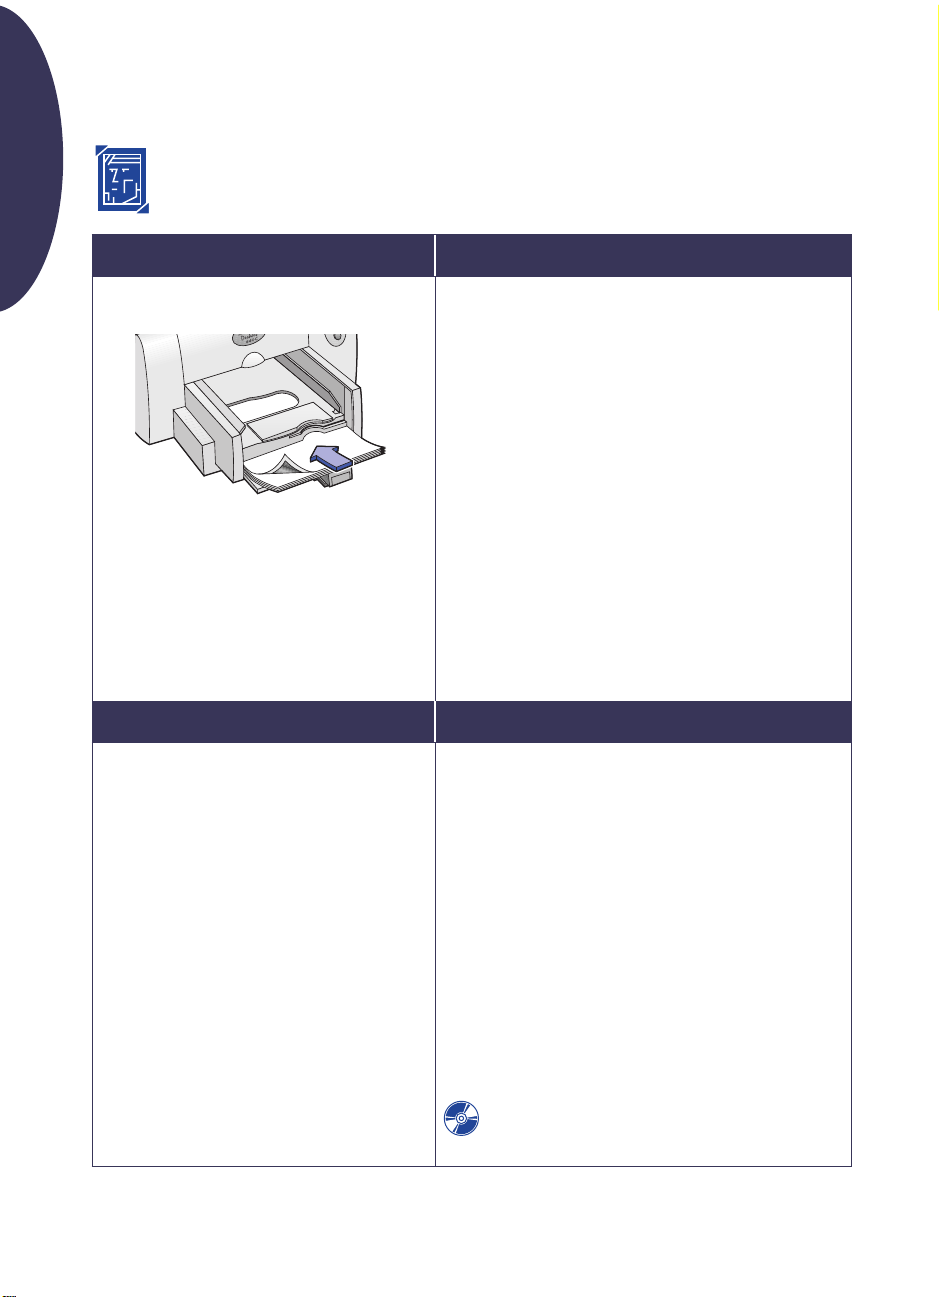
I should…
1. With the printer turned on, open the top cover and
remove the black print cartridge.
Store the black print cartridge in the print cartridge
storage container.
2. Place the photo cartridge into the now-empty
cartridge cradle, and push it back into position.
3. Close the printer’s top cover.
4. Align the cartridges.
5. Insert photo paper in the IN tray, printable side down.
6. Slide the paper adjusters to fit snugly against the
paper’s edges.
7. Choose print settings that match the type and size of
the photo paper.
8. Print the photo.
9. Reset the software for the paper you’ll be using next
after printing completes.
Guidelines to remember
For best results use
•
or
HP Premium Plus Photo Paper, Matte
•
Make sure that the photo paper is loaded in the IN tray
printable side down.
For best results, remove each sheet promptly and allow
•
it to dry printable side up. Drying time varies
depending on the humidity.
•
After printing your photo, remove the photo cartridge
from the printer and replace it with the black print
cartridge. Store the photo cartridge in the storage
container.
•
If you used any special paper, remove it from the IN
tray and replace it with paper you’ll be using next.
Reset the software for whatever you’ll be printing next.
•
If you need more information about working with
photos, see the electronic
HP Premium Photo Paper, Glossy
or
Glossy
User’s Guide
.
,
.
4
Page 5
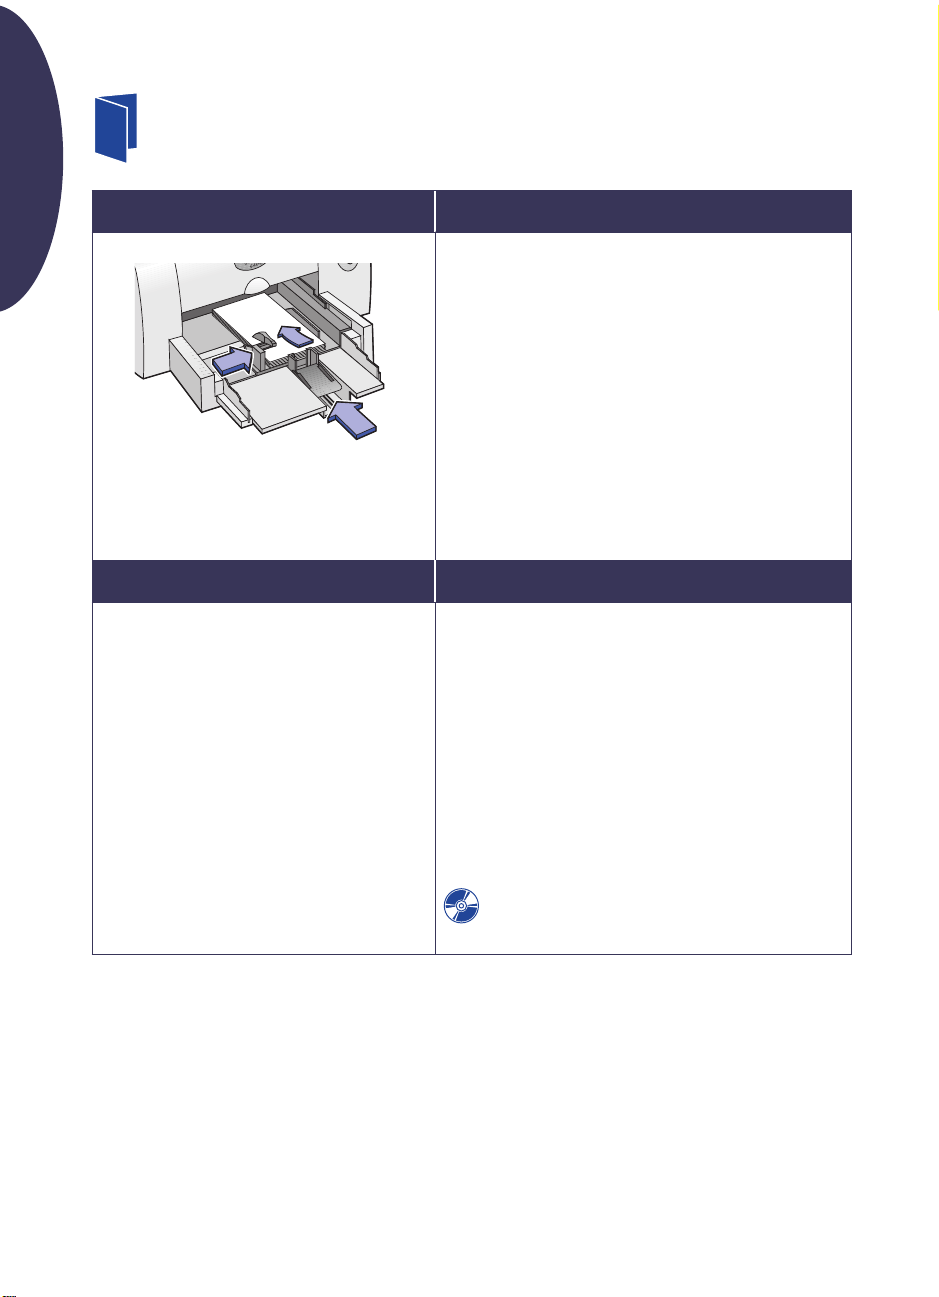
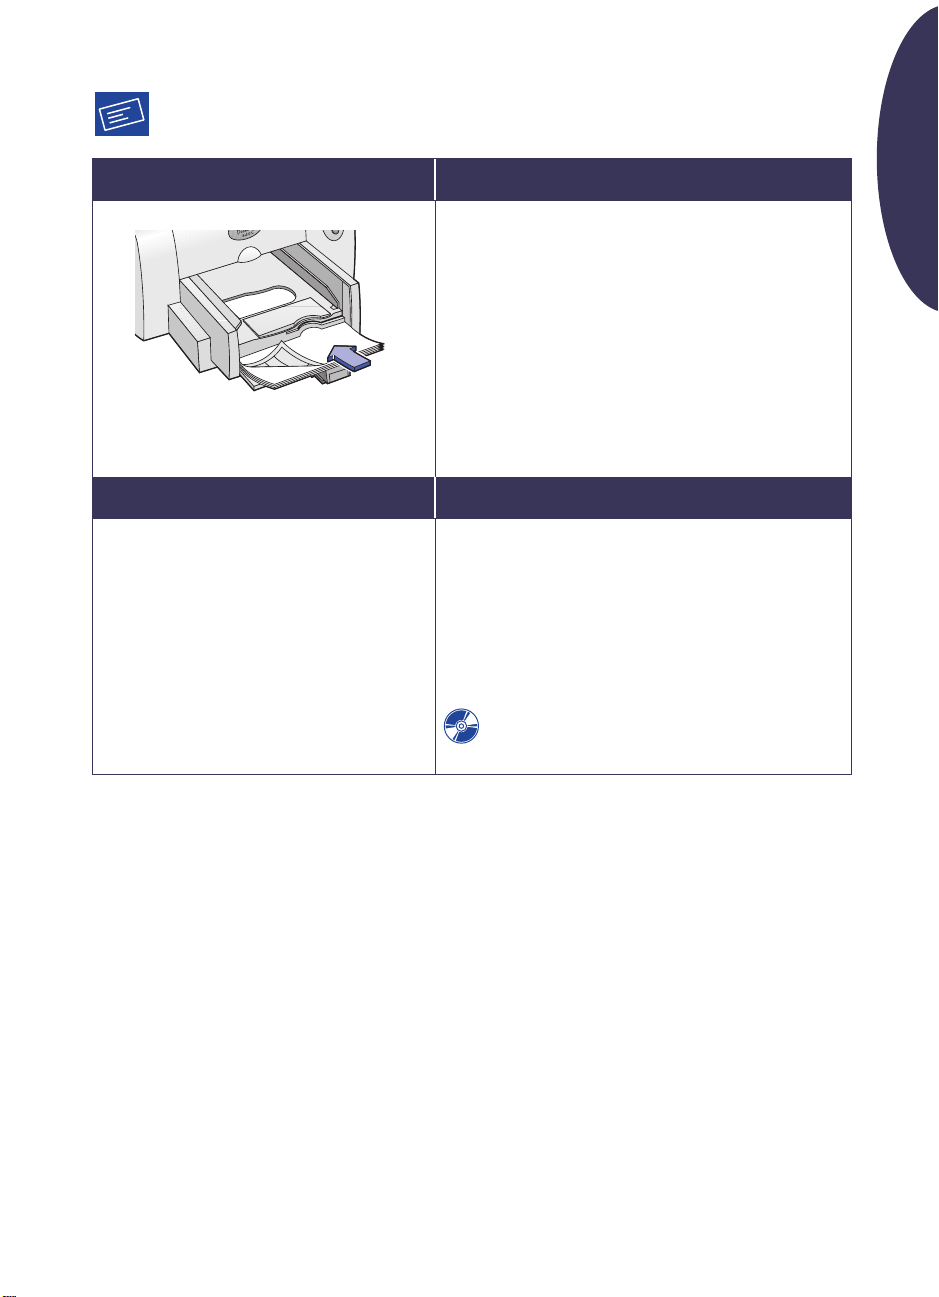
Printing Envelopes
English
I want to print…
Single envelope
Stack of up to 20 envelopes
HP print settings to choose
Setup Tab
-
Paper Type: Plain Paper
-
Print Quality: Normal
-
Paper Size:
Features Tab
-
Orientation:
-
Two-Sided Printing:
Choose appropriate envelope size
Choose appropriate orientation
Unchecked
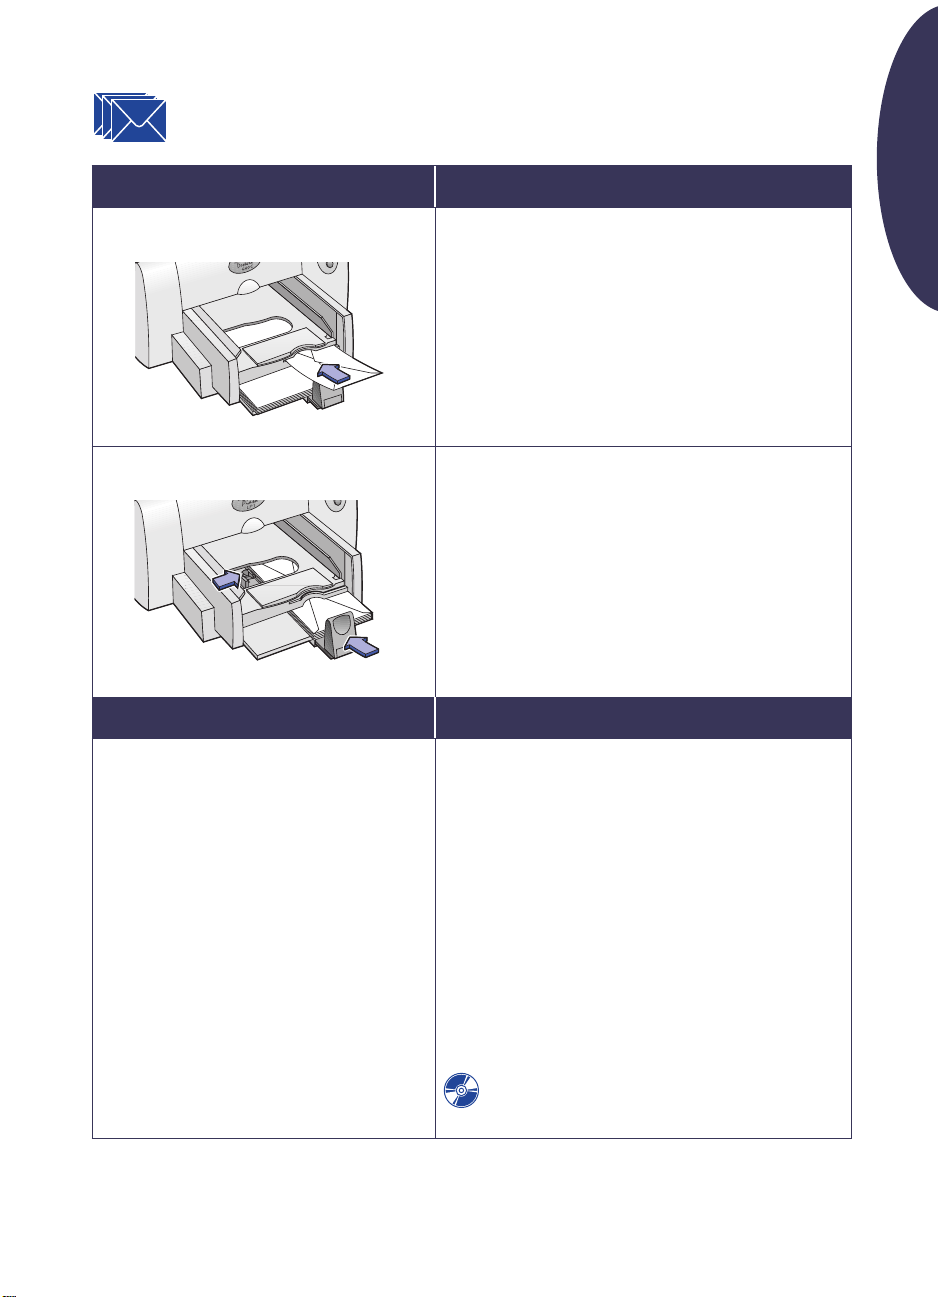
I should…
1. Slide the envelope, with its flap side up and on the
right, into the single-envelope slot until it stops.
2. Make sure there’s paper in the IN tray.
3. Choose print settings that match the type and size of
the envelope.
4. Print the envelope.
5. Reset the software for the paper you’ll be using next
after printing completes.
1. Slide out both paper adjusters, and remove all paper
from the IN tray.
2. Put a stack of up to 20 envelopes, with the flap side up
and on the right, into the IN tray.
3. Slide the paper adjusters so they fit snugly against the
edges of the stack.
4. Print the envelopes.
5. Reset the software for the paper you’ll be using next
after printing completes.
Guidelines to remember
Avoid shiny or embossed envelopes, or those that have
•
clasps or windows.
Avoid envelopes with thick, irregular, or curled edges
•
or with areas that are wrinkled, torn, or otherwise
damaged.
•
When printing a stack of envelopes, never load more
than 20 envelopes at one time.
•
Even up the stack of envelopes before inserting them
by tapping the short edge on a flat surface.
•
If printing on JIS #4 (90 x 205 mm) envelopes, follow
instructions for printing cards on page 6.
When printing on JIS #3 (120 x 235 mm) or JIS #4 (90 x
•
205 mm) envelopes, insert with flap up and toward you.
If you need information about printing small
envelopes, see the electronic
User’s Guide
.
5
Page 6
English
Printing Cards
I want to print…
I should…
1. Remove OUT tray.
2. Raise the card guide.
3. Put up to 30 cards in the IN tray. Align the right edge of
the card stack with the card guide.
4. Lower the handle on the paper-length adjuster. Press
the lower-inside portion of the handle to release it.
5. Slide the paper adjusters so they fit snugly against the
stack.
6. Replace the OUT tray.
7. Print the cards.
8. Reset the software for the paper you’ll be using next
after printing completes.
HP print settings to choose
Setup Tab
-
Paper Type: Plain Paper
-
Print Quality: Normal
-
Paper Size:
Features Tab
-
Orientation:
-
Two-Sided Printing:
Choose the appropriate card size
Choose appropriate orientation
Unchecked
Guidelines to remember
•
Even up the cards before inserting them by tapping the
short edge on a flat surface.
•
Move the paper-length adjuster by pressing the inside
of the handle to release and lower it, then pushing it
toward the card stack until it stops.
If you encounter difficulty replacing the OUT tray, lift
•
the top cover, wait a few moments for the print cartridge
cradles to move to the center position, then replace the
OUT tray, and lower the top cover.
•
When printing JIS #4 (90 x 205 mm) envelopes, insert
envelopes with flap up and toward you.
If you need information about printing cards, see the
electronic User’s Guide.
6
Page 7
Printing Labels
I want to print… I should…
1. Slide out both the paper adjusters, and remove all
paper from the IN tray.
2. Fan the edges of the label sheets to separate them.
3. Put up to 25 sheets of labels in the IN tray on top of at
least 5 sheets of plain paper of the same size.
4. Slide the paper adjusters so they fit snugly against the
stack.
5. Print the labels.
6. Reset the software for the paper you’ll be using next
after printing completes.
HP print settings to choose Guidelines to remember
English
Setup Tab
- Paper Type: Plain Paper
- Print Quality: Normal
- Paper Size: Choose the appropriate paper size
Features Tab
- Orientation: Choose appropriate orientation
- Two-Sided Printing: Unchecked
• Use only A4- or U.S. letter-sized sheets of labels.
• Use only paper labels designed specifically for use with
inkjet printers.
• Never load more than 25 sheets at one time.
• Use only full sheets of paper labels.
• Avoid sheets of labels that are sticky, curled, wrinkled,
or pulling away from their protective backing.
If you need information about printing labels, see the
electronic User’s Guide.
7
Page 8

English
Printing Transparencies
I want to print… I should…
1. Slide out both the paper adjusters, and remove all
paper from the IN tray.
2. Put up to 25 sheets of transparencies in the IN tray,
rough side down and the adhesive strip toward the
printer.
3. Slide the paper adjusters so they fit snugly against the
edges of the transparencies.
4. Print the transparency.
5. Reset the software for the paper you’ll be using next
after printing completes.
HP print settings to choose Guidelines to remember
Setup Tab
- Paper Type: Choose the appropriate
transparency film type
- Print Quality: Best
- Paper Size: Choose the appropriate
transparency film size
Features Tab
- Orientation: Choose appropriate orientation
- Two-Sided Printing: Unchecked
• For best results, use HP Premium Inkjet Rapid Dry
Transparencies, which are designed specifically for use
with HP Inkjet printers.
• Because transparencies need longer drying times than
plain paper, the printer dries them automatically before
it releases them. Press the Resume button on the
front of the printer to continue printing.
• For faster printing, choose Normal as the print quality.
If you need information about printing
transparencies, see the electronic User’s Guide.
8
Page 9

Printing Posters
I want to print… I should…
1. Load paper in the IN tray.
2. Slide the paper guides snugly against the sheets.
3. Choose the print settings that match the type and size
of your poster.
4. Print your poster.
5. Reset the software for the paper you’ll be using next
after printing completes.
HP print settings to choose Guidelines to remember
English
Setup Tab
- Paper Type: Plain Paper
- Print Quality: Normal
- Paper Size: Choose the appropriate size
Features Tab
- Orientation: Choose appropriate orientation
- Two-Sided Printing: Unchecked
- Poster Printing: Check this box and choose size
2x2, 3x3, or 4x4
• After printing, trim the edges on each sheet and tape
the sheets together.
If you need information about printing posters, see
the electronic User’s Guide.
9
Page 10

The HP Toolbox
Use the HP DeskJet Toolbox for cleaning and
English
maintaining your printer, finding information,
and printing a test page. To find the HP Toolbox,
follow the instructions for your Windows system.
Windows 95, 98, and NT 4.0
• Click Start ➔ Programs ➔ HP DeskJet 640C
Series ➔ HP DeskJet 640C Series Toolbox.
Windows 3.1x
• Double-click the HP Toolbox icon in the
HP DeskJet Utilities group in the Program
Manager.
–OR–
• Double-click the HP Toolbox icon. It’s on the
desktop when you start your computer.
–OR–
• Click the HP Toolbox icon that appears in the
Taskbar at the bottom of the screen when the
HP Toolbox is open.
10
Page 11

Getting Help When Things Go Wrong
Solving Common Problems
It’s frustrating when things go wrong. This section
contains tips that can help you determine what
the problem is and how to fix it.
USB Problems
USB Installation. If you accidentally cancelled the
USB installation the first time you connected your
HP DeskJet printer to your computer, follow these
instructions to redisplay the USB installation
screens:
1. Disconnect the USB cable from your printer.
2. Insert the printer software CD (or Disk 1 if you
have diskettes) into your computer.
3. Click Start ➔ Run.
4. Browse to the CD or diskette drive. Select
Setup, and then click Open.
5. The setup.exe file will appear in the dialog box.
Click OK.
6. Select the Remove HP DeskJet 640C Series
Software option.
7. Connect the USB cable to your printer again.
The USB installation screen should appear
again.
8. Continue with Step 8 on your Quick Start
Poster.
Printer not responding. Make sure Windows 98 is
running and your computer is connected using a
USB cable. If you do not have Windows 98, you
need to use a parallel cable.
USB is not enabled.
1. In Windows 98, click Start ➔ Settings ➔
Control Panel.
2. Double-click the System icon.
3. Click the Device Manager tab.
4. Click the plus ( + ) icon next to the Universal
Serial Bus Controller option. If you see a USB
host controller and a USB root hub listed,
USB is probably enabled. If you do not see
these devices listed, refer to your computer’s
documentation or contact the manufacturer
for more information on enabling and setting
up USB.
5. If you cannot enable USB, you can always
use a parallel cable to connect your printer’s
parallel port to your computer.
Cable connections. Make sure your USB cable is
connected properly. Disconnect and then
reconnect the USB cable from your printer,
making sure that it is securely attached.
Printing speed. When operated on a USB chain,
your printer may become slower if other USB
devices or software applications are being used
while you’re printing. For optimal print
performance, avoid using other devices in the
USB chain while printing.
USB hub. If you have connected your printer to a
USB hub, and the “Error Writing to USB Port”
message appears, your printer isn’t getting good
data from the other device or hub. Connect the
printer directly to the USB port on the computer.
Unknown device. If you get an “Unknown device is
found” message when you install the USB
software, disconnect the USB cable, uninstall the
printer software (see page 20), and turn off the
computer and printer. Unplug the electrical
power to the printer, then reconnect your printer
and restart the USB software installation (see your
Quick Start Poster).
English
11
Page 12

Error writing to LPT1. You may not have plugged
your USB cable in before installing the software.
1. Disconnect the USB cable from your printer.
2. Insert the printer software CD (or Disk 1 if you
English
have diskettes) into your computer.
3. Click Start ➔ Run.
4. Browse to the CD or diskette drive. Select
Setup, and then click Open.
5. The setup.exe file will appear in the dialog box.
Click OK.
6. Select the Remove HP DeskJet 640C Series
software option to remove the software.
7. Connect the USB cable to your printer again.
The USB installation screen should appear
again.
8. Repeat the “Install USB and printer software”
step. See your Quick Start Poster or page 18 in
your electronic User’s Guide.
Parts of the document are missing
or are in the wrong place
Paper orientation. If the printing is positioned
incorrectly on the page, make sure you’ve
selected the correct orientation (Portrait or
Landscape) on the Features tab of the HP print
settings box.
Paper size. Make sure you have selected the
correct paper size in the Setup tab of the HP print
settings box.
Alignment. If the color ink and black ink don’t line
up on the printed page, align the print cartridges.
In the HP Toolbox, click the Printer Services tab,
and then click Align the Print Cartridges.
Paper loading. If the printing is slanted or skewed,
try reloading the paper. Make sure the paper
adjusters fit snugly against the media.
Margin settings. If text is running off the edge of
the page:
• Make sure the margins are set correctly in your
software program.
• Make sure the elements in your document fit
within the printable area of the page.
• Make sure you’ve selected the right paper size
on the Setup tab of the HP print settings box.
Colors. If the colors are wrong or missing:
• Clean your tri-color print cartridge. In the HP
Toolbox, click the Printer Services tab, and
then click Clean the Print Cartridges.
• Replace the tri-color print cartridge.
• Check Print in Grayscale to clear this option
on the Advanced tab of the HP print settings
box.
Communications. If meaningless characters are
printing on your page, the computer might have
lost communication with your printer. Try turning
your computer and printer off and then turn them
on again. If the problem persists, make sure all
cables are securely attached.
12
Page 13

The print quality is poor
No page came out of the printer
English
Cartridges. If ink is smearing, streaking, or is
splotchy:
• You might need to clean the print cartridges.
See the HP Toolbox for instructions.
• You might need to replace the print cartridges.
See the HP Toolbox for instructions.
• Make sure you have removed the protective
piece of vinyl tape from the print cartridges.
• If the color and black ink aren’t lining up on the
printed page, go to the HP Toolbox and click
Align the Print Cartridges.
Paper. If the printing is faded or the colors are
dull or bleeding into each other, make sure:
• you’re using paper intended for inkjet printers.
• you’ve loaded the paper print side down.
• you have selected the correct paper type on
the Setup tab of the HP print settings box.
Ink. You can control the amount of ink on the
page by changing the Print Quality.
• If you have smearing, you may be using too
much ink. On the Setup tab of the HP print
settings box, click Normal or Draft instead of
Best. You can also reduce the amount of ink by
using the Ink Volume slider on the Advanced
tab.
• You may be printing in Draft mode. Click
Normal or Best on the Setup tab of the HP
print settings box.
Be patient. Complex documents, such as color
photographs, take a while to print. Check the
power light; if it’s blinking, the printer is
processing information.
Power. Make sure the printer is on (the power light
on the front of your printer should be on) and
that all connections are firm.
Cover. Make sure the top cover of the printer is
closed.
Blinking lights. See “What the Buttons and Lights
Do” on page 15.
Paper. Make sure you put the paper in the IN tray
correctly.
Print cartridges. Make sure both print cartridge
cradles contain properly installed cartridges with
the correct HP part number.
Printer not responding. If you are using a parallel
port on the printer you might be using the wrong
cable (HP IEEE 1284-compliant). If you have the
correct cable, turn off the printer and then turn it
back on.
“There is a problem” message. Perform the steps
in the box and click Retry. If the box reappears,
click Skip. If the printer is connected to the
computer with a parallel cable, be sure you are
using a bi-directional HP IEEE 1284-Compliant
Parallel Interface Cable.
13
Page 14

A blank page came out of the
printer
Tape. Make sure you’ve removed the protective
pieces of vinyl tape on the print cartridges.
English
Default printer. Make sure you’ve selected the
HP DeskJet 640C Series printer as the default
printer.
Ink. You may have run out of ink. Replace the
cartridges.
Faxes. If you’ve received an electronic fax at your
computer and the printer prints a blank page
when you try to print the fax, try saving the fax in
a graphic format (such as TIF). Then place it in a
word-processing document, and print from there.
Clearing Paper Jams
When a paper jam occurs, the Power and
Resume lights alternately flash. Follow these
instructions to clear a paper jam.
1. Turn off the printer.
2. Open the top cover and remove the OUT tray.
3. Pull the jammed paper out of the printer.
Remove all torn pieces from the paper path.
4. Remove any wrinkled or torn paper from the
IN tray.
5. Reload the paper.
6. Replace the OUT tray and close the top cover.
7. Turn on the printer.
14
Page 15

What the Buttons and Lights Do
There are two buttons and three lights on the
front of the printer. In general, the lights indicate
when the printer is operating correctly or when it
When these lights are... You need to...
Turned off and Turned off Press Power to turn on the printer.
Steadily lit and Turned off Send a document to the printer. The printer is in the ready-to-print state.
Steadily lit and Blinking If you just installed a print cartridge, make sure the cartridge is securely
snapped into the printer with the arrow aligned with the dots on the top of
the print cartridge cradle.
Close the top cover of the printer if it is open.
Check the IN tray to make sure it contains paper and that the paper is
correctly loaded in the tray.
Press Resume to clear the error condition. Then check your computer
screen for any reported error message and corrective action instructions.
Blinking and Turned off No action required. This indicates that either the computer is sending a
document to the printer or that the printer is currently busy printing a
document.
Blinking and Blinking Press Power to turn off the printer. At the computer, cancel any
documents awaiting printing. Press Power again to turn on the printer. If
that doesn’t solve the problem, press the Power to turn it off. Unplug the
printer. Plug the printer back in, and press the Power to turn it on.
needs attention from you. The buttons are used to
control the printer.
English
15
Page 16

HP Customer Care
HP DeskJet printers set the
standard for quality and reliability, so you have
made an excellent choice. Should you need help,
English
however, HP Customer Care’s award-winning
service and support is nearby to provide expert
advice on using your HP printer or to answer
specific questions about a problem you are
having. Whether online or by phone, you’ll find
the support you need—and you’ll find it fast.
HP Customer Care Online
Click your way to a quick solution!
HP Customer Care Online is a great place to go
for answers to questions about your HP products.
You’ll get instant access to everything from
helpful printing tips to the latest product and
software updates—24 hours a day, seven days a
week, all at no charge to you.
If you have a modem connected to your
computer and subscribe to an online service or
have direct access to the Internet, you can obtain
a wide variety of information about your printer
at the following web sites:
English:
http://www.hp.com/support/home_products
French:
http://www.hp.com/cposupport/fr
German:
http://www.hp.com/cposupport/de
Japanese:
http://www.jpn.hp.com/CPO_TC/eschome.htm
Korean:
http://www.hp.co.kr/go/support
Portuguese:
http://www.hp.com/cposupport/pt
Spanish:
http://www.hp.com/cposupport/es
Simplified Chinese:
http://www.hp.com.cn/go/support
Traditional Chinese:
http://support.hp.com.tw/psd
From HP Customer Care Online you can link
to HP Customer Care User Forums and HP
Customer Care Email.
HP Customer Care User Forums
They’re friendly. They’re informative. Check out
our online user forums. Simply review existing
messages left by other HP users to find the
answers you’re looking for. You can also post
your questions, then check back later for ideas
and suggestions from knowledgeable users and
system operators.
HP Customer Care by Email
Connect with HP via email and receive a personal
reply from an HP Customer Care service
technician. Responses are normally provided
within 24 hours of receipt (excluding holidays).
A great option for those non-urgent questions.
Note: HP Customer Care by Email may not be
available in all languages.
16
Page 17

Printer Software
Printer software (also referred to as a printer
driver) allows your printer to talk with your
computer. HP provides printer software and
software updates for Windows 3.1x, 95, 98, NT 4.0,
In the U.S. Elsewhere in the world
and Windows 2000. For MS-DOS printer software,
English
contact the manufacturer of your software
program. The table below shows several options
for getting printer software.
First time setup? • Download the printer software from the
HP Customer Care Online web site. See
page 16 for the web site addresses.
• Create diskettes using a computer with a
CD-ROM drive. To create the diskettes,
begin the printer software installation.
When the opening screen appears, select
Make diskettes of your printer software
and follow on-screen instructions.
• Call (661) 257-5565 to order 3.5-inch
diskettes. Nominal shipping and handling
charges may apply. Bonus software
provided on the CD will not be provided
on diskettes.
Need software
updates?
• Download the printer software from
the HP Customer Care Online web
site. See page 16 for the web site
addresses.
• Call (661) 257-5565 to order 3.5-inch
diskettes. Software updates are
available for the cost of the CDs or
diskettes plus shipping.
• Download the printer software from the
HP Customer Care Online web site. See
page 16 for the web site addresses.
• Create diskettes using a computer with a
CD-ROM drive. To create the diskettes,
begin the printer software installation.
When the opening screen appears, select
Make diskettes of your printer software
and follow on-screen instructions.
• Download the printer software from
the HP Customer Care Online web
site. See page 16 for the web site
addresses.
• Call the HP Customer Care Center
nearest you. See page 18 for phone
numbers.
17
Page 18

HP Customer Care by Phone
Then we can help you with your questions
immediately!
Region
English
DeskJet 640C
Series
✻Long distance charges may apply in different regions.
Before placing a call for help, please make sure
that:
1. You have checked your Quick Start Poster
and this Reference Manual for installation and
troubleshooting tips.
2. You have checked HP Customer Care Online
for product help. See page 16 for HP web site
addresses.
3. If you cannot solve your problem using the
above, then call an HP service technician while
you’re in front of your computer and printer.
Before you call, be sure you have the following
information:
- Your printer’s serial number (the label is
on the back of the printer).
______________________________
- Your printer’s model number (the label is
on the front of the printer).
______________________________
- The model of the computer.
______________________________
- The version of the printer software.
______________________________
North America
(including Canada) 90 days
Asia Pacific 90 days
Europe 90 days
Latin America 1 year
Phone
Support
See the list below for your country’s HP
✻
Customer Care Center phone number:
• Africa/Middle East 41 22/780 41 11
• Argentina (541) 778-8380
• Australia +61 3 8877 8000
• Austria 43 (0) 660 6386
• Belgium (Dutch) 32 (0)2 62688 06
• Belgium (French) 32 (0)2 62688 07
• Brazil 011 829-6612
• Canada (905) 206-4663
• Chile 800 36 0999
• China 8610-65645959
• Czech Republic 42 (2) 471 7321
• Denmark 45 (0) 39 294099
• Finland 358 (9) 2034 7288
• France 33 (0) 143623434
• Germany 49 (0) 180 532 6222
• Greece 30 1 689 64 11
• Hong Kong (800) 96 7729
• Hungary 36 (1) 252 4505
• India 91 11 682 60 35
• Indonesia 6221 350 3408
• Ireland 353 (0) 1662 5525
• Israel 972-9-9524848
• Italy 39 (0) 2 264 10350
• Japan, Osaka 81 6 6838 1155
• Japan, Tokyo 81 3 3335-8333
• Korea 02 3270 0700
• Malaysia 03 2952566
• Mexico D.F. 258 9922
• Mexico, Guadalajara 01 800 472 6684
• Middle East/Africa 41 22/780 41 11
• Netherlands 31 (0) 20 606 8751
• New Zealand (09) 356-6640
• Norway 47 (0) 22 116299
• Philippines 65 272 5300
• Poland (+48) 22 519 06 00
• Portugal 351 (0) 1 318 00 65
• Russia 7095 923 50 01
• Singapore 65 272 5300
• Spain 34 (9) 02321 123
18
Page 19

• Sweden 46 (0) 8 6192170
• Switzerland 41 (0) 84 8801111
• Taiwan 886 2-2717-0055
• Thailand (66-2) 661 4011
• Turkey 90 1 224 59 25
• United Kingdom 44 (0) 171 512 5202
• U.S. (208) 344-4131
• Venezuela 800 47 888
• Venezuela, Caracas 207 8488
After the Free Phone Support Period
You can still get help from HP for a fee. Prices are
subject to change without notice. [HP Customer
Care Online help (page 16) on the internet is still
available for free!]
• For quick questions in the United States only,
call (900) 555-1500. The charges are $2.50
per minute and will not exceed $25.
• For calls from Canada, or for calls in the U.S.
that you anticipate might be longer than ten
minutes in length, call (800) 999-1148. The
fee is US $25 per call, charged to your Visa or
MasterCard.
• If, during your phone call, it is determined
that your printer requires repair and you are
within your printer’s Limited Warranty period
(see page 24), you will not be charged for the
phone support service. However, for countries
where the above toll-free phone numbers are
not available, the regular long-distance
charges may apply.
Extended Warranty Options
English
If you would like to extend your printer coverage
beyond the limited warranty period, you have the
following options:
• Consult your reseller to get extended
coverage.
• If your reseller does not offer service contracts,
please call HP directly and ask about our
HP Service Agreements. In the U.S., call (800)
446-0522; in Canada, call (800) 268-1221. For
HP Service Agreements outside the U.S. and
Canada, contact your local HP Sales Office.
HP Customer Care Repair
If your HP printer is ever in need of
repair, simply call the HP Customer Care Center.
A trained service technician will diagnose the
problem and coordinate the repair process for
you. This service is free during your printer’s
standard warranty. Beyond the warranty period,
repairs are charged on a time and materials basis.
19
Page 20

More About Your Printer
Uninstalling the Printer Software
English
If you need to uninstall the printer driver for
your HP DeskJet printer for any reason, perform
one of the steps listed for your operating system.
If something unexpected happened during
installation, it is safest to run the uninstall utility
directly from the CD rather than from the
uninstall program that was installed on your
hard drive.
For Windows 95, Windows 98, and Windows NT 4.0 do one of the following:
• From the Start menu, click Programs, click HP
DeskJet 640C Series, and then click HP DeskJet
640C Series Uninstall.
–OR–
• From the Start menu, click Settings, click
Control Panel, and then click Add/Remove
Programs. Select HP DeskJet 640C Series
(Remove only).
–OR–
• Insert the CD into your computer and run
Setup.exe. Select Remove HP DeskJet 640C
Series software.
For Windows 3.1x, do one of the following:
• In Program Manager, locate your HP DeskJet
Series group. Double-click the Uninstall icon to
uninstall your printer software.
–OR–
• Insert the CD into your computer and run
Setup.exe. Select Remove HP DeskJet 640C
Series software.
Print Cartridges
When buying replacement print cartridges, check
the part numbers carefully so that you buy the
correct print cartridge for your printer. The table
below shows the correct part number and easy
selection number for your printer model.
Print Cartridge
HP DeskJet
Model
640C
When either print cartridge runs out of ink,
replace the empty print cartridge. If you do not
have a new print cartridge, leave the empty print
cartridge in the cradle until you can replace it.
The printer does not print with only one print
cartridge installed.
To replace a print cartridge:
1. Turn on the printer, and open the top cover.
The print cartridge cradle moves to an
accessible position, and the Resume light
flashes.
2. Grasp the top of the empty print cartridge, pull
it toward you until it pops loose. Lift the print
cartridge out of the cradle and discard it.
3. Remove the new print cartridge from its
packaging and carefully remove the protective
vinyl tape covering the ink nozzles.
Black Print
Cartridge
Vinyl Tape
Ink Nozzles
WARNING: Do NOT touch the print cartridge ink
nozzles or copper contacts. Touching these parts
will result in clogs, ink failure, and bad electrical
connections. Also, do NOT remove the copper
strips; these are required electrical contacts.
Black Color Photo
Black
HP C6614
Series
Tri-Color
HP 51649
Series
Vinyl Tape
Photo Cartridge
HP C1816
Series
Print Cartridge
Ink Nozzles
Tri-color
20
Page 21

4. Place the new cartridge into its cradle.
5. Align the arrow on the print cartridge with the
notch on top of the cradle, and push the arrow
toward the notch until the print cartridge snaps
into place.
6. Close the top cover.
The print cartridge cradle returns to the home
position on the right side of the printer, and the
Resume light stops flashing.
7. Align the print cartridges.
For more information about the care and
maintenance of your print cartridges, see the
electronic User’s Guide.
Language Codes for DOS
The language codes for locating the dosread.txt
file on the printer software CD are listed below.
This text file is in the \<language code>\djcp\
directory on the printer software CD.
Language Code
Chinese, Simplified chs
Chinese, Traditional cht
Czech csy
Danish dan
German deu
English enu
Spanish esm
Finnish fin
French fra
Hungarian hun
Italian ita
Korean kor
Dutch nld
Norwegian non
Polish plk
Portuguese ptb
Russian rus
Swedish svc
Thai tha
English
21
Page 22

Product Specifications
Printers
HP DeskJet 640C printer model number C6464A
HP DeskJet 640CL printer model number C6465A
HP DeskJet 642C printer model number C6466A
English
Print technology
Drop-on-demand thermal inkjet printing
Print speeds
Black text
Best 1
Normal 3
Draft 6
Mixed text with color graphics
Best .5
Normal 1
Draft 3
Color print speed (tri-color and
photo cartridge)
5 x 7 inch image .25
Black True Type™ text resolution
Draft mode: 300 x 300 dpi
Normal mode: 600 x 300 dpi
Best mode: 600 x 600 dpi
Color resolution (black and tri-color
cartridges)
300 x 300 dpi on plain paper
600 x 300 dpi black and color (on glossy paper, transparency
film, and premium paper)
Color resolution (tri-color and photo
cartridges)
600 x 300 dpi with 6 inks, using PhotoREt Technology and all
paper types (Best and Normal modes)
MS-DOS (graphics)
Full-page 75, 150, 300 dpi
Printer command language
HP PCL Level 3
Standard Character Sets
United Kingdom (ISO 4), German (ISO 21), French (ISO 69),
Italian (ISO 15), Danish/Norwegian (ISO 60), Swedish (ISO 11),
Spanish (ISO 17), ANSI ASCII (ISO 6), Legal, PC-8, Roman-8,
PC-850, PC-8 Danish/Norwegian, ECMA-94, Latin 1
(ISO 8859/1), PC-852, Latin 2 (ISO 8859/2), Latin 5
(ISO 8859/9), and PC-8 Turkish
Vertical Alignment
± 0.002 in
640C Series
Pages per minute
Built-in (internal) fonts
Courier (portrait and landscape orientations)
Pitch: 5, 10, 16.67, 20 cpi
Point size: 6, 12, 24 pt
Style: Upright (Italic: 5, 10, 20 cpi)
Stroke weight: Normal, Bold
CG Times (portrait and landscape orientations)
Pitch: Proportional
Point size: 5, 6, 7, 8, 10, 12, 14 pt
Style: Upright, Italic
Stroke weight: Normal, Bold
Letter Gothic (portrait and landscape orientations)
Point and pitch: 6, 12, and 24 pt for 6, 12 and 24 cpi
(Upright only): 4.75, 9.5, and 19 pt
for 16.67 cpi
Style: Upright
Stroke weight: Normal, Bold
Univers (portrait and landscape orientations)
Pitch: Proportional
Point size: 5, 6, 7, 8, 10, 12, 14 pt
Style: Upright (Italic: 5, 6, 10, 12 pt)
Stroke weight: Normal, Bold
Software compatibility
MS Windows 3.1x, 95, 98, and NT 4.0
MS-DOS applications
Mac OS 8.1 or above (USB-connected Macintosh only)
Reliability
20,000 hours MTBF
1,000 total pages per month maximum
Buttons/lights
Resume button and light
Power button and light
I/O interface
Centronics parallel, IEEE-1284-compliant with
1284-B receptacle (Bi-Tronics, ECP)
Universal Serial Bus
Printer memory
512 KB built-in RAM
32 KB receive buffer
Dimensions
Width: 436 mm (17.2 in)
Height: 199 mm (7.9 in)
Depth: 405 mm (16 in)
Weight
5.3 kg (11.6 lbs)
22
Page 23

Power requirements
Power Adapter (universal input)
Input Voltage: 100 to 240 VAC (±10%)
Input Frequency: 50 to 60 Hz (±3 Hz)
Automatically accommodates the world-wide range of AC line
voltages and frequencies. There is no on/off switch on the
power adapter.
Operating environment
Maximum operating conditions:
Temperature 41 to 104o F, 5 to 40o C
Humidity 10 to 80% RH noncondensing
Recommended operating conditions for best print quality:
Temperature 59 to 95o F or 15 to 35o C
Humidity 20 to 80% RH noncondensing
Storage conditions:
Temperature -40 to 140o F, -40 to 60o C
Declared noise emissions in accordance with ISO 9296:
Normal
Mode
Sound Power, L
Sound Pressure, L
(1B = 10 dB): 6.3 B(A)
wAd
(Bystander position): 50 dB(A)
pAm
Power consumption
2 watts maximum when off
2.5 watts maximum nonprinting
23 watts maximum when printing
Recommended media weight
Paper: 60 to 135 g/m2 (16 to 36 lb index)
Envelopes: 75 to 90 g/m2 (20 to 24 lb)
Cards: 110 to 200 g/m2 (110 lb index max.;
8.5 pt max. thickness)
Media handling
Sheets: up to 100 sheets
Multiple envelopes: up to 20 envelopes
Single envelope: only 1 envelope
Cards: up to 30 cards
Transparencies: up to 50 sheets
Labels: up to 25 sheets
OUT tray capacity: up to 50 sheets
Use only U.S. letter- or A4-sized
sheets specifically designed for
use with inkjet printers.
Printable paper sizes
U.S. letter 8.5 x 11 in
U.S. legal 8.5 x 14 in
Executive 7.25 x 10.5 in
European A4 210 x 297 mm
European A5 148 x 210 mm
B5-JIS 182 x 257 mm
User Defined size: Width: 5.0 to 8.5 in
127 to 215 mm
Length: 5.83 to 14 in
148 to 356 mm
U.S. No. 10 envelope 4.12 x 9.5 in
Invitation A2 envelope 4.37 x 5.75 in
European DL envelope 220 x 110 mm
European C6 envelope 114 x 162 mm
Index card 102 x 152 mm
4 x 6 in
Index card 127 x 203 mm
5 x 8 in
European A6 card 105 x 148 mm
Japanese Hagaki Postcard 100 x 148 mm
English
23
Page 24

Limited Warranty Statement
Region Software
North America
(including Canada)
English
Asia Pacific 1 year 90 days 1 year
Europe 1 year 90 days 1 year
Latin America 1 year 90 days 1 year
90 days 90 days 90 days
A. Extent of Limited Warranty
1. Hewlett-Packard (HP) warrants to the end-user customer
that the HP products specified above will be free from
defects in materials and workmanship for the duration
specified above, which duration begins on the date of
purchase by the customer. Customer is responsible for
maintaining proof of date of purchase.
2. For software products, HP’s limited warranty applies only
to a failure to execute programming instructions. HP does
not warrant that the operation of any product will be
uninterrupted or error free.
3. HP’s limited warranty covers only those defects which arise
as a result of normal use of the product, and do not apply
to any:
a. Improper or inadequate maintenance or modification;
b. Software, interfacing, media, parts, or supplies not
provided or supported by HP; or
c. Operation outside the product’s specifications.
4. For HP printer products, the use of a non-HP ink cartridge
or a refilled ink cartridge does not affect either the
warranty to the customer or any HP support contract with
the customer. However, if printer failure or damage is
attributable to the use of a non-HP or refilled ink cartridge,
HP will charge its standard time and materials charges to
service the printer for the particular failure or damage.
5. If HP receives, during the applicable warranty period,
notice of a defect in any software, media, or ink cartridge
product which is covered by HP’s warranty, HP shall
replace the defective product. If HP receives, during the
applicable warranty period, notice of a defect in any
hardware product which is covered by HP’s warranty, HP
shall either repair or replace the defective product, at
HP’s option.
6. If HP is unable to repair or replace, as applicable, a
defective product which is covered by HP’s warranty, HP
shall, within a reasonable time after being notified of the
defect, refund the purchase price for the product.
7. HP shall have no obligation to repair, replace, or refund
until the customer returns the defective product to HP.
8. Any replacement product may be either new or like-new,
provided that it has functionality at least equal to that of
the product being replaced.
9. HP’s limited warranty is valid in any country where the
covered HP product is distributed by HP except for the
Middle-East, Africa, Argentina, Brazil, Mexico, Venezuela,
and France’s “Departments d’Outre-Mer”; for those
excepted areas, the warranty is valid only in the country of
purchase. Contracts for additional warranty services, such
as on-site service, may be available from any authorized
HP service facility in countries where the product is
distributed by HP or by an authorized importer.
Print
Cartridges
Printer
B. Limitations of Warranty
1. TO THE EXTENT ALLOWED BY LOCAL LAW, NEITHER HP
NOR ITS THIRD PARTY SUPPLIERS MAKE ANY OTHER
WARRANTY OR CONDITION OF ANY KIND, WHETHER
EXPRESS OR IMPLIED, WITH RESPECT TO THE HP
PRODUCTS, AND SPECIFICALLY DISCLAIM THE IMPLIED
WARRANTIES OR CONDITIONS OF MERCHANTABILITY,
SATISFACTORY QUALITY, AND FITNESS FOR A
PARTICULAR PURPOSE.
C. Limitations of Liability
1. To the extent allowed by local law, the remedies provided
in this Warranty Statement are the customer’s sole and
exclusive remedies.
2. TO THE EXTENT ALLOWED BY LOCAL LAW, EXCEPT FOR
THE OBLIGATIONS SPECIFICALLY SET FORTH IN THIS
WARRANTY STATEMENT, IN NO EVENT SHALL HP OR
ITS THIRD PARTY SUPPLIERS BE LIABLE FOR DIRECT,
INDIRECT, SPECIAL, INCIDENTAL, OR CONSEQUENTIAL
DAMAGES, WHETHER BASED ON CONTRACT, TORT, OR
ANY OTHER LEGAL THEORY AND WHETHER ADVISED OF
THE POSSIBILITY OF SUCH DAMAGES.
D. Local Law
1. This Warranty Statement gives the customer specific legal
rights. The customer may also have other rights which vary
from state to state in the United States, from province to
province in Canada, and from country to country
elsewhere in the world.
2. To the extent that this Warranty Statement is inconsistent
with local law, this Warranty Statement shall be deemed
modified to be consistent with such local law. Under such
local law, certain disclaimers and limitations of this
Warranty Statement may not apply to the customer.
For example, some states in the United States, as well as
some governments outside the United States (including
provinces in Canada), may:
a. Preclude the disclaimers and limitations in this Warranty
Statement from limiting the statutory rights of a consumer (e.g., the United Kingdom);
b. Otherwise restrict the ability of a manufacturer to enforce
such disclaimers or limitations; or
c. Grant the customer additional warranty rights, specify the
duration of implied warranties which the manufacturer
cannot disclaim, or not allow limitations on the duration
of implied warranties.
3. FOR CONSUMER TRANSACTIONS IN AUSTRALIA AND
NEW ZEALAND, THE TERMS IN THIS WARRANTY
STATEMENT, EXCEPT TO THE EXTENT LAWFULLY
PERMITTED, DO NOT EXCLUDE, RESTRICT, OR MODIFY,
AND ARE IN ADDITION TO, THE MANDATORY STATUTORY
RIGHTS APPLICABLE TO THE SALE OF HP PRODUCTS TO
SUCH CUSTOMERS.
HP Year 2000 Warranty
Subject to all of the terms and limitations of the HP Limited
Warranty Statement stated above, HP warrants that this HP
Product will be able to accurately process date data (including,
but not limited to, calculating, comparing, and sequencing)
from, into, and between the twentieth and twenty-first
centuries, and the years 1999 and 2000, including leap
year calculations, when used in accordance with the Product
documentation provided by HP (including any instructions
for installing patches or upgrades), provided that all other
products (e.g., hardware, software, firmware) used in
combination with such HP Product(s) properly exchange date
data with it. The duration of the Year 2000 warranty extends
through January 31, 2001.
24
 Loading...