

Page 1

table of contents
hp deskjet 5550 series
table of contents
notices
notices and acknowledgements
terms and conventions
accessibility
using the onscreen user's guide
special features
getting started
printer features
buttons and lights
paper trays
print cartridges
automatic paper-type sensor
reserve mode
automatic two-sided printing module (duplexer)
connectivity
printing
using printer software with Mac OS 8.6, 9.x, and X Classic
using printer software with Mac OS X
printing a document
two-sided printing
printing digital photographs
auto-on and auto-off feature
Newport Hykuna Mac UG Final
file:///C|/Projects/Newport/Mac_UG_huykuna/ug_toc_level1_fs.html (1 of 3) [5/9/2002 9:40:50 AM]
11
Page 2

table of contents
using the automatic paper-type sensor
borderless printing
plain paper
envelopes
transparencies
labels
index cards and other small media
Hagaki cards
photographs
greeting cards
posters
banners
iron-on transfers
maintenance
replacing print cartridges
refilling print cartridges
aligning print cartridges
automatically cleaning print cartridges
manually cleaning the print cartridge cradle
maintaining print cartridges
maintaining the printer body
removing ink for skin and clothing
using the hp inkjet utility
troubleshooting
printer is not printing
problems with printouts
printer lights are flashing or on
print cartridge status light is on
print cartridge status light is flashing
Newport Hykuna Mac UG Final
file:///C|/Projects/Newport/Mac_UG_huykuna/ug_toc_level1_fs.html (2 of 3) [5/9/2002 9:40:50 AM]
2
Page 3

table of contents
printer is too slow
two-sided printing problems
borderless printing problems
"There is a problem with the Print Cartridges" error message
appears on the computer screen
specifications
printer specifications
minimum system requirements
automatic two-sided printing module specifications
minimum printing margins
environmental statement
print cartridge recovery
limited warranty
regulatory notices
index
Newport Hykuna Mac UG Final
file:///C|/Projects/Newport/Mac_UG_huykuna/ug_toc_level1_fs.html (3 of 3) [5/9/2002 9:40:50 AM]
3
Page 4

notices
notices
● notices and acknowledgements
● terms and conventions
● accessibility
● using the onscreen user's guide
Newport Hykuna Mac UG Final
file:///C|/Projects/Newport/Mac_UG_huykuna/ug_notices_intro_fs.html [5/9/2002 9:40:51 AM]
4
Page 5

notices and acknowledgements
notices and acknowledgements
hewlett-packard company notices
The information contained in this document is subject to change without notice.
Hewlett-Packard (HP) makes no warranty of any kind with regard to this material
including, but not limited to, the implied warranties of merchantability and fitness for a
particular purpose.
Hewlett-Packard shall not be liable for any errors or for incidental or consequential
damages in connection with the furnishing, performance, or use of this material.
All rights reserved. Reproduction, adaptation, or translation of this material is prohibited
without prior written permission of Hewlett-Packard, except as allowed under copyright
laws.
acknowledgments
Apple, the Apple logo, AppleTalk, ColorSync, the ColorSync logo, Finder, Mac, Macintosh,
MacOS, Powerbook, Power Macintosh, and Quickdraw are trademarks of Apple
Computer, Inc., registered in the U.S. and other countries.
TrueType is a U.S. trademark of Apple Computer, Inc.
Adobe and Acrobat are trademarks of Adobe Systems Incorporated.
Copyright 2002 Hewlett-Packard Company
Newport Hykuna Mac UG Final
file:///C|/Projects/Newport/Mac_UG_huykuna/ug_notices_fs.html [5/9/2002 9:40:51 AM]
5
Page 6
terms and conventions
terms and conventions
The following terms and conventions are used in the User's Guide.
terms
HP Deskjet printers may be referred to as the HP Deskjet printer, the HP printer, or
printer.
symbols
The > symbol guides you through a series of software steps. For example:
Click File > Page Setup .
cautions and warnings
A Caution indicates possible damage to the HP Deskjet printer or to other equipment.
For example:
Caution! Do not touch the print cartridge ink nozzles or copper contacts. Touching these parts
will result in clogs, ink failure, and bad electrical connections.
A Warning indicates possible harm to yourself or to others. For example:
Warning! Keep both new and used print cartridges out of the reach of children.
icons
A Note icon indicates that additional information is provided. For example:
For great results use HP products.
A Printing instructions icon indicates that a description of print options is available in
the onscreen user's guide. For example:
For a description of available print options, click the appropriate operating
system:
Mac OS 8.6, 9.x, or X Classic or Mac OS X.
Newport Hykuna Mac UG Final
file:///C|/Projects/Newport/Mac_UG_huykuna/ug_termsconventions_fs.html [5/9/2002 9:40:52 AM]
6
Page 7

accessibility
accessibility
For accessibility information, visit Apple's Website at http://www.apple.com/disability/.
Newport Hykuna Mac UG Final
file:///C|/Projects/Newport/Mac_UG_huykuna/ug_accessibility_fs.html [5/9/2002 9:40:52 AM]
7
Page 8

using the onscreen user's guide
using the onscreen user's guide
This onscreen user’s guide is viewed through Adobe Acrobat Reader version 4.0 or
greater.
Use the following tools to view and navigate the onscreen user's guide:
● View Buttons: Click these buttons to change page views:
View the page in actual size
Fit the page in the window
Fit the page width in the window
● Zoom: Use to zoom in on a page.
● Bookmarks: Click a bookmark to view a topic.
● Navigation Buttons: Click these buttons to navigate:
Go to the first page of the document
Go backward one page
Go forward one page
Go to the last page of the document
Go to the previous view
Go to the next view
Newport Hykuna Mac UG Final
file:///C|/Projects/Newport/Mac_UG_huykuna/ug_using_onscreen_guide_fs.html [5/9/2002 9:40:53 AM]
8
Page 9
special features
special features
Congratulations! You have purchased an HP Deskjet printer that is equipped with several
exciting features:
Photo print cartridge: Great performance, with a photo print cartridge that prints
stunning true-to-life photos.
Digital photo printing: Enhanced
digital photo printing capabilities.
Borderless printing: Photos and cards print to the edges of the paper with
borderless
printing.
Reserve mode:
Reserve mode lets you continue printing with one print cartridge when
the other print cartridge has run out of ink.
Auto-On and Auto-Off: Enable
Auto-Off to place the printer into a low-power, energy-
efficient mode after it has been idle for 30 minutes. The printer turns on automatically
when you print a file.
Poster Printing:
Poster printing lets you print a poster on multiple pages which can be
taped together.
Poster printing is not available in Mac OS X.
Newport Hykuna Mac UG Final
file:///C|/Projects/Newport/Mac_UG_huykuna/ug_special_features_fs.html [5/9/2002 9:40:53 AM]
9
Page 10

getting started
getting started
● printer features
● buttons and lights
● paper trays
● print cartridges
● reserve mode
● automatic paper-type sensor
● automatic two-sided printing module (duplexer)
● connectivity
Newport Hykuna Mac UG Final
file:///C|/Projects/Newport/Mac_UG_huykuna/ug_getting_started_intro_fs.html [5/9/2002 9:40:53 AM]
10
Page 11
printer features
printer features
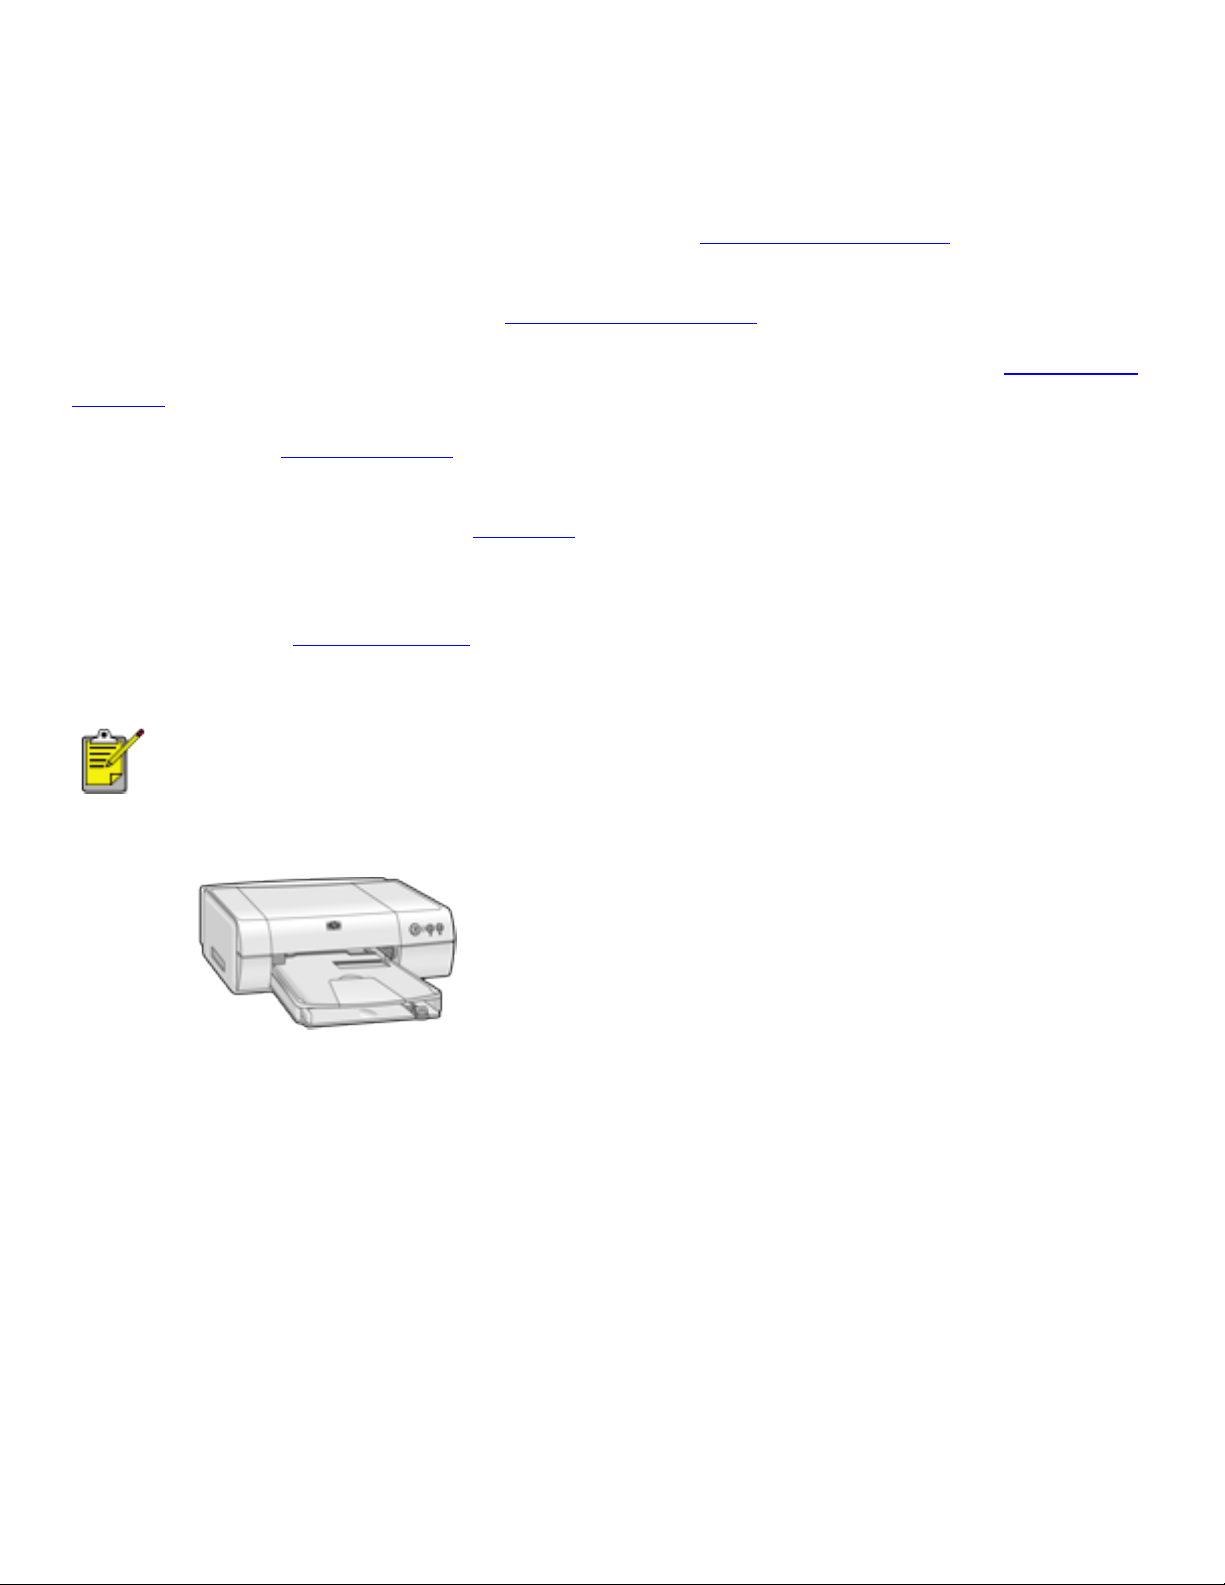
The HP printer has several features to make printing easier and more efficient.
To view a printer feature, click below on the name of the feature.
1. buttons and lights
2.
paper trays
1. reserve mode
2.
print cartridges
3.
automatic paper-type sensor
Newport Hykuna Mac UG Final
file:///C|/Projects/Newport/Mac_UG_huykuna/ug_printerfeatures_fs.html (1 of 2) [5/9/2002 9:40:54 AM]
11
Page 12
printer features
1. connectivity
2.
duplexer
Newport Hykuna Mac UG Final
file:///C|/Projects/Newport/Mac_UG_huykuna/ug_printerfeatures_fs.html (2 of 2) [5/9/2002 9:40:54 AM]
12
Page 13
buttons and lights
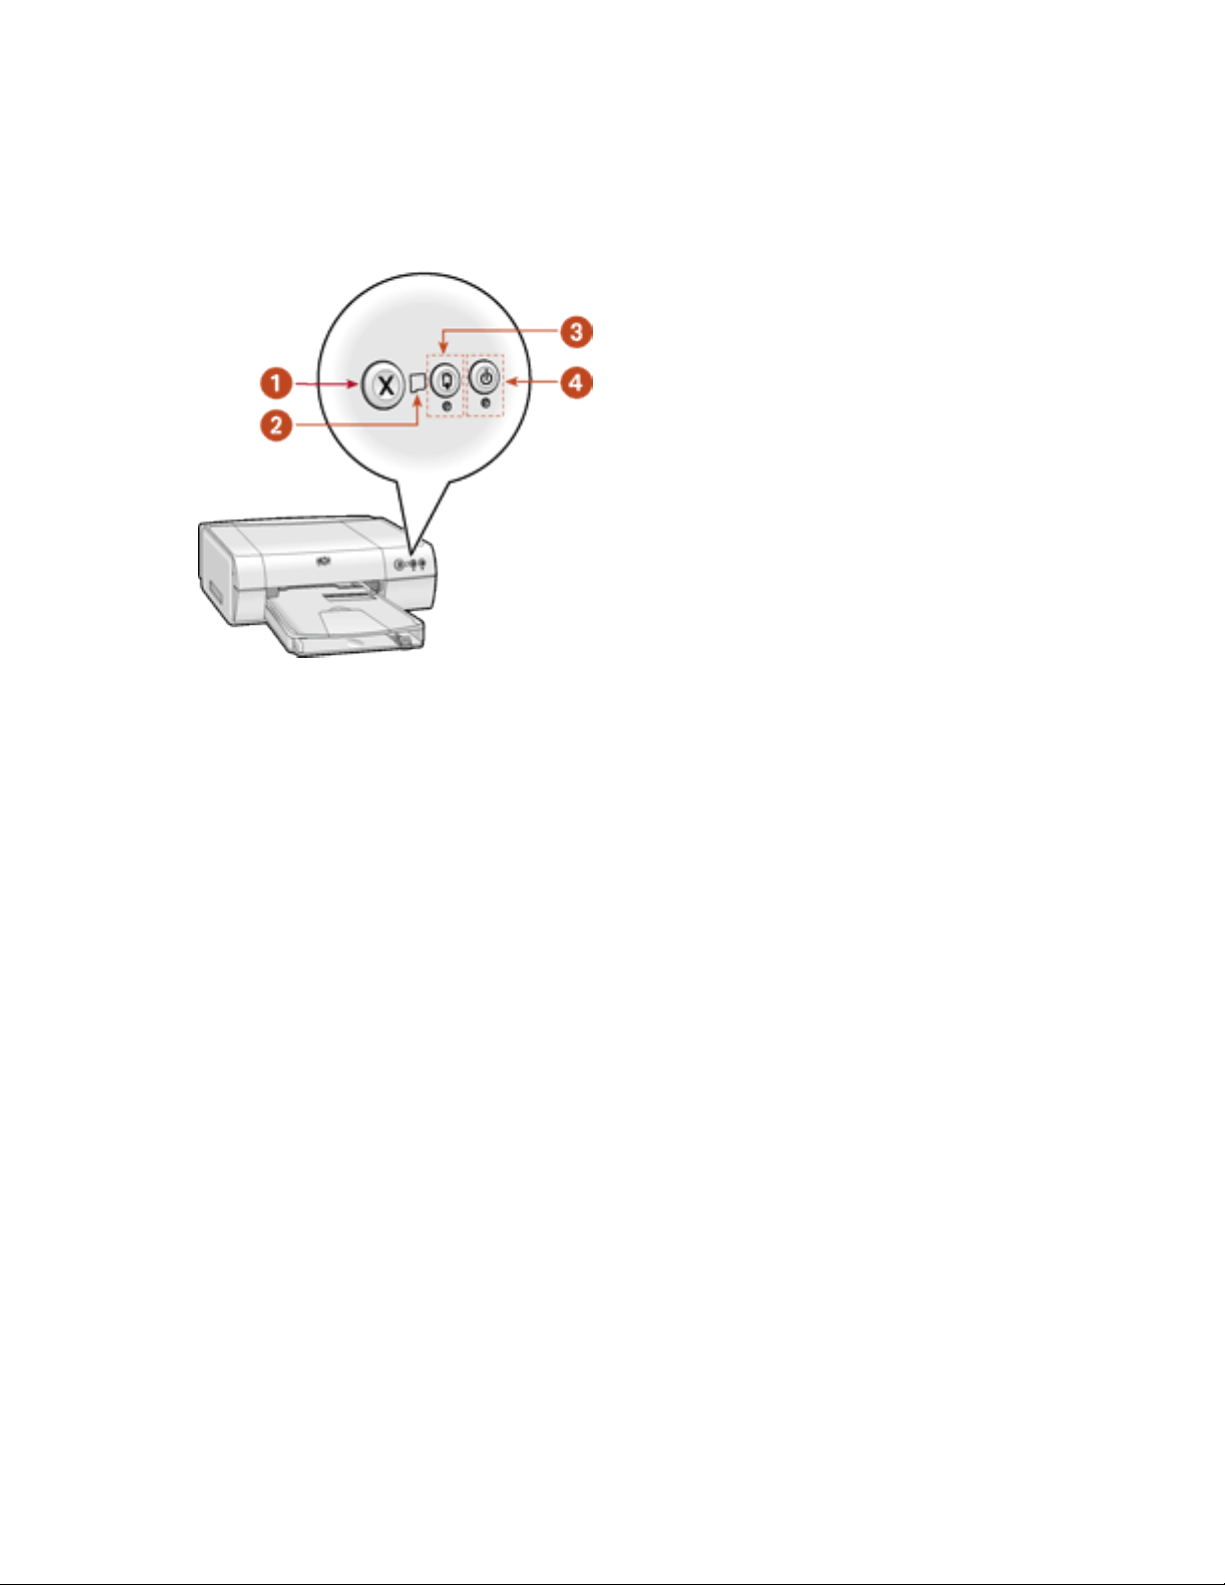
buttons and lights
The printer buttons let you turn the printer on and off, cancel a print job, or resume
printing. The lights give you visual cues about the status of the printer.
1. Cancel button 2. Print Cartridge Status light
3. Resume button and light 4. Power button and light
cancel button
Pressing the Cancel button cancels the current print job.
print cartridge status symbol and light
The Print Cartridge Status light turns on or flashes when a print cartridge needs service.
resume button and lights
The Resume light flashes when an action is required such as loading paper or clearing a
paper jam. When the problem is solved, press the Resume button to continue printing.
power button and light
The Power button turns the printer on and off. It may take a few seconds for the printer
to turn on after pressing the Power button. The green light next to the Power button
flashes when the printer is processing.
Caution! Always use the Power button on the front of the printer to turn the printer on and off.
Using a power strip, surge protector, or a wall-mounted switch to turn the printer on and off
may cause printer failure.
Newport Hykuna Mac UG Final
file:///C|/Projects/Newport/Mac_UG_huykuna/ug_buttons_fs.html [5/9/2002 9:40:54 AM]
13
Page 14

paper trays
paper trays
The printer has two paper trays: an In tray and an Out tray. The Out tray contains a slot
for single envelope printing.
1. Out tray 2. In tray 3. single envelope slot
in tray
The In tray holds paper or other media to be printed.
You can print different sizes of media by sliding the paper guides in and out.
1. paper width guide 2. paper length guide
out tray
Printed pages are deposited in the Out tray.
Remove the Out tray to load paper.
Newport Hykuna Mac UG Final
file:///C|/Projects/Newport/Mac_UG_huykuna/ug_trays_fs.html (1 of 2) [5/9/2002 9:40:55 AM]
14
Page 15
paper trays
Replace the Out tray before printing.
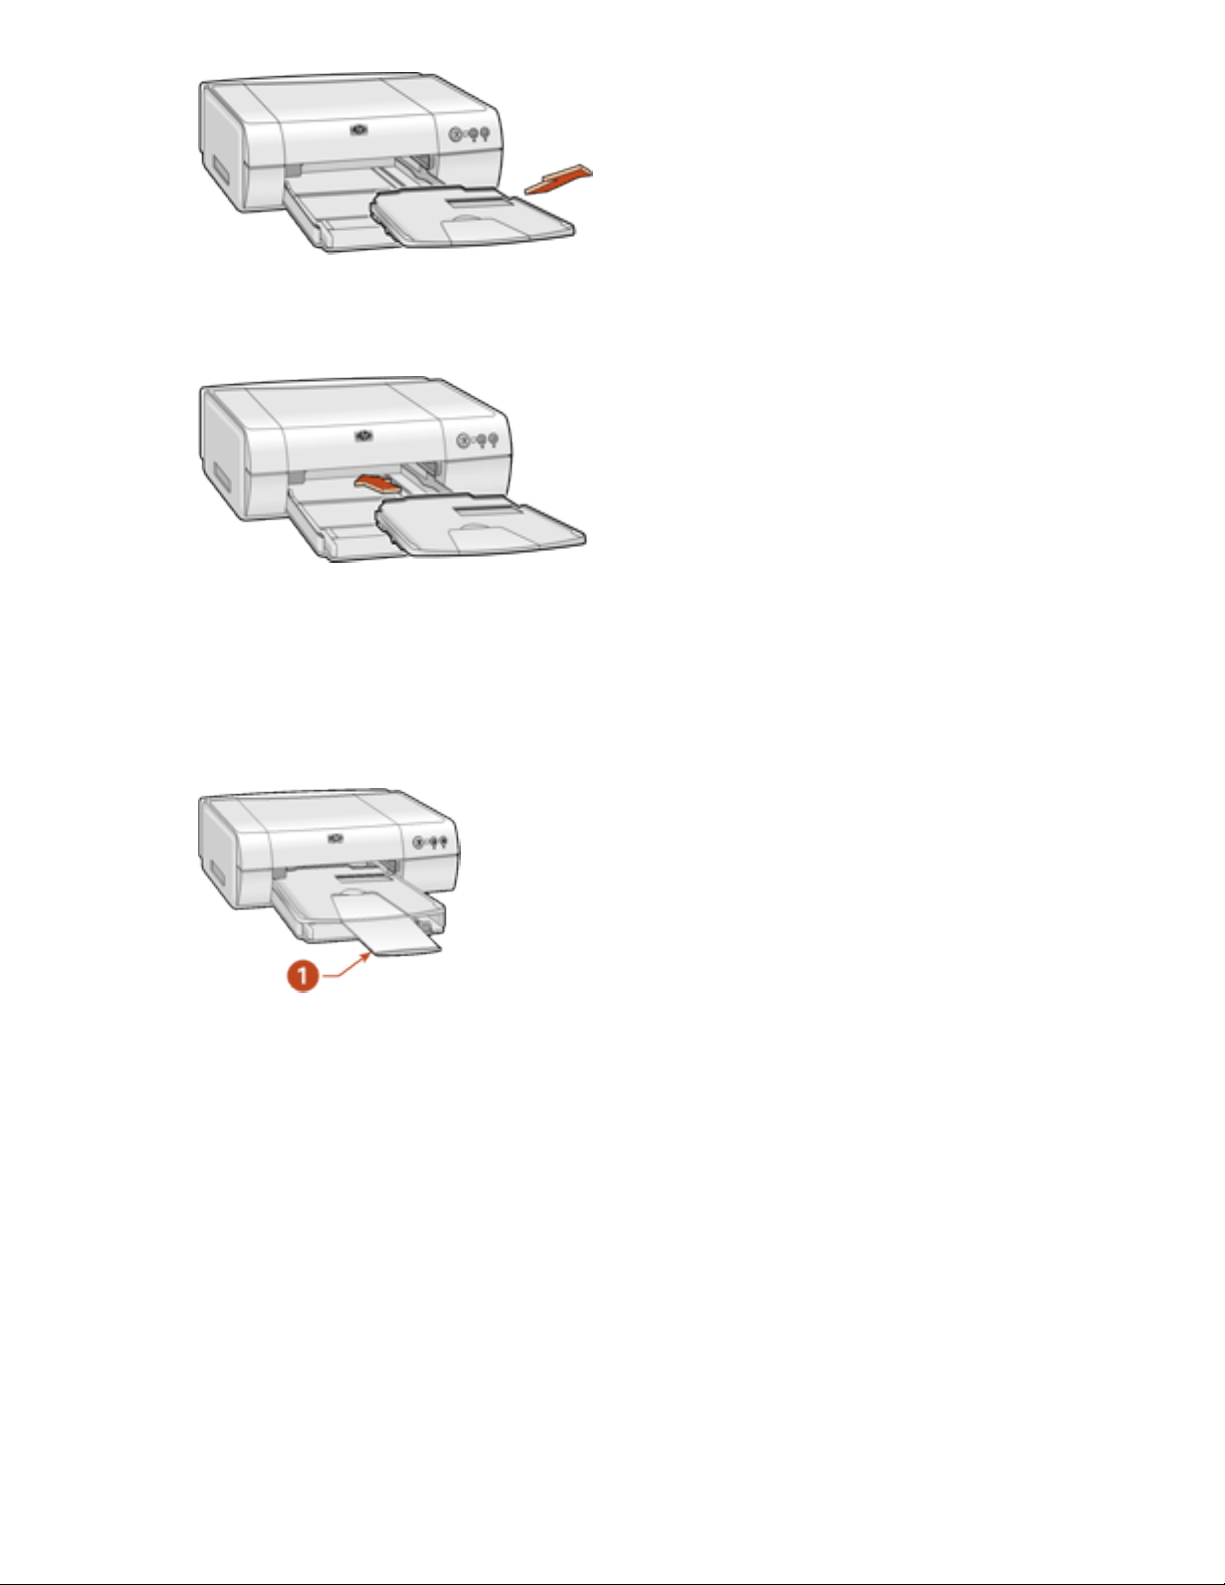
Out tray extension - Fold the Out tray extension out when printing a large number of
pages. Also fold out the extension when printing in draft mode to prevent the paper
from falling out of the tray. When the print job finishes, fold the tray extension into its
storage slot.
1. Out tray extension
Newport Hykuna Mac UG Final
file:///C|/Projects/Newport/Mac_UG_huykuna/ug_trays_fs.html (2 of 2) [5/9/2002 9:40:55 AM]
15
Page 16
print cartridges
print cartridges
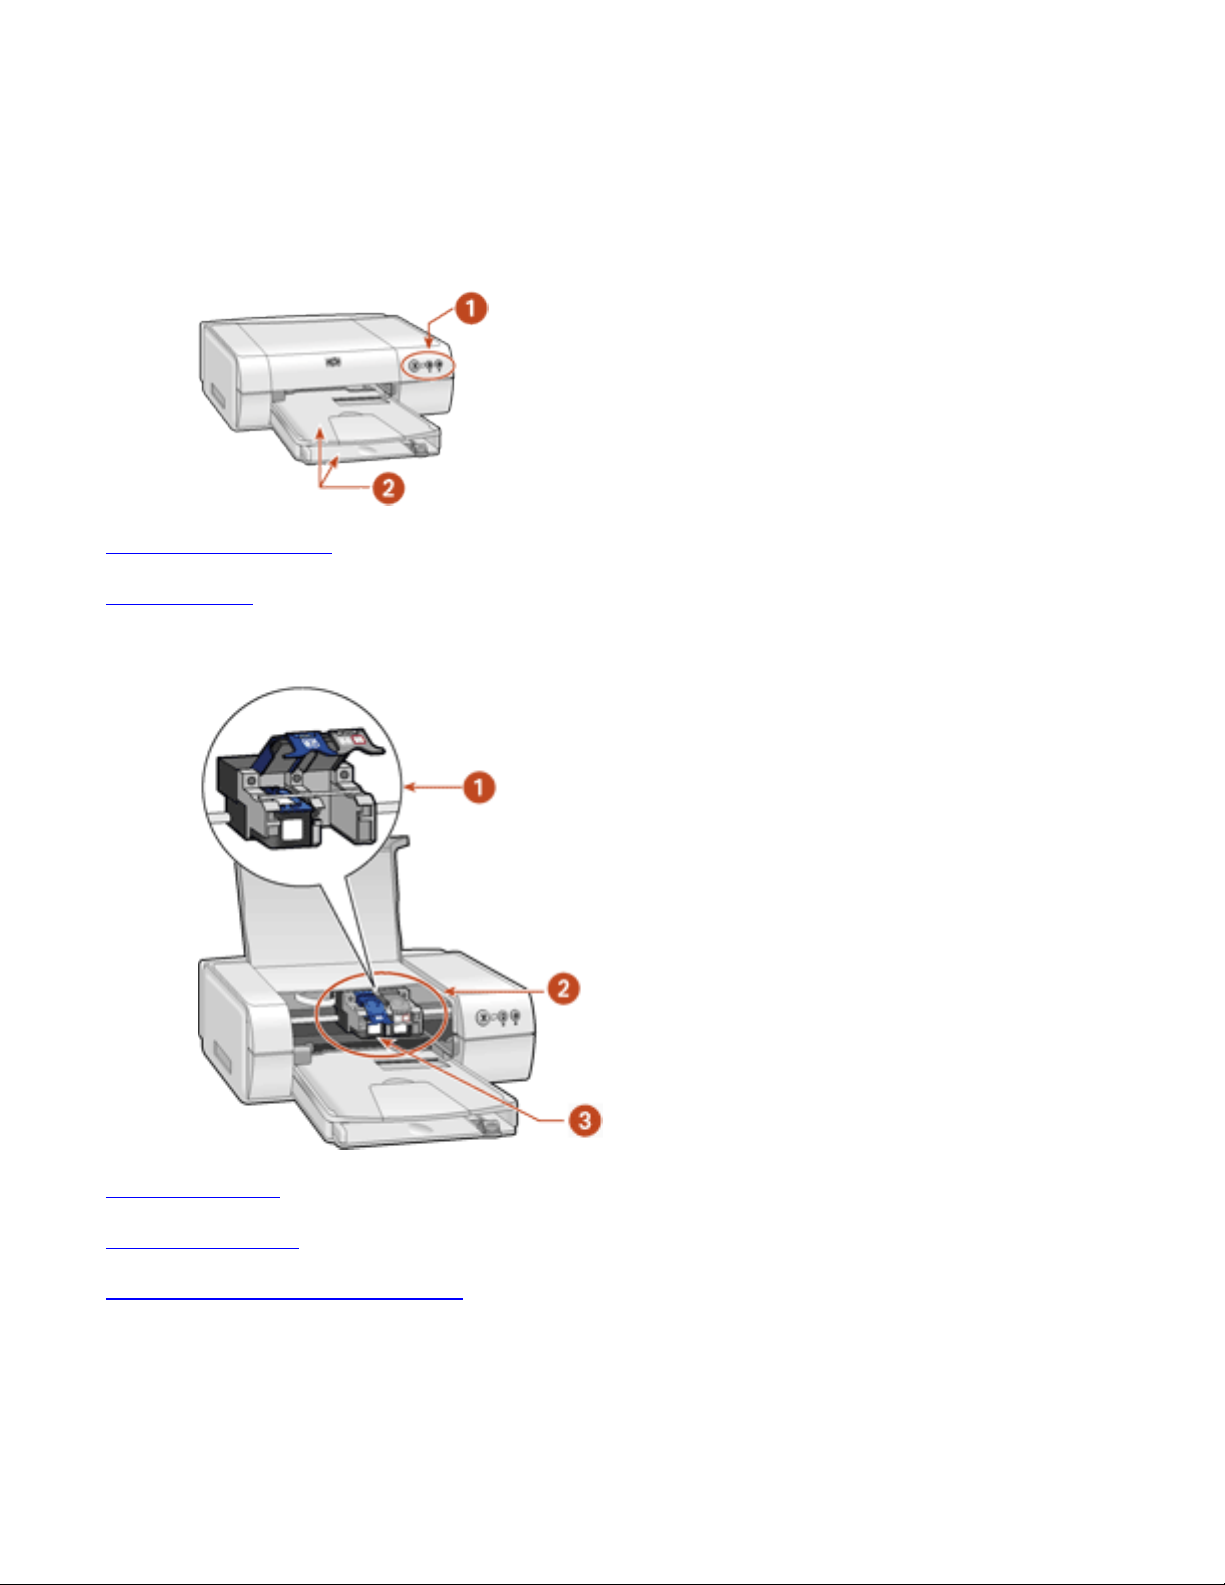
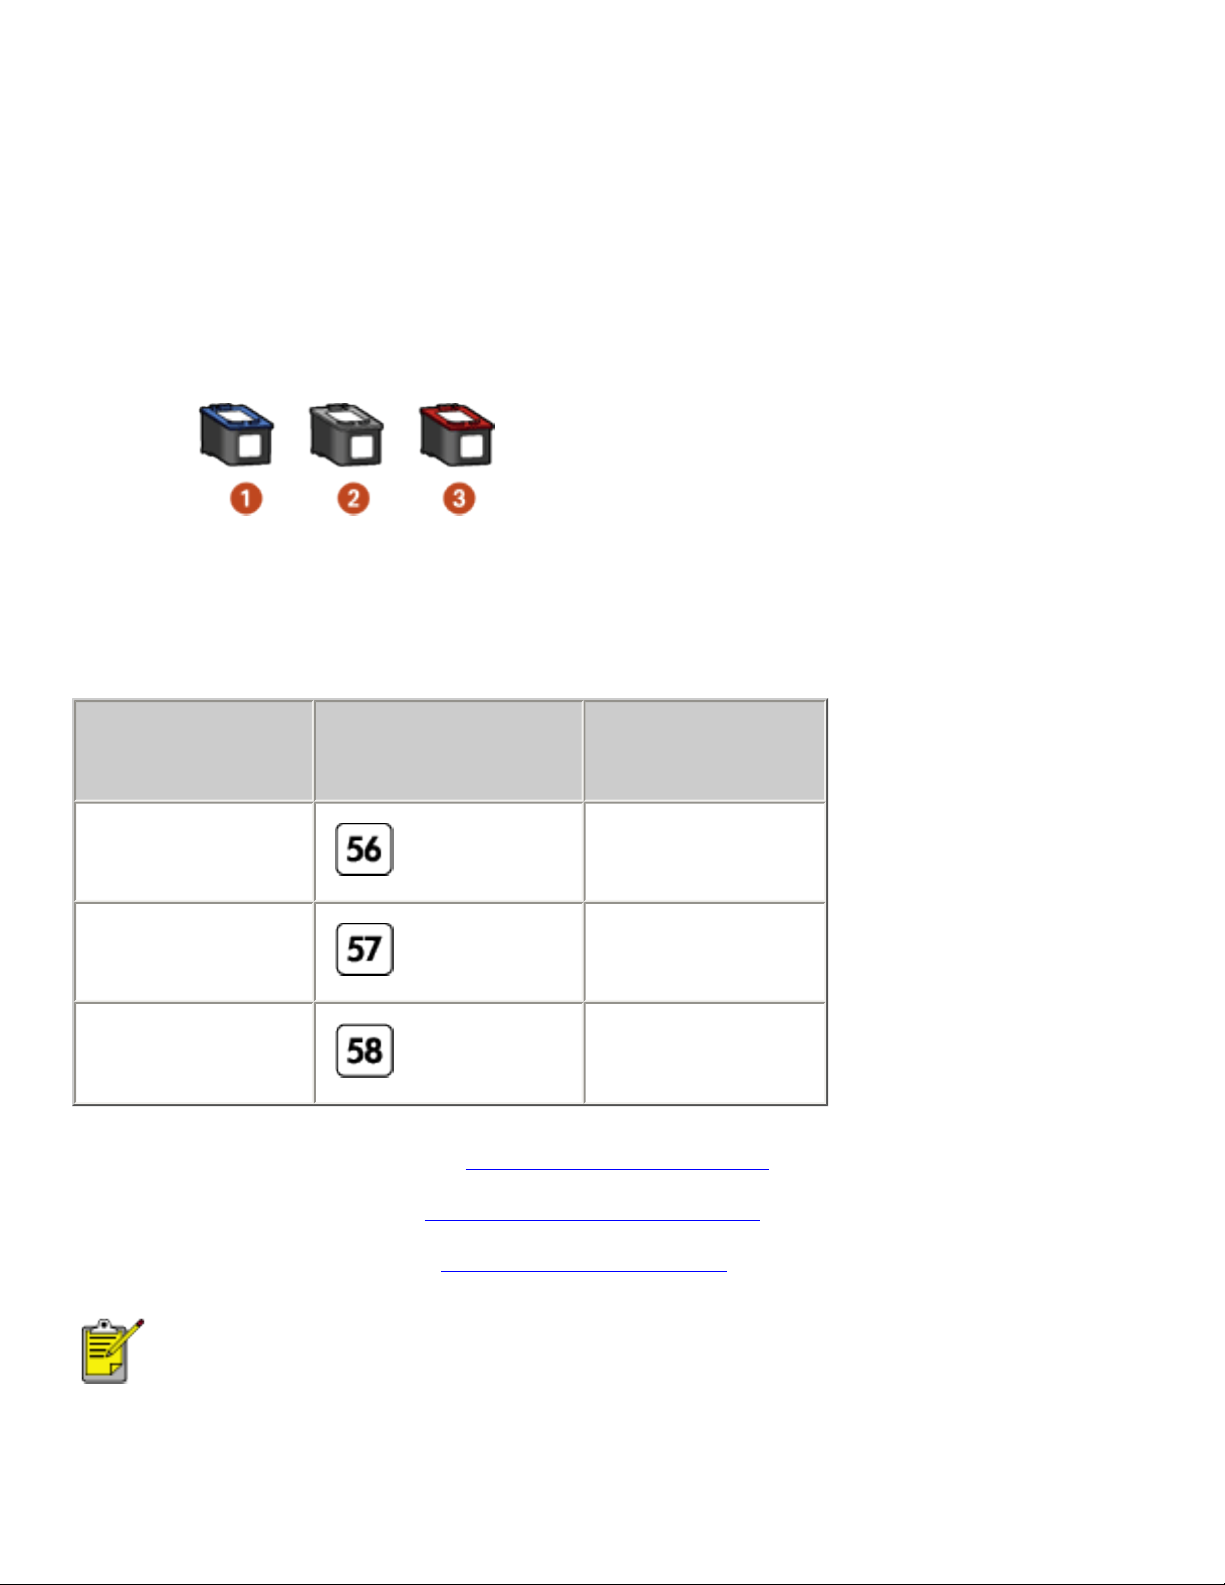
Three print cartridges can be used with your printer:
● black print cartridge
● tri-color print cartridge
● photo print cartridge
1. black print cartridge 2. tri-color print cartridge 3. photo print cartridge
print cartridge selection
print cartridge
selection
number
product
number
black
c6656a
tri-color
c6657a
photo print
c6658a
For installation instructions, see
replacing print cartridges.
For storage instructions, see
maintaining print cartridges.
For recycling instructions, see
print cartridge recovery.
For print cartridge ink capacity, see the information included in the print
cartridge packaging.
Newport Hykuna Mac UG Final
file:///C|/Projects/Newport/Mac_UG_huykuna/ug_ink_delivery_fs.html [5/9/2002 9:40:55 AM]
16
Page 17

automatic paper-type sensor
automatic paper-type sensor
The Automatic Paper-Type Sensor determines the correct paper type and adjusts the
print settings for most paper or media placed in the paper tray. Automatic is the
default option in the Print dialog box.
This feature, particularly when used with HP paper and media, provides better printing
results.
When the Automatic default option is selected, the Automatic Paper-Type Sensor is
engaged. The printer scans the first page of a document with a blue optical sensor light
to determine the best paper type setting. Once determined, the page is printed.
For more information, see
using the automatic paper type sensor.
Newport Hykuna Mac UG Final
file:///C|/Projects/Newport/Mac_UG_huykuna/ug_media_sensor_fs.html [5/9/2002 9:40:56 AM]
17
Page 18
reserve mode
reserve mode
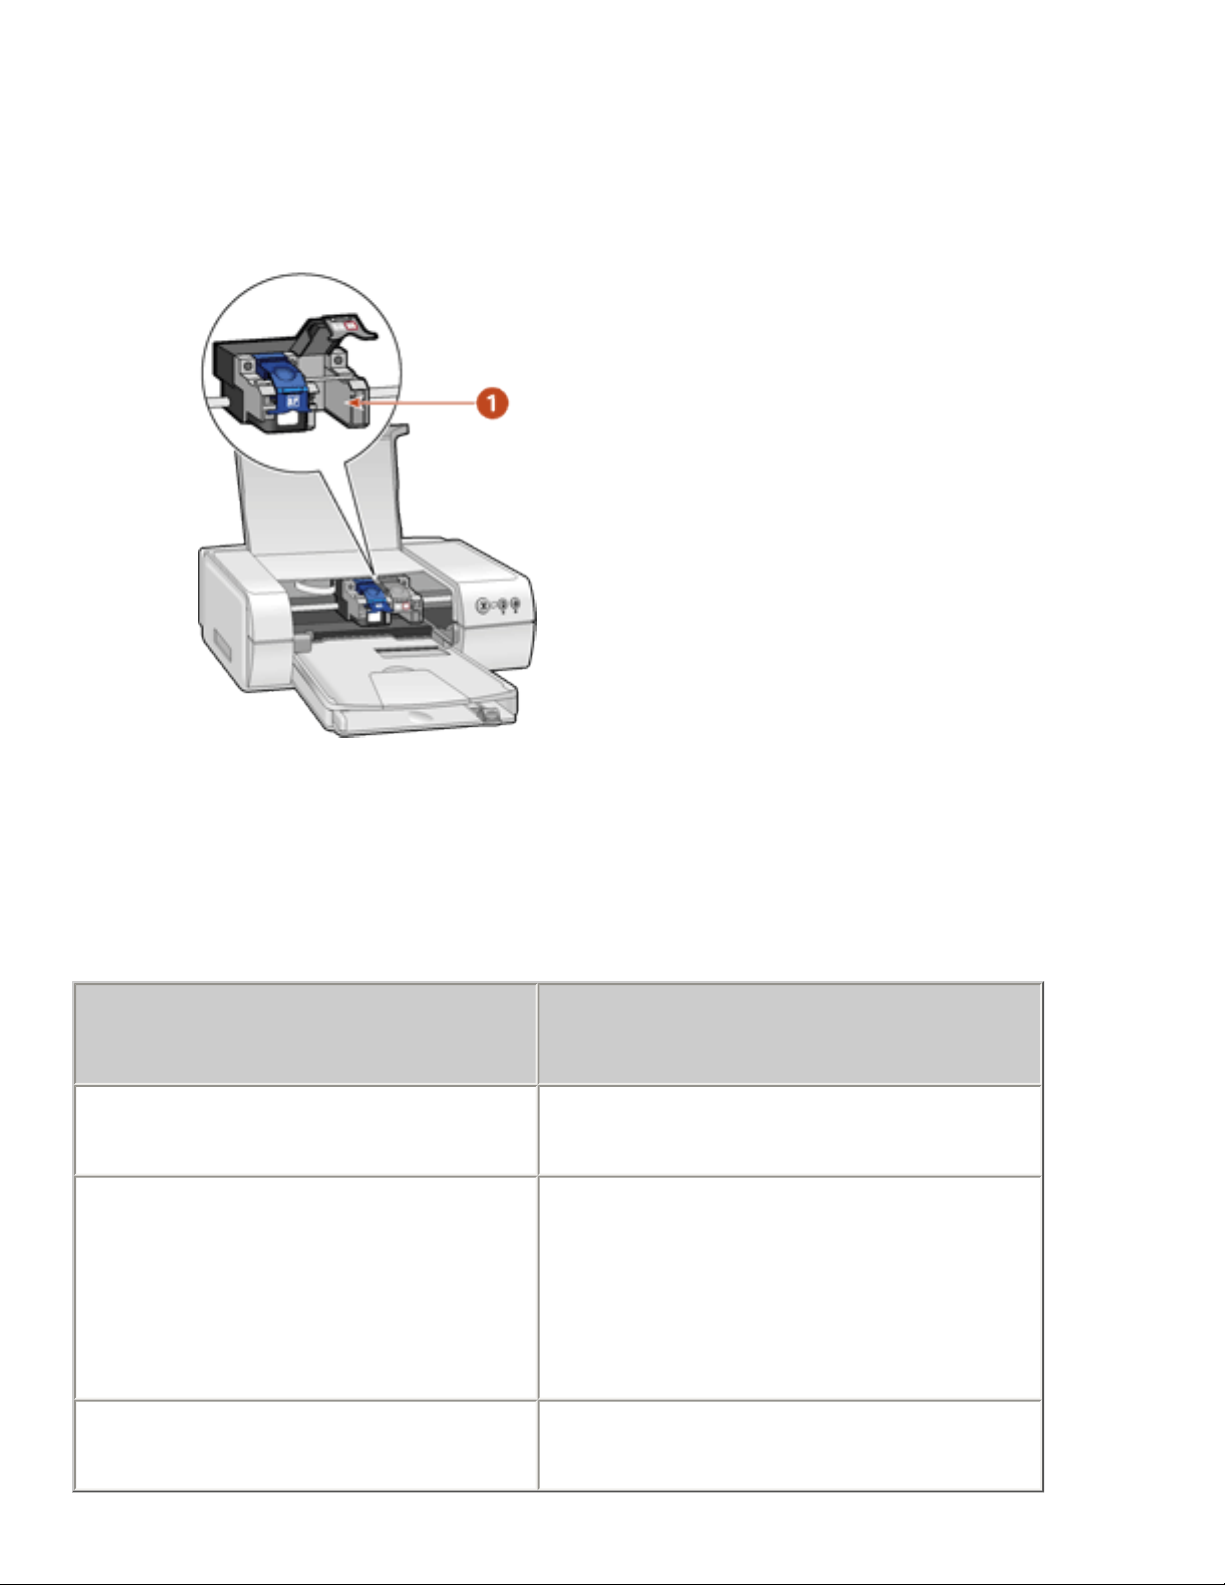
Reserve mode allows the printer to operate using only one print cartridge. It is initiated
when a print cartridge is removed from the cradle.
1. remove print cartridge to initiate reserve mode
reserve mode output
Printing in reserve mode slows the printer and affects the quality of printouts.
when only this print cartridge
is installed...
the result is...
black print cartridge Colors are printed as grayscale.
tri-color print cartridge
Colors print but black is grayed and is
not a true black.
Printing a black text or monochrome
document with a tri-color print
cartridge increases printing time.
photo print cartridge Colors are printed as grayscale.
Newport Hykuna Mac UG Final
file:///C|/Projects/Newport/Mac_UG_huykuna/ug_reservemode_fs.html (1 of 2) [5/9/2002 9:40:56 AM]
18
Page 19

reserve mode
exiting reserve mode
Install two print cartridges in the printer to exit the reserve mode.
For instructions on installing a print cartridge, see replacing print cartridges.
Newport Hykuna Mac UG Final
file:///C|/Projects/Newport/Mac_UG_huykuna/ug_reservemode_fs.html (2 of 2) [5/9/2002 9:40:56 AM]
19
Page 20
automatic two-sided printing module (duplexer)
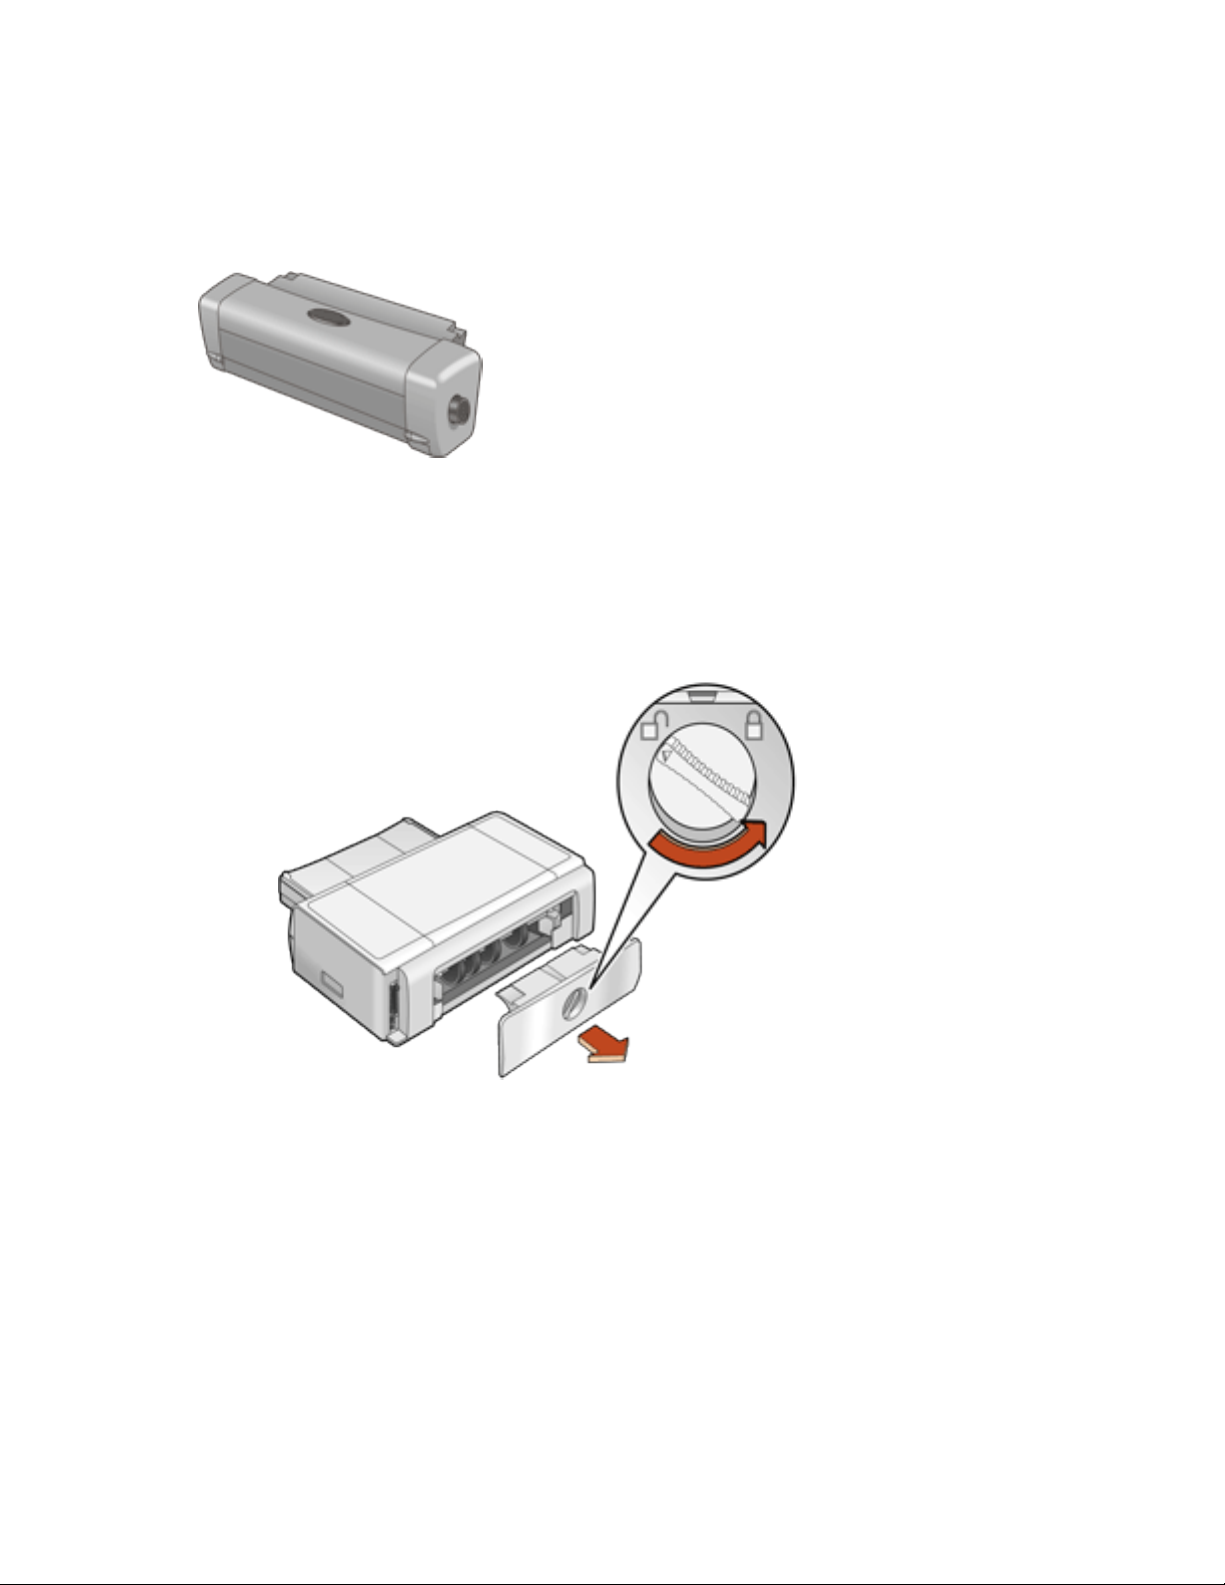
automatic two-sided printing module (duplexer)
The Automatic Two-Sided Printing Module (duplexer) is a special hardware feature that
enables the printer to automatically print on both sides of a page.
installing the duplexer
1. Turn the latch counterclockwise on the printer’s Rear Access Door and remove the
door.
Do not discard the Rear Access Door. In order to print, the Automatic Two-Sided
Printing Module or the Rear Access Door must be attached to the printer.
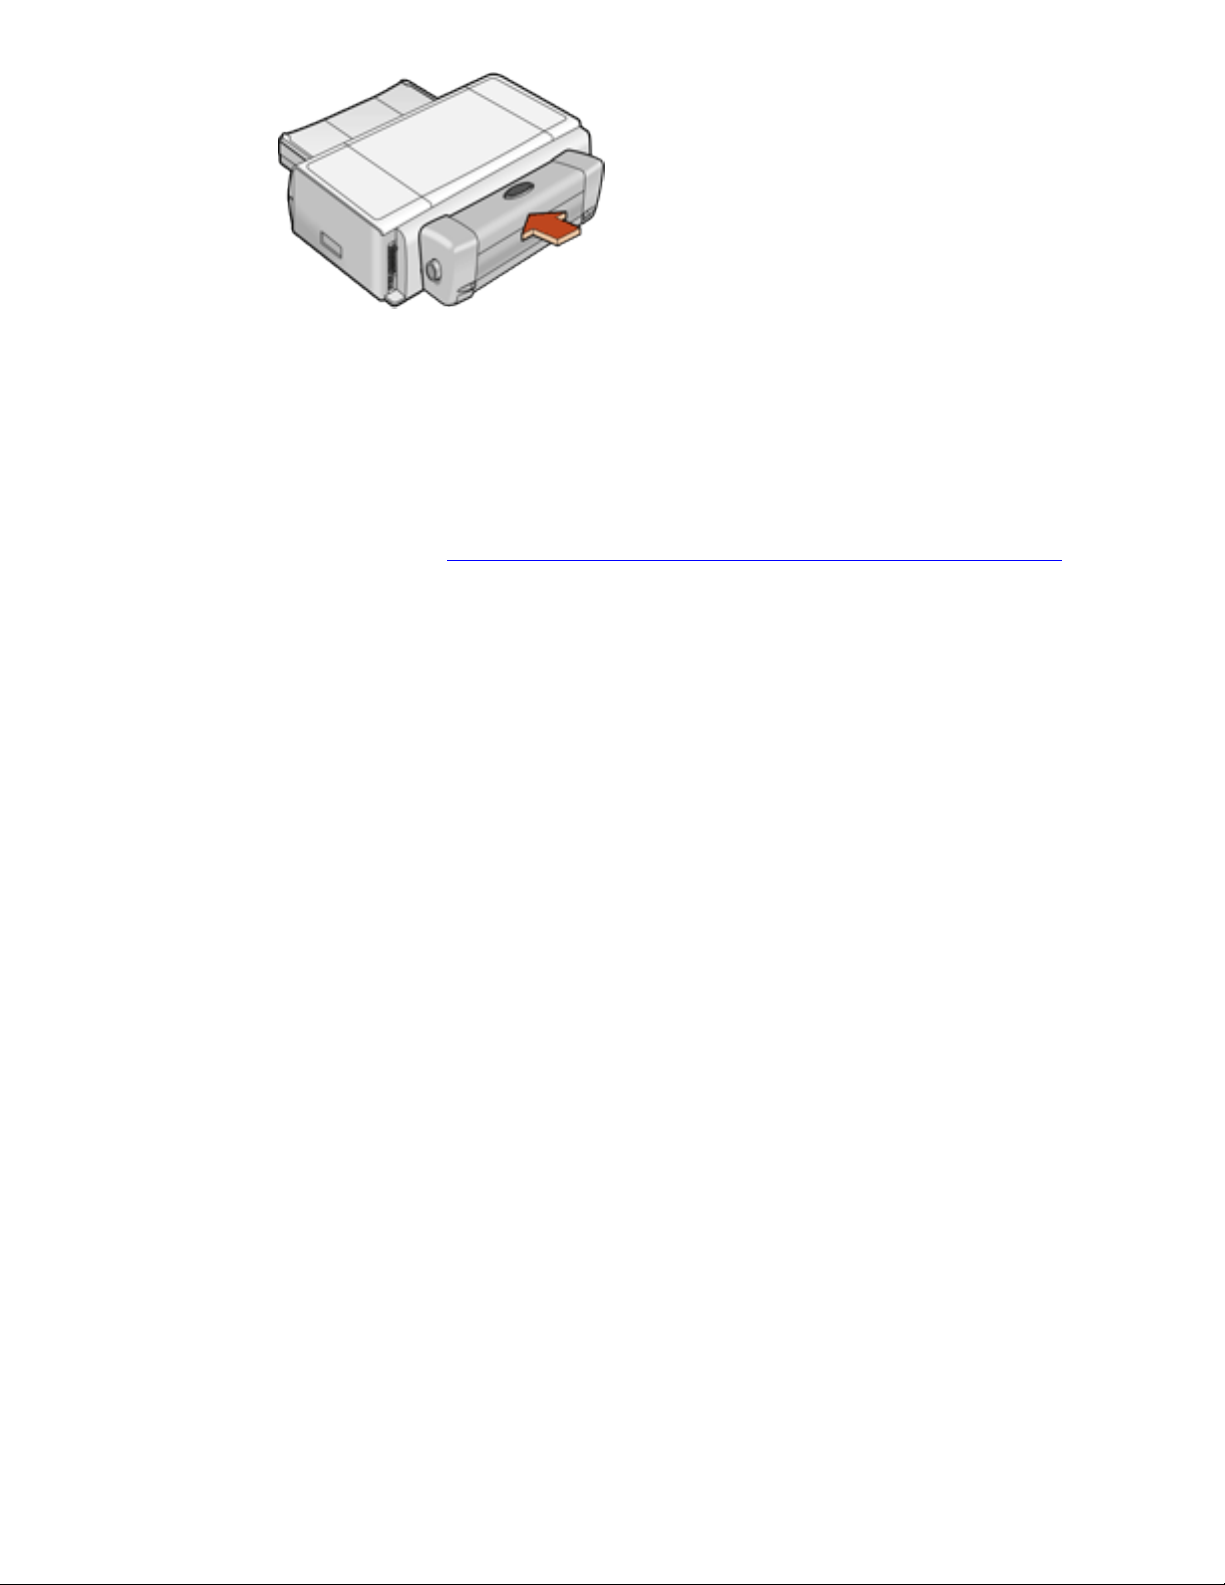
2. Insert the Automatic Two-Sided Printing Module in the back of the printer until
both sides snap into place.
Newport Hykuna Mac UG Final
file:///C|/Projects/Newport/Mac_UG_huykuna/ug_duplexer_fs.html (1 of 2) [5/9/2002 9:40:57 AM]
20
Page 21
automatic two-sided printing module (duplexer)
Do not press the buttons on either side of the Automatic Two-Sided Printing
Module when installing it in the printer. Use these buttons only when removing
the Automatic Two-Sided Printing Module from the printer.
supported paper types
The Automatic Two-Sided Printing Module only works with certain media types. For a list
of supported media types, see automatic two-sided printing module specifications.
Newport Hykuna Mac UG Final
file:///C|/Projects/Newport/Mac_UG_huykuna/ug_duplexer_fs.html (2 of 2) [5/9/2002 9:40:57 AM]
21
Page 22

connectivity
connectivity
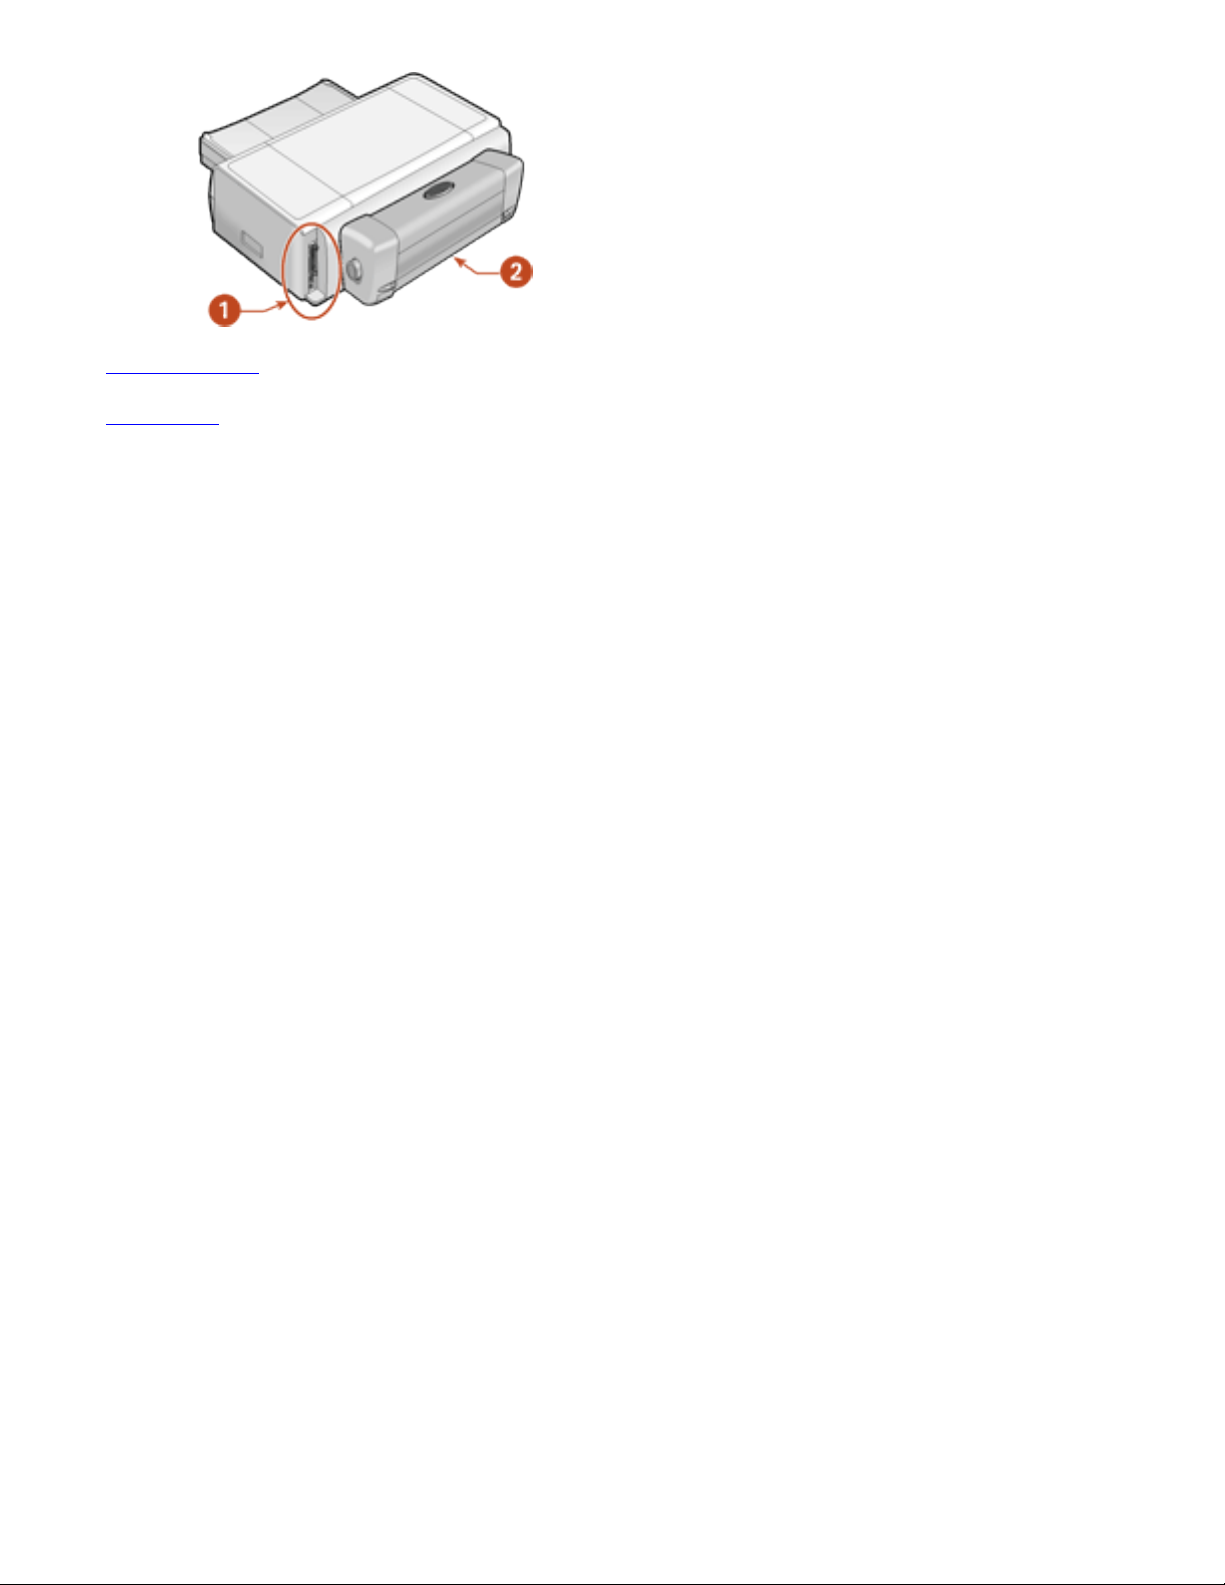
The printer offers two options for connectivity:
● USB
● network
USB
The printer can connect to the computer with a USB cable.
For instructions on connecting the printer with a USB cable, see the Setup poster that
came with the printer.
network
The printer can be connected to a network with an HP JetDirect External Print Server
that supports an AppleTalk connection.
Newport Hykuna Mac UG Final
file:///C|/Projects/Newport/Mac_UG_huykuna/ug_connectivity_fs.html [5/9/2002 9:40:57 AM]
22
Page 23

printing
printing
Click the following topic below to view an explanation of the printer software:
● using printer software with Mac OS 8.6, 9.x, and X Classic
● using printer software with Mac OS X
Click the appropriate topic below to view instructions on printing functions:
● printing a document
● printing digital photographs
● auto-on and auto-off feature
● two-sided printing
● using the automatic paper-type sensor
● borderless printing
Click the appropriate topic below to view instructions for printing on different paper
types:
● plain paper
● envelopes
● transparencies
● labels
● index cards and other small media
● Hagaki cards
● photographs
● greeting cards
● posters
● banners
● iron-on transfers
Newport Hykuna Mac UG Final
file:///C|/Projects/Newport/Mac_UG_huykuna/ug_printing_intro_fs.html [5/9/2002 9:40:58 AM]
23
Page 24

using printer software with Mac OS 8.6, 9.x, and X Classic
using printer software with Mac OS 8.6, 9.x, and X Classic
The printer is controlled by software installed on your computer. Use the printer software to perform the
following tasks:
● choosing the printer
● printing from the computer's desktop
● checking the printer status
● using the page setup dialog box
● using the print dialog box
● viewing and changing the status of a print job
Mac OS X Classic is a Mac OS X feature that allows applications built for Mac OS 9.x to run on a
Mac OS X computer. Mac OS X Classic applications have a Mac OS 9.x interface.
choosing the printer
Setting the printer as your computer's default printer will automatically route all print jobs to that printer.
You can select another printer for a particular document; however, switching printers may affect a
document's formatting and pagination. If you select a printer, always check the document for changes in
formatting and pagination before printing.
setting up the printer
Follow these steps to setup the printer:
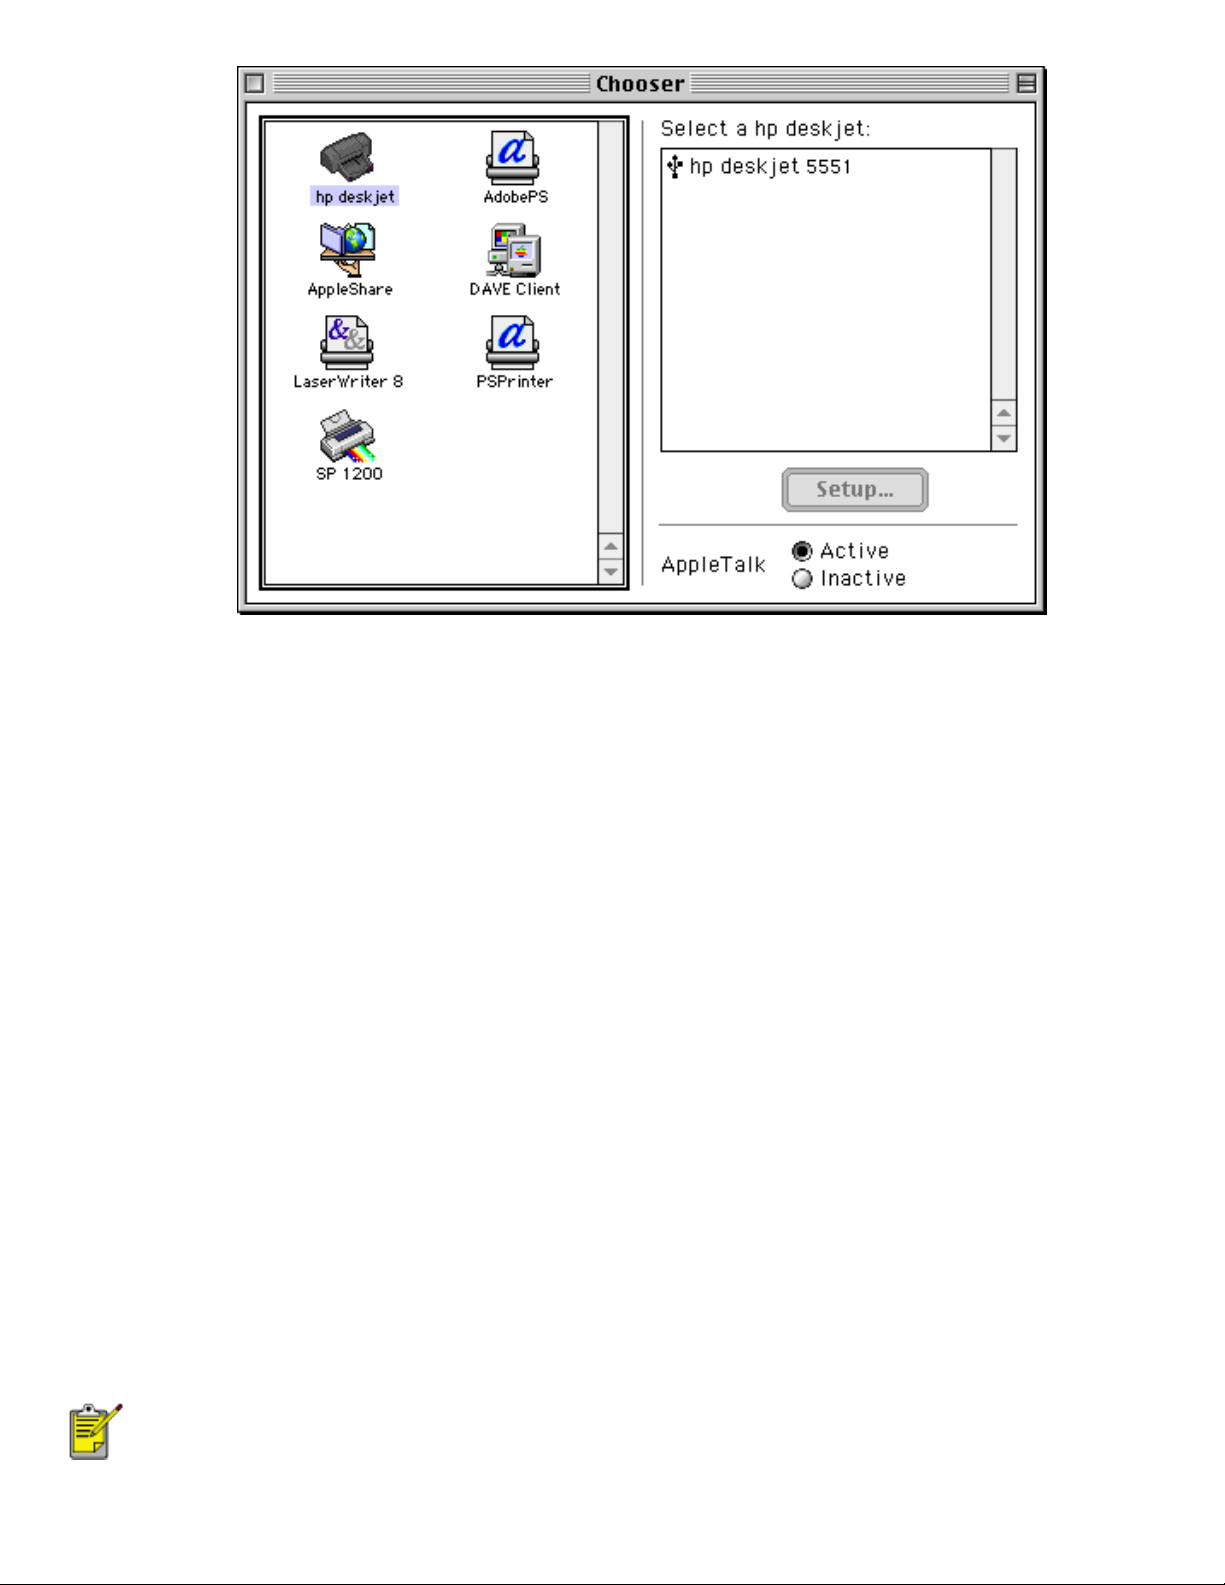
1. Select Chooser from the Apple menu.
2. Click the hp printer icon in the left side of the Chooser dialog box.
Newport Hykuna Mac UG Final
file:///C|/Projects/Newport/Mac_UG_huykuna/ug_printer_driver_legacy.html (1 of 11) [5/9/2002 9:41:00 AM]
24
Page 25
using printer software with Mac OS 8.6, 9.x, and X Classic
3. Click hp deskjet printer in the right side of the Chooser dialog box.
4. Do one of the following, depending on how the computer and the printer are connected:
❍ USB: Go to step 5.
❍ AppleTalk: Click the Setup button, then select the correct printer type.
5. Close the Chooser.
selecting a default printer
After setting up the printer with the Chooser, use one of the following methods to select it as the default
printer:
● Click the menu bar printer icon at the top of the screen, then select the printer name.
● Click the control strip printer icon, then select the printer name.
● Click the desktop printer icon, then choose Set Default Printer from the Printing menu.
printing from the computer's desktop
Desktop printing is useful when you want to print a number of documents at once or print a document
that is formatted for a particular printer.
Use one of the following methods to print from the desktop:
● Drag the icons of the documents you want to print to the printer icon on the desktop.
● Select the icons of the documents you want to print, then select File > Print. Select the options
you want from the Print dialog box, then click the OK button.
Desktop printing is not supported in Mac OS X Classic.
Newport Hykuna Mac UG Final
file:///C|/Projects/Newport/Mac_UG_huykuna/ug_printer_driver_legacy.html (2 of 11) [5/9/2002 9:41:00 AM]
25
Page 26
using printer software with Mac OS 8.6, 9.x, and X Classic
checking the printer status
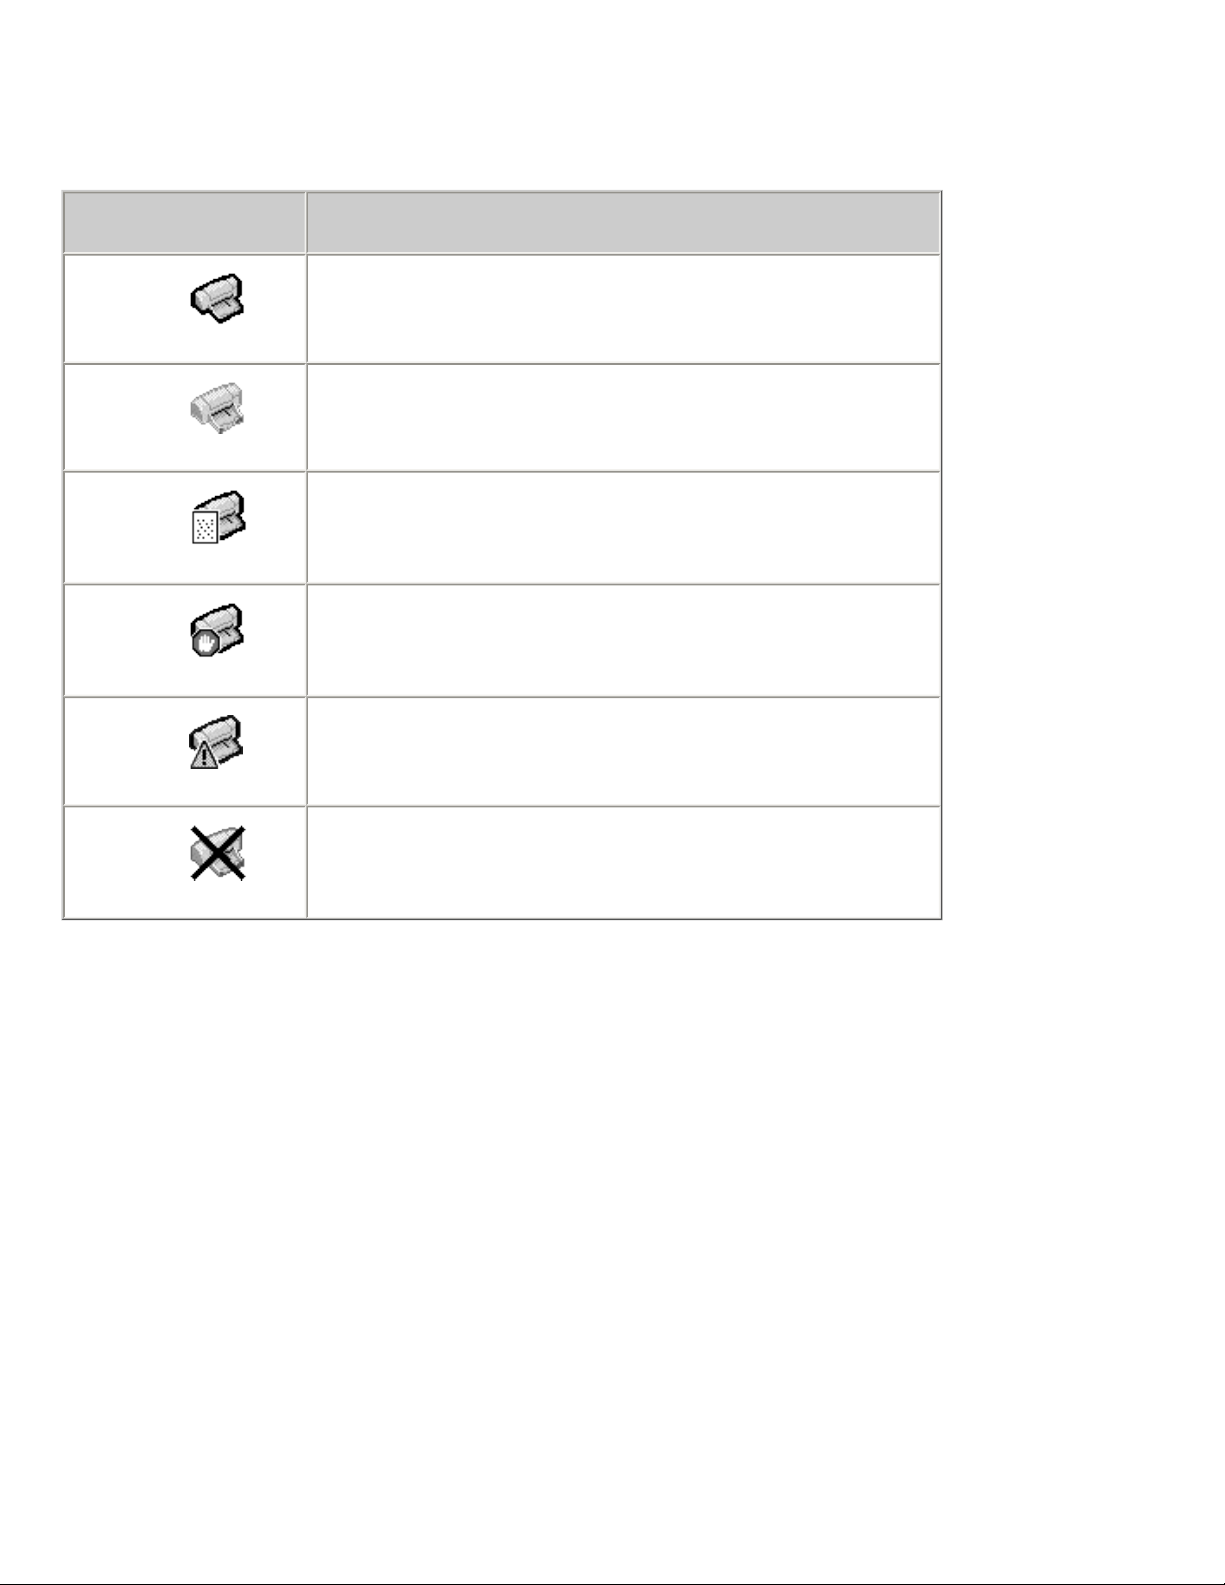
The printer desktop icon shows you the status of the printer.
icon meaning
Printer is idle and set as the default printer.
Printer is idle and not set as the default printer.
Printing on the default printer.
Printing stopped on the default printer.
Error on the default printer.
The printer driver is not available.
using the page setup dialog box
Use the Page Setup dialog box to modify a document's layout.
displaying the page setup dialog box
To display the Page Setup dialog box, open the software program used to create the document, then
select File > Page Setup.
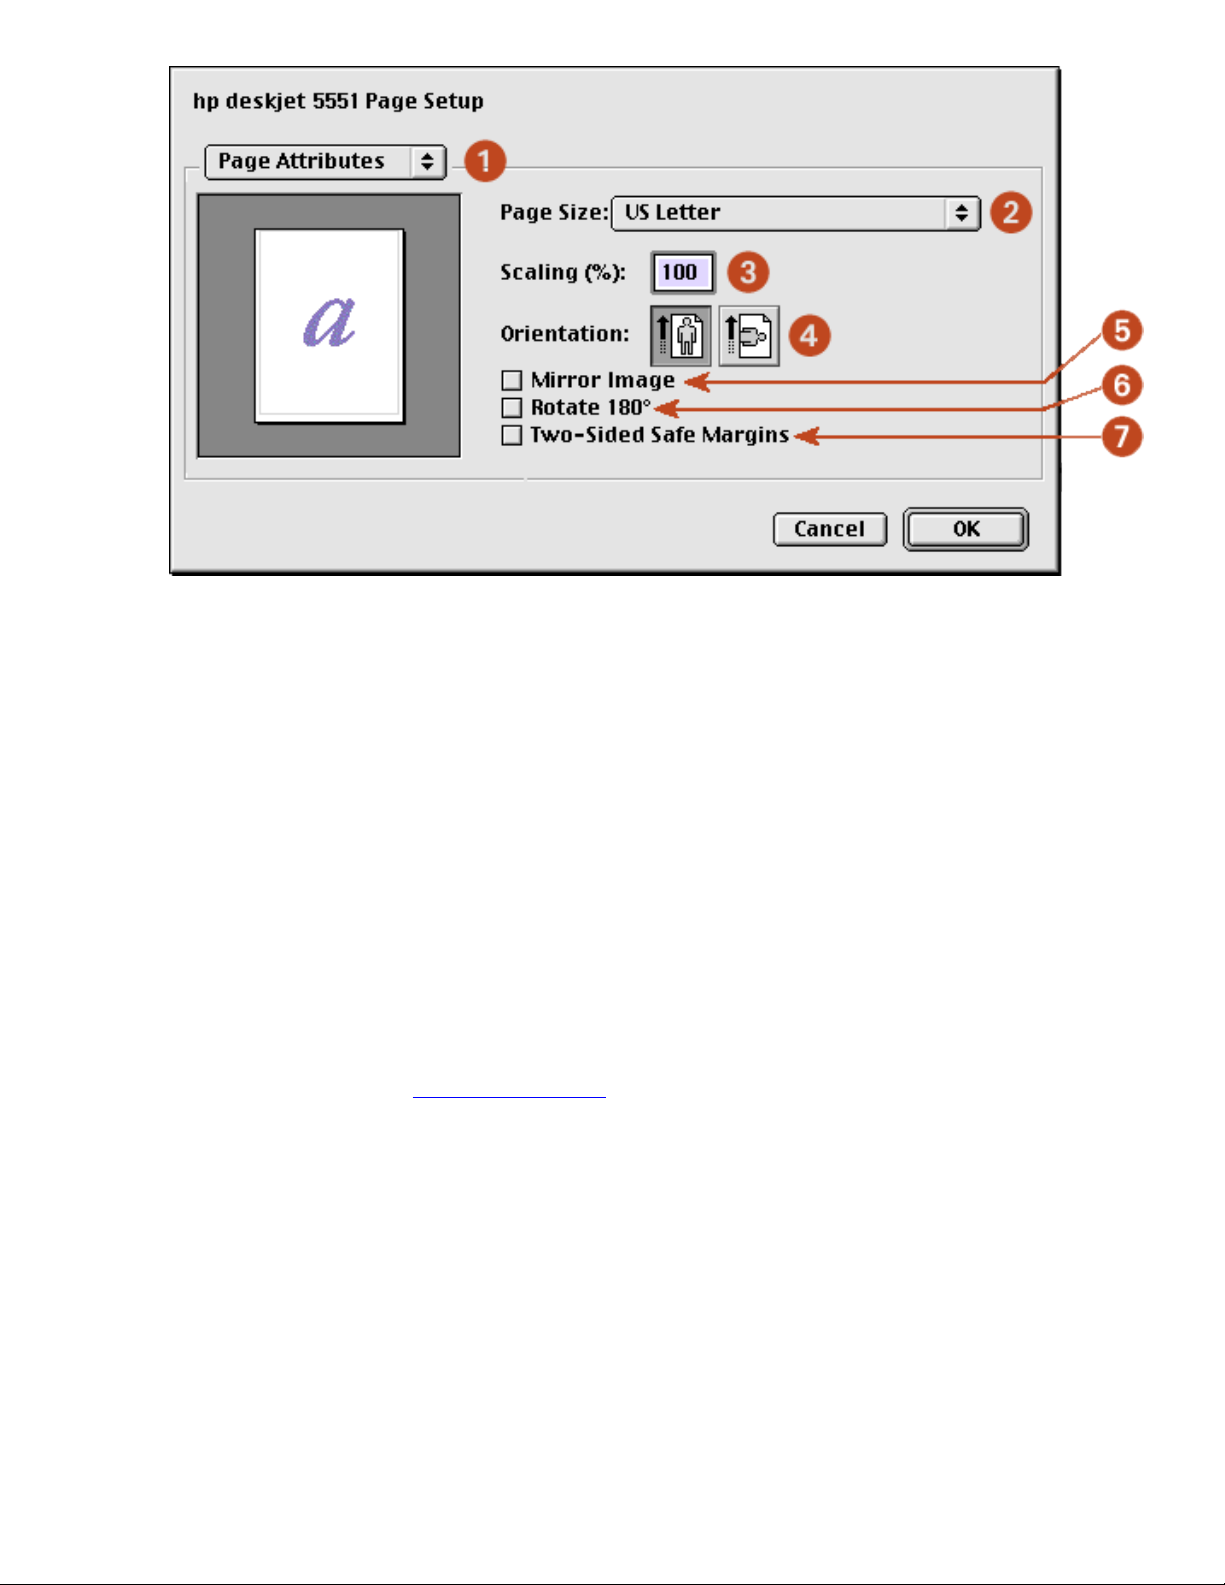
description
The following options are available on the Page Setup dialog box:
Newport Hykuna Mac UG Final
file:///C|/Projects/Newport/Mac_UG_huykuna/ug_printer_driver_legacy.html (3 of 11) [5/9/2002 9:41:00 AM]
26
Page 27
using printer software with Mac OS 8.6, 9.x, and X Classic
1. Menu: Choose one of the following:
❍ Page Attributes: To set print options for the document.
❍ Application Attributes: To set print options specific to the application being used.
2. Page Size: Select the paper size.
3. Scaling (%): Reduce or enlarge a document image:
❍ Enter a number from 25-99 to reduce a document image.
❍ Enter a number from 101 to 400 to enlarge a document image.
4. Orientation: Click the appropriate icon for the page orientation.
5. Mirror Image: Click to print a mirror image.
6. Rotate 180º: Click to rotate the page image 180 degrees top to bottom (turns the original upside
down).
7. Two-Sided Safe Margins: Click to adjust page margins for two-sided printing
8. Borderless Printing: See
borderless printing.
using the print dialog box
Use the Print dialog box to modify print settings for the document you are printing. The options displayed
depend on the panel selected.
displaying the print dialog box
To display the Print dialog box, open the document you want to print, then select File > Print.
menu and buttons
Use the menu and buttons for these functions:
Newport Hykuna Mac UG Final
file:///C|/Projects/Newport/Mac_UG_huykuna/ug_printer_driver_legacy.html (4 of 11) [5/9/2002 9:41:00 AM]
27
Page 28

using printer software with Mac OS 8.6, 9.x, and X Classic
1. Panel Menu: Click the menu to select different panels: General, Paper Type/Quality, Layout,
Color, Digital Photography, Background Printing, or an application-specific panel.
2. Settings Menu: Click to select one of the following:
❍ Select a pre-defined or Default set of print settings.
❍ Create or edit a set of print settings.
3. Preview: Click to see a preview of the printed document.
4. Cancel: Click to close the Print dialog box without printing.
5. OK: Click to print the document.
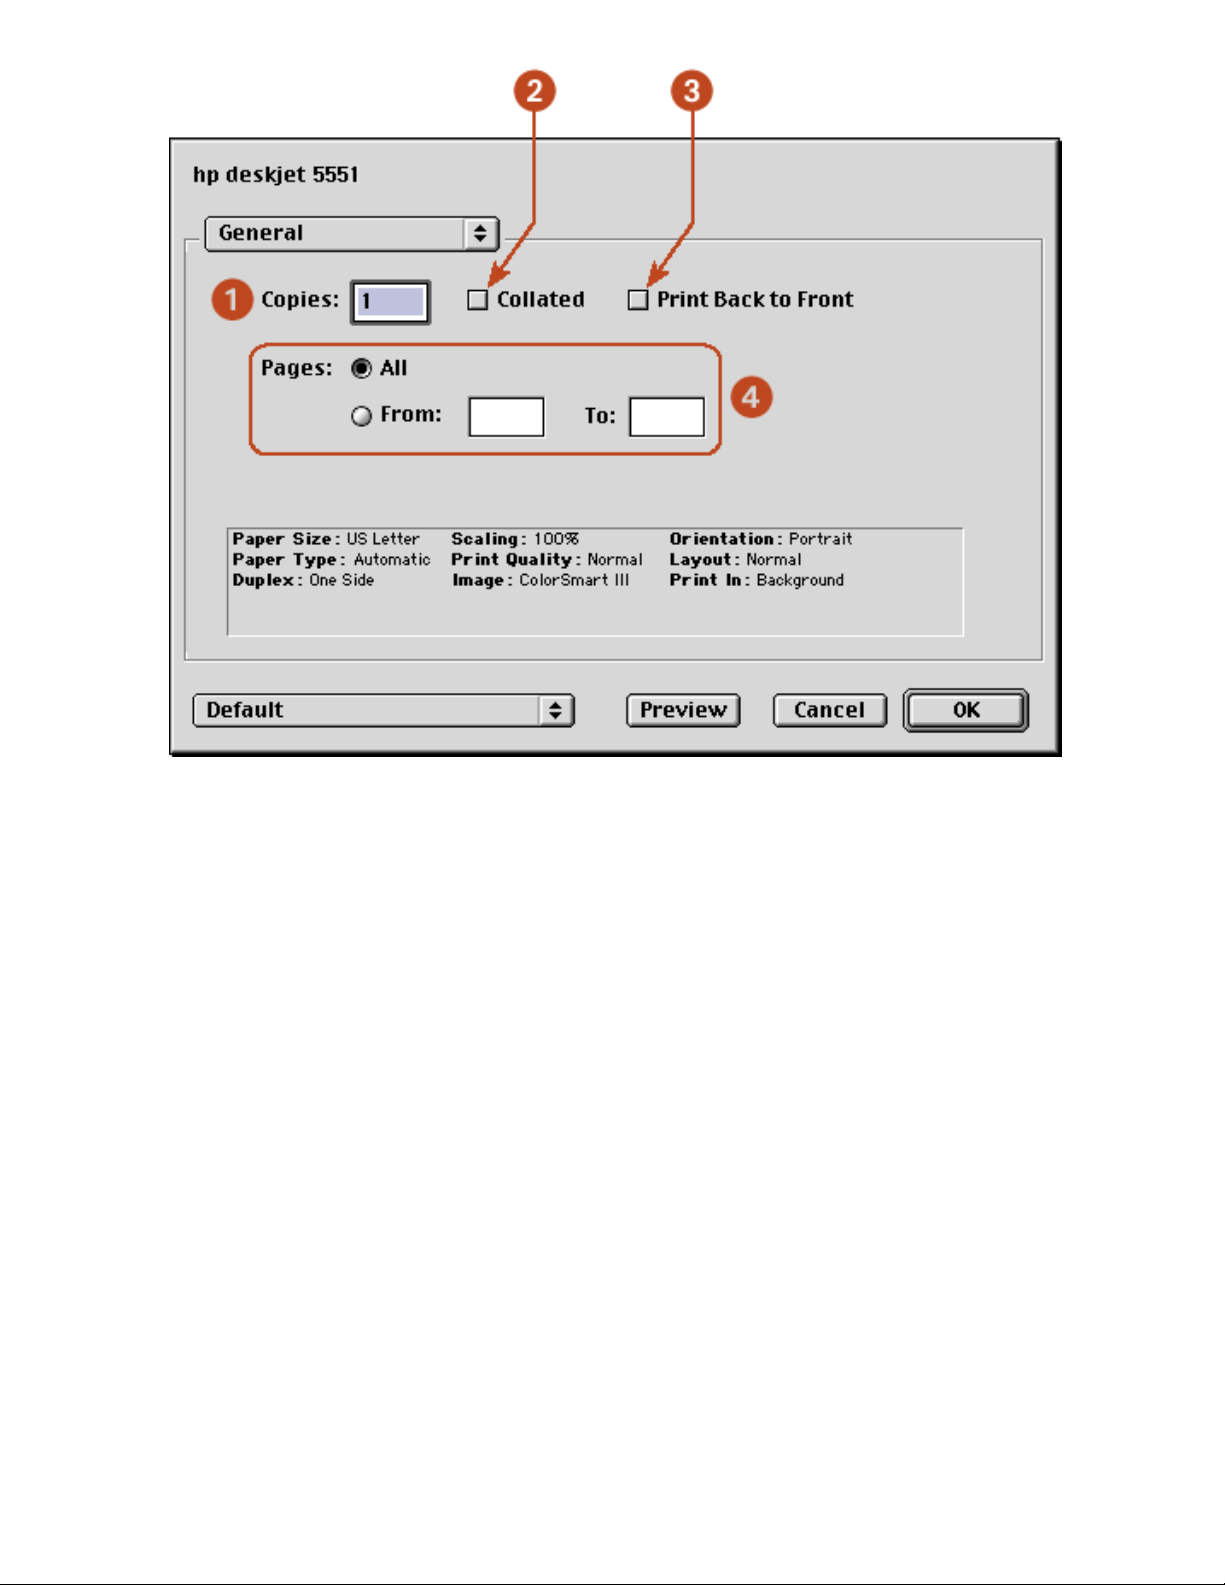
general
Use the General panel for these functions:
Newport Hykuna Mac UG Final
file:///C|/Projects/Newport/Mac_UG_huykuna/ug_printer_driver_legacy.html (5 of 11) [5/9/2002 9:41:00 AM]
28
Page 29
using printer software with Mac OS 8.6, 9.x, and X Classic
1. Copies: Enter the number of copies to be printed.
2. Collate: Select to collate if printing multiple copies.
3. Print Back to Front: Select to print the last sheet first.
4. Pages: Choose one of the following:
❍ Click All to print the entire document.
❍ To print a range of pages, click From then enter the first page to print in the From: box
and the last page to print in the To: box.
paper type/quality
Use the Paper Type/Quality panel for these functions:
Newport Hykuna Mac UG Final
file:///C|/Projects/Newport/Mac_UG_huykuna/ug_printer_driver_legacy.html (6 of 11) [5/9/2002 9:41:00 AM]
29
Page 30

using printer software with Mac OS 8.6, 9.x, and X Classic
1. Paper Group: Select the category of paper used, such as plain paper, or select automatic to
engage the Automatic Paper-Type Sensor.
2. Paper Type: Select the specific type of paper used. The available options vary according to the
Paper Group selected.
3. Quality: Quality of printout. There are five options to choose from: Best, Normal, Everyday,
FastDraft and High Resolution Photo. Best provides the best print quality at the slowest printing
speed. The print speed increases and the print quality lessens with Normal, Everyday, and
FastDraft. FastDraft provides draft quality at the fastest printing speed. High Resolution photo is
available for some photo papers.
4. Ink: Click to set the ink dry time and density.
layout
Select the Layout panel for page layout options:
Newport Hykuna Mac UG Final
file:///C|/Projects/Newport/Mac_UG_huykuna/ug_printer_driver_legacy.html (7 of 11) [5/9/2002 9:41:00 AM]
30
Page 31

using printer software with Mac OS 8.6, 9.x, and X Classic
1. Layout Menu: Choose one of the following combinations:
❍ Multiple Pages Per Sheet/Pages Per Sheet: Select these options for most printing
jobs. You can choose the number of pages to appear on each sheet of paper: 1
(Normal), 2, 4, 6, 9, or 12 up.
❍ Booklet: Select Booklet to print a booklet, then select the size of paper to use. You can
print the booklet from left to right or right to left.
❍ ZoomSmart/Print On: Select ZoomSmart to scale from one paper size to another . for
example, to shrink a legal-size document to print on letter/A4 paper.
❍ Tiling: Select to print one image on several sheets of paper. Use the the Tiling Size
option to select how many pages to print the image on.
2. Print Border: If more than one page is being printed on a sheet of paper, select Print Border to
print a border around each page on the sheet.
3. Print Both Sides: Select for two-sided printing.
4. Binding: Click the icon for Book (binding at the side), or Tablet (binding at the top) when using
two-sided printing.
5. Manual/Automatic: Select Manual for manual two-sided printing. You can select Automatic
only if you have installed the optional HP Two-Sided Printing Accessory (duplexer).
digital photography
For a description of the Digital Photography panel, see
printing digital photographs.
color
Use the Color panel for these functions:
Newport Hykuna Mac UG Final
file:///C|/Projects/Newport/Mac_UG_huykuna/ug_printer_driver_legacy.html (8 of 11) [5/9/2002 9:41:00 AM]
31
Page 32

using printer software with Mac OS 8.6, 9.x, and X Classic
1. Image: Choose one of the following:
❍ ColorSmart III: Prints optimum color quality.
❍ ColorSync: Prints using the ColorSync matching system.
❍ Grayscale: Prints in shades of gray.
❍ Black & White: Prints in black and white without shades of gray.
2. Saturation: Slide to adjust the color saturation.
3. Brightness: Slide to make the image lighter or darker.
4. Color Tone: Slide to adjust coolness and warmth.
background printing
Use the Background Printing panel for these functions:
Newport Hykuna Mac UG Final
file:///C|/Projects/Newport/Mac_UG_huykuna/ug_printer_driver_legacy.html (9 of 11) [5/9/2002 9:41:00 AM]
32
Page 33

using printer software with Mac OS 8.6, 9.x, and X Classic
1. Print In: Choose one of the following:
❍ Foreground: Faster printing.
❍ Background: Allows you to use the computer while the document prints.
2. Print Time: Choose one of the following:
❍ Urgent: Begin printing as soon as possible.
❍ Normal: Print job will be sent to queue and printed in order.
❍ Print at: Specify a date and time to print the document.
❍ Put document on hold: Hold the document in the desktop printer to print at a later
time.
viewing and changing the status of a print job
When printing a document with background printing, use the Print Status dialog box to see the status of
the document as it is printing.
displaying the print status dialog box
Double-click the hp printer icon on the desktop to display the Print Status dialog box.
using the print status dialog box
The following options are available on the Print Status dialog box:
Newport Hykuna Mac UG Final
file:///C|/Projects/Newport/Mac_UG_huykuna/ug_printer_driver_legacy.html (10 of 11) [5/9/2002 9:41:00 AM]
33
Page 34

using printer software with Mac OS 8.6, 9.x, and X Classic
1. Control Buttons: Select a print job in the print queue, then click one of the following buttons to
control printing:
Pause a print job.
Restart printing.
Set the print time.
Delete a print job.
2. Column Titles: Click a column title to sort print jobs.
3. Print Queue: Select a print job, then drag it to a new position in the print queue.
Newport Hykuna Mac UG Final
file:///C|/Projects/Newport/Mac_UG_huykuna/ug_printer_driver_legacy.html (11 of 11) [5/9/2002 9:41:00 AM]
34
Page 35

mac os x
using printer software with Mac OS X
The printer is controlled by software installed on the computer. For instructions on using the printer
software, select one of the following topics:
● using the page setup dialog box
● using the print dialog box
● using the print center
Mac OS X Classic is a Mac OS X feature that allows applications built for Mac OS 9.x to run on a Mac
OS X computer. Mac OS X Classic applications have a Mac OS 9.x interface. For more information,
see
using printer software with Mac OS 8.6, 9.x, and X Classic.
using the page setup dialog box
Use the Page Setup dialog box to modify a document's layout.
displaying the page setup screen
To display the Page Setup screen, open the software program used to create the document, then select File
> Page Setup.
description
The following options are available on the Page Setup dialog box.
1. Settings: Choose one of the following:
❍ Page Attributes: To set print options for the document.
❍ Application Attributes: To set print options specific to the application being used.
Newport Hykuna Mac UG Final
file:///C|/Projects/Newport/Mac_UG_huykuna/ug_printer_driver_osx.html (1 of 9) [5/9/2002 9:41:01 AM]
35
Page 36

mac os x
❍ Summary: To view the print settings for the document.
❍ Borderless Printing: See borderless printing .
2. Format for: Select the printer name.
3. Paper Size: Select the paper size.
4. Orientation: Click the appropriate icon for the page orientation.
5. Scale: Reduce or enlarge a document image:
❍ Enter a number from 25-99 to reduce a document image.
❍ Enter a number from 101 to 500 to enlarge a document image.
using the print dialog box
Use the Print dialog box to modify print settings for the document you are printing. The options displayed
depend on the panel selected.
displaying the print dialog box
To display the Print dialog box, open the document you want to print, then select File > Print.
menu and buttons
Use the menu and buttons for these functions:
1. Printer: If necessary, select the printer.
2. Saved Settings: Select a group of saved print options.
3. Panel Menu: Click the menu to select different panels:
Copies and Pages, Layout, Output Options,
Paper Type/ Quality, Two Sided Printing, an application-specific panel, or a summary of print settings
Newport Hykuna Mac UG Final
file:///C|/Projects/Newport/Mac_UG_huykuna/ug_printer_driver_osx.html (2 of 9) [5/9/2002 9:41:01 AM]
36
Page 37

mac os x
for the document.
4. ?: Click to view Mac Help.
5. Preview: Click to see a preview of the printed document.
6. Cancel: Click to close the Print dialog box without printing.
7. Print: Click to print the document.
copies and pages
Use the Copies and Pages panel for these functions:
1. Copies: Enter the number of copies to be printed.
2. Collated: Select to collate if printing multiple copies.
3. Pages: Choose one of the following:
❍ Click All to print the entire document.
❍ To print a range of pages, click From then enter the first page to print in the From: box and
the last page to print in the To: box.
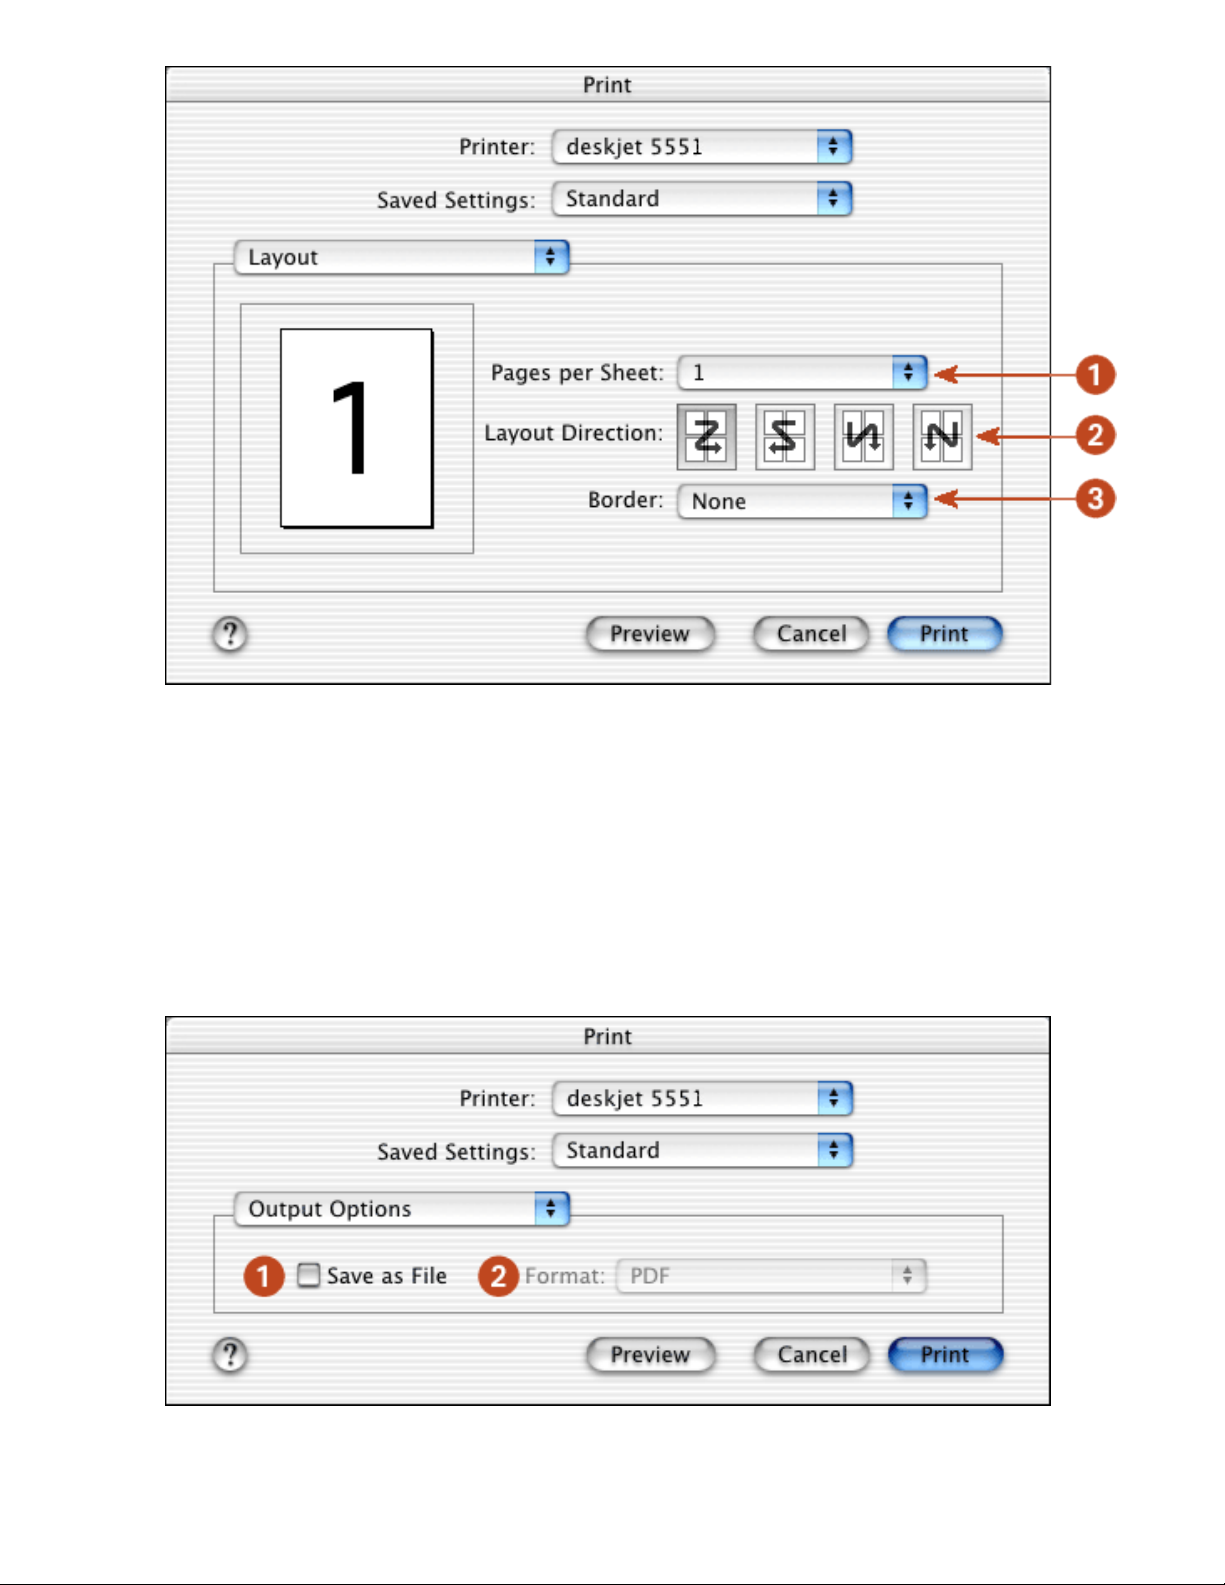
layout
Use the Layout panel for these functions:
Newport Hykuna Mac UG Final
file:///C|/Projects/Newport/Mac_UG_huykuna/ug_printer_driver_osx.html (3 of 9) [5/9/2002 9:41:01 AM]
37
Page 38
mac os x
1. Pages per Sheet: Select how many pages to print on each sheet of paper.
2. Layout Direction: Select the option for how multiple pages are arranged on a sheet of paper.
3. Border: Select the border to appear around each page.
output options
Use the Output Options panel for these functions:
1. Save as File: Select to print to file.
2. Format: Select either PDF or PS (PostScript).
Newport Hykuna Mac UG Final
file:///C|/Projects/Newport/Mac_UG_huykuna/ug_printer_driver_osx.html (4 of 9) [5/9/2002 9:41:01 AM]
38
Page 39

mac os x
paper type/quality
Use the Paper Type/Quality panel for these functions:
1. Paper : Click to select the following options:
❍ Paper Type: Select the paper type desired or select automatic to engage the Automatic
Paper-Type Sensor.
❍ Quality: Select one of the following print speed and quality options: Best, Normal,
Everyday, FastDraft and High Resolution Photo. Best provides the best print quality at
the slowest printing speed. The print speed increases and the print quality lessens with
Normal, Everyday, and FastDraft. FastDraft provides draft quality at the fastest printing
speed. High Resolution photo provides 4800 dpi printing (available with certain photo paper
types when Best mode is selected).
❍ Color: Select the color setting.
Newport Hykuna Mac UG Final
file:///C|/Projects/Newport/Mac_UG_huykuna/ug_printer_driver_osx.html (5 of 9) [5/9/2002 9:41:01 AM]
39
Page 40

mac os x
2. Color Options : Click to set saturation, brightness, and color tone.
3. Digital Photos: See
printing digital photographs .
4. Ink: Click to set ink dry time and density.
two sided printing
Use the Two Sided Printing panel for these functions:
1. Print Both Sides: Check this box to print a two-sided document.
2. Binding: Select the appropriate binding:
Book binding.
Tablet binding.
using the print center
Use the Print Center to:
● Manage available printers
● Select a default printer
● Add a printer
Newport Hykuna Mac UG Final
file:///C|/Projects/Newport/Mac_UG_huykuna/ug_printer_driver_osx.html (6 of 9) [5/9/2002 9:41:01 AM]
40
Page 41

mac os x
● Manage print jobs
displaying the print center
Follow these steps to display the Print Center:
1. Click Applications in the Finder window.
2. Select the Utilities folder.
3. Select the Print Center icon.
managing available printers
Use the Print Center to manage available printers:
1. Name Column: Click a printer name to select the printer.
2. Blue Bullet: Indicates default printer.
3. Delete: Select a printer, then click Delete to remove the printer from the computer.
4. Add Printer: See
adding a printer.
selecting a default printer
Follow these steps to set the printer as the computer's default printer:
1. Open the Print Center.
Newport Hykuna Mac UG Final
file:///C|/Projects/Newport/Mac_UG_huykuna/ug_printer_driver_osx.html (7 of 9) [5/9/2002 9:41:01 AM]
41
Page 42

mac os x
For instructions on opening the Print Center, see using the print center .
2. Click the printer name.
3. Do one of the following:
❍ Select Printers > Make Default
❍ Press Command + d
A blue bullet appears next to the printer name to indicate that it is the default printer.
adding a printer
Follow these steps to add a printer to your computer:
1. Open the Print Center.
For instructions on opening the Print Center, see
using the print center.
2. Click the Add Printer button.
The Add Printer List dialog box appears.
3. Select USB or AppleTalk from the menu.
4. Select the printer name from the printer list.
5. Click the Add button.
managing print jobs
Use the Print Center to manage print jobs.
1. Open the Print Center.
Newport Hykuna Mac UG Final
file:///C|/Projects/Newport/Mac_UG_huykuna/ug_printer_driver_osx.html (8 of 9) [5/9/2002 9:41:01 AM]
42
Page 43

mac os x
For instructions on opening the Print Center, see using the print center.
2. Select the printer.
The print queue appears.
3. Click a print job to select it.
4. Use the buttons to manage the print job as desired:
❍ Delete: Cancels the selected print job.
❍ Hold: Pauses the selected print job.
❍ Resume: Restarts a paused print job.
Newport Hykuna Mac UG Final
file:///C|/Projects/Newport/Mac_UG_huykuna/ug_printer_driver_osx.html (9 of 9) [5/9/2002 9:41:01 AM]
43
Page 44

printing a document
printing a document
For printing instructions, select the appropriate option:
● My computer runs Mac OS 8.6 or 9.x
● I am using a Mac OS 9.x application on a Mac OS X
computer
Mac OS 8.6, 9.x, and X
Classic
I am using an application built for Mac OS X
Mac OS X
Mac OS 8.6, 9.x, and X Classic
The following instructions provide the most common method of selecting page layout
and print options. The software program you are using may vary from the method
described.
controlling page layout
1. Open the file you want to print.
2. Click File > Page Setup to display the Page Attributes screen to select paper
size, scaling, borderless printing, orientation, mirror image, rotate 180º, and TwoSided Printing.
3. Click OK to save the page layout options.
selecting print options
1. Open the file you want to print.
2. Click File > Print to display the Print dialog box.
3. Use the General panel to select the number of copies to print, which pages are to
be printed, and the print order on this screen.
4. Select Paper Type/Quality to choose print quality options, paper group, paper
type, ink density, and drying time.
5. Select Layout to choose multiple pages per sheet and two-sided printing.
6. Select Digital Photography to choose options for printing digital photographs.
7. Select Color to choose options for color, grayscale, black and white printing, and
image and text resolution.
8. Select Background Printing to choose foreground or background print options
and print time.
9. Click OK to print the document.
Newport Hykuna Mac UG Final
file:///C|/Projects/Newport/Mac_UG_huykuna/ug_printing_a_document_fs.html (1 of 2) [5/9/2002 9:41:02 AM]
44
Page 45

printing a document
For a description of the Macintosh printer software, see using printer software with Mac
OS 8.6, 9.x, and X Classic.
Mac OS X
The following instructions provide the most common method of selecting page layout
and print options. The software program you are using may vary from the method
described.
controlling page layout
1. Open the file you want to print.
2. Click File > Page Setup to display the Page Setup screen to select the printer,
paper size, scaling, borderless printing, and orientation.
3. Click OK to save the page layout options.
selecting print options
1. Open the file you want to print.
2. Click File > Print to display the Print dialog box.
3. Select the Copies and Pages panel to select the number of copies to print and
which pages are to be printed.
4. Select Layout to choose multiple pages per sheet, layout order, and borders.
5. Select Output Options to save the file as a PDF or PostScript file.
6. Select Paper Type/Quality to choose print quality options, paper type, print
mode, and digital photography options.
7. Select Two Sided Printing to print a two-sided document and choose the
binding options.
8. Select Summary to view the print settings for the document.
9. Click Print to print the document.
For a description of the Mac OS X printer software, see
using printer software with Mac
OS X.
Newport Hykuna Mac UG Final
file:///C|/Projects/Newport/Mac_UG_huykuna/ug_printing_a_document_fs.html (2 of 2) [5/9/2002 9:41:02 AM]
45
Page 46

two-sided printing
two-sided printing
For printing instructions, select the appropriate option:
● My computer runs Mac OS 8.6 or 9.x
● I am using a Mac OS 9.x application on a Mac OS X computer
Mac OS 8.6, 9.x, and X Classic
I am using an application built for Mac OS X
Mac OS X
Mac OS 8.6, 9.x, and X Classic
Use one of the following methods to print two-sided documents:
● automatic two-sided printing
● manual two-sided printing
automatic two-sided printing
To print two-sided documents automatically, the Automatic Two-Sided Printing Module (duplexer)
must be attached to the printer.
The duplexer only works with certain media types. For a list of supported media types, see
automatic
two-sided printing module specifications.
If you want to print a two-sided document on a media type not supported by the automatic two-sided
printing module, see
manual two-sided printing.
printing instructions
Follow these instructions to print a two-sided document:
1. Open the
Print dialog box, then select the Layout panel.
Newport Hykuna Mac UG Final
46
file:///C|/Projects/Newport/Mac_UG_huykuna/ug_twosided_printing_fs.html (1 of 5) [5/9/2002 9:41:03 AM]
Page 47

two-sided printing
2. Select Print Both Sides.
3. Select Automatic.
4. Select the appropriate binding:
Book binding.
Tablet binding.
5. Change any other desired print settings, then click OK.
When the first side prints, the printer pauses while the first side of the printed page dries. Once dry,
the second side of the page is printed and released.
For a description of the automatic two-sided printing module, see
automatic two-sided printing
module.
manual two-sided printing
Use the manual two-sided printing feature if:
● The Automatic Two-Sided Printing Module (duplexer) is not attached to the printer.
● You want to print a two-sided document on a media type the Automatic Two-Sided Printing
Module does not support.
rear access door
If the Automatic Two-Sided Printing Module is not attached to the printer, then attach the Rear Access
Newport Hykuna Mac UG Final
file:///C|/Projects/Newport/Mac_UG_huykuna/ug_twosided_printing_fs.html (2 of 5) [5/9/2002 9:41:03 AM]
47
Page 48

two-sided printing
Door. The printer cannot feed paper unless either the Rear Access Door or Duplexer is attached.
1. Push the Rear Access Door into place.
2. Turn the latch to the right to attach the Rear Access Door to the printer.
printing instructions
Follow these instructions to print a two-sided document manually:
1. Open the
Print dialog box, then select the Layout panel.
2. Select Print Both Sides.
Newport Hykuna Mac UG Final
file:///C|/Projects/Newport/Mac_UG_huykuna/ug_twosided_printing_fs.html (3 of 5) [5/9/2002 9:41:03 AM]
48
Page 49

two-sided printing
3. Select Manual.
4. Select the appropriate binding:
Book binding.
Tablet binding.
5. Change any other desired print settings, then click OK .
6. The printer automatically prints odd-numbered pages first. Once the odd-numbered pages are
printed, a message appears prompting you to reload the paper so that the even-numbered
pages can be printed.
Book binding
Tablet binding
7. Reload the paper, then click Continue.
Mac OS X
To print a two-sided document on a Mac OS X computer, the duplexer must be attached to the
printer. If the duplexer is not attached to the printer, you cannot print a two-sided document
automatically.
1. Open the
Page Setup dialog box.
2. Click the Paper Size menu, then select a two-sided paper size.
Newport Hykuna Mac UG Final
file:///C|/Projects/Newport/Mac_UG_huykuna/ug_twosided_printing_fs.html (4 of 5) [5/9/2002 9:41:03 AM]
49
Page 50

two-sided printing
3. Click OK.
4. Open the
Print dialog box, then select the Two-Sided Printing panel.
5. Select Print Both Sides.
6. Select the appropriate binding.
Book binding.
Tablet binding.
7. Change any other desired print settings, then click Print.
Manual two-sided printing is not available in Mac OS X.
Newport Hykuna Mac UG Final
file:///C|/Projects/Newport/Mac_UG_huykuna/ug_twosided_printing_fs.html (5 of 5) [5/9/2002 9:41:03 AM]
50
Page 51

printingdigitalphotographs
printing digital photographs
The hp deskjet printer has several features to improve the print quality of your digital photographs.
For printing instructions, select the appropriate option:
● My computer runs Mac OS 8.6 or 9.x
● I am using a Mac OS 9.x application on a Mac OS X computer
Mac OS 8.6, 9.x, and X Classic
I am using an application built for Mac OS X
Mac OS X
Mac OS 8.6, 9.x, and X Classic
accessing the digital photography options
1. Open the
Print dialog box.
2. Select the Digital Photography panel.
using the digital photography options dialog box
Use the Digital Photography panel to set these options:
1. Contrast Enhancement: Adjust contrast to preference. Click Automatic to allow the printer driver
to automatically balance contrast.
2. Digital Flash: Lighten dark images. Click Automatic to allow the printer driver to automatically
balance lightness and darkness.
3. Sharpness: Adjust image sharpness to preference. Click Automatic to allow the printer driver to
Newport Hykuna Mac UG Final
file:///C|/Projects/Newport/Mac_UG_huykuna/ug_printing_digital_photographs_fs.html (1 of 3) [5/9/2002 9:41:04 AM]
51
Page 52

printingdigitalphotographs
automatically balance sharpness.
4. Smoothing: Adjust distortion to preference. Click Automatic to allow the printer driver to
automatically balance smoothing.
5. SmartFocus: Click On to allow the printer driver to automatically focus images.
Mac OS X
accessing the digital photo options
1. Open the
Print dialog box.
2. Select the Paper Type/Quality panel.
3. Click the Digital Photo tab.
using the digital photo options
1. Use the Digital Photo tab to set these options:
❍ Contrast Enhancement: Adjust contrast to preference. Click Auto to allow the printer driver
to automatically balance contrast.
Newport Hykuna Mac UG Final
file:///C|/Projects/Newport/Mac_UG_huykuna/ug_printing_digital_photographs_fs.html (2 of 3) [5/9/2002 9:41:04 AM]
52
Page 53

printingdigitalphotographs
❍ Digital Flash: Lighten dark images. Click Auto to allow the printer driver to automatically
balance lightness and darkness.
❍ Sharpness: Adjust image sharpness to preference. Click Auto to allow the printer driver to
automatically balance sharpness.
❍ Smoothing: Adjust distortion to preference. Click Auto to allow the printer driver to
automatically balance smoothing.
❍ SmartFocus: Click On to allow the printer driver to automatically focus images.
Newport Hykuna Mac UG Final
file:///C|/Projects/Newport/Mac_UG_huykuna/ug_printing_digital_photographs_fs.html (3 of 3) [5/9/2002 9:41:04 AM]
53
Page 54

auto-on and auto-off feature
auto-on and auto-off feature
enabling auto-on
Auto-On is a default feature of the printer. The printer automatically turns on when you
print a file.
enabling auto-off
Enable the auto-off feature to place the printer in a low-power, energy-efficient mode
after it has been idle for 30 minutes.
To enable the auto-off feature, open the hp inkjet utility, select the Configuration
panel, then follow the onscreen instructions.
For instructions on using the hp inkjet utility, see
using the hp inkjet utility.
Newport Hykuna Mac UG Final
file:///C|/Projects/Newport/Mac_UG_huykuna/ug_auto_off_fs.html [5/9/2002 9:41:04 AM]
54
Page 55

using the automatic paper-type sensor
using the automatic paper-type sensor
For a description of the Automatic Paper-Type Sensor feature, see Automatic Paper-Type
Sensor.
turning off the automatic paper-type sensor
1. Open the Print dialog box.
2. Select the Paper Type/Quality panel.
3. Do one of the following:
❍ Mac OS 8.6, 9.x, or X Classic: Select a paper group other than
Automatic
❍ Mac OS X: Select a paper type other than Automatic
4. Do one of the following:
❍ Mac OS 8.6, 9.x, or X Classic: Click OK
❍ Mac OS X: Click Print
For a description of available print options, click the appropriate operating
system:
Mac OS 8.6, 9.x, or X Classic or Mac OS X.
turning on the automatic paper-type sensor
1. Open the Print dialog box.
2. Select the Paper Type/Quality panel.
3. Do one of the following:
❍ Mac OS 8.6, 9.x, or X Classic: Select Automatic in the Paper Group
box
❍ Mac OS X: Select Automatic in the Paper Type box
4. Do one of the following:
❍ Mac OS 8.6, 9.x, or X Classic: Click OK
❍ Mac OS X: Click Print
Newport Hykuna Mac UG Final
file:///C|/Projects/Newport/Mac_UG_huykuna/ug_using_the_automatic_paper-type_sensor_fs.html [5/9/2002 9:41:05 AM]
55
Page 56

borderless printing
borderless printing
Borderless printing lets you print to the edges of small media such as cards and photos.
4 x 6 inch photo paper with tear-off tabs: When you print on this media, the
printout is completely borderless after the tear-off strip is removed.
A6 cards, Hagaki cards, and 4 x 6 inch photos without tear-off tabs: When you
print on any of these media types, the printout is borderless on three sides with a
narrow border on the bottom.
printing guidelines
selecting paper: Use the following paper types for borderless printing.
● Photo 4 x 6 in with tab
● Photo 4 x 6 in
● Hagaki Card 100 x 148 mm
● A6 Card 105 x 148.5 mm
Newport Hykuna Mac UG Final
file:///C|/Projects/Newport/Mac_UG_huykuna/ug_borderless_printing_fs.html (1 of 3) [5/9/2002 9:41:05 AM]
56
Page 57

borderless printing
selecting image size: Open the image file in a software application and assign the
image size. The size corresponds to the paper size on which you want to print the
image. Before printing, select the appropriate paper size and, for OS 8.6, 9.x, or X
Classic, check the Borderless Printing box on the Page Setup dialog.
preparing to print
Load the paper into the printer according to the instructions for the paper type.
● photographs
loading and printing photo paper with tear-off tab: Remove the
Out tray and, holding the tabbed edge, slide the HP Borderless Photo
paper printable or glossy–side down, into the In tray. Replace the Out
tray.
● index cards and other small media
● Hagaki cards
using the two-sided printing option (Hagaki cards): Remove the
Out tray and slide the paper, printable or address–side up, into the In
tray. Print the address side first, followed by the greeting side.
● My computer runs Mac OS 8.6 or 9.x
● I am using a Mac OS 9.x application on a Mac OS X
computer
Mac OS 8.6, 9.x, and X
Classic
I am using an application built for Mac OS X
Mac OS X
borderless printing with Mac OS 8.6, 9.x, and X Classic
1. Open the Page Setup dialog box.
2. Select the appropriate page size.
3. Click Borderless Printing.
4. > Click OK.
5. Open the Print dialog box.
6. Select any other desired print settings.
Click a two-sided printing option when appropriate, such as for Hagaki
cards. Clicking a two-sided printing option limits the options available in
the paper type menu. For example, photos are only printed on one side.
Newport Hykuna Mac UG Final
file:///C|/Projects/Newport/Mac_UG_huykuna/ug_borderless_printing_fs.html (2 of 3) [5/9/2002 9:41:05 AM]
57
Page 58

borderless printing
7. After selecting the print settings, click OK.
borderless printing with Mac OS X
1. Open the Page Setup dialog box.
2. Select a borderless printing paper size in the Paper Size box.
3. Click OK.
4. Open the Print dialog box.
5. Select any other desired print settings.
Click a two-sided printing option when appropriate, such as for Hagaki
cards. Clicking a two-sided printing option limits the options available in
the paper type menu. For example, photos are only printed on one side.
6. After selecting the print settings, click OK.
Newport Hykuna Mac UG Final
file:///C|/Projects/Newport/Mac_UG_huykuna/ug_borderless_printing_fs.html (3 of 3) [5/9/2002 9:41:05 AM]
58
Page 59

plain paper
plain paper
preparing to print
1. Remove the Out tray.
2. Slide out both paper guides.
3. Place up to 100 sheets of paper in the In tray.
4. Slide the paper guides firmly against the paper.
5. Replace the Out tray.
printing on plain paper
● My computer runs Mac OS 8.6 or 9.x
● I am using a Mac OS 9.x application on a Mac OS X
computer
Mac OS 8.6, 9.x, and X
Classic
Newport Hykuna Mac UG Final
file:///C|/Projects/Newport/Mac_UG_huykuna/ug_plain_paper_fs.html (1 of 2) [5/9/2002 9:41:06 AM]
59
Page 60

plain paper
I am using an application built for Mac OS X
Mac OS X
printing on plain paper with Mac OS 8.6, 9.x, and X Classic
1. If necessary, open the
Page Setup dialog box and select the page size, scaling, or
orientation options.
2. Open the
Print dialog box, then select the following settings:
panel setting
Paper Type/Quality
Paper Group: Automatic or Plain
Paper
3. Select any other desired print settings.
4. After you have selected the print settings, click OK.
printing on plain paper with Mac OS X
1. If necessary, open the
Page Setup dialog box and select the printer, page size,
scaling, or orientation options.
2. Open the
Print dialog box, then select the following settings:
panel setting
Paper Type/Quality
Paper Type: Automatic or Plain
Paper
3. Select any other desired print settings.
4. After you have selected the print settings, click Print.
For a description of available print options, click the appropriate operating
system:
Mac OS 8.6, 9.x, or X Classic or Mac OS X.
Newport Hykuna Mac UG Final
file:///C|/Projects/Newport/Mac_UG_huykuna/ug_plain_paper_fs.html (2 of 2) [5/9/2002 9:41:06 AM]
60
Page 61

envelopes
envelopes
Print a single envelope using the envelope slot, or print multiple envelopes using the
paper tray.
printing guidelines
● Never place more than 15 envelopes in the In tray at one time.
● Avoid using envelopes that have clasps or windows.
● Avoid using envelopes that are shiny or embossed; envelopes with thick,
irregular, or curled edges; or envelopes that are wrinkled, torn, or otherwise
damaged.
● Align the envelope edges before inserting them in the paper tray.
preparing to print a single envelope
1. Place the envelope with the flap side on the left and facing up into the single
envelope slot.
2. Push the envelope forward until it stops.
preparing to print a stack of envelopes
1. Remove the Out tray.
2. Slide out both paper guides and remove all paper from the In tray.
3. Place no more than 15 envelopes. with the flap side on the left and facing up. in
the In tray.
Newport Hykuna Mac UG Final
file:///C|/Projects/Newport/Mac_UG_huykuna/ug_envelopes_fs.html (1 of 4) [5/9/2002 9:41:07 AM]
61
Page 62

envelopes
4. Push the envelopes forward until they stop.
5. Slide the paper guides firmly against the edges of the envelopes.
6. Replace the Out tray.
printing the envelopes
● My computer runs Mac OS 8.6 or 9.x
● I am using a Mac OS 9.x application on a Mac OS X
computer
Mac OS 8.6, 9.x, and X
Classic
I am using an application built for Mac OS X
Mac OS X
printing envelopes with Mac OS 8.6, 9.x, and X Classic
1. Open the
Page Setup dialog box, then select the following settings:
panel setting
Page Attributes
Page Size: Appropriate envelope size
Orientation: Appropriate envelope
orientation
Newport Hykuna Mac UG Final
file:///C|/Projects/Newport/Mac_UG_huykuna/ug_envelopes_fs.html (2 of 4) [5/9/2002 9:41:07 AM]
62
Page 63

envelopes
2. Click OK.
3. Open the
Print dialog box, then select the following settings:
panel setting
Paper Type/Quality
Paper Group: Automatic, Plain
Paper or Inkjet Paper
Paper Type: Appropriate inkjet
paper (if Inkjet Paper is selected as
paper group)
4. Select any other desired print settings.
5. After you have selected the print settings, click OK.
printing envelopes with Mac OS X
1. Open the
Page Setup dialog box, then select the following settings:
panel setting
Page Attributes
Paper Size: Appropriate envelope size
Orientation: Appropriate envelope
orientation
2. Click OK.
3. Open the
Print dialog box, then select the following settings:
panel setting
Paper Type/Quality
Paper Type: Automatic or Plain
Paper
4. Select any other desired print settings.
5. After you have selected the print settings, click Print.
Newport Hykuna Mac UG Final
file:///C|/Projects/Newport/Mac_UG_huykuna/ug_envelopes_fs.html (3 of 4) [5/9/2002 9:41:07 AM]
63
Page 64

envelopes
For a description of available print options, click the appropriate operating
system:
Mac OS 8.6, 9.x, or X Classic or Mac OS X.
Newport Hykuna Mac UG Final
file:///C|/Projects/Newport/Mac_UG_huykuna/ug_envelopes_fs.html (4 of 4) [5/9/2002 9:41:07 AM]
64
Page 65

transparencies
transparencies
printing guidelines
For great results use hp premium inkjet transparency film.
preparing to print
1. Remove the Out tray.
2. Slide out both paper guides, then remove all paper from the In tray.
3. Fan the edges of the transparency sheets to separate them, then align the edges.
4. Place up to 25 transparency sheets in the In tray with the rough side down and
the adhesive strip toward the printer.
5. Carefully push the transparencies forward until they stop so that none of the
adhesive strips catch on one another.
6. Slide the paper guides firmly against the transparency sheets.
7. Replace the Out tray.
Newport Hykuna Mac UG Final
file:///C|/Projects/Newport/Mac_UG_huykuna/ug_transparencies_fs.html (1 of 3) [5/9/2002 9:41:07 AM]
65
Page 66

transparencies
printing transparencies
● My computer runs Mac OS 8.6 or 9.x
● I am using a Mac OS 9.x application on a Mac OS X
computer
Mac OS 8.6, 9.x, and X
Classic
I am using an application built for Mac OS X
Mac OS X
printing transparencies with Mac OS 8.6, 9.x, and X Classic
1. If necessary, open the
Page Setup dialog box and select the page size, scaling, or
orientation options.
2. Open the
Print dialog box, then select the following settings:
panel setting
Paper Type/Quality
Paper Group: Automatic or
Transparency Film
Paper Type: Appropriate
transparency film (if Transparency
Film is selected as paper group)
3. Select any other desired print settings.
4. After you have selected the print settings, click OK.
The printer may wait for transparencies to dry before releasing them to the top of
the tray.
printing transparencies with Mac OS X
1. If necessary, open the
Page Setup dialog box and select the printer, page size,
scaling, or orientation options.
2. Open the
Print dialog box, then select the following settings:
panel setting
Paper Type/Quality
Paper Type: Automatic or the
appropriate transparency film
Newport Hykuna Mac UG Final
file:///C|/Projects/Newport/Mac_UG_huykuna/ug_transparencies_fs.html (2 of 3) [5/9/2002 9:41:07 AM]
66
Page 67

transparencies
3. Select any other desired print settings.
4. After you have selected the print settings, click Print.
The printer may wait for transparencies to dry before releasing them to the top of
the tray.
For a description of available print options, click the appropriate operating
system:
Mac OS 8.6, 9.x, or X Classic or Mac OS X.
Newport Hykuna Mac UG Final
file:///C|/Projects/Newport/Mac_UG_huykuna/ug_transparencies_fs.html (3 of 3) [5/9/2002 9:41:07 AM]
67
Page 68

labels
labels
printing guidelines
● Use only paper labels that are designed specifically for inkjet printers.
● Use only full sheets of labels.
● Verify that the labels are not sticky, wrinkled, or pulling away from the
protective backing.
● Do not use plastic or clear labels. The ink will not dry on these labels.
● Never place more than 20 sheets of labels in the In tray at one time.
preparing to print
1. Remove the Out tray.
2. Slide out both paper guides, then remove all paper from the In tray.
3. Fan the edges of the label sheets to separate them, then align the label edges.
4. Load up to 20 label sheets. label side down. in the In tray.
5. Slide the paper guides firmly against the sheets.
6. Replace the Out tray.
Newport Hykuna Mac UG Final
file:///C|/Projects/Newport/Mac_UG_huykuna/ug_labels_fs.html (1 of 3) [5/9/2002 9:41:08 AM]
68
Page 69

labels
printing labels
If your software program includes a label printing feature, follow the instructions
provided with the software program. Otherwise, follow the instructions below.
● My computer runs Mac OS 8.6 or 9.x
● I am using a Mac OS 9.x application on a Mac OS X
computer
Mac OS 8.6, 9.x, and X
Classic
I am using an application built for Mac OS X
Mac OS X
printing labels with Mac OS 8.6, 9.x, and X Classic
1. Open the
Page Setup dialog box, then select the following settings:
panel setting
Page Attributes
Page Size: A4 Letter or US Letter
Orientation: Appropriate orientation
2. Click OK.
3. Open the
Print dialog box, then select the following settings:
panel setting
Newport Hykuna Mac UG Final
file:///C|/Projects/Newport/Mac_UG_huykuna/ug_labels_fs.html (2 of 3) [5/9/2002 9:41:08 AM]
69
Page 70

labels
Paper Type/Quality
Paper Group: Automatic, Plain
Paper or Inkjet Paper
Paper Type: Appropriate inkjet
paper (if Inkjet Paper is selected as
paper group)
Quality: Normal
4. Select any other desired print settings.
5. After you have selected the print settings, click OK.
printing labels with Mac OS X
1. Open the
Page Setup dialog box, then select the following settings:
panel setting
Page Attributes
Paper Size: A4 Letter or US Letter
Orientation: Appropriate orientation
2. Click OK.
3. Open the
Print dialog box, then select the following settings:
panel setting
Paper Type/Quality
Paper Type: Automatic or
appropriate label type
Quality: Normal
4. Select any other desired print settings.
5. After you have selected the print settings, click Print.
For a description of available print options, click the appropriate operating
system:
Mac OS 8.6, 9.x, or X Classic or Mac OS X.
Newport Hykuna Mac UG Final
70
file:///C|/Projects/Newport/Mac_UG_huykuna/ug_labels_fs.html (3 of 3) [5/9/2002 9:41:08 AM]
Page 71

index cards and other small media
index cards and other small media
printing guidelines
● Use only cards and small media that meet the printer's paper size
specifications.
● If an out of paper message appears, verify that the index cards or other small
media are positioned properly in the In tray.
● To print borderless A6 (105 x 148.5 mm) cards, see borderless printing.
preparing to print index cards or other small media
1. Remove the Out tray.
2. Slide out both paper guides, then remove all paper from the In tray.
3. Align the card edges.
4. Place up to 30 cards in the In tray.
5. Push the cards forward until they stop.
6. Slide the paper guides firmly against the edges of the cards.
7. Replace the Out tray.
Newport Hykuna Mac UG Final
file:///C|/Projects/Newport/Mac_UG_huykuna/ug_small_media_fs.html (1 of 4) [5/9/2002 9:41:08 AM]
71
Page 72

index cards and other small media
printing index cards and other small media
If your software program includes a card printing feature, follow the instructions
provided by the software program. Otherwise, follow the instructions below.
● My computer runs Mac OS 8.6 or 9.x
● I am using a Mac OS 9.x application on a Mac OS X
computer
Mac OS 8.6, 9.x, and X
Classic
I am using an application built for Mac OS X
Mac OS X
printing index cards and other small media with Mac OS 8.6, 9.x, and X Classic
1. Open the
Page Setup dialog box, then select the following settings:
panel setting
Page Attributes
Page Size: Appropriate card size
Orientation: Appropriate orientation
2. Click OK.
3. Open the
Print dialog box, then select the following settings:
panel setting
Newport Hykuna Mac UG Final
file:///C|/Projects/Newport/Mac_UG_huykuna/ug_small_media_fs.html (2 of 4) [5/9/2002 9:41:08 AM]
72
Page 73

index cards and other small media
Paper Type/Quality
Paper Group: Automatic, Plain
Paper or Inkjet Paper
Paper Type: Appropriate inkjet
paper (if Inkjet Paper is selected as
paper group)
Quality: Normal
Layout
Pages Per Sheet: 1 (Normal)
Print Both Sides: Unchecked for
unsupported card sizes
4. Click OK.
If an out of paper message appears, verify the cards are positioned properly in
the paper tray.
printing index cards and other small media with Mac OS X
1. Open the
Page Setup dialog box, then select the following settings:
panel setting
Page Attributes
Paper Size: Appropriate card size
Orientation: Appropriate orientation
2. Click OK.
3. Open the
Print dialog box, then select the following settings:
panel setting
Paper Type/Quality
Paper Type: Automatic or Plain
Paper
Quality: Normal
Layout
Pages Per Sheet: 1 (Normal)
Newport Hykuna Mac UG Final
file:///C|/Projects/Newport/Mac_UG_huykuna/ug_small_media_fs.html (3 of 4) [5/9/2002 9:41:08 AM]
73
Page 74

index cards and other small media
Two Sided Printing
Print Both Sides: Unchecked for
unsupported card sizes
4. Select any other desired print settings.
5. After selecting the print settings, click Print.
If an out of paper message appears, verify the cards are positioned properly in
the paper tray.
For a description of available print options, click the appropriate operating
system:
Mac OS 8.6, 9.x, or X Classic or Mac OS X.
Newport Hykuna Mac UG Final
file:///C|/Projects/Newport/Mac_UG_huykuna/ug_small_media_fs.html (4 of 4) [5/9/2002 9:41:08 AM]
74
Page 75

Hagaki cards
Hagaki cards
printing guidelines
● Use only cards that meet the printer's paper size specifications.
● If an out of paper message appears, verify that the cards are positioned
properly in the In tray.
● To print borderless cards, see borderless printing.
preparing to print Hagaki cards
1. Remove the Out tray.
2. Slide out both paper guides, then remove all paper from the In tray.
3. Align the card edges.
4. Place up to 30 cards in the In tray.
5. Push the cards forward until they stop.
6. Slide the paper guides firmly against the edges of the cards.
7. Replace the Out tray.
Newport Hykuna Mac UG Final
file:///C|/Projects/Newport/Mac_UG_huykuna/ug_Hagaki_cards_fs.html (1 of 4) [5/9/2002 9:41:09 AM]
75
Page 76

Hagaki cards
printing Hagaki cards
If your software program includes a card printing feature, follow the instructions
provided by the software program. Otherwise, follow the instructions below.
● My computer runs Mac OS 8.6 or 9.x
● I am using a Mac OS 9.x application on a Mac OS X
computer
Mac OS 8.6, 9.x, and X
Classic
I am using an application built for Mac OS X
Mac OS X
printing Hagaki cards with Mac OS 8.6, 9.x, and X Classic
1. Open the
Page Setup dialog box, then select the following settings:
panel setting
Page Attributes
Page Size: Appropriate Hagaki card size
Orientation: Appropriate orientation
Borderless Printing: Select if desired
2. Click OK.
3. Open the
Print dialog box, then select the following settings:
panel setting
Newport Hykuna Mac UG Final
file:///C|/Projects/Newport/Mac_UG_huykuna/ug_Hagaki_cards_fs.html (2 of 4) [5/9/2002 9:41:09 AM]
76
Page 77

Hagaki cards
Paper Type/Quality
Paper Group: Automatic, Plain
Paper or Inkjet Paper
Paper Type: Appropriate inkjet
paper (if Inkjet Paper is selected as
paper group)
Quality: Normal
Layout
Pages Per Sheet: 1 (Normal)
Print Both Sides: Select if desired
4. Click OK.
If an out of paper message appears, verify the cards are positioned properly in
the paper tray.
printing Hagaki cards with Mac OS X
1. Open the
Page Setup dialog box, then select the following settings:
panel setting
Page Attributes
Paper Size: Appropriate Hagaki card
size
Orientation: Appropriate orientation
Borderless Printing: Select if desired
2. Click OK.
3. Open the
Print dialog box, then select the following settings:
panel setting
Paper Type/Quality
Paper Type: Automatic or
appropriate Hagaki card type
Quality: Normal
Layout
Pages Per Sheet: 1 (Normal)
Newport Hykuna Mac UG Final
file:///C|/Projects/Newport/Mac_UG_huykuna/ug_Hagaki_cards_fs.html (3 of 4) [5/9/2002 9:41:09 AM]
77
Page 78

Hagaki cards
Two-Sided Printing
Print Both Sides: Select if desired
4. Select any other desired print settings.
5. After selecting the print settings, click Print.
If an out of paper message appears, verify the cards are positioned properly in
the paper tray.
For a description of available print options, click the appropriate operating
system:
Mac OS 8.6, 9.x, or X Classic or Mac OS X.
Newport Hykuna Mac UG Final
file:///C|/Projects/Newport/Mac_UG_huykuna/ug_Hagaki_cards_fs.html (4 of 4) [5/9/2002 9:41:09 AM]
78
Page 79

photographs
photographs
printing guidelines
● The photo must be in an electronic format (digital) before it can be printed.
Take a digital picture, scan a photo, or have your local camera shop provide an
electronic file of the photo.
● For best print quality, install a photo print cartridge in the printer, use a High
Resolution print setting, and set the
HP Digital Photography options.
● To print borderless photos, see borderless printing.
● Use hp photo papers for great results.
preparing to print small photographs
For high-quality photos, install a photo print cartridge in the printer. For
instructions on installing a print cartridge, see replacing print cartridges.
1. Remove the Out tray.
2. Slide out both paper guides, then remove all paper from the In tray.
3. Fan the edges of the photo paper to separate them, then align the photo paper
edges.
4. Place no more than 25 sheets of photo paper—printable side down—in the In tray.
If you are using 4 x 6 inch photo paper with a tear-off strip, load the paper with
the tab pointing away from the printer.
5. Push the photo paper forward until it stops.
6. Slide the paper guides firmly against the edges of the photo paper.
Newport Hykuna Mac UG Final
file:///C|/Projects/Newport/Mac_UG_huykuna/ug_photographs_fs.html (1 of 5) [5/9/2002 9:41:10 AM]
79
Page 80

photographs
7. Replace the Out tray.
preparing to print large photographs
For high-quality photos, install a photo print cartridge in the printer. For
instructions on installing a print cartridge, see replacing print cartridges.
1. Remove the Out tray.
2. Slide out both paper guides, then remove all paper from the tray.
3. Fan the edges of the photo paper to separate them, then align the photo paper
edges.
4. Place no more than 20 sheets of photo paper—printable side down—in the tray.
5. Slide the paper guides firmly against the edges of the photo paper.
Newport Hykuna Mac UG Final
file:///C|/Projects/Newport/Mac_UG_huykuna/ug_photographs_fs.html (2 of 5) [5/9/2002 9:41:10 AM]
80
Page 81

photographs
6. Replace the Out tray.
printing photographs
● My computer runs Mac OS 8.6 or 9.x
● I am using a Mac OS 9.x application on a Mac OS X
computer
Mac OS 8.6, 9.x, and X
Classic
I am using an application built for Mac OS X
Mac OS X
printing photographs with Mac OS 8.6, 9.x, and X Classic
1. Open the
Page Setup dialog box, then select the following settings:
panel setting
Page Attributes
Page Size: Appropriate paper size
Orientation: Appropriate orientation
Borderless Printing: Select if desired
2. Click OK.
3. Open the
Print dialog box, then select the following settings:
Newport Hykuna Mac UG Final
file:///C|/Projects/Newport/Mac_UG_huykuna/ug_photographs_fs.html (3 of 5) [5/9/2002 9:41:10 AM]
81
Page 82

photographs
panel setting
Paper Type/Quality
Paper Group: Automatic or
Photo Paper
Paper Type: Appropriate hp photo
paper type (if Photo Paper is
selected as paper group)
Quality: Best or High Resolution
Photo
Digital Photography
If desired for photo enhancement
options (see
digital photography)
4. Select any other desired print settings.
5. After you have selected the print settings, click OK.
printing photographs with Mac OS X
1. Open the
Page Setup dialog box, then select the following settings:
panel setting
Page Attributes
Paper Size: Appropriate paper size
(also select a borderless printing paper
size, if desired)
Orientation: Appropriate orientation
2. Click OK.
3. Open the
Print dialog box, then select the following settings:
panel setting
Newport Hykuna Mac UG Final
file:///C|/Projects/Newport/Mac_UG_huykuna/ug_photographs_fs.html (4 of 5) [5/9/2002 9:41:10 AM]
82
Page 83

photographs
Paper Type/Quality
Paper Type: Appropriate hp photo
paper type
Quality: Best or High Resolution
Photo
Digital Photo: If desired for photo
enhancement options (see
digital
photography)
4. Select any other desired print settings.
5. After you have selected the print settings, click Print.
For a description of available print options, click the appropriate operating
system:
Mac OS 8.6, 9.x, or X Classic or Mac OS X.
If a photo print cartridge is installed in the printer, replace it with a black print
cartridge when you finish printing photographs. For instructions on storing the
photo print cartridge when it is not in use, see maintaining print cartridges.
Newport Hykuna Mac UG Final
file:///C|/Projects/Newport/Mac_UG_huykuna/ug_photographs_fs.html (5 of 5) [5/9/2002 9:41:10 AM]
83
Page 84

greeting cards
greeting cards
printing guidelines
● Unfold pre-folded cards, then place them in the In tray.
● If an out of paper message appears, verify that the cards are positioned
properly in the In tray.
● For great results, use hp greeting card paper.
preparing to print
1. Remove the Out tray.
2. Slide out both paper guides, then remove all paper from the In tray.
3. Fan the edges of the greeting cards to separate them.
4. Align the edges of the cards, then place no more than 5 cards in the In tray.
5. Push the cards forward until they stop.
6. Slide the paper guides firmly against the edges of the cards.
7. Replace the Out tray.
Newport Hykuna Mac UG Final
file:///C|/Projects/Newport/Mac_UG_huykuna/ug_greeting_cards_fs.html (1 of 3) [5/9/2002 9:41:10 AM]
84
Page 85

greeting cards
printing greeting cards
If your software program includes a greeting card printing feature, follow the
instructions provided with the software program. Otherwise, follow the
instructions below.
● My computer runs Mac OS 8.6 or 9.x
● I am using a Mac OS 9.x application on a Mac OS X
computer
Mac OS 8.6, 9.x, and X
Classic
I am using an application built for Mac OS X
Mac OS X
printing greeting with Mac OS 8.6, 9.x, and X Classic
1. If necessary, open the
Page Setup dialog box and select the page size, scaling, or
orientation options.
2. Open the
Print dialog box, then select the following settings:
panel setting
Paper Type/Quality
Paper Group: Automatic or
Greeting Cards
Paper Type: Appropriate greeting
card type (if Greeting Cards is
selected as paper group)
Quality: Normal
Layout
Pages Per Sheet: 1 (Normal)
3. Click OK.
Newport Hykuna Mac UG Final
file:///C|/Projects/Newport/Mac_UG_huykuna/ug_greeting_cards_fs.html (2 of 3) [5/9/2002 9:41:10 AM]
85
Page 86

greeting cards
If an out of paper message appears, verify the greeting cards are
positioned properly in the paper tray.
printing greeting cards with Mac OS X
1. If necessary, open the
Page Setup dialog box and select the printer, paper size,
scaling, or orientation options.
2. Open the
Print dialog box, then select the following settings:
panel setting
Paper Type/Quality
Paper Type: Automatic or Plain
Paper
Quality: Normal
Layout
Pages Per Sheet: 1 (Normal)
3. Select any other desired print settings.
4. After selecting the print settings, click Print.
If an out of paper message appears, verify the greeting cards are positioned
properly in the paper tray.
For a description of available print options, click the appropriate operating
system:
Mac OS 8.6, 9.x, or X Classic or Mac OS X.
Newport Hykuna Mac UG Final
file:///C|/Projects/Newport/Mac_UG_huykuna/ug_greeting_cards_fs.html (3 of 3) [5/9/2002 9:41:10 AM]
86
Page 87

posters
posters
printing guidelines
Poster printing is not available in Mac OS X.
preparing to print
1. Remove the Out tray.
2. Slide out both paper guides, then remove all paper from the In tray.
3. Fan the edges of the sheets to separate them, then align the edges.
4. Place the paper in the In tray.
5. Slide the paper guides firmly against the paper.
6. Replace the Out tray.
printing posters
1. If necessary, open the Page Setup dialog box and set the page size, scaling, or
orientation.
2. Open the
Print dialog box, then select the following settings:
panel setting
Paper Type/ Quality
Paper Group: Automatic, Plain
Paper or Inkjet Paper
Paper Type: Appropriate inkjet
paper (if Inkjet Paper group is
selected)
Print Quality: Normal
Layout
Multiple Page Per Sheet Menu:
Tiling
Tiling Size: 2, 3, or 4
3. Select any other desired print settings.
4. After you have selected the print settings, click OK.
Newport Hykuna Mac UG Final
file:///C|/Projects/Newport/Mac_UG_huykuna/ug_posters_fs.html (1 of 2) [5/9/2002 9:41:11 AM]
87
Page 88

posters
5. After the poster has printed, trim the edges on the sheets then tape the sheets
together.
For a description of available print options, click Mac OS 8.6, 9.x, or X Classic.
Newport Hykuna Mac UG Final
file:///C|/Projects/Newport/Mac_UG_huykuna/ug_posters_fs.html (2 of 2) [5/9/2002 9:41:11 AM]
88
Page 89

banners
banners
printing guidelines
Use hp banner paper for great results.
preparing to print
1. Remove the Out tray.
2. Slide out both paper guides, then remove all paper from the In tray.
3. Select up to 20 sheets of banner paper. Remove and discard any perforated
strips.
4. Place the banner paper in the In tray with the unattached edge of the paper
facing the printer.
1. unattached edge
5. Slide the paper guides firmly against the paper.
6. Replace the Out tray.
Newport Hykuna Mac UG Final
file:///C|/Projects/Newport/Mac_UG_huykuna/ug_banners_fs.html (1 of 3) [5/9/2002 9:41:11 AM]
89
Page 90

banners
printing banners
If your software program includes a banner printing feature, follow the
instructions provided with the software program. Otherwise, follow the
instructions below.
● My computer runs Mac OS 8.6 or 9.x
● I am using a Mac OS 9.x application on a Mac OS X
computer
Mac OS 8.6, 9.x, and X
Classic
I am using an application built for Mac OS X
Mac OS X
printing banners with Mac OS 8.6, 9.x, and X Classic
1. Open the
Page Setup dialog box, then select the following settings:
panel setting
Page Attributes
Page Size: A4 Letter Banner or US
Letter Banner
2. Click OK.
3. Open the
Print dialog box, then select the following settings:
panel setting
Newport Hykuna Mac UG Final
file:///C|/Projects/Newport/Mac_UG_huykuna/ug_banners_fs.html (2 of 3) [5/9/2002 9:41:11 AM]
90
Page 91

banners
Paper Type/Quality
Paper Group: Automatic, Plain
Paper or Inkjet Paper
Paper Type: Appropriate inkjet
paper (if Inkjet Paper group is
selected)
Quality: Normal
4. Click OK.
printing banners with Mac OS X
1. Open the
Page Setup dialog box, then select the following settings:
panel setting
Page Attributes
Paper Size: A4 Letter Banner or US
Letter Banner
2. Click OK.
3. Open the
Print dialog box, then select the following settings:
panel setting
Paper Type/Quality
Paper Type: Automatic or Plain
Paper
Quality: Normal
4. Select any other desired print settings.
5. After selecting the print settings, click Print.
For a description of available print options, click the appropriate operating
system:
Mac OS 8.6, 9.x, or X Classic or Mac OS X.
Newport Hykuna Mac UG Final
file:///C|/Projects/Newport/Mac_UG_huykuna/ug_banners_fs.html (3 of 3) [5/9/2002 9:41:11 AM]
91
Page 92

iron-on transfers
iron-on transfers
printing guidelines
● When printing a document with a mirror-image, the text and pictures are
horizontally reversed from what appears on the computer screen.
● Use hp iron-on t-shirt transfer paper for great results.
preparing to print
1. Remove the Out tray.
2. Slide out both paper guides, then remove all paper from the In tray.
3. Fan the edges of the iron-on transfer paper to separate them, then align the
edges.
4. Place the iron-on transfer paper in the In tray with the printable side down.
5. Slide the paper guides firmly against the transfer paper.
6. Replace the Out tray.
Newport Hykuna Mac UG Final
file:///C|/Projects/Newport/Mac_UG_huykuna/ug_iron-on_transfers_fs.html (1 of 4) [5/9/2002 9:41:12 AM]
92
Page 93

iron-on transfers
printing iron-on transfers
If your software program includes an iron-on transfer printing feature, follow the
instructions provided with the software program. Otherwise, follow the
instructions below.
● My computer runs Mac OS 8.6 or 9.x
● I am using a Mac OS 9.x application on a Mac OS X
computer
Mac OS 8.6, 9.x, and X
Classic
I am using an application built for Mac OS X
Mac OS X
printing iron-on transfers with Mac OS 8.6, 9.x, and X Classic
1. Open the
Page Setup dialog box, then select the following settings:
panel setting
Page Attributes
Page Size: A4 Letter or US Letter
Mirror Image: Checked
2. Click OK.
3. Open the
Print dialog box, then select the following settings:
panel setting
Newport Hykuna Mac UG Final
file:///C|/Projects/Newport/Mac_UG_huykuna/ug_iron-on_transfers_fs.html (2 of 4) [5/9/2002 9:41:12 AM]
93
Page 94

iron-on transfers
Paper Type/Quality
Paper Group: Automatic or Plain
Paper
Quality: Normal
4. Click OK.
printing iron-on transfers with Mac OS X
The Mirror Image feature is not available in Mac OS X. Some applications offer
a mirror image feature that will allow you to print iron-on transfers from a Mac
OS X computer.
1. Open the Page Setup dialog box, then select the following settings:
panel setting
Page Attributes
Page Size: A4 Letter or US Letter
Orientation: Appropriate orientation
2. Click OK.
3. Open the
Print dialog box, then select the following settings:
4.
panel setting
Paper Type/Quality
Paper Type: Automatic or Plain
Paper
Quality: Normal
5. Select any other desired print settings.
6. After selecting the print settings, click Print.
Newport Hykuna Mac UG Final
file:///C|/Projects/Newport/Mac_UG_huykuna/ug_iron-on_transfers_fs.html (3 of 4) [5/9/2002 9:41:12 AM]
94
Page 95

iron-on transfers
For a description of available print options, click the appropriate operating
system:
Mac OS 8.6, 9.x, or X Classic or Mac OS X.
Newport Hykuna Mac UG Final
file:///C|/Projects/Newport/Mac_UG_huykuna/ug_iron-on_transfers_fs.html (4 of 4) [5/9/2002 9:41:12 AM]
95
Page 96

maintenance
maintenance
● replacing print cartridges
● aligning print cartridges
● automatically cleaning print cartridges
● cleaning the print cartridge cradle
● maintaining print cartridges
● maintaining the printer body
● refilling print cartridges
● removing ink from skin and clothing
● using the hp inkjet utility
Newport Hykuna Mac UG Final
file:///C|/Projects/Newport/Mac_UG_huykuna/ug_maintenance_intro_fs.html [5/9/2002 9:41:13 AM]
96
Page 97

replacing print cartridges
replacing print cartridges
Before buying replacement print cartridges, verify the correct part numbers. For the
correct part numbers, see print cartridges.
The printer can operate with only one print cartridge installed. For more
information, see reserve mode.
To replace a print cartridge:
1. Press the Power button to turn on the printer.
2. Open the top cover.
The cradle moves to the center of the printer.
3. Open the cradle latch.
4. Slide the print cartridge out of the print cartridge cradle and discard it.
1. press Power button 2. open top cover
3. open cradle latch 4. slide print cartridge out of cradle
5. Remove the replacement print cartridge from its packaging and carefully remove
the plastic tape. Hold the print cartridge so that the copper strip is on the bottom.
Newport Hykuna Mac UG Final
file:///C|/Projects/Newport/Mac_UG_huykuna/ug_replacecartridge_fs.html (1 of 3) [5/9/2002 9:41:13 AM]
97
Page 98

replacing print cartridges
1. pink pull tab
Caution! Do not touch the print cartridge ink nozzles or copper contacts. Touching these
parts will result in clogs, ink failure, and bad electrical connections. Do not remove the
copper strips. They are required electrical contacts.
6. Slide the print cartridge firmly into the cradle as shown.
Ensure that the copper contacts of the print cartridge meet the copper contacts of
the print cartridge cradle.
1. copper contacts
7. Close the cradle latch. Pull the latch forward, then press it down to tuck the tabs
into place.
8. Close the top cover.
If the Print Cartridge Status light continues to blink after installing a new print
cartridge, verify the part number on the cartridge.
9. Open the hp inkjet utility to print a test page. For instructions on using the hp
inkjet utility, see
hp inkjet utility.
Newport Hykuna Mac UG Final
file:///C|/Projects/Newport/Mac_UG_huykuna/ug_replacecartridge_fs.html (2 of 3) [5/9/2002 9:41:13 AM]
98
Page 99

replacing print cartridges
After you change the print cartridge, the printer is automatically calibrated for optimum
print quality.
For information on how to recycle your empty print cartridge, see print cartridge
recovery.
Warning! Keep both new and used print cartridges out of the reach of children.
Newport Hykuna Mac UG Final
file:///C|/Projects/Newport/Mac_UG_huykuna/ug_replacecartridge_fs.html (3 of 3) [5/9/2002 9:41:13 AM]
99
Page 100

refilling print cartridges
refilling print cartridges
To get the best performance from your HP printer, use only genuine, factoryfilled HP print cartridges.
Caution! Damage that is directly attributable to modified or refilled HP print cartridges is
specifically excluded from the HP printer’s warranty coverage.
Newport Hykuna Mac UG Final
file:///C|/Projects/Newport/Mac_UG_huykuna/ug_refilldont_fs.html [5/9/2002 9:41:14 AM]
100
 Loading...