

Page 1

HP Deskjet 460
Mobile Printer
User’s Guide
Page 2

Page 3

HP Deskjet 460 Mobile Printer
User’s Guide
First edition: 06/2005
Page 4

Copyright Information
© 2005 Copyright Hewlett-Packard Development Company, L.P.
Reproduction, adaptation or translation without prior written permission is prohibited, except as allowed under the copyright laws.
The information contained herein is subject to change without notice.
The only warranties for HP products and services are set forth in the express warranty statements accompanying such products and services.
Nothing herein should be construed as constituting an additional warranty. HP shall not be liable for technical or editorial errors or omissions
contained herein.
1, 6/2005
Trademark Credits
Adobe® and Acrobat® are trademarks of Adobe Systems Incorporated.
Bluetooth is a trademark owned by its proprietor and used by Hewlett-Packard Company under license.
Microsoft®, Windows®, and Windows® XP are U.S.-registered trademarks of Microsoft Corporation.
Pentium® is a registered trademark of Intel Corporation or its subsidiaries in the United States and other countries.
SD Logo is a trademark of its proprietor.
Page 5

Contents
1 Getting started
Finding other resources for the product. . . . . . . . . . . . . . . . . . . . . . . . . . . . . . . . . . . . . . . . . 10
Understanding the printer parts . . . . . . . . . . . . . . . . . . . . . . . . . . . . . . . . . . . . . . . . . . . . . . 11
Front view . . . . . . . . . . . . . . . . . . . . . . . . . . . . . . . . . . . . . . . . . . . . . . . . . . . . . . . . . . 11
Back and side view. . . . . . . . . . . . . . . . . . . . . . . . . . . . . . . . . . . . . . . . . . . . . . . . . . . . 12
Bottom view . . . . . . . . . . . . . . . . . . . . . . . . . . . . . . . . . . . . . . . . . . . . . . . . . . . . . . . . . 13
Travel tips . . . . . . . . . . . . . . . . . . . . . . . . . . . . . . . . . . . . . . . . . . . . . . . . . . . . . . . . . . . . . 14
2 Installing and using accessories
Installing and using the battery . . . . . . . . . . . . . . . . . . . . . . . . . . . . . . . . . . . . . . . . . . . . . . 15
Battery safety . . . . . . . . . . . . . . . . . . . . . . . . . . . . . . . . . . . . . . . . . . . . . . . . . . . . . . . . 15
Understanding the battery . . . . . . . . . . . . . . . . . . . . . . . . . . . . . . . . . . . . . . . . . . . . . . . 16
Charging and using the battery . . . . . . . . . . . . . . . . . . . . . . . . . . . . . . . . . . . . . . . . . . . 16
Installing and using 802.11 and Bluetooth accessories. . . . . . . . . . . . . . . . . . . . . . . . . . . . . . 18
Installing the 802.11 or Bluetooth wireless printer card . . . . . . . . . . . . . . . . . . . . . . . . . . . 18
Installing a Bluetooth USB adapter . . . . . . . . . . . . . . . . . . . . . . . . . . . . . . . . . . . . . . . . . 18
802.11 and Bluetooth wireless printing . . . . . . . . . . . . . . . . . . . . . . . . . . . . . . . . . . . . . . 19
3 Using the printer
Selecting print media . . . . . . . . . . . . . . . . . . . . . . . . . . . . . . . . . . . . . . . . . . . . . . . . . . . . . 21
Tips for selecting and using print media. . . . . . . . . . . . . . . . . . . . . . . . . . . . . . . . . . . . . . 21
Understanding specifications for supported print media. . . . . . . . . . . . . . . . . . . . . . . . . . . 23
Loading media . . . . . . . . . . . . . . . . . . . . . . . . . . . . . . . . . . . . . . . . . . . . . . . . . . . . . . . . . 26
Changing print settings. . . . . . . . . . . . . . . . . . . . . . . . . . . . . . . . . . . . . . . . . . . . . . . . . . . . 27
Canceling a print job . . . . . . . . . . . . . . . . . . . . . . . . . . . . . . . . . . . . . . . . . . . . . . . . . . . . . 27
Printing on both sides (duplexing, Windows). . . . . . . . . . . . . . . . . . . . . . . . . . . . . . . . . . . . . 28
Printing on special and custom-sized media . . . . . . . . . . . . . . . . . . . . . . . . . . . . . . . . . . . . . 29
Printing from mobile devices . . . . . . . . . . . . . . . . . . . . . . . . . . . . . . . . . . . . . . . . . . . . . . . . 30
Printing digital photographs . . . . . . . . . . . . . . . . . . . . . . . . . . . . . . . . . . . . . . . . . . . . . . 30
Printing from mobile phones. . . . . . . . . . . . . . . . . . . . . . . . . . . . . . . . . . . . . . . . . . . . . . 32
Printing from Pocket PC devices . . . . . . . . . . . . . . . . . . . . . . . . . . . . . . . . . . . . . . . . . . . 33
Printing from Palm OS devices . . . . . . . . . . . . . . . . . . . . . . . . . . . . . . . . . . . . . . . . . . . . 35
Using memory devices . . . . . . . . . . . . . . . . . . . . . . . . . . . . . . . . . . . . . . . . . . . . . . . . . . . . 37
Printing from memory cards and USB Flash drives. . . . . . . . . . . . . . . . . . . . . . . . . . . . . . . 37
4 Managing and configuring the printer
Managing the printer . . . . . . . . . . . . . . . . . . . . . . . . . . . . . . . . . . . . . . . . . . . . . . . . . . . . . 39
Understanding device information pages . . . . . . . . . . . . . . . . . . . . . . . . . . . . . . . . . . . . . . . 47
Printing device information pages from the control panel . . . . . . . . . . . . . . . . . . . . . . . . . . 47
Printing device information pages from the software . . . . . . . . . . . . . . . . . . . . . . . . . . . . . 48
Configuring the printer . . . . . . . . . . . . . . . . . . . . . . . . . . . . . . . . . . . . . . . . . . . . . . . . . . . . 49
Direct connection . . . . . . . . . . . . . . . . . . . . . . . . . . . . . . . . . . . . . . . . . . . . . . . . . . . . . 49
802.11 wireless connection . . . . . . . . . . . . . . . . . . . . . . . . . . . . . . . . . . . . . . . . . . . . . . 53
Bluetooth wireless connection . . . . . . . . . . . . . . . . . . . . . . . . . . . . . . . . . . . . . . . . . . . . . 61
5
Page 6

5 Maintaining and troubleshooting
Maintaining the printer. . . . . . . . . . . . . . . . . . . . . . . . . . . . . . . . . . . . . . . . . . . . . . . . . . . . 69
Cleaning the printer . . . . . . . . . . . . . . . . . . . . . . . . . . . . . . . . . . . . . . . . . . . . . . . . . . . 69
Cleaning the print cartridges . . . . . . . . . . . . . . . . . . . . . . . . . . . . . . . . . . . . . . . . . . . . . 70
Replacing the print cartridges. . . . . . . . . . . . . . . . . . . . . . . . . . . . . . . . . . . . . . . . . . . . . 72
Aligning the print cartridges. . . . . . . . . . . . . . . . . . . . . . . . . . . . . . . . . . . . . . . . . . . . . . 74
Printing with a single print cartridge . . . . . . . . . . . . . . . . . . . . . . . . . . . . . . . . . . . . . . . . 75
Calibrating color . . . . . . . . . . . . . . . . . . . . . . . . . . . . . . . . . . . . . . . . . . . . . . . . . . . . . 75
Replacing the ink service module . . . . . . . . . . . . . . . . . . . . . . . . . . . . . . . . . . . . . . . . . . 76
Troubleshooting tips and resources . . . . . . . . . . . . . . . . . . . . . . . . . . . . . . . . . . . . . . . . . . . 77
General troubleshooting tips . . . . . . . . . . . . . . . . . . . . . . . . . . . . . . . . . . . . . . . . . . . . . 77
Resolving printing problems . . . . . . . . . . . . . . . . . . . . . . . . . . . . . . . . . . . . . . . . . . . . . . . . 79
Printer shuts down unexpectedly . . . . . . . . . . . . . . . . . . . . . . . . . . . . . . . . . . . . . . . . . . . 79
All printer lights are blinking . . . . . . . . . . . . . . . . . . . . . . . . . . . . . . . . . . . . . . . . . . . . . 79
Printer is not responding (nothing prints) . . . . . . . . . . . . . . . . . . . . . . . . . . . . . . . . . . . . . 79
Printer does not accept print cartridge. . . . . . . . . . . . . . . . . . . . . . . . . . . . . . . . . . . . . . . 80
Printer takes a long time to print . . . . . . . . . . . . . . . . . . . . . . . . . . . . . . . . . . . . . . . . . . . 80
Blank page is printed . . . . . . . . . . . . . . . . . . . . . . . . . . . . . . . . . . . . . . . . . . . . . . . . . . 81
Something on the page is missing or incorrect . . . . . . . . . . . . . . . . . . . . . . . . . . . . . . . . . 81
Placement of the text or graphics is wrong . . . . . . . . . . . . . . . . . . . . . . . . . . . . . . . . . . . . 82
Poor print quality and unexpected printouts . . . . . . . . . . . . . . . . . . . . . . . . . . . . . . . . . . . 83
Meaningless characters print . . . . . . . . . . . . . . . . . . . . . . . . . . . . . . . . . . . . . . . . . . . . . 84
Ink is smearing . . . . . . . . . . . . . . . . . . . . . . . . . . . . . . . . . . . . . . . . . . . . . . . . . . . . . . . 85
Ink is not filling the text or graphics completely. . . . . . . . . . . . . . . . . . . . . . . . . . . . . . . . . 85
Output is faded or dull colored. . . . . . . . . . . . . . . . . . . . . . . . . . . . . . . . . . . . . . . . . . . . 86
Colors are printing as black and white . . . . . . . . . . . . . . . . . . . . . . . . . . . . . . . . . . . . . . 86
Wrong colors are printing . . . . . . . . . . . . . . . . . . . . . . . . . . . . . . . . . . . . . . . . . . . . . . . 87
Printout shows bleeding colors . . . . . . . . . . . . . . . . . . . . . . . . . . . . . . . . . . . . . . . . . . . . 87
Colors do not line up properly . . . . . . . . . . . . . . . . . . . . . . . . . . . . . . . . . . . . . . . . . . . . 88
Lines or dots are missing from text or graphics . . . . . . . . . . . . . . . . . . . . . . . . . . . . . . . . . 88
Resolving paper-feed problems . . . . . . . . . . . . . . . . . . . . . . . . . . . . . . . . . . . . . . . . . . . . . . 89
Media is not picked up from the input tray. . . . . . . . . . . . . . . . . . . . . . . . . . . . . . . . . . . . 89
Paper skew . . . . . . . . . . . . . . . . . . . . . . . . . . . . . . . . . . . . . . . . . . . . . . . . . . . . . . . . . 89
Paper output problem . . . . . . . . . . . . . . . . . . . . . . . . . . . . . . . . . . . . . . . . . . . . . . . . . . 89
Clearing jams . . . . . . . . . . . . . . . . . . . . . . . . . . . . . . . . . . . . . . . . . . . . . . . . . . . . . . . 89
Troubleshooting installation issues . . . . . . . . . . . . . . . . . . . . . . . . . . . . . . . . . . . . . . . . . . . . 91
Problems printing an alignment page . . . . . . . . . . . . . . . . . . . . . . . . . . . . . . . . . . . . . . . 91
Problems installing software . . . . . . . . . . . . . . . . . . . . . . . . . . . . . . . . . . . . . . . . . . . . . . 91
Problems setting up 802.11 or Bluetooth wireless communication. . . . . . . . . . . . . . . . . . . . 92
A Printer lights reference
Printer buttons and lights. . . . . . . . . . . . . . . . . . . . . . . . . . . . . . . . . . . . . . . . . . . . . . . . . . . 95
Printer light patterns . . . . . . . . . . . . . . . . . . . . . . . . . . . . . . . . . . . . . . . . . . . . . . . . . . . . . . 96
B HP supplies and accessories
Ordering printing supplies online . . . . . . . . . . . . . . . . . . . . . . . . . . . . . . . . . . . . . . . . . . . . 99
Accessories. . . . . . . . . . . . . . . . . . . . . . . . . . . . . . . . . . . . . . . . . . . . . . . . . . . . . . . . . . . . 99
Supplies . . . . . . . . . . . . . . . . . . . . . . . . . . . . . . . . . . . . . . . . . . . . . . . . . . . . . . . . . . . . . 100
Print cartridges . . . . . . . . . . . . . . . . . . . . . . . . . . . . . . . . . . . . . . . . . . . . . . . . . . . . . . 100
HP media . . . . . . . . . . . . . . . . . . . . . . . . . . . . . . . . . . . . . . . . . . . . . . . . . . . . . . . . . 100
C Support and warranty
Obtaining electronic support. . . . . . . . . . . . . . . . . . . . . . . . . . . . . . . . . . . . . . . . . . . . . . . 111
Obtaining HP telephone support . . . . . . . . . . . . . . . . . . . . . . . . . . . . . . . . . . . . . . . . . . . . 111
Before you call . . . . . . . . . . . . . . . . . . . . . . . . . . . . . . . . . . . . . . . . . . . . . . . . . . . . . . 111
Telephone support numbers . . . . . . . . . . . . . . . . . . . . . . . . . . . . . . . . . . . . . . . . . . . . . 112
Hewlett-Packard limited warranty statement. . . . . . . . . . . . . . . . . . . . . . . . . . . . . . . . . . . . . 116
6
Page 7

D Regulatory information
FCC statement. . . . . . . . . . . . . . . . . . . . . . . . . . . . . . . . . . . . . . . . . . . . . . . . . . . . . . . . . 119
EMI statement (Korea) . . . . . . . . . . . . . . . . . . . . . . . . . . . . . . . . . . . . . . . . . . . . . . . . . . . 119
VCCI statement (Japan) . . . . . . . . . . . . . . . . . . . . . . . . . . . . . . . . . . . . . . . . . . . . . . . . . . 120
Regulatory model number . . . . . . . . . . . . . . . . . . . . . . . . . . . . . . . . . . . . . . . . . . . . . . . . . 120
Power cord statement . . . . . . . . . . . . . . . . . . . . . . . . . . . . . . . . . . . . . . . . . . . . . . . . . . . . 120
LED classification . . . . . . . . . . . . . . . . . . . . . . . . . . . . . . . . . . . . . . . . . . . . . . . . . . . . . . . 120
Environmental sustainability program . . . . . . . . . . . . . . . . . . . . . . . . . . . . . . . . . . . . . . . . . 121
Reduction and elimination . . . . . . . . . . . . . . . . . . . . . . . . . . . . . . . . . . . . . . . . . . . . . . 121
Power consumption. . . . . . . . . . . . . . . . . . . . . . . . . . . . . . . . . . . . . . . . . . . . . . . . . . . 121
Hazardous materials . . . . . . . . . . . . . . . . . . . . . . . . . . . . . . . . . . . . . . . . . . . . . . . . . . 122
Material safety data sheets . . . . . . . . . . . . . . . . . . . . . . . . . . . . . . . . . . . . . . . . . . . . . 122
Recycling. . . . . . . . . . . . . . . . . . . . . . . . . . . . . . . . . . . . . . . . . . . . . . . . . . . . . . . . . . 123
Declaration of Conformity. . . . . . . . . . . . . . . . . . . . . . . . . . . . . . . . . . . . . . . . . . . . . . . . . 124
E Printer specifications
Index
7
Page 8

8
Page 9

1 Getting started
This printer provides quick, professional mobile printing. You can print from notebooks and desktop
computers through a cable or wireless connection. The printer also works with other wireless devices such
as:
• Personal digital assistants (PDAs) running Microsoft® Pocket PC, Windows® CE, or Palm OS
• Digital cameras using a USB cable or a supported memory card
• Mobile phones with Bluetooth or 802.11 connectivity
From any of these devices, the printer provides high-quality output with vibrant colors on media up to
216 mm by 356 mm (8.5 in by 14 in).
9
Page 10

Finding other resources for the product
You can obtain product information and further troubleshooting resources that are not included in this
guide from the following resources:
Setup Poster Provides illustrated setup information. A printed version of this document comes with
the printer. An electronic version is available
as an Adobe® Acrobat® Portable Document
Format (PDF) file on the Starter CD.
Getting Started
Guide
Onscreen User’s
Guide
Toolbox
(Windows)
Toolbox software
for PDAs
(Pocket PC and
Palm OS)
Includes information about setting up the printer
and installing the software.
Provides information about setting up and
completing basic tasks with the printer and
solving printer problems.
Provides status and maintenance information
about the printer, such as ink levels and battery
charge level, and provides links to this onscreen
User’s Guide for help in performing basic printing
tasks and solving problems. It also provides links
to HP Instant Support and the myPrintMileage
website, which keeps track of printer usage
information. You can also configure 802.11 and
Bluetooth wireless settings for wireless printing.
See Toolbox (Windows) for more information.
Provides status and maintenance information
about the printer. You can view ink levels and
battery charge level, understand printer lights,
align print cartridges, and also configure 802.11
and Bluetooth wireless settings for wireless
printing.
A printed version of this document comes with
the printer.
This guide is available as a PDF file and a
Microsoft HTML Help (CHM) file on the
Starter CD and as a CHM file and an Apple
Help file on the computer after software
installation. To view the CHM file, your
computer must be running Microsoft
Windows and Internet Explorer version 4.01
or later. To view the Apple Help file in the
Mac OS, use the Mac Help viewer. If your
computer does not meet these requirements,
use the PDF version.
The Toolbox is normally installed with the
printer software.
See Toolbox software for PDAs (Pocket PC
and Palm OS) for more information.
HP Printer Utility
(Mac OS)
Online Help
(Windows)
HP Instant Support
(Windows)
World Wide Web Provides the latest printer information. Visit
Chapter 1 - Getting started10
The HP Printer Utility contains tools to configure
print settings, calibrate the printer, clean the print
cartridges, print configuration and test pages,
order supplies online, and find website support
information. You can also configure 802.11 and
Bluetooth wireless settings for wireless printing.
See HP Printer Utility (Mac OS) for more
information.
Provides information about using the printer driver
and the Toolbox.
A web-based tool that provides self-help and
troubleshooting tips to diagnose and solve your
printer problems. It also includes printer usage
information, which helps you understand your
printing patterns.
The HP Printer Utility is normally installed with
the printer software.
The online help is installed with the printer
driver and the Toolbox.
This e-service can be accessed through the
Toolbox. See HP Instant Support (Windows)
for more information.
http://www.hp.com/support/dj460.
Page 11

Understanding the printer parts
Front view
1. Input tray extension (not included in models for some countries/regions) – Slides up to support legal-
size print media. This prevents possible media feed problems.
2. Input tray – Holds the media. Remove media and close this tray when the printer is not in use.
3. Wide media paper guide – Letter, legal, and A4 are loaded flush against this guide.
4. Media width guide – Adjusts to accommodate different media sizes. Slide to the right to accommodate
narrow media. This automatically slides the narrow media guide to the left to ensure that media is
aligned for correct print margins.
5. Narrow media guide – When you move the media width guide to the right, this guide automatically
slides to the left to accommodate narrower media.
6. Print cartridge latches – Lift these latches for easy removal and insertion of print cartridges.
7. Print cartridge cradle compartments – Holds the print cartridges.
8. Front access cover – Provides access to the print cartridges and for clearing paper jams. This cover
must be closed before printing can begin.
9. Output slot – Media exits the printer from here.
10. Output door – Drops open automatically when the printer is turned on. Allows media to exit the
printer.
Understanding the printer parts 11
Page 12
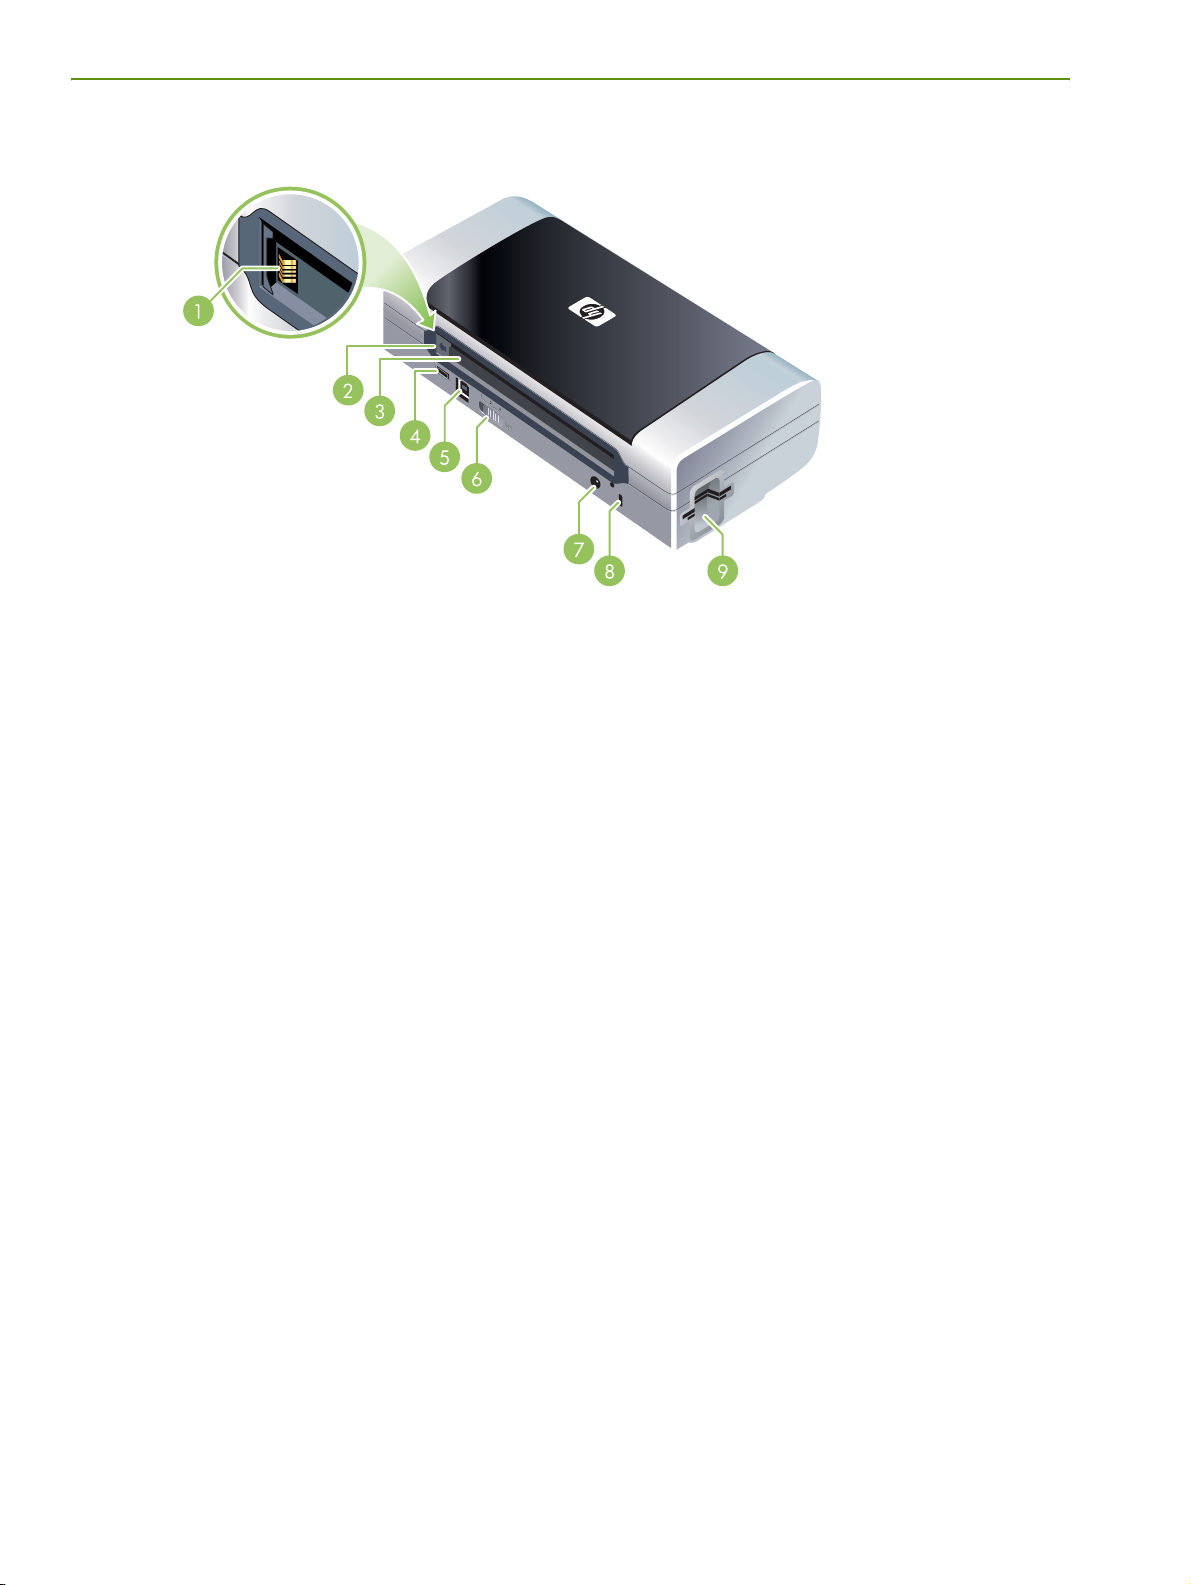
Back and side view
1. Battery contacts – Provides contact for power from the optional battery. (See HP supplies and
accessories.)
2. Battery contact cover – Covers the battery contacts when the optional battery is not installed.
3. Battery slot – Battery installs here.
4. PictBridge/USB Host Port – Connects a PictBridge device, such as a digital camera, a USB Flash drive,
or a Bluetooth USB device.
5. USB port – Connect a USB cable here.
6. Wireless profile switch – Store settings for up to three 802.11 computers or networks. This allows you
to easily move the printer from home to the office or between any three wireless network environments.
7. Power connector – Connect the power cord here.
8. Security lock slot – Connect a security lock here.
9. CF, SD, MMC slots – Top slot accepts a Type I CompactFlash (CF) card for printing digital images or an
802.11 or Bluetooth wireless printing accessory. Bottom slot accepts a Secure Digital (SD) card or
Multimedia Card (MMC) for printing digital images.
Chapter 1 - Getting started12
Page 13
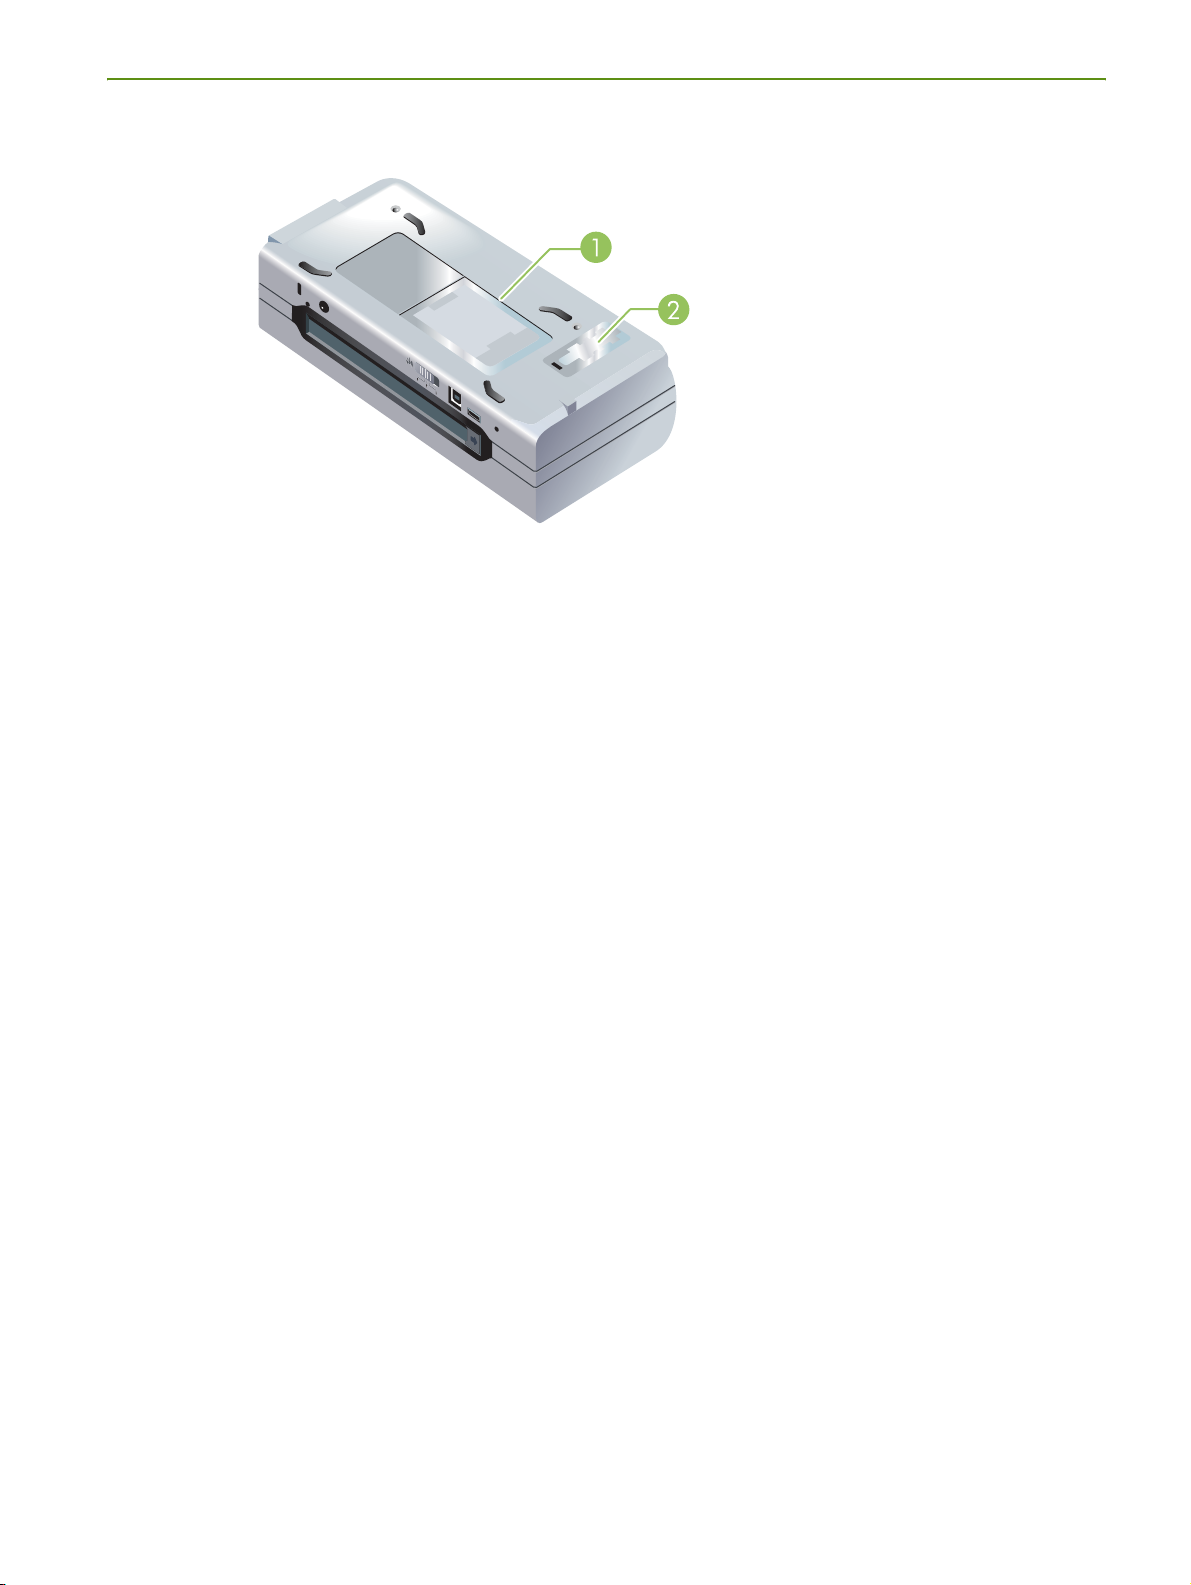
Bottom view
1. Card holder – Holds a name card or business card.
2. Cover of replaceable ink service module – Provides access to the ink service module. (See Replacing
the ink service module.)
Understanding the printer parts 13
Page 14

Travel tips
The following tips will help you prepare for traveling with your printer:
• If you are bringing an extra black or photo print cartridge, follow these guidelines: For a partially used
black print cartridge or a partially used or full photo print cartridge, store it in the travel holder to
prevent ink leakage (see HP supplies and accessories). A newly opened black print cartridge will leak
slightly at high altitudes (such as in airplanes). To avoid this, wait to install new black cartridges until
you reach your destination. Until then, keep them in their original, taped packaging.
• You can bring the printer in a carrying case. (See HP supplies and accessories.) The carrying case has
compartments for both your notebook and the printer. The compartments also detach if you want to
carry the notebook and printer separately.
• Turn off the printer using (Power button). This ensures that the print cartridges return to the home
position at the left side of the printer and lock in place.
• Disconnect the printer cable and power adapter from the printer. Slide down the input tray extension
and close the input tray.
• If you are traveling to another country/region, bring the necessary plug adapter with you.
• If you need to buy print cartridges while traveling to another country/region, see the online help called
“Traveling with your HP Mobile Printer” for regional cartridge compatibility information. This help is
available through the Toolbox (Windows), HP Printer Utility (Mac OS), or Toolbox software for PDAs
(Pocket PC and Palm OS).
• Use only the power adapter that is supplied with the printer. Do not use any other voltage transformer
or converter. The power adapter can be used with AC power sources of 100 to 240 volts, 50 or
60 Hz.
• Remove the battery if you will not be using the printer for more than a month.
• When traveling with photo paper, pack it flat so it doesn't warp or curl. Photo paper should be flat
before printing. If the corners of the photo paper curl more than 10 mm (3/8 inch), flatten the paper
by putting it in the resealable storage bag, then rolling the bag on a table edge until the paper is flat.
Chapter 1 - Getting started14
Page 15

2 Installing and using accessories
This chapter provides information on optional accessories such as the battery and wireless printer cards
that are included with certain printer models. To order accessories, see Accessories.
Installing and using the battery
The lithium-ion rechargeable battery comes with the HP Deskjet 460cb, 460wf, and 460wbt printers. It is
also available for purchase as an optional accessory. See HP supplies and accessories.
Battery safety
• Use only the battery designed specifically for the printer. See HP supplies and accessories and Printer
specifications.
• When discarding a battery, contact your local waste disposal provider regarding local restrictions on
the disposal or recycling of batteries. Though the lithium-ion rechargeable battery is mercury-free, it
might require recycling or proper disposal at end-of-life. See Recycling for more information.
• Battery might explode if incorrectly replaced or disposed of in fire. Do not short-circuit.
• To purchase a replacement battery, contact your local dealer or HP sales office. See HP supplies and
accessories.
• To avoid risk of fire, burns, or damage to your battery, do not allow a metal object to touch the battery
contacts.
• Do not disassemble the battery. There are no serviceable parts inside.
• Handle a damaged or leaking battery with extreme care. If you come in contact with the electrolyte,
wash the exposed area with soap and water. If it contacts the eye, flush the eye with water for
15 minutes and seek medical attention.
• Do not expose the battery to storage temperatures above 50°C (122°F) or below -20°C (4°F).
Important notes
Take note of the following when charging or using the battery:
• Charge the battery for 4 hours before using the battery for the first time. For subsequent charges, it
takes approximately 2 hours to fully charge the battery.
• The battery charge light is green when the battery is charging. If it is red, the battery might be faulty
and need to be replaced.
• The Power light is green when the battery is 41-100% charged, amber when 10-40% charged, and
red when less than 10% charged. Charge the battery when the Power light turns amber. If it turns red,
charge the battery as soon as possible. The battery status is also displayed on the Printer Status tab in
the Toolbox (Windows) and the Power Management panel in the HP Printer Utility (Mac OS). If you
are using a Pocket PC or Palm OS device, you can use the Toolbox software for PDAs. See Toolbox
software for PDAs (Pocket PC and Palm OS).
Installing and using the battery 15
Page 16
• If your battery is running low, either plug in the AC adapter to charge it or replace the battery with one
that is charged.
• A fully charged battery can print up to approximately 450 pages, depending on the complexity of
print jobs.
• By default, if the printer is using battery power and left idle for 15 minutes, it will turn off to conserve
the battery power. You can configure this feature in the Toolbox (Windows), the HP Printer Utility
(Mac OS), or the Toolbox software for PDAs (Pocket PC and Palm OS). See Toolbox software for PDAs
(Pocket PC and Palm OS).
• Prior to long-term storage, fully charge the battery. Do not leave the battery in a discharged (empty)
state for more than 6 months.
• To maximize battery life and capacity, observe the following temperature guidelines:
• Charging: 0° to 40°C (32° to 104°F)
• Using and storing: -20° to 50°C (-4° to 122°F)
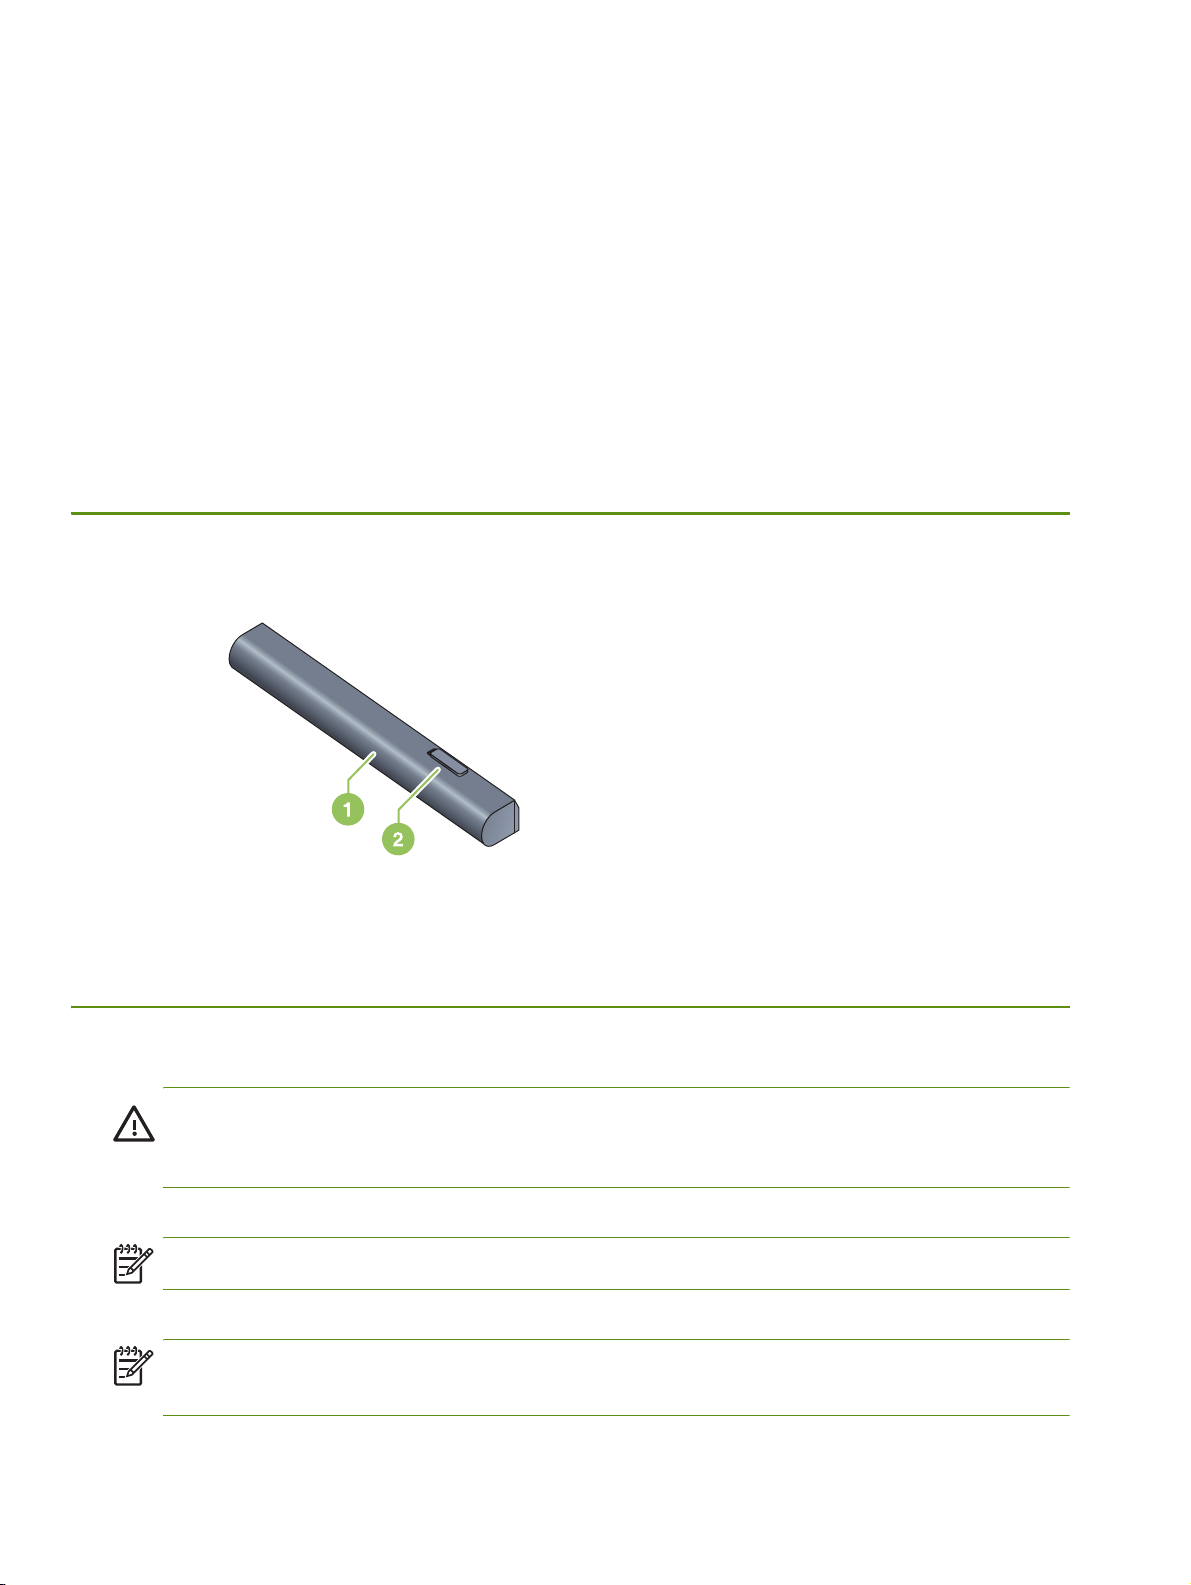
Understanding the battery
1 Battery – Supplies power to the printer.
2 Battery release slider – Slides to release the battery.
Charging and using the battery
WARNING! Charge the battery for 4 hours before using the battery for the first time. Because the battery
is normally warm while it is charging, do not charge it in a briefcase or other confined space as this might
cause the battery to overheat.
NOTE: The AC adapter is normally warm to the touch when plugged into an AC outlet.
NOTE: Wireless printing uses more battery power than wired printing. See Installing and using the
battery for information on checking the battery charge level.
Chapter 2 - Installing and using accessories16
Page 17
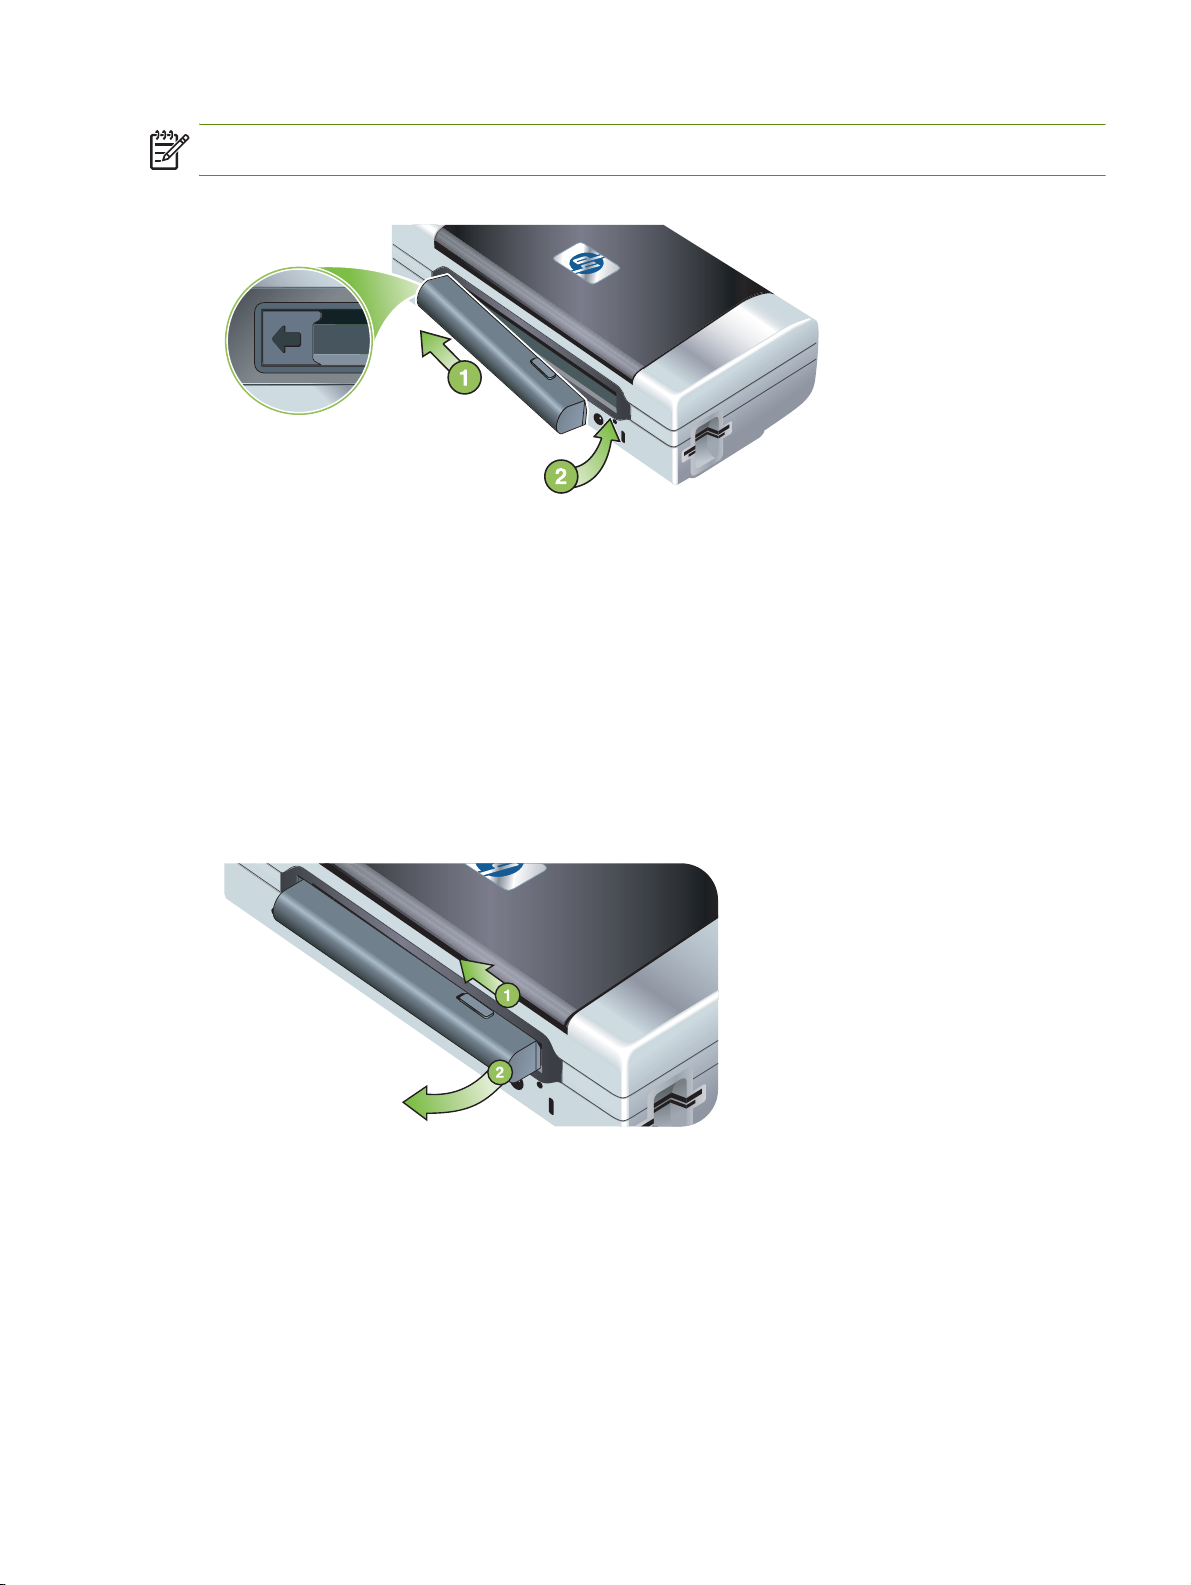
To install the battery
NOTE: You can install the battery with the printer turned on or off.
1. Slide the battery into the battery slot at an angle, until the contacts on the battery are flush with the
contacts in the battery slot. The battery contact cover slides open.
2. Push the battery into the battery slot until the battery clicks into place.
3. Plug in the AC adapter and turn on the printer. Allow the battery to charge for four hours before using
the battery for the first time. Subsequently, the battery charge light is green when the battery is
charging, and turns off when the battery is fully charged.
4. After the battery is fully charged, you can use the printer without connecting to the AC power supply.
To remove the battery
1. Slide the battery release slider in the direction of the arrow.
2. Remove the battery.
Installing and using the battery 17
Page 18
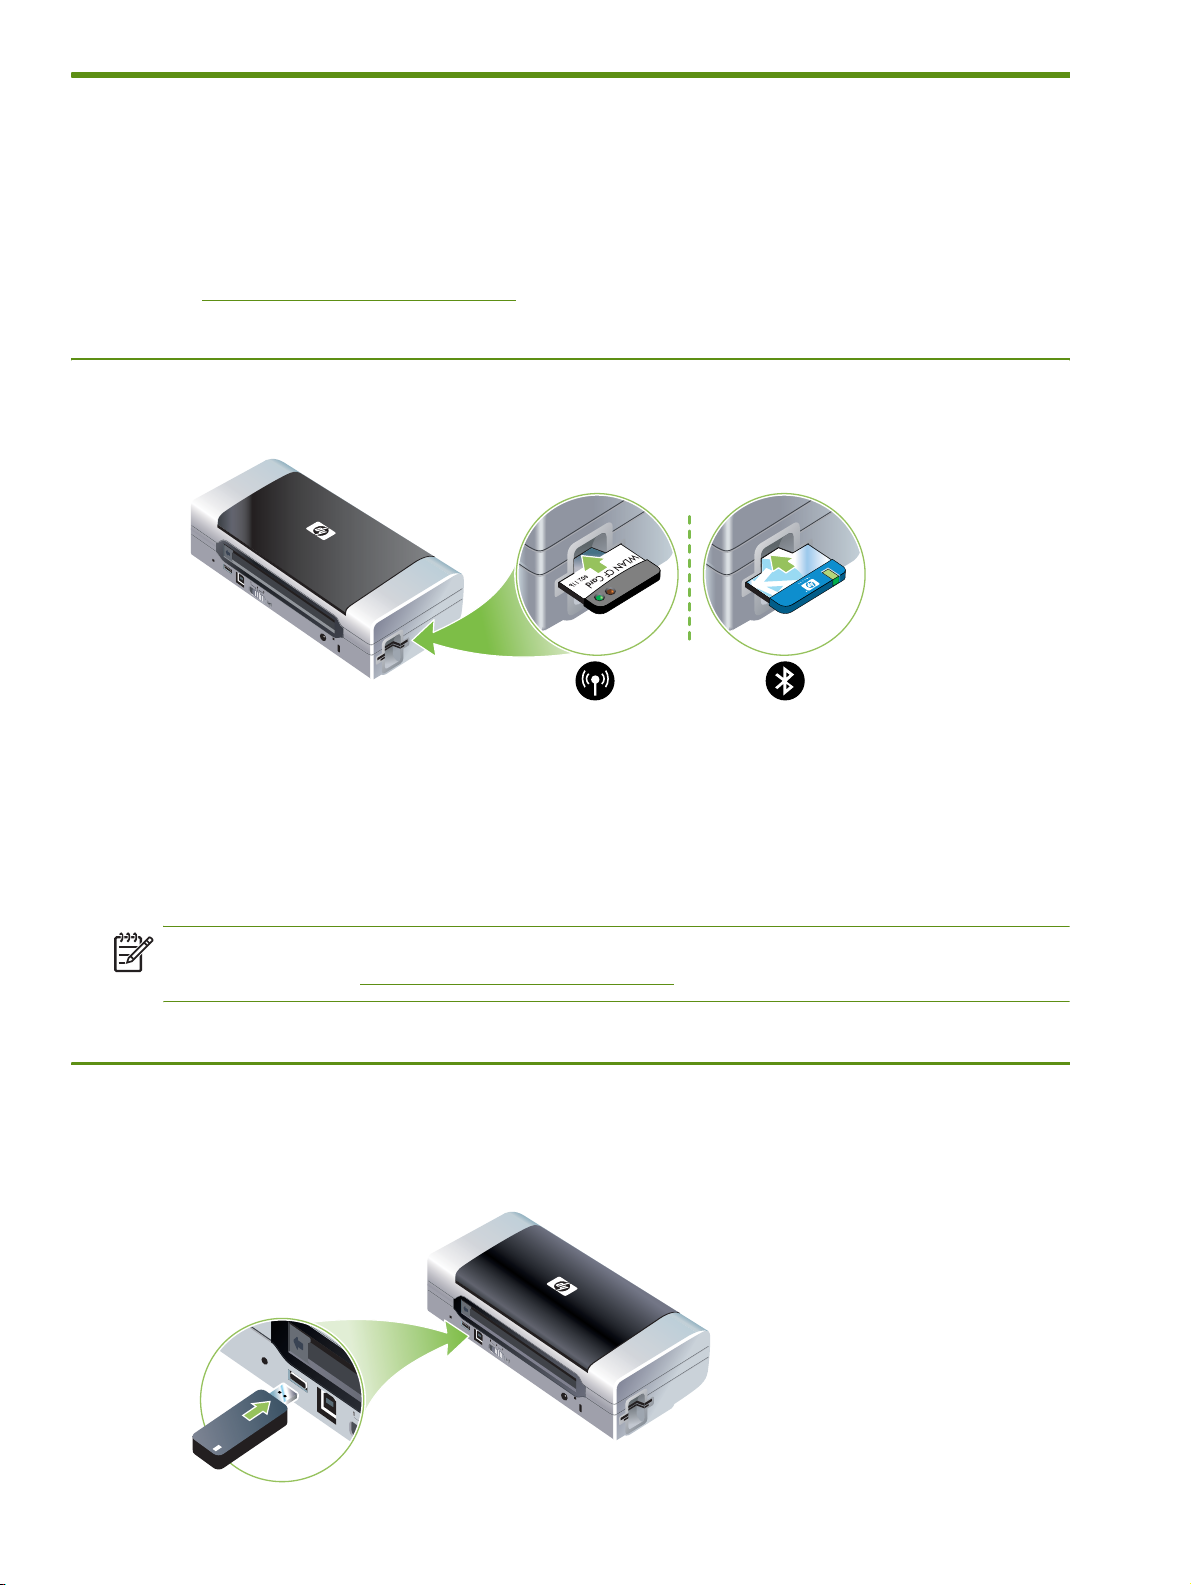
Installing and using 802.11 and Bluetooth accessories
The HP Deskjet 460wf includes an HP 802.11 wireless printer card and the HP Deskjet 460wbt includes a
Bluetooth wireless printer card. The printer also supports Bluetooth USB accessories.
See http://www.hp.com/support/dj460
to learn more about supported wireless accessories.
Installing the 802.11 or Bluetooth wireless printer card
• Insert the HP 802.11 or Bluetooth wireless printer card, with the lights facing up, into the CF card slot.
The 802.11 card has two lights: left is blue, right is orange. When the card is plugged in, the left blue
light will be on; when there is 802.11 data communication, the right orange light will be blinking.
The Bluetooth card has one light with two colors: when the card is plugged in, the green light will be on;
when there is Bluetooth data communication, the orange light will be blinking.
NOTE: Make sure that your Bluetooth host device and operating system are supported by the printer. For
more information, visit http://www.hp.com/support/dj460.
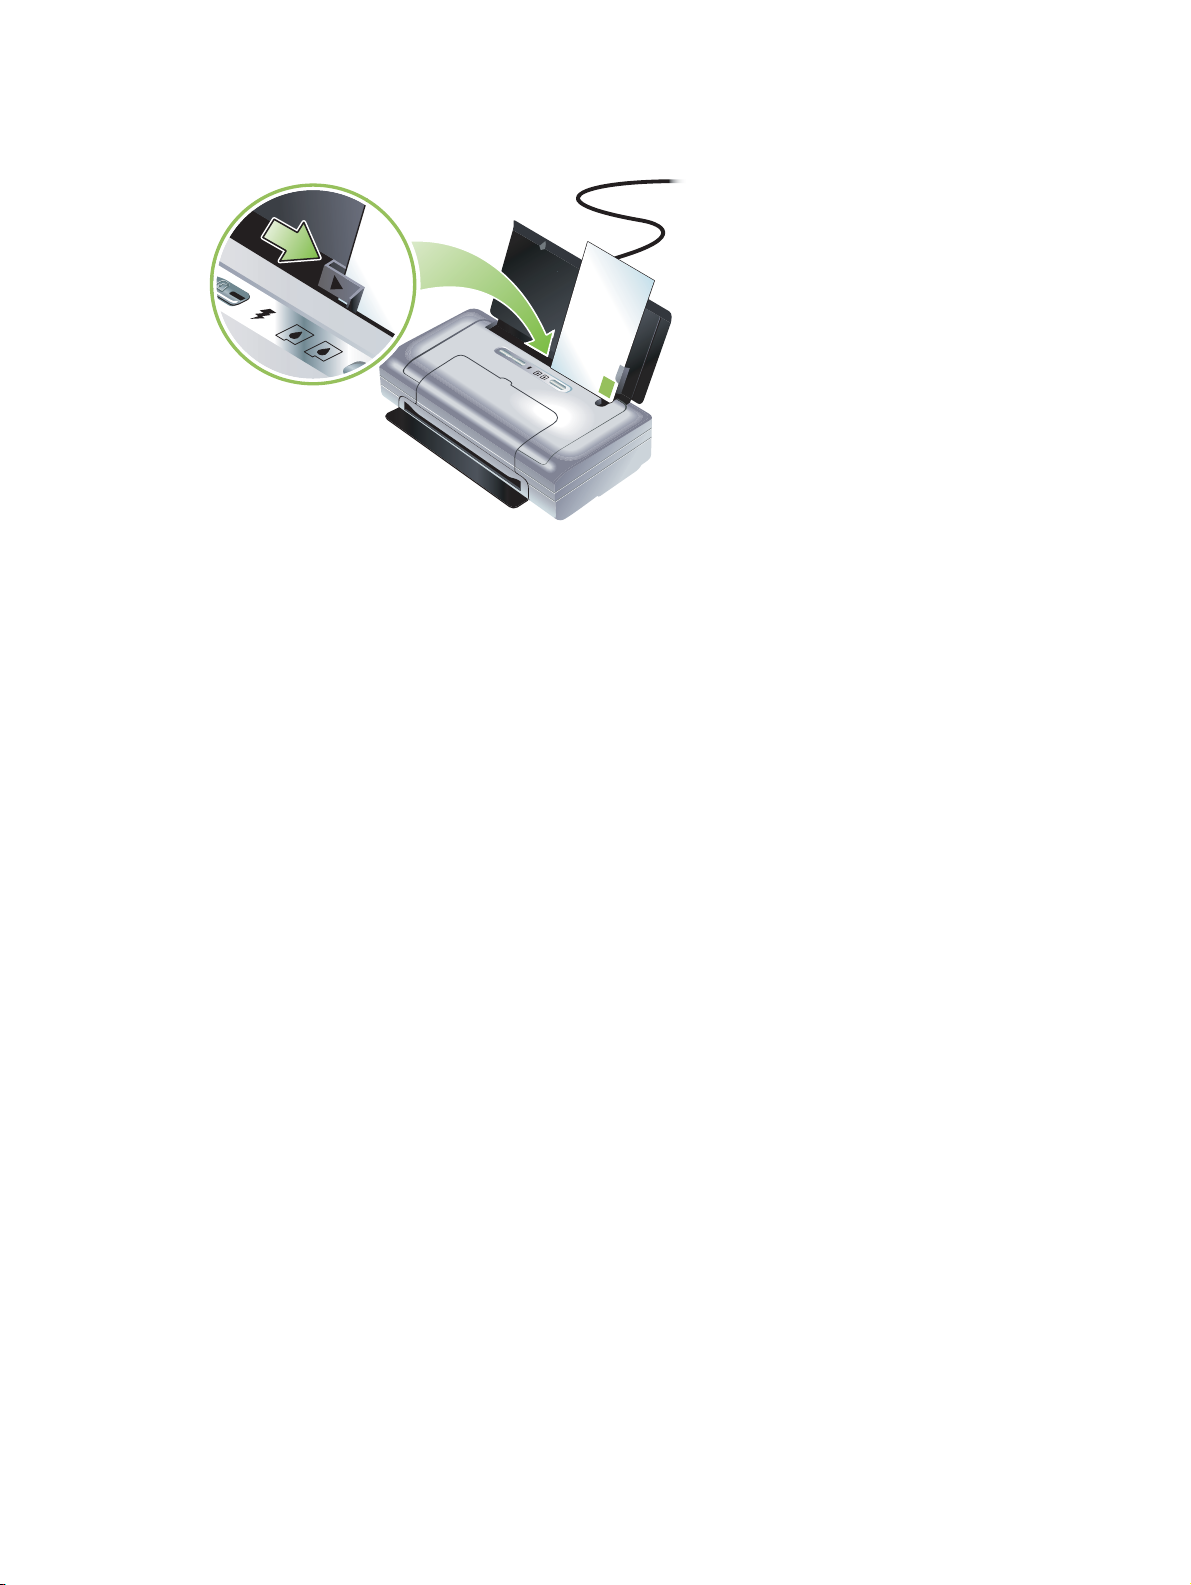
Installing a Bluetooth USB adapter
The printer supports Bluetooth accessories that connect to the USB/Pictbridge port. To install a USB
Bluetooth adapter, connect it to the USB/Pictbridge port on the back of the printer.
Chapter 2 - Installing and using accessories18
Page 19

802.11 and Bluetooth wireless printing
The 802.11 and Bluetooth features in this printer allow you to print wirelessly. 802.11 printing allows
wireless printing up to 100 meters (300 feet). Bluetooth printing allows wireless printing up to 10 meters
(30 feet).
For instructions on wireless printing from mobile devices, see Printing from mobile devices.
NOTE: Wireless communication is available through wireless printer cards that are included with certain
printer models. Also, the sending device must have built-in wireless capability or a wireless card installed.
NOTE: Wireless printing uses more battery power than wired printing. See Installing and using the
battery for information on checking the battery charge level.
About 802.11
802.11 wireless technology allows you to wirelessly connect to your printer by setting up “ad hoc”
communication between your computer and the printer. 802.11 does not require a direct line of sight
between the sending device and the receiving device.
When you set up ad hoc communication between your computer and the printer, you are creating a
network of two devices. This is the recommended setup for 802.11 printing to this mobile printer.
802.11 also lets you set up the printer on an existing “infrastructure” network. Setting it up on an
infrastructure network puts the printer directly onto a local area network (LAN) using a wireless connection
to an 802.11 wireless access point (WAP). Once the printer is successfully connected to the network
wirelessly, then all the computers on the same subnet can use the printer.
Before setting up the printer, it is recommended that you temporarily connect the printer to the computer
with a USB cable to set up the wireless connection. Once the wireless connection is established, you will
remove the cable and print wirelessly. You can also set up the printer without using a USB cable.
To set up and configure the printer for 802.11 wireless printing, see 802.11 wireless connection.
About Bluetooth
Bluetooth wireless technology allows you to wirelessly connect to your printer using radio waves in the
2.4 GHz spectrum. Bluetooth is typically used for short distances (up to 10 meters or 30 feet) and does
not require a direct line of sight between the sending device and the receiving device.
Different Bluetooth profiles emulate different types of standard cable connections and have different
capabilities. See Bluetooth wireless profiles for more information about Bluetooth profiles.
When your printer is directly connected to your computer (either by cable or Bluetooth), it is possible to
share it on a network using “printer sharing”. However, your computer has to be connected to the network
for others to use the printer.
To set up and configure the printer for Bluetooth wireless printing, see Bluetooth wireless connection.
NOTE: To configure Bluetooth settings or monitor printer status (such as ink levels) using the Toolbox, you
must connect the printer to your computer with a USB cable.
Installing and using 802.11 and Bluetooth accessories 19
Page 20

Chapter 2 - Installing and using accessories20
Page 21

3 Using the printer
This chapter provides information on media usage for the printer, changing print settings, and performing
basic printing tasks.
Selecting print media
The printer is designed to work well with most types of office paper. It is best to test a variety of print media
types before buying large quantities. Use HP media for optimum print quality. See HP supplies and
accessories.
Tips for selecting and using print media
For the best results, observe the following guidelines.
• Always use media that conforms to the printer specifications. See Understanding specifications for
supported print media.
• Load only one type of media at a time. On models that have an input tray extension, make sure the
input tray extension is fully extended.
• Load media print-side up and aligned squarely against the alignment guides. See Loading media.
• Do not overload the input tray. See Understanding specifications for supported print media.
• To prevent jams, poor print quality and other printer problems, avoid the following media:
• Multipart forms
• Media that is damaged, curled, or wrinkled
• Media with cutouts or perforations
• Media that is heavily textured, embossed, or does not accept ink well
• Media that is too lightweight or stretches easily
• For quick access to the printer settings, use the Printing Shortcuts tab (Windows only). (Open the
printer driver, select the Printing Shortcuts tab, and select the feature from the What do you want to
do? drop-down list.)
• Do not leave media in the input tray overnight. This might cause it to bend.
• Remove each sheet of media as it prints and set aside to dry. Allowing wet media to stack up might
cause smearing.
• For instructions on calibrating color, see Calibrating color.
Selecting print media 21
Page 22
Cards and envelopes
• Always load envelopes into the printer with the flap facing the back of the printer and the stamp
position oriented according to the envelope icon.
• Avoid envelopes that have a very slick finish, self-stick adhesives, clasps, or windows. Also avoid cards
and envelopes with thick, irregular, or curled edges, or areas that are wrinkled, torn, or otherwise
damaged.
• Use tightly constructed envelopes, and make sure the folds are sharply creased.
Photo paper
• Use Best mode to print photographs. This mode provides longer drying time and ensures that the ink
dries completely before the next page is printed. In this mode, printing takes longer and more memory
is required from your computer.
You can also select Maximum dpi for optimum print quality for photographs. See Printing digital
photographs.
• Remove each sheet as it prints and set it aside to dry. Allowing wet media to stack up might cause
smearing.
• Photo paper should be flat before printing. If the corners of the photo paper curl more than
10 mm (3/8 inch), flatten the paper by putting it in the resealable storage bag, then rolling the bag
on a table edge until the paper is flat.
Transparencies
• Use Best mode to print transparencies. This mode provides longer drying time and ensures that the ink
dries completely before the next page is printed. In this mode, printing takes longer and more memory
is required from your computer.
• Load transparencies print-side up and the adhesive strip pointing towards the front of the printer. The
print side of the transparencies is the rougher side.
• Remove each sheet as it prints and set it aside to dry. Allowing wet media to stack up might cause
smearing.
Custom-sized media
• Use only custom-sized media supported by the printer.
• If your application supports custom-sized media, set the media size in the application before printing
the document. If not, set the size in the printer driver. You might need to reformat existing documents to
print them correctly on custom-sized media.
Chapter 3 - Using the printer22
Page 23
Understanding specifications for supported print media
This section provides information regarding the sizes, types, and weights of media that the printer
supports. It also provides information on the tray capacity. Use HP media for optimum print quality.
See HP supplies and accessories.
NOTE: Borderless printing is available only with photo media that is L-size (89 by 127 mm;
3.5 by 5 inches); 102 by 152 mm; and 4by6inches.
Understanding supported media sizes
Media size
Standard paper sizes
U.S. Letter (216 by 279 mm; 8.5 by 11 inches)*
U.S. Legal (216 by 356 mm; 8.5 by 14 inches)*
A4 (210 by 297 mm; 8.3 by 11.7 inches)*
U.S. Executive (184 by 267 mm; 7.25 by 10.5 inches)*
U.S. Statement (140 by 216 mm; 5.5 by 8.5 inches)*
JIS B5 (182 by 257 mm; 7.2 by 10.1 inches)*
A5 (148 by 210 mm; 5.8 by 8.3 inches)*
Envelopes
U.S. #10 Envelope (105 by 241 mm; 4.12 by 9.5 inches)
Monarch Envelope (98 by 191 mm; 3.88 by 7.5 inches)
HP Greeting Card Envelope (111 by 152 mm; 4.38 by 6 inches)
A2 Envelope (111 by 146 mm; 4.37 by 5.75 inches)
DL Envelope (110 by 220 mm; 4.3 by 8.7 inches)
C5 Envelope (162 by 229 mm; 6.4 by 9 inches)
C6 Envelope (114 by 162 mm; 4.5 by 6.4 inches)
Cards
Index card (76.2 by 127 mm; 3 by 5 inches)*
Index card (102 by 152 mm; 4 by 6 inches)*
Index card (127 by 203 mm; 5 by 8 inches)*
A6 card (105 by 149 mm; 4.13 by 5.83 inches)*
Selecting print media 23
Page 24

Media size
Photo media
Photo (101.6 by 152.4 mm; 4 by 6 inches)
Photo with tab (101.6 by 152.4 mm; 4 by 6 inches)
Photo (127 by 177.8 mm; 5 by 7 inches)
Photo (203.2 by 254 mm; 8 by 10 inches)
Photo 10 by 15 cm (100 by 150 mm; 4 by 6 inches)
Photo 10 by 15 cm with tab (100 by 150 mm; 4 by 6 inches)
Borderless Photo (101.6 by 152.4 mm; 4 by 6 inches)
Borderless Photo with tab (101.6 by 152.4 mm; 4 by 6 inches)
Borderless Photo 10 by 15 cm (100 by 150 mm; 3.93 x 5.9 inches)
Borderless Photo 10 by 15 cm with tab (100 by 150 mm; 3.93 x 5.9 inches)
Photo L (89 by 127 mm; 3.5 by 5 inches)
Photo L with tear-off tab (89 by 127 mm; 3.5 by 5 inches)
Photo 2L (178 by 127 mm; 7 by 5 inches)
Photo 2L with tear-off tab (178 by 127 mm; 7 by 5 inches)
Borderless Photo L (89 by 127 mm; 3.5 by 5 inches)
Borderless Photo L with tear-off tab (89 by 127 mm; 3.5 by 5 inches)
Photo media sizes between 89 by 127 mm (3.5 by 5 inches) and 216 by
279 mm (8.5 by 11 inches)
Other media
L (89 by 127 mm; 3.5 by 5 inches)
L with tab (89 by 127 mm; 3.5 by 5 inches)
2L (178 by 127 mm; 5 by 7 inches)
2L with tab (178 by 127 mm; 5 by 7 inches)
Custom-sized media between 76.2 to 216 mm wide and 102 to 356 mm long
(3 to 8.5 inches wide and 4 to 14 inches long)*
* These media sizes support manual duplex printing. See Printing on both sides (duplexing, Windows).
Chapter 3 - Using the printer24
Page 25

Understanding supported media types and weights
Type Weight Capacity
Paper 64 to 90 g/m2
(16 to 24 lb bond)
Photo paper 5 to 12 mils Up to 10 sheets
Transparencies Up to 20 sheets
Labels Up to 20 sheets
Cards Up to 162 g/m
(90 lb index)
Envelopes 75 to 200 g/m
(20 to 53 lb bond)
2
2
Up to 50 sheets of plain paper
(5 mm or 0.2 inch stacked)
Up to 5 sheets
Up to 5 envelopes
Selecting print media 25
Page 26
Loading media
NOTE: To print on special and custom-sized media you can use the Printing Shortcuts tab (Windows
only). (Open the printer driver, select the Printing Shortcuts tab, and select the feature from the What do
you want to do? drop-down list.)
To load media
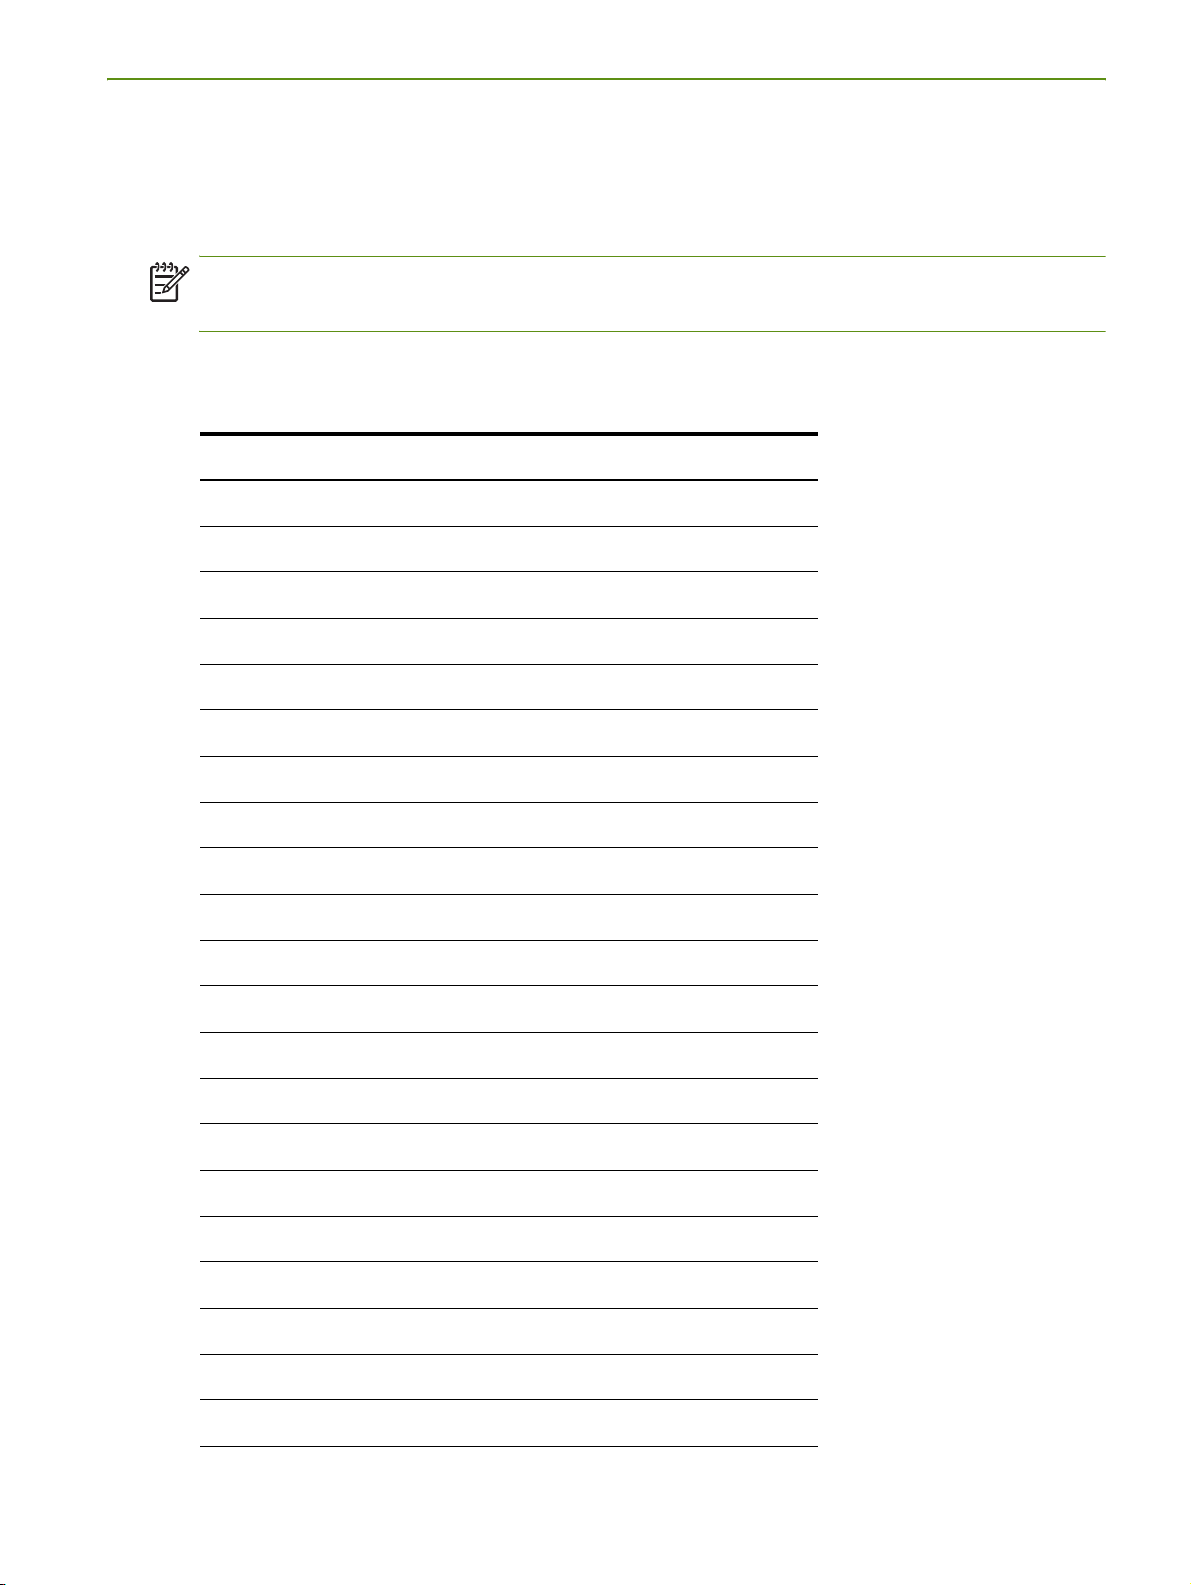
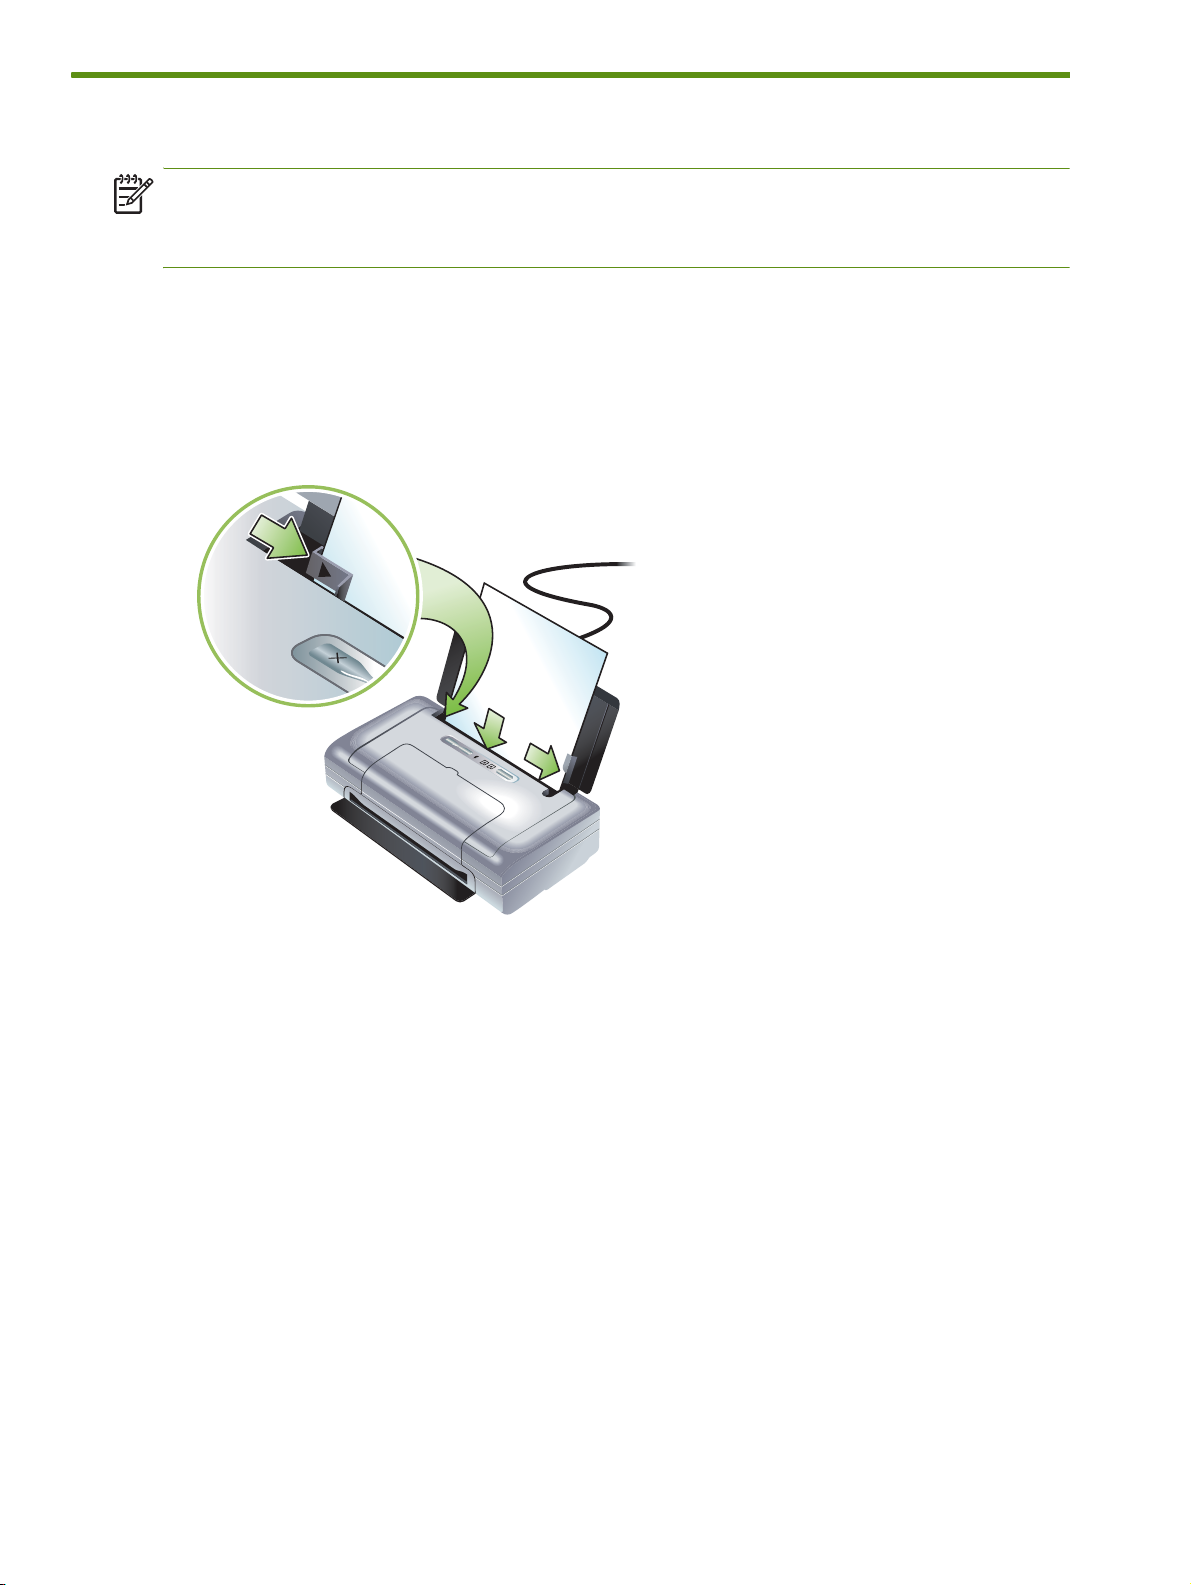
1. Remove all media from the input tray.
2. Insert the media print-side up and align it squarely against the media paper guide. Adjust the media
width guide so it fits snugly against the sides of the media.
3. If printing on legal media, extend the input tray extension, if available on your model.
4. Set desired software options:
Windows:
a. Open the printer driver (typically on the File menu, click Print, and then click Properties).
b. Select the media size from the Paper Size menu.
c. Under Paper/Quality, select the paper type you are using from the Paper Type menu.
Mac OS:
a. On the File menu, click Page Setup, and then select the media size from the Paper Size menu.
b. Open the printer driver (on the File menu, click Print).
c. Under Paper Type/Quality, select the paper type you are using from the Paper Type menu.
5. Change any other print settings if necessary, then click OK to print.
Chapter 3 - Using the printer26
Page 27

Changing print settings
You can change print settings (such as media size or type) from an application or the printer driver.
Changes made from an application take precedence over changes made from the printer driver. However,
after the application is closed, the settings return to the defaults configured in the printer driver.
NOTE: To set print settings for all print jobs, change the print settings in the printer driver.
For more information about printer driver features in Windows, see the printer driver online help. For more
information about printing from a specific application, see the documentation for that application.
To change settings from an application for current print jobs (Windows)
1. Open the document you want to print.
2. On the File menu, click Print, and then click Setup or Properties. (Specific options might vary
depending on the application you are using.)
3. Change any desired settings and click OK, Print, or a similar command.
To change default settings for all future print jobs (Windows)
1. Click the Start button, point to Settings, and then click Printers or Printers and Faxes.
2. Right-click the printer icon, and then choose Properties, Document Defaults, or Printing Preferences.
3. Change any desired settings and click OK.
To change settings (Mac OS)
1. On the File menu, click Page Setup.
2. Change any desired settings and click OK.
3. On the File menu, click Print.
4. Change any desired settings and click Print.
Canceling a print job
You can cancel a print job using one of the following methods:
• Control panel
Press (Cancel button). This will clear the current print job. It does not affect print jobs waiting to be
processed.
• Windows
Double-click the printer icon that appears in the task bar. Select the print job, and then press the Delete
key on the keyboard.
• Mac OS
Double-click the printer in the Printer Setup Utility or Print Center. Select the print job you want to
cancel and click Delete.
Changing print settings 27
Page 28

Printing on both sides (duplexing, Windows)
You can print on both sides manually using the Windows printer software.
Guidelines for printing on both sides of a page
To print on both sides of a page, you must specify duplex options in your software application or in the
printer driver.
• Always use media that conforms to the printer specifications. See Understanding specifications for
supported print media.
• Specify duplex options in your application or in the printer driver.
• Do not print on both sides of transparencies.
• Do not print on both sides of envelopes or on media lighter than 75 g/m
with these media types.
• Do not print on both sides of photo paper or glossy media unless specifically designed for two-sided
printing.
• Several kinds of media require a specific orientation when you print on both sides of a page, such as
letterhead, preprinted paper, and paper with watermarks and prepunched holes. When you print from
a computer running Windows, the printer prints the odd pages of the print job first. Load the media
with the print side facing the front of the printer.
2
(18 lb). Jams might occur
To perform duplexing (Windows)
1. Load the appropriate media. See Guidelines for printing on both sides of a page and Loading media.
2. With a document open, on the File menu, click Print, and then click Properties.
3. Click the Finishing tab.
4. Select the Print on Both Sides check box.
5. To automatically resize each page to match the document's onscreen layout, ensure Preserve Layout is
selected. Clearing this option might result in unwanted page breaks.
6. Select or clear the Flip Pages Up check box to match the way you want the binding. See the graphics
in the printer driver for examples.
7. Change any other desired settings and click OK.
8. Print your document.
9. After the first side of the document is printed, follow the onscreen instructions and reload the paper into
the tray to complete printing.
10. After reloading the paper, click Continue in the onscreen instructions to continue the print job.
Chapter 3 - Using the printer28
Page 29

Printing on special and custom-sized media
This section provides information on how to print on media such as envelopes, photo paper, postcards,
transparencies, and custom-sized media.
To print on special and custom-sized media (Windows)
1. Load the appropriate media. See Loading media.
2. With a document open, on the File menu, click Print, and then click Setup or Properties.
3. Click the Paper/Quality tab.
4. Select the media type from the Type is drop-down list.
5. Select the media size from the Size is drop-down list.
-Or-
Click Custom, enter the dimensions of the media, and then click OK.
6. Change any other desired settings and click OK.
7. Print your document.
To print on special and custom-sized media (Mac OS)
1. Load the appropriate media. See Loading media.
2. On the File menu, click Page Setup.
3. Select the media size.
4. To set a custom media size, complete the following steps:
a. Click Custom Paper Size in the Settings drop-down menu.
b. Click New, and then type a name for the size in the Paper Size Name box.
c. In the Width and Height boxes, type the dimensions, and set the margins.
d. Click OK.
e. Click Save.
5. On the File menu, click Page Setup and select the new custom size.
6. Click OK.
7. On the File menu, click Print.
8. Open the Paper Type/Quality panel.
9. Click the Paper tab and select the media type.
10. Change any other desired settings and click Print.
Printing on special and custom-sized media 29
Page 30

Printing from mobile devices
The printer supports printing from a variety of mobile devices and memory cards, such as:
• Cameras
• Mobile phones
• PDAs
Printing digital photographs
You can print photographs directly from a digital camera or directly from a memory card, or you can
transfer the photos from the card or camera to your computer and print them from a software application,
such as HP Photo Printing Software. Also, you can print photos directly from a PictBridge-compatible
camera.
If your digital camera uses a Type I CompactFlash™ (CF) card, SD card, or MMC, you can insert the card
into the printer to print your photos. Your camera must support Digital Print Order Format (DPOF) version 1
or 1.1 in order to print directly from the card to the printer. DPOF files also automatically print directly from
a USB Flash drive that is connected to the USB port of the printer.
See Printing from memory cards and USB Flash drives for more information.
To print with six-ink color
Your printer can print with six-ink color to enhance the quality of printed photographs. Print high-quality
grayscale photographs by using a black print cartridge and a tri-color print cartridge, or by using a gray
photo print cartridge and a tri-color print cartridge. To perform six-ink color printing, a photo and a tricolor print cartridge must be installed together.
NOTE: You can print high-quality black-and-white photographs using a gray photo print cartridge,
combined with the tri-color print cartridge.
Guidelines for printing photographs
• For the best results when printing photographs and images, choose Best mode and select an HP photo
paper in the printer driver. Best mode uses HP's unique PhotoREt IV color-layering technology and
ColorSmart III color optimization technology to create realistic photo images, vivid color output, and
extremely sharp text. With PhotoREt IV, a greater range of colors, lighter tones, and smoother
gradations between tones can be achieved, ensuring the best photo and image print quality.
Alternatively, select Maximum dpi, which provides up to 4800 x 1200 optimized dpi* for optimum
print quality.
*Up to 4800 x 1200 optimized dpi for color printing and 1200 input dpi. This setting might
temporarily use a large amount of hard disk space (400 MB or more) and will print more slowly. Photo
cartridge, if present, further enhances the print quality.
• It is recommended to remove each sheet of paper as it prints and set it aside to dry.
• If the printed colors visibly shift towards yellow, cyan or magenta, or there is a tinge of color in the
gray shades, you need to calibrate the color. See Calibrating color.
Chapter 3 - Using the printer30
Page 31

• If you install photo print cartridges, align the print cartridges for best possible print quality. You do not
need to align the print cartridges every time you install a photo print cartridge, only when necessary.
See Aligning the print cartridges.
• To store a print cartridge, see Travel tips.
• Always hold photo paper by the edges. Fingerprints on photo paper reduce print quality.
• Photo paper should be flat before printing. If the corners of the photo paper curl more than
10 mm (3/8 inch), flatten the paper by putting it in the resealable storage bag, then rolling the bag
on a table edge until the paper is flat.
To print from a PictBridge-compatible camera
The printer supports standard PictBridge-compliant features. See your digital camera documentation for
more information about using its PictBridge features.
1. Connect the camera to the printer with the USB cable provided with the camera. The printer and
camera compare features, and the compatible features are displayed on the camera.
2. Navigate through the camera menus to execute the desired photo-printing features.
To transfer photos to your computer
NOTE: The printer driver lets your computer read memory cards inserted into the printer as physical disk
drives when you are connected with a USB cable. You can then access your photo files and print them
with the software of your choice. (See Installing the printer software and sharing the printer (Windows).)
1. Insert the memory card into the correct card slot on the printer. Make sure the side of the card with the
connecting pins or holes is placed into the printer first.
2. Press (Cancel button) to cancel direct printing from the card. If your computer is connected to the
printer with a USB cable, the card then appears as a drive in Windows Explorer or on the Mac OS
desktop. You can then transfer the photo files to another drive on the computer or open and print your
photographs with the software application of your choice.
Printing from mobile devices 31
Page 32

Printing from mobile phones
If you have a mobile phone that supports Bluetooth and you have installed a Bluetooth wireless printer
card in your printer, you can print from your phone.
Some phones have HP’s Mobile Printing Application software installed, which can increase the quality of
the output. Visit http://www.hp.com/support/dj460
your phone and not preinstalled. Other printing applications might be available from your phone
manufacturer that support this printer.
NOTE: HP Mobile Printing Application version 2.0 and later are supported. You can download the latest
version from http://www.hp.com/support/dj460 or from your phone manufacture’s website.
See the documentation for your phone’s printing application for information on printing items such as:
• Images
• Messages: Email, short message service (SMS), and multimedia messaging system (MMS)
• Contacts
• Calendar
• Notes
to download this application if it is available for
To install the Mobile Printing Application on the phone
Use the following steps to install the Mobile Printing Application on your phone if it is not already
installed. For help using these steps, see your mobile phone documentation or visit the manufacturer’s
support website.
1. Download the Mobile Printing Application to a computer from http://www.hp.com/support/dj460
from your phone manufacturer’s website.
In this example, the name of the downloaded file is print.sis.
2. Transfer the print.sis file from the computer to the phone using one of the following methods.
• Email: Attach the print.sis file to an email, send the email to your email address, then open the
email on your phone.
• Bluetooth: If your computer has Bluetooth, use your computer’s Bluetooth utility to discover the
phone, then send the print.sis file from the computer to the phone.
• Infrared: Align the phone’s infrared lens with the computer’s infrared lens. Use the Wireless Link
feature in Windows to send the print.sis file to the phone.
3. Open the print.sis file on your phone.
4. Follow the onscreen instructions to install the application.
5. Verify that the Mobile Printing Application has been installed by scrolling through the phone’s main
menu to find the Print icon.
or
If you don’t see the Print icon, then repeat steps 3-5.
Chapter 3 - Using the printer32
Page 33

To print from a mobile phone
Print a file using one of the following methods, or see the documentation for your phone’s printing
application for information about printing.
NOTE: The printer ships with built-in fonts for Bluetooth printing. Certain models include Asian fonts for
printing from mobile phones. The fonts included depend on the country/region where the printer was
purchased. See Printer specifications.
• Mobile Printing Application
• Bluetooth Send
Printing from Pocket PC devices
Certain Pocket PC models support 802.11 and Bluetooth wireless printing. Some Pocket PC devices come
with wireless integrated and some require you to install a separate wireless card in your device to enable
802.11 or Bluetooth printing.
NOTE: 802.11 and Bluetooth wireless printing are available through wireless printer cards that are
included with certain printer models. For a description and illustration of the wireless printer cards, see
Installing and using 802.11 and Bluetooth accessories.
You can install a Pocket PC printer driver to print wirelessly from your Pocket PC, if it is not already
preinstalled. Visit http://www.hp.com/support/dj460
application to a computer running Windows.
If you are using a Pocket PC or Palm OS device, you can use the Toolbox software for PDAs to configure
802.11 and Bluetooth wireless settings for wireless printing. See Toolbox software for PDAs (Pocket PC
and Palm OS).
For printing instructions, see To print from Pocket PC devices.
For an overview of 802.11 and Bluetooth printing, see 802.11 and Bluetooth wireless printing.
For detailed information about setting up and configuring wireless settings for the printer, see 802.11
wireless connection and Bluetooth wireless connection.
To install the Pocket PC printer driver
Install the Pocket PC printer driver from a desktop or notebook computer to a Pocket PC, such as an HP
iPAQ, through Microsoft ActiveSync.
1. Download the installer program from http://www.hp.com/support/dj460t
Windows.
2. Save the installer program.
3. Connect the Pocket PC to the computer.
If you need help connecting with ActiveSync, see the Pocket PC user’s guide.
for more information and to download this
to a computer running
4. Double-click the executable file you downloaded on the computer.
The installer program copies the necessary files to the Pocket PC.
Printing from mobile devices 33
Page 34

To print from Pocket PC devices
The instructions in this section assume you have established a wireless connection with the printer using the
Toolbox software for PDAs. See Toolbox software for PDAs (Pocket PC and Palm OS).
If your PDA does not have wireless integrated, then install an 802.11 or Bluetooth wireless card in your
PDA according to the manufacturer’s instructions.
NOTE: Printing instructions for Pocket PCs vary according to the third-party printing application used. See
the documentation that came with the third-party printing application for printing instructions.
Chapter 3 - Using the printer34
Page 35

Printing from Palm OS devices
You can print from Palm OS devices using an 802.11 or Bluetooth wireless connection and the Printboy
utility. Some Palm OS devices come with wireless integrated and some require you to install a separate
wireless card in your device to enable 802.11 or Bluetooth printing.
NOTE: 802.11 and Bluetooth wireless printing are available through wireless printer cards that are
included with certain printer models. For a description and illustration of the wireless printer cards, see
Installing and using 802.11 and Bluetooth accessories.
The Printboy utility enhances the formatting for documents printed from standard Palm OS applications
such as the Address, Memo Pad, To Do List, Date Book, and Mail options. It also allows you to print using
Documents To Go. For more information, visit http://www.hp.com/support/dj460
Documents To Go enables you to print MS Word and MS Excel files. Find Documents To Go on the CD
that came with your Palm OS device or visit the DataViz website at http://www.dataviz.com
For an overview of 802.11 and Bluetooth printing, see 802.11 and Bluetooth wireless printing.
For detailed information about setting up and configuring wireless settings on the printer, see 802.11
wireless connection and Bluetooth wireless connection.
To install Printboy
.
.
For information on downloading and installing Printboy on Windows or the Mac OS, visit http://
www.hp.com/support/dj460.
For information on using Printboy, see the documentation that came with the software.
To install a wireless card
CAUTION: You must install the wireless card software files before inserting the card in the Palm OS
device. Otherwise, the card will not function properly.
If your Palm OS device does not come with wireless integrated, then install an 802.11 or Bluetooth
wireless card in your device according to the manufacturer’s instructions, or visit Palm’s website at http://
www.palm.com.
To print using standard Palm OS applications
For instructions on using Printboy to print from standard Palm OS applications, see the documentation that
came with the Printboy utility or that came with your Palm OS device.
If you are using a Pocket PC or Palm OS device, you can use the Toolbox software for PDAs to configure
802.11 and Bluetooth wireless settings for wireless printing. See Toolbox software for PDAs (Pocket PC
and Palm OS).
NOTE: Printing instructions for Palm OS devices vary according to the third-party printing application
used. See the documentation that came with the third-party printing application for printing instructions.
Printing from mobile devices 35
Page 36

To choose default printer (optional)
You can select a default printer to use for all your printing. For instructions on selecting the HP Deskjet 460
printer as the default printer, see the documentation that came with the Printboy software.
To print using Documents To Go
For instructions on printing using Documents To Go, see the documentation that came with the software, or
visit the DataViz website at http://www.dataviz.com
for more information.
Chapter 3 - Using the printer36
Page 37

Using memory devices
The following section provides information on printing from memory cards and USB Flash drives.
Printing from memory cards and USB Flash drives
If your digital camera uses a Type I CF card, SD card, or MMC, you can insert the card into the printer to
print your photos. Your camera must support Digital Print Order Format (DPOF) version 1 or 1.1 in order to
print directly from the card to the printer. See your digital camera documentation to see if it supports DPOF
files and for additional instructions on printing photos.
DPOF files are files created by digital cameras. They are stored on the camera’s memory card and contain
information such as which images are selected to print and how many of each image are to be printed or
saved. The printer can read a DPOF file from the memory card so you do not have to use the printer
software to reselect the images to print or save.
DPOF files also automatically print directly from a USB Flash drive that is connected to the USB port of the
printer.
You can also transfer photos from a memory card or a USB Flash drive onto your computer’s hard disk
and print them from a software application such as HP Photo Printing Software.
For information on loading photo paper, see Loading media.
To print from a memory card
1. Select the images you want to print by creating a DPOF file while the memory card is still in your
digital camera. The settings you can specify (such as number of copies) are specific to your camera.
See your digital camera’s documentation for more information.
2. Turn on the printer.
3. Load the appropriate media. See Loading media.
4. Configure your desired print settings:
• Windows: Open the Toolbox (see Toolbox (Windows)). Click the Printer Services tab, and then
click Print Settings. In the dialog box specify paper type, size, and print quality.
• Mac OS: Open the HP Printer Utility (see HP Printer Utility (Mac OS)). Click Direct Print Settings,
and then in the dialog box specify paper type, size, and print quality.
NOTE: If you do not have the Toolbox or HP Printer Utility installed, print a configuration page to check
printer media settings for direct printing. This information will verify whether you are loading the correct
media size and type before printing. See Understanding device information pages.
Using memory devices 37
Page 38

5. Insert the card containing the DPOF file into the correct card slot on the printer. Make sure the side of
the card with the connecting pins or holes is placed into the printer first.
CAUTION: If you do not insert the edge with card connector into the printer first, you can damage the
card, the printer, or both.
The Resume light will blink after a few seconds if there is a DPOF file on the card.
6. Press (Resume button) to print the images. The printer will automatically recognize the DPOF file on
the memory card and print the images according to the specifications you set in the file. If it is a large
file, the printer might take some time to print after you press (Resume button).
CAUTION: Do not remove the memory card until the print job is completed. Otherwise the print job will
be canceled.
NOTE: Printing might take several minutes, depending on print settings and the complexity of the image.
Chapter 3 - Using the printer38
Page 39

4 Managing and configuring the
printer
This chapter describes tools to manage the printer, such as the Toolbox (Windows), HP Printer Utility
(Mac OS), and Toolbox software for PDAs (Pocket PC and Palm OS). Other topics describe how to print
configuration and diagnostic pages, connect the printer directly to your computer using a USB cable, and
how to connect to the printer using an 802.11 or Bluetooth wireless connection.
Managing the printer
The following sections provide information on printer management tasks and tools.
Overview of printer management tasks
The following table lists the tools that can be used to manage the printer.
NOTE: The following table lists the most common tools that are used for administrator functions. Specific
procedures might include other methods.
If you want to... ...use these tools.
Toolbox
(Windows)
To monitor the printer
Media and supplies usage
View battery status
View print cartridge status
(ink levels)
Understand printer lights
To administer the printer
Printer maintenance
Configure power settings
Configure wireless settings
Toolbox
software for
PDAs
(Pocket PC
and Palm OS)
Windows
printer driver
(see Changing
print settings)
HP Printer Utility
(Mac OS)
HP Deskjet 460
Network Setup
Tool (Mac OS)
Set up alerts and notifications
Managing the printer 39
Page 40

Toolbox (Windows)
The Toolbox provides status and maintenance information about the printer. It also provides links to this
guide for help in performing basic printing tasks and solving problems. You can also configure 802.11
and Bluetooth wireless settings for wireless printing.
NOTE: If the Toolbox was not installed with the other printer software components, you can install it using
the installation program on the Starter CD.
NOTE: To configure Bluetooth settings or monitor printer status (such as ink levels) using the Toolbox, you
must connect the printer to your computer with a USB cable.
NOTE: If you are using a Pocket PC or Palm OS device, you can use the Toolbox software for PDAs. See
Toolbox software for PDAs (Pocket PC and Palm OS).
To open the Toolbox
1. Click the Start button, and then point to Programs.
2. Point to HP Deskjet 460 Series, and then click HP Deskjet 460 Series Toolbox.
Toolbox tabs
The Toolbox contains tabs where you can view product information and change configuration settings.
For more detailed information about the options on these tabs, right-click each option in the Toolbox
window and select What’s This?
Chapter 4 - Managing and configuring the printer40
Page 41

Tabs Contents
Printer Status • Selected printer
Displays a list of installed printers that are supported by the Toolbox.
• Ink level information
Shows estimated ink levels for each cartridge.
• Power Status
Displays power source (AC or battery) and percentage of battery charge remaining if the battery
is installed.
• Wireless Strength
Shows the signal strength of the wireless connection between the printer and the computer.
• Supplies information
Provides access to website where you can order printer supplies and accessories online.
• Cartridge information
Shows order numbers for the installed print cartridges.
• Preferences
Allows you to set advanced Toolbox settings. You can select which printer error messages
appear, specify whether you want to be notified by an audio alert when an error occurs, and
specify the types of error messages that you want to see.
Also, you can turn on myPrintMileage AutoSend, a service that HP provides to help you keep
track of your device usage to help you forecast and plan the purchase of supplies. See
myPrintMileage (Windows) for more information.
Managing the printer 41
Page 42

Tabs Contents
Information Printer Information
• myPrintMileage
Provides access to the myPrintMileage website where you can view the printer hardware and
print cartridge health information. You can also use this service to obtain information about
accumulated ink and media use. See myPrintMileage (Windows) for more information.
• Printer hardware
Displays detailed printer information such as model, firmware version, service ID, and other
hardware-related information.
• Traveling information
Provides information about purchasing print cartridges while traveling.
• HP Instant Support
Provides access to the HP Instant Support website for support services and troubleshooting tips.
See HP Instant Support (Windows) for more information.
• Register your printer
Registers your printer online.
• How Do I...
Displays help for common printer tasks.
• Troubleshooting
Displays step-by-step instructions to help you solve printing problems.
• Contact HP
Provides information on how to contact HP.
Printer
Services
• Align print cartridges
Aligns the print cartridges. See Aligning the print cartridges for more information.
• Clean print cartridges
Cleans the print cartridges. See Cleaning the print cartridges for more information.
• Calibrate color
Balances color tints on printed pages. See Calibrating color for more information.
• Print a demo page
Sends a demo page to the printer to verify that the printer is connected to the computer correctly
and is working properly. See Understanding device information pages for more information.
• Print settings
Prints a configuration page. See Understanding device information pages for more information.
• Bluetooth settings
Configures Bluetooth wireless settings. See Bluetooth wireless connection for more information.
• Power settings
Sets the waiting time for the printer to automatically turn off while operating in battery mode.
• Wireless profiles
Configures 802.11 wireless settings. See 802.11 wireless connection for more information.
Chapter 4 - Managing and configuring the printer42
Page 43

HP Printer Utility (Mac OS)
The HP Printer Utility contains tools to configure print settings, calibrate the printer, clean the print
cartridges, print configuration and test pages, order supplies online, and find website support information.
To open the HP Printer Utility
1. Double-click the Macintosh HD icon on the desktop.
2. Select Library, and then select Printers.
3. Select hp, select Utilities, and then select HP Printer Selector.
4. Select the printer, and then click Launch Utility.
HP Printer Utility panels
The following options are available on the HP Printer Utility:
Panel Contents
Information
And Support
Printer Settings • Direct Print Settings
• Supplies Status
Displays ink levels and information for the print cartridges.
• WOW!
Prints a sample page to view the print output quality.
• HP Support
Provides access to the HP website where you can register the printer, find support for the printer,
and find information about returning and recycling used printing supplies.
• Clean
Cleans the print cartridges.
• Device Information
Prints a configuration page that provides information about the printer.
• Travel Info
Provides information about purchasing print cartridges while traveling.
• Align
Aligns the print cartridges for best possible print quality.
• Test
Prints a test page to help identify printing problems.
• Calibrate Color
Adjusts color to correct problems with tint.
Specifies paper type, size, and print quality for Digital Print Order Format (DPOF) and personal
digital assistant (PDA) printing.
• Power Management
Displays battery charge level and provides setting to turn off the battery after a specified period
of time.
• Network Settings
Configures IP settings for network connectivity.
• Bluetooth Settings
Configures Bluetooth settings for wireless printing (only available when a USB cable is
connected).
Managing the printer 43
Page 44

HP Deskjet 460 Network Setup Tool (Mac OS)
The HP Deskjet 460 Network Setup Tool allows you to configure network settings for the printer. You can
configure wireless settings such as network location name and wireless mode, and wired settings such as
TCP/IP address, router, and subnet mask.
To open the HP Deskjet 460 Network Setup Tool
1. Double-click the Macintosh HD icon on the desktop.
2. Select Library, and then select Printers.
3. Select hp, select Utilities, and then select HP Deskjet 460 Network Setup Tool.
4. Follow the onscreen instructions to configure network settings for the printer.
Toolbox software for PDAs (Pocket PC and Palm OS)
The Toolbox software for PDAs running Pocket PC or Palm OS allows you to view status and maintenance
information about the printer. You can view ink levels and battery charge level, understand printer lights,
align the print cartridges, and also configure 802.11 and Bluetooth wireless settings for wireless printing.
See the Toolbox software documentation for more information on using the Toolbox, or visit http://
www.hp.com/support/dj460.
HP Instant Support (Windows)
HP Instant Support is a suite of Web-based troubleshooting tools. HP Instant Support helps you quickly
identify, diagnose, and resolve printing problems.
HP Instant Support provides the following information about your device:
• Easy access to troubleshooting tips
Provides tips that are customized for your device.
• Resolution of specific device errors
Provides immediate access to information that can help you resolve error messages specific to your
device.
To see a description of the problem, as well as recommendations for solving or preventing the problem,
click the link within the message. To see a list of past device errors, click Alerts on the left side of the
HP Instant Support page.
• Notification of device driver and firmware updates
Alerts you when there is a firmware or driver update with a message that appears on the HP Instant
Support homepage. Click the link within the message to go directly to the download section of the
HP website.
• Obtaining support services
Provides a list of the support services that are available for your device.
• Managing ink and media usage (myPrintMileage)
Helps you manage and forecast printer supplies usage.
Chapter 4 - Managing and configuring the printer44
Page 45

• Self diagnostic testing for your device
Runs a diagnostic test of your device. Select Printer on the Self Help menu on the Instant Support page
to start diagnosing the devices. HP Instant Support checks the computer, and a list of configured
devices appears. When you select the device that you want to diagnose, HP Instant Support helps you
with tasks such as making sure that you have the latest device driver available and gaining access to
reports about the device status and detailed device-diagnostic information.
If any errors are detected during this process, you are given the option to perform updates to the
device drivers or to perform detailed diagnostic tests on the device.
• HP expert help online (Active Chat)
Personalized help from an HP support expert is available over the Web at any time. Simply submit a
question or a description of your problem. Your recent device history, system configuration, and any
actions that you have attempted are automatically forwarded to HP (upon your approval) so that you
will not need to describe the problem again. An HP support expert will respond online to solve your
problem through a real-time Web chat.
• Knowledge database
Use the HP knowledge database to quickly find answers to your questions.
Security and privacy
When you use HP Instant Support, detailed device information, such as the serial number, error
conditions, and status, is sent to HP. HP respects your privacy and manages this information according to
the guidelines that are outlined in the HP Online Privacy Statement (http://www.hp.com/country/us/
eng/privacy.htm).
NOTE: To view all of the data that is sent to HP, select Source (for Internet Explorer) or Page Source (for
Netscape) from the View menu in your Web browser.
To access HP Instant Support
Toolbox (Windows)
• Open the Toolbox (see Toolbox (Windows)). Click the Information tab, and then click HP Instant
Support.
NOTE: Do not bookmark the Web pages that are used to open HP Instant Support. If you bookmark the
site and connect to it by using the bookmark, the pages will not contain the current information.
Managing the printer 45
Page 46

myPrintMileage (Windows)
myPrintMileage is a service that HP provides for tracking your device usage. This service helps you
forecast device usage and plan the purchase of supplies. It consists of two parts:
• myPrintMileage website
• myPrintMileage AutoSend, a utility that periodically updates the device usage information on the
myPrintMileage website
To use myPrintMileage, you must have the following:
• Toolbox (Windows) installed
• Internet connection
• Device connected
NOTE: HP recommends that you enable myPrintMileage to send data for three to six months to allow a
meaningful amount of data to accumulate on the myPrintMileage website.
On the myPrintMileage website, you can view a print analysis that includes:
• The amount of ink you have used.
• Which inks you use the most.
• The estimated number of pages you can print with the remaining ink.
To access myPrintMileage
Toolbox (Windows)
• Open the Toolbox (see Toolbox (Windows)). Click the Information tab, click myPrintMileage, and then
follow the onscreen instructions.
Windows taskbar
• Right-click the Toolbox icon in the Windows taskbar, click myPrintMileage, and then select View my
print usage.
NOTE: Do not bookmark the Web pages that are used to open myPrintMileage. If you bookmark the site
and connect to it by using the bookmark, the pages will not contain the current information.
Chapter 4 - Managing and configuring the printer46
Page 47

Understanding device information pages
The device information pages contain detailed printer information, including firmware version number,
serial number, service ID, print cartridge information, default page settings, and printer media settings.
The wireless configuration page contains 802.11 and Bluetooth connectivity information.
NOTE: The printer must not be processing any print jobs while you print the configuration and diagnostic
pages.
If you need to call HP, it is useful to print diagnostic and configuration pages before calling.
Printing device information pages from the control panel
You can print the following device information pages from the control panel on the printer, without being
connected to the printer.
To print a diagnostic page
Hold down (Power button) and press (Resume button) 4 times.
To print a configuration page
Hold down (Power button) and press (Cancel button) 4 times.
Use the configuration page to view current printer settings, ink supply status, print cartridge health, and to
troubleshoot printer problems.
To print a wireless configuration page
Hold down (Cancel button) for more than 2 seconds.
Use the wireless configuration page to view 802.11 information such as 802.11 settings for different
wireless profiles, and Bluetooth information such as Bluetooth device name.
To print a demo page
Hold down (Power button) and press (Resume button) once.
You can print a demo page to verify that you printer is working. However, if you want to verify that the
printer is connected to the computer correctly, or that the printer software is working correctly, print a test
page from the General tab in the Printer Properties dialog box (Windows) or the configuration page from
the Device Information panel in the HP Printer Utility (Mac OS).
Understanding device information pages 47
Page 48

Printing device information pages from the software
You can connect to the printer to print the following device information pages from the printer software.
To print a test page from the Toolbox (Windows)
1. Open the Toolbox. See Toolbox (Windows).
2. Click the Printer Services tab.
3. Click Print a Demo Page.
NOTE: If you are using a Pocket PC or Palm OS device, you can use the Toolbox software for PDAs. See
Toolbox software for PDAs (Pocket PC and Palm OS).
To print a configuration page from the printer driver (Windows)
1. Open the printer driver. See Changing print settings.
2. Click Properties.
3. Click the Services tab.
4. Click Print Configuration Page.
To print a test page from the HP Printer Utility (Mac OS)
1. Open the HP Printer Utility. See HP Printer Utility (Mac OS).
2. On the Test panel, click Print Test Page.
Chapter 4 - Managing and configuring the printer48
Page 49

Configuring the printer
This section describes connecting to the printer and sharing the printer with other computers that are on
the same network.
NOTE: If you are connecting the printer to a computer running Windows XP (64-bit), download the
printer software from http://www.hp.com/support/dj460
or Printers and Faxes folder.
NOTE: You must have administrator privileges to install a printer driver in Windows 2000 and later.
Direct connection
Connect the printer directly to your computer with a USB cable. For information about connecting the
printer wirelessly, see 802.11 wireless connection or Bluetooth wireless connection.
NOTE: If you install the printer software and connect a printer to a computer running Windows, you can
connect additional printers to the same computer with USB cables without reinstalling the printer software.
and install using Add Printer from the Printers
Installing the printer software and sharing the printer (Windows)
When setting up the printer, HP recommends that you connect the printer after you install the software
because the installation program is designed to provide you with the easiest setup experience.
To install the software before connecting the printer (recommended)
It is recommended to install the Toolbox, which provides status and maintenance information about your
printer. It also provides access to documentation and online help tools for solving printer problems. If you
do not install the Toolbox you will not see printer error messages on your computer screen and will not
have access to the myPrintMileage website. See Toolbox (Windows) for more information.
1. Close any running applications.
2. Insert the Starter CD into the CD drive. The CD menu runs automatically.
If the CD menu does not start automatically, double-click the Setup icon on the Starter CD.
3. On the CD menu, click Install Printer Driver.
4. Follow the onscreen instructions to complete the software installation.
5. When prompted, turn on the printer and connect the printer to your computer with a USB cable.
The Found New Hardware wizard appears on the computer screen and the printer icon is created in
the Printers folder.
NOTE: You can also share the printer with other computers using a simple form of networking known as
locally shared networking. See To share the printer on a local network.
Configuring the printer 49
Page 50

To connect the printer before the installing software
If you connected the printer to the computer before installing the printer software, the Found New
Hardware wizard appeared on the computer screen.
NOTE: If you have turned on the printer, do not turn off the printer or unplug the cable from the printer
while the installation program is running. If you do, the installation program will not finish.
1. In the Found New Hardware dialog box that provides the option for selecting a method to locate the
driver, select the advanced option and click Next.
NOTE: Do not allow the Found New Hardware wizard to perform an automatic search for the driver.
2. Select the check box for specifying the driver location, and ensure that the other check boxes are clear.
3. Insert the Starter CD into the CD drive. If the CD menu appears, close the CD menu.
4. Browse to locate the root directory on the Starter CD (for example, D:), and then click OK.
5. Click Next, and then follow the onscreen instructions.
6. Click Finish to close the Found New Hardware wizard.
The wizard automatically starts the installation program (this might take a short while). For
Windows 98 and Windows Me, you must complete the installation program at this point if you want to
install a non-English driver.
7. Complete the installation process.
NOTE: The setup program provides options to install non-driver components such as the Toolbox, which is
recommended to install. For instructions about installing these components, follow the steps outlined in To
install the software before connecting the printer (recommended).
You can also share the printer with other computers using a simple form of networking known as locally
shared networking. See To share the printer on a locally shared network.
To share the printer on a locally shared network
In a locally shared network, the printer is connected directly to the USB port of one computer (known as
the server) and is shared by other computers (clients) on the same network.
NOTE: When sharing a directly connected printer, use the computer with the newest operating system as
the server. For example, if you have a computer running Windows 2000 and another computer running
an older version of Windows, use the computer running Windows 2000 as the server.
Use this configuration only in small groups or when usage is low. The computer that is connected to the
printer is slowed down when many users print to the printer.
1. From the Windows desktop, click the Start button, point to Settings, and then click Printers or Printers
and Faxes.
2. Right-click the printer icon, click Properties, and then click the Sharing tab.
3. Click the option to share the printer, and give the printer a share name.
4. If you are sharing the printer with client computers that use other versions of Windows, you can click
Additional Drivers to install their drivers as a convenience to them. This optional step requires you to
have the Starter CD in your CD drive.
Chapter 4 - Managing and configuring the printer50
Page 51

Installing the printer software and sharing the printer (Mac OS)
You can connect the printer directly to Macintosh computers running Mac OS X (10.2 and 10.3). You can
also share the printer on a local network.
To install the software
1. Connect the printer to your computer with a USB cable.
2. Close any running applications.
3. Insert the Starter CD into the CD drive. The CD menu runs automatically.
If the CD menu does not start automatically, double-click the Setup icon on the Starter CD.
4. Click Install Driver and follow the onscreen instructions.
5. Open the Printer Setup Utility or Print Center, which is located in the Applications\Utilities folder.
6. Click Add.
7. Select USB from the menu.
8. Select the printer from the printer list, and then click Add. A mark appears beside the printer name,
indicating that this printer is now the default printer.
9. Close the Print Center.
To share the printer on a local network
When you connect the printer directly, you can still share the printer with other computers using a simple
form of networking known as locally shared networking. Use this configuration only in small groups or
when usage is low. The computer that is connected to the printer is slowed down when many users print to
the printer.
Basic requirements for sharing in a Macintosh environment include the following items:
• The Macintosh computers must be communicating on the network using TCP/IP, and the Macintosh
computers must have IP addresses. (AppleTalk is not supported.)
• The printer that is being shared must be connected to a built-in USB port on the host Macintosh
computer.
• Both the host Macintosh computer and the client Macintosh computers that are using the shared printer
must have printer-sharing software installed and the printer driver or PPD for the printer that is installed.
(You can run the Installer program to install the printer sharing software and associated Help files.)
• The client Macintosh computers should have the appropriate HP printer drivers installed.
• The client Macintosh computers must be PowerMac computers.
For more information about USB printer sharing, see the support information that is available on the Apple
website (http://www.apple.com
Use the following steps to share the printer among Macintosh computers running Mac OS X (10.2 and
10.3):
1. Open System Preferences, click Sharing, click Services, and then select the Printer Sharing check box.
2. To print from the other Macintosh computers (clients) on the network, preselect the printer in Sharing.
Then, choose the neighborhood where the printer is shared and select the printer.
) or the Mac Help on the computer.
Configuring the printer 51
Page 52

Uninstalling the printer software
To uninstall the printer software (Windows)
If you are using Windows 2000 or later, you must have administrator privileges to uninstall the printer
software.
1. If the printer is connected directly to the computer with a USB cable, disconnect the printer.
2. Close any running applications.
3. Click the Start button, point to Settings, and then click Control Panel.
4. Double-click Add/Remove Programs.
5. Select the printer software that you want to remove.
6. Click the button for adding or removing the software.
7. Follow the onscreen instructions to complete the removal of the printer software.
NOTE: If the uninstallation process fails, restart the computer and repeat the previous steps to uninstall
the software.
If the software was not successfully installed or the uninstaller could not be found, complete the following
steps to run the scrubber utility.
8. Disconnect the printer from the computer.
9. On the computer, restart Windows.
10. Insert the Starter CD into the CD drive. If the CD menu appears, exit the CD menu.
11. Locate the scrubber utility on the Starter CD and run the utility.
• For Windows 98 and Windows Me, use the scrub9x.exe file located in the
Utils\Scrubber\Win9x_Me folder.
• For Windows 2000 and later, use the scrub2k.exe file located in the Utils\Scrubber\Win2k_XP
folder.
To uninstall the printer software (Mac OS)
1. If the printer is connected directly to the computer with a USB cable, disconnect the printer.
2. Close any running applications.
3. Insert the Starter CD into the CD drive. The CD menu runs automatically.
If the CD menu does not start automatically, double-click the Setup icon on the Starter CD.
4. Click Install Driver.
5. When the Main Installation dialog box appears, select Uninstall from the drop-down list located in the
upper-left part of the dialog box.
Chapter 4 - Managing and configuring the printer52
Page 53

802.11 wireless connection
This section describes how to set up and configure the printer for an 802.11 wireless connection. The
recommended method for setting up this mobile printer for wireless communication with a single computer
is using an “ad hoc” network. However, you might want to set it up on an existing “infrastructure” network
that uses a wireless access point (WAP). For an overview of 802.11 wireless printing, see About 802.11.
NOTE: 802.11 printing is available through 802.11 wireless printer cards that are included with certain
printer models. For a description and illustration of the 802.11 wireless printer card, see Installing and
using 802.11 and Bluetooth accessories. Also, the sending device must have built-in 802.11 capability or
an 802.11 wireless card installed.
About the wireless profile switch
The printer includes an 802.11 wireless profile switch so you can store settings for up to three 802.11
computers or networks. This allows you to easily move the printer from home to office or between any
three wireless network environments.
When you install the printer driver from the Starter CD and select Wireless for the connection type, the
802.11 wireless profile settings are stored in the current position of the wireless profile switch. Once you
have installed the software using a wireless connection, you can configure the three wireless profile
settings to match the wireless networks you want to use.
The wireless profile settings used by each switch position (1, 2, and 3) can be configured using the
following tools:
• Toolbox (Windows)
When the Toolbox is communicating with the printer, you can use it to configure wireless profiles.
NOTE: If you are using a Pocket PC or Palm OS device, you can use the Toolbox software for PDAs. See
Toolbox software for PDAs (Pocket PC and Palm OS).
• Wireless Profile Configuration Utility (Windows)
You can use this tool to set up multiple printers at one time using a USB Flash drive. See To configure
multiple printers for 802.11 (Windows).
• HP Deskjet 460 Network Setup Tool (Mac OS).
This tool automatically launches during installation, or you can use it later to configure 802.11 wireless
profiles. See HP Deskjet 460 Network Setup Tool (Mac OS).
For instructions on configuring 802.11 wireless profiles after software installation, see Configuring and
using 802.11 wireless profiles.
Configuring the printer 53
Page 54

About 802.11 wireless network settings
In order to connect to an 802.11 wireless network, you need to know the network settings. If you do not
know the settings for a network, you will need to get this information from a network administrator.
You can configure the following 802.11 options for each profile:
Wireless Network Name (SSID)
By default, the printer looks for an ad hoc network called “hpsetup”. This is the wireless network name, or
SSID. Your network may have a different SSID.
Communication mode
There are two communication mode options for an 802.11 connection:
• Ad hoc (recommended)
On an ad hoc network, the printer is set to ad hoc communication mode and communicates directly
with other wireless devices without the use of a wireless access point (WAP).
• Infrastructure
On an infrastructure network, the printer is set to infrastructure communication mode and
communicates with other devices on the network, whether the devices are wired or wireless, through a
WAP. WAPs commonly act as routers or gateways on small networks.
Wireless security settings
• Network authentication: The printer’s factory default setting is Open network. The network does not
require security for authorization or encryption.
• Data encryption: Wired Equivalent Privacy (WEP) provides security by encrypting data sent over radio
waves from one wireless device to another wireless device. Devices on a WEP-enabled network use
WEP keys to encode data. If your network uses WEP, you must know the WEP key(s) it uses.
If you set Data encryption to disabled, the printer will attempt to detect and automatically associate to
open wireless network named “hpsetup”.
All devices on the ad hoc network must:
• Be 802.11-compatible
• Have ad hoc as the communication mode
• Have the same network name SSID
• Be on the same subnet
• Be on the same channel
• Have the same 802.11 security settings
Chapter 4 - Managing and configuring the printer54
Page 55

Setting up for 802.11 using factory defaults
The factory default wireless network settings are:
• Communication mode: ad hoc
• Network name (SSID): hpsetup
• Security (encryption): disabled
NOTE: On the Mac OS, an ad hoc network is referred to as a computer to computer network.
To set up using ad hoc mode and factory defaults with a USB cable (Windows and
Mac OS)
You can set up your printer on a wireless ad hoc network (Windows) or computer to computer network
(Mac OS) using the default settings if you have a USB cable nearby for a temporary connection. Follow
these steps to connect to the printer using its factory default ad hoc network settings:
1. Close any running applications.
2. Insert the Starter CD into the CD drive. The CD menu runs automatically.
If the CD menu does not start automatically, double-click the Setup icon on the Starter CD.
3. On the CD menu, click Install Printer Driver (Windows) or Install Driver (Mac OS).
4. Follow the onscreen instructions to complete the software installation, temporarily connecting a USB
cable when prompted. Mac OS only: Complete the installation using the HP Deskjet 460 Network
Setup Tool, which launches automatically during setup.
NOTE: When new 802.11 settings are sent to the printer to configure one of the wireless profiles, the
printer will turn off and then back on again (power cycle) to enable the settings.
To configure additional 802.11 wireless profiles after you have set up the printer, see Configuring and
using 802.11 wireless profiles.
To set up using ad hoc mode and factory defaults with no USB cable (Windows)
You can set up your printer on a wireless ad hoc network using the default settings even if you have no
USB cable. Follow these steps to connect to the printer using its factory default ad hoc network settings:
1. Open the configuration utility for your computer’s wireless network card, then do the following:
a. Create a new wireless profile with the following values:
• Communication mode: ad hoc
• Network name (SSID): hpsetup
• Security (encryption): disabled
b. Activate the profile.
2. Wait two minutes for the printer to obtain an IP address, then print a wireless configuration page by
holding down (Cancel button) for more than two seconds.
3. On the configuration page, verify the following for the printer’s network settings:
• Communication mode: ad hoc
• Network name (SSID): hpsetup
• The IP address is not 0.0.0.0
Configuring the printer 55
Page 56

If one of the previous conditions is not true, then repeat the preceding steps.
4. Close any running applications.
5. Insert the Starter CD into the CD drive. The CD menu runs automatically.
If the CD menu does not start automatically, double-click the Setup icon on the Starter CD.
6. On the CD menu, click Install Printer Driver.
7. On the Connection Type screen, select Wireless, and then click Next.
8. Follow the onscreen instructions to complete the software installation.
NOTE: When new 802.11 settings are sent to the printer to configure one of the wireless profiles, the
printer will turn off and then back on again (power cycle) to enable the settings.
To configure additional 802.11 wireless profiles after you have set up the printer, see Configuring and
using 802.11 wireless profiles.
To set up a computer to computer (ad hoc) connection using factory defaults with no USB
cable (Mac OS)
You can set up your printer on a wireless computer to computer (ad hoc) network using the default settings
even if you have no USB cable. Follow these steps to connect to the printer using the factory default
settings:
1. Print a wireless configuration page by holding down (Cancel button) for more than 2 seconds.
2. Open the AirPort Setup Assistant, and then follow the onscreen instructions for joining an existing
wireless network. Use hpsetup as the existing network to join.
3. Insert the Starter CD into the CD drive. The CD menu runs automatically.
If the CD menu does not start automatically, double-click the Setup icon on the Starter CD.
4. On the CD menu, click Install Driver.
5. On the Connection Type screen, select Wireless Network, and then click Done.
6. On the Welcome screen, click Continue.
7. Select Wireless from the printer list drop-down menu.
8. Select the printer in the printer name list, and then click Continue.
If the printer does not appear in the list, wait for a minute and then click Rescan.
9. Enter hpsetup as the network name, and then click Apply.
10. Select None for wireless security, and then click OK.
11. Click Send Settings to send the settings to the printer.
NOTE: When new 802.11 settings are sent to the printer to configure one of the wireless profiles, the
printer will turn off and then back on again (power cycle) to enable the settings.
To configure additional 802.11 wireless profiles after you have set up the printer, see Configuring and
using 802.11 wireless profiles.
NOTE: The HP Deskjet 460 does not support the Mac OS classic environment.
Chapter 4 - Managing and configuring the printer56
Page 57

Setting up for 802.11 on existing (non-default) networks
If you want to connect to an existing network with settings other than the factory defaults (for example an
infrastructure network), and are already connected wirelessly using the factory defaults, you can simply
enter the network settings for one of the three positions of the wireless profile switch using the Toolbox
(Windows) or HP Deskjet 460 Network Setup Tool (Mac OS). See Configuring and using 802.11 wireless
profiles.
NOTE: To use the printer with any wireless connection, you must run Setup at least once from the Starter
CD and create a wireless connection. After performing one wireless setup, you can connect the printer to
additional wireless networks by configuring new wireless profiles in the wireless profile switch.
To set up on an existing network with a USB cable (Windows or Mac OS)
You can set up your printer on any wireless network if you have a USB cable nearby to use for a
temporary connection. Follow these steps to create a wireless connection to the printer:
1. Get all of the necessary settings for the wireless network. See About 802.11 wireless network settings.
2. Close any running applications.
3. Insert the Starter CD into the CD drive. The CD menu runs automatically.
If the CD menu does not start automatically, double-click the Setup icon on the Starter CD.
4. On the CD menu, click Install Printer Driver (Windows) or Install Driver (Mac OS).
5. Follow the onscreen instructions to complete the software installation.
a. Enter the wireless network settings in the dialogs.
b. Temporarily connect a USB cable when prompted.
c. Mac OS only: Complete the installation using the HP Deskjet 460 Network Setup Tool, which
launches automatically during setup.
NOTE: When new 802.11 settings are sent to the printer to configure one of the wireless profiles, the
printer will turn off and then back on again (power cycle) to enable the settings.
To configure additional 802.11 wireless profiles after you have set up the printer, see Configuring and
using 802.11 wireless profiles.
To set up on an existing network with no USB cable
This section describes connecting to an existing network with settings other than the factory defaults, or
setting up a new ad hoc (Windows) or computer to computer (Mac OS) network that does not use the
factory defaults, when all of the following conditions are true:
• You have a computer with 802.11.
• You do not have a USB cable.
• You have never set up the printer to connect wirelessly.
If all of the above are true, then you will need to do the following:
1. Set up the printer with a wireless connection using the factory defaults. See Setting up for 802.11
using factory defaults.
2. Configure one of the three positions of the wireless profile switch with the desired network settings
using the Toolbox (Windows) or HP Deskjet 460 Network Setup Tool (Mac OS). See Configuring and
using 802.11 wireless profiles.
Configuring the printer 57
Page 58

Configuring and using 802.11 wireless profiles
The printer includes an 802.11 wireless profile switch so you can store settings for up to three 802.11
computers or networks. This allows you to easily move the printer from home to office or between any
three wireless network environments.
You can modify these wireless profiles using the Toolbox (Windows) or the HP Deskjet 460 Network Setup
Tool (Mac OS). See Toolbox (Windows) and HP Deskjet 460 Network Setup Tool (Mac OS).
NOTE: If you are using a Pocket PC or Palm OS device, you can use the Toolbox software for PDAs. See
Toolbox software for PDAs (Pocket PC and Palm OS).
After configuring a wireless profile, you can print a wireless configuration page to get a list of the profile
settings and to ensure they have been properly set. See To print a wireless configuration page.
After you have configured more than one of the wireless profiles, you can use the wireless profile switch on
the printer to switch between the different profiles. See To use the wireless profile switch.
The Wireless Profile Configuration Utility (Windows) allows you to configure several printers with the same
settings. See To configure multiple printers for 802.11 (Windows).
To configure 802.11 wireless profiles (Windows)
This section assumes that the Toolbox is communicating with the printer.
NOTE: To use the printer with any wireless connection, you must run Setup at least once from the Starter
CD and create a wireless connection. After performing one setup to create a wireless connection, you can
connect the printer to additional networks by configuring new wireless profiles and changing the wireless
profile switch position.
NOTE: If you can see the ink levels in the Toolbox, the Toolbox is communicating with the printer.
NOTE: When new 802.11 settings are sent to the printer to configure one of the wireless profiles, the
printer will turn off and then back on again (power cycle) to enable the settings.
1. Open the Toolbox. See Toolbox (Windows).
2. Click the Printer Services tab.
3. Click Wireless Profiles.
Chapter 4 - Managing and configuring the printer58
Page 59

4. Click the Edit Profile button (current, 1, 2, or 3) for the profile you want to edit.
The “current” profile is the current position (1, 2, or 3) of the wireless profile switch on the printer.
5. Enter the wireless profile information for the network that you want to connect to, and then click Save
Profile.
To configure 802.11 wireless profiles (Mac OS)
NOTE: When new 802.11 settings are sent to the printer to configure one of the wireless profiles, the
printer will turn off and then back on again (power cycle) to enable the settings.
1. Select the profile to configure using the wireless profile switch on the printer. See To use the wireless
profile switch.
2. Double-click the Macintosh HD icon on the desktop.
3. Select Library, and then select Printers.
4. Select hp, select Utilities, and then select HP Deskjet 460 Network Setup Tool.
5. On the Welcome screen, click Continue.
6. Select Wireless from the printer list drop-down menu or USB if the printer is currently connected via a
USB cable.
7. Select the printer in the printer name list, and then click Continue.
If the printer does not appear in the list, wait for a minute and then click Rescan.
8. Enter the wireless profile information, and then click Apply.
9. Click Send Settings to send the settings to the printer.
To use the wireless profile switch
Each profile you configure in the software (1, 2, and 3) corresponds to a wireless profile switch position
(1, 2, and 3) on the printer. The “current” profile is the current position (1, 2, or 3) of the wireless profile
switch.
NOTE: You can print a wireless configuration page to get a list of the profile settings and to ensure they
have been properly set. See To print a wireless configuration page.
To print on a specific set profile
1. Change the number on the wireless profile switch to that specific profile.
2. Change the wireless network on your computer to be in that specific profile.
3. Send a print job using the installed printer driver.
After you have configured more than one of the wireless profiles, you can use the wireless profile switch on
the printer to switch between the different profiles.
Configuring the printer 59
Page 60

For example, if you configured profile 1 for printing in an infrastructure environment (for example, the
office) and configured profile 2 for printing in an ad hoc environment (for example, away from the office
or on the road), you only have to move the switch between 1 and 2 to switch between those profiles.
Make sure the switch is in the appropriate position (1, 2, or 3) to match the profile you are using before
sending a print job. For example, if you are on the road and had previously configured switch position 2
for ad hoc wireless printing on the road, move the switch to position 2 before sending a print job.
NOTE: After switching from one wireless profile to another, the first print job takes 10 seconds or so
before it starts to print.
To reset 802.11 wireless profiles to factory defaults
To reset the active profile (the current position of the wireless profile switch)
• Hold down (Power button) and press (Cancel button) 8 times.
To reset all three 802.11 wireless profiles
• Hold down (Power button), press (Cancel button) twice, and then press (Resume button)
8 times.
To configure multiple printers for 802.11 (Windows)
You can use the Wireless Profile Configuration Utility to conveniently set up multiple printers for wireless
connection. This utility exports the printer’s wireless profile settings to a USB Flash drive. You can then
configure other printers with these settings by inserting the flash drive into another printer’s USB host port.
NOTE: The Wireless Profile Configuration Utility is supported on the following operating systems:
Windows 2000, and Windows XP.
To use the Wireless Profile Configuration Utility
1. Insert the 802.11 wireless printer card into the every printers’ CF card slot.
2. Connect the USB Flash drive to one printer’s USB host port. For the location of this port, see Back and
side view.
When the USB Flash drive is inserted, the 802.11 wireless printer card lights will turn off. The lights will
turn on again after the 802.11 settings have been configured on the USB Flash drive.
3. Close any running applications.
4. Insert the Starter CD into the CD drive. The CD menu runs automatically.
If the CD menu does not start automatically, double-click the Setup icon on the Starter CD.
5. On the CD menu, click Enterprise Solutions, and then click Wireless Profile Configuration Utility.
6. Follow the onscreen instructions to export the printer’s wireless profile settings to a USB Flash drive and
then configure the other printers by moving the USB Flash drive to the USB host port of each printer.
Chapter 4 - Managing and configuring the printer60
Page 61

Bluetooth wireless connection
This section describes how to set up and configure the printer for a Bluetooth wireless connection. For an
overview of Bluetooth, see About Bluetooth.
You can configure Bluetooth wireless settings during software installation (setup), or you can configure
settings later using the Toolbox (Windows) or HP Printer Utility (Mac OS). See Configuring Bluetooth
wireless settings.
NOTE: If you are using a Pocket PC or Palm OS device, you can use the Toolbox software for PDAs. See
Toolbox software for PDAs (Pocket PC and Palm OS).
NOTE: To configure Bluetooth settings or monitor printer status (such as ink levels) using the Toolbox
(Windows), you must connect the printer to your computer with a USB cable.
NOTE: Bluetooth printing is available through Bluetooth wireless printer cards that are included with
certain printer models. For a description and illustration of the Bluetooth wireless printer card, see
Installing and using 802.11 and Bluetooth accessories. Also, the sending device must have built-in
Bluetooth capability or a Bluetooth wireless card installed.
Setting up a Bluetooth wireless connection
The following sections describe how to set up a Bluetooth wireless connection.
To set up a Bluetooth wireless connection (Windows)
1. Close any running applications.
2. Insert the Starter CD into the CD drive. The CD menu runs automatically.
If the CD menu does not start automatically, double-click the Setup icon on the Starter CD.
3. On the CD menu, click Install Printer Driver.
4. Select Other Port when prompted for the port.
5. Select Skip when prompted to connect the printer.
6. Follow the onscreen instructions to complete the software installation.
7. Using the host Bluetooth software on your computer, locate the COM port number for the Bluetooth
Client assigned to your Bluetooth device. For example, if you are using a 3Com Bluetooth adapter on
your computer, open the Bluetooth Connection Manager, select COM Ports from the Tools menu, and
take note of the COM port number of the 3Com Bluetooth Serial Client port.
8. From the Windows desktop, click the Start button, point to Settings, and then click Printers or Printers
and Faxes.
9. Right-click the printer icon, and then click Properties.
10. Click the Ports tab and select the COM port as identified in step 6.
11. Click Apply, and then click OK.
To configure Bluetooth wireless settings after you have set up the printer, see Configuring Bluetooth
wireless settings.
Configuring the printer 61
Page 62

To set up a Bluetooth wireless connection (Mac OS)
1. Connect the printer to your computer with a USB cable.
2. Open System Preferences, and from the Hardware list click Bluetooth. Make sure Bluetooth is turned
on.
3. Insert the Starter CD into the CD drive.
Double-click the CD icon on the desktop, and then double-click the Setup icon. Also, you can locate
the Installer folder on the Starter CD.
4. Click Install Driver and follow the onscreen instructions.
5. Open the Printer Setup Utility or Print Center, which is located in the Applications\Utilities folder.
6. Click Add.
7. Select Bluetooth from the menu.
8. Select the printer from the printer list, and then click Add. A mark appears beside the printer name,
indicating that this printer is now the default printer.
9. Close the Print Center.
To configure Bluetooth wireless settings after you have set up the printer, see Configuring Bluetooth
wireless settings.
Configuring Bluetooth wireless settings
You can use the Toolbox (Windows), HP Printer Utility (Mac OS), or the Toolbox software for PDAs
(Pocket PC and Palm OS) to configure Bluetooth wireless settings.
NOTE: In order to change the printer’s Bluetooth settings you must connect the printer to your computer
with a USB cable.
To configure Bluetooth wireless settings (Windows)
1. Connect the printer to your computer with a USB cable.
2. Insert the Bluetooth wireless printer card into the CF slot in the printer. (See Installing the 802.11 or
Bluetooth wireless printer card.)
3. Open the Toolbox. See Toolbox (Windows).
4. Click the Printer Services tab.
5. Click Bluetooth Settings.
6. Set the Bluetooth wireless options you want.
For descriptions of the Bluetooth wireless options, see Bluetooth wireless settings options.
7. After you have set the options you want, click OK.
A warning dialog box appears.
8. Click OK to close the warning dialog box.
9. In the Toolbox, select the HP Deskjet 460 Series Bluetooth driver in the drop-down menu.
10. Close the Toolbox.
The printer ignores any other device that tries to establish a connection. The device must wait until the
original connection is closed before it can establish a new connection.
Chapter 4 - Managing and configuring the printer62
Page 63

To configure Bluetooth wireless settings (Mac OS)
Bluetooth connections are supported in Mac OS X (10.3 and later), provided Bluetooth hardware is
included or installed in your computer.
1. Connect the printer to your computer with a USB cable.
2. Insert the Bluetooth wireless printer card into the CF slot in the printer. (See Installing the 802.11 or
Bluetooth wireless printer card.)
3. Open the HP Printer Utility. See HP Printer Utility (Mac OS).
4. Select the printer and click Launch Utility.
5. Click the Bluetooth Settings panel.
6. Set the Bluetooth wireless options you want.
For descriptions of the Bluetooth wireless options, see Bluetooth wireless settings options.
7. Click Apply Now.
The printer ignores any other device that tries to establish a connection. The device must wait until the
original connection is closed before it can establish a new connection.
Bluetooth wireless settings options
NOTE: In order to change the printer’s Bluetooth settings you must connect the printer to your computer
with a USB cable.
To see the Bluetooth-specific information for your printer, print a wireless configuration page. See To print
a wireless configuration page.
Bluetooth device address
This is the address by which Bluetooth devices identify the printer. You cannot change the printer’s
Bluetooth device address.
Bluetooth device name
When a device discovers the printer, it displays the printer’s Bluetooth device name. The printer ships with
a default Bluetooth device name: HP Deskjet 460/[serial number].
This option allows you to change the printer’s Bluetooth device name. In order to change the printer’s
name you must connect the printer to your computer with a USB cable.
NOTE: Up to 60 characters can be entered and saved for the Bluetooth printer name. You can print a
wireless configuration page to see the full, 60-character name.
NOTE: The printer’s Bluetooth device name appears in Bluetooth applications only. In the Windows
Printers folder, the printer is identified as the HP Deskjet 460 series.
Configuring the printer 63
Page 64

To change the printer’s Bluetooth device name (Windows)
1. Connect the printer to your computer with a USB cable.
2. Open the Toolbox. See Toolbox (Windows).
3. Click the Printer Services tab.
4. Click Bluetooth Settings.
5. Enter a new printer name of up to 60 characters in the Printer Name box.
6. Click OK.
The printer’s Bluetooth device name is changed.
To change the printer’s Bluetooth device name (Mac OS)
1. Connect the printer to your computer with a USB cable.
2. Open the HP Printer Utility. See HP Printer Utility (Mac OS).
3. Click the Bluetooth Settings panel.
4. Enter a new printer name.
5. Click Apply Now.
The printer’s Bluetooth device name is changed.
PIN code
This option allows you to change the printer’s PIN code. When the printer is set to Encryption required
(see Encryption required), devices attempting to use the printer are prompted for a PIN code.
In order to change the printer’s PIN code you must connect the printer to your computer with a USB cable.
To change the printer’s PIN code (Windows)
1. Connect the printer to your computer with a USB cable.
2. Open the Toolbox. See Toolbox (Windows).
3. Click the Printer Services tab.
4. Click Bluetooth Settings.
5. Click the Change PIN Code button.
The Change PIN Code dialog box appears.
6. Enter the new PIN Code. The default PIN Code is “0000” (four zeros).
7. Re-enter the new PIN code.
8. Click OK.
The PIN code is changed.
To change the printer’s PIN code (Mac OS)
1. Connect the printer to your computer with a USB cable.
2. Open the HP Printer Utility. See HP Printer Utility (Mac OS).
3. Click the Bluetooth Settings panel.
4. Click the Change PIN Code button.
The Change PIN Code dialog box appears.
5. Enter the new PIN Code. The default PIN Code is “0000” (four zeros).
6. Re-enter the new PIN code.
7. Click Apply Now.
The PIN code is changed.
Chapter 4 - Managing and configuring the printer64
Page 65

Reset device access
The following steps will clear all bonded devices from the printer’s memory.
To reset device access (Windows)
1. Open the Toolbox. See Toolbox (Windows).
2. Click the Printer Services tab.
3. Click Bluetooth Settings.
4. Click the Reset Device Access button.
A warning dialog box appears.
5. Click OK to close the warning dialog box.
All bonded devices are removed from the printer’s memory.
To reset device access (Mac OS)
1. Open the HP Printer Utility. See HP Printer Utility (Mac OS).
2. Click the Bluetooth Settings panel.
3. Click the Reset Device Access button.
A warning dialog box appears.
4. Click OK to close the warning dialog box.
All bonded devices are removed from the printer’s memory.
Access modes
Access modes determine the level of access that Bluetooth-enabled devices have to the printer.
The printer has three access modes:
Public mode
The printer can be discovered by all Bluetooth-enabled devices. See Bluetooth discovery for more
information.
Private mode
The printer can be discovered only by devices that have stored the printer’s address. See Bluetooth
discovery for more information.
Encryption required
When the Encryption required checkbox is selected, all data sent to the printer is encrypted. This option
also automatically sets authentication. The printer then requires the following:
• All data sent over a Bluetooth wireless connection must be encrypted.
• All users must enter a PIN code the first time they print. See PIN code for more information.
NOTE: All devices must send a PIN code the first time they print when Encryption required is selected.
See PIN code for more information.
Configuring the printer 65
Page 66

To reset to factory default settings
NOTE: Using the following instructions will reset only the printer’s Bluetooth settings.
1. Press and hold down (Power button).
2. While holding down (Power button), press (Cancel button) 4 times, then press (Resume
button) 6 times.
3. Release (Power button).
To turn off Bluetooth
To turn off Bluetooth printing, remove the Bluetooth wireless printer card from the printer.
Bluetooth discovery
Discovery is the process by which a Bluetooth-enabled device detects other Bluetooth-enabled devices that
are within range.
When a device discovers the printer, it displays the printer’s Bluetooth device name. See Bluetooth device
name for more information.
The method of discovery varies according to the type of Bluetooth software used.
Bluetooth fonts
The printer ships with built-in fonts for Bluetooth printing. Certain models include Asian fonts for printing
from mobile phones. The fonts included depend on the country/region where the printer was purchased.
See Printer specifications.
Wireless configuration page
The wireless configuration page shows 802.11 and Bluetooth information you need when using the
printer. For more information and instructions on printing this page, see Understanding device information
pages.
Bonding
When a printer and a sending device bond, they store each other’s Bluetooth device address. This allows
the device to discover the printer in Private mode. See Private mode for more information.
The printer can bond to up to 31 devices. If you reach this limit and want to bond to an additional device,
you must clear all the previously bonded devices from the printer’s memory. See Reset device access for
instructions.
Chapter 4 - Managing and configuring the printer66
Page 67

Bluetooth wireless profiles
Serial port profile (SPP)
The Serial Port Profile is a wireless version of a serial port on the printer that can be used with notebook
computers, Pocket PC devices such as HP iPAQs, and other PDA devices to print with Bluetooth wireless
technology. The Serial Port Profile sends data as a series of bytes and does not support bi-directional
communication.
Object push profile (OPP)
The Object Push Profile lets you print from devices that use the Object Exchange protocol (OBEX), such as
mobile phones and personal digital assistants (PDAs) such as Pocket PC and Palm OS devices. Files that
can be transferred over OBEX include vCard (stores business cards, addresses and phone numbers),
vCalendar (supports event tracking and to-do lists), vMessage (supports simple messages and text), JPEG
(for images), and ASCII text for mobile phones and PDAs such as Palm OS devices.
Basic printing profile (BPP)
The Basic Printing Profile extends the capabilities of OBEX so you can better control the printing from
Bluetooth-enabled PDAs, mobile phones, and other devices. The Basic Printing Profile lets you set the
printer, the number of copies to print, and other printing attributes, such as multiple per page sheet or
handout printing.
The Basic Printing Profile is flexible, allowing for “driverless” printing, so any printer that supports the
profile can print data from a device that also supports the profile. This profile is bi-directional, so it allows
printer status information (the progress of the print job, or errors such as “out of paper” or “paper jam”) to
be sent back to the computer to be displayed.
Basic imaging profile (BIP)
The Basic Imaging Profile lets you print images from a compatible digital camera or other mobile device
with Bluetooth wireless technology.
Hardcopy cable replacement profile (HCRP)
The Hardcopy Cable Replacement Profile lets you print with the same features, quality and speed as
printing with a cable. The Hardcopy Cable Replacement Profile provides the same basic functionality as
the Serial Port Profile, with the addition of bi-directional communication (e.g., messages such as “out of
paper”, “out of ink”, and job status). It also supports all of the functions offered with HP all-in-one devices,
such as printing, scanning, faxing and copying.
Unlike the Basic Printing Profile, the Hardcopy Cable Replacement Profile requires you to have the printer
driver installed on the computer you are printing from, so it is primarily useful for printing from a PC.
Configuring the printer 67
Page 68

Chapter 4 - Managing and configuring the printer68
Page 69

5 Maintaining and troubleshooting
This chapter explains basic printer maintenance and troubleshooting. You can find information about the
state of the printer and the print cartridges from the Toolbox (Windows), the HP Printer Utility (Mac OS),
and the Toolbox software for PDAs (Pocket PC and Palm OS) if you have one of these installed. You can
also perform maintenance functions from these utilities.
Maintaining the printer
The printer does not require scheduled maintenance, except for replacing the ink service module. (See
Replacing the ink service module.) You should attempt, however, to keep the printer free of dust and
debris. This cleaning keeps the printer in peak condition and might also make the diagnosis of problems
easier.
WARNING! Turn off the printer and unplug the power cord before cleaning the printer. If using the
optional battery, turn off the printer and remove the battery before cleaning.
Cleaning the printer
When you clean the printer, follow these guidelines:
• Clean the outside of the printer with a soft cloth moistened with mild detergent and water.
NOTE: Clean the printer only with water or water mixed with a mild detergent. Using other cleaners or
alcohol can damage the printer.
• Clean the inside of the front access cover with a dry, lint-free cloth.
CAUTION: Be careful not to touch the rollers. Skin oils on the rollers can cause print quality problems.
Maintaining the printer 69
Page 70

Cleaning the print cartridges
If printed characters are incomplete, or if dots or lines are missing from the printouts, you might need to
clean the print cartridges. These are symptoms of clogged ink nozzles, which can result from prolonged
exposure to air.
NOTE: Before you clean the print cartridges, make sure the print cartridge ink levels are not low or
empty. Low ink levels can also cause incomplete characters, missing lines, or dots on the printouts. Check
the print cartridge lights to make sure they are not on. (See Printer lights reference.) You can also check the
status of the print cartridges from the Printer Status tab in the Toolbox (Windows) or HP Printer Utility
(Mac OS). Replace any low or empty print cartridges. For instructions, see Replacing the print cartridges.
If you are using a Pocket PC or Palm OS device, you can use the Toolbox software for PDAs. See Toolbox
software for PDAs (Pocket PC and Palm OS).
To clean print cartridges automatically
NOTE: Clean the print cartridges only when necessary. Cleaning uses ink and shortens the life of the
print cartridges. There are three levels of cleaning available. After one level of cleaning, perform the next
level of cleaning only if the results are not satisfactory.
Control panel
1. Press and hold down (Power button).
2. While holding down the button, do one of the following. Perform the next level of cleaning only if
results from the previous level are not satisfactory.
a. For level 1 cleaning: Press (Cancel button) twice.
b. For level 2 cleaning: Press (Cancel button) twice and (Resume button) once.
c. For level 3 cleaning: Press (Cancel button) twice and (Resume button) twice.
3. Release (Power button).
The printer begins the cleaning process.
4. Print a configuration page. See Understanding device information pages.
Toolbox (Windows)
1. Open the Toolbox. See Toolbox (Windows).
2. Click the Printer Services tab, click Clean Print Cartridges, and then follow the onscreen instructions.
HP Printer Utility (Mac OS)
1. Open the HP Printer Utility. See HP Printer Utility (Mac OS).
2. Click Clean and follow the onscreen instructions.
Chapter 5 - Maintaining and troubleshooting70
Page 71

To clean print cartridges manually
Poor contact between the print cartridges and the print cartridge cradles can also affect the quality of the
printout. When this occurs, try cleaning the electrical contacts on the print cartridges and print cartridge
cradles.
1. Remove the print cartridge from the printer. (See Replacing the print cartridges.)
2. Clean the electrical contacts on the print cartridge cradle with a dry cotton swab.
3. Carefully clean the electrical contacts on the print cartridge with a soft, dry, lint-free cloth.
CAUTION: To prevent damage to the electrical contacts, you should wipe the contacts only once. Do not
wipe the ink nozzles on the print cartridges.
4. Reinstall the print cartridges.
Maintaining the printer 71
Page 72

Replacing the print cartridges
You can check the ink levels from the Toolbox (Windows), the HP Printer Utility (Mac OS), and the Toolbox
software for PDAs (Pocket PC and Palm OS). For information about using these tools, see Overview of
printer management tasks.
After removing a print cartridge from its package, install it right away.
CAUTION: HP recognizes customer’s choice, but cannot guarantee the quality or reliability of non-
HP print cartridges. Printer services or repairs required as a result of using non-HP or refilled print
cartridges are not covered under warranty.
NOTE: To find out which print cartridges work with your printer, see HP supplies and accessories.
CAUTION: To prevent clogs, ink failure, and bad electrical connections, do not touch the print cartridge
ink nozzles or copper contacts, and do not remove the copper strips.
1. Remove the new print cartridge from its package and then pull the colored tab to remove the protective
film from the cartridge.
Chapter 5 - Maintaining and troubleshooting72
Page 73

2. With the printer turned on, open the front access cover. Wait for the carriage to stop moving. This
should take only a few seconds.
CAUTION: Only remove or install print cartridges when the print cartridge carriage stops moving.
.Lift the print cartridge latch open and gently remove the print cartridge from its cradle compartment.
3.
4. Insert the new print cartridge into its cradle compartment at the same angle at which you removed the
old print cartridge. Check the number on the latch against the number on the print cartridge to make
sure you are inserting the correct print cartridge.
Maintaining the printer 73
Page 74

5. Close the print cartridge latch. If the cartridge is inserted correctly, closing the latch gently pushes the
cartridge into its cradle compartment. Press the latch to make sure it is seated flat on the cartridge.
6. Close the front access cover.
7. Wait for the carriage to complete the print cartridge initialization routine and return to the home
position at the left side of the printer before using the printer.
NOTE: Do not open the front access cover until the print cartridge initialization is complete.
Aligning the print cartridges
Whenever you install a new print cartridge, you should align the print cartridges for the best possible print
quality. If your printout is grainy, has stray dots, jagged edges, or the ink is bleeding into another color,
you can re-align them through the Toolbox or printer driver (Windows), the HP Printer Utility (Mac OS), or
the Toolbox software for PDAs (Pocket PC and Palm OS). For information about using these tools, see
Overview of printer management tasks.
To align the print cartridges
NOTE: Load plain paper into the paper tray before aligning the print cartridges. An alignment page is
printed during the alignment process.
Toolbox (Windows)
1. Open the Toolbox. See Toolbox (Windows).
2. Click the Printer Services tab, click Align Print Cartridges, and then follow the onscreen instructions.
HP Printer Utility (Mac OS)
1. Open the HP Printer Utility. See HP Printer Utility (Mac OS).
2. Click Align and follow the onscreen instructions.
Chapter 5 - Maintaining and troubleshooting74
Page 75

Printing with a single print cartridge
If one of the print cartridges runs out of ink before you can replace it, you can still print with a single print
cartridge.
Empty cartridge Cartridges used Output
Black Prints with only the tri-color print
Tri-color Prints with only the black or photo
Photo Prints with only the tri-color print
NOTE: Printing with one print cartridge might be slower and the print quality might be affected. It is
recommended to print with both print cartridges. For borderless printing, the tri-color print cartridge must
be installed.
Calibrating color
If you are not satisfied with the appearance of the colors, you can calibrate colors manually to ensure the
best print quality
NOTE: Calibrate the color only when the tri-color and photo print cartridges are installed together. The
photo print cartridge is available for purchase as an optional accessory. See HP supplies and accessories.
Color and grayscale
cartridge
All documents will print in grayscale
print cartridge
Color and grayscale
cartridge
NOTE: If you are using a Pocket PC or Palm OS device, you can calibrate the color using the Toolbox
software for PDAs. See Toolbox software for PDAs (Pocket PC and Palm OS).
Color calibration balances color tints on printed pages. It is only necessary if:
• Printed colors have visibly shifted toward yellow, cyan or magenta.
• There is a color tinge in the gray shades.
Low ink levels in the print cartridges might also produce incorrect colors.
To calibrate color
Toolbox (Windows)
1. Open the Toolbox. See Toolbox (Windows).
2. Click the Printer Services tab, click Calibrate Color, and then follow the onscreen instructions.
HP Printer Utility (Mac OS)
1. Open the HP Printer Utility.
2. Click Calibrate Color and follow the onscreen instructions.
Maintaining the printer 75
Page 76

Replacing the ink service module
The replaceable ink service module holds waste ink from the black print cartridge. When it is almost full,
the printer lights will prompt you to replace it. See Printer light patterns.
When the ink service module is full, the printer will stop printing. If you have a new ink service module,
install it immediately by following the instructions that come with it.
Otherwise, visit http://www.hp.com/support/dj460
In the meantime, remove the black print cartridge to continue printing. The printer can print using only the
tri-color print cartridge but the color results and print speed will be affected. See Printing with a single print
cartridge.
CAUTION: Allowing the ink service module to fill completely can result in black ink spillage. Take care to
avoid spilling the ink in the ink service module. Ink can permanently stain fabric and other materials.
NOTE: If you have installed the Toolbox (Windows), you can choose to display error messages on your
screen when there is a problem with your printer. See Installing the printer software and sharing the printer
(Windows).
or see Support and warranty to get a replacement.
Chapter 5 - Maintaining and troubleshooting76
Page 77

Troubleshooting tips and resources
Use the following sections to resolve printing problems:
• For printing problems, see Resolving printing problems.
• For paper jam and paper-feed problems, see Resolving paper-feed problems.
• For installation problems, see Troubleshooting installation issues.
If these sections do not resolve the problem, see General troubleshooting tips and check the items in that
section. If your problem is still not resolved, see Support and warranty for information on contacting HP.
General troubleshooting tips
If the suggestions in Resolving printing problems, Resolving paper-feed problems, or Troubleshooting
installation issues do not resolve the problem, try the following general troubleshooting tips.
Check the printer
Verify the following:
• Power cord and other cables are working and firmly connected to the printer. Make sure the printer is
connected firmly to a functioning alternating current (AC) power outlet and is turned on. See Printer
specifications for voltage requirements.
• The printer is connected directly to the USB port if using a USB connection. Do not share the port with
other devices, such as a Zip drive. Make sure the cable is connected firmly to the printer and computer.
• All packing tapes and materials are removed from the printer.
• Print cartridges are properly installed in their correct cradle compartments. Verify that you have
removed the tape from each cartridge.
• Print cartridge latches and all covers are closed.
• Media is loaded correctly in the tray and is not jammed in the printer.
• If using battery power, confirm that the battery power is not low. See Charging and using the battery.
• Power light is on and not blinking. When the printer is first turned on, it takes approximately
45 seconds to warm up.
• Printer is in the Ready state. If lights are on or blinking, see Printer lights reference.
• Printer can print a configuration page. See Understanding device information pages.
Check the software
Verify the following:
• The printer is set as the current or default printer. See Changing print settings.
• No error messages appear on the computer screen.
• Pause Printing is not selected if you are using Windows.
• The status Stopped does not appear in the Printer Setup Utility or Print Center in the Mac OS.
• The Use Printer Offline option is not checked in Windows 2000 and Windows XP.
• The Print to file option is not checked in the Print dialog box. For Windows, try checking Print directly
to the printer from the Advanced tab in the Printer Properties dialog box.
• The print settings (such as paper type, paper size, margins, and color) in the printer driver are correct
See Changing print settings.
Troubleshooting tips and resources 77
Page 78

• You are not running too many programs when performing a print job. Close programs that you are not
using or restart the computer before attempting the print job again.
• Any necessary software, such as Printboy for Palm OS users, is installed in the host device if using a
Bluetooth connection. Make sure your Bluetooth settings are correct. See Bluetooth wireless connection.
• Your wireless network settings are correct if using an 802.11 connection. See 802.11 wireless
connection.
• You created a DPOF file on your digital camera memory card, if you are trying to print directly from
the card. See Printing from memory cards and USB Flash drives.
Chapter 5 - Maintaining and troubleshooting78
Page 79

Resolving printing problems
This section provides solutions to common printing problems.
Printer shuts down unexpectedly
Check the power and power connections
Make sure the printer is connected firmly to a functioning alternating current (AC) power outlet. See Printer
specifications for voltage requirements.
All printer lights are blinking
A non-recoverable error has occurred
Turn the printer off and turn it back on. If the printer does not turn off or on, unplug the power connector
from the back of the printer, wait a few seconds, and then plug it in again. If the problem persists, contact
HP. See Support and warranty.
Printer is not responding (nothing prints)
Check the printer
See General troubleshooting tips.
Check the printer software installation
If the printer is turned off when printing, an alert message should appear on your computer screen; if no
message appears, the printer software might not be installed correctly. To resolve this, uninstall the
software completely, and then reinstall the printer software. See Uninstalling the printer software.
Check the cable
Make sure both ends of the USB cable are secure.
Check the wireless connection
• Printing larger files using a Bluetooth wireless connection can sometimes cause the print job to fail. Try
printing a smaller file.
• See also Problems setting up 802.11 or Bluetooth wireless communication.
Resolving printing problems 79
Page 80

Printer does not accept print cartridge
Check the print cartridge
Remove the print cartridge and make sure the protective tape has been removed completely from the print
cartridge. See Cleaning the print cartridges.
Clean the print cartridge
Complete the print cartridge cleaning procedure. See Cleaning the print cartridges.
Turn off the printer after removing the print cartridge
After removing the print cartridge, turn off the printer, and then turn on the printer without the print
cartridge installed. After the printer has restarted, reinsert the print cartridge.
Printer takes a long time to print
Check the system configuration
Make sure the computer meets the minimum system requirements for the printer. See Printer specifications.
Check the print settings
The printer prints slower when Best or Maximum dpi is selected as the print quality. To increase the print
speed, select different print settings in the printer driver. See Changing print settings.
Check for radio interference
If the printer is connected using wireless communication and is printing slowly, then the radio signal might
be weak. See Problems setting up 802.11 or Bluetooth wireless communication.
Check the wireless connection
• Printing larger files using a Bluetooth wireless connection can sometimes cause the print job to fail. Try
printing a smaller file.
• After switching from one 802.11 wireless profile to another, the first print job takes 10 seconds or so
before it starts to print.
• See also Problems setting up 802.11 or Bluetooth wireless communication.
Chapter 5 - Maintaining and troubleshooting80
Page 81

Blank page is printed
Check for empty print cartridges
Check the printer lights to see which cartridge is low. The Toolbox (Windows), HP Printer Utility (Mac OS),
and Toolbox software for PDAs (Pocket PC and Palm OS) provides print cartridge information. If you are
printing black text and a blank page prints, the black print cartridge might be empty. See Replacing the
print cartridges.
Check the printer setup
See General troubleshooting tips.
Check the wireless connection
• Printing larger files using a Bluetooth wireless connection can sometimes cause the print job to fail. Try
printing a smaller file.
• See also Problems setting up 802.11 or Bluetooth wireless communication.
Something on the page is missing or incorrect
Check the margin settings
Make sure the margin settings for the document do not exceed the printable area of the printer. See
Changing print settings.
Check the print settings
Make sure Print in Grayscale is not selected in the printer driver. See Changing print settings.
Check the print cartridges
Check to make sure that both cartridges are installed and functioning correctly. Print cartridges might need
to be cleaned. See Cleaning the print cartridges. Print cartridges might have run out of ink. Replace any
empty cartridge. Try removing and reinstalling the cartridges, making sure they snap firmly into place. See
Replacing the print cartridges.
Check the printer location and length of the USB cable
High electromagnetic fields (such as those generated by USB cables) can sometimes slightly distort
printouts. Move the printer away from the source of the electromagnetic fields. Also, it is recommended
that you use a USB cable that is less than 3 meters (9.8 feet) long to minimize the effects of these
electromagnetic fields.
Check the PictBridge settings
If printing using a PictBridge device, make sure the media settings in the device are correct or are
defaulting to the current printer settings. If defaulting to the current printer settings, then check the Toolbox
(Windows), HP Printer Utility (Mac OS), or Toolbox software for PDAs (Pocket PC and Palm OS) to make
sure the current printer settings are correct.
Resolving printing problems 81
Page 82

Check the DPOF settings
If printing a DPOF file from a memory card, make sure the DPOF file was set up correctly in the device that
created it. Please see the documentation that came with the device. Always load the media for portrait
printing.
Check the borderless print settings
If printing using a PictBridge device, make sure the media settings in the device are correct or are
defaulting to the current printer settings.
Check the wireless connection
• Printing larger files using a Bluetooth wireless connection can sometimes cause the print job to fail. Try
printing a smaller file.
• See also Problems setting up 802.11 or Bluetooth wireless communication.
Check the mobile phone font
Boxes might appear when trying to print Asian fonts from a mobile phone on printers purchased outside
Asia. Asian fonts for Bluetooth mobile phone printing are supported by models purchased in Asia.
Placement of the text or graphics is wrong
Check the page-orientation setting
The page orientation selected might not be correct for the document you are printing. Make sure the
media size and page orientation selected in the software program match the settings in the printer driver.
See Changing print settings
Check the paper size
• Make sure the paper size selected in the printer driver matches the paper size loaded in the printer.
• The size of the document you are printing might be larger than the media in the tray, so that content
outside the printable area is cut off.
If the layout of the document you are trying to print will fit on a media size supported by the printer,
then load the correct media size. Make sure to select the correct page orientation.
Alternatively, in Windows you can open the printer driver and select Scale to fit to scale the document
to fit the media size currently selected. See Changing print settings.
• Print a configuration page to check printer media settings for direct printing. This information will verify
that you are loading the correct media size and type before printing.
If you have the Toolbox (Windows), HP Printer Utility (Mac OS), or Toolbox software for PDAs
(Pocket PC and Palm OS) installed, see Printing device information pages from the software.
If you do not have one of these utilities installed, see Printing device information pages from the control
panel.
Chapter 5 - Maintaining and troubleshooting82
Page 83

Check the margin settings
• Make sure the margin settings for the document do not exceed the printable area of your printer. For
information about margin settings, see Changing print settings.
• If the text or graphics are cut off at the edges of the page, make sure the margin settings for the
document do not exceed the printable area of your printer.
For information about margin settings, see Changing print settings.
Check the print mode
• When you print documents that use more ink, allow more time for the pages to dry before handling or
stacking the printouts. This is especially true for transparencies and photo papers. In the printer driver,
select Best mode, and also increase the ink drying time and reduce the ink saturation using the
ink volume control under the advanced color features (Windows) or ink features (Mac OS). However,
note that decreasing ink saturation might give printouts a “washed-out” quality.
• Color documents that have rich, blended colors can wrinkle or smear when printed using Best mode.
Try using Normal or Fast Normal mode to reduce ink, or use HP Premium Paper designed for printing
vivid color documents.
Check the media type print setting
Check that the correct media type is selected in the printer driver.
Check the graphics placement
Use the zoom or print preview feature of your software to check for gaps in the placement of graphics on
the page.
Poor print quality and unexpected printouts
Check the print cartridges
• Check to make sure that both cartridges are installed and functioning correctly. Print cartridges might
need to be cleaned. See Cleaning the print cartridges. Print cartridges might have run out of ink.
Replace any empty cartridge. Try removing and reinstalling the cartridges, making sure they snap
firmly into place. See Replacing the print cartridges.
• Whenever you install a new print cartridge, you should align the print cartridges for the best possible
print quality. If your printout is grainy, has stray dots, jagged edges, or the ink is bleeding into another
color, you can re-align them through the Toolbox or printer driver (Windows), HP Printer Utility
(Mac OS), or Toolbox software for PDAs (Pocket PC and Palm OS). See Aligning the print cartridges.
• Dropping or subjecting the print cartridges to impact might cause temporary missing nozzles in the
print cartridge. To resolve this problem, leave the print cartridge in the printer for 2 to 24 hours.
• Use the appropriate print cartridge for the project. For best results, use the HP black print cartridge to
print text documents and use the HP photo or gray photo print cartridges to print color or black and
white photos.
Check the paper quality
The paper might be too moist or too rough. Make sure the media used meets HP specifications and try to
print again. See Selecting print media.
Resolving printing problems 83
Page 84

Check the type of media loaded in the printer
• Make sure the tray supports the type of media you have loaded. See Understanding supported media
types and weights.
• Make sure you have selected the tray in the printer driver that contains the media you want to use. See
Transparencies.
Check the rollers in the printer
• The rollers in the printer might be dirty, causing lines or smudges to appear on your printout. Turn off
the printer, disconnect the power cord, clean the output rollers in the printer with isopropyl alcohol on
a lint-free cloth, and then try to print again.
Check the printer location and length of the USB cable
High electromagnetic fields (such as those generated by USB cables) can sometimes slightly distort
printouts. Move the printer away from the source of the electromagnetic fields. Also, it is recommended
that you use a USB cable that is less than 3 meters (9.8 feet) long to minimize the effects of these
electromagnetic fields.
Check the wireless connection
• Printing larger files using a Bluetooth wireless connection can sometimes cause the print job to fail. Try
printing a smaller file.
• See also Problems setting up 802.11 or Bluetooth wireless communication.
Check the mobile phone font
Boxes might appear when trying to print Asian fonts from a mobile phone on printers purchased outside
Asia. Asian fonts for Bluetooth mobile phone printing are supported by models purchased in Asia.
Meaningless characters print
If an interruption occurs to a job that is printing, the printer might not recognize the rest of the job.
Cancel the print job and wait for the printer to return to the ready state. If the printer does not return to the
ready state, cancel all jobs, and wait again. When the printer is ready, resend the job. If prompted by the
computer to retry the job, click Cancel.
Check the document file
The document file might be damaged. If you can print other documents from the same application, try
printing a backup copy of your document, if available.
Check the wireless connection
• Printing larger files using a Bluetooth wireless connection can sometimes cause the print job to fail. Try
printing a smaller file.
• See also Problems setting up 802.11 or Bluetooth wireless communication.
Check the mobile phone font
Boxes might appear when trying to print Asian fonts from a mobile phone on printers purchased outside
Asia. Asian fonts for Bluetooth mobile phone printing are supported by models purchased in Asia.
Chapter 5 - Maintaining and troubleshooting84
Page 85

Ink is smearing
Check the print settings
• When you print documents that use more ink, allow more time for the pages to dry before handling or
stacking the printouts. This is especially true for transparencies and photo papers. In the printer driver,
select Best mode, and also increase the ink drying time and reduce the ink saturation using the
ink volume control under the advanced color features (Windows) or ink features (Mac OS). However,
note that decreasing ink saturation might give printouts a “washed-out” quality.
• Color documents that have rich, blended colors can wrinkle or smear when printed using Best mode.
Try using Normal or Fast Normal mode to reduce ink, or use HP Premium Paper designed for printing
vivid color documents.
• Check that the correct media type is selected in the printer driver.
• For Windows, try adjusting the Saturation, Brightness and Color Tone in the printer driver. For the
Mac OS, adjust these settings from the Color Options panel under Paper Type/Quality, in the Print
dialog box.
Check the ink service module
• Remove the ink service module and check to see if it is full. If it is not full, reinstall the module. If it is
full, replace it with a new one. For information on removing and replacing the ink service module, see
Replacing the ink service module.
Check the media size and type
• Do not allow the printer to print media that is smaller than the print job. If you are doing borderless
printing, make sure the correct media size is loaded. If you are using the incorrect size, ink smears
might appear on the bottom of subsequent pages.
• Some types of media do not accept ink well; ink will dry more slowly and smearing might occur. See
Selecting print media.
Ink is not filling the text or graphics completely
Check the print cartridges
Check to make sure that both print cartridges are installed and functioning correctly. Print cartridges might
need to be cleaned. See Cleaning the print cartridges. Print cartridges might have run out of ink. Replace
any empty cartridge. Try removing and reinstalling the cartridges, making sure they snap firmly into place.
See Replacing the print cartridges.
Check the media type
Some media types are not suitable for use with the printer. See Selecting print media.
Resolving printing problems 85
Page 86

Output is faded or dull colored
Check the print mode
The Fast Normal and Fast Draft modes in the printer driver allow you to print at a faster rate and are good
for printing drafts. For better results, select Normal or Best mode.
Check the paper type setting
When printing on transparencies or other special media, select the corresponding media type in the
printer driver. See Printing on special and custom-sized media.
Check the print cartridges
Check to make sure that both print cartridges are installed and functioning correctly. Print cartridges might
need to be cleaned. See Cleaning the print cartridges. Print cartridges might have run out of ink. Replace
any empty cartridge. Or try removing and reinstalling the cartridges, making sure they snap firmly into
place. See Replacing the print cartridges.
Check the print settings
For Windows, try adjusting the Saturation, Brightness and Color Tone in the printer driver. For the
Mac OS, adjust these settings from the Color Options panel under Paper Type/Quality, in the Print dialog
box.
Colors are printing as black and white
Check the print cartridges
Check to make sure that both print cartridges are installed and functioning correctly. Print cartridges might
need to be cleaned. See Cleaning the print cartridges. Print cartridges might have run out of ink. Replace
any empty cartridge. Or try removing and reinstalling the cartridges, making sure they snap firmly into
place. See Replacing the print cartridges.
Check the print settings
Make sure Print in Grayscale is not selected in the printer driver. See Changing print settings.
Chapter 5 - Maintaining and troubleshooting86
Page 87

Wrong colors are printing
Check the print settings
• Make sure Print in Grayscale is not selected in the printer driver. See Changing print settings.
• For Windows, try adjusting the Saturation, Brightness and Color Tone in the printer driver. For the
Mac OS, adjust these settings from the Color Options panel under Paper Type/Quality, in the Print
dialog box.
Check the print cartridges
Check to make sure that both cartridges are installed and functioning correctly. Print cartridges might need
to be cleaned. See Cleaning the print cartridges. Print cartridges might have run out of ink. Replace any
empty cartridge. Try removing and reinstalling the cartridges, making sure they snap firmly into place. See
Replacing the print cartridges.
Printout shows bleeding colors
Check the print settings
• When you print documents that use more ink, allow more time for the pages to dry before handling or
stacking the printouts. This is especially true for transparencies and photo papers. In the printer driver,
select Best mode, and also increase the ink drying time and reduce the ink saturation using the
ink volume control under the advanced color features (Windows) or ink features (Mac OS). However,
note that decreasing ink saturation might give printouts a “washed-out” quality.
• Color documents that have rich, blended colors can wrinkle or smear when printed using Best mode.
Try using Normal or Fast Normal mode to reduce ink, or use HP Premium Paper designed for printing
vivid color documents.
• Check that the correct media type is selected in the printer driver.
• For Windows, try adjusting the Saturation, Brightness and Color Tone in the printer driver. For the
Mac OS, adjust these settings from the Color Options panel under Paper Type/Quality, in the Print
dialog box.
Check the print cartridges
Check to make sure that both cartridges are installed and functioning correctly. Print cartridges might need
to be cleaned. See Cleaning the print cartridges. Print cartridges might have run out of ink. Replace any
empty cartridge. Try removing and reinstalling the cartridges, making sure they snap firmly into place. See
Replacing the print cartridges.
Resolving printing problems 87
Page 88

Colors do not line up properly
Check the print cartridges
• Check to make sure that both cartridges are installed and functioning correctly. Print cartridges might
need to be cleaned. See Cleaning the print cartridges. Print cartridges might have run out of ink.
Replace any empty cartridge. Try removing and reinstalling the cartridges, making sure they snap
firmly into place. See Replacing the print cartridges.
• Whenever you install a new print cartridge, you should align the print cartridges for the best possible
print quality. If your printout is grainy, has stray dots, jagged edges, or the ink is bleeding into another
color, you can re-align them through the Toolbox or printer driver (Windows), HP Printer Utility
(Mac OS), or Toolbox software for PDAs (Pocket PC and Palm OS). See Aligning the print cartridges.
Lines or dots are missing from text or graphics
Check the print cartridges
Check to make sure that both cartridges are installed and functioning correctly. Print cartridges might need
to be cleaned. See Cleaning the print cartridges. Print cartridges might have run out of ink. Replace any
empty cartridge. Try removing and reinstalling the cartridges, making sure they snap firmly into place. See
Replacing the print cartridges.
Chapter 5 - Maintaining and troubleshooting88
Page 89

Resolving paper-feed problems
This section provides solutions to common paper-feed problems.
Media is not picked up from the input tray
• Remove the media, straighten it, and reload.
• Make sure you are using a supported size and type of media. See Selecting print media.
• Make sure to fully extend the input tray extension if your printer model has an extension.
Paper skew
• Make sure the media is squarely against the alignment guide and that the media width guide is snug,
but not tight, against the media. Adjust the left paper guide until it fits snugly against the edge of the
media.
• Remove the media, straighten it, and reload.
• Make sure the media you are using is not wrinkled, bent or curled. Uncurl paper by bending it in the
opposite direction of the curl. Do not leave media in the input tray overnight. This can cause it to bend.
• Make sure to fully extend the input tray extension if your printer model has an extension.
Paper output problem
Remove excess media from the output area. If printed media stacks up outside the output slot, it can
prevent media from properly exiting the printer.
Clearing jams
If print media is jammed in the printer, follow these instructions to clear the jam.
To clear a jam
1. Turn off the printer.
2. Unplug the printer from the power source.
3. Remove media that is not jammed from the input tray and the output slot.
NOTE: Do not put your hands inside the input tray. Use tweezers instead and be careful not to scratch the
inside of the printer.
4. Locate the media jam.
Resolving paper-feed problems 89
Page 90

5. If the media is visible from the output slot, gently pull it out from the slot. If the media is not visible,
open the front access cover and clear jammed media.
NOTE: Remove jammed media slowly and steadily to prevent media tear.
6. If the print carriage is obstructing the jam, gently push it to one side and then remove the media.
7. If the jammed media is not visible in the print area located inside the printer, remove what is visible in
the input tray.
8. After you clear the jam, close the front access cover, turn on the printer, and then press (Resume
button) to continue the print job.
The printer will continue the print job on the next page. You will need to resend the page or pages that
were jammed in the printer.
To avoid jams
• To prevent jams, avoid the following media:
• Multipart forms
• Media that is damaged, curled, or wrinkled
• Media with cutouts or perforations
• Media that is heavily textured, embossed, or does not accept ink well
• Media that is too lightweight or stretches easily
• Make sure the paper path is not blocked.
• Do not overload the input tray. The input tray holds up to 50 sheets of plain paper (HP Multipurpose
Paper) or other print media measuring 5 mm (0.2 in) in thickness.
• Load paper properly, making sure the paper is squarely against the alignment guide and that the
media width guide is snug, but not tight, against the paper. Adjust the left paper guide until it fits
snugly against the edge of the media.
• Use paper that conforms with the media types/sizes and media weights listed in Printer specifications.
See HP supplies and accessories for a list of HP-recommended media.
• Stack paper neatly when printing on both sides of the page (two-sided printing).
Chapter 5 - Maintaining and troubleshooting90
Page 91

Troubleshooting installation issues
If you had trouble installing the printer, check the following items.
Problems printing an alignment page
Whenever you install a new print cartridge, you should align the print cartridges for the best possible print
quality. You can discard the alignment page after it is printed. If the printer does not print the page, see
General troubleshooting tips.
Problems installing software
Check the computer requirements
Make sure the computer meets the system requirements. See Printer specifications.
Check the installation preliminaries
• Before installing software on a Windows computer, make sure all other programs are closed.
• If the computer does not recognize the path to the CD drive that you type, verify that you are specifying
the correct drive letter.
• If the computer cannot recognize the Starter CD in the CD drive, inspect the CD for damage. You can
download the printer driver from http://www.hp.com/support/dj460
• In the Windows device manager, make sure that the USB drivers have not been disabled.
Reinstall the printer software
If you are using Windows and the computer cannot detect the printer, run the Scrubber utility (located in
the Utils\Scrubber folder on the Starter CD) to perform a clean printer driver uninstallation. Restart your
computer, and then reinstall the printer driver. See Uninstalling the printer software.
.
Troubleshooting installation issues 91
Page 92

Problems setting up 802.11 or Bluetooth wireless communication
If you have problems printing using an 802.11 or Bluetooth wireless connection, try the following
suggestions. For more information on configuring wireless settings, see 802.11 wireless connection and
Bluetooth wireless connection.
NOTE: To enable 802.11 wireless communication, you must complete the wireless installation by running
the installer program on the Starter CD. You can set the wireless communication settings from the Toolbox
(Windows) if you are connected using a USB cable, but until you run the installer and set up the printer for
wireless communication, you cannot print using an 802.11 wireless connection.
Follow these general steps and use the information in the following sections to troubleshoot wireless
connection problems:
Windows
1. Check the wireless printer card. See Check the wireless printer card.
2. Check the wireless settings. See Check the wireless settings.
3. Manually assign the IP address for the printer in the Ports tab of the printer properties.
4. PING the printer. See Check the network communication.
Mac OS
1. Check the wireless printer card. See Check the wireless printer card.
2. Delete and re-add the printer in the Print Center (Mac OS).
3. PING the printer. See Check the network communication.
Check the wireless printer card
• Make sure the wireless printer card is inserted properly. See Installing the 802.11 or Bluetooth wireless
printer card.
• Make sure you inserted the wireless printer card before or after, and not during, printer initialization.
• If the light on the wireless printer card is not on, do the following:
a. Remove the wireless printer card.
b. Turn off the printer, wait a few seconds, and then turn it back on again.
c. Reinsert the card when the printer is in the Ready state. If there is no response, repeat this
procedure a few times. If there is still no response, contact HP. See Support and warranty.
• To see if wireless printer card is working, try printing using another wireless device. If you still cannot
print, the wireless printer card might be faulty. Replace the card if necessary.
Chapter 5 - Maintaining and troubleshooting92
Page 93

Check the wireless settings
• Make sure the wireless profile switch on the back of the printer is switched to the correct wireless profile
you are using. Make sure you are using a profile that was configured during installation. See 802.11
wireless connection.
• If you cannot communicate with the printer after completing the software installation and removing the
USB cable, then one or more of the following wireless settings might be incorrect:
• Network name (SSID)
• Communication mode (infrastructure or ad hoc)
• Channel (ad hoc networks only)
• Security settings (such as Authentication Type and Encryption)
For more information on configuring wireless settings, see 802.11 wireless connection and Bluetooth
wireless connection.
• To configure Bluetooth settings or monitor printer status (such as ink levels) using the Toolbox
(Windows), you must connect the printer to your computer with a USB cable.
Check the network communication
PING is a basic program that sends a series of packets over a network or the Internet to a specific device
in order to generate a response from that device. The other device responds with an acknowledgment that
it received the packets. PING verifies whether a specific device on a network or the Internet exists and is
connected.
To PING the printer:
1. Print a wireless configuration page. See To print a wireless configuration page.
2. Using the IP address on the configuration page, PING the printer to verify network communication. In
this example, the IP address is 169.254.110.107.
a. Open the MS-DOS command prompt window (Windows) or Terminal (Mac OS).
b. At the command prompt, type the IP address of the printer, and then press Enter.
• For example: ping 169.254.110.107
If the command is successful, the PING utility will return results similar to the following. The exact
information returned will vary depending on your operating system. Regardless of the operating system,
the results will show the IP address of the device, the round-trip time in milliseconds for each packet, the
number of packets sent and received, and the number and percentage of how many packets got lost.
Pinging 169.254.110.107 with 32 bytes of data:
Reply from 169.254.110.107: bytes=32 time<10ms TTL=128
Reply from 169.254.110.107: bytes=32 time<10ms TTL=128
Reply from 169.254.110.107: bytes=32 time<10ms TTL=128
Reply from 169.254.110.107: bytes=32 time<10ms TTL=128
If the command is unsuccessful, the PING utility will return results similar to the following:
Pinging 169.254.110.107 with 32 bytes of data:
Request timed out.
Request timed out.
Request timed out.
Request timed out.
Troubleshooting installation issues 93
Page 94

Check the wireless signal
Wireless communication can be interrupted or unavailable if there is signal interference, distance or
signal strength problems, or if the printer is not ready for some reason.
• Make sure the printer is within range of the 802.11 or Bluetooth sending device. 802.11 printing
allows wireless printing up to 100 meters (300 feet). Bluetooth printing allows wireless printing up to
10 meters (30 feet).
• If a document doesn't print, there could be signal interruption. If a message appears on the computer
explaining that there is a signal problem, cancel the print job and then resend it from the computer.
Chapter 5 - Maintaining and troubleshooting94
Page 95

A Printer lights reference
The printer lights indicate printer status and are useful for diagnosing printing problems. This chapter
provides a list of printer status light combinations, what they indicate, and how to solve the problem.
Printer buttons and lights
1. (Cancel button) – Cancels the current print job. The
time it takes to cancel depends on the size of the print
job. Press this button only once to cancel a queued
print job.
2. (Resume button) – Resumes a print job that is
waiting or after temporary interruption (for example,
when adding print media to the printer).
3. Resume light – Lights up in amber when a print job is
waiting, and blinks or turns on to relay status or a
need for intervention.
4. Battery charging light – Lights up in green when the
battery is charging.
5. Left print cartridge light – Blinks when the left print
cartridge is absent or improperly functioning. Turns on
solid when the ink is low or empty.
6. Right print cartridge light – Blinks when the right print
cartridge is absent or improperly functioning. Turns on
solid when the ink is low or empty.
7. (Power button) – Turns the printer off or on.
8. Power light – Lights up in green when the printer is
turned on using the AC adapter or a 41-100%
charged battery. When powered by battery, lights up
in amber when battery is 10-40% charged, and red
when battery is below 10% charged. Blinks during
printing.
95
Page 96

Printer light patterns
Light description and light pattern Explanation and recommended action
Power light is green. If using AC power: Printer is turned on and idle.
If using battery power: Battery is 41-100% charged and
printer is turned on and idle.
• No action required.
Power light is amber. Battery is 10-40% charged and printer is turned on and
idle.
• Plug in the power adapter to begin recharging the
battery. See Charging and using the battery.
Power light is red. Battery is less than 10% charged and printer is turned
on and idle.
• Plug in the power adapter to begin recharging the
battery. See Charging and using the battery.
Battery charge light is green. Battery is charging.
• No action required.
Battery charge light is red. Battery is faulty.
• Replace the battery. See HP supplies and
accessories.
Power light blinks. Printer is printing.
• No action required.
Power, resume, left and right print cartridge lights cycle. Printer is powering on.
• No action required.
Power light is green and Resume light blinks. Printer is paused either to wait for media to dry, out of
paper, or processing Digital Print Order Format (DPOF)
printing.
• If out of paper, load paper. Press (Resume
button) to continue the print job.
Left print cartridge light blinks. The tri-color print cartridge needs attention.
• Reinstall the print cartridge and try to print. If the
error persists, replace the cartridge. See Replacing
the print cartridges.
Appendix A - Printer lights reference96
Page 97

Light description and light pattern Explanation and recommended action
Right print cartridge light blinks. The right print cartridge needs attention.
• Reinstall the print cartridge and try to print. If the
error persists, replace the cartridge. See Replacing
the print cartridges.
Right and left print cartridge lights blink. Tri-color and right print cartridges need attention.
• Reinstall the print cartridges and try to print. If the
error persists, replace the cartridges. See Replacing
the print cartridges.
Left print cartridge light on. Tri-color print cartridge is low on ink.
• Replace the print cartridge. See Replacing the print
cartridges.
Right print cartridge light on. Right print cartridge is low on ink.
• Replace the print cartridge. See Replacing the print
cartridges.
Right and left print cartridge lights on. Tri-color and right print cartridges are low on ink.
• Replace the print cartridges. See Replacing the print
cartridges.
Power light off, resume light blinks. Media jam or paper motor stall.
• Clear the jammed paper. See Troubleshooting
installation issues. After clearing the jam, press
(Resume button) to continue the print job.
If no paper jam exists, press (Resume button). If
this does not work, try turning the printer off and
then on again, and resend the print job.
Power light blinks, resume light blinks. Media jam or carriage stall.
• Clear the jammed paper. See Troubleshooting
installation issues. After clearing the jam, press
(Resume button) to continue the print job.
If no paper jam exists, press (Resume button). If
this does not work, try turning the printer off and
then on again, and resend the print job.
Power light blinks, resume light blinks, left and right print cartridge
lights on.
Media jam or service station stall.
• Clear the jammed paper. See Troubleshooting
installation issues. After clearing the jam, press
(Resume button) to continue the print job.
If no paper jam exists, press (Resume button). If
this does not work, try turning the printer off and
then on again, and resend the print job.
Printer light patterns 97
Page 98

Light description and light pattern Explanation and recommended action
Resume light blinks, left and right print cartridge lights on. Media jam or pick motor stall.
• Clear the jammed paper. See Troubleshooting
installation issues. After clearing the jam, press
(Resume button) to continue the print job.
If no paper jam exists, press (Resume button). If
this does not work, try turning the printer off and
then on again, and resend the print job.
Resume light blinks, left and right print cartridge lights cycle. Media jam or switch motor stall.
• Clear the jammed paper. See Troubleshooting
installation issues. After clearing the jam, press
(Resume button) to continue the print job.
If no paper jam exists, press (Resume button). If
this does not work, try turning the printer off and
then on again, and resend the print job.
Power light on, resume light blinks, right print cartridge light turns
on twice as long as off.
Power light on, resume light on, right print cartridge light turns on
twice as long as off.
Ink service module almost full.
• If you have a replacement for the ink service
module, replace it immediately by following the
instructions that came with it.
• Otherwise, visit:
http://www.hp.com/support/dj460 or contact
Customer Support to get a replacement. See
Support and warranty.
In the meantime, you can press (Resume button)
to continue printing, but this light error state will
remain until the ink service module is replaced.
When the ink service module is full, the printer will
stop printing.
Ink service module full.
• If you have a replacement for the ink service
module, replace it immediately by following the
instructions that come with it.
• Otherwise, visit:
http://www.hp.com/support/dj460 or call
Customer Support to get a replacement.
In the meantime, you can remove the black print
cartridge and print using only the tri-color print
cartridge. The color results and print speed may be
affected. See Printing with a single print cartridge.
Power light, resume light, left and right print cartridge lights blink. Printer error.
• Press (Resume button) to print the error code.
Press (Power button) to reset the printer.
Appendix A - Printer lights reference98
Page 99

B HP supplies and accessories
This chapter provides information on HP supplies and accessories, as well as ordering information.
Ordering printing supplies online
You can order HP supplies and accessories from the HP website.
Visit hpshopping.com (http://www.hpshopping.com
Accessories
HP Bluetooth wireless printer card C8249A
HP 802.11 wireless printer card C8264A
Lithium-ion rechargeable battery C8263A
Travel holder for black/photo print cartridge C8233A
Carrying case for printer and notebook C8232A or
24 V auto adapter (for cars and trucks; Europe only) F2297A
12 V auto/airline adapter (not for trucks) F1455A
USB cable (2 m) C6518A
) for more information.
C8242A
99
Page 100

Supplies
NOTE: The availability of printer supplies varies by country/region.
Print cartridges
HP black print cartridge (11 ml)
HP tri-color print cartridge (14 ml)
HP tri-color print cartridge (7 ml)
HP photo print cartridge
HP gray photo print cartridge
HP media
Plain papers
Media Size Quantity Availability Part number
HP Bright White Paper A4
HP Bright White Paper A4
HP Bright White Paper A
HP Bright White Paper A
500 sheets Europe C1825A
210 by 297 mm
(8.27 by 11.69 inches)
250 sheets Europe C5977B
210 by 297 mm
(8.27 by 11.69 inches)
500 sheets Europe HPB1124
215.9 by 279.4 mm
(8.5 by 11 inches)
250 sheets Europe HPB250
215.9 by 279.4 mm
(8.5 by 11 inches)
Appendix B - HP supplies and accessories100
 Loading...