

Page 1
getting started guide
• Windows: Install the printer software first.
Only connect the USB or parallel cable when
prompted.
• Mac OS: Connect the printer before installing
the printer software.
Leitfaden zur Inbetriebnahme
• Windows: Installieren sie zuerst die
Druckersoftware. Schließen Sie das
USB-Kabel bzw. Parallelkabel erst an, wenn
die entsprechende Anweisung angezeigt wird.
• Mac OS: Schließen Sie vor der Installation
der Druckersoftware den Drucker an.
guide de mise en marche
• Windows : Commencez par installer le logiciel
de l’imprimante. Ne branchez le câble USB ou
parallèle que lorsque vous y serez convié(e).
• Mac OS : Branchez l’imprimante avant
d’installer le logiciel de l’imprimante.
beknopte handleiding
• Windows: Installeer eerst de printersoftware.
Sluit de USB-kabel of parallelle kabel alleen
aan wanneer u dit gevraagd wordt.
• Mac OS: Sluit de printer aan voordat u de
printersoftware installeert.
guida introduttiva
• Windows: Installare prima il software della
stampante. Collegare il cavo USB o parallelo
solo quando richiesto.
• Mac OS: Collegare la stampante prima di
installare il software della stampante.
guía de instalación inicial
• Windows: Instale el software de la impresora
primero. Sólo conecte el cable USB o paralelo
cuando se le solicite.
• Mac OS: Conecte la impresora antes de
instalar el software de la impresora.
π𫫨¨°°ûûààddGG AAóóHH ππ««ddOO
Windowsâ«ÑãàH ºb :
π𫫨¨°°ûûJJ ΩΩÉɶ¶ff ≈≈∏∏YY
πHÉc π°U .k’hCG á©HÉ£dG èeÉfôH USBhCG
.∂dP Ö∏£àj ÉeóæY §≤a …RGƒàªdG
π𫫨¨°°ûûJJ ΩΩÉɶ¶ff ≈≈∏∏YY
OSMACπÑb á©HÉ£dG π°Uh :
.á©HÉ£dG èeGôH â«ÑãJ
●
●
Page 2

Copyright Information
© 2003 Copyright Hewlett-Packard Development
Company, L.P.
Reproduction, adaptation or translation without prior written
permission is prohibited, except as allowed under the
copyright laws.
The information contained herein is subject to change
without notice.
The only warranties for HP products and services are set
forth in the express warranty statements accompanying
such products and services. Nothing herein should be
construed as constituting an additional warranty. HP shall
not be liable for technical or editorial errors or omissions
contained herein.
1, 9/2003
Trademark Credits
HP ZoomSmart Scaling Technology is a trademark of
Hewlett-Packard Company.
Microsoft, MS-DOS, MS Windows, Windows, Windows NT,
Windows CE, and Microsoft Pocket PC Software are either
registered trademarks or trademarks of Microsoft
Corporation in the United States and/or other countries/
regions.
Pentium is a U.S. registered trademark of Intel Corporation.
Mac, Macintosh, Mac OS, PowerBook, and Power
Macintosh are trademarks of Apple Computer, Inc.,
registered in the U.S. and other countries/regions.
TrueType is a U.S. trademark of Apple Computer, Inc.
Bluetooth and the Bluetooth logos are trademarks
owned by Bluetooth SIG, Inc., U.S.A. and licensed to
Hewlett-Packard.
Informations relatives aux droits d’auteur
© 2003 Copyright Hewlett-Packard Development
Company, L.P.
Il est interdit de reproduire, adapter ou traduire ce manuel
sans autorisation expresse par écrit, sauf dans les cas
permis par les lois régissant les droits d’auteur.
Les informations contenues dans ce document sont
sujettes à modification sans préavis.
Les seules garanties concernant les produits et services
HP sont énoncées dans la garantie qui accompagne ces
produits et services. Rien en ceci ne devra être interprété
comme constituant une garantie supplémentaire. HP ne
pourra être tenue pour responsable des erreurs techniques
et rédactionnelles ou des omissions présentes dans ce
document.
1, 9/2003
Marques
HP ZoomSmart Scaling Technology est une marque de
Hewlett-Packard Company.
Les logiciels Microsoft, MS-DOS, MS Windows, Windows,
Windows NT, Windows CE et Microsoft Pocket PC sont des
marques déposées ou commerciales de Microsoft
Corporation aux Etats-Unis et/ou dans d’autres pays ou
régions.
Pentium est une marque déposée d’Intel Corporation aux
Etats-Unis.
Mac, Macintosh, Mac OS, PowerBook et Power Macintosh
sont des marques déposées d’Apple Computer, Inc. aux
Etats-Unis et dans d’autres pays ou régions. TrueType
est une marque commerciale d’Apple Computer, Inc aux
Etats-Unis.
Bluetooth et les logos de Bluetooth sont des marques
commerciales appartenant à Bluetooth SIG, Inc., U.S.A. et
octroyées sous licence à Hewlett-Packard.
Page 3

Safety Information
Sicherheitsinformationen
Always follow basic safety precautions when using this
product to reduce risk of injury from fire or electric shock.
1 Read and understand all instructions in the
documentation that comes with the printer.
2 Observe all warnings and instructions marked on the
product.
3 Unplug this product from wall outlets before cleaning.
4 Do not install or use this product near water, or when
you are wet.
5 Install the product securely on a stable surface.
6 Install the product in a protected location where no one
can step on or trip over the line cord, and the line cord
cannot be damaged.
7 If the product does not operate normally, see
Troubleshooting in the onscreen user's guide on the
Starter CD.
8 There are no user-serviceable parts inside. Refer
servicing to qualified service personnel.
Consignes de sécurité
Verwenden Sie dieses Produkt zur Vermeidung von
Verletzungen (Feuer und Stromschlag) ausschließlich
unter Einhaltung der allgemeinen Sicherheitsvorschriften.
1 Lesen Sie alle Anweisungen in der mit dem Drucker
gelieferten Dokumentation, und stellen Sie sicher,
daß Sie alles verstehen.
2 Beachten Sie alle am Produkt angebrachten
Warnungen und Anweisungen.
3 Ziehen Sie das Netzkabel aus der Steckdose,
bevor Sie das Produkt reinigen.
4 Installieren bzw. verwenden Sie das Produkt nicht in
der Nähe von Wasser. Verwenden Sie das Produkt
nicht, wenn Sie naß sind.
5 Installieren Sie das Produkt auf einer stabilen
Oberfläche.
6 Installieren Sie das Produkt an einem geschützten Ort,
an dem die Kabel weder betreten noch beschädigt
werden können.
7 Wenn das Produkt nicht normal funktioniert,
schlagen Sie unter „Fehlersuche“ nach.
8 Im Innern des Druckers gibt es keine kundenseitig
wartbaren Teile. Vergeben Sie Servicearbeiten
ausschließlich an qualifiziertes Personal.
Veiligheidsinformatie
Pour éviter les risques de blessures dûs aux flammes et
aux chocs électriques, toujours respecter les précautions
de sécuritées en utilisant cet appareil.
1 Lisez et comprenez toutes les instructions du
documentation fournie avec l’imprimante.
2 Respectez tous les avertissements et étiquettes de
mise en garde sur l’imprimante.
3 Débranchez cette imprimante de la prise murale avant
de la nettoyer.
4 N’installez et n’utilisez pas cet appareil à proximité de
l’eau, ou si vous êtes mouillé.
5 Placez l’imprimante bien à plat sur une surface stable.
6 Installez le produit dans un endroit protégé, où
personne ne peut marcher ni trébucher sur le cordon
secteur afin de ne pas endommager le cordon.
7 Si la produit ne fonctionne pas normalement, lisez la
section Dépannage.
8 L’imprimante ne contient pas de pièces réparables par
l’utilisateur. Confiez l’entretien et les réparations de
l’imprimante à des techniciens qualifiés.
Neem bij gebruik van dit product altijd elementaire
veiligheidsvoorzorgen in acht om het risico van letsel ten
gevolge van brand of elektrische schok te verkleinen.
1 Zorg dat u alle instructies in dedocumentatie die bij
de printer geleverd wordt, heeft gelezenen begrepen.
2 Neem alle op dit product vermelde waarschuwingen
en instructies in acht.
3 Haal het netsnoer uit het stopcontact voordat u dit
product reinigt.
4 Plaats of gebruik dit product niet in de buurt van water
of wanneer u nat bent.
5 Zorg dat het product stevig op een stabiel oppervlak
staat.
6 Zet het product op een veilige plaats waar niemand op
het netsnoer kan trappen of erover kan struikelen en
het netsnoer niet wordt beschadigd.
7 Als het product niet naar behoren functioneert, zie dan
Problemen oplossen.
8 De printer bevat geen onderdelen die door de gebruiker
kunnen worden gerepareerd. Onderhoud en reparaties
moeten worden verricht door gekwalificeerde
onderhoudstechnici.
Page 4

Informazioni sulla sicurezza
Información de seguridad
Per utilizzare questo prodotto, attenersi sempre alle
precauzioni di base sulla sicurezza onde evitare il rischio
di lesioni da incendio o folgorazione.
1 Leggere e comprendere bene tutte le istruzioni
contenute nella documentazione in dotazione con la
stampante.
2 Osservare tutti i messaggi di avvertenza e le istruzioni
riportate sul prodotto.
3 Scollegare il prodotto dalla presa di rete prima di
pulirlo.
4 Non installare o usare questo prodotto in prossimità di
acqua o se è bagnato.
5 Installare il prodotto in modo sicuro e su una superficie
stabile.
6 Installare il prodotto in un punto protetto in cui non si
corra il rischio di inciampare nel cavo di alimentazione,
e in cui il cavo non possa venire essere danneggiato.
7 In caso di problemi di funzionamento, consultare la
sezione Risoluzione dei problemi.
8 All’interno della stampante non vi sono parti riparabili
dall’utente. Rivolgersi pertanto a personale di
assistenza qualificato.
Siga siempre las precauciones básicas de seguridad al
utilizar este producto a fin de reducir el riesgo de lesiones
por incendio o descargas eléctricas.
1 Lea y entienda las instrucciones contenidas en la
documentación que viene con la impresora.
2 Tenga en cuenta todas las advertencias e
instrucciones indicadas en el producto.
3 Desenchufe este producto de las tomas de corriente de
pared antes de limpiarlo.
4 No instale ni utilice este producto cerca del agua o
cuando usted esté mojado.
5 Instale el producto de manera segura, sobre una
superficie estable.
6 Instale el producto en un lugar protegido donde nadie
pueda pisar o tropezarse con el cable de alimentación
eléctrica y donde dicho cable no sufra daños.
7 Si el producto no funciona normalmente, consulte la
sección Solución de problemas.
8 No hay piezas reparables por el usuario dentro de la
impresora. Remita las tareas de servicio a personal de
servicio calificado.
Page 5
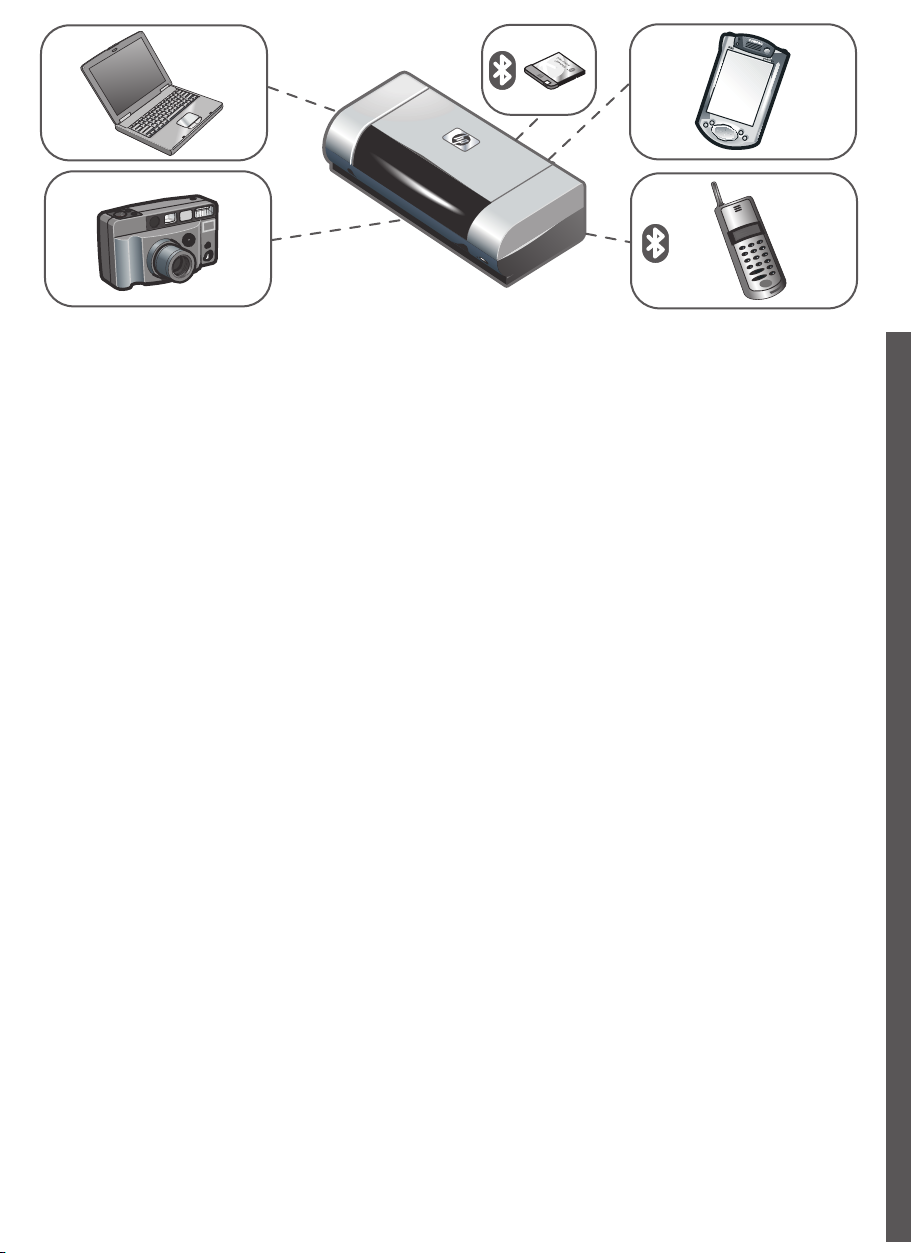
HP Deskjet 450 series printer.
This printer provides quick, professional mobile printing.
You can print from notebooks; desktops; wireless
devices such as personal digital assistants (PDAs)
running Microsoft
and Palm OS
®
Pocket PC software,Windows®CE,
®
; digital cameras via CompactFlash™
card; and mobile phones with Bluetooth and infrared
connectivity.
For information about using PDAs and Bluetooth, see the
Personal Digital Assistant Guide and the Bluetooth
Printing Guide on the Starter CD.
English
Drucker HP Deskjet 450.
Dieser Drucker ermöglicht schnelles und professionelles
mobiles Drucken. Drucken ist möglich von Notebooks,
Desktop PCs, schnurlosen Geräten wie PDAs mit
Microsoft
Palm OS
®
Pocket PC Software, Windows®CE, und
®
, Digitalkameras über CompactFlash™-Karte
sowie von Mobiltelefonen mit Bluetooth und
Infrarotschnittstelle.
Imprimante HP Deskjet série 450.
Cette imprimante offre une impression mobile rapide
et professionnelle. Elle permet d’imprimer à partir
d’ordinateurs portables, d’ordinateurs de bureau, de
dispositifs sans fil tels que les assistants personnels
munis des systèmes Microsoft
Windows
®
CE et Palm OS®, d’appareils photo
®
Pocket PC,
numériques par le biais d’une carte CompactFlash™ et
de téléphones mobiles dotés du système Bluetooth et
d’une connectivité infrarouge.
Näheres über den Einsatz von PDAs und Bluetooth
finden Sie in folgenden Handbüchern auf der Starter-CD:
Anleitung für Personal Digital Assistant und Anleitung für
das Drucken mit Bluetooth.
Pour obtenir de plus amples informations sur l’utilisation
des assistants personnels et sur le système Bluetooth,
reportez-vous au guide d’assistant personnel et au guide
d’impression Bluetooth sur le CD d’installation.
FrançaisDeutsch
Page 6

1
6
1
8
7
4
5
Step 1: Check the package contents.
1) HP Deskjet 450 series printer, 2) power adaptor,
3) power cord, 4) black and color print cartridges,
5) parallel cable, 6) printed documentation (setup poster,
getting started guide, HP customer support guide),
English
Schritt 1: Überprüfen des Verpackungsinhalts.
1) Drucker HP Deskjet 450, 2) Netzteil, 3) Netzkabel,
4) Schwarz- und Farbdruckpatronen, 5) Parallelkabel,
6) gedruckte Dokumentation (Installationsposter,
Anleitung “Die ersten Schritte”, Handbuch
HP Kundenunterstützung),
2
3
7) Starter CD (software and electronic documentation),
8) battery (HP Deskjet 450CBi/450wbt), 9) HP Bluetooth
printer card (HP Deskjet 450wbt).
7) Starter-CD (Software und elektronische
Dokumentation), 8) Akku (HP Deskjet 450CBi/450wbt),
9) HP Bluetooth Druckerkarte (HP Deskjet 450wbt).
9
Etape 1 : Vérifier le contenu du carton.
1) Imprimante HP Deskjet série 450, 2) Bloc
d’alimentation, 3) Cordon d’alimentation, 4) Cartouches
d’encre noire et couleur, 5) Câble parallèle,
6) Documentation imprimée (carte de configuration,
guide de démarrage, guide d’assistance clientèle HP),
Français Deutsch
7) CD d’installation (logiciels et documentation
électronique), 8) Batterie (HP Deskjet 450CBi/450wbt),
9) Carte d’imprimante HP Bluetooth
(HP Deskjet 450wbt).
Page 7
2
3
6
7
8
9
1
2
3
4
5
10
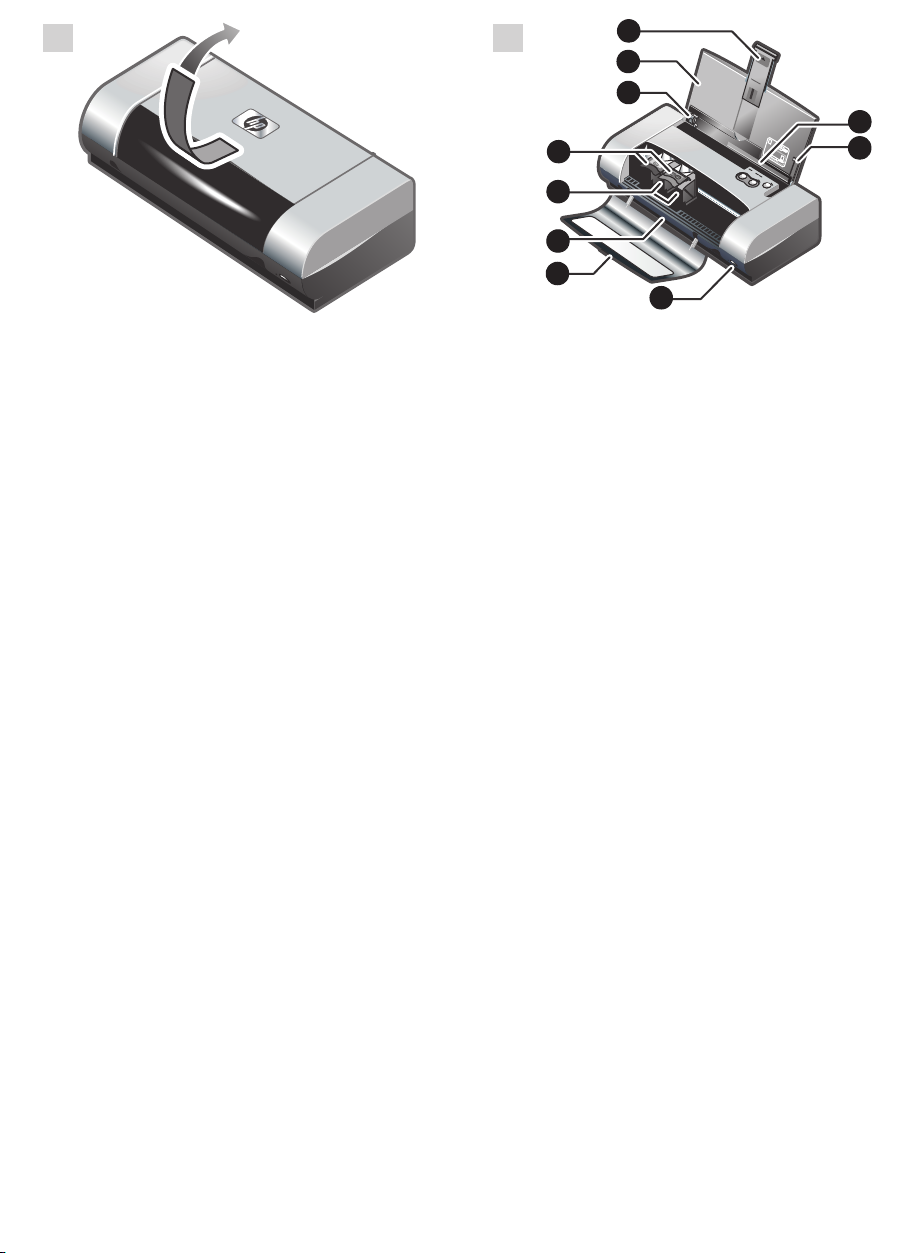
Step 2: Remove the packing tape.
Remove all packing tape from the printer.
Schritt 2: Entfernen von Klebeband.
Entfernen Sie sämtliches Klebeband vom Drucker.
Step 3: Identify printer parts (front).
1) Input tray extension, 2) input tray, 3) paper guide,
4) card slot, 5) alignment guide, 6) print cartridge latch,
7) print cartridge socket, 8) output slot, 9) front access
cover, 10) infrared port.
Schritt 3: Druckerteile (Vorderseite).
1) Zufuhrfachverlängerung, 2) Zufuhrfach,
3) Papierführung, 4) Karteneinzug, 5) Ausrichtungsstange,
6) Verriegelung für Druckpatrone,
7) Druckpatronenhalterung, 8) Ausgabefach,
9) Vordere Abdeckung, 10) Infrarotanschluss.
Etape 2 : Retirer le ruban d’emballage.
Retirez tous les rubans d’emballage de l’imprimante.
Etape 3 : Identifier les parties de l’imprimante
(face avant).
1) Rallonge du bac d’alimentation, 2) Bac d’alimentation,
3) Guide-papier, 4) Fente à carte, 5) Guide d’alignement,
6) Loquet de cartouche d’encre, 7) Logement de cartouche
d’encre, 8) Fente de sortie, 9) Capot avant, 10) Port
infrarouge.
Page 8
1 2 3
5
7
5
6
5
8
1
4
5
9
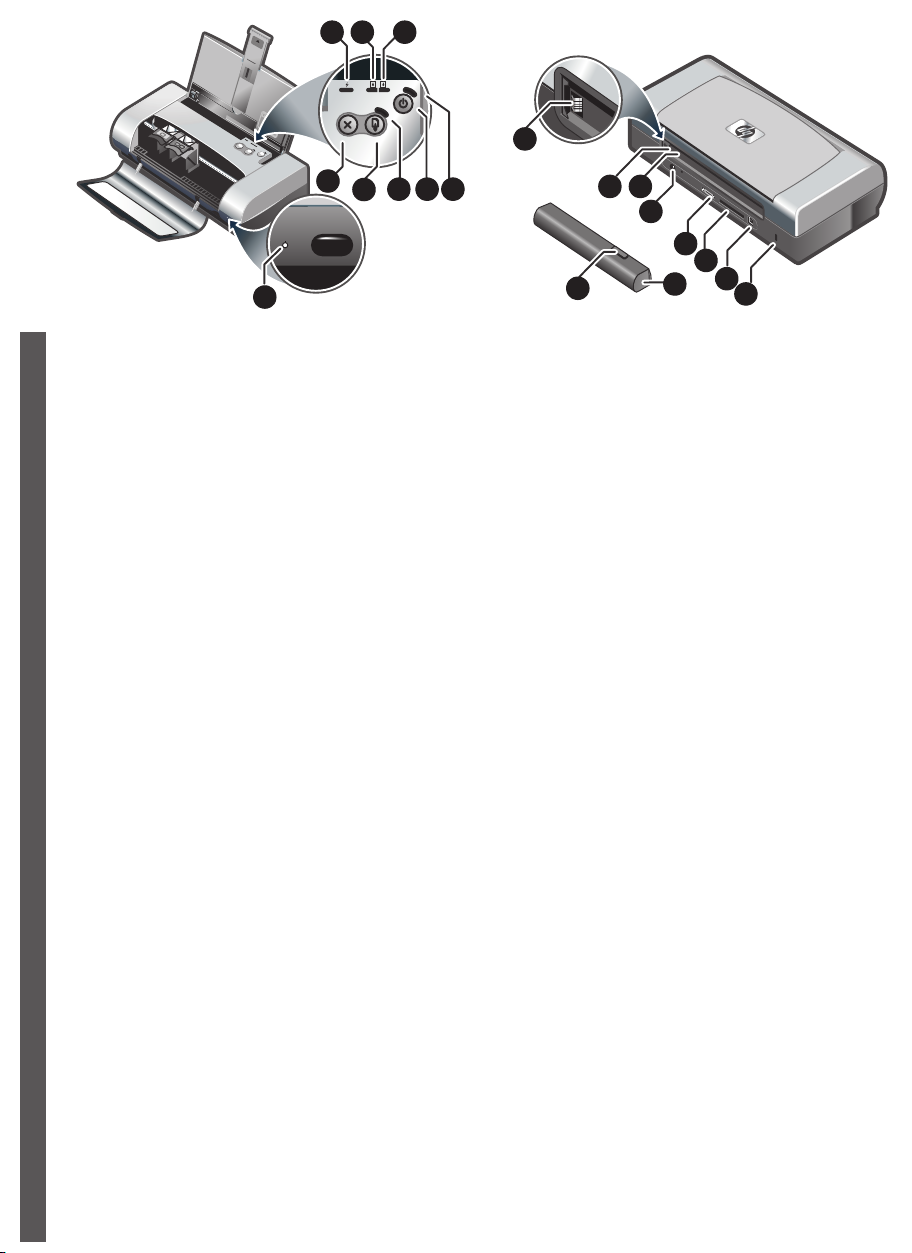
Identify printer parts (control panel).
1) Battery charge LED, 2) left print cartridge LED, 3) right
print cartridge LED, 4) Cancel button, 5) Resume button,
6) Resume LED, 7) Power button, 8) Power LED,
9) Infrared LED. Note: See LED Reference to diagnose
printing problems.
English
Druckerteile (Bedienfeld).
1) LED für Akku-Ladezustand, 2) LED für linke
Druckpatrone, 3) LED für rechte Druckpatrone, 4) Taste
“Abbrechen”, 5) Taste “Weiterdrucken”, 6) LED für
“Weiterdrucken”, 7) Taste “Ein/Aus”, 8) LED für
Stromversorgung, 9) LED für Infrarot-Empfang.
Hinweis: Siehe LED-Referenz zur Diagnose von
Druckerstörungen.
6 7 8
2 3
4
5
6
7
10
9
8
Identify printer parts (back).
1) Battery contacts, 2) battery contact cover,
3) battery slot, 4) power connector, 5) parallel port,
6) CompactFlash™ card slot, 7) universal serial bus
(USB) port, 8) security lock slot, 9) battery,
10) battery release slider.
Druckerteile (Rückseite).
1) Akku-Kontakte, 2) Abdeckung für Akku-Kontakte,
3) Akku-Steckplatz, 4) Netzanschluss,
5) Parallelanschluss, 6) Steckplatz für
CompactFlash™-Karte, 7) USB-Anschluss,
8) Vorrichtung für Sicherheits-Verriegelung,
9) Akku, 10) Akku-Entriegelung.
Identifier les parties de l’imprimante
(panneau de commande).
1) Témoin de charge de la batterie, 2) Voyant gauche de
cartouche d’encre, 3) Voyant droit de cartouche d’encre,
4)
Touche d’annulation, 5) Touche de reprise, 6) Voyant de
reprise, 7)
Bouton d’alimentation, 8) Témoin
d’alimentation, 9) Voyant infrarouge. Remarque :
reportez-vous à la section Référence des voyants pour
identifier les problèmes d’impression.
Français Deutsch
Identifier les parties de l’imprimante (face arrière).
1) Contacts de batterie, 2) Capot des contacts de
batterie, 3) Fente de batterie, 4) Connecteur
d’alimentation, 5) Port parallèle, 6) Fente à carte
CompactFlash™, 7) Port USB, 8) Fente de verrouillage
de sécurité, 9) Batterie, 10) Glissière de déblocage
de batterie.
Page 9
4
1
2
1
2
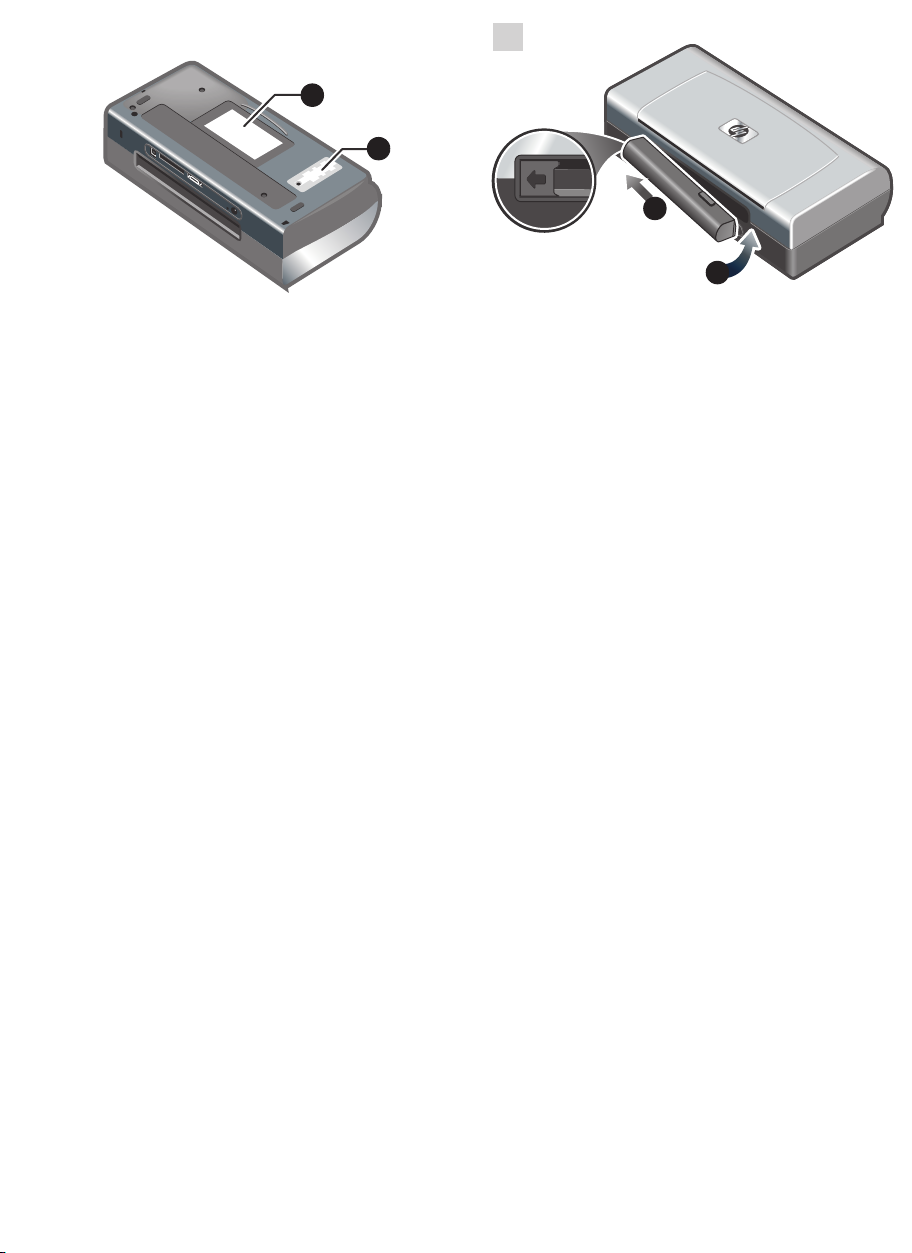
Identify printer parts (bottom).
1) Card holder, 2) cover of replaceable ink service module.
Druckerteile (unten).
1) Kartenhalter, 2) Abdeckung des auswechselbaren
Tinten-Servicemoduls.
Step 4: Install the battery (HP Deskjet 450CBi/450wbt).
1) Slide the battery into the battery slot at an angle until the
battery is flushed with the contacts. 2) Push the battery into
the battery slot until the battery clicks into place.
Schritt 4: Einsetzen des Akkus
(HP Deskjet 450CBi/450wbt).
1) Schieben Sie den Akku schräg in den Akku-Steckplatz,
bis der Akku an den Kontakten anliegt. 2) Drücken Sie den
Akku bis zum Einrasten in den Steckplatz.
Identifier les parties de l’imprimante
(vue de dessous).
1) Porte-cartes, 2) Capot du module de service d’encre
remplaçable.
Etape 4 : Installer la batterie
(HP Deskjet 450CBi/450wbt).
1) Glissez la batterie dans sa fente selon un angle qui
permette de l’aligner au niveau des contacts. 2) Poussez la
batterie dans la fente de façon à entendre le déclic
indiquant que la batterie est en place.
Page 10

5
Note: Use only the C8222A battery with the printer. Fully
charge the battery before using (approximately 1 hour
and 30 minutes). When the battery is charging, the
battery charge LED is green. If the LED is red while
charging, the battery might be faulty and need to be
replaced.
English
Hinweis: Verwenden Sie für den Drucker nur Akkus mit
der Typenbezeichnung C8222A. Laden Sie den Akku vor
der Verwendung vollständig auf (ca. 1 Stunde und
30 Minuten). Während des Ladevorgangs leuchtet die
Akku-LED grün. Leuchtet die LED während des
Ladevorgangs rot, ist der Akku möglicherweise defekt
und muss ersetzt werden.
Step 5: Install the HP Bluetooth printer card
(HP Deskjet 450wbt).
Note: Make sure that your Bluetooth host device and
operating system are supported by the printer. For more
information, refer to http://www.hp.com/support/dj450.
1) Insert the Bluetooth card with the LED facing up into
the CompactFlash™ card slot.
Schritt 5: Einsetzen der Bluetooth Druckerkarte
(HP Deskjet 450wbt).
Hinweis: Vergewissern Sie sich, dass ihr Bluetooth-
Hostgerät und das Betriebssystem vom Drucker
unterstützt werden. Weitere Informationen finden
Sie unter http://www.hp.com/support/dj450.
1) Setzen Sie die Bluetooth-Karte mit der LED nach oben
in den dafür vorgesehenen Steckplatz ein.
Remarque : N’utilisez que la batterie C8222A avec cette
imprimante. Rechargez complètement la batterie avant
l’utilisation (env. 1 heure et 30 minutes). Lors du
chargement de la batterie, le voyant de charge de la
batterie est vert. Si le voyant est rouge, la batterie est
sans doute défectueuse et doit être remplacée.
Français Deutsch
Etape 5 : Installer la carte d’imprimante HP Bluetooth
(HP Deskjet 450wbt).
Remarque : Assurez-vous que le périphérique hôte
Bluetooth et son système d’exploitation sont pris en
charge par l’imprimante. Pour plus d’informations,
consultez la page http://www.hp.com/support/dj450.
1) Insérez la carte Bluetooth avec le voyant orienté vers
le haut dans la fente à carte CompactFlash™.
Page 11
6
1
2
7
4
3
2
1
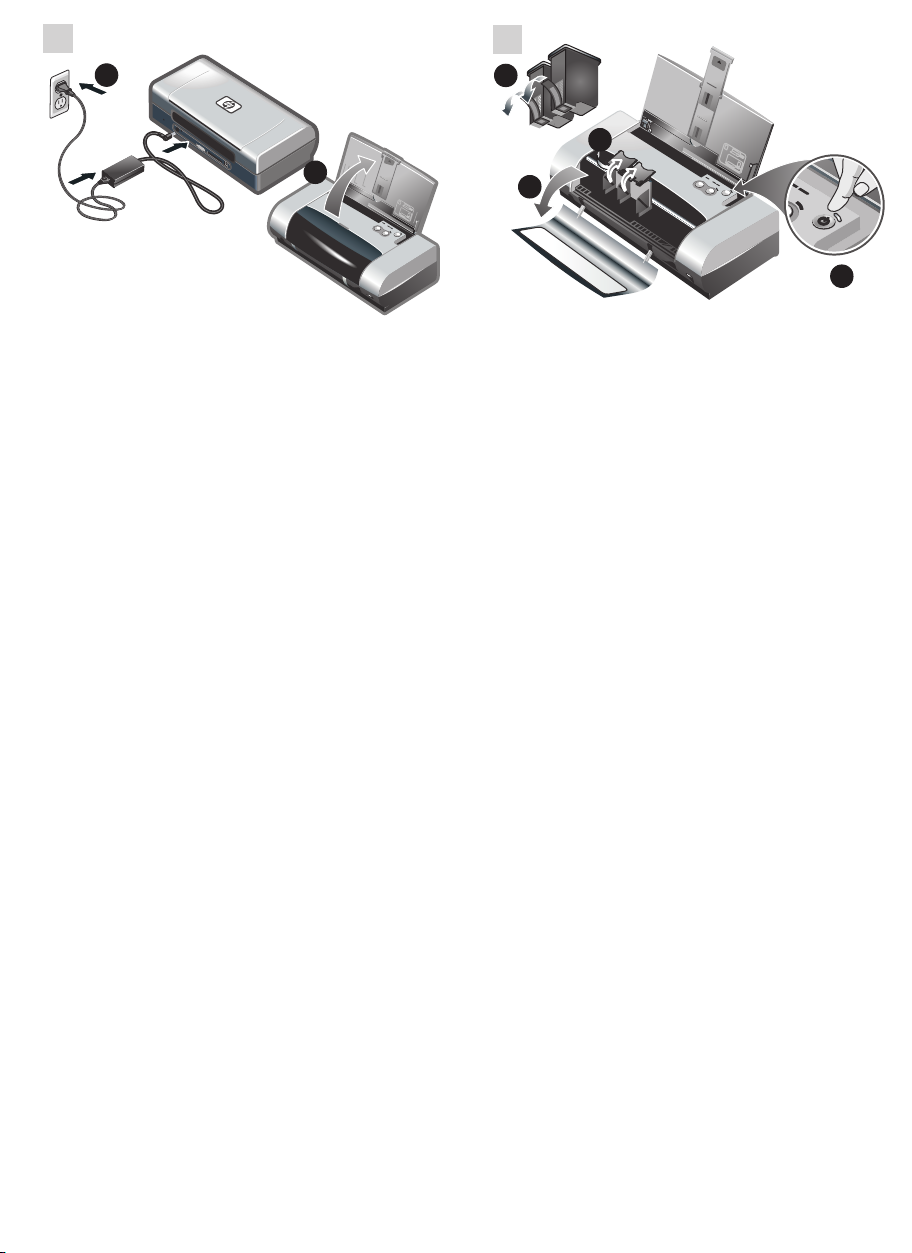
Step 6: Connect the power cord.
1) Connect the power cord to the printer and an alternating
current (AC) power receptacle. 2) Lift the input tray to its
open position. Note: For Windows, only connect the printer
to the computer when you have completed the software
installation or when prompted to do so during installation.
Schritt 6: Schließen Sie das Netzkabel an.
1) Schließen Sie das Netzkabel an den Drucker und an
eine Netzsteckdose an. 2) Heben Sie das Zufuhrfach in
die offene Position. Hinweis: Falls Sie unter Windows
arbeiten, schließen Sie den Drucker erst an den Computer
an, wenn Sie die Software fertig installiert haben bzw. wenn
Sie während der Installation dazu aufgefordert werden.
Step 7: Turn on the printer and install the
print cartridges.
1) Press the Power button to turn on the printer. 2) Open
the front access cover. 3) Lift up the print cartridge latches.
4) Remove the print cartridge from its package, and then
remove the protective tape from the print cartridge.
Schritt 7: Schalten Sie den Drucker ein und installieren
Sie die Druckpatronen.
1) Drücken Sie zum Einschalten des Druckers die Taste
“Ein/Aus”. 2) Öffnen Sie die vordere Abdeckung. 3) Öffnen
Sie die Verriegelung der Druckpatronen. 4) Entnehmen Sie
die Druckpatronen aus der Verpackung, und ziehen Sie die
Schutzfolie von den Patronen ab.
Etape 6 : Brancher le cordon d’alimentation.
1) Raccordez le cordon d’alimentation à l’imprimante
et à une prise fournissant du courant alternatif (CA).
2) Soulevez le bac d’alimentation pour le mettre en
position ouverte. Remarque : Avec Windows, ne
raccordez l’imprimante à l’ordinateur que lorsque
l’installation du logiciel est terminée ou lorsque vous
y êtes convié(e) au cours de l’installation.
Etape 7 : Mettre l’imprimante sous tension et installer
les cartouches d’encre.
1) Appuyez sur la
l’imprimante. 2) Ouvrez le capot avant. 3) Soulevez les
loquets des cartouches d’encre. 4) Retirez la cartouche
d’encre de son emballage, puis enlevez le film protecteur
de la cartouche d’encre.
touche d’alimentation pour allumer
Page 12

5
6
7
8
1
3
2
5) Insert and push the color print cartridge into the left
cradle and the black print cartridge into the right cradle.
6) Snap the cartridge latch onto the print cartridge.
7) Close the front access cover. Note: Do not open the
front access cover until the printer has completed the
initialization.
English
5) Setzen Sie die Farbdruckpatrone in die linke
Halterung und die Schwarzdruckpatrone in die rechte
Halterung ein. 6) Rasten Sie die Verriegelung über den
Druckpatronen ein. 7) Schließen Sie die vordere
Abdeckung. Hinweis: Öffnen Sie die vordere
Abdeckung erst, wenn der Drucker initialisiert ist.
Step 8: Load paper in the input tray.
1) Slide up the input tray extension. 2) Insert up to
45 sheets of paper into the tray. 3) Slide the paper guide
snugly against the edge of the paper.
Schritt 8: Einlegen von Papier.
1) Schieben Sie die Zufuhrfachverlängerung nach oben.
2) Legen Sie bis zu 45 Blatt Papier in das Fach ein.
3) Schieben Sie die Papierführung mit leichtem Druck
gegen das Papier.
5) Insérez et poussez la cartouche d’encre couleur dans
le chariot de gauche et la cartouche d’encre noire dans
le chariot de droite. 6) Refermez le loquet de la
cartouche sur la cartouche d’encre. 7) Fermez le capot
avant. Remarque : N’ouvrez pas le capot avant tant que
l’initialisation de l’imprimante n’est pas terminée.
Français Deutsch
Etape 8 : Charger le papier dans le bac
d’alimentation.
1) Faites glisser la rallonge du bac d’alimentation vers
le haut. 2) Insérez jusqu’à 45 feuilles de papier dans le
bac. 3) Faites glisser le guide-papier pour qu’il soit bien
calé contre les bords du papier.
Page 13
9
1
2
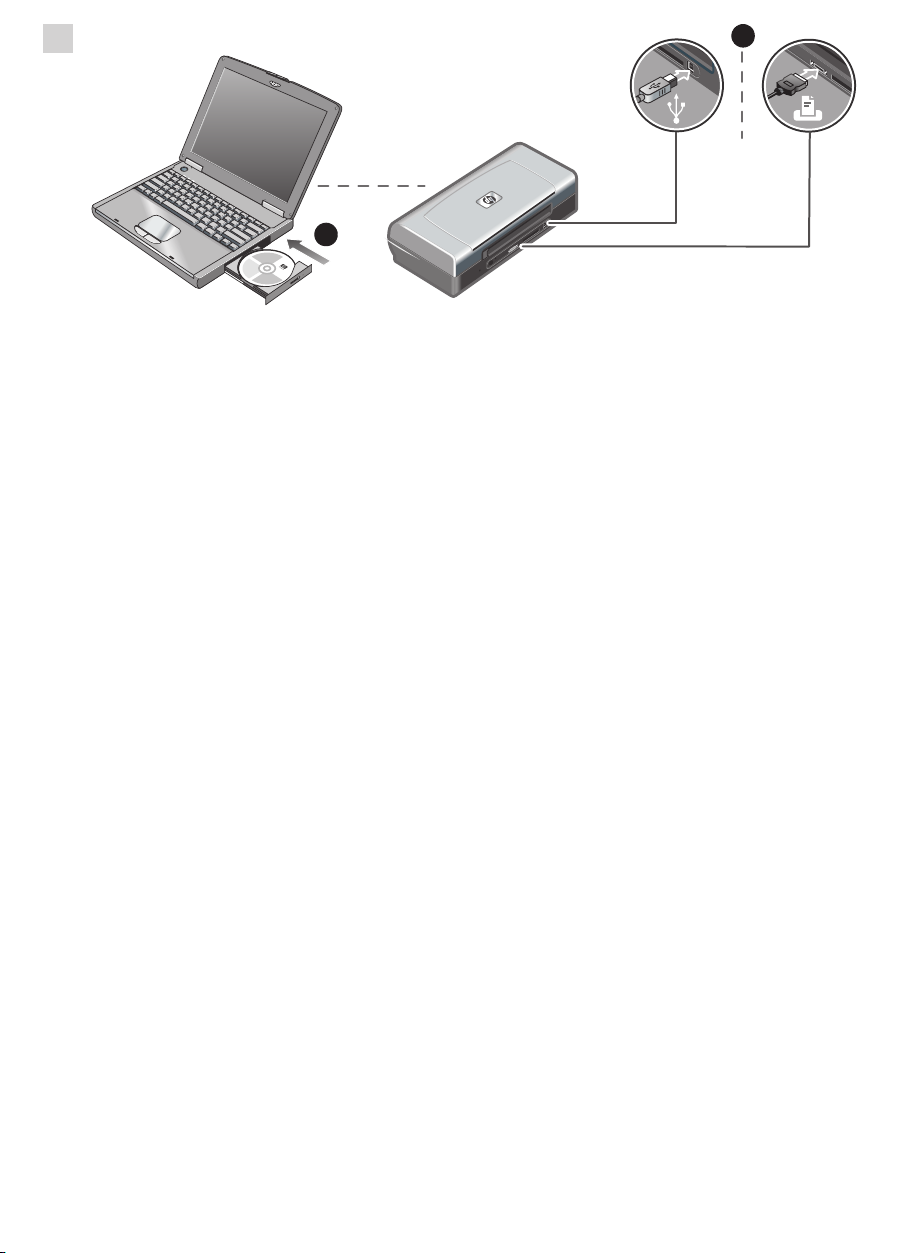
Step 9: Install the software and connect the printer.
1) Insert the Starter CD into the CD-ROM drive, and then
follow the appropriate procedure for your operating system
and connection. For Bluetooth connection, select either
USB or Parallel and click Skip when prompted to connect
the printer. For infrared (IR) connection, ensure the IR port
of your device is enabled (see Infrared Reference to enable
the IR port). Select Other in the Select Port dialog and then
choose the port assigned to the IR device in your host
machine.
Schritt 9: Installieren Sie die Software, und schließen
Sie den Drucker an.
1) Legen Sie die Starter-CD in das CD-Laufwerk ein, und
folgen Sie der Anleitung für Ihr Betriebssystem und den
jeweiligen Anschluss. Für eine Bluetooth-Verbindung
wählen Sie entweder USB oder Parallel und klicken Sie
auf Überspringen, wenn Sie dazu aufgefordert werden,
den Drucker anzuschließen. Für eine Infrarot-Verbindung
vergewissern Sie sich, dass der Infrarotanschluss Ihres
Geräts aktiviert ist (siehe Infrarot-Referenz zum Aktivieren
des Infrarotanschlusses). Wählen Sie Andere im
Dialogfeld zur Anschlussauswahl und wählen Sie den
Anschluss, der dem Infrarotgerät ihres Hostgerätes
zugeordnet ist.
2) For USB or parallel connection, connect the USB or
parallel cable. Note: Only connect the printer to the
computer when you have completed the software
installation or when prompted to do so during installation.
If you have connected the printer to the computer before
you install the software, refer to the Readme file in the
Starter CD to complete the printer installation. 3) Follow
the onscreen instructions to complete the printer
installation.
2) Für eine USB- oder Parallel-Verbindung schließen Sie
das USB- oder Parallelkabel an. Hinweis: Schließen Sie
den Drucker erst an den Computer an, wenn Sie die
Software fertig installiert haben bzw. wenn Sie während
der Installation dazu aufgefordert werden. Falls Sie den
Drucker an den Computer angeschlossen haben, ohne
vorher die Software zu installieren, lesen Sie die ReadmeDatei auf der Starter-CD, um die Druckerinstallation
abzuschließen. 3) Folgen Sie zum Abschließen der
Druckerinstallation den Anweisungen auf dem Bildschirm.
Etape 9 : Installer le logiciel et raccorder l’imprimante.
1) Insérez le CD d’installation dans le lecteur de CD-ROM,
puis suivez la procédure correspondant à votre système
d’exploitation et à votre connexion. En cas de connexion
Bluetooth, sélectionnez USB ou Parallèle et cliquez
sur Ignorer lorsque vous êtes invité(e) à raccorder
l’imprimante. En cas de connexion infrarouge (IR),
assurez-vous que le port IR de votre périphérique est activé
(reportez-vous à la section Référence sur l’infrarouge pour
activer le port IR). Sélectionnez Autres dans la boîte de
dialogue de sélection du port et choisissez le port affecté au
périphérique IR dans l’appareil hôte.
2) Pour les connexions USB ou parallèles, branchez le
câble USB ou parallèle. Remarque : Ne raccordez
l’imprimante à l’ordinateur que lorsque l’installation du
logiciel est terminée ou lorsque vous y êtes convié(e) au
cours de l’installation. Si vous avez raccordé l’imprimante
à l’ordinateur avant d’installer le logiciel, reportez-vous au
fichier Lisez-moi présent sur le CD d’installation pour
terminer l’installation. 3) Suivez les instructions en ligne
pour terminer l’installation de l’imprimante.
Page 14

10
Step 10: Enable Bluetooth printing
(HP Deskjet 450wbt - Windows).
Note: For a Bluetooth connection, make sure that your
Bluetooth host device is supported by the printer and that
Bluetooth printing is enabled in your device. See
http://www.hp.com/support/dj450 for a list of supported
Bluetooth devices and refer to the manufacturer’s
documentation for more instructions. 1) After installing
the software in Step 9, perform printer discovery with
English
your host device (see the Bluetooth Printing Guide).
2) Select the printer from the list of Bluetooth-enabled
printers.
Schritt 10: Aktivieren von Bluetooth-Druck
(HP Deskjet 450wbt - Windows).
Hinweis: Für eine Bluetooth-Verbindung vergewissern
Sie sich, dass ihr Bluetooth-Hostgerät vom Drucker
unterstützt wird und Bluetooth-Druck aktiviert ist.
Unter http://www.hp.com/support/dj450 finden Sie eine
Liste der unterstützten Bluetooth-Geräte. Weitere
Anweisungen können Sie der Dokumentation des
Herstellers entnehmen. 1) Nach der Installation der
Software in Schritt 9 führen Sie eine Druckersuche mit
Ihrem Hostgerät durch (siehe die Anleitung zum Drucken
mit Bluetooth). 2) Wählen Sie den Drucker aus der Liste
der Bluetooth-fähigen Drucker.
3) Check that the Deskjet 450 printer icon is in the
Printers or Printers and Faxes folder. (Click Start, point
to Settings, and then click Printers in Windows NT 4.0,
Windows 98, Windows Me, and Windows 2000 or click
Start and click Printers and Faxes in Windows XP.) If
you do not see the printer icon, double-click Add Printer
and select the COM port assigned for your Bluetooth
device. Click Next. Select HP and hp deskjet 450 series
in the Add Printer Wizard. Follow the onscreen
instructions to complete the printer installation.
3) Überprüfen Sie, ob sich das Deskjet 450
Druckersymbol im Verzeichnis “Drucker” bzw.
“Drucker und Faxgeräte” befindet. (Klicken Sie auf Start,
wählen Sie Einstellungen, und klicken Sie dann auf
Drucker (Windows NT 4.0, Windows 98, Windows Me
und Windows 2000) bzw. auf Drucker und Faxgeräte
(Windows XP). Falls Sie das Druckersymbol dort nicht
sehen, doppelklicken Sie auf Neuer Drucker und
wählen Sie den COM-Anschluss, der Ihrem BluetoothGerät zugeordnet ist. Klicken Sie auf Weiter. Wählen Sie
HP und hp deskjet 450 series im DruckerinstallationsAssistenten. Folgen Sie zum Abschließen der
Druckerinstallation den Anweisungen auf dem
Bildschirm.
Etape 10 : Activer l’impression Bluetooth
(HP Deskjet 450wbt - Windows).
Remarque : En cas de connexion Bluetooth, vérifiez que
l’appareil hôte Bluetooth est pris en charge par l’imprimante
et que l’impression Bluetooth est activée dans cet appareil.
Consultez la page http://www.hp.com/support/dj450 pour
connaître tous les appareils Bluetooth pris en charge.
Reportez-vous à la documentation fournie par le fabricant
pour plus d’informations. 1) Une fois le logiciel installé
Français Deutsch
comme indiqué à l’étape 9, lancez une recherche
d’imprimante sur l’appareil hôte (reportez-vous au Guide
d’impression Bluetooth). 2) Sélectionnez l’imprimante
correspondante dans la liste des imprimantes gérant
Bluetooth.
3) Vérifiez que l’icône de l’imprimante Deskjet 450 se
trouve dans le dossier Imprimantes ou Imprimantes et
télécopieurs. (Cliquez sur Démarrer, pointez sur
Paramètres, puis cliquez sur Imprimantes sous
Windows NT 4.0, Windows 98, Windows Me et
Windows 2000 ou cliquez sur Démarrer, puis sur
Imprimantes et télécopieurs sous Windows XP.)
Si vous ne voyez pas l’icône de l’imprimante, doublecliquez sur Ajout d’imprimante et sélectionnez le
port COM attribué à l’appareil Bluetooth. Cliquez sur
Suivant. Sélectionnez HP et hp deskjet série 450 dans
l’assistant Ajout d’imprimante. Suivez les instructions en
ligne pour terminer l’installation de l’imprimante.
Page 15
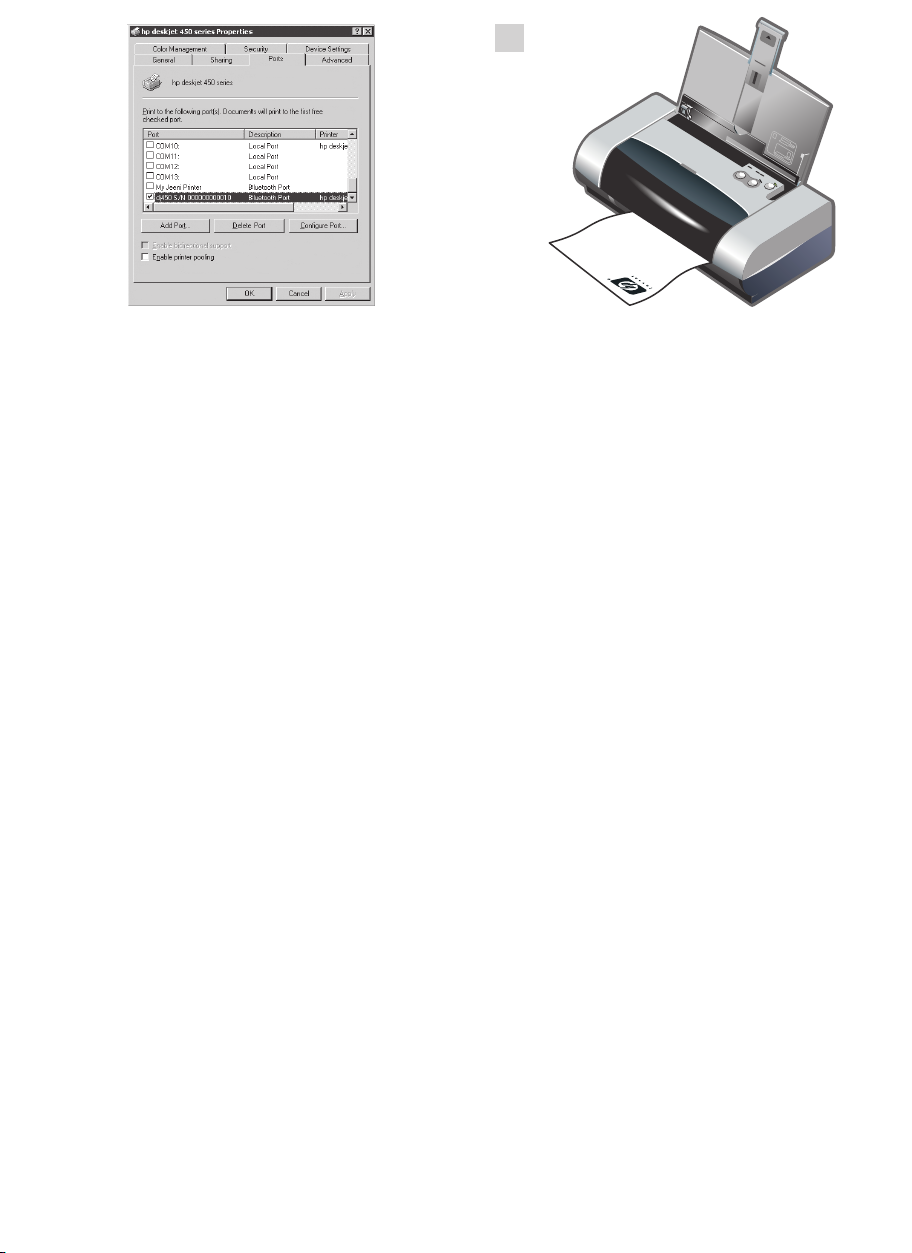
11
4) Right-click the printer icon and click Ports
(Windows 2000, Windows XP, Windows NT 4.0) or Details
(Windows 98 and Windows Me). 5) Make sure that the
printer is assigned to the COM port or virtual Bluetooth port
created for your Bluetooth device.
4) Klicken Sie mit der rechten Maustaste auf das
Druckersymbol und wählen Sie Anschlüsse
(Windows 2000, Windows XP, Windows NT 4.0) bwz.
Details (Windows 98 und Windows Me). 5) Vergewissern
Sie sich, dass der Drucker dem COM-Anschluss oder dem
für Ihr Bluetoothgerät erzeugten virtuellen BluetoothAnschluss zugeordnet ist.
Step 11: Test the software installation.
Print a document from an application you use frequently
to test the software installation and printer connection.
Note: For Bluetooth configuration and printing information,
see the Bluetooth Printing Guide on the Starter CD. For
printing via infrared device, place the device’s infrared
lens within 3 feet (1 meter) from the printer and within
a 30-degree total angle from the printer’s infrared lens.
The printer’s infrared LED turns green when receiving
an infrared transmission.
Schritt 11: Testen der Software-Installation.
Um die Installation der Software und den Druckeranschluss
zu überprüfen, drucken Sie ein Dokument aus einer
Anwendung, die Sie häufig verwenden. Hinweis: Näheres
zur Konfiguration von Bluetooth und Informationen zum
Drucken finden Sie in der Anleitung zum Drucken mit
Bluetooth auf der Starter-CD. Zum Drucken mit einem
Infrarotgerät positionieren Sie das infrarot sendende Gerät
so, dass die Infrarotlinse sich im Abstand von weniger als
einem Meter und innerhalb eines Winkels von 30 Grad von
der Infrarotlinse des Druckers befindet. Die Infrarot-LED
des Druckers leuchtet grün auf, wenn eine
Infrarotübertragung empfangen wird.
4) Cliquez sur l’icône de l’imprimante avec le bouton
droit de la souris et cliquez sur Ports (Windows 2000,
Windows XP, Windows NT 4.0) ou Détails (Windows 98
et Windows Me). 5) Assurez-vous que l’imprimante est
affectée au port COM ou au port Bluetooth virtuel créé pour
le périphérique Bluetooth.
Etape 11 : Tester l’installation du logiciel.
Imprimez un document à partir d’une application que vous
utilisez fréquemment pour tester l’installation du logiciel et
la connexion à l’imprimante. Remarque : Pour configurer le
système Bluetooth et obtenir des informations concernant
l’impression, reportez-vous au guide d’impression
Bluetooth sur le CD d’installation. Pour pouvoir imprimer via
un appareil infrarouge, placez la lentille à infrarouge de
l’appareil à moins d’un mètre (3 pieds) de l’imprimante en
formant un angle inférieur à 30° avec la lentille à infrarouge
de l’imprimante. Lorsqu’il reçoit une transmission
infrarouge, le voyant infrarouge de l’imprimante
devient vert.
Page 16

12
Step 12: Align the print cartridges (Windows).
Whenever you install a print cartridge, align the print
cartridges for the best possible print quality. 1) Click
Start, point to Settings, and then click Printers
(Windows NT 4.0, Windows 98, Windows Me, and
Windows 2000) or click Start and click Printers and
Faxes (Windows XP). 2) Right-click the printer icon
and click Printing Preferences (Windows 2000 and
Windows XP), Properties (Windows 98 and
English
Windows Me), or Document Defaults
(Windows NT 4.0).
Schritt 12: Ausrichten der Druckpatronen
(Windows).
Nach jedem Druckpatronenwechsel müssen Sie die
Druckpatronen ausrichten, um die bestmögliche
Druckqualität zu erhalten. 1) Klicken Sie auf Start,
wählen Sie Einstellungen und klicken Sie dann auf
Drucker (Windows NT 4.0, Windows 98, Windows Me
und Windows 2000), oder klicken Sie auf Start und dann
auf Drucker und Faxgeräte (Windows XP). 2) Klicken
Sie mit der rechten Maustaste auf das Druckersymbol
und wählen Sie Druckeinstellungen (Windows 2000
und Windows XP), Eigenschaften (Windows 98 und
Windows Me) bzw. Standardeinstellungen für
Dokumente (Windows NT 4.0).
3) Click the Services tab, and then click Align Print
Cartridges. 4) Click Align in the dialog and follow the
onscreen instructions to complete the alignment
procedure. Note: You can also align the print cartridge
from the Printer Services tab in the Toolbox.
3) Klicken Sie auf die Registerkarte Gerätewartung
und dann auf Druckpatronen ausrichten. 4) Klicken
Sie im Dialogfeld auf Ausrichten, und folgen Sie zum
Abschließen des Ausrichtvorgangs den Anweisungen
auf dem Bildschirm. Hinweis: Sie können die
Druckpatronen auch über die Registerkarte
Druckerdienste in der Toolbox ausrichten.
Etape 12 : Aligner les cartouches d’encre (Windows).
Pour obtenir la meilleure qualité d’impression possible,
effectuez un alignement des cartouches d’encre chaque
fois que vous installez une cartouche. 1) Cliquez sur
Démarrer, pointez sur Paramètres, puis cliquez
sur Imprimantes (Windows NT 4.0, Windows 98,
Windows Me et Windows 2000) ou cliquez sur
Démarrer, puis sur Imprimantes et télécopieurs
(Windows XP). 2) Cliquez sur l’icône de l’imprimante
Français Deutsch
avec le bouton droit de la souris et cliquez sur
Préférences d’impression (Windows 2000 et
Windows XP), Propriétés (Windows 98 et Windows Me)
ou Valeurs par défaut du document
(Windows NT 4.0).
3) Cliquez sur l’onglet Services, puis cliquez sur Aligner
les cartouches d’encre. 4) Cliquez sur Aligner dans la
boîte de dialogue et suivez les instructions en ligne pour
terminer la procédure d’alignement. Remarque : Vous
pouvez également aligner les cartouches d’encre à partir
de l’onglet Services de l’imprimante dans la boîte à
outils.
Page 17

13
14
Step 13: Align the print cartridges (Mac).
Whenever you install a print cartridge, align the
print cartridges for the best possible print quality.
1) Open the HP Inkjet Utility and click Calibrate Device.
2) Follow the onscreen instructions to complete the
alignment procedure.
Schritt 13: Ausrichten der Druckpatronen (Mac).
Nach jedem Druckpatronenwechsel müssen Sie die
Druckpatronen ausrichten, um die bestmögliche
Druckqualität zu erhalten. 1) Öffnen Sie das HP InkjetDienstprogramm und klicken Sie auf Gerät kalibrieren.
2) Folgen Sie zum Abschließen des Ausrichtvorgangs den
Anweisungen auf dem Bildschirm.
Step 14: Register the printer.
Register the printer to receive important support and
technical information. If you did not register your printer
while installing the software, you can register later at
http://www.register.hp.com.
Schritt 14: Registrieren des Druckers.
Registrieren Sie den Drucker, um Kundenunterstützung
und wichtige technische Informationen zu erhalten. Falls
Sie den Drucker nicht beim Installieren der Software
registriert haben, haben Sie hierzu später die Möglichkeit
unter http://www.register.hp.com.
Etape 13 : Aligner les cartouches d’encre (Mac).
Pour obtenir la meilleure qualité d’impression possible,
effectuez un alignement des cartouches d’encre chaque
fois que vous installez une cartouche. 1) Ouvrez l’utilitaire
HP Inkjet et cliquez sur Calibrer le périphérique.
2) Suivez les instructions en ligne pour terminer la
procédure d’alignement.
Etape 14 : Enregistrer l’imprimante.
Enregistrez votre imprimante afin de recevoir des
informations techniques et d’assistance importantes.
Si vous n’avez pas enregistré l’imprimante lors de
l’installation du logiciel, vous pouvez le faire ultérieurement
à l’adresse suivante : http://www.register.hp.com.
Page 18

Congratulations!
Your printer is ready to use. For information about using the
printer and troubleshooting, refer to the following
resources:
• the onscreen documentation on the Starter CD
• HP Instant Support (For more information, see the
onscreen user’s guide.)
• the product support site at
http://www.hp.com/support/dj450
English
• the HP customer support guide (in box).
Herzlichen Glückwunsch!
Ihr Drucker ist betriebsbereit. Informationen zum Betrieb
des Druckers und zur Fehlersuche finden Sie in den
folgenden Ressourcen:
• Online-Dokumentation auf der Starter-CD
• HP Instant Support (näheres hierzu siehe
Online-Benutzerhandbuch)
• Website für Produktsupport unter
http://www.hp.com/support/dj450
• Handbuch HP Kundenunterstützung (im Karton).
Félicitations !
Votre imprimante est prête à l’emploi. Pour de plus amples
informations concernant l’utilisation de votre imprimante ou
son dépannage, reportez-vous aux sources suivantes :
• Documentation en ligne disponible sur le CD
d’installation
• HP Instant Support (pour de plus amples informations,
reportez-vous au guide de l’utilisateur en ligne)
• Site Internet de support produit :
Français Deutsch
http://www.hp.com/support/dj450
• Guide d’assistance clientèle HP (dans le carton).
Page 19

Travel tips
The following tips will help you prepare for traveling with
your printer:
• If you are bringing along an extra black or photo print
cartridge, store it in the travel holder (part number
C8233A) to prevent ink leakage.
• You can bring the printer along in a carrying case (part
number C8232A). The carrying case has compartments
for both your notebook and the printer. The
compartments can also be detached if you want to
carry the notebook and printer separately.
• Turn off the printer using the Power button. This
ensures that the print cartridges are returned to the
home position at the right side of the printer and locked
in place.
• Disconnect the printer cable and power adapter from
the printer. Slide down the input tray extension and
close the input tray.
• If you are traveling to another country/region, bring the
necessary plug adapter with you.
• Use only the power adapter that is supplied with the
printer. Do not use any other voltage transformer or
converter. The power adapter can be used with AC
power sources of 100 to 240 volts, 50 or 60 Hz.
• Remove the battery if you will not be using the printer
for more than a month.
Reisetips
Die folgenden Tips helfen Ihnen, den Drucker auf eine Reise
vorzubereiten.
• Falls Sie eine zusätzliche schwarze oder FotoDruckpatrone mitnehmen, lagern Sie diese in der
Reisehalterung (Teilenummer C8223A), um ein
Auslaufen von Tinte zu vermeiden.
• Sie können den Drucker in der Tragtasche mitnehmen
(Teilenummer C8232A). Die Tragtasche hat
Abteilungen für Ihr Notebook und den Drucker. Die
Abteilungen können außerdem voneinander getrennt
werden, falls Sie Notebook oder Drucker getrennt
mitnehmen möchten.
• Schalten Sie den Drucker mithilfe der Netztaste aus. So
wird sicher gestellt, dass die Patronenhalterung in die
Ausgangsposition auf der rechten Seite des Drucker
zurück kehr und verriegelt wird.
• Trennen Sie das Druckerkabel und den Netzadapter
vom Drucker. Fahren Sie die Verlängerung des
Eingabefachs ein, und schließen Sie das Eingabefach.
• Falls Sie in ein andere Land bzw. eine andere Region
reisen, nehmen Sie den richtigen Steckeradapter mit.
• Verwenden Sie nur den Netzadapter, der zum
Lieferumfang des Druckers gehört. Benutzen Sie
keinen anderen Spannungstransformator. Der
Netzadapter kann mit Wechselstromquellen von
100 bis 240 Volt und 50 oder 60 Hz verwendet werden.
• Entfernen Sie die Batterie, wenn Sie den Drucker für
mehr als einen Monat nicht verwenden.
Conseils de voyage
Les conseils suivants vous aideront à préparer vos
déplacements avec l’imprimante :
• Si vous emportez une cartouche d’encre noire ou photo
supplémentaire, rangez-la dans le porte-cartouche
(référence C8233A) pour éviter les fuites d’encre.
• L’imprimante peut être emportée dans une sacoche de
transport (référence C8232A). Cette sacoche possède
des compartiments pour loger un ordinateur portable et
l’imprimante. Ces compartiments peuvent être
également détachés l’un de l’autre pour transporter
l’ordinateur portable et l’imprimante séparément.
• Mettez l’imprimante hors tension à l’aide de la touche
d’alimentation. Les cartouches d’encre reviennent ainsi
à droite de l’imprimante où elles sont verrouillées en
position de repos.
• Débranchez le câble d’imprimante et le module
d’alimentation de l’imprimante. Faites glisser la rallonge
du bac d’alimentation et fermez le bac d’alimentation.
• Si vous voyagez à l’étranger, emportez-vous avec vous
la fiche d’adaptation nécessaire.
• N’utilisez que le module d’alimentation fourni avec
l’imprimante. N’utilisez aucun autre convertisseur ou
transformateur de tension. Le module d’alimentation
peut être utilisé avec des alimentations c.a. de 100 à
240 volts, 50 ou 60 Hz.
• Retirez la batterie si vous n’envisagez pas d’utiliser
l’imprimante pendant plus d’un mois.
Page 20
Infrared Reference
You must enable the infrared port in your host machine before you can use it.
1. Reboot your system and press F2 while your system is starting up.
2. Select the System Devices menu and set Infrared Port to Enabled.
3. Set Mode to FIR.
4. If DMA channel conflicts with Parallel port DMA channel, change Parallel Port to EPP.
5. Save and Exit to continue reboot.
LED Reference
LED indication Explanation and recommended action
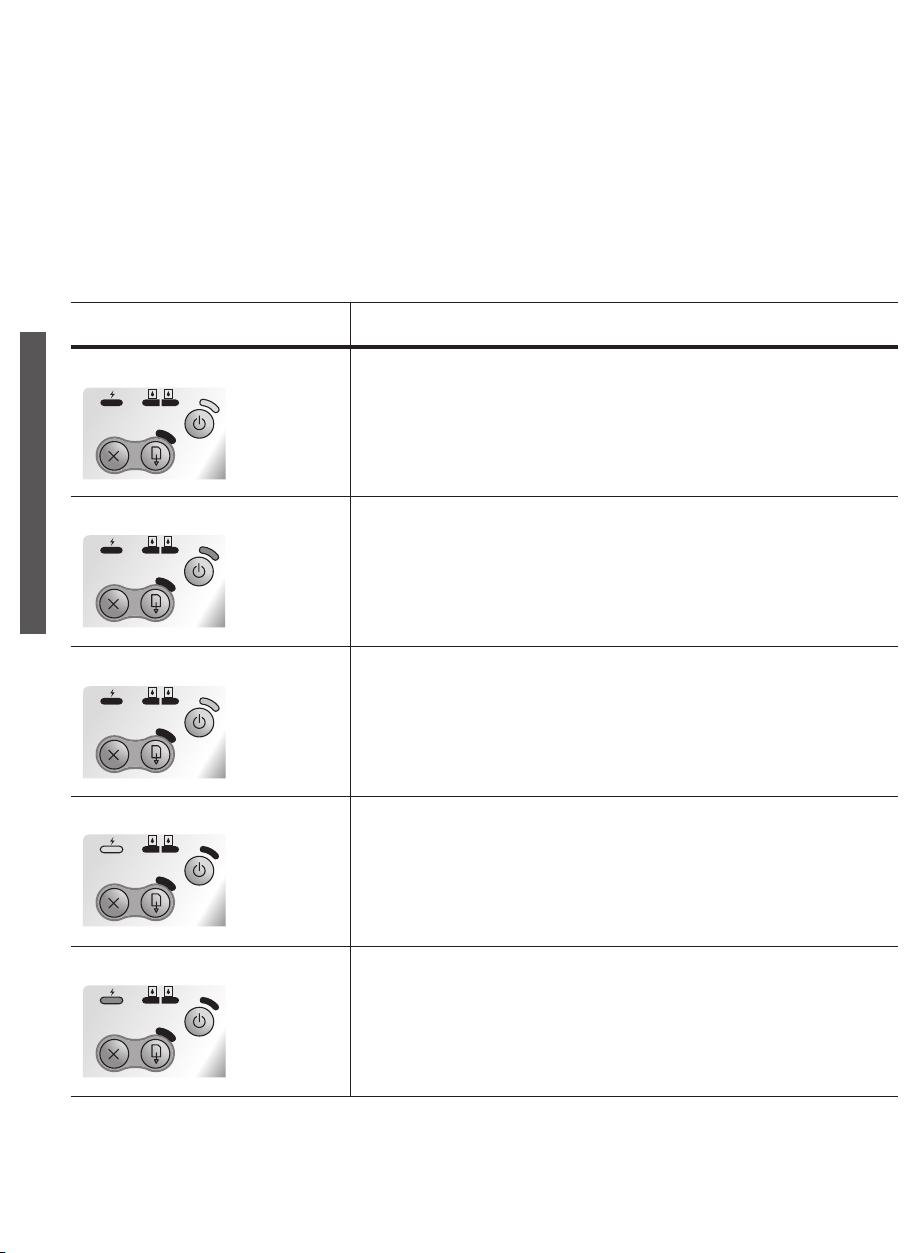
Power LED is green. If using AC power: Printer is turned on and idle.
If using battery power: Battery is 41-100% charged and printer is turned
on and idle.
• No action required.
English
Power LED is red. Battery is less than 10% charged and printer is turned on and idle.
• Plug in the power adapter to begin recharging the battery.
See Charging and using the battery in the onscreen user’s guide.
Power LED is amber. Battery is 10-40% charged and printer is turned on and idle.
• Plug in the power adapter to begin recharging the battery.
See Charging and using the battery in the onscreen user’s guide.
Battery charge LED is green. Battery is charging.
• No action required.
Battery charge LED is red. Battery is faulty.
• Replace the battery (part number C8233A).
Page 21
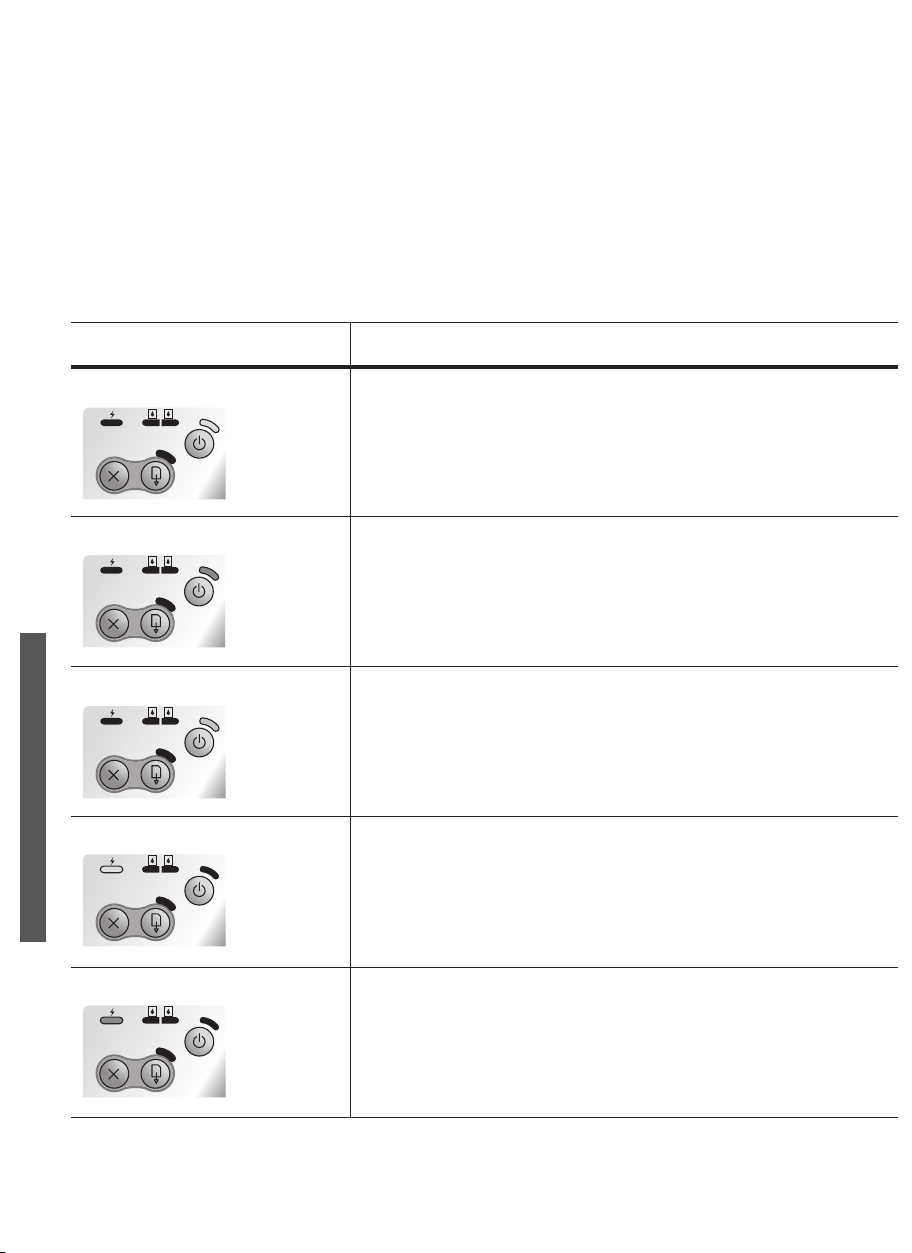
LED indication Explanation and recommended action
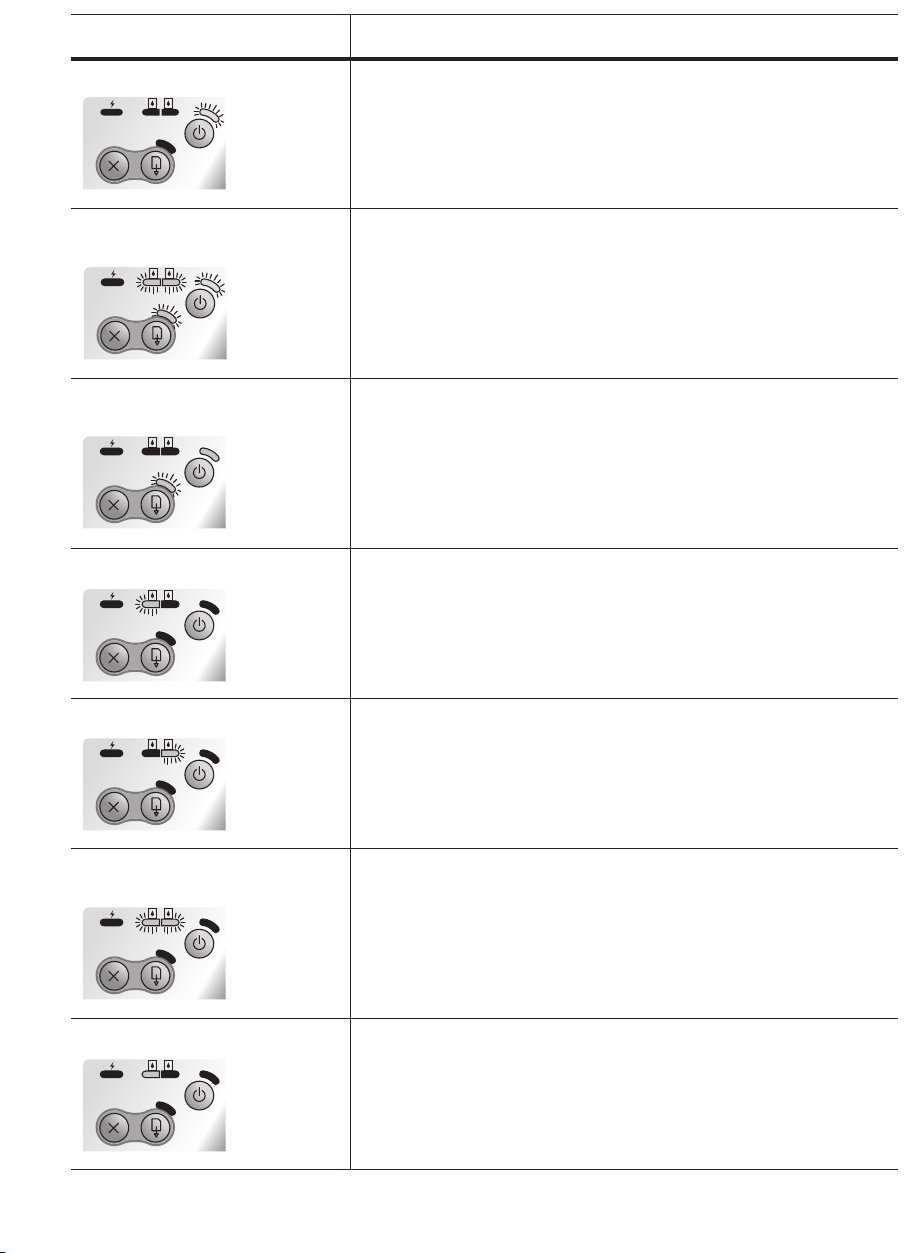
Power LED blinks. Printer is printing.
• No action required.
Power, Resume, Left and Right
print cartridge LEDs cycle.
Power LED is green and Resume
LED blinks.
Left print cartridge LED blinks. Tri-color print cartridge needs attention.
Right print cartridge LED blinks. Black or photo print cartridge needs attention.
Printer is powering on.
• No action required.
Printer is either stalled, waiting for special media to dry, out of paper,
or processing Digital Print Order Format (DPOF) printing.
• If out of paper, load paper. Press the Resume button to continue the
print job.
• Reinstall the print cartridge and try to print. If the error persists, replace
the cartridge. See Replacing the print cartridges in the onscreen
user’s guide.
• Reinstall the print cartridge and try to print. If the error persists, replace
the cartridge. See Replacing the print cartridges in the onscreen
user’s guide.
Right and Left print cartridge
LEDs blink.
Left print cartridge LED on. Tri-color print cartridge is low on ink.
Tri-color and black or photo print cartridges need attention.
• Reinstall the print cartridges and try to print. If the error persists,
replace the cartridges. See Replacing the print cartridges in the
onscreen user’s guide.
• Replace the print cartridge. See Replacing the print cartridges in the
onscreen user’s guide.
Page 22
LED indication Explanation and recommended action
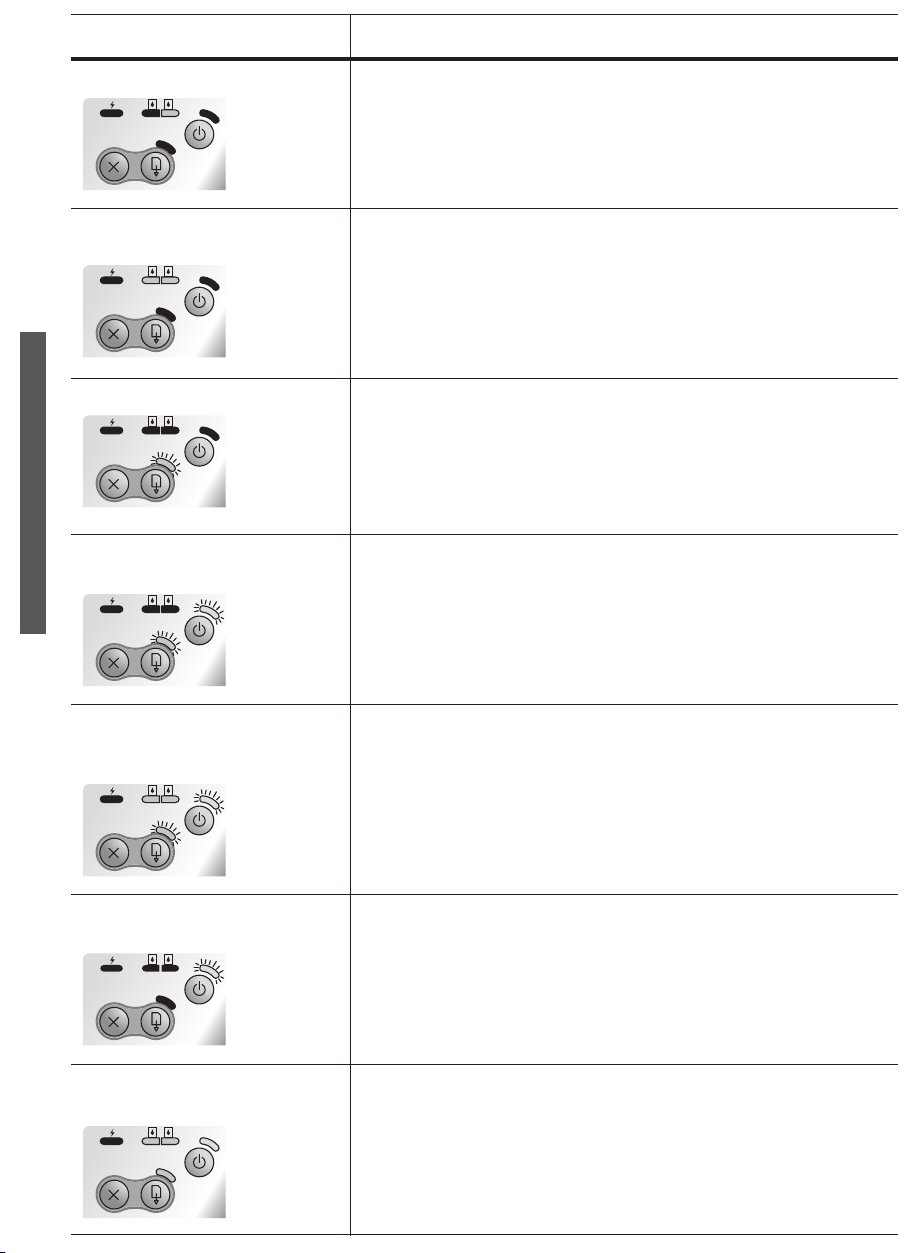
Right print cartridge LED on. Black or photo print cartridge is low on ink.
• Replace the print cartridge. See Replacing the print cartridges in the
onscreen user’s guide.
Right and Left print cartridge
LEDs on.
Power LED off, Resume LED blinks. Media jam or paper motor stall.
English
Power LED blinks,
Resume LED blinks.
Power LED blinks, Resume LED
blinks, Left and Right print cartridge
LEDs on.
Tri-color and black or photo print cartridges are low on ink.
• Replace the print cartridges. See Replacing the print cartridges in the
onscreen user’s guide.
• Clear the jammed paper. See Print media is jammed in the onscreen
user’s guide. After clearing the jam, press the Resume button to
continue the print job.
If no paper jam exists, press the Resume button. If this does not work,
try turning the printer off and then on again, and resend the print job.
Media jam or carriage stall.
• Clear the jammed paper. See Print media is jammed in the onscreen
user’s guide. After clearing the jam, press the Resume button to
continue the print job.
If no paper jam exists, press the Resume button. If this does not work,
try turning the printer off and then on again, and resend the print job.
Media jam or service station stall.
• Clear the jammed paper. See Print media is jammed in the onscreen
user’s guide. After clearing the jam, press the Resume button to
continue the print job.
Power LED turns on twice as long
as off.
Power LED, Resume LED, Left and
Right print cartridge LEDs on.
If no paper jam exists, press the Resume button. If this does not work,
try turning the printer off and then on again, and resend the print job.
Print job is being canceled.
• No action required.
New firmware is being flashed to the printer.
• No action required.
Page 23
LED indication Explanation and recommended action
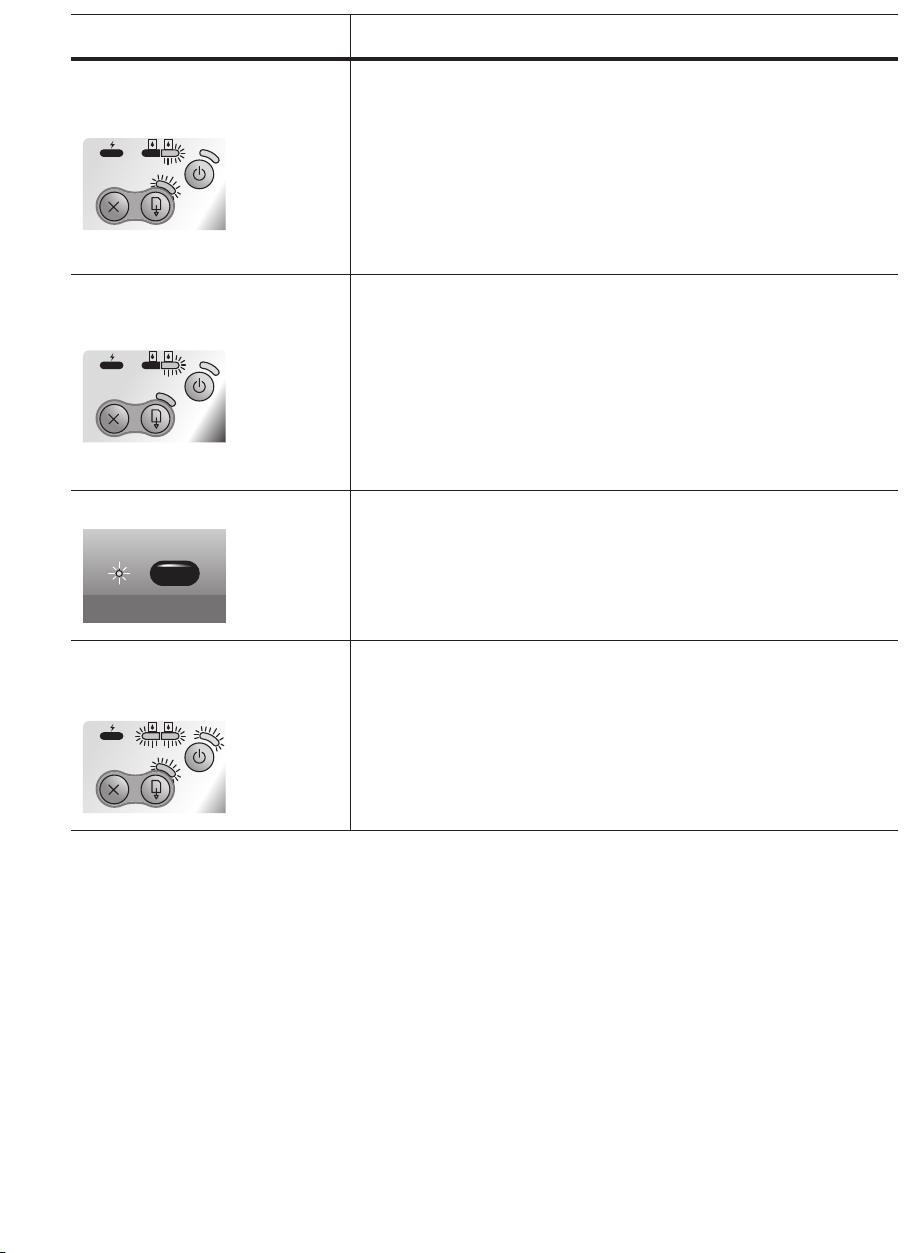
Power LED on, Resume LED blinks,
Right print cartridge LED turns on
twice as long as off.
Power LED on, Resume LED on,
Right print cartridge LED turns on
twice as long as off.
Infrared LED on. Printer is receiving infrared transmission.
Ink service module almost full.
• If you have a replacement for the ink service module, replace it
immediately by following the instructions that come with it.
• Otherwise, visit www.hp.com/support/dj450 or see Customer Support
to get a replacement.
In the meantime, you can press the Resume button to continue printing,
but this LED error state will remain until the ink service module is
replaced. When the ink service module is full, the printer will stop
printing.
Ink service module full.
• If you have a replacement for the ink service module, replace it
immediately by following the instructions that come with it.
• Otherwise, visit www.hp.com/support/dj450 or see Customer Support
to get a replacement.
In the meantime, you can remove the black print cartridge and print
using only the tri-color print cartridge. The color results and print speed
may be affected. See Single-cartridge printing mode in the onscreen
user’s guide.
• No action required.
Power LED, Resume LED, Left and
Right print cartridge LEDs cycle at
fast rate.
Printer error.
• Press the Resume button to print the error code. Press the Power
button to reset the printer.
Page 24
Infrarot-Referenz
Vor der Verwendung müssen Sie zuerst den Infrarotanschluss an Ihrem Hostgerät aktivieren.
1. Starten Sie das System neu und drücken Sie F2 während das System hochfährt.
2. Wählen Sie das Menü Systemkomponenten und aktivieren Sie den Infrarotanschluss.
3. Stellen Sie den Modus FIR ein.
4. Wenn ein Konflikt zwischen dem DMA-Kanal und dem DMA-Kanal des Parallelanschlusses auftritt, ändern Sie
den Parallelanschluss auf EPP.
5. Speichern und Schließen zum Fortsetzen des Startvorgangs.
LED-Referenz
LED-Anzeige Erklärung und empfohlene Vorgehensweise
Strom-LED ist grün. Bei Wechselstromversorgung: Drucker ist eingeschaltet und
betriebsbereit.
Bei Batterieversorgung: Batterie is 41-100% aufgeladen; der Drucker ist
eingeschaltet und betriebsbereit.
• Keine Aktion erforderlich.
Strom-LED ist rot. Batterie is weniger als 10% aufgeladen; der Drucker ist eingeschaltet und
betriebsbereit.
• Schließen Sie den Netzadapter an, um die Batterie aufzuladen.
Siehe Aufladen und Verwenden der Batterie im Online-
Benutzerhandbuch.
Strom-LED ist gelb. Batterie is 10-40% aufgeladen; der Drucker ist eingeschaltet und
betriebsbereit.
• Schließen Sie den Netzadapter an, um die Batterie aufzuladen.
Siehe Aufladen und Verwenden der Batterie im Online-
Benutzerhandbuch.
Deutsch
Batterie-Ladeanzeige ist grün. Batterie wird aufgeladen.
• Keine Aktion erforderlich.
Batterie-Ladeanzeige ist rot. Batterie ist defekt.
• Ersetzen Sie die Batterie (Teilenummer C8223A).
Page 25

LED-Anzeige Erklärung und empfohlene Vorgehensweise
Strom-LED blinkt. Der Drucker druckt.
• Keine Aktion erforderlich.
LEDs für Strom, Fortfahren sowie
linke und rechte Druckpatrone.
Strom-LED ist grün und FortfahrenLED blinkt.
LED für linke Druckpatrone blinkt. Die Drei-Farben-Druckpatrone muss überprüft werden.
LED für rechte Druckpatrone blinkt. Die schwarze oder Foto-Druckpatrone muss überprüft werden.
Der Drucker wird eingeschaltet.
• Keine Aktion erforderlich.
Der Drucker ist stehen geblieben, wartet darauf, dass Spezialmedien
trocknen, hat kein Papier mehr oder verarbeitet DPOF-Druck.
• Falls das Papier alle ist, muss es nachgeladen werden. Drücken Sie die
Fortfahren-Taste, um den Druckauftrag fortzusetzen.
• Setzen Sie die Druckpatrone wieder ein, und versuchen Sie zu
drucken. Wenn der Fehler weiterhin auftritt, ersetzen Sie die Patrone.
Siehe Auswechseln der Druckpatronen im Online-Benutzerhandbuch.
• Setzen Sie die Druckpatrone wieder ein, und versuchen Sie zu
drucken. Wenn der Fehler weiterhin auftritt, ersetzen Sie die Patrone.
Siehe Auswechseln der Druckpatronen im Online-Benutzerhandbuch.
LEDs für rechte und linke
Druckpatrone blinken.
LED für linke Druckpatrone ist an. Die Drei-Farben-Druckpatrone ist bald leer.
Die Drei-Farben- oder Fotodruckpatrone muss überprüft werden.
• Setzen Sie die Druckpatronen wieder ein, und versuchen Sie zu
drucken. Falls der Fehler weiterhin auftritt, ersetzen Sie die Patronen.
Siehe Auswechseln der Druckpatronen im Online-Benutzerhandbuch.
• Ersetzen Sie die Druckpatrone. Siehe Auswechseln der Druckpatronen
im Online-Benutzerhandbuch.
Page 26

LED-Anzeige Erklärung und empfohlene Vorgehensweise
LED für rechte Druckpatrone ist an. Die Schwarze oder Foto-Druckpatrone ist bald leer.
• Ersetzen Sie die Druckpatrone. Siehe Auswechseln der Druckpatronen
im Online-Benutzerhandbuch.
LED-Anzeigen für rechte und linke
Druckpatrone sind an.
Strom-LED aus, Fortfahren-LED
blinkt.
Strom-LED blinkt, Fortfahren-LED
blinkt.
Strom-LED blinkt, Fortfahren-LED
blinkt, LEDs für linke und rechte
Druckpatrone sind an.
Deutsch
Die Drei-Farben- oder Fotodruckpatrone ist bald leer.
• Ersetzen Sie die Druckpatronen. Siehe Auswechseln der
Druckpatronen im Online-Benutzerhandbuch.
Papierstau oder Papiermotorversagen.
• Beseitigen Sie den Papierstau. Siehe Gestaute Druckmedien im
Online-Benutzerhandbuch. Nachdem der Papierstau beseitigt ist,
drücken Sie die Fortfahren-Taste, um den Druckauftrag fortzusetzen.
Falls kein Papierstau vorhanden ist, drücken Sie die
Fortfahren-Taste. Falls das nicht funktioniert, schalten Sie den Drucker
aus und wieder ein, und senden Sie den Druckauftrag erneut.
Medienstau oder Patronenhalterung blockiert.
• Beseitigen Sie den Papierstau. Siehe Gestaute Druckmedien im
Online-Benutzerhandbuch. Nachdem der Papierstau beseitigt ist,
drücken Sie die Fortfahren-Taste, um den Druckauftrag fortzusetzen.
Falls kein Papierstau vorhanden ist, drücken Sie die Fortfahren-Taste.
Falls das nicht funktioniert, schalten Sie den Drucker aus und wieder
ein, und senden Sie den Druckauftrag erneut.
Medienstau oder Servicestation blockiert.
• Beseitigen Sie den Papierstau. Siehe Gestaute Druckmedien im
Online-Benutzerhandbuch. Nachdem der Papierstau beseitigt ist,
drücken Sie die Fortfahren-Taste, um den Druckauftrag fortzusetzen.
Falls kein Papierstau vorhanden ist, drücken Sie die Fortfahren-Taste.
Falls das nicht funktioniert, schalten Sie den Drucker aus und wieder
ein, und senden Sie den Druckauftrag erneut.
Strom-LED ist doppelt so lange an
wie aus.
Druckauftrag wird gelöscht.
• Keine Aktion erforderlich.
Page 27

LED-Anzeige Erklärung und empfohlene Vorgehensweise
Die LED-Anzeigen für Strom,
Fortfahren sowie die linke und
rechte Druckpatrone sind an.
Strom-LED an, Fortfahren-LED
blinkt, LED-Anzeige für rechte
Druckpatrone ist doppelt so lange
an wie aus.
Strom-LED an, Fortfahren-LED
an, LED-Anzeige für rechte
Druckpatrone ist doppelt so
lange an wie aus.
Neue Firmware wird auf den Drucker übertragen.
• Keine Aktion erforderlich.
Das Tinten-Servicemodul ist fast voll.
• Falls Ersatz für das Tinten-Servicemodul verfügbar ist, wechseln Sie es
unter Beachtung der mitgelieferten Anweisungen sofort aus.
• Andernfalls besuchen Sie www.hp.com/support/dj450 oder lesen Sie
unter Kundendienst nach, um Ersatz anzufordern.
In der Zwischenzeit können Sie die Fortfaren-Taste drücken, um den
Druckvorgang fortzusetzen, der LED-Fehlerstatus bleibt aber bestehen,
bis das Tinten-Servicemodul ausgewechselt wird. Wenn das TintenServicemodul voll ist, kann der Drucker nicht mehr drucken.
Das Tinten-Servicemodul ist voll.
• Falls Ersatz für das Tinten-Servicemodul verfügbar ist, wechseln Sie es
unter Beachtung der mitgelieferten Anweisungen sofort aus.
• Andernfalls besuchen Sie www.hp.com/support/dj450 oder lesen Sie
unter Kundendienst nach, um Ersatz anzufordern.
In der Zwischenzeit können Sie die schwarze Druckpatrone entfernen
und nur mit der Drei-Farben-Druckpatrone weiter drucken.
Die Farbergebnisse und die Druckgeschwindigkeit können
beeinträchtigt werden. Siehe Einzelpatronen-Druckmodus im
Online-Benutzerhandbuch.
Infrarot-LED an. Der Drucker empfängt eine Infrarot-Übertragung.
• Keine Aktion erforderlich.
Srom-LED, Fortfahren-LED sowie
die LED für linke und rechte
Druckpatrone leuchten schnell
nacheinander auf.
Druckerfehler.
• Drücken Sie die Fortfahren-Taste, um den Fehlercode zu drucken.
Drücken Sie die Netztaste, um den Drucker zurück zu setzen.
Page 28

Référence sur l’infrarouge
Avant de pouvoir utiliser le port infrarouge de l’appareil hôte, vous devez l’activer.
1. Redémarrez le système et appuyez sur F2 au cours du redémarrage.
2. Sélectionnez le menu Périphériques système et réglez l’option Port infrarouge sur Activé.
3. Réglez l’option Mode sur FIR.
4. Si le canal DMA entre en conflit avec le canal DMA du port parallèle, passez de Port parallèle à EPP.
5. Sauvegardez et quittez la fenêtre pour poursuivre le redémarrage.
Référence des voyants
Signification du voyant Explication et action recommandée
Le témoin d’alimentation est vert. Si l’alimentation secteur est utilisée : L’imprimante est sous tension et
en attente.
Si la batterie est utilisée : La batterie est chargée de 41 à 100 % et
l’imprimante est sous tension et en attente.
• Aucune action requise.
Le témoin d’alimentation est rouge. La batterie est chargée à moins de 10 %, et l’imprimante est sous tension
Le témoin d’alimentation est ambré. La batterie est chargée entre 10 et 40 % et l’imprimante est sous tension
Le témoin de charge de batterie est
vert.
Le témoin de charge de batterie est
rouge.
et en attente.
• Branchez le bloc d’alimentation et commencez à recharger la batterie.
Reportez-vous à la section Chargement et utilisation de la batterie du
guide de l’utilisateur en ligne.
et en attente.
• Branchez le bloc d’alimentation et commencez à recharger la batterie.
Reportez-vous à la section Chargement et utilisation de la batterie du
guide de l’utilisateur en ligne.
La batterie est en train de charger.
• Aucune action requise.
La batterie est défectueuse.
• Remplacez la batterie (référence C8233A).
Français
Page 29

Signification du voyant Explication et action recommandée
Le témoin d’alimentation clignote. L’imprimante est en train d’imprimer.
• Aucune action requise.
Les témoins d’alimentation, le
voyant de reprise, les voyants
gauche et droit de cartouche
d’encre clignotent alternativement.
Le témoin d’alimentation est vert et
le voyant de reprise clignote.
Le voyant gauche de cartouche
d’encre clignote.
Le voyant droit de cartouche d’encre
clignote.
L’imprimante est en cours de mise sous tension.
• Aucune action requise.
L’imprimante est bloquée, attend le séchage des supports spéciaux,
manque de papier ou effectue une impression DPOF (format de
commande d’impression numérique).
• Si le bac est vide, rechargez du papier. Appuyez sur la touche de
reprise pour poursuivre la tâche d’impression.
La cartouche d’encre trichromique exige votre attention.
• Repositionnez correctement la cartouche d’encre et essayez
d’imprimer. Si l’erreur persiste, changez la cartouche. Reportez-vous
à la section Remplacement des cartouches d’encre du guide de
l’utilisateur en ligne.
La cartouche d’encre noire ou photo exige votre attention.
• Repositionnez correctement la cartouche d’encre et essayez
d’imprimer. Si l’erreur persiste, changez la cartouche. Reportez-vous
à la section Remplacement des cartouches d’encre du guide de
l’utilisateur en ligne.
Les voyants droit et gauche de
cartouche d’encre clignotent.
Les cartouches d’encre trichromique et noire ou photo exigent votre
attention.
• Repositionnez correctement les cartouches d’encre et essayez
d’imprimer. Si l’erreur persiste, changez les cartouches. Reportez-vous
à la section Remplacement des cartouches d’encre du guide de
l’utilisateur en ligne.
Page 30

Signification du voyant Explication et action recommandée
Le voyant gauche de cartouche
d’encre est allumé.
Le voyant droit de cartouche
d’encre est allumé.
Les voyants droit et gauche de
cartouche d’encre sont allumés.
Le témoin d’alimentation est éteint,
le voyant de reprise clignote.
La cartouche d’encre trichromique est presque vide.
• Remplacez la cartouche d’encre. Reportez-vous à la section
Remplacement des cartouches d’encre du guide de l’utilisateur
en ligne.
La cartouche d’encre noire ou photo est presque vide.
• Remplacez la cartouche d’encre. Reportez-vous à la section
Remplacement des cartouches d’encre du guide de l’utilisateur
en ligne.
Les cartouches d’encre trichromique et noire ou photo sont presque vides.
• Remplacez les cartouches d’encre. Reportez-vous à la section
Remplacement des cartouches d’encre du guide de l’utilisateur
en ligne.
Bourrage papier ou blocage du circuit du papier.
• Retirez le papier coincé. Reportez-vous à la section Le support
d’impression a provoqué un bourrage dans le Manuel d’utilisation
affiché à l’écran. Après avoir supprimé le bourrage, appuyez sur la
touche de reprise pour poursuivre la tâche d’impression.
Le témoin d’alimentation clignote,
le voyant de reprise clignote.
Le témoin d’alimentation clignote,
le voyant de reprise clignote,
les voyants droit et gauche de
cartouche d’encre sont allumés.
Français
S’il n’y a aucun bourrage de papier, appuyez sur le touche de reprise.
Si cela ne fonctionne pas, mettez l’imprimante hors tension, puis à
nouveau sous tension, et relancez la tâche d’impression.
Bourrage papier ou blocage du chariot.
• Retirez le papier coincé. Reportez-vous à la section Le support
d’impression a provoqué un bourrage dans le Manuel d’utilisation
affiché à l’écran. Après avoir supprimé le bourrage, appuyez sur la
touche de reprise pour poursuivre la tâche d’impression.
S’il n’y a aucun bourrage de papier, appuyez sur la touche de reprise.
Si cela ne fonctionne pas, mettez l’imprimante hors tension, puis à
nouveau sous tension, et relancez la tâche d’impression.
Bourrage papier ou blocage du poste de service.
• Retirez le papier coincé. Reportez-vous à la section Le support
d’impression a provoqué un bourrage dans le Manuel d’utilisation
affiché à l’écran. Après avoir supprimé le bourrage, appuyez sur la
touche de reprise pour poursuivre la tâche d’impression.
S’il n’y a aucun bourrage de papier, appuyez sur la touche de reprise.
Si cela ne fonctionne pas, mettez l’imprimante hors tension, puis à
nouveau sous tension, et relancez la tâche d’impression.
Page 31

Signification du voyant Explication et action recommandée
Le témoin d’alimentation s’allume
deux fois plus longtemps qu’il ne
s’éteint.
Le témoin d’alimentation, le voyant de
reprise, les voyants droit et gauche
de cartouche d’encre sont allumés.
Le témoin d’alimentation est allumé,
le voyant de reprise clignote,
le voyant droit de cartouche d’encre
s’allume deux fois plus longtemps
qu’il ne s’éteint.
La tâche d’impression est annulée.
• Aucune action requise.
Un nouveau micrologiciel est envoyé vers l’imprimante.
• Aucune action requise.
Module de service d’encre presque plein.
• Si vous disposez d’un module de service d’encre de rechange,
installez-le immédiatement en suivant les instructions qui
l’accompagnent.
• Sinon, consultez www.hp.com/support/dj450 ou voir Assistance
clientèle pour obtenir un module de rechange.
Dans l’intervalle, appuyez sur la touche de reprise pour poursuivre
l’impression, mais l’état de ce témoin d’erreur reste le même tant que le
module de service d’encre n’est pas remplacé. Lorsque le module de
service d’encre est plein, l’imprimante s’arrête d’imprimer.
Le témoin d’alimentation est allumé,
le voyant de reprise est allumé, le
voyant droit de cartouche d’encre
s’allume deux fois plus longtemps
qu’il ne s’éteint.
Voyant infrarouge allumé. L’imprimante reçoit une transmission infrarouge.
Le témoin d’alimentation, le voyant
de reprise, les voyants gauche et
droit de cartouche d’encre
clignotent rapidement.
Module de service d’encre plein.
• Si vous disposez d’un module de service d’encre de rechange, installezle immédiatement en suivant les instructions qui l’accompagnent.
• Sinon, consultez www.hp.com/support/dj450 ou voir Assistance clientèle
pour obtenir un module de rechange.
Dans l’intervalle, vous pouvez retirer la cartouche d’encre noire et
imprimer avec la seule cartouche d’encre trichromique. Les couleurs
obtenues et la vitesse d’impression en seront sans doute affectées.
Reportez-vous à la section Mode d’impression à une cartouche du guide
de l’utilisateur en ligne.
• Aucune action requise.
Erreur de l’imprimante.
• Appuyez sur la touche de reprise pour imprimer le code d’erreur.
Appuyez sur la touche d’alimentation pour réinitialiser l’imprimante.
Page 32

HP Deskjet 450 serie printer.
Deze printer drukt snel en professioneel af in een
mobiele omgeving. U kunt afdrukken vanaf
notebookcomputers, desktopcomputers, draadloze
apparaten zoals personal digital assistants (PDA’s)
met Microsoft
Palm OS
®
Pocket PC Software, Windows®CE of
®
, digitale camera’s met CompactFlash™-kaart
en mobiele telefoons met Bluetooth- en
infraroodaansluiting.
Nederlands
Voor informatie over het gebruik van PDA’s en Bluetooth
kunt u de handleiding bij de Personal Digital Assistant en
de Handleiding voor afdrukken met Bluetooth
raadplegen op de Starter-CD.
Stampante serie HP Deskjet 450.
Questa stampante consente di effettuare stampa mobile
in modo rapido e professionale. È possibile stampare da
computer portatili e da scrivania, da periferiche wireless,
quali PDA con Microsoft
Windows
®
CE e Palm OS®, macchine fotografiche
®
Pocket PC Software,
digitali tramite scheda CompactFlash™ e telefoni
cellulari con connettività ad infrarossi.
Impresora HP Deskjet 450 series.
Esta impresora portátil proporciona impresión rápida y
de calidad profesional. Permite imprimir desde
ordenadores portátiles, ordenadores de sobremesa,
dispositivos inalámbricos como los asistentes digitales
personales (PDA) con sistemas operativos
Microsoft
Palm OS
CompactFlash™ y teléfonos móviles con conectividad
Español Italiano
por infrarrojos y Bluetooth.
®
Pocket PC software, Windows®CE y
®
; cámaras digitales mediante una tarjeta
Per informazioni sull’uso di PDA e Bluetooth, vedere la
Guida di assistenza digitale personale e la Guida per la
stampa Bluetooth sul CD di avviamento.
Para obtener información sobre el uso de PDAs y
Bluetooth, consulte la Guía del Asistente digital personal
y la Guía de Impresión Bluetooth en el Starter CD.
Page 33

1
6
1
8
3
7
Stap 1: de inhoud van de verpakking controleren.
1) HP Deskjet 450 serie printer, 2) Adapter, 3) Netsnoer,
4) Zwarte en kleureninktpatronen, 5) Parallelle kabel,
6) Gedrukte documentatie (installatieposter, beknopte
installatiehandleiding, HP klantenondersteuningsgids),
Fase 1: Controllare il contenuto della confezione.
1) Stampante serie HP Deskjet 450, 2) alimentatore,
3) cavo di alimentazione, 4) cartucce di stampa del
nero e a colori, 5) cavo parallelo, 6) documentazione
su supporto cartaceo (poster di installazione, guida rapida
all’avviamento, guida al supporto clienti HP),
4
5
2
3
7) Starter-CD (software en elektronische documentatie),
8) Batterij (HP Deskjet 450CBi/450wbt), 9) HP Bluetoothprinterkaart (HP Deskjet 450wbt).
7) CD di avviamento (documentazione software ed
elettronica), 8) batteria (HP Deskjet 450CBi/450wbt),
9) scheda stampante HP Bluetooth (HP Deskjet 450wbt).
9
Paso 1: Examine el contenido del paquete.
1) impresora HP Deskjet 450 series, 2) adaptador de
corriente, 3) cable de alimentación, 4) cartuchos de
impresión en negro y a color, 5) cable paralelo,
6) documentación impresa (póster de instalación,
introducción, HP guía de asistencia al cliente),
7) Starter CD (software y documentación electrónica),
8) batería (HP Deskjet 450CBi/450wbt), 9) tarjeta de
impresora HP Bluetooth (HP Deskjet 450wbt).
Page 34

2
3
6
7
8
9
1
2
3
4
5
10
Stap 2: de tape verwijderen.
Verwijder alle verpakkingstape van de printer.
Nederlands
Fase 2: Rimuovere il nastro di imballaggio.
Rimuovere tutto il nastro di imballaggio dalla stampante.
Stap 3: de printeronderdelen controleren (voorkant).
1) Verlengstuk van invoerlade, 2) Invoerlade,
3) Papiergeleider, 4) Kaartsleuf, 5) Uitlijngeleider,
6) Inktpatroonklem, 7) Inktpatroonhouder,
8) Uitvoersleuf, 9) Voorste toegangsklep,
10) Infraroodpoort.
Fase 3: Identificare i componenti della stampante
(parte frontale).
1) Prolunga vassoio di alimentazione, 2) vassoio di
alimentazione, 3) guida della carta, 4) alloggiamento per
le schede, 5) guida di allineamento, 6) fermo delle
cartucce di stampa, 7) alloggiamento delle cartucce di
stampa, 8) uscita carta, 9) coperchio di accesso frontale,
10) porta a infrarossi.
Paso 2: Quite la cinta del embalaje.
Quite toda la cinta del embalaje de la impresora.
Español Italiano
Paso 3: Identifique las partes de la impresora
(vista frontal).
1) extensión de la bandeja de entrada, 2) bandeja de
entrada, 3) guía del papel, 4) ranura para tarjetas,
5) guía de alineación, 6) seguro del cartucho de
impresión, 7) receptáculo del cartucho de impresión,
8) ranura de salida, 9) cubierta de acceso frontal,
10) puerto de infrarrojos.
Page 35

1 2 3
57
56
58
4
5
6 7 8
9
De printeronderdelen controleren (bedieningspaneel).
1) Batterijlampje, 2) Lampje voor linkerpatroon, 3) Lampje
voor rechterpatroon, 4)
6) Lampje Doorgaan, 7)
Knop Annuleren, 5) Knop Doorgaan,
Aan/Uit-knop, 8) Aan/Uit-lampje,
9) Infraroodlampje. Opmerking: Zie Lichtjes voor het
oplossen van printerproblemen.
Identificare i componenti della stampante
(pannello di controllo).
1) LED carica batteria, 2) LED cartuccia di stampa sinistra,
3) LED cartuccia di stampa destra, 4) pulsante Annulla,
5) pulsante Riprendi, 6) LED Riprendi, 7) pulsante
Alimentazione, 8) LED Alimentazione, 9) LED Infrarossi.
Nota: Vedere LED di riferimento per la diagnosi dei
problemi di stampa.
1
2 3
4
5
6
7
10
9
8
De printeronderdelen controleren (achterkant).
1) Batterijcontacten, 2) Batterijcontactklep,
3) Batterijsleuf, 4) Stroomconnector, 5) Parallelle poort,
6) CompactFlash™-kaartsleuf, 7) Universal Serial Bus
(USB)-poort, 8) Sleuf met veiligheidsgrendel, 9) Batterij,
10) Batterijschuifje.
Identificare i componenti della stampante
(parte posteriore).
1) Contatti della batteria, 2) Coperchio dei contatti della
batteria, 3) Alloggiamento della batteria, 4) Connettore di
alimentazione, 5) Porta parallela, 6) Alloggiamento per la
scheda CompactFlash™, 7) Porta USB, 8) Alloggiamento
per blocco di sicurezza, 9) Batteria, 10) Cursore per
sgancio batteria.
Identifique las partes de la impresora
(panel de control).
1) LED de carga de la batería, 2) LED del cartucho de
impresión izquierdo, 3) LED del cartucho de impresión
derecho, 4) botón Cancelar, 5) botón Reanudar,
6) LED Reanudar, 7) botón de Alimentación,
8) LED de alimentación, 9) LED de infrarrojos.
Nota: Consulte LED Reference para determinar
problemas de impresión.
Identifique las partes de la impresora (vista posterior).
1) contactos de la batería, 2) tapa de los contactos
de la batería, 3) ranura para batería, 4) conector de
alimentación, 5) puerto paralelo, 6) ranura para tarjeta
CompactFlash™, 7) puerto USB (Universal Serial Bus),
8) ranura de cierre de seguridad, 9) batería,
10) cursor de liberación de la batería.
Page 36

4
1
2
1
2
De printeronderdelen controleren (onderkant).
1) Kaarthouder, 2) Klep van verwisselbare
inktservicemodule.
Nederlands
Identificare i componenti della stampante
(parte inferiore).
1) Alloggiamento per le schede, 2) Coperchio per il
modulo di manutenzione inchiostro sostituibile.
Stap 4: de batterij plaatsen (Deskjet 450CBi/450wbt).
1) Schuif de batterij in de batterijsleuf totdat de batterij
zich op gelijke hoogte met de contacten bevindt. 2) Duw
de batterij in de batterijsleuf totdat hij vastklikt.
Fase 4: Installare la batteria
(HP Deskjet 450CBi/450wbt).
1) Far scorrere la batteria nell’apposito alloggiamento
tenendola inclinata fino a che arriva ad allinearsi con i
contatti. 2) Spingere la batteria nel suo vano fin quando
non scatta in posizione.
Identifique las partes de la impresora (vista inferior).
1) portatarjeta, 2) cubierta del módulo auxiliar de tinta
reemplazable.
Español Italiano
Paso 4: Instalación de la batería
(HP Deskjet 450CBi/450wbt).
1) Deslice la batería en la ranura para batería en
posición inclinada hasta que la batería quede alineada
con los contactos. 2) Presione la batería para introducirla
en su ranura hasta que encaje con un clic en su lugar.
Page 37

5
Opmerking: Gebruik uitsluitend batterij C8222A in
de printer. Laad de batterij helemaal op voor gebruik
(ongeveer 1 uur en 30 minuten). Tijdens het opladen van
de batterij brandt het batterijlampje groen. Als het lampje
rood is tijdens het opladen, is de batterij mogelijk defect
en aan vervanging toe.
Nota: Con questa stampante usare solo la batteria
C8222A. Prima dell’uso caricare completamente la batteria
(per circa 1 ora e 30 minuti). Mentre la batteria è sotto
carica, il LED di carica è acceso di luce verde. Se durante
la carica il LED è acceso di luce rossa, la batteria potrebbe
essere difettosa ed andrà sostituita.
Stap 5: de HP Bluetooth printerkaart installeren
(HP Deskjet 450wbt).
Opmerking: Controleer of het Bluetooth-hostapparaat
en het besturingssysteem door de printer worden
ondersteund. Ga voor meer informatie naar
http://www.hp.com/support/dj450. 1) Plaats de
Bluetooth-kaart met het lampje in de richting van de
CompactFlash™-kaartsleuf.
Fase 5: Installare la scheda HP Bluetooth
(HP Deskjet 450wbt).
Nota: Controllare che il dispositivo host Bluetooth e il
sistema operativo in uso siano supportati dalla stampante.
Per ulteriori informazioni, fare riferimento a
http://www.hp.com/support/dj450. 1) Inserire la scheda
Bluetooth nell’alloggiamento della scheda CompactFlash™
con il LED rivolto verso l’alto.
Nota: Utilice únicamente la batería C8222A con la
impresora. Cargue completamente la batería antes de
utilizarla (aproximadamente 1 hora y 30 minutos). Cuando
la batería se está cargando, el LED de carga de la batería
está verde. Si está rojo mientras está cargando, es posible
que la batería tenga algún fallo o defecto y haya que
cambiarla.
Paso 5: Instalar la tarjeta de la impresora HP Bluetooth
(HP Deskjet 450wbt).
Nota: Asegúrese de que el dispositivo host de Bluetooth y
el sistema operativo son compatibles con la impresora.
Para obtener más información, consulte
http://www.hp.com/support/dj450. 1) Inserte la tarjeta
Bluetooth con el LED en frente de la ranura de la tarjeta
CompactFlash™.
Page 38

6
1
2
7
4
3
2
1
Stap 6: het netsnoer aansluiten.
1) Sluit het netsnoer aan op de printer en op een
stopcontact. 2) Til de invoerlade omhoog om deze te
openen. Opmerking: sluit de printer onder Windows
pas aan op de computer nadat u de software heeft
geïnstalleerd of wanneer dit tijdens de installatie van
de software wordt gevraagd.
Nederlands
Fase 6: Collegare il cavo di alimentazione.
1) Collegare il cavo di alimentazione alla stampante e ad
una presa di corrente alternata (AC). 2) Sollevare il
vassoio di alimentazione per aprirlo.
collegare la stampante al computer solo dopo aver
terminato l’installazione del software o quando richiesto
durante l’installazione.
Nota: per Windows,
Stap 7: de printer aanzetten en de inktpatronen
plaatsen.
1) Druk op de
2) Open de voorste toegangsklep. 3) Klap de
inktpatroonklemmen omhoog. 4) Verwijder de
inktpatroon uit de verpakking en verwijder de tape van de
inktpatroon.
Fase 7: Accendere la stampante ed installare le
cartucce di stampa.
1) Premere il pulsante Alimentazione per accendere la
stampante. 2) Aprire il coperchio di accesso anteriore.
3) Sollevare i fermi delle cartucce di stampa.
4) Rimuovere la cartuccia di stampa dal suo imballo,
quindi rimuovere il nastro protettivo dalla cartuccia.
Aan/Uit-knop om de printer aan te zetten.
Paso 6: Conecte el cable de alimentación.
1) Conecte el cable de alimentación a la impresora y
un enchufe de alimentación de corriente alterna (CA).
2) Levante la bandeja de entrada a la posición de
abierta. Nota: Para Windows, conecte sólo la impresora
al equipo cuando haya completado la instalación del
software o cuando se le indique que lo haga durante
la instalación.
Español Italiano
Paso 7: Encienda la impresora e instale los
cartuchos de impresión.
1) Pulse el Botón de alimentación para encender la
impresora. 2) Abra la cubierta de acceso frontal.
3) Levante los seguros de los cartuchos de impresión.
4) Saque el cartucho de impresión de su embalaje y
retire la cinta protectora del cartucho de impresión.
Page 39

5
8
1
3
6
7
5) Duw de kleureninktpatroon in de linkerhouder en de
zwarte inktpatroon in de rechterhouder. 6) Bevestig de
grendel op de inktpatroon. 7) Sluit de voorste
toegangsklep. Opmerking: open de voorste toegangsklep
pas nadat de printerinitialisatie voltooid is.
5) Inserire e spingere la cartuccia di stampa dei colori
nell’alloggiamento di sinistra e quella del nero
nell’alloggiamento di destra. 6) Chiudere il fermo sulla
cartuccia. 7) Chiudere il coperchio di accesso anteriore.
Nota: Non aprire il coperchio di accesso anteriore fino a
che l’inizializzazione della stampante non è stata
completata.
2
Stap 8: papier in de invoerlade plaatsen.
1) Trek het verlengstuk van de invoerlade uit.
2) Plaats maximaal 45 vellen papier in de lade.
3) Schuif de papiergeleider goed tegen de rand
van het papier aan.
Fase 8: Caricare la carta nel vassoio di alimentazione.
1) Far scorrere verso l’alto la prolunga del vassoio di
alimentazione. 2) Inserire fino a 45 fogli di carta nel
vassoio. 3) Far scorrere la guida della carta fino a toccare
il bordo della carta.
5) Inserte el cartucho de impresión a color en el soporte
izquierdo y el cartucho de impresión negro en el soporte
derecho. 6) Cierre el seguro del cartucho sobre el cartucho
de impresión. 7) Cierre la cubierta de acceso frontal.
Nota: No abra la cubierta de acceso frontal hasta que la
impresora haya finalizado la inicialización.
Paso 8: Cargue papel en la bandeja de entrada.
1) Deslice hacia arriba la extensión de la bandeja de
entrada. 2) Inserte hasta 45 hojas de papel en la bandeja.
3) Deslice la guía del papel hasta que quede ceñida al
borde del papel.
Page 40

9
1
2
Stap 9: de software installeren en de printer
aansluiten.
1) Plaats de Starter-CD in het cd-romstation en volg de
aanwijzingen voor het gebruikte besturingssysteem en
de gebruikte aansluiting. Voor een Bluetooth-aansluiting
selecteert u USB of Parallel en klikt u op Overslaan
wanneer u wordt gevraagd de printer aan te sluiten. Voor
een infraroodaansluiting (IR) controleert u of de IR-poort
van uw apparaat is ingeschakeld (zie de Handleiding bij
de infraroodaansluiting voor het inschakelen van de
Nederlands
IR-poort). Selecteer Overigen in het dialoogvenster voor
de poortselectie en selecteer vervolgens de poort die is
toegekend aan het IR-apparaat op de host.
Fase 9: Installare il software e collegare la
stampante.
1) Inserire il CD di avviamento nell’unità CD-ROM, quindi
seguire la procedura idonea per il sistema operativo e la
connessione in uso. Per la connessione Bluetooth, per
collegare la stampante, selezionare
fare clic su
infrarossi (IR), verificare che la porta IR del dispositivo in
uso sia abilitata (per abilitare la porta IR, vedere
Riferimento IR). Selezionare
dialogo Selezione porta, quindi sceglire la porta
assegnata al dispositivo IR della macchina host in uso.
Salta quando richiesto. Per la connessione a
USB o Parallela e
Altra nella finestra di
2) Voor een parallelle of USB-aansluiting sluit u de
parallelle of USB-kabel aan. Opmerking: Sluit de printer
pas aan op de computer nadat u de software heeft
geïnstalleerd of wanneer dit tijdens de installatie van de
software wordt gevraagd. Wanneer u de printer op de
computer heeft aangesloten voordat u de software heeft
geïnstalleerd, raadpleegt u het Leesmij-bestand op de
Starter-CD om de installatie van de printer te voltooien.
3) Volg de aanwijzingen op het scherm om de installatie
van de printer te voltooien.
2) Per effettuare una connessione USB o parallela,
collegare il cavo USB o il cavo parallelo.
la stampante al computer solo dopo aver terminato
l’installazione del software o quando richiesto durante
l’installazione. Se la stampante è stata collegata al
computer prima di aver installato il software, per
completare l’installazione della stampante fare
riferimento al file Reame sul CD di avviamento.
3) Seguire le istruzioni visualizzate sullo schermo per
portare a termine la procedura di installazione della
stampante.
Nota: Collegare
Paso 9: Instalación del software y conexión de
la impresora.
1) Inserte el Starter CD en la unidad de CD-ROM y siga
el procedimiento correspondiente para su sistema
operativo y conexión. Para la conexión Bluetooth,
seleccione USB o Paralela y haga clic en Omitir cuando
se le pregunte si desea conectar la impresora. Para la
conexión de infrarrojos (IR), asegúrese de que el puerto
IR del dispositivo está activado (consulte Referencia
Español Italiano
de infrarrojos para activar el puerto IR). Seleccione
Otros en el cuadro de diálogo Seleccionar puerto y,
a continuación, elija el puerto asignado al dispositivo
IR del equipo host.
2) Para la conexión paralela o USB, conecte el cable
paralelo o USB. Nota: Conecte sólo la impresora al
equipo cuando haya completado la instalación del
software o cuando se le indique que lo haga durante la
instalación. Si conectó la impresora al equipo antes de
instalar el software, consulte el archivo Readme (léame)
en el Starter CD para completar la instalación de la
impresora. 3) Siga las instrucciones en pantalla para
completar la instalación de la impresora.
Page 41

10
Stap 10: afdrukken via Bluetooth inschakelen
(HP Deskjet 450wbt - Windows).
Opmerking: Voor een Bluetooth-aansluiting controleert u
of uw Bluetooth-hostapparaat wordt ondersteund door de
printer en of afdrukken via Bluetooth is ingeschakeld op uw
apparaat. Zie http://www.hp.com/support/dj450 voor een
overzicht van ondersteunde Bluetooth-apparaten en
raadpleeg de documentatie van de fabrikant voor meer
informatie. 1) Nadat u de software heeft geïnstalleerd bij
Stap 9 controleert u de aanwezigheid van de printer op uw
hostapparaat (zie de Handleiding voor afdrukken met
Bluetooth ). 2) Selecteer de printer in de lijst met
Bluetooth-printers.
Fase 10: Abilitare la stampa Bluetooth
(HP Deskjet 450wbt - Windows).
Nota: Per effettuare una connessione Bluetooth, verificare
che il dispositivo host Bluetooth in uso sia supportato dalla
stampante e che nel dispositivo sia abilitata la stampa
Bluetooth. Per ulteriori informazioni, consultare
http://www.hp.com/support/dj450 per visualizzare un
elenco dei dispositivi Bluetooth supportati e fare riferimento
alla documentazione del costruttore. 1) Dopo aver
installato il software come descritto alla Fase 9, eseguire la
ricerca della stampante con il dispositivo host (vedere
Guida alla stampa Bluetooth). 2) Selezionare la stampante
dall’elenco delle stampanti abilitate Bluetooth.
3) Controleer of het pictogram van de Deskjet 450-printer
wordt weergegeven in de map Printers of Printers en faxen.
(Klik op Start, wijs Instellingen aan en klik op Printers in
Windows NT 4.0, Windows 98, Windows Me en
Windows 2000 of klik op Start en op Printers en faxen in
Windows XP.) Wanneer het printerpictogram niet wordt
weergegeven, dubbelklikt u op Printer toevoegen en
selecteert u de COM-poort die is toegekend voor uw
Bluetooth-apparaat. Klik op Volgende. Selecteer HP en
hp deskjet 450 serie in de wizard Printer toevoegen.
Volg de aanwijzingen op het scherm om de installatie
van de printer te voltooien.
3) Controllare che nella cartella Stampanti o Stampanti e
fax sia presente l’icona della stampante Deskjet 450. (Fare
clic su
Avvio, selezionare Impostazioni, quindi fare clic su
Stampanti in Windows NT 4.0, Windows 98, Windows Me,
e Windows 2000, oppure fare clic su
in Windows XP.) Se l’icona della stampante non è
e fax
visualizzata, fare doppio clic su
selezionare la porta COM assegnata al dispositivo
Bluetooth in uso. Fare clic su
hp deskjet 450 series nell’Installazione guidata stampante.
Seguire le istruzioni visualizzate sullo schermo per portare
a termine la procedura di installazione della stampante.
Avvio e su Stampanti
Aggiungi stampante e
Avanti. Selezionare HP e
Paso 10: Active la impresión Bluetooth
(HP Deskjet 450wbt - Windows).
Nota: Para una conexión Bluetooth, asegúrese de que el
dispositivo host Bluetooth es compatible con la impresora y
que la impresión Bluetooth está activada en el dispositivo.
Consulte http://www.hp.com/support/dj450 para obtener
una lista de dispositivos Bluetooth compatibles y la
documentación del fabricante para obtener más
instrucciones. 1) Una vez instalado el software en el paso
9, examine la impresora con el dispositivo host (consulte la
Guía de Impresión Bluetooth). 2) Seleccione la impresora
de la lista de impresoras activadas para Bluetooth.
3) Asegúrese de que el icono de la impresora Deskjet 450
se encuentra en la carpeta Impresoras o Impresoras y
faxes. (Haga clic en Inicio, elija Configuración y, a
continuación, haga clic en Impresoras en
Windows NT 4.0, Windows 98, Windows Me y
Windows 2000 o haga clic en Inicio y en Impresoras y
faxes en Windows XP.) Si no ve el icono de la impresora,
haga doble clic en Agregar impresora y seleccione el
puerto COM asignado al dispositivo Bluetooth. Haga clic en
Siguiente. Seleccione HP y hp deskjet 450 series en el
Asistente para agregar impresoras. Siga las instrucciones
en pantalla para completar la instalación de la impresora.
Page 42

11
4) Klik met de rechtermuisknop op het printerpictogram
en klik op Poorten (Windows 2000, Windows XP,
Windows NT 4.0) of Details (Windows 98 en
Windows Me). 5) Controleer of de printer is toegekend
aan de COM-poort of aan de virtuele Bluetooth-poort die
is aangemaakt voor uw Bluetooth-apparaat.
Nederlands
4) Fare clic con il pulsante destro del mouse sull’icona
della stampante, quindi fare clic su
(Windows 2000, Windows XP, Windows NT 4.0) o su
Dettagli (Windows 98 e Windows Me). 5) Controllare
che la stampante sia assegnata alla porta COM o alla
porta Bluetooth virtuale creata per il dispositivo
Bluetooth.
Porte
Stap 11: de software-installatie testen.
Druk een document af in een toepassing die u vaak
gebruikt om de installatie van de software en de
printeraansluiting te controleren. Opmerking: Voor de
Bluetooth-configuratie en afdrukinformatie raadpleegt
u de handleiding voor afdrukken met Bluetooth op de
Starter-CD. Voor afdrukken via een infraroodapparaat
plaatst u de infraroodlens van het apparaat op maximaal
1 meter afstand van de printer en onder een hoek van
maximaal 30 graden van de infraroodlens van de printer.
Het infraroodlampje van de printer brandt groen als de
printer een infraroodtransmissie ontvangt.
Fase 11: Verificare l’installazione del software.
Stampare un documento da un’applicazione di uso
frequente per verificare l’installazione del software e la
connessione della stampante.
configurazione e informazioni sulla stampa Bluetooth,
vedere la Guida per la stampa Bluetooth sul CD di
avviamento. Posizionare la periferica per la stampa IR in
modo che la lente ad infrarossi si trovi a 3 piedi (1 metro)
dalla stampante, con un’angolazione totale dalla lente
non superiore a 30 gradi. La spia LED ad infrarossi della
stampante si accende verde durante il ricevimento di una
trasmissione ad infrarossi.
Nota: Per la
4) Haga clic con el botón derecho del ratón en el icono
de la impresora y, a continuación, haga clic en Puertos
(Windows 2000, Windows XP, Windows NT 4.0) o
Detalles (Windows 98 y Windows Me). 5) Asegúrese de
que la impresora está asignada al puerto COM o al
puerto virtual Bluetooth creado para el dispositivo
Bluetooth.
Español Italiano
Paso 11: Prueba de la instalación del software.
Imprima un documento desde una aplicación que utilice
de forma habitual para comprobar la instalación del
software y la conexión de la impresora. Nota: Para
obtener información de impresión y configuración de
Bluetooth, consulte la Guía de Impresión Bluetooth en el
Starter CD. Para imprimir mediante un dispositivo de
infrarrojos, sitúe la lente infrarroja del dispositivo a una
distancia de menos de 3 pies (1 metro) de la impresora
y dentro de un ángulo total de 30 grados de la lente
infrarroja de la impresora. El indicador LED de infrarrojos
de la impresora se enciende en verde al recibir una
transmisión infrarroja.
Page 43

12
Stap 12: de inktpatronen uitlijnen (Windows).
Telkens als u een inktpatroon plaatst, moet u de
inktpatronen uitlijnen voor een optimale afdrukkwaliteit.
1) Klik op Start, wijs Instellingen aan en klik op Printers
(Windows NT 4.0, Windows 98, Windows Me en
Windows 2000) of klik op Start en op Printers en faxen
(Windows XP). 2) Klik met de rechtermuisknop op het
printerpictogram en klik op Voorkeursinstellingen
voor afdrukken (Windows 2000 en Windows XP),
Eigenschappen (Windows 98 en Windows Me) of
Standaardinstellingen voor document
(Windows NT 4.0).
Fase 12: Allineare le cartucce di stampa (Windows).
Ogni volta che si installa una cartuccia di stampa, occorre
allineare le cartucce per garantire la massima qualità di
stampa. 1) Fare clic su
quindi fare clic su
Avvio, selezionare Impostazioni,
Stampanti (Windows NT 4.0, Windows
98, Windows Me e Windows 2000), oppure fare clic su
Avvio quindi su Stampanti e fax (Windows XP). 2) Fare clic
con il pulsante destro sull’icona della stampante quindi fare
clic su
Preferenze stampa (Windows 2000 e Windows XP),
Proprietà (Windows 98 e Windows Me), o Impostazioni
predefinite documento
(Windows NT 4.0).
3) Klik op het tabblad Services en klik vervolgens op
Inktpatronen uitlijnen. 4) Klik op Uitlijnen in het
dialoogvenster en volg de aanwijzingen op het scherm
om het uitlijnen te voltooien. Opmerking: u kunt de
inktpatronen ook uitlijnen in het tabblad Printerservice
in de Werkset.
3) Fare clic sulla scheda
di stampa. 4) Fare clic su Allinea nella finestra di dialogo e
Servizi, quindi su Allinea testine
seguire le istruzioni visualizzate sullo schermo per portare
a termine la procedura di allineamento.
di stampa può essere allineata anche dalla scheda
stampante
della Casella degli strumenti.
Nota: La cartuccia
Servizi
Paso 12: Alineación de los cartuchos de impresión
(Windows).
Siempre que instale un cartucho de impresión, alinee los
cartuchos de impresión para obtener la mejor calidad
de impresión posible. 1) Haga clic en Inicio, elija
Configuración y, a continuación, haga clic en Impresoras
(Windows NT 4.0, Windows 98, Windows Me y Windows
2000) o haga clic en Inicio y en Impresoras y faxes
(Windows XP). 2) Haga clic con el botón derecho del ratón
sobre el icono de la impresora y, a continuación, haga clic
en Preferencias de impresión (Windows 2000 y
Windows XP), Propiedades (Windows 98 y Windows Me)
o Valores predeterminados del documento
(Windows NT 4.0).
3) Haga clic en la ficha Servicios y, a continuación,
en Alinear cartuchos de impresión. 4) Haga clic en
Alinear en el cuadro de diálogo y siga las instrucciones en
pantalla para completar el procedimiento de alineación.
Nota: También puede alinear el cartucho de impresión
desde la ficha Servicios de la impresora en Caja de
herramientas.
Page 44

13
14
Stap 13: de inktpatronen uitlijnen (Mac).
Telkens als u een inktpatroon plaatst, moet u de
inktpatronen uitlijnen voor een optimale afdrukkwaliteit.
1) Open het HP Inkjet hulpprogramma en klik op
Kalibreer Apparaat. 2) Volg de aanwijzingen op het
scherm om het uitlijnen te voltooien.
Nederlands
Fase 13: Allineare le cartucce di stampa (Mac).
Ogni volta che si installa una cartuccia di stampa,
occorre allineare le cartucce per garantire la massima
qualità di stampa. 1) Aprire l’utilità HP Inkjet e fare clic
sul pulsante
visualizzate sullo schermo per portare a termine la
procedura di installazione.
Calibra periferica. 2) Seguire le istruzioni
Stap 14: de printer registreren.
Registreer de printer om belangrijke
ondersteuningsinformatie en technische informatie te
kunnen ontvangen. Wanneer u de printer niet heeft
geregistreerd tijdens de installatie van de software
kunt u de printer later registreren op
http://www.register.hp.com.
Fase 14: Registrare la stampante.
Registrare la stampante per ricevere assistenza e
informazioni tecniche importanti. Se la stampante non è
stata registrata durante l’installazione del software,
è possibile registrarla successivamente al sito
http://www.register.hp.com.
Paso 13: Alineación de los cartuchos de impresión
(Mac).
Siempre que instale un cartucho de impresión, alinee los
cartuchos de impresión para obtener la mejor calidad de
impresión posible. 1) Abra HP Inkjet Utility y haga clic
en Calibrar dispositivo. 2) Siga las instrucciones en
pantalla para completar el procedimiento de alineación.
Español Italiano
Paso 14: Registre la impresora.
Registre la impresora para recibir información y
asistencia técnica importante. Si no registró la impresora
al instalar el software, puede registrarla posteriormente
en http://www.register.hp.com.
Page 45

Gefeliciteerd!
Uw printer is klaar voor gebruik. Voor informatie over het
gebruik van de printer en het oplossen van problemen kunt
u de volgende bronnen raadplegen:
• de elektronische documentatie op de Starter-CD
• HP Instant Support (zie de elektronische
gebruikershandleiding voor meer informatie.)
• de website voor productondersteuning
http://www.hp.com/support/dj450
• de HP klantenondersteuningsgids (in de verpakking).
Congratulazioni!
La stampante è pronta per l’uso. Per informazioni sull’uso
della stampante e la ricerca e soluzione dei problemi, fare
riferimento alle fonti seguenti:
• documentazione visualizzata dal CD di avviamento
• HP Instant Support (per ulteriori informazioni, vedere la
guida per l’utente visualizzata)
• il sito di assistenza http://www.hp.com/support/dj450
• la guida di assistenza clienti HP (nella confezione).
¡Felicitaciones!
La impresora está lista para su uso. Para obtener
información acerca del uso de la impresora y solución
de problemas, consulte los siguientes recursos:
• la documentación en pantalla del Starter CD
• HP Instant Support (Para obtener más información,
consulte la guía del usuario en pantalla).
• el sitio de asistencia del producto en
http://www.hp.com/support/dj450
• la guía de asistencia al cliente de HP (en la caja).
Page 46

Reistips
De volgende tips zijn nuttig wanneer u de printer mee op
reis neemt:
• Als u een extra zwarte inktpatroon of fotopatroon
meeneemt, berg deze dan op in het reisetui
(onderdeelnummer C8233A) om te voorkomen dat de
inkt uitlekt.
• U kunt de printer mee op reis nemen in een draagtas
(onderdeelnummer C8232A). De draagtas heeft vakken
voor uw notebook en printer. U kunt de vakken ook van
elkaar losmaken om de notebook en de printer
afzonderlijk te dragen.
• Zet de printer uit met de aan/uit-knop. Dit verzekert dat
de inktpatronen in de startpositie aan de rechterzijde
van de printer worden vergrendeld.
• Maak de printerkabel en netadapter los van de printer.
Schuif het verlengstuk van de invoerlade in en sluit de
invoerlade.
• Als u naar een ander land of andere regio reist,
moet u de vereiste adapterstekker meenemen.
• Gebruik alleen de netadapter die bij de printer is
geleverd. Gebruik geen andere spanningstransformator
of -omvormer. De netadapter kan met netstroom van
100 à 240 volt, 50 of 60 Hz, worden gebruikt.
• Verwijder de batterij als u de printer langer dan één
maand niet gebruikt.
Suggerimenti per chi viaggia
I seguenti suggerimenti torneranno utili durante i preparativi
di viaggio con la stampante:
• Se ci si porta dietro una cartuccia di stampa in bianco e
nero o per foto in più, conservarla nel contenitore da
viaggio (N. di parte C8233A) per prevenire eventuali
perdite.
• È possibile portarsi dietro la stampante in una custodia
(N. di parte C8232A). La custodia dispone di vani
separati per il computer portatile e la stampante, che è
possibile staccare se si prevede di portarsi dietro solo il
computer o solo la stampante separatamente.
• Spegnere la stampante con il pulsante di
alimentazione. In questo modo si è sicuri che le
cartucce di stampa tornino alla posizione iniziale, sul
lato destro della stampante, e restino bloccate in
posizione.
• Scollegare il cavo della stampante ed il convertitore di
alimentazione dalla stampante. Far scorrere verso il
basso l’estensione del vassoio di entrata e chiudere
quest’ultimo.
• Se si viaggia in un altro Paese o regione, non
dimenticare il convertitore di corrente adeguato.
• Usare solo il convertitore in dotazione alla stampante.
Non usare un trasformatore o convertitore di tensione.
Il convertitore di alimentazione può essere usato con
alimentazioni c.a. da 100 a 240 volt, 50 o 60 Hz.
• Se non si prevede di usare la stampante per oltre
un mese, togliere la batteria.
Sugerencias para viajar
Las siguientes sugerencias le servirán para prepararse para
viajar con la impresora:
• Si lleva consigo un cartucho de impresión negro o para
fotografías extra, guárdelo en el portacartuchos (número
de referencia: C8233A) para evitar fugas de tinta.
• La impresora puede llevarla en una bolsa de transporte
(número de referencia: C8232A). La bolsa de transporte
tiene dos compartimentos, uno para el ordenador portátil y
otro para la impresora. Estos compartimentos pueden
separarse si prefiere llevar el portátil y la impresora por
separado.
• Apague la impresora mediante el botón de alimentación.
Los cartuchos de impresión regresan a la posición de inicio
en el lado derecho de la impresora y quedan bloqueados
en su lugar.
• Desconecte de la impresora el cable de la impresora y el
adaptador de potencia. Deslice hacia abajo la extensión de
la bandeja de entrada y cierre la bandeja.
• Si viaja a otro país o región, no olvide llevar consigo el
adaptador de enchufe eléctrico necesario.
• Utilice únicamente el adaptador de potencia que se
suministra con la impresora. No utilice ningún convertidor
o transformador de voltaje de otro tipo. El adaptador de
potencia puede utilizarse con fuentes de alimentación de
CA de 100 a 240 V y 50 ó 60 Hz.
• Quite la batería si no va a utilizar la impresora durante más
de un mes.
Page 47

Handleiding bij de infraroodaansluiting
Vóór het gebruik van de infraroodpoort moet u deze poort inschakelen in het hostapparaat.
1. Start het systeem opnieuw op en druk op F2 tijdens het opstarten.
2. Selecteer het menu System Devices (Systeemapparatuur) en schakel de infraroodpoort in (Enabled).
3. Stel Mode (Modus) in op FIR.
4. Wanneer het DMA-kanaal een conflict heeft met het DMA-kanaal van de parallelle poort, wijzigt u de parallelle
poort in EPP.
5. Sla de wijzigingen op (Save) en sluit het menu af (Exit) om verder te gaan met opstarten.
Lichtjes
Lichtje Toelichting en aanbevolen actie
Aan/uit-lichtje is groen. Bij gebruik van netstroom: Printer staat aan en drukt niet af.
Bij gebruik van batterijvoeding: Batterij is 41 à 100% opgeladen en de
printer staat aan en drukt niet af.
• Geen actie nodig.
Aan/uit-lichtje is rood. Batterij is minder dan 10% opgeladen en de printer staat aan en drukt niet
af.
• Sluit de netadapter aan en laad de batterij op. Zie Batterij opladen en
gebruiken in de elektronische gebruikershandleiding.
Nederlands
Aan/uit-lichtje is geel. Batterij is 10 à 40% opgeladen en de printer staat aan en drukt niet af.
Batterijlichtje is groen. Batterij wordt opgeladen.
Batterijlichtje is rood. Batterij is defect.
• Sluit de netadapter aan en laad de batterij op. Zie Batterij opladen en
gebruiken in de elektronische gebruikershandleiding.
• Geen actie nodig.
• Vervang de batterij (onderdeelnummer C8233A).
Page 48

Lichtje Toelichting en aanbevolen actie
Aan/uit-lichtje knippert. Printer drukt af.
• Geen actie nodig.
Aan/uit-lichtje, doorgaan-lichtje,
lichtje voor linker inktpatroon en
lichtje voor rechter inktpatroon
wisselen elkaar af.
Het Aan/Uit-lampje is groen en het
lampje Doorgaan knippert.
Nederlands
Lichtje voor linker inktpatroon
knippert.
Lichtje voor rechter inktpatroon
knippert.
De Printer is bezig met opwarmen.
• Geen actie nodig.
De printer is geblokkeerd, de printer wacht totdat speciaal afdrukmateriaal
droog is, het papier is op of er worden DPOF-gegevens verwerkt.
• Als het papier op is, vult u papier bij. Druk op de doorgaan-knop om de
afdruktaak voort te zetten.
Driekleurenpatroon heeft aandacht nodig.
• Installeer de inktpatroon opnieuw en probeer af te drukken. Als de fout
niet is verholpen, vervangt u de inktpatroon. Zie De inktpatronen
vervangen in de elektronische gebruikershandleiding.
Zwarte inktpatroon of fotopatroon heeft aandacht nodig.
• Installeer de inktpatroon opnieuw en probeer af te drukken. Als de fout
niet is verholpen, vervangt u de inktpatroon. Zie De inktpatronen
vervangen in de elektronische gebruikershandleiding.
Lichtje voor rechter inktpatroon en
lichtje voor linker inktpatroon
knipperen.
Driekleurenpatroon en zwarte inktpatroon of fotopatroon hebben aandacht
nodig.
• Installeer de inktpatronen opnieuw en probeer af te drukken. Als de fout
niet is verholpen, vervangt u de inktpatronen. Zie De inktpatronen
vervangen in de elektronische gebruikershandleiding.
Page 49

Lichtje Toelichting en aanbevolen actie
Lichtje voor linker inktpatroon
brandt.
Lichtje voor rechter inktpatroon
brandt.
Lichtje voor rechter inktpatroon en
lichtje voor linker inktpatroon
branden.
Aan/uit-lichtje uit, doorgaan-lichtje
knippert.
Driekleurenpatroon is bijna op.
• Vervang de inktpatroon. Zie De inktpatronen vervangen in de
elektronische gebruikershandleiding.
Zwarte inktpatroon of fotopatroon is bijna op.
• Vervang de inktpatroon. Zie De inktpatronen vervangen in de
elektronische gebruikershandleiding.
Driekleurenpatroon en zwarte inktpatroon of fotopatroon zijn bijna op.
• Vervang de inktpatronen. Zie De inktpatronen vervangen in de
elektronische gebruikershandleiding.
Vastgelopen afdrukmateriaal of stilgevallen papiermotor.
• Verwijder het vastgelopen papier. Zie Vastgelopen afdrukmateriaal in
de Gebruikershandleiding op het scherm. Als de papierstoring is
verholpen, drukt u op de doorgaan-knop om de afdruktaak voort te
zetten.
Aan/uit-lichtje knippert, doorgaanlichtje knippert.
Aan/uit-lichtje knippert, doorgaanlichtje knippert, lichtje voor linker
inktpatroon en lichtje voor rechter
inktpatroon branden.
Als er geen papierstoring is, drukt u op de doorgaan-knop. Als dit niet
werkt, zet de printer dan uit en weer aan, en stuur de afdruktaak
opnieuw.
Vastgelopen afdrukmateriaal of stilgevallen wagen.
• Verwijder het vastgelopen papier. Zie Vastgelopen afdrukmateriaal in
de Gebruikershandleiding op het scherm. Als de papierstoring is
verholpen, drukt u op de doorgaan-knop om de afdruktaak voort te
zetten.
Als er geen papierstoring is, drukt u op de doorgaan-knop. Als dit niet
werkt, zet de printer dan uit en weer aan, en stuur de afdruktaak
opnieuw.
Vastgelopen afdrukmateriaal of stilgevallen servicestation.
• Verwijder het vastgelopen papier. Zie Vastgelopen afdrukmateriaal in
de Gebruikershandleiding op het scherm. Als de papierstoring is
verholpen, drukt u op de doorgaan-knop om de afdruktaak voort te
zetten.
Als er geen papierstoring is, drukt u op de doorgaan-knop. Als dit niet
werkt, zet de printer dan uit en weer aan, en stuur de afdruktaak
opnieuw.
Page 50

Lichtje Toelichting en aanbevolen actie
Aan/uit-lichtje knippert 2 x zo lang
aan als uit.
Aan/uit-lichtje, doorgaan-lichtje,
lichtje voor linker inktpatroon en
lichtje voor rechter inktpatroon
branden.
Aan/uit-lichtje aan, doorgaan-lichtje
knippert, lichtje voor rechter
inktpatroon knippert 2 x zo lang aan
als uit.
Nederlands
Afdruktaak wordt geannuleerd.
• Geen actie nodig.
Nieuwe firmware wordt naar de printer geflasht.
• Geen actie nodig.
Inktservicemodule bijna vol.
• Als u een reserve-inktservicemodule heeft, moet u de module
onmiddellijk vervangen volgens de bij de module geleverde instructies.
• Ga anders naar www.hp.com/support/dj450 of zie
Klantenondersteuning om een vervangende module te bestellen.
Ondertussen kunt u op de doorgaan-knop drukken om verder af te
drukken, maar de foutstatus van de lichtjes verdwijnt niet totdat de
inktservicemodule is vervangen. Als de inktservicemodule vol is, stopt
de printer met afdrukken.
Aan/uit-lichtje aan, doorgaan-lichtje
aan, lichtje voor rechter inktpatroon
knippert 2x zo lang aan als uit.
Infraroodlichtje aan. Printer ontvangt infraroodtransmissie.
Aan/uit-lichtje, doorgaan-lichtje,
lichtje voor linker inktpatroon en
lichtje voor rechter inktpatroon
wisselen elkaar snel af.
Inktservicemodule vol.
• Als u een reserve-inktservicemodule heeft, moet u de module
onmiddellijk vervangen volgens de bij de module geleverde instructies.
• Ga anders naar www.hp.com/support/dj450 of zie
Klantenondersteuning om een vervangende module te bestellen.
Ondertussen kunt u de zwarte inktpatroon verwijderen en afdrukken
met alleen de driekleurenpatroon. De kleurresultaten en de
afdruksnelheid zijn wellicht minder goed. Zie Afdrukken met slecht één
inktpatroon in de elektronische gebruikershandleiding.
• Geen actie nodig.
Printerfout.
• Druk op de doorgaan-knop om de foutcode af te drukken.
Druk op de aan/uit-knop om de printer te resetten.
Page 51

Riferimento IR
Prima di potere utilizzare la porta a raggi infrarossi della macchina host in uso, è necessario abilitarla.
1. Riavviare il sistema e premere F2 durante l’avviamento.
2. Selezionare il menu Periferiche sistema e impostare a Abilitata la porta IR.
3. Impostare la modalità a FIR.
4. Se il canale DMA mostra conflitti con il canale DMA della porta parallela,
modificare l’impostazione della porta parallela a EPP.
5. Salvare e uscire per continuare la procedura di riavvio.
LED di riferimento
Spie LED Spiegazione ed azione consigliata
La spia LED di alimentazione è
verde.
La spia LED di alimentazione è rossa. La batteria è carica a meno del 10%; la stampante è accesa, ma ferma.
La spia LED di alimentazione è
ambra.
La spia LED di carica della
batteria è verde.
Se si usa alimentazione c.a.: La stampante è accesa, ma ferma.
Se si usa alimentazione a batteria: La batteria è carica al 41-100%;
la stampante è accesa, ma ferma.
• Non occorre fare nulla.
• Inserire l’adattatore di alimentazione per cominciare a ricaricare la
batteria. Fare riferimento al capitolo riguardante la carica e l’uso della
batteria sulla guida per l’utente visualizzata su schermo.
Battery is 10-40% charged and printer is turned on and idle.
• Inserire l’adattatore di alimentazione per cominciare a ricaricare la
batteria. Fare riferimento al capitolo riguardante la carica e l’uso della
batteria sulla guida per l’utente visualizzata su schermo.
La batteria è in fase di carica.
• Non occorre fare nulla.
Italiano
La spia LED di carica della
batteria è rossa.
La batteria è difettosa.
• Sostituire la batteria (N. di parte C8233A).
Page 52

Spie LED Spiegazione ed azione consigliata
La spia LED di alimentazione
lampeggia.
Accendere, riprendere, spegnere e
riaccende le spie LED delle cartucce,
sinistra e destra.
Il LED alimentazione è acceso di luce
verde e il LED Riprendi lampeggia.
La spia LED della cartuccia di stampa
sinistra lampeggia.
La stampante sta stampando.
• Non occorre fare nulla.
La stampante si sta accendendo.
• Non occorre fare nulla.
La stampante si è bloccata, oppure attende che il supporto speciale si
asciughi, ha esaurito la carta o elabora la stampa DPOF (Digital Print Order
Format)
• Inserire della nuova carta se manca. Premere il pulsante Riprendi per
continuare il processo di stampa.
Controllare la cartuccia di stampa a tre colori.
• Reinstallare la cartuccia di stampa e provare a stampare. Se l’errore
continua, sostituire la cartuccia. Fare riferimento al capitolo Sostituzione
delle cartucce di stampa sulla guida per l’utente visualizzata sullo
schermo.
La spia LED della cartuccia di stampa
destra lampeggia.
Italiano
Cartucce di stampa destra e sinistra
Le spie LED lampeggiano.
La spia LED della cartuccia di stampa
sinistra è accesa.
Controllare la cartuccia di stampa in bianco e nero o per foto.
• Reinstallare la cartuccia di stampa e provare a stampare. Se l’errore
continua, sostituire la cartuccia. Fare riferimento al capitolo Sostituzione
delle cartucce di stampa sulla guida per l’utente visualizzata sullo
schermo.
Controllare le cartucce di stampa a tre colori, in bianco e nero o per foto.
• Reinstallare le cartucce di stampa e provare a stampare. Se l’errore
continua, sostituire le cartucce. Fare riferimento al capitolo Sostituzione
delle cartucce di stampa sulla guida per l’utente visualizzata sullo
schermo.
La cartuccia di stampa a tre colori ha quasi finito l’inchiostro.
• Sostituire la cartuccia di stampa. Fare riferimento al capitolo Sostituzione
delle cartucce di stampa sulla guida per l’utente visualizzata sullo
schermo.
Page 53

Spie LED Spiegazione ed azione consigliata
La spia LED della cartuccia di stampa
destra è accesa.
Le spie LED delle cartucce di stampa
destra e sinistra sono accese.
La spia LED di alimentazione è
spenta, la spia LED Riprendi
lampeggia.
La spia LED di alimentazione
lampeggia, la spia LED Riprendi
lampeggia.
La cartuccia di stampa in bianco e nero o per foto ha quasi finito l’inchiostro.
• Sostituire la cartuccia di stampa. Fare riferimento al capitolo Sostituzione
delle cartucce di stampa sulla guida per l’utente visualizzata sullo
schermo.
Controllare le cartucce di stampa a tre colori, in bianco e nero o per foto.
• Sostituire le cartucce di stampa. Fare riferimento al capitolo Sostituzione
delle cartucce di stampa sulla guida per l’utente visualizzata sullo
schermo.
Supporto inceppato o motore di alimentazione carta bloccato.
• Togliere la carta inceppata. Vedere Il supporto di stampa è inceppato nel
Manuale dell’utente su schermo. Dopo aver tolto la carta inceppata,
premere il pulsante Riprendi per continuare il processo di stampa.
Se non vi è carta inceppata, premere il pulsante Riprendi. Se questo non
funziona, spegnere e riaccendere la stampante e rinviare quindi il
processo di stampa.
Supporto inceppato o carrello bloccato.
• Togliere la carta inceppata. Vedere Il supporto di stampa è inceppato nel
Manuale dell’utente su schermo. Dopo aver tolto la carta inceppata,
premere il pulsante Riprendi per continuare il processo di stampa.
Le spie LED di alimentazione,
Riprendi, cartuccia di stampa sinistra
e destra sono accese.
La spia LED di alimentazione si
accende e spegne due volte.
Se non vi è carta inceppata, premere il pulsante Riprendi. Se questo non
funziona, spegnere e riaccendere la stampante e rinviare quindi il
processo di stampa.
Supporto inceppato o stazione di servizio bloccata.
• Togliere la carta inceppata. Vedere Il supporto di stampa è inceppato nel
Manuale dell’utente su schermo. Dopo aver tolto la carta inceppata,
premere il pulsante Riprendi per continuare il processo di stampa.
Se non vi è carta inceppata, premere il pulsante Riprendi. Se questo non
funziona, spegnere e riaccendere la stampante e rinviare quindi il
processo di stampa.
Il processo di stampa è in fase di annullamento.
• Non occorre fare nulla.
Page 54

Spie LED Spiegazione ed azione consigliata
Le spie LED di alimentazione,
Riprendi, cartuccia di stampa sinistra
e destra sono accese.
La spia LED di alimentazione è
accesa, la spia LED Riprendi
lampeggia, la spia LED della
cartuccia di stampa destra si accende
e spegne due volte.
La spia LED di alimentazione è
accesa, la spia LED Riprendi è
accesa, la spia LED della cartuccia di
stampa destra si accende e spegne
due volte.
Il nuovo firmware viene inviato alla memoria flash della stampante.
• Non occorre fare nulla.
Il contenitore dell’inchiostro è quasi pieno.
• Se si dispone di un contenitore di ricambio, sostituirlo immediatamente
seguendo le istruzioni in dotazione allo stesso.
• Per acquistare un contenitore di ricambio, visitare
www.hp.com/support/dj450 o consultare la sezione Assistenza clienti.
Nel frattempo, è possibile premere il pulsante Riprendi per continuare a
stampare, ma questo errore resta fin quando non si sostituisce il
contenitore dell’inchiostro usato. Quando il contenitore dell’inchiostro
usato è pieno, la stampante si arresta.
Il contenitore dell’inchiostro è pieno.
• Se si dispone di un contenitore di ricambio, sostituirlo immediatamente
seguendo le istruzioni in dotazione allo stesso.
• Per acquistare un contenitore di ricambio, visitare
www.hp.com/support/dj450 o consultare la sezione Assistenza clienti.
Nel frattempo, togliere la cartuccia di stampa in bianco e nero e stampare
solo con quella a tre colori. Questo compromette i colori e la velocità di
stampa. Fare riferimento al capitolo Stampa con una cartuccia sulla
guida per l’utente visualizzata sullo schermo.
La spia LED a infrarossi è accesa. La stampante riceve trasmissioni ad infrarossi.
• Non occorre fare nulla.
Italiano
Le spie LED di alimentazione,
Riprendi, cartuccia di stampa sinistra
e destra si accendono e spengono
rapidamente.
Errore della stampante.
•Premere il pulsante Riprendi per stampare il codice dell’errore. Premere
il pulsante di alimentazione per reimpostare la stampante.
Page 55

Referencia de infrarrojos
Debe activar el puerto de infrarrojos en el equipo host antes de utilizarlo.
1. Reinice el sistema y pulse F2 mientras se inicia el sistema.
2. Seleccione el menú Dispositivos del sistema y establezca el Puerto de infrarrojos como Activado.
3. Establezca Modo como FIR.
4. Si el canal DMA entra en conflicto con el canal DMA del puerto paralelo, cambie Puerto paralelo a EPP.
5. Guarde y salga de la aplicación para continuar reiniciando.
LED Reference
Indicación LED Explicación y acción recomendada
El LED de alimentación está verde. Si está utilizando corriente alterna: La impresora está encendida
y en reposo.
Si está utilizando corriente de la batería: La batería contiene un 41-100% de
carga y la impresora está encendida y en reposo.
• No se requiere ninguna acción.
El LED de alimentación está rojo. La batería contiene menos del 10% de carga y la impresora está encendida
y en reposo.
• Enchufe el adaptador de potencia para empezar a recargar la batería.
Consulte Carga y uso de la batería en la Guía del usuario en pantalla.
El LED de alimentación está ámbar. La batería contiene un 10-40% de carga y la impresora está encendida y en
El LED de carga de la batería está
verde.
El LED de carga de la batería está
rojo.
reposo.
• Enchufe el adaptador de potencia para empezar a recargar la batería.
Consulte Carga y uso de la batería en la Guía del usuario en pantalla.
La batería se está cargando.
• No se requiere ninguna acción.
La batería está fallando.
• Cambie la batería (número de referencia: C8233A).
Español
Page 56

Indicación LED Explicación y acción recomendada
El LED de alimentación parpadea. La impresora está imprimiendo.
• No se requiere ninguna acción.
Ciclo de indicadores LED:
Alimentación, reanudación, cartucho
de impresión izquierdo y derecho.
El LED de alimentación está verde y
el LED de reanudación parpadea.
El LED del cartucho de impresión
izquierdo parpadea.
El LED del cartucho de impresión
derecho parpadea.
La impresora está en el proceso de encendido.
• No se requiere ninguna acción.
La impresora está parada, esperando a que se seque un soporte especial,
no tiene papel o está procesando una impresión PDOF (Digital Print Order
Format).
• Si no tiene papel, cargue papel. Pulse el botón Reanudar para continuar
con el trabajo de impresión.
El cartucho de impresión tricolor necesita atención.
• Vuelva a instalar el cartucho de impresión y pruebe a imprimir de nuevo.
Si el error persiste, sustituya el cartucho. Consulte Cambio de los
cartuchos de impresión en la Guía del usuario en pantalla.
El cartucho de impresión negro o para fotografías necesita atención.
• Vuelva a instalar el cartucho de impresión y pruebe a imprimir de nuevo.
Si el error persiste, sustituya el cartucho. Consulte Cambio de los
cartuchos de impresión en la Guía del usuario en pantalla.
Los LED de los cartuchos de
impresión
izquierdo y derecho parpadean..
El LED del cartucho de impresión
izquierdo está encendido.
Español
Los cartuchos de impresión tricolor y negro o para fotografías necesitan
atención.
• Vuelva a instalar el cartucho de impresión y pruebe a imprimir de nuevo.
Si el error persiste, sustituya el cartucho. Consulte Cambio de los
cartuchos de impresión en la Guía del usuario en pantalla.
El cartucho de impresión tricolor tiene poca tinta.
• Sustituya el cartucho de impresión. Consulte Cambio de los cartuchos de
impresión en la Guía del usuario en pantalla.
Page 57

Indicación LED Explicación y acción recomendada
El LED del cartucho de impresión
derecho está encendido.
Los LED de los cartuchos de
impresión derecho e izquierdo están
encendidos.
El LED de alimentación está apagado
y el LED de reanudación parpadea.
Los LED de alimentación y de
reanudación parpadean.
El cartucho de impresión negro o para fotografías tiene poca tinta.
• Sustituya el cartucho de impresión. Consulte Cambio de los cartuchos de
impresión en la Guía del usuario en pantalla.
Los cartuchos de impresión tricolor y negro o para fotografías tienen poca
tinta.
• Sustituya los cartuchos de impresión. Consulte Cambio de los cartuchos
de impresión en la Guía del usuario en pantalla.
Atasco de papel o motor del papel parado.
• Quite el papel atascado. Véase Soporte de impresión atascado en la
Guía del usuario en pantalla. Después de eliminar el atasco, pulse el
botón Reanudar para continuar con el trabajo de impresión.
Si no existe ningún atasco de papel, pulse el botón Reanudar. Si esto no
funciona, pruebe a apagar y encender la impresora, y vuelva a enviar el
trabajo de impresión.
Atasco de soporte de impresión o carro parado.
• Quite el papel atascado. Véase Soporte de impresión atascado en la
Guía del usuario en pantalla. Después de eliminar el atasco, pulse el
botón Reanudar para continuar con el trabajo de impresión.
El LED de alimentación parpadea, el
LED de reanudación parpadea y los
LED de los cartuchos de impresión
derecho e izquierdo están
encendidos.
El LED de alimentación está
encendido el doble de tiempo que
apagado.
Si no existe ningún atasco de papel, pulse el botón Reanudar. Si esto no
funciona, pruebe a apagar y encender la impresora, y vuelva a enviar el
trabajo de impresión.
Atasco de soporte de impresión o estación de servicio parada.
• Quite el papel atascado. Véase Soporte de impresión atascado en la
Guía del usuario en pantalla. Después de eliminar el atasco, pulse el
botón Reanudar para continuar con el trabajo de impresión.
Si no existe ningún atasco de papel, pulse el botón Reanudar. Si esto no
funciona, pruebe a apagar y encender la impresora, y vuelva a enviar el
trabajo de impresión.
El trabajo de impresión se está cancelando.
• No se requiere ninguna acción.
Page 58

Indicación LED Explicación y acción recomendada
El LED de alimentación, el LED de
reanudación y los LED de los
cartuchos de impresión derecho e
izquierdo están encendidos.
El LED de alimentación está
encendido, el LED de reanudación
parpadea, el LED del cartucho de
impresión derecho está encendido el
doble que apagado.
El LED de alimentación está
encendido, el LED de reanudación
está encendido, el LED del cartucho
de impresión derecho está encendido
el doble que apagado.
Se está enviando nuevo firmware a la impresora.
• No se requiere ninguna acción.
Módulo auxiliar de tinta casi lleno.
• Si tiene un módulo auxiliar de tinta de repuesto, instálelo
inmediatamente siguiendo las instrucciones que lo acompañan.
• De lo contrario, visite www.hp.com/support/dj450 o consulte el apartado
Asistencia al cliente para instrucciones sobre cómo obtener un módulo
de repuesto.
Mientras, pulse el botón Reanudar para seguir imprimiendo; el estado de
error LED no desaparecerá hasta que se cambie el módulo auxiliar de
tinta. Cuando el módulo auxiliar de tinta se llena, la impresora deja de
imprimir.
Módulo auxiliar de tinta lleno.
• Si tiene un módulo auxiliar de tinta de repuesto, instálelo
inmediatamente siguiendo las instrucciones que lo acompañan.
• De lo contrario, visite www.hp.com/support/dj450 o consulte el apartado
Asistencia al cliente para instrucciones sobre cómo obtener un módulo
de repuesto.
Mientras, puede extraer el cartucho de impresión negro y seguir
imprimiendo sólo con el cartucho tricolor. Los resultados de color y la
velocidad de impresión podrían verse afectados. Consulte Modo de
impresión de un solo cartucho en la Guía del usuario en pantalla.
El LED de infrarrojos está encendido. La impresora está recibiendo transmisión infrarroja.
• No se requiere ninguna acción.
Power LED, Resume LED, Left and
Right print cartridge LEDs cycle at
fast rate.
Error de la impresora.
• Pulse el botón Reanudar para imprimir el código de error. Pulse el botón
de alimentación para restablecer la impresora.
Español
Page 59

Hewlett-Packard Limited Warranty Statement
HP product Duration of Limited Warranty
Software 90 days
Accessories 1 year if sold with printer; 90 days if purchased
separately
Print cartridges Until the HP print cartridge has been depleted of HP ink,
or until the “end of warranty” date printed on the HP print
cartridge, whichever occurs first.
Printer peripheral hardware (see below for details) 1 year
Extent of Limited Warranty
1 Hewlett-Packard warrants to the end-user customer that the
HP products specified above will be free from defects in
materials and workmanship for the duration specified
above, which duration begins on the date of purchase by
the customer.
2 For software products, HP’s limited warranty applies only to
a failure to execute programming instructions. HP does not
warrant that the operation of any product will be uninterrupted or error free.
3 HP’s limited warranty covers only those defects that arise
as a result of normal use of the product, and does not cover
any other problems, including those that arise as a result of:
a Improper maintenance or modification;
b Software, media, parts, or supplies not provided or
supported by HP;
c Operation outside the product’s specifications;
d Unauthorized modification or misuse.
4 For HP printer products, the use of a non-HP print cartridge
or a refilled print cartridge does not affect either the
warranty to the customer or any HP support contract with
the customer. However, if printer failure or damage is
attributable to the use of a non-HP or refilled print cartridge,
HP will charge its standard time and materials charges to
service the printer for the particular failure or damage. This
warranty does not extend to empty HP print cartridges,
refilled HP print cartridges, or HP print cartridges which
have been tampered with.
5 If HP receives, during the applicable warranty period, notice
of a defect in any product which is covered by HP’s
warranty, HP shall either repair or replace the product, at
HP’s option.
6 If HP is unable to repair or replace, as applicable, a
defective product which is covered by HP’s warranty, HP
shall, within a reasonable time after being notified of the
defect, refund the purchase price for the product.
7 HP shall have no obligation to repair, replace, or refund until
the customer returns the defective product to HP.
8 Any replacement product may be either new or like new,
provided that it has functionality at least equal to that of the
product being replaced.
9 HP products may contain remanufactured parts,
components, or materials equivalent to new in
performance.
10 HP’s Limited Warranty Statement is valid in any country/
region where the covered HP product is distributed by HP.
Contracts for additional warranty services, such as on-site
service, are available from any authorized HP service
facility in countries/regions where the product is distributed
by HP or by an authorized importer.
Limitations of Warranty
TO THE EXTENT ALLOWED BY LOCAL LAW, NEITHER HP
NOR ITS THIRD PARTY SUPPLIERS MAKES ANY OTHER
WARRANTY OR CONDITION OF ANY KIND, WHETHER
EXPRESS OR IMPLIED WARRANTIES OR CONDITIONS OF
MERCHANTABILITY, SATISFACTORY QUALITY, AND
FITNESS FOR A PARTICULAR PURPOSE.
Limitations of Liability
1 To the extent allowed by local law, the remedies provided in
this Warranty Statement are the customer’s sole and
exclusive remedies.
2 TO THE EXTENT ALLOWED BY LOCAL LAW, EXCEPT
FOR THE OBLIGATIONS SPECIFICALLY SET FORTH IN
THIS WARRANTY STATEMENT, IN NO EVENT SHALL HP
OR ITS THIRD PARTY SUPPLIERS BE LIABLE FOR
DIRECT, INDIRECT, SPECIAL, INCIDENTAL, OR
CONSEQUENTIAL DAMAGES, WHETHER BASED ON
CONTRACT, TORT, OR ANY OTHER LEGAL THEORY
AND WHETHER ADVISED OF THE POSSIBILITY OF
SUCH DAMAGES.
Local Law
1 This Warranty Statement gives the customer specific legal
rights. The customer may also have other rights which vary
from state to state in the United States, from province to
province in Canada, and from country/region to country/
region elsewhere in the world.
2 To the extent that this Warranty Statement is inconsistent
with local law, this Warranty Statement shall be deemed
modified to be consistent with such local law. Under such
local law, certain disclaimers and limitations of this
Warranty Statement may not apply to the customer. For
example, some states in the United States, as well as some
governments outside the United States (including provinces
in Canada), may:
a Preclude the disclaimers and limitations in this Warranty
Statement from limiting the statutory rights of a customer
(e.g. the United Kingdom);
b Otherwise restrict the ability of a manufacturer to enforce
such disclaimers or limitations; or
c Grant the customer additional warranty rights, specify
the duration of implied warranties which the
manufacturer cannot disclaim, or allow limitations on the
duration of implied warranties.
3 FOR CONSUMER TRANSACTIONS IN AUSTRALIA AND
NEW ZEALAND, THE TERMS IN THIS WARRANTY
STATEMENT, EXCEPT TO THE EXTENT LAWFULLY
PERMITTED, DO NOT EXCLUDE, RESTRICT, OR
MODIFY, AND ARE IN ADDITION TO, THE MANDATORY
STATUTORY RIGHTS APPLICABLE TO THE SALE OF
THE HP PRODUCTS TO SUCH CUSTOMERS.
Page 60

Vereinbarung zur beschränkten Gewährleistung
HP Produkt Dauer der beschränkten Garantie
Software 90 Tage
Zubehör 1 Jahr, falls mit Drucker verkauft; 90 Tage, falls getrennt
Druckpatronen Beschränkte 6-monatige Garantie, sofern vor dem auf der
Drucker-Hardware (Einzelheiten siehe unten) 1 Jahr
gekauft
Schachtel angegebenen Installationsdatum installiert.
Umfang der beschränkten Gewährleistung
1 Hewlett-Packard (HP) gewährleistet dem Endkunden,
dass die obengenannten HP Produkte während des
obengenannten Gewährleitungszeitraums frei von
Material- und Verarbeitungsfehlern sind. Der
Gewährleitungszeitraum beginnt mit dem Kaufdatum.
2 Bei Softwareprodukten gilt die beschränkte HP
Gewährleistung ausschließlich für die fehlerhafte
Ausführung von Programmieranweisungen. HP
gewährleistet weder einen unterbrechungs- noch
fehlerfreien Betrieb eines Softwareproduktes.
3 Die beschränkte Garantie von HP deckt nur solche Defekte
ab, die sich aus dem normalen Gebrauch des Produkts
ergeben. Sie deckt keinerlei andere Probleme ab,
einschließlich solcher, die sich auf die folgenden Ursachen
zurückführen lassen:
a Unsachgemäße Wartung oder Modifikationen;
b Verwendung von Software, Druckmedien, Ersatzteilen
oder Zubehör, die von HP nicht zur Verfügung gestellt
bzw. unterstützt werden
c Betrieb außerhalb der Produktspezifikationen.
d Nicht autorisierte Änderungen oder Missbrauch.
4 HP Druckerprodukte: Die Verwendung von Nicht-HP
Druckpatronen oder nachgefüllten Druckpatronen hat keine
Auswirkung auf die Gewährleistung oder andere HP
Unterstützungsvereinbarungen mit dem Kunden. Falls
jedoch die Verwendung einer nicht von HP hergestellten
oder einer nachgefüllten Druckpatrone für das
Druckerversagen oder den Druckerschaden verantwortlich
ist, berechnet HP für die Druckerwartung bezüglich dieses
spezifischen Versagens oder Schadens die
Standardgebühren für Arbeitszeit und Materialkosten.
5 Wenn HP während des Garantiezeitraums von einem
Defekt in einem durch die HP-Garantie abgedeckten
Produkt in Kenntnis gesetzt wird, wird HP das Produkt nach
eigenem Ermessen entweder reparieren oder ersetzen.
6 Falls HP nicht in der Lage sein sollte, ein defektes Produkt,
das durch die HP-Garantie abgedeckt ist, zu reparieren
oder zu ersetzen, wird HP den Kaufpreis des Produkts
innerhalb eines angemessenen Zeitraums ab Mitteilung
des Defekts zurückerstatten.
7 HP ist erst dann verpflichtet, das mangelhafte Produkt
zu reparieren, zu ersetzen oder den Kaufpreis
zurückzuerstatten, wenn der Endkunde dieses an
HP zurückgesandt hat.
8 Das Ersatzprodukt kann entweder neu oder neuwertig sein,
vorausgesetzt, seine Funktionalität ist der Funktionalität
des zu ersetzenden Produkts zumindest gleichwertig.
9 HP-Produkte können umgearbeitete Teile, Komponenten
oder Materialien enthalten, die in Bezug auf ihre Leistung
neuwertig sind.
10 Die beschränkte Gewährleistung von HP ist in allen
Ländern/Regionen gültig, in denen das durch sie gedeckte
HP Produkt von HP vertrieben wird. Vereinbarungen für
zusätzliche Gewährleistung, zum Beispiel Service vor Ort,
sind in Ländern/Regionen, in denen das Produkt durch HP
oder durch einen autorisierten Importeur vertrieben wird,
über jede autorisierten HP Servicestelle verfügbar.
Gewährleistungsausschlüsse
IM UMFANG DER BEDINGUNGEN DES ÖRTLICH
GELTENDEN RECHTS LEHNEN HP UND DEREN
LIEFERANTEN ALLE WEITEREN GARANTIEN ODER
GEWÄHRLEISTUNGEN AB, GLEICH OB AUSDRÜCKLICHE
ODER KONKLUDENTE GEWÄHRLEISTUNGEN DER
MARKTGÄNGIGKEIT, DER HANDELSÜBLICHEN QUALITÄT
UND DER EIGNUNG FÜR EINEN BESTIMMTEN ZWECK.
Haftungsausschlüsse
1 Sofern durch die geltende Gesetzgebung keine anderen
Bestimmungen festgelegt sind, stehen dem Endkunden
über die in dieser Hersteller-Gewährleistung genannten
Leistungen hinaus keine weiteren Ansprüche zu.
2 IM UMFANG DER BESTIMMUNGEN DES ÖRTLICH
GELTENDEN RECHTS, UND MIT AUSNAHME DER IN
DIESER GARANTIEERKLÄRUNG AUSDRÜCKLICH
GENANNTEN VERPFLICHTUNGEN, ÜBERNEHMEN
HP UND DEREN LIEFERANTEN KEINERLEI HAFTUNG
FÜR UNMITTELBARE, MITTELBARE, KONKRETE,
ZUFÄLLIG ENTSTANDENE ODER FOLGESCHÄDEN,
UNABHÄNGIG DAVON, OB SOLCHE ANSPRÜCHE AUF
VERTRAG, DELIKTSRECHT ODER EINER ANDEREN
RECHTSTHEORIE BASIEREN, UND UNABHÄNGIG
VON DER MITTEILUNG DER MÖGLICHKEIT SOLCHER
SCHÄDEN.
Geltendes Recht
1 Diese Gewährleistungserklärung stattet den Endkunden
mit bestimmten Rechten aus. Der Endkunde hat unter
Umständen noch weitere Rechte, die in den Vereinigten
Staaten von Bundesstaat zu Bundesstaat, in Kanada von
Provinz zu Provinz, in der restlichen Welt von Land/Region
zu Land/Region verschieden sein können.
2 Soweit diese Erklärung zur Gewährleistung nicht dem
geltenden Recht entspricht, soll sie so als abgeändert
gelten, dass die hierin enthaltenen Bestimmungen dem
geltenden Recht entsprechen. Nach geltendem Recht
treffen u.U. bestimmte Erklärungen und Einschränkungen
dieser Gewährleistungserklärung nicht auf den Endkunden
zu. In einigen US-Staaten und in einigen Ländern
außerhalb der USA (sowie in einigen kanadischen
Provinzen):
a ausschließen, dass die Ausschlüsse und
Beschränkungen in dieser Garantieerklärung die
gesetzlichen Rechte eines Kunden einschränken
(z. B. in Großbritannien);
b Ist ein Hersteller nicht berechtigt, solche Erklärungen
und Einschränkungen durchzusetzen
c dem Kunden zusätzliche G arantieansprüche einräumen,
die Dauer von konkludenten Gewährleistungen
festlegen, die der Hersteller nicht beschränken kann,
oder die zeitliche Befristung von konkludenten
Gewährleistungen gestatten.
3 FOR CONSUMER TRANSACTIONS IN AUSTRALIA AND
NEW ZEALAND, THE TERMS IN THIS WARRANTY
STATEMENT, EXCEPT TO THE EXTENT LAWFULLY
PERMITTED, DO NOT EXCLUDE, RESTRICT, OR
MODIFY, AND ARE IN ADDITION TO, THE MANDATORY
STATUTORY RIGHTS APPLICABLE TO THE SALE OF
THE HP PRODUCTS TO SUCH CUSTOMERS.
Page 61

Garantie limitée Hewlett-Packard
Produit HP Durée de la Garantie limitée
Logiciel 90 jours
Accessoires Garantie d’un an si les accessoires sont vendus avec
Cartouches d’encre Garantie limitée de 6 mois si les cartouches sont
Matériel périphérique de l’imprimante
(voir les détails ci-dessous)
l’imprimante ; de 90 jours s’ils sont achetés séparément
installées avant la date limite imprimée sur l’emballage.
1 an
Etendue de la Garantie limitée
1 Hewlett-Packard garantit à l’utilisateur final que les produits
HP spécifiés précédemment ne comporteront aucun défaut
de fabrication ou de matériau pendant la période précisée
ci-dessus, à compter de la date d’achat par le client.
2 Pour les produits logiciels, la Garantie limitée HP ne
s’applique qu’à l’impossibilité d’exécuter des instructions
de programmation. HP ne garantit pas le fonctionnement
ininterrompu ou sans erreur de ses produits.
3 La Garantie limitée HP couvre uniquement les défauts
détectés dans le cadre d’une utilisation normale du produit.
Elle ne couvre donc aucun autre problème, quel qu’il soit,
dû aux raisons suivantes :
a maintenance ou modification inadéquates ;
b logiciels, supports, pièces ou fournitures non fournis ni
pris en charge par HP ;
c utilisation non conforme aux spécifications indiquées
pour le produit ;
d modification non autorisée ou abusive.
4 Pour les imprimantes HP, l’utilisation de cartouches d’encre
non HP ou de cartouches d’encre reconditionnées n’affecte
ni la garantie au client, ni les contrats d’assistance HP
conclus avec le client. Cependant, si une imprimante tombe
en panne ou est endommagée suite à l’utilisation d’une
cartouche d’encre non HP ou reconditionnée, HP facturera
le coût de la main d’œuvre et des matériaux nécessaires
au dépannage de l’imprimante dans ces cas précis.
5 Si, pendant la période de garantie applicable, HP est
informé d’un défaut dans un produit couvert par la garantie
HP, HP s’engage alors à réparer ou à remplacer le produit,
à sa discrétion.
6 Si HP n’est pas en mesure de réparer ou de remplacer le
produit défectueux couvert par la garantie HP, comme cela
est prévu par la garantie, HP s’engage à rembourser le prix
d’achat du produit dans un délai raisonnable après que le
défaut lui ait été signalé.
7 HP n’a aucune obligation de réparer, de remplacer ni de
rembourser le produit tant que le client n’a pas renvoyé le
produit défectueux à HP.
8 Tout produit de remplacement sera neuf ou remis à neuf,
à condition que ses fonctionnalités soient au moins égales
à celle du produit remplacé.
9 Les produits HP peuvent comporter des pièces, des
composants ou des matériaux reconditionnés dont les
performances sont équivalentes aux éléments à l’état neuf.
10 La Garantie limitée HP est valable dans tous les pays ou
régions où le produit HP couvert par cette garantie est
distribué par HP. Des contrats couvrant des services de
garantie supplémentaires, tels qu’un service sur site, sont
proposés chez tous les prestataires de services agréés HP
dans les pays ou régions où le produit est distribué par HP
ou par un importateur agréé.
Limites de la garantie
DANS LA MESURE PERMISE PAR LA LEGISLATION
LOCALE EN VIGUEUR, HP ET SES FOURNISSEURS TIERS
N'OFFRENT AUCUNE AUTRE GARANTIE OU CONDITION,
DE QUELQUE SORTE QUE CE SOIT, EXPLICITES OU
IMPLICITES, OU CONCERNANT LES CONDITIONS DE
COMMERCIALISATION, DE QUALITE SATISFAISANTE ET
D’ADEQUATION A UN USAGE PARTICULIER.
Limites de la responsabilité
1 Dans la mesure permise par la législation locale en vigueur,
les recours s’inscrivant dans le cadre de cette Garantie
sont les seuls recours exclusifs du client.
2 DANS LA MESURE PERMISE PAR LA LEGISLATION
LOCALE EN VIGUEUR, A L’EXCEPTION DES
OBLIGATIONS SPECIFIQUEMENT STIPULEES DANS
CETTE GARANTIE, HP OU SES FOURNISSEURS TIERS
NE PEUVENT EN AUCUN CAS ETRE TENUS POUR
RESPONSABLES DE DOMMAGES DIRECTS OU
INDIRECTS, SPECIAUX, FORTUITS OU CONSECUTIFS,
QUE LA RECLAMATION SOIT FONDEE SUR UN
CONTRAT OU UN PREJUDICE SUBI, OU QUELLE QUE
SOIT LA RAISON LEGALE INVOQUEE, MEME S’ILS
AVAIENT ETE AVISES DU RISQUE DE TELS
DOMMAGES.
Législation locale
1 Cette Garantie confère au client des droits juridiques
spécifiques. Le client peut également bénéficier d’autres
droits pouvant varier, d’un état à l’autre aux Etats-Unis ou
d’une province à l’autre au Canada, et d’un pays ou d’une
région à l’autre ailleurs dans le monde.
2 Si le texte de cette Garantie contredit une législation locale,
il sera considéré comme modifié pour se conformer à cette
législation. Dans le cadre d’une telle législation locale,
certaines exclusions et limitations de responsabilité
stipulées dans cette Garantie ne s’appliquent pas au client.
Par exemple, certains états des Etats-Unis, de même que
certains gouvernements hors des Etats-Unis (notamment
ceux de provinces canadiennes), peuvent :
a annuler les exclusions et les limitations de responsabilité
stipulées dans cette Garantie restreignant les droits
statutaires d’un client (c’est le cas du Royaume-Uni).
b restreindre la capacité pour un fabricant d’imposer de
telles exclusions ou limitations ; ou bien
c accorder au client des droits de garantie
supplémentaires, spécifier la durée de garanties
implicites que le fabricant ne peut dénoncer, ou autoriser
des limitations quant à la durée des garanties implicites.
3 POUR TOUTE VENTE A DES CLIENTS EN AUSTRALIE
OU EN NOUVELLE-ZELANDE, LES TERMES DE CETTE
GARANTIE, SAUF DANS LA LIMITE DES DISPOSITIONS
LEGALES, N’EXCLUENT, NE LIMITENT NI NE
MODIFIENT LES DROITS STATUTAIRES OBLIGATOIRES
APPLICABLES A LA VENTE DE PRODUITS HP A DE
TELS CLIENTS, MAIS VIENNENT S’Y AJOUTER.
Page 62

Beperkte garantieverklaring van Hewlett-Packard
HP-product Duur van beperkte garantie
Software 90 dagen
Accessoires 1 jaar indien verkocht met printer; 90 dagen indien
Inktpatronen Beperkte garantie van 6 maanden indien geïnstalleerd
Printerrandapparatuur (zie details hieronder) 1 jaar
Geldigheid van beperkte garantie
1 Hewlett-Packard verstrekt aan de eindgebruiker de garantie dat
bovengenoemde producten van HP vrij zijn van materiaal- en
fabricagefouten gedurende bovengenoemde periode die begint
op de dag van aankoop door de klant.
2 Wat softwareproducten betreft, geldt de beperkte garantie van
HP uitsluitend voor niet-uitvoerbare programmeerinstructies.
HP garandeert niet dat de werking van een product
ononderbroken of vrij van fouten is.
3 De beperkte garantie van HP geldt alleen voor defecten die zich
voordoen als resultaat van normaal gebruik van het product en
is niet van toepassing bij andere problemen, met inbegrip van
defecten die het resultaat zijn van:
a verkeerd of ondeskundig onderhoud of aanpassing
b software, informatiedragers, onderdelen of benodigdheden
die niet door HP worden geleverd of ondersteund
c gebruik dat niet in overeenstemming is met de specificaties
van het product
d niet-toegestane modificaties of misbruik.
4 Wat printerproducten van HP betreft, heeft het gebruik van een
niet door HP vervaardigde of een nagevulde inktpatroon geen
invloed op de garantie aan de klant of op eventuele
ondersteuningscontracten van HP met de klant. Als defecten of
beschadigingen van de printer echter aan het gebruik van een
niet door HP vervaardigde of een nagevulde inktpatroon kunnen
worden toegeschreven, zal HP de gebruikelijke arbeidsuren en
materiaalkosten voor het repareren van het betreffende defect
of de betreffende beschadiging van de printer in rekening
brengen.
5 Als HP tijdens de garantieperiode op de hoogte wordt gebracht
van een defect van een product dat onder de garantie van HP
valt, wordt het defecte product door HP ofwel gerepareerd ofwel
vervangen naar goeddunken van HP.
6 Als een defect product dat onder de garantie van HP valt, niet
door HP gerepareerd of vervangen kan worden, zal HP de
aankoopprijs voor het defecte product terugbetalen binnen een
redelijke termijn nadat HP op de hoogte is gebracht van het
defect.
7 HP is niet verplicht tot reparatie, vervanging of terugbetaling zo
lang de klant het defecte product niet aan HP heeft
geretourneerd.
8 Een vervangingsproduct mag nieuw of bijna nieuw zijn op
voorwaarde dat het ten minste dezelfde functionaliteit bezit als
het product dat vervangen wordt.
9 Producten van HP kunnen gereviseerde onderdelen,
componenten of materialen bevatten, waarvan de prestaties
gelijkwaardig zijn aan die van nieuwe producten.
10 De beperkte garantieverklaring van HP is geldig in alle landen
of regio's waar het product van HP waarop deze garantie
betrekking heeft, door HP wordt gedistribueerd. Contracten
voor extra garantieservice, zoals service op de locatie van de
klant, zijn verkrijgbaar bij ieder erkend HP servicekantoor in
landen of regio's waar het product door HP of een erkende
importeur wordt gedistribueerd.
afzonderlijk aangeschaft
uiterlijk op de op de doos vermelde installatiedatum.
Beperking van garantie
IN ZOVERRE DOOR DE PLAATSELIJKE WET IS TOEGESTAAN,
VERSTREKKEN NOCH HP, NOCH DERDE LEVERANCIERS
ENIGE ANDERE GARANTIE OF VOORWAARDE, HETZIJ
UITDRUKKELIJKE OF STILZWIJGENDE GARANTIES OF
VOORWAARDEN VAN VERKOOPBAARHEID, BEVREDIGENDE
KWALITEIT EN GESCHIKTHEID VOOR EEN BEPAALD DOEL.
Beperking van aansprakelijkheid
1 In zoverre door de plaatselijke wet is toegestaan, zijn de
rechtsmiddelen in deze garantieverklaring het enige en
exclusieve verhaal van de klant.
2 IN ZOVERRE DOOR DE PLAATSELIJKE WET IS
TOEGESTAAN, MET UITZONDERING VAN DE SPECIFIEKE
VERPLICHTINGEN IN DEZE GARANTIEVERKLARING, ZIJN
HP EN DERDE LEVERANCIERS ONDER GEEN BEDING
AANSPRAKELIJK VOOR DIRECTE, INDIRECTE, SPECIALE
EN INCIDENTELE SCHADE OF GEVOLGSCHADE, ZIJ HET
OP BASIS VAN CONTRACT, BENADELING OF ENIG
ANDERE JURIDISCHE THEORIE EN OF HP AL DAN NIET
VAN DE MOGELIJKHEID VAN DERGELIJKE SCHADE OP DE
HOOGTE IS.
Plaatselijke wet
1 Deze garantieverklaring biedt de klant specifieke juridische
rechten. De klant kan over andere rechten beschikken die in de
VS van staat tot staat, in Canada van provincie tot provincie en
elders van land tot land of regio tot regio kunnen verschillen.
2 In zoverre deze garantieverklaring niet overeenstemt met de
plaatselijke wet, zal deze garantieverklaring als aangepast en in
overeenstemming met dergelijke plaatselijke wet worden
beschouwd. Krachtens dergelijke plaatselijke wet is het
mogelijk dat bepaalde afwijzingen en beperkingen in deze
garantieverklaring niet op de klant van toepassing zijn.
Sommige staten in de VS en bepaalde overheden buiten de
Verenigde Staten (inclusief provincies in Canada) kunnen
bijvoorbeeld:
a de afwijzingen en beperkingen in deze garantieverklaring als
tenietgedaan beschouwen ter bescherming van de wettelijk
voorgeschreven rechten van de klant (bijvoorbeeld in het
Verenigd Koninkrijk);
b de mogelijkheid van een fabrikant voor het doen gelden van
dergelijke afwijzingen of voorwaarden anderzijds beperken;
of
c de klant aanvullende rechten onder de garantie bieden, de
tijdsduur van stilzwijgende garanties bepalen die niet door de
fabrikant afgewezen kan worden, en beperkingen op de
tijdsduur van stilzwijgende garanties niet toestaan.
3 MET BETREKKING TOT CONSUMENTENTRANSACTIES IN
AUSTRALIË EN NIEUW-ZEELAND WORDEN DE WETTELIJK
VOORGESCHREVEN RECHTEN DIE VAN TOEPASSING
ZIJN OP DE AANKOOP VAN PRODUCTEN VAN HP AAN
DERGELIJKE KLANTEN, DOOR DE VOORWAARDEN IN
DEZE GARANTIEVERKLARING NIET TENIETGEDAAN,
BEPERKT OF VERANDERD, BEHALVE IN ZOVERRE DOOR
DE WET IS TOEGESTAAN, EN VORMEN DE
VOORWAARDEN VAN DEZE GARANTIEVERKLARING EEN
AANVULLING OP DEZE RECHTEN.
Page 63

Dichiarazione di garanzia limitata Hewlett-Packard
Prodotto HP Durata della garanzia limitata
Software 90 giorni
Accessori 1 anno se venduto con la stampante; 90 giorni se
acquistato separatamente
Cartucce di stampa Garanzia limitata di 6 mesi se installate entro la data
indicata sulla confezione.
Hardware per periferiche per stampante (vedi sotto per
dettagli in merito)
1 anno
Estensione della garanzia limitata
1 La Hewlett-Packard garantisce al cliente finale che i
prodotti HP specificati in precedenza saranno esenti
da difetti di materiale e di manodopera per la durata
specificata sopra, a decorrere dalla data d’acquisto da
parte del cliente stesso.
2 Per i prodotti software, la garanzia limitata HP vale
solo per errori durante l’esecuzione delle istruzioni di
programmazione. HP non garantisce che il funzionamento
dei prodotti sarà ininterrotto o privo di errori.
3 La garanzia limitata HP copre solo quei difetti risultanti dal
normale utilizzo del prodotto, e non copre altri problemi,
inclusi quelli che derivano da:
a Manutenzione inadeguata o modifiche
b Software, supporti, parti o forniture non forniti o
supportati dalla HP
c Funzionamento non conforme alle specifiche
del prodotto
d Modifiche non autorizzate o uso improprio.
4 Per i prodotti per stampanti HP, l’uso di una cartuccia di
stampa non HP non compromette la garanzia offerta al
cliente o il contratto di assistenza HP con il cliente stesso.
Tuttavia, qualora il guasto o il danno alla stampante fossero
attribuibili all’uso di una cartuccia di stampa non HP o
ricaricabile, HP addebiterà le sue tariffe orarie standard
ed il materiale per riparare il guasto o eventuali danni
alla stampante.
5 Qualora durante il periodo di garanzia applicabile la HP
ricevesse avviso di un difetto in uno dei prodotti coperti
dalla garanzia, si impegna a riparare o sostituire il prodotto,
a propria discrezione.
6 Qualora la HP non fosse in grado di riparare o sostituire (a
seconda del caso) un prodotto coperto dalla garanzia HP,
dovrà entro un periodo di tempo ragionevole dal momento
in cui ha ricevuto avviso del difetto, rimborsare il prezzo
dell’acquisto del prodotto stesso.
7 La HP non avrà alcun obbligo a riparare, sostituire o
rimborsare il prezzo di acquisto fin quando il cliente non
avrà restituito alla HP il prodotto difettoso.
8 Le parti di ricambio dovranno essere nuove o come nuove,
ammesso che la loro funzionalità sia almeno pari a quella
del prodotto sostituito.
9 I prodotti HP potrebbero contenere parti, componenti
o materiali fabbricati equivalenti a parti, componenti
o materiali nuovi in termini di prestazioni.
10 La garanzia limitata HP è valida in qualsiasi Paese/regione
in cui la HP distribuisce il prodotto HP coperto dalla
garanzia. Sono inoltre disponibili contratti per servizi
addizionali in garanzia; a tale proposito rivolgersi ad un
centro di assistenza HP autorizzato nei Paesi o nelle
regioni in cui il prodotto viene distribuito dalla HP o da
un importatore autorizzato.
Limitazioni della garanzia
LADDOVE CONSENTITO DALLE LEGGI LOCALI VIGENTI,
LA HP O I SUOI FORNITORI DI PARTI TERZE NON
OFFRONO ALCUNA GARANZIA O CONDIZIONE DI ALCUN
TIPO, SIA ESPRESSA CHE IMPLICITA, O CONDIZIONI DI
COMMERCIABILITÀ, QUALITÀ SODDISFACENTE O
IDONEITÀ AD UNO SCOPO PARTICOLARE.
Limitazioni di responsabilità
1 Laddove consentito dalle leggi locali vigenti, i rimedi previsti
in questa Garanzia sono gli unici ed esclusivi rimedi a
disposizione del cliente.
2 LADDOVE CONSENTITO DALLE LEGGI LOCALI
VIGENTI, FATTA ECCEZIONE PER GLI OBBLIGHI
DELINEATI IN MANIERA SPECIFICA IN QUESTA
GARANZIA, IN NESSUN CASO LA HP O I SUOI
FORNITORI DI PARTI TERZE SARANNO RITENUTI
RESPONSABILI PER DANNI DIRETTI, INDIRETTI,
SPECIALI, FORTUITI O DERIVATI, SIA CHE SI BASINO
SU CONTRATTO, TORNO O ALTRA TEORIA LEGALE
E SIA CHE SIANO STATI AVVISATI DELLA POSSIBILITÀ
DI TALI DANNI.
Leggi locali vigenti
1 Questa garanzia offre al cliente diritti legali specifici. Il
cliente potrebbe godere di altri diritti, che variano da stato a
stato negli Stati Uniti, da provincia a provincia in Canada e
da Paese/regione a Paese/regione nel resto del mondo.
2 Laddove questa Garanzia dovesse risultare non conforme
alle leggi locali vigenti, verrà modificata al fine di renderla
conforme a tali leggi. Secondo queste leggi locali, alcune
rinunce di responsabilità o limitazioni di questa Garanzia
potrebbero non essere pertinenti per il cliente. Ad esempio,
alcuni stati negli Stati Uniti ed alcuni governi fuori degli Stati
Uniti (incluse alcune province del Canada) potrebbero:
a Precludere le rinunce di responsabilità e le limitazioni
previste in questa Garanzia dal limitare i diritti statutari
di un cliente (ad esempio, Gran Bretagna)
b Limitare altrimenti la capacità di un fabbricante di
applicare tali rinunce di responsabilità o limitazioni;
oppure
c Concedere al cliente diritti di garanzia addizionali,
specificare la durata delle garanzie implicite che il
fabbricante non può rinnegare, o consentire limitazioni
sulla durata delle garanzie implicite.
3 PER TRANSAZIONI CON I CLIENTI IN AUSTRALIA E
NUOVA ZELANDA, I TERMINI DI QUESTA GARANZIA,
LADDOVE CONSENTITO DALLE LEGGI VIGENTI, NON
ESCLUDONO, LIMITANO O MODIFICANO, E NON SI
AGGIUNGONO AI DIRITTI STATUTORI OBBIGATORI
RELATIVI ALLA VENDITA DI PRODOTTI HP A TALI
CLIENTI.
Page 64

Declaración de Garantía Limitada de Hewlett-Packard
Producto HP Duración de la garantía limitada
Software 90 días
Accesorios 1 año si se venden con la impresora, 90 días si se
compran por separado
Cartuchos de impresión Garantía limitada de 6 meses si los cartuchos se
instalan antes de la fecha indicada en la caja.
Hardware periférico de la impresora (véase más abajo para
los detalles)
Alcance de la garantía limitada
1 Hewlett-Packard garantiza al cliente usuario final que los
productos HP especificados más arriba estarán libres de
defectos en materiales y mano de obra durante el período
especificado, cuya duración comienza a contarse a partir
de la fecha de compra por el cliente.
2 Para productos de software, la garantía limitada de HP
se aplica sólo a la imposibilidad de ejecutar las instrucciones de programación. HP no garantiza el funcionamiento ininterrumpido y sin problemas de ninguno de
sus productos.
3 La garantía limitada de HP cubre exclusivamente los
defectos que surjan como resultado del uso normal del
producto, por lo que se excluye cualquier otro tipo de
problema, incluidos los que surjan como consecuencia de:
a Mantenimiento o modificación indebida;
b Software, soportes de impresión, piezas o suministros
no distribuidos ni aceptados por HP;
c Funcionamiento fuera de las especificaciones del
producto.
d Modificación no autorizada o uso indebido.
4 En el caso de productos para impresoras HP, el uso de un
cartucho de impresión que no sea HP o de un cartucho de
impresión rellenado no afecta ni a la garantía del cliente ni
a ningún contrato de asistencia técnica HP con el cliente.
No obstante, si el fallo o daño de la impresora es imputable
al uso de un cartucho de impresión rellenado o que no sea
de HP, HP cobrará sus tarifas de materiales y tiempo
habituales para reparar dicho fallo o daño concreto de la
impresora.
5 Si HP recibe aviso durante el período de garantía aplicable
de un defecto en cualquier producto que esté cubierto por
una garantía de HP, HP reparará o sustituirá el producto, a
su discreción.
6 Si HP no puede reparar o sustituir, según corresponda, un
producto defectuoso que esté cubierto por la garantía de
HP, HP deberá, dentro de un tiempo razonable tras ser
informado del defecto, reembolsar el precio de compra de
dicho producto.
7 HP no estará obligado a reparar, sustituir o reembolsar el
importe de un producto hasta que el cliente devuelva el
producto defectuoso a HP.
8 Los productos de repuesto pueden ser nuevos o como
nuevos, a condición de que su funcionalidad sea por lo
menos igual a la del producto que se está sustituyendo.
9 Los productos HP pueden contener piezas, componentes o
materiales remanufacturados, de rendimiento equivalente
al de los nuevos.
10 Esta Declaración de Garantía Limitada de HP es válida en
cualquier región o país en el que el producto HP cubierto
sea distribuido por HP. Otros contratos de servicios de
garantía, tales como servicio en el emplazamiento, están
disponibles en cualquier centro de servicio HP autorizado
en regiones y países en los que el producto sea distribuido
por HP o por un importador autorizado.
1 año
Limitaciones de la garantía
EN LA MEDIDA EN QUE LO PERMITAN LAS LEYES
LOCALES, NI HP NI NINGUNO DE SUS PROVEEDORES
CONCEDEN NINGUNA OTRA GARANTÍA NI CONDICIÓN DE
NINGÚN TIPO, YA SE TRATE DE GARANTÍAS EXPRESAS O
IMPLÍCITAS O CONDICIONES DE COMERCIABILIDAD,
CALIDAD SATISFACTORIA E IDONEIDAD PARA UNA
APLICACIÓN PARTICULAR.
Limitaciones de responsabilidad
1 En la medida en que lo permitan las leyes locales, los
remedios proporcionados en esta Declaración de Garantía
son los únicos y exclusivos remedios del cliente.
2 EN LA MEDIDA EN QUE LO PERMITAN LAS LEYES
LOCALES, SALVO EN LO RELATIVO A LAS
OBLIGACIONES ESPECÍFICAMENTE ESTABLECIDAS
EN ESTA DECLARACIÓN DE GARANTÍA, EN NINGÚN
CASO SERÁ HP NI NINGUNO DE SUS PROVEEDORES
RESPONSABLE DE DAÑOS DIRECTOS, INDIRECTOS,
ESPECIALES, IMPREVISTOS O EMERGENTES, YA SEA
EN BASE A CONTRATO, LESIÓN JURÍDICA O
CUALQUIER OTRA TEORÍA LEGAL, Y CON
INDEPENDENCIA DE QUE SE LE HAYA ADVERTIDO DE
LA POSIBILIDAD DE DICHOS DAÑOS.
Leyes locales
1 Esta Declaración de Garantía otorga al cliente derechos
legales específicos. Es posible que el cliente tenga también
otros derechos que varían de un estado a otro de Estados
Unidos, de una provincia a otra de Canadá y de una región
o país a otra región o país de otros lugares del mundo.
2 En la medida en que esta Declaración de Garantía sea
inconsistente con las leyes locales, esta Declaración de
Garantía se modificará para ser consistente con dichas
leyes locales. Bajo dichas leyes locales, ciertas renuncias y
limitaciones de esta Declaración de Garantía podrían no
ser aplicables al cliente. Por ejemplo, algunos estados de
Estados Unidos, así como algunos gobiernos fuera de
Estados Unidos (incluyendo provincias de Canadá),
podrían:
a Impedir que las renuncias y limitaciones en esta
Declaración de Garantía limiten los derechos legales de
un cliente (por ejemplo, el Reino Unido);
b Restringir en otra forma la capacidad de un fabricante
para hacer valer dichas renuncias o limitaciones; o
c Garantizar los derechos de garantía adicionales del
cliente, especificar la duración de las garantías implícitas
que el fabricante no puede denegar o permitir
limitaciones sobre la duración de las garantías
implícitas.
3 PARA TRANSACCIONES DE CONSUMIDORES EN
AUSTRALIA Y NUEVA ZELANDA, LOS TÉRMINOS EN
ESTA DECLARACIÓN DE GARANTÍA, SALVO EN LA
MEDIDA LEGALMENTE PERMITIDA, NO EXCLUYEN,
RESTRINGEN NI MODIFICAN, Y HAN DE ENTENDERSE
EN ADICIÓN A, LOS DERECHOS ESTATUTARIOS
PRECEPTIVOS APLICABLES A LA VENTA DE
PRODUCTOS HP A DICHOS CLIENTES.
Page 65

Page 66

Page 67

Hewlett-Packard
ááccôô°°ûûdd IIOOhhóóÙÙGG ááffÉɪª°°††ddGG ¿¿ÉÉ««HH
OOhhóóÙÙGG ¿¿Éɪª°°††ddGG IIóóee
Ωƒj 90 èeGôÑdG
.¥hóæ°üdG ≈∏Y
ááffÉɪª°°††ddGG OOhhóóMM
HPøe ådÉK ±ôW …CG hCG
ácô°T Ωõà∏J ’ ,»∏ÙG ¿ƒfÉ≤dG ¬H íª°ùj …òdG óë∏d Ék≤ah
hCG á«æª°V •hô°T hCG äÉfɪ°V âfÉcCG AGƒ°S ,´ƒf …CG øe •hô°T hCG ¿Éª°V …CÉH É¡jOQƒe
èàæŸG áªFÓe hCG á«°VôŸG IOƒ÷G hCG …QÉéàdG êGhôdÉH ≥∏©àj ɪ«a áëjô°U äÉfɪ°V
Ú©e ¢Vô¨d.
áá««ddƒƒÄÄ°°ùùŸŸGG OOhhóóMM
√óMh ¬«∏Y Iô°UÉbh 𫪩dÉH á°UÉN äÉ°†jƒ©J Gòg ¿Éª°†dG ¿É«H ‘ ÉgÒaƒJ.
ácô°T πªëàJ ød ,Gòg ¿Éª°†dG ¿É«H
HP±ô£dG ,É¡FÓchh É¡«YRƒe øe …CG hCG
ådÉãdG ,á°UÉN hCG Iô°TÉÑe ÒZ hCG Iô°TÉÑe QGô°VCG ájCÉH ≥∏©àj ɪ«a á«dƒÄ°ùe ájCG
ÒZ hCG Oƒ°ü≤e Qô°V hCG ó≤Y ≈∏Y Ióæà°ùe âfÉc AGƒ°S áªLÉf hCG á«°VôY hCG
á«dɪàMÉH ácô°ûdG ÆÓHEG ” ¿EGh ≈àM iôNCG á«fƒfÉb ájô¶f …CG hCG Oƒ°ü≤e
QGô°VC’G √òg OƒLh.
áá««∏∏ÙÙGG ÚÚffGGƒƒ≤≤ddGG
á≤£æe ¤EG á©WÉ≤e øeh ,IóëàŸG äÉj’ƒdG ‘ áj’ƒd áj’h øe ∞∏àîJ iôNG
⁄É©dG ‘ iôNCG ádhO ¤EG ádhO øeh ,Góæc ‘ iôNCG.
Gòg »∏ÙG ¿ƒfÉ≤dG ‘ Oôj Ée ™e ≥aGƒàJ »c ¿Éª°†dG .¿ƒfÉ≤dG Gòg ÖLƒÃh
¿É«ÑH ≥∏©àj ɪ«a ä’RÉæàdGh Ohó◊G ¢†©H 𫪩dG ≈∏Y ≥Ñ£æJ ’ ób ,»∏ÙG
¿Éª°†dG .IóëàŸG äÉj’ƒdG ‘ äÉj’ƒdG ¢†©H ∑Éæg ,∫ÉãŸG π«Ñ°S ≈∏©a
á«ÑæLC’G äÉeƒµ◊G ¢†©H ¤EG áaÉ°VE’ÉH ,᫵jôeC’G)¢†©H ∂dP ‘ ÉÃ
Góæc äÉ©WÉ≤e(ób ,:
CGøe ¿Éª°†dG ¿É«H ‘ IOQGƒdG Ohó◊Gh äGAÉæãà°S’G ó– ¿CG ¿hO ∫ƒ–
𫪩∏d á«fƒfÉ≤dG ¥ƒ≤◊G)IóëàŸG áµ∏ªŸG ,∫ÉãŸG π«Ñ°S ≈∏Y(;
ÜäGAÉæãà°S’G √òg πãe ¢Vôa ≈∏Y ™«æ°üàdG á¡L IQób øe ó– ,’EGh
hCG ;äGójóëàdGh
êá«æª°†dG äÉfɪ°†dG Ióe Oó– hCG ,á«aÉ°VEG á«fɪ°V ¥ƒ≤M 𫪩dG íæ“
Ióe ≈∏Y GkOƒ«b ¢VôØJ hCG ,ÉgAÉæãà°SG ™«æ°üàdG á¡L ™£à°ùJ ’ »àdG
á«æª°†dG äÉfɪ°†dG.
¥ƒ≤◊G ∫ó©J hCG øe ó– hCG ,¿ƒfÉ≤dG ¬H íª°ùj …òdG ó◊G AÉæãà°SÉH ,Gòg ¿Éª°†dG
дЙйажe ™«H ≈∏Y б≤С£ŸG бjQЙСLE’G б«fƒfЙ≤dG
HPAÓª©dG A’Dƒg πãŸ.
(π«°UÉØàdG øe ójõŸ √ÉfOCG ô¶fG) á≤ë∏ªdG á©HÉ£dG Iõ¡LCGóMGh ΩÉY
Hewlett-Packard дЙйажe ƒ∏N Ъeуоа°щŸG шe Й¡FУª©dHP
áæ«ÑŸG IÎØ∏d áeóîà°ùŸG OGƒŸG hCG ™«æ°üàdG ‘ ܃«Y ájCG øe √ÓYCG IQƒcòŸG
èàæª∏d 𫪩dG AGô°T ïjQÉJ øe CGóÑJ »àdGh √ÓYCG.
HPò«ØæJ ‘ π°ûØdG ≈∏Y §≤a OhóÙG
HPøe èàæe …CG 𫨰ûJ á«∏ªY ƒ∏N
1ºàj »àdG ¢†jƒ©àdG ¬LhCG Èà©J ,»∏ÙG ¿ƒfÉ≤dG ¬H íª°ùj …òdG óë∏d Ék≤ah
2‘ IOóÙG äÉeGõàd’G AÉæãà°SÉH ,»∏ÙG ¿ƒfÉ≤dG ¬H íª°ùj …òdG óë∏d Ék≤ah
øY áªLÉædG ∂∏J ∂dP ‘ Éà iôNCG äÓµ°ûe ájCG »£¨j ’h:
HP ;
1IOófi á«fƒfÉb Ékbƒ≤M 𫪩∏d ¿Éª°†dG ¿É«H íæÁ .¥ƒ≤M ¿ƒHõ∏d ¿ƒµj ób ɉEG
ácô°T ÉgôaƒJ ’ »àdG È◊G ¢û«WGôN ΩGóîà°S’ áé«àf ∞∏J hCG
HP¢û«WGôN hCG
2Gòg πjó©J ºàj ,»∏ÙG ¿ƒfÉ≤dÉH Oôj Ée ™e ¿Éª°†dG ¿É«H ¥É°ùJG ΩóY ádÉM ‘
´É£≤f’ ¬°Vô©J ΩóY hCG AÉ£NC’G.
ácô°T πÑb øe É¡ªYO hCG ÉgÒaƒJ
HPÉgôaƒJ ’ »àdG È◊G ¢û«WGôN ΩGóîà°SG ôKDƒj ’ ,
HP𫪩dG ™e .Qô°V …CG á©HÉ£dÉH ≥◊ GPEG ,∂dP ™eh
ácô°T ≈°VÉ≤àà°S ,É¡àÄÑ©J OÉ©ŸG È◊G
HPÉgOGƒeh É¡àbh πHÉ≤e Ékeƒ°SQ
¬Lh ≈∏Y ¥ÉØNE’G hCG ∞∏àdG Gòg ìÓ°UE’ áé«àf á©HÉ£dG áeóN ‘ áµ∏¡à°ùŸG
¿Йª°V Й¡«£¨j »аdG дЙйажŸGHPhCG èàæŸG ìÓ°UEÉH ÉeEG ácô°ûdG Ωƒ≤à°ùa ,
𫪩∏d èàæŸG AGô°T øªK IOÉYEÉH Ö«©dG OƒLƒH.
ácô°ûdG ¤EG Ö«©ŸG èàæŸG IOÉYEÉH 𫪩dG.
3¿É«H •hô°T »æãà°ùJ ’ ,Góæ∏jRƒ«fh É«dGΰSCG ‘ AÓª©dG äÓeÉ©Ã ≥∏©àj ɪ«a
∫GóÑà°S’G ó«b èàæª∏d á«∏«¨°ûàdG äÉØ°UGƒª∏d πbC’G ≈∏Y ádOÉ©e á«∏«¨°ûàdG.
AGOC’G å«M øe Iójó÷G OGƒŸGh Iõ¡LC’Gh ™£≤dG äÉØ°UGƒŸ.
HPádhO ájCG ‘ ∫ƒ©ØŸG …QÉ°S/ºàj á≤£æe
áeóÿG πãe ,á«aÉ°VEG äÉeóN ≈∏Y ∫ƒ°üë∏d É¡eGôHEG ºàj »àdG äÉfɪ°†dG
бeуN хcфe …CG ‘ ,дЙйажŸG уLGƒаJ е«M ™bƒŸЙH
HP»àdG ∫hódG ‘ óªà©e
HPóªà©e OQƒà°ùe πÑb øe.
áYÉÑ£dG ¢û«WGôN´ƒÑ£ªdG Ö«côàdG ïjQÉJ ∫ÓN Ö«côàdG ºJ GPEG Qƒ¡°T 6 Ióªd Ohóëe ¿Éª°V
OOhhóóÙÙGG ¿¿Éɪª°°††ddGG iióóee
á›ÈdG äɪ«∏©J . ácô°T øª°†J ’h
HP,èàæª∏d …OÉ©dG ΩGóîà°S’G øY áªLÉædG ܃«©dG §≤a
ácô°T
HP≈∏Y hCG 𫪩dG ¿Éª°V ≈∏Y AGƒ°S É¡àÄÑ©J OÉ©ŸG È◊G ¢û«WGôN hCG
ácô°T ¬eÈJ ºYO ó≤Y …CG
ójóëàdG.
HPøe …CG ‘ Ö«Y OƒLƒH GkQÉ£NEG ,¿Éª°†dG IÎa ∫ÓN ,
ÉgQÉ«àNG Ö°ùM ¬dGóÑà°SG.
HP¢Uƒ°üæe ƒg ɪc ` Ö«©e èàæe ∫GóÑà°SG hCG ìÓ°UEG øe
¿Éª°V ¬«£¨j `¡«∏Y,HPÉgQÉ£NEG ó©H ádƒ≤©e IÎa ∫ÓN ácô°ûdG Ωƒ≤à°ùa
HPΩƒ≤j ¿CG ó©H ’EG èàæŸG øªK IOÉYEG hCG ∫GóÑà°SG hCG ìÓ°UEÉH
HPádOÉ©e ™«æ°üàdG IOÉ©e OGƒe hCG Iõ¡LCG hCG ™£b ≈∏Y
дЙйажe ™jRƒJ Й¡«a
HP¿Éª°†dG Gòg É¡«£¨j »àdG .Oƒ≤Y ôaGƒàJh ,Gòg
дЙйажe ™jRƒJ Й¡«a ºаj
èèààææee
HP
äÉ≤ë∏ªdG .π°üØæe πµ°ûH AGô°ûdG ºJ GPEG Ωƒj 90 ,á©HÉ£dG ™e ™«ÑdG ºJ GPEG IóMGh áæ°S
1 ácô°T øª°†J
2 ¿Éª°V ≥Ñ£æj ,èeGÈ∏d áÑ°ùædÉH
3 ácô°T ¿Éª°V »£¨j
CG;᪫∏°ùdG ÒZ πjó©àdG hCG áfÉ«°üdG äÉ«∏ªY
ܺàj ’ »àdG OQGƒŸG hCG QÉ«¨dG ™£b hCG áYÉÑ£dG §FÉ°Sh hCG èeGÈdG
ê.èàæªdG äÉØ°UGƒe ¥É£f êQÉN 𫨰ûàdG
OΩGóîà°S’G Aƒ°S hCG óªà©e ÒZ πjó©J AGôLCG.
4 б©HЙW дЙйажŸ бС°щжdЙH
5 ácô°T â≤∏J GPEG
6 ácô°T øµªàJ ⁄ GPEG
7 ácô°T Ωõà∏J ød
8¬JÉØ°UGƒe ¿ƒµJ ¿CG á£jô°T ójóL ¬Ñ°T hCG ójóL ÉeEG πjóÑdG èàæŸG ¿ƒµj ób
9 дЙйажe …ƒа– уb
10 ácô°ûd OhóÙG ¿Éª°†dG ¿É«H ó©j
Page 68

ΩΩóóîîàà°°ùùªªddGG AAGGôôLLEE’’GG ääÉÉ««°°UUƒƒJJhh ììôô°°TT
(LED)
ôô°°TTDDƒƒee ììÉÉÑÑ°°üüee
ÉkÑjô≤J Å∏àªe ôÑëdG IóMh á°TƒWôN.
ºYO
Customer Support∫GóÑà°SÓd.
𫪩dG
AÉ°†e CÉ£N ô°TDƒe ôªà°ùj qøµd ,áYÉÑq£dG QGôªà°S’ á©HÉàªdG qQR ≈∏Y §¨°†J ¿CG øµªj ,∂dP AÉæKCG »a
.áYÉÑ£dG øY á©HÉq£dG ∞qbƒàà°S ,ôÑëdG á°TƒWôN AÓàeG óæY .ôÑëdG á°TƒWôN ∫GóÑà°SG ºàj ≈qàM
áÄ∏àªe ôÑëdG IóMh á°TƒWôN
ºYO
Customer Support∫GóÑà°SÓd.
𫪩dG
áYÉÑW ¢TƒWôN §≤a Éeóîà°ùe áYÉÑ£dÉH Ωƒ≤Jh Oƒ°SC’G áYÉÑ£dG ¢TƒWôN ´õf ∂浪j ,∂dP AÉæKCG »a
¢TƒWôN ΩGóîà°SÉH áYÉÑ£dG ™°Vh
ô¶fCG .áYÉÑ£dG áYô°Sh ¿GƒdC’G IOƒL ôKCÉàJ ób .IOó©àªdG ¿GƒdC’G
.á°TÉ°ûdG ≈∏Y
Ωóîà°ùªdG π«dO
Single-cartrige printing »a
óMGh
.AGôªëdG âëqJ á©°TC’G ∫É°SQEG á©HÉq£dG ≈q≤∏àJ
. áYÉqÑqW CÉ£N
ábÉ£dG ô°TDƒe ìÉÑ°üe
(LED)ìÉÑ°üe ,πª©j
¬H á≤aôªdG äɪ«∏©àdG ´ÉÑJCÉH GkQƒa É¡dGóHEÉH ºb ,ôÑëdG ¢TƒWôN øe áÄ∏àªe IƒÑY ∂∏ªJ âæc GPEG.
™bƒe IQÉjõH ºb ,∂dP øe ’óH hCGttp://www.hp.com/support/dj450h ¢VGô©à°SG hCG
á©HÉàªdG(LED)á°TƒWôN ô°TDƒe ìÉÑ°üe ,¢†eƒj
øªj’G áYÉÑ£dG(LED)ΩóY AÉæKCG ø«Jôe Å°†j
.𫨰ûàdG
(LED)ìÉÑ°üe ,πª©j
ábÉ£dG ô°TDƒe ìÉÑ°üe
¬H á≤aôªdG äɪ«∏©àdG ´ÉÑJCÉH GkQƒa É¡dGóHEÉH ºb ,ôÑëdG ¢TƒWôN øe áÄ∏àªe IƒÑY ∂∏ªJ âæc GPEG.
™bƒe IQÉjõH ºb ,∂dP øe ’óH hCGttp://www.hp.com/support/dj450h ¢VGô©à°SG hCG
øªj’G áYÉÑ£dG á°TƒWôN ô°TDƒe(LED)Å°†j
á©HÉàªdG(LED)ìÉÑ°üe ,𫨰ûàdG ™°Vh »a
ΩóY AÉæKCG ø«Jôe
.𫨰ûàdG
AGôªëdG âëJ á©°TC’G ô°TDƒe(LED)πª©j.
.AGôLEG …CG ܃∏£e ô«Z
,ábÉ£dG ô°TDƒe ìÉÑ°üe(LED),á©HÉàªdG ô°TDƒe
CÉ£îdG Oƒc ™Ñ£àd á©HÉàªdG qQR ≈∏Y §¨°VG .á©HÉq£dG §Ñ°V IOÉYC’ ábÉ£dG QR §¨°VG.
(LED) äGô°TDƒe(LED)áYÉÑ£dG ¢TƒWôN
. ™jô°S ∫ó©ªH QhóJ øªjC’Gh ô°ùjC’G
Page 69

the print cartridges
Replacing the print cartridges
áYÉÑq£dG ¢û«WGôN ∫GóÑà°SG
ôÑëdG ¢†Øîæe Qƒ°üdG áYÉÑ£H ¢UÉîdG hCG Oƒ°SC’G áYÉÑ£dG ¢TƒWôN.
á°TÉ°ûdG ≈∏Y.
ôÑëdG ≈∏Y á°†Øîæe IQƒq°üdG hCG Oƒ°SC’G h ¿GƒdC’G áYÉÑW ¢û«WGôN.
áYÉÑq£dG ¢û«WGôN ∫GóÑà°SG
ΩΩóóîîàà°°ùùªªddGG AAGGôôLLEE’’GG ääÉÉ««°°UUƒƒJJhh ììôô°°TT
Ωóîà°ùªdG π«dO
á°TÉq°ûdG ≈∏Y.
»a
Replacing
Ωóîà°ùªdG π«dO
»a
ôô°°TTDDƒƒee ììÉÉÑÑ°°üüee
(LED)
øªjC’G áYÉÑ£dG ¢TƒWôN
(LED)™°Vh »a
áYÉÑq£dG ¢TƒWôN ∫GóÑà°SÉH ºb . ô¶fG
(LED)øªjC’G áYÉÑ£dG ¢TƒWôN
áYÉÑ£dG ¢û«WGôN ∫óÑà°SCG . ô¶fG
.𫨰ûàdG
ô°TDƒe ìÉÑ°üe
™°Vh »a ô°ùjC’Gh
.𫨰ûàdG
.¥QƒdG Öë°S »a ô«NCÉJ hCG §FÉ°SƒdG QÉ°ûëfG
Print media is jammed »a
π«dO
.áYÉÑ£dG áØ«Xh πªµà°ùàd á©HÉàªdG qQR §¨°VG ,QÉ°ûëf’G ádGREG ó©H .á°TÉq°ûdG ≈∏Y
áYÉÑ£dG §FÉ°Sh QÉ°ûëfG
Ωóîà°ùªdG
ºK á©HÉq£dG ¥ÓZEG ∫hÉM ,á∏µ°ûªdG ∂dP èdÉ©j ºd GPEG .á©HÉàªdG qQR §¨°VG ,ô°ûëæe ¥Qh óLƒj ºd GPEG
.áYÉÑ£dG áØ«Xh OhÉYh ,iôNCG Iôe É¡∏«¨°ûJ IOÉYEG
áHô©dG ôNCÉJ hCG §FÉ°SƒdG QÉ°ûëfG
Print media is jammed »a
π«dO
.áYÉÑ£dG áØ«Xh πªµà°ùàd á©HÉàªdG qQR §¨°VG ,QÉ°ûëf’G ádGREG ó©H .á°TÉq°ûdG ≈∏Y
áYÉÑ£dG §FÉ°Sh QÉ°ûëfG
Ωóîà°ùªdG
ºK á©HÉq£dG ¥ÓZEG ∫hÉM ,á∏µ°ûªdG ∂dP èdÉ©j ºd GPEG .á©HÉàªdG qQR §¨°VG ,ô°ûëæe ¥Qh óLƒj ºd GPEG
.áYÉÑ£dG áØ«Xh OhÉYh ,iôNCG Iôe É¡∏«¨°ûJ IOÉYEG
áeóîdG á£ëe »a ô«NCÉJ hCG hCG §FÉ°Sh QÉ°ûëfG.
Print media is jammed »a
π«dO
.áYÉÑ£dG áØ«Xh πªµà°ùàd á©HÉàªdG qQR §¨°VG ,QÉ°ûëf’G ádGREG ó©H .á°TÉq°ûdG ≈∏Y
áYÉÑ£dG §FÉ°Sh QÉ°ûëfG
Ωóîà°ùªdG
ºK á©HÉq£dG ¥ÓZEG ∫hÉM ,á∏µ°ûªdG ∂dP èdÉ©j ºd GPEG .á©HÉàªdG qQR §¨°VG ,ô°ûëæe ¥Qh óLƒj ºd GPEG
.áYÉÑ£dG áØ«Xh OhÉYh ,iôNCG Iôe É¡∏«¨°ûJ IOÉYEG
.áYÉÑ£dG áØ«Xh AɨdEG ºJ
ábÉ£dG ô°TDƒe(LED)á©HÉàªdG ô°TDƒe ,πª©j ’
ô¶fG . ô°ûëæªdG ¥QƒdG ádGREÉH ºb
.¢†eƒj
»»``````HHôôYY
(LED)¢†eƒj .ìÉÑ°üe
ábÉ£dG ô°TDƒe ìÉÑ°üe
ô¶fG . ô°ûëæªdG ¥QƒdG ádGREÉH ºb
ô¶fG . ô°ûëæªdG ¥QƒdG ádGREÉH ºb
.AGôLEG …CG ܃∏£e ô«Z
(LED).¢†eƒj
ábÉ£dG ô°TDƒe ìÉÑ°üe(LED)ìÉÑ°üe ,¢†eƒj
(LED)äGô°TDƒªdG ,¢†eƒj
(LED)AÉæKCG ø«Jôe ¢†eƒj
ábÉ£dG ìÉÑ°üe ô°TDƒe
á©HÉàªdG ô°TDƒe
á©HÉàªdG ô°TDƒe
(LED)ô°ùjC’G
¢TƒWôîd øªjC’Gh
𫨰ûàdG ™°Vh »a.
∞bƒàdG.
(LED) á©HÉàªdG ô°TDƒe ,(LED),
á©HÉ£dG »a ¢†eƒj ójóL èeÉfôH.
.AGôLEG …CG ܃∏£e ô«Z
ábÉ£dG ô°TDƒe
(LED)
äGô°TDƒe
øªjC’Gh ô°ùjC’G
»a ôÑëdG ¢û«WGôN
𫨰ûàdG ™°Vh.
Page 70

ΩΩóóîîàà°°ùùªªddGG AAGGôôLLEE’’GG ääÉÉ««°°UUƒƒJJhh ììôô°°TT
(LED)
ôô°°TTDDƒƒee ììÉÉÑÑ°°üüee
Ωóîà°ùªdG π«dO
≈∏Y
™Ñ£J á©HÉ£dG
ábÉ£dÉH á∏°üàe á©HÉ£dG
hCG ,¥Qh É¡H óLƒj ’ , á°UÉN §FÉ°Sh ±ÉØL ô¶àæJ ,É¡fCG ÉqeEG äôNCÉJ á©HÉq£dG
(DPOF)
É«ªbQ ´ƒÑ£ªdG ¥QƒdG áédÉ©ªH Ωƒ≤J
.áYÉÑ£dG
.√ÉÑàfÓd »KÓãdG ¿GƒdC’G áYÉÑW ¢TƒWôN êÉàëj
Replacing the print cartridges»a
áYÉÑq£dG ¢û«WGôN ∫GóÑà°SG
ô¶fG
.á°TÉq°ûdG
(LED)¢†eƒj.
ábÉ£dG ô°TDƒe
AGôLEG …CG ܃∏£e ô«Z
ábÉ£dG äGô°TDƒe(LED) á©HÉàªdG ,(LED),
AGôLEG …CG ܃∏£e ô«Z
(LED)á©HÉàªdG ô°TDƒeh ,ô°†NCG
áØ«Xh πªµà°ùàd á©HÉàªdG qQR ≈∏Y §¨°VG ºK .¥QƒdG π«ªëàH ºb ,¥QƒdG øe Égƒ∏N ÖÑ°ùdG ¿Éc GPEG
áYÉÑ£dG ¢TƒWôîd ô°ùjC’G ô°TDƒe
(LED).¢†eƒj
.¢TƒWôîdG ∫GóÑà°SÉH ºb ,CÉ£îdG qôªà°SG GPEG .™Ñq£J ¿CG ∫hÉMh áYÉÑq£dG ¢û«WGôN â«ÑãJ IOÉYEÉH ºb
¢û«WGôN.QhóJ ô°ùjC’Gh øªjC’G áYÉÑ£dG
ábÉ£dG ô°TDƒe
(LED).¢†eƒj
Ωóîà°ùªdG π«dO
≈∏Y
Ωóîà°ùªdG π«dO
≈∏Y
Replacing the print cartridges»a
.√ÉÑàfÓd IQƒq°üdG áYÉÑ£H ¢UÉîdG hCG Oƒ°SC’G áYÉÑ£dG ¢TƒWôN êÉàëj
Replacing the print cartridges»a
áYÉÑq£dG ¢û«WGôN ∫GóÑà°SG
ô¶fG
.á°TÉq°ûdG
.√ÉÑàfÓd IQƒq°üdG áYÉÑ£H ¢UÉîdG hCG Oƒ°SC’Gh ¿GƒdC’G áYÉÑW ¢TƒWôN êÉàëj
Replacing the print cartridges»a
áYÉÑq£dG ¢û«WGôN ∫GóÑà°SG
ô¶fG
.á°TÉq°ûdG
ôÑëdG ¢†Øîæe ¿GƒdC’G áYÉÑW ¢TƒWôN
áYÉÑq£dG ¢û«WGôN ∫GóÑà°SG
.á°TÉq°ûdG ≈∏Y
Ωóîà°ùªdG π«dO
áYÉÑ£dG ¢TƒWôîd øªjC’G ô°TDƒe(LED).¢†eƒj
.¢TƒWôîdG ∫GóÑà°SÉH ºb ,CÉ£îdG qôªà°SG GPEG .™Ñq£J ¿CG ∫hÉMh áYÉÑq£dG ¢û«WGôN â«ÑãJ IOÉYEÉH ºb
(LED)
áYÉÑ£dG ¢TƒWôîd ô°ùjC’G h øªjC’G ô°TDƒe
.¢TƒWôîdG ∫GóÑà°SÉH ºb ,CÉ£îdG qôªà°SG GPEG .™Ñq£J ¿CG ∫hÉMh áYÉÑq£dG ¢û«WGôN â«ÑãJ IOÉYEÉH ºb
.¿É°†eƒj
ô°ùjC’G áYÉÑ£dG ¢TƒWôN ô°TDƒe(LED)™°Vh »a
ºb ô¶fG .¢TƒWôîdG ∫GóÑà°SÉH
.𫨰ûàdG
Page 71

AAGGôôªªëëddGG ââëëqqJJ áá©©°°TT’’GG IIQQÉÉ°°TTEEGG ππ««ddOO
.¬eóîà°SG øe øµªàJ ¿CG πÑb áØ«°†ªdG ∂àæ«cÉe »a AGôªëdG âëqàdG òaÉæªdG øq«µªàH Ωƒ≤J ¿CG Öéj
§¨°VCGh ∂eɶf 𫨰ûJ óYCG .1F2.∂eɶf 𫨰ûJ CGóH AÉæKCG
.¬æ«µªàd AGôªëdG âëàdG á©°TC’G òØæe §Ñ°VCGh ΩɶædG äGhOCG áªFÉb ôàNG .2
™™°°VVƒƒddGG
FIR.
≈∏Y
DMA,…RGƒàªdG òØæªdG IÉæb ™eDMA ≈dEG …RGƒàe òØæªdG ô««¨àH ºbEPP.
.𫨰ûàdG IOÉYEG ™HÉJh êhôîdG ºK ßØëdÉH ºb .5
ääGGôô°°TTDDƒƒªªddGG ππ««ddOO
LED
§Ñ°VCG .3
IÉæb â°VQÉ©J GPEG .4
A§ÑH á©HÉ£dG πª©à°S % 100-41 øe áqjQÉq£ÑdG áæë°T : äÉqjQÉq£ÑdG ábÉW âeóîà°SG GPEG
áqjQÉq£ÑdG ΩGóîà°SGh øë°ûdG IOÉYEG
. á°TÉq°ûdG ≈∏Y
áqjQÉq£ÑdG ΩGóîà°SGh øë°ûdG IOÉYEG
. á°TÉq°ûdG ≈∏Y
ΩΩóóîîàà°°ùùªªddGG AAGGôôLLEE’’GG ääÉÉ««°°UUƒƒJJhh ììôô°°TT
.A§ÑH á©HÉ£dG πª©à°S : ábÉW ∫ƒëe âeóîà°SG GPEG
. A§ÑH øµdh á©HÉW πª©à°S % 10 øe qπbCG É¡àæë°T áqjQÉq£H âeóîà°SG GPEG
Ωóîà°ùªdG π«dO
Charging and using the battery »a
. A§ÑH øµdh á©HÉ£dG πª©à°S % 40-10 øe É¡àæë°T áqjQÉq£ÑdG øë°T
Ωóîà°ùªdG π«dO
Charging and using the battery »a
. áqjQÉq£ÑdG øë°T
ôô°°TTDDƒƒee ììÉÉÑÑ°°üüee
(LED)
ábÉ£dG ô°TDƒeLED.ô°†NG Å°†j
AGôLEG …CG ܃∏£e ô«Z
ábÉ£dG ô°TDƒeLED.ôªMG Å°†j
ô¶fG .áqjQÉq£ÑdG øë°T IOÉYEG »a AóÑ«d AÉHô¡µdG ∫ƒëe π«°UƒàH ºb
»»``````HHôôYY
ábÉ£dG ô°TDƒeLED¿ƒd hP.¿Éeô¡c
ô¶fG .áqjQÉq£ÑdG øë°T IOÉYEG »a AóÑ«d AÉHô¡µdG ∫ƒëe π«°UƒàH ºb
áqjQÉq£ÑdG øë°T ô°TDƒeLED.ô°†NCG Å°†j
AGôLEG …CG ܃∏£e ô«Z
áqjQÉq£ÑdG øë°T ô°TDƒe
. áÑ«©e áqjQÉq£ÑdG
(C8233A).
AõédG ºbQ áqjQÉq£ÑdG ∫GóÑà°SÉH ºb
LED.ôªMG Å°†j
Page 72

1144
1133
.á©HÉ£dG π«é°ùJ :14 Iƒ£îdG
øµJ ºd GPEG á«æ≤àdG äÉeƒ∏©ªdGh ΩÉ¡dG ºYódG ≈∏Y π°üëàd ∂à©HÉW π«é°ùàH ºb
»a ó©H ɪ«a É¡∏«é°ùJ øµª«a èeÉfôÑdG â«ÑãJ óæY ∂à©HÉW π«é°ùàH âªb ób
register.hp.com.http://www.
13 Iƒ£N : áYÉÑq£dG ¢û«WGôN IGPÉëe(Mac).
π°üëàd áYÉÑ£dG ¢TƒWôN IGPÉëªH ºb ,áYÉÑ£dG ¢TƒWôN â«ÑãàH Ωƒ≤J ÉeóæY
HP InkjetºK
πªµà°ùàd á°TÉq°ûdG ≈∏Y á°Vhô©ªdG äɪ«∏©àdG ™ÑqJG (2.
äÉeGóîà°SG íàØH ºb .(1 .á浪e áYÉÑW IOƒL π°†aCG ≈∏Y
¢¢üüëëØØddGG IIGGOOCCGG
≈∏Y §¨°VG
.IGPÉëªdG äGAGôLEG
!∑hÈe
πMh á©HÉ£dG ΩGóîà°SG øY äÉeƒ∏©ª∏d .ΩGóîà°SÓd IõgÉL ∂à©HÉW ¿ƒµJ
:á«dÉàdG ™LGôŸG á©dÉ£e »Lôj ,πcÉ°ûŸG
.(á°TÉ°ûdG
●π«dO äGóæà°ùe‘ á°TÉ°ûdG ≈∏Y Ωóîà°ùŸGCD𫨰ûàdG AóH
●Instant SupportHP≈∏Y Ωóîà°ùŸG π«dO ô¶fCG ,äÉeƒ∏©ªdG øe ójõªd)
●™bƒe ‘ èàæŸG ºYód âfÎfE’Gttp://www.hp.com/support/dj450h
●ábÉ£HHP.(¥hóæ°üdG ‘ óLƒJ) Ωóîà°ùªdG IófÉ°ùŸ
Page 73

1111
èeÉfôÑdG â«ÑãJ ôÑàNG :11 Iƒ£N.
иeЙfфСdG в«СгJ фСаоаd QGфªа°SЙH бeуоа°щJ ≥«С£J шe ужа°щe бYЙС£H ºb
ááXXƒƒëë∏∏ee
π«dO ô¶fG ,áYÉÑq£dG äÉeƒ∏©eh çƒJƒ∏H áÄ«¡àd :
.á©HÉ£dG ∫É°üJGh
á©°TC’G ∫ÓN øe áYÉÑq£∏d .𫨰ûàdG CGóÑd èeóªdG ¢Uô≤dG ≈∏Y çƒJƒ∏H áYÉÑW
(Gkôàe1) ΩGóbCG 3 ó©H ≈∏Y AGôªëdG âëqàdG á©°TC’G á°SóY ™°VƒH ºb ,AGôªM âëàdG
âëqJ á©°TC’ÉH áYÉqÑq£dG á°SóY øe áLQO 30 áq«q∏c ájhGR ∫ÓN øeh á©HÉq£dG øe
(LED)¿ƒ∏dG ≈dEG ∫ƒëàj AGôªëdG âëJ á©°TC’ÉH
á©HÉ£dG ô°TDƒe . AGôªëdG
.AGôªëdG âëJ á©°TC’G øe ä’É°SQEG πÑ≤à°ùj ÉeóæY ô°†NC’G
òòaaÉÉæ檪ddGG
≈∏Y §¨°VCGh á©HÉ£dG áfƒ≤jCG ≈∏Y øªjC’G ¢ShɪdG QõH §¨°†dÉH ºb (4
Windows 98 hWindows Me¿CG øe ócCÉJ (5 .(
COMçƒJƒ∏H RÉ¡éd É«∏©a ≥∏îe çƒJƒ∏H òØæe ¿CG hCG
òØæªH á∏°üàe á©HÉ£dG
1122
4.0Windows 2000, Windows XP, Windows NT(hCG
) øe πc »a
) øe πc »a
ππ««°°UUÉÉØØJJ
.∂H ¢UÉîdG
»»``````HHôôYY
IIGGPPÉÉëëee
≈∏Y §¨°†dÉH ºb qºK ,
äɪ«∏©àdG ™ÑJG ºK QGƒëdG »a
áá©©HHÉÉ££ddGG ääÉÉeeóóNN
»a
::áᶶMMÓÓee
É°†jCG ∂浪j
ääÉÉeeóóNN
ÖjƒÑJ áeÓY ≈∏Y §¨°†dÉH ºb (3
IIGGPPÉÉëëee
≈∏Y §¨°VCG (4 .
ááYYÉÉÑÑ££ddGG ¢¢ûû««WWGGôôNN
.IGPÉëªdG πªY äGAGôLEG πªµà°ùàd á°TÉ°ûdG ≈∏Y IOƒLƒªdG
ÖjƒÑJ áeÓY ≥jôW øY áYÉÑ£dG ¢û«WGôN IGPÉëe πªY
.äGhOC’G ¥hóæ°U
áYÉÑq£dG ¢û«WGôN IGPÉëe :12 Iƒ£î∏d(Windows).
π°üëàd áYÉÑ£dG ¢TƒWôN IGPÉëªH ºb ,áYÉÑ£dG ¢TƒWôN â«ÑãàH Ωƒ≤J ÉeóæY
CCGGóóHHCCGG
≈dEG IQÉ°TE’ÉH ºb ,
98, Windows Me, Windows 2000)
≈∏Y §¨°VCGh
2000)
èeGôH »a
(Windows 98) hMe)
QR ≈∏Y §¨°VG (1 .á浪e áYÉÑW IOƒL π°†aCG ≈∏Y
ääÉÉ©©HHÉÉqqWW
CCGGóóHHCCGG
QR ≈∏Y §¨°†dÉH ºb hCG
Ωɶf »a(Windows XP)øªjC’G ¢ShɪdG QõH §¨°VG (2 .
ääÓÓ««°°††ØØJJááYYÉÉÑÑ££ddGG
ôeCG ≈∏Y §¨°VCG ºK á©HÉ£dG áfƒ≤jCG ≈∏Y
¢¢üüFFÉÉ°°üüNN
èeÉfôH »a 4.0)(Windows NT.
óóææàà°°ùùªªddGG ääÉÉ°°VVGGôôààaaGG
ääGGOOGGóóYYEEGG
§¨°VCG qºK
4.0, Windows(Windows NT
ääÉÉ°°ùùccÉÉaahh ääÉÉ©©HHÉÉWW
h(Windows XP) ,
(Windows
Windows
hCG
Page 74

99
1
2
á∏°Uh Ωóîà°SC’ (2USB `dG πHÉc π°U ,ájRGƒàe á∏°Uh hCGUSBπHɵdG hCG
::ááXXƒƒëë∏∏ee
â«ÑãJ øe ∂FÉ¡àfG ó©H §≤a ôJƒ«Ñªµ∏d á©HÉ£dG π«°UƒàH ºb
.…RGƒàªdG
≈dEG á©HÉq£dG πq°UƒH âªb GPEG . â«ÑãàdG AÉæKCG ∂dP πª©d áLÉëdG óæY hCG èeGôÑdG
ReadmeèeóªdG ¢Uô≤dG »a
∞∏e ≈dEG ™LQG ,èeGôÑdG â«ÑãJ πÑb ôJƒ«ÑªµdG
á°TÉq°ûdG ≈∏Y á°Vhô©ªdG äɪ«∏©àdG ™ÑqJG (3 .á©HÉ£dG â«ÑãJ πªµàd 𫨰ûàdG CGóÑd
.áYÉqÑq£dG â«ÑãJ ∫ɪcEG øe øµªààd
1100
9 Iƒ£îdG :.á©HÉ£dG π«°UƒJh èeÉfôÑdG â«ÑãJ
™ÑqJG qºK ,áéeóªdG ¢UGôbC’G π¨°ûe »a 𫨰ûàdG CGóÑd èeóªdG ¢Uô≤dG πNOCG (1
QÉàNG ,çƒJƒ∏ÑdG á∏°Uƒd .∂à∏°Uhh ∂H ¢UÉîdG 𫨰ûàdG Ωɶæd Ö°SÉæªdG AGôLE’G
π«°Uƒàd áLÉëdG óæY
»»££îîJJ
§¨°VCGh
áájjRRGGƒƒààee áá∏∏°°UUhh
USB hCG
á∏°Uh ÉqeEG
AGôªëdG âëqàdG á©°TC’G á∏°Uƒd .á©HÉq£dG(IR)âëàdG á©°TC’G òØæe ¿CG ócCÉJ ,
™«£à°ùàd AGôªëdG âëJ á©°TC’G π«dO ô¶fG) ¬æ«µªJ ºJ ∑RÉ¡L »a AGôªëdG
QGƒM ™Hôe øe
iiôôNNCCGG
AGôªëdG âëàdG á©°TC’G òØæe ø«µªJIR ôeB’G QÉ«àNÉH ºb .(
AGôªëdG âëàdG á©°TCÓd OGôªdG òØæªdG ôàNG ºK òØæªdGIR.áØ«°†ªdG ∂àæ«cÉe »a
ääÉÉ©©HHÉÉqqWW
»a
»aXP
áá©©HHÉÉqqWW ¬¬aaÉÉ°°VVCCGG
»»ddÉÉààddGG
ºb .
≈∏Y §¨°VG qºK
ääÉÉ°°ùùccÉÉaahh ääÉÉ©©HHÉÉqqWW
á©HÉ£dG â«ÑãJ πªµàd á°TÉq°ûdG ≈∏Y á°Vhô©ªdG äɪ«∏©àdG.
ääGGOOGGóóYYEEGG
QÉàNGh
≈dEG ô°TCGh ,
4.0, Windows 98Windows NTWindows Me,.
á©HÉW áfƒ≤jCG OƒLh øe ≥≤ëJ (3450DeskjethCG äÉ©HÉqW ó∏ée »a
CCGGóóHHCCGG
§¨°VG) .äÉ°ùcÉah äÉ©HÉW
CCGGóóHHCCGG
COM §¨°VG .∂H á°UÉîdG çƒJƒ∏H IGOC’
OGôªdG òØæªdG QÉ«àNÉH ºbh
á«dÉàdG èeGôÑdG øe πc
.( ôeCG ¥ƒa ø«Jôe §¨°VG ,áYÉqÑq£dG áfƒ≤jCG óéJ ºd GPEG
Windows
HPká∏°ù∏°Shhp Deskjet 450™ÑqJG .äÉ©HÉ£dG ¬aÉ°VCG èdÉ©e øe
QÉ«àNÉH
çƒJƒ∏ÑdG áYÉÑW ø«µªJ :10 Iƒ£N(HP Deskjet 450wbt - Windows).
∂H á°UÉîdG áØ«°†ªdG çƒJƒ∏ÑdG IGOCG ¿ƒc øe óqcCÉJ ,çƒJƒ∏H á∏°Uƒd :
ááXXƒƒëë∏∏ee
ô¶fCG .∑RÉ¡L »a ɡ櫵ªJ ºJ çƒJƒ∏ÑdG áYÉÑW q¿CGh á©HÉ£dG É¡ªYóJ
hwindows 2000 ≈∏Y §¨°VCG hCG
http://www.hp.com/support/dj450IGOCÉH áeƒYóªdG áªFÉ≤dG áaô©ªd
øe ójõªdG ≈∏Y ∫ƒ°üë∏d ™æ°üªdG äGóæà°ùe ≈dEG ´ƒLôdÉH ºbh çƒJƒ∏H
á©HÉq£dG ±É°ûàcÉH ºb ,9 Iƒ£N èeGôÑdG â«ÑãàH ΩÉ«≤dG ó©H (1 .äÉeƒ∏©ªdG
Printing Guide
çƒJƒ∏ÑdG áYÉÑW Ωóîà°ùe π«dO
.çƒJƒ∏ÑdG äÉ©HÉW ø«µªJ áªFÉb øe á©HÉ£dG ôàNG (2
ô¶fG) áØ«°†ªdG ∂JGOCGh
(
.
Bluetooth
Page 75

77 66
4
3
2
1
.áYÉÑ£dG ¢û«WGôN â«ÑãJh á©HÉ£dG 𫨰ûàH ºb :7 Iƒ£N
∫ƒ°UƒdG AÉ£Z íàØH ºb(2 .á©HÉ£dG 𫨰ûàH Ωƒ≤àd ábÉ£dG QR ≈∏Y §¨°VCG (1
¢TƒWôN ∞«∏¨J ´õæH ºb (4 .áYÉÑ£dG ¢TƒWôN ê’õe ™aôH ºb (3 .»eÉeC’G
.áYÉÑ£dG ¢TƒWôN øe »bGƒdG §jô°ûdG ´õfG ∂dP ó©Hh ,áYÉÑ£dG
88
1
3
1
2
.ábÉ£dG ∂∏°S π«°UƒJ :6 Iƒ£N
Windows
::áᶶMMÓÓee
É¡H ¢UÉîdG íàØdG ™°Vh ≈dEG ∫ÉNOE’G á«æ«°U .
óæY hCG èeGôÑdG â«ÑãJ πªµJ ¿CG ó©H ôJƒ«ÑªµdÉH á©HÉq£dG π«q°UƒàH ºb §≤a
â«ÑãàdG AÉæKCG ∂dP πª©d áLÉëdG.
5
(1 OOôàe QÉ«J ábÉW òØæªHh á©HÉ£dÉH ábÉ£dG ∂∏°S π°U(AC)™aôH ºb (2 .
»»``````HHôôYY
2
.∫ÉNOE’G á«æ«°U »a ¥QƒdG π«ªëJ 8 Iƒ£îdG
»a ábQh 45 »dGƒM ™°V (2 .∫ÉNOE’G áq«æ«°U OGóàeG ∂jôëJh ™aôH ºb (1
.¥QƒdG óM √ÉéJG ¢ùµ©H ≥aôH ¥QƒdG äÉ¡Lƒe Öë°ùH ºb (3 .áq«æ«q°üdG
6
7
¢TƒWôNh QÉ°ù«dG Ö≤ãdG »a ¿qƒ∏ªdG áYÉÑ£dG ¢TƒWôN ™aOh â«ÑãàH ºb (5
≈∏Y ¢TƒWôîdG ê’õe ≥∏Z ΩɵMEÉH ºb (6 .øªjC’G Ö≤ãdG »a Oƒ°SC’G áYÉÑ£dG
::áᶶMMÓÓee
íàØH º≤J ’
.q»eÉeC’G ∫ƒ°UƒdG AÉ£Z ¥ÓZEÉH ºb (7 .áYÉÑ£dG ¢TƒWôN
.á©HÉ£dG â«ÑãJ πªàµj ≈àM q»eÉeC’G πNóªdG AÉ£Z
Page 76

44
1
2
1
2
áqjQÉq£ÑdG â«ÑãJ :4 Iƒ£N.(HP Deskjet 450CBi/450wbt)
ájQÉ£ÑdG ¢†eƒJ ≈qàM ájhGõH É¡H ¢UÉîdG Ö≤ãdG πNGO áqjQÉq£ÑdG Öë°ùH ºb (1
âÑãJ ≈qàM É¡H ¢UÉîdG Ö≤ãdG πNGO áqjQÉq£ÑdG ™aOG (2 .∫É°üqJ’G ≈∏Y ád’O
.¿ÉµªdG πNGO áqjQÉq£ÑdG
55
.(QRC’G) áYÉqÑq£dG AGõLCG ∞jô©J
.ôÑëdG ¢û«WGôN ô««¨J AÉ£Z (2 ,ábÉ£ÑdG πeÉM (1
ójõªd .á©HÉq£dG ¬ªYóJ 𫨰ûàdG Ωɶfh áØ«°†ªdG çƒJƒ∏H IGOCG ¿CG óqcCÉJ
≈dEG ™LQCG äÉeƒ∏©ªdG øehttp://www.hp.com/support/dj450
ô°TDƒe ìÉÑ°üe ™e çƒJƒ∏ÑdG ábÉ£H â«ÑãàH ºb (1LEDπNGO ≈∏YCG ≈dEG ¬éàe
CompactFlash.
™
5 Iƒ£N : á©HÉW ábÉ£H â«ÑãJHP çƒJƒ∏H(HP Deskjet 450wbt).
::áᶶMMÓÓee
ábÉ£H Ö≤K
áᶶMMÓÓee
: áqjQÉq£H Ωóîà°SGC8222Aá©HÉq£dG ™e §≤a.
.(ÉkÑjô≤J ká≤«bO 30h káYÉ°S) ΩGóîà°S’G πÑb ÓeÉc kÉæë°T ájQÉ£ÑdG øë°ûH ºb
LED¿ƒdÉH ájQÉ£ÑdG øë°T
ô°TDƒe ìÉÑ°üe A»°†«°S ,áqjQÉq£ÑdG øë°ûJ ÉeóæY
áqjQÉq£ÑdG ¿ƒµJ ób ,øë°ûdG AÉæKCG ôªMCG Aƒ°V ô°TDƒªdG ìÉÑ°üe AÉ°VCG GPEG .ô°†NC’G
.É¡dGóÑà°SG Öëjh áÑ«©e
Page 77

57
58
56
33 22
6
7
8
9
1
2
3
4
5
10
.(á«eÉeC’G) á©HÉ£dG AGõLCG ∞jqô©J :3 Iƒ£N
Ö≤K (4 ,¥QƒdG äÉ¡Lƒe (3 ,∫ÉNOE’G áq«æ«°U (2 ,∫ÉNOE’G áq«æ«°U OGóàeG (1
¢TƒWôN ∞jƒéJ (7 ,áYÉÑ£dG ¢TƒWôN ê’õe (6 ,IGPÉëªdG ó°Tôe (4 ,ábÉ£ÑdG
,(q»eÉeC’G πNóe) ∫ƒ°UƒdG AÉ£Z (9 ,(äÉLôîªdG) äÉYƒÑ£ªdG Ö≤K (8 ,áYÉÑ£dG
.AGôªëdG âëJ á©°TC’G òØæe (10
1
2
3
4
5
6
7
10
9
8
.∞«∏¨àdG §jô°T ¬dGRCG :2 Iƒ£N
.á©HÉ£dG øe πeɵdÉH ∞«∏¨àdG §jô°T ´õæH ºb
1 2 3
4
5
6
7
9
»»``````HHôôYY
8
.(á«Ø∏îdG) á©HÉ£dG AGõLCG ∞jô©J
(1π°Uƒe (4 ,ájQÉ£ÑdG Ö≤K (3 ,ájQÉ£ÑdG á∏°Uh AÉ£Z (2 ,ájQÉ£ÑdG á∏°Uh
CompactFlashòØæe (7 ,
ábÉ£H Ö≤K (6 ,…RGƒàe òØæe (5 ,AÉHô¡µdG™
»ªdÉ©dG »∏°ù∏°ùàdG πbÉædG(USB)(10 ,äÉjQÉ£ÑdG (9 ,¿ÉeB’G πØb Ö≤K (8 ,
.ájQÉ£ÑdG ™aQ ∑ôëe
ô¶fG
::áᶶMMÓÓee
.(ºqµëàdG áMƒd) á©HÉ£dG AGõLCG ∞jô©J
LED ô°TDƒe ìÉÑ°üe (2 ,áqjQÉq£ÑdG øë°TLED¢TƒWôN
ô°TDƒe ìÉÑ°üe (1
LED,AɨdE’G qQqR (4 ,øªjC’G ¢TƒWôN
ô°TDƒe ìÉÑ°üe (3 ,ô°ùjC’G áYÉÑ£dG
LEDìÉÑ°üe (8 ,ábÉ£dG qQR (7 ,á©HÉàªdG
ô°TDƒe ìÉÑ°üe (6 ,á©HÉàªdG qQR (5
LED .AGôªëdG âëJ á©°TC’G
ô°TDƒe ìÉÑ°üe (9 ,ábÉ£dG ô°TDƒe
äGô°TDƒªdG í«HÉ°üe π«dO
LEDLED Reference.
Page 78

(PDAs) èeGôÑH πª©J »àdGPCPocket
software, Windowsh
CompactFlashá©°TC’G äÓ°Uh h çƒJƒ∏H ™e ádƒªëªdG ∞JGƒ¡dGh
äÉ©HÉW á∏°ù∏°SHP Deskjet 450 series printer.
áq«°üî°ûdG áq«ªbQ
®
™
.AGôªëdG âëqàdG
óYÉ°ùªdG π«dO
áYÉÑqW π«dO
ΩGóîà°SG ∫ƒM äÉeƒ∏©e ≈∏Y ∫ƒ°üë∏dPDAs ô¶fG ,çƒJƒ∏Hh
øe ™Ñ£J ¿CG ™«£à°ùJ .áYÉÑq£∏d ™jô°Sh ¢ü°üîàe πbÉæH IOqhõe á©HÉq£dG √òg
äGóYÉ°ùªdG πãe ᫵∏°SÓdG ä’B’G ,Ö൪dG äGôJƒ«Ñªc ,ádƒªëªdG äGôJƒ«ÑeƒµdG
®
Microsoft,CE
®
Palm OS,ábÉ£H ôÑY áq«ªbôdG äGô«eɵdG
Printing Guidethe Bluetooth.𫨰ûàdG AóH èeóe ¢Uôb »a
»°üîq°ûdG q»ªbqôdG
qAssistant GuidePresonal Digitalh
çƒJƒ∏ÑdG
»»``````HHôôYY
11
6
1
8
7
4
5
,(á«fhôàµdE’G äGóæà°ùªdGh èeGôÑdG) 𫨰ûàdG AóH èeóe ¢Uôb (7
2
3
9
.IƒÑ©dG äÉjƒàëe øe ≥≤ëJ 1 Iƒ£îdG
áqjQÉq£ÑdG (8(HP Deskjet 450CBi/,450wbt),
á©HÉW ábÉ£H (9HP450 çƒJƒ∏H.(HP Deskjet 450wbt)
äGóæà°ùe (6 ,…RGƒàe πHÉc (5 ,¿GƒdCG ¢TƒWôNh Oƒ°SG áYÉÑW ¢TƒWôN (4
HPAÓª©dG ºYód.(
á©HÉW (1HP Deskjet 450 series ,AÉHô¡c ∂∏°S (3 ,AÉHô¡c ∫ƒëe (2 ,
áYƒÑ£e) π«dO ,𫨰ûàdG AóH π«dO ,OGóYE’G ≥°ü∏e
Page 79

áájjQQÉÉééààddGG ááeeÓÓ©©ddGG ääGGOOÉɪªààYYGG
¢SÉ«≤dG É«LƒdƒæµJHP ZoomSmartácô°ûd ájQÉéJ áeÓY »g
.Hewlett-Packard
äÉ«éeôHhMicrosoft h ,MS-DOS h ,Windowsh ,Windows NTh ,CE
Windows
,PCPocketMicrosoftäÉeÓY hCG á∏é°ùe ájQÉéJ äÉeÓY »g
Microsofth ᫵jôeC’G IóëàªdG äÉj’ƒdG »a/∫hódG hCG/≥WÉæªdG
ácô°ûd ájQÉéJ
Inc,Apple Computer»a á∏é°ùe »gh ,
»dB’G Ö°SÉëdG ácô°ûd ájQÉéJ äÉeÓY
∫hOh IóëàªdG äÉj’ƒdG/iôNCG ≥WÉæe .ájQÉéàdG áeÓ©dG ƒg »≤«≤ëdG ´ƒædGh
Apple .
»dB’G Ö°SÉëdG ácô°ûd ᫵jôeC’G
Bluetooth çƒJƒ∏H ƒLƒdhBluetooth logosÉ¡µ∏àªJ ájQÉéJ äÉeÓY »g
Hewlett-Packard.
.iôNC’G
Pentium ácô°ûd ᫵jôeCG á∏é°ùe ájQÉéJ áeÓY »gIntel.
Mac ,Macintosh ,Mac OS ,PowerBook h ,Power Macintosh»g
ácô°TInc ,Bluetooth SAIGá°üNôe »gh ,᫵jôeC’G IóëàªdG äÉj’ƒdÉH ,
ácô°ûd
∞∞««ddCCÉÉààddGG ¥¥ƒƒ≤≤MM ääÉÉeeƒƒ∏∏©©ee
¿PEG ≈∏Y ∫ƒ°üëdG ¿hO É¡àªLôJ hCG É¡°SÉÑàbG hCG IOɪdG √òg êÉàfEG IOÉYEG ô¶ëj
ô°ûædGh ™Ñ£dG ¥ƒ≤M ø«fGƒb ¬H íª°ùJ Ée AÉæãà°SÉH ≥Ñ°ùe »HÉàc.
QÉ©°TEG ¿hóH ô««¨à∏d Éæg IQƒcòªdG äÉeƒ∏©ªdG ™°†îJh.
HP¿Éª°†dG äÉfÉ«H »a áë°Vƒe
бcф°T дЙeуNh дЙйажªd Iу«MƒdG дЙfЙª°†dG
дЙeуоdGh дЙйажªdG √т¡H б≤aфªdG блjф°ьdG .Éæg OQh Ée QÉÑàYG »¨Ñæj ’h
HPhCG á«æa AÉ£NCG …CG øY É¡à«dƒÄ°ùe
»aÉ°VEG ¿Éª°V áHÉãªH . ácô°T »∏îJh
Éæg äOQh ±òM AÉ£NCG …CG hCG ájôjôëJ.
2003/9 ,1
áᶶMMÓÓee
Ió«MƒdG äÉfɪ°†dG ¿CÉH ɪ∏Y ,¿PEG ¿hO ô««¨à∏d Éæg áLQóªdG äÉeƒ∏©ªdG ™°†îJ
HP√ò¡d á≤aôªdG íjô°üdG ¿Éª°†dG äÉfÉ«H »a áë°Vƒe
дЙeуNh дЙйажªd
дЙeуоdGh дЙйажªdG .É«aÉ°VEG Éfɪ°V πµ°ûj ¬fCG ≈∏Y Éæg A»°T …CG ô«°ùØJ ºàj ’h.
HPájôjôëàdG hCG á«æØdG äÉahòëdG hCG AÉ£NC’G á«dƒÄ°ùe
ácô°T πªëàJ ødh
Éæg áLQóªdG .¿hO iôNCG á¨∏d áªLôàdG hCG ï°ùf IOÉYEG hCG ôjƒ°üàdG Rƒéj ’h
Hewlett-Packard.
ácô°T øe á≤Ñ°ùªdG á«HÉàµdG á≤aGƒªdG
© 2003P.L.Hewlett-Packard Development Company,Copyright
ôôØØqq°°ùùddGG ííFFÉÉ°°üüff
:∂à©HÉW ∂©eh ôØq°ù∏d OGóYE’G »a ∑óYÉ°ùà°S á«dÉqàdG íFÉ°üqædG
C8233A.ôÑëdG Üqô°ùJ ™æªd (
AõédG ºbQ) ôØ°ùdG πeÉM »a ¬æjõîàH
C8232A∫ƒªëªdG ∑ôJƒ«Ñªc øe Óµd á°ü°üîe ΩÉ°ùbCG É¡H πªëdG áÑ«≤M (
ôJƒ«ÑªµdG πªëJ ¿CG äOQCG GPEG Ék°†jCG ΩÉ°ùbC’G √òg πn°ürØoJ ¿CG ∂浪j .á©HÉq£dGh
π°üØæe πµ°ûH á©HÉq£dGh ∫ƒªëªdG.
É¡fɵe »a áàÑãeh á©HÉ£∏d øªjC’G ÖfÉédG »a í«ë°üdG ™°VƒdG ≈dEG ränó«pYoCG.
∫ÉNOE’G áq«æ«°U ¥ÓZEÉH ºbh πØ°SC’ ∫ÉNOE’G.
iôNCG ä’ƒëe …CG .OOôàªdG QÉ«àdG Qó°üe ™e ábÉ£dG ∫qƒëe Ωnórînàr°ùoj ¿CG øµªj
(AC).õg 60 hCG 50,âdƒa 240 ≈dEG 100 IQób
ºb q»aÉ°VEG Qƒq°üdG áYÉÑW ¢TƒWôN hCG Oƒ°SCG áYÉÑW ¢TƒWôN äô°†MCG GPEG
QÉ£NBG π«∏≤àd èàæŸG Gòg ΩGóîà°SG óæY á«°SÉ°SC’G áeÓ°ùdG äGôjò– kɪFGO ™ÑJG
.á«FÉHô¡µdG áeó°üdÉH áHÉ°UE’G
AõédG ºbQ) É¡H á°UÉîdG πªëdG áÑ«≤M »a áYÉqÑq£dG ô°†ëJ ¿CG øµªj
.á©HÉ£dG RÉ¡éH ≥ë∏ŸG óæà°ùŸG Gòg ‘ äɪ«∏©àdG ™«ªL º¡aCGh AGôbCG .1
.èàæŸG ≈∏Y áHƒàµŸG äɪ«∏©àdGh äGQɶfE’G ™«ªL ≥ÑW .2
.É¡Ø«¶æJ πÑb §FÉ◊G êôfl øe á©HÉ£dG ¢ùHÉb π°üaEG .3
ábÉ£dG qQqR ΩGóîà°SÉH áYÉqÑq£dG ¥ÓZEÉH ºb .áYÉÑq£dG ¢û«WGôN ¿CG øª°†j Gòg
.πàÑe âæc hCG ,AÉŸG QGƒéH á©HÉ£dG √òg Ωóîà°ùJ hCG ÖcôJ ’ .4
.¿RGƒàe í£°S ≈∏Y ¿ÉeCÉH á©HÉ£dG ÖcQ .5
á©HÉq£dG øY AÉHô¡µdG ∫qƒëeh á©HÉq£dG πÑc π°üØH ºb .áq«æ«°U OGóàeG ≥dRCG
πÑc ≈∏Y ¢üî°T …BG »°ûÁ hCG ƒ£îj ’ ≈àM »ªfi ¿Éµe ‘ á©HÉ£dG ÖcQ .6
.AÉHô¡µdG πÑc ∞∏àj ’ ≈àMh ,AÉHô¡µdG π«°UƒJ
∂©e q…Qhôq°†dG ∫qƒëªdG ¢ùÑ≤e ô°†MCG ,iôNCG á≤£æe/ó∏H ≈dEG ∑ôØ°S ¿Éc GPEG.
á™HÉq£dG ™e ≥aôªdG AÉHô¡µdG ∫qƒëe §≤a Ωóîà°SG .hCG ó¡édG ∫qƒëe Ωóîà°ùJ ’
π«dO »a πcÉ°ûªdG êÓY π«dO ¤EG ™LQEG ,á«©«ÑW á≤jô£H á©HÉ£dG πª©J ⁄ GPEG .7
.1 𫨰ûàdG AóH èeóe ¢Uôb ≈∏Y á°TÉ°ûdG ≈∏Y Ωóîà°ùªdG
»dEG áLÉ◊G óæY .Ωóîà°ùªdG ᣰSGƒH É¡àfÉ«°U ºàj AGõLG á©HÉ£dG πNGóH óLƒj ’ .8
.áfÉ«°üdG ∫ɪYEÉH ΩÉ«≤∏d Ú∏gDƒŸG OGôa’ÉH π°üJCG áfÉ«°üdG
ô¡°T øe ôãcC’ á©HÉ£dG ∂eGóîà°SG ΩóY ádÉM »a ájQÉ£ÑdG ´õæH ºb .
¿¿ÉÉeeBB’’GG ääÉÉeeƒƒ∏∏©©ee
Page 80

printed on
recycled paper
imprimé sur
papier recyclé
copyright © 2003
Hewlett-Packard Development Company, L.P.
printed in Germany
imprimé en Allemagne
http://www.hp.com/support/dj450
*C8145-90004*
*C8145-90004*
C8145-90004
 Loading...