

Page 1
DesignJet 1050C/1055CMHP Large-Format Printers
Service Manual
Page 2

For HP Internal U s e Onl y
©Copyright Hewlett-Packard
Compa n y 1999
This document contains
proprietary information that is
protected by copyright. All rights
are reserved. No part of this
document may be photocopied,
reproduced, or translated to
another language with out th e
prior written con sen t of He wle ttPackard Company.
First Edition, March 1999
Warranty
The information contained in this
document is subject to change
without notice.
Hewlett-Packard makes no
warrant y of any kind with
regard to this material,
including, but not limited to,
the implied warranties of
merchantabilit y and fitness f or
a particular purpose.
Hewlett- Packard shall not be
liable for errors contained herein
or for incidental or cons equential
damages in connection with the
furnishing, performance, or use
of this material.
WARNING
The procedu r es des cribed in this
manual are to be performed by
HP-qualified service per s onnel
only.
Electrical Shock Hazard
Serious shock hazard leading to
death or injury may result if you
do not take t he following
precautions:
- Ensure that th e ac pow er outlet
(mains) has a protective earth
(ground) terminal.
- Disconnect the Printer from the
power source prior to performing
any maintenance.
- Prevent water or any other
liquids from running onto
electrical components or ci rcuits,
or through openings in the
enclosure.
Electrostatic Discharge
Refer to the beginning of Chapter
8 of this manual, for precautions
you should take to prevent
damage to the Printer circuits
from electrost atic discharge.
WARNING
The Warning symbol calls
attention to a procedure, practice,
or the like, which, if not correctly
performed or adhered to, could
result in personal in jur y. Do not
proceed beyond a Warning
symbol until the in di cated
conditions are fully understood
and met.
CAUTION
The Caution symbol calls
attention to an oper atin g
procedure, practice, or the like,
which, if not correctly performed
or adhered to, could result in
damage to or destruction of part
or all of t h e pr o duct. Do not
proceed beyond a Caution
symbol until the in di cated
conditions are fully understood
and met.
Technical Marketing,
Barcelona Division,
Hewlett-Packard Espa nola, S.A.
Avda. Graells, 501
08190 Sant Cugat del Valles
Spain
Safety S ymbols
General definitions of safety
symbols are given immediatel y
after the tabl e of contents.
Page 3
1
DesignJet 1050C/1055CMHP Large-Format Printers
Service Manual
Page 4

Using this Manual
Purpose
This Service Manual contains information necessary to test,
calibrate and service:
n
HP DesignJet 1050C Printer (Model C6074A)
n
HP DesignJet 1055CM Printer (Model C6075A)
For information about using these printers, refer to the
corresponding User and Quick Reference Guides.
Readership
The procedures described in this Service Manual are to be
performed by HP Certified service personnel only.
Part Numbers
Part Numbers for Printer options, accessories and service parts are
located in Chapter 7.
Conventions
A small arrow ⇒ is used to indicate other parts of the Service
Manual where you can find information related to the topic you are
consulting.
2
HP DesignJets 1050C and 1055CM Printers Service Manual
Page 5

Table of Contents 1
Troubleshooting 1-1
Introduction 1-2
Troubleshooting System Error Codes 1-2
Performing a Service Test on a Failed Assembly 1-3
Performing the Necessary Service Calibrations 1-3
Solving Image Quality Problems 1-3
Front-Panel LEDs Flash Briefly at Power ON & Nothing Else Happens 1-4
The Printer does not Power ON 1-5
ALL the Front-Panel LEDs are Lit but Nothing Else Happens 1-5
One of the Print Quality LEDs on the Front Panel is Lit (and nothing
else) and the "SELF TEST..." Message Remains on the Front P anel 1-5
The Printer Continuously Rejects Printheads 1-6
Cover Sensors are not Working 1-6
The Line Sensor has Problems Detecting Media 1-6
Troubleshooting Media Jams/Printhead Crashes 1-7
Troubleshooting Shutdowns 1-7
Problems with the Vacuum Fan 1-9
Vacuum suction much lower at high altitudes 1-9
Bin marks on prints done on HP High Gloss media 1-9
Printhead Crashes/Smears on High Density Prints Using Coated Media 1-10
Color changes when stacking prints done on HP High Gloss Media 1-10
HP-GL/2 color differences in different HP DesignJet Printers 1-1 1
Scratches on prints done on NTP, Vellum and HP High Gloss media 1-11
Banding at variable extreme environmental conditions 1-12
Banding due to Ink Cartridge replacement while printing 1-12
Long term bleed and hue shift on HP High Gloss media 1-12
Lower imag e gloss directly after printing on HP H igh Gloss Photo Pape r 1-13
34" Rice Paper not supported 1-13
Cut Sheet rice paper loading failure 1-13
Worm marks on HP Coated media with light area fills 1-13
Solving Media-Handling Problems 1-14
How to Navigate through the Front-Panel Menu 1-15
Service Configuration Print 1-19
Table of Contents
HP DesignJets 1050C and 1055CM Printers Service Manual
3
Page 6

Table of Contents
System Error Codes 2-1
Introduction 2-2
Continuable and Non-Continuable Error Codes 2-2
System Error Codes During Initialization 2-18
HP No.80 Ink Supplies Troubleshoo ting 3-1
What are HP No.80 Supplies? 3-2
Ink Cartridges 3-2
Printheads and Printhead Cleaners 3-2
Identifying the Components 3-3
General Information About HP No.80 Supplies 3-4
Some General Precautions When Handling HP No.80 Supplies 3-5
Priming the Ink System 3-6
When Should You Replace the HP No.80 Supplies? 3-6
The Front Panel Display 3-7
Obtaining Ink Cartridge Information 3-8
Obtaining Printhead Information 3-9
Ink Cartridge Status Messages 3-11
Ink Cartridge Status While Printing 3-11
Ink Cartridge Status While Replacing 3-12
Printhead Status Messages While Printing 3-13
Printhead Status Messages While Replacing 3-15
Summary of Solving HP No.80 Supplies Problems 3-17
Carriage Interconnect Wiper 3-18
4
HP DesignJets 1050C and 1055CM Printers Service Manual
Page 7

Service Tests and Utilities 4-1
Service Tests (Diagnostics) 4-3
Entering the Service Te sts Menu 4-4
1. Electronic Systems 4-5
2. EIO Card 4-10
3. Hard Disk Drive 4-12
4. Ink Pressure System 4-14
5. Scan Axis 4-17
6. Paper Axis 4-20
7. Drop Detector 4-22
Service Utilities 4-25
Entering the Service Utilities Menu 4-26
1. Tubes Purge 4-28
2. Release Info 4-32
3. Set Asian PS Fonts 4-33
4. Printer Model T ype 4-35
5. Overdrive Cleaning 4-37
6. EEROM Utilities 4-38
7. Printhead Check 4-41
8. Mon. Mode Baud Sel. 4-42
Table of Contents
Service Calibrations 5-1
Service Calibrations 5-2
Entering the Service Calibrations Menu 5-4
1. Accuracy Calibration 5-6
2. Line Sensor 5-9
3. Service Station 5-11
4. Roller Mark Position 5-13
5. Pen to Paper Spacing 5-15
6. Color to Color calibration 5-16
7. Calibrations Backup 5-19
8. Pen Alignment 5-22
Carriage Height Calibration 5-24
HP DesignJets 1050C and 1055CM Printers Service Manual
5
Page 8

Table of Contents
Print Quality 6-1
Print Quality Troubleshooting Checklist 6-2
Print Modes 6-3
How to Use the Print Quality Test 6-4
What is the Print Quality Test? 6-4
Considerations for Printing the Print Quality Test. 6-4
Printing the Print Quality Test 6-4
Nozzle Print Test 6-6
How to fix the Nozzle Defects 6-7
Color Alignment Print Test 6-7
Solving the Color Alignment Problem 6-8
Overall Print Quality Test in BEST mode 6-9
What is Banding? 6-9
Solving the Banding Problem 6-10
Aligning the Printheads 6-12
Service Accuracy Calibration 6-12
Troubleshooting Print Quality Problems 6-13
Problems with Stepped Lines 6-13
Problems with printing lines 6-14
Problems with Color-to-Color Alignment 6-15
Problems with Horizontal Lines (Banding) 6-17
No Printing Defects Found in the Print Quality Test 6-21
Solving Color Accuracy problems 6-22
Color Consistency problems 6-22
Long T e rm Color Bleeding (Glossy Papers) 6-22
Color Accuracy Configuration 6-23
Media 6-24
There are Smears or Scratching on the Printed Media 6-24
6
HP DesignJets 1050C and 1055CM Printers Service Manual
Page 9

Parts and Diagrams 7-1
Printer Support 7-2
Rear Covers 7-4
Electronics Module 7-6
Right Hand Cover 7-8
Left Hand Cover and Window 7-10
Right Hand Assemblies 7-12
ISS and APS Assembly 7-14
Clutch Assembly 7-16
Carriage Assembly 7-18
Scan-Axis Assemblies 7-20
Drive Roller and ARSS Miscellaneous Parts 7-22
Paper Path Assemblies 7-24
Pinch Assembly 7-26
Drive Roller Assemblies 7-28
Center Guide and Media Sensor 7-30
Tubes Guide Assemblies 7-32
Ordering Accessories 7-34
Table of Contents
Removal and Installation 8-1
Introduction 8-2
Safety Precautions 8-2
Electrostatic Discharge (ESD) Precautions 8-3
Required Tools 8-3
Right Hand Cover 8-4
Front Panel Assembly 8-6
Right Hand Trim and Window Switch 8-7
Service Station Assembly 8-8
Drop Detector Assembly 8-10
Vacuum Fan 8-11
Paper-axis Motor Assembly 8-12
Left Hand Cover 8-13
Left Hand Trim Assembly 8-18
Ink Supply Station Assembly (ISS) 8-19
Air Pressurization System (APS) 8-20
Clutch Assembly and left hand miscellaneous parts 8-21
Tail Deflectors and Rear Platen 8-23
Left and Right Rear Covers 8-24
HP DesignJets 1050C and 1055CM Printers Service Manual
7
Page 10

Table of Contents
Electronics Module 8-25
Media Sensor 8-29
Window 8-30
Top Cover 8-31
Back Cover 8-32
Scan-axis Motor Assembly 8-33
Encoder Strip 8-34
Tensioner 8-37
Trailing Cable 8-39
Cutter Assembly 8-42
Carriage Assembly and Belt 8-44
Tubes System Assembly 8-53
Ink Leak Detector Assembly 8-60
Front Platen Assembly 8-62
Platen Assembly 8-63
Paper Entry Assembly 8-64
Roller Guide 8-66
Media Holder Strip 8-69
Drive Roller 8-70
Center Guide 8-71
Pinch-Wheel Assembly and Cam 8-73
Preventive Maintenance 9-1
Moisture on the Printer 9-2
Noisy Carriage Bushing 9-2
Belt Swelling 9-2
Cleaning the Printer 9-2
General Cleaning 9-2
Cleaning the Overdrive 9-3
Scheduled Maintenance 9-3
Level of Printer Usage 9-3
Scan-axis Maintenance 9-4
8
HP DesignJets 1050C and 1055CM Printers Service Manual
Page 11

Funct ional Overv iew 10-1
Introduction 10-2
HP DesignJet 1050C Printer 10-2
HP DesignJet 1055CM printer 10-2
Electrical System 10-2
Power Supply Unit (PSU) 10-3
Soft Power-Off Switch 10-4
Front Panel 10-4
Ink Delivery System (IDS) 10-5
Ink Supply Station (ISS) 10-5
Tubes System 10-6
Air Pressurization System (APS) 10-7
Ink Level Sense (ILS) 10-7
Leak Detect System (LDS) 10-8
Service Station 10-9
Print Head Cleaner (PHC) 10-9
Printer Specifications 10-12
Printable Area 10-16
Interface Specifications 10-17
Regulatory Notices 10-18
To Obtain a Material Safety Data Sheet (MSDS) 10-18
Sound 10-18
Electro-Magnetic Compatibility (E MC) 10-18
VCCI Class A and Class B (Japan) 10-21
Declaration of Conformity 10-22
www.designjet-online.hp.com 10-23
Table of Contents
Glossary
Index
HP DesignJets 1050C and 1055CM Printers Service Manual
9
Page 12

Table of Contents
10
HP DesignJets 1050C and 1055CM Printers Service Manual
Page 13

Tr oubleshooting 1
Introduction 1-2
Troubleshooting System Error Codes 1-2
Performing a Service Test on a Failed Assembly 1-3
Performing the Necessary Service Calibrations 1-3
Solving Image Quality Problems 1-3
Front-Panel LEDs Flash Briefly at Power ON & Nothing Else Happens 1-4
The Printer does not Power ON 1-5
ALL the Front-Panel LEDs are Lit but Nothing Else Happens 1-5
One of the Print Quality LEDs on the Front Panel is Lit (and nothing else) and
the "SELF TEST..." Message Remains on the Front Panel 1-5
The Printer Continuously Rejects Printheads 1-6
Cover Sensors are not Working 1-6
The Line Sensor has Problems Detecting Media 1-6
Troubleshooting Media Jams/Printhead Crashes 1-7
Troubleshooting Shutdowns 1-7
Problems with the Va cuum Fan 1-9
Vacuum suction much lower at high altitudes 1-9
Bin marks on prints done on HP High Gloss media 1-9
Printhead Crashes/Smears on High Density Prints Using Coated Media 1-10
Color changes when stacking prints done on HP High Gloss Media 1-10
HP-GL/2 color differences in different HP DesignJet Printers 1-11
Scratches on prints done on NTP, Vellum and HP High Gloss media 1-11
Banding at variable extreme environmental conditions 1-12
Banding due to Ink Cartridge replacement while printing 1-12
Long term bleed and hue shift on HP High Gloss media 1-12
Lower image g lo ss dire c tly after prin ting on HP High Glos s P hot o Pa per 1-13
Cut Sheet rice paper loading failure 1-13
34" Rice Paper not supported 1-13
Worm marks on HP Coated media with light area fills 1-13
Solving Media-Handling Problems 1-14
How to Navigate through the Front-Panel Menu 1-15
Service Configuration Print 1-19
1
HP DesignJets 1050C and 1055CM Printers Service Manual
1-1
Page 14

Troubleshooting
Guide to Troublesho oti ng the Printer
Introduction
This chapter will guide you through the relevant steps to take when
troubleshooting the printer.
Troubleshooting System Error Codes
Chapter 2 - System Error Codes contains a list of system error
codes and their respective descriptions and recommended corrective
actions. Only try one recommended action at a time and check if the
error code has disappeared.
If you have an error code which is not documented in this Service
Manual or you have an error which you cannot resolve, then report
the error to the HP Response Center or the nearest HP Support
Office. When reporting the error , have the following information
ready:
n
Model and Serial Number of the printer.
n
Which firmware revision the printer is using (See Note below).
Check firmware in Utilities / Statistics / Code rev.
n
The complete error number (See Note below).
n
The Service Configuration Print ⇒ Page 1-19
n
The Current configuration sheet.
n
Which software application the customer is using (name, version,
etc. ) .
NOTE When reporting the System Error Code, make sure that you
supply the full Error Code (including the last 8 numbers where
applicable) and the firmware version. Without thi s information,
HP Support Personnel cannot help you.
1-2
HP DesignJets 1050C and 1055CM Printers Service Manual
Page 15

Troubleshooting
Performing a Service Test on a Failed Assembly
If possible, always perform a Service Test on the component/
assembly that you are about to replace, just to make sure that is the
component/assembly that has failed.
NOTE If the test on that component/assembly passes, you should NOT
replace it.
For information on the Service Tests and how to use them see
Chapter 4 - Service T es ts and Utilities.
Performing the Necessary Service Calibrations
Is the printer calibrated correctly after replacing a component?
Refer to the table on Page 5-2 to determine when a calibration is
required.
NOTE Remember that certain Calibrations are required even if an
Assembly has been disassembled to gain access to another
Assembly or Component.
For information on the Service Calibrations and how to use them
see Chapter 5 - Service Calibrations.
Solving Image Qua lity P roblems
Whenever an Image Quality problem appears, it is advisable to print
the Image Quality Print to help diagnose the problem. The Image
Quality Print will help you differentiate between possible printhead
errors and other problems such as incorrect front-panel selection,
driver or RIP configuration or mechanical problems. For
information on solving Image Quality problems see Chapter 6 -
Print Quality.
HP DesignJets 1050C and 1055CM Printers Service Manual
1-3
Page 16

Troubleshooting
Front-Panel LEDs Flash Briefly at Power ON &
Nothing Else Happen s
The Power Supply detects a Short and shuts down the Power.
1 The Hard Disk Drive or the Network Card could be faulty.
Troubleshoot the problem as follows:
a If the Printer has a Hard Disk Drive and/or a Network card
installed, switch the Printer OFF from the back of the Print er , and
remove them both.
b Switch the Printer ON again.
c If the Printer functions correctly now, switch the Printer OFF
again and reinstall the Network Card correctly, making sure that
the two installation screws are completely tightened.
NOTE If the Printer DOES NOT function correctly with the Hard Disk
Drive and the Network Card removed, then you must replace the
Electronics Module.
d Switch the Printer ON again
e If the Printer functions correctly with the Network C ard installe d,
switch the Printer OFF again.
NOTE If the Printer DOES NOT function correctly with the Network
Card installed, then you must replace it.
f Reinstall the Hard Disk Drive corr ect ly, making sure that the two
installation screws are completely tightened.
g Switch the Printer ON again
h Check if the Printer f uncti ons cor rec tly with the Hard Disk Drive
installed.
NOTE If the Printer DOES NOT function correctly with the Hard Disk
Drive installed, then you must replace it.
2 Make sure that none of the cables connected to the Electronics
Module have been pinched between the cover and the sideplate.
1-4
HP DesignJets 1050C and 1055CM Printers Service Manual
Page 17

Troubleshooting
The Printer does not Power ON
1 Check that the power cord is connected correctly to the Printer and
to the Power Socket.
2 Check that the Firmware DIMM is installed correctly in the correc t
slot (the first slot from the right) at the back of the Printer.
3 Check that the Power Switch on the BACK of the Printer is in the
ON position.
4 Check that the Front-Panel Cable is correctly connected to the
Electronics Module. Also make sure that the Front-Panel cable is
not damaged.
ALL the Front-Panel LEDs are Lit but Nothing Else
Happens
The Firmware DIMM is NOT correctly installed.
1 Power OFF the Printer from the back and disconnect the power
cord. Reseat the Firmwar e DIMM (the firs t slot from the right)
making sure that it is installed correctly.
One of the Print Quality LEDs on th e Front Panel is
Lit (and nothing else) and the "SELF TEST..."
Message Remains on the Front Panel
One of the DRAM DIMMs is NOT correctly installed or Faulty.
1 Power OFF the Printer from the back and disconnect the power
cord. Reseat both Firmware DIMMs (the first two slots from the
left) making sure that they are installed correctly. If reseating the
DRAM DIMMs does not solve the problem, replace them instead.
HP DesignJets 1050C and 1055CM Printers Service Manual
1-5
Page 18

Troubleshooting
The Printer Continuously Rejects Printhead s
1 Clean the flex contacts on the Printhead and in the Carriage
Assembly using the Carriage Interconnect Wiper (R e fer to Chapter
3) and try again.
2 If ALL the Printheads are rejected (the status message on the Front
Panel does NOT show "OK" for all the Print heads) then perf orm the
Electronic Systems Test ⇒ Page 4-5.
Cover Sensors are not Working
1 Check if the faulty sensor is installed correctly.
2 Check if the cable for the faulty sensor is connected correctly .
3 Replace the faulty Sensor.
The Line Sensor has Problems Detecting Media
1 Check the type of media that is being used since the Line sensor
may have problems detecting transparent media or some types of
Non-HP media. Try loading white HP media in to the Printer and
check if the Line sensor detects it.
2 Excessive ink deposits on the Platen surface can fool the sensor by
reflecting the light. Clean the Platen.
3 The Line Sensor is not calibrated correctly. Perform the Line Sensor
calibration ⇒ Page 5-9.
4 The Line Sensor is damaged or faulty. Replace the Carriage
Assembly ⇒ Page 8-44.
1-6
HP DesignJets 1050C and 1055CM Printers Service Manual
Page 19

Troubleshooting
Troubleshooting Media Jams/Printhead Crashes
NOTE If using HP Coated Media when problem occurred, please also
refer to Page 1-10, Printhead Crashes/Smears on High Density
Prints Using Coated Media.
The failure modes "media jam" and "head crash" are grouped
together because in many cases a media jam causes the media to lift
up into the carriage path and cause a head crash, thus causing many
media jam failures to be reported as head crashes.
1 Did the media jam occur when loading media?
n
If the client has had media jams, it is common for pieces of media
to get stuck in the media path. Clear the media path.
NOTE When clearing a media jam, sometimes media is stuc k in the
paper path. To clear this, you must lift the media load handles
and insert thicker media into the paper path to pus h out the
media that is still stuck there.
2 Is the customer using non-HP media?
n
The use of non-HP media can easily be the cause of media jams
and head crashes (especially head crashes because HP media is
specially formulated to avoid cockle, one of the primary causes
of head crashes). If the media is not HP approved, advise the
customer to use HP media and check to see if the problem is now
solved .
3 The Carriage is at the incorrect height in relation to the Center
Platen. Adjust the carriage to the correct height ⇒ Page 5-24 and try
to load the media again.
4 Check that the Vacuum Fan works correctly - Refer to Page 1-9,
Problems with the Vacuum Fan.
Troubleshooting Shutdowns
If a shutdown occurs, you will get the message "Switch Power Off"
followed by:
n
Check Printhead Cleaner Path.
n
Check Paper Path.
n
Check Printhead Path (followed by (1), (2) or (3)).
A shutdown in each path will require different steps to resolve the
HP DesignJets 1050C and 1055CM Printers Service Manual
1-7
Page 20

Troubleshooting
problem as explained as follows.
WARNING In each case, make sure that you power OFF the printer before
attempting any procedures to resolve the problem.
Printhead Cleaner Path
1 Open the right door of the printer and check for any visible
obstacles restricting the movement of the Service Station. Manually
move the Service Station, checking for smooth and free movement.
Paper Path
1 Open the Window and check for any visible obstacles restricting the
movement of the Drive Roller. If there is a wrinkled mass of media
inside the paper path, lift the Pinch wheels (using the Media Load
Handles) and clear the obstruction. If you cannot reach the media,
remove the Electronics Module (⇒ Page 8-25) and the Roller Guide
(⇒ Page 8-66) from the Rear of the Printer to gain better access.
2 If this shutdown happens at the end of a Roll of Media, it could be
because the media is stuck firmly to the Roll. Lift the Pinch wheels
(using the Media Load Handles) and pull the media clear.
3 Replace media spindle if broken.
4 Replace the Paper-Axis Motor ⇒ Page 8-12.
Printhead Path
When a shutdown occurs in the Printhead path, you will get the
message "Switch Power Off / Check Printhead Path (*). The (*)
will be a number, which will give an indication on where the f a ilure
occurred:
PWM Shutdown (1) and Energy Shutdown (3)
1 Clean Slider Rods and Apply Oil along the complete axis of the
Slider Rods. After applying the Oil, perform the Scan-Axis Te st ⇒
Page 4-17 and ch eck that the valu es are within the given limits.
2 Replace the Scan-Axis Motor ⇒ Page 8-33.
Velocity Shutdown (2)
1 Open the Window and check for any visible obstacles restricting the
movement of the Carriage Assembly. Try and move the Carriage
Assembly manually , checking for smooth and free movement.
1-8
2 Check that the Encoder Strip is clean. If necessary, clean Encoder
Strip using a damp cloth.
HP DesignJets 1050C and 1055CM Printers Service Manual
Page 21

Troubleshooting
Problems wi th the Vacu um Fan
If you have problems loading either Roll or Sheet Media, then there
could be a problem with the Vacuum Fan. T o ver ify i f ther e really is
a problem with the Vacuum Fan, try the following:
1 With the Printer ON, open the Window of the Printer and place a
sheet of HP High Gloss Photo Paper (must be D-Size), aligned with
the blue lines on the Center Platen. If the Vacuum Fan holds the
sheet in place, and then loads it correctly, then the Vacuum Fan
functions correctly. If the Vacuum Fan does not hold the sheet in
place (no suction), then try the following:
n
Check that the holes in the Center Platen are NOT blocked.
n
Check that the Vacuum Fan is installed correctly.
n
Replace the Vacuum Fan ⇒ Page 8-11.
2 If the Vacuum Fan held the sheet in place, but couldn’t correctly
load it, then there could be a problem with the Overdrive. In this
case, replace the Platen Assembly ⇒ Page 8-63.
Vacuum suction much lower at high altitudes
At altitudes above 3,000 meters, the vacuum force holding down the
media will be lower, therefore the media will not be held in place
properly causing:
n
Ink Smearing on the Media.
n
Printhead crashes against the Media.
n
Cut Sheet loading problems (high probability).
n
Roll Media loading problems (low probability).
PRINTER LIMITATION - NO SOLUTION AVAILABLE.
Bin marks on prints done on HP High Gloss media
Prints done on HP High Gloss media are sensitive to scratches when
they fall into the media bin. To solve the problem, try the following:
n
Advise the customer to install the Media Bin cover, that was
included with the Printer, to avoid this problem.
n
If possible, advise the customer to hold the prints and prevent
them from falling in to the bin.
HP DesignJets 1050C and 1055CM Printers Service Manual
1-9
Page 22

Troubleshooting
Printhead Cra s hes/Smears on Hig h D e nsity Pr ints
Using Coated Media
High density prints can cause cockle mainly on HP Coated Media.
This causes two main problems:
1. Cockling in the borders - Because the printer places too much ink on
the Coated Media, the borders of the print become raised, causing
the Printhead to crash against the media. To solve the problem, try
the following:
n
Check in the Front Panel if Ink Limiting is ON or OFF. If Ink
Limiting is OFF, turn it ON.
n
Change the paper margins to 15mm, either in the Front Panel or
in the Driver. If the customer is printing PostScript images, send
them a PPD file containing the extended margins of 15mm.
2. Cockling within the print - If the P rinter places too much ink within
the print, the media starts to ripple, causing the Printhead to smear
against the media. To solve the problem, try the following:
n
Check in the Front Panel if Ink Limiting is ON or OFF. If Ink
Limiting is OFF, turn it ON.
n
Never use HP Coated Media for High Density prints. As a
substitute use HP Heavy Coated Media.
Color changes whe n s tacking prints done on HP High
Gloss Media
Color differences can be seen between the covered and uncovered
part of a print done on HP High Gloss Media. This is because the
part of the print exposed to the air is always lighter than the covered
one. The ink on the covered part of the print cannot evaporate
therefore the ink continues to diffuse creating larger ink dots. To
solve the problem, try the following:
n
Allow the print to absolute drying completion before stacking.
Depending on the ink percentage, this can take from 10 minutes
up to 3 hours.
n
Creating dryer environmental conditions helps reduce the
problem. To find the environmental conditions, print the Service
Configuration Print (Printer Setup Menu / Utilities / Test prints /
Service config)
1-10
HP DesignJets 1050C and 1055CM Printers Service Manual
Page 23

Troubleshooting
HP-GL/2 color differences in different HP DesignJet
Printers
Color differences between one image printed on the HP DesignJet
1000 Series and the rest of the DesignJet platforms are due to the
different chemistry of the 1000 series inks compared with the rest of
the inks for other printers. This color variability among different HP
DesignJet Series Printers has been always present. To solve the
problem, try the following:
n
Perform the color calibration from the driver at the time of
printing. However, that calibration is not very accurate but it may
help in the most severe cases.
n
Some applications have color controls for the user to modify the
image in order to obtain the desired colors.
n
Printing with PostScript reduces the problem significantly.
n
A void very long exposures to extreme environmental conditions
after printing with glossy media (more than 12 hours at 80%
humidity may result in severe changes in color).
Scratches on prints done on NTP , Vellum and HP High
Gloss media
Normally at the end of a roll, the curl on the media is high and the
printed area can touch the media load handles or the media roll,
transferring ink to the "still-not-printed" media or damaging the
actual print. This problem mainly affects Natural Tracing Paper
(NTP), Vellum and HP High Gloss Media. To solve the problem, try
the following:
n
Increase the Dry Time using the Front Panel (Refer to the User’s
Guide - Chapter 3 Work ing with Paper).
n
Install a new roll of media.
HP DesignJets 1050C and 1055CM Printers Service Manual
1-11
Page 24

Troubleshooting
Banding at variable extreme environmental conditions
Since the Accuracy Calibration has been done at normal
environmental conditions, printing in extreme environmental
conditions will cause banding because the advance of the Drive
Roller does not correspond to the same conditions that the
calibration was done in. To solve the problem, try the following:
n
Perform the Accuracy Calibration in the new environmental
conditions (Refer to the User’s Guide - Chapter 8 Reconfiguring
your Printer).
Banding due to Ink Cartridge replacement while
printing
A user has removed the Ink Cartridge while the printer was printing,
which has caused the printer to stop. If the user does not replace the
Ink Cartridge immediately, when the printer starts to print again, a
band will appear in the position where the printing restarted. This is
because the wet ink interacts with the dried ink on the media
causing the band to appear. To solve the problem, try the following:
n
Do NOT remove the Ink Cartridge while the Printer is Printing.
Only replace/remove Ink Cartridges in between Prints.
n
If the Ink Cartridge was replaced due to the "Empty" status on the
Front Panel, then advise the customer to replace the Ink Cartridge
when the "Very Low" status is showing on the Front Panel.
Long term bleed and hue shift on HP High Glos s
media
Under high humidity conditions (approx. >65%) the water trapped
in the air can easily be absorbed by the highly hydrophilic media
coating polymers. That allows the dye to migrate through the
coating and causes bleeding. This problem is especially noticeable
with the colors that require Magenta. To solve the problem, try the
following:
n
Reduce the level of humidity (<65%) that the Printer is working
in. T o find the humidity level, print the Service Configuration
Print (Printer Setup Menu / Utili tie s / Test prints / Service config).
1-12
HP DesignJets 1050C and 1055CM Printers Service Manual
Page 25

Troubleshooting
Lower image gloss directly after printing on HP High
Gloss Photo Paper
Lower gloss appearance of the print when the media is drying which
gradually disappears to get the final gloss level (between 10 and 60
minutes depending on the ink density). Try the following:
n
W a it at least 60 minutes to achieve the high gloss appearance.
34" Rice Paper not supported
Roll length is 34" (Non-standard) and the pinch wheels can’t control
edge of media causing ink smears and Printhead crashes in middle
of prints with or without area fills.
PRINTER LIMITATION - NO SOLUTION AVAILABLE.
Cut Sheet rice paper loading failure
Thin rice paper is sucked into the Center Platen grooves and Linear
Blade Ridge. This implies that the friction between the Center
Platen and the rice paper becomes higher than between the
Overdrive wheels and the paper. This effect make it almost
impossible to load the rice paper correctly because the Vacuum is
too high.
PRINTER LIMITATION - NO SOLUTION AVAILABLE.
Worm marks on HP Coated media with light area fills
Light bands (S-shaped) in Paper axis direction where light area fills
are printed, causing unacceptable Image Quality defect.
n
Print the Service Configuration Print (⇒ Page 1-19) and check if
the level of Humidity is very low (below 30%). Increasing
humidity may help in reducing the severity of the problem.
NOTE The media is causing the problem and NOT the Printer. Do not
attempt to try an d re pla c e Pri nte r part s to solv e this pr o blem.
HP DesignJets 1050C and 1055CM Printers Service Manual
1-13
Page 26

Troubleshooting
Solving Media-Handling Problems
The Front Panel Keeps Indicating that Media Is Misa ligned or
Incorrectly Positioned
Roll media
n
The roll may be loaded the wrong way. The paper should load
over the roll toward you.
n
The paper may be loaded at an angle. The right-hand edge must
be parallel to the white line on the paper entry roller.
WARNING Ensure that the paper is wrapped tightly on the roll. This is a
very important step to remember b ecau s e i f this i s not do ne, t h e
media may be loaded at an angle, causing the media to be
rejected.
n
Perform the manual alignment procedure (Refer to the User’s
Guide).
n
Check that the paper is correctly loaded onto the spindle.
Sheet media
n
It must be loaded with the right-hand edge against the blue
perforated line on the printer.
n
The media may be crumpled or warped or may have irregular
edges.
n
If you are using hand-cut media, the edges may not form a rightangle or they may be rough. Do not use hand-cut media. Use only
purchased sheet media.
n
If the media you are trying to load is very slippery, hold the
media with both hands, and gently push the media into the printer
until it buckles upwards in the middle, this will help the printer to
load it.
n
If the overdrive is covered in dust, it will have problems picking
up the sheet media during the load process. Clean the Overdrive
using the Overdrive Cleaning Service Utility ⇒ Page 4-37.
1-14
HP DesignJets 1050C and 1055CM Printers Service Manual
Page 27
Troubleshooting
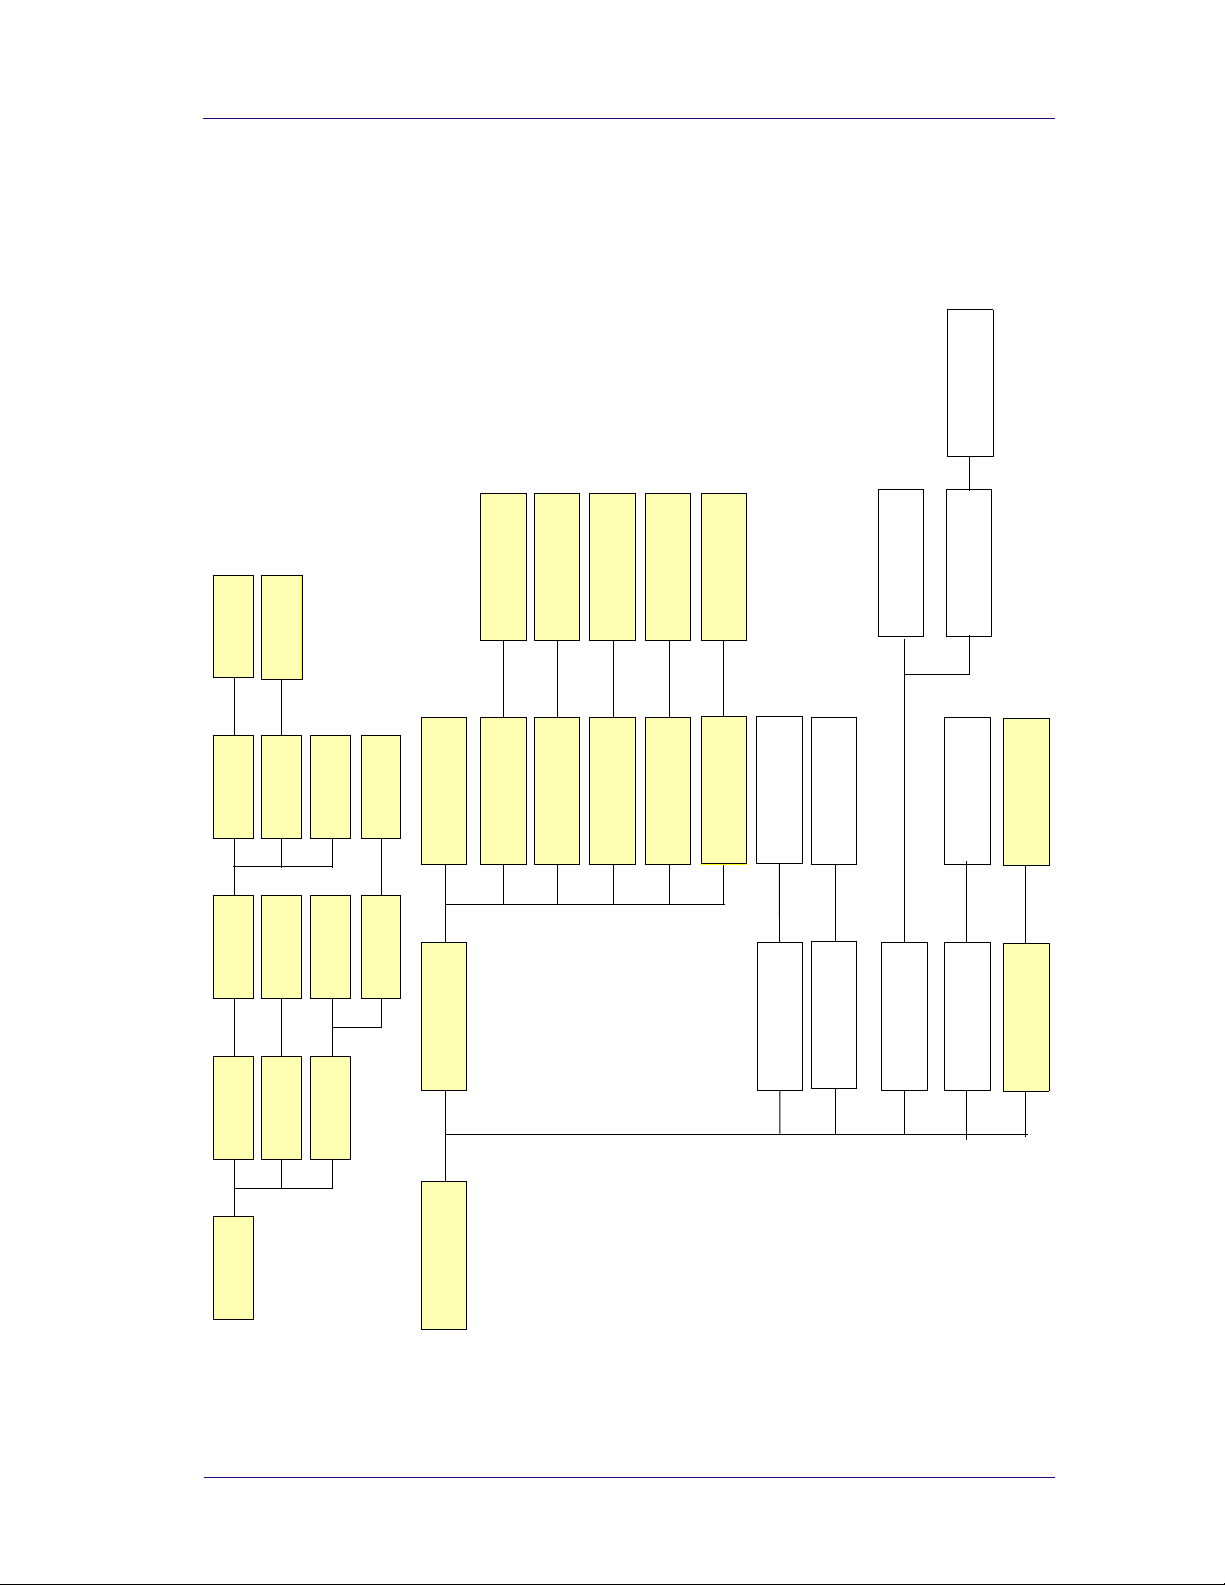
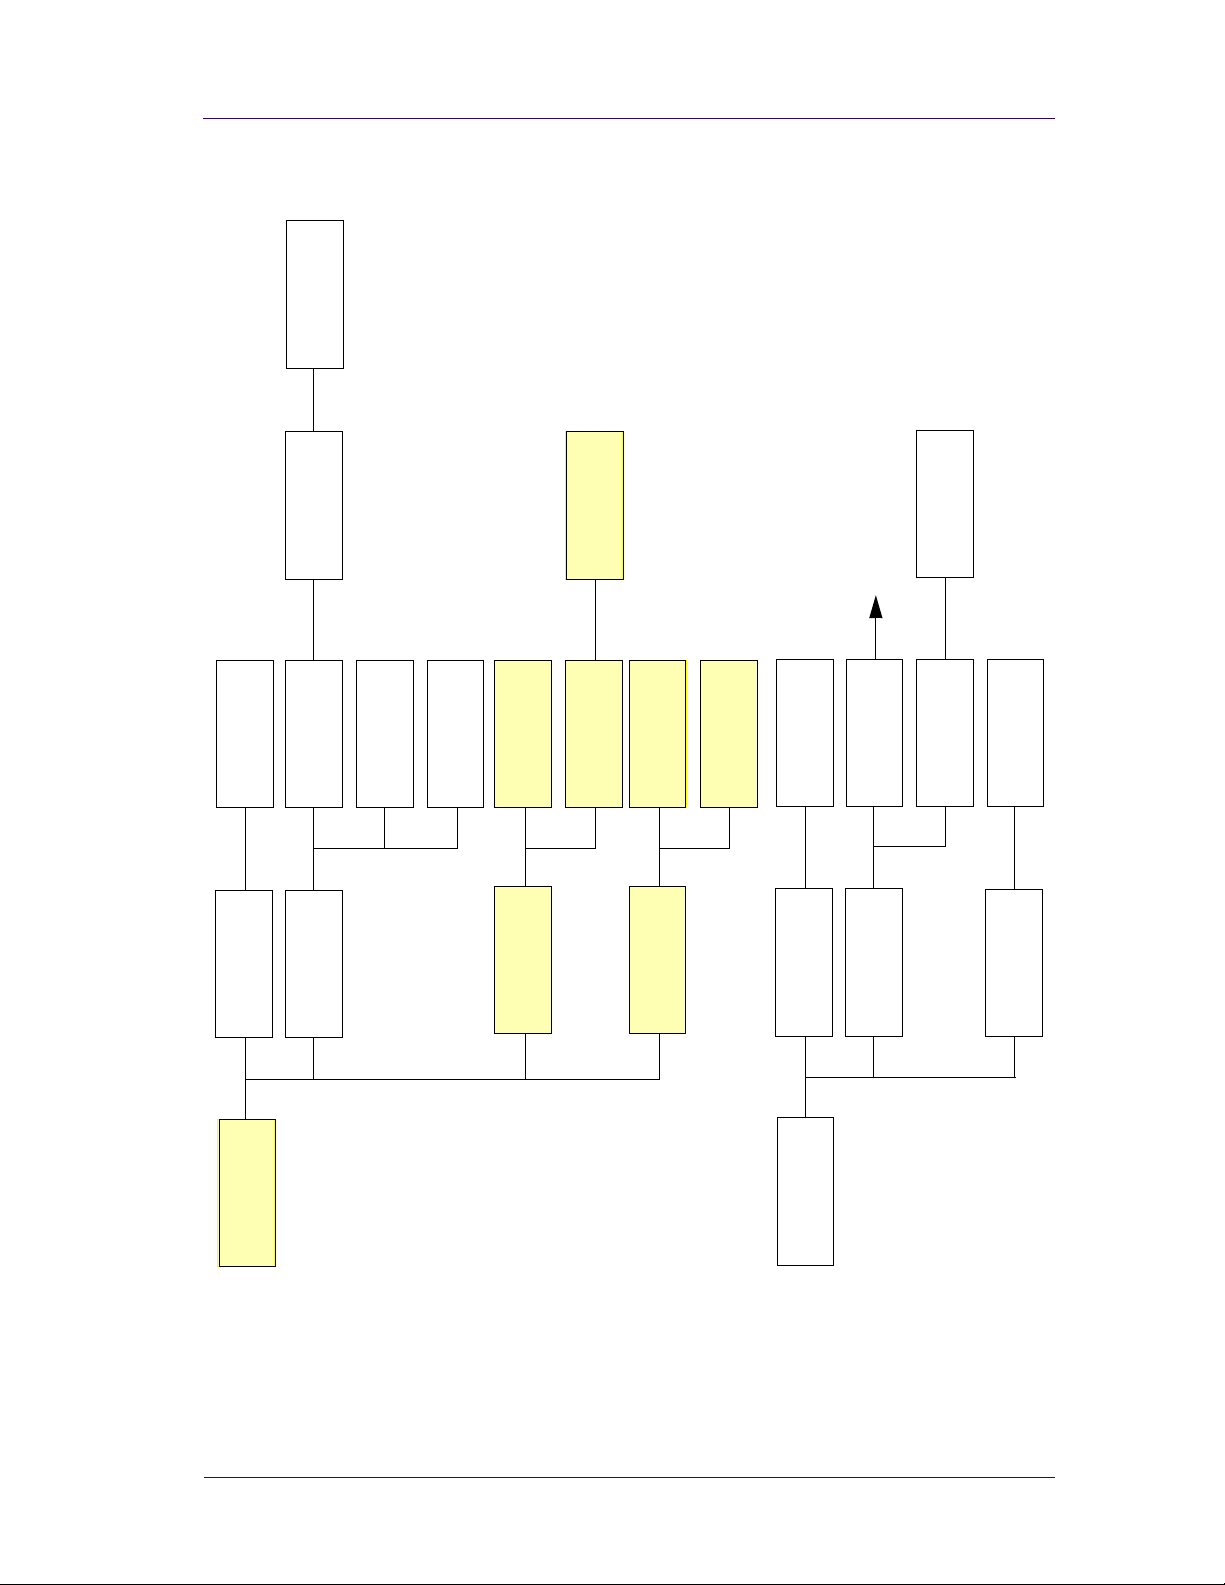
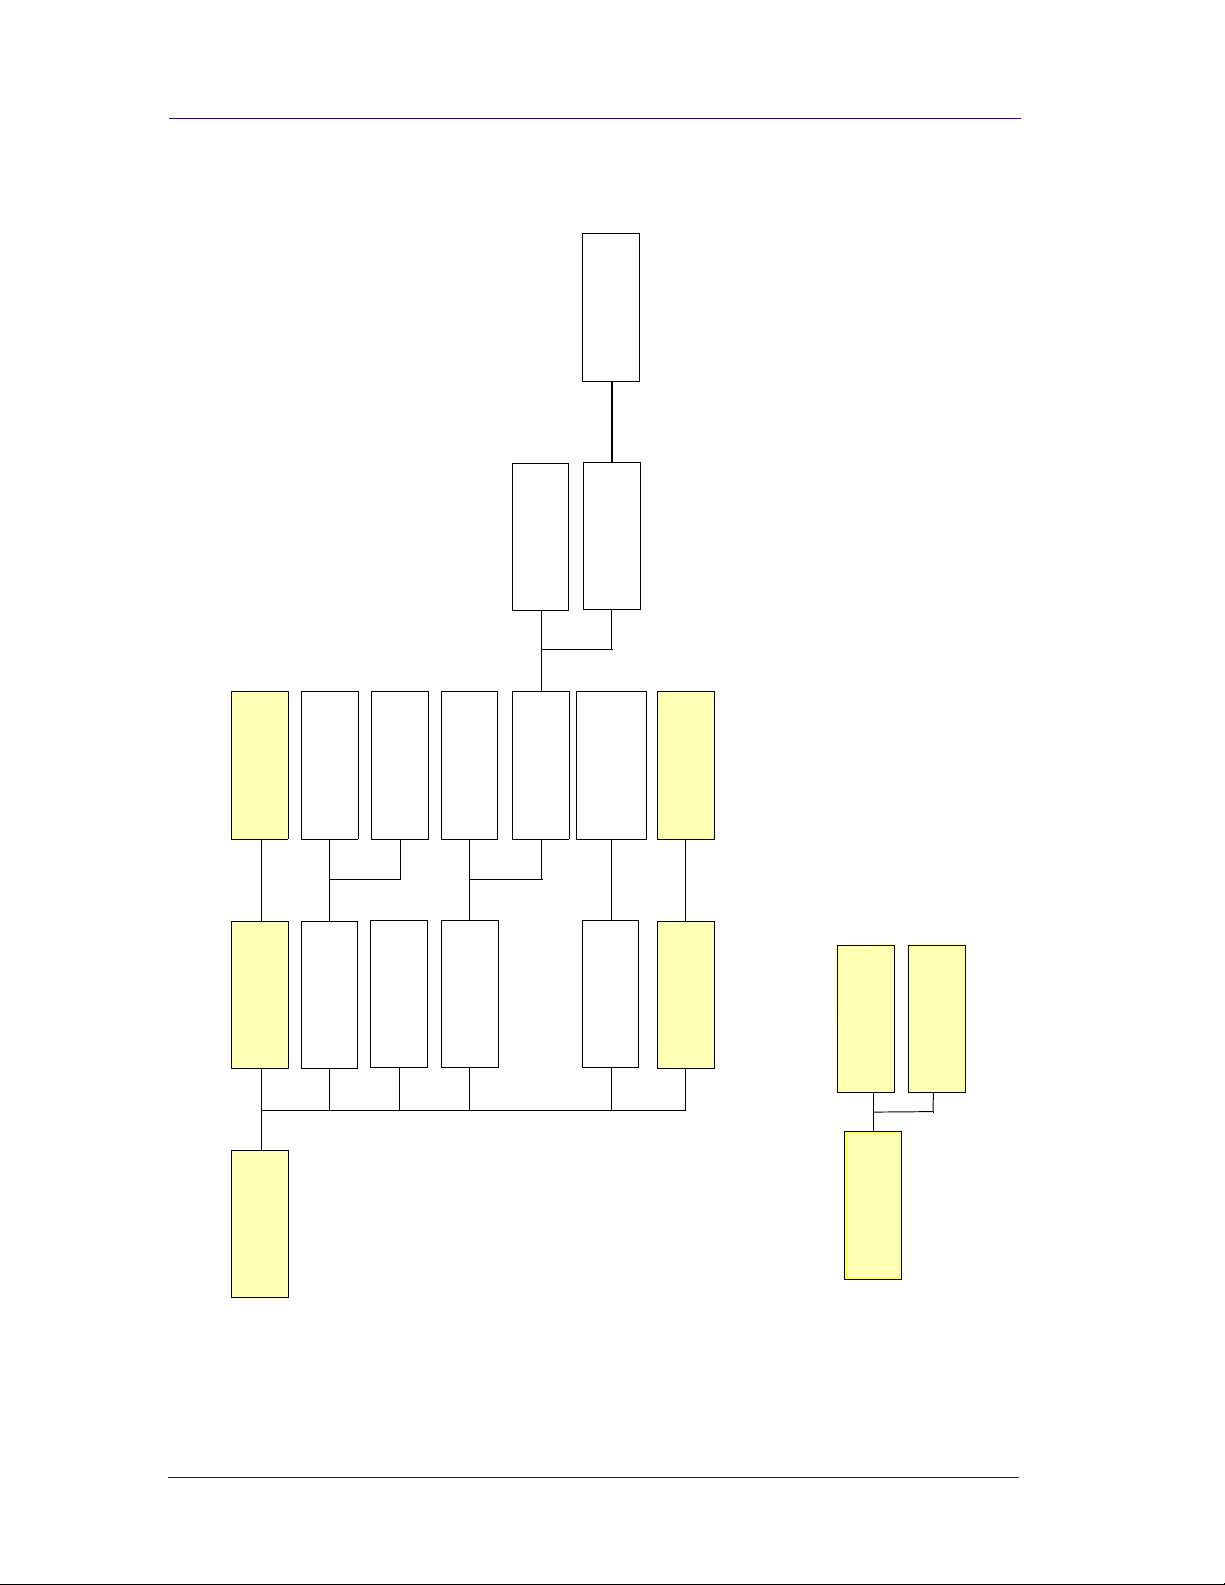
How to Navigate through the Front-Panel Menu
30...5
Statistics
Best ARCH,
Over A2, Over A1
99 ... 1, 0
Width, Length
ARCH A ... E1
Best ANSI,
Best JIS B,
JIS B4 ... B1
Best ISO A,
ANSI A ... E
ISO A4 ... A0
Automatic
Manual
@@
Copies
Statistics
Delete page
Move to top,
99 ... 2, 1 min
Oversize
JIS
ARCH
Inked Area, Software etc
O. K.
Off
On, Off
In orde r, Opt imal
Size
Nest
Queue
Queuing Management
ISO
ANSI
0 ... 270
TOYO,
Rotate
On, Off
On, Off
Normal, Extended
SWOP, Native
Margins
Nest Spacing
On, Off
Fit to Page
100% ... 419%
Mirroring
PostScript Scale
Page Format
Queuing & Nesting
HP DesignJets 1050C and 1055CM Printers Service Manual
1-15
Page 28
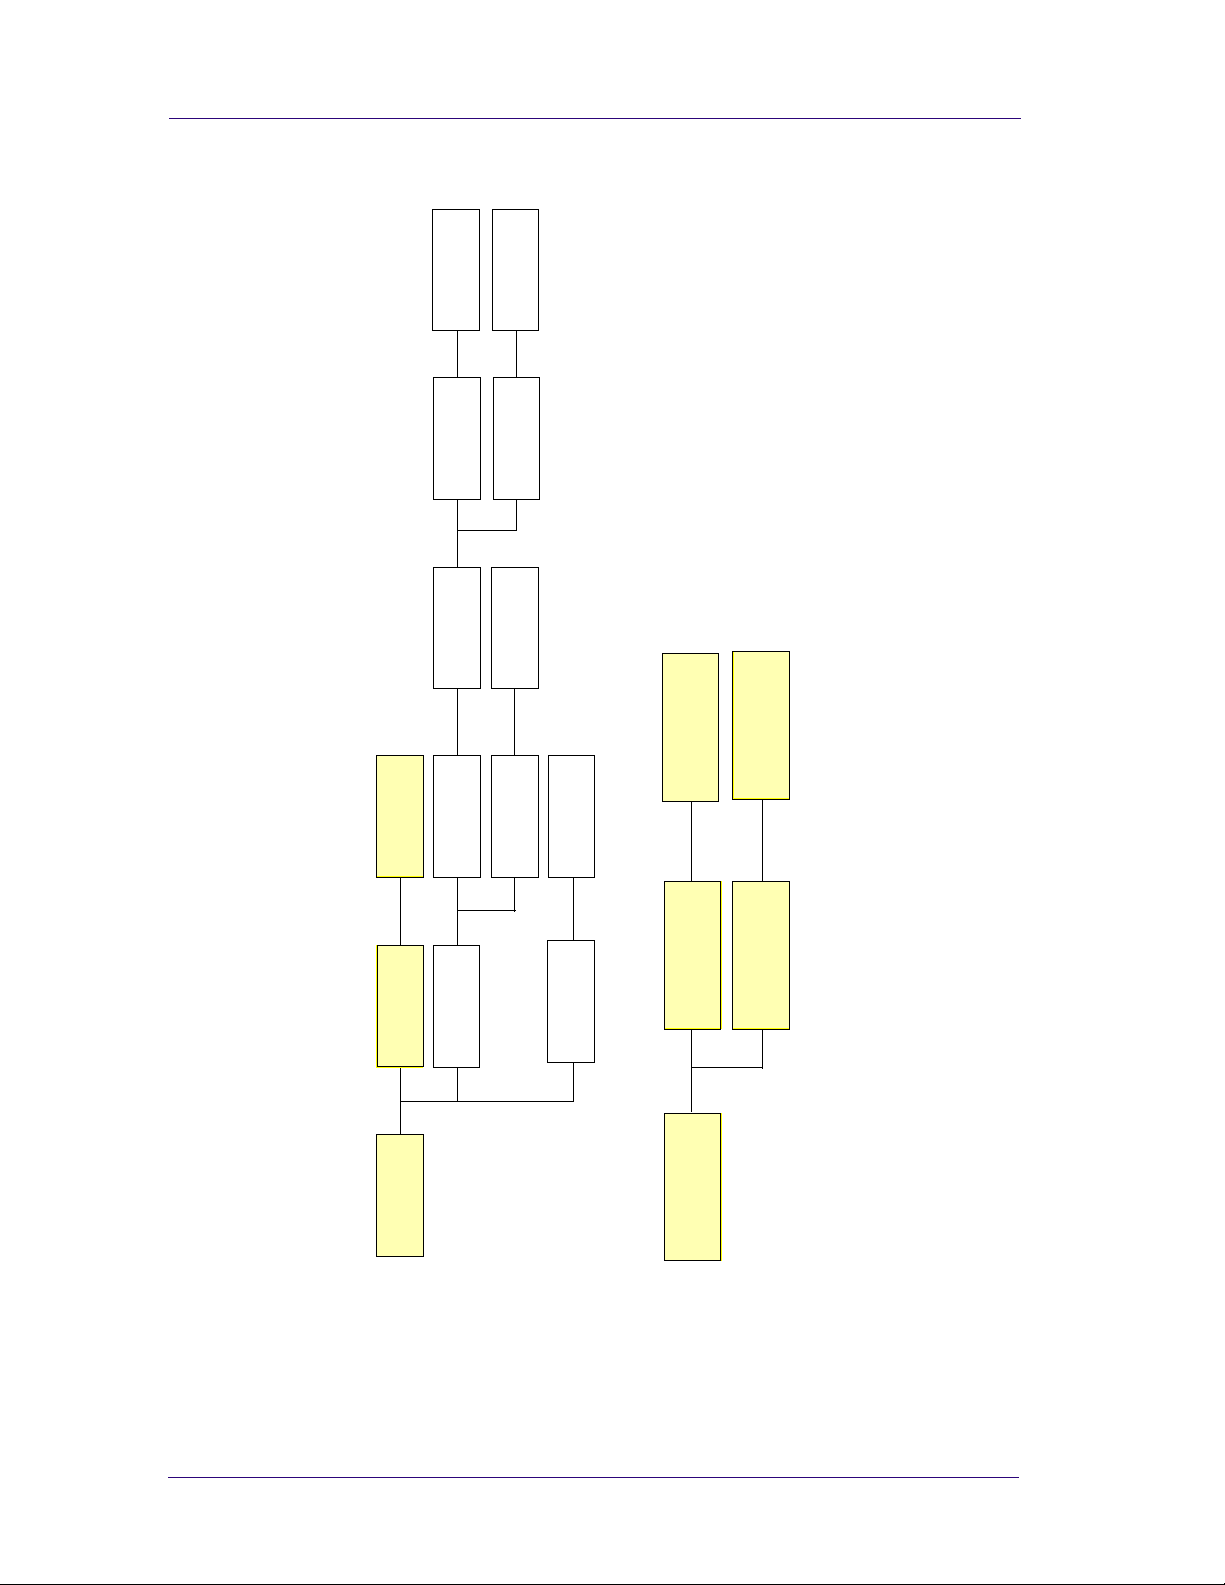
Troubleshooting
255 ... 1, 0
0.13 mm - 12.0 mm
Width
Color
Pen Number 0 ... 15
Pen Number 0 ... 15
@
@
Off, On
TOYO, EuroScale
SWOP, Native
Off, On
Palette A,
Software, Factory,
Pale tte A, P alette B
Palette
Factory
Palette B
@
Merging
Define palette
@
Color Calib.,
Ink Emulation
Ink Limit ing
@
HP-GL/2 S ettin gs
Image Quality
1-16
HP DesignJets 1050C and 1055CM Printers Service Manual
Page 29
Troubleshooting
Normal, Special
Terminator
@
On, Off
7586, HP-GL/2
Cutter
Lang
HP-GL/2,
CALS/G4
Automatic
PostScript,
None
Automatic,
Drying time
255 ... 2, 1 min
JetDirect Menu
Manual
Optimized
Page Accuracy
Maximum
HW Address
DNS Name,
Appletalk, IP Address
Network ID
Configuration
Network Ca r d
Reset Card
See the Setup Guide
Advanced
0.5 min ... 30 mi n
I/O Timeout
Device Setup
HP DesignJets 1050C and 1055CM Printers Service Manual
I/O Setup
1-17
Page 30
Troubleshooting
Create pattern,
Measure pattern
Restore Factory
@
Up, Down
Display contrast
RAM present,
Hard disk, Code Rev
Statistics
PostScript Font Rev
PostScript Code Rev,
Palette, Menu,
Samples
Default menu,
Recover printheads,
Off, On
Printhead alignment
Off, On
Calibration
Display data
Palette, Menu,
Samples
Accuracy
Recalibrate
Short, Full
Print Quality
Usage Report,
Service Config,
HP-GL/ 2 Config,
@
enu,
Test prints
Menu mo de
alette, M
P
onts
F
ples
cript
am
S
ostS
P
1-18
os
em
D
Demos
Utilities
HP DesignJets 1050C and 1055CM Printers Service Manual
Page 31

Troubleshooting
Servi c e C onfigu r a tion Pr int
The Service Configuration Print is a useful tool for troubleshooting
the Printer. The Service Configuration Print contains the following
information about the Printer:
n
General Configuration
n
Printhead Info.
n
Cartridge In fo.
n
Operating Conditions.
n
Calibrations.
n
Maintenance.
n
IIO Configuration.
How to Print the Service Configuration Print
1 Load media (Roll media or at least an A4 Sheet) into the Printer.
2 Once the message "Ready" is displayed on the front-panel, scroll to
the "Printer Setup Options" icon and press the Enter key.
Ready
Ink
CYAN
MAGENTA
YELLOW
BLACK
Printer Setup Options
3 Once inside the "Printer Setup Options" menu, use the Arrow keys
to scroll to the "Utilities" menu display and press the Enter key.
Top
Printer setup options
Pen settings ...
Device setup ...
Utilitie s ...
Demos ...
Imag e qu a lity ...
Back
↑
↓
Enter
Press Enter
4 Once inside the "Utilities" menu, use the Arrow keys to scroll to the
"Test Prints" menu display and press the Enter key.
Top
Utilitie s
Display Contrast ...
Contrast .. .
Recover Printheads ...
Calibr at io ns ...
Test Pr ints ...
Back
↑
↓
Enter
Press Enter
HP DesignJets 1050C and 1055CM Printers Service Manual
1-19
Page 32

Troubleshooting
5 Use the Arrow keys to scroll to "Service Config." and press the
Enter key to print the Service Configuration Print.
Top
Test Pr ints
HP-GL/2 config
Service config
Usage report
Print Quality
Back
↑
↓
Enter
Press Enter
How to Use the Service Configuration Print
The Service Configuration Print is divided into 7 different areas
where you can find information to troubleshoot the Printer .
n
General Configuration - In this area you can find information
regarding the general configuration of the Printer, for example,
the firmware version, amount of memory installed or the capacity
of the Hard Disk Drive.
n
Printhead Info - In this area you can find all the information
regarding the Printheads, for example, the part number, the
manufacturing date or the number of times a certain Printhead
has been inserted in the carriage. This information is useful for
troubleshooting Printhead problems and even knowing if the
Printheads have been used with Non-HP Cartridges.
n
Cartridge In f o - In this area you can find all the information
regarding the Cartridges, for example, the part number, the
manufacturing date or the ink level. This area also shows you if
the customer is using Non-HP Cartridges.
n
Operating Conditions - In this area you can find the level of
humidity and the temperature that the Printer is working in.
n
Calibrations - In this area you can find information on certain
calibrations that have been performed on the Printer. It will also
tell you if a required calibration was performed or not.
n
Maintenance - In this area you can find information relating to
maintenance, for example, the number times the Printer ha s been
powered ON, the number of Carriage cycles or the last System
Error Code that was triggered.
n
IIO Configuration - I n this area you can find information on the
configuration of the JetDirect Card.
1-20
HP DesignJets 1050C and 1055CM Printers Service Manual
Page 33

Sample of the Service Configuration Print
Troubleshooting
HP DesignJets 1050C and 1055CM Printers Service Manual
1-21
Page 34

Troubleshooting
1-22
HP DesignJets 1050C and 1055CM Printers Service Manual
Page 35

System Err or Codes 2
System Err or Codes 1
System Error Codes 2-2
0000D8 XXXXXXXX (Non-Continuable) 2-3
01002D (Non-Continuable) 2-3
010020 (Non-Continuable) 2-3
010021 (Non-Continuable) 2-4
010023 (Non-Continuable) 2-4
010040 2-5
010041 2-5
010042 2-6
010050 XXXXXXXX (Non-Continuable) 2-6
01009X (Continuable) 2-7
02xxxx (Non-Continuable) 2-7
04Cxxx 2-8
048xxx 2-8
060301 2-9
060305 0000000X 2-9
060309 2-10
06030A (Continuable) 2-10
06030B 2-11
070100 XXXXXXXX (Non-Continuable) 2-11
080001 (Non-Continuable) 2-12
09xxxx (Non-Continuable) 2-12
0A0000 2-13
0A0010 2-13
0A0020 2-14
0A0030 2-14
0A0040 2-14
0A0050 (Non-Continuable) 2-15
0A0060 (Non-Continuable) 2-15
0A0070 (Continuable) 2-16
0C0030 2-16
0C0032 (Continuable) 2-17
0C1000 2-17
0C1001 2-17
System Error Codes During Initialization 2-18
2
HP DesignJets 1050C and 1055CM Printers Service Manual
2-1
Page 36

System Error Codes
System Error Codes
Introduction
System error codes are hexa-decimal based numbers generally
caused by internal system errors. The following pages contain a list
of system error codes and their respective descriptions and
recommended corrective actions. Only try one recommended action
at a time and check if the error code has disappeared.
If you have an error code which is not documented in this Service
Manua l or you have an er ror which you cannot res olve, then report
the error to the HP Resp onse Cente r or the nearest HP S upport Of fice.
When reporting the er ror, have the follow ing information ready :
n
Model and Serial Number of the printer.
n
Which firmware revision the printer is using (See Note below).
Check firmware in Utilities / Statistics / Code rev.
n
The complete error number (See Note below).
n
The Service Configuration Print ⇒ Page 1-19.
The Current configuration sheet.
n
n
Which software application the customer is using (name, version, etc.).
NOTE When reporting the System Error Code, make sure that you
supply the full Error Code (including the last 8 numbers where
applicable) and the firmware version. Without this information,
HP Support Personnel cannot help you.
Continuable and Non-Continuable E rror Codes
Some of the Error Codes are continuable, which means you can
press Enter on the front-panel and continue working with the
Printer. Non-Continuable Error Codes do not allow you to continue
working with the Printer, in this case power the Printer OFF and ON
again and see if the System Error disappears. If the Error Code
reappears, then the Printer requires an on-site visit in order to
resolve the problem.
NOTE Even though the customer can continue working with a
Continuable Error Code, an on-site visit should still be planned
to troubleshoot the problem.
2-2
HP DesignJets 1050C and 1055CM Printers Service Manual
Page 37

System Error: 0000D8 XXXXXXXX (Non-Continuable)
System Error Codes
Problem
Description:
Corrective Acti on: Refer to System Error Code 070100.
System Error: 01002D (Non-Continuable)
Problem
Description:
Corrective Acti on: Perform the Electronic Systems Test ⇒ Page 4-5.
System Error: 010020 (Non-Continuable)
Problem
Description:
Corrective Acti on: Try the following:
External Li b rary Error.
The Main PCA cannot communicate with the Carriage.
Firmware DIMM Test failure.
n
Switch the Power OFF from the back of the Printer and
disconnect the Power cord. Reseat the Firmware DIMM,
reconnect the power cord and power On the Printer.
n
If the Error Code appears again, switch the Power OFF from the
back of the Printer, disconnect the power cord and Replace the
Firmware DIMM. Reconnect the power cord and power On the
Printer and check if the Error Code has been resolved.
n
If the System Error continues, replace the Electronics Module ⇒
Page 8-25.
WARNING Only replace one component at a time and check if the error has
gone before replacing another component. Using this procedure
you will be able to determine exactly which component failed.
HP DesignJets 1050C and 1055CM Printers Service Manual
2-3
Page 38

System Error Codes
System Error: 010021 (Non-Continuable)
Problem
Description:
Corrective Acti on: Try the following:
Memory DRAM DIMM Test failure.
n
Switch the Power OFF from the back of the Printer and
disconnect the Power cord. Reseat the DRAM DIMMs (Memory
Modules), reconnect the power cord and power On the Printer.
n
If the Error Code appears again, switch the Power OFF,
disconnect the power cord and Replace the Flash DIMMs
(Memory Modules). Reconnect the power cord and power On the
Printer and check if the Error Code has been resolved.
n
If the Error Code continues, replace the Electronics Module ⇒
Page 8-25.
WARNING Only replace one component at a time and check if the error has
gone before replacing another component. Using this procedure
you will be able to determine exactly which component failed.
System Error: 010023 (Non-Continuable)
Problem
Description:
Corrective Acti on: Try the following:
EEROM Test failure.
n
Clear the EEROM ( ⇒ Page 4-38) and turn the Printer OFF and
ON again from the back of the Printer. If after clearing the
EEROM, the Error Code disappears, make sure you perform the
Calibrations Backup ⇒ Page 5-19.
NOTE Make sure that you select "Electronics Module Replaced" when
performing the Calibrations Backup.
n
If the Error Code continues, replace the Electronics Module ⇒
Page 8-25.
2-4
HP DesignJets 1050C and 1055CM Printers Service Manual
Page 39

System Error: 010040
System Error Codes
Problem
Description:
Corrective Acti on: Try the following:
Error in Paper-axis Encoder quadrature.
n
Check that the Paper-Axis Motor cable is NOT broken or
damaged.
n
Check that the Paper-Axis Motor cable is correctly connected.
n
Replace the Paper-Axis Motor ⇒ Page 8-12.
n
If the Error Code continues, replace the Electronics Module ⇒
Page 8-25.
WARNING Only replace one component at a time and check if the error has
gone before replacing another component. Using this procedure
you will be able to determine exactly which component failed.
System Error: 010041
Problem
Description:
Error in Scan-axis Encoder quadrature.
Corrective Acti on: Try the following:
n
Check that the Encoder Strip is NOT broken or damaged.
n
Replace the Encoder Strip ⇒ Page 8-34.
n
Replace the Carriage Assembly ⇒ Page 8-44.
n
If the Error Code continues, replace the Electronics Module ⇒
Page 8-25.
WARNING Only replace one component at a time and check if the error has
gone before replacing another component. Using this procedure
you will be able to determine exactly which component failed.
HP DesignJets 1050C and 1055CM Printers Service Manual
2-5
Page 40

System Error Codes
System Error: 010042
Problem
Description:
Corrective Acti on: Try the following:
Error in Service Station-axis Encoder quadrature.
n
Check that the Service Station Encoder-Cable is NOT broken or
damaged.
n
Check that the Service Station Encoder-Cable is correctly
connected.
n
Replace the Service Station ⇒ Page 8-8.
n
If the Error Code continues, replace the Electronics Module ⇒
Page 8-25.
WARNING Only replace one component at a time and check if the error has
gone before replacing another component. Using this procedure
you will be able to determine exactly which component failed.
System Error: 010050 XXXXXXXX (Non-Continuable)
Problem
Description:
PostScript Processing Error.
Corrective Acti on: Power the Printer OFF and ON again to see if the System Error
disappears. Try sending the print again.
If the Error Code reappears after sending the print again, then report
the error to the HP response Center or the nearest HP Support
Office, stating the following information.
n
Model and Serial Number of the printer.
n
Which firmware revision the printer is using (See Note below).
Check firmware in Utilities / Statistics / Code rev.
n
The complete error number (See Note below).
n
The Service Configuration Print ⇒ Page 1-19.
The Current configuration sheet.
n
n
Which software application the customer is using (name, version, etc.).
NOTE When reporting the System Error Code, make sure that you
supply the full Error Code (including the last 8 numbers where
applicable) and the firmware version. Without this information,
HP Support Personnel cannot help you.
2-6
HP DesignJets 1050C and 1055CM Printers Service Manual
Page 41

System Error: 01009X (Continuable)
System Error Codes
Problem
Description:
Corrective Acti on: Try the following:
Error in Paper-axis Motor Enc oder
n
Check that the Paper-Axis Motor cable is NOT broken or
damaged.
n
Check that the Paper-Axis Motor cable is correctly connected.
n
Replace the Paper-Axis Motor ⇒ Page 8-12.
n
If the Error Code continues, replace the Electronics Module ⇒
Page 8-25.
WARNING Only replace one component at a time and check if the error has
gone before replacing another component. Using this procedure
you will be able to determine exactly which component failed.
System Error: 02xxxx (Non-Continuable)
Problem
Description:
PostScript/Firmware Err or.
Corrective Acti on: Power the Printer OFF and ON again to see if the System Error
disappears.
If the Error Code reappears, then report the error to the HP response
Center or the nearest HP Support Office, stating the following
information.
n
Model and Serial Number of the printer.
n
Which firmware revision the printer is using (See Note below).
Check firmware in Utilities / Statistics / Code rev.
n
The complete error number (See Note below).
n
The Service Configuration Print ⇒ Page 1-19.
The Current configuration sheet.
n
n
Which software application the customer is using (name, version, etc.).
NOTE When reporting the System Error Code, make sure that you
supply the full Error Code (including the last 8 numbers where
applicable) and the firmware version. Without this information,
HP Support Personnel cannot help you.
HP DesignJets 1050C and 1055CM Printers Service Manual
2-7
Page 42

System Error Codes
System Error: 04Cxxx
Problem
Description:
Corrective Acti on: Try the following:
EIO Accessories (EIO Card/Hard Disk Drive) Error.
n
Press ENTER and switch the printer OFF. Remove the Hard Disk
Drive (if installed) and make sure that the EIO card is installed
correctly by pushing it firmly inwards and checking that the two
installation screws are completely tightened. Switch the printer
ON again. If this error code continues to appear then replace the
EIO card.
n
If this Error Code disappeared after removing the Hard Disk
Drive, then switch the Printer OFF and reinstall the Hard Disk
Drive, making sure that the two installation screws are
completely tightened. Switch the Printer ON again. If this Error
Code reappears, then the Hard Disk Drive could be faulty.
Replace the Hard Disk Drive.
n
If this system error continues to appear after replacing the EIO
card or the Hard Disk Drive, then r e place the E lectronics M odule
⇒ Page 8-25.
System Error: 048xxx
Problem
Description:
The EIO card is from a third party vendor and may not be fully
compliant with the IIO Protocol specification 2.0 OR the EIO Card
firmware is not updated.
Corrective Acti on: Try the following:
n
Check with the third party vendor. If the EIO card is not
compliant with the IIO Protocol specification 2.0 then you must
install a new EIO card which is compliant.
n
Update the EIO Card firmware.
2-8
HP DesignJets 1050C and 1055CM Printers Service Manual
Page 43

System Error: 060301
System Error Codes
Problem
Description:
Corrective Acti on: Try the following:
One of the Printheads has an Internal Electrical Problem.
n
Remove all the Printheads and clean the flex contacts on the
Printheads and in the Carriage Assembly (Refer to Chapter 2).
n
Perform the Electronic Systems Test ⇒ Page 4-5.
n
Make sure that the T railing Cable is connected correctly.
n
Replace the Trailing Cable ⇒ Page 8-39.
n
Replace the Carriage Assembly ⇒ Page 8-44.
n
If the error code continues, replace the Electronics Module ⇒
Page 8-25.
WARNING Only replace one component at a time and check if the error has
gone before replacing another component. Using this procedure
you will be able to determine exactly which component failed.
System Error: 060305 0000000X
Problem
Description:
Thermal Shutdown error (one of the Printheads has gone above the
maximum T e mperature).
Error Data:
00000000
00000001
00000002
00000003
Corrective Acti on: Try the following:
n
Replace the failing Printhead.
n
If the problem remains after replacing the failing Printhead then
Í
Cyan Printhead Failed.
Í
Magenta Printhead Failed.
Í
Yellow Printhead Failed.
Í
Black Printhead Failed.
check if the customer is using a 3rd Party RIP. If a 3rd Party RIP
is being used, check the Print Settings in the RIP or try printing
one of the Internal Demo Prints to see if the problem is solved
without the RIP.
HP DesignJets 1050C and 1055CM Printers Service Manual
2-9
Page 44

System Error Codes
System Error: 060309
Problem
Description:
Corrective Acti on: Try the following:
Problem with setting the Voltage of the Printheads.
n
Remove ALL the Printheads and clean the flex contacts on the
Printheads and in the Carriage Assembly (Refer to Chapter 2).
n
Perform the Electronic Systems Test ⇒ Page 4-5.
n
Replace ALL the Printheads.
n
Replace the Trailing Cable ⇒ Page 8-39.
n
Replace the Carriage Assembly ⇒ Page 8-44.
n
If the Error Code continues, replace the Electronics Module ⇒
Page 8-25.
WARNING Only replace one component at a time and check if the error has
gone before replacing another component. Using this procedure
you will be able to determine exactly which component failed.
System Error: 06030A (Continuable)
Problem
Description:
Corrective Acti on: Try the following:
Error in finding the Mark Encoder.
n
Clean the Mark Encoder if necessary (use the Overdrive Cleaning
Utility to position the Mark Encoder ⇒ Page 4-37).
n
Clean the Line Sensor (located on the Carriage Assembly).
n
Perform the Line Sensor Calibration ⇒ Page 5-9.
n
Perform the Mark Encoder Calibration ⇒ Page 5-13.
n
Replace the Trailing Cable ⇒ Page 8-39.
n
Replace the Carriage Assembly ⇒ Page 8-44.
n
If the Error Code continues, replace the Electronics Module ⇒
Page 8-25.
WARNING Only replace one component at a time and check if the error has
gone before replacing another component. Using this procedure
you will be able to determine exactly which component failed.
2-10
HP DesignJets 1050C and 1055CM Printers Service Manual
Page 45

System Error: 06030B
System Error Codes
Problem
Description:
Corrective Acti on: Try the following:
The Ambient Temperature measured is out of the normal range.
n
Make sure that the Ambient temperature is within the allowed
range (between 0 and 55 Degrees Centigrade).
n
Replace the Electronics Module ⇒ Page 8-25.
System Error: 070100 XXXXXXXX (Non-Continuable)
Problem
Description:
Corrective Acti on: Power the Printer OFF and ON again to see if the System Error
Firmware Er ror.
disappears.
If the Error Code reappears, then report the error to the HP response
Center or the nearest HP Support Office, stating the following
information.
n
Model and Serial Number of the printer.
n
Which firmware revision the printer is using (See Note below).
Check firmware in Utilities / Statistics / Code rev.
n
The complete error number (See Note below).
n
The Service Configuration Print ⇒ Page 1-19.
The Current configuration sheet.
n
n
Which software application the customer is using (name, version, etc.).
NOTE When reporting the System Error Code, make sure that you
supply the full Error Code (including the last 8 numbers where
applicable) and the firmware version. Without this information,
HP Support Personnel cannot help you.
HP DesignJets 1050C and 1055CM Printers Service Manual
2-11
Page 46

System Error Codes
System Error: 080001 (Non-Continuable)
Problem
Description:
Corrective Acti on: Refer to System Error Code 070100.
System Error: 09xxxx (Non-Continuable)
Problem
Description:
Corrective Acti on: Try the following:
PostScript Error.
EIO Accessories (EIO Card/Hard Disk Drive) Error.
n
Swit ch the P rin t er OF F a nd O N a ga in an d w a it fo r t he in it ia liza ti o n.
n
If the Error code continues to appear, switch the Printer OFF.
Remove the EIO Card (if installed) and make sure that the Hard
Disk Drive is installed correctly by pushing it firmly inwards and
checking that the two installation screws are completely
tightened. Switch the Printer ON again. If the error codes 09Axxx
or 09Bxxx appear then replace the Hard Disk Drive.
n
If the Error Code disappeared after removing the EIO Card, then
switch the Printer OFF and reinstall the EIO Card, making sure
that the two installation screws are completely tightened. Switch
the Printer ON again. If the Error Code reappears, then the EIO
Card could be faulty. Replace the EIO Card.
n
If Error Code 09Cxxx appears after initialization, then replace the
Electronics Module ⇒ Page 8-25.
n
Once the Error Code has been solved, print an Internal Demo
Print to make sure that the Hard Disk Drive is functioning
correctly. If the Error Code reappears, then use the above
information to troubleshoot the problem.
2-12
HP DesignJets 1050C and 1055CM Printers Service Manual
Page 47

System Error: 0A0000
System Error Codes
Problem
Description:
Corrective Acti on: Try the following:
The Air Pressure is below the minimum requirement.
n
Check all the cables of the APS and make sure they are correctly
connected and are NOT damaged.
n
Check all the tubes of the APS and Tubes System and make sure
they are correctly connected and are NOT pinched or damaged.
n
Check that the Air Tube from the APS is correctly connected to
the Tubes System.
n
Faulty APS Sensor, APS Valve or APS Pump. Replace the
complete APS ⇒ Page 8-20.
n
Replace ONE Ink Cartridge at a time, checking if the error code
disappears.
WARNING Only replace one component at a time and check if the error has
gone before replacing another component. Using this procedure
you will be able to determine exactly which component failed.
System Error: 0A0010
Problem
Description:
Corrective Acti on: Try the following:
Problem in Pressurizing the Air System.
n
Replace ONE Ink Cartridge at a time, checking if the error code
disappears.
n
Check all the cables of the APS and make sure they are correctly
connected and are NOT damaged.
n
Check all the tubes of the APS and Tubes System and make sure
they are correctly connected and are NOT pinched or damaged.
n
Faulty APS Sensor, APS Valve or APS Pump. Replace the
complete APS ⇒ Page 8-20.
WARNING Only replace one component at a time and check if the error has
gone before replacing another component. Using this procedure
you will be able to determine exactly which component failed.
HP DesignJets 1050C and 1055CM Printers Service Manual
2-13
Page 48

System Error Codes
System Error: 0A0020
Problem
Description:
Corrective Acti on: Try the following:
Error in Calibrating the APS Sensor.
n
Check all the cables of the APS and make sure they are correctly
connected and are NOT damaged.
n
Check all the tubes of the APS and Tubes System and make sure
they are correctly connected and are NOT pinched or damaged.
n
Faulty APS Sensor or APS Valve. Replace the complete APS ⇒
Page 8-20.
System Error: 0A0030
Problem
Description:
Corrective Acti on: Try the following:
Problem in Depressurizing Air System.
n
Check the APS for any signs of Ink. Also inspect ALL Ink
Cartridges for any signs of leaking (the bottom valve of the Ink
Cartridge will contain ink).
n
If there is Ink Leakage, replace ALL Ink Cartridges, the APS ( ⇒
Page 8-20) and the Tubes System ( ⇒ Page 8-53).
System Error: 0A0040
Problem
Description:
Corrective Acti on: Try the following:
Ink Tubes Initialization Failure Due to Low Air Pressure.
n
Check all the cables of the APS and make sure they are correctly
connected and are NOT damaged.
n
Check all the tubes of the APS and Tubes System and make sure
they are correctly connected and are NOT pinched or damaged.
n
Replace ONE Ink Cartridge at a time, checking if the error code
disappears.
n
Faulty APS Sensor or APS Pump. Replace the complete APS ⇒
Page 8-20.
2-14
HP DesignJets 1050C and 1055CM Printers Service Manual
Page 49

System Error: 0A0050 (Non-Continuable)
System Error Codes
Problem
Description:
Corrective Acti on: Try the following:
The Printer has detected a leak in the Tubes System before the life
of the System.
n
The leak detector could have been triggered due to condensation
in the Printer . Power OFF the Printer and allow the Printer to dry
for 15 minutes. Power ON the Printer and check if the error code
has disappeared.
n
If the Error Code reappears, replace the complete Tubes System
(SRK) ⇒ Page 8-53.
WARNING Only replace one component at a time and check if the error has
gone before replacing another component. Using this procedure
you will be able to determine exactly which component failed.
System Error: 0A0060 (Non-Continuable)
Problem
Description:
Corrective Acti on: Try the following:
The Printer has detected a leak in the Tubes System after the life of
the System.
n
The leak detector could have been triggered due to condensation
in the Printer . Power OFF the Printer and allow the Printer to dry
for 15 minutes. Power ON the Printer and check if the error code
has disappeared.
n
If the error code reappears, replace the complete Tubes System
(SRK) ⇒ Page 8-53.
WARNING Only replace one component at a time and check if the error has
gone before replacing another component. Using this procedure
you will be able to determine exactly which component failed.
HP DesignJets 1050C and 1055CM Printers Service Manual
2-15
Page 50

System Error Codes
System Error: 0A0070 (Continuable)
Problem
Description:
Corrective Acti on: Try the following:
NOTE Make sure that you s elect "Tubes Replaced" when performing
The Backup EEROM contents stored in the Tubes System are not
consistent with the ones required by the firmware.
n
Perform the Calibrations Backup ⇒ Page 5-19.
the Calibrations Backup.
System Error: 0C0030
Problem
Description:
Corrective Acti on: Try the following:
Bad Drop Detector.
n
Check that the Drop Detector Cable is NOT broken or damaged.
n
Check that the Drop Detector cable is correctly connected to the
Service Station Cable.
n
Remove the Drop Detector and make sure that there are no
obstacles inside which are blocking the sensor.
n
Replace the Drop Detector Assembly ⇒ Page 8-10.
n
If the Error Code continues, replace the Electronics Module ⇒
Page 8-25.
WARNING Only replace one component at a time and check if the error has
gone before replacing another component. Using this procedure
you will be able to determine exactly which component failed.
2-16
HP DesignJets 1050C and 1055CM Printers Service Manual
Page 51

System Error: 0C0032 (Continuable)
System Error Codes
Problem
Description:
Corrective Acti on: Try the following:
Drop Detector not Calibrated for all Printheads.
n
Perform the Service Station Calibration ⇒ Page 5-11.
n
Replace the Drop Detector Assembly ⇒ Page 8-10.
n
If the Error Code continues, replace the Electronics Module ⇒
Page 8-25.
WARNING Only replace one component at a time and check if the error has
gone before replacing another component. Using this procedure
you will be able to determine exactly which component failed.
System Error: 0C1000
Problem
Description:
Corrective Acti on: Try the following:
Primer not Calibrated.
n
Perform the Service Station Calibration ⇒ Page 5-11.
n
Make sure that the Primer Arm is not damaged. If the Primer
Arm is damaged, replace the Service Station ⇒ Page 8-8.
n
Replace the Electronics Module ⇒ Page 8-25.
System Error: 0C1001
Problem
Description:
Corrective Acti on: Try the following:
Primer Shutdown Error.
n
Check that the Primer Stepper-Motor Cable is NOT broken or
damaged and that the Primer arm moves freely from side to side.
n
Replace the Service Station ⇒ Page 8-8.
n
If the Error Code continues, replace the Electronics Module ⇒
Page 8-25.
WARNING Only replace one component at a time and check if the error has
gone before replacing another component. Using this procedure
you will be able to determine exactly which component failed.
HP DesignJets 1050C and 1055CM Printers Service Manual
2-17
Page 52

System Error Codes
System Error Codes During Initialization
The following System Error Codes will only appear during the
Initialization process when you power ON the Printer.
System Error: 0B0000
Problem
Description:
Corrective Acti on: Try the following:
Bad Ambient Temperature measured.
n
Make sure that the Ambient temperature is within the allowed
range (between 0 and 55 Degrees Centigrade).
n
Replace the Electronics Module ⇒ Page 8-25.
System Error: 0B0001
Problem
Description:
Corrective Acti on: Replace the Electronics Module ⇒ Page 8-25.
System Error: 0B0002
Problem
Description:
Corrective Acti on: Try the following:
Bad Humidity read.
Bad IDS pressure re a d.
n
Check that the cable from the Ink Supply Station (ISS) PCA to
the Ink Supply Station is correctly connected.
n
Check that the Air Pressurization System Sensor Cable is
correctly connected and is NOT damaged.
n
Check all the tubes of the APS and make sure they are NOT
pinched or damaged.
n
Faulty APS Sensor. Replace the complete APS ⇒ Page 8-20.
n
If the error code continues, replace the Electronics Module ⇒
Page 8-25.
WARNING Only replace one component at a time and check if the error has
gone before replacing another component. Using this procedure
you will be able to determine exactly which component failed.
2-18
HP DesignJets 1050C and 1055CM Printers Service Manual
Page 53

System Error: 0B0003
System Error Codes
Problem
Description:
Corrective Acti on: Replace the Electronics Module ⇒ Page 8-25.
System Error: 0B0004
Problem
Description:
Corrective Acti on: Try the following:
ADC0 Internal channels check Failure.
Unable to detect Pump.
n
Check that the cable from the Ink Supply Station (ISS) PCA to
the Ink Supply Station is correctly connected.
n
Faulty APS Pump. Replace the complete APS ⇒ Page 8-20 .
n
If the error code continues, replace the Electronics Module ⇒
Page 8-25.
WARNING Only replace one component at a time and check if the error has
gone before replacing another component. Using this procedure
you will be able to determine exactly which component failed.
System Error: 0B0005
Problem
Description:
Corrective Acti on: Try the following:
Unable to detect Valve.
n
Check that the cable from the Ink Supply Station (ISS) PCA to
the Ink Supply Station is correctly connected.
n
Faulty APS Valve. Replace the complete APS ⇒ Page 8- 20.
n
If the error code continues, replace the Electronics Module ⇒
Page 8-25.
WARNING Only replace one component at a time and check if the error has
gone before replacing another component. Using this procedure
you will be able to determine exactly which component failed.
HP DesignJets 1050C and 1055CM Printers Service Manual
2-19
Page 54

System Error Codes
System Error: 0B0006
Problem
Description:
Corrective Acti on: Turn the Printer OFF and disconnect the trailing cable. Check that
The Trailing Cable has been incorrectly connected OR the fuse in
the Electronics Module has been burned.
the ends of the Trailing Cable are flat and are not damaged or bent.
Reconnect the Trailing Cable correctly, making sure it is pushed in
firmly (Refer to the instructions on Page 8-39). Power ON the
Printer and check if the Error Code disappears. If the Error Code
continues, replace the Electronics Module (Refer to the instructions
on Page 8-25), making sure you take care when you reconnect the
Trailing Cable.
WARNING PLEASE TAKE CARE WHEN CONNECTING THE
TRAILING CABLE TO THE ELECTRONICS MODULE.
INCORRECT INSTALLATION WILL BURN THE FUSE IN
THE ELECTRONICS MODULE, CAUSI NG THE COMPLETE
REPLACEM ENT OF THE ELEC TRO NICS MODUL E.
System Error: 0B0007
Problem
Description:
Unable to detect Vacuum Fan.
Corrective Acti on: Try the following:
n
Make sure that the Vacuum Fan is connected correctly to the
Electronics Module.
n
Turn the Printer OFF and disconnect the V acuum Fan from the
Electr onics Module. Connect a
New
Vacuum Fan to the
Electronics Module and power ON the Printer. If the
Fan functions correctly without any Error Codes then remove the
Old
Vacuum Fa n f rom the Pr inter an d install t he
n
If the New Vacuum Fan does not function correctly either, then
replace the Electronics Module ⇒ Page 8-25.
System Error: 0B0008
Problem
Description:
Corrective Acti on: Replace the Electronics Module ⇒ Page 8-25.
Unable to detect Cooling Fan.
New
New
one.
Vacuum
2-20
HP DesignJets 1050C and 1055CM Printers Service Manual
Page 55

System Error: 0B0009
System Error Codes
Problem
Description:
Corrective Acti on: Try the following:
Unable to detect Aerosol Fan (Included on the Right Cover).
n
Make sure that the Aerosol Fan is connected correctly to the
Electronics Module.
n
Turn the Pr inter OFF and disconnect the A erosol Fan from the
Electronics Modul e. Connect a
new Right Cover) to the Electronics Module and power ON the
Printer. If the
New
Error Codes then remove the
and install the
n
If the New Aerosol Fan does not function correctly either, then
replace the Electronics Module ⇒ Page 8-25.
System Error: 0B000A
Problem
Description:
Primer Shutdown Error.
New
Aerosol Fan (comes with the
Aerosol Fan functions correctly without any
Old
Aerosol Fan from the Print er
New
one.
Corrective Acti on: Try the following:
n
Check that the Primer Stepper-Motor Cable is NOT broken or
damaged and that the Primer arm moves freely from side to side.
n
Replace the Service Station ⇒ Page 8-8.
n
If the Error Code continues, replace the Electronics Module ⇒
Page 8-25.
WARNING Only replace one component at a time and check if the error has
gone before replacing another component. Using this procedure
you will be able to determine exactly which component failed.
HP DesignJets 1050C and 1055CM Printers Service Manual
2-21
Page 56

System Error Codes
System Error: 0B000B
Problem
Description:
Corrective Acti on: Try the following:
Pump or Pressure Sensor not working.
n
Check that the cable from the Ink Supply Station (ISS) PCA to
the Ink Supply Station is correctly connected.
n
Check that the Air Pressurization System Sensor Cable is
correctly connected and is NOT damaged.
n
Check all the tubes of the APS and make sure they are NOT
pinched or damaged.
n
Faulty APS Sensor, APS Valve or APS Motor. Replace the
complete APS ⇒ Page 8-20.
n
If the error code continues, replace the Electronics Module ⇒
Page 8-25.
WARNING Only replace one component at a time and check if the error has
gone before replacing another component. Using this procedure
you will be able to determine exactly which component failed.
System Error: 0B000C
Problem
Description:
Corrective Acti on: Replace the Electronics Module ⇒ Page 8-25.
System Error: 0B000D
Problem
Description:
Corrective Acti on: Replace the Electronics Module ⇒ Page 8-25.
Serial Device ADC test failure.
24 V source test failure.
2-22
HP DesignJets 1050C and 1055CM Printers Service Manual
Page 57

HP No.80 Ink Supplies
Troubleshooting
What are HP No.80 S upplies? 3-2
Ink Cartridges 3-2
Printheads and Printhead Cleaners 3-2
Identifying the Components 3-3
General Information About HP No.80 Supplies 3-4
Some Gener al Precautions When Handling HP No.80 Supplies 3-5
Priming the Ink System 3-6
When Should You Replace the HP No.80 Supplies? 3-6
The Front Panel Display 3-7
Obtaining Ink Cartridge Information 3-8
Obtaini ng Printhead Info rm ation 3-9
Ink Cartridge Status Messages 3-11
Ink Cartridge Status While Printing 3-11
Ink Cartridge Status While Replacing 3-12
Printhead Status Messages While Printing 3-13
Printhead Status Messages While Replacing 3-15
Summary of Solving HP No.80 Supplies Problems 3-17
Carriage Interconnect Wiper 3-18
3
3
HP DesignJets 1050C and 1055CM Printers Service Manual
3-1
Page 58

HP No.80 Ink Supplies Troubleshooting
What are HP No.80 Supplies?
For each of the four ink colors used in the printer, there are three
separate components. The printhead and the printhead cleaner are
supplied together, and the ink cartridge is supplied separately . All of
these components are called the HP No.80 Supplies. They are coded
with an HP No.80 selection number to identify the correct
replacement supplies.
80
Expanding Possibilities
80
Ironk
Pojfdjop ernk aure
Pojfdjop ernk Chorme
Printhead and
Printhead Clea ner
Pojfdjop ernk aure
Expanding Possibilities
80
Ink erov
Caps
Ink cartridge
kheuhg sfrfefg
kheuhg sfrfefg
80
80
Ink Cartridge
Ink Cartridges
The HP No.80 ink cartridges for the HP DesignJet 1050C and
1055CM printers require no maintenance or cleaning. As long as
each ink cartridge is inser ted c orre ctly into its slot, the ink will flow
to the printheads.
The front panel displays the status of the Ink Cartridge. With the
front panel, detailed information can be checked on the Ink
Cartridges.
3-2
Printheads and Printhead Cleaners
The HP No.80 printheads are extremely durable and do not need to
be replaced every time an ink cartridge is replaced. They are
independent of the ink cartridges and will continue giving excellent
image quality results even if the ink cartridges are low on ink. See
page 3-6, When Should You Replace the HP No.80 Supplies?
If you notice a decline in print quality such as lines or dots missing
from text / graphics, go to page 6-13, Troubleshooting Print Quality
Problems.
HP DesignJets 1050C and 1055CM Printers Service Manual
Page 59

HP No.80 Ink Supplies Troubleshooting
HP DESIGNJET
1050 C
The HP No.80 printhead cleaners keep the printheads in good
condition and they prevent them from being damaged when the
printer is not active. They service the printhead, making sure it’s
always ready to be used.
Identifying the Components
The following illustration will help you identify the components of
the HP No.80 supplies.
Printhead
Ink Cartridge
Printhead Cleaner
B
MY
C
C6074074
HP DesignJets 1050C and 1055CM Printers Service Manual
3-3
Page 60

HP No.80 Ink Supplies Troubleshooting
General Informati on About HP No.80 Supplies
For optimum results from the printer and modular ink delivery
system always follow these guidelines when handling the HP No.80
supplies:
n
Always install the ink cartridges, printheads and printhead
cleaners before the expire date, which is on the packaging.
n
Install a new printhead cleaner every time you change a
printhead.
n
Allow the printer and printhead cleaners to automatically clean
the printheads.
n
Install ink cartridges, printheads and printhead cleaners in their
color-coded slots.
n
Follow the instructions on the front panel of the printer during
installation.
n
A void unnecessary removal of the ink cartridges and printheads.
n
When turning off the printer always use the power Off button on
the front panel. The printheads are then stored correctly which
prevents them from drying out.
n
The ink cartridges should never be removed while the printer is
printing. They should only be removed when the printer is ready
for you to replace them. The front panel will guide you through
the removal and installation procedure. See page 3-6, When
Should You Replace the HP No.80 Supplies?
3-4
HP DesignJets 1050C and 1055CM Printers Service Manual
Page 61

CAUTION
Some General Precautions When Handl ing HP No.80
Supplies
Do no t touch, wipe o r attempt to cle an the printh ead nozzles. This can
damage the printhead.
Do not touch, wipe or attempt
to clean t h e printhead nozzles.
This can damage the printhead.
Handle the HP No.80 supplies with care. In particular the printhead,
which is a high precision device and must be handled carefully.
n
Do not touch the printhead nozzles.
HP No.80 Ink Supplies Troubleshooting
C6074297a
n
Do not put the printhead down on the nozzles.
n
Do not be rough when handling the printheads. Always set them
down gently.
n
Do not drop the printheads.
n
Proper handling will assure optimum performance throughout the
printhead life.
n
The printhead cleaner should always be handled and stored
upright to avoid a potential spillage of ink.
n
Do not touch the end of the ink cartridge which is inserted into
the printer as there may be a small amount of ink on the
connection.
n
Avoid storing partially used ink cartridges on their ends.
HP DesignJets 1050C and 1055CM Printers Service Manual
3-5
Page 62

HP No.80 Ink Supplies Troubleshooting
Priming the Ink System
When the customer first receives the printer, it is supplied with a s et
of four setup printheads pre-installed in the printhead carriage.
These setup printheads are used for the priming of the tubes in the
modular ink delivery system. The customer must not remove the
setup printheads from the carriage without following the procedures
in the Setup Guide.
When the Printer is powered ON for the first time, the printer will
automatically perform the priming process. Without the priming
process, the customer will NOT be able to use the printer.
Why does the Printer require priming:
n
The Tubes System is empty when the customer receives the
Printer.
n
The Tubes System has to be pressurized and filled with ink,
ejecting any air bubbles.
CAUTION If the Printing Printheads are installed in the carriage during the
priming process, they will be rejected and the front panel will
show the "Wrong Model" message.
When Should You Replace the HP No.80 Supplies?
When to change the HP No.80 supplies is mostly determined by you
with guidance from the front panel. In conjunction with the
messages displayed in the front panel and the message explanations
in this chapter, you will be able to choose for yourself when is the
right time to change the HP No.80 supplies.
The printer will also display the ink level and will tell you when the
ink supply is low, very low or empty . This means you have
constantly updated information about the HP No.80 supplies.
Printhead life is anticipated to be 700ml or twelve months in the
printer, whichever occurs first, provided that the printhead is used
under normal operating conditions (using HP Ink Cartridges only)
and its “install before date” has not lapsed. However results vary
depending on the print quality setting being used.
3-6
HP DesignJets 1050C and 1055CM Printers Service Manual
Page 63

HP No.80 Ink Supplies Troubleshooting
The Front Panel Display
The front panel display has a dedicated area to report the status of
your HP No.80 supplies. There are two different screens:
n
One screen displays information on the ink cartridges:
Printer Stat us
Ink Cartri dge Status
n
The other screen displays information on the printheads and the
Ready
Ink
CYAN
MAGENTA
YELLOW
BLACK
Low
Very Lo w
printhead cleaners.
Printer Status
Printhead Status
n
During normal operation the front panel displays the ink levels,
Printing
CYAN
MAGENTA
YELLOW
BLACK
QualityMonitor
Printhead
Monitor
OK
OK
OK
however if there is a printhead status message such as: monitor
for example see page 3-13, Printhead Status Messages While
Printing, the printhead message will take precedence. This is the
case until you replace the printhead. If you need to see the ink
levels when they are not being displayed you can use the ink
systems menu to check them.
HP DesignJets 1050C and 1055CM Printers Service Manual
3-7
Page 64

HP No.80 Ink Supplies Troubleshooting
Obtaining Ink Cartridge Information
1 To get information on the ink cartridges press the Top key on the
front panel to go to the main menu.
Ready
Ink
CYAN
MAGENTA
YELLOW
BLACK
2 Press the ↑ or ↓ key until the front panel displays the ink system
menu. Press Enter.
Ready
Ink
CY AN
MAGENTA
YELLOW
BLACK
Very Low
3 Press the ↑ or ↓ key until the front panel highlights “Ink Cartridge
info”. Press the Enter key.
Ink System options
Replace printhead
Replace Ink cartridge
Ink cartridge info...
Printhead info...
4 Press the ↑ or ↓ key until the front panel highlights the color that
you want to see information on. Press the Enter key.
Ink System options
Cyan cart. info...
Magenta cart. info...
Yellow cart. info...
Black cart. info...
3-8
HP DesignJets 1050C and 1055CM Printers Service Manual
Page 65

HP No.80 Ink Supplies Troubleshooting
5 The front panel displays information on the selected ink cartridge.
Cyan cart. info
HP No.80 ink cartridge
Ink level=87%
Capacity=350ml
Part number=C4871A
Mfg. month=5/1998
The information supplied is:
n
The make of the ink cartridge (HP No.80 are recommended).
n
The percentage of how much ink is remaining.
n
Original capacity of the ink cartridge in milliliters.
n
Re-order part number of the ink cartridge.
n
The month and year that the ink cartridge was manufactured.
Obtainin g Pr inthead Inform ation
1 To get information on your printheads, press the Top key on the
front panel to go to the main menu.
Ready
Ink
CYAN
MAGENTA
YELLOW
BLACK
2 Press the ↑ or ↓ key until the front panel displays the ink system
menu. Press Enter.
Ready
Ink
CY AN
MAGENTA
YELLOW
BLACK
Very Low
Ink System Menu
HP DesignJets 1050C and 1055CM Printers Service Manual
3-9
Page 66

HP No.80 Ink Supplies Troubleshooting
3 Press the ↑ or ↓ key until the front panel highlights “Printhead
info”. Press the Enter key.
Ink System options
Replace printhead
Repl ace Ink ca r tr idge
Ink cartridge info...
Printhea d info . ..
4 Press the ↑ or ↓ key until the front panel highlights the color that
you want to see information on. Press the Enter key.
Printhead info.
Cya n prin thead info...
Magenta printh ead inf o...
Yellow printhead info...
Black printhead info...
5 The front panel displays information on the selected printhead.
Cyan printhead info
HP No.80 printhead
Status=OK
Part Number=C4821AW
Usage time=50h
Ink consumed=3 m l
Mfg. month=5/1998
The information supplied is:
n
The make of the printheads (HP No.80 are recommended).
n
The current status of the printhead.
n
Re-order part number of the printhead.
n
The time that the printhead has been operating in the printer.
n
How much ink has been consumed by the printhead. Note: It is
possible for a printhead to consume more than one ink cartridge.
n
The year and the month that the printhead was manufactured.
3-10
HP DesignJets 1050C and 1055CM Printers Service Manual
Page 67

HP No.80 Ink Supplies Troubleshooting
Ink Cartridge Status Messages
Stat us Bars The front panel displays four horizontal bars. These bars represent
how much ink is remaining in the ink cartridges: as ink is used up
the bars get shorter in length. To see how much ink you have
remaining, go to the ‘Ink Cartridge Info’ menu. See page 3-8,
Obtaining Ink Cartridge Information
Ink Cartridge Status While Printing
Low The Low message is an early warning sign and it is advisable that
new supplies should be obtained of that particular color. The
amount of ink remaining in the Ink Cartridge depends on it’s
capacity:
n
Approx. 43.8 ml remaining in a 175 ml Ink Cartridge.
n
Approx. 63.8 ml remaining in a 350 ml Ink Cartridge.
To check how much ink is remaining, refer to page 3-8, Obtaining
Ink Cartridge Information.
Very Lo w When the Very Low message is displayed, overnight printing
should not be attempted. Changing the Ink Cartridge is strongly
recommended to prevent the printer from stopping halfway through
a print. The amount of ink remaining in the Ink Cartridge will be
approx. 25 ml.
To check how much ink is remaining, refer to page 3-8, Obtaining
Ink Cartridge Information.
Empty The printer will stop and will not be able to continue printing until a
new ink cartridge has been installed. If this occurs halfway through
printing an image, you should check the quality of this image, as
stopping mid-plot can affect the print.
HP DesignJets 1050C and 1055CM Printers Service Manual
3-11
Page 68

HP No.80 Ink Supplies Troubleshooting
Ink Cartridge Status While Replacing
The printer can report the following status messages while the Ink
Cartridge is being replaced:
Faulty The ink cartridge is faulty and must be replaced, before you can
continue printing.
Reseat The ink cartridge is having continuity problems. Try reseating the
Ink Cartridge.
Wrong Model The ink cartridge is not recognized by the printer and needs to be
replaced before the printer can continue.
Unknown The ink cartridge installed is not approved and must be replaced by
a genuine HP No.80 Ink Cartridge.
NOTE The main actions for all 4 status messages is as follows:
1 Reseat the Ink Cartridge.
2 If reseating does not resolve the status message, replace the Ink
Cartridge.
3 If the Status messages continue to appear, even after replacing the
Ink Cartridge, replace the complete Tubes System ⇒ Page 8-53.
3-12
HP DesignJets 1050C and 1055CM Printers Service Manual
Page 69

HP No.80 Ink Supplies Troubleshooting
Printhead Status Messages While Printing
Detailed below are the printhead status messages that may be
displayed while printing.
OK The printhead is operating correctly and will provide an acceptable
level of print quality . To find more information on the printheads,
refer to page 3-9, Obtaining Printhead Information.
Ready/Replace The front panel displays Ready and the printhead status is
REPLACE. The printer is giving an early warning that there may be
a degradation of print quality. The Printer has detected more than 4
black nozzles or 7 color nozzles out in 5 out of every 8 servicing
procedures.
A new printhead should be bought. Depending on the print mode
you are using (best, normal or draft) you may still be able to print
with an acceptable print quality, there may be however, a slight loss
in speed. Refer to the table below for more details.
Ready
CYAN
MAGENTA
YELLOW
BLACK
Printhead
Replace
OK
OK
OK
Ready/Replace
The printer can still operate with a printhead that needs replacing.
The front panel will display:
Printing. Printheads
Limiting performance.
Printhead
CYAN
MAGENTA
YELLOW
BLACK
Replace
OK
OK
OK
HP DesignJets 1050C and 1055CM Printers Service Manual
3-13
Page 70

HP No.80 Ink Supplies Troubleshooting
Front panel displays Ready/Replace
Draft Normal Best
Print Quality is
Affected
Speed not affected Spee d is affected Speed not affected
Replace Printhead The front panel displays a warning, meaning that the printhead has
Print Quality is maintained but the printer changes the
printing process to compensate for an ageing
printhea d. Subsequently the printer will p rint slower.
Printer will try to
comp ensate for an
ageing printhead
quite a few nozzles operating incorrectly. There is a risk that media
could be wasted. The printer will stop at the beginning of every print
job and the front panel will display:
Warning! Printhead
quality degrading select
YE S to rep lace failing
printheads
YES (Replace)
NO (Continue)
Press the ↓ or ↑ down key to select YES or NO. Press the Enter
key . If you select YES the print job will be cancelled and a
replacement will be started. If you say NO, the printer will continue
printing. Next time you print, the same message will appear until
you select YES (Replace).
Failed This message generally indicates that the printhead must be
replaced. This situation must be corrected before the printer will
operate. However, this problem may be corrected as follows:
1 Reseat the printhea d.
2 Clean the Carriage and Printhead flex circuits using the Carriage
Interconnect Wiper ⇒ Page 3-18.
3 If after reseating and cleaning the printhead, the failed message
disappears but then reappears later, replace the printhead.
NOTE If all 4 Printheads have th e S t atus "F ailed", it is pos sible that the
Carriage Assembly is faulty.
3-14
HP DesignJets 1050C and 1055CM Printers Service Manual
Page 71

HP No.80 Ink Supplies Troubleshooting
Monitor When this message is displayed it means that the printhead has
reached its life expectancy.
To find out how to see the amount of ink consumed by the printhead and
the usage time, go to page
3-9, Obtaining Printhead Information.
Printhead life is anticipated to be 700ml or twelve months (9,000
hours) in the printer, whichever occurs first, provided that the
printhead is used under normal operating conditions (using HP ink
cartridges only) and its “install before date” has not lapsed.
However results vary depending on the print quality setting used.
The printer will attempt to warn the user when this stage is reached
with the monitor message.
Even with the monitor message being displayed good image quality
can still be obtained, but it could start degrading. The customer will
have t o check t he imag es being printed and d ecide if they are of an
accept able print qua lity. If the customer wants to ensure optimum
print quality with maximum unattendedness, they should consider
buying a new printhead and replacing the old printhead with a new
one.
Printhead Status Messages While Re placing
The following are the printhead status messages that may be
displayed while replacing the Printheads.
Setup The Printer has detected that a Setup Printhead is installed.
Used The Printer has detected that a USED Setup Printhead is installed.
Insert No Printhead has been detected in that Carriage stall. If a Printhead
is installed in the Carriage stall when this status message is shown:
1 Reseat the Printhead, making sure it is installed correctly.
2 Clean the Carriage and Printhead flex circuits using the Carriage
Interconnect Wiper ⇒ Page 3-18.
3 Replace the Printhead.
4 Perform the Electronic Systems Test ⇒ Page 4-5.
NOTE If all 4 Printheads are installed but have the Status message
"Insert", it is possible that the Carriage Assembly is faulty.
HP DesignJets 1050C and 1055CM Printers Service Manual
3-15
Page 72

HP No.80 Ink Supplies Troubleshooting
Reseat The printhead has moved slightly and is not making good electrical
contact with the carriage assembly. Reseat the printhead into the
correct position. This situation must be corrected before the printer
will operate.
1 Reseat the Printhead in the correct position.
2 Clean the Carriage and Printhead flex circuits using the Carriage
Interconnect Wiper ⇒ Page 3-18.
3 Replace the Printhead.
4 Perform the Electronic Syst em s Test ⇒ Page 4-5.
NOTE If all 4 Printheads have the S tatus "Re seat", it is possible that the
Carriage Assembly is faulty.
Faulty The smartchip on the printhead is not correct or the digital
communications between the Carriage and the Printhead is
incorrect. This situation must be corrected before the printer will
operate.
1 Reseat the Printhead.
2 Clean the Carriage and Printhead flex circuits using the Carriage
Interconnect Wiper ⇒ Page 3-18.
3 Replace the Printhead.
4 Perform the Electronic Syst em s Test ⇒ Page 4-5.
NOTE If all 4 Prin theads have t he Status "Faulty", it i s pos sible that the
Carriage Assembly is faulty.
Wrong Model The printer does not recognize the printhead or printhead cleaner
that you have inserted into the printer. You will have to remove it
before the printer can continue.
CAUTION If the Printing Printheads are installed in the carriage during the
priming process, they will be rejected and the front panel will
show the "Wrong Model" message.
Unknown The Printhead installed is not approved and must be replaced by a
genuine HP No.80 Printhead.
3-16
HP DesignJets 1050C and 1055CM Printers Service Manual
Page 73

HP No.80 Ink Supplies Troubleshooting
Summary of Solving HP No.80 Supplies Problems
Most of the problems that you could encounter when working with
the HP No.80 supplies are solved with guidance from the front
panel. A full list of front messages are supplied in the Users Guide.
Problems reseating the printhead
If you have inserted the printhead into the printhead carriage
assembly and the printer does not “BEEP” try the following steps.
NOTE Check that during the priming pr ocess, the Setup Print heads are
installed in th e Carriage. If the p rintin g Printheads are i nstalled
in the carriage durin g the pr im ing process, they will be rejected
and the front panel will show the "Wrong Model" mes sage.
n
Check that you have removed the protective tape from the printhead.
n
Insert the printhead into the carriage assembly but this tim e close
the cover using the latch.
n
Clean the electrical contacts on both the printheads and the
printhead carriage assembly using the carriage interconnect wiper
⇒ Page 3-18
n
Replace the printhead with a new one.
You Cannot Insert the Ink Cartridge Into the Printer
1 Ensure that you have the correct HP No.80 ink cartridge.
2 Ensure that the Ink Cartridge is the correct color for that slot.
3 Ensure that the Ink Cartridge is the correct orientation, with the
color coded label at the top.
CAUTIO N Never clean inside the ink cartrid ge s lots.
You Cannot Insert the Printhead Into the Printer
1 Ensure that you have the correct HP No.80 printhead.
2 Ensure that the printhead is the correct color for that slot.
3 Ensure that the printhead is the correct orientation.
4 Ensure that the protective cap is removed from the Printhead.
You Cannot Insert the Printhead Cleaner Into the Printer
1 Ensure that you have the correct HP No.80 printhead cleaner.
2 Ensure that the printhead cleaner is the correct color for that slot.
3 Ensure that the printhead cleaner is the correct orientation.
HP DesignJets 1050C and 1055CM Printers Service Manual
3-17
Page 74

HP No.80 Ink Supplies Troubleshooting
Carriage Interconnect Wiper
NOTE When you order the Carriage Assembly, the Carriage
Interconnect Wiper will come with it. All the instructions needed
to use the Carriage Interconnect Wiper will be packaged with
the part.
Whenever you replace the printhead, check the empty slots to see if
they need cleaning. In extreme circumstances, when a printhead is
inserted, it is possible that the printer will not recognize it due to the
build-up of ink on the electrical connection between the printhead
and the printhead carriage.
Included with the HP DesignJet Printer, is a Carriage Interconnect
Wiper. This tool is provided in a separate package. It also contains
replacement sponges and an instruction sheet. This tool should be
used for cleaning the electrical interconnects of both the printhead
carriage and the printhead.
If the front panel displays the message “Reseat” or possibly
“Failed” next to the offending printhead, try cleaning the flex
circuits of the carriage and the Printheads.
NOTE Do not touch, wipe or attempt to clean the printhead nozzles.
This can damage the printhead and redu ce print quality.
3-18
HP DesignJets 1050C and 1055CM Printers Service Manual
Page 75

Service Tests and
Utilities
Introduction 4-2
Diagnostics - Self Test 4-2
Service Tests (Diagnostics) 4-3
Entering the Service Tests Menu 4-4
1. Electronic Systems 4-5
2. EIO Card 4-10
3. Hard Disk Drive 4-12
4. Ink Pressure System 4-1 4
5. Scan Axis 4-17
6. Paper Axis 4-20
7. Drop Detector 4-22
Service U tilities 4-25
Entering the Service Utilities M en u 4-26
1. Tubes Purge 4-28
2. Release Info 4-32
3. Set Asian PS Fonts 4-33
4. Printer Model Type 4-35
5. Overdrive Cleaning 4-37
6. EEROM Util ities 4-38
7. Printhead Check 4-41
8. Mon. Mode Baud Sel. 4-42
4
4
HP DesignJets 1050C and 1055CM Printers Service Manual
4-1
Page 76

Service Tests and Utilities
Introduction
This chapter explains how to use the built-in Service Tes ts and
Service Utilities and what to do if any of the Service Tests fail. If
possible, always perform a Service Test on the component that you
are about to replace, just to make sure that is the component that has
failed. If the test on that component passes, there is no need to
replace it.
Diagnostics - Self Test
Initialization Sequences
Whenever the Printer is switched ON, it automatically performs a
series of internal self tests and mechanical initialization sequences.
If any of the parts fail, a system error will appear and you should
consult Chapter 2 - System Error Codes.
4-2
HP DesignJets 1050C and 1055CM Printers Service Manual
Page 77

Service Tests and Utilities
Service Tests (Diag nostics)
The following is a list of all internal Service T es ts ava ila ble in the
Printer. Instructions for entering the Service Tes t s menu are given
on Page 4-4.
WARNING The Service Tests work in a special Mode which does NOT
require the full Initialization of the Printer. Therefore it is
important that once you have finished with the Service T ests, you
MUST power OFF the Printer and Power ON again before
trying to print.
1 Electronics System ⇒ Page 4-5
The purpose of this test is to verify the operation of the:
n
Electronics Module.
n
DRAM.
n
Trailing Cable.
n
Carriage Assembly.
2 EIO Card ⇒ Page 4-10
The purpose of this test is to verify the operation of the EIO Card.
3 Hard Disk Drive ⇒ Page 4-12
The purpose of this test is to verify the operation of the Hard Disk
Drive.
4 Ink Pressure System ⇒ Page 4-14
The purpose of this test is to verify the operation of the:
n
Service Replaceable Kit (SRK).
n
Air Pressurization System (APS).
5 Scan Axis ⇒ Page 4-17
The purpose of this test is to verify the operation of the Scan-Axis.
6 Paper Axis ⇒ Page 4-20
The purpose of this test is to verify the operation of the Paper-Axis.
7 Drop Detector ⇒ Page 4-22
The purpose of this test is to verify the operation of the Drop
Detector.
HP DesignJets 1050C and 1055CM Printers Service Manual
4-3
Page 78

Service Tests and Utilities
Entering the Service Tests Menu
NOTE In order to enter the Service Utility Menu, please refer to the
instructions on Page 4-26.
1 Make sure the printer is switched OFF from the power switch on the
front of the printer and NOT from the power switch on the back of
the printer.
2 Hold the COLOR key down and switch the printer ON using the
front power switch. Wait until the message "Initializing" is
displayed on the front-panel before releasing the COLOR key.
3 Once inside the Service Tes ts Menu use the Arrow keys to scroll
through the "Service Tests" selections.
Service Tests
1. Electronic Systems
2. EIO Ca rd
3. Hard Disk Drive
4. Ink Pressure Sy s tem
5. Scan Axis
4 Press the Enter key to begin a specific test when the required
Service Test is highlighted.
NOTE If the printer is not us ed for 3 minutes, the printe r hangs and you
must repeat the above steps to enter the Service Mode again.
NOTE In some cases a quick press of a bu tton may not be r ecognized by
the Printer. When pressing a button, be sure to press it
deliberately and all the way to the bottom of its travel.
NOTE If the Printer hangs up during a test, switch the Printer OFF and
restart from step 1.
4-4
HP DesignJets 1050C and 1055CM Printers Service Manual
Page 79

Service Tests and Utilities
1. Electronic Systems
The purpose of this test is to verify the operation of the:
n
Electronics Module.
n
DRAM.
n
Trailing Cable.
n
Carriage Assembly.
NOTE This test does not test the EIO Card or the Hard Disk Dri ve.
NOTE The Service Tests work in a special Mode which does NOT
require the full Initialization of the Printer. Therefore it is
important that once you have finished with the Service Test, you
MUST power OFF the Printer and Power ON again before
trying to print.
WARNING IF POSSIBLE ALWAYS PERFORM THIS TEST BEFORE
REPLACING THE ELECTRONICS MODULE, TRAILING
CABLE OR THE CARRIAGE ASSEMBLY. IF THIS TEST
PASSES, DO NOT REPLACE THE ELECTRONICS
MODULE, TRAILING CABLE OR THE CARRIAGE
ASSEMBLY.
Tip for Repair This test can be performed with just the Front Panel, Trailing
Cable, Carriage, Electronics Module and the Power Cord
connected together to isolate problems.
HP DesignJets 1050C and 1055CM Printers Service Manual
4-5
Page 80

Service Tests and Utilities
Perform the Electronic Systems test as follows:
1 In the Service Tests submenu, scroll to "1. Electronic Systems" and
press Enter.
Service Tests
1. Electronic Systems
2. EIO Card
3. Hard Disk Drive
4. Ink Pres sure Sys tem
5. Scan Axis
2 The test will start and the following sequence of messages will
appear on the front panel:
Top
Back
↑
↓
Enter
Make Selection
Press Enter
ELECTRONIC SYSTEMS
Running Electronics
Module Test
ELECTRONIC SYSTEMS
Ru nn i n g D R AM Test
XXXXXXXX
XXXXXXXX
XXXXXXXX
EEROM functionality
XXXXXXXX
DRAM access functi onality
ACMEEP DMA functionality
Fans test
Main PCA to ISS Communication
ISS shift register
ELECTRONIC SYSTEMS
Running Carr iage Test
XXXXXXXX
XXXXXXXX
XXXXXXXX
Trailing Cable Test
Yuyu R/W
Carriage ADC
Pen Continuity Digital Cyan / Magenta / Yellow / Black
PEN ACUMEN
Pen Digital functionality
Pen Analog Continuity
VPP regulation Cyan / Magenta / Yellow / Black
Line Sensor zero test
4-6
HP DesignJets 1050C and 1055CM Printers Service Manual
Page 81

Service Tests and Utilities
3 If the test passes, then the following message will appear on the
front panel:
ELECTRONIC SYSTEMS
Tests passed
FW: A.00.13
PS: 6.0A 77R
DIMM1: EDO 32MB 60ns
DIMM2: EDO 16 MB 60ns
WARNING IF THIS TEST PASSES, DO NOT REPLACE THE
ELECTRONICS MODULE, TRAILING CABLE OR THE
CARRIAGE ASSEMBLY.
4 If the test fails.
El ectronics Fa ilure
If there is a problem with the components within the Electronics
module then the following message will appear on the front panel:
ELECTRONIC SYSTEMS
Possible Failure on:
1. Elect ronics Module
Code: 00XXXX:0000XX
In this ca se, Replace the Electronics Module ⇒ Page 8-25.
DRAM Test Failure
If there is a problem with the DRAM then the following message
will appear on the front panel:
ELECTRONIC SYSTEMS
Possible Failure on:
1. DRAM DI MMs
2. Elect ronics Module
Code: 00XXXX:0000XX
In this ca se, try one of the following:
1 Switch the Power OFF from the back of the Printer and disconnect
the Power cord. Reseat the DRAM DIMMs (Memory Modules),
reconnect the power cord and power On the Printer. Perform the
Electronic Systems Test again.
HP DesignJets 1050C and 1055CM Printers Service Manual
4-7
Page 82

Service Tests and Utilities
2 If the Tes t fails again, switch the Power OFF, disconnect the power
cord and Replace the DRAM DIMMs (Memory Modules).
Reconnect the power cord and power On the Printer and perform
the test again.
3 Replace the Electronics Module ⇒ Page 8-25.
WARNING Only replace one component at a time and try the Service Test
again before replacing anoth er component. Using this pr ocedure
you will be able to determine exactly which component failed.
Trailing Cable Failure
If there is a problem with the Trailing Cable then the following
message will appear on the front panel:
ELECTRONIC SYSTEMS
Possible Failure on:
1. Trailing Cable
2. Carri age
3. Elect ronics Module
Code: 00XXXX:0000XX
In this ca se, try one of the following:
1 Make sure that the Tr ailing Cable is connected correctly.
2 Power OFF the Printer and connect a new Trailing Cable to the
Carriage and the Electronics Module (without removing the old
T railing Cable from the Printer). Perform this test again and if the
test FAILS, then DO NOT replace the trailing cable. If the test
PASSES, replace the Trailing Cable ⇒ Page 8-39.
3 Power OFF the Printer and connect a new Carriage Assembly to
the Trailing Cable (without r emoving the old Carriage Assembly
from the Printer). Perform this test again and if the tes t FAILS, then
DO NOT replace the Carriage Assembly. If the test PASSES, replace
the Carriage Assembly ⇒ Page 8-44.
4 Power OFF the Printer and connect a new Electronics Module to
the Trailing Cable (without re moving the old Electronics Module
from the Printer). Perform this test again and if the tes t FAILS, then
DO NOT replace the Electronics Module. If the test PASSES,
replace the Electronics Module ⇒ Page 8-25.
WARNING Only replace one component at a time and try the Service Test
again before replacing anoth er component. Using this pr ocedure
you will be able to determine exactly which component failed.
4-8
HP DesignJets 1050C and 1055CM Printers Service Manual
Page 83

Service Tests and Utilities
Carriage Test Failure
If there is a problem with the Carriage and any related parts then the
following message will appear on the front panel:
ELECTRONIC SYSTEMS
Possible Failure on:
1. Printhead CYMK
2. Trailing/Carriage
3. Elect ronics Module
Code: 00XXXX:0000XX
In this ca se, try one of the following:
1 Remove the Printheads and clean the Carriage and Printhead flex
circuits using the Carriage Interconnect Wiper ⇒ Page 3-18.
Reinstall the Printheads and try the test again.
2 If the test fails again, replace the Printheads.
3 Make sure that the Tr ailing Cable is connected correctly to the
Carriage Assembly and to the Electronics Module.
4 Power OFF the Printer and connect a new Trailing Cable to the
Carriage and the Electronics Module (without removing the old
T railing Cable from the Printer). Perform this test again and if the
test FAILS, then DO NOT replace the trailing cable. If the test
PASSES, replace the Trailing Cable ⇒ Page 8-39.
5 Power OFF the Printer and connect a new Carriage Assembly to
the Trailing Cable (without r emoving the old Carriage Assembly
from the Printer). Perform this test again and if the tes t FAILS, then
DO NOT replace the Carriage Assembly. If the test PASSES, replace
the Carriage Assembly ⇒ Page 8-44.
6 Power OFF the Printer and connect a new Electronics Module to
the Trailing Cable (without re moving the old Electronics Module
from the Printer). Perform this test again and if the tes t FAILS, then
DO NOT replace the Electronics Module. If the test PASSES,
replace the Electronics Module ⇒ Page 8-25.
WARNING Only replace one component at a time and try the Service Test
again before replacing anoth er component. Using this pr ocedure
you will be able to determine exactly which component failed.
HP DesignJets 1050C and 1055CM Printers Service Manual
4-9
Page 84

Service Tests and Utilities
2. EIO Card
The purpose of this test is to verify the operation of the EIO Card.
WARNING IF POSSIBLE ALWAYS PERFORM THIS TEST BEFORE
REPLACING THE EIO CARD. IF THIS TEST PASSES, DO
NOT REPLACE THE EIO CARD.
NOTE The Service Tests work in a special Mode which does NOT
require the full Initialization of the Printer. Therefore it is
important that once you have finished with the Service Test, you
MUST power OFF the Printer and Power ON again before
trying to print.
Perform the EI O Ca rd tes t as fo llow s:
1 In the Service Tests submenu, scroll to "2. EIO Card" and press
Enter.
Top
Service Tests
1. Electronic Systems
2. EIO Card
3. Hard Disk Drive
4. Ink Pres sure Sys tem
5. Scan Axis
Back
↑
↓
Enter
Make Selection
Press Enter
2 The test will start and the following message will appear on the
front panel:
EIO CARD
Running EIO
Card Test...
3 If the test passes, then the following message will appear on the
front panel:
EIO CARD
Tests passed
DNS Name: XXXXXX
Appletalk: XXXXXX
IP addr: XXXXXX
HW addrr: XXXXXX
4-10
HP DesignJets 1050C and 1055CM Printers Service Manual
Page 85

Service Tests and Utilities
WARNING IF THIS TEST PASSES, DO NOT REPLACE THE EIO CARD.
If there is a problem with the EIO Card then the test will fail and the
following message will appear on the front panel:
EIO CARD
Possible Failure on:
1. EIO CARD
2. Elect ronics Module
Code: 00XXXX:0000XX
NOTE Check that the EIO Card is actually installed before starting to
troubleshoot. If the EIO Card is NOT installed, the test will of
course always fail.
In this case, to resolve the problem, try the following:
1 Switch the printer OFF. Remove the Hard Disk Drive (if installed)
and reinstall the EIO Card making sur e it installed correct ly by
pushing it firmly inwards and checking that the two installation
screws are completely tightened. Switch the printer ON again and
repeat the EIO Card Test. If the EIO Card Tes t fails again then
replace the EIO card.
2 If the EIO Card Test passed after removing the Hard Disk Drive,
then switch the Printer OFF and reinstall the Hard Disk Drive,
making sure that the two installation screws are completely
tightened. Switch the Printer ON again and repeat the EIO Card
Test. If the EIO Card Test fails, then the Hard Disk Drive could be
faulty. Replace the Hard Disk Drive.
3 If the EIO Card T est continues to fail after replacing the EIO card or
the Hard Disk Drive, then replace the Electronics Module ⇒ Page
8-25.
WARNING Only replace one component at a time and try the Service Test
again before replacing anoth er component. Using this pr ocedure
you will be able to determine exactly which component failed.
HP DesignJets 1050C and 1055CM Printers Service Manual
4-11
Page 86

Service Tests and Utilities
3. Hard Disk Drive
The purpose of this test is to verify the operation of the Hard Disk
Drive.
WARNING IF POSSIBLE ALWAYS PERFORM THIS TEST BEFORE
REPLACING THE HARD DISK DRIVE. IF THIS TEST
PASSES, DO NOT REPLACE THE HARD DISK DRIVE.
NOTE The Service Tests work in a special Mode which does NOT
require the full Initialization of the Printer. Therefore it is
important that once you have finished with the Service Test, you
MUST power OFF the Printer and Power ON again before
trying to print.
Perform the Hard Disk Drive test as follows:
1 In the Service Tests submenu, scroll to "3. Hard Disk Drive" and
press Enter.
Service Tests
1. Electronic Systems
2. EIO Card
3. Hard Disk Drive
4. Ink Pres sure Sys tem
5. Scan Axis
Top
Back
↑
↓
Enter
Make Selection
Press Enter
2 The test will start and the following message will appear on the
front panel:
HARD DISK DRIVE
Running Hard Disk
Drive Test...
3 If the test passes, then the following message will appear on the
front panel:
HARD DISK DRIVE
4-12
Tests passed
Capacity: 2067 KB
PS font re v: V_6.0A75
HP DesignJets 1050C and 1055CM Printers Service Manual
Page 87

Service Tests and Utilities
WARNING IF THIS TEST PASSES, DO NOT REPLACE THE HARD
DISK DRIVE.
If there is a problem with the Hard Disk Drive then the test will fail
and the following message will appear on the front panel:
HARD DISK DRIVE
Possible Failure on:
1. HDD
2. Elect ronics Module
Code: 00XXXX:0000XX
NOTE Check that the Hard Disk Drive is actually installed before
starting to troubleshoot. If the Hard Disk Drive is NOT installed,
the test will of course always fail.
In this case, to resolve the problem, try the following:
1 Switch the printer OFF. Remove the EIO Card (if installed) and
reinstall the Hard Disk Drive making sure it installed corr ectly by
pushing it firmly inwards and checking that the two installation
screws are completely tightened. Switch the printer ON again and
repeat the Hard Disk Drive Test. If the Hard Disk Drive T e st fails
again then replace the Hard Disk Drive.
2 If the Hard Disk Drive Test passed after removing the EIO Card,
then switch the Printer OFF and re instal l the EIO Card, making
sure that the two installation screws are completely tightened.
Switch the Printer ON again and repeat the Hard Disk Drive T e st. If
the Hard Disk Drive Test fails, then the EIO Card could be faulty.
Replace the EIO Card.
3 If the Hard Disk Drive Test continues to fail after replacing the EIO
card or the Hard Disk Drive, then replace the Electronics Module
⇒ Page 8-25.
WARNING Only replace one component at a time and try the Service Test
again before replacing anoth er component. Using this pr ocedure
you will be able to determine exactly which component failed.
HP DesignJets 1050C and 1055CM Printers Service Manual
4-13
Page 88

Service Tests and Utilities
4. In k Pressure S y stem
The purpose of this test is to verify the operation of the:
n
Tu b es System .
n
Air Pressurization System (APS).
WARNING IF POSSIBLE ALWAYS PERFORM THIS TEST BEFORE
REPLACING T HE TUBES SYSTEM OR THE APS. IF T HIS
TEST PASSES, DO NOT REPLACE THE TUBES SYSTEM
OR THE APS.
NOTE The Service Tests work in a special Mode which does NOT
require the full Initialization of the Printer. Therefore it is
important that once you have finished with the Service Test, you
MUST power OFF the Printer and Power ON again before
trying to print.
Perform the Ink Pressure System test as follows:
1 In the Service T ests s ubmenu, scroll to "4. Ink Pressure System" and
press Ente r.
Top
Service Tests
1. Electronic Systems
2. EIO Card
3. Hard Disk Drive
4. Ink Pres sure Sys tem
5. Scan Axis
Back
↑
↓
Enter
Make Selection
Press Enter
2 The test will start and the following sequence of messages will
appear on the front panel:
INK PRESSURE SYSTEM
Ru nn i n g S RK Test...
INK PRESSURE SYSTEM
Running APS Test...
4-14
HP DesignJets 1050C and 1055CM Printers Service Manual
Page 89

Service Tests and Utilities
3 If the test passes, then the following message will appear on the
front panel:
INK PRESSURE SYSTEM
Tests passed
WARNING IF THIS TEST PASSES, DO NOT REPLACE THE TUBES
SYSTEM OR THE APS.
4 If the test fails.
Tubes System Failure
If there is a problem with the Tubes System then the following
message will appear on the front panel:
INK PRESSURE SYSTEM
Possible Failure on:
1. Ink Cart ridge CMYK
2. Tu bes
3. Elect ronics Module
Code: 00XXXX:0000XX
In this ca se, try one of the following:
1 Replace ALL the Ink Cartri dges .
2 Replace the complete T ubes System ⇒ Page 8-53.
3 Replace the Electronics Module ⇒ Page 8-25.
WARNING Only replace one component at a time and try the Service Test
again before replacing anoth er component. Using this pr ocedure
you will be able to determine exactly which component failed.
APS Test Failure
If there is a problem with the APS then the following message will
HP DesignJets 1050C and 1055CM Printers Service Manual
4-15
Page 90

Service Tests and Utilities
appear on the front panel:
In this ca se, try one of the following:
1 Check all the cables of the APS and make sure they are correctly
connected and are NOT damaged.
2 Check all the tubes of the APS and make sure they ar e NOT pinched
or damaged.
3 Replace ALL the Ink Cartri dges .
4 Replace the complete APS ⇒ Page 8-20.
5 Replace the Electronics Module ⇒ Page 8-25.
ELECTRONIC SYSTEMS
INK PRESSURE SYSTEM
Possible Failure on:
Possible Failure on:
1. DRAM DI MM(s )
1. APS
2. Elect ronics Module
2. Elect ronics Module
Code: 00XXXX:0000XX
Code: 00XXXX:0000XX
WARNING Only replace one component at a time and try the Service Test
again before replacing anoth er component. Using this pr ocedure
you will be able to determine exactly which component failed.
4-16
HP DesignJets 1050C and 1055CM Printers Service Manual
Page 91

Service Tests and Utilities
5. Scan Axis
The purpose of this test is to verify the operation of the Scan Axis
Motor.
You must perform the Scan-Axis Test after:
n
Scan-Axis Assemblies are disassembled or replaced.
n
Carriage is disassembled or replaced.
n
Electronics Module is replaced.
n
Tubes System is disassembled or replaced.
WARNING ALL THE COVER SENSORS ARE DISABLED WHEN IN
THE SERVICE TESTS MENU. IF THE CARRIAGE IS
MOVING IT WILL NOT STOP IF THE WINDOW IS
OPENED, SO BE VERY CAREFUL NOT TO PUT YOUR
HANDS INSIDE.
WARNING IF POSSIBLE ALWAYS PERFORM THIS TEST BEFORE
REPLACING THE SCAN AXIS MOTOR. IF THIS TEST
PASSES, DO NOT REPLACE THE SCAN AXIS MOTOR.
NOTE The Service Tests work in a special Mode which does NOT
require the full Initialization of the Printer. Therefore it is
important that once you have finished with the Service Test, you
MUST power OFF the Printer and Power ON again before
trying to print.
Perform the Scan Axis test as follows:
NOTE Perform this test with the Printheads and the Tubes System
installed in order to get values that can be compared correctly .
1 In the Service Tests submenu, scroll to "5. Scan Axis" and press
Enter.
Top
Service Tests
1. Electronic Systems
2. EIO Card
3. Hard Disk Drive
4. Ink Pres sure Sys tem
5. Scan Axis
Back
↑
↓
Enter
Make Selection
Press Enter
HP DesignJets 1050C and 1055CM Printers Service Manual
4-17
Page 92

Service Tests and Utilities
2 The test will start and the following message will appear on the
front panel:
3 Once the test is completed, the following message will appear on the
front panel:
SCAN AXIS
Running Scan
Axis Test...
(takes 2mn...)
SCAN AXIS FORWARD
Avg PWM: XXX
Max PWM: XXX
Stabilizat Dist: XXXX
Avg speed offset: XXX
STD speed offset: XXX
4 Press Enter and the following message will appear on the front
panel:
SCAN AXIS BACKWARDS
Avg PWM: XXX
Max PWM: XXX
Stabilizat Dist: XXXX
Avg speed offset: XXX
STD speed offset: XXX
To check if the values displayed after the test are within the limits,
refer to the following table:
Scan-Axis Forward Scan-Axis Backwards
Normal Maximum Normal Maximum
Avg. PWM 165 185 -165 -185
Max. PWM 220 240 220 240
Stabilize Dist. 1800 2400 1800 2400
4-18
Avg. Speed offset 2.4 10 2.4 10
STD Speed offset 4.4 10 4.4 10
HP DesignJets 1050C and 1055CM Printers Service Manual
Page 93

Service Tests and Utilities
If the values obtained in the test are less than the Maximum values
in the previous table, then the test has passed.
If the values obtained in the test are greater than the Maximum
values in the previous table, then the test has failed. To resolve the
problem, try the following:
1 Clean the Slider Rods and Apply Oil along the complete axis of the
Slider Rods. After applying the Oil, perform the test again.
2 Check that the Encoder Strip is clean. If necessary , clean Encoder
Strip using a damp cloth.
3 Check that the Tubes System is installed correctly.
4 Check that the Carriage Belt and pulleys are installed correctly.
5 Replace the Scan-Axis Motor ⇒ Page 8-33.
HP DesignJets 1050C and 1055CM Printers Service Manual
4-19
Page 94

Service Tests and Utilities
6. Paper Axis
The purpose of this test is to verify the operation of the Paper Axis
Motor.
WARNING IF POSSIBLE ALWAYS PERFORM THIS TEST BEFORE
REPLACING THE PAPER AXIS MOTOR. IF THIS TEST
PASSES, DO NOT REPLACE THE P APER AXIS MOTOR.
NOTE The Service Tests work in a special Mode which does NOT
require the full Initialization of the Printer. Therefore it is
important that once you have finished with the Service Test, you
MUST power OFF the Printer and Power ON again before
trying to print.
NOTE Make sure you perform this test with NO media loaded.
Perform the Paper Axis test a s follows :
1 In the Service Tests submenu, scroll to "6. Paper Axis" and press
Enter.
Service Tests
3.Hard Disk Drive
4. Ink Pres sure Sys tem
5. Scan Axis
6. Paper A xis
7. Drop Det ector
Top
Back
↑
↓
Enter
Make Selection
Press Enter
2 The test will start and the following messages will appear on the
front panel:
PAPER AXIS
Running Paper
Axis Test...
PAPER AXIS
Ru nn i n g P aper
Axis Test...
pressin g clutch
4-20
HP DesignJets 1050C and 1055CM Printers Service Manual
Page 95

Service Tests and Utilities
3 Once the test is completed, the following message will appear on the
front panel:
PAPER AXIS
Max PWM: XXX
Avg PWM: XXX
Max PWM (C): XXX
Avg PWM (C): XXX
If the values of the Max. PWM is less than 95 and the Avg. PWM is
less than 85, then the test has passed.
If the values of the Max. PWM is more than 95 and the Avg. PWM is
more than 85, then the test has failed. To resolve the problem, try
the following:
1 Open the Wi ndow and check for any vis ible obstacles restricting the
movement of the Drive Roller or the Overdrive Assembly.
2 Replace the Paper-Axis Motor ⇒ Page 8-12.
If the values of the Max. PWM is less than 95 and the A vg. PWM is
less than 85, but the values of the Max. PWM(C) is more than 100
and the Avg. PWM(C) is more than 90 then the test has failed. To
resolve the problem, try the following:
1 Replace the Overdrive Assembly ⇒ Page 8-64.
HP DesignJets 1050C and 1055CM Printers Service Manual
4-21
Page 96

Service Tests and Utilities
7. Drop Detector
The purpose of this test is to verify the operation of the Drop
Detector.
WARNING IF POSSIBLE ALWAYS PERFORM THIS TEST BEFORE
REPLACING THE DROP DETECTOR. IF THIS TEST
PASSES, DO NOT REPLACE THE DROP DETECTOR.
NOTE The Service Tests work in a special Mode which does NOT
require the full Initialization of the Printer. Therefore it is
important that once you have finished with the Service Test, you
MUST power OFF the Printer and Power ON again before
trying to print.
Perform the Drop Detector test as follows:
1 In the Service Tests submenu, scroll to "7. Drop Detector" and press
Enter.
Service Tests
3. Hard Disk Drive
4. Ink Pres sure Sys tem
5. Scan Axis
6. Paper A xis
7. Drop Det ector
Top
Back
↑
↓
Enter
Make Selection
Press Enter
2 The test will start to initialize and the following m essage will appear
on the front panel:
DROP DETECTOR TEST
Initializing
in Tclware (90s)...
Close any open door
4-22
HP DesignJets 1050C and 1055CM Printers Service Manual
Page 97

Service Tests and Utilities
3 After initialization, the tes t will start and the following me ssage will
appear on the front panel:
DROP DETECTOR TEST
Runnin g Drop
Detector Test...
WARNING In the following step, make sure you do not drop the piece of
paper inside the Drop Detector.
4 When the following message appears, open the Window and insert a
thin piece of paper inside the Drop Detector in order to block it.
Press any Front Panel key once the Drop Detector is blocked.
Sensor
Drop Detector
5 When the following message appears, remove the piece of paper
6 The Printer will test the Drop Detector and the following message
paper
Block the Drop Dete ctor
and press a FP key
when it is blocked
from inside the Drop Detector and close the Window. Press any
Front Panel key once the Window is closed.
Unblock Drop Det ector
close the window
and pre ss a FP key
to continue
will appear on the front panel:
DROP DETECTOR TEST
Runnin g Drop
Detector Test, ghost d
HP DesignJets 1050C and 1055CM Printers Service Manual
4-23
Page 98

Service Tests and Utilities
7 If the test passes, then the following message will appear on the
front panel:
DROP DETECTO R
BLOCKED DD: PASS
GHOST DROPS: PASS
WARNING IF THIS TEST PASSES, DO NOT REPLACE THE DROP
DETECTOR.
If there is a problem with the Drop Detector then the following
message will appear on the front panel:
DROP DETECTO R
Blocked DD: Fail
Code: 00XXXX:0000XX
In this case, to resolve the problem, try the following:
1 Check that the Drop Detector Cable is NOT broken or damaged.
2 Check that the Drop Detector cable is correctly connected to the
Service Station Cable.
3 Check that the Service Station Cable is NOT broken or damaged.
4 Remove the Dr op Detector and make sure that there are no
obstacles inside which are blocking the sensor.
5 Replace the Drop Detector Assembly ⇒ Page 8-10.
6 If the test continues to fail, replace the Electronics Module ⇒ Page
8-25.
WARNING Only replace one component at a time and try the Service Test
again before replacing anoth er component. Using this pr ocedure
you will be able to determine exactly which component failed.
4-24
HP DesignJets 1050C and 1055CM Printers Service Manual
Page 99

Service Utilities
The following is a list of all internal Service Utilities available in the
Printers. Instructions for entering the Service Utilities menu are
given on Page 4-26.
1 Tubes Purge ⇒ Page 4-28
The purpose of this Service Utility is to Prime the Tubes when a
new Tubes System has been installed.
2 Release Info ⇒ Page 4-32
This Service Utility provides information on the current Firmware
version.
3 Set Asian PS Font ⇒ Page 4-33
The purpose of this Service Utility is to set the Asian Fonts after
replacing the Hard Disk Drive.
4 Printer Model Type ⇒ Page 4-35
The purpose of this Service Utility is to set the correct Printer
Model.
Service Tests and Utilities
5 Overdrive Cleaning ⇒ Page 4-37
The purpose of this Service Utility is to rotate the Overdrive in order
to clean it.
6 EEROM Utilities ⇒ Page 4-38
The purpose of this Service Utility is to either clear the EEROM or
to test it.
7 Printhead Check ⇒ Page 4-41
This Service Utility allows you to have the Printhead checking
facility ON or OFF.
8 Mon. Mode Baud Sel. ⇒ Page 4-42
This Service Utility allows you to change the Baudrate of the Serial
Port.
HP DesignJets 1050C and 1055CM Printers Service Manual
4-25
Page 100

Service Tests and Utilities
Entering the Service Utilities Menu
1 Once the message "Ready" is displayed on the front-panel, scroll to
the "Printer Setup Options" icon and press the Enter key.
Ready
Ink
CYAN
MAGENTA
YELLOW
BLACK
Printer Setu p Options
2 Once inside the "Printer Setup Options" menu, use the Arrow keys
to scroll to the "Utilities" menu display and press the Enter key.
Top
Printer setup options
Pen settings ...
Device setup ...
Utilitie s ...
Demos ...
Imag e qu a lity ...
Back
↑
↓
Enter
Press Enter
NOTE Make sure that you are in the Full menu mode (Utilities / Menu
/ Full) because otherwise you will not be able to access the
"Service Tools" submenu.
3 Once inside the "Utilities" menu, press the UP and Enter keys
together. You are now in the Service Tools Menu.
4-26
Top
Utilitie s
Display Contrast ...
Contrast .. .
Recover Printheads ...
Calibr at io ns ...
Test Pr ints ...
Back
↑
↓
Enter
Press
Together
4 Use the Arrow keys to scroll to the "Service Utilities" menu and
press the Enter key.
Top
Service Tools
Service Cal ibrations.. .
Service Utilities...
Service Tests...
HP DesignJets 1050C and 1055CM Printers Service Manual
Back
↑
↓
Enter
Press Enter
 Loading...