

Page 1

EN
HP Designjet T1120 SD-MF P
Quick reference guide
Page 2

You can nd legal and warranty information on the CD. Further information is available at HP’s support Web
site (http://www.hp.com/go/knowledge_center/).
Legal notices
The information contained herein is subject to change without notice. The only warranties for HP Products and
services are set forth in the express warranty statement accompanying such products and services. Nothing herein
should be construed as constituting an additional warranty. HP shall not be liable for technical or editorial errors or
omissions contained herein.
Page 3

Table of conten ts
1 Introduction
Using this guide .............................................................................................. 1
Scanner software ............................................................................................ 2
Scanner .......................................................................................................... 3
Documentation and help ............................. ............ .......... .............................. 3
2 Basic operations
Turn the scanner on or off .............................................................................. 4
Load and eject documents ...................... ........................................................ 5
Set a destination folder for scans ................................................................... 6
Copy a document ............................................................................................ 8
Scan to a file ................................................................................................... 9
Batch scan and batch copy ............................ ............................................... 10
Specify the original type and make image adjustments ................................ 11
Set input and output sizes ............................................................................ 13
Preview copies and scans ............................................................................ 15
Set the output quality .................................................................................... 17
Create a media profile .................................................................................. 19
View, move, rename or delete scanned files ................................................ 21
System setup and options ............................................................................ 22
3 Maintenance
Clean the glass plate and the scanning area ................................................ 25
Calibrate the scanner ........................ ....... ..................................................... 27
Calibrate the touch screen pointer ............................. ............. ............ .......... 29
Replace the scanner glass plate .................... ............................................... 29
4 Troubleshooting
The system reports an error ......................................................................... 30
There is a paper jam ........................................................... .......... .......... .. .... 30
Streaks in the scanned image ...................................................................... 32
Lines in the scanned image appear too thin or discontinuous ...................... 33
Cannot connect or scan to a destination folder on the LAN ......................... 33
Image cropped—not whole image scanned ................................................. 34
A media profile cannot be generated ............................................................ 34
My color matching results are not optimal .................................................... 35
I need to update or recover the system ........................................................ 35
ENWW iii
Page 4

The system software is in the wrong language ............................................. 36
Install new system software .......................................................................... 37
Index ............................................................................................................................... 39
iv ENWW
Page 5

1Introduction
Using this guide
This guide is organized into the following chapt ers.
1. Introduction: This chapter provides a brief introduction to the software,
scanner device and available documentation.
2. Basic operations: This chapter helps you to carry out various common
procedures.
3. Maintenance: This chapter helps you to carry out various calibration and
maintenance procedures.
4. Troubleshooting: This chapter helps you to solve probl ems that may occur
while scanning.
5. Index: In addition to the table of contents, there is an alpha betic al inde x to
help you to find topics quickly.
Warnings and cautions
Symbols are used in this manual to ensure the proper use of the printer and to
prevent printer damage. Follow the instructions that are marke d with these symbols.
WARNING! Failure to follow the guidelines that are ma rked with this symbol could
result in serious personal injury or death.
CAUTION: Failure to follow the guidelines that are marked with this symbol could
result in minor personal injury or damage to the product.
Introduction
ENWW
Using this guide
1
Page 6
Scanner software
Introduction
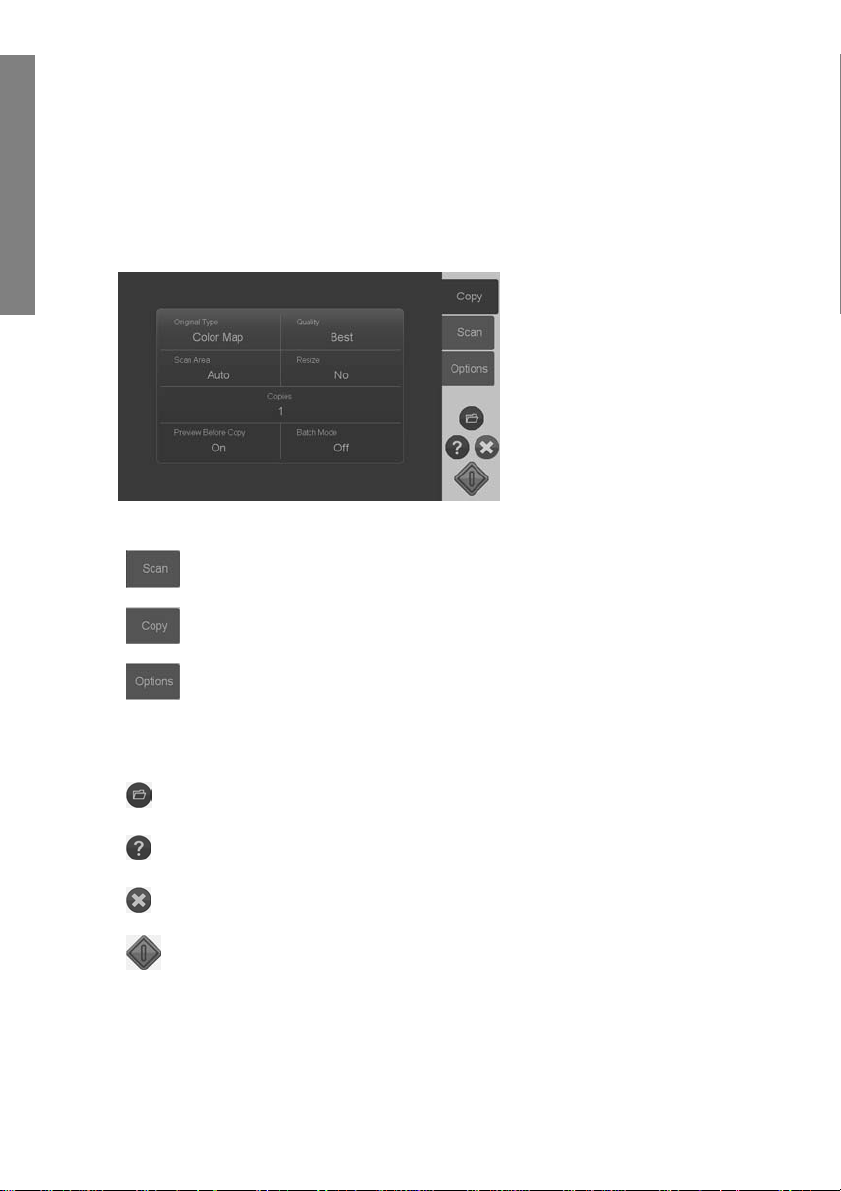
The scanner software runs automatically w hen you turn on the touch sc reen. The
main screen is divided into the following sections:
Main menu area
●
Right bar, top: the task buttons
●
Right bar, bottom: the function buttons
●
Task buttons
Press this button to set the program in the copy (scan to printer) task mode.
Press this button to set the program in the scan (scan to file) task mode.
Press this button to open progra m settings and preference menus.
Function buttons
File manager: Opens the File Manager dialog box.
Online help: Provides detailed information on many topics. Opens instructions related to
your current task.
Stop: Cancels the current activity.
Start scan/copy: Init i ate s the copy or scan, dep end i ng on whic h task bu tton has bee n
selected.
2 Chapter 1 Introduction ENWW
Page 7
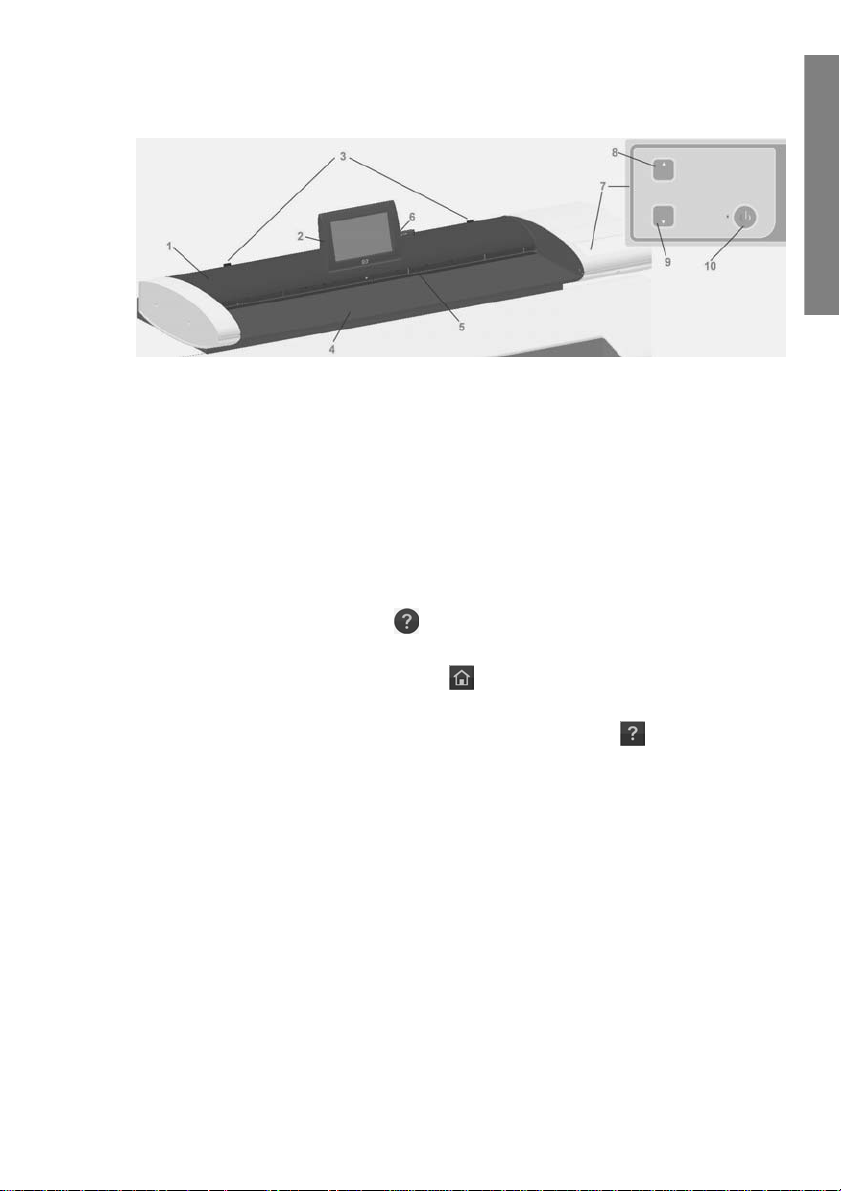
Scanner
Introduction
1. Scanner lid
2. Touch screen for scan/copy appl ication
3. Release buttons for opening scanner lid
4. Scanner bed: paper feed area
5. Insertion slot for document feeding
Documentation and help
This Quick Refere nce Guide pr ovides a brief overvie w of the sys tem an d softwa re.
The Online Help function button
general help on the current task (Scan, Copy, Options).
The online help window’s Home button
links to online help sections and topics .
In many dialogs you will find a Context-sensitive Help button
instructions specifically related to the current dialog and its options.
6. USB port
7. Operator's panel
8. Paper forward button
9. Paper backward button
10. Power button and indicator
opens the online help window and displays
will take you to a table of contents with
that will open
ENWW
Scanner
3
Page 8
2 Basic operations
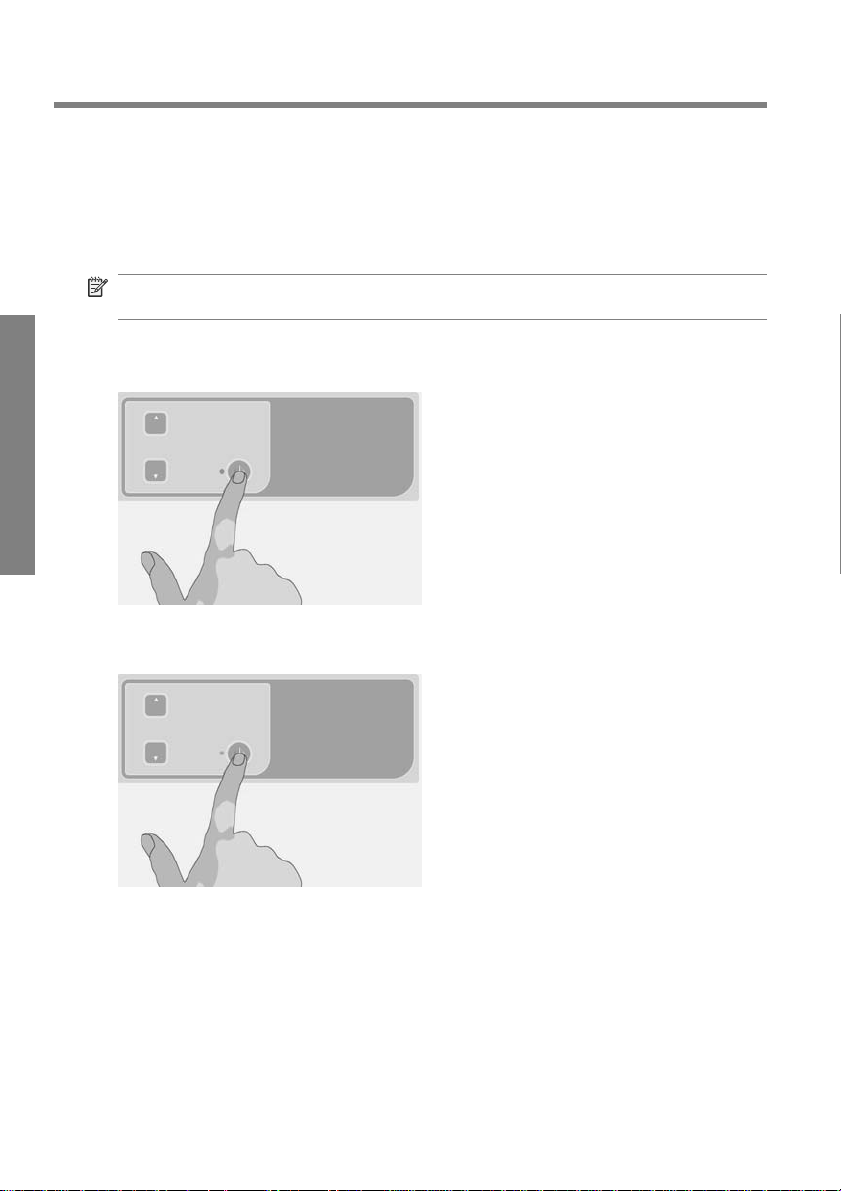
Turn the scanner on or off
The system (scanner, screen and software) can be turned on or off by pressi ng the
power button on the scanner operation panel.
NOTE: The printer has a separate power on/off button. Normally this button is
always left turned on and is not pressed in connection with restarting the system.
Turn on
Basic operations
Turn off
Press the power button. The power LED shows a green light.
Press the power button. The power LED blinks and then turns off.
Restart
Press the power button to turn the system off and then press it again to turn the
system on.
4 Chapter 2 Basic operations ENWW
Page 9

Load and eject documents
Load document
1. Load your document with the image side facing upwards. Align the center of
the document with the center arrow mark on and above the scanner bed.
2. Use the standard size markings to help align the docum ent for a straight sc an
path.
3. Push the original into the insertion slot until you feel it contact the rollers.
4. The scanner will automatically grab the original and move it into start-scan
position.
Eject document
Press the Paper Backward button to eject the original back to the scanner
●
feeding bed (towards you).
Basic operations
ENWW
Load and eject documents
5
Page 10
Press the Paper Forward button if you wish to eject the original out the back
●
of the scanner.
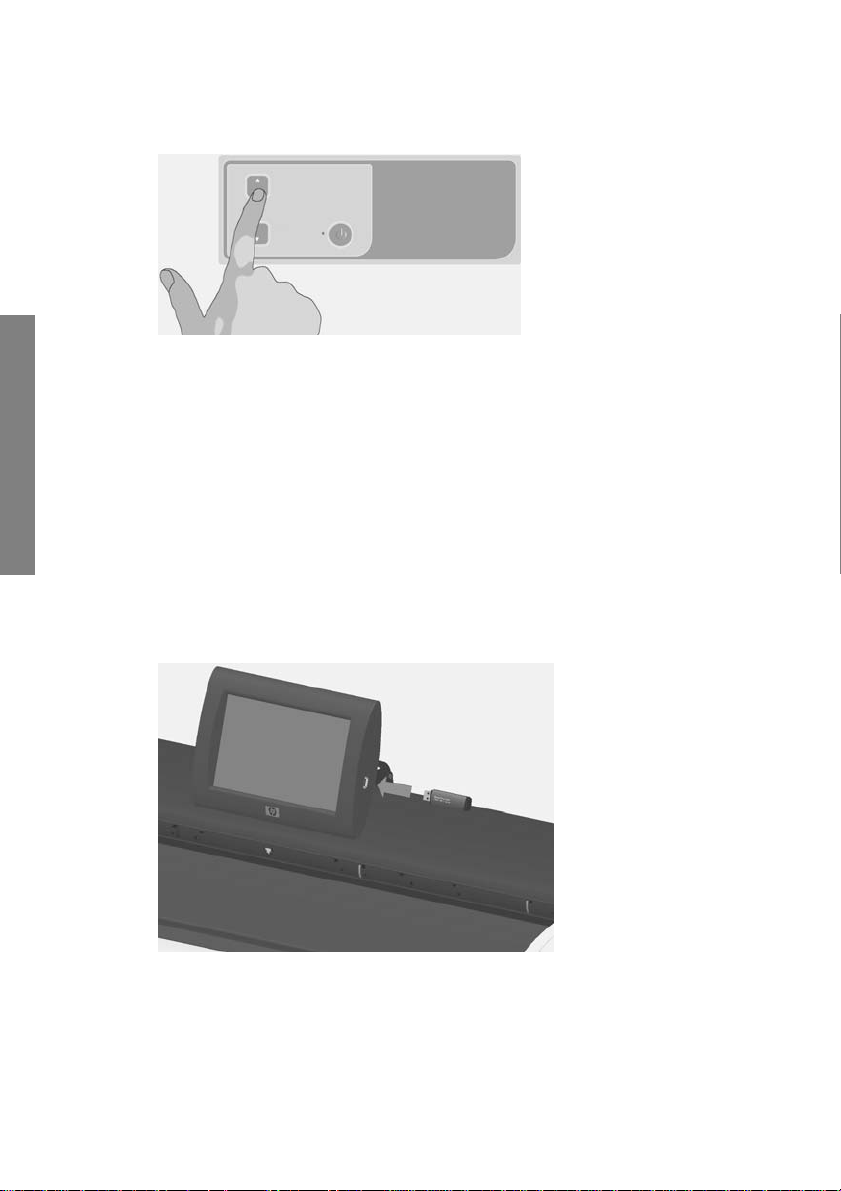
Set a destination folder for scans
Basic operations
The instructions below describe how to set up and select a destination folder in
which you will save your scan-to-fi le outpu t. Desti nations are folders on com puters
known to your system through the local network (LAN) or folders on a USB flash
drive inserted in the touch screen.
1. Make sure your system and any in tended destinati on computers are c orrectly
set up on your local network (LAN). Configurat ion of your system on the LAN
is carried out through the Options > Advanced Options > Network menu.
This is a system administrator option that may require a password.
2. If you wish to save your scans on a USB flash drive, press the Scan button
and insert the drive into the USB port on the touch screen. The system will
detect the drive and enquire whether you want to set/change the destination
to USB.
3. To access the destination setup options, pres s Options > Advanced
Options > Manage Destinations. From there you can selec t, add and change
destinations.
6 Chapter 2 Basic operations ENWW
Page 11
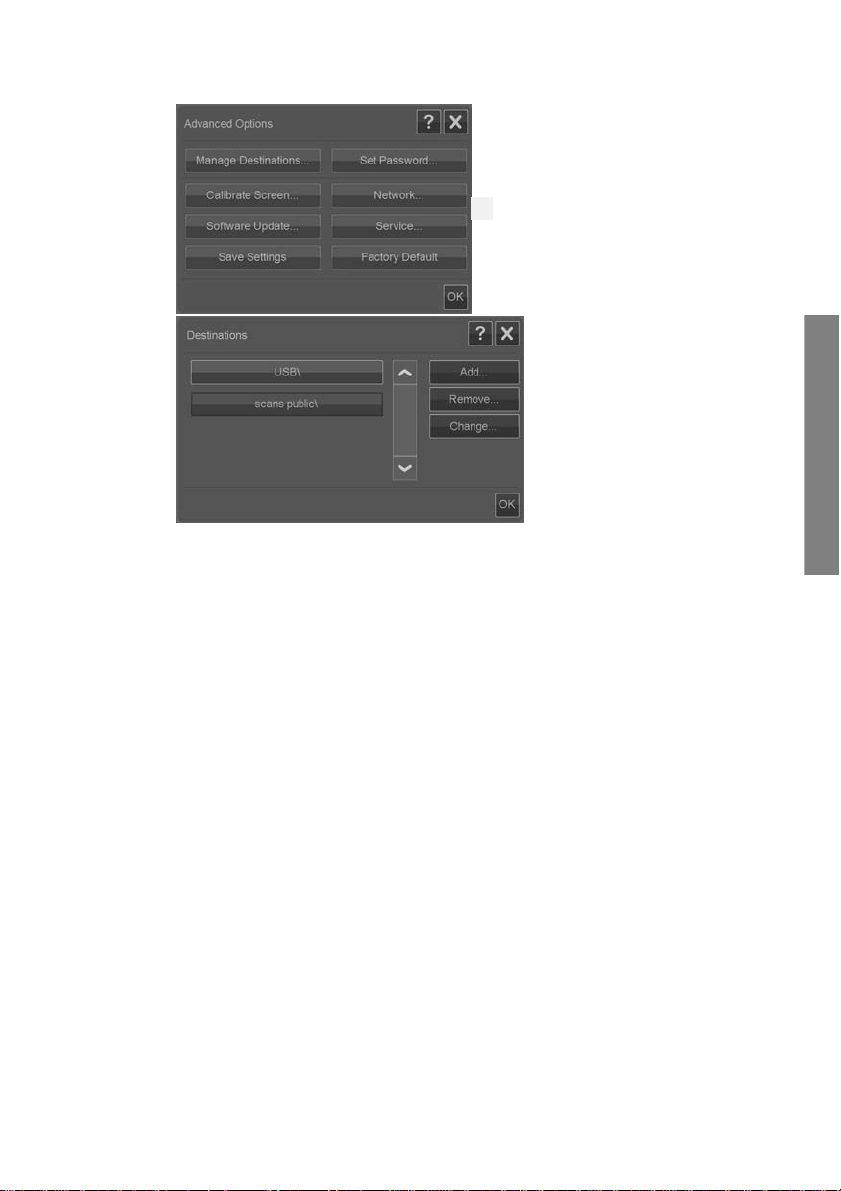
Select a destination
Select a destination from the list of destinations previ ousl y creat ed and sa ved on
the system. If there are no destinations ava ilabl e, or y ou w ant to use a desti nation
that is not on the list, you will have to add a new destination. Press the USB
destination if you want to scan to an inserted USB flash drive.
Add a new destination
Press the Add button to enter desti nation details. Enter values in the Label, Network
Path, Domain, Username and Password fields. Select Remember if you want to
save the destination password in t he sy st em. Leave Remember unselected if you
want users to enter the password to connect to the destination. Press Test
Connection to check your settings.
Change (edit) a destination
Press the Change button and edit the Label, Network Path, Domain, Username
and Password fields. Select Remember if you want to save the destination
password in the system. Leave Remember unselected if you want users to enter
the password to connect to th e des tina tion. Press Test Connection to check your
settings.
Remove a destination
Select a destination from the Destinations list and press the Remove button.
Basic operations
ENWW
Set a destination folder for scans
7
Page 12

Copy a document
Follow the steps below to make a copy (scan to print).
1. Insert and feed your document into the scanner, with the side to be scanne d
facing upwards.
2. Make sure the printer is turned on and the intended media is loaded.
NOTE: To copy, you need a media profile fo r the loade d media. The sy stem
comes with a set of media pro f iles for the m os t co mm only - use d m edia. If y ou
need to create a new media profile, see
on page 19.
3. Press the Copy button to acc ess the copy (sc an to print) settings and bu ttons.
Basic operations
The Copy dialog is shown below.
4. Press the Original Type button and select the type that matches your
document and required output. See
adjustments on page 11.
5. Press the Quality button and select the desired quality of your output.
6. Press the Scan Area button to set the size of the image capture area. If you
wish to capture the whole image, select Auto and the system will mea sure
and set the size for you.
7. Press the Resize button to determine the size of the printed copy. Set to No
if you want a 1:1 copy.
8. Press the Copies button to select how many cop ies you want printed with the
job.
9. Toggle the Preview before Copy button to On if you want to control settings
before committing the job to the printer. See
on page 15.
10.
When you have made your settings, press the Start Sca n/Copy butt on
start copying.
Create a media profile
Specify the original type and make image
Preview copies and scans
to
8 Chapter 2 Basic operations ENWW
Page 13

See also:
Set and preview image adjustments on page 15
●
Set input and output sizes on page 13
●
Set the output quality on page 17
●
Scan to a file
Follow the steps below to scan to file.
1. Insert and feed your document into the scanner with the side to be scanned
facing upwards.
2. Press the Scan button to access the scan to file settings and buttons. The
Scan dialog is shown below.
3. Press the Original Type button and select the type that matches/describes
your document. See
on page 11.
4. Press the Quality button and select the scan resolution.
5. Press the Scan Area button to set the size of the image capture area. If you
wish to capture the whole image, select Auto and the system wi ll measure
and set the size for you.
6. Press the File Format button to determine the file form at, su ch as JPG or
TIFF.
7. Press the File Name button to enter a name for the destinat ion file.
8. The Destination button shows where your scan output file w ill be crea ted.
Press the Destination button if you want to select a different dest ination.
9. Toggle the Preview before Scan button to On if you want to control your
settings before saving to file. See
10.
When you have made your settings, p ress the Start Scan /Copy button
start scanning.
Basic operations
Specify the original type and make image adjustment s
Preview copies and scans on page 15.
to
ENWW
Scan to a file
9
Page 14
See also:
Set and preview image adjustments on page 15
●
Set input and output sizes on page 13
●
Set the output quality on page 17
●
Set a destination folder for scans on page 6
●
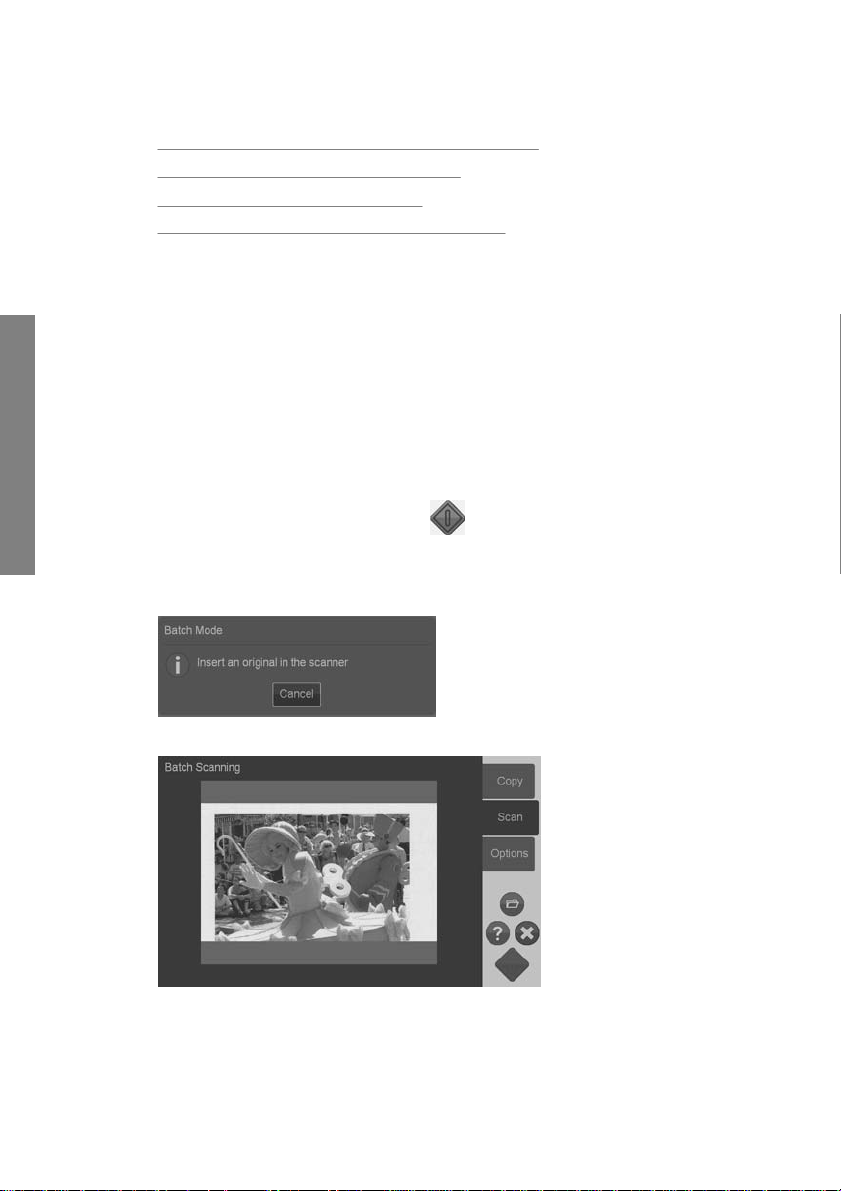
Batch scan and batch copy
With batch scanning and batch copying y ou can c ontin uous ly feed new originals
into the scanner and the system will start proc essing right away withou t waitin g for
you to press the Start Scan/ Copy button. Th e system will apply the current se ttings
Basic operations
to all documents. If you are scanning to file, your files will automatically be named
with increasing numbers.
1. Lay your originals face up, near the scanner so they are easily reached .
2. Make your scan or copy settings. These will apply for all the originals in the
batch.
3. Press the Batch Mode button to turn batch mode to On.
4.
Press the Start Scan/Copy button
5. If you have already loaded the first original, the syste m will sta r t scanning or
copying. If not, the Batch Mode dialog will ask you to insert the first origina l
into the scanner.
.
6. When you insert the first original, the system will star t scanning it right aw ay .
10 Chapter 2 Basic operations ENWW
Page 15
7. When an original is scanned, it is ejected. The Batch Mode dialog returns and
asks for the next original.
8. Remove the ejected original and feed the next one.
9. Continue to feed originals until finished wi th the bat ch.
10. Press the Batch Mode dialog’s Cancel button to abort batch mode.
NOTE: Previewing is disabled when in Batc h Mod e.
NOTE: To ensure fas t loading i n batch m ode, the scanner w ill automatic ally ejec t
each original after it is sc anned. The setting in Options > Basic Options > Rewind
after scan will determine the direction. If the option is s elec ted, s cann ed origin als
will be ejected towards the front and if the option is not selected, scanned orig inals
will be ejected out the back.
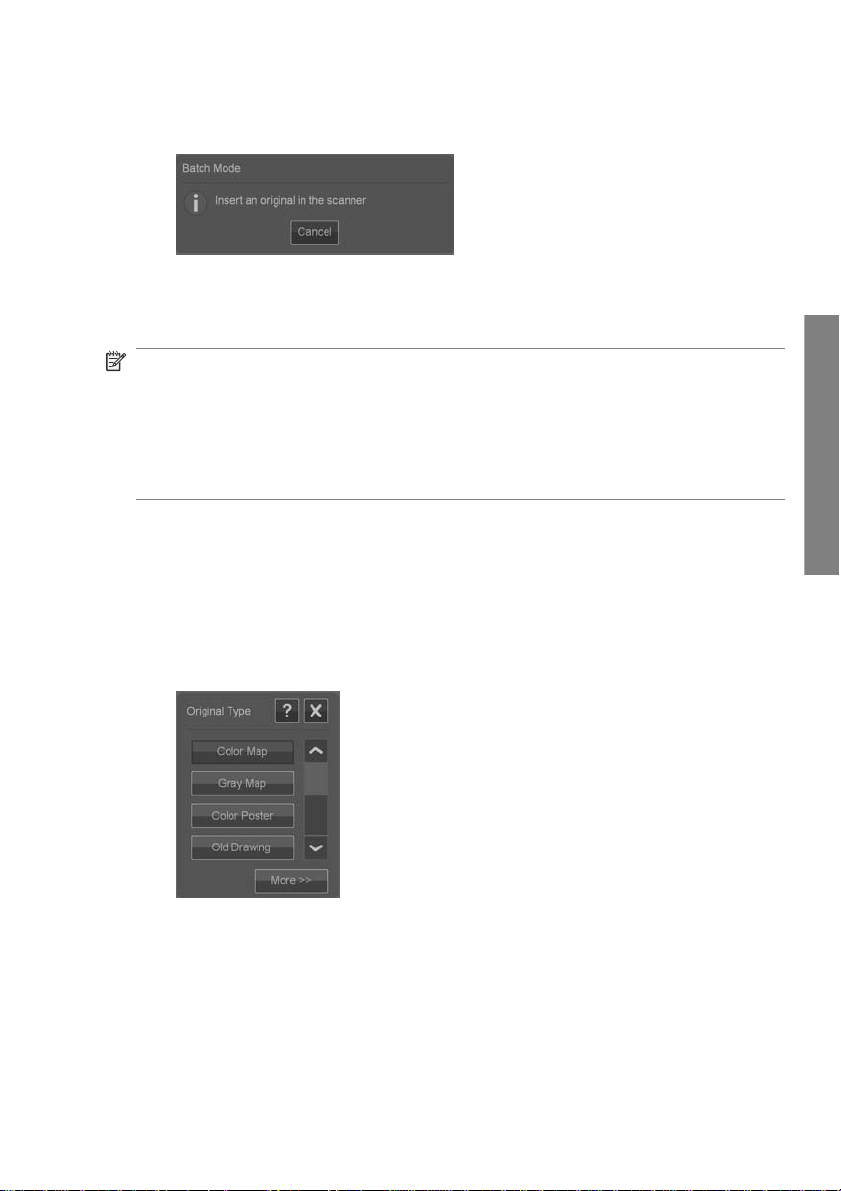
Specify the original type and make image adjustments
Basic capture parameters are set when you select Original Type. You can then
adjust specific factors such as imag e brightn ess , sharp ening and back groun d
cleaning level. The adjustments available will depend on the Original Type
selection.
1. Press the Scan or Copy button and then the Original Type button to reac h
the Original Type selection list.
Basic operations
ENWW
2. Select an Original Type that best describ es yo ur origina l.
Specify the original type and make image adjustments
11
Page 16

Basic operations
Original Type Description
Color Lines Suitable for color CAD drawing s and gra phi cs wi th a hig h le vel of de tai l.
Applies image processin g to clea n t he ba ckgr oun d and sharp en l i ne s. 24- bi t
color scan.
Gray Lines Suitable for grayscale CAD drawings and graphics with a high level of detail.
Applies image processin g to clea n t he ba ckgr oun d and sharp en l i ne s. 8-b i t
grayscale scan.
B&W Lines Suitable for clean B&W CAD drawings and graphics with a high level of detail.
Especially useful for scan-to-file as file sizes are minimal compared to color
and gray original types. Minimal application of image processing for a neutral
and fast scan.1-bit B&W scan.
Color Map Suitable for color maps such as topogr aph i c map s, roa d maps or other
document types that contain fill areas and a high level of detail. Applies image
processing to sharpen details . 24 -bit color scan.
Gray Map Suitable for grayscale maps such as topograp hic maps, ro ad m aps or othe r
document types that contain fill areas and a high level of detail. Applies image
processing to sharpen details. 8-bit gr aysca le scan .
Color Poster Suitable for color photos and posters of good quality. Minimal application of
image processing for a neutral and fast scan. 24-bit color scan.
Old Drawing Suitable for faded and creased drawings with low contrast between the
foreground and background . Appl ies i m age processi ng to clean t he
background and sharpen lines. 8- bit gr aysca le scan .
12 Chapter 2 Basic operations ENWW
Page 17

3. You can fine-tune the Original Type settings (optional): Press the More button
to expand the Original Type dialog and make adjustment options
relevant to the selected Original Type. Press OK when done.
4.
Press the Context-sensitive Help button
each setting and about saving your settings as a new custom Original Type.
NOTE: You can press the Preview Before Scan/Copy button and then the
Adjustment button to mak e image adjust ments and view the effects on yo ur screen.
Preview copies and scans on page 15.
See
for additional information about
Set input and output sizes
The "Scan Area" is your input s ize and defin es how much of the i mage is capture d.
Often, this will be equal to the total size of the orig inal. However, there may be cases
when you only want to scan a p ortion of the original or wish the capture area to be
equal to a certain standard size.
When copying, you can also determine the output size (the size of the ima ge in your
printed copy) through the Resize setting. You can choos e No resize to use the
current Scan Area size for a 1:1 copy, or you can select a different size in order to
reduce or enlarge the printed image in relation to the Scan Area size.
NOTE: When scanning, the image’s size in the output file is always equal to the
Scan Area size (1:1).
Set the Scan Area (input size) for Copy and Scan
When in the Scan or Copy screens, press the Scan Area button to view the Scan
Area size list.
Basic operations
ENWW
Set input and output sizes
13
Page 18

The list offers different methods you can use to determine the Scan Area siz e:
Auto: The program will automatically detect the size of the full docu men t
Basic operations
●
loaded in the scanner. You can use the preview to check that the scanner has
detected the size correctly.
Use a standard or custom size: The dialog c onta ins a l ist of standard sizes
●
and custom sizes saved on the system. Scroll through the lis t and selec t the
size you want to use. To create a new custom size, follow the ins truct ions
below.
●
Set size values for width and length: Press the More button
expand the Scan Area dialog. Make your wi dth and l ength siz e sett ings in the
fields or set Auto on width or length separately. You can save your changes
to create a new custom size or use them for the current job only.
NOTE: You can also set the Scan Area visually on th e screen through a preview.
Preview copies and scans on page 15.
See
Set the Resize value (output size) for Copy only
1. Press the Resize button.
2. Select No if you do not want to resize the image: that is, you want the end
result to be the same size as the Scan Area.
3. Press the Size button to select a st andard size (such as A2 or A4 ) fro m a lis t.
4. Select Scale to resize according to a scale factor (such as 50% or 32%).
to
14 Chapter 2 Basic operations ENWW
Page 19

Preview copies and scans
You can preview your copies and scans before committing them to the printer or
file system. With previewing you can:
Make image adjustments that are relevant for your selected Original Type,
●
such as brightness and sharpening, and view the effec ts of thes e on your
screen.
Visually set the Scan Area (input size) using handles to drag and posit ion a
●
Scan Area frame on the image.
Zoom in and out to evaluate specific image areas and the effects of your
●
settings.
Load a preview scan or copy
1. Load your original and press the Preview Before Scan/Copy button to turn
preview mode to On.
2. Press the Scan or Copy button to load the preview.
3.
You can at any time press the Cancel button
to close the preview.
Basic operations
Set and preview image adjustments
1.
Press the Adjustment button
2. Make your settings in the adjustmen ts dia log.
3. Press the OK button to close the adjustments dialog and see the effects of
your settings on the p review. Use the zoom tools to inspect details and area s
of interest.
4. Repeat steps 1–3 if you need to readjust your settings.
NOTE: The effects of the image a djustment s ettings are a pplied and dis played in
the low-resolution preview and hence do not fully represent t he final imag e in the
destination file or printed copy.
ENWW
at the top left corner of the preview screen.
Preview copies and scans
15
Page 20

Set and preview the scan area
The preview shows the image inside a white frame. The frame represent s the
current Scan Area (input) size. Changing the frame’s size before sc anni ng w ill
change the Scan Area settings. The frame's size can be adjusted by moving its
borders and corners. To do so you can:
Drag the resize handles
●
Press with your finger on the place where you wish to reposition the neare st
●
border edge or corner. The border will jump to that place.
Use the image zoom and positioning tools to assist you in setting the frame
●
size and positioning the image inside of it. The image zoom and posi tion ing
Basic operations
tools are:
Zoom crop: Snaps to the image as cropped by the borders.
Zoom in: Enlarge the image size in the preview. Zooming is targeted on
the center of the window.
Zoom out: Reduce the image size in the preview. Zooming is targeted on
the center of the window.
Zoom all: Displays the whole capture area without cropping. The borders
positions are defined by the current Origin al siz e set ting.
Image panning tools: Use these arrows to center the captured image
in the window.
Frame center handle (blue circle): Use this to drag the whole size frame
and reposition it on the captured image.
on the frame’s sides and corners.
Press the Start Scan/Copy butt on
to commit the job.
Press the Cancel button
committing the job.
16 Chapter 2 Basic operations ENWW
if you want to abort the preview process without
when you are finished previewing and want
Page 21

Set the output quality
Set quality when scanning to file
You apply quality settings to scanning (scan to file) in terms of the sc an reso luti on
measured in dots per inch (dpi).
1. Press the Scan button and then the Quality button to open the Quali ty(dp i)
dialog.
2. Use the scroll bar to view available resolutions.
3. Press the button displaying the scan resolution you want to use.
The Custom button opens a list with alternative reso luti ons.
Basic operations
ENWW
Set the output quality
17
Page 22

Set quality when scanning to print
When copying (scan-to-print), you set general print-q uality parameters (Fast,
Normal, Best) that apply for the whole copy process (scan and print).
The scan quality is defined by resolutio n (dpi). You can sel ect the scan
●
resolution you want tied to each quality setting (Fast, Normal, Best). This is
done through the Original Type adjustment options (see below).
The print quality parameters that are tied to a quality setting (Fast, Normal,
●
Best) are defined in the printer.
1. Press the Copy button and then the Quality button to open the print Quality
dialog.
Basic operations
2. Select the required quality setting from the list .
Fast is for making a quick draft with minimum use of ink.
●
Normal is good for most copy jobs that require an average quality leve l.
●
Best is for high-quality prints.
●
Tie scan resolutions to the Fast, Normal, Best quality settings (scanto-print)
1. Press the Original Type bu tton and then the More button to open t he Original
Type’s adjustment options.
2. Scroll down the list of adjustments to reach the buttons Fast Scan
Resolution, Normal Scan Resolution and Best Scan Resolution.
18 Chapter 2 Basic operations ENWW
Page 23

3. Press a button to open a list of resolution selections.
4. Select the scan resolution you want applied when you choose the named
quality setting (Fast, Normal, Best) with the current Original Type.
Example: Select the Color Poster original ty pe and press the More button to make
adjustments. Press the B est Scan Resolution button and then select 400 dpi. This
means that, thereafter, 400 dpi will be applied as the scan resolution whenever you
use the Color Poster original type and the quali ty s ettin g Copy > Quality > Best.
Create a media profile
Your system supports color matching between scanner, printer and media type
through media profiles. A media profile must exist for each media type (such as
glossy or coated paper) used with your printer.
In most cases, color matchi ng and m edi a profil es are adm inis trated by the system
and their application is transparent for t he user. R ight aft er you load new media on
your printer, you select the media type in the printer’s settings menus. If a media
profile for the media type exis ts, your syst em automatic ally loads it for optimal color
matching of your copy.
There are, however, two cases that will require your attention:
No media profile found: If the system does not already contain a media
●
profile for the current media, you will need to create one. A message dia log
will inform you when you need to create a media profile and display a button
that takes you to the Create Media Profile wizard (see below).
Colors not optimal: Some of the default media profiles supplied with the
●
system are generic and m ay not be optim al with all m edia types. Also, cu rrent
conditions may not be optimal for even specific media profi les . If your trial s
show the need for improved color matching, you should update (renew) the
current media profile through the Create Media Profile w iza rd (see bel ow).
Update (renew) the current media profile
1. Make sure your printer’s media type setting corre sponds t o the loaded m edia.
2. Make a trial copy with the current media profile to evaluate wheth er it needs
to be updated.
Basic operations
ENWW
Create a media profile
19
Page 24

3. Press Options > Printer Options.
4. The Printer Options dialog displa ys inform ation about your printer and shows
Basic operations
the Current media which is the media sett ing made on the printer’s main menu.
The Media profile value may show:
Default: The media profile for the current media was supplied with the
●
program and has not been updated.
Created dd-mm-yyyy: The current media profile has been created or
●
updated on the date specified.
Not Created: The system has not found a media profile for the current
●
media.
5. If you see the status Not Created, you need to create a media profi le in order
to make a copy. Press the C reate Pr ofile button to start the Create Media
Profile wizard.
6. If you are satisfied with the media profile status and color matc hing resu lts in
your trials, press OK to close the dialog.
7. If your colors are not optim al in y our trials , press the Update Profile b utton to
start the Create Media Profile wizard.
The Create Media Profile wizard
The wizard is both for creating a new media profi le and for updating an existing one.
Follow the wizard’s instructions on your screen.
The process will require that you print a system-stored color patch sheet and then
scan it. The system will take care of the rest.
TIP: The wizard prints two pages; you should discard the f irst pa ge and scan the
second.
The media profile creation date will be updated when you co mpl ete the proc es s.
20 Chapter 2 Basic operations ENWW
Page 25

View, move, rename or delete scanned files
Your system's scan destinations, on the LAN and on your USB drive, will contain
image files that you will need to access and manage. Access to your image files
takes place through the File Manager dialog.
Open the File Manager
Press the File Manager button .
Browse the file system
The File Manager is limi ted to folders that are defi ned on your system as scan
●
destinations. The file list def aults to the root of your current destin ation fol der.
The Folder Up button (marked ..) will move you up a level until you reach the
●
list of created destination folders.
Click a folder name to move onto its level.
●
Click an image name to display an image thumbnail and basic information
●
about the image.
Select image files for a file action (see below) by checking the box to the left
●
of the image file name.
Basic operations
ENWW
View, move, rename or delete scanned files
21
Page 26

File action buttons
To use the action buttons, check one or more boxes next to file names and then
press the relevant action button.
Copy: To copy one or more selected (check-marked) files to another folder.
●
Move: To move one or more selected (check-marked) files to another folder.
●
Rename: To change the name of a selected (check-marked) file.
●
Delete: To delete one or more selected (chec k-marked) files from the system.
●
New folder: To create a new subfolder in the current folder.
●
All / None: will toggle between chec king and un-checki ng the boxes to t he left
●
Basic operations
of all the file names in the current folder being viewed.
View: Opens a separate window with a larger view of the image file currentl y
●
displayed.
System setup and options
Basic options
Set date and time
Local date and time parameters are entered through the conf iguration program that
is run the first time the system is turne d on. If needed you can change the local date
and time settings through the Options menu.
1. Press Options > Basic Options > Date & Time.
2. Enter the correct local date and time values and time zone. The date and time
settings will be used with various program acti ons.
Units of measure
1. Press Options > Basic Options > Units of measu re.
2. Select the preferred unit (such as inch or mm) to use when defining document
sizes.
22 Chapter 2 Basic operations ENWW
Page 27

Paper series preference
1. Press Options > Basic Options.
2. Select/tick the Paper series fields that represent the paper series you wish
displayed in the size dialogs (Scan Area and Resize). You can s elec t one or
more paper series to display.
Rewind after scan
1. Press Options > Basic Options.
2. Select/tick the Rewind after scan option if you want the document to return
to the paper feed area after it is scanned so that you can eject it backwards
by pressing the paper backward button on the scanner’s panel. Leave the
option unselected if you want the document to hang behind the sc anner so
that you can eject towards the back with the paper forward button.
Auto reset and inactivity timeout
Press Options > Basic Options.
These two options tell the system to re turn automatic ally to default para meters after
a defined idle period—by default, five minutes—so that users will alway s start wi th
the system’s basic settings even if a previous user has changed the m. The system
returns to the saved system parameters: those set when the Options >
Advanced > Save Settings button was last pressed (see below).
Select/tick the Auto Reset option if you want to apply the function. Use Inactivity
Timeout to set the idle time before Auto Reset is triggered.
NOTE: New destinations and media profiles are not affected or lost when Auto
Reset is applied.
Basic operations
Advanced options
Set password for advanced options
Press Options > Advanced Options > Set Password to apply passw ordprotected access to the Advanced Options dialog.
ENWW
System setup and options
23
Page 28

Network settings
Network parameters are entered through the configuration program that is run the
first time the system is turne d on. If the sys tem is moved or th e network paramete rs
have changed, new network settings can be entered through the Options menu.
1. Press Options > Advanced Options > Network.
2. Select Auto IP address if you know tha t your network has a DHCP server and
thus your system can automatically retriev e its net w ork con nec tion
parameters. Otherwise, enter the IP address, sub net mas k and default
gateway manually.
Save settings
Basic operations
Press Options > Advanced Options > Sav e Settings.
This will save the current settings as the new system default settings. The saved
settings will be reapplied when an Auto Reset is triggered (see above).
Reset settings to the factory defaults
Press Options > Advanced Options > Fa ctor y Default.
This will restore all settings to their factory def aults . The st andard O rigin al Typ es
that came with the program are restored to their original settings. Resetting to
factory defaults is an administrator function and may require a password.
Other advanced options
Manage Destinations is described under
●
on page 6.
Calibrate Screen is described under
●
on page 29.
Software Update is described under
●
on page 37.
Service is an option for service technicians and not within the scope of this
●
guide.
Set a destination folder for scans
Calibrate the touch screen pointer
Install new system software
24 Chapter 2 Basic operations ENWW
Page 29

3 Maintenance
Clean the glass plate and the scanning area
1. Turn off the scanner and disconnect the power cable.
2. Flip the touch screen backwards.
ENWW
Clean the glass plate and the scanning area
Maintenance
25
Page 30

Maintenance
3. There are two lid release buttons on the backside of the scanne r.
Simultaneously slide t he lid release butto ns towards the sc anner's center un til
you feel them unlock, and pull the lid backw ards towards your bo dy. Open the
scanner lid all the way back.
4. Gently wipe the glass plate and the three rows of rollers with a lint-free cloth
dampened with a mild, streak-free glass cleane r.
CAUTION: Do not use abrasives, acetone, benzene or fluids that contain
these chemicals. Do not sp ray li quids directly onto the scanner glass plat e or
anywhere else in the scanner.
26 Chapter 3 Maintenance ENWW
Page 31

5. Dry the glass fully using a separate clean, dry lint-free cloth. When done, use
the cloth to dry the rollers.
6. Close the scanner lid and gently push it down to lock it into place. Ret urn the
touch screen to its normal position.
Calibrate the scanner
HP recommends that you calibrate the scanner if your output is not optimal and
cleaning the scan area does not remedy the problem. Calibration will renew the
scanner’s original color and BW precision.
ENWW
Calibrate the scanner
Maintenance
27
Page 32

Maintenance
NOTE: It is important that you clean the glass before calibrating the scanner.
1. Turn the scanner off and clean the scan area. Calibration works best with a
clean scanner.
2. When you have finished cleaning the scan area, turn the scann er on. The
scanner is ready for calibration when the power LED on the scanner’s panel
lights green.
3. Press Options > Calibrate Scanner to start the Scann er Calibrati on Wizard.
4. The Scanner Calibration Wizard guides you through the procedure for scanner
calibration. To calibrate the scanner, you need the maintenance sheet that
came with your scanner.
28 Chapter 3 Maintenance ENWW
Page 33

Calibrate the touch screen pointer
1. Press Options > Advanced Options > Calibrate Screen.
NOTE: Access to the Advanced Options may require the system’s
administrator password.
2. Follow the instructions on the screen. Cali bratio n is done by press ing targ et-
points that appear in different positions on the sc reen. Press the target-point s
until they no longer appear.
3. Press the OK button in the final dialog to confirm and conclude screen
calibration.
Replace the scanner glass plate
Over time, the condition of the glass plate can deteriorate. Smal l scrat ches on the
glass surface can reduce image quality. Call H P Support to order a new glass plate.
Step-by-step instructions on replacing the glass pla te are sup plied with the new
glass plate.
ENWW
Calibrate the touch screen pointer
Maintenance
29
Page 34

4 Troubleshooting
The system reports an error
The system will report an error mess age on your scree n when an error is detecte d.
Correcting common errors
The actual nature and cause of the error will be reported through a message on
your screen.
The information on your screen may inc lude instructions and actions to remedy the
error. If this is the case, follow the instructions on your screen.
If your screen does not display a solution, look for a description of the error and
remedy in the troubleshooting sections of this quick guide, or in the s ystem’s online-help. Follow the instructi ons p r ovid ed.
Most scan-quality errors can be resolved by cleaning and calibrating the scanner.
If your error is not resolved in that way:
Try restarting the system by turning the scanner off and then on.
●
Try resetting the system's factory defaults through Options > Advanced
●
Options > Factory Defaults.
Try to recover the last system im age k nown to work satisfactorily. See
●
to update or recover the system on page 35.
If the above actions fail to resolve the problem, contact technic al as sis tanc e (see
below).
Technical assistance
In some cases you may need technical assistance. You shoul d contact HP support
if one or more of the following cases is true:
The error cannot be remedied through the action suggest ed on you r touch
●
screen nor through any of the steps described above under "Correcting
common errors".
The error and its remedy is not de scribed in this guide and cannot be remedied
●
Troubleshooting
There is a paper jam
through any of the steps d escribed above un der "Correcti ng com mon errors".
The system fails to re port t he error on your screen and it cann ot b e re med ied
●
through any of the steps d escribed above un der "Correcti ng com mon errors".
You know a paper jam has occurred when the scanner stops scanning while the
document is still engaged in the drive system. Your system will report the paper
jam. To remedy this, try to eject the document from the scanner: press and hold
I need
30 Chapter 4 Troubleshooting ENWW
Page 35

down the Paper Backward or the Paper Forward key. If the document will not
respond to these keys, remove it manually in the following way.
1. Flip the touch screen backwards.
2. Simultaneously slide the li d release buttons t owards the sca nner's center until
you feel them unlock.
ENWW
There is a paper jam
Troubleshooting
31
Page 36

3. With one hand, pull the lid backwards to open and use the other hand to pull
out the document so it comes completely free of the sca nning area.
4. Close the lid.
5. Return the touch screen to its normal position.
When the scanner is ready again, reload the document to scan.
Streaks in the scanned image
Troubleshooting
32 Chapter 4 Troubleshooting ENWW
In most cases, streaks are caused by dust particles on the document and in the
scanner's environment. The scanner's v ery high precision and captu re of fine detail
means that even tiny dust particles c an be noticed. Cleanin g the document usuall y
remedies the problem. First, check the original document to make sure that it is
clean and free of creases or other impediments that may drag across the glass. If
the document is clean and in g ood c ondition, try cleaning the glass : s ee
glass plate and the scanning area on page 25. If the p roblem persists, try cal ibrating
Clean the
Page 37

the scanner: see Calibrate the scanner on page 27. If the problem still persists, you
may need to replace the glass: see
Replace the scanner glass plate on page 29.
Lines in the scanned image appear too thin or
discontinuous
When scanning documents w ith thin lines s uch as CAD drawin gs, a scan reso lution
setting of less than 300 dpi can result in disproporti onate ly thi n or disc ontin uous
lines. HP recommends that you set the scan resolution to a minimum of 300 dpi
when scanning CAD drawings and other documents with thin lines. Scanning with
higher resolution lengthens the overall scan time, but it ensures greater image
quality. This issue is not as noticeable when scanning pho tos and are a fills. For
more information on setting the scan resolution , see
on page 17.
The images below help to illustrate the issue:
Figure 4-1 CAD drawing scanned at 150 dpi
Figure 4-2 CAD drawing scanned at 300 dpi
Set the output quality
Cannot connect or scan to a destination folder on the LAN
Ensure that you have carried out all the foll owing steps in order to connect and scan
to a specific destination folder on the LAN:
ENWW
1. Make sure your system is set up on the LAN. See
options on page 22.
Lines in the scanned image appear too thin or discontinuous
System setup and
Troubleshooting
33
Page 38

2. Destination folder setup is carried out when you inst all the sys tem and
afterwards through Options > A dva nced O ptions > Manage Destinations
> Add or Change. Make sure you have entered the full network path correctly .
3. Make sure you have entered the correct login information – Domain
\Username and Password. Remember to enter the backslash character ‘\’
between the domain and username.
4. Press the Test Connection button to chec k that your pa rameters are c orrect.
If you have performed all of the above, and still cannot connect or scan to the
destination folder, contact your loc al network adm inis trator.
Image cropped—not whole image scanned
Your size settings may be wrong. Press the Scan Area button to check your
●
size settings. Your Scan Area should be set to either Auto for automatic
detection of the size, or to a standard or custom size that corresponds to the
size of the whole original loaded in the scanner.
Ensure that you are loading the original correctly. Be sure to align the center
●
of the original with the scanner’s center arrow marking.
A media profile cannot be generated
If the Create Media Profile wizard stops running or reports errors:
1. Ensure that the scanner and the printer are both turned on and ready for
normal operation.
2. Ensure that your scanner is functioning. Scan a small document (to file) to test
the scanner.
3. Ensure that media is loaded in the printer.
Troubleshooting
4. Ensure that the printer’s media type setting corresponds to the actual media
loaded.
5. Ensure that the color sheet you printed with the Create Media Profile wizard
is inserted and aligned correctly in the scanner.
34 Chapter 4 Troubleshooting ENWW
Page 39

6. Ensure that you scanned the second page p rinted by the Cr eate Media Profi le
wizard, and not the first.
7. Check that the scanner is clean and recently calibrated . If in doubt , clea n the
scanning area and calibrate the scanner: see
scanning area on page 25 and Calibrate the scanner on page 27.
Clean the glass plate and the
My color matching results are not optimal
1. Try using the Color Poster original type. This is a neutral original type that does
not apply special image processing that coul d affec t col or matc hin g.
2. Check your Original Type setti ngs in the Copy > Ori gi nal Ty pe di alog. Press
the More button to view and adjust the specific s ettings relevant to the Original
Type.
3. Press Options > Printer Options > Update Profile and follow the steps on
your screen to ensure your media profile is optimal for the current media and
printer conditions.
4. If the above does not help, check that the scanner is clean and recentl y
calibrated. If in doubt, clean the scanning area and calib rate the s canner:
Clean the glass plate and the scanni ng area on p age 25 and Calibrate the
see
scanner on page 27.
I need to update or recover the system
Perform a system recovery if the scanner hangs in boot mode and the system
cannot start normally, or if you want to return to an earlier or the initial program
version. System recovery will reforma t the syst em’s progra m partitio n and rein stall
a fresh program image.
To perform system recovery, you need to ac tivate the Software Updat e & Recovery
mode. There are two ways to activate the Software Update & Recovery mode:
1. If the program on your touch screen is running, press Options > Advanced
Options > Software Update.
2. If your system is hanging and the program interface on your touch screen
cannot be accessed, follow the instructio ns belo w to activate the Software
Update & Recovery menu on your screen.
a. Connect a USB-driven keyboard to the USB port on the side of the
system’s touch screen.
b. Turn off the scanner with the On/Off switch at the back of the scanner.
c. Turn on the scanner with the On/Off switch at the back of the scanner.
ENWW
My color matching results are not optimal
Troubleshooting
35
Page 40

d. Follow closely the messages that appear on your touch screen as the
system restarts. When the option for starting the system in Software
Update & Recovery mode appears, select the option with your keyboard.
e. The Software Update & Recovery screen will appear and can be
controlled from your touch screen.
Once in the Software Update & Recovery mode, you can recover your syste m by
reinstalling a complete image of the software. Follow the ins truc tions below:
1. Choose the System Update/Recover option in the Software Updat e &
Recovery menu.
2. Choose the program image to install from the list. The default image is the
initial version that was delivered with your system and the ac tive image is the
version currently installe d. Other listed ima ges are versions y ou installed prior
to the active version.
3. Confirm your selection when asked. The syst em w ill proc eed to updat e the
system with the selected program image. This take s about two minutes . Press
the OK button to return to the Software Update & Recovery menu.
4. Select the Return to normal scanner operation button and confirm. The
system will load and initializ e all its para met ers. Do not turn off the scanner
or interrupt the load process. This step can take up to ten minutes to
complete.
5. At the end of the system load process, you will be asked to calibra te the touch
screen. Press the arrows and OK button when prompted.
6. Select the language for your system software.
7. Accept the HP license agreement.
8. Your system will complete the recovery process and start up your scan and
copy program interface.
The system software is in the wrong language
Your system’s language is set up during installatio n; to cha nge the la nguage , you
must reinstall the software with a new language selection.
1. Press Options > Advanced Options > Software Update.
2. Choose the System Update/Recover option in the Software Updat e &
Troubleshooting
Recovery menu.
3. In the program version ima ge list, choose to install the “active” program image.
4. Confirm your selection when asked. The syst em w ill proc eed to updat e the
system with the program image. This takes about two minutes. Press the
OK button to return to the Software Update & Recovery menu.
5. Select the Return to normal scanner operation button and confirm. The
system will load and initializ e all its para met ers. Do not turn off the scanner
36 Chapter 4 Troubleshooting ENWW
Page 41

or interrupt the load process. This step can take up to ten minutes to
complete.
6. At the end of the system load process, you will be asked to calibrat e the touch
screen. Press the arrows and OK button when prompted.
7. Select the new language for your system software.
8. Accept the HP license agreement.
9. Your system will complete t he update process and s tart up your scan and copy
program interface in the new language you select ed in step 7.
Install new system software
A new software version for your system can be supplied in the following w ays :
On a USB flash memory
●
Through a network PC: Internet download, CD-ROM, other
●
To install a new software version from a USB flash memory
1. Press Options > Advanced Options > Software Update.
2. Be sure to wait for the Software Update & Recovery menu to appear before
proceeding with the next step.
3. Insert the USB flash memory into the USB port on the side of the touch screen.
4. Choose the System Update/Recover option in the Software Update &
Recovery menu.
5. The new program version image wil l appear in the program versi on image list.
It can be identified by the text “USB” in the list.
6. Select this image to install it.
7. Select the Return to normal scanner operation button and conf irm. The
system will load and initia lize all it s paramete rs. Do not turn off the scanner
or interrupt the load process. This step can take up to ten minutes to
complete.
8. At the end of the system load process, you will be asked to calibrat e the touch
screen. Press the arrows and OK button when prompted.
9. Select the language for your system software.
10. Accept the HP license agreement.
11. Your system will compl ete the installat ion process and sta rt up you r scan and
copy program interface.
ENWW
Install new syste m software
Troubleshooting
37
Page 42

To install a new software version from a PC
The following requirements must apply:
Your scan/copy system must be connecte d and set up (recog nize d) on the
●
local network.
You need access to a PC that is set up on the network.
●
A Web browser must be installed on the PC.
●
To install from the CD-ROM:
1. Write down your scan/copy system’ s IP address. The IP address ca n be seen
through the Options > Advanced Options > Network dialog.
2. Save the new software ins t alla tion file on the PC; either from an inserte d CD -
ROM, or downloaded from the Internet.
3. Open a Web browser on the PC and enter the scan/copy system IP in the
address field. This will open the scan/copy system’s network accessed
Upgrading Scanner Software interface.
4. Use the browse option to locate and se lect the installation fil e on the CD-ROM.
5. Install the software. This will upload the software to your scan/copy system.
You can now shut down the PC. The remai ning step s take pl ace on the scan/
copy system’s touch screen.
6. Press Options > Advanced Options > Software Update to start the Software
Update & Recovery menu.
7. Choose the System Update/Recover option in the Software Updat e &
Recovery menu.
8. The new program version image you uploaded from the CD -ROM will a ppear
in the program version image list.
9. Select this image to install it.
10. Select the Return to normal scanner operation button and confirm. The
system will load and initializ e all its para met ers. Do not turn off the scanner
or interrupt the load process. This step can take up to ten minutes to
complete.
11. At the end of the system load process, you will be asked to calibra te the touch
screen. Press the arrows and OK button when prompted.
Troubleshooting
12. Select the language for your system software.
13. Accept the HP license agreement.
14. Your system will complete the installation process and st art up yo ur scan and
copy program interface.
38 Chapter 4 Troubleshooting ENWW
Page 43

Index
A
adjustment button 15
advanced setup options 23
auto reset 23
B
basic setup options 22
batch copy documents 10
batch scan documents 10
C
calibrate
scanner 27
screen 29
clean
glass plate 25
scanning area 25
color matching problems 35
copy document 8
cropped image 34
D
date 22
destination folder
cannot connect 33
management 6
document
batch copy 10
batch scan 10
copy 8
eject 5
jammed in scanner 30
load 5
scan 9
size 13
E
eject document 5
error messages 30
F
factory default settings 24
file manager 21
function buttons 2
G
glass plate
clean 25
replace 29
H
help 3
I
image adjustments 15
image cropped 34
inactivity timeout 23
input size 13
L
language, changing 36
lines
discontinuous 33
too thin 33
load document 5
M
manage destinatio ns 6
media profile errors 34
media profiles 19
N
network settings 2 4
O
options
advanced 23
basic 22
original type 1 1
output quality 17
output size 13
P
paper backward button 3
paper forward button 3
paper jam 30
paper sizes 23
password 23
power button 3
preview 15
ENWW
Index
39
Page 44

print quality 17
Q
quality, print 17
R
recover software 35
restart 4
rewind after scan 2 3
S
save settings 24
scan area 13
scan document 9
scanner components 3
scanning area, clean 25
size
image 13
paper 23
software 2
software recovery 35
software update 35, 37
streaks in scanned image 32
system setup 22
T
task buttons 2
time 22
timeout, inactivity 23
touch screen 2
turn off 4
turn on 4
U
units of measure 22
update software 35
40 Index ENWW
Page 45

Page 46

Page 47

Page 48

© 2009 Hewlett-Packard Company
Inkjet Commercial Division
Avenida Graells 501 · 08174
Sant Cugat del Vallès
Barcelona · Spain
All rights reserved
Printed in Germany · Imprimé en Allemagne · Stampato in Germania
 Loading...