

Page 1

EN
HP Designjet T1120 SD-MF P
Quick reference guide
ZHTW
KO
ID
HP Designjet T1120 SD-MFP
快速參考指南
HP Designjet T1120 SD-MFP
빠른 참조 설명서
HP Designjet T1120 SD-MF P
Panduan ringkas
Page 2

EN
You can nd legal and warranty information on the CD. Further information is available at HP’s support Web
site (http://www.hp.com/go/knowledge_center/).
Legal notices
The information contained herein is subject to change without notice. The only warranties for HP Products and
services are set forth in the express warranty statement accompanying such products and services. Nothing herein
should be construed as constituting an additional warranty. HP shall not be liable for technical or editorial errors or
omissions contained herein.
ZHTW
您可以在 CD 上找到法律與保固的資訊。在 HP 的支援網站上 (http://www.hp.com/go/knowledge_center/) 可
以取得進一步的資訊。
法律聲明
此文件所包含資訊如有更改,恕不另行通知。HP 產品和服務的唯一保固明確記載於該等產品和服務所隨附的保固
聲明中。本文件的任何部分都不可構成任何額外的保固。HP 不負責本文件在技術上或編輯上的錯誤或疏失。
KO
CD에서 법적 정보 또는 보증 정보를 찾아볼 수 있습니다. 자세한 내용은 HP의 지원 웹 사이트
(http://www.hp.com/go/knowledge_center/)를 참조하십시오.
법적 고지사항
여기에 수록된 정보는 예고 없이 변경될 수 있습니다. HP는 HP 제품 및 서비스와 함께 제공된 보증서에 명시된
사항에 대해서만 보증합니다. 이 문서의 어떤 내용도 추가 보증으로 간주되어서는 안 됩니다. HP는 이 문서에
포함된 기술 또는 편집상의 오류나 누락된 내용에 대해 책임지지 않습니다.
ID
Anda dapat mencari informasi tentang hukum dan jaminan di CD tersebut. Informasi lebih lanjut tersedia di
situs Web dukungan HP (http://www.hp.com/go/knowledge_center/).
Informasi hukum
Informasi yang terdapat dalam dokumen ini dapat berubah tanpa pemberitahuan sebelumnya. Satu-satunya
jaminan untuk berbagai Produk dan layanan HP adalah yang terdapat dalam pernyataan jaminan tertulis yang
menyertai produk dan layanan tersebut. Tidak ada informasi apapun dalam dokumen ini yang dapat ditafsirkan
sebagai jaminan tambahan. HP tidak bertanggung jawab atas kesalahan teknis, editorial, atau kelalaian yang
terdapat dalam dokumen ini.
Page 3

Table of conten ts
1 Introduction
Using this guide .............................................................................................. 1
Scanner software ............................................................................................ 2
Scanner .......................................................................................................... 3
Documentation and help ............................. ............ .......... .............................. 3
2 Basic operations
Turn the scanner on or off .............................................................................. 4
Load and eject documents ...................... ........................................................ 5
Set a destination folder for scans ................................................................... 6
Copy a document ............................................................................................ 8
Scan to a file ................................................................................................... 9
Batch scan and batch copy ............................ ............................................... 10
Specify the original type and make image adjustments ................................ 11
Set input and output sizes ............................................................................ 13
Preview copies and scans ............................................................................ 15
Set the output quality .................................................................................... 17
Create a media profile .................................................................................. 19
View, move, rename or delete scanned files ................................................ 21
System setup and options ............................................................................ 22
EN
3 Maintenance
Clean the glass plate and the scanning area ................................................ 25
Calibrate the scanner ........................ ....... ..................................................... 27
Calibrate the touch screen pointer ............................. ............. ............ .......... 29
Replace the scanner glass plate .................... ............................................... 29
4 Troubleshooting
The system reports an error ......................................................................... 30
There is a paper jam ........................................................... .......... .......... .. .... 30
Streaks in the scanned image ...................................................................... 32
Lines in the scanned image appear too thin or discontinuous ...................... 33
Cannot connect or scan to a destination folder on the LAN ......................... 33
Image cropped—not whole image scanned ................................................. 34
A media profile cannot be generated ............................................................ 34
My color matching results are not optimal .................................................... 35
I need to update or recover the system ........................................................ 35
ENWW
Page 4

The system software is in the wrong language ............................................. 36
Install new system software .......................................................................... 37
Index ............................................................................................................................... 39
ENWW
Page 5

1Introduction
Using this guide
This guide is organized into the following chapt ers.
1. Introduction: This chapter provides a brief introduction to the software,
scanner device and available documentation.
2. Basic operations: This chapter helps you to carry out various common
procedures.
3. Maintenance: This chapter helps you to carry out various calibration and
maintenance procedures.
4. Troubleshooting: This chapter helps you to solve probl ems that may occur
while scanning.
5. Index: In addition to the table of contents, there is an alpha betic al inde x to
help you to find topics quickly.
Warnings and cautions
Symbols are used in this manual to ensure the proper use of the printer and to
prevent printer damage. Follow the instructions that are marke d with these symbols.
WARNING! Failure to follow the guidelines that are ma rked with this symbol could
result in serious personal injury or death.
CAUTION: Failure to follow the guidelines that are marked with this symbol could
result in minor personal injury or damage to the product.
Introduction
ENWW
Using this guide
1
Page 6

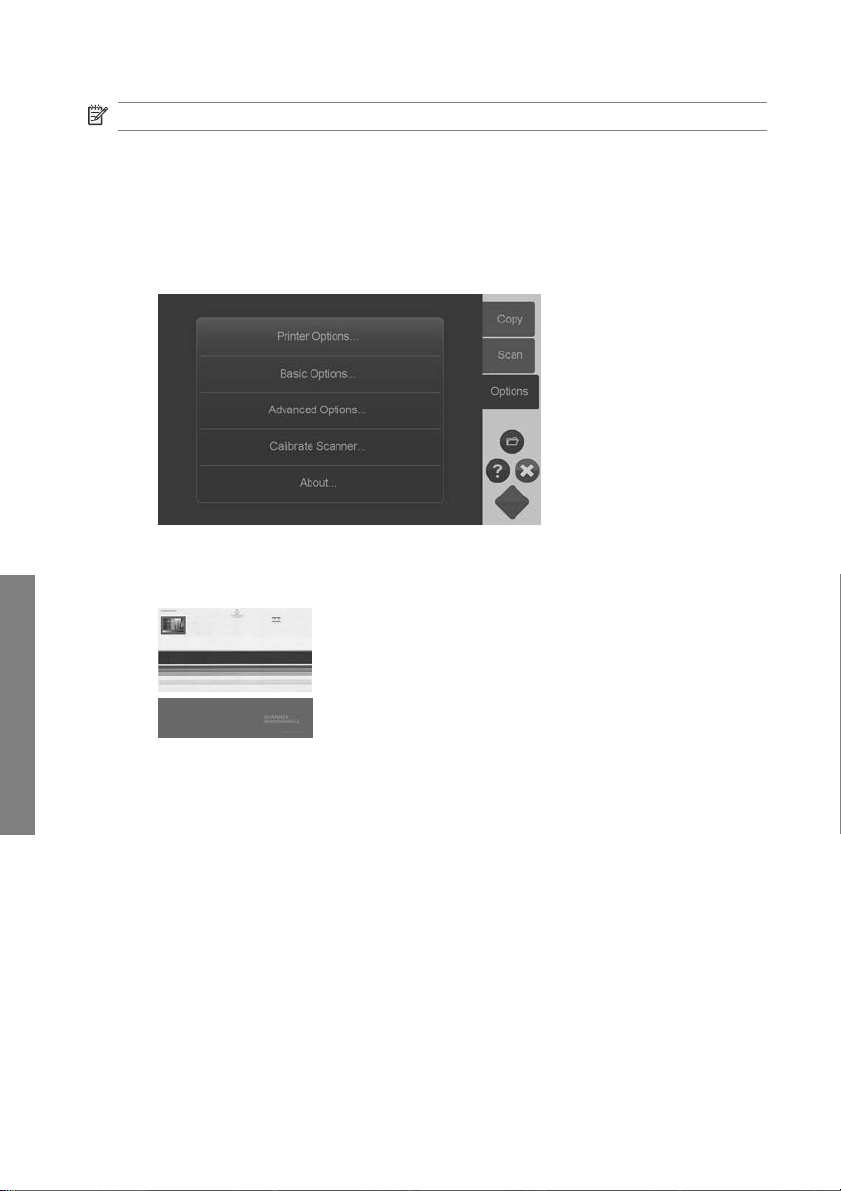
Scanner software
Introduction
The scanner software runs automatically w hen you turn on the touch sc reen. The
main screen is divided into the following sections:
Main menu area
●
Right bar, top: the task buttons
●
Right bar, bottom: the function buttons
●
Task buttons
Press this button to set the program in the copy (scan to printer) task mode.
Press this button to set the program in the scan (scan to file) task mode.
Press this button to open progra m settings and preference menus .
Function buttons
File manager: Opens the File Manager dialog box.
Online help: Provides detailed information on many topics. Opens instructions related to
your current task.
Stop: Cancels the current activity.
Start scan/copy: Init i ate s the copy or scan, dep end i ng on whic h task bu tton has bee n
selected.
2 Chapter 1 Introduction ENWW
Page 7

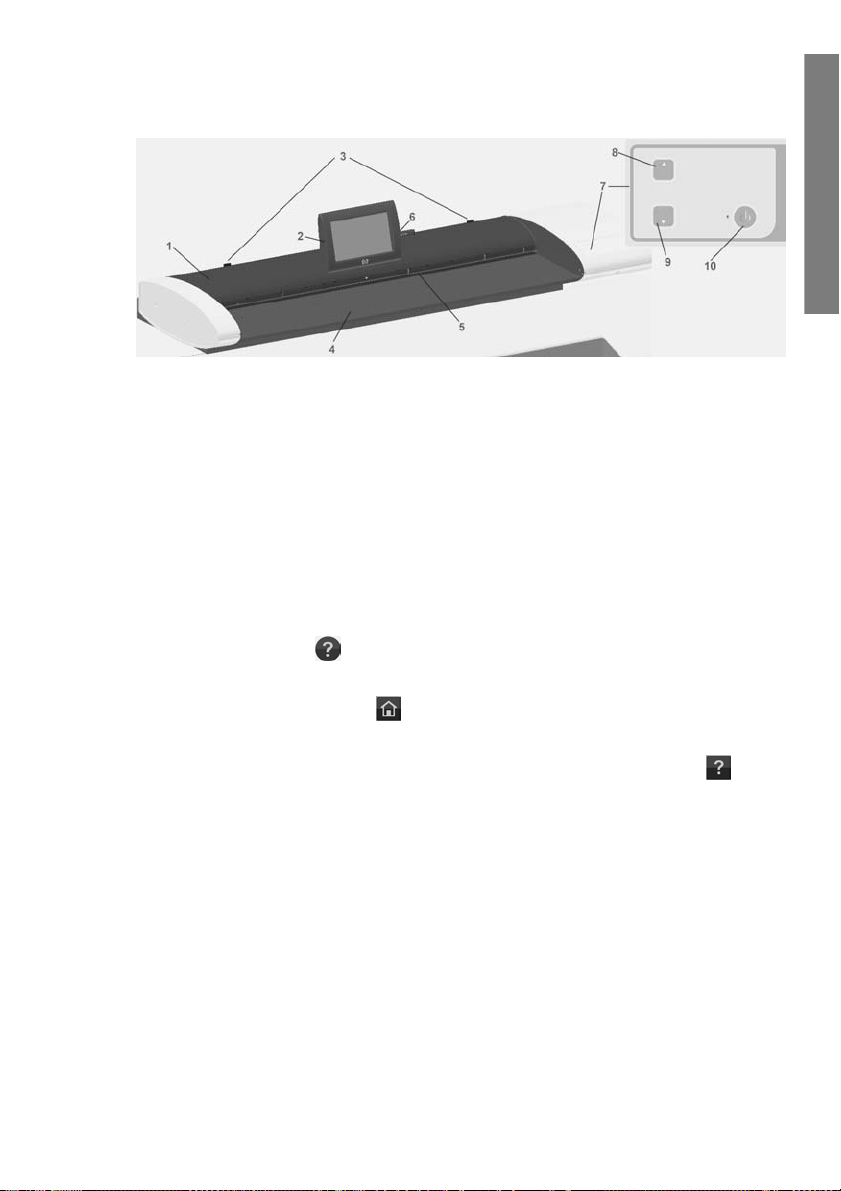
Scanner
Introduction
1. Scanner lid
2. Touch screen for scan/copy appl ication
3. Release buttons for opening scanner lid
4. Scanner bed: paper feed area
5. Insertion slot for document feeding
Documentation and help
This Quick Refere nce Guide pr ovides a brief overvie w of the sys tem an d softwa re.
The Online Help function button
general help on the current task (Scan, Copy, Options).
The online help window’s Home button
links to online help sections and topics .
In many dialogs you will find a Context-sensitive Help button
instructions specifically related to the current dialog and its options.
6. USB port
7. Operator's panel
8. Paper forward button
9. Paper backward button
10. Power button and indicator
opens the online help window and displays
will take you to a table of contents with
that will open
ENWW
Scanner
3
Page 8

2 Basic operations
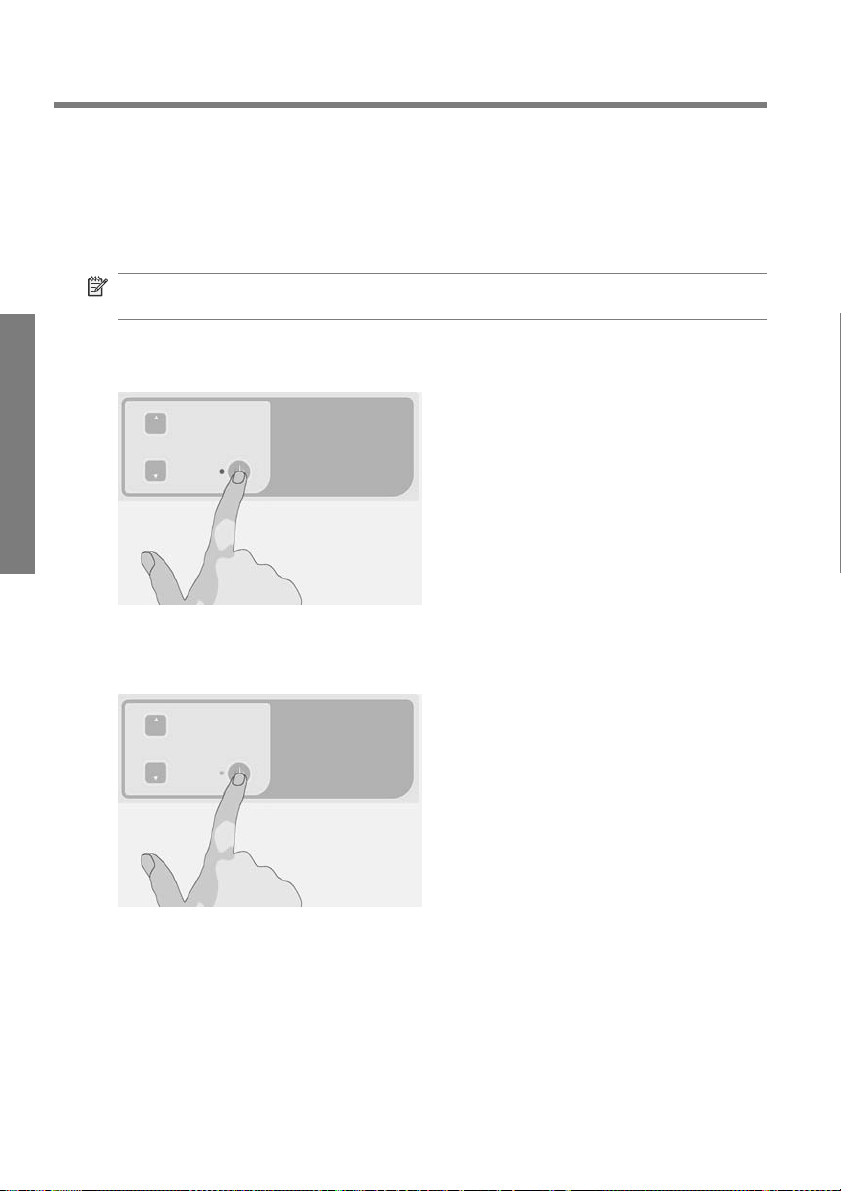
Turn the scanner on or off
The system (scanner, screen and software) can be turned on or off by pressi ng the
power button on the scanner operation panel.
NOTE: The printer has a separate power on/off button. Normally this button is
always left turned on and is not pressed in connection with restarting the system.
Turn on
Basic operations
Turn off
Press the power button. The power LED shows a green light.
Press the power button. The power LED blinks and then turns off.
Restart
Press the power button to turn the system off and then press it again to turn the
system on.
4 Chapter 2 Basic operations ENWW
Page 9

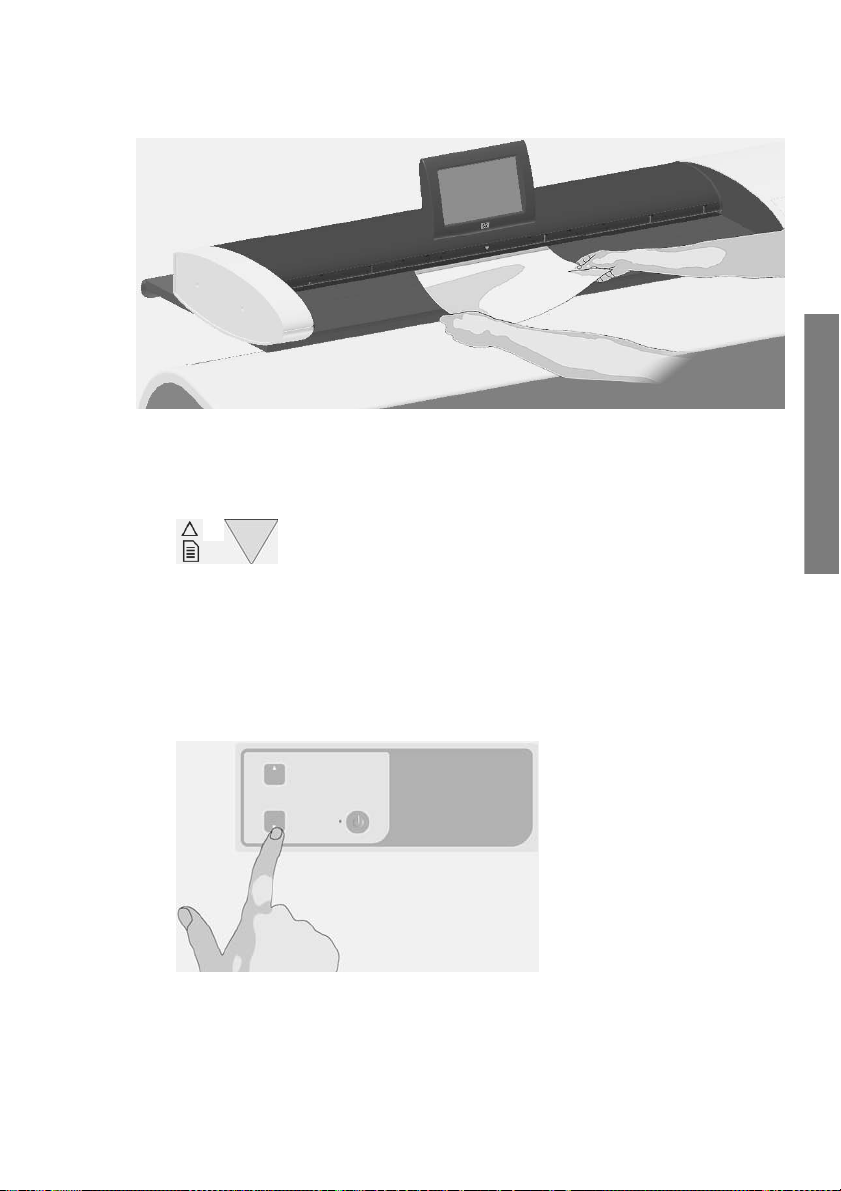
Load and eject documents
Load document
1. Load your document with the image side facing upwards. Align the center of
the document with the center arrow mark on and above the scanner bed.
2. Use the standard size markings to help align the docum ent for a straight sc an
path.
3. Push the original into the insertion slot until you feel it contact the rollers.
4. The scanner will automatically grab the original and move it into start-scan
position.
Eject document
Press the Paper Backward button to eject the original back to the scanner
●
feeding bed (towards you).
Basic operations
ENWW
Load and eject documents
5
Page 10

Press the Paper Forward button if you wish to eject the original out the back
●
of the scanner.
Set a destination folder for scans
Basic operations
The instructions below describe how to set up and select a destination folder in
which you will save your scan-to-fi le outpu t. Desti nations are folders on com puters
known to your system through the local network (LAN) or folders on a USB flash
drive inserted in the touch screen.
1. Make sure your system and any in tended destinati on computers are c orrectly
set up on your local network (LAN). Configurat ion of your system on the LAN
is carried out through the Options > Advanced Options > Network menu.
This is a system administrator option that may require a password.
2. If you wish to save your scans on a USB flash drive, press the Scan button
and insert the drive into the USB port on the touch screen. The system will
detect the drive and enquire whether you want to set/change the destination
to USB.
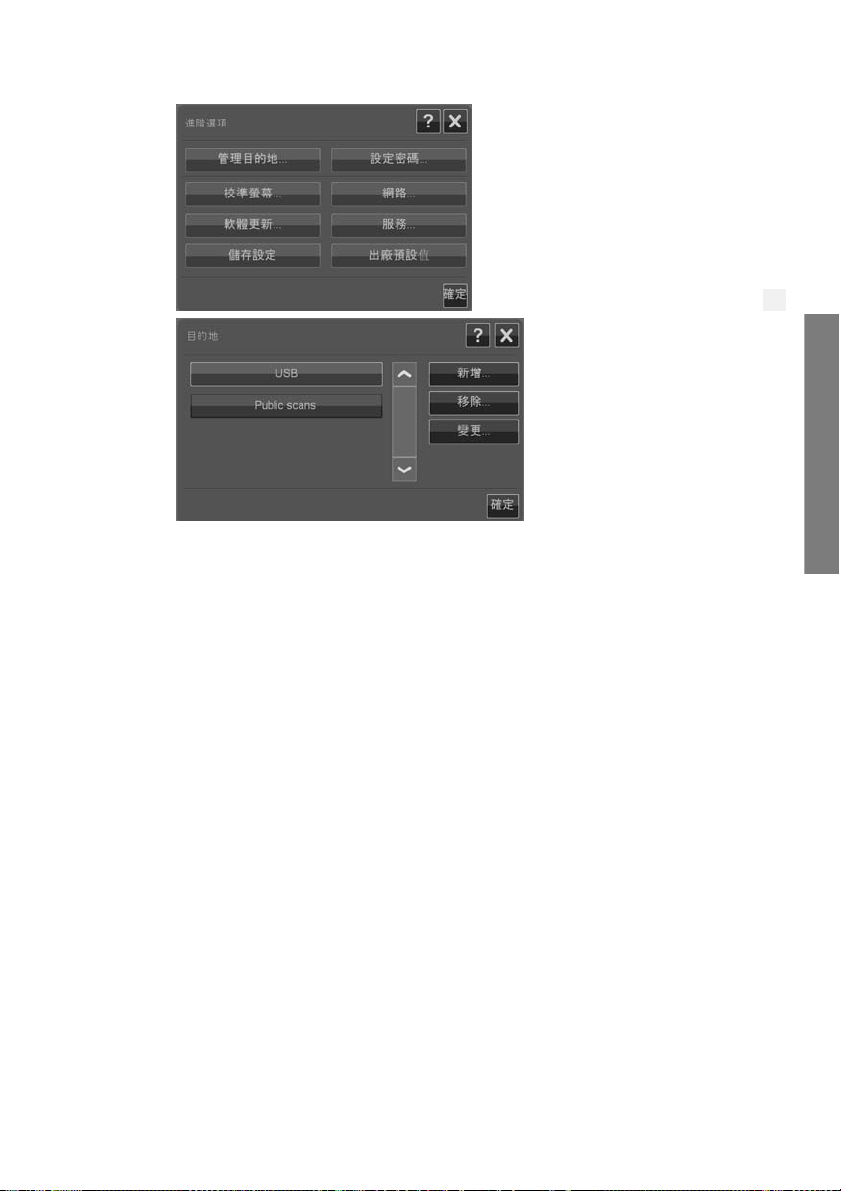
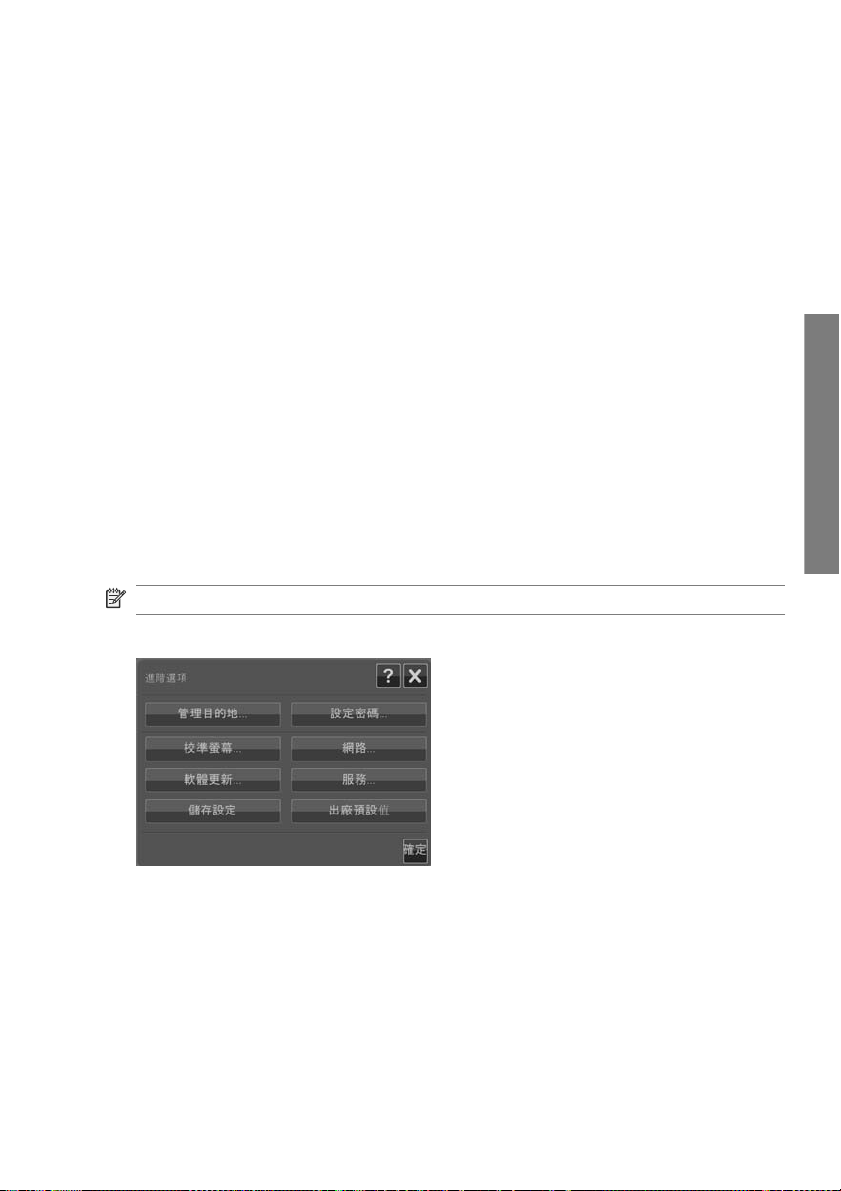
3. To access the destination setup options, pres s Options > Advanced
Options > Manage Destinations. From there you can selec t, add and change
destinations.
6 Chapter 2 Basic operations ENWW
Page 11

Select a destination
Select a destination from the list of destinations previ ousl y creat ed and sa ved on
the system. If there are no destinations ava ilabl e, or y ou w ant to use a desti nation
that is not on the list, you will have to add a new destination. Press the USB
destination if you want to scan to an inserted USB flash drive.
Add a new destination
Press the Add button to enter desti nation details. Enter values in the Label, Network
Path, Domain, Username and Password fields. Select Remember if you want to
save the destination password in t he sy st em. Leave Remember unselected if you
want users to enter the password to connect to the destination. Press Test
Connection to check your settings.
Change (edit) a destination
Press the Change button and edit the Label, Network Path, Domain, Username
and Password fields. Select Remember if you want to save the destination
password in the system. Leave Remember unselected if you want users to enter
the password to connect to th e des tina tion. Press Test Connection to check your
settings.
Remove a destination
Select a destination from the Destinations list and press the Remove button.
Basic operations
ENWW
Set a destination folder for scans
7
Page 12

Copy a document
Follow the steps below to make a copy (scan to print).
1. Insert and feed your document into the scanner, with the side to be scanne d
facing upwards.
2. Make sure the printer is turned on and the intended media is loaded.
NOTE: To copy, you need a media profile fo r the loade d media. The sy stem
comes with a set of media pro f iles for the m os t co mm only - use d m edia. If y ou
need to create a new media profile, see
on page 19.
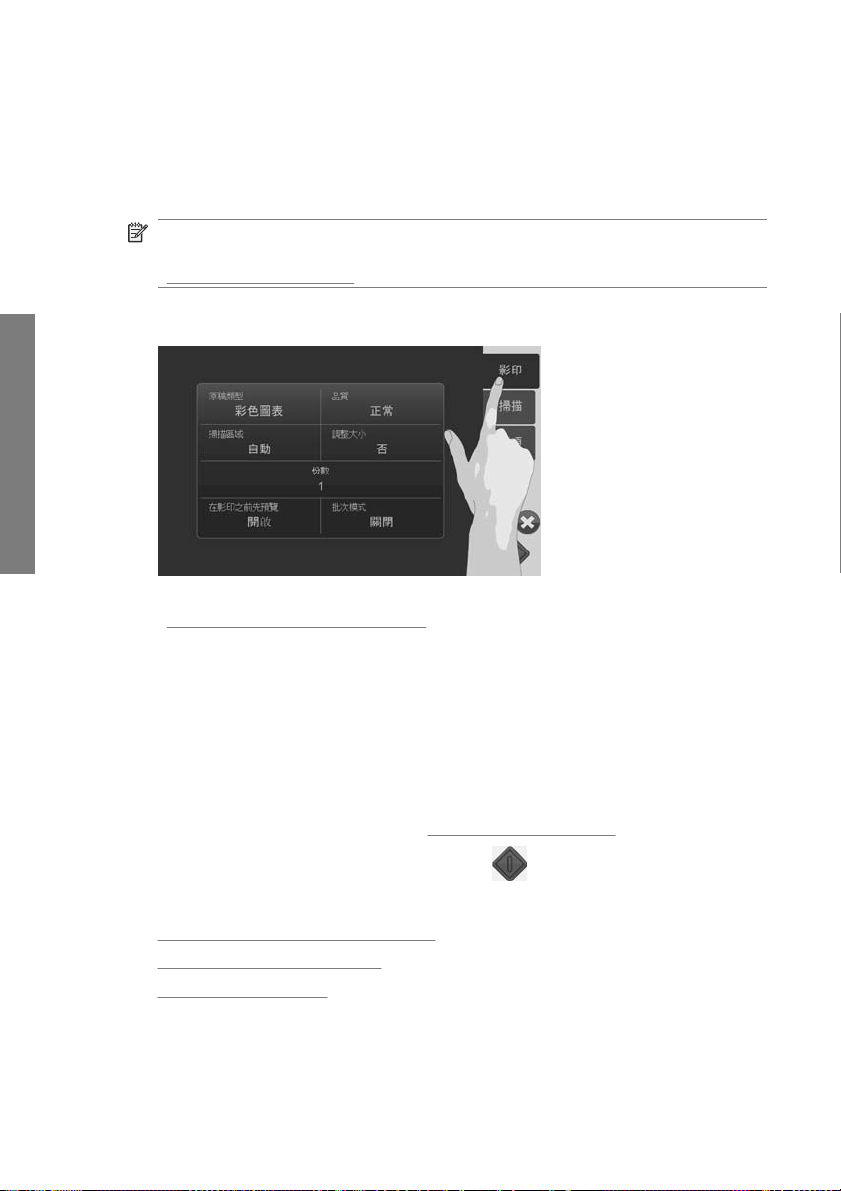
3. Press the Copy button to acc ess the copy (sc an to print) settings and bu ttons.
Basic operations
The Copy dialog is shown below.
4. Press the Original Type button and select the type that matches your
document and required output. See
adjustments on page 11.
5. Press the Quality button and select the desired quality of your output.
6. Press the Scan Area button to set the size of the image capture area. If you
wish to capture the whole image, select Auto and the system will mea sure
and set the size for you.
7. Press the Resize button to determine the size of the printed copy. Set to No
if you want a 1:1 copy.
8. Press the Copies button to select how many cop ies you want printed with the
job.
9. Toggle the Preview before Copy button to On if you want to control settings
before committing the job to the printer. See
on page 15.
10.
When you have made your settings, press the Start Sca n/Copy butt on
start copying.
Create a media profile
Specify the original type and make image
Preview copies and scans
to
8 Chapter 2 Basic operations ENWW
Page 13

See also:
Set and preview image adjustments on page 15
●
Set input and output sizes on page 13
●
Set the output quality on page 17
●
Scan to a file
Follow the steps below to scan to file.
1. Insert and feed your document into the scanner with the side to be scanned
facing upwards.
2. Press the Scan button to access the scan to file settings and buttons. The
Scan dialog is shown below.
3. Press the Original Type button and select the type that matches/describes
your document. See
on page 11.
4. Press the Quality button and select the scan resolution.
5. Press the Scan Area button to set the size of the image capture area. If you
wish to capture the whole image, select Auto and the system wi ll measure
and set the size for you.
6. Press the File Format button to determine the file form at, su ch as JPG or
TIFF.
7. Press the File Name button to enter a name for the destinat ion file.
8. The Destination button shows where your scan output file w ill be crea ted.
Press the Destination button if you want to select a different dest ination.
9. Toggle the Preview before Scan button to On if you want to control your
settings before saving to file. See
10.
When you have made your settings, p ress the Start Scan /Copy button
start scanning.
Basic operations
Specify the original type and make image adjustment s
Preview copies and scans on page 15.
to
ENWW
Scan to a file
9
Page 14

See also:
Set and preview image adjustments on page 15
●
Set input and output sizes on page 13
●
Set the output quality on page 17
●
Set a destination folder for scans on page 6
●
Batch scan and batch copy
With batch scanning and batch copying y ou can c ontin uous ly feed new originals
into the scanner and the system will start proc essing right away withou t waitin g for
you to press the Start Scan/ Copy button. Th e system will apply the current se ttings
Basic operations
to all documents. If you are scanning to file, your files will automatically be named
with increasing numbers.
1. Lay your originals face up, near the scanner so they are easily reached .
2. Make your scan or copy settings. These will apply for all the originals in the
batch.
3. Press the Batch Mode button to turn batch mode to On.
4.
Press the Start Scan/Copy button
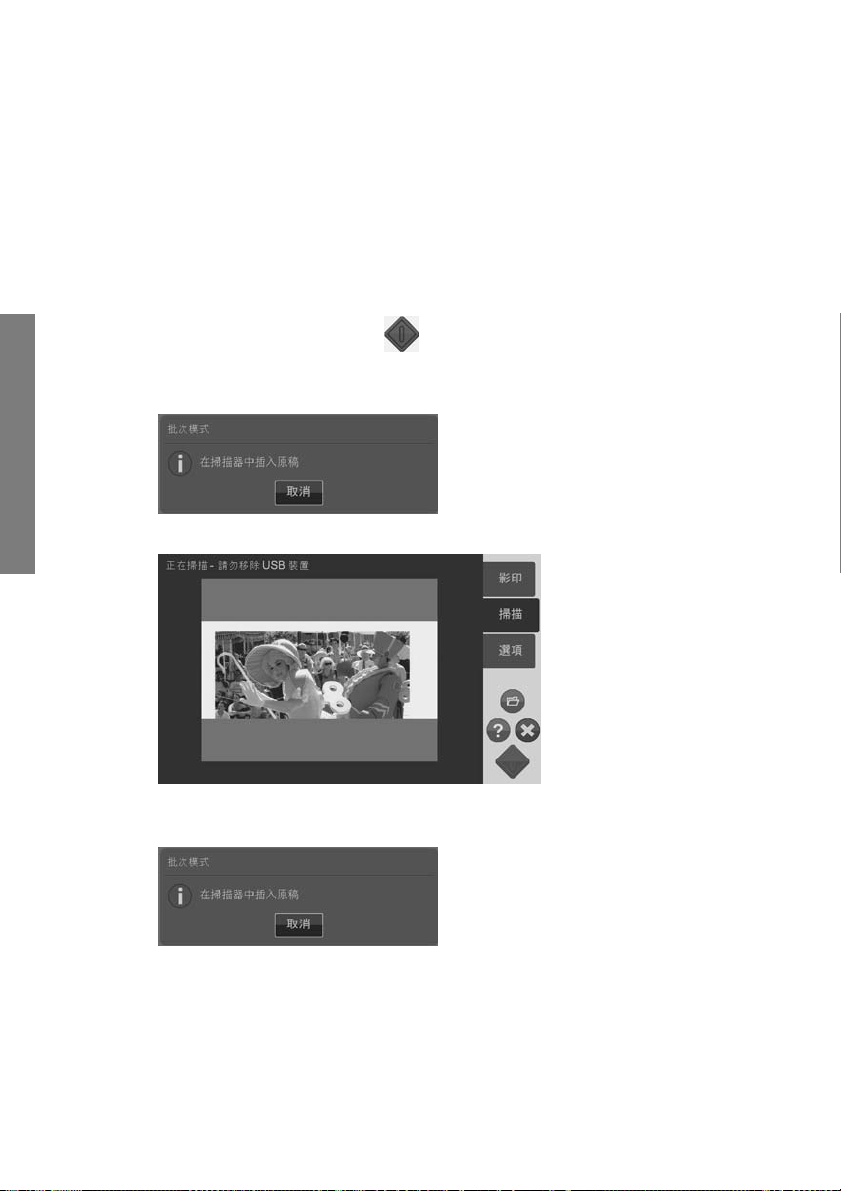
5. If you have already loaded the first original, the syste m will sta r t scanning or
copying. If not, the Batch Mode dialog will ask you to insert the first origina l
into the scanner.
.
6. When you insert the first original, the system will star t scanning it right aw ay .
10 Chapter 2 Basic operations ENWW
Page 15

7. When an original is scanned, it is ejected. The Batch Mode dialog returns and
asks for the next original.
8. Remove the ejected original and feed the next one.
9. Continue to feed originals until finished wi th the bat ch.
10. Press the Batch Mode dialog’s Cancel button to abort batch mode.
NOTE: Previewing is disabled when in Batc h Mod e.
NOTE: To ensure fas t loading i n batch m ode, the scanner w ill automatic ally ejec t
each original after it is sc anned. The setting in Options > Basic Options > Rewind
after scan will determine the direction. If the option is s elec ted, s cann ed origin als
will be ejected towards the front and if the option is not selected, scanned orig inals
will be ejected out the back.
Specify the original type and make image adjustments
Basic capture parameters are set when you select Original Type. You can then
adjust specific factors such as imag e brightn ess , sharp ening and back groun d
cleaning level. The adjustments available will depend on the Original Type
selection.
1. Press the Scan or Copy button and then the Original Type button to reac h
the Original Type selection list.
Basic operations
ENWW
2. Select an Original Type that best describ es yo ur origina l.
Specify the original type and make image adjustments
11
Page 16

Basic operations
Original Type Description
Color Lines Suitable for color CAD drawing s and gra phi cs wi th a hig h le vel of de tai l.
Applies image processin g to clea n t he ba ckgr oun d and sharp en l i ne s. 24- bi t
color scan.
Gray Lines Suitable for grayscale CAD drawings and graphics with a high level of detail.
Applies image processin g to clea n t he ba ckgr oun d and sharp en l i ne s. 8-b i t
grayscale scan.
B&W Lines Suitable for clean B&W CAD drawings and graphics with a high level of detail.
Especially useful for scan-to-file as file sizes are minimal compared to color
and gray original types. Minimal application of image processing for a neutral
and fast scan.1-bit B&W scan.
Color Map Suitable for color maps such as topogr aph i c map s, roa d maps or other
document types that contain fill areas and a high level of detail. Applies image
processing to sharpen details . 24 -bit color scan.
Gray Map Suitable for grayscale maps such as topograp hic maps, ro ad m aps or othe r
document types that contain fill areas and a high level of detail. Applies image
processing to sharpen details. 8-bit gr aysca le scan .
Color Poster Suitable for color photos and posters of good quality. Minimal application of
image processing for a neutral and fast scan. 24-bit color scan.
Old Drawing Suitable for faded and creased drawings with low contrast between the
foreground and background . Appl ies i m age processi ng to clean t he
background and sharpen lines. 8- bit gr aysca le scan .
12 Chapter 2 Basic operations ENWW
Page 17

3. You can fine-tune the Original Type settings (optional): Press the More button
to expand the Original Type dialog and make adjustment options
relevant to the selected Original Type. Press OK when done.
4.
Press the Context-sensitive Help button
each setting and about saving your settings as a new custom Original Type.
NOTE: You can press the Preview Before Scan/Copy button and then the
Adjustment button to mak e image adjust ments and view the effects on yo ur screen.
Preview copies and scans on page 15.
See
for additional information about
Set input and output sizes
The "Scan Area" is your input s ize and defin es how much of the i mage is capture d.
Often, this will be equal to the total size of the orig inal. However, there may be cases
when you only want to scan a p ortion of the original or wish the ca pture area to be
equal to a certain standard size.
When copying, you can also determine the output size (the size of the ima ge in your
printed copy) through the Resize setting. You can choos e No resize to use the
current Scan Area size for a 1:1 copy, or you can select a different size in order to
reduce or enlarge the printed image in relation to the Scan Area size.
NOTE: When scanning, the image’s size in the output file is always equal to the
Scan Area size (1:1).
Set the Scan Area (input size) for Copy and Scan
When in the Scan or Copy screens, press the Scan Area button to view the Scan
Area size list.
Basic operations
ENWW
Set input and output sizes
13
Page 18

The list offers different methods you can use to determine the Scan Area siz e:
Auto: The program will automatically detect the size of the full docu men t
Basic operations
●
loaded in the scanner. You can use the preview to check that the scanner has
detected the size correctly.
Use a standard or custom size: The dialog c onta ins a l ist of standard sizes
●
and custom sizes saved on the system. Scroll through the lis t and selec t the
size you want to use. To create a new custom size, follow the ins truct ions
below.
●
Set size values for width and length: Press the More button
expand the Scan Area dialog. Make your wi dth and l ength siz e sett ings in the
fields or set Auto on width or length separately. You can save your changes
to create a new custom size or use them for the current job only.
NOTE: You can also set the Scan Area visually on th e screen through a preview.
Preview copies and scans on page 15.
See
Set the Resize value (output size) for Copy only
1. Press the Resize button.
2. Select No if you do not want to resize the image: that is, you want the end
result to be the same size as the Scan Area.
3. Press the Size button to select a st andard size (such as A2 or A4) fro m a lis t.
4. Select Scale to resize according to a scale factor (such as 50% or 32%).
to
14 Chapter 2 Basic operations ENWW
Page 19

Preview copies and scans
You can preview your copies and scans before committing them to the printer or
file system. With previewing you can:
Make image adjustments that are relevant for your selected Original Type,
●
such as brightness and sharpening, and view the effec ts of thes e on your
screen.
Visually set the Scan Area (input size) using handles to drag and posit ion a
●
Scan Area frame on the image.
Zoom in and out to evaluate specific image areas and the effects of your
●
settings.
Load a preview scan or copy
1. Load your original and press the Preview Before Scan/Copy button to turn
preview mode to On.
2. Press the Scan or Copy button to load the preview.
3.
You can at any time press the Cancel button
to close the preview.
Basic operations
Set and preview image adjustments
1.
Press the Adjustment button
2. Make your settings in the adjustmen ts dia log.
3. Press the OK button to close the adjustments dialog and see the effects of
your settings on the p review. Use the zoom tools to inspect details and area s
of interest.
4. Repeat steps 1–3 if you need to readjust your settings.
NOTE: The effects of the image a djustment s ettings are a pplied and dis played in
the low-resolution preview and hence do not fully represent t he final imag e in the
destination file or printed copy.
ENWW
at the top left corner of the preview screen.
Preview copies and scans
15
Page 20

Set and preview the scan area
The preview shows the image inside a white frame. The frame represent s the
current Scan Area (input) size. Changing the frame’s size before sc anni ng w ill
change the Scan Area settings. The frame's size can be adjusted by moving its
borders and corners. To do so you can:
Drag the resize handles
●
Press with your finger on the place where you wish to reposition the neare st
●
border edge or corner. The border will jump to that place.
Use the image zoom and positioning tools to assist you in setting the frame
●
size and positioning the image inside of it. The image zoom and posi tion ing
Basic operations
tools are:
Zoom crop: Snaps to the image as cropped by the borders.
Zoom in: Enlarge the image size in the preview. Zooming is targeted on
the center of the window.
Zoom out: Reduce the image size in the preview. Zooming is targeted on
the center of the window.
Zoom all: Displays the whole capture area without cropping. The borders
positions are defined by the current Origin al siz e set ting.
Image panning tools: Use these arrows to center the captured image
in the window.
Frame center handle (blue circle): Use this to drag the whole size frame
and reposition it on the captured image.
on the frame’s sides and corners.
Press the Start Scan/Copy butt on
to commit the job.
Press the Cancel button
committing the job.
16 Chapter 2 Basic operations ENWW
if you want to abort the preview process without
when you are finished previewing and want
Page 21

Set the output quality
Set quality when scanning to file
You apply quality settings to scanning (scan to file) in terms of the sc an reso luti on
measured in dots per inch (dpi).
1. Press the Scan button and then the Quality button to open the Quali ty(dp i)
dialog.
2. Use the scroll bar to view available resolutions.
3. Press the button displaying the scan resolution you want to use.
The Custom button opens a list with alternative reso luti ons.
Basic operations
ENWW
Set the output quality
17
Page 22

Set quality when scanning to print
When copying (scan-to-print), you set general print-q uality parameters (Fast,
Normal, Best) that apply for the whole copy process (scan and print).
The scan quality is defined by resolutio n (dpi). You can sel ect the scan
●
resolution you want tied to each quality setting (Fast, Normal, Best). This is
done through the Original Type adjustment options (see below).
The print quality parameters that are tied to a quality setting (Fast, Normal,
●
Best) are defined in the printer.
1. Press the Copy button and then the Quality button to open the print Quality
dialog.
Basic operations
2. Select the required quality setting from the list .
Fast is for making a quick draft with minimum use of ink.
●
Normal is good for most copy jobs that require an average quality level.
●
Best is for high-quality prints.
●
Tie scan resolutions to the Fast, Normal, Best quality settings (scanto-print)
1. Press the Original Type bu tton and then the More button to open t he Original
Type’s adjustment options.
2. Scroll down the list of adjustments to reach the buttons Fast Scan
Resolution, Normal Scan Resolution and Best Scan Resolution.
18 Chapter 2 Basic operations ENWW
Page 23

3. Press a button to open a list of resolution selections.
4. Select the scan resolution you want applied when you choose the named
quality setting (Fast, Normal, Best) with the current Original Type.
Example: Select the Color Poster original ty pe and press the More button to make
adjustments. Press the B est Scan Resolution button and then select 400 dpi. This
means that, thereafter, 400 dpi will be applied as the scan resolution whenever you
use the Color Poster original type and the quali ty s ettin g Copy > Quality > Best.
Create a media profile
Your system supports color matching between scanner, printer and media type
through media profiles. A media profile must exist for each media type (such as
glossy or coated paper) used with your printer.
In most cases, color matchi ng and m edi a profil es are adm inis trated by the system
and their application is transparent for t he user. R ight aft er you load new media on
your printer, you select the media type in the printer’s settings menus. If a media
profile for the media type exis ts, your syst em automatic ally loads it for optimal color
matching of your copy.
There are, however, two cases that will require your attention:
No media profile found: If the system does not already contain a media
●
profile for the current media, you will need to create one. A message dia log
will inform you when you need to create a media profile and display a button
that takes you to the Create Media Profile wizard (see below).
Colors not optimal: Some of the default media profiles supplied with the
●
system are generic and m ay not be optim al with all m edia types. Also, cu rrent
conditions may not be optimal for even specific media profi les . If your trial s
show the need for improved color matching, you should update (renew) the
current media profile through the Create Media Profile w iza rd (see bel ow).
Update (renew) the current media profile
1. Make sure your printer’s media type setting corre sponds t o the loaded m edia.
2. Make a trial copy with the current media profile to evaluate wheth er it needs
to be updated.
Basic operations
ENWW
Create a media profile
19
Page 24

3. Press Options > Printer Options.
4. The Printer Options dialog displa ys inform ation about your printer and shows
Basic operations
the Current media which is the media sett ing made on the printer’s main menu.
The Media profile value may show:
Default: The media profile for the current media was supplied with the
●
program and has not been updated.
Created dd-mm-yyyy: The current media profile has been created or
●
updated on the date specified.
Not Created: The system has not found a media profile for the current
●
media.
5. If you see the status Not Created, you need to create a media profi le in order
to make a copy. Press the C reate Pr ofile button to start the Create Media
Profile wizard.
6. If you are satisfied with the media profile status and color matc hing resu lts in
your trials, press OK to close the dialog.
7. If your colors are not optim al in y our trials , press the Update Profile b utton to
start the Create Media Profile wizard.
The Create Media Profile wizard
The wizard is both for creating a new media profi le and for updating an existing one.
Follow the wizard’s instructions on your screen.
The process will require that you print a system-stored color patch sheet and then
scan it. The system will take care of the rest.
TIP: The wizard prints two pages; you should discard the f irst pa ge and scan the
second.
The media profile creation date will be updated when you co mpl ete the proc es s.
20 Chapter 2 Basic operations ENWW
Page 25

View, move, rename or delete scanned files
Your system's scan destinations, on the LAN and on your USB drive, will contain
image files that you will need to access and manage. Access to your image files
takes place through the File Manager dialog.
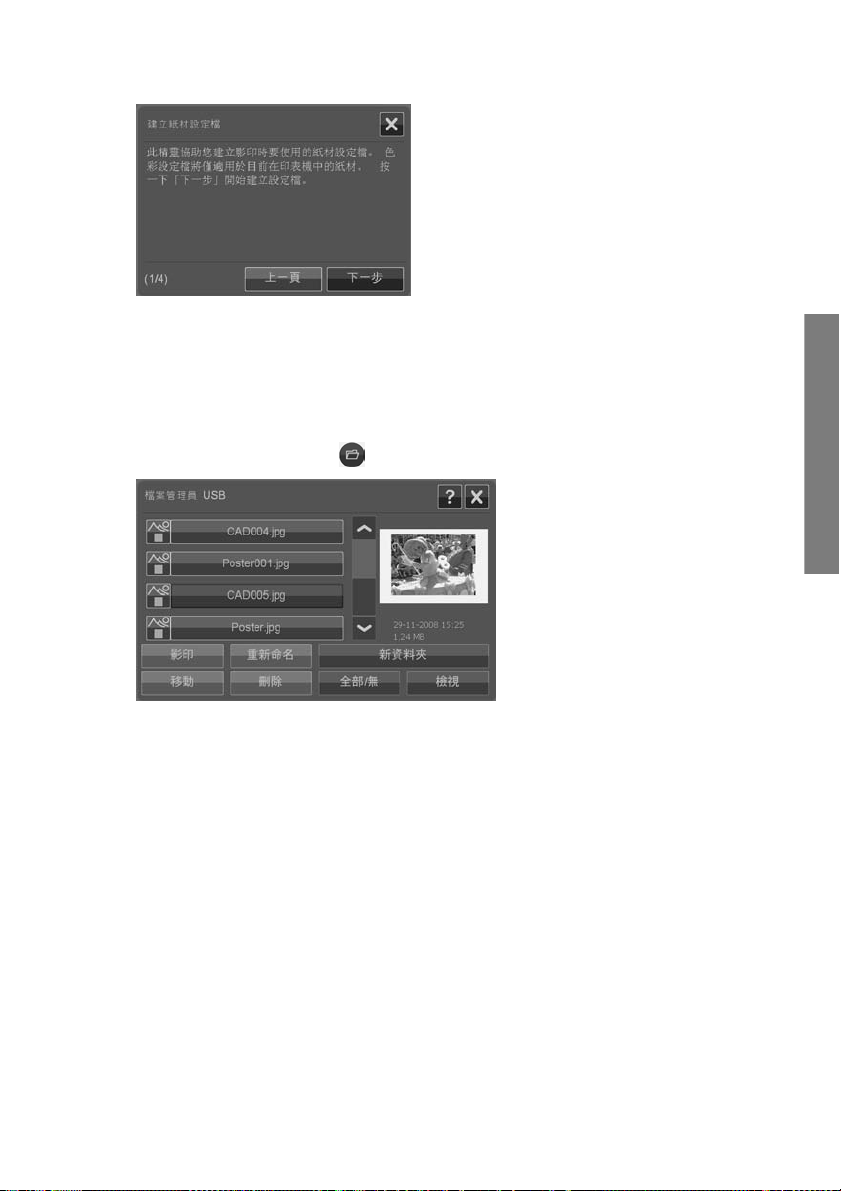
Open the File Manager
Press the File Manager button .
Browse the file system
The File Manager is limi ted to folders that are defi ned on your system as scan
●
destinations. The file list def aults to the root of your current destin ation fol der.
The Folder Up button (marked ..) will move you up a level until you reach the
●
list of created destination folders.
Click a folder name to move onto its level.
●
Click an image name to display an image thumbnail and basic information
●
about the image.
Select image files for a file action (see below) by checking the box to the left
●
of the image file name.
Basic operations
ENWW
View, move, rename or delete scanned files
21
Page 26

File action buttons
To use the action buttons, check one or more boxes next to file names and then
press the relevant action button.
Copy: To copy one or more selected (check-marked) files to another folder.
●
Move: To move one or more selected (check-marked) files to another folder.
●
Rename: To change the name of a selected (check-marked) file.
●
Delete: To delete one or more selected (chec k-marked) files from the system.
●
New folder: To create a new subfolder in the current folder.
●
All / None: will toggle between chec king and un-checki ng the boxes to t he left
●
Basic operations
of all the file names in the current folder being viewed.
View: Opens a separate window with a larger view of the image file currentl y
●
displayed.
System setup and options
Basic options
Set date and time
Local date and time parameters are entered through the conf iguration program that
is run the first time the system is turne d on. If needed you can change the local date
and time settings through the Options menu.
1. Press Options > Basic Options > Date & Time.
2. Enter the correct local date and time values and time zone. The date and time
settings will be used with various program acti ons.
Units of measure
1. Press Options > Basic Options > Units of measu re.
2. Select the preferred unit (such as inch or mm) to use when defining document
sizes.
22 Chapter 2 Basic operations ENWW
Page 27

Paper series preference
1. Press Options > Basic Options.
2. Select/tick the Paper series fields that represent the paper series you wish
displayed in the size dialogs (Scan Area and Resize). You can s elec t one or
more paper series to display.
Rewind after scan
1. Press Options > Basic Options.
2. Select/tick the Rewind after scan option if you want the document to return
to the paper feed area after it is scanned so that you can eject it backwards
by pressing the paper backward button on the scanner’s panel. Leave the
option unselected if you want the document to hang behind the sc anner so
that you can eject towards the back with the paper forward button.
Auto reset and inactivity timeout
Press Options > Basic Options.
These two options tell the system to re turn automatic ally to default para meters after
a defined idle period—by default, five minutes—so that users will alway s start wi th
the system’s basic settings even if a previous user has changed the m. The system
returns to the saved system parameters: those set when the Options >
Advanced > Save Settings button was last pressed (see below).
Select/tick the Auto Reset option if you want to apply the function. Use Inactivity
Timeout to set the idle time before Auto Reset is triggered.
NOTE: New destinations and media profiles are not affected or lost when Auto
Reset is applied.
Basic operations
Advanced options
Set password for advanced options
Press Options > Advanced Options > Set Password to apply passw ordprotected access to the Advanced Options dialog.
ENWW
System setup and options
23
Page 28

Network settings
Network parameters are entered through the configuration program that is run the
first time the system is turne d on. If the sys tem is moved or th e network paramete rs
have changed, new network settings can be entered through the Options menu.
1. Press Options > Advanced Options > Network.
2. Select Auto IP address if you know that your network has a DHCP server and
thus your system can automatically retriev e its net w ork con nec tion
parameters. Otherwise, enter the IP address, sub net mas k and default
gateway manually.
Save settings
Basic operations
Press Options > Advanced Options > Sav e Settings.
This will save the current settings as the new system default settings. The saved
settings will be reapplied when an Auto Reset is triggered (see above).
Reset settings to the factory defaults
Press Options > Advanced Options > Fa ctor y Default.
This will restore all settings to their factory def aults . The st andard O rigin al Typ es
that came with the program are restored to their original settings. Resetting to
factory defaults is an administrator function and may require a password.
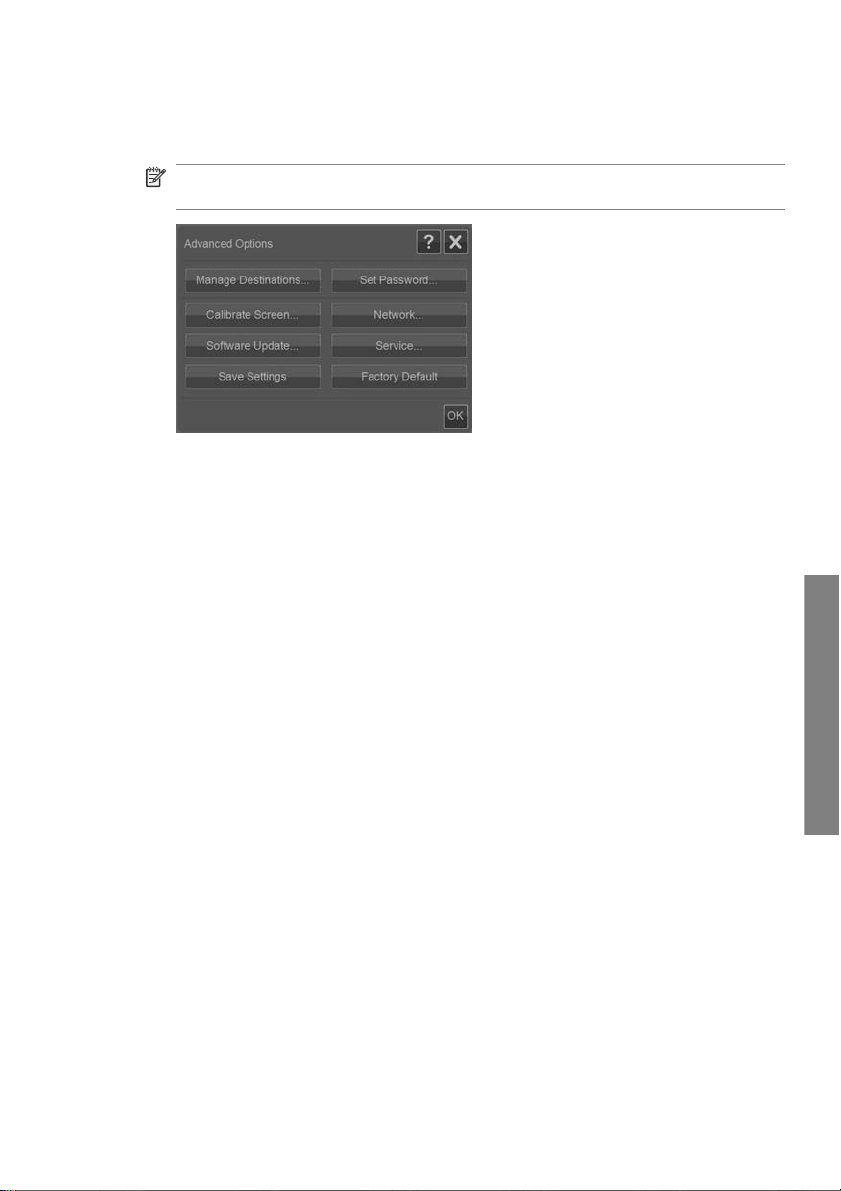
Other advanced options
Manage Destinations is described under
●
on page 6.
Calibrate Screen is described under
●
on page 29.
Software Update is described under
●
on page 37.
Service is an option for service technicians and not within the scope of this
●
guide.
Set a destination folder for scans
Calibrate the touch screen pointer
Install new system software
24 Chapter 2 Basic operations ENWW
Page 29

3 Maintenance
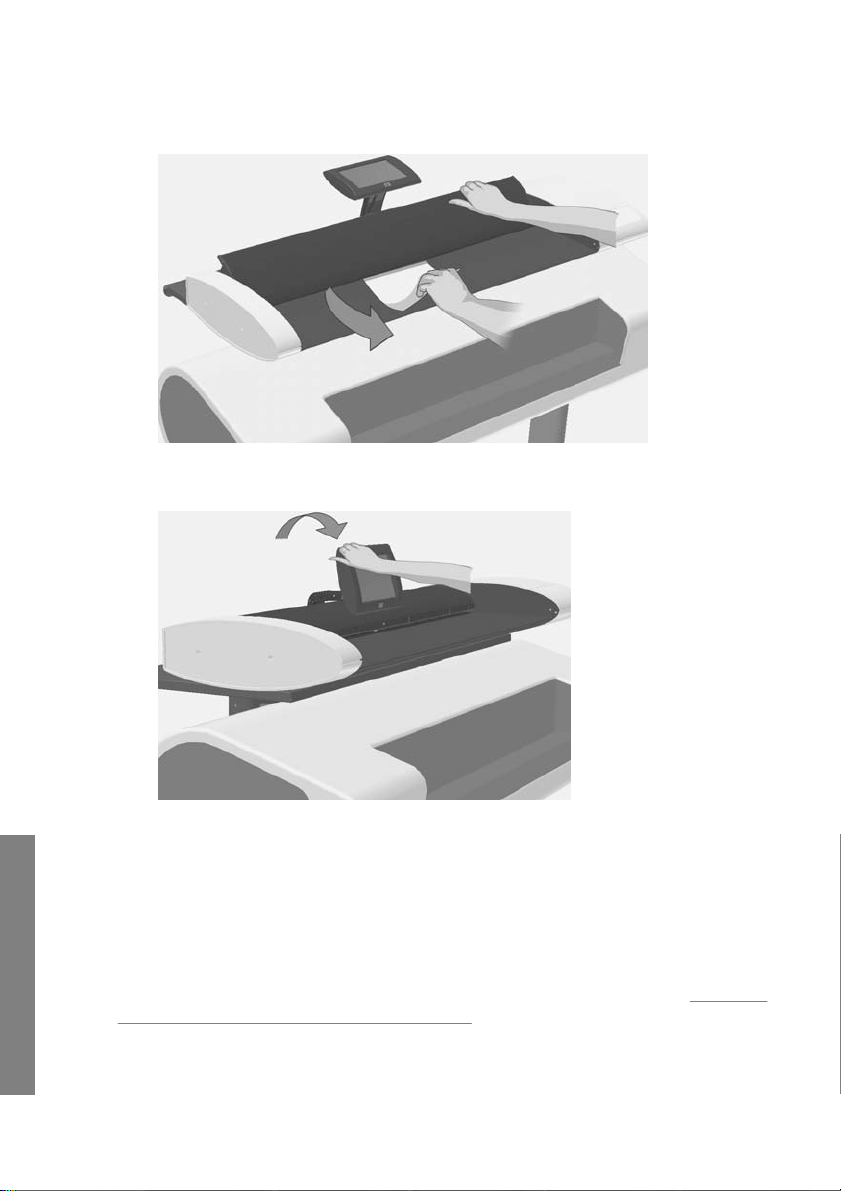
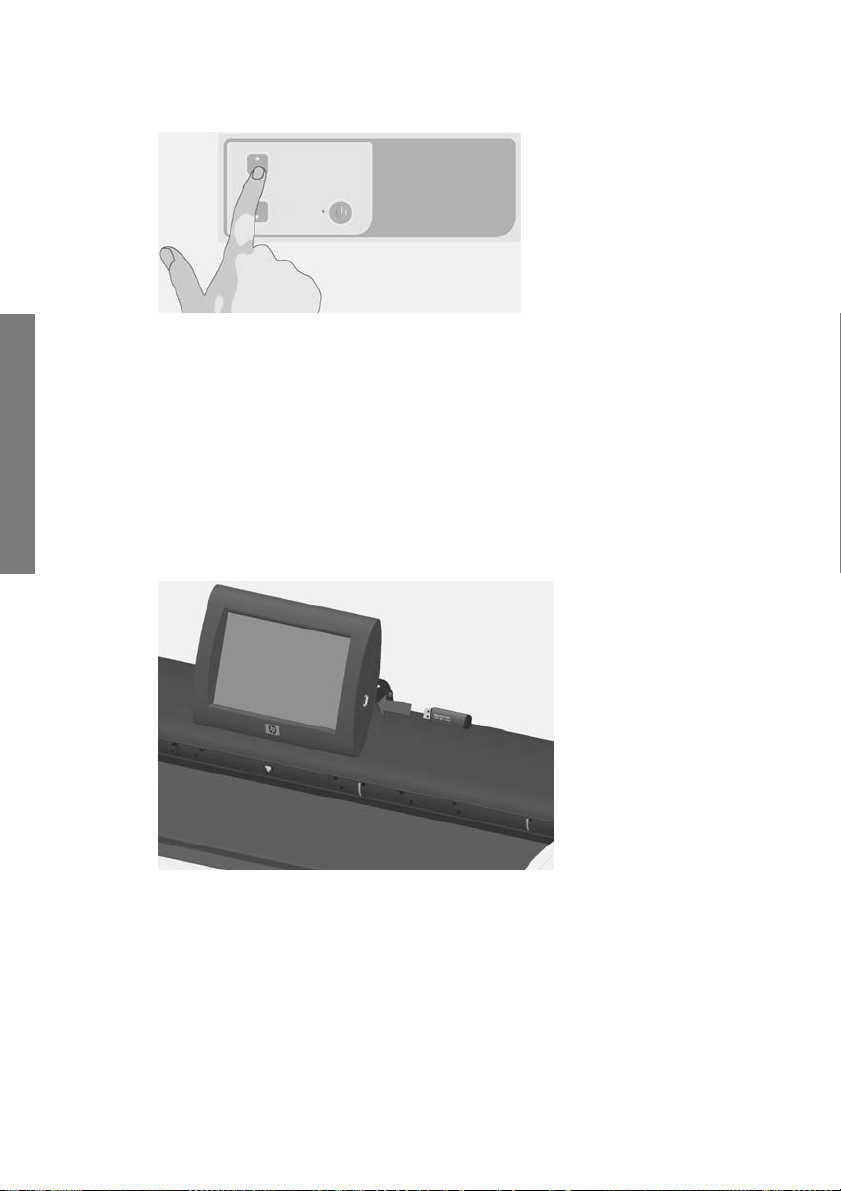
Clean the glass plate and the scanning area
1. Turn off the scanner and disconnect the power cable.
2. Flip the touch screen backwards.
ENWW
Clean the glass plate and the scanning area
Maintenance
25
Page 30

Maintenance
3. There are two lid release buttons on the backside of the scanne r.
Simultaneously slide t he lid release butto ns towards the sc anner's center un til
you feel them unlock, and pull the lid backw ards towards your bo dy. Open the
scanner lid all the way back.
4. Gently wipe the glass plate and the three rows of rollers with a lint-free cloth
dampened with a mild, streak-free glass cleane r.
CAUTION: Do not use abrasives, acetone, benzene or fluids that contain
these chemicals. Do not sp ray li quids directly onto the scanner glass pla te or
anywhere else in the scanner.
26 Chapter 3 Maintenance ENWW
Page 31

5. Dry the glass fully using a separate clean, dry lint-free cloth. When done, use
the cloth to dry the rollers.
6. Close the scanner lid and gently push it down to lock it into place. Ret urn the
touch screen to its normal position.
Calibrate the scanner
HP recommends that you calibrate the scanner if your output is not optimal and
cleaning the scan area does not remedy the problem. Calibration will renew the
scanner’s original color and BW precision.
ENWW
Calibrate the scanner
Maintenance
27
Page 32
Maintenance
NOTE: It is important that you clean the glass before calibrating the scanner.
1. Turn the scanner off and clean the scan area. Calibration works best with a
clean scanner.
2. When you have finished cleaning the scan area, turn the scann er on. The
scanner is ready for calibration when the power LED on the scanner’s panel
lights green.
3. Press Options > Calibrate Scanner to start the Scann er Calibrati on Wizard.
4. The Scanner Calibration Wizard guides you through the procedure for scanner
calibration. To calibrate the scanner, you need the maintenance sheet that
came with your scanner.
28 Chapter 3 Maintenance ENWW
Page 33
Calibrate the touch screen pointer
1. Press Options > Advanced Options > Calibrate Screen.
NOTE: Access to the Advanced Options may require the system’s
administrator password.
2. Follow the instructions on the screen. Cali bratio n is done by press ing targ et-
points that appear in different positions on the sc reen. Press the target-point s
until they no longer appear.
3. Press the OK button in the final dialog to confirm and conclude screen
calibration.
Replace the scanner glass plate
Over time, the condition of the glass plate can deteriorate. Smal l scrat ches on the
glass surface can reduce image quality. Call H P Support to order a new glass plate.
Step-by-step instructions on replacing the glass pla te are sup plied with the new
glass plate.
ENWW
Calibrate the touch screen pointer
Maintenance
29
Page 34

4 Troubleshooting
The system reports an error
The system will report an error mess age on your scree n when an error is detecte d.
Correcting common errors
The actual nature and cause of the error will be reported through a message on
your screen.
The information on your screen may inc lude instructions and actions to remedy the
error. If this is the case, follow the instructions on your screen.
If your screen does not display a solution, look for a description of the error and
remedy in the troubleshooting sections of this quick guide, or in the s ystem’s online-help. Follow the instructi ons p r ovid ed.
Most scan-quality errors can be resolved by cleaning and calibrating the scanner.
If your error is not resolved in that way:
Try restarting the system by turning the scanner off and then on.
●
Try resetting the system's factory defaults through Options > Advanced
●
Options > Factory Defaults.
Try to recover the last system im age k nown to work satisfactorily. See
●
to update or recover the system on page 35.
If the above actions fail to resolve the problem, contact technic al as sis tanc e (see
below).
Technical assistance
In some cases you may need technical assistance. You shoul d contact HP support
if one or more of the following cases is true:
The error cannot be remedied through the action suggest ed on you r touch
●
screen nor through any of the steps described above under "Correcting
common errors".
The error and its remedy is not de scribed in this guide and cannot be remedied
●
Troubleshooting
There is a paper jam
through any of the steps d escribed above un der "Correcti ng com mon errors".
The system fails to re port t he error on your screen and it cann ot b e re medied
●
through any of the steps d escribed above un der "Correcti ng com mon errors".
You know a paper jam has occurred when the scanner stops scanning while the
document is still engaged in the drive system. Your system will report the paper
jam. To remedy this, try to eject the document from the scanner: press and hold
I need
30 Chapter 4 Troubleshooting ENWW
Page 35

down the Paper Backward or the Paper Forward key. If the document will not
respond to these keys, remove it manually in the following way.
1. Flip the touch screen backwards.
2. Simultaneously slide the li d release buttons t owards the sca nner's center until
you feel them unlock.
ENWW
There is a paper jam
Troubleshooting
31
Page 36
3. With one hand, pull the lid backwards to open and use the other hand to pull
out the document so it comes completely free of the sca nning area.
4. Close the lid.
5. Return the touch screen to its normal position.
When the scanner is ready again, reload the document to scan.
Streaks in the scanned image
Troubleshooting
32 Chapter 4 Troubleshooting ENWW
In most cases, streaks are caused by dust particles on the document and in the
scanner's environment. The scanner's v ery high precision and captu re of fine detail
means that even tiny dust particles c an be noticed. Cleanin g the document usuall y
remedies the problem. First, check the original document to make sure that it is
clean and free of creases or other impediments that may drag across the glass. If
the document is clean and in g ood c ondition, try cleaning the glass : s ee
glass plate and the scanning area on page 25. If the p roblem persists, try cal ibrating
Clean the
Page 37
the scanner: see Calibrate the scanner on page 27. If the problem still persists, you
may need to replace the glass: see
Replace the scanner glass plate on page 29.
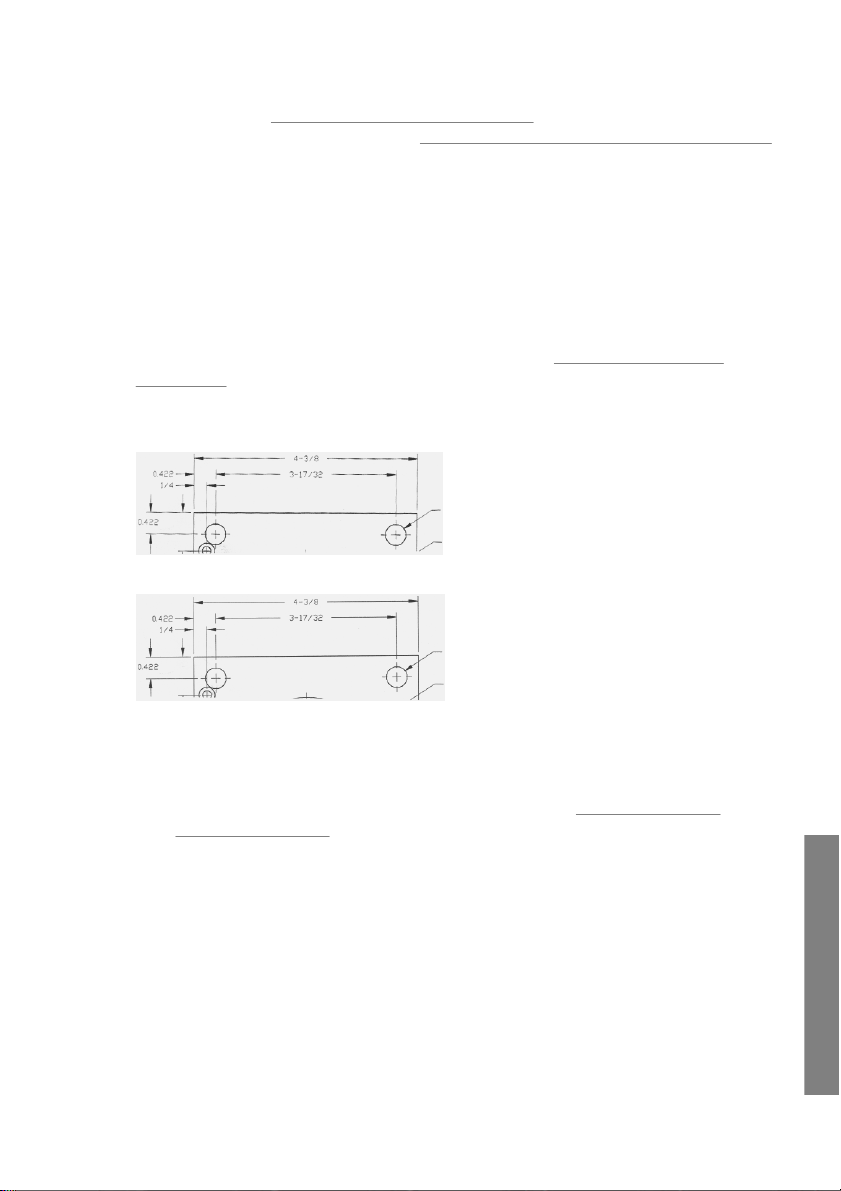
Lines in the scanned image appear too thin or
discontinuous
When scanning documents w ith thin lines s uch as CAD drawin gs, a scan reso lution
setting of less than 300 dpi can result in disproporti onate ly thi n or disc ontin uous
lines. HP recommends that you set the scan resolution to a minimum of 300 dpi
when scanning CAD drawings and other documents with thin lines. Scanning with
higher resolution lengthens the overall scan time, but it ensures greater image
quality. This issue is not as noticeable when scanning pho tos and are a fills. For
more information on setting the scan resolution , see
on page 17.
The images below help to illustrate the issue:
Figure 4-1 CAD drawing scanned at 150 dpi
Figure 4-2 CAD drawing scanned at 300 dpi
Set the output quality
Cannot connect or scan to a destination folder on the LAN
Ensure that you have carried out all the foll owing steps in order to connect and scan
to a specific destination folder on the LAN:
ENWW
1. Make sure your system is set up on the LAN. See
options on page 22.
Lines in the scanned image appear too thin or discontinuous
System setup and
Troubleshooting
33
Page 38

2. Destination folder setup is carried out when you inst all the sys tem and
afterwards through Options > A dva nced O ptions > Manage Destinations
> Add or Change. Make sure you have entered the full network path correctly .
3. Make sure you have entered the correct login information – Domain
\Username and Password. Remember to enter the backslash character ‘\’
between the domain and username.
4. Press the Test Connection button to chec k that your pa rameters are c orrect.
If you have performed all of the above, and still cannot connect or scan to the
destination folder, contact your loc al network adm inis trator.
Image cropped—not whole image scanned
Your size settings may be wrong. Press the Scan Area button to check your
●
size settings. Your Scan Area should be set to either Auto for automatic
detection of the size, or to a standard or custom size that corresponds to the
size of the whole original loaded in the scanner.
Ensure that you are loading the original correctly. Be sure to align the center
●
of the original with the scanner’s center arrow marking.
A media profile cannot be generated
If the Create Media Profile wizard stops running or reports errors:
1. Ensure that the scanner and the printer are both turned on and ready for
normal operation.
2. Ensure that your scanner is functioning. Scan a small document (to file) to test
the scanner.
3. Ensure that media is loaded in the printer.
Troubleshooting
4. Ensure that the printer’s media type setting corresponds to the actual media
loaded.
5. Ensure that the color sheet you printed with the Create Media Profile wizard
is inserted and aligned correctly in the scanner.
34 Chapter 4 Troubleshooting ENWW
Page 39

6. Ensure that you scanned the second page p rinted by the Cr eate Media Profi le
wizard, and not the first.
7. Check that the scanner is clean and recently calibrated . If in doubt , clea n the
scanning area and calibrate the scanner: see
scanning area on page 25 and Calibrate the scanner on page 27.
Clean the glass plate and the
My color matching results are not optimal
1. Try using the Color Poster original type. This is a neutral original type that does
not apply special image processing that coul d affec t col or matc hin g.
2. Check your Original Type setti ngs in the Copy > Ori gi nal Ty pe di alog. Press
the More button to view and adjust the specific s ettings relevant to the Original
Type.
3. Press Options > Printer Options > Update Profile and follow the steps on
your screen to ensure your media profile is optimal for the current media and
printer conditions.
4. If the above does not help, check that the scanner is clean and recentl y
calibrated. If in doubt, clean the scanning area and calib rate the s canner:
Clean the glass plate and the scanni ng area on p age 25 and Calibrate the
see
scanner on page 27.
I need to update or recover the system
Perform a system recovery if the scanner hangs in boot mode and the system
cannot start normally, or if you want to return to an earlier or the initial program
version. System recovery will reforma t the syst em’s progra m partitio n and rein stall
a fresh program image.
To perform system recovery, you need to ac tivate the Software Updat e & Recovery
mode. There are two ways to activate the Software Update & Recovery mode:
1. If the program on your touch screen is running, press Options > Advanced
Options > Software Update.
2. If your system is hanging and the program interface on your touch screen
cannot be accessed, follow the instructio ns belo w to activate the Software
Update & Recovery menu on your screen.
a. Connect a USB-driven keyboard to the USB port on the side of the
system’s touch screen.
b. Turn off the scanner with the On/Off switch at the back of the scanner.
c. Turn on the scanner with the On/Off switch at the back of the scanner.
ENWW
My color matching results are not optimal
Troubleshooting
35
Page 40

d. Follow closely the messages that appear on your touch screen as the
system restarts. When the option for starting the system in Software
Update & Recovery mode appears, select the option with your keyboard.
e. The Software Update & Recovery screen will appear and can be
controlled from your touch screen.
Once in the Software Update & Recovery mode, you can recover your syste m by
reinstalling a complete image of the software. Follow the ins truc tions below:
1. Choose the System Update/Recover option in the Software Updat e &
Recovery menu.
2. Choose the program image to install from the list. The default image is the
initial version that was delivered with your system and the ac tive image is the
version currently installe d. Other listed ima ges are versions y ou installed prior
to the active version.
3. Confirm your selection when asked. The syst em w ill proc eed to updat e the
system with the selected program image. This take s about two minutes . Press
the OK button to return to the Software Update & Recovery menu.
4. Select the Return to normal scanner operation button and confirm. The
system will load and initializ e all its para met ers. Do not turn off the scanner
or interrupt the load process. This step can take up to ten minutes to
complete.
5. At the end of the system load process, you will be asked to calibra te the touch
screen. Press the arrows and OK button when prompted.
6. Select the language for your system software.
7. Accept the HP license agreement.
8. Your system will complete the recovery process and start up your scan and
copy program interface.
The system software is in the wrong language
Your system’s language is set up during installatio n; to cha nge the la nguage , you
must reinstall the software with a new language selection.
1. Press Options > Advanced Options > Software Update.
2. Choose the System Update/Recover option in the Software Updat e &
Troubleshooting
Recovery menu.
3. In the program version ima ge list, choose to install the “active” program image.
4. Confirm your selection when asked. The syst em w ill proc eed to updat e the
system with the program image. This takes about two minutes. Press the
OK button to return to the Software Update & Recovery menu.
5. Select the Return to normal scanner operation button and confirm. The
system will load and initializ e all its para met ers. Do not turn off the scanner
36 Chapter 4 Troubleshooting ENWW
Page 41

or interrupt the load process. This step can take up to ten minutes to
complete.
6. At the end of the system load process, you will be asked to calibrat e the touch
screen. Press the arrows and OK button when prompted.
7. Select the new language for your system software.
8. Accept the HP license agreement.
9. Your system will complete t he update process and s tart up your scan and copy
program interface in the new language you select ed in step 7.
Install new system software
A new software version for your system can be supplied in the following w ays :
On a USB flash memory
●
Through a network PC: Internet download, CD-ROM, other
●
To install a new software version from a USB flash memory
1. Press Options > Advanced Options > Software Update.
2. Be sure to wait for the Software Update & Recovery menu to appear before
proceeding with the next step.
3. Insert the USB flash memory into the USB port on the side of the touch screen.
4. Choose the System Update/Recover option in the Software Update &
Recovery menu.
5. The new program version image wil l appear in the program versi on image list.
It can be identified by the text “USB” in the list.
6. Select this image to install it.
7. Select the Return to normal scanner operation button and conf irm. The
system will load and initia lize all it s paramete rs. Do not turn off the scanner
or interrupt the load process. This step can take up to ten minutes to
complete.
8. At the end of the system load process, you will be asked to calibrat e the touch
screen. Press the arrows and OK button when prompted.
9. Select the language for your system software.
10. Accept the HP license agreement.
11. Your system will compl ete the installat ion process and sta rt up you r scan and
copy program interface.
ENWW
Install new syste m software
Troubleshooting
37
Page 42

To install a new software version from a PC
The following requirements must apply:
Your scan/copy system must be connecte d and set up (recog nize d) on the
●
local network.
You need access to a PC that is set up on the network.
●
A Web browser must be installed on the PC.
●
To install from the CD-ROM:
1. Write down your scan/copy system’ s IP address. The IP address ca n be seen
through the Options > Advanced Options > Network dialog.
2. Save the new software ins t alla tion file on the PC; either from an inserte d CD -
ROM, or downloaded from the Internet.
3. Open a Web browser on the PC and enter the scan/copy system IP in the
address field. This will open the scan/copy system’s network accessed
Upgrading Scanner Software interface.
4. Use the browse option to locate and se lect the installation fil e on the CD-ROM.
5. Install the software. This will upload the software to your scan/copy system.
You can now shut down the PC. The remai ning step s take pl ace on the scan/
copy system’s touch screen.
6. Press Options > Advanced Options > Software Update to start the Software
Update & Recovery menu.
7. Choose the System Update/Recover option in the Software Updat e &
Recovery menu.
8. The new program version image you uploaded from the CD -ROM will a ppear
in the program version image list.
9. Select this image to install it.
10. Select the Return to normal scanner operation button and confirm. The
system will load and initializ e all its para met ers. Do not turn off the scanner
or interrupt the load process. This step can take up to ten minutes to
complete.
11. At the end of the system load process, you will be asked to calibra te the touch
screen. Press the arrows and OK button when prompted.
Troubleshooting
12. Select the language for your system software.
13. Accept the HP license agreement.
14. Your system will complete the installation process and st art up yo ur scan and
copy program interface.
38 Chapter 4 Troubleshooting ENWW
Page 43

Index
A
adjustment button 15
advanced setup options 23
auto reset 23
B
basic setup options 22
batch copy documents 10
batch scan documents 10
C
calibrate
scanner 27
screen 29
clean
glass plate 25
scanning area 25
color matching problems 35
copy document 8
cropped image 34
D
date 22
destination folder
cannot connect 33
management 6
document
batch copy 10
batch scan 10
copy 8
eject 5
jammed in scanner 30
load 5
scan 9
size 13
E
eject document 5
error messages 30
F
factory default settings 24
file manager 21
function buttons 2
G
glass plate
clean 25
replace 29
H
help 3
I
image adjustments 15
image cropped 34
inactivity timeout 23
input size 13
L
language, changing 36
lines
discontinuous 33
too thin 33
load document 5
M
manage destinatio ns 6
media profile errors 34
media profiles 19
N
network settings 2 4
O
options
advanced 23
basic 22
original type 1 1
output quality 17
output size 13
P
paper backward button 3
paper forward button 3
paper jam 30
paper sizes 23
password 23
power button 3
preview 15
ENWW
Index
39
Page 44

print quality 17
Q
quality, print 17
R
recover software 35
restart 4
rewind after scan 2 3
S
save settings 24
scan area 13
scan document 9
scanner components 3
scanning area, clean 25
size
image 13
paper 23
software 2
software recovery 35
software update 35, 37
streaks in scanned image 32
system setup 22
T
task buttons 2
time 22
timeout, inactivity 23
touch screen 2
turn off 4
turn on 4
U
units of measure 22
update software 35
40 Index ENWW
Page 45

目錄
1 簡介
2 基本作業
ZHTW
使用本指南 ...................................................................................................... 1
掃描器軟體 ...................................................................................................... 2
掃描器 ............................................................................................................. 3
文件和說明 ...................................................................................................... 3
開啟或關閉掃描器 ........................................................................................... 4
裝入或退出文件 ............................................................................................... 5
設定掃描作業的目的地資料夾 ......................................................................... 6
影印文件 ......................................................................................................... 8
掃描至檔案 ...................................................................................................... 9
批次掃描和批次影印 ..................................................................................... 10
指定原稿類型並調整影像 .............................................................................. 11
設定輸入和輸出尺寸 ..................................................................................... 12
預覽影印和掃描 ............................................................................................. 14
設定輸出品質 ................................................................................................ 16
建立紙材設定檔 ............................................................................................. 17
檢視、移動、重新命名或刪除掃描檔案 ......................................................... 19
系統設定和選項 ............................................................................................. 20
3 維護
4 疑難排解
ZHTW
清潔玻璃板和掃描區域 .................................................................................. 23
校準掃描器 .................................................................................................... 25
校準觸控式螢幕指標 ..................................................................................... 26
更換掃描器玻璃板 ......................................................................................... 27
系統回報錯誤 ................................................................................................ 28
夾紙 ............................................................................................................... 29
掃描影像中出現條紋 ..................................................................................... 30
掃描影像中的線條太細或中斷 ....................................................................... 31
無法連線或掃描到區域網路上的目的地資料夾 .............................................. 31
影像遭裁切,未掃描完整的影像 ................................................................... 32
無法產生紙材設定檔 ..................................................................................... 32
我的色彩調配結果並未最佳化 ....................................................................... 32
Page 46

我需要更新或修復系統 .................................................................................. 32
系統軟體的語言錯誤 ..................................................................................... 33
安裝新系統軟體 ............................................................................................. 34
索引 ................................................................................................................................. 36
ZHTW
Page 47

簡介
1
使用本指南
本指南的內容已整合為下列幾章。
簡介:這一章提供軟體、掃描器及相關說明文件的簡短介紹。
1.
基本作業:這一章將協助您完成各種常用的程序。
2.
維護:這一章將協助您完成各種校準和維護程序。
3.
疑難排解:這一章將協助您解決掃描時可能發生的問題。
4.
索引:除了查閱目錄之外,您還可以利用依字母順序編排的索引迅速找到主
5.
題。
警告與注意事項
本手冊使用下列符號提醒讀者如何正確使用印表機,以免印表機受損。請務必依照
標有這些符號的操作指示來執行。
警告! 未依照以此符號標示的指示執行可能會導致人身重大傷害或喪失生命。
注意: 未依照以此符號標示的指示執行可能會導致人身輕微傷害或損壞產品。
簡介
ZHTW
使用本指南
1
Page 48

掃描器軟體
簡介
工作按鈕
當您打開觸控式螢幕的電源時,掃描器軟體就會自動執行。主畫面分割為下列區
域:
主功能表
●
右側上方:工作按鈕
●
右側下方:功能按鈕
●
按下此鈕可使程式進入影印(掃描至印表機)工作模式。
按下此鈕可使程式進入掃描(掃描至檔案)工作模式。
按下此鈕可開啟各種程式設定以及喜好設定功能表。
功能按鈕
檔案管理員:可開啟「檔案管理員」對話方塊。
線上說明:可針對多種主題提供詳細資訊。可針對您目前的工作開啟相關的指示。
停止:取消目前的活動。
開始掃描/影印:根據所選取的工作按鈕而定,開始影印或掃描。
2 第 1 章 簡介 ZHTW
Page 49
掃描器
簡介
1. 掃描器蓋板
2. 掃描/影印應用程式的觸控式螢幕
3. 釋放鈕,用以開啟掃描器蓋板
4. 掃描器平台:送紙區
5. 插入槽,用以送入文件
文件和說明
本快速參考指南針對系統與軟體提供扼要的介紹。
「線上說明」功能按鈕
作、選項)顯示一般說明資訊。
線上說明視窗的「首頁」按鈕
說明主題的連結。
您在許多對話方塊中都可以看到依照當前內容即時反應的「說明」按鈕
按鈕會根據目前的對話方塊與其選項顯示相關的指示。
6. USB 連接埠
7. 操作面板
8. 往前退紙按鈕
9. 往後退紙按鈕
10. 電源按鈕和電源指示燈
可開啟線上說明視窗,然後針對目前的工作(掃描、工
可帶您查閱目錄,其中含有各種線上說明教程和
,這個
ZHTW
掃描器
3
Page 50
2
基本作業
開啟或關閉掃描器
只要按下掃描器操作面板上的電源按鈕,就可以開啟或關閉系統(掃描器、螢幕和
軟體)。
附註: 印表機本身具有一個個別的電源開關按鈕。在正常情況下,這個按鈕會一
直維持為開啟,按下後也不會重新啟動系統。
開啟
按下電源按鈕。電源 LED 會亮起綠燈。
基本作業
關閉
按下電源按鈕。電源 LED 會先閃爍再熄滅。
重新啟動
按下電源按鈕可關閉系統,再按一次便可重新開啟系統。
4 第 2 章 基本作業 ZHTW
Page 51
裝入或退出文件
裝入文件
裝入您的文件,影像面朝上。將文件的中央對齊掃描器平台與其上方的中央箭
1.
頭記號。
利用標準尺寸記號協助對齊文件,使掃描結果整齊不扭曲。
2.
將原稿推進插入槽,直到您感覺它碰到滾輪為止。
3.
掃描器將自動抓住原稿,並將它移到開始掃描的位置。
4.
退出文件
按下「往後退紙」按鈕可使原稿退到掃描器的送紙台(也就是朝您的方向退
●
出)。
基本作業
ZHTW
裝入或退出文件
5
Page 52
如果您想讓原稿從掃描器的後方退出,請按下「往前退紙」按鈕。
●
設定掃描作業的目的地資料夾
下列指示將說明如何設定並選取目的地資料夾,以儲存「掃描至檔案」作業的輸
基本作業
出。目的地資料夾可以是系統經由區域網路 (L A N ) 連線之電腦的資料夾,也可以是
插入觸控式螢幕之 USB 快閃磁碟的資料夾。
1. 請確認您已在區域網路 (LAN) 上正確設定了系統以及嘗試連結的目的地電腦。
您可以在「選項」 > 「進階選項」 > 「網路」功能表中,進行系統的區域網路
設定。這是屬於系統管理員的設定選項,因此可能需要輸入密碼。
2. 如果您想將掃描儲存至 USB 快閃磁碟,請按「掃描」按鈕,然後將磁碟插入
觸控式螢幕的 USB 連接埠。系統會偵測到該磁碟,並詢問您是否要將目的地
設定/變更至 USB。
3. 若要存取目的地設定選項,請按下「選項」>「進階選項」>「管理目的地」。
您可以在該處選取、新增和變更目的地。
6 第 2 章 基本作業 ZHTW
Page 53
選取目的地
請在目的地清單中選取一個目的地,這些目的地已先建立並儲存在系統上。如果清
單中沒有任何目的地,或如果您想使用某個未列在清單中的目的地,就必須加入新
的目的地。如果您想掃描至接上的 USB 快閃磁碟,請按下「USB」做為目的地。
新增目的地
請按下「新增」按鈕,輸入目的地的詳細資料。將各值輸入「標籤」、「網路路
徑」、「網域」、「使用者名稱」和「密碼」欄位中。如果您想將目的地密碼儲存
到系統中,請選取「請記住」。如果您希望使用者須輸入密碼才能連線至目的地,
請不要選取「請記住」。按下「測試連線」,檢查您的設定。
變更(編輯)目的地
按下「變更」按鈕,然後編輯「標籤」、「網路路徑」、「網域」、「使用者名
稱」和「密碼」欄位。如果您想將目的地密碼儲存到系統中,請選取「請記住」。
如果您希望使用者須輸入密碼才能連線至目的地,請不要選取「請記住」。按下
「測試連線」,檢查您的設定。
移除目的地
在「目的地」清單中選取一個目的地,然後按下「移除」按鈕。
基本作業
ZHTW
設定掃描作業的目的地資料夾
7
Page 54
影印文件
基本作業
依照下列步驟進行影印(掃描以列印)。
插入您的文件,送入掃描器時,掃描面朝上。
1.
確定印表機電源已開啟、所需的紙材已經裝入。
2.
附註: 若要影印,您必須有該紙材的紙材設定檔。系統附有一組紙材設定
檔,適用於某些最為常用的紙材。如果您需要建立新的紙材設定檔,請參閱
「
17 頁的建立紙材設定檔」。
按下「影印」按鈕,以存取影印(掃描以列印)設定和按鈕。「影印」對話方
3.
塊如下所示。
按下「原稿類型」按鈕,然後選取符合文件以及所需輸出的類型。請參閱
4.
11 頁的指定原稿類型並調整影像」。
「
按下「品質」按鈕,選取所需的輸出品質。
5.
按下「掃描區域」按鈕,設定影像擷取區域的尺寸。如果您想擷取整個影像,
6.
請選取「自動」,系統將為您測量並設定尺寸。
7. 按下「調整大小」按鈕,調整影印本的尺寸。如果您需要 1: 1 的影印尺寸,請
設定為「否」。
按下「份數」,設定此工作須影印的份數。
8.
如果您想在要求印表機進行工作前先調整某些設定,請將「在影印之前先預
9.
覽」按鈕切至「開啟」。請參閱「
10.
完成設定後,按下「開始掃描/影印」按鈕
亦請參閱:
14 頁的設定並預覽影像的調整結果
●
12 頁的設定輸入和輸出尺寸
●
16 頁的設定輸出品質
●
14 頁的預覽影印和掃描」。
即可開始影印。
8 第 2 章 基本作業 ZHTW
Page 55

掃描至檔案
依照下列步驟掃描至檔案。
插入您的文件,送入掃描器時,掃描面朝上。
1.
按下「掃描」按鈕,以存取「掃描至檔案」的設定和按鈕。「掃描」對話方塊
2.
如下所示。
3. 按下「原稿類型」按鈕,然後選取符合/適合您原稿的類型。請參閱「11 頁的
指定原稿類型並調整影像」。
按下「品質」按鈕,選取掃描解析度。
4.
按下「掃描區域」按鈕,設定影像擷取區域的尺寸。如果您想擷取整個影像,
5.
請選取「自動」,系統將為您測量並設定尺寸。
6. 按下「檔案格式」按鈕,選取檔案的格式,例如 JPG 或 TIFF。
按下「檔案名稱」按鈕,輸入目的地檔案的名稱。
7.
「目的地」按鈕可顯示掃描輸出檔的建立位置。如果您想選取其他目的地,請
8.
按下「目的地」按鈕。
如果您想在儲存至檔案前先調整某些設定,請將「在掃描之前先預覽」按鈕切
9.
至「開啟」。請參閱「
10.
完成設定後,按下「開始掃描/影印」按鈕
亦請參閱:
14 頁的設定並預覽影像的調整結果
●
12 頁的設定輸入和輸出尺寸
●
16 頁的設定輸出品質
●
6 頁的設定掃描作業的目的地資料夾
●
基本作業
14 頁的預覽影印和掃描」。
即可開始掃描。
ZHTW
掃描至檔案
9
Page 56
批次掃描和批次影印
只要使用批次掃描和批次影印功能,您就可以不斷將新的原稿送入掃描器,系統會
立即開始處理,不須等您按下「開始掃描/影印」按鈕。系統會將目前的設定套用至
所有文件。如果您選擇掃描至檔案,系統就會自動以遞增的數字命名檔案。
將原稿放在一個靠近掃描器的位置,面朝上,如此可方便您將原稿送入掃描
1.
器。
調整您的掃描或影印設定。這些設定將會套用至批次中的所有原稿。
2.
按下「批次模式」按鈕,將批次模式設為「開啟」。
3.
4.
按下「開始掃描/影印」按鈕
如果您已經裝入第一張原稿,系統就會開始掃描或影印。否則,「批次模式」
5.
基本作業
對話方塊就會要求您將第一張原稿插入掃描器。
插入第一張原稿後,系統便立刻開始掃描。
6.
。
原稿經過掃描後便會退出。「批次模式」對話方塊將再次出現,然後要求您送
7.
入下一頁原稿。
請移開退出的原稿,然後送入下一頁。
8.
持續送入原稿,直到此批次結束為止。
9.
若要中止批次模式,請按下「批次模式」對話方塊的「取消」按鈕。
10.
10 第 2 章 基本作業 ZHTW
Page 57

附註: 預覽功能在「批次模式」中為停用。
附註: 為了確保能在批次模式中快速送入原稿,掃描器會自動退出每一頁完成掃
描的原稿。在「選項」>「基本選項」>「在掃描後倒轉」中可設定退出的方向。如
果選取此選項,則完成掃描的原稿就會從前方退出;如果沒有選取,則從後方退出。
指定原稿類型並調整影像
當選取「原稿類型」時,系統就會設定某些基本的擷取參數。您便可調整某些特定
元素,例如影像亮度、清晰度和背景清理程度。可調整的設定會根據選取的「原稿
類型」不同而有所不同。
按下「掃描」或「影印」按鈕,然後按下「原稿類型」按鈕,以顯示「原稿類
1.
型」選擇清單。
選取最符合您原稿的原稿類型。
2.
原稿類型 說明
基本作業
ZHTW
彩色線條
灰色線條
黑白線條
彩色圖表 適合各種彩色圖表,例如地形圖、公路圖或其他含有填色區域且複雜細緻的文
灰色圖表 適合各種灰階圖表,例如地形圖、公路圖或其他含有填色區域且複雜細緻的文
適合彩色的 CAD 圖形以及複雜細緻的圖形。會套用影像處理工作,藉以清理
背景並使線條銳利化。24 位元彩色掃描。
適合灰階的 CAD 圖形以及複雜細緻的圖形。會套用影像處理工作,藉以清理
背景並使線條銳利化。8 位元灰階掃描。
適合黑白鮮明的 CAD 圖形以及複雜細緻的圖形。這對「掃描至檔案」作業尤
其有用,因為相較於彩色和灰色原稿類型,它的檔案尺寸是最小的。牽涉最少
的影像處理,掃描的效果既自然又快速。1 位元黑白掃描。
件類型。會套用影像處理工作,藉以使細節銳利化。24 位元彩色掃描。
件類型。會套用影像處理工作,藉以使細節銳利化。8 位元灰階掃描。
指定原稿類型並調整影像
11
Page 58

基本作業
原稿類型 說明
彩色宣傳單 適合高品質的彩色相片和宣傳單。牽涉最少的影像處理,掃描的效果既自然又
快速。24 位元彩色掃描。
舊繪圖 適合已褪色並有縐摺的繪圖,且前景與背景的對比度很低。會套用影像處理工
作,藉以清理背景並使線條銳利化。8 位元灰階掃描。
3.
您可以微調「原稿類型」的設定(選用):按下「更多」按鈕
展開
「原稿類型」對話方塊,然後設定所選原稿類型的相關調整選項。完成後按下
「確定」。
4.
按下「說明」按鈕
,這個按鈕會依照當前內容即時反應,因此您便可以取
得各個設定的額外資訊,並瞭解如何將設定儲存為新的自訂「原稿類型」。
附註: 您可以按下「在掃描/影印之前先預覽」按鈕,然後按下「調整」按鈕以開
始影像調整,並在螢幕上檢視調整後的效果。請參閱「
14 頁的預覽影印和掃
描」。
設定輸入和輸出尺寸
「掃描區域」就是您的輸入尺寸,定義了影像的擷取大小。這個尺寸通常等於原稿的
整體尺寸。不過,您有時候也可能只想掃描原稿的一部分,或是希望擷取區域能相
等於特定的標準尺寸。
影印時,您也可以透過「調整大小」設定來決定輸出的尺寸(也就是影印本中的影
像尺寸)。您可以選擇「否」,不調整大小,以目前的「掃描區域」尺寸進行 1:1
的影印;或者,您也可以選擇其他的尺寸,依照「掃描區域」尺寸縮小或放大列印
的影像。
附註: 掃描時,輸出檔案中的影像尺寸永遠等於「掃描區域」的尺寸 (1:1)。
設定影印和掃描的掃描區域(輸入尺寸)
在掃描或影印畫面中按下「掃描區域」按鈕,即可檢視「掃描區域」的尺寸清單。
12 第 2 章 基本作業 ZHTW
Page 59

此清單提供了幾種可讓您設定「掃描區域」尺寸的方法:
自動:程式會自動偵測掃描器裝入文件的完整尺寸。您可以使用預覽功能來檢
●
查掃描器對於尺寸的偵測是否正確。
使用標準或自訂尺寸:此對話方塊含有一份清單,列出系統中所儲存的標準尺
●
寸和自訂尺寸。您可以捲動清單來選取想使用的尺寸。若要建立新的自訂尺
寸,請依照下列指示進行。
●
設定寬度和長度的尺寸值:按下「更多」按鈕
對話方塊。在欄位中設定寬度和長度的尺寸,或個別將寬度或長度設為「自
動」。您可以將所做的變更儲存下來,藉以建立新的自訂尺寸,或者,也可以
只將那些變更用在目前的工作上。
附註: 您也可以透過預覽功能,根據在螢幕上看到的結果來設定「掃描區域」。
請參閱「
14 頁的預覽影印和掃描」。
設定僅用於影印的「調整大小」值(輸出尺寸)
按下「調整大小」按鈕。
1.
如果您不想調整影像的大小,請選取「否」:也就是說,您希望影印的成品尺
2.
寸與「掃描區域」相同。
3. 按下「尺寸」按鈕,在清單中選取一個標準尺寸(例如 A2 或 A4)。
4. 選取「縮放比例」,以某個縮放係數(例如 50% 或 32%)來調整大小。
基本作業
,展開「掃描區域」
ZHTW
設定輸入和輸出尺寸
13
Page 60

預覽影印和掃描
您可以先預覽影印和掃描內容,然後再傳給印表機或檔案系統。預覽功能可讓您:
根據您選取的原稿類型調整影像(例如亮度和清晰度),然後在螢幕上檢視調
●
整後的效果。
以視覺化方式設定「掃描區域」(輸入尺寸),方法是利用控點將「掃描區
●
域」畫框拖放至影像上。
您可以透過放大和縮小來觀察特定的影像區域,為您所做的設定評估效果。
●
載入掃描或影印的預覽影像
1. 裝入您的原稿,然後按下「在掃描/影印之前先預覽」按鈕,將預覽模式設為
「開啟」。
按下「掃描」或「影印」按鈕即可載入預覽影像。
2.
基本作業
3.
您可以隨時按下「取消」按鈕
來關閉預覽。
設定並預覽影像的調整結果
1.
按下預覽畫面左上角的「調整」按鈕
在「調整」對話方塊中進行設定。
2.
按下「確定」按鈕關閉「調整」對話方塊,然後觀察您所做的設定在預覽中有
3.
何效果。您可以使用縮放工具來檢視細節以及感興趣的區域。
4. 如果您需要重新調整設定,請重複步驟 1–3。
附註: 系統會將影像調整設定的效果套用並顯示在低解析度的預覽畫面中,因此
並不完全代表目的地檔案或影印本的最終影像。
14 第 2 章 基本作業 ZHTW
。
Page 61

設定並預覽掃描區域
預覽功能會將影像顯示在白色畫框內。此畫框即代表目前的「掃描區域」(輸入)
尺寸。如果在掃描前變更畫框的尺寸,也會同時變更「掃描區域」的設定。您可以
移動畫框的邊和角來調整其尺寸。若要這麼做,您可以:
拖曳畫框邊和角上的調整控點
●
以手指按一下您想重新定位的位置,重新定位最接近該處的邊或角。最接近的
●
邊會跳到該位置。
利用影像縮放和定位工具,協助您設定畫框的大小以及調整畫框中的影像位
●
置。影像縮放和定位工具包括:
縮放裁切:貼齊影像,如同以邊界裁切一般。
放大:在預覽中放大影像尺寸。縮放會以視窗中心為基準。
縮小:在預覽中縮小影像尺寸。縮放會以視窗中心為基準。
。
縮放到正好顯示全部:顯示整個擷取區域,毫不裁切。邊界位置是由目前
的原稿尺寸設定所定義。
影像取景工具:使用這些箭頭將擷取的影像調整到視窗中央。
畫框中心控點(藍色的圓圈):使用此控點拖曳完整尺寸的畫框,重新將
其置於擷取的影像上。
當您結束預覽且想要確認此工作時,請按下「開始掃描/影印」按鈕
如果您想中止預覽程序而不確認此工作,請按下「取消」按鈕
。
基本作業
。
ZHTW
預覽影印和掃描
15
Page 62

設定輸出品質
設定掃描至檔案的品質
您對掃描(掃描至檔案)所套用的品質設定,是以每英吋點數 (dpi) 的掃描解析度為
單位。
1. 按下「掃描」按鈕,再按「品質」按鈕,開啟「品質 (dpi)」對話方塊。
基本作業
使用捲軸檢視可用的解析度。
2.
按下顯示您要使用之解析度的按鈕。
3.
「自訂」按鈕會開啟一份列有其他解析度的清單。
設定掃描以列印的品質
影印(掃描以列印)時,您必須設定一般列印品質參數(快速、正常、最佳),以
套用至整個影印程序(掃描和列印)。
「掃描」的品質取決於解析度 (dpi)。您可以為各個品質設定(快速、正常、最
●
佳)選取專屬的掃描解析度,而這是透過「原稿類型」調整選項所完成的(請
參閱以下內容)。
品質設定(快速、正常、最佳)的專屬「列印」品質參數,則是在印表機中定
●
義。
1. 按下「影印」按鈕,再按下「品質」 按鈕,即可開啟「列印品質」對話方塊。
在清單中選取所需的品質設定。
2.
「快速」可製作一份快速草稿,墨水的用量最少。
●
「正常」適合大多數要求一般品質水準的影印工作。
●
「最佳」適合高品質的列印輸出。
●
16 第 2 章 基本作業 ZHTW
Page 63

設定各個品質設定(快速、正常、最佳)的專屬掃描解析度(掃描以列印)
按下「原稿類型」,然後按下「更多」按鈕,即可開啟「原稿類型」的調整選
1.
項。
將調整清單往下捲動,尋找「快速掃描解析度」、「正常掃描解析度」和「最
2.
佳掃描解析度」這三個按鈕。
按下任一按鈕皆可開啟一份清單,其中列出可供您選擇的解析度。
3.
選取一個想要套用的掃描解析度,當您使用此「原稿類型」選擇該名稱的品質
4.
設定(快速、正常、最佳)時,便套用這個解析度。
範例:選取「彩色宣傳單」這個原稿類型,然後按下「更多」按鈕以進行調整。按
下「最佳掃描解析度」按鈕,再選取「400 dpi」。這表示,此後每當您使用「彩色
宣傳單」的原稿類型以及「影印」>「品質」>「最佳」的品質設定時,都將套用
400 dpi 的掃描解析度。
建立紙材設定檔
透過紙材設定檔,您的系統便可支援掃描器、印表機和紙材類型之間的色彩調配。
每一種紙材類型(例如光面紙或塗層紙)都有一個紙材設定檔,搭配印表機使用。
在大部分的情況下,色彩調配和紙材設定檔都是由系統所管理,它們的應用對使用
者而言是簡單明瞭的。將新紙材裝入印表機時,您會在印表機的設定功能表中選取
紙材類型。如果系統內有該紙材類型的紙材設定檔,就會自動將其載入,以使影印
的色彩調配獲得最佳化。
不過,有兩種情形需要您注意:
找不到紙材設定檔:如果系統沒有當前紙材的紙材設定檔,您就必須自行建立
●
一個。系統會顯示一個訊息對話方塊告知您必須建立紙材設定檔,並顯示一個
按鈕帶您前往「建立紙材設定檔」精靈(請參閱以下內容)。
色彩並未最佳化:系統所提供的某些預設紙材設定檔屬於一般通用的性質,可
●
能無法讓所有的紙材類型都獲得最佳化。此外,即使是某些特定的紙材設定
檔,也有可能受限於當下的條件而無法最佳化。如果您的測試稿顯示出色彩調
配的效果需要改善,便必須透過「建立紙材設定檔」精靈更新目前的紙材設定
檔(請參閱以下內容)。
基本作業
ZHTW
建立紙材設定檔
17
Page 64

更新目前的紙材設定檔
請確定印表機的紙材類型設定符合裝入的紙材。
1.
以目前的紙材設定檔進行測試影印,判斷該設定檔是否需要更新。
2.
3. 按下「選項」>「印表機選項」。
基本作業
「印表機選項」對話方塊除了會顯示印表機的相關資訊,還會顯示目前的紙
4.
材,也就是印表機主功能表上確定的紙材設定。紙材設定檔的值可能為:
●
●
●
如果您看到「未建立」的狀態,就必須先建立一個紙材設定檔,才能開始影
5.
印。按下「建立設定檔」按鈕,即可啟動「建立紙材設定檔」精靈。
如果您對紙材設定檔的狀態以及測試稿的色彩調配結果感到滿意,請按「確
6.
定」關閉對話方塊。
如果測試稿中的色彩並未最佳化,請按下「更新設定檔」按鈕,啟動「建立紙
7.
材設定檔」精靈。
建立紙材設定檔精靈
此精靈除了可建立新的紙材設定檔,亦可更新現有的設定檔。請依照此精靈在螢幕
上的指示進行。
此程序會要求您將系統所儲存的色塊頁印出,然後再掃描該頁,接下來就交給系統
處理。
提示: 精靈會列印兩頁,請您捨棄第一頁、掃描第二頁。
預設值:當前紙材的紙材設定檔是由程式所提供,尚未經過更新。
建立於 dd-mm-yyyy:目前的紙材設定檔是在所列的日期中建立或更新。
未建立:系統沒有為目前的紙材找到任何紙材設定檔。
完成此程序後,紙材設定檔的建立日期將會更新。
18 第 2 章 基本作業 ZHTW
Page 65
檢視、移動、重新命名或刪除掃描檔案
您的系統在區域網路和 USB 磁碟上的掃描目的地,會含有您必須存取和管理的影
像檔案。您可以透過「檔案管理員」對話方塊存取影像檔案。
開啟「檔案管理員」。
按下「檔案管理員」按鈕 。
瀏覽檔案系統。
「檔案管理員」只會顯示已在系統上定義為掃描目的地的資料夾。檔案清單預
●
設會顯示當前目的地資料夾的根。
「上一層資料夾」按鈕(標記為「..」)會移往上一層,直到您找到已建立之目
●
的地資料夾的清單為止。
按一下某個資料夾的名稱,即可前往該資料夾所在的層級。
●
按一下某個影像名稱,即可顯示該影像的縮圖和基本資訊。
●
透過核取影像檔案名稱左邊的方塊,選取影像檔案執行某個檔案動作(請參閱
●
以下內容)。
基本作業
ZHTW
檢視、移動、重新命名或刪除掃描檔案
19
Page 66

檔案動作按鈕
若要使用動作按鈕,請核取一或多個檔案名稱旁的方塊,然後按下相關的動作按鈕。
●
●
●
●
●
●
●
系統設定和選項
基本作業
基本選項
複製:將一或多個選取(核取)的檔案複製到其他資料夾。
移動:將一或多個選取(核取)的檔案移動到其他資料夾。
重新命名:為選取(核取)的檔案變更名稱。
刪除:將一或多個選取(核取)的檔案從系統中刪除。
新資料夾:在目前的資料夾裡建立新的子資料夾。
全部/無:在目前檢視的資料夾中,將所有檔案名稱旁的方塊切換為核取與取消
核取的狀態。
檢視:開啟另一個視窗,為目前顯示的影像檔案提供較大的檢視。
設定日期與時間
當地日期與時間的參數,是在系統首次開啟時所執行的設定程式中輸入。如果有需
要,您可以透過「選項」功能表,變更當地的日期和時間設定。
1. 按下「選項」>「基本選項」>「日期與時間」。
輸入正確的當地日期與時間值,並輸入時區。日期與時間的設定將會用於各種
2.
程式動作中。
測量單位
1. 按下「選項」>「基本選項」>「測量單位」。
請選取偏好的單位(例如英吋或公釐),在定義文件尺寸時使用。
2.
20 第 2 章 基本作業 ZHTW
Page 67
紙張系列喜好設定
1. 按下「選項」>「基本選項」。
對於您想在尺寸對話方塊中(「掃描區域」和「調整大小」)顯示、用以代表
2.
紙張系列的各個欄位,請對其加以選取/核取。您可以選取一或多種顯示的紙張
系列。
在掃描後倒轉
1. 按下「選項」>「基本選項」。
2. 如果您希望文件在掃描後能回到送紙區域,請選取/核取「在掃描後倒轉」選
項,如此您便可以在掃描器面板上按「往後退紙」按鈕,使文件往後退出。如
果您希望文件留在掃描器後方,請不要選取這個選項,如此您便可以藉由「往
前退紙」按鈕,使文件從機器後方退出。
自動重設與沒有任何活動逾時
按下「選項」>「基本選項」。
這兩個選項會要求系統在經過一段預先定義的閒置時間後(預設為五分鐘)自動回
復為預設的參數,因此使用者永遠都能以系統的基本設定開始使用,即使上一位使
用者變更設定也無妨。系統會回復為儲存的系統參數:也就是上一次按下「選項」
>「進階」>「儲存設定」按鈕時設定的參數(請參閱以下內容)。
如果您想套用這個功能,請選取/核取「自動重設」選項。使用「沒有任何活動逾
時」可設定系統在觸發「自動重設」前所經過的閒置時間。
附註: 套用「自動重設」時,並不會影響或遺失新的目的地和紙材設定檔。
進階選項
基本作業
設定進階選項的密碼
按下「選項」>「進階選項」>「設定密碼」,對「進階選項」對話方塊套用密碼保
護存取功能。
網路設定
在系統首次開啟時所執行的設定程式中,會輸入網路參數。如果系統已經移動或網
路參數已經變更,則可以透過「選項」功能表輸入新的網路設定。
ZHTW
系統設定和選項
21
Page 68

1. 按下「選項」>「進階選項」>「網路」。
2. 如果您知道自己的網路是使用 DHCP 伺服器,則請選取「自動 IP 位址」,系
統便可自動擷取其網路連線參數。否則,請手動輸入 IP 位址、子網路遮罩和
預設閘道。
儲存設定
按下「選項」>「進階選項」>「儲存設定」。
這會將目前的設定儲存為新的系統預設設定。當系統觸發「自動重設」時,就會重
新套用所儲存的設定(請參閱以上內容)。
將設定重設為出廠預設值
按下「選項」>「進階選項」>「出廠預設值」。
這會將所有設定回復為出廠預設值。程式隨附的標準「原稿類型」會回復成它們的
基本作業
原始設定。重設出廠預設值是管理員的功能,因此可能需要輸入密碼。
其他進階選項
「管理目的地」將在「
●
「校準螢幕」將在「
●
「軟體更新」將在「
●
「服務」是屬於服務技術人員的選項,並不在本指南的討論範圍內。
●
6 頁的設定掃描作業的目的地資料夾」中說明。
26 頁的校準觸控式螢幕指標」中說明。
34 頁的安裝新系統軟體」中說明。
22 第 2 章 基本作業 ZHTW
Page 69
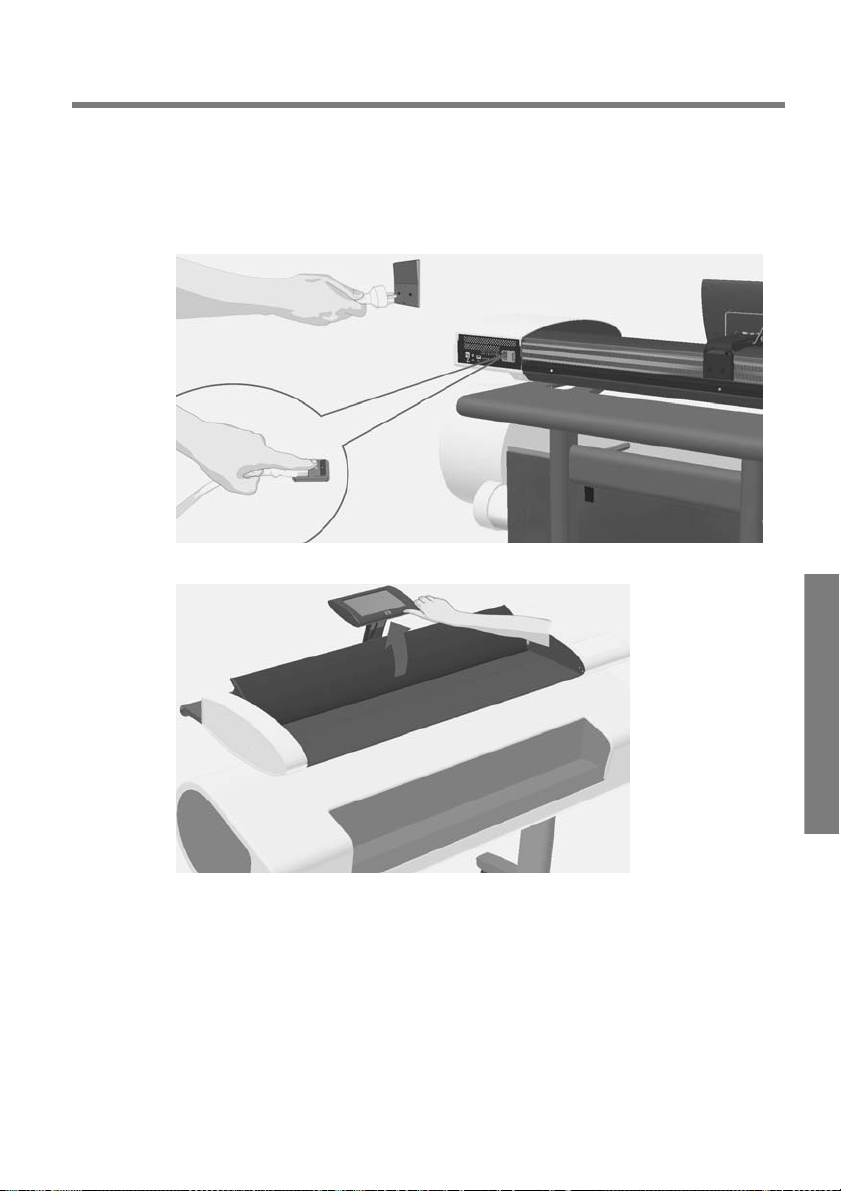
維護
3
清潔玻璃板和掃描區域
關閉掃描器電源,並中斷電源線的連接。
1.
將觸控式螢幕往後掀開。
2.
維護
ZHTW
清潔玻璃板和掃描區域
23
Page 70
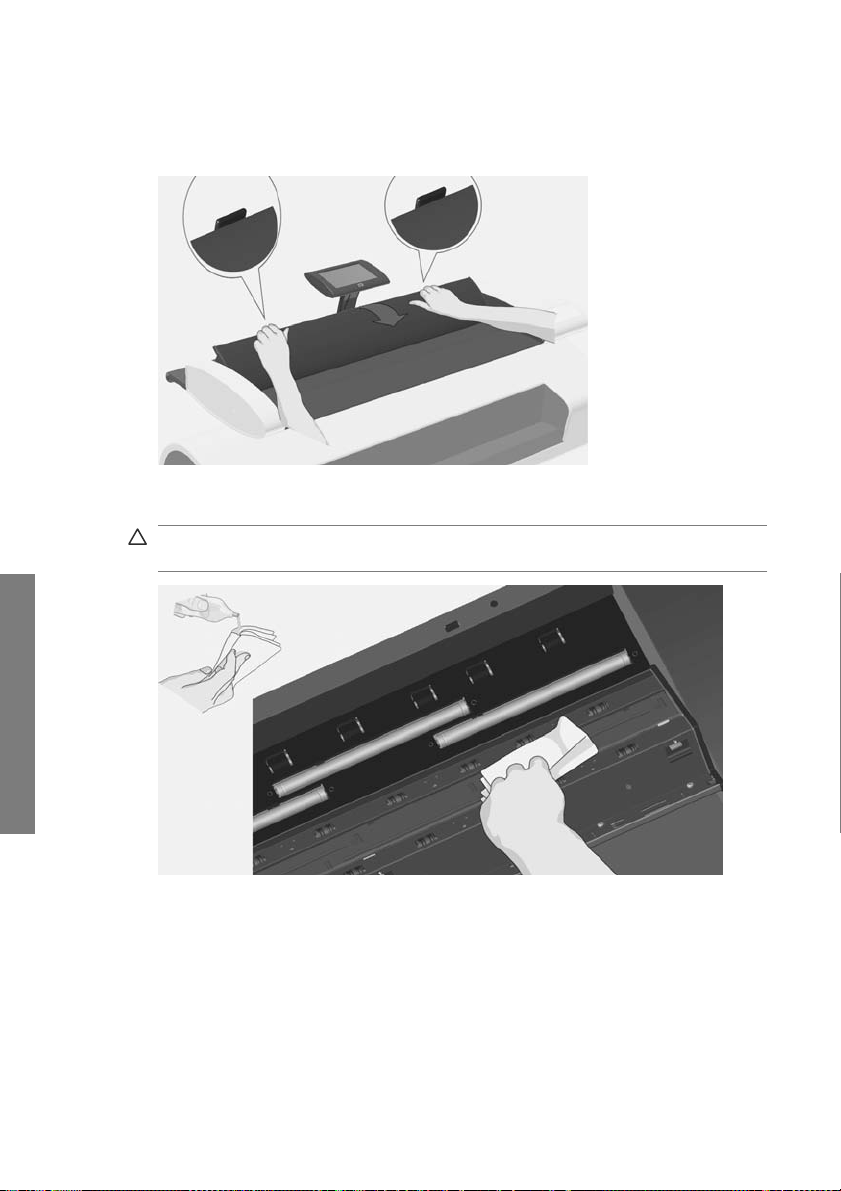
維護
掃描器後側有兩個蓋板釋放鈕。同時將這兩個蓋板釋放鈕往掃描器的中央滑
3.
動,直到您感覺到它們解除鎖定為止,然後將蓋板往後朝您身體的方向拉。將
掃描器蓋板往後開到最大。
使用無棉絮的布,以溫和、不留痕跡的玻璃清潔液沾濕,輕輕擦拭玻璃板和捲
4.
筒的三個滾輪。
注意: 請勿使用研磨劑、丙酮、苯或含有這些化學物質的液體。請勿將液體
直接噴灑在掃描器的玻璃板上或是掃描器內的任何地方。
24 第 3 章 維護 ZHTW
Page 71
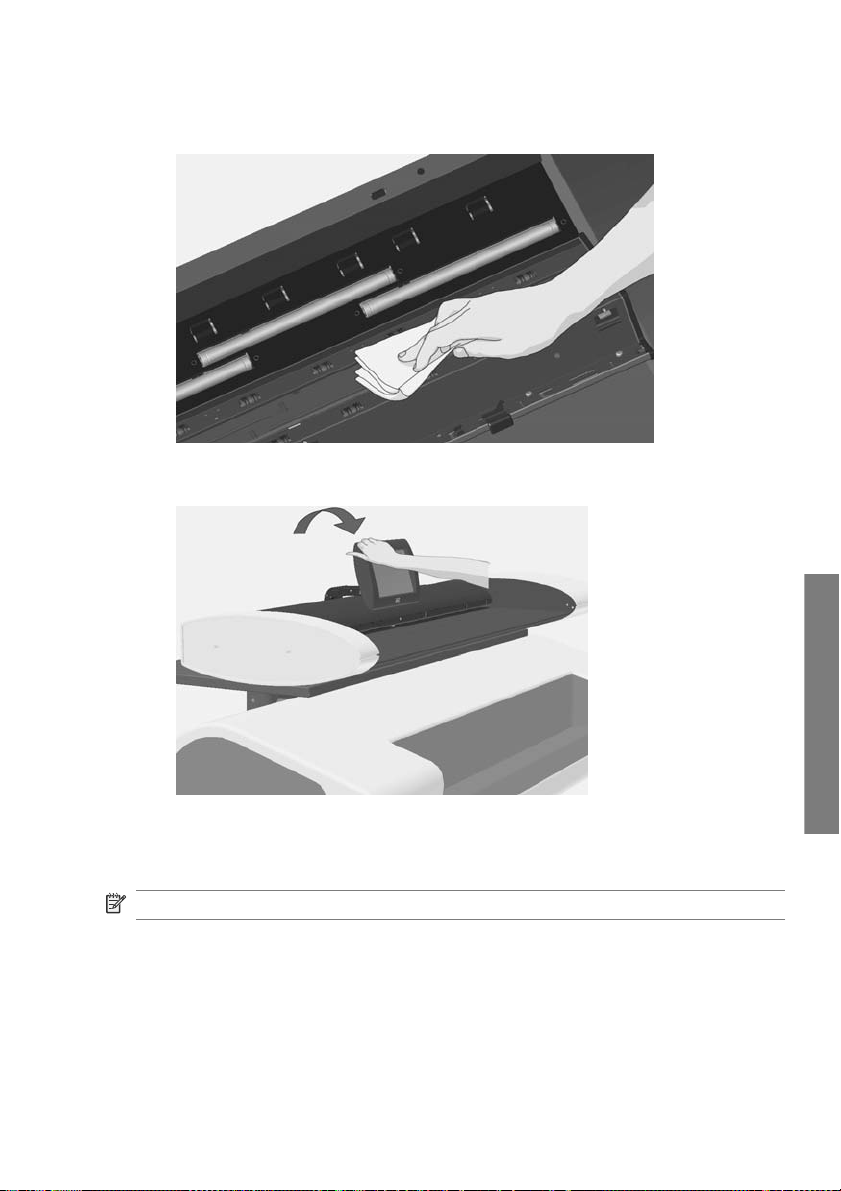
使用另一塊潔淨的無棉絮乾布將玻璃完全擦乾。接著再使用這塊布將滾輪擦
5.
乾。
關閉掃描器蓋板時輕輕往下壓,將它鎖入正確位置。將觸控式螢幕回復到正常
6.
位置。
校準掃描器
如果您的輸出效果並未最佳化,且清潔掃描區域無法解決問題,則 HP 建議您校準
掃描器。校準程序將使掃描器回復為原始的彩色及黑白精確度。
附註: 請務必在校準掃描器前先清潔玻璃。
關閉掃描器並清潔掃描區域。清潔的掃描器,其校準效果最佳。
1.
2. 清潔掃描區域後,請開啟掃描器電源。掃描器面板上的電源 LED 亮起綠燈
時,掃描器就已準備好進行校準。
ZHTW
校準掃描器
維護
25
Page 72
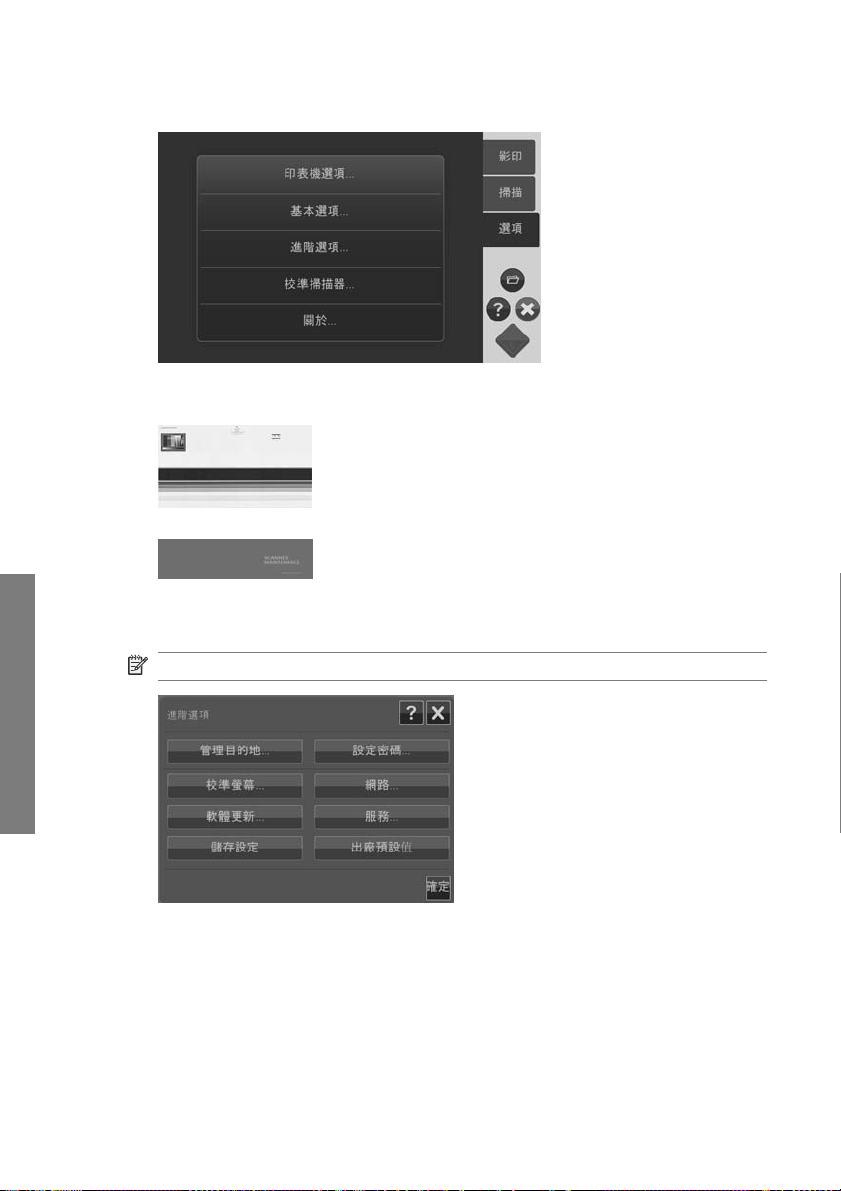
3. 按下「選項」>「校準掃描器」,啟動「掃描器校準精靈」。
「掃描器校準精靈」將引導您進行掃描器的校準程序。為了校準掃描器,您需
4.
要備妥掃描器隨附的維護表。
校準觸控式螢幕指標
1. 按下「選項」>「進階選項」>「校準螢幕」。
維護
附註: 您可能需要輸入系統的管理員密碼,才能存取「進階選項」。
依照螢幕上的指示執行。透過按下出現在螢幕上不同位置的目標點,完成校
2.
準。按下目標點,直到它們不再出現為止。
按下最終對話方塊中的「確定」按鈕以確認,並結束螢幕校準。
3.
26 第 3 章 維護 ZHTW
Page 73

更換掃描器玻璃板
玻璃板的性能會隨著時間衰減。玻璃表面的微小刮痕可能會降低影像品質。請聯絡
HP 支援中心,以訂購新的玻璃板。
新的玻璃板將隨附更換玻璃板的逐步指示。
ZHTW
更換掃描器玻璃板
維護
27
Page 74

4
疑難排解
系統回報錯誤
當系統偵測到錯誤時,就會在螢幕上顯示錯誤訊息。
修正一般錯誤
錯誤的實際性質與原因,將透過螢幕上的錯誤訊息報告。
螢幕上的資訊可能包含如何修正錯誤的指示和動作。如果是這種情形,請依照螢幕
上的指示進行。
如果螢幕並未顯示任何解決方案,請在本快速指南的疑難排解章節中尋找該錯誤的
說明和解決辦法,或前往此系統的線上說明尋找。請依照所提供的指示進行。
大多數的掃描品質錯誤,都可以透過清潔與校準掃描器來解決。
如果該方法無法解決錯誤:
請嘗試重新啟動系統,關閉掃描器電源後再開啟電源。
●
嘗試透過「選項」>「進階選項」>「出廠預設值」重設系統的出廠預設值。
●
嘗試以最近一個已知可正確運作的系統影像進行修復。請參閱「
●
要更新或修復系統」。
如果上述方法無法解決問題,請聯絡技術支援(請參閱以下內容)。
技術支援
在某些情況下,您可能需要技術支援。如果符合下列一或多種情形,您就應該聯絡
HP 支援中心:
觸控式螢幕所建議的方法和以上「修正一般錯誤」所述的步驟都無法解決錯
●
誤。
本指南沒有提到所發生的錯誤及其解決方法,而且以上「修正一般錯誤」所述
●
的步驟都無法解決錯誤。
系統沒有在您的螢幕上回報錯誤,而且以上「修正一般錯誤」所述的步驟都無
●
法解決錯誤。
32 頁的我需
疑難排解
28 第 4 章 疑難排解 ZHTW
Page 75

夾紙
當掃描器停止掃描且文件仍留在傳動裝置內,這就表示已經發生夾紙。系統將會回
報發生夾紙。若要解決問題,請試著讓文件退出掃描器:按住「往後退紙」或「往
前退紙」鍵。如果文件對這些按鍵都沒有反應,請以下列方式手動取出文件。
將觸控式螢幕往後掀開。
1.
同時將這兩個蓋板釋放鈕往掃描器的中央滑動,直到您感覺到它們解除鎖定為
2.
止。
ZHTW
夾紙
疑難排解
29
Page 76

以一隻手將蓋板往後拉開,再以另一隻手拉出文件,使其完全退出掃描區域。
3.
關上蓋板。
4.
將觸控式螢幕回復到正常位置。
5.
掃描器就緒時重新裝入文件,進行掃描。
掃描影像中出現條紋
在大部分的情況下,條紋是由文件上或掃描器所在環境中的灰塵微粒所造成。掃描
器具有很高的精確度、還能捕捉到精密的細節,這表示連細小的塵粒也無所遁形。
疑難排解
30 第 4 章 疑難排解 ZHTW
通常清潔一下文件就可以解決這個問題。請先檢查原稿文件,確定它是乾淨的,且
沒有會在玻璃上產生拖痕的皺折或其他阻礙物。如果文件乾淨且狀況良好,則嘗試
清潔玻璃:請參閱「
校準掃描器:請參閱「
璃:請參閱「
23 頁的清潔玻璃板和掃描區域」。如果問題仍然存在,則嘗試
25 頁的校準掃描器」。如果問題還是存在,就需要更換玻
27 頁的更換掃描器玻璃板」。
Page 77

掃描影像中的線條太細或中斷
當掃描含有細線條的文件(例如 CAD 圖形)時,將掃描解析度設定為小於 300
dpi,就可能產生不勻稱的細線或中斷的線條。HP 建議在掃描 CAD 圖形及其他含
有細線條的文件時,掃描解析度至少要設定為 300 dpi。掃描的解析度愈高,總計的
掃描時間就愈久,但可以確保取得更佳的影像品質。如果是掃描相片以及填滿區域
時,這個問題就不會那麼明顯。如需有關設定掃描解析度的詳細資訊,請參閱
16 頁的設定輸出品質」。
「
下面影像有助於瞭解這個問題:
圖示 4-1 以 150 dpi 掃描得到的 CAD 圖形
圖示 4-2 以 300 dpi 掃描得到的 CAD 圖形
無法連線或掃描到區域網路上的目的地資料夾
為了連線並掃描到區域網路上某個特定的目的地資料夾,請確定您已經執行下列所
有步驟:
1. 確認您的系統已設定在區域網路之中。請參閱「
2. 您在安裝系統之後已經透過「選項」>「進階選項」>「管理目的地」>「新
增」或「變更」設定了目的地資料夾。請確定您已正確地輸入完整的網路路
徑。
20 頁的系統設定和選項」。
ZHTW
掃描影像中的線條太細或中斷
疑難排解
31
Page 78

3. 確定您已輸入正確的登入資訊,也就是「網域\使用者」和「密碼」。請記得在
網域和使用者之間輸入反斜線字元「\」。
按下「測試連線」按鈕,檢查您的參數是否正確。
4.
如果在執行上述所有步驟之後仍無法連線或掃描到目的地資料夾,請聯絡您的區域
網路管理員。
影像遭裁切,未掃描完整的影像
您的尺寸設定可能有誤。按下「掃描區域」按鈕,檢查您的尺寸設定。「掃描
●
區域」應該設定為「自動」來自動偵測尺寸,或是設定為某個與掃描器中裝入
原稿相符的標準尺寸或自訂尺寸。
確定您已正確裝入原稿。請務必將原稿的中心對齊掃描器中央所標示的箭頭。
●
無法產生紙材設定檔
如果「建立紙材設定檔」精靈停止執行或回報錯誤:
確定掃描器與印表機的電源皆已開啟,且可以開始正常作業。
1.
確定您的掃描器可正常運作。掃描一份小型文件(至檔案),以測試掃描器。
2.
確定紙材已經裝入印表機。
3.
確定印表機的紙材類型設定與實際裝入的紙材相符。
4.
確定您已將「建立紙材設定檔」精靈所印出的色彩頁送入掃描器,且已對齊正
5.
確的位置。
確定您掃描的是「建立紙材設定檔」精靈所印出的第二頁,而不是第一頁。
6.
檢查掃描器是否乾淨,且已於近期校準。如果不確定,請清潔掃描區域並校準
7.
掃描器:請參閱「
23 頁的清潔玻璃板和掃描區域」和「25 頁的校準掃描器」。
我的色彩調配結果並未最佳化
嘗試使用「彩色宣傳單」的原稿類型。這是一般的原稿類型,並不會使用特殊
1.
影像處理(此類處理可能會影響色彩調配)。
2. 檢查您在「影印」>「原稿類型」對話方塊中的「原稿類型」設定。按下「更
多」按鈕,檢視和調整該「原稿類型」的相關設定。
3. 按下「選項」>「印表機選項」>「更新設定檔」,並依照螢幕上的步驟進行,
以確保您的紙材設定檔對於目前的紙材和印表機狀況是最佳的。
如果以上的方法無效,請檢查掃描器是否乾淨,且已於近期校準。如果不確
4.
定,請清潔掃描區域並校準掃描器:請參閱「
疑難排解
域」和「25 頁的校準掃描器」。
我需要更新或修復系統
如果掃描器在開機模式中停止反應且系統無法正常啟動,或是想回復至稍早或最初
的程式版本,則請執行系統修復。系統修復會將系統的程式磁碟區重新格式化,然
後重新安裝乾淨的程式影像。
23 頁的清潔玻璃板和掃描區
32 第 4 章 疑難排解 ZHTW
Page 79

若要執行系統修復作業,您必須啟動「軟體更新和修復」模式。有兩種方法可以啟
動「軟體更新和修復」模式:
1. 當程式在觸控式螢幕上執行時,請按下「選項」>「進階選項」>「軟體更
新」。
如果您的系統停止回應,且觸控式螢幕上的程式介面無法使用,請依照下例指
2.
示,在螢幕上啟動「軟體更新和修復」功能表。
a. 將 USB 驅動鍵盤連接到系統觸控式螢幕側面的 USB 連接埠。
以掃描器背面的電源開關關閉掃描器電源。
b.
以掃描器背面的電源開關開啟掃描器電源。
c.
系統重新啟動時,請確實依照觸控式螢幕上的訊息進行。當「軟體更新和
d.
修復」模式顯示啟動系統的選項時,請以鍵盤選取該選項。
「軟體更新和修復」畫面隨即顯示,並可供您透過觸控式螢幕進行控制。
e.
一旦進入「軟體更新和修復」模式,您就可以重新安裝軟體的完整影像,藉以修復
系統。請依照下列指示進行:
1. 在「軟體更新和修復」功能表中,選取「System Update/Recover(系統更
新/修復)」選項。
在清單中選取要安裝的程式影像。預設的影像是系統隨附的最初版本,而運作
2.
中的影像則是指目前安裝的版本。清單中所列的其他影像,則是您在現有版本
之前安裝過的版本。
請在系統詢問時確認您的選項。系統會以選取的程式影像更新系統。這大約需
3.
要兩分鐘的時間。按下「確定」按鈕,返回「軟體更新和修復」功能表。
4. 選取「Return to normal scan ner operation(回復掃描器的正常操作)」按
鈕並加以確認,系統會載入並初始化所有的參數。請勿關閉掃描器或中斷此載
入程序,這個步驟可能得花上十分鐘才能完成。
系統載入程序結束時,會要求您校準觸控式螢幕。請在系統提示時按下箭頭和
5.
「確定」按鈕。
選取系統軟體的語言。
6.
7. 接受 HP 授權合約。
系統將完成修復程序,並啟動您的掃描和影印程式介面。
8.
系統軟體的語言錯誤
系統的語言是在安裝期間設定的,如果要變更語言,您就必須以新選取的語言重新
安裝軟體。
1. 按下「選項」>「進階選項」>「軟體更新」。
2. 在「軟體更新和修復」功能表中,選取「System Update/Recover(系統更
新/修復)」選項。
在程式版本影像清單中,選擇安裝「運作中」的程式影像。
3.
疑難排解
ZHTW
系統軟體的語言錯誤
33
Page 80

請在系統詢問時確認您的選項,系統會開始以這個程式影像進行更新。這大約
4.
需要兩分鐘的時間。按下「確定」按鈕,返回「軟體更新和修復」功能表。
5. 選取「Return to normal sca nner operation(回復掃描器的正常操作)」按
鈕並加以確認。系統會載入並初始化所有的參數。請勿關閉掃描器或中斷此載
入程序。這個步驟可能得花上十分鐘才能完成。
系統載入程序結束時,會要求您校準觸控式螢幕。請在系統提示時按下箭頭和
6.
「確定」按鈕。
為系統軟體選取新的語言。
7.
8. 接受 HP 授權合約。
9. 系統將完成更新程序,然後以您在步驟 7 選取的新語言啟動掃描和影印程式介
面。
安裝新系統軟體
系統的新軟體版本可經由下列方式取得:
USB 快閃記憶體
●
網路 PC:網際網路下載、CD-ROM、其他
●
從 USB 快閃記憶體安裝新的軟體版本
1. 按下「選項」>「進階選項」>「軟體更新」。
請先等候「軟體更新和修復」功能表出現,再繼續下一個步驟。
2.
3. 將 USB 快閃記憶體插入觸控式螢幕側面的 USB 連接埠。
4. 在「軟體更新和修復」功能表中,選取「System Update/Recover(系統更
新/修復)」選項。
5. 新的程式版本影像將出現在程式版本影像清單中。您可以根據「USB」這個文
字在清單中找出該影像。
選取此影像來加以安裝。
6.
7. 選取「Return to normal sca nner operation(回復掃描器的正常操作)」按
鈕並加以確認。系統會載入並初始化所有的參數。請勿關閉掃描器或中斷此載
入程序。這個步驟可能得花上十分鐘才能完成。
系統載入程序結束時,會要求您校準觸控式螢幕。請在系統提示時按下箭頭和
8.
「確定」按鈕。
選取系統軟體的語言。
9.
疑難排解
10. 接受 HP 授權合約。
系統將完成安裝程序,並啟動您的掃描和影印程式介面。
11.
34 第 4 章 疑難排解 ZHTW
Page 81

從 PC 安裝新的軟體版本
您必須滿足下列要求:
您的掃描/影印系統必須在區域網路上連線,並且已經完成設定(可供區域網路
●
辨識)。
對於網路上設置之 PC,您必須擁有其存取權限。
●
PC 上必須安裝網頁瀏覽器。
●
從 CD-ROM 安裝:
1. 請記下掃描/影印系統的 IP 位址。您可以透過「選項」>「進階選項」>「網
路」對話方塊檢視 IP 位址。
2. 將新的軟體安裝檔案儲存在 PC 上(來自插入的 CD-ROM,或是來自網際網路
下載)。
3. 開啟 PC 上的網頁瀏覽器,然後在位址欄位中輸入掃描/影印系統的 IP。這會
開啟掃描/影印系統的「Upgradi ng Sc anne r Softw are (升級掃描器軟體)」
網路存取介面。
4. 使用瀏覽選項尋找並選取 CD-ROM 上的安裝檔案。
5. 安裝軟體。這會將軟體上載至您的掃描/影印系統。您現在已可將 PC 關機。剩
下的步驟將在掃描/影印系統的觸控式螢幕上進行。
6. 按下「選項」>「進階選項」>「軟體更新」,開啟「軟體更新和修復」功能
表。
7. 在「軟體更新和修復」功能表中,選取「System Update/Recover(系統更
新/修復)」選項。
8. 您從 CD-ROM 上載的新程式版本影像,將出現在程式版本影像清單中。
選取此影像來加以安裝。
9.
10. 選取「Return to normal scan ner operation(回復掃描器的正常操作)」按
鈕並加以確認。系統會載入並初始化所有的參數。請勿關閉掃描器或中斷此載
入程序。這個步驟可能得花上十分鐘才能完成。
系統載入程序結束時,會要求您校準觸控式螢幕。請在系統提示時按下箭頭和
11.
「確定」按鈕。
選取系統軟體的語言。
12.
13. 接受 HP 授權合約。
系統將完成安裝程序,並啟動您的掃描和影印程式介面。
14.
ZHTW
安裝新系統軟體
疑難排解
35
Page 82

索引
三畫
工作按鈕 2
四畫
尺寸
紙張 21
影像 12
文件
尺寸 12
批次掃描 10
批次影印 10
退出 5
掃描 9
掃描器夾紙 29
裝入 5
影印 8
日期 20
五畫
出廠預設設定 22
功能按鈕 2
目的地資料夾
無法連線 31
管理 6
六畫
列印品質 16
在掃描後倒轉 21
自動重設 21
色彩調配問題 32
七畫
夾紙 29
批次掃描文件 10
批次影印文件 10
更新軟體 32
沒有任何活動逾時 21
系統設定 20
九畫
品質, 列印 16
玻璃板
更換 27
清潔 23
重新啟動 4
十畫
修復軟體 32
原稿類型 11
時間 20
校準
掃描器 25
螢幕 26
紙材設定檔 17
紙材設定檔錯誤 32
紙張尺寸 21
退出文件 5
十一畫
基本設定選項 20
21
密碼
掃描文件 9
掃描區域 12
掃描區域, 清潔 23
掃描影像中出現條紋 30
掃描器元件 3
清潔
玻璃板 23
掃描區域 23
軟體 2
軟體更新 32, 34
軟體修復 32
十二畫
測量單位 20
進階設定選項 21
開啟 4
八畫
往前退紙按鈕 3
往後退紙按鈕 3
索引
36
十三畫
裝入文件 5
逾時, 沒有任何活動 21
電源按鈕 3
預覽 14
ZHTW
Page 83

十四畫
管理目的地 6
網路設定 21
語言, 變更 33
說明 3
十五畫
影印文件 8
影像調整 14
影像遭裁切 32
線條
中斷 31
太細 31
調整按鈕 14
遭裁切的影像 32
十六畫
輸入尺寸 12
輸出尺寸 12
輸出品質 16
選項
基本 20
進階 21
錯誤訊息 28
十七畫
儲存設定 22
檔案管理員 19
十九畫
關閉 4
二十畫
觸控式螢幕 2
ZHTW
索引
37
Page 84

Page 85

목차
1 소개
2 기본 작업
KO
설명서 사용 방법 ............................................................................ 1
스캐너 소프트웨어 .......................................................................... 2
스캐너 .......................................................................................... 3
설명서 및 도움말 ............................................................................ 3
스캐너 켜기 및 끄기 ........................................................................ 4
문서 넣기 및 빼기 ........................................................................... 5
스캔용 대상 폴더 설정 ..................................................................... 6
문서 복사 ...................................................................................... 8
파일로 스캔 ................................................................................... 9
배치 스캔 및 배치 복사 ................................................. .................. 10
원본 형식 지정 및 이미지 조정 ......................................................... 11
입력 및 출력 크기 설정 ................................................. .................. 13
복사 및 스캔 미리보기 .................................................. .................. 14
출력 품질 설정 ...................................................... ........................ 16
용지 프로파일 만들기 ................................................... .................. 18
스캔한 파일 보기, 이동하기, 이름 변경하기 또는 삭제하기 .................... 20
시스템 설정 및 옵션 ................................................... .................... 21
3 유지보수
4 문제 해결
KOWW
유리판 및 스캔 영역 청소 ................................................ ................ 24
스캐너 보정 .................................................................................. 26
터치 스크린 포인터 보정 ................................................. ................ 27
스캐너 유리판 교체하기 .................................................. ................ 28
시스템 오류 보고 ..................................................... ...................... 29
용지 걸림이 발생한 경우 ................................................. ................ 29
스캔한 이미지에 줄이 있는 경우 ............................................. .......... 31
스캔한 이미지의 선이 너무 가늘거나 끊어지는 경우 ............................. 32
LAN 의 대상 폴더로 연결할 수 없거나 스캔할 수 없는 경우 ................... 32
전체 이미지가 스캔되지 않고 이미지가 잘리는 경우 ............................. 33
용지 프로파일을 생성할 수 없는 경우 ................................................ 33
색상 일치 결과가 최적이 아닌 경우 ........................................... ........ 34
시스템을 업데이트 또는 복구해야 할 경우 .......................................... 34
Page 86

시스템 소프트웨어 언어가 다른 경우 ................................................. 35
새 시스템 소프트웨어 설치하기 ........................................................ 36
색인 ............................................................................................................. 38
KOWW
Page 87

1
소개
설명서 사용 방법
본 설명서는 다음과 같이 구성되어 있습니다.
1.
소개: 이 장에서는 소프트웨어, 스캐너 및 관련 설명서에 대해 간략하게 소개
합니다.
2.
기본 작업: 이 장을 참조하여 다양한 일반 절차를 수행할 수 있습니다.
3.
유지보수: 이 장을 참조하여 다양한 보정 및 유지보수 절차를 수행할 수 있습
니다.
4.
문제 해결: 이 장을 참조하여 스캔 중에 발생하는 문제를 해결할 수 있습니
다.
5.
색인: 목차 이외에 항목을 빠르게 찾을 수 있도록 도와주는 사전식 색인이 있
습니다.
경고 및 주의
이 설명서에는 프린터를 제대로 사용하고 프린터가 손상되지 않도록 하는 데 도움
을 주는 기호가 사용됩니다. 기호와 함께 표시된 지시사항은 따라야 합니다.
경고! 이 기호가 표시된 지침을 따르지 않을 경우 심각한 부상이나 사망의 원인
이 될 수 있습니다.
주의: 이 기호가 표시된 지침을 따르지 않을 경우 경미한 부상이나 제품 손상의
원인이 될 수 있습니다.
소개
KOWW
설명서 사용 방법
1
Page 88
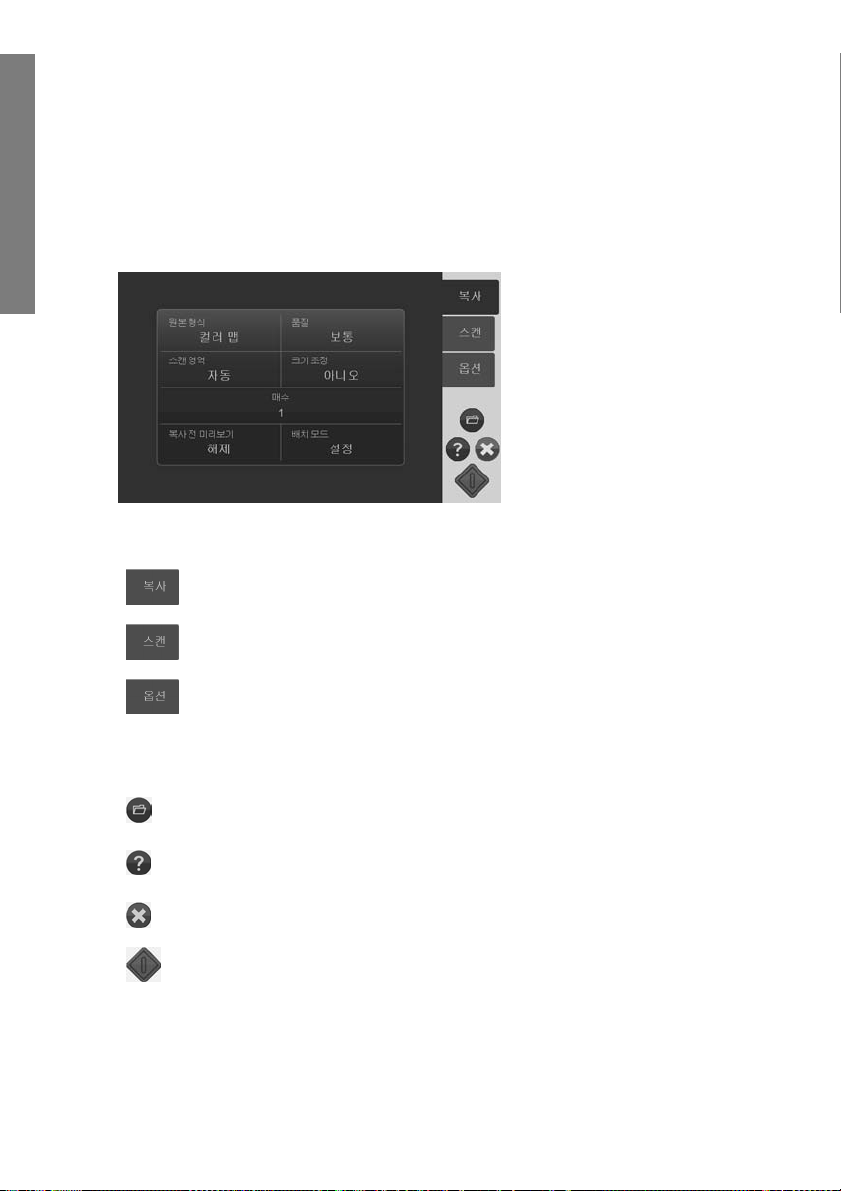
스캐너 소프트웨어
소개
작업 버튼
터치 스크린을 켜면 스캐너 소프트웨어가 자동으로 실행됩니다. 기본 화면은 다음
과 같은 섹션으로 구성됩니다.
●
●
●
주 메뉴 영역
오른쪽 표시줄 상단: 작업 버튼
오른쪽 표시줄 하단: 기능 버튼
이 버튼을 누르면 프로그램에 복사(프린터로 스캔) 작업 모드가 설정됩니다.
이 버튼을 누르면 프로그램에 스캔(파일로 스캔) 작업 모드가 설정됩니다.
이 버튼을 누르면 프로그램 설정 및 기본 설정 메뉴가 나타납니다.
기능 버튼
파일 관리자: 파일 관리자 대화상자를 엽니다.
온라인 도움말: 여러 주제에 대한 자세한 내용을 제공하며, 현재 작업에 관련된 안내를
보여줍니다.
중지: 현재 작업을 취소합니다.
스캔/복사 시작: 선택된 작업 버튼에 따라 복사 또는 스캔을 시작합니다.
21 장 소개 KOWW
Page 89

스캐너
소개
1. 스캐너 덮개
2. 스캔/복사 응용프로그램 터치 스크린
3. 스캐너 덮개를 열기 위한 분리 버튼
4. 스캐너 베드: 용지 공급 영역
5. 문서 공급용 삽입 슬롯
설명서 및 도움말
본
빠른 참조 안내서
온라인 도움말 기능 버튼
션 등 현재 작업에 대한 일반적인 도움말을 표시합니다.
온라인 도움말 창에서 홈 버튼
되는 링크와 함께 목차가 표시됩니다.
대부분의 대화상자에서는 현재 대화상자 및 관련 작업과 연관된 지시사항을 표시
하는 상황 인식 도움말 버튼
6. USB 포트
7. 작업 패널
8. 용지 전진 버튼
9. 용지 후진 버튼
10. 전원 버튼 및 표시등
는 시스템과 소프트웨어에 대해 간략하게 설명합니다.
을 누르면 온라인 도움말 창이 나타나 스캔, 복사, 옵
을 누르면 각 온라인 도움말 섹션과 주제로 연결
을 제공합니다.
KOWW
스캐너
3
Page 90

2
기본 작업
스캐너 켜기 및 끄기
스캐너 작업 패널의 전원 버튼을 눌러 스캐너, 스크린 및 소프트웨어 시스템을 켜
거나 끌 수 있습니다.
주: 프린터에는 전원을 켜고 끄는 버튼이 따로 있습니다. 일반적으로 이 버튼은
항상 켜져 있으며 시스템을 다시 시작하는 데 사용하지 않습니다.
켜기
전원 버튼을 누릅니다. 전원 LED 에 녹색 등이 표시됩니다.
기본 작업
끄기
전원 버튼을 누릅니다. 전원 LED 가 몇 번 깜박인 후 꺼집니다.
다시 시작
전원 버튼을 누르면 시스템이 꺼지고 다시 전원 버튼을 누르면 시스템이 켜집니
다.
42 장 기본 작업 KOWW
Page 91

문서 넣기 및 빼기
문서 넣기
1.
이미지가 있는 쪽을 위로 향하게 하여 문서를 넣습니다. 스캐너 베드 및 그 위
에 있는 중앙 화살표가 문서 가운데 오도록 맞춥니다.
2.
표준 크기 표시를 사용하여 문서를 정렬하면 문서를 똑바르게 스캔할 수 있습
니다.
3.
롤러에 닿을 때까지 원본을 삽입 슬롯에 밀어 넣습니다.
4.
스캐너에서 자동으로 원본을 집어 스캔 시작 지점까지 이동합니다.
문서 빼기
용지 후진 버튼을 누르면 원본이 작업자를 향해 스캐너 공급 베드로 배출됩니
●
다.
기본 작업
KOWW
문서 넣기 및 빼기
5
Page 92

스캐너 뒤쪽으로 원본이 배출되게 하려면 용지 전진 버튼을 누릅니다.
●
스캔용 대상 폴더 설정
아래에 설명된 방법에 따라 파일로 스캔 작업의 결과를 저장할 대상 폴더를 설정
기본 작업
하고 선택할 수 있습니다. 대상 폴더는 LAN 을 통해 시스템에서 인식하는 컴퓨터
의 폴더 또는 터치 스크린에 삽입된 USB 플래시 드라이브 폴더가 될 수 있습니
다.
1.
시스템과 원하는 대상 컴퓨터가 LAN 에 올바르게 설정되어 있어야 합니다.
옵션 > 고급 옵션 > 네트워크 메뉴를 통해 LAN 에 시스템을 구성할 수 있습니
다. 이 시스템 관리자 옵션을 설정하려면 시스템 관리자 암호가 필요할 수 있
습니다.
2.
스캔을 USB 플래시 드라이브에 저장하려면 스캔 버튼을 누르고 터치 스크
린의 USB 포트에 드라이브를 끼웁니다. 시스템에서 드라이브를 인식하면 대
상 폴더를 USB 로 설정 또는 변경할 것인지 확인하는 메시지가 표시됩니다.
3.
대상 설정 옵션에 액세스하려면 옵션 > 고급 옵션 > 대상 관리를 누릅니다. 그
런 다음 대상 폴더를 선택, 추가 및 변경할 수 있습니다.
62 장 기본 작업 KOWW
Page 93

대상 폴더 선택
이전에 생성되어 시스템에 저장된 대상 폴더 목록에서 대상 폴더를 선택합니다. 이
목록에 사용할 수 있는 대상 폴더가 없거나 목록에 없는 대상 폴더를 사용하려면
새 대상 폴더를 추가합니다. 삽입된 USB 플래시 드라이브로 스캔하려면 USB 대
상을 누릅니다.
새 대상 폴더 추가
추가 버튼을 눌러 대상 폴더 정보를 입력합니다. 레이블, 네트워크 경로, 도메인,
사용자 이름 및 암호 필드에 값을 입력합니다. 대상 폴더 암호를 시스템에 저장하
려면 기억을 선택합니다. 대상 폴더에 연결하려는 사용자가 암호를 입력하게 하
려면 기억을 선택하지 않습니다. 연결 테스트를 눌러 설정을 확인합니다.
대상 폴더 변경(수정)
변경 버튼을 눌러 레이블, 네트워크 경로, 도메인, 사용자 이름 및 암호 필드를 수
정합니다. 대상 폴더 암호를 시스템에 저장하려면 기억을 선택합니다. 대상 폴더에
연결하려는 사용자가 암호를 입력하게 하려면 기억을 선택하지 않습니다. 연결 테
스트를 눌러 설정을 확인합니다.
대상 폴더 제거
대상 폴더 목록에서 폴더를 선택하고 제거 버튼을 누릅니다.
기본 작업
KOWW
스캔용 대상 폴더 설정
7
Page 94

문서 복사
기본 작업
다음 단계에 따라 복사(프린터로 스캔)를 합니다.
1. 스캔하려는 면이 위로 향하게 하여 스캐너에 문서를 넣습니다.
2.
프린터가 켜져 있고 원하는 용지가 공급되어 있는지 확인합니다.
주: 복사하려면 공급된 용지의 용지 프로파일이 설정되어 있어야 합니다. 시
스템에 가장 일반적으로 사용되는 용지 프로파일이 함께 제공됩니다. 용지 프
로파일을 새로 만들어야 하는 경우
조하십시오.
3.
복사 버튼을 누르면 복사(프린터로 스캔) 설정 및 버튼에 액세스할 수 있습니
다. 복사 대화상자는 다음과 같습니다.
4. 원본 형식 버튼을 눌러 문서와 원하는 출력에 알맞은 형식을 선택합니다.
11페이지의 원본 형식 지정 및 이미지 조정을 참조하십시오.
5. 품질 버튼을 눌러 원하는 출력 품질을 선택합니다.
6.
스캔 영역 버튼을 눌러 이미지 캡처 영역의 크기를 설정합니다. 전체 이미지
를 캡처하려는 경우 자동을 선택하면 시스템에서 이미지를 측정해 크기를 설
정합니다.
7.
크기 조정 버튼을 눌러 인쇄 사본의 크기를 정합니다. 1:1 복사를 하려면 아니
요를 선택합니다.
8.
매수 버튼을 눌러 인쇄할 사본의 수를 선택합니다.
9.
프린터로 작업을 전송하기 전에 설정을 제어하려면 복사 전 미리보기 버튼을
눌러 설정 상태로 만듭니다.
시오.
10.
설정을 선택한 후 스캔/복사 시작 버튼
18페이지의 용지 프로파일 만들기를 참
14페이지의 복사 및 스캔 미리보기를 참조하십
을 누르면 복사가 시작됩니다.
82 장 기본 작업 KOWW
Page 95

다음을 참조하십시오.
15페이지의 이미지 조정 설정 및 미리보기
●
13페이지의 입력 및 출력 크기 설정
●
16페이지의 출력 품질 설정
●
파일로 스캔
다음 단계에 따라 파일로 스캔합니다.
1.
스캔하려는 면이 위로 향하게 하여 스캐너에 문서를 넣습니다.
2.
스캔 버튼을 누르면 파일로 스캔 작업의 설정 및 버튼에 액세스할 수 있습니
다. 스캔 대화상자는 다음과 같습니다.
3.
원본 형식 버튼을 눌러 문서에 알맞은 형식을 선택합니다.
형식 지정 및 이미지 조정을 참조하십시오.
4.
품질 버튼을 눌러 스캔 해상도를 선택합니다.
5. 스캔 영역 버튼을 눌러 이미지 캡처 영역의 크기를 설정합니다. 전체 이미지
를 캡처하려는 경우 자동을 선택하면 시스템에서 이미지를 측정해 크기를 설
정합니다.
6.
파일 형식 버튼을 눌러 JPG, TIFF 등의 파일 형식을 정합니다.
7.
파일 이름 버튼을 눌러 대상 파일의 이름을 입력합니다.
8.
대상 버튼을 누르면 스캔 출력 파일이 저장될 위치를 알 수 있습니다. 다른 대
상을 선택하려면 대상 버튼을 누릅니다.
9.
파일로 저장하기 전에 설정을 제어하려면 스캔 전 미리보기 버튼을 눌러 설
정 상태로 만듭니다.
10.
설정을 선택한 후 스캔/복사 시작 버튼
다음을 참조하십시오.
15페이지의 이미지 조정 설정 및 미리보기
●
13페이지의 입력 및 출력 크기 설정
●
기본 작업
11페이지의 원본
14페이지의 복사 및 스캔 미리보기를 참조하십시오.
을 누르면 스캔이 시작됩니다.
KOWW
파일로 스캔
9
Page 96
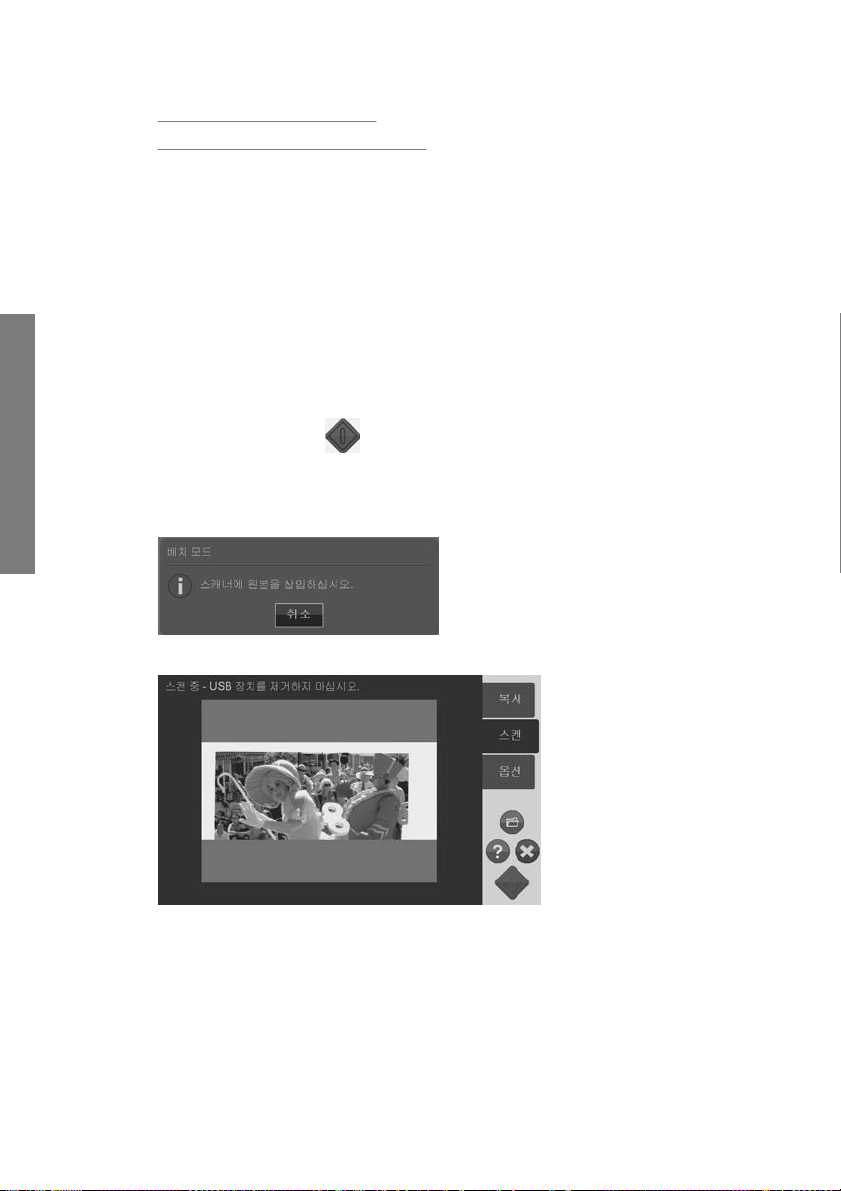
16페이지의 출력 품질 설정
●
6페이지의 스캔용 대상 폴더 설정
●
배치 스캔 및 배치 복사
배치 스캔과 배치 복사를 사용하면 스캐너에 지속적으로 새 원본을 공급할 수 있
으며 스캔/복사 시작 버튼을 누르지 않아도 시스템에서 바로 작업을 처리합니다.
이때 시스템은 모든 문서에 현재 설정을 적용합니다. 파일로 스캔할 때 파일 이름
은 자동으로 번호가 하나씩 증가하여 지정됩니다.
1.
스캔하려는 면이 위로 향하게 하여 작업하기 쉽게 원본을 스캐너 가까이 둡니
다.
2.
스캔 또는 복사 설정을 선택합니다. 이 설정은 배치로 작업하는 모든 원본에
적용됩니다.
3.
기본 작업
배치 모드 버튼을 눌러 배치 모드를 설정으로 전환합니다.
4.
스캔/복사 시작 버튼
5.
스캐너에 첫 번째 원본을 이미 공급한 경우 시스템에서 스캔 또는 복사를 시
작합니다. 그렇지 않은 경우 배치 모드 대화상자가 나타나 첫 번째 원본을 스
캐너에 넣도록 요청합니다.
6. 첫 번째 원본을 넣는 즉시 시스템에서 스캔을 시작합니다.
을 누릅니다.
10 2 장 기본 작업 KOWW
Page 97
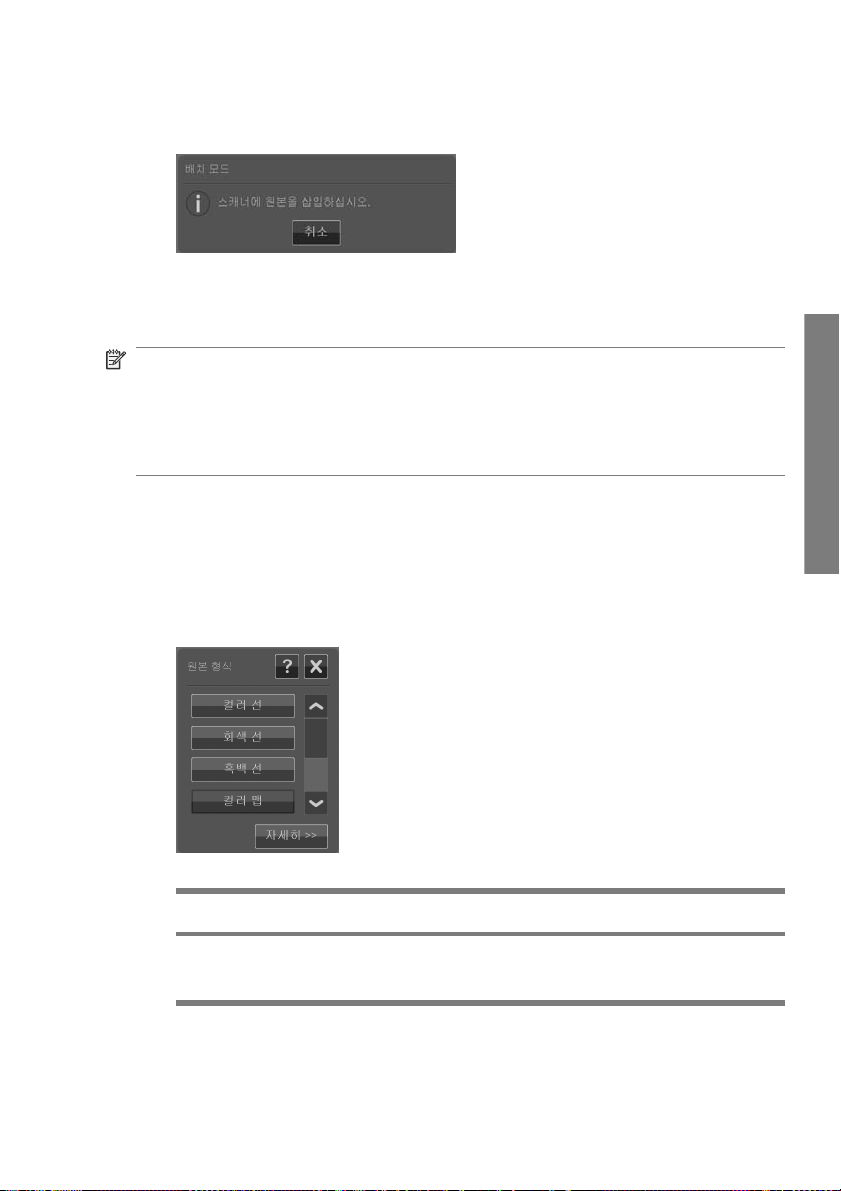
7.
스캔이 끝난 원본은 자동으로 배출되며, 배치 모드 대화상자가 나타나 다음
원본을 요청합니다.
8.
배출된 원본을 제거하고 다음 원본을 공급합니다.
9.
배치 작업이 끝날 때까지 원본을 계속 공급합니다.
10.
배치 모드 대화상자의 취소 버튼을 누르면 배치 모드가 중지됩니다.
주: 배치 모드에서는 미리보기를 사용할 수 없습니다.
주: 배치 모드에서는 빠른 공급을 위해 스캔이 끝난 각각의 원본은 자동으로 배
출되며, 옵션 > 기본 옵션 > 스캔 후 되감기의 설정에 따라 배출 방향이 결정됩니
다. 이 옵션을 선택하면 스캔된 원본이 앞쪽으로 배출되고 선택하지 않으면 뒤쪽
으로 배출됩니다.
원본 형식 지정 및 이미지 조정
원본 형식을 선택할 때 기본 캡처 매개변수가 설정됩니다. 이때 이미지 밝기, 선명
도, 배경 정리 수준과 같은 특정 요소를 조정할 수 있습니다. 선택된 원본 형식에
따라 조정할 수 있는 요소도 달라집니다.
1. 스캔 또는 복사 버튼을 누른 다음 원본 형식 버튼을 누르면 원본 형식 선택 목
록에 액세스할 수 있습니다.
기본 작업
KOWW
2.
원본에 가장 잘 맞는 원본 형식을 선택합니다.
원본 형식 설명
컬러 선 컬러 CAD 도면과 매우 정교한 그래픽에 적합합니다. 이미지 프로세싱을 통
해 배경이 정리되고 선은 더욱 선명해집니다. 24 비트 색상으로 스캔합니다.
원본 형식 지정 및 이미지 조정
11
Page 98
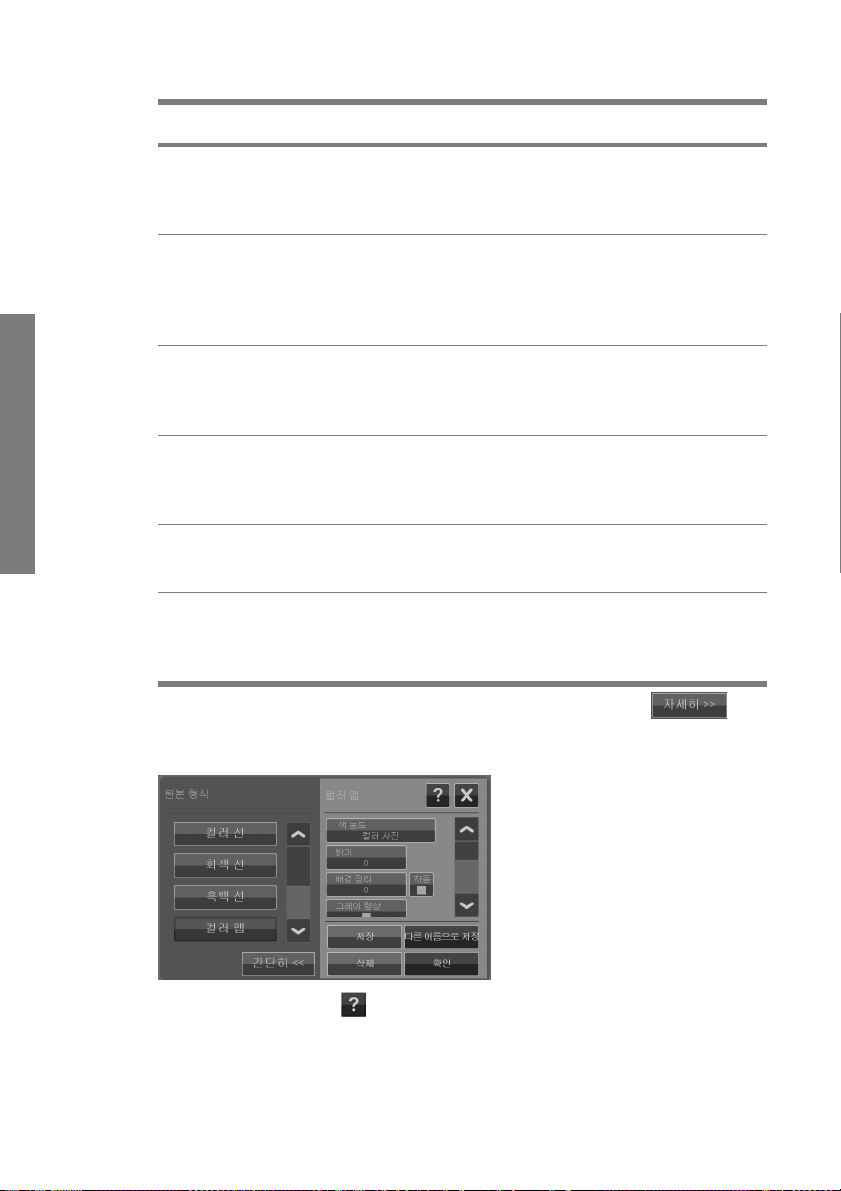
기본 작업
원본 형식 설명
회색 선 그레이스케일 CAD 도면과 매우 정교한 그래픽에 적합합니다. 이미지 프로세
싱을 통해 배경이 정리되고 선은 더욱 선명해집니다. 8 비트 그레이스케일로
스캔합니다.
흑백 선 흑백 CAD 도면과 매우 정교한 그래픽에 적합합니다. 컬러 및 그레이스케일
원본 형식에 비해 파일 크기가 작기 때문에 파일로 스캔하는 작업에 특히 유
용합니다. 원본 그대로 신속하게 스캔할 수 있도록 이미지 프로세싱을 최소
화했으며, 1 비트 흑백으로 스캔합니다.
컬러 맵 지형도, 도로 지도, 기타 지리 정보를 제공하는 정교한 문서 형식의 컬러 지
도에 적합합니다. 이미지 프로세싱을 통해 세부사항이 선명하게 표현됩니
다. 24 비트 색상으로 스캔합니다.
회색 맵 지형도, 도로 지도, 기타 지리 정보를 제공하는 정교한 기타 문서 형식의 그
레이스케일 지도에 적합합니다. 이미지 프로세싱을 통해 세부사항이 선명하
게 표현됩니다. 8 비트 그레이스케일로 스캔합니다.
컬러 포스터 고품질의 컬러 사진과 포스터에 적합합니다. 원본 그대로 신속하게 스캔할 수
있도록 이미지 프로세싱을 최소화했습니다. 24 비트 색상으로 스캔합니다.
이전 도면 전경과 배경 간 대비가 낮으며 오래되어 퇴색되고 구겨진 도면에 적합합니
다. 이미지 프로세싱을 통해 배경이 정리되고 선은 더욱 선명해집니다. 8 비
트 그레이스케일로 스캔합니다.
3.
원본 형식 설정을 세부 조정할 수 있습니다(옵션). 자세히 버튼
을 누
르면 원본 형식 대화상자가 확장되고 선택된 원본 형식 관련 옵션을 조정할
수 있습니다. 조정이 완료되면 확인을 누릅니다.
4.
상황 인식 도움말 버튼
을 누르면 각 설정에 대한 자세한 정보와 새 사용자
지정 원본 형식으로 설정을 저장하는 방법을 확인할 수 있습니다.
12 2 장 기본 작업 KOWW
Page 99
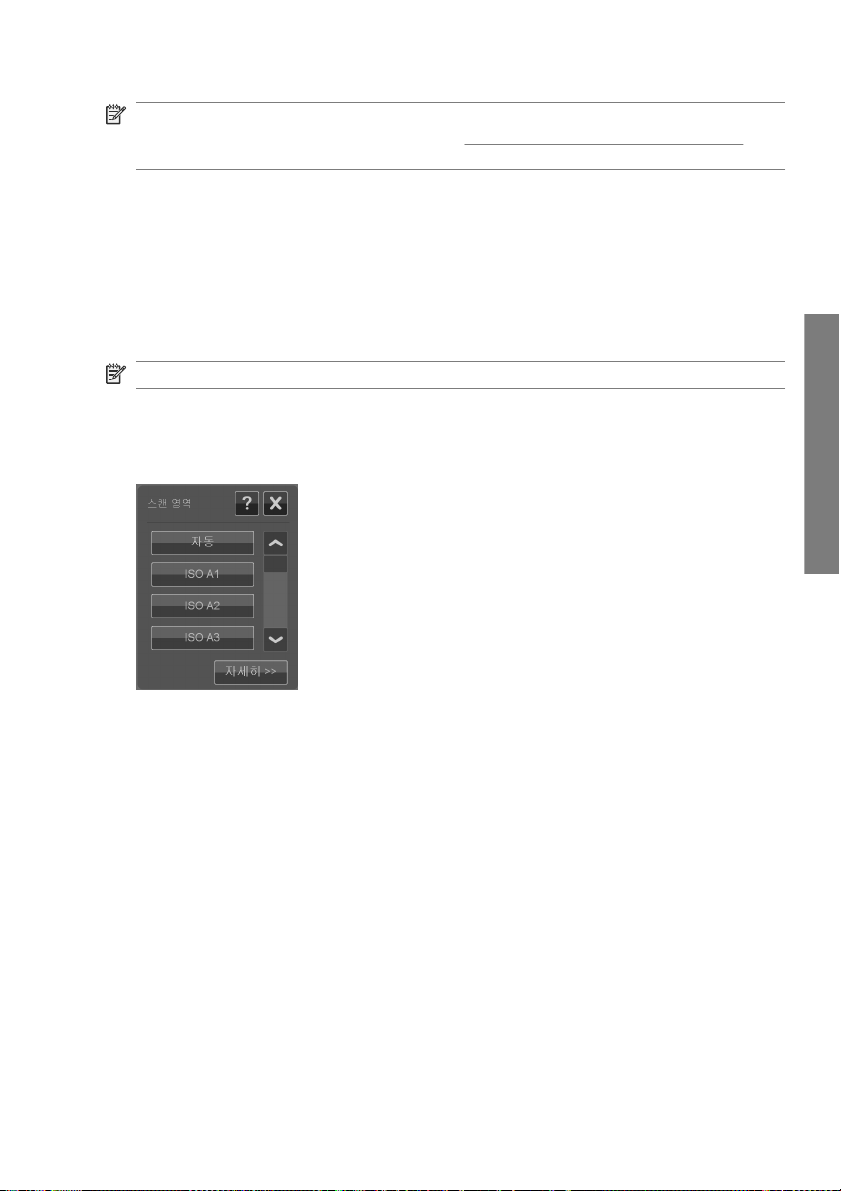
주: 스캔/복사 전 미리보기 버튼과 조정 버튼을 차례로 눌러 이미지를 조정하고
그 효과를 화면으로 확인할 수 있습니다.
참조하십시오.
14페이지의 복사 및 스캔 미리보기를
입력 및 출력 크기 설정
“스캔 영역”은 입력 크기를 말하며 이미지를 얼마나 캡처할 것인지를 지정합니
다. 보통 전체 원본 크기와 동일하게 설정합니다. 그러나 원본의 일부만 스캔하거
나 특정 표준 크기에 맞도록 영역을 캡처하려는 경우도 있을 수 있습니다.
복사 시에도 크기 조정 설정을 통해 출력 크기(인쇄 사본의 이미지 크기)를 지정할
수 있습니다. 현재 스캔 영역 크기를 1:1 로 복사하려면 아니요를 선택합니다. 스캔
영역 크기보다 이미지를 축소 또는 확장하여 인쇄하려면 크기를 변경합니다.
주: 스캔 시 출력 파일의 이미지 크기는 항상 스캔 영역 크기와 동일합니다(1:1).
복사 및 스캔을 위한 스캔 영역(입력 크기) 설정
스캔 또는 복사 화면에서 스캔 영역 버튼을 누르면 스캔 영역 크기 목록이 표시됩
니다.
기본 작업
KOWW
이 목록은 다음과 같이 스캔 영역 크기를 지정하는 데 사용할 수 있는 다양한 방법
을 제공합니다.
자동: 프로그램에서 스캐너에 공급된 문서의 전체 크기를 자동으로 측정합니
●
다. 미리보기를 사용하여 스캐너에서 올바르게 사이즈를 측정했는지 확인할
수 있습니다.
표준 또는 사용자 지정 크기 사용: 대화상자에는 시스템에 저장된 사용자 지
●
정 크기 및 표준 크기가 표시됩니다. 목록을 스크롤하여 사용하려는 크기를
선택합니다. 사용자 지정 크기를 새로 만들려면 아래의 단계를 따르십시오.
입력 및 출력 크기 설정
13
Page 100

●
폭과 길이에 대한 크기 값 설정: 자세히 버튼
상자를 확장합니다. 필드에 폭과 길이를 설정하거나 폭과 길이에 각각 자동을
설정합니다. 변경 사항은 새 사용자 지정 크기로 저장하거나 현재 작업에 대
해서만 사용하도록 할 수 있습니다.
기본 작업
주: 미리보기를 통해 화면으로 보면서 스캔 영역 크기를 설정할 수도 있습니다.
14페이지의 복사 및 스캔 미리보기를 참조하십시오.
복사 전용 크기 조정 값(출력 크기) 설정
1.
크기 조정 버튼을 누릅니다.
2.
이미지 크기를 조정하지 않으려면 아니요를 선택합니다. 이 경우 스캔 영역과
동일한 크기로 출력됩니다.
3.
크기 버튼을 눌러 목록에서 A2, A4 등의 표준 크기를 선택합니다.
4.
배율을 선택하여 50%, 32% 등의 배율에 맞춰 크기를 조정할 수 있습니다.
복사 및 스캔 미리보기
프린터 또는 파일 시스템에 전송하기 전에 복사 및 스캔 결과를 미리볼 수 있습니
다. 미리보기를 통해 다음과 같은 작업을 수행할 수 있습니다.
선택한 원본 형식과 관련된 밝기, 선명도 등 이미지를 조정하여 그 효과를 화
●
면으로 확인할 수 있습니다.
핸들을 사용하여 이미지에 스캔 영역 프레임을 끌어다 놓아 눈으로 확인하면
●
서 스캔 영역(입력 크기)을 설정할 수 있습니다.
특정 이미지 영역과 설정에 따른 효과를 확인하기 위해 확대 및 축소를 할 수
●
있습니다.
스캔 또는 복사 미리보기 실행
1.
원본을 공급한 후 스캔/복사 전 미리보기 버튼을 눌러 미리보기 모드를 설정
으로 전환합니다.
2.
스캔 또는 복사 버튼을 눌러 미리보기를 실행합니다.
3.
언제든지 취소 버튼
을 눌러 스캔 영역 대화
을 눌러 미리보기를 닫을 수 있습니다.
14 2 장 기본 작업 KOWW
 Loading...