

Page 1

quickref.book Page i Friday, January 25, 2002 3:02 PM
quick reference
guide
hp designjet copier
cc800ps
Page 2

frontref.fm Page ii Monday, February 25, 2002 4:11 PM
Your hp designjet copier cc800ps
The HP Designjet Copier system delivers large-format color copies and is as simple to use as a conventional office copy machine. The components of the system
are:
■ hp designjet copier cc800ps
■ hp designjet 800ps printer
■ hp designjet copier software
Where to find information...
By pressing the Online help button in your HP Designjet Copier software, you
can get online help while using the copier.
If you wish to view this information on your PC, you can view the online help
files on the ‘Using your copier’ CD.
There is also more information available from the following sources:
■ The Copier Setup Instructions that came with the system.
■ The documentation that came with your Printer (Setup instructions, the CD
and Reference Guide).
■ HP Designjet Online: www.designjet.hp.com.
ii hp designjet copier cc800ps
Page 3

frontref.fm Page iii Monday, February 25, 2002 4:11 PM
Contents
Using your copier software ....................................1
Making Copies (overview) ......................................3
Copying (step-by-step) ...........................................5
Scan to file ..........................................................10
Printing from files ................................................12
Collated copies - copy sets ...................................14
Scanning thick media ...........................................15
Previewing copies ................................................18
System Recovery ..................................................21
hp designjet copier cc800ps iii
Page 4

frontref.fm Page iv Monday, February 25, 2002 4:11 PM
iv hp designjet copier cc800ps
Page 5

quickref.fm Page 1 Monday, February 25, 2002 4:09 PM
Using your copier software
Using your copier software
The user interface can be divided into two main sections:
■ The Viewing Section on the left.
■ The Control Section on the right.
Viewing section
image toolbar preview window
Control section
online help scan to file collate copies preview reset stop copy
Copy toolbar
The Control section consists of the following control tabs:
■ Copy - Primary copy settings. The options available in the
Copy Tab will be sufficient for most users and common
copy tasks.
hp designjet copier cc800ps 1
Page 6

quickref.fm Page 2 Monday, February 25, 2002 4:09 PM
■ Output - Secondary copy settings that mainly have to do
with the printer, the printing media, layout and accounting.
■ List - Selecting saved image files for batch or singular
printing.
■ Setup - copier and system preferences such as calibration,
user interface, units of measurement (mm, inches), loading, etc.
The viewing section consists of:
■ The Image toolbar at the top with tools for moving the
image, moving and resizing the Paper Frame, alignment
and zooming tools.
■ The Preview Window for on-screen previewing and adjust-
ing of expected results.
The Copy toolbar contains the main copy commands and the
help button for online help.
Using your copier software
Entering numbers and names
A text keyboard and a value keyboard appear in the touchscreen interface whenever written information is required to set
the option.
The return key accepts your setting and returns to the previous
dialog.
2 hp designjet copier cc800ps
Page 7

quickref.fm Page 3 Monday, February 25, 2002 4:09 PM
Making Copies (overview)
Making Copies (overview)
With your system up and ready, wide format color copying is
easy and most copy tasks will require only a few settings.
Remember to set your printer media width in your copy system
software (see ‘How do I setup the printer media width’ in your
online help).
Copying is controlled through the Copy tab and involves the
following steps:
a - Insert the original into the scanner.
b - Select Color or B&W (black and white) copying.
c - Select your Type of original template.
d - Set the Input size. Usually this will be equal to the size
of your original. You can let the scanner detect the
document's size.
hp designjet copier cc800ps 3
Page 8

quickref.fm Page 4 Monday, February 25, 2002 4:09 PM
e - Set the intended Output size of your copy. For making
one-to-one copies, this will be the size of your original.
You can also use Scale to determine the copy’s size.
f - Press the Copy button.
To preview the image before printing, press the Preview button
to load a preview of your copy.
You can use the Stop button to abort the current
copy process.
You can also use it to cancel a preview of an image file while it
is being loaded.
Making Copies (overview)
4 hp designjet copier cc800ps
Page 9
quickref.fm Page 5 Monday, February 25, 2002 4:09 PM
Copying (step-by-step)
Copying (step-by-step)
1. Inser ting your Do cumen t
You can load your original into the scanner from the scanner’s center or side. See the current loading method in the
Setup Tab -> Load.
a - Place the document with the intended top edge for-
ward in the scanner insertion slot.
b - Slide the document gently into the insertion slot until
you feel it pulled into the start position.
2. Select Color or Black and White Copying
Your selection determines which Type of original templates
will be available in the following step.
3. Selecting the Type of Original template
a - Press the Type of original button in the Copy tab.
hp designjet copier cc800ps 5
Page 10

quickref.fm Page 6 Monday, February 25, 2002 4:09 PM
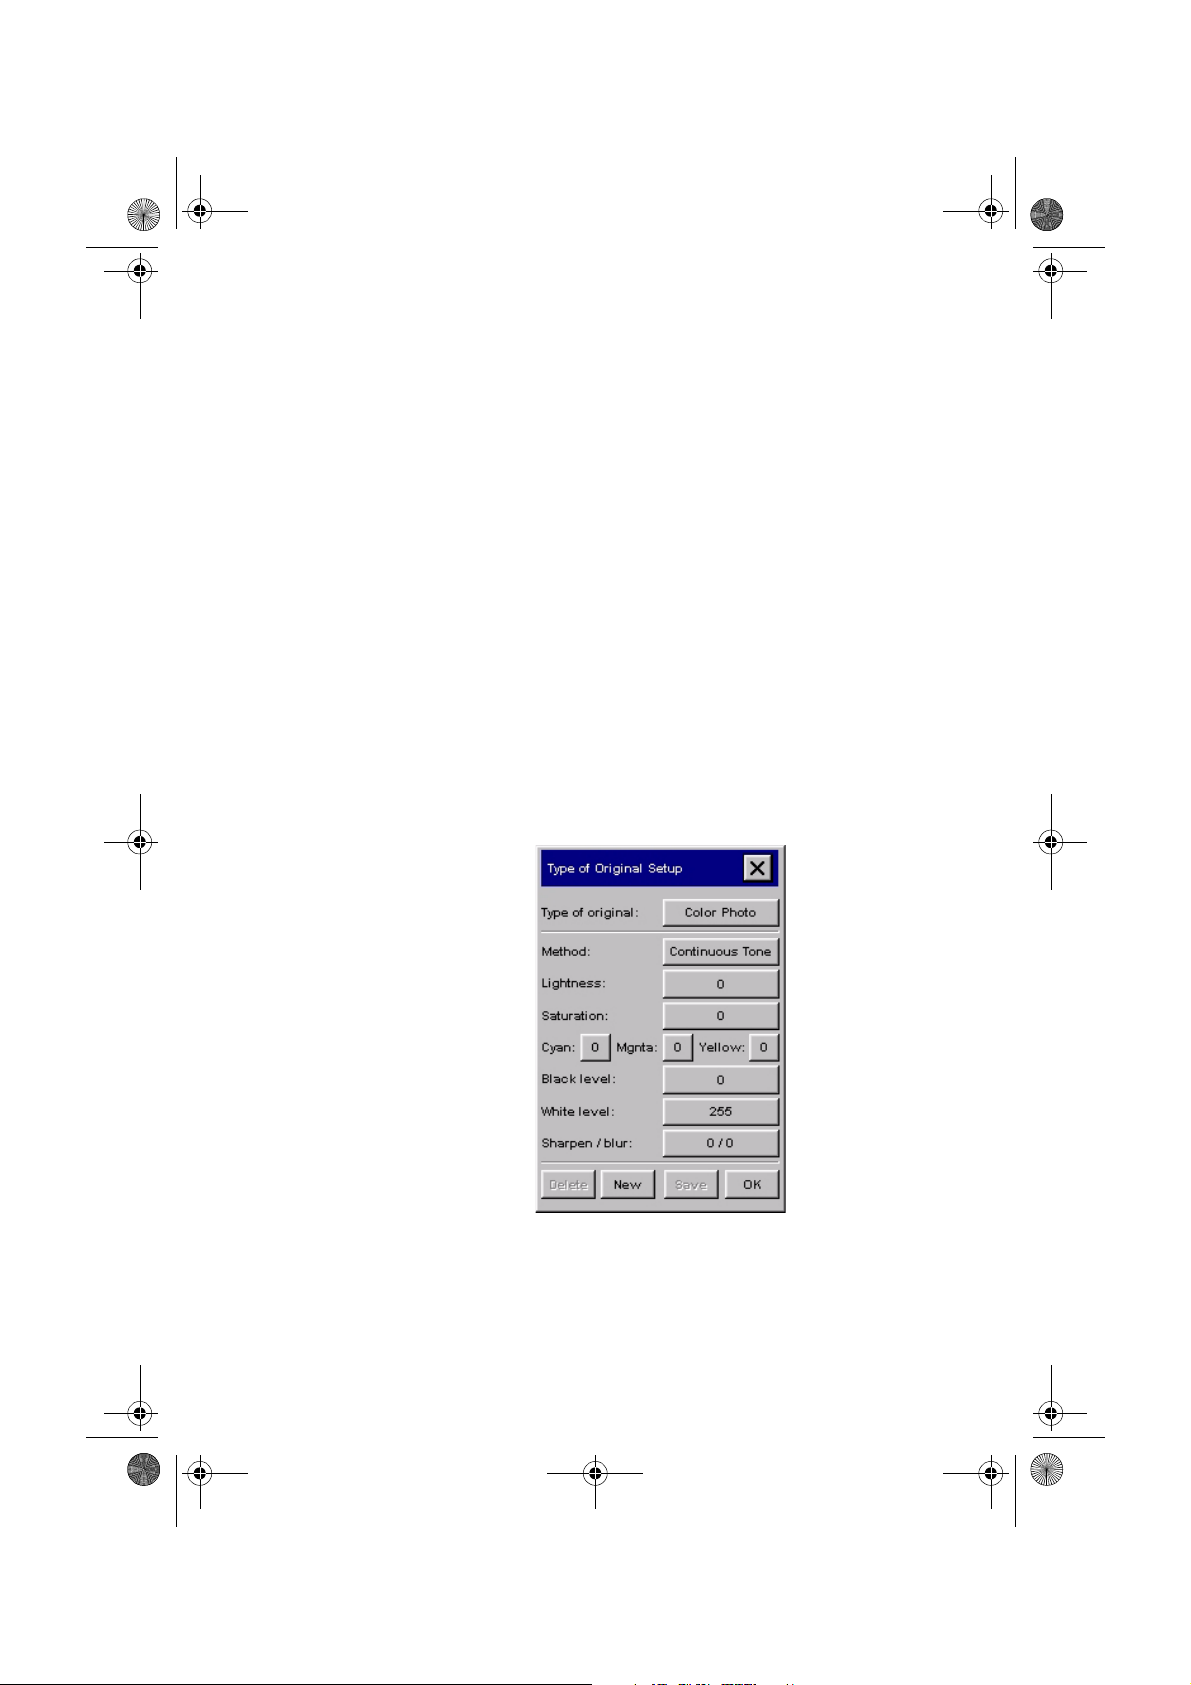
b - In the Type of Original (template) Setup dialog, press
the Type of original button to see the list of templates
available.
c - Select a Type of Original template that best describes
your current input.
Copying (step-by-step)
d - Press OK to apply your choice.
4. Selecting the Input size
a - Press the Input size button in the Copy tab.
6 hp designjet copier cc800ps
Page 11

quickref.fm Page 7 Monday, February 25, 2002 4:09 PM
Copying (step-by-step)
b - In the dialog box, press the Input size button to display
the list of sizes predefined in your system.
c - Select from the list the size that fits your original. Auto
detection of width and length can be also selected.
d - Press OK to return to the Copy tab.
hp designjet copier cc800ps 7
Page 12

quickref.fm Page 8 Monday, February 25, 2002 4:09 PM
5. Selecting the Output size
a - Press the Output size button in the Copy tab.
Copying (step-by-step)
b - In the Output size Setup dialog, press the Output size
button. Auto detection of width and length can be also
selected.
c - Select from the list the size you want for your output
copy.
d - Press OK to return to the Copy tab.
8 hp designjet copier cc800ps
Page 13

quickref.fm Page 9 Monday, February 25, 2002 4:09 PM
Copying (step-by-step)
6. Set the Number of Copies
a - Press the Copies option if you want to make more than
one copy of the loaded original.
b - Enter the number of copies in the edit field. This option
allows you to leave the system working unattended.
7. St ar t C op yi ng
The Copy button starts the copy process with the
settings you made.
You can use the Stop button to abort the current
copy process. You can also use it to cancel a preview of an
image file while it is being loaded.
Press the Reset button to clear your own settings
and reset the application to all of the copier software’s default
values.
hp designjet copier cc800ps 9
Page 14

quickref.fm Page 10 Monday, February 25, 2002 4:09 PM
Scan to file
Scan to file stores your copies as files. You can send them to
the printer using the print from file function.
a - Make your copy settings - Type of original, input and
output size, etc. Output settings such as Margins, Layout, Media Profile, etc. can be made later when you
print from the file.
b - Press the Scan to file button to open the scan
to file dialog.
Scan to file
The default name is the current date and time.
Press the File Name button to enter a new name.
You can change the destination folder by pressing the
Change button.
10 hp designjet copier cc800ps
Page 15

quickref.fm Page 11 Monday, February 25, 2002 4:09 PM
Scan to file
c - To change folder:
■ use the arrows to find the desired folder.
■ use folder up button (marked "..") to move you up a direc-
tory level.
■ press a folder name to access a directory.
■ create a new folder in the current directory with the New
Folder button.
d - Click OK to return to the Scan to file dialog.
e - Press the Scan button to start the scan-
to-file process and save the image.
NOTE Each file will be saved with the Copy tab settings that
applied when you pressed the Scan to file button.
hp designjet copier cc800ps 11
Page 16

quickref.fm Page 12 Monday, February 25, 2002 4:09 PM
Printing from files
Printing your files is setup and controlled through a convenient
Print List. You can set the number of copies you want output by
defining the number for each file individually, by determining
the number of sets (how many times the whole list will be
printed) or by using a combination of both.
a - Press the List tab.
Printing from files
Whenever you enter the List dialog, the copy button
changes to the Print button.
The Print list group displays the files currently selected for
printing. If the list is empty or it needs changing, then you
will have to select files by pressing the Add to List button.
b - Check or change your current Output tab settings. The
current Output tab settings such as Margins, Layout,
12 hp designjet copier cc800ps
Page 17

quickref.fm Page 13 Monday, February 25, 2002 4:09 PM
Printing from files
Printer and Media Profile will apply to the whole print
job.
c - Press the Print button to send the listed files
to the printer.
NOTE Print from file functionality is designed specifically for
printing files created with the Scan to file feature and is
not recommended for outputting files from other
sources.
hp designjet copier cc800ps 13
Page 18

quickref.fm Page 14 Monday, February 25, 2002 4:09 PM
Collated copies - copy sets
You can group your copies into sets that are stored before
going to the printer, and then output a selected number of
these sets on your printer.
a - Insert the first document of your set into the scanner.
b - Make your copy settings in the Copy tab dialog.
c - Press the Collate Copy button.
The original will then be copied as normal, but it will be
stored inside your system instead of going to the printer.
Continue inserting originals that belong to the set and
press the Collate Copy button for each one until all the
originals in the set have been scanned.
Collated copies - copy sets
You can adjust each copy in the set just like you can with
single document copying.
d - Set the number of sets by pressing the Copies button in
the Copy tab. A set contains all the input originals.
e - Press the Collate Print button to activate the
whole copy job.
Abort the Collate session any time by pressing the Reset button.
TIP For jobs that require a high level of control and flexibility, use
the Scan to file button and List tab to create and
print your copy sets.
14 hp designjet copier cc800ps
Page 19

quickref.fm Page 15 Monday, February 25, 2002 4:09 PM
Scanning thick media
Scanning thick media
NOTE To scan thick media you may need to change the inser-
tion slot height and this can affect the copier’s automatic
control of border lines between the cameras – called
Stitching.
To scan thick media, you can change the insertion slot height
on your copier from 0 to 15 mm (0 to .6"). You can fit the slot
to the thickness of your original.
To scan thick originals:
a - Open the copier cover.
b - Press down on the platen as you pull first one slider,
and then the other (left and right), towards the copier’s
center until the media thickness adjustment sliders
found at each side are the same setting.
hp designjet copier cc800ps 15
Page 20

quickref.fm Page 16 Monday, February 25, 2002 4:09 PM
c - Close the copier cover.
d - Load the thick original you wish to scan. Center load-
ing is recommended with thick originals as the media
transport rollers grip more evenly.
e - Make a test scan to check for errors. Bulky thick media
needs to be supported with both hands on its way in
and out of the scanner.
Scanning thick media
Errors will be easier to see in an image with a clear diagonal line. If lines seem uneven, do the following:
f - In the setup tab, select the Scanner button.
g - In the scanner setup dialog, select the scanner setup
button.
16 hp designjet copier cc800ps
Page 21

quickref.fm Page 17 Monday, February 25, 2002 4:09 PM
Scanning thick media
h - Check the box labeled Adjust for extended media
thickness.
i - Change the value for each of the scanner’s cameras.
Normally, only positive values should be used.
j - Make test scans and readjust the values until you are
satisfied that the lines are stitched correctly.
k - Click OK to accept your settings.
l - Repeat steps (d) to (h) until you are satisfied with the
results.
To return the insertion slot height to its Normal position:
a - Press down on the platen as you push first one slider
and then the other (left and right) towards the sides of
the copier.
b - When the platen is returned to its Normal position, the
message Paper Guide in Extended Position will be
replaced by the Load option: Center or Side.
hp designjet copier cc800ps 17
Page 22

quickref.fm Page 18 Monday, February 25, 2002 4:09 PM
Previewing copies
The previewing feature allows you to visually control your document size and margins on the final output and readjust or relocate the Paper Frame on the image. Its size is determined by
the size settings made in the Copy Tab dialog. The Paper
Frame’s size and thickness in the Preview Window will be
determined by the Input Size, Output Size and Margins settings.
Press the Preview button to load a fresh Preview.
Zoom All
Setting size and margins, you need a view of the whole image.
Resize the image so that it exactly fits in the Preview Window.
Previewing copies
Zoom In
Zoom in axis is in the center of the Preview Window. Continue
to press the Zoom In button to the required level of detail.
Zoom Out
Zoom out axis is in the center of the Preview Window. Continue to press the Zoom In button to the required level of detail
One to One pixel viewing
View the image with one scanned pixel shown as one screen
pixel.
Resize Paper Frame
The Resize Paper Frame tool is especially interesting for copying non-standard paper sizes.
18 hp designjet copier cc800ps
Page 23

quickref.fm Page 19 Monday, February 25, 2002 4:09 PM
Previewing copies
When activated, the Resize Paper Frame Tool partitions the
areas around the Paper Frame into sections. When a section is
touched, the closest frame side or corner is resized to the new
position.
Move Tool
Move the image to get any part of it centered or visible in the
Preview Window.
There are two ways to move the image:
■ By dragging anywhere in the image window.
■ Centering by touch a point on the screen and that point will
then be centered in the preview window.
Position the Paper Frame
You can position the Paper Frame directly in the preview and
visually set your copy area.
There are two ways to move the frame:
■ By dragging anywhere on the screen. Imagine you are
gripping hold of the frame and dragging it around over the
image.
■ Centering by touching a point on the screen and that point
becomes the new center for the Paper Frame.
This method is especially useful when you are making spot
test strips for outputting on the printer. It lets you continuously
hp designjet copier cc800ps 19
Page 24

quickref.fm Page 20 Monday, February 25, 2002 4:09 PM
and rapidly reposition the frame on important areas that you
want tested.
■ Dragging the edges will resize the paper frame and is an
alternative to the Resize Paper Frame tool.
Align left - Align right
The original appears crooked in the Preview Window. You do
not need to reload the original. Click the align buttons to align
the image with the paper frame.
Previewing copies
20 hp designjet copier cc800ps
Page 25

quickref.fm Page 21 Monday, February 25, 2002 4:09 PM
System Recovery
System Recovery
You need the ’System Recovery’ CD that came with your
copier system.
If your copy system software does not start up when you turn
on the touch screen, you need to re-install the copier system
software.
WARNING This procedure will automatically erase all the data on
your hard disk.
a - With the system ON, insert the System Recovery CD in
the CD-ROM drive.
b - Power OFF the touch-screen and then power it ON
again.
Once recovery has started, it is automatic. Ignore any
menus. Remember to remove the CD when recovery is finished.
c - Power OFF the touch-screen and then power it ON
again.
hp designjet copier cc800ps 21
Page 26

quickref.fm Page 22 Monday, February 25, 2002 4:09 PM
22 hp designjet copier cc800ps
Page 27

quickref.book Page 1 Friday, January 25, 2002 3:02 PM
Page 28

quickref.book Page 2 Friday, January 25, 2002 3:02 PM
©
Copyright Hewlett-Packard Company 2002
Manual Part Number: Q1262-9003 1
First Edition
Printed in Europe
 Loading...