


Hotpoint HTX24GASK0WW, HTX24GASK0WS, HTX24EASK0WW, HTX24EASK0WS, HTX21PASK0WW Owner’s Manual
...Dryers
Printed in Mexico
Safety Instructions. . . . . . . . 2–3
Operating Instructions . . . 4-5
Control Panel . . . . . . . . . . . . . . . . . . . . 4
Dryer Features . . . . . . . . . . . . . . . . . . . 6
Loading and Using the Dryer. . . . . . 6
Venting the Dryer . . . . . . . . . . . . . . . . 8
Care and Cleaning . . . . . . . . . . . 7
Troubleshooting Tips . . . . 9-10
Consumer Support
Consumer Support . . . . . . . . . . . . . . 12
Warranty . . . . . . . . . . . . . . . . . . . . . . . 11
Write the model and serial number here:
Model # __________________
Serial # ___________________
You can find them on a label on the front of the dryer behind the door.
Owner’s Manual
234D2431P003
49-90550-1 03-16 GE
IMPORTANT SAFETY INFORMATION.
READ ALL INSTRUCTIONS BEFORE USING.
This is the safety alert symbol. This symbol alerts you to potential hazards that can kill you or hurt you and others. All safety messages will follow the safety alert symbol and the word “DANGER”, “WARNING”, or “CAUTION”. These words are defined as:
DANGER |
Indicates a hazardous situation which, if not avoided, will result in death or serious injury. |
WARNING |
Indicates a hazardous situation which, if not avoided, could result in death or serious injury. |
CAUTION |
Indicates a hazardous situation which, if not avoided, could result in minor or moderate injury. |
IMPORTANT SAFETY INSTRUCTIONS
WARNING |
To reduce the risk of fire, explosion, electric shock, or injury to persons when using your appliance, follow basic |
precautions, including the following: |
Read all instructions before using the appliance.
DO NOT dry articles that have been previously cleaned in, washed in, soaked in or spotted with gasoline, dry-cleaning solvents, or other flammable or explosive substances, as they give off vapors that could ignite or explode.
DO NOT place items exposed to cooking oils in your dryer. Items contaminated with cooking oils may contribute to a chemical reaction that could cause a load to catch fire.
DO NOT allow children to play on or in this appliance. Close supervision of children is necessary when this appliance is used near children. Before the appliance is removed from service or discarded, remove the door to the drying compartment.
DO NOT reach into the appliance if the drum is moving.
DO NOT install or store this appliance where it will be exposed to the weather.
DO NOT tamper with controls, repair or replace any part of this appliance or attempt any servicing unless specifically recommended in the user maintenance instructions or in published user repair instructions that you understand and have the skills to carry out.
DO NOT use fabric softeners or products to eliminate static unless recommended by the manufacturer of the fabric softener or product.
DO NOT use heat to dry articles containing foam rubber or similarly textured rubber-like materials. Clean lint screen before or after each load. DO NOT operate the dryer without the lint filter in place.
Do not store combustible materials, gasoline or other flammable liquids near the dryer. Keep area around the exhaust opening and adjacent surrounding areas free from the accumulation of lint, dust and dirt. Keep dryer area clear and free from items that would obstruct the flow of combustion and ventilation air.
The interior of the appliance and exhaust duct should be cleaned periodically by qualified service personnel.
Unplug the appliance or turn off the circuit breaker before servicing. Pressing the Power or Start/Pause button DOES NOT disconnect power.
DO NOT operate this appliance if it is damaged, malfunctioning, partially disassembled, or has missing or broken parts, including a damaged cord or plug.
DO NOT spray any type of aerosol into, on or near dryer at any time. Do not use any type of spray cleaner when cleaning dryer interior. Hazardous fumes or electrical shock could occur.
See “Electrical Connection” located in the Installation Instructions for grounding instructions.
SAVE THESE INSTRUCTIONS
2

GEAppliances.com
ADDITIONAL GAS DRYER WARNINGS
|
|
For your safety, the information in this manual must be followed to minimize the risk of fire or explosion |
|
WARNING |
|
|
or to prevent damage, personal injury, or death. |
|
|
|
|
-DO NOT store or use gasoline or other flammable vapors and liquids in the vicinity of this or any other appliance.
-WHAT TO DO IF YOU SMELL GAS:
•DO NOT try to light any appliance.
•DO NOT touch any electrical switch; DO NOT use any phone in your building.
•Clear the room, building, or area of any occupants.
•Immediately call your gas supplier from a neighbor’s phone. Follow the gas supplier’s instructions.
•If you cannot reach your gas supplier, call the fire department.
-Installation and service must be performed by a qualified installer, service agency, or the gas supplier.
State of California Proposition 65 Warnings:
The California Safe Drinking Water and Toxic Enforcement Act requires the governor of California to publish a list of substances known to the state to cause cancer, birth defects or other reproductive harm and requires businesses to warn of potential exposure to such substances.
WARNING |
This product contains one or more chemicals known to the State of California to cause cancer, birth defects or |
other reproductive harm. |
Gas appliances can cause low-level exposure to some of these substances, including benzene, carbon monoxide, formaldehyde and soot, caused primarily by the incomplete combustion of natural gas or LP fuels. Exposure to these substances can be minimized by properly venting the dryer to the outdoors.
SAVE THESE INSTRUCTIONS
3

Operating instructions
 WARNING!
To reduce the risk of fire, electric shock, or injury to persons, read the IMPORTANT SAFETY INSTRUCTIONS before operating this appliance.
 WARNING
Explosion Hazard
Keep flammable materials and vapors, such as gasoline, away from dryer.
DO NOT dry anything that has ever had anything flammable on it (even after washing).
Failure to do so can result in death, explosion, or fire.
 WARNING
Fire Hazard
No washer can completely remove oil.
Do not dry anything that has ever had any type of oil on it (including cooking oils).
Items containing foam, rubber, or plastic must be dried on a clothesline or by using an air dry cycle.
Failure to follow these instructions can result in death or fire.
Throughout this manual, features and appearance may vary from your model.
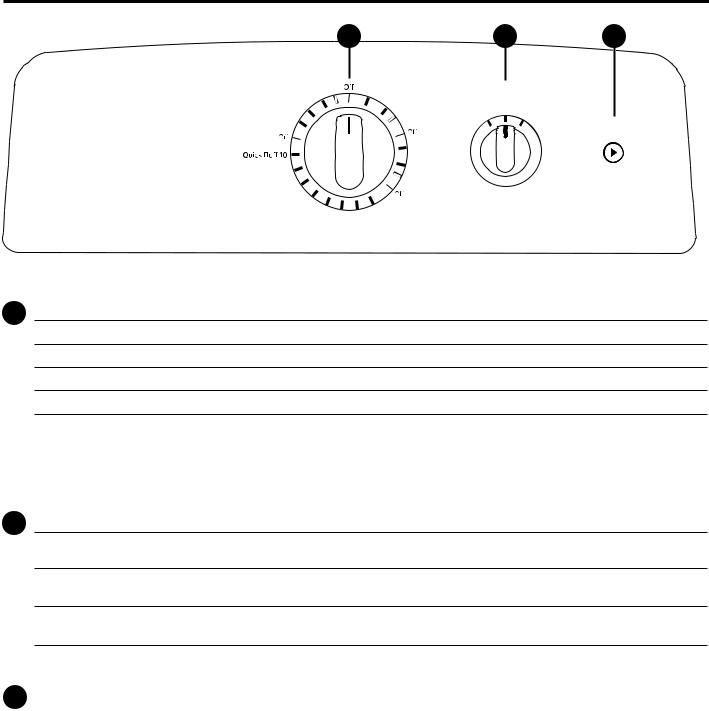
A B C
A B C
4
GEAppliances.com
A B C
Cottons |
Cool Down |
|
|
Casuals |
|
|
More Dry |
||
Less Dry |
|
|
||
|
|
|
||
Optimum Dry |
|
|
Less Dry |
|
|
|
|
||
More Dry |
|
|
|
Cool Down |
|
|
|
|
|
|
|
|
|
More Dry |
20 |
|
|
|
Less Dry |
|
|
|
|
|
|
|
|
|
Cool Down |
30 |
|
|
|
Delicates |
|
|
|
|
|
|
40 |
|
|
|
|
50 |
60 |
70 |
80 Min. |
Time Dry |
|
|||
|
|
|
||
Temperature |
||
|
Casuals |
|
Cottons |
Medium |
Delicates |
|
||
Start
PUSH TO START
End of Cycle Signal
IMPORTANT: Clean the lint filter each time you use the dryer.
A Drying Cycles (Not all features are on all models)
Cottons For cottons and most linens. For most loads, select Optimum Dry (on some models).
Casuals For wrinkle-free, permanent press and delicate items, and knits.
Delicates On some models. For delicate items, special-care fabrics and knits.
Time Dry Set the Cycle Selector at the desired drying time.
Quick Fluff For freshening or fluffing up already dry clothing, fabrics, linens and pillows. Use with Air Fluff No Heat. Provides 10 minutes of no heat tumbling.
Sensor cycles automatically determine fabric dryness. Select Less Dry if you want your clothes slightly damp at the end of the drying cycle. Select More Dry if you want them to feel drier.
Timed cycles run for a selected time.
B Temperature (Not all features are on all models)
Cottons For regular to heavy cottons.
Regular
Casuals For synthetics, blends, delicates and items labeled permanent press.
Medium
Delicates On some models. For delicates, synthetics and items labeled tumble dry low.
Low
Air Fluff On some models. For fluffing items without heat. Use the Time Dry cycle.
No Heat
C Start³&ORVH WKH GU\HU GRRU 6HOHFW Start. Opening the door during operation will stop the dryer. To restart the dryer, close the door and select Start to complete the cycle.
NOTE: Drying times will vary according to the type of heat used (Electric, Natural or LP gas), size of load, types of fabrics, wetness of clothes and condition of exhaust ducts.
5
About loading and using the dryer.
Always follow the fabric manufacturer’s care label when laundering.
Sorting and Loading Hints
As a general rule, if clothes are sorted properly for the washer, they are sorted properly for the dryer.
Do not add fabric softener sheets once the load has become warm. They may cause fabric softener stains. Bounce® Fabric Conditioner Dryer Sheets have been approved for use in all GE Dryers when used in accordance with the manufacturer’s instructions.
Do not overload. This wastes energy and causes wrinkling.
Do not dry the following items: fiberglass items, woolens, rubber-coated items, plastics, items with plastic trim and foam-filled items.
Fabric Care Labels
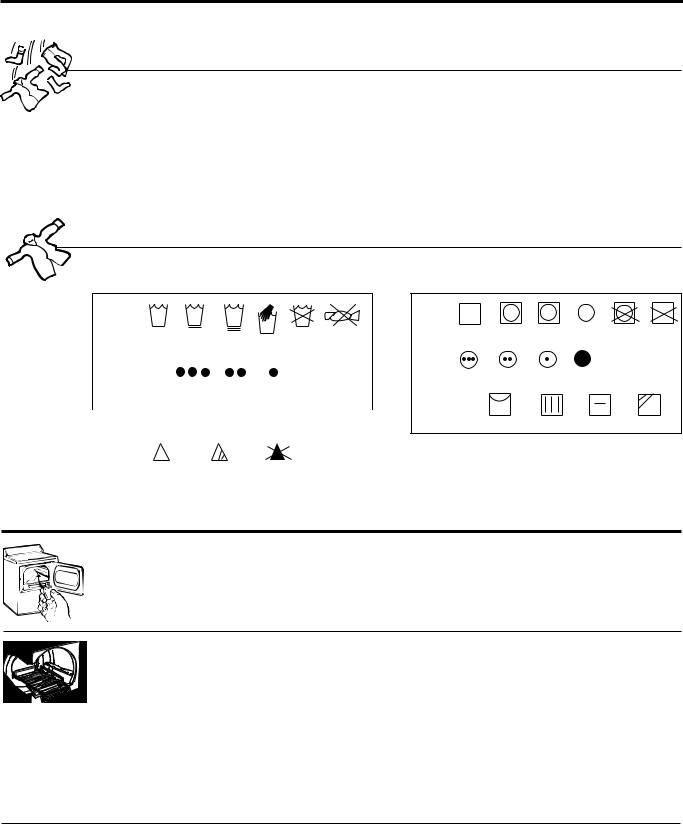
Below are fabric care label “symbols” that affect the clothing you will be laundering.
WASH LABELS |
DRY LABELS |
Machine |
|
|
|
|
Tumble |
wash |
|
|
|
|
dry |
cycle |
Normal Permanent Press/ |
Gentle/ |
Hand wash |
Do not wash Do not wring |
Dry |
|
wrinkle resistant |
delicate |
|
|
|
|
|
|
|
|
Heat |
Water |
|
|
|
|
setting |
temperature |
|
|
|
|
High |
|
Hot |
Warm |
Cold/cool |
||
|
(50C/120F) |
(40C/105F) |
(30C/85F) |
||
|
|
|
|
|
Special |
BLEACH LABELS |
|
|
instructions |
||
|
|
|
|||
|
|
|
|
|
|
Bleach |
|
|
|
|
|
symbols Any bleach |
Only non-chlorine bleach |
Do not bleach |
|
||
(when needed) |
|
(when needed) |
|
|
|
|
|
|
|
|
|
Normal |
|
|
|
|
|
|
Do not dry |
|
|
|
|
|
|
||
Permanent Press/ |
|
Gentle/ |
Do not tumble dry (used with |
||||
|
wrinkle resistant |
|
delicate |
|
do not wash) |
||
Medium |
|
Low |
No heat/air |
|
|
||
Line dry/ |
|
Drip dry |
|
Dry flat |
In the shade |
||
hang to dry
About the dryer features.
Drum Lamp (on some models)
Before replacing the light bulb, be sure to unplug the dryer power cord or disconnect the dryer at the household distribution panel by removing the fuse or switching off the circuit breaker.
Reach above dryer opening from inside the drum. Remove the bulb and replace with the same size bulb.
Drying Rack (on some models)
A handy drying rack may be used for drying delicate items such as washable sweaters.
Hook the rack over the lint filter so the rack extends into the dryer drum.
NOTE:
The drying rack must be used with the Time Dry cycle.
Do not use this drying rack when there are other clothes in the dryer.
If your model did not come with a drying rack, order one on-line at GEApplianceparts.com today, 24 hours a day or by phone at 800.626.2002 during normal business hours.
Part Number |
Accessory |
WE01X25160 |
Drying Rack |
Alloy Steel Drum (on some models)
The alloy steel used to make the dryer drum provides the highest reliability available in a GE dryer.
If the dryer drum should be scratched or dented during normal use, the drum will not rust or corrode. These surface blemishes will not affect the function or durability of the drum.
6
Care and Cleaning of the Dryer. |
GEAppliances.com |
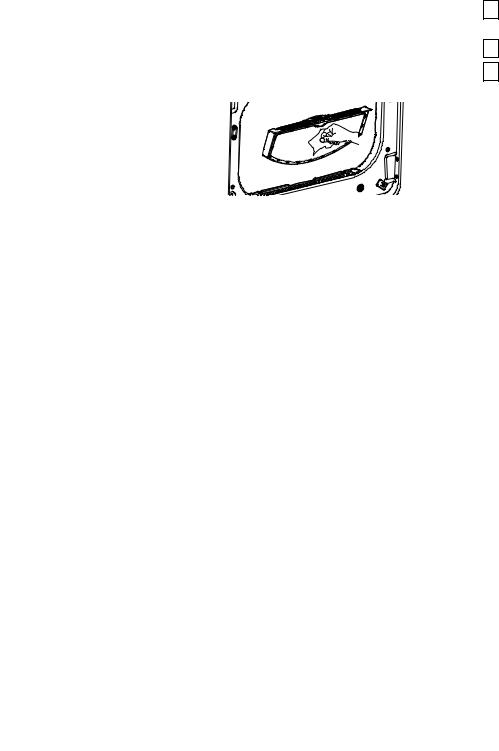
The Exterior: Wipe or dust any spills or washing compounds with a damp cloth. Dryer control panel and finishes may be damaged by some laundry pretreatment soil and stain remover products. Apply these products away from the dryer. The fabric may then be washed and dried normally. Damage to your dryer caused by these products is not covered by your warranty.
The Lint Filter: Clean the lint filter before each use. Remove by pulling straight up. Run your fingers across the filter. A waxy buildup may form on the lint filter from using dryer added fabric softener sheets.
To remove this buildup, wash the lint screen in warm, soapy water. Dry thoroughly and replace. Do not operate the dryer without the lint filter in place.
Vacuum the lint from the dryer lint filter area if you notice a change in dryer performance.
Stainless Steel: To clean stainless steel surfaces, use a damp cloth with a mild, non-abrasive cleaner suitable for stainless steel surfaces. Remove the cleaner residue, and then dry with a clean cloth.
Dryer Interior and Duct: The interior of the appliance and exhaust duct should be cleaned once a year by qualified service personnel.
The Exhaust Duct: Inspect and clean the exhaust ducting at least once a year to prevent clogging. A partially clogged exhaust can lengthen the drying time.
Follow these steps:
1Turn off electrical supply by disconnecting the plug from the wall socket.
2 Disconnect the duct from the dryer.
3Vacuum the duct with the hose attachment and reconnect the duct.
The Exhaust Hood: Check from the outside that the flaps of the hood move freely when operating. Make sure that there is not wildlife (birds, insects, etc.) nesting inside the duct or hood.
7
About venting the dryer.
For the best drying performance, the dryer needs to be properly vented. The dryer will use more energy and run longer if it is not vented to the below specifications. Carefully follow the details on Exhausting in the Installation Instructions.
Use only rigid metal 4” diameter ductwork inside the dryer cabinet. Use only rigid metal or UL listed flexible metal 4” diameter ductwork for exhausting to the outside.
Do not use plastic or other combustible ductwork.
Use the shortest length possible.
Do not crush or collapse.
Avoid resting the duct on sharp objects.
Venting must conform to local building codes.
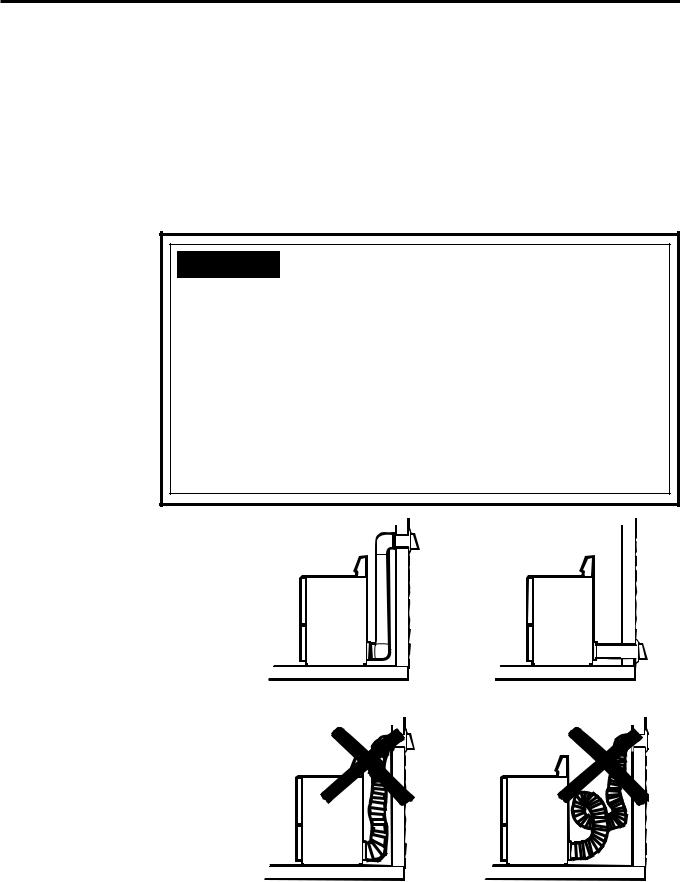
 WARNING
  - Fire Hazard
This dryer MUST be exhausted to the outdoors.
Use only 4” rigid metal ducting for the home exhaust duct.
Use only 4” rigid metal or UL-listed dryer transition duct to connect the dryer to the home exhaust.
DO NOT use a plastic vent.
DO NOT exhaust into a chimney, kitchen exhaust, gas vent, wall, ceiling, attic, crawl space, or concealed space of a building.
DO NOT install a screen in or over the exhaust duct. DO NOT install a booster fan in the exhaust duct.
DO NOT use duct longer than specified in the exhaust length table. Failure to follow these instructions can result in death or fire.
Correct
Venting
Incorrect
Venting
8
 Loading...