


Instructions for installation and use
WASHING MACHINE
EN DE NL
English,1 |
Deutsch,13 |
Nederlands,25 |
Contents |
EN |
|
Installation, 2-3
Unpacking and levelling
Connecting the electricity and water supplies
Technical data
ES PT
Español,37 Português,49
AQUALTIS
AQ105D 49D
Description of the machine, 4-5
Touch control panel
Running a wash cycle, 6
Wash cycles and options, 7
Table of wash cycles Wash options
Detergents and laundry, 8
Detergent
Preparing the laundry Washing recommendations
Precautions and advice, 9
General safety
Load balancing system Disposal
Opening the porthole door manually
Care and maintenance, 10
Cutting off the water and electricity supplies Cleaning the machine
Cleaning the detergent dispenser drawer Caring for your appliance drum Cleaning the pump
Checking the water inlet hose
Trouble shooting, 11
Assistance, 12
1
Installation
! This instruction manual should be kept in a safe place EN for future reference. If the washing machine is sold, given
away or moved, please ensure the manual is kept with the machine, so that the new owner may benefit from the advice contained within it.
!Read these instructions carefully: they contain vital information relating to the safe installation and operation of the appliance.
!Inside the pack containing this manual, you will also find the guarantee and all the details necessary for installation.
Unpacking and levelling
Unpacking
1. Once you have removed all the packaging from the washing machine, make sure it has not been damaged during transportation.
If it has been damaged, contact the retailer and do not proceed any further with the installation process.
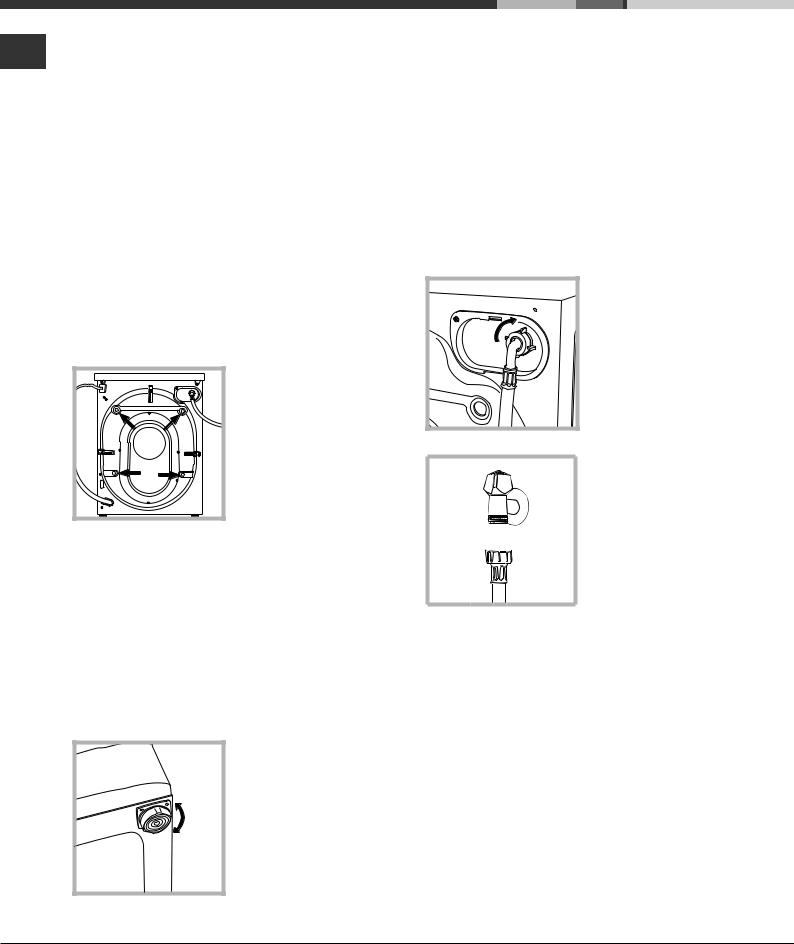
2. Remove the 4 protective screws (used during transportation) and the corresponding spacer, located on the rear part of the appliance (see figure).
3.Close off the holes using the plastic plugs supplied in the pack.
4.Keep all the parts in a safe place; they will be needed again if the washing machine is moved to another location, to prevent the inside of the appliance being damaged.
! Packaging materials should not be used as toys for children.
Levelling
1. Place the washing machine on a flat sturdy floor, without resting it up against walls or cabinets.
2. If the floor is uneven, the front feet of the machine may be adjusted until
it reaches a horizontal position (the angle of inclination must not exceed 2 degrees).
!If the appliance is levelled correctly, it will be more stable and much less likely to cause vibrations and noise while it is operating, particularly during the spin cycle.
!If it is placed on carpet or a rug, adjust the feet in such a way as to allow a sufficient ventilation space underneath the washing machine.
Connecting the electricity and water supplies
Connecting the water inlet hose
! Before connecting the inlet hose to the water supply, run the water until it is perfectly clear.
1. Connect the inlet hose to the machine by screwing it onto the cold water inlet of the appliance, which is situated on the top righthand side of the rear part of the appliance (see figure).
2. Connect the inlet hose by screwing it to a cold water tap using a 3/4 gas threaded connection (see figure).
3. Make sure that the hose is not folded over or bent.
!The water pressure at the tap must fall within the values indicated in the Technical data table (see next page).
!If the inlet hose is not long enough, contact a specialised shop or an authorised technician.
!Never use second-hand or old inlet hoses; use the products supplied with the machine.
2
Connecting the drain hose
65 - 100 cm |
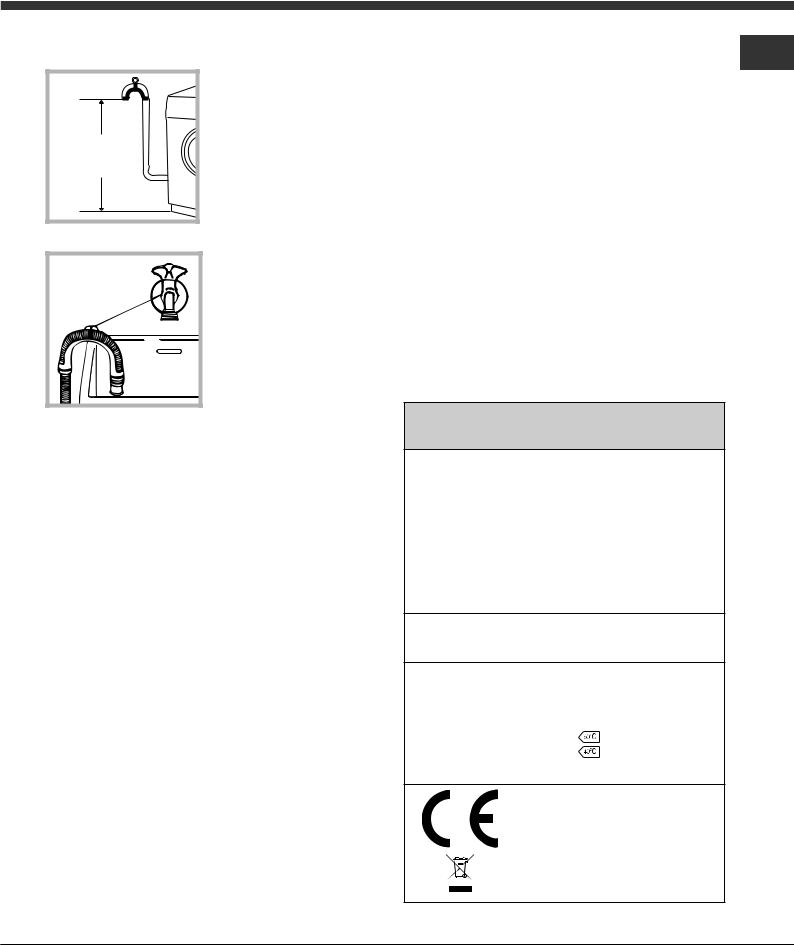
Connect the drain hose to drain duct piping or a wall drain located between 65 and 100 cm above the floor, making sure it is not bent at all.
Alternatively, rest the drain hose on the side of a washbasin or bathtub, fastening the duct supplied to the tap (see figure).
The free end of the hose should not be underwater.
! Do not use extension cords or multiple sockets.
EN
!The cable should not be bent or compressed.
!The power supply cable and plug must only be replaced by authorised technicians.
Warning! The company shall not be held responsible in the event that these regulations are not respected.
! We advise against the use of hose extensions; if it is absolutely necessary, the extension must have the same diameter as the original hose and must not exceed 150 cm in length.
Electrical connections
Before plugging the appliance into the electricity socket, make sure that:
•the socket is earthed and complies with all applicable laws;
•the socket is able to withstand the maximum power load of the appliance as indicated in the Technical data table
(see opposite);
•the power supply voltage falls within the values indicated in the Technical data table (see opposite);
•the socket is compatible with the plug of the appliance. If this is not the case, have the socket or the plug replaced.
!The machine must not be installed outdoors, even in covered areas. It is extremely dangerous to leave the appliance exposed to rain, storms and other weather conditions.
!The mains socket must remain within easy reach after the washing machine has been installed.
Technical data
Model |
AQ105D 49D |
|
|
|
width 59.5 cm |
Dimensions |
height 85 cm |
|
depth 64,5 cm |
|
|
Capacity |
from 1 to 10 kg |
|
|
Electrical |
please refer to the technical data plate |
connections |
fixed to the machine |
maximum pressure 1 MPa (10 bar) Water connections minimum pressure 0.05 MPa (0.5 bar)
drum capacity 71 litres
Spin speed |
up to 1400 rotations per minute |
||
|
|
|
|
Test wash cycles |
|
|
|
in accordance |
programme |
; Cotton standard 60°C. |
|
with directives |
|||
programme |
; Cotton standard 40°C. |
||
1061/2010 and |
|||
|
|
||
1015/2010 |
|
|
|
This appliance conforms to the following
EC Directives:
-2004/108/EC (Electromagnetic Compatibility)
-2006/95/EC (Low Voltage)
- 2002/96/EC
3

Description of the machine
EN
PORTHOLE DOOR |
CONTROL |
|
PANEL |
||
|
PORTHOLE DOOR
HANDLE
KICK STRIP
ADJUSTABLE FEET
PORTHOLE DOOR
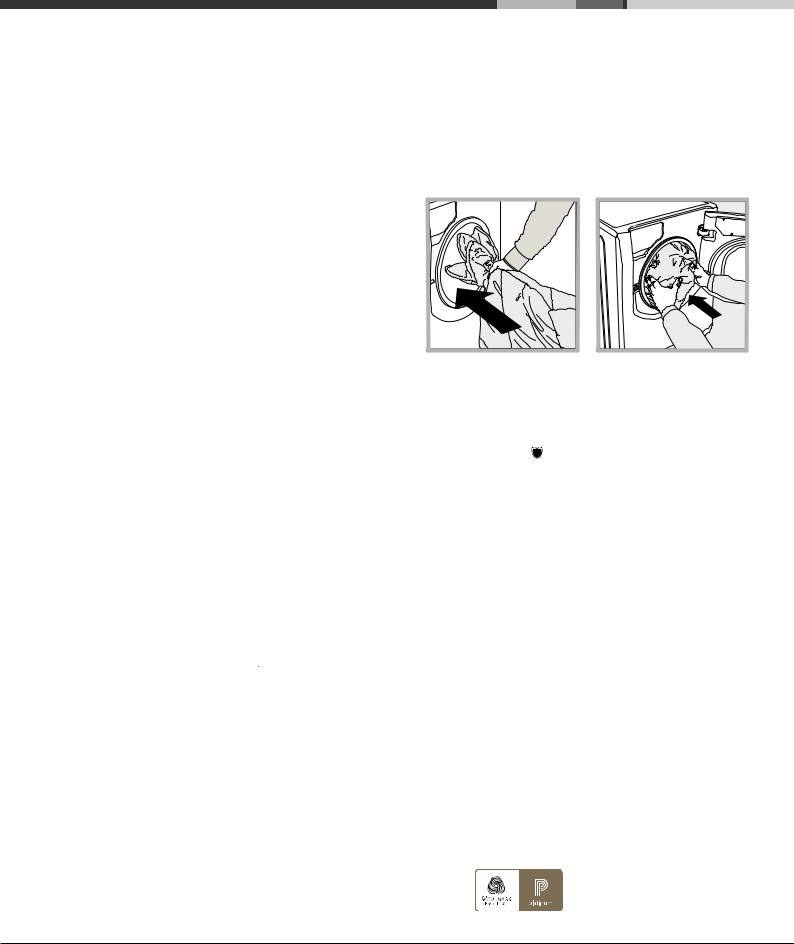
Always use the handle to open the porthole door (see figure).
DETERGENT DISPENSER DRAWER
The detergent dispenser drawer is located inside the
 machine and can be accessed by opening the door.
For more information on detergent measures, please refer to the chapter entitled
“Detergents and laundry”.
|
|
|
1. pre-wash compartment: |
|
A |
3 |
use powder detergent. |
|
|
!Beforepouringinthedetergent, |
|
|
|
1 |
makesurethatextracompartment |
|
|
3hasbeenremoved. |
|
|
|
|
|
B |
|
2 |
2. main wash compartment: |
|
If liquid detergent is used, |
||
|
|
|
it is recommended that the |
|
|
|
removable plastic partition A |
|
|
|
(supplied) be used for proper |
|
|
|
dosage.If powder detergent is |
|
|
|
used, place the partition into slot |
B.
3. extra compartment: Bleach
! The use of extra compartment 3 excludes the prewashfunction.
 washing additives compartment: for fabric softener or liquid additives. We recommend that the maximum level indicated by the grille is not exceeded, and that concentrated fabric softeners are diluted.
DIRECT INJECTION SYSTEM
The washing machine features the innovative “Direct Injection” technology that quickly solubilises the detergent and efficiently activates all the various components. The system guarantees the complete use and dissolution of the detergent, which is mixed with water before reaching the garments. This ensures better cleaning results already at low temperatures, providing significant energy savings while perfectly protecting colours and fibres. The “Direct Injection” technology is activated automatically in all the cycles.
TOUCH CONTROL PANEL
To adjust the settings, gently press the icon inside the sensitive (touch control) area as illustrated in the figure.
Standby mode
This washing machine, in compliance with new energy saving regulations, is fitted with an automatic standby system which is enabled after about 30 minutes if no activity is detected. Press the ON-OFF  button briefly and wait for the machine to start up again.
Consumption in off-mode: 0,5 W Consumption in Left-on: 0,5 W
4

|
|
|
|
|
|
|
|
|
|
|
|
|
Touch control panel |
|
|
|
|
START/PAUSE button |
|
||||||
|
|
|
|
EN |
||||||||
|
|
|
|
|
|
SPIN |
with indicator light |
WASH |
||||
|
|
|
|
|
|
|
|
|
|
|||
WASH CYCLE |
|
|
|
M1 |
button |
ECO |
|
CYCLE |
|
|||
|
|
|
|
|
||||||||
SELECTOR knob |
M2 |
TEMPERATURE |
|
|
PHASE |
|
||||||
|
|
|
indicator light |
|
|
|||||||
|
|
|
|
|
button |
|
|
icons |
|
|||
|
|
|
|
|
|
|
|
|
||||
|
|
|
|
|
|
|
|
|
|
|
||
|
|
|
|
|
|
|
|
|
|
|
|
|
|
|
|
|
|
|
|
|
|
|
|
|
|
|
|
|
|
|
|
|
|
|
|
|
|
|
|
|
|
|
|
|
|
|
|
|
|
|
|
|
|
|
|
|
|
|
|
|
|
|
|
|
DISPLAY
|
|
|
|
|
|
|
|
CONTROL PANEL LOCK |
|
|
|
|
|
|
|
|
|
|
|
|
|
|
|
|
|
|
Button with ON/OFF |
|
|
|
OPTION |
|
|
|
|
M3 |
|
DELAYED START |
button with indicator light |
|||||
|
buttons |
|||||||
indicator light |
|
|||||||
|
|
|
|
button |
|
|||
|
|
|
|
|
|
|||
|
|
|
|
|
|
|
DOOR LOCKED indicator light |
|
Button with  ON/OFF indicator light: press this briefly to switch the machine on or off. The green indicator light indicates that the machine is switched on. To switch off the washing machine during the wash cycle, press and hold the button for approximately 3 seconds; if the button is pressed briefly or accidentally the machine will not switch off. If the machine is switched off during a wash cycle, this wash cycle will be cancelled.
WASH CYCLE SELECTOR knob: may be turned in either direction. To select the most suitable wash cycle, please refer to the “Table of wash cycles”.
The knob will not move during the wash cycle.
M1-M2-M3 buttons: press and hold one of the buttons to store a cycle with your own set preferences in the memory of the machine. To recall a previously-stored cycle, press the corresponding button.
TEMPERATURE  button: press to modify or exclude the temperature setting; the value selected will appear on the display above (see “Running a wash cycle”).
SPIN CYCLE  button: press to modify or exclude the spin cycle; the value selected will appear on the display above (see “Running a wash cycle”).
DELAYED START  button: press to set a delayed start for the selected wash cycle; the set delay time will appear on the display above (see “Running a wash cycle”).
OPTION buttons: press to select the available options. The indicator light corresponding to the selected option will remain lit (see “Running a wash cycle”).
WASH CYCLE PHASE icons: these illuminate to indicate the progress of the wash cycle (Wash  – Rinse
  – Spin
  – Drain
  ). The text
 lights up when the cycle is complete.
START/PAUSE button with indicator light: when the green indicator light flashes slowly, press the button to start a wash cycle. Once the cycle has begun the indicator light will remain lit in a fixed manner. To pause the wash cycle, press the button
again; the indicator light will flash in an orange colour. If the “Door locked”  indicator light is switched off, the door may be opened. To start the wash cycle from the point at which it was interrupted, press the button again.
DOOR LOCKED  indicator light: indicates that the porthole door is locked. To open the door, pause the wash cycle (see “Running a wash cycle”).
CONTROL PANEL LOCK  button with indicator light: to activate or deactivate the control panel lock, press and hold the button for approximately 2 seconds. when the indicator light is illuminated, the control panel is locked. This means it is possible to prevent wash cycles from being modified accidentally, especially where there are children in the home.
ECO indicator light: the
 icon lights up when, after altering the washing parameters, an energy saving of at least 10% is made. Furthermore, before the machine enters “Standby” mode, the icon will light up for a few seconds; when the machine is switched off the estimated energy saving will be around the 80% mark.
CHANGE LANGUAGE.
The first time the machine is switched on, the first language will flash on the display. The “ “, “OK” and “V” symbols will appear on the display, in line with the 3 buttons on the righthand side. The languages change automatically every 3”; alternatively, they can be changed by pressing the buttons next to the “
 “ and “V” symbols. Use the “OK” button to confirm the language, which will be set after 2”. If no buttons are pressed, the automatic language change will begin again after 30”.
To change the language, switch the machine on and off again; in the 30” time period after it has been switched off, press and hold the temperature  +spin
+spin  +delayed
  start buttons simultaneously for 5’’. A short sound alert will be emitted and the set language will flash on the display. Press the buttons next to the “
 “ and “V” symbols to change the language. Use the button next to the “OK” symbol to confirm the language, which will be set after 2”. If no buttons are pressed, the language set previously will be displayed after 30”. Switch on the machine.
5

Running a wash cycle
WARNING: before you use the washing machine for the EN first time, run a wash cycle with detergent and no laundry,
using the 90° cottons cycle without pre-wash.
1.SWITCH THE MACHINE ON. Press the  button. All the indicator lights will illuminate for 1 second and the text AQUALTIS will appear on the display; the indicator
light corresponding to the  button will then remain lit in a constant manner and the START/PAUSE indicator light will flash.
2.SELECT THE PROGRAMME. Turn the PROGRAMME KNOB left or right, until the required programme has been selected; the name of the programme will appear on the display. A temperature and spin speed is set for each programme; these may be adjusted. The cycle duration will also appear on the display.
3.LOAD THE LAUNDRY. Open the porthole door. Load the laundry, making sure you do not exceed the maximum load value indicated in the table of wash cycles on the following page.
4.MEASURE OUT THE DETERGENT. Pull out the detergent dispenser drawer and pour the detergent into the relevant compartments as described in “Description of the machine”.
5.CLOSE THE PORTHOLE DOOR.
6.CUSTOMISE THE WASH CYCLE. Use the relevant buttons on the control panel:
 Modify the temperature and/or spin speed.
The machine automatically displays the maximum temperature and spin speed values set for the selected cycle, or the most recently-used settings if they are compatible with the selected cycle. The temperature can be decreased by pressing the 
 button, until the cold wash “OFF” setting is reached. The spin speed may be progressively reduced by pressing the
  button, until it is completely excluded “OFF”. If these buttons are pressed again, the maximum values are restored.
! Exception: if the  programme is selected, the temperature can be increased up to a value of 90°C.


 Setting a delayed start.
To set a delayed start for the selected cycle, press the corresponding button repeatedly until the required delay period has been reached. During the setting procedure, the delay period and the text “Starts in:” will be displayed, along with the flashing  symbol. After the delayed start has been set, the

 symbol will remain fixed on the display, which will also indicate the duration of the selected cycle with the text “Ends in:” and the cycle duration. Press the DELAYED START button just once to display the delay time set previously.
After the countdown has begun, the display will show the text “Starts in:” and the delay period. Once the set delay time has elapsed, the machine will begin its cycle and the display will show “Ends in:” and the time remaining until the end of the cycle.
To remove the delayed start option, press the button until the display shows the text OFF; the 

 symbol will disappear.


 Modify the cycle settings.
•Press the button to activate the option; the name of the option will then appear on the display and the corresponding indicator light will illuminate.
•Press the button again to deactivate the option; the name of the option will then appear on the display followed by the text OFF, and the corresponding indicator light will switch off.
!If the selected option is not compatible with the selected wash cycle, this incompatibility will be signalled by the flashing of the indicator light and a sound alert (3 beeps); the option will not be activated.
!If the selected option is not compatible with another option that has been selected previously, the indicator light corresponding to the first option selected will flash and only the second option will be activated; the indicator light corresponding to the button will remain lit in a constant manner.
!The options may affect the recommended load value and/
or the duration of the cycle.
7.START THE PROGRAMME. Press the START/PAUSE button. The corresponding indicator light remains lit
in a fixed manner and the porthole door locks (the  DOOR LOCKED indicator light illuminates). The icons corresponding to the wash cycle phases will light up during the cycle to indicate which phase is currently in progress.
To change a wash cycle once it has already started, pause the washing machine by pressing the START/ PAUSE button; then select the desired cycle and press the START/PAUSE button again.
To open the door during a wash cycle, press the START/
PAUSE button; if the DOOR LOCKED  indicator light is switched off you may open the door. Press the START/ PAUSE button again to restart the wash cycle from the point at which it was interrupted.
8.THE END OF THE WASH CYCLE. This is indicated by the illuminated text END. The porthole door may be opened immediately. If the START/PAUSE indicator light is flashing, press the button to end the cycle. Open the door, unload the laundry and switch off the machine.
! If you wish to cancel a cycle which has already begun, press and hold the  button until the cycle stops and the machine switches off.
Bag for quilts, curtains and delicate garments
The Aqualtis washing machine makes it easier for you to wash even the most valuable and delicate garments in complete confidence thanks to the special bag which protects the laundry (this is supplied with the machine).
We recommend that the bag is used every time you wash quilts and padded items with an outer layer made using synthetic material.
6

Wash cycles and options
Table of wash cycles
Icon |
|
Max. |
|
Description of the wash cycle |
temp. |
||
|
|||
|
|
(°C) |
|
|
Synthetics Resistant |
60° |
|
|
Synthetics Resistant (4) |
40° |
|
|
Coloureds Intensive |
40° |
|
|
Multi Colour |
20° |
|
|
Darks |
30° |
|
|
Shirts |
40° |
|
|
Duvets: for down-stuffed garments. |
30° |
|
|
Bed&Bath for bedlinen and towels. |
60° |
|
|
Rinse |
- |
|
|
Spin and Pump out |
- |
|
|
Anti Allergy Plus |
60° |
|
|
Anti Allergy Delicate |
40° |
|
|
Ultradelicates |
30° |
|
|
Wool: for wool, cashmere, etc. |
40° |
|
|
Mix 30': to refresh lightly soiled garments quickly (not suitable for |
30° |
|
|
wool, silk and clothes which require washing by hand). |
||
|
60° |
||
|
Cotton Standard 60°C (1): heavily soiled whites and resistant colours. |
||
|
(Max. 90°) |
||
|
Cotton Standard 40°C (2): lightly soiled whites and delicate colours. |
40° |
|
|
|
|
Max. speed (rpm)
800
800
1400
1400
800
600
1200
1400
1400
1400
1400
1400
0
800
800
1400
1400
Detergent and additives
Prewash |
Wash |
Bleach |
Fabric softener |
|
|
|
|
|
|
|
|
|
|
- |
|
- |
|
- |
|
- |
|
- |
|
- |
|
|
|
- |
|
- |
|
|
|
|
|
- |
- |
|
|
- |
- |
- |
- |
- |
|
- |
|
- |
|
- |
|
- |
|
- |
|
- |
|
- |
|
- |
|
- |
|
(3) |
|
|
|
- |
|
|
|
|
|
|
|
Max. (kg)load
5
5
9
9
6
2,5
3,5
10
10
10
6
6
1
2,5
4
10
10
Residualpness -dam%
48
48
-
-
-
-
-
-
-
-
-
-
-
-
71
53
53
conEnergykWhsumption |
|
waterTotallt |
|
durationCycle |
|
EN |
|
|
|
||||
|
|
|
|
|
|
|
1,12 |
|
58 |
|
120’ |
|
|
|
|
|
|
|||
0,67 |
|
54 |
|
100’ |
|
|
- |
|
- |
|
175’ |
|
|
- |
|
- |
|
185’ |
|
|
- |
|
- |
|
80’ |
|
|
- |
|
- |
|
75’ |
|
|
- |
|
- |
|
110’ |
|
|
- |
|
- |
|
155’ |
|
|
- |
|
- |
|
49’ |
|
|
- |
|
- |
|
16’ |
|
|
- |
|
- |
|
210’ |
|
|
- |
|
- |
|
230’ |
|
|
- |
|
- |
|
80’ |
|
|
- |
|
- |
|
105’ |
|
|
0,20 |
|
44 |
|
30’ |
|
|
0,95 |
|
60 |
|
200’ |
|
|
0,92 |
|
88 |
|
185’ |
|
|
|
|
|
|
|
|
|
The length of cycle shown on the display or in this booklet is an estimation only and is calculated assuming standard working conditions. The actual duration can vary according to factors such as water temperature and pressure, the amount of detergent used, the amount and type of load inserted, load balancing and any wash options selected.
Note: 10 minutes after the START, the machine will recalculate the time remaining until the end of the wash cycle on the basis of the load inside it; this value will then be shown on the display.
1) Test wash cycle in compliance with directive 1061/2010: set wash cycle  with a temperature of 60°C.
This cycle is designed for cotton loads with a normal soil level and is the most efficient in terms of both electricity and water consumption; it should be used for garments which can be washed at 60°C. The actual washing temperature may differ from the indicated value.
2) Test wash cycle in compliance with directive 1061/2010: set wash cycle  with a temperature of 40°C.
This cycle is designed for cotton loads with a normal soil level and is the most efficient in terms of both electricity and water consumption; it should be used for garments which can be washed at 40°C. The actual washing temperature may differ from the indicated value.
3) At 60 °C the “Prewash” function cannot be selected.
For all Test Institutes:
2) Long wash cycle for cottons: set wash cycle 
4) Long wash cycle for synthetics: set wash cycle
 with a temperature of 40°C.
  with a temperature of 40°C.
Wash options
 Super Wash
|
This option offers a high- |
|
3 |
performance wash due to the |
|
greater quantity of water used in |
||
|
||
1 |
the initial phase of the cycle, and |
|
2 |
due to the increased wash cycle |
|
duration, is particularly useful for |
||
|
the removal of stubborn stains. |
|
|
It can be used with or without |
|
|
bleach. If you desire bleaching, |
|
|
insert the extra tray compartment |
|
|
(3) into compartment 1. When |
pouring in the bleach, be careful not to exceed the “max” level marked on the central pivot (see figure). To bleach laundry without carrying out a full wash cycle, pour the bleach into the
extra compartment 3, select the “Rinse” cycle |
and activate |
||
the “Super Wash” option . |
, |
, , |
, , , |
! It cannot be used in conjunction with |
|||
, , , . |
|
|
|
 Extra rinse
By selecting this option, the efficiency of the rinse is increased and optimal residual detergent removal is guaranteed. It is particularly useful for skin which is sensitive to detergents. We recommend this option is used with a full load of washing, or when a large amount of detergent is required.
! It cannot be used in conjunction with  ,
,  ,
,  ,
,  ,
,  ,
,  .
.
 Easy Iron
By selecting this option, the wash and spin cycles will be modified in order to reduce the formation of creases.
At the end of the cycle the washing machine drum will rotate slowly; the “Easy Iron” and START/PAUSE indicator lights will flash. To end the cycle press the START/PAUSE button or the “Easy Iron” button.
! It cannot be used in conjunction with  ,
,  ,
,  ,
,  ,
,  ,
,  .
.
 Prewash
If this function is selected, the pre-wash cycle will run; this is useful for removing stubborn stains.
N.B.: put the detergent in the relevant compartment. |
|
|||
! It cannot be used in conjunction with |
, , |
, |
, , |
|
, , , , , , |
(60°), |
. |
|
|
7
Detergents and laundry
EN |
Detergent |
|
The type and quantity of detergent required depend on the |
||
|
||
|
type of fabric you are washing (cotton, wool, silk, etc.), as |
|
|
well as its colour, the washing temperature, the level of soiling |
|
|
and the hardness of the water in the area. Measuring out the |
|
|
detergent carefully will avoid wastage and help to protect the |
|
|
environment: although they are biodegradable, detergents still |
|
|
contain ingredients which alter the balance of nature. |
|
|
We recommend the following: |
|
|
• use powder detergents for white cotton garments and |
|
|
pre-washing. |
|
|
• use liquid detergents for delicate cotton garments and |
|
|
for all low-temperature wash cycles. |
|
|
• use gentle liquid detergents for wool and silk garments. |
|
|
The detergent should be poured into the relevant |
|
|
compartment - or the dispenser placed directly inside the |
|
|
drum - before the wash cycle begins. In the latter case, it will |
|
|
not be possible to select the Cottons with pre-wash cycle. |
|
|
! Use powder detergent for white cotton garments, for |
|
|
pre-washing, and for washing at temperatures over 60°C |
|
|
! Follow the instructions given on the detergent packaging. |
|
|
! Do not use hand washing detergents because these |
|
|
create too much foam. |
Preparing the laundry
•Shake out the garments before loading them into the machine.
•Divide the laundry according fabric type (symbol on the washing instruction label) and colour, making sure you separate the coloured garments from the white ones;
•Empty all pockets and check the buttons;
•Do not exceed the values listed in the “Table of wash cycles”, which refer to the weight of the laundry when dry.
How much does your laundry weigh?
1 sheet |
400-500 g |
1 pillowcase |
150-200 g |
1 tablecloth |
400-500 g |
1 bathrobe |
900-1200 g |
1 towel |
150-250 g |
1 pair of jeans |
400-500 g |
1 shirt |
150-200 g |
Washing recommendations
Coloureds Intensive: use the  cycle on light coloured garments to remove tough stains without damaging
the integrity and brightness of the colours. The cycle is studied to guarantee a 60° performance at only 40°. We recommend the use of detergents suitable to wash coloured clothes.
Multi Colour: use the  cycle to wash medium-soiled multi-coloured garments or garments of different colours. Cycle designed to ensure colour care while achieving a 40° performance at just 20°. We recommend using detergents that are suitable for coloured washes and active already at low temperatures.
! We always recommend a separate wash for running garments and the first time you wash a new coloured item. Darks: use cycle  to wash dark-coloured garments. This programme is designed to maintain dark colours over time. We recommend using a liquid detergent for the best results when washing dark-coloured garments.
Shirts: use the special  wash cycle to wash shirts in different fabrics and colours to guarantee they receive the best possible care.
Duvets: to wash double or single duvets (the weight of which should not exceed 3,5 kg), cushions or clothes padded with goose down such as puffa jackets, use the special  wash cycle. We recommend that duvets are placed in the drum with their edges folded inwards (see figure) and that no more than ¾ of the total volume of the drum is used. To achieve the best results, we recommend that a liquid detergent is used and placed inside the detergent dispenser drawer.
Quilts: to wash quilts with a synthetic outer layer, use the bag provided and set the wash cycle to  .
.
Bedlinen and towels: Use programme  to wash bed linen and towels in one single cycle: it optimises softener performance and helps you save time and energy. We recommend the use of powder detergent
Anti Allergy Plus  : cycle studied for cotton laundry and other resistant fabrics to guarantee the removal of the main allergens such as pollen, mites, cat and dog hair.
Anti Allergy Delicate  : cycle studied for cotton laundry and other resistant fabrics to guarantee the removal of pollen and cat and dog hair already at 40°. Ultradelicates: use programme
  to wash very delicate garments having strasses or sequins.
We recommend turning the garments inside out before washing and placing small items into the special bag for washing delicates. Use liquid detergent on delicate garments for best results.
To wash Silk garments and Curtains (these should be folded and placed inside the bag provided), select cycle  and then option
  (in this case it will also be possible to enable the “Extra Rinse” option); the machine will end the cycle while the laundry is soaking and the
  indicator light will flash. To drain the water so that the laundry may be removed, press the START/PAUSE button or the
  button.
Wool: the wool wash cycle on this Hotpoint-Ariston machine has been tested and approved by The Woolmark Company for washing wool garments labelled as hand washable provided that the garments are washed according to the instructions on the garment label and those issued by the manufacturer of this washing machine. Hotpoint-Ariston is the first washing machine brand to be approved by The Woolmark Company for Apparel CarePlatinum for its washing performance and consumption of energy and water. (M1135) 

8
Precautions and tips
! The machine was designed and constructed in accordance with international safety regulations. The following information is provided for safety reasons and must therefore be read carefully.
General safety
•This appliance was designed for domestic use only.
•This appliance is not intended for use by persons (including children) with reduced physical, sensory or mental capabilities, or lack of experience and knowledge, unless they have been given supervision or instruction concerning use of the appliance by a person responsible for their safety. Children should be supervised to ensure that they do not play with the appliance.
•Do not touch the machine when barefoot or with wet or damp hands or feet.
•Do not pull on the power supply cable when unplugging the appliance from the electricity socket. Hold the plug and pull.
•Do not touch the drained water as it may reach extremely high temperatures.
•Never force the porthole door. This could damage the safety lock mechanism designed to prevent accidental opening.
•If the appliance breaks down, do not under any circumstances access the internal mechanisms in an attempt to repair it yourself.
•Always keep children well away from the appliance while it is operating.
•If it must be moved, proceed with the help of two or three people and handle it with the utmost care. Never try to do this alone, because the appliance is very heavy.
•Before loading laundry into the washing machine, make sure the drum is empty.
Load balancing system
Before every spin cycle, to avoid excessive vibrations before every spin and to distribute the load in a uniform manner, the drum rotates continuously at a speed which is slightly greater than the washing rotation speed. If, after several attempts, the load is not balanced correctly, the machine spins at a reduced spin speed. If the load is excessively unbalanced, the washing machine performs the distribution process instead of spinning. To encourage improved load distribution and balance, we recommend small and large garments are mixed in the load.
Disposal
•Disposing of the packaging materials: observe local regulations so that the packaging may be re-used.
•The European Directive 2002/96/EC relating to Waste Electrical and Electronic Equipment (WEEE) states that household appliances should not be disposed of using the normal solid urban waste cycle. Exhausted appliances should be collected separately in order to
optimise the cost of re-using and recycling the materials inside the machine, while preventing potential damage to the atmosphere and to public health.
The crossed-out dustbin is marked on all products
to remind the owner of their obligations regarding EN separated waste collection.
For more information relating to the correct disposal of household appliances, owners should contact their local authorities or appliance dealer.
Opening the porthole door manually
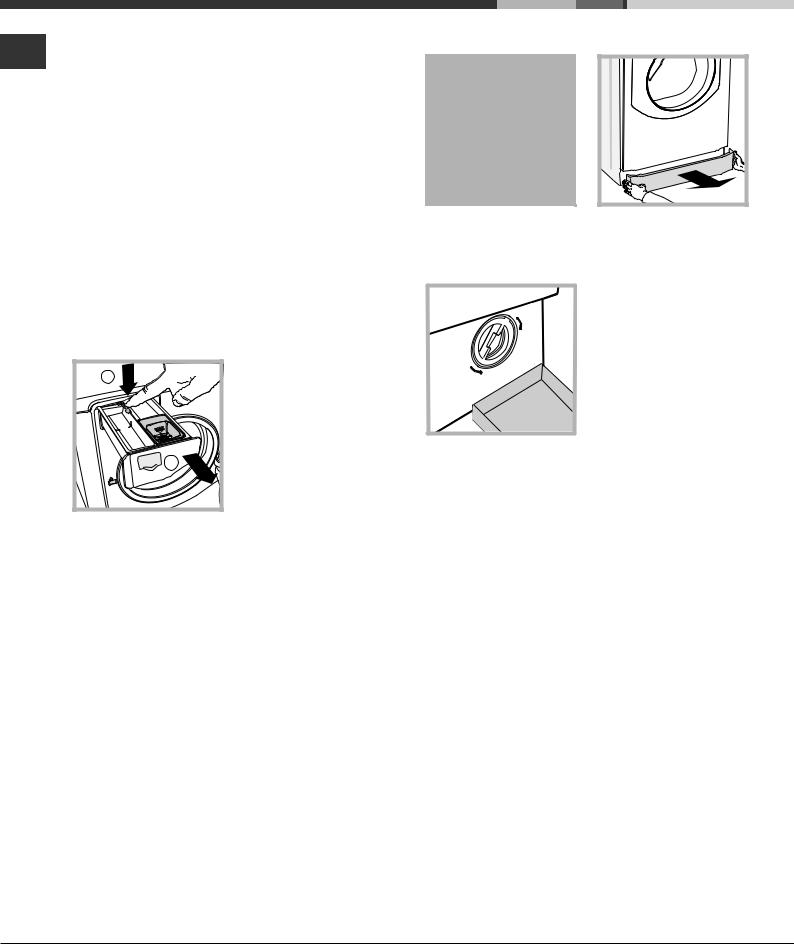
In the event that it is not possible to open the porthole door due to a powercut, and if you wish to remove the laundry, proceed as follows:
1. remove the plug from the electrical socket.
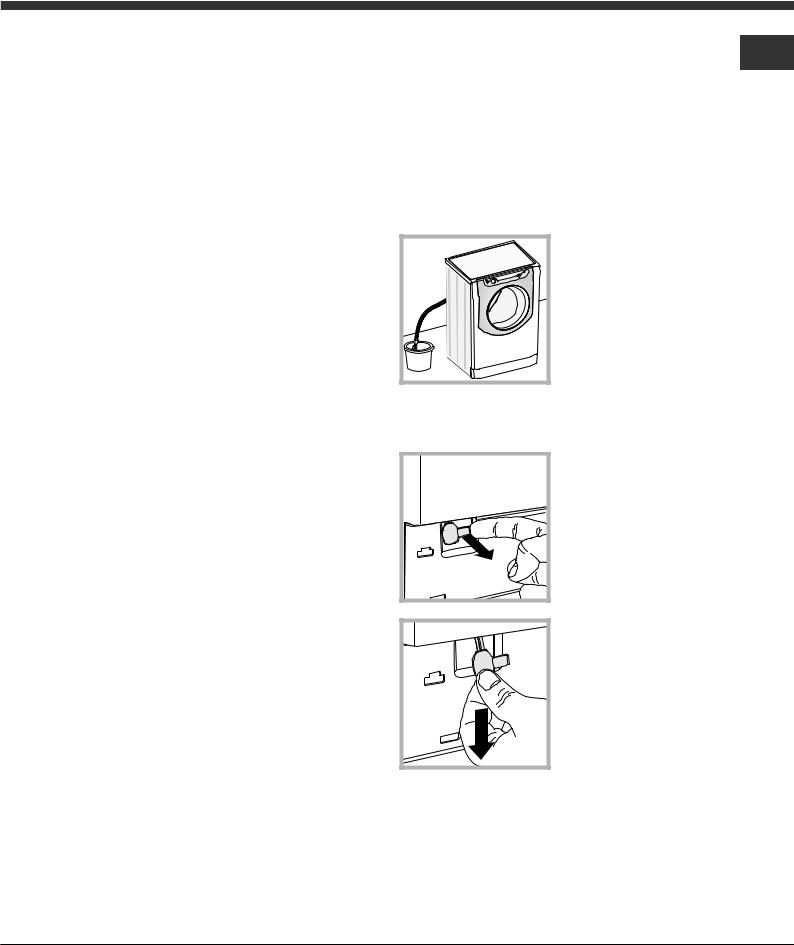
2. make sure the water level inside the machine is lower than the door opening; if
it is not, remove excess water using the drain hose, collecting it in a bucket as indicated in the figure.
3. remove the cover panel on the lower front part of the washing machine (see overleaf).
4. pull outwards using the tab as indicated in the figure, until the plastic tie-rod is freed from its stop position; pull downwards until you hear a “click”, which indicates that the door is now unlocked.
5. open the door; if this is still not possible repeat the procedure.
6. reposition the panel, making sure the hooks are securely in place before you push it onto the appliance.
9
Care and maintenance
Cutting off the water and electricity EN supplies
•Turn off the water tap after every wash cycle. This will limit wear on the hydraulic system in the machine and help to prevent leaks.
•Unplug the appliance when cleaning it and during all maintenance work.
Cleaning the machine
The outer parts and rubber components of the appliance can be cleaned using a soft cloth soaked in lukewarm soapy water. Do not use solvents or abrasives.
Cleaning the detergent dispenser drawer
1 |
1 |
2 |
2 |
To remove the drawer, press lever (1) and pull the drawer outwards (2) (see figure).
Wash it under running water; this procedure should be repeated frequently.
To access the pre-chamber:
1. take off the cover panel on the front of the machine by first pressing it in the centre and then pushing downwards on both sides until you can remove it (see figures);
2. position a container so that it will collect the water which flows out (approximately 1.5 l) (see figure);
3. unscrew the lid by rotating it in an anti-clockwise direction (see figure);
4.clean the inside thoroughly;
5.screw the lid back on;
6.reposition the panel, making sure the hooks are securely in place before you push it onto the appliance.
Caring for your appliance drum
•Always leave the door ajar to prevent unpleasant odours from forming.
Cleaning the pump
The washing machine is fitted with a self-cleaning pump which does not require any maintenance. Sometimes, small items (such as coins or buttons) may fall into the protective pre-chamber at the base of the pump.
! Make sure the wash cycle has finished and unplug the appliance.
Checking the water inlet hose
Check the inlet hose at least once a year. If there are any cracks, it should be replaced immediately: during the wash cycles, water pressure is very strong and a cracked hose could easily split open.
10
Trouble shooting
Your washing machine could occasionally fail to work. Before contacting the Technical Assistance Centre (see “Assistance”), |
EN |
make sure that the problem cannot be not solved easily using the following list. |
Problem:
The washing machine does not switch on.
Possible causes / Solutions:
•The appliance is not plugged into the socket fully, or not enough to make contact.
•There is no power in the house.
The wash cycle does not start.
•The door is not closed properly.
•The START/PAUSE button has not been pressed.
•The water tap has not been opened.
•A delayed start has been set.
The washing machine does not fill with water.
The washing machine door remains locked.
The machine continuously fills with water and drains.
•The water inlet hose is not connected to the tap.
•The hose is bent.
•The water tap has not been opened.
•There is no water supply in the house.
•The pressure is too low.
•The START/PAUSE button has not been pressed.
•If you have selected the  function, at the end of the cycle the washing machine drum will rotate slowly; to end the cycle press the START/PAUSE button or the
  button.
•The drain hose is not fitted at a height between 65 and 100 cm from the floor (see “Installation”).
•The free end of the hose is under water (see “Installation”).
•If the dwelling is on one of the upper floors of a building, there may be problems relating to water drainage, causing the washing machine to fill with water and drain continuously. Special anti-draining valves are available in shops and help to prevent this inconvenience.
•The wall drainage system is not fitted with a breather pipe.
The washing machine does not drain or spin.
•The wash cycle does not include draining: Some wash cycles require the drain phase to be started manually (see “Wash cycles and options”).
•The  option is enabled: to complete the wash cycle, press the START/ PAUSE button (“Wash cycles and options”).
•The drain hose is bent (see Installation).
•The drainage duct is clogged.
The machine vibrates a lot during the spin cycle.
The washing machine leaks.
•The drum was not unlocked correctly during installation (see “Installation”).
•The machine is not level (see “Installation” ).
•The machine is trapped between cabinets and walls (see “Installation”).
•The load is unbalanced (see “Detergents and laundry”).
•The water inlet hose is not screwed on properly (see “Installation”).
•The detergent dispenser is blocked (to clean it, see “Care and maintenance”).
•The drain hose is not fixed in place properly (see “Installation”).
The icons corresponding to the “Phase in progress” flash rapidly at the same time as the ON/OFF indicator light.
There is too much foam.
•Switch off the machine and unplug it, wait for approximately 1 minute and then switch it back on again. If the problem persists, contact the Technical Assistance Service.
•The detergent is not suitable for machine washing (it should display the text “for washing machines” or “hand and machine wash”, or the like).
•Too much detergent was used.
The washing machine door |
• Perform the manual unlocking procedure (see “Precautions and tips”). |
remains locked. |
|
! Note: to exit “Demo mode”, switch machine off, press and hold the two 
 and
and  buttons simultaneously for 3 seconds.
11

Assistance
|
|
|
|
|
|
|
|
Before calling for Assistance: |
|
||||
EN |
|
|||||
• Check whether you can solve the problem by yourself (see “Trouble shooting”); |
|
|||||
|
|
|||||
|
• Restart the wash cycle to check whether the problem has been solved; |
|
||||
|
|
|||||
|
• If it has not, contact the Authorised Technical Assistance Service. |
|
||||
|
! If the washing machine has been installed or used incorrectly, you will have to pay for the call-out service. |
|
||||
|
! Always request the assistance of authorised technicians. |
|
||||
Please have the following information to hand:
•the type of problem;
•the appliance model (Mod.);
•the serial number (S/N).
The above information can be found on the data plate located on the appliance itself.
12

Installationsund Bedienungsanleitungen WASCHVOLLAUTOMAT
DE
Deutsch
INHALTSVERZEICHNIS DE
Aufstellung, 14-15
Auspacken und Aufstellen
Wasserund Elektroanschlüsse
Technische Daten
AQUALTIS
AQ105D 49D
Beschreibung Ihres Gerätes, 16-17
Bedienblende “touch control”
Durchführung eines Waschprogramms, 18
Programme und Zusatzfunktionen, 19
Programmtabelle
Zusatzfunktionen
Waschmittel und Wäsche, 20
Waschmittel
Vorsortieren der Wäsche
Waschhinweise
Vorsichtsmaßregeln und Hinweise, 21
Allgemeine Sicherheit
System zur Auswuchtung der Wäscheladung Entsorgung
Manuelles Öffnen der Gerätetür
Reinigung und Pflege, 22
Abstellen der Wasserund Stromversorgung Reinigung des Gerätes
Reinigung der Waschmittelschublade Pflege der Wäschetrommel Reinigung der Pumpe
Kontrolle des Wasserzulaufschlauchs
Störungen und Abhilfe, 23
Kundendienst, 24
13

Aufstellung
! Es ist äußerst wichtig, diese Bedienungsanleitung
DE sorgfältig aufzubewahren, um sie jederzeit zu Rate ziehen zu können. Sorgen Sie dafür, dass sie im Falle eines Umzugs oder Übergabe an einen anderen Benutzer das Gerät stets begleitet.
!Lesen Sie bitte folgende Hinweise aufmerksam durch: sie liefern wichtige Informationen hinsichtlich der Installation, des Gebrauchs und der Sicherheit.
!In der Plastikhülle dieser Bedienungsanleitung befinden sich, außer dem Garantieschein, auch Kleinteile zur Installation.
Auspacken und Aufstellen
Auspacken
1. Nach Entfernen der Verpackung überzeugen Sie sich bitte davon, dass das Gerät während des Transportes nicht beschädigt wurde.
Schließen Sie das Gerät im Falle einer Beschädigung bitte nicht an und kontaktieren Sie Ihren Händler.
2. Schrauben Sie die 4 Transportschutzschrauben aus und nehmen Sie das entsprechende an der Rückwand befindliche Distanzstück ab (siehe Abbildung).
3.Schließen Sie die Löcher mittels der in der Plastikhülle befindlichen Kunststoffstöpsel.
4.Bewahren Sie bitte sämtliche Teile auf. Im Falle eines erneuten Transportes des Gerätes sind alle Teile wieder einzusetzen, um Schäden im Geräteinnern zu vermeiden. ! Verpackungsmaterial ist kein Spielzeug für Kinder.
Nivellierung
1. Der Waschvollautomat muss auf einem ebenen, festen Untergrund aufgestellt werden, ohne ihn an Wände oder Möbelteile anzulehnen.
2. Eventuelle Unebenheiten durch Anbzw. Ausdrehen der vorderen Stellfüße ausgleichen, (der Neigungsgrad darf 2° nicht überschreiten).
!Eine präzise Nivellierung verleiht dem Gerät die erforderliche Stabilität, durch die Vibrationen und Betriebsgeräusche, vor allem während des Schleuderns, vermieden werden.
!Bei Teppichböden müssen die Stellfüße so reguliert werden, dass ein ausreichender Freiraum zur Belüftung unter dem Waschvollautomaten gewährleistet ist.
Wasserund Elektroanschlüsse
Anschluss des Zulaufschlauches
! Lassen Sie das Wasser vor dem Anschluss so lange auslaufen, bis klares Wasser austritt.
1. Schließen Sie das andere Ende des Schlauches an den oben rechts am Rückteil des Gerätes befindlichen Wasseranschluss an (siehe Abbildung).
2. Schrauben Sie den Wasserschlauch an einen Kaltwasserhahn mit ¾-GAS- Gewindeanschluss an (siehe Abbildung).
3. Der Schlauch darf nicht eingeklemmt oder abgeknickt werden.
!Der Wasserdruck muss innerhalb der Werte liegen, die in der Tabelle der Technischen Daten angegeben sind (siehe nebenstehende Seite).
!Sollte der Zulaufschlauch nicht lang genug sein, dann wenden Sie sich bitte an einen Fachhändler oder an einen autorisierten Fachmann.
!Verwenden Sie bitte niemals alte oder gebrauchte Zulaufschläuche, sondern nur die, die Sie mit dem Gerät erhalten haben.
14

Anschluss des Ablaufschlauches
65 - 100 cm |
Schließen Sie den Ablaufschlauch, ohne ihn dabei zu krümmen, an eine Ablaufleitung, oder an einen in der Wand (in einer Mindesthöhe von 65 – 100 cm) angelegten Ablauf an,
oder hängen Sie ihn in ein Becken oder eine Wanne ein; befestigen Sie ihn in diesem Falle mittels der mitgelieferten Führung an dem Wasserhahn (siehe Abbildung).
Das freie Ablaufschlauchende darf nicht unter Wasser bleiben.
! Verwenden Sie bitte keine Verlängerungen oder |
DE |
Mehrfachstecker. |
!Das Netzkabel darf nicht gebogen bzw. eingeklemmt werden.
!Das Versorgungskabel darf nur durch autorisierte Fachkräfte ausgetauscht werden.
Achtung! Der Hersteller übernimmt keinerlei Haftung, sollten diese Vorschriften nicht genau beachtet werden.
! Verlängerungsschläuche sollten nicht eingesetzt werden, sollte dies jedoch absolut unvermeidlich sein, muss die Verlängerung denselben Durchmesser des Originalschlauchs aufweisen und darf eine Länge von 150 cm nicht überschreiten.
Elektroanschluss
Vor Einfügen des Netzsteckers in die Steckdose ist sicherzustellen, dass:
•die Steckdose über eine normgerechte Erdung verfügt;
•die Steckdose die in den Technischen Daten angegebenen Höchstlast des Gerätes trägt (siehe nebenstehende Tabelle);
•die Stromspannung den in den Technischen Daten angegebenen Werten entspricht (siehe nebenstehende Tabelle);
•der Netzstecker mit der Steckdose übereinstimmt. Lassen Sie den Netzstecker oder die Steckdose andernfalls ersetzen.
!Das Gerät darf nicht im Freien installiert werden, auch nicht, wenn es sich um einen geschützten Platz handelt. Es ist gefährlich, Ihren Vollwaschautomaten Gewittern und Unwettern auszusetzen.
!Die Steckdose sollte nach installiertem Gerät leicht zugänglich sein.
Technische Daten
Modell |
AQ105D 49D |
Breite 59,5 cm
Abmessunge Höhe 85 cm
Tiefe 64,5 cm
Fassungsvermögen 1 bis 10 kg
Elektroanschlüsse siehe das am Gerät befindliche Typenschild
Höchstdruck 1 MPa (10 bar) Wasseranschlüsse Mindestdruck 0,05 MPa (0,5 bar)
Trommelvolumen 71 Liter
Schleudertouren |
bis zu 1400 U/min. |
Prüfprogramme
gemäß der RichtProgramm  ; Baumwolle 60°C. linien 1061/2010 Programm
  ; Baumwolle 40°C. und 1015/2010
Dieses Gerät entspricht den folgenden
EG-Richtlinien:
-2004/108/CE (elektromagnetische Verträglichkeit)
-2002/96/CE
-2006/95/CE (Niederspannung)
15

Beschreibung Ihres Gerätes
DE
GERÄTETÜR
GRIFF
SOCKEL
BEDIENBLENDE
SYSTEM DIRECT INJECTION
Die Waschmaschine ist mit der innovativen Technologie „Direct Injection” ausgestattet, die das Waschmittel schnell auflöst und somit die darin enthaltenen Komponenten bestmöglich aktiviert. Durch die Vermischung des Waschmittels mit Wasser, bevor es auf die Wäsche gelangt, sichert das System sichert die komplette Nutzung und Auflösung des Waschmittels zu. Damit werden höchste Waschleistungen bereits bei niedrigen Temperaturen erzielt und gleichzeitig kann deutlich Energie eingespart werden und die Farben und Fasern werden perfekt gepflegt.
Die Technologie „Direct Injection” ist automatisch für alle Waschzyklen aktiv.
REGULIERBARE STELLFÜSSE
GERÄTETÜR |
Öffnen Sie die Gerätetür bitte stets nur am entsprechenden Griff (siehe Abbildung ).
WASCHMITTELBEHÄLTER
|
|
|
Der Waschmittelbehälter |
|
|
|
befindet sich im Innern des |
|
|
|
Gerätes, um ihn zu erreichen, |
|
|
|
muss die Gerätetür geöffnet |
|
|
|
werden. |
|
|
|
Hinsichtlich der Dosierung |
|
|
|
des Waschmittels verweisen |
|
|
|
wir auf den Absatz |
|
|
|
„Waschmittel und Wäsche“ . |
|
A |
|
1. Waschmittelkammer für |
|
3 |
den Vorwaschgang: für |
|
|
|
||
|
|
Waschpulver. |
|
|
|
|
|
|
|
1 |
! Vergewissern Sie sich vor |
B |
|
2 |
Einfüllen des Waschmittels, |
|
dass die Zusatzkammer 3 |
||
|
|
|
nicht eingesetzt wurde. |
|
|
|
2. Waschmittelkammer für |
|
|
|
den Hauptwaschgang: Falls |
|
|
|
Sie ein Flüssigwaschmittel |
|
|
|
verwenden, wird empfohlen, |
die mitgelieferte Trennwand A zu benutzen, um eine korrekte Dosierung zu gewährleisten. Wenn Sie ein
Pulverwaschmittel verwenden, geben Sie die Trennwand in die Kammer B.
3. Zusatzkammer:Bleichmittel
! Die Verwendung der zusätzlichen Kammer 3 schließt die Vorwäsche aus.
 Kammer für Zusätze: für Weichspüler oder flüssige Zusätze. Bitte achten Sie darauf, dass der maximale auf dem Gitter angezeigte Stand nicht überschritten wird. Konzentrierte Weichspüler müssen verdünnt werden.
Bedienblende “touch control”
Zur Änderung der Einstellung drücken Sie leicht auf die
Ikone im berührungssensiblen Bereich (touch control) wie auf der Abbildung gezeigt.
Funktion Standby
Zur Erfüllung der neuen Richtlinien zum Energieverbrauch ist diese Waschmaschine mit einem automatischen Ausschaltsystem (Standby) ausgestattet, das nach 30 Minuten des Nichtgebrauchs in Funktion tritt. Drücken Sie kurz die Taste ON/OFF  und warten Sie, bis sich die Maschine wieder einschaltet.
Verbrauch in Off-Betrieb: 0,5 W
Verbrauch in Left-On: 0,5 W
16

|
|
|
|
|
|
|
|
|
|
|
|
|
|
|
|
|
|
|
|
|
Taste mit Kontrollleuchte |
||||
Bedienblende “touch control” |
|
|
START/PAUSE |
|
|
|||||||
|
|
|
DE |
|||||||||
Wählschalter |
|
M2 |
|
M1 |
Taste SCHLEUDERGANG |
Kontrollleuchte |
|
Symbole |
||||
|
|
|
|
|||||||||
|
|
|
|
|||||||||
|
|
|
|
ECO |
|
PROGRAMMA- |
||||||
PROGRAMME |
|
|
|
|
|
Taste TEMPERATUR |
|
|
||||
|
|
|
|
|
|
|
|
|
BLAUF |
|||
|
|
|
|
|
|
|
|
|
|
|||
|
|
|
|
|
|
|
|
|
|
|
|
|
|
|
|
|
|
|
|
|
|
|
|
|
|
|
|
|
|
|
|
|
|
|
|
|
|
|
|
|
|
|
|
|
|
|
|
|
|
|
|
DISPLAY
Taste mit Kontrollleuchte |
|
|
|
|
|
|
|
Taste mit Kontrollleuchte |
|
|
|
|
|
|
|
||
|
|
|
|
|
|
|
||
|
|
|
|
|
|
|
||
|
|
|
Tasten |
|
|
|
||
ON/OFF |
M3 |
ZUSATZFUNKTIONEN |
|
TASTENSPERRE |
||||
|
|
|||||||
|
|
|
|
|
|
Taste STARTZEIT- |
Kontrollleuchte |
|
|
|
|
|
|
|
VORWAHL |
LOCK |
|
Taste mit Kontrollleuchte  ON/OFF: Drücken Sie kurz auf die Taste, um das Gerät einbzw. auszuschalten. Die grüne Kontrollleuchte zeigt an, dass das Gerät eingeschaltet ist. Um den WaschvollautomatenwährendeinesWaschgangsauszuschalten, muss die Taste etwas länger gedrückt werden (ca. 3 Sekunden); ein kurzer oder ein ungewollter Druck bewirkt kein Ausschalten des Gerätes.
Das Ausschalten des Gerätes während eines laufenden Waschprogramms löscht den gesamten Waschzyklus.
Wählschalter PROGRAMME: Der Schalter kann in beide Richtungen gedreht werden. Um sicher zu sein, das am besten geeignete Waschprogramm gewählt zu haben, raten wir die “Programmtabelle” zu Rate zu ziehen. Während des Programmablaufs bleibt der Schalter feststehend.
TastenM1-M2-M3:HaltenSieeinedieserTastengedrückt,umeinen Waschzyklusindividuellzuspeichern.Umeinenbereitsgespeicherten Zyklus abzurufen, drücken Sie die entsprechende Taste.
Taste 
 TEMPERATUR: Taste drücken, wenn Sie die Temperatur ändern oder ausschalten möchten, der ausgewählte Wert wird auf dem darüberliegenden Display angezeigt (siehe “Durchführung eines Waschprogramms“).
Taste  SCHLEUDERGANG: Taste drücken, wenn Sie die Schleuderdrehzahl ändern oder nicht schleudern möchten. Der ausgewählte Wert wird auf dem darüberliegenden Display angezeigt (siehe “Durchführung eines Waschprogramms“).
Taste  STARTZEITVORWAHL: Taste drücken, um den verzögerten Start des gewünschten Programms zu programmieren. Die Restzeit bis zu Programmstart wird auf dem darüberliegenden Display angezeigt (siehe „Durchführung eines Waschprogramms“).
Tasten mit Kontrollleuchten ZUSATZFUNKTIONEN: Die Taste zur Einstellung der verfügbaren Zusatzfunktionen drücken. Die entsprechende Kontrollleuchte leuchtet (siehe „Durchführung eines Waschprogramms“).
Symbole PROGRAMMABLAUF: Die Symbole zeigen die
jeweilige Programmphase (Hauptwäsche |
– Spülen |
– |
|
Schleudern – Abpumpen |
). Die Anzeige |
leuchtet auf, |
|
wenn der Zyklus abgelaufen ist. |
|
|
|
Taste mit Kontrollleuchte START/PAUSE: Sobald die grüne Kontrollleuchte auf langsames Blinklicht schaltet, drücken Sie die Taste, um den Waschgang zu starten.Nach StartdesProgramms
ist die Kontrollleuchte dauerhaft an. Um den Waschgang zu unterbrechen, drücken Sie erneut die Taste die Kontrollleuchte blinkt orangefarben. Sobald die Kontrollleuchte “LOCK”  erlischt, kann die Gerätetür geöffnet werden. Um das Programm an der Stelle, an der es unterbrochen wurde, wieder in zu starten, drücken Sie die Taste erneut.
Kontrollleuchte  LOCK: Diese zeigt an, dass die Gerätetür nicht geöffnet werden kann. Um die Gerätetür zu öffnen, muss der Waschzyklus auf Pause geschaltet werden (siehe “Durchführung eines Waschprogramms”).
Taste mit Kontrollleuchte  TASTENSPERRE: Zur Sperre bzw. Freigabe der Schaltelemente halten Sie die Taste ca. 2 Sekunden lang gedrückt. Die eingeschaltete Kontrollleuchte zeigt an, dass die Bedienblende gesperrt ist. Auf diese Weise wird verhindert, dass ein Programm aus Versehen geändert wird, (eventuell durch Kinder).
Kontrollleuchte ECO: das Symbol 
 wird angezeigt, sobald bei Änderung der Waschoptionen den Energiebverbrauch um mindestens 10% reduziert. Außerdem leuchtet die Ikone, bevor das Gerät in Standby-Modus übergeht, für wenige Sekunden auf. Bei ausgeschaltetem Gerät liegt die geschätzte Energierückgewinnung bei etwa 80%.
SPRACHÄNDERUNG
Beim ersten Einschalten der Maschine erscheint auf dem Display die erste Sprache blinkend. Neben den 3 Tasten rechts vom Display erscheinen die Symbole “ ”, “OK” und “V”. Die Sprachen wechseln automatisch alle 3’’ oder durch Drücken der Tasten neben den Symbolen “
 “ und “V”. Mit der Taste “OK” wird die Sprache bestätigt, die sich nach 2’’ fest einstellt. Wird keine Taste gedrückt, dann beginnt der automatische Sprachenwechsel nach Ablauf von 30’’ erneut.
Um die Sprache zu ändern, muss man das Gerät einund wieder ausschalten und innerhalb von 30” nach dem Ausschalten gleichzeitig die Tasten Temperatur 
 +Schleudern +Startvorwahl
  5” lang drücken; es ertönt ein kurzer Signalton und auf dem Display wird die eingestellte SpracheblinkendangezeigtDurchDrückenderTastennebenden Symbolen “
 “ und “V” kann sie Sprache geändert werden. Mit der Taste neben dem Symbol „OK“ wird die Sprache bestätigt, die sich nach 2’’ fest einstellt. Wird keine Taste gedrückt, dann wird die zuvor eingestellte Sprache nach Ablauf von 30’’ erneut angezeigt. Schalten Sie das Gerät.
17

Durchführung eines Waschprogramms
ANMERKUNG: Lassen Sie vor erstmaligem Gebrauch des DE Waschvollautomaten erst einen Waschgang ohne Wäsche, jedoch mit Waschmittel durchlaufen. Stellen Sie hierzu das
90°C-Waschprogramm ohne Vorwäsche ein.
1.EINSCHALTEN DES GERÄTES. Drücken Sie die Taste
 . Alle Kontrolllampen leuchten für 1 Sekunde auf, im Display erscheint der Schriftzug AQUALTIS; im Anschluss
schaltet die Kontrollleuchte der Taste  auf Dauerlicht und die Kontrollleuchte START/PAUSE auf Blinklicht.
2.WAHL DES WASCHPROGRAMMS. Drehen Sie den PROGRAMMWÄHLSCHALTER nach rechts oder nach links auf das gewünschte Programm; die
Bezeichnung des Programms wird im Display angezeigt; dem jeweiligen Programm ist eine Temperatur und Schleudergeschwindigkeit vorgegeben, die nur reduziert werden können.
Auf dem Display wird die Programmdauer angezeigt.
3.EINFÜLLEN DER WÄSCHE. Öffnen Sie die Gerätetür. Füllen Sie die Wäsche ein. Beachten Sie die maximale Füllmenge laut Programmtabelle.
4.DOSIERUNG DES WASCHMITTELS. Ziehen Sie die Waschmittelschublade heraus und füllen Sie das Waschmittel in die entsprechenden Kammern (siehe „ Beschreibung Ihres Gerätes“).
5.SCHLIESSEN SIE DIE GERÄTETÜR.
6.INDIVIDUALISIERUNG DES WASCHGANGS. Dies erwirken Sie über die auf dem Bedienfeld befindlichen Tasten:

 Änderung der Temperatur und/ Schleuderdrehzahl.
Das Gerät zeigt automatisch die für das eingestellte Programm vorgesehene maximale Temperatur sowie die maximale Schleudergeschwindigkeit, wenn sie kompatibel mit dem eingestellten Programm sind.
Durch Drücken der Taste 
 kann die Temperatur Schritt für Schritt herabgesetzt werden, bis auf Kaltwäsche (OFF). Durch Drücken der Taste kann die Schleudergeschwindigkeit Schritt für
Schritt herabgesetzt werden, bis auf die Abwahl des Schleudergangs (OFF). Ein weiterer Druck auf die Tasten
setzt die Einstellungen wieder auf die maximalen Werte.
! Ausnahme: Wird das Waschprogramm  eingestellt, kann die Temperatur bis auf 90° erhöht werden.
 Die Startzeitvorwahl einstellen.
Zur Vorwahl der Startzeit des eingestellten Programms drücken Sie die entsprechende Taste, bis die gewünschte Zeitverschiebung angezeigt wird. Bei der Einstellung wird die Startzeit zusammen mit der Anzeige “Start in:” und das Symbol  blinkend angezeigt. Nachdem die Startzeit eingestellt wurde, zeigt das Display das Symbol
  feststehend und das Display kehrt zur Anzeige der Dauer des eingestellten Zyklus “Ende in:” und der
Zyklusdauer zurück. Wird die Taste STARTZEITVORWAHL einmal gedrückt, dann wird die zuvor eingestellte Startzeit angezeigt.
Nach dem Start zeigt das Display die Anzeige “Start in:” und die Verzögerungszeit. Sobald die Verzögerungszeit abgelaufen ist, startet die Maschine und auf dem Display wird die Anzeige “Ende in:” und die Restzeit bis zum Zyklusende angezeigt.
Um die Startzeitvorwahl zu deaktivieren, drücken Sie die Taste, bis auf dem Display der Schriftzug OFF eingeblendet wird; das Symbol  erlischt.


 Änderung der Eigenschaften des Waschgangs.
•Drücken Sie die Taste, um die Zusatzfunktion einzustellen; im Display wird die Bezeichnung der Funktion angezeigt, und die Kontrollleuchte der jeweilgen Taste leuchtet auf.
•Drücken Sie die Taste erneut, um die Zusatzfunktion auszuschalten; im Display wird OFF angezeigt, und die Kontrollleuchte erlischt.
!Lässt sich eine Waschoption nicht mit dem gewählten Programm kombinieren, blinkt die entsprechnde Anzeige, es ertönt ein akustisches Signal (3 Signaltöne) und die Funktion wird nicht aktiviert.
!Ist die gewählte Zusatzfunktion mit einer anderen, bereits eingestellten nicht kompatibel, blinkt die Anzeige der ersten Option, wird deaktiviert und nur die zweite Funktion wird aktiviert.
!Die Zusatzfunktionen können eine Änderung der empfohlenen Ladungsmenge und/oder Waschzeit bewirken.
7.STARTEN DES PROGRAMMS. Drücken Sie die Taste START/PAUSE. Die Kontrollanzeige leuchtet und
die Gerätetür wird gesperrt (Kontrollleuchte LOCK  eingeschaltet). Während des Programmablaufs leuchten die entsprechenden Symbole auf, um die jeweils erreichte Phase anzuzeigen.
Um ein bereits laufendes Programm zu ändern, schalten Sie das Gerät auf Pause , drücken Sie hierzu die Taste START/PAUSE, wählen Sie daraufhin das gewünschte Programm und drücken Sie erneut die Taste START/ PAUSE.
Zum Öffnen der Gerätetür während eines Zyklusses drücken Sie die Taste START/PAUSE; ist die
Kontrollleuchte LOCK  ausgeschaltet, kann die Gerätetür geöffnet werden. Drücken Sie die Taste START/PAUSE erneut, um das Programm an der Stelle, an der es unterbrochen wurde, wieder in Gang zu setzen.
8.ENDE DES PROGRAMMS. Dieses wird durch die Leuchtanzeige END angezeigt. Die Gerätetür kann geöffnet werden. Blinkt die Kontrollleuchte START/ PAUSE, muss die Taste gedrückt werden, um den Waschgang abzuschließen. Öffnen Sie die Gerätetür, nehmen Sie die Wäsche heraus und schalten Sie das Gerät aus.
! Möchten Sie ein bereits in Gang gesetztes Waschprogramm löschen, halten Sie die Taste  gedrückt, bis der Zyklus unterbrochen wird und sich das Gerät ausschaltet.
Sack für Steppdecken, Vorhänge und Feinwäsche
Dank des speziellen mitgelieferten Sacks können Sie im Waschvollautomaten Aqualtis auch ihre kostbarsten und empfindlichsten Wäschestücke bei maximalem Schutz waschen. Es empfiehlt sich, diesen Sack in jedem Fall für die Wäsche wie z.B. (Steppund Daunendecken mit Synthetikbezug zu verwenden).
18
 Loading...