


Instruction booklet
TUMBLE DRYER
GB
English,1
AQUALTIS
AQC9 BF7
Contents |
GB |
Important Information, 2-3
Installation, 4
Where to put your dryer
Ventilation
Electrical connection
Levelling the tumble dryer
Before you start using your dryer
Dryer Description, 5
Open the door
The Features
Control Panel
The Display, 6
Start and Programmes, 7-12
Choosing a Programme
Special Programmes
Table of Programmes
The Controls
Laundry, 13-14
Sorting your laundry
Wash care labels
Special clothing items
Drying times
Warnings and Suggestions, 15
General safety
Save energy and respect the
Environment
! This symbol reminds you to read this instruction manual.
!Keep this instruction booklet on hand in order to refer to it when
necessary. Take it with you when you move, and, should you sell this appliance or pass it on to another party, make sure that this booklet is supplied along with the dryer so that the new owner may be informed about warnings and suggestions on how the dryer works.
! Read these instructions carefully; the following pages contain important information on installation and suggestions on how the appliance works
Maintenance and Care, 16
Switching off the electricity Clean the filter after each cycle Check the drum after each cycle
Empty the Water Container after each cycle Cleaning the Heat Pump Filter
Cleaning the dryer
Troubleshooting, 17
Service, 18
Spare parts Disposal
Hotpoint Guarantee, 19
Hotpoint After Sales Service, 20
1

Important Information
For your Condenser dryer to operate efficiently, GB you must follow the regular maintenance schedule
shown below:
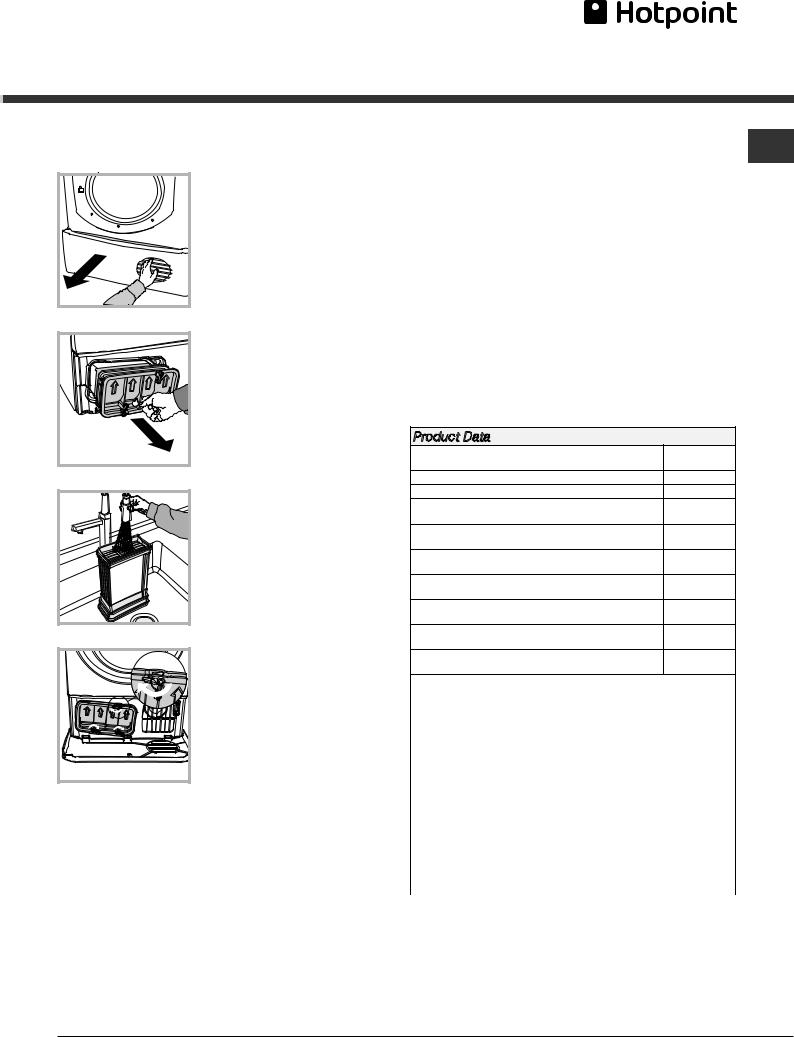
Fluff Filter – You MUST Clean the fluff filter after every drying cycle.
Step 1
Open the door of your dryer.
Failure to clean the filter after every drying cycle will affect the drying performance of your machine – It will take longer to dry and as a result will use more electricity during drying.
Water Container – You must empty the water container after every drying cycle.
2 |
Step 1
Pull the water container towards you and remove it fully from the dryer.
Step 2
Pull out the filter (using the two finger grips).
Step 3
Open the filter by releasing the clip.
Step 4
Clean any fluff deposits from the inside surface of the filter mesh.
Step 5
Refit the filter – Never run the dryer without a filter.
Step 2
Empty the Water from the
Container.
Step 3
Refit the Water Container ensuring that it is pushed fully back into position.
Failure to empty the Water Container will result in:
-The machine will stop heating (so the load may be wet at the end of the cycle).
-The ”Empty Water” light will flash to tell you that
the Container is full.
! The water bottle/clean filter light comes on when you select a programme to remind you to make sure that the water bottle is empty and that the filter is clean before starting a new cycle’
Priming the Water Collection System
When your dryer is new, the Water Container will not collect Water until the system is primed, this will take 1 or 2 drying cycles. Once primed it will collect Water
during every cycle.
2
Condenser unit - You must clean the fluff from the condenser every month!
Step 1
Open the Condenser Cover - hold the handle and pull towards you.
Step 2
Remove the condenser by rotating the 3 clips then pulling the condenser towards you. (There may be some water in the tubes this is normal).
Step 3
Flush the condenser, from the rear with water, to remove any fluff deposits.
Step 4
Refit the condenser unit - ensure that the unit is pushed in fully, all 3 clips are resecured and the positioning arrows on the front of the condenser are pointing upwards.
Failure to clean the condenser could cause premature failure of your dryer!
GB
Product Data |
|
|
Rated capacity of cotton laundry for the "standard cotton |
9.0 |
|
programme" at full load - kg |
||
|
||
Energy efficiency class |
B |
|
The weighted Annual Energy Consumption (AEc)* kWh |
615.8 |
|
This household tumble drier is a |
Automatic |
|
This household tumble drier is a |
Condenser |
|
Energy consumption full load; Edry - kWh |
5.19 |
|
Energy consumption partial load; Edry½ - kWh |
2.83 |
|
Power consumption: off-mode (Po) - Watts |
0.14 |
|
Power consumption: left-on mode (Pl) - Watts |
2.68 |
|
Duration of the 'left-on mode' for power management system - |
30 |
|
minutes |
||
|
The Standard Cotton Programme** suitable for drying normal wet cotton landry that it is the most efficient programme in terms of energy consumption for cotton used at full and partial load.
Prog. Time - weighted (Tt) full & partial load - minutes |
113 |
|
|
Full load (Tdry) - minutes |
151 |
Partial load (Tdry½) - minutes |
84 |
|
|
Condensation efficiency class |
B |
|
|
Average condensation efficiency - % |
|
|
|
full load (Cdry) |
86 |
|
|
partial load (Cdry½) |
81 |
|
|
weighted (Ct) full & partial load |
83 |
|
|
Airborne acoustical noise emissions - dB(A) re 1 pW |
69 |
|
|
This is the test cycle in accordance with Regulation 392/2012. See our website for all product fiche data: http://www.hotpoint.eu/hotpoint/.
*Consumption per year is based on 160 drying cycles of the standard cotton programme at full and partial load, and the consumption of the low-power modes. Actual energy con-
sumption per cycle will depend on how the appliance is used.
**The Standard Cotton Programme is Cottons Cupboard Dry
3
Installation
GB
Where to put your dryer
• Place your dryer at a distance from gas ranges, stoves, heaters, or cooktops because flames can damage the appliance.
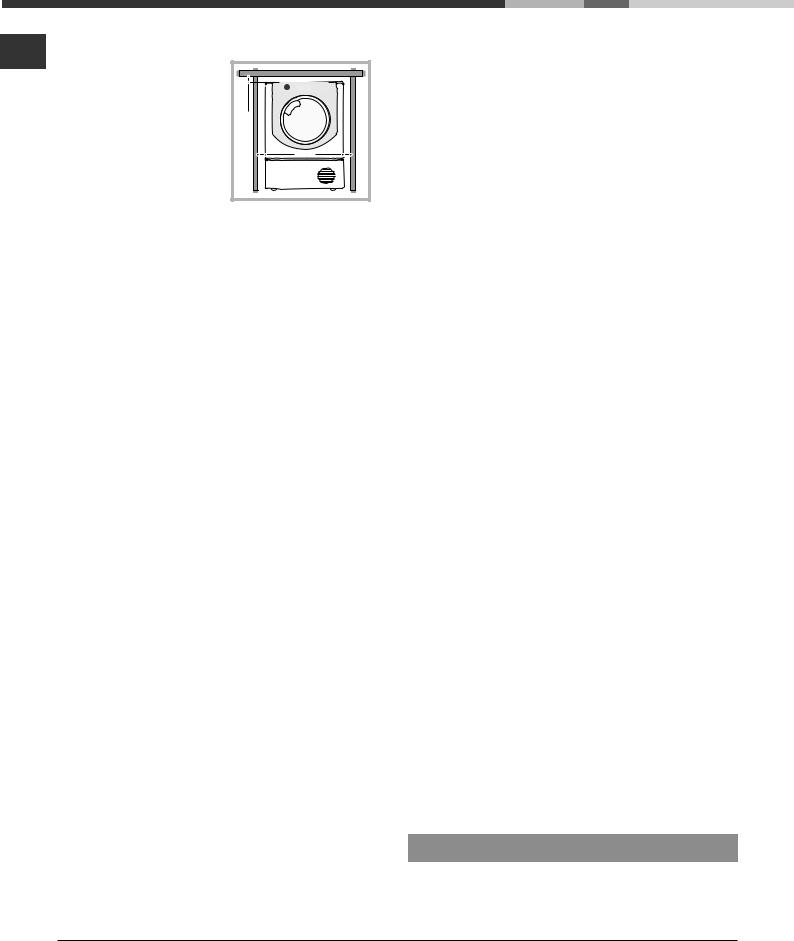
If you are going to install the appliance under a work counter, be sure to leave a 10 mm space between the top and any other objects on or above the machine and a 15 mm space between the sides and lateral furnishings or walls. This is to ensure proper air circulation.
10 mm |
|
15 |
m |
Ventilation
• When the dryer is in use, there has to be adequate ventilation. Make sure you put your dryer in an environment that is not damp and has proper air circulation throughout. Airflow around the dryer is essential to condense the water produced during the washing, the dryer will not operate efficiently in an enclosed space or cupboard.
!If using the dryer in a small or cold room some condensation will be experienced.
!We do not recommend that the dryer is installed in a cupboard but the dryer must never be installed behind a lockable door, a sliding door or a door with a hinge on the opposite side to that of the dryer door.
Water Drain
If the machine is positioned close to a drain it is possible to drain the condensed water directly without using the
waterbottle. In which case it is no longer necessary to empty the water bottle at the end of each cycle.If the Dryer is positioned above or close to a Washing Machine the same drainage can be used. Just unlink the tube indicated in figure A and connect it to the drainage.
If the drainage is further away than the length of the tube it is possible to buy and connect a tube of the same diameter and the necessary length in order to reach the drainage. To install the new tube just substitute the existing one as indicated in figure B inserting it in the same place.
!The drain tube has to be below 1 m from the bottom of the Dryer.
!Once the Dryer has been installed please assure that the drain tube is not bent or contorted.
Fig. A |
Fig. B |
Electrical connection
Make sure of the following before you insert the plug into the electrical socket:
•Ensure your Hands are dry.
•The socket must be grounded.
•The socket must be able to sustain the machine’s maximum power, which is indicated on the rating plate (see Dryer Description).
•Power voltage must be within the values indicated on the rating label (see Dryer Description).
•The socket must be compatible with the dryer’s plug. Should
this not be the case, replace the plug or the socket. ! Do not use extension cords.
! The dryer must not be installed outdoors, even if the space is
sheltered. It can be very dangerous if exposed to rain or storms.
!Once installed, the dryer’s electrical wire and plug must be within reach.
!The power cord must not be bent or squashed.
!The power cord is supplied fitted with a BS1363 plug and with a 13 amp BS1362 fuse. If it is necessary to fit a replacement fuse, it must be a 13 Amp ASTA approved to BS1362 type. WARNING: The plug must not be used without a fuse cover.
If a replacement fuse holder/cover is required, it must be of the same colour coding or wording as shown on the base of the plug. Replacements are available from authorised dealers.
Moulded plug
Changing the plug
The wires in the power cord are coloured in accordance with the following.
Green and Yellow (Earth) |
|
|
13A ASTA approved fuse to |
wire to terminal marked “E”, |
|
|
BS 1362. |
symbol x, or coloured green |
GREEN & |
|
|
and yellow. |
YELLOW |
|
|
|
BROWN |
13 ampere fuse |
|
|
|
|
|
Blue (Neutral) wire to |
|
|
Brown (live) wire to teminal |
BLUE |
CROSS-BAR |
marked “L” or coloured red. |
|
terminal marked ”N” or |
|
CORD GRIP |
|
coloured black. |
|
|
|
|
|
|
|
!If the plug being replaced is a non-rewirable type, then the cut-off plug must be disposed of safely. DO NOT leave it where it can be inserted into a socket and create a shock hazard.
!The power cord should be checked periodically and replaced by a cord specially prepared for this dryer and fitted only by authorized technicians (see Service). New or longer power cords are supplied at an extra charge by authorized dealers.
!The manufacturer denies any responsibility should any of these rules not be followed.
!If in doubt about any of the above consult a qualified electrician.
Before you start using your dryer
Once you’ve installed your dryer and before you use it, clean the inside of the drum to remove any dust that could have accumulated during transportation.
4
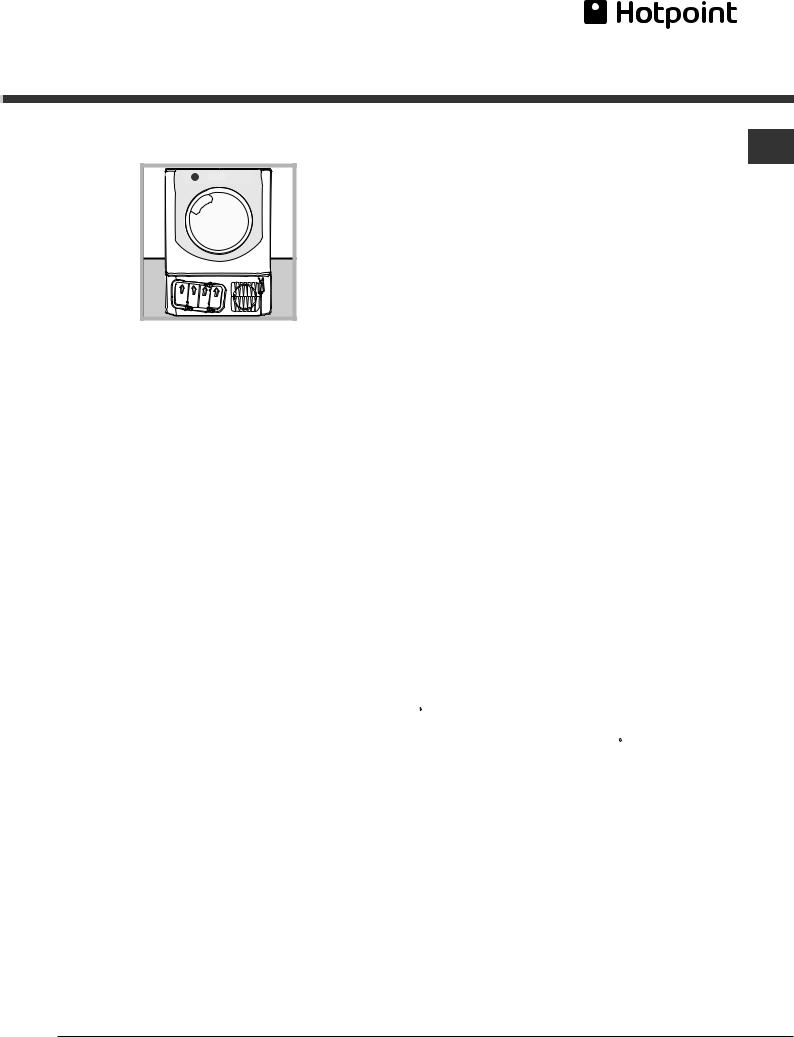
Dryer Description
To open door |
The Features |
|
|
|
|
Rating |
|
|
GB |
Pull on handle |
Plate |
|
|
|
|
Water |
|
|
|
|
container |
|
|
Model |
|
|
|
|
& Serial |
|
Filter |
|
Numbers |
|
Condenser unit |
|
|
|
Air Intake |
|
|
|
Grille |
|
(cover open) |
|
|
|
|
|
|
|
|
|
|
|
|
|
Condenser |
Control Panel |
|
|
|
cover handle |
|
|
|
(Pull to open) |
|
On/Off Button & Light |
Option Buttons and Lights |
ECO |
Start/Pause |
Programme |
|
Light |
Button & Light |
Progress Light |
|
Display Panel
Programme Knob |
|
Sensor Dry |
|
|
|
|
|
|
Child Lock |
|
|
|
|
|
|
|
|||
|
Timed Dry |
Delay |
Clean |
Empty |
Button & Light |
||||
|
|||||||||
|
|
Timer |
Condenser |
Water / |
|
||||
|
|
|
|
|
|
Light |
Clean Filter |
|
|
|
|
|
|
|
|
|
Light |
|
|
The On/Off button/ light  , if the dryer is running and this button is pressed and held for more than 3 seconds the dryer is turned off. The light signals that your dryer is in use or ready to select a programme.
The Programmes knob sets the programme: rotate until the indicator is pointing to the programme you want to select (see Start and Programmes).
The Option buttons/ lights select available options for your selected programme. The lights indicate that the option has
been selected (see Start and Programmes).
The Display Panel has three sections: Sensor Dry = Drying level, Timed dry = Drying time and Time to End / Delay start each with a corresponding selection button (see The Display).
START/PAUSE button with indicator light 
 : when the green indicator light flashes slowly, press the button to start the programme. When the cycle has started, the indicator light is illuminated in a fixed manner. To pause the programme, press the button again; the indicator light will turn orange and begin to flash again.
To restart the programme from the point at which it was interrupted, press the button again (see Start and Programmes).
The Programme Progress Lights indicate each state of the programme by turning on as appropriate (see Start and Programmes).
Note: this light also flashes amber during post care phase.
The Empty Water indicator “h2o” signals that the water container should be emptied. The light will take a few seconds to go out after replacing the empty water container; the dryer must be running for this to happen (see The Controls).
Note: if the water bottle is full the display shows “h2o” and the
 indicator flashes, the heat is turned off and your clothes will not dry.
The Empty Water / Clean Filter Light  gives a reminder before every programme, that its essential to clean the filter and empty the water container every time the dryer is used (see Maintenance and Care).
The Clean Condenser Light  gives a reminder, that its essential to clean the condenser at regular intervals (see Maintenance and Care).
The Child Lock button/light  Press and hold this button after selecting your programme and any options. This prevents the programme settings from being changed.
When the light is lit the other buttons and programme knob are disabled. Hold the button to cancel and the light will go out.
ECO Light - this light is illuminated as you select options that use less energy (see the controls).
5

The Display
The Display has three sections each with its corresponding button.
GB
Sensor Dry
After selecting a programme that has a Sensor Dry Option, press and release the button until the required dryness
sensing level is displayed. If the sensing option is not available the display will flash and the buzzer beeps three
times.
! Some drying programmes are not compatible with all sensor drying levels.
Dryness levels available
Damp dry: the most delicate level which makes sure that your clothes are not dripping wet. After a hand-wash the perfect level to then hang your clothes if you do not want to tumble dry them all the way to the end.
Iron Dry: a very delicate drying, It is useful for garments you would like to iron afterwards.
Hanger plus: just the drying status to hang delicate garments up (as curtains). Hanger Dry: just the drying level to hang the garments up.
Light dry: ideal for delicate clothes to be folded and placed into the cupboard.
Cupboard Dry: the garments are completely dry and are ready to be folded and placed in the cupboard.
Ready to Wear: used for clothes to be worn straight away once the cycle is completed.
Timed Dry
After selecting a Programme that has a Timed Dry Option, press the Timed Button to select a drying time. The display will reduce the selected time each time you press and release this button (see Start and Programmes).
Each press decreases the set time 180, 160, 120, 90, 60, 30, 20 and then repeats. If the Timed Dry option is
not available the display will flash and the buzzer beeps three times. The selected time remains displayed after the
programme starts and can be changed during the programme if you wish. ! You can either choose a sensor dry level or a drying time.
Delay Timer
After selecting a Programme that has a Delay Start Option a delay start time can be selected.
Each press of the Delay start button 

 advances the delay setting in 1 hour increments from “1h” to “24h” then
“OFF” and then after five seconds cancels the delay.
For delays of 10 hours or more the display counts down the time in hours until 10 hours, then the display shows
“9:59” and then counts down in minutes. For delays of 9 hours or less the display shows hours and minutes and
then counts down in minutes for all of the delay.
After the Start/Pause Button 

 is pressed the delay time can be changed or cancelled, if you wish. When the delay period finished the


 symbol is off and the Time to End is displayed, if you wish.
If you have chosen a timed drying the display during programming will show the drying time only in the timed drying display in the middle. After having pressed start the machine will turn the time display on and visualize the countdown of the programme time.
Time to End
If the delay icon  is off the time displayed is the Time to End of the programme running.
When timed programmes are selected the time displayed throughout the cycle is the actual time remaining. When an Automatic programme is selected the time displayed is an estimate of the time remaining.
When the programme is selected the display shows the time required to dry a full load. The remaining time is constantly monitored during the drying cycle and is updated to show the best forecast.
The time to end is displayed in hours and minutes and counts down each minute.
The colon between the hours and minutes display flashes to show that the time is counting down.
The Display also shows if there is a problem with your dryer, if this occurs the display will show F followed by a fault code number, the four option lights and the pause light will also flash Orange (see Troubleshooting).
6
 Loading...