


DMH D1013A2X-S

INSTRUCTION BOOK
Heat Pump Tumble Dryer
English
Deutsch
Español
Français
Deutsch
Italiano
Türkçe
Deutsch
Suomi
Deutsch
Dansk
Deutsch
Norsk
Deutsch
Svenska
Porteguese
Slovensko
Ελληικα
2
16
30
44
58
72
86
100
114
128
142
156
170
Dutch
184

Safety Reminders
Drain Hose Kit: Fitting Instructions
Preparing the Load
Controls and Indicators
Selecting the Programme
Door and Filter
Water Container
Operation
Cleaning and Routine Maintenance
Troubleshooting
Customer Service
Please read and follow these instructions carefully and operate the machine accordingly. This
booklet provides important guidelines for safe use, installation, maintenance and some useful
advice for best results when using your machine.
Keep all documentation in a safe place for future reference or for any future owners.
3
8
9
10
11
12
13
14
14
15
15
Please check that the following items are
delivered with the appliance:
● Instruction manual
● Guarantee card
● Energy label
02 EN
Check that no damage has occurred to
the machine during transit. If it has, call for
service by GIAS. Failure to comply with the
above can compromise the safety of the
appliance. You may be charged for a service
call if a problem with your machine is caused
by misuse.

SAFETY REMINDS
Use
●This appliance can be used by children aged from 8 years and above
and persons with reduced physical,sensory or mental capabilities or
lack of experience and knowledge if they have been given supervision or
instruction concerning use of the appliance in a safe way and understand
the hazards involved.Children shall not play with the appliance. Cleaning
and user maintenance shall not be made by children without
supervision.Children of less than 3 years should be kept away unless
continuously supervised.
● WARNING Misuse of a tumble dryer may create a fire hazard.
● This appliances is intended to be used in household and similar
applications such as:
- Staff kitchen areas in shops , offices and other working environments;
- Farm houses
- By clients in hotels, motels and other residential type environments;
- Bed and breakfast type environments"
A different use of this appliance from household environment or from
typical housekeeping functions,as commercial use by expert or trained
users, is excluded even in the above applications.
If the appliance is used in a manner inconsistent with this it may reduce
the life of the appliance and may void the manufacturer’s warranty. Any
damage to the appliance or other damage or loss arising through use
that is not consistent with domestic or household use ( even if located in a
domestic or household environment) shall not be accepted by the
manufacturer to the fullest extent permitted by law.'›
●This machine should only be used for its intended purpose as described
in this manual. Ensure that the instructions for installation and use are
fully understood before operating the appliance.
● Do not touch the appliance when hands or feet are damp or wet.
● Do not lean on the door when loading the machine or use the door to lift
or move the machine.
●Do not allow children to play with the machine or its controls.
0 EN3
● WARNING Do not use the product if the fluff filter is not in position or is
damaged; fluff could be ignited.
● WARNING Where the hot surface symbol is located the
temperature rise during operation of the tumble dryer may be in excess of
60 degrees C.
● Remove the plug from the electricity supply. Always remove the plug
before cleaning the appliance.
● Do not continue to use this machine if it appears to be faulty.
● Lint and fluff must not be allowed to collect on the floor around the
outside of the machine.
● The final part of a tumble dryer cycle occurs without heat (cool down
cycle) to ensure that the items are left at a temperature that ensures that
the items will not be damaged.
●The tumble dryer is not to be used if industrial chemicals have been used
for cleaning.
● WARNING: Never stop a tumble dryer before the end of the drying cycle
unless all items are quickly removed and spread out so that the heat is
dissipated.
●Maximum load drying weight : see energy label.
Installation
• Do not use adapters, multiple connectors and/or extensions.
• Never install the dryer against curtains and be sure to prevent items from
falling or collecting behind the dryer.
•The appliance must not be installed behind a lockable door, a sliding door
or a door with a hinge on the opposite side to that of the tumble dryer.
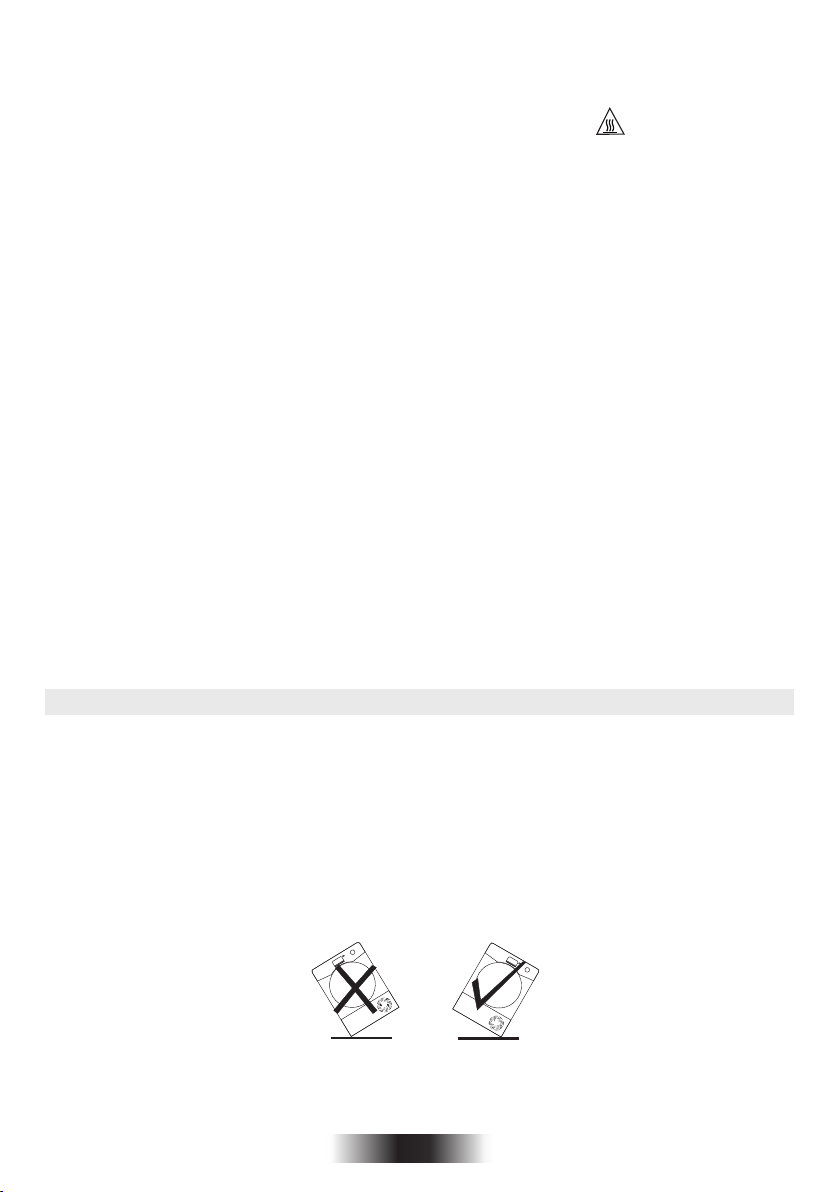
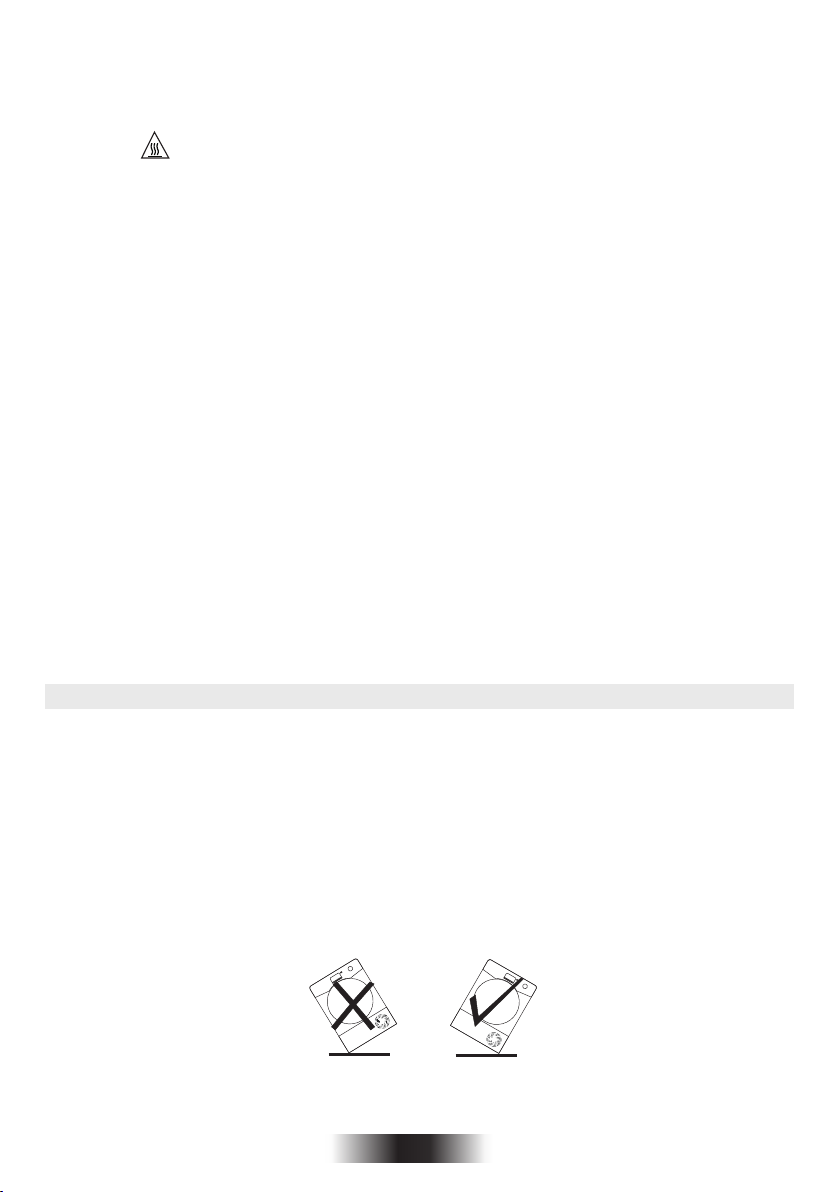
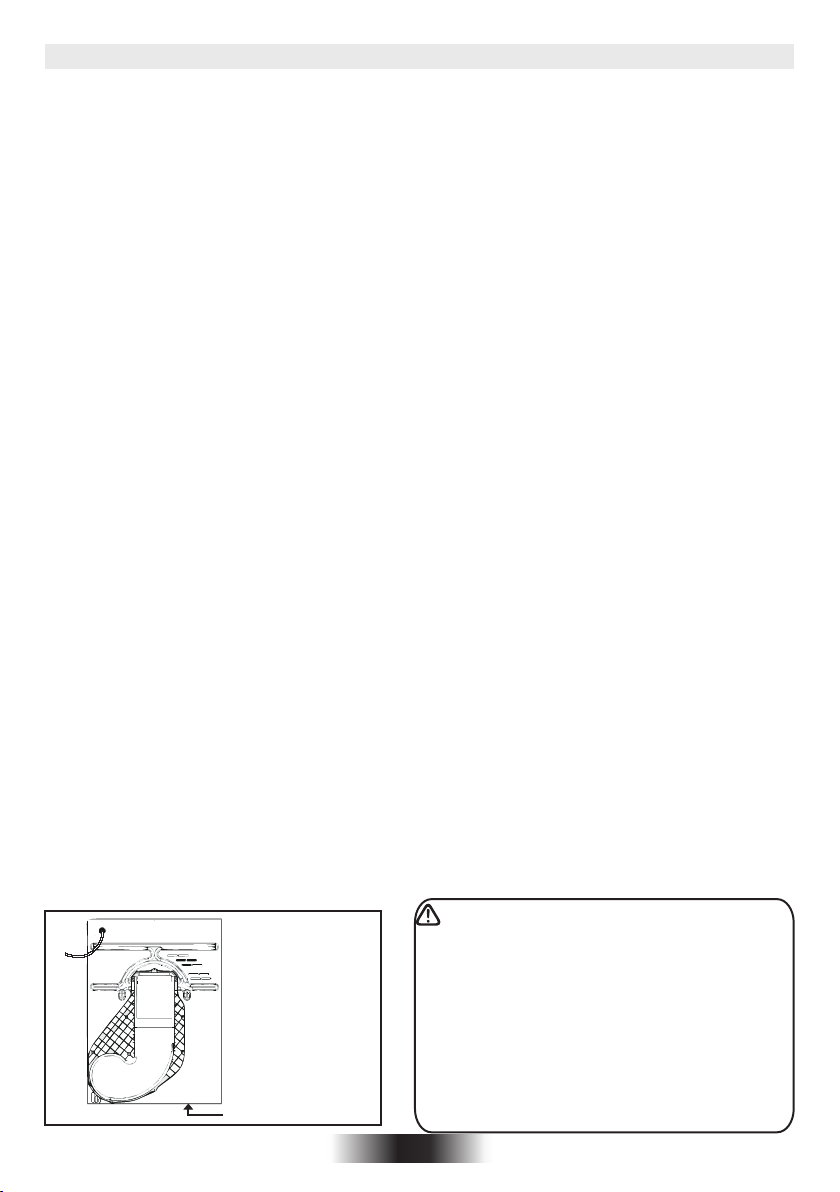
Important: During transport ensure that the dryer is in an upright position, if it's necessary you
can only flip in the side shown;
Caution: If the product is in different side, wait at least 4 hours before switching on so that the oil
can flow back into the compressor. Failure to do this could result in damage to the compressor.
0 EN4

The Laundry
•Do not dry unwashed items in the tumble dryer.
•WARNING Do not tumble dry fabrics treated with dry cleaning fluids.
•WARNING Foam rubber materials can, under certain circumstances,
when heated become ignited by spontaneous combustion. Items such as
foam rubber (latex foam), shower caps, waterproof textiles, rubber
backed articles and clothes or pillows fitted with foam rubber pads MUST
NOT be dried in the tumble dryer.
•Always refer to the laundry care labels for directions on suitability for
drying.
•Clothes should be spin dried or thoroughly wrung before they are put into
the tumble dryer. Clothes that are dripping wet should not be put into the
dryer.
• Lighters and matches must not be left in pockets and NEVER use
flammable liquids near the machine.
•Glass fibre curtains should NEVER be put in this machine. Skin irritation
may occur if other garments are contaminated with the glass fibres.
• Items that have been soiled with substances such as cooking oil,
acetone, alcohol, petrol, kerosene, spot removers, turpentine, waxes and
wax removers should be washed in hot water with an extra amount of
detergent before being dried in the tumble dryer.
•Fabric softeners, or similar products, should be used as specified by the
fabric softener instructions.
0 EN5

Ventilation
• Adequate ventilation must be provided in the room where the tumble
dryer is located to prevent gases from appliances burning other fuels,
including open fires, being drawn into the room during operation of the
tumble dryer.
• Installing the rear of the appliance close to a wall or vertical surface.
•There should be a gap of at least 12 mm between the machine and any
obstrubtions.The inlet and outlet should be kept clear of obstruction.To
ensure adequate ventilation the space between the bottom of the
machine and the floor must not be obstructed.
• Check regularly that the air flowing through the dryer is not restricted.
• Check frequently the fluff filter after use, and clean, if necessary.
•Prevent items from falling or collecting behind the dryer as these may
obstruct the air inlet and outlet
• NEVER install the dryer up against curtains.
• In cases where the dryer is installed on top of a washing machine, a
suitable stacking kit must be used according to the follow configuration.
-Stacking kit Mod 35100019: for minimum washing machine depth 49 cm
-Stacking kit Mod 35900120: for minimum washing machine depth 51 cm
The stacking kit shall be one of that above, obtainable from our spare
service.
The stacking kit shall be one of that above, obtainable from our spare
service.
The instructions for installation and any fixing attachments, are provided
with the staking kit.
Do not install the product in a low
temperature room or in a room where there is
a risk of frost occurring. At temperature
around freezing point the product may not be
able to operate properly: there is a risk of
damage if the water is allowed to freeze in
the hydraulic circuit (valves, hoses, pumps).
For a better product performance the
ambient room temperature must be between
+2°C and +35°C. Please note that operating
Air Outlets in the Base
in cold condition (between +2 and +15°C)
might simply some water condensation and
0 EN6
water drops on floor.
0 EN6
Environmental Issues
Electrical Requirements
● A ll p ac ka gi ng ma t er i a l s us e d ar e
environmentally-friendly and recyclable. Please
h e l p di s po s e o f t h e p a ck ag i n g vi a
environmentally-friendly means. Your local council
will be able to give you details of current means of
disposal.
● To ensure safety when disposing of an old tumble
dryer disconnect the mains plug from the socket,
cut the mains power cable and destroy this
together with the plug. To prevent children shutting
themselves in the machine break the door hinges
or the door lock.
European Directive 2012/19/EU
This appliance is marked according
to the European directive 2012/19/EU
on Waste Electrical and Electronic
Equipment (WEEE).
WEEE contains both polluting substances (which
can cause negative consequences for the
environment) and basic components (which can
be re-used). It is important to have WEEE
subjected to specific treatments, in order to
remove and dispose properly all pollutants, and
recover and recycle all materials.
Individuals can play an important role in ensuring
that WEEE does not become an environmental
issue; it is essential to follow some basic rules:
- WEEE should not be treated as household
waste.
- WEEE should be handed over to the relevant
collection points managed by the municipality or
by registered companies. In many countries, for
large WEEE, home collection could be present.
Tumble dryers are supplied to operate at a
voltage of 220-240V, 50 Hz single phase.
Check that the supply circuit is rated to at least
6 A.
Electricity can be extremely dangerous.
This appliance must be earthed.
The socket outlet and the plug on the
appliance must be of the same type.
Do not use multiple adapters and/or
extension leads.
The plug should be accessible for
disconnection after the appliance has been
installed.
CE Appliance complies with European
Directive 2004/108/EC, 2006/95/EC and
subsequent amendments.
You may be charged for a service call if a
problem with your machine is caused by
incorrect installation.
If the mains cord on this appliance is
damaged, it must be replaced by a special cord
which is ONLY obtainable from the spares
service. It must be installed by a competent
person.
Do not plug the machine in and switch it
on at the mains until the installation is
completed.For your safety, this dryer must be
correctly installed. If there is any doubt about
installation, call GIAS Service for advice.
In many countries, when you buy a new appliance,
the old one may be returned to the retailer who has
to collect it free of charge on a one-to-one basis, as
long as the equipment is of equivalent type and
has the same functions as the supplied equipment.
GIAS Service
● To ensure the continued safe and efficient
operation of this appliance we recommend that
any servicing or repairs are only carried out by an
authorised GIAS service engineer.
0 EN7
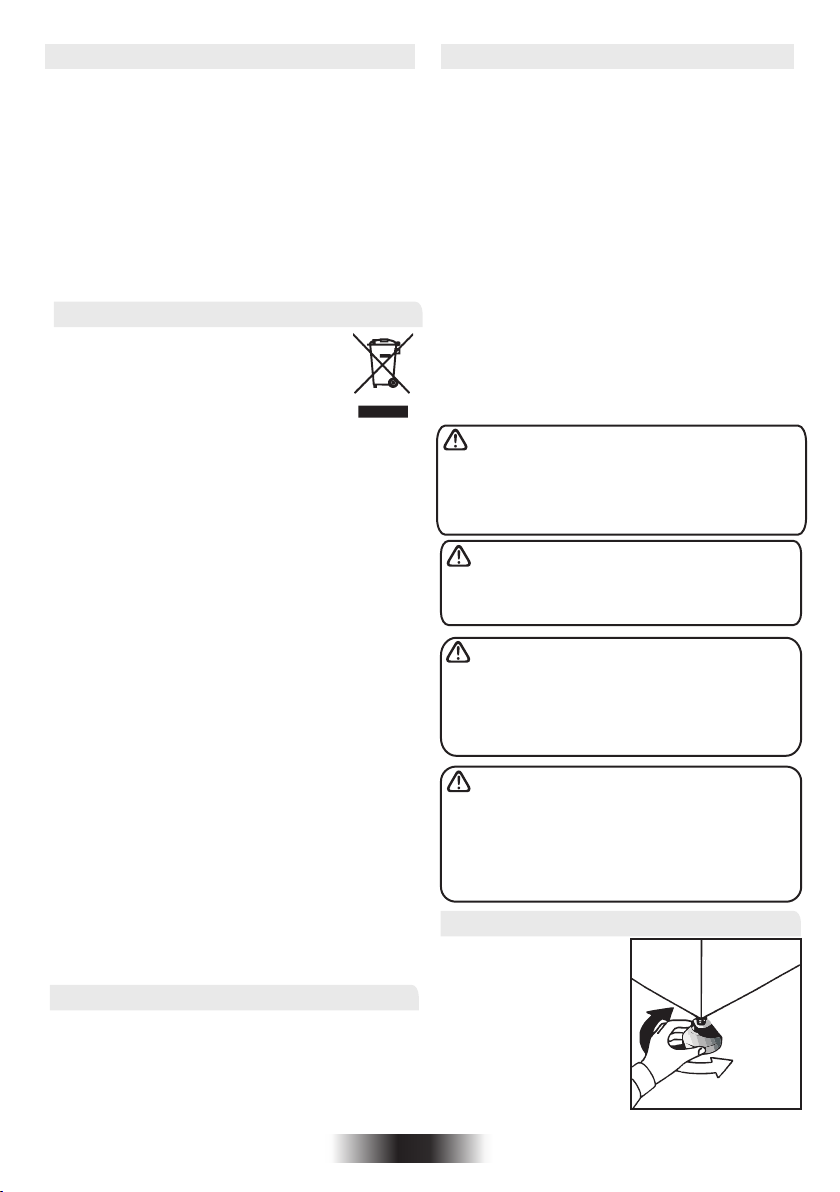
Adjusting the Feet
Once the machine is
in place the feet
should be adjusted to
e n s u re t h at t h e
machine is level.
DRAIN HOSE : FITTING INSTRUCTIONS
To avoid emptying the water container after each
drying cycle, the water can be discharged directly
to a waste water drain pipe (the same drainage
system as household sinks). Water Bye-Laws
prohibit connection to a surface water drain. The
waste water drain pipe should be located adjacent
to the tumble dryer.
The kit consists of:1 hose and 1 tap.
WARNING! Switch off and remove the
tumble dryer plug from the electricity supply
before carrying out any work.
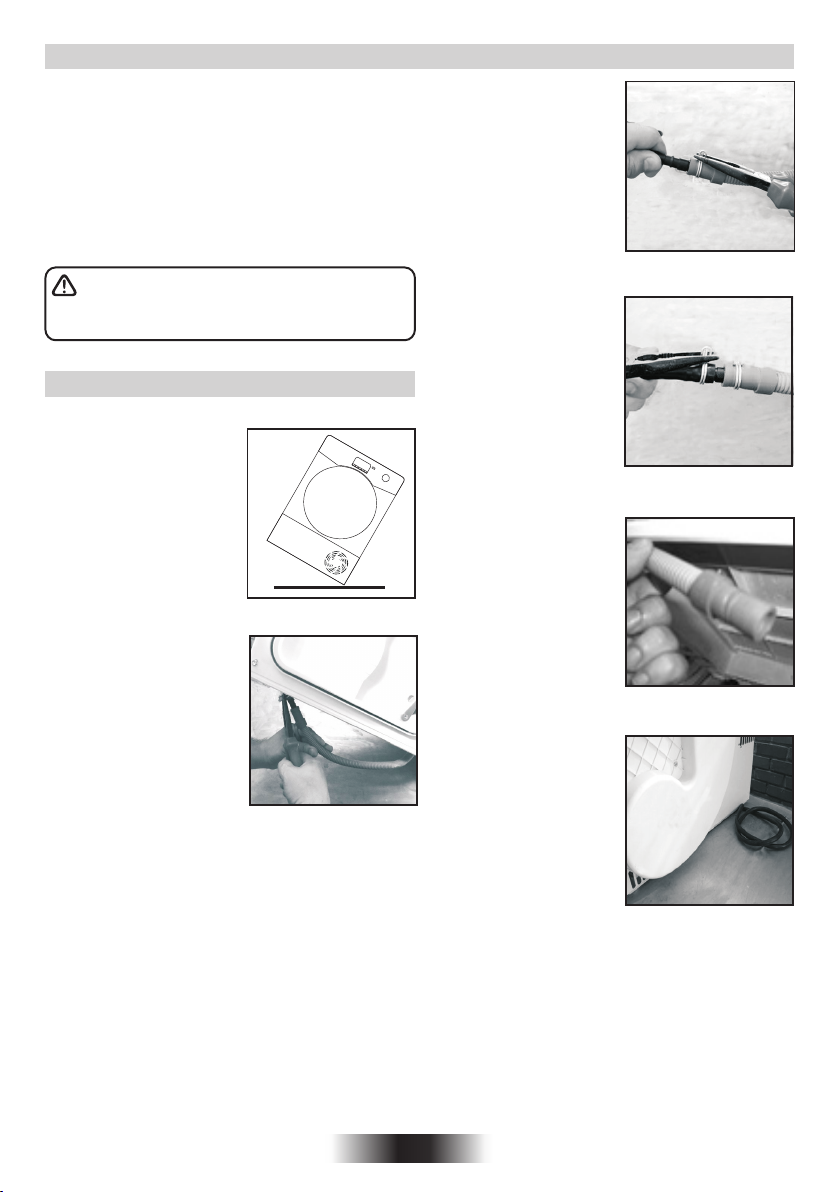
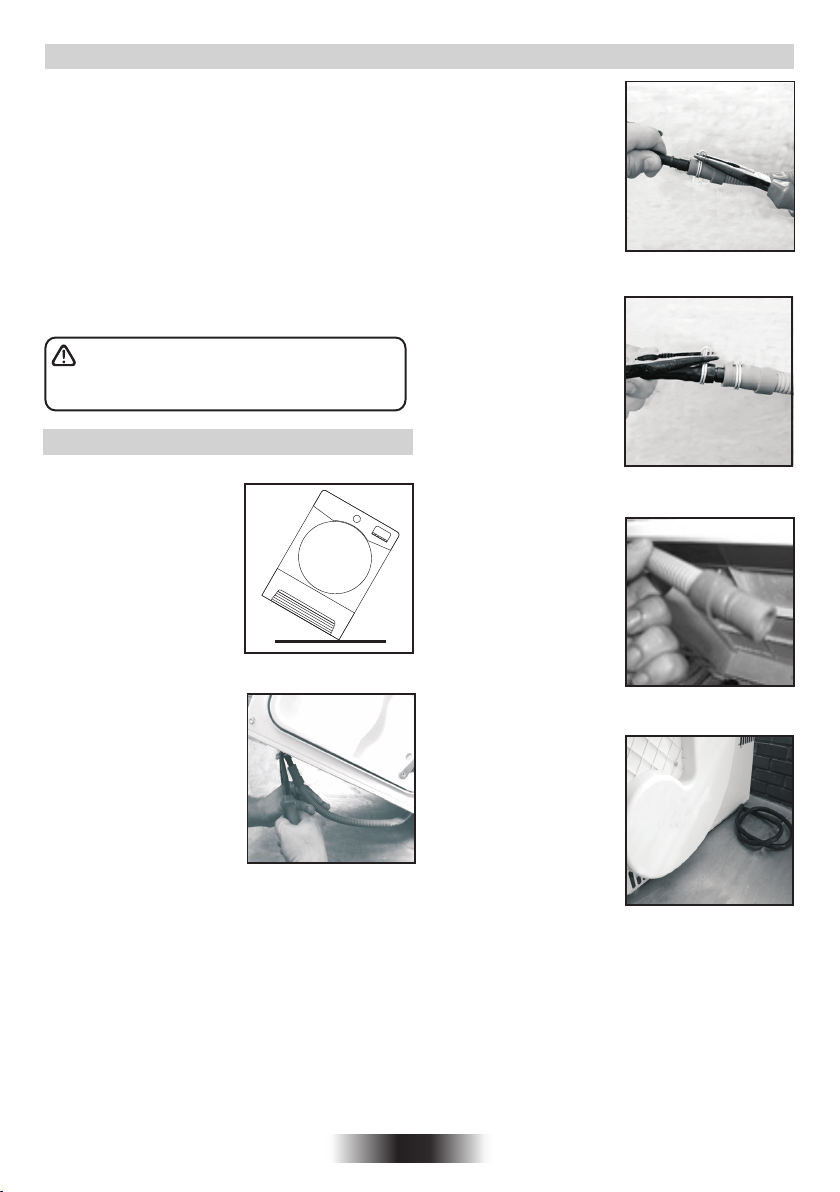
Fit the Hose as Follows:
1.Flip the machine
slowly to the right side.
4. Attach the black
hose from the kit,
(using the connector
a n d p i p e c l i p s
supplied), to the hose
rem o ved from the
bridge connection.
5. Once the machine is
in place, check the
bottom to ensure that
the new hose does not
kink when pushing the
tumbl e d r y e r into
position.
2. The waste water
pipe is situated at the
right-hand side of the
machi n e ( see the
picture). A grey hose
connects to the bridge
at the left hand side of
the machine. Using
pliers, remove the pipe
retaining clip from the
bridge.
3. Pull the hose off the
bridge connection.
6. Connect the new
drain hose to the waste
Water pipe.
7. Connect to the
m a in s e l e ct r ic i ty
supply.
Caution: If the product
is in different side, wait
at least 4 hours before
switching on so that the
oil can flow back into
t h e c o m p r e s s o r.
Failure to do this could
result in damage to the
compressor.
0 EN8
PREPARING THE LOAD
Before using the tumble dryer for the first time:
Please read this instruction book thoroughly.
Remove all items packed inside drum.
Wipe the inside of the drum and door with a damp
cloth to remove any dust which may have settled in
transit.
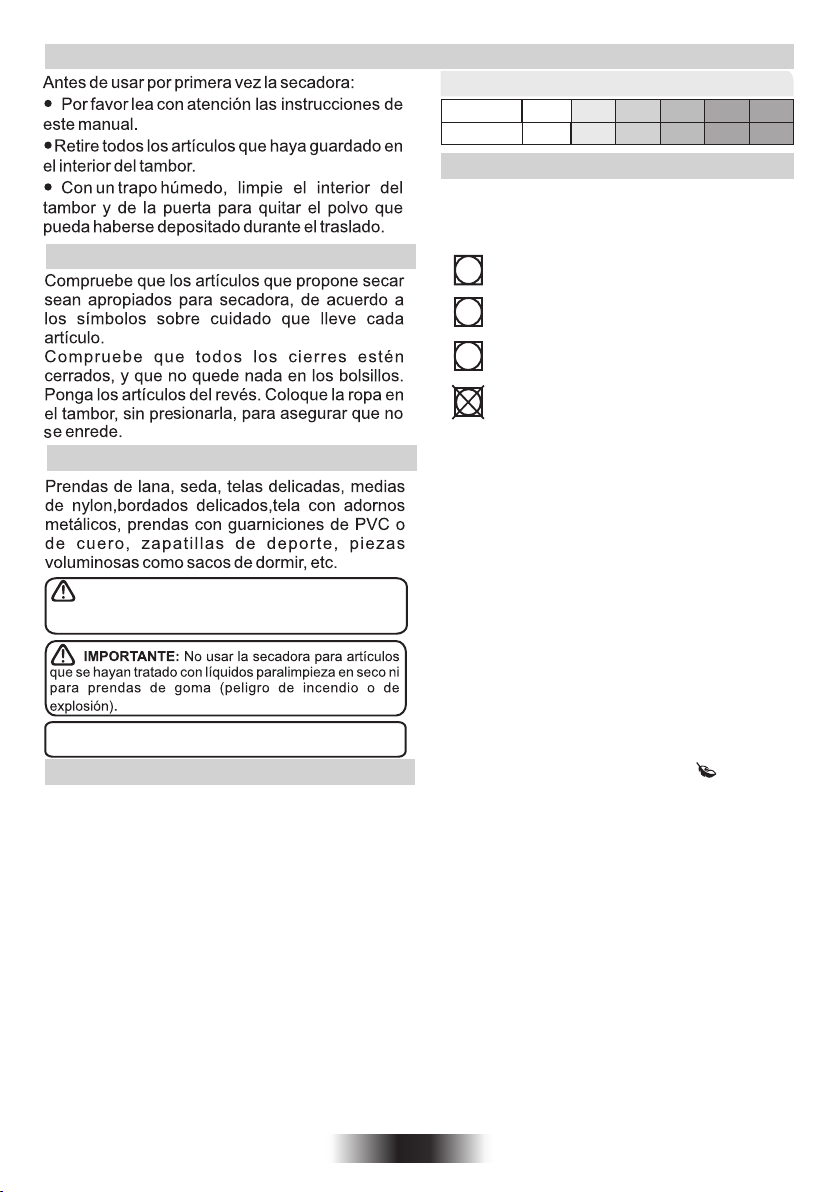
Clothes Preparation
Make sure that the laundry you are going to dry is
suitable for drying in a tumble dryer, as shown by
the care symbols on each item.
Check that all fastenings are closed and that
pockets are empty. Turn the articles inside out.
Place clothes loosely in the drum to make sure
that they don't get tangled.
Do Not Tumble Dry:
Woollens, silk, delicate fabrics, nylon stockings,
delicate embroidery, fabrics with metallic
decorations, garments with PVC or leather
trimmings, training shoes, bulky items such as
sleeping bags, etc.
IMPORTANT: Do not dry articles which have
been treated with a dry cleaning fluid or rubber
clothes (danger of fire or explosion).
During the last 15 minutes the load is always
tumbled in cool air.
Energy Saving
Only put into the tumble dryer laundry which has
been thoroughly wrung or spin-dried. The drier the
laundry the shorter the drying time thus saving
electricity.
ALWAYS
•Try to dry the maximum weight of laundry, this will
save time and electricity.
•Check that the filter is clean before every drying
cycle.
NEVER
• Exceed the maximum weight, this will waste time
and electricity.
•Put dripping wet items into the tumble dryer, this
may damage the appliance.
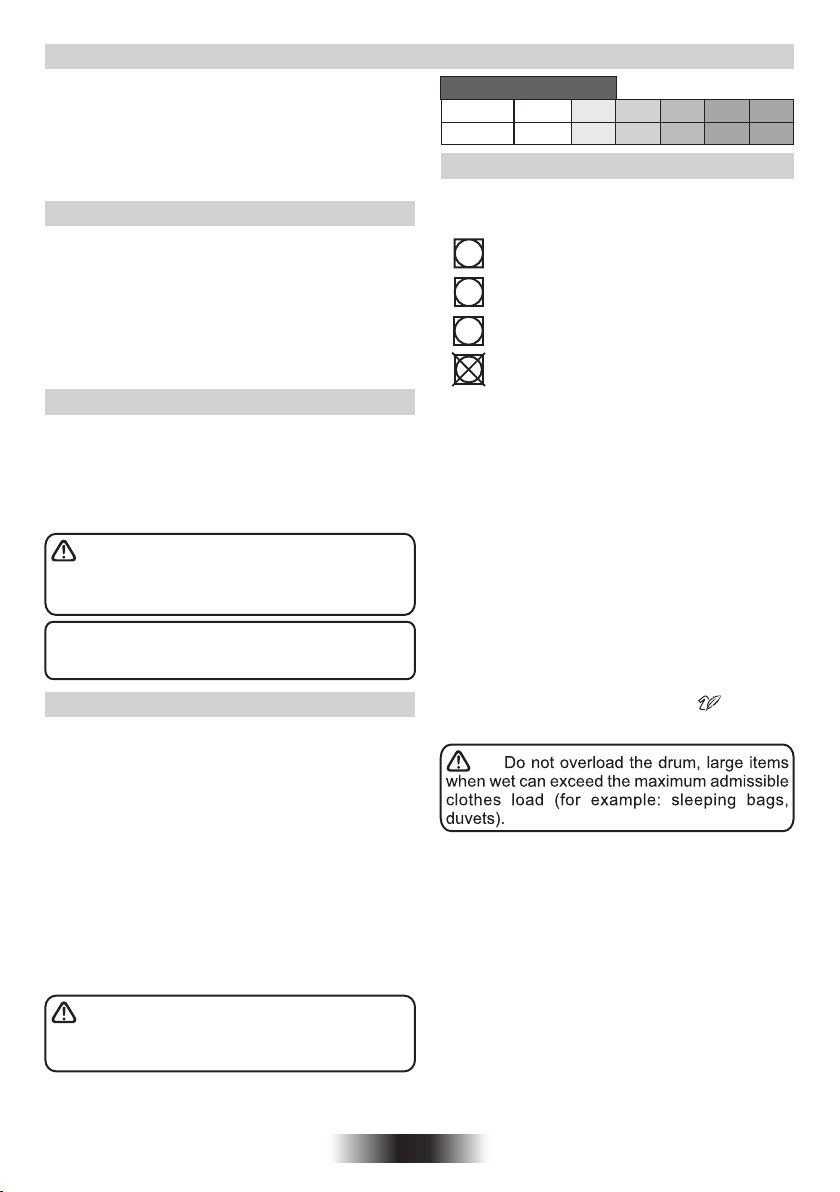
Do not overload the drum, large items when
wet can exceed the maximum admissible clothes
load (for example: sleeping bags, duvets).
Maximum Drying Weight
Max.
Cottons
Synthetics
Max.
10 Kg
4 Kg
9 Kg
4 Kg
8 Kg
4 Kg
7 Kg
3,5 Kg
6 Kg
3 Kg
Sort the Load as Follows
• By care symbols
These can be found on the collar or inside seam:
Suitable for tumble drying.
. .
Tumble drying at high temperature.
.
Tumble drying at low temperature only.
Do not tumble dry.
If the item does not have a care label it must be
assumed that it is not suitable for tumble drying.
● By amount and thickness
Whenever the load is bigger than the dryer
capacity, separate clothes according to
thickness (e.g. towels from thin underwear).
•By type of fabric
Cottons/linen: Towels, cotton jersey, bed and
table linen.
Synthetics: Blouses, shirts, overalls, etc. made
of polyester or polyamid, as well as for
cotton/synthetic mixes.
•By drying level
Sort into: iron dry, cupboard dry, etc. For delicate
articles press the Delicates button to select
low drying temperature.
0 EN9
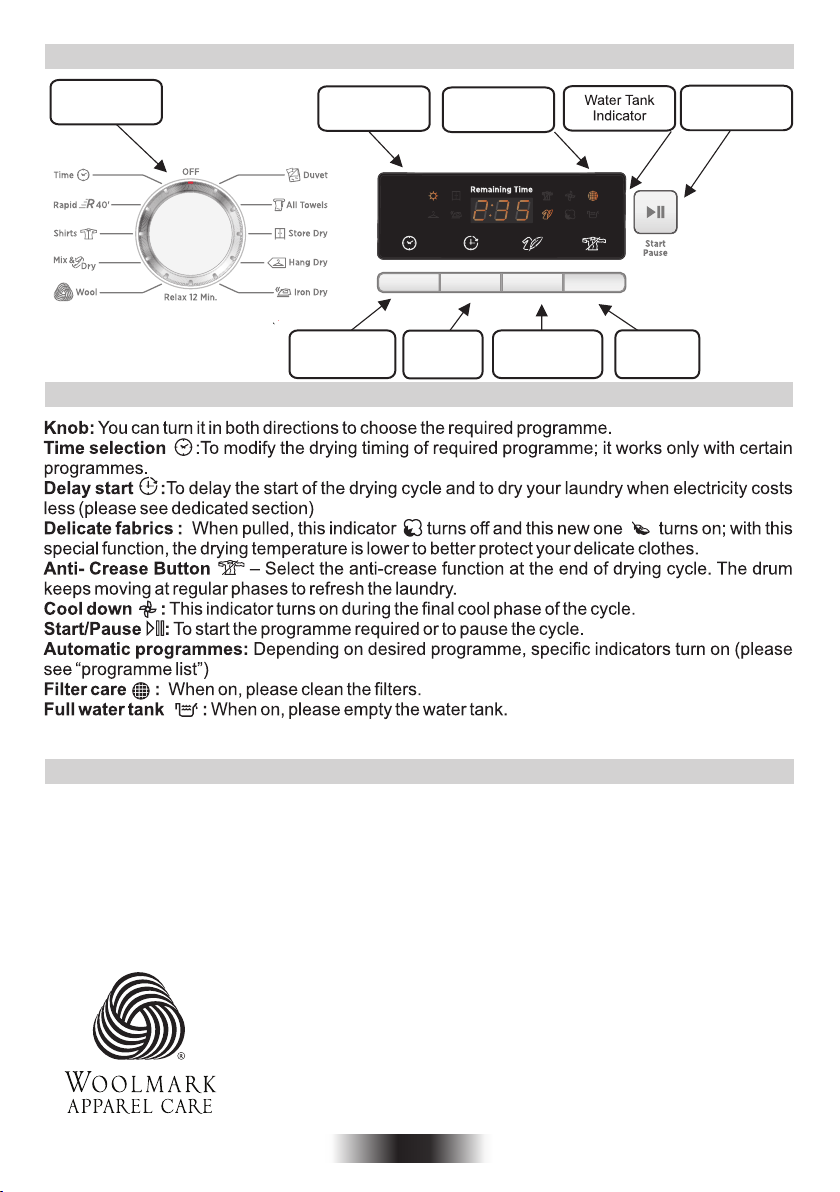
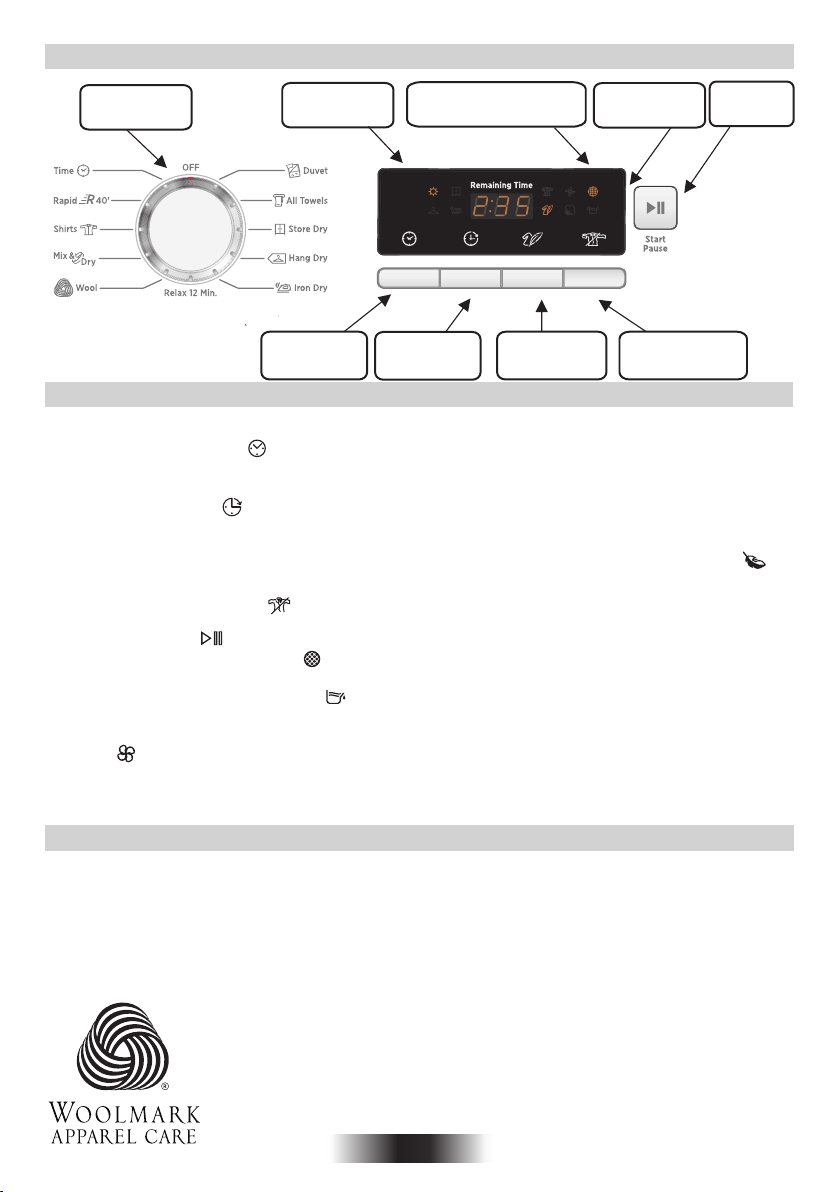
CONTROLS AND INDICATORS
Programme
Selector
Programme
Display
Time Selection
Button
Control Panel and Indicator Lights
Filter Care
Delay Start
Button
Indicator
Acrylic Synthetic
Button
Anti-Crease
Button
Start/Pause
Button
SELECTING THE PROGRAMME
The Candy Sensor Dry machine gives many options for drying the laundry to suit all circumstances.
The table on the next page lists the programmes and the function of each programme.
Note:
The sensor may not detect a small load of small articles. For small loads and separate items or predried fabrics with low moisture content, use the timed programmes. If the sensor does not detect the
item the dryer will only operate for 10 minutes before going into cooldown. If the load is too large or
too wet to tumble dry the dryer will automatically go into cooldown after approximately 3 hours. In
these cases we advise to use a time cycles between 30 and 75minutes depending on the load size
and dryness required, and select high or low heat depending upon the fabric type.
The wool drying cycle of this machine has been approved by The Woolmark
Company for the drying of machine washable wool products provided that the
products are washed and dried according to the instructions on the garment label
and those issues by the manufacturer of this machine. .
M1530
In UK, Eire, Hong Kong and India the Woolmark trade mark is a Certification
trade mark.
10 EN
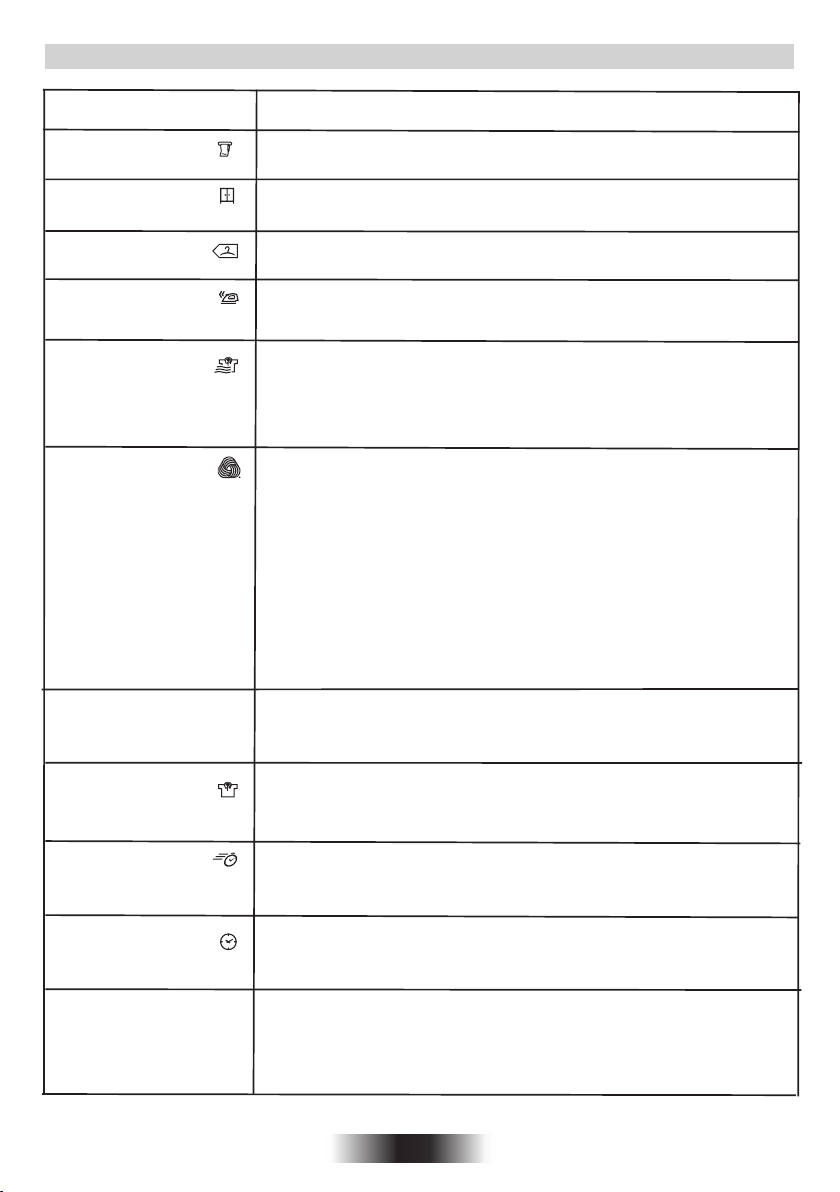
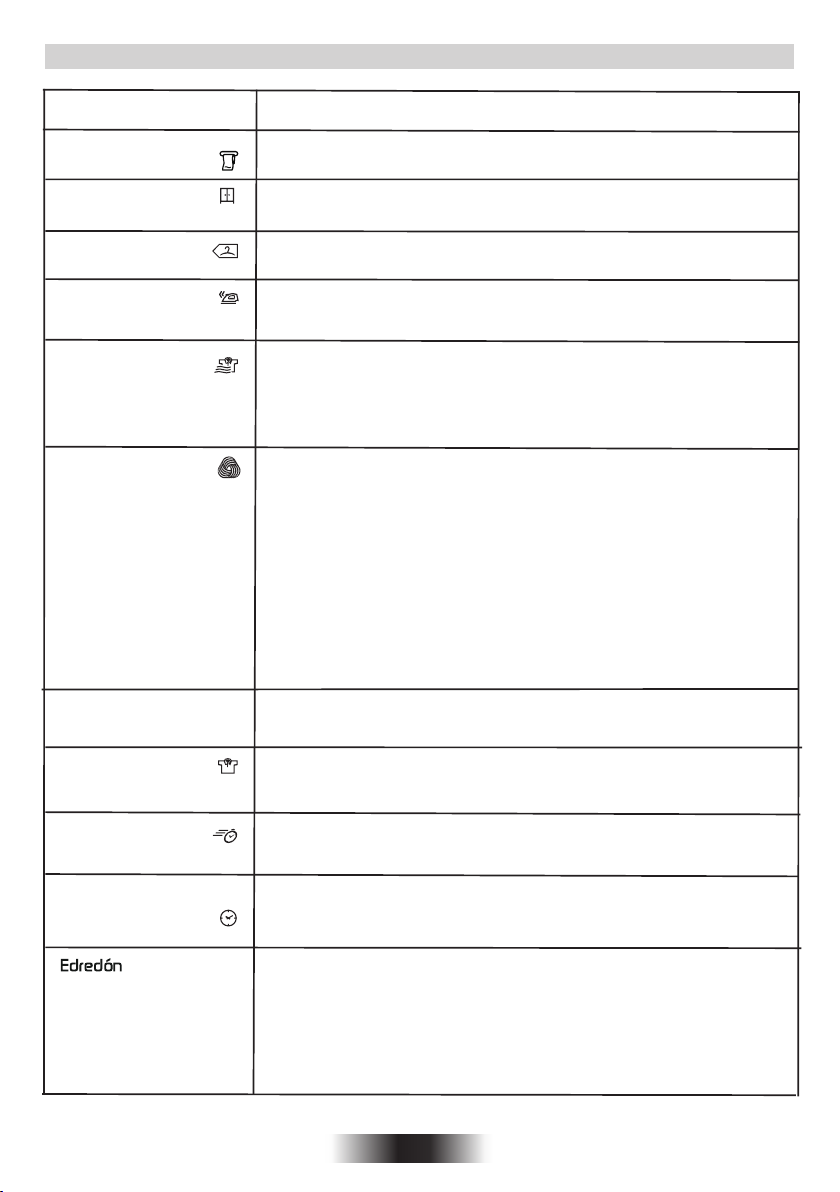
SELECTING THE PROGRAMME
PROGRAMME
All Towels
Store Dry
Hang Dry
Iron Dry
Relax 12 Min.
Wool
IDEAL FOR
Clothes you want completely dryed, e.g. towels, bathrobes, table clothes
or sheet. Time: around 3h.
Clothes you want to fold and store without ironing, e.g. shirts in mixed fabrics,
socks, baby clothes. Time: around 2h and 45 min.
Clothes you don’t need to iron, but just hang after the drying cycle. Time:
around 2h and 30 min.
Leave clothes slightly damp to allow easier ironing. Time: around 1h and
50 min.
Clothes you just need to refresh. Good for items of clothing which have
been left prior to ironing or if they have been dried outside or on radiators.
This programme has a specific Anti-Crease function that relaxes fibres and
makes easier ironing. Time: 9 min + 3 min cool down.
Woolen clothes: the program can be used to dry up to 1 kg of laundy
(around 3 jumpers). It is recommended to reverse all clothes before
drying. Timing can change due to dimensions and thickness of load
and to spinning chosen during washing. At the end of the cycle,
clothes are ready to be worn, but if they are more heavy, edges can
be a bit wet: it is suggested to dry them naturally. It is recommended
to unload clothes at the very end of the cycle. Attention: felting
process of wool is irreversible; please dry exclusively clothes with
symbol (symbol "ok tumble"); this program is not indicated for
acrylic clothes.
Mix & Dry
Shirts
Rapid 40
Time
Duvet
To dry mixed cotton and synthetic clothes: save time and no need to
separate the washing and dry them in different cycles. Time: around 2h
(max 4 kg).
To dry shirts both cotton and synthetic fabrics. Time: 1h for 2kg of synthetic
shirts (around 10 shirts); 1h and 20 min for 3 kg of cotton shirts (around 10
shirts).
For dry, refreshed and ready to dress clothes in onyl 40 minutes. Sensor
system keeps under control the temperature to have always the best result.
Max 2 kg.
If you want to choose drying times, from 30 to 180 minutes. By selecting “20
min” you choose a “cool programme”, ideal to refresh clothes and to remove
eventual smells.
For single duvet or quilted jackets; please do not dry double or bigger duvet. Please do
not dry damaged items as filling may block filters and air duct. This programme works
for around 2h, but time can change according to dimensions, density of load or washing
spin speed. At the end of the cycle, the duvet is ready for use; if some parts are slightly
wet, please shake the load and re-start the programme for few minutes. If you need to
dry a duvet filled with synthetic fabrics, please push “Delicate fabrics” button.
11 EN
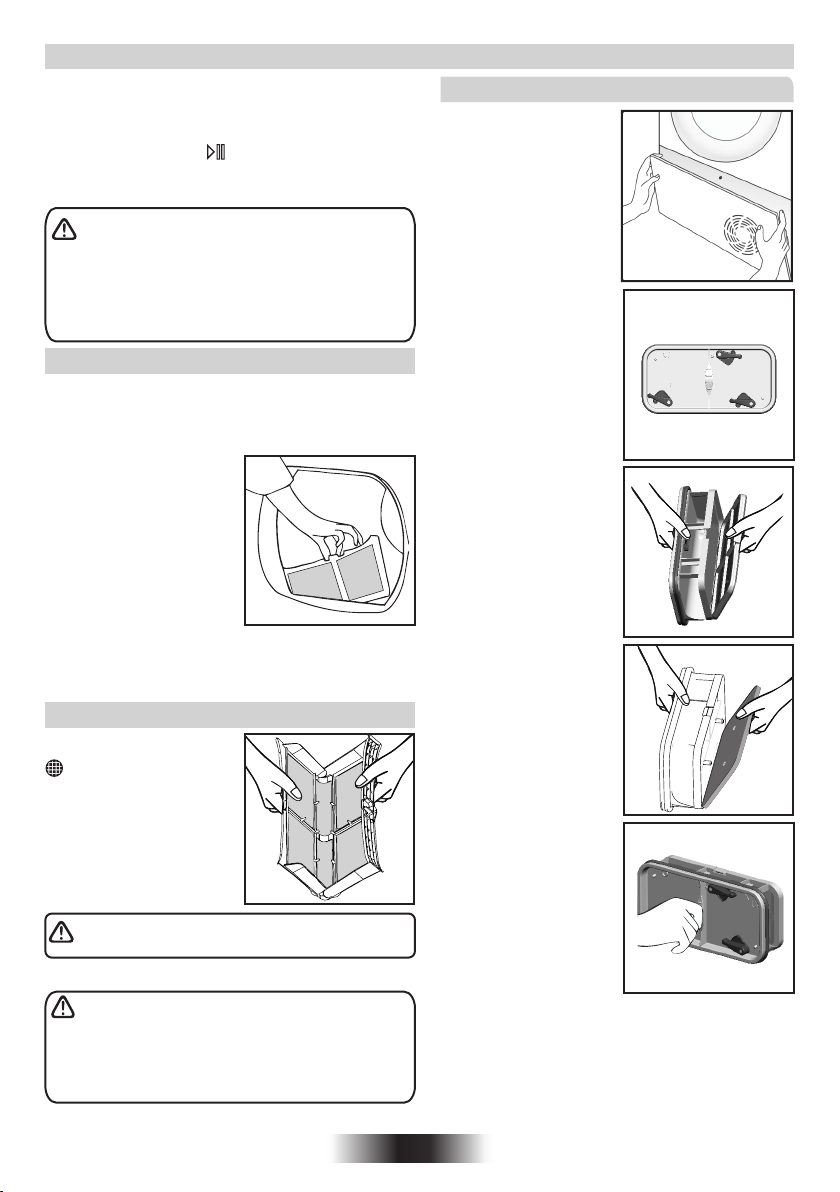
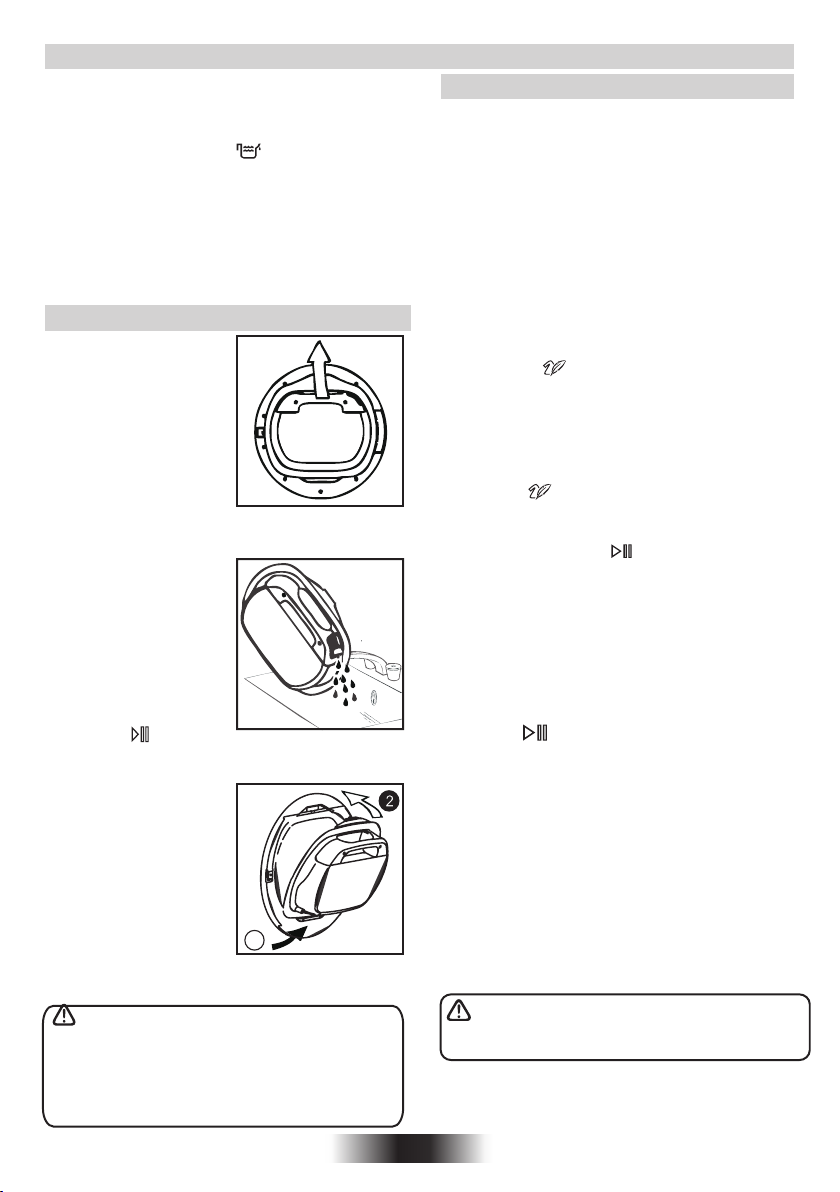
DOOR and FILTER
Pull on handle to open the door.
To restart the dryer, close the door and press
Start / Pause button.
To Clean the Condenser Filter
1 . R e m o v e t h e
kickplate.
WARNING! When the tumble dryer is in use
the drum and door may be VERY HOT. Never
stop a tumble dryer before the end of the drying
cycle unless all items are quickly removed and
spread out so that the heat is dissipated.
Filter
IMPORTANT: To maintain the efficiency of the
dryer check that the fluff filter is clean before
each drying cycle.
1 . P u l l t he f il te r
upwards.
2. Open filter as shown.
3. Gently remove lint
using a soft brush or
your fingertips.
4 . S n ap th e f i lt er
together and push
back into place.
Filter Care Indicator
Lights when the
filter needs cleaning.
If the laundry is not
drying check that the
filter is not clogged.
2. Turn the two locking
levers anti-clockwise
and pull out the front
cover.
3. Gently remove the
filter frame and clean
any dust or fluff with a
cloth from the filter. Do
not use water to clean
the filter.
4. Remove the sponge
gently from its place
and then wash the
sponge by holding it
under a running tap
turning it so to remove
any dust or fluff.
5. Refit the front cover
ensuring it is in the
c o rr e ct w a y ( a s
indicated by the arrow)
and pushed firmly into
place. Lock the two
levers by turning them
clockwise.
6. Refit the kickplate.
DO NOT USE WATER TO CLEAN THE FILTER.
WARNING! If you open the door mid cycle,
before the cool-down cycle has completed,the
handle may be hot. Please use extreme caution
when attempting to empty the water reservoir
during the cycle.
12 EN
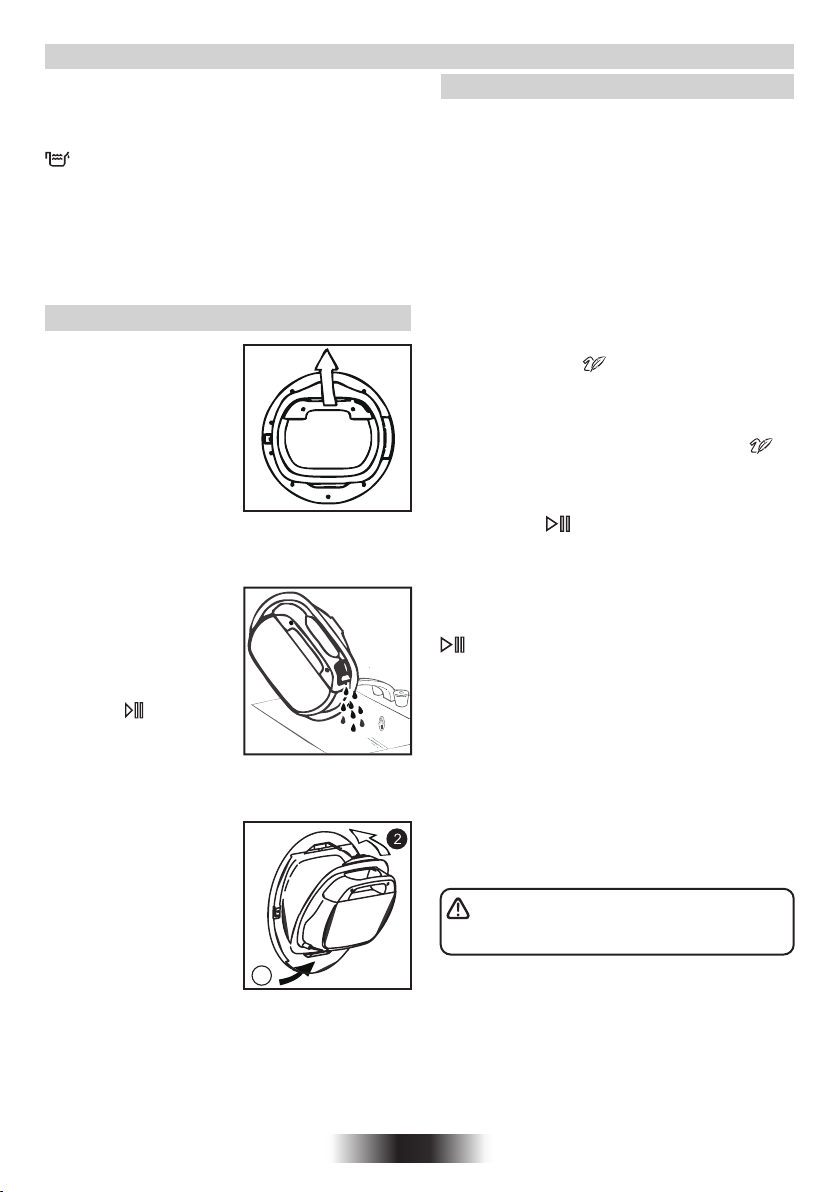
WATER CONTAINER
The water removed from the laundry during the
drying cycle is collected in a container inside the
door of the dryer. When the container is full the
indicator on the control panel will light, and the
container MUST be emptied. However, we
recommend that the container is emptied after
each drying cycle.
NOTE: Very little water will collect during the first
few cycles of a new machine as an internal
reservoir is filled first.
To Remove the Container
1. Gently pull out the
water container holding
the handle.
When it is full the
water container will
weigh about 6 kg.
2 . Ti l t t h e w a t e r
container to empty the
water out through the
spout.
When empty, replace
the water container
back as shown; first
insert the base of the
container into position
as shown then gentle
push the t o p i n t o
position.
3. Press Button to
restart the cycle.
NOTE: If you have the
option of drainage near
to the dryer you can use
the discharge kit to
provide a permanent
drainage for the water
c ol l e c t e d i n t he
container of the dryer.
This means that you
don't have to empty the
water container.
1
OPERATION
1. Open the door and load the drum with
laundry. Ensure that garments do not hinder
closure of the door.
2. Gently close the door pushing it slowly until
you hear the door 'click' shut.
3. Turn the Programme Selector dial to select
the required drying programme (see
Programme Guide).
4. If drying synthetics, acrylics or delicate
items, press the button to reduce the
heat level.
The indicator will light up when the machine is
in low heat setting. To deselect in the first few
minutes of the programme, press the
button , after this time reset the machine to
change the setting.
5. Press the button. The dryer will start
automatically and the indicator above the
button will be continuously lit.
6. If the door is opened during the programme
to check the laundry, it is necessary to press
to recommence drying after the door has
been closed.
7. When the cycle is nearing completion the
machine will enter the cool down phase, the
clothes will be tumbled in cool air allowing the
load to cool down.
8. Following the completion of the cycle the
drum will rotate intermittently to minimize
creasing. This will continue until the machine
is switched OFF or the door is opened.
Do not open the door during the automatic
programs in order to obtain a proper drying.
13 EN
OPERATION
Drum capacity 115
Maximum load See energy label
Height 85 cm
Width 60 cm
Depth 60 cm
Energy class See energy label
Power consumption of off-mode 0,20 W
Power consumption of on-mode 0,75 W
Delay Start Function
The Delay Start Function allows the user to delay the start of the drying cycle by 1 to 24 hours.
When the function is first selected the display will show a delay of 1 hour, subsequent presses of
the button will increase the delay with 1 hour steps.
To commence the programme press and the appliance will complete the drying cycle at the
end of this time. The indicator light will flash to indicate that the start delay is in progress.
Cancelling and Resetting the Programme
To cancel a programme press the button for 3 seconds. In the TIME CONTROL display 0:00
Light will flash to indicate that it has been reset.
CLEANING AND ROUTINE MAINTENANCE
Cleaning the Dryer
●Clean the filter and empty the water container
after every drying cycle.
●Regularly clean the condenser.
●After each period of use, wipe the inside of the
drum and leave the door open for a while to
allow circulation of air to dry it.
● Wipe the outside of the machine and the door
with a soft cloth.
● DO NOT use abrasive pads or cleaning
agents.
● To prevent the door sticking or the build up of
fluff clean the inner door and gasket with a
damp cloth after every drying cycle.
WARNING! The Drum, door and load may
be very hot.
Drying Guide
The standard cycle HANG DRY ( ) is the most
energy efficient and best suited for drying normal
wet cotton laundry.
The table in last page shows the approximate time
and energy consumption of the main drying
programmes.
Drying Guide
Information for Test Laboratory
EN 61121 Programme
-DRY COTTON
-IRON DRY COTTON
-EASY-CARE TEXTILE
Programme To Use
-HANG DRY
-IRON DRY
-HANG DRY + SYNTHETIC
IMPORTANT Always switch off and remove
the plug from the electricity supply before
cleaning this appliance.
For electrical data refer to the rating label on
the front of the dryer cabinet (with the door open).
WARNING! The Drum, door and load may
be very hot.
Technical Specifications
14 EN
TROUBLESHOOTING
What Might be the Cause of...
Defects you can remedy yourself
Before calling GIAS Service for technical advice
please run through the following checklist. A
charge will be made if the machine is found to be
working or has been installed incorrectly or used
incorrectly.
If the problem persists after completing the
recommended checks, please call GIAS
Service, they may be able to assist you over the
telephone.
Time display to end could change during
dryi n g cycle. T h e time to e n d is
continuously checked during the drying
cycle and the time is adjusted to give the
best estimation time. The displayed time
may increase or decrease during the cycle
and this is normal.
Drying time is too long/clothes are not dry
enough…
•Have you selected the correct drying
time/programme?
• Were the clothes too wet? Were the clothes
thoroughly wrung or spindried?
•Does the filter need cleaning?
•Is the dryer overloaded?
•Has the option been selected from a previous
cycle?
The dryer is noisy…
• Switch off the dryer and contact GIAS
Service for advice.
The Indicator is on…
• Does the filter need cleaning?
The Indicator is on…
• Does the water container need emptying?
CUSTOMER SERVICE
Should there still be a problem with your dryer
after completing all the recommended
checks, please call GIAS Service for advice.
They may be able to assist you over the
telephone or arrange for a suitable
appointment for an engineer to call under the
terms of your guarantee. However, a charge
may be made if any of the following applies to
your machine:
• Is found to be in working order.
• Has not been installed in accordance with
the installation instructions.
• Has been used incorrectly.
Spares
Always use genuine spares, available direct
from GIAS Service.
GIAS Service
For service and repairs call your local GIAS
Service engineer.
The dryer does not operate…
• Is there a working electricity supply to the
dryer? Check using another appliance such as a
table lamp.
• Is the plug properly connected to the mains
supply?
• Is there a power failure?
•Has the fuse blown?
• Is the door fully closed?
• Is the dryer switched on, both at the mains
supply and at the machine?
• Has the drying time or the programme been
selected?
● Has the machine been switched on again after
opening the door?
15 EN
T h e m an u fa c tu r er d e c li n es a l l
responsibility in the event of any printing
mistakes in this booklet. The manufacturer
also reserves the right to make appropriate
modifications to its products without
changing the essential characteristics.
ÍNDICE
Advertencias sobre seguridad
Desagüe: Instrucciones de Colocación
Preparación del material para secar
Controles e indicadores
Selección del programa
Puerta y filtro
Depósito del agua
Operación
Limpieza y mantenimiento de rutina
Resolución de problemas
Servicio de atención al cliente
Por favor lea cuidadosamente estas instrucciones y utilice la máquina según sus indicaciones. Este
folleto presenta directrices importantes para el seguro, la instalación y el mantenimiento seguros y
algunos consejos útiles para obtener los mejores resultados de su secadora.
17
22
23
24
25
26
27
28
28
29
29
Por favor verifique que los siguientes artículos
hayan sido entregados con el electrodoméstico:
● Manual de instrucciones
● Tarjeta de garantía
● Etiqueta de energía
16 ES
.Conserve toda la documentación en un lugar seguro para referencia futura o para los dueños futuros
Verifique que no se hayan producido daños al
electrodoméstico durante el transporte. De
haberlos, llame al Servicio técnico de GIAS. El
incumplimiento de lo anterior puede perjudicar a la
seguridad del electrodoméstico. Es posible que se
le cobre una llamada al servicio técnico si el
problema con el electrodoméstico es el resultado
de un uso incorrecto.

ADVERTENCIAS SOBRE SEGURIDAD
Uso
● Este electrodoméstico puede ser utilizado por niños mayores de 8 años
y por personas con capacidades físicas, sensoriales o mentales
limitadas o que carezcan de la experiencia y el conocimiento necesarios,
siempre y cuando estén supervisadas por una persona encargada de
velar por su seguridad o hayan sido instruidas en su utilización de
manera segura.
Los niños no deben jugar con el electrodoméstico. Los niños no deben
ocuparse del mantenimiento ni de la limpieza del electrodoméstico, salvo
que estén supervisados una persona encargada de velar por su
seguridad.
● ADVERTENCIA El uso incorrecto de una secadora puede provocar
riesgo de incendio.
●Este producto es exclusivamente para uso doméstico o similar:
-zona de cocina para el personal de tiendas, oficinas y otros entornos
laborales;
-granjas;
-pasajeros de hoteles, moteles u otros entornos residenciales;
-hostales (B&B).
No se recomienda el uso de este producto con fines diferentes del
doméstico o similar, por ejemplo, con fines comerciales o profesionales.
El empleo de la lavadora con fines no recomendados puede reducir la
vida útil del artefacto e invalidar la garantía. Todos los daños, averías o
pérdidas ocasionados por un uso diferente del doméstico o similar
(aunque ese uso se realice en un entorno doméstico) no serán
reconocidos por el fabricante en la medida en que lo permita la ley.
● Esta máquina debe usarse solamente para el propósito para el cual
fue diseñada, tal y como se describe en este manual. Asegúrese de
que entiende todas las instrucciones de instalación antes de utilizar el
electrodoméstico.
● No toque el electrodoméstico cuando tenga las manos o los pies
mojados o húmedos.
● No se apoye en la puerta al cargar la secadora ni utilice la puerta para
levantar o mover la máquina.
● No permita a los niños jugar con la máquina ni los mandos.
17 ES
● ADVERTENCIA No use el producto si el filtro de pelusa no está en su
lugar o si está dañado, ya que la pelusa podría arder.
● ADVERTENCIA En el lugar donde aparezca el símbolo de superficie
caliente ,el incremento de temperatura durante la operación de la
secadora puede exceder los 60 grados centígrados.
● Desconecte el enchufe de la red del suministro eléctrico. Siempre debe
desenchufar la máquina antes de limpiarla.
● No siga usando esta máquina si pareciera tener algún desperfecto.
● No hay que dejar que se acumulen lanilla y pelusas en el suelo
alrededor de la máquina.
● El tambor interior puede calentarse mucho. Antes de retirar la ropa de
la máquina, siempre deje que ésta termine de enfriarse.
● La última parte del ciclo de secado se realiza sin calor (ciclo frío) para
lograr una temperatura final que no dañe los tejidos.
●La secadora no debe ser usada si se han empleado agentes químicos
en el lavado.
●ATENCIÓN: Nunca detenga la secadora antes del fin de ciclo sin que
los tejidos hayan sido removidos velozmente y separados de manera
que el calor se disperse.
●Máxima capacidad de secado: Ver etiqueta energética.
Instalación
● No utilice adaptadores, conectores múltiples y/o alargaderas.
● Nunca instale la secadora junto a cortinas, y procure que no caigan
objetos ni se acumule nada detrás de la secadora.
● El electrodoméstico no debe instalarse detrás de una puerta con cierre,
de una puerta corredera ni de puertas cuyas bisagras se encuentren en
el lado opuesto del lugar donde se encuentra la secadora.
Important: Importante; Durante el transporte asegúrese que la secadora este en posición
vertical, si es necesario puede girarla por el lado que se muestra;
Atención : Si el producto está en lado diferente, espere por lo menos 4 horas antes de
encenderlo para que el aceite pueda fluir de nuevo enel compresor. De no hacerlo, podría
dañarse el compresor.
18 ES

La Colada
● No utilice la secadora con prendas que no haya lavado.
● ADVERTENCIA No debe usarse para secar tejidos tratados con
líquidos para limpieza en seco.
● ADVERTENCIA Los materiales de gomaespuma, en algunas
circunstancias, pueden arder por combustión espontánea si se
calientan. Los artículos como gomaespuma (espuma de látex), los
gorros de ducha, los tejidos impermeables a base de goma, así como las
almohadas o las NO DEBEN secarse en la secadora.
● Consulte siempre las etiquetas sobre lavado de las prendas para
conocer si se pueden secar en secadora.
● Antes de introducir ropa en la secadora, aquélla debe centrifugarse
o escurrirse bien. Las prendas que escurren agua NO deben
introducirse en la secadora.
● Deben sacarse de los bolsillos encendedores y cerillas y no se
deben NUNCA usar líquidos inflamables cerca de la máquina.
● No se deben introducir NUNCA cortinas de fibra de vidrio en esta
máquina. Puede producirse irritación de la piel si otras prendas se
contaminan con fibras de vidrio.
● Las prendas que se hayan ensuciado con sustancias como aceite
de cocina, acetona, alcohol,gasolina, queroseno, limpiamanchas,
trementina, ceras y limpiadores de ceras deben lavarse en agua caliente
con una cantidad extra de detergente antes de introducirse en la
secadora.
● Los suavizantes de tejidos y los productos similares pueden
utilizarse siguiendo las instrucciones del suavizante.
19 ES
VENTILACIÓN
Debe asegurarse una ventilación adecuada en la sala donde esté ubicada
la secadora para evitar que los gases de aparatos que quemen otros
combustibles, incluyendo llamas abiertas, entren en la sala cuando se
está usando la secadora.
● El aire extraído no debe descargarse dentro de un conducto que sea
utilizado para expulsar humos de aparatos que quemen gas u otros
combustibles.
●Compruebe periódicamente que no esté obstruido el paso de la corriente
de aire a través de la secadora.
● Después de usar la máquina, revise el filtro de pelusas y límpielo si es
necesario.
●Installar la parte trasera del aparato cerca de un muro o pared vertical.
● Tiene que dejarse almenos un espacio de 12 mm entre la secadora y
cualquier obstrucción. La válvulade entrada y de salida tienen que estar
lejos de obstáculos. Para asegurarse de una adecuada ventilación el
espacio entre la parte inferior de la máquina y el pavimento no debe ser
obstruido.
●Procure que no caigan objetos ni se acumulen detrás de la máquina, ya
que éstos pueden obstruir la entrada y salida de aire
● Controlar frecuentemente el fitro despues del uso y limpiarlo, si fuera
necesario.
● NUNCA instale la secadora junto a cortinas.
● En el caso de que la secadora se instale encima de una lavadora, se
debe instalar el kit accesorio columna correspondiente de acuerdo con la
siguiente configuración.
-Kit Mod 35100019: para una lavadora de profundidad de al menos 49 cm.
-Kit Mod 35100120: para una lavadora de profundidad de al menos 51 cm.
El kit debe ser uno de los indicados arriba, disponibles en los centros se
asistencia técnica. Las intrucciones de montaje en la secadora y de todos
los accesorios están en el própio kit.
.
Air Outlets in the Base
No instalar el producto en una habitación expuesta a
bajas temperaturas o en la que exista riesgo de
formación de hielo. A la temperatura de congelación del
agua, el producto podría no funcionar correctamente. Si
el agua del circuito hiela, se pueden producir daños en
los componentes tales como: (válvulas, bombas,
tubos...). Para garantizar las prestaciones del producto,
la temperatura de la habitación debe estar comprendida
entre +2ºC y +35ºC. Por favor, tenga en cuenta que el
funcionamiento del aparato en condiciones de bajas
temperaturas ( entre +2ºC y +15ºC) podría implicar
condensación de agua y la presencia de gotas de agua
en el suelo.
0 EN6
20 ES
Temas edioambientalesM
● Todos los materiales de embalaje utilizados son
ecológicos y reciclables. Por favor deshágase de
los materiales de embalaje por medios
ecológicos. Su ayuntamiento podrá informarle de
los medios actuales de desecho.
● Por razones de seguridad cuando se deseche
una secadora, desenchufe el cable eléctrico de la
toma general, corte el cable y destrúyalo junto con
el enchufe. Para evitar que los niños se queden
encerrados en la máquina, rompa las bisagras o la
cerradura de la puerta.
Directiva Europea 2012/19/EU
Este dispositivo tiene el distintivo de la
directiva europea 2012/19/EU sobre
Residuos de Aparatos Eléctricos y
Electrónicos (RAEE).
Los RAEE cont ienen tant o sus t ancia s
cont a m inante s (que p ueden reperc u t ir
negativamente en el medio ambiente) como
componentes básicos (que pueden reutilizarse).
Es importante que los RAEE se sometan a
tratamientos específicos con el objeto de extraer y
eliminar, de forma adecuada, todos los agentes
contaminantes. Igual de importante es recuperar
y reciclar todo el material posible.
La gente puede desempeñar una función
importante a la hora de asegurarse de que los
RAEE no se convierten en un problema
medioambiental; es crucial seguir algunas
normas básicas:
- Los RAEE no han de tratarse como residuos
domésticos.
- Los RAEE han de depositarse en los puntos de
recogida habilitados para ello que gestiona el
ayuntamiento o empresas contratadas para ello.
En muchos países se ofrece la posibilidad de
recogida a domicilio de los RAEE de mayor
volumen.
En muchos países, cuando la gente compra un
nuevo dispositivo, el antiguo se puede entregar al
vendedor, quien lo recoge de forma gratuita (un
dispositivo antiguo por cada dispositivo adquirido)
siempre que el equipo entregado sea similar y
disponga de las mismas funciones que el
adquirido.
Servicio écnico de GIAST
Para que esta máquina siga funcionando de modo
seguro y eficiente, recomendamos que todo
mantenimiento o reparación sea efectuado
únicamente por un ingeniero de mantenimiento
autorizado de GIAS.
Requisitos léctricosE
Las secadoras están preparadas para funcionar
con un voltaje monofásico de 220-240 V, a 50 Hz.
Verifique que el circuito de suministro tenga una
corriente nominal de al menos 6 A.
● La electricidad puede ser muy peligrosa.
Este electrodoméstico debe conectarse a
tierra.
● La toma de corriente y el enchufe del
electrodoméstico deben ser del mismo tipo.
● No utilice adaptadores múltiples y/o
alargaderas.
● Después de instalar la máquina, el enchufe
debe quedar en una posición accesible para su
desconexión.
Este electrodoméstico CE cumple la Directiva
europea 2004/108/EC, 2006/95/EC y sus
enmiendas subsiguientes.
Si el electrodoméstico no funciona
correctamente o se avería, apáguelo y
desconecte el enchufe de la toma de corriente.
Consulte al Servicio técnico de GIAS para la
posible reparación.
Es posible que se le cobre una llamada al
servicio técnico si el probl ema con el
electrodoméstico es el resultado de una
instalación incorrecta.
Si se dañara el cable eléctrico de este
electrodoméstico, debe reemplazarse con un
cab l e espec i al que se pue d e obten er
ÚNICAMENTE del Servicio de recambios. Una
persona capacitada debe encargarse de la
instalación.
No enchufe el electrodoméstico ni lo encienda
conectado a la red eléctrica hasta que se haya
completado la instalación. Por su seguridad, esta
secadora debe instalarse correctamente.En caso
de alguna duda acerca de la instalación, llame al
Servicio GIAS de Atención al Cliente para obtener
información.
Ajuste de las atasP
U n a v e z q u e l a
máquina esté en su
sitio, las patas deben
a j u s t a r s e p a r a
asegurarse de que
esté nivelada.
21 ES
DESAGüE: INSTRUCCIONES DE COCLOCACIÓN
Para evitar el vaciado del recipiente
contenedor de agua después de cada ciclo de
sec ado, el agu a pued e ser verti da
directamente al tubo de desagüe
(El mismo sistema de drenaje existente en
hogares)
La legislación prohíben la conexión a
un drenaje de agua superficial. La evacuación
del las aguas debe estar ubicado junto a la
secadora.
El kit se compone de: 1 manguera y 1 grifo.
ADVERTENCIA! Desconecte el enchufe
de la secadora del suministro de electricidad
antes de realizar cualquier trabajo.
Coloque la manguera de la siguiente manera:
Incline la secadora
1.
lentamente hacia el
lado derecho.
4.
Conecte la manera
negra del kit,(Usando
e l c o n e c t o r y
a b r a z a d e r a s
suministradas),a la
manguera retirado de
la conexión de puente.
Una vez que la
5.
máquina está
en su lugar, comprobar
en la parte inferior que
El nuevo tubo instalado
no queda doblado ni
obstruido.
6. Conecte el nuevo
tubo al desagüe
2 . E l t u v o d e
e v ac u a c i ó n e s tá
s i t u a d o a m a n o
derecha (consulte
laimagenn).Unamang
uera gris conecta al
puente en el lado
i z qu i e r d a d e l a
m á q u i n a .U s an d o
alicates, retirar el clip
de r et e n c i ón d e l
Puente del tubo.
Tire de la manguera
3.
de laconexión de
puente.
22 ES
Conéctese a la red
7.
eléctrica
Precaución:
Si el
producto ha estado
inclinado o en posición
diferente a la normal,
espere por lo menos 4
horas antes de su
conexión de manera
que l e lub r i c ant e
pueda fluir de nuevo en
el compresor.
De no hacerlo, podría
resultar dañado el
Compresor.
PREPARACIÓN DEL MATERIAL PARA SECAR
Preparación de la opaR
Maximum Drying Weight
Peso áximo de ara el ecadoM P S
Peso áximo de ara el ecadoM P S
Algodón
Fibras sintéticas
Clasifique la arga de la iguiente anera:C S M
Según los símbolos de cuidado
●
máx
máx
10 Kg
4 Kg
9 Kg
4 Kg
8 Kg
4 Kg
7 Kg
3,5 Kg
Se encuentran en el cuello o en la costura
interior:
Apropiado para secadora.
. .
Usar secadora a alta temperatura.
Usar secadora solamente a baja
.
temperatura.
No secar en secadora.
6 Kg
3 Kg
No Secar En Secadora:
No cargue el tambor en exceso; los artículos grandes,
al humedecerse, pueden superar la carga de ropa máxima
admisible (por ejemplo: sacos de dormir, edredones)
Durante los últimos 15 minutos (aproximada-mente) la
carga siempre se seca con aire frío.
Ahorro De Energía
Se deben poner en la secadora solamente
artículos que se hayan escurrido bien o que se
hayan centrifugado. A menos humedad que
tengan las prendas que se han de secar, más
corto será el tiempo de secado, lo cual ahorrará
energía eléctrica.
SIEMPRE
● Procure secar el máximo peso permitido de
prendas, para economizar tiempo y energía.
● Compruebe que el filtro esté limpio antes de
iniciar el ciclo de secado.
NUNCA
● Debe excederse del peso máximo, porque de
hacerlo malgastaría tiempo y energía eléctrica.
● Introduzca en la secadora artículos que
chorreen agua, porque se puede dañar el
aparato.
23 ES
Si el artículo no tiene etiqueta de cuidado, se
debe presuponer que no es apropiado para
secadora.
● Según la cantidad y el grosor
Cuando la cantidad del material para secar sea
mayor que la capacidad de la secadora, separe
la ropa de acuerdo a su espesor (por ej. separe
las toallas de la ropa interior fina).
● Según el tipo de tejido
Algodón/hilo: Toallas, jerseys de algodón,
ropa de cama y mantelería.
Fibras sintéticas: Blusas, camisas, monos,
etc. hechos de poliéster o poliamida y también
para mezclas de algodón/fibras sintéticas.
● Según el grado de secado
Clasificar los artículos según como tienen que quedar:
listos para planchar, listos para guardar, etc. Para
prendas delicadas, presione el botón Delicados
Sintéticos para seleccionar una temperatura más
CONTROLES E INDICADORES
Selector De
Programa
Panel De Control Y Luces De Aviso
Selector de Programa
– Selecciona el programa deseado.
Botón Selección Tiempo
Pantalla
Botón Selección
Tiempo
– Permite que el usuario modifique la duración del programa
Indicador De
Mantenimiento Del Filtro
Botón De
Inicio Diferido
Botón Acrilicos
Synteticos
Indicador
Depósito Lleno
Botón Anti-
Arrugas
Botón
Start/pausa
seleccionado por el Selector de Programa. Sólo puede utilizarse con las opciones: Mix&Dry,
Camisas y Tiempo.
Botón Inicio Diferido
- Permite que el usuario retrase el inicio del ciclo de secado (ver detalles
del funcionamiento).
Botón Acrilicos Synteticos
- Pulse para seleccionar el tipo de tejido a secar: Acrylic y
Synthetics. Cuando se pulsa este botón, la opción Acrylic Synthetics se activa y el indicador se
enciende.
Botón Botón Anti- Arrugas
– Permite que el usuario seleccione un ciclo antiarrugas post
secado.
Botón Start/Pause
Indicador Mantenimiento Filtro
– Pulse para iniciar/ detener el programa de secado seleccionado.
- Se enciende cuando el filtro necesita limpiarse. Indicador
Empty Water – Se enciende cuando el contenedor de agua está lleno.
Indicador Contenedor Agua lleno
Auto Programa en Display
- Se enciende el indicador correspondiente cuando se ha
– Se enciende cuando el contenedor de agua está lleno.
seleccionado un programa automático.
Refresh
– El indicador se enciende cuando el programa inicia la fase de enfriado.
SELECCIÓN DEL PROGRAMA
La secadora Candy Sensor Dry ofrece muchas opciones para secar la colada y adaptarse a todas las
circunstancias.En la siguiente tabla se enumeran los programas y la función de cada programa.
Nota: Es posible que el sensor no detecte una pequeña cantidad de piezas pequeñas.Para cantidades pequeñas y
piezas separadas o telas previamente secadas que contienen poca humedad, utilice los programas de duración
controlada. Ajuste el programa entre 30 y 75 minutos según la cantidad de piezas que se quiere secar y el grado de
secado requerido, y seleccione temperatura alta o baja, dependiendo del tipo de tela. Si el sensor no detecta la
pieza, la secadora sólo funcionará durante 10 minutos antes de entrar en la etapa de enfriamiento.Si la carga es
excesiva o las prendas están demasiado mojadas para secar en la secadora, ésta entrará automáticamente en la
etapa de enfriamiento después de aproximadamente 3 horas.
El programa de secado de lana de esta secadora ha sido aprobado por The Woolmark
Company para el secado de productos de lana lavables a máquina siempre y cuando
los productos sean lavados y secados siguiendo las instrucciones en la etiqueta de la
prenda y las indicadas por el fabricante de esta máquina. M1530
En Reino Unido, Irlanda, Hong Kond e India la marca Woolmark es una Certificación de
marca registrada.
24 ES
24 ES
SELECCIÓN DEL PROGRAMA
PROGRAMME
Toallas
Seco Armario
Seco no plancha
Seco listo plancha
Relax '12 Min.
Refresh lana
Mezclar & Secar
Camisas
Rápido 40'
Tiempo
IDEAL FOR
Las prendas que han de ser secadas completamente, tales como toallas,
albornoces y sábanas. Duración: 3 horas aproximadamente.
Las prendas que se pueden doblar sin, planchar, como camisetas con
mezclas de tejidos, jerseys, calcetines, ropa de bebé. Duración: unas 2
horas y 45 min.
Prendas que se prefiere no planchar directamente después del secado.
Duración unas 2 horas y 30 minutos.
Prendas que se prefiere mantener ligeramente húmedas, de manera que
se facilita el planchado. Duración una hora y 50 minutos.
Prendas que se han de ahuecar, después de averlos dejado secos en el
cesto de la ropa por unos pocos días o después del secado al aire libre o en
los radiadores. El ciclo tiene una función que anti arrugas que hace que
actúa en las fibras haciéndo el planchado más fácil y más rápido.
Duración: 9 minutos + 3 minutos de enfriamiento.
Prendas de lana: el programa puede ser utilizado para secar hasta
1kg de colada (alrededor de 6 jerseys). se aconseja de hacer girar la
ropa antes de secarla.El tiempo puede variar según las
dimensiones, la densidad de la carga y del centrifugado
seleccionado en el lavado.Al final del ciclo, las prendas están listas
para ser utilizadas, pero en el caso de aquellas más pesadas, los
bordes podrían estar ligeramente húmedas: se sugiere de secarlas
naturalmente.Se aconseja extraer de inmediato las prendas al final
del ciclo de secado.Atención: el proceso de encogimiento de la lana
es irreversible, secar las prendas exclusivamente que contengan el
simbolo (simbolo "ok tumble"), este programa no está pensado para
acrílicos.
Cuando se desea mezclar tejidos de algodón y sintéticos, sin perder el
tiempo a dividirlos y a secar en ciclos diferentes- Duración: unas 2 horas
(maximo 4 kg de colada)
secado de las camisas de algodón o fibras sintéticas. Duración: 1 hora para
2 kg de ropa de fibras sintéticas (alrededor de 10 prendas), 1 hora y 20
minutos para 3 kg de camisas de algodón (alrededor de 10 prendas)
Tener ropa seca y lista para usar en tan sólo 40 minutos. El sensor controla
constantemente la temperatura para los mejores resultados de secado.
Max 2 kg de ropa.
Quién quiere seleccionar manualmente el tiempo de secado de 30 a 180
minutos. Seleccionando "20 Minutos", se elije un programa frío, ideal para
refrecar las prendas y para eliminar los malos olores.
Para edredones cuadrados y chaquetas de plumón. No es adecuado para plumones de
dos piezas o mas grandes.No seque prendas dañadas: el relleno puede obstruir los
filtros y conductos de aire. El programa requiere aproximadamente 2 horas, pero el
tiempo puede variar dependiendo del tamaño, la densidad de la carga y la velocidad de
la centrífugado usado en el lavado. Al final del ciclo, la prenda por lo general está lista
para se usada. En caso que algunas zonas estén ligeramente húmedas, es aconsejable
sacudir la prenda y reiniciar el programa durante un corto período. Si desea secar
edredones rellenos de materiales sintéticos, deberá presionar el texto "Tejidos
delicados".
25 ES

PUERTA Y FILTRO
Tire de la palanca para abrir la puerta.
Pa ra p oner la s ecadora en m archa
nuevamente, cierre la puerta y presione.
ADVERTENCIA! Cuando la secadora está
en uso, el cesto y la puerta pueden estar muy
calientes.Nunca detenga la secadora antes de
que el final del ciclo de secado a menos que todos
los artículos son rápidamente extraídos y
extendidos para disipar el calor.
Filtro
Para limpiar el filtro del condensador
Extraiga el zócalo.
1.
Gire el bloqueo de
2.
d o s p a l a n c a s e n
sentido anti-horarioy
t i r e d e l a p a r t e
delantera
IMPORTANTE:
secadora esté limpio de pelusa antes de cada ciclo
de secado.No haga funcionar la secadora sin el
filtro.Los filtros tapados u obstruidos pueden
aumentar el tiempo de secado y causar daños que
pueden dar lugar a altos costos de reparación.
Para mantener la eficiencia de la
Extraiga el filtro hacia
1.
Compruebe que el filtro de la
arriba .
2. Abra filtrado como
se muestra
3.3.D e l i c adame n t e
quitar la pelusa
utilizando un cepillo
suave o con los dedos
4 Cierre el filtro y
.
colóquelo en su lugar.
Indicador Cuidado del Filtro
Se enciende cuando
el f il t ro n ec e si t a
limpieza.
Revise y limpie el filtro
principal en la puerta
y el conden s a d o r
situado en laparte
inferior de la secadora.
Si la ropa no está seca
controle que el filtro no
esté obstruido.
3. Retire suavemente el
marco del filtro y limpie
el polvo y la pelusa con
un paño suave. No
utilice agua para limpiar
el filtro.
4. 4.Retire la esponja
con suavidad y lávela
sosteniéndola bajo el
grifo para eliminar
el polvo y la pelusa.
Vuelva a colocar la
5.
c u b i e r t a f r o n t a l
asegurándose que se
e n c u e n t r a e n
laposición correcta (la
indicada por la flecha)
y empuje firmemente
en su lugar. Bloquee las
d o s p a l a nc a s e n
sentido horario.
Vuelva a colocar el
6.
zócalo.
26 ES
NO USE AGUA PARA LAVAR EL FILTRO
DEPÓSITO DEL AGUA
El agua extraída de la ropa durante
el ciclo de secado se recoge en un recipiente
dentro de la puerta de la secadora. Cuando el
contenedor está lleno el indicador en el
panel de mandos se ilumina, y el contenedor
deberá ser vaciado. Sin embargo, se
recomienda que el contenedor sea vaciado
después de cada ciclo de secado.
NOTAS:
losprimeros ciclos dado que el depósito se
llena primero.
Para retirar el recipiente
1. Retire con cuidado
e l r e c i p i e n t e
contenedor mediante
el asa.
lleno, el depósito de
agua pesa alrededor
de 6 kg.
2. Incline recipiente para
vaciar elagua a través
delasurtidor.Cuando está
vacío,repongael depósito
d e a g u a , c o m o s e
m u e st r a ,E n p r i me r
lugarinsertar la base
del r e cipien t e e n s u
posición comosemuestra
a c o n t i n u a c i ó n , y
posteriormente con un
suave empuje la parte
superior.
3. Accione el Botón
re-iniciar el ciclo.
NOT :Si usted tiene
la opción de drenaje
cerca de la secadora
se puede utilizar la
descarga mediante el
kit en dotación.
Esto significa que
usted no tiene que
vaciar el recipiente.
Muy poca agua se recogerá durante
Cuando está
A
1
FUNCIONAMIENTO
1.Colada. Asegúrese de que no estorbe el
cierre de la puerta.
2. Cierre suavemente la puerta empujándola
lentamente hasta que escuche la puerta 'clic'.
Gire selector programador para seleccionar
3.
el programa de secado requerido (véase
Guía del Programa).
4. En caso de sintéticos, acrílicos o artículos
delicados, pulse el botón para bajar la
temperatura. El indicador se encenderá
cuando la máquina está en baja temperatura.
Para anular la selección de los primeros
minutos del programa, pulse el botón
después de reiniciar esta vez la máquina para
cambiar la programación.
En caso de
sintéticos, acrílicos o artículos delicados,
pulse el botón para bajar la temperatura.
5. Pulse el botón. La secadora se
accionará
automáticamente y el indicador por encima
del
botón se ilumina de forma continua
6.Si se abre la puerta durante el programa
para
comprobar la ropa, es necesario recomenzar
el secado después cerrar la puerta.
Cuando el ciclo está a punto de
7.
completarse, la máquina entrará en la fase de
enfriamiento, la ropa se rociará con aire
fresco. Permitir que la carga se enfríe.
8. Tras la finalización del ciclo el
tambor gira intermitentemente para reducir al
mínimo las arrugas. Esto continuará hasta
que la máquina se desconecta o se abre la
puerta.
ADVERTENCIA!
Si se abre la puerta de la
mitad del ciclo, antes de que el ciclo de
enfriamiento se ha completado, el mango
puede estar caliente. Por favor, tenga mucho
cuidadoal intentar vaciar el depósito de agua
durante el ciclo.
27 ES
No abra la puerta durante el programa
automático con el fin de preservar el correcto
secado seleccionado.
OPERACIÓN
Consumo de electricidad en modo apagado 0, 20 W
Consumo de electricidad en modo "STAND BY 0, 75 W
Capacidad del tambor 115
Peso máximo que se puede secar Ver etiqueta energética
Altura 85 cm
Inicio Diferido
La función permite al usuario retrasar el inicio del ciclo de secado entre 1 y 24
horas.
Cuando la función se selecciona por primera vez, en el display aparecerá un retraso de 1 hora.
Cuando se pulse este botón sucesivas veces, el retraso se irá incrementando 1 hora.
Para iniciar el programa, pulse el electrodoméstico completará el ciclo de secado al
término de este tiempo. La luz del indicador se encenderá para indicar que la función Delay Start
está activada.
Cancelación Y Restablecimiento Del Programa
Inicio Diferido
Start/Pausa
Para cancelar un programa, pulse el botón Start/Pausa durante 3 segundos. En el display TIME
CONTROL se encenderá la luz del indicador 0:00 para indicar que éste se ha puesto a cero.
LIMPIEZA Y MANTENIMIENTO DE RUTINA
Limpieza De La Secadora
● Limpie el filtro después de cada ciclo de
secado.
● Después de usar la secadora, pase un trapo
por el interior del tambor y deje la puerta
abierta durante un rato para permitir que
Guía de secado
El ciclo estandar ( ) es el de
mayor eficiencia energética y el pensado para el
secado de una colada normal de algodón.
La t a b l a e n l a ú l t im a p á g in a m u e st ra
aproximadamente los tiempos y consumos de energía
de los programas principales.
Drying Guide
SECO NO PLANCHA
circule el aire para secarla.
● Con un trapo suave, limpie la parte exterior
de la máquina y la puerta.
● NO use almohadillas abrasivas ni productos
de limpieza.
● Para evitar que la puerta se atasque o que se
acumule pelusa, limpie la parte interna de la
puerta y la junta con un paño húmedo después
de cada ciclo de secado.
¡
AVISO! El tambor, la puerta y las piezas
que se han secado pueden estar muy calientes.
IMPORTANTE Antes de limpiar esta
Información para las pruebas de laboratorio
EN 61121 Programa
-Algodón Seco
-Planchar Algodón
-Tejidos Delicados
P P E U rograma ara l so
-Seco no plancha
-Seco listo plancha
- +
Seco no plancha
Sintetico
Especificaciones Técnicas
Ancho
Profundidad 60 cm
Categoría de consumo de energía Ver etiqueta energética
60 cm
máq u i n a , s iem p r e d e b e a p aga r l a y
desenchufarla del suministro eléctrico.
Para datos referentes a energía eléctrica,
refiérase a la etiqueta de homologación que se
encuentra en la parte delantera de la secadora
(con la puerta abierta).
28 ES
RESOLUCIÓN DE PROBLEMAS
Causa Posible De...
Defectos que puede solucionar usted mismo
Antes de llamar al Servicio técnico de GIAS para
o b t en er as e s ora m i en to té c n ico , l e a
de t e n id a me n t e l a s i gu i e n te li s t a d e
comprobación. Se cobrará el servicio técnico si
resulta que la máquina funciona correctamente, o
si ha sido instalada o utilizadaincorrectamente. Si
el problema continúa después de completar la
verificación recomendada, por favor llame al
Servicio técnico de GIAS para recibir asistencia
telefónica.
El tiempo restante fin ciclo puede cambiar
durante el ciclo. El tiempo fin está
continuamente controlado durante el ciclo y
el tiempo se adapta para ofrecer la
información mas actualizada posible. El
tiempo puede incrementarse o disminuir
durante el ciclo, lo cual es perfectamente
normal.
El tiempo de secado es excesivamente
largo/la ropa no se seca suficientemente…
●Ha seleccionado el tiempo de secado/programa
correcto?
●Estaba la ropa demasiado mojada?
●La ropa fue bien estrujada o centrifugada?
● Hace falta limpiar el filtro?
●Se ha sobrecargado la secadora?
● Está enroscada o tapada la manguera de
ventilación?
●Se tiene todavía seleccionada la opción de
un ciclo anterior?
La secadora no funciona…
● Está funcionando el suministro de electricidad
hacia la secadora?
Compruébelo
lámpara de mesa.
● El enchufe está correctamente conectado al
suministro de la red?
● Se ha cortado la electricidad?
● Se ha quemado el fusible?
● La puerta está completamente cerrada?
● La secadora está encendida, tanto en el
suministro de electricidad como en la máquina?
● Se ha seleccionado el programa o el tiempo de
secado?
● Se ha encendido la máquina después de abrir la
puerta?
● La secadora ha dejado de funcionar porque el
depósito del agua está lleno y hay
Que vaciarlo?
Con otro aparato como una
La secadora hace mucho ruido…
● Apague la secadora y póngase en contacto con
el Servicio técnico de GIAS para obtener
asesoría.
El indicador está encendido…
Hace falta limpiar el filtro?
Está enroscada o tapada la manguera de
ventilación?
El indicador está encendido…
● Hace falta sacar el agua del recipiente?
SERVICIO DE ATENCIÓN AL CLIENTE
Si después de realizar todas las
comprobaciones recomendadas persistiera
algún problema con la secadora, llame al
Servicio GIAS de Atención al Cliente para
obtener asesoramiento. Es posible que le
puedan asesorar por teléfono o bien convenir
una hora apropiada para que le visite un
ingeniero bajo los términos de la garantía. Sin
embargo, es posible que sele cobre si alguna
de las situaciones siguientes es aplicable a
su máquina:
● Si s e hall a en bu e n esta do de
funcionamiento.
● Si no se ha realizado la instalación de
acuerdo a las instrucciones.
● Si se ha usado incorrectamente.
Servicio De Recambios
Utilice siempre recambios originales, que se
pueden conseguir a través del Servicio
técnico de GIAS.
Servicio Técnico De Gias
Para mantenimiento y reparaciones, llame al
ingeniero del Servicio técnico de GIAS local.
El fabricante no se hace responsable de los
errores de imprenta que pueda contener este
folleto. El fabricante también se reserva el
derecho de efectuar modificaciones a sus
productos sin cambiar las características
esenciales.
29 ES
Rappels de sécurité
Desagüe: Instrucciones de Colocación
Preparación del material para secar
Controles e indicadores
Selección del programa
Puerta y filtro
Depósito del agua
onctionnement
F
Nettoyage et entretien de routine
Dépistage de pannes
Service clientèle
Veuillez lire et suivre ces instructions avec soin et utiliser la machine en conséquence. Ce livret
contient des instructions importantes sur la sécurité d'utilisation, l'installation et l'entretien de la
machine, ainsi que des conseils utiles pour obtenir les meilleurs résultats possibles lors de son
utilisation. Conservez toute la documentation dans un endroit sûr pour pouvoir vous y reporter à une
date ultérieure ou la transmettre aux prochains propriétaires
31
36
37
38
39
40
41
42
42
43
43
Vérifiez que les articles suivants ont bien été
livrés avec l’appareil :
● Manuel d'utilisation
● Carte de garantie
● Étiquette d'énergie
30 FR
Vérifiez que la machine ne s'est pas
détériorée en transit. Si c'est le cas, contactez
GIAS pour une opération de dépannage.Le
no n-r esp ect de ces i nstructions peu t
compromettre la sécurité de votre appareil. Un
appel de service peut vous être facturé si la
défaillance de votre appareil est causée par une
mauvaise utilisation.
 Loading...