


Owner’s Manual
Operating and Servicing Instructions
Español - página E1
AIR PURIFIER |
www.hoover.com |
|
IMPORTANT: READ CAREFULLY BEFORE ASSEMBLY AND USE.
Questions or concerns? For assistance, please call Customer Service at 1-800-944-9200 Mon-Fri 8am-7pm EST. PLEASE DO NOT RETURN THIS PRODUCT TO THE STORE.
THIS PRODUCT IS INTENDED FOR HOUSEHOLD USE ONLY. IF USED COMMERCIALLY WARRANTY IS VOID.
CAUTION: HIGH VOLTAGE.
©2011 Techtronic Floor Care Technology Limited. All rights reserved. #961136001 ID101344-R4
Thank you for choosing a HOOVER® product.
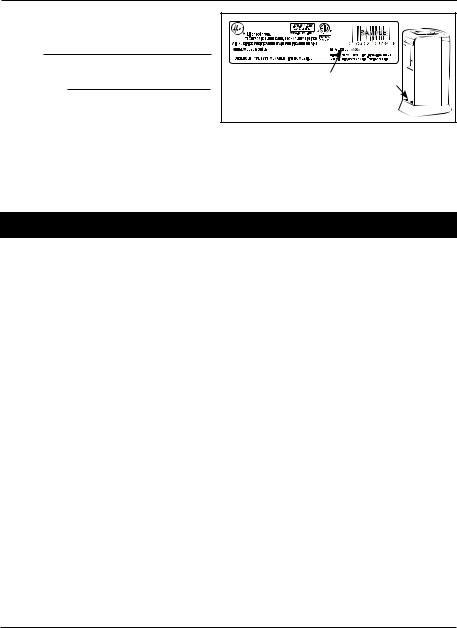
Please enter the complete model and Manufacturing Code in the spaces provided.
Model
MFG. CODE
Hint: Attach your sales receipt to this owner’s manual. Verification of date of purchase may be required for warranty service of your HOOVER® product.
Be sure to register your product online at Hoover.com or call 1-800-944-9200 to register by phone.
Conforms to |
UL Std. 867 |
Certified to |
CSA Std. |
C22.2 No. 187 |
XXXXX |
XX.X V. XXHz XX.X |
Manufacturing code |
(Label located on side of product.) |
Contents |
|
Important Safeguards............................................................................................... |
3 |
Set Up and How To Use............................................................................................ |
5 |
Product Description.............................................................................................. |
5 |
Setup................................................................................................................... |
5 |
Maintenance.............................................................................................................. |
6 |
Rinsable Pre-Filter............................................................................................... |
6 |
Replacement of filter made with HEPA media..................................................... |
6 |
UV Bulb Replacement......................................................................................... |
6 |
Power Cord Care................................................................................................. |
7 |
Troubleshooting........................................................................................................ |
7 |
Specifications............................................................................................................ |
7 |
Service....................................................................................................................... |
7 |
Warranty..................................................................................................................... |
8 |
If you need assistance:
Visit our website at hoover.com. Follow the authorized dealer locator link to find the Hoover® authorized dealer nearest you or call 1-800-944-9200 for an automated referral of Hoover® authorized dealer locations (U.S. only) or to speak with a customer service representative; MonFri 8am7pm EST.
Please do not return this product to the store.
2
IMPORTANT SAFETY INSTRUCTIONS
SAVE THESE INSTRUCTIONS
When using an electrical appliance, basic precautions should always be
followed, including the following:
READ ALL INSTRUCTIONS BEFORE USING THIS APPLIANCE.
WARNING: TO REDUCE THE RISK OF FIRE, ELECTRIC SHOCK OR INJURY:
•Fully assemble before operating.
•Operate product only at voltage specified on data plate located on side of product.
•Unplug from outlet when not in use and before cleaning or servicing.
•Do not use outdoors or on wet surfaces. Keep the unit away from water.
•Do not allow to be used as a toy. Not intended for use by children age 12 and under. Close supervision is necessary when used near children. To avoid injury or damage, keep children away from product, and do not allow children to place fingers or other objects into any openings.
•Use only as described in this manual.
•Do not use with damaged cord or plug. If appliance is not working as it should, has been dropped, damaged, left outdoors, or dropped into water, take it to a service center prior to continuing use.
•Do not pull or carry by cord, use cord as a handle, close a door on cord, or pull cord around sharp edges or corners. Do not place product on cord.
•Do not unplug by pulling on cord. To unplug, grasp the plug, not the cord.
•Do not handle plug or appliance with wet hands.
•Do not put any object into openings. Do not use with any opening blocked; keep free of dust, lint, hair, and anything that may reduce air flow.
•Keep hair, loose clothing, fingers, and all parts of body away from openings.
•Turn off all controls before unplugging.
•Do not use without filters in place.
3
WARNING: To reduce the risk of electric shock, this appliance has a polarized plug (one blade is wider than the other). This plug will fit in a polarized outlet only one way. If the plug does not fit fully in the outlet, reverse the plug. If it still does not fit, contact a qualified electrican to install the proper outlet. Do not change the plug in any way.
CAUTION:
•Do not block or partially block the air intake or air outtake grilles. Ensure that there is adequate airflow around the product.
•Keep the Air Purifier away from heaters / fireplaces and other hot objects / locations.
•Do not disassemble the unit.
•Do not place any items on top of the unit, or sit on the product.
•Never open the rear grille while the unit is plugged into a wall outlet.
•Keep personal and loose objects (such as jewelry, loose ties, long hair etc.) away from the unit.
•Keep children and pets away from the product.
•Never use compressed gas dusters, canned air, flammable or aerosol cleaners on this product. Some cleaning agents may combust, causing serious injury and/or property damage. Never use this product near flammable solvents or substances and vapors.
4
1. SET-UP & HOW TO USE
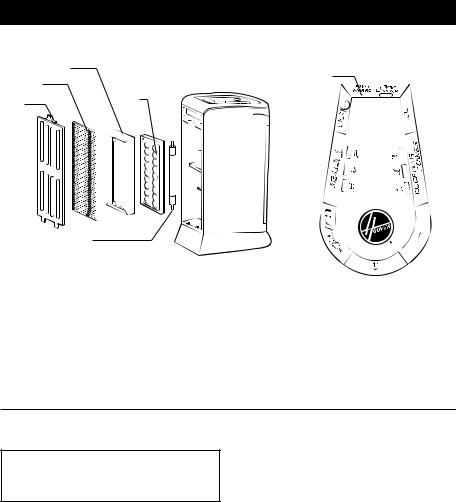
PRODUCT DESCRIPTION
1.1 |
|
3 |
BACK |
FRONT |
|
|
CONTROL PANEL |
||||||||||
|
2 |
|
|
|
11 |
|
|
|
|
|
|
|
|||||
|
|
|
|
|
|
|
|
|
|
|
|
||||||
|
|
5 |
|
|
|
|
|
|
|
|
|
|
|
9 |
|
||
|
1 |
|
|
|
|
7 |
|
|
|
|
|
|
10 |
||||
|
|
|
|
|
|
|
|
|
|
|
|||||||
|
|
|
|
|
|
|
|
|
|
|
|
|
|||||
|
|
|
4 |
|
|
|
8 |
|
|
|
|
|
|
|
|
||
|
|
|
|
|
|
|
|
|
|
|
|
|
|||||
|
|
|
|
|
|
|
|
|
|
|
|
|
|
|
|
||
|
|
|
|
|
|
|
|
|
|
|
|
|
|
|
|
||
|
|
|
|
|
|
6 |
|
|
|
|
|
|
|
|
|
|
|
|
|
|
|
|
|
|
|
|
|
|
|
|
|
|
|
||
|
|
|
|
|
|
|
|
|
|
|
|
|
|
|
|||
|
|
|
|
|
|
|
|
|
|
|
|
|
|
|
|
||
BACK/FRONT |
|
CONTROL PANEL |
|
|
|
|
|||||||||||
1. |
Rear Grille |
|
|
6. UV Bulb/ TiO2 On |
|
|
|
|
|||||||||
2. |
Rinsable Pre-Filter |
|
7. Ionizer |
|
|
|
|
|
|
|
|
|
|
|
|||
3. |
Replaceable Filter made with HEPA Media* |
8. 2/4/8 Hour Timer |
|
|
|
|
|||||||||||
4. |
UV Bulb |
|
|
9. Filter made with HEPA Media Replacement |
|||||||||||||
5. TiO2 Coated Screen |
|
|
Indicator |
|
|
|
|
|
|
|
|
|
|
|
|||
|
|
|
|
|
10. 3 Speed Fan Control |
|
|
|
|
||||||||
11. Filter Reset
Set-up
- Remove the air purifier from its packaging.
 IMPORTANT
Place the unit on a flat, stable surface with adequate ventilation.
-Plug the unit into an AC outlet.
-Press the POWER button.
-Adjust the Air Cleaning Power with the “+” and “-“ buttons. The unit has 3 Air Cleaning Power settings, and an LED will indicate which setting is in operation.
-Press the “UV/TiO2” button to toggle on/off. The curved light at the front of the unit will illuminate when the UV/TiO2 mode has been activated.
-Press the “ION” button to toggle on/off. The button will illuminate with an amber light when the ION mode has been activated.
-Press the TIMER button to set the timer to 2 hours/4 hours/8 hours/OFF (hours indicated with LEDs).
5
2. MaintenanCe
Familiarize yourself with these home maintenance tasks as proper use and care of your cleaner will ensure continued cleaning effectiveness.
Any other servicing should be done by an authorized service representative.
! WARNING ! |
|
2.1 |
|
FILTER |
|
|
|
|
WITH HEPA |
||
HIGH VOLTAGE. To reduce the risk of electric |
|
|
|
|
|
shock - unplug Air Purifier before servicing. |
|
|
|
FOAM PRE-FILTER |
|
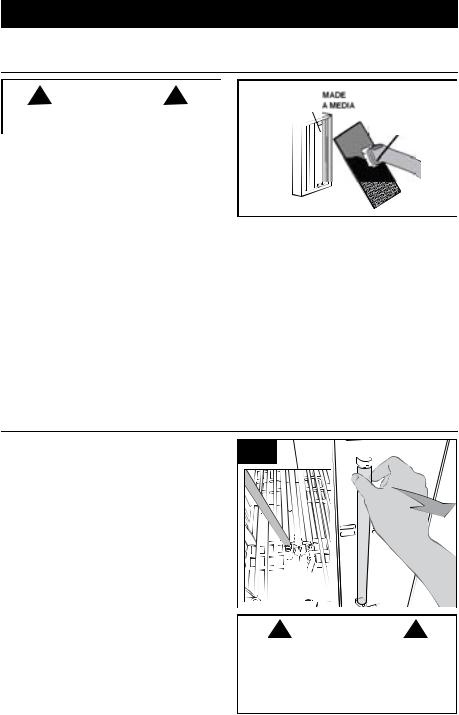
rinsable Pre-filter |
|
|
|
|
|
The rinsable pre-filter extends the life of your filter |
|
|
|
|
|
made with HEPA media by trapping larger airborne |
|
|
|
|
|
particles before they reach the filter made with HEPA |
|
|
|
|
|
Media. |
|
|
|
|
|
The pre-filter is black in color and is attached to the filter |
2.1 When you observe that the pre-filter is becoming |
||||
made with HEPA media by hook and loop fastener. |
|||||
We recommend that you inspect the pre-filter once a |
clogged and requires cleaning, remove the pre-filter |
||||
month to ensure that it is clean and therefore working |
from the filter assembly and either gently vacuum it |
||||
most effectively. Before inspecting the pre-filter, switch |
or gently rinse it under a running tap. (NOTE: Do not |
||||
off the unit, and unplug it from the AC outlet. |
use any cleaning solutions, as these may damage |
||||
|
the pre-filter.) Allow filter to dry. |
||||
rePlaCeMent of filter Made |
Reset” button next to the red light. Press and hold until |
||||
witH HePa Media |
beep occurs and light turns off. |
||||
To replace the filter made with HEPA media: |
|||||
Your Air Purifier is equipped with a feature that |
|||||
- Switch off the unit, and unplug it from the AC |
|||||
automatically advises you when your filter made with |
|
outlet. |
|
||
HEPA Media needs replacement. |
- Remove the rear grille and filter made with HEPA |
||||
A red light will illuminate reminding you to change |
|
media. |
|
||
the filter. Replace the filter with Hoover Part Number: |
- |
Replace the old filter made with HEPA media |
|
|
ensuring that the pre-filter is aligned correctly. |
||
AH60010 and then use a paper clip to press the “Filter |
|
||
- |
Replace the rear grille. |
||
|
uV bulb rePlaCeMent
The UV/TiO2 feature is activated by a fluorescent bulb inside the Air Purifier. As with all bulbs, this will require periodic replacement, depending on frequency of use. To ensure bulb is operational, periodically look at back of the assembled product for a blue glow through the grille. Checking in a low light environment or in the dark will aid in seeing the glow. Replace the UV Bulb with Hoover part #440001068.
To replace the UV bulb:
- Switch off the unit, and unplug it from the
AC outlet.
- Remove the rear grille and filter made with HEPA Media.
- Remove the TiO2 coated screen.
- Loosen the larger screw (2.2 A) on the top clamp and the larger screw on the bottom clamp. Do not remove the screws entirely.
- Gently grasp bulb at the top and pull outward until bulb is free of clamp (2.2 B). Repeat for the bottom of bulb. Place new bulb in position and apply very light pressure to top of bulb to seat. Repeat steps for bottom of bulb.
- Tighten both screws. Reinstall TiO2 coated screen, Filter made with HEPA Media and rear cover.
2.2

 A
A


 B
B
! WARNING !
To avoid injury do not touch the glass. Use a tissue to remove.
The ultra violet bulb in this product contains mercury. Dispose according to Local, State or Federal Laws. For information please refer to www. lamprecycle.com
NOTE: The TiO2 coated screen does not require replacement or cleaning.
6

Power Cord Care
-Do not rest anything on the power cord.
-Do not place the Air Purifier where people or pets may trip over or walk on the power cord.
-Do not pick the unit up by the power cord.
-Inspect the power cord before use to ensure the cord and plug are in a good condition.
3. TROUBLESHOOTING
If a minor problem occurs, it usually can be solved quite easily when the cause is found by using the checklist below.
Any other servicing should be done by an authorized service representative.
|
|
|
! WARNING ! |
|
To reduce risk of personal injury - unplug product before servicing. |
||
|
|
|
|
PROBLEM |
|
POSSIBLE SOLUTION |
|
The air purifier will not |
1. Check that the power cord is securely plugged into an AC outlet. |
||
power on. |
|
2. |
Check that the rear grille is securely closed. |
|
|
3. |
Check that the unit is on a level surface |
The airflow is |
|
1. Check that there is adequate airflow around the unit. |
|
reduced. |
|
2. |
Check that the pre-filter is not clogged. |
|
|
3. |
Check that the filter made with HEPA Media is not clogged. |
4. Specifications
Power Source: AC 120V/60HZ
Power Consumption: 50 Watts
Weight: 7.3lbs
Dimensions: 15.2 x 9.3 x 6.5 inches
5. Service
To obtain approved Hoover® service and genuine Hoover® parts, locate the nearest Authorized Hoover® Warranty Service Dealer (Depot) by:
• Visit our website at hoover.com (U.S. Customers) or hoover.ca (Canadian customers).
Follow the service center link to find the service outlet nearest you.
• For an automated referral of authorized service outlet locations call 1-800-944-9200.
Do not send your product to Hoover®, Inc., Company in Glenwillow for service. This will only result in delay.
If you need further assistance:
To speak with a customer service representative call 1-800-944-9200; Mon-Fri 8am-7pm EST.
Always identify your product by the complete model number when requesting information or ordering parts.
(Label located on side of product.)
PLEASE DO NOT RETURN THIS PRODUCT TO THE STORE.
7

6. WARRANTY
HOOVER® AIR PURIFIER
LIMITED 2 YEAR WARRANTY
(Domestic Use)
WHAT THIS WARRANTY COVERS
When used and maintained in normal household use and in accordance with the Owner’s Manual, your HOOVER® product is warranted against original defects in material and workmanship for a full 2 years from date of purchase (the “Warranty Period”). During the Warranty Period, Hoover will provide labor and parts, at no cost to you, to correct any such defect in products purchased in the United States, U.S. Military Exchanges and Canada.
HOW TO MAKE A WARRANTY CLAIM
If this product is not as warranted, take or send the product to Hoover® Authorized Warranty Service Dealer along with proof of purchase. For an automated referral to authorized service outlets in the U.S.A., phone: 1-800-944-9200 OR visit Hoover® online at www.hoover.com. For additional assistance or information concerning this Warranty or the availability of warranty service outlets, phone the Hoover® Consumer Response Center, Phone 1-800-944-9200, Mon-Fri 8am7pm EST.
WHAT THIS WARRANTY DOES NOT COVER
This Warranty does not cover: rinsable pre-filter, filter made with HEPA media, TiO2 coated screen, UV bulb, use of the product in a commercial operation, improper maintenance of the product, damage due to misuse, acts of God, nature, vandalism or other acts beyond the control of Hoover, owner’s acts or omissions, use outside the country in which the product was initially purchased and resales of the product by the original owner. This warranty does not cover pick up, delivery, transportation or house calls. However, if you mail your product to a Hoover® Authorized Warranty Service Dealer for warranty service, cost of shipping will be paid one way.
This warranty does not apply to products purchased outside the United States, including its territories and possessions, outside a U.S. Military Exchange and outside of Canada. This warranty does not cover products purchased from a party that is not an authorized retailer, dealer, or distributor of Hoover® products.
OTHER IMPORTANT TERMS
This Warranty is not transferable and may not be assigned. This Warranty shall be governed and construed under the laws of the state of Ohio. The Warranty Period will not be extended by any replacement or repair performed under this Warranty.
THIS WARRANTY IS THE EXCLUSIVE WARRANTY AND REMEDY PROVIDED BY HOOVER. ALL OTHER WARRANTIES, EXPRESSED OR IMPLIED, INCLUDING WARRANTIES OF MERCHANTABILITY OR FITNESS FOR PARTICULAR PURPOSE, ARE DISCLAIMED. IN NO EVENT WILL HOOVER BE LIABLE FOR ANY SPECIAL, INDIRECT, INCIDENTAL OR CONSEQUENTIAL DAMAGES OF ANY KIND OR NATURE TO OWNER OR ANY PARTY CLAIMING THROUGH OWNER, WHETHER BASED IN CONTRACT, NEGLIGENCE, TORT OR STRICT PRODUCTS LIABILITY OR ARISING FROM ANY CAUSE WHATSOEVER. Some states do not allow the exclusion of consequential damages, so the above exclusion may not apply to you. This warranty gives you specific rights; you may also have others that vary from state to state.
8
 Loading...