


05651106 22/11/00 8:30 pm Page 1


 ®
®
Washing machine |
Instructions for use |
SIX.AAA WHISPER 1600 AAA 160
SIX.AAA WHISPER 1400 AAA 140
SIX.SPORTSWEAR 1300 AI 130
05651106 22/11/00 8:30 pm Page 2
Introduction
Please read and follow these instructions carefully and operate the machine accordingly.
Keep all documentation in a safe place for future reference or for any future owners.
Note: this machine is solely for domestic use, i.e. to wash, rinse and spin dry household textiles and garments.
Notes on disposal
All packaging materials used are environmentally-friendly and recyclable. Please help dispose of the packaging via environmentally-friendly means.
Your retailer or local council will be able to give you Your retailer or local council will be able to give you
details of current means of disposal. details of current means of disposal.
Appliances that have reached the end of their useful life are not worthless rubbish! Valuable materials can be salvaged from an old appliance via scrap reprocessing.
Note: to ensure safety when disposing of an old Note: To ensure safety when disposing of an old
washing machine disconnectthe mains plug from the washing machine the mains plug from the
socket, cut the mains power cable and destroy this socket, cut the mains power cable and destroy this
together with the plug. To prevent children shutting together with the plug. To prevent children shutting
themselvesin the machine break the door hinges or in the machine break the door hinges or
the door lock. the door lock.
2

05651106 22/11/00 8:30 pm Page 3
Contents |
Page |
Introduction |
2 |
General Delivery Notes |
4 |
Safety Notes |
4 |
Quick Start |
5 |
Installation & Testing |
6 |
Useful Washing Advice |
11 |
Using Inter@ct for the first time |
12 |
Description of Controls |
15 |
Detergent Drawer |
19 |
Detergents, washing aids & amounts to use |
20 |
Programme Selector |
22 |
Auto Half Load |
24 |
Sorting the Laundry |
24 |
Selecting the wash Progamme |
26 |
Consumption data |
27 |
Programme Guide |
28 |
Cleaning and Routine Maintenance |
30 |
Trouble shooting |
32 |
Power failure |
33 |
Technical data |
34 |
Customer service |
35 |
3
05651106 22/11/00 8:30 pm Page 4
General delivery notes
Please check that the following items are delivered with the appliance:
–Instruction manual
–Guarantee card
–Blanking plug
–Inlet hoses & bracket
–Base panel and x2 push clips
Check that no damage has occurred during transit. If it has, call the manufactures service by GIAS (tel: 08705 400 600). Please see Customer Service.
Safety notes
Note: before carrying out any cleaning or maintenance Note: before carrying out any cleaning or
of the washing machine. of the washing machine
A)Disconnect the plug from the mains supply
B)Turn off the water supply
C)Ensure that the mains power supply is earthed, if not, seek assistance from a qualified electrician. This appliance must be earthed.
D)Do not touch the appliance when hands or feet are wet or damp. Do not use the appliance with bare feet.
E)The use of adapters, multiple connectors and/or extensions is not recommended.
F)Caution: water temperature can reach 90˚C during
F)Note: water temperature can reach 90˚C during the
the whites wash cycle and as a result the door whites wash cycle and as a result the door glass
glass may get very hot. may get very hot.
G)Check there is no water visible in the drum before opening the door.
H)Do not allow children or unauthorised persons to use the appliance without supervision.
I)Do not pull the power cable or the appliance itself to remove the plug from the socket.
J)The appliance must not be exposed to weather conditions (rain, direct sun, etc...)
4

05651106 22/11/00 8:30 pm Page 5
K)When moving the appliance never lift it by the controls, the detergent drawer, the hoses or the power cable.
To avoid damaging the door when moving the appliance never rest the door against objects e.g a trolley.
L)IMPORTANT!
If the appliance is installed on a carpeted floor ensure that the ventilation through the base of the appliance is not obstructed.
M)When lifting the machine always use two people to help avoid back injuries.
N)If the appliance is not running properly or breaks down, switch it off, disconnect the plug from the socket, turn off the water supply and do not tamper with the appliance.
Consult GIAS Service (tel: 08705 400 600) for possible repair. Failure to comply with the above can compromise the safety of the appliance.
O)If the appliance’s power cable is damaged it must be replaced by a special cord which is only available from GIAS Service.
P)After the machine has been installed, ensure that the mains plug and water supply valves are easily accessible.
Q)Glass fibre curtains should never be put into this machine.
R)Lint or fluff must not be allowed to collect on the floor around the outside of this machine.
S)Always ensure that the door locked indicator neon has switched itself off before opening the door. By doing so the machine is allowed to cool down before the laundry is handled.
T)Always ensure that the base panel is fitted to the machine.
Quick Start
Note:AfterPlewaseshingensure that Inter@ct set-up, installation and testing
has been completed before referring to the Quick Start.
– Switch off the washing machine by pressing the
Washing
–Open the door with the DOOR OPEN button
–Select laundry and put it in the machine
–Close the door
–Put detergent in the dispenser compartments, compartment I for speed wash (prog. 26) and compartment II for all other programmes.
–Select programme by turning the programme knob (Your desired programme may be seen on the display)
–Select any function buttons required and then press the Start/Pause button
–There may be a short time delay from pressing the start/pause bottom to the start of the programme, while the machine senses the water required and sets the parameters for the programme
After washing
After washing
–– WaitSwitchaboutofftwotheminuteswashing(onlymachineif door lockedby pressingindicator istheON) forON/OFFthe doorbuttonlocking device to disengage
–Switch off the machine by turning the control knob to the OFF
–Wait about two minutes for the door locking device
position
to disengage
– Open the door and remove the laundry
– Open the door and remove the laundry
5
05651106 22/11/00 8:30 pm Page 6
Installation & Testing
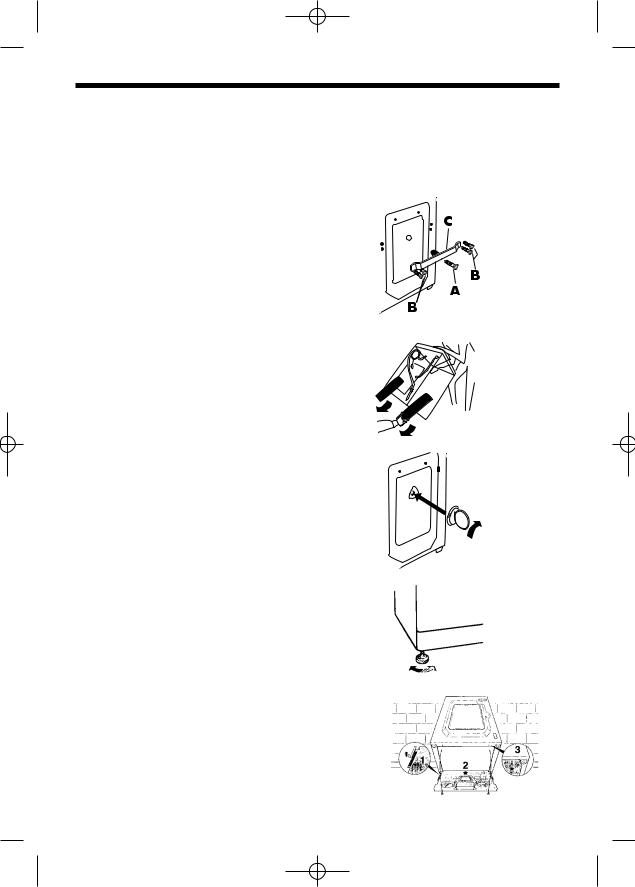
Remove the machine from the packaging - close to where it will finally be positioned - and proceed as follows: On the back of the machine
1) Remove the central screw A and side screws B and pull out the transit
bracket C complete with the red spacer.
2)Tilt the machine forward and remove the polystyrene spacers .
3 Cover the central hole using the cap enclosed in the instructions bag.
4)Adjust the two feet at the front to level the machine.
5)Tilt the machine forward and locate the base panel by removing the paper backing from the adhesive tape, locate
the base panel in the front of the machineoffer the base panel up to the base of the washing machine and locate the two clips.
6

05651106 22/11/00 8:30 pm Page 7
Note: we |
you keep the transit bracket and |
||
Note: werecommend you keep the transit bracket and |
|||
screws to protect the machine for future transit. |
|
||
screws to protect the machine for future transit. |
|
||
The |
will not be |
for any |
|
TheManufacturers will not beresponsible for any |
|||
damage to the machine caused by not |
the |
||
damage to the machine caused by notfollowing the |
|||
|
relating to |
the transit |
. |
instructions relating toreleasing the transitprotection. |
|||
The user is |
for all |
costs. |
|
The user isresponsible for allinstallation costs.
Connecting the fill hoses
This machine has inlet hoses with 19mm (3/4”) threaded ferrules fitted to the ends to attach between the threaded connector on the appliance and the water supply.
Only use the new hoses supplied to connect the machine and ensure that the sealing washers are in place inside the hose connectors.
Do not re-use old hoses which are attached to existing installations. Do not over-tighten the connections. Hand tight is sufficient.
Do not trap or kink the hoses.
1. Connect the elbow end of hoses to the back of the machine: red connector (for hot water) to the red threaded inlet, the white connector (for the cold water) to the white threaded inlet.
2. Connect the straight end of the hoses to the stop taps.
WHITE
7
05651106 22/11/00 8:30 pm Page 8
If the inlet hose’s connection point is changed, check that the 3/4” threaded ferrule on the inlet hose is firmly attached to the electrovalve connector.
Water supply requirements
Connect the machine to the drainage system used by household sinks.
THIS |
MUST BE |
IN |
THISMACHINE MUST BECONNECTED IN |
||
|
WITH THE WATER SUPPLY |
|
ACCORDANCE WITH THE WATER SUPPLY |
||
. WATER |
|
REGULATIONS. WATERBYELAWSPROHIBIT |
|
TO A |
WATER DRAIN. |
CONNECTION TO ASURFACE WATER DRAIN.
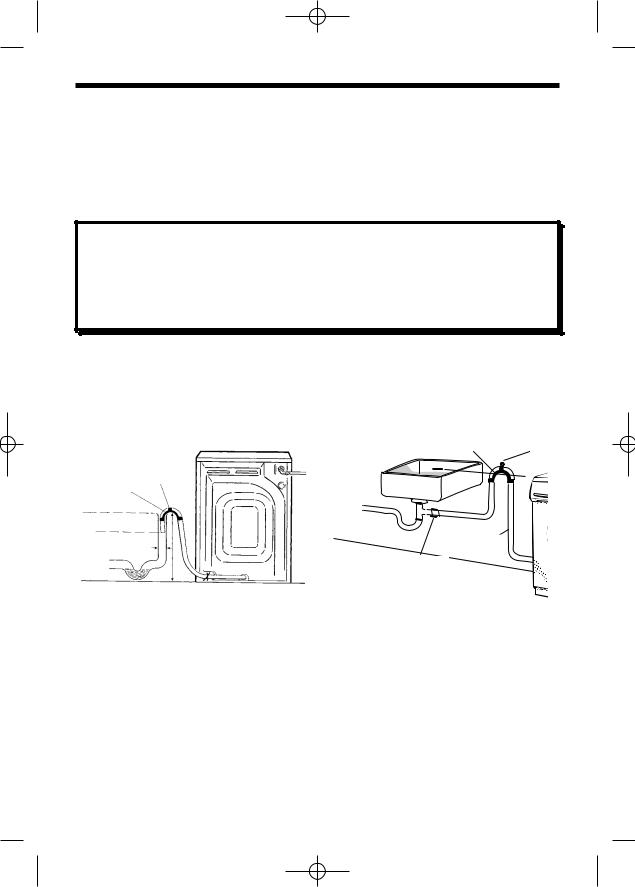
No other appliance should be plumbed into the standpipe.
There are two possible arrangements which can be seen below :-
HOSE SUPPORT
CROOK
DRAIN HOSE
12-15cm
32mm
min 80cm -60
|
FIX SECURELY |
|
ABOVE OVERFLOW |
HOSESUPPORTCROOKCROOK |
OUTLET OF SINK |
FI |
|
|
OV |
DRAIN HOSE
ATTACHHOSE
SECURELY TO
WASTE OUTLET
WASTE OUTLET
For the washing machine to function properly the outlet end of the drain hose must be at a minimum of 60 cm and a maximum of 80 cm from the ground.
8

05651106 22/11/00 8:30 pm Page 9
Testing the installation
Refer to the programme guide for details of how to select programmes.
For stopping each programme before its completion, the programme must be cancelled by holding down the START/PAUSE button for five seconds. The display will inform you that the programme has been cancelled.
1.Turn on the water supply and check for leaks from fill hoses.
2.Switch on the electricity supply.
3.Select spin programme 29 and then press the Start button to start the machine. Allow the programme to continue for one minute and then cancel the programme (Please see ‘Description of controls’ section for cancelling the programme). This will remove any water remaining in the machine from factory testing.
4.To check for cold water filling to the machine:
Select a rinse programme and press the Start button to start the machine. Allow the tumble action to continue until the water has pumped out. Check that the drain outlet is not leaking or overflowing.
5.Switch off the machine at the end of the cycle by turning the control knob to the off position.
6.To check for hot water filling to the machine:
Select programme 2 and press the Start button to start the machine.
Allow the wash action to continue for one minute, then cancel the programme.
Alternatively, both inlets can be connected to the cold water supply by using a suitable adaptor.
7.Select spin programme 29 and press the Start button to switch the machine on. If the machine takes longer than one minute to empty check the drain hoses for kinks.
Installation testing is now complete.
9
05651106 22/11/00 8:30 pm Page 10
To ensure the drum is thoroughly clean after testing and storage, select programme 2 and run the machine for a complete cycle using only wash detergent and water.
If the machine is not to be used immediately, switch off the mains power supply and remove the plug from the power socket. We also recommend that the water stop taps are turned off.
Note: it is |
to isolate the washing machine |
Note: it isadvisable to isolate the washing machine |
|
from the water and |
supplies after each wash. |
from the water andelectricity supplies after each wash.
Electricity supply and safety advice
Washing machines are supplied to operate at a voltage of 240V, 50 Hz singlephase. Check that the conductor is powerful enough to supply at least 3.0 kW, then connect the plug to a 13A earthed socket.
Electricity can be extremely dangerous. This washing machine must be earthed.
The socket outlet and the plug on the appliance must be of the same type.
It is not advisable to use multiple adapters and/or extension leads.
The wires in the mains lead are coloured in accordance with the following codes:
Blue |
– |
NEUTRAL |
Brown |
– |
LIVE |
Green & Yellow |
– |
EARTH |
If the mains cord on this appliance is damaged, it must be replaced by a special cord which is only available from the Hoover spares service, GIAS (01204 556111).
10
05651106 22/11/00 8:30 pm Page 11
Useful washing advice
Tips on using your appliance in the most environmentally-friendly and economical way.
Loading your washing machine
To make further reductions of energy, water and detergent consumption, we recommend that you put a full load into your machine. Energy savings of up to 50% can be achieved by washing one full load compared to two half loads.
When is prewashing really needed?
Only with particularly dirty loads!
Energy savings of 5 to 15% are made by not selecting the prewash option for less dirty laundry.
Which wash temperature should you choose?
Using stain removers before machine washing reduces the need to wash at temperatures over 60°C.
Energy savings of up to 50% can be made by using a 40°C wash temperature.
Heavily soiled laundry
To ensure the best performance when washing a particularly dirty load, we recommend that you reduce the amount of items to be put into the machine. If the drum is not crammed full, the items will circulate more freely and will wash cleaner.
ARIEL - Chosen and recommended by Hoover
When we produce a new washing machine we subject it to every test possible. And one of the most important tests is the one that enables our experts to identify the most suitable detergent for solving laundry problems. Ariel was able to meet our needs: to make the washing machine function efficiently, not compromise the machine’s lifespan and produce the best wash results. Consistently excellent results, which was the main aim of the test we carried out, determined our choice and our recommendation. The prime function of a detergent that answers all washing requirements is to work with the water to remove dirt from fabrics, holding it in suspension until it is removed when the water is pumped out, and to control the amount of foam forming in the washing machine, without damaging the fibres of the items being washed. Ariel fully satisfies all these requirements, as it contains high quality elements, the result of the most advanced research, ensuring excellent results under all conditions.
11
 Loading...