


TM  MC
MC  TM
TM
HAND VAC |
ASPIRATEUR |
ASPIRADORA |
|
À MAIN |
DE MANO |
OWNER’S MANUAL
GUIDED’UTILISATION•MANUALDELUSUARIO
Operating and Servicing Instructions
Please read these instructions carefully before using your HOOVER® Hand Vac.
Be sure to register your product online at Hoover.com or call 1-800-944-9200 to register by phone.
Instructions d’Utilisation et d’Entretien
Lire attentivement ces instructions avant d’utiliser l’aspirateur à main HOOVERMD. N’oubliez pas d’enregistrer votre produit en ligne, à l’adresse Hoover.com, ou par téléphone, au 1-800-944-9200.
Instrucciones de Funcionamiento y Mantenimiento
Por favor lea estas instrucciones con cuidado antes de usar su aspiradora manual HOOVER®. Inscriba su producto en línea en Hoover.com, o llame al 1-800-944-9200 si prefiere hacerlo por teléfono.
©2010 Techtronic Floor Care Technology Limited. All Rights Reserved. Tous droits réservés. Todos los derechos reservados. #960009655 ID101171-R0

THIS VACUUM IS INTENDED FOR HOUSEHOLD USE ONLY.
IMPORTANT SAFETY INSTRUCTIONS
WARNING:
CLEANER ASSEMBLY MAY INCLUDE SMALL PARTS. SMALL PARTS CAN
PRESENT A CHOKING HAZARD.
When using an electrical appliance, basic precautions should always be followed, including the following:
• READ ALL INSTRUCTIONS BEFORE USING THIS APPLIANCE.
• ALWAYS FOLLOW THESE SAFETY INSTRUCTIONS.
• SEE SEPARATE MANUAL PERTAINING TO BATTERY AND CHARGING
OPERATION.
• DO NOT LEAVE VACUUM CLEANER UNATTENDED.
• WARNING: FULLY ASSEMBLE VACUUM CLEANER BEFORE OPERATING.
• WARNING: THIS PRODUCT CONTAINS CHEMICALS KNOWN TO THE STATE OF
CALIFORNIA TO CAUSE CANCER, BIRTH DEFECTS OR REPRODUCTIVE HARM.
WARNING: TO REDUCE THE RISK OF FIRE, ELECTRIC SHOCK OR INJURY:
•Do not use product or charge battery on wet surfaces. Do not expose to rain. Store indoors.
•Do not allow to be used as a toy. Close attention is necessary when used by or near children.
•Use only as described in this manual. Use only manufacturer’s recommended attachments.
•Do not use charger with damaged cord or plug. If vacuum or charger is not working as it should, has been dropped, damaged, left outdoors, or dropped into water, return it to an authorized HOOVER® Dealer for inspection.
•Do not pull or carry by charger cord, use cord as a handle, close a door on cord, or pull cord around sharp edges or corners. Do not run appliance over cord. Keep cord away from heated surfaces.
•Do not unplug charger by pulling on cord. To unplug charger, grasp the plug, not the cord.
•Do not handle charger (including charger plug and terminals), battery, or appliance with wet hands.
•Keep hair, loose clothing, fingers, and all parts of body away from openings and moving parts.
•Do not pick up anything that is burning or smoking, such as cigarettes, matches or hot ashes.
•Do not use the vacuum cleaner without filter and dirt cup in place.
•Use extra care when cleaning on stairs.
•Do not use to pick up flammable or combustible liquids such as gasoline, or use in areas where they may be present.
•Leaksfrombatterycellscanoccurunderextremeconditions.Ifanyliquidgetsontheskinwashquickly withsoapandwater.Ifanyliquidgetsintotheeyes,donotrubeyes,immediatelyflushthemwithclean water continuously for a minimum of 15 minutes. Seek medical attention immediately.
•Use only the charger (Hoover® Part# BH50005) supplied by the manufacturer to recharge.
•Store the vacuum cleaner indoors. Put the vacuum cleaner away after use to prevent tripping accidents.
•Use only battery (Hoover® Part# BH50000) supplied by manufacturer to operate this product.
•Always turn off and remove battery before connecting or disconnecting optional motorized power brush (LiNXTM Power Head), or before servicing.
•Do not dispose of battery in a fire or trash compactor. See battery disposal section at end of this manual for directions.
•Do not put any object into openings. Do not use with any opening blocked; keep free of dust, lint, hair, and anything that may reduce air flow.
•Do not incinerate the charger, battery, or appliance even if it is severely damaged. The batteries can explode in a fire.
•Use only the Hoover® motorized power brush (LiNXTM Power Head), Hoover® Model #BH50035 (available on select models or can be purchased separately).
SAVE THESE INSTRUCTIONS
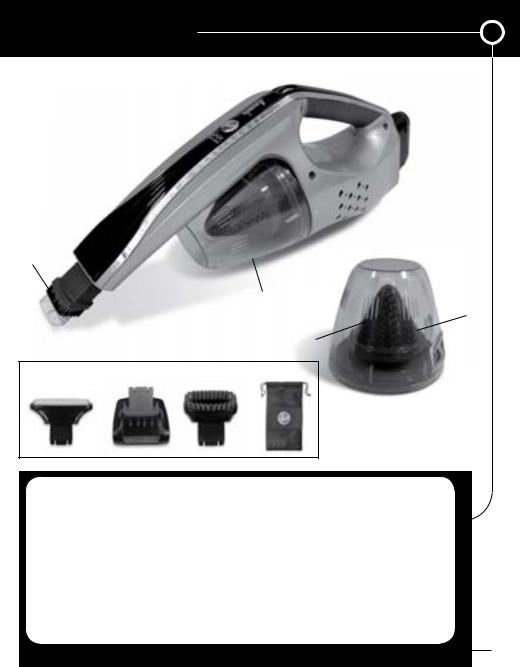
1. FEATURES
3
 4 2
4 2 

1
5 
7
6
8 |
9 |
10 |
11 |
1.1 |
FRONT |
ACCESSORIES* |
||
|
1. |
Combination Crevice/Brush Tool |
8. |
Pet Upholstery Tool (part #410048001) |
2. |
Fuel Gauge |
9. |
LiNXTM Power Head (part #410051001) |
|
3.On/Off Switch (0=OFF, I=ON) 10. Deluxe Dusting Brush (part #410049001)
4.Battery
5.Dirt Cup
DIRTCUP
5.Dirt Cup
6.Pre-Screen
7.Filter (inside pre-screen)
11.Mesh Storage Bag
*Available on BH50030 Hand Vac with Pet Tools.
If desired, accessories can be purchased at hoover.com or 1-800-944-9200 - refer to part numbers to order.
Ifyouneedassistance:
Visitourwebsiteathoover.com.FollowtheauthorizeddealerlocatorlinktofindtheHoover® authorized dealer nearest you or call 1-800-944-9200 for an automated referral of Hoover® authorized dealer locations (U.S. only) or to speak with a customer service representative; MonFri 8am7pm EST.
PLEASE DO NOT RETURN THIS PRODUCT TO THE STORE.
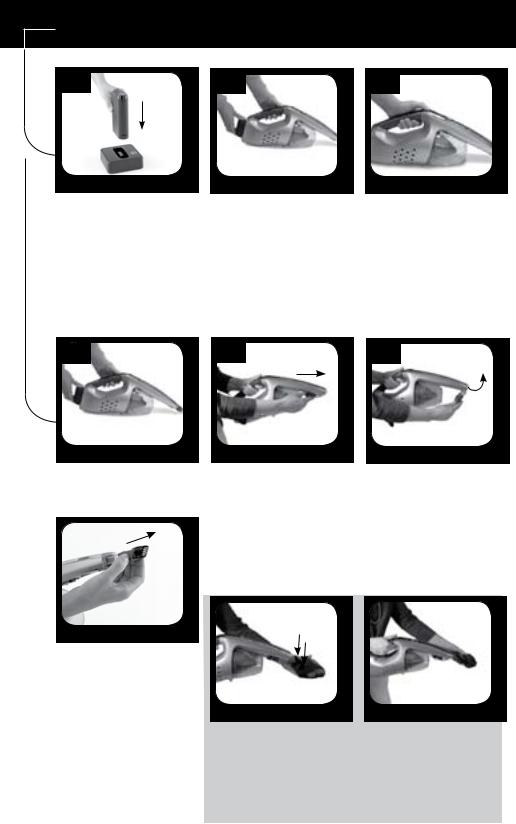
2. HOW TO OPERATE
Charge Battery |
Insert Battery |
ON/OFF Switch |
2.1 |
2.2 |
2.3 |
Charge battery fully before first use. Fully discharged battery will take up to 3 hours to charge.
NOTE: See battery and charger manual for battery charging instructions.
Use only manufacturer’s supplied or recommended battery and charger.
Insert charged battery into battery cavity until latch is locked into place.
NOTE: When inserting and removing battery, ensure the switch is in the off position marked “O”.
To turn vacuum |
on, roll |
switch forward to |
position |
marked “I”. |
|
Remove Battery |
Integrated Tools |
|
2.4 |
2.5 |
2.6 |
To remove and charge battery, |
CREVICETOOL |
Pivot Crevice Tool up and |
pull on release lever located |
Push Crevice Tool forward to |
lock into place. |
on end of battery and pull out |
release. |
|
gently. |
|
|
|
|
Attachments* |
|
|
|
2.7 |
|
|
|||
|
*Available on BH50030 Hand Vac with Pet Tools. |
||||
|
|
WARNING: Remove battery before inserting or |
|||
|
|
removing all attachment tools. |
|
|
|
|
|
CAUTION: Not recommended for use on leather. |
|||
|
|
CAUTION: Not to be used for grooming a pet. |
|||
|
|
|
|
|
|
|
2.8 |
|
|||
|
|
|
2.9 |
|
|
BRUSHTOOL
Pull brushes forward on Crevice
Tool to reveal Brush Tool.
Reverse steps 1-3 to store
Crevice or Brush Tool.
LiNXTM PowerHead
Align pins on LiNXTM Power Head with small openings on nozzle and insert until securely in place. To utilize LiNXTM Power Head pivot feature, move handle in a vertical motion while cleaning. Pull out to remove.
ADDITIONAL PET TOOLS
Slide tool with Hoover® logo facing up into nozzle until locked securely in place. To remove, pull tool directly out.

3. MAINTENANCE WARNING: Remove battery before performing service or maintenance.
Dirt Cup & Filter Removal & Replacement
IMPORTANT:For best results, clean after each use.
REGULAR MAINTENANCE:Each time the dirt cup is emptied, the filter should be cleaned. (Filter will be discolored after use. This will not affect the filter’s performance.)
Removal
3.13.2
Grip dirt cup and twist off in direction indicated on hand vac until unlock symbol is aligned with mark.
3.4
Pull pre-screen from dirt cup.
Pull out filter and brush or wash clean with cold water.
WARNING: Always dry for 24 hours before replacing.
WARNING: Do not use detergent or hot water to clean.
For filter replacement, please call 1-800-944-9200 or visit our website at www.hoover.com to locate a dealer nearest you. Filter Service Part #001331007.
Replacement
3.3
Empty dirt cup over trash can to remove debris.
3.5
To remove debris from prescreen, gently tap over trash.
3.6 |
Micro-layer side |
3.7 |
3.8 |
|
|
|
Replace filter in pre-screen with |
Replace filter and pre-screen |
micro-layer side facing out. |
in dirt cup. |
Cleaning LiNXTM Power Head*
*Available on BH50030 Hand Vac with Pet Tools.
3.93.10
Replace dirt cup by twisting on in direction indicated on hand vac until lock symbol is aligned with mark.
3.11
Remove LiNX™ Power Head Tool from nozzle and turn over. Press eject button on side of tool to release brushroll and remove.
Remove red end cap and clean away hair and debris. IMPORTANT: Do not discard red end cap.
Ensure red end cap is replaced. Place opposite end onto hexagonal drive gear and pivot into place until brushroll snaps secure.
 Loading...