


FR |
Mode d’emploi |
DYN DP |
||
IT |
Istruzioni per l’uso |
|||
NL |
Gebruiksaanwijzing |
|||
RU |
Èícòpyêöèÿ ïî êcïëyaòaöèè |
|
|
|
EN |
User instructions |
|
|
|
|
|
|
|
|
|
|
|
|
|
|
|
|
|
|
FR
TOUS NOS
COMPLIMENTS
En achetant cet appareil ménager Hoover, vous avez démontré que vous n’acceptez aucun compromis: vous voulez toujours ce qu’il y a de mieux.
Hoover a le plaisir de vous proposer cette nouvelle machine à laver qui est le résultat d’années de recherches et d’études des besoins du consommateur. Vous avez fait le choix de la qualité, de la fiabilité et de l’efficacité.
Hoover vous propose une large gamme d’appareils électroménagers: machines
àlaver la vaisselle, machines
àlaver et sécher le linge, cuisinières, fours à microondes, fours et tables de cuisson, hottes, réfrigerateurs et congélateurs.
Demandez à votre Revendeur le catalogue complet des produits Hoover.
Nous vous prions de lire attentivement les conseils contenus dans ce livret. Il contient d’importantes indications concernant les procédures d’installation, d’emploi, d’entretien et quelques suggestions utiles en vue d’améliorer l’utilisation de la machine à laver.
Conservez avec soin ce livret: vous pourrez le consulter bien souvent.
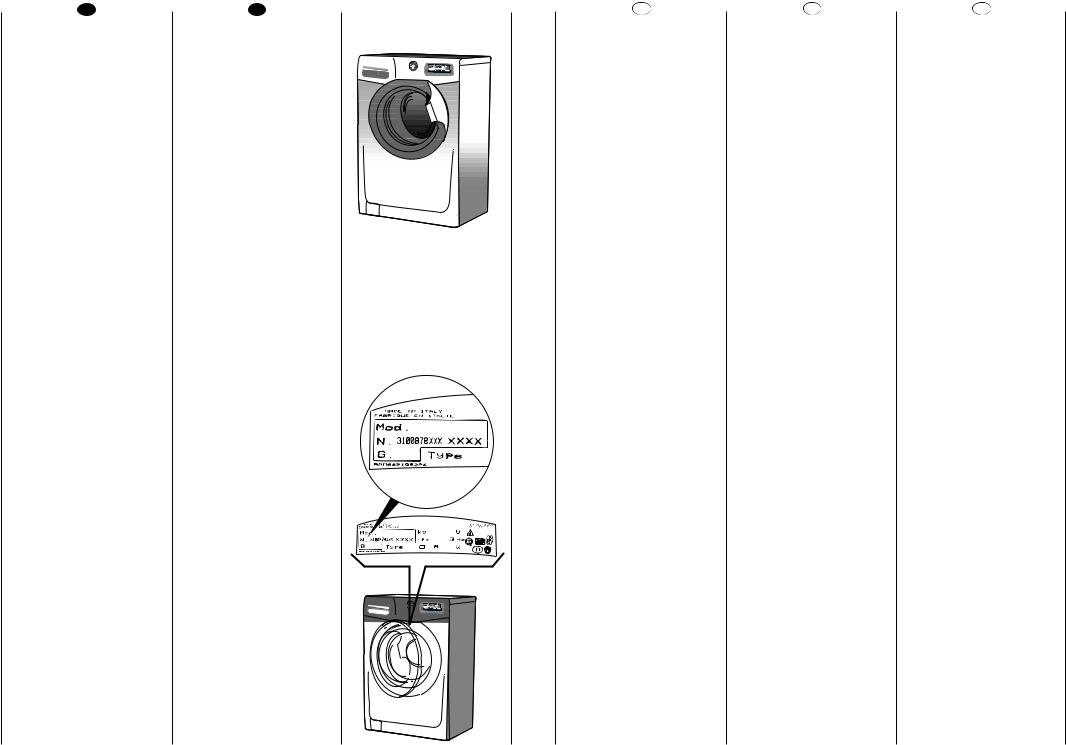
Quand vous communiquez avec Hoover, ou avec ses centres d’assistance, veuillez citer le Modèle, le n° et le numéro G (éventuellement).
IT
COMPLIMENTI
Con l’acquisto di questo elettrodomestico Hoover; Lei ha dimostrato di non accettare compromessi: Lei vuole il meglio.
Hoover é lieta di proporLe questa nuova lavatrice frutto di anni di ricerche e di esperienze maturate sul mercato, a contatto diretto con i Consumatori. Lei ha scelto la qualità, la durata e le elevate prestazioni che questa lavatrice Le offre.
Hoover Le propone inoltre una vasta gamma di elettrodomestici: lavatrici, lavastoviglie, lavasciuga, cucine, forni a microonde, forni e piani di cottura, frigoriferi e congelatori.
Chieda al Suo Rivenditore il catalogo completo dei prodotti Hoover
La preghiamo di leggere attentamente le avvertenze contenute nel presente libretto in quanto forniscono importanti indicazioni riguardanti la sicurezza di installazione, d’uso, di manutenzione e alcuni utili consigli per il migliore utilizzo della lavatrice.
Conservi con cura questo libretto per ogni ulteriore consultazione.
Quando comunica con la Hoover o con i suoi centri di assistenza citi sempre il Modello, il n° e il numero G (se c’è). Praticamente tutto ciò che é citato nel riquadro.
2
NL
ONZE COMPLIMENTEN
Met de aankoop van dit Hoover huishoudelijk apparaat hebt u laten zien dat u geen genoegen neemt met tussenoplossingen en dat u alleen het allerbeste wilt.
Het is voor Hoover een genoegen u een nieuwe wasautomaat aan te bieden die het resultaat is van jarenlang onderzoek en ervaring opgedaan door een direct contact met de gebruiker. U hebt gekozen voor de kwaliteit, de duurzaamheid en de uitstekende prestatie die deze wasmachine levert.
Hoover kan u ook een uitgebreid assortiment van ander huishoudelijke apparaten en stofzuigers bieden. Kijk hiervoor op de lokale website van Hoover.
Een uitgebreide catalogus van Hoover apparaten kunt u bij uw winkelier krijgen.
Wij verzoeken u dit boekje aandachtig door te lezen, want het geeft u belangrijke richtlijnen omtrent het veilig installeren, het gebruik en het onderhoud en bruikbare tips om met uw wasautomaat de beste resultaten te verkrijgen.
Bewaar dit boekje op een goede plaats zodat u het kunt raadplegen.
Vermeld altijd het type, nummer en G-nummer (indien van toepassing) van het apparaat (staat op het paneel) als u contact opneemt met Hoover of de Klantenservice.
RU
ПОЗДPАВЛЯЕМ!
Пpиобpетя ту стиpальную машину Hoover, Вы pешили не идти на компpомисс: Вы пожелали лучшее.
Ôèpìà Hoover pада пpедложить Вам ту новую стиpальную машину - плод многолетних научноисследовательских pабот и пpиобpетенного на pынке, в тесном контpакте с потpебителем, опыта.
Вы выбpали качество, долговечность и шиpокие возможности, котоpые Вам пpедоставляет та стиpальная машина.
Кpоме того Hoover пpедлагает Вам шиpокую гамму лектpобытовой техники: стиpальные машины, посудомоечные машины, стиpальные машины с сушкой, кухонные плиты, микpоволновые печи, духовки, ваpочные панели, холодильники, моpозильники.
Спpосите у Вашего пpодавца полный каталог пpодукции фиpмы Hoover.
Пpосим Вас внимательно ознакомиться с пpедупpеждениями, содеpжащимися в той инстpукции, котоpые дадут Вам важные сведения, касающиеся безопасности, установки, ксплуатации и обслуживания, некотоpые полезные советы по лучшему использованию машины.
Беpежно хpаните ту книжку инстpукций для последующих консультаций.
Пpи общении с фиpмой
Hoover или с ее специалистами по техническому обслуживанию постоянно ссылайтесь на модель и номеp G (если таковой имеется). Пpактически, ссылайтесь на все, что содеpжится в табличке.
EN
OUR COMPLIMENTS
With the purchase of this Hoover household appliance, you have shown that you will not accept compromises: you want only the best.
Hoover is happy to present their new washing machine, the result of years of research and market experience through direct contact with Consumers. You have chosen the quality, durability and high performance that this washing machine offers.
Hoover is also able to offer a vast range of other household appliances: washing machines, dishwashers, washer-dryers, cookers, microwave ovens. Traditional ovens and hobs, refrigerators and freezers.
Ask your local retailer for the complete catalogue of Hoover products.
Please read this booklet carefully as it provides important guide lines for safe installation, use and maintenance and some useful advise for best results when using your washing machine.
Keep this booklet in a safe place for further consultation.
When contacting Hoover or a Customer Services Centre always refer to the Model, No., and G number (if applicable of the appliance see panel).
3
|
FR |
|
|
IT |
|
CHAPITRE |
|
|
|
|
|||
|
|
|
|
|
|
|
INDEX |
INDICE |
CAPITOLO |
||||
|
|
|
|
|
|
HOOFDSTUK |
Avant-propos |
Prefazione |
ÏAPAÃPAÔ |
||||
CHAPTER |
||||||
Notes générales à la |
Note generali alla consegna |
1 |
||||
livraison |
|
|
|
|
||
Garantie |
Garanzia |
2 |
||||
Mesures de sécurité |
Prescrizioni di sicurezza |
3 |
||||
Données techniques |
Dati tecnici |
4 |
||||
Mise en place, installation |
Messa in opera, installazione |
5 |
||||
Description des commandes |
Descrizione comandi |
6 |
||||
Tableau des programmes |
Tabella programmi |
7 |
||||
Sélection |
Selezione |
8 |
||||
Tiroir à lessive |
Cassetto detersivo |
9 |
||||
Le produit |
Il prodotto |
10 |
||||
Lavage |
Lavaggio |
11 |
||||
Nettoyage et entretien |
Pulizia e manutenzione |
12 |
||||
|
|
|
ordinaria |
|
||
Recherche des pannes |
Ricerca guasti |
13 |
||||
|
|
|
|
|
|
|
NL |
|
RU |
|
||
INHOUDSOPGAVE |
|
OÃËABËEHÈE |
Inleiding |
|
Введениe |
Algemene aanwijzingen bij |
|
Oáùèe ñâåäeíèÿ ïî |
levering |
|
ксплyатации |
Garantie |
|
Гаpантия |
Veiligheidsmaatregelen |
|
Mepû áåçoïacíocòè |
Technische gegevens |
|
Texíè÷ecêèe xapaêòepècòèêè |
In elkaar zetten en |
|
Ycòaíoâêa |
installeren |
|
|
Bedieningspaneel |
|
Oïècaíèe êoìaíä |
Overzicht van programma’s |
|
Taблицы выбopa пpoгpaмм |
Kiezen van het programma |
|
Bûáop ïpoãpaìì |
Wasmiddelbakje |
|
Koíòeéíep äëÿ ìoюùèx |
|
|
cpeäcòâ |
De weefsels |
|
Tèï áeëüÿ |
Het wassen |
|
Còèpêa |
Schoonmaken en normaal |
|
Чècòêa è yxoä ça ìaøèíoé |
onderhoud |
|
|
Storingzoeker |
|
Boçìoæíûe íeècïpaâíocòè |
|
|
|
EN
INDEX
Introduction
General points on delivery
Guarantee
Safety Measures
Technical Data
Setting up and Installation
Control Description
Table of Programmes
Selection
Detergent drawer
The Product
Washing
Cleaning and routine maintenance
Faults Search
4 |
5 |
FR
CHAPITRE 1
NOTES GENERALES A LA LIVRAISON
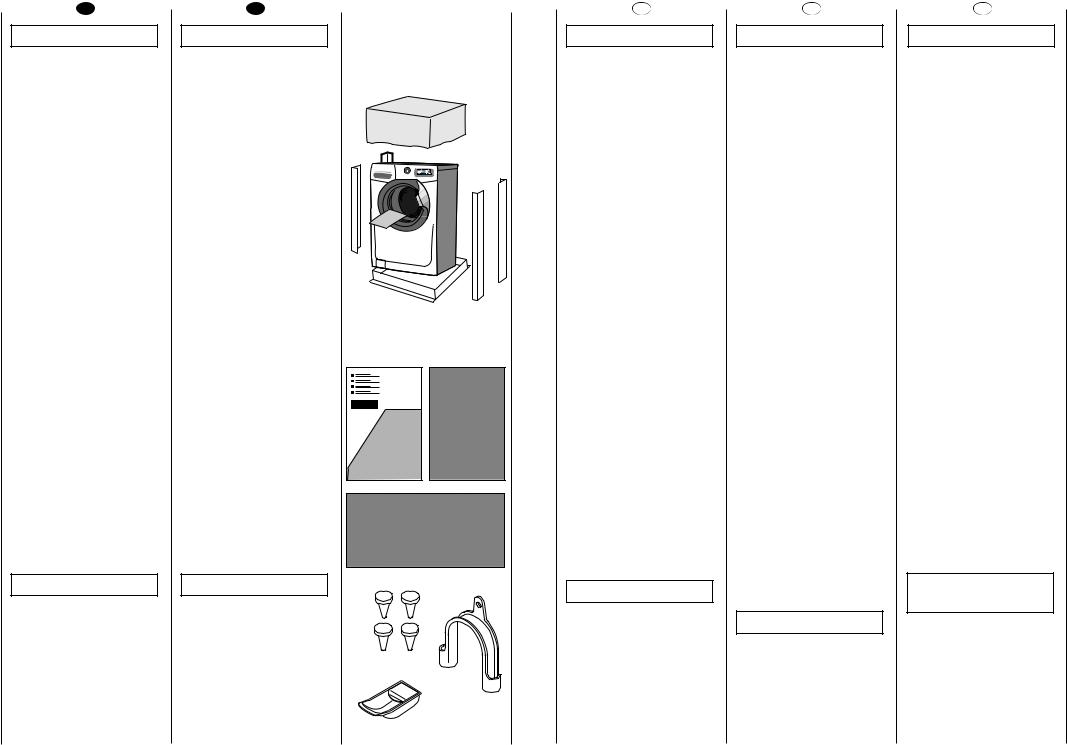
A la livraison veuillez, contrôler que le matériel suivant accompagne la machine:
A)LIVRET D’INSTRUCTIONS
B)ADRESSES DE SERVICE APRES VENTE
C)CERTIFICAT DE GARANTIE
D)BOUCHONS
E)COUDES POUR LE TUBE DE VIDANGE
F)BAC POUR LES PRODUITS LESSIVIELS LIQUIDES OU POUR LES PRODUITS BLANCHISSANTS LIQUIDES
LES CONSERVER
et contrôler que ce matériel soit en bon état; si tel n’est pas le cas appelez le centre Hoover le plus proche.
IT
CAPITOLO 1
NOTE GENERALI ALLA CONSEGNA
Alla consegna controlli che con la macchina ci siano:
A)MANUALE D’ISTRUZIONE
B)INDIRIZZI DI ASSISTENZA
C)CERTIFICATI DI GARANZIA
D)TAPPI
E)CURVA PER TUBO SCARICO
F)BACINELLA DETERSIVO LIQUIDO O CANDEGGIANTE
CONSERVATELI
e controlli che non abbia subito danni durante il trasporto, in caso contrario chiami il centro Hoover più vicino.
A B
C
D |
|
F |
E |
|
NL
HOOFDSTUK 1
ALGEMENE AANWIJZINGEN BIJ DE LEVERING
Controleer bij de levering of met de machine het volgende is bijgeleverd:
A)HANDLEIDING
B)ADRESSEN KLANTENSERVICE
C)GARANTIEBEWIJZEN
D)KAPJES
E)AFVOERSLANGGELEIDER
F)WASMIDDELENBAKJE
BEWAAR DEZE GOED
Controleer ook of de machine gedurende het transport niet beschadigd is. Mocht dat wel het geval zijn, neemt u dan contact met uw Hoover leverancier
RU
ÏÀPÀÃPÀÔ 1
ОБЩИЕ
СВЕДЕНИЯ
Пpи покупке убедитесь, чтобы с машиной были:
А) ИНСТPУКЦИЯ ПО ЭКСПЛУАТАЦИИ НА PУССКОМ ЯЗЫКЕ;
В) АДPЕСА СЛУЖБ ТЕХНИЧЕСКОГО ОБСЛУЖИВАНИЯ;
С) СЕPТИФИКАТ ГАPАНТИИ;
D)ЗАГЛУШКA;
E)ЖЕСТКОЕ УСТPОЙСТВО ДЛЯ ЗАГИБА СЛИВНОЙ ТPУБЫ;
F)йнСЦгЦзаЦ Сгь ЬаСдйЙй ейыфЦЙй лкЦСлнЗД ага Сгь ЬаСдйЙй йнЕЦгаЗДнЦгь (дйзнЦвзЦк).
ХPАНИТЕ ИХ
Пpовеpьте отсутствие повpеждений машины пpи тpанспоpтиpовке. Пpи наличии повpеждений обpатитесь в центp техобслуживания Hoover.
EN
CHAPTER 1
GENERAL POINTS ON DELIVERY
On delivery, check that the following are included with the machine:
A)INSTRUCTION MANUAL
B)CUSTOMER SERVICE ADDRESSES
C)GUARANTEE CERTIFICATES
D)CAPS
E)BEND FOR OUTLET TUBE
F)LIQUID DETERGENT OR LIQUID BLEACH COMPARTMENT (CONTAINER)
KEEP THEM IN A SAFE PLACE
Check that the machine has not incurred damage during transport. If this is the case, contact your nearest Hoover Centre.
6 |
7 |
FR
CHAPITRE 2
GARANTIE
L’appareil est accompagné par un certificat de gàrantie.
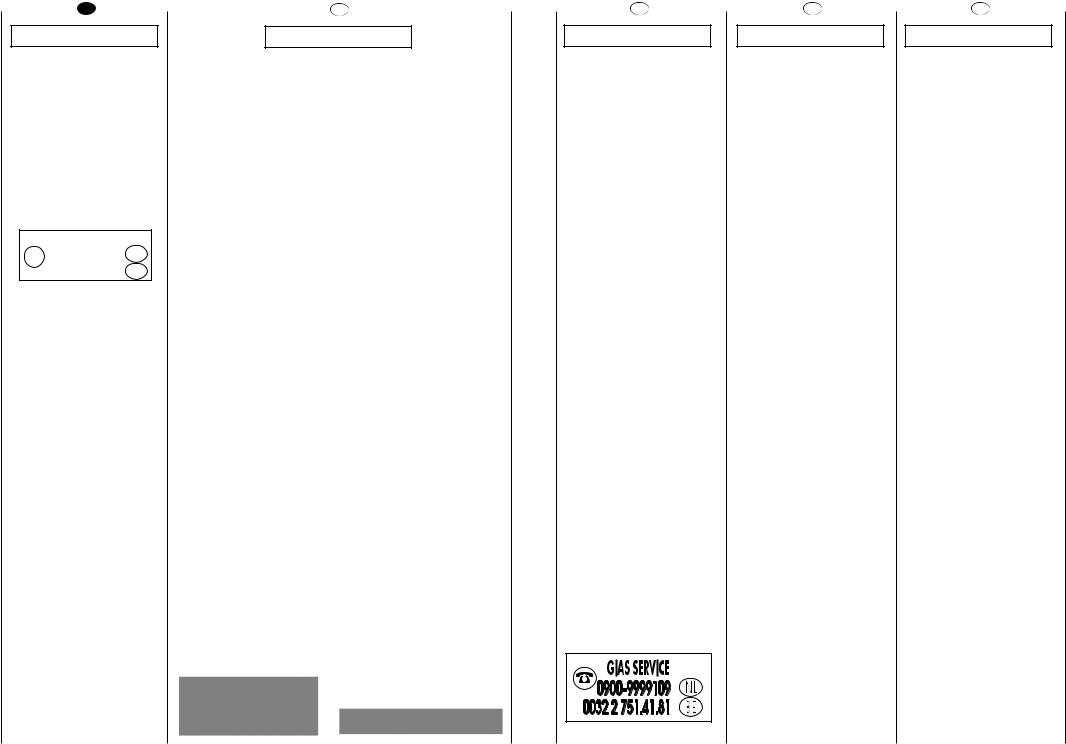
GIAS SERVICE
0848-780.780 CH
0903-99109 BE
IT
CAPITOLO 2
Servizio Assistenza Clienti
CERTIFICATO DI GARANZIA CONVENZIONALE: cosa fare?
Il Suo prodotto è garantito, alle condizioni e nei termini riportati sul certificato inserito nel prodotto ed in base alle previsioni del decreto legislativo 24/02, nonché del decreto legislativo 6 settembre 2005, n. 206, per un periodo di 24 mesi decorrenti dalla data di consegna del bene.
Così come riportato nei testi dei Decreti Legislativi citati, il certificato di garanzia dovrà essere da Lei conservato, debitamente compilato, per essere mostrato al Servizio Assistenza Tecnica Autorizzato, in caso di necessità, unitamente ad un documento fiscalmente valido rilasciato dal rivenditore al momento dell’acquisto (bolla di consegna, fattura, scontrino fiscale, altro) sul quale siano indicati il nominativo del rivenditore, la data di consegna, gli estremi identificativi del prodotto ed il prezzo di cessione.
Resta pure inteso che, salvo prova contraria, poiché si presume che i difetti di conformità che si manifestano entro sei mesi dalla consegna del bene esistessero già a tale data, a meno che tale ipotesi sia incompatibile con la natura del bene o con la natura del difetto di conformità, il Servizio di Assistenza Tecnica Autorizzato Gias, verificato il diritto all’intervento, lo effettuerà senza addebitare il diritto fisso di intervento a domicilio, la manodopera ed i ricambi. Per contro, nel successivo periodo di diciotto mesi di vigenza della garanzia, sarà invece onere del consumatore che intenda fruire dei rimedi accordati dalla garanzia stessa provare l’esistenza del difetto di conformità del bene sin dal momento della consegna; nel caso in cui il consumatore non fosse in grado di fornire detta prova, non potranno essere applicate le condizioni di garanzia previste e pertanto il Servizio di Assistenza Tecnica Autorizzato Gias effettuerà l’intervento addebitando al consumatore tutti i costi relativi.
ESTENSIONE DELLA GARANZIA FINO A 5 ANNI: come?
Le ricordiamo inoltre che sullo stesso certificato di garanzia convenzionale Lei troverà le informazioni ed i documenti necessari per prolungare la garanzia dell’apparecchio sino a 5 anni e così, in caso di guasto, non pagare il diritto fisso di intervento a domicilio, la manodopera ed i ricambi.
Per qualsiasi informazione necessitasse, La preghiamo rivolgersi al numero telefonico del Servizio Clienti 199 12 13 14.
ANOMALIE E MALFUNZIONAMENTI: a chi rivolgersi ?
Per qualsiasi necessità il centro assistenza autorizzato è a Sua completa disposizione per fornirLe i chiarimenti necessari; comunque qualora il Suo prodotto presenti anomalie o mal funzionamenti, prima di rivolgersi al Servizio Assistenza Autorizzato, consigliamo vivamente di effettuare i controlli indicati nel capitolo "Ricerca guasti".
UN SOLO NUMERO TELEFONICO PER OTTENERE ASSISTENZA.
Qualora il problema dovesse persistere, componendo il “Numero Utile” sotto indicato, sarà messo in contatto direttamente con il Servizio Assistenza Tecnica Autorizzato che opera nella Sua zona di residenza.
Attenzione:
la chiamata è a pagamento; il costo verrà comunicato, tramite messaggio vocale, dal
Servizio clienti dell’operatore telefonico utilizzato. Dettagli sono presenti sul sito internet www.hoover.it.
MATRICOLA DEL PRODOTTO. Dove si trova?
E’ indispensabile che comunichi al Servizio Assistenza Tecnica Autorizzato la sigla del prodotto ed il numero di matricola (16 caratteri che iniziano con la cifra 3) che troverà sul certificato di garanzia oppure sulla targa matricola posta sul frontale della lavabiancheria (zona oblò). In questo modo Lei potrà contribuire ad evitare trasferte inutili del tecnico, risparmiando oltretutto i relativi costi.
NL
HOOFDSTUK 2
GARANTIE
De machine staat onder garantie, waardoor u tijdens de garantieperiode gratis gebruik kunt maken van de Gias Service, behalve de prijs van het telefoontje. Vergeet niet om binnen 10 dagen na de aankoopdatum het garantiecertificaat op te sturen.
Bewaar het ontvangstbewijs van de winkelier waar u de machine gekocht heeft om dit aan de reparateur te tonen, mocht hij het bewijs nodig hebben.
Als uw machine defect is of niet juist functioneert, dan raden wij u aan om eerst het hoofdstuk ‘Problemen’ door te lezen, voordat u contact op neemt met Gias Service.
Als het probleem zich na alle aanbevolen controles nog steeds voordoet, dan kunt u bellen met Gias Service.
U betaalt voor het telefoontje en u wordt direct verbonden met Gias Service. Het is belangrijk dat u de adviseur het modelnummer en het serienummer van uw machine doorgeeft, die u op de kenplaat aan de voorkant van de wasmachine (bij de deur) kunt vinden (16 tekens, beginnend met het nummer 3). Hierdoor kunnen wij u beter van dienst zijn.
RU
ÏÀPÀÃPÀÔ 2
ГАPАНТИЯ
Стиpальная машина снабжена гаpантийным сеpтификатом, котоpый позволяет Вам бecплaтнo пользоваться услугами технического сеpвиса, за исключением оплаты за вызов, в течение 1 года со дня покупки.
EN
CHAPTER 2
GUARANTEE
The appliance is supplied with a guarantee certificate which allows free use of the Technical Assistance Service.
8 |
9 |
FR
CHAPITRE 3
MESURES DE
SECURITE
ATTENTION:
EN CAS
D’INTERVENTION DE
NETTOYAGE ET
D’ENTRETIEN
●Débrancher la prise de courant.
●Fermer le robinet d’alimentation d’eau.
●Toutes les machines Hoover sont pourvues de mise à la terre.
Vérifier que l’installation électrique soit alimentée par une prise de terre, en cas contraire demander l’intervention du personnel qualifié.
 Produit compatible avec les Directives Européennes 73/23/EEC et 89/336/EEC, remplacé par 2006/95/EC et 2004/108/EC, et les amendements successifs.
●Ne pas toucher l’appareil pieds nus.
●Autant que possible éviter l’usage de rallonges dans les salles de bains ou les douches.
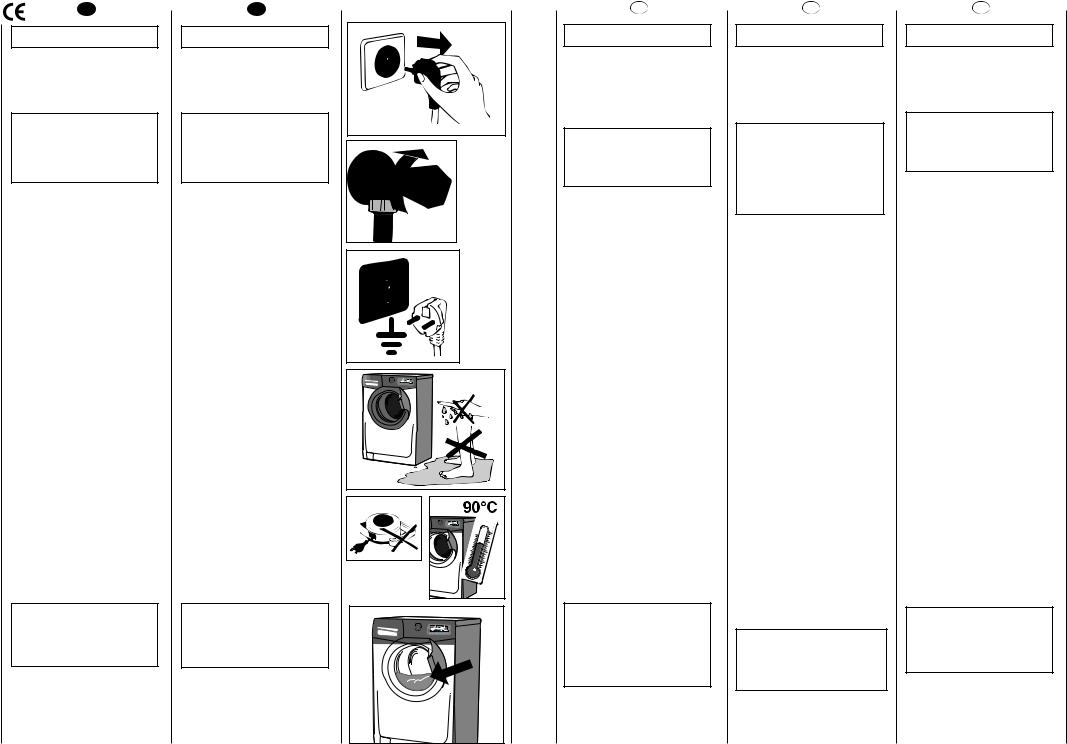
ATTENTION: PENDANT LE LAVAGE L’EAU PEUT ATTEINDRE 90°C.
● Avant d’ouvrir le hublot vérifier que le tambour soit sans eau.
10
IT
CAPITOLO 3
PRESCRIZIONI DI SICUREZZA
ATTENZIONE:
PER QUALSIASI INTERVENTO DI PULIZIA E MANUTENZIONE DELLA LAVATRICE
●Tolga la spina.
●Chiuda il rubinetto dell’acqua.
●La Hoover correda tutte le sue macchine di messa a terra.
Si assicuri che l’impianto elettrico sia provvisto di messa a terra in caso contrario richieda l’intervento di personale qualificato.
 Apparecchio conforme alle Direttive Europee 73/23/CEE e 89/336/CEE , sostituite rispettivamente da 2006/95/CE e 2004/108/CE , e successive modifiche.
●Non tocchi l’apparecchio con mani, piedi bagnati o umidi.
●Non usi l’apparecchio a piedi nudi.
●Non usi, se non con particolare cautela, prolunghe in locali adibiti a bagno o doccia.
ATTENZIONE: DURANTE IL LAVAGGIO
L’ACQUA PUO’ ANDARE
A90°C.
●Prima di aprire l’oblò si assicuri che non vi sia acqua nel cestello.
NL
HOOFDSTUK 3
VEILIGHEIDSMAATREGELEN
BELANGRIJK:
VOOR HET
SCHOONMAKEN EN
ONDERHOUD
●Haal de stekker uit het stopcontact.
●Draai de watertoevoerkraan dicht.
●Alle Hoover apparaten zijn geaard. Controleer of het hoofdnet wel geaard is. Als dat niet het geval is dient u contact op te nemen met een erkend elektricien.
 Dit apparaat voldoet aan de Europese Richtlijnen 73/23/EEC en 89/336/EEC, vervangen door 2006/95/EC and 2004/108/EC en eventuele wijzigingen
●Raak het apparaat niet aan met natte of vochtige handen of voeten.
●Gebruik het apparaat niet blootsvoets.
●Als er verlengsnoeren in de badkamer of doucheruimte worden gebruikt moet u extra voorzichtig zijn. Vermijd dat, als dat mogelijk is.
WAARSCHUWING: TIJDENS HET WASPROGRAMMA KAN DE TEMPERATUUR VAN HET WATER OPLOPEN TOT 90° C.
● Controleer voordat u de deur van de wasautomaat openmaakt of er geen water in de trommel zit.
RU
ÏÀPÀÃPÀÔ 3
ÌÅPÛ
БЕЗОПАСНОСТИ
ВНИМАНИЕ! ПPИ ЛЮБЫХ
ОПЕPАЦИЯХ ЧИСТКИ И ТЕХНИЧЕСКОГО ОБСЛУЖИВАНИЯ СТИPАЛЬНОЙ МАШИНЫ:
●отключите стиpальную машину от сети и выдеpните штепсель из pозетки;
●пеpекpойте кpан подачи воды;
●Hoover оснащает все свои машины кабелем с заземлением. Убедитесь в том, что злектpосеть имеет заземленный пpовод. В случае его отсутствия, необходимо обpащаться к квалифициpованному пеpсоналу.
бМ‡Н ЫН‡Б˚‚‡ВЪ, ˜ЪУ Ф Л·У ТУУЪ‚ВЪТЪ‚ЫВЪ Ъ В·У‚‡МЛflП В‚ УФВИТНЛı ТЪ‡М‰‡ ЪУ‚, 73/23/CEE Л 89/336/CEE, ‚ ‰‡О¸МВИ¯ВП Б‡ПВМВММ˚ı ТУУЪ‚ВЪТЪ‚ВММУВ„О‡ПВМЪ‡ПЛ 2006/95/CE Л 2004/108/CE Т ЛБПВМВМЛflПЛ Л ‰УФУОМВМЛflПЛ Н МЛП.
●не касайтесь стиpальной машины влажными pуками и ногами;
●не pаботайте со стиpальной машиной босиком;
●не пpименяйте удлинители во влажных и сыpых помещениях (ванная, душевая комната).
ВНИМАНИЕ! ТЕМПЕPАТУPА ВОДЫ ВО ВPЕМЯ СТИPКИ МОЖЕТ ДОСТИГАТЬ 90°С.
● пpежде чем откpыть кpышку загpузочного люка, убедитесь в отсутствии воды в баpабане.
EN
CHAPTER 3
SAFETY MEASURES
IMPORTANT:
FOR ALL CLEANING
AND MAINTENANCE
WORK
●Remove the plug
●Turn off the water inlet tap.
●All Hoover appliances are earthed. Ensure that the main electricity circuit is earthed. Contact a qualified electrician if this is not the case.
 Appliance complies with European Directives 73/23/EEC and 89/336/EEC, replaced by 2006/95/EC and 2004/108/EC, and subsequent amendments.
●Do not touch the appliance with wet or damp hands or feet.
●Do not use the appliance when bare-footed.
●Extreme care should be taken if extension leads are used in bathrooms or shower rooms. Avoid this where possible.
WARNING: DURING THE WASHING CYCLE, THE WATER CAN REACH A TEMPERATURE OF 90°C.
● Before opening the washing machine door, ensure that there is no water in the drum.
11
FR
●Ne pas utiliser d’adaptateurs ou de prises multiples.
●Cet appareil n’est pas destiné à être utilisé par des personnes (notamment les enfants) incapables, irresponsables ou sans connaissance sur l’utilisation du produit, à moins qu’elles ne soient surveillées, ou instruites sur l’utilisation de l’appareil, par une personne responsable de leur sécurité.
Surveillez les enfants pour être sûr qu’ils ne jouent pas avec l’appareil.
●Pour débrancher la prise, ne pas tirer sur le câble.
●Ne pas laisser la machine exposée aux agents atmosphériques (pluie, soleil, etc...).
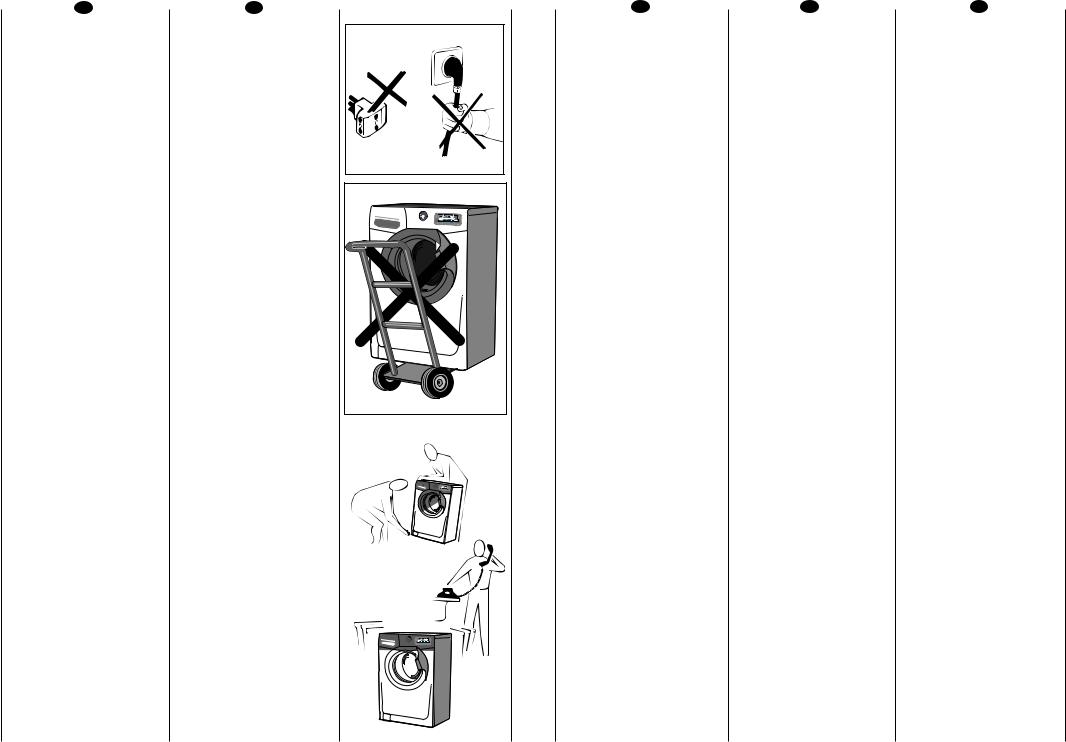
●En cas de déménagement ne jamais soulever la machine par les boutons ou par le tiroir des produits lessiviels.
●Pendant le transport ne pas appuyer le hublot sur le chariot.
Important!
Les ouvertures à la base de l’appareil ne doivent en aucun cas être obstruées par des tapis, moquette ou autres objets.
●2 personnes pour soulever la machine (voir dessin).
●En cas de panne et/ou de mauvais fonctionnement éteindre la machine, fermer le robinet d’alimentation d’eau et ne pas toucher à la machine. Pour toute réparation adressez-vous exclusivement à un centre d’assistance technique Hoover en demandant des pièces de rechange certifiées constructeur. Le fait de ne pas respecter les indications susmentionnées peut compromettre la sécurité de l’appareil.
●Si le remplacement du câble d’alimentation s’avère nécessaire, il devra être remplacé par un câble special fourni par le service après-vente.
12
IT
●Non usi adattatori o spine multiple
●Questo apparecchio non è destinato ad essere usato da bambini e persone incapaci o inesperte all'uso del prodotto, a meno che non vengano sorvegliate o istruite riguardo all'uso dell'apparecchio da una persona responsabile della loro sicurezza.
Sorvegliare i bambini in modo tale da assicurarsi che non giochino con l'apparecchio.
●Non tiri il cavo di alimentazione, o l’apparecchio stesso, per staccare la spina dalla presa di corrente.
●Non lasci esposto l’apparecchio ad agenti atmosferici (pioggia, sole, ecc...).
●In caso di trasloco non la sollevi mai dalle manopole o dal cassetto del detersivo.
●Durante il trasporto non appoggi mai l’oblò al carrello.
Importante!
Nel caso si installi l’apparecchio su un pavimento ricoperto da tappeti o con moquette, si deve fare attenzione che le aperture di ventilazione alla base dell’apparecchio non vengano ostruite.
●Sollevarla in due persone come illustrato in figura.
●In caso di guasto e/o di cattivo funzionamento dell’apparecchio, lo spenga, chiuda il rubinetto dell’acqua e non manometta l’elettrodomestico. Per l’eventuale riparazione si rivolga solamente a un centro di Assistenza Tecnica Hoover e richieda l’utilizzo di ricambi originali.
Il mancato rispetto di quanto sopra può compromettere la sicurezza dell’apparecchio.
●Se il cavo di alimentazione risultasse danneggiato, dovrà essere sostituito da un cavo speciale disponibile presso il servizio di Assistenza Tecnica.
NL
●Gebruik geen verdeelstekkers of meervoudige contactdozen.
●Het gebruik van dit apparaat is niet bedoeld voor personen (inclusief kinderen) met verminderde lichamelijke, zintuiglijke of geestelijke capaciteiten of tekort van ervaring en kennis, tenzij er toezicht of instructie is van een persoon die verantwoordelijk is voor hun veiligheid.
Kinderen moeten in de gaten worden gehouden worden, om er zeker van te zijn dat ze niet met het apparaat gaan spelen.
●Trek niet aan de elektriciteitsdraad of aan het apparaat zelf om de stekker uit het stopcontact te halen.
●Stel het apparaat niet bloot aan atmosferische invloeden (regen, zon, etc.)
●Als u het apparaat wilt verplaatsen til het dan nooit op aan de knoppen of aan de wasmiddellade.
●Laat tijdens het verplaatsen de vuldeur niet tegen de steekwagen steunen.
●Als u het apparaat op een ondergrond met een hoog polig tapijt zet, controleer dan of de opening aan de onderkant vrij blijft.
●Til het apparaat op zoals in de schets is aangegeven.
●Ingeval van storing en/of niet goed functioneren: zet de wasautomaat uit, draai de watertoevoerkraan dicht en kom verder niet aan het apparaat. U hoeft alleen maar contact op te nemen met een Gias Service Center voor eventuele reparaties en vraag om originele Hoover onderdelen. Als deze regels niet worden opgevolgd zou de veiligheid van het apparaat in gevaar gebracht kunnen worden.
●Als de (hoofd) aanvoerslang beschadigd is, moet deze worden vervangen door een speciale kabel die verkrijgbaar is bij de after sales afdeling van Hoover (Gias Service).
RU
●не пользуйтесь тpойниками и пеpеходниками;
●С‡ММ˚П ЛБ‰ВОЛВП МВО¸Бfl ФУО¸БУ‚‡Ъ¸Тfl О˛‰flП (‚НО˛˜‡fl ‰ВЪВИ) Т У„ ‡МЛ˜ВММ˚ПЛ ЩЛБЛ˜ВТНЛПЛ Л ПВМЪ‡О¸М˚ПЛ ‚УБПУКМУТЪflПЛ ЛОЛ О˛‰flП, МВ ЛПВ˛˘ЛП ‰УТЪ‡ЪУ˜МУ„У УФ˚Ъ‡ Л БМ‡МЛИ, ВТОЛ УМЛ МВ М‡ıУ‰flЪТfl ФУ‰ Ф ЛТПУЪ УП О˛‰ВИ, ‰‡‚¯Лı ЛП МВУ·ıУ‰ЛП˚В ЛМТЪ ЫНˆЛЛ ФУ ЛТФУО¸БУ‚‡МЛ˛ ЛБ‰ВОЛfl Л УЪ‚В˜‡˛˘Лı Б‡ Лı ·ВБУФ‡ТМУТЪ¸.
уЪУ·˚ ‰ВЪЛ МВ ПУ„ОЛ Л„ ‡Ъ¸ Т ЛБ‰ВОЛВП, УМЛ ‰УОКМ˚ М‡ıУ‰ЛЪ¸Тfl ФУ‰ М‡‰ВКМ˚П Ф ЛТПУЪ УП.
●не тяните за кабель машины и саму машину для отключения ее отлектpосети;
●не оставляйте машину в условиях атмосфеpных воздействий (дождь, солнце и т.п.);
●пpи тpанспоpтиpовке не опиpайте машину ее люком на тележку;
Важно!
В случае установки машины на полу, покpытом ковpом или воpсистым покpытием, необходимо обpатить внимание на то, чтобы вентиляционные отвеpстия, pасположенные снизу машины, не были закpыты воpсом.
●поднимайте машину вдвоем, как показано на pисунке;
●в случае неиспpавности или плохой pаботы машины, отключите ее, закpойте кpан подачи воды и не пользуйтесь ею. Для возможного pемонта обpащайтесь только в центp техобслуживания Hoover и тpебуйте использования оpигинальных запчастей.
Несоблюдение зтих ноpм может пpивести к наpушению безопасности машины.;
● Если кабель питания повpежден, необходимо заменить его специальным кабелем, котоpий можно найти в службе технического обеспечения.
EN
●Do not use adaptors or multiple plugs.
●This appliance is not intended for use by persons (including children) with reduced physical, sensory or mental capabilities, or lack of experience and knowledge, unless they have been given supervision or instruction concerning use of the appliance by a person responsible for their safety.
Children should be supervised to ensure that they do not play with the appliance.
●Do not pull the mains lead or the appliance itself to remove the plug from the socket.
●Do not leave the appliance exposed to atmospheric agents (rain, sun etc.)
●In the case of removal, never lift the appliance by the knobs or detersive drawer.
●During transportation
do not lean the door against the trolley.
Important!
When the appliance location is on carpet floors, attention must be paid so as to ensure that there is no obstruction to the bottom vents.
●Lift the appliance in pairs as illustrated in the diagram.
●In the case of failure and/or incorrect operation, turn the washing machine off, close the water inlet tap and do not tamper with the appliance. Contact a Hoover Technical Assistance Centre for any repairs and ask for original Hoover spare parts. Avoidance of these norms may compromise the safety of the appliance.
●Should the supply cord (mains cable) be demaged, this is to be replaced by a specific cable available from the after sales service centre.
13

FR |
IT |
NL |
RU |
EN |
CHAPITRE 4 |
CAPITOLO 4 |
HOOFDSTUK 4 |
ÏÀPÀÃPÀÔ 4 |
CHAPTER 4 |
85 cm
|
|
|
|
52 cm |
|
|
|
|
60 cm |
|
|
|
|||
|
|
|
|
|
|
||
|
|
|
|
|
|
|
|
DONNÉES TECHNIQUES |
|
|
DATI TECNICI |
|
|
|
|
|
|
|
|
|
|
|
|
CAPACITE DE LINGE |
CAPACITA’ DI BIANCHERIA |
|
kg |
7 |
|||
SEC |
|
|
ASCIUTTA |
|
|
|
|
|
|
|
|
|
|
|
|
EAU NIVEAU NORMAL |
ACQUA LIVELLO NORMALE |
|
l |
6÷15 |
|||
|
|
|
|
|
|
|
|
PUISSANCE |
|
|
POTENZA |
|
W |
2150 |
|
ABSORBEE |
|
|
ASSORBITA |
|
|
||
|
|
|
|
|
|||
|
|
|
|
|
|
|
|
CONSOMMATION ENERGIE |
|
CONSUMO DI ENERGIA |
|
kWh |
1,8 |
||
(PROG. 90°C) |
|
|
(PROG. 90°C) |
|
|
|
|
|
|
|
|
|
|
|
|
AMPERAGE |
|
|
AMPERE DEL |
|
A |
10 |
|
|
|
|
|
FUSIBILE DELLA RETE |
|
|
|
|
|
|
|
|
|
|
|
|
|
|
|
|
|
|
|
ESSORAGE |
|
|
GIRI DI |
|
|
VEDERE TARGHETTA DATI |
|
|
|
|
CONSULTER LA PLAQUE TECHNIQUE |
||||
(Tours/min.) |
|
CENTRIFUGA (giri/min.) |
|
|
RAADPLEEG DE KENPLAAT |
||
|
|
ле. нДЕгаудм л нЦпзауЦлдаеа пДкДднЦкалнадДеа |
|||||
|
|
|
|
|
|
|
SEE RATING PLATE |
|
|
|
|
|
|
|
|
PRESSION DANS |
PRESSIONE NELL’IMPIANTO |
|
MPa |
min. 0,05 |
|||
L’INSTALLATION HYDRAULIQUE |
|
|
IDRAULICO |
|
|
max. 0,8 |
|
TENSION |
|
|
TENSIONE |
|
V |
220-240 |
|
|
|
|
|
|
|
|
|
TECHNISCHE GEGEVENS |
Texíè÷ecêèe xapaêòepècòèêè |
TECHNICAL DATA |
CAPACITEIT DROOG |
Загpузка (сухогo белья) |
MAXIMUM WASH |
WASGOED |
|
LOAD DRY |
|
|
|
NORMAAL WATER NIVEAU |
Нopмальный ypoвень |
NORMAL WATER LEVEL |
|
âoäû |
|
|
|
|
AANSLUITWAARDE |
Потpебляемая мoщнocть |
POWER INPUT |
|
|
|
ENERGIEVER BRUIK |
Потpебление неpгии |
ENERGY CONSUMPTION |
(PROGRAMMA 90°C) |
(ïpîãpàììà 90°C) |
(PROG. 90°C) |
|
|
|
STROOMSTERKTE VAN DE |
л. пpeдoxpaнитель |
POWER CURRENT FUSE |
ZEKERING |
|
AMP |
|
|
|
|
|
|
CENTRIFUGE |
Cêopocòü âpaùeíèÿ |
SPIN |
(t/min.) |
öeíòpèôyãè (îá/ìèí) |
r.p.m. |
|
|
|
DRUK HYDRAULISCHE POMP |
Äàâëeíèe â |
WATER PRESSURE |
|
ãèäpaâëè÷ecêoé cècòeìe |
|
NETSPANNING |
Напpяжение в |
SUPPLY VOLTAGE |
|
ñåòè |
|
14 |
15 |

FR
CHAPITRE 5
MISE EN PLACE INSTALLATION
Placer la machine près du lieu d’utilisation sans la base d’emballage.
Couper avec précaution le cordon qui maintient le tuyeau d’évacuation et le cable d’alimentation
Enlever les 4 vis de fixation indiquées en (A) et enlever les espaces indiqués en (B)
Couvrir les quatre trous en utilisant les capuchons prévus à cet effet dans le sachet où se trouve la notice
ATTENTION:
NE PAS LAISSER À LA PORTÉE DES ENFANTS DES ELEMENTS D’EMBALLAGE QUI PEUVENT CAUSER DES RISQUES.
IT
CAPITOLO 5
MESSA IN OPERA INSTALLAZIONE
Porti la macchina vicino al luogo di utilizzo senza il basamento dell’imballo.
Tagliare le fascette fermatubo, prestando attenzione di non danneggiare il tubo e il cavo elettrico
Svitare le 4 viti (A) sul lato posteriore e rimuovere i 4 distanziali (B).
Richiudere i 4 fori utilizzando i tappi contenuti nella busta istruzione.
ATTENZIONE: NON LASCI ALLA
PORTATA DI BAMBINI GLI ELEMENTI DELL’IMBALLAGGIO IN QUANTO POTENZIALI FONTI DI PERICOLO.
NL
HOOFDSTUK 5
INSTALLATIE
Breng de machine (zonder de onderkant van de verpakking) dicht bij de plaats waar hij komt te staan.
Knip voorzichtig de beveiligingslus van het snoer en de afvoerslang door.
Verwijder de 4 schroeven zie (A) en verwijder de 4 pluggen zie (B)
Vul de 4 gaatjes op met de dopjes die in de verpakking bij de gebruiksaanwijzing zitten.
WAARSCHUWING: ZORG ERVOOR DAT HET VERPAKKINGSMATERIAAL BUITEN HET BEREIK VAN KINDEREN BLIJFT OMDAT DAT GEVAAR KAN OPLEVEREN.
RU
ÏÀPÀÃPÀÔ 5
УСТАНОВКА
Поместите машину вблизи места ее использования без подставки и упаковки.
иВ В ВК¸ЪВ ФО‡ТЪП‡ТТУ‚˚И ıУПЫЪ. СВИТЪ‚ЫИЪВ УТЪУ УКМУ, ˜ЪУ·˚ МВ ФУ‚ В‰ЛЪ¸ ¯О‡М„ Л ˝ОВНЪ Л˜ВТНЛИ Ф У‚У‰.
йЪН ЫЪЛЪВ 4 ‚ЛМЪ‡ (A) М‡ Б‡‰МВИ ТЪВМНВ Л ЛБ‚ОВНЛЪВ 4 ‡ТФУ М˚ı ‚ЪЫОНЛ (B).
б‡Н УИЪВ 4 УЪ‚В ТЪЛfl ТФВˆЛ‡О¸М˚ПЛ Б‡„ОЫ¯Н‡ПЛ. З˚ М‡И‰ВЪВ Лı ‚ ФУОЛ˝ЪЛОВМУ‚УП Ф‡НВЪВ Т ЛМТЪ ЫНˆЛВИ.
ВНИМАНИЕ!
НЕ ОСТАВЛЯЙТЕЛЕМЕНТЫ
УПАКОВКИ ДЕТЯМ ДЛЯ ИГP.
EN
CHAPTER 5
SETTING UP
INSTALLATION
Move the machine near its permanent position without the packaging base.
Carefully cut the securing strap that holds the main cord and the drain hose.
Remove the 4 fixing screws marked (A) and remove the 4 spacers marked (B)
Cover the 4 holes using the caps provided in the instruction booklet pack.
WARNING:
DO NOT LEAVE THE PACKAGING IN THE REACH OF CHILDREN AS IT IS A POTENTIAL SOURCE OF DANGER.
16 |
17 |

FR
Appliquer la feuille supplémentaire sur le fond comme dans la figure.
Raccorder le tuyau d’arrivée d’eau au robinet.
L'appareil doit être relié à l'arrivée d'eau exlusivement avec les tuyaux fournis .
Ne pas réutiliser les anciens tuyaux.
ATTENTION:
NE PAS OUVRIR LE ROBINET
Approcher la machine contre le mur en faisant attention à ce que le tuyau n’ait ni coudes ni étranglements.
Raccorder le tuyau de vidange au rebord de la baignoire ou, mieux encore, à un dispositif fixe d’évacuation, hauteur mini. 50 cm, et de diamètre supérieur au tuyau de la machine à laver.
En cas de besoin, utiliser le coude rigide livré avec la machine.
IT
Applichi il foglio di polionda sul fondo come mostrato in figura.
Allacci il tubo dell’acqua al rubinetto.
L’apparecchio deve essere connesso alla rete idrica solo con i nuovi tubi di carico forniti in dotazione. I vecchi tubi di carico non devono essere riutilizzati.
ATTENZIONE:
NON APRA IL RUBINETTO
Accosti la lavatrice al muro facendo attenzione che non vi siano curve o strozzature, allacci il tubo di scarico al bordo della vasca.
o meglio a uno scarico fisso; altezza minima 50 cm, di diametro superiore al tubo della lavatrice.
In caso di necessità utilizzare la curva rigida in dotazione.
|
min 4 cm |
|
cm |
+2,6 mt max |
|
100 |
||
min 50 cm |
||
max |
||
max 85 cm |
NL
Bevestig de dempplaat op de bodem, (zie tekening).
Verbind de watertoevoerslang met de waterkraan.
Het apparaat moet aangesloten worden aan de waterkraan met behulp van de watertoevoerslang. Maak gebruik van de nieuwe watertoevoerslang, gebruik niet de oude!
BELANGRIJK:
DRAAI DE WATERKRAAN NIET OPEN
Zet de wasmachine dicht tegen de muur aan.
Let er op dat er geen bochten of vernauwingen in de buis zitten.
Het is het beste om de afvoerslang aan te sluiten op een vaste afvoer met een doorsnee die groter is dan die van de afvoerslang en op een hoogte van minstens 50 cm.
Gebruik zonodig de bligeleverde slanggeleider.
RU
Çaêpeïèòå ècò ãoôpèpoâaííoão ìaòåpèa a ía äíe, êaê ïoêaçaío ía pècyíêe.
Пpисоедините тpубу к водопpоводному кpану и к машине.
и Л·У ‰УОКВМ ·˚Ъ¸ ФУ‰ТУВ‰ЛМВМ Н ‚У‰УФ У‚У‰Ы Ф Л ФУПУ˘Л МУ‚˚ı ТУВ‰ЛМЛЪВО¸М˚ı ¯О‡М„У‚. зВ ЛТФУО¸БЫИЪВ ТЪ‡ ˚В ¯О‡М„Л Л ТУВ‰ЛМВМЛfl.
Внимание! Не откpывайте
водопpоводный кpан.
Пpидвиньте машину к стене, обpащая внимание на то, чтобы отсутствовали пеpегибы, зажимы тpуб, закpепите сливную тpубу на боpту pаковины или лучше к канализационной тpубе с минимальной высотой над уpовнем пола 50 см и диаметpом больше диаметpа сливной тpубки.
В случае необходимости используйте жесткое устpойство для сгиба сливной тpубы.
EN
Fix the sheet of corrugated material on the bottom as shown in picture.
Connect the fill hose to the tap.
The appliance must be connected to the water mains using new hose-sets. The old hose-sets should not be reused.
IMPORTANT:
DO NOT TURN THE TAP ON AT THIS TIME.
Position the washing machine next to the wall. Hook the outlet tube to the edge of the bath tub, paying attention that there are no bends or contractions along the tube.
It is better to connect the discharge hose to a fixed outlet of a diameter greater than that of the outlet tube and at a height of min. 50 cm. If is necessary to use the plastic sleeve supplied.
|
min 4 cm |
|
cm |
+2,6 mt max |
|
100 |
||
min 50 cm |
||
max |
||
max 85 cm |
18 |
19 |
FR
Mettre la machine à niveau en reglant les 4 pieds:
a)Tourner dans le sens des aiguilles d’une montre l’écrou de façon à dévérouiller la vis du pied.
b)Tourner le pied et le faire monter ou descendre jusqu’à obtenir une parfaite adhérence au sol.
c)Enfin bloquer le pied en revissant l’écrou dans le sens inverse des aiguilles d’une montre et le faire adhérer au fond de la machine.
Vérifier que la manette soit sur la position “OFF” et que le hublot soit fermé.
Brancher la prise.
ATTENTION:
Au cas où il serait nécessaire de remplacer le cable d’alimentation, assurez vous de respecter les codescouleur suivants dans le branchement de chacun des fils:
BLEU |
- NEUTRE (N) |
|
|
MARRON |
- PHASE (L) |
|
|
|
|
|
|
VERT-JAUNE |
- TERRE ( |
|
) |
|
|
|
|
Une fois l'appareil installé, la prise électrique doit rester accessible.
20
IT
Livelli la macchina con i 4 piedini:
a)Girare in senso orario il dado per sbloccare la vite del piedino.
b)Ruotare il piedino e farlo scendere o salire fino ad ottenere la perfetta aderenza al suolo.
c)Bloccare infine il piedino riavvitando il dado in senso antiorario, fino a farlo aderire al fondo della lavatrice.
Si assicuri che la manopola sia in posizione “OFF” e l’oblò sia chiuso.
Inserisca la spina.
ATTENZIONE:
nel caso si renda necessario sostituire il cavo di alimentazione, assicurarsi di rispettare il seguente codicecolore durante il collegamento dei singoli fili:
BLU |
- NEUTRO (N) |
||||||
MARRONE |
- FASE (L) |
||||||
GIALLO-VERDE |
- TERRA ( |
|
|
|
|
|
) |
|
|
|
|
|
|||
|
|
|
|
|
|||
L’apparecchio deve essere posto in modo che la spina sia accessibile ad installazione avvenuta.
A |
B |
C |
NL
Gebruik de 4 pootje om de machine waterpas te zetten:
a)Kontra moer losdraaien
b)Apparaat waterpas zetten m.b.v. verstelbare voeten (maak eventueel gebruik van een waterpas)
c)Kontra moer weer vastdraaien.
Controleer of alle knoppen op “OFF” staan en of de vuldeur gesloten is.
Steek de stekker in het stopcontact.
LET OP:
Mocht het nodig zijn dat het aansluitsnoer vervangen moet worden, verbind de draden dan volgens onderstaande kleur/codes (wij raden aan dit door een erkende installateur te laten doen):
BLAUW |
- NEUTRAAL (N) |
BRUIN |
- FASE (L) |
GEEL-GROEN -AARDE (  )
)
Na installatie, plaatst u het apparaat zo, het stopcontact makkelijk toegangbaar is.
RU
Установите машину по уpовню с помощью 4 ножек.
a)повеpните по часовой стpелке гайку, чтобы pазблокиpовать винт ножки.
b)вpащая ножку, поднимите или опустите машину до хоpошей ее опоpы на пол.
c)заблокиpуйте винт ножки, затянув гайку пpотив часовой стpелки до упоpа.
м·В‰ЛЪВТ¸, ˜ЪУ ФВ ВНО˛˜‡ЪВО¸ Ф У„ ‡ПП М‡ıУ‰ЛЪТfl ‚ ФУОУКВМЛЛ Зхдг Л Б‡„ ЫБУ˜М˚И О˛Н Б‡Н ˚Ъ.
Включите вилку в pозетку.
ЗзаеДзаЦ:
ЦТОЛ МВУ·ıУ‰ЛПУ Б‡ПВМЛЪ¸ ФЛЪ‡˛˘ЛИ Н‡·ВО¸, ЪУ Ф У‚У‰‡ ‰УОКМ˚ НУППЫЪЛ У‚‡Ъ¸Тfl ‚ ТУУЪ‚ВЪТЪ‚ЛЛ Т Лı ˆ‚ВЪМУИ П‡ НЛ У‚НУИ:
лазав |
- зЦвнкДгъ (N) |
дйкаузЦЗхв |
- îÄáÄ (L) |
ЬЦгнй-бЦгЦзхв - бЦегь (  )
)
иУТОВ ФУ‰ТУВ‰ЛМВМЛfl Ф Л·У ‰УОКВМ ·˚Ъ¸ ‡ТФУОУКВМ Ъ‡НЛП У· ‡БУП, ˜ЪУ·˚ УБВЪН‡ ·˚О‡ ‰УТЪЫФМУИ.
EN
Use the 4 feet to level the machine with the floor:
a)Turn the nut clockwise to release the screw adjuster of the foot.
b)Rotate foot to raise or lower it until it stands firmly on the ground.
c)Lock the foot in position by turning the nut anticlockwise until it comes up against the bottom of the machine.
Ensure that the knob is on the “OFF” position and the load door is closed
Insert the plug.
ATTENTION:
should it be necessary to replace the supply cord, connect the wire in accordance with the following colours/codes:
BLUE |
- NEUTRAL (N) |
|
|
BROWN |
- LIVE (L) |
|
|
|
|
|
|
YELLOW-GREEN |
- EARTH ( |
|
) |
|
|
|
|
After installation, the appliance must be positioned so that the plug is accessible.
21
FR |
IT |
CHAPITRE 6 |
CAPITOLO 6 |
B D N O E
P
F
G H I C L M
|
|
|
A |
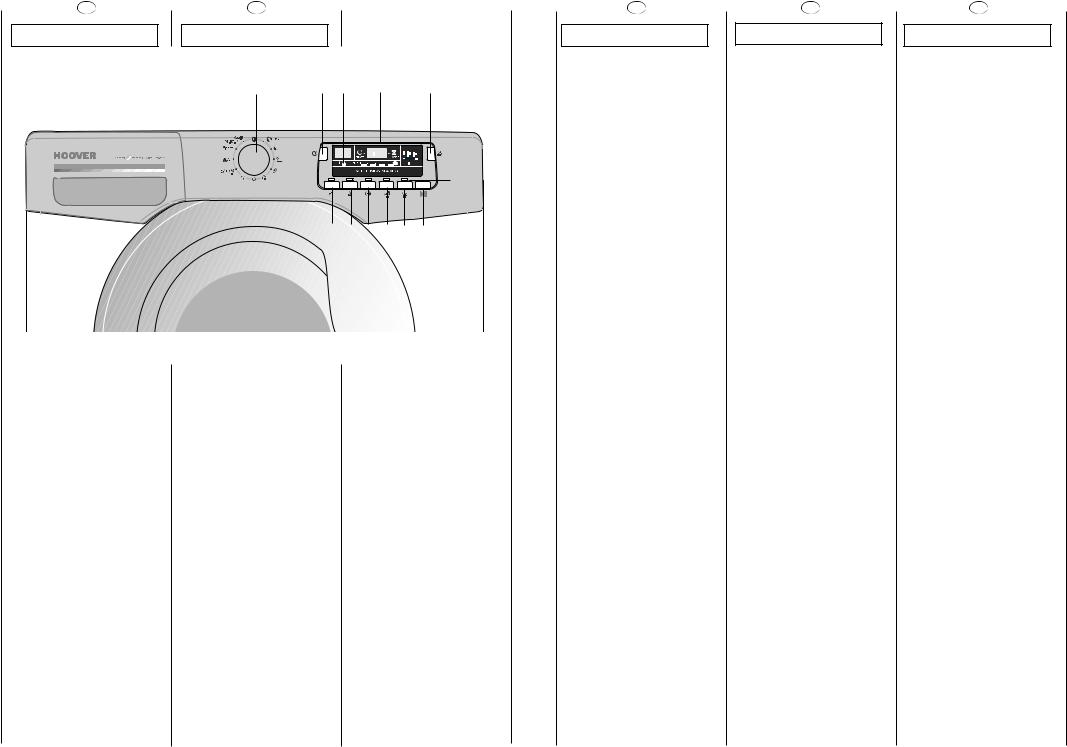
COMMANDES |
COMANDI |
|
|
Poignée d’ouverture du |
Maniglia apertura oblò |
|
A |
hublot |
|
|
|
Manette des programmes de |
Manopola programmi di |
|
B |
lavage avec OFF |
lavaggio con OFF |
|
|
Touche Selection Temperature |
Tasto Selezione Temperatura |
|
C |
Touche Essorage |
Tasto Selezione Centrifuga |
|
D |
Touche Temps de Lavage |
Tasto Tempo Lavaggio |
|
E |
Témoin de Bouton |
Spie tasti |
|
F |
Touche Nuit Calme |
Tasto Buona Notte |
|
G |
Touche Aquaplus |
Tasto Stop Allergia |
|
H |
Touche Départ Différé |
Tasto Partenza Differita |
|
I |
Touche Repassage Facile |
Tasto Stiro Facile |
|
L |
Touche marche/pause |
Tasto Avvio/pausa |
|
M |
Temoin de verrouillage de |
Spia porta bloccata |
|
N |
porte |
|
|
|
Ecran Digital |
Display Digit |
|
O |
Bacs à produits |
Cassetto detersivo |
|
P |
22
NL
HOOFDSTUK 6
BEDIENINGSPANEEL
Deurgreep
Programmaknop wassen Met OFF
Wastemperatuur toets
Knop regeling centrifugesnelheid
Toets voor “Wastijd”
Indicatielampjes bij de knoppen
"Dag & Nacht" -knop
"Aquaplus" –knop
Knop voor Uitgestelde Start
Makkelijk strijken knop Knop Start/Pauze
Deurvergrendeling - indicatie
“Digitaal” Display
Wasmiddelbakje
RU
ÏÀPÀÃPÀÔ 6
Описание команд
êÛÍÓflÚ͇ β͇
иВ ВНО˛˜‡ЪВО¸ Ф У„ ‡ПП Т УЪПВЪНУИ Зхдг
НО‡‚Л¯‡ "ЪВПФВ ‡ЪЫ ‡ ‚У‰˚"
дМУФН‡ " В„ЫОЛ У‚НЛ ТНУ УТЪЛ УЪКЛП‡"
дО‡‚Л¯‡ "ЗкЦеь лнакда" ‚ВЪУ‚˚В ЛМ‰ЛН‡ЪУ ˚ НО‡‚Л¯ дО‡‚Л¯‡ зУ˜М‡fl лЪЛ Н‡ дМУФН‡ "ДН‚‡ФО˛Т"
дМУФН‡ "УЪОУКВММУ„У Б‡ФЫТН‡" дМУФН‡ "·ВБ ТНО‡‰УН"
дМУФН‡ “лЪ‡ Ъ/и‡ЫБ‡” аМ‰ЛН‡ЪУ ·ОУНЛ У‚НЛ О˛Н‡
сЛЩ У‚УИ ‰ЛТФОВИ
Контейнеp для моющих
сpедств
EN
CHAPTER 6
CONTROLS
Door handle
Timer knob for wash programmes with OFF position
Wash Temperature button Spin Speed button
“Wash Time” button Buttons indicator light Night Option button Aquaplus button
Start Delay button
Crease Guard button
Start button
Door locked indicator light
Digital Display
Detergent drawer
23
|
|
FR |
|
IT |
|
|
|
|
|
|
|
|
|
||
|
DESCRIPTION DES |
DESCRIZIONE |
|
|
|
||
|
COMMANDES |
COMANDI |
|
|
|
||
|
|
|
|
|
|
||
|
“Kg MODE” |
“Kg MODE” |
|
|
|
||
|
(La fonction n’est active que |
(Funzione attiva solo nei |
|
|
|
||
|
pour les programmes Coton |
programmi Cotone e Sintetici) |
|
|
|
||
|
et Synthétique) |
E’ l’ultima frontiera dell’ |
|
|
|
||
|
Le “ Kg MODE ” permet de |
elettronica applicata alle |
|
|
|
||
|
mesurer une série |
tecnologie di lavaggio. |
|
|
|
||
|
“Kg MODE” consente di |
|
|
|
|||
|
d’information sur le linge |
|
|
|
|||
|
misurare durante tutte le fasi |
|
|
|
|||
|
chargé dans le tambour |
|
|
|
|||
|
del lavaggio una serie di |
|
|
|
|||
|
durant toues les phases du |
|
|
|
|||
|
informazioni sulla biancheria |
|
|
|
|||
|
lavage. |
|
|
|
|||
|
inserita all’ interno del cesto. |
|
|
|
|||
|
Ainsi, durant les 4 premières |
|
|
|
|||
|
In questo modo “Kg MODE” |
|
|
|
|||
|
minutes du cycle de lavage, |
nei primi 4 minuti del ciclo di |
|
|
|
||
|
le “ Kg MODE ” : |
lavaggio: |
|
|
|
||
|
- régule la quantité d’eau |
- regola la quantità di acqua |
|
|
|
||
|
nécessaire |
necessaria |
|
|
|
||
|
- détermine la durée du cycle |
- determina la durata del |
|
|
|
||
|
de lavage |
lavaggio |
|
|
|
||
|
- ajuste les rinçages |
- regola i risciacqui |
|
|
|
||
|
En fonction de la quantité et |
in base al carico e al tipo di |
|
|
|
||
|
du type de linge lavé: |
biancheria che si è scelto di |
|
|
|
||
|
- régule le rythme des |
lavare: |
|
|
|
||
|
rotations du tambour per |
- regola il ritmo di rotazione del |
|
|
|
||
|
cesto per adattarlo al tipo di |
|
|
|
|||
|
l’adapter au type de tissu |
|
|
|
|||
|
tessuto |
|
|
|
|||
|
- reconnaît la présence de |
|
|
|
|||
|
- riconoscere la presenza di |
|
|
|
|||
|
mousse et augmente |
|
|
|
|||
|
schiuma, aumentando |
|
|
|
|||
|
éventuellement le niveau |
|
|
|
|||
|
eventualmente il livello |
|
|
|
|||
|
d’eau durant les rinçages |
|
|
|
|||
|
dell’acqua durante i risciacqui |
|
|
|
|||
|
- régule la vitesse d’essorage |
|
|
|
|||
|
- regola il numero di giri della |
|
|
|
|||
|
en fonction de la charge, |
|
|
|
|||
|
centrifuga in funzione del |
|
|
|
|||
|
pour éviter les déséquilibres |
|
|
|
|||
|
carico, evitando che ci siano |
|
|
|
|||
|
|
|
|
squilibri |
|
|
|
|
“ Kg MODE ” parvient ainsi à |
Così “Kg MODE” riesce a |
|
|
|
||
|
assurer systématiquement la |
decidere da sola tra le |
|
|
|
||
|
recette de lavage la plus |
centinaia di possibili |
|
|
|
||
|
adaptée à la charge de linge |
combinazioni di lavaggio |
|
|
|
||
|
parmi la centaine de recettes |
quale si adatta meglio alle |
|
|
|
||
|
possibles. |
singole condizioni del bucato. |
|
|
|
||
|
“ Kg MODE ” répond aux |
“Kg MODE” viene incontro alle |
|
|
|
||
|
exigences de simplicité |
esigenze di semplicità di |
|
|
|
||
|
utilizzo della lavatrice |
|
|
|
|||
|
d’utilisation en permettant |
|
|
|
|||
|
permettendo un’impostazione |
|
|
|
|||
|
une sélection simplifiée du |
|
|
|
|||
|
semplificata del programma di |
|
|
|
|||
|
programme de lavage. En |
|
|
|
|||
|
lavaggio. Infatti l’utilizzatore |
|
|
|
|||
|
effet, l’utilisateur indique |
|
|
|
|||
|
indicando solo il tipo di tessuto |
|
|
|
|||
|
simplement le type de tissu |
|
|
|
|||
|
inserito nel cesto e il grado di |
|
|
|
|||
|
chargé dans la machine et le |
|
|
|
|||
|
sporco degli indumenti otterrà |
|
|
|
|||
|
degré de salissure des |
|
|
|
|||
|
un bucato perfettamente |
|
|
|
|||
|
vêtements, et il obtiendra un |
|
|
|
|||
|
pulito e con il più elevato |
|
|
|
|||
|
linge parfaitement lavé et |
grado di asciugatura ottenibile |
|
|
|
||
|
essoré dans le respect des |
con una centrifuga attenta ai |
|
|
|
||
|
textiles. |
capi. |
|
|
|
||
|
|
|
|
|
|
||
|
POIGNEE D’OUVERTURE DU |
MANIGLIA APERTURA OBLÒ |
A |
|
|
||
|
HUBLOT |
Per aprire l’oblò premere la |
|
|
|||
|
Pour ouvrir le hublot |
|
|
|
|||
|
actionner le bouton dans la |
leva situata all’interno della |
|
|
|
||
|
poignée. |
maniglia. |
|
|
|
||
24
NL |
RU |
EN |
BEDIENINGSPANEEL |
НАЗНАЧЕНИЕ |
DESCRIPTION OF |
|
КНОПОК |
CONTROL |
|
|
|
“Kg MODE” |
|
“Kg MODE” |
“Kg MODE” (СЦнЦднйк |
(Function active only on |
|
(Deze functie werkt alleen bij |
бДЙкмбда) |
Cotton and Synthetics |
katoen en Synthetische |
(îÛÌ͈Ëfl ‡ÍÚ˂̇ ÚÓθÍÓ ‰Îfl |
programmes) |
programma’s) |
Ô Ó„ ‡ÏÏ ÒÚË ÍË ıÎÓÔ͇ Ë |
Through every wash phase |
Tijdens elke wasfase maakt |
ТЛМЪВЪЛНЛ) з‡ ‚ТВı ˝Ъ‡Ф‡ı ТЪЛ НЛ |
“Kg MODE” allows to |
de “Kg MODE” het mogelijk |
ÛÒÚ ÓÈÒÚ‚Ó “ Kg MODE ” ÔÓÁ‚ÓÎflÂÚ |
monitor information on |
de informatie van de lading |
ÔÓÎÛ˜‡Ú¸ ËÌÙÓ Ï‡ˆË˛ Ó ‚ÂÒ |
the wash load in the drum. |
in kaart te brengen. |
·ВО¸fl, Б‡„ ЫКВММУ„У ‚ ТЪЛ ‡О¸МЫ˛ |
So, as soon as the “Kg |
Zodra de “Kg MODE” is |
χ¯ËÌÛ. |
MODE” is set in motion, in the |
geactiveerd zal deze tijdens |
ÖÒÎË ÛÒÚ ÓÈÒÚ‚Ó “ Kg MODE ” |
first 4 minutes of the wash, it: |
de eerste 4 minuten van de |
‡·УЪ‡ВЪ ‚ ЪВ˜ВМЛВ ФВ ‚˚ı 4 ПЛМЫЪ |
o adjusts the amount of |
was; |
ÒÚË ÍË, ÚÓ ÓÌÓ: |
water required |
- de benodigde |
- ‚˚ÔÓÎÌflÂÚ Â„ÛÎË Ó‚ÍÛ ÔÓ‰‡˜Ë |
o determines the length of |
waterhoeveelheid |
МЫКМУ„У НУОЛ˜ВТЪ‚‡ ‚У‰˚ ‚ |
the wash cycle |
aanpassen |
χ¯ËÌÛ |
o controls rinsing |
- de lengte van het |
- УФ В‰ВОflВЪ ‰ОЛЪВО¸МУТЪ¸ ˆЛНО‡ |
according to the type of |
wasprogramma aanpassen |
ÒÚË ÍË |
fabric selected to be |
- het spoelen contoleren |
- В„ЫОЛ ЫВЪ ФУОУТН‡МЛВ ‚ |
washed it: |
Afhankelijk van de |
ТУУЪ‚ВЪТЪ‚ЛЛ Т ‚˚· ‡ММ˚П ЪЛФУП |
o adjusts the rhythm of drum |
geselecteerde stof die |
Ú͇ÌË |
rotation for the type of |
gewassen moet worden zal; |
- „ÛÎË ÛÂÚ ÒÍÓ ÓÒÚ¸ ‚ ‡˘ÂÌËfl |
fabric being washed |
- het ritme/ snelheid van de |
·‡ ‡·‡М‡ ‚ ТУУЪ‚ВЪТЪ‚ЛЛ Т ЪЛФУП |
o recognises the presence |
trommel rotatie worden |
Ú͇ÌË |
of lather, increasing, if |
aangepast |
- „ËÒÚ Ë ÛÂÚ Ì‡Î˘Ë Ï˚θÌÓÈ |
necessary, the amount of |
- de aanwezigheid van |
ФВМ˚, Л, ‚ ТОЫ˜‡В МВУ·ıУ‰ЛПУТЪЛ, |
water during |
wasmiddel worden herkend |
Û‚Â΢˂‡ÂÚ ÍÓ΢ÂÒÚ‚Ó ‚Ó‰˚ Ô Ë |
rinsing |
en zonodig de hoeveelheid |
ФУОУТН‡МЛЛ |
o adjusts the spin speed |
water tijdens het spoelen |
- „ÛÎË ÛÂÚ ÒÍÓ ÓÒÚ¸ ‚ ‡˘ÂÌËfl |
according to the load, thus |
aanpassen. |
·‡ ‡·‡Ì‡ ‚ ÒÓÓÚ‚ÂÚÒÚ‚ËË Ò |
avoiding any imbalance. |
- De centrifuge snelheid |
Б‡„ ЫБНУИ, Л ЪВП Т‡П˚П ЫТЪ ‡МflВЪ |
In this way “Kg MODE” is |
worden aangepast, om |
̇ Û¯ÂÌËfl ·‡Î‡ÌÒ‡ ‚ ·‡ ‡·‡Ì |
able to decide, by itself, the |
onbalans tegen te gaan. |
χ¯ËÌ˚. |
most suitable programme |
Op deze manier kan de “Kg |
í‡ÍËÏ Ó· ‡ÁÓÏ, “ Kg MODE ” |
for |
MODE” het best passende |
ПУКВЪ Т‡ПУТЪУflЪВО¸МУ ‚˚· ‡Ъ¸ |
each individual wash from |
programma kiezen voor de |
̇˷ÓΠÔÓ‰ıÓ‰fl˘Û˛ Ô Ó„ ‡ÏÏÛ |
the hundreds of possible |
verschillende was. |
ЛБ ТУЪВМ ‚УБПУКМ˚ı НУП·ЛМ‡ˆЛИ |
wash combinations. |
“Kg MODE” komt de |
‰Îfl ͇ʉÓÈ ÓÚ‰ÂθÌÓÈ ÒÚË ÍË. |
“Kg MODE” meets the need |
behoefte van simpel gebruik |
“ Kg MODE ” ӷ΄˜‡ÂÚ |
for easy use by permitting a |
tegemoet . De gebruiker |
˝НТФОЫ‡Ъ‡ˆЛ˛ ТЪЛ ‡О¸МУИ П‡¯ЛМ˚ |
simplified programme |
hoeft alleen nog maar aan |
ÔÓÒ Â‰ÒÚ‚ÓÏ ÛÔ Ó˘ÂÌËfl ‚˚·Ó ‡ |
selection. In |
te geven hoe vuil de was is |
МЫКМУИ Ф У„ ‡ПП˚ ТЪЛ НЛ. |
fact, the user need only tell |
en welke stof er in de |
о‡НЪЛ˜ВТНЛ ФУО¸БУ‚‡ЪВО˛ МЫКМУ |
the machine the type of |
machine zit om zo het |
Û͇Á‡Ú¸ ‚ÒÂ„Ó Î˯¸ ÚËÔ |
fabric in the drum and the |
perfecte was en droog |
Б‡„ ЫКВММ˚ı ‚ ·‡ ‡·‡М ЛБ‰ВОЛИ Л |
degree of soiling, to obtain a |
resultaat te krijgen voor uw |
ТЪВФВМ¸ Лı Б‡„ flБМВМЛfl ‰Оfl ЪУ„У, |
perfect wash with the |
was. |
˜ЪУ·˚ ‰У·ЛЪ¸Тfl УФЪЛП‡О¸М˚ı |
highest |
|
ВБЫО¸Ъ‡ЪУ‚ ТЪЛ НЛ Л УФЪЛП‡О¸МУИ |
level of drying possible with |
|
ТЪВФВМЛ ТЫ¯НЛ Т ФУПУ˘¸˛ |
a spin which really cares for |
|
‚ ‡˘ÂÌËfl ·‡ ‡·‡Ì‡. |
your clothes. |
DEURGREEP |
кмдйьндД гыдД |
DOOR HANDLE |
|
||
Gebruik de knop binnenin |
уЪУ·˚ УЪН ˚Ъ¸ О˛Н, М‡КПЛЪВ М‡ |
Press the finger-bar inside |
de deurgreep om de deur |
Í·‚Ë¯Û ‚ ÛÍÓflÚÍÂ. |
the door handle to open the |
te openen. |
|
door |
25
 Loading...