


Commercial
Upright Vacuum Cleaner
User’s Manual |
|
ENGLISH pp. 1-12 |
|
ESPAÑOL pág. 13-19 |
® |
FRANÇAIS p. 20-26 |
|
|
|
Read this manual before operating cleaner
Contents |
|
Getting Started ...................................... |
2 |
How to use ............................................ |
3 |
Cleaner Description .......................... |
3 |
Cleaning Tools .................................. |
5 |
If You Have a Problem ........................ |
11 |
Clearing Blockages ........................ |
12 |
Important Safeguards .......................... |
1 |
Maintenance |
|
Authorized Service .......................... |
11 |
Cleaning Filters .............................. |
7-8 |
Emptying Dirt Cup ............................ |
7 |
Lubrication ...................................... |
10 |
Replacing Agitator Brush Roll ...... |
10 |
Replacing Belt .............................. |
9-10 |
Replacing Headlight.......................... |
8 |
Thermal Protector .............................. |
11 |
Please enter the COMPLETE model and serial numbers in the spaces provided. The numbers are located on the bottom of your cleaner.
Model_________________________________________
Serial number_________________________________________
Hint: Attach your sales receipt to this owner’s manual.
Verification of date of purchase may be required for warranty service of your HOOVER product.
Important Safeguards
When using an electrical appliance, always follow basic precautions, including the following:
READ ALL INSTRUCTIONS BEFORE USING THIS APPLIANCE
Warning:To reduce the risk of fire, electric shock, or injury:
•Do not use outdoors or on wet surfaces.
•Connect to a suitable extension cord. See “Extension cord instructions”.
•Connect to a properly grounded outlet only. See “Grounding Instructions”.
•Close supervision is necessary when any appliance is used by or near children. Do not allow vacuum cleaner to be used as a toy or to run unattended at any time.
•Keep hair, loose clothing, fingers, feet and all parts of body away from openings, rotating agitator and other moving parts. Do not operate cleaner in bare feet or when wearing open toe shoes or sandals.
•Do not pick up anything that is burning or smoking, such as cigarettes, matches, or hot ashes.
•Do not use to pick up flammable or combustible materials such as gasoline or fine wood sandings or use in areas where they may be present.
•Avoid picking up hard, sharp objects with the cleaner. They may damage the cleaner.
•Always turn off this appliance before connecting or disconnecting hose.
•Do not use without dirt cup or filters in place. Empty dirt cup and clean filters frequently when picking up very fine materials such as powder.
•Use extra care when cleaning on stairs.
•Do not put any object into openings. Do not use with any opening blocked; keep free of dust, lint, hair, or anything that may reduce air flow.
•Do not pull or carry by cord, use cord as a handle, close door on cord or pull cord around sharp edges or corners. Do not run appliance over cord. Keep cord away from heated surfaces.
•Always disconnect cord from electrical outlet before servicing the cleaner.
•Unplug cleaner when not in use. Turn off all controls before unplugging.
•Do not unplug by pulling on cord. To unplug, grasp the plug, not the cord. Never handle plug or appliance with wet hands.
•Do not use with damaged cord or plug. If appliance is not working as it should, has been dropped, damaged, left outdoors, or dropped into water, take it to a Hoover Factory Service Center or Authorized Hoover Warranty Service Dealer (Depot).
•Use vacuum cleaner only for its intended use as described in the instructions.
Use only attachments recommended by The Hoover Company; others may cause hazards.
© 2004 The Hoover Company |
Save these instructions! |
www.hoover.com |
|
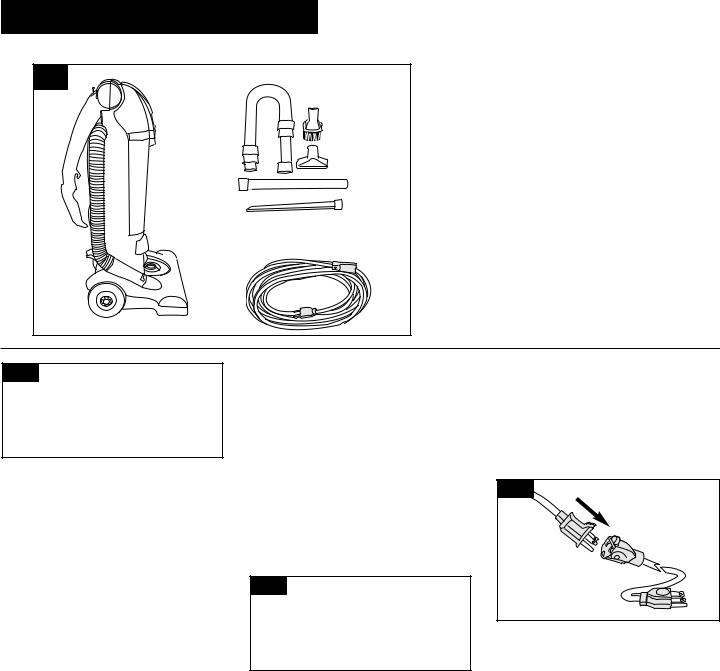
1. Getting started
Carton contents
1-1 |
B |
|
Your cleaner comes fully |
|
|
||
|
|
|
assembled with the |
|
|
|
tools and hose stored on |
|
|
|
board. |
|
* |
|
Remove any tape or packing material |
|
*Packed inside |
|
from the cleaner. |
|
|
A. Cleaner |
|
|
extension wand |
|
|
|
|
|
B. Hose, cleaning tools and wands |
|
|
C |
(packed on cleaner) |
|
|
C. Extension cord |
|
|
|
|
|
|
A |
|
|
1-2
B
Operate cleaner only at voltage specified on data plate on bottom of cleaner.
Warning: Electrical shock could occur if used outdoors or on wet surfaces.
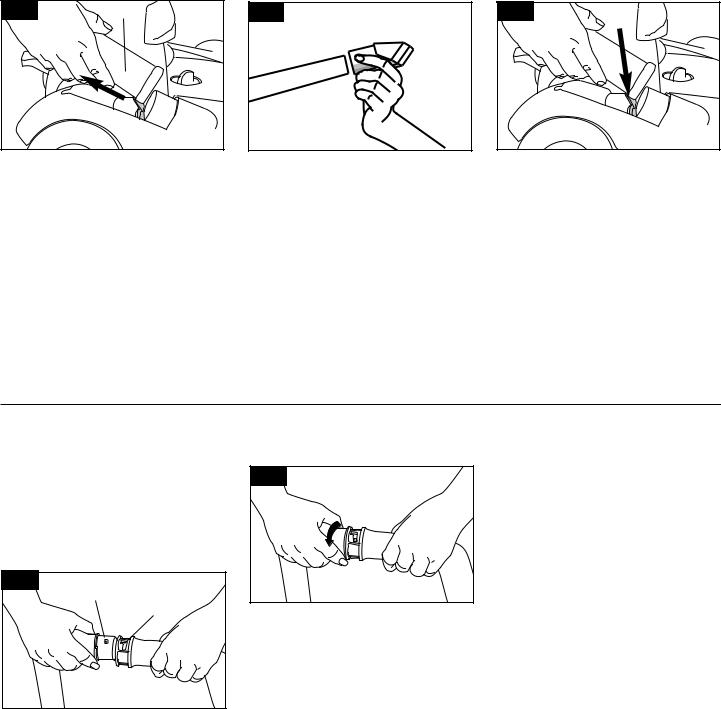
Grounding instructions
This appliance must be grounded. If it should malfunction or breakdown, grounding provides a path of least resistance for electrical current to reduce the risk of electric shock. This appliance is equipped with a cord having an equip- ment-grounding conductor (C) and grounding plug (A) (Fig. 1-2). The plug must be plugged into an appropriate extension cord and outlet (B) that is properly installed and grounded in accordance with all local codes and ordinances.
DANGER -
Improper connection of the equipment grounding conductor can result in the risk of electric shock. Check with a qualified electrician or service person if you are in doubt as to whether the outlet is properly grounded. Do not modify the plug or extension cord provided with the appliance - if it will not fit the outlet, have a proper outlet installed by a qualified electrician. This appliance is for use on a nominal 120 volt circuit and has a grounding plug that looks like the plug illustrated in sketch (A).
1-3
E
A temporary adapter (D) may be used to connect this plug to a 2-pole receptacle
(E) if a properly grounded outlet is not available. The temporary adapter should be used only until a properly grounded outlet (B) can be installed by a qualified electrician.
The green colored rigid ear, lug, or the like (F) extending from the adapter must be connected to a permanent ground
(G) such as a properly grounded outlet box cover. Whenever the adapter is used, it must be held in place by a metal screw.
Note: In Canada, the use of a temporary adapter is not permitted by the Canadian Electrical Code.
Extension cord instructions
Use at least a 16 gauge, grounded type SJ or SJT type extension cord. The extension cord must employ a 3-prong grounding type plug and a 3-pole receptacle that accepts the machine plug.
1-4 |
Do not use appliance with damaged cords or plugs.
When servicing, refer to a qualified electrician or service person only. Use only identical replacement parts.
2
Using fold down handle
1-5 |
A |
1-6 |
B |
Raise upper handle (A) to upright position until it locks in place.
Press upper handle release button (B) back to fold handle to storage position.
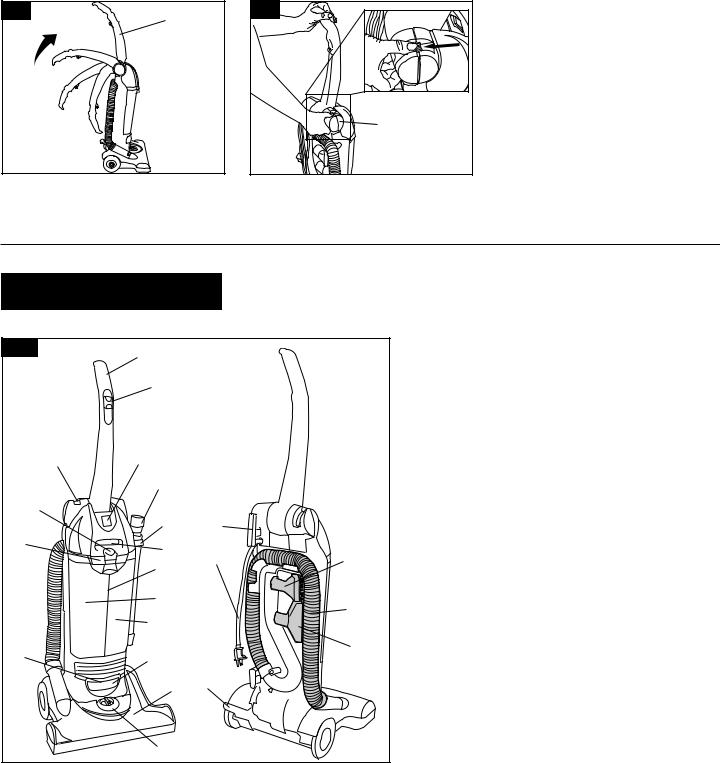
2. How to use |
|
|
|
|
|
Cleaner description |
|
|
|
||
2-1 |
1 |
|
|
1. |
Folding handle |
|
|
|
2. |
Upper handle release |
|
|
|
|
|
||
|
3 |
|
|
|
button |
|
|
|
3. |
Power Boost Switch |
|
|
|
|
|
||
|
|
|
|
4. |
Dirt cup latch |
|
|
|
|
5. |
Carrying handle |
|
22 |
|
|
6. |
Pre-filter |
2 |
|
|
7. |
HEPA filter (inside filter |
|
|
19 |
|
|
|
chamber) |
|
|
|
8. |
Dirt cup (Twin Chamber) |
|
|
|
|
|
||
4 |
|
|
|
9. |
Dirt cup lid |
|
18 |
20 |
|
10. Headlight |
|
9 |
5 |
|
|
11. Stair cleaning handle: |
|
21 |
17 |
|
located above the |
||
|
6 |
|
headlight. |
||
|
|
|
|
||
|
|
|
|
12. Hood |
|
|
7 |
|
15 |
13. Carpet height adjustment |
|
|
8 |
|
|
knob: rotate knob to cor- |
|
|
|
|
|
rect setting for height of |
|
|
|
|
16 |
|
carpet being cleaned. |
11 |
10 |
|
14. Handle release pedal: |
||
|
|
||||
|
|
14 |
|
|
step on pedal to lower |
|
12 |
|
|
handle to operating or low |
|
|
|
|
|
positions. |
|
|
|
|
|
|
|
|
13 |
|
|
|
|
15.Hose
16.Furniture nozzle
17.Dusting brush
18.Extension wand
19.Crevice wand: stores inside wand
20.Cord hook: hang cord from hook for storage.
21.Cord
22.ON-OFF-HUSH™ switch: located on front of cleaner body
Operate cleaner only at voltage specified on data plate on bottom of cleaner.
Continued
3
2-2 |
A |
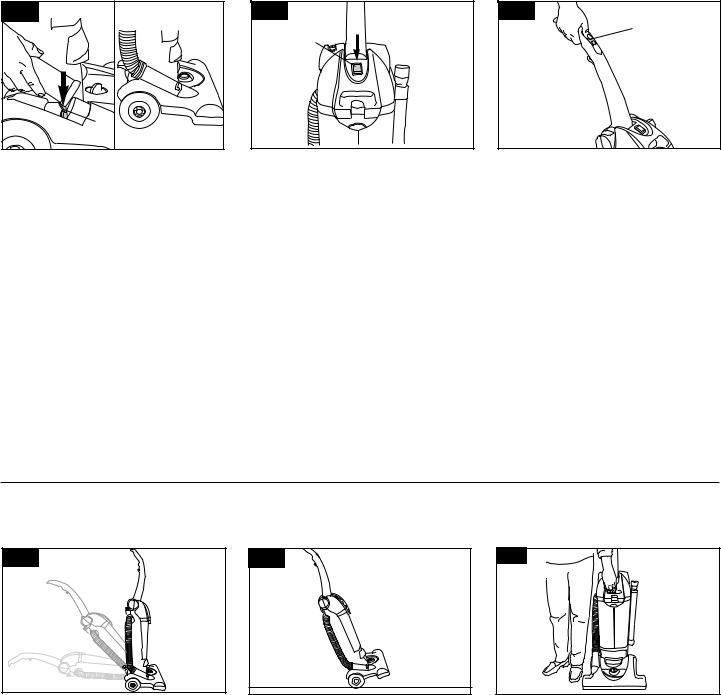
Hose connection
Hose must be attached to cleaner base for floor cleaning.
To attach hose, use the end of the hose to push the cover (A) down and push hose onto opening.
Twist hose end slightly to tighten the connector.
2-3 |
B |
ON-OFF-HUSH™ switch
Plug cord into electrical outlet.
To turn cleaner ON, push switch (B) up.
To turn cleaner OFF, push switch to middle position.
For quieter vacuuming, push switch down (HUSH) position.
Put Power Boost Switch in neutral when using ON or HUSH setting.
2-4 |
C |
Power Boost Switch
Use the Power Boost Switch (C) to add extra cleaning power for cleaning heavily soiled areas and for picking up dry debris spills.
Push the switch forward for a temporary boost. When released, the boost will automatically go to the “neutral” position.
Push the switch back to lock it in the Boost position. To unlock, push the switch forward to the “neutral” position.
Use the lock position for larger areas or when using the cleaning tools.
The Boost can be used with either the ON or HUSH mode selected (see Fig. 2-3).
Put Power Boost Switch in neutral when using ON or HUSH setting.
2-5 |
2-6 |
Handle positions
The handle of your cleaner has three positions; upright when using cleaning tools; operating position for general operation on carpet and floors; low for reaching under low furniture. Step on handle release pedal to lower handle.
Transporting cleaner
Put handle in upright position. Tilt cleaner back on rear wheels. Push forward.
2-7 |
Carrying handle
Use the carrying handle to lift the cleaner.
4
2-8 |
E |
D |
Carpet height |
adjustment |
The cleaning of carpet and rugs takes place at the nozzle (D).
When it is necessary to raise and lower the nozzle for various carpet pile heights, turn the carpet height adjustment knob (E) to the desired setting.
For ease in turning the knob, place handle in upright position.
Nozzle won’t move to adjusted position until handle is lowered to operating position.
2-9
Settings
For maximum cleaning performance, the following carpet height settings are recommended.
• Low setting:for all types of carpet and hard floors.
Note: If the cleaner is difficult to push, rotate knob to the next higher setting.
• Medium and High settings:for deeper pile carpet where easier pushing effort is desired, while maintaining good cleaning performance.
2-10
Cleaning lightweight flexible rugs
Stand on one end of rug and move cleaner toward other end or edge. Before reaching edge, push down on handle. This will lift up the nozzle (front of cleaner) as shown and will prevent rug from clinging to cleaner. Continue to lift up nozzle so that when you have reached the edge, it is completely off the rug. Move cleaner back to start again, lower nozzle, and use only forward strokes.
2-11
Stair cleaning
A stair cleaning handle has been designed for ease in using your cleaner on stairs. With handle in operating position, place fingers under edge of stair cleaning handle and guide cleaner with other hand on upper handle.
As an alternative, you may use the hose and furniture nozzle for stair cleaning. Clean from bottom to top.
When using cleaning tools, the agitator will continue to rotate.
CAUTION: To avoid personal injury or unnecessary wear to carpet, and to prevent the cleaner from falling, always place it at the bottom of the stairs.
Cleaning tools
Tools allow for cleaning surfaces above the floor and for reaching hard to clean areas.
•The cleaner is ready for tool use when handle is in upright position.
•For best tool performance, set the ON- OFF-HUSH™ switch to ON and set the Power Boost Switch to lock.
CAUTION: Agitator continues to rotate while cleaner handle is in upright position. Avoid tipping cleaner or setting it on furniture, fringed area rugs or carpeted stairs during tool use.
2-12 |
F |
G |
H |
I |
Select proper tool
F.Dusting brush may be used for carved furniture, table tops, books, lamps, lighting fixtures, venetian blinds, baseboards, shutters, and registers.
G.Furniture nozzle may be used for upholstered furniture, draperies, mattresses, clothing, automobile interiors, and carpeted stairs.
H.Crevice wand (stores inside extension wand) can be used in tight spaces, corners and along edges in such places as dresser drawers, upholstered furniture, stairs and baseboards. It can also be used for extra reach with the dusting brush and/or extension wand.
I.Extension wand is used to give extra length to your hose. Use it with any of the above tools.
Continued
5
2-13 J
Remove hose
When using cleaning tools, cleaner handle should be in the upright position. Also, turn cleaner OFF before disconnecting and connecting the hose (J).
Remove hose end from cleaner base.
2-14 |
Attach wand and tools
The tools are attached to the hose or the wand in the same manner.
Push tool firmly onto hose; twist tool slightly to tighten or loosen connection.
Attach second wand or tool to the wand in the same manner.
2-15 |
K |
Replacing hose
When you are finished cleaning with the tools, use the end of the hose to push the cover (K) down and push hose onto opening.
Twist hose end slightly to tighten the connector.
Hose must be connected to cleaner base for floor cleaning.
Extra reach hose
(available at additional cost)
The extra reach hose provides easier cleaning of stairs and hard to reach places. Follow the steps below for attaching and detaching hose.
2-16 |
L |
M |
Turn cleaner OFF before disconnecting and connecting hose.
Remove hose end from cleaner base.
Align end of extra reach hose with projections (L) with slots (M) on end of attached hose.
2-17
Slide hose into slots and twist hose to lock it into place. (To detach hose, reverse procedure.)
Attach wands or tools to the other end of hose.
How to clean tools
To clean the hose, wipe off dirt with a cloth dampened in a mild detergent. Rinse with a damp cloth.
Cleaning tools may be washed in warm water with a detergent. Rinse and air dry before using.
6
3. Maintenance
Familiarize yourself with these home maintenance tasks as proper use and care of your cleaner will ensure continued cleaning effectiveness.
Dirt cup
3-1

 A
A
 E
E
D
B
 C
C
The dirt cup assembly consists of the following parts:
Lid (A)
Dirt cup (B)
Pre-filter (C)
HEPA cartridge filter (D)
Dirt inlet opening (E)
While the cleaner is in operation, the prefilter screen will stop larger debris from entering the HEPA cartridge filter chamber. This larger debris will be seen collecting in the left side of the dirt cup. The HEPA cartridge filter will collect fine particles that have passed through the pre-filter screen.
When to empty
It is recommended that the dirt cup be emptied before the dirt reaches the dirt inlet opening on back of dirt cup (Fig. 3- 1) or after every use if preferred.
CAUTION: Very fine materials, such as face powder or cornstarch, may seal the filter and cause loss of suction. When using the cleaner for this type of dust, empty the cup and clean the filters often.
3-2 |
F |
How to empty
Turn cleaner off and allow motor to stop completely.
Disconnect cleaner from electrical outlet. Do not use the cleaner without dirt cup or filters in place.
Press dirt cup latch (F) and remove dirt cup.
3-3
Remove lid.
Note: It is not necessary to remove the HEPA cartridge filter to empty the dirt cup.
Tap side of cup until no more dust particles fall from the HEPA cartridge filter.
3-4 |
G |
Replace dirt cup lid.
Place bottom of cup into cleaner. Pivot cup and snap into place.
Bottom of cup will rest behind grooves at bottom of cleaner cavity (G).
Press latch down.
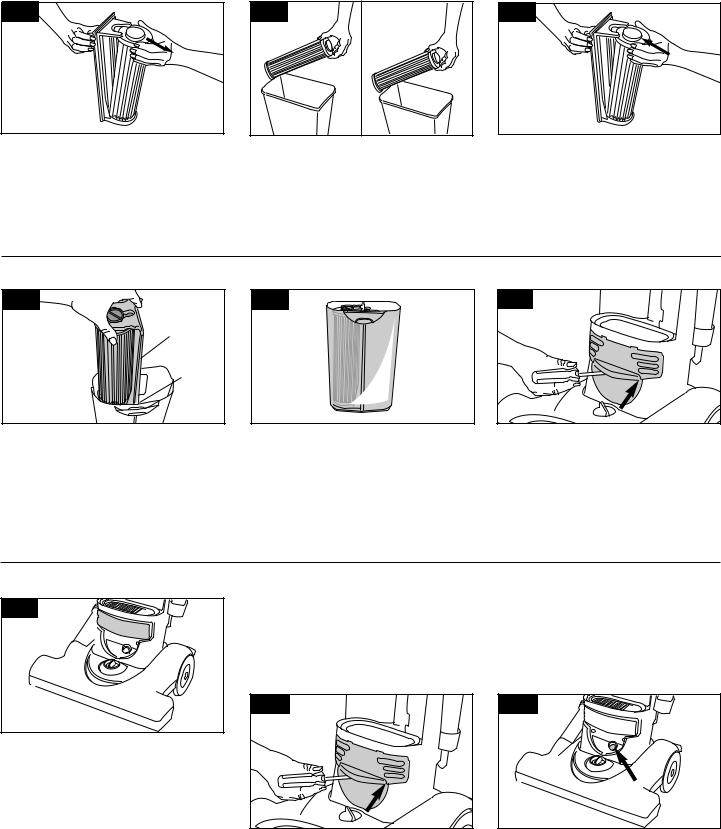
Filter assembly
The HEPA filter and pre-filter screen are essentially self-shedding.
Tapping the side of the dirt cup as described in “How to empty dirt cup” should sufficiently remove dust and fine particles from the HEPA filter and pre-fil- ter.
The filter assembly can also be removed for additional cleaning.
3-5
H
How to clean filter assembly
Remove dirt cup and dirt cup lid as described in “How to empty dirt cup”.
Grasp pre-filter frame (H) and pull up firmly. Slide filter assembly out of cup.
Continued |
7 |
|
3-6 |
Grasp end of cartridge filter and gently pull it away from pre-filter. Remove cartridge from assembly.
The pre-filter can be cleaned with a brush and then rinsed with water. Allow pre-filter to dry thoroughly.
3-7 RIGHT |
WRONG |
It is recommended that the HEPA cartridge filter be cleaned by tapping either of the ends until no more dust particles fall from the filter. DO NOT tap the soft, pleated sides of the filter. It could damage the filter.
Do not rinse or wash the filter.
3-8 |
To re-assemble the filter assembly, place large knob of cartridge filter in hole on bottom of pre-filter.
Snap top of cartridge filter into place.
3-9
I
J
Align grooves (I) on pre-filter frame with ribs (J) in dirt cup.
3-10
Slide filter assemby down into cup until a light snap is felt. Gently pull up on assembly to ensure that it is seated properly in the cup. Ensure that no part of pre-filter screen extends above top edge of dirt cup.
Replace lid and return cup to cleaner (Fig. 3-4).
3-11 |
Cleaning final filter
The final filter assists in returning clean air to the room.
Using a screwdriver, remove the two screws as shown and lift off lens.
3-12
K 
Lift out filter (K) and hand wash in cold water with a mild detergent.
Let filter air dry then reposition. Replace lens and screws.
Should you want to replace this filter, ask for HOOVER part no. 38765024 (filter package part no. 40110004).
Do not operate cleaner without any of the filters in place.
Headlight replacement
What to buy
This cleaner uses a 12 volt, wedge base type 912 bulb, HOOVER part No.
27313107.
3-13
Remove lens - Disconnect cleaner from electrical outlet.
Using a screwdriver, remove the two screws as shown and lift off lens.
3-14
Install bulb - Pull old bulb straight out of socket. Push new bulb straight into socket until locked in place. Do not twist bulb.
Excessive force is not required.
8

3-15
L
Replace lens - Reposition lens (L) and secure with the two screws.
Belt replacement
The belt on your Hoover cleaner causes the agitator to rotate and is important for the effective operation of the cleaner.
The belt is located under the hood of the cleaner and should be checked from time to time to be sure it is in good condition.
When to replace
Disconnect cleaner from electrical outlet.
To check belt, remove hood and agitator cover as shown in Figs. 3-16 through 3- 19. Replace belt if it is stretched, cut or broken.
What to buy
To assure effective operation, use only genuine HOOVER belts with your cleaner. When purchasing a new belt, ask for HOOVER part No. 38528040
(belt package part no. 40201190).
3-16 |
How to replace
Disconnect cleaner from electrical outlet.
With the handle in the upright position, tilt cleaner back until it rests on floor.
Remove the 2 screws near the front of the brush roll cavity.
3-17 |
A |
Press on handle release pedal (A) and lower the nozzle so it is flat.
Remove hose end (Fig. 2-13).
Remove 2 screws at rear of hood.
3-18 |
Lift hood off cleaner.
3-19 |
B |
Remove the 2 screws behind the agitator cover.
Remove agitator cover (B).
3-20 |
Remove agitator and used belt.
Discard used belt.
3-21
C
With lettering to the outside of belt, slide new belt along side of cleaner cavity and over motor pulley (C).
3-22 |
D |
Insert agitator through belt and place belt in belt guide (D).
Continued
9
 Loading...