


Dolphin™ 75e
powered by Android 6.0
User’s Guide

Disclaimer
Honeywell International Inc. (“HII”) reserves the right to make changes in specifications and other information contained in this document without prior notice, and the reader should in all cases consult HII to determine whether any such changes have been made. The information in this publication does not represent a commitment on the part of HII.
HII shall not be liable for technical or editorial errors or omissions contained herein; nor for incidental or consequential damages resulting from the furnishing, performance, or use of this material. HII disclaims any and all responsibility and liability for the selection and use of software and/or hardware to achieve intended results.
This document contains proprietary information that is protected by copyright. All rights are reserved. No part of this document may be photocopied, reproduced, or translated into another language without the prior written consent of HII.
Web Address: www.honeywellaidc.com
Trademarks
Android, Google, and other marks are trademarks of Google Inc.
Microsoft, Windows are either registered trademarks or registered trademarks of Microsoft Corporation in the United States and/or other countries.
The Bluetooth trademarks are owned by Bluetooth SIG, Inc., U.S.A. and licensed to Honeywell.
MIFARE Classic is a registered Trademark of NXP B.V.
Qualcomm is a registered trademark of Qualcomm Incorporated.
Other product names mentioned in this manual may be trademarks or registered trademarks of their respective companies and are the property of their respective owners.
Patents
For patent information, see www.hsmpats.com.
Copyright 2016 Honeywell International Inc. All rights reserved.

Table of Contents
Customer Support
Contacting Customer Support ............................................................................................... |
xi |
Product Service and Repair .................................................................................................. |
xi |
Limited Warranty ................................................................................................................... |
xi |
Warranty Disclaimer: Proper Use of a Touch Screen Mobile Device .................................... |
xi |
How to Extend Your Warranty .............................................................................................. |
xi |
Send Feedback ..................................................................................................................... |
xi |
Chapter 1 - Getting Started |
|
Out of the Box ...................................................................................................................... |
1-1 |
Memory Card Specifications .......................................................................................... |
1-1 |
Initial Setup for Dolphin 75e Terminal.................................................................................. |
1-1 |
Customizing the Home Screen and Accessing Apps........................................................... |
1-4 |
How to Access Apps ...................................................................................................... |
1-5 |
Accessing the Notification Panel and Quick Settings from the Status Bar........................... |
1-6 |
Common Status and Notification Icons .......................................................................... |
1-6 |
Search Bar ..................................................................................................................... |
1-7 |
Voice Search and Voice Actions.......................................................................................... |
1-7 |
Personalizing the Home Screen Panels and Favorites Tray.......................................... |
1-7 |
Navigation/Function Buttons ................................................................................................ |
1-8 |
Remap a Button Function .............................................................................................. |
1-9 |
Virtual Keyboard .................................................................................................................. |
1-9 |
Using the Virtual Keyboard ............................................................................................ |
1-9 |
Turning Power On/Off .......................................................................................................... |
1-9 |
Turning Sleep Mode (Suspend Mode) On/Off ..................................................................... |
1-9 |
Turning Airplane Mode On/Off ........................................................................................... |
1-10 |
Replacing the Battery......................................................................................................... |
1-10 |
Restarting the Terminal...................................................................................................... |
1-11 |
Entering Safe Mode for Troubleshooting ..................................................................... |
1-11 |
Resetting the Terminal....................................................................................................... |
1-12 |
Connecting the Terminal to a Computer via a USB Connection........................................ |
1-14 |
Using the File Browser Power Tool on the Terminal.......................................................... |
1-14 |
Enabling or Disabling File Auto Install ............................................................................... |
1-15 |
Installing Upgrades ...................................................................................................... |
1-15 |
Chapter 2 - Hardware Overview |
|
Standard Configuration for the Dolphin 75e......................................................................... |
2-1 |
Peripherals for the Dolphin 75e ........................................................................................... |
2-1 |
Accessories for the Dolphin 75e .......................................................................................... |
2-2 |
Holsters (Model HOLSTER-2 and 6000-HOLSTER) ..................................................... |
2-2 |
Wrist Lanyard (Model SL-LANYARD-1) ......................................................................... |
2-2 |
Stylus (Model 75e-Stylus) .............................................................................................. |
2-2 |
Battery Door Kits ............................................................................................................ |
2-2 |
Battery (Models 70e-BTSC and 70e-BTEC) .................................................................. |
2-2 |
iii

Features of the Dolphin 75e ................................................................................................ |
2-3 |
Front, Bottom, and Right Panels.................................................................................... |
2-3 |
Back, Top, and Left Panels............................................................................................ |
2-6 |
The I/O Connector ............................................................................................................... |
2-8 |
Battery ................................................................................................................................. |
2-8 |
Replacement Battery Specifications .............................................................................. |
2-8 |
Invalid Battery Error Message ....................................................................................... |
2-9 |
Charging Options........................................................................................................... |
2-9 |
Charging Times ............................................................................................................. |
2-9 |
Understanding and Changing the Battery Charge Status LED Indicator..................... |
2-10 |
Important Charging Guidelines .................................................................................... |
2-10 |
Checking the Battery Health........................................................................................ |
2-11 |
Managing Battery Power ............................................................................................. |
2-11 |
Storing Batteries .......................................................................................................... |
2-12 |
Guidelines for Battery Pack Use and Disposal ............................................................ |
2-12 |
System Resets .................................................................................................................. |
2-12 |
Hardware Maintenance ..................................................................................................... |
2-12 |
Installing a Memory Card................................................................................................... |
2-12 |
Installation and/or Replacement .................................................................................. |
2-13 |
Chapter 3 - Using the Scan Image Engine |
|
Overview.............................................................................................................................. |
3-1 |
Image Engine Specifications ............................................................................................... |
3-1 |
Field of View .................................................................................................................. |
3-1 |
Depth of Field ................................................................................................................ |
3-1 |
Supported Bar Code Symbologies ............................................................................... |
3-2 |
Decoding ............................................................................................................................. |
3-2 |
Scan Wedge .................................................................................................................. |
3-2 |
Changing the Scan Settings of the Default Profile......................................................... |
3-3 |
Restoring the Modified Default Profile to the Factory Default Values............................ |
3-6 |
Adding a Scanning Profile ............................................................................................. |
3-6 |
Deleting a Scanning Profile ........................................................................................... |
3-6 |
Using the Scan Demo to Decode a Bar Code ............................................................... |
3-7 |
Configuring the Scan Demo Application ........................................................................ |
3-8 |
Using the Demo to Save a Picture for Troubleshooting................................................. |
3-8 |
Aiming Beam ................................................................................................................. |
3-9 |
Capturing Images .............................................................................................................. |
3-10 |
Using the IQ Image Demo to Decode Intelligent Bar Codes and Capture Images...... |
3-10 |
Using the Signature Demo........................................................................................... |
3-11 |
Uploading Images.............................................................................................................. |
3-11 |
Chapter 4 - Using the Color Camera |
|
Overview.............................................................................................................................. |
4-1 |
Opening the Camera app and Adjusting the Settings ......................................................... |
4-1 |
Adjusting the Camera/Video Settings ............................................................................ |
4-1 |
Taking a Photo .................................................................................................................... |
4-2 |
Recording Video .................................................................................................................. |
4-2 |
iv

Uploading Pictures and Videos ........................................................................................... |
4-3 |
Chapter 5 - Settings |
|
Overview.............................................................................................................................. |
5-1 |
Wireless & Network Settings ............................................................................................... |
5-1 |
Device Settings.................................................................................................................... |
5-1 |
Changing the Sound Settings ........................................................................................ |
5-1 |
Changing the Display Settings....................................................................................... |
5-2 |
Viewing Storage Statistics ............................................................................................. |
5-3 |
Changing the Battery Settings ....................................................................................... |
5-3 |
Managing Apps.............................................................................................................. |
5-3 |
Personal Settings ................................................................................................................ |
5-4 |
Enabling or Disabling Location Service ......................................................................... |
5-4 |
Managing Security ......................................................................................................... |
5-4 |
Language & input ................................................................................................................ |
5-6 |
Changing the Display Language.................................................................................... |
5-6 |
Activating Spell Check ................................................................................................... |
5-6 |
Managing the Personal Dictionary................................................................................. |
5-7 |
Changing the Keyboard & Input Methods...................................................................... |
5-7 |
Customizing the Optional Enhanced Keyboard ............................................................. |
5-7 |
Adjusting the Sensitivity and Speed of the Touch Panel Response .............................. |
5-8 |
Honeywell Settings .............................................................................................................. |
5-9 |
Key Remapping ............................................................................................................. |
5-9 |
Modifying the Smart Sensors......................................................................................... |
5-9 |
Changing the Battery LED Functionality........................................................................ |
5-9 |
Viewing the Battery Health ............................................................................................ |
5-9 |
Activating the Logger..................................................................................................... |
5-9 |
Scanning........................................................................................................................ |
5-9 |
Web applications ........................................................................................................... |
5-9 |
Accounts.............................................................................................................................. |
5-9 |
Adding a Personal IMAP/POP3, Google or Exchange Account .................................... |
5-9 |
Modifying an Account .................................................................................................. |
5-10 |
Removing an Account.................................................................................................. |
5-10 |
System............................................................................................................................... |
5-10 |
Setting the Date & Time............................................................................................... |
5-10 |
Customizing Services and System Features for Accessibility ..................................... |
5-10 |
Enabling Developer Options ........................................................................................ |
5-11 |
About Phone................................................................................................................ |
5-11 |
Chapter 6 - Communication |
|
Wireless & Networks Settings ............................................................................................. |
6-1 |
Connecting the Terminal to a Wireless Network ................................................................. |
6-1 |
v

Wi-Fi Network Connections ................................................................................................. |
6-2 |
Turning Wi-Fi Networking On or Off .............................................................................. |
6-2 |
Connecting to a Wi-Fi Network ...................................................................................... |
6-2 |
Adding a Wi-Fi Network ................................................................................................. |
6-2 |
Configuring Proxy Settings for a Wi-Fi Network ............................................................ |
6-2 |
Receiving Network Notifications .................................................................................... |
6-3 |
Advanced Wi-Fi Settings and Network Utilities ................................................................... |
6-3 |
Advanced Wi-Fi Menu ................................................................................................... |
6-3 |
Honeywell Proprietary Settings for Configuring the Wi-Fi Radio ......................................... |
6-4 |
Viewing General Wi-Fi Info.................................................................................................. |
6-4 |
Airplane Mode ..................................................................................................................... |
6-4 |
Virtual Private Networks (VPN) ........................................................................................... |
6-4 |
Adding a VPN Profile..................................................................................................... |
6-4 |
Connecting to a VPN ..................................................................................................... |
6-5 |
Disconnecting from a VPN............................................................................................. |
6-5 |
Editing or Deleting a VPN Profile................................................................................... |
6-5 |
Working with Certificates ..................................................................................................... |
6-5 |
Installing a Certificate .................................................................................................... |
6-5 |
Viewing, Disabling, or Removing Certificates ................................................................ |
6-6 |
Ethernet Communication ..................................................................................................... |
6-6 |
Chapter 7 - Working with Bluetooth and NFC Technology |
|
Bluetooth Technology.......................................................................................................... |
7-1 |
Turning the Bluetooth Radio On or Off .......................................................................... |
7-1 |
Pairing and Trusted Devices.......................................................................................... |
7-1 |
Connecting to Other Bluetooth Devices......................................................................... |
7-1 |
Changing the 75e Bluetooth Name and Viewing Received file Statistics ...................... |
7-1 |
Rename or Disconnect a Paired Device........................................................................ |
7-2 |
Sharing Pictures and Video ........................................................................................... |
7-2 |
Near Field Communication (NFC) Technology.................................................................... |
7-2 |
Hardware Requirements................................................................................................ |
7-3 |
Security Recommendation............................................................................................. |
7-3 |
NFC Settings ................................................................................................................. |
7-3 |
Reading NFC Tags ........................................................................................................ |
7-3 |
Transferring screen content via NFC............................................................................. |
7-4 |
Using the NFC Demos................................................................................................... |
7-4 |
Chapter 8 - Dolphin 70e Black HomeBase (Model 70e-HB) |
|
Overview.............................................................................................................................. |
8-1 |
Unpacking the HomeBase................................................................................................... |
8-1 |
Optional Equipment ....................................................................................................... |
8-1 |
Charging Overview .............................................................................................................. |
8-1 |
Convenient Storage............................................................................................................. |
8-1 |
Capacity............................................................................................................................... |
8-2 |
Dimensions.......................................................................................................................... |
8-2 |
Weight ................................................................................................................................. |
8-2 |
vi

Parts and Functions............................................................................................................. |
8-3 |
Front Panel ................................................................................................................... |
8-3 |
Back Panel .................................................................................................................... |
8-4 |
Bottom Panel ................................................................................................................. |
8-4 |
Power .................................................................................................................................. |
8-4 |
Connecting Power to the HomeBase............................................................................. |
8-5 |
Charging the Main Battery ............................................................................................. |
8-5 |
To Power a Terminal and Charge its Main Battery........................................................ |
8-5 |
Charging a Spare Battery in the Auxiliary Battery Well ................................................. |
8-5 |
Communication.................................................................................................................... |
8-6 |
Establishing USB Communication ................................................................................. |
8-6 |
Mounting the HomeBase ..................................................................................................... |
8-6 |
Optional DIN Rail Mount ................................................................................................ |
8-6 |
Additional Hardware ...................................................................................................... |
8-6 |
Installing the DIN Rail .................................................................................................... |
8-7 |
Chapter 9 - Dolphin 70e Black eBase (Model 70e-EHB) |
|
Overview.............................................................................................................................. |
9-1 |
Unpacking the eBase .......................................................................................................... |
9-1 |
Optional Equipment ....................................................................................................... |
9-1 |
Charging Overview .............................................................................................................. |
9-1 |
Convenient Storage............................................................................................................. |
9-1 |
Capacity............................................................................................................................... |
9-1 |
Dimensions.......................................................................................................................... |
9-2 |
Weight ................................................................................................................................. |
9-2 |
Parts and Functions............................................................................................................. |
9-2 |
Front Panel .................................................................................................................... |
9-2 |
Back Panel .................................................................................................................... |
9-3 |
Bottom Panel ................................................................................................................. |
9-4 |
Power .................................................................................................................................. |
9-4 |
Connecting Power to the eBase .................................................................................... |
9-4 |
Charging the Main Battery ............................................................................................. |
9-5 |
To Power a Terminal and Charge its Main Battery........................................................ |
9-5 |
Charging a Spare Battery in the Auxiliary Battery Well ................................................ |
9-5 |
Communication.................................................................................................................... |
9-5 |
Establishing Ethernet Communication........................................................................... |
9-5 |
Establishing USB Communication ................................................................................. |
9-6 |
Mounting the eBase............................................................................................................. |
9-7 |
Optional DIN Rail Mount ................................................................................................ |
9-7 |
Additional Hardware ...................................................................................................... |
9-7 |
Installing the DIN Rail .................................................................................................... |
9-7 |
Chapter 10 - Dolphin 70e Black Mobile Base (Model 70e-MB) |
|
Overview............................................................................................................................ |
10-1 |
Charging Overview ............................................................................................................ |
10-1 |
Convenient Storage........................................................................................................... |
10-1 |
Dimensions........................................................................................................................ |
10-1 |
vii

Weight ............................................................................................................................... |
|
10-1 |
Parts and Functions .......................................................................................................... |
|
10-2 |
Adjustable Arm with Suction Cup Base for Windshield Mounting................................ |
10-2 |
|
Mounting the Mobile Base ................................................................................................. |
|
10-3 |
Safety Precautions....................................................................................................... |
|
10-3 |
Installation.................................................................................................................... |
|
10-3 |
Charging the Main Battery................................................................................................. |
|
10-4 |
To Power a Terminal and Charge its Main Battery...................................................... |
|
10-5 |
Removing the Cable .......................................................................................................... |
|
10-6 |
Chapter 11 - Dolphin 70e Black ChargeBase (Model 70e-CB) |
|
|
Overview............................................................................................................................ |
|
11-1 |
Unpacking the ChargeBase............................................................................................... |
|
11-1 |
Charging Overview ............................................................................................................ |
|
11-1 |
Convenient Storage........................................................................................................... |
|
11-1 |
Capacity............................................................................................................................. |
|
11-1 |
Dimensions........................................................................................................................ |
|
11-2 |
Weight ............................................................................................................................... |
|
11-2 |
Parts and Functions........................................................................................................... |
|
11-2 |
Front Panel .................................................................................................................. |
|
11-2 |
Back Panel................................................................................................................... |
|
11-3 |
Bottom Panel ............................................................................................................... |
|
11-3 |
Power ................................................................................................................................ |
|
11-3 |
Connecting Power to the ChargeBase ....................................................................... |
|
11-4 |
Charging the Main Battery ........................................................................................... |
|
11-4 |
To Power a Terminal and Charge its Main Battery...................................................... |
|
11-4 |
Mounting the ChargeBase................................................................................................. |
|
11-4 |
Optional DIN Rail Mount .............................................................................................. |
|
11-5 |
Additional Hardware .................................................................................................... |
|
11-5 |
Installing the DIN Rail .................................................................................................. |
|
11-5 |
Chapter 12 - Dolphin 70e Black Net Base (Model 70e-NB) |
|
|
Overview .................................................................................. |
1 |
|
Unpacking the Net Base.................................................................................................... |
|
12-1 |
Optional Equipment ..................................................................................................... |
|
12-1 |
Charging Overview ............................................................................................................ |
|
12-1 |
Convenient Storage........................................................................................................... |
|
12-1 |
Capacity............................................................................................................................. |
|
12-1 |
Dimensions........................................................................................................................ |
|
12-2 |
Weight ............................................................................................................................... |
|
12-2 |
Parts and Functions........................................................................................................... |
|
12-2 |
Front Panel .................................................................................................................. |
|
12-2 |
Back Panel .................................................................................................................. |
|
12-3 |
Bottom Panel ............................................................................................................... |
|
12-4 |
viii

Power ................................................................................................................................ |
12-4 |
Connecting Power to the Net Base.............................................................................. |
12-4 |
Charging the Main Battery ........................................................................................... |
12-4 |
To Power a Terminal and Charge the Main Battery .................................................... |
12-4 |
Communication.................................................................................................................. |
12-5 |
Establishing Ethernet Communication......................................................................... |
12-5 |
Bottom Panel ............................................................................................................... |
12-6 |
Optional DIN Rail Mount .............................................................................................. |
12-6 |
Additional Hardware .................................................................................................... |
12-6 |
Installing the DIN Rail .................................................................................................. |
12-7 |
Appendix A - Dolphin 75e Terminal Agency Information |
|
Label Locations ................................................................................................................... |
A-1 |
Model Number and Serial Number ................................................................................ |
A-1 |
RF Exposure Information (SAR).......................................................................................... |
A-1 |
ix

x
Customer Support
Contacting Customer Support
To search our knowledge base for a solution or to log in to the Technical Support portal and report a problem, go to www.hsmcontactsupport.com.
For our latest contact information, see www.honeywellaidc.com/locations.
Product Service and Repair
Honeywell International Inc. provides service for all of its products through service centers throughout the world. To find your service center, go to www.honeywellaidc.com and select Support > Contact Support > Service and Repair. Contact your service center to obtain a Return Material Authorization number (RMA #) before you return the product. To obtain warranty or non-warranty service, return your product to Honeywell (postage paid) with a copy of the dated purchase record.
For ongoing and future product quality improvement initiatives, the terminal comes equipped with an embedded device lifetime counter function. Honeywell may use the lifetime counter data for future statistical reliability analysis as well as ongoing quality, repair and service purposes.
Limited Warranty
For warranty information, go to www.honeywellaidc.com and click Resources > Warranty.
The duration of the limited warranty for the Dolphin 75e is as follows:
•The duration of the limited warranty for terminals with an integrated imager is one year.
•The duration of the limited warranty for touch screens is one year.
The duration of the limited warranty for batteries is one year. Use of any battery from a source other than Honeywell may result in damage not covered by the warranty. Batteries returned to Honeywell International Inc. in a reduced state may or not be replaced under this warranty. Battery life will be greatly increased when following the battery instructions in this user's guide.
The duration of the limited warranty for the Dolphin 70e Black HomeBase, Dolphin 70e Black eBase, Dolphin 70e Black Net Base, Dolphin 70e Black Mobile Base, Dolphin 70e Black ChargeBase, and the Common QuadCharger is one year.
Warranty Disclaimer: Proper Use of a Touch Screen Mobile Device
If your device has a touch screen display, please note that a touch screen responds best to a light touch from the pad of your finger or a Honeywell approved stylus. Using excessive force or a metallic object when pressing on the touch-screen may cause damage to the tempered glass surface and may not be covered by the product's warranty.
How to Extend Your Warranty
Honeywell International Inc. offers a variety of service plans on our hardware products. These agreements offer continued coverage for your equipment after the initial warranty expires. For more information, contact your Sales Representative, Customer Account Representative, or Product Service Marketing Manager from Honeywell International Inc., or your Authorized Reseller.
Send Feedback
Your feedback is important to the continual improvement of our documentation. To provide feedback about this manual, contact the Honeywell Technical Communications department at ACSHSMTechnicalCommunications@honeywell.com.
xi

xii

1
Getting Started
Out of the Box
Verify that the carton contains the following items:
•Dolphin 75e handheld computer (terminal)
•1 GB, 2 GB or 4 GB industrial grade microSD™ memory card (optional)
•Rechargeable 3.7V Li-ion battery
•USB charge/communication cable
•Power adapter with regional plug adapters
•Product documentation
If you ordered accessories for your terminal, verify that they are also included with the order. Be sure to keep the original packaging in case you need to return the Dolphin terminal for service.
Memory Card Specifications
Honeywell recommends the use of Single Level Cell (SLC) industrial grade microSD or microSDHC™ memory cards with Dolphin terminals for maximum performance and durability. Contact a Honeywell sales representative for additional information on qualified memory card options.
Initial Setup for Dolphin 75e Terminal
Step 1. Install the Battery
Before installing the main battery, read the Guidelines for Battery Pack Use and Disposal on page 2-12.
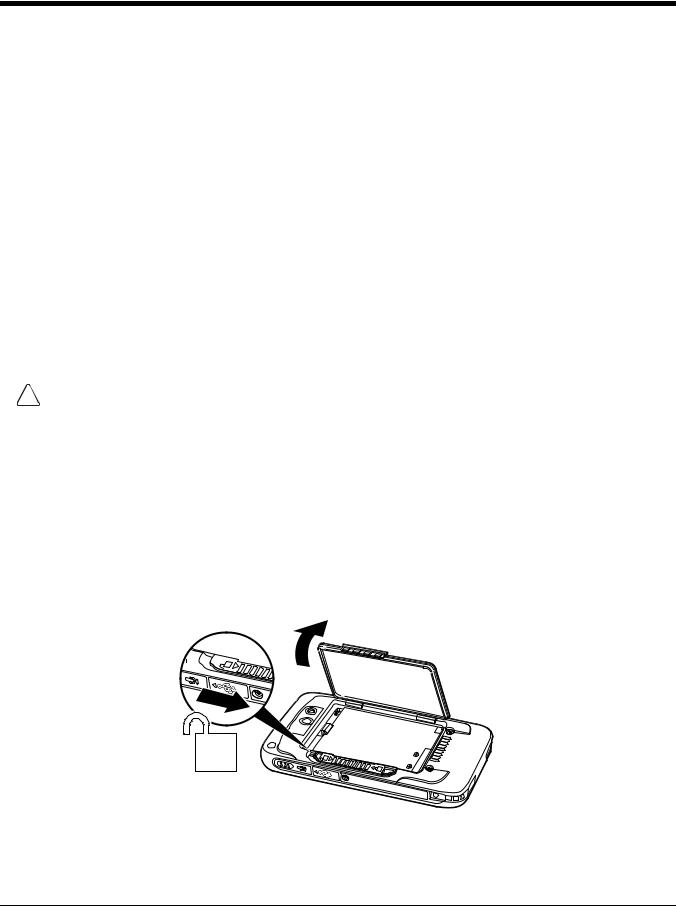
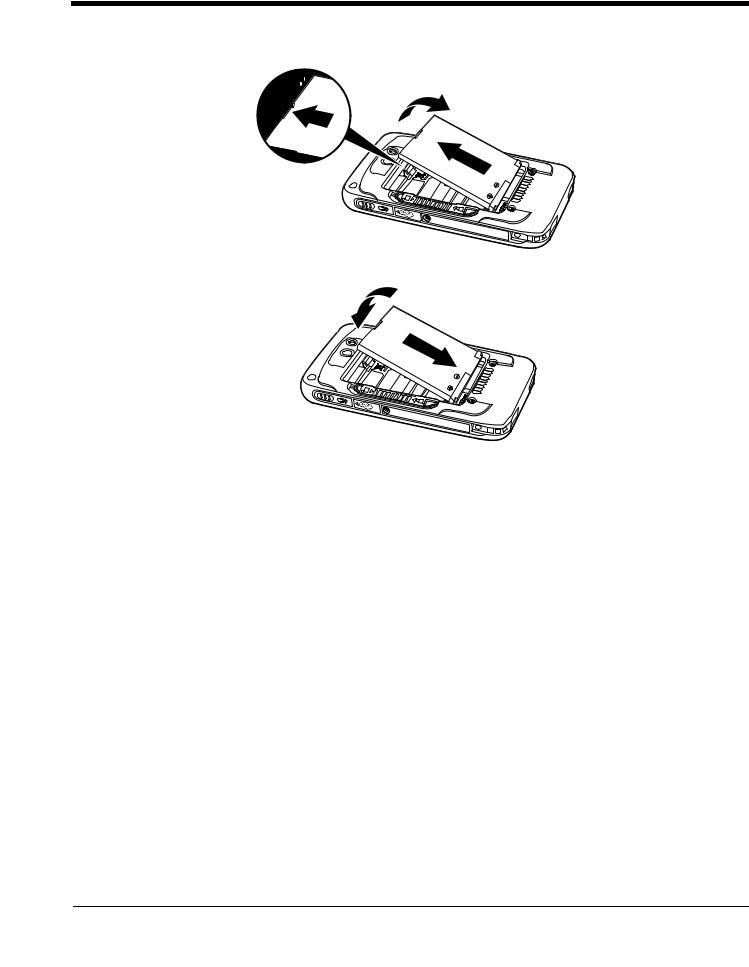
The terminal is shipped with the battery packaged separate from the unit. To install the battery, follow the installation steps illustrated. For information on how to remove the battery, see Replacing the Battery on page 1-10.
!damage not covered by the warranty.
We recommend use of Honeywell Li-ion battery packs. Use of any non-Honeywell battery may result in damage not covered by the warranty.Ensure all components are dry prior to placing the battery in the terminal. Mating wet components may cause
Important: All battery and connector doors must be present, undamaged, and properly closed to maintain the environmental rating of the terminal.
Note: Standard battery and standard battery door shown.
2 

1
Battery Door Lock
1 - 1

4 
3
5 
Apply pressure to the edges of the battery door before engaging the lock to ensure the door is properly closed.
 6
6
Step 2. Charge the Battery
The power source for the Dolphin terminal is the 3.7V Li-ion rechargeable battery located under the battery door on the back panel of the device. See Battery on page 2-8 for additional information on battery storage, use, and disposal.
Important: Removing the battery from the terminal erases all non-persistent memory. Always power off the terminal before removing the battery. For information on how to remove the battery from the terminal, see Replacing the Battery on page 1-10.
Before Initial Use
Dolphin terminals ship with the battery significantly discharged of power. After installing the battery in the terminal, charge the battery with a Dolphin 75e compatible charging peripheral for a minimum of 4 hours for the standard battery pack or 6 hours for the extended battery pack.
When using the 70e-USB Charge/Communication cable to charge from a 500mA USB port on a host device, charge the battery for a minimum of 6 hours for the standard battery and 8 hours for the extended battery.
Note: Inadequate source current may interfere with effective battery charging; see Important Charging Guidelines on page 2-10 for additional information.
We recommend use of Honeywell peripherals, power cables, and power adapters. Use of any non-Honeywell ! peripherals, cables, or power adapters may cause damage not covered by the warranty.
Dolphin 75e model terminals are designed for use with the following charging devices and cables: 70e-HB, 70e-CB, 70e-EHB, 70e-NB, 70e-MB, 70e-MC, and 70e-USB ADAPTERKIT. See pages 2-1 and 2-2 for additional information on
peripherals and accessories.
Ensure all components are dry prior to mating terminals/batteries with peripheral devices. Mating wet ! components may cause damage not covered by the warranty.
1 - 2
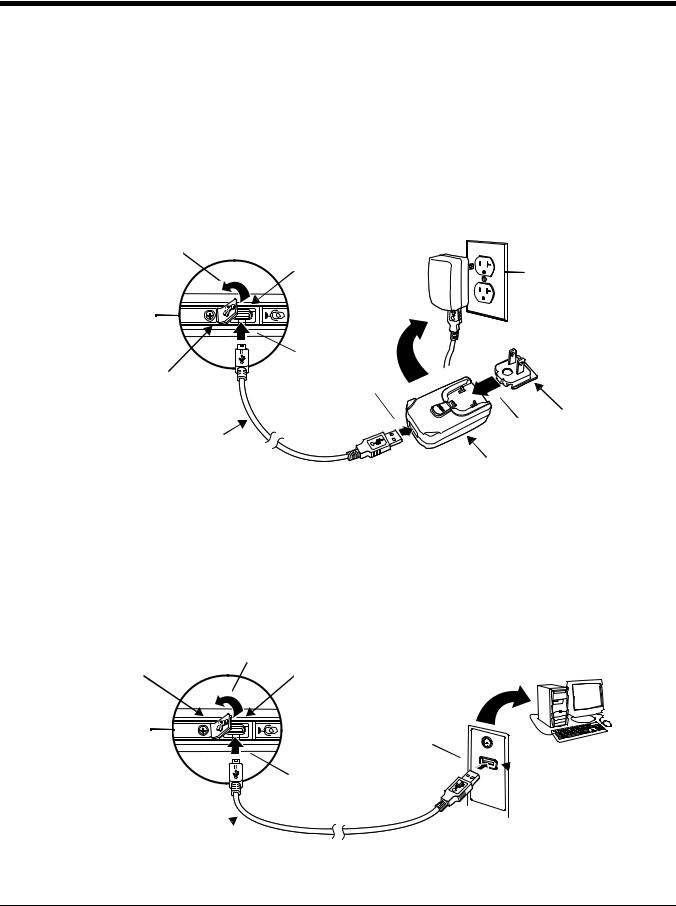
Using the USB Charge/Communication Cable (Model 70e-USB ADAPTERKIT)
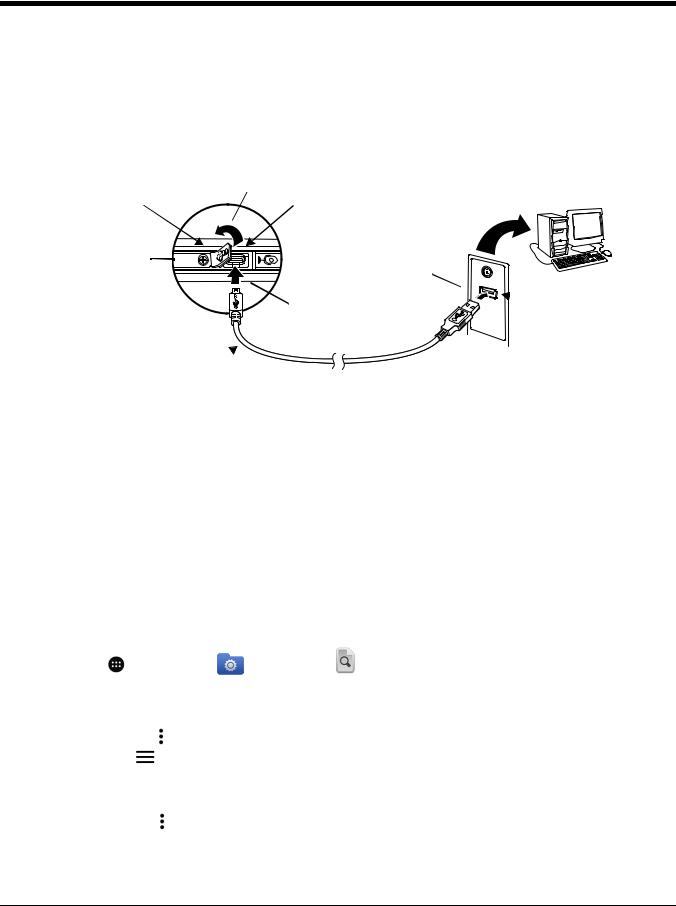
Dolphin 75e terminals ship with a USB Charge/Communication Cable and a power adapter with regional plug adapters. The USB Charge/Communication cable provides two options for charging the terminal. Use the cable in conjunction with the provided power supply adapter and plug adapter to charge the terminal from a power outlet (Option 1) or connect the cable to a high-power USB port to charge from a host device (Option 2).
Warning: The terminal shall only be connected to CTIA certified adapters, products that bear the USB-IF logo or products that have completed the USB-IF compliance program when using the micro USB port as a charging source.
Option 1: Charging from a power outlet
Use only a UL Listed power supply, which has been qualified by Honeywell with an output rated at 5VDC and 1A with
the device.
1
|
Micro USB Port |
5 |
|
|
|
|
|
||
Right Side Panel |
|
|
|
|
of the Terminal |
|
|
|
|
USB Door |
2 |
3 |
|
|
|
|
|
||
USB Charge/Communication Cable |
|
|
4 |
Plug Adapter |
|
|
|
Power Adapter |
|
Option 2: Charging from a high power USB port on a host device (PC)
Charging the battery through a USB port takes more time than direct charging using the provided power supply. Inadequate source current may lengthen the charge time or prevent the battery from charging if the terminal is drawing more current than supplied by the USB port. The maximum current supplied by a USB Host can vary from 100mA to 500mA. Do not attempt to charge the terminal from a 100mA source. An active Dolphin terminal uses more current than supplied by a 100mA source causing the terminal to continue to draw power from the battery.
See Important Charging Guidelines on page 2-10 for additional information.
Note: Placing the terminal in Sleep (Suspend) mode while charging reduces the current draw of the terminal and shortens the charging time of the battery.
|
1 |
USB Door |
Micro USB Port |
Right Side Panel |
3 |
of the Terminal |
|
 USB Port
2
USB Charge/Communication Cable 
1 - 3

Step 3. Unlock the Screen
Swipe up from the lock icon  near the bottom of the screen or press the Menu button
  to unlock the terminal and access the Home screen.
For information on customizing the security feature, see Setting up a Screen Lock on page 5-4.
Screen Lock
Customizing the Home Screen and Accessing Apps
Home is the first screen you see once the terminal is turned on and unlocked. You can personalize the Home screen with your choice of shortcuts, apps, folders and widgets. If you need more space, you have the option to add additional Home screen panels. Once more panels are added, simply swipe left or right to scroll through the screens.
Notifications and status indicators appear at the top of the screen. Notifications appear on the left and status indicators for various system functions appear on the right with the current time. For information on how to view notification details, see Accessing the Notification Panel and Quick Settings from the Status Bar on page 1-6.
The Favorites tray, located at the bottom of the screen, and is visible from any Home screen panel. You can modify the apps in the Favorites tray to include the apps you use most. To learn how, see Personalizing the Home Screen Panels and Favorites Tray on page 1-7.
Select the All apps icon  to access all the apps installed on the terminal.
You can press the Home button  on the front of the terminal to return to the Home screen from any open app.
1 - 4
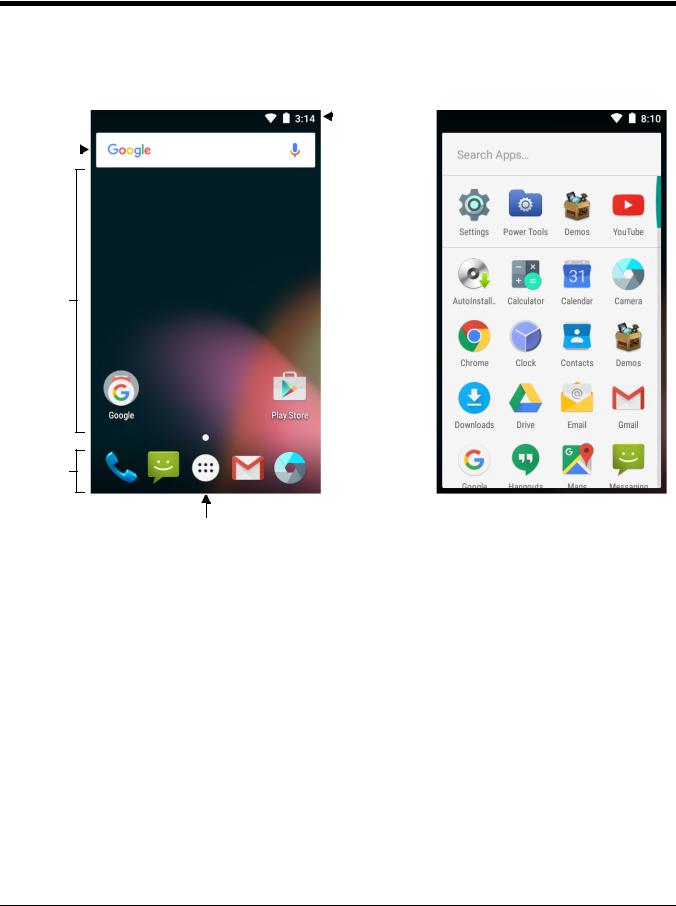
Note: Some of the apps shown are specific to Dolphin 75e models equipped with Google Mobile™ Services and may require an active Google account be setup on your terminal.
|
|
Home |
|
All Apps |
|
|
|
|
Notification / |
|
|
|
|
|
|
|
|
|
Status Bar |
Search Bar |
|
|
|
|
|
|
|
Home Screen
Panel
Favorites Tray
All Apps
How to Access Apps
To find an app:
1.Touch All Apps  .
.
2.Locate the app using one of these actions:
•Swipe up or down on the screen to scroll through the apps.
•Touch and hold the scroll bar on the right side of the screen for quick scrolling with index letter guides.
•Enter the app name in the search bar at the top of the screen. Matching apps appear as you type.
3.Touch the app to open it. You can also touch and hold the app to add it to the Home screen.
Apps you use frequently and the last selected app automatically appear in the first row of the All Apps screen.
1 - 5
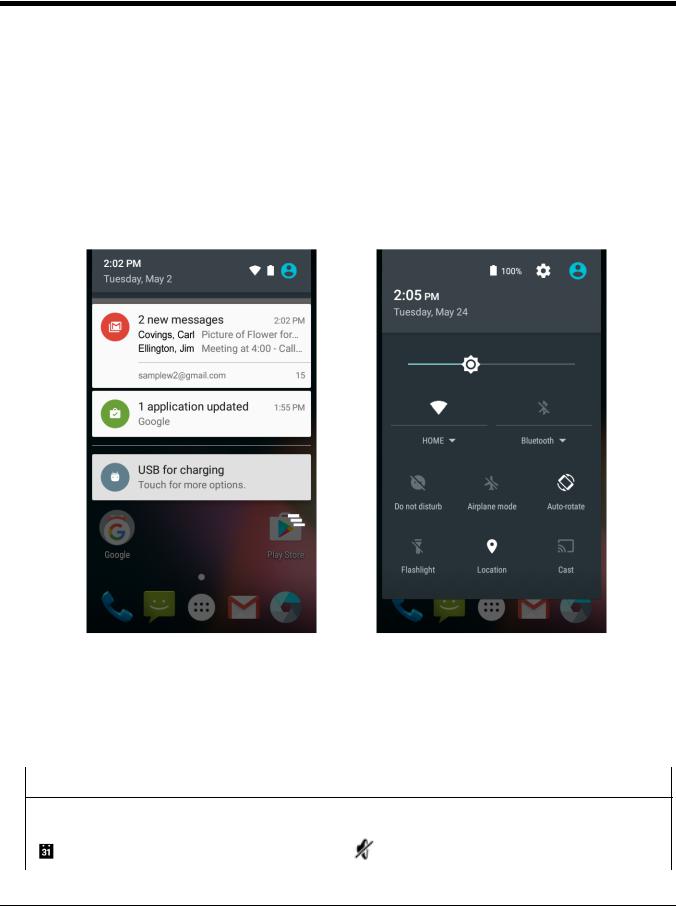
Accessing the Notification Panel and Quick Settings from the Status Bar
To view additional details about a notification, touch and hold the status bar at the top of the screen and then drag down. The notification panel provides quick access to all your notifications and quick settings.
•Touch any notification for more detailed information in the relevant app or to change available settings.
•Touch the status bar at the top of the screen open or close quick settings.
•Swipe left or right on a single notification to dismiss only that notification.
•Select  to dismiss all the notifications listed.
To close the notification panel, swipe up from the bottom of the screen.
Notification Panel |
Quick Settings |
|
|
|
|
|
|
|
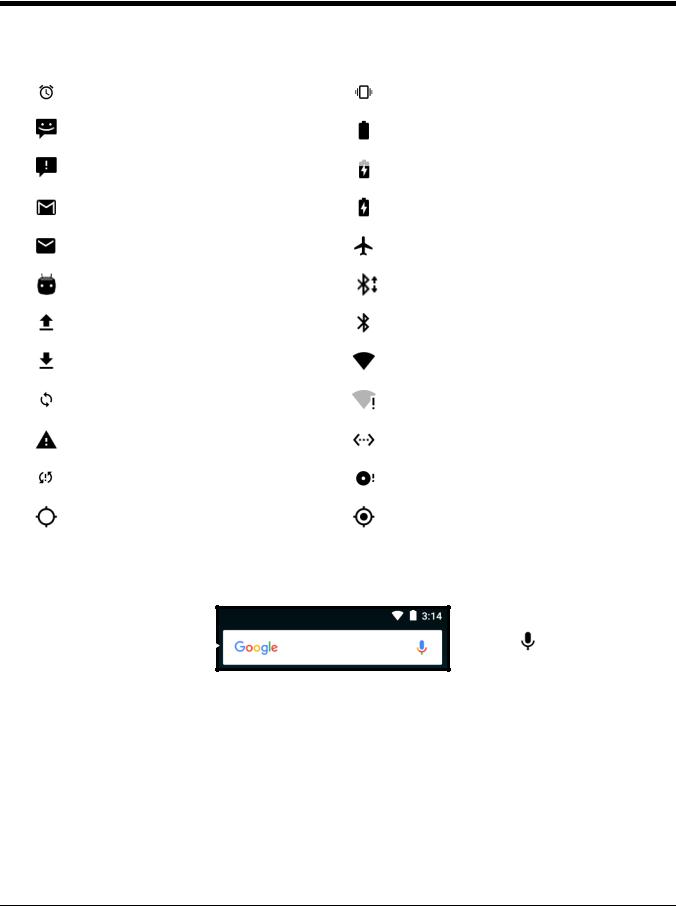
Common Status and Notification Icons
Notifications and status indicators appear at the top of the screen.
Notifications on the Left 

 Status and Time on the Right
Icon |
Meaning |
Icon |
Meaning |
|
|
|
|
Note: Notification and status icons are hardware and software dependent. Some of the icons listed below may not be relevant for your Dolphin model.
|
Pending calender event |
|
Sound is turned off |
|
|
|
|
1 - 6
Icon |
Meaning |
Icon |
Meaning |
|
|
|
|
|
|
|
|
|
Pending alarm and Alarm is set |
|
Vibrate mode is turned on |
|
|
|
|
|
New text message or multimedia message |
|
Battery charge is at 100% |
|
|
|
|
|
Error with text or multimedia message delivery |
|
Terminal is connected to external power and the |
|
|
|
battery is charging. |
|
|
|
|
|
New Gmail™ message |
|
Terminal is connected to external power and the |
|
|
|
battery is fully charging. |
|
|
|
|
|
New E-mail |
|
Airplane mode is turned on |
|
|
|
|
|
ADB active (USB debugging enabled) |
|
Bluetooth incoming file notification |
|
|
|
|
|
Uploading data |
|
Bluetooth technology is turned on |
|
|
|
|
|
Downloading data |
|
Wi-Fi network connected with full signal strength |
|
|
|
|
|
Synchronizing data |
|
Wi-Fi network connected but no Internet |
|
|
|
|
|
Error with sync or sign-in |
|
Ethernet status - connected. |
|
|
|
|
|
The terminal could not synchronize data with the |
|
SD card is full |
|
computer |
|
|
|
|
|
|
|
GPS is turned on |
|
Receiving location data from GPS |
|
|
|
|
Search Bar
You can search for an item on the terminal or Internet using Google™ Search active Internet connection is required.
Touch inside the box to  access the virtual keyboard
for text entry.
at the top of any Home screen panel. An
Touch to initiate Google Voice Search or a Voice Action.
Voice Search and Voice Actions
To initiate Google Voice™ Search or a Voice Action select the microphone  on the search bar. Speak the terms to search for or the Voice Action to perform. For example, say “What time is it in France” or “send email”.
Personalizing the Home Screen Panels and Favorites Tray
Streamline your work flow by customizing the Home screen panels and Favorites tray with your choice of app shortcuts, folders, and widgets.
To add an app and Home screen panel:
1. Touch All Apps  .
.
1 - 7

2.Locate the app using one of these actions:
•Swipe up or down on the screen to scroll through the apps.
•Touch and hold the scroll bar on the right side of the screen for quick scrolling with index letter guides.
•Enter the app name in the search bar at the top of the screen. Matching apps appear as you type.
3.Touch and hold the app you want to add. The terminal vibrates, and then switches to the Home screen panel view.
4.Do one of the following:
•Drag and drop the app icon into position onto the first Home screen panel.
•Drag the icon to the right edge of the screen to add a panel where you can drop the icon. Once a panel is added, a navigation dot is added above the Favorites tray.
•Drag and drop an app icon on top of another icon to create a folder.
•Drag and drop the app into an open spot on the Favorites tray.
To find a widget:
1.Touch and hold on an open section of the Home screen.
2.Select WIDGETS.
3.Locate the widget using one of these actions:
•Swipe up or down on the screen to scroll through the apps.
•Touch and hold the scroll bar on the right side of the screen for quick scrolling with index letter guides.
4.Touch and hold a widget to add it to the Home screen and then drag and drop it into place.
To remove/delete an item:
1.Touch and hold the item.
2.Drag and drop the item on top of  Remove.
To move an item:
1.Tap and hold the item.
2.When the unit vibrates, drag and drop the item in the new location.
Note: The next panel automatically opens if you drag the item to the edge of the touchscreen.
Navigation/Function Buttons
The Dolphin terminal has seven navigation/function buttons.
Button |
Function |
|
|
Back |
Return to the previous screen. |
|
|
Menu |
Access additional menu options. |
|
|
|
Wakes the terminal from Sleep mode (Suspend mode). |
Scan |
Triggers the scanner/imager. The Scan wedge feature is enabled by default setting. For |
|
|
|
information on modifying the scan wedge feature see page 3-2. |
|
|
Recent Apps |
View and switch between recently used apps. |
|
|
Home |
Return to the Home screen. |
|
|
1 - 8
Button |
Function |
|
Right & Left |
Trigger the scanner/imager. |
|
Side |
||
|
||
Volume |
Raise or lower the volume of the active speaker. |
Remap a Button Function
You can change the default function of the Scan, Left and Right side buttons.
1.Touch All Apps  > Settings
  > Key remap.
2.Select the button to remap (i.e., LeftScan, RightScan, BottomScan).
3.Touch KEYS or APPS to view the available functions.
4.Select the function you want assigned to the button.
5.Touch  to return to the Settings screen.
If you want to remove the custom settings and return the buttons to their default functions, select Clear All Key Remap.
For information on the button locations on the terminal, see Features of the Dolphin 75e on page 2-3.
Virtual Keyboard
The virtual keyboard appears when you open an application or select a field that requires text or numerical input. The content of the keyboard may vary depending on the application in use and the input field requirements.
Using the Virtual Keyboard
During text input, you may need to switch between keyboard modes to access additional character sets (e.g., function keys, symbols, and numbers). Each keyboard mode, includes navigation keys, which allow you to quickly switch between modes. Touch the ABC key to switch to the Qwerty Mode, and the ?123 key to switch to the Numeric Mode. Touch and hold the comma “,” key to access the settings for input options or the period “.” key to access additional symbols (e.g., @, %, +, &).
See Language & input on page 5-6 for additional information on configuring keyboard & input methods.
Note: The content of the keyboard and the mode initially displayed may vary depending on the application in use and the input field requirements.
Turning Power On/Off
To turn the terminal On, press and release the Power button  .
.
To turn the terminal Off:
1.Press and hold the Power button  until the options menu displays.
2.Touch Power Off.
You should always power off the terminal before removing the battery. For information on removing the battery, see Replacing the Battery.
Turning Sleep Mode (Suspend Mode) On/Off
Sleep mode automatically turns the touch panel display off and locks the terminal to save battery power when the terminal is inactive for a programmed period of time.
1. Press and release the Power button  to wake the terminal.
1 - 9
2. Swipe up from the lock  or press the Menu button
  to unlock the terminal.
To manually place the unit in Sleep mode, press and release the Power button.
To adjust the timeout limit, touch All Apps  > Settings
  > Display > Sleep.
Turning Airplane Mode On/Off
Turn Airplane Mode on to disable all the terminal radios that transmit voice or data.
1.Swipe down from the top of the touch screen to open the notifications panel.
2.Touch the status bar at the top of the screen to open the quick settings.
3.Touch Airplane Mode to toggle the mode On or Off. When Airplane Mode is turned on,  appears on the status bar.
Replacing the Battery
Before replacing the battery, read the Guidelines for Battery Pack Use and Disposal on page 2-12. For battery replacement part numbers, see Replacement Battery Specifications on page 2-8.
!by a qualified re-cycler or hazardous materials handler. Do not incinerate the battery or dispose of the battery with general waste materials.
Ensure all components are dry prior to mating terminals/batteries with peripheral devices. Mating wet components may cause damage not covered by the warranty.
We recommend use of Honeywell Li-ion battery packs. Use of any non-Honeywell battery may result in damage not covered by the warranty.RISK OF EXPLOSION IF BATTERY IS REPLACED BY AN INCORRECT TYPE. The battery should be disposed of
The following illustrations depict a standard battery with a standard battery door; however, battery removal and installation procedures are the same for the extended battery and extended battery door.
To replace the battery:
1.Power Off the terminal.
2.Unlock and remove the battery door.
Battery Door Lock 


1 - 10
3. Pull the battery latch back and remove the battery.
Battery Latch 


4. Insert the new battery and install the battery door.
5.Apply pressure to the edges of the battery door to ensure the door is properly closed. Engage the door lock.
6.Press the Power button  .
.
Important: All battery and connector doors must be present, undamaged, and properly closed to maintain the environmental rating of the terminal.
Restarting the Terminal
You may need to restart the terminal to correct conditions where an application stops responding to the system or the terminal seems to be locked up.
•Press and hold the Power button  until the options menu appears, and then select Reboot. Select OK to confirm. To perform a restart if the touch panel is unresponsive:
•Press and hold the Power button  for approximately 8 seconds until the terminal starts to reboot. When the reset is complete, the Lock screen appears.
Note: The Internal storage\honeywell folder on the Dolphin terminal is semi-permanent storage on the terminal. By default, files in this folder are maintained after a Reboot.
Entering Safe Mode for Troubleshooting
Safe mode disables all third party applications installed on the terminal. To enter safe mode, press and hold the Menu button  when the unit is booting, and then select OK when prompted. To exit safe mode reboot the terminal.
Note: This mode may not be available if your system administrator has set policies to prevent its use.
1 - 11

Resetting the Terminal
You may need to perform a Factory reset (clean boot) for one of two reasons:
•You want a clean configuration without any of the custom apps, settings, and data you added to the terminal.
This reason is the most common and should be used for most situations when you need to do a Factory Reset (clean boot). Use Method 1 (below) to reset the terminal back to the factory state.
OR
•The terminal has become completely unresponsive and all other recovery methods have failed.
This is a rare situation that requires a special reset process, which you should only use as a last resort. See Method 2 on page 1-13.
Because a Factory reset can result in data loss, use a reset only after trying a standard restart and if all other recovery methods have failed. All personal content is erased (e.g., emails, pictures, contacts) and factory default settings are restored when a factory reset is performed.
!with the exception of those found in the IPSM partition (unless otherwise selected) and on any removable
storage.A Factory reset (Clean Boot) erases the memory in the terminal, including all applications and data files,Caution:
Note: These methods of recovery may not be available if your system administrator has set policies to prevent their use.
Method 1
Before You Start
1.If you recently reset your Google Account password, wait 24 hours before performing a Factory reset.
2.Make sure you have your screen lock password, PIN or pattern if you activated one. You will need this to reset the terminal.
3.If you have a Google Account, back up your data and settings to your Google Account so you can restore them if needed.
4.Connect the terminal to an external power source or make sure you have a full battery charge.
5.Make sure you have an Internet connection.
To Perform a Factory Reset Using the Touch Screen
1.Touch All Apps  > Settings
  > Backup & reset.
2.Select Factory data reset.
3.If you also want to erase all data in the IPSM partition as well as internal storage, swipe to the bottom of the screen and check the box next to Erase IPSM.
4.Touch RESET PHONE.
5.If prompted, enter your screen lock security pattern, PIN or password.
6.Select Delete everything.
1 - 12

Method 2
Important: You should never use this method unless all other recovery methods have failed and the terminal is still completely unresponsive.
Before You Start
1.If you added a Google Account to the 75e, make sure you have your Google username and password associated with the terminal. If you do not have the username and password, you will not be able to use the terminal after the reset. This is a security measure that prevents unauthorized users from using the device if they try a factory reset.
If you did not add a Google Account to the terminal, the extra security level is not enabled and you will not need a Google username and password.
2.If you recently reset your Google Account password, wait 24 hours before performing a Factory reset.
3.Connect the terminal to an external power source or make sure you have a full battery charge.
4.Make sure you have an Internet connection.
To Perform a Factory Reset for an Unresponsive Terminal
To perform a Factory Reset if the 75e is unresponsive and all other recovery methods have failed:
1.Press and hold the Power button  for approximately 8 seconds until the terminal starts to reboot.
2.When the Honeywell splash screen appears, press and hold the Power button  and Volume Down
  buttons until the Recovery screen appears.
3.Verify “Recovery Mode” appears at the top of the screen.
If “Recovery Mode” does not appear, press the Volume button to move through the options until “Recovery Mode” appears.
4.Press the Power button  to enter the advanced options screen.
5.Use the Volume Down  button to highlight Wipe data/factory reset.
6.Press the Power button  .
.
7.After the reset is complete, press the Power button  to reboot.
1 - 13
Connecting the Terminal to a Computer via a USB Connection
You can transfer files (e.g., pictures, music, and videos) between your computer and the terminal using the supplied USB Charge/Communication cable or a Dolphin 70e Black HomeBase with a standard USB cable.
Note: The terminal supports Hi-Speed USB communication (USB 2.0) with a maximum data transfer rate of 480 Mbps.
1. Connect the terminal to your computer using the USB Charge/Communication cable supplied.
|
1 |
USB Door |
Micro USB Port |
Right Side Panel |
3 |
of the Terminal |
|
 USB Port
2
USB Charge/Communication Cable 
2.By default, the Dolphin 75e is in USB charging only mode. To enable file transfers, swipe down from the top of the Home screen to access the Notifications panel.
3.Touch the USB notification, and then select either File transfers (MTP) or Photo transfer (PTP).
4.Depending on the Windows operating system on your computer, either select File Explorer or Windows Explorer.
5.Under Computer, click on D75E.
6.You can now copy, delete and/or move files or folders between the computer and the terminal or the microSD card installed in the terminal (optional) as you would with any other storage drive (e.g., cut and paste or drag and drop).
Note: When you connect as a Camera (PTP), only the DCIM and Pictures folders from the Internal Storage are available.
The Dolphin 75e should only be connected via its microUSB connector to CTIA certified adapters, products that bear the USBIF logo or products that have completed, the USB-IF compliance program.
Using the File Browser Power Tool on the Terminal
File Browser provides a graphical utility to browse the files stored on the terminal and the optional microSD card.
1. Touch All Apps |
> Power Tools |
> File Browser |
. |
2.From the File Browser screen you can:
•Touch a folder name or file name to open the folder or file.
• Select the three dots |
next to a file or folder to view details about the file or folder. |
•Touch the Menu in the upper left corner of the screen and select a folder shortcut (i.e., Root, Storage, DCIM, Download, Music, Pictures, autoinstall).
•Touch  to add a folder.
• Select the three dots |
in the upper right corner of the screen to Go Up one level, change the Sort by settings or |
Exit the browser. |
|
Note: Due to system permissions, some files cannot be opened. Depending on the associated application(s), a choice of applications may be available to open the file.
1 - 14

Enabling or Disabling File Auto Install
AutoInstall is enabled by default. When AutoInstall is enabled, during the power up boot or reboot process, the following folders are searched for zip files containing applications.
•\Internal storage\honeywell\autoinstall on the terminal
•\IPSM card\honeywell\autotinstall on the terminal
•\honeywell\autoinstall on a microSD card if installed in the terminal
Each zip file found is then compared to the applications already installed on the Dolphin terminal and:
•If the application is not installed, AutoInstall installs the application.
•If the application is already installed, AutoInstall checks to see if the zip file contains a newer version of the application, and then installs the newer version.
•If the application is already installed and there is not a newer version, AutoInstall ignores the installation file.
When AutoInstall is not enabled, the contents of the honeywell\autoinstall folders on the terminal and on the SD card (optional) are ignored.
To disable AutoInstall:
1.Touch All Apps  > AutoInstall Settings
  .
.
2.Remove the check from the Enable AutoInstall box to disable the option.
Installing Upgrades
Upgrades for the Power Tools and other system software on the Dolphin terminal come in the form of zip files and are available from Customer Support or www.honeywellaidc.com.
Important: The terminal must have power for the length of the entire upgrade process or it could become unstable. Do not attempt to remove the battery during the process.
To install a software upgrade:
1.Copy the upgrade file (*.zip) into one of the following folders:
•Internal storage\honeywell\autoinstall on the terminal
Software updates saved to this folder, do not persist when a Factory Reset (Clean Boot) is performed.
•IPSM card\honeywell\autoinstall on the terminal
Software updates saved to this folder, persist when a Factory Reset (Clean Boot) is performed.
•\honeywell\autoinstall on an SD card (if installed)
Software updates saved to this folder, do not persist when a Factory Reset (Clean Boot) is performed.
2.Touch All Apps  > AutoInstall Settings
  . Verify Autoinstall is enabled.
3.Select Packages update from the AutoInstall Settings  screen. The terminal automatically initiates a reboot and installs the software upgrade.
You can also initiate a software upgrade using the terminal buttons instead of the package update option.
1.Press and hold the Power button  until the options menu appears.
2.Select Reboot.
3.When the Honeywell splash screen appears, simultaneously press and hold the Power button  and
and
Volume Down  buttons until the Recovery screen appears.
4.Verify  appears at the top of the screen. If “Recovery Mode” does not appear, press the Up or Down Volume button to move through the options until “Recovery Mode” appears.
1 - 15

5.Press the Power button  to enter the advanced options screen.
6.Use the Volume buttons to highlight one of the following options:
•Apply update from IPSM
•Apply update from SD card
7.Use the Volume buttons to select (highlight) the upgrade file.
8.Press the Power button  .
.
1 - 16

2
Hardware Overview
Standard Configuration for the Dolphin 75e
WLAN, WPAN, NFC & Camera
•Android 6.0
•Qualcomm® APQ8074AB Processor
•2GB RAM X 16GB Flash
•3.7V Li-ion rechargeable standard or extended battery pack
•Dedicated imager capable of decoding standard 1D and 2D bar code symbologies
•8.0 megapixel auto focus color camera
•802.11a/b/g/n/ac and Bluetooth
•Near Field Communication (NFC) support
Peripherals for the Dolphin 75e
Each of the following items is sold separately to enhance the capabilities of your Dolphin terminal. Dolphin 70e Black peripherals are compatible with Dolphin 75e terminals.
Dolphin 70e Black HomeBase (Model 70e-HB)
The HomeBase is a charging and communication cradle equipped with a USB host port that is Hi-Speed 2.0v compliant, which enables the terminal to interface with the majority of PC-based enterprise systems. This device also contains an auxiliary battery well that charges a spare Honeywell standard or extended battery pack.
For more information, see Dolphin 70e Black HomeBase (Model 70e-HB) on page 8-1.
Dolphin 70e Black eBase (Model 70e-EHB)
The Ethernet Base (eBase) enables a single Dolphin 75e terminal to communicate with a host device over an Ethernet network. In addition, the ebase is equipped with a USB host port that is Hi-Speed 2.0v compliant, which enables the terminal to interface with the majority of PC-based enterprise systems. This device also contains an auxiliary battery well that charges a spare Honeywell standard or extended battery pack.
For more information, see Dolphin 70e Black eBase (Model 70e-EHB) on page 9-1.
Dolphin 70e Black Mobile Base (Model 70e-MB)
The Mobile Base is a charging cradle designed specifically for in-premise and in-transit data collection applications. It features a flexible mounting bracket, an integrated speaker with volume control, and a cigarette lighter adapter to adapt it to your mobile environment.
For more information, see Dolphin 70e Black Mobile Base (Model 70e-MB) on page 10-1.
Dolphin 70e Black ChargeBase (Model 70e-CB)
The ChargeBase is a 4-slot charging cradle that holds, powers, and charges terminals.
For more information, see Dolphin 70e Black ChargeBase (Model 70e-CB) on page 11-1.
Dolphin 70e Black Net Base (Model 70e-NB)
The Net Base enables up to four Dolphin 75e terminals to communicate with a host device over an Ethernet network. In addition, the Net Base provides a second RJ45 Ethernet port for connection to an additional device such as a printer, workstation, eBase, or another Net Base.
For more information, see Dolphin 70e Black Net Base (Model 70e-NB) on page 12-1.
QuadCharger (Model COMMON-QC)
The QuadCharger is a compact 4-slot battery charging station designed for use with Dolphin 75e 3.7V Li-ion rechargeable batteries. For additional information on the common QuadCharger, visit the Dolphin 75e product page at www.honeywellaidc.com or contact your local sales representative.
2 - 1

Accessories for the Dolphin 75e
Each of the following items is sold separately to enhance your terminal’s capabilities.
Note: When using accessories where the terminal is worn on the body, the terminal’s touch panel must face away from the body.
Dolphin 70e Black Mobile Charger (Model 70e-MC)
The Mobile Charger is a charging cable that connects the terminal directly to a 12 Volt DC power source, such as a cigarette lighter port inside a vehicle, eliminating the need for a cradle. Intelligent battery technology on-board the terminal ensures proper charging. The Mobile Charger is an ideal low-cost charging solution for in-transit mobile applications.
USB Charge/Communication Cable Adapter Kit (Model 70e-USB ADAPTERKIT)
The Dolphin USB charge/communication cable adapter kit is an all-in-one solution for charging and communication. Use the 70e-USB cable in conjunction with the included power supply adapter and plug adapter to charge the terminal from a power outlet or connect the cable to a high-power USB port to charge from a host device. The 70e-USB cable also supports communication with a computer without the need for a cradle. See Connecting the Terminal to a Computer via a USB Connection on page 1-14.
Holsters (Model HOLSTER-2 and 6000-HOLSTER)
A holster provides convenient storage for the Dolphin 75e terminal in mobile environments. Long and short holster models with integrated belt clips and spare battery pouches are available.
Wrist Lanyard (Model SL-LANYARD-1)
The black wrist lanyard attaches to the bottom corner of the terminal providing additional security from accidental drop during terminal use.
Stylus (Model 75e-Stylus)
The stylus has a special tip for added accuracy and ease when operating the touch panel. The tether is a coiled, elastic cord, which secures the stylus to the terminal to prevent accidental loss. The stylus may be ordered with or without the tether.
Battery Door Kits
Replacement battery door kits are available for both standard and extended battery door types. See Important Battery and Battery Door Replacement Guidelines on page 2-9 before ordering battery door kits for your terminal.
Battery (Models 70e-BTSC and 70e-BTEC)
The 3.7V Li-ion rechargeable battery provides the main power for the terminal. See Battery on page 2-8 for battery specifications, replacement part numbers, and guidelines for use and disposal.
Protective Rubber Boot (Model 70e-BOOT)
Protective Black Rubber Enclosure provides added protection.
2 - 2
 Loading...