


CT50
Table of contents
 Loading...
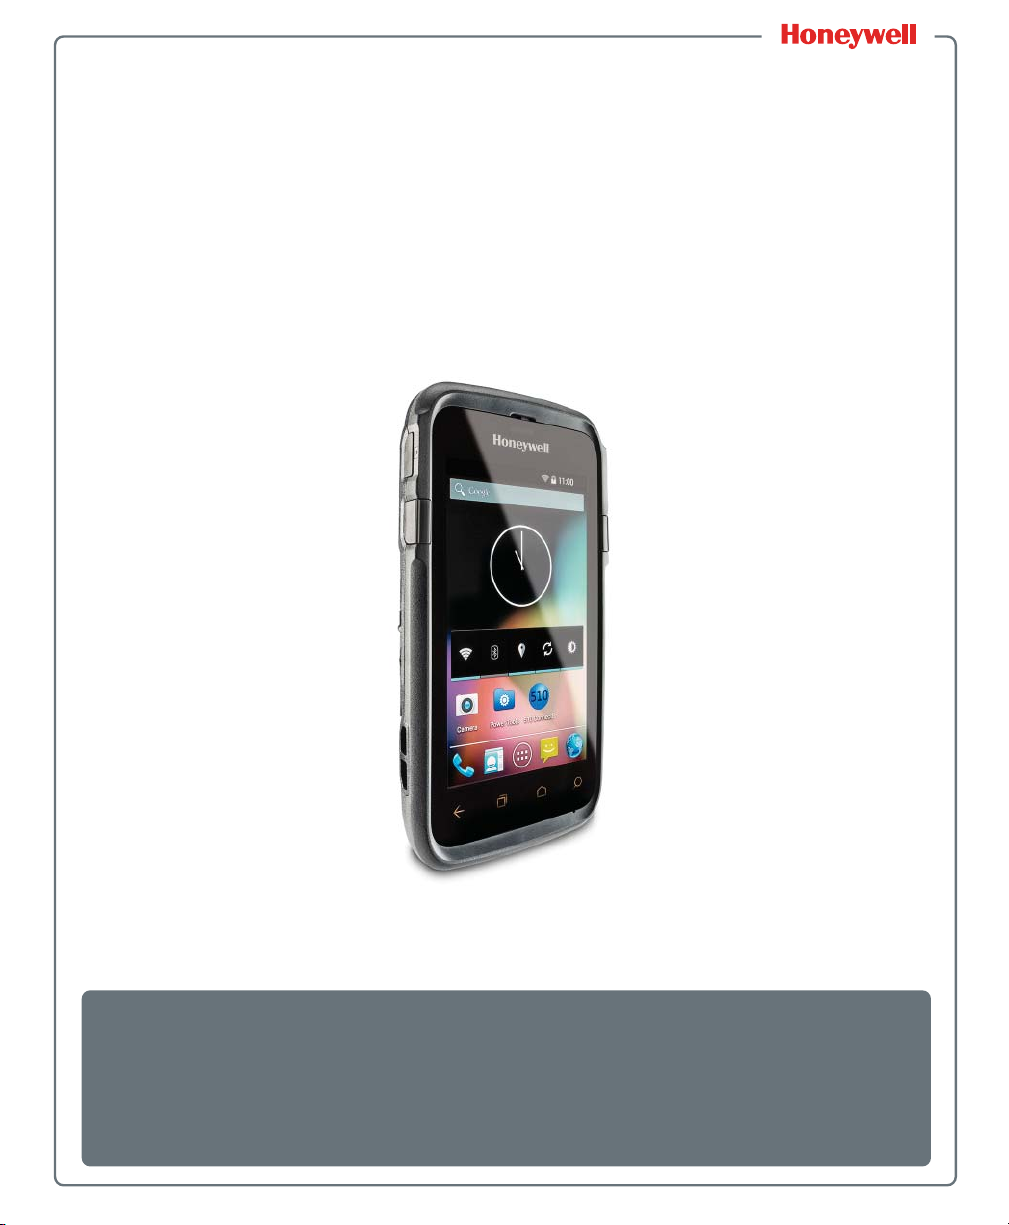
Dolphin CT50 & CT50h
Mobile Computer
with Android™ 4.4 Operating System
User Guide

Disclaimer
Honeywell International Inc. (“HII”) reserves the right to make changes in specifications and
other information contained in this document without prior notice, and the reader should in all
cases consult HII to determine whether any such changes have been made. The information
in this publication does not represent a commitment on the part of HII.
HII shall not be liable for technical or editorial errors or omissions contained herein; nor for
incidental or consequential damages resulting from the furnishing, performance, or use of
this material. HII disclaims all responsibility for the selection and use of software and/or
hardware to achieve intended results.
This document contains proprietary information that is protected by copyright. All rights are
reserved. No part of this document may be photocopied, reproduced, or translated into
another language without the prior written consent of HII.
Trademarks
Android, Google, and other marks are trademarks of Google Inc.
Microsoft, Windows are either registered trademarks or registered trademarks of Microsoft
Corporation in the United States and/or other countries.
The Bluetooth trademarks are owned by Bluetooth SIG, Inc., U.S.A. and licensed to
Honeywell.
Other product names mentioned in this manual may be trademarks or registered trademarks
of their respective companies and are the property of their respective owners.
Patents
For patent information, see www.hsmpats.com.
Copyright © 2015–2016 Honeywell International Inc. All rights reserved.
ii Dolphin CT50 and CT50h Mobile Computer User Guide

Contents
Customer Support. . . . . . . . . . . . . . . . . . . . . . . . . . . . . . . . . . . . . . . . . . . . . . . . . . vii
Product Service and Repair . . . . . . . . . . . . . . . . . . . . . . . . . . . . . vii
Limited Warranty . . . . . . . . . . . . . . . . . . . . . . . . . . . . . . . . . . . . . . vii
Send Feedback . . . . . . . . . . . . . . . . . . . . . . . . . . . . . . . . . . . . . . . vii
About the Computer Features . . . . . . . . . . . . . . . . . . . . . . . . . . . . . . . . 1
1
About the Dolphin CT50 Mobile Computer . . . . . . . . . . . . . . . . . . . . . . . . . . . . . . . . 2
Contents
About the Battery . . . . . . . . . . . . . . . . . . . . . . . . . . . . . . . . . . . . . . . . . . . . . . . . . . . 6
Power On the Computer . . . . . . . . . . . . . . . . . . . . . . . . . . . . . . . . . . . . . . . . . . . . . 14
Unlock the Screen . . . . . . . . . . . . . . . . . . . . . . . . . . . . . . . . . . . . . . . . . . . . . . . . . . 15
About the Good Read LED . . . . . . . . . . . . . . . . . . . . . . . . . . . . . . . . . . . . . . . . . . . 16
Configure the Screen Backlight. . . . . . . . . . . . . . . . . . . . . . . . . . . . . . . . . . . . . . . . 17
About the Audio Features . . . . . . . . . . . . . . . . . . . . . . . . . . . . . . . . . . . . . . . . . . . . 17
Insert a microSD Card. . . . . . . . . . . . . . . . . . . . . . . . . . . . . . . . . . . . . . . . . . . . . . . 21
How to Transfer Files. . . . . . . . . . . . . . . . . . . . . . . . . . . . . . . . . . . . . . . . . . . . . . . . 24
How to Browse Files on the Computer . . . . . . . . . . . . . . . . . . . . . . . . . . . . . . . . . . 24
Charge the Battery . . . . . . . . . . . . . . . . . . . . . . . . . . . . . . . . . . . . . . . . . . . . 6
Change the Battery . . . . . . . . . . . . . . . . . . . . . . . . . . . . . . . . . . . . . . . . . . . 7
About the Battery Status Icon . . . . . . . . . . . . . . . . . . . . . . . . . . . . . . . . . . . 9
Change the Battery Status LED Behavior . . . . . . . . . . . . . . . . . . . . . . . . . 11
Check the Battery Level . . . . . . . . . . . . . . . . . . . . . . . . . . . . . . . . . . . . . . . 12
About Battery Life and Conservation . . . . . . . . . . . . . . . . . . . . . . . . . . . . . 12
Battery Recommendations and Safety Precautions. . . . . . . . . . . . . . . . . . 13
Enable Airplane Mode . . . . . . . . . . . . . . . . . . . . . . . . . . . . . . . . . . . . . . . . 13
Adjust Ringtone and Notification Volume . . . . . . . . . . . . . . . . . . . . . . . . . . 17
Enable Vibrate Mode . . . . . . . . . . . . . . . . . . . . . . . . . . . . . . . . . . . . . . . . . 19
Audio Settings . . . . . . . . . . . . . . . . . . . . . . . . . . . . . . . . . . . . . . . . . . . . . . 20
Accessories for the Computer . . . . . . . . . . . . . . . . . . . . . . . . . . . . . . . . . . . . . . . . . 25
Dolphin CT50 and CT50h Mobile Computer User Guide iii

Contents
About the User Interface and Applications . . . . . . . . . . . . . . . . 27
2
About the User Interface . . . . . . . . . . . . . . . . . . . . . . . . . . . . . . . . . . . . . . . . . . . . . 28
About the Home Screen . . . . . . . . . . . . . . . . . . . . . . . . . . . . . . . . . . . . . . . 28
Navigation and Function Buttons . . . . . . . . . . . . . . . . . . . . . . . . . . . . . . . . 29
About Status Bar Icons. . . . . . . . . . . . . . . . . . . . . . . . . . . . . . . . . . . . . . . . 29
Remap a Button . . . . . . . . . . . . . . . . . . . . . . . . . . . . . . . . . . . . . . . . . . . . . 30
View Notifications . . . . . . . . . . . . . . . . . . . . . . . . . . . . . . . . . . . . . . . . . . . . 31
Manage Notifications . . . . . . . . . . . . . . . . . . . . . . . . . . . . . . . . . . . . . . . . . 31
Customize the Home Screen . . . . . . . . . . . . . . . . . . . . . . . . . . . . . . . . . . . 32
Customize the Favorites Tray . . . . . . . . . . . . . . . . . . . . . . . . . . . . . . . . . . . 32
Use Google™ Search . . . . . . . . . . . . . . . . . . . . . . . . . . . . . . . . . . . . . . . . 32
About Screen Gestures . . . . . . . . . . . . . . . . . . . . . . . . . . . . . . . . . . . . . . . 33
Set the Time Zone . . . . . . . . . . . . . . . . . . . . . . . . . . . . . . . . . . . . . . . . . . . 33
About Honeywell Applications . . . . . . . . . . . . . . . . . . . . . . . . . . . . . . . . . . . . . . . . . 34
Download Honeywell Launcher. . . . . . . . . . . . . . . . . . . . . . . . . . . . . . . . . . . . . . . . 35
Unlock Developer Options. . . . . . . . . . . . . . . . . . . . . . . . . . . . . . . . . . . . . . . . . . . . 36
About the Scanner . . . . . . . . . . . . . . . . . . . . . . . . . . . . . . . . . . . . . . . . . . . . 37
3
About the Scanner . . . . . . . . . . . . . . . . . . . . . . . . . . . . . . . . . . . . . . . . . . . . . . . . . 38
How to Scan Bar Codes as Keyboard Input . . . . . . . . . . . . . . . . . . . . . . . . 38
Change the Scanner Settings . . . . . . . . . . . . . . . . . . . . . . . . . . . . . . . . . . 38
Restore Default Scanner Settings . . . . . . . . . . . . . . . . . . . . . . . . . . . . . . . 38
Scanners Default Settings . . . . . . . . . . . . . . . . . . . . . . . . . . . . . . . . . . . . . 39
Data Processing Settings . . . . . . . . . . . . . . . . . . . . . . . . . . . . . . . 39
Symbology Settings. . . . . . . . . . . . . . . . . . . . . . . . . . . . . . . . . . . . 41
Decode Settings . . . . . . . . . . . . . . . . . . . . . . . . . . . . . . . . . . . . . . 42
Imager Settings . . . . . . . . . . . . . . . . . . . . . . . . . . . . . . . . . . . . . . . 43
Trigger Settings . . . . . . . . . . . . . . . . . . . . . . . . . . . . . . . . . . . . . . . 43
Notification Settings. . . . . . . . . . . . . . . . . . . . . . . . . . . . . . . . . . . . 43
Scan a Bar Code . . . . . . . . . . . . . . . . . . . . . . . . . . . . . . . . . . . . . . . . . . . . . . . . . . . 44
Use the Phone . . . . . . . . . . . . . . . . . . . . . . . . . . . . . . . . . . . . . . . . . . . . . . . . . 45
4
About the Phone . . . . . . . . . . . . . . . . . . . . . . . . . . . . . . . . . . . . . . . . . . . . . . . . . . . 46
iv Dolphin CT50 and CT50h Mobile Computer User Guide
Activate the UMTS Phone . . . . . . . . . . . . . . . . . . . . . . . . . . . . . . . . . . . . . 46
Activate the CDMA Phone . . . . . . . . . . . . . . . . . . . . . . . . . . . . . . . . . . . . . 49
Make a Phone Call . . . . . . . . . . . . . . . . . . . . . . . . . . . . . . . . . . . . . . . . . . . 49
Answer the Phone . . . . . . . . . . . . . . . . . . . . . . . . . . . . . . . . . . . . . . . . . . . 50
Switch Apps During a Phone Call . . . . . . . . . . . . . . . . . . . . . . . . . . . . . . . 50

Check Your Voicemail . . . . . . . . . . . . . . . . . . . . . . . . . . . . . . . . . . . . . . . . . . . . . . . 50
Set Your Voicemail Number . . . . . . . . . . . . . . . . . . . . . . . . . . . . . . . . . . . . 51
Change Voicemail Settings . . . . . . . . . . . . . . . . . . . . . . . . . . . . . . . . . . . . 51
Make an Emergency Phone Call. . . . . . . . . . . . . . . . . . . . . . . . . . . . . . . . . . . . . . . 51
Configure Phone Settings . . . . . . . . . . . . . . . . . . . . . . . . . . . . . . . . . . . . . . . . . . . . 51
Use the Camera. . . . . . . . . . . . . . . . . . . . . . . . . . . . . . . . . . . . . . . . . . . . . . . . 53
5
About the Color Camera . . . . . . . . . . . . . . . . . . . . . . . . . . . . . . . . . . . . . . . . . . . . . 54
Adjust the Camera and Video Settings . . . . . . . . . . . . . . . . . . . . . . . . . . . . . . . . . . 54
How to Zoom . . . . . . . . . . . . . . . . . . . . . . . . . . . . . . . . . . . . . . . . . . . . . . . 54
Change Camera Settings . . . . . . . . . . . . . . . . . . . . . . . . . . . . . . . . . . . . . . 54
Take a Photo . . . . . . . . . . . . . . . . . . . . . . . . . . . . . . . . . . . . . . . . . . . . . . . . . . . . . . 54
Record a Video . . . . . . . . . . . . . . . . . . . . . . . . . . . . . . . . . . . . . . . . . . . . . . . . . . . . 55
Change Video Settings . . . . . . . . . . . . . . . . . . . . . . . . . . . . . . . . . . . . . . . . . . . . . . 55
Configure the Computer. . . . . . . . . . . . . . . . . . . . . . . . . . . . . . . . . . . . . . 57
6
How to Configure the Computer . . . . . . . . . . . . . . . . . . . . . . . . . . . . . . . . . . . . . . . 58
Start the Settings App . . . . . . . . . . . . . . . . . . . . . . . . . . . . . . . . . . . . . . . . 58
About the Structure of the Settings App. . . . . . . . . . . . . . . . . . . . . . . . . . . 58
Contents
About Network Communications . . . . . . . . . . . . . . . . . . . . . . . . . . . . . . . . . . . . . . . 62
Connect to a Wi-Fi Network . . . . . . . . . . . . . . . . . . . . . . . . . . . . . . . . . . . . 62
Configure Proxy Settings for a Wi-Fi Network. . . . . . . . . . . . . . . . 63
Disable Wi-Fi Notifications . . . . . . . . . . . . . . . . . . . . . . . . . . . . . . 64
Connect to an Ethernet Network . . . . . . . . . . . . . . . . . . . . . . . . . . . . . . . . 64
How to Connect to Virtual Private Networks . . . . . . . . . . . . . . . . . . . . . . . 65
About Wireless Security . . . . . . . . . . . . . . . . . . . . . . . . . . . . . . . . . . . . . . . . . . . . . 66
About Certificates. . . . . . . . . . . . . . . . . . . . . . . . . . . . . . . . . . . . . . . . . . . . 66
Dolphin CT50 and CT50h Mobile Computer User Guide v
Add a VPN. . . . . . . . . . . . . . . . . . . . . . . . . . . . . . . . . . . . . . . . . . . 65
Connect to a VPN . . . . . . . . . . . . . . . . . . . . . . . . . . . . . . . . . . . . . 65
Edit VPN Information. . . . . . . . . . . . . . . . . . . . . . . . . . . . . . . . . . . 66
Load a Certificate . . . . . . . . . . . . . . . . . . . . . . . . . . . . . . . . . . . . . 67
Disable or Remove Certificates . . . . . . . . . . . . . . . . . . . . . . . . . . . 67

Contents
About Bluetooth Communications . . . . . . . . . . . . . . . . . . . . . . . . . . . . . . . . . . . . . . 68
Connect a Bluetooth Device . . . . . . . . . . . . . . . . . . . . . . . . . . . . . . . . . . . . 68
Configure Bluetooth Settings . . . . . . . . . . . . . . . . . . . . . . . . . . . . . . . . . . . 70
Making the Computer Discoverable . . . . . . . . . . . . . . . . . . . . . . . . . . . . . . 70
Rename or Disconnect a Paired Device. . . . . . . . . . . . . . . . . . . . . . . . . . . 70
About Serial and USB Communications . . . . . . . . . . . . . . . . . . . . . . . . . . . . . . . . . 71
About Near Field Communication (NFC). . . . . . . . . . . . . . . . . . . . . . . . . . . . . . . . . 71
Manage and Maintain the Computer . . . . . . . . . . . . . . . . . . . . . . . . 73
7
How to Upgrade the System Software . . . . . . . . . . . . . . . . . . . . . . . . . . . . . . . . . . 74
How to Restart the Computer . . . . . . . . . . . . . . . . . . . . . . . . . . . . . . . . . . . . . . . . . 74
Reset the Computer . . . . . . . . . . . . . . . . . . . . . . . . . . . . . . . . . . . . . . . . . . 75
Clean Boot the Computer. . . . . . . . . . . . . . . . . . . . . . . . . . . . . . . . . . . . . . 75
Clean the Computer . . . . . . . . . . . . . . . . . . . . . . . . . . . . . . . . . . . . . . . . . . . . . . . . 76
Specifications. . . . . . . . . . . . . . . . . . . . . . . . . . . . . . . . . . . . . . . . . . . . . . . . . 79
A
Physical and Environmental Specifications . . . . . . . . . . . . . . . . . . . . . . . . . . . . . . . 80
vi Dolphin CT50 and CT50h Mobile Computer User Guide

Customer Support
If you need assistance installing or troubleshooting your product, contact
us by using one of these methods:
Knowledge Base: www.hsmknowledgebase.com
Our Knowledge Base provides thousands of immediate solutions. If the
Knowledge Base does not help you solve your problem, log into the
Technical Support Portal to submit your problem or ask your question.
Technical Support Portal: www.hsmsupportportal.com
Log into the Technical Support Portal to search our Knowledge Base,
submit your problem or question, request a call back, or provide
feedback. When filling out one of the forms, provide as much detail as
possible. You can even include attachments.
Telephone: www.honeywellaidc.com/locations
For our latest contact information, please check our website.
Product Service and Repair
Honeywell International Inc. provides service for all of its products
through service centers throughout the world. To find your service
center, go to www.honeywellaidc.com and select Support > Contact
Support > Service and Repair. Contact your service center to obtain a
Return Material Authorization number (RMA #) before you return the
product.
To obtain warranty or non-warranty service, return your product to
Honeywell (postage paid) with a copy of the dated purchase record.
Customer Support
Limited Warranty
For warranty information, go to www.honeywellaidc.com and click
Resources > Warranty.
Send Feedback
Your feedback is crucial to the continual improvement of our
documentation. To provide feedback about this manual, please contact
the Technical Communications department directly at
ACSHSMTechnicalCommunications@honeywell.com.
Dolphin CT50 and CT50h Mobile Computer User Guide vii

Customer Support
viii Dolphin CT50 and CT50h Mobile Computer User Guide

1
About the Computer Features
This chapter introduces the Dolphin® CT50 and CT50h
Healthcare Mobile Computers with the Android 4.4 operating
system. Use this chapter to learn about the basic computer
features, functions, and accessories.
1

Chapter 1 — About the Computer Features
About the Dolphin CT50 Mobile Computer
The Honeywell Dolphin CT50 Mobile Computer is an enterprise-focused
smartphone that uses the Android operating system to provide reliable
and secure management of corporate data and wireless
communications. The CT50 offers key features such as a large display,
long-lasting battery, bar code imager, and rugged durability. The
healthcare version of the CT50 is called the Dolphin CT50h Healthchare
Mobile Computer. The CT50h has blue buttons and was designed to
withstand the healthcare environment. Throughout this user guide,
”computer” refers to both models CT50 and CT50h unless specifically
stated.
• Android 4.4 operating system
• 2 GB DRAM, 16 GB flash memory
• Large, sunlight-readable display with responsive multi-touch screen
• Glove operation touch screen
• High performance 2D imager with ergonomic scan buttons
• IEEE 802.11a/b/g/n (ac if supported) radio
• Bluetooth 4.0 radio
• NFC technology for short-range wireless data exchange
• Value-added software components supporting specialized imaging
and OCR functions
• Mid-tier rugged specifications with IP54 (CT50h) or IP67 (CT50)
sealing
• Customer-accessible microSD™ slot for removable memory cards
(up to 32 GB)
• Integrated GPS receiver (with WWAN radio option) (not available on
the CT50h)
• 8-megapixel color camera
• Receiver Category 3 in accordance with EN 300 440-1
Caution: The CT50h Healthcare Mobile Computer shall not be used
directly for active patient monitoring purposes or used for
displaying alerts and alarms directly from a patient’s medical
device.
2 Dolphin CT50 and CT50h Mobile Computer User Guide
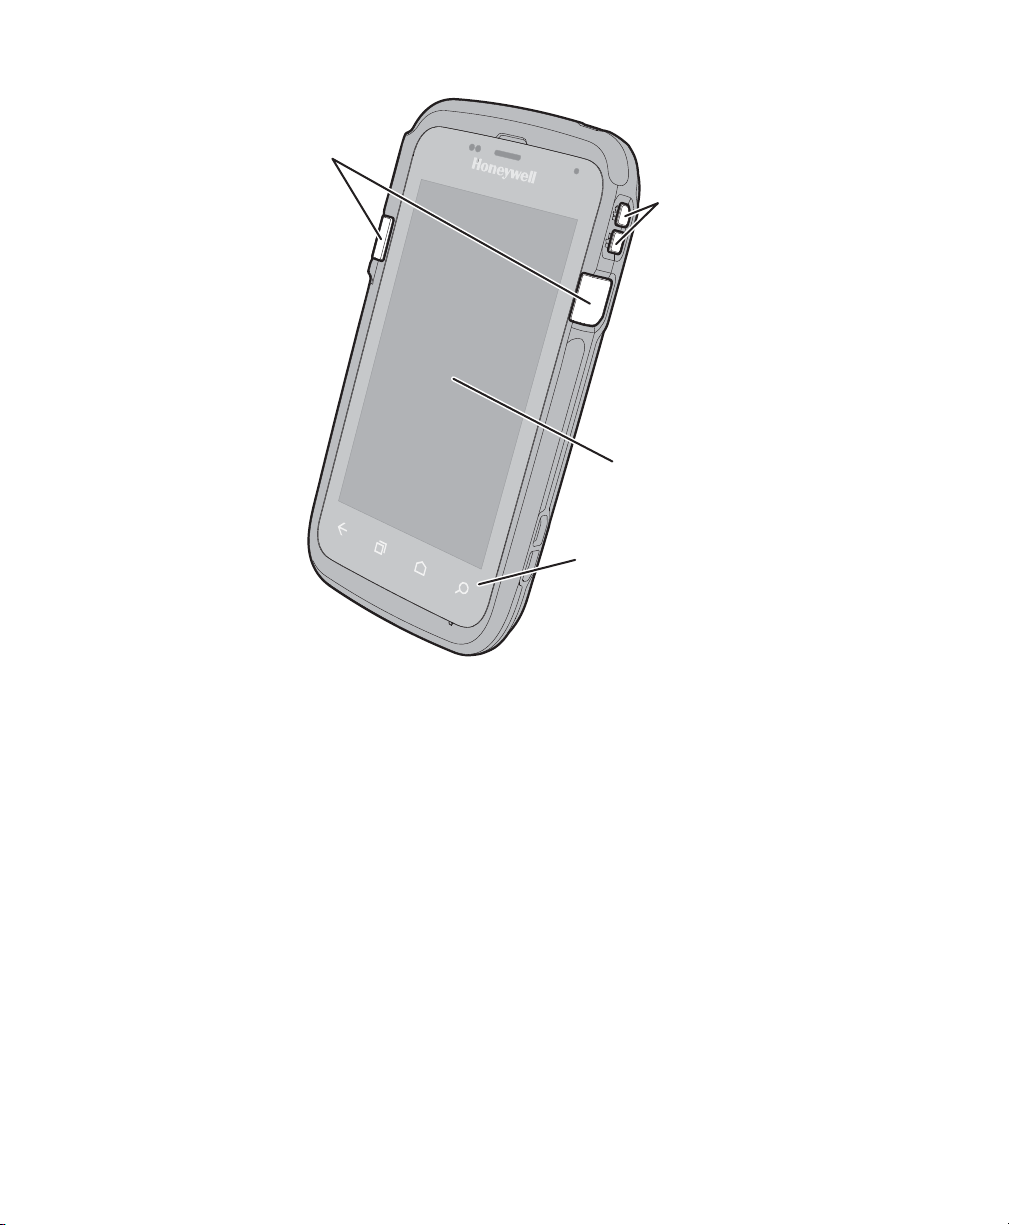
Scan buttons
Chapter 1 — About the Computer Features
Volume buttons
Touch panel
Navigation panel
Front View of the CT50
Dolphin CT50 and CT50h Mobile Computer User Guide 3
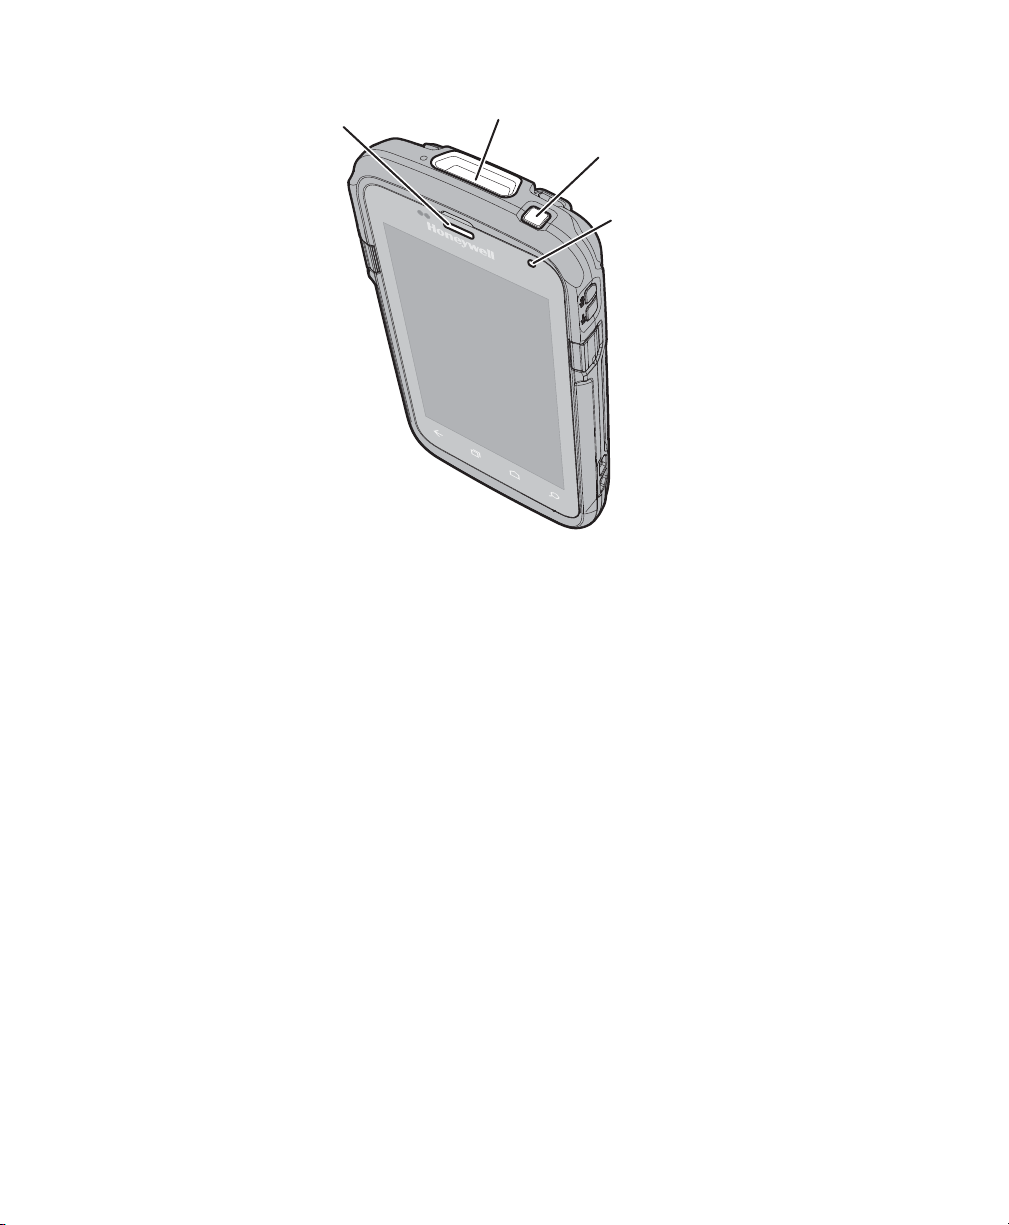
Chapter 1 — About the Computer Features
Good Read LED
Scanner window
Top View of the CT50
Power button
Battery status LED
4 Dolphin CT50 and CT50h Mobile Computer User Guide
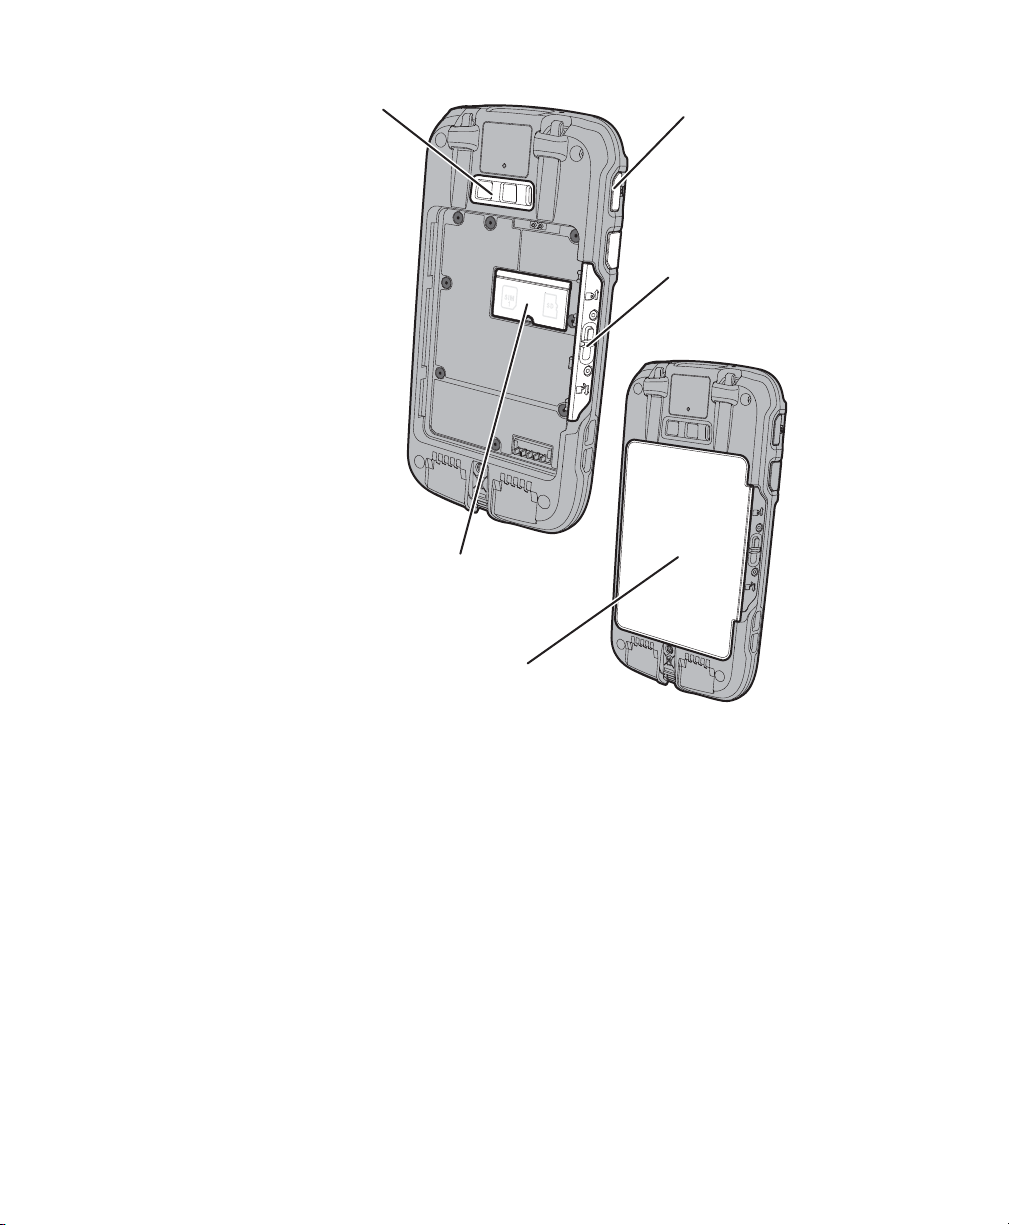
Chapter 1 — About the Computer Features
Camera
button
Camera lens
Battery door
latch
microSIM and microSD door
Battery
Back View of the CT50
Dolphin CT50 and CT50h Mobile Computer User Guide 5

Chapter 1 — About the Computer Features
About the Battery
The computer uses a rechargeable 3.6 V Li-ion battery as its main power
source. The battery has a 14.6 watt hour capacity. Several factors
determine the life of your battery, such as display brightness, display
timeout, input device, extreme temperature, and your usage.
The CT50h battery (P/N 318-055-002) has the same specifications as
the CT50 battery (P/N 318-055-001), but it is made out of specialty
plastic designed for healthcare environments. The batteries are not
interchangeable. Use only the battery designed for your model of
computer.
Honeywell recommends that you keep the battery charged at all times to
prevent data loss. When you change the battery, the computer
automatically goes into a power-off state and then cold boots.
Contact your local sales representative for replacement batteries.
Caution: The battery used in this device may present a fire or
chemical burn hazard if it is mistreated. Do not disassemble it, heat
it above 100 °C (212 °F), or incinerate it. Dispose of used batteries
promptly. Keep away from children.
Caution: We recommend the use of Honeywell Li-ion battery packs.
The use of any non-Honeywell battery may result in damage not
covered by the warranty. A non-Honeywell battery will not be
charged in the device or in a Honeywell charger.
Charge the Battery
Make sure you fully charge the battery (Model CT50-BTSC) before you
use your computer. You can charge the battery before or after you install
it in the computer. It takes about 6 hours for the battery to fully charge in
any of the accessories
• Insert the battery into a Quad Battery Charger or the battery well of
an eHomeBase.
or
• Insert the computer with the battery installed into an eHomeBase,
ChargeBase, NetBase, Quad Battery Charger, USB Adapter, or
Vehicle Power Adapter.
6 Dolphin CT50 and CT50h Mobile Computer User Guide
Change the Battery
If your battery power is low, you need to either charge the battery in the
computer, or replace it with a charged battery.
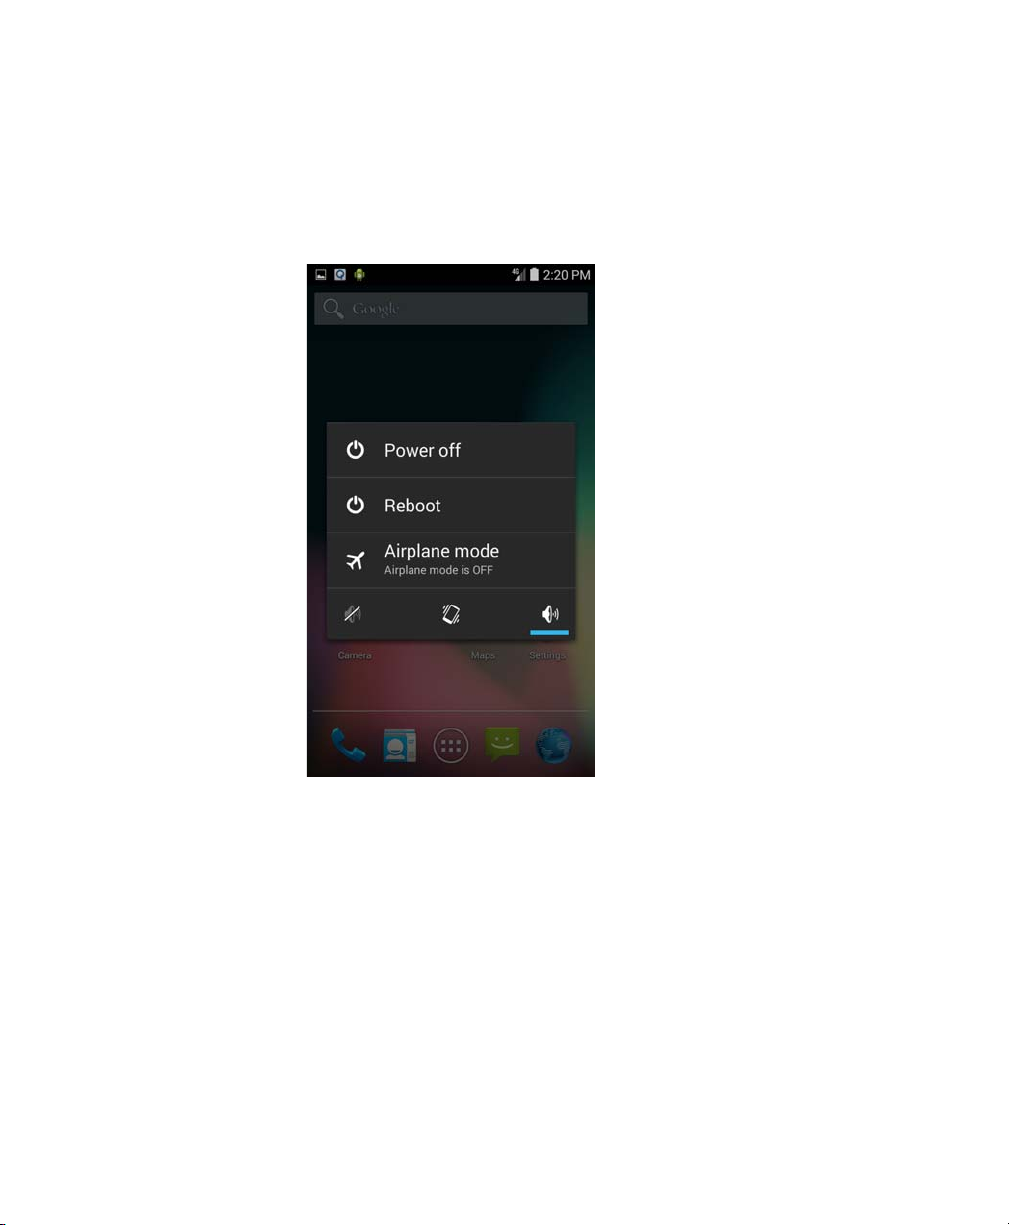
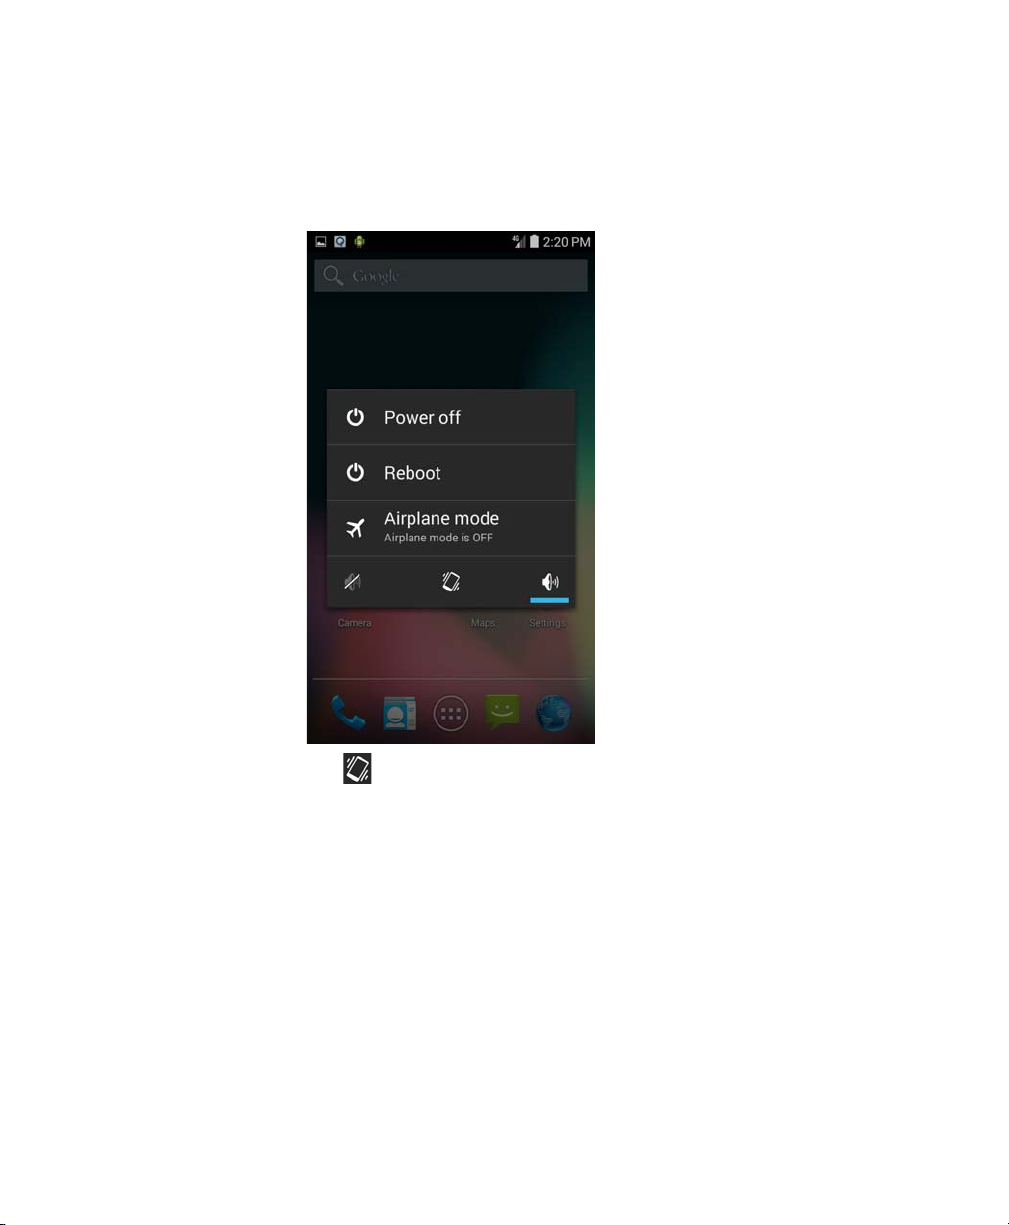
1 Save your files and close any open applications.
2 Press and hold the Power button. This screen appears:
Chapter 1 — About the Computer Features
3 Ta p Power off.
4 When prompted that the computer will shut down, tap OK.
Dolphin CT50 and CT50h Mobile Computer User Guide 7
Chapter 1 — About the Computer Features
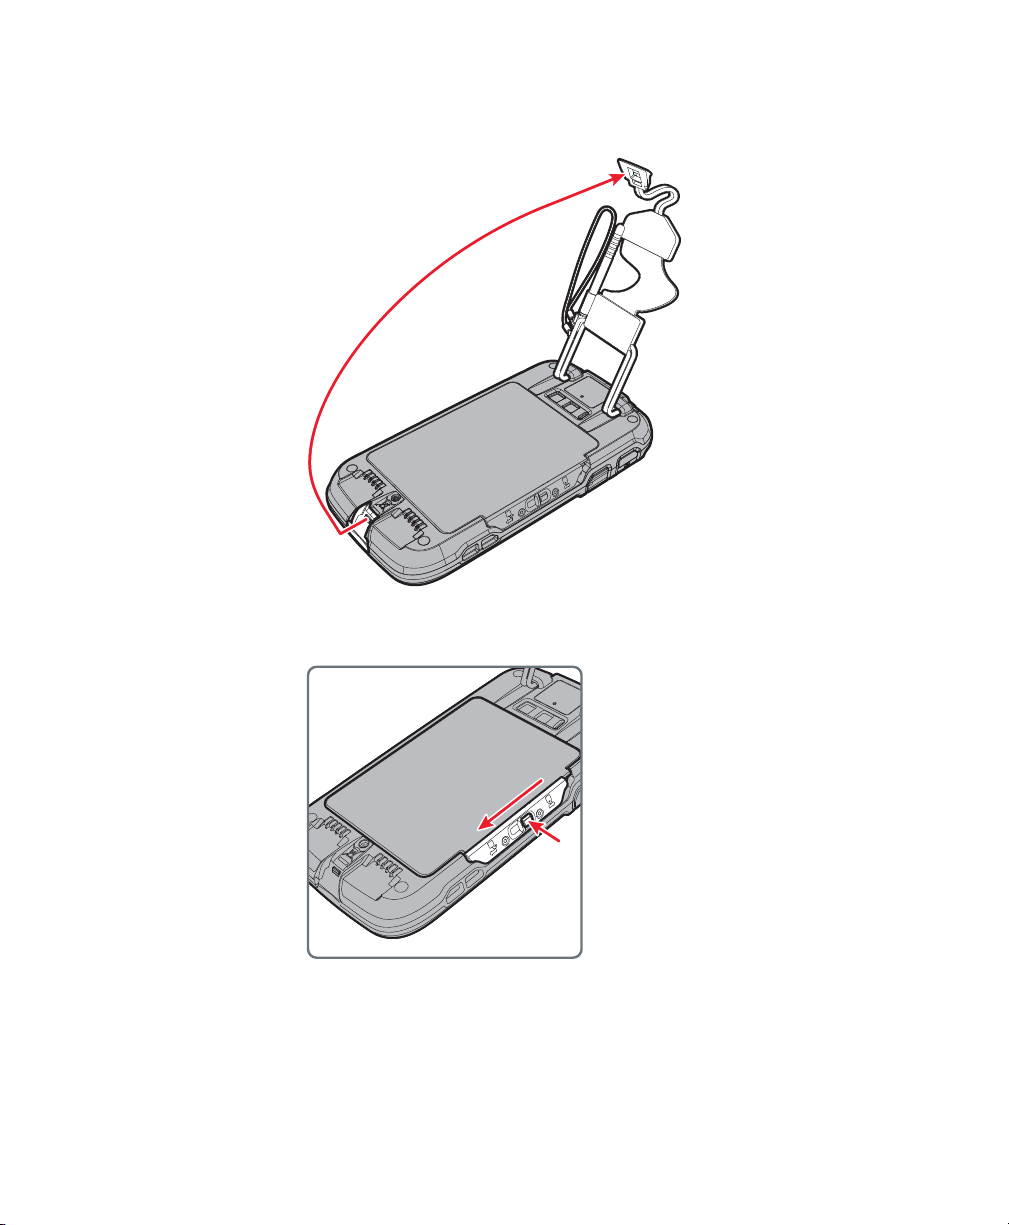
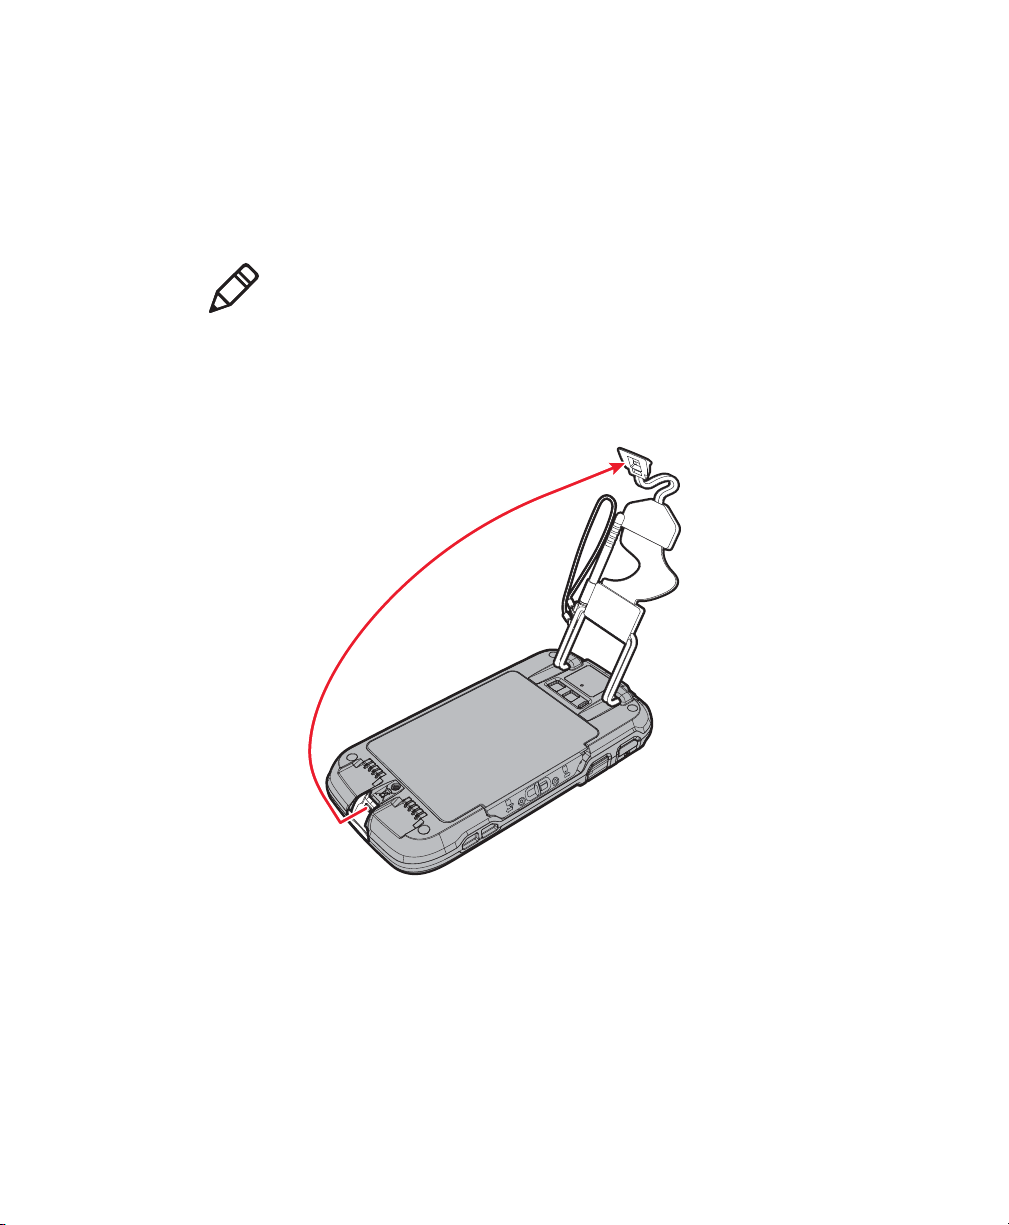
5 Disconnect the handstrap from the bottom of the computer. If you
have a CT50h, you do not have a handstrap.
6 Press and slide the battery door toward the bottom of the computer
to unlock the door.
8 Dolphin CT50 and CT50h Mobile Computer User Guide
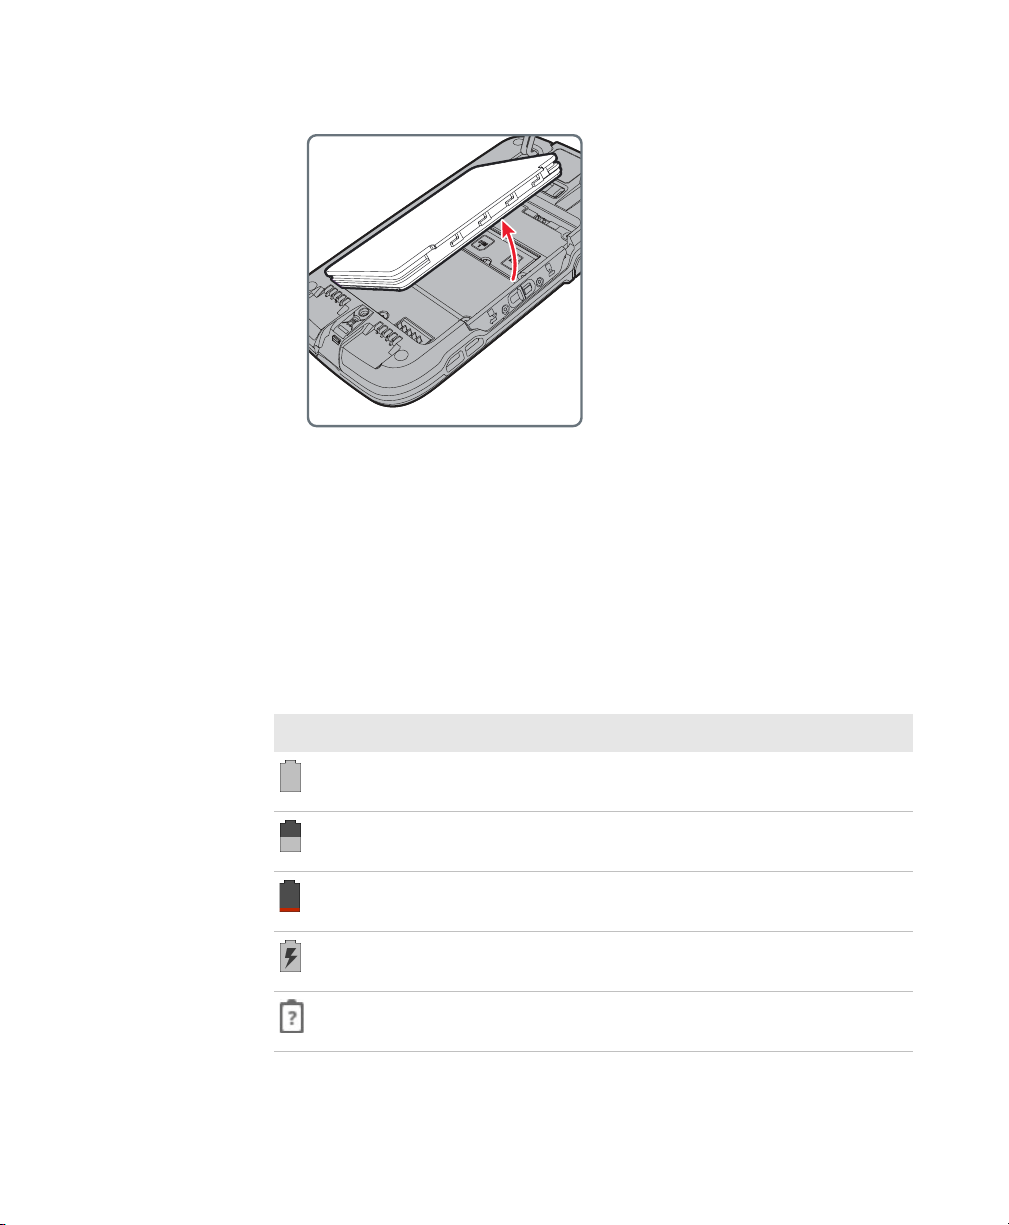
7 Lift up on the edge of the battery and remove it from the computer.
8 Insert the charged battery into the computer.
9 Press in on the battery door and slide it into the locked position.
About the Battery Status Icon
Use the battery icon in the Status bar to see the power status of your
battery. The table below only includes some of the icons. If you want
more detailed information on your battery, such as usage time or charge
remaining on the battery, go to Settings > Battery.
Chapter 1 — About the Computer Features
Battery Status Icons
Icon Status
The battery charge is at 100%.
The battery charge is at 50%.
The battery is critically low. You need to replace the
battery now.
The computer is connected to external power and the
battery is charging.
There is a battery error. Install another battery. If the
problem persists, call Honeywell Technical Support.
Dolphin CT50 and CT50h Mobile Computer User Guide 9
Chapter 1 — About the Computer Features
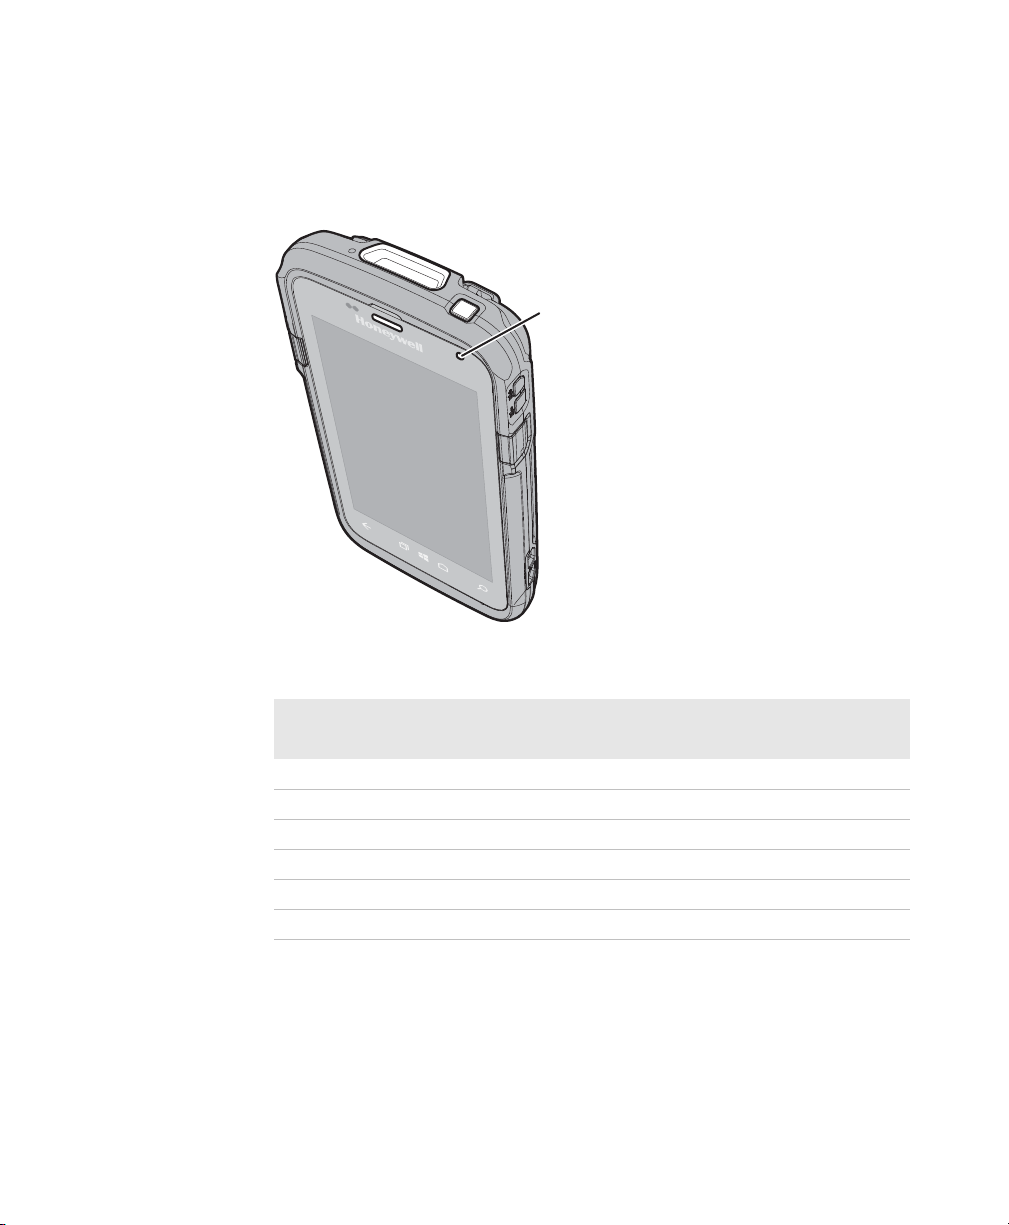
The Battery status LED in the upper right corner of the computer
indicates the charging status of the battery. You can also use the Battery
status LED as a notification LED. For more information on how to use the
LED as a notification LED, see http://developer.android.com/guide/
topics/ui/notifiers/notifications.html.
Battery status LED
Out-of-Box Battery Status LED Descriptions
Connected to
Power
LED State Description
No Blinking amber Battery level is below 20%
No Off Battery level is more than 20%
Yes Steady amber Battery level is between 0% and 60%
Yes Blinking green Battery level is between 60% and 95%
Yes Steady green Battery level is above 95%
Either Blinking red Battery error
10 Dolphin CT50 and CT50h Mobile Computer User Guide

Chapter 1 — About the Computer Features
Change the Battery Status LED Behavior
You can change the behavior of the Battery status LED if the default
behavior for a charging battery (blinking green) is not acceptable to your
environment.
In addition to the out-of-box Battery status LED behavior, you can
choose:
• Default Battery LED
• No Battery LED
Use the Default Battery LED setting if you want the status LED to turn on
steady amber and then steady green when charging. Select the No
battery LED setting if you want to use the LED as a notification LED for
applications or device management solutions.
Default Battery LED Descriptions
Connected to
Power
No Blinking red Battery level is below 15%
No Off Battery level is 15% or more
Yes Steady red Battery level is below 15%
Yes Steady amber Battery level is between 15% and 90%
Yes Steady green Battery level is 90% or more
LED State Description
1 Ta p All Apps > Settings > Battery LED.
2 Select one of these options:
• Default Battery LED
• HSM Battery LED (Out-of-Box setting)
• No Battery LED
Dolphin CT50 and CT50h Mobile Computer User Guide 11

Chapter 1 — About the Computer Features
Check the Battery Level
In addition to the Battery status icons and the Battery status LED, you
can get the battery status from the Settings app.
1 Ta p All Apps > Settings.
2 Ta p Battery. The current percentage of battery power remaining and
the amount of usage time left on the battery appear on the screen. A
list shows the battery usage for individual apps and services.
For usage details, tap one of the apps or services in the list.
About Battery Life and Conservation
If you store the batteries outside of the computer for long periods of time,
they slowly discharge. Honeywell recommends storing the battery in a
charger to maintain battery performance.
Battery Conservation Tips
When You Want to: Do this to Save Battery Power:
Use the computer and
the low battery status
icon appears or the
battery light turns on.
Stop using the
computer for 5 minutes
or more.
Store the computer for
more than a day.
Store the battery
outside of the
computer.
Press and hold the Power button and then
select Power off from the menu. After the
computer turns off, remove the battery and
insert a fully charged battery.
Make sure that the low battery status icon is not
on the screen and that the battery status LED
is not on. Press the Power button to suspend
the computer.
• If you are storing the computer for a few
days (such as over the weekend), install a
charged battery or connect the computer to
a power source.
• If you are storing the computer for a longer
period of time, remove and charge the
battery. When the battery is done charging,
store both the battery and the computer is a
cool location.
• If you store the battery for several months,
recharge the battery periodically to keep it at
peak performance.
Store the batteries in a charger.
12 Dolphin CT50 and CT50h Mobile Computer User Guide

Chapter 1 — About the Computer Features
Battery Recommendations and Safety Precautions
• Charge the battery before use. Battery ships with a partial charge
only.
• See “Charge the Battery” on page 6 for approved charging
methods. Use of this battery in other devices could result in damage
to the device or battery.
• Avoid dropping the battery or computer. If you suspect that the
battery or computer is damaged, send it to Honeywell service center
for inspection.
• Replace this battery only with another model CT50-BTSC battery.
These batteries have been tested in accordance with applicable
safety standards. Contact your Honeywell sales representative or
distributor if this battery is no longer available.
• Discarded batteries may create a safety hazard. Before disposal,
cover the battery contacts with electrical insulating tape.
• Do not modify the battery or attempt to insert foreign objects into it.
• Do not solder directly to the battery contacts.
• Do not short circuit the battery, and keep it away from metallic items.
• Do not drop the battery or apply mechanical shocks or pressure to it.
• Do not disassemble or open, crush, bend or deform, puncture, shred
or burn the battery.
• Do not immerse the battery in water or get the battery wet.
Enable Airplane Mode
If you do not need to connect to any wireless networks, you can enable
Airplane mode to turn off all the radios and save battery power.
1 Tap the Settings app.
2 In the Wireless & Networks section, tap More.
3 Select the Airplane mode check box to enable it.
Dolphin CT50 and CT50h Mobile Computer User Guide 13

Chapter 1 — About the Computer Features
Power On the Computer
The first time you power on the computer, a Welcome screen appears.
Follow the prompts on the Welcome screen as the setup wizard helps
you:
• set the default language.
• set up the Wi-Fi network connections.
• set the time, date, and time zone.
• personalize (name) the computer.
After you have fully charged and installed a battery, power on the
computer for the first time:
• Press and release the Power button.
Note: Once you complete the Setup Wizard, the Welcome screen no
longer appears when you power on the computer. You will now see the
Lock screen each time you power it on.
14 Dolphin CT50 and CT50h Mobile Computer User Guide

Unlock the Screen
Every time you power on the computer, you will need to unlock it.
• Drag the lock toward any edge of the screen to unlock it.
Chapter 1 — About the Computer Features
After you start using the computer, you should set a password to protect
the computer. Tap All Apps > Settings > Security.
Dolphin CT50 and CT50h Mobile Computer User Guide 15

Chapter 1 — About the Computer Features
Good Read LED
About the Good Read LED
The Good Read LED indicates the status of the scanner. For more
information on how to scan bar codes, see “Scan a Bar Code” on
page 44.
16 Dolphin CT50 and CT50h Mobile Computer User Guide
I
Good Read LED Descriptions
LED Color Description
Green Good read of a bar code.
Blinking green The data collection engine is processing or starting
up.

Chapter 1 — About the Computer Features
Configure the Screen Backlight
The display has an ambient light sensor that automatically adjusts the
backlight intensity to conserve power and ensure the display is readable.
You can set the backlight intensity level as needed for your environment.
1 Tap the Settings app.
2 Ta p Display > Brightness.
3 Tap AUTO to use the ambient light sensor to automatically adjust the
brightness for your work environment.
Or, adjust the slider to set the brightness level.
About the Audio Features
The computer has a speaker, a microphone, and several software tools
for configuring the sound volumes.
Adjust Ringtone and Notification Volume
You can quickly adjust the volume of ringtone and notification sounds by
using the side volume buttons.
Note: This method of adjusting the volume only affects the volume of
ringtone and notification sounds. To change the volume for other sounds,
open the Settings app and tap Sound > Vol ume s.
Dolphin CT50 and CT50h Mobile Computer User Guide 17

Chapter 1 — About the Computer Features
1 Press one of the buttons on the right side of the computer. The
Volume slider appears.
2 Press the buttons or adjust the slider to change the volume.
18 Dolphin CT50 and CT50h Mobile Computer User Guide
Enable Vibrate Mode
You can switch to Vibrate mode and disable the speaker if necessary for
your working environment.
1 Press and hold the Power button. The power options screen appears.
Chapter 1 — About the Computer Features
2 Tap to turn on Vibrate mode.
Dolphin CT50 and CT50h Mobile Computer User Guide 19

Chapter 1 — About the Computer Features
Audio Settings
This section describes the audio and sound settings you can configure in
the Settings app. To change audio settings, start the Settings app and
tap Sound.
Audio and Sound Settings
Setting Description
Volumes Use the sliders to set the volume for:
Phone ringtone Select a ringtone.
Vibrate when ringing Select to enable vibrate mode when the
Default notification sound Select a notification sound.
Dial pad touch tones Select to enable audio tones when you use
Touch sounds Select to enable audio sounds when you
Screen lock sound Select to enable an audio tone when the
Vibrate on touch Select to enable vibrate mode when you
• music, video, games, and other media.
• ringtone and notifications. You can also
use the side volume buttons to change
the volume.
• alarms.
phone is ringing.
the phone keypad.
use the touch screen.
screen is locked.
touch the screen.
20 Dolphin CT50 and CT50h Mobile Computer User Guide
Insert a microSD Card
You can use a microSD card to increase file storage capacity or to install
software. Honeywell recommends the use of Single Level Cell (SLC)
industrial grade microSD or microSDHC memory cards with the
computer for maximum performance and durability.
Note: Format the memory card before initial use.
1 Power off the computer.
2 Disconnect the handstrap from the bottom of the computer. If you
have a CT50h, you do not have a handstrap.
Chapter 1 — About the Computer Features
Dolphin CT50 and CT50h Mobile Computer User Guide 21
Loading...