


Henny Penny MCS 6, BCS 6, MCG 6, MCS 10, BCS 10 Installation Manual
...
Installation
Refer to the following pages for important information regarding the installation of MCS/G and BCS Combis. It is recommended that installation be accomplished by a certified and properly trained technician.
Site, leveling
Minimum clearance sides and back: 2 in. (50 mm)
Service clearance, left side: 20 in. (500 mm)
Clearance for door opening:
Model 6 & 10: 201⁄2 in. (521 mm)
Model 1020: 291⁄2 in. (749 mm)
Model 20: 283⁄4 in. (730 mm)
Model 40: 303⁄4 in. (781 mm)
1) Check for any transport damages. Should there be any signs of transport damage immediately inform your dealer/freight forwarder.
2) Check installation site. Check entrance clearance. Minimum entrance space needed without pallet:
|
Model 6 & 10: |
351⁄2 |
in. (902 mm) |
fig. 1 |
Model 1020: |
495⁄8 |
in. (1262 mm) |
Model 20: |
78 |
|
|
|
39 ⁄ in. (1012 mm) |
||
|
Model 40: |
521⁄2 |
in. (1332 mm) |
|
■ Floor at installation site must be level. |
||
|
■ Cold water line should be in place. (page 40) |
||
|
■ 2 in. (50 mm) drain connection installed. |
||
|
■ Max. drain height for floor units: 4 in. (100mm) |
||
|
■ Electrical power supply/protective measures installed and sized correctly. |
||
|
(page 38-39) |
|
|
fig. 2 |
3)Remove all cartons, packing materials, documents etc. from the interior cabinet.
4)Remove grid shelves/mobile rack from cabinet.
5)Take unit off the pallet.
■Moving unit without pallet: Models 6, 10, 1020 (fig. 1)
■Moving unit without pallet: Models 20, 40 (fig. 2)
37
INSTALLATION |
Unit weights: |
|
|
|
|
|
MCS/BCS 6 |
270 lbs. (123 kg) |
MCG 6 |
335 lbs. (152 kg) |
|
|
|
|
|
|
|
continued |
MCS/BCS 10 |
334 lbs. (152kg) |
MCG 10 |
384 lbs. (174 kg) |
|
|
|
|
|
||
MCS/BCS 1020 |
484 lbs. (220 kg) |
MCG 1020 |
584 lbs. (265 kg) |
||
|
|||||
|
|
|
|
|
|
|
MCS/BCS 20 |
686 lbs. (312 kg) |
MCG 20 |
798 lbs. (362 kg |
|
|
|
|
|
|
|
|
MCS/BCS 40 |
972 lbs. (442 kg) |
MCG 40 |
888 lbs. (403 kg) |
|
|
|
|
|
|
Fig. 3
Fig. 4 |
6)Installation models 6, 10, 1020
■Place floor stand at the installation place and level by adjusting legs (fig. 3).
■Minimum clearance required to neighboring equipment or walls (page 36)
■Place the unit on top of the stand. The unit’s legs must be centered on the locating pins of the stand (fig. 4).
■Unit must be level (fig. 5).
7)Installation models 20, 40
■The unit must be secured against shifting on the floor by means of floor fixtures (fig. 6). If floor fixtures are glued to the floor (use polyurethane glue or similar), remove all grease from the floor first.
■Place the unit at its final location and level by adjusting legs (fig. 5).
■Minimum clearance required to neighboring equipment or walls (page 36)
■The area of floor under the unit where Mobile Oven Racks will roll in must be level or door will not seal (fig. 7).
Fig. 5
Fig. 6
Fig. 7 |
Electrical
8)Electrical connection
■Connect the unit only according to the information given on the data plate.
■Observe all regulations of your local Electrical Code.
■The appliance may only be connected by a licensed electrician.
■Each appliance requires an independent fused power supply line.
■Connection via GFI circuit breaker is advisable.
■On-site installation: provide accessible all-pole disconnection device with minimum of 1⁄8 in. (3 mm) contact gap (not required for 120v gas units.)
■Connect appliance to ground.
■Special voltages on request. Circuit diagram is located behind the operator panel.
Connected load for electric units:
Model |
KW |
|
Amps |
|
||
|
|
|
|
|||
208v 3Phase |
240v 3 Phase |
208v 1 Phase |
240v 1 Phase |
|||
|
|
|||||
|
|
|
|
|
|
|
MCS/BCS-6 |
10 |
28 |
24 |
48 |
42 |
|
|
|
|
|
|
|
|
MCS/BCS-10 |
19 |
53 |
45.8 |
|
|
|
|
|
|
|
|
|
|
MCS/BCS-1020 |
31.5 |
87.5 |
75.9 |
|
|
|
|
|
|
|
|
|
|
MCS/BCS-20 |
38 |
105.6 |
91.5 |
|
|
|
|
|
|
|
|
|
|
MCS/BCS-40 |
63 |
175.1 |
151.8 |
|
|
|
|
|
|
|
|
|
|
38
INSTALLATION
fig. 8
L L L N 1 2 3
fig. 9
Cable
Inlet 
(Gas) (Electric)
12
11
10
9
8
7
6
5
4
3
2
1
240 Volt
208 Volt
Common
Electrical requirements of gas units:
Model |
Voltage |
Phase |
Cycle/Hz |
KW |
|
|
|
|
|
MCG-6 |
120 |
1 |
60 |
1 |
|
|
|
|
|
MCG-10 |
120 |
1 |
60 |
1 |
|
|
|
|
|
MCG-1020 |
208/240 |
1 |
60 |
1.5 |
|
|
|
|
|
MCG-20 |
208/240 |
1 |
60 |
1.6 |
|
|
|
|
|
MCG-40 |
208/240 |
1 |
60 |
3.5 |
|
|
|
|
|
Choose conductor size according above tables and your local regulations.
IMPORTANT
Gas units are voltage specific. Supply voltage must match voltage rated on data plate.
■Gas units are supplied with grounded power cord and plug.
■Electric units are NOT supplied with power cord.
To connect power supply for electric units, models 6, 10:
■Open the operator panel. (fig. 8)
■Insert power cord through cable inlet under left side of unit to desired length and secure the cable connection tight. (fig. 9)
■The circuit diagram is located behind the control panel.
To connect power supply for electric units, models 1020, 20, 40:
■Access power connection terminals by removing left side panel.
■Insert power supply cable through cable inlet under left side of unit to desired length and secure the cable connection tight. (fig. 9)
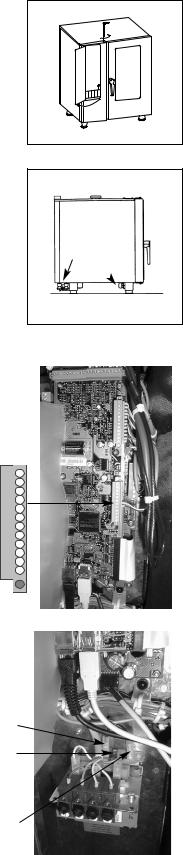
■Connect supply wires as follows:
Gray terminals: |
L1, L2, L3, phase sequence |
|
does not need to be observed |
Blue terminal: |
Neutral (if applicable) |
Yellow/Green terminal: |
Ground |
IMPORTANT/MCS Only
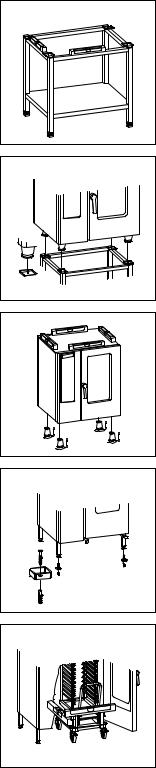
Henny Penny Combi Ovens are shipped set up for 240 volts, but can be changed to operate on 208 volt by proceeding with the following steps:
1.Disconnect unit from power supply source.
2.Open service door (fig. 8) by loosening fastener at top of the unit over the control panel using a 5 mm Allen wrench. A rubber grommet must first be removed to access the bolt.
3.Remove jumper between pins 8 and 9 of connector shown at left. The jumper is removed for 208 volt supply, it stays in place between pins 8 and 9 for 240 volt.
4.Move transformer primary lead from the 240 volt terminal to the 208 volt terminal.
5.Secure all panels and covers.
|
NOTE: BCS electric units are voltage specific. Only MCS electric units |
39 |
are convertible. |
 Loading...