


Specifications
Overall Dimensions |
22.82"H x 14.17"W x 13"D |
|
Inside Dimensions |
18.25"H x 12.75"W x 11.25"D |
|
Capacity |
1.5 cubic foot |
|
|
9 ga. steel plate housing |
|
Construction |
6 ga. steel plate door frame |
|
|
5 ga. steel door |
|
|
0 - 9, A & B key code set |
|
Keypad Features |
Green LED code “OPEN” |
|
Red LED code “Battery Change” |
||
|
||
|
Yellow LED code “Change Accepted” |
|
Emergency Keys |
2 emergency override keys |
|
Interior |
Padded floor |
|
Adjustable shelf |
||
|
||
Placement, |
4 Removable wheels; |
|
Mounting |
Can be wall mounted |
|
Finish |
Dark gray powder coat |
|
Weight |
76.5 lbs. |
|
Batteries |
4 ”C” |
IMPORTANT SAFETY INFORMATION
Installation Precautions
1. |
Verify that installation surface has no hidden |
6. |
Keep bystanders out of the area during installation. |
|
|
utility lines before drilling or driving screws. |
7. |
Do not install when tired or when under the |
|
|
|
|||
2. |
Wear ANSI-approved safety |
|
influence of alcohol, drugs or medication. |
|
|
goggles during installation. |
8. |
At least two people are needed to move this product. |
|
3. |
Mount securely before use. |
|||
9. |
Place the Safe on correct surface. |
|||
|
|
|||
4. |
Install only according to these instructions. |
|
Only use this Safe on a stable, level, clean and dry |
|
|
Improper installation can create hazards. |
|
surface that is capable of sustaining the load. |
|
5. |
Keep installation area clean and well lit. |
|
|
Use Precautions
1.Keep closed and locked whenever unattended. RISK OF CHILD ENTRAPMENT AND SUFFOCATION.
Check inside before closing.
Do not allow children to play with or near safe. Keep keys and codes away from children.
2.Keep clear of door when closing.
3.Position batteries in proper polarity and do not install batteries of different types, charge levels, or capacities together.
4.Use as intended only.
5.Inspect before every use; do not use if parts are loose or damaged.
6.Maintain product labels and nameplates. These carry important safety information. If unreadable or missing, contact
Harbor Freight Tools for a replacement.
7.Do not store Keys inside of the Safe.
Place the emergency keys in a location outside of the safe making sure they are in a secure location that you can find.
Page 2 |
For technical questions, please call 1-800-444-3353. |
Item 91006 |
8.Warning: The brass components of this product contain lead, a chemical known to the State of California to cause birth defects (or other reproductive harm).
(California Health & Safety code § 25249.5, et seq.)
Installation Instructions
9.The warnings, cautions, and instructions discussed in this instruction manual cannot cover all possible conditions and situations that may occur. It must be understood by the operator that common sense and caution are factors which cannot be built into this product, but must be supplied by the operator.
10.The Safe is not fireproof.
NOTE: Harbor Freight Tools is not responsible for the loss of any property stored within this safe due to theft, fire, or any other circumstance.
Read the ENTIRE IMPORTANT SAFETY INFORMATION section at the beginning of this document including all text under subheadings therein before set up or use of this product.
This safe may be used as a roll-about with the included casters, or may be bolted to the wall for more permanent installation.
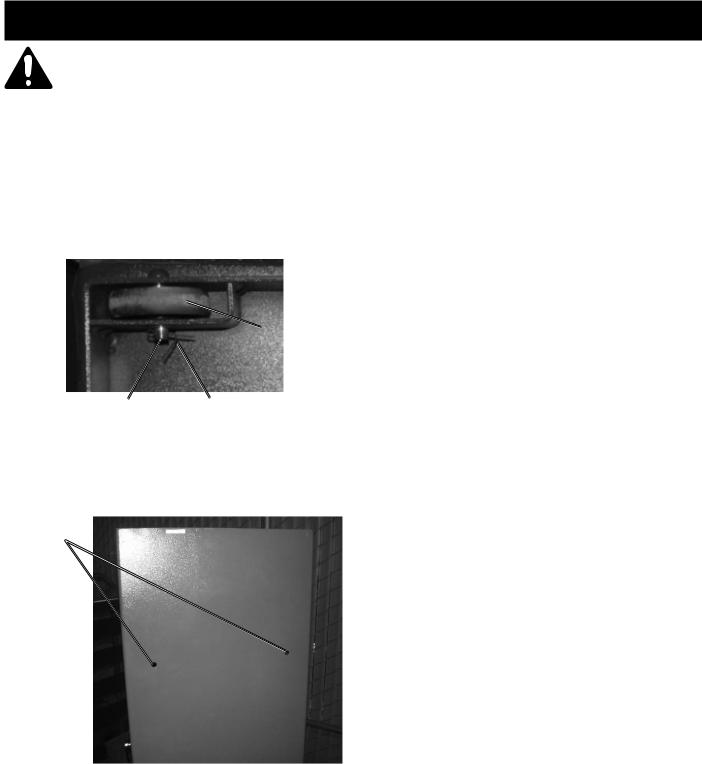
Wheel Assembly:
1.Place the Safe on its side for easy access to the bottom of the Safe.
2.Assemble each wheel using the included wheel axles.
3.Secure each wheel in place using Cotter Pin.
Wheel
Wheel |
Cotter |
Axle |
Pin |
4.The Safe may be bolted to a wall or
a floor to deter theft and prevent tipping. There are mounting holes in the back wall and bottom of the safe. See Figure A below.
Mounting
Holes
5.Use Anchor Bolts, or seek a bonded professional for installation of the Safe into cement.
Note: For floor or wall mounting, use bolts of a suitable size (not included) to bolt into wall studs or floor joists.
6.Using the back of or bottom of the Safe as a template, mark the location of the mounting holes on the concrete surface using a pencil or other marker.
7.Move the Safe aside, and drill four suitable pilot holes in the mounting surface. Make certain that the drilling path is clear and free of obstacles such as wires, cables and electrical lines. Drill holes should be the diameter of the Anchor Bolt sleeves.
8.Insert the Anchor Bolts into each drilled hole and tap Bolts into concrete. Remove washer and nut from each bolt. The Safe now has to be lifted into position to fit over the four anchor bolts. Because of the heavy weight of the Safe, this task should only be done by several capable workmen. With the Safe in position, add washers and nuts to Anchor Bolts. By tightening the nuts in place, the sleeve around each bolt will expand, and secure each bolt into the concrete to secure the Safe in place.
Figure A: Rear Mounting Hole Locations
Item 91006 |
For technical questions, please call 1-800-444-3353. |
Page 3 |
 Loading...