


OHV GAS ENGINE - HORIZONTAL
Model 99856 - 13 HP
Model 96154 - 11 HP
Assembly And Operation Instructions
IMPORTANT! Your Warranty is voided if:
You do not put Engine oil in the Engine’s crankcase prior to its first use.
Never run the Engine with low or no oil.
Running the Engine with low or no oil will permanently damage the Engine.
Due to continuing improvements, actual product may differ slightly from the product described herein.
Distributed exclusively by Harbor Freight Tools.
3491 Mission Oaks Blvd., Camarillo, CA 93011
Visit our website at: http://www.harborfreight.com
To prevent serious injury, read and understand all warnings and instructions before use.
Copyright© 2007 by Harbor Freight Tools®. All rights reserved. No portion of this manual or any artwork contained herein may be reproduced in any shape or form without the express written consent of Harbor Freight Tools.
For technical questions or replacement parts, please call 1-800-444-3353.

SPEcIfIcATIONS
|
Model 99856 |
Model 96154 |
|
|
13 HP, 4-Stroke Gasoline Engine |
11 HP, 4-Stroke Gasoline Engine |
|
|
Air Cooled, Horizontal Shaft |
Air Cooled, Horizontal Shaft |
|
|
Electric Start w/Recoil Back-Up |
Electric Start w/Recoil Back-Up |
|
Engine Type |
Powered w/mid-to-high octane |
Powered w/mid-to-high octane |
|
|
unleaded gasoline |
unleaded gasoline |
|
|
Model: 188FD, Family: 6CLGS.38988F |
Model: 182FD, Family: 6CLGS.38988F |
|
|
Battery Type: 12 VDC (not included) |
Battery Type: 12 VDC (not included) |
|
Displacement |
389CC |
337cc |
|
|
|
|
|
Compression Ratio |
8:1 |
8:1 |
|
|
|
|
|
Maximum Power |
13 HP @ 3600 rpm |
11 HP @ 3600 RPM |
|
Output |
|||
|
|
||
Maximum Torque |
17 Ft.-Lb. @ 2500 RPM |
15.5 Ft.-Lb. @ 2500 RPM |
|
Fuel Tank Capacity |
1.7 Gal. |
1.7 Gal. |
|
Engine Oil Capacity |
2.3 Pints |
2.3 Pints |
|
|
1” Diameter x 2-7/8” Long |
1” Diameter x 2-7/8” Long |
|
Shaft Size |
Drilled & Tapped with 3/8”- 4 UNF |
Drilled & Tapped with 3/8”- 4 UNF |
|
|
1/4” Keyway |
1/4” Keyway |
|
Engine Rotation |
Counterclockwise facing the Shaft |
Counterclockwise facing the Shaft |
|
Spark Plug Type |
NGK® BR-6HS / Champion® RL86C |
NGK® BR-6HS / Champion® RL86C |
|
Air Cleaner Type |
Semi-Dry |
Semi-Dry |
|
Engine Approvals* |
2008 U.S. E.P.A. Phase II |
2008 U.S. E.P.A. Phase II |
|
2008 California Emissions Regulations |
|||
|
|
||
Weight |
68.3 Lb. |
68.3 Lb. |
IMPORTANT!
This product requires oil and fuel to be added before starting. Attempting to start the Engine without oil WILL ruin the Engine and void the warranty.
NOTE:
The Engine’s carburetor may need to be adjusted by a qualified mechanic for efficient high-altitude use.
* The emission control system for this Engine is warranted for standards set by the u.S. Environmental Protection Agency for warranty information, refer to the last pages of this manual.
SAVE THIS MANuAL
You will need this manual for the safety warnings and precautions, assembly, operating, inspection, maintenance and cleaning procedures, parts list and assembly diagram. Keep your invoice with this manual. Write the invoice number on the inside of the front cover. Write the product’s serial number in the back of the manual near the assembly diagram, or write month and year of purchase if product has no number. Keep this manual and invoice in a safe and dry place for future reference.
|
|
REV 07g |
SKU 99856-96154 |
for technical questions, please call 1-800-444-3353. |
Page |

GENERAL SAFETY RULES
WARNING!
READ AND UNDERSTAND ALL INSTRUCTIONS Failure to follow all instructions listed below may result in
electric shock, fire, and/or serious injury.
SAVE THESE INSTRUCTIONS
Work Area
1.Keep your work area clean and well lit. Cluttered and dark areas invite accidents.
2.Do not operate the Engine in explosive atmospheres, such as in the presence of flammable liquids, gases, or dust. Gasoline engines create sparks which may ignite the dust or fumes.
3.Keep bystanders, children, and visitors away while operating a power tool. Distractions can cause you to lose control. Protect others in the work area from debris such as chips and sparks. Provide barriers or shields as needed. Children should never be allowed in the work area.
Personal Safety
1.Stay alert. Watch what you are doing, and use common sense when operating a power tool. Do not use a power tool while tired or under the influence of drugs, alcohol, or medication. A moment of inattention while operating the Engine may result in serious personal injury.
2.Dress properly. Do not wear loose clothing or jewelry. Contain long hair. Keep your hair, clothing, and gloves away from moving parts. Loose clothes, jewelry, or long hair can be caught in moving parts.
3.Do not overreach. Keep proper footing and balance at all times. Proper footing and balance enables better control of the Engine in unexpected situations.
4.Use safety equipment. Always wear eye protection. Dust mask, nonskid safety shoes, hard hat, or hearing protection must be used for appropriate conditions. Always wearANSI-approved safety goggles when using or performing maintenance on this Engine.
Tool Use And Care
1.Do not force the Engine. Use the correct Engine for your application. The correct Engine will do the job better and safer at the rate for which it is designed. Do not force the Engine and do not use the Engine for a purpose for which it is not intended.
SKU 99856-96154 |
For technical questions, please call 1-800-444-3353. |
Page |

2.Do not use the Engine if the Engine’s Ignition Switch does not turn it on or off. Any tool that cannot be controlled with the Ignition Switch is dangerous and must be replaced.
3.Disconnect the Spark Plug Wire from the Engine before making any adjustments, changing accessories, or storing the tool. Such preventive safety measures reduce the risk of starting the tool accidentally. Always disconnect the Spark Plug Wire before performing any inspection, maintenance, or cleaning procedures. Maintain tools with care. Keep the Engine clean. Properly maintained engines are less likely to malfunction and are easier to control. Do not use a damaged Engine. Tag damaged engines “Do not use” until repaired.
4.Check for misalignment or binding of moving parts, breakage of parts, and any other condition that may affect the tool’s operation. If damaged, have the Engine serviced before using. Many accidents are caused by poorly maintained equipment.
5.Use only accessories that are recommended by the manufacturer for your model.
Accessories that may be suitable for one tool may become hazardous when used on another tool.
Service
1.Engine service must be performed only by qualified repair personnel. Service or maintenance performed by unqualified personnel could result in a risk of injury.
2.When servicing the Engine, use only identical replacement parts. Follow instructions in the “Inspection, Maintenance, And Cleaning” section of this manual. Use of unauthorized parts or failure to follow maintenance instructions may create a risk of injury and void applicable warranties.
SPECIFIC SAFETY RULES
1.IMPORTANT! Your Warranty is voided if:
YoudonotputengineoilintheEngine’scrankcasepriortoitsfirstuse. Before each use, check the oil level. Never run the Engine with low or no engine oil. Running the Engine with low or no Engine oil will permanently damage the Engine.
2.Maintain labels and nameplates on the Engine. These carry important information.
If unreadable or missing, contact Harbor Freight Tools for a replacement.
3.Maintain a safe working environment. Make sure there is adequate surrounding workspace.
4.Avoid unintentional starting. Make sure you are prepared to begin work before turning on the Engine. Learn and memorize how to shut off the Engine prior to starting it.
SKU 99856-96154 |
For technical questions, please call 1-800-444-3353. |
Page |

5.People with pacemakers should consult their physician(s) before use. Electromagnetic fields in close proximity to a heart pacemaker could cause pacemaker interference or pacemaker failure. Caution is necessary when near the Engine’s magneto or recoil starter.
6.Never leave the Engine unattended when it is running. Turn off the Engine before leaving the work area.
7.Always use the Engine on a flat, level, dry ground surface.
8.Make sure to keep hands and fingers away from all moving parts of the Engine.
9.Prior to installing the Engine onto a power equipment unit, make sure to read and understand all instructions and safety precautions as outlined in the owner’s manual for the power equipment.
TOXIC FUMES, FIRE, AND EXPLOSION PRECAUTIONS
1.This Engine is designed for outdoor use only. Do not operate the Engine in a closed area or in a poorly ventilated area. When running, the Engine produces carbon monoxide, a colorless, odorless, toxic gas that, when inhaled, can cause serious personal injury or death. Whenever possible, use a carbon monoxide detector (not included) to detect excessive carbon monoxide fumes in the work area and in the surrounding area.
2.Gasoline fuel and fumes are flammable, and potentially explosive. Use proper fuel storage and handling procedures. Always have multiple ABC class fire extinguishers nearby.
3.Keep the Engine and surrounding areas clean at all times.
4.When spills of fuel or oil occur, they must be cleaned up immediately. Dispose of fluids and cleaning materials as per any local, state, or federal codes and regulations. Store oil rags in a covered metal container.
5.Never store fuel or other flammable materials near the Engine.
6.Do not smoke, or allow sparks, flames, or other sources of ignition around the
Engine.
7.Keep grounded conductive objects, such as tools, away from exposed, live electrical parts and connections to avoid sparking or arcing. These events could ignite fumes or vapors.
8.Do not refill the Fuel Tank while the Engine is running or hot.
9.Do not operate the Engine with known leaks in the Engine’s fuel system.
10.Use only Engine manufacturer recommended oil and fuel.
SKU 99856-96154 |
For technical questions, please call 1-800-444-3353. |
Page |

MECHANICAL PRECAUTIONS
1.Prior to performing service, maintenance, or cleaning procedures, always make sure the Engine’s Ignition Switch is in its “OFF” position. Allow the Engine to completely cool. Then, remove the Spark Plug Wire from the Spark Plug.
2.Do not alter or adjust any part of the Engine that is assembled and supplied by the manufacturer or distributor.
3.Always follow and complete scheduled Engine maintenance.
CHEMICAL PRECAUTIONS
1.Avoid contact with hot fuel, oil, exhaust fumes, and solid surfaces.
2.Avoid body contact with fuels, oils, and lubricants used in the Engine. If swallowed, seek immediate medical treatment. Do not induce vomiting if fuel is swallowed. For skin contact, immediately wash with soap and water. For eye contact, immediately flush eyes with clean water.
NOISE PRECAUTION
Prolonged exposure to high noise levels is hazardous to hearing. Always wear
ANSI-approved hearing protection when operating or working around the Engine when it is running.
MISC. PRECAUTION
WARNING! The warnings and precautions discussed in this manual cannot cover all possible conditions and situations that may occur. It must be understood by the operator that common sense and caution are factors which cannot be built into this product, but must be supplied by the operator.
UNPACKING
When unpacking, check to make sure all of the parts shown on the Parts List in this manual are included. If any parts are missing or broken, please call Harbor
Freight Tools at the number shown on the cover (and at the bottom of each page) of this manual as soon as possible.
SKU 99856-96154 |
For technical questions, please call 1-800-444-3353. |
Page |
ASSEMBLY INSTRUCTIONS
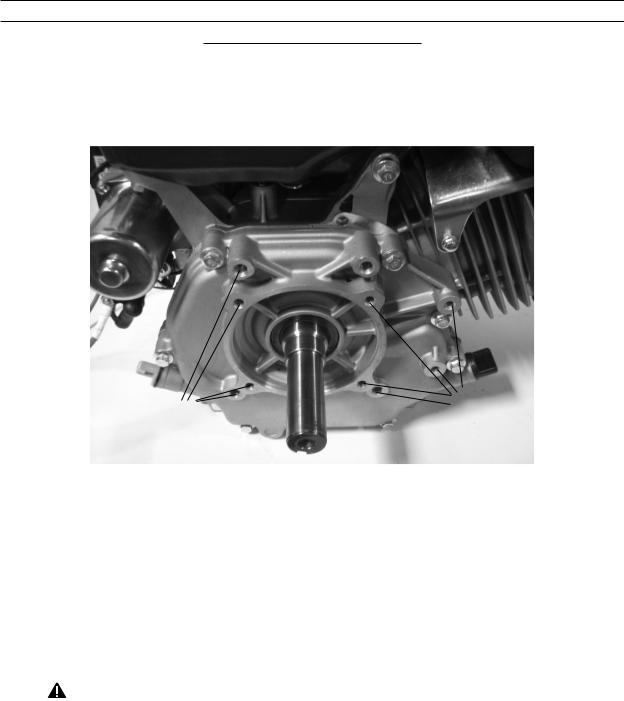
TO MOUNT THE ENGINE
1.IMPORTANT: If you have any doubts about your ability to perform the following assembly procedures, you should have a qualified service technician perform the assembly for you.
Mounting |
Mounting |
|
Holes |
||
Holes |
||
Figure A |
||
|
2.Located near the Crankshaft (16 - page 16) are different-sized mounting holes with which to mount the Engine to your power equipment unit. (See Figure A.)
3.Set the Engine side-by-side to the power equipment unit, and align the mounting holes of the Engine with the mounting holes in the power equipment unit. NOTE:
There are different patterns of mounting holes available. Use the mounting holes that best match the ones on the power equipment unit. (See Figure A.)
4.Use hardened steel Bolts, Washers, Lock Washers, and Nuts (not included) of the appropriate diameter and length to secure the Engine to the power equipment unit.
(See Figure A.)
5.CAUTION! Check to make sure the Bolts, Washers, Lock Washers, and the Nuts used DO NOT come in contact with any moving part of the Engine and power equipment unit.
6.NOTE: Refer to the power equipment unit’s owner manual for instructions on how to properly install a belt drive pulley, chain drive gear, etc. onto the Crankshaft (16 - page 16) of the Engine.
SKU 99856-96154 |
For technical questions, please call 1-800-444-3353. |
Page |
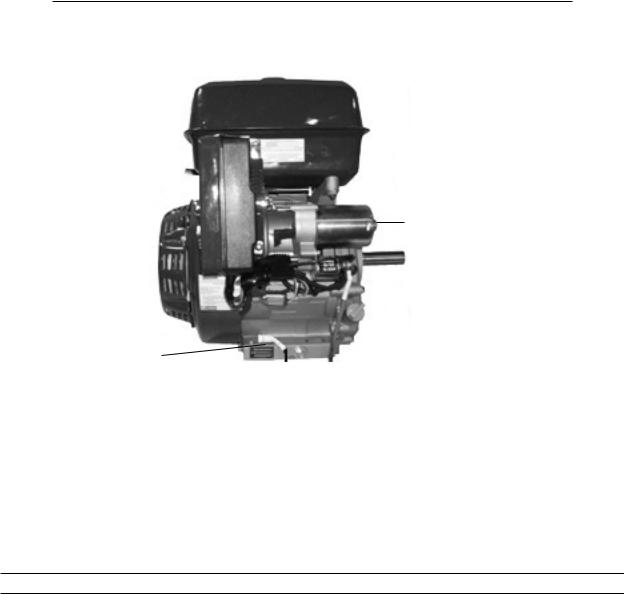
TO PROVIDE BATTERY POWER TO THE STARTER MOTOR
1.The Engine’s Starter Motor (4 - page 26) unit can be powered by a typical 12 VDC battery (not included).
FIGURE B
STARTER MOTOR (4 - PAGE 26)
Black wire |
|
RED STARTER WIRE |
|
||
from this Bolt |
|
TO |
to Negative (-) |
|
POSITIVE (+) |
Battery Post |
|
BATTERY POST |
2.To provide battery power to the Starter Motor (4 - page 26), connect the BLACK (negative -) wire from the negative (-) post on the battery to the Bolt designated on the base of the engine. Then connect the RED (positive +) wire from the Starter
Motor to the positive (+) post on the battery. (See Figure B.)
PRE-OPERATING INSTRUCTIONS
1.Make sure the Engine’s Crankcase is filled with approximately 37 ounces of 10-30W automotive oil. Also, make sure the Engine’s Fuel Tank is filled with approximately 1-1/2 gallon of unleaded gasoline before attempting to start the Engine. Failure to do so WILL damage the Engine and void the Warranty.
2.Before adding oil check to make sure the Drain Plug (2 - page 13) is tight. Unscrew and remove the Dipstick (15 - page 14). Pour the required amount of oil into the Crankcase Cover (4 - page 14). Then screw the Dipstick back into the Crankcase
Cover. (See Figure C, next page.)
3.Unscrew and remove the Fuel Filler Cap (11 - page 19) from the Fuel Tank
(9 - page 19). Pour the required amount of unleaded gasoline (mid to high octane) into the Fuel Tank. Then screw the Fuel Filler Cap back onto the Fuel Tank.
(See Figure C.)
|
|
REV 07k |
SKU 99856-96154 |
For technical questions, please call 1-800-444-3353. |
Page |

FUEL FILLER CAP (11 - PAGE 19)
FUEL TANK (8 - PAGE 19)
FIGURE C
DIPSTICK (15 - PAGE 14)
DRAIN PLUG (2 - PAGE 13)
OPERATING INSTRUCTIONS
1.Make sure the power equipment unit’s transmission (if applicable) is in its “NEUTRAL” or “PARK” position before attempting to start the Engine.
THROTTLE (7 - PAGE 23)
CHOKE
FIGURE D
FUEL LEVER
2.To start the Engine, turn the Fuel Lever to its “OPEN” position. Turn the Choke to its “START” position. Then turn the Throttle to the RIGHT to its “SLOW” position. (See Fig. D.) Note: If the Engine is already hot, keep the Choke in the “RUN” position.
|
|
REV 07g |
SKU 99856-96154 |
For technical questions, please call 1-800-444-3353. |
Page |
 Loading...