


Owner’s Manual & Safety Instructions
Save This Manual Keep this manual for the safety warnings and precautions, assembly, operating, inspection, maintenance and cleaning procedures. Write the product’s serial number in the back of the manual near the assembly diagram (or month and year of purchase if product has no number). Keep this manual and the receipt in a safe and dry place for future reference.
10 Ft. x 20 Ft. Canopy
All-Purpose
Vehicle not included.
Visit our website at: http://www.harborfreight.com Email our technical support at: tech@harborfreight.com
ITEM 69034
When unpacking, make sure that the product is intact and undamaged. If any parts are missing or broken, please call 1-800-444-3353 as soon as possible.
Copyright© 2012 by Harbor Freight Tools®. All rights reserved.
No portion of this manual or any artwork contained herein may be reproduced in any shape or form without the express written consent of Harbor Freight Tools.
Diagrams within this manual may not be drawn proportionally. Due to continuing improvements, actual product may differ slightly from the product described herein.
Tools required for assembly and service may not be included.
Read this material before using this product. Failure to do so can result in serious injury. SAVE THIS MANUAL.
SAFETY
ASSEMBLY
Table of Contents
Safety.......................................................... |
2 |
Maintenance................................................ |
8 |
|
Specifications.............................................. |
3 |
Parts List and Diagram............................... |
10 |
|
Assembly..................................................... |
4 |
Warranty..................................................... |
12 |
|
|
|
|
|
|
|
|
|
|
|
WARNING SYMBOLS AND DEFINITIONS
This is the safety alert symbol. It is used to alert you to potential personal injury hazards. Obey all safety messages that follow this symbol to avoid possible injury or death.
Indicates a hazardous situation which, if not avoided, will result in death or serious injury.
Indicates a hazardous situation which, if not avoided, could result in death or serious injury.
Indicates a hazardous situation which, if not avoided, could result in minor or moderate injury.
Addresses practices not related to personal injury.
MAINTENANCE
Double Insulated
Canadian Standards Association
Underwriters Laboratories, Inc.
WARNING marking concerning Risk of Eye Injury. Wear ANSI approved safety goggles with side shields.
Read the manual before set-up and/or use.
Page 2 |
For technical questions, please call 1-800-444-3353. |
Item 69034 |
IMPORTANT SAFETY INFORMATION
Read all safety warnings and instructions.
Failure to follow the warnings and instructions may result in serious injury.
Save all warnings and instructions for future reference.
The warnings, precautions, and instructions discussed in this instruction manual cannot cover all possible conditions and situations that may occur. It must be understood by the operator that common sense
and caution are factors which cannot be built into this product, but must be supplied by the operator.
Assembly Precautions
1.Do not assemble in windy conditions.
2.Assemble and install only on flat, level, hard surface.
3.Assemble and anchor only according to these instructions. Improper assembly or inadequate anchoring can create hazards.
4.Wear ANSI-approved safety goggles and heavy-duty work gloves during assembly.
5.Keep assembly area clean and well lit.
6.Keep bystanders out of the area during assembly.
7.Do not assemble when tired or when under the influence of drugs or medication.
8.Product capabilities apply to properly and completely assembled product only.
Use Precautions
1.Do not use grill or any other type of fire under cover. Cover may catch fire if exposed to heat rising from fire.
2.Do not allow snow or debris to accumulate on this item.
3.Heavy, wet snow or strong wind could cause damage or sudden collapse. Remove the Cover when these or similar conditions are expected.
4. This product is not |
not allow |
children to play |
this item. |
5.Use as intended only.
Do not use for long term shelter.
6.Inspect regularly, tighten all loose hardware and loose cords, and secure all loosened anchors.
If any parts are damaged, bent, or stretched, they must be replaced. Hardware may loosen during normal operation stresses. Loose hardware
or damaged/altered parts will compromise the structural integrity of this product.
7.Maintain product labels and nameplates. These carry important safety information. If unreadable or missing, contact
Harbor Freight Tools for a replacement.
SAFETY
ASSEMBLY
SAVE THESE INSTRUCTIONS.
Specifications
Center Height |
9′ 3″ |
Side Height |
6′ 3″ |
MAINTENANCE
Item 69034 |
For technical questions, please call 1-800-444-3353. |
Page 3 |
SAFETY
Assembly
Read the ENTIRE IMPORTANT SAFETY INFORMATION section at the beginning of this manual including all text under subheadings therein before set up or use of this product.
TO PREVENT SERIOUS INJURY:
Do not leave this product partially assembled. Assemble this product completely at one time.
Note: For additional information regarding the parts listed in the following pages, refer to Parts List and Diagram on page 10.
Note: Much of this product’s assembly is done using slip fit construction. Make sure all parts seat completely and securely. A rubber mallet (sold separately) can be used to gently tap parts in place to ensure a tight fit.
ASSEMBLY
MAINTENANCE
5 |
|
2 |
|
4 |
|
|
|
|
|
|
|
|
|
|
|
|
|
2 |
|
|
|
|
|
|
|
|
|
||
|
|
|
|
6 |
|
2 |
|
|
|
|
|
|
||
|
|
|
|
|
|
|
4 |
|
|
|
|
|||
|
|
|
|
|
|
|
|
|
|
|
|
|||
|
|
|
|
|
|
|
|
|
2 |
|
|
|
||
|
|
|
|
|
|
|
|
|
|
|
5 |
|
||
|
2 |
|
|
|
|
|
|
|
|
|
|
|
||
|
|
|
|
|
|
|
|
2 |
|
|
|
|
||
|
|
|
|
|
|
|
|
|
|
|
|
|
||
|
|
|
3 |
|
|
|
|
|
|
|
|
|
|
|
|
|
|
5 |
|
|
|
|
|
3 |
|
|
|
2 |
|
|
|
|
|
|
|
|
|
|
|
|
|
|||
|
|
|
|
2 |
|
|
|
|
|
|
|
|
3 |
|
|
|
|
|
|
|
4 |
|
2 |
|
|
|
|
||
|
|
|
|
|
|
|
|
6 |
|
|
|
5 |
||
|
|
|
|
|
|
|
|
|
|
2 |
|
|||
|
|
|
|
|
|
|
|
|
|
|
4 |
|||
|
|
|
|
|
|
|
|
|
|
|
|
2 |
||
|
|
|
|
|
|
|
|
|
|
|
|
|
||
|
|
|
|
|
|
|
|
|
|
|
|
|
|
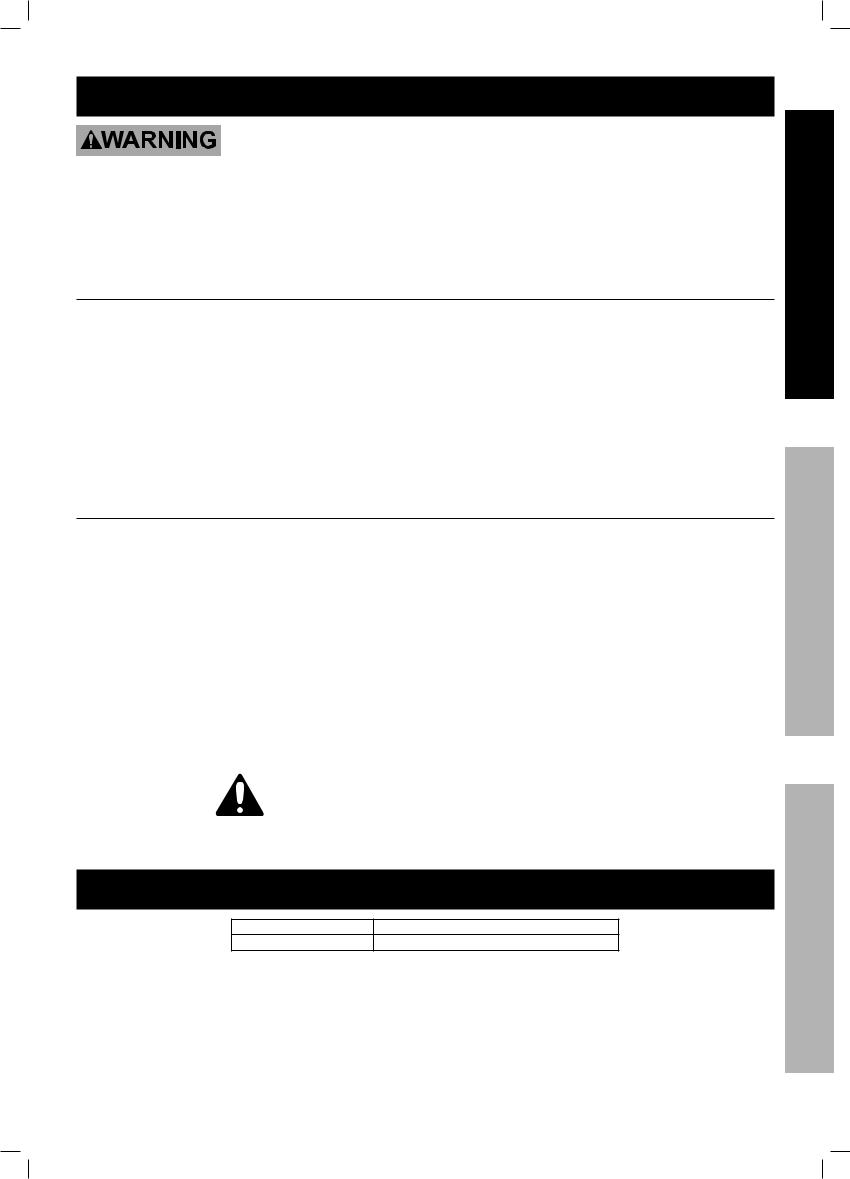
Figure 1: Roof Assembly - 1
1.Assemble one half of the roof using 11x Swaged Tubes (2), 3x Rafter Tubes (3),
4x Straight Cross Tubes (4), 4x 3 Way Connectors (5), and 2x 4 Way Connectors (6).
Align the 3- and 4-Way Connectors so that the free ends are all on the same side of the assembly, as shown in Figure 1.
5
2
5
6 |
2 |
4 |
|
|
|
|
|
||
|
|
2 |
5 |
|
|
|
|
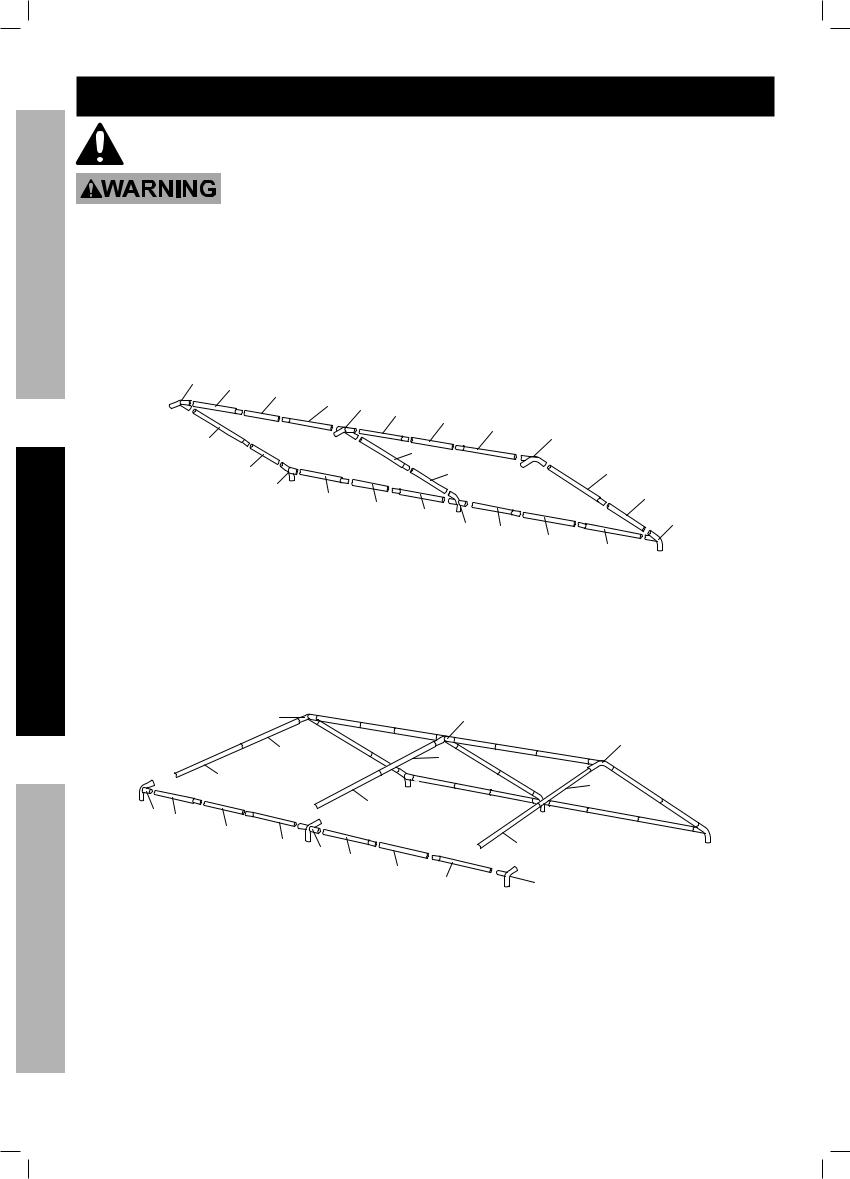
Figure 2: Roof Assembly - 2
2.Connect a Swaged Tube (2) to each 3- and 4-Way Connector (5,6) at the top of the roof. Connect a Rafter Tube (3) to the end of each Swaged Tube (2).
Connect 4x Swaged Tubes (2), 2x Straight Cross Tubes (4), 2x 3 Way Connectors (5), and
1x 4 Way Connector (6) together, then attach that assembly to the ends of the Rafter Tubes (3).
Page 4 |
For technical questions, please call 1-800-444-3353. |
Item 69034 |
 Loading...