Harbor Freight Tools 61856, 61857 Product manual

Owner’s Manual & Safety Instructions
Save This Manual Keep this manual for the safety warnings and precautions, assembly, operating, inspection, maintenance and cleaning procedures. Write the product’s serial number in the back of the manual near the assembly diagram (or month and year of purchase if product has no number). Keep this manual and the receipt in a safe and dry place for future reference.
|
Visit our website at: http://www.harborfreight.com |
REV 14d |
Email our technical support at: productsupport@harborfreight.com |
When unpacking, make sure that the product is intact and undamaged. If any parts are missing or broken, please call 1-888-866-5797 as soon as possible.
Copyright© 2014 by Harbor Freight Tools®. All rights reserved.
No portion of this manual or any artwork contained herein may be reproduced in any shape or form without the express written consent of Harbor Freight Tools.
Diagrams within this manual may not be drawn proportionally. Due to continuing improvements, actual product may differ slightly from the product described herein.
Tools required for assembly and service may not be included.
Read this material before using this product. Failure to do so can result in serious injury. SAVE THIS MANUAL.

AFETS y
Table of contents
Safety ......................................................... |
2 |
Maintenance.............................................. |
14 |
Specifications ............................................. |
5 |
Parts Lists and Diagrams .......................... |
16 |
Setup .......................................................... |
5 |
Warranty .................................................... |
20 |
Operation.................................................... |
6 |
|
|
ETUS p
WARNING SyMBOLS AND DEFINITIONS
This is the safety alert symbol. It is used to alert you to potential personal injury hazards. Obey all safety messages that
follow this symbol to avoid possible injury or death.
Indicates a hazardous situation which, if not avoided, will result in death or serious injury.
Indicates a hazardous situation which, if not avoided, could result in death or serious injury.
Indicates a hazardous situation which, if not avoided, could result in minor or moderate injury.
Addresses practices not related to personal injury.
ERATIONOp
cE
AINTENANM
INSTRUcTIONS pERTAINING TO RISK OF FIRE,
ELEcTRIc SHOcK, OR INJURy TO pERSONS
IMpORTANT SAFETy INSTRUcTIONS
When using electric appliances, basic precautions should always be followed, including the following:
1.Read all the instructions before using the appliance.
2.To reduce the risk of injury, close supervision is necessary when an appliance is used near children.
3.Do not contact moving parts.
4.Only use attachments recommended or sold by the manufacturer.
5.Do not use outdoors.
6.To disconnect, turn all controls to the off (″O″) position, then remove plug from outlet.
7.Do not unplug by pulling on cord.
To unplug, grasp the plug, not the cord.
8.Unplug from outlet when not in use and before servicing or cleaning.
9.Do not operate any appliance with a damaged cord or plug, or after the appliance malfunctions or is dropped or damaged in any manner. Return appliance to the nearest authorized service facility for examination, repair, or electrical or mechanical adjustment.
10.To reduce the risk of electrical shock, do not put motor or cord in water or other liquid. Do not place or store appliance where it can fall or be pulled into a tub or sink.
11.Connect to a properly grounded outlet only. See Grounding Instructions on page 4.
12.Risk of Electric Shock. Keep extension cord connection dry and off the ground.
Page 2 |
For technical questions, please call 1-888-866-5797. |
Items 61856 61857 |

13.Do not wear cloth gloves or loose clothing, or use a rag to grasp the cable to prevent entanglement.
14.To prevent cable from whipping, place Drain Cleaner as close to drain line as possible (within 2 feet)
or thread cable through guide (not included).
15.Wear ANSI-approved splash-resistant safety goggles under face shield, NIOSH-approved dust mask/respirator,
and heavy-duty LEATHER gloves during use.
16.Do not use in pipe containing drain cleaning chemicals.
17.Do not use in pipe obstructed by roots.
18.Do not operate the Drain Cleaner with the belt guard removed. Fingers can get caught between the drive belt and pulley.
19.To prevent Cable from whipping, place
Drain Cleaner within 2 feet of drain line or thread Cable through guide (not included). Greater distances can result in the Cable twisting or kinking.
20.Keep gloved hand on the Cable whenever the Drain Cleaner is running.
21.Keep hands away from the rotating Drum and Distributor Tube. Do not reach into Drum unless the Drain Clean power cord is unplugged.
22.Use appropriate personal protective equipment while handling and using Drain Cleaner. Drains may contain chemicals, bacteria and other substances that may be toxic, infectious, cause burns or
other issues. Appropriate personal protective equipment always includes ANSI-approved safety glasses and heavy-duty LEATHER work gloves, and may include equipment such as latex or rubber gloves, face shields, goggles, protective clothing, respirators and steel toed footwear.
23.Wash hands after use. Use hot, soapy water to wash hands and other exposed body parts
exposed to drain contents after handling or using Drain Cleaner. Do not eat or smoke while operating or handling Drain Cleaner. This will help prevent contamination with toxic or infectious material.
24.Keep children and bystanders away while operating a Drain Cleaner.
Distractions can cause you to lose control.
25.Stay alert, watch what you are doing and use common sense when operating the Drain Cleaner. Do not use Drain Cleaner while you are tired
or under the influence of drugs, alcohol or medication. A moment of inattention while operating may result in serious personal injury.
26.Prevent unintentional starting. Turn switch to the off-position before plugging in.
27.Have your Drain Cleaner serviced by a qualified repair person using only identical replacement parts. This will ensure that the safety of the
Drain Cleaner is maintained.
28.Maintain labels and nameplates on the Drain Cleaner
These carry important safety information. If unreadable or missing, contact
Harbor Freight Tools for a replacement.
29.Avoid unintentional starting. Prepare to begin work before turning on the Drain Cleaner.
30.Do not operate the Drain Cleaner if it is sitting in standing water, or if the operator is in standing water.
31.Locate on a flat, level, and solid surface that is capable of supporting the weight of the Drain Cleaner.
32.Do not put too much stress on Cable. Quickly release tension if it starts to build in the cable. Excess tension will cause the Cable to twist, kink, or break.
33.One person must control both the Cable and the Foot Switch. If the Cutting Tool stops rotating, the operator must turn the Drain Cleaner motor off quickly.
34.Reverse Motor direction only when pulling the Cable off an obstruction. Trying to push the Cable down the pipe or pull it out of a pipe while in reverse operation will unravel and break
the Cable. Wait for the Drum to stop turning completely before changing the Rotation Switch.
35.Only use Drain Cleaner to clean drains of recommended sizes according to these instructions. Other uses or modifying the Drain Cleaner for
other applications may increase the risk of injury.
36.People with pacemakers should consult their physician(s) before use. Electromagnetic fields in close proximity to heart pacemaker could cause pacemaker interference or pacemaker failure.
37.WARNING! Handling the cord on this product will expose you to lead, a chemical known to the State of California to cause cancer, and birth defects or other reproductive harm. Wash hands after handling. (California Health & Safety Code § 25249.5, et seq.)
38.The warnings, precautions, and instructions discussed in this instruction manual cannot cover all possible conditions and situations that may occur. It must be understood by the operator that common sense and caution are factors which cannot be built into this product, but must be supplied by the operator.
SAVE THESE INSTRUcTIONS
Items 61856 61857 |
For technical questions, please call 1-888-866-5797. |
Page 3 |
SAFETy
SETUp
OpERATION
MAINTENANcE

AFETS y
ETUS p
ERATIONOp
cE
AINTENANM
GROUNDING INSTRUcTIONS
1.This appliance must be grounded. In the event of malfunction or breakdown, grounding provides a path of least resistance for electric current to reduce the risk of electric shock. This appliance is equipped with a cord having an equipmentgrounding conductor and a grounding plug.
The plug must be plugged into an appropriate outlet that is properly installed and grounded in accordance with all local codes and ordinances.
2.DANGER - Improper connection of the equipmentgrounding conductor can result in a risk of electric shock. The conductor with insulation having an outer surface that is green with or without yellow stripes is the equipment-grounding conductor.
If repair or replacement of the electric cord or plug is necessary, do not connect the equipment-
grounding conductor to a live terminal. Check with a qualified electrician or serviceman if the grounding instructions are not completely understood, or if
in doubt as to whether the appliance is properly grounded. Do not modify the plug provided with the appliance – if it will not fit the outlet, have a proper outlet installed by a qualified electrician.
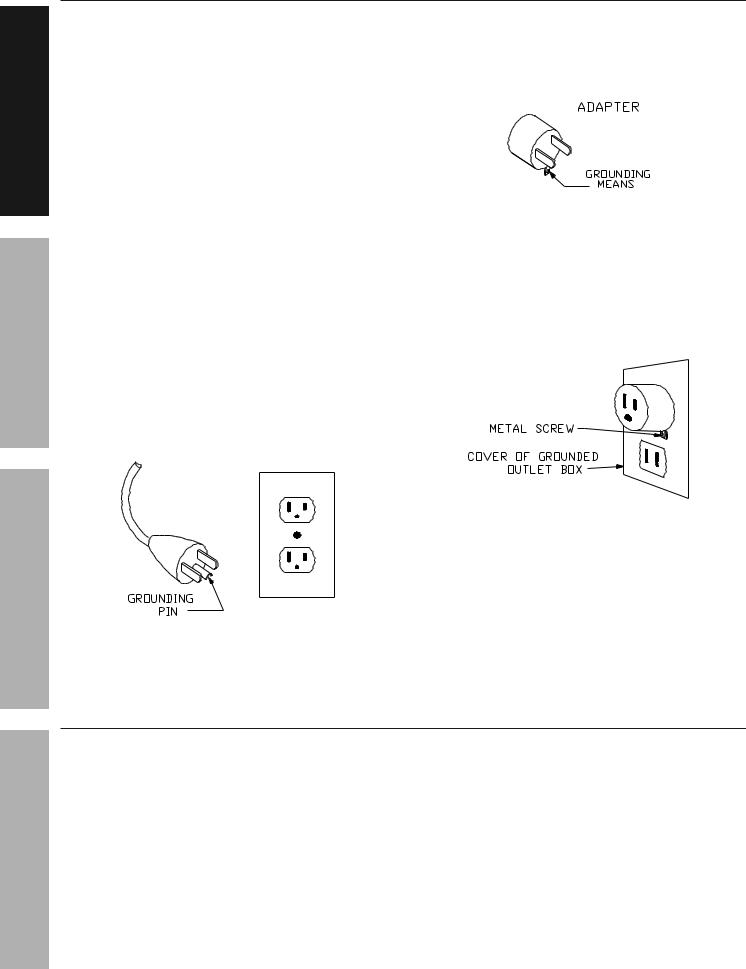
3.This appliance is for use on a nominal 120 V circuit, and has a grounding plug that looks like the plug illustrated in Figure A.
4.A temporary adaptor, which looks like the adaptor illustrated in Figures B and C, may be used to connect this plug to a 2-pole receptacle as shown in Figure B if a properly grounded outlet is not available.
Figure B: Grounding Adapter
5.The temporary adaptor should be used only until a properly grounded outlet can be installed by a qualified electrician. The green colored rigid ear, lug, and the like, extending from the adaptor must be connected to a permanent ground such as a properly grounded outlet
box cover. Whenever the adaptor is used, it must be held in place by the metal screw.
Figure c: Grounding Adapter connection
6. The adapter should not be used if a three-slot grounded receptacle is available.
7. A qualified electrician should be consulted if there is any doubt as to whether an
outlet box is properly grounded.
Figure A: 3-prong plug
8. A qualified electrician should be consulted if there is any doubt as to whether an outlet box is properly grounded.
Ground Fault circuit Interrupter (GFcI)
The appliance is equipped with a ground fault circuit interrupter (GFCI), which reduces the risk of electric shock. Check that the receptacle is properly grounded and test the GFCI before each use.
1.Plug the GFCI Power Plug into a grounded, 120 VAC electrical outlet.
2.Press the TEST button. The GFCI indicator light should go out and power to the appliance should cut off.
WARNING! If the light does not go out when TEST button is pushed, do not use the appliance until it is properly repaired.
3.To restore power after TEST, push the RESET button.
WARNING! If the appliance doesn’t start, stops while running, or if you experience
an electric shock, disconnect the power cord and do not use the appliance. Have it repaired by a qualified electrician or replace it.
Note: The Power Cord is not GFCI-protected from the GFCI to the 3-prong plug in the electrical outlet.
Page 4 |
For technical questions, please call 1-888-866-5797. |
Items 61856 61857 |

Specifications
Electrical Rating |
120VAC, 60Hz, 5.3A |
|
Motor Speed |
1716 RPM |
|
Drum Speed |
202 RPM |
|
Power Cord |
6′ |
|
Cable Size |
Ø1/2″ x 50′ L |
4004713 |
Drain Pipe Capacity |
2″ to 4″ I.D. |
|
Drum Dimensions |
13″ x 6.3″ |
|
Drum Capacity |
up to 75′ of 1/2″ Cable (Not Included) |
|
up to 100′ of 3/8″ Cable (Not Included) |
|
|
|
|
INSTALLATION INSTRUcTIONS
Read the ENTIRE IMpORTANT SAFETy INFORMATION section at the beginning of this manual including all text under subheadings therein before set up or use of this product.
Note: No assembly needed for Item 61856.
Assembly for 61857
TO pREVENT SERIOUS INJURy FROM AccIDENTAL OpERATION:
Turn the Rotation Switch of the tool to its position and unplug the tool from its electrical outlet before assembling or making any adjustments to the tool.
Step 1: Slide Handles
into slots
Step 2: Lock Handles into place using
Handle Locking Knobs
SAFETy
SETUp
OpERATION
MAINTENANcE
Items 61856 61857 |
For technical questions, please call 1-888-866-5797. |
Page 5 |

AFETS y
ETUS p
ERATIONOp
cE
AINTENANM
OpERATING INSTRUcTIONS
Read the ENTIRE IMpORTANT SAFETy INFORMATION section at the beginning of this manual including all text under subheadings therein before set up or use of this product.
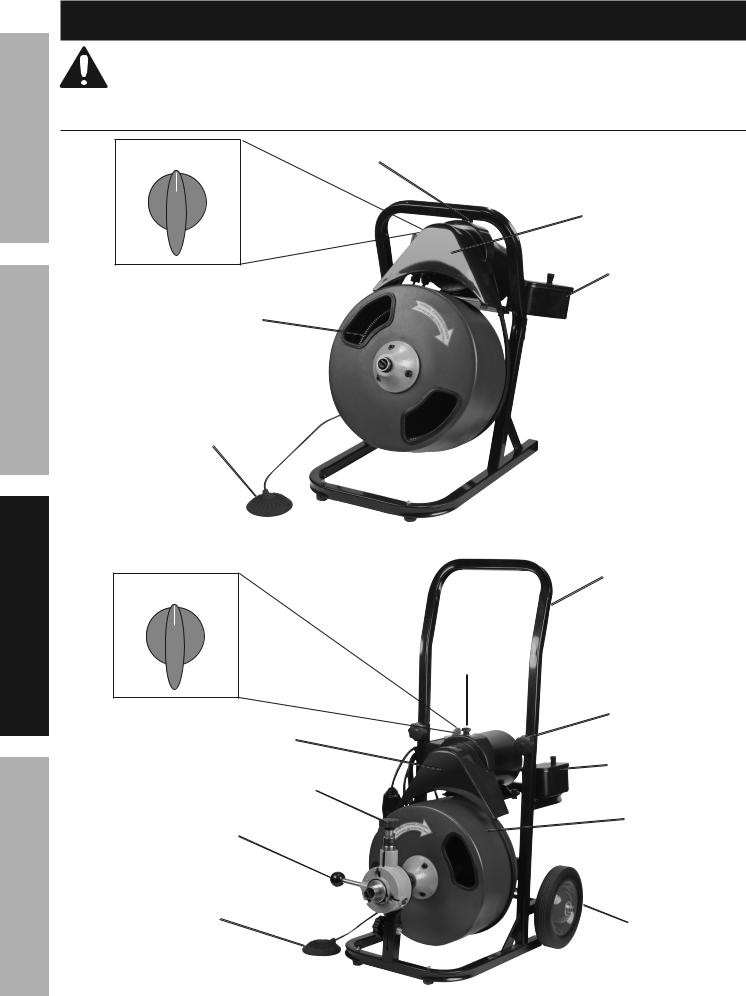
User-Operated controls
|
OFF |
Belt Guard Knob |
|
|
|
FOR |
REV |
Belt Guard |
Tool Holder
Rotation Switch
Cable
 Drum
Drum
Foot Switch
|
|
Item 61856 |
|
|
Handle |
|
OFF |
|
FOR |
REV |
Belt Guard |
|
|
|
|
|
Knob |
Rotation Switch |
Handle Locking Knob |
|
|
|
Belt Guard |
|
|
Tool Holder |
|
|
Tension Knob |
Drum
Power-Feed Lever
 Cable
Cable
Foot Switch
Wheel
Item 61857
Page 6 |
For technical questions, please call 1-888-866-5797. |
Items 61856 61857 |
 Loading...