


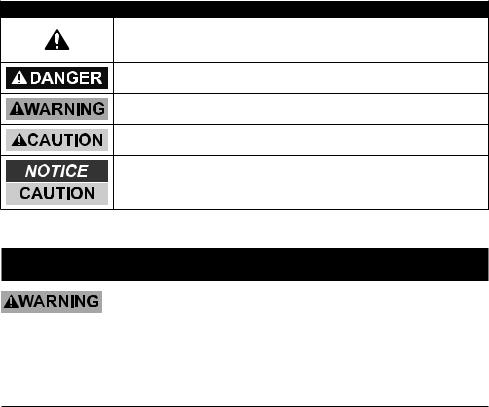
WARNING SYMBOLS AND DEFINITIONS
This is the safety alert symbol. It is used to alert you to potential personal injury hazards. Obey all safety messages that follow this symbol to avoid possible injury or death.
Indicates a hazardous situation which, if not avoided, will result in death or serious injury.
Indicates a hazardous situation which, if not avoided, could result in death or serious injury.
Indicates a hazardous situation which, if not avoided, could result in minor or moderate injury.
Addresses practices not related to personal injury.
Important Safety Information
Read all safety warnings and instructions.
Failure to follow the warnings and instructions may result in electric shock, fire and/or serious injury.
Save all warnings and instructions for future reference.
Safety Warnings
1.Maintain labels and nameplates on the tool. These carry important safety information. If unreadable or missing, contact Harbor Freight Tools for a replacement.
2.This product is not a toy. Do not allow children to play with this item.
3.Position batteries in proper polarity and do not install batteries of different types, charge levels, or capacities together.
4.Use as intended only.
5.Inspect before use; do not use if parts are loose or damaged.
6.Do not expose to liquids.
7.Do not place under direct sunlight, or near or over heat sources.
8.The warnings, precautions, and instructions discussed in this instruction manual cannot cover all possible conditions and situations that may occur. It must be understood by the operator that common sense and caution are factors which cannot
be built into this product, but must be supplied by the operator.
 SAVE THESE INSTRUCTIONS.
Page 2 |
For technical questions, please call 1-888-866-5797. |
Item 61959 |

Specifications
Batteries Required |
(2) AA Batteries |
|
|
Dimensions |
11" L x 5" W x 0.96" Thick |
|
|
FCC Compliance
1.This device complies with part 15 of the FCC Rules. Operation is subject to the following two conditions:
a.This device may not cause harmful interference.
b.This device must accept any interference received, including interference that may cause undesired operation.
2.This equipment has been tested and found to comply with the limits for a Class B digital device, pursuant to part 15 of the FCC Rules. These limits are designed to provide reasonable protection against harmful interference in a residential installation.
This equipment generates, uses and can radiate radio frequency energy and, if not installed and used in accordance with the instructions, may cause harmful interference to radio communications.
However, there is no guarantee that interference will not occur in a particular installation. If this equipment does cause harmful interference to radio
or television reception, which can be determined by turning the equipment off and on, the user is encouraged to try to correct the interference by one or more of the following measures:
a.Reorient or relocate the receiving antenna.
b.Increase the separation between the equipment and receiver.
c.Connect the equipment into an outlet on a circuit different from that to which the receiver is connected.
d.Consult the dealer or an experienced radio TV technician for help.
Trademark Acknowledgements
All brand names and trademarks are the property of their respective holders.
Item 61959 |
For technical questions, please call 1-888-866-5797. |
Page 3 |

Set Up Instructions
Read the ENTIRE IMPORTANT SAFETY INFORMATION section at the beginning of this document including all text under subheadings therein before set up or use of this product.
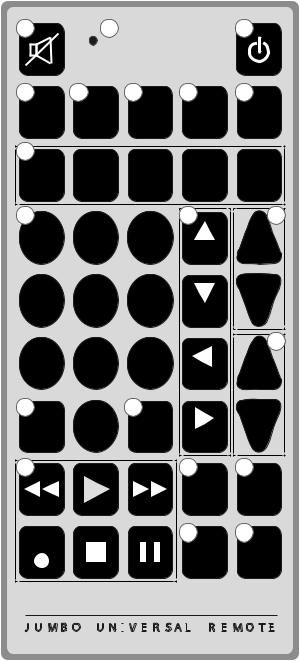
Controls
1.MUTE Mutes volume on TV.
2.LED INDICATOR LIGHT Flashes to show remote is working properly.
Will light up when a button is pressed and will turn off when the button is released. Will also blink when device codes are entered into the Remote.
3.ON/OFF Turns the device being controlled on or off.
4.SLEEP Use to set sleep timer / auto shutoff function on controlled devices that have this capability built-in.
5.GUIDE Displays satellite or cable on-screen program guide.
6.MENU Displays the Main Menu of many devices that have a built-in menu system. May also exit a menu.
7.REPEAT Returns to the last channel in TV mode.
8.TV/VCR Switches between the available viewing sources on many older devices: Cable, TV, VCR, DVD, DTC, SAT.
9.DEVICE SELECT CONTROLS Use to select device to control: STB/DTC, TV, VCR/DVR, DVD, SAT/CABLE.
10.0–9 NUMBER BUTTONS Use to enter channel numbers or device codes.
11.NAVIGATION BUTTONS Use to move though on-screen menus and guides:
UP▲, DOWN▼, LEFT◄, RIGHT ►.
12.CHANNEL CONTROLS Use for changing channels.
13.VOLUME CONTROLS Use to raise or lower volume.
14.ENTER Use to complete channel selection after entering channel number on numeric keyboard.
15.DIGITAL (–) Use to select digital sub-channels. For example, to select CH 15, sub-channel 0.1: enter 1, 5, DIGITAL (–), and 1.
16.DEVICE CONTROLS These buttons for
DVD/VCR/DVR use operate the same as the original remote:
REVERSE◄◄, PLAY►, FORWARD►►, RECORD REC●, STOP ■, PAUSE ıı.
17.OK Selects menu items for the device being controlled.
18.INPUT Switches between the available viewing sources on some new devices: Cable, TV, VCR, DVD, DTC, SAT.
19.DISP Displays information.
20.QUIT Use to exit menu functions.
Note: For control buttons to work, the device being controlled must have the button function / necessary feature built-in to enable the Remote button to control that function.
On different types of devices or different brands of the same type of device, some buttons will perform different functions than those listed. A trial and error process may be required to determine functionality of buttons with various devices.
Page 4 |
For technical questions, please call 1-888-866-5797. |
Item 61959 |
1 |
2 |
4 |
5 |
6 |
SLEEP |
GUIDE |
MENU |
9 |
TV |
VCR |
STB |
||
DTC |
|
DVR |
101 |
2 |
3 |
4 |
5 |
6 |
7 |
8 |
9 |
14 |
0 |
15 |
|
ENTER |
DIGITAL |
|
( - ) |
||
|
||
16 |
|
REC
7
REPEAT
DVD
11
UP
DOWN
LEFT
RIGHT
17
OK
19
DISP
3
8
TV/VCR
S AT
C A B LE
+12
CH
CH-
+13
VOL
VOL-
18
INPUT
20
QUIT
J U M B O U N I
 V E
V E
 R S A L
 R E
R E
 M O T E

Item 61959 |
For technical questions, please call 1-888-866-5797. |
Page 5 |

Set Up Instructions (continued)
Battery Installation
1.Remove the battery compartment cover from the back of Remote.
2.Install (2) AA 1batteries according to indicated polarity.
3.Slide battery compartment cover over batteries and snap into place.
Note: Reprogramming may be required after batteries have been replaced.
Direct Code Setting
1.Find the code(s) for the device and brand to be programmed in the Code Lists starting on page 10.
Note: Many brands have more than one code in the listings. It may be necessary to repeat the following steps, trying multiple codes until the code that works with the Remote and selected device is found.
2.Manually turn on the device to be programmed into the Remote.
3.Aim the Remote at the device and press and hold the corresponding Device Select Control button until the LED Indicator Light turns on and stays solid red. Release the button.
4.Enter the first 4-digit code from the Code Lists using the number keys. The LED will blink as each number is pushed.
Note: Enter the code within 30 seconds or the LED Indicator will flash twice and the Remote will exit programming mode.
5.If the LED turns off after entering the code, the Remote has recognized the entry – go to the next step. If the LED flashes, the code is not recognized.
Return to step 1 and repeat with the next code from the Code Lists.
6.Press the ON/OFF button on the
Remote. If the device shuts off, this may be the correct code. Test other buttons on the Remote to verify functionality. If the device does not shut off, or if all of the other buttons do not work correctly, return to step 1 and repeat with the next code from the Code Lists.
Note: The Remote may recognize the code but the device may not. It may be necessary to try more than one code to get the device to function.
7.If the correct code cannot be found from the Code Lists or a particular brand
is not listed, use one of the alternate methods under the headings that follow to find the code with the Remote.
8.Use the Personal Code Reference Chart at the back of this manual to record codes for future reference.
Page 6 |
For technical questions, please call 1-888-866-5797. |
Item 61959 |

Brand Name Code Search
1.Find the digit number for the device and brand to be programmed in the chart. Refer to Figure A.
Note: Brand and device type must be listed in chart to use this method.
2.Manually turn on the device to be programmed into the Remote.
3.Aim the Remote at the device and press and hold the corresponding Device Select Control button, then press and hold the appropriate digit number using the number keys.
4.The LED Indicator Light turns on solid red, then flashes intermittently as the Remote searches for the correct code.
5.When the device shuts off, (may take several minutes) immediately release both buttons. The Remote will automatically save the code and quit the search mode.
6.The Remote will perform a complete search cycle. If the LED flashes twice and then shuts off, the Remote has searched all the codes without finding the correct code and quit the search mode.
Digit |
TV |
VCR/DVD/DVR |
CABLE |
SAT/DBS |
CD/AUDIO |
|
1 |
RCA, GE, |
RCA, GE, |
Scientific |
RCA, GE, |
RCA, GE, |
|
Proscan |
Proscan |
Atlanta |
Proscan, Pioneer |
Proscan |
||
|
||||||
2 |
Zenith |
Zenith, Apex |
Jerold |
Zenith, Gemini |
Zenith |
|
3 |
Philips, |
Marantz, Philips, |
Tocom, General |
Philips, Magnavox |
Marantz, Philips, |
|
|
Magnavox |
Magnavox |
Instrument |
|
Magnavox |
|
|
Sony, |
Sony, Panasonic, |
|
|
Sony, Panasonic, |
|
|
Panasonic, |
Sharp, Toshiba, |
RCA, GE, |
Sony, Panasonic, |
||
4 |
Technics, Sharp, |
|||||
Sharp, Toshiba, |
Daewoo, |
Proscan, Pioneer |
Sharp, Toshiba |
|||
|
Toshiba |
|||||
|
Daewoo |
Yamaha, Denon |
|
|
||
|
|
|
|
|||
|
Hitachi, Sanyo, |
Hitachi, Sanyo, |
|
|
Hitachi, Sanyo, |
|
5 |
LG, Goldstar, |
LG, Goldstar, |
Zenith, Gemini |
Hitachi, JVC, |
LG, Goldstar, |
|
Samsung, JVC, |
Samsung, JVC, |
Samsung |
Samsung, JVC, |
|||
|
Mitsubishi |
Mitsubishi |
|
|
Mitsubishi |
|
|
Sylvania, Fisher, |
Sylvania, Fisher, |
|
General |
Sylvania, Fisher, |
|
|
Philips, |
Instrument, |
Curtis-Mathes, |
|||
6 |
Curtis-Mathes, |
Curtis-Mathes, |
||||
Magnavox |
Echostar, Dish, |
Emerson, |
||||
|
Emerson |
Emerson |
||||
|
|
Hughes, Primestar |
Optimus |
|||
|
|
|
|
|||
7 |
|
|
|
|
Pioneer, |
|
|
|
|
|
Teac, Nad |
||
|
|
|
|
|
||
|
|
|
|
|
Kenwood, |
|
8 |
|
|
|
|
Yamaha, |
|
|
|
|
|
|
Denon, Onkyo |
Figure A: Brand Name Chart
Item 61959 |
For technical questions, please call 1-888-866-5797. |
Page 7 |
Set Up Instructions (continued)
Manual Code Search with the Remote
1.Manually turn on the device to be programmed into the Remote.
2.Aim the Remote at the device and press and hold the corresponding Device Select Control button until the LED Indicator Light turns on and stays solid red. Release the button.
3.Press the “CH+” button on the Remote and release. Repeat this action slowly and continuously to search.
It may take up to 300 repetitions to reach the correct code since the unit is searching through all the codes.
4.When the device shuts off, immediately press ENTER to save the code. The LED will shut off. If the device shuts off and “CH+” is pressed again accidentally, press “CH-” the same number of times to return to the correct code. Then press ENTER to save the code.
5.Press the ON/OFF button on the Remote. If the device turns on, this may be the correct code. Test other buttons on the Remote to verify functionality.
6.If the device does not turn on, or if all of the other buttons do not work correctly, return to step 2 to repeat this search option, or use one of the alternate search methods.
Auto Code Search
1.Manually turn on the device to be programmed into the Remote.
2.Aim the Remote at the device and press and hold the corresponding Device Select Control button until the LED Indicator Light turns on and stays solid red. Release the button.
3.Press and release the ON/OFF button on the Remote. The LED will flash intermittently as the Remote searches for the correct code. When the device shuts off, immediately press ENTER to save the code. The LED will shut off.
4.Press the ON/OFF button on the Remote. If the device turns on, this may be the correct code. Test other buttons on the Remote to verify functionality.
5.If the device does not turn on, or if all of the other buttons do not work correctly, return to step 2 to repeat this search option.
6.The Remote will perform a complete search cycle. If the LED flashes twice and then shuts off, the Remote has searched all the codes without finding the correct code and quit the search mode. No code will be saved.
Page 8 |
For technical questions, please call 1-888-866-5797. |
Item 61959 |
 Loading...