


|
|
|
[ |
] |
1 |
|
PANTONEBLACKC |
|
|
2 |
|
|
|
|
3 |
A4, |
A4 |
|
|
4 |
|
|
|
|
|
|
|
6710024319 |
|
|
|
GBF412SGMBB(WQP12-77M3) |
||
|
|
|
|
|
|
|
(GE) |
|
|
D |
|
|
80 |
|
|
|
|
|
|
|
|
02 |
|
|
|
|
|
2 |
|
<![endif]>DISHWASHERS
SAFETY INFORMATION. . . . . . . . . . . 4
USING THE DISHWASHER
Getting Started . . . . . . . . . . . . . . . . . . . . . . . . . 6
Loading . . . . . . . . . . . . . . . . . . . . . . . . . . . . . . .12
Dispensers . . . . . . . . . . . . . . . . . . . . . . . . . . . . .15
CARE AND CLEANING . . . . . . . . . . . .16 TROUBLESHOOTING TIPS. . . . . . . .17
WARRANTY . . . . . . . . . . . . . . . . . . . . . . . .21
CONSUMER SUPPORT . . . . . . . . . . . 22
FRONT CONTROL MODELS
OWNER’S MANUAL
GBF 180 Series
GBF 412-532 Series
MBF 422 Series
GBT 412 Series
GBT 632 Series
Includes Moffat Series and GE® Series products
ENGLISH/FRANÇAIS
TOP CONTROL MODELS
Write the model and serial numbers here:
Model #_________________
Serial # _________________
You can find them on a label on the tub wall just inside the door.
GE is a trademark of the General Electric Company. Manufactured under trademark license.
29-6273 06-18 MC

THANK YOU FOR MAKING GE APPLIANCES A PART OF YOUR HOME.
Whether you grew up with GE Appliances, or this is your first, we’re happy to have you in the family.
We take pride in the craftsmanship, innovation and design that goes into every GE Appliances product, and we think you will too. Among other things, registration of your appliance ensures that we can deliver important product information and warranty details when you need them.
Register your GE appliance now online. Helpful websites and phone numbers are available in the
Consumer Support section of this Owner’s Manual. You may also mail in the pre-printed registration card included in the packing material.
2 29-6273

Notes
<![endif]>WELCOME
29-6273 3

<![endif]>SAFETY INFORMATION
IMPORTANT SAFETY INFORMATION
READ ALL INSTRUCTIONS BEFORE USING THE APPLIANCE
 WARNING For your safety, the information in this manual must be followed to minimize
the risk of fire, explosion, electric shock, and to prevent property damage, personal injury, or death.

 WARNING PROPER INSTALLATION AND MAINTENANCE
This dishwasher must be properly installed and located in accordance with the Installation Instructions before it is used. If you did not receive an Installation Instructions sheet with your dishwasher, you can receive one by visiting our Website at GEAppliances.ca.
■Connect the dishwasher/appliance to a grounded metal, permanent wiring system; or run an equipment-grounding conductor with the circuit conductors and connect to the equipment-grounding terminal or lead of the appliance.
■Improper connection of the equipment-grounding conductor can result in a risk of electric shock. Check with a qualified electrician or service representative if you are in doubt whether the appliance is properly grounded.
■Dispose of discarded appliances and shipping or packing material properly.
■Do not attempt to repair or replace any part of your dishwasher unless it is specifically recommended in this manual. All other servicing should be referred to a qualified technician.
■Use only cord kit WG04F10796 or hard-wire to building electrical. Failure to follow this instruction, could result in risk of fire and personal injury.
■To minimize the possibility of electric shock, disconnect this appliance from the power supply before attempting any maintenance.
NOTE: Turning the dishwasher off does not disconnect the appliance from the power supply. We recommend having a qualified technician service your appliance.
 WARNING WHEN USING YOUR DISHWASHER, FOLLOW BASIC PRECAUTIONS, INCLUDING THE FOLLOWING:
■Use this appliance only for its intended purpose as described in this Owner’s Manual.
■Use only detergents or wetting agents recommended for use in a dishwasher and keep them out of reach of children. Using a detergent that is not specifically designed for dishwashers will cause the dishwasher to fill with suds.
■Locate sharp items so that they are not likely to damage the door seal.
■Load sharp knives with the handles up to reduce the risk of cut-type injuries.
■Do not wash plastic items unless marked dishwasher safe or the equivalent. For plastic items not so marked, check the manufacturer’s recommendations.
■Do not touch the heating element during or immediately after use.
■Do not operate your dishwasher unless all enclosure panels are properly in place.
■Do not tamper with controls.
■Do not abuse, sit on or stand on the door or dish rack of the dishwasher.
■To reduce the risk of injury, do not allow children to play with, on or inside this appliance at any time.
■Do not store or use combustible materials including gasoline or other flammable liquids or vapors in the vicinity of this or any other appliance.
■Small parts, such as rack clips and filter retaining posts, can be a choke hazard to small children if removed from the dishwasher. Keep out of reach of small children.
READ AND SAVE THESE INSTRUCTIONS
4 29-6273

IMPORTANT SAFETY INFORMATION
READ ALL INSTRUCTIONS BEFORE USING THE APPLIANCE

 WARNING WATER HEATER SAFETY
Under certain conditions, hydrogen gas may be produced in a water heater that has not been used for two or more weeks. HYDROGEN GAS IS EXPLOSIVE.
If the hot water has not been used for two or more weeks, prevent the possibility of damage or injury by turning on all hot water faucets and allowing them to run for several minutes. Do this before using any electrical appliance connected to the hot water system. This simple procedure will allow any built-up hydrogen gas to escape. Since the gas is flammable, do not smoke, use an open flame, or use the appliance during this process.

 WARNING RISK OF CHILD ENTRAPMENT
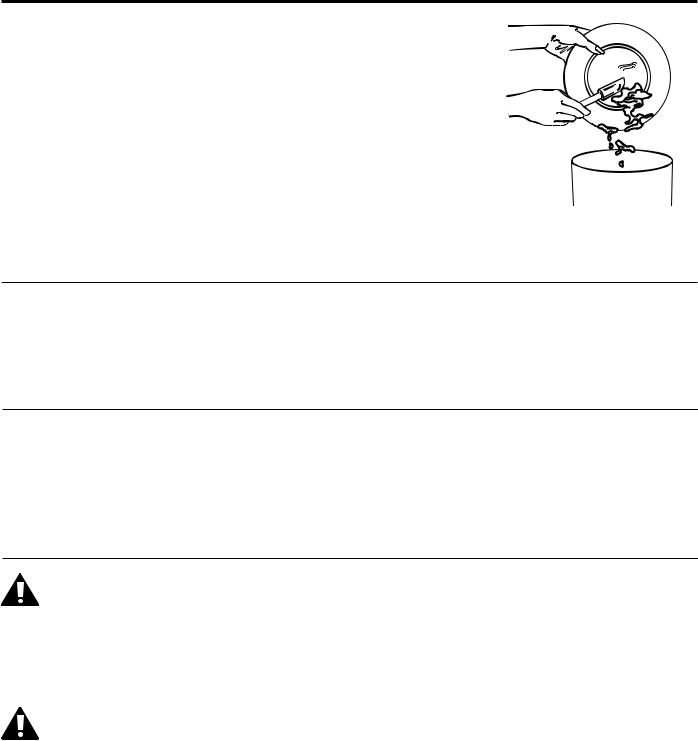
PROPER DISPOSAL OF THE DISHWASHER
Junked or abandoned dishwashers are dangerous…even if they will sit for “just a few days.” If you are getting rid of your dishwasher, please follow the instructions below to help prevent accidents.
■ Do not allow children to play with, on, or inside this or any discarded appliance. |
|
■ Take off the door of the washing compartment or remove the latch by removing |
Two screws |
the two screws from the latch receiver inside the tub (as shown). |

 CAUTION TO PREVENT MINOR INJURY AND PROPERTY DAMAGE
■During or after wash cycle, contents may be hot to the touch. Use care before handling.
■Close supervision is necessary if this appliance is used by or near children. Do not allow children to play around the dishwasher when closing the door, closing the upper rack, or while vertically adjusting the upper rack due to the possibility of small fingers being pinched.
■Non-Dishware Items: Do not wash items such as electronic air cleaner filters, furnace filters and paint brushes in your dishwasher. Damage to the dishwasher and discoloration or staining of the dishwasher may result.
■Load light-weight, plastic items so they do not become dislodged and drop to the bottom of the dishwasher—they might come into contact with the heating element and be damaged.

 CAUTION ELECTRICAL REQUIREMENTS
■ This appliance must be supplied with 120V, 60 Hz, |
■ If the electric supply provided does not meet the |
and connected to an individual, properly grounded |
above specifications, it is recommended that a |
branch circuit, protected by a 15 or 20 amp circuit |
licensed electrician install an approved outlet. |
breaker or time-delay fuse. |
■ Your dishwasher circuit should not be used for any |
|
other appliance while the dishwasher is in operation as |
|
the dishwasher requires the full capacity of the circuit. |

 NOTICE
■If your dishwasher is connected to a wall switch, ensure that the switch is on prior to use.
■If you choose to turn the wall switch off between wash cycles, allow 5-10 seconds after turning the switch on before touching Start to allow the control to initialize.
■Use only powder, Finish® Quantum® Automatic Dishwashing Detergent, liquid detergents or rinse agents recommended for use in a dishwasher and keep them out of the reach of children. Finish® Quantum® Automatic Dishwashing Detergent, and Finish® Jet-Dry® Rinse Aid rinse agents have been approved for use in all GE Appliances dishwashers.
READ AND SAVE THESE INSTRUCTIONS
<![endif]>INFORMATION SAFETY
29-6273 5
<![endif]>USING THE DISHWASHER
Getting started
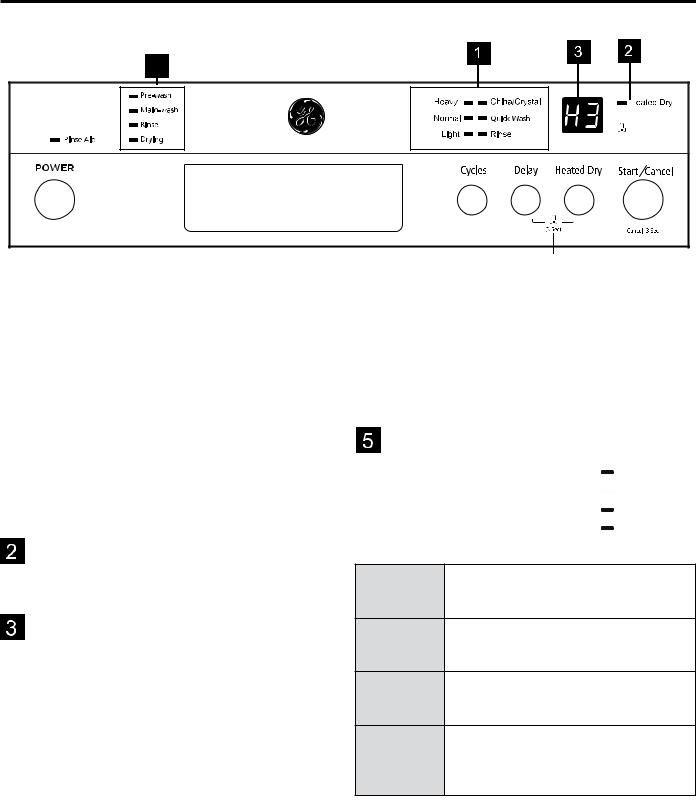
CONTROL PANEL - Model GBF180 Series
5 |
Eco- |
|
Wash Cycle Selections |
|
Child Lock |
|
|
|
|
||
|
|
|
Heavy. This cycle is for hard-to-clean, heavily soiled dishes, pots, pans, and dishes.
Normal. This is standard program. It is for regularly soiled dinner dishes or silverware.
Light. For lightly soiled loads, such as glasses, crystal and fine china.
Quick-Wash. A shorter wash for lightly soiled loads that do not need drying.
Rinse. Use for rinsing dishes glasses and silverware that will not be washed right away.
Heated Dry
When the Heating Dry function is selected, the heater will work during the drying process.
Functions
Delay. To delay the start of a selected cycle, press the Delay Start pad until the desired delay time shows in the LED display. You can delay the start for 1 to 24 hours. To cancel the Delay Start option before the delay period is over, press the Start/Cancel pad for 3-5 seconds.
Display window. This displays the remained hours and minutes of the running cycle, delay hours and error codes etc.
Start/Cancel. Select the washing program or Cancel the washing program when the machine is working.
Press the Delay and Heated Dry buttons for 3 seconds the lock light will display on the LCD. No buttons can be operated when the dishwasher controls are locked. To cancel the Child Lock option, press the buttons for 3 seconds, the lock light will no longer be shown on the LCD and the dishwasher controls will be unlocked.
Cycle progress indicator
These lights indicate how far |
|
|
Pre-wash |
||
along the current wash cycle is, |
||
Main-wash |
||
while the dishwasher is |
||
running. |
Rinse |
|
|
Drying |
|
|
|
When the dishwasher is in a Pre-wash Pre wash portion of the cycle, the Pre-wash lights
are illuminated.
When the dishwasher is in a Main-wash Main wash of the cycle, the Main-wash lights are
illuminated.
When the dishwasher is in a Rinse Rinse portion of the cycle, the Rinse lights are
illuminated.
When the dishwasher is in a Drying
Drying portion of the cycle, the Drying lights are illuminated, the Drying lights will turn off
after the cycle is ended.
6 |
29-6273 |

Getting started
CONTROL PANEL - Model GBF412 Series
5
|
Wash Cycle Selections |
|
Child Lock |
|
|
|
|
|
|
|
|
||
|
|
|
|
|
||
|
|
|
|
|
||
|
|
|
|
|
Heavy. This cycle is for hard-to-clean, heavily soiled dishes, pots, pans, and dishes.
Normal. This is standard program. It is for regularly soiled dinner dishes or silverware.
Light. For lightly soiled loads, such as glasses, crystal and fine china.
Rinse. Use for rinsing dishes glasses and silverware that will not be washed right away.
Heated Dry
When the Heating Dry function is selected, the heater will work during the drying process.
Functions
Delay. To delay the start of a selected cycle, press the Delay Start pad until the desired delay time shows in the LED display. You can delay the start for 1 to 24 hours. To cancel the Delay Start option before the delay period is over, press the Start/Cancel pad for 3-5 seconds.
Display window. This displays the remained hours and minutes of the running cycle, delay hours and error codes etc.
Start/Cancel. Select the washing program or Cancel the washing program when the machine is working.
Press the Delay and Heated Dry buttons for 3 seconds, the lock light will display on the LCD.No buttons can be operated when the dishwasher controls are locked.
To cancel the Child Lock option, press the buttons for 3 seconds, the lock light will no longer be shown on the LCD and the dishwasher controls will be unlocked.
Cycle progress indicator
These lights indicate how far |
|
|
Pre-wash |
||
along the current wash cycle is, |
||
Main-wash |
||
while the dishwasher is |
||
running. |
Rinse |
|
|
Drying |
|
|
|
When the dishwasher is in a Pre-wash Pre wash portion of the cycle, the Pre-wash lights
are illuminated.
When the dishwasher is in a Main-wash Main wash of the cycle, the Main-wash lights are
illuminated.
When the dishwasher is in a Rinse Rinse portion of the cycle, the Rinse lights are
illuminated.
When the dishwasher is in a Drying
Drying portion of the cycle, the Drying lights are illuminated, the Drying lights will turn off
after the cycle is ended.
<![endif]>DISHWASHER THE USING
29-6273 |
7 |

<![endif]>USING THE DISHWASHER
Getting started
CONTROL PANEL - Model GBF532 Series
5 |
|
Wash Cycle Selections |
|
Functions |
|
|
|
|
|
|
|
|
||
|
|
|
|
|
||
|
|
|
|
|
||
|
|
|
|
|
Select the appropriate wash cycle depending on the soil level of your dishes. After you select a cycle, the Cycle On light for that cycle lights up. If you want to cancel the selected cycle, press the selected cycle button again.
Pots and Pans. This cycle is for hard-to-clean, heavily soiled dishes, pots, pans, and dishes.
Normal. This is standard program.For regularly soiled dinner dishes or silverware.
China/Crystal. For lightly soiled loads, such as glasses, crystal and fine china.
Energy Saver. It is suitable to clean normally soiled tableware and it is the most efficient program in terms of it’s combined energy and water consumption for that type of tableware.
Quick-Wash. A shorter wash for lightly soiled loads that do not need drying.
Rinse. Use for rinsing dishes glasses and silverware that will not be washed right away.
Options
Hi Temp. When the Hi Temp wash function is selected, the temperature of the water will be maintained at 60°C (140°F) max.
Heated Dry. When the Heated Dry function is selected, the heater will work during the drying process.
Sanitize. When the Sanitize function is selected, the temperature of water will be maintained at 69°C (156.2°F) max. The max temperature may not be
reached if the incoming water temperature is not correct. Certified residential dishwashers are not intended for licensed food establishments. WARNING: The sanitize option is available with Heavy, Nomal and Light cycles.
Delay. To delay the start of a selected cycle, press the Delay Start pad until the desired delay time shows in the LED display. You can delay the start for 1 to 24 hours. To cancel the Delay Start option before the delay period is over, press the Start/Cancel pad for 3-5 seconds.
Display window. This displays the remaining hours and minutes of the running cycle, delay hours and error codes, etc.
Start/Cancel. Select or Сancel the washing program when the machine is working.
Child Lock
Press Delay and Heated Dry buttons for 3 seconds, the lock light will display on the LCD.No buttons can be operated when the dishwasher controls are locked.
To cancel the Child Lock option, press the buttons for 3 seconds, the lock light will no longer be shown on the LCD and the dishwasher controls will be unlocked.
Cycle progress indicator
These lights indicate how far |
|
||
Pre-wash |
|||
along the current wash cycle is, |
|||
Main-wash |
|||
while the dishwasher is |
|||
running. |
|
Rinse |
|
|
|
Drying |
|
|
|
|
|
|
|
||
Pre |
When the dishwasher is in a Pre-wash portion |
||
wash |
of the cycle, the Pre-wash lights are illuminated. |
||
Main |
When the dishwasher is in a Main-wash of the |
||
wash |
cycle, the Main-wash lights are illuminated. |
||
Rinse |
When the dishwasher is in a Rinse portion of |
||
the cycle, the Rinse lights are illuminated. |
|||
|
|||
Drying |
When the dishwasher is in a Drying portion of |
||
the cycle, the Drying lights are illuminated, the |
|||
|
Drying lights will turn off after the cycle is ended. |
||
8 |
29-6273 |

Getting started
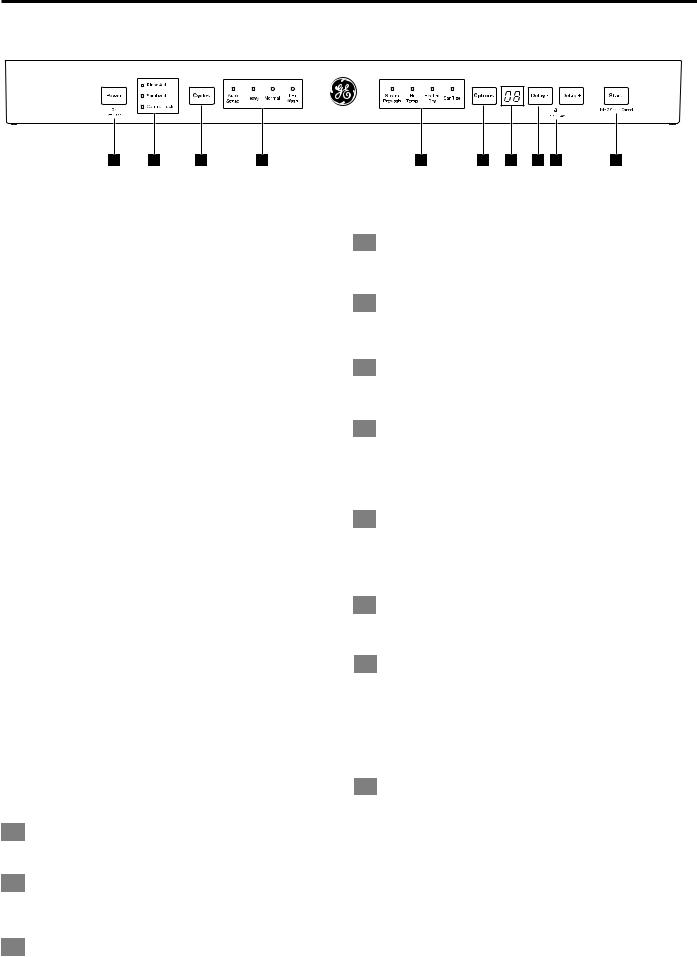
CONTROL PANEL - Model GBT412/632 Series
1 |
|
6 |
|
2 |
 8
8
Power Button
Switch on / off the power by pushing.
Cycles Button
To select the program by pushing.
Options Button
To select a function after setting a program.
Delay Start Button
To set the delay start time, showing in the display window as H01H24.
Start/Cancel Button
When the program and options have been selected, make sure the door is closed press the START/ CANCEL button. To stop or reset the wash cycle, press the START/ CANCEL button, the dishwasher will stop washing.
Note: Once the Start button is pressed and the door is closed, the dishwasher will start operating within a few seconds.
Wash Cycle selections
Rinse Aid. When the indication lights are on, please refill the detergent from the hole located on the dispenser.
Sanitized.
Clean.
Display - Wash Cycle selections
Auto. Auto sensing wash, lightly, or heavily soiled crockery, with or with out dried-on food
Heavy. This cycle is for hard-to-clean, heavily soiled dishes, pots, pans, and dishes.
 7
7
3 |
|
4 |
|
5 |
Normal. For regularly soiled dinner dishes or silverware.
ECO. This is a standard program, suitable to clean normally soiled tableware and is the most efficient program in terms of combined energy and water consumption for that type of tableware.
China/Crystal. For lightly soiled loads, such as glasses, crystal and fine china.
90 mins. Lightly soiled plates and pans that need a quick wash.
Speed. Shorter wash for lightly soiled loads that do not need drying.
Rinse. Use for rinsing dishes glasses and silverware that will not be wash right away.
Options
Heated Dry. When the Heated Dry function is selected, the heater will work during the drying process.
Sanitize. When the”Sanitize”function is selected, the temperature of water will be maintained at 69°C (156.2°F) max. The max. temperature may not be reached if the incoming water temperature
is not correct. Certified residential dishwashers are not intended for licensed food establishments.
TIPS The sanitize option is available with Nomal, Heavy and Energy cycles.
Hi Temp. When the Hi Temp function is selected, the temperature of the water will be maintained at 60°C (140°F) max.
<![endif]>ASHER DISH THE USING
29-6273 |
9 |
<![endif]>USING THE DISHWASHER
Getting started
CONTROL PANEL - Model MBF422 Series
4
|
Wash Cycle Selections |
|
Functions |
Select the appropriate wash cycle depending on the soil level of your dishes. After you select a cycle, the Cycle On light for that cycle lights up. If you want to cancel the selected cycle, press the selected cycle button again.
Heavy. This cycle is for hard-to-clean, heavily soiled dishes, pots, pans, and dishes.
Normal. This is a standard program. For regularly soiled dinner dishes or silverware.
Light. It is suitable to clean normally soiled tableware and it is the most efficient program in terms of it’s combined energy and water consumption for that type of tableware.
Rinse. Use for rinsing dishes glasses and silverware that will not be washed right away.
Heated Dry
When the Heated Dry function is selected, the heater will work during the drying process.
Delay. To delay the start of a selected cycle, press the Delay Start pad until the desired delay time shows in the LED display. You can delay the start for only 2,4,8 hours. To cancel the delay start option before the delay period is over, press the Start/Cancel pad for 3-5 seconds.
Display window. This displays the remaining hours and minutes of the running cycle, delay hours and error codes, etc.
Start/Cancel. Select the washing program or Сancel the washing program when the machine is working.
Child Lock
Press the Programs and Heated Dry buttons for 3 seconds the lock light will display on the LCD.No
buttons can be operated when the dishwasher controls are locked. To cancel the Child Lock option, press the buttons for 3 seconds, the lock light will no longer be shown on the LCD and the dishwasher controls will be unlocked.
10 |
29-6273 |
Getting started
CONTROL PANEL - Model GBP420SSPSS/GBP534SSPSS/GBP534SGPWW Series
1 |
7 |
2 |
8 |
9 |
3 |
10 |
4 |
5 |
6 |
1.Power button
Press this button to turn on the dishwasher or hold the button for 3 seconds to turn off the dishwasher when the machine is on power.
2.Cycles button
Press this button to select the appropriate washing program, corresponding indicator will be lit.
3.Options button
Press the button to select a function, corresponding indicator will be lit.
8.Wash Cycle Selections
Auto
Auto sensing wash, lightly, or heavily soiled crockery, with or with out dried-on food
Heavy
This cycle is for hard-to-clean, heavily soiled dishes, pots, pans, and dishes.
Normal
This cycle is for regularly soiled dinner dishes or silverware.
1 Hour wash
A shorter wash for lightly soiled loads that do not need drying.
4.Delay Start button
Press the Delay+ button to add the delay time or press the Delaybutton to decrease the delay time, maximum 24 hours delay can be defined.
5.Control Lock button
This option allows you to lock the buttons on the control panel, so children cannot accidently start the dishwasher by pressing the buttons on the panel. Only the Power button remains active.
To lock or unlock the buttons on the control panel, press and hold the Delay+ button + Delaybutton for 3 seconds simultaneously.
6.Start button
Start the washing program or pause the washing program when the machine is working.
7.Wash Cycle Selections
Rinse Aid
Turns on when you need to add rinse aid.
Sanitized
Turns on when a sanitized cycle is choosed and the
temperature achieves 69 ( 156.2 ) . Turns off after 30 seconds when the door is opened.
Control Lock
Turns29-6273 on when the control lock function is activate.
29-6273
9.Options
Steam Prewash
Use for heavily soiled items. This option adds additional time to the cycle time and is available with the Auto, Heavy and Normal.
Heated Dry
When the "Heated Dry" function is selected, the heater will work during the drying process.
Sanitize
When the "Sanitize" function is selected, the temperature of water will be maintained at
69 (156.2 ) max. The max temperature may not be reached if the incoming water temperature is not correct. Certified residential dishwashers are not intended for licensed food establishments.
High Temp
When the "High Temp" function is selected,
the temperature of the water will be maintained at 60 (140 ) max.
10.Screen
This displays the remained hours and minutes of the running cycle, delay hours and error codes etc.
11

Getting Started
Filter System
Your dishwasher has a multiple Filter System. In the System there are three mesh filters. It can separate soiled
water and clean water in different chambers.
The multiple filter system helps your dishwasher to get better performance with less water and less energy.
Smart Wash System
Your dishwasher has a
Smart Wash System.
When a partial load of lightly soiled dishes is placed in the unit, a wash cycle similar to a short wash will automatically be performed.
When a full load of heavily soiled dishes is placed
in the unit, a heavy wash cycle will automatically be performed. It can determine the type of cycle required to clean the dishes and
will clean more efficiently every time.
How your dishwasher cleans
Your dishwasher cleans by spraying a mixture of hot water and detergent through the spray arms against soiled surfaces. The dishwasher fills with water covering the filter area. Water is then pumped through the multiple filter and spray arms. Separated soil particles go down the drain as the water is pumped out and replaced with clean water.
The number of water fills will vary with the cycle being used.
Getting Started
1.Load the dishwasher (See Dish Preparation and Loading sections).
2.Add detergent (See Filling the detergent dispenser).
3.Add rinse aid (See Filling the rinse aid dispenser).
4.Select desired CYCLE (See Cycle Chart).
5.Select desired OPTIONS (See Control Panel). The indicator light above the pad will glow when selected.
6.Select desired Options (See Control Panel). The indicator light above the pad will glow when selected.
7.Run the hot water faucet nearest the dishwasher until the water is hot, then turn it off.
8.To start, press Start/Cancel (See Control Panel) and close the door within four seconds.
Note: Your dishwasher has the controls mounted in the front of the door. The door should be closed first if you want to operate the machine.
Wash Cycle Selections
Cycle times are approximate and will vary with the options selected. Hot water is necessary to activate the detergent and melt fatty food soils. An automatic sensor will check the incoming water temperature. If it is not at the appropriate temperature the timer will delay the cycle to allow automatic water heating during the main wash.
When the Hi-Temp wash is selected an even higher temperature will be assured to handle heavier soil loads.
<![endif]>DISHWASHER THE USING
12
29-6273
<![endif]>USING THE DISHWASHER
Loading
Dish Preparation
Scrape away large pieces of food, bones, pits, toothpicks, etc.
The continuously filtered wash system will remove the remaining food particles. Burned-onfoods should be loosened before loading. Empty liquids from glasses and cups.
Foods such as mustard, mayonnaise, vinegar, lemon juice and tomato based products may cause discoloration of stainless steel and plastics if allowed to sit for a long period of time.
Unless the dishwasher is to be operated at once it is best to rinse off these food soils.
If the dishwasher drains into a food disposer, be sure disposer is
completely empty before starting the dishwasher.
Loading the Upper Basket
The upper basket is designed for cups, glasses, small plates, bowls and plastic items marked dishwasher safe, etc.
For best results, place the bowls, cups, glasses, sauce pans with soiled surface facing down or toward the center.
Tilt slightly for better drainage.
Loading the Bottom Basket
The bottom basket is designed to load plates, soup bowls, plates, saucers and cookware. The adjustable basket space will allow you to load items with a maximum height of 11 inches (27.9 cm).
The fold-down tins in the bottom basket make it easy to load those extra large and hard-to-fit items. The tins may be left up for normal use or folded down for more flexible loading. Fold down for more space to load large pots or pans.
Make sure the loaded dishes do not interfere with the rotation of the middle spray arm, which is located at the bottom of the upper basket.
(Check this by rotating the middle spray arm by hand.)
Large items should be placed along the edge so they do not interfere with the middle spray arm rotation, and make sure they not prevent the detergent dispenser from opening.
Large items should be turned so that the inside faces downward, and make sure these items do not interfere with the lower spray arm rotation.
29-6273 |
13 |

Loading
Loading the Lower Basket
The lower basket has been especially designed for dinner dishes, soup bowls, plates, pots, lids, casserole dishes, and plates.
Load large items such as pans and pots into the dishwasher so their open sides face downwards. We recommend loading cups, stemware, and small plates into the upper basket.
See the recommended loading patterns below.
<![endif]>DISHWASHER THE USING
8 Place Setting - GBF180 Series Only
Loading the Upper Basket
The upper basket has been designed for small plates, mugs, glasses, and plastic items marked “dishwasher safe”. Load your plates into the dishwasher in two half rows, so that the front of each plate faces the back of the plate in front of it, and the open sides of the plates at the center of the dishwasher face each other.
See the illustrations below.
10 Place Setting
Make sure the loaded dishes do not interfere with the rotation of the nozzle which is located at the bottom of the upper basket. (Check this by rotating the nozzle by hand.)
When loading dishes, pull the upper basket out sufficiently so you can load it without striking the counter.
8 Place Setting - GBF180 Series Only |
10 Place Setting |
14 |
29-6273 |
 Loading...