


ROOM |
CONDITIONER |
|
|
||
|
AIR |
|
SAFETY INFORMATION . . . . . . . . .3
USING THE AIR CONDITIONER
Temperature Control . . . . . . . . . . . . . . . . . . .4
Air Direction . . . . . . . . . . . . . . . . . . . . . . . . . .4
CARE AND CLEANING
Grille and Case . . . . . . . . . . . . . . . . . . . . . . . .5
Air Filter. . . . . . . . . . . . . . . . . . . . . . . . . . . . . .5
Outdoor Coils . . . . . . . . . . . . . . . . . . . . . . . . .5
Install Batteries in Remote . . . . . . . . . . . . . .5
INSTALLATION INSTRUCTIONS
Before you begin . . . . . . . . . . . . . . . . . . . . . .6 Electrical Requirements . . . . . . . . . . . . . . . .6 Parts Included . . . . . . . . . . . . . . . . . . . . . . . . .7 Window Requirements . . . . . . . . . . . . . . . . .8 Prepare the Air Conditioner . . . . . . . . . . . . .8 Install the Air Conditioner. . . . . . . . . . . . 9-10
TROUBLESHOOTING TIPS. . . . . . 11
Normal Operating Sounds . . . . . . . . . . . . . 12
CONSUMER SUPPORT
Warranty . . . . . . . . . . . . . . . . . . . . . . . . . . . . 15
Consumer Support . . . . . . . . . . . .Back Cover
Write the model and serial numbers here:
Model #_________________
Serial # _________________
You can find the rating label on the side of the air conditioner.
OWNER’S MANUAL
AHD06
AHD08
GE is a trademark of the General Electric Company. Manufactured under trademark license.
49-7778 10-17 GEA

THANK YOU FOR MAKING GE APPLIANCES A PART OF YOUR HOME.
Whether you grew up with GE Appliances, or this is your first, we’re happy to have you in the family.
We take pride in the craftsmanship, innovation and design that goes into every GE Appliances product, and we think you will too. Among other things, registration of your appliance ensures that we can deliver important product information and warranty details when you need them.
Register your GE appliance now online. Helpful websites and phone numbers are available in the Consumer Support section of this Owner’s Manual. You may also mail in the pre-printed registration card included in the packing material.
2 |
|
49-7778 |

IMPORTANT SAFETY INFORMATION
READ ALL INSTRUCTIONS BEFORE USING THE APPLIANCE
WARNING For your safety, the information in this manual must be followed to minimize the risk of fire, electric shock or personal injury.
Ŷ 8VH WKLV DSSOLDQFH RQO\ IRU LWV LQWHQGHG SXUSRVH DV described in this Owner’s Manual.
Ŷ This air conditioner must be properly installed in accordance with the Installation Instructions before it is used.
Ŷ Never unplug your air conditioner by pulling on the power cord. Always grip plug firmly and pull straight out from the receptacle.
Ŷ Replace immediately all electric service cords that have become frayed or otherwise damaged. A damaged power supply cord must be replaced with a new power supply cord obtained from the manufacturer and not repaired. Do not use a cord that shows cracks or abrasion damage along its length or at either the plug or connector end.
Ŷ Turn the unit OFF and unplug your air conditioner before cleaning.
Ŷ GE Appliances does not support any servicing of the air conditioner. We strongly recommend that you do not attempt to service the air conditioner yourself.
Ŷ For your safety…do not store or use combustible materials, gasoline or other flammable vapors or liquids in the vicinity of this or any other appliance.
Ŷ All air conditioners contain refrigerants, which under federal law must be removed prior to product disposal. If you are getting rid of an old product with refrigerants, check with the company handling disposal about what to do.
Ŷ If the receptacle does not match the plug, the receptacle must be changed out by a qualified electrician.
Ŷ These R410A air conditioning systems require contractors and technicians to use tools, equipment and safety standards approved for use with this refrigerant. DO NOT use equipment certified for R22 refrigerant only.

 WARNING USE OF EXTENSION CORDS
RISK OF FIRE. Could cause serious injury or death. |
Ŷ '2 127 XVH VXUJH SURWHFWRUV RU PXOWL RXWOHW DGDSWRUV |
Ŷ '2 127 XVH DQ H[WHQVLRQ FRUG ZLWK WKLV :LQGRZ $LU |
with this Window Air Conditioner. |
|
|
Conditioner. |
|
|
|
HOW TO CONNECT ELECTRICITY |
|
Do not, under any circumstances, cut or remove the third (ground) prong from the power cord. For personal safety, this appliance must be properly grounded.
DO NOT use an adapter plug with this appliance.
The power cord of this appliance is equipped with a 3-prong (grounding) plug which mates with a standard 3-prong (grounding) wall outlet to minimize the possibility of electric shock hazard from this appliance.
Power cord includes a current interrupter device. A test and reset button is provided on the plug case. The device should be tested on a periodic basis by first pressing the TEST button and then the RESET button while plugged into the outlet. If the TEST button does not trip or if the RESET button will not stay engaged, discontinue use of the air conditioner and contact a qualified service technician.
Have the wall outlet and circuit checked by a qualified electrician to make sure the outlet is properly grounded.
Where a 2-prong wall outlet is encountered, it is your personal responsibility and obligation to have it replaced with a properly grounded 3-prong wall outlet.
The air conditioner should always be plugged into its own individual electrical outlet which has a voltage rating that matches the rating plate.
This provides the best performance and also prevents overloading house wiring circuits which could cause a fire hazard from overheated wires.
See the Installation Instructions, Electrical Requirements section for specific electrical connection requirements.
INFORMATION SAFETY
READ AND SAVE THESE INSTRUCTIONS
49-7778 |
3 |

USING THE AIR CONDITIONER
Controls
Features and appearance will vary.
FAN |
COOL |
HIGH |
QUIET |
°F/°C |
ON |
SLEEP |
CLEAN FILTER |
|
|
|
|
|
|
|
|
E-SAVE |
DEHUM. |
MED |
AUTO |
Hr |
OFF |
|
|
POWER
MODE |
SPEED |
Temp. |
TIMER |
FILTER |
|
Time |
RESET |
||||
|
|
|
7KLV VHFWLRQ H[SODLQV KRZ WR RSHUDWH WKLV DLU FRQGLWLRQHU
IMPORTANT:
When you turn off the air conditioner, either at the control panel or with the remote control, wait at least 3 minutes before turning it back on. This prevents the compressor from overloading. This 3 minute delay also applies when switching from cool mode to fan and back.
NOTE: There is a built in 3 minute delay. You may notice the compressor might not start right away. This was designated to protect the unit.
Do not operate your air conditioner in the Cool Mode when the outside temperature is below 61° F (16° C). This inside evaporator coil will freeze up, and the air conditioner will not operate properly.
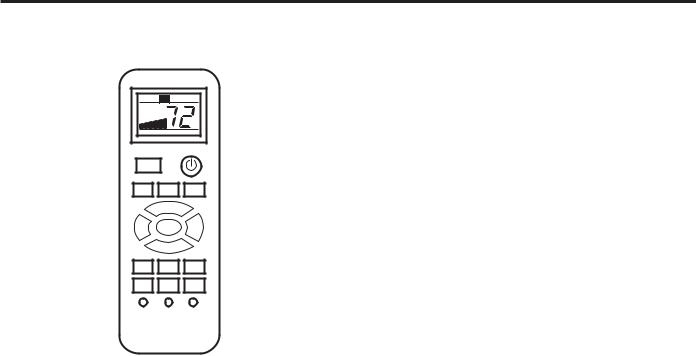
NOTE: When the air conditioner is first plugged in, the LED display will show “88” for 3 seconds. After the air conditioner is turned on for the first time, the display will show the temperature 72° F and the fan will automatically set the Quiet speed and the Mode indicator will show ENERGY SAVE.
NOTE: To switch the temperature display between Fahrenheit (°F) and Celsius (°C), the air conditioner must be plugged in and turned on. On the control panel on the
IURQW RI WKH DLU FRQGLWLRQHU SUHVV WKH 83 DQG '2:1 EXWWRQ at the same time and hold for 3 seconds. Press F/C button on remote control to switch between Fahrenheit (°F) and Celsius (°C).
NOTE: Each time this ENERGY STAR qualified air conditioner is turned on, it will operate in energy save mode per the EPA requirements. You can select any other mode to satisfy your needs.
Controls
1. MODE
1.Press MODE until you see the indicator light come on
QH[W WR WKH GHVLUHG VHWWLQJ
2.Choose Fan, Cool, Energy Save, or Dehum.
Fan - Only the fan runs. Press SPEED to select High, Med or Quiet fan speed. The display shows the current room temperature. NOTE: in fan mode, the temperature cannot be set.
Energy Save - In this this mode the fan runs only when cooling is needed. The fan will run for 3 minutes after the compressor shuts off. The fan then cycles on for 2 minutes at 10 minute intervals until the temperature in the room is above the set temperature. The compressor then turns back on.
Cool - Cools the room. Press SPEED to select High, Med, Quiet or Auto Cool fan speed. Press the TEMP/ TIME or arrow button to adjust the temperature. The fan will run continuously in cool mode.
Dehum - Aids in removing humidity from the room. Dehum mode cannot be used to cool room.
NOTE: In Dehum mode, when the set temperature is close to ambient temperature, the compressor may stop and the fan will run in Quiet speed only.
2. SPEED
1.Press SPEED until you see the indicator light come
RQ QH[W WR WKH GHVLUHG VHWWLQJ
2.Choose High, Med, Quiet, or Auto Cool
+,*+ )RU PD[LPXP FRROLQJ
MED - For normal cooling.
48,(7 )RU PLQLPXP FRROLQJ DQG QRLVH
$872 &22/ $GMXVWV WKH IDQ VSHHG DXWRPDWLFDOO\ WR provide ideal cooling based on the room temperature.
4 |
49-7778 |

Controls
3. TIMER OFF |
5. SLEEP |
To set the air conditioner to turn off between 1 hour and 24 hours (the air conditioner must be ON to set).
1.Press TIMER button until Timer Off indicator light illuminates. The display will show the remaining hours before the air conditioner will turn off.
2.Press the TEMP/TIME or arrow button to change the delay time from 1 hour to 24 hours..
3.Timer Off indicator light will remain on. The display will show the remaining time to Timer Off.
4.TIMER ON
To set the air conditioner to turn on between 1 hour and 24 hours.
1.Press TIMER button until Timer On indicator light illuminates. The display will show the remaining hours before the air conditioner will turn on.
2.Press the TEMP/TIME or arrow button to change the delay time from 1 hour to 24 hours..
3.Timer On indicator light will remain on. The display will show the remaining time to Timer On.
To clear TIMER Program:
NOTE: Air conditioner can be either on or off. Press TIMER until Timer indicator light turns off.
To view or change the remaining time (in hours): TIMER OFF -
1.Press the Temp Time or arrows button to increase or decrease the time.
2.The display will show the remaining time to Timer OFF.
TIMER ON -
1.The display will show the remaining time.
2.Press the Temp Time or arrows button to increase or decrease the time.
3.The display will show the remaining time to Timer ON.
NOTE: In TIMER and SLEEP mode, temperature cannot be adjusted.
1.Press the TIMER button to choose Sleep mode. The indicator light will turn on.
2.The temperature will increase by 2° F one hour after the mode is chosen. The temperature then increases another 2° F after one hour. The unit will hold this
WHPSHUDWXUH IRU VL[ KRXUV WKHQ VWRS
3.To turn off Sleep mode, press the TIMER button until the indicator light is off.
6.TEMP/TIME
1.Press the TEMP/TIME arrow button to raise the temperature. Each time you press the TEMP/TIME up arrow button, the temperature will go up by 1° F until it reaches 86° F (30° C).
2.Press the TEMP/TIME arrow button to lower the temperature. Each time you press the TEMP/TIME down arrow button, the temperature will go down by 1° F until it reaches 61° F (16° C).
NOTE 8QGHU )DQ PRGH WKH GLVSOD\ ZLOO VKRZ WKH FXUUHQW WHPSHUDWXUH 8QGHU (QHUJ\ 6DYH &RRO RU
Dehum mode, the display will show the set temperature.
7. FILTER RESET
This feature automatically notifies you that the air filter must be cleaned. The indicator light will come on after 240 hours of operation. Clean the air filter (refer to Care and Cleaning section), place it back in the front panel, and press the Filter Reset button. The light will turn off.
CONDITIONER AIR THE USING
49-7778 |
5 |
USING THE AIR CONDITIONER
Controls
Using the Remote Control
Remote Control may differ in appearance from the image show.
QUIET |
|
|
HIGH |
MED |
AUTO |
|
TEMP UP |
|
FAN |
COOL |
ENERGY |
|
|
SAVE |
|
TEMP DOWN |
|
TIMER |
TIMER |
TIMER |
UP |
ON/OFF |
DOWN |
DEHUM |
F/C |
SLEEP |
LOCK |
LIGHT |
RESET |
NOTE: Please remove the back of the controller and insert two AAA batteries. Replace batteries after 6 months of use or when remote control starts to lose power.
NOTE: '2 127 PL[ ROG DQG QHZ EDWWHULHV
1. POWER
Press the power button to turn on the air conditioner. When you first press the power button, the air conditioner will operate in Energy Save mode, Quiet fan speed and temperature of 72°F. You can select any other mode to satisfy your needs .
2. SPEED
High - Press HIGH button to choose high fan speed. Med - Press MED button to choose medium fan speed.
Quiet 3UHVV 48,(7 EXWWRQ WR FKRRVH TXLHW IDQ VSHHG Auto Cool 3UHVV $872 EXWWRQ WR FKRRVH DXWR FRRO IDQ speed.
3. MODE
Fan- Press the FAN button to activate fan mode. Cool - Press the COOL button to activate cool mode.
Energy Save Press the ENERGY SAVE button to activate fan mode.
Dehum - 3UHVV WKH '(+80 EXWWRQ WR DFWLYDWH GHKXP mode.
4. TIMER
To set the air conditioner to turn off after a set amount of time between 1 hour and 24 hours (unit must be ON):
1. Press TIMER ON/OFF button on the remote control to select the time off function.
3UHVV WKH 7,0(5 83 RU 7,0(5 '2:1 DUURZ EXWWRQ to change the delay time from 1 hour to 24 hours. Timer OFF indicator light on the air conditioner panel will illuminate.
3. The buzzer beeps twice after 5 seconds, then Timer OFF countdown will initiate.
To clear TIMER Program:
NOTE: Air conditioner can be either on or off.
Press TIMER ON/OFF button until Timer indicator light turns off.
5. TEMP UP/TEMP DOWN
3UHVV WKH 7(03 83 EXWWRQ WR UDLVH WKH WHPSHUDWXUH
(DFK WLPH \RX SUHVV WKH 7(03 83 EXWWRQ WKH temperature will go up 1° F until it reaches 86°F (30°C).
• Press the TEMP DOWN button to lower the temperature. Each time you press the TEMP DOWN button, the temperature will go down 1° F until it reaches
61°F (16°C).
6.SLEEP
1.Press SLEEP button on the remote control to choose Sleep mode. This display will show (08) and the indicator light will turn on.
2.The temperature will increase by 2° F one hour after the mode is chosen. The temperature then increases another 2° F after one hour. The until will hold this
WHPSHUDWXUH IRU VL[ KRXUV WKHQ VWRS
3. To turn off Sleep mode, press the SLEEP button until the indicator light is off.
7.FAHRENHEIT/CELSIUS
•Press the F/C button to choose between Fahrenheit and Celsius.
8.LOCK
•Press the LOCK button on the remote control to disable button functionality. Press the LOCK button again to activate the remote control functionality.
9.LIGHT
•When you press the LIGHT button, the display on the unit will turn off, but the unit is still operating normally. When you press the LIGHT button again or press
any button on the remote control, the display will be illuminated again.
10.RESET
• Press the RESET button to reset the unit to factory settings.
6 |
49-7778 |

Controls
Air Direction |
|
COOL MIN: |
COOL MAX: |
To reduce cooling capacity, point air directional louvers |
7R PD[LPL]H FRROLQJ FDSDFLW\ SRLQW DLU GLUHFWLRQDO |
up. |
louvers down. |
Changing the Air Direction
4-Way Air Flow: The air directional louvers let you control the direction of the airflow. The airflow can be directed up-down and left to right.
CONDITIONER AIR THE USING
49-7778 |
7 |
CARE AND CLEANING
Care and Cleaning
Cleaning the Air Filter
The air filter is removable for easy cleaning. A clean air filter helps remove dust, lint and particles from the air for optimal cooling operating efficiency. The Filter Reset light will turn on to notify you that the air filter must be cleaned. The light goes on after the air conditioner has been operating for 240 hours.
8VH D YDFXXP FOHDQHU ZLWK WKH KRVH DWWDFKPHQW WR FOHDQ the air filter. If the air filter is very dirty, wash it in warm water with mild detergent. Do not wash the air filter in
a dishwasher or clothes washer, or use any chemical cleaners. Do not use a cloth dryer or microwave oven to dry it. Air dry the air filter completely before placing it back in the unit.
1.Turn off the air conditioner and unplug the power supply cord from the outlet.
2.Remove the air filter by opening the front panel and removing the air filter. Some models may have a filter that slides out instead and does not require opening of the front panel.
4.Place the air filter back in the air conditioner.
5.Close the front panel.
6.Plug the power supply cord into the outlet, turn on the air conditioner and press the filter reset button to turn off the indicator light.
NOTE: Do not operate the air conditioner without the filter in place.
Cleaning the Front Panel
1.Turn off the air conditioner and unplug the power supply cord from the outlet.
2.Clean the front panel with a soft cloth. Do not use chemical cleaners, especially spray cleaners, sharp instruments, or flammable fluids. These products can damage the surface of your air conditioner.
3.Air-dry the front panel completely.
4.Plug the power supply cord in the outlet and turn on the air conditioner.
8 |
49-7778 |

Installation Instructions
Questions? Call 800.GE.CARES (800.432.2737) or Visit our Website at: GEAppliances.com
BEFORE YOU BEGIN
Read these instructions completely and carefully.
• IMPORTANT – Save these
instructions for local inspector’s use.
• IMPORTANT – Observe all
governing codes and ordinances.
•Note to Installer – Be sure to leave these instructions with the Consumer.
•Note to Consumer – Keep these instructions for future reference.
•Skill level – Installation of this appliance requires basic mechanical skills.
•Completion time ± $SSUR[LPDWHO\ KRXU
•We recommend that two people install
this product.
•Proper installation is the responsibility of the installer.
•Product failure due to improper installation is not covered under the Warranty.
<RX 0867 XVH DOO VXSSOLHG SDUWV DQG XVH SURSHU installation procedures as described in these instructions when installing this air conditioner.
UNPACKING THE AIR CONDITIONER
 WARNING
EXCESSIVE WEIGHT HAZARD - When moving or lifting the air conditioner, use two or more people. Wear gloves when handling the air conditioner to protect against possible sharp edges and metal fins.
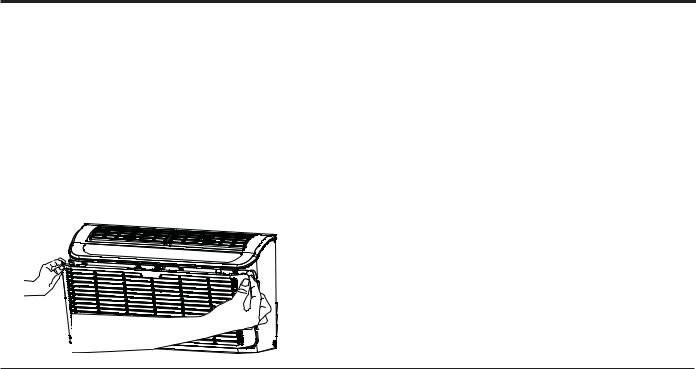
Remove Packaging Materials
•Remove packaging materials. Save the carton and the foam packaging for storing the unit when not in use.
NOTE: There is NO internal packing material inside the air conditioner to remove - DO NOT open the cabinet.
•Handle the air conditioner gently.
•Keep the air conditioner upright and level. Do not set the air conditioner on its side, front, back or upside down.
•The air conditioner must be standing upright for 2 hours prior to installation and operation.
INSTRUCTIONS INSTALLATION
ELECTRICAL
REQUIREMENTS
These models require a 115/120-volt AC, 60-Hz grounded outlet protected with a
15-amp time-delay fuse or circuit breaker.
The 3-prong grounding plug minimizes the possibility of electric shock hazard. If the wall outlet you plan to use is only a 2-prong outlet, it is your responsibility to have it replaced with a properly grounded 3-prong wall outlet.

 CAUTION
Do not, under any circumstances, cut or remove the third (ground) prong from the power cord.
Do not change the plug on the power cord of this air conditioner.
Aluminum house wiring may present special problems—consult a qualified electrician.
Power cord includes a current interrupter device. A test and reset button is provided on the plug case. The device should be tested on a periodic basis by first pressing the TEST button and then the RESET button while plugged into the outlet. If the TEST button does not trip or if the RESET button will not stay engaged, discontinue use of the air conditioner and contact a qualified service technician.
TOOLS YOU WILL NEED
Phillips head screwdriver
Drill and 1/8” drill bit
Pencil |
|
Ruler or tape measure |
|
|
|
Level |
|
Scissors or knife |
|
|
|
|
|
|
49-7778 |
9 |
INSTRUCTIONS |
Installation Instructions |
|
|
|
|
|
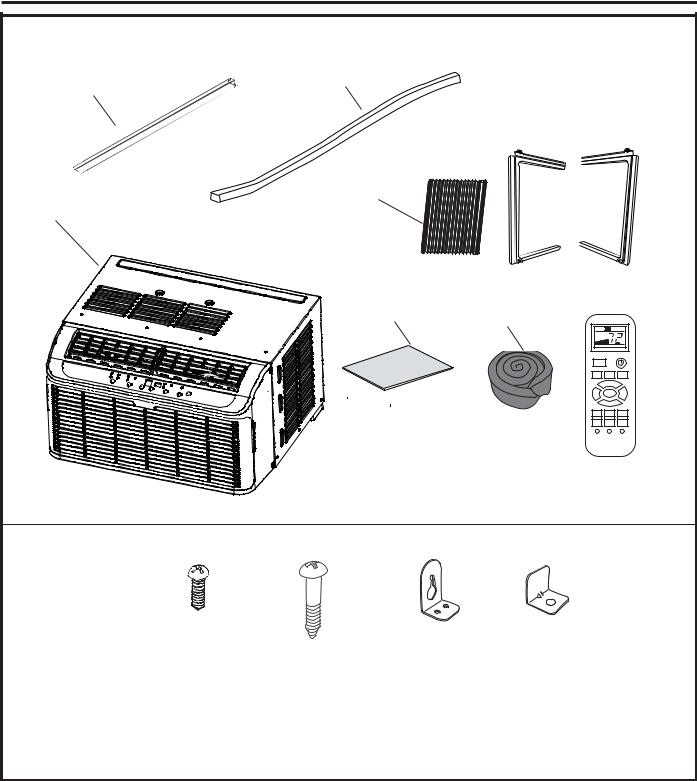
PARTS INCLUDED |
|
|
|
|
|
|
|
(Appearance may vary) |
Weather Seal (3) |
|
|
|
|
|
Top mounting rail |
AHD06 only |
|
|
|
|
|
|
|
|
|
|
|
|
|
|
|
Side Curtain |
|
|
|
|
|
|
Frame |
|
Right |
|
|
|
|
Left |
|
|
INSTALLATION |
|
Side |
|
|
|
|
Air |
Curtain (2) |
|
|
|
|
|
|
|
|
|
|
||
|
conditioner |
|
|
|
|
|
|
|
Side Curtain |
|
|
|
|
|
|
Foam (2) |
Foam |
|
|
|
|
|
AHD06 only |
Seal |
|
|
|
|
|
|
|
QUIET |
|
|
|
|
|
|
HIGH |
MED |
AUTO |
|
|
|
|
|
TEMP UP |
|
|
|
|
|
FAN |
COOL |
ENERGY |
|
|
|
|
SAVE |
||
|
|
|
|
|
TEMP DOWN |
|
|
|
|
|
TIMER |
TIMER |
TIMER |
|
|
|
|
UP |
ON/OFF |
DOWN |
|
|
|
|
DEHUM |
F/C |
SLEEP |
|
|
|
|
LOCK |
LIGHT |
RESET |
|
|
|
|
Remote Control |
||
|
Type A (4) |
Type B (9) |
Side Brackets (2) |
Window locking |
|
|
|
3/8” self- |
1” wood screw |
|
bracket (1) |
|
|
|
tapping screw |
|
|
|
|
|
|
10 |
|
|
|
|
49-7778 |
Installation Instructions
1.WINDOW REQUIREMENTS
•These instructions are for a standard double-hung window. You will need to modify them for other types of windows.
•The air conditioner can be installed without the side curtain panels if needed to fit in a narrow window. See the window opening dimensions.
•All supporting parts must be secured to firm wood, masonry or metal.
•The electrical outlet must be within reach of the power cord.
•Follow the dimensions in the table and illustration for your model.
13 3/8”
26-1/16”- 39-1/4”
(With side curtain panels)
2. STORM WINDOW REQUIREMENTS
A storm window frame will not allow the air conditioner to tilt toward the outside, and will keep it from draining properly. To adjust for this, attach a piece of wood to the sill.
WOOD PIECES WIDTH: 2Ǝ
LENGTH: Long enough to fit inside the window frame.
THICKNESS: To determine the thickness, place
D SLHFH RI ZRRG RQ WKH VLOO WR PDNH LW Ǝ KLJKHU than the top of the storm window frame or the vinyl frame.
Attach securely with nails or screws provided by the installer.
|
Ǝ KLJKHU |
|
|
than vinyl frame |
|
|
(on some windows) |
|
Ǝ KLJKHU |
Wood |
|
|
||
than storm |
|
|
window |
Sill |
|
frame |
||
|
||
Storm window |
|
|
frame |
Vinyl frame |
|
|
3.PREPARE THE AIR CONDITIONER
A.Install the top mounting rail with 3 Type A screws
Top Mounting rail
B. Slide the side curtain panels into the side panel rails.
C. For model AHD06, cut and apply a weather strip to side of the curtain frame (one each side).
D. Slide left and right side curtain frames into top and bottom rails. Make sure that side curtains snap into side of the frames.
CLICK
INSTRUCTIONS INSTALLATION
49-7778 |
11 |
 Loading...