

Page 1

THE UNDERWATER COMBAT SIMULATION
Game Manual
Page 2

THE UNDERWATER COMBAT SIMULATION
Technical Supplement
for IBM PC Compatibles
Page 3

TECHNICAL SUPPLEMENT
Contents
Your SubWar 2050 package should contain a Game Manual, a copy of
UnderCurrents, this Technical Supplement, a Key Guide, a set of 3.5” high density
disks and a registration card.
Required Equipment
● Computer
SubWar 2050 requires an IBM PC AT or a computer 100% compatible with this
model.
The computer must have a high density floppy disk drive and a hard disk.
SubWar 2050 requires an 80386 processor and at least 1Mb RAM.
● Controls
Although SubWar 2050 can be run entirely from a standard or portable PC
keyboard, a mouse and joystick are strongly recommended.
● Display
SubWar 2050 requires a colour monitor with a VGA graphics system. If you are
using a compatible graphics card/monitor, it must be 100% compatible with VGA
systems.
● Disk Drives
SubWar 2050 must be installed onto a hard disk with 12Mb of free space.
● DOS
You must have IBM PC-DOS or Microsoft MS-DOS version 5.0 or higher.
2
Page 4

TECHNICAL SUPPLEMENT
Copy Protection
SubWar 2050 has no disk copy protection. However, the program asks you a
manual-related question. Use the manual to answer the question. MicroProse
regrets that continuing casual and organised software piracy requires that this
minimal form of copy protection is retained.
Installation
An installation program is included on the SubWar 2050 Disk A.
Insert Disk A into your floppy drive (drive A or B) and designate that drive (by
typing “A: [Return]” or “B: [Return]”).
When the new prompt appears, type “INSTALL [Return]”
Please follow the on-screen text which appears.
The default (pre-set) installation routine places SubWar 2050 in a directory named
C:\MPS\SUBWAR
Loading Instructions
Switch on your machine and wait until the C:\> prompt appears.
Type “CD MPS\SUBWAR [Return]” and then type “SUBWAR [Return]” to run
the game.
Note: If you have installed SubWar 2050 to another directory, you must type “CD
[name of your directory]” first.
If the game fails to load, read the Problem Section of this Technical Supplement.
3
Page 5

TECHNICAL SUPPLEMENT
Sound
SubWar 2050 supports the PC internal speaker, AdLib compatible cards,
SoundBlaster compatible cards and the Roland LAPC-1 card.
Operating Difficulties and Loading Problems
Q. Why can’t I install the game to my hard disk?
1. You must check all system requirements, especially any mention of hard disk
space required, listed in this Technical Supplement.
2. If you still have a problem, you should make copies of the original disks and use
the duplicates in place of the originals; sometimes you’ll get a read error due to a
difference in head alignment.
3. If the game still doesn’t work, make sure you are not running a compression
utility program on your hard disk.
4. Finally, try installing the game on another machine to see if the problem recurs.
Q. How do I copy disks?
From the C:\> prompt, use the DOS command DISKCOPY A: A: [Return]. Follow
the on-screen prompts.
Q. Why won’t my game load?
You must have 611,000 bytes (596K) of Conventional Memory and 10K UMB
(Upper Memory Block).
To check that you have allocated an upper memory block, look for the line
DOS=UMB (MS-DOS 6) or DOS=HIGH,UMB (MS-DOS 5) in your PC's
CONFIG.SYS file.
Slow Running
If you are not running from a boot disk, please ensure that you have
SMARTDRV.SYS or SMARTDRV.EXE loaded into your CONFIG.SYS or
AUTOEXEC.BAT.
4
Page 6

TECHNICAL SUPPLEMENT
Conventional Memory
To check how much Conventional Memory is available, type MEM/C from the C:\>
prompt and press the Return key. Look for the Largest Executable Program
details. If there is not enough Conventional Memory, you may need a Boot Disk.
Q. What is a Boot Disk?
This is a Start Up disk for your computer which contains alternative start up files
to those on your hard disk. The Boot Disk will allow you more Conventional
Memory.
Making a Boot Disk
Instructions for making an MS-DOS Boot Disk (also known as a System Disk) will
be found in your Microsoft manual.
Using a Boot Disk
Insert the Boot Disk into your floppy disk drive A and then switch on the
computer. You should leave the disk in the floppy drive during play.
Q. Can I run my game through Windows?
No, this is not recommended, unless specifically mentioned in the system
requirements.
Q. Does my game run with DR DOS?
Success is not guaranteed. MicroProse games are currently designed to run with
MS-DOS 5.0 or 100% compatible DOS.
5
Page 7

TECHNICAL SUPPLEMENT
Q. What is Base Memory?
This is the original 1Mb (1024K) in your machine. It is divided up into
Conventional Memory (640K), where MS-DOS and all PC programs load and
Upper Memory (384K), where system drivers (such as the mouse driver) reside.
In MS-DOS 5.0 the bulk of the operating system and associated drivers are
normally loaded into Upper Memory. Other drivers held in the area of
Conventional Memory will reduce your 640K available for the program.
Q. What is Extended Memory (XMS)?
Further memory, beyond the 1Mb of Base Memory on your PC is called Extended
Memory. XMS can be used to free more Conventional Memory so that bigger games
can be run. XMS can also be used to simulate Expanded Memory.
Q. What is Expanded Memory (EMS)?
EMS was originally designed to give the PC more memory to run programs. It has
been around far longer than XMS so most programs take advantage of it. Most
MicroProse games take advantage of EMS. The DOS command EMM386.EXE can
be used to turn XMS into EMS and should be in your CONFIG.SYS.
Remember that hard disk space is also measured in Megabytes (Mb). Don’t confuse
this with memory - the two are completely different!
6
Page 8

TECHNICAL SUPPLEMENT
Technical Assistance
If you have read through the Problems Section of this technical supplement and
still experience difficulties with the game, you may need some help from us. As we
receive many calls every day, we can deal with your enquiry more efficiently if you
have the following information available:
1. The correct name of the game
2. The type of computer you are running it on
3. Your DOS version
4. How much conventional memory you have
5. The exact error message reported (if any)
6. The version # of the game
Ring us on 0454 329510, Monday to Friday 0900 to 1700 hours. Have a pen and
paper handy when you call. Alternately, you can write to Customer Services at the
address shown in this document.
Virus
Be aware that a virus may have transferred into your hardware from another piece
of software. Pirated copies of games are an incredibly common source of virus
problems It always pays to own original software.
Software Fault
In the unlikely event of a software fault please return the complete package, with
your receipt, to the place of purchase. MicroProse regret that goods cannot be
replaced unless bought from the company directly.
The Read Me File
The latest notes regarding this program, additions, revisions etc can be found in a
file named README.TXT in the SUBWAR directory. These notes may be read by
using either standard DOS commands or the DOS 5.0 text editor (type EDIT
README.TXT).
7
Page 9

TECHNICAL SUPPLEMENT
Seriously Fun Software
®
MicroProse Ltd. The Ridge, Chipping Sodbury, Avon BS17 6AY
Tel: 0454 329510
Game Design and Program Copyright ©1993 Particle Systems
Documentation, Packaging and Logo Copyright ©1993 MicroProse Ltd
This documentation, accompanying manuals and floppy disks are copyrighted. The owner of this
product is entitled to use this product for his or her personal use. Except for back-up copies of the disks
for personal use and the quoting of brief passages for the purposes of reviews, no one may transfer,
copy, back-up, give or sell any part of the manual or the information on the disks, or transmit in any
form or by any means, electronic, mechanical, photocopying, recording or otherwise without the prior
permission of the publisher. Any person or persons reproducing any part of this program, in any media,
for any reason, shall be guilty of copyright violation and shall be subject to civil liability at the
discretion of the copyright holder.
Made in the UK
MP122153T/SR
8
Page 10

THE UNDERWATER COMBAT SIMULATION
MicroProse Ltd. The Ridge, Chipping Sodbury, Avon BS17 6AY
Tel: 0454 329510
Game Design and Program Copyright ©1993 Particle Systems
Documentation, Packaging and Logo Copyright ©1993 MicroProse Ltd
This documentation, accompanying manual and floppy disks are copyrighted. The owner of this product
is entitled to use this product for his or her personal use. Except for back-up copies of the disks for
personal use and the quoting of brief passages for the purposes of reviews, no one may transfer, copy,
back-up, give or sell any part of the manual or the information on the disks, or transmit in any form or
by any means, electronic, mechanical, photocopying, recording or otherwise without the prior
permission of the publisher. Any person or persons reproducing any part of this program, in any media,
for any reason, shall be guilty of copyright violation and shall be subject to civil liability at the
discretion of the copyright holder.
Made in the UK
Page 11

GAME MANUAL
CREDITS
Game Design & Programming Michael Powell for Particle Systems
3-D Shape Design Saul Markese
Michael Powell
Additional Shape Design Amanda Roberts
Kevin Ayre
Graphics and Animations Mark Scott
Eddie Garnier
Additional Graphics Martin Smillie
Mission Design Mike Brunton
Music and Sound Effects Matthew Walden
Quality Assurance Management Peter Woods
Quality Assurance Testing Andrew Luckett
Darren Kirby
James Hawkins
Andrew Hieke
Peter Moreland
Documentation Kristian Ramsay-Jones
Packaging Design Julie Burness
Sarah Warburton
Game Manual Design Sarah Kerr
Undercurrents Design Sarah Warburton
Managing Editor Alkis Alkiviades
Product Marketing Manager John Davis
Producer Tim Roberts
Publishers Paul Hibbard
Peter Moreland
Special Thanks to Peter Hunter at the Institute of Oceanographic Studies for
Undersea Topological Data.
2
Page 12

GAME MANUAL
CONTENTS
Introduction ..................................................................................5
The Manuals ..........................................................................5
Controls.................................................................................6
The Controller...................................................................6
The Selector......................................................................6
Getting Started .............................................................................7
Sorting the Materials..............................................................7
Installing/Loading
SubWar 2050.............................................7
Copy Protection.....................................................................7
The Command Centre...................................................................8
New Campaign .......................................................................9
Quit........................................................................................9
Game Options.......................................................................10
Simulated Combat.................................................................12
Pilot Roster ..........................................................................12
Mission Briefing....................................................................13
The Orders......................................................................14
The Mission Map...............................................................14
The 3-D Briefing...............................................................15
Configure Subs .....................................................................16
The Configuration Screen ...................................................16
The Arming Screen............................................................17
Enter Mission........................................................................17
3
Page 13

GAME MANUAL
CONTENTS
The Mission.................................................................................18
Piloting Your Submarine.......................................................18
Primary Controls..............................................................18
The 3-D Display................................................................19
The Head-Up Display.........................................................20
The Cockpit Displays .........................................................22
Full-Screen Displays..........................................................26
Other Controls .................................................................27
Views....................................................................................28
Cockpit Views ..................................................................28
External Views .................................................................28
Returning to the Sub Carrier................................................29
Mission Debriefing.....................................................................30
4
Page 14

GAME MANUAL
INTRODUCTION
ubWar 2050 is a unique simulation. It combines elements of submarine
S
warfare, flight simulation and strategy game; set in a realistic future world
scenario.
You take the part of one of the new breed of submariners, piloting the latest in
marine technology; the fighter sub. Working for huge corporations as an
independent mercenary, each mission you carry out is rewarded in hard cash.
One moment, you are battling using tactics which are drawn from air warfare. The
next, you are diving deep to reduce your cavitation and coming to a halt to reduce
your passive sonar visibility.
Varied missions in four theatres of war, simulated combat mode and a full
complement of training missions make SubWar 2050 the definitive underwater
combat simulation.
The Manuals
This manual is organised to help you start playing SubWar 2050 quickly:The section on The Command Centre will introduce you to the different levels of
play in SubWar 2050.
The section on The Mission explains how to operate your sub’s control, navigation
and combat systems.
The separate UnderCurrents manual contains information which may be useful as
you get deeper into the game.
5
Page 15

GAME MANUAL
Controls
The Controller
You can play SubWar 2050 using a combination of Keyboard, Mouse or Joystick.
For piloting submarines, it is recommended that you use a Joystick and for menu
selection it is recommended that you use a Mouse.
In this manual, which is applicable to all computer systems, these three devices are
known as the Controller.
The Selector
During the game, you may be asked to select from a list of options. You will be able
to use either the Keyboard Return/Enter key, the Left Mouse Button (abbreviated
to LMB) or the Joystick Fire Button.
In this manual, these devices are referred to as the Selector.
6
Page 16

GAME MANUAL
GETTING STARTED
Sorting the Materials
Your SubWar 2050 package contains this Manual, a copy of UnderCurrents, a
Technical Supplement, a Key Guide and a set of disks to run the simulation.
Installing/Loading
The Technical Supplement gives specific instructions for installing and/or loading
SubWar 2050 for your particular computer.
SubWar 2050
Copy Protection
After the opening screens, you are taken to the Copy Protection screen. Enter the
correct word from the manual using the reference given.
When you have completed the Copy Protection, you are transferred to The
Command Centre, on board the sub carrier.
7
Page 17

GAME MANUAL
THE COMMAND CENTRE
The Command Centre is the central room of your sub carrier. The Command
Centre screen contains a number of options which are accessed by moving the
Cursor over an ‘active’ area of the screen and pressing the Selector.
New
Campaign
Quit
Simulated
Combat
Pilot Roster
Mission
Briefing
When you move the cursor over an ‘active’ area of the Command Centre, its
function is displayed in the box at the top centre of the screen.
Game
Options
Configure
Subs
Enter
Mission
8
Page 18

GAME MANUAL
➦
New Campaign
Select ‘New Campaign’ to begin a new campaign. You may choose from:-
North Pacific - Training
Antarctica - The Hot Cold War
North Atlantic - The Treasure Trove
South China Sea - Trouble in Paradise
North Pacific/Sea of Japan - Small Insults, Big Business
The training campaign is recommended for rookie sub pilots. Each of the other
four scenarios have their own unique challenges and may be played in any order.
Click on the icon to change the current campaign. You may change your
current campaign at any time; the position reached in your previous campaign will
be saved.
Click on the icon to view the scenario briefing text.
Click on the icon to return to the Command Centre.
Quit
Select ‘Quit’ to exit Subwar 2050 and return to your computer’s operating system.
9
Page 19
GAME MANUAL
➦
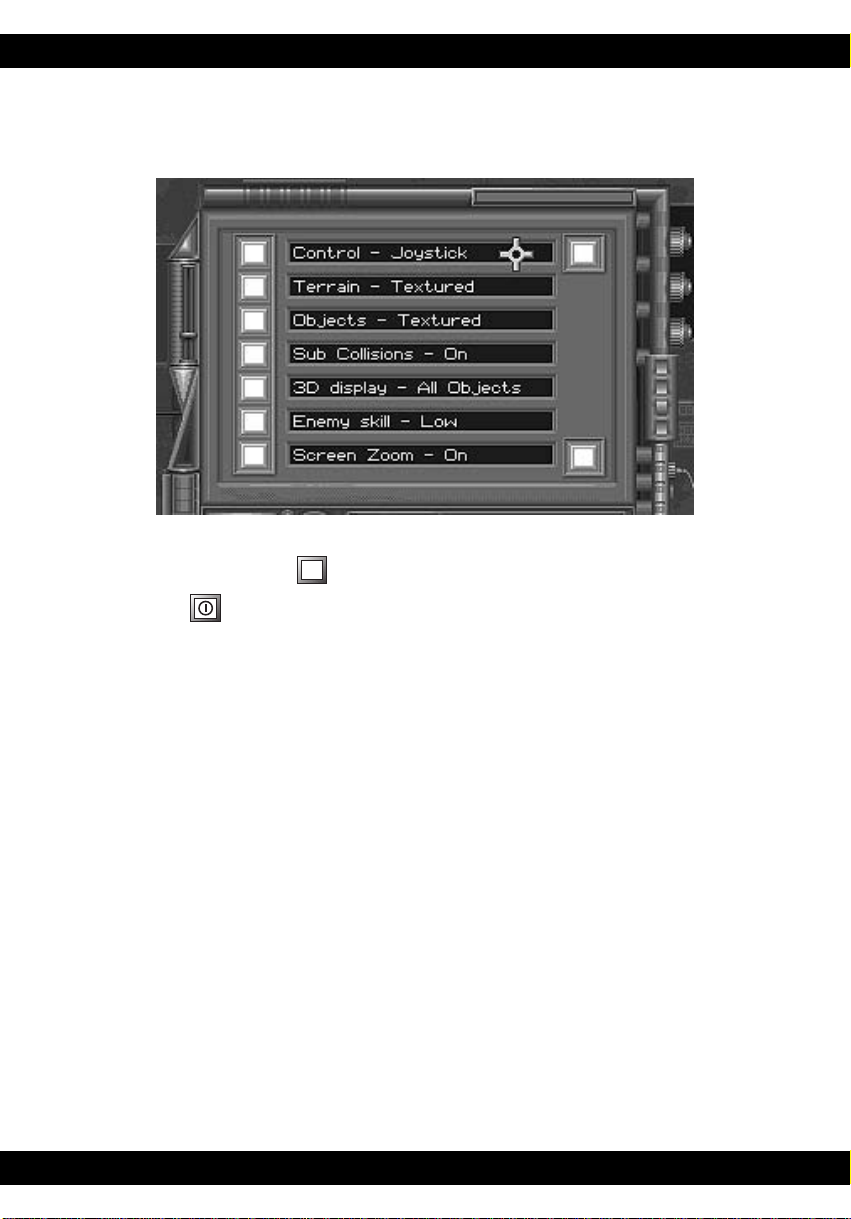
Game Options
Select ‘Game Options’ to make game configuration changes. To change a particular
game option, click on the icon.
Click on the icon at the bottom of the Game Options screen to return to the
Command Centre.
Calibrate Joystick
Select this option to calibrate an analogue joystick.
Control Mode - Mouse/Joystick/Keyboard
Select this option to change the submarine control mode.
Terrain Shading - Textured/Plain/Wireframe
Select this option to change the 3-D terrain shading mode - fully textured terrain
can slow the frame update rate significantly, especially on slower machines.
Object Shading - Textured/Plain/Wireframe
Select this option to change the 3-D object shading mode.
10
Page 20

GAME MANUAL
Collisions - On/Off
Selecting ‘Collisions Off’ prevents your submarine from sustaining damage if it hits
the seabed or another submarine.
Selecting ‘Collisions On’ is more difficult to play, but will result in a higher mission
score.
Sonar Realism - Realistic/Simplified
During real underwater engagements, the only way of seeing stationary enemies is
to use your active sonar. However, this has the disadvantage of broadcasting your
position to the enemy.
The ‘Simplified’ sonar realism setting allows you to see all submarines within a
range of approximately 1 kilometre. This is unrealistic, but makes the game easier
to play. However, while you can see the enemy, you cannot target them until they
are detected by your active or passive sonar.
The ‘Realistic’ sonar realism setting will only display those submarines which your
active or passive sonar has detected. Playing on this setting is more difficult, but
will result in a higher mission score.
Enemy Skill Level - High/Medium/Low
The enemy skill level affects the intelligence, aggressiveness and number of
opponents you encounter during a mission.
Playing on a high skill level will result in a higher mission score.
Screen Zoom - On/Off
Select ‘Screen Zoom off’ to turn off the zoom effect between screens.
11
Page 21

GAME MANUAL
Simulated Combat
Selecting ‘Simulated Combat’ puts you into a fighter sub simulator, in the middle of
a multi-sub underwater dogfight. ‘Simulated Combat’ allows you to perfect your
underwater combat technique without getting killed.
The score which you get at the end of a ‘Simulated Combat’ session is dependent on
several factors, including how many enemy subs you destroy and the number of
weapons it took to destroy them.
For more details on piloting submarines, see the section of this manual on ‘The
Mission’.
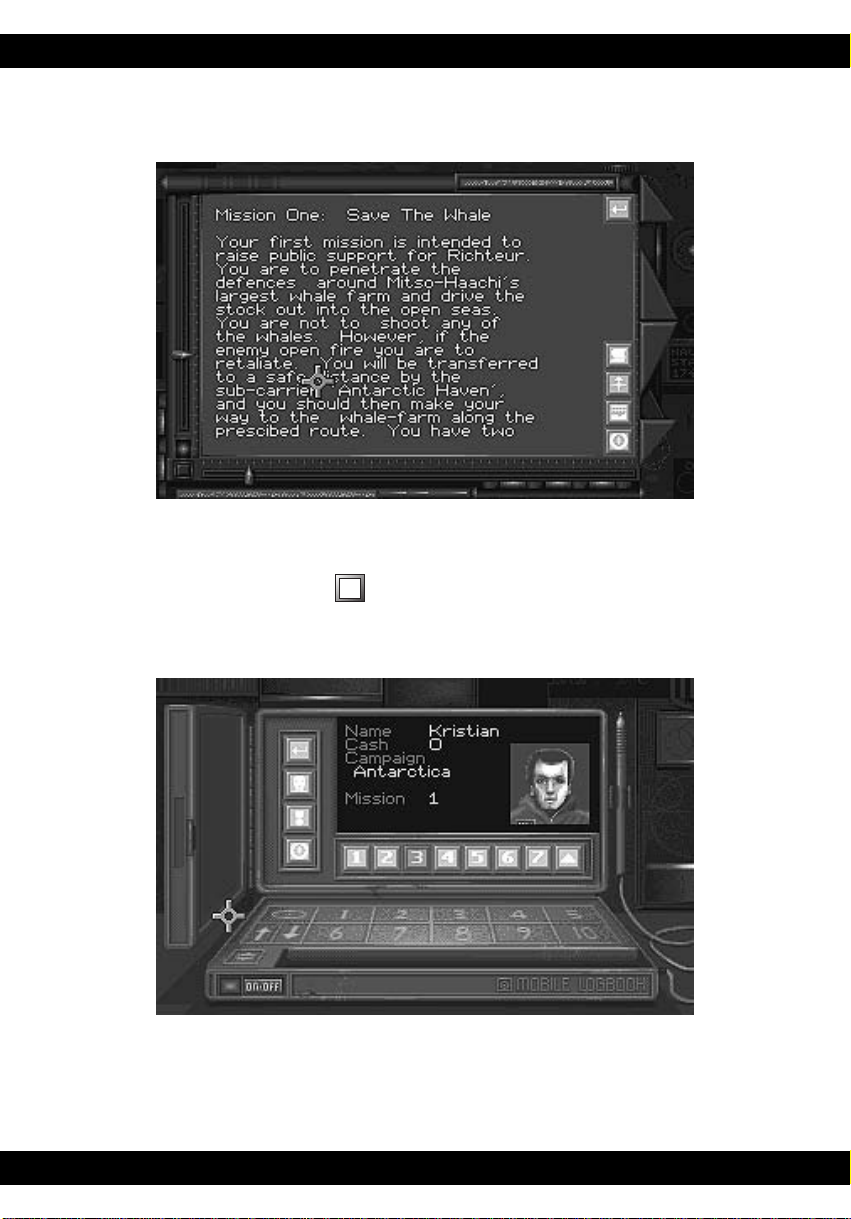
Pilot Roster
The Pilot Roster screen allows you to select or create a pilot.
If you wish to play a different pilot, click on one of the eight numbered icons along
the bottom of the pilot status display. If the pilot is unavailable for action, they are
listed as either ‘KIA’ (Killed In Action), ‘MIA’ (Missing In Action) or ‘Captured’.
12
Page 22

GAME MANUAL
➦
If you want to create a new pilot, click on one of the eight numbered icons to select
the pilot you wish to delete, then click on the icon. Type in the new pilot’s
name using the keyboard and press RETURN. The default campaign for new sub
pilots is ‘Training’. Return to the Command Centre and enter the ‘New Campaign’
screen if you wish to select a different campaign.
If you wish to change the face of the selected pilot, click on the icon.
Click on the icon to view the selected pilot’s medals and awards.
Click on the icon to return to the Command Centre.
Mission Briefing
When you have created or selected a pilot in the Pilot Roster and you have selected
a campaign, you are able to enter the Mission Briefing.
The Mission Briefing consists of three screens:-
● the Orders - click on the icon.
● the Mission Map - click on the icon.
● the 3-D Briefing - click on the icon.
Click on the icon to return to the Command Centre.
13
Page 23
GAME MANUAL
➦
The Orders
The Orders screen consists of a brief description of the mission’s objectives, rules
of engagement and intelligence data on enemy activity. To view the next page of the
Mission Briefing, click on the icon.
The Mission Map
The Mission Map is a top-down view of the mission area. You may also call up a
Mission Map when you are in the cockpit of your submarine.
14
Page 24

GAME MANUAL
The 3-D Briefing
The 3-D Briefing augments the Mission Map by providing a 3-D view of the mission
area. Additional data is provided on this screen concerning the depth of the mission
waypoints.
The 3-D view may be manipulated by using the ten icons in the top right of the 3-D
briefing screen:-
Select the or icons to move the display West or East.
Select the or icons to move the display North or South.
Select the or icons to move the display up or down.
Select the or icons to rotate the display to the right or left.
Select the or icons to tilt the display forward or backward.
15
Page 25

GAME MANUAL
Configure Subs
When you have completed your Mission Briefing, you may enter the ‘Configure
Subs’ screens. This consists of two displays:-
● the Configuration Screen
● the Arming Screen
The Configuration Screen
This is the first screen in the ‘Configure Subs’ section. It consists of a 3-D display
of the sub(s) you are taking on your mission and their payload, orders, type and
formation position.
Click on the or icons to select the next/previous sub. The selected sub
is highlighted with a pair of yellow brackets.
Click on the icon to change the highlighted sub’s position in the formation.
Click on the icon to change the highlighted sub’s orders.
Click on the icon to enter the Arming Screen.
16
Page 26

GAME MANUAL
The Arming Screen
This screen allows you to adjust the payload of your sub to suit your particular
tactics or skill level. For example, when you have become a proficient sub pilot you
might prefer to take rockets on a mission instead of torpedoes.
Click on the or icons to select the next/previous weapon bay. The
selected weapon bay is highlighted with a yellow box.
Click on the icon to load more of the selected weapon onto your sub.
Click on the icon to unload the selected weapon from your sub.
Click on the icon to return to the Command Centre,
Enter Mission
When you have configured your submarines, click on the bottom right-hand
monitor to begin your mission.
17
Page 27

GAME MANUAL
THE MISSION
Piloting Your Submarine
You begin most missions under the submarine carrier, moments after launching.
Primary Controls
Submarine controls are split into three different groups -
Directional Controls which allow you to turn, dive and climb.
Engine Controls which allow you to control your speed.
Ballast Tank Controls which provide additional control over depth. These controls
may also be used when you are stationary, hiding from passive sonar.
Directional Controls
Joystick Keyboard Mouse
roll left
pitch down
roll
right
pitch up
pitch down
roll left
pitch down
roll right
roll right
roll left
pitch up
pitch up
18
Page 28

GAME MANUAL
Press L to lock your submarine into single-plane manoeuvring. With this function
on, moving the controller to the left or right will make the sub turn in that direction
with no change in its roll angle. Single-plane manoeuvring is useful when you are
lining up on targets and when you are running on the surface.
Engine Controls
+ Increase throttle
- Decrease throttle
shift - Set throttle to minimum power
[ Set throttle to 1/3 power
] Set throttle to 2/3 power
shift + Set throttle to maximum power
Ballast Tank Controls
8 Flood ballast tanks
9 Flood/blow ballast tanks to remain at current depth
0 Blow ballast tanks
Note: If you want to dive or climb really fast, combine the dive controls with the
engine controls.
The 3-D Display
It is too dark to navigate a submarine visually at depths below about 200 feet. For
this reason a 3-D seafloor display, generated from seafloor survey data, is
projected onto the inside of your sub’s cockpit. This ‘virtual world’ display is also
used to show your opponents’ submarines via active sonar imaging.
19
Page 29

GAME MANUAL
The Head-Up Display
The Head-Up Display is overlaid on the 3-D display and shows the following data:-
Artificial Horizon
When your sub is not at a high nose-up or nose-down angle, you will be able to see
the artificial horizon bar. This is displayed on the HUD as a short red line,
allowing you to see if your sub is in a level attitude.
Waypoints
When you reach a waypoint, it will be displayed on your HUD as a green triangle.
If you fly through the centre of this triangle, your sub’s navigation system will
automatically switch to track the next mission waypoint.
Thermal Layers
Thermal layers are boundaries between warm and cool water which are set up by
ocean currents. They are very important to sub pilots because they reflect sonar
just like a mirror reflects light. If you position your sub with a thermal layer
between it and the enemy, you will be invisible to their sonar.
Thermal layer boundaries may be one of two types:From warm to cool water - displayed on your HUD as a green grid.
From cool to warm water - displayed on your HUD as a red grid.
Thermal layers are also useful to orientate yourself. For example, if you are
upside-down you will see red thermal layers below you.
Waypoint
Thermal
Layer
Artificial
Targeted
object
20
marker
Horizon
Page 30

GAME MANUAL
Targeting
When your sonar detects an object, it will mark it with a box on the HUD. The
currently targeted object is marked with a diamond-shaped box, all other contacts
are marked with square boxes. The HUD targeting display also presents the
following target information:-
● the object’s distance from the nearest thermal boundary. This is represented
by a line extending vertically from the sonar contact to the thermal boundary.
If there is no thermal boundary nearby, this line will not be displayed.
● target type, which may be one of the following:SUB - a submarine
BIO - a marine lifeform
SHP - a ship
HLI - a helijet
TRP - a torpedo or rocket
MNE - a mine or depth charge
TRN - a transponder
DCY - a decoy
STR - a structure such as an underwater base
DBR - underwater debris
UNK - unknown
● target rating, denoted by the colour of the tracking box:Blue - friendly object
Red - enemy object
Green - neutral or unknown object
The Head-Up Display may be toggled on or off by pressing H.
21
Page 31

GAME MANUAL
The Cockpit Displays
Instruments
Targeting
Display
Navigation
Display
The cockpit display consists of four large screens, augmenting the 3-D display and
the HUD. There are also two small displays for instant assessment of your
detectability and damage status.
Weapon
Display
Sonar
Cross
Section
(SCS)
Display
Damage
Status
22
Page 32

GAME MANUAL
Navigation Display
The Navigation Display has two modes; Waypoint and Map. Press M to toggle
between these two modes.
In Waypoint mode, the Navigation Display lists the following information:-
WAYPT - waypoint currently being tracked by the navigation system.
BEARING - the bearing along which you must travel to reach the waypoint.
RANGE - the distance to the waypoint.
DEPTH - the depth of the waypoint.
TIME - the elapsed mission time (you will be told in the briefing if you
have a set time to complete the mission).
CLRNC - the clearance between the seabed and your sub. If you get within
100 feet of the seabed, this readout will change from yellow to red.
In Map mode, the Navigation Display shows a map of the immediate terrain with
your sub in the centre. As on the HUD, all objects are colour coded:Yellow - your sub Blue - friendly object
Red - enemy object Green - neutral or unknown object
Instruments
The Instruments consist of three rows of figures:The top line shows your current heading in degrees. The direction you must turn to
reach the currently selected waypoint is also shown, as arrows to either side of the
heading readout.
The second line shows the speed of your sub in knots, followed by your throttle
setting (between 0 and 120).
The last line shows your current depth in feet.
23
Page 33

GAME MANUAL
Targeting Display
The targeting display gives a readout of data concerning the currently targeted
sonar contact. To change the currently targeted sonar contact, press r.
CONTACT - the number of the currently targeted contact followed by the
total number of sonar contacts.
TYPE - the type of contact (e.g. SUB - a submarine). This may change as
your sub gets closer to a contact and identifies it more positively.
RATING - the target’s rating (friendly, enemy, unknown).
BEARING - the bearing which you must follow to reach the contact.
COURSE - the course which the contact is following.
SPEED - the speed at which the contact is travelling.
RANGE - the distance from your sub to the contact, in nautical miles.
CONF - the confidence factor of your submarine’s weapon systems in
hitting the targeted object with an active homing torpedo.
Confidence factors are based on many separate considerations
including the time the object has been tracked for and the amount
of noise it is making. Confidence factors in excess of 100 are
required to guarantee a hit.
Note: if a torpedo is fired at you, it will be targeted automatically to give you the
maximum chance of avoiding it. By making maximum use of the external views, you
should be able to anticipate the torpedo’s manoeuvres and outsmart it.
24
Page 34

GAME MANUAL
Weapon Display
The Weapon Display allows you to see what weapons you have selected and how
many are remaining.
The top line of the display shows which weapon bay is selected. To change the
selected weapon bay, press B.
The second line of the display shows the weapon carried in the selected bay and
number of these weapons remaining. To fire a weapon, press X.
The third line of the display is the weapon status. This can be one of the following:-
READY - the selected weapon is ready to be launched
ARMING - the selected weapon has just been launched and is arming itself
EMPTY - the selected weapon bay is empty
DAMAGED - the weapon systems are damaged
The final line of the Weapon Display is the sonar status. Press S to change your
sub’s sonar mode. You may choose between:-
OFF - sonar systems off
PASSIVE - passive (listening) sonar on
ACTIVE - active (echo) sonar on
If an enemy torpedo is launched at you,press D to release a decoy, then carry out a
hard turn. This should allow you to escape unscathed.
Sonar Cross-Section (SCS) Display
The SCS Display is a bar scale running from left to right which allows you to see the
amount of noise you are making. If the display is black, you are completely silent.
If it is yellow, you are making some noise and you risk enemy detection. If it is red,
you are broadcasting your position to everyone in the immediate vicinity. To keep
your noise level down, you must run slowly and use active sonar with extreme care.
Damage Status
The eight bars below the SCS Display represent the status of your sub’s primary
systems. The bar scale is entirely green if the system is undamaged, yellow if partly
damaged, red if heavily damaged and black if destroyed. See Damage Status in the
next section for full details.
25
Page 35

GAME MANUAL
Full Screen Displays
Map Screen
Press 1 to enter the mission map. This is similar to the Mission Map in the
Command Centre, but has some additional functions:-
Click on the icon to increase the map magnification.
Click on the icon to decrease the map magnification.
Click on the icons to toggle the auto-centring function on or off. Auto-
centring keeps your sub at the centre of the map display at all times.
Click on the icon to return to your sub’s cockpit.
Damage Status Screen
Your sub is equipped with a complex network of damage assessment and automatic
repair systems. Press 2 to enter the screen which controls these systems; the
Damage Status screen.
The Damage Status screen allows you to assess your current damage status and modify
your sub’s automatic damage repair systems to repair important systems first.
In the bottom of the Damage Status screen, there is a list of your sub’s primary
systems. These include such items as Hull Structure, Weapon Systems and Sensor
Systems.
For each primary system, there is a display consisting of, from left to right:-
● the name of the system.
● a bar chart which shows the damage status. This is green if the system is fully
operational, yellow if partly damaged, red if heavily damaged and black if
destroyed.
● a brief description of the repair state. This may be:-
OPERATIONAL - the system is fully operational
UNDER REPAIR - the system is under repair
MINOR DAMAGE - the system has suffered minor damage
MAJOR DAMAGE - the system has suffered major damage
DESTROYED - the system is beyond repair
26
Page 36

GAME MANUAL
➨➨
To select a particular damage system, click on the or icons.
To make this system the priority system to repair, click on the icon. Repairs
will now be made to this system before all others.
Click on the icon to return to your sub’s cockpit.
Wingman Orders Screen
You will need to give orders to your wingmen during missions. Press 3 to display
the Wingman Orders Screen.
The Wingman Orders screen consists of a 3-D display of the sub(s) on your mission
and their type, damage status, orders and formation position.
Click on the or icons to select the next/previous sub. The selected
sub is highlighted with a pair of yellow brackets.
Click on the icon to change the highlighted sub’s position in the formation.
Click on the icon to change the highlighted sub’s orders.
Click on the icon to return to your sub’s cockpit.
Object Viewer Screen
Press 4 to enter the Object Viewer; a reference library of 3-D images. You may
wish to consult this library to review the shapes of enemy vessels before engaging
the enemy. Click on the or the icon to view the next/previous object.
Click on the icon to return to your sub’s cockpit.
Other Controls
Press shift E to activate your submarine’s ejection capsule.
Press shift A to accelerate the passage of time.
Press P to pause the game.
Press shift Q to either end or abort the current mission and return to the Control
Centre.
Press ` to display the ‘Game Options’ screen, allowing you to make game
configuration changes mid-mission
27
Page 37

GAME MANUAL
VIEWS
Cockpit Views
When you are in the cockpit, you may move your viewpoint to the left, right, up
and down:-
<moves the view to the left
/ moves the view to the right
>re-centres the view
;moves the viewpoint up or down, allowing you to see more or less of the 3-D world
2 or V hides the cockpit completely, displaying full-screen 3-D
External Views
Flypast Camera View - Press 3
● a stationary viewpoint which tracks your sub as it goes past.
Chase Camera View - Press 4
● a view which follows your sub from just behind, allowing you to see all around
it. This view is very useful when manoeuvring in a restricted space.
Weapon Camera View - Press 5
● a view looking out of the nose of the last weapon you fired.
Tactical View - Press 6
● tracks the currently targeted sonar contact in the background with your sub in
the foreground and is a very useful view in underwater dogfights.
28
Page 38

GAME MANUAL
Inverse Tactical View - Press 7
● tracks your sub in the background with the currently targeted sonar contact in
the foreground and is useful for seeing what the enemy is doing in an
underwater dogfight.
Current Contact View - Press 8
● a view through the nose of the currently targeted sonar contact, allowing you
to see if it is lining up on you. This is a very useful view when you have targeted
a hostile torpedo.
Returning to the Sub Carrier
When you want to land back aboard the sub carrier, you must bring your sub into
a position immediately below the carrier’s hangar. The carrier’s automatic docking
system will then pilot your sub into its hangar bay. Press sQ to end the mission.
29
Page 39

GAME MANUAL
MISSION DEBRIEFING
hen you have completed your mission, you will be taken to the mission
W
debriefing screen. The debriefing presents a summary of the mission and you
are paid depending on your mission performance.
If you achieve an outstanding result in your mission, you may qualify for an award
from either the mercenary’s union or the company who you are currently working for.
To get a mercenary award, it is only necessary to score high points on the mission.
To get a more valuable Corporate Award, you must carry out the mission
objectives with maximum damage to the enemy and minimum damage to friendly
forces, using the minimum amount of weapons (and therefore money).
You may review your medals and awards by selecting Pilot Roster in the Command
Centre.
30
Page 40

GAME MANUAL
NOTES
31
Page 41

GAME MANUAL
NOTES
32
 Loading...